

Page 1

Contents
WELCOME . . . . . . . . . . . . . . . . . . . . . . . . . . . . . . . . . . . . . . . . . . . . . . . . . . . . . . . . . . . . .1
PRODUCTS COVERED BY THIS USER MANUAL . . . . . . . . . . . . . . . . . . . . . . . . . . . . . . .1
1 SAFETY INSTRUCTIONS . . . . . . . . . . . . . . . . . . . . . . . . . . . . . . . . . . . . . . . . . . . . . . . . . .2
2 PRODUCT OVERVIEW . . . . . . . . . . . . . . . . . . . . . . . . . . . . . . . . . . . . . . . . . . . . . . . . . . . .3
Preparing the remote for use . . . . . . . . . . . . . . . . . . . . . . . . . . . . . . . . . . . . . . . . . . . . . 4
3 USING YOUR REMOTE . . . . . . . . . . . . . . . . . . . . . . . . . . . . . . . . . . . . . . . . . . . . . . . . . . .5
4 CONNECTING TO YOUR EXISTING EQUIPMENT . . . . . . . . . . . . . . . . . . . . . . . . . . . . . . .7
4.1 If your television set and video have SCART sockets . . . . . . . . . . . . . . . . . . . . . . . . . . . 7
4.2 If your television set and video have ONLY a standard coaxial aerial input . . . . . . . . . . . 8
4.3 Connecting to your HIFI . . . . . . . . . . . . . . . . . . . . . . . . . . . . . . . . . . . . . . . . . . . . . . . . . 9
4.4 Inserting your smart card . . . . . . . . . . . . . . . . . . . . . . . . . . . . . . . . . . . . . . . . . . . . . . . . 9
5 MENU TREE . . . . . . . . . . . . . . . . . . . . . . . . . . . . . . . . . . . . . . . . . . . . . . . . . . . . . . . . . . .10
6 GENERAL OPERATION OF YOUR DIGITAL TERRESTRIAL RECEIVER . . . . . . . . . . . . .11
7 FINDING AND STORING CHANNELS . . . . . . . . . . . . . . . . . . . . . . . . . . . . . . . . . . . . . . . .11
8 DAY TO DAY OPERATION . . . . . . . . . . . . . . . . . . . . . . . . . . . . . . . . . . . . . . . . . . . . . . . .13
8.1 Switching on - switching off your receiver. . . . . . . . . . . . . . . . . . . . . . . . . . . . . . . . . . . 13
8.2 Changing channels . . . . . . . . . . . . . . . . . . . . . . . . . . . . . . . . . . . . . . . . . . . . . . . . . . . 13
8.3 Using the TV/DTV button . . . . . . . . . . . . . . . . . . . . . . . . . . . . . . . . . . . . . . . . . . . . . . . 14
8.4 Using the on screen TV guide . . . . . . . . . . . . . . . . . . . . . . . . . . . . . . . . . . . . . . . . . . . 15
8.5 Choosing your favourite channels. . . . . . . . . . . . . . . . . . . . . . . . . . . . . . . . . . . . . . . . . 16
8.6 Using ONmail . . . . . . . . . . . . . . . . . . . . . . . . . . . . . . . . . . . . . . . . . . . . . . . . . . . . . . . 16
9 ADVANCED SETINGS . . . . . . . . . . . . . . . . . . . . . . . . . . . . . . . . . . . . . . . . . . . . . . . . . . .17
9.1 Using your parental lock . . . . . . . . . . . . . . . . . . . . . . . . . . . . . . . . . . . . . . . . . . . . . . . . 17
Entering your parental code for the first time . . . . . . . . . . . . . . . . . . . . . . . . . . . . . . . . . . . . . . 17
To change your parental code . . . . . . . . . . . . . . . . . . . . . . . . . . . . . . . . . . . . . . . . . . . . . . . . . 18
9.2 Selecting channels to be locked . . . . . . . . . . . . . . . . . . . . . . . . . . . . . . . . . . . . . . . . . . 19
9.3 Watching your locked channels . . . . . . . . . . . . . . . . . . . . . . . . . . . . . . . . . . . . . . . . . . 19
To unlock individual channel . . . . . . . . . . . . . . . . . . . . . . . . . . . . . . . . . . . . . . . . . . . . . . . . . . 19
To temporarily unlock all channels . . . . . . . . . . . . . . . . . . . . . . . . . . . . . . . . . . . . . . . . . . . . . . 2 0
9.4 Re-arranging your channels . . . . . . . . . . . . . . . . . . . . . . . . . . . . . . . . . . . . . . . . . . . . . 20
9.5 Timer . . . . . . . . . . . . . . . . . . . . . . . . . . . . . . . . . . . . . . . . . . . . . . . . . . . . . . . . . . . . . 21
Setting the timer . . . . . . . . . . . . . . . . . . . . . . . . . . . . . . . . . . . . . . . . . . . . . . . . . . . . . . . . . . . 21
Timer alarm. . . . . . . . . . . . . . . . . . . . . . . . . . . . . . . . . . . . . . . . . . . . . . . . . . . . . . . . . . . . . . . 22
Deleting a timer. . . . . . . . . . . . . . . . . . . . . . . . . . . . . . . . . . . . . . . . . . . . . . . . . . . . . . . . . . . . 23
9.6 Using teletext. . . . . . . . . . . . . . . . . . . . . . . . . . . . . . . . . . . . . . . . . . . . . . . . . . . . . . . . 23
9.7 Checking your postbox. . . . . . . . . . . . . . . . . . . . . . . . . . . . . . . . . . . . . . . . . . . . . . . . . 24
9.8 Altering your ONdigital box settings . . . . . . . . . . . . . . . . . . . . . . . . . . . . . . . . . . . . . . . 25
9.9 Altering settings for your TV and video. . . . . . . . . . . . . . . . . . . . . . . . . . . . . . . . . . . . . 26
9.10 Altering modem settings. . . . . . . . . . . . . . . . . . . . . . . . . . . . . . . . . . . . . . . . . . . . . . . . 28
9.11 Technical information . . . . . . . . . . . . . . . . . . . . . . . . . . . . . . . . . . . . . . . . . . . . . . . . . . 28
9.12 Adding new channels. . . . . . . . . . . . . . . . . . . . . . . . . . . . . . . . . . . . . . . . . . . . . . . . . . 29
10 IF YOUR DIGITAL RECEIVER’S REMOTE COMMANDS INTERFERES
WITH YOUR TELEVISION . . . . . . . . . . . . . . . . . . . . . . . . . . . . . . . . . . . . . . . . . . . . . . . . .30
10.1 To change your digital receiver from system A to system B. . . . . . . . . . . . . . . . . . . . . . 30
10.2 To change your remote control from system A to system B. . . . . . . . . . . . . . . . . . . . . . 30
11 PROGRAMMING THE REMOTE FOR YOUR TV AND VIDEO . . . . . . . . . . . . . . . . . . . . . .31
12 TROUBLE SHOOTING GUIDE . . . . . . . . . . . . . . . . . . . . . . . . . . . . . . . . . . . . . . . . . . . . .35
13 TECHNICAL SPECIFICATION . . . . . . . . . . . . . . . . . . . . . . . . . . . . . . . . . . . . . . . . . . . . .37
Page 2

Welcome to digital television made simple.
Congratulations on your choice of Philips’ DTX6372 digital terrestrial receiver.Using your Philips
digital receiver will allow you to access digital terrestrial programmes and services.
Note: To access ONdigital services you will need to take out a subscription. Refer to the
envelope included with your receiver, to get more information.
The simplest way to get digital television is here. No dish. No cable. Simply an aerial. It is,
without doubt, the most exciting development in television history since the first ever broadcast in
1936.
In the last 60 years there have been up to five normal channels on analogue television. Digital
terrestrial television changes that.
ONdigital is the next step in television. Simply plug in your ONdigital box for a feast of
mouthwatering television. ONdigital is the only company that lets you pick and choose the
channels you want to watch.
Subscription channels from ONdigital together with free channels from the BBC and ITV, will
cover everything from sports and movies to news and current affairs, all with improved picture
and sound and widescreen, too.
Products covered by this User Manual:
This user manual applies to the models DTX 6370, DTX 6371 and DTX 6372. The illustrations
are taken from DTX 6372. For the previous models there are small differences in the position of
the buttons on the front panel and the connectors on the rear panel, but buttons and connectors
perform the very same functions for all three models.
1
Page 3

2
SAFETY INSTRUCTIONS
For best results position your receiver away from radiators or other heat sources. Leave a space
of at least 3 cm all round the receiver for ventilation making sure that the ventilation holes are
not obstructed.
This receiver is intended for use in a domestic environment only and should never be operated
or stored in excessively hot, humid or damp conditions.
Make sure no objects or fluids enter the housing through the ventilation slots. Should this
happen, disconnect your receiver from the mains and consult your retailer.
For cleaning, use a damp chamois leather, never use any abrasive cloth, sponge or cleaner.
When connecting or disconnecting cables to the receiver always ensure the receiver is
disconnected from the mains.
Please wait before connecting your receiver - read on.
Mains connection
Before connecting the receiver to the mains, check that the mains supply voltage corresponds to
the voltage printed on the type plate of the receiver. If the mains voltage is different, consult your
dealer.
Important
This apparatus is fitted with an approved moulded 13 Aplug.
To change a fuse in this type of plug proceed as follows:
1. Remove fuse cover and fuse.
2. Fit new fuse which should be a BS1362 3A, A.S.T.A. or BSI approved type.
3. Refit the fuse cover.
If the fitted plug is not suitable for your socket outlets, it should be cut off and appropriate plug
fitted in its place. If the mains plug contains a fuse, this should have a value of 3A.
If a plug without a fuse is used, the fuse at the distribution board should not be greater than 5A.
Note : The severed plug must be destroyed to avoid a possible shock hazard should it be
inserted into a 13A socket elsewhere.
How to connect a plug
The wires in the mains lead are coloured in accordance with the following code:
- BLUE - "NEUTRAL" ("N")
- BROWN - "LIVE" ("L")
1. The BLUE wire must be connected to the terminal which is marked withg the letter "N" or
coloured BLACK.
2. The BROWN wire must be connected to the terminal which is marked with the letter "L" or
coloured RED.
3. Do not connect either wires to the earth terminal in the plug which is marked by the letter "E"
or by the safety earth symbol l or coloured green or green-and-yellow. Before replacing the
plug cover, make certain that the cord grip is clamped over the sheath of the lead - not
simply over the two wires.
1
1
Page 4

3
PRODUCT OVERVIEW
FRONT VIEW
REAR VIEW
Note: The label showing the set type and serial number is underneath your receiver.
1 Smart card reader.
2 4 Digit LED front indicator.
3 ON/OFF : Mains ON/OFF button.
4 Select : Open channel list in TV mode
Confirm selection in menu.
5
C : Adjust a menu option setting.
6 W : Move highlight downwards in
menu.
7 V : Move highlight upwards in menu.
8 B : Adjust a menu option setting.
9 Menu : Open and close Main Menu.
12 3
45 67 89
2
2
1 230 V - 50 Hz power cord socket.
2 RJ11 connector for telephone line.
Note : Ready for ONmail and
ONrequest.
3 SCART* socket for TV.
4 UHF aerial output for TV.
* : Euroconnector = SCART
5 RS 232 serial port socket.
Note : Ready to connect multimedia
product.
6 Audio-cinch outputs for HIFI
system.
7 SCART* socket for VCR/video.
8 Common interface.
Note : Ready for connection of a future
module.
9 UHF aerial input.
12 3 4
567 89
Page 5
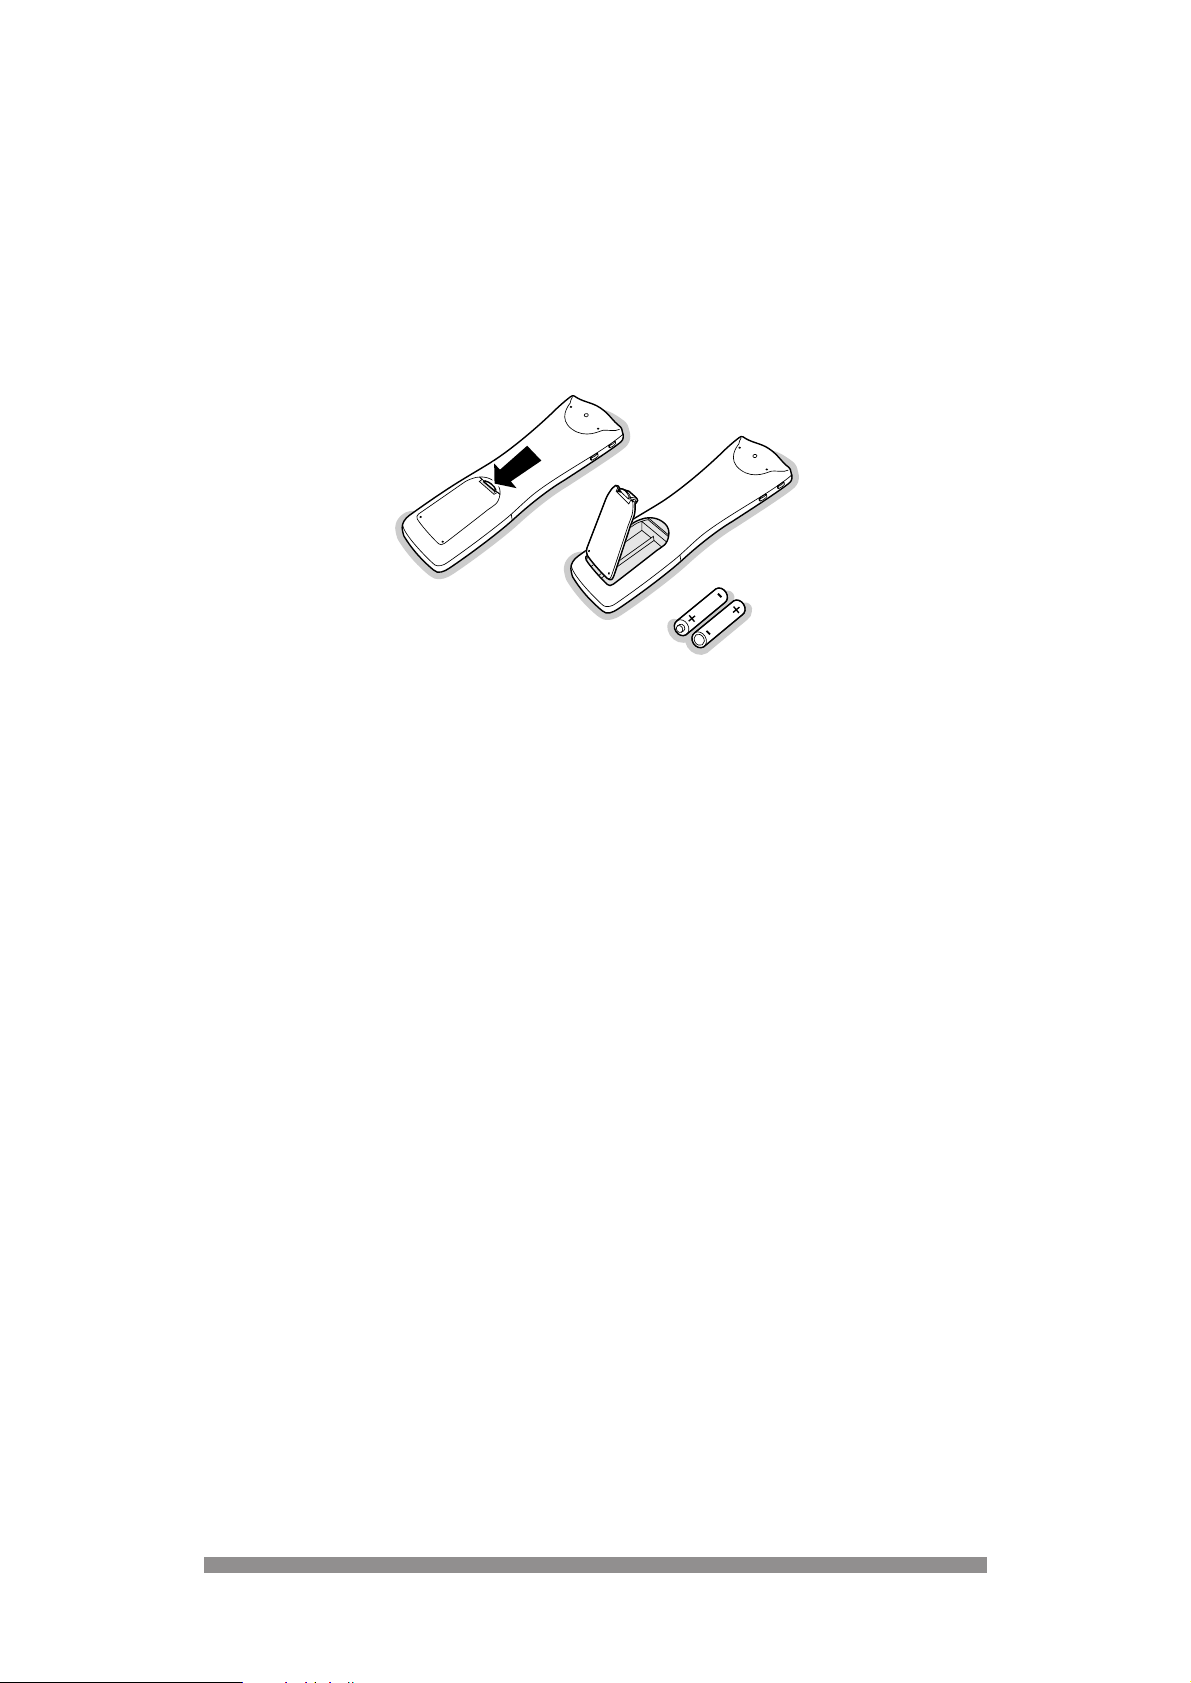
PREPARING YOUR REMOTE FOR USE
Your remote not only works your digital receiver but also the main operating features of majorbrand televisions and video (VCR’s).Please consult chapter 10 of this manual for programming
instructions.
Before using the remote:
- Remove its back cover
- Insert the two batteries (type R06G/AA - 1.5 V) supplied.
- Position them as shown in the diagram in the battery compartment.
- Replace the cover.
The Philips batteries supplied with your receiver’s remote do not contain heavy metals such as
Mercury or Nickel Cadmium. Nevertheless in many countries exhausted batteries may not be
disposed of with your household waste. Please ensure you dispose of exhausted batteries
according to local regulations.
RO6 / AA
4
Page 6
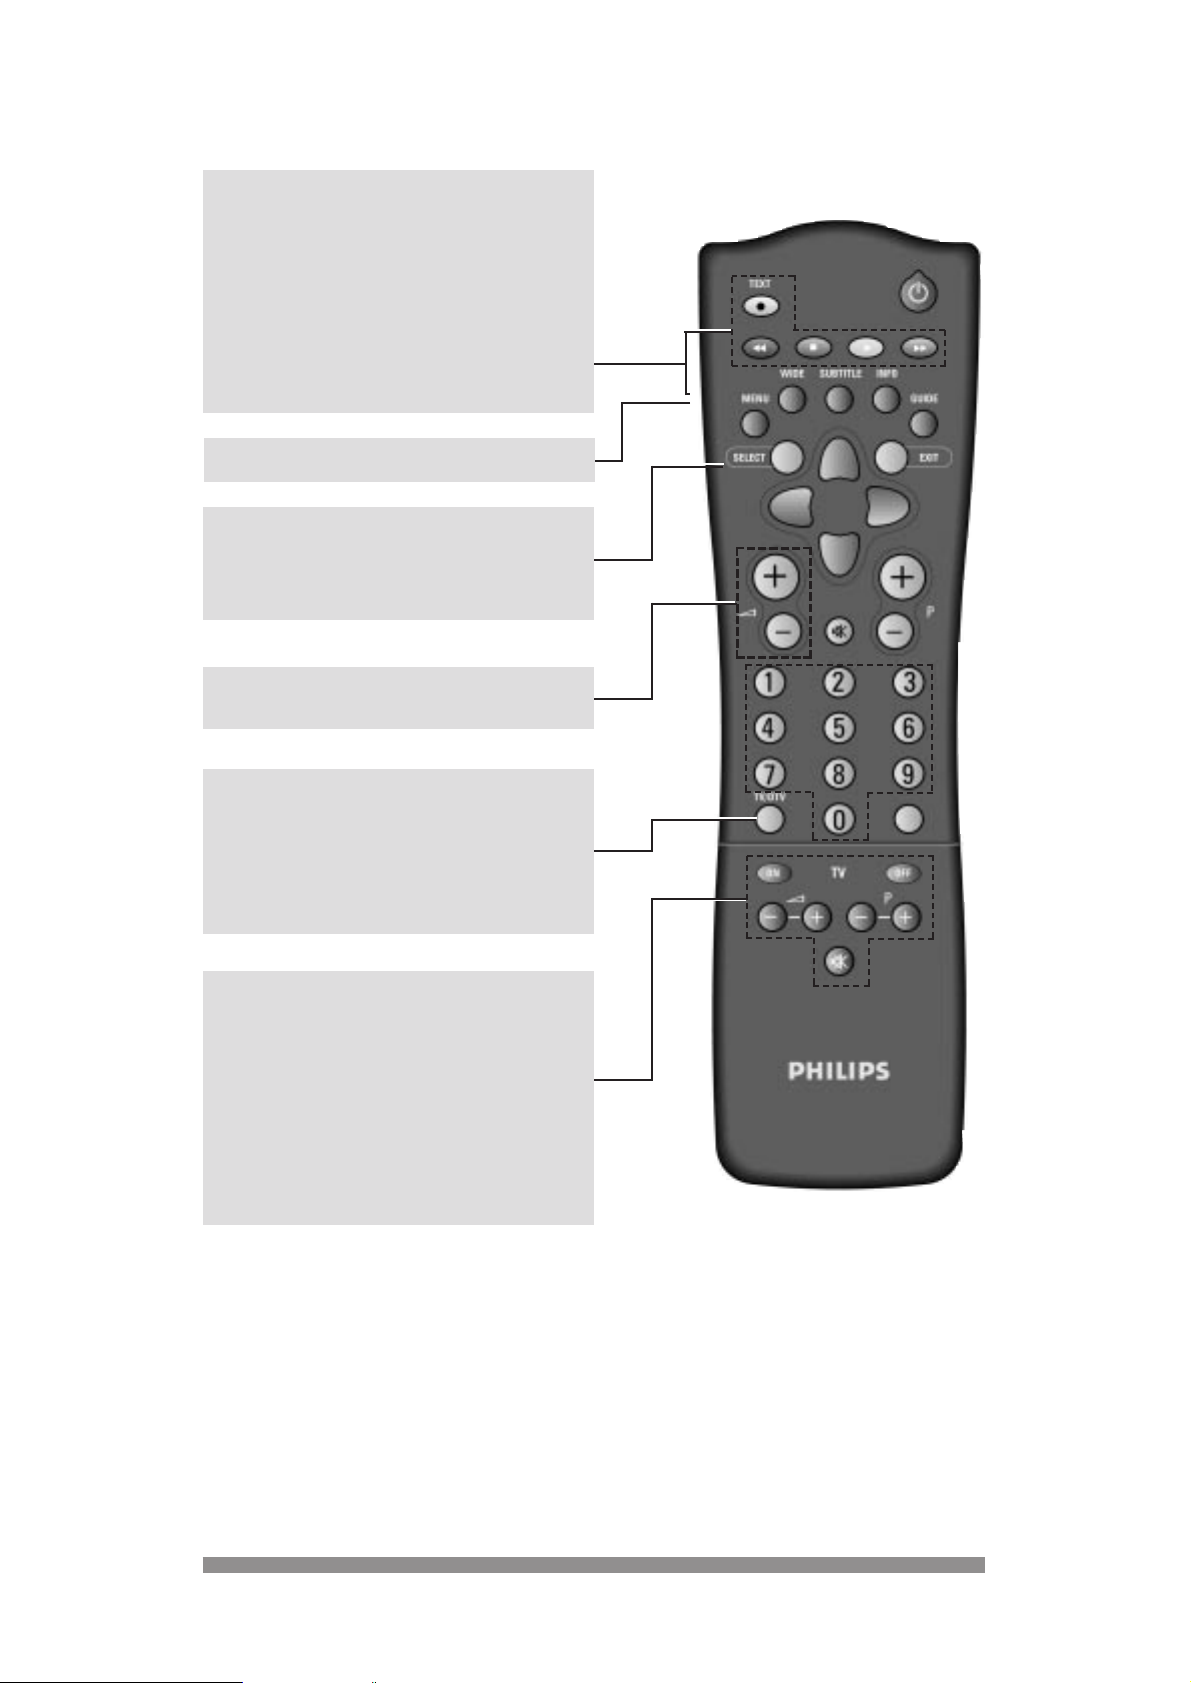
USING YOUR REMOTE
5
◗
Multibrand Video control
Press VCR side key together with:
+
B key : standby
+
M key : record
+
G key : rewind
+
L key : stop
+
B key : play
+
F key : fast forward
3
3
VCR side key see above description
Multibrand TV and video controls
Your remote can control different major-brand televisions and video’s.
Initially your remote is programmed for Philips-brand televisions and video’s. If you have a
different brands, follow the instructions in chapter 11.
SELECT
In normal mode: open channel list
In channel list : select a programme
In menu : confirm your selection
a+/- : Adjust volume up/down
TV/DTV (only with receiver/TV scart lead
connection)
Switch between watching digital programme
from your receiver to watching analogue
programmes from your TV set:
(refer to chapter 8.2).
Multibrand TV control
ON : wake up TV on programme 1
OFF : switch TV to standby
a+ : adjust TV volume up
-
a : adjust TV volume down
P+ : select one programme up
P- : select one programme down
cc
: mute/demute the sound
Page 7
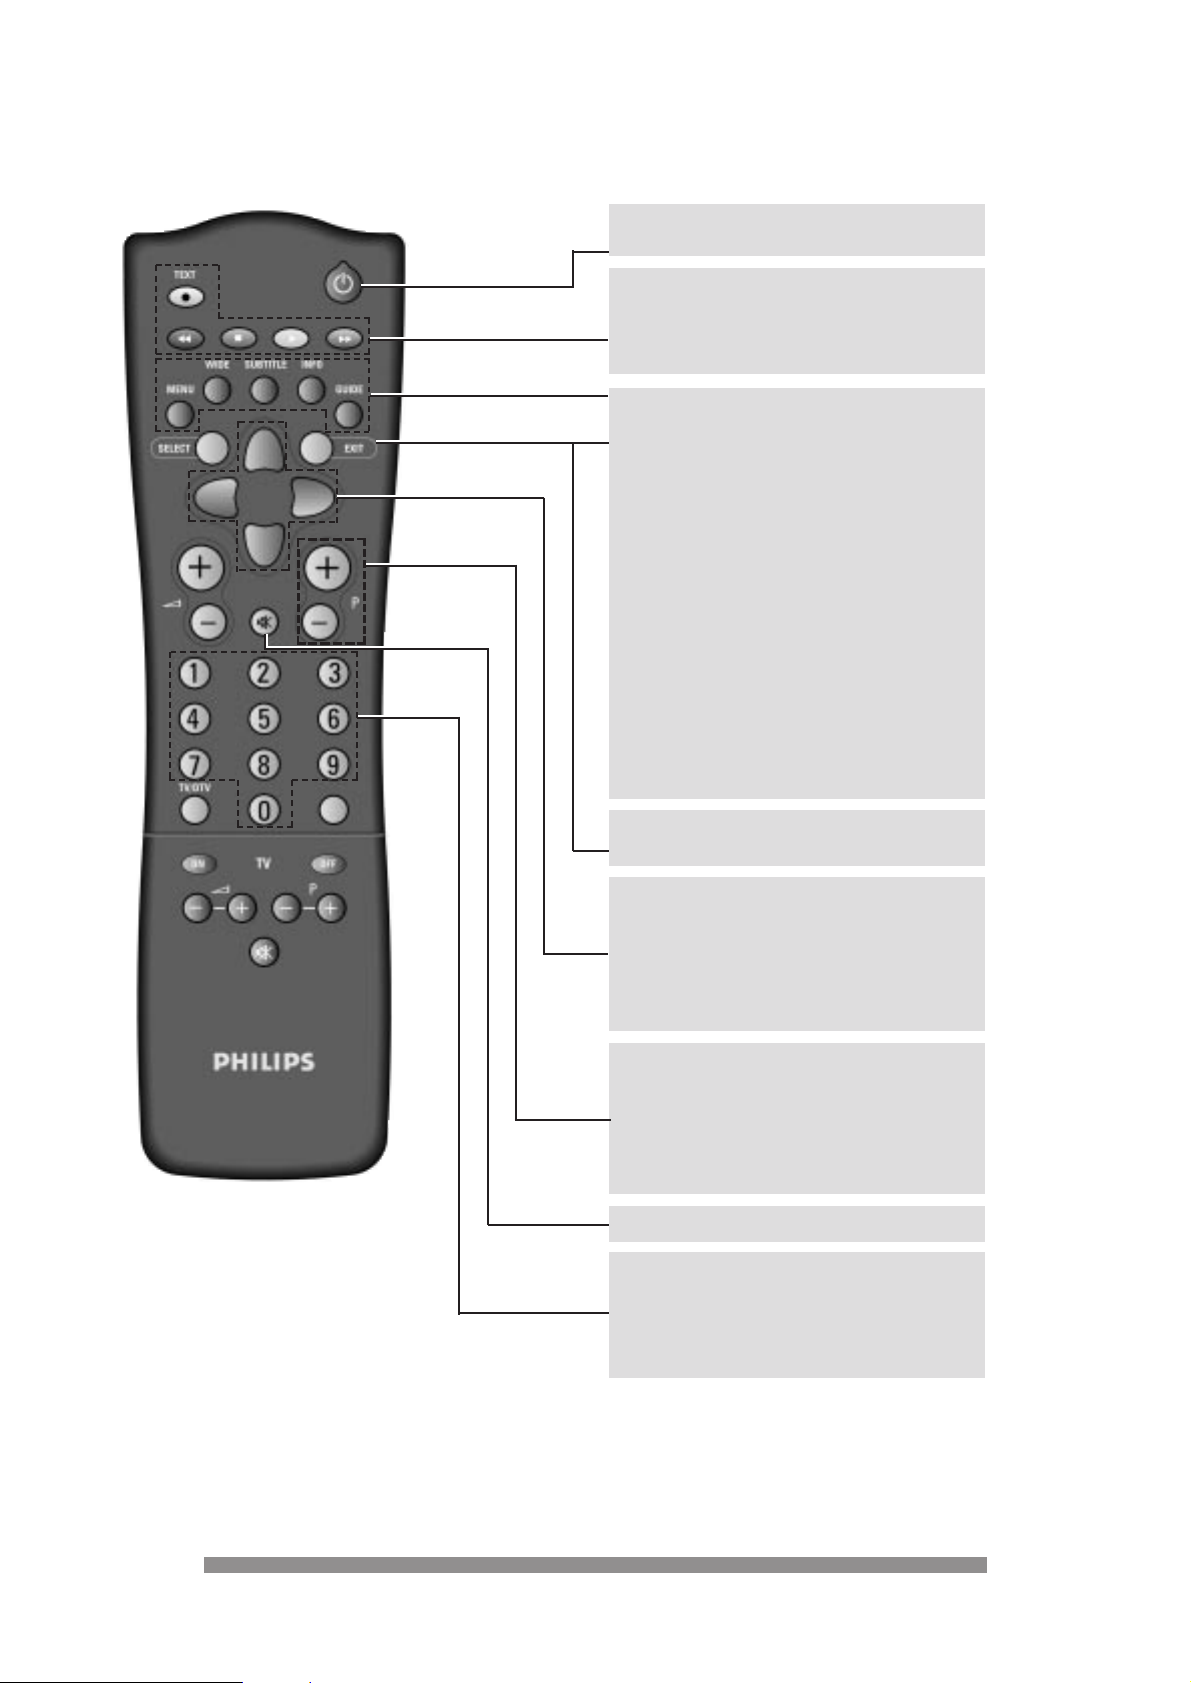
6
MENU Open/Menu/Return to normal
mode
WIDE Toggle from “FULL SCREEN” to
“LETTER BOX” picture format
once 4:3 TV format option is
selected in “tv and video settings”
menu (refer to chapter 9.9).
SUBTITLE DISPLAY/HIDE subtitles
providing function is set up in
“ONdigital box settings” menu
(refer to chapter 9.8).
INFO Enter on screen tv guide to
display programme information
GUIDE Reserved for interactive
applications e.g. ONmail and
ONrequest.
22
In normal mode: put receiver in standby
In standby mode: wake up the receiver
TEXT open/close the text mode
RED, GREEN,YELLOW,BLUE
select options in either menu or
text mode.
RECEIVER FRONT PANEL BUTTON FUNCTIONS
- In stand by mode:
Any key wakes up the receiver from standby
- In normal mode:
keys have same function as relevant remote control keys (refer below).
Menu = MENU; Select = SELECT; C/B = LEFT/RIGHT; V/W = UP/DOWN
EXIT In menu mode: return to normal
mode disregarding changes.
UP/DOWN Select menu option one step
up/one step down
Select a programme up/down in
channel list .
LEFT/RIGHT Change setting of selected menu
option.
P+/P- In normal mode: select one
programme up/one programme
down.
In favourite mode: select one
programme up/one programme
down within the favourite list.
0-9 In standby mode: wake up the receiver
on selected program number
In normal mode: select a programme.
In menu mode: direct access to menu
option.
cc
Mute / Demute the sound.
◗
Page 8
7
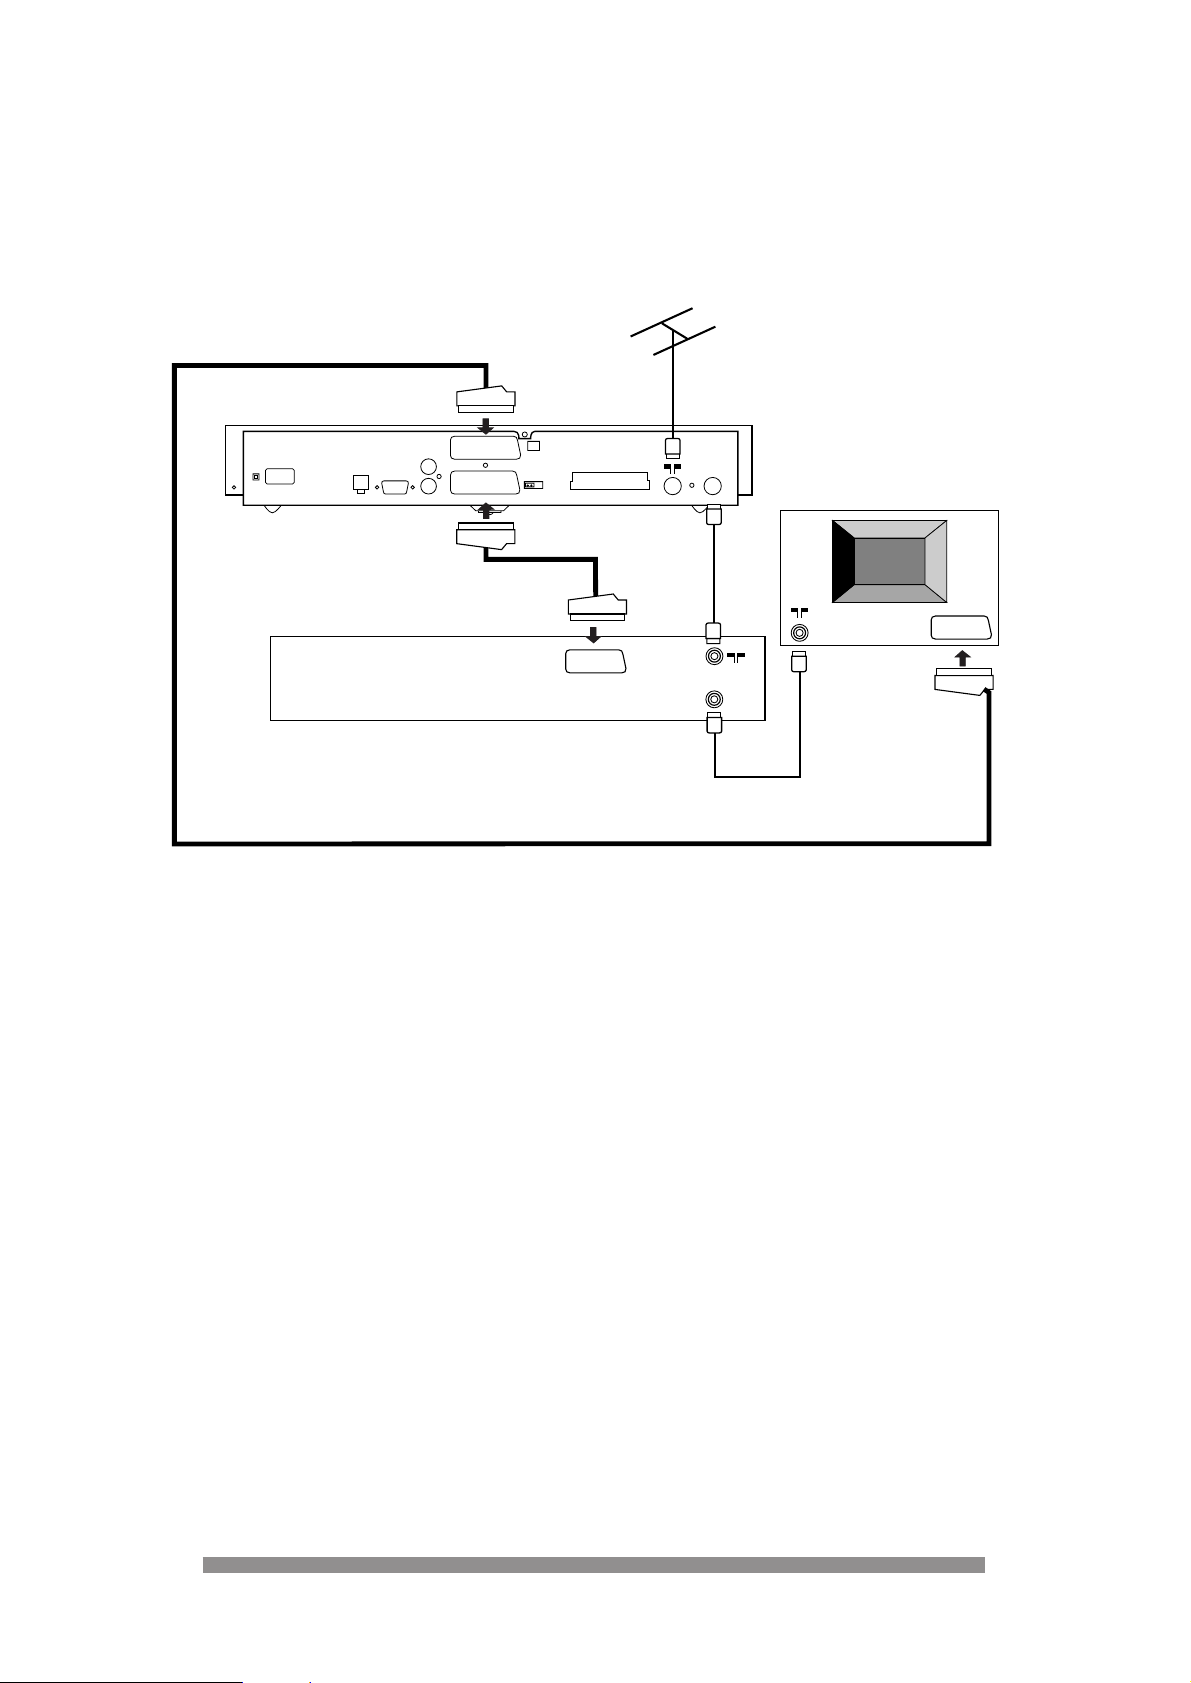
CONNECTING TO YOUR EXISTING
EQUIPMENT
4.1 IF YOUR TELEVISION AND VIDEO HAVE
SCART SOCKETS.
1. Unplug all equipment from the mains before making connections.
Note:
Before starting to connect check your current wiring because you can keep the coaxial
connection in between your TV and your video provided they are connected as shown
above. This connection ensures you can still record your current channels.
2. Connect a SCART lead between the “TV” socket of your digital receiver, and the television.
Using the first SCART of your TV (usually described as EXT AV 1) will provide the best
picture quality. This will also cause a digital television picture to automatically appear on your
TV screen when you turn on the digital receiver.
3. If you already have a SCART lead use it between the “VCR” socket of your digital receiver
and your video. This connection provides the best recording/playback quality. Use the first
EXT AV1 SCART socket on your video. It will make it possible for your video, to play through
your digital receiver connection.
4. Refer to the connection diagram above to complete the wiring of your receiver. No further
adjustment is required .
5. Then plug all your equipment , including your digital receiver, into the mains.
6. Switch on your TV first and select a channel. Now switch on your digital receiver using the
ON/OFF button on the front panel. The front display will show “ - - : - - “.
7. Press the
B (standby) button on your remote to wake up your digital receiver. Your receiver
will now be generating a “welcome” screen.
8. Then go to chapter 6.
4
4
SERIAL
TV
DIGITAL TERRESTRIAL RECEIVER
AUDIO
LEFT
RIGHT
MODEM
VCR
COMMON INTERFACE
AERIAL
CH 21-69
TV
TV
VIDEO
TV set
EXT1
EXT1
SCART lead (supplied)
Existing SCART lead (optional)
RF lead
(supplied)
RF lead(existing)
Aerial previously in the back
of your TV or video
Page 9

8
4.2 IF Y OUR TELEVISION AND VIDEO HA VE ONL Y
A ST ANDARD COAXIAL AERIAL INPUT.
1. Unplug all equipment from the mains power before making connections.
Before starting the connection, check your current wiring as you can keep the coaxial aerial
connection in between your TV and video. This connection ensures you can still playback
your video and watch digital channels.
2. Connect your equipment according to the diagram above but do not connect your aerial to
the digital receiver at this stage.
3. Once connected, plug in your equipment. Switch on your TV first and select a spare channel
to be used when watching digital programmes, then switch on your video.
(It doesn't matter what channel number your video is on at this stage.)
4. Now switch on your digital receiver using the mains ON/OFF button on the front panel. The
front panel display will show - - : - -.
5. Press the
B (standby) button on your remote to wake up your digital receiver. Your receiver
will now be generating a welcome screen to give you something to look out for when you are
tuning your TV.
6. Tuning your television
You now need to manually tune the channel you have selected on your TV to watch digital
programmes. Please refer to your TV’s user guide if you need to check how to do this. When
the welcome screen appears on your TV, store that channel.
7. If you haven't managed to display the welcome screen at this stage, press the M button on
the front of the receiver. This will generate the main menu on-screen which you can then
look out for when tuning. Try manually tuning your TV again, this time looking for the main
menu.
8. Connect your aerial to the digital receiver and check that the picture remains steady
(no interference or snow).
SERIAL
TV
DIGITAL TERRESTRIAL RECEIVER
AUDIO
LEFT
RIGHT
MODEM
VCR
COMMON INTERFACE
AERIAL
CH 21-69
TV
TV
VIDEO
TV set
RF lead
(supplied)
RF lead(existing)
Aerial previously in the back
of your TV or video
Page 10
9. Switch your TV to all other tuned channels, including that tuned for your video, and check
the picture quality. If there is no interference, go to chapter 6.
If there is any interference, continue as follows:
- Disconnect your aerial from the back of the receiver.
- Make sure that your TV is on the channel you have tuned for watching digital
programmes
- If you have the welcome message on-screen, press the SELECT button on your
remote. You will now see the main menu screen.
- From the main menu, select option 4 viewing preferences, option 2 tv and video
settings and then option 6 uhf channel number.
The current setting for this option is 38, which needs to be changed if you are
experiencing interference. To do this, use the number buttons to enter a new uhf
channel number. Choose one that is significantly different from 38. Press the RED
button (back) to move back a screen and store your setting.
- Repeat previous steps from step 6 Tuning your television to see if the picture
improves. When you are satisfied with the picture, continue to chapter 6.
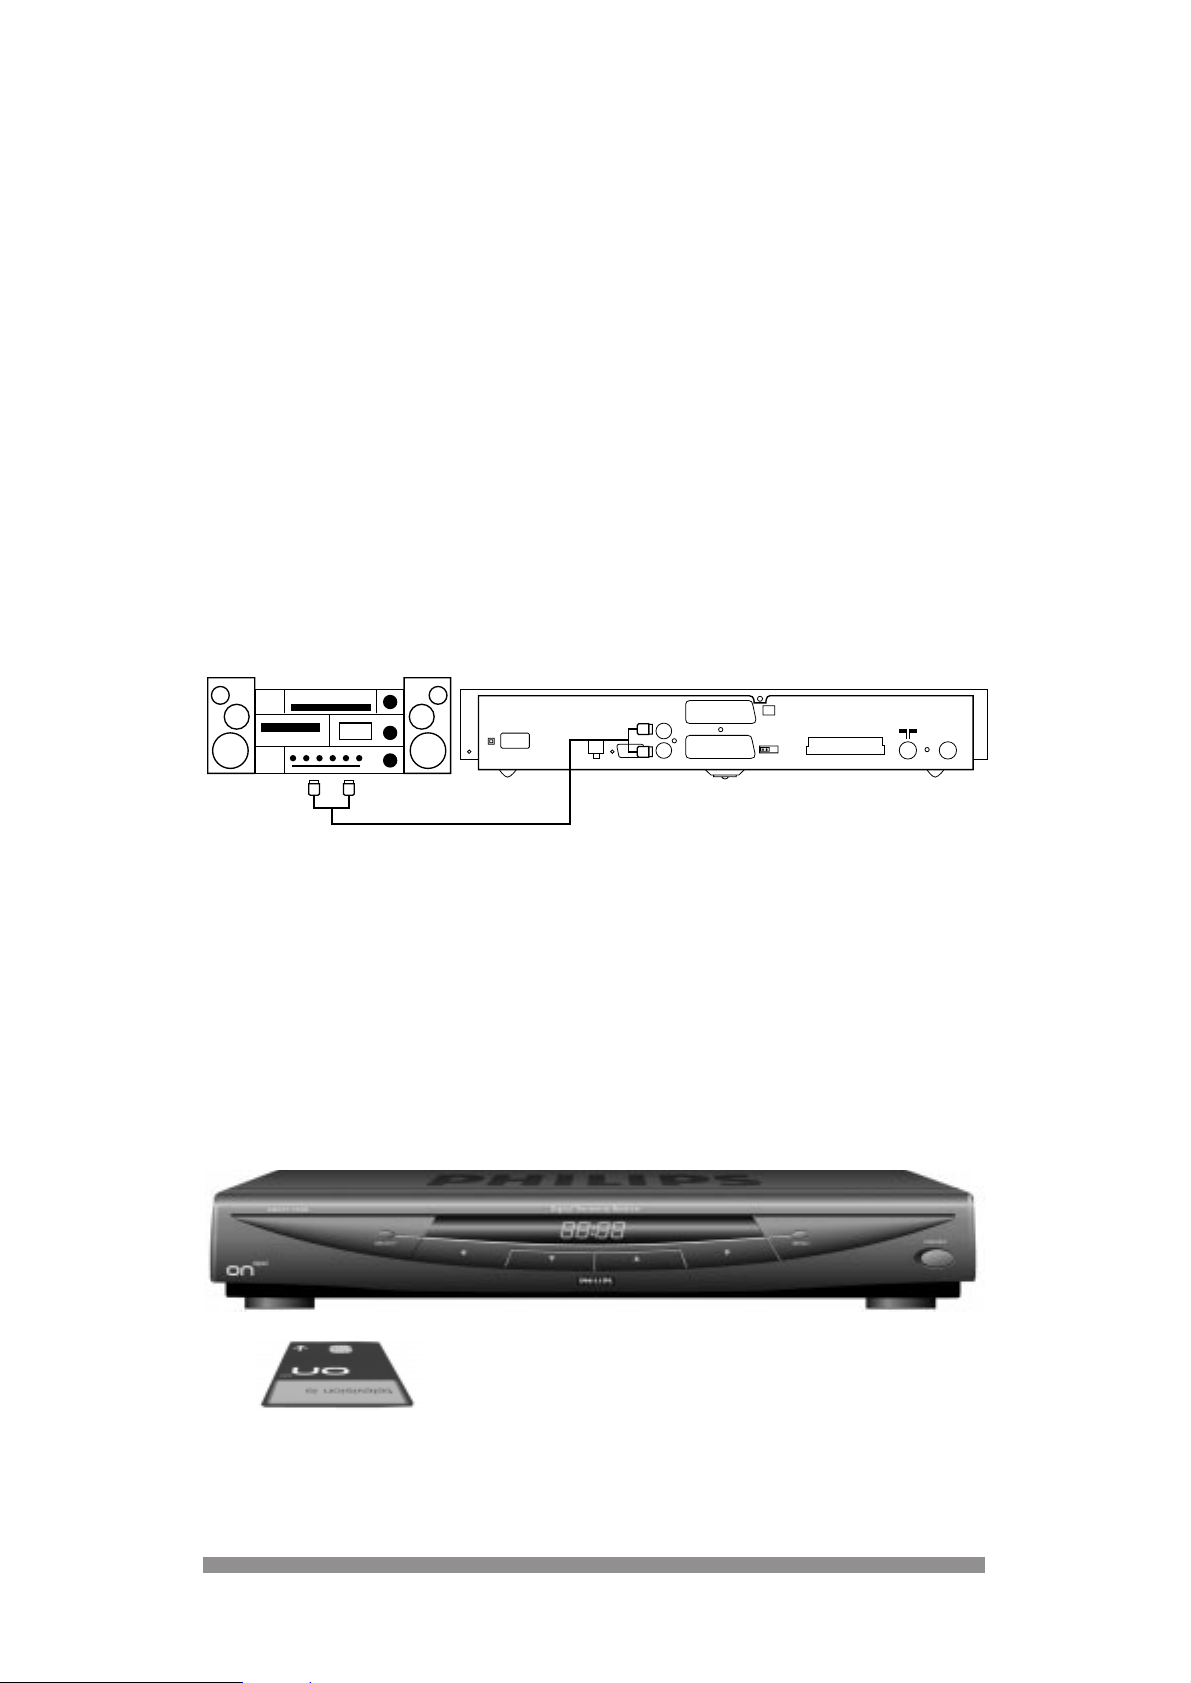
4.3 CONNECTING TO YOUR HIFI
Please refer to your HIFI’s instruction book should you require further information.
4.4 INSERTING Y OUR SMARTCARD
In order to watch ONdigital channels your viewing smartcard needs to be inserted in the
smartcard slot on the front of your digital receiver.
Remove the smartcard from the ONdigital envelope supplied with your receiver and insert into
the smartcard slot on the front of the receiver. You should have the ARROW facing forwards into
the box and the GOLD CHIP facing upwards. Push the card into the slot as far as it will go, the
end will be visible outside of the slot.
9
SERIAL
TV
DIGITAL TERRESTRIAL RECEIVER
AUDIO
LEFT
RIGHT
MODEM
VCR
COMMON INTERFACE
AERIAL
CH 21-69
TV
Page 11
10
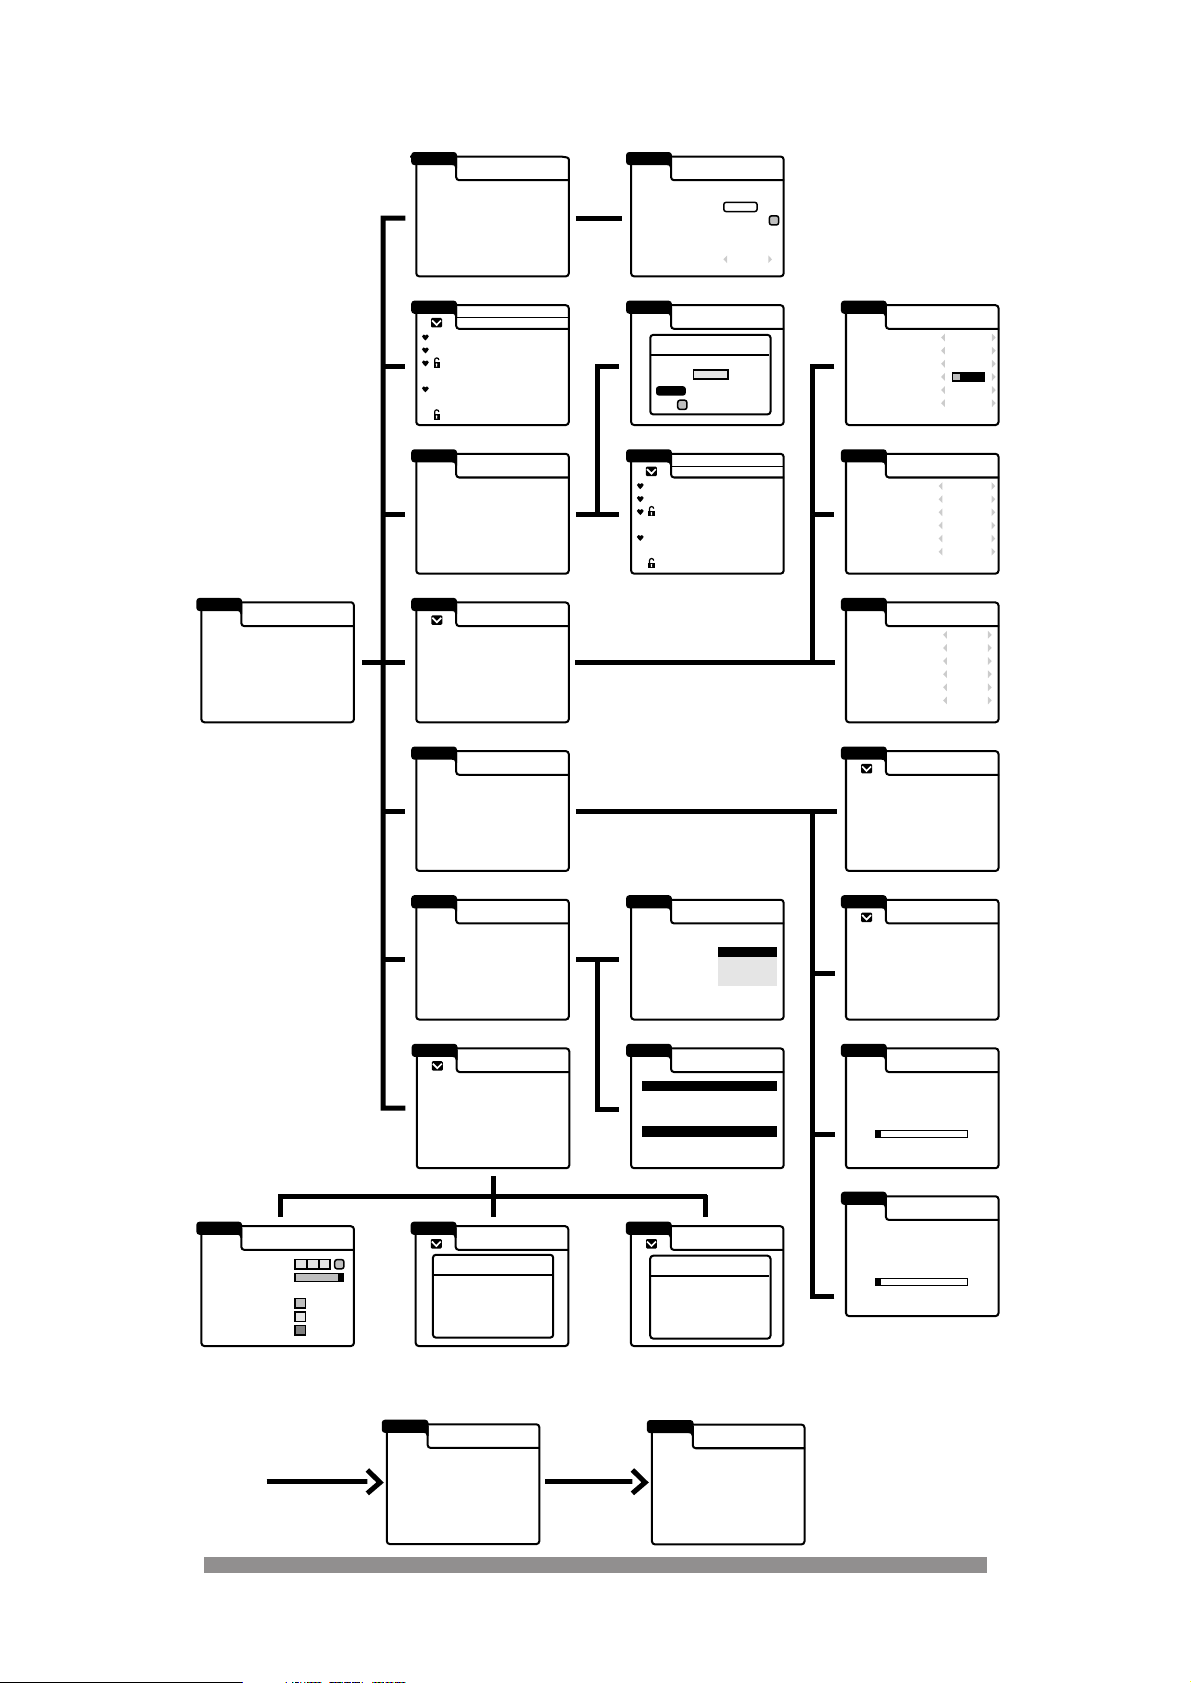
MENU TREE
5
5
on
setup
1 ONdigital box settings
2 tv and video settings
3 modem setting
viewing preferences
on
setup
1
signal strength
2 manufacturer data
3 auto update
technical information
on
setup
1 BBC ONE
2 BBC TWO
3 ITV CHANNEL 3
4 CHANNEL 4
5 CHANNEL 5
6 ITV 2
7 BBC CHOICE
favourite channels
favourites are off
on
setup
lock or unlock
locks are open
on
setup
1 channel list
2 change channel numbers
3 add channels
4 store channels
getting started
on
setup
1 smartcard data
2 check your postbox
ONdigital updates
on
setup
postbox
ON digital 1 02 SEPT 1998
ON digital 2 24 JULY 1998
on
setup
ON digital
ON digital
smartcard data
rights end on
31 OCT 98
31 OCT 98
on
setup
1 enter new parental code
2
choose channel to lock or unlock
parental lock
on
setup
1 change parental code
2 choose channel to lock or unlock
parental lock
confirm your code
back
enter parental code
select
++++
on
setup
1 setting the timer
2 choosing favourite channels
3 parental lock
4 viewing preferences
5 getting started
6 ONdigital updates
7 technical information
main menu
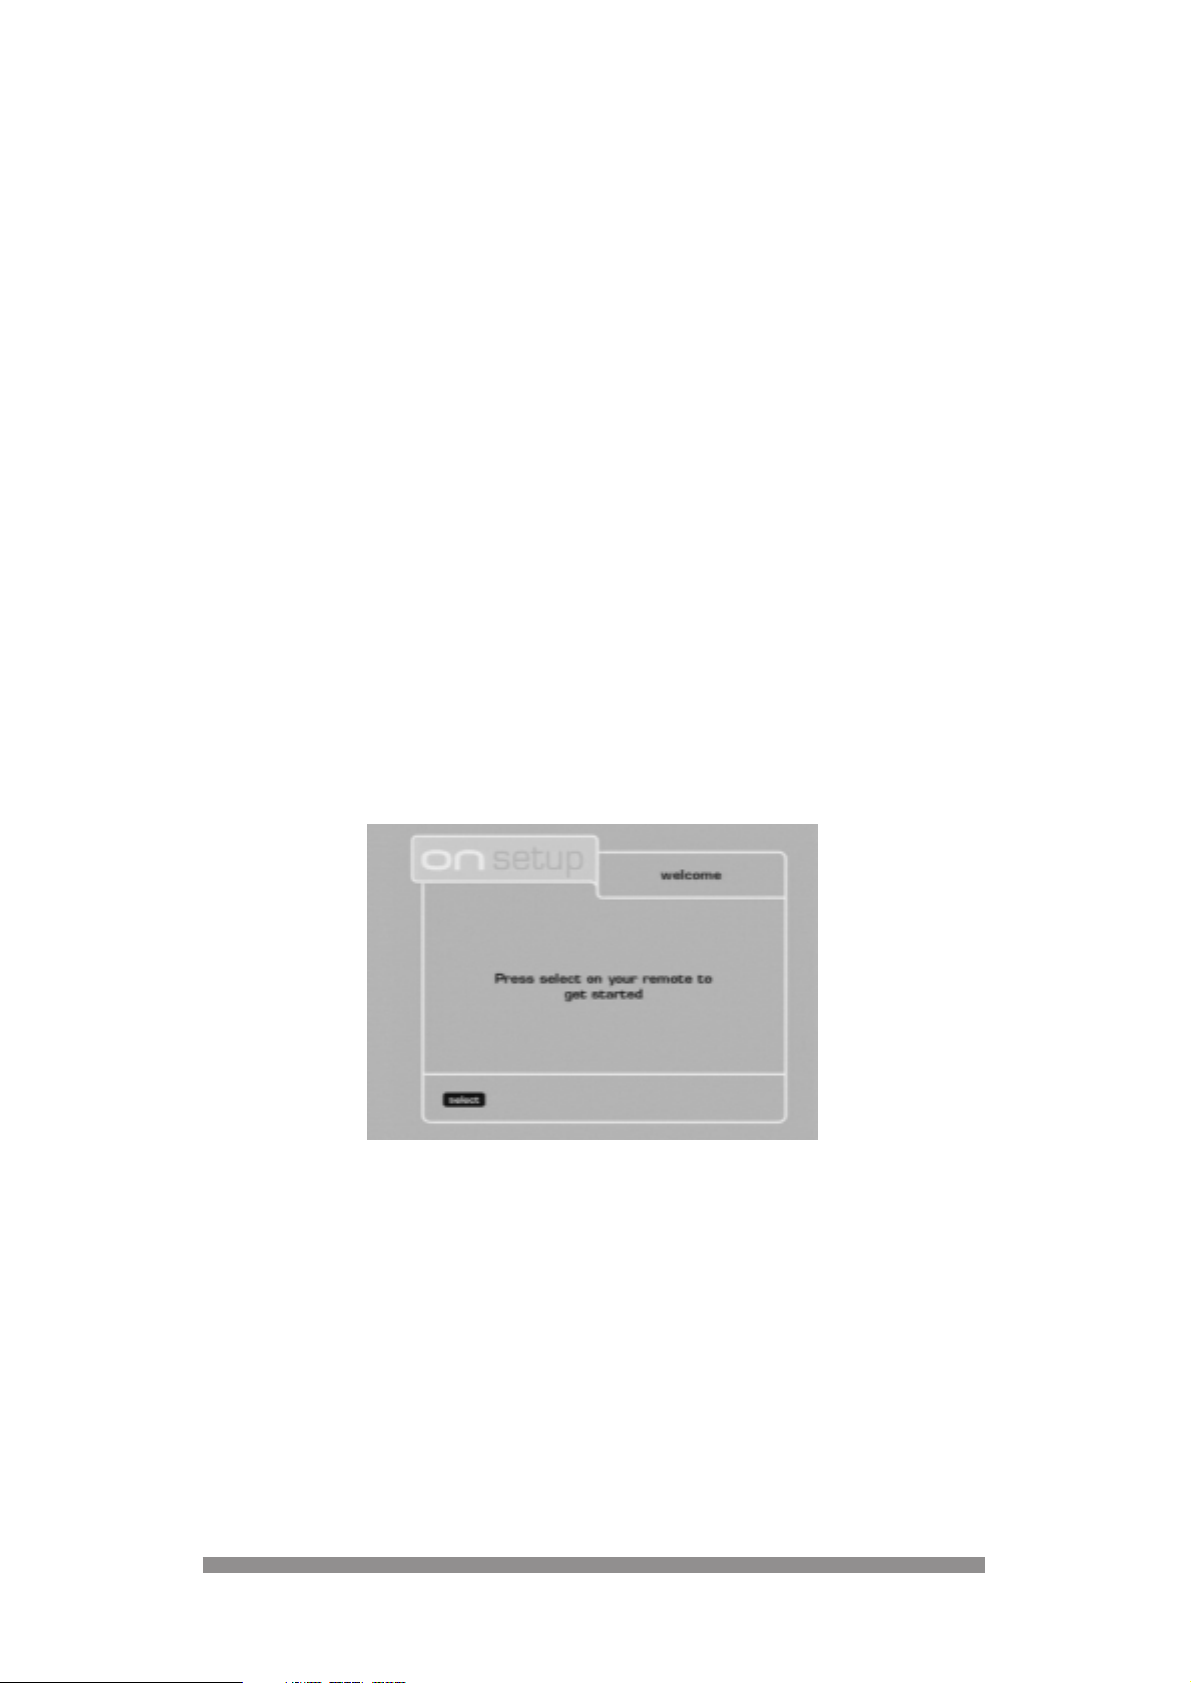
on
setup
Press select on your remote to
get started
welcome
on
setup
1 setting the timer
2 choosing favourite channels
3 parental lock
4 viewing preferences
5 getting started
6 ONdigital updates
7 technical information
main menu
on
setup
store channels
Your ONdigital box is now shearching
for all available channels.
This may take about 20 minutes.
Please wait
%
0 25 50 75 100
number of channels found 1
on
setup
add channels
Your ONdigital box is now shearching
for all available channels.
This may take about 20 minutes.
Please wait
%
0 25 50 75 100
number of channels found 1
4
3
2
1
5
6
7
2
1
2
1
3
2
2
4
1
on
setup
1 available
2 available
3 available
4 available
5 available
6 available
setting the timer
DON'T FORGET TO PROGRAM YOUR VIDEO
on
setup
channel list
on
setup
change channel
number
2
1
3
on
setup
date
channel
start time
end time
recording repeat
++ : ++
++ : ++
once only
setting the timer
or
timer 1
01.01
DON'T FORGET TO PROGRAM YOUR VIDEO
on
setup
1 tv screen
normal (4:3)
2 tv sound
3 tv standard
4 video sound
5 video standard
6 uhf channel number
normal 4:3
full screen
stereo
composite
stereo
pal 1
50
tv and video settings
on
setup
1
2
3
4
5
6
modem
dialing
connection
prefix
wait for dial tone
std code
internal
pulse
direct
0
yes
no
modem settings
on
setup
uhf channel nr.
signal stength
good
satisfactory
poor
signal strength
1 2 3 4 5
21 xx 69
on
setup
gaelic
on
english
visual+audio
00:40
ONdigital box settings
1 preferred language
2 subtitles
3 subtitle language
4 tv volume
5 timer alarm
6 date and time
13
on
setup
1
positioning of the antenna
2 ONdigital box data
3 start download
technical information
manufacturer data
manufacturer
hardware version
software version
api version
run version
PHILIPS
0 0 9 2
0 0 4 0 4
0 12 1 2c
0 7 3 22
on
setup
1
positioning of the antenna
2 ONdigital box data
3 start download
technical information
auto update
do you really want to
start downloading
to update your box
At first power up (Initial Installation) the following screens are shown:
First power up
Press select
1 BBC ONE
2 BBC TWO
3 ITV CHANNEL 3
4 CHANNEL 4
5 CHANNEL 5
6 ITV 2
7 BBC CHOICE
1 BBC ONE
2 BBC TWO
3 ITV CHANNEL 3
4 CHANNEL 4
5 CHANNEL 5
6 ITV 2
7 BBC CHOICE
1 BBC ONE
2 BBC TWO
3 ITV CHANNEL 3
4 CHANNEL 4
5 CHANNEL 5
6 ITV 2
7 BBC CHOICE
Page 12
11
GENERAL OPERATION OF YOUR
DIGIT AL TERRESTRIAL RECEIVER
Throughout this instruction book you will notice that the everyday operation of your digital
receiver is based on a series of user friendly on-screen displays and menus. These displays will
help you get the most from your digital receiver, guiding you through initial installation, channel
selection, timer settings and many other functions.
All functions can be carried out using either the buttons on the front of your digital receiver or the
remote, however we suggest that you will find it easier to use your remote in most instances. If
at any time when using the menus you want to return to the normal TV picture, press either the
EXIT or MENU button.
Should you experience any difficulties with the operation of your receiver, please consult the
relevant section of the instruction book, including the trouble shooting guide, or alternatively call
ONdigital customer services on 0870 600 9696.
FINDING AND STORING CHANNELS
Now you have connected your digital receiver as described on the previous pages, you are
ready to begin searching for your new channels. This is also covered within the ONdigital
envelope included with your digital receiver. We recommend that if possible, you use this guide
to install your receiver.
The procedure in the ONdigital envelope or that described in chapter 4 of this instruction book
will result in you seeing either the welcome or main menu screen on your TV.
IMPORTANT:
- If you do not see either screen and you have used SCART leads when connecting you
may need to press the TV/DTV button twice on your remote.
Alternatively use the button on your TV remote that selects the TV’s AV or External
(SCART) socket.
- If you do not see either screen and you have not been able to use SCART leads when
connecting check the channel number you have selected, alternatively you may need to
adjust the tuning of your TV again. Please refer back to chapter 4.
6
6
7
7
Page 13

12
1. If you have the welcome message on-screen at the moment, press the SELECT button on
your remote. If you allready have the main menu go to step 3.
2. Choose option 5 getting started using the DOWN ARROW button, and press the SELECT
button.
The receiver will start to search for all available channels, as indicated on-screen.
3. If you already had the main menu on-screen
- Choose option 5 getting started in the same manner as above.
- Highlight the store channels option using the DOWN ARROW button and press the
SELECT button.
- Press the SELECT button again, the receiver will start to search for all available
channels, as indicated on-screen.
During the installation process the display on screen will indicate the number of channels
that have been found and the percentage of the installation that has been completed. You
will also see the message Your ONdigital box is searching for all available channels – this
may take about 20 minutes – please wait.
When complete, the display will briefly show 100%, the number of channels that have been
found and indicates that these are being stored. It will then display a list of channels.
• Press the UP or DOWN button to highlight the channel you want to watch followed by the
SELECT button to watch that channel.
Page 14

13
DAY TO DAY OPERATION
8.1 SWITCHING YOUR RECEIVER ON AND OFF
With your digital receiver connected to the mains, press the ON/OFF button to power it on.
- Press the
B button on your remote to wake up your receiver.
- Press the
B button on your remote again to put your receiver into standby.
8.2 CHANGING CHANNELS
There are three ways to select channels on your digital receiver, as identified in the remote
section at the front of this instruction book. In all case, the receiver will wait approximately 1
second before changing channels after the selection has been made.
USING NUMBER BUTTONS
When using the number buttons, a channel number of up to 3 digits can be entered. To select a
multiple digit channel number, simply press the other number buttons immediately after the first.
IMPORTANT :
Using the number buttons will enable you to select ALL channels,regardless of whether
they have been selected as your favourite channels.
USING THE P+ / P- BUTTONS
- In normal viewing mode pressing P+ or P- selects the next or the previous channel to
the one you are currently watching.
- In favourite channel mode pressing P+ or P- selects the next or the previous channel
to the one you are currently watching only from those channel in the favourite list.
8
8
Page 15

14
USING THE CHANNEL LIST
The channel list is an alternative way of viewing what channels are available on your digital
receiver. The list will be displayed over the programme you are currently watching and will also
indicate which channels have been selected as your favourites or have been locked (see 8.5 to
9.3 on how to select favourite and locked channel).
1. To display the channel list, press the SELECT button whilst viewing any channel. The
following is an example of the information that will appear on-screen. All available channels
will be included in the channel list. Make the channel list in the photograph consistent with
the menu tree on page 10.
2. The display will show a total of 6 channels at a time, along with symbols that identify the
status of particular channels, such as favourite and/or locked channel. The channel you are
currently viewing will be highlighted on this list.
3. To move through the channel list, press the UP or DOWN arrow button as indicated on-
screen. The selected channel will be highlighted. When you reach the bottom of one screen,
continue to press the DOWN arrow to scroll to the next screen. Alternatively press RIGHT or
LEFT to move a whole page at a time.
4. At any stage, you can press the EXIT button to remove the channel list from the screen, or
alternatively, with the required channel highlighted, you can change to that channel by
pressing the SELECT button.
8.3 USING THE TV/DTV BUTTON
This button is used to switch between watching digital channels via your digital receiver and
standard analogue channels on your TV. The function of the button depends on whether you
have connected your digital receiver using the scart lead supplied.
As an example, if you have used the scart lead between your digital receiver and TV, and are
currently recording a digital programme, you may need to use the TV/DTV button to watch a
standard analogue channel. Pressing this button again will switch back to watching a digital
channel.
In most cases, having connected your digital receiver and TV by a scart lead, you will not have
to manually select the correct channel on your TV for watching digital programmes. To ensure
the correct channel is selected automatically, your TV should be switched on before your digital
receiver. If your TV is switched on after your digital receiver, you may need to use the TV/DTV
button to select the correct channel on your TV.
Page 16

8.4 USING THE ON-SCREEN TV GUIDE
Your digital receiver has the ability to display details of programmes currently being broadcast
and those being broadcast immediately afterwards. You can change channels on your digital
receiver whilst the information is displayed on your TV.
1. To activate the on-screen tv guide, press the INFO button on your remote. The following
information will be displayed on your TV. At any of the following stages, you can return to
normal viewing by pressing the INFO or EXIT button. Make the banner text in the
photograph consistent with the menu tree on page 10 : Channel 1 / BBC ONE.
The top half of the screen will display the current channel number, channel name, the name
of the current programme and the time.
The bottom half of the screen will initially show the same information and additionally, the
name and start time of the programme currently being shown as well as that of the next
programme. It will also show options to view more information about the programmes.
2. Whilst this information is displayed on-screen, you can press the UP and DOWN arrow
buttons, or number buttons 0 to 9 on your remote to see programme information for other
channels, without actually changing the channel you are currently watching.
As you change channels, the top part of the screen will continue to display information for
the channel you are currently watching.
3. If you want to change channels whilst this screen is displayed, you can do so by pressing
the SELECT button on your remote when the information for the channel you require is
displayed.
4. As part of this feature, you also have access to additional information about both the current
and the next programme. You can view this by pressing the YELLOW button to display
information about the current programme and the BLUE button for the next programme.
Pressing the same button a second time will return to the standard programme information.
Note:
The channel cannot be changed by pressing the SELECT button if you are viewing
information for the next programme.
5. When viewing the additional programme information you may find that it is not all displayed
on one screen. In this case, use the UP and DOWN arrow buttons as indicated on screen to
display this information.
The lower section of the on screen TV guide also indicates whether subtitles are available on a
particular programme, whether it is broadcast in mono or stereo and also the type of programme.
(such as film, drama or comedy.)
15
Page 17

16
8.5 CHOOSING YOUR FAVOURITE CHANNELS
This function enables you to select channels that become your favourites, and are therefore
easier and faster to access.
When using the P+ and P- buttons to change channels when the favourite mode is ON, only
those identified as your favourite channels will be available for selection. You can view a list of
your chosen favourite channels by selecting the channel list or the favourite channels menu.
1. Firstly, press the MENU button to display the main menu.
2. Then select the “choosing favourite channels” option using the UP and DOWN arrow buttons
until it is highlighted, followed by the SELECT button. Alternatively press number button 2.
3. To add channels into your list of favourites, highlight the channel you want to select using
the UP and DOWN buttons. Then press the SELECT button to display the favourite channel
heart symbol alongside the channel name.
4. Repeat these steps for any other channel that you wish to select as a favourite.
5. To remove any of these channels from your favourites list, use the UP and DOWN arrow
buttons to highlight the channel that you want to remove, and press SELECT.
6. After you have selected or de-selected all your favourites, press the GREEN button as
indicated to activate the favourite mode. The favourite mode status is displayed on the right
top part of the menu as favourites are on or favourites are off.
7. Press the EXIT button to return to normal operation.
8. Press the
B button to store your selection.
8.6 USING ONmail
For instructions about the ONmail service, please refer to « Set up guide » and « User guide »
included in the ONmail package.
Page 18

ADVANCED SETTINGS
9.1 USING YOUR PARENTAL LOCK
This feature will enable you to limit the access to any particular channel by choosing a security
code. Your unique code must then be entered before you can watch a locked channel.
When this option is selected for the first time, you will be prompted to choose your parental
code. You must choose your own code following these instructions before you can lock a
channel. You will be asked for your parental lock code before being able to gain access to the
channel locking menus or a locked channel.
ENTERING YOUR PARENTAL CODE FOR THE FIRST TIME
1. Firstly, press the MENU button (main menu) then number button 3 (parental lock) then
button 1 for parental lock option.
Note: Getting access to this menu is only possible once the smart card is in the smart card slot.
2. This menu will display an area where you should input your 4 digit code, using the number
buttons on the remote.
As you enter the code, it will be displayed on-screen. If you enter an incorrect number, you
can use the LEFT arrow button to move back one space and make an amendment.
3. Please keep a note of the number you select for future reference.
17
9
9
Page 19

4. When you have entered the code and made a note of it, press the SELECT button to store
the code in the memory of your digital receiver. If for any reason the code is not accepted,
the entry will be cleared and you will be prompted to enter another code.
5. Press the RED button to return to the “main parental code” menu or EXIT to return to normal
operation.
TO CHANGE YOUR PARENTAL CODE
Once a code has been entered, the parental lock menu will give you the option of changing your
current code. In order to do this, you will need to enter the current code before a new code can
be entered.
1. From the main menu, select the parental lock option followed by the change parental code
option.
2. The display will ask you to enter your current code, this time asterisks will be displayed as
the code is entered. If necessary, use the LEFT arrow button to correct any mistakes.
3. When you have entered the code, press the SELECT button. If you entered the code
correctly, it will be cleared and the screen will prompt the entry of a new code.
Note:
If you have entered an incorrect code, an error message will be displayed and you will
be asked if you want to try again.
4. Enter your new code in the same way, this time it will be displayed on-screen as you enter
the code. Press the SELECT button to confirm. Remember to make a note of your new code
as you enter it.
5. Press the RED button to return to the main parental lock menu or EXIT to return to normal
operation.
Note:
If you forget your parental code, contact ONdigital customer services
on 0870 600 9696 who can reset it for you.
18
Page 20

19
9.2 SELECTING CHANNELS TO BE LOCKED
1. From the parental lock menu, select the choose channel to lock or unlock option and by
pressing the SELECT button you will be asked to enter to your current code and then a
complete list of all available channels will be displayed.
2. Use the UP and DOWN arrow buttons to select the channels that you wish to lock. With one
of these channels highlighted, press the SELECT button to lock the channel. A“padlock”
symbol will appear alongside the selected channel to confirm that it has been locked.
3. Continue to select other channels that you wish to lock in the same way.
4. Press the GREEN button as indicated on screen to lock (closed padlock) or to unlock
(opened padlock) channels.
5. Press the EXIT button to return you to a normal TV picture.
9.3 WATCHING YOUR LOCKED CHANNELS
Once you have locked all the required channels, there are 2 ways to regain access and watch
these channels. You can either unlock individual channels as you select them or return to the
choose channel to lock or unlock menu and temporarily unlock them all.
TO UNLOCK INDIVIDUAL CHANNELS
1. When selecting a channel that has been locked the channel will not change and you will be
asked to press the SELECT button to access the channel.
2. You will then be prompted to enter your parental code.
3. Using the number buttons, enter your code. As you do, asterisks will be displayed in the 4
digit field.
4. With the code entered, press the SELECT button to confirm the code. Providing that you
entered it correctly the locked channel will be selected.
Page 21

20
5. If the code was entered incorrectly, a message will appear on screen to advise that the code
was incorrect and ask you to try again.
6. If necessary, repeat steps 4 and 5 until the correct code is entered. Alternatively, to escape
from this option, press the RED button to take you back a step then select a channel which
is not locked.
TO TEMPORARILY UNLOCK ALL CHANNELS
1. If you temporarily want to unlock all your locked channels, the easiest way to do this is from
the choose channel to lock or unlock menu. (Press MENU, then buttons 3 and 2 in turn).
2. Enter your current code where requested.
3. With the channel list displayed press the GREEN button as indicated on-screen, this will
open all the padlocks. Pressing this button again will close the padlocks. The top of the
screen will indicate whether the locks are open or close.
IMPORTANT:
Don’t forget to your channels again after unlocking them all in this manner.
9.4 RE-ARRANGING YOUR CHANNELS
This feature enables you to swap two channel positions within the total channel list, so that they
are displayed in your prefered order.
1. Press the MENU button then button 5 and 2 to get access to change channel number menu.
2. A complete list of channels currently available on your digital receiver is displayed.
(Alongside these channels will be symbols to indicate whether they have been selected as
your favourite or locked channels).
3. To move a channel to an alternative location, firstly highlight the channel using the UP and
DOWN arrow buttons and press the SELECT button to choose that channel.
4. Now select the new channel location using the UP and DOWN arrow buttons to highlight the
channel number where you want to move the channel to. The original channel remains
highlighted.
5. Lastly, press the SELECT button to swap the two channel locations. Repeat the above steps
to move further channels or press the EXIT button to return to a normal TV picture.
6. Press the
B button to store the new order of your channels.
Page 22

21
9.5 SETTING THE TIMER
The timer settings function enables you to program your digital receiver to switch on and off at
selected times, for upto 8 different time slots. Your video can then be set to record digital
programmes.
At any stage of the following procedure, pressing the RED button on the remote will return you to
the previous menu, or pressing the EXIT button will discard any changes that have been made
and return your receiver to normal operation.
1. Firstly press the MENU button on the remote, to display the main menu. The setting the
timer option will already be highlighted.
2. Select this option by pressing either the SELECT button or a number button 1 on your remote.
3. The screen will now show a list of 8 timer slots, each one indicating that it is either available
for programming, or that it has a programme already stored in it.
4. Select an available row using the UP and DOWN buttons, then press the SELECT button to
display the setting the timer screen. This screen asks you to confirm the date, channel
number, start time, end time and the status of the programme (whether it is on only once, or
whether it is repeated daily or weekly).
You can now start enter details of the programme you would like to record. All required buttons
are on the remote.
5. Use the number buttons to enter the date. Only the day and month should be entered, the
digital receiver will automatically know the year. You must enter a total of 4 digits, for
example to enter 8th February 1999, press 0802.
6. Press the DOWN arrow button to confirm the entry and move to the channel number line.
7. Enter the channel number you want to record from by pressing the relevant number buttons.
Page 23

22
8. Alternatively, if you do not know the number of the channel you want to record, you can
choose from the channel list by pressing the GREEN button as indicated. The channel list
will then be displayed. Use the UP and DOWN arrow buttons to find the channel you require
and press the SELECT button. The channel number will then be added to the “set the timer”
screen.
9. Press the DOWN arrow button to confirm the entry and move to the start time line.
10. Use the number buttons to enter the time when you want the receiver to switch on,
preferably several minutes before you set your video recorder to start recording. Your
receiver uses a 24 hour clock, so for example to switch on at 8.25pm, you should enter
2025. If you enter something incorrectly, the LEFT and RIGHT arrow buttons can be used to
overtype the entry.
11. Press the DOWN arrow button to confirm the entry and move to the next line.
12. Now enter the time you want your receiver to switch off, preferably after your video will have
stopped recording. Again, you should enter 4 digits and in the 24 hour format. Press the
DOWN arrow button to confirm the entry and move to the next line.
13. Use the LEFT and RIGHT arrow buttons to select the required recording frequency. The
screen display will give you options of ONCE ONLY, DAILY or WEEKLY. Select the 1st option
to record only once. Select the 2nd option if you want the receiver to record at these times
every day, and select the 3rd option to record at that time on a weekly basis.
14. With all the details entered, press the SELECT button to confirm the settings and return to
previous menu to check them, then press EXIT to return to normal mode or repeat from step
4 for additional timer setting.
If you have finished watching programmes on your digital receiver, you must leave your receiver
in standby mode in order for the timer settings to be activated. Once the timer is active the
message ”rEC” is shown on the front panel display.
THESE STEPS WILL NOW ACTIVATE YOUR DIGITAL RECEIVER, PLEASE REMEMBER YOU
STILL NEED TO PROGRAM YOUR VIDEO RECORDER !
TIMER ALARM
If after setting the timer you wish to continue watching other digital a timer, you can do so by
changing channels in the normal way. If you are watching another digital channel when the timer
is due to start the timer alarm will sound and “rEd” will be shown on the front display. Press the
RED button on your remote to display the following screen.
You have two choices, whether to change to the channel set in the timer or continue to watch the
current channel.
- To change to the channel set in the timer, press the SELECT button. In this case the
digital receiver will not go into standby at the end of the timer.
- To continue watching the current channel, press the RED button again.
Page 24

23
VIDEO RECORDING
As previously mentioned in the setting the timer section of this instruction book, it is not currently
possible to record one digital channel whilst watching another. If you are recording a programme
from your digital receiver, the channel you are recording is the only digital channel that can be
watched.
You can however record a digital channel and watch an analogue channel on your TV, or vice
versa.
DELETING A TIMER
To delete a timer previously set, follow these steps:
1. Press MENU then button 1 (setting the timer).
2. Press UP or DOWN to select the timer you want to delete.
3. Press the BLUE button.
9.6 USING TELETEXT
Digital Terrestrial television gives you access to new and vastly improved digital teletext services,
including high quality text and graphics as well as advanced navigational options.
DIGIT AL TELETEXT CHANNEL
Unlike previous teletext services, you now have access to dedicated digital teletext channels.
These appear on their own channel numbers which you select like any other channels. Check
the channel list to see what channel numbers these services are on.
Individual teletext pages can be selected using the arrow buttons followed by the SELECT
button. Alternatively, the number or coloured buttons can be used.
OTHER DIGITAL TELETEXT AND INFORMATION
SERVICES
Other digital channels may also operate digital teletext or information services. These can be
selected either by choosing the appropriate channel number or by pressing the text button on
your remote whilst you are watching a digital channel that includes teletext services.
Page 25

24
9.7 CHECKING YOUR POSTBOX
Your digital receiver has the ability to display messages that have been sent to you by a
broadcaster, perhaps about a special offer or your current subscription package.
This service will be available during 1999, when ONdigital will give you more details about how
this will benefit you.
You will see when a message is waiting to be read by the message ”POSt” appearing in the LED
on the front of your digital receiver.
Your personal postbox can then be accessed through the main menu.
1. Press the MENU button and use the UP and DOWN arrow buttons to highlight the ONdigital
update option. Alternatively press the number button 6.
2. From the next menu, choose option 2, “check your postbox” by either pressing the number
2 button or using the DOWN arrow button to highlight, followed by the SELECT button.
3. Your current messages will then be displayed, the most recent message appears at the top
of the screen, with previous messages following.
4. Should you wish to check previous messages, you can scroll around the screen by pressing
the UP or DOWN arrow buttons on your remote. Each time you re-enter the postbox, the
latest message will always appear first.
5. When you have read your messages, you can return to normal operation by pressing the
EXIT button.
NOTE:
Messages cannot be manually deleted, but the oldest messages are automatically
removed as new messages are received.
CHECKING YOUR SUBSCRIPTION
When you access your postbox, you will notice another menu with the option of checking your
subscription. Selecting this option will display the current expiry date of your subscription
account.
Page 26

25
9.8 ALTERING YOUR ONdigital BOX SETTINGS
This menu offers the following options, enabling you to set the preferred language, subtitles, tv
volume, info display time and timer alarm. The steps involved in making changes to these
options are described below.
1. To see the receiver settings menu, press the MENU button, then 4 (viewing references),
then 1 (ONdigital box settings) on your remote. Each option can be highlighted using the UP
and DOWN arrow buttons.
2. When the required option is highlighted, you can make adjustments using the LEFT and
RIGHT arrow buttons.
3. When you have made the adjustment, press the RED button followed by the EXIT button on
your remote to save the new setting and return to a normal TV picture.
An explanation of each option is detailed below:
PREFERRED LANGUAGE
When your receiver is first switched on, the default setting for this option will be English. Other
options are Welsh and Gaelic. Should you wish to change the language, use the LEFT and
RIGHT arrow buttons. If the language selected is not available, the receiver will use English as a
default.
SUBTITLES
Similarly, this option will allow you to choose the language that subtitles are displayed in. Options
are English, Welsh, Gaelic and None. If any of the languages are selected, subtitles will always
be displayed when they are available. The SUBTITLE button on your remote, can be used to
switch the subtitles on and off. The option also includes a setting for hard of hearing people,
indicated by a symbol next to the language. This means that the subtitles will also include
descriptive text, such as telling the viewer when there is laughter or applause.
If the none option is selected, subtitles will not be displayed, even if they are available, unless
the SUBTITLE button on your remote is pressed.
You will know if subtitles are available for a programme either by a symbol that appears when
you look at the channel list, or if you are made aware of this by a broadcaster.
TV VOLUME
This option sets the default sound output level at wake up from your receiver to your TV. This is
factory set to a medium level, but you may notice that when switching between channels on your
digital receiver and channels on your normal TV, that the volume differs.
With this option highlighted, use the LEFT and RIGHT arrow buttons to adjust the digital
receivers volume to minimize this sound difference.
Note:
You should use the TV multibrand remote supplied with your digital receiver to adjust
volume levels (consult chapter 3 and 10), alternatively use your TV remote.
Page 27

26
INFO DISPLAY TIME
With this option you can set the length of time that on-screen information is displayed. This only
applies to screens that you do not make adjustments to such as channel change. The options
available are off, normal or long.
IMPORTANT:
If this option is set to Off, certain menus will no longer appear on-screen at all.
TIMER ALARM
This option enables you to select either visual or audio&visual for the timer alarm. The alarm is
factory set to audio&visual, and as such will give a warning when a programme is about to start
for which the timer has been set. Your digital receiver will display the code rEd on the LED and
will beep. More information on how the timer works is included in section 9.5.
TIME and DATE
Your digital receiver will automatically set the current time and date by taking information from
broadcasters. However, should you wish to adjust these settings, you can do so manually using
this menu.
Use the number buttons to enter the correct details, remembering that the time should be
entered in a 24 hour clock format.
9.9 ALTERING SETTINGS FOR YOUR TV and
VIDEO
The settings that appear on this menu when you install your receiver have been made by the
factory, and in most case need not be changed. Press the MENU button, then button 4 (viewing
preferences) and button 2 (TV and video settings) to display the menu below.
Each option is briefly described below. Pressing the EXIT button at any stage of this menu will
return you to a normal TV picture.
In all instances, the UP and DOWN arrow buttons should be used to select the required option
and the LEFT and RIGHT buttons to amend the setting.
TV SCREEN
This option enables you to tell the receiver whether you have a 4:3 or 16:9 (widescreen) TV.
If you select 16:9 in this option, the receiver will automatically display any widescreen
programmes in the correct format.
If you choose 4:3, a further option will be highlighted below that enables you to select how you
would like a widescreen programme to be shown on your standard 4:3 TV.
Page 28

27
NORMAL 4:3 (only available if 4:3 is selected in item 1 of this
menu)
If you have a 4:3 TV, you need to choose whether widescreen programmes are shown in a
letterbox format ie. with blank areas at the top and bottom of the TV screen, or whether the
programme is expanded to fill the height of the screen, but as a result parts of the picture at the
side are lost.
While watching a programme the WIDE button switches between “letterbox” and “full screen”
picture format.
4 : 3 full screen 4 : 3 letter box
TV SOUND
This gives you the option of selecting either mono or stereo sound. As a default, stereo has been
selected. You need only change this selection if you are connecting to a mono TV.
TV STANDARD
If you have connected your digital receiver and your TV by a scart lead, you should try adjusting
this option to ensure the best possible picture. The receiver will default to a setting called
“composite”. However you may see further improvement if you select the alternative “rgb” option.
Change the option as previously described. If you do not notice any difference in the picture
quality, please ensure the setting remains on composite and exit the menu.
VIDEO SOUND
Leave this set to “stereo”.
VIDEO STANDARD
Leave this set to “pal I”
UHF OUTPUT CHANNEL
This is another setting that has been made during manufacture which you should not find
necessary to adjust. If relates to the output frequency from your digital receiver to your TV
(coaxial connection).
Should you be unable to tune a channel on your TV or video to watch pictures from your digital
receiver, you may need to adjust this setting. It may also require slight adjustment if you can see
a picture but there is also some interference. (Refer to chapter 4.1.2).
If you are in any doubt about adjusting this setting, please contact your local retailer or ONdigital
customer services on 0870 600 9696
Page 29

28
9.10 ALTERING MODEM SETTINGS
You may need to alter the settings within this menu when you connect your digital receiver to a
telephone line. Press the MENU button, followed by number button 4 (viewing preferences) then
3 for modem settings.
MODEM
This option enables you to tell the receiver if you are using the internal modem or have added an
external modem.
DIALLING
This option is to choose either tone or pulse dialling. Most domestic telephones use tone dialling.
If you are unsure, check with your telephone company.
CONNECTION
You will only need to change this setting to pabx if your digital receiver is connected to a phone
line that requires you to dial a prefix for an outside line. Most domestic telephones will operate
with a direct connection.
PREFIX
This option is only available If you have chosen pabx in the connection option. You can then
choose the prefix that the digital receiver will dial in order to get an outside line.
WAIT FOR DIAL TONE
This option is only available if you have chosen pabx in the connection option. You can then
adjust this setting depending on what your system requires.
STD CODE
This allows you to tell the receiver whether it will always be required to dial an STD code.
PREFIX
If you have selected to choose an STD code, this allows you to enter the code using the
NUMBER buttons.
9.11 TECHNICAL INFORMATION
The options contained within the technical information menu enable you to check the status of
your digital receiver. This is not something you should need to do, apart from in the unlikely
event of a problem occurring with your receiver. In this instance, it will help the ONdigital
customer services people to understand the problem and resolve it as quickly as possible.
There are 3 options from the menu, signal strength, manufacturer data and auto update.
SIGNAL STRENGTH
This section will help to determine the strength of signal that is available to your digital receiver.
The display details the output channel that has been selected and the signal strength of that
channel.
To enter the UHF number, press the GREEN button, enter the channel number and press the
RED button to measure the signal strength.
You will not normally need to refer to this screen, but should you have any reception problems, it
maybe referred to during a call to the ONdigital customer services.
Page 30

MANUFACTURER DATA
This option shows various information about your digital receiver, such as it’s manufacturer and
the versions of hardware and software that it contains. This is another screen that will be used
by the ONdigital customer service people.
AUTO UPDATE
The final option on this menu can update the software used in your digital receiver. This may
update certain menus or functions of your digital receiver, as well as add new features, but the
general way in which it operates will not change.
Normally, this type of update will be broadcast to your receiver like any normal programme. The
receiver will detect the broadcast and update itself the next time it is switched on. Whilst this is
happening you may notice certain messages on the LED display on the front of the receiver.
These messages and their meanings are described below.
On other occasions, you may be asked to start this update process by a member of the
ONdigital customer services team. Before the update starts, a message will be displayed to ask
if you want to go ahead as it may change some of the personal settings you have made on your
receiver, such as locked or favourite channels.
FRONT PANEL MESSAGES
The front panel display can also indicate the status of your digital receiver during an auto update.
Messages include:
Auto update – this is indicating that your digital receiver is searching for an updated version of
software and then updating your receiver.
Update error – this will indicate that the software your receiver is currently using is in fact the
most up to date version.
Retrying update – this message may be seen when a newer version of software has been
located, but the receiver is having difficulty updating. In this instance, the auto update message
will be seen again as the receiver continues the update process.
Out of order – this indicates that your receiver has tried to update the software it currently uses,
but has been unsuccessful. It maybe necessary to contact your retailer, but if you are in any
doubt, call ONdigital customer services on 0870 600 9696.
9.12 ADDING NEW CHANNELS
This function can be used to add channels to your existing list of stored channels. Follow these
instructions should you wish to search for new channels that may have subsequently been
launched by the broadcasters.
1. Press MENU, then button 5 (getting started), and button 3 (add channels).
2. During the channel search the display on screen will indicate the number of channels that
have been found.
3. When the search is complete the channel list will be displayed showing any additional
channel, that were found.
29
Page 31

30
IF YOUR DIGITAL RECEIVER ’S REMOTE
INTERFERES WITH Y OUR TELEVISION.
If you have interference between your digital receiver’s remote control and your particular brand
of television set, it may be because the television incorrectly responds to infra-red commands not
intended for it.
Your digital receiver and remote can work with one of two infra-red coding systems A& B. The
normal setting for your receiver and remote control is system A, these can however be changed
to system
B
, to avoid conflict with your television set.
10.1 To change your digital receiver from system
A to system B.
1. Ensure your digital receiver is switched off (if necessary press the ON/OFF button)
2. Press the ON/OFF button to switch on your digital receiver (the front display shows the time
or “—:—”), your digital receiver will now be in standby.
3. Press and hold the M button on the front panel of your digital receiver for at least 3 seconds.
4. The front control panel of the digital receiver will now show “-SA-” (this stands for system A).
5. Press the B (right arrow) button to change the display from “-SA-” to “-Sb-”.
6. Press the S button to store the displayed setting, your digital receiver returns to standby and
is now programmed to use system B.
Note:
During the above process, if there is a time lapse of more than 10 seconds between
key presses the digital receiver will return to standby.
Should you at any time wish to change your digital receiver back to system Acommands, exactly
the same sequence should be used except this time the B (right arrow) button is used to change
the display to “-SA-”.
10.2 To change your remote control from system
A to system B.
1. Locate the B (standby) and TEXT buttons on your remote control.
2. Simultaneously press and hold these two buttons for at least 3 seconds.
3. After releasing the B (standby) and TEXT buttons use the number buttons on the remote
to enter the three digit code 161.
Your remote is now programmed to work with system B commands.
Note:
Should you at any time wish to change your remote control back, to work with system
A commands, exactly the same sequence should be used except this time the code
entered should be 160.
Important:
If your remote is not powered for more than one minute, for instance when the batteries are
changed, it is possible your remote could revert back to system Aand no longer works your
digital receiver.
Should this happen, please carry out the steps shown above to change the remote back to
system B
.
TV or Video settings you may have entered to operate products other than Philips will also be
lost. Refer to chapter 11 “Programming the remote for your TV and Video” for information about
these settings.
10
10
Page 32

31
PROGRAMMING THE REMOTE FOR
Y OUR TV AND VIDEO
Your remote can control different major-brand televisions and video’s.
Initially your remote is programmed for Philips-brand televisions and video’s. If you have different
brands, follow the instructions below to set up your remote.
TV brand Setup
This applies to the TV only.
1. Turn on the television you wish to control.
2. Locate the
-
aa
and P+ buttons in the TV section of the remote control
(as shown below).
3. Simultaneously press both of these buttons for at least 4 seconds.
4. Enter the 3 digit code for the TV (found on pages 32 and 33).
5. Aim the remote at the TV and press the
OFF
button located in the TV section.
The television should now go to standby.
6. If the TV does not go to standby, repeat steps 2-5, trying each code listed for your brand of TV.
VIDEO brand Setup
This applies to the video only.
1. Turn on the video for which the code needs to be identified.
2. Press and hold the “G and F” buttons simultaneously on the RC for a minimum of
4 seconds.
3. Enter the 3 digit code for the video (found on pages 33 and 34).
4. Aim the remote at the video and press the yellow B button (keep the side button pressed
when the yellow B button is pressed). The video should start playback.
5. If the video does not start playback, repeat steps 2-4, trying each code listed for your brand
of video.
Resetting your remote
If necessary the remote can be reset to the factory default clearing all the pre-programmed
codes.
TV OFF and
B are pressed simultaneously for at least 4 seconds.
This restores the remote to the factory setting.
Changing batteries
When changing batteries in your remote, programmed codes will only be remembered for one
minute. Be careful not to press any button when changing the batteries as this will also reset
your remote.
All manufacturers are concerned about the constant improvement of their products.
Although the RC 2580 remote is compatible with most of the equipment of the following
brand list, Philips cannot guarantee its operation with the complete range of products on
the market.
11
11
Page 33

32
CODES FOR TELEVISION
Acura 036
Admiral 190
Adyson 244
Akai 235, 388
Akura 245, 291, 396
Alba 036, 063, 064, 245, 398
Allorgan 321
Amplivision 244, 427
Amstrad 036, 389, 396, 398, 439, 460
Anitech 036
Arcam 243, 244
Asuka 245
Atlantic 233
Audiosonic 064, 136
Autovox 233, 363
BPL 309
BSR 321
BTC 245
Baird 370
Basic Line 036, 245
Baur 037, 064, 376, 388, 581
Beko 397
Beon 064
Binatone 244
Blaupunkt 218, 222, 227, 354, 355, 581
Blue Sky 245
Blue Star 309
Bondstec 274
Boots 244
Brandt 136, 223, 225, 360, 362
Brionvega 389
Britannia 243
Bush 036, 063, 064, 245, 309,
321, 376, 398, 401, 546
CGE 274, 333
CS Electronics 243
CTC 274
Carrefour 063
Cascade 036
Cathay 064
Centurion 064
Cimline 036
Clarivox 064
Clatronic 274, 397
Condor 347, 397
Contec 036, 063, 243
Continental Edison 223, 225, 360, 426
Crown 036, 064, 397, 445
Crystal 458
Cybertron 245
Daewoo 036, 064, 401
Dainichi 242, 245
Dansai 064
Dayton 036
De Graaf 235, 575
Decca 064, 099
Dixi 036, 064
Dual 363, 379, 546
Dual Tec 244
Dumont 097
Elbe 286
Elin 064, 575
Elite 245, 347
Elta 036
Emerson 388
Erres 039, 064
Expert 233
Ferguson 064, 136, 265, 314, 362, 370
Fidelity 243, 388
Finlandia 235, 373, 386
Finlux 064, 097, 099, 132, 373, 438
Firstline 036, 243, 244, 274, 321, 348
Fisher 235, 244, 330, 397
Flint 482
Formenti 064, 347
Frontech 190, 274, 291, 458, 475
Fujitsu 099, 233
Funai 291, 321, 330
GEC 064, 099, 244
GPM 245
Geloso 036
Genexxa 190, 245
GoldStar 064, 136, 244, 317
Goodmans 063, 064, 099, 244, 344,
370, 398, 401
Gorenje 397
Graetz 190, 388
Granada 064, 099, 235, 244, 366, 386
Grandin 309
Grundig 097, 218, 222, 514, 581
HCM 036, 309, 439
Hanseatic 064, 347, 388, 583
Hinari 036, 063, 064, 245
Hisawa 309, 427, 482
Hitachi 063, 071, 132, 136, 190,
223, 225, 244, 252, 333,
376, 575
Huanyu 243, 401
Hypson 064, 291, 309
Ice 244, 291, 398
Ices 245
ITS 398
ITT 190, 388, 575
Imperial 274, 397, 445
Indiana 064
Ingelen 190
Inno Hit 099
Interfunk 064, 190, 274, 388
Intervision 064, 129, 244, 291
Isukai 245
JVC 063, 080, 398
Kaisui 036, 243, 244, 245, 309
Kapsch 190, 233
Kathrein 583
Kendo 064, 389
Kingsley 243
Kneissel 286, 462
Korpel 064
Koyoda 036
Leyco 064, 099, 291, 321
Liesenk & Tter 064
Luma 233
Luxor 376, 388
M Electronic 036, 064, 132, 136, 190,
244, 314, 373, 401, 507
MTC 376
Magnadyne 129, 274
Magnafon 129
Maneth 244, 291, 347
Marantz 064, 583
Mark 064
Matsui 036, 062, 063, 064, 099,
235, 244, 321, 398, 470, 514
Mediator 039, 064
Memorex 036
Memphis 364
Metz 394
Minerva 097, 514, 581
Minoka 396, 439
Mitsubishi 063, 135, 177
BRAND CODE LIST
Page 34

33
Mivar 243, 317, 318, 319
Multitech 036, 129, 243
NEI 064, 364, 458
Neckermann 064, 218, 376, 581, 583
Nikkai 062, 064, 099, 243, 245,
291, 364
Nobliko 129
Nokia 388, 507, 575
Nordmende 136, 223, 225, 314, 370
Oceanic 190, 242, 388
Onwa 460
Orion 064, 321, 347, 348, 470
Osaki 099, 244, 245, 291, 439
Oso 245
Osume 099, 184
Otake 344
Otto Versand 037, 063, 064, 218, 244,
347, 370, 376, 581, 583
Palladium 397, 445
Panama 244, 291
Panasonic 190, 253, 277, 394
Pathe Cinema 243, 265, 347
Pathe Marconi 223, 225, 360
Pausa 036
Perdio 347
Philco 274
Philips 039, 064, 401, 581, 583
Phonola 039, 064
Pioneer 136, 190, 314
Profex 036, 388
Proline 348
Protech 036, 064, 129, 244, 274,
291, 364, 445, 458
Pye 039
Quelle 037, 064, 097, 227, 333,
354, 355, 388, 581
Questa 063
R-Line 064
RBM 097
Radiola 039, 064
Rank Arena 063
Rediffusion 388
Revox 064
Rex 190, 233, 286, 291
Roadstar 036, 245, 291, 445
SBR 039, 064
SEG 063, 244, 291
SEI 129, 321
Saba 136, 190, 223, 225, 314,
362, 370
Saccs 265
Saisho 036, 291, 458
Salora 190, 376, 386, 388, 575
Sambers 129
Samsung 036, 064, 117, 244, 291, 317,
397, 583
Sandra 243
Sanyo 063, 099, 184, 235, 366
Schaub Lorenz 388
Schneider 064, 245, 274, 330, 363,
379, 398, 421
Sei-Sinudyne 037
Seleco 190, 233, 286, 389, 438
Sentra 062
Sharp 063, 120
Shorai 321
Siarem 129
Siemens 064, 184, 218, 222, 227,
354, 355, 581
Silver 063
Sinudyne 129, 321
Solavox 190
Sonitron 235
Sonoko 036, 064
Sonolor 190, 235, 242
Sontec 064
Sony 037, 063
Soundwave 064, 445
Standard 036, 244, 245
Stern 190, 233, 286
Sunkai 321, 348
Susumu 245
Sysline 064
Tandy 099, 190, 244, 245
Tashiko 063, 244, 386
Tatung 064, 099, 244
Tec 244, 274
Technema 347
Technics 277
Teleavia 360, 370
Telefunken 136, 333, 362, 370, 498, 525
Telemeister 347
Teletech 036
Teleton 233, 244, 376
Tensai 245, 321, 344, 347
Texet 243, 245
Thomson 136, 223, 225, 314, 360,
370, 376, 426
Thorn 062, 064, 099, 370, 388
Tomashi 309
Toshiba 062, 063, 097, 270
Triumph 270
Uher 233, 330, 347
Ultravox 129
Universum 064, 132, 291, 373, 397, 519
Vestel 064
Videosat 274
Videotechnic 244
Vision 347
Voxson 190
Waltham 244
Watson 064, 347
Watt Radio 129
Wega 063
White Westinghouse064, 243, 347
Yoko 064, 244, 291, 458
Zanussi 233
CODES FOR VCR
ASA 064, 108
Aiwa 027, 375, 379
Akai 068, 080, 133, 342
Akiba 099
Alba 047, 099, 236, 305, 342, 379
Ambassador 047
Amstrad 027, 305, 359
Anitech 099
Asuka 064
Baird 027, 068, 131
Basic Line 047, 099, 305
Blaupunkt 030, 033, 061, 181, 189,
222, 253, 254, 430
Brandt 214, 347, 348
Brandt Electronic 068
Bush 099, 236, 305, 379
CGE 027
Catron 047
Cimline 099
Clatronic 047
Combitech 379
Condor 047
Crown 047, 099, 305
Cyrus 108
Daewoo 047, 305
Dansai 099
Page 35

34
De Graaf 069, 193
Decca 027, 108
Denon 069
Dual 068
Dumont 027, 108, 131
ESC 267, 305
Elbe 065
Elcatech 099
Ferguson 068, 347, 348
Fidelity 027
Finlandia 108, 131
Finlux 027, 069, 108, 131
Firstline 064, 070, 072, 099, 236
Fisher 073, 074, 131
frontech 047
Funai 027
GEC 108
General 047
GoldHand 099
GoldStar 064, 252
Goodmans 027, 047, 064, 099, 305, 430
Graetz 068, 131, 267
Granada 073, 108, 131
Grandin 027, 064, 099
Grunding 030, 033, 034 ; 099, 108,
222, 234, 253, 374, 376, 430
HCM 099
Hanseatic 064
Hinari 031, 099, 267, 379
Hitachi 027, 031, 068, 069, 193, 267
Hypson 099
ITT 068, 073, 131, 133, 267, 411
ITV 064, 305
Imperial 027
Ingersol 031
Interfunk 108
JVC 035, 068, 094, 233, 234, 411
Kaisui 099
kendo 133, 236
Kenwood 068
Korpel 099
Lenco 305
Leyco 099
Loewe 031, 033, 064, 108, 189
Logik 031, 267
Luxor 070, 073, 075, 131, 133
M Electronic 027
Manesth 072, 099
Marantz 030, 033, 108
Matsui 031, 063, 236, 375, 379
Melectronic 065
Marantz 030, 033, 108
Matsui 031, 063, 236, 375, 379
Melectronic 065
Memorex 027, 064, 073, 131
Memphis 099
Metz 030, 033, 189, 222, 254, 374
Minerva 033, 222
Mitsubishi 070, 094, 108
Multitech 027, 099
Murphy 027
Nec 065, 068, 094
Neckermann 108
Nesco 099
Nokia 068, 073, 131, 133, 267
Nordmende 068, 324, 347, 348, 411
Oceanic 027, 068
Okano 342, 375
Orion 031, 063, 236, 375, 379
Osaki 027, 064, 099
Otto Versand 108
Palladium 033, 064, 068, 099
Panasonic 189, 253, 254
Pathe Cinema 063
Pathe Marconi 068
Pentax 069
Perdio 027
Philco 065
Philips 108, 411, 430
Phonola 108
Pionner 094, 108
Portland 047
Profex 349
Profitronic 267
Proline 027
Pye 108
Quartz 073
Quelle 108
RFT 430
Radiola 108
Rex 068, 411
Roadstar 064, 099, 267, 305
SBR 108
SEG 267, 349
SEI 031, 108
Saba 068, 233, 234, 324, 347,
348, 411
Saisho 031, 063, 236
Salora 070, 073, 133
Samsung 267, 459
Sansui 068, 094
Sanyo 073, 131
Saville 379
Schaub Lorenz 027, 068, 131
Schneider 027, 099, 108
Seleco 068
Sentra 047
Sharp 075
Shintom 099, 131
Shorai 031
Siemens 030, 033, 064, 108, 131, 222
Silva 064
Singer 072
Sinudyne 031, 108
Solavox 047
Sonolor 073
Sontec 064
Sony 038, 059, 060, 061
Sunkai 375
Sunstar 027
Suntronic 027
Tashiko 027
Tatung 027, 068, 108
Tec 047
Technics 189, 253
Teleavia 068
Telefunken 068, 214, 347, 348, 411
Tenosal 099
Tensai 027, 349
Thomson 068, 347, 411
Thorn 063, 068, 131
Toshiba 068, 070, 072, 108, 411
Towada 349
Uher 267
Universum 027, 033, 064, 108, 133,
222, 267
Yamishi 099
Yokan 099
Yoko 047, 267
Page 36

35
Problem
No picture, no sound and no front
panel display.
No picture, no sound but the front
panel shows the time or - - : - - .
No picture, no sound but the front
panel shows a channel number.
The remote does not operate.
You cannot find all the channels
you think should be available.
You can see interference on your
normal TV channels or your
video.
You sometimes see a red dot or
square on the screen, or your
picture is “freezing”.
I cannot select all of my channels
and the P+/- or Arrow up/down
buttons do not always work.
Even if I use the number buttons I
cannot access a particular
channel.
Possible cause
Receiver is not plugged into the
mains or is not switched on.
The receiver is in standby.
You are viewing standard
analogue television.
The scart connection has been
made wrong or your TV has not
selected the correct AV/EXT
channel.
Your receiver could be in standby,
if it is, it will show the time.
The batteries have been inserted
incorrectly or are dead.
Your are not pointing your remote
at the receiver.
The signal to your aerial may be
weak.
Your aerial may need adjusting or
your local transmitter may not be
working.
Your digital receiver is interfering
with the frequency of your other
equipment.
There could be a transmission
problem.
Your aerial may have been
moved, for example by severe
weather.
Your connecting cables have
become loose or disconnected.
Some channels have been
selected as favourites and the
favourites mode is on.
The parental lock has been
activated on this channel.
Action
Check mains connection. Press
the ON/OFF button on the front of
the recceiver.
Press the standby button or any
number button to bring the
receiver out of standby.
If you have used a scart cable
when connecting, press the
TV/DTV button on your remote.
If you have not used scart, make
sure your TV is on the channel
that has been tuned for watching
digital.
Check scart connections, making
sure cables are firmly pushed into
the sockets.
Try manually selecting the
AV/EXT channel on your TV.
Press the standby button on your
remote to bring the receiver out of
standby. The front panel will then
show a channel number.
Check the condition of the
batteries and replace if necessary,
according to instructions earlier in
this book.
Make sure you point the remote
at the receiver and not directly at
your TV.
Try retuning your receiver,
following the relevant steps in
chapter 7. If you are still missing
channels, your aerial may need
adjusting.
Call ONdigital customer services
on 0870 600 9696. They will
check this for you.
Your need to change the UHF
output of your receiver as described in section 4.1.2. of this book.
This is normally only a temporary
situation and should correct itself.
If it persists, contact ONdigital
customer services.
Check and if necessary re-align
your aerial.
check all connections and make
sure they are all firmly pushed
into sockets.
Using the number buttons will
enable you to select all of your
channels all of the time. The P+/and arrow buttons will only select
favourite channels when favourites are on. See chapter 8.5.
Enter your parental code to
access the channel or remove it
as a locked channel.
See sections 9.1 to 9.3 for more
details.
12
12
TROUBLESHOOTING
Experiencing difficulty operating your digital receiver? Check the following points first!
Page 37

36
Problem
I have forgotten my parental
code.
I set the timer but it did not record
what I wanted.
When I have more than 1
programme in the timer, I
sometimes miss the beginning of
the second programme.
There is no picture on certain
channels but the channel name is
displayed.
Pressing the TV/DTV button does
not do anything.
The order of my channels has
changed.
The remote will not operate my
TV or video.
The on-screen displays are not as
sharp as I expected.
The picture on some channels
seems to have been stretched or
squashed.
Possible cause
The video was set incorrectly.
Your receiver was not left in
standby.
Your were watching another
digital channel and ignored the
timer alarm.
The timer automatically adds 5
minutes to the start and end times
set in the timer. If the 2nd
programme starts immediately
after the first,this can delay the
start of the second recording.
Your ONdigital subscription does
not currently include these
channels
You have not connected your
digital receiver and TV by a scart
lead.
They have been re-arranged as
described in section 9.4.
An incorrect code has been
entered into the remote.
If you have connected using scart
and you have an RGB compatible
TV, one of the TV settings could
be wrong.
The broadcast is probably in
widescreen and the receiver
settings may not be correct.
Action
Call ONdigital customer services
who can help you enter a new
code.
Make sure that your video is set
for the same time as your digital
receiver.
If you set the timer and have
finished watching TV, make sure
you put your receiver into
standby, otherwise it will not
activate.
If you set the timer and continued
watching, you must change to the
timer channel when the alarm
activates. See section 9.5 for
more detail.
Only set the timer for the exact
time of the programme. Allow for
the 5minutes run in and out times
when setting more than one
event.
To add channels to your
subscription, call ONdigital
customer services.
Use a scart lead if possible, but if
you cannot this button will have
no function. This is not a fault.
Refer to this section to change
the order again.
Refer to section 11 to make sure
that the right codes are being
used for your other equipment.
Refer to chapter 9.9 and alter the
TV standard to RGB.
Check the receiver settings,
following the information in
chapter 9.9. If you have a
widescreen TV, you may also
need to check the settings on
your TV.
Page 38

37
Sytem capabilities
- DVB compliant MPEG-2 reception of
broadcasts up to Main Profile @ Main
Level
Video decoding
- MPEG-2 DVB compliant up to MP@ ML
- Video bit rate : up to 15 Mbit/sec
- Video format : 4 :3 and 16 :9
- Resolution: up to 720x576 pixels
Audio decoding
- MPEG layer I / II (excluding
multichannel management from one
bitstream)
Operation/Features
- Automatic program loading via
scanning installation
- Free to air reception
- DVB subtitles
- Program parental lock with PIN code
- Audio mode :single channel, dual
channel, stereo, joint stereo
- Volume control
- Fully remote controlled
- Menu controlled operation using On
Screen Display
- Menu controlled installation using On
Screen Display
- 8 events over one year VCR timer
- Automatic VCR play back
- Receiver compatible with ONdigital
services
- Electronic program guide for ONdigital
bouquet services
- Mains switch
- Multibrand TV and VCR remote control
Reception-Demodulation
- Demodulationaccording DVB-T
Type COFDM 2K
Mode All modes
Non hierarchical
Descrambling
Type DVB
Implementation Internal
Smart card : 1 x for CA
Note : subscription is required for the
reception of ONdigital scrambled services
Connections
- RF input (for aerial) connector
Female IEC 169-2
Input frequency range (MHz)
470-868
(CH21 to 69)
Input level range (dBµV) 40 to 80
- RF output (to TV) connector
Male IEC 169-2
Loopthrough frequency range (MHz)
470-868
(CH21 to 69)
Remodulated ouput PAL I
CH21-69 range
Preset CH38
- TV SCART
Output : CVBS , Controlled audio L/R
RGB , Slow blanking,
Fast blanking
- VCR SCART
Input : CVBS, Slow blanking , Audio L/R
Output : CVBS, Audio L/R
- Audio CINCH :
Output : Controlled audio L/R
- Serial interface :
RS 232 / DB 9 female
- Integrated modem telephone line
interface : RJ-11
- Common interface for type II or III
module
Return path
- Integrated Telephone modem
- Type V22 bis
- Error correction V42
- Dialing mode DTMF and pulse
Acessories
- Remote control : RC6 coding
Type RC2580
- Scart cable
- Instruction for use
- Worldwide Guarantee booklet
- Starter kit including Smart card
- Telephone cord with plugs (10 m)
- Batteries : 2 x 1.5V type AA/R06/UM-3
- UHF coaxial lead
- Mains cord
Miscellaneous
- Temperature range (°C)
Operating +5 to 45
Storage -10 to +70
- Mains 230 V ~ +/-10%
50 Hz
DTX 6372 :
- Power consumption (W) 17 max
- Standby consumption (W) 8 max
- Weight (kg) 2.30
Including packaging (kg) 3.65
- Dimensions (wxhxd mm) 380x60x255
Including packaging 470x150x350
DTX 6370 and DTX 6371 :
- Power consumption (W) 17 max
- Standby consumption (W) 10 max
- Weight (kg) 2.500
Including packaging (kg) 3.850
- Dimensions (wxhxd mm) 380x71x255
Including packaging 470x150x350
13
13
DTX 6372 DIGITAL TERRESTRIAL RECEIVER
REAR PANEL TERMINALS (refer to rear view of chapter 2).
1 230 V - 50 Hz power cord socket. 5 RS 232 serial port socket (SELV).
(excessive voltage) 6 Audio-cinch outputs for HIFI system (SELV).
2 RJ11 connector for telephone line (TNV 3). 7 SCART socket for video (SELV).
3 SCART socket for TV(SELV). 8 Common interface (SELV).
4 UHF aerial output for TV (SELV). 9 UHF aerial input (SELV).
SELV: Safety Extra Low Voltage.
TNV 3: Telecommunication Network 3.
Due to continued product improvements, this information is subject to change without notice.
Page 39

DTX 6372 / DTX 6371 / DTX 6370 - 3111 176 49641 03 / 00
 Loading...