


DE
Benutzerhandbuch
EN
User manual
DTR 4020
2
34

EN
Meaning of symbols
Important information:
Must be read and understood.
Yo ur product has been designed and manufactured with high quality materials and
components, which can be recycled and reused.
When this crossed-out wheeled bin symbol is attached to a product or its packaging, it
means the product is covered by European Directive 2002/96/EC.
Please inform yourself about the local separate collection system for electronic
products.
Please act according to your local ru
your normal household waste. The correct disposal of your old product will help
prevent potential negative consequences for the environment and human health.
The “Material recyclability symbol” affixed on package cardboard and user manu al
means these parts are recyclable.
So do not dispose of them with your normal household waste.
The “Material recyclability symbol” affixed on plastic packaging parts means these parts
02
are recyclable.
So do not dispose of them with your normal household waste.
The “Green Dot” affixed on cardboard means PHILIPS pays a financial duty to the
“Avoidance and Recovery of Packaging Waste” organization.
les and do not dispose of your old products with
34

Safety instructions
Yo ur receiver is powered using an AC adaptor.This equipment has been
manufactured to meet the appropriate safety standards, but the instructions
below must be followed to operate it safely.These instructions must be kept for
future reference.
- Before connecting the AC adaptor to the mains, check that the mains supply voltage
corresponds to the voltage printed on it. If the mains voltage is different, consult your
dealer.
- The AC adaptor has been designed for indoor use only.
- The receiver and AC adaptor do
to open them.All maintenance work must be carried out by qualified personnel.
- Periodically inspect the AC adaptor for damage. Do not use if damage is found. Refer to
qualified personnel.
- Unplug the AC adaptor from the mains during lightning storms.
- To prevent fire or shock hazard, do not expose this equipment to rain or moisture.
- The receiver should be placed on a firm surface, an
be covered with items, such as newspapers, table clothes, curtains, etc.
- Do not install this equipment near any heat sources such as radiators, stoves or other
apparatus that produce heat. Protect it from direct sunlight.
- When installing the receiver, ensure there is a gap of approximately 2 cm around it to
enable air to circulate freely and prevent overheating.
- Leave access to the AC adaptor in case emergency shutdown is required.
- Do not place any combu
- No objects filled with liquids, such as vases, shall be placed on the receiver. It shall not
be exposed to dripping or splashing. Should this happen, disconnect the AC adaptor
from the mains and consult qualified personnel.
- Make sure that children do not place any foreign objects in any of the openings.
- For cleaning, use a soft, damp (not wet) cloth. Never use any abrasive cloth and aerosol
cleaners.
stible objects on the receiver (candles, etc.).
not contain any user-serviceable parts. Do not attempt
d the ventilation openings must not
EN
35

EN
Contents
34 Meaning of symbols
35 Safety instructions
38 Introduction
38 Included in the package
39 Product description
39 Front panel
40 Rear Panel
41 Remote control
42 Connecting your receiver
42 Connecting to TV and VCR/DVD player using
SCART Support
43 Connecting to your audio equipment
44 First installation
44 First installation settings
44 Channel scanning
44 Scanning failure
36
45 General Functions
45 Receiver wake-up
46 Channel selection
46 Channel banner
47 TV or Radio mode selection
47 Volume & Audio Control
47 Menu
48 What’s on

48 The EasyLogic TV guide
49 Search
49 Scheduled Recordings
50 Channel Preset
51 Favorites lists
52 Settings Menu
52 Preferences
54 Parental Control
55 Channel Lock
55 Installation
57 Menu Tree
58 Advanced settings
58 Remote control setting
58 Connection for Easy Record
(VCR or DVD control)
59 Digital receiver and VCR or DVD settings
59 Recording with the VCR control feature
EN
60 Troubleshooting
62 Technical specifications
63 Usage rights tvtv
37

Introduction
Welcome to digital television!
EN
The Philips Digital Terrestrial Receiver DTR 4020 allows you to view a wide variety of
free-to-air channels with the best digital picture and sound quality.
It includes the EasyLogic TV guide that offers the easiest to use TV program guide and
provides comprehensive information on the programs available in your area.
With this product you can enjoy advanced functions and features including:
- Digital picture and sound quality
- EasyLogic TV guide - never miss a television show again
- Wide screen format
- TV SCART and VCR/DVD SC ART connectors
- Easy access to all digital TV and Radio channels
- Easy installation and use through the user i
- Personal channel list and favorite lists
This user manual covers the installation of your receiver and the necessary steps to use
the various functions, so you can optimally enjoy every feature.
Philippe Alcaras, General Manager/Senior Vice President,
Philips CE/BG Home Networks
nterface
Included in the package
As you unpack your receiver, make sure the following accessories are included:
• 1 x remote control unit
• 2 x AA batteries
• 1 x mains cord with adapter for power supply
• 1 x SCART cable
• 1 x user
Plastic bags can be dangerous.To avoid suffocation keep the bag away from babies
and children.
38
manual

Product description
Front panel
QWE R
1 I . . . . . . . . . . . . . . . . . . . . . . . . . . . . . . . . . . . channel -
. . . . . . . . . . . . . . . . . . . . . . . . . . . . . . . . . . . channel +
2 U
. . . . . . . . . . . . . . . . . . . . . . . . . . . . . . . . . . . . . remote control receiver window
3
. . . . . . . . . . . . . . . . . . . . . . . . . . . . . . . . . ON/“Low Power”
4
The front panel button includes a colour LED indicating the receiver status.
The LED blinks at remote control command reception.
Receiver operating mode LED
Low Power red
Standby orange
TV/Radio mode green
Recording in progress blinking green
Recording in progress in standby mode blinking orange
Download in progress blinking red
EN
If the red LED is blinking continuously, it indicates that an upgrade of your terminal
software is taking place. Do not interrupt this operation.Wait for the LED to
light up for two seconds, either in green to indicate successful upgrade, or in red to
indicate a failure, and then continue as normal.
When your receiver is in low power mode, software functions are no longer
supported.Therefore:
- TV guide data cannot be downloaded, so TV guide data is not up-to-date when wakingup from low power
- Transmission of the RF and SCART signals is not supported.
39

Rear panel
EN
Y
W
Q E R
T
U
1 5 V (*) . . . . . . . . . . . . . . . . . . . . . . . . . . . . . . . . . . Socket used to connect the mains adapter
2 RF In (*)
. . . . . . . . . . . . . . . . . . . . . . . . . . . . . . RF input used to connect the antenna cord from the
wall socket. Refer to chapter Connecting your
receiver.
3 RF Out (*)
. . . . . . . . . . . . . . . . . . . . . . . . . . . . RF output used to connect your receiver to a
VCR/TV set to watch analogue channels only,
or to connect another receiver.
4 TV (*)
5 VCR (*)
. . . . . . . . . . . . . . . . . . . . . . . . . . . . . . . . . . SCART
. . . . . . . . . . . . . . . . . . . . . . . . . . . . . . . . SCART
(1)
socket used to connect your TV set.
(1)
socket used to connect your video
recorder or DVD player/recorder.
6 (*)
. . . . . . . . . . . . . . . . . . . . . . . . . . . . . . . . . Digital audio cinch output used to connect your
HiFi/audio receiver system.
7 IR (*)
8 L/R (*)
. . . . . . . . . . . . . . . . . . . . . . . . . . . . . . . . . . . Currently inactive. For future use.
. . . . . . . . . . . . . . . . . . . . . . . . . . . Left/Right analogue audio cinch outputs used to
connect your HiFi/audio receiver system.
The label showing the type and serial number is underneath the receiver.
I
(1)
SCART is also called Euroconnector or Peritel.
* Safety Extra Low Voltage
40

Remote control
Standby
Switch your receiver into the
standby mode
0-9 number keys
- In TV/radio mode: select
channels
- In standby: wake up the
receiver
INFO
Switch between normal viewing,
Channel Banner, and Channel
Banner with Extended Info
MENU
Open/Close the menu
VOLUME +/-
Increases/Decreases the volume
level
MUTE
Mute/Demute the sound on
your TV or receiver
RED,GREEN,
YELLOW, BLUE
Contextual keys
TV guide
EN
Open/Close the TV guide
BACK
- In TV/radio mode: return to
the previously tuned channel
- In menu mode: return to the
previous screen
CURSOR t/y
- Switch the Channel Banner in
the browsing mode.
- Scroll up/down in a menu or
channel list
CURSOR u/ i
In Channel Banner: switch
between the current and next
program
OK
Confirm your choice
P+ / P-
- In TV/radio mode: tune the
next/previous channel within
the current channel list.
- In standby: wake up the
receiver
- In lists: page up/down
TV/STB
Toggle between watching digital
TV via your receiver and
standard analog TV
1-11
Open the Audio Languages
screen to momentarily change
the soundtrack and audio mode
Switch between available display
formats
TIMER
Open/Close the list of
scheduled recordings
TEXT
In TV/radio mode:
enable/disable teletext display
SUBTITLE
Open the Subtitles Language
screen to momentarily change
subtitles language
FAV
Open the current channel list,
then switch between channels lists
RADIO
In TV/radio mode: toggle
between TV and Radio
41

Connecting your receiver
PHILIPS
There are several ways you can connect and incorporate your digital receiver into your
EN
existing audio/video equipment set up.
Before starting to connect:
- Unplug all equipment (TV set as well as VCR and/or DVD or DVD+R) from the mains.
- Do not connect your digital receiver to mains supply now.
- Check your current wiring: you may not need to modify your existing audio/video
connections if they already match the connection diagra
- Depending on your existing set up, choose the best suited connection method for
incorporating your digital receiver.
When adding new equipment, be sure to refer to the related installation instructions
of the manual of the respective devices.
Connecting to TV and VCR/DVD player using
SCART Support
ms below.
42
to AC outlet
RF Cable
TV set
PHILIPS
Terrestrial Receiver
VCR/DVD
EXT 1
EXT 1EXT 2
EXT 2
ANT IN
ANT OUT

Use the SCART cable supplied to connect your receiver to the TV set.
Connect your receiver to the antenna wall socket or to your indoor antenna using an RF cable.
To be able to record analogue TV, you need to connect your recorder to your receiver using an
RF coaxial cable as depicted above.
To be able to watch analogue TV, you need to connect your TV set to your receiver using an RF
coaxial cable (or to connect your TV set to your recorder as depicted above).
For best DVD/VCR viewing, connect the DVD/VCR SCART EXT 1 directly to the TV
set SCART.
Connecting to your audio equipment
Terrestrial Receiver
to AC outlet
EN
AB
Audio equipment
Analogue
input
Analogue connection (A)
Connect the L/R audio output sockets to the relevant L/R audio input sockets of your
audio equipment using a double CINCH cable (not supplied). Consult the user manual of
your audio equipment to choose the proper analog audio inputs.
Digital connection (B)
Connect the audio output socket to the relevant digital audio input socket of your
audio equipment using a si
your audio equipment to choose the proper digital audio input.
With this connection set up you can only control the audio volume up/down and
mute from your audio equipment.
AUDIO
LR
Digital
input
ngle CINCH cable (not supplied). Consult the user manual of
43

First installation
EN
For fast and successful start-up, check that your receiver
is connected to the wall socket,TV set and other
equipment according to the diagrams in chapter
Connecting your receiver.
- Reconnect your TV set and recorder to the mains. Do
not connect your receiver yet!
- Switch on your TV set and select a channel.
- Plug the adapter into the mains.The welcome screen
appears, then the menu language selection screen.
First installation settings
- Scroll to your favorite Language. Press the green
color key or OK to proceed.
- Scroll to your Country. Press the green color key or
OK to proceed.
- Scroll to the appropriate TV shape. Press the green
color key or OK to proceed.
The display format being managed by the receiver, set
your TV to "full screen" or to the similar equivalent
setting (refer to your TV set user manual).
- Press OK to start scanning for channels.
44
Channel scanning
During the scanning process, the number of TV and
Radio channels detected is reported on screen.
When scanning has been successfully completed, a
completion message is displayed. Press the green color
key to tune the receiver to the first channel in the list.
In order to load the EasyLogic TV guide information,
turn your receiver to standby for one hour.
Scanning failure
In case of channel scanning failure, a failure message is
displayed.

Before starting a new scan
- Check the following points:
• Coverage of your area:
for France, see www
for Germany, see www.digitv.de
for Spain, see www.tdtcat.net
• Aerial cable condition,and connection to your
receiver as described in Connecting your receiver
• Signal quality
In case of a scan failure, press the yellow color button
and try adjusting your aerial position using the onscreen indications or see Antenna position.Then press
the green color key to launch a new scan.
If the same failure message appears after a while, refer
to chapter Troubleshooting. If the problem remains,
contact your dealer.
General Functions
This section describes the basic functions available while
watching digital TV or listening to digital radio.
For general menu navigation, see Menu.
.tnt-gratuite.fr
EN
Receiver wake-up
If your receiver is in “low power”.The only way to wake
it up is to press on the front panel.
If your receiver is in standby, press P+, P-, or any
number key of the remote control to wake it up.
Alternatively, press t or y on the front panel.
Yo ur receiver, as any electronic equipment,
consumes power. In order to reduce power
consumption, please switch your receiver to
standby whenever you are not using it.
For maximum energy savi
off the receiver by unplugging it from the mains if you
are not using it for a long time.
ng we recommend you switch
45

EN
Channel selection
Using P+/P- or number keys
To change channels, use P+/P- or the number keys of
the remote control.
Previous channel recall
Press BACK to move to the previous channel you watched.
Using channel lists
While watching digital TV or listening to digital radio,
you can access existing channel lists by pressing FAV.
Successively press FAV to switch between the “All
Channels” list and the favorite lists you created.The
current channel list is indicated in the middle of the top
part of the banner.
If you press BACK, the channel list disappears.
To select a channel:
- Scroll up or down to the desired channel.
- Press OK.
icon description
46
Dolby Digital audio
available
Alternate audio available
Subtitles available
Teletext available
Recording set
Multiple recordings set
Reminder set
Multiple reminders set
Yo u can only zap through the channels of the current
list.
To manage your favorite lists, see paragraph Favorites lists.
Channel banner
Every time you tune to a channel, the channel banner
appears, displaying information on this channel, including
information on the current program.
The channel banner is displayed for 5 seconds as per
default.This can be adjusted from the Display
Preferences item of the Preferences sub menu.
While watching a channel, you can display the channel
banner at anytime by pressing INFO. Use the green
color key to move to the next page and the red color
key to move to the previous page. Press the yellow
color key to display information on the next program.
Press INFO again to close the channel banner.

TV or Radio mode selection
While watching digital TV or listening to digital radio,
press RADIO to toggle between TV and radio modes.
Volume & Audio Control
Volume control and Mute
To decrease or increase the volume,use .
The volume level can also be controlled from your TV.
To mute the sound, press .
A change of volume is signaled on-screen using a bar
graph, while audio mute is signaled with an icon in the
top right corner of the screen.
Audio settings
If you want to change the audio mode or language for a
particular program, press I-II to directly access the
audio options available for this program.Available
languages depend on the audio content transmitted.
EN
Menu
Basic navigation
While watching digital TV or listening to digital radio:
- Press MENU to display the main menu.
- Press t or y to scroll up or down to the
appropriate menu item.
- Press i to display the corresponding sub items.
- Press t or y to move to the desired sub item,and
so on.
Press MENU to return to normal viewing.
Changing settings
Once you have highlighted an adjustable item,you can
view the list of available settings or the corresponding
numerical value on the right-hand side of the screen.
- Press i to move to the right-hand side of the screen.
- Scroll to the appropriate setting using the t or y
key or enter a value using numerical keys.
47

EN
- Press u to save your changes and return to the
previous screen.
To open a locked menu item,you need to enter your
PIN-Code.
In a number of screens, color keys are used to perform
actions according to the context.The actions
performed are described at the bottom of the screen.
The EasyLogic TV guide
The TV guide gives access to an 8-day overview of the TV
programs broadcast on the channels available in your area.
It is also used to set recordings for the programs you
want to record using your VCR or DVD recorder and
reminders to receive a warning and automatically change
channel before the start of programs you want to see.
What’s on
To view the TV guide:
- Press when watching a channel, or select What’s
on from the TV guide sub-menu.
- To display the programs broadcast another day, press
the yellow color button. Scroll to the appropriate
option and press OK to jump accordingly. Press the
yellow color key again when you have finished.
- Highlight the name of the program you are interested
in using t, y, u, or i.
• Press the blue color key once to get extended
information (program description), and once agai
to close it.
• Press the red color key to set a recording on the
current selection.Then press the green color key
to modify the timer you just set and proceed as
described in Scheduled Recordings.Alternatively,
press the red color key a second time to set a
recording for all episodes of the series when
applicable (serial recording).
Yo u must also enable recording on the VCR or
DVD recorder.
• Press the green color key to set a reminder on the
current selection.
n
48
Reminders will only function when both your
TV set and receiver are switched on.
If the What’s on screen of the TV guide appears to be
empty, either your receiver does not receive any
television signal or no tvtv data is available.Turn your
receiver to standby and wait for an hour for your
receiver to load the content.
In case you do receive a TV signal but do not see any
program information, please contact the tvtv helpdesk.
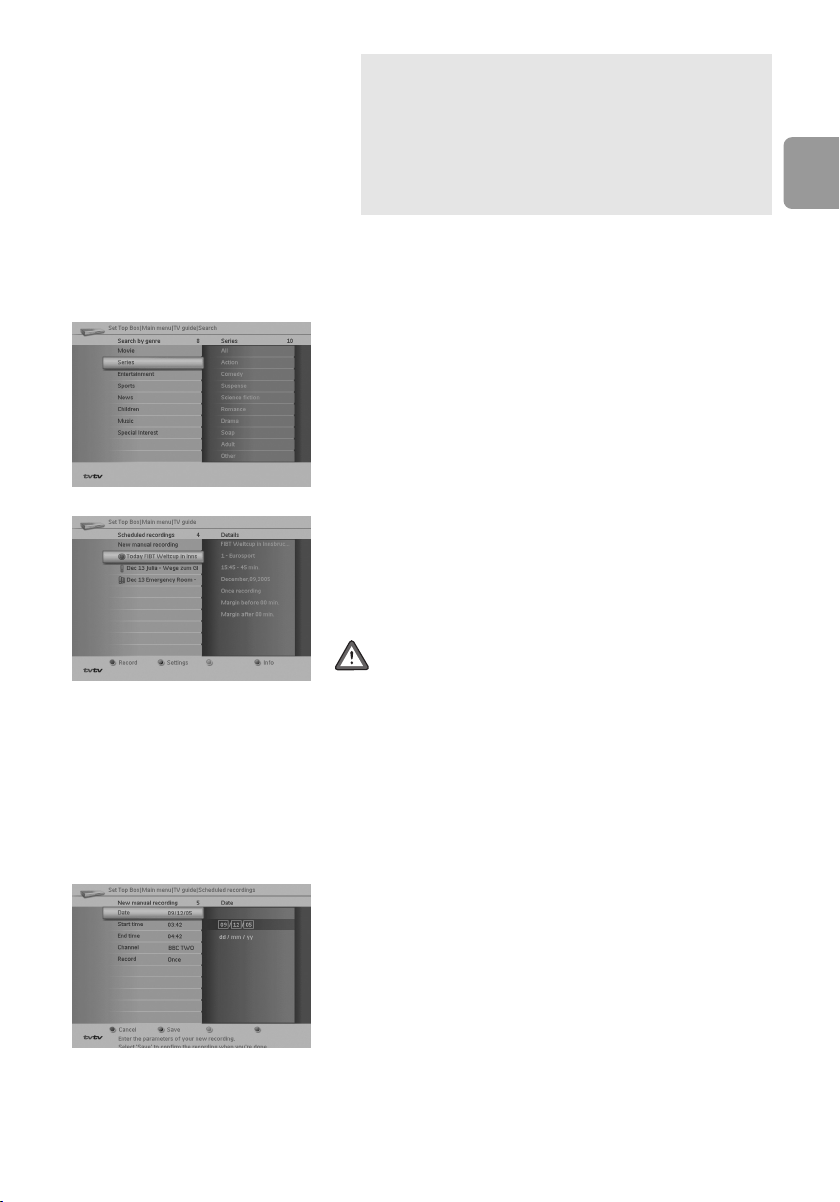
Search
Search is used to perform searches for programs by
categories such as movies, sports or children shows.
Within categories, you can sort by type, such as soccer
or tennis for the sports category.You can also search by
key words, such as show titles or actor.
Scheduled Recordings
Scheduled Recordings is used to set VCR or DVD
recordings.
EN
To be able to record a digital channel using a VCR
or DVD recorder, you must set both your
recorder and receiver:
- You must set a recording on your receiver.
- You must also enable recording on the VCR or DVD
recorder, either by enabling an Easy Record option or
by programming your recorder (refer to paragraph
Connection for Easy Record -VCR or DVD control-)
and to the VCR or DVD recorder user manual).
Setting or modifying a recording
- Select New Manual Recording to set a new recording,
or select from the list the scheduled recordings you
want to modify.
- Set or re-set the recording parameters as
appropriate:
• Date: set the date using the nu mber keys
• Start time: set a start time using the number
keys
• Stop Time: set a end time using the number keys
49

EN
• Channel:current channel. Alternatively, press the
green color key to display the list of available
channels.Then scroll to the channel on which the
program you want to record is broadcast using the
t or y key, and press OK to select it.
• Repeat: set Once for a single recording,
Monday/…/Sunday to record on such day every
week,Week-end to record on both Saturday and
Sunday every week,Weekdays to record from
Monday to Friday every week, or every day to
record once every day.
If you set a recording from the TV guide or using the
TIMER key, the date, start time and end time are
already set.
- Press TIMER.
Interrupting a recording
A recording is in progress. Recording is signaled by the
front LED blinking green in TV or Radio mode or
blinking orange if your receiver is in standby.
To i nterrupt a recording in progress:
- If your receiver is in standby, press P+, P-, or any
number key of the remote control.
- Press the key sequence TIMER then 0.The LED is
no longer blinking and you can change channels.
50
When a recording is active, you cannot change digital
channels, but you can switch to analog TV using the
TV/STB key and zap through analog channels.
Channel Preset
Channels Preset is used to modify the channels
numbering or to remove a channel from the What’s on
view of the TV guide.
- Press i.
- Scroll to an available channel.Available channels are
marked with a cross.
- Press OK to remove this channel from the What’s
on view.
- Press i to modify the channel numbering. Enter the
new channel number – 3 digits, for instance enter
“008” to assign number 8 to a given channel.

Favorites lists
At installation, all the channels found are added to the TV
or RADIO “All Channels” list. From these two lists, you
may create favorite lists according to your preferences.
Favorites is used to create, delete, and rename lists of
favorite TV or radio channels.
- Scroll to TV Channels or Radio Channels from
the Favorites sub menu.
- Move to the list of available lists on the right-hand
side of the screen.
To create a favorite list:
- Press the red color key.
- Press OK to individually select the channels you want
to add to the current list. Selected channels are
marked with a tick.
- Press the red color key to return to the list of lists.
The new list is now listed.
To delete a favorite list:
- Scroll to the list you want to delete.
- Press the green color key.A
prompting you to confirm deletion.
- Press the red color key to confirm or the green color
key to cancel.
message is displayed,
EN
To r e name a favorite list:
- Scroll to the list you want to rename.
- Press the blue color key.
- Proceed according to the on-screen instructions.
When you activate one of the favorite lists by pressing
FAV while watching digital TV or listening to digital radio,
the receiver only zaps through your favorite channels.
Press FAV to again toggle between your favorite lists
and the full channel list.
Favorites is also used to edit individual favorite lists.
To edit a given favorite list, select this list on the righthand side of the screen.You can then access various
edition features.
51

EN
To add channels to the selected list:
- Press the red colour key.
- Press OK to individually select the channels you want
to add to the current list. Selected channels are
marked with a tick.
- Press the red colour key to return to the list of lists.
To r e move channels from the selected list:
- Scroll to the channel you want to remove.
- Press the green colour key. Deletion is immediate!
To sort the selected list:
- Press the blue colour key.
- Press the appropriate colour key depending on the
type of sorting you want to perform:
• Press the red colour key to renumber all channels
according to their rank in the list.
• Press the green colo
selected channel.
• Press the yellow colour key to reorder all channels
according to their numbers.
• Press the blue colour key to move the selected
channel; move to the desired position,and then
press OK.
ur key to renumber the
52
Settings Menu
Preferences
Preferences is used to
• Set the language and on screen display options
according to your preferences
• Set up your receiver and remote control
• Enable sleep timers.
Display Settings
Set appropriate values for the following:
• Banner Duration:banner display duration
• Banner Transparency: On or Off
Languages Settings
- Set your preferred Menu Language and Audio
Language.
- Set the Subtitles mode:
• Off or On: disable or enable subtitles

• If preferred audio not available: display
subtitles in case no audio track in your preferred
language is available
• Hearing impaired:enable subtitles specifically
intended for Hard-of-hearing people.
- Set your preferred Subtitle Language.
TV Settings
Set appropriate values for the following:
• TV Format: 4:3 or 16:9 Widescreen
• Display Format: defines the way the video
format is adapted, Letter Box (black bars at the
top and bottom or on the left and the right) or
Center Cutout (video cut on the left and right
or at the top and bottom)
The display format being managed by the receiver, set
you TV set to "full screen" or to the similar equivalent
setting (refer to your TV set user manual).
System Settings
Set appropriate values for the following:
• TV Scart: RGB, PAL CVBS, SECAM CVBS,or
S-VIDEO
• VCR Scart: PAL CVBS or S VHS
• Dolby Digital: On or Off
• TV audio: Mono or Stereo
• VCR audio: Mono or Stereo
• Default Volume:volume level at turn-on
• VCR control: Off, Prepare Record, or Record
Link. See chapter Advanced Settings
• Ext.Antenna Power Supply: select On if your
antenna requires power supply
EN
Time settings
Set the appropriate time offset:
• Time offset: Auto (recommended) or from -12
to +12 hours
Sleep timer
Yo u can set a sleep timer to automatically switch your
receiver to Standby mode after a given time lapse.
- To set a sleep timer, select the time lapse after which
the receiver should go to Standby (up to 3 hours).
- To disable a sleep timer, select Off instead of a time
lapse.
53

EN
Remote control
Yo u may change your remote control setting to control
another receiver or to keep your receiver’s remote
control from interfering with another receiver.
- Scroll to Set Code and press OK.A message is
displayed, prompting you to press OK on the new
remote control.
- Change your remote control setting as described in
Remote control setting and then press the OK key of
your new remote control within the next 2 m
- If your receiver accepts the command, press OK
again to save the new setting and exit.
- If your receiver does not accept the command, a
failure message is displayed. Press the red color key to
make a new attempt, or press the green color key to
cancel and exit.
inutes.
Parental Control
Parental Control is used to set locking options so as
to enable PIN code protection. Locking options include
locking access to the menu, locking access to individual
channels, and locking access to programs according to
their maturity rating.
Parental Control is also used to change your receiver
PIN code.
54
Access Control
Access control is used to enable locking options.
Set the appropriate access control level:
• Set Off to disable locking options; the PIN Code
will never be required.
• Set ON - High to enable all locking option;the
PIN Code will be required each time a protected
content is accessed.
• Set ON - Medium to enable all locks; the PIN Code
will not be asked more than once every 20 minutes.
• Set ON - Low to enable receiver locking only; the
PIN Code will be asked the first time a protected
content is accessed after waking up the receiver.
Maturity Level
Maturity level is used to set PIN code protection on
programs according to their maturity rating.
Set a maturity level from Age 3 or less to Age 17 to
prevent undesired access to programs for which maturity
rating is higher, or set Off to disable PIN code protection.

For instance, to prevent your 10 years old to watch a
non-suitable program, set the maturity rating to Age 10.
To access this program,you will be prompted to enter
your PIN code.
Access Timer
To t e mporarily disable locking, you may set an access
timer for a certain time period.
- Select Set a new timer.
- Set the timer settings as appropriate:
• Start Time, End Time:timer start and end time
• Frequency:timer repeat frequency
• Date
Channel Lock
To lock or unlock channels:
- Scroll to the channel you want to lock or unlock.
- Press OK to lock or unlock the channel. Locked
channels are marked with a cross.
Locking will take effect only if you activate the Channel
Lock option. Locked channels are locked in all the lists
they belong to.
PIN code
The PIN code default value is 0000.
To change your PIN code:
- Enter your new PIN code.
- Enter your new PIN code again.
EN
Once you have changed your PIN code, keep it secret
to prevent others from using it. If you forget or lose
your PIN code, refer to the Troubleshooting.
Installation
Setup is used to
• install channels
• position your aerial - Test signal level and quality
• view information on your receiver
• manage software updates
• restore the receiver factory settings.
Access to this menu can be protected by Pin Code.
55

EN
Channel installation
- Press OK to start scanning for channels.
Antenna position
Antenna Positioning is used to view the signal level
and quality for the UHF channel you set.
For information on the UHF channels available in your
area: for France, see www
see www.digitv.de and for Spain, see www.tdtcat.net
.tnt-gratuite.fr, for Germany,
Software Info
System Info is used to display the software version
and receiver model, as well as the date of last update.
Software Download
Software Download is used to set the software
download method.
Select Always to accept automatic downloads, or
Never to prevent automatic downloads. Select Ask
first to be prompted when new software is available.
Factory Reset
Factory Reset is used to restore the receiver factory
configuration.
- Scroll to Start.A warning message is displayed.
- Press OK when prompted to confirm.
56
If you restore the factory settings of your receiver,
you lose all data and information previously stored,
and you have to restart first installation.
Once you have restored the factory settings of
your receiver, your remote control setting may not
match your receiver setting any longer. In this case,
restore the remote control factory setting:
simultaneously press 1 and 3, then release these
two keys, and then press 1.

Menu Tree
EN
TV Guide
Favorites
Settings menu
What's on
Search
Scheduled Recordings
Channel Presets
TV channels
Radio channels
Preferences
Parental control
Search by keyword
Search by genre
New manual recording
All channels
<User-defined favorites 1-4>
All channels
<User-defined favorites 1-4>
Display settings
Language settings
TV settings
System settings
Time settings
Sleep timer
Remote control
Parental control activation
Maturity level
Child timers
Channel lock
Change PIN Code
Installation
Channel installation
Antenna positioning
Software information
Software download
Factory reset
57

PHILIPS
Advanced settings
Remote control setting
EN
To change the setting of your remote control:
- Simultaneously press number keys 1 and 3 and hold them for at least 5 seconds.
- Simultaneously release these two keys.
- Enter the new setting within the next 60 seconds:
• Either press 1 (default setting),
• Or press 2 (alternative setting).
Yo u may reset your remote control to its default setting by removing the batteries
and reinserting them after more than 3 minutes.
Connection for Easy Record (VCR or DVD control)
This connection allows automatic recording without requiring you to program your VCR
or DVD recorder.You mu st, however, set a timer on your receiver as described in
paragraph Scheduled Recordings.
Prior to choosing this connection method:
• Consult the user manual of your VCR or DVD recorder to check if and how this
feature is supported. Most Philips VCR and DVD recorders support an Easy Record
options.
• Check that your TV and VCR or DVD are both fitted with two SCART sockets.
• Incorporate your receiver in your existing installation as described below:
58
to AC outlet
RF Cable
TV set
PHILIPS
Terrestrial Receiver
VCR/DVD
EXT 1
EXT 1EXT 2
EXT 2
ANT IN
ANT OUT
For optimum configuration

- Connect the receiver “RF In” socket to the cable wall socket using an antenna cord.
- Connect the “RF Out” socket of your digital receiver to the aerial input socket of
your VCR or DVD using an antenna cord.
- Connect the RF OUT socket of your VCR or DVD to the aerial input socket of your
TV using an antenna cord.
- Connect the “TV” SCART socket of your digital receiver to the EXT1 SCART socket
of your TV using the SCART lead supplied with your digital receiver.
- Connect the “VCR” SCART socket of your digital receiver to the EXT2 SCART socket
of your VCR (called “IN”) using a SCART lead.
- Connect the EXT1
socket of your TV using a SCART lead.
- Plug all your equipment, excluding your digital receiver, into the mains.
- Switch on your TV set and select a channel.
- Plug your adapter into the mains.The welcome screen appears, then the First
installation screen (the LED is lit in green).
- See First installation to proceed with the channel scan if not already done.
With this connection set up:
• You can watch digital TV while you record analog TV.
• You can
• You can record the digital TV channel you are watching.
Some VCR or DVD recorders need to be in standby to use the Easy Record feature.
Refer to your VCR or DVD User manual.
watch analog TV while you record digital TV.
SCART socket of your VCR (called “OUT”) to the EXT2 SCART
EN
Digital receiver and VCR or DVD settings
Refer to chapter System Settings for information on how to enable the “Easy Record”
function on your digital receiver.
- Depending on your VCR or DVD brand and type, you have to set the VCR recording
control option to “Prepare Record” or “Record Link”. Refer to the VCR or DVD User
manual or try the two options to find out which is most suitable.
- Set your VCR or DVD to the mode allowing control by your digital receiver.
Recording with the VCR control feature
- Your digital receiver,TV and VCR or DVD are connected and set according to the
diagram.
- You have programd a timer on your digital receiver as described in paragraph Scheduled
Recordings.
- At timer start, your VCR or DVD starts recording and at timer end, it stops recording
under the control of your digital receiver.You no longer need VCR or DVD
programming to record digital TV channels.
59

Troubleshooting
Be aware that new software may change the functionality of your receiver.
EN
Should you experience any difficulties with the operation of your receiver, please consult
the relevant section of this manual, including this section. If the problem cannot be solved,
call your customer service adviser.
Problem Possible cause Action
The LED on the front panel
does not light up.
No sound or picture but the
front panel LED is lit in red.
No sound or picture but the
front panel LED is lit in green.
No sound or picture but the
front panel LED is blinking
green.
The remote control does not
operate your receiver.
Faulty power supply
Receiver in standby or “low
power”
Poor signal
Receiver in TV mode
Poor SCART connections
Yo u are performing a recording
and you cannot view what you are
recording because it is protected
content.
Check that the power cord is
correctly connected. Disconnect this
cord and reconnect it to ensure it is
in place.
Check that the power is available at
the wall socket.
Press P+, P-, or any number key of
the remote control. If the receiver
does not wake up, press on the
front panel.
Check the connections at the wall
socket and receiver.
Press TV/STB on the remote
control once or twice.
Check the SCART connections.
Press the red colour key,and then
enter your PIN code to disable
protection.
Make sure the receiver is on.
Make sure you are pointing your
remote control at the receiver front
panel.
On-screen display working but
there is no reception
Intermittent reception
60
Poor reception/signal
Faulty connections
Check the batteries in your remote
control.
Check the installation.
Check all connections and cable.

Problem Possible cause Action
The picture is not sharp and
on-screen text is difficult to
read.
Yo u cannot find all the
channels you think should be
available.
The picture on some channels
seems to have been stretched
or squashed.
TV SCART output format not set
to RGB
TV SCART not connected to the
RGB capable SCART socket of
your TV set
Inappropriate SCART cable
Signal quality may be temporarily
affected, for instance in case of
bad weather.
The signal may be weak.
The broadcast is probably in wide
screen and the receiver settings
may not be correct.
Change setting of the TV output
signal item to RGB from the TV
Configuration screen.
Refer to your TV User Manual.
Use the SCART cable supplied with
your receiver.
Try re-tuning your receiver, following
the relevant steps in paragraph
Channels installation.
If you are still missing channels,
call your customer service adviser.
Check the receiver TV format
setting, following the information in
paragraph System Settings. If you have a
wide screen TV, you may also need to
check the settings on you
display format being managed by the
receiver, set your TV to "full screen" or
to the similar equivalent setting (refer
to your TV set user manual).
r TV. The
EN
Even if you use the number
keys, you cannot access a
particular channel.
Yo u set a recording but did
not record what you wanted.
The order of the channels has
changed.
Yo u have forgotten your PIN
code
The parental lock has been
activated on this channel and a
message asks for your PIN code.
The recorder was set incorrectly.
They have been re-arranged.
Enter your PIN code to access the
channel or unlock it.
The default PIN code is 0000.
Make sure that your recorder is set
for the same time as your receiver.
Refer to paragraph Favorites lists to
change the order again.
When prompted for your PIN code,
enter the Master PIN code.This will
allow you to proceed as well as reset
the PIN to its default value (default is
0000).
The Master PIN code is 2901.
Keep this code secret to prevent
others from using it.
If you have tried all of the actions suggested above and could not solve the problem,
contact your customer service adviser.
61
Technical specifications
This product is in conformity with European Directives 95/47/EC and 2002/21/EC.
EN
Connectivity
- Audio Output - Analogue:
L/R cinch
- Audio Output - Digital:
AC3 over Coaxial SPDIF (cinch)
- Plug & Play
- Terrestrial antenna interface: RF
in, IEC 169-2, RF out, (bypass)
IEC 169 2
- TV SCART out:
Controlled audio L/R, CVBS,
RGB
- VCR SCART in:
Audio L/R, CVBS, RGB
Convenience
- Ease of Installation:
Auto install
- Favourite list TV programmes: 8
- Parental control:
Lock with PIN code, Child
timer
- Programmable Events: 1
- Recording:
Record failure alarm, Record
header message
- User Interface:
Automatic programme list
update, Multiple subtitles
supported, On Screen Display,
Software upgrade over the air,
TV and Radio modes, the
EasyLogic TV guide (using tvtv
data)
Accessories
- Batteries: 2 size AA
- Included Accessories:
Mains cord with adapter
Remote Control
Warranty booklet
User Manual
Dimensions
- Carton dimensions (WxDxH):
320x245x65 mm
- Product dimensions
(WxHxD): 240x44x145mm
- Te mperature (storage):
-20 to 60º Celsius
- Weight: 0.98 kg
- Weight incl. packaging:
1 780 kg
- Te mperature (operation):
5º to 35º Celsius
Power
- Mains power:
230 V ~ 50 Hz
- Power consumption: 7 W
- Standby power consumption:
6W
- Low power consumption:
<1,5 W
System Specifications
- CPU speed: 166 MHz
- Flash memory size: 4 MB
- CPU/Video graphics:
16 MB DDRAM
- Video decoding:
MPEG-2 DVB up to MP@ML,
Video bit rate up to 15 Mbit/s,
Video format 4:3 and 16:9,
resolution up to 720x576 pix
Audio Decoding
- Compression format:
MPEG layer I/II
Video Decoding
- Reception-Demodulation:
COFDM 2K/8K,
Network: MFN/SFN
- Frequency range:
VHF III & UHF IV/V
Green Specifications
- Banned Substance Declaration:
Yes, Packaging Manufacturer,
Yes, ODM
- Lead-free soldered product
The product complies
with the following
European Directives:
- 73/23/EEC
- 93/68/EEC
- 89/336/EEC
®
AC3 and Dolby Digital
are registered trademarks of Dolby Laboratories Licensing
Corporation.
Manufactured under license from Dolby Laboratories.
62

tvtv Services and the tvtv trademark are the registered trade marks of tvtv Services,
subsidiaries of Sony United Kingdom Ltd. Other applications, product or company names
may, even if they are not expressly designated as such, be third party trademarks or
business names.The user rights granted under these user conditions do not extend to the
use on which the named trademarks and business names on this page where such a right
has not previously been specifically granted in
the time.
Due to continued product improvements, this information is subject to change without
notice.
writing by tvtv Services or the owner at
Usage rights tvtv
The data made available by tvtv Services may be protected by copyright or other
statutory provisions.
tvtv Services grants the customer the non exclusive, untransferable right to use the data
made exclusively available to them by tvtv TV guide for private and not commercial
purposes.This includes the right to duplicate the data unchanged for private use on their
own end set if and provided this duplication is required for the use of the data and the
data is designated and intended for duplication.
EN
tvtv Services does not grant any other user rights to the custo
in particular use the data made available to them in full or in part to:
• Forward it to a third party or to enable a third party to have access to it
• Amend or to process it in any other way
• Transfer it to any other working forms than that made available
• Produce their own data bank and/or to use an information service.
mer.The customer may not
63

Trademarks are the property of Koninklijke Philips Electronics N.V. or their respective owners.
Specifications are subject to change without notice.
2005 © Koninklijke Philips Electronics N.V. All rights reserved.
www.philips.com
3111 176 52821
 Loading...