

Page 1
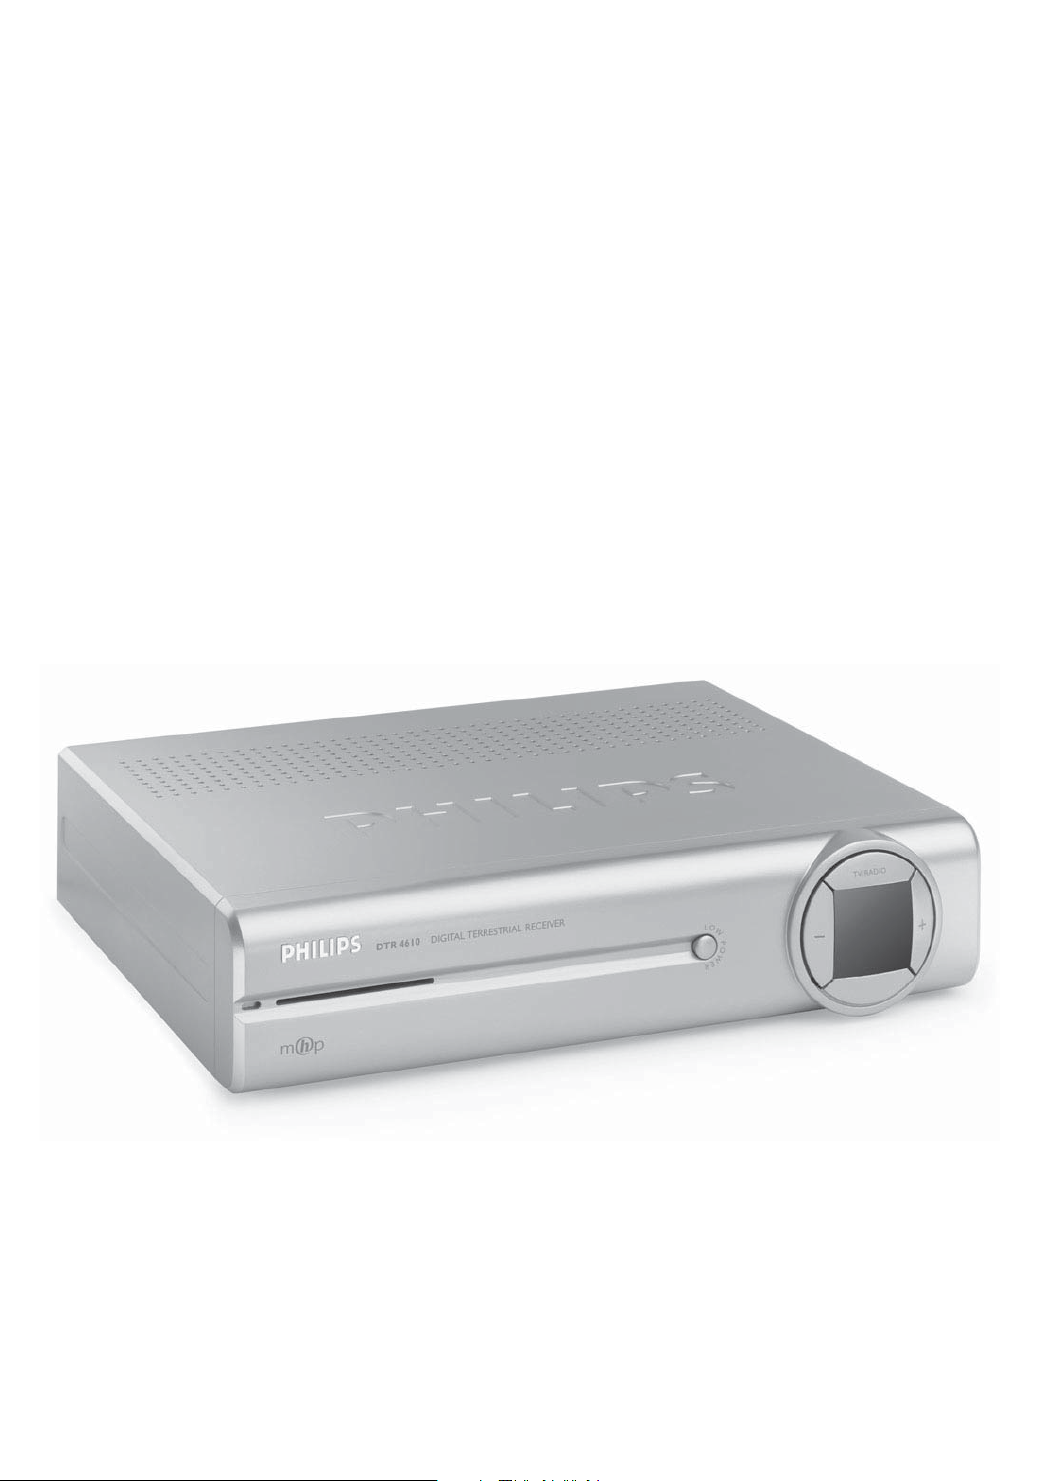
MANUELE D'UTILIZZO
USER MANUAL
DTR2610/24
(ne
610)
R2
il DT
r
e
p
o
r
PHILIPS
Page 2
Meaning of symbols
Important information:
Must be read and understood.
The "Material recyclability symbol" means the package cardboard or User manual
paper is recyclable.
The "Material recyclability symbol" affixed on plastic parts means these parts are
recyclable.
The "Green Dot" affixed on cardboard means PHILIPS pays a financial duty to the
"Avoidance and Recovery of Packaging Waste" organization.
This receiver contains a large number of materials that can be recycled. If you are
disposing of an old receiver, please take it to a recycling centre.
Safety and environmental instructions
Your receiver has been manufactured to meet the appropriate safety standards, but the
instructions below should be followed to operate it safely.
These instructions must be kept for future reference.
- Before connecting the receiver to the mains, check that the mains supply voltage corresponds
to the voltage printed on the rear of the receiver. If the mains voltage is different, consult the
dealer.
- The receiver does not contain any user-serviceable parts. All maintenance work must be
carried out by qualified personnel.
- If you disconnect the receiver from the mains, make sure to unplug it from the wall socket and
not just from the AC socket at the back of the unit. Children could seriously injure themselves,
as the free end of the cable is still alive.
- Unplug the receiver during lightning storms.
- To prevent fire or shock hazard, do not expose this equipment to rain or moisture.
- The receiver should be placed on a firm surface, and the ventilation openings must not be
covered with items such as newspapers, table clothes, curtains, etc.
- Do not install the receiver near any heat sources such as radiators, stoves or any other
apparatus that produces heat. Protect it from direct sunlight.
- When installing the receiver, ensure there is a gap of approximately 2.5 cm around the receiver
to enable air to circulate freely and prevent overheating.
- Leave accessible the mains connector at the back of the unit in case emergency shutdown is
required.
- Do not place any combustible objects on the receiver (candles, etc.).
- No objects filled with liquids, such as vases, should be placed on the unit. The receiver should
not be exposed to dripping or splashing. Should this happen, disconnect your receiver from the
mains and consult your dealer.
- Make sure that children do not place any foreign objects in any of the openings.
- For cleaning, use a soft, damp (not wet) cloth. Never use any abrasive cloth or aerosol cleaners.
English
SAFETY INSTRUCTIONS 1
Page 3
Contents
Meaning of symbols ___________________1
Safety and environmental instructions___1
English
Contents_____________________________2
1 Unpacking _______________________3
2 Installation guide _________________3
3 Product description_______________6
3.1 Front view ______________________6
3.2 Rear view_______________________7
4 Remote Control __________________8
5 Day to Day operation _____________9
5.1 Turn ON your receiver or switch to low
power _________________________9
5.2 Wake up your receiver or switch to
standby ________________________9
5.3 Change channel __________________9
5.3.1 Using number keys ________________9
5.3.2 Using P+ and P- __________________9
5.3.3 Using the channel list(s)_____________9
5.3.4 Using BACK (last channel recall) ______9
5.4 Selecting digital TV or digital Radio__10
5.5 Channel Banner_________________10
5.6 Changing the current programme
options________________________11
5.7 How to Run MHP Interactive
Applications ____________________11
6 Main Menu _____________________12
6.1 Menu navigation ________________13
6.2 Channel manager _______________13
6.3 Timer manager _________________14
6.4 For Parents ____________________15
6.4.1 Decoder Lock___________________15
6.4.2 Parental Control _________________15
6.4.3 Change your PIN code____________15
6.5 Data channels __________________15
6.6 Your preferences________________15
6.6.1 Display options __________________16
6.6.2 Language options ________________16
6.7 Installation _____________________16
6.7.1 Local Time _____________________16
6.7.2 Settings ________________________16
6.7.3 Signal meter ____________________18
6.7.4 Channel Search__________________18
6.7.5 Decoder Status__________________18
6.7.6 Factory Reset ___________________18
6.8 Help__________________________18
7 Advanced Settings_______________19
7.1 Easy Recording _________________19
7.2 Remote control setting ___________20
8 Troubleshooting guide ___________21
9 Technical Specifications __________22
2 CONTENTS
Page 4
1 Unpacking
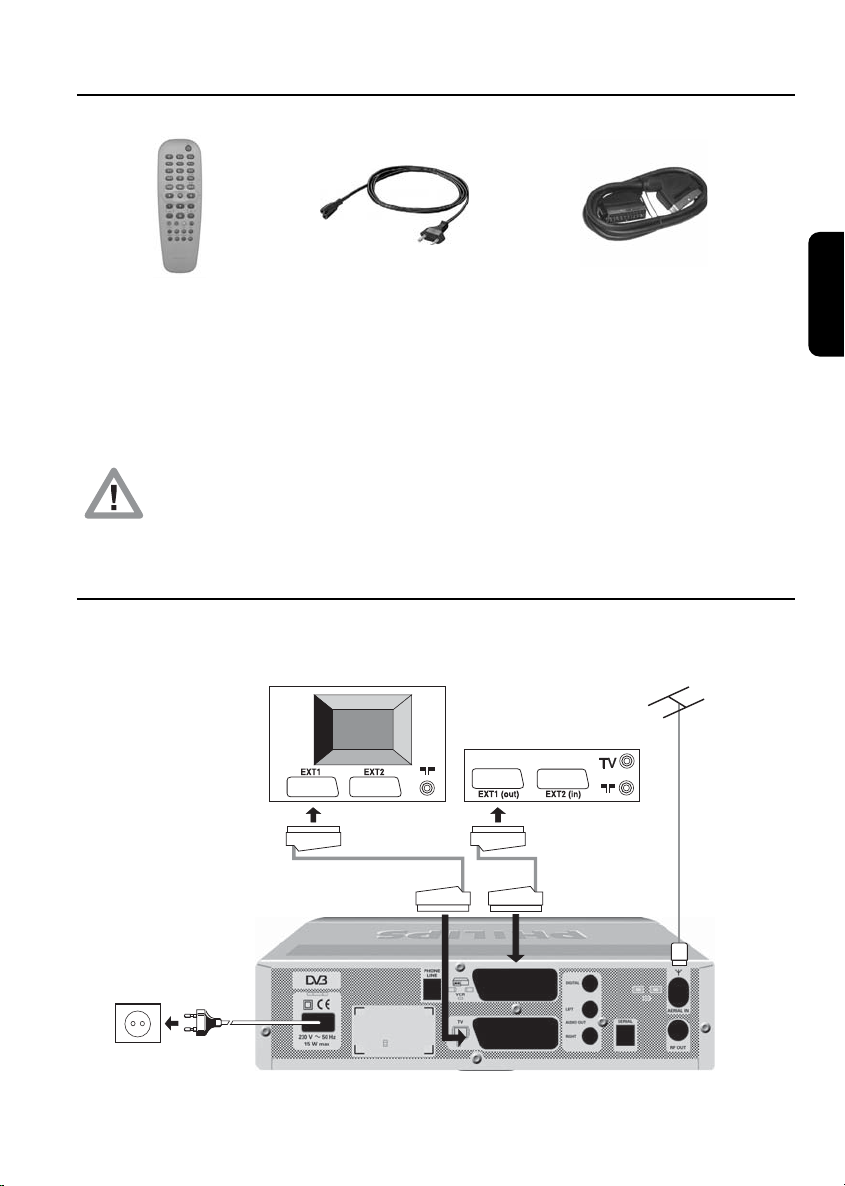
As you unpack your receiver, please make sure the following accessories are included:
Remote control Mains cord SCART cable
with batteries
The package also includes the following documents:
- User Manual
- Philips World-Wide Guarantee
Plastic bags can be dangerous. To avoid suffocation keep the bag away from babies and
children.
2 Installation guide
Please refer to the safety section before connecting your receiver.
English
TV set
Terrestrial
receiver
Video recorder
UNPACKING 3
Page 5
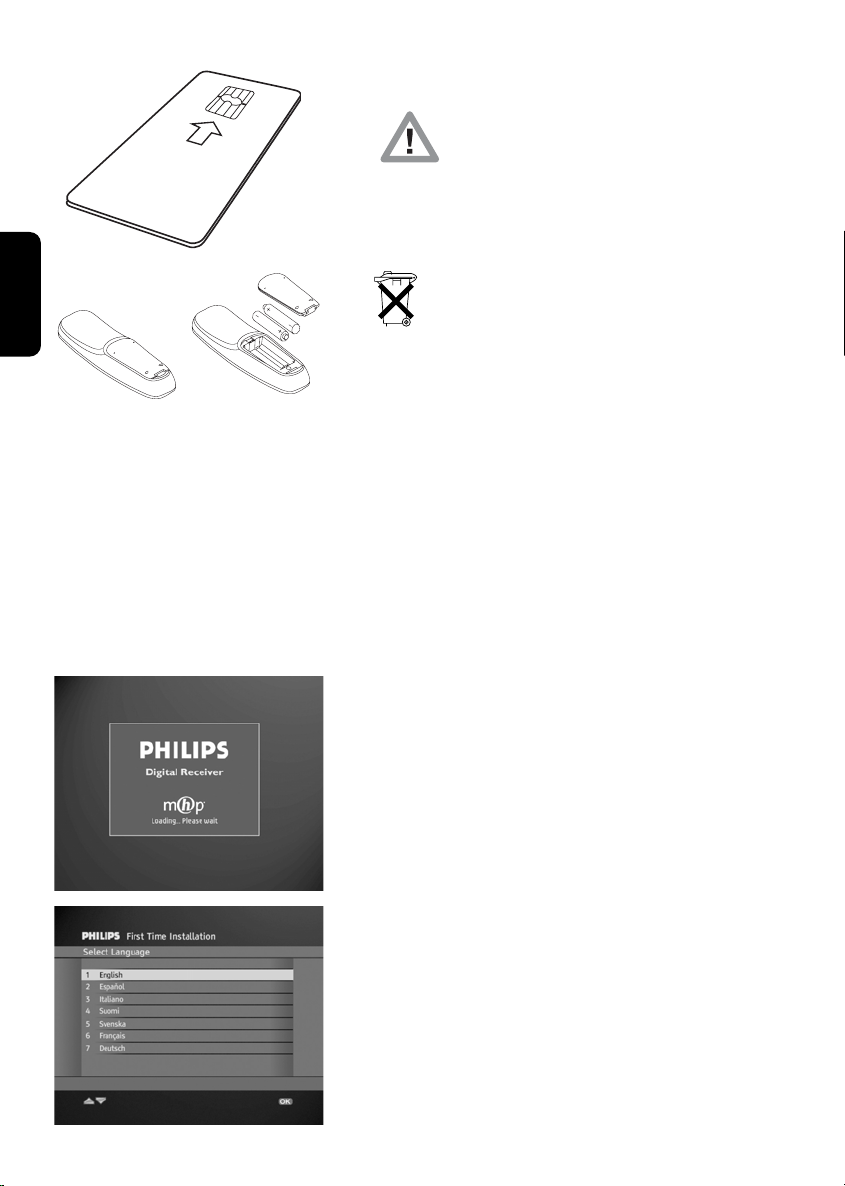
The smart card golden or silver contacts must
be facing up at card insertion.
English
The "crossed-out wheeled bin" means separate
disposal is required for the receiver, accessories
and used batteries. They mustn't be disposed of
with your household waste. Please, inquire about the local
regulations.
For information: the Philips batteries supplied with your
receiver remote do not contain hazardous substances
such as Mercury, Cadmium, or Lead.
1 Disconnect your TV set and recorder from the mains.
2 Integrate your receiver in your existing installation as
shown on the above diagram.
3 Insert the two batteries supplied in your remote control.
4 Reconnect your TV set and recorder to the mains. Do not
connect your receiver to the mains yet!
5 Switch on your TV set and select a channel.
6 Plug the receiver's power supply cord to the mains. The
receiver front panel green LED gets on.
4 INSTALLATION GUIDE
7 Now you should see the Welcome screen on your TV
screen. After a few seconds, the Welcome screen
disappears.
8 Then, a screen appears, that allows you to select the
language. Highlight the desired language by pressing V or
W, and then press OK.
You are prompted to confirm your choice by pressing OK
again.
Page 6
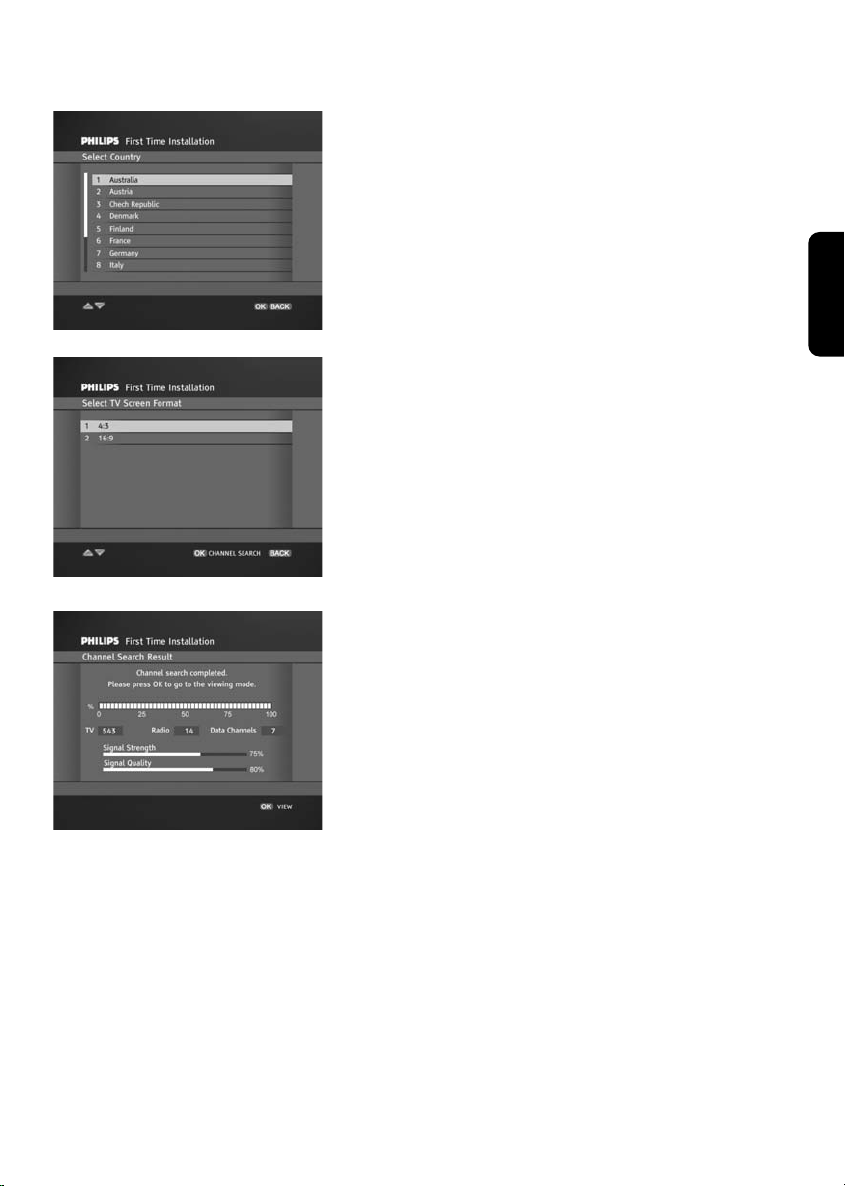
9 Next, highlight the country where you operate the
receiver by pressing V or W, and then press OK.
You are prompted to confirm your choice by pressing
OK again.
10 The next screen is used to select both the TV screen
format corresponding to your TV set and update mode.
Highlight the appropriate format by pressing C or B,
then move to the update mode selection using V or W,
and highlight Yes to allow for automatic software
upgrade. Alternatively, highlight No if you prefer to be
notified when software upgrade is available. Press OK to
initiate the channel search.
11 Once it has been completed, follow the prompts
displayed on the screen.
Press OK to store the channels found and tune the
receiver to the first found TV channel.
English
Now you are ready to enjoy viewing digital terrestrial TV.
Refer to chapter 5 and 6 to learn more about using your
receiver.
INSTALLATION GUIDE 5
Page 7
English
3 Product description
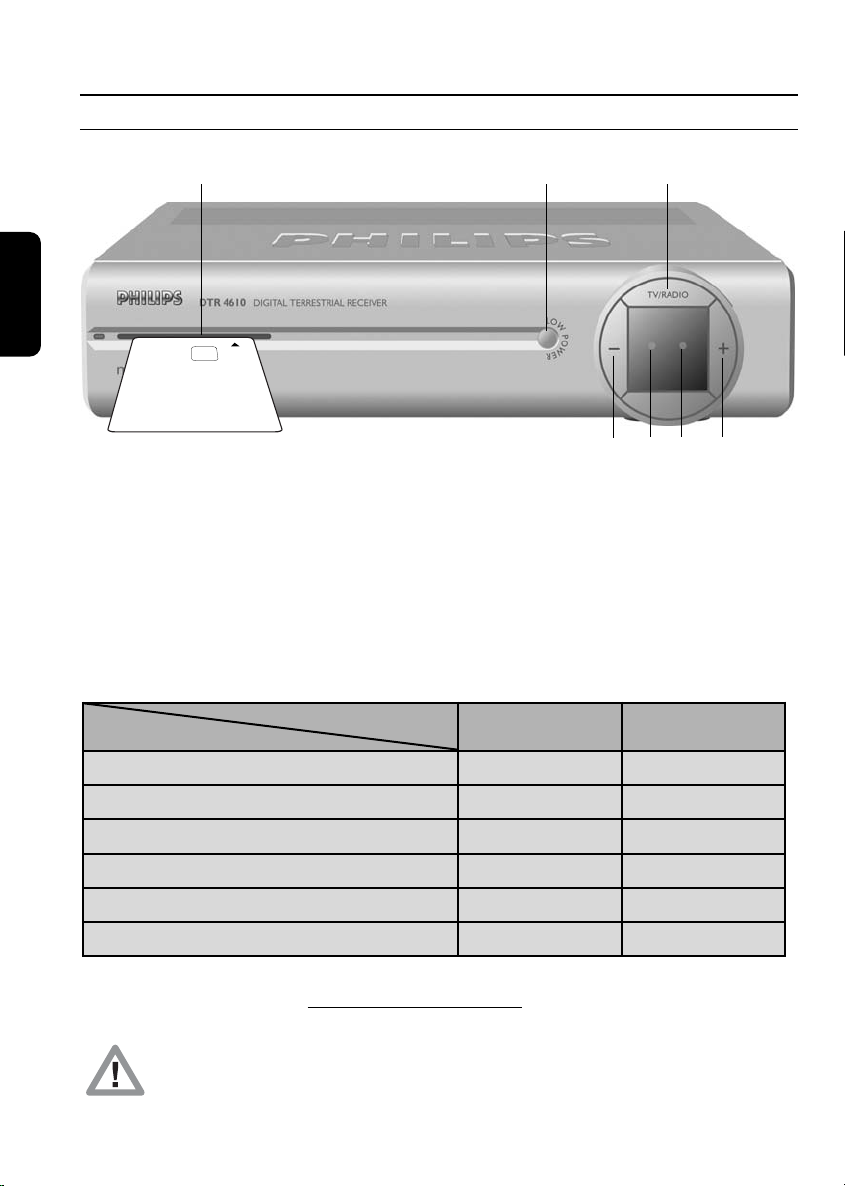
3.1 Front view
123
456 7
1 Smartcard slot
2 LOW POWER button: Switch the receiver on or to "low power".
3 TV/RADIO button: Toggle between digital TV and digital radio.
4 "-" button: Channel down.
5 Bicolour LED: Display receiver status (see status indicator table).
6 Red LED Display receiver status (see status indicator table).
Blink at remote control command reception.
7 "+" button: Channel up.
STATUS INDICATOR TABLE
Mode
Low power red
Standby Orange
TV/Radio mode green
Download in progress Blinking red
Timer active when receiver on red green
Timer active when receiver in standby red orange
Note: if the red LED is blinking while your receiver is in "Standby", it indicates that an upgrade of your
receiver software is taking place. Do not interrupt this operation
indicating successful upgrade, and then continue as normal.
Your receiver, as any electronic equipment, consumes power. In order to reduce power
consumption, please switch your receiver to either Standby or "Low Power" whenever you
are not using it. For maximum energy saving we recommend you switch off the receiver by
unplugging it from the mains if you are not using it
6 PRODUCT DESCRIPTION
Indicator
Red LED Bicolour LED
. Wait for the green LED to light up,
for a long time
.
Page 8
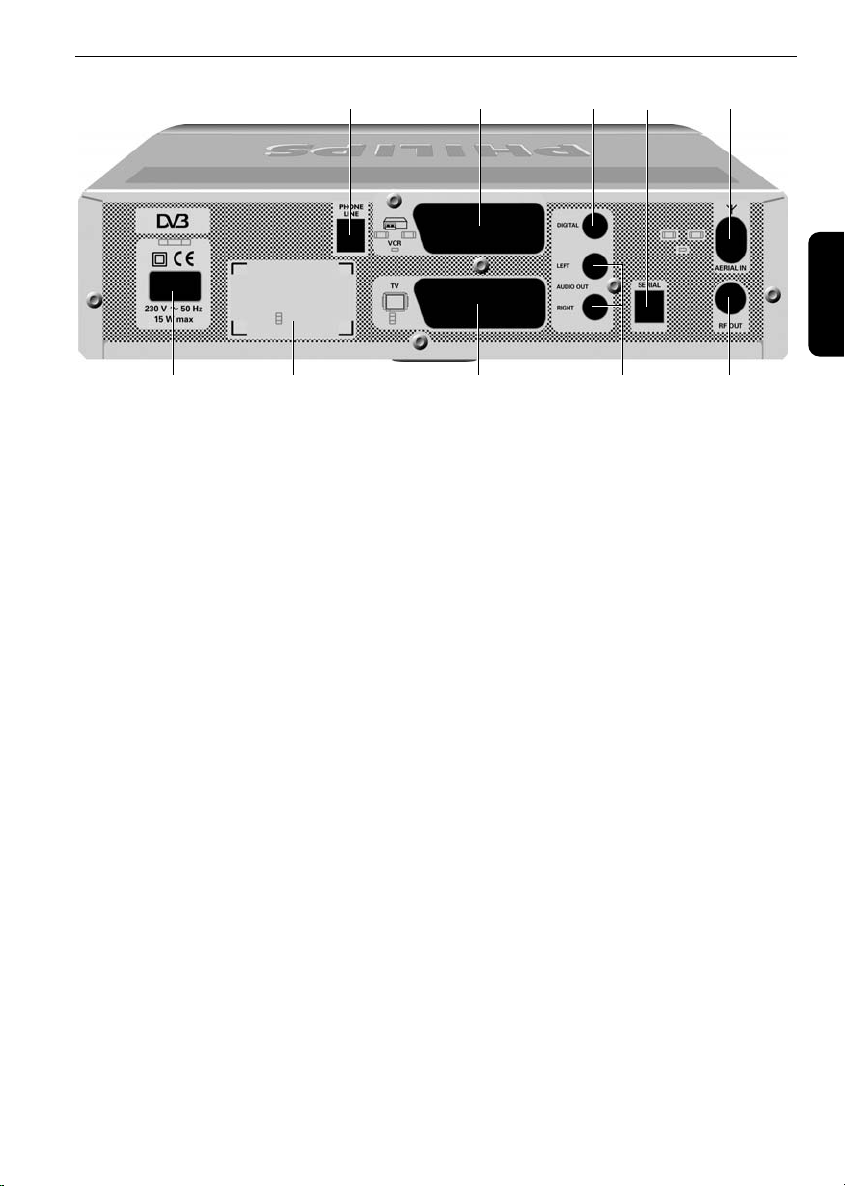
3.2 Rear view
12345
67 8 910
1 Telephone Line*** (3) To connect the supplied telephone cord to be connected to
your telephone line using the appropriate adapter (adapter not
supplied).
2 VCR SCART* (1) To connect a SCART lead to be connected to the SCART socket
input (EXT1) of your VCR or DVD Recorder.
3 Digital Audio* To connect to one of the digital audio input of your HiFi /audio
receiver system.
4 Serial* Data interface used during servicing.
5 Aerial In* To connect the plug of your aerial cable.
6 230V~50Hz 15W max** To connect the supplied mains cord to be connected to the
power socket.
7 Label Type and serial number of your receiver.
8 TV SCART* (1)(2) To connect the supplied SCART lead to be connected to the
SCART socket input of your TV set.
9 L/R Audio Output* To connect to the Left/Right audio Cinch inputs of your
HIFI/audio receiver system.
10 RF Out* To connect the supplied RF coaxial cable to be connected to the
aerial input socket of your TV or VCR.
English
* Safety Extra Lo w Voltage
** Hazardous Voltage
*** Telecommunication Network Voltage 3
(1) SCART is also called Euroconnector or Peritel.
(2) The supplied SCART lead is suited for RGB format, which allows the best picture quality. Consult
the user manual of your TV set to select its RGB capable SCART socket input.
(3) This equipment has been approved pursuant to Commission Decision 99/303/EC for pan-
European connection to the public switched telephone network (PSTN). However, due to
differences between the individual PSTNs provided for in different countries, the approval does
not, of itself, give an unconditional assurance of successful operation on every PSTN network
termination point. In the event of problems, you should contact your equipment supplier in the
first instance.
PRODUCT DESCRIPTION 7
Page 9
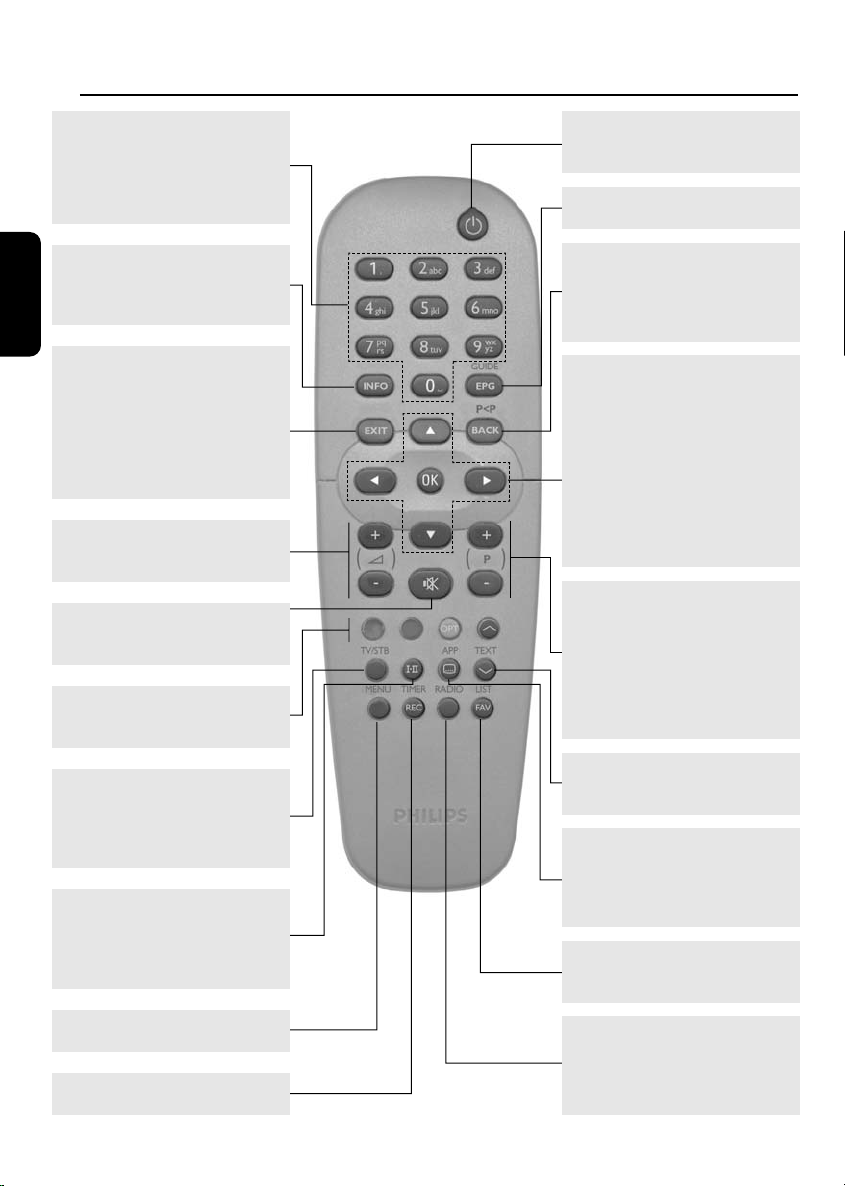
4 Remote Control
0-9 number keys
- In viewing mode: select channels.
- In menu: directly select a menu
item or set a setting.
- In standby: wakes up the
receiver.
INFO
English
Switch between viewing, Channel
Banner, and Channel Banner with
Extended Info.
EXIT
Return to normal viewing. If EXIT
is pressed and held for at least 2
seconds, the current application is
closed and normal viewing is
resumed. The "Autostart" status is
then switched off temporarily until
the receiver tunes to this channel.
A
+/-
Increase/Decrease the volume
level.
MUTE c
Mute the sound on your TV or
receiver.
RED, GREEN, YELLOW, BLUE
Contextual keys used in MHP
applications.
TV/STB
Toggle between watching
terrestrial digital TV via your
receiver and standard analogue TV
via your TV set.
4
Open the Options menu to
momentarily change the
soundtrack, subtitles, teletext, or
display format setting.
MENU
Open/Close the Menu.
REC
Open the Setting a Timer screen.
Standby
Switch your receiver into the
standby mode.
EPG
Open/Close the Programme Guide.
BACK
- In viewing mode: return to the
- In menu mode: return to the
2
previously tuned channel.
previous screen.
VW
- Switch the Channel Banner in
the browsing mode.
- Scroll up/down in a menu or
channel list.
CB
In Channel Banner: switch
between the current and next
programme.
OK
Confirms your choice.
P+/P-
- In viewing mode: tunes the
next/previous channel within the
current channel list.
- In channel lists: scrolls one page
up/down.
- In standby: wakes up the
receiver.
TEXT
Contextual key used in MHP
applications.
i
Open the Options menu to
momentarily change the
soundtrack, subtitles, teletext, or
display format setting.
FAV
Open/Close the current channel
list.
RADIO
- In viewing mode: toggle between
TV and Radio.
- In standby: wakes up the
receiver.
8 REMOTE CONTROL
Page 10
5 Day to Day operation
5.1 Turn ON your receiver or switch to low power
While your receiver is in "low power", the only way to turn it on is to press the LOW POWER
button on the front panel.
While watching digital TV or listening to digital radio, press the LOW POWER button on the
front panel to switch your receiver to "low power".
5.2 Wake up your receiver or switch to standby
While watching digital TV or listening to digital radio, press the standby key of the remote control
to switch your receiver to standby.
While your receiver is in standby, to wake it up:
- Either press the P+, P-, RADIO or any number key of the remote control.
- Or press the PROG-/PROG+ or TV/RADIO button on the front panel.
5.3 Change channel
When you are watching digital TV or listening to digital radio, there are different ways of changing
channel.
5.3.1 Using number keys
Enter the desired channel number using number keys.
5.3.2 Using P+ and P-
Press P+ to select the next channel in the current list, or P- to select the previous channel in the
current list.
Note: Skipped channels cannot be selected using P+or P-; they can only be selected either using the
number keys or from a channel list.
English
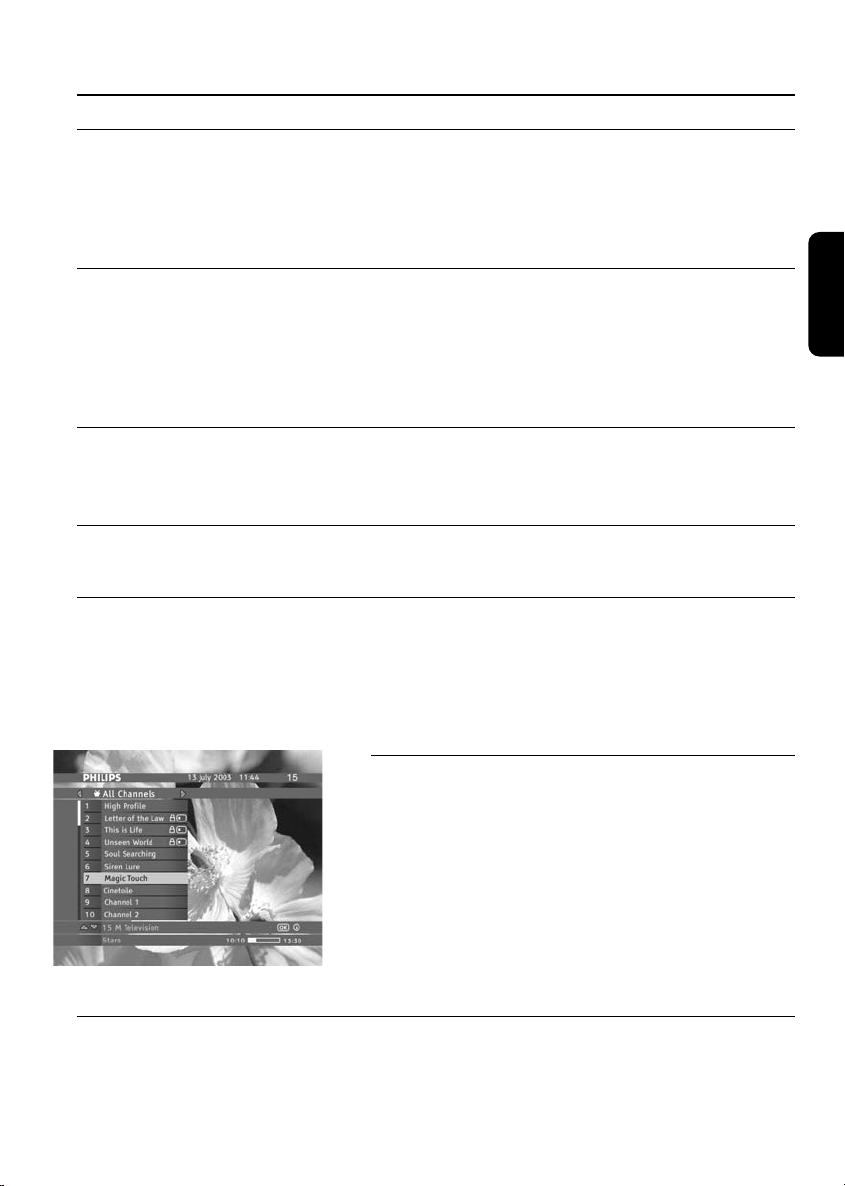
5.3.3 Using the channel list(s)
- Press the FAV key to open the current channel list.
- Scroll to the desired channel, and then press OK to
select it.
- Alternatively, press FAV, and then use the C or B to
enable another channel list to choose from.
Note: empty lists are not displayed.
TV Channel List
5.3.4 Using BACK (last channel recall)
Press the BACK key to return to the previously selected channel.
DAY TO DAY OPERATION 9
Page 11
English
Channel Number
5.4 Selecting digital TV or digital Radio
To switch between digital TV and digital Radio, press the RADIO key.
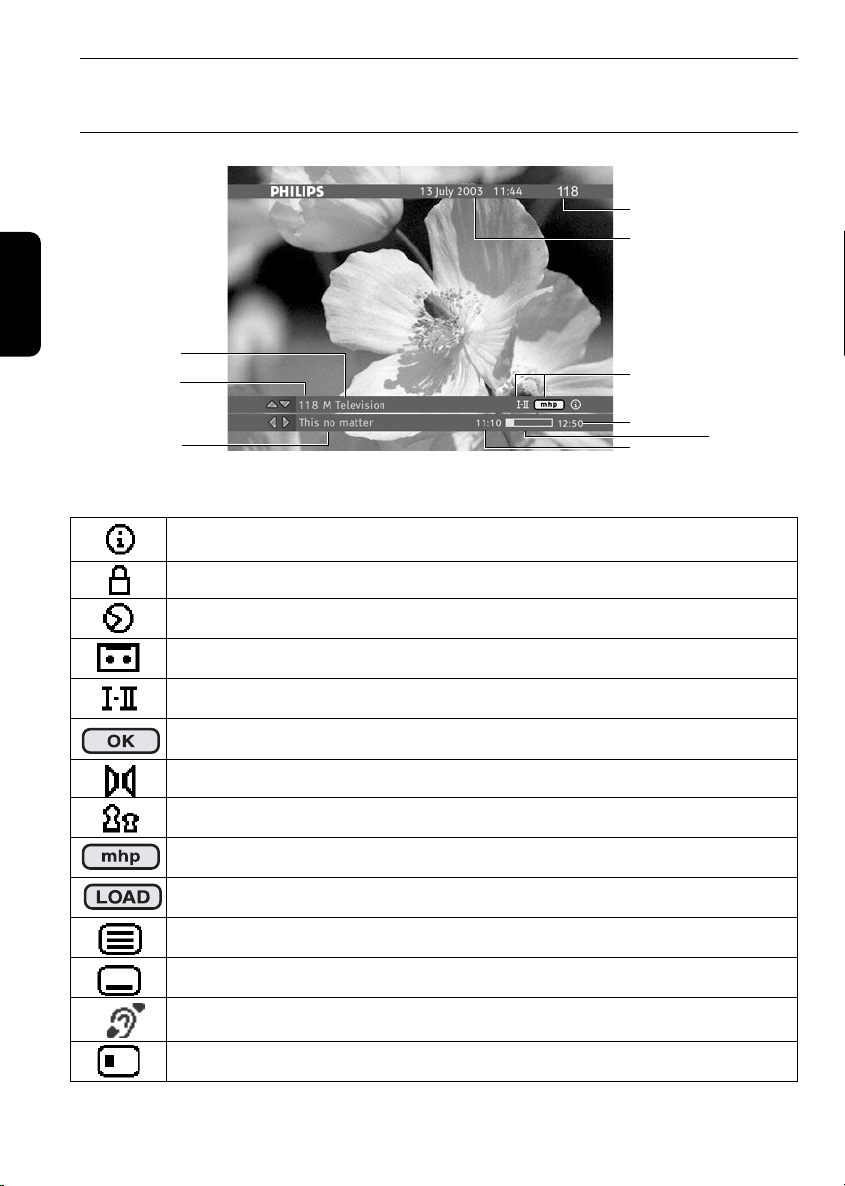
5.5 Channel Banner
Channel Number
Current Time & Date
Channel Name
Icons
Program Name
Channel Banner Icons
This icon informs that some program information is available for the program
displayed in Channel Banner.
This icon informs that the current channel is locked.
This icon informs that a viewing reminder has been set for a particular program.
This icon informs that a recording reminder has been set for a particular program.
This icon informs that a program with more than one soundtrack is broadcast.
This icon informs you that pressing OK tunes to the channel that the Channel
Banner refers to, or sets/cancels a reminder.
This icon informs you that the program is broadcast with AC3/Dolby Digital sound.
This icon informs you that the particular program is parentally locked.
This symbol informs that you may launch external applications by pressing OK.
This icon informs you that an mhp application is loading.
This icon informs that teletext is broadcast on the currently tuned channel.
This icon informs that you may select subtitles for the current program.
This icon informs that you may select subtitles intended for deaf or hard-of-hearing
viewers for the current program.
This icon informs you that the current channel is scrambled.
End Time
Start Time
Progress Bar
10 DAY TO DAY OPERATION
Page 12
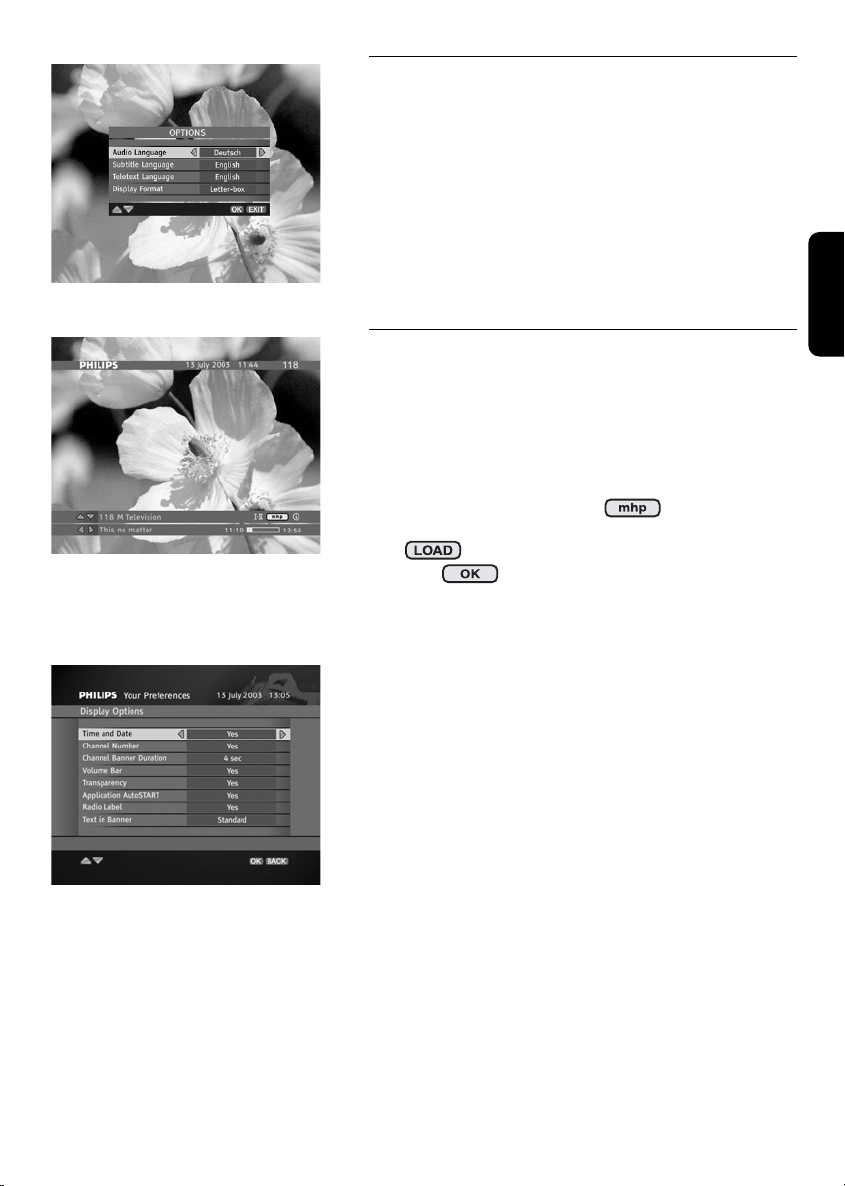
Option Menu
Interactive Applications Icon
Display Option Screen
5.6 Changing the current programme
options
Press the 4or ikey to access the Options menu.
This menu allows you to change the Audio Language,
Subtitle Language, or the Display Format for the
current programme, and the Teletext Language for the
current channel.
English
5.7 How to Run MHP Interactive
Applications
Your receiver supports downloading and running MHP
interactive applications. Some applications are run
automatically on tuning to a respective channel. Other
applications need to be launched manually.
If you tune to a channel on which interactive applications
are broadcast, you will see the icon on the
Channel Banner. This icon is displayed alternately with
the icon if applications are run automatically or
with the icon otherwise.
In case of manual applications pressing OK brings up the
Applications window allowing you to select the
application you want to run. Once you select the
application, press OK again. However, if you are not
interested in running interactive applications, press EXIT
to remove the Applications window from the screen.
Once the application is running follow the instruction
given by the application played on screen.
To quit the interactive application, press and hold the
EXIT key for at least 2 seconds. You can also quit the
application by following the on-screen descriptions
brought to you by the application itself or tuning to a
different channel by pressing P+/ P-.
Please note that if you do not want any interactive
applications to be run automatically, set the Application
AutoSTART option in the Display Options screen to
NO.
DAY TO DAY OPERATION 11
Page 13
English
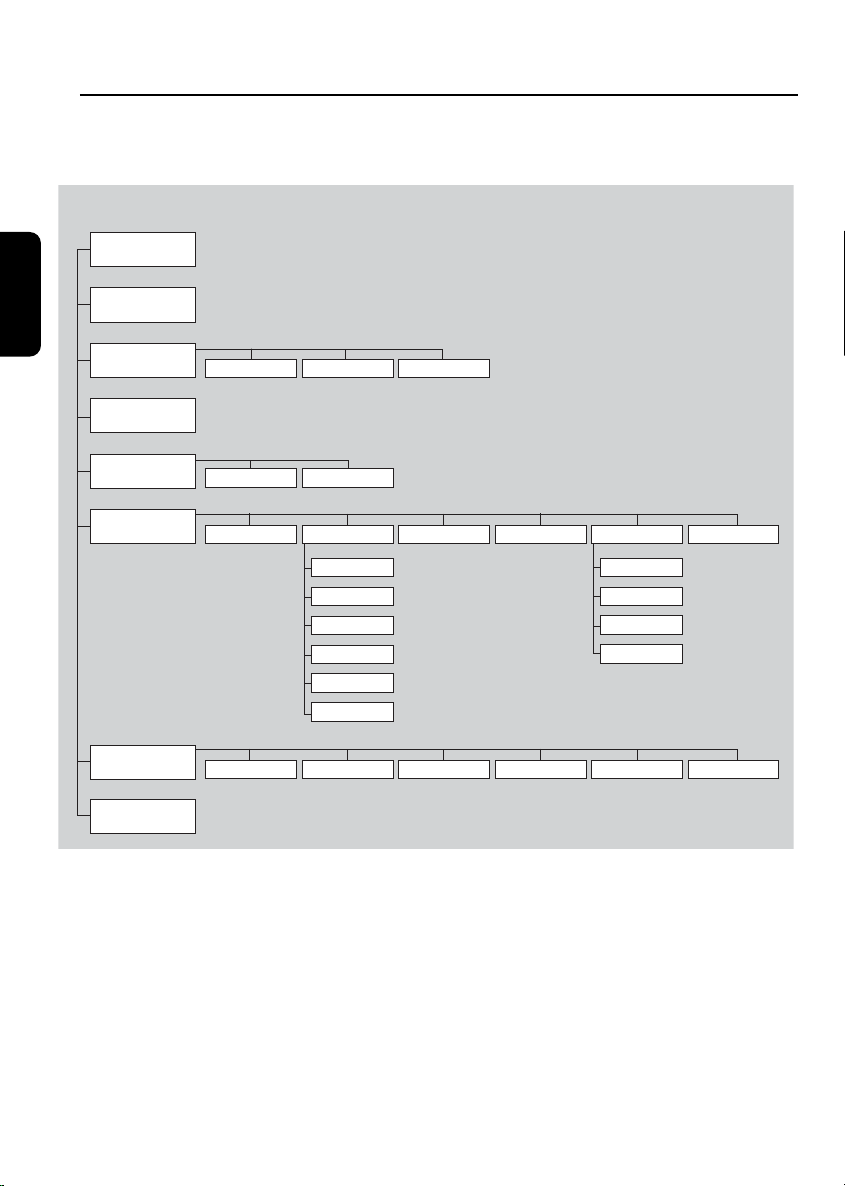
6 Main Menu
1-Timer Manager
(refer to chapter 6.3)
2-Channel Manager
(refer to chapter 6.2)
3-For Parents
(refer to chapter 6.4)
4-Data Channels
Main Menu
Parental ControlDecoder Lock
Change PIN Code
5-Your Preferences
(refer to chapter 6.6)
6-Installation
(refer to chapter 6.7)
7-Help
8-Pay Per View
Display Options
Language Options
TV Settings
System Settings
Modem Settings
Modem Connection
Upgrade Settings
Country
Signal MeterSettingsLocal Time Decoder StatusChannel Search
Reminders And Timers
Factory Reset
System Information
Loader Information
Decoder Upgrade
Smart Card
Software UpgradeFor ParentsRemote ControlUsing Your Decoder MHP Applications
12 MAIN MENU
Page 14
6.1 Menu navigation
Your receiver offers a menu system that allows you to set the way many of the features of your
receiver operate.
MENU
To access the Main Menu, press the MENU key.
VW, OK and number keys
The Main Menu consists of 7 submenus. To evoke one of the submenus, highlight its name using
the W or V keys, and then press OK. You may also press the number key to directly access the
respective menu item.
CB and number keys
To set settings in any screen, use either the C or B keys to select from predefined values, or
number keys to enter figures, dates, times, etc.
OK, BACK and EXIT
To quit a menu and save changes, press OK.
Alternatively, press BACK to go back one level in the menu system without saving changes. To
exit the menu system without saving changes, press MENU or EXIT.
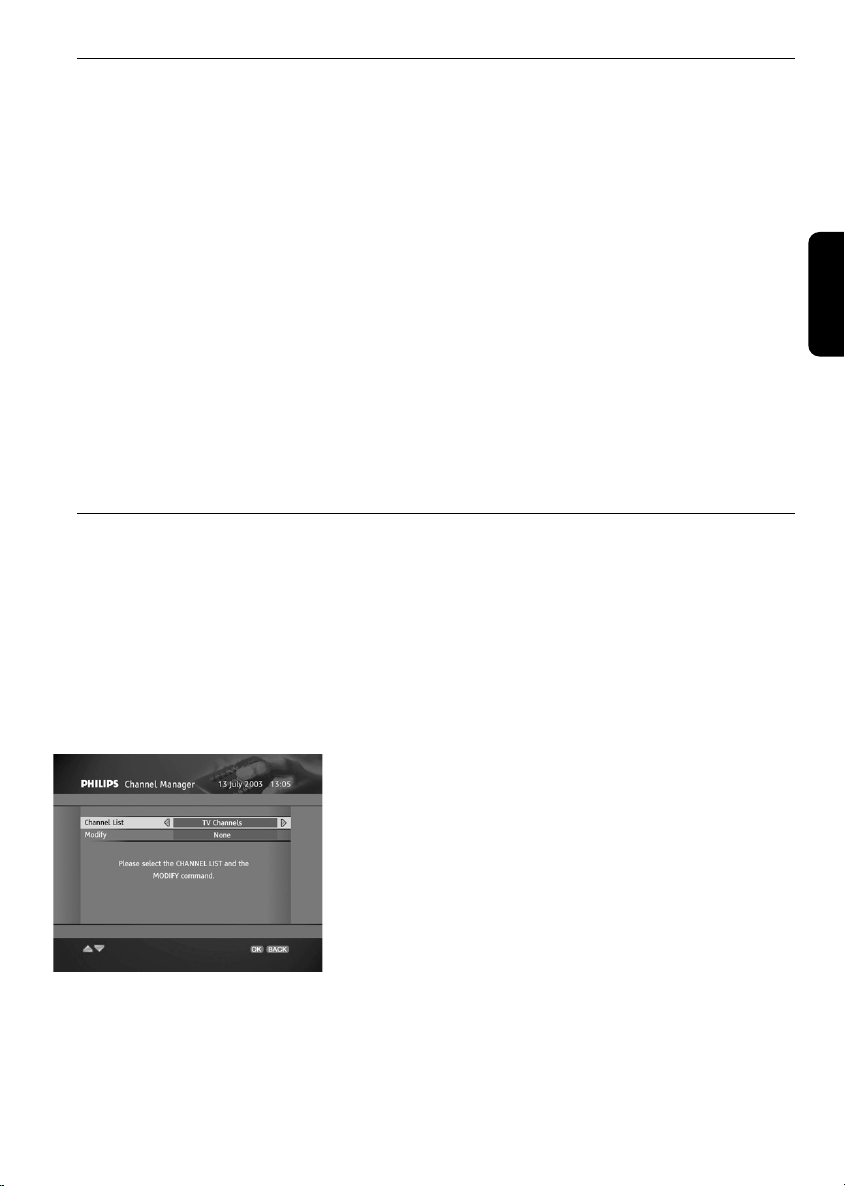
6.2 Channel manager
Channel Manager is used to:
• set channel properties (lock, unlock, skip, and rename channels);
• edit channels lists (move channels).
Note:
Skip
The
The
The
The
feature is used to skip channels when zapping through channel lists.
Move
feature is used to move channels within a channel list.
Lock
feature is used to protect access to certain channels using a 4-digit PIN code.
Rename
feature is used to edit channel names.
English
Channel Manager
Selecting the channels you want to list
- Select the Mode: TV or Radio.
- Set the Channel List setting: All channels, Free
channels, or scrambled.
- Select the Modify feature you want to use:
None/Skip/Move/Lock/Rename.
- Press OK to proceed.
MAIN MENU 13
Page 15
English
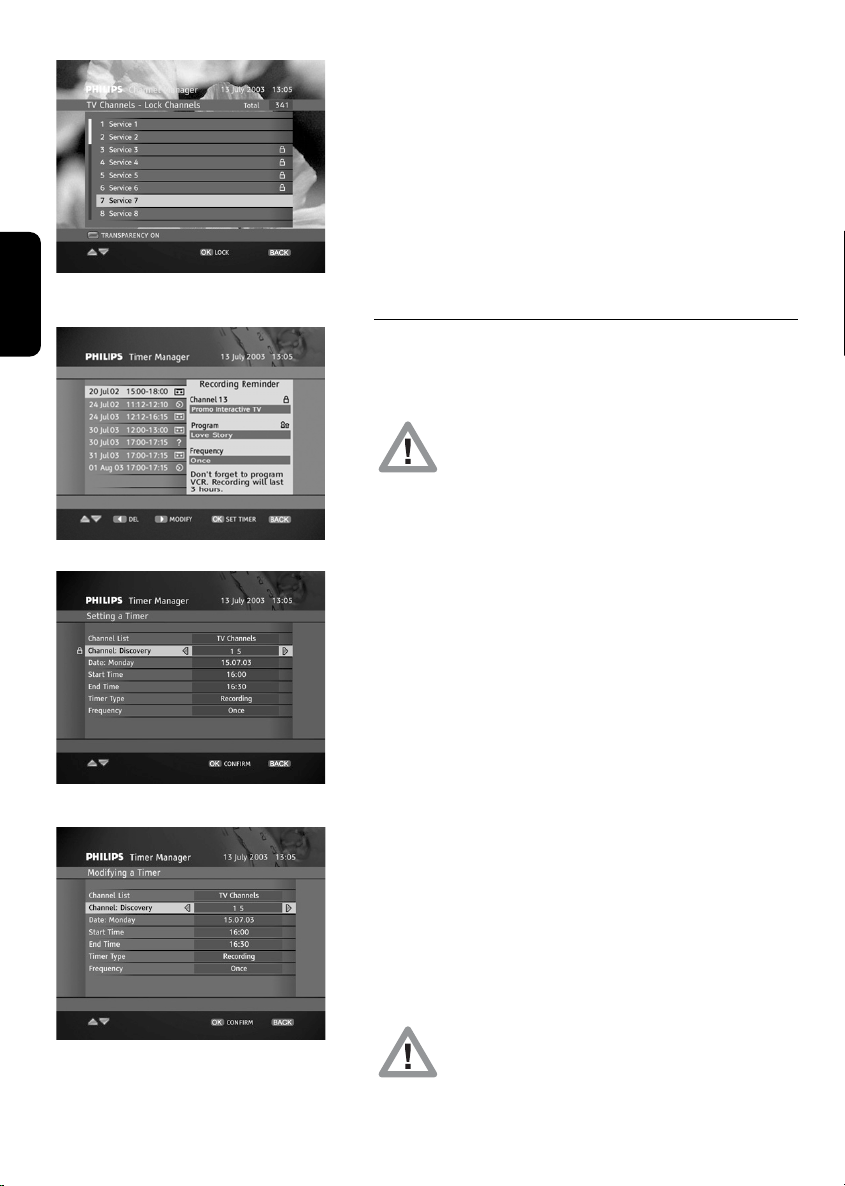
Locking a Channel
Timer Manager
Setting a Timer
Modifying a Timer
Managing channels
- Scroll to the channel you want to
view/skip/move/lock/rename, and then press OK.
- To skip or lock the selected channel, press OK. A Lock
or Skip icon appears.
- To move the selected channel, move to the new
position, and then press OK to confirm.
- To rename the selected channel, select characters from
the keyboard. To select/deselect the keyboard, press
P+.
6.3 Timer manager
Timer Manager lists all the existing timers. From this
screen, you can set, modify, and delete timers.
To be able to record a digital programme using a
VCR or DVD recorder, you must set a timer on
your receiver and also enable recording on the
recorder.
Setting a timer
- Press OK to add a timer.
- Set the timer settings:
• Mode: TV or Radio
• Channel List: All channels, Free channels, or
Scrambled
• Channel
• Date, Start time and End time
• Timer type: Recording or Viewing
• Frequency: Once, Daily, or Weekly
- Press OK to confirm.
Modifying a timer
- Highlight the timer to be modified from the timer list,
and then press B.
- Edit the timer settings, and then press OK.
Deleting Timers/Reminders
- Highlight the timer to be deleted from the timer list,
and then press C.
- Press OK to confirm deletion.
Please note that when you set a recording, it is
protected from being interrupted. To cancel the
recording, press
when prompted.
EXIT
, and press
O K
to confirm
14 MAIN MENU
Page 16
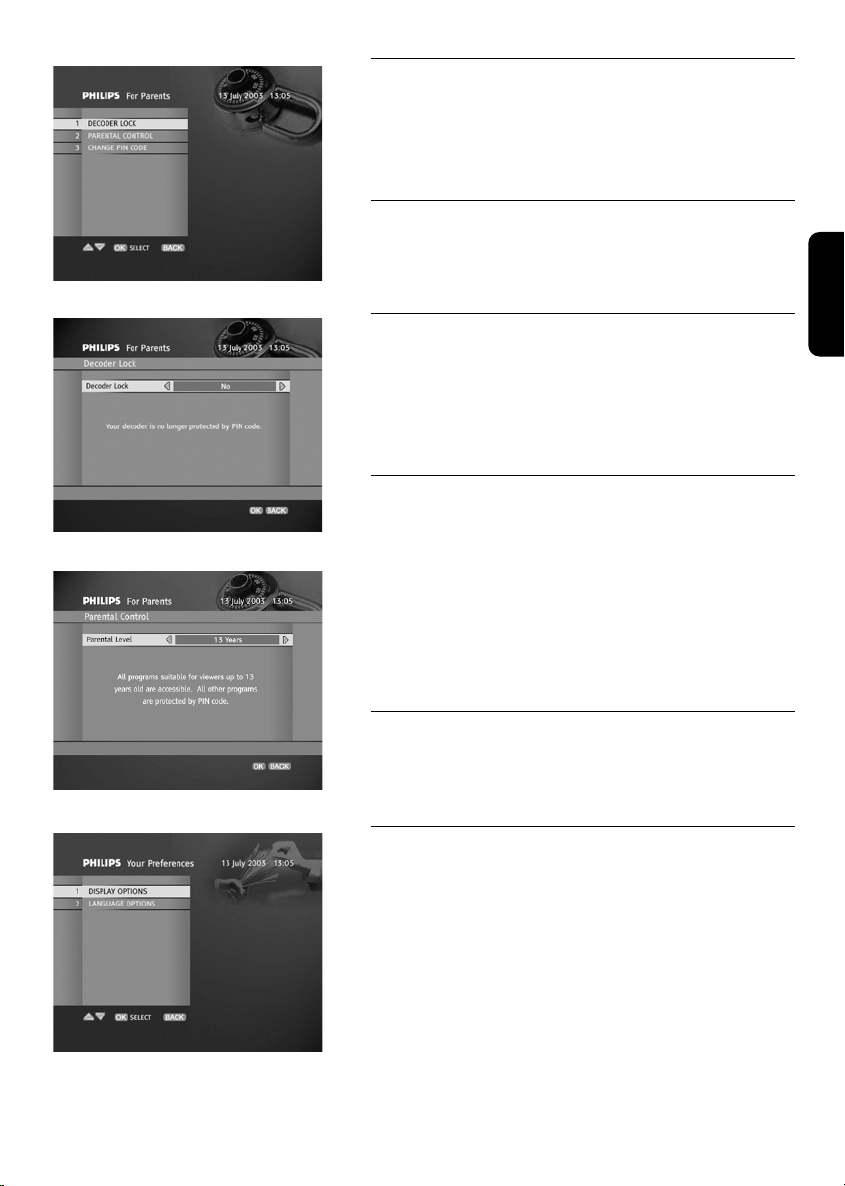
For parents Submenu
Receiver lock
6.4 For Parents
For Parents is used to set PIN code protection on
some menus, locked channels, and programmes not
suitable for certain audiences.
6.4.1 Decoder Lock
This item is used to enable or disable the protection
features mentioned above (Yes = enabled).
6.4.2 Parental Control
This item is used to protect access to programmes
according to their maturity level. PIN code protection is
automatically enabled for programmes which maturity
level is higher than the parental level you set.
6.4.3 Change your PIN code
This item is used to change your personal 4-digit code,
called PIN code.
Initially, your PIN code is assigned the value 1234.
To change your PIN code:
- Enter the current value.
- Then enter the new value of your choice.
- Enter the new value again to confirm.
English
Parental Level
Your Preferences Submenu
6.5 Data channels
Please note that only MHP applications can be run.
6.6 Your preferences
Your Preferences is used to set on-screen display and
language options of your choice.
MAIN MENU 15
Page 17
English
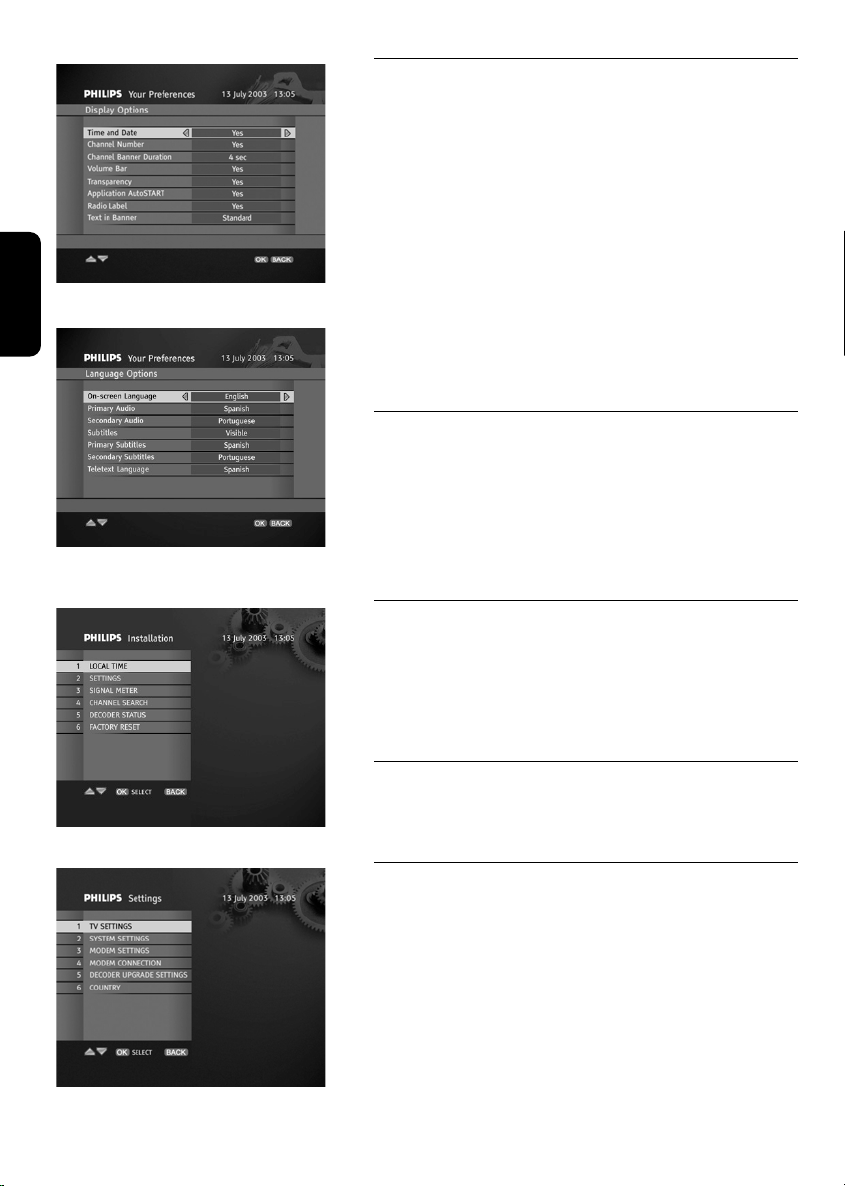
Display Option Screen
Language Options Screen
6.6.1 Display options
This item is used to set on-screen display settings,
including the channel banner settings.
- Set Time and date/Channel Number to Ye s to
include them in the channel banner.
- Set the channel banner display duration of your choice.
- Set Text in Banner to Bigger to increase the size of
the text in the channel banner.
- Set Volume bar/Radio Label to Ye s to include them
in the on-screen display.
- Set Transparency to Ye s for the on-screen display to
appear transparent.
- Set Application Autostart to Ye s to automatically
launch the available MHP applications (recommended
setting).
6.6.2 Language options
This item is used to define the on-screen display
language, audio languages, subtitle languages, and teletext
language of your choice.
6.7 Installation
Installation is used to configure your system, search for
channels, and manage your receiver status.
Note: when the decoder is locked, access to the Installation
menu is protected by PIN code.
Installation Submenu
Settings Submenu
16 MAIN MENU
6.7.1 Local Time
This item is used to set the Time Zone so that the Local
Time setting matches your actual local time.
6.7.2 Settings
Settings is used to match your receiver settings to your
TV and recorder as well as location.
Page 18
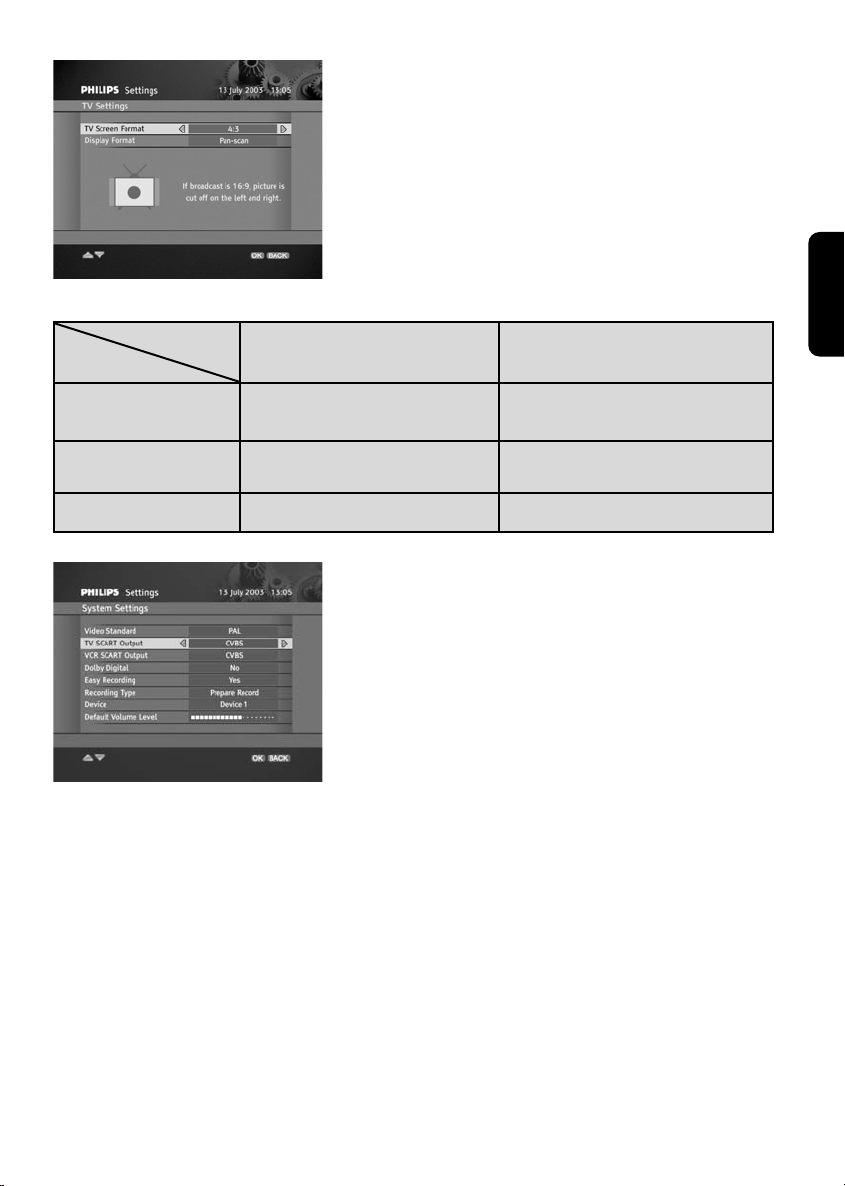
TV Settings:
refer to the table below to set TV Screen Format and
Display Format.
TV Settings Screen
Aspect ratio
Displayformat
Letter-box
Pan-Scan
Full screen full picture squeezed to fit full picture squeezed to fit
System Settings Screen
TV screen format = 4:3
broadcast format = 16:9
full picture with black bars at
the top and bottom
picture cut-off on the left and
right
System settings:
- Video standard:
PAL or SECAM, pre-configured according to the
selected country
- TV SCART Output, VCR SCART Output:
to get the best picture quality, set this option to RGB
- Easy Recording/Recording Type/Device:
refer to chapter 6
- Default Volume Level:
volume level at wake-up from standby
TV screen format = 16:9
broadcast format = 4:3
full picture with black bars on
the left and right
picture cut-off at the top and
bottom
English
Modem Settings:
modem configuration is generally handled by the MHP applications.
Modem Connection:
follow the instructions displayed on-screen to check your modem connection.
Decoder Upgrade Settings:
set Auto Upgrade to Ye s to automatically initiate the upgrade procedure when available.
Otherwise you will be prompted to initiate the procedure.
Note that your decoder must be in running mode in order to check for upgrade.
Country:
changing the country will initiate a channel search and you will lose your current channel list.
MAIN MENU 17
Page 19
English
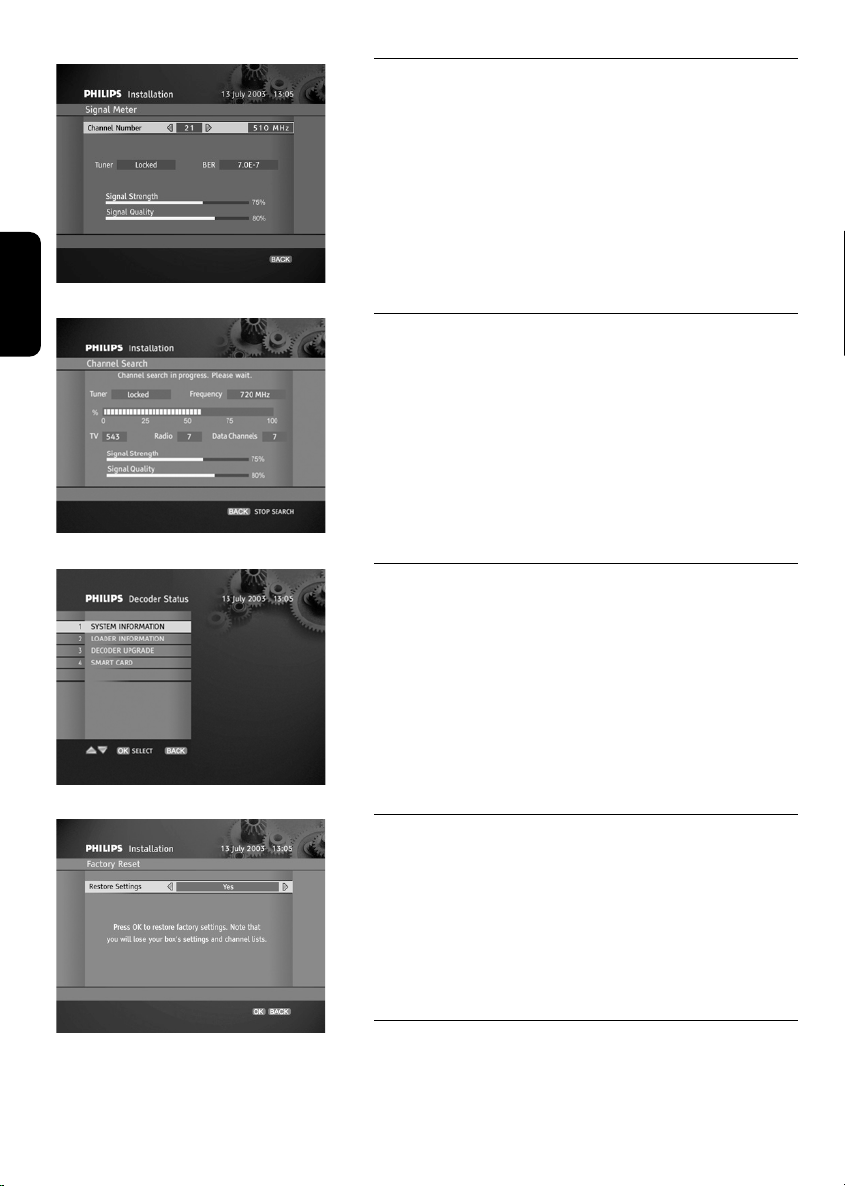
6.7.3 Signal meter
Signal Meter is used to display the strength and quality
of the signal broadcast at the specified frequency in order
to check your antenna connection and setup.
Signal Meter
6.7.4 Channel Search
Channel Search is used to either Search for New
Channels or Reinstall All Channels (your channel list
will be replaced by a new one).
Press OK to launch the channel search. You may
interrupt this procedure by pressing BACK.
Channel Searching
6.7.5 Decoder Status
Decoder Status provides information about the system,
loader, and smart card.
Besides, the Decoder Upgrade item is used to check
whether new software is available for your receiver. If
available, press OK to initiate the upgrade. Do not
interrupt this operation once started.
Decoder Status Submenu
Factory Re s e t
18 MAIN MENU
6.7.6 Factory Reset
Set Restore Settings to Ye s, and then press OK to
restore the factory settings of the receiver and restart the
first-time installation process. As a result, your channel list
will be replaced by a new one.
6.8 Help
This submenu is used to provide information on how to
use your receiver and set the various settings.
Page 20
7 Advanced Settings
7.1 Easy Recording
The Easy Recording feature allows you to perform recordings without the necessity to program
your video recorder (VCR or DVD recorder). When you set a recording reminder or timer from
the Channel Banner or Timer Manager, the VCR starts/ends recording at the correct time.
Please note, however, that you may only use the Easy Recording feature provided that your
recorder supports it.
• First of all, consult User Manual of your recorder equipment to check if it supports Easy
Recording. Please note that most Philips VCR/DVD recorders support one of the two Easy
Recording options: either Prepare Record (to be checked first) or Record Link.
• Also, both your TV and VCR shall be equipped with two SCART sockets.
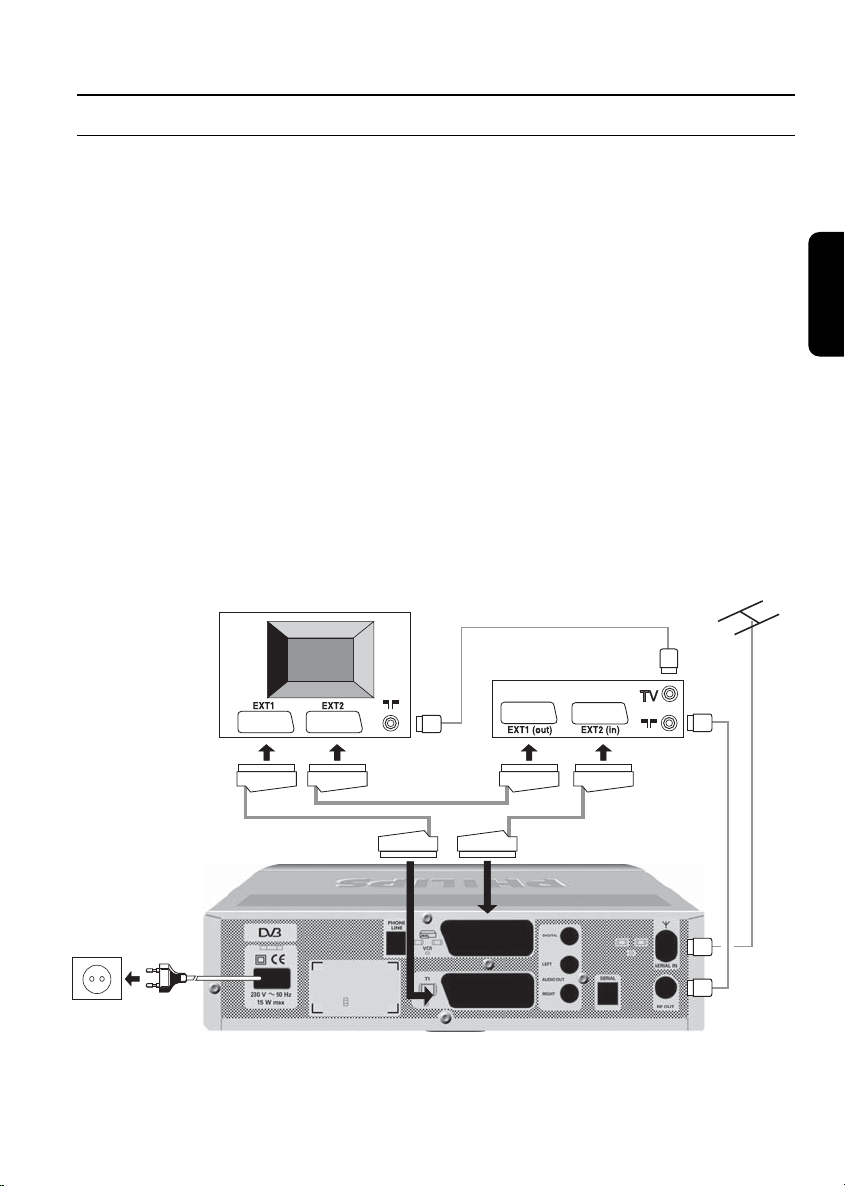
If your equipment satisfies above two conditions, connect your receivers as shown in the
Connection diagram below.
Then, select the System Settings item from the Settings submenu, enable the Easy
Recording feature by setting its option to YES, and assign to the Recording Type an
appropriate value: either Prepare Record or Record Link. You might have to test both settings
to find out the one applicable for your recorder.
TV set
English
Terrestrial
receiver
Video recorder
ADVANCED SETTINGS 19
Page 21
English
Assuming the settings of your receiver and recorder (refer to your VCR or DVD recorder user
manual) are done, to perform a recording you shall:
- Program a timer with your receiver (refer to section 6.3)
- Put your recorder in the appropriate status to be controlled by your receiver (refer to the VCR
or DVD recorder user manual).
At timer occurrence your recorder shall start and stop recording automatically.
Note: While the recording is in progress, your receiver is protected from inadvertent action to disrupt
the recording. To cancel the running recording, press
you for confirmation. To cancel the recording, press
EXIT
. This brings up a small window prompting
O K
.
7.2 Remote control setting
If you have other items of equipment in your home and
the Philips remote control of your digital receiver
interferes with them, you can change the setting of your
remote control. Please note that you must change the
setting of both your remote control and receiver.
Changing the setting of your receiver
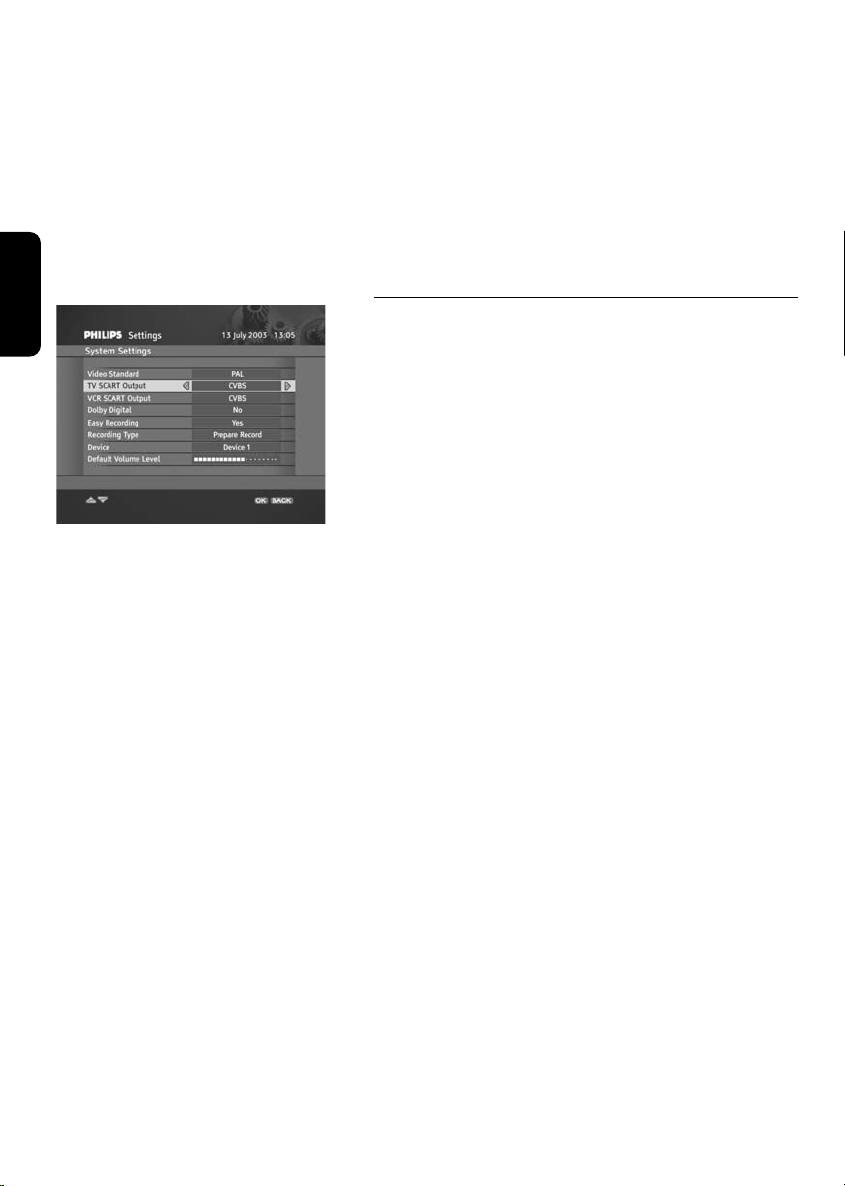
By default, your receiver is identified as Device 1 and the
remote control is set to control Device 1.
System Settings Screen
To change this identifier to Device 2:
- Select Installation, then Settings, and then System
Settings. The System Settings screen appears.
- Set Device to Device 2.
- Press OK to confirm and exit.
Changing the setting of your remote control
- Press number keys 1 and 3 simultaneously and hold
them for at least 4 seconds.
- Release these two keys.
- Enter the new code setting within the next 60 seconds:
• Either 2 for Device 2 (alternative setting).
• Or 1 for Device 1 (default setting).
Alternatively you may reset your remote control to its
default setting (Device 1) by removing the batteries.
20 ADVANCED SETTINGS
At battery change, the remote control setting is reset to
Device 1. Please remember that if your remote control
was set so as to control Device 2, you must set it to
Device 2 again after changing the batteries.
Page 22
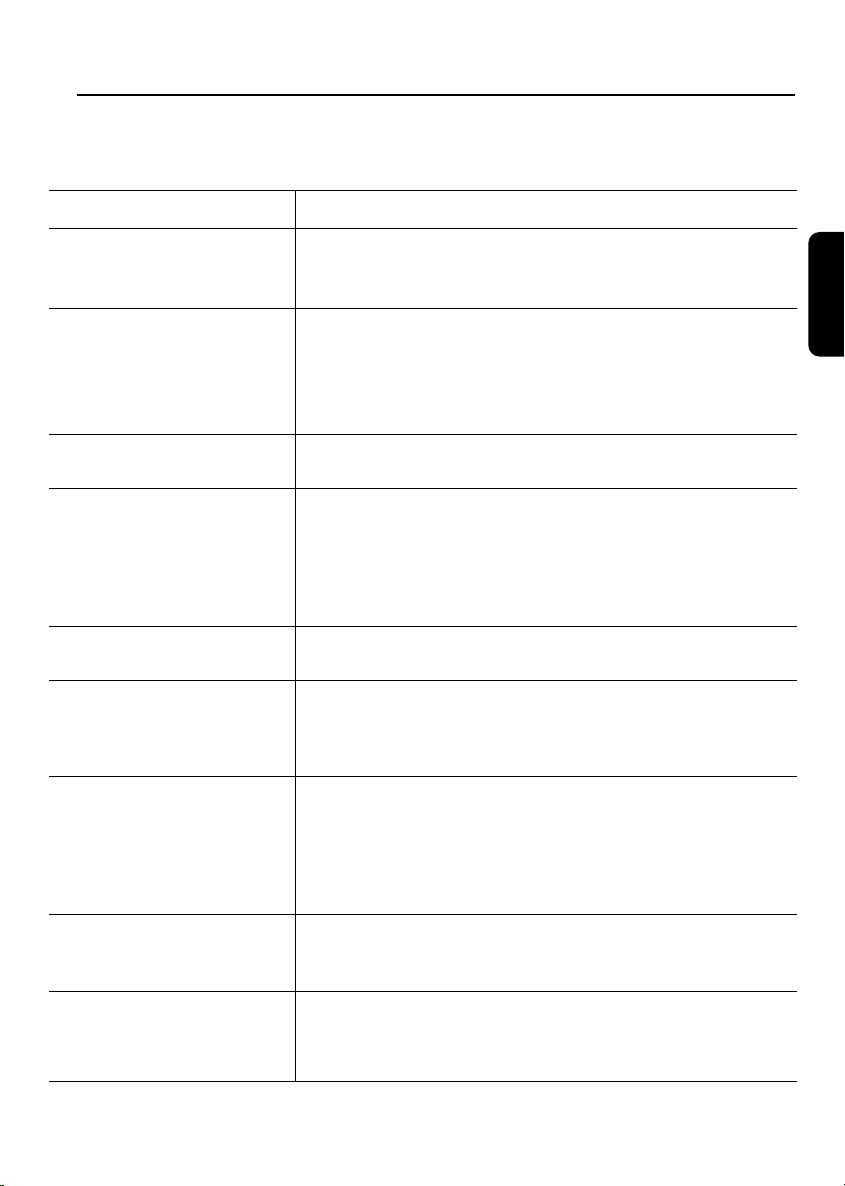
8 Troubleshooting guide
Check the guide below for a possible cause of the problem you are experiencing.
The most common problems that arise are related to cable connections. Make sure that your
receiver is properly connected.
Symptom
Nothing lights up on your receiver front
panel.
Your remote control fails to operate your
receiver.
There is no sound/picture but the front panel
orange LED is on.
There is no sound/picture. However, front
panel display is correct.
Main Menu can be displayed but you cannot
select channels.
Main Menu and Channel Banner can be
displayed, but there is no reception (black
screen).
Check that the mains power cord is correctly connected. Disconnect this cord, and then
reconnect it to ensure it is in place.
Check that power is available at the wall socket.
Make sure your receiver is in operating mode.
Make sure that you are pointing your remote control at the receiver front panel.
Check the batteries in your remote control.
Check if your remote control setting and your receiver "Device" setting (1 or 2) are set
accordingly (see 7.2).
Your receiver is in standby. Press P+ / P- on your remote control to wake up your receiver.
Alternatively, press the + / - button on the receiver front panel.
You are watching ordinary TV via your TV set. Press the TV / STB remote control button to
watch digital TV via your receiver.
Make sure that the SCART connections are correct.
Connections are correct but the TV set is NOT switched to external AV source. Press the TV
/ STB remote control button twice; if the problem is not fixed refer to the user manual of
your TV set.
Your receiver has not been properly configured. Perform the Channel Search procedure
(from Installation submenu). Optionally return to factory setting.
Your aerial is not receiving the signal. Check the installation, and the aerial positioning and
connection. Also, check signal quality.
Signal is too weak. Check the installation, and the aerial positioning and connection. This effect
may also be due to severe weather conditions.
Remedy
English
The picture is not sharp and text is difficult to
read.
Intermittent reception ("mosaic" effect or
"frozen" image).
You have forgotten your PIN code.
The TV SCART output video format is not set to RGB. Change the TV SCART setting to RGB
from the System Settings item of the Installation submenu.
The TV SCART lead is not connected to the RGB-capable SCART socket of your TV set (refer
to TV set user manual for proper connection).
The SCART lead for TV connection is not RGB-capable (not fully wired). Use the SCART cable
supplied with your receiver for the connection to the TV set.
You may have defective cable links. Check all connections and cables.
Poor signal due to the incorrect positioning of the aerial. Reorient the aerial and fasten it
securely.
You have the possibility to reset your PIN code to its default value (1234). To reset your PIN
code, type in the Master PIN Code (00799700) in quick succession at the level of the Main
Menu. Before you enter the Master PIN code, press the
secret to prevent your children from using it.
/INFO key. Please keep this code
m
TROUBLESHOOTING GUIDE 21
Page 23
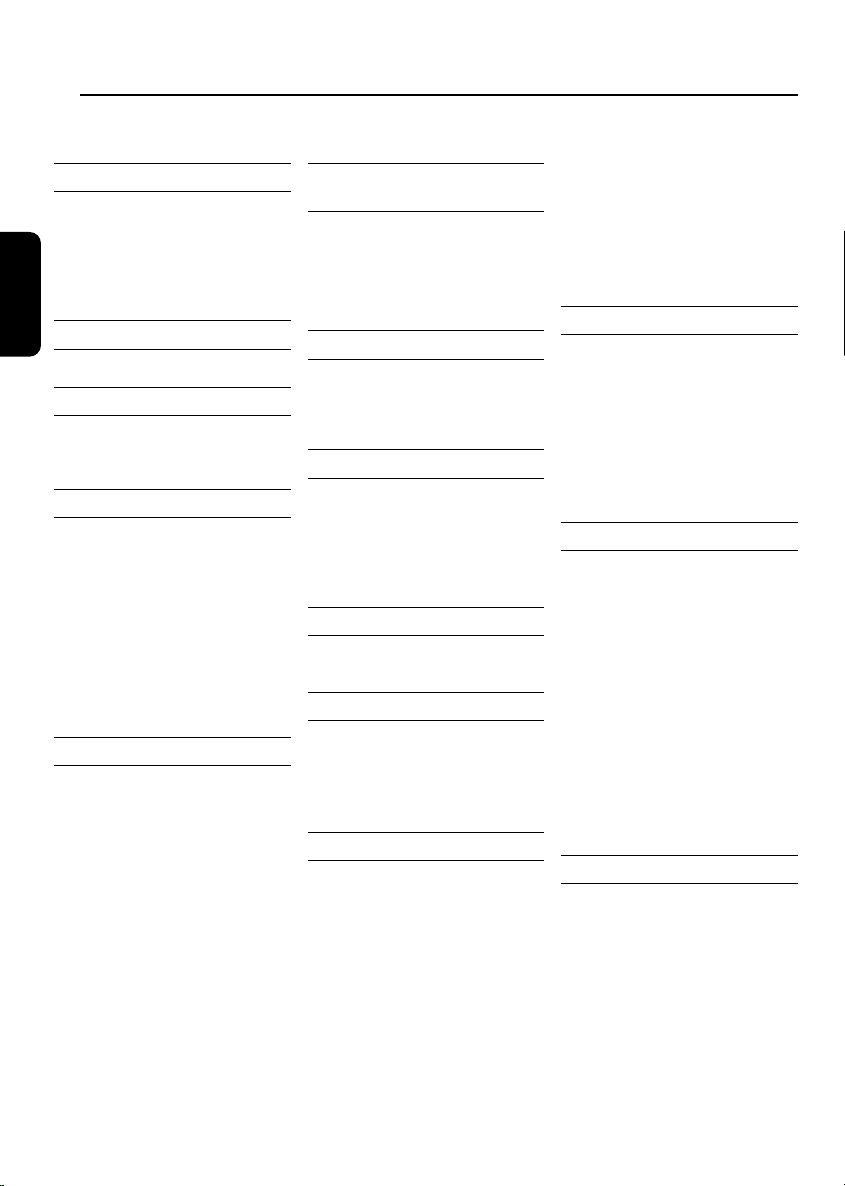
9 Technical Specifications
This product is in conformity with the requirements of the 95/47/EC and 2002/21/EC directives.
Video Decoding
- MPEG-2 DVB compliant up to MP@ ML (SD)
- Video bit rate: up to 15 Mbit /sec
- Video format: 4:3 (letter box or
English
- Resolution: up to 720x576 pixels
Pan & scan if source
is in 16:9) and 16:9
Audio Decoding
- MPEG layer I / II
Ease of installation
- Automatic program installation via scanning
- Program editing for personalised installation
(delete, add, move)
Ease of use
- Automatic program list update
- Direct access TV & Radio modes
- Full remote controlled
- Automatic recording via:
• Timer programming by tagging in banner
• Easy recording for Philips VCR and
DVD+RW.
• Prepare Record
• Record Link
- Now & Next program in banner
- EPG list per channel based on EIT schedule
Operation/Features
- Receiver compatible with services based on
MHP
- 1000 presets
- Free to air reception
- DVB Subtitles
- Parental lock with PIN code
- Channel lock with PIN code
- Menu controlled installation and operation
using On Screen Display
- 8 event VCR timer / Reminder
- Automatic VCR play back: Audio L/R + CVBS
or RGB / Fast blanking
- Full range RF loop-through
- Software upgrade via over the air download
- PCM Digital audio out
Application System
Resources
Processor clock speed 180 MHz
SDRAM - CPU/Video-Graphics 40 MB
Flash memory 8 MB
EEPROM 16 kB
Graphics resolution 16 bits
Terrestrial antenna interface
- RF input: IEC 169-2
female connector
- RF output (bypass): IEC 169-2 male
connector
Reception-Demodulation
- Demodulation type: COFDM 2K / 8K
- Network: MFN /SFN
- Input frequency range: VHF III & UHF IV/V
Prepared for Europe and Australia
- Loop-through frequency
range (MHz): 47 - 862 MHz
Secured transaction
For future application - Italy only
Smart card type: Citizen card
De-scrambling
Type: DVB
Implementation: Embedded
Smart card reader: 1 for CA
CA system for pay-TV: Nagra & Irdeto for
Italy
Connections
TV SCART:
Output: CVBS or RGB / Fast blanking
volume controlled audio L/R, slow
blanking outputs
VCR SCART
- Input: CVBS or RGB / Fast blanking, slow
blanking , audio L/R
- Output: CVBS , audio L/R, slow blanking
during timer if "Prepare Record"
mode is activated
Audio CINCH
- Analog audio output: L / R
- Digital audio output: PCM
Serial interface:
- Type RJ 9
Modem
- Type V90
- interface RJ 11
Smart card reader
- Type: ISO 7816
Accessories
- Remote control: RC 19137008/01
- 1 Scart cable
- User manual
- Worldwide Guarantee booklet
- Batteries: 2 x 1.5V type
AA/R06
- RF cable (DTR4610 only)
- Telephone cord (DTR4610 only)
- Mains cord
Miscellaneous
Temperature range (°C)
- Operating +5°C to 45°C
- Storage -10°C to +70°C
Mains: 230 V ~ +/-10%
Consumption
- Power: < 10W
- Standby: < 6 W
- Low power < 1 W
Weight
- Product 2 kg
- Including packaging 2.5 kg
Dimensions:
- Product 260 x 225 x 60 mm
- Packaging 365 x 275 x 90 mm
Multi-language
Menu
- English, Italian, French, German.
User manual
- English, Italian, French, German.
Due to continued product improvements, this
information is subject to change without notice.
50 Hz
22 TECHNICAL SPECIFICATIONS
Page 24

EnglishItaliano
3111 176 52404 04/07
 Loading...