

Page 1
www.philips.com/support
DTR 2530
For support call 0870 900 9070
EN Digital Terrestrial Receiver 2
Page 2

Table of contents
1 Important 4
2 Your Digital Terrestrial Receiver 6
2.1 What’s in the box? 6
2.2 What you also need 7
2.3 Digital Terrestrial Receiver overview 7
2.4 Main menu overview 8
2.5 How to read this manual 8
3 Getting started 8
3.1 Prepare 8
3.2 Connect 9
3.3 Install 10
4 Using your Digital Terrestrial
Receiver 11
4.1 Watching live TV 11
4.2 Using options 13
4.3 Settings 13
4.4 Video Settings 13
4.5 Language Settings 15
4.6 Menu Settings 15
4.7 Miscellaneous Settings 16
4.8 Restore Factory Settings 16
5 Use more of your Digital Terrestrial
Receiver 17
5.1 Digital Terrestrial Receiver full overview 17
5.2 Remote control full overview 18
5.3 Using channel list 19
5.4 Creating and Editing channel list 19
5.5 Extended installation 21
5.6 EPG 22
5.7 Timer 23
5.8 Miscellaneous functions 24
5.9 Radio 25
5.10 Security 25
7 Accessories and connections 27
7.1 Recorder connection 27
7.2 Audio connection 27
8 Guarantee and service 28
9 Technical data 29
10 Frequently asked questions 30
Contact information 31
Trademarks and partner logos 31
ENGLISH
6 Maintenance 26
6.1 Cleaning 26
6.2 Replacement 26
6.3 Disposal 26
3
Page 3
Important1
Take time to read this User Manual before using the Digital Terrestrial Receiver.
It contains important information and notes regarding how to operate it.
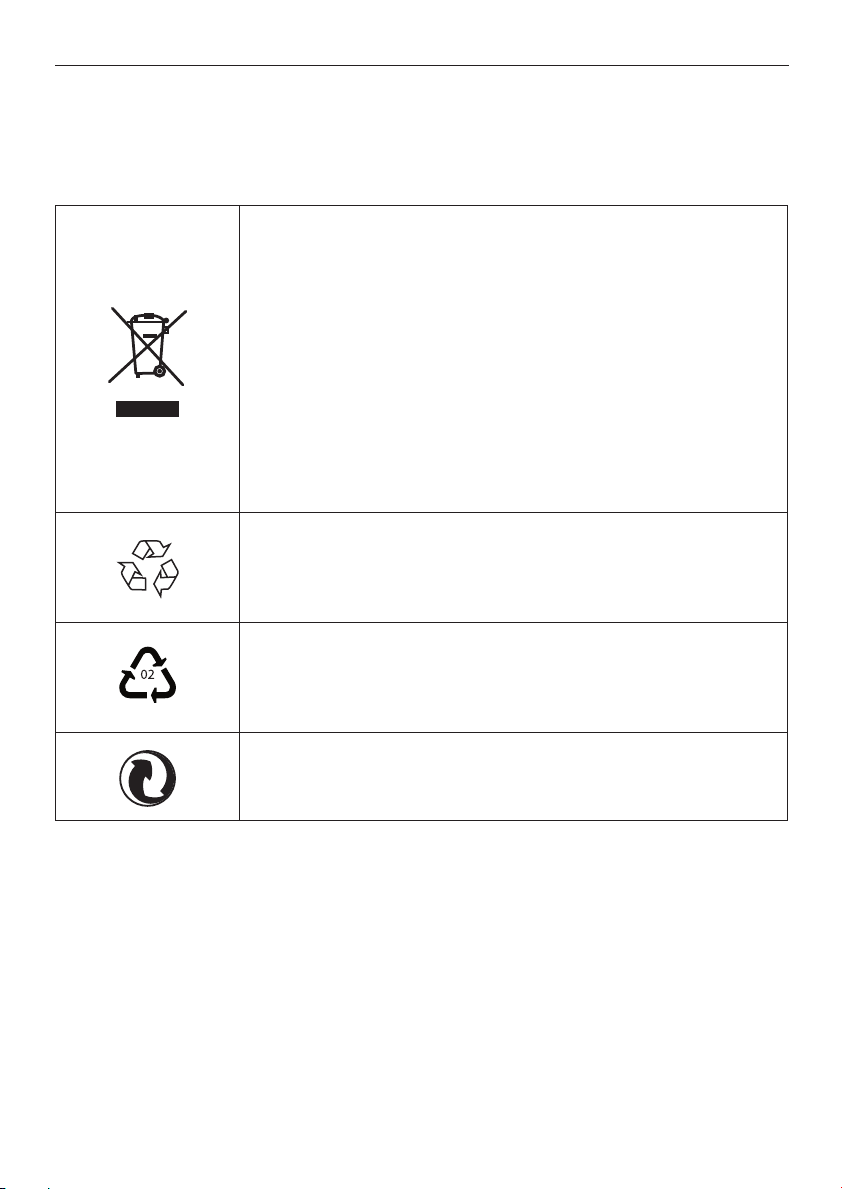
Disposal of your old product
Your product is designed and manufactured with high quality materials
and components, which can be recycled and reused.
When this crossed-out wheeled bin symbol is attached to a product or
its packaging, it means the product is covered by European Directive
2002/96/EC.
Please inform yourself about the local separate collection process for
electrical and electronic products.
Please act according to your local rules and do not dispose of your old
products with your normal household waste. The correct disposal of
your old product will help prevent potential negative consequences for
the environment and human health.
The “Material recyclability symbol” affi xed on package cardboard and
user manual means these parts are recyclable.
So do not dispose of them with your normal household waste.
The “Material recyclability symbol” affi xed on plastic packaging parts
means these parts are recyclable.
So do not dispose of them with your normal household waste.
The “Green Dot” affi xed on cardboard means PHILIPS pays a fi nancial
duty to the “Avoidance and Recovery of Packaging Waste” organization.
Important4
Page 4

Your receiver is powered using an AC adaptor. The Digital Terrestrial Receiver has been
manufactured to meet the appropriate safety standards, but the instructions below must be followed
to operate it safely. These instructions must be kept for future reference.
Danger
The Digital Terrestrial Receiver and AC adaptor do not contain any user-serviceable parts. Do not •
attempt to open them. All maintenance work must be carried out by qualifi ed services centres.
Make sure that children do not place any foreign objects in any of the openings.•
Warnings
Before connecting the AC adaptor to the mains, check that the mains supply voltage corresponds •
to the voltage printed on it. If the mains voltage is different, consult your dealer.
The AC adaptor has been designed for indoor use only.•
Is it recommended to unplug the AC adaptor from the mains during lightning storms.•
Periodically inspect the AC adaptor for damage. Do not use if damage is found. Always refer to •
qualifi ed services centres.
To prevent fi re or shock hazard, do not expose the Digital Terrestrial Receiver to rain or moisture.•
The Digital Terrestrial Receiver should be placed on a fi rm surface, and the ventilation openings •
must not be covered with items, such as newspapers, table clothes, curtains, etc.
Do not install the Digital Terrestrial Receiver near heat sources such as radiators, stoves or other •
apparatus that produce heat. Protect it from direct sunlight.
When installing the Digital Terrestrial Receiver, ensure there is a gap of approximately 5 cm •
around the Digital Terrestrial Receiver to enable air to circulate freely and prevent overheating.
Leave accessible the AC adaptor in case emergency shutdown is required.•
Do not place any combustible objects on the Digital Terrestrial Receiver (candles, etc.).•
No objects fi lled with liquids, such as vases, shall be placed on the unit. The Digital Terrestrial •
Receiver shall not be exposed to dripping or splashing. Should this happen, disconnect the AC
adaptor from the mains and consult qualifi ed services centres.
ENGLISH
Refer also to the cautions throughout this manual.
5Important
Page 5
Your Digital Terrestrial 2
Receiver
Thank you for purchasing this product which
has been designed and manufactured to give you
many years of trouble-free service.
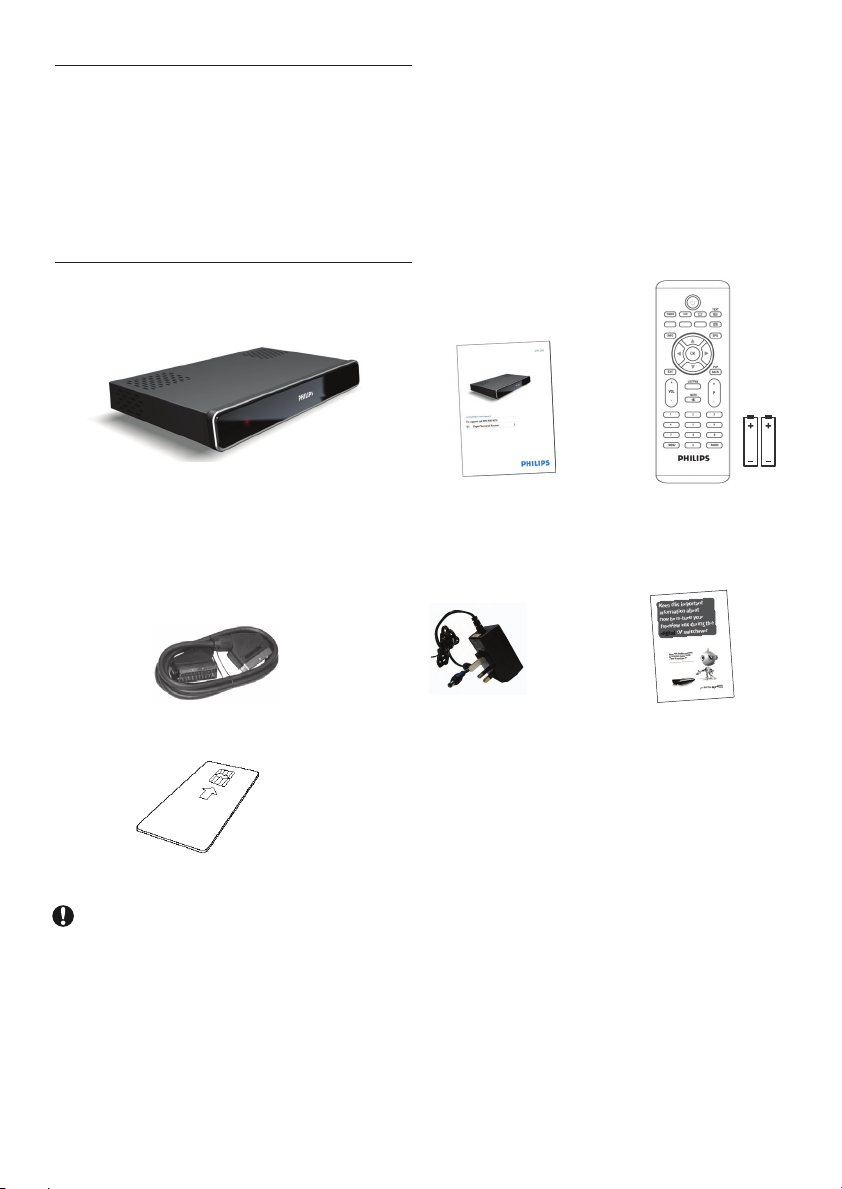
What’s in the box?2.1
Digital Terrestrial Receiver User manual Remote control and
2 batteries
SCART cable AC Adaptor Leafl et
Smart card
Caution
Plastic bags can be dangerous.
To avoid suffocation keep the bag away from babies and children.
Your Digital Terrestrial Receiver6
Page 6
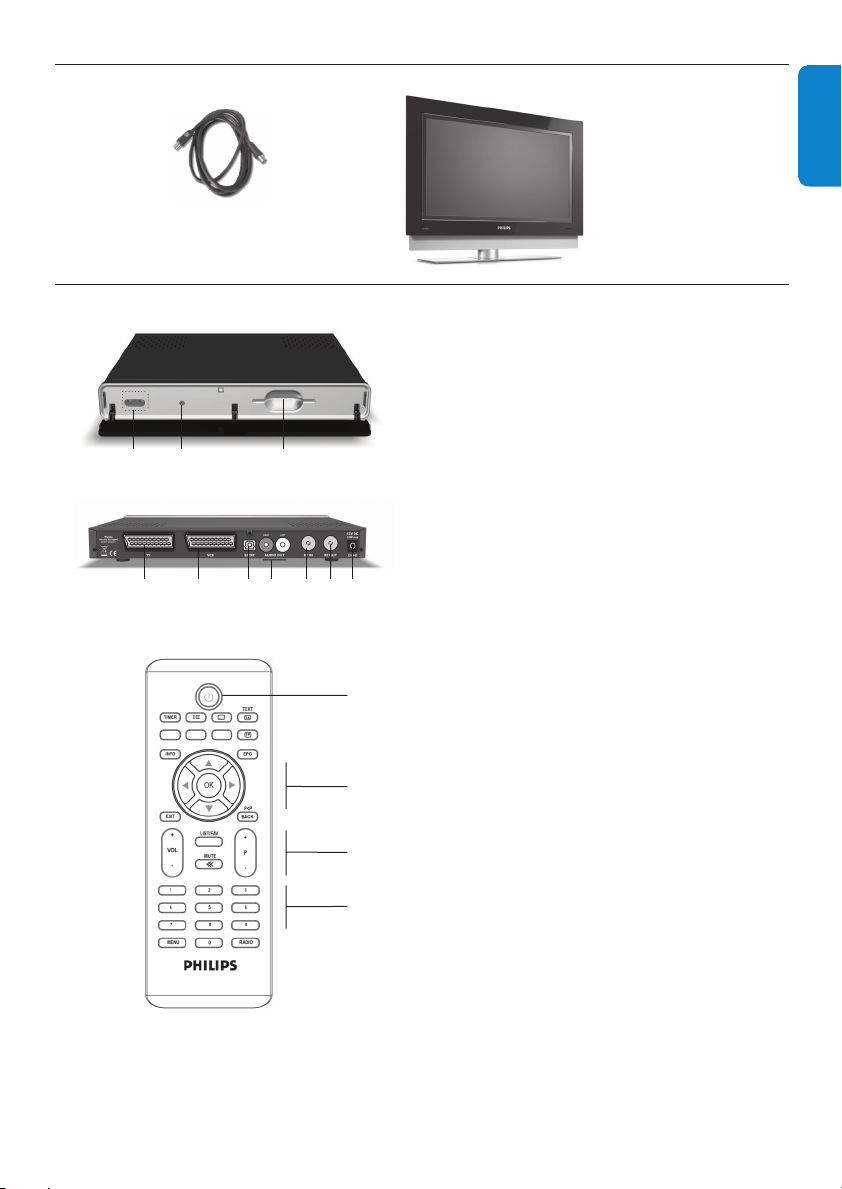
What you also need2.2
Coaxial cable
Digital Terrestrial Receiver overview2.3
ACB
Main Unit
A BCDEFG
Main unit backside
Main unit
A IR Receiver
B Status led
C Smart Card slot
Main unit backside
*
A TV
*
B VCR
C SPDIF* (optical)
D L/R AUDIO OUT
E RF IN
F RF OUT
G Power
*
*
*
*
(analogue)
ENGLISH
Remote control unit
A
*
Safety extra low voltage
B
Remote control unit
A Standby
C
B Navigation keys
C Volume/channel control
D
D Alphanumeric keypad
7Your Digital Terrestrial Receiver
Page 7
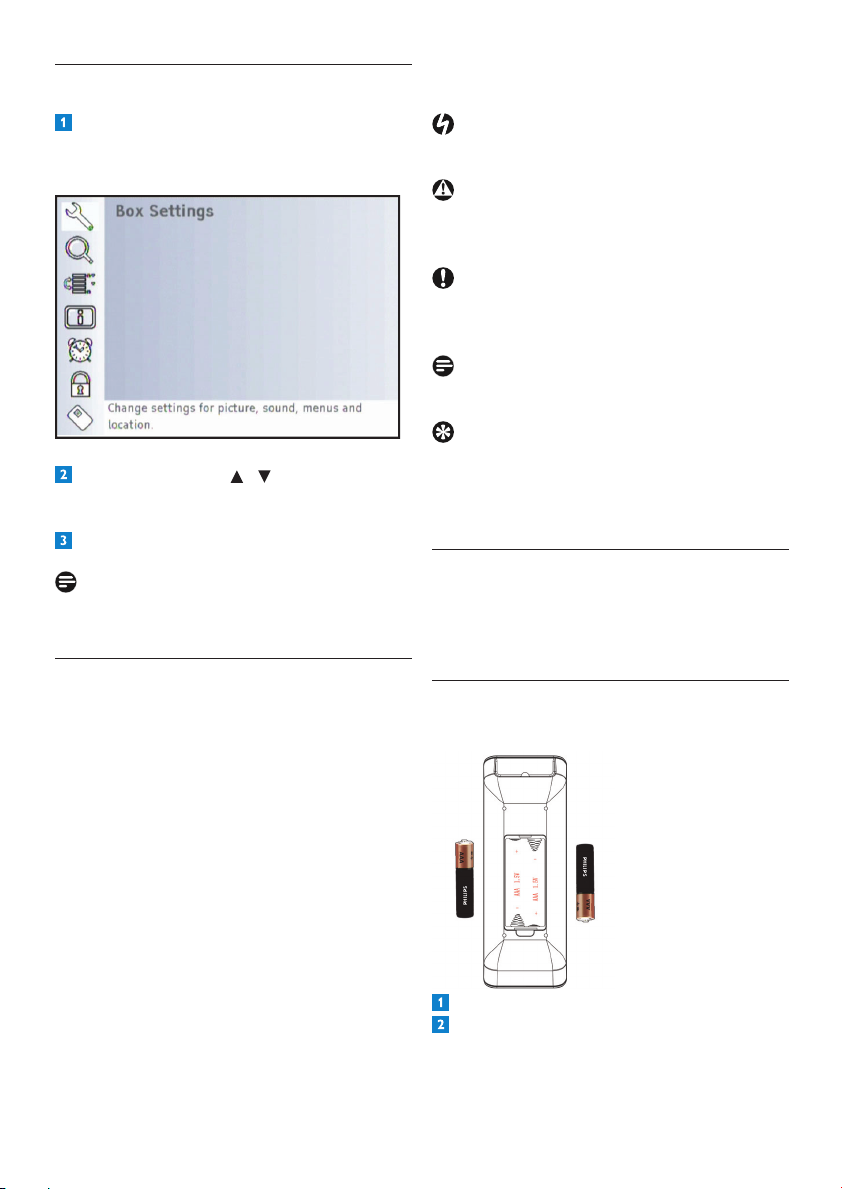
Main menu overview 2.4
Each symbol below has a specifi c meaning.
Press the MENU key to access the main
menu.
Use the arrow keys / to navigate
through the different options.
Press OK to validate your choice.
Note
For menu full overview, see chapter 5.
How to read this manual2.5
This User Manual contains all informations you
need to:
Set up all the available channels•
Use correctly your Digital Terrestrial •
Receiver
Danger
Describes situations of injury or loss of life.
Warning
Describes actions that may cause damage to the
product.
Caution
Describes the actions required to avoid
dangerous or illegal situations.
Note
Additional information.
Tip
Information that is useful to know but not
essential to the task. For example, information
about alternative use.
Getting started3
In this chapter, the basic steps to get you started
are described.
Prepare3.1
Prepare the remote control
Open the battery compartment.
Insert the two batteries supplied according
to the indications (+/-) inside the
compartment.
Getting started8
Page 8
Close the battery compartment.
Connect3.2
Note
Point the remote control directly at the remote
sensor on the front panel and select the desired
function.
Caution
Do not mix batteries or keep them in the remote
control for long periods of time without use.
Batteries must not be disposed of with your
household waste but to a local separate battery
collection system.
Do not dispose of batteries in a fi re.
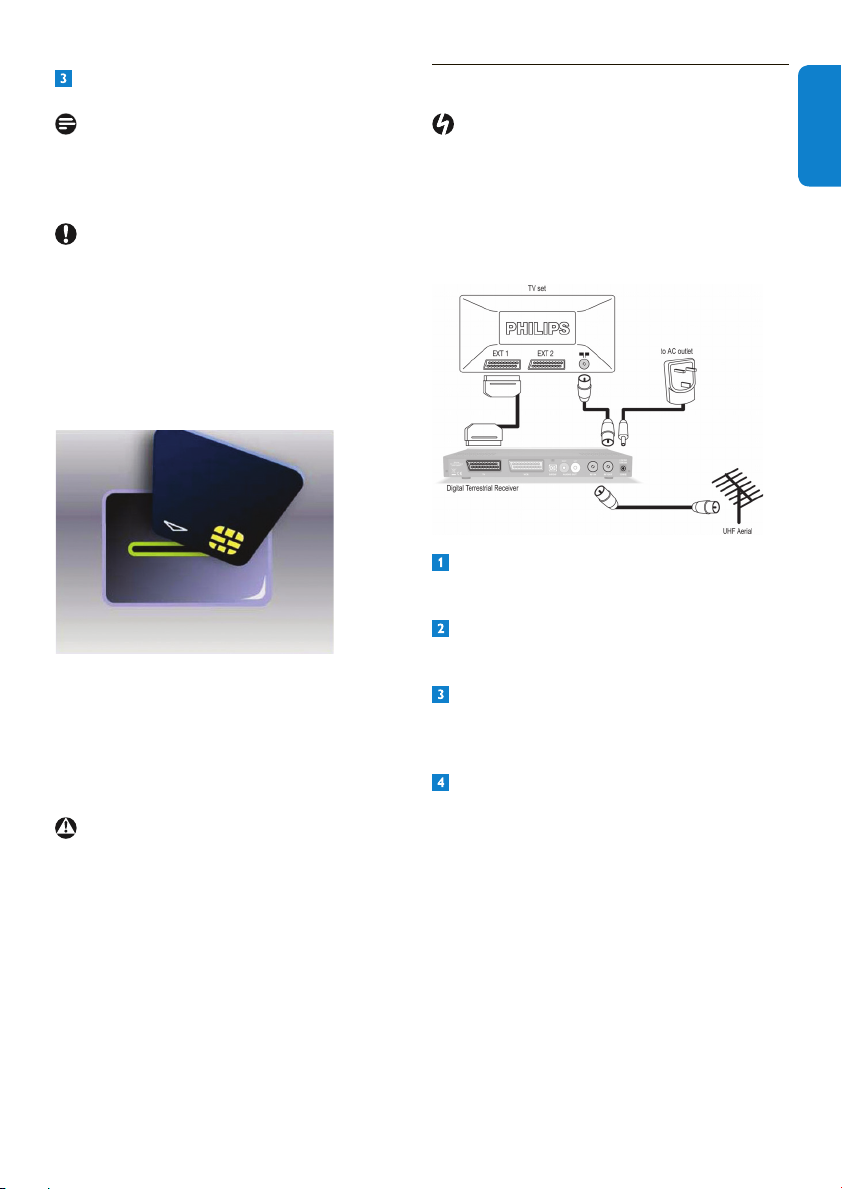
Insert the Smart card
To insert the smart card:
Open the smart card door on the right •
side of the front panel.
Insert the smart card into the smart card •
slot as far as it will go. The end of the card
will be visible from outside the slot.
Warning
Insert the Smart card with the chip facing down.
Danger
Risk of electric shock!
Make sure all the devices are disconnected from
the mains before making any connections.
SCART connection
Connect the aerial cable from the wall
socket to the RF IN socket at the rear of
the Digital Terrestrial Receiver.
Connect the RF OUT socket at the rear
of the Digital Terrestrial Receiver to the RF
input of your TV set using a coaxial cable.
Connect the supplied scart cable to the
scart input of the TV set and to the TV
scart socket at the rear of the Digital
Terrestrial Receiver.
Plug your Digital Terrestrial Receiver to the
mains using the supplied power adaptor.
ENGLISH
9Getting started
Page 9
Install3.3
Press B on the remote control and wait a few
seconds to switch the receiver on.
The receiver is on: the LED is green.
The receiver is in standby mode: the LED is red.
During a software loading: the LED is blinking.
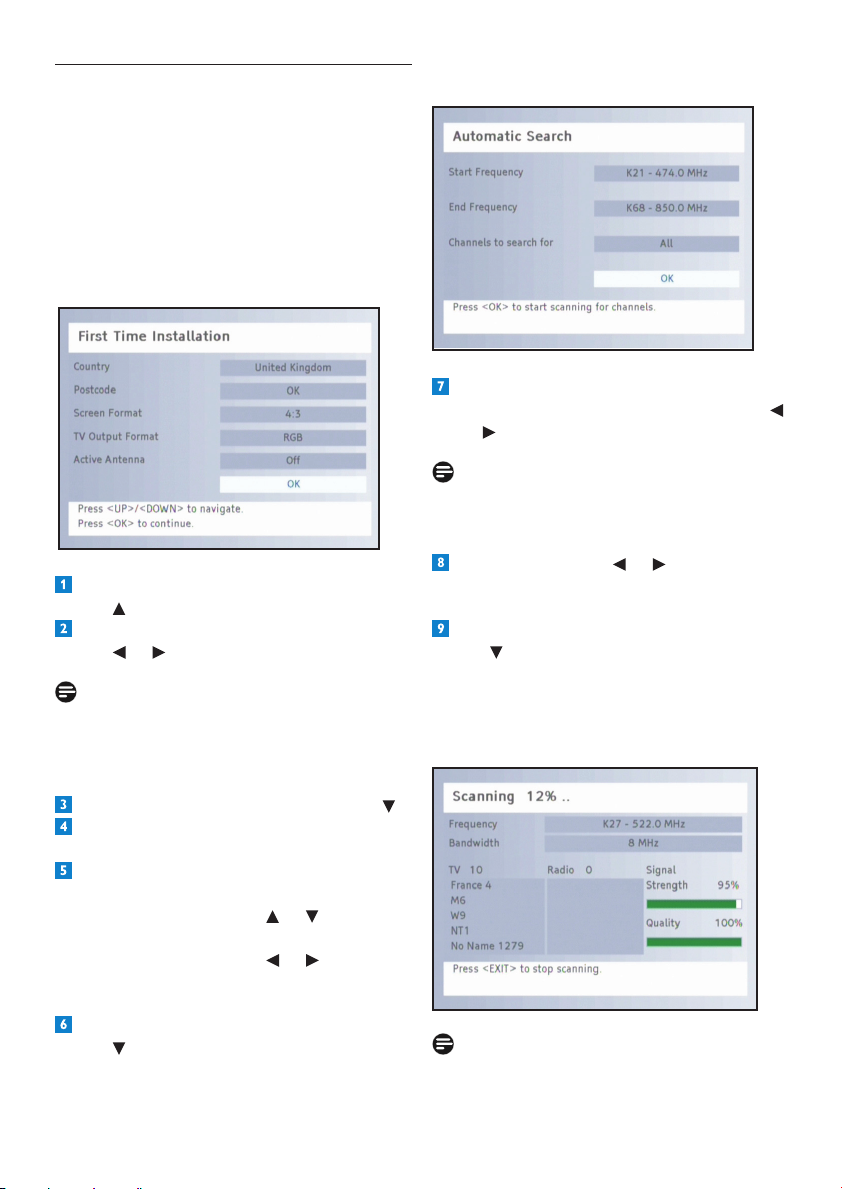
At the fi rst installation, the First Time
Installation window appears:
Highlight the Country fi eld using the arrow
key
.
Select the desired language using the arrow
key
or .
Note
Read the information messages displayed on
the screen. They will help you to set the correct
values.
The Automatic Search window is displayed:
If desired, change the values for the Start
and End Frequency using the arrow key
or
.
Note
The displayed values for the Start and End
Frequency can normally be maintained.
Using the arrow key or , you defi ne the
channels to be searched for: All channels or
channels that are Free to air only.
Then highlight the OK fi eld using the arrow
key
, and press OK to start the channel
search.
The window displayed provides information on
the progress of the channel search.
Highlight Postcode using the arrow key .
Press OK and enter your postcode.
Then successively set the desired values. In
doing so, observe the following:
By using the arrow key •
between the individual setting possibilities.
By using the arrow key •
the displayed values.
•
Then highlight the OK fi eld using the arrow
key
, and press OK.
or , you switch
or , you change
Note:
By pressing EXIT, you can stop the scan mode
at any time.
Getting started10
Page 10

As soon as the scan is completed, a window
is displayed. Press OK to close it.
Press OK again.
Now all the available channels are scanned and
registered on your Digital Terrestrial Receiver.
Note
If the signal quality is poor, a message prompting
you to check your antenna/cable is displayed.
Check your cable connections and scan for
channels again.
If you do not receive channels that should be
available, check also the Coverage of your area:
See http://www.freeview.co.uk
Using your Digital 4
Terrestrial Receiver
Once you have connected your Digital
Terrestrial Receiver, use the remote control to
operate the basic, frequently-used functions,
such as switching on and off, changing channels
and altering the volume.
Watching live TV4.1
Digital Terrestrial Receiver wake-up
To wake up your Digital Terrestrial Receiver
from standby, press one of the following keys
and wait a few seconds:
• on the remote control
P+/P-• on the remote control
Any numerical key of the remote control •
Note
In order to reduce power consumption, switch
your Digital Terrestrial Receiver to standby
mode whenever you are not using it.
For maximum energy saving we recommend
you to switch off the Digital Terrestrial Receiver
by unplugging the AC adaptor of the Digital
Terrestrial Receiver if you are not using it for a
long time.
ENGLISH
Channel selection
To change channels, use P+/P- or the numerical
keys of the remote control.
Press P<P / BACK to return to the previously
tuned channel.
11Using your Digital Terrestrial Receiver
Page 11

Volume Control
To decrease or increase the volume level, use the
volume keys VOL +/-. A change of volume is
shown on-screen using a bar graph.
Note
You can defi ne the display time of the
information banner for yourself or completely
prevent the automatic display. To do so, see the
Menu settings chapter.
Extended information banner
While the information banner is displayed on the
lower screen edge, you can call up the extended
information banner by pressing the INFO key
again. The extended information banner supplies
further details with regard to the current
programme.
To mute the sound, press the
icon in the bar graph indicates audio mute. This
icon disappears after a few seconds. To restore
the sound, press the
keys VOL +/-.
Note
The volume level is controlled from your TV set.
It can also be controlled using your TV remote
control.
Displaying information banner
Every time you change channels, the information
banner is displayed. To display the banner
anytime, press INFO. To exit it, press EXIT.
The information banner displays the selected
channel memory number and the channel name.
In addition, the time is displayed on the lower
left edge of the information banner.
The display bar on the right next to the time
graphically indicates the programme time that
has already elapsed. The lower menu line displays
the current and the next programme including
its broadcasting time. After a few seconds, the
information banner is automatically hidden.
key again or the volume
key. The
Notes
If the text is more extensive, it is •
distributed to several pages. By repeatedly
pressing the OK key, you browse the
next pages (arrow keys
possible).
If you press the • INFO or arrow
key
, information on the next
programme is displayed. By pressing
the arrow key
information on the current programme.
Note
The extended information banner is not
automatically closed. Press the EXIT key in
order to close the extended information banner.
, you return to the
and are also
Using your Digital Terrestrial Receiver12
Page 12

Using options4.2
Some channels occasionally provide sound,
subtitle and/or text options.
If a channel provides one or more of these
options, the respective symbol is displayed in the
right corner of the information banner when
calling up the channel.
• for sound options
• for subtitle options
INFO for text options•
ENGLISH
Highlight the desired option using or .
Press OK.
It means that a sound, subtitle or text selection
is available.
How to use the options:
Call up the desired channel.
Press the key for audio selection, the
key for subtitle selection or the INFO key
for text selection.
Settings4.3
Press the MENU key to open the main
menu. The menu item Box Settings is
highlighted by default.
Notes
In any case, observe the information text •
displayed on the bottom of the screen. It
will help you to select the correct settings.
Selecting and altering the settings is •
respectively effected by means of the
arrow keys
/ and / .
A pop-up window can be closed by •
pressing the EXIT key
Video Settings4.4
The video displayed on the TV depends on:
Screen format•
Digital Terrestrial Receiver setting•
Broadcast content format setting•
Screen Format
Press OK.
You can select screen format according to the
TV you have:
16:9 / Widescreen TV format•
4:3 format•
13Using your Digital Terrestrial Receiver
Page 13

Picture Scaling
This option allows you to determine the scaling
of the picture. The effect of a selected option is
visible in the background instantly.
If you have chosen 16:9 format, the next three
picture scaling are available.
Pillarbox
Reduces the picture in 4:3 mode for 16:9 format
TV to scale, and for this purpose inserts two
black bars left and right on the screen.
Zoom
Presents the images in the 4:3 format in a
screen-fi lling manner. Therefore, the top and
bottom picture border is cut off.
Letterbox 16:9
Reduces fi lms in 16:9 mode for 4:3 format TV to
scale, and for this purpose inserts two black bars
above and below on the screen
Pan & Scan / CCO
Presents fi lms in the 16:9 format in a
screen-fi lling manner. With regard to 4:3 TV, the
left and right picture borders are cut off.
Automatic
The scaling is automatic.
If you have chosen 4:3 format, the next three
picture scaling are available.
Letterbox 14:9
This represents a compromise between the
other two settings. Small black bars are inserted
and only a bit of the left and right picture
borders is cut off.
Using your Digital Terrestrial Receiver14
Page 14

TV Output Format
For the video output TV, the formats RGB, Video
(CVBS) and S-Video (Y/C) are provided. Here
RGB is the correct selection in most cases.
Note
If the desired programme is not broadcast in the
main audio language, the language used will be
the second audio language.
ENGLISH
VCR Output Format
Here you can choose between Video (CVBS)
and S-Video (Y/C).
AFD Automatic
The broadcast picture format may deviate
from the picture format to be displayed. AFD
recognizes and corrects the presentation if you
choose On.
Restore Default settings
With this function, you reset the confi guration
for the picture settings to predefi ned default
values. In most cases they allow for an
acceptable image and language reproduction.
Language Settings4.5
With this option, you set the language of the
on-screen display (OSD).
Subtitle Language
Select a language for the subtitles.
Subtitle Language #2
Select an additional subtitle language for the
subtitles.
Note
If the desired programme is not available in the
main subtitle language, the language used will be
the second subtitle language.
Subtitles Automatic
Set this option to On if you want to
automatically show broadcast subtitles in the
selected caption language (by default, this option
is set to Off).
Audio Language
Select the language broadcast for the
programmes.
Audio Language #2
Select an additional language broadcast for the
programmes.
Menu Settings4.6
Info Banner Duration
With this option you defi ne for how long the
information banner is displayed when you
switch to another channel. If you never want the
information banner to appear when changing
channels, select None. If you want it to appear
all the time, select Permanent.
15Using your Digital Terrestrial Receiver
Page 15

Info Banner Automatic
When a new programme begins, the information
banner is automatically shown as a default. If you
want to remove this option, select Off.
Note
This option is only available if the value set
under Info Banner Duration is at least 4
seconds.
Menu Transparency
With this option you set the transparency of the
OSD. If you have diffi culties to read the OSD
with transparent setting, select None.
Miscellaneous Settings4.7
Time Zone Adjustment
With this option you can select whether the
local time offset with regard to Greenwich mean
time is to be set automatically, or if you want to
specify it yourself.
Time zone (GMT)
Select the entry GMT +01:00 for Germany and
Central Europe for example (time difference
with regard to the Greenwich mean time).
Notes
If the Time Zone Adjustment is set •
to Automatic, the Time zone and
the Summertime / DST are defi ned
automatically and thus not available.
The Digital Terrestrial Receiver obtains the •
information regarding summer time for the
currently selected channel.
Postcode
Select your postcode.
Audio Format
This option provides mono and stereo formats
for the audio output.
Dolby Digital Automatic
This option enables automatic detection of
Dolby Digital audio channels.
Two options are available:
Off• if you only have connected a recorder
device;
On• if you have connected a Dolby Digital
Home entertainment system.
Sorting
This option modifi es the appearance and
behaviour of the channel lists.
Restore Factory Settings4.8
You can reset the device to default settings.
Your Digital Terrestrial Receiver will have all
its settings initialized like they were at fi rst
installation.
Summertime / DST
Set the menu item summer time to Off if it is
not summer time at the moment.
Using your Digital Terrestrial Receiver16
Page 16

Use more of your Digital 5
Terrestrial Receiver
This chapter gives a complete description of the
functionalities of your Digital Terrestrial Receiver.
Digital Terrestrial Receiver full 5.1
overview
ACB
Main unit
Main unit backside
A
B
ENGLISH
E
D
C
F
G
Main unit
A IR Receiver
B Status led
Green: the receiver is on
Red: standby mode
Blinking: software update in progress
C Smart Card slot
Main unit backside
A TV scart
B VCR scart
*
- Output to connect your TV set
*
- Output to connect your video
recorder
C Optical digital audio output
*
D L/R audio* - Left/Right analogue audio outputs
E RF IN
*
- Input to connect your aerial cable
from the wall socket
F RF OUT
*
- Output to connect your receiver
to a VCR/TV set/another receiver
G Power supply
*
- Output to connect the AC
adaptor
*
Safety extra low voltage
17Use more of your Digital Terrestrial Receiver
Page 17

5.2 Remote control full overview
Remote control unit
A
- Switch on or to standby mode
B c - Subtitle
A
M
N
O
P
Q
R
S
C TEXT (not applicable) / k Page up
B
D l Page down
E EPG - Open / Close the Programme Guide
C
F Navigation keys - Move up/down, left/right
D
OK: confi rm the selection
G P<P / BACK- Return to the previously tuned
E
channel
H LIST / FAV key - Favourite lists
F
I Channel up / down - Select the next or
previous channel
J c - Mute or restore the sound
G
K Alphanumeric keypad
H
L RADIO - Toggle between TV and Radio
M e - Audio selection
I
N TIMER
O Contextual keys
J
P INFO - Display the Information Banner
Q EXIT - Close Menu / Info Banner
K
R Volume control - Turn the sound level up /
down
S MENU - Open / Close menu
L
Remote control unit
Use more of your Digital Terrestrial Receiver18
Page 18

5.3 Using channel list
Press LIST/FAV to call up the channel list.
Note
If no other window on the screen is opened, you
can also call up the channel list by pressing the
OK key.
This list contains all TV channels the device has
found and stored during automatic channel scan.
Note
Press the LIST/FAV key again, the favourite
list is displayed. This individual channel list only
contains the channels you have chosen to be as
your favourite channels.
For further information on this, refer to chapter
Defi ning channels as your Favourites.
Favourites are marked with a star in the channel
list.
Notes
The programme of the selected channel is •
displayed in the background. The channel
list remains opened for several seconds.
During this time, you can select another
channel by using the arrow keys, or press
the OK key in order to close the channel
list immediately.
If the device is switched to radio mode, •
you can also carry out the previously
described actions in the same manner for
the stored radio channels.
Creating and Editing channel list5.4
Sometimes the channel list may appear too
complex or may contain channels that you are
not interested to watch anymore.
Via the main menu, you can edit and create your
own favourite list.
Press the MENU key.
Select the third menu item Sort Channels
using the arrow key
or and then press
OK.
ENGLISH
Observe the following to navigate through
the channels
Use •
or to highlight the next or the
previous channel in the list.
Use •
or to skip eight positions in the
channel list respectively backwards or
forwards.
Use the • Page up / Page down keys to
skip eight positions in the channel list
respectively backwards or forwards.
Press the OK key after you have selected
the desired channel.
Select one of the Favourite lists using the
arrow key
or and then press OK.
19Use more of your Digital Terrestrial Receiver
Page 19

Press the yellow key to access the fi lter
options. You may fi lter the channel list by
criteria such as free or scrambled broadcasts
or by network / provider. You may sort the
list by numbers or alphabetically. Use the
arrow keys to navigate inside the Filter
channels screen.
Press the green key to lock a channel. A
padlock appears next to the channel name.
Note
The previously described functions are also
provided to you with regard to the radio
channel list.
Press the RADIO key to call up the overview
of the radio channels. You can return to the TV
channel list by pressing the RADIO key again.
Shifting channels in the favourite list
You can individually set the sequence of the
channels within the channel list.
Note
To be able to lock a channel, the Channel
lock setting has to be active. Refer to chapter
Security.
Defi ning channels as your favourites
The favourite list contains all channels you have
defi ned as favourites. From this list, you can
create a personalized channel list.
Select the channel you want to indicate as a
favourite using the arrow key
Press the OK key to add the channel to
the favourite list. A star indicates that the
channel is in a favourite list.
Repeat this process with all channels you
want to indicate as favourites.
After you have carried out the desired
settings, press the EXIT key in order to
close the window.
Save the changes by pressing the OK key.
or .
Press the arrow key to highlight and edit
the favourite list.
Highlight the channel you want to shift using
the arrow key
Press the OK key to confi rm the channel to
be shifted.
Shift the highlighted channel to the desired
position using the arrow key
Press the OK key to store the channel at
the desired position.
Press the EXIT key to save.
Press the OK key to save the changes.
Deleting channels in the favourite list
Press the arrow key to highlight and edit
the favourite list.
Highlight the channel you want to delete
using the arrow key
Press the red-coloured key Delete.
To delete all the channels in the favourite list,
press the yellow-coloured key Delete all.
Press the EXIT key to save.
Press the OK key to save the changes.
Use more of your Digital Terrestrial Receiver20
or .
or .
or .
Page 20

Extended installation5.5
Press the MENU key.
Highlight the second menu item Search for
Channels using the arrow key
or and
then press OK.
After the fi rst installation (refer to chapter
Install), i
t may be required to search for
channels again or to add specifi c channels that
are additionally broadcast.
Note
In order to carry out an extended installation,
you have to reset the device to its default
settings. Refer to chapter Restoring Factory
Settings.
Two options are available.
Automatic Search
This scan mode is usually the appropriate
one, because normally all channels are found
automatically.
Highlight Automatic Search and then
press OK.
ENGLISH
Press the OK key to start the automatic
scan mode.
Using or , choose whether:
The channels found are to be added to the •
old list (standard setting),
The old channel list is to be overwritten,•
The new found channels are to be •
discarded.
Press the OK key.
Manual Search
This type of scan mode enables the specifi c
search for an individual channel. This is
particularly interesting if you only want to
include one individual channel into your channel
list and you know the accurate information on
the channel and frequency.
Highlight Manual Search and then press
OK.
21Use more of your Digital Terrestrial Receiver
Page 21

Successively select the adjustable values
using the arrow key
The desired • Frequency is set with the
arrow key
The frequency in • MHz is entered via the
numerical keys of the remote control.
Choose whether All channels or channels
that are Free to air only are to be searched
for.
Then highlight OK and press the OK key to
start the manual scan mode.
If some channels were found, the same •
message as the one in the automatic scan
mode will be displayed. Refer to previous
paragraph.
If no channel was found, a message will be •
displayed.
Press the OK key.
EPG5.6
The electronic programme guide (EPG) offers
you an overview of all programmes to be
broadcast in the coming week on the current
channel.
or .
or .
Notes
Not all channels offer an extensive • EPG.
Many broadcasting services broadcast the •
current day programme but do not offer
detailed descriptions.
There are broadcasting services that do •
not offer any EPG information.
Due to the progressive technical •
development, more and more broadcasting
services will extend this offer in the future.
Select the desired channel.
Press the EPG key to call up the electronic
programme guide.
Close the EPG by pressing the EXIT key.
EPG offers the following functions:
If you require more information on a •
programme, highlight it using the arrow key
or and then press INFO.
You can select programmes earlier or later •
in the day using the arrow key
Change to the programme of another •
day using the green (next day) or the red
button (previous day).
If you want to adopt a programme into the •
timer list, highlight it and press the TIMER
key. Confi rm the request by selecting Yes
and pressing the OK key.
Note
Detailed information on the Timer can be
found in the next paragraph.
or .
Use more of your Digital Terrestrial Receiver22
Page 22

Timer5.7
By means of the timer setting, you can switch
your Digital Terrestrial Receiver on and off
at a specifi c time. For example, it can allow a
recording with a recorder device. The device
then automatically switches on in the standby
mode. If the device is already switched on, the
device automatically switches to the selected
programme.
Note
Remember to program your recorder device to
the respective time.
Adding a programme to timer list
The timer function is included into the timer list
via the EPG. Refer to previous paragraph.
Open the EPG and highlight the desired
programme.
Press the TIMER key. By default, the answer
to the confi rmation question is Ye s .
Editing timer list
During the normal programme replay, press the
TIMER key to open the timer list.
ENGLISH
Deleting (a) programme(s) from the
timer list
Select the desired programme.
Press the respective coloured key:
Red: the selected programme is deleted•
Yellow: all programmes are deleted.•
Choose Ye s using the arrow key .
Press OK to confi rm the request.
Timer editing
In the Timer list, select the desired
programme and press OK.
Press the OK key.
The window is closed and the selected
programme is stored in the timer list.
Change the displayed settings by using the
arrow and numerical keys. Then you can:
Change the date (month and day)•
Set the time (starting and end time)•
The cycle (interesting for series and •
regularly recurring programmes)
Then highlight OK, and press the OK key.
23Use more of your Digital Terrestrial Receiver
Page 23

Switching off current timer functions
Note
During a timer programme, no key is activated.
To switch off the timer function:
Press the Standby key .
A programme message is displayed.
Press the OK key.
A message telling that the Timer is deleted
appears.
Miscellaneous functions5.8
Restoring default settings
You can reset the device to default settings.
Your Digital Terrestrial Receiver will have all its
settings initialized like there were at the fi rst
installation.
For example, all the favourite lists created will be
deleted.
Press the MENU key. By default, the item
Box Settings is highlighted
Press the OK key.
Highlight the item Restore Factory
Settings using the arrow key
then press OK.
or , and
Carry out an initial installation. Refer to
chapter Install.
Displaying channel and system
information / adjusting the antenna
This function solely serves to supply information
on one channel. However, you can use it for
adjusting your antenna and for improving the
television reception.
Press the MENU key to access the main
menu.
Highlight the fourth menu item Technical
Information using the arrow key
, and then press OK. By default, Channel
Information is highlighted.
Press OK.
Adjust your antenna so that the two
specifi cations Signal Strength and Signal
Quality display a preferably high value.
or
Set Ye s by using and then press OK. The
device carries out a reboot. It switches off,
and shortly afterwards switches on again.
Note:
Depending on your antenna, you can possibly
carry out settings on your antenna.
Press the EXIT key.
Highlight System Information using the
arrow key
you fi nd technical information on your
device. This information normally is only
relevant with regard to support.
Press the EXIT key three times to return to
the TV programme.
Use more of your Digital Terrestrial Receiver24
or and then press OK. Here
Page 24

Carrying out software update
Note
For this purpose, your Digital Terrestrial
Receiver has to be set to standby mode.
Every night between 1 am and 5 am, your Digital
Terrestrial Receiver checks whether a software
update is available. If a new software is available,
you will receive a message, at the next switch on
of your Digital Terrestrial Receiver to accept the
update. Then the software update starts.
You can also start the search process manually.
Press the MENU key.
Highlight Technical Information using the
arrow key
or and then press OK.
Highlight System Information using the
arrow key
or and then press OK.
In order to view the TV programme again,
press the RADIO key again.
Security5.10
Press the MENU key.
Highlight the sixth menu item Security
using the arrow key
or and then press
OK.
Enter the PIN code.
Notes
The PIN code is set to 0000 at the •
factory. Take into account the displayed
information. It will help you to select the
correct settings.
Selecting and altering the settings is carried •
out by means of the arrow keys.
A displayed window can be closed by •
pressing the EXIT key.
ENGLISH
Press OK to start the software update.
Use the arrow key or to select Ye s .
Press OK to start the update.
Radio5.9
Note
Digital radio programmes are not broadcast in
all countries. In this case, a message indicating
that the radio list is empty appears.
If a digital radio programme is broadcast
in your country, press the RADIO key to
receive it.
25Use more of your Digital Terrestrial Receiver
Page 25

Receiver Lock
Set this option to On if you want to protect
your complete device against unauthorized
access.
So, at the next switch on, the PIN code will be
requested (the PIN code is set to 0000 at the
factory).
Menu lock
Set this option to On if you want to protect
your menus against unauthorized access.
For the next activation of the menu, the PIN
code will be requested (the PIN code is set to
0000 at the factory).
Channel lock
Set this option to On if you want to be able
to lock a channel. These channels are PINprotected. You can only watch them after
entering the right PIN code. Refer to chapter
Creating and Editing channel list.
Change PIN
This option allows you to specify your personal
PIN code.
Press the OK key.
For this purpose, enter the Current PIN
code and confi rm by pressing the OK key.
Then, enter your New PIN code and then
press OK.
To confi rm your new PIN code, enter it
again and then press OK. A confi rmation
message is displayed.
Press OK
Maintenance6
Cleaning6.1
For cleaning, use a soft, damp (not wet) cloth.
Never use any abrasive cloth and aerosol
cleaners.
Replacement6.2
The Digital Terrestrial Receiver does not contain
any user-serviceable parts. Do not attempt to
open it. All maintenance work must be carried
out by qualifi ed service centres.
Disposal6.3
Your product is designed and manufactured with
high quality materials and components, which
can be recycled and reused.
Please inform yourself about the local separate
collection process for electrical and electronic
products.
Please act according to your local rules and
do not dispose of your old products with your
normal household waste. The correct disposal
of your old product will help prevent potential
negative consequences for the environment and
human health.
Maintenance26
Page 26

Accessories and 7
connections
ENGLISH
Recorder connection7.1
Connect the supplied scart cable to the
VCR scart socket at the rear of the Digital
Terrestrial Receiver and to the scart input
EXT1 of the recorder.
Connect the aerial cable from the wall
socket to the RF IN socket at the rear of
the Digital Terrestrial Receiver.
Connect the RF OUT socket at the rear of
the Digital Terrestrial Receiver to the ANT
IN socket at the rear of the recorder using a
coaxial cable.
Connect the ANT OUT socket at the rear
of your recorder to the RF input of your TV
set using a coaxial cable.
Connect a scart cable to the scart input of
the TV set and to the TV scart socket at the
rear of the Digital Terrestrial Receiver.
Plug your Digital Terrestrial Receiver to the
mains using the supplied power adaptor.
Audio connection7.2
Analogue connection
Connect the L/R audio outputs of the Digital
Terrestrial Receiver to the relevant input of your
audio equipment using a double CINCH cable
(not supplied).
Consult the user manual of your audio
equipment to choose the proper analogue audio
inputs.
Digital connection
Connect the SPDIF output of the Digital
Terrestrial Receiver to the relevant input of your
audio equipment using a single CINCH cable
(not supplied).
Consult the user manual of your audio
equipment to choose the proper digital audio
input.
Warning
To be able to record digital television, you must
make sure the Digital Terrestrial Receiver is on.
27Accessories and connections
Page 27

Guarantee and service8
English
Dear Customer,
Thank you for purchasing this Philips product.
For the Philips warranty applicable to this
product, we refer you to the Philips website
www.philips.com/guarantee. In the event you do
not have an Internet connection, please contact
your local Philips Consumer Care Centre.
Contact details are given in the Consumer Care
Centres list hereafter.
Guarantee and service28
Page 28

Technical data9
The product complies with the following
European council Directive: 2006/95/CE.
Specifi cations
Connectivity
•Terrestrial antenna interface: RF in, IEC 169-2,
RF out, (bypass) IEC 169-2
•Audio Output - Digital: Optical (TOSLINK)
•TV scart out: CVBS, RGB, Audio L/R
•VCR scart out: Audio L/R, CVBS
Convenience
•Ease of Installation: Autoinstall
•Parental control: Lock with PIN code, Child
timer
•Programmable Events: 8
•User Interface: Automatic program list update,
Multiple subtitles supported, On Screen Display
on TV, Software upgrade over the air, TV and
Radio mode, Now & Next ESG, 7 day Electronic
program Guide
System Specifi cations
•Flash memory size: 2 MB
•Ram size: 16 MB SDRAM
Power
•Mains power: 230V AC/50Hz to 12V DC
•Power consumption: 7 W
•Standby power consumption: 5W
Dimensions
•Product dimensions (W x H x D):
240 x 44 x 145 mm
•Carton dimensions (WxDxH): 305x245x65mm
•Weight: 0.98 kg
•Weight incl. Packaging: 1.78 kg
Accessories
•Included Accessories: Mains cord, Remote
Control, User Manual, SCART cable
•Batteries: 2 size AAA
Tuner/Reception/Transmission
•Demodulation type: COFDM 2K/8K, MPEG-2
DVB compliant, Network: MFN/SFN, QAM,
QPSK
•DVB: Terrestrial
•Input frequency range: 474-862 MH
ENGLISH
Video Decoding
•Aspect Ratio: 16:9, 4:3 Letterbox, 4:3 Pan Scan
•Compression Format: MPEG-2 MP@ML (std
defi nition)
•Conditional access system: Mediaguad(card not
supplied), Subscription needed for pay-TV
•Resolution: up to 720 x 576 interlaced
•De-scrambling: Smart Card reader
Audio Decoding
•Compression format: MPEG layer I/II
•Sound system: Dolby Digital Bitstream out,
Mono, Stereo
29Technical data
Page 29

Frequently asked 10
questions
This chapter gives the most frequently asked
questions and answers about your Digital
Terrestrial Receiver.
Connection
On-screen display working but there is no
reception
Check the installation
Intermittent reception
Check all connections and cables
The picture is not sharp and on-screen
text is diffi cult to read
Change the• TV scart output setting to
RGB from the System settings screen
Refer to your TV user manual•
Use the scart cable supplied with the Digital •
Terrestrial Receiver
Set-up
The LED on the front panel does not light
up.
Check that the AC adaptor is correctly •
connected. Disconnect this cord and
reconnect it to ensure it is in place
Check that power is available at the wall •
socket
The remote control does not operate the
Digital Terrestrial Receiver
Make sure the Digital Terrestrial Receiver is •
on
Make sure you are pointing your remote •
control at the front panel of the Digital
Terrestrial Receiver
Check the batteries in your remote control•
You cannot fi nd all the channels you think
should be available.
Try re-tuning the device, following the relevant
steps in chapter Install. If you are still missing
channels, call your customer service adviser.
Some radio stations cannot be received
from time to time
These services are not transmitted 24 hours a
day and can sometimes be unavailable. This is not
a fault.
You have forgotten your PIN Code
When prompted for your PIN Code, enter the
Master PIN Code. This will allow you to proceed
as well as reset the current PIN Code to its
default value (default is 0000). The Master PIN
Code is 8111. Keep this code secret to prevent
others from using it.
Installation
No sound or picture but the front panel
LED is lit in green
Check the connections at the wall socket •
and Digital Terrestrial Receiver
Press • B on the remote control twice or
press P+/P-.
The picture on some channels seems to
have been stretched or squashed.
Check the Digital Terrestrial Receiver TV shape
setting, following the information in paragraph
Video Settings. If you have a wide screen TV,
you may also need to check the settings on
your TV. The display format being managed by
the Digital Terrestrial Receiver, set your TV to
“full screen” or to the similar equivalent setting
(refer to the user manual of your TV set).
The order of the channels has changed.
Refer to chapter Miscellaneous Settings to
change the order again.
If none of the above suggestions seems
to work, try unplugging your Set Top Box and
then plugging it in again. If this does not work,
contact either your supplier or a qualifi ed repair
technician. Never attempt to repair your set top
box yourself.
Frequently asked questions30
Page 30

Contact information
Trademarks and partner logos
DTR 2530
Serial number:
UNITED KINGDOM
Philips CE, The Philips Centre,
Surrey
Phone: 0870 900 9070 (ps tn)
Trademarks are the property of Koninklijke
Philips Electronics N.V. or their respective
owners.
100% recycled paper
100% papier recyclé
ENGLISH
31Contact information
Page 31

© 2008 Koninklijke Philips Electronics N.V.
All rights reserved.
Document order number: 3111 176 54421
 Loading...