

Page 1

Page 2

Page 3

WELCOME TO DIGITAL TELEVISION
Congratulations on choosing the Philips' DTR 1000 digital terrestrial receiver. The DTR 1000 will
allow you:
- To enjoy access to more choice of digital terrestrial television and radio channels.
- To benefit from digital video and audio quality.
- To get easier access to television channels via your aerial.
CONTENTS
English
1 Safety instructions ______________3
2 Unpacking / Putting the receiver in
your existing set up ______________4
2.1 Unpacking ______________________4
2.2 Putting the receiver in your existing
set up _________________________4
3 Product description ______________5
3.1 Front view _____________________5
3.2 Rear view ______________________6
4 Preparing your remote control ____7
4.1 Installing the batteries ____________7
4.2 Using the remote control _________8
5 Connecting your Digital receiver __9
5.1 Connecting to a TV fitted with one
SCART socket __________________9
5.2 Connecting to a TV and a VCR both
fitted with one SCART socket _____10
5.3 Connecting to your HiFi / Audio
receiver equipment (Analogue /
Digital) _______________________11
5.4 Connection of a Video projector to
your receiver to watch Digital TV
programmes on a video projector __11
6 Quick start up / First installation /
Channel scan ___________________12
6.1 Quick start ____________________12
6.2 Scanning has failed / check installation /
check signal from aerial __________13
6.3 Scanning has failed again _________13
7 Day to day operation ____________14
7.1 Switch ON / Switch OFF your
receiver (low power, standby) _____14
7.2 Select TV / Radio mode __________14
7.3 Change channel ________________14
7.4 Zap banner / More programme info 15
7.5 Volume control - Vol+ / Vol- / Mute 15
7.6 Select a favourite list ___________16
7.7 Temporarily change the Subtitle
selection (circular toggle) _________16
7.8 Temporarily change the Audio
language selection (circular toggle) _16
7.9 Electronic channel guide _________16
7.10 Set timer / Set Reminder from
Guide or Zap list / Zap banner Delete a timer _________________17
7.11 Alarm Notification/ Recording Reminder - New services - Software
download _____________________18
7.11.1 Recording / TIMER ______________18
7.11.2 Recording Failure _______________18
CONTENTS 1
Page 4

7.11.3 Reminder ______________________18
7.11.4 List of New channels _____________18
7.11.5 Software download ______________18
English
7.12 Using the TV / STB button _______19
7.13 Watching locked channels ________19
7.14 How do I reset my receiver if it
"Freezes"? _____________________19
8 Changing the settings on your
receiver _______________________20
8.1 Menu navigation /item selection /
change settings / store changes ____20
8.2 Change the installation settings ____21
8.2.1 Receiver settings ________________21
8.2.2 Channel installation ______________22
8.2.3 Check signal quality / Check your
aerial _________________________23
8.2.4 Software update ________________24
8.2.5 TIMERS (schedule, delete, edit,
conflict) _____________________24
8.2.6 Edit a timer ____________________25
8.2.7 Remove a timer via the MENU _____25
8.2.8 Disable Recording (Manage conflicts) _25
8.3 Favourite list editing _____________26
8.4 Parental control / pin Code - lock
Programme - Parental Timer ______28
8.4.1 Change PIN ___________________28
8.4.2 Parental control _________________28
8.4.3 Maturity level __________________28
8.4.4 Lock TV or Radio channel _________28
8.4.5 Edit a parental timer ____________29
8.4.6 Remove a parental timer _________29
8.5 Preferences / language - timer banner _______________________29
10 Advanced settings ______________31
10.1 Restore virgin mode _____________31
10.2 Change remote control setting ____31
10.3 You forgot your PIN code / Master
PIN code _____________________31
10.4 More about Recording / Easy
Recording - VCR control _________32
10.4.1 Connection for Easy recording ______32
10.4.2 Digital receiver and VCR settings ____33
10.4.3 How to make a recording with the
VCR control feature? _____________33
10.4.4 Timer / Front panel indicator _______33
10.4.5 Cancel a running Timer ___________33
10.4.6 Errors during recording ___________33
11 Trouble shooting guide __________34
12 Technical specification ___________36
9 Menu tree _____________________30
2 CONTENTS
Page 5

1 Safety instructions
All the safety and operating Instructions
should be read and understood before the
receiver is operated.
For best results, position your receiver away
from radiators or other heat sources. Leave
a space of at least 3 cm around the receiver
for ventilation making sure that the
ventilation holes are not obstructed.
This receiver is intended for use in a
domestic environment only and should
never be operated or stored in excessively
hot, humid or damp conditions.
Make sure no objects or fluids enter the
housing through the ventilation slots. Should
this happen, disconnect your receiver from
the mains and consult your retailer.
For cleaning, use a damp chamois leather.
Never use any abrasive cloth, sponge or
cleaner.
When connecting or disconnecting cables to
the receiver always ensure the receiver is
disconnected from the mains.
Please wait before connecting your receiver
- read on.
Do not disassemble the equipment. There
are no user serviceable parts.
Mains connection
Before connecting the receiver to the
mains, check that the mains supply voltage
corresponds to the voltage printed on the
rear of the receiver. If the mains voltage is
different, consult your dealer.
Please wait before connecting your
receiver - read on.
English
SAFETY INSTRUCTIONS 3
Page 6

2 Unpacking / Putting the receiver in your
English
existing set up
2.1 Unpacking
Start by unpacking your receiver. You will
find the following cables and accessories:
- The digital terrestrial receiver
- The remote control and batteries (2 x
LR6 AA 1,5 V)
- One SCART lead
- One RF coaxial lead
- A mains cord
- A user manual
- A Guarantee card
- A stand for using the receiver in the
upright position
Note: As advised in chapter 5 make use of the
Scart lead provided. It has been selected to get
the best picture quality and performance out of
your digital receiver .
Plastic bags can be dangerous. To avoid
suffocation keep the bag away from babies
and children.
2.2 Putting the receiver in your
existing set up
- Your receiver can be integrated in
different ways within your existing AudioVideo set up. The receiver can be used in
the horizontal or vertical position. If you
decide to use your receiver in the upright
position, follow the instructions below.
Unpack the stand, place it on a horizontal
surface with click fit side on the right and
lug side on the left.
- Take the receiver as shown below (rear
panel on the left side / coaxial connectors
on the bottom side).
The Symbol on the packaging
means that material is recyclable.
If the receiver will not be used for a long
time, unplug the mains cord from the wall
socket.
4 UNPACKING
- Insert the stand lug in the slot located on
the front of the receiver, close to the
Philips badge.
- Rock the receiver to insert the stand lug
fully in the slot until it is locked by the
click fit.
- From now on, your receiver can be used
in the upright position.
Note: Removing the stand can be done by first
unlocking the click fit at the rear side of the
stand, rocking and pulling back the receiver to
extract it from the stand lug.
Page 7

3 Product description
3.1 Front view
12
3456
1 LOW POWER button: Switch receiver ON or into low power mode.
Reset the receiver, in case of hanging up, after a 5 second
keypress.
2 TV/RADIO button: Toggle between TV and Radio mode.
3 "-" button: Channel down.
4 Three colours LED indicator: Display receiver status (see status indicator table).
5 Red LED indicator: Display receiver status (see status indicator table)
Blink at remote control command reception.
6 "+" button: Channel up.
English
Status indicator table
Mode Receiver Low power Standby TV mode Radio Software Timer
LED off mains mode mode mode update (1) running (2)
4 Left hand LED Off Off Orange Green Blinking Off Green or
(3 colours) Green / Orange
5
Right hand Off Red Off Off Off Blinking Red
LED (Red) red (blinking if
(1) If you have put your receiver in "Standby" or "Low power" mode and red, right hand LED is blinking
this indicates that a free over-the-air upgrade of your receiver is taking place. Do not interrupt this
operation. Wait until the blinking LED stops and the left hand LED is either orange or red (signalling
either standby mode or low power mode). You can now continue with normal operation.
(2) To cancel a running timer, press button sequence: TIMER + 0.
Orange (in standby mode)
pressing a button)
PRODUCT DESCRIPTION 5
Page 8

3.2 Rear view
English
Español
56 7 89
1 VCR (SELV): SCART (1) socket to connect your video recorder.
2 Digital audio output (SELV): Coaxial Digital audio output to connect your HIFI /
Audio receiver system.
3 Serial (SELV): RJ 9 socket for serial data transfer during servicing.
4 AERIAL IN (SELV): Input to connect your UHF aerial.
5 230 V ~ 50 Hz 10 W max (HV): Socket to connect the Mains cord.
6 Label showing the type and serial number of the receiver.
1234
7 TV (SELV): SCART (1) socket to connect to your TV set or a video
projector (2).
8 L/R Audio out (SELV): Left/Right audio-cinch outputs to connect your HIFI / Audio
receiver system.
9 RF out (SELV): RF output to be connected to the aerial input of your Video
Recorder or TV set, refer to chapter 5 for recommended
connection diagrams.
(1) SCART is also called Euroconnector or Peritel.
(2) To connect a video projector to the TV SCART socket refer to chapter 5.4.
SELV : Safety Extra Low Voltage.
HV : Hazardous Voltage.
6 PRODUCT DESCRIPTION
Page 9

4 Preparing your remote control
4.1 Installing the batteries
- Remove the back cover.
- Insert two batteries (type R06G/AA - 1.5 V) supplied.
- Place them in the remote control battery compartment as shown in the diagram.
- Replace the cover.
- Your remote is now ready to control your digital terrestrial receiver.
The Philips batteries supplied with your receiver's remote do not contain heavy metals such as
Mercury or Lead Cadmium. Nevertheless, in many countries exhausted batteries may not be
disposed of with your household waste. Please ensure you dispose of empty batteries according
to local regulations.
English
PREPARING YOUR REMOTE CONTROL 7
Page 10

4.2 Using the remote control
English
Mute ?
Audio mute.
RED, GREEN, YELLOW,
BLUE:
Non active.
FAV
- Short key press selects the
next favourite list
- Long key press displays all
available lists.
SUBTITLE ?
- Temporarily starts or stops
Audio Subtitling.
I-II
- Temporary update of audio
language.
MENU
- Open menu (in digital TV
mode).
- Close menu (in digital TV
mode).
Cursor 8/9 The four
cursor keys are used to move
within the menus and lists.
OK key
- Select / call up programme
list / zap.
Volume ==+/ -
Volume Up / Down.
Standby
Standby.
$$
- Scrolls one Page Up or one
Page Down in guide or
favourites list.
GUIDE
- Open Now & Next Guide.
INFO
- Open info banner.
- Show extended program
information.
- Close banner.
TIMER
- Set a timer (recording or
reminder) when in program
banner, Guide and Zap List.
The "TIMER, 0" sequence
keystroke deletes the current
running timer.
BACK
- Selects the previously
watched digital TV channel
- In menu mode
Either exit the menu
Or bring selection one level
back
Or bring selection back one
level and cancel the changes
you have made. The prompt
at the bottom of the menu
screen indicates which
function will be carried out.
P+ / P-
Selection of Next / Previous
channel.
**
(blue) resp. %%(white)
TV / STB
Toggle between Digital TV and
Analogue transmission from
your TV.
8 PREPARING YOUR REMOTE CONTROL
TV / RADIO
Toggle TV / Radio mode.
0-9
Channel selection in digital
TV mode.
Page 11
5 Connecting your Digital receiver
There are several ways you can connect and incorporate your digital receiver into your existing
audio / video equipment set up.
Warning before starting to connect:
- Unplug all equipment (TV set as well as VCR and / or DVD if required) from the mains.
- Do not connect your digital receiver to mains supply now.
- Check your current wiring because you might keep existing connections of your current Audio /
Video set up.
- Choose the relevant connecting method for incorporating your digital receiver into your
existing Audio / Video set up. Please read chapters 5.1 and 5.2.
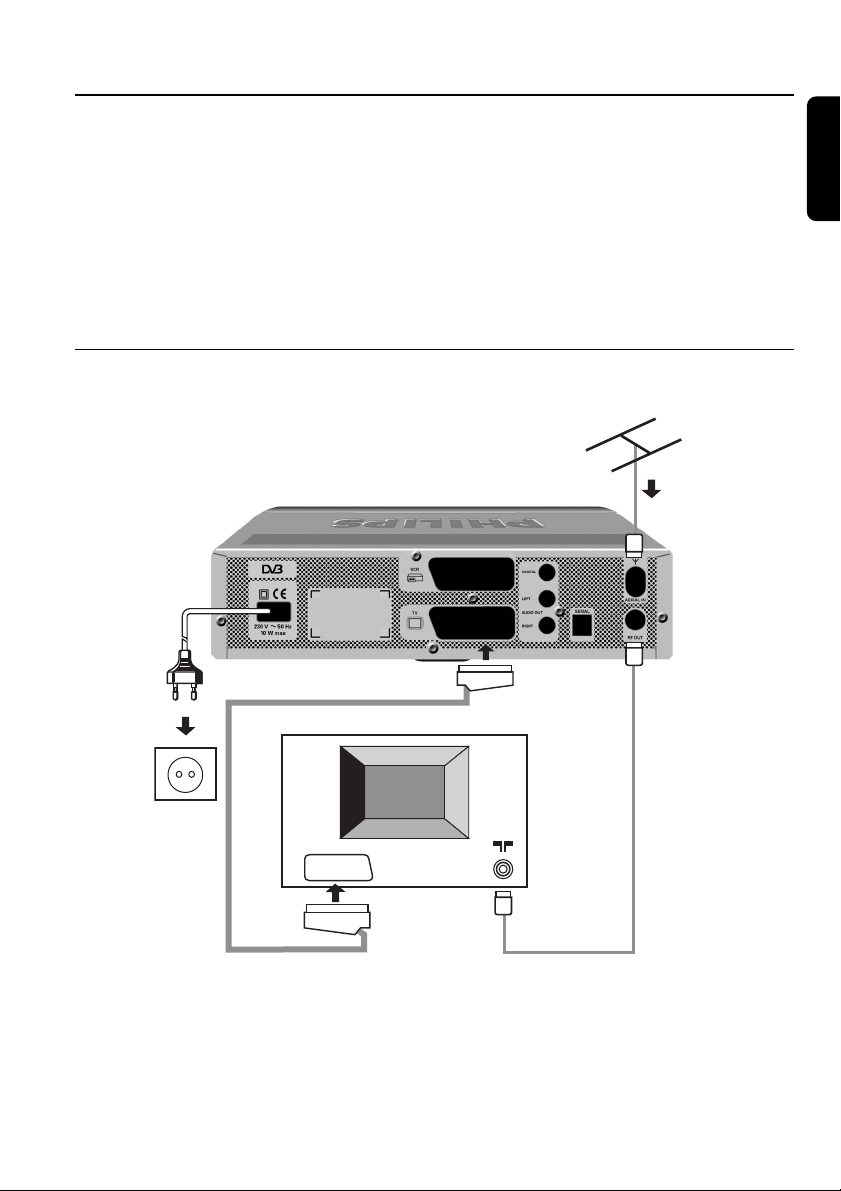
5.1 Connecting to a TV fitted with one SCART socket
Incorporate your receiver in your existing installation as shown below:
Aerial previously
in the back of your
TV or Video
English
SCART lead (supplied)
TV set
EXT1
RF lead (supplied)
- Plug your aerial lead plug into the "AERIAL IN" socket of your digital receiver.
- Connect the "RF OUT" socket of your digital receiver to the "Aerial input" socket of your TV by
means of the RF coaxial lead supplied with your digital receiver.
- Connect the "TV" SCART socket of your digital receiver to the "EXT1" SCART socket of your
TV set by means of the SCART lead supplied with your digital receiver.
- Plug all your equipment, excluding your digital receiver, into the mains.
- Switch on your TV and select a channel.
CONNECTING YOUR DIGITAL RECEIVER 9
Page 12
- Plug your digital receiver into the mains. Your digital receiver will display the WELCOME
screen(the left-hand LED will be illuminated green).
- Go to chapter 6 to proceed with the channel scan of your digital receiver.
English
If the WELCOME screen is not displayed, press two times the TV/STB button to get the screen
displayed.
Note:
With this connection set up you can:
- Watch digital terrestrial TV by means of your Digital receiver.
- Continue watching analogue TV by means of your TV.
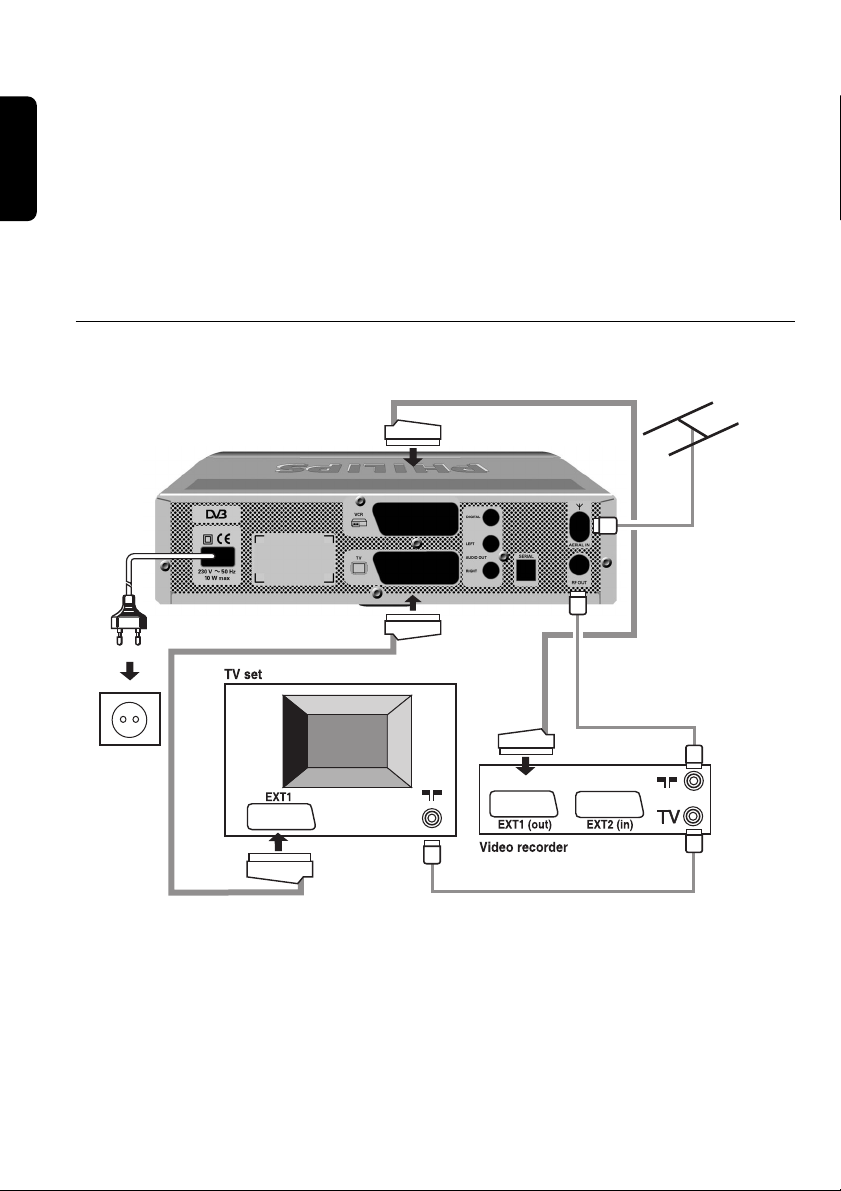
5.2 Connecting to a TV and a VCR both fitted with one SCART socket
Incorporate your receiver in your existing installation as shown below:
- Plug your aerial lead plug into the "AERIAL IN" socket of your digital receiver.
- Connect the "RF OUT" socket of your digital receiver to the "Aerial input" socket of your VCR
by means of the RF coaxial lead supplied with your digital receiver.
- Connect the "RF OUT" socket of your VCR to the "Aerial input" socket of your TV by means of
a RF coaxial lead.
- Connect the "TV" SCART socket of your digital receiver to the "EXT1" SCART socket of your
TV by means of the SCART lead supplied with your digital receiver.
- Connect the "VCR" SCART socket of your digital receiver to the "EXT1" SCART socket of your
VCR (so called OUT) by means of a SCART lead.
10 CONNECTING YOUR DIGITAL RECEIVER
Page 13

- Plug all your equipment, excluding your digital receiver, into the mains.
- Switch on your TV and select a channel.
- Plug your digital receiver into the mains. Your digital receiver will display the WELCOME
screen (the left -hand LED will be illuminated green).
- Go to chapter 6 to proceed with the channel scan of your digital receiver
If the WELCOME screen is not displayed, press two times the TV/STB button to get the screen
displayed.
Note:
1 This connection also applies if your VCR has two SCART sockets.
2 If you have a S-Video VCR refer to chapter 8.2.1.1 for further settings and consult the user manual of
your VCR.
3 With this connection set up you can:
- Watch digital TV while you record analogue TV.
- Watch analogue TV while you record digital TV.
- Record the digital TV channel you are watching.
- Watch Play Back from your VCR.
5.3 Connecting to your HiFi / Audio receiver equipment. (Analogue /
Digital)
Depending on your HiFi / Audio receiver equipment, you might have several options to connect
your digital receiver.
- Analogue connection
Connect the L/R audio output sockets to the relevant L/R audio input sockets of your audio
equipment by means of a double CINCH cable (not supplied). Consult the user manual of your
HiFi/Audio receiver equipment to choose the proper analogue audio inputs.
Note: With this connection set up you can control the audio volume up/down and mute with the remote
control of your digital receiver and alternatively with your HiFi's remote control.
- Digital connection
Connect the audio "DIGITAL" output socket to the relevant digital audio input socket of your
audio equipment by means of a single CINCH cable (not supplied). Consult the user manual of
your HiFi/Audio receiver equipment to choose the proper digital audio input.
Note: With this connection set up you can only control the audio volume up/down and mute with your
HiFi / Audio Receiver remote control, refer to the relevant user manual.
English
5.4 Connection of a Video projector to your receiver to watch Digital
TV programmes on a video projector
Connect the "TV" SCART socket of your digital receiver, to your Video projector.
A video projector is often fed with S-Video format video signals, if this is the case with your
projector, follow the instructions below for connection and installation:
- Connect a SCART to the S Video adapter between the TV SCART of your digital receiver and
the S VIDEO input of your video projector.
- Installation: Refer to chapters 8.2, 8.2.1 and 8.2.1.1 to change the "TV/VCR output" setting of
your digital receiver to SVIDEO/PAL-CVBS.
CONNECTING YOUR DIGITAL RECEIVER 11
Page 14
6 Quick start up / First installation / Channel
English
scan
6.1 Quick start
You already have an aerial
Your aerial is correctly pointed at the terrestrial
transmitter corresponding to your area.(1)
Your digital receiver connection is according to the
diagram depicted in chapter 5.1 or 5.2.
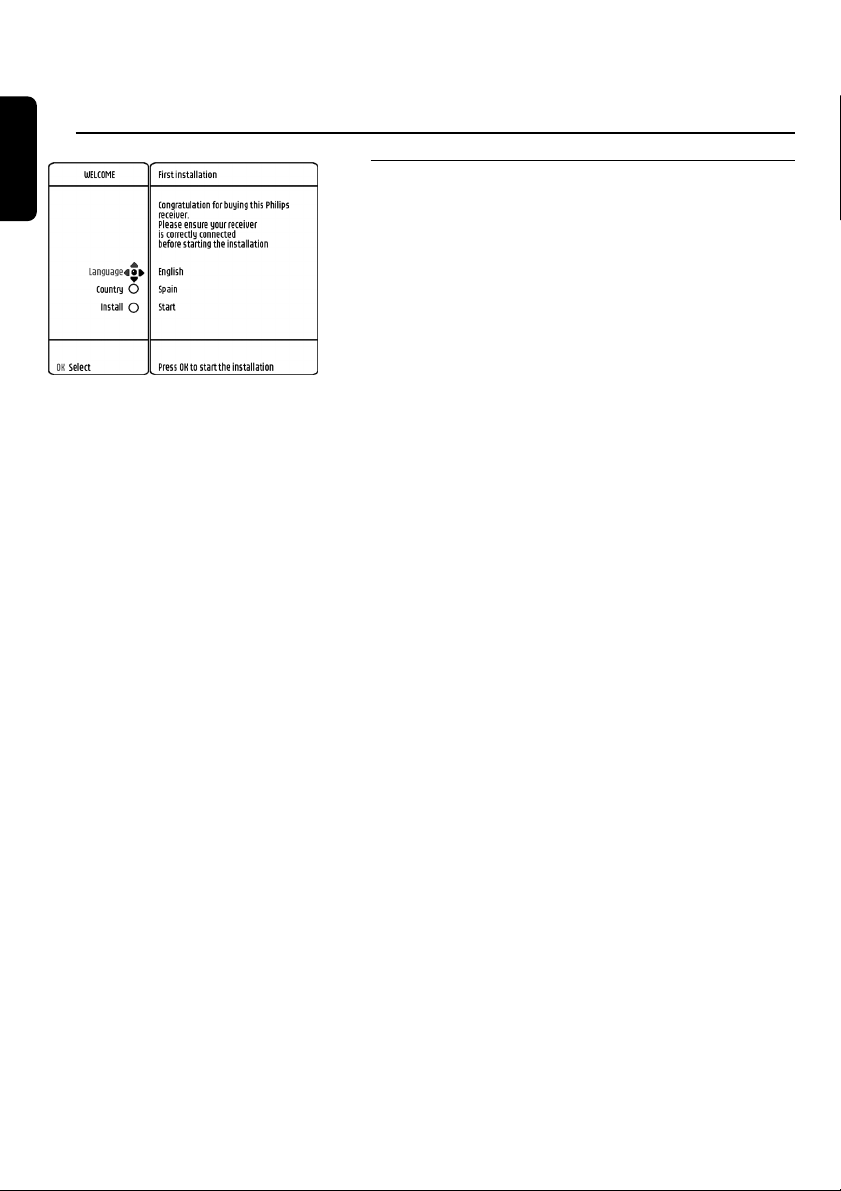
Your digital receiver is ON and the WELCOME screen
(shown here) pops up.
The selection is on "Language". Press the * button to
open the selection window (right part of the screen). Use
the 8 or 9 button to select the wanted language (1)
and press the + button to store your choice. The
selection is back on "Language".
Press the 9 button , the selection is on "Country", Press
the * button to open the selection window . Use the
8 or 9 button to select the wanted country and press
the + button to store your choice. The selection is back
on "Country".
Press the 9 button , the selection is on "Install" and
press the * button to start scanning for channels.
The receiver scans the RF band(s) and reports scanning
progress and found channels.
When scanning is completed:
- Either scanning ended successfully, found channels are
displayed and the digital receiver tunes the first channel
in the list. If so proceed to chapter 7.
- Or scanning failed and stopped while the "Check signal"
screen pops up. If so proceed with chapter 6.2.
12 QUICK START
Note:
(1) If your country is not shown in the list select the "Other"
country option.
If you want to set another country while the first installation has
already been performed successfully you shall first restore the
receiver virgin mode (see chapter 10.1) then the first
installation will automatically be re-launched (see chapter 6.1).
Page 15

6.2 Scanning has failed / check
installation / check signal from aerial
Scanning failed therefore before making a new scanning
check:
- Aerial cable.
- Check the aerial connection to your digital receiver.
Refer to the connection diagram of chapter 5.1 or 5.2
- Check channel(s) available in the region corresponding
to your area.
- Check signal quality, by means of the "Check signal"
menu beside.
Press the 9 button to select the "RF channel" option.
Press the * button and scroll with the 9 or 8 button
to select the wanted RF channel number, corresponding
to your area.
Check signal strength and quality on bar meters.
Either signal is good enough (orange or green bar meters)
then choose the "Install" option and select the "Re-start"
option to scan channels one more time. When scanning
ends successfully, channels found are displayed and the
digital receiver tunes the first channel in the list. . If so
proceed to chapter 7.
Or signal is bad or no signal is available (red bar meter or
no bar at all). Then refer to chapter 6.3.
English
6.3 Scanning has failed again
You could not scan the channels and this was repeated
after checking the signal quality delivered by your aerial.
Either your aerial is not pointing properly at the digital TV
transmitter, or your aerial installation needs to be
upgraded or you are not in the coverage area to correctly
receive digital Television.
For a proper diagnosis, call your electrical retailer.
QUICK START 13
Page 16

7 Day to day operation
English
7.1 Switch ON / Switch OFF
your receiver (low power,
standby)
THE RED LEFT-HAND LED IS ON
Your receiver is in "Low power" mode.
Press the "Low power" button, on the front
of your receiver, to put your receiver in
Standby
You have 5 minutes to wake your receiver
up by pressing:
- Either P+, P-, BACK or a number button
on your remote. Alternatively you can
press the "+" or "-" button on the front
panel of your receiver.
Note: your remote does not control the receiver
if it is in Low Power mode.
THE ORANGE LEFT-HAND LED IS ON
Your receiver is in "Standby" mode
To Wake Up Your Receiver:
- Either Press One Of The Following
Remote Buttons: P+, P-, BACK or a
number button
- Or press "+" or "-" button on the front
panel.
To put your receiver in Low power mode
(<1W consumption)
- Press the front panel's "LOW POWER"
button
THE GREEN RIGHT-HAND LED IS ON
(TV MODE) / GREEN+ORANGE LED IS
ON (RADIO MODE
You are in TV mode / Radio Mode
To put your receiver in standby:
- Press the remote standby button
To put your receiver in Low power mode
(<1W consumption)
- Press the front panel's "LOW POWER"
button
7.2 Select TV / Radio mode
If your receiver is in TV mode
- Press the TV/RADIO button to switch to
RADIO mode
If your receiver is in Radio Mode
- Press the TV/RADIO button to switch to
TV mode
Note: The TV/Radio buttons on the Front Panel
and on the Remote Control have the same
behaviour.
7.3 Change channel
7.3.1 USING number buttons
While watching digital TV or listening to
Digital Radio
- Press the number button(s) to select the
desired channel number
7.3.2 P+/P-
You are watching digital TV or listening to a
digital radio programme
- Press P+ to select the next channel in the
list
- Press P- to select the previous channel in
the list
Note: The '-' and '+' buttons on the Front Panel
have the same function as P- and P+ buttons
on the remote control.
7.3.3 Back (last channel recall)
While watching digital TV or listening to a
digital radio programme
- press the BACK button to select the
previously watched / listened to
programme.
14 DAY TO DAY OPERATION
Page 17
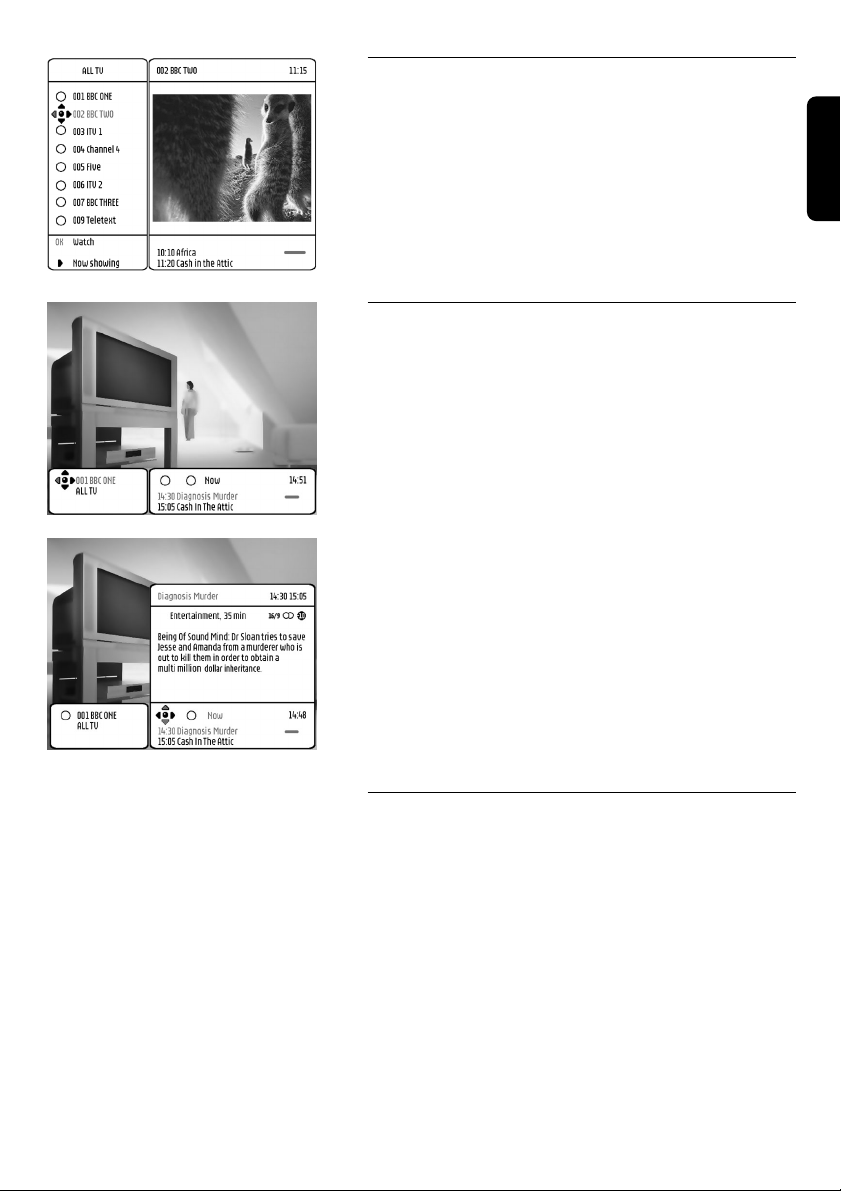
7.3.4 Zap list (so called index list)
While you are watching digital TV or listening to Digital
Radio
- Press the OK button to open the channel list
- Press the 8 or 9 button to select the desired channel
- Press OK to preview the selected channel
- By Pressing OK again you will view / listen to the
selected channel in full screen.
7.4 Zap banner / More programme info
Each time you select a new channel, a banner appears at
the bottom of the screen to show:
- Channel name and number.
- Now programme name and Next programme names.
- Channel status: locked, available.
- Start time of the current program.
- Start time of the next program.
- Current time.
Getting more info once the banner is ON:
- Press the * button to get more info about the current
programme, a second key press will show more info
about the next channel.
- Press the BACK button to close the Zap Banner.
English
Note: Pressing the INFO button three times essively access to
the banner, more info for the current channel and more info for
the next channel. A fourth keypress on INFO returns to
watching digital TV.
7.5 Volume control - Vol+ / Vol- / Mute
While watching digital TV
- Press Vol- to decrease volume
- Press Vol+ to increase volume
- Press MUTE to mute the sound, press MUTE again to
de-mute.
Note: Change of volume is signalled with a bar graph, while
audio mute is signalled with an icon on the top right corner of
the screen.
DAY TO DAY OPERATION 15
Page 18
English
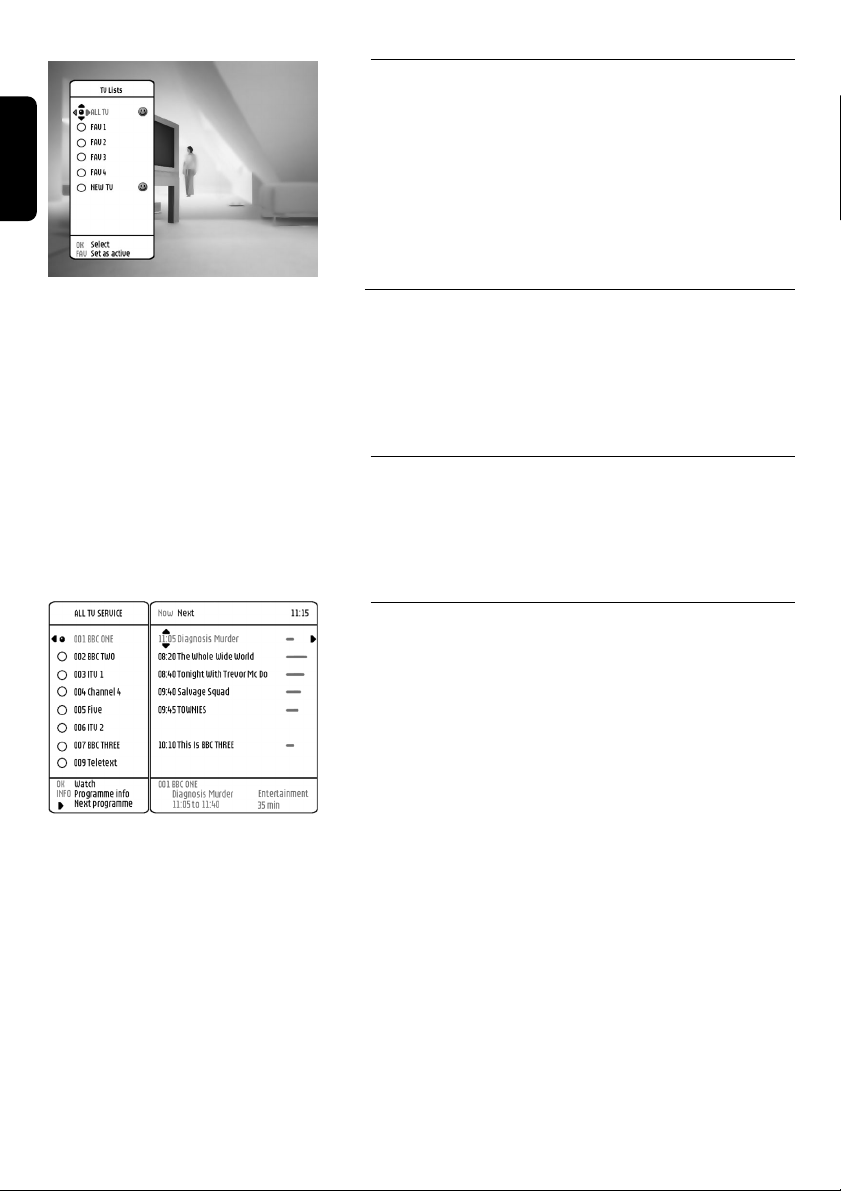
7.6 Select a favourite list
While watching digital TV / or listening to Digital Radio
- Press the FAV button for more than two seconds to
display all the favourites lists.
- Press the 9 or 8 to select a list. Press the OK
button to make a list active.
- Press FAV again to add or remove.
Note: empty favourite list(s) can not be opened.
7.7 Temporarily change the Subtitle
selection (circular toggle)
Press the SUBTITLE button:
- Either select from the available subtitle languages.
- Or switch subtitles Off.
7.8 Temporarily change the Audio
language selection (circular toggle)
Press the I/II button:
- select from the audio languages available
7.9 Electronic channel guide
While watching digital TV or listening to digital radio
- Press the GUIDE button to open the channel guide
16 DAY TO DAY OPERATION
Current view is current program list so called "Now"
- Press the * button to consult the "Next" program list
The next view screen includes a round icon to signal
programs which are about to start within 20 minutes.
- Press the 9 or 8 to select the wanted channel
- Press the OK button to watch / listen to the selected
channel
Page 19

7.10 Set timer / Set Reminder
from Guide or Zap list /
Zap banner - Delete a
timer
SET A TIMER FROM THE BANNER
- Either press INFO, *, TIMER sequence
to record the "Now" programme on the
current channel
- Or press INFO, *, *, TIMER sequence
to record "Next" programme on current
channel
SET A TIMER FROM THE ZAP LIST
- Either press OK, *, TIMER sequence to
record the "Now" programme on the
selected channel
- Or press OK, *, *, TIMER sequence
to record Next programme on the
selected channel
SET A TIMER FROM THE GUIDE
- Either press GUIDE, *, TIMER
sequence to record the Now
programme on the selected channel
- Or press GUIDE, *, *, TIMER
sequence to record Next programme
on the selected channel
- A timer is running and your receiver is in
standby
- The recording is signalled by two front
LED's, the right hand one is red while
the left hand one is orange.
- Press the key sequence "TIMER, 0" to
delete the running timer
English
Notes:
- Press two times TIMER on Next programme
to set a REMINDER.
- Press three times TIMER to cancel the
REMINDER.
- The TIMER/REMINDER will be signalled by an
Icon.
DELETE A RUNNING TIMER
- A timer is running and you are watching
what you are recording:
- The recording is signalled by two front
LED's, the right hand one is red while
the left hand one is green.
- Press the key sequence "TIMER, 0" to
delete the running timer
DAY TO DAY OPERATION 17
Page 20

English
7.11 Alarm Notification/ Recording Reminder - New services - Software
download
A generic alarm mechanism provides you important on
screen messages. In order not to disturb your current
programme, an animated icon in the top right corner is
first shown indicating you the presence of an alarm. You
have then to press the INFO button to read the alarm
message.
7.11.1 Recording / TIMER
When you are watching a programme and a Timer is
about to start you will be informed.
The alarm can be earlier than the timer start. This can be
configured in the Timer Preference Menu.
7.11.2 Recording Failure
In case of a failure during a recording, you will be
informed with a message.
7.11.3 Reminder
For programmes you do not want to miss, you can create
Reminders. The following alarm will then be generated.
The alarm will be earlier than the reminder start time.
This can be configured in the Timer Preference Menu.
18 DAY TO DAY OPERATION
7.11.4 List of New channels
When the receiver is in standby, it will check for the
presence of new channels for you. The following alarm
will be generated informing you about their availability in
the New Favourite programme list.
7.11.5 Software download
When the receiver is in standby, it will check for the
presence of new software in the broadcast.
An Alarm will be generated after detection of new
software and after its successful update.
Page 21
7.12 Using the TV / STB button
This button is used to switch between watching digital
channels via your digital receiver and standard analogue
channels on your TV.
You are watching digital TV or listening to digital radio:
- Press the TV/STB button to switch to analogue TV
Press again to revert to digital TV.
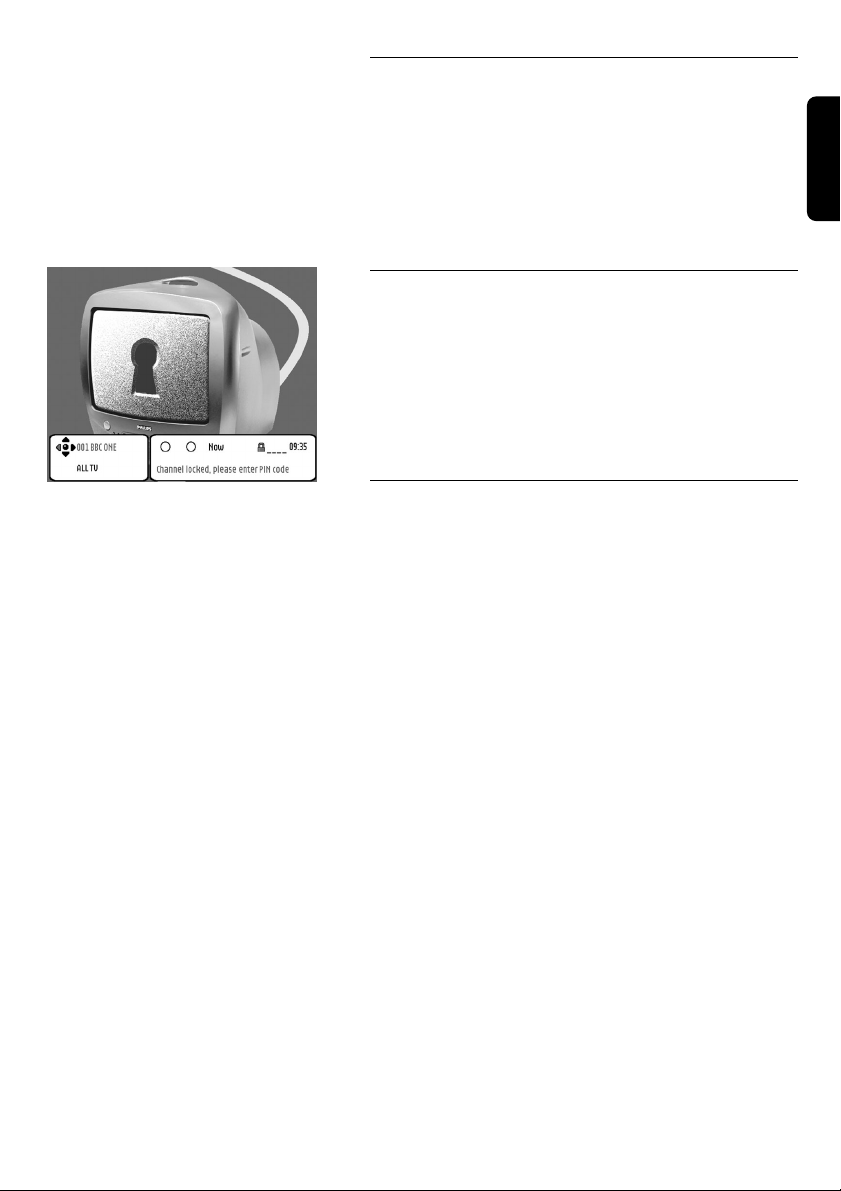
7.13 Watching locked channels
If you have selected a locked channel, you must unlock
the channel to watch it.
- You are prompted by a lock icon and a field in the
banner to enter a 4 digit PIN code (default 0000).
- Enter you PIN code to unlock and watch the selected
channel.
7.14 How do I reset my receiver if it
"Freezes"?
In the unlikely event that your receiver "Freezes" (i.e. you
can no longer control it with the remote control), simply
proceed with the steps described below:
Press the "LOW POWER" button, on the receiver front
panel for at least 5 seconds. After releasing the button
wait for a stable front display indication (i.e. the left LED
is either orange for standby mode or green for TV mode).
You can now continue with normal operation.
English
DAY TO DAY OPERATION 19
Page 22
8 Changing the settings on your receiver
English
You can change the receiver settings to adapt the receiver
to your aerial conditions, Audio / Video set up or other
preferences.
8.1
Menu navigation /item selection / change
settings / store changes
Basics about Menu navigation:
- Being in the normal viewing mode, press MENU
button to turn Main Menu on.The orange selection
button appears on the first menu item in the window.
- Press the 9 or 8 button to scroll up down to bring
the orange selection on the wanted menu item.
Change setting:
- Use the * button to activate the sub-items in the
menu window. Repeat this step, as many time as
necessary to navigate to the required feature.
- Press the 9 or 8 button to select the desired option
value.
Cancel - Store changes:
- Either press the BACK button to cancel changes or
press the + button to store the change.
In both cases the selection is brought one level up in
the menu.
- If the Menu is on, press the MENU button to turn
menu off.
20 CHANGE THE SETTINGS
Notes:
- Opening a menu item signalled by a lock icon requires the
PIN code entry.
- To avoid burning your TV screen, messages/menus are
automatically set off after 30 min.
The Puck element, is always present when menu is
displayed. The puck contains 5 elements:
- The ball indicates the position of the selection.
- The 8, 9, + and * cursors indicate which
navigation direction is possible. A grey coloured cursor
means un-authorised navigation in the relevant cursor
direction.
Note:
- The puck is always as shown beside the left menu window.
Page 23
8.2 Change the installation settings
Press MENU button to open the main menu.
Press 9 button 4 times to bring the selection onto
"Installation".
Note: If the Parental control is active, you need to enter your
PIN code to access the relevant items of the selected menu
option.
Press the * button to access the "Installation" sub
options.
The selection is now on "Receiver settings" in the new
"Installation" menu.
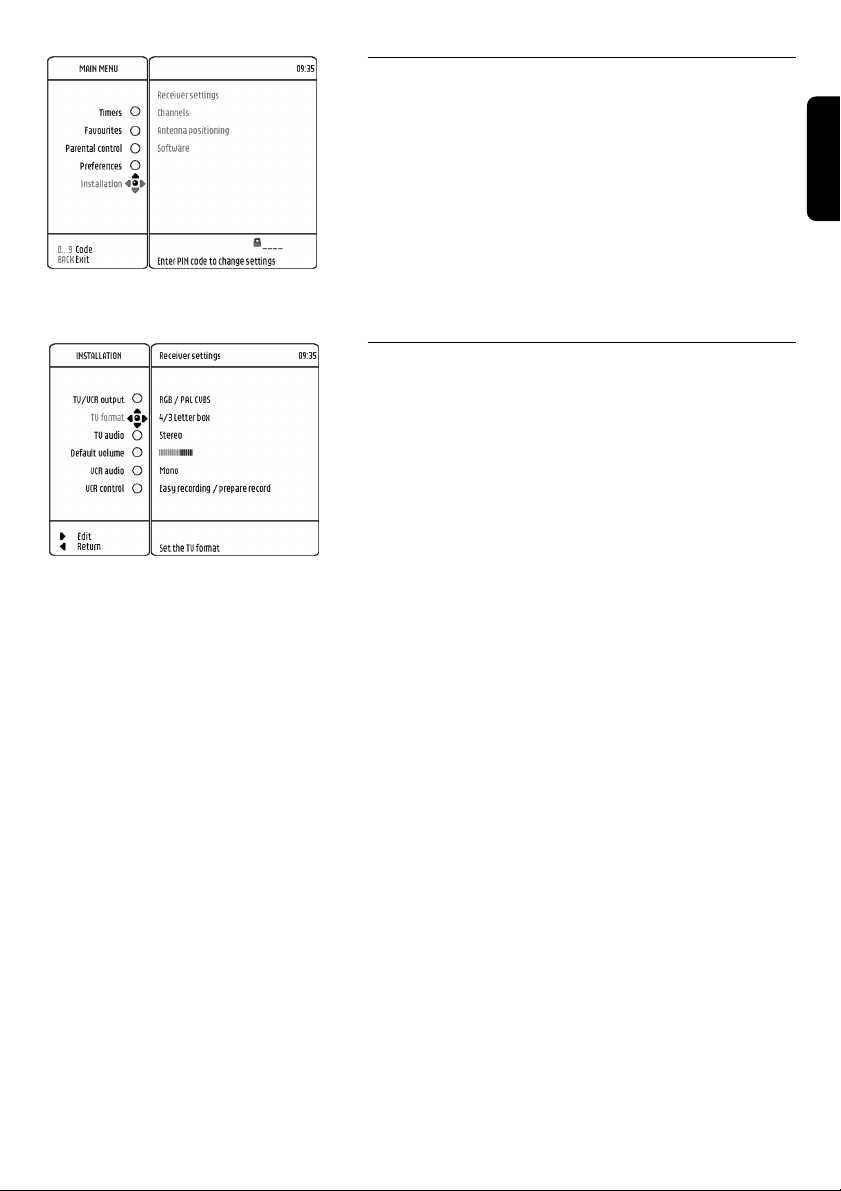
8.2.1 Receiver settings
From the "Installation" menu, you selected "Receiver
settings" and pressed * button.
A new menu is drawn to control the features below:
- TV/VCR signal output
- TV video format
- TV sound format
- Default volume of TV sound
- VCR sound format
- VCR control for recording
The selection is now on "TV/VCR output".
You can scroll down or up with the 9 or 8 button to
choose the wanted option.
For each option, you can press on * button to access its
sub options.
8.2.1.1 For "TV/VCR output" item, you set-up the
format of the signal output for TV and VCR
SCART sockets from the list below:
- RGB/PAL-CVBS
- RGB/SVHS
- PAL-CVBS/PAL-CVBS
- PAL-CVBS/SVHS
- SVIDEO/PAL-CVBS
- SVIDEO/SVHS
- SECAM-CVBS/SECAM-CVBS
- RGB/SECAM-CVBS
Note: First word before "/" is dedicated to TV SCART. Second
word after "/" is dedicated to VCR SCART
Note: We advise to use "RGB/PAL-CVBS" setting to get the best
quality of the video at the TV screen. If a Video Projector is used
instead of a TV set, the SVIDEO/PAL-CVBS setting is advised
(refer to chapter 5.4 for connection and installation).
Note: If you have a S-Video VCR Recorder you might use the
RGB/SVHS setting, consult the user manual of your VCR /
Recorder.
CHANGE THE SETTINGS 21
English
Page 24
English
8.2.1.2 For "TV format" item, you set-up the format
of the video output in one of the following
ways:
- 16/9
- 4/3 - Letterbox
- 4/3 - Pan & Scan
8.2.1.3 For "TV sound" item, you set-up the
standard of the TV sound output in one of
the following ways:
- Mono
- Stereo
8.2.1.4 For the "Default volume" item, you set-up
the volume of TV sound output.
Use the 9 or 8 button to choose desired default
volume setting.
8.2.1.5 For "VCR sound" item, you set-up the
standard of the VCR sound output in one of
the following ways:
- Mono
- Stereo
8.2.1.6 For "VCR control" item, you set-up the
control of your VCR recording in one of the
following ways:
- Off
- Easy recording so called "Prepare Record"
- Record Link
For more details consult chapter 10.4.
Note: this setting is also applicable for Philips DVD recorders or
other brand equipment which supports one of the two control
system.
22 CHANGE THE SETTINGS
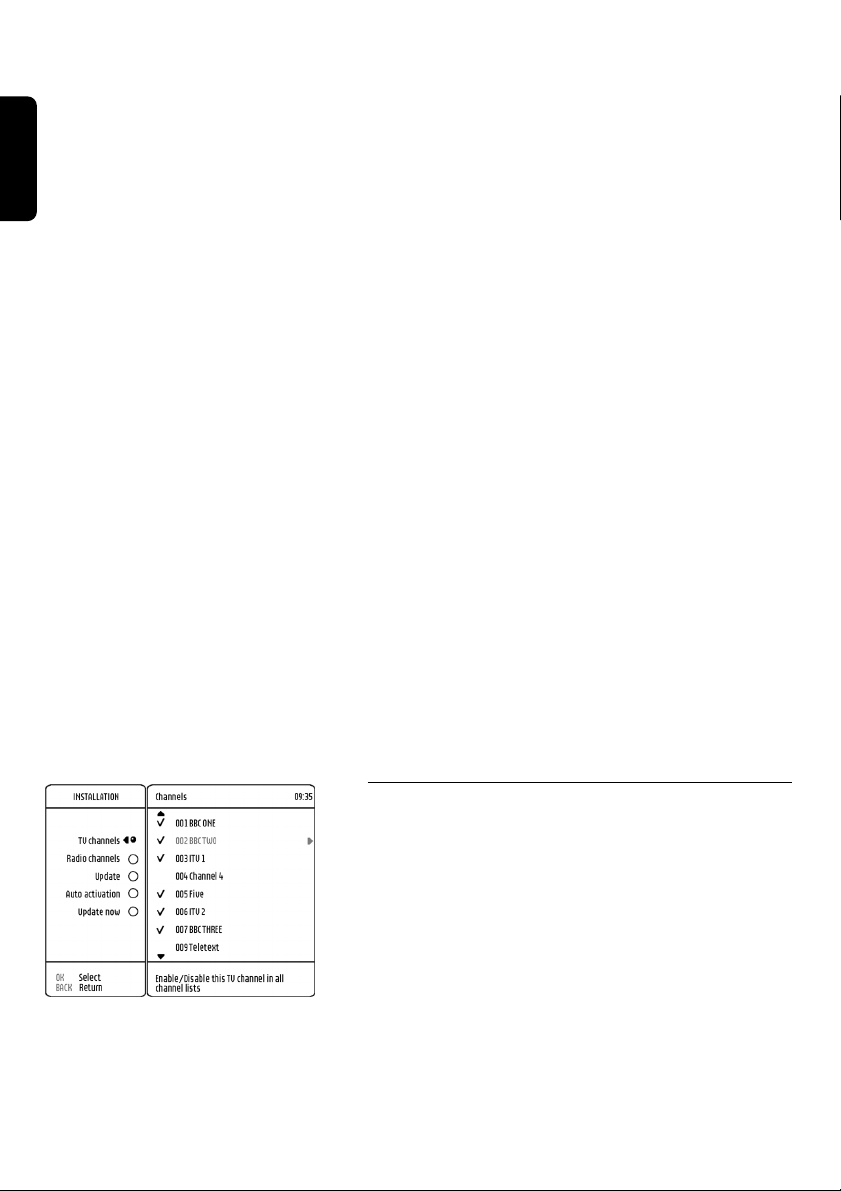
8.2.2 Channel installation
From "Installation" menu, you selected "Channels" and
pressed * button.
A new menu is drawn to control the features below:
- Installation of the TV channels.
- Installation of the RADIO channels.
- Enable or disable automatic update of channels.
- Enable or disable installation of scrambled channels.
- Start searching for new channels.
The selection is now on "TV channels":
- You can scroll down or up with the 9 or 8 button to
choose the required option.
- For each option, you can press on * button to access
its setting sub options.
Page 25
8.2.2.1 For "TV channels" item, the full TV channel
list, which has been found after the scanning
process, is shown.
You can scroll down or up with the 9 or 8 button to
select a channel.
You can press the OK button to enable or disable the
channel.
IMPORTANT: All non-tagged channels are disabled and
consequently not visible in all channel lists.
8.2.2.2 For "RADIO channels" item, the full RADIO
channels list, which has been found after
scanning process, is shown.
You can scroll down or up with the 9 or 8 button to
select a channel
You can press the OK button to enable or disable the
channel
IMPORTANT: All non-tagged channels are disabled and
consequently not visible in all channel lists.
8.2.2.3 For "Update mode" item, you can enable or
disable automatic update of channels.
You can scroll down or up with the 9 or 8 button to
choose the wanted sub option
You can press the OK button to store your choice
8.2.2.4 For "New channels" item, you can enable or
disable installation of scrambled channel.
You can scroll down or up with the 9 or 8 button to
choose the wanted sub option
You can press the OK button to store your choice
English
8.2.2.5 For "Update now" item.
Press the OK button to start the new update of channels
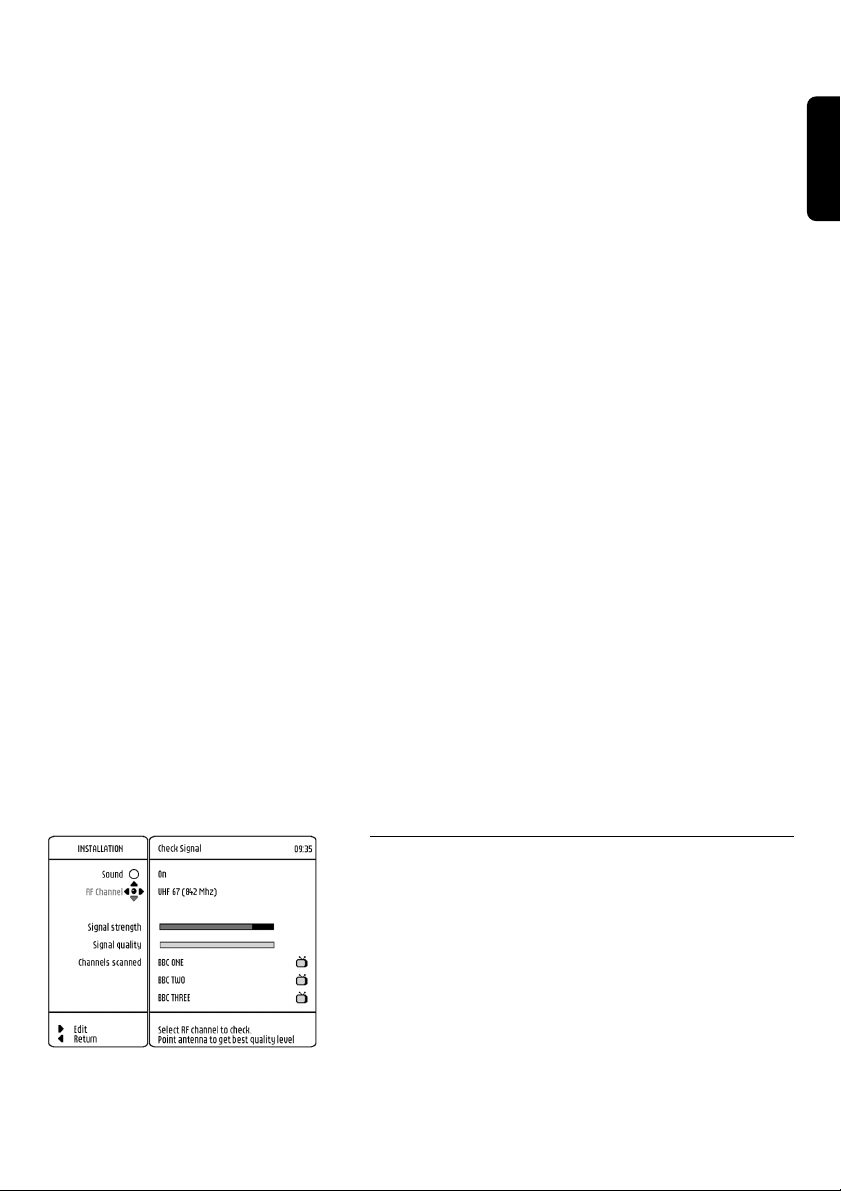
8.2.3 Check signal quality / Check your aerial
From "Installation" menu, you selected "Antenna
Positioning" and pressed * button.
This menu is used to help positioning your antenna and
checking the availability of signals on a specific RF
channel.
Positioning your antenna:
- Two bar graphs help you pointing your antenna by
indicating the signal strength and the signal quality.
- When signal quality is medium or good, the available
channels present on this channel are indicated.
CHANGE THE SETTINGS 23
Page 26

English
By activating the Sound output, a modulated sound will
help you to define the best position of your antenna
without requiring you to watch the TV screen.
You can also select the RF channel you want to use
during the positioning process.
8.2.4 Software update
To keep you up-to-date with the development in Digital
Television and / or to make new features available, your
receiver is prepared to receive software updates. Do not
worry this update is part of normal transmissions.
Simply follow the on screen instructions.
Note: Upgrades will enhance your box and help ensure the
smooth operation of your receiver when new software is
released. We advise that you accept any downloads that are
offered.
From "Installation" menu, you selected "Software" and
pressed * button.
A new menu is drawn to:
- Indicate the current version of the software code
- Indicate whether a new update of the software has
been detected.
- Confirm that the update is accepted. If so, the
download will take place when the box is switched to
standby
The selection is now on "Software update".
You can press the * button to access the sub options.
24 CHANGE THE SETTINGS
Your receiver is automatically set up to accept upgrades
for your DTR 1000. If you would like to be prompted
each time a new upgrade is available, then switch the
toggle to "Manual".
8.2.5 TIMERS (schedule, delete, edit, conflict)
Press MENU button to open the main menu
The selection is on the Timers option.
Press the * button to access the Timers sub-options.
The selection is now on "Edit a timer".
Page 27
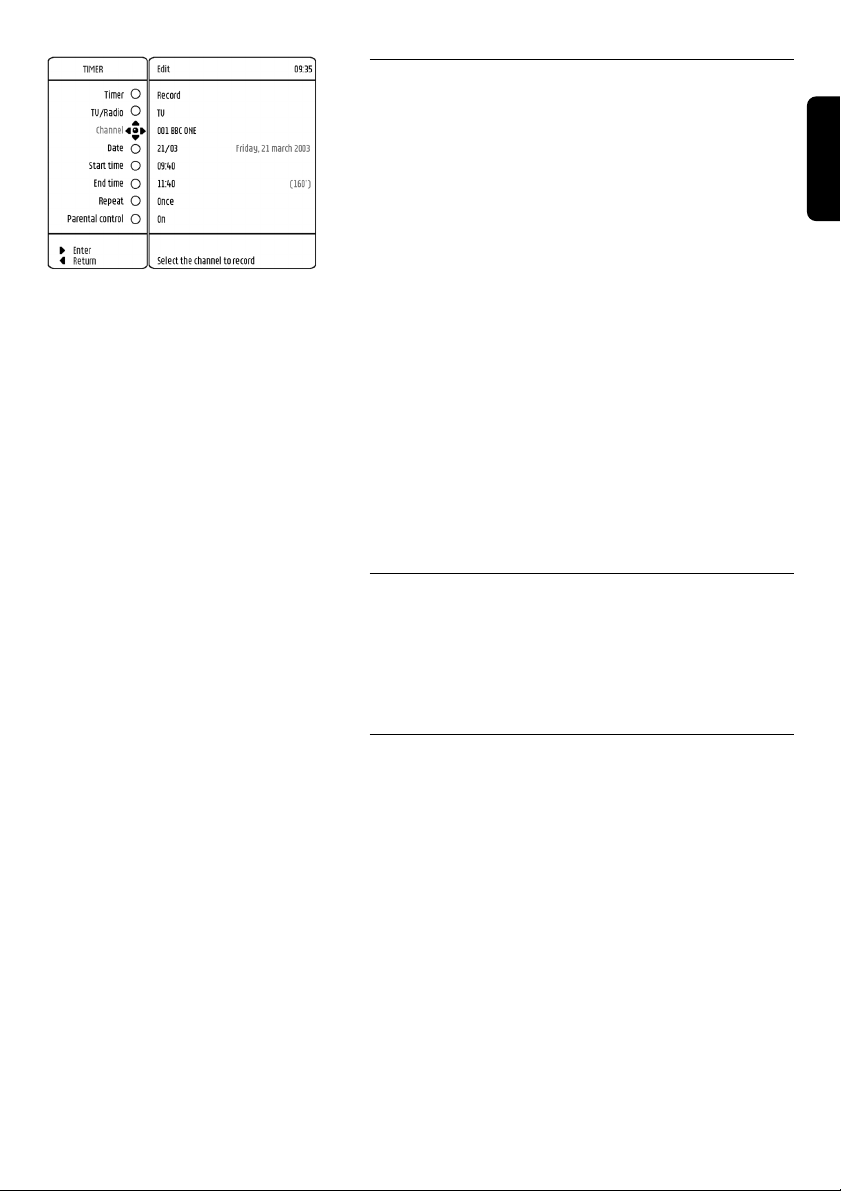
8.2.6 Edit a timer
From the Edit a Timer selected sub menu.
Select a "Free timer" you want to edit or a timer you
want to modify by using down or up with the 9 or 8
button.
Press the * button to access the Timers detailed sub-
options.
The following fields can be modified:
- Timer type (Record or Reminder).
- Channel type (TV or Radio).
- The Channel to record.
- The recording date (Up to one year in advance).
- The starting time.
- The ending time.
- The repeating configuration (Once, Every Day, Every
Weekday, Every Week).
- Parental Control (On, Off).
Note: Every Weekday is used to record series transmitted only
during weekdays.
8.2.7 Remove a timer via the MENU
From the Remove a Timer selected sub menu.
Select the timer you want to remove by using down or
up with the 9 or 8 button.
Press the OK button to remove the timer.
English
8.2.8 Disable Recording (Manage conflicts)
Concept:
- Timers can be enabled and disabled
- A timer can be activated only if it is not in conflict with
another timer
- Timers created by any other means than through this
menu will always be created but enabled only if not in
conflict with a previously existing timer.
Enabling/Disabling:
- From the "Disable Recording" selected sub menu
- Select the timer you want to disable by using down or
up with the 9 or 8 button
- Press the OK button to change the activation status of
that timer. Timer cannot be enabled if another timer is
in conflict with it.
CHANGE THE SETTINGS 25
Page 28
Favourite lists allow you to navigate
easily on your preferred channels.
English
By using this feature, you are able to
set several favourite lists for RADIO
and TV channels.
For activation of these favourite
lists, refer to chapter 7.6.
8.3 Favourite list editing
Press MENU button to open the main menu.
Press once the 9 button to bring the selection on
"Favourite".
Press the * button to access the "Favourite" sub
options.
The selection is now on "Edit TV favourites" item.
You can scroll down or up with the 9 or 8 button to
choose the TV or RADIO lists.
Note: As the menu system is similar for RADIO and TV lists,
only TV features have been described in the following chapters.
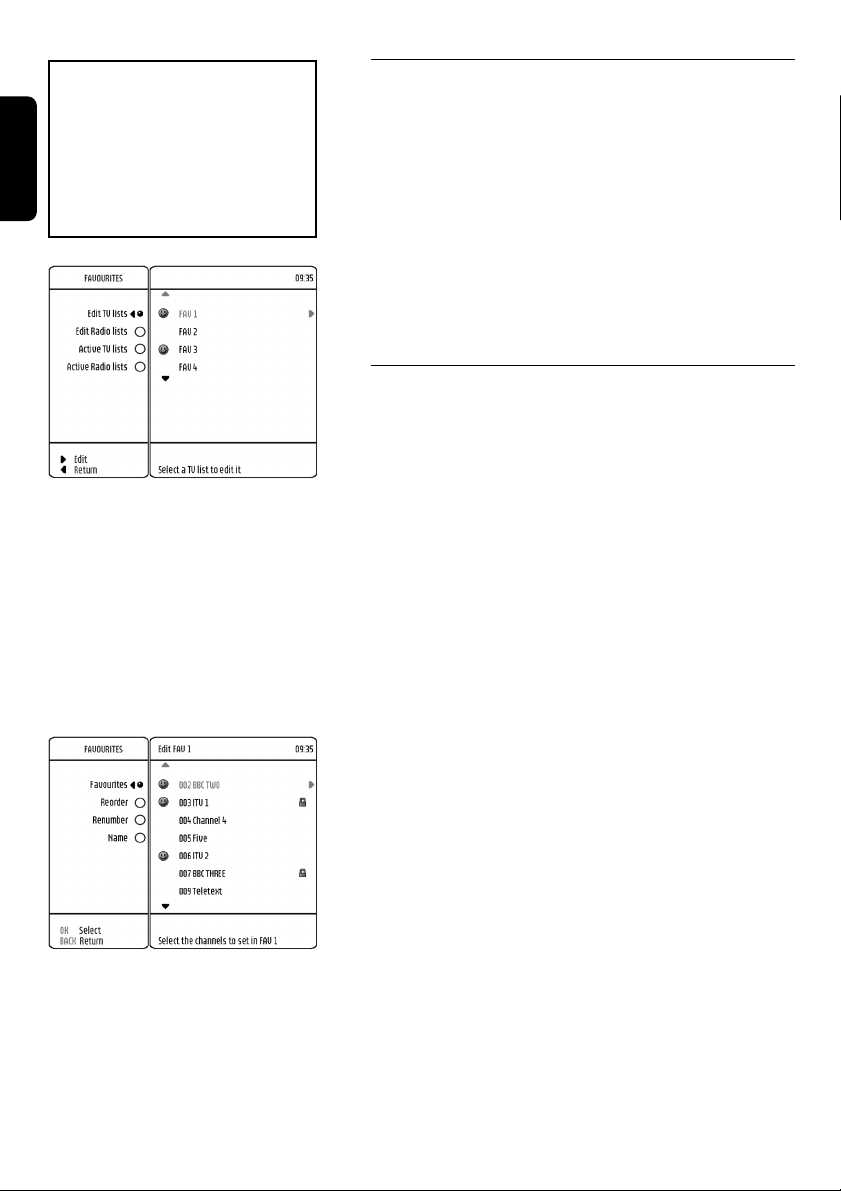
8.3.1 Edit / Rename favourite list - Re-order /
Re-number channels in a favourite list
From "Favourites" sub menu, the selection is on "Edit TV
lists" item.
Press the * button to access the "Edit TV lists" sub
options.
You can scroll down or up with the 9 or 8 button to
choose a TV favourite list.
Press the * button to access the selected TV favourite
list for editing.
The "Edit TV lists" sub menu is now drawn and the
selection is on "Favourites" item.
The content of the selected TV favourite list appears.
You can scroll down or up with the 9 or 8 button to
choose the required option.
26 CHANGE THE SETTINGS
8.3.1.1 Edit the selected favourite list
From "Edit TV lists" sub menu, the selection is on
"Favourites" item.
Press the * button to access the "Favourites" sub
options.
You can scroll down or up with the 9 or 8 button to
choose the channel or to go through the installed list of
TV channels.
You can press OK button to tag or un-tag the selected
TV Channel.
8.3.1.2 Re-order channels in a favourite list
From "Edit TV lists" sub menu, the selection is on
"Favourites" item.
Press once the 9 button to bring the selection on "Re-
order".
Page 29

Press the * button to access the "Re-
order" sub options.
Unlike the first "Favourites" item, only
tagged channels appear for the selected TV
favourite list. To re-order one channel in the
list, follow the sequence described below:
- Scroll down or up with the 9 or 8
button to select the channel you wish to
re-order.
- Press OK button to select it for moving.
- Select the new position by scrolling down
or up with the 9 or 8 button.
- Press the OK button to store it in the
new selected position.
Note: If the selected TV favourite list is empty or
contains only one element, the access to "Reorder" sub options will be blocked.
8.3.1.3 Re-number favourite channels
From "Edit TV lists" sub menu, the selection
is on "Favourites" item.
Press the 9 button twice to bring the
selection on "Re-number".
Press the * button to access the "Re-
number" sub options.
Unlike the first "Favourites" item, only
tagged channels appear for the selected TV
favourite list. To re-number a channel,
follows the sequence below:
- Scroll down or up with the 9 or 8
button and select the channel to be renumbered.
- Enter the new number using the DIGIT
keys.
- Press on OK button to store the new
number.
You scroll down or up with the 9 or 8
button to change the selected character
from the range [09 , AZ].
Use the * button to select the next
character.
Use the+ button to select the previous
character.
At the end, press the OK button to save the
modification.
8.3.2 Edit preferred list
From "Favourites" sub menu, the selection is
on "Edit TV favourites" item.
Press the 9 button twice to bring the
selection to "Preferred TV lists".
Press the * button to access the selected
preferred TV list for editing.
Scroll down or up with the 9 or 8 button
Press the OK button to tag or un-tag the
selected TV list.
English
8.3.1.4 Re-name a favourite list
From "Edit TV favourite" sub menu, the
selection is on "Favourites" item.
Press the 9 button three times to bring
the selection on "Name".
Press the * button to access the "Name"
sub options.
At this moment, you are able to modify the
name of the selected favourite list. The first
character of the name is selected in first
CHANGE THE SETTINGS 27
Page 30

English
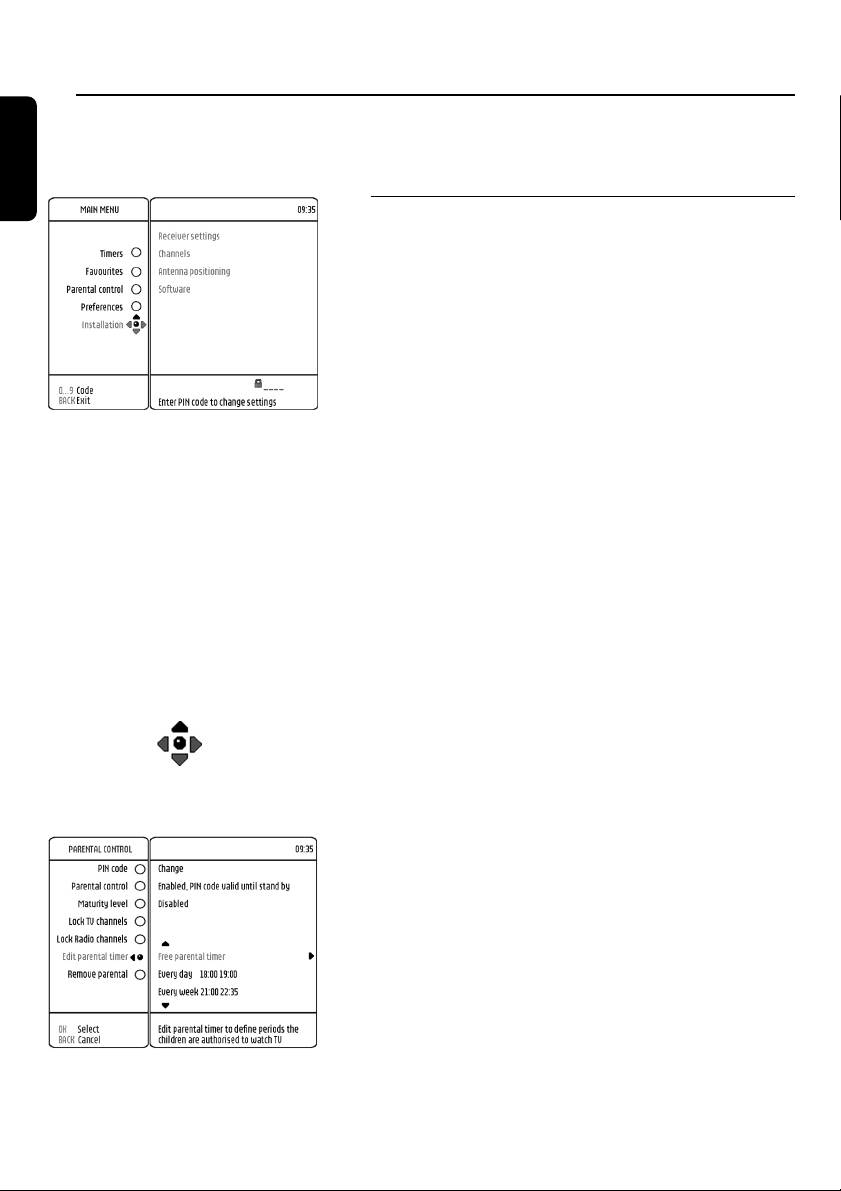
8.4 Parental control / pin Code - lock
Programme - Parental Timer
Press MENU button to open the main menu.
Press the 9 button twice to bring the selection on
Parental control.
You are prompted to enter your PIN code.
Enter default 0000 PIN code.
Press the * button to access the "Parental control" sub
options.
The selection is now on "Change PIN code".
You can scroll down or up with the 9 or 8 button to
choose the required option.
8.4.1 Change PIN
Press the * button twice to open the CHANGE PIN
CODE menu:
- Enter NEW PIN CODE.
- Confirm new PIN code.
- Memorize the new PIN code.
8.4.2 Parental control
This option allows you to set the security level in using the
PIN code. The different options are:
- Enabled, PIN code always required
- Enabled, PIN code entry valid for 20 min
- Enabled, PIN code valid until stand-by
- Disabled (security is disabled)
28 CHANGE THE SETTINGS
8.4.3 Maturity level
This option allows you to define the age (so called
maturity level) over which the PIN code entry will be
needed.Set the age that suits your needs or disable the
option.
Note: This automatically controls the channel lock provided the
digital signal carries maturity information.
8.4.4 Lock TV or Radio channel
These options allow you to select the TV and Radio
channels you wish to lock.
Follow the on screen instructions to lock channels. The
relevant channels present in the favourite lists will also
have the same locking status.
Page 31

8.4.5 Edit a parental timer
This option allows you to set an authorised time window
from which the PIN code entry will be necessary.
Follow the on screen instructions to set:
- Date
- Start time
- End time
- Repetition
Note: You can set up to three parental timers.
8.4.6 Remove a parental timer
This option allows you to remove a parental timer.
8.5 Preferences / language - timer banner
Press MENU button to open the main menu.
Select the "Preferences".
Press the * button to access the "Preferences" sub
options. The selection is now on "Language preferences".
You can scroll down or up with the 9 or 8 button to
choose the required option.
8.5.1 Language preferences
This menu option allows you to:
- Set the preferred menu language.
- Set the preferred audio language.
- Set the subtitle preferred language;
- Enable or disable subtitles.
English
8.5.2 Timer preferences
This menu option allows you to:
- Select when you want to be warned of a reminder.
- Select when you want to be warned of the start of a
recording.
- Set the presentation of the programme to be recorded.
In this way, you record a few seconds of the banner of
the programme so you can identify it easily during
playback.
- Set the Time offset (difference in between the local
time and the Greenwich Mean time). This option will
be available if the receiver cannot recover this setting
automatically from the broadcast.
8.5.3. Banner preferences
This option allows you to:
- Set the banner duration in between 3 and 10 seconds.
- Set the banner transparency to on or off.
CHANGE THE SETTINGS 29
Page 32

9 Menu tree
English
Edit
MAIN
MENU
Timers
Favourites
Parental control
Preferences
Installation
Remove
Disable recording
Edit TV lists
Edit RADIO lists
Active TV lists
Active RADIO lists
PIN code
Parental control
Maturity level
Lock TV channels
Lock RADIO channels
Edit parental timer
Remove parental timer
Language
Timers
Banner
Receiver settings
Channels
Antenna positioning
Software
Menu
Audio
Subtitle
Enable subtitle
Reminder
Record warning
Banner record
Time offset
Display duration
Transparency
TV/VCR output
TV format
TV Audio
Default volume
VCR Audio
VCR Control
Services installation
Opening a menu item signaled by a locker
requires the PIN code entry.
30 MENU TREE
Current Software
New Software
Software update
Page 33

10 Advanced settings
10.1 Restore virgin mode
"Install wizard" is shown only once at the
first power up of your receiver.
If you want to reinitialise your receiver and
put it back to virgin / factory mode, follow
the steps below.
Disconnect your receiver from the mains.
Keep pressing the Front Panel '+' button
while re-connecting your receiver to the
mains.
The left hand LED will start to blink orange
while right hand LED is off.
Release the Front Panel '+' button.
Briefly press the front Panel '+' button.
Right hand LED turns on RED and the left
hand LED is blinking Red.
Enter the following code with the remote
control: '9' '9' '0' '0'.
Once entered, the left hand LED turns
shortly Green. In case of a bad code
entered, the left hand LED stays Red.
Wait until the receiver re-starts by
displaying the First Install Wizard.
Note: After this procedure, your PIN code has
also been reset to its factory setting ('0', '0', '0',
'0'), and all "Favourite" lists will be lost.
10.2 Change remote control
setting
If you have other equipment in your home
and the remote control of the Philips
receiver interferes with them, you can
change the setting of the remote control.
Change Remote Control Configuration:
- Press number buttons 1 and 3
simultaneously for 3 seconds.
- Release the two buttons simultaneously.
- Enter the new setting within 60 seconds:
- By pressing number button 4
(corresponding to new setting).
- Or by pressing number button 3 to
come back on the default factory
setting.
Note: At first power up of the remote control (or
battery change while pressing a button) the
default factory setting (value 3) is restored.
Change Receiver Remote Control
Configuration:
- After you changed the remote control
setting to the desired value:
- Disconnect your receiver from the
mains.
- Keep on pressing the Front Panel '+'
button while re-connecting your
receiver to the mains
- up to the time the Multicoloured
LED is blinking orange while Red LED
remains on all the time.
- Then release the '+' button.
- Press the OK key on your remote
control.
- The Multicoloured LED becomes
Green if the new code is accepted.
- The Multicoloured LED becomes Red
if the received code is not accepted.
The receiver will then use the default
factory setting of the remote control.
10.3 You forgot your PIN code /
Master PIN code
If you have forgotten your PIN code, you
have the possibility to reset it to the default
PIN Code ('0', '0', '0', '0').
To reset the PIN Code, you have to enter
the Master PIN Code in any Pin Code
request menu. This will have the effect to
accept the PIN Code and to reset the PIN
Code to the default PIN Code of the
receiver.
The Master PIN Code is the following:
('RED', '3', '8', '9', '5').
Note: Keep this code secret to prevent your
children from using it.
English
ADVANCED SETTINGS 31
Page 34

10.4 More about Recording / Easy Recording - VCR control
English
10.4.1 Connection for Easy recording
This connection allows automatic recording without necessity of programming your VCR. Prior
deciding for this connection method:
- Consult the user manual of your VCR / DVD Recorder to check if and how this feature is
supported. Most Philips VCR and DVD Recorders support one of the two easy recording
options.
- Verify that your TV and VCR both have two SCART sockets.
Incorporate your receiver in your existing installation as shown below:
- Plug your aerial lead plug into the "AERIAL IN" socket of your digital receiver.
- Connect the "RF OUT" socket of your digital receiver to the "Aerial input" socket of your VCR
by means of the RF coaxial lead supplied with your digital receiver.
RF lead
(supplied)
TV set
EXT1 EXT2
Video recorder
EXT1 (OUT)
EXT2 (IN)
- Connect the "RF OUT" socket of your VCR to the "Aerial input" socket of your TV by means of
a RF coaxial lead.
- Connect the "TV" SCART socket of your digital receiver to the "EXT1" SCART socket of your
TV by means of the SCART lead supplied with your digital receiver.
- Connect the "VCR" SCART socket of your digital receiver to the "EXT2" SCART socket of your
VCR (so called "IN") by means of a SCART lead.
- Connect the "EXT1" SCART socket of your VCR (so called "OUT") to the "EXT2" SCART
socket of your TV by means of a SCART lead.
- Plug all your equipment, excluding your digital receiver, into the mains.
32 ADVANCED SETTINGS
Page 35

- Switch on your TV and select a channel.
- Plug your digital receiver into the mains.
Your digital receiver will display the
WELCOME screen (the left hand LED
will be illuminated green).
- Read chapter 7 to proceed with the
channel scan of your digital receiver if not
already done.
Note:
With this connection set up:
- You can watch digital TV while you record
analogue TV.
- You can watch analogue TV while you record
digital TV.
- You can record the digital TV channel you are
watching without programming your VCR.
10.4.2 Digital receiver and VCR
settings
Refer to chapter 8.2.1.6 on how to enable
the "Easy Recording" function of your digital
receiver.
Depending on your VCR brand and type
you have to set the "VCR control" option to
"Prepare Record" or "Record Link". Refer to
the user manual of your VCR alternatively
try the two options to find out the most
suitable.
Set your VCR to the mode allowing control
by your digital receiver.
10.4.3 How to make a recording with
the VCR control feature?
Your digital receiver, TV and VCR are
connected and set according to 10.4.1-2.
You have programmed a timer with your
digital receiver.
At timer start your VCR starts recording
and at timer end your VCR stops recording
under the control of your digital receiver.
You no longer need VCR programming to
record digital TV channels.
10.4.4 Timer / Front panel indicator
Feedback on front panel LED's:
- While a Timer is running, the Receiver is
locked to prevent any inadvertent action
from damaging the recording.
To indicate that the receiver is recording,
the Front Panel LEDs will signal as follows:
- Right hand red LED on.
- Left hand Multicoloured LED Orange for
recording during standby or Green for
Recording while watching.
10.4.5 Cancel a running Timer
While a Timer is running, the Receiver is
locked to prevent any inadvertent action
from damaging the recording.
The following procedure allows you to
cancel the current running Timer:
- Press the 'Timer' Key.
- Press the '0' Key.
- The Receiver is now unlocked.
10.4.6 Errors during recording
Three kinds of error can occur during the
recording:
- Lost of input signal
- Lost of power
- Locked channel
Your Philips receiver can detect those
errors during the recording, it will signal you
those errors the next time you will use it by
means of an Alarm.
English
ADVANCED SETTINGS 33
Page 36

11 Trouble shooting guide
Experiencing difficulty operating your digital receiver? Check the following points first!
English
Problem Possible cause Action
No picture, no sound and no
front panel indication.
No picture, no sound but the
front panel shows orange left
hand LED on.
No wake up at Remote
Control key press and the Red
right hand LED is on.
No picture, no sound but the
front panel shows the Green
left hand LED on.
The remote does not operate.
Receiver is not plugged into
the mains. None of the front
LED's are on.
The receiver is in standby.
Your receiver is in Low Power
Mode.
You are viewing standard
analogue television.
The SCART connection to the
TV is incorrect or is loose.
Your TV has not selected the
correct AV/EXT channel.
A timer is running, the receiver
is locked, the front LED's are
either Green / Red or Orange /
Red
The remote control batteries
have been inserted incorrectly
or are dead.
Check mains connection and
press the LOW POWER
button on the front of the
receiver.
Press either P+ or P- button
or any number button to bring
the receiver out of standby.
Press the Low Power Button
on front panel then press any
Remote Control number
button to wake up your
receiver.
Press the TV/STB button on
your remote.
Check SCART TV connection,
making sure cables are firmly
pushed into the sockets.
Try manually selecting the
AV/EXT channel on your TV.
Press successively the "TIMER"
and the "0" buttons to cancel
the TIMER and unlock the
receiver.
Check the condition of the
batteries and replace if
necessary.
You are not aiming your
remote control at the receiver.
You cannot find all the channels
you think should be available.
34 TROUBLE SHOOTING GUIDE
The signal to your aerial may
be weak.
Your aerial may need adjusting
or your local transmitter may
not be working.
Make sure you aim the
remote at the receiver and not
at the TV.
Try retuning your receiver,
following the relevant steps in
chapter 7. If you are still
missing channels, your aerial
may need adjusting.
Call your local dealer.
Page 37

Problem Possible cause Action
You sometimes see a squared
pattern on the screen, your
picture is "freezing" or a
picture showing a TV with a
noisy pattern.
There could be a transmission
problem.
Your aerial may have been
moved, for example by severe
weather.
Your aerial connection have
become loose or disconnected.
This is normally only a
temporary situation and should
correct itself.
Check signal quality and if
necessary re-align your aerial.
Check all aerial connections
and make sure they are all
firmly pushed into sockets.
English
I cannot select all of my
channels and the P+/- or
Arrow up/down buttons do
not always work.
Even if I use the number
buttons I cannot access a
particular channel.
I have forgotten my parental
code.
I set the timer but it did not
record what I wanted.
The order of my channels has
changed.
The on-screen displays are not
as sharp as expected.
Some channels have been
selected as favourites and the
favourites mode is on.
The parental lock has been
activated on this channel and
an OSD message ask for your
parental code.
The video was set incorrectly.
They have been re-arranged as
described in section 8.3.1.2
If you have connected using
SCART and you have an RGB
compatible TV, one of the
receiver settings could be
wrong.
You have connected the
receiver TV SCART to a
SCART socket of your TV set
which is not RGB capable
Use Fav button to select an
other Favourite list. Use the All
TV Channel list to see all
possible TV channels.
Enter your parental code to
access the channel or remove
it as a locked channel.
See sections 8.4.2 for more
details.
See section 10.3
Make sure that your video is
set for the same time as your
digital receiver.
Alternatively use one of the
Easy Recording options to
control automatically your VCR
(see chapter 10.4)
Refer to this section to change
the order again.
Refer to chapter 8.2.1 and
alter the "TV / VCR output"
setting to RGB/CVBS.
Check if the TV SCART socket
of the TV is RGB capable, if
not refer to the user manual of
your TV to change the SCART
connection to your TV.
The picture on some channels
seems to have been stretched
or squashed.
The broadcast is probably in
widescreen and the receiver
settings may not be correct.
TROUBLE SHOOTING GUIDE 35
Check the receiver "TV
format" option setting,
following the information in
chapter 8.2.1 . If you have a
widescreen TV, you may also
need to check the settings on
your TV.
Page 38

12 Technical specification
This product is in conformity with the requirements of the 95/47/EC directive.
English
Video decoding
- MPEG-2 DVB compliant up to
MP@ ML
- Video bit rate: up to 15
Mbit/sec
- Video format: 4:3
(letter box if source
is in 16:9) and 16:9
- Resolution: up to 720x576
pixels
Application system
resources
Processor clock speed166 MHz
SDRAM - CPU/Video-Graphics
16 MB
Flash memory 4 MB
Terrestrial antenna interface
- RF input:
IEC 169-2 female connector
- RF output (bypass): IEC 169-2
male connector
Audio decoding
- MPEG layer I / II
Reception-Demodulation
- Demodulation type: COFDM
Operation/Features
- Automatic channel installation
via scanning
- TV & Radio modes
- Free to air reception
- Network: MFN /SFN
- Input frequency range:
- Loopthrough frequency range
(MHz): 47 - 862 MHz
- 4 favourite TV lists
- 4 favourite Radio lists
- Program editing for
personalised installation
(delete, add, move)
Connections
TV SCART
Output: CVBS or S-Video or
- Subtitles
- Parental lock with PIN code
- Full remote controlled
- Menu controlled installation
and operation using On
Screen Display
- 8 VCR timers
VCR SCART
Input: CVBS or RGB / Fast
- Automatic recording via:
Timer programming and
Easy recording for Philips
Output: CVBS or S-Video
VCR and DVD- RW
- Automatic VCR play back :
Audio L/R + CVBS or RGB /
Fast blanking
- Full range RF loopthrough
- Now & Next ESG
- Software upgrade via over the
Audio CINCH
Analog audio output: L / R
Digital audio output:
air download
- Low power mode
Serial interface: RJ 9
- Suited for feeding a Video
projector
36 TECHNICAL SPECIFICATION
2K / 8K
VHF III, UHF IV / V
RGB/ Fast blanking
Volume controlled
audio L/R, Slow
blanking, Fast
blanking.
blanking, Slow
blanking , Audio L/R,
Audio L/R, Slow
blanking during timer
if "Prepare Record"
mode is activated
Dolby Digital or PCM
07/03 - Due to continued product improvements, this
Accessories
- Remote control:
Type RC19336002
- Scart cable
- User manual
- Worldwide Guarantee
booklet
- Batteries: 2 x 1.5V
type AA/R06
- RF cable
- Mains cord
Miscellaneous
- Temperature range (°C)
Operating +5 to 45
Storage -10 to +70
Mains: 230 V ~ +/-10%
50 Hz
- Power
consumption: 10 W max
- Standby
consumption: 6 W max
- Low power mode: 1 W max
- Weight 1.400 kg
Including packaging 2.500 kg
- Dimensions: 260x230x60
The product complies with
the following European
council Directives:
- 73/23/EEC
- 93/68/EEC
- 89/336/EEC
information is subject to change without notice.
Page 39

BIENVENIDO A LA TELEVISIÓN DIGITAL
Enhorabuena por elegir el receptor digital terrestre DTR 1000 de Philips. El DTR 1000 le
permitirá:
- Disfrutar de una mayor oferta de canales de TV digital terrestre y emisoras de radio.
- Beneficiarse de la calidad digital en imagen y sonido.
- Acceder más fácilmente a los canales de TV a través de su antena convencional.
ÍNDICE
1 Instrucciones de seguridad _______3
2 Desembalaje / integración del
receptor en su sistema ___________4
2.1 Desembalaje ____________________4
2.2 Integracíon del receptor en su
sistema ________________________4
3 Descripción del producto _________5
3.1 Vista frontal ____________________5
3.2 Vista posterior __________________6
4 Preparación del mando a distancia _7
4.1 Inserción de las pilas ______________7
4.2 Uso del mando a distancia para
controlar el receptor terrestre _____8
5 Conexión del receptor digital _____9
5.1 Conexión a un TV provisto de terminal
SCART (Euroconector) ___________9
5.2 Conexión a TV y VCR, ambos provistos
de terminal SCART (Euroconector) 10
5.3 Conexión a un sistema HI-FI o
equipado con receptor de audio
(analógico/digital) _______________11
Español
5.4 Conexión de un proyector de vídeo al
receptor para ver programas de TV
Digital en el proyector ___________11
6 Inicio rápido / primera instalación /
exploración de canales __________12
6.1 Inicio rápido ___________________12
6.2 Exploración incorrecta / comprobar
instalación / revisar señal de antenna 13
6.3 Exploración de nuevo infructuosa __13
7 Operaciones cotidianas __________14
7.1 Encendido y apagado del receptor
(bajo consumo, modo de espera) __14
7.2 Selección de modo TV / Radio _____14
7.3 Cambio de canal ________________14
7.4 Báner del directorio / más información
del programa actual _____________15
7.5 Control de volumen - Vol+ / Vol- /
Mute _________________________15
7.6 Selección de una lista de favoritos _16
7.7 Cambio temporal de la selección
de subtítulos (circular) __________16
7.8 Cambio temporal de la selección
de idioma de audio (circular) ______16
7.9 Guía electrónica de canales _______16
ÍNDICE 1
Page 40

7.10 Ajuste del temporizador /
recordatorio desde la guía / directorio /
báner - cancelación de un evento
programado ___________________17
7.11 Notificación de avisos / Grabación Recordatorio - Nuevos servicios Descarga de software ___________18
7.11.1 Grabación / Temporizador ________18
7.11.2 Fallo de grabación _______________18
Español
7.11.3 Recordatorio ___________________18
7.11.4 Lista de nuevos canales ___________18
7.11.5 Descarga de software ____________18
7.12 Uso del botón TV / STB _________19
7.13 Visionado de canales bloqueados ___19
7.14 ¿Cómo reinicio el receptor si se
queda bloqueado? ______________19
8 Cambio de configuración del
receptor _______________________20
8.1 Navegación por el menú / Selección de
opciones / Cambio de ajustes /
Almacenamiento o cancelación de
los cambios ____________________20
8.2 Cambio de ajustes de instalación ___21
8.2.1 Ajustes del receptor ______________21
8.2.2 Instalación de canales _____________22
8.2.3 Compruebe la calidad de señal /
Revise la antena _________________23
8.2.4 Actualización de software __________24
8.2.5 temporizadores (programar, borrar,
editar, conflictos) ______________24
8.2.6 Editar un temporizador ___________25
8.2.7 Supresión de un temporizador desde
el menú _______________________25
8.2.8 Desactivación de grabación (gestión
de conflictos) ___________________25
8.3 Edición de listas de favoritos ______26
8.4 Control infantil / Código PIN Bloqueo de programa -
Temporizador infantil ___________28
8.4.1 Cambio de PIN _________________28
8.4.2 Control infantil __________________28
8.4.3 Nivel de madurez _______________28
8.4.4 Bloqueo de canales de TV o radio ___28
8.4.5 Edición de un temporizador infantil __29
8.4.6 Supresión de un temporizador infantil 29
8.5 Preferencias / Idioma Temporizador - Báner ___________29
9 Árbol de menú _________________30
10 Configuración avanzada _________31
10.1 Reinicio _______________________31
10.2 Cambio de configuración del mando
a distancia _____________________31
10.3 Si olvida el código PIN / Código PIN
maestro ______________________31
10.4 Más sobre grabación / Grabación
sencilla - Control del VCR ________32
10.4.2 Ajustes de receptor digital y VCR ____33
11 Guía de solución de problemas ___34
12 Especificaciones técnicas _________36
2 ÍNDICE
Page 41

1 Instrucciones de seguridad
Todas las instrucciones de seguridad y
funcionamiento deberán leerse y entenderse
antes de utilizar el receptor.
Para obtener los mejores resultados, instale
el receptor lejos de radiadores y otras
fuentes de calor. Deje como mínimo un
espacio de 3 cm alrededor del receptor
para la ventilación, asegurándose de que no
se obstruyan los orificios.
Este receptor está diseñado exclusivamente
para el uso en entornos domésticos, y nunca
deberá utilizarse ni guardarse en lugares
extremadamente cálidos o húmedos.
Procure que no se introduzcan cuerpos
sólidos o líquidos por las aberturas de
ventilación. En tal caso, desconecte la toma
de alimentación y consulte a su proveedor.
Utilice una gamuza húmeda para limpiar la
unidad. No emplee nunca paños abrasivos,
esponjas ni productos de limpieza.
Cuando conecte o desconecte cables del
receptor, compruebe siempre que está
desconectado de la toma de alimentación.
No conecte aún el receptor: siga leyendo.
No desmonte el equipo. En su interior no
hay piezas utilizables por el usuario.
Conexión de alimentación
Antes de conectar el receptor a la toma de
alimentación, compruebe que la tensión del
suministro se corresponde con la indicada
en el panel posterior de la unidad. Si no
coincide, consulte a su proveedor.
No conecte aún el receptor: siga
leyendo.
Español
INSTRUCCIONES DE SEGURIDAD 3
Page 42

2 Desembalaje / integración del receptor en su
sistema
2.1 Desembalaje
Primero desembale el receptor. Encontrará
los siguientes cables y accesorios:
Español
- El receptor digital terrestre
- El mando a distancia y las pilas (2 x LR6
AA 1,5 V)
- Un cable SCART (Euroconector)
- Un cable RF coaxial
- Un cable de alimentación
- Un manual de uso
- Una tarjeta de garantía
- Un soporte para colocar el receptor en
posición vertical.
Observación: Como se recomienda en el capítulo
5, utilice el cable Scart suministrado. Con él
obtendrá la mejor calidad de imagen y el mejor
rendimiento de su receptor digital.
Las bolsas de plástico pueden ser peligrosas.
Para evitar el riesgo de asfixia, mantenga la
bolsa fuera del alcance de los niños.
El símbolo del embalaje significa
que el material es reciclable.
Si el receptor no se va a usar durante un
tiempo prolongado, desconecte el cable de
alimentación de la toma mural.
2.2 Integracíon del receptor en
su sistema
- El receptor se puede integrar de varias
maneras en su sistema audiovisual, y
tanto en posición horizontal como
vertical. Si decide usarlo en posición
vertical, siga las instrucciones que se
indican a continuación. Desembale el
soporte y colóquelo en una superficie
horizontal, con el lateral de encaje a
presión a la derecha y el lateral de la
patilla a la izquierda..
- Sitúe el receptor como se indica en la
ilustración (panel posterior a la izquierda,
conectores coaxiales hacia abajo).
- Inserte la patilla del soporte en la ranura
del frontal del receptor, junto al logotipo
de Philips.
- Balancee el receptor para insertar la
patilla del soporte en la ranura, hasta que
quede bien asegurada por el cierre a
presión.
4 DESEMBALAJE
- El receptor está listo para usarse en
posición vertical.
Observación: El soporte se desmonta
desbloqueando primero el cierre de su parte
posterior, y después inclinando y tirando hacia
atrás del receptor para extraerlo de la patilla.
/ INTEGRACIÓN DEL RECEPTOR EN SU SISTEMA
Page 43

3 Descripción del producto
3.1 Vista frontal
12
3456
1 Botón LOW POWER: Encendido del receptor o selección del modo de bajo
consumo.
Reinicio del receptor en caso de bloqueo mediante una
pulsación de 5 segundos.
2 Botón TV/RADIO: Conmutación entre los modos TV y Radio.
3 Botón "-": Canal anterior.
4 Diodo indicador de tres colores: Indica el estado del receptor (véase tabla).
5 Diodo indicador rojo: Indica el estado del receptor (véase tabla).
Intermitente ante la recepción de una orden del mando a
distancia.
6 Botón "+": Siguiente canal.
Español
Tabla de indicadores de estado
Modo Receptor Modo bajo Modo de Modo TV Modo Actualiz. Temporizador
Diodo desconectado consumo espera radio software (1) activo (2)
Indicador
4 Izquierda
(3 colores)
5
Derecha Apagado Rojo Apagado Apagado Apagado Rojo Rojo
(rojo) intermitente (intermitente si se
(1) Si sitúa el receptor en espera o bajo consumo y el diodo rojo de la derecha comienza a parpadear:
indica que está teniendo lugar una actualización gratis del software de su receptor a través de la señal
radiodifundida. No interrumpa esta operación. Espere a que el diodo deje de parpadear y el de la
izquierda se ilumine en naranja o en rojo (modo de espera o bajo consumo). Después podrá continuar
normalmente.
(2) Para cancellar el temporizador, pulse la secuencia de botones: TIMER + 0.
Apagado Apagado Naranja Verde Intermit Apagado Verde o naranja
verde / (en modo
naranja de espera)
pulsa un botón)
DESCRIPCIÓN DEL PRODUCTO 5
Page 44

3.2 Vista posterior
1234
Español
56 7 89
1 VCR (SELV): Terminal SCART (1) para conectar la grabadora de vídeo.
2 Salida de audio digital (SELV): Salida de audio digital coaxial para conectar el equipo de
HI-FI o sistema con receptor de audio.
3 Serial (SELV): Conector RJ 9 para la transferencia de datos serie durante la
asistencia técnica.
4 AERIAL IN (SELV): Entrada para la antena de UHF.
5 230 V ~ 50 Hz 10 W max (HV): Conector del cable de alimentación.
6 Placa de identificación, con el tipo y el número de serie del receptor.
7 TV (SELV): Terminal SCART (1) para la conexión al TV o a un proyector
de vídeo (2).
8 L/R Audio out (SELV): Salidas de audio I/D para la conexión al equipo de HI-FI o
sistema con receptor de audio.
9 RF out (SELV): Salida de RF para conectar a la entrada de antena de la
grabadora de vídeo o del televisor. Véanse esquemas de
conexión recomendados en el capítulo 5.
(1) SCART también se conoce como Euroconector o Peritel.
(2) Para la conexión de un proyector de vídeo al terminal TV SCART, consulte el apartado 5.4.
SELV : Safety Extra Low Voltage (tensión extra baja de seguridad)
HV : Hazardous Voltage (tensión peligrosa)
6 DESCRIPCIÓN DEL PRODUCTO
Page 45

4 Preparación del mando a distancia
4.1 Inserción de las pilas
- Abra la tapa del reverso del mando.
- Inserte las dos pilas (tipo R06G/AA - 1,5 V) suministradas.
- Introdúzcalas en el compartimento como se indica en la ilustración.
- Cierre la tapa del compartimento.
- El mando está listo para controlar el receptor digital terrestre.
Las pilas Philips facilitadas con el mando del receptor no contienen metales pesados tales como
mercurio, plomo o cadmio. No obstante, en muchos países no se pueden mezclar las pilas usadas
con los residuos domésticos. Cumpla las normativas locales sobre eliminación de pilas agotadas.
Español
PREPARACIÓN DEL MANDO A DISTANCIA 7
Page 46

4.2 Uso del mando a distancia para controlar el receptor terrestre
Mute ?
Silenciamiento de audio.
Español
ROJO, VERDE, AMARILLO,
AZUL:
Sin función.
FAV
- Pulsación breve: selecciona la
siguiente lista de favoritos.
- Pulsación larga: muestra
todas las listas existentes.
SUBTITULO ?
- Activa o desactiva
temporalmente el subtitulado
de audio.
I-II
- Actualiza provisionalmente el
idioma de audio.
MENU
- Abre el menú (en modo TV
digital).
- Cierra el menú (en modo TV
digital).
Cursor 8/9 Las cuatro
teclas de cursor se usan para
desplazarse por los menús y
las listas.
Tecla OK
- Selecciona / recupera la lista
de programas o el índice.
Volume ==+/ -
Elevación y reducción del
volumen.
Standby
Modo de espera / Encendido.
$$
- Avance o retroceso de página
en la guía o en la lista de
favoritos.
GUIDE
- Abre la guía Ahora y
Después.
INFO
- Abre el báner de
información.
- Amplía la información de
programa.
- Cierra el báner.
TIMER
- Programa un temporizador
(grabación o recordatorio)
desde el báner de programa,
la guía o el directorio de
canales.
La secuencia "TIMER, 0"
cancela el temporizador actual.
BACK
- Selecciona el canal de TV
digital previamente
sintonizado.
- En el modo de menú
Salir del menú
ó retroceder un nivel en el
menú.
óretroceder un nivel y
cancelar los cambios
realizados.
Una marca en la parte
inferior de la pantalla del
menú indica la función que se
ejecutará.
P+ / P-
Selecciona el canal siguiente o
anterior.
**
(azul) %%(blanco)
TV / STB
Conmuta entre transmisión
digital y analógica en el TV.
8 PREPARACIÓN DEL MANDO A DISTANCIA
TV / RADIO
Conmuta entre los modos TV
y Radio.
0-9
Selección de canales en el
modo de TV digital.
Page 47

5 Conexión del receptor digital
Existen varias maneras de conectar e incorporar el receptor digital a su sistema audiovisual.
Advertencia antes de proceder a la conexión:
- Desconecte todos los equipos (TV, VCR y DVD en su caso) de la toma de red.
- De momento no conecte el receptor digital al suministro de red.
- Revise el cableado por si hay alguna conexión que desee aprovechar de su configuración actual.
- Elija uno de los métodos de conexión para incorporar el receptor digital a su sistema A/V
actual. Lea los capítulos 5.1 y 5.2.
5.1 Conexión a un TV provisto de terminal SCART (Euroconector)
Conecte el receptor a la instalación existente como se indica a continuación:
EXT1
Español
- Conecte el cable de antena a la toma "AERIAL IN" del receptor digital.
- Conecte la salida "RF OUT" del receptor digital a la entrada "Aerial input" del TV por medio del
cable coaxial RF facilitado con la unidad.
- Conecte el terminal SCART "TV" del receptor digital al terminal SCART "EXT1" del TV por
medio del cable SCART (Euroconector) facilitado.
- Conecte todos los equipos a la red, excepto el receptor digital.
- Encienda el televisor y seleccione un canal.
CONEXIÓN DEL RECEPTOR DIGITAL 9
Page 48

- Conecte el receptor digital a la red. En el receptor aparecerá la pantalla de presentación (el
diodo de la izquierda se iluminará en verde).
- Vaya al capítulo 6 para proceder a la exploración de canales del receptor digital.
Si no aparece la pantalla de bienvenida, pulse dos veces el botón TV/STB.
Observación:
Con este tipo de conexión podrá:
- Ver TV digital terrestre a través del receptor.
- Seguir viendo TV analógica a través del televisor.
Español
5.2 Conexión a TV y VCR, ambos provistos de terminal SCART
(Euroconector)
Conecte el receptor a la instalación existente como se indica a continuación:
- Conecte el cable de antena a la toma "AERIAL IN" del receptor digital.
- Conecte la salida "RF OUT" del receptor digital a la entrada "Aerial input" del VCR por medio
del cable coaxial RF facilitado con la unidad.
- Conecte la salida "RF OUT" del VCR a la entrada "Aerial input" del TV por medio de un cable
coaxial RF.
- Conecte el terminal SCART " TV " del receptor digital al terminal SCART "EXT1" del TV por
medio del cable SCART (Euroconector) facilitado.
- Conecte el terminal SCART "VCR" del receptor digital al terminal SCART "EXT1" del VCR
(también denominado OUT) por medio de un cable SCART (Euroconector).
10 CONEXIÓN DEL RECEPTOR DIGITAL
Page 49

- Conecte todos los equipos a la red, excepto el receptor digital.
- Encienda el TV y seleccione un canal.
- Conecte el receptor digital a la red. En el receptor aparecerá la pantalla de presentación (el
diodo de la izquierda se iluminará en verde).
- Vaya al capítulo 6 para proceder a la exploración de canales del receptor digital.
Si no aparece la pantalla de bienvenida, pulse dos veces el botón TV/STB.
Observación:
1 Esta conexión también es aplicable si el VCR dispone de dos terminales SCART.
2 Si su equipo de vídeo (VCR) es S-Vídeo, consulte el capítulo 8.2.1.1 para ver otros ajustes y consulte
también el manual de uso del VCR.
3 Con este tipo de conexión podrá:
- Ver TV digital mientras graba TV analógica.
- Ver TV analógica mientras graba TV digital.
- Grabar el canal de TV digital que esté viendo.
- Ver cintas de vídeo.
5.3 Conexión a un sistema HI-FI o equipado con receptor de audio
(analógico/digital)
En función del sistema de alta fidelidad o receptor de audio existente, posiblemente disponga de
varias opciones para conectar el receptor digital.
- Conexión analógica
Conecte las salidas de audio I/D a las entradas de audio I/D correspondientes del equipo de
audio, utilizando un cable CINCH doble (no incluido). Consulte el manual de uso del sistema de
HI-FI/receptor de audio para identificar las entradas de audio analógico apropiadas.
Observación: Este tipo de conexión le permite controlar el volumen de audio y el silenciamiento desde el
mando a distancia tanto del receptor digital como del sistema HI-FI.
- Conexión digital
Conecte la salida de audio "DIGITAL" a la entrada de audio digital correspondiente del equipo
de audio, utilizando un cable CINCH simple (no incluido). Consulte el manual de uso del
sistema de HI-FI/receptor de audio para identificar la entrada de audio digital apropiada.
Observación: Este tipo de conexión sólo le permite controlar el volumen de audio y el silenciamiento
desde el mando a distancia del sistema HI-FI/receptor de audio. Consulte el manual de uso
correspondiente.
Español
5.4 Conexión de un proyector de vídeo al receptor para ver programas
de TV Digital en el proyector
Conecte el terminal SCART "TV" del receptor digital al proyector de vídeo.
Los proyectores de vídeo suelen utilizarse con señales en formato S-Vídeo. Si es el caso de su
proyector, observe las siguientes instrucciones de conexión e instalación:
- Conecte un cable SCART (Euroconector) al adaptador de S-Vídeo, entre el terminal TV SCART
del receptor digital y la entrada S-VIDEO del proyector.
- Instalación: Consulte los capítulos 8.2, 8.2.1 y 8.2.1.1 para cambiar el ajuste de salida de
TV/VCR del receptor digital a SVIDEO/PAL-CVBS.
CONEXIÓN DEL RCEPTOR DIGITAL 11
Page 50

6 Inicio rápido / primera instalación /
exploración de canales
6.1 Inicio rápido
Ya dispone de antena
La antena está correctamente orientada al transmisor
Español
terrestre de su zona. (1)
La conexión del receptor digital está conforme con el
esquema ilustrado en el capítulo 5.1 ó 5.2.
El receptor digital está encendido y ha mostrado la
pantalla de bienvenida (véase figura).
Está marcada la selección de idioma. Pulse el botón *
para abrir la ventana de selección (parte derecha de la
pantalla). Utilice los botones 8 o 9para elegir el
idioma deseado (1) y pulse +para guardar la opción
elegida. Aparecerá resaltada de nuevo la opción de
idioma.
Pulse el botón 9 para descender a la opción de país.
Pulse * para abrir la ventana de selección, utilice los
botones 8 y 9 para elegir el país, y pulse + para
almacenarlo. Aparecerá resaltada de nuevo la opción de
país.
Pulse el botón 9 para descender a la opción de
instalación, y pulse *para iniciar la exploración de
canales.
El receptor explora la(s) banda(s) de RF e informa del
curso de la exploración y de los canales encontrados.
Una vez completada la exploración:
- Si se ha realizado con éxito, los canales localizados se
muestran en la pantalla y el receptor digital sintoniza el
primero de la lista. En tal caso, continúe en el capítulo 7.
- Si la exploración no se ha completado con tenido éxito
y una ventana le indica que revise la señal, continúe en
el capítulo 6.2.
12 INICIO RÁPIDO
Observación:
(1) Si su país no está incluido en la lista, seleccione la opción
"Otro".
Si desea cambiar el país después de una primera instalación
correcta, deberá reiniciar el receptor (véase el capítulo 10.1) y
repetir el procedimiento (capítulo 6.1).
Page 51

6.2 Exploración incorrecta / comprobar
instalación / revisar señal de antenna
La exploración no se ha completado con éxito. Antes de
repetir, deberá comprobar los siguientes puntos:
- Revisar el cable de antena.
- Comprobar la conexión de la antena al receptor digital.
Consulte el esquema del capítulo 5.1 ó 5.2.
- Comprobar la calidad de la señal en el menú ilustrado a
la derecha:
Pulse el botón 9 para seleccionar la opción "Canal RF".
Pulse el botón * y desplácese con los botones 9 y 8
para seleccionar el número de canal RF deseado
correspondiente a su zona.
Compruebe la intensidad de la señal y la calidad en los
medidores de barras.
Si la señal es suficiente (medidores de color naranja o
verde), elija la opción "instalar" y seleccione "reinicio" para
volver a explorar los canales. Si la exploración concluye
con éxito, los canales localizados aparecerán en la pantalla
y el receptor digital sintonizará el primero de la lista.
Continúe en el capítulo 7.
Si la señal es defectuosa o inexistente (medidor en rojo o
no aparece ninguna barra), consulte el capítulo 6.3.
6.3 Exploración de nuevo infructuosa
No se han podido explorar los canales, y la circunstancia
se ha repetido después de comprobar la calidad de la
señal recibida por la antena.
O bien la antena no está orientada correctamente hacia el
transmisor de TV digital, o la instalación de antena
necesita una actualización, o no se halla en un área de
cobertura con recepción correcta de la señal de TV
digital.
Para identificar el problema, consulte a una empresa
instaladora cualificada.
Español
INICIO RÁPIDO 13
Page 52

7 Operaciones cotidianas
7.1 Encendido y apagado del
receptor (bajo consumo,
modo de espera)
DIODO IZQUIERDO ROJO ILUMINADO
Español
El receptor se encuentra en el modo de
bajo consumo.
Pulse el botón "LOW POWER" del frontal
del receptor para situarlo en modo de
espera.
Dispone de 5 minutos para encender el
receptor pulsando:
- Los botones P+, P-, BACK o uno
numérico del mando a distancia. También
puede pulsar los botones "+" o "-" del
panel frontal del receptor.
Observación: el mando a distancia no controlará
el receptor si éste se encuentra en el modo de
bajo consumo.
DIODO IZQUIERDO NARANJA ILUMINADO
El receptor se encuentra en el modo de
espera.
Para encender el receptor:
- Pulse uno de los siguientes botones del
mando a distancia: P+, P-, BACK o uno
numérico.
- O bien pulse "+" o "-" en el panel frontal.
Para situar el receptor en el modo de bajo
consumo (< 1 W):
- Pulse el botón "LOW POWER" del panel
frontal.
DIODO DERECHO VERDE ILUMINADO
(MODO TV) / DIODO INTERMITENTE
VERDE+NARANJA ILUMINADO (MODO
RADIO)
Está activado el modo de TV o de radio
Para poner el receptor en el modo de
espera:
- Pulse el botón de Standby
(apagado/espera) del mando a distancia.
Para situar el receptor en el modo de bajo
consumo (< 1 W):
- Pulse el botón "LOW POWER" del panel
frontal.
7.2 Selección de modo TV /
Radio
Si el receptor se encuentra en el modo TV:
- Pulse el botón TV/RADIO para cambiar al
modo RADIO.
Si el receptor se encuentra en el modo de
radio:
- Pulse el botón TV/RADIO para cambiar al
modo TV.
Observación: Los botones TV/Radio del panel
frontal y del mando a distancia tienen la misma
función.
7.3 Cambio de canal
7.3.1 Con los botones numéricos
Mientras está viendo TV digital u oyendo
radio digital:
- Utilice los botones numéricos para
seleccionar el canal deseado.
7.3.2 P+/P-
Mientras está viendo TV digital u oyendo un
programa de radio digital:
- Pulse P+ para seleccionar el siguiente
canal de la lista.
- Pulse P- para seleccionar el canal anterior
de la lista.
Observación: Los botones '-' y '+' del panel
frontal funcionan igual que los botones P- y P+
del mando a distancia.
7.3.3 Back (recuperación del último
canal)
Mientras está viendo TV digital u oyendo un
programa de radio digital:
- Pulse el botón BACK para seleccionar el
programa que estaba viendo u oyendo
antes del actual.
14 OPERACIONES COTIDIANAS
Page 53

7.3.4 Directorio de canales
Mientras está viendo TV digital u oyendo radio digital:
- Pulse OK para desplegar la lista de canales.
- Use los botones 8 y 9para seleccionar el canal
deseado.
- Pulse OK para previsualizar el canal seleccionado.
- Si pulsa OK de nuevo, verá/oirá el canal seleccionado
en pantalla completa.
7.4 Báner del directorio / más
información del programa actual
Cada vez que seleccione un nuevo canal, aparecerá un
báner en la parte inferior de la pantalla, mostrando:
- Nombre y número de canal.
- Nombres de programa actual y siguientes.
- Estado del canal: bloqueado o disponible.
- Hora de inicio del programa actual.
- Hora de inicio del siguiente programa.
- Hora actual.
Para obtener más información con el báner en pantalla:
- Pulse * para obtener más información del programa
actual, y pulse de nuevo el botón para informarse sobre
el siguiente canal.
- Pulse BACK para cerrar el báner del directorio.
Observación: Puede pulsar INFO tres veces para acceder
sucesivamente al báner, información adicional del canal actual y
más información del siguiente canal. Si pulsa INFO por cuarta
vez, regresará a la pantalla de TV digital.
7.5 Control de volumen - Vol+ / Vol- /
Mute
Mientras está viendo TV digital:
- Pulse Vol- para reducir el volumen
- Pulse Vol+ para elevar el volumen
- Pulse MUTE para silenciar el sonido, y MUTE de nuevo
para restablecerlo.
Español
Observación: El cambio de volumen se reproduce en una barra
gráfica en la pantalla, y el silenciamiento de audio se reconoce
por un icono en el ángulo superior derecho de la pantalla.
OPERACIONES COTIDIANAS 15
Page 54

Español
7.6 Selección de una lista de favoritos
Mientras está viendo TV digital u oyendo radio digital:
- Pulse el botón FAV durante más de dos segundos para
visualizar todas las listas de favoritos..
- Use los botones 9 y 8 para seleccionar una lista.
Pulse el botón OK para abrir la lista.
- Pulse de nuevo FAV para añadir o quitar favoritos.
Observación: las listas de favoritos vacías no se pueden abrir.
7.7 Cambio temporal de la selección de
subtítulos (circular)
Pulse el botón SUBTITULO:
- Seleccione uno de los idiomas de subtítulos disponibles.
- O bien desactive los subtítulos.
7.8 Cambio temporal de la selección de
idioma de audio (circular)
Pulse el botón I/II:
- Seleccione uno de los idiomas de audio disponibles.
7.9 Guía electrónica de canales
Mientras está viendo TV digital u oyendo radio digital:
- Pulse el botón GUIDE para abrir la guía de canales.
16 OPERACIONES COTIDIANAS
La pantalla actual corresponde a la lista de programas
denominada "Ahora":
- Pulse el botón * para consultar la lista de programas
"Siguientes".
La siguiente pantalla incluye un icono circular que señala
los programas que comenzarán antes de veinte minutos:
- Use los botones 9 y 8para seleccionar el canal
deseado.
- Pulse OK para ver u oír el canal seleccionado.
Page 55

7.10 Ajuste del temporizador /
recordatorio desde la guía /
directorio / báner cancelación de un evento
programado
PROGRAMACIÓN DE UN
TEMPORIZADOR DESDE EL BÁNER
- Pulse consecutivamente INFO, *,
TIMER para grabar el programa que se
está emitiendo ("ahora") en el canal
actual.
- O bien INFO, *, *, TIMER para grabar
el programa "siguiente" del canal actual.
PROGRAMACIÓN DE UN
TEMPORIZADOR DESDE EL
DIRECTORIO
- Pulse consecutivamente OK, *, TIMER
para grabar el programa actual ("ahora")
del canal seleccionado.
- O bien OK, *, *, TIMER para grabar
el programa "siguiente" del canal
seleccionado.
CANCELACIÓN DE UN
TEMPORIZADOR ACTIVADO
- El temporizador se ha activado y el
programa se graba mientras se está
viendo:
- La grabación se reconoce por los dos
diodos frontales, el derecho iluminado
en rojo y el izquierdo en verde.
- Pulse consecutivamente "TIMER, 0"
para anular el evento del temporizador
actual.
- El temporizador se ha activado y el
receptor está en el modo de espera:
- La grabación se reconoce por los dos
diodos frontales, el derecho iluminado
en rojo y el izquierdo en naranja.
- Pulse consecutivamente "TIMER, 0"
para anular el evento del temporizador
actual.
Español
PROGRAMACIÓN DE UN
TEMPORIZADOR DESDE LA GUÍA
- Pulse consecutivamente GUIDE, *,
TIMER para grabar el programa actual
("ahora") del canal seleccionado.
- O bien GUIDE, *, *, TIMER para
grabar el programa "siguiente" del canal
seleccionado.
Observaciones:
- Pulse dos veces TIMER en el programa
"siguiente" para fijar un RECORDATORIO.
- Pulse tres veces TIMER para cancelar el
RECORDATORIO.
- El temporizador / recordatorio quedará
identificado por un icono.
OPERACIONES COTIDIANAS 17
Page 56

Español
7.11 Notificación de avisos / Grabación Recordatorio - Nuevos servicios Descarga de software
Un mecanismo de alarma del sistema le ofrece avisos
importantes en la pantalla. Para no interferir con el
programa que se esté viendo, primero aparece un icono
animado en el ángulo superior derecho de la pantalla
indicándole la existencia de un aviso. Deberá pulsar el
botón INFO para leer el mensaje.
7.11.1 Grabación / Temporizador
Si está viendo un programa y el temporizador está a
punto de activarse, recibirá un aviso.
El aviso puede emitirse antes de la hora de comienzo.
Esta opción puede configurarse en el menú de
preferencias del temporizador.
7.11.2 Fallo de grabación
Si se produce un error durante una grabación, recibirá un
mensaje.
7.11.3 Recordatorio
Para los programas que no quiera perderse, puede crear
recordatorios. Se generará el correspondiente aviso.
El aviso se emitirá antes de la hora de inicio del
recordatorio.
Esta opción puede configurarse en el menú de
preferencias del temporizador.
18 OPERACIONES COTIDIANAS
7.11.4 Lista de nuevos canales
Cuando el receptor está en el modo de espera,
comprobará por usted la presencia de nuevos canales. Se
generarán los siguientes avisos para informarle de su
disponibilidad en la lista de nuevos favoritos.
7.11.5 Descarga de software
Cuando el receptor está en el modo de espera,
comprobará la presencia de nuevo software en la
emisión.
Se generará un aviso tras la detección de nuevo software
y tras su correcta actualización.
Page 57

7.12 Uso del botón TV / STB
Este botón se utiliza para alternar entre el visionado de
canales digitales a través del receptor digital y los canales
analógicos normales del televisor.
Mientras está viendo TV digital:
- Pulse el botón TV/STB para cambiar a TV analógica.
- Púlselo de nuevo para restablecer la TV digital.
7.13 Visionado de canales bloqueados
Si ha seleccionado un canal bloqueado, deberá
desbloquearlo para poder verlo:
- El icono de un candado y un campo del báner le pedirán
que introduzca un código de cuatro cifras
(predeterminado: 0000).
- Introduzca el PIN para desbloquear y ver el canal
seleccionado.
7.14 ¿Cómo reinicio el receptor si se
queda bloqueado?
En el improbable caso de que el receptor se bloquee
(esto es, ya no se controla desde el mando a distancia),
simplemente proceda como se indica a continuación:
Pulse el botón "LOW POWER" del panel frontal del
receptor durante al menos 5 segundos. Después de
liberarlo, espere a que aparezca una indicación estable en
la pantalla frontal (diodo izquierdo iluminado en naranja
modo de espera o en verde modo TV). Ahora podrá
reanudar el funcionamiento normal.
Español
OPERACIONES COTIDIANAS 19
Page 58

8 Cambio de configuración del receptor
Los ajustes del receptor se pueden modificar para
adaptarlo a las condiciones de la antena, a la configuración
de audio o vídeo, o a otros factores o preferencias
personales.
8.1
Navegación por el menú / Selección de
Español
opciones / Cambio de ajustes /
Almacenamiento o cancelación de los
cambios
Aspectos básicos de la navegación por el menú:
- Desde el modo de visionado normal, pulse el botón
MENU para abrir el menú principal. El botón de
selección naranja aparecerá en la primera opción de
menú de la ventana.
- Utilice los botones 9 y 8 para subir y bajar el
selector naranja a la opción de menú deseada..
Cambio de ajuste:
- Use el botón * para abrir el submenú, y repita la
operación tantas veces como sea preciso para
desplazarse hasta la opción deseada.
- Utilice los botones 9 y 8 para seleccionar el valor
deseado.
Almacenamiento o cancelación de los cambios:
- Pulse el botón BACK para cancelar los cambios, o el
botón + para guardarlos.
En ambos casos, el selector naranja ascenderá un nivel
en el menú.
- -Si el menú está abierto, pulse el botón MENU para
cerrarlo.
Observaciones:
- Para abrir una opción de menú marcada con un icono de
bloqueo, será necesario introducir un código PIN.
- A fin de evitar daños en la pantalla del TV, los mensajes y
menús se cierran automáticamente a los 30 minutos.
El "puck" siempre está presente cuando se abre el menú,
y contiene cinco elementos:
- La bola indica la posición seleccionada.
- Los cursores 8, 9, + y * indican las direcciones
de navegación posibles. Si el cursor aparece en gris,
significa que no se puede desplazar en esa dirección.
Observación:
- El "puck" siempre aparece en la ventana izquierda del menú,
como se muestra en la ilustración.
20 CAMBIO DE CONFIGURACIÓN DEL RECEPTOR
Page 59

8.2 Cambio de ajustes de instalación
Pulse el botón MENU para abrir el menú principal.
Pulse el botón 9 4 veces para seleccionar "instalación".
Observación: Si está activado el control infantil, deberá
introducir el código PIN para poder acceder a las opciones de
este apartado del menú.
Pulse el botón * para acceder a las opciones de instalación.
Aparecerá seleccionada la opción de ajustes del receptor
del menú de instalación.
8.2.1 Ajustes del receptor
En el menú de instalación, se ha seleccionado "Ajustes del
receptor" y pulsado el botón *.
Aparece un nuevo menú con las siguientes opciones:
- Salida de señal TV/VCR.
- Formato de imagen del TV.
- Formato de sonido del TV.
- Volumen estándar del sonido del TV.
- Formato de sonido del VCR.
- Control del VCR para grabación.
Ahora está seleccionada la opción "Salida TV/VCR".
Puede recorrer la lista con los botones 9 y 8 para
elegir la opción deseada.
En cada caso podrá pulsar el botón * para acceder a los
submenús.
8.2.1.1 En la opción "Salida TV/VCR" se determina el
formato de la salida de señal de los terminales SCART (Euroconector) del TV y el VCR:
- RGB/PAL-CVBS
- RGB/SVHS
- PAL-CVBS/PAL-CVBS
- PAL-CVBS/SVHS
- SVIDEO/PAL-CVBS
- SVIDEO/SVHS
- SECAM-CVBS/SECAM-CVBS
- RGB/SECAM-CVBS
Español
Observación: El formato indicado delante del "/" se refiere a TV
SCART, y el de detrás a VCR SCART.
Observación: Recomendamos usar el ajuste "RGB/PAL-CVBS"
para obtener la mejor calidad de imagen en la pantalla del TV.
Si se utiliza un proyector de vídeo en lugar de un televisor, se
aconseja la opción SVIDEO/PAL-CVBS (instrucciones de conexión
e instalación en el capítulo 5.4).
Observación: Si el VCR es S-Vídeo, también podría usar la opción
RGB/SVHS. Consulte el manual de uso de su VCR/grabadora de
vídeo.
CAMBIO DE CONFIGURACIÓN DEL RECEPTOR 21
Page 60

Español
8.2.1.2 En "Formato TV" se determina el formato de
la salida de vídeo, con las siguientes opciones:
- 16/9 (panorámico)
- 4/3 - Letterbox
- 4/3 - Pan & Scan
8.2.1.3 En "Sonido TV" se determina el tipo de sonido del TV:
- Mono
- Estéreo
8.2.1.4 En "Volumen predeterminado" se ajusta el
volumen de salida del TV.
Utilice los botones 8 y 9 para establecer el volumen
predeterminado deseado
8.2.1.5 En "Sonido VCR" se determina el tipo de
sonido del VCR:
- Mono
- Estéreo
8.2.1.6 En "Control VCR" se determina el control de
la grabación en vídeo:
- Desactivado
- Grabación sencilla ("Prepare Record")
- Record Link
Si desea más detalles, consulte el capítulo 10.4.
Observación: Este ajuste también es aplicable a los DVDgrabadores de Philips y equipos de otras marcas compatibles
con uno de los dos tipos de control.
8.2.2 Instalación de canales
En el menú de instalación, se ha seleccionado "Canales" y
pulsado el botón *.
Aparece un nuevo menú con las siguientes opciones:
- Instalación de los canales de TV.
- Instalación de los canales de radio.
- Activar o desactivar la actualización automática de
canales.
- Activar o desactivar la instalación de canales
codificados.
- Iniciar la búsqueda de nuevos canales.
Ahora está seleccionada la opción "Canales de TV":
- Puede recorrer la lista con los botones 9 y 8 para
elegir la opción deseada.
- En cada caso podrá pulsar el botón * para acceder a
los submenús.
22 CAMBIO DE CONFIGURACIÓN DEL RECEPTOR
Page 61

8.2.2.1 En "Canales de TV" aparece la lista completa
de canales localizados tras la exploración.
Puede recorrer la lista con los botones 9 y 8 para
seleccionar un canal.
Con el botón OK puede habilitar o deshabilitar el canal.
IMPORTANTE: Los canales sin marca están deshabilitados y
por tanto no están visibles en todas las listas de canales.
8.2.2.2 En "Canales de radio" aparece la lista completa de canales localizados tras la exploración.
Puede recorrer la lista con los botones 9 y 8 para
seleccionar un canal.
Con el botón OK puede habilitar o deshabilitar el canal.
IMPORTANTE: Los canales sin marca están deshabilitados y
por tanto no están visibles en todas las listas de canales.
8.2.2.3 En "Modo de actualización" puede activar o
desactivar la actualización automática de
canales.
Puede recorrer la lista con los botones 9 y 8 para
elegir la opción deseada.
Pulse el botón OK para guardar la opción elegida.
8.2.2.4 En "Nuevos canales" puede activar o desactivar la instalación de canales codificados.
Puede recorrer la lista con los botones 9 y 8 para
elegir la opción deseada.
Pulse el botón OK para guardar la opción elegida.
8.2.2.5 En "Actualizar ahora".
Pulse el botón OK para iniciar la nueva actualización de
canales.
Español
8.2.3 Compruebe la calidad de señal / Revise la
antena
En el menú de instalación, ha seleccionado "Posición de
antena" y pulsado el botón *.
Este menú se usa como ayuda para ubicar la antena y
comprobar la disponibilidad de señales en un canal RF
específico.
Emplazamiento de la antena:
- Dos barras gráficas le ayudan a orientar la antena con
las lecturas de intensidad y calidad de la señal.
- Si la calidad de la señal es media o alta, se indican los
canales disponibles.
CAMBIO DE CONFIGURACIÓN DEL RECEPTOR 23
Page 62

Español
Activando la salida de sonido, una señal acústica modulada
le ayudará a determinar la mejor posición de la antena sin
necesidad de mirar a la pantalla del TV.
También puede seleccionar el canal RF que desea utilizar
durante la orientación de la antena.
8.2.4 Actualización de software
Para mantenerle al día en el desarrollo de la TV Digital y
poder disfrutar de las nuevas prestaciones disponibles, el
receptor está preparado para recibir actualizaciones de
software. Pero no se preocupe Esta actualización
forma parte de las transmisiones normales. Simplemente
siga las instrucciones de la pantalla.
Observación: Las actualizaciones mejorarán el sistema y
garantizarán un funcionamiento homogéneo del receptor con el
desarrollo de nuevas versiones de software. Le recomendamos
que acepte todas las descargas que se le ofrezcan.
En el menú de instalación, ha seleccionado "Software" y
pulsado el botón *.
Aparece un nuevo menú con estas opciones:
- Indicar la versión actual de software .
- Indicar si se detecta una nueva actualización de
software.
- Confirmar que se acepta la actualización. En tal caso, la
descarga tendrá lugar cuando el equipo entre en modo
de espera.
Ahora está seleccionada la opción "Actualización de
software".
Puede pulsar el botón * para acceder al submenú.
El receptor está configurado para aceptar actualizaciones
del DTR 1000 automáticamente. Si quiere recibir un aviso
cada vez que haya disponible una nueva actualización,
seleccione "Manual".
8.2.5 temporizadores (programar, borrar, edi-
tar, conflictos)
Pulse MENU para abrir el menú principal.
Aparece seleccionada la opción "temporizadores".
Pulse * para acceder al submenú.
Ahora estará seleccionada la opción "Editar un
temporizador".
24 CAMBIO DE CONFIGURACIÓN DEL RECEPTOR
Page 63

8.2.6 Editar un temporizador
Desde el submenú seleccionado de "Editar un
temporizador".
Seleccione un "temporizador libre" que desee editar, u
otro que desee modificar, con los botones 9 y 8.
Pulse * para acceder a las opciones detalladas.
Se pueden modificar los siguientes campos:
- Tipo (grabación o recordatorio)
- Tipo de canal (TV o radio)
- Canal para grabar
- Fecha de grabación (hasta un año de antelación)
- Hora de inicio
- Hora de finalización
- Configuración de repetición (una vez, todos los días,
laborables, semanal)
- Control infantil (activado o desactivado)
Observación: "Laborables" se usa para grabar series que se
emiten de lunes a viernes.
8.2.7 Supresión de un temporizador desde el
menú
Desde el submenú seleccionado de "Suprimir un
temporizador".
Seleccione el evento que desea suprimir con los botones
9 y 8
Pulse el botón OK para suprimirlo.
Español
8.2.8 Desactivación de grabación (gestión de
conflictos)
Concepto:
- Los temporizadores se pueden activar y desactivar.
- Un temporizador puede activarse únicamente si no
entra en conflicto con otro.
- Los temporizadores definidos por otro medio distinto
de este menú se crearán siempre, pero sólo se
activarán si no entran en conflicto con otro ya
existente.
Activación y desactivación:
- Desde el submenú seleccionado de "Desactivar
grabación".
- Seleccione el temporizador que desea desactivar,
utilizando los botones9 y 8.
- Pulse el botón OK para cambiar el estado del
temporizador, si bien no se podrá activar si entra en
conflicto con otro ya existente.
CAMBIO DE CONFIGURACIÓN DEL RECEPTOR 25
Page 64

Las listas de favoritos permiten
navegar fácilmente por los canales
preferidos.
Con esta función podrá establecer
varias listas de canales preferidos de
radio y TV.
Sobre la activación de estas listas de
favoritos, consulte el capítulo 7.6.
Español
8.3 Edición de listas de favoritos
Pulse el botón MENU para abrir el menú principal.
Pulse una vez el botón 9 para situarse sobre "favoritos".
Pulse el botón * para acceder al submenú de
"favoritos".
Ahora está seleccionada la opción "Editar favoritos de
TV".
Puede recorrer las opciones con los botones 9 y 8
para elegir las listas de TV o RADIO.
Observación: Como el sistema de menús es similar para las
listas de radio y TV, sólo nos referiremos a las de televisión en
los siguientes capítulos.
8.3.1 Editar / Cambiar nombre en listas de
favoritos - Reordenar / Renumerar canales
Desde el submenú de favoritos, seleccionada la opción
"Editar listas de TV".
Pulse el botón * para acceder al submenú de "Editar
listas de TV".
Puede recorrer las opciones con los botones 9 y 8
para elegir una lista de favoritos de TV.
Pulse el botón * para acceder a la lista seleccionada y
editarla.
Se abrirá el submenú de "Editar listas de TV", con la
opción "Favoritos" seleccionada.
Aparecerá el contenido de la lista de favoritos de TV
seleccionada.
Puede recorrer las opciones con los botones 9 y 8
para realizar la selección.
8.3.1.1 Edición de la lista de favoritos seleccionada
Desde el submenú de "Editar listas de TV", con la opción
"Favoritos" seleccionada.
Pulse el botón * para acceder al submenú de favoritos.
Puede recorrer las opciones con los botones 9 y 8
para elegir el canal o desplazarse por la lista instalada de
canales de TV.
Con OK puede marcar o desmarcar el canal de TV
seleccionado.
26 CAMBIO DE CONFIGURACIÓN DEL RECEPTOR
Page 65

8.3.1.2 Reordenación de canales en una
lista de favoritos
Desde el submenú de "Editar listas de TV",
con la opción "Favoritos" seleccionada.
Pulse una vez el botón 9 para seleccionar
"Reordenar".
Pulse el botón * para acceder al submenú.
A diferencia de la primera opción de
"favoritos", sólo aparecerán los canales
marcados de la lista de favoritos de TV
seleccionada. Para cambiar un canal de
posición en la lista, siga el procedimiento
descrito a continuación:
- Recorra la lista con los botones 9 y 8
para seleccionar el canal que desea
cambiar de posición.
- Pulse el botón OK para seleccionarlo y
proceder a su traslado.
- Seleccione la nueva posición
desplazándose con los botones 9 y 8
- Pulse el botón OK para guardarlo en la
nueva posición seleccionada.
Observación: Si la lista de favoritos de TV
seleccionada está vacía o sólo contiene un
elemento, el acceso al submenú de reordenación
quedará bloqueado.
8.3.1.3 Renumeración de canales
favoritos
Desde el submenú de "Editar listas de TV",
con la opción "favoritos" seleccionada.
Pulse dos veces el botón 9 para
seleccionar "Renumerar".
Pulse el botón * para acceder al submenú.
A diferencia de la primera opción de
"favoritos", sólo aparecerán los canales
marcados de la lista de favoritos de TV
seleccionada. Para renumerar un canal, siga
el procedimiento descrito a continuación:
- Recorra la lista con los botones 9 y 8 y
seleccione el canal que desea cambiar de
número.
- Introduzca el nuevo número con los
botones numéricos.
- Pulse el botón OK para almacenar el
nuevo número.
8.3.1.4 Cambio de nombre de una lista
de favoritos
Desde el submenú de "Editar favoritos de
TV", con la opción "Favoritos" seleccionada.
Pulse tres veces el botón 9 para
seleccionar "Nombre".
Pulse el botón * para acceder al submenú
de "Nombre".
Ahora podrá modificar el nombre de la lista
de favoritos seleccionada, empezando por el
primer carácter
Utilice los botones 9 y 8para desplazarse
y cambiar el carácter [09 , AZ].
Use el botón * para avanzar a la siguiente
posición.
Use el botón + para retroceder a la
posición anterior.
Cuando termine, pulse el botón OK para
guardar los cambios.
8.3.2 Edición de listas preferidas
Desde el submenú de "Favoritos", con la
opción "Editar favoritos de TV"
seleccionada.
Pulse dos veces el botón 9para seleccionar
"Listas de TV preferidas".
Pulse el botón * para acceder a la lista de
TV preferidas y proceder a su edición.
Utilice los botones 9 y 8 para
desplazarse.
Use el botón OK para marcar o desmarcar
la lista de TV seleccionada.
Español
CAMBIO DE CONFIGURACIÓN DEL RECEPTOR 27
Page 66

Español
8.4 Control infantil / Código PIN Bloqueo de programa Temporizador infantil
Pulse el botón MENU para abrir el menú principal.
Pulse dos veces el botón 9 para seleccionar "control
infantil".
La pantalla solicitará el código PIN.
Introduzca el código predeterminado 0000.
Pulse el botón * para acceder a las opciones de "control infantil".
Aparecerá seleccionada la opción "Cambiar código PIN".
Puede recorrer las opciones con los botones 9 y 8
para realizar su selección.
8.4.1 Cambio de PIN
Pulse dos veces el botón * para abrir el menú "Cambiar
código PIN":
- Introduzca el nuevo código PIN.
- Confirme el nuevo código.
- Memorice el código introducido.
8.4.2 Control infantil
Esta opción le permite establecer un nivel de seguridad
para el uso del código PIN. Las posibilidades son:
- Activado, el código PIN se solicita siempre
- Activado, introducción de código válida durante 20
minutos
- Activado, código PIN válido hasta entrada en modo de
espera
- Desactivado (modo de seguridad anulado)
8.4.3 Nivel de madurez
Esta opción le permite determinar la edad (nivel de
madurez) a partir de la cual se requerirá el código PIN.
Seleccione la edad que mejor se adapte a sus
circunstancias, o bien desactive la opción.
Observación: Esta función controla automáticamente el bloqueo
de canales siempre que la señal digital incluya información de
nivel de madurez.
8.4.4 Bloqueo de canales de TV o radio
Estas opciones le permiten seleccionar canales de radio o
televisión para bloquearlos.
Siga las instrucciones de la pantalla para bloquear los
canales. Los canales que se encuentren en las listas de
favoritos tendrán el mismo tratamiento.
28 CAMBIO DE CONFIGURACIÓN DEL RECEPTOR
Page 67

8.4.5 Edición de un temporizador infantil
Esta opción le permite establecer una ventana de tiempo
autorizado desde la que será preciso introducir el código PIN.
Siga las instrucciones de la pantalla para determinar:
- Fecha
- Hora de inicio
- Hora de finalización
- Repetición
Observación: Se pueden configurar tres temporizadores infantiles.
8.4.6 Supresión de un temporizador infantil
Esta opción le permite anular un temporizador infantil.
8.5 Preferencias / Idioma - Temporizador
- Báner
Pulse MENU para abrir el menú principal.
Seleccione "Preferencias".
Pulse el botón * para acceder al submenú de
"Preferencias".Aparecerá seleccionada la opción "Preferencias
de idioma".
Puede recorrer las opciones con los botones 9 y 8
para realizar la selección.
8.5.1 Preferencias de idioma
Esta opción le permite:
- Elegir el idioma deseado para los menús
- Elegir el idioma de audio deseado
- Elegir el idioma preferido para los subtítulos
- Activar o desactivar los subtítulos
Español
8.5.2 Preferencias de temporizador
Esta opción le permite:
- Elegir cuándo desea recibir un aviso o un recordatorio
- Elegir cuándo desea recibir el aviso de inicio de grabación
- Determinar la presentación del programa que se va a
grabar. Así podrá grabar unos segundos del báner del
programa para identificarlo fácilmente durante su
reproducción.
- Introducir la diferencia horaria (entre la hora local y la
del meridiano de Greenwich). Esta opción estará
disponible si el receptor no puede capturar
automáticamente este parámetro de la emisión.
8.5.3 Preferencias de báner
Esta opción le permite:
- Establecer la duración del báner entre 3 y 10 segundos.
- Activar o desactivar la transparencia del báner.
CAMBIO DE CONFIGURACIÓN DEL RECEPTOR 29
Page 68

9 Árbol de menú
Edición
Español
MENÚ
PRINCIPAL
Timers
Favoritos
Control infantil
Preferencias
Instalación
Suprimir
Desactivar timer
Editar listas TV
Editar listas radio
Activar listas TV
Activar listas radio
Código PIN
Control infantil
Nivel de madurez
Bloq. canales TV
Bloq. canales radio
Editar temporizador
Suprimir temporizador
Idioma
Timers
Báner
Ajustes del receptor
Canales
Posición de antena
Software
Menú
Audio
Subtítulos
Activar subtítulos
Recordatorio
Aviso de grabación
Grabación del báner
Zona horaria
Duración
Transparencia
Salida de TV/VCR
Formato de TV
Audio
Volumen
Audio del VCR
Control del VCR
Para abrir una opción del menú señalizada
con un candado es necesario introducir el código PIN.
30 ÁRBOL DE MENÚ
Actualizar ahora
Software actual
Nuevo software
Actualización
Page 69

10 Configuración avanzada
10.1 Reinicio
El asistente para la instalación aparece una
sola vez la primera vez que se enciende el
receptor.
Si desea reiniciar el receptor y restablecer
el modo original de fábrica, siga este
procedimiento:
Desconecte el receptor de la red.
Mantenga pulsado el botón '+' del panel
frontal mientras vuelve a conectar el
receptor a la toma de alimentación.
El diodo izquierdo comenzará a parpadear
en naranja mientras el derecho permanece
apagado.
Libere el botón '+' del panel frontal.
Pulse brevemente el botón '+' del panel
frontal.
El diodo derecho se ilumina en rojo, y el
izquierdo en rojo intermitente.
Introduzca el siguiente código desde el
mando a distancia: '9' '9' '0' '0'.
Una vez introducido, el diodo izquierdo se
iluminará en verde. Si el código es
incorrecto, el diodo izquierdo permanecerá
de color rojo.
Espere a que el receptor se reinicie y
muestre en pantalla el asistente de primera
instalación.
Observación: Después de ejecutar esta
operación, el código PIN también se habrá
reiniciado a su valor original de fábrica ('0', '0',
'0', '0'), y todas las listas de favoritos habrán
quedado borradas.
10.2 Cambio de configuración
del mando a distancia
Si tiene otros equipos en casa y el mando
del receptor Philips interfiere con ellos,
puede cambiar su configuración.
Cambio de configuración del mando a
distancia:
- Pulse simultáneamente los botones
numéricos 1 y 3 durante tres segundos.
- Libere los dos botones al mismo tiempo.
- Introduzca el nuevo ajuste antes de 60
segundos:
- Pulsando el botón numérico 4
(correspondiente al nuevo ajuste)
- O pulsando el botón numérico 3 para
restablecer el ajuste original de fábrica.
Observación: La primera vez que se activa el
mando a distancia (o si se cambian las pilas
mientras se pulsa un botón), se restablece el
ajuste original de fábrica (valor 3).
Cambio de configuración del control
remoto del receptor:
- Después de cambiar la configuración del
mando a distancia:
- Desconecte el receptor de la red.
- Mantenga pulsado el botón '+' del
panel frontal mientras vuelve a
conectar el receptor a la red
- hasta que el diodo multicolor
parpadee en naranja mientras el diodo
rojo permanece iluminado en rojo.
- A continuación libere el botón '+'.
- Pulse el botón OK del mando a distancia.
- El diodo multicolor se iluminará en
verde si el nuevo código es válido.
- El diodo multicolor se iluminará en rojo
si el código recibido no es válido. En tal
caso, el receptor utilizará el ajuste de
fábrica del mando a distancia.
10.3 Si olvida el código PIN /
Código PIN maestro
En caso de no recordar el código PIN,
existe la posibilidad de restablecer el código
predeterminado original ('0', '0', '0', '0').
Para reiniciar el código PIN, deberá
introducir el código maestro en cualquiera
de los menús que solicitan una clave. De
esta forma se aceptará el código y se
restablecerá el PIN predeterminado del
receptor.
El código PIN maestro es el siguiente:
('ROJO', '3', '8', '9', '5')
Observación: Guarde en un lugar seguro este
código secreto para evitar que lo usen los niños.
Español
CONFIGURACIÓN AVANZADA 31
Page 70

10.4 Más sobre grabación / Grabación sencilla - Control del VCR
10.4.1 Conexión para la grabación sencilla
Esta conexión permite la grabación automática sin necesidad de programar el vídeo. Antes de
elegir este método:
- Consulte el manual de uso del grabador VCR/DVD para ver si admite esta función y cómo se
usa. La mayoría de los grabadores VCR y DVD de Philips son compatibles con una de las dos
Español
opciones de grabación sencilla.
- Compruebe que tanto el TV como el VCR están equipados con dos conectores SCART
(Euroconectores).
Incorpore el receptor a su instalación como se indica a continuación.
- Conecte la antena a la toma "AERIAL IN" del receptor digital.
- Conecte la salida "RF OUT" del receptor digital a la entrada "Aerial input" del VCR por medio
del cable coaxial RF facilitado con el receptor.
- Conecte la salida "RF OUT" del VCR a la entrada "Aerial input" del TV con un cable coaxial RF.
- Conecte el terminal SCART "TV" del receptor digital al terminal SCART "EXT1" del TV por
medio del cable SCART facilitado con el receptor.
- Conecte el terminal SCART "VCR" del receptor digital al terminal SCART "EXT2" del VCR
(también denominado "IN") utilizando un cable SCART.
- Conecte el terminal SCART "EXT1" del VCR (también llamado "OUT") al terminal SCART
"EXT2" del TV utilizando un cable SCART.
- Conecte todos los equipos a la red, excepto el receptor digital.
32 CONFIGURACIÓN AVANZADA
Page 71

- Encienda el TV y seleccione un canal.
- Conecte el receptor digital a la red. En el
receptor aparecerá la pantalla de
presentación (el diodo de la izquierda se
iluminará en verde).
- Vaya al capítulo 7 para proceder a la
exploración de canales del receptor digital
si aún no lo ha hecho...
Observación:
- Con esta conexión podrá...
- Ver TV digital mientras graba TV analógica.
- Ver TV analógica mientras graba TV digital.
- Grabar el canal de TV digital que esté viendo
sin programar el vídeo.
10.4.2 Ajustes de receptor digital y
VCR
Consulte el capítulo 8.2.1.6 para activar la
función de grabación sencilla del receptor
digital.
Según la marca y el tipo de vídeo, deberá
ajustar el control VCR como "Preparar
grabación" o "Record Link". Consulte el
manual de uso del VCR o pruebe ambas
opciones para determinar la más apropiada.
Configure el vídeo de manera que permita
el control por parte del receptor digital.
10.4.3 Cómo realizar una grabación
con la función de control VCR
El receptor digital, el TV y el vídeo están
conectados como se indica en el capítulo
10.4.1-2.
Ha programado un temporizador en el
receptor digital.
A las horas programadas, el vídeo inicia y
detiene la grabación, bajo el control del
receptor digital. Ya no es necesario
programar el vídeo para grabar canales de
TV digital.
10.4.4 Temporizador / Indicador del
panel frontal
Información de los diodos del panel frontal:
Mientras se está ejecutando un
temporizador, el receptor queda bloqueado
para evitar daños accidentales en la
grabación.
Para indicar que el receptor está grabando,
los diodos del panel frontal aparecen de la
siguiente forma:
- Diodo derecho iluminado en rojo
- Diodo izquierdo multicolor iluminado en
naranja para la grabación durante el modo
de espera, o en verde para la grabación
con visionado.
10.4.5 Cancelación de un temporizador activo
Mientras se está ejecutando un programa
del temporizador, el receptor queda
bloqueado para evitar daños accidentales en
la grabación.
El siguiente procedimiento le permitirá
cancelar el temporizador en curso:
- Pulse el botón 'Timer'.
- Pulse el botón numérico '0'.
- El receptor queda desbloqueado.
10.4.6 Errores durante la grabación
Se pueden producir tres tipos de errores
durante la grabación:
- Pérdida de la señal de entrada.
- Corte de alimentación.
- Canal bloqueado.
El receptor Philips puede detectar estos
errores durante la grabación, y comunicarlos
la próxima vez que se grabe mediante un
aviso.
Español
CONFIGURACIÓN AVANZADA 33
Page 72

11 Guía de solución de problemas
¿Ha surgido algún problema con el receptor digital? Antes de nada compruebe los siguientes
puntos:
Problema Posible causa Medida
No hay imagen, no hay sonido,
o no hay indicaciones en el
Español
panel frontal.
No hay imagen, no hay sonido,
pero el diodo izquierdo del
panel frontal está iluminado en
naranja.
No hay respuesta tras pulsar
un botón del mando, y el diodo
derecho rojo está iluminado.
No hay imagen, no hay sonido,
pero el panel frontal tiene el
diodo izquierdo iluminado en
verde.
No funciona el mando a
distancia.
El receptor no está conectado
a la red. No hay iluminado
ningún diodo en el panel
frontal.
El receptor está en modo de
espera.
El receptor está en modo de
bajo consumo.
Está viendo televisión analógica
estándar.
La conexión SCART al TV es
incorrecta o está suelta.
El TV no tiene seleccionado el
canal AV/EXT correcto.
Temporizador en ejecución,
receptor bloqueado, diodos del
panel frontal iluminados en
verde/rojo o naranja/rojo.
Las pilas del mando están mal
insertadas o agotadas.
Revise la conexión de
alimentación y pulse LOW
POWER en el frontal del
receptor.
Pulse P+ o P-, o un botón
numérico, para encender el
receptor.
Pulse el botón Low Power del
panel frontal y después un
botón numérico del mando
para reactivar el receptor.
Pulse el botón TV/STB del
mando a distancia.
Revise la conexión SCART del
TV, observando que los cables
estén bien conectados a los
terminales. Pruebe a
seleccionar manualmente el
canal AV/EXT en el TV.
Pulse consecutivamente
"TIMER" y "0" para cancelar el
temporizador y desbloquear el
receptor.
Revise el estado de las pilas y
sustitúyalas si es necesario.
No está apuntando con el
mando al receptor.
No encuentra todos los canales
que cree que deberían estar
disponibles.
34 GUÍA DE SOLUCIÓN DE PROBLEMAS
La señal de la antena puede ser
débil.
La antena puede estar mal
situada, o la emisora puede no
estar transmitiendo.
Procure apuntar con el mando
al receptor y no al televisor.
Pruebe a resintonizar el
receptor como se indica en el
capítulo 7. Si siguen faltando
canales, quizá tenga que
reajustar la antena.
Contacte con su instalador
cualificado local.
Page 73

Problema Posible causa Medida
A veces se ve un patrón
cuadrado en la pantalla, la
imagen se congela, o aparece la
imagen de un TV con
interferencias.
Podría ser un problema de
transmisión.
La antena puede haberse
movido, por ejemplo por las
condiciones atmosféricas.
La conexión de la antena se
puede haber aflojado o
desprendido.
Suele ser una situación
temporal y se soluciona sin
hacer nada.
Compruebe la calidad de la
señal y reoriente la antena si es
necesario.
Revise todas las conexiones de
antena y compruebe que están
firmemente insertadas en los
terminales.
No puedo seleccionar todos
mis canales, y los botones P+/o arriba/abajo no funcionan
siempre.
Aunque uso los botones
numéricos, no puedo acceder a
un canal concreto.
He olvidado el código de
control infantil.
Programé el temporizador,
pero no se grabó lo que yo
quería.
Ha cambiado el orden de los
canales.
Los menús de pantalla no se
ven tan nítidos como sería de
esperar.
Hay algunos canales
seleccionados como favoritos,
y el modo de favoritos está
activado.
Está activado el bloqueo infantil
para este canal, y una ventana
le solicita el código de acceso.
El vídeo se programó
incorrectamente.
Se han reorganizado según se
describe en la sección 8.3.1.2.
Si ha realizado una conexión
SCART y el televisor es
compatible con RGB, podría
ser un fallo de configuración.
Ha conectado el terminal
SCART "TV" del receptor a un
terminal SCART del televisor
que no es compatible con
RGB.
Use el botón Fav para
seleccionar otra lista de
favoritos. Use la lista Todo TV
para ver todos los canales
posibles de televisión.
Introduzca el código para
acceder al canal o quítelo de la
lista de canales bloqueados.
Más detalles en las secciones
8.4.2.
Véase la sección 10.3
Compruebe que el vídeo está
configurado igual que el
receptor digital.
También puede usar una de las
opciones de grabación sencilla
para controlar
automáticamente el VCR
(véase el capítulo 10.4).
Consulte dicha sección para
volver a ordenarlos.
Consulte el capítulo 8.2.1 y
cambia el ajuste "Salida
TV/VCR" a RGB/CVBS.
Compruebe si el terminal SCART
"TV" del TV es compatible con
RGB. Si no lo es, consulte el manual
de uso del TV para cambiar la
conexión SCART al TV.
Español
En algunos canales, la imagen
parece alargada o aplastada.
Probablemente la emisión sea
en formato panorámico y la
configuración del receptor no
sea la correcta.
GUÍA DE SOLUCIÓN DE PROBLEMAS 35
Compruebe la opción "Formato
de TV" del receptor siguiendo las
instrucciones del capítulo 8.2.1.
Si su TV es panorámico, quizá
también tenga que revisar la
configuración.
Page 74

12 Especificaciones técnicas
Este producto cumple los requisitos de la directiva 95/47/EC.
Decodificación de vídeo
- Salida RF en bucle
- Guía electrónica de
- Compatible con MPEG-2
DVB hasta MP@ ML
- Lista de programas que
- Bit rate de vídeo: hasta 15
Español
- Formato de vídeo: 4:3
Mbit/s
- Actualización de software a
(LB si la fuente es 16:9) y
16:9
- Resolución: hasta 720x576
píxeles
Decodificación de audio
- MPEG Layer I / II
- Modo de bajo consumo
- Apto para proyector de vídeo
Recursos del sistema
Velocidad de reloj del
procesador 166 MHz
Operación/Funciones
- Instalación automática de
canales por exploración
- Posibilidad de almacenar hasta
1000 canales
- Modos TV y Radio
- Recepción de canales en abierto
Memoria SDRAM - CPU/VídeoGráficos 16 MB
Memoria Flash 4 MB
Interfaz de antena terrestre
- Entrada RF:
- Salida RF (puente): conector
- 4 listas de favoritos TV
- 4 listas de favoritos Radio
- Actualización automática de la
lista de programas edición
Recepción-Demodulación
- Tipo de demodulación:
para instalación personalizada
(suprimir, añadir, mover)
- Subtítulos
- Red : MFN /SFN
- Margen de frecuencia de
- Bloqueo infantil con código
PIN Temporizador infantil
- Margen de frecuencias de la
- Control remoto completo
- nstalación por menús y
funcionamiento guiado por
menús de pantalla (OSD)
- 8 temporizadores de VCR
- Recordatorios Grabación
automática por:
Conexiones
SCART TV
Salida: CVBS o S-Vídeo o
Programación de
temporizador y grabación
sencilla para Philips VCR y
DVD-RW
- Alarma de fallo en la grabación
- Mensaje encabezamiento de
SCART VCR
Entrada:CVBS o RGB /
grabación
- Reproducción de VCR
automática: Audio L/R +
CVBS o RGB / "fast blanking"
36 ESPECIFICACIONES TÉCNICAS
programas Actual y Siguiente
comienzan próximamente en
la Guía electrónica
través de la señal
radiodifundida ("por el aire")
conector hembra IEC 169-2
macho IEC 169-2
COFDM 2K / 8K
entrada: VHF III, UHF IV / V
salida RF en bucle (MHz):
47 - 862 MHz
RGB/ supresión rápida,
audio I/D controlado
por volumen,
supresión lenta
supresión rápida,
supresión lenta, audio
I/D
07/03 - Debido a nuestra política de mejora continua de producto,
esta información está sujeta a modificación sin previo aviso.
Salida: CVBS o S-Vídeo, Audio
I/D, supresión lenta
con temporizador si
está activado el modo
"Preparar grabación"
CINCH Audio:
Salida audio analógica: I/D
Salida audio digital: PCM
Interfaz serie: RJ 9
Accesorios
- Mando a distancia Tipo
RC19336002
- Cable SCART
- Manual de uso
- Garantía mundial
- Pilas: 2 x 1,5V AA/R06
- Cable RF
- Cable de alimentación
Varios
- Margen de temperatura (°C)
En uso +5 a 45
Almacenamiento: -10 a +70
Alimentación:230 V ~ +/-10%
50 Hz
- Consumo: 10 W máx
- Consumo en espera: 6 W
máx
- Modo bajo consumo 1 W máx
Peso 1,400 kg
- Incluido embalaje 2,500 kg
Dimensiones: 260 x 230 x 60
Este producto cumple las
siguientes directivas del
Consejo Europeo:
- 73/23/EEC
- 93/68/EEC
- 89/336/EEC
Page 75

WILLKOMMEN IN DER WELT DES DIGITALEN FERNSEHENS
Wir gratulieren Ihnen zu der Anschaffung des Philips DTR 1000 Digital-Terrestrischen Receivers.
Der DTR 1000 bietet Ihnen die Möglichkeit:
- des Zugriffs auf eine größere Auswahl an digitalen terrestrischen Fernseh- und
Rundfunksendern.
- die Vorteile digitaler Bild- und Tonqualität zu nutzen.
- auf einfachere Weise über Ihren Antennenanschluss auf Fernsehsender zuzugreifen.
Inhaltsangabe
1 Sicherheitsanweisungen __________3
2 Auspacken / den Receiver an die
vorhandene Anglage Anschließen __4
2.1 Auspacken _____________________4
2.2 Den Receiver an die vorhandene Anlage
Anschließen ____________________4
3 Produktbeschreibung ____________5
3.1 Ansicht der Vorderseite ___________5
3.2 Ansicht der Rückseite _____________6
4 Vorbereitung der Fernbedienung __7
4.1 Einlegen der Batterien ____________7
4.2 Benutzung der Fernbedienung zur
Steuerung des Recievers __________8
5 Anschließen des Digital-Receivers __9
5.1 Anschluss an ein Fersehgerät mit einer
SCART-Buchse __________________9
5.2 Anschluss an ein Fersehgerät und einen
Videorecorder mit je einer SCARTBuchse ________________________9
5.3 Anschluss an Ihre HiFi/Audio-ReceiverAnlage (Analog / Digital) __________11
5.4 Anschluss eines Videoprojektors an den
Receiver zur Wiedergabe von DigitalFernsehprogrammen ____________11
6 Kurzanleitung / erste Inbetriebnahme
/ Sendersuchlauf ________________12
6.1 Kurzanleitung __________________12
6.2 Sendersuchlauf fehlgeschlagen /
Installation prüfen / Antennensignal
prüfen ________________________13
6.3 Sendersuchlauf erneut
fehlgeschlagen _________________13
7 Normaler Betrieb ______________14
7.1 Den Receiver ein-/ausschalten
(Stromsparbetrieb, Standby-Betrieb) 14
7.2 TV- / Radio-Modus wählen _______14
7.3 Senderwahl ____________________14
7.4 Zap-Banner / zusätzliche Informationen
zu Fernsehsendern ______________15
7.5 Lautstärkeregelung - Vol+ / Vol- /
Mute _________________________15
7.6 Eine Vorwahlsenderliste wählen __16
7.7 Untertitelwahl vorübergehend ändern
(Wechselschaltfunktion) __________16
7.8 Audio-Sprachenwahl vorübergehend
ändern (Wechselschaltfunktion) ____16
7.9 Elektronischer Programmführer ___16
7.10 Timer / Hinweis anhand des
Programmführers oder / Zap-Liste /
Zap-Banner einstellen - Timer
Einstellung löschen ______________17
Deutsch
INHALTSANGABE 1
Page 76

7.11 Warnmeldung/ Aufnahme - Hinweis Neue Dienste - Software-Download 18
7.11.1 Aufnahme / TIMER ______________18
7.11.2 Aufnahme fehlgeschlagen __________18
7.11.3 Hinweis _______________________18
7.11.4 Liste neuer Sender _______________18
7.11.5 Software-Download _____________18
7.12 Benutzung der Taste TV / STB ____19
7.13 Wiedergabe von gesperrten
Sendern ______________________19
7.14 Wie läßt sich der Receiver rückstellen,
wenn das Gerät einfriert"? _______19
Deutsch
8 Ändern der Einstellungen des
Receivers ______________________20
8.1 Menü-Navigation / Optionswahl /
Ändern der Einstellungen / Änderungen
speichern - rückgängig machen ____20
8.2 Ändern der InstallationsEinstellungen __________________21
8.2.1 Receiver-Einstellungen ____________21
8.2.2 Senderprogrammierung ___________23
8.2.3 Signalqualität prüfen / Antenne prüfen 24
8.2.4 Software-Update ________________25
8.2.5 TIMER (einstellen, löschen, bearbeiten,
Konflikt) _____________________25
8.2.6 Timereinstellung bearbeiten ________26
8.2.7 Eine Timereinstellung über das Menü
löschen _______________________26
8.2.8. Aufnahme ausschalten
(Konfliktbehebung) _______________26
8.3 Bearbeiten Vorwahlsender Listen __27
8.4 Kindersicherung / Pin-Code Programmsperre Kindersicherungstimer ___________29
8.4.1 PIN-Code ändern _______________29
8.4.2 Kindersicherung _________________30
8.4.3 Altersstufe _____________________30
8.4.4 Fernseh- oder Radiosender sperren __30
8.4.5 Kindersicherungstimer bearbeiten ___30
8.4.6 Kindersicherungstimer-Einstellung
löschen _______________________30
8.5 Vorzugseinstellungen / Sprache Timer - Banner _________________31
9 Menüstruktur __________________32
10 Erweiterte Einstellungen _________33
10.1 Wiederherstellen der
Ausgangseinstellungen ___________33
10.2 Ändern der
Fernbedienungseinstellung ________33
10.3 Sie haben Ihren PIN-Code /
Master-PIN-Code vergessen. ______33
10.4 Näheres über Aufnahme / Easy
Recording Videorecordersteuerung _________34
10.4.1 Anschluss für Easy Recording _______34
10.4.2 Einstellungen des Digital-Receivers
und des Videorecorders ___________35
10.4.3 Wie funktionieren Aufnahmen mit
Hilfe der VideorecorderSteuerungsfunktion? ______________35
10.4.4 Timer / Anzeige auf der
Gerätevorderseite _______________35
10.4.5 Einen laufenden Timer abbrechen ___36
10.4.6 Fehler während der Aufnahme _____36
11 Fehlerbehebung ________________37
12 Technische Daten _______________39
2 INHALTSANGABE
Page 77

1 Sicherheitsanweisungen
Sie sollten alle Sicherheits- und
Bedienungsanweisungen gelesen und
verstanden haben, bevor Sie versuchen, den
Receiver zu bedienen.
Für einen störungsfreien Betrieb sollte das
Gerät nicht in der Nähe von Heizkörpern
oder anderen Wärmequellen aufgestellt
werden. Lassen Sie zwecks Belüftung
mindestens 3 cm Freiraum um das Gerät
herum offen und achten Sie darauf, dass die
Entlüftungsöffnungen nicht versperrt
werden.
Dieser Receiver ist nur für die Benutzung in
einer Heimumgebung vorgesehen und sollte
niemals in extrem heißen, nassen oder
feuchten Umgebungen betrieben oder
gelagert werden.
Achten Sie darauf, dass keine Gegenstände
oder Flüssigkeiten durch die
Entlüftungsöffnungen in das Gehäuse
gelangen können. Sollte dies dennoch
passieren, trennen Sie den Receiver vom
Netz und wenden Sie sich an den Händler.
Benutzen Sie zur Reinigung einen
Wildlederlappen. Benutzen Sie niemals ein
Scheuertuch, einen Scheuerschwamm oder
Scheuermittel.
Beim Herstellen oder Trennen von
Kabelverbindungen am Receiver sollten Sie
sicherstellen, dass das Gerät ausgeschaltet
ist.
Schließen Sie den Receiver noch nicht an
und lesen Sie weiter.
Bauen Sie das Gerät nicht auseinander. Es
sind keine vom Benutzer zu wartenden
Bauteile enthalten.
Netzanschluss
Bevor Sie den Receiver an das Netz
anschließen, sollten Sie sicherstellen, dass
die Netzspannung mit der auf der Rückseite
des Geräts aufgedruckten Spannung
übereinstimmt. Wenn die Netzspannung
abweicht, sollten Sie sich an Ihren Händler
wenden..
Schließen Sie den Receiver noch nicht
an und lesen Sie weiter.
Deutsch
SICHERHEITSANWEISUNGEN 3
Page 78

2 Auspacken / den Receiver an die vorhandene
Anglage Anschließen
2.1 Auspacken
Packen Sie das Gerät zuerst aus. Zum
Lieferumfang gehören folgende Kabel und
Zubehörteile:
- Der digitale terrestrische Receiver
- Die Fernbedienung und Batterien (2 x
LR6 AA 1,5 V)
- Ein SCART-Kabel
- Ein RF-Koaxialkabel
- Ein Netzkabel
Deutsch
- Eine Bedienungsanleitung
- Eine Garantiekarte
- Ein Standfuß, um den Receiver aufrecht
aufzustellen.
Hinweis: Wie in Kapitel 5 empfohlen, sollten Sie
das mitgelieferte Scart-Kabel benutzen. Es dient
dazu, mit dem digitalen Receiver die beste
Bildqualität und einen störungsfreien Betrieb zu
erzielen.
Plastikbeutel können gefährlich sein. Um
der Gefahr von Erstickung vorzubeugen,
sollten Sie den Beutel von Kleinkindern
fernhalten.
Das Symbol auf der Verpackung
bedeutet, dass das Material recycelbar ist.
Wenn das Gerät über längere Zeit nicht
benutzt wird, sollten Sie den Netzstecker
ziehen.
2.2 Den Receiver an die
vorhandene Anlage
Anschließen
- Der Receiver lässt sich auf verschiedene
Weise in eine vorhandene Audio-VideoAnlage integrieren. Das Gerät kann
waage recht oder senkrecht aufgestellt
werden. Wenn Sie den Receiver
senkrecht aufstellen möchten, befolgen
Sie die untenstehenden Anweisungen.
Packen Sie den Standfuß aus und stellen
Sie ihn mit dem Einrast-Verschluß nach
rechts und der Lasche nach links auf einer
waagerechten Oberfläche auf.
- Stellen Sie den Receiver wie unten
angegeben auf (rechte Seitenwand links /
Koaxial-Anschlüsse nach unten).
- Führen Sie die Lasche am Standfuß in die
Öffnung auf der Vorderseite des
Receivers in der Nähe des Philips Logos
ein.
- Bewegen Sie den Receiver hin und her,
um die Lasche des Standfußes so in die
Öffnung einzuführen, dass sie einrastet.
4 AUSPACKEN
- Jetzt kann der Receiver in senkrechter
Stellung benutzt werden.
Hinweis: Zum Abnehmen des Standfußes lösen
Sie zuerst den Einrastverschluß auf der Rückseite
des Standfußes und bewegen Sie anschließend
den Receiver hin und her, um die Haltelasche
freizugeben.
Page 79

3 Produktbeschreibung
3.1 Ansicht der Vorderseite
12
3456
1 LOW POWER Taste: Zum Einschalten des Receivers oder zum Umschalten auf
Stromsparbetrieb.
Rücksetzen des Receivers im Falle eines Systemabsturzes,
nachdem die Taste 5 Sekunden gedrückt gehalten wurde.
2 TV/RADIO Taste: Umschalten zwischen TV- und Radiomodus.
3 "-" Taste: Senderwahl abwärts.
4 Dreifarbige LED-Anzeige: Anzeige der Receiver-Betriebsart (siehe Statusanzeige-Tabelle)
5 Rote LED- Anzeige Anzeige der Receiver-Betriebsart (siehe Statusanzeige-Tabelle)
Blinkt beim Empfang von Befehlen der Fernbedienung.
6 "-" Taste: Senderwahl aufwärts.
Statusanzeige-Tabelle
Modus Receiver Stromspar- Standby- TV- Radio-. Software- Timer läuft (2)
LED aus-geschaltet Modus Modus Modus Modus Update (1)
Deutsch
4
LED links Aus Aus Orange Grün Blinkend Aus Grün oder
(
3 Farben) Grün / Orange (im
5
LED rechts Aus Rot Aus Aus Aus Blinkt Rot (blinkt,
(Rot) Rot wenn eine Taste
(1) Wenn Sie den Receiver in die Betriebsart Standby" oder Low Power" (Stromsparmodus) geschaltet
haben und die rote LED auf der rechten Seite blinkt, bedeutet dies, dass ein kostenloses, über den
Äther ausgestrahltes Upgrading des Receivers stattfindet. Unterbrechen Sie diesen Vorgang nicht. Warten
Sie, bis die LED aufhört zu blinken und die LED auf der linken Seite entweder orangefarben oder rot
leuchtet (wodurch die Betriebsart Standby bzw. Low Power angezeigt wird). Sie können jetzt den
normalen Betrieb fortsetzen.
(2) Zum abbrechen eines laufenden timerprogramms, untenstehende tastenfolge drücken: TIMER +0.
Orange Standby-Modus)
gedrückt wird)
PRODUKTBESCHREIBUNG 5
Page 80

3.2 Ansicht der Rückseite
1234
Deutsch
1 VCR (SELV): SCART-Buchse (1) zum Anschluss des Videorecorders.
2 Digital-Audio-Ausgang (SELV): Koaxialer Digital-Audio-Ausgang zum Anschluss der
3 Serial (SELV): RJ 9-Buchse für serielle Datenübertragung im Wartungsfall.
4 AERIAL IN (SELV): Eingang zum Anschluß der UHF-Antenne.
5 230 V ~ 50 Hz 10 W max (HV): Buchse zum Anschluss des Netzkabels.
6 Typenschild mit Angabe des Typs und Seriennummer des Receivers.
7 TV (SELV): SCART-Buchse (1) zum Anschluss eines Fernsehgeräts oder
8 L/R Audio out (SELV): Audio-Cinch-Ausgangsbuchsen Links/Rechts zum Anschluss
9 RF out (SELV): RF-Ausgang zum Anschluss an die Antennen-Eingangsbuchse
(1) SCART wird auch als Euro-A/V- oder Peritel-Anschluss bezeichnet.
(2) Für den Anschluss eines Videorecorders an die TV SCART-Buchse siehe Kapitel 5.4.
56 7 89
HiFi/Audio-Receiveranlage.
eines Videoprojektors (2).
der HiFi/Audio-Receiveranlage.
des Videorecorders oder Fernsehgeräts. Siehe Kapitel 5 für
Anschlussbilder der empfohlenen Verbindungen.
SELV : Safety Extra Low Voltage (Sichere extra-niedrige Spannung)
HV : Hazardous Voltage (Gefährliche Spannung)
6 PRODUKTBESCHREIBUNG
Page 81

4 Vorbereitung der Fernbedienung
4.1 Einlegen der Batterien
- Den Deckel des Batteriefachs auf der Rückseite abnehmen.
- Die beiden mitgelieferten Batterien (Typ R06G/AA - 1,5 V) einlegen.
- Die Batterien wie auf der Abbildung angegeben in das Batteriefach einlegen.
- Den Deckel wieder anbringen.
- Die Fernbedienung ist jetzt bereit zur Steuerung des Receivers.
Die Philips Batterien, die der Fernbedienung beigelegt wurden, enthalten keine Schwermetalle
wie Quecksilber oder Blei-Kadmium. Dennoch dürfen leere Batterien in vielen Ländern nicht
einfach mit dem Hausmüll entsorgt werden. Bitte achten Sie darauf, dass leere Batterien gemäß
der örtlichen Bestimmungen entsorgt werden.
Deutsch
VORBEREITUNG DER FERNBEDIENUNG 7
Page 82

4.2 Benutzung der Fernbedienung zur Steuerung des Recievers
Mute ?
Stummschaltung.
ROT, GRÜN, GELB, BLAU:
Nicht aktiv
Deutsch
FAV
- Kurzer Tastendruck: nächste
Vorwahlsenderliste wählen.
- Taste gedrückt halten: alle
verfügbaren Listen anzeigen.
UNTERTITEL ?
- Audio-Untertitel
vorübergehend starten oder
stoppen.
I-II
- Audio-Sprache
vorübergehend anpassen.
MENU
- Menü aufrufen (im Digital-TVModus).
- Menü schließen (im DigitalTV-Modus).
Cursor 8/9 Die vier
Cursortasten dienen zur
Cursorsteuerung innerhalb der
Menüs und Listen.
Taste OK
- Wählen / Programmliste
aufrufen / zappen.
Lautstärke ==+/ -
Lautstärke hoher / niedriger.
Standby
Standby / EIN.
$$
- Zur vorigen oder nächsten
Seite im Programmführer
(Guide) oder in der
Vorwahlsenderliste.
GUIDE
- Programmführer Jetzt und
Anschließend aufrufen.
INFO
- Info-Banner aufrufen
- Erweiterte
Programminformation
anzeigen
- Banner schließen.
TIMER
- Timer einstellen (Aufnahme
oder Hinweis), innerhalb des
Programm- banners, des
Programmführers und der
Zap-Liste.
Mit der Tastenfolge "TIMER,
0" wird der derzeit laufende
Timer gelöscht.
BACK
- den vorher gewählten
digitalen V-Sender erneut
aufrufen
- Im Menü-Modus
Entweder Menü verlassen
Oder Auswahl eine Ebene
zurück
Oder Auswahl eine Ebene
zurück und Änderungen
rückgängig machen. Unten im
Menü wird angezeigt, welche
Funktion ausgeführt wird.
P+ / P-
Nächsten / vorigen Sender
wählen.
**
(blau) bzw. %%(weiß)
TV / STB
Fernsehgerät zwischen DigitalTV und analoger Übertragung
umschalten.
8 VORBEREITUNG DER FERNBEDIENUNG
TV / RADIO
Zwischen TV- und Radiomodus
umschalten.
0-9
Senderwahl im Digital-TVModus.
Page 83

5 Anschließen des Digital-Receivers
Es gibt mehrere Möglichkeiten zum Anschließen und Integrieren des Digital-Receivers in eine
vorhandene Audio/Video-Anlage.
Hinweise vor dem Herstellen von Verbindungen:
- Ziehen Sie die Netzstecker aller Geräte (sowohl vom Fernsehgerät als auch vom Videorecorder
und/oder DVD-Spieler, falls erforderlich).
- Schließen Sie den Digital-Receiver zunächst noch nicht an das Netz an.
- Überprüfen Sie die Verkabelung, denn Sie können vorhandene Verbindungen an Ihrer bereits
vorhandenen Audio/Video-Anlage möglicherweise beibehalten.
- Wählen Sie die entsprechende Verbindungsmethode zum Anschluss des Digital-Receivers an die
vorhandene Audio/Video-Anlage. Bitte lesen Sie die Kapitel 5.1 und 5.2.
5.1 Anschluss an ein Fersehgerät mit einer SCART-Buchse
Schließen Sie den Receiver wie folgt an die vorhandene Anlage an:
Deutsch
TV
EXT1
- Schließen Sie den Antennenstecker an die mit AERIAL IN" gekennzeichnete Buchse des
Digital-Receivers an.
- Verbinden Sie die Buchse RF OUT" des Digital-Receivers mit der Antennen-Eingangsbuchse
Aerial input" am Fernsehgerät mit Hilfe des zum Digital-Receiver mitgelieferten RFKoaxialkabels.
- Verbinden Sie die SCART-Buchse TV" des Digital-Receivers mit der SCART-Buchse EXT1" am
Fernsehgerät mit Hilfe des zum Digital-Receiver mitgelieferten SCART-Kabels.
- Schließen Sie alle Gerate, mit Ausnahme des Digital-Receivers, an das Netz an.
ANSCHLIEßEN DES DIGITAL
-RECEIVERS 9
Page 84

- Schalten Sie das Fernsehgerät ein und wählen Sie einen Sender.
- Schließen Sie den Digital-Receiver an das Netz an. Der Digital-Receiver zeigt darauf eine
Bildschirmseite mit der Begrüßung WELCOME / WILLKOMMEN (die LED auf der linken Seite
leuchtet grün).
- Fahren Sie fort mit Kapitel 6, um den Sendersuchlauf des Digital-Receivers zu starten.
Wenn die Meldung WELCOME / WILLKOMMEN nicht auf dem Bildschirm erscheint, drücken
Sie die Taste TV/STB zweimal, um diese Seite aufzurufen.
Hinweis: Mit den auf diese Weise hergestellten Verbindungen können Sie:
- Digitale terrestrische Fernsehsender über den Digital-Receiver empfangen.
- Weiterhin analoge Fernsehprogramme über das Fernsehgerät empfangen.
5.2 Anschluss an ein Fersehgerät und einen Videorecorder mit je einer
SCART-Buchse
Schließen Sie den Receiver wie folgt an die vorhandene Anlage an:
Deutsch
TV
VCR
- Schließen Sie den Antennenstecker an die mit AERIAL IN" gekennzeichnete Buchse des
Digital-Receivers an.
- Verbinden Sie die Buchse RF OUT" des Digital-Receivers mit der Antennen-Eingangsbuchse
Aerial input" des Videorecorders mit Hilfe des zum Digital-Receiver mitgelieferten RFKoaxialkabels.
- Verbinden Sie die Buchse RF OUT" des Videorecorders mit der Antennen-Eingangsbuchse
Aerial input" am Fernsehgerät mit Hilfe eines RF-Koaxialkabels.
- Verbinden Sie die SCART-Buchse TV" des Digital-Receivers mit der SCART-Buchse EXT1" am
Fernsehgerät mit Hilfe des zum Digital-Receiver mitgelieferten SCART-Kabels.
- Verbinden Sie die mit VCR" gekennzeichnete SCART-Buchse des Digital-Receivers mit der
SCART-Buchse EXT1" des Videorecorders (auch als OUT bezeichnet) mit Hilfe eines SCARTKabels.
10 ANSCHLIEßEN DES DIGITAL
-RECEIVERS
Page 85

- Schließen Sie alle Gerate, mit Ausnahme des Digital-Receivers, an das Netz an.
- Schalten Sie das Fernsehgerät ein und wählen Sie einen Sender.
- Schließen Sie den Digital-Receiver an das Netz an. Der Digital-Receiver zeigt darauf die
Meldung WELCOME (WILLKOMMEN) (die LED auf der linken Seite leuchtet grün).
- Fahren Sie fort mit Kapitel 6, um den Sendersuchlauf des Digital-Receivers zu starten.
Wenn die Meldung WELCOME / WILLKOMMEN nicht auf dem Bildschirm erscheint, drücken Sie
die Taste TV/STB zweimal, um diese Seite aufzurufen.
Hinweis:
1 Diese Verbindung kann auch hergestellt werden, wenn Ihr Videorecorder mit zwei SCART-Buchsen
ausgestattet ist.
2 Wenn Sie einen S-Video-Recorder besitzen, schlagen Sie Kapitel 8.2.1.1 für weitere Einstellungen auf und
lesen Sie die Bedienungsanleitung des Videorecorders.
3 Mit den auf diese Weise hergestellten Verbindungen können Sie:
- Digitale Fernsehprogramme sehen, während Sie analoge Fernsehprogramme aufzeichnen.
- Analoge Fernsehprogramme sehen, während Sie digitale Fernsehprogramme aufzeichnen.
- Das digitale Fernsehprogramm, das Sie gerade sehen, aufzeichnen.
- Die Wiedergabe vom Videorecorder ansehen.
5.3 Anschluss an Ihre HiFi/Audio-Receiver-Anlage (Analog / Digital)
Je nach dem, welche Hifi/Audio-Geräte Sie benutzen, gibt es mehrere Möglichkeiten zum
Anschließen des Digital-Receivers.
- Analoge Verbindung
Verbinden Sie die L/R Audio-Ausgangsbuchsen mit den entsprechenden L/R AudioEingangsbuchsen der Audio-Anlage mit Hilfe eines doppelten Cinch-Kabels (nicht mitgeliefert).
Schlagen Sie im Handbuch Ihrer HiFi/Audio-Receiveranlage die geeigneten analogen AudioEingänge nach.
Hinweis: Mit diesen Verbindungen können Sie die Lautstärkeregelung und Stummschaltung sowohl mit der
Fernbedienung des Digital-Receicers als auch mit der Fernbedienung der HiFi-Anlage steuern.
- Digitale Verbindung
Verbinden Sie die DIGITAL" Audio-Ausgangsbuchse mit der entsprechenden Digital-AudioEingangsbuchse der Audio-Anlage mit Hilfe eines einzelnen Cinch-Kabels (nicht mitgeliefert).
Schlagen Sie im Handbuch Ihrer HiFi/Audio-Receiveranlage den geeigneten digitalen AudioEingang nach.
Hinweis: Mit dieser Verbindung können Sie die Lautstarkeregelung und Stummschaltung nur mit Hilfe der
Fernbedienung der HiFi/Audio-Anlage steuern. Siehe die entsprechende Bedienungsanleitung
Deutsch
5.4 Anschluss eines Videoprojektors an den Receiver zur Wiedergabe
von Digital-Fernsehprogrammen
Schließen Sie den Videoprojektor an die TV"-SCART-Buchse des Digitalreceivers an.
Häufig sind Videoprojektoren nur für Videosignale im S-Video-Format vorgesehen. Sollte dies bei
Ihrem Projektor der Fall sein, befolgen Sie die untenstehenden Anweisungen zum Anschließen und
zur Installation.
- Schließen Sie einen SCART-S-Video-Adapter zwischen der Buchse TV SCART des DigitalReceivers und dem S-Video-Eingang des Videoprojektors an.
- Installation: Siehe die Kapitel 8.2, 8.2.1 und 8.2.1.1 zum Umschalten der Einstellung "TV/VCR
output / TV/Videorecorder-Ausgangsnorm" des Digital-Receivers auf SVIDEO/PAL-CVBS.
ANSCHLIEßEN DES DIGITAL
-RECEIVERS 11
Page 86

6 Kurzanleitung / erste Inbetriebnahme /
Sendersuchlauf
6.1 Kurzanleitung
Sie verfügen bereits über eine Antenne.
Ihre Antenne ist korrekt auf den terrestrischen Sender in
Ihrer Region ausgerichtet. (1)
Die Verbindungen des Digital-Receivers entsprechen dem
Verkabelungsplan in Kapitel 5.1 oder 5.2.
Der Digital-Receiver ist eingeschaltet und das Menü
WELCOME / WILLKOMMEN (nebenstehend abgebildet)
erscheint.
Die Option Language / Sprache" ist angewählt. Drücken
Deutsch
Sie die Taste * zum Aufrufen des Auswahlmenüs (rechts
auf dem Bildschirm). Wählen Sie mit Hilfe der Taste 8
oder 9 die gewünschte Sprache und drücken Sie die
Taste + zum Speichern ihrer Auswahl. Das AuswahlHighlight steht wieder auf der Option Language /
Sprache".
Drücken Sie die Taste 9. Die Option Country/Land" ist
angewählt. Drücken Sie die Taste * zum Aufrufen des
Auswahlmenüs. Wählen Sie mit Hilfe der Taste 8 oder
9 das gewünschte Land und drücken Sie die Taste +
zum Speichern ihrer Auswahl. Das Auswahl-Highlight
steht wieder auf der Option Country / Land" .
Drücken Sie die Taste 9. Die Option "Install /
Installieren" ist angewählt. Drücken Sie anschließend die
Taste * zum Starten des Sendersuchlaufs.
Der Receiver durchsucht den (die) RF-Bereich(e) und gibt
Rückmeldungen über den Verlauf des Suchlaufs und die
gefundenen Sender.
Nach Beendigung des Sendersuchlaufs:
- Der Sendersuchlauf wurde entweder erfolgreich
abgeschlossen, die gefundenen Sender werden
angezeigt und der Digital-Receiver wählt den ersten
Sender in der Liste. Ist dies der Fall, fahren Sie fort mit
Kapitel 7.
- Oder der Sendersuchlauf ist fehlgeschlagen und wurde
abgebrochen, wobei das Menü Check signal / Signal
prüfen" angezeigt wird. Ist dies der Fall, fahren Sie fort
mit Kapitel 6.2.
Hinweis:
(1) Wenn Ihr Land nicht in der Liste angezeigt wird, wählen Sie
die Länder-Option Other / Sonstige".
Wenn Sie ein anderes Land wahlen möchten, nachdem die
erste Installation bereits erfolgreich ausgeführt wurde, müssen
Sie zuerst den Ausgangs-Modus (Virgin Mode") des Receivers
wiederherstellen (siehe Kapitel 10.1). Daraufhin wird die
Erstinstallation erneut gestartet (siehe Kapitel 6.1).
12 KURZANLEITUNG
Page 87

6.2 Sendersuchlauf fehlgeschlagen /
Installation prüfen / Antennensignal
prüfen
Der Sendersuchlauf ist fehlgeschlagen. Prüfen Sie daher
vor einem erneuten Suchlauf:
- Das Antennenkabel
- Prüfen Sie die Antenneverbindung zum Digital-Receiver.
Siehe den Verkabelungsplan in Kapitel 5.1 oder 5.2.
- Prüfen Sie die in Ihrer Region verfügbaren Sender.
- Prüfen Sie die Signalqualität mit Hilfe des
nebenstehenden Menüs Check signal / Signal prüfen".
Drücken Sie die Taste 9 zum Wählen der Option FR
Channel / RF Kanal"
Drücken Sie die Taste * und wählen Sie mit Hilfe der
Taste 9 oder 8 die gewünschte RF-Kanalnummer, die
Ihrer Region entspricht.
Prüfen Sie die Signalstärke und -qualität anhand der
Balkenanzeige.
Wenn Signalstärke und -qualität ausreichend sind
(orangefarbene oder grüne Balkenanzeige), wählen Sie die
Option Install / Installieren" und wählen Sie anschließend
die Option Re-start / Neustart", um den Sendersuchlauf
erneut zu starten. Wenn der Sendersuchlauf erfolgreich
abgeschlossen wurde, werden die gefundenen Sender
angezeigt und der Digital-Receiver wählt den ersten
Sender in der Liste. Ist dies der Fall, fahren Sie fort mit
Kapitel 7.
Oder die Signalqualität ist mangelhaft bzw. es ist gar kein
Signal vorhanden (rote oder gar keine Balkenanzeige).
Siehe dazu Kapitel 6.3.
Deutsch
6.3 Sendersuchlauf erneut fehlgeschlagen
Der Sendersuchlauf ist fehlgeschlagen und dieser Fehler
konnte nicht behoben werden, nachdem die Signalqualität
der Antenne geprüft wurde.
Entweder ist Ihre Antenne nicht einwandfrei auf den
digitalen Fernsehsender ausgerichtet, Ihre Antennenanlage
muss aufgerüstet werden oder Sie befinden sich außerhalb
des Bereichs, in dem digitale Fernsehsignale störungsfrei
empfangen werden können.
Für eine eingehende Überprüfung sollten Sie sich an den
Fachhändler wenden.
KURZANLEITUNG 13
Page 88

7 Normaler Betrieb
7.1 Den Receiver ein-/ausschalten (Stromsparbetrieb,
Standby-Betrieb)
DIE ROTE LED AUF DER LINKEN SEITE
LEUCHTET.
Der Receiver befindet sich im StromsparModus.
Drücken Sie die Taste Low Power" auf der
Vorderseite des Receivers, um das Gerat auf
Standby zu schalten.
Sie können den Receiver innerhalb von 5
Deutsch
Minuten aus dem Standby-Betrieb
aufwecken", indem Sie:
- Entweder die Taste P+, P-, BACK oder
eine Zifferntaste auf der Fernbedienung
drücken. Außerdem können Sie die Taste
+" oder -" auf der Vorderseite des
Receivers drücken.
Hinweis: der Receiver reagiert nicht auf die
Fernbedienung, wenn er sich im StromsparModus befindet.
DIE ORANGEFARBENE LED AUF DER
LINKEN SEITE LEUCHTET.
Der Receiver befindet sich im Standby"Modus.
Zum Wiedereinschalten des Receivers:
- Drücken Sie entweder eine der folgenden
Tasten auf der Fernbedienung: P+, P-,
BACK oder eine Zifferntaste
- Oder drücken Sie die Taste "+" oder "-"
auf der Gerätevorderseite.
Um den Receiver in den Stromspar-Modus
zu schalten (weniger als 1W
Stromverbrauch):
- Drücken Sie die Taste "LOW POWER" auf
der Gerätevorderseite.
DIE GRÜNE LED AUF DER RECHTEN
SEITE LEUCHTET (TV-MODUS) / DIE
GRÜNE+ORANGEFARBENE LED
LEUCHTET (RADIO-MODUS)
Das Gerät befindet sich im TV-Modus /
Radio-Modus.
Um den Receiver auf Standby zu schalten:
- Drücken Sie die Taste Standby auf der
Fernbedienung.
14 NORMALER BETRIEB
Um den Receiver in den Stromspar-Modus
zu schalten (weniger als 1W
Stromverbrauch):
- Drücken Sie die Taste "LOW POWER" auf
der Gerätevorderseite.
7.2 TV- / Radio-Modus wählen
Wenn sich der Receiver im TV-Modus
befindet:
- Drücken Sie die Taste TV/RADIO, um auf
RADIO-Modus umzuschalten.
Wenn sich der Receiver im Radio-Modus
befindet:
- Drücken Sie die Taste TV/RADIO, um auf
TV-Modus umzuschalten.
Hinweis: Die TV/Radio-Tasten auf der
Gerätevorderseite und auf der Fernbedienung
haben die gleiche Funktion.
7.3 Senderwahl
7.3.1 Mit Hilfe der Zifferntasten
Bei digitalen Fernsehprogrammen oder
digitalen Radiosendern
- Drücken Sie die Zifferntaste(n), um die
gewünschte Sendernummer zu wählen.
7.3.2 P+/P-
Bei digitalen Fernsehprogrammen oder
digitalen Radiosendern
- Drücken Sie die Taste P+, um den
nächsten Sender der Liste zu wählen.
- Taste P-, um den vorigen Sender der Liste
zu wählen.
Hinweis: Die Tasten '-' und '+' auf der
Gerätevorderseite haben die gleiche Funktion wie
die Tasten P- und P+ auf der Fernbedienung.
7.3.3 Back (Aufrufen des zuletzt
gewählten Senders)
Bei digitalen Fernsehprogrammen oder
digitalen Radiosendern
- Drücken Sie die Taste BACK, um den
zuletzt gewählten Fernseh- oder
Radiosender wieder aufzurufen.
Page 89

7.3.4 Zap-Liste (sog. Indexliste)
Während Sie ein digitales Fernsehprogramm sehen oder
einen digitalen Radiosender hören:
Drücken Sie die Taste OK, um die Senderliste
aufzurufen
Drücken Sie die Taste 8 oder 9, um den
gewünschten Sender zu wählen.
Drücken Sie die Taste OK für eine Vorschau des
gewünschten Senders.
Wenn Sie die Taste OK erneut drücken, können Sie den
gewählten Sender im Vollbildmodus sehen/hören.
7.4 Zap-Banner / zusätzliche
Informationen zu Fernsehsendern
Jedes Mal, wenn Sie einen neuen Sender wählen, erscheint
ein sog. Banner am unteren Bildrand, in dem angezeigt
wird:
- Sendername und -nummer
- Programmname Jetzt" und Anschließend"
- Sender-Status: gesperrt, verfügbar
- Startzeit des derzeitigen Programms
- Startzeit des anschließenden Programms
- Aktuelle Uhrzeit
Sie erhalten mehr Informationen, wenn das Banner
eingeschaltet (ON/EIN) ist.
- Drücken Sie die Taste *, um mehr Information zum
derzeit laufenden Programm zu erhalten. Wenn Sie die
Taste noch einmal drücken, erhalten Sie Informationen
zum anschließenden Programm.
- Drücken Sie die Taste BACK, um das Zap-Banner
verschwinden zu lassen.
Hinweis: Wird die Taste INFO dreimal gedrückt, erhalten Sie
Zugriff auf das Banner, zusätzliche Info zum derzeit laufenden
Programm und zusätzliche Info zum anschließenden Programm.
Wird die Taste INFO ein viertes Mal gedrückt, kehren Sie zum
normalen digitalen Fernsehprogramm zurück.
Deutsch
7.5 Lautstärkeregelung - Vol+ / Vol- /
Mute
Bei digitalen Fernsehprogrammen:
- Drücken Sie die Taste Vol-, um die Lautstärke zu
verringern.
- Drücken Sie die Taste Vol+, um die Lautstärke zu
erhöhen.
- Drücken Sie die Taste MUTE, um den Ton
stummzuschalten; drücken Sie die Taste MUTE erneut,
um den Ton wieder einzuschalten.
NORMALER BETRIEB 15
Page 90

Deutsch
Hinweis: Eine Änderung der Lautstärke wird anhand einer
Balkengraphik angezeigt, während die Stummschaltung des
Tons durch ein Symbol in der oberen rechten Ecke des
Bildschirms angezeigt wird.
7.6 Eine Vorwahlsenderliste wählen
Während Sie ein digitales Fernsehprogramm sehen oder
einen digitalen Radiosender hören:
- Halten Sie die Taste FAV länger als zwei Sekunden
gedrückt, um alle Vorwahlsenderlisten anzuzeigen.
- Drücken Sie die Taste 9 oder 8, um eine Liste zu
wählen. Drücken Sie die Taste OK, um die Liste zu
aktivieren.
- Drücken Sie die Taste FAV erneut, um eine Liste
hinzuzufügen oder zu löschen.
Hinweis: leere Vorwahlsenderlisten können nicht geöffnet
werden.
7.7 Untertitelwahl vorübergehend ändern
(Wechselschaltfunktion)
Taste SUBTITLE drücken:
- Entweder eine der verfügbaren Untertitel-Sprachen
wählen.
- Oder Untertitel ausschalten (Off/Aus).
7.8 Audio-Sprachenwahl vorübergehend
ändern (Wechselschaltfunktion)
Die Taste I/II drücken:
- Eine der verfügbaren Audio-Sprachen wählen.
16 NORMALER BETRIEB
7.9 Elektronischer Programmführer
Bei digitalen Fernsehprogrammen oder digitalen
Radiosendern
- Drücken Sie die Taste GUIDE, um den
Programmführer aufzurufen.
Daraufhin wird die derzeitige Programmliste mit der
Bezeichnung Now / Jetzt" angezeigt.
- Drücken Sie die Taste *, um die Programmliste Next
/ Anschließend" aufzurufen.
Auf der nächsten Bildschirmseite wird ein rundes Symbol
angezeigt, das auf Programme hinweist, die innerhalb der
nächsten 20 Minuten starten werden.
- Drücken Sie die Taste 9 oder 8, um den
gewünschten Sender zu wählen.
- Drücken Sie die Taste OK, um den gewählten Sender
sehen / hören zu können.
Page 91

7.10 Timer / Hinweis anhand
des Programmführers oder
/ Zap-Liste / Zap-Banner
einstellen - Timer
Einstellung löschen
TIMER ANHAND DES BANNERS
EINSTELLEN
- Entweder Tastenfolge INFO, *, TIMER
drücken, um das mit Now / Jetzt"
gekennzeichnete Programm auf dem
derzeit gewahlten Sender aufzuzeichnen,
- Oder Tastenfolge INFO, *, *, TIMER
drücken, um das mit Next /
Anschließend" gekennzeichnete
Programm auf dem derzeit gewahlten
Sender aufzuzeichnen.
TIMER ANHAND DER ZAP-LISTE
EINSTELLEN
- Entweder Tastenfolge OK, *, TIMER
drücken, um das mit Now / Jetzt"
gekennzeichnete Programm auf dem
gewählten Sender aufzuzeichnen,
- Oder Tastenfolge OK, *, *, TIMER
drücken, um das mit Next /
Anschließend" gekennzeichnete
Programm auf dem gewählten Sender
aufzuzeichnen.
TIMER ANHAND DES
PROGRAMMFÜHRERS BANNERS
EINSTELLEN
- Entweder Tastenfolge GUIDE, *,
TIMER drücken, um das mit Now /
Jetzt" gekennzeichnete Programm auf
dem derzeit gewahlten Sender
aufzuzeichnen,
- Oder Tastenfolge GUIDE *, *, TIMER
drücken, um das mit Next /
Anschließend" gekennzeichnete
Programm auf dem gewählten Sender
aufzuzeichnen.
Anmerkungen:
- Drücken Sie zweimal die Taste TIMER beim
mit Next / Anschließend" gekennzeichneten
Programm, um einen HINWEIS einzustellen.
- Drücken Sie dreimal die Taste TIMER, um den
HINWEIS wieder rückgangig zu machen.
- Die TIMER-Einstellung/der HINWEIS wird
durch ein Symbol angezeigt.
LÖSCHEN EINER LAUFENDEN
TIMER-EINSTELLUNG
- Ein Timer läuft und Sie sehen sich
gleichzeitig das Programm an, das Sie
gerade aufzeichnen.
- Die Aufnahme wird durch zwei LEDs
auf der Gerätevorderseite angezeigt.
Die LED auf der rechten Seite leuchtet
rot, die LED auf der linken Seite
leuchtet grün.
- Drücken Sie die Tastenfolge "TIMER,
0", um die Einstellung des gerade
laufenden Timers zu löschen.
- Ein Timer läuft und der Receiver befindet
sich im Standby-Modus.
- Die Aufnahme wird durch zwei LEDs
auf der Gerätevorderseite angezeigt.
Die LED auf der rechten Seite leuchtet
rot, die LED auf der linken Seite
leuchtet orangefarben.
- Drücken Sie die Tastenfolge "TIMER,
0", um die Einstellung des gerade
laufenden Timers zu löschen.
Deutsch
NORMALER BETRIEB 17
Page 92

Deutsch
7.11 Warnmeldung/ Aufnahme - Hinweis Neue Dienste - Software-Download
Eine allgemeine Warnfunktion sorgt dafür, dass wichtige
Meldungen auf dem Bildschirm angezeigt werden. Um
das derzeitige Programm nicht unnötig zu stören,
erscheint ein Animationssymbol oben rechts auf dem
Bildschirm, um darauf hinzuweisen, dass eine
Warmeldung vorliegt. Sie müssen daraufhin die Taste
INFO drücken, um die Warnmeldung lesen zu können.
7.11.1 Aufnahme / TIMER
Wenn Sie sich ein Programm ansehen und ein Timer wird
in Kürze starten, werden Sie darüber informiert.
Die Meldung kann erfolgen, bevor der Timer startet.
Dies kann im Menü Timer Vorzugseinstellungen
eingestellt werden.
7.11.2 Aufnahme fehlgeschlagen
Wenn während einer Aufnahme eine Störung auftritt,
werden Sie mit einer Meldung darauf hingewiesen.
7.11.3 Hinweis
Für Sendungen, die Sie nicht verpassen möchten, können
Sie Hinweise erstellen. Daraufhin wird folgende
Warnmeldung erzeugt.
Die Warnmeldung erfolgt früher als die Startzeit des
Hinweises. Dies kann im Menü Timer
Vorzugseinstellungen eingestellt werden.
18 NORMALER BETRIEB
7.11.4 Liste neuer Sender
Wenn sich der Receiver im Standby-Modus befindet, wird
geprüft, ob neue Sender verfügbar sind.
Folgende Meldung wird erscheinen, so dass Sie in der
Liste mit Neuen Vorwahlsendern sehen, welche neuen
Sender verfügbar sind.
7.11.5 Software-Download
Wenn sich der Receiver im Standby-Modus befindet, wird
geprüft, ob neue Software über das Sendersignal
verfügbar ist.
Eine Meldung wird erscheinen, nachdem erkannt wurde,
dass neue Software verfügbar ist, und nach dem
erfolgreichen Software-Update.
Page 93

7.12 Benutzung der Taste TV / STB
Diese Taste dient zum Umschalten zwischen dem
Empfang von digitalen Sendern über den Digital-Receiver
und standardmäßigen analogen Sendern über das
Fernsehgerät.
Sie sehen digitale Fernsehprogramme.
- Drücken Sie die Taste TV/STB, um auf AnalogFernsehen umzuschalten.
- Drücken Sie die Taste erneut, um wieder auf DigitalFernsehen umzuschalten.
7.13 Wiedergabe von gesperrten Sendern
Wenn Sie einen gesperrten Sender gewählt haben, müssen
Sie diesen freigeben, um ihn sehen zu können.
- Sie erhalten eine Eingabeaufforderung in der Form eines
Schloss-Symbols und es erscheint ein Feld innerhalb des
Banners zur Eingabe eines vierstelligen PIN-Codes
(Werkseinstellung 0000).
- Geben Sie en PIN-Code ein, um den gewählten Sender
freizugeben und wiederzugeben.
7.14 Wie läßt sich der Receiver
rückstellen, wenn das Gerät
einfriert"?
Wenn der Receiver unverhofft einfrieren" sollte (d.h.,
dass das Gerät nicht mehr auf die Fernbedienung
reagiert), können Sie einfach wie folgt vorgehen:
Halten Sie die Taste LOW POWER" auf der
Gerätevorderseite mindestens 5 Sekunden gedrückt.
Warten Sie nach dem Loslassen der Taste, bis eine stabile
Anzeige auf der Gerätevorderseite erscheint (d.h. die
linke LED leuchtet entweder orangefarben zur Anzeige
des Standby-Modus oder grün zur Anzeige des TVModus.) Sie können jetzt den normalen Betrieb
fortsetzen.
Deutsch
NORMALER BETRIEB 19
Page 94

8 Ändern der Einstellungen des Receivers
Sie können die Einstellungen des Receivers ändern, um
das Gerät an die Empfangsbedingungen oder an die
Audio-/ Video-Anlage anzupassen oder um andere
Vorzugseinstellungen vorzunehmen.
8.1
Menü-Navigation / Optionswahl / Ändern
der Einstellungen / Änderungen speichern
- rückgängig machen
Grundlegendes zur Menü-Navigation:
- Drücken Sie im normalen Wiedergabemodus die Taste
MENU, um das Hauptmenü aufzurufen. Die
Deutsch
orangefarbene Auswahlschaltfläche erscheint auf der
ersten Menü-Option im Fenster.
- Drücken Sie die Taste 9 oder 8, um die
orangefarbene Auswahlschaltfläche auf die gewünschte
Menü-Option zu steuern.
Einstellung ändern:
- Benutzen Sie die *-Taste, um die untergeordneten
Menü-Optionen im Menü-Fenster zu aktivieren.
Wiederholen Sie diesen Schritt sooft wie notwendig um
die gewünschte Funktion anzusteuern.
- Drücken Sie die Taste 9 oder 8 zum Wählen des
gewünschten Wertes der Option.
Änderungen speichern - rückgängig machen
- Drücken Sie entweder die Taste BACK, um die
Änderungen rückgängig zu machen oder drücken Sie
die Taste +, um die Änderung zu speichern.
In beiden Fällen verschiebt sich die Auswahlschaltfläche
um eine Menü-Ebene nach oben.
- Wenn das Menü eingeschaltet ist, drücken Sie die Taste
MENU, um das Menü auszuschalten.
Anmerkungen:
- Zum Aufrufen einer Menü-Option, die mit einem SperrSymbol gekennzeichnet ist, muss ein PIN-Code eingegeben
werden.
- Um ein Einbrennen" des Fernsehbildschirms zu vermeiden,
verschwinden Meldungen/Menüs automatisch nach 30
Minuten.
Das sog. Puck"-Navigationselement (die
Auswahlschaltfläche) ist immer sichtbar, wenn ein Menü
angezeigt wird. Der Puck enthält 5 Elemente:
- Die Kugel zeigt die Position der Auswahloption an.
- Die Cursorpfeile 8, 9, + und * zeigen an, welche
Navigationsrichtung möglich ist. Ein grauer Cursorpfeil
bedeutet, dass die Navigation in der entsprechenden
Richtung nicht erlaubt ist.
20 ÄNDERN DER EINSTELLUNGEN DES RECEIVERS
Page 95

Hinweis:
- Der Puck wird immer wie abgebildet neben dem linken MenüFenster angezeigt.
- Zur Freigabe einer gesperrten Option ist die Eingabe eines
Pin-Codes erforderlich.
8.2 Ändern der Installations-Einstellungen
Drücken Sie die Taste MENU, um das Hauptmenü
aufzurufen.
Drücken Sie die Taste 9 viermal, um die
Auswahlschaltfläche auf "Installation" zu stellen.
Hinweis: Wenn die Kindersicherungsfunktion aktiv ist, müssen
Sie Ihren PIN-Code eingeben, um Zugriff auf die
entsprechenden Einstellmöglichkeiten der gewählten MenüOption zu erhalten.
Drücken Sie die Taste *, um Zugriff auf die
untergeordneten Optionen des Menüs Installation" zu
erhalten. Die Auswahlschaltfläche befindet sich jetzt auf
Receiver settings / Receiver-Einstellungen" im neuen
Installations"-Menü.
8.2.1 Receiver-Einstellungen
EIm Menü Installation" haben Sie Receiver settings /
Receiver-Einstellungen" gewählt und die Taste *
gedrückt.
Ein neues Menü erscheint, um die untenstehenden
Funktionen einzustellen:
- TV/Videorecorder-Ausgangssignal
- TV-Format
- TV Audio
- Standard-Lautstärke des TV-Tons
- Videorecorder Audio
- Steuerung von Video-Aufnahme
Die Auswahlschaltfläche befindet sich jetzt auf
TV/Videorecorder Ausgangssignal".
Sie können die Auswahlschaltfläche mit Hilfe der Taste 9
oder 8 nach oben oder unten auf die gewünschte
Option steuern.
Bei jeder Option können Sie die Taste * drücken, um
Zugriff auf die untergeordneten Optionen zu erhalten.
Deutsch
ÄNDERN DER EINSTELLUNGEN DES RECEIVERS 21
Page 96

8.2.1.1 Bei der Menü-Option "TV/VCR
output / TV/Videorecorder
Ausgangssignal" können Sie das
Format des Ausgangssignals, das
Über die SCART-Buchsen am
Fernsehgerät und
Videorecorder ausgegeben
wird, aus der untenstehenden
Liste auswählen:
- RGB / PAL-CVBS (FBAS)
- RGB / SVHS
- PAL-CVBS / PAL-CVBS (FBAS)
- PAL-CVBS (FBAS) / SVHS
- SVIDEO / PAL-CVBS (FBAS)
- SVIDEO / SVHS
- SECAM-CVBS (FBAS) / SECAM-CVBS
Deutsch
(FBAS)
- RGB / SECAM-CVBS (FBAS)
Hinweis: Die erste Abkürzung vor dem
Schragstrich /" bezieht sich auf die SCARTBuchse des Fernsehgeräts. Die zweite
Abkürzung hinter dem Schragstrich /" bezieht
sich auf die SCART-Buchse des Videorecorders.
Hinweis: Wir empfehlen, die Einstellung RGB /
PAL-CVBS" zu benutzen, um die beste
Bildqualität auf dem Fernsehbildschirm zu
erhalten. Wenn statt eines Fernsehgeräts ein
Video-Projektor benutzt wird, empfiehlt sich die
Einstellung SVIDEO/PAL-CVBS (siehe Kapitel 5.4
für Anschluss und Installation).
Hinweis: Wenn Sie über einen S-Video
Videorecorder verfügen, können Sie die
Einstellung RGB/SVHS benutzen. Schlagen Sie
dazu die entsprechenden Informationen im
Benutzerhandbuch Ihres Videorecorders nach.
8.2.1.4 Bei der Option StandardLautstärke" können Sie die
Lautstärke des FernsehTonsignals einstellen.
Benutzen Sie die Taste 8 oder 9 um die
gewünschte Standard-Lautstärkeeinstellung
zu wählen.
8.2.1.5 Bei der Option VCR Audio /
Videorecorder Audio" können
Sie das Format des Tonsignals
des Videorecorders wie folgt
einstellen:
- Mono
- Stereo
8.2.1.6 Bei der Option VCR control /
Videorecorder-Steuerung"
können Sie die
Steuerungsmöglichkeiten für
Videoaufnahmen wie folgt
einstellen:
- Off / Aus
- Easy Recording (sog. "Prepare Record /
Aufnahme vorbereiten")
- Record Link
Nähere Einzelheiten finden Sie in Kapitel
10.4.
Hinweis: diese Einstellung ist auch Philips DVDRecordern oder anderen Markengeräten
anwendbar, die eines der beiden
Steuerungsysteme unterstützen.
8.2.1.2 EBei der Option TV Format"
können Sie das Format des
Video-Ausgangssignals wie folgt
einstellen:
-16/9
- 4/3 - Letterbox
- 4/3 - Pan & Scan
8.2.1.3 Bei der Option TV Audio"
können Sie das Format des
Tonsignals des Fernsehgeräts
wie folgt einstellen:
- Mono
- Stereo
22 ÄNDERN DER EINSTELLUNGEN DES RECEIVERS
Page 97

8.2.2 Senderprogrammierung
Im Menü Installation" haben Sie Channels / Sender"
gewählt und die Taste * gedrückt.
Ein neues Menü erscheint, um die untenstehenden
Funktionen einzustellen:
- Installation der Fernsehsender.
- Installation der Radiosender.
- Ein- oder Ausschalten des automatischen
Senderupdate.
- Ermöglichen oder Sperren der Installation von
verschlüsselten Sendern.
- Starten des Suchlaufs nach neuen Sendern.
Die Auswahlschaltfläche befindet sich jetzt auf TV
channels / TV Sender":
- Sie können die Auswahlschaltfläche mit Hilfe der Taste
9 oder 8 nach oben oder unten auf die benötigte
Option steuern.
- Bei jeder Option können Sie die Taste * drücken, um
Zugriff auf die untergeordneten Einstell-Optionen zu
erhalten.
8.2.2.1 Unter der Option TV Channels / TV
Sender" wird die gesamte Liste mit
Fernsehsendern angezeigt, die beim
Suchlauf gefunden wurden.
Sie können die Auswahlschaltfläche mit Hilfe der Taste 9
oder 8 nach oben oder unten auf den gewünschten
Sender steuern.
Sie können die Taste OK drücken, um den Sender ein-
oder auszuschalten.
WICHTIG: Alle Sender ohne Kennzeichnung werden
ausgeschaltet und sind folglich nicht in allen Senderlisten
aufgeführt.
Deutsch
8.2.2.2 Unter der Option RADIO Channels /
Radiosender" wird die gesamte Liste mit
Radiosendern angezeigt, die beim Suchlauf
gefunden wurden.
Sie können die Auswahlschaltfläche mit Hilfe der Taste 9
oder 8 nach oben oder unten auf den gewünschten
Sender steuern.
Sie können die Taste OK drücken, um den Sender ein-
oder auszuschalten.
WICHTIG: Alle Sender ohne Kennzeichnung werden
ausgeschaltet und sind folglich nicht in allen Senderlisten
aufgeführt.
ÄNDERN DER EINSTELLUNGEN DES RECEIVERS 23
Page 98

Deutsch
8.2.2.3 Unter der Option Update mode / Update
Modus" können Sie die Funktion zum
automatischen Update von Sender ein- oder
ausschalten.
Sie können die Auswahlschaltfläche mit Hilfe der Taste 9
oder 8 nach oben oder unten auf die gewünschte
untergeordnete Option steuern.
Sie können die Taste OK drücken, um Ihre Auswahl zu
speichern.
8.2.2.4 Unter der Option New channels / Neue
Sender" können Sie die Funktion zur
Installation verschlüsselter Sender ein- oder
ausschalten.
Sie können die Auswahlschaltfläche mit Hilfe der Taste 9
oder 8 nach oben oder unten auf die gewünschte
untergeordnete Option steuern.
Sie können die Taste OK drücken, um Ihre Auswahl zu
speichern.
8.2.2.5 Option Update now / Update jetzt"
Drücken Sie die Taste OK zum Starten den neuen
Senderupdate-Vorgangs.
8.2.3 Signalqualität prüfen / Antenne prüfen
Im Menü Installation" haben Sie Antenna Positioning /
Antennen-Ausrichtung" gewählt und die Taste *
gedrückt.
Dieses Menü dient zur Unterstützung bei der Ausrichtung
der Antenne und beim Prüfen der Verfügbarkeit von
Signalen auf einem bestimmten RF-Kanal.
Ausrichten der Antenne:
- Zwei Balkenanzeigen helfen bei der Ausrichtung der
Antennen, indem sie die Signalstärke und Signalqualität
anzeigen.
- Wenn die Signalqualität mittelmäßig oder gut ist,
werden die auf diesem Kanal vorhandenen Sender
angezeigt.
Nach Einschalten des Tonsignals (Option Sound / Ton")
hilft Ihnen ein moduliertes Tonsignal beim Bestimmen der
besten Position der Antenne, ohne das Sie den
Fernsehbildschirm im Auge behalten müssen.
Sie können während der Ausrichtung außerdem den
gewünschten RF-Kanal wählen.
24 ÄNDERN DER EINSTELLUNGEN DES RECEIVERS
Page 99

8.2.4 Software-Update
Damit Sie in der Entwicklung des Digitalen Fernsehens
immer auf dem neuesten Stand sind und / oder neue
Funktionen verfügbar haben, ist der Receiver für den
Empfang von Software-Updates vorbereitet. Keine
Sorge... dieses Update ist Teil der normalen
Übertragungen. Befolgen Sie einfach die Anweisungen auf
dem Bildschirm.
Hinweis: Durch Upgrades wird Ihr Gerät ständig aufgerüstet
und sie garantieren einen problemlosen Betrieb des Receivers,
wenn neue Software erscheint. Es empfiehlt sich, jeden
Software-Download, der angeboten wird, zu akzeptieren.
Im Menü Installation" haben Sie Software" gewählt und
die Taste * gedrückt.
Ein neues Menü erscheint, in dem:
- die derzeitige Version der Software-Code angezeigt
wird;
- angezeigt wird, ob ein neues Update der Software
gefunden wurde.
- bestätigt wird, dass das Update akzeptiert wird. In
diesem Fall erfolgt das Download, wenn das Gerät auf
Standby geschaltet wird.
Die Auswahlschaltfläche befindet sich jetzt auf SoftwareUpdate".
Sie können die Taste * drücken, um Zugriff auf die
untergeordneten Optionen zu erhalten.
Your receiver is automatically set up to accept upgrades
for your DTR 1000. If you would like to be prompted
each time a new upgrade is available, then switch the
toggle to "Manual"
Deutsch
8.2.5 TIMER (einstellen, löschen, bearbeiten,
Konflikt)
Drücken Sie die Taste MENU, um das Hauptmenü
aufzurufen.
Die Auswahlschaltfläche befindet sich auf der Option
Timers / Timer".
Drücken Sie die Taste *, um Zugriff auf die
untergeordneten Optionen des Menüs Timer" zu
erhalten.
Die Auswahlschaltfläche befindet sich jetzt auf edit a
timer / Timer bearbeiten".
ÄNDERN DER EINSTELLUNGEN DES RECEIVERS 25
Page 100

Deutsch
8.2.6 Timereinstellung bearbeiten
Im gewählten Untermenü Edit a Timer / Timer
bearbeiten".
Wählen Sie einen Freien Timer", den Sie bearbeiten
möchten oder eine Timer-Einstellung, die Sie ändern
möchten, indem Sie sie mit Hilfe der Taste 9 oder 8
ansteuern.
Drücken Sie die Taste *, um Zugriff auf die
untergeordneten Optionen des Menüs Timer" zu
erhalten.
Folgende Felder können angepasst werden:
- Timer-Typ (Aufnahme oder Hinweis)
- Art des Senders (TV oder Radio)
- Sender für die Aufnahme
- Aufnahmedatum (bis zu einem Jahr im Voraus)
- Startzeit
- Endzeit
- Wiederholung (Einmal, Jeden Tag, Jeden Wochentag,
Jede Woche)
- Kindersicherung (Ein, Aus)
Hinweis: Die Option Every Weekday / Jeder Wochentag" kann
zur Aufnahme von Fernsehserien benutzt werden, die nur an
Wochentagen ausgestrahlt werden.
8.2.7 Eine Timereinstellung über das Menü
löschen
Im gewählten Untermenü Remove a Timer / Timer
löschen":
Wählen Sie den Timer, den Sie löschen möchten, in dem
Sie ihn mit Hilfe der Taste 9 oder 8 ansteuern.
Drücken Sie die Taste OK, um den Timer zu löschen.
8.2.8. Aufnahme ausschalten (Konfliktbehebung)
Konzept:
- Timer können ein- und ausgeschaltet werden.
- Ein Timer kann nur aktiviert werden, wenn kein
Konflikt mit einem anderen Timer auftritt.
- Timereinstellungen, die statt über dieses Menü auf eine
andere Weise erstellt wurden, werden zwar
beibehalten, können jedoch nur aktiviert werden, wenn
sie keinen Konflikt mit einem vorher engestellten
Timer verursachen.
Timer einschalten / ausschalten:
- Im gewahlten Untermenü Disable Recording /
Aufnahme aus".
- Wählen Sie den Timer, den Sie ausschalten möchten, in
dem Sie ihn mit Hilfe der Taste 9 oder 8 ansteuern.
- Drücken Sie die Taste OK, um den Aktivierungs-Status
dieses Timer zu ändern. Der Timer kann nicht
eingeschaltet werden, wenn dadurch ein Konflikt mit
einem anderen Timer entsteht.
26 ÄNDERN DER EINSTELLUNGEN DES RECEIVERS
 Loading...