

Page 1
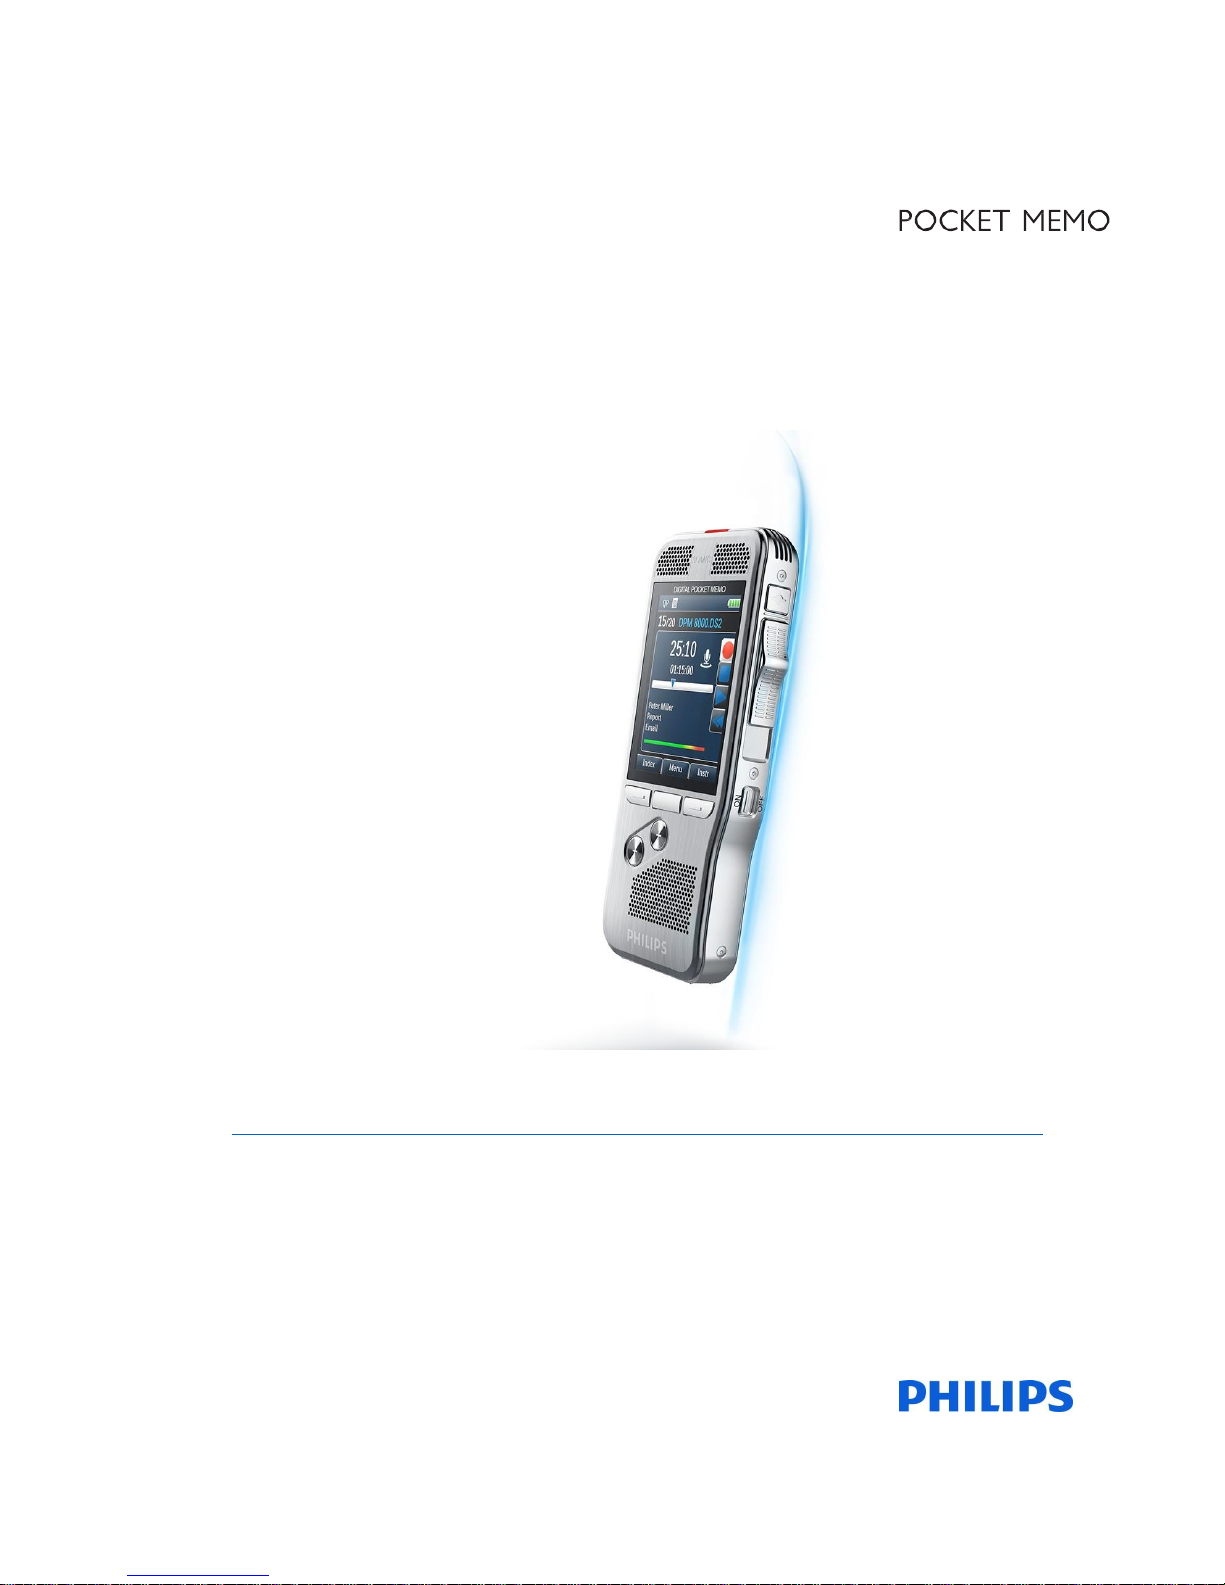
DPM8000
DPM8100
DPM8500
Technical Documentation
Advanced Configuration
For Certified MDC Partners and Support technicians
Page 2

Page 2 DPM 8000 series - Technical Specification and Advanced Device Configuration
This page is intentionally left blank
Page 3

DPM 8000 series - Technical Specification and Advanced Device Configuration Page 3
1. Hardware Specification .............................................................................. 6
1.1. Connectivity ................................................................................................ 6
1.2. Built-In Microphone ..................................................................................... 6
1.3. Microphone sensitivities .............................................................................. 6
1.4. Display ....................................................................................................... 7
1.5. Storage media ............................................................................................ 7
1.6. Audio Recording File Type ......................................................................... 7
1.7. Sound ......................................................................................................... 8
1.8. Headphone Output ..................................................................................... 8
1.9. Power ......................................................................................................... 8
1.10. Security ...................................................................................................... 8
1.11. DPM8500 Barcode scanner ........................................................................ 8
1.12. DPM8500 Scanner decode range ............................................................. 10
1.13. DPM8500 Scanner – Ambient Light Immunity .......................................... 12
1.14. Operation conditions ................................................................................. 12
1.15. Dimensions and weight ............................................................................. 12
1.16. USB Driver Specification .......................................................................... 12
1.16.1. USB Drivers – example Windows 7 64Bit .......................................................... 12
1.16.2. USB Drivers – example Windows 8 64Bit .......................................................... 14
1.16.3. USB Data Transfer Rate ..................................................................................... 17
1.17. Power Supply and charging ...................................................................... 19
1.17.1. Directly charge the DPM8000 series through the Micro-USB socket. ................ 20
1.17.2. Charge the DPM8000 series over night when switching off the Notebook. ....... 20
2. DPM8000 Menu Structure ......................................................................... 22
3. DPM8000 Advanced Recorder Configuration. ........................................ 25
3.1. Display ..................................................................................................... 26
3.1.1. Classic Display ....................................................................................................... 26
3.1.2. Advanced Display ................................................................................................... 27
3.1.3. Display backlight ..................................................................................................... 27
3.1.4. Time Format............................................................................................................ 27
3.2. Downloading ............................................................................................. 28
3.3. Buttons and slide-switch configuration ...................................................... 28
3.3.1. Philips classic switch .............................................................................................. 29
3.3.2. Philips slide switch .................................................................................................. 29
3.3.3. International slide switch ......................................................................................... 29
3.3.4. Grundig slide switch ................................................................................................ 29
3.3.5. Programmable smart button ................................................................................... 30
3.4. Hands-free recording with Foot Control .................................................... 31
3.5. Keywords.................................................................................................. 33
3.5.1. Definition of a Keyword ........................................................................................... 33
3.5.2. Transfer keywords .................................................................................................. 33
3.5.3. Paste values ........................................................................................................... 33
3.5.4. Import values .......................................................................................................... 33
3.5.5. Special barcode and mandatory keyword settings ................................................. 34
3.5.6. Mandatory keyword ................................................................................................ 34
3.5.7. Barcode into keyword ............................................................................................. 34
3.5.8. Find csv data-list entry with barcode scanner ........................................................ 34
3.6. Security .................................................................................................... 36
3.6.1. Encryption ............................................................................................................... 36
3.6.2. Device security settings .......................................................................................... 37
3.7. Advanced configuration ............................................................................ 40
3.7.1. Recording profiles ................................................................................................... 40
3.7.2. Mic directivity in hand / Mic directivity on desk ....................................................... 40
Page 4

Page 4 DPM 8000 series - Technical Specification and Advanced Device Configuration
3.7.3. Recording format .................................................................................................... 41
3.7.4. Microphone sensitivity ............................................................................................ 41
3.7.5. File Name................................................................................................................ 41
3.7.6. Edit Mode – Insert, Overwrite, Append. .................................................................. 42
3.7.7. Index / Spoken instructions..................................................................................... 42
3.7.8. Device beep ............................................................................................................ 42
3.7.9. Voice-activated recording ....................................................................................... 43
3.8. More recording settings ............................................................................ 44
3.8.1. Jump back............................................................................................................... 44
3.8.2. Acoustic feedback ................................................................................................... 44
3.8.3. Dictation number ..................................................................................................... 44
3.8.4. Record into one file only ......................................................................................... 45
3.8.5. Record notification beep ......................................................................................... 45
3.8.6. Noise reduction ....................................................................................................... 45
3.8.7. Record from external sources Line-IN .................................................................... 45
3.9. Settings transfered ................................................................................... 46
4. Backup the DPM8000 Settings ................................................................. 46
4.1. Diagnosis file ............................................................................................ 46
5. CSV List ................................................................ ................................ ..... 47
5.1. Example of content ................................................................................... 47
5.2. Invalid list format recognition .................................................................... 47
5.3. Create csv list with Microsoft Excel ........................................................... 49
5.3.1. Region and Language settings ............................................................................... 49
5.3.2. Create list.csv with Excel ........................................................................................ 50
5.3.3. Transfer to DPM8000 series ................................................................................... 52
5.4. Sort column of the csv-data list ................................................................. 53
5.5. Create Author/PIN list ............................................................................... 53
5.5.1. Example of content authorPIN.csv ......................................................................... 53
6. Customize the start screen logo .............................................................. 56
6.1. Create Start screen picture with Microsoft Paint ....................................... 56
Page 5

DPM 8000 series - Technical Specification and Advanced Device Configuration Page 5
Introduction
The Pocket Memo dictation recorder takes dictation to a new level. Breakthrough 3D Mic technology
delivers best audio quality in any recording situation. Its robust yet lightweight stainless steel design
offers perfect ergonomics for working over longer periods of time. Coupled with SpeechExec Pro
software for efficient data management and a docking station for uploading your files, going from your
voice to your text document has never been quicker.
The new Advanced Recorder Configuration wizard enables you to configure your recorder according to
your individual preferences.
This document contains technical information and describes the functions and settings.
Highlights
Superior audio quality and design
3D Mic system for best audio quality and accurate speech-recognition results
Built-in motion sensor for automatic microphone selection
Ergonomic slide switch for efficient single-handed operation
Robust stainless steel casing for extra durability
Enhance your productivity
SpeechExec workflow software for efficient data management
Large color display and clear user interface for easy, intuitive operation
Docking station for fast battery charging and hands-free recording
Light and motion sensors for extended battery life
Designed for professionals
File encryption and device PIN lock for high data security
Integrated barcode scanner for streamlined documentation
Remote management support for time-saving deployment and maintenance
Classic mode for clear and easy-to-use operation
Page 6
Page 6 DPM 8000 series - Technical Specification and Advanced Device Configuration
1. Hardware Specification
1.1. Connectivity
Headphone: 3,5mm Jack
Microphone: 3,5mm Jack
USB: USB2.0 High-Speed.
Micro-USB Connector
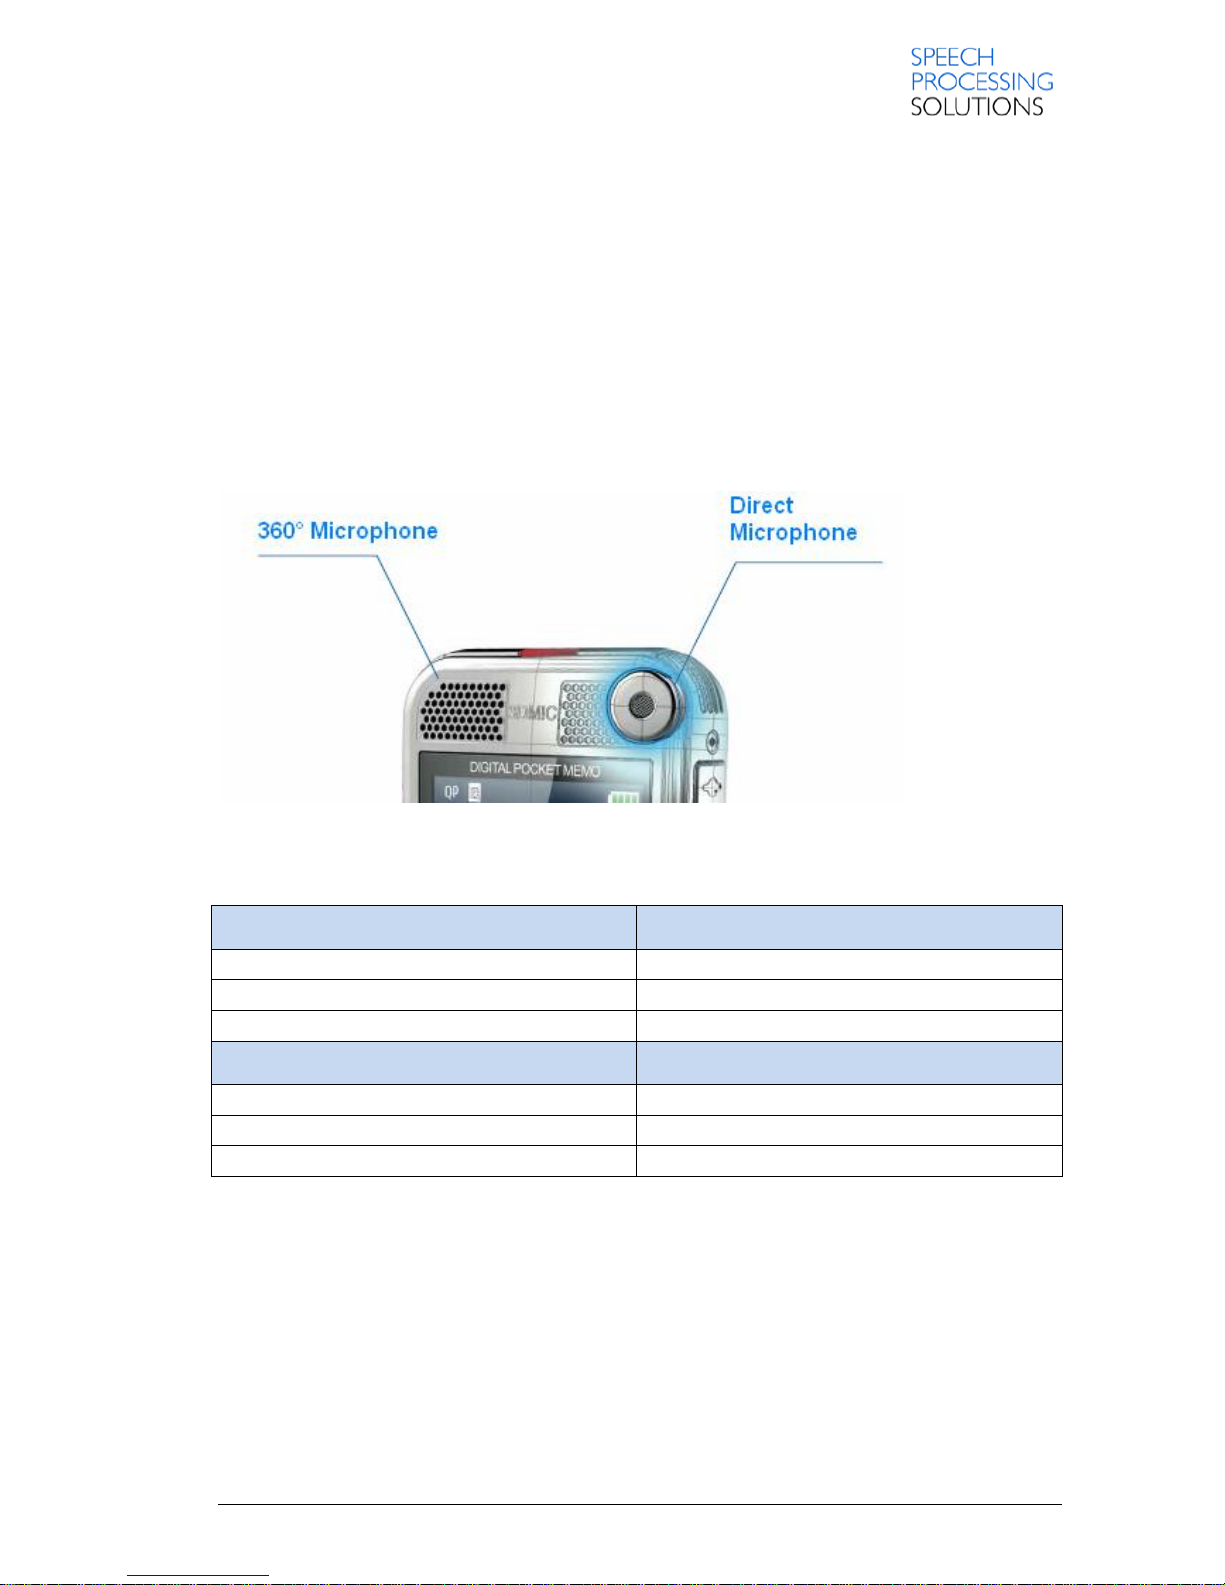
1.2. Built-In Microphone
1.3. Microphone sensitivities
External Microphone Input
Full Scale Input Voltage (mVrms)
Ext. Microphone low
11,52mV
Ext. Microphone mid
8,15mV
Ext. Microphone high
2,43mV
Line-In Input
Full Scale Input Voltage (mVrms)
Line-In low
229,75mV
Line-In mid
162,65mV
Line-In high
48,56mV
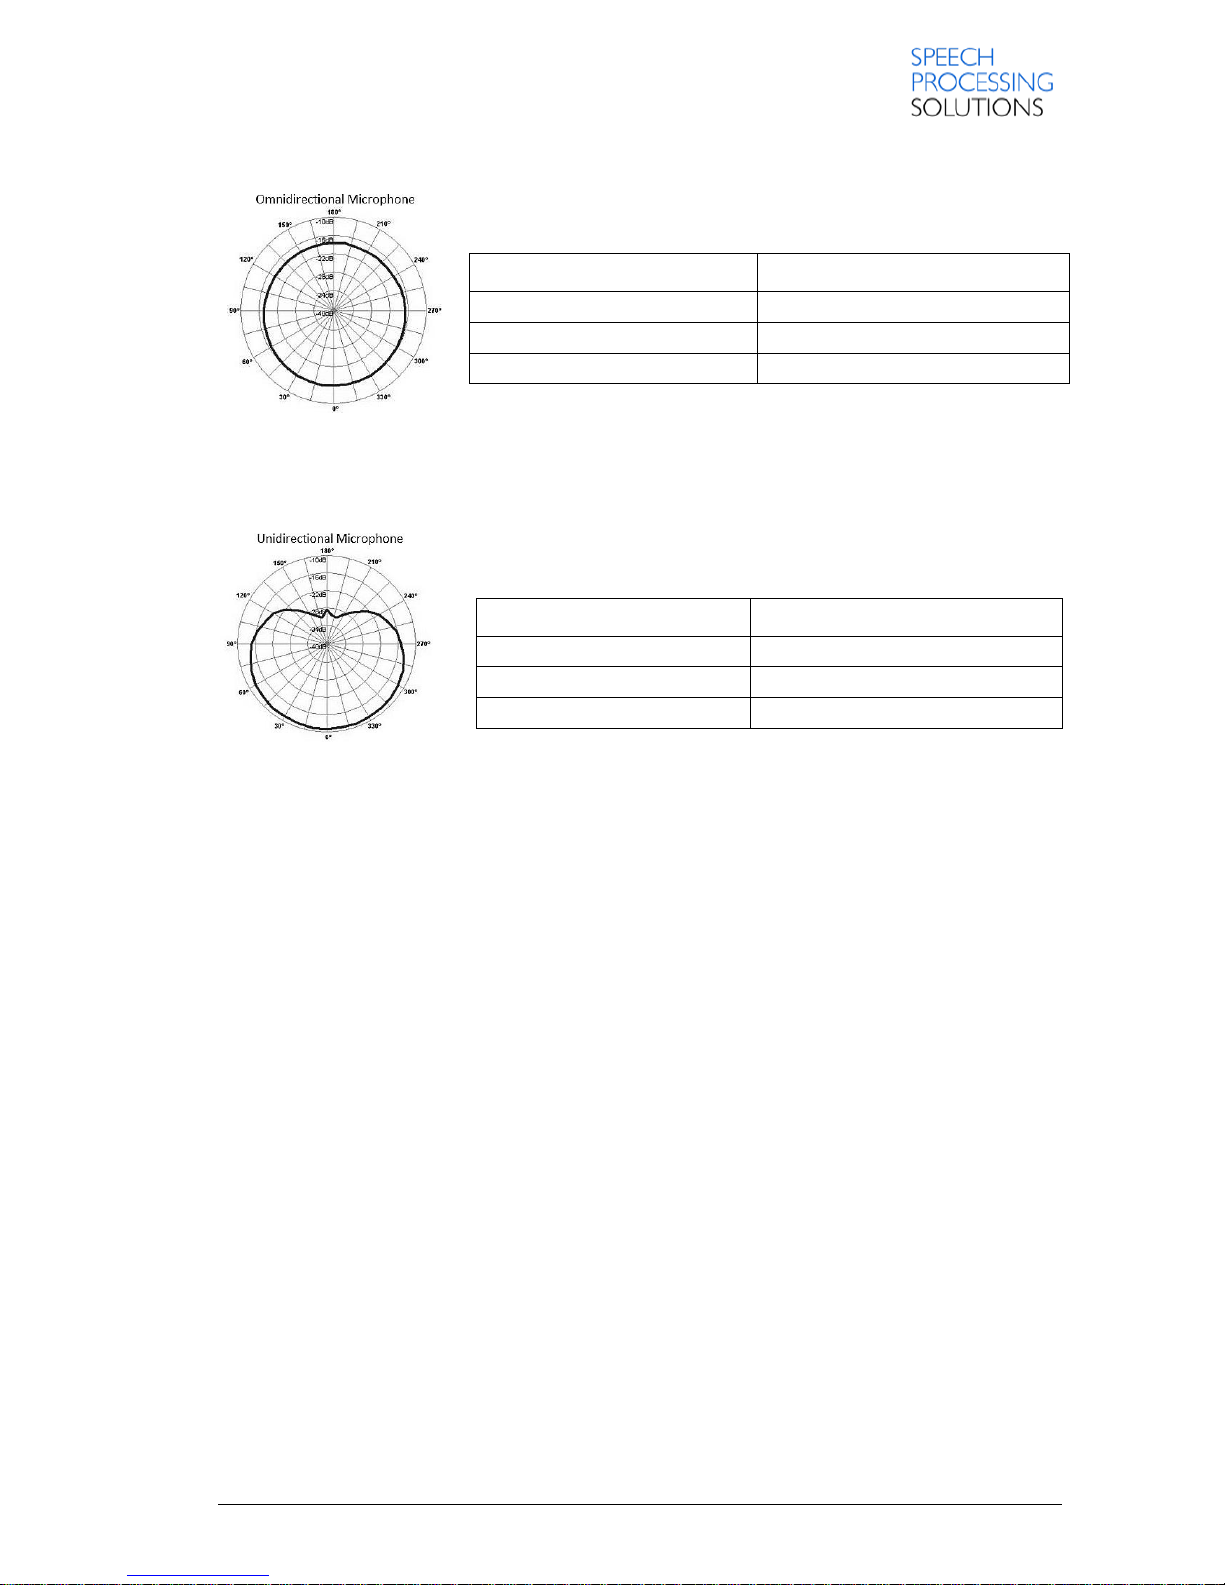
Omnidirectional Microphone - Meeting
Page 7
DPM 8000 series - Technical Specification and Advanced Device Configuration Page 7
Settings
Full Scale Sound Pressure (Pa)
Dictation Microphone low
0,46 Pa
Dictation Microphone medium
0,32 Pa
Dictation Microphone high
0,10 Pa
Unidirectional Microphone – Dictate
Settings
Full Scale Sound Pressure (Pa)
Dictation Microphone low
0,73 Pa
Dictation Microphone medium
0,51 Pa
Dictation Microphone high
0,15 Pa
1.4. Display
Color TFT Display with 320x240 pixel resolution
Screen size: 2,4” / 6,1 cm diagonal size
1.5. Storage media
DPM8000, DPM8200: SD/SDHC Memory Card up to 32GB
DPM8500 : micro SD Memory Card up to 32GB
1.6. Audio Recording File Type
Recording Format: DSS, DSS Pro, MP3, PCM
Recording mode Bit rate Sampling rate Recording Time (4GB SD Card)
DSS SP (*.dss mono) 13,7kbit/s 12kHz 700 hours (~29days)
DSS QP (*.ds2 mono) 28kbit/s 16kHz 350 hours (~14 days)
MP3 (*.mp3 stereo 192kbit/s 44,1kHz 50 hours
PCM Voice (*.wav mono) 353kbit/s 22,05kHz 27 hours
PCM Stereo (*.wav stereo) 705kbit/s 22,05kHz 13 hours
Page 8
Page 8 DPM 8000 series - Technical Specification and Advanced Device Configuration
1.7. Sound
Built-In round dynamic speaker with 28mm diameter, 200mW output power.
1.8. Headphone Output
RL (Ohm) Pout max (mW)
32 6,4 mW
16 8,35 mW
1.9. Power
Philips Li-Ion rechargeable battery type ACC8100. 3,7V 1000mAh 3,7Wh
1.10. Security
Real time AES 256bits File encryptions.
Device security with PIN and PUK Code
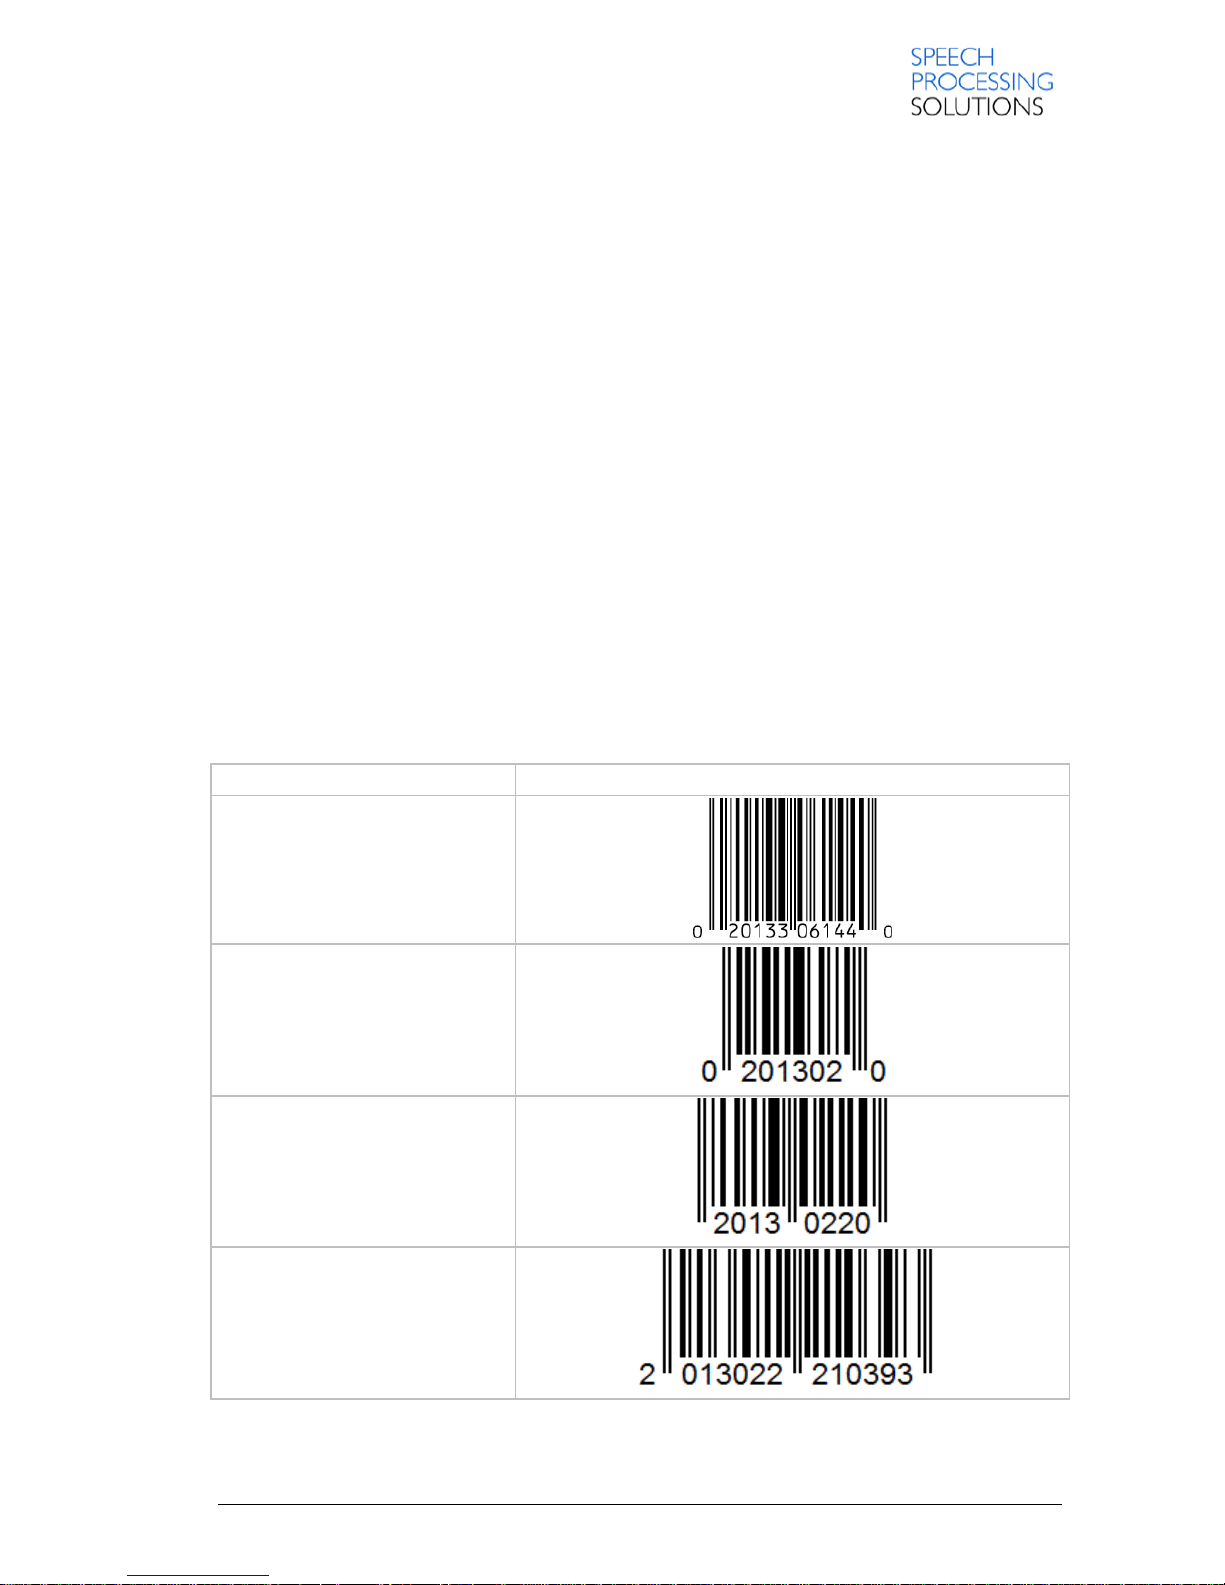
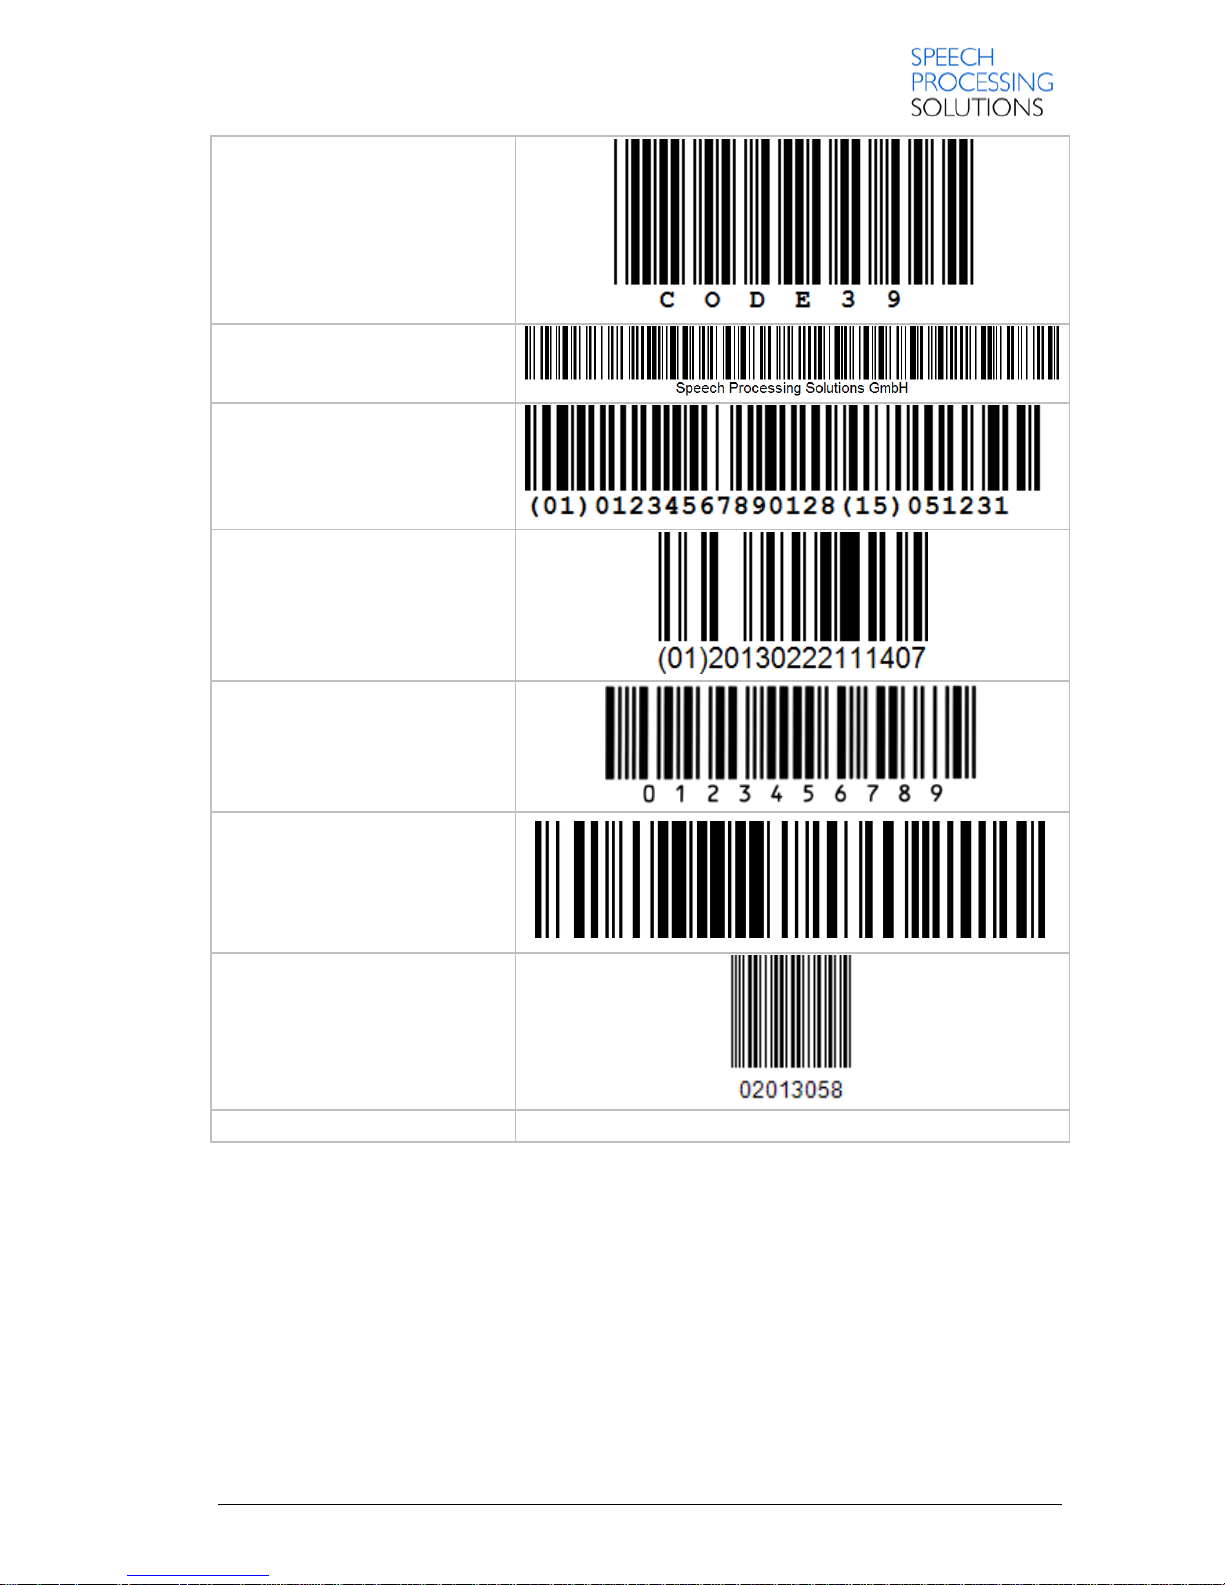
1.11. DPM8500 Barcode scanner
Scan Engine: CCD-based single line.
Barcode type
Barcode
UPC-A
UPC-E
EAN-8
EAN-13
Page 9
DPM 8000 series - Technical Specification and Advanced Device Configuration Page 9
Code 39
Code 128
GS1-128
GS1 Databar
Matrix 2of5
ISBT 128
Interleaved 2of5
Inverse 1D
Page 10
Page 10 DPM 8000 series - Technical Specification and Advanced Device Configuration
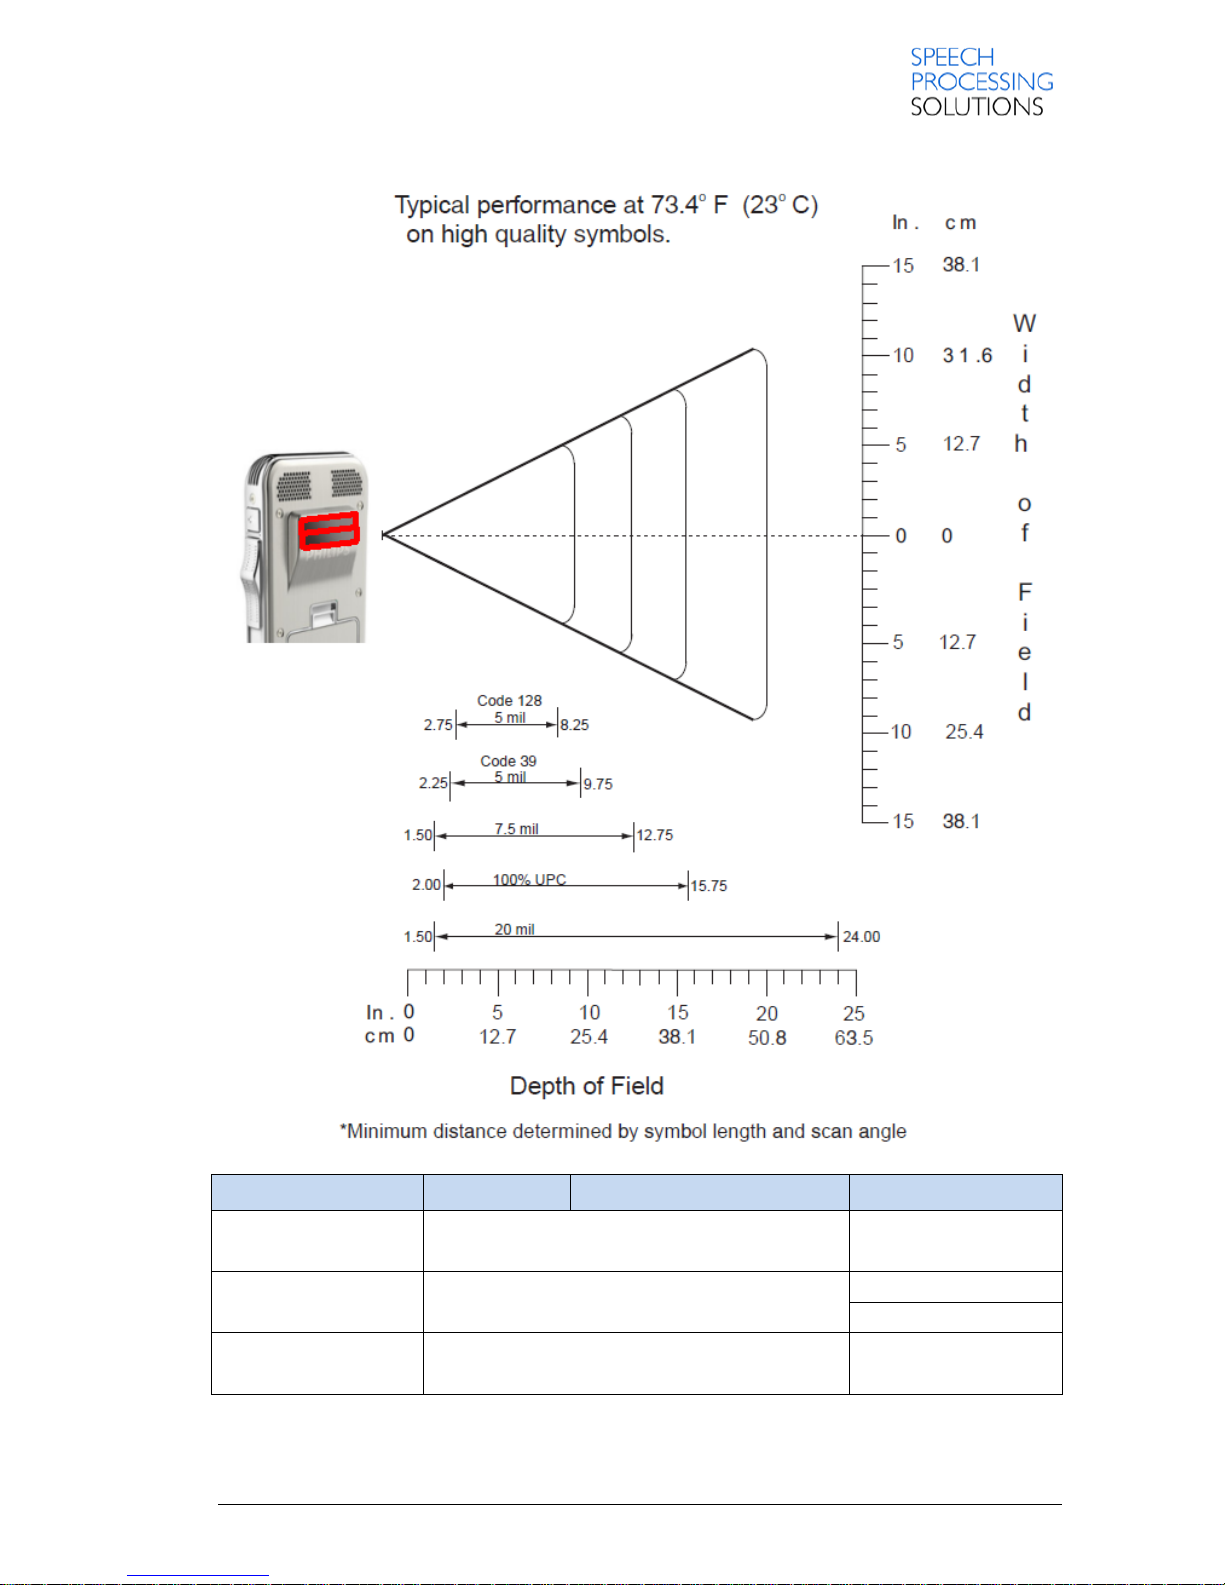
1.12. DPM8500 Scanner decode range
Barcode type
Distance
Typical
Guaranteed
Code 128 / 5mil
Near
2,75 in. / 70 mm
3,90 in. / 99 mm
Far
8,25 in. / 210 mm
6,25 in. / 159 mm
Code 39 / 5 mil
Near
2,25 in. / 57 mm
3,15 in. / 80 mm
Far
9,75 in. / 248 mm
8,00 in. / 203 mm
UPC-A
Near
2,00 in. / 51 mm
2,25 in. / 57 mm
Far
15,75 in. / 400 mm
11,00 in. / 279 mm
Page 11
DPM 8000 series - Technical Specification and Advanced Device Configuration Page 11
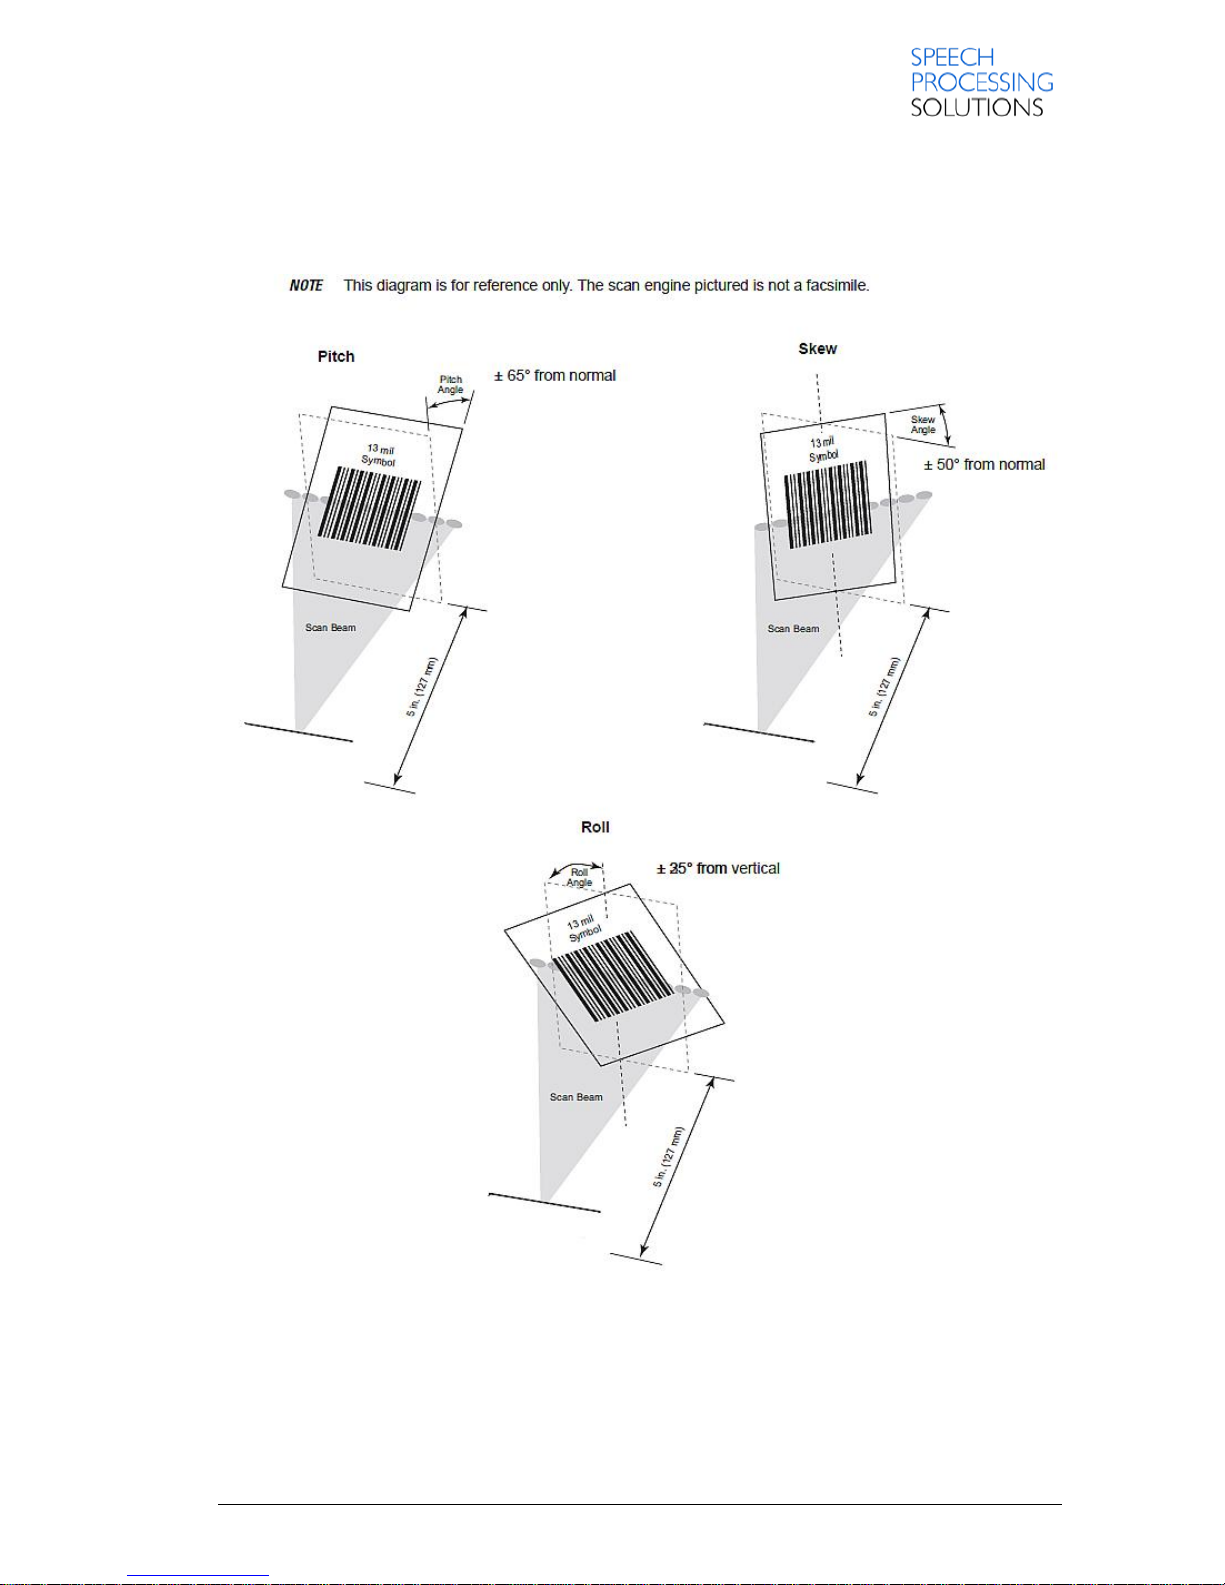
Notes:
Distances are measured from the front flange surface of the image lens
Symbols are to be mounted with a pitch of 15 +/- 3° away from the engine.
Maximum allowable roll angle of symbols relative to the engine to the engine mounting base
plane is +/- 3°.
Page 12
Page 12 DPM 8000 series - Technical Specification and Advanced Device Configuration
1.13. DPM8500 Scanner – Ambient Light Immunity
Light Source
Intensity (lux)
Fluorescent
4845 ±5%
High efficiency fluorescent
4845 ±5%
Incandescent
4845 ±5%
Mercury Vapor
4845 ±5%
Sodium Vapor
4845 ±5%
Sunlight
9690 ±5%
1.14. Operation conditions
Temperature: 5°-45° C / 41°-113° F
Humidity: 10% - 90%, non condensing
1.15. Dimensions and weight
53x123x15mm / 2,1x4,8x0,6 inches (WxDxH), 117g /4,1 oz incl battery.
1.16. USB Driver Specification
Vendor ID 0911
Product ID 1F40
1.16.1. USB Drivers – example Windows 7 64Bit
Driver Information taken from Windows 7 64Bit Enterprise operating system with Service pack 1as
an example
Windows Version: 6.1.7601 Service Pack 1 Build 7601
Driver Provider: Microsoft
Created at: 14.05.2013
Device type: Sound, video and game controllers
Driver: DPM4 Audio Control
Driver Date: 19.11.2010
Driver Version: 6.1.7601.17514
Inf name: wdma_usb.inf
Inf section: USBAudio
Included Infs: ks.inf
wdmaudio.inf
Class installer: mmci.dll
Driver files: C:\WINDOWS\system32\drivers\drmk.sys
Provider: Microsoft Corporation
File version: 6.1.7600.16385 (win7_rtm.090713-1255)
Driver files: C:\WINDOWS\system32\drivers\ksthunk.sys
Provider: Microsoft Corporation
File version: 6.1.7600.16385 (win7_rtm.090713-1255)
Page 13

DPM 8000 series - Technical Specification and Advanced Device Configuration Page 13
Driver files: C:\WINDOWS\system32\drivers\portcls.sys
Provider: Microsoft Corporation
File version: 6.1.7600.16385 (win7_rtm.090713-1255)
Driver files: C:\WINDOWS\system32\drivers\USBAUDIO.sys
Provider: Microsoft Corporation
File version: 6.1.7601.17514 (win7sp1_rtm.101119-1850)
Driver files: C:\WINDOWS\system32\SysFxUI.dll
Provider: Microsoft Corporation
File version: 6.1.7600.16385 (win7_rtm.090713-1255)
Driver files: C:\WINDOWS\system32\WMALFXGFXDSP.dll
Provider: Microsoft Corporation
File version: 6.1.7600.16385 (win7_rtm.090713-1255)
Device type: Portable Devices
Driver Date: 21.06.2006
Driver Version: 6.1.7600.13385
Inf name: wpdfs.inf
Inf section: Basic_Install
Class installer: wpd_ci.dll
Driver files: C:\WINDOWS\system32\UMDF\WpdFs.dll
Provider: Microsoft Corporation
File version: 6.1.7600.16385 (win7_rtm.090713-1255)
Driver files: C:\WINDOWS\system32\drivers\WUDFRd.sys
Provider: Microsoft Corporation
File version: 6.2.9200.16384 (win8_rtm.120725-1247)
HID-compliant device
Driver Date: 21.06.2006
Driver Version: 6.1.7601.17514
Inf name: input.inf
Inf section: HID_Raw_inst
USB Input Device
Driver Date: 21.06.2006
Driver Version: 6.1.7601.17514
Inf name: input.inf
Inf section: HID_inst
Driver files: C:\WINDOWS\system32\DRIVERS\hidclass.sys
Provider: Microsoft Corporation
File version: 6.1.7601.17514 (win7sp1_rtm.101119-1850)
Driver files: C:\WINDOWS\system32\DRIVERS\hidparse.sys
Provider: Microsoft Corporation
File version: 6.1.7600.16385 (win7_rtm.090713-1255)
Driver files: C:\WINDOWS\system32\DRIVERS\hidusb.sys
Provider: Microsoft Corporation
File version: 6.1.7601.17514 (win7sp1_rtm.101119-1850)
Philips DPM4-Harddisk USB Device
Driver Date: 21.06.2006
Page 14

Page 14 DPM 8000 series - Technical Specification and Advanced Device Configuration
Driver Version: 6.1.7600.16385
Inf name: disk.inf
Inf section: disk_install
Driver files: C:\WINDOWS\system32\DRIVERS\disk.sys
Provider: Microsoft Corporation
File version: 6.1.7600.16385 (win7_rtm.090713-1255)
Driver files: C:\WINDOWS\system32\drivers\partmgr.sys
Provider: Microsoft Corporation
File version: 6.1.7600.16385 (win7_rtm.090713-1255)
Driver files: C:\WINDOWS\system32\DRIVERS\stdcfltn.sys (position sensor)
Provider: ST Microelectronics
File version: 1.00.00.08
USB Composite Device
Driver Date: 21.06.2006
Driver Version: 6.1.7600.16385
Inf name: usb.inf
Inf section: Composite.Dev
Driver files: C:\WINDOWS\system32\drivers\usbccgp.sys
Provider: Microsoft Corporation
File version: 6.1.7601.17586 (win7sp1_gdr.110324-1501)
USB Mass Storage Device
Driver Date: 21.06.2006
Driver Version: 6.1.7601.17577
Inf name: usbstor.inf
Inf section: USBSTOR_BULK
Driver files: C:\WINDOWS\system32\drivers\USBSTOR.SYS
Provider: Microsoft Corporation
File version: 6.1.7601.17577 (win7sp1_gdr.110310-1504)
1.16.2. USB Drivers – example Windows 8 64Bit
Driver Information taken from Windows 8 Pro 64bit operating as an example
Windows Version: 6.2.9200 Build 9200
Driver Provider: Microsoft
Created at: 14.05.2013
Device type: Sound, video and game controllers
Driver: DPM4 Audio Control
Driver Date: 25.07.2012
Driver Version: 6.2.9200.16384
Inf name: wdma_usb.inf
Inf section: USBAudio
Included Infs: ks.inf
wdmaudio.inf
Class installer: mmci.dll
Page 15

DPM 8000 series - Technical Specification and Advanced Device Configuration Page 15
Driver files: C:\WINDOWS\system32\drivers\drmk.sys
Provider: Microsoft Corporation
File version: 6.2.9200.16433 (win8_gdr.121010-1704)
Driver files: C:\WINDOWS\system32\drivers\ksthunk.sys
Provider: Microsoft Corporation
File version: 6.2.9200.16384 (win8_rtm.120725-1247)
Driver files: C:\WINDOWS\system32\drivers\portcls.sys
Provider: Microsoft Corporation
File version: 6.2.9200.16384 (win8_rtm.120725-1247)
Driver files: C:\WINDOWS\system32\drivers\USBAUDIO.sys
Provider: Microsoft Corporation
File version: 6.2.9200.16384 (win8_rtm.120725-1247)
Driver files: C:\WINDOWS\system32\SysFxUI.dll
Provider: Microsoft Corporation
File version: 6.2.9200.16384 (win8_rtm.120725-1247)
Driver files: C:\WINDOWS\system32\WMALFXGFXDSP.dll
Provider: Microsoft Corporation
File version: 6..2.9200.16433 (win8_gdr.121010-1704)
Device type: Portable Devices
Driver Date: 21.06.2006
Driver Version: 6.2.9200.16384
Inf name: WpdFs.inf
Inf section: Basic_Install
Class installer: wpd_ci.dll
Driver files: C:\WINDOWS\system32\DRIVERS\UMDF\WpdFs.dll
Provider: Microsoft Corporation
File version: 6.2.9200.16384 (win8_rtm.120725-1247)
Driver files: C:\WINDOWS\system32\drivers\WpdUpFltr.sys
Provider: Microsoft Corporation
File version: 6.2.9200.16384 (win8_rtm.120725-1247)
Driver files: C:\WINDOWS\system32\DRIVERS\WUDFRd.sys
Provider: Microsoft Corporation
File version: 6.2.9200.16384 (win8_rtm.120725-1247)
HID-compliant device
Driver Date: 21.06.2006
Driver Version: 6.2.9200.16579
Inf name: input.inf
Inf section: HID_Raw_inst
USB Input Device
Driver Date: 21.06.2006
Driver Version: 6.1.7601.17514
Inf name: input.inf
Inf section: HID_RAW_Inst.NT
Philips DPM4-Harddisk USB Device
Driver Date: 21.06.2006
Driver Version: 6.2.9200.16384
Page 16

Page 16 DPM 8000 series - Technical Specification and Advanced Device Configuration
Inf name: disk.inf
Inf section: disk_install.NT
Driver files: C:\WINDOWS\system32\DRIVERS\disk.sys
Provider: Microsoft Corporation
File version: 6.2.9200.16384 (win8_rtm.120725-1247)
Driver files: C:\WINDOWS\system32\drivers\partmgr.sys
Provider: Microsoft Corporation
File version: 6.2.9200.16384 (win8_rtm.120725-1247)
Driver files: C:\WINDOWS\system32\drivers\EhStorClass.sys
Provider: Microsoft Corporation
File version: 6.2.9200.16384 (win8_rtm.120725-1247)
USB Composite Device
Driver Date: 21.06.2006
Driver Version: 6.2.9200.16384
Inf name: usb.inf
Inf section: Composite.Dev.NT
Driver files: C:\WINDOWS\system32\drivers\usbccgp.sys
Provider: Microsoft Corporation
File version: 6.2.9200 (win8_rtm.120725-1247)
USB Mass Storage Device
Driver Date: 21.06.2006
Driver Version: 6.2.9200.16384
Inf name: usbstor.inf
Inf section: USBSTOR_BULK.NT
Driver files: C:\WINDOWS\system32\drivers\USBSTOR.SYS
Provider: Microsoft Corporation
File version: 6.2.9200.16384 (win8_rtm.120725-1247)
Page 17
DPM 8000 series - Technical Specification and Advanced Device Configuration Page 17
1.16.3. USB Data Transfer Rate
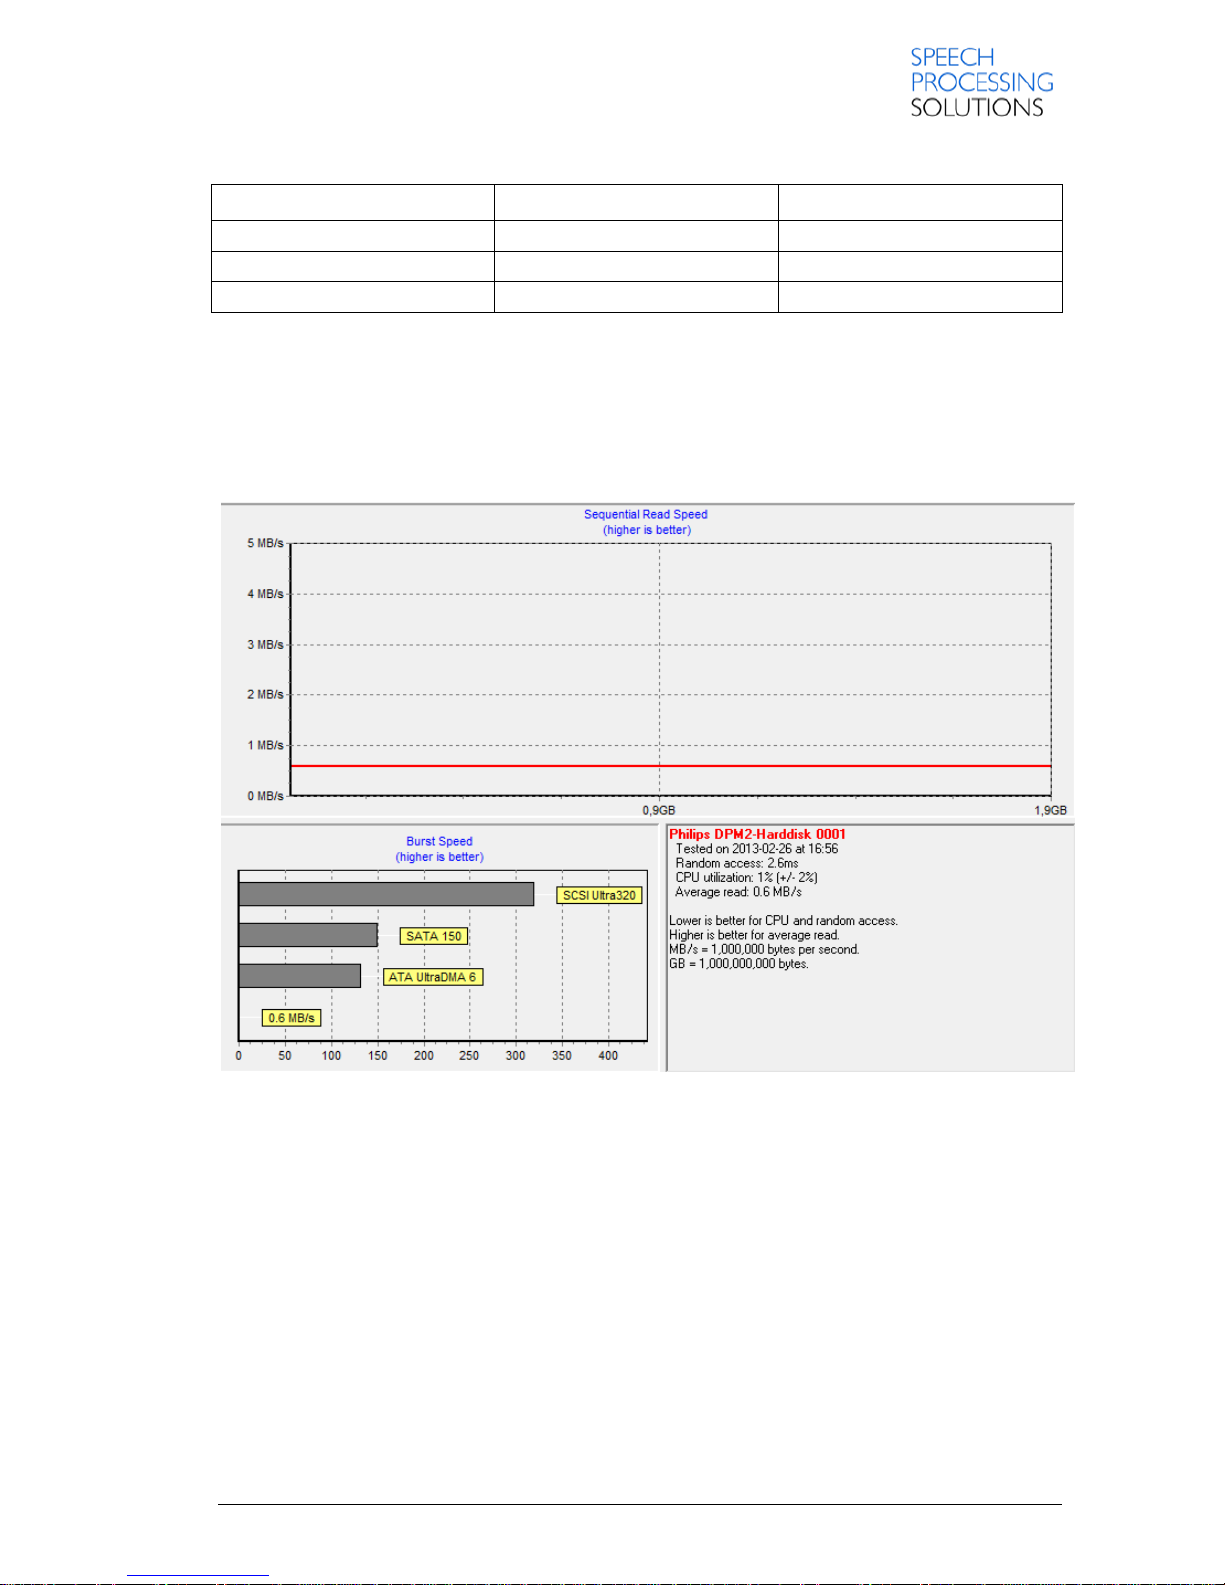
Product Type
Random access
Average read
DPM2 (LFH94XX series)
2,6ms
0,6 MB/s
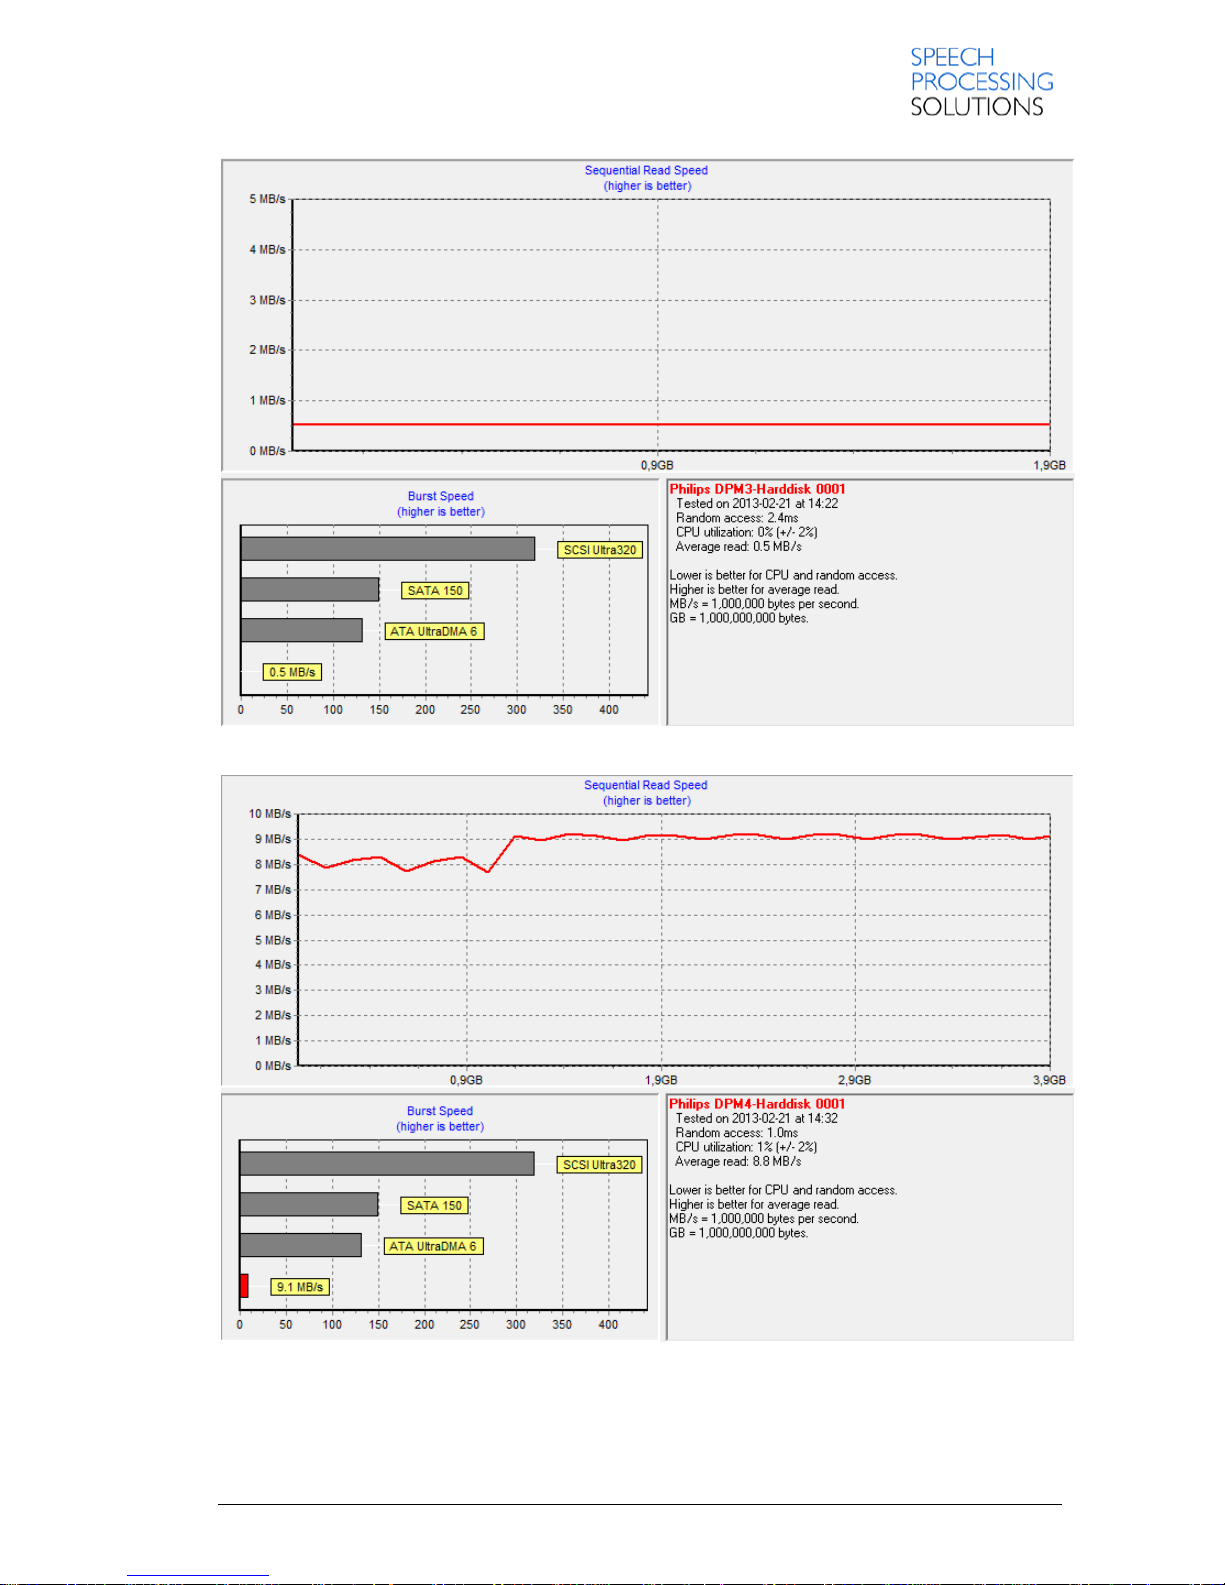
DPM3 (LFH96XX series)
2,4ms
0,5MB/s
DPM4 (LFH8000 series)
1,0ms
8,8MB/s
Test environment:
OS: Microsoft Windows 7 Ultimate 64 Bit
Software for testing: HD Tach version 3.0.4.0
Run in Windows XP compatibility mode
Select long bench – 32MB zones, on 2GB SD Philips memory card
DPM2
Page 18
Page 18 DPM 8000 series - Technical Specification and Advanced Device Configuration
DPM3
DPM4
Page 19
DPM 8000 series - Technical Specification and Advanced Device Configuration Page 19
1.17. Power Supply and charging
Battery type: Philips rechargeable Li-ion battery ACC8100
Battery Voltage: 3,7V
Battery Capacity: 1000mAh
Battery lifetime: up to 23 hours of recording (DSS Pro mode)
up to 200 hours standby
Charging time: 3 hours (Full Charging)
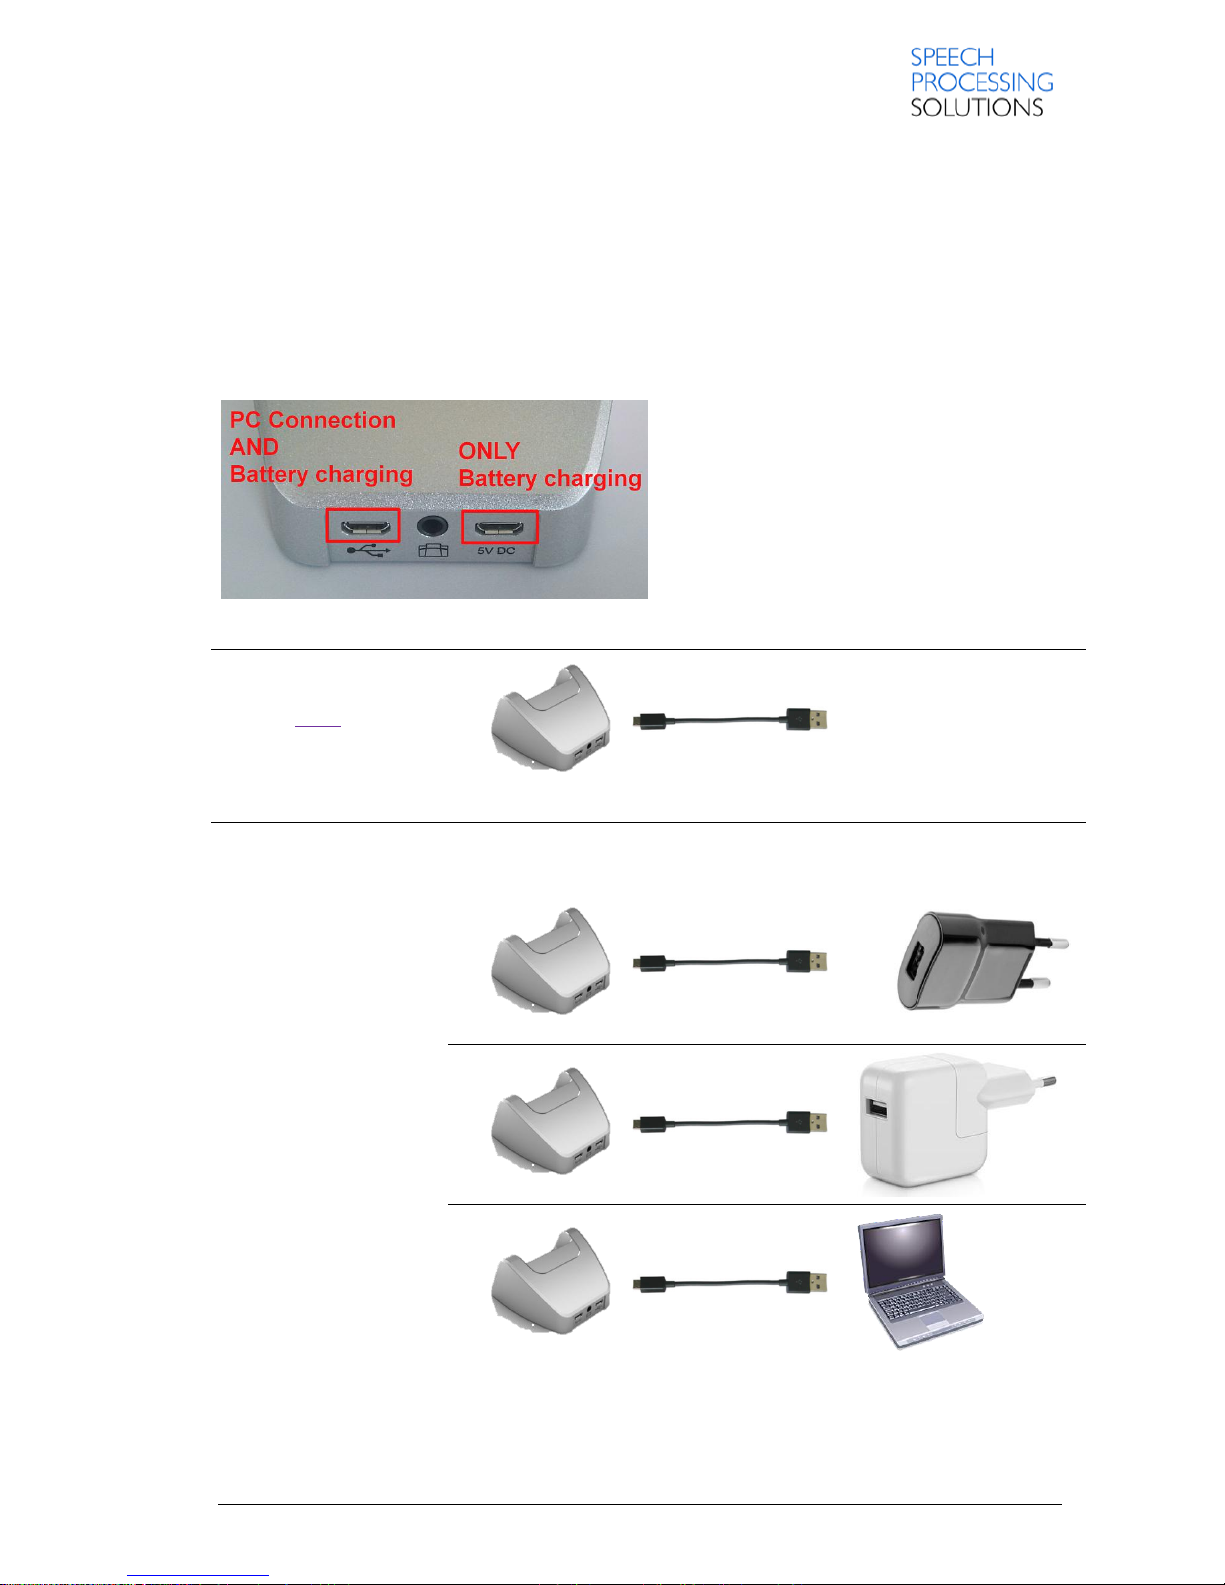
Options to charge the DPM through the docking station?
Insert the micro USB plug of
the cable into the Docking
station’s 5V DC Power
supply port
Insert the other end of the cable into the any USB power adapter or simply to your computer’s USB port.
Blackberry power adapter
iPhone power adapter
Computer/Netbook/Tablet
with powered USB port
Page 20
Page 20 DPM 8000 series - Technical Specification and Advanced Device Configuration
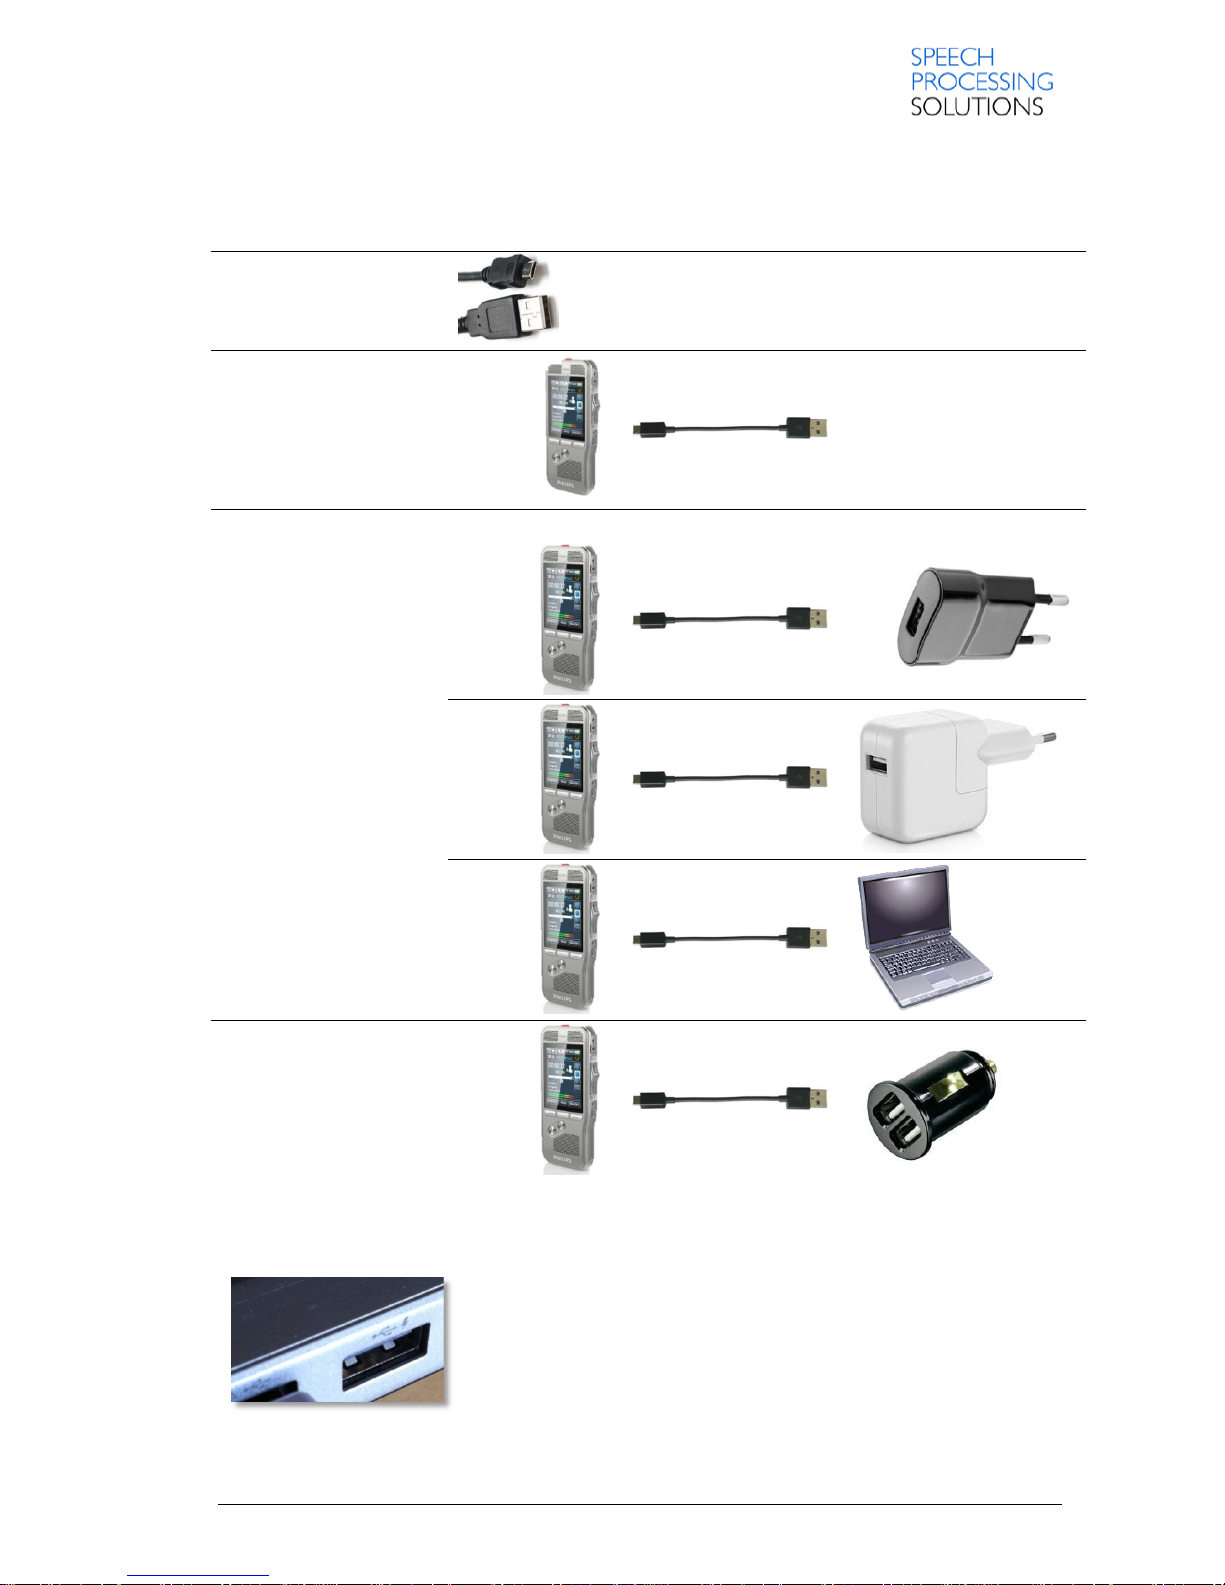
1.17.1. Directly charge the DPM8000 series through the Micro-USB socket.
Take the supplied or any
standard Micro-USB to USB
cable.
Insert the micro USB plug
into the USB port on the
recorder
Connect the other end of the cable to any USB power adapter or simply to your computer’s USB port.
Blackberry power adapter
iPhone power adapter
Computer/Netbook/Tablet
with standard or powered
USB port
Also a USB car charger (12V
to 5V USB adapter) can be
used to charge the device
while on the go
1.17.2. Charge the DPM8000 series over night when switching off the
Notebook.
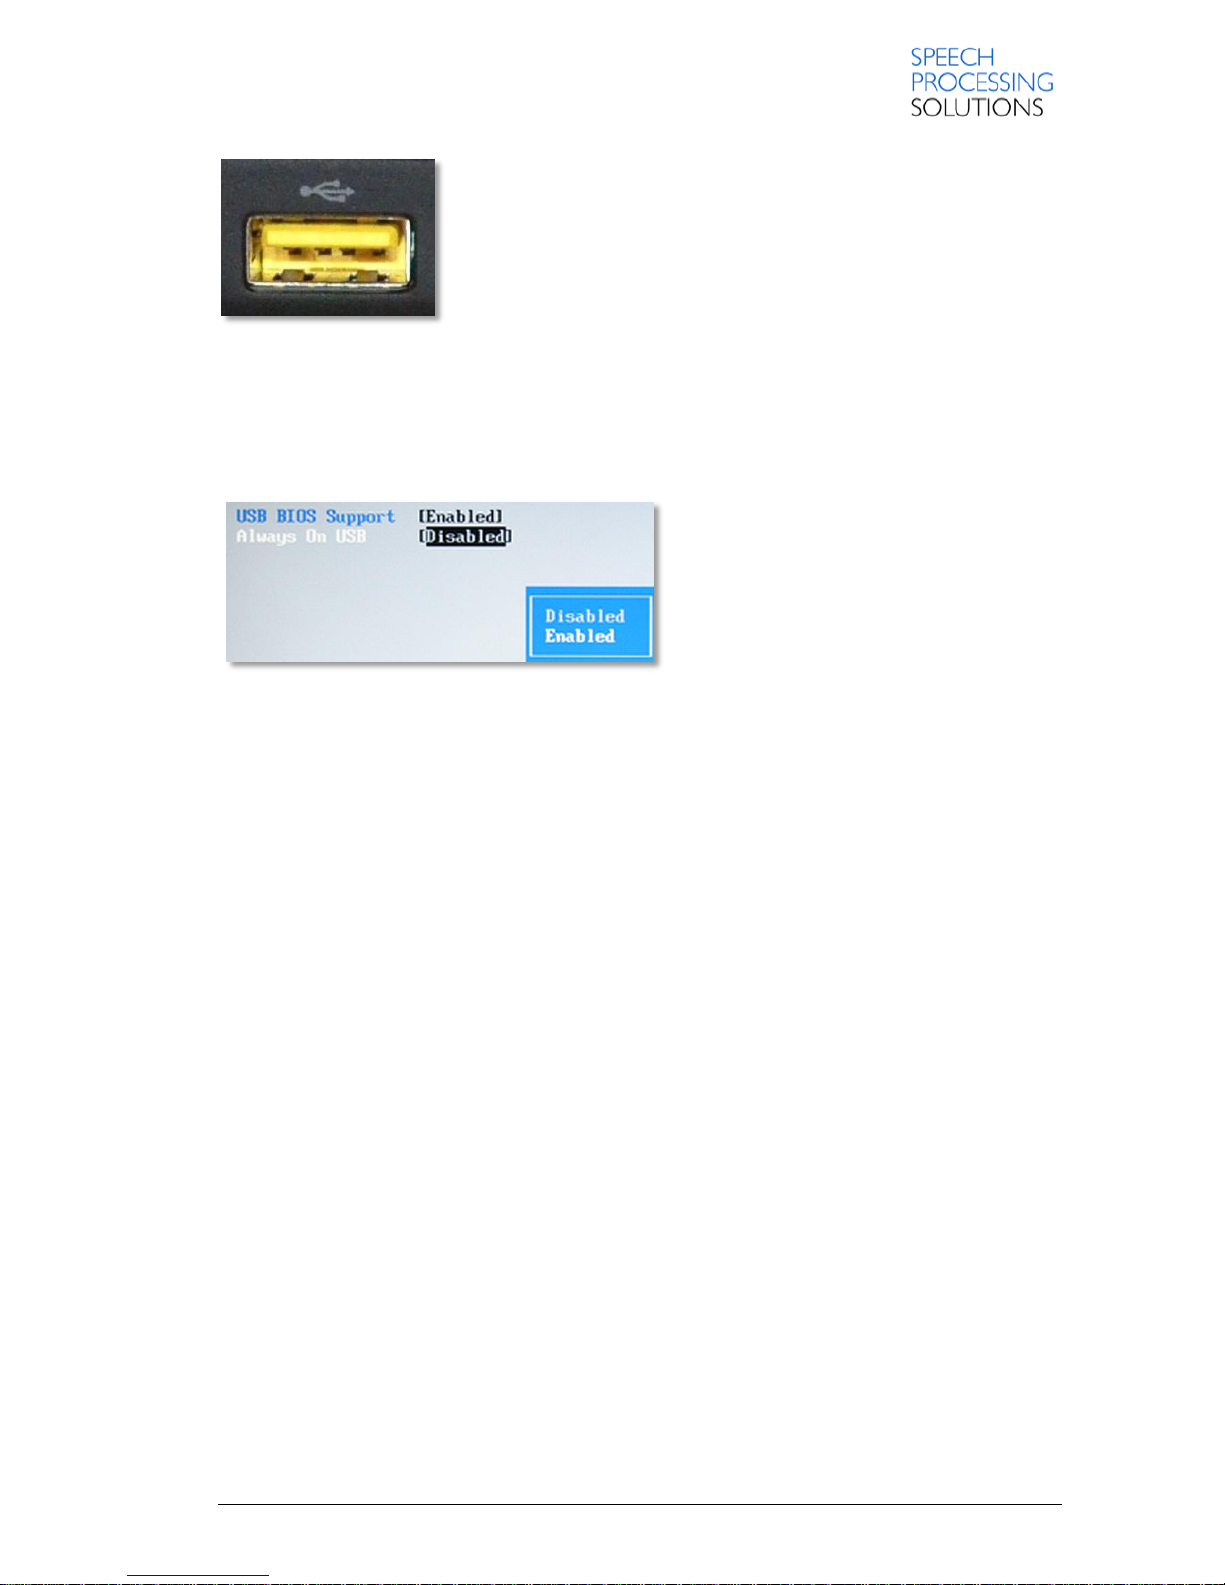
Many modern notebooks provide power through USB even when the
notebook is switched off. On the picture you can see a ‘flash’ icon right
beside the USB icon. This ‘flash’ icon indicates that this particular USB
port (often one of the available ones) will provide power even when the
notebook is fully turned off. Connecting to this USB port will make sure
the DPM will be charged even when the computer is fully switched off.
Page 21
DPM 8000 series - Technical Specification and Advanced Device Configuration Page 21
Yellow USB Port with Always-ON function.
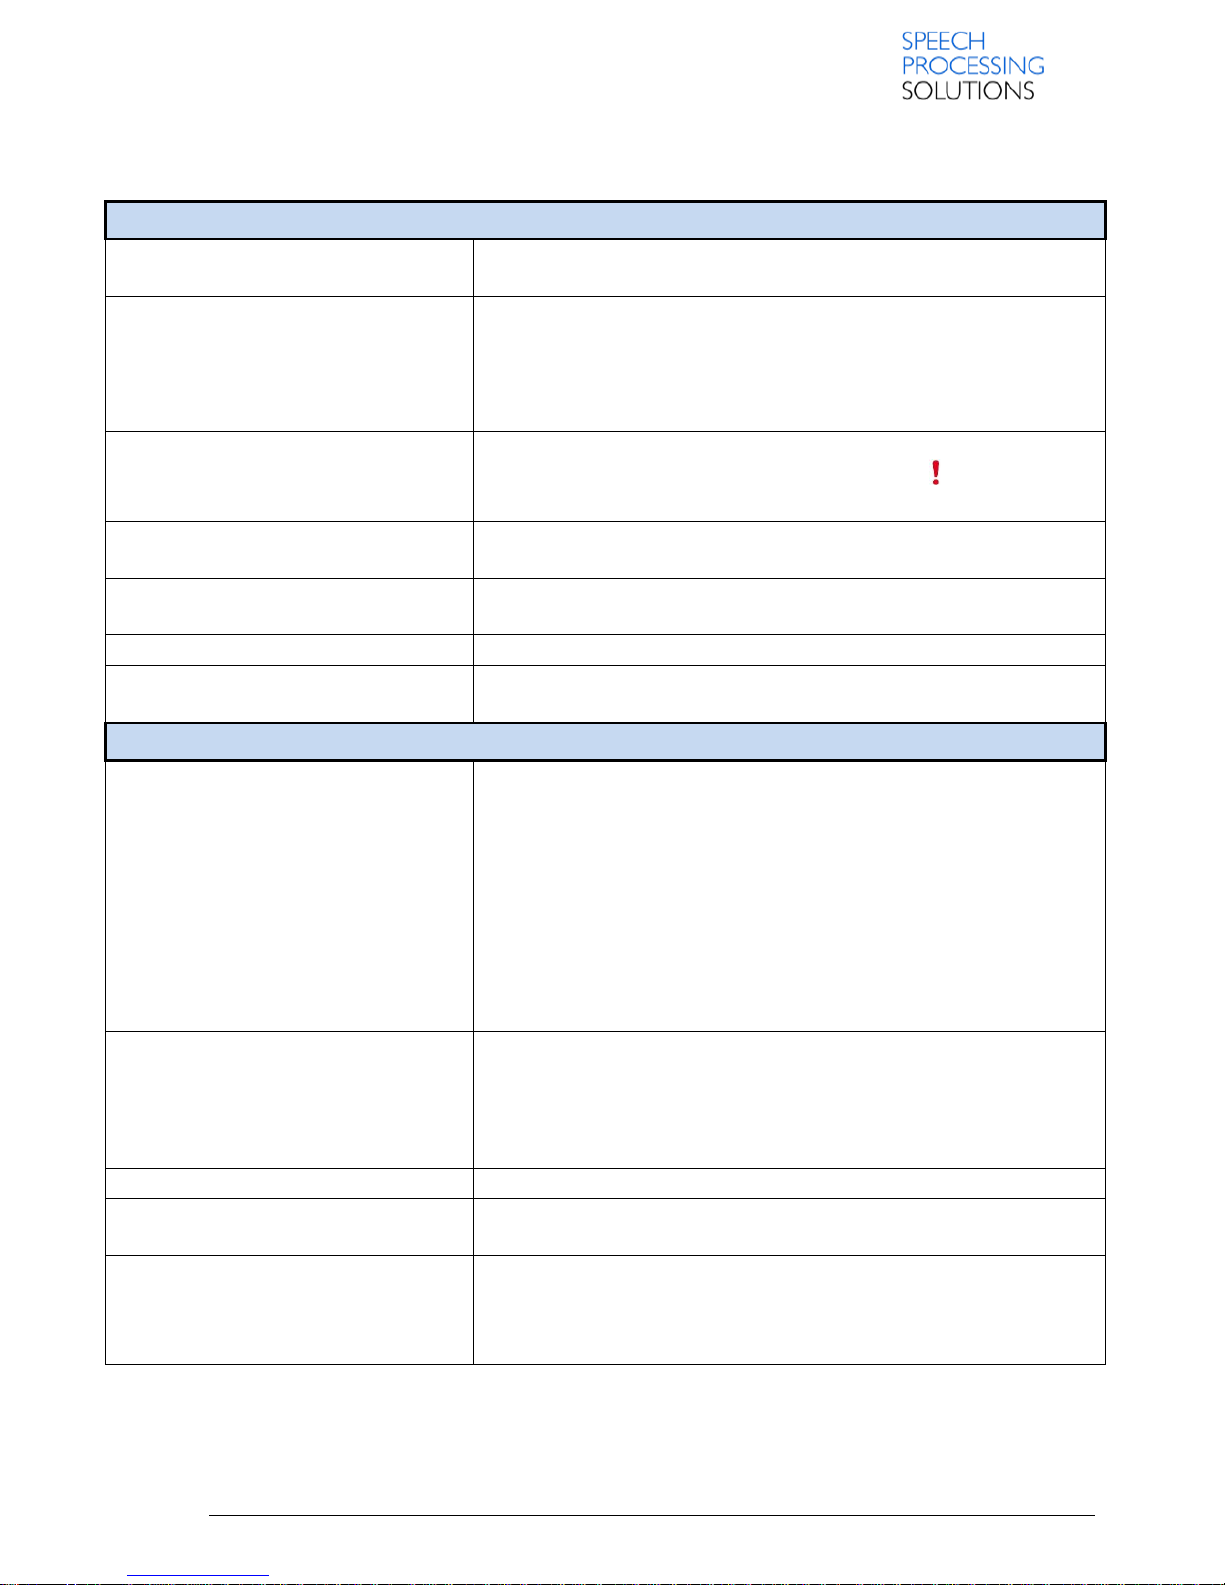
Please check also the BIOS Settings
You can set security options for protecting the files as well as the DPM8000 series devices. Open
the SpeechExec Pro Software, select Settings and General Settings. Select “Enabled”
For details of your PC or Laptop please refere to the technical specification and user manual.
Page 22
Page 22 DPM 8000 series - Technical Specification and Advanced Device Configuration
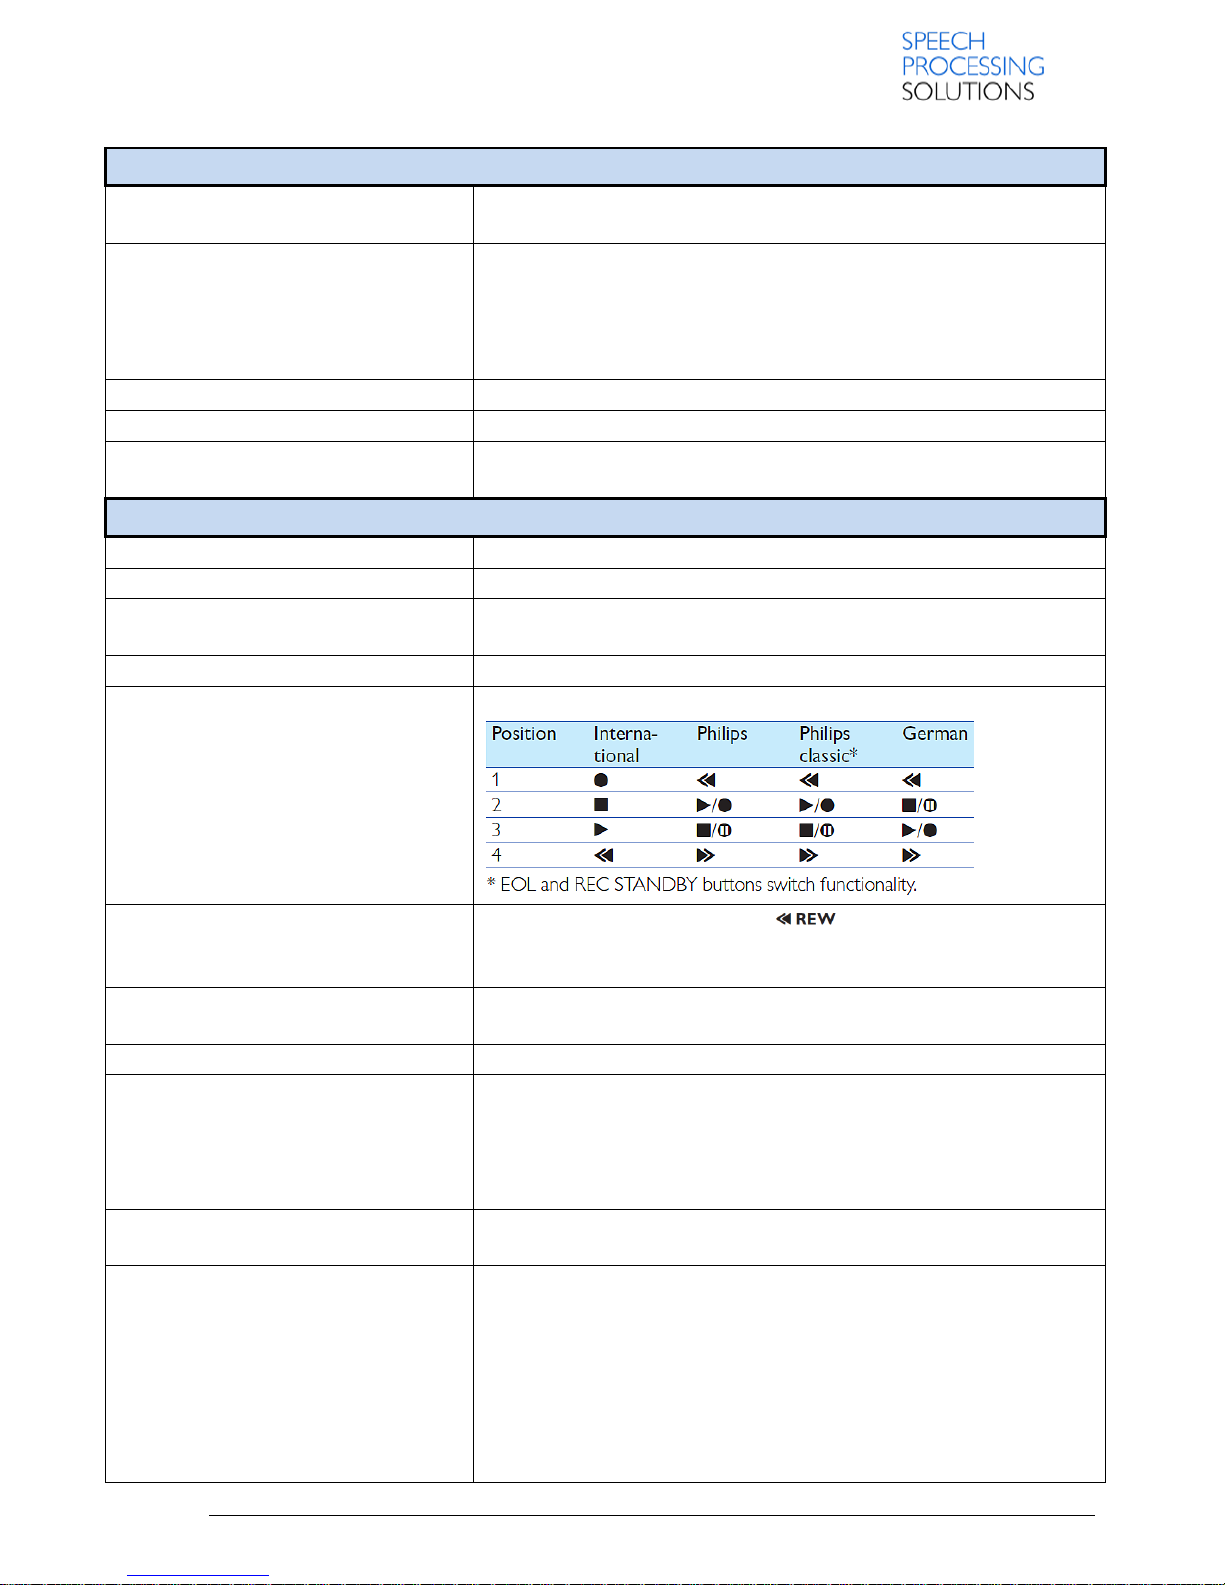
2. DPM8000 Menu Structure
File
Description
Delete file
You can delete individual files from the device while the recorder is in
STOP mode.
Delete section
Using the play, forward or rewind functions, navigate to the beginning of
the section to be deleted, press the F3 Button (MARK), using the play,
forward or rewind functions, navigate to the end of the section to be
deleted. The section is marked in red. Press F2 Button to confirm the
erasing of the marked section.
Priority normal / high
With the priority-setting option, urgent recordings can be prioritized
during transcription. You can select High (the symbol is displayed) or
Normal. The default value is Normal.
Lock / EOL
Use the file lock function to prevent important files from being
accidentally deleted and mark them as finished
Index set
Index marks can be used to mark certain points in a recording as points
of reference
Delete all
Delete all files from the device
File information
Display information about the current file, such as file number, file name,
assigned keywords, barcode information, recording date and time
Record
Description
Profile
The recording profile presets recording parameters such as recording
quality and file format, microphone sensibility and the microphone mode
to suit the recording conditions. The profile’s symbol is displayed in the
information bar at the top of the Display.
Meeting: optimized for the recording of multiple sound sources, such as
meetings and conferences with a small number of people Dictate:
optimized setting for the recording of a sound source close to the device
Speech recognition: optimized for subsequent editing using speech
recognition software
Personal: customize all settings
Line-in
If you connect an external microphone to the device, the recording
source will switch automatically and the device’s microphones will be
turned oT. Set the line-in option depending on the external source: OFF
connect an external mono or stereo microphone.
On: connect an amplified recording source (e.g. a stereo system)
Record notification beep
Enable/disable a beep tone indicating recording is about to begin.
Edit mode
You can edit an existing recording by overwriting a part of it or inserting
additional recording.
Voice Activation
When voice-activated recording is enabled, recording will start when you
begin speaking. When you stop speaking, the device will automatically
pause recording after three seconds of silence, and resume only when
you begin speaking again.
Page 23
Page 23 DPM 8000 series - Technical Specification and Advanced Device Configuration
Display
Description
Brightness
Adjust the brightness of the display in 9 steps. The brightness level of the
display will affect how quickly the device consumes battery power.
Backlight
Set the length of time the device waits before turning o: the display’s
backlight:
Auto: adjusts the brightness of the display automatically and turns o: the
display’s backlight after 8 seconds.
8 sec (default), 20 sec, On
Appearance
Select a display mode: Advanced (default), Classic
Record lamp
Enable/disable the LED light.
Language
Set the language for the device’s user interface: English, Deutsch,
Français, Español, and Italiano.
Device
Description
Beep
Enable/disable key and signal tones.
Acoustic feedback
Allows you to listen to the recording while forwarding or rewinding.
Power save
Set the length of time before the recorder will enter into powersave
mode: 1 min, 5 min (default), 10 min, 15 min, Off
Date & time
The date and time are saved with each recording as the recording time.
Slide switch
You can customize the functionality of the slide switch
Auto backspace
Move the slide switch briefly to the position to jump back the
configured number of seconds in the recording:
Off (default), 1 sec, 2 sec, 3 sec, 4 sec.
Device information
Display information about the device, such serial number, model number
and firmware version.
Format card
Deletes all recordings and files saved on the device.
USB charge
Change the charging option of the device. If the USB port of your
computer does not supply enough power capacity (500 mA), charging
may not be successful. Set the USB charge option to Slow [100 mA] or
O+ and use an (optional) power supply.• Fast [500 mA] (default)• Slow
[100 mA] Off
USB audio
When set to On, the device can be used as audio output device for the
computer when it is connected via the USB cable.
External spaker
Factory default Off, which means the audio output signal is routed to the
internal speaker if no headphone is connected and to the headphonejack if a headphone is connected.
By changing this setting to On, the audio output signal is routed to the
internal speaker and to the headphone-jack at the same time (no matter
if a headphone is connected or not).
The remote control (only available for DPM8900) can’t be detected
reliably if this setting is changed to “On”.
Page 24

Page 24 DPM 8000 series - Technical Specification and Advanced Device Configuration
Hands free mode
The recorder can be used for hands-free recording and transcription by
connecting the optional Philips foot switch LFH2210 to the docking
station. In this operating mode, you can control the recording and
playback functions with the foot switch.
Diagnosis file
Save a diagnosis file for error analysis and a file with all device
configuration settings on the memory card.
Reset settings
Reset your settings to the factory default values.
Noise reduction
Turn on the noise reduction function for better playback quality.
This page is intentionally left blank
Page 25
Page 25 DPM 8000 series - Technical Specification and Advanced Device Configuration
3. DPM8000 Advanced Recorder Configuration.
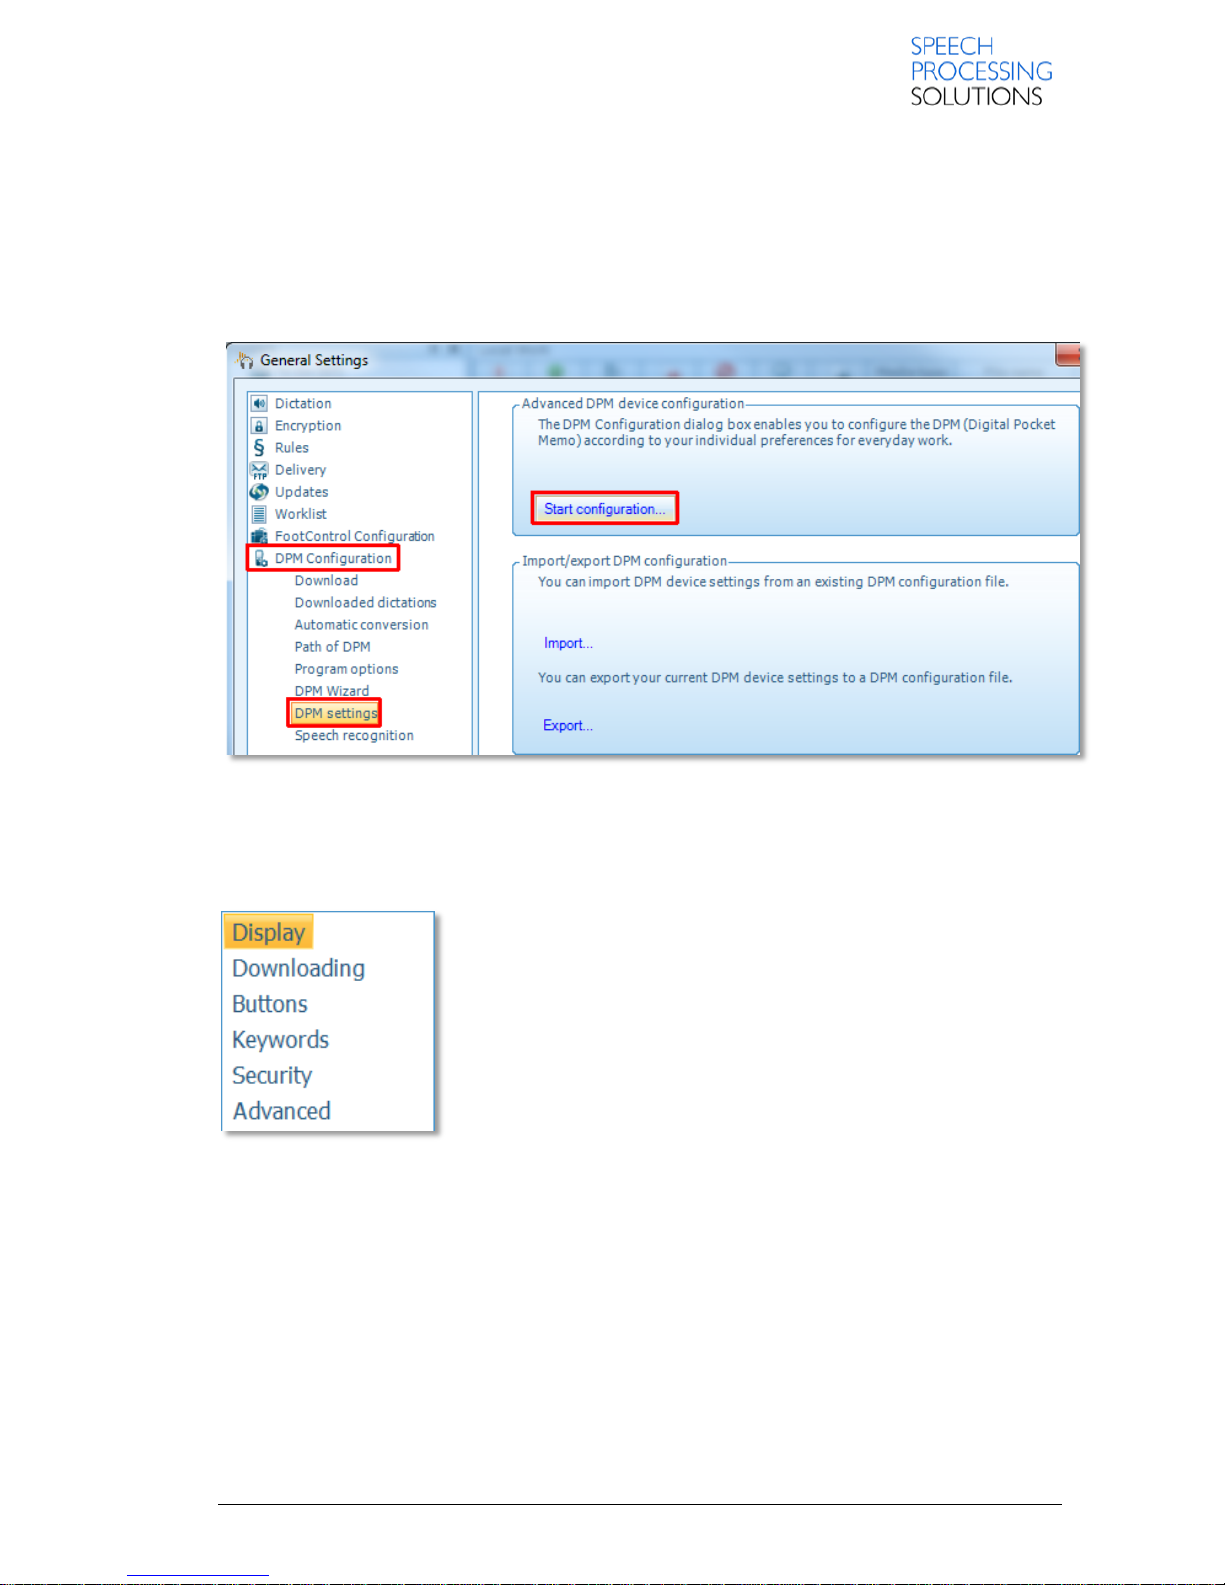
The SpeechExec Pro Dictate Advanced Recorder Configuration wizard enables you to configure
your recorder according to your individual preferences.
To start the Advanced Recorder Configuration wizard, click SETTINGS, select DPM Configuration
and click on DPM settings.
The wizard consists of the following pages
Display: Enables users to customize the display of the recorder.
Downloading: Enables users to make device-specific settings for the
file transfer between the recorder and the computer.
Buttons: Enables users to customize the functions of the buttons on
their recorder.
Keywords: Enables users to create keywords with strings for their
displayed name and selectable values.
Security: Enables users to set security options for their recordings and
for the recorder as well.
Advanced: Provides advanced options and settings for the behavior of
the recorder.
Page 26
Page 26 DPM 8000 series - Technical Specification and Advanced Device Configuration
3.1. Display
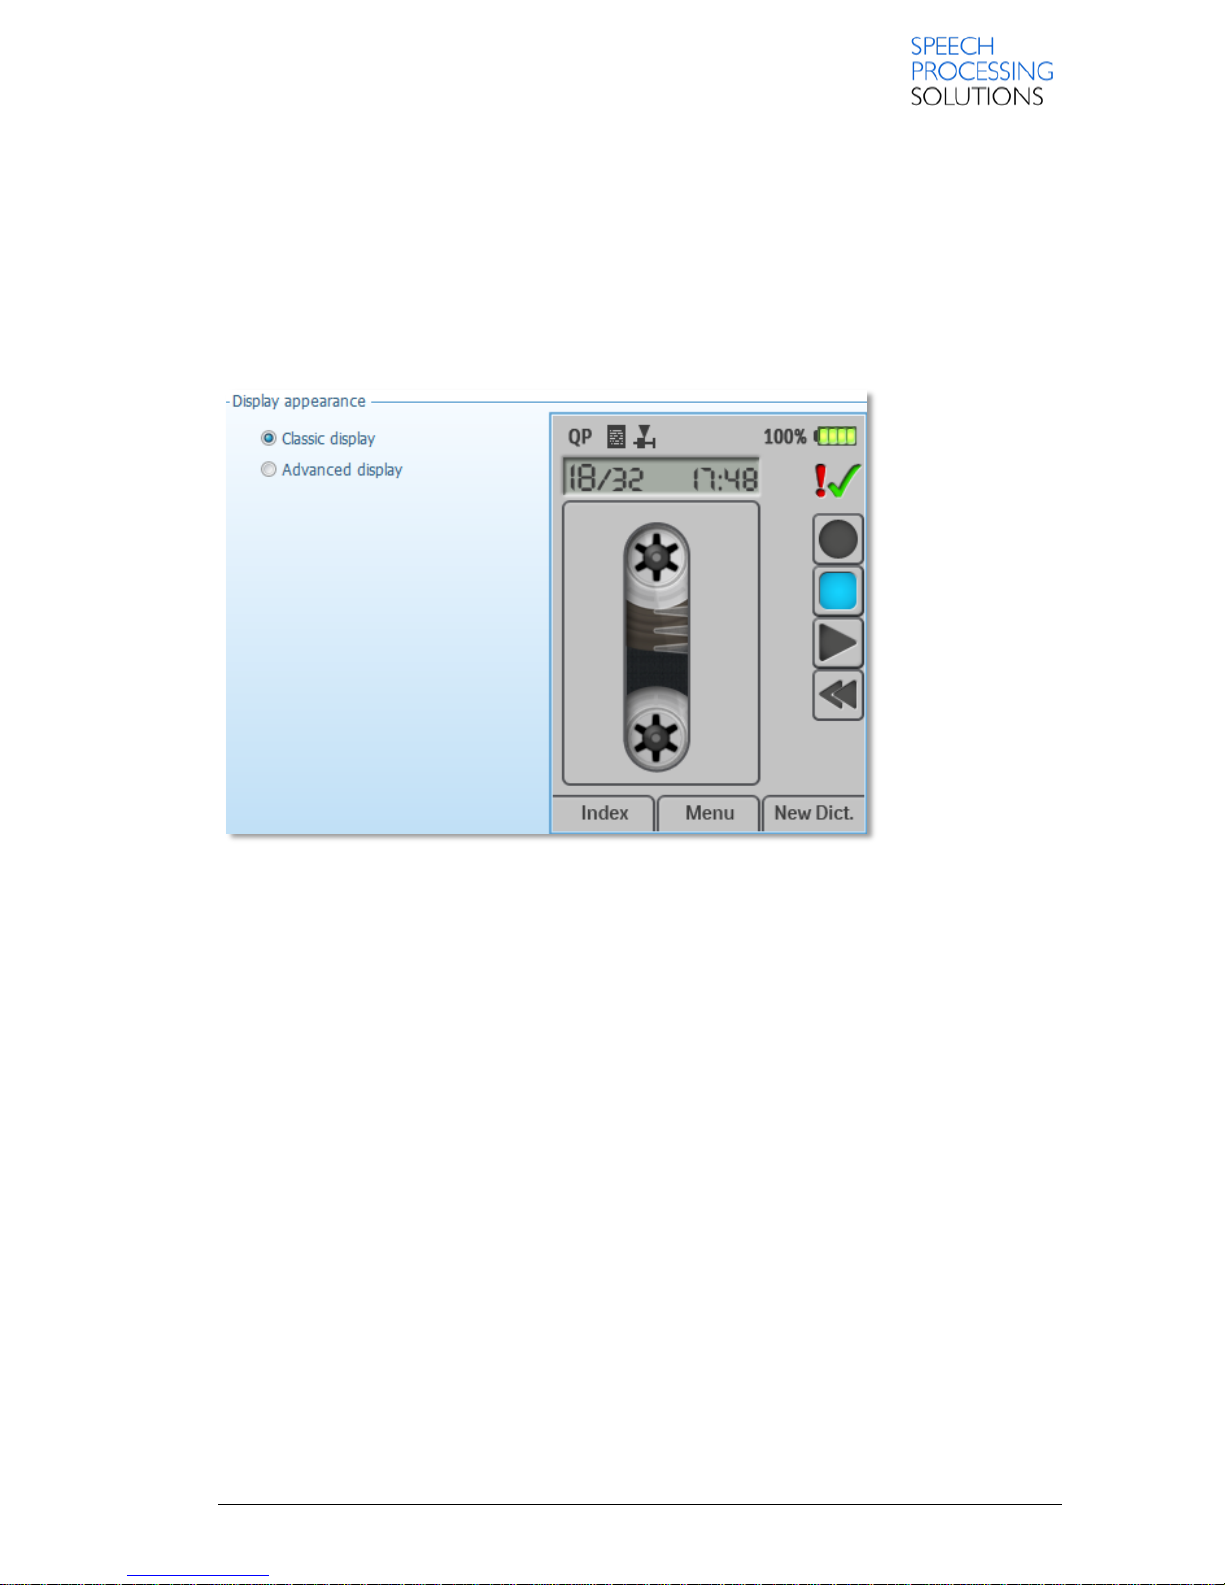
Here you can customize the display of the recorder.
3.1.1. Classic Display
Classic Display - this option uses larger symbols. The image of the tape-based recorder is used here
as an illustration.
Page 27
Page 27 DPM 8000 series - Technical Specification and Advanced Device Configuration
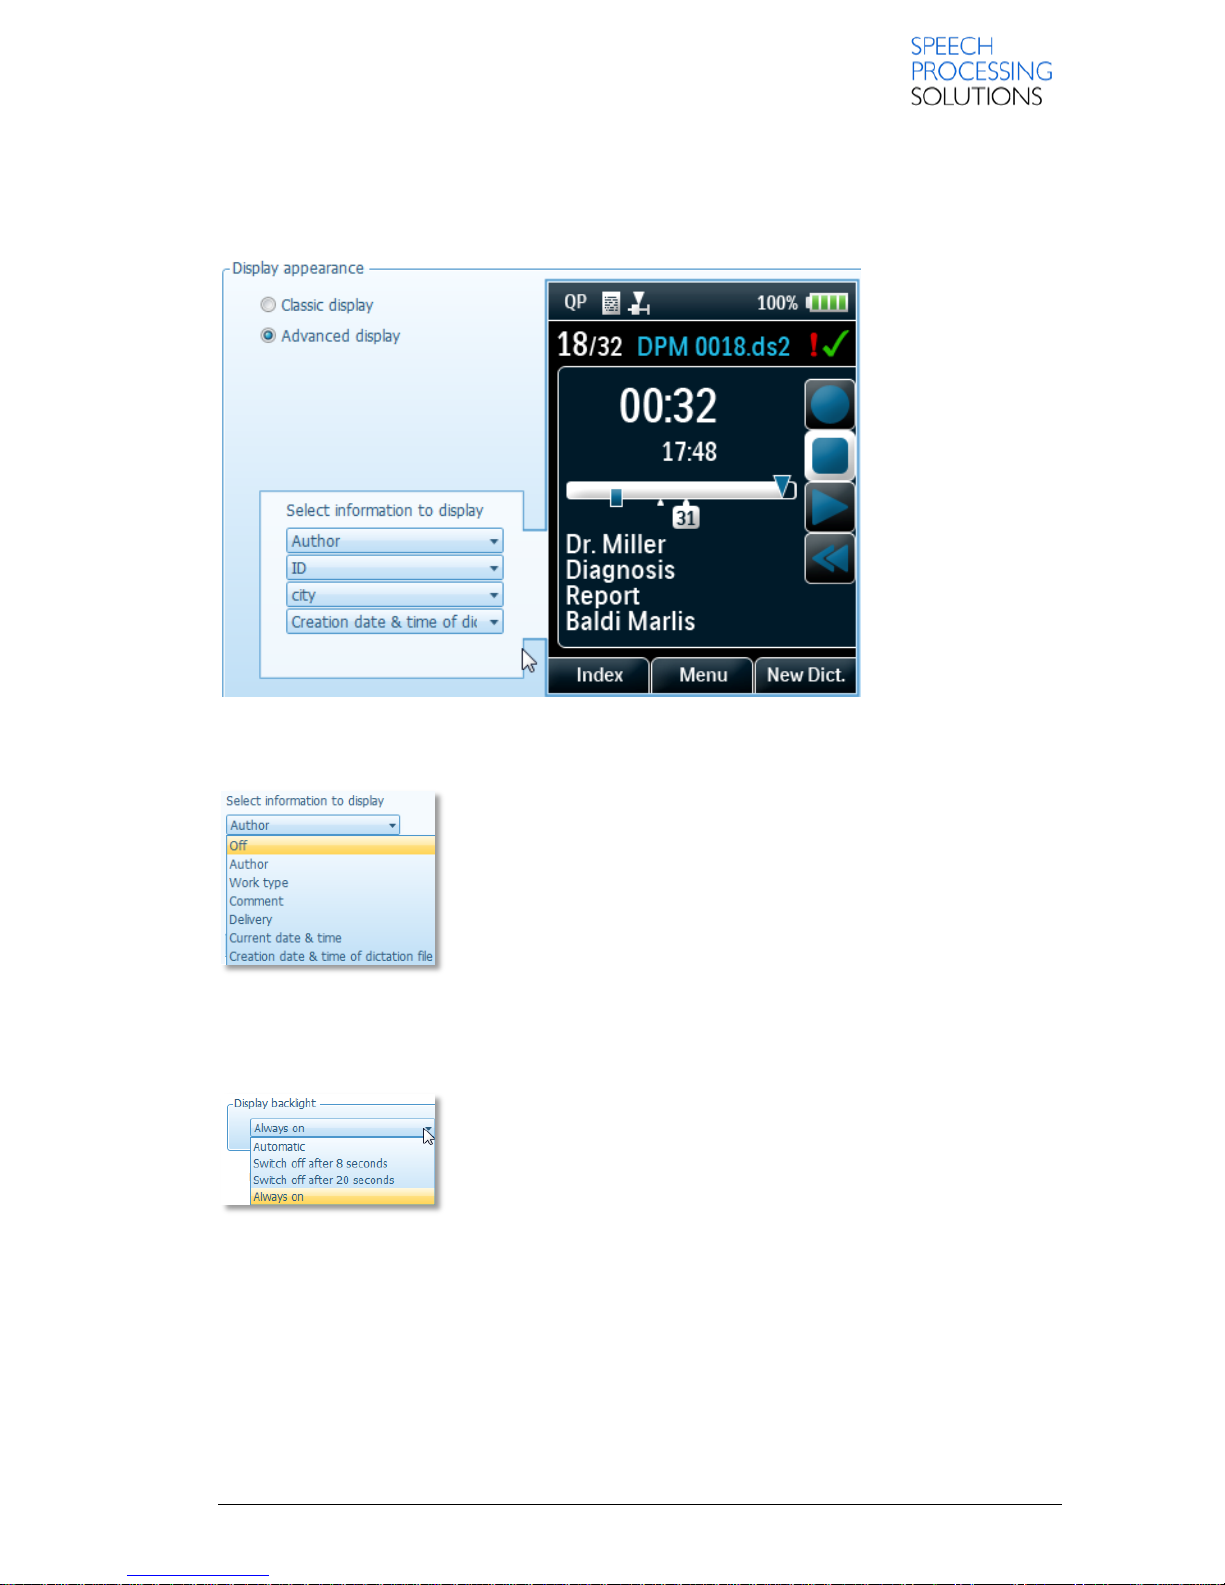
3.1.2. Advanced Display
This option uses smaller symbols and shows more detailed information about the current dictation.
A group-box enclosing four combo boxes are displayed here.
You can also specify what kind of additional information you would like to see about your dictation
file:
Available values of keywords:
Off
Author
Work type
Comment
Delivery
Current date & time
Creation date & time of dictation file
3.1.3. Display backlight
This setting enables you to control the switch-off time of the recorder
display by selecting one of the following values:
Automatic – Light sensor
Switch off after 8 seconds
Switch off after 20 seconds
Always on
3.1.4. Time Format
This setting defines that the time is displayed in the 12-hour time format with AM/PM symbols on the
recorder. Otherwise, the time is displayed in the standard 24-hour format.
Note: The date is always displayed in the YYYY-MM-DD format.
Page 28
Page 28 DPM 8000 series - Technical Specification and Advanced Device Configuration
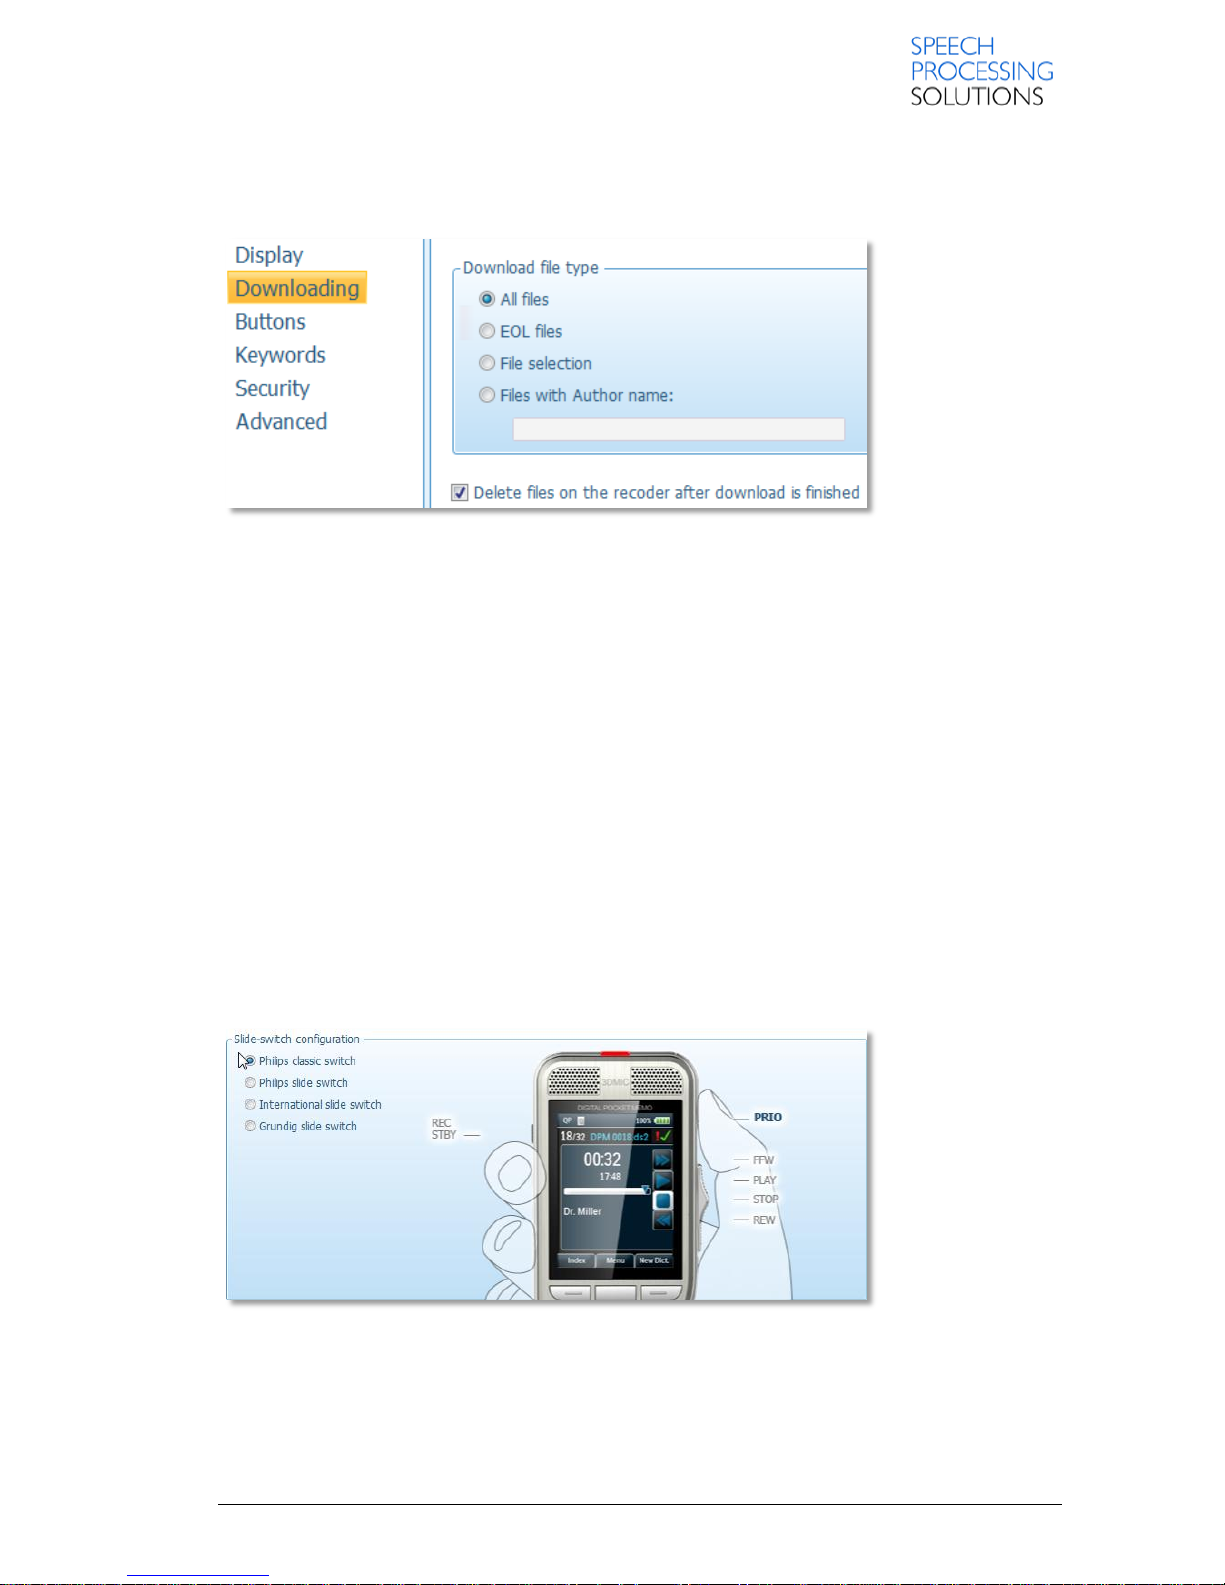
3.2. Downloading
This page provides various options for device-specific settings for the file transfer between the
recorder and the computer.
Download file type:
Note: This setting is ignored when performing manual download in SpeechExec. In this case, all the
files on the recorder are displayed and can be selected individually for download.
All files
Downloads all files from the recorder to the computer. This is the default setting.
EOL files
Downloads all files with the EOL indication.
File selection
Instructs the download application to display the list of files on the recorder. This dialog enables you
to select individual files for downloading.
Files with Author name
Downloads all files with a specific author name (1st keyword). The maximum number of characters
is 30.
Delete files on the recorder after download is finished
Deletes the downloaded dictation files on the recorder after they have been transferred to the
computer.
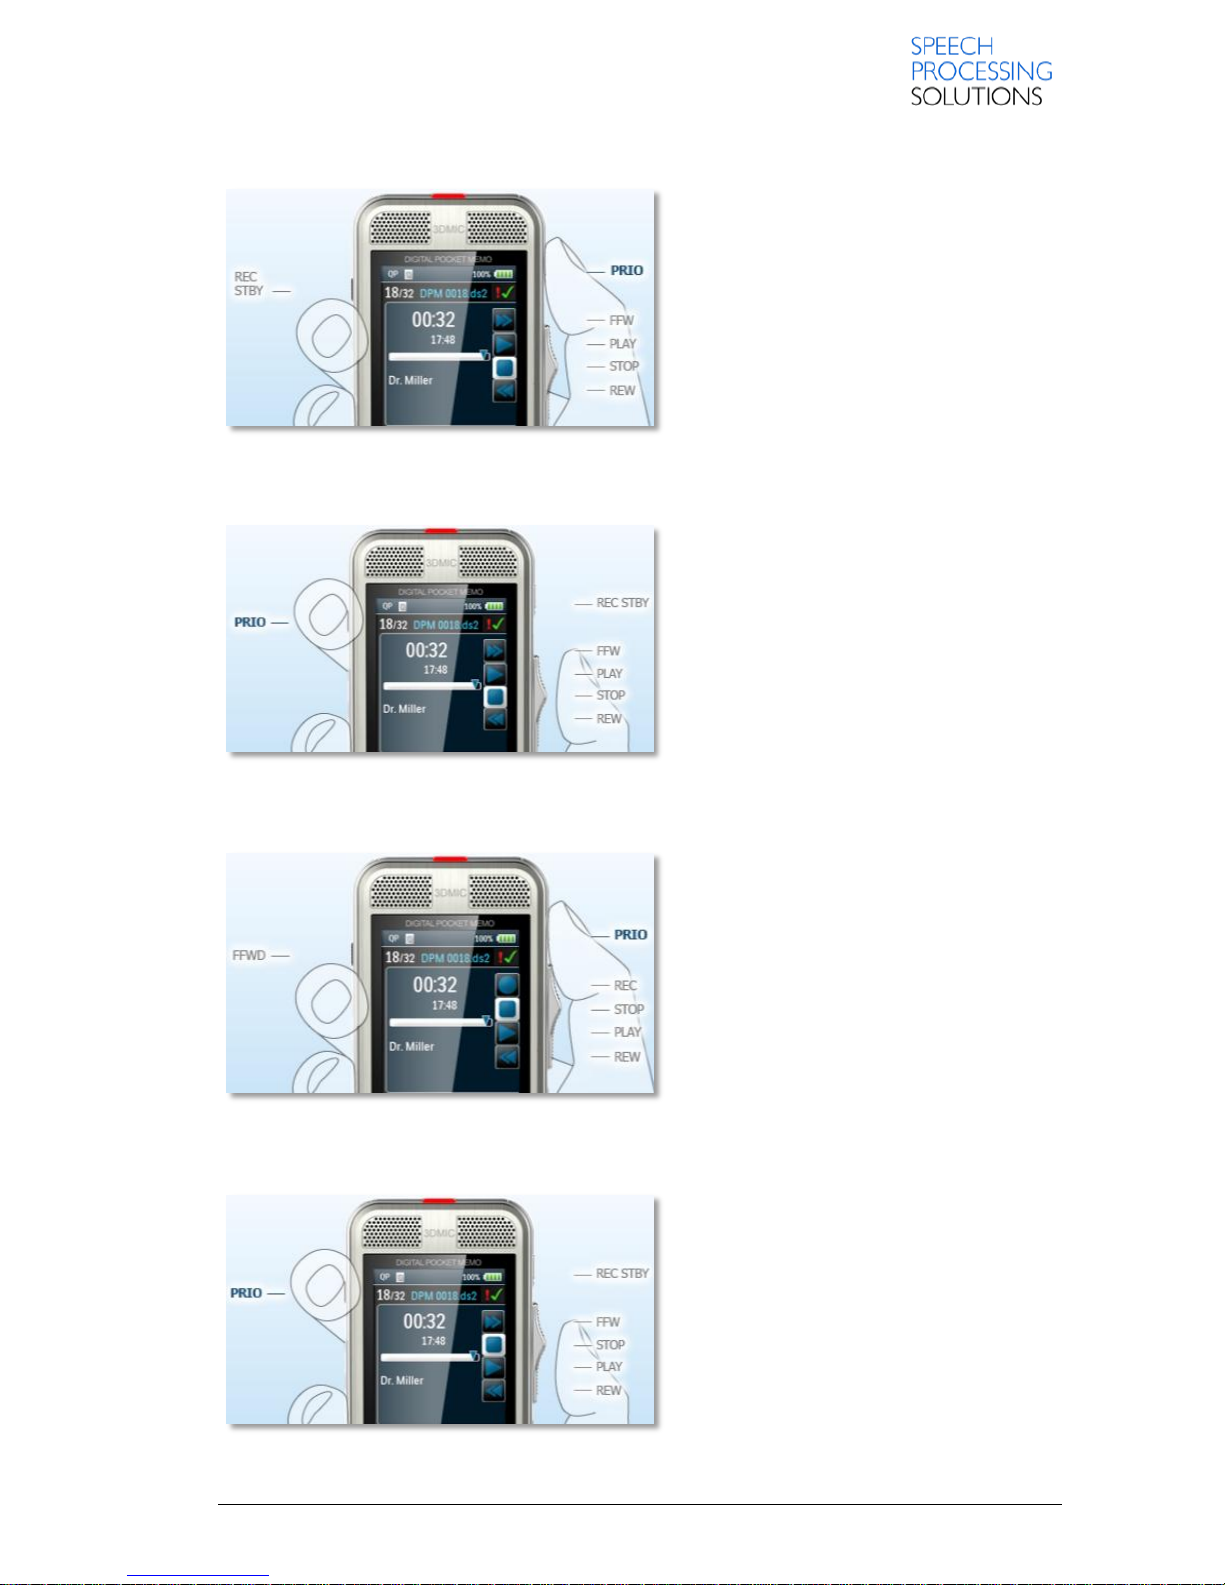
3.3. Buttons and slide-switch configuration
On the right-hand side of the group-box, an animation related to the currently selected slide switch
configuration is played.
The following slide-switch types are available:
Page 29
Page 29 DPM 8000 series - Technical Specification and Advanced Device Configuration
3.3.1. Philips classic switch
3.3.2. Philips slide switch
3.3.3. International slide switch
3.3.4. Grundig slide switch
Page 30
Page 30 DPM 8000 series - Technical Specification and Advanced Device Configuration
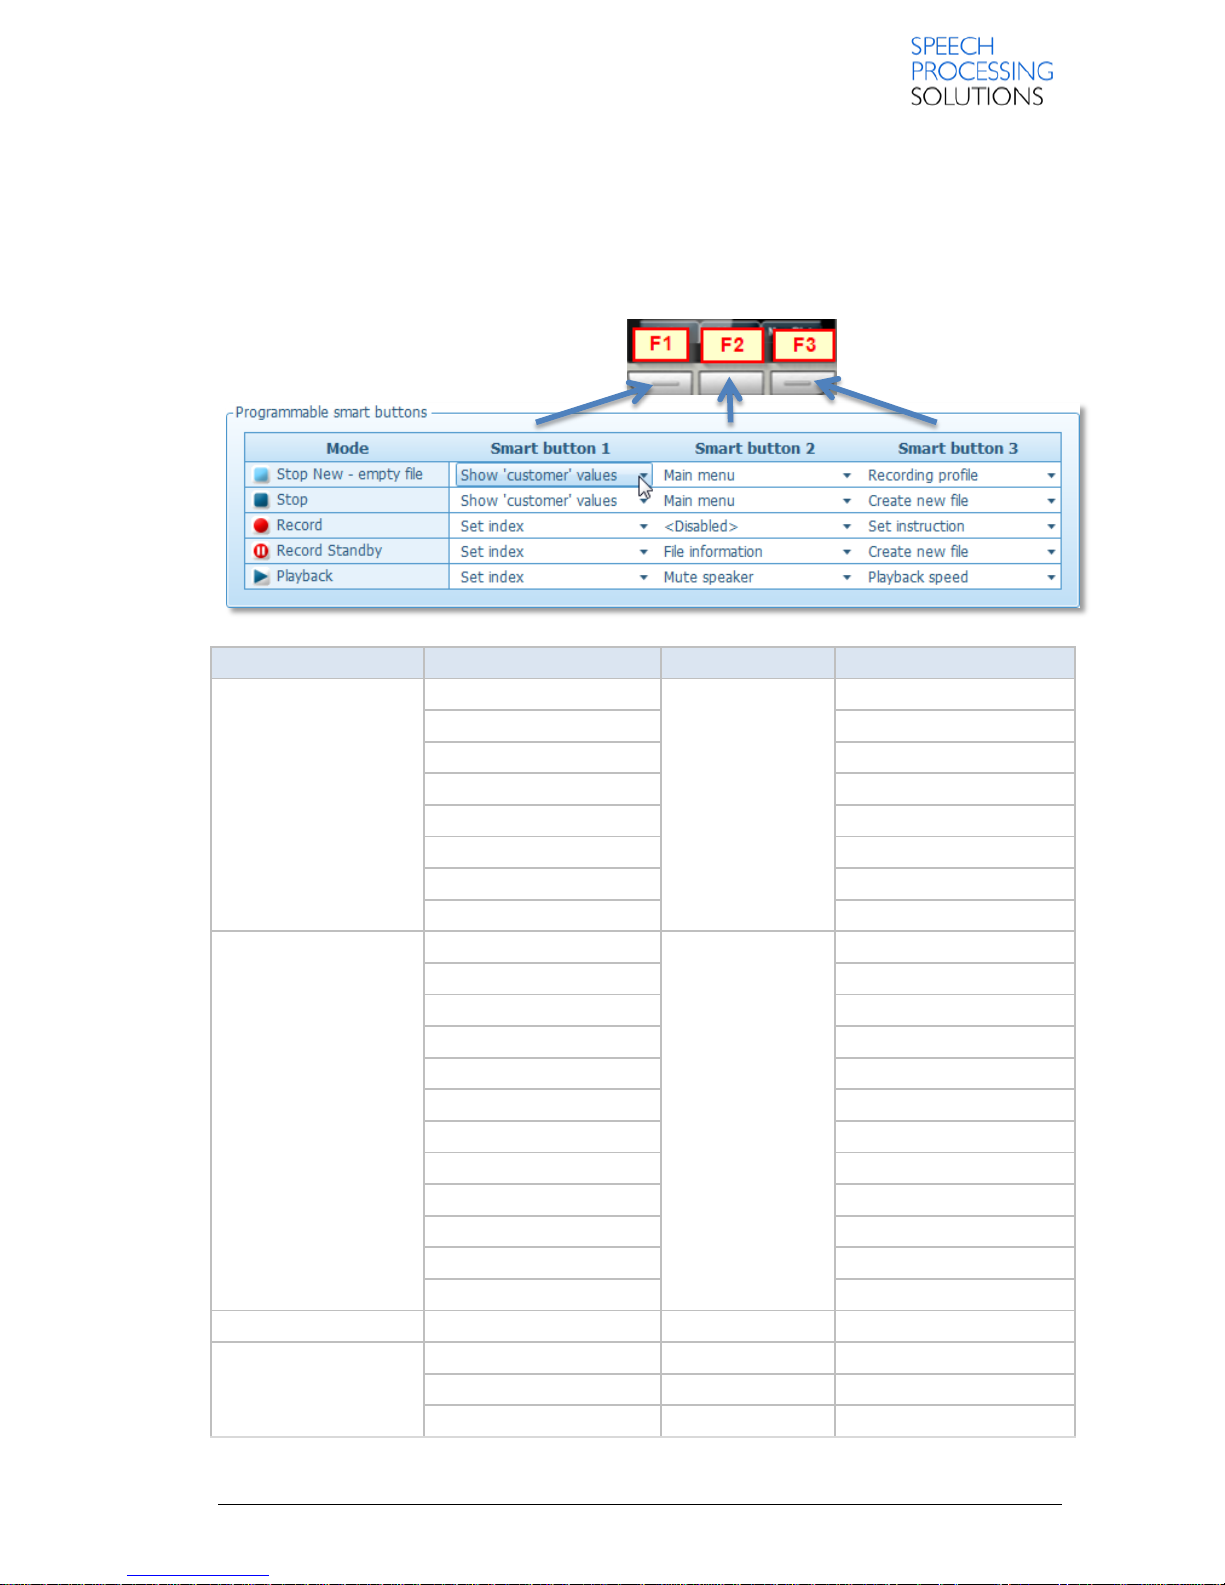
3.3.5. Programmable smart button
Here you can customize the role and behaviour of the Smart buttons 1-3 on the selected recorder to
meet your personal requirements in Stop New, Stop, Record, Record Standby and Playback
mode.
Note: In case of International slide switch configuration, the smart buttons cannot be customized in
Record Standby mode.
Pocket Memo Mode
Smart Button 1
Smart Button 2
Smart Button 3
Stop New – empty file
Show “Author” values
Main menu
Show “Author” values
Show “Work type” values
Show “Work type” values
Show “Comment” values
Show “Comment” values
Show “Delivery” values
Show “Delivery” values
Toggle priority
Toggle priority
File information
File information
Recording profile
Recording profile
Disabled
Disabled
Stop
Set index
Main menu
Set index
Change edit mode
Change edit mode
Show “Author” values
Show “Author” values
Show “Work type” values
Show “Work type” values
Show “Comment” values
Show “Comment” values
Show “Delivery” values
Show “Delivery” values
Toggle priority
Toggle priority
File information
File information
Delete file
Delete file
Toggle EOL
Toggle EOL
Create new file
Create new file
Disabled
Disabled
Record
Set index
Set index
Set index
Set instruction
Set instruction
Set instruction
Disabled
Disabled
Disabled
Page 31
Page 31 DPM 8000 series - Technical Specification and Advanced Device Configuration
Pocket Memo Mode
Smart Button 1
Smart Button 2
Smart Button 3
Record Standby
This functionality is not
available for the
International slide-switch
configuration
Show “Author” values
Show “Author”
values
Show “Author” values
Show “Work type” values
Show “Work type”
values
Show “Work type” values
Show “Comment” values
Show “Comment”
values
Show “Comment” values
Show “Delivery” values
Show “Delivery”
values
Show “Delivery” values
File information
File information
File information
Set index
Set index
Set index
Create new file
Create new file
Create new file
Disabled
Disabled
Disabled
Playback
Mute speaker
Mute speaker
Mute speaker
Playback speed
Playback speed
Playback speed
Set index
Set index
Set index
Disabled
Disabled
Disabled
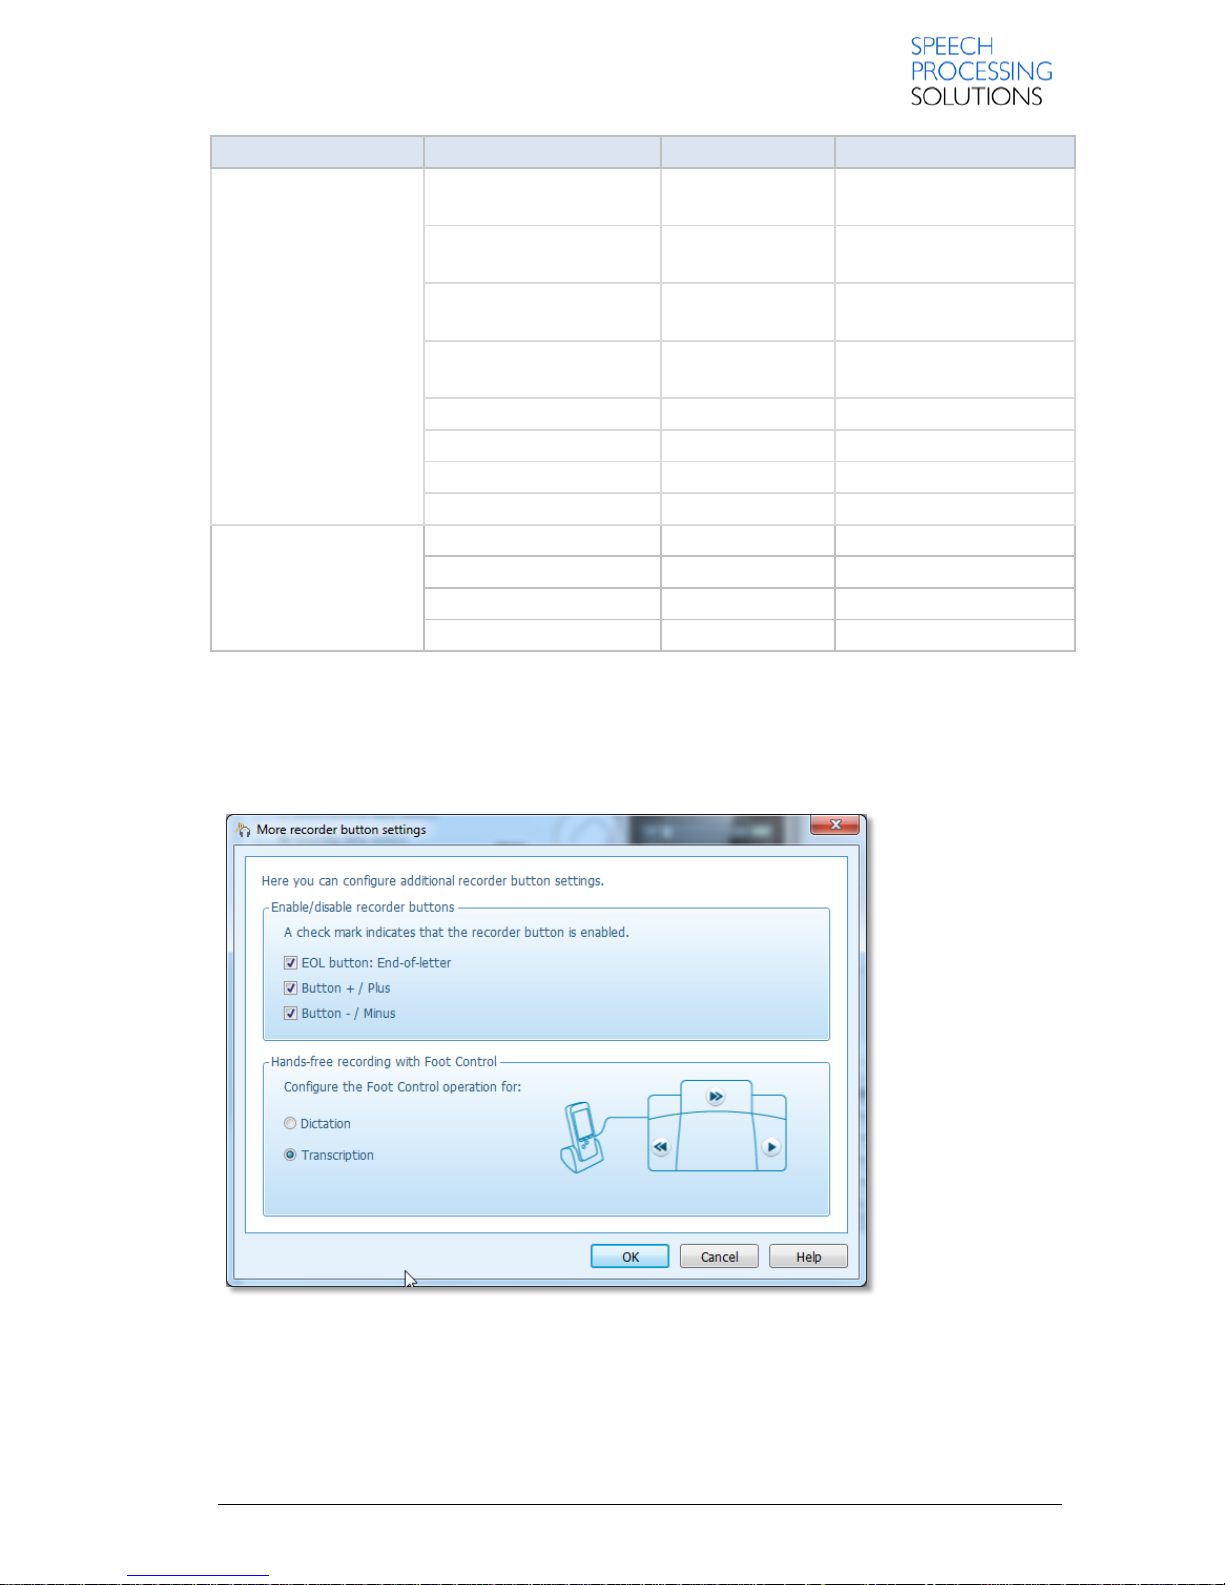
3.4. Hands-free recording with Foot Control
Here you can configure additional recorder button settings.
Enable / Disable recorder buttons
EOL button
Button +
Button -
Hands-free recording with Foot Control
Page 32

Page 32 DPM 8000 series - Technical Specification and Advanced Device Configuration
To the right of the radio buttons, a picture related to the currently selected radio button is displayed.
Here you can configure the Foot Control operation for the followings:
Dictate
In this operating mode, you can control the dictation functions with the Foot Control to keep your
hands free for your work.
1. Connect the plug of the Foot Control to the Foot Control socket of the docking station.
2. Set the switch on the underside of the Foot Control to the T position.
3. Place the Digital Pocket Memo into the docking station. A Foot Control icon is displayed on
the screen.
4. Press the middle pedal of the Foot Control to enter Record standby mode. To start
recording, press the right pedal of the Foot Control. For short pauses, press the right pedal
of the Foot Control again. To continue recording, press the right pedal of the Foot Control
again.
5. To stop recording, press the left pedal of the Foot Control. To continue recording, repeat
step 4.
6. Press and hold the left pedal of the Foot Control for fast rewind. When rewinding reaches
the desired position, release the pedal.
7. When recording is stopped, press the right pedal of the Foot Control to start playback. Press
the right pedal of the Foot Control again to stop playback.
Notes:
The right pedal can be configured via a switch on the back side of the foot pedal to either Normal- or
Toggle-mode.
Double click the left pedal of the Foot Control during recording to finish/lock (EOL) the current
recording and create a new file.
Transcribe
In this operating mode, you can control the transcription functions with the Foot Control to keep your
hands free for your work.
1. Connect the plug of the Foot Control to the Foot Control socket of the docking station.
The foot control has three pedals, from left to right: fast rewind, fast forward and playback.
2. Press and hold the left pedal for fast rewind.
When rewinding reaches the desired position, release the pedal.
3. Press and hold the middle pedal to fast forward.
When forwarding reaches the desired position, release the pedal.
4. Press the right pedal to start playback.
The behavior for starting and stopping playback depends on the setting of the playback
switch on the underside of the foot control:
N (Neutral) position: Press and hold the right pedal for playback. When the pedal is released,
playback is stopped.
T (Toggle) position: Press and release the right pedal to start continuous playback.
Press the right pedal again to stop playback.
Page 33
Page 33 DPM 8000 series - Technical Specification and Advanced Device Configuration
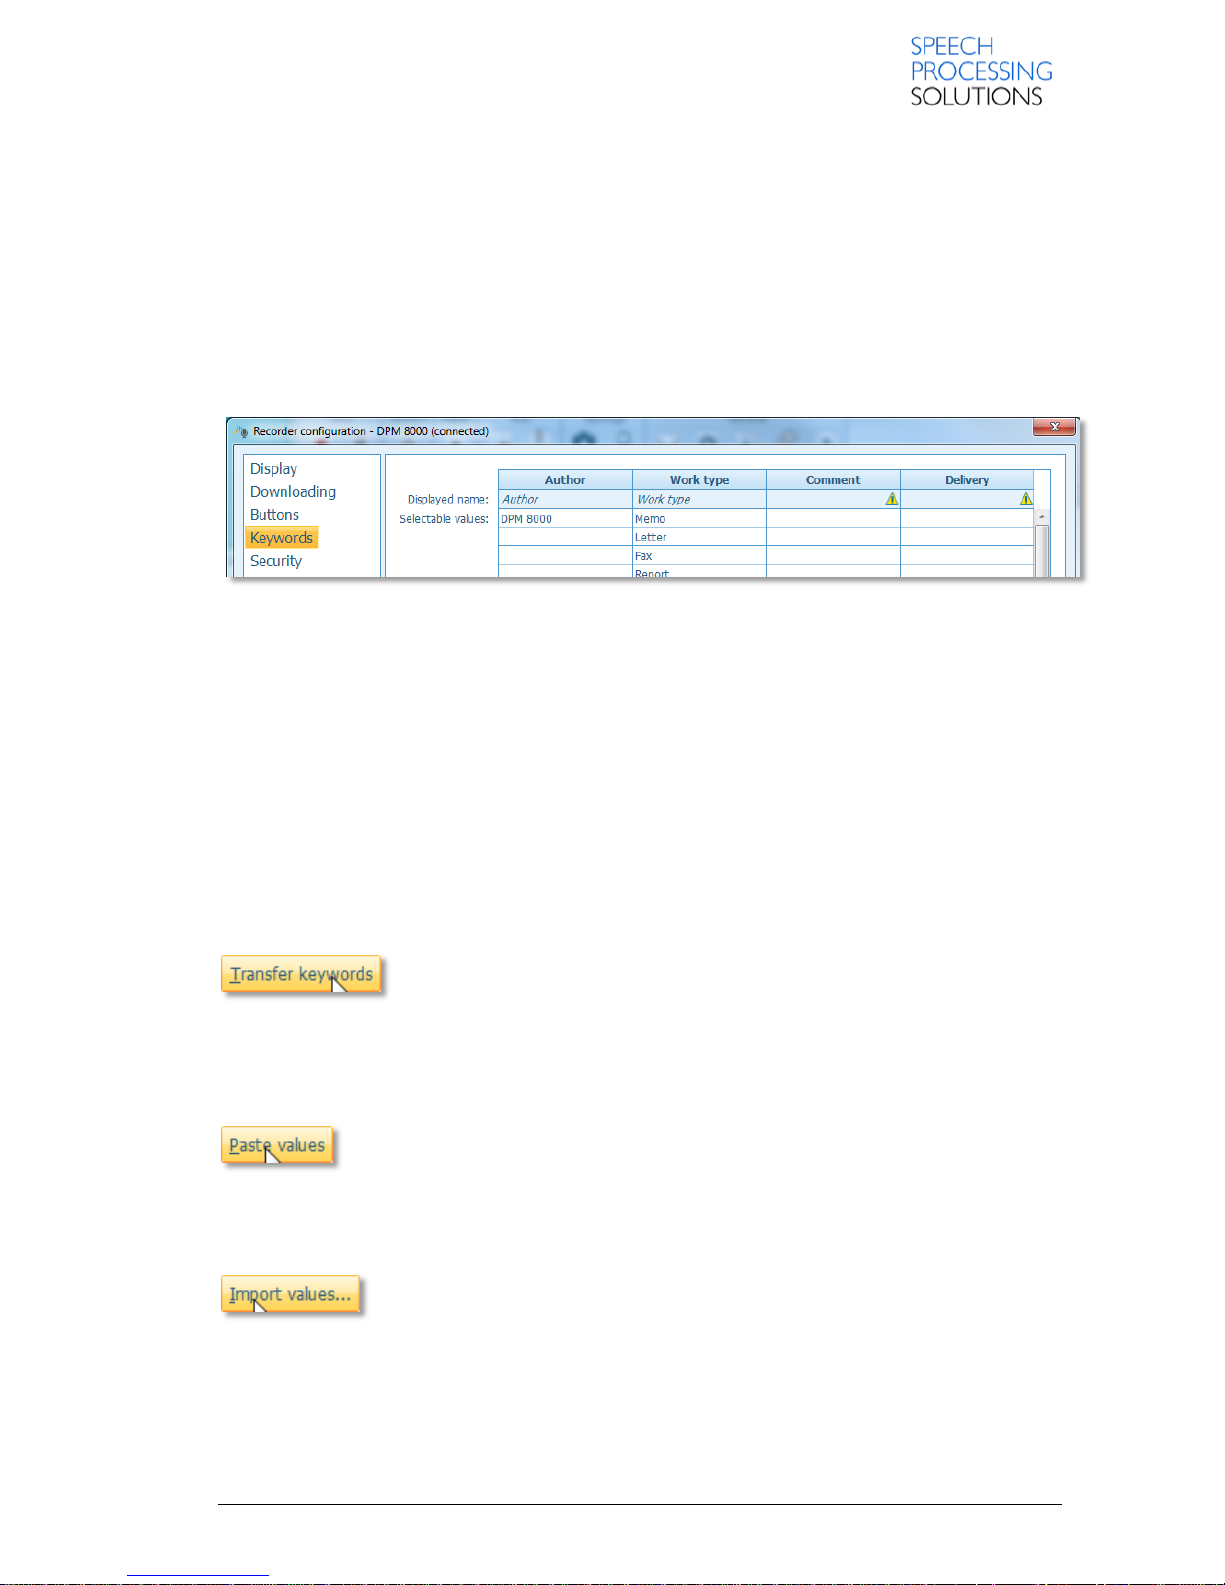
3.5. Keywords
The definition of recorder keywords enables authors to personalize their dictations via these
predefined keywords. The keywords are a combination of a displayed name and several content
strings. This information is transferred to the recorder where the predefined keywords become
available to the authors. You can configure the displayed name and the selectable values for
keywords.
The authors can select from the predefined entries and assign them to their dictations. These entries
are saved together with the dictation. They can, for example, be used by the transcriptionist for
filtering the dictations.
3.5.1. Definition of a Keyword
The definition of a recorder keyword involves the following steps:
Definition of displayed name.
The maximum number of characters for each usage entry is 30. For example, the usage for
the second keyword can be Worktype, the usage for the third keyword Comment.
Definition of Selectable values strings.
Each Keyword can have up to 40 content entries; the maximum number of characters for
each content entry is 30.For example, the content entries for the keyword with usage
Worktype can be a selection of possible subject areas, such as Memo and Letter.
3.5.2. Transfer keywords
Click this button to transfer the keyword definitions immediately to the
connected recorder. Configuring the author's name as a keyword is
particularly useful when configuring many recorders at the same time.
3.5.3. Paste values
Click this button to insert custom property values of a specified keyword among the
recorder keyword entries from the clipboard.
3.5.4. Import values
Click this button to import custom property values of a specified keyword among
the recorder keyword entries from a previously saved text file.
Note:
The maximum length of a keyword value can be 30 characters, longer strings will be truncated.
Page 34
Page 34 DPM 8000 series - Technical Specification and Advanced Device Configuration
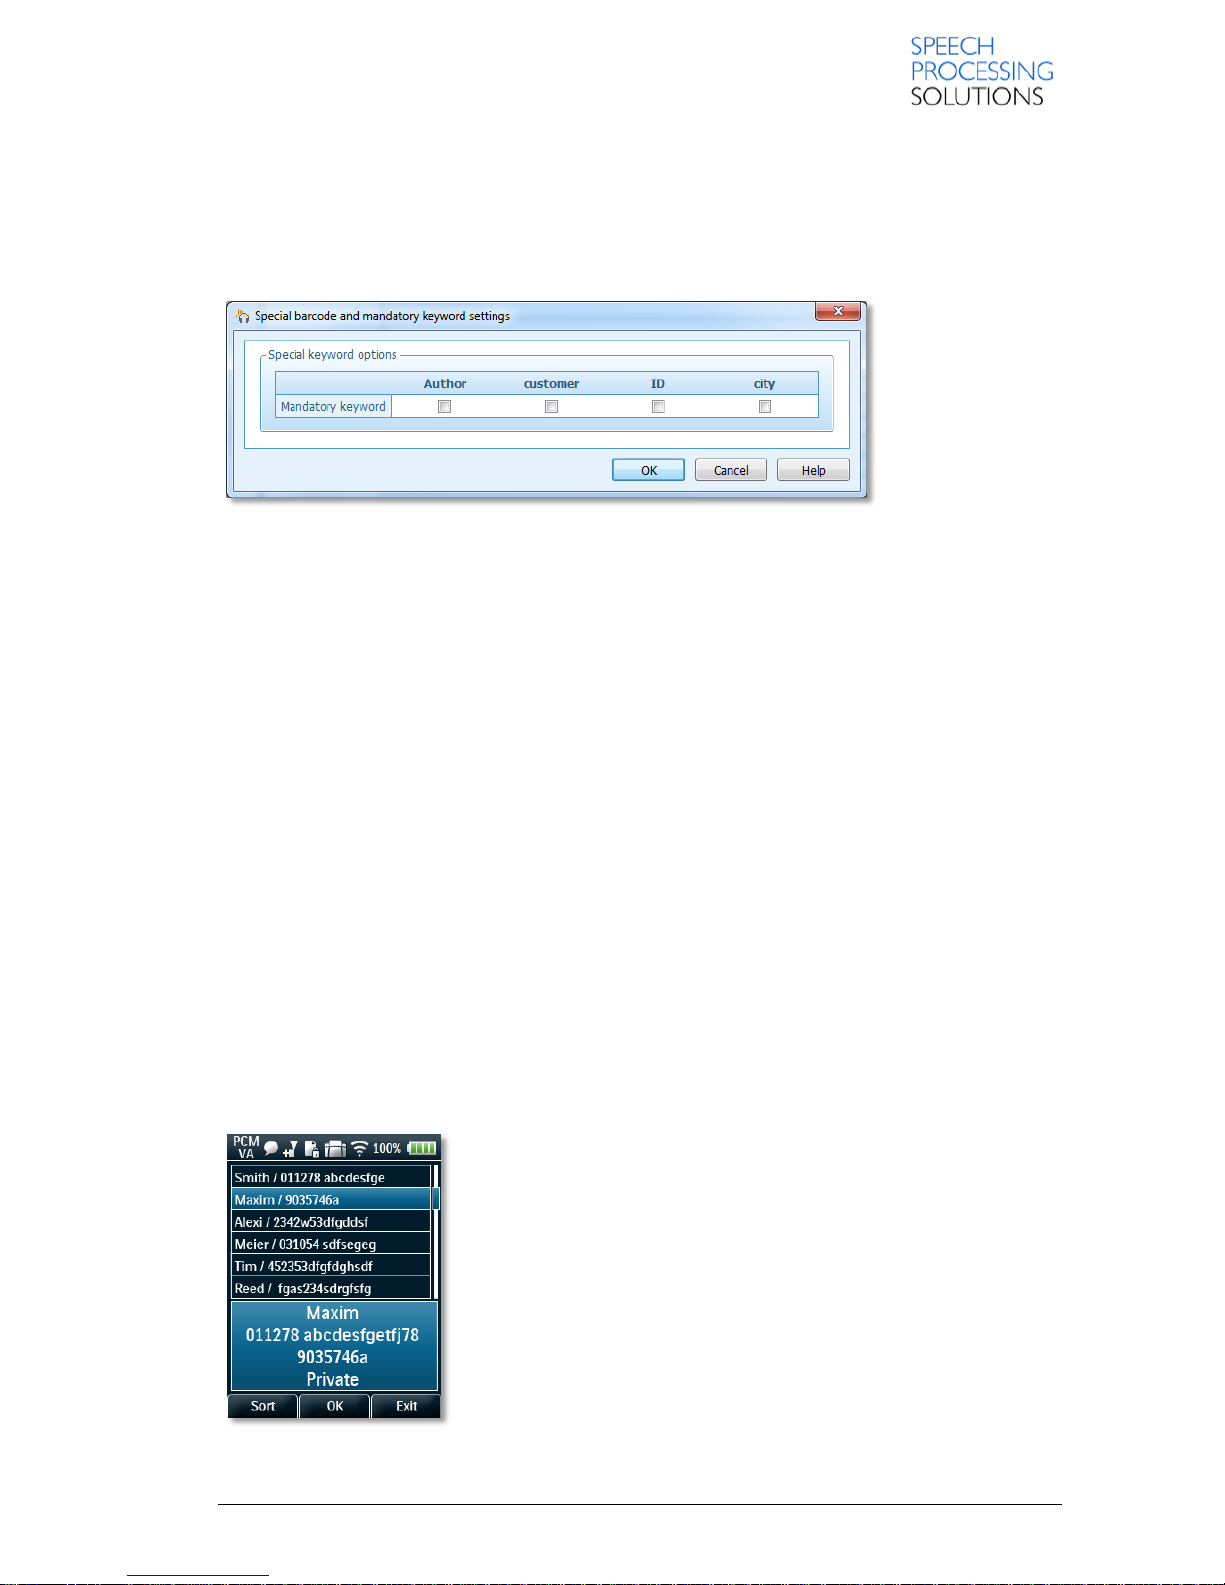
3.5.5. Special barcode and mandatory keyword settings
This window enables you to define input options for keywords. You can assign the keywords for the
input options listed below. Activate the checkboxes of those Keywords you want to set the selected
input option for. If you do not want to set an input option, make sure that all checkboxes are
deactivated.
3.5.6. Mandatory keyword
This setting defines the keyword selection as mandatory. This means that you have to provide the
required keyword input before you can start recording.
3.5.7. Barcode into keyword
This setting enables you to scan information into keyword fields using the barcode scanner on the
8500 recorder. You have to provide the required input via barcode scanning; the Digital Pocket
Memo automatically displays the barcode scanning screen.
If the recorder has been configured to work with Linked Keywords, manually changing the values of
keywords ’KW2Usage’ to ’KW4Usage’ is not allowed.
If the recorder has been configured to work with a PIN code Author list, manually changing the
values of keyword ’KW1Usage’ is not allowed.
If the recorder is configured to work with a PIN code Author list, a barcode scan or mandatory polling
of Keyword1 is not possible when working with pre-defined Author PIN code assignment. To
deactivate this specific configuration you need to reset the recorder back to factory defaults.
Note:
This setting is available with Pocket Memo 8500 only.
3.5.8. Find csv data-list entry with barcode scanner
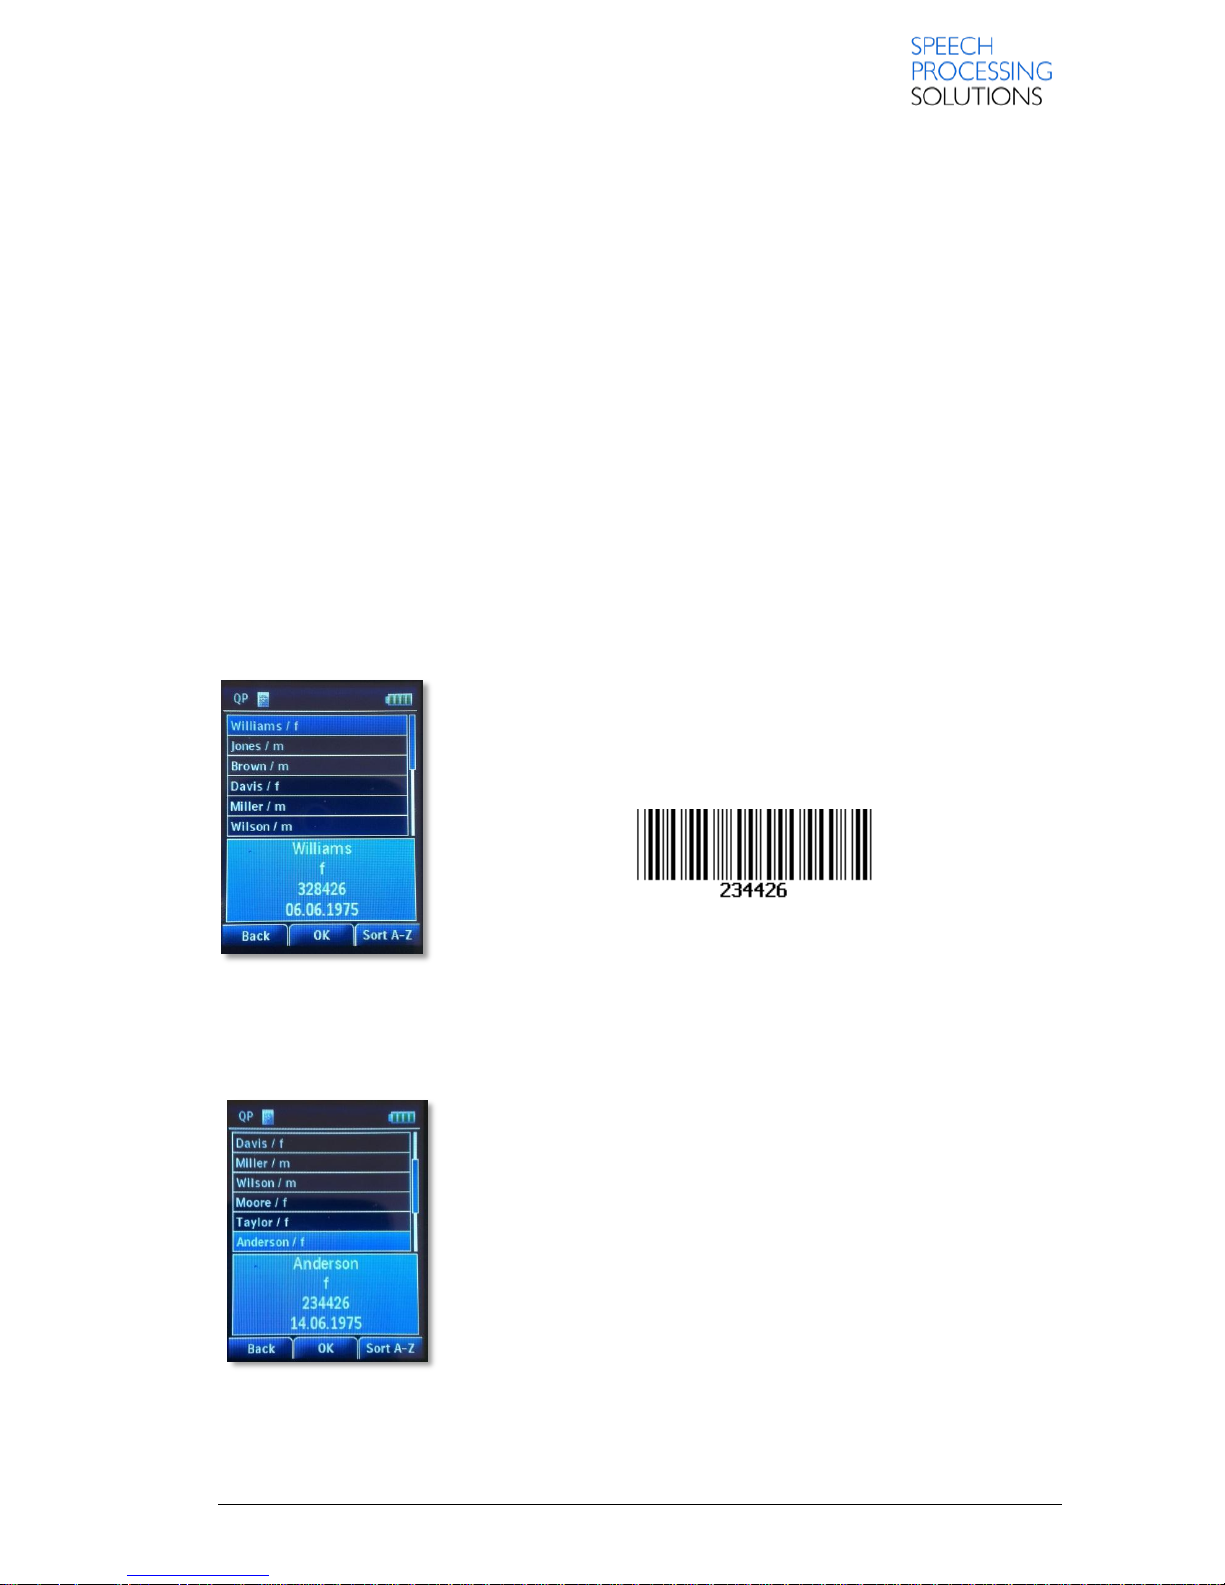
The barcode scanner of a DPM8500 can be used to search for a data-set in the data list.
When the top right button (above the slider) is pressed while the data
list is displayed (see picture above), the scanned result will be used to
search for the scanned string in the data list.
The search inside the data list is not limited to a specific row in the
data list. All available list entries are browsed until the scanned string
is found as a data list entry. If the entry is found, the data list cursor is
placed at this data list entry. The user must still select this entry by
pressing “OK” smart button. Only the cursor is moved by this
advanced search with the barcode scanner.
However, the data list display will show only the first two columns for
each data list-row, even if the string is found in the eg.: 3rd column.
Page 35
Page 35 DPM 8000 series - Technical Specification and Advanced Device Configuration
If a barcode is scanned successfully, the DPM8500 will search in the data list for this string and will
set the cursor in the data-list to the first entry matching this string. In addition a short confirmation
beep is audible. The entry is not selected automatically. The user has still to confirm the found entry.
If the scanned string can’t be found in the data-list, the DPM8500 will not move the cursor and will
generate 3 beep tones as a warning.
Example:
This data list is loaded into the DPM4:
name,gender,ID,birthdate
Williams,f,328426,06.06.1975
Jones,m,322426,07.06.1975
Brown,m,428426,08.06.1975
Davis,f,328726,09.06.1975
Miller,m,23423,10.06.1975
Wilson,m,528426,11.06.1975
Moore,f,256426,12.06.1975
Taylor,f,323456,13.06.1975
Anderson,f,234426,14.06.1975
Thomas,m,675426,15.06.1975
Jackson,m,234234,16.06.1975
White,m,234526,17.06.1975
Harris,f,748426,18.06.1975
The user enters the data list display:
The user can activate the barcode scanner by pressing the top right
button (above the slider).
Assuming this barcode is scanned:
The device would make an ascending beep sound and the display would change to the
representation below because the string “234426” was found in this line of the data list:
Anderson,f,234426,14.06.1975
The user has now the option to either confirm this selection by pressing “OK” smart button, to
change the selection with the PLUS/MINUS buttons or to exit the data
list by pressing “Back” smart button.
Page 36
Page 36 DPM 8000 series - Technical Specification and Advanced Device Configuration
3.6. Security
Here you can set security options for protecting the files as well as the recorder devices.
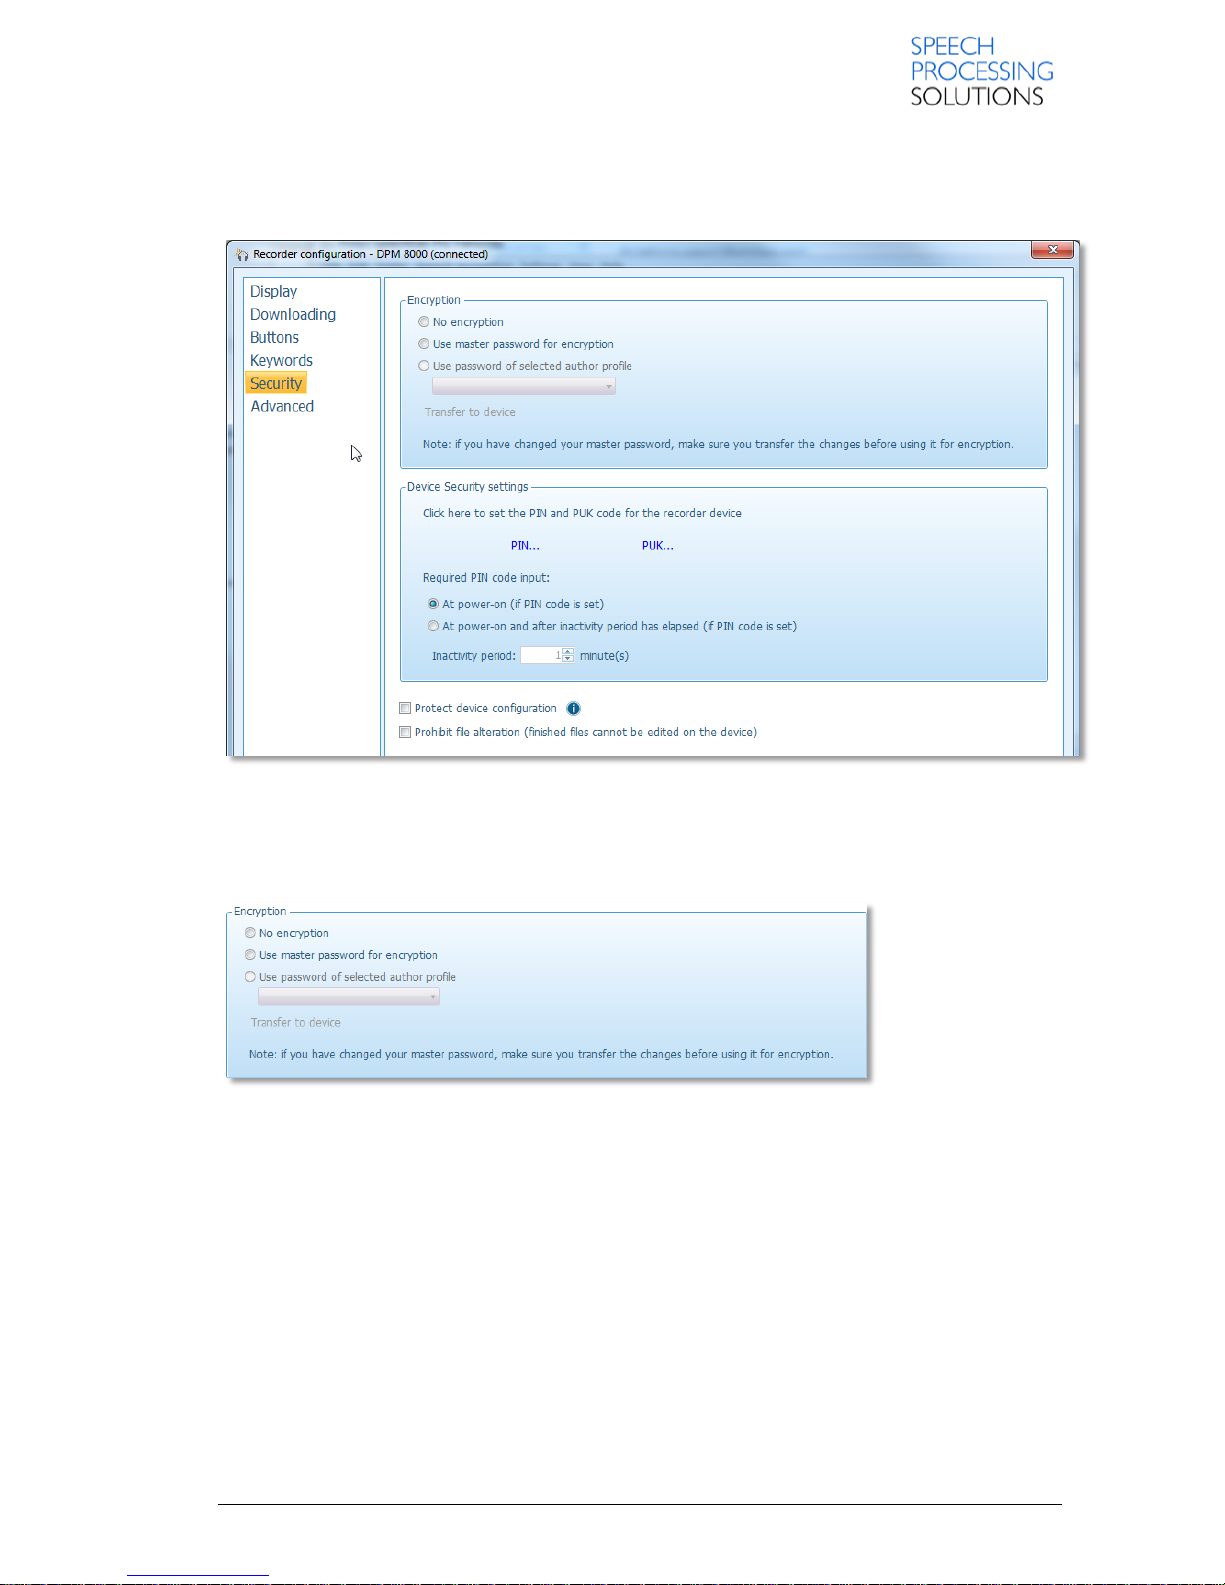
3.6.1. Encryption
Encryption enhances the protection and safety of your dictations.
No encryption
This option means that your recordings are not protected from third-parties.
Use master password for encryption
With this option, you can use your predefined master password from SpeechExec for encrypting the
dictation of an author, even if there is a different password set in the corresponding author’s profile.
This option is generally used when only one author uses SpeechExec and, therefore, it is
insignificant to set different passwords for different authors.
Use password of selected author profile
This option automatically uses the password in the author’s profile for encrypting dictations. This
means that if more than one author uses SpeechExec at the same time for working on dictations,
then each of them uses her own password for encryption.
Page 37
Page 37 DPM 8000 series - Technical Specification and Advanced Device Configuration
Note:
If you have changed your master password, make sure you transfer the changes before using it for
encryption.
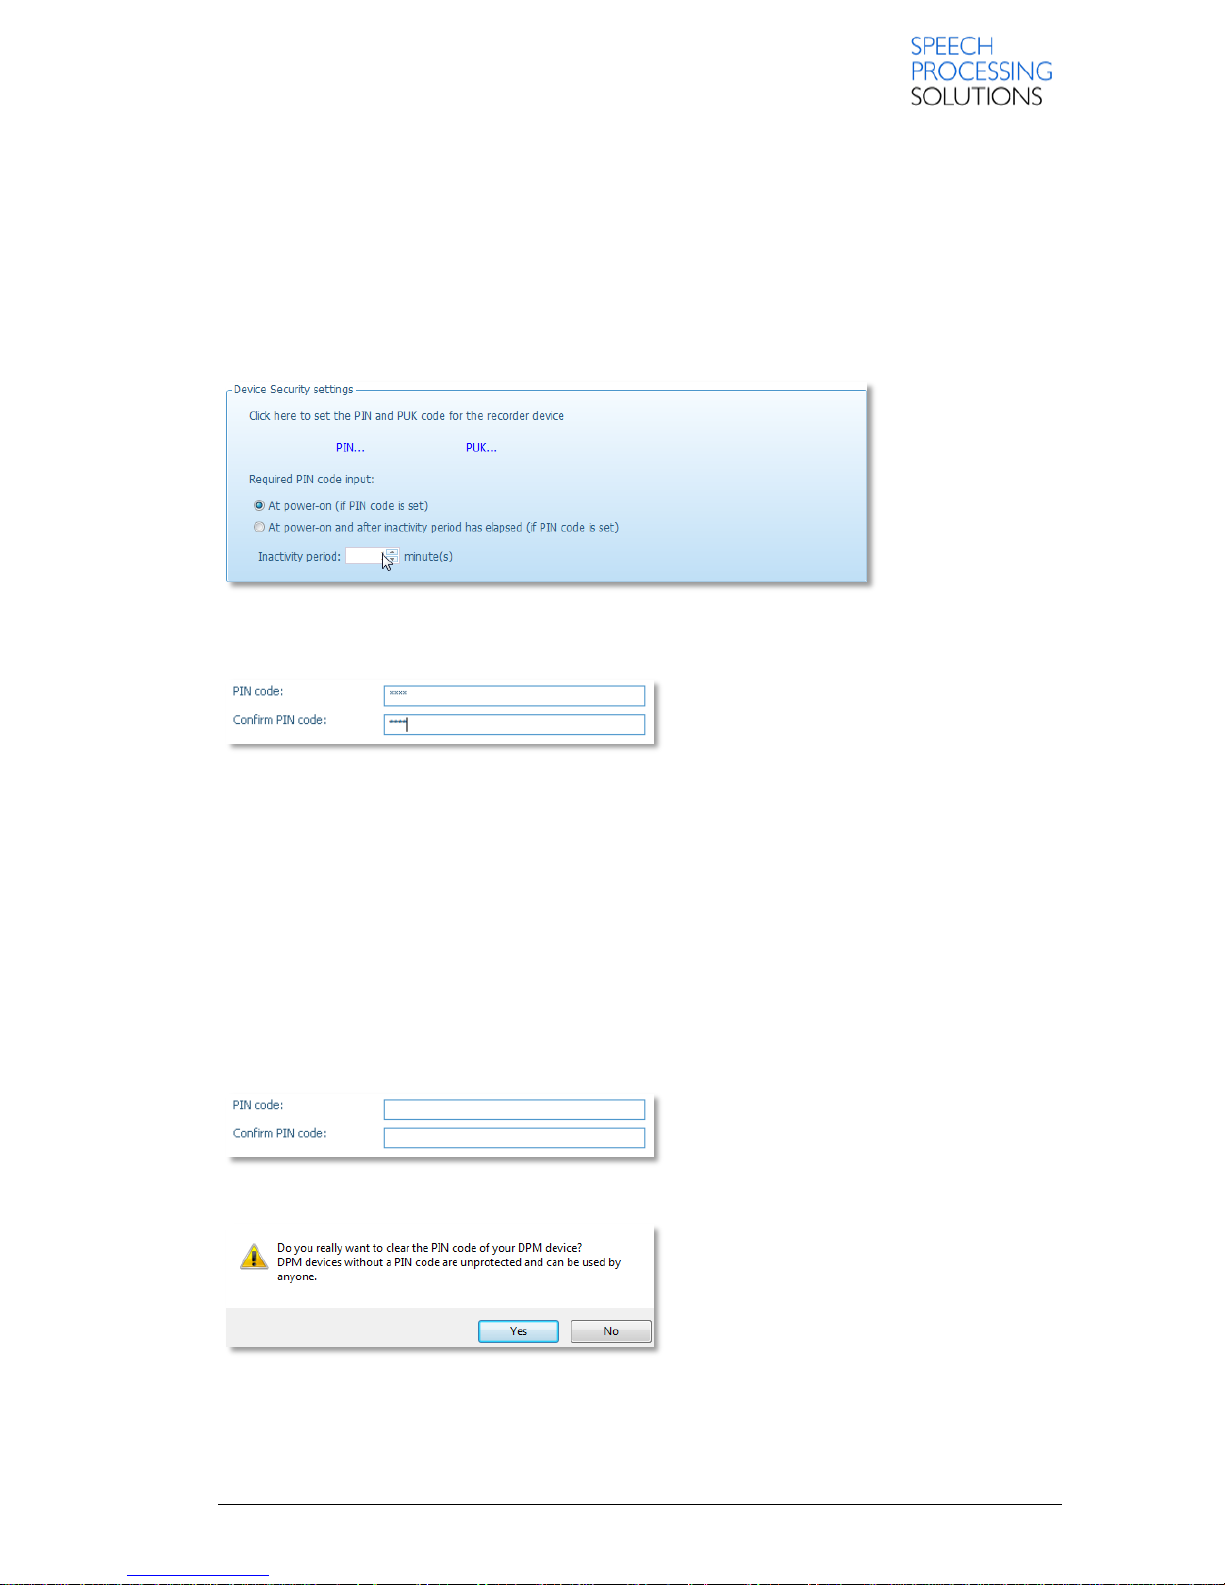
3.6.2. Device security settings
By setting the PIN and PUK codes, you can protect the recorder itself by prohibiting others from
turning the device on.
3.6.2.1. PIN activate
Here you can set the PIN code for the recorder device.
The following options can be defined for PIN code usage:
At power-on (if PIN code is set):
The PIN code must be entered when turning on the recorder.
At power-on and after inactivity period has elapsed (if PIN code is set): The PIN code must
be entered when turning on the recorder and when the specified time during which no action
has been taken with the device has elapsed. Possible values for the inactivity period range
between 1-99 minutes.
PIN protected device will be not recognized on USB before you type the right PIN Code.
All the dictation files can be transferred to the PC with external SD-Card reader.
3.6.2.2. PIN deactivate
Clear the PIN code field and Confirm PIN code field areas and click on OK.
You see the Warning Message, click on YES and your Device is open.
Page 38
Page 38 DPM 8000 series - Technical Specification and Advanced Device Configuration
3.6.2.3. PUK...
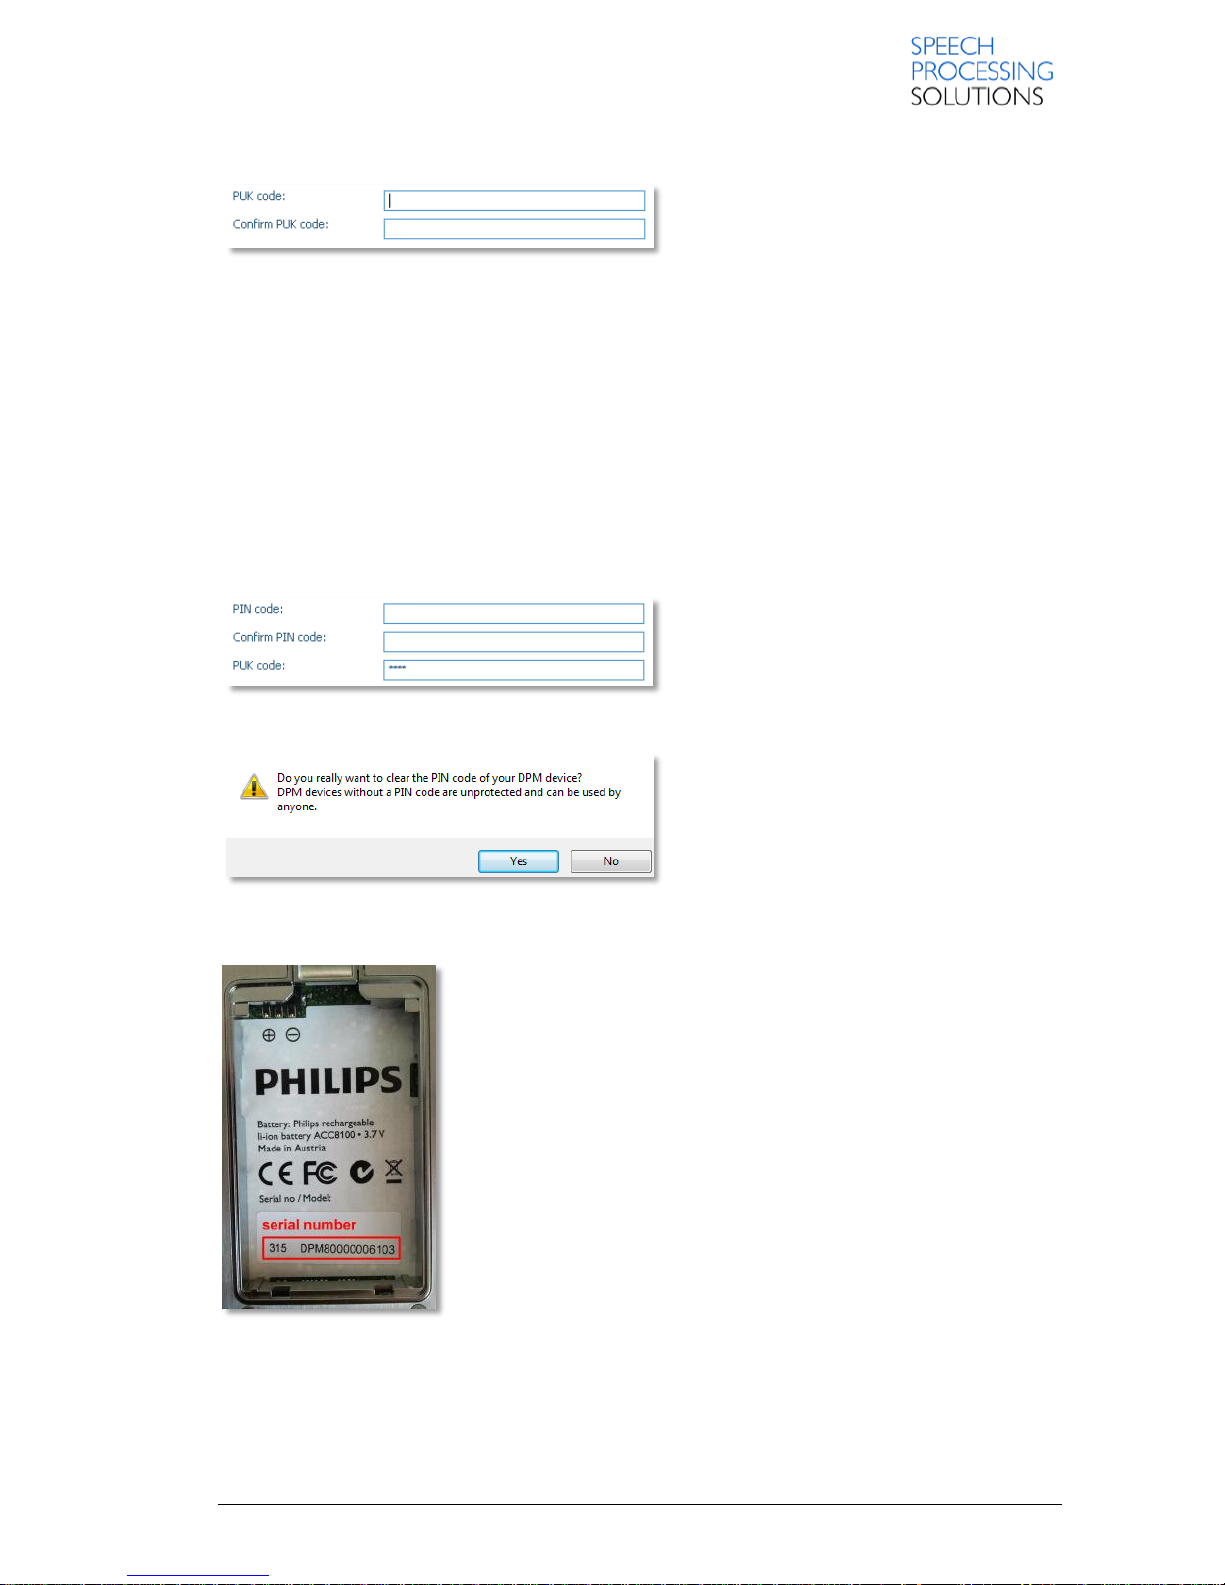
Here you can set the PUK code for the recorder device. With PUK code you protect the PIN Code.
If you will change the PIN Code, then the PUK code is needed.
Note1:
If you define the PUK code for the device, an you enter a wrong PIN code 10 times, then the
device is locked and you will be asked to enter PUK2
Note2:
If you define the PUK code for the device you can´t reset the connected device to defaults
factory setting with the Software SpeechExec. Please use the MENU / DEVICE / RESET
SETTINGS to restore the standard settings.
3.6.2.4. PIN deactivate with PUK
Clear the PIN code field and Confirm PIN code field put the PUK code and click on OK.
You see the Warning Message, click on YES and your Device is open.
3.6.2.5. PIN / PUK is lost, how to recover?
To recover a PIN/PUK the PUK2 is needed . PUK2 can only be created
by Service and Support Group in Vienna.
The user needs to contact his local dealer who then needs to create a
ticket in consol. In order to unlock the device with the PUK2 we need
the serial number of the device which can be found uderneth the
rechargeable battery – open the battery cover, remove the Li-Ion
battery and you see the full serial number.
(see picture) to ensure that the user is the owner of the device
therefore a purchase receipt needs to be attached to the tickes if this is
not available we need n declaration on oath from the user.
Page 39

Page 39 DPM 8000 series - Technical Specification and Advanced Device Configuration
3.6.2.6. Protect device configuration
By selecting this option, the settings for the recorder which have been made with the SpeechExec
Pro Dictate program cannot be changed by users when they are working with the recorder.
3.6.2.7. Prohibit file alteration
By selecting this option, you cannot modify the recordings on the recorder. Such modifications
include the deletion of a file or insertion into an existing recording.
3.6.2.8. USB Mass Storage write protection
Page 40
Page 40 DPM 8000 series - Technical Specification and Advanced Device Configuration
3.7. Advanced configuration
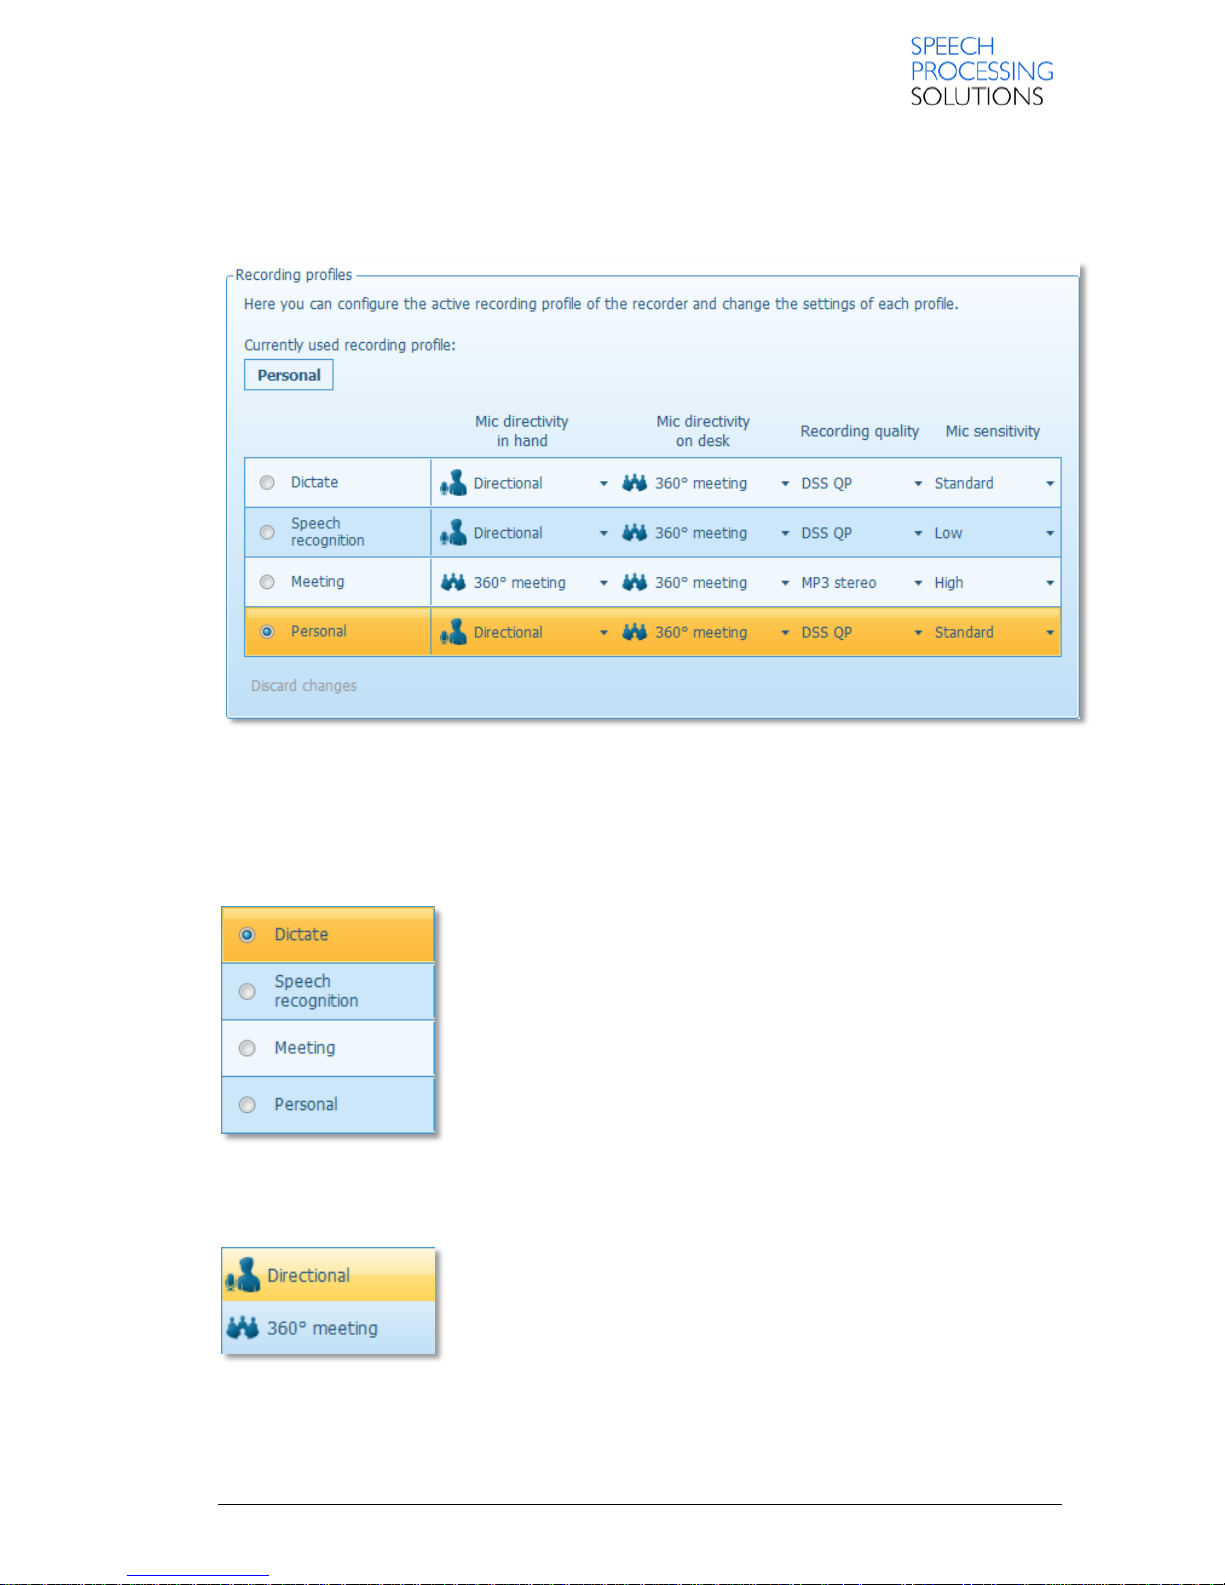
Here you can configure the active recording profile of the recorder and change the settings of each
profile.
3.7.1. Recording profiles
The following recording profiles are available:
Dictate
Speech recognition
Meeting
Personal
3.7.2. Mic directivity in hand / Mic directivity on desk
Here you can set how the recorder uses its microphones while that is
hold in hand or put on a desk.
The following two options are available:
Directional: This option is used for focused recording.
360° meeting: This option is used for recording overall ambient sound
equally with two active microphones.
Page 41
Page 41 DPM 8000 series - Technical Specification and Advanced Device Configuration
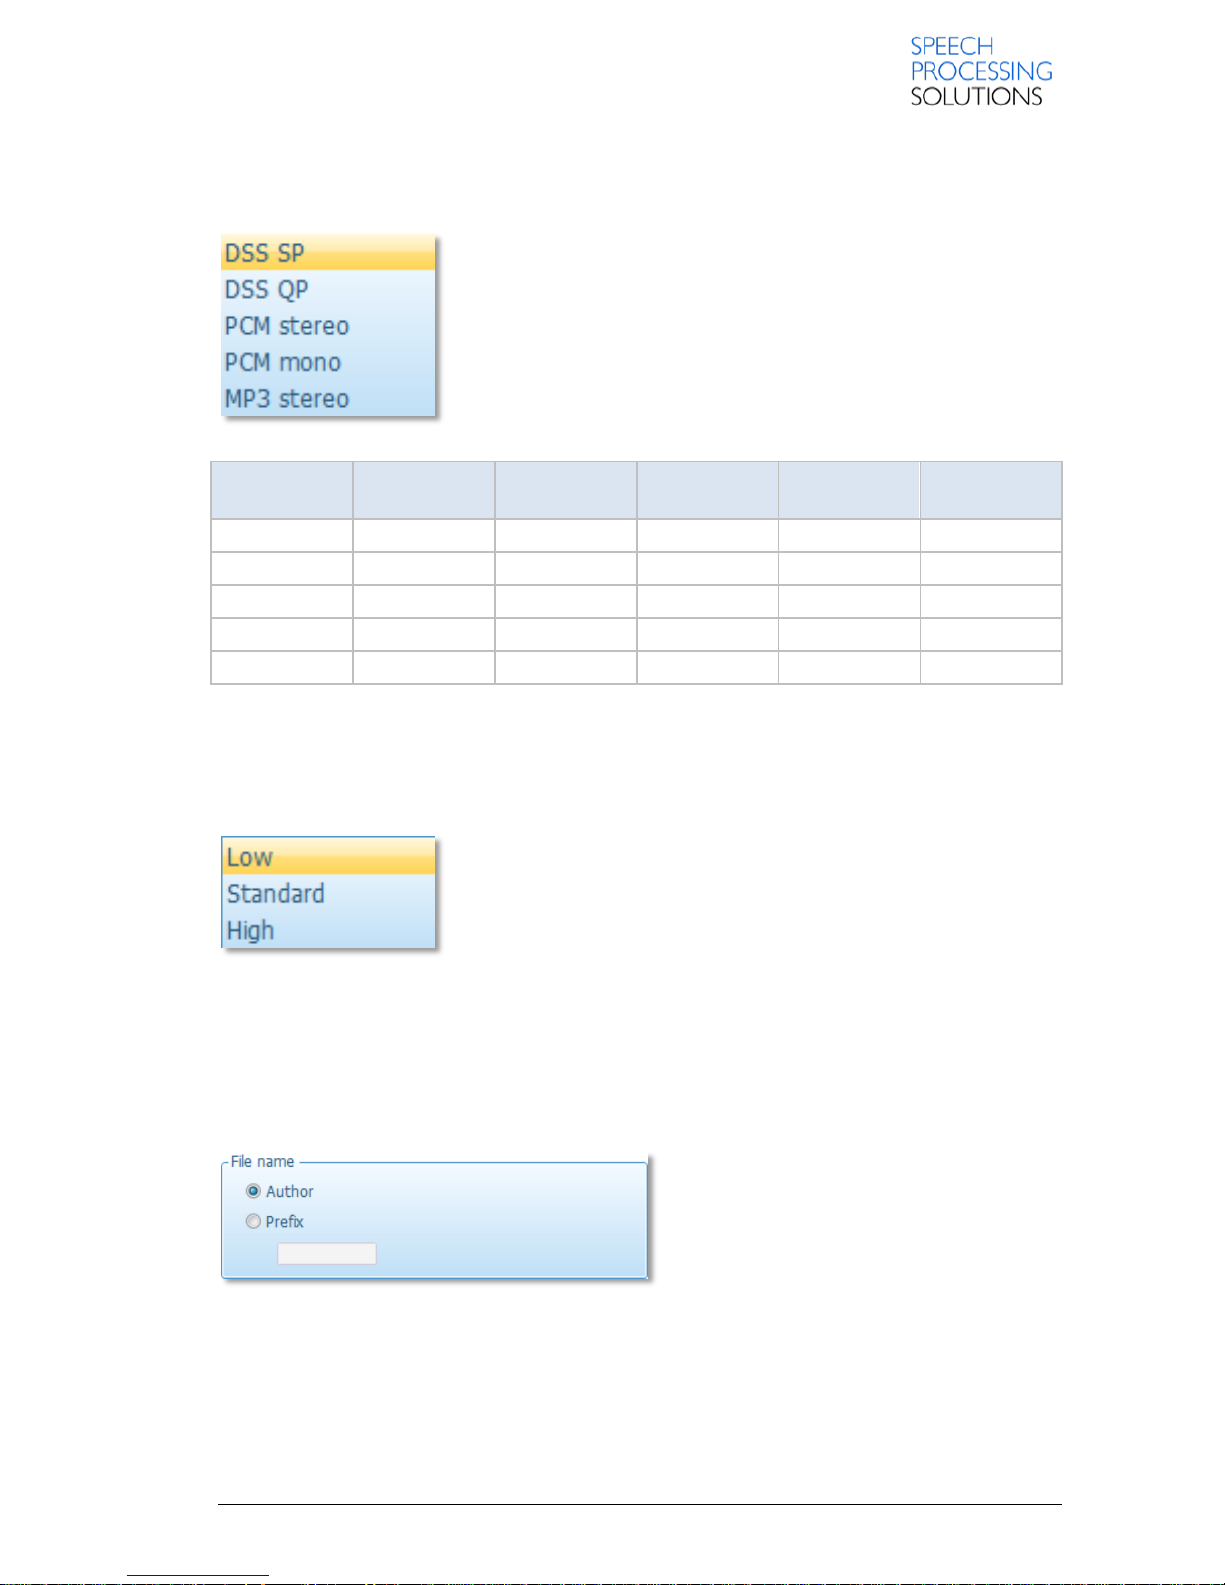
3.7.3. Recording format
Here you can define what sound format is used for recording dictations on the recorder
DSS SP: This recording format provides excellent audio quality.
It is recommended when the dictation sound files are used, for
example,
for speech recognition.
DSS QP: This recording format provides you with the best quality for
your recordings.
PCM (mono or stereo format): This recording format provides
uncompressed data.
MP3: This recording format provides high audio quality.
File type
Sample/sec
Bit rate
Channels
Average
bytes/s
Codec
DSS SP
12kHz
13,7 kbps
1
1750
dss
DSS QP
16kHz
28 kbps
1
3563
ds2
MP3 Stereo
44,1 kHz
192 kbps
2
24000
MP3 CBR
PCM Voice
22,05 kHz
352 kbps
1
44100
PCM
PCM Stereo
22,05 kHz
705 kbps
2
88200
PCM
3.7.4. Microphone sensitivity
Here you can set the sensitivity level for the audio input via the built-in microphone.
Low (Private): This setting is recommended when recording dictations
in a noisy environment. To get a good quality recording it is important
to speak close to the microphone
Medium (Dictate): This is the default setting and recommended when
recording dictations in a normal environment.
High (Conference): This setting is recommended when, for example,
recording at a conference.
3.7.5. File Name
This setting defines how the file names of recorder recordings are created.
Author option creates a file name based on
the predefined author name.
Prefix enables you to define a prefix string
with up to 4 characters.
Example: File name creation with author name
The entries for the keyword usage, this means the defined content strings, are a selection of author's
names: Jones, Singh, Watson.
Author Watson selects the respective author name on the recorder. The recorder generates this file
name: Wats001.dss
Page 42
Page 42 DPM 8000 series - Technical Specification and Advanced Device Configuration
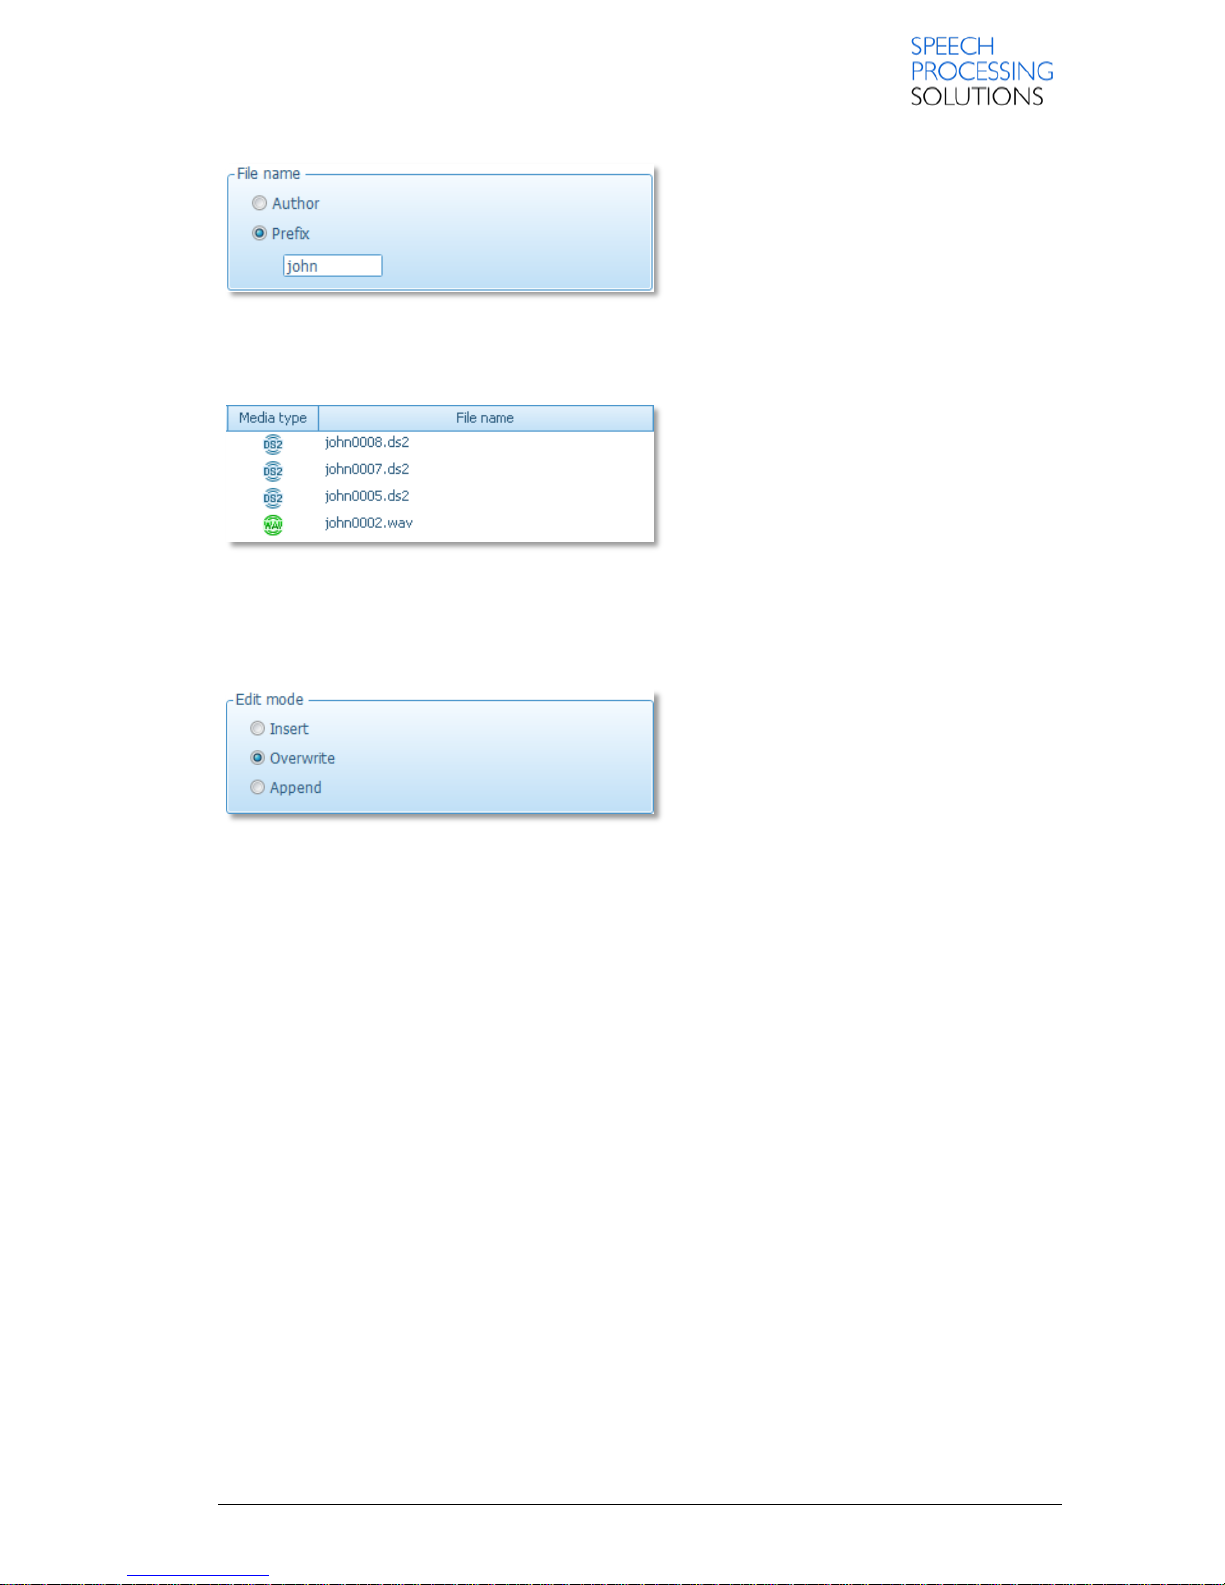
Example: File name creation with prefix string
Author Watson defines the prefix string john. The recorder generates this file name: john0001.dss,
john0002.wav, john0005.ds2….
3.7.6. Edit Mode – Insert, Overwrite, Append.
Insert mode means that the newly recorded speech is inserted at the current position in the sound
file. Any existing recorded speech is preserved.
Overwrite mode means that the newly recorded speech replaces existing recorded speech at that
position in the sound file. The default setting is Overwrite mode.
Append mode means that the newly recorded speech is added to the end of the sound file. Any
existing recorded speech is preserved.
3.7.7. Index / Spoken instructions
Depending on the recorder which is connected, this setting defines that the Index button on the
recorder records a special instruction or a spoken instruction or sets an Index marker when it is
pressed during recording.
Note:
If you press the button for a short time no spoken instruction is created. If you keep the button
pressed, a spoken instruction with zero length is created; this means that an Index marker is set.
3.7.8. Device beep
The recorder provides an audio signal (beep) when certain operations are completed, for example
after you played back a dictation. If the setting is not activated, the recorder only provides an audio
signal when you receive a warning, such as when the batteries are low or when you press a button
that does not have any function.
Page 43

Page 43 DPM 8000 series - Technical Specification and Advanced Device Configuration
3.7.9. Voice-activated recording
This setting defines that the voice-activated recording mode is used.
Voice-activated recording mode is a convenient feature for hands-free dictation. When voiceactivated recording is enabled, the recorder is in Record Standby; recording will start automatically
when the input level exceeds a certain threshold (this is usually when the author starts speaking).
Recording stops automatically a few seconds after the author stops speaking and restarts
automatically when the author starts speaking again.
Page 44
Page 44 DPM 8000 series - Technical Specification and Advanced Device Configuration
3.8. More recording settings
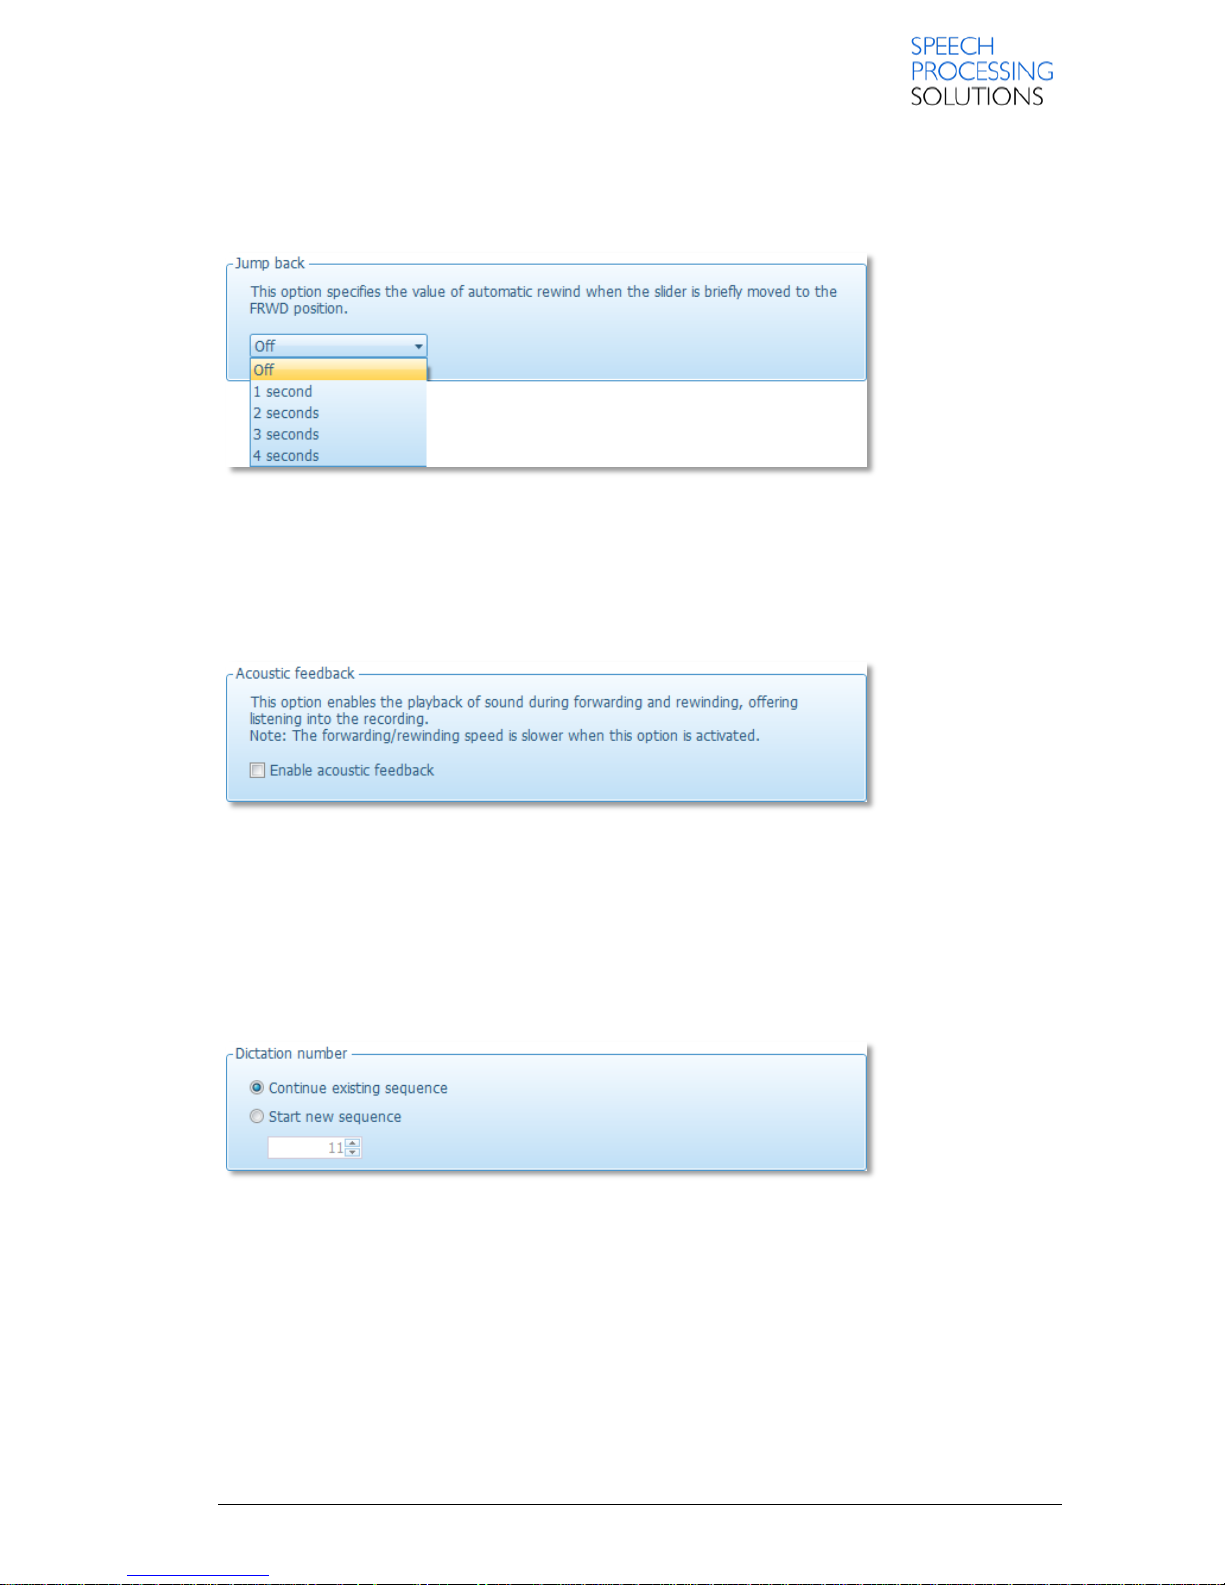
3.8.1. Jump back
Specifies the number of seconds to rewind a file when moving the slider to the FRWD position.
To set this option, select the desired value (from 0 to 4) from the combo-box. After the device reset,
this value will be set to Off (0).
3.8.2. Acoustic feedback
Enables you to listen to the recorded speech or easily find a specific position in the sound file.
Enable acoustic feedback
Activate this option to listen to the dictation file while forwarding or rewinding a recording on the
recorder.
3.8.3. Dictation number
This setting defines the numbering sequence for dictation sound files on the recorder.
Continue existing sequence:
The current numbering sequence on the recorder remains unchanged.
Example
Author Watson selects this option to continue the current numbering sequence. There are already 15
files on the recorder, therefore the recorder continues the file numbering as follows: Wats016.dss,
Wats017.dss, Wats018.dss, Wats019.dss and so on.
Page 45
Page 45 DPM 8000 series - Technical Specification and Advanced Device Configuration
Start new sequence:
The number which is entered in the field will be used for creating a new numbering sequence after
the settings have been transferred to the recorder. This means that the next new file, and from that
point on all subsequent files, will use the new numbering sequence.
Example
Author Watson selects this option to create a new numbering sequence and types the following
number into the field: 100
The recorder generates file numbers as follows: Wats100.dss, Wats101.dss, Wats102.dss,
Wats103.dss and so on.
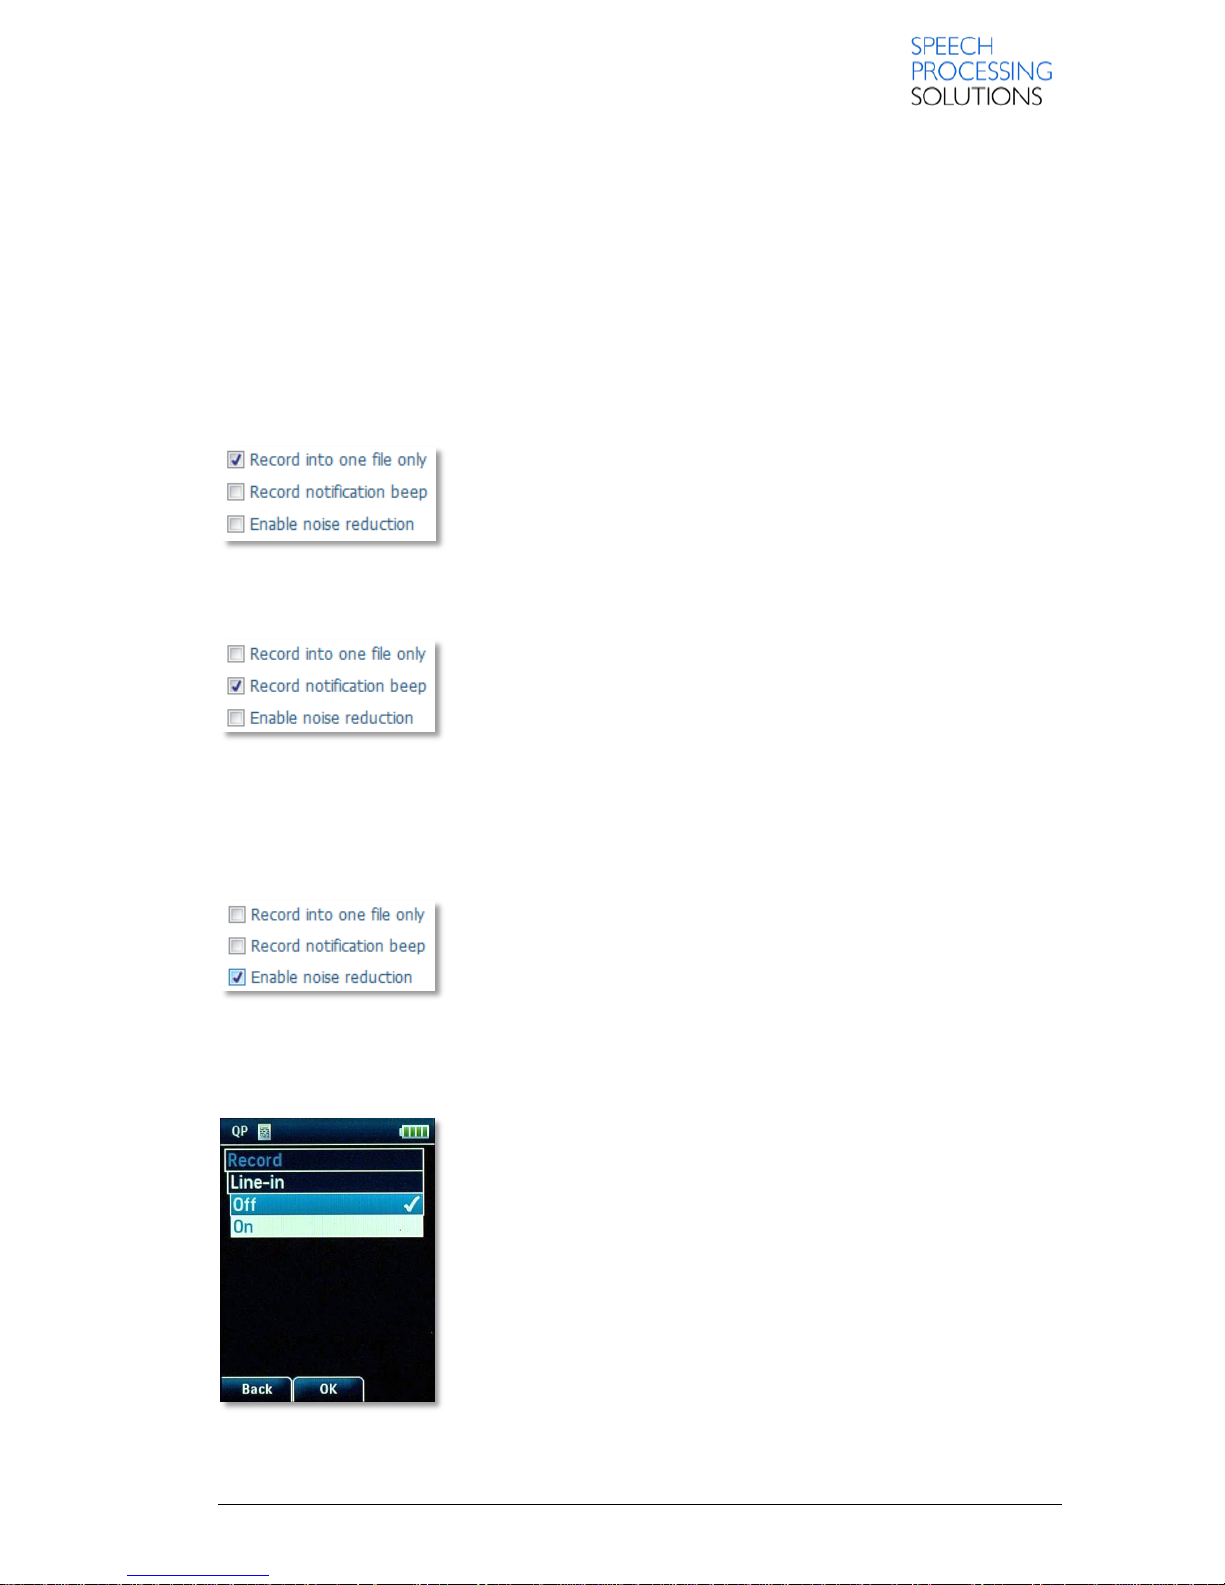
3.8.4. Record into one file only
This setting defines that only one dictation sound file is created.
Activating this option changes the behavior of the recorder. Any
recording you make is stored in a single file, instead of separate files
for different subjects; this behavior is similar to recording on a tape with
an analog device.
3.8.5. Record notification beep
This setting defines that the recorder beeps when recording is possible.
Activating this option means that you must wait until you hear a beep
before you start recording; this behavior is similar to the behavior of
standard voice mail machines.
In a Citrix environment, SpeechExec does not play such acoustic notifications even if this option is
enabled.
3.8.6. Noise reduction
If you activate this setting, the recorder reduces background noise
while you are creating a new recording.
3.8.7. Record from external sources Line-IN
ON will attenuate the recording sensitivity by 26dB in order to allow
higher input levels from a line-out source.
This attenuation is only enabled when an external device is connected
to the mic-in jack.
DPM8000 can’t distinguish between an external microphone and an
external line-out device. Even the external microphone would be
attenuated if Line-in is set to ON.
As long as no external device is attached via the mic-in jack, the
recording sensitivity is not changed.
This setting has no influence on the mono/stereo file property.
Page 46
Page 46 DPM 8000 series - Technical Specification and Advanced Device Configuration
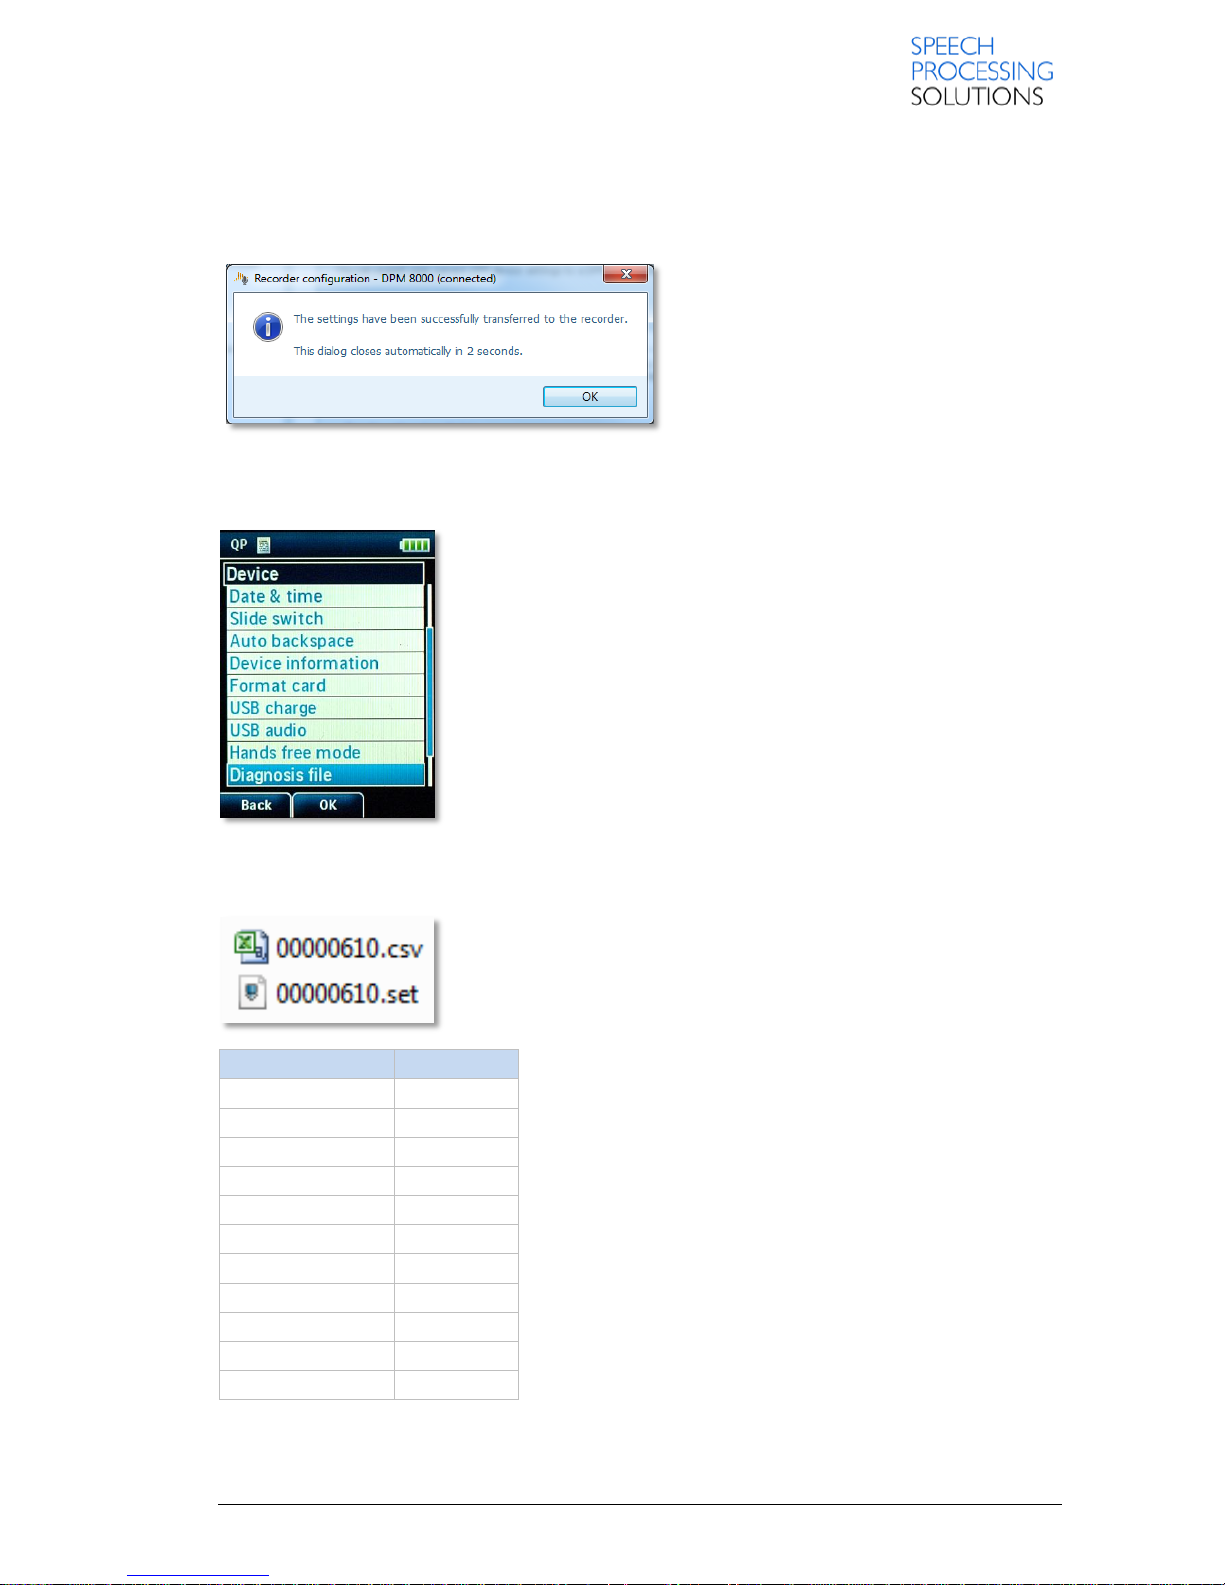
3.9. Settings transfered
When all changes have been made the configuration values can be transmitted to the device.
The confirmation window closes automatically after 3 seconds.
4. Backup the DPM8000 Settings
With the Diagnosis file you can create a backup file (*.set) with
complete device configurations settings. This is helpful for generating
an exact set of same settings and can be used to clone customer’s
device.
Note: Rename the file to dpm4.set and copy it to another DPM8000
series device – it then will have the same configuration and settings as
the device where the 00000610.set file has been generated.
In any case of problems with the device please create the diagnosis file
and the device configuration file and send this via E-mail to your local
Partner or Technical Manager.
4.1. Diagnosis file
With the diagnosis file (*.csv) you have information about the last
functions performed and a overview about the working conditions.
This example 00000610.set file content following information:
Button
Value
Powerswitch
;0000000072
Side left
;0000000004
Side right
;0000000015
Soft left
;0000000324
Soft middle
;0000000254
Soft right
;0000000457
Plus key
;0000000298
Minus key
;0000001114
Pos1
;0000000031
Pos2
;0000000091
Pos3
;0000000064
Page 47
Page 47 DPM 8000 series - Technical Specification and Advanced Device Configuration
5. CSV List
A csv list with patient or insurance issues can be transferred to the DPM4 by copying a file named
‘list.csv’ to the memory card of the DPM4. The device will validate the ‘list.csv’ file and when found
valid will delete it from the memory card and write in to device. A valid list.csv file has one title-row
and up to 40 content-rows with 4 columns each. Every string has a max. of 30 chars. The strings are
not validated, they can even be empty.
5.1. Example of content
Example1 list.csv:
name,gender,ID,birthdate
John,m,34879,04.06.1970
Morris,m,487523,01.01.1940
Smith,f,237,23.02.2001
Example2 list.csv
car,insurance,driver,day
Ford,insur1,peter,Monday
Audi,insur2,martin,Tuesday
Mercedes,insur3,tim,Wednesday
Porsche,insur4, ,Sunday
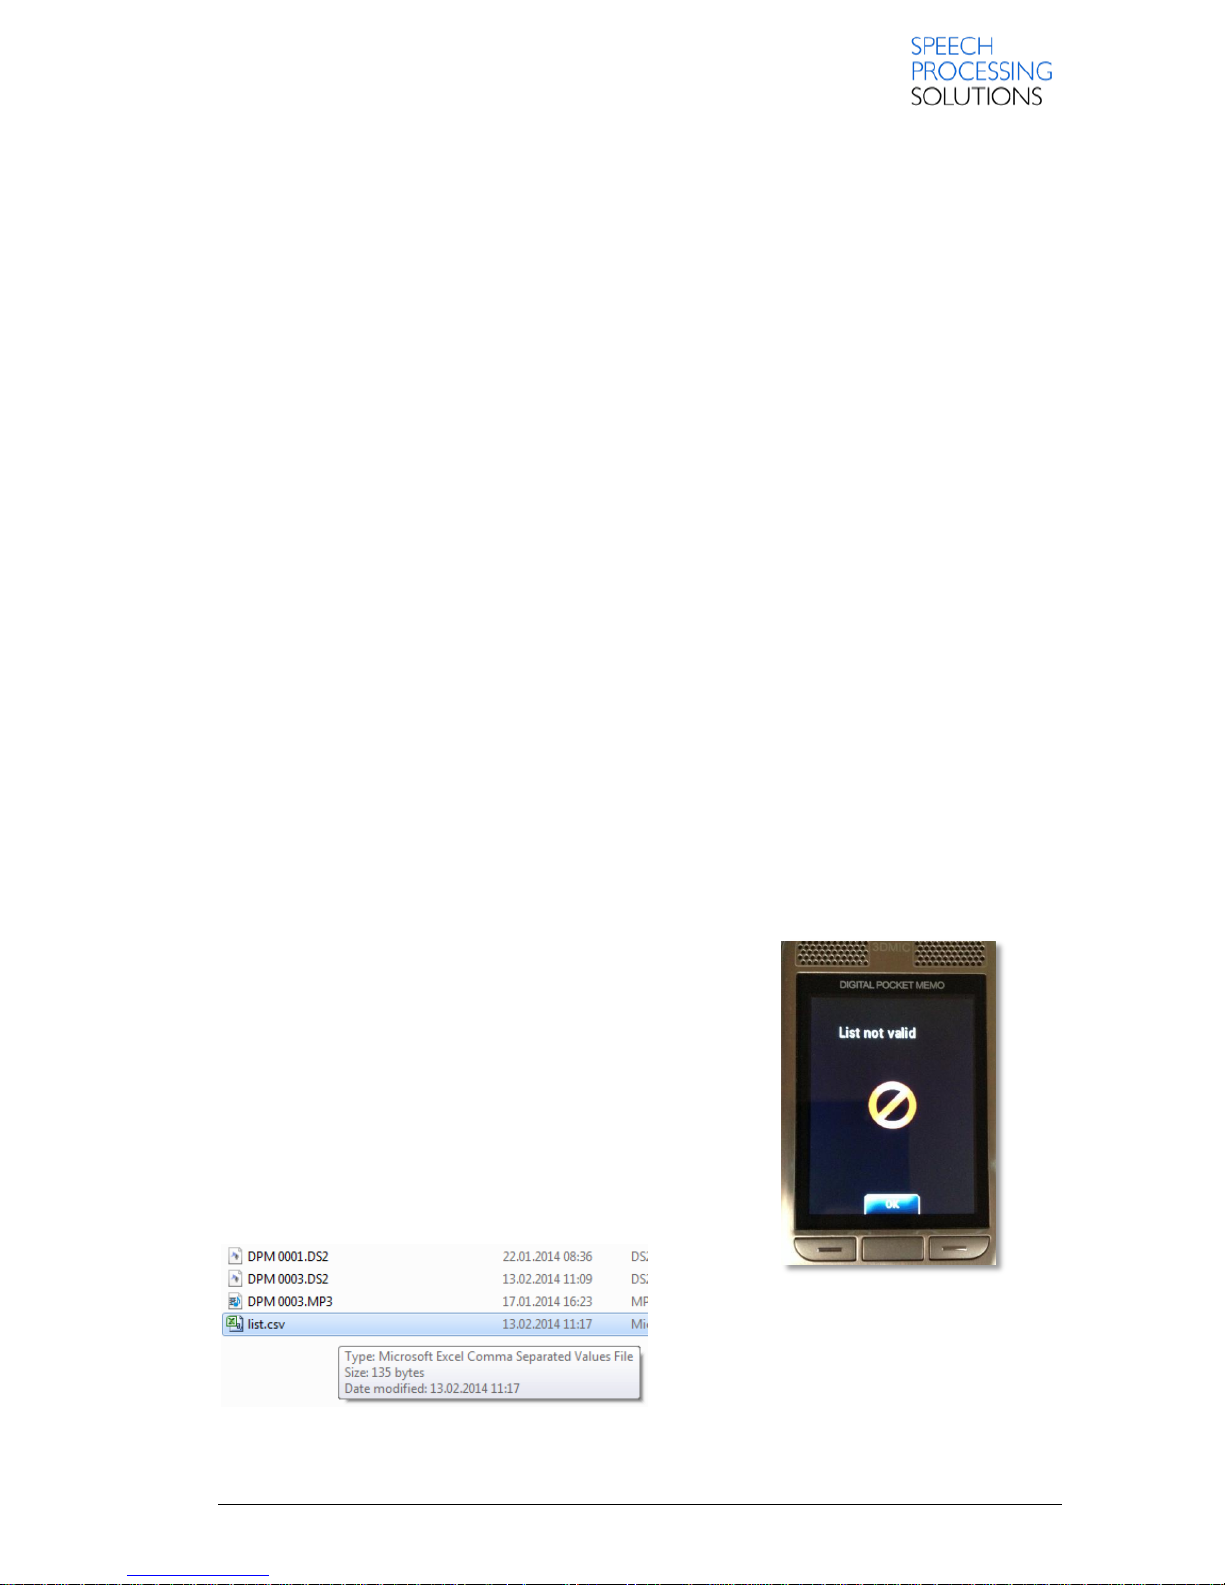
5.2. Invalid list format recognition
An error message will be displayed if an invalid list.csv or authorPIN.csv has been uploaded to the
DPM4-Pro. These invalid files are simply ignored if uploaded to a DPM4-Entry.
The warning message must be confirmed by pressing SMART2-button with caption “OK”.
The invalid *.csv file remains on the card, so this error message will reappear if the device is
restarted again.
Example for wrong format:
car,insurance,driver,day
Ford,insur1,peter,Monday
Audi,insur2,martin,Tuesday
Mercedes,insur3,tim,Wednesday
Porscheinsur4Sunday
You can delete this list.csv file from the memory card or edit
this file directly in the device.
Page 48

Page 48 DPM 8000 series - Technical Specification and Advanced Device Configuration
Page 49
Page 49 DPM 8000 series - Technical Specification and Advanced Device Configuration
5.3. Create csv list with Microsoft Excel
This step-by-step instruction describe how to prepare a csv list with Microsoft Excel installed on
Windows 7 and transfer a csv list to DPM8000 device.
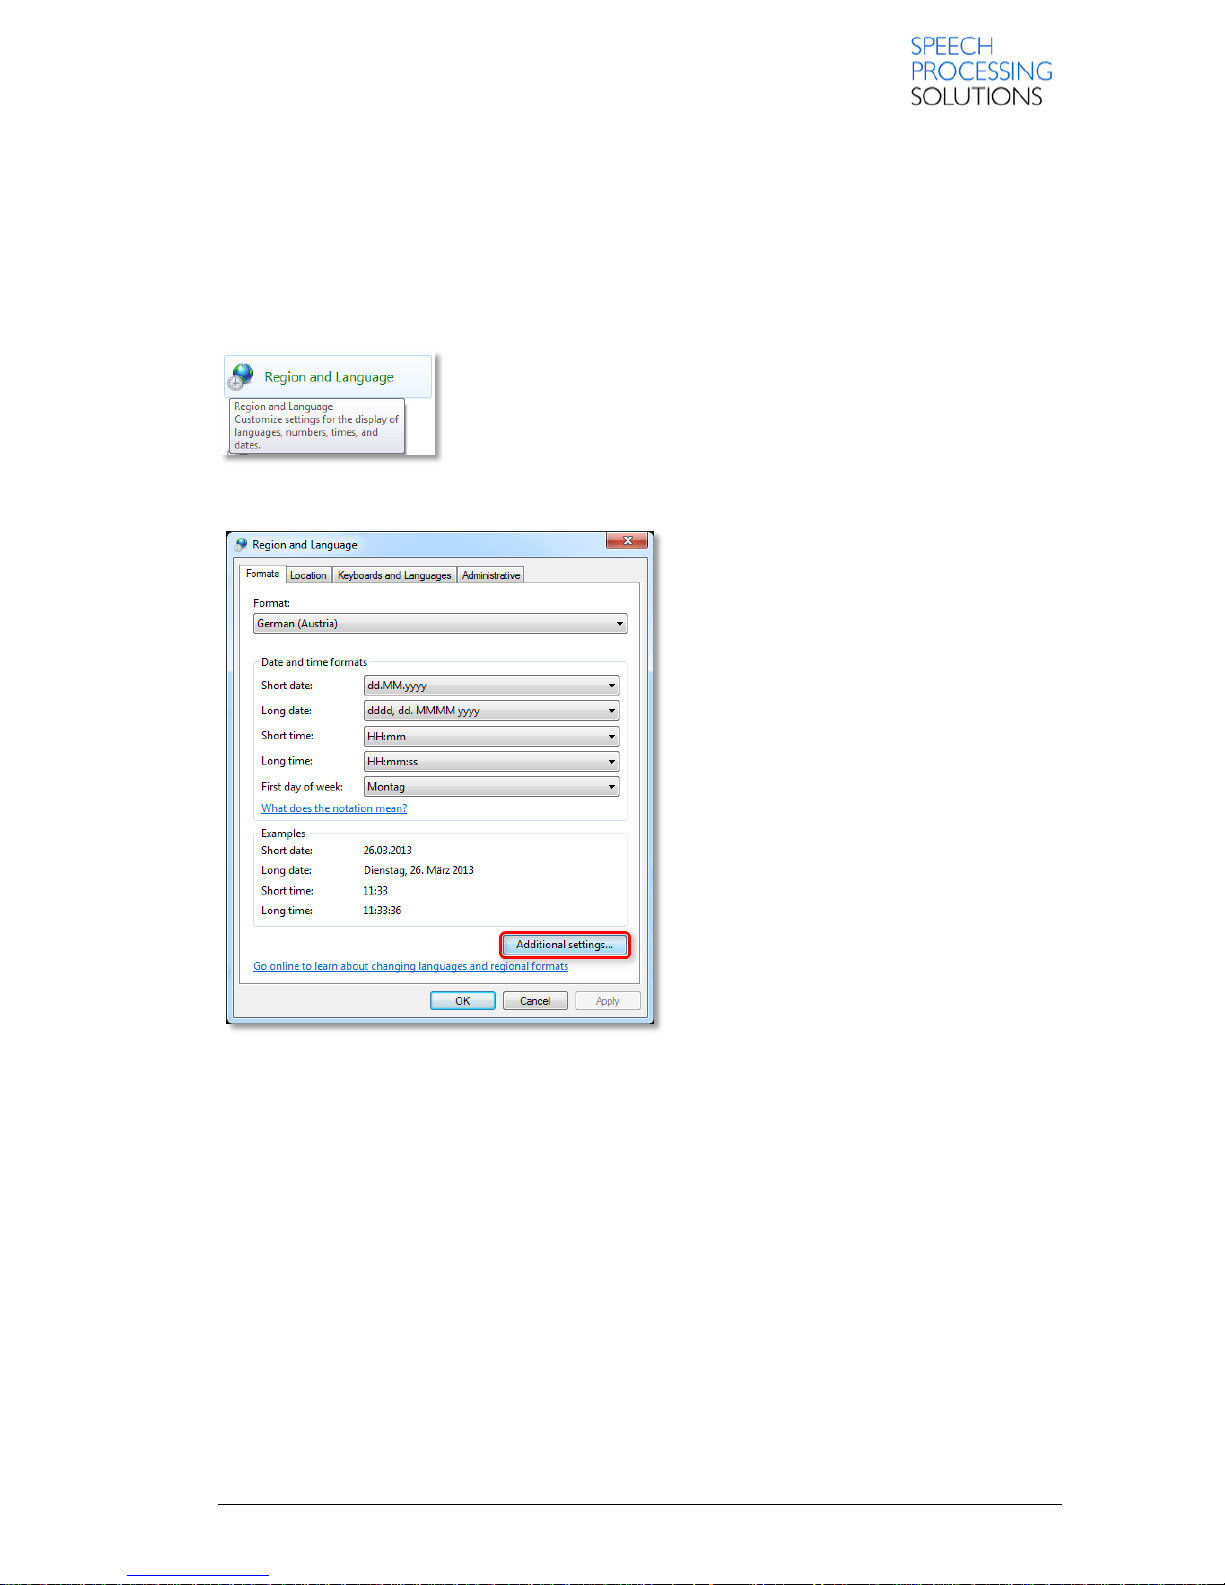
5.3.1. Region and Language settings
Click on Windows Start Button and select Control Panel.
Open the Region and Language options
Click on Additional settings…
Page 50
Page 50 DPM 8000 series - Technical Specification and Advanced Device Configuration
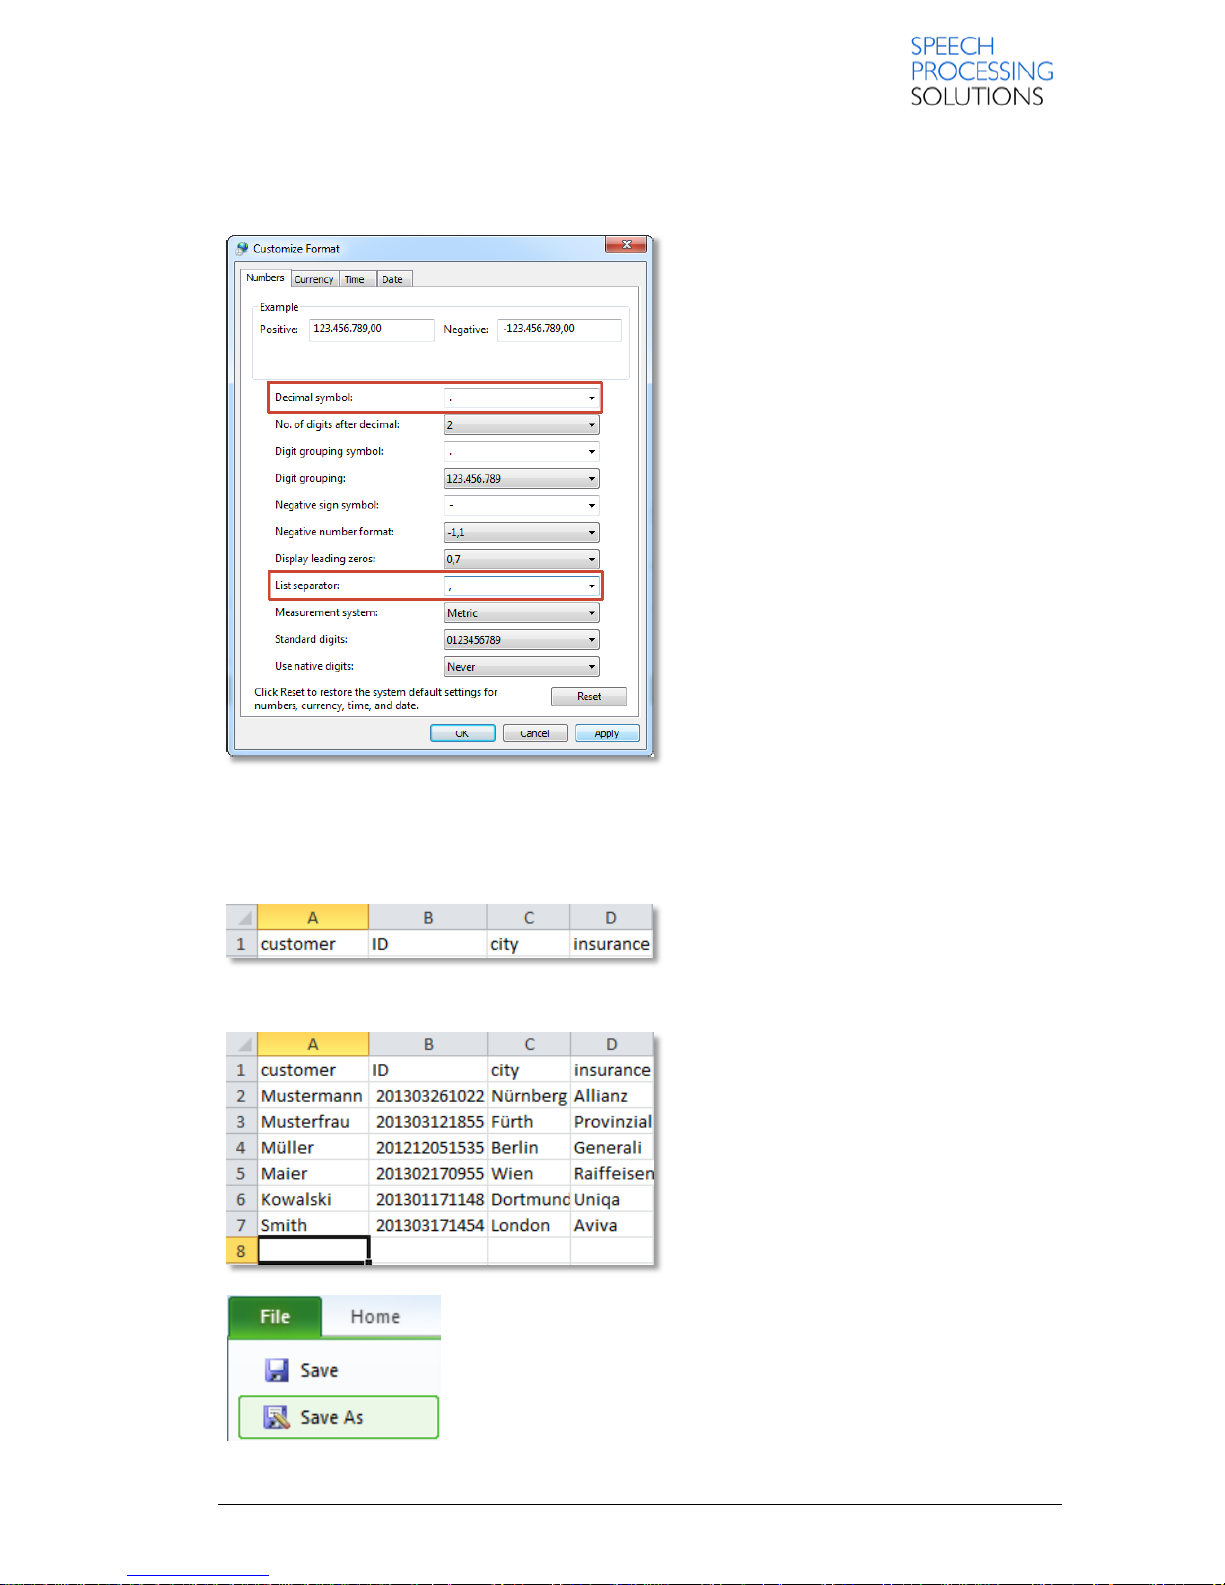
Check or set the characters for Decimal symbol and for List separator.
For the decimal symbol is necessary . (dot) and for list separator , (comma).
Click Apply, and OK, and leave the window.
5.3.2. Create list.csv with Excel
Open new Excel sheet and create a table with 4 columns, in our example named – customer, ID,
city, insurance. The first row is the Title row.
You can use up to 40 rows, for any cells up to 30 characters for content description.
After the list is created, save this direct in to
DPM8000 device or make a local copy for
backup. Please don’t click on Save, select
the File ribbon, and click on Save As.
Page 51
Page 51 DPM 8000 series - Technical Specification and Advanced Device Configuration
You can also prepare many list.csv files for different issues, and save this in folder with different
naming.
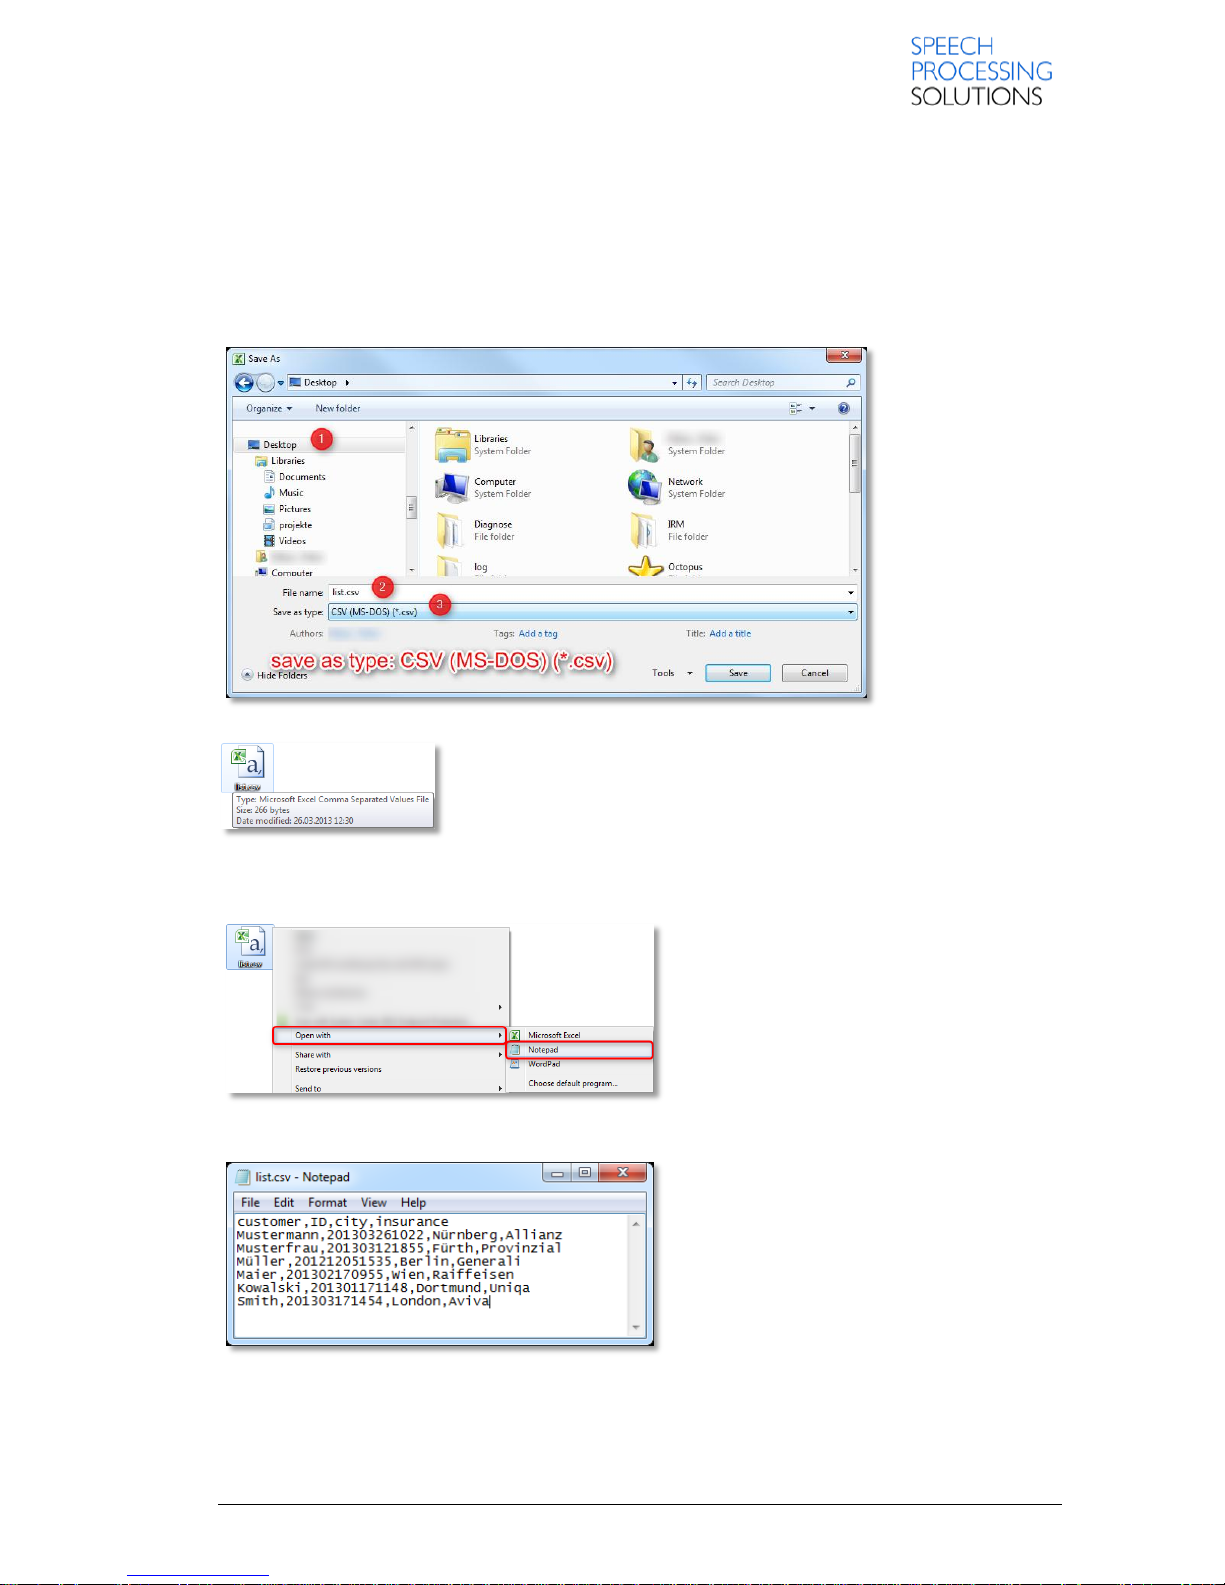
In our example we save this list.csv file on the Desktop.
Please don’t forget – DPM8000 accept only list.csc file name, any other file name like mylist.csv or
privatelist.csv will be nor recognized and imported in to the device.
Click on Save as type, and select the file type CSV (MS-DOS). With this File format the Digital
Pocket Memo can recognize special country characters or letters like german öäüß or è à.
And finally we have list.csv file on the Desktop and we can transfer this
in to Digital Pocket Memo 8000-series.
Also, you can check this file with Notepad, click on the list.csv file with right mouse button, and select
Open with – Notepad.
Now, you see the list.csv in the “raw” view.
Page 52
Page 52 DPM 8000 series - Technical Specification and Advanced Device Configuration
5.3.3. Transfer to DPM8000 series
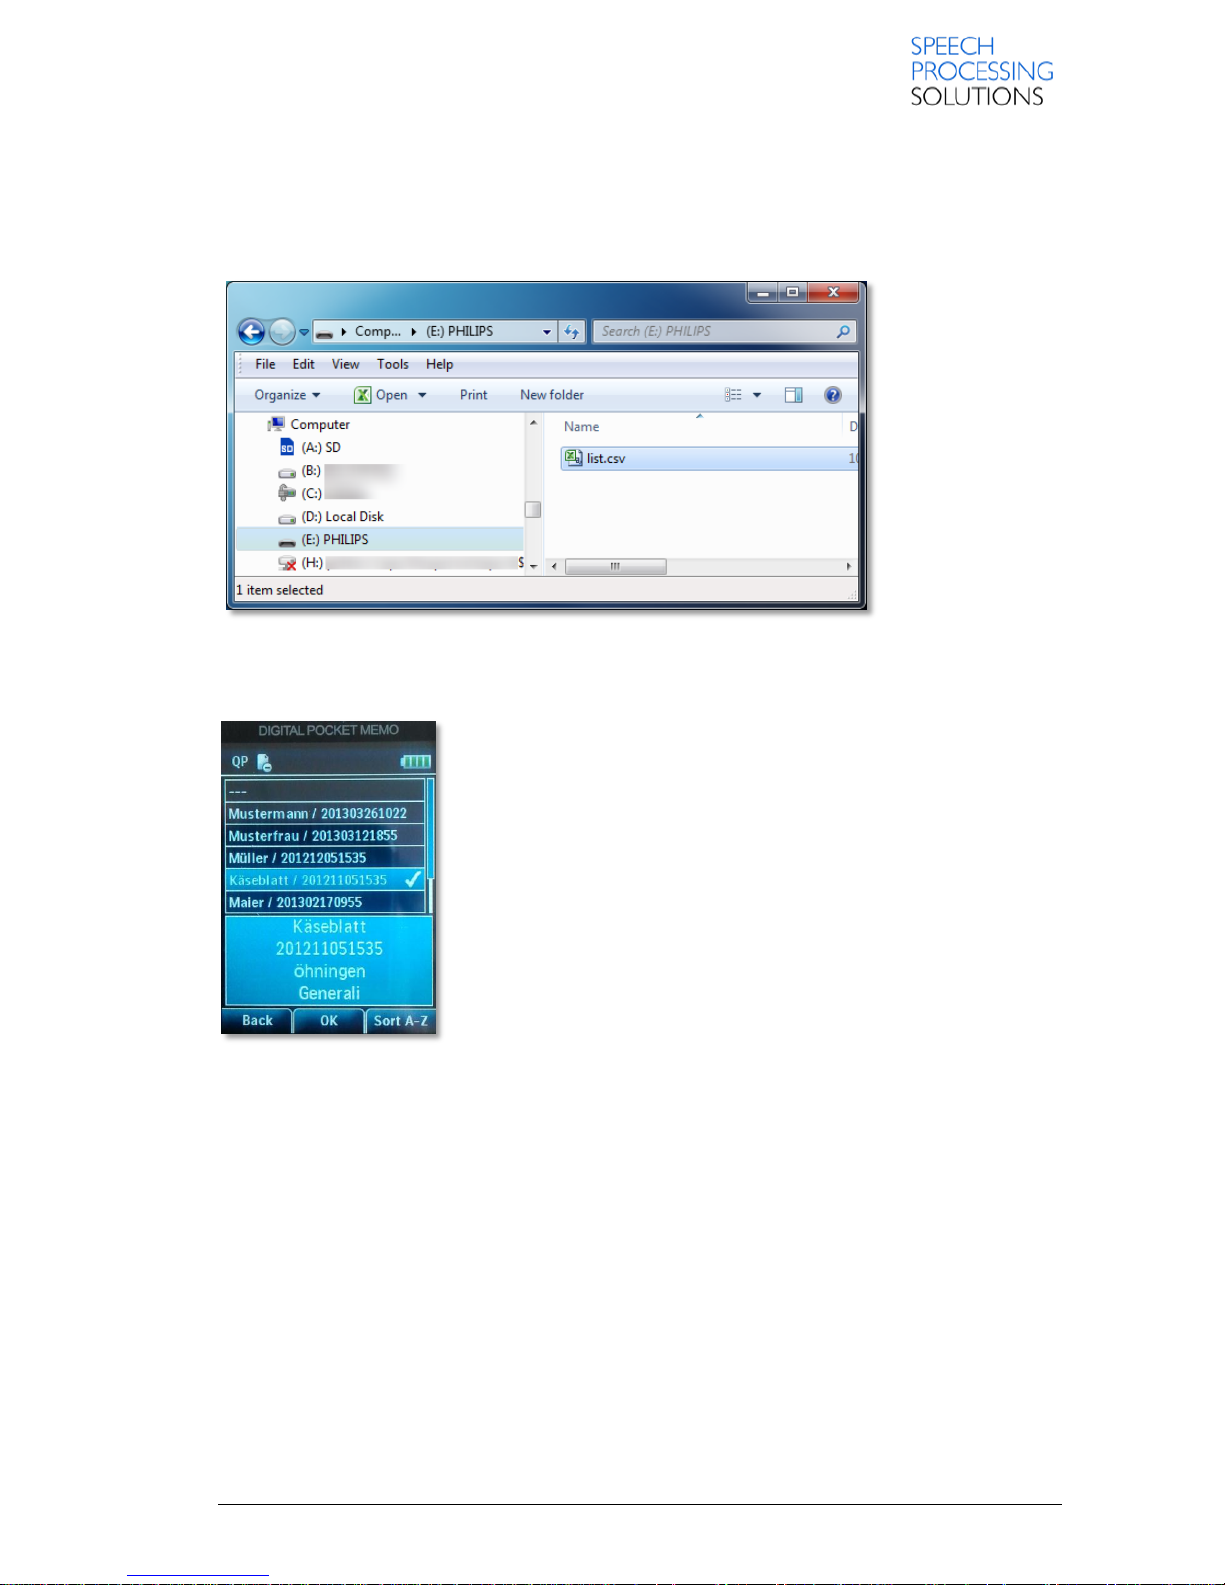
Open the Windows Explorer, select the DPM8000 external drive and copy the list.csv in to memory
card.
In our example, the DPM8000 is recognize as Drive E:
After you remove the DPM8000 device from the Docking station, the device will recognize the
list.csv file, validate this and import to the device.
Your Device is ready to use with the full content of list.csv file. Click on Function Button1 , open the
list, select a value and record your message.
Page 53
Page 53 DPM 8000 series - Technical Specification and Advanced Device Configuration
5.4. Sort column of the csv-data list
With the first firmware versions, sorting of the list was only possible with the 1st column of the list as
sort key. From version 1.59 onwards, it is possible to select which list-column should be the sort key.
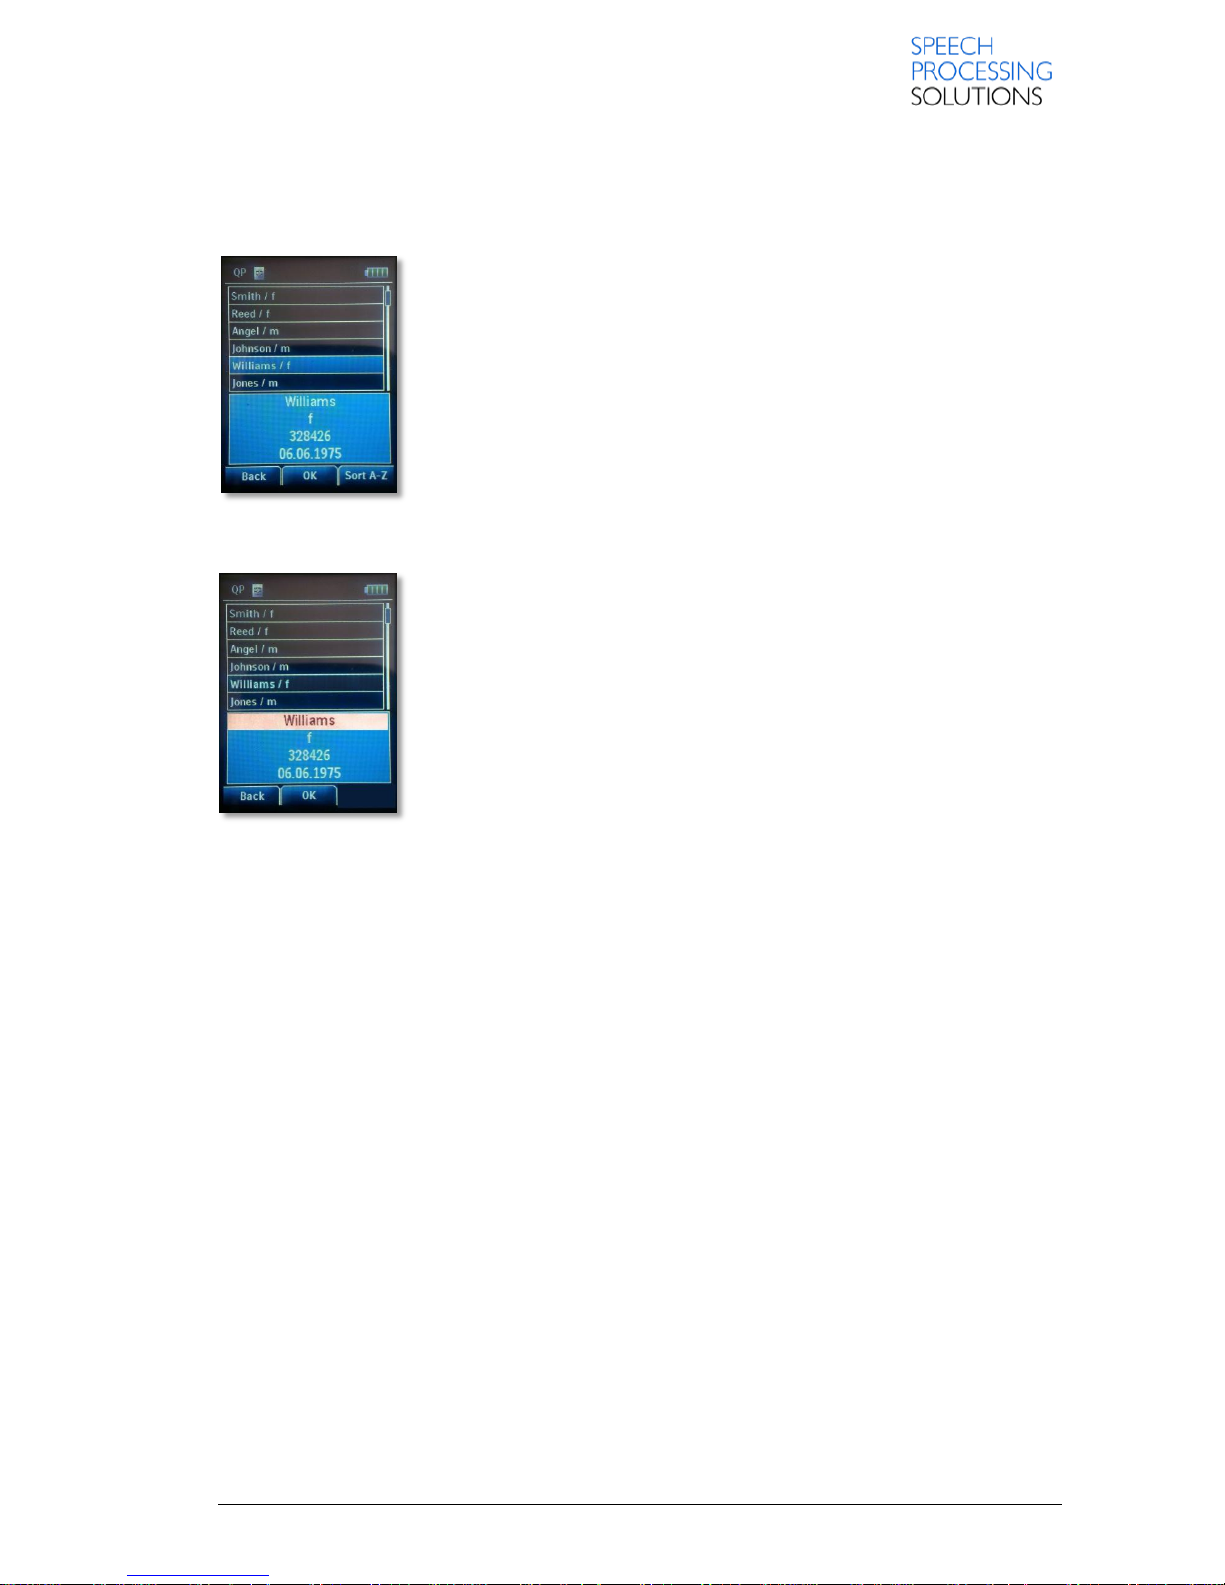
Cursor in list-overview
After pressing the SMART3-button “Sort A-Z” for >=2s, the cursor will jump from the upper list-
overview to the bottom list-detail-view and the SMART3-button is disabled:
Cursor in list-detail-view
The cursor can be moved up/down with the PLUS/MINUS buttons. There is
no wrap-around of the cursor if the cursor reaches the top-most or bottommost position.
By pressing SMART1-button “Back” the cursor jumps back to the listoverview and the sort key is not changed. (SMART3-button is enabled
again with the toggle-function “Sort A-Z” / “Sort Z-A” / “List”)
By pressing SMART2-button “OK” the cursor jumps back to the list-overview AND the sort key is
active on the selected list column.
ie: if the cursor would highlight “328426” in the above screenshot, the sort-key would be column 3 of
the data list.
5.5. Create Author/PIN list
A keyword1 PIN-list can be transferred to the DPM4 by storing an authorPIN.csv file on the Memory
card of the DPM4. DPM4 will validate the authorPIN.csv file and delete it from Memory Card if it is
valid.
5.5.1. Example of content authorPIN.csv
The name of the file needs to be ‘authorPIN.csv’
Limited up to 40 rows with 2 columns each
Every keyword string can have up to 30 characters
Every PIN must be a 4-digit number
A PIN must not be defined twice
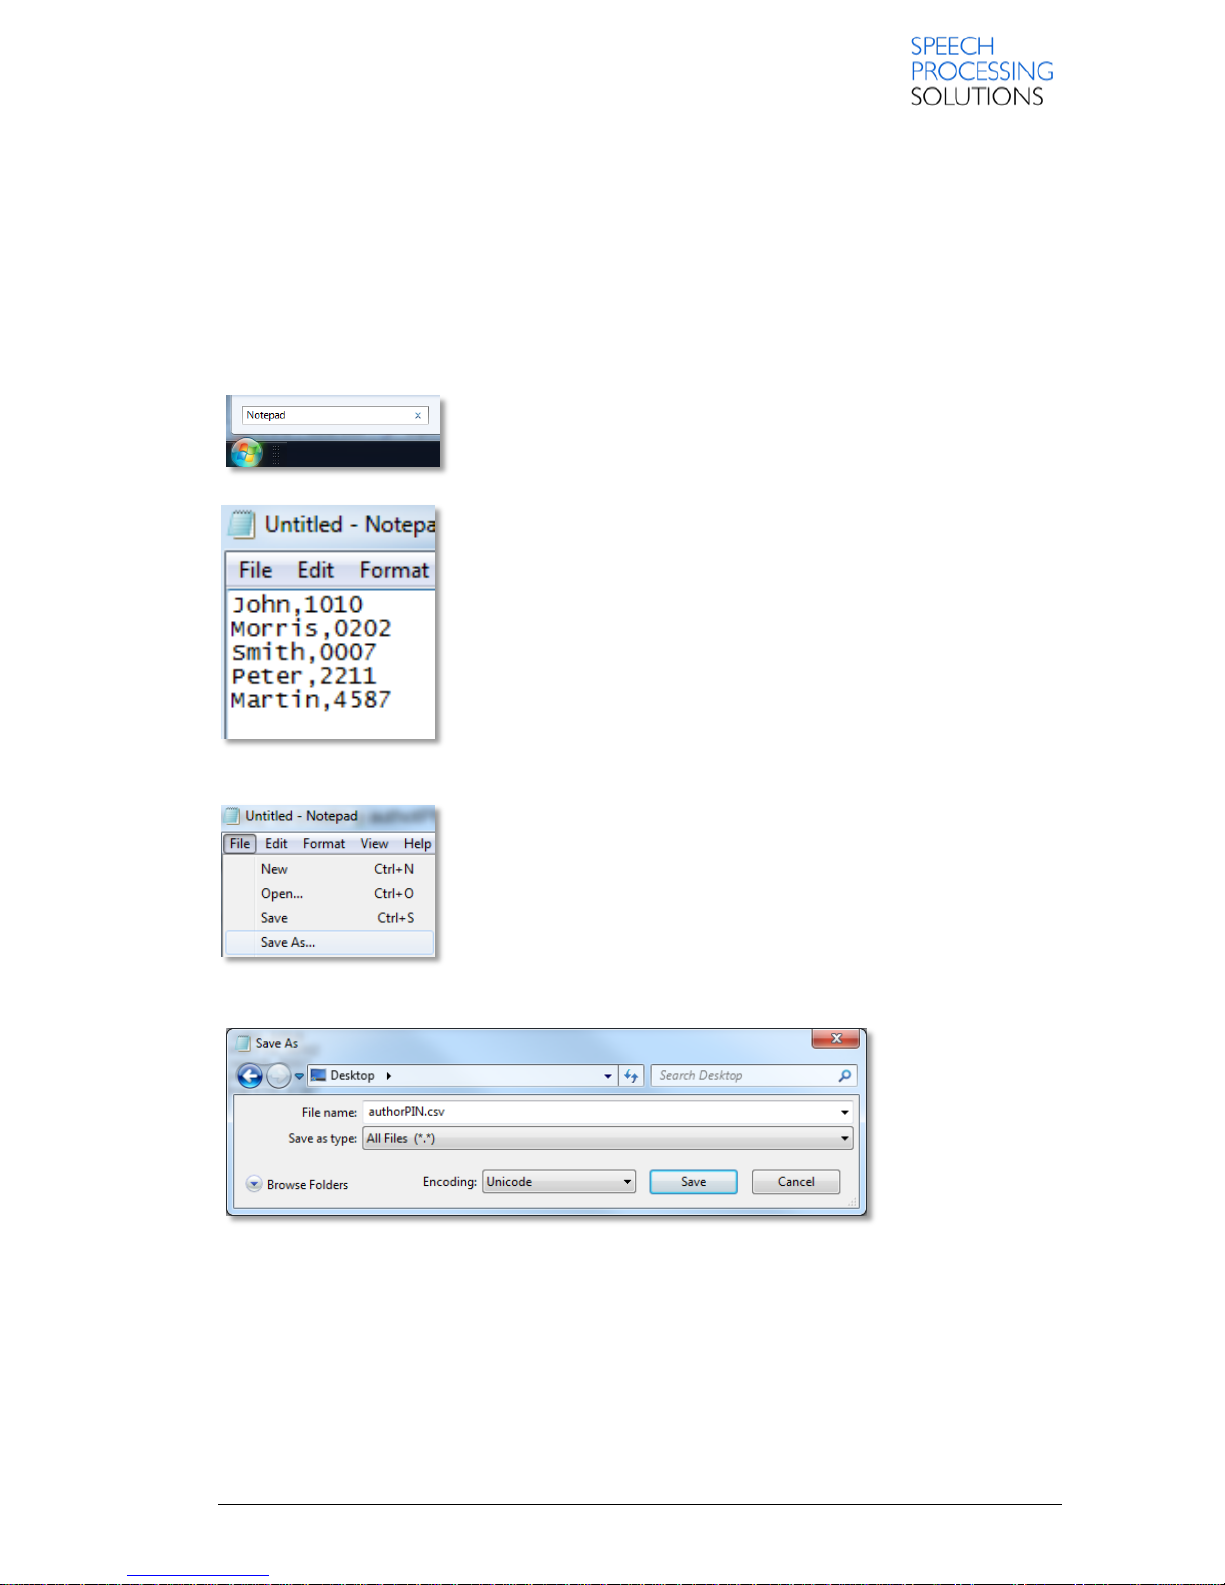
As an example for the authorPIN.csv file:
John,1010
Morris,0202
Smith,0007
Page 54
Page 54 DPM 8000 series - Technical Specification and Advanced Device Configuration
Peter,2211
Martin,4587
SpeechExec will grey out the keyword1 contents in the User Interface if the keyword1PIN-flag is set
(the “TRANSFER” button will only transfer keyword2-4 in this case).
AuthorPin.csv can be created with Microsoft Excel or any other Editor, like a Notepad.
We describe a simply way to create a authotPIN.csv with Microsoft Notepad.
Click on Windows Start Button, type Notepad in to - Search programs and files - field and confirm
with ENTER
Crate a list with Name and PIN, delimited with , (comma).
Save the file on your Desktop as authorPIN.csv
Select Save as
Click on Save as type – All Files (*.*) and save the created File with File name authorPIN.csv
Transfer the file in to Memory card and remove the device from the Docking station.
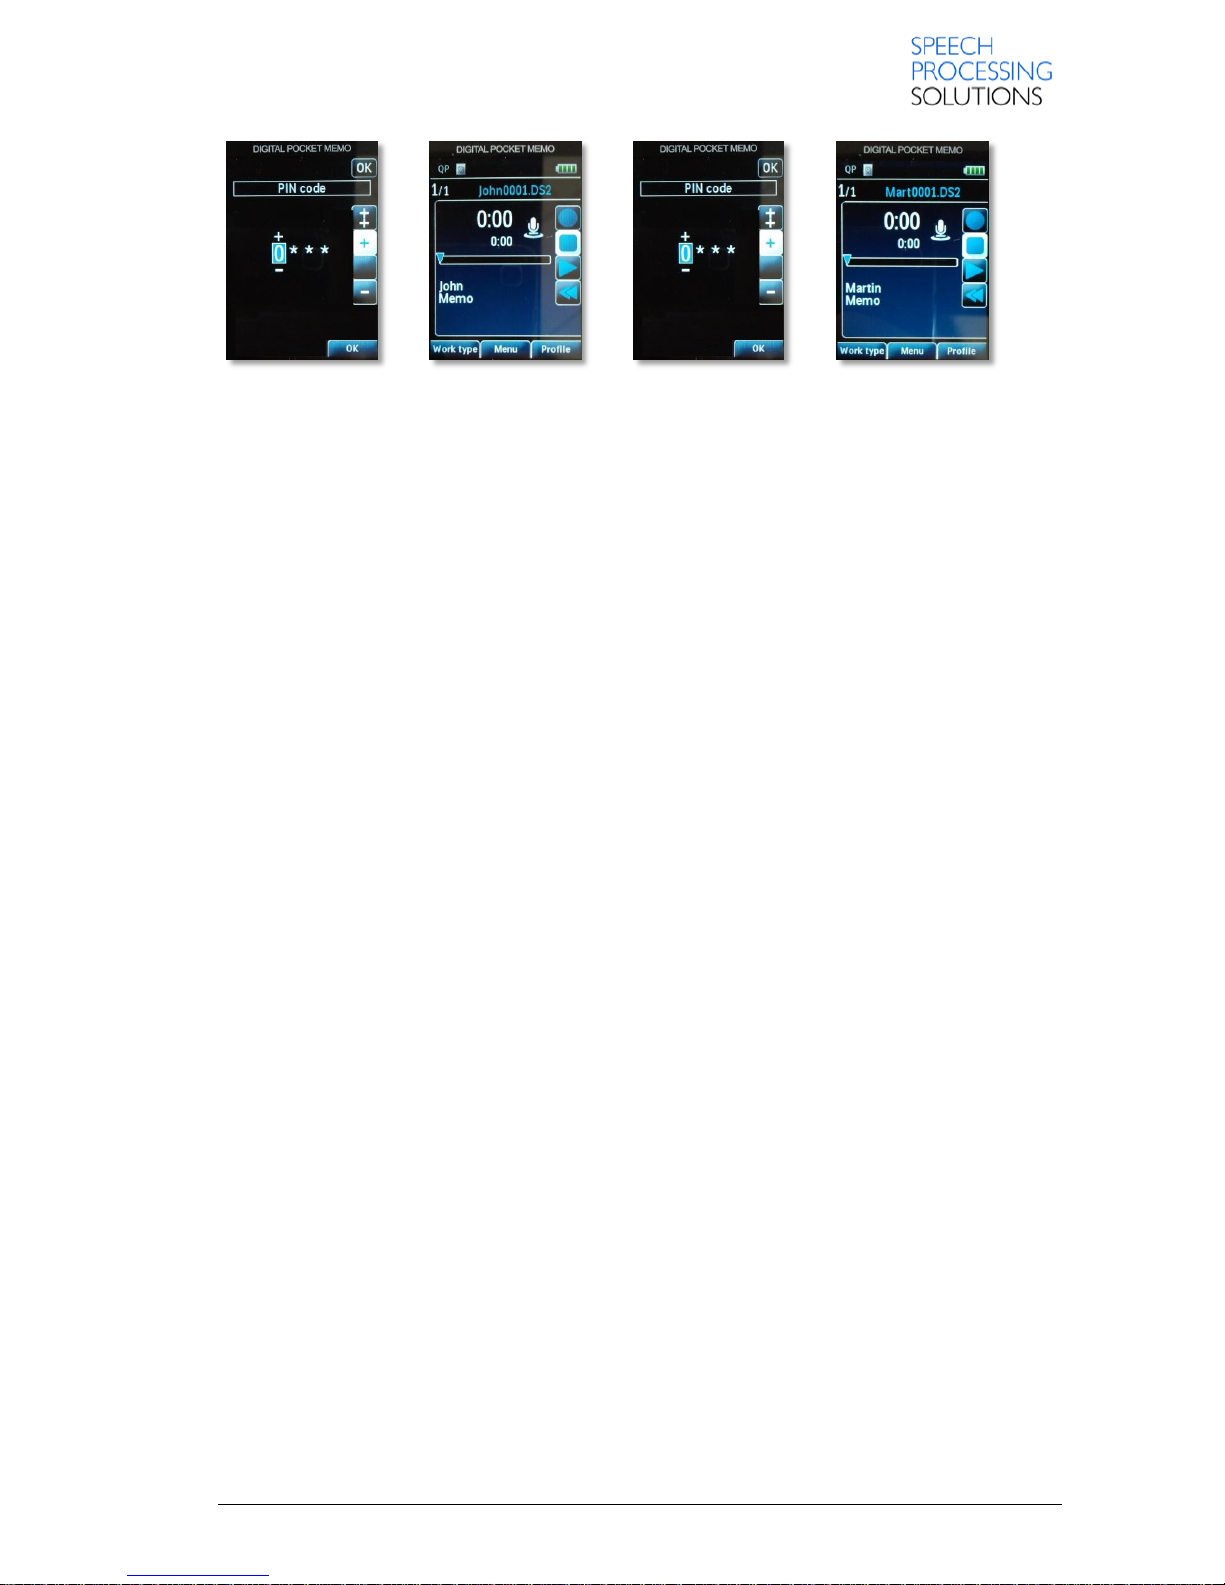
Digital Pocket Memo recognizes the authorPIN.csv file and asks for PIN
PIN Code: 1010 Author: John Pin Code: 4587 Author: Martin
Page 55
Page 55 DPM 8000 series - Technical Specification and Advanced Device Configuration
Note:
Please make a local copy of the authorPIN.csv file. Digital Pocket Memo will be deleting this after
import to internal memory and you can not recovery this file.
If the keyword1PIN-flag has been set (because a valid authorPIN.csv was found on the SD Memory
Card), the only way to reset this flag again is to revert to factory default settings via DPM4-menu.
If a line in the authorPIN.csv file has a PIN but no author, or vice versa, the line is ignored.
The device will not accept an authorPIN.csv file if a PUK is configured for this device. The PUK must
be reset via DPM4 menu with the factory default function in order to accept the authorPIN.csv file
again.
Page 56
Page 56 DPM 8000 series - Technical Specification and Advanced Device Configuration
6. Customize the start screen logo
You can create a custom start screen with Logo or other graphic elements.
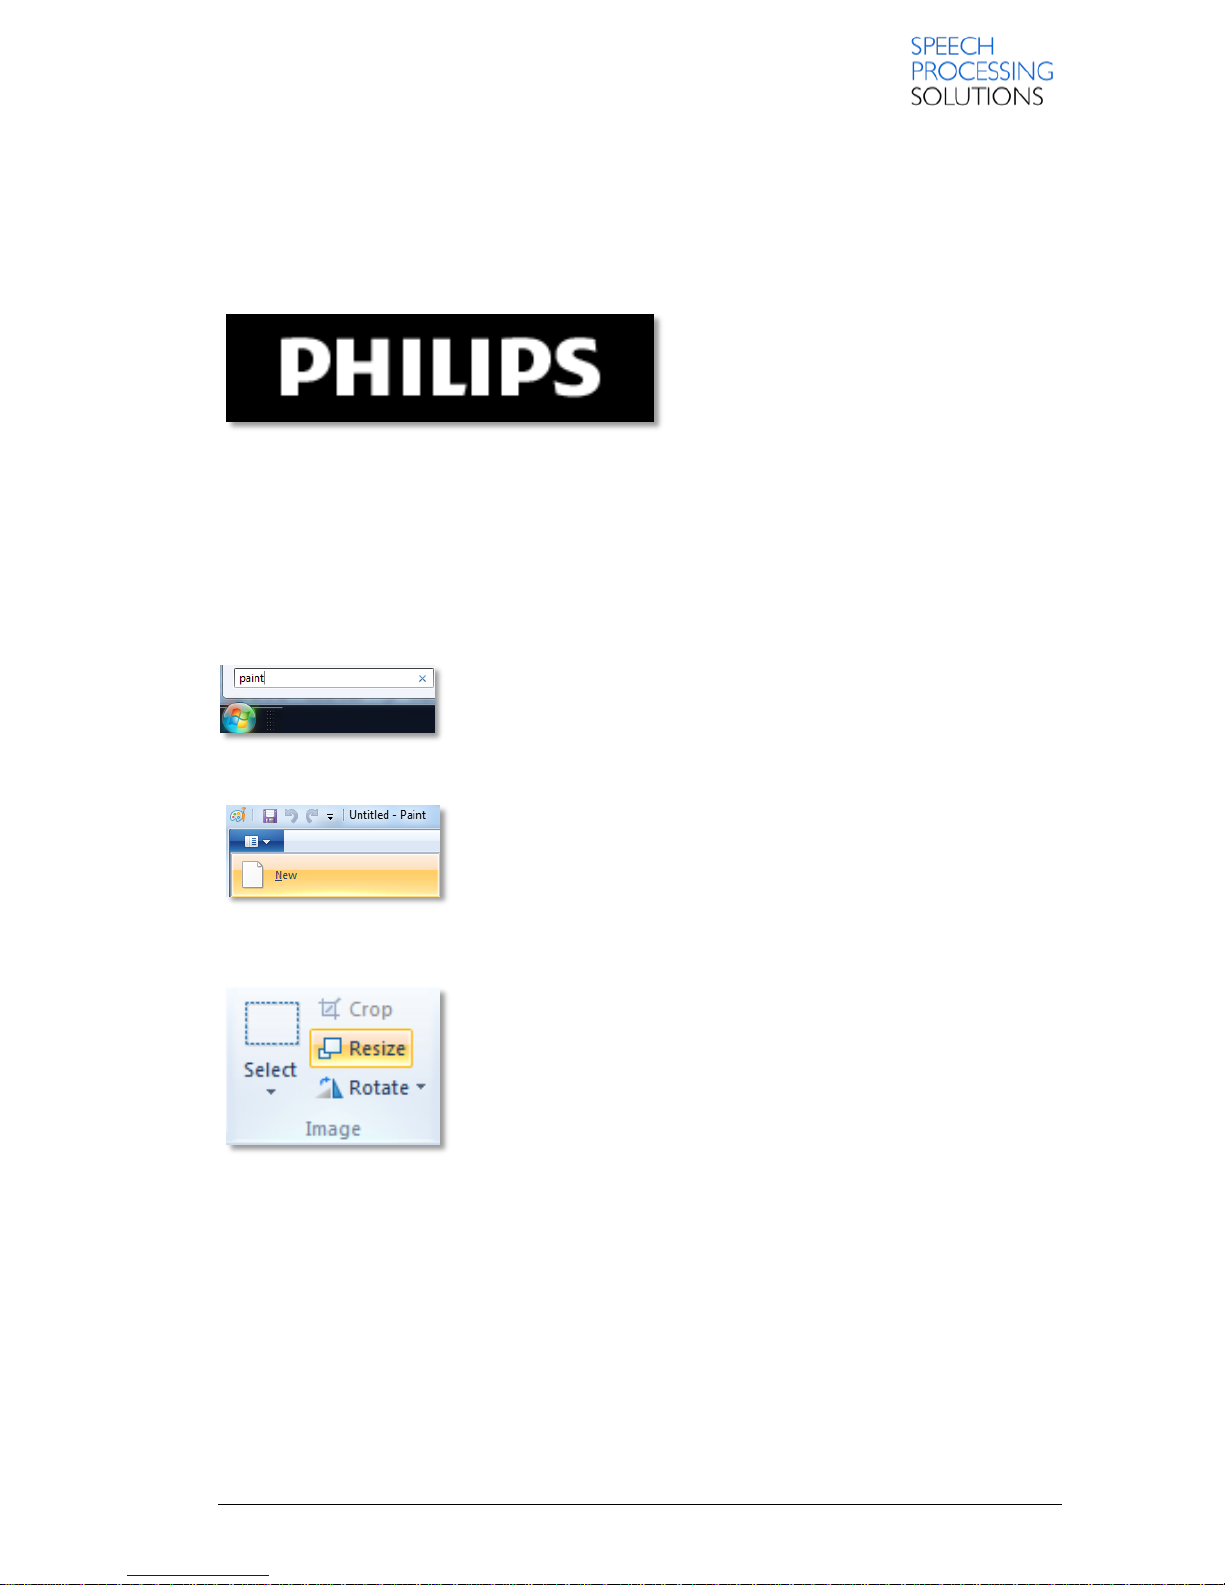
Create a 200pixel x 50pixel 24-bit Bitmap file and save this as welcome.bmp in to root folder on
the Memory Card.
Example :
Whenever the Digital Pocket Memo is now switched on this welcome screen will be presented
during startup time – that is roughly 3 seconds. We recommend using black background color as
the surrounding display area on the Digital Pocket Memo.
6.1. Create Start screen picture with Microsoft Paint
Click on Windows Start Button, type paint in to - Search programs and files - field and confirm with
ENTER
Create new file
On Ribbon Image click on Resize
Page 57
Page 57 DPM 8000 series - Technical Specification and Advanced Device Configuration
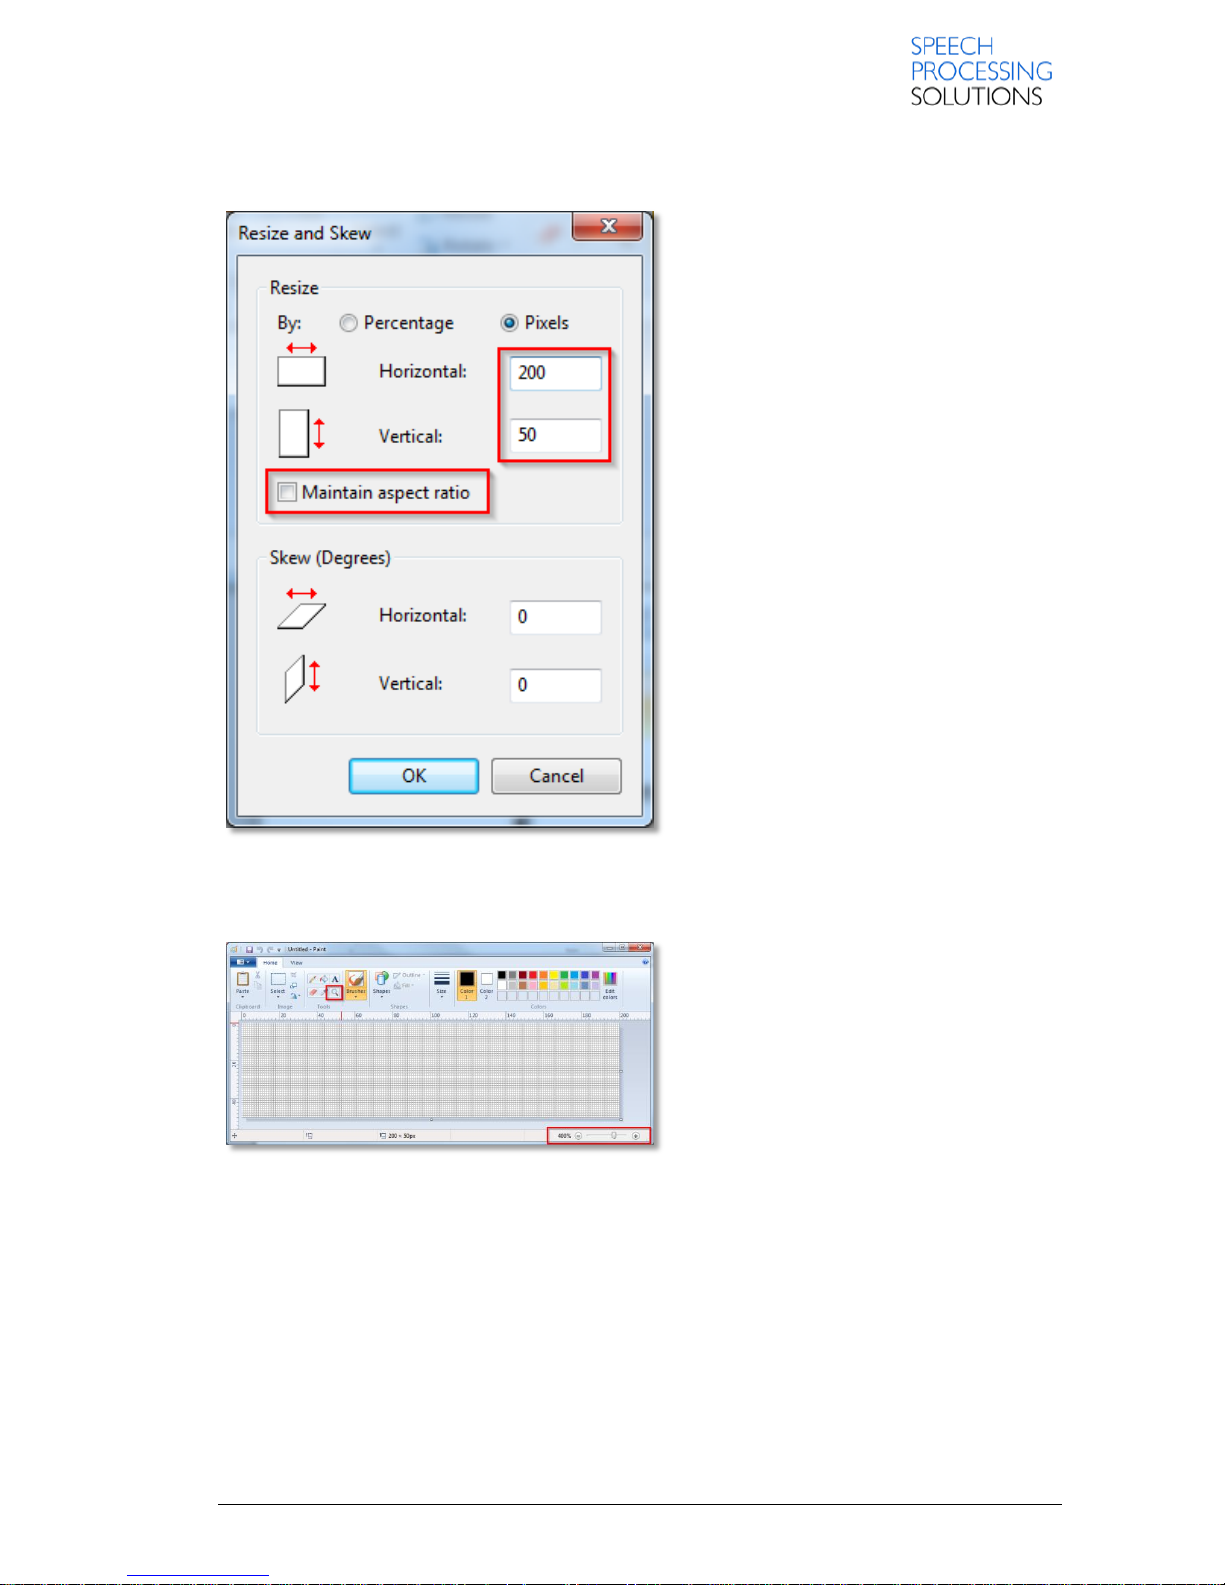
Select Pixel, deactivate the Maintain aspect ratio option and set the hotizontal and vertical pixel size:
Horizontal: 200, Vertical: 50. Click on OK and close the Resize and skew window.
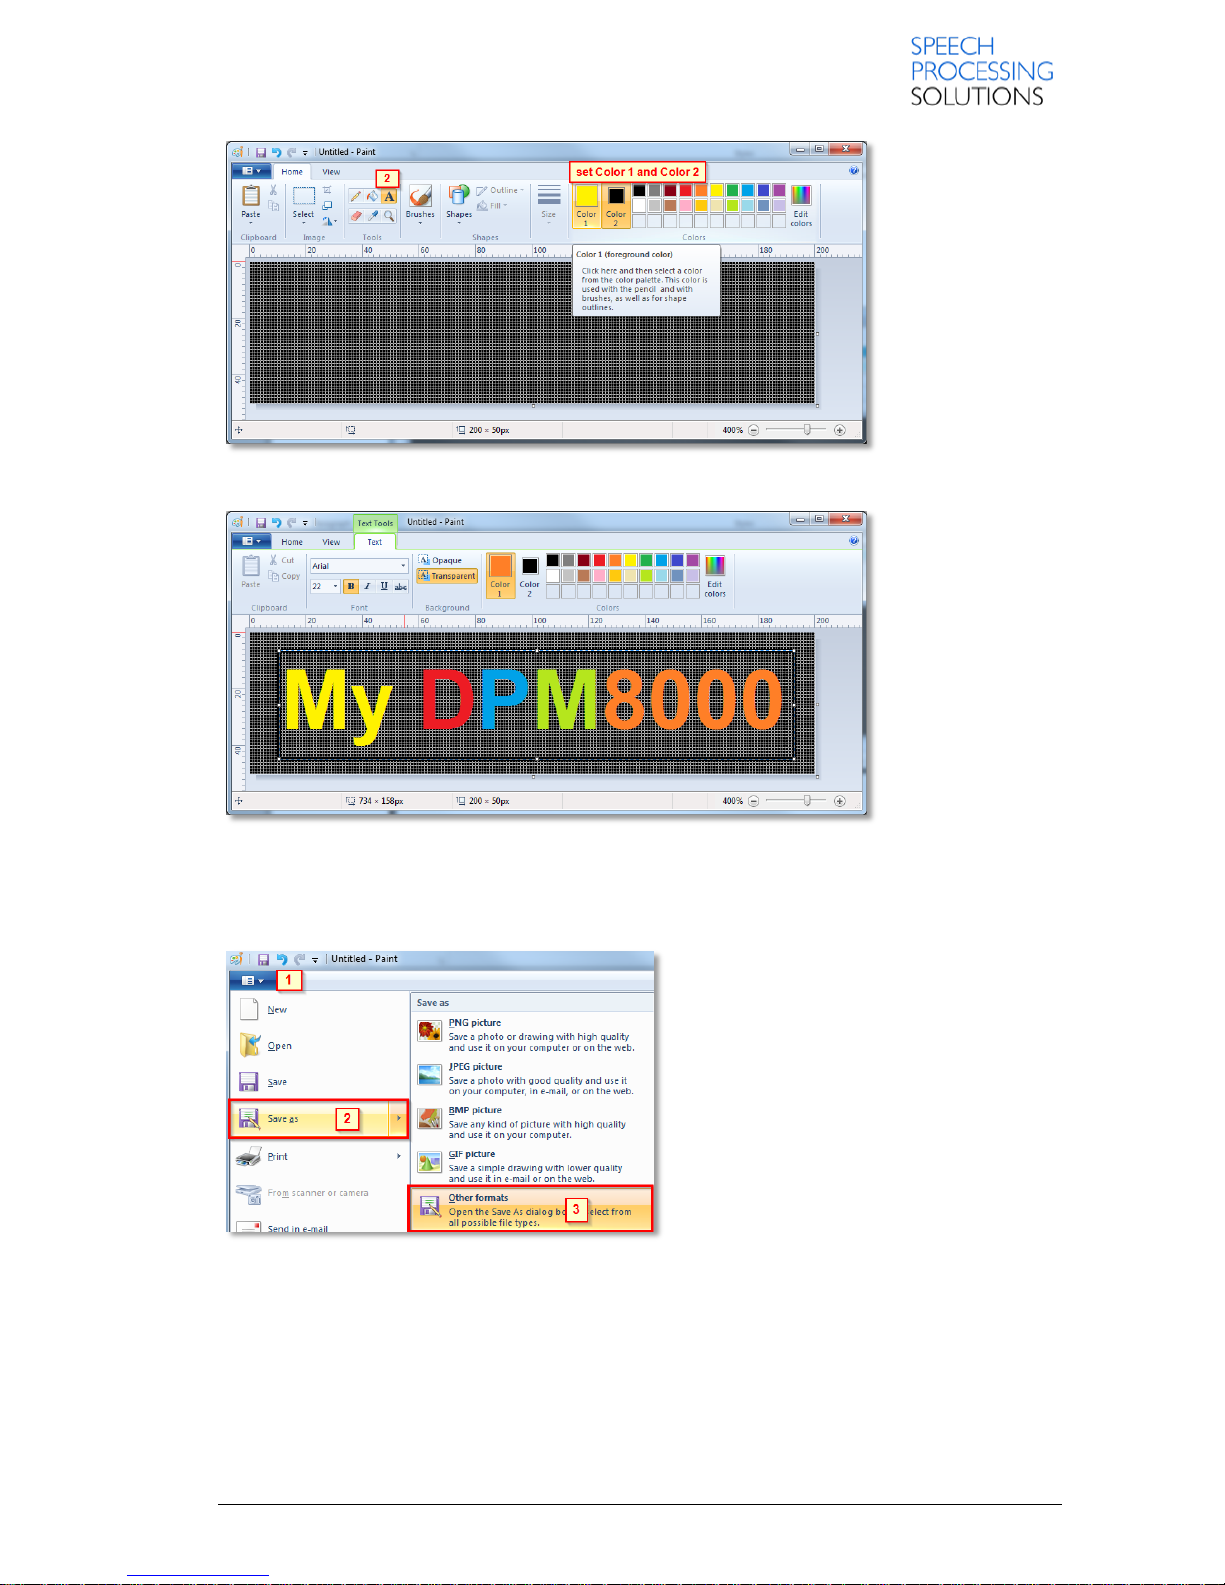
Click on the magnifier symbol or use the Zoom-Slider and make the picture bigger.
1. Set the Color1 for foreground and Color2 for background
2. Click on Text [2]
Page 58
Page 58 DPM 8000 series - Technical Specification and Advanced Device Configuration
Create a text or paste a picture from clipboard, in our example we create a text.
If you have created the picture, then save this to your local folder (Desktop) and copy in the root
folder of the Digital Pocket Memo. By way of example we save this file directly to the DPM.
Click on Paint [1] select Save as [2] and click on Other formats [3]
Page 59
Page 59 DPM 8000 series - Technical Specification and Advanced Device Configuration
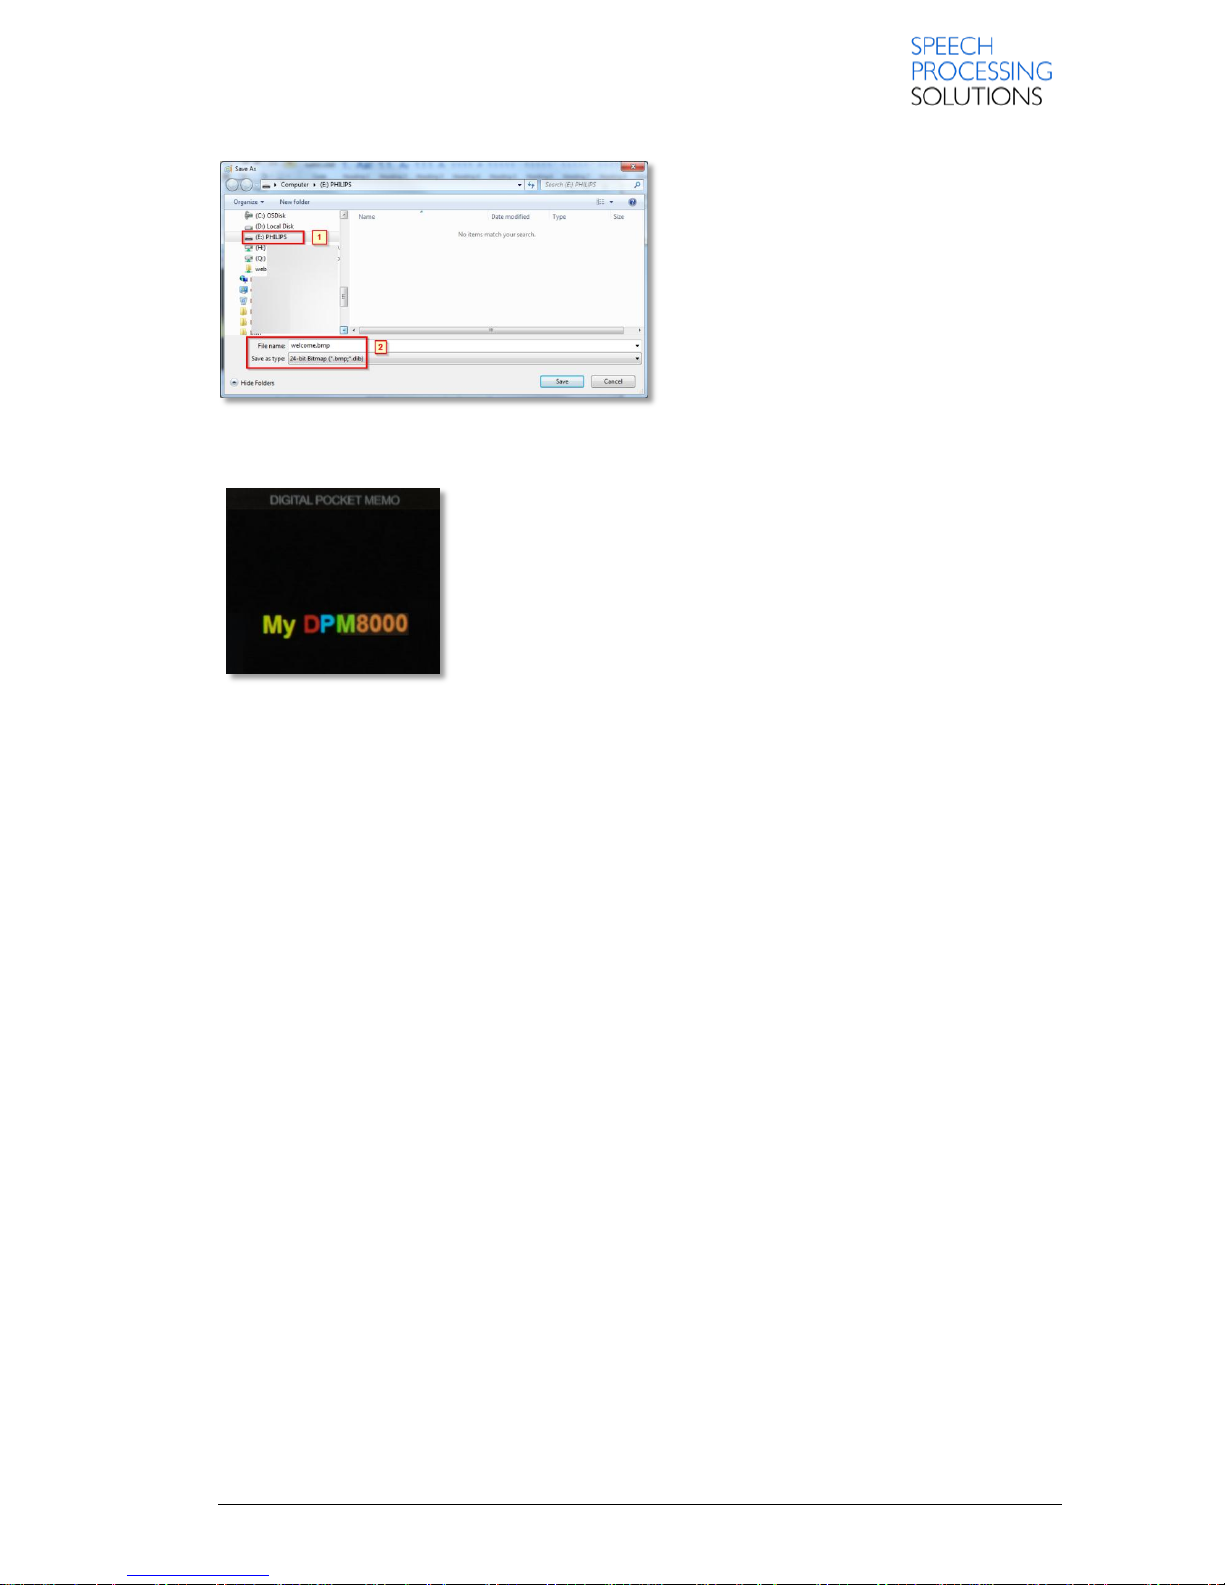
Select the Philips Drive, type on File name:
welcome and select Save as type: 24-bit
Bitmap. Click on Save and the picture is save
on the DPM.
And finally, after restart the device we see our new logo as boot screen.
Page 60

Discover the comprehensive range of professional dictation products from Philips
http://www.philips.com/dictation
February 2014
Doc. No: PRI-1139/20140218
Philips and the Philips’ Shield Emblem are registered trademarks of Koninklijke Philips N.V. and
are used by Speech Processing Solutions GmbH under license from Koninklijke Philips N.V.
Dragon NaturallySpeaking is a trademark of Nuance, Inc. and is used here under license
All other trademarks are the property of their respective owners.
Errors and omissions excepted.
© 2014 by Speech Processing Solutions GmbH.
All rights reserved. No part of this document may be reproduced or transmitted in any form or by any means, electronic,
mechanical, photocopying, recording, or otherwise, without prior written permission of Company Name.
 Loading...