

Philips DE-SC463/00 User Manual [pt]
A
2
ENGLISH
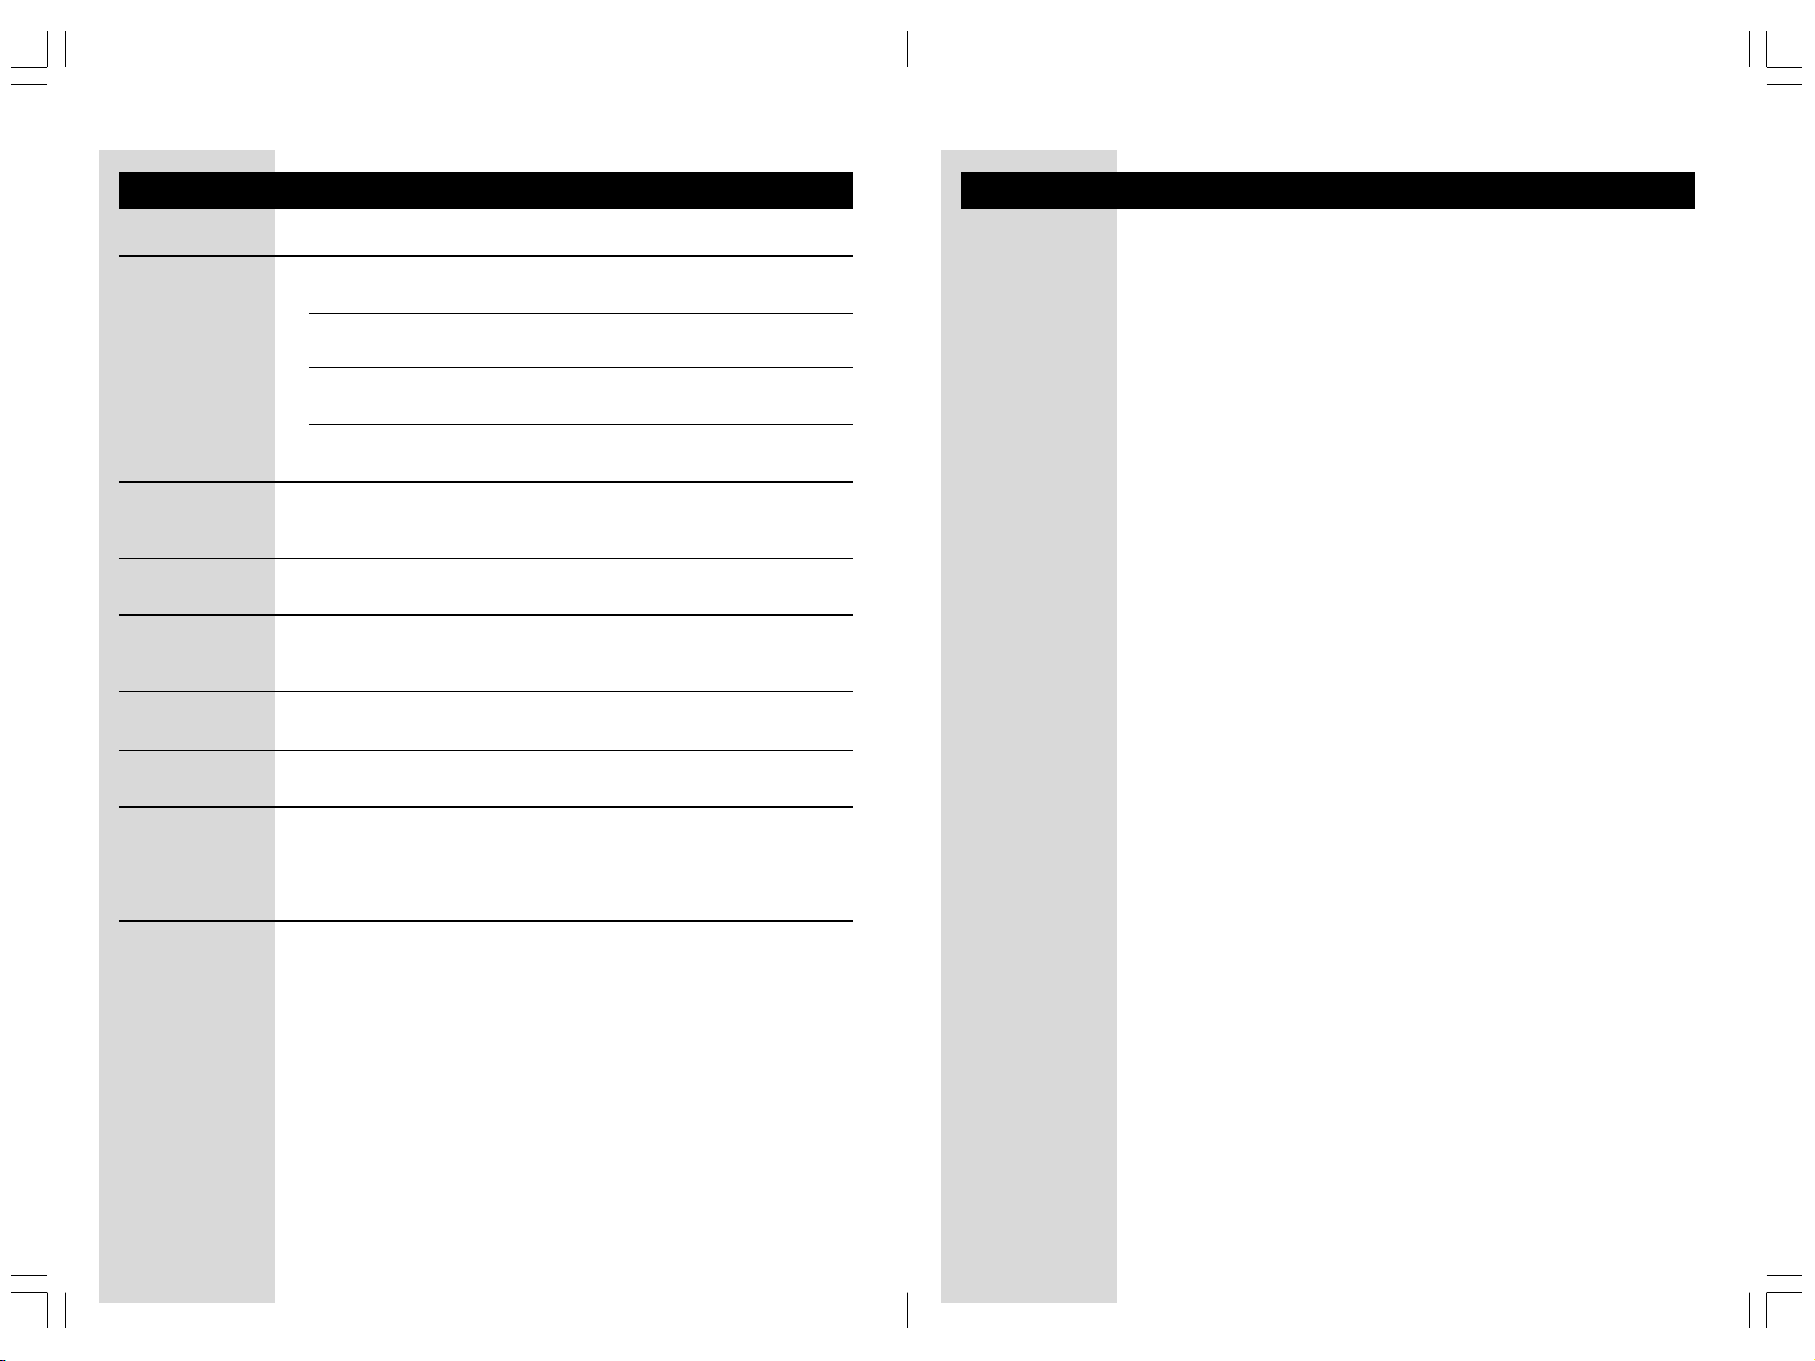
Your baby monitor
SBC SC463
B
10
11
2
POWER
3
4
5
3
-
+
S
Y
E
T
N
I
V
S
I
I
T
7
4
N
E
P
1
5
O
8
Product illustration on
inside flap:
6
Philips is dedicated to producing caring, reliable products that new moms
and dads really need. Products whose reliability and operating quality bring
reassurance. You can trust this Philips baby monitor to provide round-theclock support by ensuring you can always hear your baby clearly, no matter
where you are in the house.
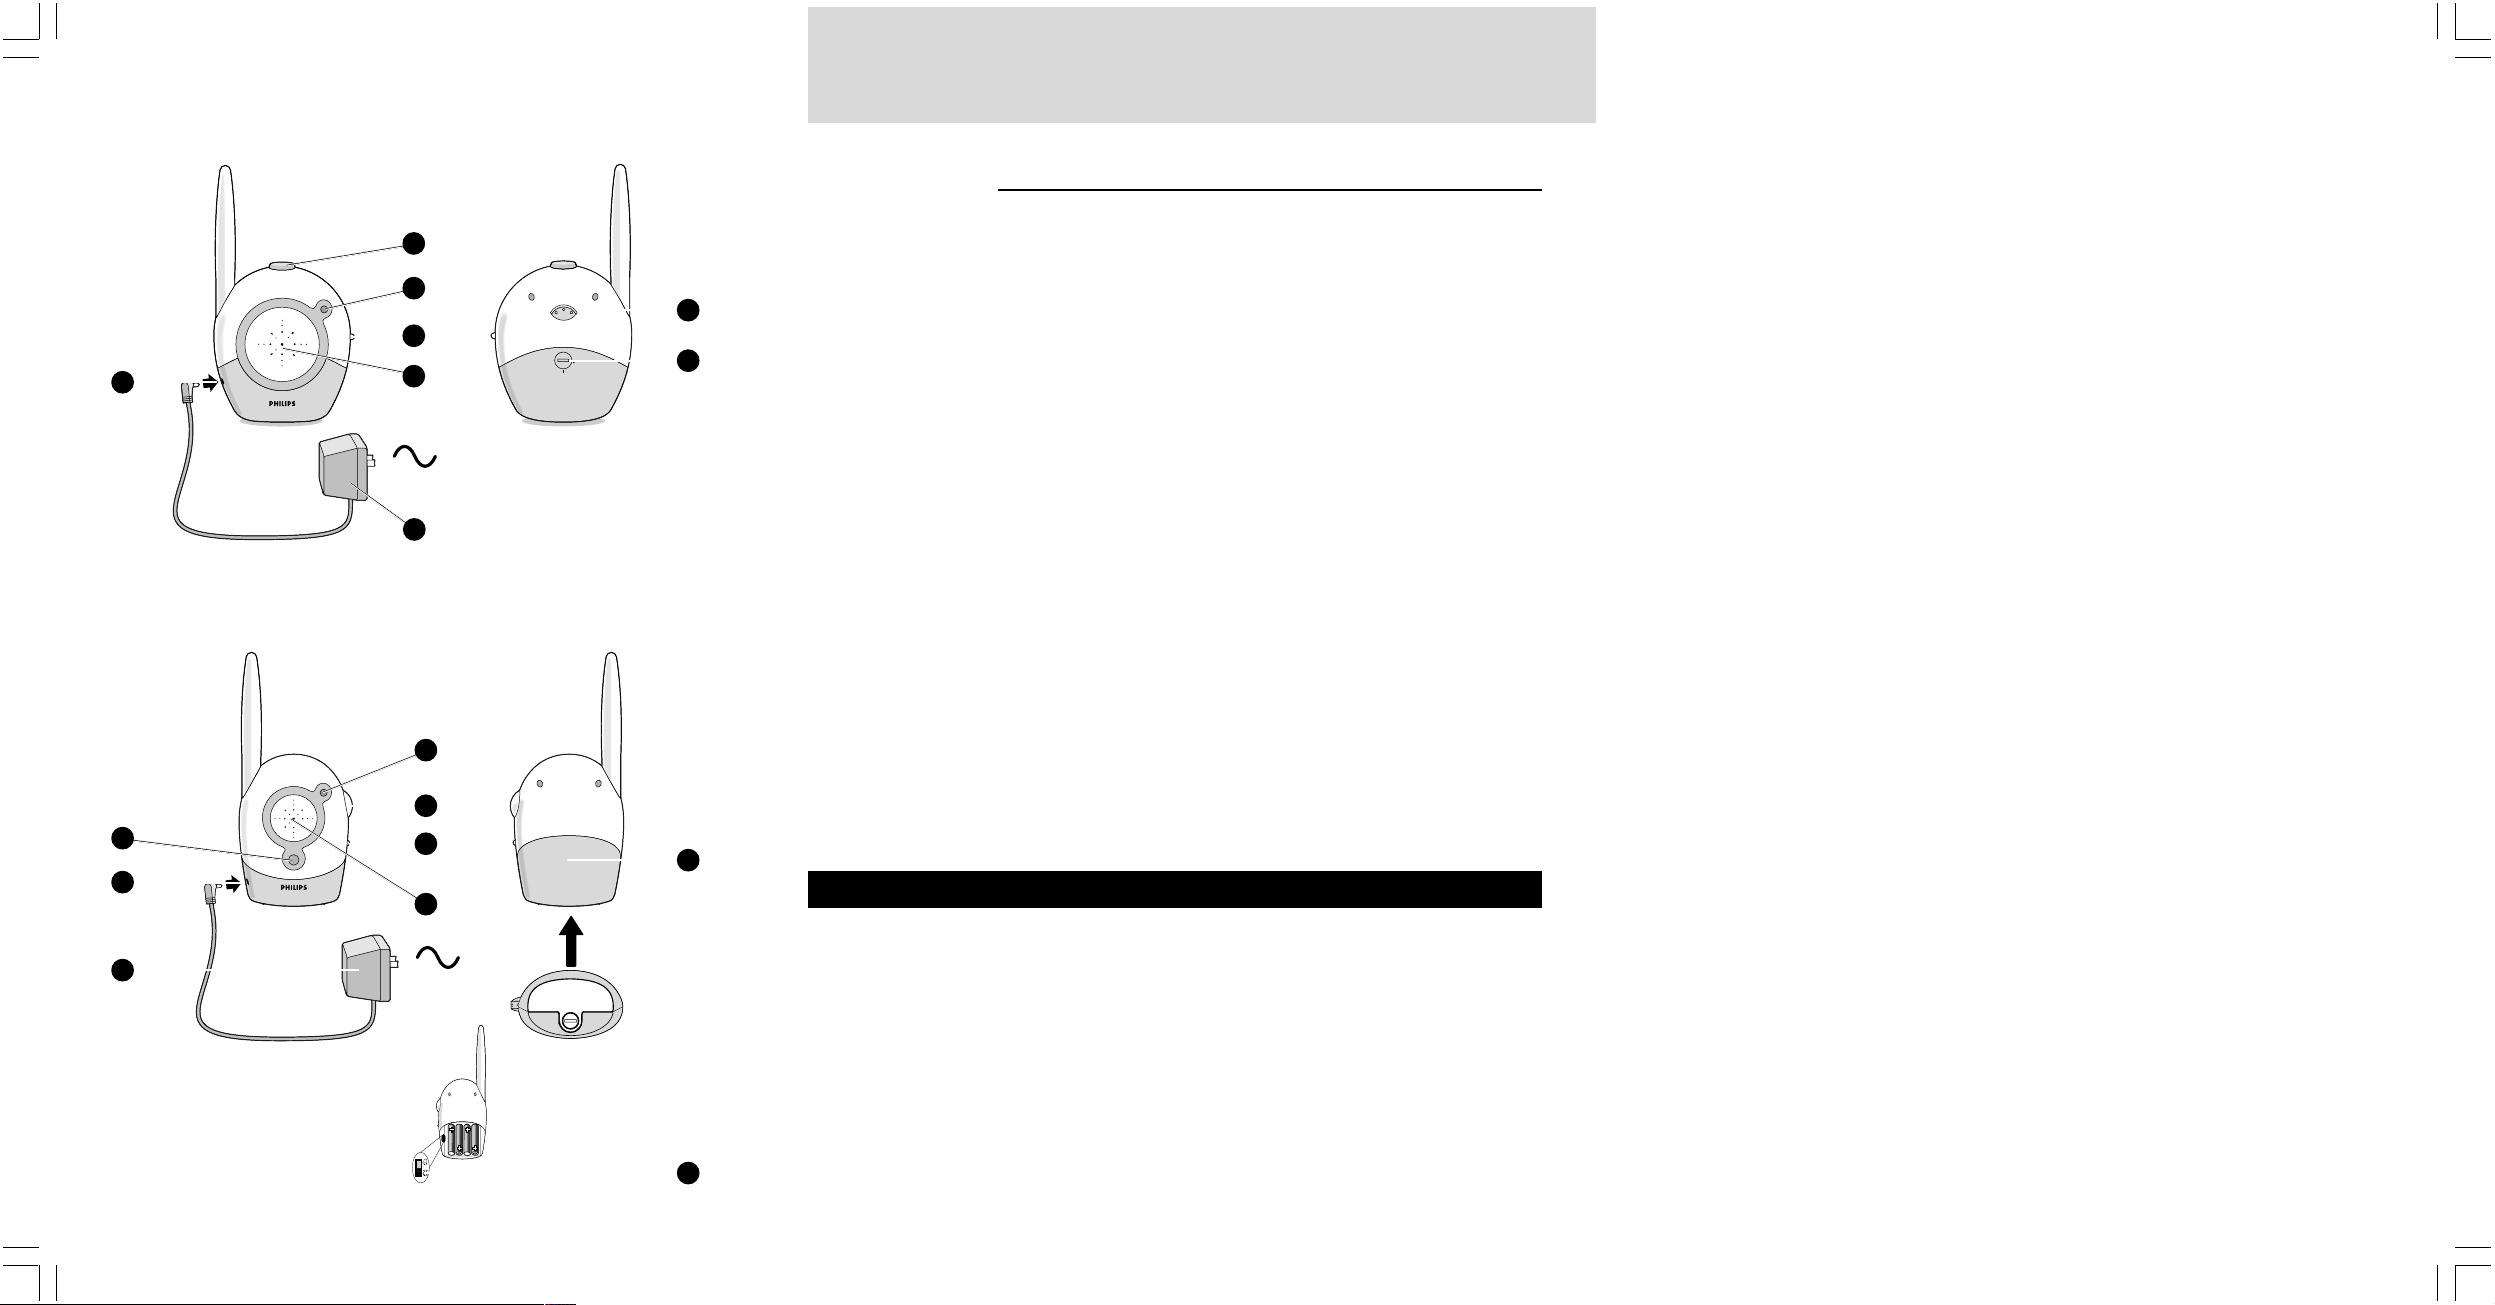
A
Baby unit
1
DC power supply socket
2
power button
3
power light
4
channel selection switch
5
microphone
6
AC power adapter
7
microphone sensitivity control
8
battery compartment cover
B
Parent unit
9
system check light
10
DC power supply socket
11
AC power adapter
12
power light
13
volume control - on/off switch
14
channel selection switch
15
loudspeaker
16
battery compartment cover
17
system check alarm switch
12
13
9
SYSTEM CHECK
14
16
Important information
15
Please read this guide carefully before using the baby monitor, and keep it
for future reference. This baby monitor is intended as an aid. It is not a
substitute for responsible and proper adult supervision and should not be
used as such.
•
Make sure the Baby unit and adapter cable are always out of reach of the
baby, at least one metre away.
•
Never place the Baby unit inside the baby’s bed or playpen!
•
Never cover the baby monitor (with a towel, blanket, etc.).
•
Clean the baby monitor with a damp cloth.
•
Never use the baby monitor near water.
IFU463Foldout.p65 17/01/2002, 19:312
17

2 32
ENGLISH
ENGLISH
Product illustration on
inside flap:
Your baby monitor
SBC SC463
Philips is dedicated to producing caring, reliable products that new moms
and dads really need. Products whose reliability and operating quality bring
reassurance. You can trust this Philips baby monitor to provide round-theclock support by ensuring you can always hear your baby clearly, no matter
where you are in the house.
A
Baby unit
1
DC power supply socket
2
power button
3
power light
4
channel selection switch
5
microphone
6
AC power adapter
7
microphone sensitivity control
8
battery compartment cover
B
Parent unit
9
system check light
10
DC power supply socket
11
AC power adapter
12
power light
13
volume control - on/off switch
14
channel selection switch
15
loudspeaker
16
battery compartment cover
17
system check alarm switch
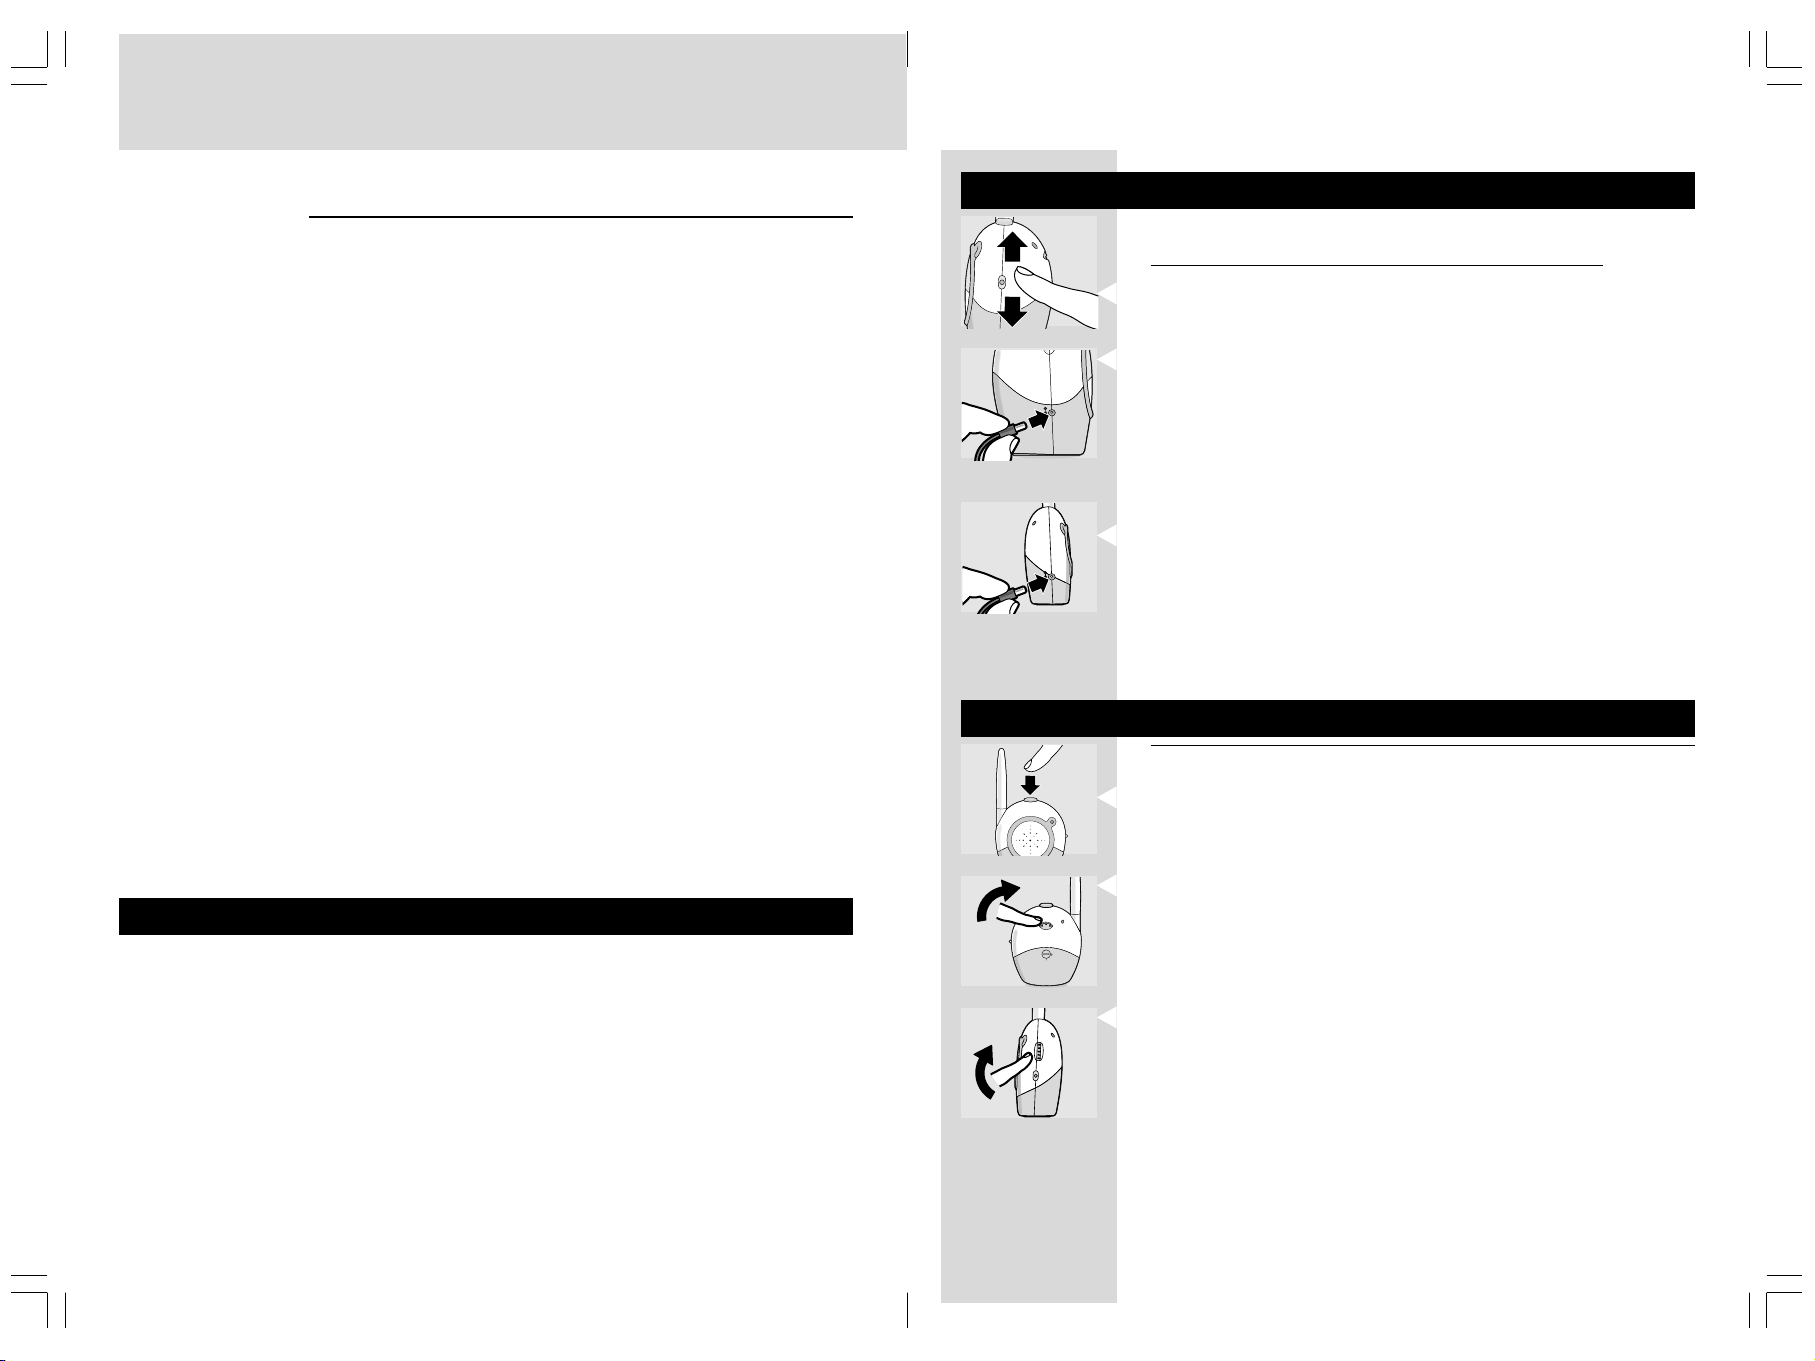
Getting your baby monitor ready
1
Position the Baby unit at least one metre away from your baby.
C
A
H
B
A
N
C
N
E
D
L
V
9
C
D
Never place the baby unit inside the baby’s bed or playpen.
2
Set channel selection switches to the same channel on both units.
3
Connect the power adapter to Baby unit socket.
4
Plug the power adapter into mains supply.
5
Move away from the Baby unit with the Parent unit.
If units are positioned too close to each other then a high-pitched noise
can be heard.
Connect the second power adapter to the Parent unit’s socket.
6
V
9
C
D
Plug the second power adapter into a mains supply.
7
Using your baby monitor
Listening to your baby
Important information
Please read this guide carefully before using the baby monitor, and keep it
for future reference. This baby monitor is intended as an aid. It is not a
substitute for responsible and proper adult supervision and should not be
used as such.
•
Make sure the Baby unit and adapter cable are always out of reach of the
baby, at least one metre away.
•
Never place the Baby unit inside the baby’s bed or playpen!
•
Never cover the baby monitor (with a towel, blanket, etc.).
•
Clean the baby monitor with a damp cloth.
•
Never use the baby monitor near water.
IFU463.p65 17/01/2002, 19:292-3
POWER
1
Push the power button on the Baby unit to turn it on.
> The power light lights (green).
2
Adjust the microphone sensitivity of the Baby unit to a level you prefer
4
5
3
-
+
S
Y
E
T
I
N
V
I
S
I
T
N
E
P
O
O
N
V
O
L
U
M
E
O
F
F
C
A
H
B
A
N
C
N
E
D
L
(using your own voice as a sound reference).
> The power light lights (yellow) when a sound is picked up.
3
Switch the Parent unit on and adjust the volume to level you prefer using
the VOLUME ON/OFF control.
The SYSTEM CHECK light lights continuously (green) when the Parent unit
and Baby unit are in touch with each other.

4 5
ENGLISHENGLISH
Features explanation
Avoiding interference
C
A
H
B
A
N
C
N
E
D
L
If there is interference or if sound reception is poor, switch both units to
another channel.
4
5
3
-
+
S
Y
E
T
I
N
V
I
S
I
T
N
E
P
O
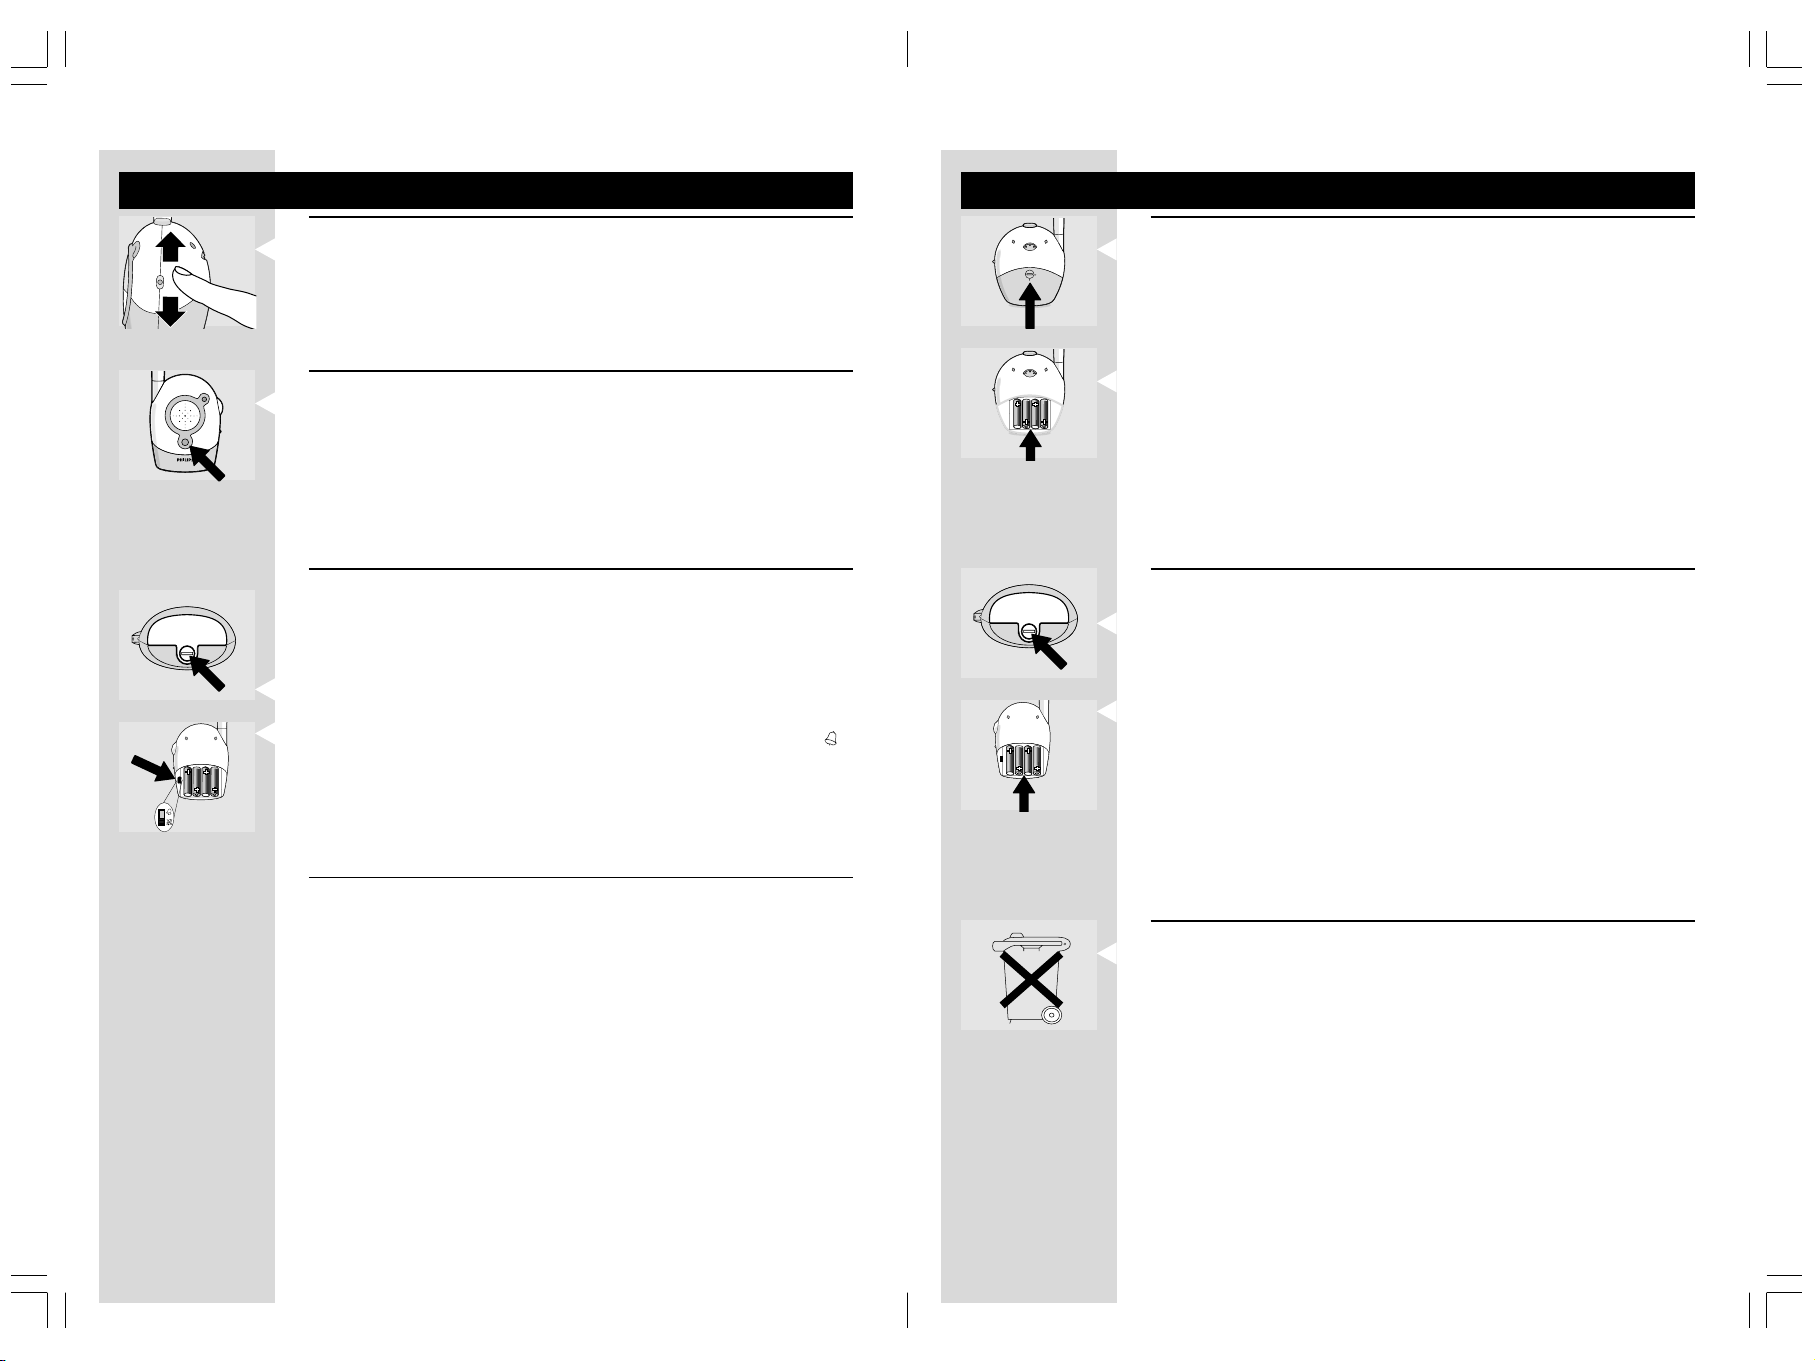
Using batteries
Operating the Baby unit cordlessly
Remove the battery compartment cover using a coin.
1
Always make sure that the channel selection switches on both units are set
to the same position.
Insert four 1.5V, LR6 (AA) batteries noting the + and - configuration
4
5
3
-
+
S
Y
E
T
I
N
V
I
S
I
Checking that the units are in touch
T
Check that the SYSTEM CHECK light on the Parent unit lights
continuously (green) to confirm that the connection between both units
SYSTEM CHECK
is reliable.
If the light flashes (red), move the Parent unit closer to the Baby unit.
The light flashes if the units are out of range for more than 30 seconds or
if there is interference.
Switching on the system check alarm
2
inside the battery compartment.
Batteries not included; we recommend non-chargeable Philips Alkaline
batteries.
Put the cover back in place and secure using a coin.
3
> If the power light flashes (red) install new batteries.
The unit operates for up to 30 hours on batteries.
Operating the Parent unit cordlessly
You can switch on the system check alarm on the Parent unit that beeps
when the units are not in touch. The Parent unit is delivered with the
Remove the battery compartment cover using a coin.
1
system check alarm switched off.
Open the Parent unit’s battery compartment cover.
1
Insert four 1.5V, LR6 (AA) batteries noting the + and - configuration
2
Set the switch inside compartment to the ON position (
2
).
inside the battery compartment.
Batteries not included; we recommend non-chargeable Philips Alkaline
Close battery compartment cover.
3
batteries.
The SYSTEM CHECK light can still flash even if the system check alarm is
switched off.
Put the cover back in place and secure using a coin.
3
> If the power light flashes (red) install new batteries.
The unit operates for up to 30 hours on batteries.
Range 250m in open air
The baby monitor has an operating range of up to 250 metres in ideal
open-air conditions. This means that the units can see each other with no
obstacles in between. Walls, ceilings, large objects and even glass affect the
operating range. The more obstacles there are in between, the shorter the
operating range.
Batteries
Dispose of used batteries in an environmentally friendly manner.
Do not mix old and new batteries, or different types of batteries.
Remove batteries if the baby monitor is not to be used for long periods.
IFU463.p65 17/01/2002, 19:294-5
6 7ENGLISHENGLISH
Problem
Power light does not
light.
High pitched noise.
No sound.
Power light flashing.
Interference or poor
reception.
Problem solving
Possible cause
Parent unit: unit is not turned on.
Power adapter is not plugged in or
batteries are exhausted.
Baby unit: unit is not turned on.
Power adapter is not plugged in or
batteries are exhausted.
Units are too close together.
Volume on parent unit is set too
low.
Batteries are low or empty.
Mobile or cordless phones too close
to the baby monitor.
Solution
Turn VOLUME ON/OFF control
downwards.
Plug in power adapter or replace
batteries.
Push power button.
Plug in power adapter or replace
batteries.
Move parent unit away from baby
unit. Turn VOLUME ON/OFF
control on parent unit upwards.
Turn VOLUME ON/OFF control
downwards.
Replace batteries or connect to
mains power.
Move phones away from the units.
Power supply:
Operating range:
Operating
temperature:
Pilot tone:
Transmission
frequencies:
Technical specifications
•
Optional batteries 4 x 1.5V; AA alkaline for Parent unit (not included);
•
Optional batteries 4 x 1.5V; AA alkaline for Baby unit (not included);
•
AC power adapter 230V AC, 50 Hz (two included): - Output voltage 9V
DC, 200mA.
•
Only use the AC power adapter included or a type that complies with
safety standard EN60950 and that has the following specification: input
230V AC, 50 Hz; output 9 Volt DC / 200mA.
•
up to 250 metres in ideal conditions (walls, floors, etc. can limit this
distance.)
10°C to 40°C
•
Continuous communication link (hidden signal helps reduce interference
•
and ensures a continuous link between both units so you only hear your
baby’s sounds).
SBC SC463/00: from 40.695 to 40.675 MHz
SBC SC463/05 (IRE, UK): from 49.830 to 40.890 MHz
SBC SC463/16 (ES): from 31.000 to 31.350 MHz
Pick-up from another
baby monitor.
System check light
flashing (red) /
System check alarm.
IFU463.p65 17/01/2002, 19:296-7
Both systems are operating on the
same frequency.
Units are out of range or there is
interference from another FM
source.
Switch channels.
Move units closer together to
restore the link. Remove the other
FM source.
8 98
FRANÇAIS
FRANÇAIS
Illustration produit sur
le rabat intérieur :
Votre babyphone
SBC SC463
Philips entend fabriquer des produits fiables et conviviaux répondant aux
vrais besoins des pères et des mères. Des produits dont les nombreuses
fonctions et la fiabilité inspirent confiance. Vous pouvez vous fier à ce
babyphone: heure après heure, fidèlement, il vous permet d’entendre
clairement bébé, où que vous soyez dans la maison.
A
Unité bébé
1
prise d’alimentation c.c.
2
bouton d’allumage
3
témoin d’allumage
4
sélecteur de canal
5
microphone
6
adaptateur c.a.
7
commande de la sensibilité du
microphone
8
couvercle du compartiment des
piles
B
Unité parents
9
témoin de vérification
système
10
prise d’alimentation c.c.
11
adaptateur c.a.
12
témoin d’allumage
13
commande du volume interrupteur on/off
14
sélecteur de canal
15
haut-parleur
16
couvercle du compartiment
des piles
17
interrupteur d’alarme de
vérification système
Comment préparer votre babyphone
1
Installez l’unité bébé à au moins un mètre de votre bébé.
C
A
H
B
A
N
C
N
E
D
L
V
9
C
D
Ne mettez jamais l’unité bébé dans le berceau, le lit ou le parc.
2
Réglez les sélecteurs de canaux des deux unités sur le même canal.
3
Raccordez l’adaptateur d’alimentation à la prise de l’unité bébé.
4
Enfichez ce même adaptateur dans la prise murale.
5
Ecartez l’unité parents de l’unité bébé.
Si les unités sont trop proches l’une de l’autre, on peut entendre un bruit
très aigu.
Raccordez le second adaptateur d’alimentation à la prise de l’unité
6
parents.
V
9
C
D
Enfichez ce second adaptateur dans la prise murale.
7
Comment utiliser votre babyphone
Pour écouter bébé
Information importante
Veuillez lire attentivement ce manuel avant d’utiliser le babyphone, et le
conserver pour toute consultation future. Ce babyphone n’est conçu que
comme une aide. Il ne peut en rien remplacer une surveillance responsable
et adulte et ne peut servir à cette fin.
•
Vérifiez si l’unité bébé et le câble de l’adaptateur sont toujours hors
portée de bébé, à au moins un mètre de lui.
•
Ne mettez jamais l’unité bébé dans le berceau, le lit ou le parc.
•
Ne la recouvrez jamais (d’une serviette, d’une couverture etc.).
•
Nettoyez-la à l’aide d’un chiffon humide.
•
N’utilisez jamais ce babyphone près d’une source d’eau.
IFU463.p65 17/01/2002, 19:298-9
POWER
1
Poussez sur le bouton d’alimentation de l’unité bébé pour l’allumer.
> Le témoin d’alimentation s’allume (en vert).
2
Réglez la sensibilité du microphone de l’unité bébé au niveau souhaité
4
5
3
-
+
S
Y
E
T
I
N
V
I
S
I
T
N
E
P
O
O
N
V
O
L
U
M
E
O
F
F
C
A
H
B
A
N
C
N
E
D
L
(en utilisant votre propre voix comme son de référence).
> Le témoin d’alimentation s’allume (en jaune) dès qu’un son est capté.
3
Allumez l’unité parents et réglez le volume au niveau souhaité en utilisant
la commande VOLUME ON/OFF.
Le témoin SYSTEM CHECK s’allume en continu (en vert) quand les deux
unités (parents et bébé) entrent en contact.
10 11
FRANÇAIS
FRANÇAIS
Explication des fonctions
Comment éviter les interférences
C
A
H
B
A
N
C
N
E
D
L
S’il y a des interférences ou si la réception sonore est mauvaise, réglez
les deux unités sur un autre canal.
Attention: il est impératif que les deux unités soient réglées sur le même
4
5
3
-
+
S
Y
E
T
I
N
V
I
S
I
T
N
E
P
O
Comment utiliser les piles
Faire fonctionner le babyphone sans fil
Enlevez le couvercle du compartiment des piles en utilisant une pièce de
1
monnaie.
canal.
Insérez quatre piles 1.5V LR6 (AA) en respectant les polarités + et - du
4
5
3
-
+
S
Y
E
T
I
N
V
I
S
I
Comment vérifier si les deux unités communiquent
T
Vérifiez si le témoin SYSTEM CHECK de l’unité parents s’allume en
continu (en vert) pour confirmer que la communication entre les deux
SYSTEM CHECK
unités est fiable.
Si le témoin clignote (en rouge), rapprochez l’unité parents de l’unité bébé.
Le témoin clignote si les unités sont hors portée pendant plus de 30
secondes ou s’il y a des interférences.
Comment activer l’alarme de vérification système
2
compartiment des piles.
Les piles ne sont pas livrées avec l’appareil. Nous recommandons des piles
Philips Alcaline non rechargeables.
3
Remettez le couvercle en place et verrouillez-le à l’aide d’une pièce de
monnaie.
> Si le témoin d’alimentation clignote (en rouge), installez de nouvelles
piles. L’unité fonctionne jusqu’à 30 heures sur piles.
Faire fonctionner l’unité parents sans fil
Vous pouvez activer l’alarme de vérification système de l’unité parents. Elle
émet un signal dès que les deux unités perdent la communication. L’unité
parents est livrée d’origine avec l’alarme de vérification système coupée.
Ouvrez le couvercle du compartiment des piles de l’unité parents.
1
Réglez l’interrupteur à l’intérieur du compartiment en position ON (
2
).
Enlevez le couvercle du compartiment des piles en utilisant une pièce de
1
monnaie.
2
Insérez quatre piles 1.5V LR6 (AA) en respectant les polarités + et - du
compartiment des piles.
Les piles ne sont pas livrées avec l’appareil. Nous recommandons des piles
Fermez le couvercle du compartiment des piles.
3
Le témoin SYSTEM CHECK peut encore clignoter même si l’alarme de
vérification système est coupée.
Philips Alcaline non rechargeables.
3
Remettez le couvercle en place et verrouillez-le à l’aide d’une pièce de
monnaie.
> Si le témoin d’alimentation clignote (en rouge), installez de nouvelles
piles. L’unité fonctionne jusqu’à 30 heures sur piles.
Portée jusqu’à 250 m en plein air
Le babyphone dispose d’une portée atteignant 250 mètres en plein air,
dans de bonnes conditions. Cela implique que les deux unités puissent se
«voir», sans rencontrer d’obstacle. Les murs, les plafonds, les grands objets
et même les vitres réduisent la portée de l’appareil. Plus il y a d’obstacles,
plus petite sera la portée.
Comment jeter les piles
Jetez les piles usées dans le respect des directives environnementales.
Ne mélangez pas vieilles et nouvelles piles ou différents types de piles.
Enlevez les piles si vous n’utilisez pas le moniteur bébé pendant une longue
période.
IFU463.p65 17/01/2002, 19:2910-11

FRANÇAIS
12 13FRANÇAIS
Problème
Le témoin
d’alimentation ne
s’allume pas.
Son très aigu.
Pas de son.
Le témoin
d’allumage clignote.
Interférences ou
mauvaise réception.
Résolution des problèmes
Cause possible
Unité parents:Unité parents:
Unité parents: l’unité n’est pas
Unité parents:Unité parents:
allumée.
L’adaptateur d’alimentation n’est pas
enfiché ou les piles sont usées.
Unité bébé:Unité bébé:
Unité bébé: l’unité n’est pas allumée.
Unité bébé:Unité bébé:
L’adaptateur d’alimentation n’est pas
enfiché ou les piles sont usées.
Les unités sont trop proches.
Le volume de l’unité parents est
réglé trop bas.
Piles faibles ou plates.
D’autres téléphones portables ou sans
fil trop proches du moniteur bébé.
Solution
Réduisez la commande VOLUME ON/
OFF.
Enfichez l’adaptateur d’alimentation
ou remplacez les piles.
Poussez sur le bouton d’alimentation.
Enfichez l’adaptateur d’alimentation
ou remplacez les piles.
Eloignez l’unité parents de l’unité
bébé. Augmentez la commande
VOLUME ON/OFF de l’unité parents.
Réduisez la commande
OFF.
Remplacez les piles ou raccordez à
une prise du réseau.
Eloignez les autres téléphones des
unités.
VOLUME ON/
Alimentation:
Portée utile:
Température de
service:
Pilot tone:
Fréquences de
transmission:
Caractéristiques techniques
Piles optionnelles 4 x 1.5V AA alcaline pour l’unité parents (non
•
comprises);
Piles optionnelles 4 x 1.5V AA alcaline pour l’unité bébé (non comprises);
•
Adaptateur c.a. 230V 50 Hz (deux compris) : - Tension de sortie 9V c.c.
•
200mA.
N’utilisez que les adaptateurs d’alimentation c.a. fournis ou des modèles
•
répondant à la norme de sécurité EN60950 affichant les caractéristiques
suivantes: entrée 230V c.a. 50 Hz; sortie 9 Volts c.c. 200mA.
Jusqu’à 250 mètres dans de bonnes conditions (les murs, planchers etc.
•
peuvent réduire la distance).
10°C à 40°C
•
Lien de communication continu (le signal caché aide à réduire les
•
interférences et garantit un lien continu entre les deux unités pour que
vous n’entendiez que les sons émis par bébé).
SBC SC463/00: de 40.695 à 40.675 MHz
SBC SC463/05 (IR, RU): de 49.830 à 40.890 MHz
SBC SC463/16 (ES): de 31.000 à 31.350 MHz
Capte un autre
babyphone.
Le témoin de
vérification système
clignote (rouge) /
Les deux systèmes opèrent sur la
même fréquence.
Les unités sont hors portée ou il y a
des interférences provenant d’une
autre source FM.
Alarme
IFU463.p65 17/01/2002, 19:2912-13
Commutez les canaux.
Rapprochez les unités pour restaurer
la communication. Supprimez l’autre
source FM.

14 1514
ESPAÑOL
ESPAÑOL
Ilustración del
producto sobre el lado
interior de la tapa:
Su monitor de Bebé
SBC SC463
Philips está dedicado a fabricar productos seguros para cuidado de bebés,
que realmente necesitan los nuevos mamás y papás. Productos cuya
confianza y calidad operativa proporcionan confianza. Usted puede confiar
en este Monitor de Bebé de Philips que proporciona ayuda permanente
asegurando que siempre puede oír claramente a su bebé, sin importar
dónde se encuentra en la casa.
A
Unidad de Bebé
1
conector para alimentación de
corriente continua
2
interruptor de alimentación
3
luz testigo de alimentación
4
selector de canal
5
micrófono
6
adaptador de alimentación de
corriente alterna
7
mando de sensibilidad del
micrófono
8
tapa del compartimiento de pilas
B
Unidad de Padres
9
luz testigo de verificación del
sistema
10
conector para alimentación de
corriente continua
11
adaptador de alimentación de
corriente alterna
12
luz testigo de alimentación
13
mando de volumen – interruptor
de encendido/apagado
14
selector de canal
15
altavoz
16
tapa del compartimiento de pilas
17
interruptor de alarma de
verificación del sistema
Preparar el Monitor de Bebé para el uso
1
Colocar la unidad de Bebé por lo menos a una distancia de 1 metro de
C
A
H
B
A
N
C
N
E
D
L
su bebé.
Nunca colocar la unidad de Bebé dentro de la cuna o corralito.
2
Fijar los selectores de canal en ambas unidades al mismo canal.
3
Empalmar el adaptador de alimentación en el conector de la unidad de
Bebé.
4
V
9
C
D
Enchufar el adaptador de alimentación en la toma de red.
5
Mover la unidad de Bebé lejos de la unidad de Padres.
Si las unidades están demasiado cerca una de otra entonces puede oírse
un sonido de tono alto.
6
Empalmar el segundo adaptador de alimentación en el conector de la
unidad de Padres.
V
9
C
D
Enchufar el segundo adaptador de alimentación en una toma de red.
7
Usar su Monitor de Bebé
Escuchar los sonidos de su bebé
Información importante
Sírvanse leer esta guía detenidamente antes de utilizar el Monitor de Bebé
por primera vez, y guardarla para su referencia en el futuro. Este Monitor
de Bebé es pensado como una ayuda. No es un substituto para la
supervisión adulta responsable y adecuada, y no debe ser utilizado como
tal.
•
Siempre mantener la Unidad de Bebé y el cable del adaptador fuera del
alcance de bebé, por lo menos a una distancia de 1 metro.
•
¡ Nunca colocar la Unidad de Bebé dentro de la cuna o corralito !
•
Nunca cubrir el Monitor de Bebé (con una toalla, manta, etcétera).
•
Limpiar el Monitor de Bebé con un paño húmedo.
•
Nunca utilizar el Monitor de Bebé cerca de agua.
IFU463.p65 17/01/2002, 19:2914-15
POWER
1
Pulsar el interruptor de alimentación sobre la unidad de Bebé para
encenderla.
> La luz testigo de alimentación se enciende (verde).
2
Ajustar la sensibilidad del micrófono de la unidad de Bebé al nivel
4
5
3
-
+
S
Y
E
T
I
N
V
I
S
I
T
N
E
P
O
O
N
V
O
L
U
M
E
O
F
F
C
A
H
B
A
N
C
N
E
D
L
preferido (utilizando su propia voz como un sonido de referencia).
> La luz testigo de alimentación se enciende (amarillo) cuando es
detectado un sonido.
3
Conectar la unidad de Padres y ajustar el volumen al nivel preferido
utilizando el mando de VOLUME ON/OFF.
La luz testigo de VERIFICACIÓN DEL SISTEMA lucirá continuamente
(verde) cuando la unidad de Padres y la unidad de Bebé están en contacto
entre sí.

16 17
ESPAÑOL
ESPAÑOL
Explicación de dispositivos
Evitar interferencia
C
A
H
B
A
N
C
N
E
D
L
Si hay interferencia o la recepción del sonido es mala, conmutar ambas
unidades a otro canal.
4
5
3
-
+
S
Y
E
T
I
N
V
I
S
I
T
N
E
P
O
Usar pilas
Hacer funcionar la unidad de Bebé sin cordón
Retirar la tapa del compartimiento de pilas usando una moneda.
1
Cerciorarse siempre de que los selectores de canal en ambas unidades
sean fijados a la misma posición.
Insertar cuatro pilas de 1,5V, tipo LR6 (AA) teniendo en cuenta la
4
5
3
-
+
S
Y
E
T
I
N
V
I
S
I
Comprobar que las unidades estén en contacto entre sí
T
Comprobar que la luz testigo de VERIFICACIÓN DEL SISTEMA sobre la
unidad de Padres luce continuamente (verde) confirmando que la
SYSTEM CHECK
conexión es segura entre ambas unidades.
Si la luz testigo parpadea (rojo), mover la unidad de Padres más cerca hacia
la unidad de Bebé. La luz testigo parpadea si las unidades están fuera del
alcance durante más de 30 segundos o si hay interferencia.
Conectar la alarma de verificación del sistema
2
indicación de configuración de + y – dentro del compartimiento de pilas.
Pilas no están incluidas; recomendamos las pilas de Alcalina no recargables
de Philips.
Trabar la tapa de nuevo en su lugar y fijarla con una moneda.
3
> Si la luz testigo de alimentación se enciende intermitente (roja) instalar
nuevas pilas. La unidad funciona hasta 30 horas con las pilas.
Hacer funcionar la unidad de Padres sin cordón
Se puede encender la alarma de verificación del sistema sobre la unidad de
Padres para que pite cuando las unidades ya no están en contacto entre sí.
Retirar la tapa del compartimiento de pilas usando una moneda.
1
La unidad de Padres se entrega con el sistema de alarma desconectado.
Abrir la tapa del compartimiento de pilas de la unidad de Padres.
1
Insertar cuatro pilas de 1,5V, tipo LR6 (AA) teniendo en cuenta la
2
Fijar el interruptor dentro del compartimiento a la posición de
2
conectado “ON” (
).
indicación de configuración de + y – dentro del compartimiento de pilas.
Pilas no están incluidas; recomendamos las pilas de Alcalina no recargables
de Philips.
Cerrar la tapa del compartimiento de pilas.
3
La luz testigo de VERIFICACIÓN DEL SISTEMA puede todavía lucir
intermitente si el sistema de verificación está desconectado.
Trabar la tapa de nuevo en su lugar y fijarla con una moneda.
3
> Si la luz testigo de alimentación se enciende intermitente (roja) instalar
nuevas pilas. La unidad funciona hasta 30 horas con las pilas.
Alcance de 250m al aire libre
El Monitor de Bebé tiene un alcance de operación de hasta 250 metros en
condiciones ideales al aire libre. Esto significa que las unidades pueden
verse una a otra sin obstáculos entre medias. Paredes, techos, objetos
grandes y aún cristal afectan el alcance de operación. Cuantos más
obstáculos haya entre medias, más corto es el alcance operativo.
IFU463.p65 17/01/2002, 19:2916-17
Desechar las pilas
Desechar pilas usadas de manera respetuosa con el medio ambiente.
No mezclar pilas antiguas con nuevas, o diferentes tipos de pilas.
Retirar las pilas si el Monitor de Bebé no va a ser usado durante periodos
largos.
18 19ESPAÑOL
ESPAÑOL
Problema
La luz testigo de
alimentación no está
encendido.
Sonido de tono alto.
No hay sonido.
La luz testigo de
alimentación se enciende
intermitente.
Interferencia o mala
recepción.
Recepción de señales de
otro Monitor de Bebé.
Resolver problemas
Causa posible
Unidad de PUnidad de P
Unidad de P
Unidad de PUnidad de P
encendida.
El adaptador de alimentación no es enchufado
o las pilas están agotadas.
Unidad de Bebé:Unidad de Bebé:
Unidad de Bebé: la unidad no está encendida.
Unidad de Bebé:Unidad de Bebé:
El adaptador de alimentación no es enchufado
o las pilas están agotadas.
Las unidades se encuentran demasiado cerca
una de otra.
Volumen de la unidad de Padres es fijado
demasiado bajo.
Pilas están descargadas o vacías.
Teléfonos móviles o sin cordón están
demasiado cerca del Monitor de Bebé.
Ambos sistemas están funcionando con la
misma frecuencia.
adres:adres:
adres: la unidad no está
adres:adres:
Solución
Girar el mando de VOLUME - ON/OFF hacia abajo.
Enchufar el adaptador de alimentación o
sustituir las pilas.
Pulsar el interruptor de alimentación para
encenderla.
Enchufar el adaptador de alimentación o
sustituir las pilas.
Mover unidad de Padres lejos de la unidad de
Bebé. Girar el mando de
la unidad de Padres hacia arriba.
Girar el mando de VOLUME - ON/OFF sobre la
unidad de Padres hacia abajo.
Sustituir las pilas o conectar a la alimentación
de red.
Mover los teléfonos lejos de las unidades.
Conmutar canales.
VOLUME - ON/OFF sobre
Fuente de
alimentación de red:
Alcance de
operación:
Temperatura de
operación:
Tono Piloto:
Frecuencias de
transmisión:
Especificaciones técnicas
Pilas opcionales 4 x 1,5V; tipo AA de alcalina para unidad de Padres (no
•
incluidas);
•
Pilas opcionales 4 x 1,5V; tipo AA de alcalina para unidad de Bebé (no
incluidas);
Adaptador de alimentación de corriente alterna 230V de CA, 50Hz (dos
•
incluidos): Voltaje de salida 9V de CC, 200mA.
Solamente usar el adaptador de alimentación de corriente alterna incluido
•
o un tipo que cumple la norma de seguridad EN60950 y que tiene la
siguiente especificación: entrada 230V CA, 50Hz; salida 9 V CC /200mA.
hasta 250 metros bajo condiciones ideales (paredes, pisos, etcétera pueden
•
limitar esta distancia.)
10°C hasta 40°C
•
Enlace de comunicación continuo (señal oculta ayuda a reducir
•
interferencia y asegura un enlace continuo entre ambas unidades de forma
que solamente se puede oír los sonidos de su bebé).
SBC SC463/00: desde 40,695 hasta 40,675 MHz
SBC SC463/05 (Irlanda, Reino Unido): desde 49,830 hasta 40,890 MHz
SBC SC463/16 (España): desde 31,000 hasta 31,350 MHz
La luz testigo de
verificación del sistema se
enciende intermitente
(roja) / alarma de
verificación del sistema.
IFU463.p65 17/01/2002, 19:2918-19
Unidades están fuera del alcance o hay
interferencia de otra fuente de FM.
Mover las unidades más cerca una de otra para
restablecer el enlace. Quitar la otra fuente de
FM.

20 2120
DEUTSCH
DEUTSCH
Produktillustration auf
der Innenseite:
Ihr Babyphon
SBC SC463
Philips hat sich der Herstellung zuverlässiger Produkte gewidmet, die frisch
gebackene Mütter oder Väter gute Dienste leisten. Produkte, deren
Zuverlässigkeit und Qualität eine Beruhigung darstellen. Sie können darauf
vertrauen, dass dieses Philips Babyphon eine vierundzwanzigstündige
Unterstützung darstellt, da stets sichergestellt ist, dass Sie Ihr Baby hören
können, egal wo im Haus Sie sich befinden.
A
Babygerät
1
Netzteilanschluss
2
Netzschalter
3
Bereitschaftsleuchte
4
Kanalwahlschalter
5
Mikrofon
6
Netzteil
7
Empfindlichkeitseinstellung für
das Mikrofon
8
Batteriefachdeckel
B
Elterngerät
9
Systemkontrollleuchte
10
Netzteilanschluss
11
Netzteil
12
Bereitschaftsleuchte
13
Lautstärkeregelung – Ein-/
Aus-Schalter
14
Kanalwahlschalter
15
Lautsprecher
16
Batteriefachdeckel
17
Alarmschalter
Systemkontrolle
Inbetriebnahme Ihres Babyphons
1
Stellen Sie das Babygerät mindestens einen Meter von Ihrem Baby
C
A
H
B
A
N
C
N
E
D
L
entfernt auf.
Stellen Sie das Babygerät nie in das Babybett oder den Laufstall.
2
Stellen Sie die Kanalwahlschalter an beiden Geräten auf denselben Kanal
ein.
3
Schließen Sie das Netzteil an den Anschluss am Babygerät an.
Stecken Sie den Netzteilstecker in eine Steckdose.
V
9
C
D
4
Entfernen Sie sich mit dem Elterngerät vom Babygerät.
5
Wenn die Einheiten zu nahe beieinander aufgestellt werden, kann ein
hoher Pfeifton entstehen.
Schließen Sie das zweite Netzteil an den Anschluss des Elterngeräts an.
6
V
9
C
D
Stecken Sie auch den zweiten Netzteilstecker in die Steckdose.
7
Gebrauch Ihres Babyphons
Überwachung Ihres Babys
Wichtige Informationen
Bitte lesen Sie diese Anleitung vor Verwendung des Babyphons sorgfältig
durch und bewahren es als Referenz auf. Dieses Babyphon ist nur als
Hilfsmittel gedacht. Es ist kein Ersatz für eine verantwortungsbewusste und
korrekte Aufsicht der Eltern und sollte daher auch nicht als solches
eingesetzt werden.
•
Das Anschlusskabel des Netzteils niemals in der Reichweite des Babys
legen, mindestens 1 Meter davon entfernt.
•
Stellen Sie das Babygerät niemals in das Babybett oder den Laufstall!
•
Decken Sie das Babygerät nie ab (mit einem Handtuch, Laken, usw.)
•
Reinigen Sie das Babyphon mit einem feuchten Tuch
•
Verwenden Sie das Babyphon niemals in der Nähe von Wasser
IFU463.p65 17/01/2002, 19:2920-21
POWER
1
Betätigen Sie den Netzschalter am Babygerät, um es einzuschalten.
> Die Bereitschaftsleuchte leuchtet (grün).
2
Stellen Sie die Mikrofonempfindlichkeit am Babygerät auff ein
4
5
3
-
+
S
Y
E
T
I
N
V
I
S
I
T
N
E
P
O
gewünschtes Niveau ein (nehmen Sie Ihre eigene Stimme als
Lautstärkereferenz).
> Die Bereitschaftsleuchte leuchtet (gelb), wenn ein Geräusch registriert
wird.
3
O
N
V
O
L
U
M
E
O
F
F
C
A
H
B
A
N
C
N
E
D
L
Schalten Sie das Elterngerät ein und stellen die Lautstärke mit Hilfe des
Lautstärkereglers auf das gewünschte Niveau ein.
Die Leuchte für die Systemkontrolle (SYSTEM CHECK) leuchtet
kontinuierlich (grün), wenn zwischen Elterngerät und Babygerät Empfang
möglich ist.

22 23
DEUTSCH DEUTSCH
Erklärung der Funktionen
Vermeiden von Störungen
C
A
H
B
A
N
C
N
E
D
L
Wenn Störungen vorhanden sind oder der Empfang schlecht ist, schalten
Sie beide Geräte auf einen anderen Kanal.
4
5
3
-
+
S
Y
E
T
I
N
V
I
S
I
T
N
E
P
O
Verwendung von Batterien
Batteriebetrieb des Babygeräts
Entfernen Sie den Batteriefachdeckel mit einer Münze.
1
Stellen Sie stets sicher, dass die Kanalwahlschalter an beiden Geräten in
derselben Stellung stehen.
Legen Sie vier 1,5V, LR6 (AA) Batterien unter Beachtung der korrekten
4
5
3
-
+
S
Y
E
T
I
N
V
I
S
I
Überprüfung der Verbindung zwischen den Geräten
T
Prüfen Sie, ob die Systemkontrollleuchte (SYSTEM CHECK) am
Elterngerät kontinuierlich leuchtet (grün), um sicherzustellen dass der
SYSTEM CHECK
Empfang zwischen den beiden Geräten zuverlässig gewährleistet ist.
Wenn das Licht blinkt (rot), das Elterngerät näher an das Babygerät
heranbringen. Die Leuchte blinkt, wenn die Geräte länger als 30 Sekunden
keine Verbindung herstellen können oder es Störungen gibt.
Einschalten des Systemkontrollalarms
2
Polung (+ und -) in das Batteriefach.
Batterie werden nicht mitgeliefert; wir empfehlen nicht aufladbare Philips
Alkali-Batterien.
Legen Sie den Deckel wieder auf und schließen in mit einer Münze.
3
> Wenn die Bereitschaftsleuchte blinkt (rot), neue Batterien einlegen.
Das Gerät kann bis zu 30 Stunden auf Batterien betrieben werden.
Batteriebetrieb des Elterngeräts
Sie können den Kontrollalarm am Elterngerät einschalten, so dass ein
Piepen ertönt, wenn die Geräte keine Verbindung haben. Das Elterngerät
Entfernen Sie den Batteriefachdeckel mit einer Münze.
1
wird mit ausgeschaltetem Alarm ausgeliefert.
Öffnen Sie den Batteriefachdeckel des Elterngeräts.
1
Legen Sie vier 1,5V, LR6 (AA) Batterien unter Beachtung der korrekten
2
Stellen Sie den Schalter in dem Fach auf die Stellung ON (
2
).
Polung (+ und -) in das Batteriefach.
Batterie werden nicht mitgeliefert; wir empfehlen nicht aufladbare Philips
Schließen Sie den Batteriefachdeckel.
3
Alkali-Batterien.
Die Systemkontrollleuchte blinkt auch bei ausgeschaltetem Alarm.
Legen Sie den Deckel wieder auf und schließen in mit einer Münze.
3
> Wenn die Bereitschaftsleuchte blinkt (rot), neue Batterien einlegen.
Das Gerät kann bis zu 30 Stunden auf Batterien betrieben werden.
250 m Reichweite im Freien
Das Babyphon verfügt im Freien unter idealen Bedingungen über eine
Reichweite von bis zu 250 Metern. Das bedeutet, dass sich keine
Hindernisse zwischen den Geräten befinden dürfen. Wände, Decken, große
Objekte und sogar Glas beeinträchtigen die Reichweite. Je mehr
Hindernisse sich zwischen den Geräten befinden, desto geringer wird die
Reichweite.
Entsorgung der Batterien
Entsorgen Sie die Batterien auf umweltfreundliche Weise.
Verwenden Sie keine alten und neuen Batterien oder unterschiedliche
Batterietypen gleichzeitig. Entfernen Sie die Batterien, wenn das Babyphon
längere Zeit nicht verwendet wird.
IFU463.p65 17/01/2002, 19:2922-23
 Loading...