

Page 1
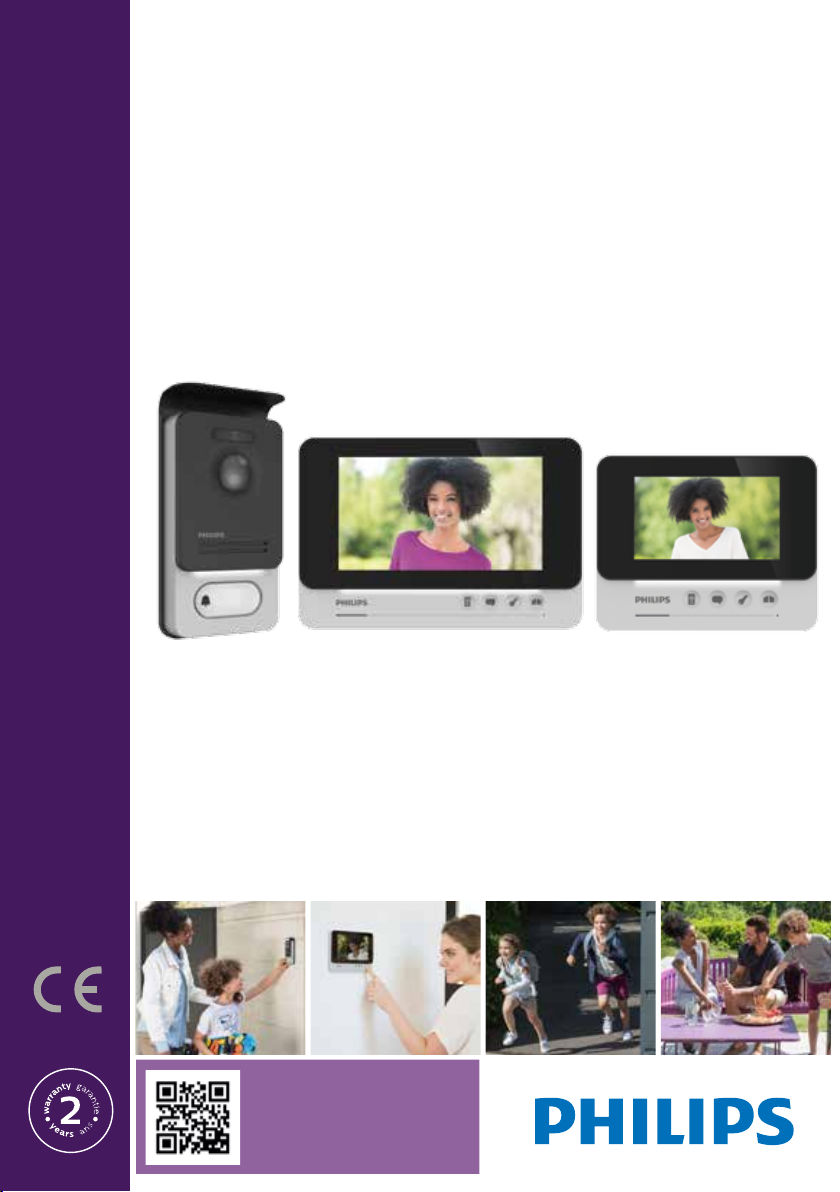
WelcomeEye Comfort
DES9500VDP - 531000
WelcomeEye Compact
DES9300VDP - 531004
Guide d’installation rapide / Quick installation guide
08/2017
FR. Notice téléchargeable sur philips.com
IT- Il manuale è disponibile anche su www.philips.com.
ES - Manual que puede descargar en philips.com
PT - Manual de instruções disponível no site philips.com
GB - Downloadable instructions at phillips.com
NL - De handleiding kan gedownload worden op philips.com
D - Anleitung kann auf philips.com heruntergeladen werden
PL - Instrukcja do pobrania na philips.com
Scan me
to nd out about our products
Flashez-moi
pour découvrir nos produits
Page 2
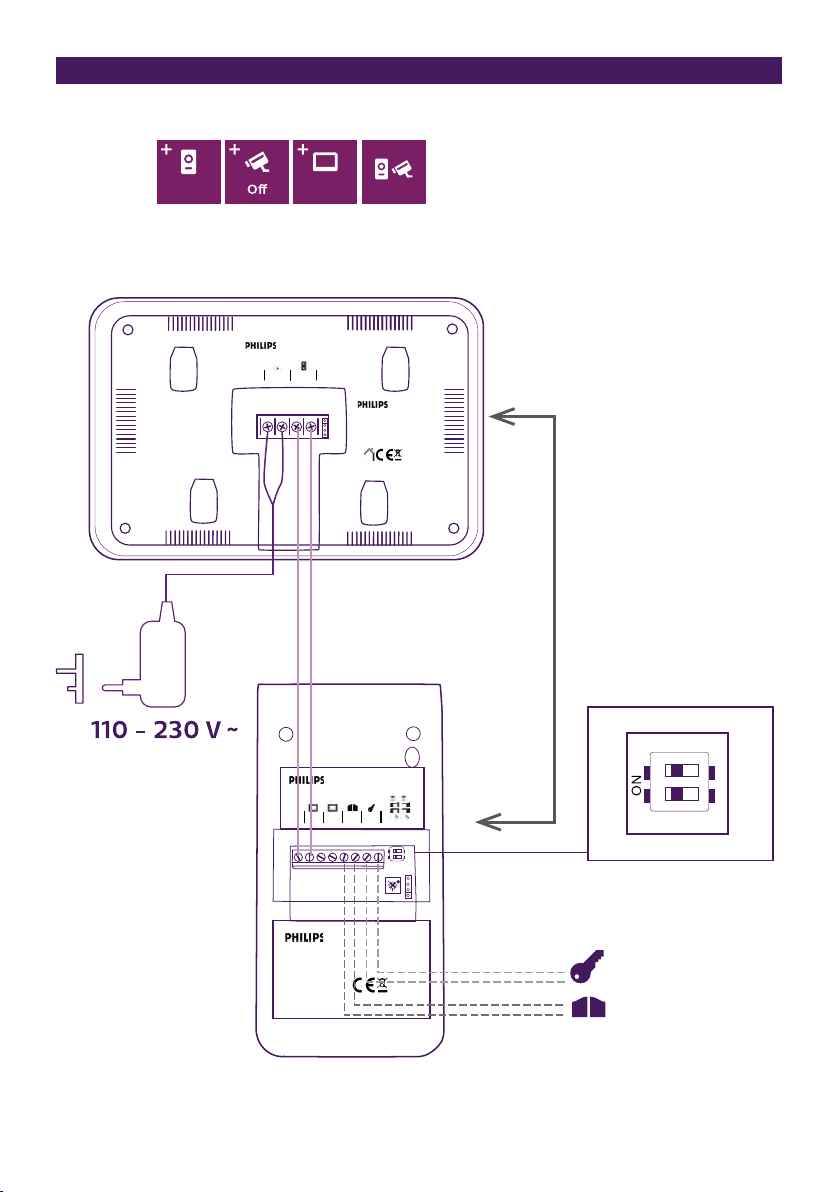
Fig. 1
Of On (Master) On
+
-
OO O
DES 9900 VDP
2/4
1/3
CFI Extel
ZI de Fétan, 01600 Trévoux
FRANCE
Z
Z
Z
Z
Z
Z
Made in P.R.C
120 m max
1
1 2
3 4 5
2
1
CFI Extel
ZI de Fétan, 01600 Trévoux
FRANCE
IP44
2
WelcomeEye Comfort / Compact / 08/17
2
2
1
8
7
6
Made in P.R.C
2
1
Page 3
Fig. 2
120 m max
1
2
CFI Extel
ZI de Fétan, 01600 Trévoux
FRANCE
IP44
1
2
CFI Extel
ZI de Fétan, 01600 Trévoux
FRANCE
IP44
Made in P.R.C
1
1 2
2
3
4
5
6
7
8
1
1
2
2
Made in P.R.C
1
1 2
2
3
4
5
6
7
8
1
1
2
2
Of On (Master) On
+
-
DES 9900 VDP
1/3
On (Master)OnOn
2/4
CFI Extel
ZI de Fétan, 01600 Trévoux
FRANCE
Made in P.R.C
Z
Z
Z
Z
Z
Z
Of On (Master) On
+
-
DES 9900 VDP
1/3
On (Slave)OnOn
2/4
CFI Extel
ZI de Fétan, 01600 Trévoux
FRANCE
Made in P.R.C
Of On (Master) On
+
-
DES 9900 VDP
1/3
On (Slave)OnOn
2/4
CFI Extel
ZI de Fétan, 01600 Trévoux
FRANCE
Made in P.R.C
WelcomeEye Comfort / Compact / 08/17
1
Z
Z
Z
Z
Z
Z
Z
Z
Z
Z
Z
Z
3
Page 4
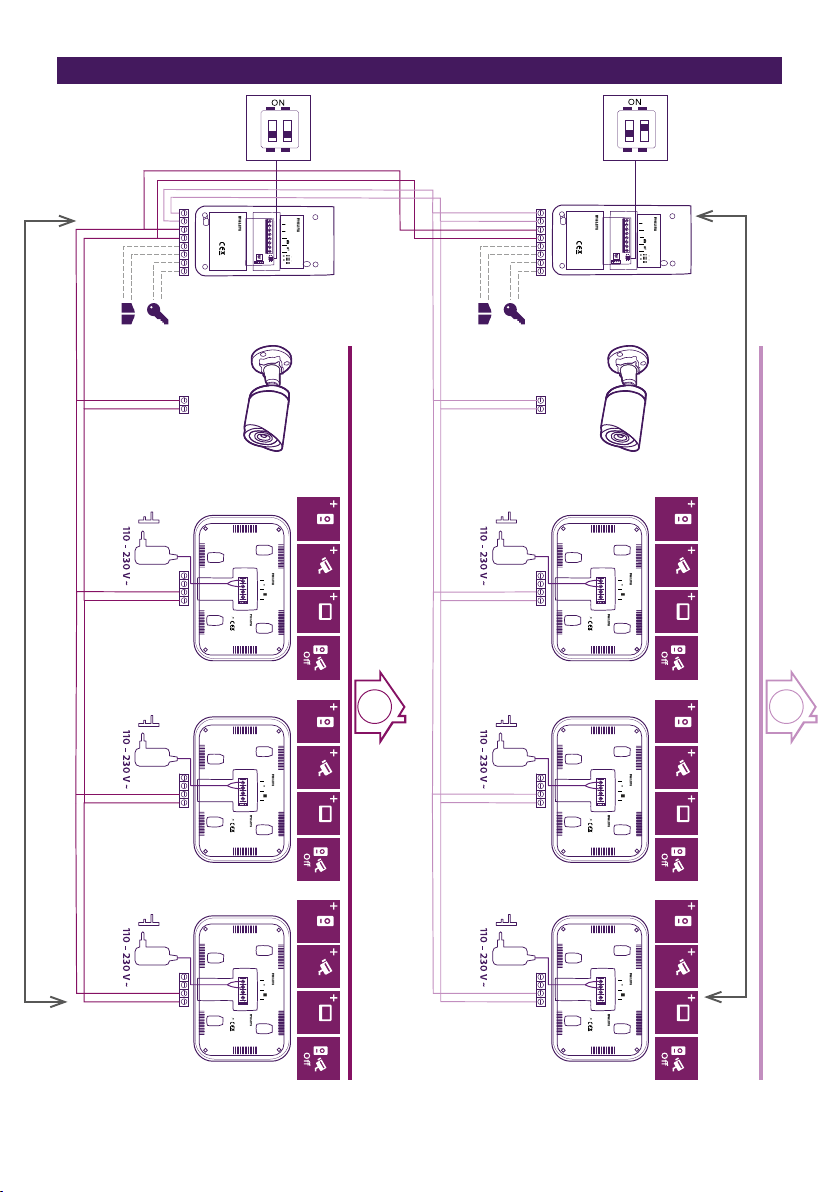
Fig. 3
1
2
CFI Extel
ZI de Fétan, 01600 Trévoux
FRANCE
1
IP44
Made in P.R.C
1 2
2
3
4
5
6
7
8
1
1
2
2
1
2
CFI Extel
ZI de Fétan, 01600 Trévoux
FRANCE
1
IP44
Made in P.R.C
1 2
2
3
4
5
6
7
8
1
1
2
2
120 m max
Of On (Master) On
Of On (Master) On
120 m max
+
-
DES 9900 VDP
1/3
On (Master)OnOn
2/4
CFI Extel
ZI de Fétan, 01600 Trévoux
FRANCE
Made in P.R.C
Z
Z
Z
Z
Z
Z
2
Of On (Master) On
+
-
DES 9900 VDP
1/3
On (Slave)OnOn
2/4
CFI Extel
ZI de Fétan, 01600 Trévoux
FRANCE
Made in P.R.C
Z
Z
Z
Z
Z
Z
Of On (Master) On
+
-
DES 9900 VDP
1/3
On (Slave)OnOn
2/4
CFI Extel
ZI de Fétan, 01600 Trévoux
FRANCE
Made in P.R.C
Z
Z
Z
Z
Z
Z
+
-
DES 9900 VDP
1/3
On (Master)OnOn
2/4
CFI Extel
ZI de Fétan, 01600 Trévoux
FRANCE
Made in P.R.C
Z
Z
Z
Z
Z
Z
Of On (Master) On
+
-
DES 9900 VDP
1/3
On (Slave)OnOn
2/4
CFI Extel
ZI de Fétan, 01600 Trévoux
FRANCE
Made in P.R.C
Z
Z
Z
Z
Z
Z
1
Of On (Master) On
+
-
DES 9900 VDP
1/3
On (Slave)OnOn
2/4
CFI Extel
ZI de Fétan, 01600 Trévoux
FRANCE
Made in P.R.C
Z
Z
Z
Z
Z
Z
4
WelcomeEye Comfort / Compact / 08/17
Page 5

SOMMAIRE
1 CONSIGNES DE SÉCURITÉ ...............................................................p.2
2 CONTENU DU KIT ................................................................................ p.2
3 GÉNÉRALITÉ ......................................................................................... p.3
4 NOMENCLATURE ................................................................................p.3
5 INSTALLATION DU PRODUIT ..........................................................p.5
1. Câblage
2. Paramétrage de la platine
3. Installation du moniteur principal ou supplémentaire
4. Installation de la platine de rue principal ou supplémentaire
5. Installation d’une caméra (en option)
6. Pour aller plus loin
6 CARACTÉRISTIQUES TECHNIQUES ..............................................p.8
7 ACCESSOIRES .....................................................................................p.9
8 ASSISTANCE TECHNIQUE GARANTIE ....................................p.10
9 MESURES DE SÉCURITÉ ................................................................. p.11
Page 6
1. CONSIGNE DE SÉCURITÉ
Important !
• Veuillez lire le manuel d’utilisation soigneusement avant d’installer ou d’utiliser ce produit.
• Si vous installez ce produit pour d’autres, pensez à laisser le manuel ou une copie à
l’utilisateur nal.
Avertissement :
• Les diérents éléments ne devront être démontés que par un technicien autorisé.
Mesures de sécurité :
• Pour une exploitation en toute sécurité de ce système, il est essentiel que les installateurs,
utilisateurs et techniciens suivent toutes les procédures de sûreté décrites dans
ce manuel.
• Des avertissements spéciques et des symboles d’attention sont indiqués sur les éléments
si nécessaire.
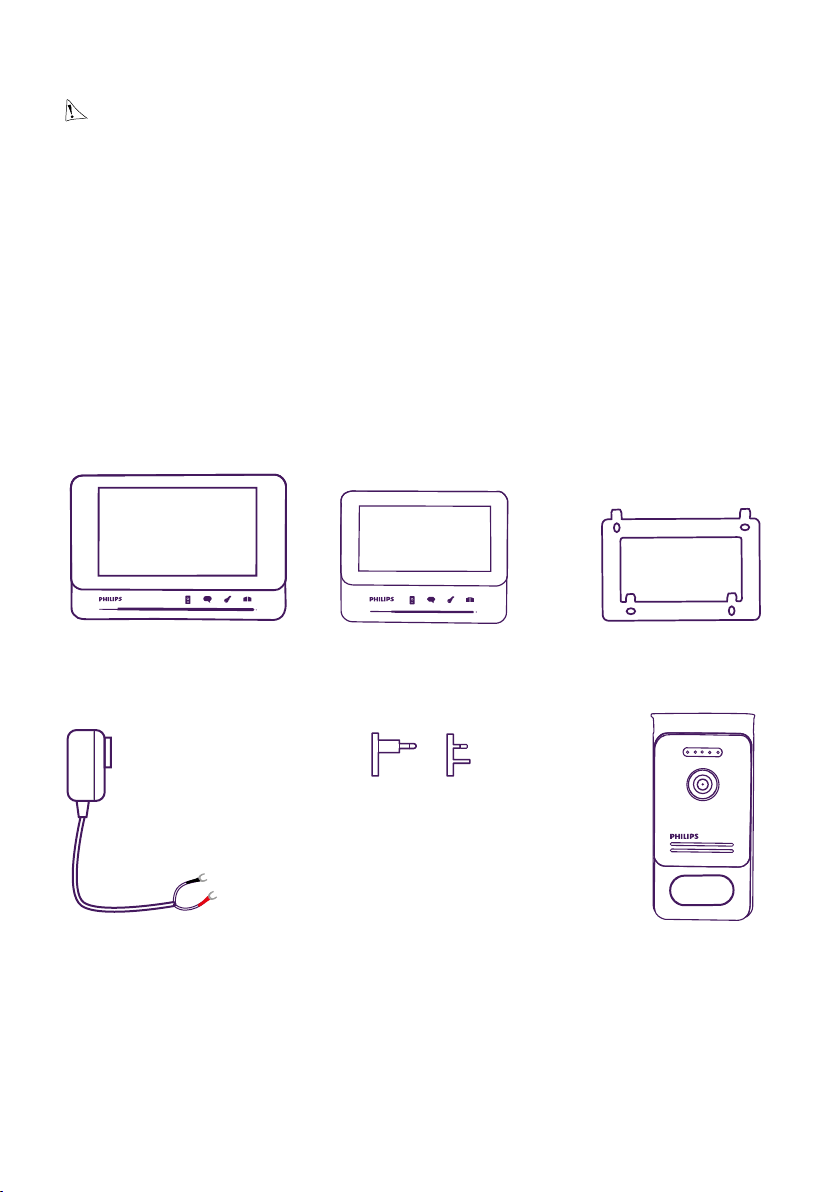
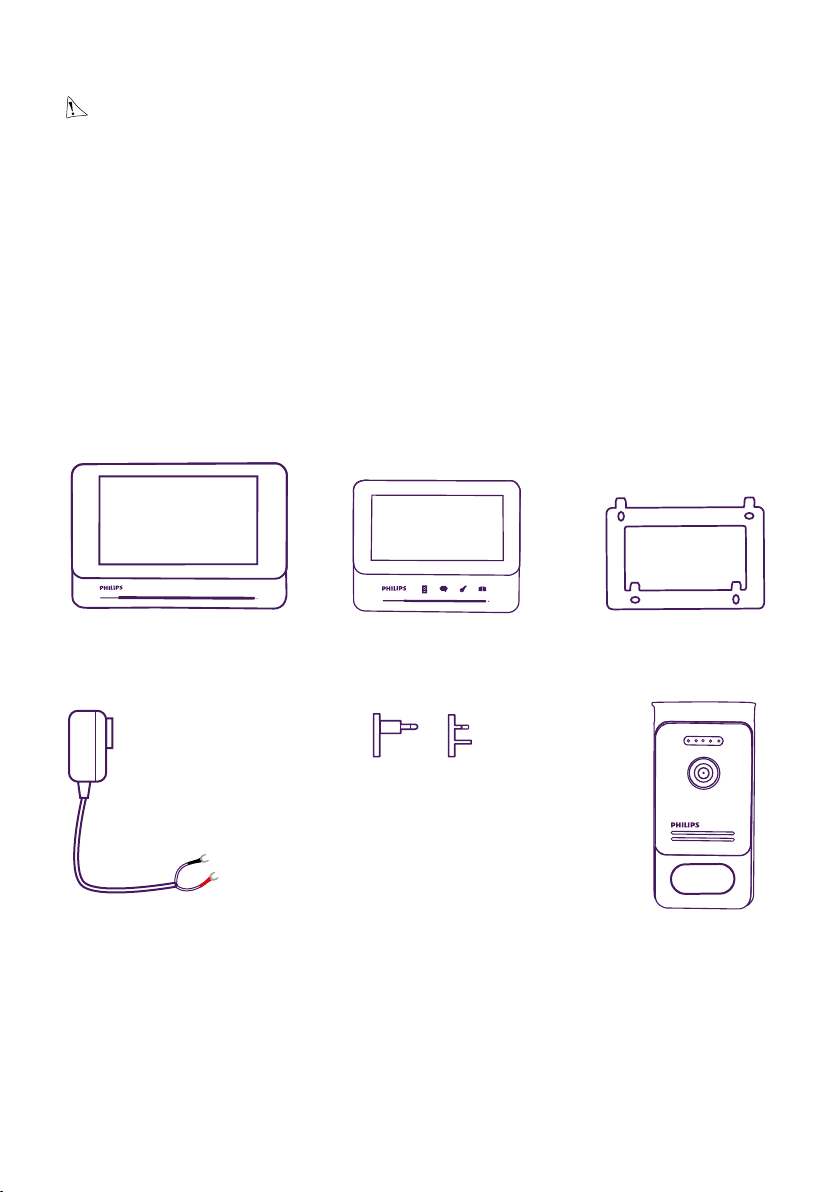
2. CONTENU DU KIT
1. Moniteur 7’’
(WelcomeEye Comfort)
3. Alimentation
enchable
F2
1.bis Moniteur 4,3’’
(WelcomeEye Compact)
4. Adaptateur
pour
alimentation
enchable
compatible
prise EU ou UK
WelcomeEye Comfort / Compact / 08/17
2. Support mural
5. Platine de rue
Page 7
3. GÉNÉRALITÉ
Ce visiophone est composé d’un poste de réponse intérieur avec écran tactile et d’une
platine extérieure avec interphone et caméra permettant de voir et communiquer avec le
visiteur qui a sonné. Il est facile d’installation puisque 2 ls sont nécessaires pour toutes les
fonctions (sonnerie, vidéo, interphone, commandes gâche et automatisme).
La technologie WelcomeEye vous permet de partager la platine de rue entre 2 familles.
Chaque famille peut posséder jusqu’à 3 moniteurs.
Le système peut comporter un maximun d’une caméra et 2 platines de rue.
Pour un usage ecace, veuillez lire attentivement ce manuel d’instructions.
La notice complète est téléchargeable sur www.philips.com.
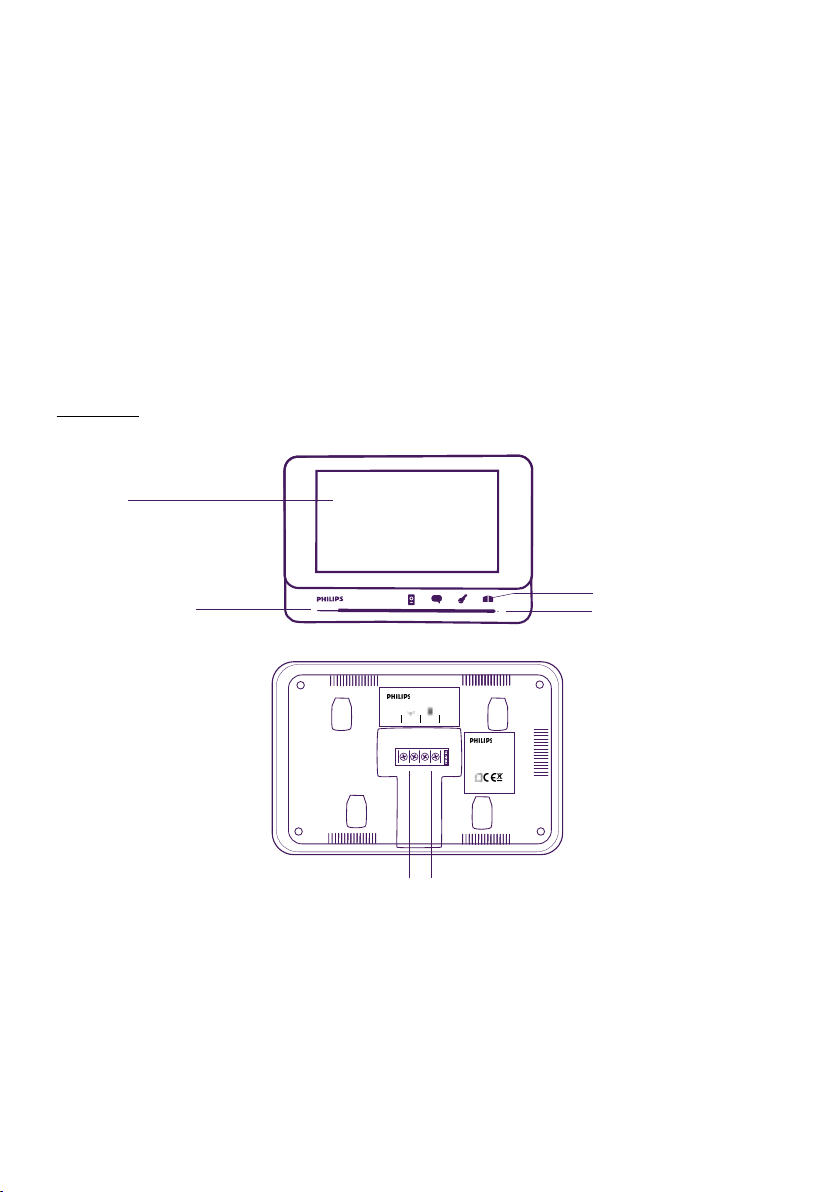
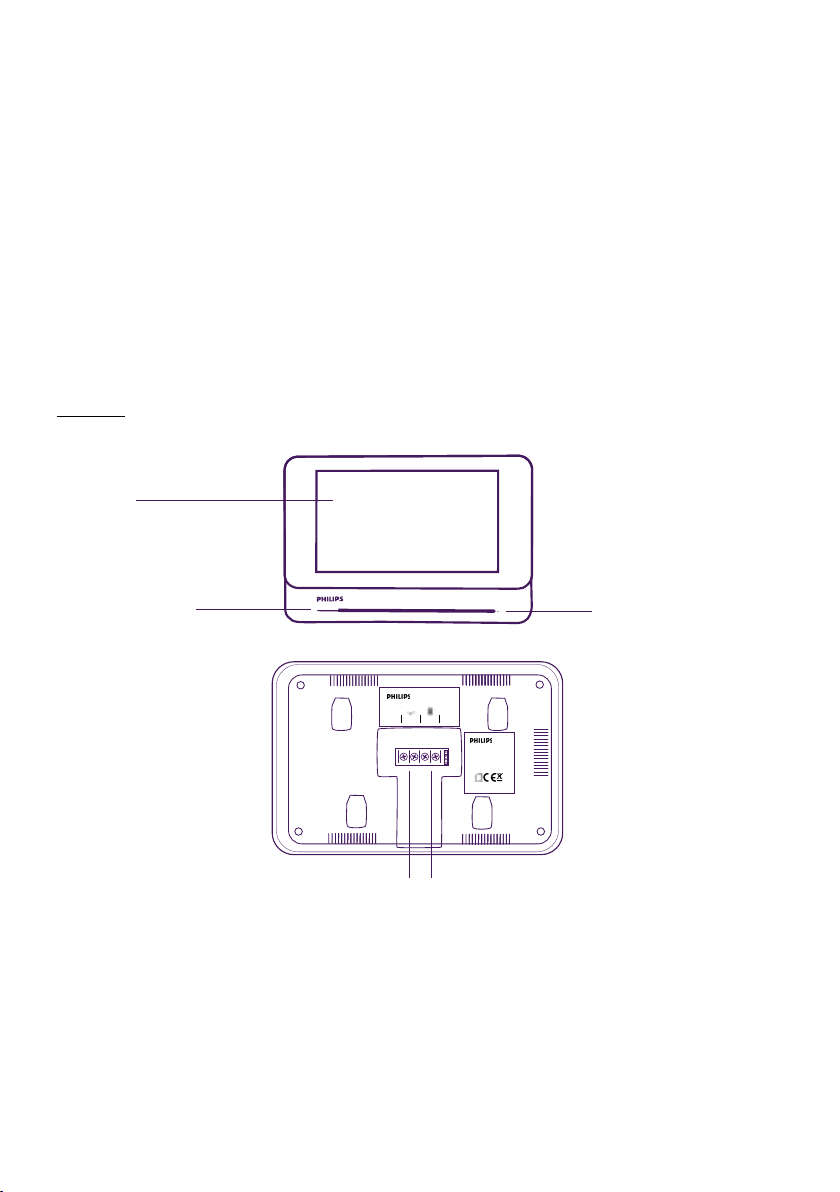
4. NOMENCLATURE
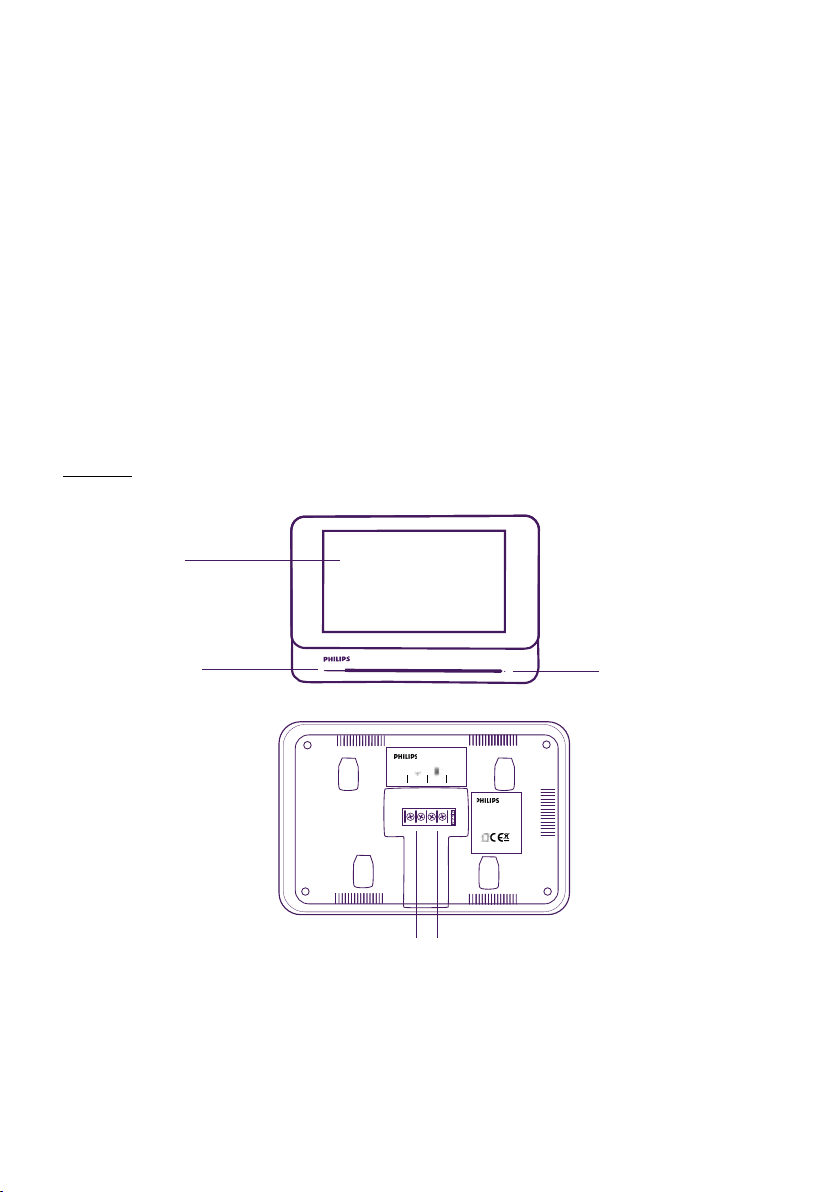
Moniteur :
Écran
Haut-parleur
Boutons sensitifs
Microphone
DES 9900 VDP
2/4
1/3
+
-
CFI Extel
ZI de Fétan, 01600 Trévoux
FRANCE
Made in P.R.C
Bornier d’alimentation Bornier de raccordement à la
platine de rue et aux accessoires
WelcomeEye Comfort / Compact / 08/17
F3
Page 8
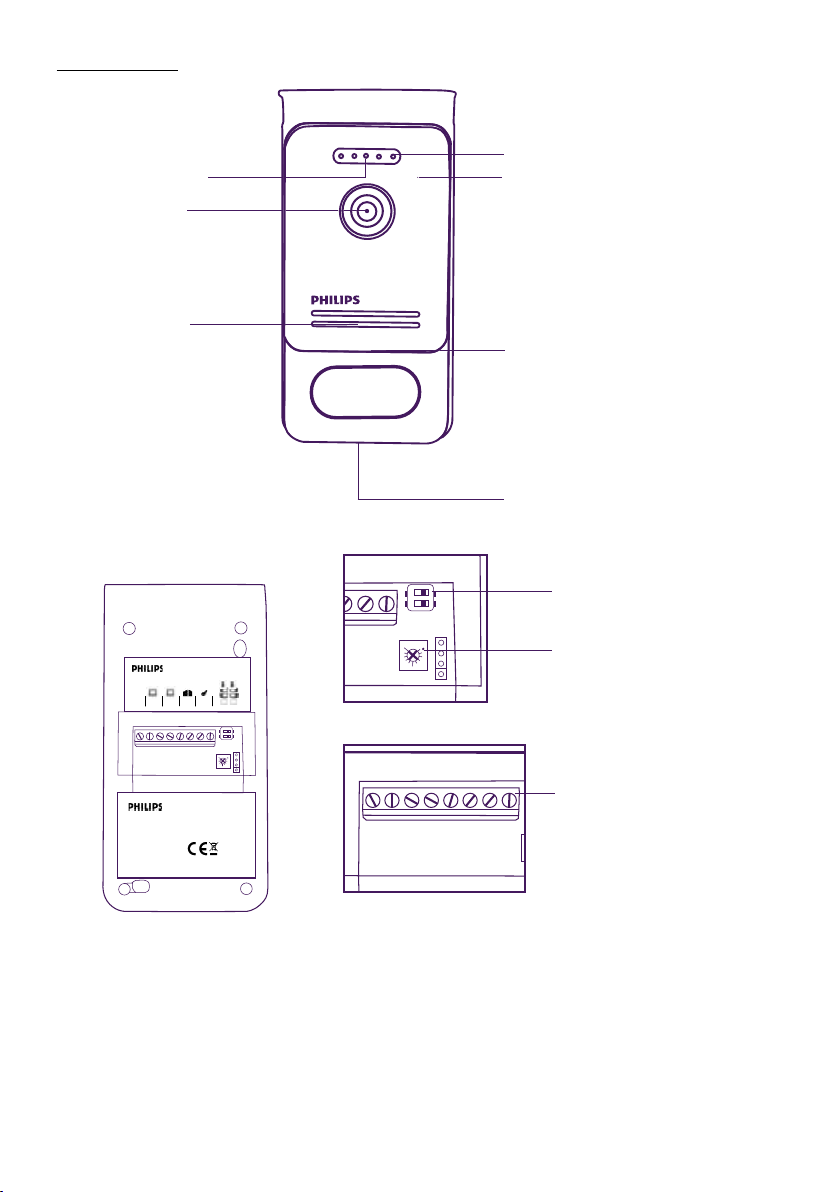
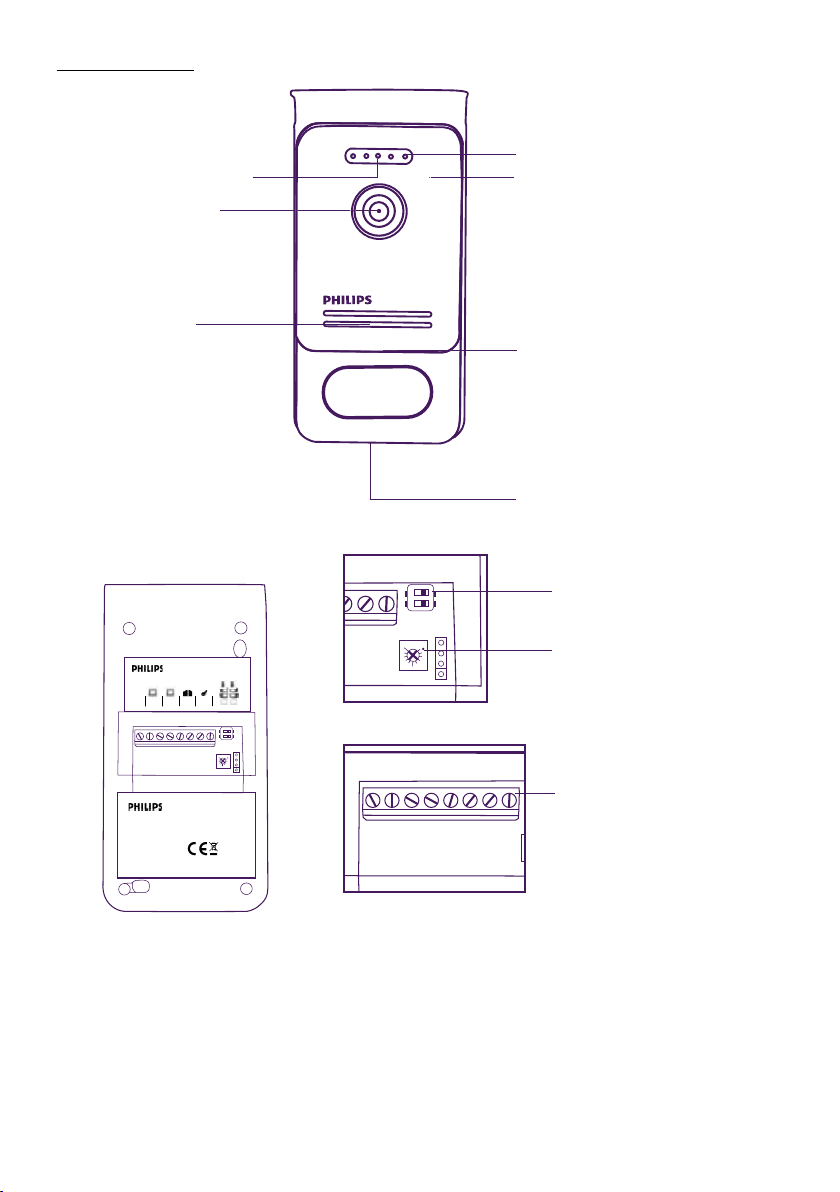
Platine de rue :
6
7
8
1
2
1
2
1
2
3 4 5
6
1 2
7
8
1
2
1
2
Capteur
crépusculaire
Objectif de la
caméra
Haut-parleur
1 2
3 4 5
2
1
LED blanche (vision de nuit)
Microphone
Éclairage porte-nom
Vis antivol de xation
Switch de
programmation
Réglage volume haut-
1
2
2
1
8
7
6
parleur
Bornier de
raccordement des ls
CFI Extel
ZI de Fétan, 01600 Trévoux
FRANCE
IP44
Notes :
- Lorsque l’on appuie sur le bouton d’appel, le moniteur sonne à l’intérieur et la vidéo
s’ache.
- Pour changer l’étiquette du porte nom, démonter la façade et déclipser le cache plastique
derrière l’étiquette.
F4
Made in P.R.C
WelcomeEye Comfort / Compact / 08/17
Page 9

5. INSTALLATION DU PRODUIT
Conseils et notes importantes :
- An de proter pleinement de votre platine de rue, nous vous conseillons de la paramétrer
(mode 1 ou 2 familles, 1 ou 2 platines, volume du haut-parleur), avant installation dénitive.
Pour cela, un branchement sur table peut être nécessaire an de vérier que les réglages
ont été eectués correctement.
- Si vous essayez votre produit avant de l’installer, veillez à ne pas le faire avec la platine
de rue et le moniteur dans la même pièce, sinon le visiophone émettra un son strident
(eet larsen).
- Ne pas exposer la caméra directement face au soleil ou face à une surface rééchissante.
- Il est conseillé de faire passer les câbles dans une gaine de protection an de les protéger
des chocs et intempéries.
1. Câblage
Pour éviter les risques de parasites et de dysfonctionnement, ne pas passer le câble de
votre visiophone dans la même gaine que les câbles électriques.
Attention : Il ne faut jamais doubler les ls pour en augmenter la section.
a. Raccordement du visiophone (moniteur, platine de rue et caméra, voir g. 1, g. 2 ou g. 3)
Fils à utiliser : 2 ls 0.75 mm2 jusqu’à 80 m ou 2 ls 1.5 mm2 jusqu’à 120 m.
- Bien raccorder les ls en respectant un des schémas de câblage en fonction de la
conguration souhaitée.
- Bien se référer à l’étiquette collée au dos du moniteur et au dos de la platine de rue.
- En fonction de la conguration choisie, paramétrer les switchs au dos de la platine et
congurer l’interface moniteur (voir section 2 paramètrage platine).
b. Raccordement d’une motorisation de portail
- La platine délivre un contact sec (sans courant) à raccorder sur la commande bouton
poussoir de l’automatisme.
- La raccorder directement sur les bornes 5 et 6 au dos de la platine (aucune polarité à
respecter).
- La fonction ouverture n’est possible que si la vidéo de la platine de rue respective est
achée.
c. Raccordement d’une gâche ou serrure électrique
Important : La gâche ou serrure électrique que vous commandez devra impérativement
être équipée d’une mémoire mécanique. Le courant de la gâche ne doit pas excéder 1,1A.
- La raccorder directement sur les bornes 7 et 8 au dos de la platine (aucune polarité à
respecter).
- La fonction ouverture n’est possible que si la vidéo de la platine de rue respective est
achée.
WelcomeEye Comfort / Compact / 08/17
F5
Page 10
2. Paramétrage de la platine (voir g. 1, g. 2 ou g. 3)
a. Paramétrage du numero de la platine :
Placer le switch 2 à gauche sur la platine n°1 et à droite sur la platine n°2.
b. Paramétrage du nombre de famille :
Placer le switch 1 à gauche pour être en mode une famille et à droite pour être en mode 2
familles.
c. Réglage du volume de la platine :
Tourner le réglage volume à l’aide d’un tournevis cruciforme an de régler le niveau sonore
de la platine.
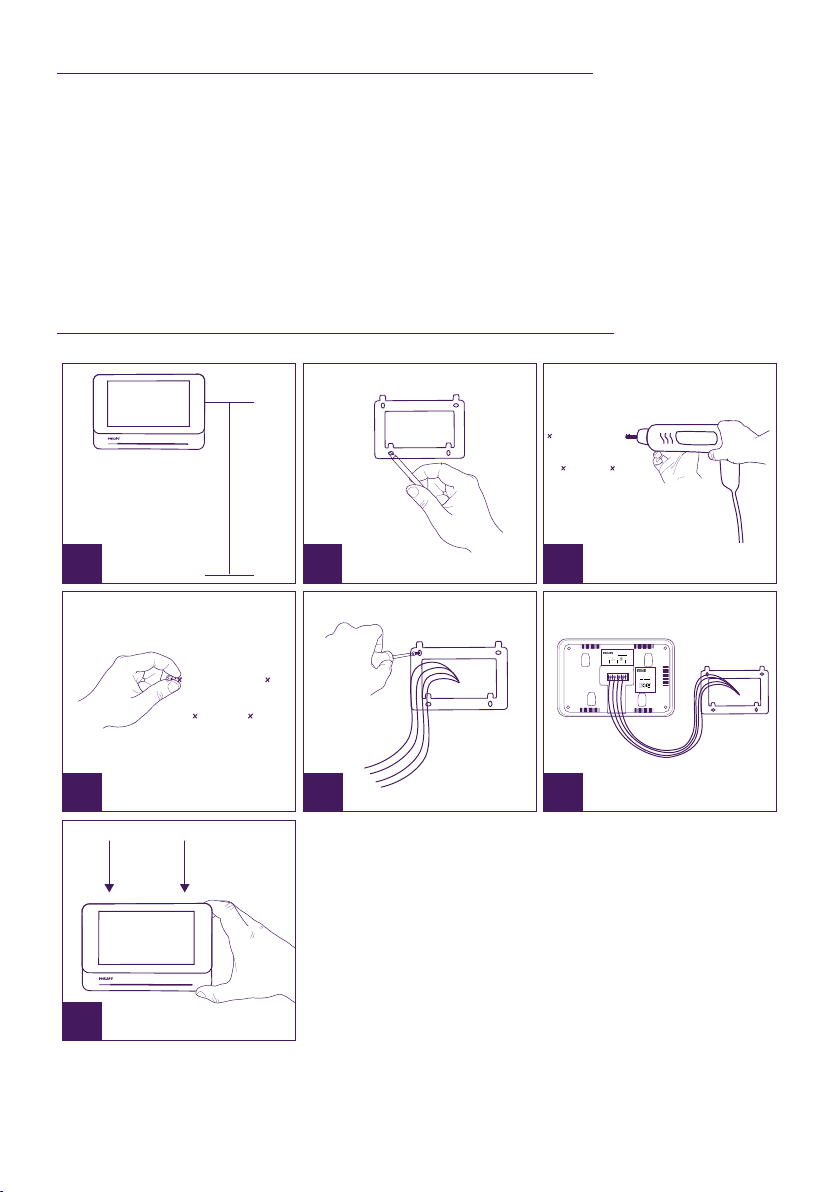
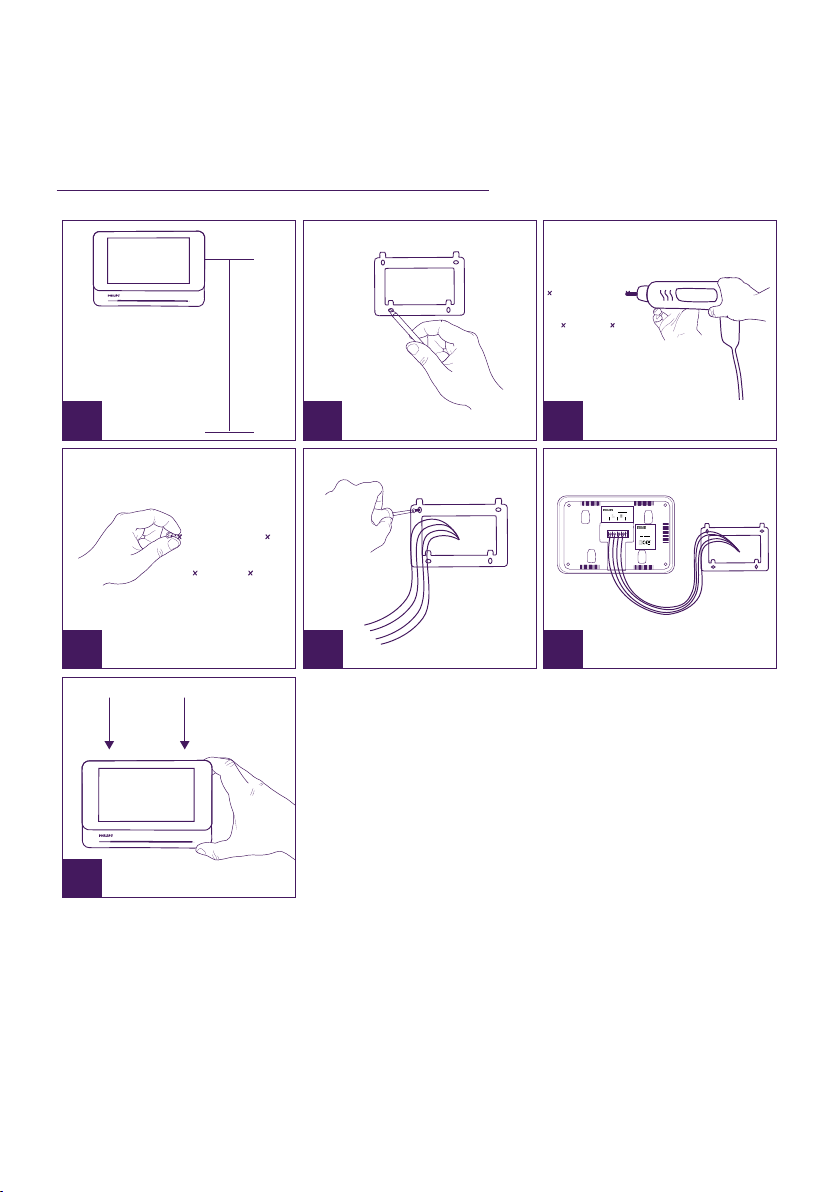
3. Installation du moniteur principal ou supplémentaire
1m60
1 2
4
5 6
3
DES 9900 VDP
5 8 1 0 2 3
WiĮ 2.4GHz
24V 550mA
2/4
1/3
+
-
CFI Extel
ZI de Fétan, 01600 Trévoux
FRANCE
DES 9900 VDP
5 8 1 0 2 3
Made in P.R.C
7
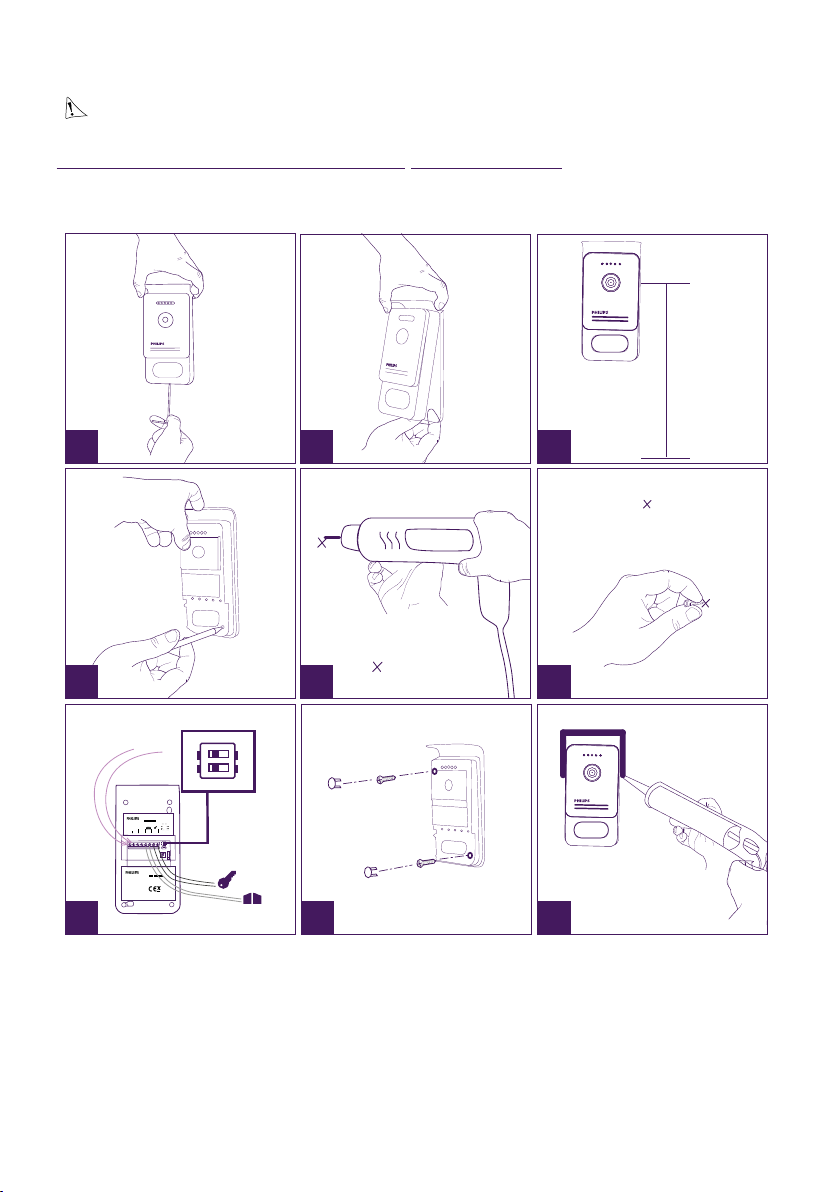
1 - Positionner le support mural en faisant en sorte que l’écran du moniteur soit à une
hauteur d’environ 1m60 du sol.
2 – Repèrer l’emplacement des perçages à l’aide de l’étrier de xation.
3 – Percer.
F6
WelcomeEye Comfort / Compact / 08/17
Page 11
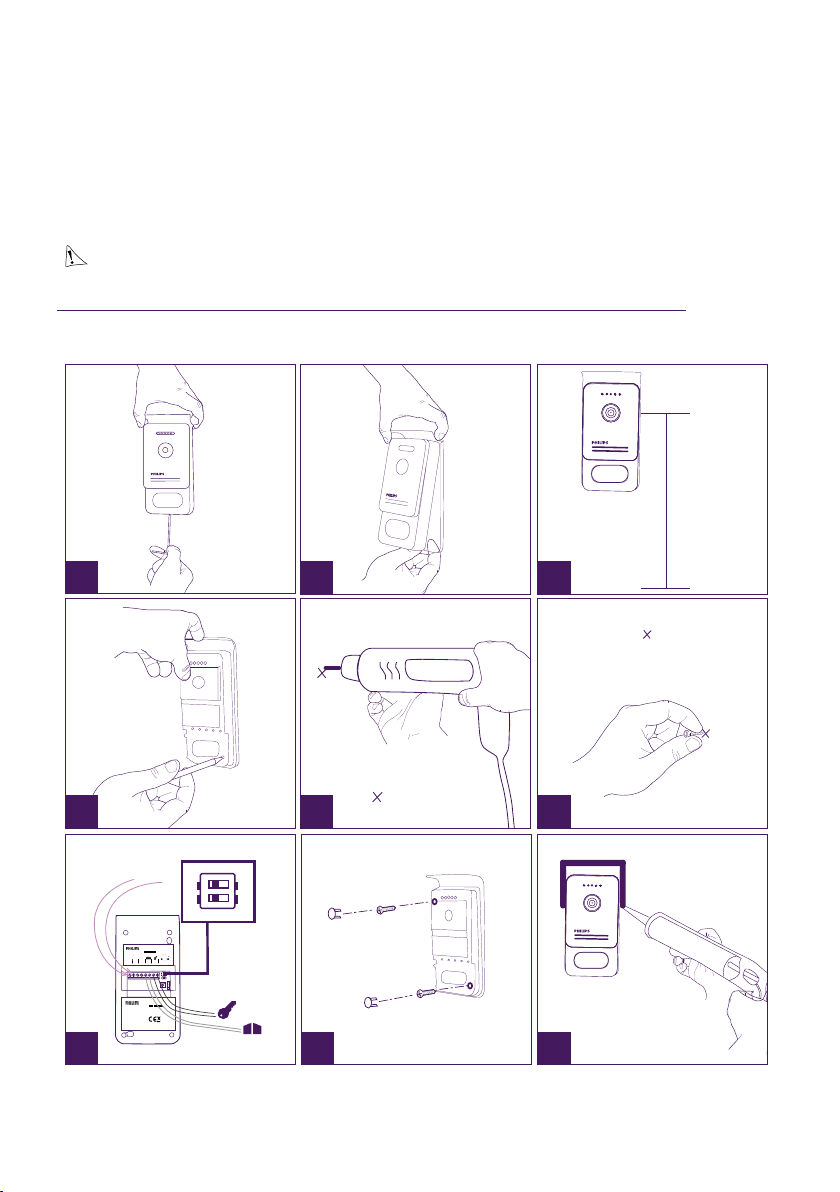
4 – Mettre des chevilles adaptées au support (celles fournies conviennent pour des murs
en matériaux pleins).
5 – Fixer le support mural.
6 – Raccorder les 2 ls de la platine de rue et les 2 ls d’alimentation en respectant bien le
schéma de câblage.
7 – Mettre en place le moniteur sur son support mural.
8 - En fonction de la conguration choisie, et lorsque l’ensemble du cablage est terminé, un
paramétrage de l’interface peut-être necessaire. Pour plus d’information référez vous à
la notice complète téléchargeable sur www.philips.com.
Attention : à cette étape, ne pas relier l’alimentation au 230V AC.
4. Installation de la platine de rue principal ou supplémentaire
Attention : Le produit ne doit pas être relié à l’alimentation avant la n du câblage.
1m60
1 2
4
DES 9900 VDP
5 1 0 0 6 3
1
2
1 2
2
1
8
7
6
3 4 5
2
1
DES 9900 VDP
CFI Extel
5 1 0 0 6 3
ZI de Fétan, 01600 Trévoux
FRANCE
20V 110mA
RFID 125kHz
IP44
Made in P.R.C
7
5
1
2
1
2
8 9
3
6
WelcomeEye Comfort / Compact / 08/17
F7
Page 12

1 - Dévisser la vis antivol sous la platine de rue.
2 - Basculer la façade de la platine de rue vers l’avant.
3 – L’objectif de la platine doit être placé à une hauteur d’environ 1m60 du sol.
4 – Faire des repères.
5 - Percer.
6 - Utiliser des chevilles adaptées à la nature du support (les vis fournies conviennent pour
des murs en matériaux pleins).
7 – Raccorder les deux ls provenant du moniteur et si besoin raccorder la gâche éléctrique
et le portail (voir section 1. Cablage). Paramétrer les switchs au dos de la platine de rue
(voir section 2. Paramétrage de la platine).
8 – Mettre les vis puis replacer les deux capuchons masquant les vis de xation.
Note : visser à travers les caches noirs placés au dos de la platine de rue sans les retirer.
9 – Replacer la façade avant de la platine et revisser la vis antivol de xation.
10 - Brancher l’alimentation 230V AC sur l’adapteur modulaire, sur une installation conforme
aux normes en vigueur ( NFC 15-100 pour la France).
- Vérier le bon fonctionnement (appel vidéo...).
- Dans le cas d’une deuxième platine de rue, penser à congurer le(s) moniteur(s).
11 - Mettre un joint silicone* entre la visière et le mur an d’éviter le ruissellement de
l’eau. *Ne pas utiliser de silicone à base d’acide acétique (odeur de vinaigre).
On
5. Installation d’une caméra (en option)
Raccorder les ls en respectant le schéma de câblage.
Choisisser un emplacement approprié pour l’installation de la caméra.
S’assurer qu’aucun élément ne gêne l’installation.
Visser la partie murale avec les vis fournies (pour matériaux pleins).
Pointer la caméra dans la direction désirée et serrer la bague de maintien.
Congurer le(s) moniteur(s)
On
6. Pour aller plus loin
Pour découvrir plus de fonctionnalités sur votre produit Philips WelcomeEye, vous pouvez
télécharger la notice complète sur le site www.philips.com.
6. CARACTÉRISTIQUES TECHNIQUES
Moniteur :
réf : 531003 (WelcomeEye Comfort)
réf : 531005 (WelcomeEye Compact)
- 2 ls
- Ecran 7’’ (Comfort), 4,3’’ (Compact)
- Résolution 800 x 480 (Comfort), 480 x 272 (Compact)
- Courant consommé : 460mA (Comfort), 400mA (Compact)
- Puissance consommé : 11.1W (Comfort), 9,6W (Compact)
- 6 sonneries (85dB)
- Dimensions : 142(h) x 210(l) x 15(p) (Comfort), 116(h) x 146(l) x 16(p) (Compact)
Platine de rue :
réf : 538200
- Capteur C-MOS couleur 900 TVL
- Angle de vue H100° / V75°
F8
WelcomeEye Comfort / Compact / 08/17
Page 13

- Vision nocture (Leds blanches)
- Commande de gâche 12V/1,1A
- Commande de portail : pouvoir de coupure 12V/2A
- IP44
- Température d’utilisation : -20°C / +50°C
WelcomeEye Outdoor : (Platine de rue supplémentaire)
réf : 531006
- Capteur C-MOS couleur 900TVL
- Angle de vue H130° / V 90°
- Vision nocturne (Leds blanches)
- Commande de gâche 12V/1.1A
- Commande de portail : pouvoir de coupure 12V/2A
- RFID (125kHz)
- IP44
- température d’utilisation : -20°C / +50°C
- Dimensions: 168(h) x 82(l) x 38(p)
WelcomeEye AddComfort : (moniteur supplémentaire)
réf : 531003
- 2 ls
- Ecran 7’’
- Résolution 800 x 480
- Courant consommé : 460mA
- Puissance consommé : 11.1W
- 6 sonneries (85dB)
- Dimensions : 142(h) x 210(l) x 15(p)
WelcomeEye AddCompact : (moniteur supplémentaire)
réf : 531005
- 2 ls
- Ecran 4,3’’
- Résolution 480 x 272
- Courant consommé : 400mA
- Puissance consommé : 9,6W
- 6 sonneries (85dB)
- Dimensions : 116 (h.) x 146 (l.) x 16 (p.)
WelcomeEye Cam : (caméra supplémentaire)
réf : 531007
- capteur C-MOS couleur 900TVL
- angle de vue : H95° / V75°
- température d’utilisation : -20°C / +50°C
- indice de protection : IP66
7. ACCESSOIRES
WelcomeEye AddCompact - DES 9300 DDE (réf: 531005)*
WelcomeEye AddComfort - DES 9500 DDE (réf: 531003)*
WelcomeEye Cam - DES 9900 CVC (réf: 531007)
WelcomeEye Outdoor - DES 9900 VOS (réf: 531006)**
WelcomeEye Lock - DES 1000 EDL (réf: 531008)
WelcomeEye Comfort / Compact / 08/17
F9
Page 14

WelcomeEye Lock - DES 1100 EDL (réf: 531009)
WelcomeEye Power - DES 1000 DPS (réf: 531010)**
WelcomeEye TAG - DES 1000 ACI (réf: 531011)**
** Réferez-vous à la notice complète WelcomeEye Connect/Touch disponible sur le site
www.philips.com pour plus d’informations.
* Réferez-vous à la notice complète WelcomeEye Comfort/Compact disponible sur le site
www.philips.com pour plus d’informations.
8. ASSISTANCE TECHNIQUE - GARANTIE
La FAQ est disponible dans la notice complète téléchageable sur www.philips.com.
Cet appareil est garanti, pièces et main d’œuvre dans nos ateliers.
La garantie ne couvre pas : les consommables (piles, batteries, etc.) et les dégâts occasionnés
par : mauvaise utilisation, mauvaise installation, intervention extérieure, détérioration par
choc physique ou électrique, chute ou phénomène atmosphérique.
• Ne pas ouvrir l’appareil afin de ne pas perdre le couvert de la garantie.
• Lors d’un éventuel retour en SAV, protéger l’écran afin d’éviter les rayures.
• Entretien avec un chiffon doux seulement, pas de solvants. La garantie s’annule si vous
démontez les pièces. Avant le nettoyage, débranchez ou mettez l’appareil hors tension.
Attention : N’employez aucun produit ou essence d’épuration carboxylique, alcool
ou similaire. En plus de risquer d’endommager votre appareil, les vapeurs sont également
dangereuses pour votre santé et explosives.
N’employez aucun outil pouvant être conducteur de tension (brosse en métal, outil pointu...
ou autre) pour le nettoyage.
Le ticket de caisse ou la facture fait preuve de la date d’achat.
En cas de besoin, les contacts et les horaires d’ouverture de nos centres d’assistance
technique sont disponible sur le site www.philips.com.
CARTE DE GARANTIE
M/Mme :
Numéro de téléphone :
Adresse :
E-mail :
Date d’achat : / / (JJ/MM/AAAA)
Revendeur :
Téléphone du revendeur :
Adresse du revendeur :
Numéro de série PHI/1031/
Important : veuillez conserver précieusement cette carte de
garantie, ainsi que votre preuve d’achat.
F10
WelcomeEye Comfort / Compact / 08/17
Page 15

Philips et l’emblème bouclier Philips sont des marques déposées de Koninklijke Philips
N.V. et sont utilisées sous licence. Ce produit a été fabriqué par et est vendu sous la
responsabilité de CFI Extel SAS, et CFI Extel SAS est le seul garant de ce produit.
9. MESURES DE SÉCURITÉ
Les dommages provoqués par le manque de conformité au manuel mènent à l’expiration
de la garantie. Nous n’assumerons aucune responsabilité pour les dommages en résultant !
Nous n’assumerons aucune responsabilité concernant tout dommage, sur les biens ou
les personnes, causé par une mauvaise manipulation ou par manque de conformité aux
consignes de sécurité.
Ce produit a été fabriqué dans le respect total des consignes de sécurité. An de maintenir
ce statut et d’assurer la meilleure exploitation du produit, l’utilisateur doit observer les
consignes et avertissements de sûreté contenus dans ce manuel.
: Ce symbole indique un risque de choc électrique ou un risque de court-circuit.
- Vous ne devez utiliser ce produit qu’à une tension comprise entre : 100-240 Volts et 50-
60 hertz. N’essayez jamais d’utiliser cet appareil avec une tension diérente.
- Veillez à ce que tous les raccordements électriques du système soient conformes aux
consignes d’utilisation.
- Dans les établissements commerciaux, assurez-vous d’observer les règles de prévention
des accidents pour les installations électriques.
- Dans les écoles, les équipements de formation, les ateliers… la présence d’un personnel
qualié est nécessaire pour contrôler le fonctionnement des appareils électroniques.
- Observez les consignes d’utilisation des autres appareils reliés au système.
- Veuillez contacter une personne expérimentée au cas où vous auriez des doutes au sujet
du mode de fonctionnement ou de la sûreté des appareils.
- Ne jamais brancher ou débrancher les appareils électriques avec les mains mouillées.
- Lors de l’installation de ce produit, vériez bien que les câbles d’alimentation ne risquent
pas d’être endommagés.
- Ne remplacez jamais les câbles électriques endommagés vous-même ! Dans ce cas,
enlevez-les et faites appel à une personne expérimentée.
- La prise de courant doit se trouver à proximité de l’appareil et doit être aisément
accessible.
- Un dispositif de coupure (interrupteur sectionneur, disjoncteur, dispositif équivalent)
rapidement accessible doit être incorporé dans l’installation de câblage du bâtiment pour
le matériel relié à demeure au réseau.
- Conserver une distance minimum autour de l’appareil pour assurer une ventilation
susante.
- La ventilation ne doit pas être empêchée en couvrant l’ouverture de ventilation avec un
objet tel qu’un papier journal, une nappe, un rideau, etc.
- Aucune source à amme nue telle qu’une bougie allumée ne doit être placée sur l’appareil.
- Respecter la température de fonctionnement de produit.
- L’appareil ne doit pas être exposé à l’écoulement ou l’éclaboussement de liquide et aucun
objet rempli de liquide tel qu’un vase ne doit être placé sur l’appareil.
WelcomeEye Comfort / Compact / 08/17
F11
Page 16

TABLE OF CONTENTS
3 GENERAL INFORMATION ...............................................................p.3
4 NOMENCLATURE ..............................................................................p.3
5 PRODUCT INSTALLATION ..............................................................p.5
1. Wiring.
2. Conguring the intercom
3. Installing the main or additional monitor
4. Installing the main or additional intercom panel
5. Installing a camera (optional)
6. Get more out of your device
7 ACCESSORIES.....................................................................................p.9
1
SAFETY INSTRUCTIONS ..................................................................p.2
2
CONTENTS OF THE KIT. ..................................................................p.2
6
TECHNICAL CHARACTERISTICS ...................................................p.8
8
TECHNICAL ASSISTANCE WARRANTY ..................................p.10
9 SAFETY PRECAUTIONS ..................................................................p.11
GB1
WelcomeEye Comfort / Compact / 08/17
Page 17

1. SAFETY INSTRUCTIONS
Important!
• Please read the user manual carefully before installing or using this product.
• If you are installing this product for a third party, please remember to leave the manual or
a copy of it with the end user.
Warning:
• The various components may only be dismantled by an authorised technician.
Safety precautions:
• To ensure the safe operation of the system, installers, users and technicians must follow
all the safety procedures described in this manual.
Specic warnings and warning symbols are marked on the components where necessary.
•
2. CONTENTS OF THE KIT
1. Monitor 7’’
(WelcomeEye Comfort)
3. Plug-in power
supply
1.bis Monitor 4,3’’
(WelcomeEye Compact)
4. Adaptor
for plug-in
power supply
compatible with
EU or UK plug
WelcomeEye Comfort / Compact / 08/17
2. Wall bracket
5. Intercom panel
GB2
Page 18
3. GENERAL
This videophone consists of an indoor answering unit with a touch screen and an outdoor
panel with an intercom and camera, allowing you to see and communicate with the visitor
who has pressed the bell. It is easy to install as only two wires are needed for all functions:
bell, video image, intercom and strike plate and automatic opener controls.
The WelcomeEye technology allows you to share the intercom panel between 2 families.
Each family can own up to 3 monitors.
The system can operate up to one camera and two intercom panels.
To get the most out of your intercom, please read this instruction manual carefully.
The complete instructions can be downloaded at www.philips.com.
4. NOMENCLATURE
Monitor:
Screen
Loudspeaker
GB3
Microphone
DES 9900 VDP
2/4
1/3
+
-
CFI Extel
ZI de Fétan, 01600 Trévoux
FRANCE
Made in P.R.C
Power supply terminal block Terminal block for connection
to the intercom panel and
accessories
WelcomeEye Comfort / Compact / 08/17
Page 19
Intercom panel
6
7
8
1
2
1
2
1
2
3 4 5
6
1 2
7
8
1
2
1
2
Twilight sensor
Camera lens
Loudspeaker
White LED (night vision)
Microphone
Name holder lighting
Tamper-resistant
retaining screw
Programming switch
1
1 2
3 4 5
2
1
2
2
1
8
7
6
settings
Terminal block
connecting the wires
Loudspeaker volume
CFI Extel
ZI de Fétan, 01600 Trévoux
FRANCE
IP44
Notes:
- When someone presses the call button, the inside monitor rings and the video is displayed.
- To change the nameplate label, remove the front cover and unclip the plastic cap behind
the label.
Made in P.R.C
WelcomeEye Comfort / Compact / 08/17
GB4
Page 20

5. PRODUCT INSTALLATION
Important notes and advice:
- To make the most of your intercom panel, we recommend conguring it (for 1 or 2
families, 1 or 2 intercoms, loudspeaker volume) before nal installation. To do this, a table
connection may be necessary to check that the settings are correct.
- If you test your product before installing it, ensure that you do not test it with the intercom
panel and the monitor in the same room to avoid the videophone emitting a shrill noise
(feedback).
- Do not expose the camera lens to direct sunlight or a reective surface.
- We recommend running the cables through a protective sheath to protect them against
breakage and bad weather.
1. Wiring.
To avoid the risk of interference and malfunctions, do not run the videophone cable through
the same sheath as the electrical cables.
Warning: Do not double up the wires to increase their section.
a. Connecting the videophone (monitor, intercom panel and camera, see g. 1, g. 2 and g. 3)
Wires to be used: 2 wires 0.75 mm2 with 80 m length or 2 wires 1.5 mm2 with 120 m length.
- Make sure to connect the wires in accordance with one of the wiring diagrams depending
on the desired conguration.
- Refer to the label stuck to the back of the monitor and the back of the intercom panel.
- Congure the switches on the back of the intercom panel as well as the monitor interface
according to the chosen conguration (see section 2 intercom conguration).
b. Connecting a gate motor
The camera delivers a dry contact with no current, to be connected to the push button
control of your automatic opener.
- Connect it directly to terminals 5 and 6 at the back of the intercom panel (no need to
observe polarity).
- The opening function is only possible if the video of the respective intercom panel is
displayed.
c. Connecting a strike plate or electric lock
Important: The strike plate or electric lock that you are ordering must have a mechanical
memory. The strike plate current cannot exceed 1.1A.
- Connect it directly to terminals 7 and 8 at the back of the intercom panel (no need to
observe polarity).
- The opening function is only possible if the video of the respective intercom panel is
displayed.
2. Conguring the intercom (see g. 1, g. 2 and g. 3)
a. Conguring the intercom number:
Place switch 2 on the left on intercom no. 1 and on the right on intercom no. 2.
GB5
WelcomeEye Comfort / Compact / 08/17
Page 21
b. Conguring the number of families:
Place switch 1 on the left to be in one-family mode and on the right to be in 2-family mode.
c. Intercom volume settings:
Turn the volume control with a Phillips head screwdriver to adjust the intercom volume.
3. Installing the main or additional monitor
1m60
1 2
4
5 6
3
DES 9900 VDP
5 8 1 0 2 3
WiĮ 2.4GHz
24V 550mA
2/4
1/3
+
-
CFI Extel
ZI de Fétan, 01600 Trévoux
FRANCE
DES 9900 VDP
5 8 1 0 2 3
Made in P.R.C
7
1 - Position the wall bracket so that the screen of the monitor is approximately 1.60m above
the ground.
2 – Mark the location of the holes using the U bolt.
3 – Drill.
4 – Use pegs adapted to the bracket (those supplied are suitable for solid walls).
5 - Attach the wall bracket.
6 - Connect the 2 intercom panel wires and the 2 power supply wires in accordance with
the wiring diagram.
7 - Position the monitor on the wall bracket.
8 - Depending on the conguration selected, and when wiring is completed, the interface
may have to be congured. For more information please refer to the complete
WelcomeEye Comfort / Compact / 08/17
GB6
Page 22
instructions which can be downloaded at www.philips.com.
Warning: during this step, do not connect the power supply to the 230V AC
4. Installing the main or additional intercom panel
Warning: The product must not be connected to the power supply before wiring is complete.
1m60
1 2
4
DES 9900 VDP
5 1 0 0 6 3
1
2
1 2
2
1
8
7
6
3 4 5
2
1
DES 9900 VDP
CFI Extel
5 1 0 0 6 3
ZI de Fétan, 01600 Trévoux
FRANCE
20V 110mA
RFID 125kHz
IP44
Made in P.R.C
7
5
1
2
1
2
8 9
3
6
1 - Remove the tamper-resistant screw from the intercom panel.
2 - Tip the intercom panel cover forward.
3 – The intercom’s lens should be approximately 1.60m above the ground.
4 – Mark the locations.
5 - Drill.
6 - Use pegs adapted to the nature of the support (the screws supplied are suitable for
solid walls).
7 – Connect the two wires from the monitor and, if necessary, connect the electric strike
GB7
WelcomeEye Comfort / Compact / 08/17
Page 23

plate and the gate (see section 1. Wiring). Congure the switches at the back of the
intercom panel (see section 2. Conguring the intercom).
8 – Insert the screws and ret the two caps concealing the retaining screws.
Note: screw through the black covers on the back of the intercom panel – do not remove
them.
9 – Ret the front cover of the intercom and tighten the tamper-resistant retaining screw.
10 - Connect the 230V AC power supply to the modular adaptor, for an installation compliant
with applicable standards (NFC 15-100 in France).
- Verify the smooth functioning (video call, etc.).
- When there is a second intercom panel, don’t forget to congure the monitor(s).
11 - Attach a silicone seal* between the shield and the wall to stop owing water. *Do not
use acetic acid-based silicone (vinegar odour).
On
5. Installing a camera (optional)
Connect the wires in accordance with the wiring diagram.
Choose a suitable place to install the camera.
Ensure that nothing gets in the way of the installation.
Screw the wall section with the screws provided (for solid walls).
Point the camera in the desired direction and tighten the retainer screw.
Congure the monitor(s)
On
6. Get more out of your device
To nd out more about your Philips WelcomeEye product, you can download the complete
instructions at www.philips.com.
6. TECHNICAL CHARACTERISTICS
Monitor:
ref.: 531003 (WelcomeEye Comfort)
ref.: 531005 (WelcomeEye Compact)
- 2 wires
- 7” screen (Comfort), 4.3” screen (Compact)
- Resolution 800 x 480 (Comfort), 480 x 272 (Compact)
- Current consumption: 460mA (Comfort), 400mA (Compact)
- Power consumption: 11.1W (Comfort), 9.6W (Compact)
- 6 chimes (85dB)
- Dimensions: 142(h) x 210(l) x 15(d) (Comfort), 116(h) x 146(l) x 16(d) (Compact)
Intercom panel
ref.: 538200
- C-MOS colour sensor 900TVL
- Viewing angle H100° / V75°
- Night vision (white Leds)
- Strike plate control 12V/1.1A
- Gate control: breaking capacity 12V/2A
- IP44
- Operating temperature: -20°C / +50°C
WelcomeEye Comfort / Compact / 08/17
GB8
Page 24

WelcomeEye Outdoor (additional intercom panel)
ref.: 531006
- C-MOS colour sensor 900TVL
- Viewing angle H130° / V 90°
- Night vision (white Leds)
- Strike plate control 12V/1.1A
- Gate control: breaking capacity 12V/2A
- RFID (125kHz)
- IP44
- operating temperature: -20°C / +50°C
- Dimensions: 168 (h) x 82 (w) x 38 (d)
WelcomeEye AddComfort (additional monitor)
ref.: 531003
- 2 wires
- 7” screen
- Resolution 800 x 480
- Current consumption: 460mA
- Power consumption: 11.1W
- 6 chimes (85dB)
- Dimensions: 142 (h) x 210 (w) x 15 (d)
WelcomeEye AddCompact (additional monitor)
ref.: 531005
- 2 wires
- 4.3” screen
- 480 x 272 Resolution
- Current consumption: 400mA
- Power consumption: 9.6W
- 6 chimes (85dB)
- Dimensions: 116 (h) x 146 (l) x 16 (d)
WelcomeEye Cam (additional camera)
ref.: 531007
- C-MOS colour sensor 900TVL
- viewing angle: H95° / V75°
- operating temperature: -20°C / +50°C
- protection index: IP66
7. ACCESSORIES
WelcomeEye AddCompact - DES 9300 DDE (ref.: 531005)*
WelcomeEye AddComfort - DES 9500 DDE (ref.: 531003)*
WelcomeEye Cam - DES 9900 CVC (ref.: 531007).
WelcomeEye Outdoor - DES 9900 VOS (ref.: 531006)**
WelcomeEye Lock - DES 1000 EDL (ref.: 531008).
WelcomeEye Lock - DES 1100 EDL (ref.: 531009).
WelcomeEye Power - DES 1000 DPS (ref.: 531010)**
WelcomeEye TAG - DES 1000 ACI (ref.: 531011)**
** Refer to the complete WelcomeEye Connect/Touch instructions available on the
www.philips.com website for more information.
GB9
WelcomeEye Comfort / Compact / 08/17
Page 25

* Refer to the complete WelcomeEye Comfort/Compact instructions available on the
www.philips.com website for more information.
8. TECHNICAL ASSISTANCE - WARRANTY
FAQs are available in the complete instructions which can be downloaded at
www.philips.com.
This product is guaranteed for parts and labour in our workshops.
The warranty does not cover: consumables (batteries, etc.) and damage caused by misuse,
improper use, improper installation, external intervention, damage due to physical or
electrical shocks, dropping, or atmospheric phenomena.
• Do not open the device, as this will void the warranty.
• If the unit is returned for After Sales Service, protect the unit to prevent scratches.
• Clean with a soft cloth only, no solvents. The guarantee is void if parts have been
dismantled. Before cleaning it, disconnect the equipment or switch it o at the mains.
Warning: Do not use any gasoline or carboxylic acid, alcohol or similar treatment. In
addition to damaging your device, the fumes are also hazardous to your health and are
explosive.
Do not use any tool that can conduct voltage (wire brush or other sharp tool, etc.) for
cleaning.
The till receipt or invoice is your proof of purchase date.
If necessary, the contacts and opening hours of our technical assistance centres are
available on the www.philips.com website.
WARRANTY CARD
Mr / Mrs :
Phone number :
Address :
E-mail :
Date of purchase : / / (DD/MM/YYYY)
Dealer :
Dealer Phone :
Dealer address :
Serial number PHI/1031/
Important : Please keep this warranty card with your proof of
purchase.
Philips and Philips’ shield emblem are registered trademarks of Koninklijke Philips N.V.
and are used under licence. This product has been manufactured by and is sold under the
WelcomeEye Comfort / Compact / 08/17
GB10
Page 26

responsibility of CFI Extel SAS, and CFI Extel SAS is the sole guarantor of this product.
9. SAFETY PRECAUTIONS
Any damage caused by a failure to adhere to the manual shall void the warranty. We assume
no liability for damages resulting therefrom!
We cannot be held responsible for any damage to property or persons caused by incorrect
use or a failure to adhere to the safety instructions.
This product has been manufactured in full compliance with safety instructions. In order to
maintain this status and get the most out of the product, users must adhere to the safety
instructions and warnings contained in this manual.
: This symbol indicates that there is a risk of electric shock or short-circuit.
- You should only use this product with a voltage between: 100-240 Volts and 50-60 hertz.
Never attempt to use this device with a dierent voltage.
- Ensure that all the system’s electrical connections conform to the instructions for use.
- In commercial establishments, ensure that you adhere to the electrical installation
accident prevention regulations.
- In schools, training facilities, workshops, etc. qualied personnel must be on hand to
monitor electronic equipment operation.
- You must follow the instructions for use of any other devices connected to the system.
- Please contact an experienced person if you have any doubts regarding equipment
operation or safety.
- Never plug in or unplug electrical equipment with wet hands.
- When installing this product, check that the power supply cables are not at risk of being
damaged.
- Never replace damaged electrical cables yourself! In this case, remove them and call an
expert.
- The mains supply should be located close to the device and must be easily accessible.
- An easily accessible cut-o system (switch disconnector, circuit breaker, equivalent
system) must be integrated into the building’s wiring installation for the equipment
connected to the power grid.
- Keep a minimum distance around the device to guarantee sucient ventilation.
- Ventilation should not be blocked by covering the ventilation opening with an object such
as a newspaper, tablecloth or curtain, etc.).
- No open ame source such as a burning candle must be placed on the device.
- Respect the product’s operating temperature.
- The device must not be exposed to liquid ow or splashing. Do not place any objects lled
with liquid such as vases on the device.
GB11
WelcomeEye Comfort / Compact / 08/17
Page 27

INHALT
3 ALLGEMEINES ...................................................................................S. 3
4 NOMENKLATUR ................................................................................S. 3
5 INSTALLATION DES PRODUKTS ................................................. S. 5
1. Verkabelung
2. Parametrierung der Sprechanlage
3. Installation des Haupt- oder Zusatzmonitors
4. Installation der Haupt- oder Nebentürsprechanlage
5. Installation einer Kamera (optional)
6. Für weitergehende Informationen
7 ZUBHÖR ............................................................................................S. 10
1 SICHERHEITSANWEISUNGEN ......................................................S. 2
2 INHALT DES SETS .............................................................................S. 2
6
TECHNISCHE MERKMALE .............................................................S. 8
8 TECHNISCHER KUNDENDIENST GARANTIE ......................S. 10
9 SICHERHEITSMASSNAHMEN ......................................................S. 11
WelcomeEye Comfort / Compact / 08/17
D1
Page 28
1. SICHERHEITSANWEISUNGEN
Wichtig!
• Bitte lesen Sie diese Bedienungsanleitung vor Installation oder Verwendung des Geräts
aufmerksam durch.
• Wenn Sie dieses Gerät für Dritte installieren, muss dem Endnutzer diese
Bedienungsanleitung oder eine Kopie davon überlassen werden.
Warnhinweis:
• Die unterschiedlichen Elemente dürfen ausschließlich durch einen Techniker mit
entsprechender Zulassung demontiert werden.
Sicherheitsmaßnahmen:
• Für einen sicheren Betrieb dieses Systems müssen die Installateure, Benutzer und
Techniker sämtliche, in dieser Anleitung beschriebenen Sicherheitsmaßnahmen befolgen.
• Auf den Teilen sind gegebenenfalls Warnsymbole und spezische Warnungen angebracht.
2. INHALT DES SETS
1. Monitor 7“
(WelcomeEye Comfort)
3. Netzteilstecker
D2
1.bis Monitor 4,3’’
(WelcomeEye Compact)
4. Adapter für
Netzteilstecker
kompatibel mit EU-
oder UK-Buchse
WelcomeEye Comfort / Compact / 08/17
2. Wandhalterung
5. Türsprechanlage
Page 29
3. ALLGEMEINES
Diese Video-Türsprechanlage besteht aus einer Antwortstation für den Innenraum mit
taktilem Bildschirm und einer Außenanlage mit Gegensprechanlage und Kamera. Sie
ermöglicht es Ihnen, den Besucher an der Tür nach dem Läuten zu sehen und mit ihm
zu sprechen. Sie lässt sich leicht installieren, da zwei Kabel für das Ausführen sämtlicher
Funktionen nötig sind: Klingel, Video, Gegensprechanlage, Steuerung von Türöner und
Automatik.
Die WelcomeEye Technik ermöglicht, die Türsprechanlage mit zwei Familien gemeinsam zu
nutzen. Jede Familie kann bis zu 3 Monitore haben.
Das System kann maximal eine Kamera und 2 Türsprechanlagen umfassen.
Bitte lesen Sie für eine ordnungsgemäße Verwendung dieser Anlage diese Betriebsanleitung
aufmerksam durch.
Die vollständige Anleitung kann auf www.philips.com heruntergeladen werden.
4. NOMENKLATUR
Monitor:
Bildschirm
Lautsprecher
DES 9900 VDP
2/4
1/3
+
-
CFI Extel
ZI de Fétan, 01600 Trévoux
FRANCE
Made in P.R.C
Mikrofon
Klemmleiste für Stromversorgung Klemmleiste für Anschluss der
Türsprechanlage und Zubehör
WelcomeEye Comfort / Compact / 08/17
D3
Page 30
Türsprechanlage:
6
7
8
1
2
1
2
1
2
3 4 5
6
1 2
7
8
1
2
1
2
Dämmerungssensor
Kameraobjektiv
Lautsprecher
Weiße LED (Nachtsicht)
Mikrofon
Beleuchtung des Namensfelds
Schraube zum
Diebstahlschutz
Programmierschalter
1
1 2
3 4 5
2
1
2
2
1
8
7
6
den Lautsprecher
Klemmleiste für den
Anschluss der Kabel
Lautstärkeregler für
CFI Extel
ZI de Fétan, 01600 Trévoux
FRANCE
IP44
Hinweise:
- Wenn die Klingeltaste gedrückt wird, klingelt der Monitor im Innenrohr und zeigt das
Videobild.
- Um das Namensschild an der Tür zu wechseln, nehmen Sie die Frontpartie ab und ziehen
die Plastikabdeckung hinter dem Etikett ab.
D4
Made in P.R.C
WelcomeEye Comfort / Compact / 08/17
Page 31

5. INSTALLATION DES PRODUKTS
Wichtige Empfehlungen und Hinweise:
- Damit Sie Ihre Türsprechanlage optimal nutzen können, empfehlen wir Ihnen, sie vor der
endgültigen Installation einzustellen (Familienmodus 1 oder 2, 1 oder 2 Außenanlagen,
Lautsprecherlautstärke). Hierbei kann eine provisorische Testinstallation erforderlich
sein, um zu prüfen, ob die Einstellungen korrekt vorgenommen worden sind.
- Sollten Sie Ihr Gerät vor dem Installieren ausprobieren wollen, achten Sie bitte darauf,
dass sich dabei die Außenanlage und der Monitor nicht im gleichen Raum benden, da
die Türsprechanlage sonst einen schrillen Ton von sich gibt (Rückkopplungseekt).
- Die Kamera nicht direkt gegen die Sonne oder in Richtung einer reektierenden Fläche
ausrichten.
- Um Kabel vor Stößen und Witterungseinüssen zu schützen, wird empfohlen, sie durch
einen Kabelschutzschlauch zu führen.
1. Verkabelung
Um Störungen und Fehlfunktionen zu vermeiden, führen Sie das Kabel Ihrer VideoTürsprechanlage nicht durch den gleichen Leitungskanal wie die Stromkabel.
Achtung: Keinesfalls die Kabel doppelt legen, um ihren Querschnitt zu vergrößern.
a. Anschluss der Video-Sprechanlage (Monitor, Türsprechanlage und Kamera, Siehe Abb. 1,
Abb. 2 oder Abb. 3)
Zu verwendende Kabel: 2 Kabel 0,75 mm2 bis 80 m oder 2 Kabel 1,5 mm2 bis 120 m.
- Kabel ordnungsgemäß und unter Beachtung eines der gewünschten Konguration
entsprechenden Kabelschemas anschließen.
- Bitte beachten Sie genau das Etikett, das sich auf der Rückseite des Monitors und der
Türsprechanlage bendet.
- Stellen Sie die Schalter auf der Rückseite der Türsprechanlage und kongurieren Sie
die Monitorschnittstelle entsprechend der von Ihnen gewählten Konguration (siehe
Abschnitt 2 Einstellungen der Sprechanlage).
b. Anschluss eines Torantriebs
- Die Kamera verfügt über einen „Trocken“-Kontakt ohne Strom, der an die Druckschalter-
Steuerung Ihrer Automatik angeschlossen werden muss.
- Direkt an die Klemmen 5 und 6 auf der Rückseite der Sprechanlage anschließen (es ist
keine Polarität zu beachten).
- Die Önen-Funktion ist nur dann verfügbar, wenn auch das Videobild der Türsprechanlage
verfügbar ist.
c. Anschluss eines elektrischen Türöners oder Schlosses
Wichtig: Der Türöner oder das elektrische Schloss, das Sie bedienen möchten, muss in
jedem Fall über einen mechanischen Speicher verfügen. Der Strom am Türöner darf 1,1 A
nicht überschreiten.
- Direkt an die Klemmen 7 und 8 auf der Rückseite der Sprechanlage anschließen (es ist
keine Polarität zu beachten).
- Die Önen-Funktion ist nur dann verfügbar, wenn auch das Videobild der Türsprechanlage
verfügbar ist.
WelcomeEye Comfort / Compact / 08/17
D5
Page 32

2. Parametrierung der Sprechanlage (Siehe Abb. 1, Abb. 2 oder Abb. 3)
a. Einstellung der Nummer der Sprechanlage:
Schalter 2 auf Sprechanlage Nr. 1 nach links stellen und auf Sprechanlage Nr. 2 nach rechts
stellen
b. Einstellung der Anzahl von Familien
Schalter 1 für den Modus 1 Familie nach links stellen und für den Modus 2 Familien nach
rechts.
c. Einstellen der Lautstärke der Sprechanlage:
Zum Einstellen der Lautstärke der Sprechanlage den Lautstärkeregler mithilfe eines
Kreuzschlitzschraubenziehers drehen.
3. Installation des Haupt- oder Zusatzmonitors
1m60
1 2
4
5 6
3
DES 9900 VDP
5 8 1 0 2 3
WiĮ 2.4GHz
24V 550mA
2/4
1/3
+
-
CFI Extel
ZI de Fétan, 01600 Trévoux
FRANCE
DES 9900 VDP
5 8 1 0 2 3
Made in P.R.C
7
1 – Wandhalterung befestigen und dabei darauf achten, dass sich der Bildschirm des
Monitors etwa 1,60 m über dem Boden bendet.
2 – Ermitteln Sie die Positionen der Bohrungen mithilfe der Bohrschablone.
D6
WelcomeEye Comfort / Compact / 08/17
Page 33

3 – Löcher bohren.
4 – Verwenden Sie geeignete Dübel (die mitgelieferten Dübel sind für Mauern aus
Vollmaterial geeignet).
5 – Bringen Sie die Wandhalterung an.
6 – Schließen Sie die 2 Kabel der Außenanlage und die 2 Stromversorgungskabel an und
halten Sie sich dabei genau an das Kabelschema.
7 – Bringen Sie den Monitor an der Wandhalterung an.
8 – Wenn die gesamte Verkabelung abgeschlossen ist und je nach gewählter Konguration
kann ein Einstellen der Schnittstelle erforderlich sein. Für weitere Informationen siehe
vollständige Anleitung, die Sie auf www.philips.com herunterladen können.
Achtung: zu diesem Zeitpunkt nicht an die 230V AC Stromversorgung anschließen.
4. Installation der Haupt- oder Nebentürsprechanlage
Achtung: Das Gerät darf nicht vor Ende der Verkabelung an die Stromversorgung
angeschlossen werden.
1m60
1 2
4
DES 9900 VDP
5 1 0 0 6 3
1
2
1 2
2
1
8
7
6
3 4 5
2
1
DES 9900 VDP
CFI Extel
5 1 0 0 6 3
ZI de Fétan, 01600 Trévoux
FRANCE
20V 110mA
RFID 125kHz
IP44
Made in P.R.C
7
WelcomeEye Comfort / Compact / 08/17
5
1
2
1
2
8 9
3
6
D7
Page 34

1 - Schraube der Diebstahlsicherung unter der Türsprechanlage entfernen.
2 - Kippen Sie die Frontseite Türsprechanlage nach vorne.
3 - Das Objektiv der Türsprechanlage ist etwa 1,60 m über dem Boden zu platzieren.
4 - Markierungen anzeichnen.
5 – Löcher bohren.
6 – Verwenden Sie für die Art des Untergrunds geeignete Dübel (die mitgelieferten Dübel
sind für Mauern aus Vollmaterial geeignet).
7 - Schließen Sie die beiden vom Monitor kommenden Kabel und gegebenenfalls den
elektrischen Türöner und das Tor an (siehe Abschnitt 1 Verkabelung). Die Schalter
auf der Rückseite der Türsprechanlage einstellen (siehe Abschnitt 2 Einstellung der
Sprechanlage).
8 – Setzen Sie die Schrauben ein und setzen Sie dann wieder die beiden Abdeckungen auf,
die die Befestigungsschrauben verdecken.
Hinweis: Die Schrauben durch die schwarzen Klappen auf der Rückseite der Türsprechanlage
anziehen, ohne diese abzunehmen.
9 - Setzen Sie die Frontseite wieder vor die Sprechanlage und ziehen wieder die Schraube
zum Diebstahlschutz fest.
10 - Schließen Sie die 230V~-Stromversorgung mit dem modularen Adapter an eine
geltenden Normen (NFC 15-100 für Frankreich) genügende Installation an.
- Prüfen Sie das ordnungsgemäße Funktionieren (Videoruf...)
- Denken Sie im Fall einer zweiten Türsprechanlage daran, den (die) Monitor(e) zu
kongurieren.
11 - Bringen Sie eine Silikonfuge zwischen dem Schutz und der Mauer an, um das Eindringen
von Wasser zu verhindern. *Kein Silikon auf Essigsäurebasis verwenden (Essiggeruch).
Ein
5. Installation einer Kamera (optional)
Die Kabel gemäß Kabelschema anschließen.
Geeigneten Ort für die Installation der Kamera auswählen.
Sicherstellen, dass kein Element die Installation stört.
Die Wandhalterung mit den mitgelieferten Schrauben befestigen (Vollmaterialien).
Kamera in die gewünschte Richtung drehen und den Haltering festdrehen.
Den (die) Monitor(e) kongurieren
Ein
6. Für weitergehende Informationen
Um weitere Funktionalitäten Ihres Philips WelcomeEye Produkts kennenzulernen, können
Sie die vollständige Anleitung auf der Website www.philips.com herunterladen
6. TECHNISCHE MERKMALE
Monitor:
Ref.: 531003 (WelcomeEye Comfort)
Ref.: 531005 (WelcomeEye Compact)
- 2 Kabel
- Monitor 7’’ (Comfort), 4,3’’ (Compact)
- Auösung 800 x 480 (Comfort), 480 x 272 (Compact)
- Stromverbrauch: 460mA (Comfort), 400mA (Compact)
- Leistungsaufnahme: 11,1W (Comfort), 9,6W (Compact)
- 6 Klingeltöne (85 dB)
- Abmessungen: 142(H) x 210(B) x 15(T) (Comfort), 116(H) x 146(B) x 16(T) (Compact)
D8
WelcomeEye Comfort / Compact / 08/17
Page 35

Türsprechanlage:
Ref.: 538200
- 900 TVL C-MOS-Farbsensor
- Blickwinkel H100° / V75°
- Nachtsicht (weiße LEDs)
- Türöner 12 V/1,1A
- Steuerung Tor: Schaltvermögen 12V/2A
- IP44
- Betriebstemperatur: -20 °C / +50°C
WelcomeEye Outdoor: (Zusatztürsprechanlage)
Ref.: 531006
- 900TVL C-MOS-Farbsensor
- Blickwinkel H130° / V90°
- Nachtsicht (weiße LEDs)
- Türöner 12 V/1.1A
- Steuerung Tor: Schaltvermögen 12V/2A
- RFID (125 kHz)
- IP44
- Betriebstemperatur: -20 °C / +50°C
- Abmessungen: 168 (H) x 82 (B) x 38 (T)
WelcomeEye AddComfort: (Zusatzmonitor)
Ref.: 531003
- 2 Kabel
- 7’’ Bildschirm
- Auösung 800 x 480
- Stromverbrauch: 460mA
- Leistungsaufnahme: 11.1W
- 6 Klingeltöne (85 dB)
- Abmessungen: 142 (H) x 210 (B) x 5 (T)
WelcomeEye AddCompact: (Zusatzmonitor)
Ref.: 531005
- 2 Kabel
- 4,3’’ Bildschirm
- Auösung 480 x 272
- Stromverbrauch: 400mA
- Leistungsaufnahme: 9,6W
- 6 Klingeltöne (85 dB)
- Abmessungen: 116 (H) x 146 (B) x 16 (T)
WelcomeEye Cam: (Zusatzkamera)
Ref.: 531007
- 900TVL C-MOS-Farbsensor
- Blickwinkel: H 95°/V 75°
- Betriebstemperatur: -20 °C / +50°C
- Schutzindex: IP66
WelcomeEye Comfort / Compact / 08/17
D9
Page 36

7. ZUBEHÖR
WelcomeEye AddCompact - DES 9300 DDE (Ref.: 531005)*
WelcomeEye AddComfort - DES 9500 DDE (Ref.: 531003)*
WelcomeEye Cam - DES 9900 CVC (Ref.: 531007)
WelcomeEye Outdoor - DES 9900 VOS (Ref.: 531006)**
WelcomeEye Lock - DES 1000 EDL (Ref.: 531008)
WelcomeEye Lock - DES 1100 EDL (Ref.: 531009)
WelcomeEye Power - DES 1000 DPS (Ref.: 531010)**
WelcomeEye TAG - DES 1000 ACI (Ref.: 531011)**
** Für weitere Informationen siehe vollständige Anleitung von WelcomeEye Connect/
Touch auf der Website www.philips.com.
* Für weitere Informationen siehe vollständige Anleitung von WelcomeEye Comfort/
Compact auf der Website www.philips.com.
8. TECHNISCHER KUNDENDIENST - GARANTIE
Die FAQ sind Teil der vollständigen, auf www.philips.com herunterladbaren Anleitung.
Für dieses Gerät gilt eine Garantie auf Teile und Arbeitsstunden in unseren Werkstätten.
Von dieser Garantie ausgeschlossen sind Verbrauchsteile (Akkus, Batterien, etc.) sowie
Schäden, die auf die folgenden Arten verursacht wurden: unsachgemäße Verwendung,
unsachgemäße Installation, externer Eingri, Beschädigung durch Stoß oder Stromschlag,
Sturz oder eine atmosphärische Erscheinung.
• Um den Garantieschutz nicht hinfällig werden zu lassen, darf das Gerät nicht geöffnet
werden.
• Wenn das Gerät an den Kundendienst eingeschickt werden soll, muss der Bildschirm zum
Schutz vor Kratzern entsprechend geschützt werden.
• Für die Pflege nur ein weiches Tuch, niemals Lösungsmittel verwenden. Durch Demontage
der Teile erlischt die Garantie. Stecken Sie das Gerät vor der Reinigung aus oder schalten
Sie es aus.
Achtung: Verwenden Sie niemals ein Produkt oder eine Reinigungslösung auf
Carboxylbasis, Alkohol oder ähnliches. Diese Produkte können Ihr Gerät beschädigen, ihre
Dämpfe stellen außerdem eine Explosionsgefahr und eine Gefahr für Ihre Gesundheit dar.
Verwenden Sie für die Reinigung keine Vorrichtung, die den Strom leiten kann (Metallbürste,
spitze Werkzeuge etc.).
Der Kassenzettel oder die Rechnung gelten als Nachweis des Kaufdatums.
Die Kontaktinformationen und Servicezeiten unserer Kundendienstzentren sind erhältlich
auf der Website www.philips.com.
D10
WelcomeEye Comfort / Compact / 08/17
Page 37

GARANTIEKARTE
Herr / Frau :
Telefonnummer :
Adresse :
E-mail :
Kaufdatum : / / (TT / MM / JJJJ)
Händler :
Händler Telefon :
Händler Anschrift :
Seriennummer PHI/1031/
Wichtig : Bitte bewahren Sie diese Garantiekarte und Kaufbeleg.
Philips und das Logo mit dem Schild sind eingetragene Warenzeichen von Koninklijke
Philips N.V. und werden im Rahmen einer Lizenzvereinbarung benutzt. Dieses Produkt
wurde von CFI Extel SAS gefertigt und wird unter der Verantwortlichkeit von CFI Extel SAS
vertrieben und CFI Extel SAS ist der einzige Garantiepartner für dieses Produkt.
9. SICHERHEITSMASSNAHMEN
Schäden, die durch ein Nichtbeachten der Betriebsanleitung verursacht wurden, führen zu
einem Verfallen der Garantie. Für Schäden, die auf diese Weise entstanden sind, haften wir
nicht!
Des Weiteren haften wir nicht für Sach- oder Personenschäden, die durch eine unsachgemäße
Bedienung oder ein Nichtbeachten der Sicherheitsanweisungen eingetreten sind.
Dieses Gerät wurde unter Einhaltung aller Sicherheitsanweisungen hergestellt. Zur
Aufrechterhaltung dieses Zustands und der Gewährleistung optimaler Betriebsbedingungen,
muss der Benutzer die in dieser Betriebsanleitung enthaltenen Sicherheitsanweisungen
und -warnungen einhalten.
: Dieses Symbol weist auf ein Stromschlag- oder Kurzschlussrisiko hin.
- Dieses Gerät darf nur mit einer Spannung zwischen 100-240 Volt und 50-60 Hertz
verwendet werden. Versuchen Sie niemals, dieses Gerät mit einer anderen Spannung in
Betrieb zu nehmen.
- Sorgen Sie dafür, dass alle elektrischen Anschlüsse des Systems den Betriebsvorschriften
entsprechen.
- In Geschäftsräumen ist dafür zu sorgen, dass bei elektrischen Anlagen die Regeln für eine
Verhinderung von Unfällen eingehalten werden.
- In Schulen, Bildungseinrichtungen oder Werkstätten muss die Betriebsfähigkeit von
elektronischen Geräten durch qualiziertes Personal kontrolliert werden.
- Halten Sie die Nutzungsbedingungen anderer, mit dem System verbundenen Geräte ein.
- Kontaktieren Sie bei Zweifeln hinsichtlich der Funktionsweise oder der Sicherheit der
WelcomeEye Comfort / Compact / 08/17
D11
Page 38

Geräte eine Person mit entsprechender Erfahrung.
- Elektrische Geräte dürfen niemals mit feuchten Händen angeschlossen oder getrennt
werden.
- Vergewissern Sie sich bei der Installation dieses Geräts, dass die Stromkabel nicht
beschädigt werden können.
- Tauschen Sie beschädigte Stromkabel niemals selbst aus! Ziehen Sie sie in diesem Fall
aus der Steckdose und wenden Sie sich an eine Person mit entsprechender Erfahrung.
- Die Steckdose muss sich in der Nähe des Geräts benden und leicht zugänglich sein.
- In der Gebäudekabelinstallation für das fest mit dem Stromnetz verbundenen Gerät
muss sich eine schnell zugängliche Unterbrechungsvorrichtung benden (Netzschalter,
Unterbrecher, gleichwertige Vorrichtungen).
- Um das Gerät herum muss ein minimaler Freiraum beibehalten werden, um ausreichende
Ventilation zu gewährleisten.
- Die Ventilation darf nicht durch Bedecken der Ventilationsönung mit einem Gegenstand
wie einem Papier, einer Zeitschrift, einer Tischdecke, einem Vorhang usw. behindert
werden.
- Es darf keinerlei oenes Feuer, wie etwa eine brennende Kerze auf das Gerät gestellt
werden.
- Betriebstemperatur des Geräts beachten.
- Das Gerät darf keinen Flüssigkeiten oder Spritzern ausgesetzt werden und es dürfen
üssigkeitsgefüllten Gegenstände, wie etwa Vasen, darauf abgestellt werden.
D12
WelcomeEye Comfort / Compact / 08/17
Page 39

INHOUDSOPGAVE
3 ALGEMEEN ..........................................................................................p.3
4 NOMENCLATUUR ..............................................................................p.3
5 INSTALLATIE VAN HET PRODUCT ...............................................p.5
1. Bedrading
2. Instelling van de straatunit
3. Installatie van het hoofdscherm of extra scherm
4. Installatie van de hoofd- of extra straatunit
5. Installatie van een camera (optie)
6. Voor meer informatie
7 TOEBEHOREN ..................................................................................p.10
1 VEILIGHEIDSVOORSCHRIFTEN ....................................................p.2
2 INHOUD VAN DE KIT. ........................................................................p.2
6
TECHNISCHE EIGENSCHAPPEN ..................................................p.8
8
TECHNISCHE BIJSTAND GARANTIE ......................................p.10
9 VEILIGHEIDSMAATREGELEN .......................................................p.11
WelcomeEye Comfort / Compact / 08/17
NL1
Page 40

1. VEILIGHEIDSVOORSCHRIFTEN
Belangrijk!
• Lees de gebruiksaanwijzing zorgvuldig door voordat u dit product installeert of gebruikt.
• Indien u dit product installeert voor derden, vergeet dan niet om de handleiding of een
kopie hiervan achter te laten voor de eindgebruiker.
Waarschuwing:
• De diverse onderdelen mogen alleen worden gedemonteerd door een erkende vakman.
Veiligheidsmaatregelen:
• Voor een veilig gebruik van dit systeem is het noodzakelijk dat de installateurs, gebruikers
en technici alle veiligheidsprocedures volgen die in deze handleiding beschreven worden.
Er worden zo nodig specieke waarschuwingen en attentiesymbolen aangegeven op de
•
onderdelen.
2. INHOUD VAN DE KIT
1. Scherm 7’’
(WelcomeEye Comfort)
3. Inplugbare
voeding
NL2
1.bis Scherm 4,3’’
(WelcomeEye Compact)
2. Wandhouder
4. Adapter voor
inplugbare
voedingsstekker
voor EU of UK
WelcomeEye Comfort / Compact / 08/17
5. Straatunit
Page 41

3. ALGEMEEN
Deze videofoon is samengesteld uit een antwoordset binnen met aanraakscherm en een
buitenunit met intercom en camera waarmee u de bezoeker die heeft gebeld kunt zien en
ermee kunt praten. Het systeem kan eenvoudig geïnstalleerd worden omdat er slechts 2
draden nodig zijn voor alle functies: bel, video, intercom, bediening slot en automatische
poort).
De WelcomeEye technologie stelt u in staat de straatunit te delen tussen 2 families. Elke
familie kan over maximaal 3 schermen beschikken.
Het systeem kan uit maximaal een camera en twee straatunits bestaan.
Lees voor een eciënt gebruik deze handleiding zorgvuldig door.
De complete handleiding kan gedownload worden op www.philips.com.
4. NOMENCLATUUR
Scherm:
Scherm
Luidspreker
Microfoon
DES 9900 VDP
2/4
1/3
+
-
CFI Extel
ZI de Fétan, 01600 Trévoux
FRANCE
Made in P.R.C
Voedingsaansluiting Aansluiting op de straatunit en de
toebehoren
WelcomeEye Comfort / Compact / 08/17
NL3
Page 42

Straatunit:
6
7
8
1
2
1
2
1
2
3 4 5
6
1 2
7
8
1
2
1
2
Schemersensor
Lens van de
camera
Luidspreker
Witte LED (nachtzicht)
Microfoon
Verlichting naamplaatje
Antidiefstalbevestigingsschroef
Programmaswitch
1
1 2
3 4 5
2
1
CFI Extel
ZI de Fétan, 01600 Trévoux
FRANCE
IP44
Opmerkingen:
- Wanneer men op de belknop drukt, gaat binnen bij het scherm een beltoon over en wordt
het videobeeld weergegeven.
- Demonteer om het etiket van het naamplaatje te veranderen het frontpaneel en klik het
plastic plaatje los achter het etiket.
NL4
2
2
1
8
7
6
Made in P.R.C
WelcomeEye Comfort / Compact / 08/17
luidspreker
Connector voor de
aansluiting van de draden
Volumeregeling
Page 43

5. INSTALLATIE VAN HET PRODUCT
Advies en belangrijke opmerkingen:
- Om optimaal gebruik te maken van uw straatunit raden wij u aan deze in te stellen (mode
1 of 2 families, 1 of 2 straatunits, volumeregeling van de luidspreker), alvorens het systeem
denitief te installeren. Hiervoor kan een binnenaansluiting nodig zijn om te controleren
of de instellingen goed werden uitgevoerd.
- Als u het product vóór de installatie wilt testen, moet u ervoor zorgen dat de straatunit
en de monitor zich hierbij niet in hetzelfde vertrek bevinden, omdat de videofoon anders
een schelle uittoon kan afgeven (Larsen-eect).
- Plaats de camera niet direct in de zon of tegenover een weerspiegelend oppervlak.
- Het verdient aanbeveling de kabels tegen schokken of weersinvloeden te beschermen
door een mantel.
1. Bedrading
Laat de kabel van de videofoon niet door dezelfde kabelmantel lopen als de
elektriciteitskabels om risico op storingen of slechte werking te vermijden.
Let op: In geen geval de draden verdubbelen om de doorsnede te vergroten
a. Aansluiting van de visiofoon (scherm, straatunit en camera, zie g. 1, g. 2 of g. 3)
Te gebruiken draden: 2 draden 0.75 mm2 tot 80 m of 2 draden 1.5 mm2 tot 120 m.
- Sluit de draden stevig aan volgens een van de bekabelingsschema’s naargelang de
gewenste conguratie.
- Raadpleeg zorgvuldig het etiket op de achterzijde van het scherm en op de achterzijde
van de straatunit.
- Stel naargelang de gekozen conguratie de switches in op de achterzijde van de straatunit
en stel de scherminterface in (zie hoofdstuk 2 instelling straatunit).
c. Aansluiting van een automatische poort
- De straatunit beschikt over een droog (spanningsvrij) contact dat op de bedieningsdrukknop
van de automatische poort aangesloten moet worden.
- Sluit deze rechtstreeks aan op de aansluitklemmen 5 en 6 op de achterzijde van de
straatunit (u hoeft geen rekening te houden met de polariteit).
- De openingsfunctie is uitsluitend mogelijk als de video van de betreende straatunit
weergegeven wordt.
b. Aansluiting van een elektrische slotplaat of elektrisch slot
Belangrijk: De slotplaat of het elektrische slot dat u wilt bedienen, moet uitgerust zijn met
een mechanisch geheugen. De stroom van de slotplaat mag niet hoger zijn dan 1,1A.
- Sluit deze rechtstreeks aan op de aansluitklemmen 7 en 8 op de achterzijde van de
straatunit (u hoeft geen rekening te houden met de polariteit).
- De openingsfunctie is uitsluitend mogelijk als de video van de betreende straatunit
weergegeven wordt.
WelcomeEye Comfort / Compact / 08/17
NL5
Page 44

2. Instelling van de straatunit (zie g. 1, g. 2 of g. 3)
a. Instelling van het nummer van de straatunit:
Schuif switch 2 naar links op straatunit nr. 1 en naar rechts op straatunit nr. 2.
b. Instelling van het aantal families:
Zet switch 1 naar links voor een familie en naar rechts voor 2 families.
c. Volumeregeling van de straatunit:
Draai met een kruisknopschroevendraaier de stelschroef van de volumeregeling in de
gewenste stand.
3. Installatie van het hoofdscherm of extra scherm
1m60
1 2
4
5 6
3
DES 9900 VDP
5 8 1 0 2 3
WiĮ 2.4GHz
24V 550mA
2/4
1/3
+
-
CFI Extel
ZI de Fétan, 01600 Trévoux
FRANCE
DES 9900 VDP
5 8 1 0 2 3
Made in P.R.C
7
1 - Breng de wandhouder zodanig aan dat het scherm op een hoogte van ongeveer 1,60 m
staat.
2 – Teken de plaats van de boorgaten af met behulp van het bevestigingsframe.
3 – Boor de gaten.
4 – Gebruik aan de ondergrond aangepaste deuvels (de meegeleverde deuvels zijn geschikt
NL6
WelcomeEye Comfort / Compact / 08/17
Page 45

voor massieve muren).
5 - Bevestig de wandhouder.
6 - Sluit de 2 draden van de straatunit en de 2 voedingskabels aan volgens het
bekabelingsschema.
7 - Breng het scherm op de wandhouder aan.
8 - Naargelang de gekozen conguratie en nadat de bekabeling voltooid is, kan een
instelling van de interface nodig zijn. Raadpleeg voor meer informatie de complete
handleiding die gedownload kan worden op www.philips.com.
Let op: bij deze stap de 230V AC voeding niet aansluiten
4. Installatie van de hoofd-of extra straatunit
Let op: Het apparaat mag niet op de voeding aangesloten worden voordat de bekabeling
voltooid is.
1m60
1 2
4
DES 9900 VDP
5 1 0 0 6 3
1
2
1 2
2
1
8
7
6
3 4 5
2
1
DES 9900 VDP
CFI Extel
5 1 0 0 6 3
ZI de Fétan, 01600 Trévoux
FRANCE
20V 110mA
RFID 125kHz
IP44
Made in P.R.C
7
WelcomeEye Comfort / Compact / 08/17
5
1
2
1
2
8 9
3
6
NL7
Page 46

1 - Draai de antidiefstalschroef onder de straatunit los.
2 - Kantel het frontpaneel van de straatunit naar voren.
3 - De lens van de straatunit moet op een hoogte van ongeveer 1,60 m van de grond worden
geplaatst.
4 - Teken de gaten af.
5 – Boor de gaten.
6 – Gebruik aan de ondergrond aangepaste deuvels (de meegeleverde deuvels zijn geschikt
voor massieve muren).
7 – Sluit de twee draden vanuit het scherm aan en sluit zo nodig de elektrische slotplaat
en poort aan (zie Hoofdstuk 1. Bedrading). Stel de switches op de achterzijde van de
straatunit in (zie Hoofdstuk 2. Instelling van de straatunit).
8 – Breng de schroeven aan en plaats dan de twee doppen terug die de bevestigingsschroeven
verbergen.
Opmerking: schroef vast via de zwarte plaatjes die op de achterkant van de straatunit zijn
geplaatst zonder ze te verwijderen.
9 – Breng het frontpaneel van de straatunit aan en draai de antidiefstalschroef weer aan.
10 - Sluit de 230V AC voeding aan op de modulaire adapter op een installatie die voldoet
aan de van kracht zijnde regelgeving (voor Frankrijk NFC 15-100).
- Controleer de goede werking (bel, video...).
- Vergeet niet in geval van een tweede straatunit het (de) scherm(en) in te stellen.
11 - Breng een silicone* pakking aan tussen de afdekplaat en de muur om insijpeling van
water te voorkomen. *Gebruik geen siliconen op basis van azijnzuur (ruikt naar azijn).
On
5. Installatie van een camera (optie)
Sluit de draden aan volgens het bedradingsschema.
Kies een geschikte plaats voor de installatie van de camera.
Controleer of geen enkel element de installatie hindert.
Schroef de muurhouder vast met behulp van de meegeleverde schroeven (voor massieve
muren)
Richt de camera in de gewenste richting en draai de klembus vast.
Stel het (de) scherm(en) in
On
6. Voor meer informatie
Voor meer informatie over de functies van uw Philips WelcomeEye kunt u de complete
handleiding downloaden op de website www.philips.com.
6. TECHNISCHE EIGENSCHAPPEN
Scherm:
ref: 531003 (WelcomeEye Comfort)
ref: 531005 (WelcomeEye Compact)
- 2 draden
- Scherm 7’’ (Comfort), 4,3’’ (Compact)
- Resolutie 800 x 480 (Comfort), 480 x w272 (Compact)
- Stroomverbruik: 460mA (Comfort), 400mA (Compact)
- Verbruikt vermogen: 11,1W (Comfort), 9,6W (Compact)
- 6 beltonen (85dB)
- Afmetingen: 142(h) x 210(l) x 15(d) (Comfort), 116(h) x 146(l) x 16(p) (Compact)
NL8
WelcomeEye Comfort / Compact / 08/17
Page 47

Straatunit:
ref: 538200
- Sensor C-MOS kleur 900 TVL
- Kijkhoek H100° / V75°
- Nachtzicht (witte leds)
- Slotplaatbediening 12V/1.1A
- Bediening poort: uitschakelvermogen 12V/2A
- IP44
- Gebruikstemperatuut: -20°C / +50°C
WelcomeEye Outdoor: (extra straatunit)
ref: 531006
- Sensor C-MOS kleur 900TVL
- Kijkhoek H130° / V90°
- Nachtzicht (witte leds)
- Slotplaatbediening 12V/1.1A
- Bediening poort: uitschakelvermogen 12V/2A
- RFID (125kHz)
- IP44
- Bedrijfstemperatuur: -20°C / +50°C
- Afmetingen: 168 (h) x 82 (b) x 38 (d)
WelcomeEye AddComfort: (extra scherm)
ref: 531003
- 2 draden
- Scherm 7”
- Resolutie 800 x 480
- Stroomverbruik: 460mA
- Verbruikt vermogen: 11,1 W
- 6 beltonen (85dB)
- Afmetingen: 142 (h) x 210 (b) x 15 (d)
WelcomeEye AddCompact: (extra scherm)
ref: 531005
- 2 draden
- Scherm 4,3”
- Resolutie 480 x 272
- Stroomverbruik: 400mA
- Verbruikt vermogen: 9,6W
- 6 beltonen (85dB)
- Afmetingen: 116(h.) x 146(l.) x 16(d.)
WelcomeEye Cam: (extra camera)
ref: 531007
- Sensor C-MOS kleur 900TVL
- Kijkhoek: H95°/V75°
- Bedrijfstemperatuur: -20°C / +50°C
- Beschermingsindex: IP66
WelcomeEye Comfort / Compact / 08/17
NL9
Page 48

7. TOEBEHOREN
WelcomeEye AddCompact - DES 9300 DDE (ref.: 531005)*
WelcomeEye AddComfort - DES 9500 DDE (ref.: 531003)*
WelcomeEye Cam - DES 9900 CVC (ref.: 531007)
WelcomeEye Outdoor - DES 9900 VOS (ref.: 531006)**
WelcomeEye Lock - DES 1000 EDL (ref: 531008)
WelcomeEye Lock - DES 1100 EDL (ref: 531009)
WelcomeEye Power - DES 1000 DPS (ref.: 531010)**
WelcomeEye TAG - DES 1000 ACI (ref.: 531011)**
** Raadpleeg voor meer informatie de complete handleiding van WelcomeEye Connect/
Touch, beschikbaar op de site www.philips.com.
* Raadpleeg voor meer informatie de complete handleiding van WelcomeEye Comfort/
Compact, beschikbaar op de site www.philips.com.
8. TECHNISCHE BIJSTAND - GARANTIE
De FAQ zijn beschikbaar in de complete handleiding die gedownload kan worden op www.
philips.com.
De garantie van dit apparaat geldt voor onderdelen en werkzaamheden in onze
werkplaatsen.
De garantie dekt niet: verbruiksproducten (batterijen, accu’s, etc.) en schade veroorzaakt
door: onjuist gebruik, onjuiste installatie, externe interventie, beschadiging door fysieke of
elektrische schokken, vallen of weersinvloeden.
• Open het apparaat niet, bij opening vervalt de garantie.
• Bescherm het scherm in geval van een eventuele retourzending naar de technische dienst
om krassen te voorkomen.
• Alleen reinigen met een zachte doek, geen oplosmiddelen gebruiken. Bij het demonteren
van de onderdelen komt de garantie te vervallen. Schakel het apparaat uit of trek de
stekker uit het stopcontact voordat u het apparaat reinigt.
Let op: Gebruik geen carbonzure schoonmaakproducten of -benzine, alcohol of
soortgelijke middelen. Naast het beschadigen van uw apparaat kunnen de dampen
bovendien gevaarlijk zijn voor uw gezondheid en explosiegevaar met zich meebrengen.
Gebruik voor de reiniging geen gereedschap dat spanning kan geleiden (staalborstel,
puntig gereedschap en dergelijke).
De kassabon of de factuur is het bewijs van de datum van aankoop.
De contactadressen en openingstijden van onze technische centra kunnen zo nodig
geraadpleegd worden op de website www.philips.com.
NL10
WelcomeEye Comfort / Compact / 08/17
Page 49

GARANTIEKAART
De heer / mevrouw :
Telefoonnummer :
Adres :
E-mail :
Datum van aankoop : / / (DD/MM/YYYY)
Handelaar :
Dealer Phone :
Dealer Adres :
Volgnummer PHI/1031/
Belangrijk : Bewaar deze garantiekaart en het aankoopbewijs.
Philips en het schildembleem van Philips zijn gedeponeerde merken van Koninklijke Philips
N.V. en worden onder licentie gebruikt. Dit product werd gefabriceerd door en verkocht
onder de aansprakelijkheid van CFI Extel SAS, die als enige garant staat voor dit product.
9. VEILIGHEIDSMAATREGELEN
Schade als gevolg van niet-naleving van de voorschriften van de handleiding leidt tot
verval van de garantie. Wij kunnen op generlei wijze aansprakelijk gesteld worden voor
schade die hieruit voortvloeit
Wij kunnen op generlei wijze aansprakelijk gesteld worden voor schade aan
goederen of personen als gevolg van een onjuiste hantering of niet-naleving van de
veiligheidsvoorschriften.
Dit product werd strikt vervaardigd volgens de veiligheidsvoorschriften. Om deze veiligheid
te behouden en om het optimale gebruik van dit product te garanderen, dient de gebruiker
de veiligheidsinstructies en de waarschuwingen in deze handleiding in acht te nemen.
: Dit symbool duidt op een risico op elektrische schokken of kortsluiting.
- Dit product dient uitsluitend gebruikt te worden op een spanning tussen: 100-240 Volt en
50-60 hertz. Probeer nooit het apparaat op een andere spanning te gebruiken.
- Controleer of alle elektrische aansluitingen van het systeem voldoen aan de
gebruiksvoorschriften.
- In commerciële ruimtes moet u ervoor zorgen dat aan de regels voor ongevallenpreventie
voor elektrische installaties is voldaan.
- In scholen, ruimtes voor opleidingen, werkplaatsen... is de aanwezigheid van een
gekwaliceerd persoon vereist voor het controleren van de werking van elektronische
apparaten.
- Leef de gebruiksvoorschriften van andere apparaten die aan het systeem zijn gekoppeld
na.
- Neem contact op met een deskundig persoon als u twijfelt over de werking of de veiligheid
WelcomeEye Comfort / Compact / 08/17
NL11
Page 50

van de apparaten.
- Elektrische apparaten nooit met natte handen aan- en uitschakelen of loskoppelen.
- Bij het installeren van dit product moet u controleren of de voedingskabels van het
apparaat niet beschadigd zijn.
- Vervang nooit zelf beschadigde elektrische kabels! Verwijder beschadigde kabels en
raadpleeg een vakman.
- Het stopcontact dient zich in de nabijheid van het apparaat te bevinden en moet
eenvoudig bereikbaar zijn.
- Een snel bereikbare onderbrekingsinrichting (lastschakelaar, stroomonderbreker of
gelijksoortige inrichting) dient in de bekabelingsinstallatie van het pand opgenomen te
worden voor permanent op het stroomnet aangesloten apparatuur.
- Behoud een minimale afstand rond het apparaat om verzekerd te zijn van voldoende
ventilatie.
- De ventilatie mag niet belemmerd worden door de afdekking met voorwerpen als kranten,
doeken, gordijnen, enz. van de ventilatieopening.
- Er mogen geen vlammen zoals een aangestoken kaars in de nabijheid van het apparaat
geplaatst worden.
- Neem de bedrijfstemperatuur van het product in acht.
- Het apparaat mag niet blootgesteld worden aan stromende of spattende vloeistof en er
mogen geen met vloeistof gevulde voorwerpen zoals vazen op het apparaat gezet worden.
NL12
WelcomeEye Comfort / Compact / 08/17
Page 51

SPIS TREŚCI
3 INFORMACJE OGÓLNE ................................................................ str.3
4 TERMINOLOGIA .............................................................................. str.3
5 MONTAŻ URZĄDZENIA ................................................................ str.5
1. Okablowanie
2. Ustawienia panela
3. Montaż ekranu głównego lub dodatkowego
4. Montaż zewnętrznej płyty głównej lub dodatkowej
5. Montaż kamery (opcjonalnie)
6. Więcej informacji
7 DODATKI.......................................................................................... str.10
1 WYTYCZNE Z ZAKRESU BEZPIECZEŃSTWA ......................... str.2
2
ZAWARTOŚĆ ZESTAWU ............................................................... str.2
6
DANE TECHNICZNE ....................................................................... str.8
8
POMOC TECHNICZNA GWARANCJA .................................. str.10
9 ŚRODKI BEZPIECZEŃSTWA........................................................str.11
WelcomeEye Comfort / Compact / 08/17
PL1
Page 52

1. ZALECENIA BEZPIECZEŃSTWA
Ważna uwaga!
• Przed montażem lub użyciem produktu należy dokładnie przeczytać niniejszą instrukcję
obsługi.
• Jeśli produkt instalowany jest na rzecz osób trzecich, należy pamiętać o pozostawieniu
dla użytkownika końcowego niniejszej instrukcji obsługi lub jej kopii.
Uwaga:
• Demontaż poszczególnych elementów powinien być wykonany wyłącznie przez
wykwalikowanego technika.
Środki bezpieczeństwa:
• Dla bezpiecznej eksploatacji systemu, instalatorzy, użytkownicy oraz technicy powinni
przestrzegać wszystkich procedur bezpieczeństwa zawartych w niniejszej instrukcji
obsługi.
• W stosownych przypadkach, poszczególne elementy zostały oznaczone ostrzeżeniami
oraz znakami ostrzegawczymi.
2. ZAWARTOŚĆ ZESTAWU
1. Monitor 7’’
(WelcomeEye Comfort)
3. Zasilacz podłączany
do gniazdka
PL2
1.bis Monitor 4,3’’
(WelcomeEye Compact)
2. Uchwyt ścienny
4. Zasilacz
podłączany do
gniazdka zgodny
ze standardem
brytyjskim lub
5. Panel zewnętrzny
europejskim
WelcomeEye Comfort / Compact / 08/17
Page 53

3. INFORMACJE OGÓLNE
Wideodomofon składa się z wewnętrznego odbiornika z ekranem dotykowym oraz panela
zewnętrznego z interkomem i kamerą umożliwiającego komunikację audio-wizualną z
osobą odwiedzającą. Jest urządzeniem łatwym w montażu ponieważ do korzystania ze
wszystkich jego funkcji (dzwonka, rejestracji wideo, interkomu, sterowania zaczepem i
sterowania automatyką) niezbędna jest jedynie instalacja 2-przewodowa.
Wykonany w technologii WelcomeEye panel zewnętrzny przeznaczony jest do systemu
2-rodzinnego. Każda rodzina może używać do 3 ekranów.
System może posiadać maksymalnie jedną kamerę i 2 panele zewnętrzne.
Aby w pełni korzystać z funkcjonalności domofonu należy dokładnie przeczytać niniejszą
instrukcję.
Pełna instrukcja obsługi do pobrania na www.philips.com.
4. TERMINOLOGIA
Monitor:
Ekran
Głośnik
Mikrofon
DES 9900 VDP
2/4
1/3
+
-
CFI Extel
ZI de Fétan, 01600 Trévoux
FRANCE
Made in P.R.C
Zaciskowa listwa zasilająca Zaciskowa listwa podłączeniowa
do panela głównego i dodatków
WelcomeEye Comfort / Compact / 08/17
PL3
Page 54

Panel zewnętrzny:
6
7
8
1
2
1
2
1
2
3 4 5
6
1 2
7
8
1
2
1
2
Czujnik
zmierzchu
Obiektyw kamery
Głośnik
Białe światło ledowe
(widzenie w nocy)
Mikrofon
Podświetlenie wizytówki
Śruba mocująca
antywłamaniowa
Przełącznik
programowy
1
1 2
3 4 5
2
1
2
2
1
8
7
6
głośnika
Zaciskowa listwa
Regulacja siły dźwięku
CFI Extel
ZI de Fétan, 01600 Trévoux
FRANCE
IP44
Uwaga:
- Naciśnięcie przycisku wywołania umożliwia uruchomienie dźwięku na monitorze
wewnętrznym oraz wyświetlenie obrazu wideo.
- W celu zmiany wizytówki adresowej należy zdemontować front kasety wideodomofonowej
oraz odczepić plastikowe osłony za wizytówkami.
PL4
Made in P.R.C
WelcomeEye Comfort / Compact / 08/17
podłączeniowa do
przewodów
Page 55

5. MONTAŻ URZĄDZENIA
Ważne rady i uwagi:
- Aby korzystać w pełni z funkcjonalności panela zewnętrznego, zaleca się jego ustawienie
przed ostatecznym montażem (tryb 1 lub 2 rodziny, 1 lub 2 panele, ustawienie siły dźwięku
głośnika). W celu sprawdzenia poprawności ustawień, należy podłączyć i uruchomić
urządzenie na stole.
- W przypadku testowania urządzenia przed jego zamontowaniem, należy pamiętać, aby nie
umieszczać panela zewnętrznego oraz ekranu w jednym pomieszczeniu. W przeciwnym
wypadku, wideofon będzie wydawał charakterystyczne piskliwe dźwięki (efekt Larsena).
- Nie ustawiać kamery bezpośrednio w kierunku słońca lub innych odbijających światło
powierzchni.
- Zaleca się ułożenie kabli w osłonie w celu ich zabezpieczenia przed uszkodzeniem lub
działaniem czynników atmosferycznych.
1. Okablowanie
Aby uniknąć zakłóceń i zaburzeń działania wideodomofonu, nie należy montować jego
przewodów w jednej osłonie z przewodami elektrycznymi.
Uwaga: W celu zwiększenia przekroju przewodu, nie należy podwajać jego długości.
a. Podłączenie wideodomofonu (ekran, panel zewnętrzny i kamera, zob.rys. 1, rys. 2 lub rys. 3)
Należy zastosować następujące przewody: 2 przewody 0.75 mm2 do 80 m lub 2 przewody
1.5 mm2 do 120 m.
- Podłączyć przewody zgodnie ze schematami instalacji okablowania w zależności od
żądanej konguracji.
- Należy uwzględnić informacje na etykietach umieszczonych z tyłu ekranu i panela
zewnętrznego.
- W zależności od wybranej konguracji, należy odpowiednio ustawić przełączniki z tyłu
panela zewnętrznego i skongurować ekran (zobacz część 2 ustawienia panela).
b. Podłączenie automatyki bramy
- Panel posiada styk bezpotencjałowy (bez napięcia), który podłącza się do przycisku
sterującego automatyką.
- Należy podłączyć przycisk bezpośrednio do zacisków 5 lub 6 z tyłu panela (polaryzacja
nie ma znaczenia).
- Funkcja otwierania jest możliwa tylko wtedy, gdy wyświetla się obraz wideo z
odpowiedniego panela zewnętrznego.
c. Podłączenie zaczepów lub zamka elektrycznego
Ważna uwaga: Zdalnie sterowane zaczepy lub zamek elektryczny należy bezwzględnie
wyposażyć w pamięć mechaniczną. Napięcie zaczepów nie może przekraczać 1,1 A.
- Należy podłączyć przycisk bezpośrednio do zacisków 7 lub 8 z tyłu panela (polaryzacja
nie ma znaczenia).
- Funkcja otwierania jest możliwa tylko wtedy, gdy wyświetla się obraz wideo z
odpowiedniego panela zewnętrznego.
WelcomeEye Comfort / Compact / 08/17
PL5
Page 56

2. Ustawienia panela (zob.rys. 1, rys. 2 lub rys. 3)
a. Ustawienia numeru panela głównego:
Umieścić przełącznik 2 po lewej stronie na panelu nr 1 i po prawej stronie na panelu nr 2.
b. Ustawienie liczby rodzin:
Dla trybu jednorodzinnego - umieścić przełącznik 2 po lewej stronie, dla trybu
dwurodzinnego- po prawej stronie.
a. Regulacja siły dźwięku panela:
Ustawić siłę dźwięku panela za pomocą śrubokręta krzyżakowego.)
3. Montaż ekranu głównego lub dodatkowego
1m60
1 2
4
5 6
3
DES 9900 VDP
5 8 1 0 2 3
WiĮ 2.4GHz
24V 550mA
2/4
1/3
+
-
CFI Extel
ZI de Fétan, 01600 Trévoux
FRANCE
DES 9900 VDP
5 8 1 0 2 3
Made in P.R.C
7
1 - Umieścić uchwyt ścienny w taki sposób, aby ekran znajdował się na wysokości ok.1,60
m od podłoża.
2 – Wyznaczyć miejsca otworów za pomocą uchwytów mocujących.
3 – Wywiercić otwory.
4 – Umieścić w otworach odpowiednie do uchwytów kołki (te znajdujące się w zestawie
PL6
WelcomeEye Comfort / Compact / 08/17
Page 57

przeznaczone są do ścian pełnych).
5 – Zamocować uchwyt ścienny.
6 – Podłączyć 2 przewody panela zewnętrznego i 2 przewody zasilające zgodnie ze
schematem instalacji okablowania.
7 – Zamontować ekran na uchwycie ściennym.
8 - W zależności od wybranej konguracji, po zakończeniu instalacji okablowania, zmiana
ustawienia interfejsu może okazać się niezbędna. Więcej informacji na ten temat
znajduje się w pełnej instrukcji obsługi do pobrania na www.philips.com.
Uwaga: na tym etapie prac nie podłączać zasilania 230 V AC.
4. Montaż zewnętrznej płyty głównej lub dodatkowej
Uwaga: Przed zakończeniem instalacji okablowania, nie należy podłączać urządzenia do
zasilania.
1m60
1 2
4
DES 9900 VDP
5 1 0 0 6 3
1
2
1 2
2
1
8
7
6
3 4 5
2
1
DES 9900 VDP
CFI Extel
5 1 0 0 6 3
ZI de Fétan, 01600 Trévoux
FRANCE
20V 110mA
RFID 125kHz
IP44
Made in P.R.C
7
WelcomeEye Comfort / Compact / 08/17
5
1
2
1
2
8 9
3
6
PL7
Page 58

1 - Odkręcić śrubę mocującą antywłamaniową na płycie zewnętrznej.
2 - Podważyć front kasety wideodomofonowej do góry.
3 – Obiektyw płyty powinien znajdować się na wysokości ok 1,60 m od podłoża.
4 – Oznaczyć miejsca otworów.
5 – Wywiercić otwory.
6 – Zastosować odpowiednie do rodzaju uchwytów kołki (śruby znajdujące się w zestawie
przeznaczone są do ścian pełnych).
7 – Podłączyć dwa przewody ekranu i, w razie potrzeby, podłączyć zaczep elektryczny i
bramę (zob.część 1. Okablowanie). Ustawić przełączniki znajdujące się z tyłu panela
zewnętrznego (zob. część 2. Ustawienia panela).
8 – Zamontować śruby i zamontować zaślepki maskujące śruby mocujące.
Informacja: przykręcić przez czarne osłony umieszczone z tyłu panelu zewnętrznego bez
zdejmowania ich.
9 – Umieścić kasetę wideodomofonu z przodu panela i przykręcić śrubę mocującą
antywłamaniową.
10 - Podłączyć zasilanie 230V AC do adaptera modularnego, w instalacji spełniającej
obowiązujące normy (NFC 15-100 dla Francji).
- Sprawdzić poprawne działanie (połączenia wideo...).
- W przypadku drugiego panela zewnętrznego, należy skongurować ekran(y).
11 - Uszczelnić za pomocą silikonowej uszczelki* szczelinę między daszkiem i ścianą w celu
zabezpieczenia przed przeciekaniem wody. *Nie stosować silikonu na bazie kwasu
octowego (zapach octu).
On
5. Montaż kamery (opcjonalnie)
Podłączyć przewody zgodnie ze schematem instalacji okablowania.
Wybrać odpowiednie dla montażu kamery miejsce.
Upewnić się, że żaden element nie będzie przeszkadzał w instalacji.
Przykręcić część naścienną za pomocą śrub znajdujących się w zestawie (do ścian z
materiałów pełnych).
Ustawić kamerę w odpowiednim kierunku i przykręcić obręcz mocującą.
Skongurować ekran(y)
On
6. Więcej informacji
Więcej informacji na temat funkcjonalności produktu Philips WelcomeEye znajduje się w
pełnej instrukcji obsługi do pobrania na www.philips.com.
6. DANE TECHNICZNE
Monitor:
nr ref.: 531003 (WelcomeEye Comfort)
nr ref.: 531005 (WelcomeEye Compact)
- 2 przewody
- Ekran 7’’ (Comfort), 4,3’’ (Compact)
- Rozdzielczość 800 x 480 (Comfort), 480 x 272 (Compact)
- Pobór prądu: 460 mA (Comfort), 400 mA (Compact)
- Pobór mocy: 11,1 W (Comfort), 9,6 W (Compact)
- 6 sygnałów dzwonków (85dB)
- Wymiary: 142 (wys.) x 210 (szer.) x 15 (gł.) (Comfort), 116 (wys.) x 146 (szer.) x 16 (gł.) (Compact)
PL8
WelcomeEye Comfort / Compact / 08/17
Page 59

Panel zewnętrzny:
nr ref.: 538200
- Czujnik C-MOS kolorowy 900 TVL
- Kąt widzenia: w poziomie 100° / w pionie 75°
- Widzenie w nocy (białe światło ledowe)
- Sterowanie zaczepami 12V/1.1A
- Sterowanie bramą: zdolność wyłączania 12 V / 2 A
- IP44
- Temperatura pracy: -20°C / +50°C
WelcomeEye Outdoor: (Panel zewnętrzny dodatkowy)
nr ref.: 531006
- Czujnik C-MOS kolorowy 900TVL
- Kąt widzenia: w poziomie 130° / w pionie 90°
- Widzenie w nocy (białe światło ledowe)
- Sterowanie zaczepami 12V/1.1A
- Sterowanie bramą: zdolność wyłączania 12 V / 2 A
- RFID (125 kHz)
- IP44
- temperatura pracy: -20°C / +50°C
- Wymiary: 168 (wys.) x 82 (szer.) x 38 (gł.)
WelcomeEye AddComfort: (monitor dodatkowy)
nr ref.: 531003
- 2 przewody
- Ekran 7’’
- Rozdzielczość 800 x 480
- Pobór prądu: 460 mA
- Pobór mocy: 11,1 W
- 6 sygnałów dzwonków (85dB)
- Wymiary: 142(wys.) x 210(szer.) x 15(gł.)
WelcomeEye AddCompact: (monitor dodatkowy)
nr ref.: 531005
- 2 przewody
- Ekran 4,3’’
- Rozdzielczość 480 x 272
- Pobór prądu: 400 mA
- Pobór mocy: 9,6 W
- 6 sygnałów dzwonków (85dB)
- Wymiary: 116 (wys.) x 146 (szer.) x 16 (gł.)
WelcomeEye Cam: (dodatkowa kamera)
nr ref.: 531007
- czujnik C-MOS kolorowy 900TVL
- kąt widzenia: w poziomie 95° / w pionie 75°
- temperatura pracy: -20°C / +50°C
- współczynnik ochrony: IP66
WelcomeEye Comfort / Compact / 08/17
PL9
Page 60

7. DODATKI
WelcomeEye AddCompact - DES 9300 DDE (nr. ref: 531005)*
WelcomeEye AddComfort - DES 9500 DDE (nr. ref.: 531003)*
WelcomeEye Cam - DES 9900 CVC (nr. ref.: 531007)
WelcomeEye Outdoor - DES 9900 VOS (nr. ref.: 531006)**
WelcomeEye Lock - DES 1000 EDL (nr. ref.: 531008)
WelcomeEye Lock - DES 1100 EDL (nr. ref.: 531009)
WelcomeEye Power - DES 1000 DPS (nr. ref.: 531010)**
WelcomeEye TAG - DES 1000 ACI (nr ref.: 531011)**
** Patrz kompletna instrukcja WelcomeEye Connect/Touch dostępna na stronie
www.philips.com, aby uzyskać więcej informacji.
* Patrz kompletna instrukcja WelcomeEye Comfort/Compact dostępna na stronie
www.philips.com, aby uzyskać więcej informacji.
8. POMOC TECHNICZNA - GWARANCJA
FAQ- Najczęściej Zadawane Pytania znajdują się w pełnej instrukcji obsługi do pobrania
na www.philips.com.
Gwarancja obejmuje urządzenie, jego części i robociznę w serwisie naprawczym.
Gwarancja nie obejmuje: materiałów eksploatacyjnych (baterii, akumulatorów itd.) oraz
uszkodzeń powstałych na skutek nieodpowiedniego użytkowania, niepoprawnego montażu,
dokonania zewnętrznych ingerencji przez osoby trzecie, awarii wynikających z uszkodzeń
zycznych lub mechanicznych, upadku lub oddziaływania zjawisk atmosferycznych.
• Otwarcie urządzenia powoduje utratę gwarancji.
• Podczas przekazywania urządzenia do serwisu pogwarancyjnego należy zabezpieczyć
ekran przed zadrapaniem.
• Czyścić za pomocą delikatnej szmatki bez użycia rozpuszczalników. Gwarancja
zostaje anulowana w przypadku samodzielnego demontażu części urządzenia. Przed
czyszczeniem należy odłączyć urządzenie od zasilania.
Uwaga: Nie używać karboksylowanych produktów i benzyny czyszczącej, a także
alkoholi czy produktów pochodnych. Poza ryzykiem uszkodzenia urządzenia, opary tych
substancji są niebezpieczne dla zdrowia i mogą grozić wybuchem.
Nie stosować podczas prac konserwacyjnych narzędzi przewodzących prąd elektryczny
(metalowa szczotka, narzędzia ostro zakończone...lub inne).
Paragon skalny lub faktura stanowią dowód zakupu.
Numery kontaktowe oraz godziny otwarcia naszych centrów obsługi znajdują się na stronie
www.philips.com.
PL10
WelcomeEye Comfort / Compact / 08/17
Page 61

KARTA GWARANCYJNA
Pan / Pani :
Numer telefonu :
Adres :
E-mail :
Data zakupu : / / (Dd / mm / rok)
Sprzedawca :
Telefon handlowiec :
Adres dealera :
Numer seryjny PHI/1031/
Ważny : Proszę zachować tę kartę gwarancyjną i dowód zakupu.
Nazwa Philips oraz emblemat tarczy Philips są objętymi licencją, zastrzeżonymi znakami
towarowymi rmy Koninklijke Philips N.V. Ten produkt został wyprodukowany i jest
sprzedawany na odpowiedzialność rmy CFI Extel SAS, która jest jedynym gwarantem w
odniesieniu do tego produktu.
9. ŚRODKI BEZPIECZEŃSTWA
Wszelkie uszkodzenia wynikające z niestosowania się do wskazówek zawartych w niniejszej
instrukcji obsługi prowadzą do wygaśnięcia gwarancji. Producent nie ponosi żadnej
odpowiedzialności za szkody wynikające z nieodpowiedniego użytkowania.
Producent nie ponosi odpowiedzialności za szkody osobowe bądź na mieniu wynikające
z nieprawidłowego użytkowania lub z braku zgodności z wytycznymi w zakresie
bezpieczeństwa.
Niniejszy produkt został wyprodukowany zgodnie z zaleceniami w zakresie bezpieczeństwa.
W celu utrzymania tego stanu rzeczy i zapewnienia najlepszego wykorzystania produktu,
użytkownik jest zobowiązany do przestrzegania zawartych w niniejszej instrukcji zaleceń i
ostrzeżeń w zakresie bezpieczeństwa.
: Ten symbol wskazuje zagrożenie związane z możliwością porażeniem prądem lub
powstaniem zwarcia elektrycznego.
- Produkt może być zasilany napięciem o wartości: 100-240 Volt i częstotliwości 50-60 Hz.
Nie zasilać urządzenia napięciem o innej wartości.
- Wszystkie podłączenia elektryczne systemu powinny być wykonane zgodnie z zaleceniami
instrukcji użytkowania.
- W przypadku montażu urządzenia w obiektach handlowych, należy przestrzegać zasad
zapobiegania wypadkom związanym z instalacją elektryczną.
- W placówkach szkolnych, instytucjach szkoleniowych, warsztatach wymagana jest
obecność wykwalikowanego personelu kontrolującego poprawne działanie urządzeń
elektrycznych.
WelcomeEye Comfort / Compact / 08/17
PL11
Page 62

- Należy przestrzegać zaleceń zawartych w instrukcji użytkowania połączonych z systemem
urządzeń.
- W przypadku wątpliwości związanych ze sposobem działania lub bezpieczeństwem
urządzeń, należy zwrócić się do odpowiednio wykwalikowanej osoby.
- Nie wolno włączać i wyłączać urządzenia mokrymi rękoma.
- W trakcie montażu urządzenia należy sprawdzić czy nie ma ryzyka uszkodzenia kabli
zasilających.
- Nie wolno wymieniać uszkodzonych kabli elektrycznych we własnym zakresie! W
podobnym przypadku, należy je usunąć i zwrócić się do odpowiednio wykwalikowanej
osoby.
- Gniazdo elektryczne powinno znajdować się w pobliżu urządzenia i być łatwo dostępne.
- Urządzenie odcinające dopływ prądu (przełącznik do rozłączania, rozłącznik lub
podobne w działaniu urządzenie), o łatwym dostępie, powinno znajdować się w instalacji
okablowania budynku dla urządzeń trwale podłączonych do sieci elektrycznej.
- Zachować minimalną odległość wokół urządzenia w celu zapewnienia odpowiedniej
wentylacji.
- Nie należy ograniczać dopływu powietrza blokując otwór wentylacyjny za pomocą gazety,
serwetki, ranki itp.
- Nie ustawiać na urządzeniu otwartego źródła ognia jak np.świeca.
- Zachować odpowiednią temperaturę działania urządzenia.
- Urządzenie nie może być wystawiane na działanie wody kapiącej lub rozpryskiwanej oraz
nie wolno na nim ustawiać żadnych obiektów wypełnionych płynami np. wazonów.
PL12
WelcomeEye Comfort / Compact / 08/17
Page 63

INDICE
3 INFORMAZIONI GENERALI ..............................................................p.3
4 NOMENCLATURA ................................................................................p.3
5 INSTALLAZIONE DEL PRODOTTO .................................................p.5
1. Cablaggio
2. Impostazione della pulsantiera
3. Installazione del monitor principale o supplementare
4. Installazione della pulsantiera esterna principale o supplementare
5. Installazione di una telecamera (opzionale)
6. Maggiori informazioni
6 CARATTERISTICHE TECNICHE .......................................................p.8
7 ACCESSORI .........................................................................................p.10
8 ASSISTENZA TECNICA GARANZIA ...........................................p.10
9 MISURE DI SICUREZZA .................................................................... p.11
1 ISTRUZIONI DI SICUREZZA ..............................................................p.2
2
CONTENUTO DEL KIT ........................................................................p.2
WelcomeEye Comfort / Compact / 08/17
IT1
Page 64

1. ISTRUZIONI DI SICUREZZA
Importante!
• Prima di installare o utilizzare il prodotto, leggere attentamente il manuale d’istruzioni.
• Se si installa il prodotto per conto di terzi, ricordarsi di lasciare il manuale o una copia
dello stesso all’utente nale.
Avvertenza:
• Le varie parti dell’apparecchiatura possono essere smontate solo da un tecnico autorizzato.
Misure di sicurezza:
• Per un uso in tutta sicurezza dell’impianto, è fondamentale che installatori, utenti e tecnici
si attengano a tutte le istruzioni relative alla sicurezza descritte nel presente manuale.
Ove necessario, sulle varie parti dell’apparecchiatura sono riportati simboli di avvertimento
•
o avvisi specici.
2. CONTENUTO DEL KIT
1. Monitor 7’’
(WelcomeEye Comfort)
3. Spina alimentazione
IT2
1.bis Monitor 4,3’’
(WelcomeEye Compact)
2. Supporto murale
4. Adattatore di
alimentazione
con spina
compatibile
prese EU o GB
WelcomeEye Comfort / Compact / 08/17
5. Pulsantiera esterna
Page 65

3. INFORMAZIONI GENERALI
Il presente videocitofono è composto da un touch screen e da una pulsantiera esterna
con citofono e telecamera che consentono di vedere chi ha suonato e comunicare con
l’esterno. L’installazione è particolarmente semplice, poiché bastano 2 li per assicurare
tutte le funzioni (audio, video, citofono e comando di bocchetta e automatismo).
La tecnologia WelcomeEye permette a 2 famiglie di condividere la pulsantiera esterna.
Ogni famiglia può avere no a 3 monitor.
Il sistema può comportare no a un massimo di una telecamera e 2 pulsantiere esterne.
Per un uso ottimale dell’impianto, leggere attentamente il presente manuale d’istruzioni.
Il manuale d’uso completo è disponibile su www.philips.com.
4. NOMENCLATURA
Monitor:
Schermo
Altoparlante
Morsettiera alimentazione Morsettiera per il collegamento a
DES 9900 VDP
2/4
1/3
+
-
CFI Extel
ZI de Fétan, 01600 Trévoux
FRANCE
Made in P.R.C
pulsantiera esterna e accessori
WelcomeEye Comfort / Compact / 08/17
Microfono
IT3
Page 66

Pulsantiera esterna:
6
7
8
1
2
1
2
1
2
3 4 5
6
1 2
7
8
1
2
1
2
Sensore
crepuscolare
Obiettivo della
telecamera
Altoparlante
1 2
3 4 5
2
1
LED bianco (visione notturna)
Microfono
Illuminazione portaetichette
Vite di ssaggio
antifurto
Switch di
programmazione
Regolazione volume
1
2
2
1
8
7
6
altoparlante
CFI Extel
ZI de Fétan, 01600 Trévoux
FRANCE
IP44
N.B.:
- Premendo il pulsante di chiamata, all’interno dell’abitazione si avverte una suoneria e
vengono visualizzate le immagini dell’esterno.
- Per modicare l’etichetta con il nome, smontare la facciata e sganciare il coperchio di
plastica che si trova dietro l’etichetta.
IT4
Made in P.R.C
WelcomeEye Comfort / Compact / 08/17
Morsettiera per il
collegamento dei li
Page 67

5. INSTALLAZIONE DEL PRODOTTO
Consigli e note importanti:
- Per sfruttare a pieno tutte le potenzialità della pulsantiera esterna, prima di installarla
nella sua posizione denitiva, si consiglia di impostarne tutti i vari parametri (modalità
1 o 2 famiglie, 1 o 2 pulsantiere, volume altoparlante). Per controllare che tutte le
regolazioni siano state eseguite correttamente, è possibile che sia necessario collegare
l’apparecchiatura su un piano di lavoro.
- Se si desidera provare il prodotto prima dell’installazione, fare attenzione a non eettuare
il test con pulsantiera esterna e monitor nella stessa stanza, altrimenti il videocitofono
emetterà un suono stridente (eetto Larsen).
- Non puntare la telecamera direttamente contro la luce del sole o di fronte a una supercie
riettente.
- Per proteggere i cavi dagli urti e dalle intemperie si consiglia di farli passare all’interno di
una guaina di protezione.
1. Cablaggio
Per evitare eventuali interferenze o malfunzionamenti, non far passare il cavo del
videocitofono all’interno della stessa guaina in cui passano i cavi elettrici.
Attenzione: Non addoppiare mai i li per aumentarne la sezione.
a. Collegamento del videocitofono (monitor, pulsantiera esterna e telecamera, v. g. 1, g.
2 o g. 3)
Fili da utilizzare: 2 li da 0,75 mm2 no a 80 m o 2 li da 1,5 mm2 no a 120 m.
- Collegare i li rispettando lo schema di cablaggio corrispondente alla congurazione
desiderata.
- Fare riferimento all’etichetta presente sul retro del monitor e sul retro della pulsantiera
esterna.
- Posizionare gli switch sul retro della pulsantiera e congurare l’interfaccia del monitor (v.
sezione 2 dell’impostazione della pulsantiera) in base alla congurazione scelta.
b. Collegamento di un motore per cancello
- La pulsantiera dispone di un contatto pulito (senza corrente) da collegare al comando
“pulsante” dell’automatismo.
- Collegarlo direttamente ai morsetti 5 e 6 sul retro della pulsantiera esterna (nessuna
polarità da rispettare).
- La funzione di apertura è possibile solo se vengono visualizzate le immagini riprese dalla
pulsantiera esterna interessata.
c. Collegamento di una bocchetta o di una serratura elettrica
Importante: La bocchetta o la serratura elettrica da comandare deve essere dotata di
memoria meccanica. La corrente della bocchetta/serratura non deve superare 1,1A.
- Collegare la bocchetta/serratura direttamente ai morsetti 7 e 8 sul retro della pulsantiera
esterna (nessuna polarità da rispettare).
- La funzione di apertura è possibile solo se vengono visualizzate le immagini riprese dalla
pulsantiera esterna interessata.
WelcomeEye Comfort / Compact / 08/17
IT5
Page 68

2. Impostazione della pulsantiera (v. g. 1, g. 2 o g. 3)
a. Impostazione del numero della pulsantiera:
Posizionare lo switch 2 a sinistra sulla pulsantiera esterna n°1 e a destra sulla pulsantiera
esterna n°2.
b. Impostazione del numero di famiglie:
Posizionare lo switch 1 a sinistra per la modalità monofamiliare e a destra per la modalità
bifamiliare.
c. Regolazione del volume della pulsantiera esterna:
Per regolare il volume della pulsantiera esterna, girare l’apposita vite usando un cacciavite
a croce
3. Installazione del monitor principale o supplementare
1m60
1 2
4
5 6
3
DES 9900 VDP
5 8 1 0 2 3
WiĮ 2.4GHz
24V 550mA
2/4
1/3
+
-
CFI Extel
ZI de Fétan, 01600 Trévoux
FRANCE
DES 9900 VDP
5 8 1 0 2 3
Made in P.R.C
7
1 – Disporre il supporto a parete facendo in modo che lo schermo del monitor si trovi a
un’altezza di circa 1,60 m da terra.
2 – Individuare l’ubicazione dei fori da praticare servendosi della staa di ssaggio.
IT6
WelcomeEye Comfort / Compact / 08/17
Page 69

3 – Forare.
4 – Inserire dei tasselli adatti al tipo di supporto (quelli in dotazione sono adatti a muri
pieni).
5 – Fissare il supporto murale.
6 – Collegare i 2 li della pulsantiera esterna e i 2 li dell’alimentazione seguendo
attentamente lo schema di cablaggio.
7 – Installare il monitor sul supporto murale.
8 – A seconda della congurazione scelta, al termine del cablaggio, è possibile che sia
necessario impostare l’interfaccia. Per maggiori informazioni, fare riferimento alla
versione completa del manuale d’istruzioni disponibile su www.philips.com.
Attenzione: in questa fase NON collegare l’apparecchiatura alla rete di alimentazione
230V AC.
4. Installazione della pulsantiera esterna principale o supplementare
Attenzione: Non collegare il prodotto alla fonte di alimentazione prima di aver portato a
termine il cablaggio.
1m60
1 2
4
DES 9900 VDP
5 1 0 0 6 3
1
2
1 2
2
1
8
7
6
3 4 5
2
1
DES 9900 VDP
CFI Extel
5 1 0 0 6 3
ZI de Fétan, 01600 Trévoux
FRANCE
20V 110mA
RFID 125kHz
IP44
Made in P.R.C
7
WelcomeEye Comfort / Compact / 08/17
5
1
2
1
2
8 9
3
6
IT7
Page 70

1 – Svitare la vite antifurto sotto la pulsantiera esterna.
2 – Spostare la parte anteriore della pulsantiera esterna in avanti.
3 – L’obiettivo della pulsantiera esterna deve trovarsi a un’altezza di circa 1,60 m da terra.
4 – Prendere i punti di riferimento necessari per i fori.
5 – Forare.
6 – Utilizzare dei tasselli adatti al tipo di supporto (quelli in dotazione sono adatti a muri
pieni).
7 – Collegare i due li provenienti dal monitor e, se necessario, collegare la bocchetta
elettrica e il cancello (v. sezione 1. Cablaggio). Posizionare in maniera opportuna gli
switch sul retro della pulsantiera esterna (v. sezione 2. Impostazione della pulsantiera).
8 – Inserire le viti e reintrodurre i due tappi che coprono le viti di ssaggio.
N.B.: avvitare direttamente attraverso i coperchi neri sul retro della pulsantiera esterna
senza rimuoverli.
9 – Reinserire la parte anteriore della pulsantiera esterna e riavvitare la vite di ssaggio
antifurto.
10 – Collegare l’alimentazione 230V AC all’adattatore modulare in un impianto conforme
alle norme vigenti (per la Francia, NFC 15-100).
- Controllare che l’impianto funzioni correttamente (videochiamata, ecc.).
- Nel caso in cui siano presenti due pulsantiere esterne, non dimenticare di congurare
il/i monitor.
11 – Applicare del silicone* tra la visiera e il muro per evitare che nell’interstizio scorra
acqua. *Non utilizzare silicone a base di acido acetico (odore di aceto).
On
5. Installazione di una telecamera (opzionale)
Collegare i li rispettando lo schema di cablaggio.
Scegliere un punto adatto per installare la telecamera.
Controllare che nessun elemento intralci l’installazione.
Fissare la parte a contatto con la parete usando le viti in dotazione (adatte a muri pieni).
Puntare la telecamera nella direzione desiderata e stringere la boccola di sostegno.
Congurare il/i monitor
On
6. Maggiori informazioni
Per scoprire tutte le funzioni di Philips WelcomeEye, scarica il manuale d’istruzioni
completo sul sito www.philips.com.
6. CARATTERISTICHE TECNICHE
Monitor:
rif.: 531003 (WelcomeEye Comfort)
rif.: 531005 (WelcomeEye Compact)
- 2 li
- Schermo 7’’ (Comfort), 4,3’’ (Compact)
- Risoluzione 800 x 480 (Comfort), 480 x 272 (Compact)
- Corrente consumata: 460mA (Comfort), 400mA (Compact)
- Potenza consumata: 11,1W (Comfort), 9,6W (Compact)
- 6 suonerie (85dB)
- Misure: 142 (h) x 210 (l) x 15 (p) (Comfort), 116 (h) x 146 (l) x 16 (p) (Compact)
IT8
WelcomeEye Comfort / Compact / 08/17
Page 71

Pulsantiera esterna:
rif.: 538200
- Sensore C-MOS a colori 900 TVL
- Angolo di visione O100° / V75°
- Visione notturna (led bianchi)
- Comando bocchetta elettrica 12V/1,1A
- Comando cancello: potere di interruzione 12V/2A
- IP44
- Temperatura di utilizzo: -20°C / +50°C
WelcomeEye Outdoor: (Pulsantiera esterna supplementare)
rif.: 531006
- Sensore C-MOS a colori 900TVL
- Angolo di visione O130° / V90°
- Visione notturna (led bianchi)
- Comando bocchetta elettrica 12V/1,1A
- Comando cancello: potere di interruzione 12V/2A
- RFID (125kHz)
- IP44
- temperatura operativa: -20°C / +50°C
- Misure: 168 (h) x 82 (l) x 38 (p)
WelcomeEye AddComfort: (monitor supplementare)
rif.: 531003
- 2 li
- Schermo 7”
- Risoluzione 800 x 480
- Corrente consumata: 460mA
- Potenza consumata: 11,1W
- 6 suonerie (85dB)
- Misure: 142 (h) x 210 (l) x 15 (p)
WelcomeEye AddCompact: (monitor supplementare)
rif.: 531005
- 2 li
- Schermo 4,3”
- Risoluzione 480 x 272
- Corrente consumata: 400mA
- Potenza consumata: 9,6W
- 6 suonerie (85dB)
- Misure: 116 (h.) x 146 (l.) x 16 (p.)
WelcomeEye Cam: (telecamera supplementare)
rif.: 531007
- sensore C-MOS a colori 900TVL
- angolo di visione: O95° / V75°
- temperatura operativa: -20°C / +50°C
- indice di protezione: IP66
WelcomeEye Comfort / Compact / 08/17
IT9
Page 72

7. ACCESSORI
WelcomeEye AddCompact - DES 9300 DDE (rif: 531005)*
WelcomeEye AddComfort - DES 9500 DDE (rif: 531003)*
WelcomeEye Cam - DES 9900 CVC (rif: 531007)
WelcomeEye Outdoor - DES 9900 VOS (rif: 531006)**
WelcomeEye Lock - DES 1000 EDL (rif: 531008)
WelcomeEye Lock - DES 1100 EDL (rif: 531009)
WelcomeEye Power - DES 1000 DPS (rif: 531010)**
WelcomeEye TAG - DES 1000 ACI (rif.: 531011)**
** Per maggiori informazioni consultare il manuale completo WelcomeEye Connect/Touch
disponibile sul sito www.philips.com.
* Per maggiori informazioni consultare il manuale completo WelcomeEye Comfort/
Compact disponibile sul sito www.philips.com.
8. ASSISTENZA TECNICA - GARANZIA
Le risposte alle domande frequenti sono presenti nella versione completa del manuale
d’istruzioni disponibile su www.philips.com.
Il presente dispositivo è coperto da garanzia pezzi e manodopera presso i nostri laboratori.
La garanzia non copre: dispositivi non riutilizzabili (pile, batterie, ecc.) e danni causati da:
uso improprio, installazione non corretta, interventi esterni, danneggiamento causato da
urti, scosse elettriche, eventuali cadute del dispositivo o fenomeni atmosferici.
• Per non far decadere la garanzia evitare di aprire il dispositivo.
• Qualora fosse necessario inviare il dispositivo in assistenza, coprire lo schermo in modo
da proteggerlo da eventuali graffi.
• Pulire usando solo un panno morbido. Non utilizzare solventi. Se i componenti vengono
smontati, la garanzia è annullata. Prima di pulire, scollegare o mettere fuori tensione il
dispositivo.
Attenzione: Non utilizzare prodotti o soluzioni pulenti a base carbossilica, alcol o
simili. Oltre al rischio di danneggiare il dispositivo, i vapori emanati sono pericolosi per la
salute ed esplosivi.
Non utilizzare utensili conduttori di tensione (spazzole di metallo, utensili appuntiti o altro)
per pulire il dispositivo.
Per la data d’acquisto, fa fede lo scontrino o la fattura.
In caso di necessità, i contatti e gli orari di apertura dei nostri centri di assistenza sono
disponibili sul sito www.philips.com.
IT10
WelcomeEye Comfort / Compact / 08/17
Page 73

SCHEDA DI GARANZIA
Mr / Mrs :
Numero di telefono :
Indirizzo :
E-mail :
Data di acquisto : / / (GG / MM / AAAA)
Commerciante :
Dealer Phone :
Indirizzo del rivenditore :
Numero di serie PHI/1031/
Importante : Si prega di conservare questa scheda di garanzia e
la prova di acquisto.
Philips e il simbolo dello scudo Philips sono marchi depositati da Koninklijke Philips N.V.
usati con licenza. Il presente prodotto è stato costruito da CFI Extel SAS ed è venduto sotto
la responsabilità di CFI Extel SAS, che ne è anche l’unico garante.
9. MISURE DI SICUREZZA
Eventuali danni provocati dal mancato rispetto di quanto specicato nel manuale
d’istruzioni del prodotto provocano il venire meno delle condizioni di garanzia. CFI EXTEL
declina ogni responsabilità in caso di danni dovuti al mancato rispetto di quanto indicato
nel manuale d’istruzioni.
CFI EXTEL declina ogni responsabilità in caso di danni a cose e/o persone causati da un
uso improprio del dispositivo o dal mancato rispetto delle misure di sicurezza.
Il presente prodotto è stato realizzato nel pieno rispetto di tutte le norme di sicurezza
applicabili. Per fare in modo che il prodotto rimanga sicuro e funzioni correttamente,
l’utente deve attenersi alle istruzioni e alle avvertenze relative alla sicurezza contenute nel
presente manuale.
: Questo simbolo indica un pericolo di elettrocuzione o cortocircuito.
- Utilizzare il presente prodotto esclusivamente a una tensione compresa tra 100-240 volt
e 50-60 hertz. Non provare mai a utilizzare il dispositivo con una tensione diversa da
quella indicata.
- Controllare che tutti i collegamenti elettrici dell’impianto siano conformi alle istruzioni
per l’uso.
- Per l’impiego in locali commerciali, assicurarsi di attenersi alle regole di prevenzione degli
incidenti relative agli impianti elettrici.
- Per l’uso in scuole, istituti di formazione, laboratori, ecc. la presenza di personale
qualicato è necessaria per controllare che tutti i dispositivi elettronici funzionino
correttamente.
WelcomeEye Comfort / Compact / 08/17
IT11
Page 74

- Attenersi alle istruzioni per l’uso degli altri dispositivi collegati all’impianto.
- Nel caso in cui si avessero dubbi riguardanti le modalità di funzionamento o la sicurezza
dei dispositivi, contattare una persona qualicata.
- Non collegare o scollegare mai i dispositivi elettrici dalla rete con le mani bagnate.
- Mentre si installa il prodotto controllare che i cavi di alimentazione non corrano il rischio
di essere danneggiati.
- Non sostituire mai da soli i cavi elettrici danneggiati: qualora si dovessero sostituire dei
cavi danneggiati, rivolgersi a una persona qualicata.
- La presa di corrente deve trovarsi nelle immediate vicinanze del dispositivo e deve essere
di facile accesso.
- L’impianto deve integrare un dispositivo di interruzione dell’alimentazione delle
apparecchiature collegate alla rete (interruttore, sezionatore, salvavita, dispositivo
equivalente) di facile e rapido accesso.
- Mantenere una distanza minima tutto intorno all’apparecchiatura in modo da garantire
una ventilazione suciente.
- Non impedire la ventilazione coprendo l’apposita apertura con fogli di giornale, stronacci,
tende, ecc.
- Non disporre sotto l’apparecchiatura fonti di amme libere come ad esempio candele.
- Rispettare la temperatura operativa indicata.
- Fare in modo che l’apparecchiatura non sia esposta a schizzi o rivoli di liquido e non
disporre oggetti pieni di liquido, come ad esempio vasi, sopra la stessa.
IT12
WelcomeEye Comfort / Compact / 08/17
Page 75

ÍNDICE
3 GENERALIDADES .............................................................................p. 3
4 NOMENCLATURA .............................................................................p. 3
5 INSTALACIÓN DEL PRODUCTO ...................................................p. 5
1. Cableado
2. Conguración de la placa
3. Instalación del monitor principal o adicional
4. Instalación de la placa externa principal o adicional
5. Instalación de una cámara (opcional)
6. Para ir más lejos
7 ACCESORIOS ...................................................................................p. 10
1 NORMAS DE SEGURIDAD ..............................................................p. 2
2
CONTENIDO DEL KIT.......................................................................p. 2
6
CARACTERÍSTICAS TÉCNICAS .....................................................p. 8
8
ASISTENCIA TÉCNICA GARANTÍA .........................................p. 10
9 MEDIDAS DE SEGURIDAD ............................................................p. 11
WelcomeEye Comfort / Compact / 08/17
ES1
Page 76

1. NORMAS DE SEGURIDAD
¡Importante!
• Lea atentamente el manual de uso antes de la instalación o utilización de este producto.
• Si instala este producto para terceros, recuerde dejar el manual o una copia del mismo al
usuario nal.
Advertencia:
• Solo un técnico autorizado podrá desmontar los diferentes elementos.
Medidas de seguridad:
Para un uso de este sistema con total seguridad, resulta fundamental que los instaladores,
•
usuarios y técnicos sigan todos y cada uno de los procedimientos de seguridad descritos
en el presente manual.
• En caso necesario, guran advertencias especícas y símbolos de atención en los
elementos.
2. CONTENIDO DEL KIT
1. Monitor 7’’
(WelcomeEye Comfort)
3. Alimentación
con conexión
ES2
1.bis Monitor 4,3’’
(WelcomeEye Compact)
2. Soporte de pared
4. Adaptador
para
alimentación
con conexión
compatible con
toma UE o RU
WelcomeEye Comfort / Compact / 08/17
5. Placa externa
Page 77

3. GENERALIDADES
Este videoportero se compone de un módulo para contestar desde el interior con pantalla
táctil y una placa externa con interfono y cámara que permite ver y comunicarse con el
visitante que ha llamado. Es sencillo de instalar ya que son necesarios 2 cables para todas
las funciones (timbre, vídeo, interfono y controles del cerradero y del automatismo).
La tecnología WelcomeEye le permite compartir la placa externa entre 2 familias. Cada
familia puede disponer de hasta 3 monitores.
El sistema puede tener un máximo de una cámara y 2 placas externas.
Para un uso ecaz, lea detenidamente este manual de instrucciones.
El manual completo se puede descargar en www.philips.com.
4. NOMENCLATURA
Monitor:
Pantalla
Altavoz
Micrófono
DES 9900 VDP
2/4
1/3
+
-
CFI Extel
ZI de Fétan, 01600 Trévoux
FRANCE
Made in P.R.C
Bornera de alimentación Bornera de conexión a la placa
externa y a los accesorios
WelcomeEye Comfort / Compact / 08/17
ES3
Page 78

Placa externa:
6
7
8
1
2
1
2
1
2
3 4 5
6
1 2
7
8
1
2
1
2
Sensor
crepuscular
Objetivo de la
cámara
Altavoz
1 2
3 4 5
2
1
Led blanco (visión nocturna)
Micrófono
Iluminación portanombre
Tornillo antirrobo de
jación
Conmutador de
programación
Ajuste volumen de
1
2
2
1
8
7
6
altavoz
CFI Extel
ZI de Fétan, 01600 Trévoux
FRANCE
IP44
Notas:
- Al pulsar el botón de llamada, el monitor suena en el interior y aparece el vídeo.
- Para cambiar la etiqueta del portanombre, desmontar la parte delantera y desencajar la
tapa de plástico detrás de la etiqueta
ES4
Made in P.R.C
WelcomeEye Comfort / Compact / 08/17
de los cables
Bornera para conexión
Page 79

5. INSTALACIÓN DEL PRODUCTO
Consejos y notas importantes:
- Para disfrutar plenamente de su placa externa, le recomendamos congurarla (modo 1 o
2 familias, 1 o 2 placas, volumen del altavoz) antes de su instalación denitiva. Para ello
puede ser necesaria una conexión previa para comprobar que los ajustes se han realizado
correctamente.
- Si prueba el producto antes de instalarlo, asegúrese de no hacerlo con la placa externa
y el monitor en la misma habitación, de lo contrario, el videoportero emitirá un sonido
estridente (efecto Larsen).
- No exponer la cámara directamente al sol ni dirigirla a una supercie reectante.
- Se recomienda pasar los cables por una vaina de protección para protegerlos de los
golpes y de la intemperie.
1. Cableado
Para evitar los riesgos de interferencias y de funcionamiento incorrecto, no pasar el cable
del videoportero por la misma vaina que los cables eléctricos.
Atención: Nunca debe duplicar los cables para aumentar la sección.
a. Conexión del videoportero (monitor, placa externa y cámara, (ver g. 1, g. 2 o g. 3)
Cables que se deben usar: 2 cables de 0,75 mm2 hasta 80 m o 2 cables de 1,5 mm2 hasta
120 m.
- Conectar los cables respetando uno de los esquemas de cableado en función de la
conguración deseada.
- Respetar bien la etiqueta pegada al dorso del monitor y al dorso de la placa externa.
- En función de la conguración elegida, congurar los conmutadores al dorso de la placa y
congurar la interfaz del monitor (ver sección 2 conguración de placa.
b. Conexión de una motorización de cancela
- La placa suministra un contacto seco (sin corriente) al control del botón pulsador del
automatismo.
- Debe conectarse directamente a los bornes 5 y 6 que se encuentran al dorso de la placa
(no hace falta respetar la polaridad).
- La función de apertura solo está disponible si aparece el vídeo de la placa externa
correspondiente.
c. Conexión de un cerradero o cerradura eléctricos
Importante: El cerradero o cerradura eléctrica que usted controle deberá contar
obligatoriamente con una memoria mecánica. La corriente del cerradero no debe superar
1,1 A.
- Debe conectarse directamente a los bornes 7 y 8 que se encuentran al dorso de la placa
(no hace falta respetar la polaridad).
- La función de apertura solo está disponible si aparece el vídeo de la placa externa
correspondiente.
WelcomeEye Comfort / Compact / 08/17
ES5
Page 80

2. Conguración de la placa (ver g. 1, g. 2 o g. 3)
a. Conguración del número de la placa:
Colocar el conmutador 2 a la izquierda en la placa n.° 1 y a la derecha en la placa n.° 2.
b. Conguración del número de familias:
Colocar el conmutador 1 a la izquierda para el modo una familia y a la derecha para el modo
2 familias.
c. Ajuste del volumen de la placa:
Girar el ajuste del volumen con un destornillador de cruz para ajustar el nivel sonoro de la
placa.
3. Instalación del monitor principal o adicional
1m60
1 2
4
5 6
3
DES 9900 VDP
5 8 1 0 2 3
WiĮ 2.4GHz
24V 550mA
2/4
1/3
+
-
CFI Extel
ZI de Fétan, 01600 Trévoux
FRANCE
DES 9900 VDP
5 8 1 0 2 3
Made in P.R.C
7
1 - Colocar el soporte de pared procurando que la pantalla del monitor esté a una altura de
aproximadamente 1,60 m del suelo.
2 - Marcar la ubicación de las perforaciones mediante el estribo de jación.
3 - Perforar.
ES6
WelcomeEye Comfort / Compact / 08/17
Page 81

4 - Colocar tacos adaptados al soporte (los suministrados son adecuados para paredes
macizas).
5 - Fijar el soporte de pared.
6 - Conectar los 2 cables de la placa externa y los 2 cables de alimentación respetando
correctamente el esquema del cableado.
7 - Colocar el monitor sobre su soporte de pared.
8 - En función de la conguración elegida, y tras terminar todo el cableado, puede ser
necesaria la conguración de la interfaz. Para más información, consulte el manual
completo que puede descargar en www.philips.com.
Atención: en esta etapa, no conectar la alimentación al 230 V CA.
4. Instalación de la placa externa principal o adicional
Atención: El producto no debe estar conectado a la alimentación antes de haber terminado
el cableado.
1m60
1 2
4
DES 9900 VDP
5 1 0 0 6 3
1
2
1 2
2
1
8
7
6
3 4 5
2
1
DES 9900 VDP
CFI Extel
5 1 0 0 6 3
ZI de Fétan, 01600 Trévoux
FRANCE
20V 110mA
RFID 125kHz
IP44
Made in P.R.C
7
WelcomeEye Comfort / Compact / 08/17
5
1
2
1
2
8 9
3
6
ES7
Page 82

1 - Retirar el tornillo antirrobo debajo de la placa externa.
2 - Bascular la parte delantera de la placa externa hacia delante.
3 - El objetivo de la placa debe colocarse a una altura de aproximadamente 1,60 m del
suelo.
4 - Colocar las marcas.
5 - Perforar.
6 - Usar tacos adaptados a la naturaleza del soporte (los tornillos suministrados son
adecuados para paredes macizas).
7 - Conectar los dos cables procedentes del monitor y, en caso necesario, conectar el
cerradero eléctrico y la cancela (ver sección 1. Cableado). Congurar los conmutadores
al dorso de la placa externa (ver sección 2. Conguración de la placa).
8 – Poner los tornillos y volver a colocar las dos tapas que ocultan los tornillos de jación.
Nota: atornillar a través de las tapas negras situadas al dorso de la placa externa sin
retirarlas.
9 - Volver a colocar la parte delantera de la placa y el tornillo antirrobo de jación.
10 - Conectar la alimentación de 230 V CA al adaptador modular, en una instalación que
cumpla con las normas vigentes (NFC 15-100 para Francia).
- Comprobar el funcionamiento correcto (llamada de vídeo...).
- En el caso de una segunda placa externa, recordar congurar el/los monitor(es).
11 - Aplicar una junta de silicona* entre la visera y la pared para evitar que circule el
agua. *No use silicona con ácido acético (olor a vinagre).
On
5. Instalación de una cámara (opcional)
Conectar los cables respetando el esquema de cableado.
Elegir un emplazamiento adecuado para la instalación de la cámara.
Asegurarse de que ningún elemento interera con la instalación.
Atornillar la parte de la pared con los tornillos suministrados (para materiales macizos).
Orientar la cámara en la dirección deseada y apretar el anillo de sujeción.
Congurar el/los monitor(es)
On
6. Para ir más lejos
Para descubrir más funciones del producto Philips WelcomeEye, puede descargar el
manual completo en el sitio www.philips.com.
6. CARACTERÍSTICAS TÉCNICAS
Monitor:
ref.: 531003 (WelcomeEye Comfort)
ref.: 531005 (WelcomeEye Compact)
- 2 cables
- Pantalla 7’’ (Comfort), 4,3’’ (Compact)
- Resolución 800x480 (Comfort), 480 x 272 (Compact)
- Corriente consumida: 460 mA (Comfort), 400 mA (Compact)
- Potencia consumida: 11,1 W (Comfort), 9,6 W (Compact)
- 6 timbres (85 dB)
- Dimensiones: 142 (alto) x 210 (ancho) x 15 (profundo) (Comfort), 116 (alto) x 146 (ancho) x
16 (profundo) (Compact)
ES8
WelcomeEye Comfort / Compact / 08/17
Page 83

Placa externa:
ref.: 538200
- Sensor C-MOS color 900 TVL
- Ángulo de visión H100° / V75°
- Visión nocturna (ledes blancos)
- Control de cerradero 12 V/1,1A
- Control de cancela: poder de corte de 12 V/2 A
- IP44
- Temperatura de uso: -20 °C / +50 °C
WelcomeEye Outdoor: (Placa externa adicional)
ref.: 531006
- Sensor C-MOS color 900TVL
- Ángulo de visión H130° / V90°
- Visión nocturna (ledes blancos)
- Control de cerradero 12 V/1.1A
- Control de cancela: poder de corte de 12 V/2 A
- RFID (125 kHz)
- IP44
- temperatura de uso: -20 °C / +50 °C
- Dimensiones: 168 (alto) x 82 (ancho) x 38 (profundo)
WelcomeEye AddComfort: (monitor adicional)
ref.: 531003
- 2 cables
- Pantalla 7’’
- Resolución 800 x 480
- Corriente consumida: 460mA
- Potencia consumida: 11,1 W
- 6 timbres (85 dB)
- Dimensiones: 142 (alto) x 210 (ancho) x 15 (profundo)
WelcomeEye AddCompact: (monitor adicional)
ref.: 531005
- 2 cables
- Pantalla 4,3’’
- Resolución 480 x 272
- Corriente consumida: 400mA
- Potencia consumida: 9,6W
- 6 timbres (85 dB)
- Dimensiones: 116 (alto) x 146 (largo) x 16 (ancho)
WelcomeEye Cam: (cámara adicional)
ref.: 531007
- sensor C-MOS color 900TVL
- ángulo de visión: H95° / V75°
- temperatura de uso: -20 °C / +50 °C
- índice de protección: IP66
WelcomeEye Comfort / Compact / 08/17
ES9
Page 84

7. ACCESORIOS
WelcomeEye AddCompact - DES 9300 DDE (ref.: 531005)*
WelcomeEye AddComfort - DES 9500 DDE (ref.: 531003)*
WelcomeEye Cam - DES 9900 CVC (ref.: 531007)
WelcomeEye Outdoor - DES 9900 VOS (ref.: 531006)**
WelcomeEye Lock - DES 1000 EDL (ref.: 531008)
WelcomeEye Lock - DES 1100 EDL (ref.: 531009)
WelcomeEye Power - DES 1000 DPS (ref.: 531010)**
WelcomeEye TAG - DES 1000 ACI (ref.: 531011)**
** Consulte el manual completo WelcomeEye Connect/Touch disponible en el sitio
www.philips.com para más información.
* Consulte el manual completo WelcomeEye Comfort/Compact disponible en el sitio
www.philips.com para más información.
8. ASISTENCIA TÉCNICA GARANTÍA
Las preguntas frecuentes están disponibles en el manual completo que puede descargar
en www.philips.com.
Este aparato tiene garantía para las piezas y el mantenimiento en nuestros talleres.
La garantía no cubre: los consumibles (pilas, baterías, etc.) y los daños ocasionados por:
un uso o instalación incorrectos, la intervención de una tercera persona, el deterioro por
golpes físicos o cortocircuitos, caídas o fenómenos atmosféricos.
• No abrir el aparato para no perder la cobertura de la garantía.
• En caso de una eventual devolución a SPV, proteger la pantalla para evitar que se raye.
• Limpiar únicamente con un trapo suave, no usar disolventes. La garantía quedará anulada
en el caso de que desmonte las piezas. Antes de la limpieza, desconecte el aparato de la
corriente o apáguelo.
Atención: No utilice ningún producto o solución de depuración carboxílica, alcohol o
similar. Además de poder dañar el aparato, los vapores son asimismo peligrosos para la
salud y explosivos.
No utilice ninguna herramienta que pueda conducir la corriente (cepillo de metal,
herramienta puntiaguda... u otros) durante la limpieza.
El ticket de compra o la factura sirven para demostrar la fecha de compra.
En caso de necesidad, encontrará los contactos y los horarios de apertura de nuestros
centros de asistencia técnica en el sitio www.philips.com.
ES10
WelcomeEye Comfort / Compact / 08/17
Page 85

TARJETA DE GARANTÍA
Sr / Sra :
Número de teléfono :
Dirección :
E-mail :
Fecha de compra : / / (DD / MM / AAAA)
Comerciante :
De teléfono del proveedor :
Dirección del proveedor :
Número de serie PHI/1031/
Importante : Conserve esta tarjeta de garantía y el comprobante
de compra.
Philips y el emblema escudo Philips son marcas registradas de Koninklijke Philips N.V. y se
usan bajo licencia. Este producto ha sido fabricado por y es vendido bajo la responsabilidad
de CFI Extel SAS y CFI Extel SAS es el único garante de dicho producto.
9. MEDIDAS DE SEGURIDAD
Los daños provocados por el incumplimiento de lo estipulado en el manual tendrán como
consecuencia la terminación de la garantía. No asumiremos responsabilidad alguna por los
daños resultantes.
No asumiremos responsabilidad alguna por cualesquiera daños, en los bienes o personas,
provocados por una manipulación incorrecta o el incumplimiento de las instrucciones de
seguridad.
Este producto ha sido fabricado respetando completamente las normas de seguridad.
Para mantener este estado y garantizar el uso correcto del producto, el usuario deberá
respetar las instrucciones y avisos de seguridad incluidos en el manual.
: Este símbolo indica un riesgo de electrocución o de cortocircuito.
- Solo deberá utilizar este producto con un nivel de corriente situado entre: 100-240 voltios
y 50-60 hercios. No intente nunca utilizar este aparato con un nivel de corriente distinto.
- Compruebe que todas las conexiones eléctricas del sistema cumplen las instrucciones
de uso.
- En los establecimientos comerciales, compruebe que cumple con las normas de
prevención de accidentes correspondientes a las instalaciones eléctricas.
- En las escuelas, los equipos de formación, talleres... se requiere la presencia de personal
cualicado para el control del funcionamiento de los aparatos electrónicos.
- Respete los consejos de uso del resto de aparatos asociados al sistema.
- Póngase en contacto con una persona experimentada en caso de que tenga dudas sobre
el modo de funcionamiento o la seguridad de los aparatos.
- No conecte ni desconecte nunca los aparatos eléctricos con las manos húmedas.
WelcomeEye Comfort / Compact / 08/17
ES11
Page 86

- Durante la instalación de este producto, compruebe que los cables de alimentación no
corren peligro de sufrir daños.
- ¡No cambie nunca los cables eléctricos dañados usted mismo! En este caso, quítelos y
llame a una persona experimentada.
- La toma de corriente debe encontrarse cerca del aparato y debe poder acceder a ella
fácilmente.
- Se debe incorporar un dispositivo de corte (interruptor seccionador, disyuntor, dispositivo
equivalente) al que se pueda acceder rápidamente en la instalación de cableado del
edicio para el material conectado en el domicilio a la red eléctrica.
- Conservar una distancia mínima alrededor del aparato para garantizar una ventilación
suciente.
- La ventilación no debe impedirse cubriendo la apertura de ventilación con ningún objeto
tipo papel de periódico, mantel, cortina, etc.
- No se debe colocar sobre el aparato ninguna fuente de llama abierta, como por ejemplo
una vela encendida.
- Respetar la temperatura de funcionamiento del producto.
- El aparato no debe exponerse a la circulación o salpicadura de líquido ni a ningún objeto
lleno de líquido como por ejemplo un jarrón, que no debe colocarse encima.
ES12
WelcomeEye Comfort / Compact / 08/17
Page 87

ÍNDICE
3 GENERALIDADE .................................................................................p.3
4 NOMENCLATURA ..............................................................................p.3
5 INSTALAÇÃO DO PRODUTO ..........................................................p.5
1. Cablagem
2. Parametrização da placa de rua
3. Instalação do monitor principal ou suplementar
4. Instalação da placa de rua principal ou suplementar
5. Instalação de uma câmara (opcional)
6. Para saber mais
7 ACESSÓRIOS.......................................................................................p.9
1
INSTRUÇÕES DE SEGURANÇA .....................................................p.2
2
CONTEÚDO DO KIT ..........................................................................p.2
6
CARACTERÍSTICAS TÉCNICAS ......................................................p.8
8
ASSISTÊNCIA TÉCNICA GARANTIA ........................................p.10
9 MEDIDAS DE SEGURANÇA ...........................................................p.11
WelcomeEye Comfort / Compact / 08/17
PT1
Page 88

1. INSTRUÇÃO DE SEGURANÇA
Importante !
• Leia atentamente o manual de utilização antes de instalar ou utilizar este produto.
• Se instalar este produto para outras pessoas, não se esqueça de transmitir o manual ou
uma cópia para o utilizador nal.
Advertência:
• Os diferentes elementos deverão ser desmontados por um técnico autorizado.
Medidas de segurança:
• Para uma exploração em total segurança deste sistema, é essencial que os instaladores,
utilizadores e técnicos respeitem todos os procedimentos de segurança descritos neste
manual.
• Se necessário, consulte as advertências especícas e símbolos de atenção indicados nos
elementos.
2. CONTEÚDO DO KIT
1. Monitor 7’’
(WelcomeEye Comfort)
3. Transformador
PT2
1.bis Monitor 4,3’’
(WelcomeEye Compact)
2. Suporte de parede
4.
Transformador
compatível com
tomadas do
Reino Unido e
UE
WelcomeEye Comfort / Compact / 08/17
5. Placa de rua
Page 89

3. GENERALIDADE
Este videoporteiro é composto por um posto de resposta interno com ecrã táctil e uma
placa externa com intercomunicador e câmara que permite ver e comunicar com o visitante
que tocou a campainha. A instalação do videoporteiro é fácil com apenas 2 os para todas
as funções (campainha, vídeo, intercomunicador e comandos do trinco e do automatismo).
A tecnologia WelcomeEye permite compartilhar a placa de rua entre 2 domicílios. Cada
domicílio pode ter até 3 monitores.
O sistema pode incluir no máximo uma câmara e duas placas de rua.
Para uma utilização ecaz, ler atentamente este manual de instruções.
O manual completo do seu produto está disponível na página www.philips.com.
4. NOMENCLATURA
Monitor:
Ecrã
Altifalante
Microfone
DES 9900 VDP
2/4
1/3
+
-
CFI Extel
ZI de Fétan, 01600 Trévoux
FRANCE
Made in P.R.C
Terminal de alimentação Terminal de ligação à placa de rua
e aos acessórios
WelcomeEye Comfort / Compact / 08/17
PT3
Page 90

Placa de rua:
6
7
8
1
2
1
2
1
2
3 4 5
6
1 2
7
8
1
2
1
2
Sensor
crepuscular
Objetiva da
câmara
Altifalante
1 2
3 4 5
2
1
LED branco (visão noturna)
Microfone
Iluminação da etiqueta de
identicação
Parafuso de xação
antirroubo
Switch de programação
Ajuste do volume do
1
2
2
1
8
7
6
altifalante
CFI Extel
ZI de Fétan, 01600 Trévoux
FRANCE
IP44
Notas:
- Ao premir o botão de chamada, aciona a campainha do monitor no interior e o dispositivo
vídeo.
- Para mudar a etiqueta de identicação, desmontar a fachada e retirar a tampa plástica
atrás da etiqueta.
PT4
Made in P.R.C
WelcomeEye Comfort / Compact / 08/17
Terminal para a ligação
dos os
Page 91

5. INSTALAÇÃO DO PRODUTO
Conselhos e notas importantes:
- Para desfrutar plenamente da sua placa de rua, não se esqueça de congurar o dispositivo
(modo 1 ou 2 domicílios, 1 ou 2 placas de rua, volume do altifalante), antes da instalação
denitiva. Uma ligação com teste do aparelho sobre uma mesa pode ser necessária a m
de vericar que os ajustamentos foram efetuados corretamente.
- Se experimentar o seu produto antes de o instalar, tenha o cuidado de não o fazer com a
placa de rua e o monitor na mesma divisão, caso contrário o intercomunicador emitirá um
som estridente (efeito Larsen).
- Não expor a câmara diretamente face ao sol ou a uma superfície reetora.
- Recomenda-se que se passem os cabos numa manga de proteção, para que quem
protegidos dos choques e intempéries.
1. Cablagem
Com vista a evitar os riscos de parasitas e de disfunção, não passar o cabo do seu
intercomunicador na mesma manga que os cabos elétricos.
Atenção : Não duplicar os os para aumentar a secção.
a. Ligação do intercomunicador (monitor, placa de rua e câmara, (ver g. 1, g. 2 ou g. 3)
Fios a utilizar: 2 os de 0,75 mm2 até 80 m ou 2 os de 1,5 mm2 até 120 m.
- Ligar corretamente os os respeitando os esquemas de cablagem em função da
conguração desejada.
- Para a cablagem consultar a etiqueta colada na parte traseira do monitor e da placa de
rua.
- Em função da conguração escolhida, parametrizar os switchs na parte traseira da placa
de rua e congurar a interface do monitor (consulte a secção 2 para a parametrização da
placa de rua).
b. Ligação de uma motorização de portão
- A placa de rua emite um contacto seco (sem corrente) a ligar ao comando do botão de
pressão do seu automatismo.
- Ligar diretamente o motor aos terminais 5 e 6 na parte traseira da placa de rua (nenhuma
polaridade a respeitar).
- A função de abertura só é possível se o vídeo da placa de rua correspondente for exibido.
c. Ligação de um trinco ou fechadura elétrica
Importante : O trinco ou fechadura elétrica que vai controlar, deverá obrigatoriamente
dispôr de uma memória mecânica. A corrente do trinco não deve exceder 1,1A.
- Ligar diretamente o motor aos terminais 7 e 8 na parte traseira da placa de rua (nenhuma
polaridade a respeitar).
- A função de abertura só é possível se o vídeo da placa de rua correspondente for exibido.
2. Parametrização da placa de rua (ver g. 1, g. 2 ou g. 3)
a. Parametrização do número da placa:
WelcomeEye Comfort / Compact / 08/17
PT5
Page 92

Colocar o switch 2 à esquerda na placa de rua n°1 e à direita na placa de rua n°2.
b. Parametrização do número de domicílios:
Colocar o switch 1 à esquerda se pretender o modo 1 domicílio e à direita se pretender o
modo 2 domicílios.
c. Ajuste do volume da placa de rua:
Gire o ajuste de volume com uma chave cruciforme para ajustar o nível do som da placa.
3. Instalação do monitor principal ou suplementar
1m60
1 2
4
5 6
3
DES 9900 VDP
5 8 1 0 2 3
WiĮ 2.4GHz
24V 550mA
2/4
1/3
+
-
CFI Extel
ZI de Fétan, 01600 Trévoux
FRANCE
DES 9900 VDP
5 8 1 0 2 3
Made in P.R.C
7
1 - Posicionar o suporte de parede de modo que o ecrã do monitor que à uma altura de
cerca de 1m60 do solo.
2 – Marcar as posições a perfurar com um suporte de montagem.
3 – Furar.
4 – Colocar buchas adaptadas ao suporte (as buchas fornecidas são adequadas para
paredes de materiais sólidos).
5 – Fixar o suporte de parede.
6 – Ligar os 2 os da placa de rua e os 2 os da alimentação respeitando bem o esquema
PT6
WelcomeEye Comfort / Compact / 08/17
Page 93

de cablagem.
7 – Instalar o monitor no seu suporte de parede.
8 – Em função da conguração escolhida, e quando toda a cablagem estiver terminada,
a parametrização da interface pode ser necessária. Para obter mais informações,
consulte o manual completo disponível no site www.philips.com.
Atenção: nesta etapa, não ligue a alimentação de 230V AC.
4. Instalação da placa de rua principal ou suplementar
Atenção: Não ligar o produto à alimentação antes de terminar a cablagem.
1m60
1 2
4
DES 9900 VDP
5 1 0 0 6 3
1
2
1 2
2
1
8
7
6
3 4 5
2
1
DES 9900 VDP
CFI Extel
5 1 0 0 6 3
ZI de Fétan, 01600 Trévoux
FRANCE
20V 110mA
RFID 125kHz
IP44
Made in P.R.C
7
5
1
2
1
2
8 9
3
6
1 - Retirar o parafuso antirroubo na parte inferior da placa de rua.
2 - Balançar a placa de rua para a frente.
3 - A objetiva da placa de rua deve ser colocada à uma altura de cerca de 1,60m do solo.
4 - Marcar as posições de furo.
WelcomeEye Comfort / Compact / 08/17
PT7
Page 94

5 - Furar.
6 - Colocar buchas adaptadas ao suporte (os parafusos fornecidos foram concebidos para
paredes de materiais sólidos).
7 - Ligar os dois os que provêm do monitor e, se necessário, ligar o trinco elétrico e o
portão (ver secção 1. Cablagem). Parametrizar os switchs na parte traseira da placa de
rua (ver secção 2. Parametrização da placa de rua).
8 – Coloque os parafusos e recoloque as duas tampas dos parafusos de xação.
Nota: aparafusar passando através das tampas pretas colocadas na parte traseira da placa
de rua sem removê-las.
9 - Recolocar a fachada dianteira da placa e apertar o parafuso de xação antirroubo.
10 - Ligar a alimentação de 230V AC no adaptador modular, numa instalação conforme às
normas em vigor (IEC 61439 em Portugal).
- Vericar o bom funcionamento (chamada vídeo…).
- Se tiver uma segunda placa de rua, congure o(s) monitor(es).
11 - Colocar uma junta de silicone* entre a viseira e a parede a m de evitar a inltração de
água. *Não colocar silicone à base de ácido acético (odor de vinagre).
On
5. Instalação de uma câmara (opcional)
Ligar os os respeitando o esquema de cablagem.
Escolher um espaço adequado para a instalação da câmara.
A instalação não deve ser perturbada por nenhum elemento.
Aparafusar a parte mural com os parafusos fornecidos (para materiais sólidos).
Orientar a câmara na direção desejada e apertar o anel de retenção.
Congurar o(s) monitor(es)
On
6. Para saber mais
Para descobrir mais funcionalidades do produto Philips WelcomeEye, descarregue o
manual completo no site www.philips.com.
6. CARACTERÍSTICAS TÉCNICAS
Monitor:
ref: 531003 (WelcomeEye Comfort)
ref: 531005 (WelcomeEye Compact)
- 2 os
- Ecrã 7’’ (Comfort), 4,3’’ (Compact)
- Resolução 800 x 480 (Comfort), 480 x 272 (Compact)
- Energia consumida: 460mA (Comfort), 400mA (Compact)
- Potência consumida: 11.1W (Comfort), 9,6W (Compact)
- 6 melodias (85dB)
- Dimensões: 142(A) x 210(L) x 15(P) (Comfort), 116(A) x 146(L) x 16(P) (Compact)
Placa de rua:
ref: 538200
- Sensor C-MOS a cores 900 TVL
- Ângulo de vista H100° / V75°
- Visão noturna (LEDs brancos)
- Comando do trinco 12V/1.1A
- Comando de portão : poder de corte 12V/2A
PT8
WelcomeEye Comfort / Compact / 08/17
Page 95

- IP44
- Temperatura de utilização: -20°C / +50°C
WelcomeEye Outdoor: (Placa de rua suplementar)
ref: 531006
- Sensor C-MOS a cores 900TVL
- Ângulo de vista H130° / V 90°
- Visão noturna (LEDs brancos)
- Comando do trinco 12V/1.1A
- Comando de portão : poder de corte 12V/2A
- RFID (125kHz)
- IP44
- temperatura de utilização: -20°C / +50°C
- Dimensões: 168(A) x 82(L) x 38(P)
WelcomeEye AddComfort : (monitor suplementar)
ref: 531003
- 2 os
- Ecrã de 7”
- Resolução: 800 x 480
- Energia consumida: 460mA
- Potência consumida: 11.1W
- 6 melodias (85dB)
- Dimensões: 142(A) x 210(L) x 15(P)
WelcomeEye AddCompact : (monitor suplementar)
ref: 531005
- 2 os
- Ecrã de 4,3”
- Resolução: 480 x 272
- Energia consumida: 400mA
- Potência consumida: 9.6W
- 6 melodias (85dB)
- Dimensões: 116(A.) x 146(L.) x 16(P.)
WelcomeEye Cam : (câmara suplementar)
ref: 531007
- sensor C-MOS a cores 900TVL
- ângulo de vista: H95° / V75°
- temperatura de utilização: -20°C / +50°C
- Índice de proteção: IP66
7. ACESSÓRIOS
WelcomeEye AddCompact - DES 9300 DDE (ref: 531005)*
WelcomeEye AddComfort - DES 9500 DDE (ref: 531003)*
WelcomeEye Cam - DES 9900 CVC (ref: 531007)
WelcomeEye Outdoor - DES 9900 VOS (ref: 531006)**
WelcomeEye Lock - DES 1000 EDL (ref: 531008)
WelcomeEye Lock - DES 1100 EDL (ref: 531009)
WelcomeEye Power - DES 1000 DPS (ref: 531010)**
WelcomeEye TAG - DES 1000 ACI (ref: 531011)**
WelcomeEye Comfort / Compact / 08/17
PT9
Page 96

** Consulte o manual de instruções completo do WelcomeEye Connect/Touch disponível
no site www.philips.com para obter mais informações.
* Consulte o manual de instruções completo do WelcomeEye Comfort/Compact disponível
no site www.philips.com para obter mais informações.
8. ASSISTÊNCIA TÉCNICA - GARANTIA
As PERGUNTAS FREQUENTES podem ser descarregadas no site www.philips.com.
Este aparelho é garantido, peças e mão-de-obra nos nossos ateliês.
A garantia não cobre: os consumíveis (pilhas, baterias, etc.) e os danos ocasionados por :
má utilização, má instalação, intervenção exterior, deterioração por choque físico ou
eléctrico, queda ou fenómeno atmosférico.
• Não abrir o aparelho, de modo a não perder a cobertura da garantia.
• Durante um eventual regresso em SPV, proteger o ecrã para evitar riscos.
• Manutenção com um pano suave unicamente, sem solventes. A garantia é anulada se
desmontar os componentes. Antes da limpeza, desligue ou coloque o aparelho fora de
tensão.
Atenção: Não utilizar qualquer produto ou essência de lavagem com ácido carboxílico,
álcool ou semelhantes. Para além de poderem danicar o seu aparelho, os vapores são
perigosos para a sua saúde e são explosivos.
Não utilize nenhum instrumento que possa ser condutor de tensão (escova metálica,
ferramenta pontiaguda...ou outro) para a limpeza.
O talão de compra ou a factura comprovam a data de compra.
Se necessário, os contactos e os horários de abertura dos nossos centros de assistência
técnica estão disponíveis no site www.philips.com.
CARTÃO DE GARANTIA
Sr / Sra :
Número de telefone :
Endereço :
E-mail :
Data da compra : / / (DD / MM / AAAA)
Negociante :
Negociante do telefone :
Comerciantes Endereço :
Número de série PHI/1031/
Importante : Por favor, guarde este cartão de garantia e prova de
compra.
Philips e o logotipo Philips são marcas registadas da Koninklijke Philips N.V. e são utilizadas
sob licença. Este produto foi fabricado e é vendido sob a responsabilidade da CFI Extel
PT10
WelcomeEye Comfort / Compact / 08/17
Page 97

SAS, e a CFI Extel SAS é o único responsável pela garantia deste produto.
9. MEDIDAS DE SEGURANÇA
Os danos provocados pela falta de conformidade ao manual conduzem à expiração da
garantia. Não assumiremos qualquer responsabilidade pelos danos daí resultantes!
Não assumiremos qualquer responsabilidade relativamente a todo o dano, em bens e
pessoas, causado por uma má manipulação ou pela falta da conformidade relativamente
às instruções de segurança.
Este produto é fabricado no estrito respeito das instruções de segurança. Para manter
este estatuto e assegurar a melhor exploração do produto, o utilizador deve observar as
instruções de segurança e os avisos de segurança contidos neste manual.
: Este símbolo indica o risco de choque eléctrico ou o risco de curto-circuito.
- Só deverá utilizar este produto a uma tensão compreendida entre: 100-240 Volts e 50-60
hertz. Nunca tente utilizar este aparelho com uma tensão diferente.
- Verique se todas as instalações elétricas do sistema estão em conformidade com as
instruções de utilização.
- Nos estabelecimentos comerciais, assegure-se de que observa as regras de prevenção
dos acidentes para as instalações eléctricas.
- Nas escolas, nos equipamentos de formação, os ateliês… é necessária a presença de
pessoal qualicado para controlar o funcionamento dos aparelhos eletrónicos.
- Observe as instruções de utilização dos outros aparelhos ligados ao sistema.
- Queira contactar uma pessoa experiente em caso de dúvida sobre o funcionamento ou a
segurança dos aparelhos.
- Nunca ligue ou desligue os aparelhos elétricos com as mãos molhadas.
- Durante a instalação deste produto, verique se os cabos de alimentação não cam
danicados.
- Nunca substituir os cabos eléctricos danicados por si mesmo! Neste caso, retire-os e
contacte uma pessoa experiente.
- A tomada deve estar perto do aparelho e ser facilmente acessível.
- Um dispositivo de corte (interruptor-seccionador, disjuntor, dispositivo equivalente)
rapidamente acessível deve ser incorporado na instalação de cablagem do edifício para
o material ligado à rede.
- Conservar uma distância mínima em redor do aparelho para assegurar uma ventilação
suciente.
- A ventilação não deve ser impedida por um objeto como um jornal, uma cobertura, uma
cortina, etc.
- Nenhuma fonte de chama aberta, como as velas acesas, deve ser colocado sobre o
aparelho.
- Respeitar a temperatura de funcionamento de produto.
- O aparelho não deve ser exposto ao escoamento ou salpicos de líquidos, e nenhum
recipiente com líquido (por exemplo, vasos) deve ser colocado sobre o aparelho.
WelcomeEye Comfort / Compact / 08/17
PT11
Page 98

Page 99

Page 100

FR - Ne jetez pas les piles et les
appareils hors d’usage avec
les ordures ménagères. Les
substances dangereuses qu’ils
sont susceptibles de contenir
à l’environnement. Faites reprendre ces
appareils par votre distributeur ou utilisez
les moyens de collecte sélective mise
à votre disposition par votre commune.
Directive WEEE 2012/19/EU
GB - Don’t throw batteries or out of
order products with the household waste
(garbage). The dangerous substances that
they are likely to include may harm health
or the environment. Make your retailer take
back these products or use the selective
collect of garbage proposed by your city.
Directive WEEE 2012/19/EU
D - Verbrauchte Batterien und nicht mehr
benützte Geräte sind Sondermüll. Sie
enthalten möglicherweise gesundheitsund umweltschädliche Substanzen.
Geben Sie alte Geräte zur fachgerechten
Entsorgung beim Gerätehändler ab bzw.
benutzen Sie die örtlichen Recyclinghöfe.
peuvent nuire à la santé et
FR - Ce symbole indique que l’appareil s’installe et s’utilise uniquement à l’intérieur
GB - This symbol indicates that the device must only be installed and used indoors
D - Dieses Symbol zeigt an, dass das Gerät nur innen installiert und verwendet wird
NL - Dit symbool betekent dat het apparaat alleen binnen mag worden geïnstalleerd en gebruikt
PL - Ten symbol wskazuje, iż urządzenie przeznaczone jest wyłącznie do montażu i użytku wewnętrznego
IT - Questo simbolo indica che l’apparecchio si installa e si utilizza unicamente all’interno
ES - Este símbolo indica que el aparato se instala y utiliza únicamente en el interior
PT - Este símbolo indica que o aparelho só pode ser instalado e usado em interiores
FR - La protection des appareils qui portent ce symbole est assurée par une double isolation et ne requiert pas de
branchement de sécurité à la terre/masse électrique.
GB - The protection of devices bearing this symbol is guaranteed by double insulation, they do not require a safety
connection to electrical earth.
D - Der Schutz der dieses Symbol tragenden Geräte wird durch eine zweifache Isolation gewährleistet und erfordert keinen
elektrischen Schutzanschluss an Erde/Masse.
NL - Apparatuur die voorzien is van dit symbool, wordt beschermd door een dubbele isolatie en vereist geen beveiligde
elektriciteitsaansluiting op de aarde/massa.
PL - Urządzenia oznaczone takim symbolem są chronione podwójną izolacją i nie wymagają one bezpiecznego podłączenia
do uziemienia/masy.
IT - La protezione delle apparecchiature che riportano questo simbolo è garantita da un doppio isolamento e non necessita
di messa a terra/collegamento a massa.
ES - La protección de los aparatos que llevan este símbolo está garantizada por un doble aislamiento y no requiere una
conexión de seguridad a tierra/masa eléctrica.
PT - A proteção dos aparelhos que contêm este símbolo é assegurada através de isolação dupla e não necessita de ligações
de segurança à terra/massa elétrica.
FR - Courant continu
GB - Direct Current
D - Gleichstrom
NL - Draaistroom
PL - Prąd stały
IT - Corrente continua
ES - Corriente continua
PT - Corrente contínua
FR - Courant alternatif
GB - Alternating Current
D - Wechselstrom
NL - Gelijkstroom
PL - Prąd zmienny
IT - Corrente alternata
ES - Corriente alterna
PT - Corrente alterna
Directive WEEE 2012/19/EU
NL - De lege batterijen en oude apparaten
niet met het huisvuil meegeven: deze
kunnen gevaarlijke stoen bevatten die de
gezondheid en het milieu schaden.
De oude apparaten door uw distributeur
laten innemen of de gescheiden
vuilinzameling van uw gemeente
gebruiken. Directive WEEE 2012/19/EU
PL - Nie wyrzucać zużytych baterii
i zepsutych urządzeń do śmieci.
Substancje niebezpieczne, które mogą
zawierać są szkodliwe dla zdrowia i
środowiska. Urządzenia należy zwrócić
do dystrybutora lub wykorzystać system
zbiórki selektywnej dostępny na terenie
gminy. Dyrektywa WEEE 2012/19/EU
IT - Non gettare le pile e le apparecchiature
fuori uso insieme ai riuti domestici. Le
sostanze dannose contenute in esse
possono nuocere alla salute dell’ambiente.
Restituire questo materiale al distributore
o utilizzare la raccolta dierenziata
organizzata dal comune. Directive WEEE
2012/19/EU
F. La marque Philips est une marque déposée par Koninklijke Philips N.V.
GB. The Philips trademarks are registered trademarks of Koninklijke
Philips N.V.
D. Die Philips Warenzeichen sind eingetragene Warenzeichen der
Koninklijke Philips N.V.
NL. De handelsmerken van Philips zijn gedeponeerde handelsmerken van
Koninklijke Philips N.V.
PL. Znaki handlowe Philips są zarejestrowanymi znakami handlowymi
Koninklijke Philips N.V.
IT. I marchi Philips sono marchi registrati di proprietà di Koninklijke
Philips N.V.
ES. Las marcas registradas de Philips son marcas registradas de
Koninklijke Philips N.V.
PT. As marcas registadas da Philips são marcas registadas da Koninklijke
ES - No tire las pilas ni los aparatos
inservibles con los residuos domésticos, ya
que las sustancias peligrosas que puedan
contener pueden perjudicar la salud y al
medio ambiente.
Pídale a su distribuidor que los recupere
o utilice los medios de recogida
selectiva puestos a su disposición por el
ayuntamiento. Directive WEEE 2012/19/EU
PT - Não junte as pilhas nem os aparelhos
que já não se usam com o lixo caseiro. As
substâncias perigosas que ambos podem
conter podem ser prejudiciais para a
saúde e para o ambiente. Entregue esses
aparelhos ao seu lixeiro ou recorra aos
meios de recolha selectiva ao seu dispor.
Directive WEEE 2012/19/EU
Philips N.V.
 Loading...