

Page 1
Always there to help you
Question?
Contact
Philips
Register your product and get support at
www.philips.com/welcome
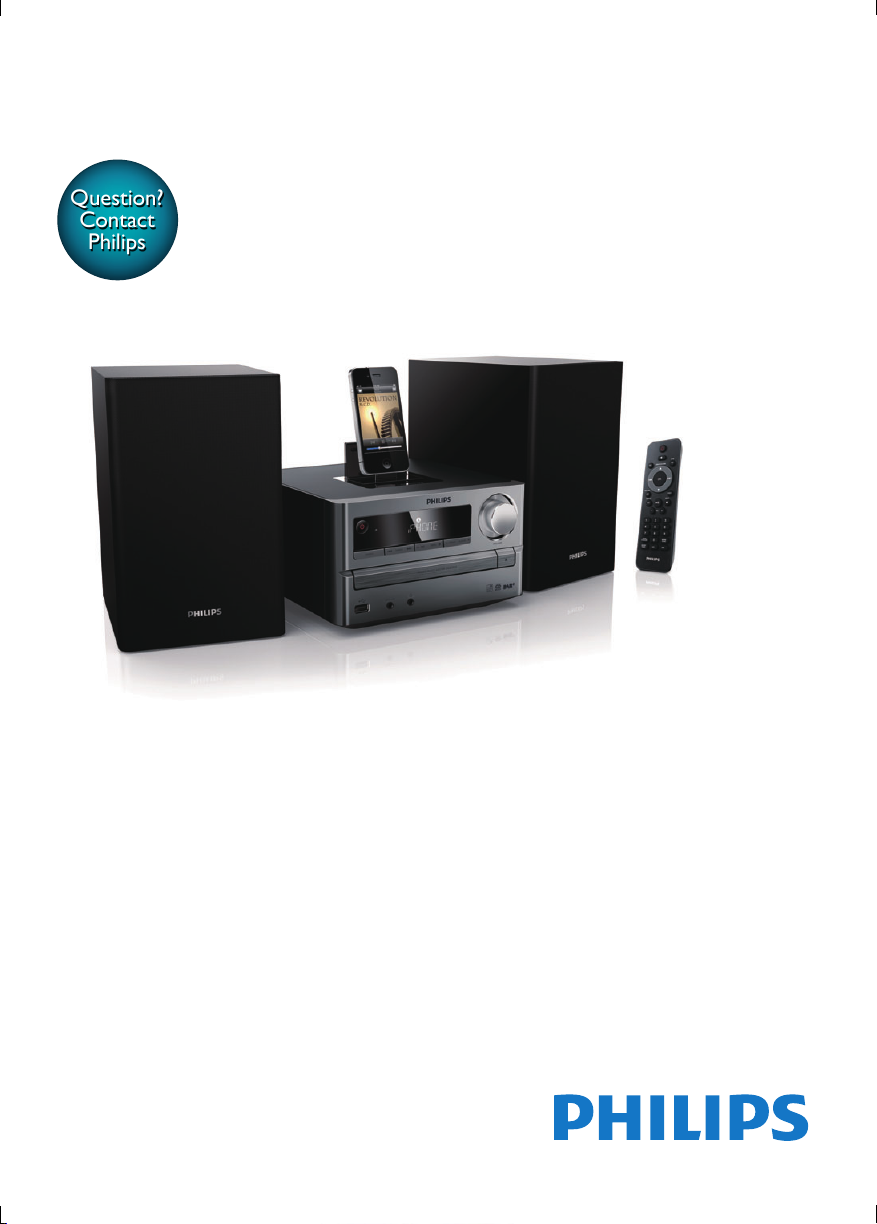
DCB2020
User manual
Page 2

Contents
1 Safety and Notice 2
Safety 2
Notice 4
2 Your Micro Music System 5
Introduction 5
What's in the box 5
Overview of the remote control 5
Overview of the main unit 7
3 Before use 8
Place the product 8
Connect speakers 8
Connect power 9
Install/replace the remote control batteries 9
4 Get started 10
Turn on 10
Set clock 10
Demonstrate features 10
5 Play 11
Play a disc 11
Play from a USB storage device 11
Basic control 11
Program audio tracks 11
Adjust sound 12
8 Other features 16
Set sleep timer 16
Set alarm timer 16
Listen to external audio device 16
Listen through headphone 17
9 Upgradethermware 17
Register your product 17
Check the current rmware version 18
Perform the upgrade 18
10 Product information 18
Specications 18
USB playability information 19
Supported MP3 disc formats 19
RDS program types 20
11 Troubleshooting 21
6 Play from iPod/iPhone/iPad 12
Compatible iPod/iPhone/iPad 12
Load the iPod/iPhone/iPad 12
Charge the iPod/iPhone/iPad 13
Listen to the iPod/iPhone/iPad 13
Remove the iPod/iPhone/iPad 13
7 Listen to radio 14
Store DAB radio stations automatically 14
Basic operations 14
Use the menu 15
1EN
Page 3
1 Safety and
Notice
Read and understand all instructions before you
use this product. If damage is caused by failure
to follow the instructions, the warranty does
not apply.
Safety
This 'bolt of lightning' indicates uninsulated
material within your unit may cause an electrical
shock. For the safety of everyone in your
household, please do not remove product
covering.
The 'exclamation point' calls attention to
features for which you should read the enclosed
literature closely to prevent operating and
maintenance problems.
WARNING: To reduce the risk of re or
electric shock, this apparatus should not be
exposed to rain or moisture and objects lled
with liquids, such as vases, should not be placed
on this apparatus.
CAUTION: To prevent electric shock, match
wide blade of plug to wide slot, fully inser t.
Riskofelectricshockorre!
• Never expose the product and accessories
to rain or water. Never place liquid
containers, such as vases, near the product.
If liquids are spilt on or into the product,
disconnect it from the power outlet
2 EN
immediately. Contact Philips Consumer
Care to have the product checked before
use.
• Never remove the casing of this apparatus.
• Never place the product and accessories
near naked ames or other heat sources,
including direct sunlight.
• Never insert objects into the ventilation
slots or other openings on the product.
• Where the mains plug or an appliance
coupler is used as the disconnect device,
the disconnect device shall remain readily
operable.
• Disconnect the product from the power
outlet before lightning storms.
• When you disconnect the power cord,
always pull the plug, never the cable.
Riskofshortcircuitorre!
• Before you connect the product to the
power outlet, ensure that the power voltage
matches the value printed on the back of the
product. Never connect the product to the
power outlet if the voltage is different.
• Never expose the remote control or
batteries to rain, water or excessive heat.
• Avoid force coming onto power plugs.
Loose power plugs can cause arcing or re.
Riskofinjuryordamagetotheproduct!
• Visible and invisible laser radiation when
open. Avoid exposure to beam.
• Do not touch the disc optical lens inside
the disc compartment. Never place the
product or any objects on power cords or
on other electrical equipment.
• If the product is transported in
temperatures below 5°C, unpack the
product and wait until its temperature
matches room temperature before
connecting it to the power outlet.
Riskofoverheating!
• Never install this product in a conned
space. Always leave a space of at least four
inches around the product for ventilation.
Make sure that curtains or other objects
never cover the ventilation slots on the
product.
Page 4
Riskofcontamination!
• Remove the battery if it is exhausted or if
the remote control is not to be used for
an extended period of time.
• Batteries contain chemical substances, they
should be disposed of properly.
Care for your product
• Do not insert any objects other than discs
into the disc compartment.
• Do not insert warped or cracked discs into
the disc compartment.
• Remove the discs from the disc
compartment if you are not using the
product for an extended period of time.
• Only use microber cloth to clean the
product.
Your product contains batteries covered by
the European Directive 2006/66/EC, which
cannot be disposed with normal household
waste.Please inform yourself about the local
rules on separate collection of batteries
because correct disposal helps to prevent
negative consequences for the environmental
and human health.
Compliance
This apparatus includes this label:
Care of the environment
Your product is designed and manufactured
with high quality materials and components,
which can be recycled and reused.
When this crossed-out wheeled bin symbol is
attached to a product it means that the product is
covered by the European Directive 2002/96/EC.
Please inform yourself about the local separate
collection system for electrical and electronic
products.
Please act according to your local rules and
do not dispose of your old products with your
normal household waste. Correct disposal of
your old product helps to prevent potential
negative consequences for the environment and
human health.
Note
The type plate is located on the bottom of the
•
apparatus.
Hearing safety
Caution
To prevent possible hearing damage, do not listen at
•
high volume levels for long periods.
Listen at a moderate volume:
• Using headphones at a high volume can
impair your hearing. This product can
produce sounds in decibel ranges that may
cause hearing loss for a normal person,
even for exposure less than a minute. The
3EN
Page 5
higher decibel ranges are offered for those
that may have already experienced some
hearing loss.
• Sound can be deceiving. Over time your
hearing 'comfort level' adapts to higher
volumes of sound. So after prolonged
listening, what sounds 'normal' can actually
be loud and harmful to your hearing. To
guard against this, set your volume to a safe
level before your hearing adapts and leave
it there.
To establish a safe volume level:
• Set your volume control at a low setting.
• Slowly increase the sound until you can
hear it comfortably and clearly, without
distortion.
Listen for reasonable periods of time:
• Prolonged exposure to sound, even
at normally 'safe' levels, can also cause
hearing loss.
• Be sure to use your equipment reasonably
and take appropriate breaks.
Be sure to observe the following guidelines
when using your headphones.
• Listen at reasonable volumes for
reasonable periods of time.
• Be careful not to adjust the volume as your
hearing adapts.
• Do not turn up the volume so high that
you can’t hear what’s around you.
• You should use caution or temporarily
discontinue use in potentially hazardous
situations.
• Do not use headphones while operating
a motorized vehicle, cycling, skateboarding,
etc.; it may create a trafc hazard and is
illegal in many areas.
Notice
Environmental information
All unnecessary packaging has been omitted.
We have tried to make the packaging easy to
separate into three materials: cardboard (box),
polystyrene foam (buffer) and polyethylene
(bags, protective foam sheet.)
Your system consists of materials which can
be recycled and reused if disassembled by
a specialized company. Please observe the
local regulations regarding the disposal of
packaging materials, exhausted batteries and old
equipment.
The making of unauthorized copies of copyprotected material, including computer
programs, les, broadcasts and sound
recordings, may be an infringement of
copyrights and constitute a criminal offence.
This equipment should not be used for such
purposes.
“Made for iPod,” “Made for iPhone,” and “Made
for iPad” mean that an electronic accessory
has been designed to connect specically to
iPod, iPhone, or iPad, respectively, and has
been certied by the developer to meet
Apple performance standards. Apple is not
responsible for the operation of this device
or its compliance with safety and regulatory
standards. Please note that the use of this
accessory with iPod, iPhone, or iPad may affect
wireless performance.
iPod and iPhone are trademarks of Apple Inc.,
registered in the U S. and other countries. iPad
is a trademark of Apple Inc.
Any changes or modications made to this
device that are not expressly approved by
Philips Consumer Lifestyle may void the user’s
authority to operate the equipment.
4 EN
Page 6
2 Your Micro
Music System
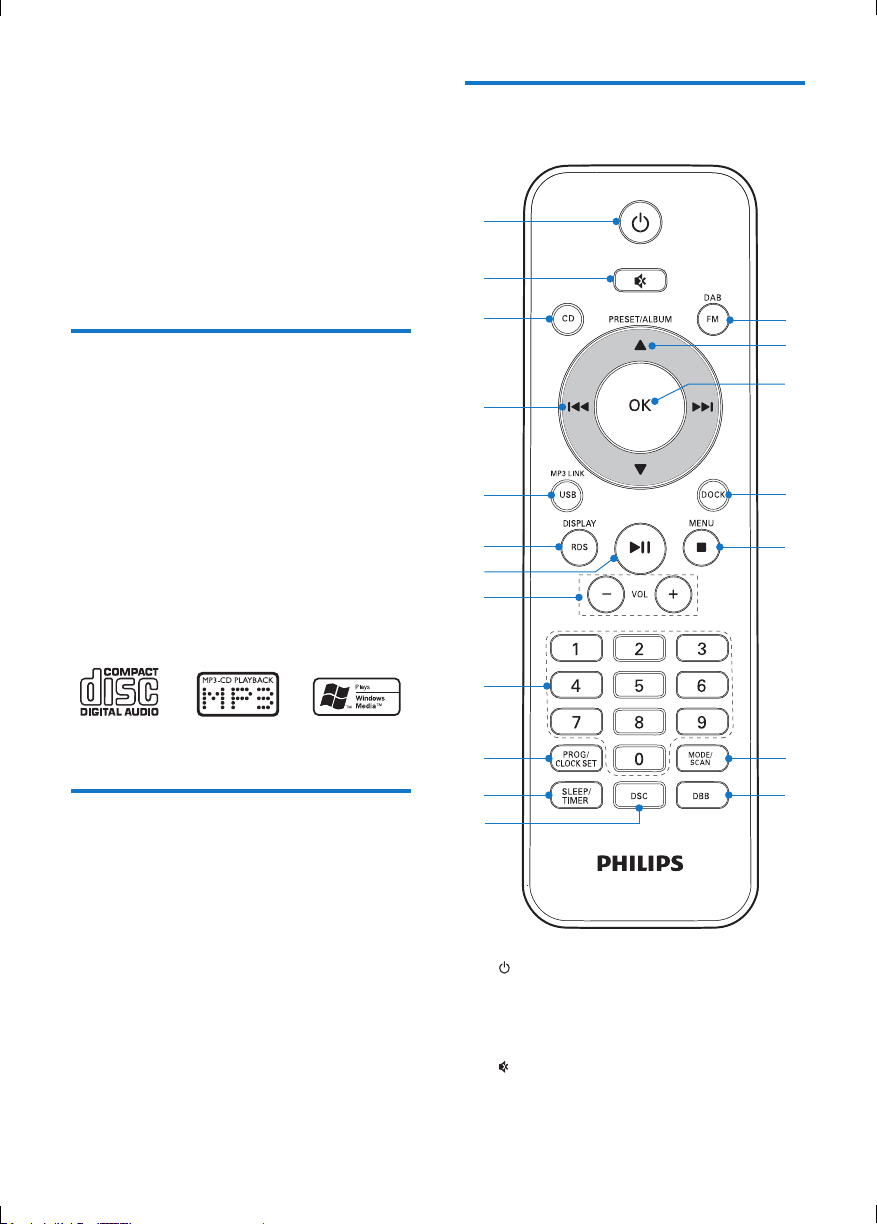
Overview of the remote control
Congratulations on your purchase, and
welcome to Philips! To fully benet from the
support that Philips offers, register your product
at www.philips.com/welcome.
Introduction
With this product, you can:
• enjoy audio from discs, USB storage
devices, iPod, iPhone, iPad, and other
external devices
• listen to radio stations
You can enrich sound output with these sound
effects:
• Digital sound control (DSC)
• Dynamic bass boost (DBB)
The product supports these media formats:
What's in the box
a
b
c
d
e
f
g
h
i
j
k
l
s
r
q
p
o
n
m
Check and identify the contents of your
package:
• Main unit
• Speaker X 2
• Rubber bumper for iPad 2
• 2 x AAA batteries
• Remote control
• User manual
• Quick start guide
a
• Turn on the product.
• Switch to eco-power standby mode or
normal standby mode.
b
• Mute or restore volume.
5EN
Page 7

c CD
• Select CD source.
d
/
• Skip to the previous or next track.
• Press and hold to search within a
track/disc.
• Tune to a radio station.
e MP3 LINK/USB
• Select MP3 LINK or USB source.
f RDS/DISPLAY
• Synchronize the clock with an RDS
radio station that transmits time signals.
• Display the current status or media
information.
• Display available ID3 information of
MP3 tracks.
• When playing music from CD or USB
storage device, press to display the
clock.
g
• Start, pause, or resume play.
• In DAB or FM mode, conrm the
menu option.
h VOL +/-
• Adjust the volume level or time.
i Numeric keypad
• Enter numbers.
• Enter the track number to select a
track directly.
• Enter the sequence number to select a
preset radio station.
j PROG/CLOCK SET
• Program audio tracks.
• Program radio stations.
• Set the clock.
k SLEEP/TIMER
• Set the sleep timer or alarm timer.
l DSC
• Select a preset sound setting.
m DBB
• Turn on or off dynamic bass
enhancement.
n MODE/SCAN
• Select a play mode: normal play, repeat,
or shufe.
• Search for available FM or DAB radio
stations.
o
/MENU
• Stop the play of music.
• Press twice to erase a program.
• In normal standby mode, turn on or off
feature demonstration.
• In DAB or FM mode, access the menu.
• Access the playlist of iPod/iPhone.
p DOCK
• Select the dock source for iPod/
iPhone/iPad.
q OK
• In DAB or FM mode, conrm the
menu option.
• In FM mode and with no menu option
displayed, switch the sound mode
between stereo and monophonic.
• After you select a le from the playlist
of iPod/iPhone/iPad, press OK to start
play.
r PRESET/ALBUM
/
• Skip to the previous or next album.
• Select a preset radio station.
• Navigate through iPod/iPhone/iPad
menu.
s DAB/FM
• Select DAB or FM radio source.
6 EN
Page 8
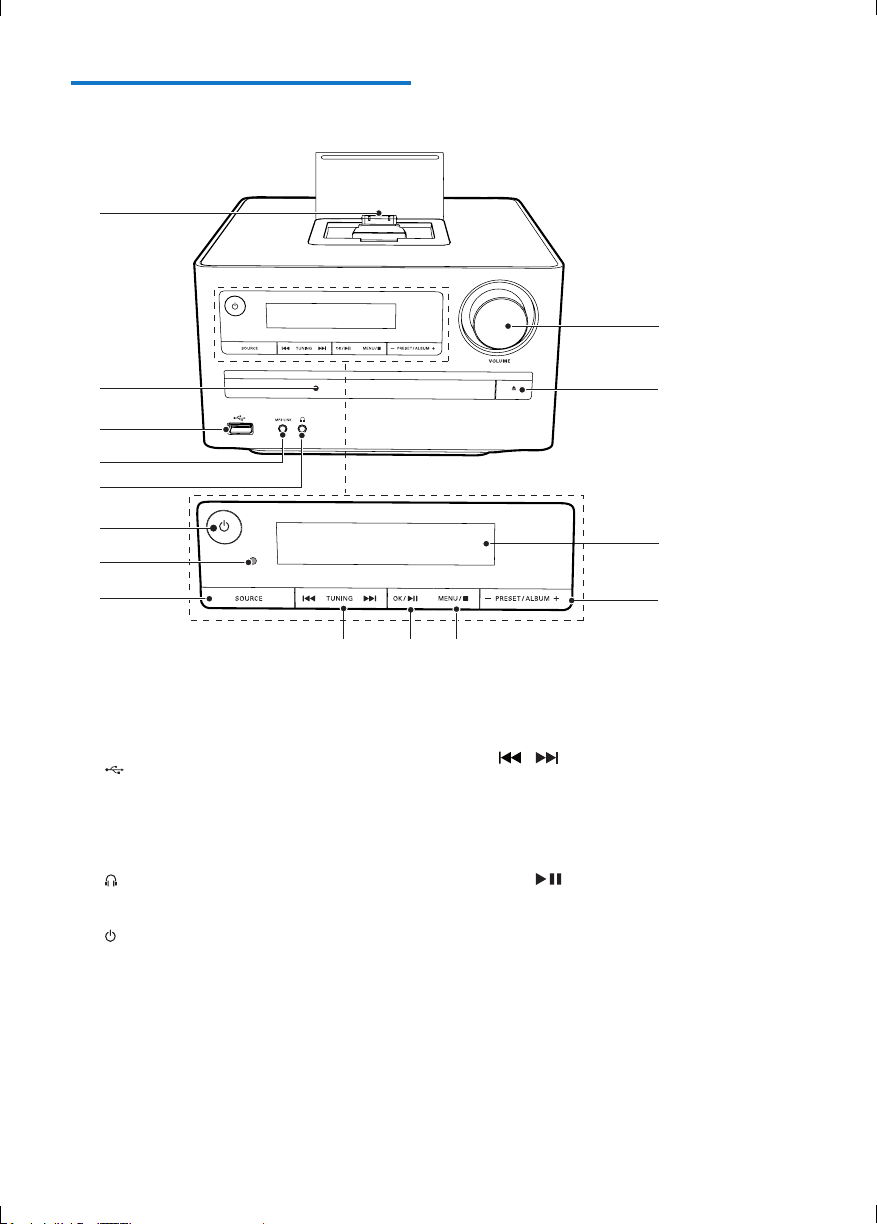
Overview of the main unit
a
o
b
c
d
e
f
g
h
a Dock for iPod/iPhone/iPad
b Disc compartment
c
• USB socket.
d MP3-LINK
• Connect an external audio device.
e
• Headphone socket.
f
• Turn on the product.
• Switch to eco-power standby mode or
normal standby mode.
g IR sensor
• Receive signals from the remote
control.
ijk
n
m
l
h SOURCE
• Select a source.
i
/
• Skip to the previous or next track.
• Press and hold to search within a
track/disc.
• Tune to a radio station.
j OK/
• Start, pause, or resume play.
• In DAB or FM mode, conrm the
menu option.
• In FM mode and with no menu option
displayed, switch the sound mode
between stereo and monophonic.
7EN
Page 9
k MENU /
• Stop the play of music.
• Press twice to erase a program.
• In normal standby mode, turn on or off
feature demonstration.
• In DAB or FM mode, access the menu.
• Access the playlist of iPod/iPhone.
l - PRESET/ALBUM+
• Skip to the previous or next album.
• Select a preset radio station.
• Navigate through iPod/iPhone/iPad
menu.
m Display panel
• Display current status.
n
• Eject or close the disc tray.
o VOLUME
• Adjust the volume level or time.
3 Before use
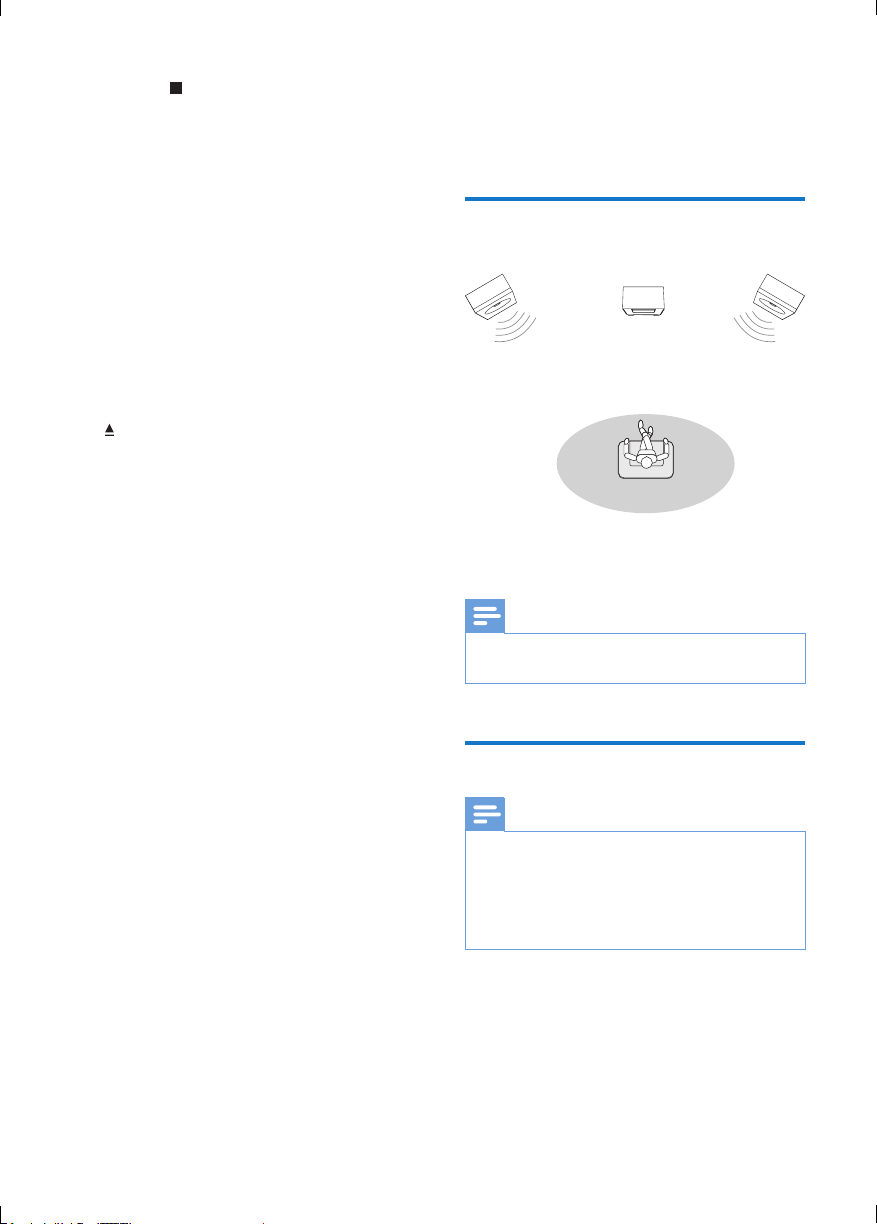
Place the product
Place the speakers at an angle of approximately
45 degrees from the listening position.
Note
To avoid magnetic interference or unwanted noise, never
•
place this product too close to any radiation devices.
8 EN
Connect speakers
Note
Make sure that the colors of the speaker wires and
•
terminals are matched.
• For optimal sound, use the supplied speakers only.
• Connect only speakers with impedance that is the
same or higher than the supplied speakers. Refer to the
chapter "Specications" in this manual.
1 Hold down the socket ap.
2 Insert the stripped part of the wire completely.
• Insert the right speaker wires to "R",
left speaker wires to "L".
• Insert the red wires to "+", black wires
to "-".
Page 10
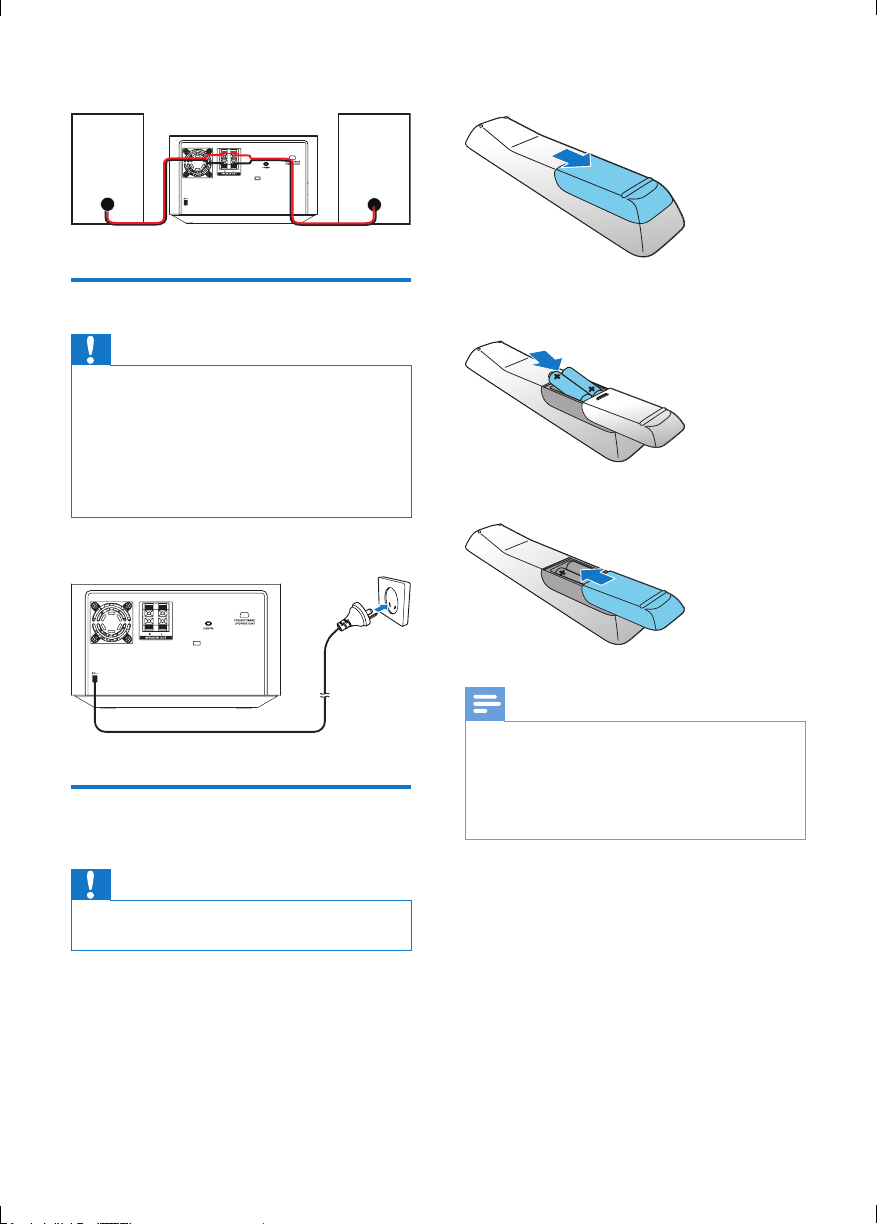
3 Release the socket ap.
1 Open the battery compartment.
Connect power
Caution
Risk of product damage! Make sure that the power
•
supply voltage corresponds to the voltage printed on
the back or the underside of the product.
• Risk of electric shock! When you unplug the AC power
cord, always pull the plug from the socket. Never pull
the cord.
• Before you connect the AC power cord, make sure that
you have completed all other connections.
Connect the power plug to the wall outlet.
Install/replace the remote control batteries
2 Insert 2 AAA batteries with correct
polarity (+/-) as indicated.
3 Close the battery compartment.
Note
If you are not going to use the remote control for a
•
long time, remove the batteries.
• Do not use old and new or different types of batteries
in combination.
• Batteries contain chemical substances, so dispose of
them properly.
Caution
Risk of explosion! Keep batteries away from heat,
•
sunshine, or re. Never discard batteries in re.
9EN
Page 11
4 Get started
Caution
Use of controls or adjustments or performance of
•
procedures other than herein may result in hazardous
radiation exposure or other unsafe operation.
Always follow the instructions in this chapter in
sequence.
Turn on
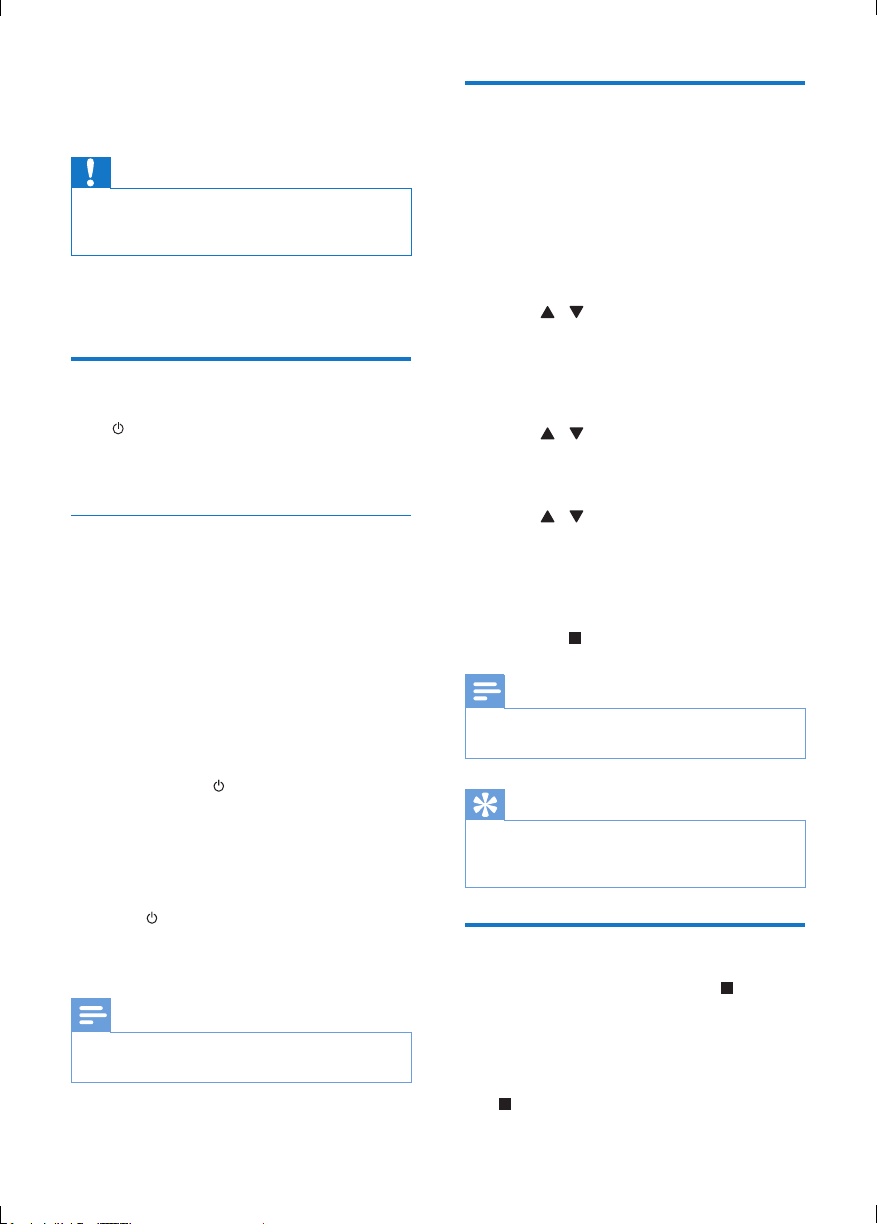
Press .
» This product switches to the last
selected source.
Switch modes
Automatically switch the modes:
• After this product keeps inactive for 15
minutes, it automatically switches to the
normal standby mode.
• After this product keeps in the normal
standby mode for 15 minutes, it
automatically switches to the eco power
standby mode.
Manually switch the modes:
• Press and hold
• from the working mode or normal
standby mode to the eco power
standby mode.
• from the eco power standby mode to
the normal standby mode.
• Press
When an iPod/iPhone/iPad is connected, this product
•
does not switch to the eco-power standby mode.
to switch this product
• between the working mode and a
standby mode.
Note
to switch this product:
Set clock
1
In standby mode, press and hold
PROG/CLOCK SET to activate clock
setting.
» [CLOCK SET] (set clock) scrolls on
the display, and then [CLOCK 24]
(24-hour time format) is displayed with
"24" blinking.
2 Press / or VOL +/- to select
[CLOCK 24] or [CLOCK 12] (12-
hour time format), and then press
PROG/CLOCK SET.
» The hour digits begin to blink.
3 Press / or VOL +/- to set the hour.
4 Press PROG/CLOCK SET again.
» The minute digits begin to blink.
5 Press / or VOL +/- to set the minute.
6 Press PROG/CLOCK SET to conrm the
clock setting.
» The set clock is displayed.
• To exit clock setting without storing,
press
.
Note
If no button is pressed in 90 seconds, the system exits
•
clock setting mode automatically.
Tip
To adjust the digits of hour or minute, you can also turn
•
the VOLUME knob or press PRESET/ALBUM +/- on
the main unit.
Demonstrate features
1
In normal standby mode, press .
• [WELCOME TO PHILIPS] (welcome
to Philips) scrolls on the display, and
then feature names one by one.
2 To exit the feature demonstration, press
again.
10 EN
Page 12
5 Play
Play a disc
Caution
Risk of damage to the product! During play, never move
•
the product.
• Never put any object other than a disc into the disc
compartment.
• Never look at the laser beam inside the player.
• Never play discs with accessories such as disc stabilizer
rings or disc treatment sheets.
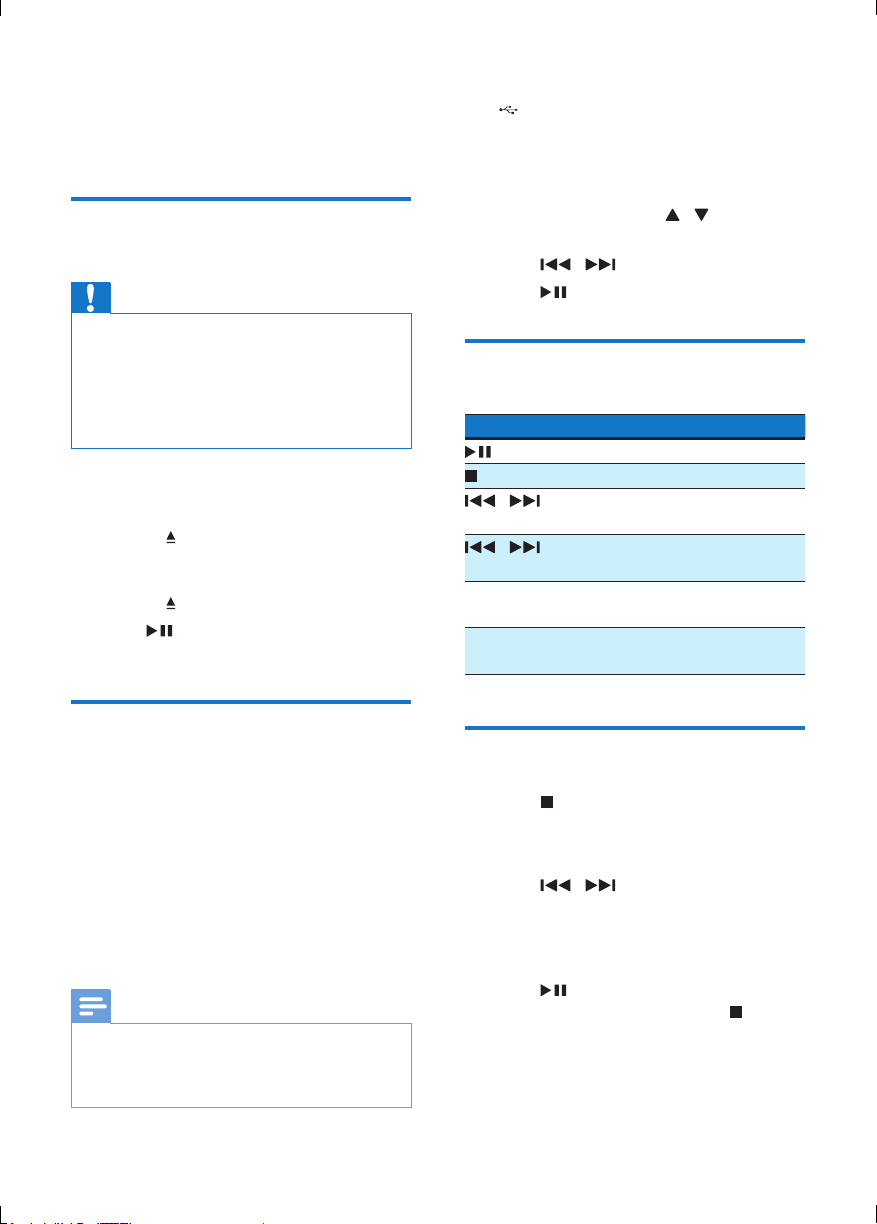
1 Press CD to select the disc source.
2 Load a disc.
1) Press
2) Place a disc onto the disc tray with its
label facing up.
3) Press
3 Press if the play does not start
automatically.
to eject the disc tray.
to close the disc compartment.
1 Connect the USB storage device into the
(USB) socket.
2 Press USB to select the USB source.
» Play starts automatically.
If the play does not start automatically,
1 Press PRESET/ALBUM / to select a
folder.
2 Press / to select a le.
3 Press to start the play.
Basic control
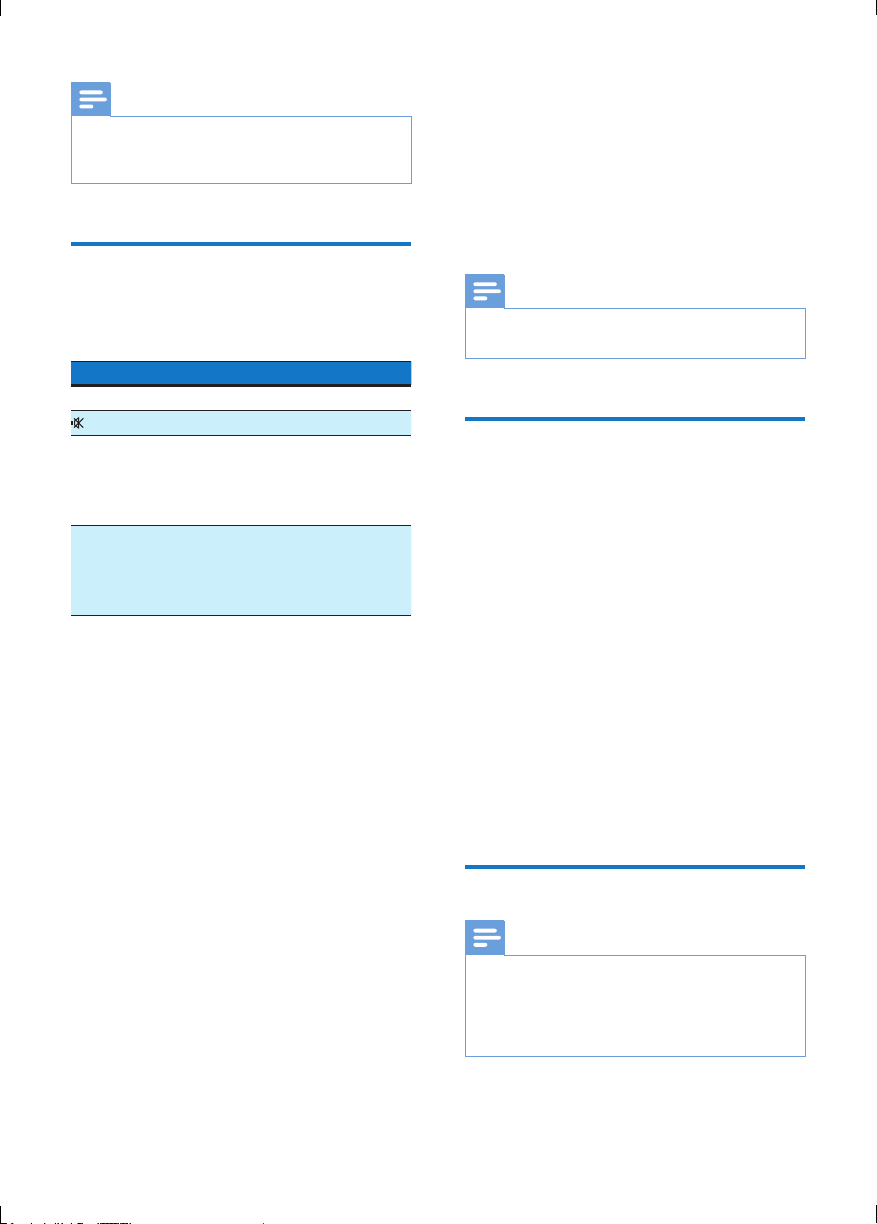
Buttons Actions
Start, pause, or resume play.
Stop play.
/ Skip to the previous or next
le.
/ Press and hold to rewind or
search forward.
MODE/SCAN Select a play mode: normal
play, repeat, or shufe.
RDS/DISPLAY Display the current status and
media information.
Play from a USB storage device
This product can play les that are copied onto
a supported USB storage device:
• ash drive
• memory card reader
• HDD (This product can only detect a
portable hard disc drive with the peak
current no higher than 500 mA through
the USB socket.)
Note
Philips does not guarantee compatibility with all USB
•
devices.
• NTFS (New Technology File System) data format is not
supported.
Program audio tracks
1
Press to stop the play.
2 Press PROG/CLOCK SET.
» [PRG] blinks on the display panel.
3 Press / to select a track number.
4 Press PROG/CLOCK SET.
5 Repeat steps 3 and 4 to program more
tracks.
6 Press to play the programmed tracks.
• To erase the program, press
twice.
11EN
Page 13
Note
The programmed tracks must be stored on the same
•
disc or USB storage device.
• You can program a maximum of 20 tracks.
Adjust sound
During play, you can adjust the volume level and
sound effect through following operations.
Button Function
VOL +/- Increase or decrease the volume.
Mute or restore sound.
DBB Turn on or off the dynamic bass
enhancement (DBB).
• If DBB is activated, [DBB] is
displayed.
DSC Select a sound effect: [POP] (pop),
[JAZZ] (jazz), [ROCK] (rock),
[CLASSIC] (classic), or [FLAT]
(at).
6 Play from iPod/
iPhone/iPad
You can enjoy audio from iPod/iPhone/iPad
through this product.
Note
No audio output from the headphone socket in this
•
situation.
Compatible iPod/iPhone/iPad
This product supports the following iPod,
iPhone and iPad models.
• iPad 2
• iPad
• iPhone 4
• iPhone 3GS
• iPhone 3G
• iPhone
• iPod touch (1st, 2nd, 3rd, and 4th
generation)
• iPod nano (1st, 2nd, 3rd, 4th, 5th, and 6th
generation)
• iPod classic
• iPod with video
• iPod with color display
• iPod mini
12 EN
Load the iPod/iPhone/iPad
Note
The peak current through the dock connector is limited
•
as 1000 mA for iPod/iPhone and 2100 mA for iPad/
iPad 2. To avoid damage to your iPod/iPhone/iPad and
this product, securely load your iPod/iPhone/iPad as
indicated.
1 Push the lock key to release the dock lid.
Page 14
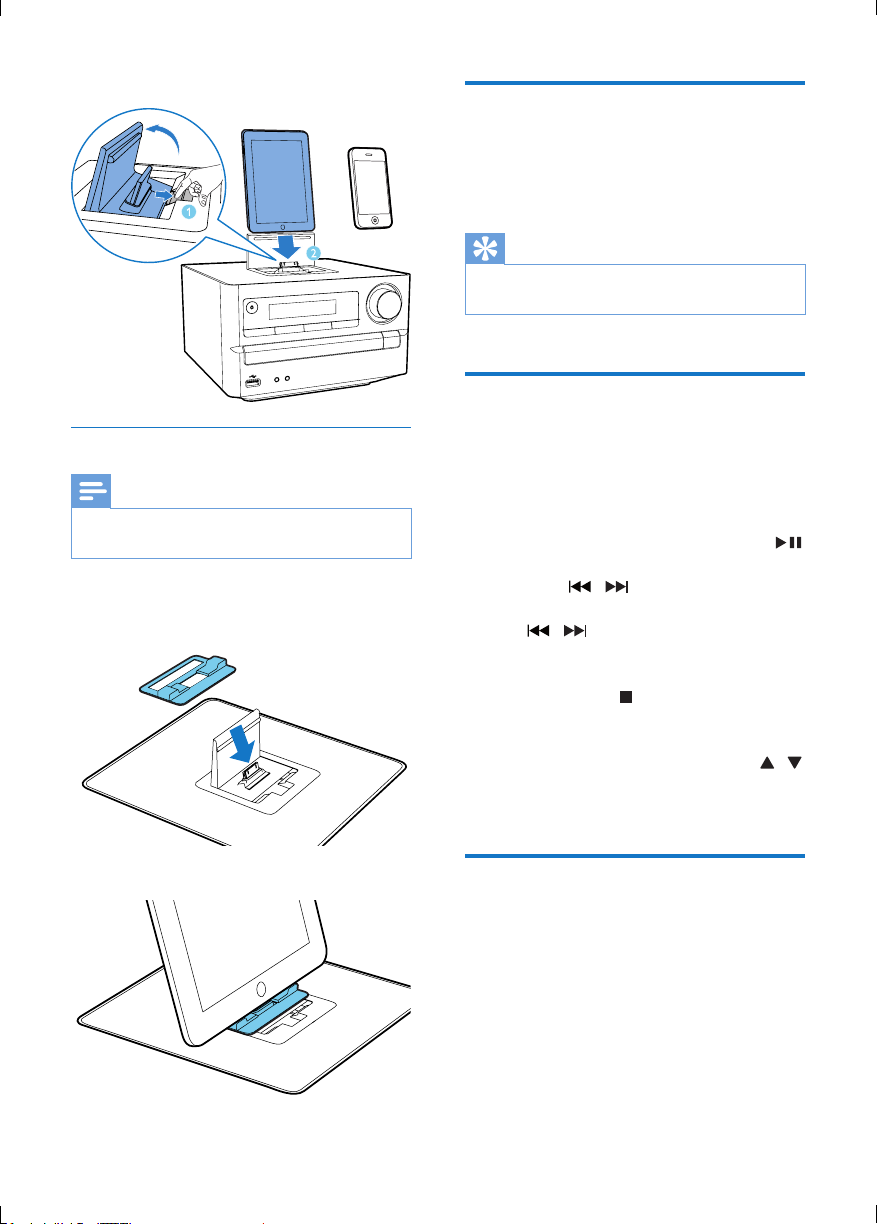
2 Inser t your iPod/iPhone/iPad onto the dock.
Charge the iPod/iPhone/iPad
When the product is connected to power,
the docked iPod/iPhone/iPad star ts charging
automatically.
Tip
For certain iPod models, it may take up to a minute
•
before the charging indication appears.
Install the rubber bumper
Note
If your iPad 2 is not in a case, use the supplied rubber
•
bumper to keep it stable.
1 Release the dock lid, and then place the
rubber bumper onto the dock compartment.
2 Load your iPad 2.
Listen to the iPod/iPhone/iPad
1
Press DOCK to select the iPod/iPhone/
iPad source.
2 Select and play a track on your iPod/
iPhone/iPad.
• To pause or resume the play, press
• To skip to the previous or next track,
press
• To search during play, press and hold
normal play.
• To access the playlist of iPod/iPhone,
press Menu/
• To access the playlist of iPad/iPad 2,
operate on the iPad/iPad 2 screen.
• To scroll through the playlist, press
• To conrm an option, press OK on the
remote control.
Remove the iPod/iPhone/iPad
1
Pull the iPod/iPhone/iPad out of the dock.
2 Flip down the lid to hide the dock.
/ .
/ , and then release it to resume
.
/ .
.
13EN
Page 15
7 Listen to radio
Note
For optimal reception, fully extend the antenna and
•
adjust its position, or connect an outdoor antenna.
• This product does not support MW (medium wave)
radio reception.
• You can program a maximum of 30 DAB radio stations
and 30 FM radio stations.
• Check with local retailer or go to www.WorldDAB.org
for the applicable DAB radio frequencies in your area.
• Refer to "Product information" > "RDS program types"
for more information about RDS radio stations.
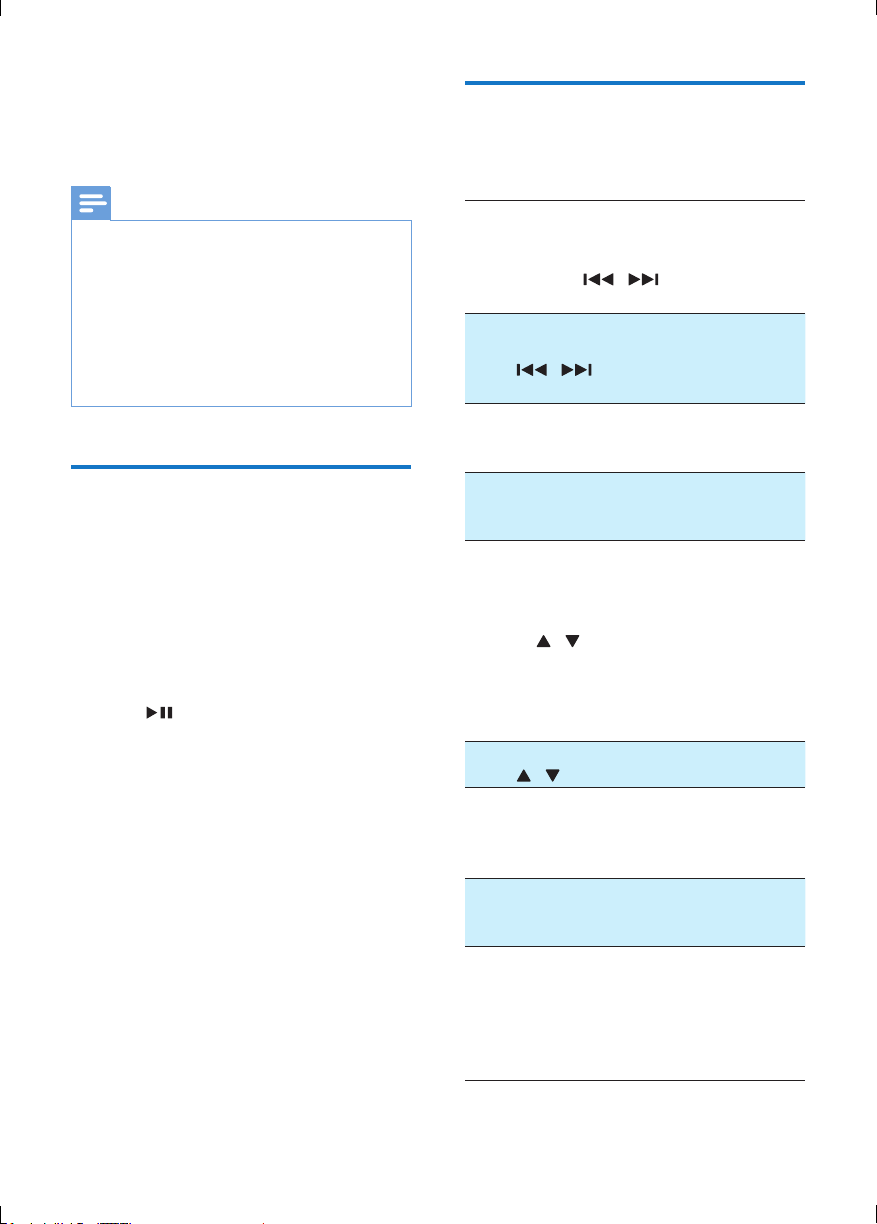
Store DAB radio stations automatically
If no DAB radio station is stored, this product
can search and store DAB radio stations
automatically.
1 Press DAB/FM repeatedly to switch to the
DAB mode.
» [FULL SCAN] is displayed.
2 Press or OK to start the auto
installation.
» This product automatically stores radio
stations with sufcient signal strength.
» After all available radio stations are
stored, the rst stored radio station is
broadcast automatically.
Basic operations
Follow the instructions below for more
functions.
Tune to the next FM radio station with
sufcientsignalstrengthatthelower/higher
frequency:
Press and hold
search.
TunetotheFMradiostationataspecic
frequency:
Press
frequency digitals are displayed.
Program FM radio stations automatically:
Press and hold MODE/SCAN or PROG/
CLOCK SET to start the auto programming.
Program DAB radio stations automatically:
Press and hold MODE/SCAN to start the
auto programming.
Program radio stations manually:
1) Tune to a radio station.
2) Press PROG/CLOCK SET to activate the
programming.
3) Press
to the radio station.
4) Press PROG/CLOCK SET to conrm.
5) Repeat steps 1-4 to program more radio
stations.
Tune to a preset radio station:
Press
Switch the audio mode between [STEREO]
(stereo) and [MONO] (monophonic) for FM
radio:
Press OK repeatedly.
Display available information about the
current radio station:
Press RDS/DISPLAY repeatedly.
Synchronize the clock with an RDS radio
station:
1) Tune to an RDS radio station that transmits
time signals.
2) Press and hold RDS/DISPLAY until
[CT SYNC] is displayed.
/ repeatedly until the
/ to assign a sequence number
/ repeatedly.
/ to start the auto
14 EN
Page 16
Use the menu
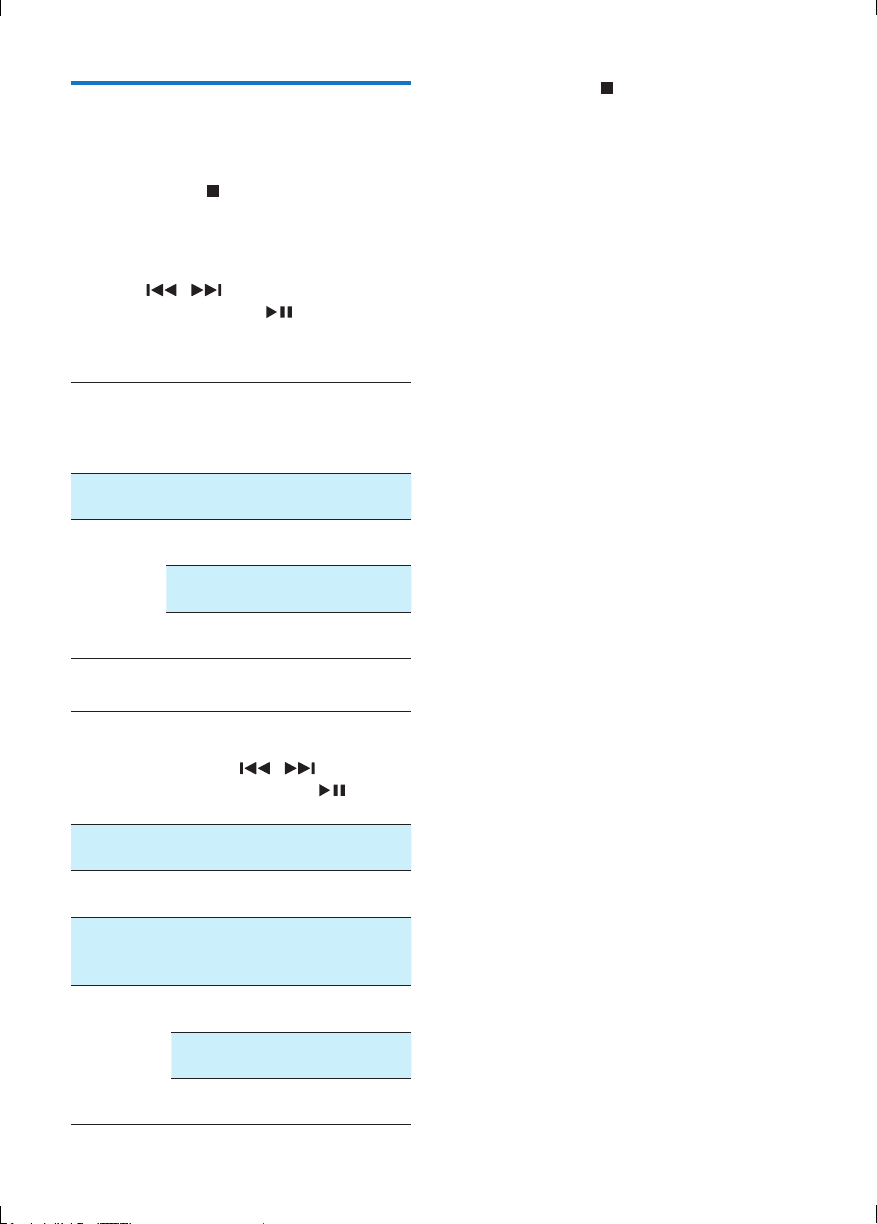
When you listen to radio, you can access the
menu for control options.
1 Press MENU/ .
» FM mode: [SCAN SETTINGS] is
displayed.
» DAB mode: [STATION] is displayed.
2 Press / to select a menu option,
and then press OK or
option or enter the lower-level menu.
FM mode:
to conrm the
3 Press MENU/ to exit the menu.
[SCAN
SETTINGS]
[AUDIO] Select a sound mode: [STEREO]
[SYSTEM] [RESET]: Reset all radio settings
DAB mode:
[STATION] Access the list of the previously
[FULL
SCAN]
[MANUAL] Tune to a DAB radio station
[DRC] Dynamic range control: Select
[SYSTEM] [RESET]: Reset all radio settings
Search and store radio stations
automatically: [STRONG] for
radio stations with strong signal
only, [ALL] for all radio stations.
or [MONO].
to the factory default status.
[SW VER]: Display the current
version of the rmware.
[UPGRADE]: Upgrade the
rmware.
stored DAB radio stations.
• Press
station, and then
listening.
Scan and store DAB radio
stations within full range.
manually.
a level for the effect of dynamic
range control.
to the factory default status.
[SW VER]: Display the version
of the current rmware.
[UPGRADE]: Upgrade the
rmware.
/ to select a
to start
15EN
Page 17
8 Other features
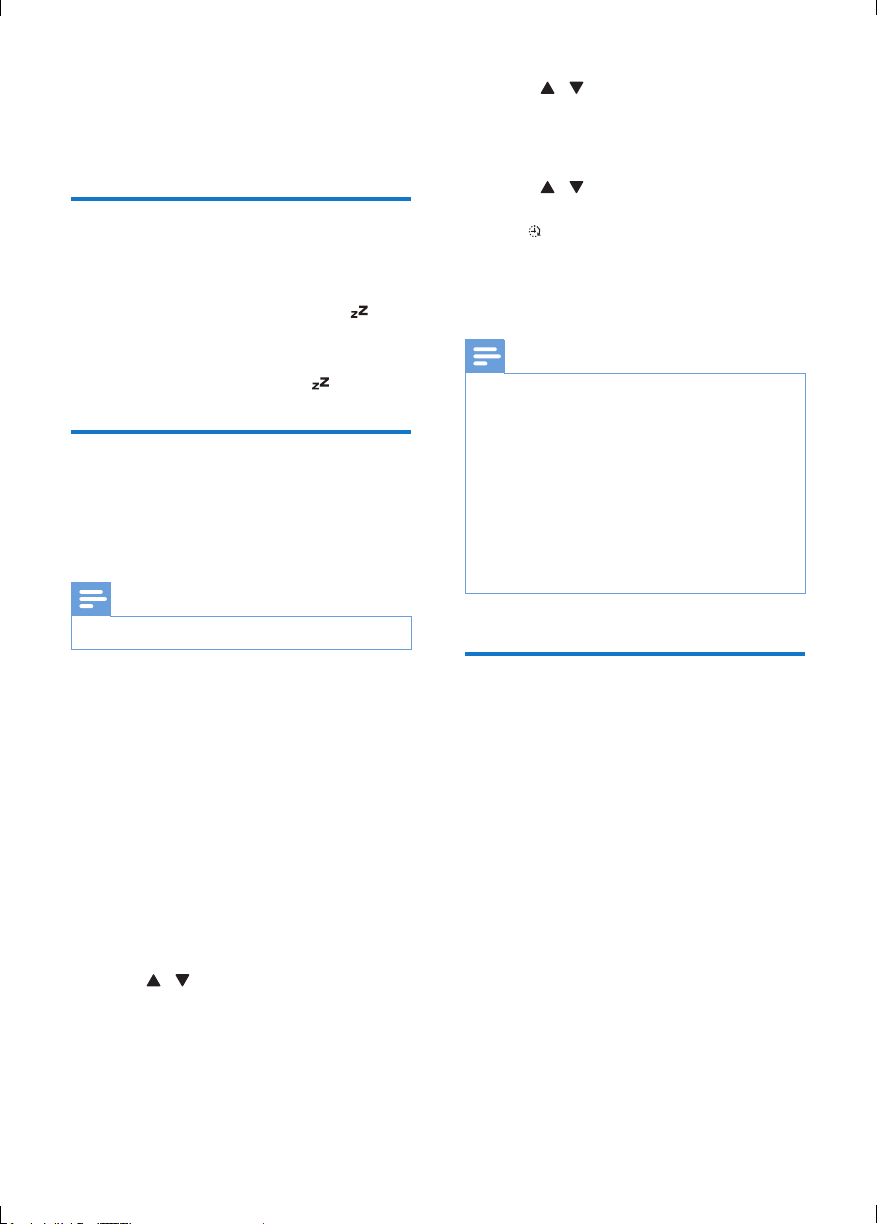
Set sleep timer
In working mode, press SLEEP/TIMER
repeatedly to select a set period (in minutes).
» When sleep timer is activated,
displayed.
• To deactivate sleep timer, press
SLEEP/TIMER again until
Set alarm timer
This product can be used as an alarm clock. You
can select CD, iPod/iPhone/iPad library, PHILIPS
playlist, FM/DAB, or USB as alarm source.
Note
Make sure that you have set the clock correctly.
•
is
disappears.
5 Press / or VOL +/- to set minute, and
then press SLEEP/TIMER again.
» [VOL] (volume) is displayed and begins
to blink.
6 Press / or VOL +/- to adjust volume,
and then press SLEEP/TIMER to conrm.
»
is displayed.
• To deactivate/activate the alarm timer,
press SLEEP/TIMER repeatedly in
normal standby mode.
Note
When the alarm sounds, you can press VOL +/- to
•
adjust volume.
• The alarm timer is not available in MP3 LINK mode.
• To use iPod/iPhone/iPad playlist as the alarm source,
create a playlist named “PHILIPS” in your iPod/iPhone/
iPad rst.
• If no playlist named “PHILIPS” exists in the iPod/iPhone/
iPad or the playlist includes no playable track, this
product switches the alarm source to iPod/iPhone/
iPad library.
• If other alarm sources are unavailable, this product
switches to FM mode automatically.
1 In standby mode, press and hold
SLEEP/TIMER until[TIMER SET] (set the
timer) scrolls on the display.
» [SELECT SOURCE] (select a source)
scrolls on the screen.
2 Press VOL +/-, SOURCE, or PRESET/
ALBUM+/- repeatedly to select a source:
CD, USB, FM, DAB, iPod/iPhone/iPad
library, or PHILIPS playlist.
3 Press SLEEP/TIMER to conrm.
» The hour digits are displayed and begin
to blink.
4 Press / or VOL +/- repeatedly to set
hour, and then press SLEEP/TIMER.
» The minute digits are displayed and
begin to blink.
16 EN
Listen to external audio device
You can listen to an external audio device, for
example, MP3 player through this product.
1 Press MP3 LINK/USB repeatedly to select
MP3 link source.
2 Connect the MP3 Link cable to
• the MP3-LINK socket in the front
panel of the main unit
• the headphone socket on the external
device.
3 Star t to play the external device. (See the
device user manual).
Page 18
Listen through headphone
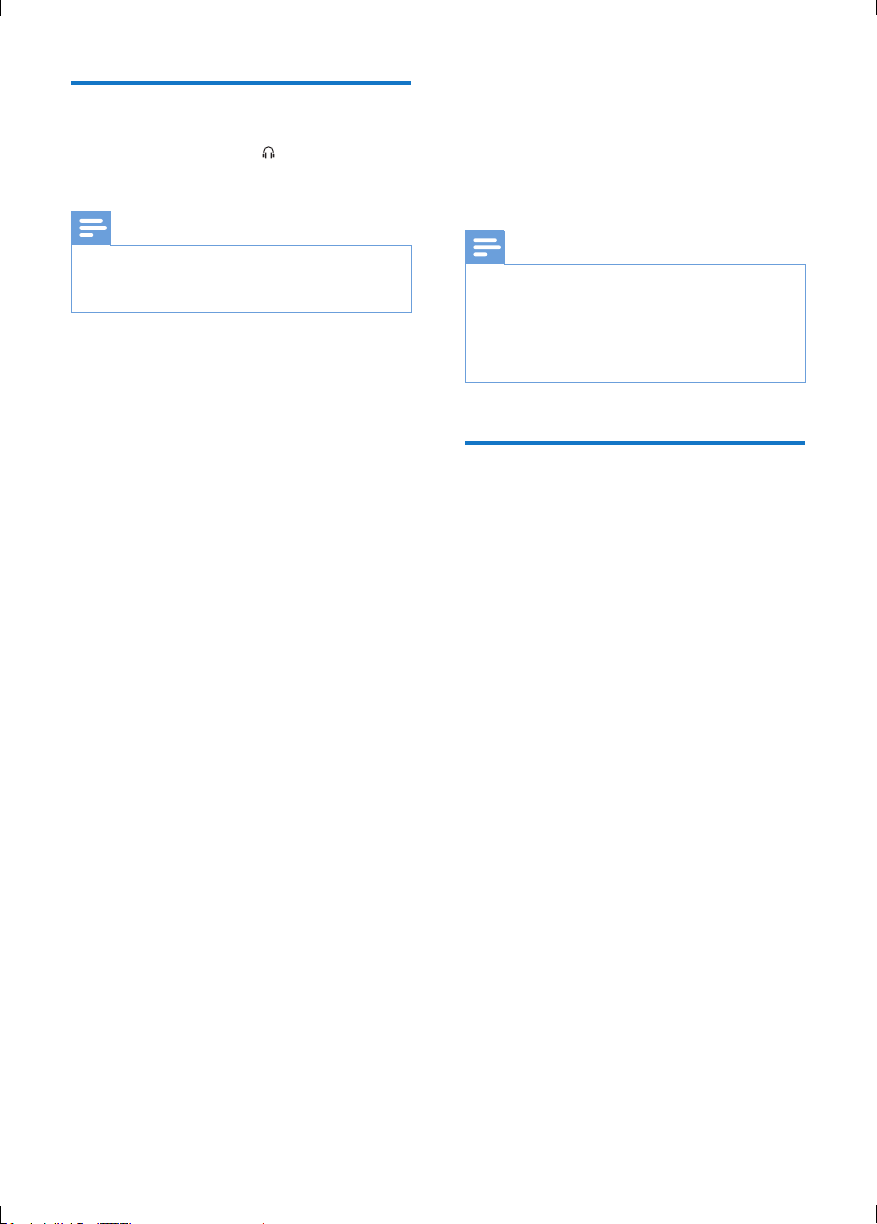
9 Upgrade the
Plug a headphone into the socket in the front
panel of the main unit.
Note
No audio output from the headphone socket when
•
you listen to the docked iPod/iPhone/iPad. Listen
through the speakers instead.
firmware
Note
Power supply must not be interrupted during the
•
upgrade.
• The rmware upgrade can only be available through
the mini-USB port on the back plate.
• When the rmware upgrade succeeds, all settings are
restored to the factory default status.
Register your product
1
Go to www.philips.com/welcome.
2 Click the link of "Register my product"
(the exact wording of this link name may
vary in different languages).
3 Login with your account on the prompt
Web page.
• If you have no account for Club Philips,
create one rst on this Web page.
4 Search your product with "DCB2020/79"
as the keywords.
5 Click the link of search result to access the
Web page for registering your product.
6 Fill in necessar y information about this
product to complete the registration.
» With the registration, you can get
information about software update and
product support at this website or via
your mailbox that is registered as the
account for Club Philips.
17EN
Page 19
Checkthecurrentrmware
version
Follow the steps to check the current version
of rmware on your product.
1 Press DAB/FM to switch to radio mode.
2 Press MENU/ to access the menu.
3 Press / to select [SYSTEM].
4 Press OK or .
5 Press / to select [SW VER].
6 Press OK or .
» The version of current rmware scrolls
on the display panel
Perform the upgrade
1
Go to www.philips.com/welcome.
2 Login with your account for Club Philips.
» Support information about your
registered product is displayed.
3 Click the link of "Firmware Upgrade
Readme File" (the exact wording of this
link name may vary in different languages).
4 Read and understand the instructions on
rmware upgrade.
5 Follow the instructions to download the
upgrade packet and complete the upgrade.
• If the upgrade fails, reconnect the
power supply, turn on this product, and
perform the upgrade again.
10 Product
information
Note
Product information is subject to change without prior
•
notice.
Specications
Amplier
Rated Output Power 2 x 10 W RMS
Frequency Response 40 Hz-20 kHZ, ±3 dB
Signal to Noise Ratio > 77 dB
MP3-Link Input 600 mV RMS 22 kohm
Disc
Laser Type Semiconductor
Disc Diameter 12 cm/8 cm
Support Disc CD-DA, CD-R, CD-
RW, MP3-CD, WMA-
CD
Audio DAC 24 Bits / 44.1 kHz
Total Harmonic
Distortion
Frequency Response 4 Hz - 20 kHz (44.1
S/N Ratio >75 dBA
<0.8% (1 kHz)
kHz)
18 EN
Page 20

Tuner (FM)
Tuning Range 87.5 - 108 MHz
Tuning grid 50 KHz
Sensitivity
- Mono, 26dB S/N Ratio
- Stereo, 46dB S/N Ratio
Search Selectivity > 28 dBf
Total Harmonic Distortion < 2%
Signal to Noise Ratio > 55 dB
< 22 dBf
< 43 dBf
DAB Tuner
Tuning Range 174–240 MHz (Band III)
Sensitivity > 90 dBf
Speakers
Speaker Impedance 6 ohm
Speaker Driver 10 cm full range
Sensitivity > 84 dB/m/W ± 4
dB/m/W
General information
AC power 220-240 V ~,
50/60 Hz
Operation Power
Consumption
Power Consumption in
Eco-power Standby
Headphone Output <150 mV
Wide Band
Characteristic Voltage
USB Direct Version 2.0 HS
Dimensions
- Main Unit
(W x H x D)
- Speaker Box
(W x H x D)
Weight
- Main Unit
- Speaker Box
25 W
≤ 0.5 W
>75 mV
200 x 118 x 210 mm
140 x 224 x 144 mm
1.35 kg
1.05 kg x 2
USB playability information
Compatible USB devices:
• USB ash memory (USB 2.0 or USB1.1)
• USB ash players (USB 2.0 or USB1.1)
• memory cards (requires an additional card
reader to work with this product)
Supported formats:
• USB or memory le format FAT12, FAT16,
FAT32 (sector size: 512 bytes)
• MP3 bitrate (data rate): 32-320 Kbps and
variable bitrate
• WMA v9 or earlier
• Directory nesting up to a maximum of 8
levels
• Number of albums/folders: maximum 99
• Number of tracks/les: maximum 999
• ID3 tag v2.0 or later
• File name in Unicode UTF8 (maximum
length: 64 bytes)
Unsupported formats:
• Empty albums: an album that does not
contain MP3/WMA les
• Unsupported le formats are skipped. For
example, Word documents (.doc) or MP3
les with extension .dlf are ignored and
not played.
• AAC, WAV, PCM audio les
• DRM protected WMA les (.wav, .m4a,
.m4p, .mp4, aac)
• WMA les in Lossless format
Supported MP3 disc formats
• ISO9660, Joliet
• Maximum track/le number: 999
(depending on le name length)
• Maximum album number: 99
• Supported sampling frequencies: 32 kHz,
44.1 kHz, 48 kHz
• Supported bitrates: 32-320 kbps, variable
bitrates
19EN
Page 21

RDS program types
NO TYPE No RDS programme type
NEWS News services
AFFAIRS Politics and current affairs
INFO Special information programs
SPORT Sports
EDUCATE Education and advanced training
DRAMA Radio plays and literature
CULTURE Culture, religion and society
SCIENCE Science
VARIED Entertainment programs
POP M Pop music
ROCK M Rock music
MOR M Light music
LIGHT M Light classical music
CLASSICS Classical music
OTHER M Special music programs
WEATHER Weather
FINANCE Finance
CHILDREN Children’s programs
SOCIAL Social Affairs
RELIGION Religion
PHONE IN Phone In
TRAVEL Tr avel
LEISURE Leisure
JAZZ Jazz Music
COUNTRY Country Music
NATION M National Music
OLDIES Oldies Music
FOLK M Folk Music
DOCUMENT Documentar y
TES Alarm Test
ALARM Alarm
20 EN
Page 22
11 Troubleshooting
Warning
•
Never remove the casing of this apparatus.
To keep the warranty valid, never try to repair the product yourself.
If you encounter problems when using this product, check the following points before requesting
service. If the problem remains unsolved, go to the Philips Web page (www.philips.com/welcome). When
you contact Philips, make sure that the product is nearby and the model number and serial number are
available.
Problem Solution
No power Make sure that the AC power cord is connected properly.
Make sure that there is power at the AC outlet.
With a power-saving feature, the system switches off automatically
15 minutes after the product stays inactivity.
No sound or poor sound Adjust the volume.
Disconnect the headphones.
Make sure that the speakers are connected correctly.
Make sure that the stripped speaker wires are clamped.
No response from the product Reconnect the AC power plug, and then turn on the product again.
With a power-saving feature, the system switches off automatically
15 minutes after the product stays inactivity.
Remote control does not work Before you press any function button, select the correct source with
the remote control instead of the main unit.
Reduce the distance between the remote control and the main unit.
Insert each battery with its polarity (+/– signs) aligned as indicated.
Replace the batteries.
Aim the remote control directly at the sensor on the front panel of
the main unit.
No disc detected Insert a disc.
Make sure that you place the disc with its label facing upwards.
Wait until the moisture condensation at the lens has cleared.
Replace or clean the disc.
Make sure that the recordable disc is nalized and the format
supported.
USB storage device not
supported
Cannot play some les on the
USB storage device
Make sure that the USB storage device is compatible with the
product.
Tr y another one.
Make sure that the le format is supported.
Make sure that the le quantity does not exceed the maximum.
21EN
Page 23

Problem Solution
Poor radio reception Increase the distance between the product and other electrical
appliances.
Fully extend the antenna.
Connect an outdoor FM/DAB antenna instead.
Timer does not work Set the clock correctly.
Switch on the timer.
Clock/timer setting erased Power has been interrupted or the AC power cord has been
disconnected.
Reset the clock/timer.
22 EN
Page 24

August 2011
Philips Electronics Australia Limited and Philips New Zealand Limited
Level 1, 65 Epping Rd, Level 2, 1 Nugent St,
North R yde, SYDNE Y NSW 2113 Grafton, AUCKLAND, 1
In this warranty:
We or us means Philips Electronics Australia Limited ACN 008 445 743 or Philips New Zealand Limited (Company
Number 1723), and our contact details are set out at the end of this warranty;
You means the purchaser or the original end-user of the Goods;
Supplier means the authorised distributor or retailer of the Goods that sold you the Goods in Australia or New
Zealand; and
Goods means the product or equipment which was accompanied by this warranty and purchased in Australia or New
Zealand.
If you require a ssistance with the operation of the product, its features or specifications please call the Philips
Consumer Care Centre on 1300 363 391 in Australia or 0800 658 224 in New Zealand.
: Our Goods come with guarantees that cannot be excluded under the Australian Consumer Law. You are
Australia
entitled to a replacement or refund for a major failure and for compensation for any other reasonably foreseeable loss
or damage. You are also entitled to have the Goods repaired or replaced if the goods fail to be of acceptable quality
and the failure does not amount to a major failure. This is not a complete statement of your legal rights as a consu mer.
New Zealand:
This guarantee applies in addition to the conditions and guarantees implied by that legislation.
Additional Warranty:
In addition to the rights and remedies that you have under the Australian Consumer Law, Consumer Guarantees Act
of New Zealand or any other applicable law, we provide the following war ranty against defects:
1. If, during the first 12 months from their date of purchase from the Supplier (Warranty Period), the Goods prove
2. We do not have to repair or replace the Goods under this Additional Warranty if the Goods have been used f or a
3. Even when we do not have to repair or replace the Goods, we may decide to do so anyway. In some cases, we
4. All such repaire d, replaced or substituted Goods continue to receive the benefit of this Additional Warranty for the
5. This Additional Warranty is limited to repair, replacement or substitution only. As far as the law permits, w e will not
6. In order to claim under this Additional Warranty you must telephone us on 1300 363 391 in Australia or 0800 658
∗ All returned Goods must be accompanied by satisfactory proof of purchase which clearly indicates the name and
∗ You must bear any expense for return of the Goods or otherwise associated with making your claim under this
7. This warranty is only valid and enforceable in Australia and New Zealand.
Contact us or the place of purchase for further details.
Philips Electronics Australia Limited Philips New Zealand Limited
Consumer Care: 1300 363 391 Consumer Care: 0800 658 224
E-mail: [email protected]
Website: www.philips.com/support Website: www.philips.com/support
Our Goods come with guarantees that cannot be excluded under the Consumer Guarantees Act 1993.
defective by reason of improper workmanship or materials and none of your statutory rights or remedies apply, we
will repair or replace the Goods without charge.
commercial purpose; misused, improperly or inappropriately installed, operated or repaired; abused; damaged; or
not maintained in accordance with the manufacturer’s instructions.
may decide to substitute the Goods with a similar alternative product of our choosing. All such decisions are at
our absolute discretion.
time remaining on the original Warranty Period.
be liable for any loss or damage caused to property or persons arising from any cause whatsoever.
224 in New Zealand within the Warranty Period. You will be asked for details of the Goods, a description of the
defect and your personal details. Upon accepting your claim, we shall assist you with either returning the Goods to
the Supplier for replacement or to the most convenient Philips Authorised Service Centre for your Goods to be
repaired. In some case we may require that you return to the Goods to us (at the address below) for repair,
replacement or substitution.
address of the Supplier, the date and place of pur chase and identifies product. It is best to provide a legible and
unmodified receipt or sales invoice.
Additional Warranty.
Warranty against Defects
023
Email: [email protected]
23
Page 25

Specifications are subject to change without notice
© 2012 Koninklijke Philips Electronics N.V.
All rights reserved.
DCB2020_79_UM_V1.0
 Loading...