

Philips CT7668-BWUAS0P1 User Manual
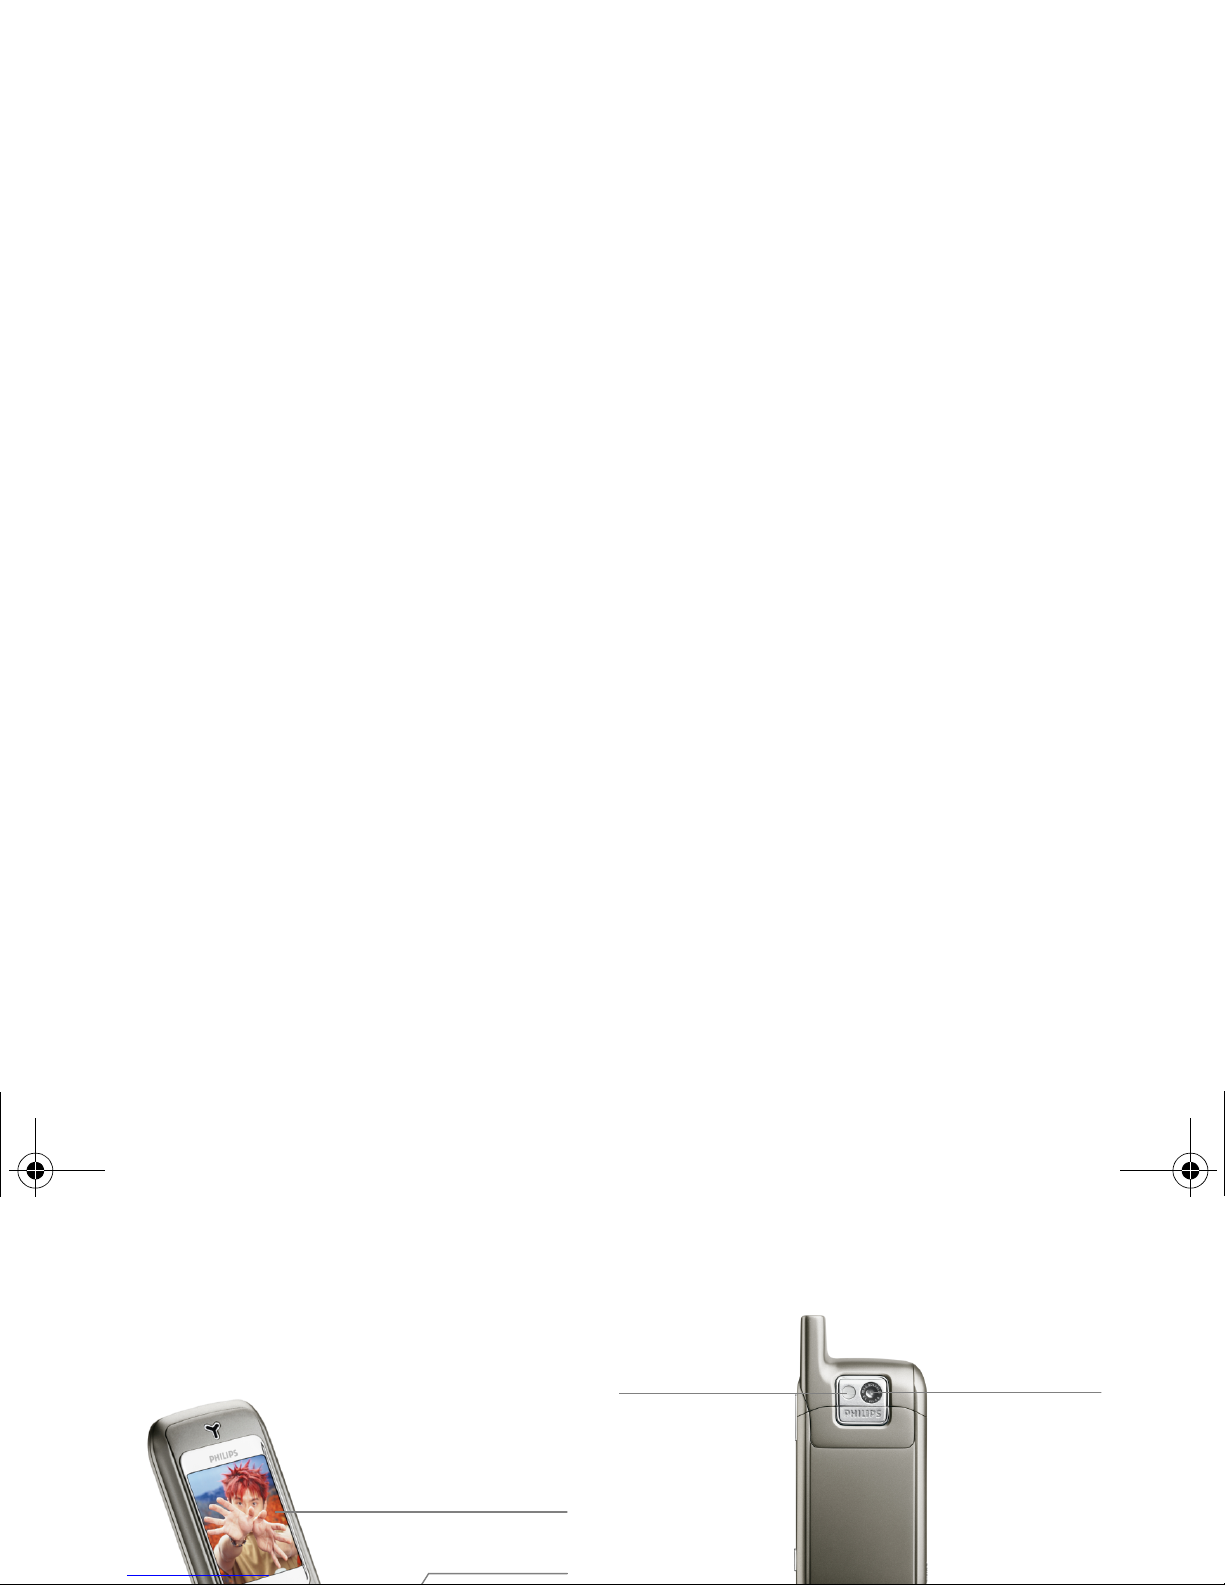
Discover your phone
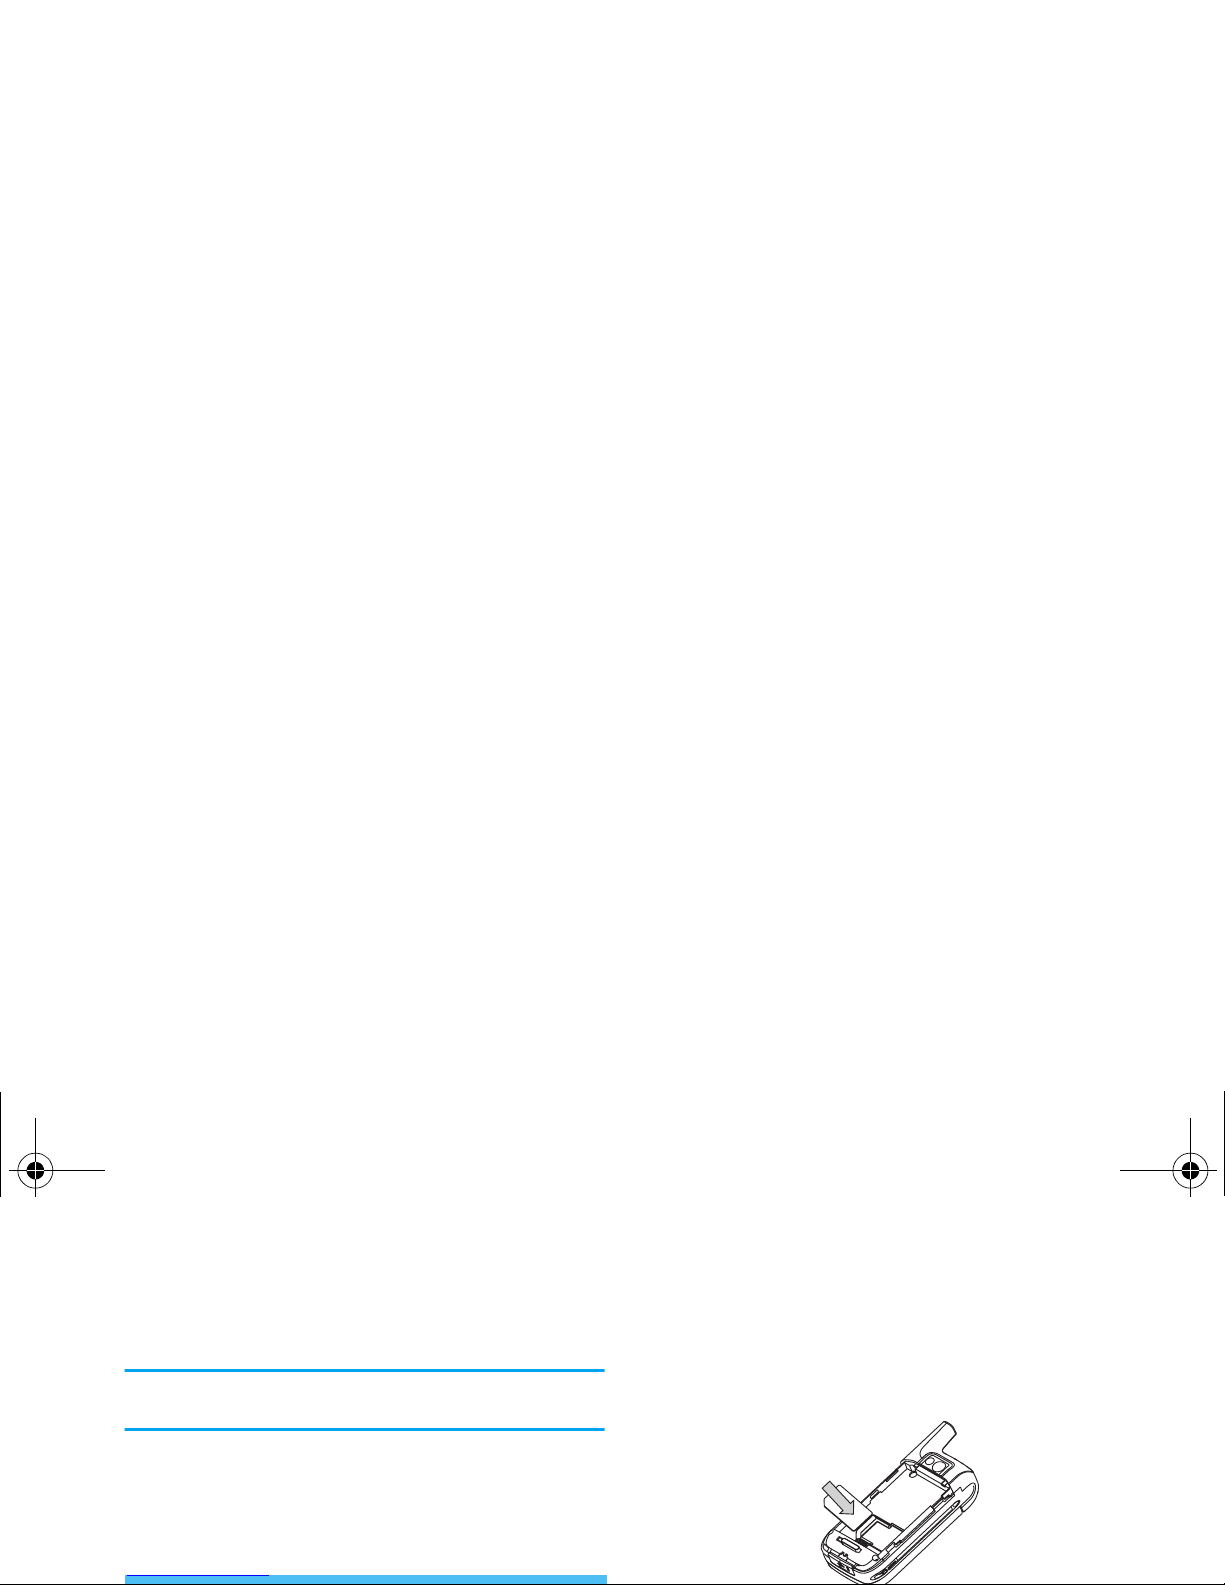
262K-colour screen
Right soft key
Flashlight
Camera lens
Philips766_APMEA.book Page 0 Monday, June 6, 2005 3:28 PM

Keypad description
OK
,
• In idle screen, press to
access the main menu.
• In function list screen,
press to select the
highlighted function.
• Press to confirm a
setting or option.
Right soft key
R
• In idle screen, it is a
default shortcut key to
access
Camera
. You may
change this shortcut key.
• In other screens, press
to perform the function
indicated at the bottom
right of the screen.
Pick up key
(
• To dial an outgoing call
or answer an incoming
Philips766_APMEA.book Page 1 Monday, June 6, 2005 3:28 PM
Navigation keys
[Up]
+
•Cursor up.
• In idle screen, short
press to access
Call list
(can be user defined).
[Down]
-
•Cursor down.
• In idle screen, short
press to access
Names list
(can be user defined).
Numeric keys
• In idle screen, short
press
0-9
to enter
numbers.
• In idle screen, long
press for quick access to
a designated function
or flash dial a
designated phone
number (can be user
defined, except for
0
Philips766_APMEA.book Page 2 Monday, June 6, 2005 3:28 PM

*
•In idle screen, short
press to enter "*", long
press to enter "+".
•In
Calculator
or
Currency converter
,
press to enter decimal
point.
#
•In idle screen, short
press to enter "#", long
press to access
WAP
.
Camera key
•In idle screen when flip
is closed (backlight on),
long press to activate
the flashlight for use as
torchlight. Long press
again to turn off the
flashlight.
• In idle screen, press to
access the preview
mode of the camera.
Philips766_APMEA.book Page 3 Monday, June 6, 2005 3:28 PM

Table of contents
1. Menu tree
...................................................... 6
2. Getting started
........................................... 9
Insert the SIM card .......................................... 9
Charge the battery ........................................ 10
Switch on the phone ..................................... 11
Set date and time ........................................... 11
Calibration ....................................................... 11
Copy the SIM phonebook ............................ 11
7. Contacts
....................................................... 26
Names list ........................................................ 26
Use the phonebook ....................................... 27
Send phonebook entries .............................. 28
Contacts select ............................................... 28
Status ................................................................ 28
8. WAP
............................................................... 29
Philips766_APMEA.book Page 4 Monday, June 6, 2005 3:28 PM

10. Multimedia
................................................ 39
Picture album .................................................. 39
Sound album .................................................... 39
Video ................................................................. 40
Games ............................................................... 40
11. Messages
.................................................... 42
SMS .................................................................... 42
MMS .................................................................. 46
Broadcast SMS ................................................ 50
Settings ............................................................. 50
Icons & symbols
............................................ 69
Precautions
....................................................... 71
Troubleshooting
........................................... 75
Philips authentic accessories
................. 78
Limited warranty
.......................................... 79
Philips766_APMEA.book Page 5 Monday, June 6, 2005 3:28 PM

1 • Menu tree
The table below describes the complete menu tree of
your mobile phone, and the page number you should
refer to for more information. Your phone features a
numbered menu/sub-menu/options. You may enter
the number corresponding to your selection to enter
the menu or options directly.
Call services p24
Contacts p26
Names list p26
Settings
Copy all / Delete all / Contacts select /
Group / Status
WAP p 29
Philips766_APMEA.book Page 6 Monday, June 6, 2005 3:28 PM
Organiser p33
Calendar p33
Dictionary p34
Eng-Chi / Chi-Eng
Calculator p35
Alarm p35
Games p40
Intris / Traffic police / Puzzle bobble /
Box / Colour liner / Linker
Messages p42
SMS p42
Write SMS / Inbox / Outbox /
User folder / SMS guard
Philips766_APMEA.book Page 7 Monday, June 6, 2005 3:28 PM
Settings p59
Language p59
Time and date p59
Sounds p59
Ringtone / Message ringer / Key tones /
Screen tap tone / Sound alerts / Profiles
STK p68
Philips766_APMEA.book Page 8 Monday, June 6, 2005 3:28 PM
2 • Getting started
Read the safety instructions in the "Precautions"
section before use (see page 71).
To use your phone, you must insert a valid SIM card
supplied by your GSM operator or retailer. The SIM
card contains your subscription, your mobile number,
and a memory in which you can store phone numbers
and messages.
2.
Insert the SIM card: slide the SIM card it into
the card slot carefully. Make sure that the clipped
corner is in the correct corner and the metal
contacts are facing down.
Philips766_APMEA.book Page 9 Monday, June 6, 2005 3:28 PM
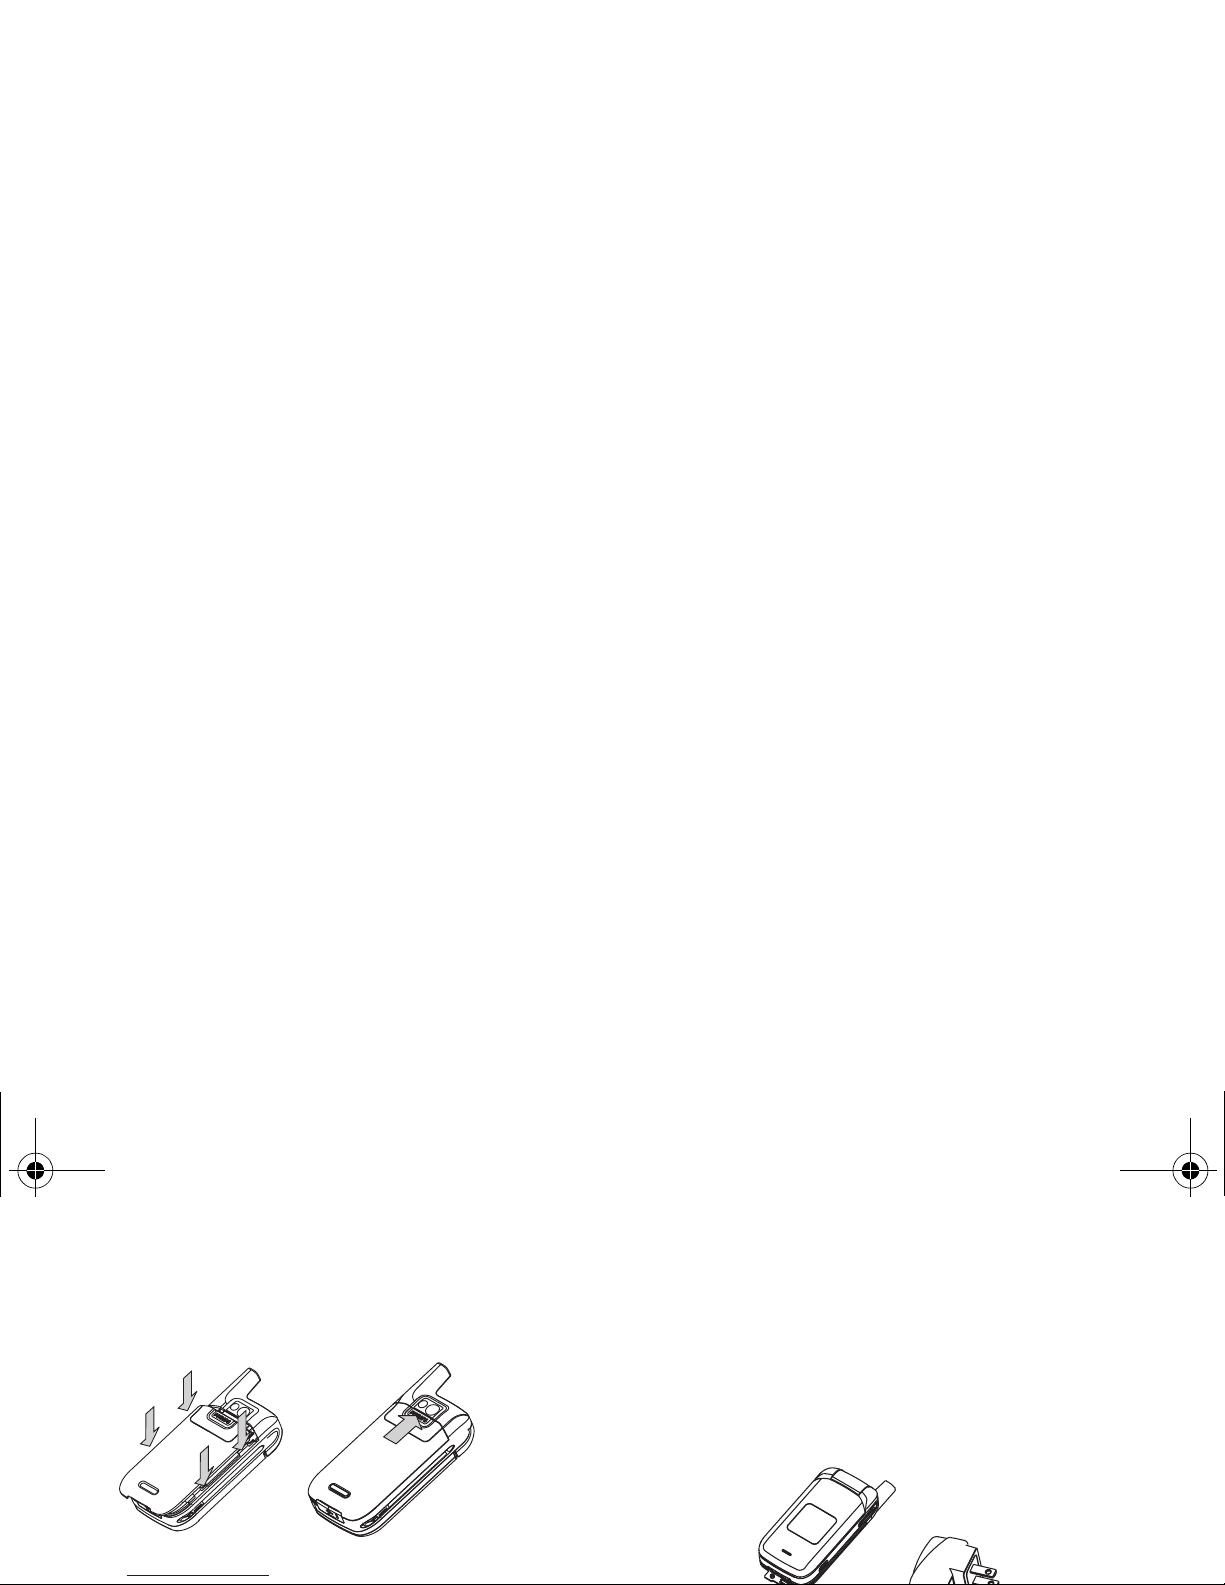
4.
Replace the back cover of your phone: slide it
upwards until it locks into place.
5.
Remove the protective film covering the screen
2.
Pull away the protective rubber cap covering the
sockets at the base of phone (it is attached to the
phone so that you cannot lose it) and plug the
charger connector (supplied with the phone)
into the right socket, then plug the charger into
an AC wall outlet.
Philips766_APMEA.book Page 10 Monday, June 6, 2005 3:28 PM

Keeping the charger connected to the phone when the
battery is fully charged will not damage the battery.
The only way to turn off the charger is to disconnect it,
so use an easily accessible AC well outlet. You can
connect the charger to an IT supply (Belgium only).
1.
Long press
)
to switch on the phone. If
"Please insert SIM card" appears on the screen, it
means that your SIM card has not been inserted
When you switch on your phone for the first time,
you will be prompted to set the date and time. Use the
alphanumeric keypad to enter numbers.
For complete date and time options, see page 59.
This feature allows you to calibrate your screen, in
order to achieve better precision when using it with
Switch on the phone
Set date and time
Calibration
Philips766_APMEA.book Page 11 Monday, June 6, 2005 3:28 PM

3 • Input methods
Your phone provides you with the following input
methods:
•T9 Pinyin
•T9 Stroke
•T9 English
•ABC
Pinyin Input
A Chinese character is made up of one or several
Pinyin letters. Press the keys corresponding to the
required Pinyin letters to enter the Chinese Pinyin.
(please note that the pinyin "ü" is represented by "v ").
Each Pinyin letter is represented by one of the
numeric keys as described in the following table.
Keypad input methods
Number key Pinyin letter
2
abc
Philips766_03_InputMethods.fm Page 12 Monday, June 6, 2005 3:28 PM

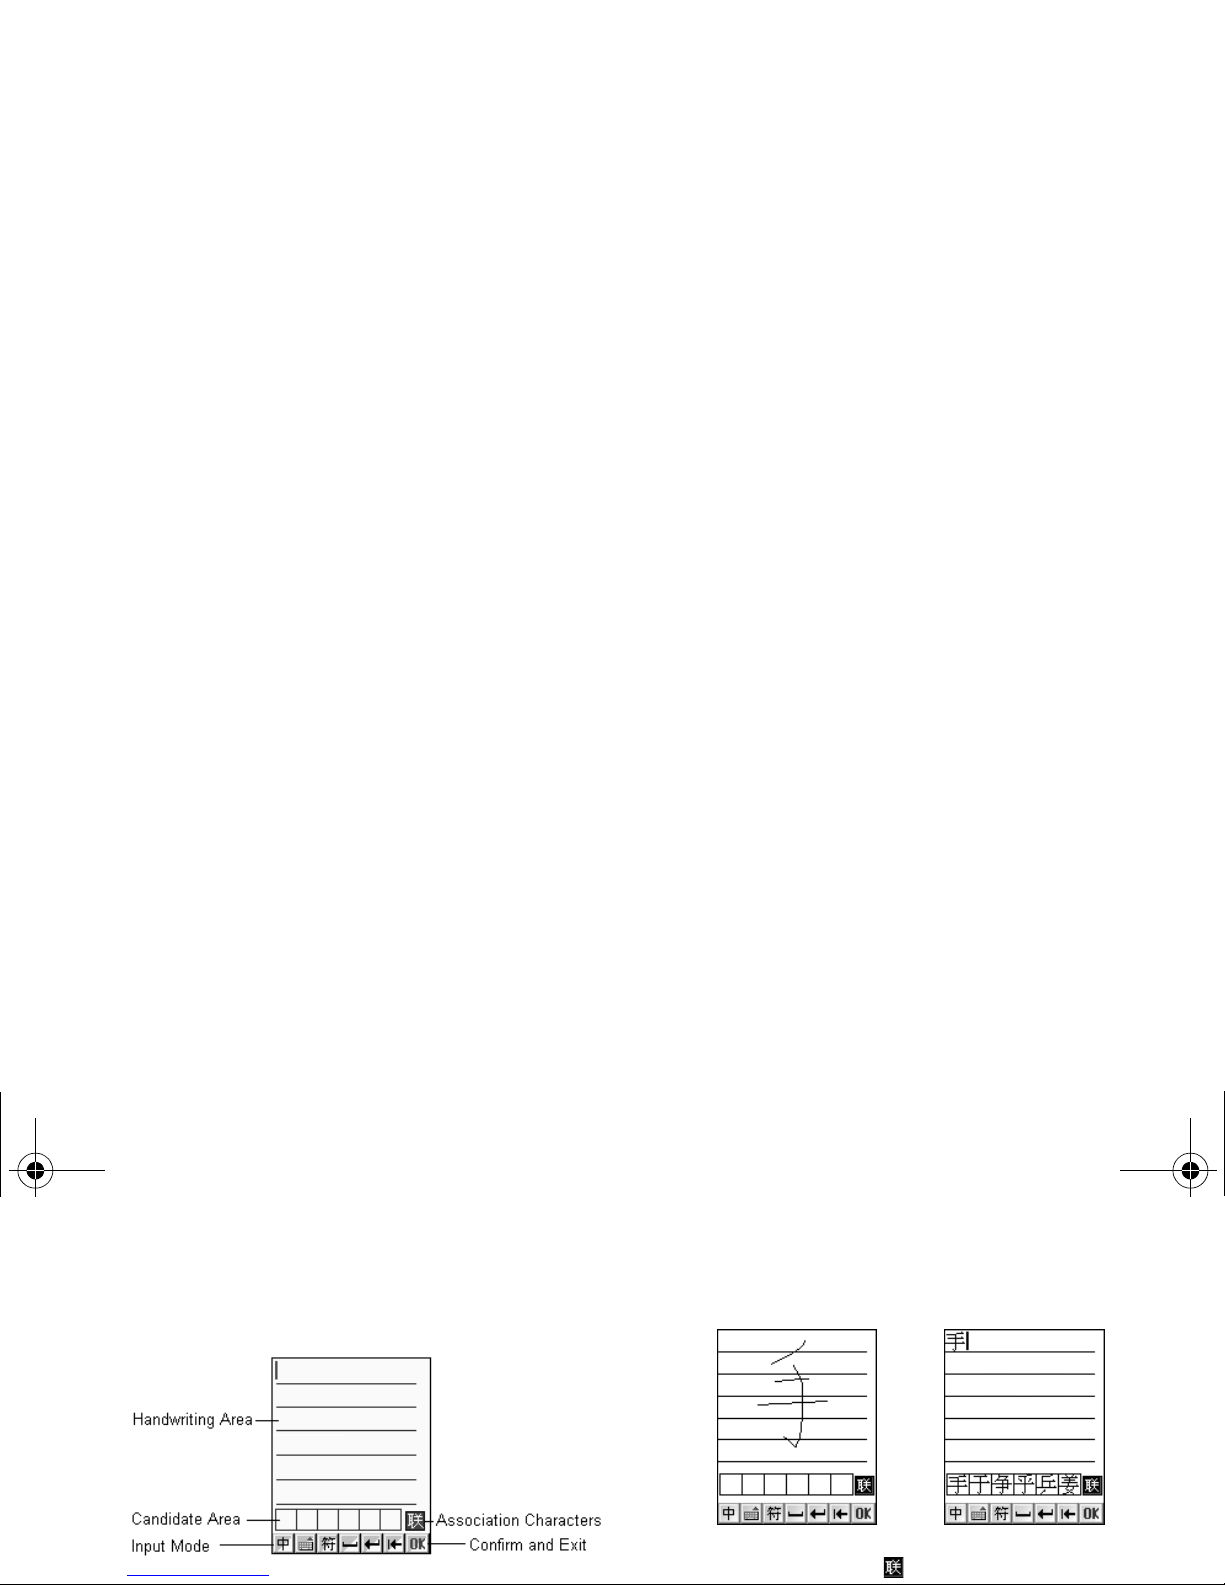
Input process
1. Input Pinyin:
when you use number keys to input
Pinyin letters, there will be two lines at the
bottom of the screen: the first line is the input
area showing the proposed Pinyin combinations
corresponding to your input, the second line is
the candidate area showing the candidate
Chinese characters corresponding to the
highlighted Pinyin combination in the input
area. During the input process, the Pinyin
combinations displayed in the input area keep
4. Enter a selected character:
press
,
or the
corresponding number key.
-
Press
,
to enter the highlighted character.
-
Press the corresponding number key of the
desired character to enter it.
As soon as a Chinese character has been entered,
the input area will disappear and the association
characters for the entered character will be shown
in the candidate area.
5.
Select an association character or use the number
keys to enter a new character as described in Step 1.
Philips766_03_InputMethods.fm Page 13 Monday, June 6, 2005 3:28 PM
When entering Pinyin letters, you can press R to
delete the last entered Pinyin letter. After the last
Pinyin letter has been deleted, the input area will
disappear, and
R
can be used to delete the character
before the cursor. Long press
R
to delete all
characters at once.
After entering the desired characters, press
)
to exit
association character list and press
,
to confirm the
text input.
Number
key
Stroke
category
Basic
strokes
Example
character
2
Horizontal
stroke
十 慧
七 冰 骏
羽 输 泰
4
Left-falling
stroke
人 川 牛小 常
5
Vertical
stroke
十
了 小 利
6
Rightfalling
入 边
Philips766_03_InputMethods.fm Page 14 Monday, June 6, 2005 3:28 PM

Input process
1.
Press the keys corresponding to the required
strokes.
2.
Press </> to select the proposed characters in the
candidate area, or press
+/-
to view the previous/
next line of proposed characters.
3.
When you have found the desired character, you
can move the cursor to highlight it and then
press
,
to enter it, or you can press the
corresponding number key to enter it directly.
4.
After the character has been entered, the input
Generally, you will be able to find a desired character
before you have finished entering all of its strokes.
After entering the desired characters, press
)
to exit
association character list and press
,
to confirm the
text input.
T9® Text Input
T9® predictive Text Input is an intelligent editing
mode for text messages, that comes with a
comprehensive dictionary. It allows you to quickly
enter texts. Press only once on the key corresponding
Philips766_03_InputMethods.fm Page 15 Monday, June 6, 2005 3:28 PM
Example: how to enter the word "home":
Press
4, 4
(GHI),
6, 6, 6
(MNO),
6
(MNO),
3, 3
(DEF). Press
,
when the message
is completed.
During the input process, you can short press
0
to
shift case or long press to enter "0", or press
#
to
access a table of symbols and punctuations.
Handwriting recognition function can be used to
recognize Chinese characters, English letters, and
2
to
9
To input letters.
,
To confirm entry.
<
or
>
To browse the list of candidate
words.
R
Short press to clear one entry, long
press to clear all texts.
0
Shift case.
L
Shift from one available input mode
Handwriting recognition
Philips766_03_InputMethods.fm Page 16 Monday, June 6, 2005 3:28 PM
Write a Chinese character on the touch screen using
the stylus pen.
You can:
2.
Then, you can tap to display the association
Philips766_03_InputMethods.fm Page 17 Monday, June 6, 2005 3:28 PM

Onscreen keyboard can be used to enter English
letters, numbers and punctuations. To access the on
screen keyboard, you can tap in the text input
screen or tap in the handwriting screen.
Input numbers and letters
Tap an icon on the on screen keyboard to enter a
corresponding number/letter/symbol, the text you
input will be simultaneously displayed above the
Input symbols
You can tap to toggle between normal keyboard
and symbol keyboard mode.
On-screen keyboard
Philips766_03_InputMethods.fm Page 18 Monday, June 6, 2005 3:28 PM
4 • Stylus operations
The main display of your phone is a touch screen,
which is a faster and more intuitive way of navigating
through lists and menus. The touch screen is
automatically enabled when you use the stylus pen
supplied with your phone.
1.
In the menu screen, double tap a menu/icon to
1.
Tap the on-screen function icons to perform the
corresponding functions.
2.
In most contexts, an arrow , on the upper
right corner of the screen or a red cross mark
together with a prompt message allows you to
cancel the last action or go back one level. The
OK or a green check mark will let you
validate your choice or action. Using these
touchscreen items are similar to pressing the
)
Basic operations
Perform functions
Philips766_APMEA.book Page 19 Monday, June 6, 2005 3:28 PM

5 • Call functions
Make calls
1.
In idle mode, enter the phone number using the
keypad.
2.
Press
(
or
L
to dial the number.
3.
Press
)
to end or cancel the call.
In the phone number input screen, you can press:
2.
Enter the country code and area code directly.
Or, you can press
L
Area
to display the world
city list. Press
+/-
to select a desired entry and
press
,
to insert the corresponding country
code and area code automatically.
3.
Enter the phone number, or press
,
then
2
to find a desired phone number in the
Contacts
menu.
4.
Press
(
or
L
to dial the displayed number.
Redial
Make or answer calls
Philips766_APMEA.book Page 20 Monday, June 6, 2005 3:28 PM

Dial from call list
1.
In idle screen, press
(
to display the last dialed
numbers. Press:
•
+/-
to select a desired number.
•
(
to dial the selected number.
2.
In idle screen, press
,
to enter the main menu.
Press:
•
1-1
to enter the
Call list
.
•
1
to access the list of
Missed calls
, or press
2
to access the list of
Incoming calls
, or press
3
to
Answer incoming calls
When the flip is open, information about the call will
be displayed on the main display. You can press:
If
Call forward
(If busy) is set to be On, incoming calls
will be forward to a designated number for Call
forwarding.
(
or
L
To answer the call.
)
or
R
To reject the call.
Philips766_APMEA.book Page 21 Monday, June 6, 2005 3:28 PM
Headset auto answer
If you have activated
Auto answer
in
Settings
>
Phone
settings
>
Answering
and inserted the headset to your
phone, you can answer an incoming call automatically.
Adjusting the volume
During a call, press the volume keys at the right side
of the phone to adjust the volume up/down.
During a call, the phone provides you with many
• Press
R
to reject the second incoming call, by
which the caller will hear a busy tone.
Meanwhile the first incoming call is still active.
Conference call
You can activate a conference call by making several
outgoing calls. You may have up to five members at
the same time.
1.
Establish a first call with someone, then make a
second call. Press
,
and use the +/- keys to
select
Multiparty
>
Join all
and press
,
to
Functions during a call
Philips766_APMEA.book Page 22 Monday, June 6, 2005 3:28 PM
• To activate, press
,
during a call and use the
+/-
keys to select
Handsfree
, and then press
,
t
to confirm.
• To deactivate, press
,
during a call and use the
+/-
keys to select
No handsfree
, and then press
,
to confirm.
This function will not be available when the headset is
inserted.
Send DTMF
Return to main menu
During a call, you can return to main menu.
1.
Press
,
and use the +/- keys to select
Main
menu
.
2.
Press
,
to access the main menu.
Please note that you cannot access
Call settings, WAP
,
Multimedia, MMS, Camera, PC communication
and
Settings
during a call.
Philips766_APMEA.book Page 23 Monday, June 6, 2005 3:28 PM
6 • Call services
The last 30 missed calls/incoming calls/outgoing call
are stored in their corresponding folders in the
Call
list
.
In the
Call list
menu, you can press
1
to access
Missed calls
, press
2
to access
Incoming calls
or press
3
to access
Outgoing calls
. Meanwhile, you can
Delete
In the
Missed calls/Incoming calls/Outgoing calls
list,
you can use the
+/-
keys to select a record and press
,
and select
Delete
to delete the selected record and
then press
,
to confirm. To delete all the records in
a selected folder, press
,
and select
Delete all
, and
then press
,
to confirm. Press
)
to cancel.
Call forward
Call list
Call settings
Philips766_APMEA.book Page 24 Monday, June 6, 2005 3:28 PM
 Loading...