

Philips BDP3100/96 User Manual
Register your product and get support at
www.philips.com/welcome
BDP3100
EN User manual 3
ZH-TWԚʹ˫ 25

Contents
1 Important 4
Safety and important notice 4
Trademark notice 4
2 Your product 5
Feature highlights 5
Playable media 6
Product overview 6
3 Connect 7
Connect video/audio cables 7
Route audio to other devices 8
Connect a USB device 9
Connect network 9
Connect power 9
4 Get started 10
Prepare the remote control 10
Find the TV input 10
Use the Home menu 10
Navigate the menu 10
Select menu display language 10
Setup network 11
Use Philips EasyLink 11
5 Play 11
Play a disc 11
Play from USB device 12
Play video 12
Play photo 14
Play music 15
English
6 Adjust settings 15
Video setup 15
Audio setup 16
Network setup 17
EasyLink setup 17
Preference setup 18
Advanced setup 19
7 Additional Information 20
Update software 20
Care 20
Specifications 20
8 Troubleshooting 21
9 Glossary 22
EN
3

1 Important
Safety and important notice
Copyright notice
Warning
Risk of overheating! Never ins tall the produc t in a •
confined space. Alw ays leave a space of a t leas t 4 inches
around the product for ve ntilation . Ensure cur ta ins or
other objec ts never cover the ventilation sl ots on t he
product.
•
Never p lace th e product , remote control or batte ries
near naked flames or other heat sources, including direct
sunlight.
•
Only use this product indoors. Keep this product away
from water, moisture and liquid-filled objects.
•
Never p lace this product o n other elec tri cal equipment.
Keep away from this pr oduc t dur ing lig htning storms. •
Wher e the ma ins plug or an ap pliance coupler is used as •
the disconnect device, t he disconnect device shall remain
readily operable.
•
Visible and i nvisible laser radiation when open. Avoid
exposure to b eam.
CLASS 1
LASER PRODUCT
Disposal of your old product and
batteries
Your product is designed and manufactured
with high quality materials and components,
which can be recycled and reused.
Never dispose of your product with other
household waste. Please inform yourself about the
local r ules on the separate collection of electrical
and electronic produc ts and batteries. The correct
disposal of these products helps prevent potentially
negative consequences on the environment and
human health.
Your product contains batteries, which cannot be
disposed of with normal household waste.
Please inform yourself about the local rules on
separ ate collection of bat teries. The correct
disposal of batteries helps prevent potentially
negative consequences on the environment and
human health.
Please visit www.recycle.philips.com for additional
information on a recycling center in your area.
This item incorporates copy protection technology
that is protected by U.S. patents and other
intellectual property rights of Rovi Corporation.
Reverse engineering and disassembly are
prohibited.
Open source software
Philips Electronics Hong Kong Ltd. hereby offers
to deliver, upon request, a copy of the complete
corresponding source code for the copyrighted
open source sof tware packages used in this product
for which such offer is requested by the respective
licenses.
This offer is valid up to three years after product
purchase to anyone in receipt of this information.
To obtain source code, please contact open.
source@philips.com. If you prefer not to use email
or if you do not receive confirmation receipt within
a week af ter mailing to this email address, please
write to “Open Source Team, Philips Intellec tual
Property & Standards, P.O. Box 220, 5600 AE
Eindhoven, The Netherlands.” If you do not receive
timely confirmation of your letter, please email to
the email address above.
Trademark notice
‘Blu-ray Disc’ and ‘Blu-r ay Disc’ logo
are trademarks.
HDMI, and HDMI logo and
High-Definition Multimedia Interface are
trademarks or registered trademarks of HDMI
licensing LLC.
Manufactured under license from
Dolby Laboratories. Dolby and the double-D
symbol are trademarks of Dolby Laboratories.
4
EN
U.S. Patent #’s: 5,451,942; 5,956,674; 5,974,380;
Manufactured under license under
5,978,762; 6,226,616; 6,487,535; 7,392,195;
7,272,567; 7,333,929; 7,212,872 & other U.S. and
worldwide patents issued & pending. DTS is a
registered trademark and the DTS logos, Symbol,
DTS-HD and HTS- HD Master Audio are
trademarks of DTS, Inc. © 1996-2008 DTS, Inc. All
Rights Reserved.
DVD Format/Logo Licensing Corporation.
‘DVD Video’ is a trademark of
Java and all other Java trademarks and
logos are trademarks or registered trademarks of
Sun Microsystems, Inc. in the United States and/or
other countries.
English
digital video format created by DivX, Inc. This is an
official DivX Certified device that plays DivX video.
Visit www.divx.com for more information and
software tools to conver t your files into DivX video.
ABOUT DIVX VIDEO-ON-DEMAND: This DivX
Certified
play DivX Video-on-Demand (VOD) content. To
generate the registr ation code, locate the DivX
VOD section in the device setup menu. Go to vod.
divx.com with this code to complete the registration
process and learn more about DivX VOD.
®
DivX
and DivX Ultra® are registered trademarks
of DivX, Inc., and are used under license.
‘BD LIVE’ and ‘BONUSVIEW’ are trademarks of
Blu-ray Disc Association.
trademar ks of Matsushita Electric Industrial Co., Ltd
and Sony Corporation.
Corporation.
Universal Serial Bus Implementers Forum, Inc.
ABOUT DIVX VIDEO: DivX® is a
®
device must be registered in order to
BONUSVIEW™
‘AVCHD’ and ‘AVCHD’ logo are
‘x.v.Colour’ is a trademark of Sony
The USB-IF Logos are trademarks of
Windows logo are trademarks, or registered
Windows Media and the
trademarks of Microsof t Corporation in the United
States and/or other countries.
2 Your product
Congratulations on your purchase, and welcome to
Philips! To fully benefit from the support that Philips
offers (e.g. product software upgrade), register your
product at www.philips.com/welcome.
If you contact Philips, you will be asked for the model
and serial number of your product. The model
number and serial number are on the back of your
product. Write the numbers here:
Model No. __________________________
Serial No. ___________________________
Feature highlights
For optimal performance of this product, it is
recommended to regularly update the software of
this product.
High-Definition entertainment
Watch high-definition content disc with HDTV
(High Definition Television). Connect it through
a high speed HDMI cable (1.3 or categor y 2). You
can enjoy excellent pic ture quality up to 1080p
resolution with the frame rate of 24 frames per
second with progressive scan output.
BD-Live
Connect this player to the movie studios website
via the LAN port to access a variety of up-to-date
content (e.g. refreshed previews and exclusive
special features).
EN
5
Playable media
This product can play:
BD-Video, BD-R/RE2.0•
DVD, DVD-Video, DVD+R /+RW, DVD-R /-•
RW, DVD+R/-R DL (Dual Layer)
Video CD/SVCD•
Audio CD, CD-R/CD-RW, MP3 media, WMA •
media, JPEG files
DivX (Ultra) media•
USB flash drive•
Region codes
You can play discs with the following region codes.
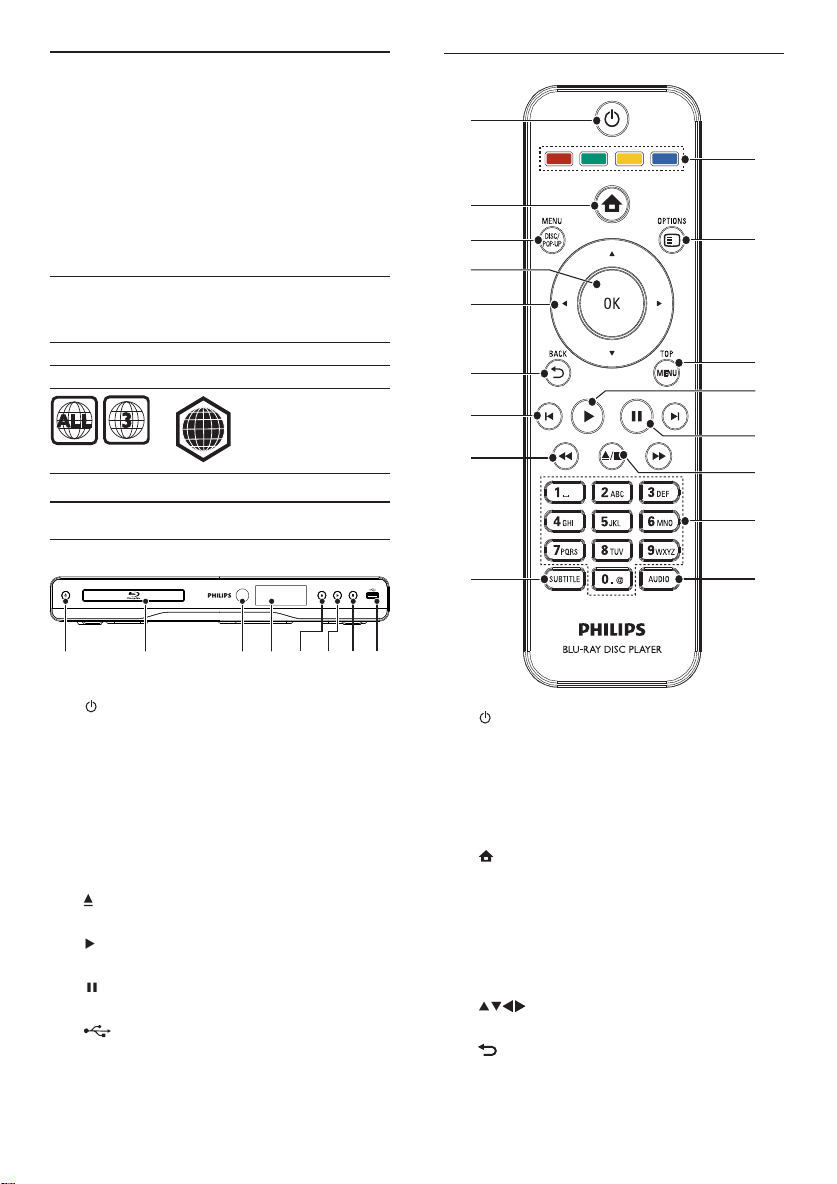
Remote control
a
b
c
d
e
q
p
Region code Countries
DVD Blu-ray
Asia Pacific,
Taiwan,
Korea
A
Product overview
Main unit
ab cefghd
a
b Disc compartment
c IR sensor
d Display panel
e
f
g
h
Turn on this product or switch to •
standby mode.
Detec t signals from the remote control. •
Always point the remote control at the
IR sensor.
Open or close the disc compartment. •
Start or resume play.•
Pause play.•
jack
Connect a USB flash drive. •
f
g
h
i
a
b
c DISC MENU / POP-UP MENU
d OK
e
f
Turn on this product or switch to •
standby mode.
When EasyLink is enabled, press and •
hold for at least three seconds to tur n all
connected HDMI CEC compliant devices
to standby.
Access the home menu of this product.•
• BD: Access or exit the pop-up menu.
• DVD: Access or exit the disc menu.
Confirm an entry or selection.•
Navigate through the menus.•
BACK
Retur n to a previous display menu.•
o
n
m
l
k
j
6
EN
g
/
Skip to the previous or nex t title, chapter, •
or track.
h
/
Search backward or forward.•
i SUBTITLE
j AUDIO
k Alphanumeric buttons
l
m
n
o TOP MENU
p
q Color buttons
Select a subtitle language on a disc.•
Select an audio language or channel on •
a disc.
Select an item to play.•
Enter values.•
/
Stop play.•
Press and hold to open/close the disc •
compar tment.
Pause play.•
Move the paused picture one s tep •
forward.
Start or resume play.•
• BD: Display the top menu.
• DVD: Display the title menu.
OPTIONS
Access options for the current activity or •
selection.
• BD: Select tasks or options.
3 Connect
Make the following connections to use this product.
Basic connections:
Video•
Audio•
Power•
Optional connections:
Route audio to other devices•
HDMI-compliant AV receiver/amplifier•
Digital AV amplifier/receiver•
Analog stereo system•
USB flash drive•
LAN (networ k)•
Note
Refer to the ty pe plate at the back or bottom of the •
product for identification and supply ratings.
•
Befor e you make or change any con nections , ensure that
all the devices are disconn ected from the powe r outlet.
Connect video/audio cables
Select the best video connection that the TV can
support.
• Option 1: Connect to the HDMI jack (for a
HDMI, DVI or HDCP-compliant TV).
• Option 2: Connect to the component video
jacks (for a standard TV or Progressive Scan TV).
• Option 3: Connect to the composite video
jack (for a standard T V).
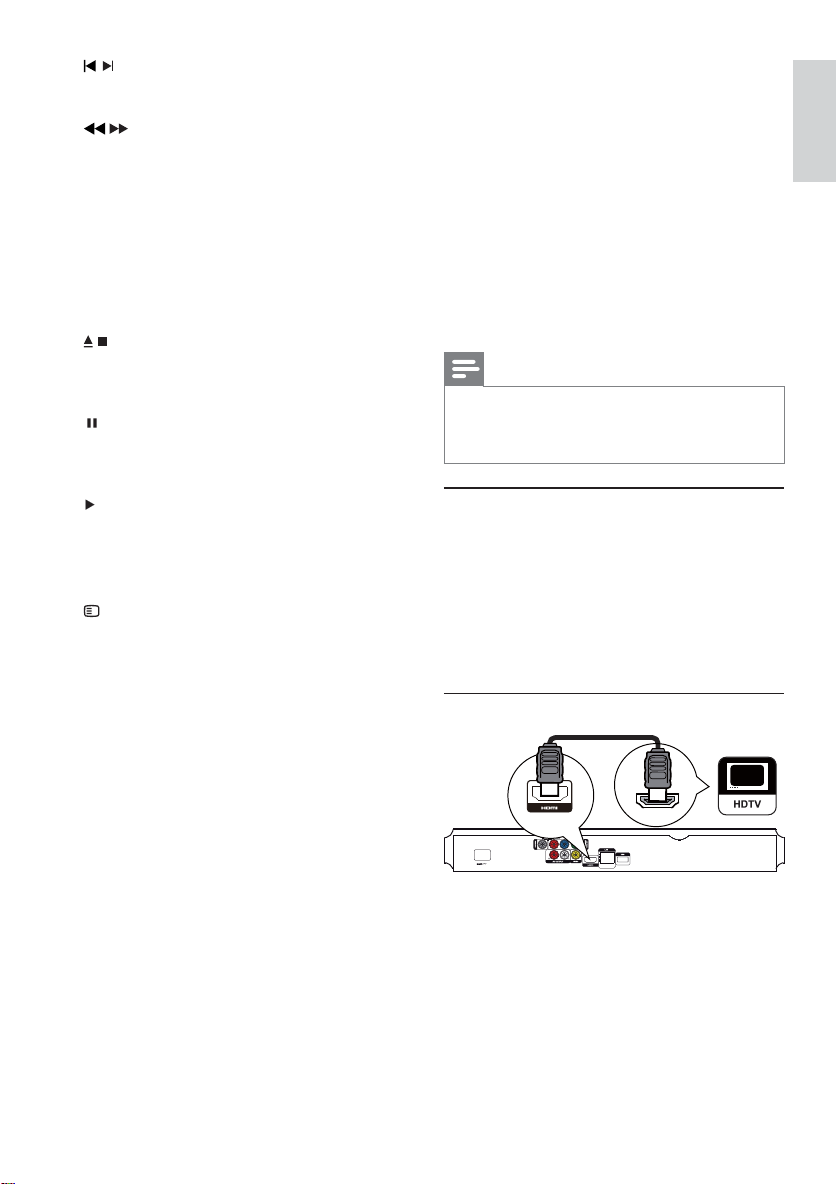
Option 1: Connect to the HDMI jack
English
HDMI IN
1 Connect an HDMI cable (not supplied) to:
the • HDMI jack on this product.
the HDMI input jack on the TV. •
EN
7
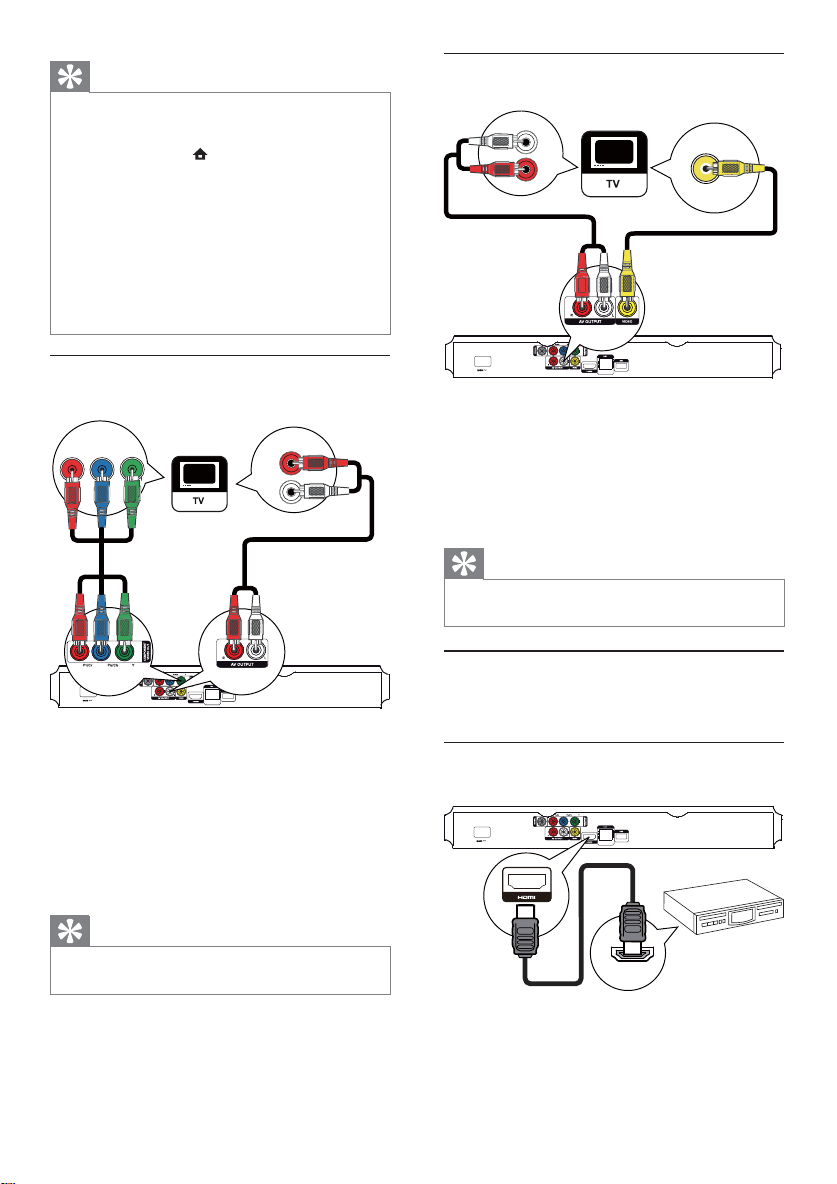
Tip
If the T V has a DV I conne ctor only, connect v ia an HD MI/ •
DVI adaptor. Connect a n audio cable for soun d outp ut.
•
If there is a blank scr een under HDMI connection, on the
remote control press and then press “731” (nu meric
but tons) to recover picture display.
•
If this product connects to a T V compa tible with 10 80p
or 1080p/24Hz, Philips recommends HDMI category 2
cable, also know n as High Speed HDM I cable, for o ptimal
video and aud io out put .
•
To play the digital video images of a BD-video or DVDvideo via an HDMI con nection, it is necessary that both this
product and the display device (or an AV receiver/amplifier)
support a copyright pr otec tion s ystem call ed HDC P (hig hbandwidt h digital con tent protec tion system).
•
This connection provides best picture quality.
Option 3: Connect to the composite
video jack
VIDEO IN
AUDIO IN
Option 2: Connect to the component
video jack
Pb Y
Pr
1 Connect the component video cables (not
supplied) to:
the • Y Pb/Cb Pr/Cr jacks on this product.
the COMPONENT VIDEO input jack s •
on the T V.
2 Connect the audio cables to:
the • AV OUTPUT-L/R jacks on this
product.
the AUDIO input jacks on the TV.•
Tip
The com ponent video inpu t jack on the TV might b e •
labeled as Y Pb Pr or YU V.
AUDIO IN
1 Connect a composite video cable to:
2 Connect the audio cables to:
Route audio to other devices
You can route the audio from this product to other
devices.
Connect to HDMI-compliant AV receiver/
amplifier
1 Connect an HDMI cable (not supplied) to:
the • VIDEO jack on this product.
the VIDEO input jack on the T V.•
the • AV OUTPUT- L /R jacks on this
product.
the AUDIO input jacks on the TV.•
Tip
The video input jack on the T V might be lab eled a s A/ V •
IN, VIDEO I N, COMPOSITE or B ASEB AND.
HDMI IN
the • HDMI jack on this product.
the HDMI jack input jack on the device.•
8
EN
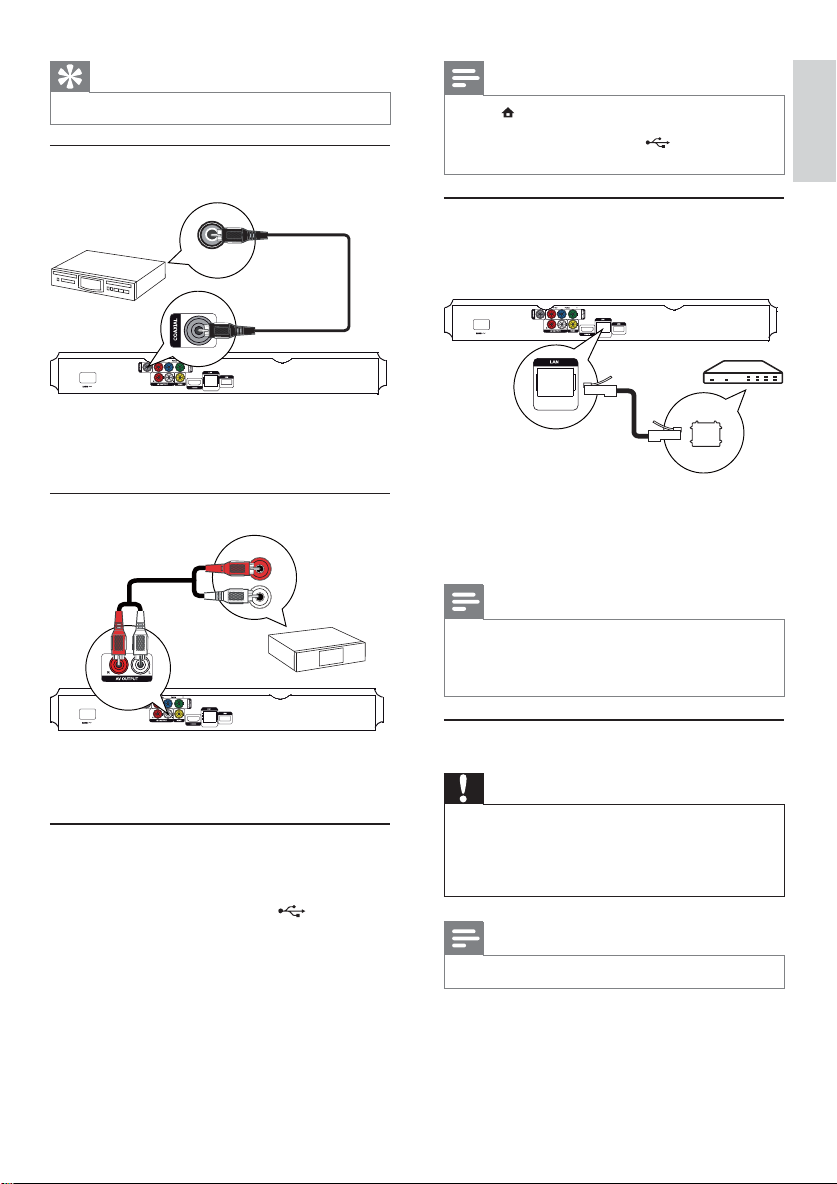
Tip
The HDMI connection provides best audio quality. •
Connect to digital AV amplifier/receiver
Connect to coaxial jack
COAXIAL
1 Connect a coaxial cable (not supplied) to:
the • COAXIAL jack on this product.
the COAXIAL /DIGITAL input jack on •
the device.
Connect analogue stereo system
AUDIO IN
Note
Press • , and select [browse USB] in the menu to access
the content and play th e files .
• jack of this product.
Connect a USB devi ce only to the
•
Phili ps does not guarantee compatibility with a ll USB d evices.
Connect network
Connect this product to the network to enjoy
software updates and BD-Live.
1 Connect the network cable (not supplied) to:
the • LAN jack on this product.
the LAN jack on the broadband modem •
or router.
Note
Internet a ccess to P hilips website for software u pdate •
may not be a llowed, depending on the r oute r you use
or the Inter net Se rvice Prov ider ’s policy. Cont act your
Internet S ervice Pr ovider for more informat ion.
English
1 Connect the audio cables to:
the • AV OUTPUT- L /Ron this product.
the AUDIO input jack s on the device.•
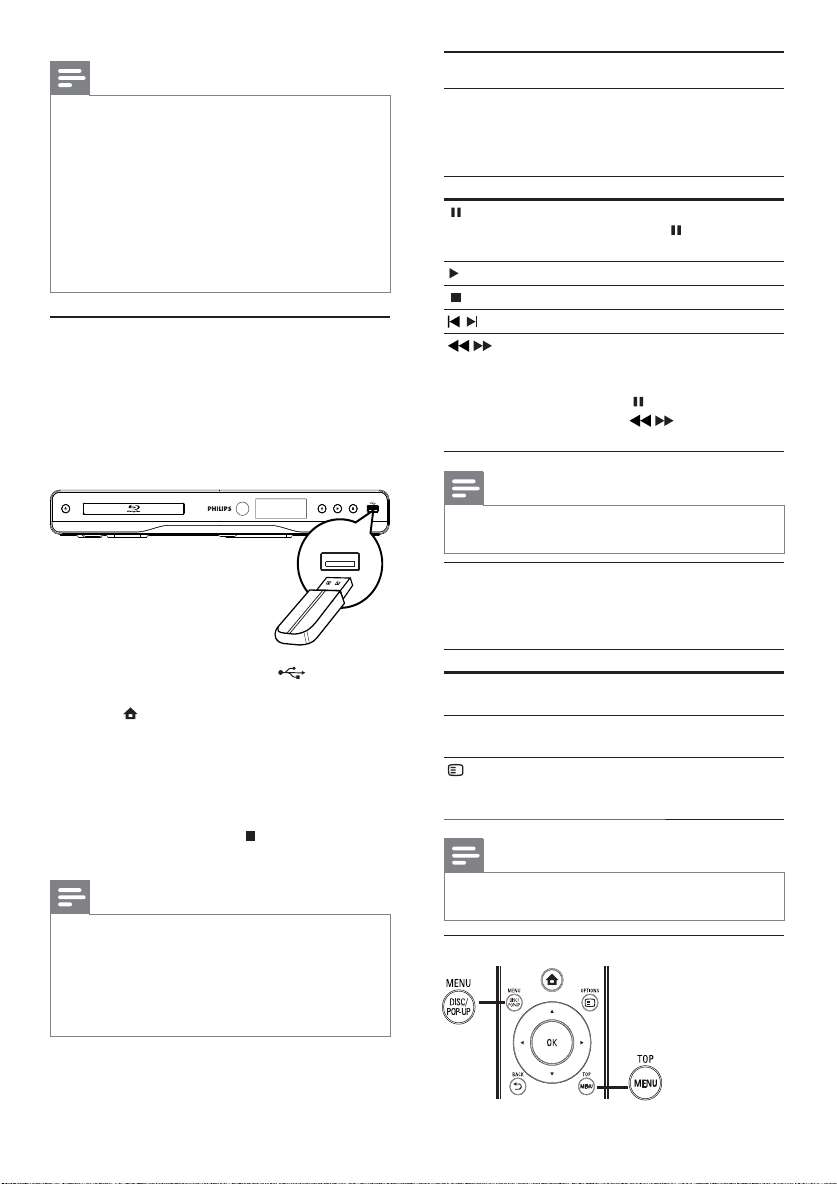
Connect a USB device
A USB device provides an additional memory to
enjoy sof tware updates and BD-Live.
1 Connect a USB device to the (USB) jack
on this product.
The USB jack on the rear panel is not for •
media files lay, only for software upgrade/
BD Live via USB.
Connect power
1 Connect the AC power cable to:
Caution
Risk of product da mage! Ensur e that t he powe r supply •
voltage cor responds to the vol tage print ed on the back
of the un it.
•
Befor e connecting the AC power cor d, ens ure you have
completed all other connections.
Note
The type pla te is loc ated on the back of the pr oduc t. •
this product.•
the wall socket.•
This product is ready to be set up for use. »
EN
9
4 Get started
Caution
Use of controls or adju stments or per formance of •
proce dure s other than herein may result in hazardous
radiation exposure or other unsafe operation.
Always follow the instructions in this chapter in
sequence.
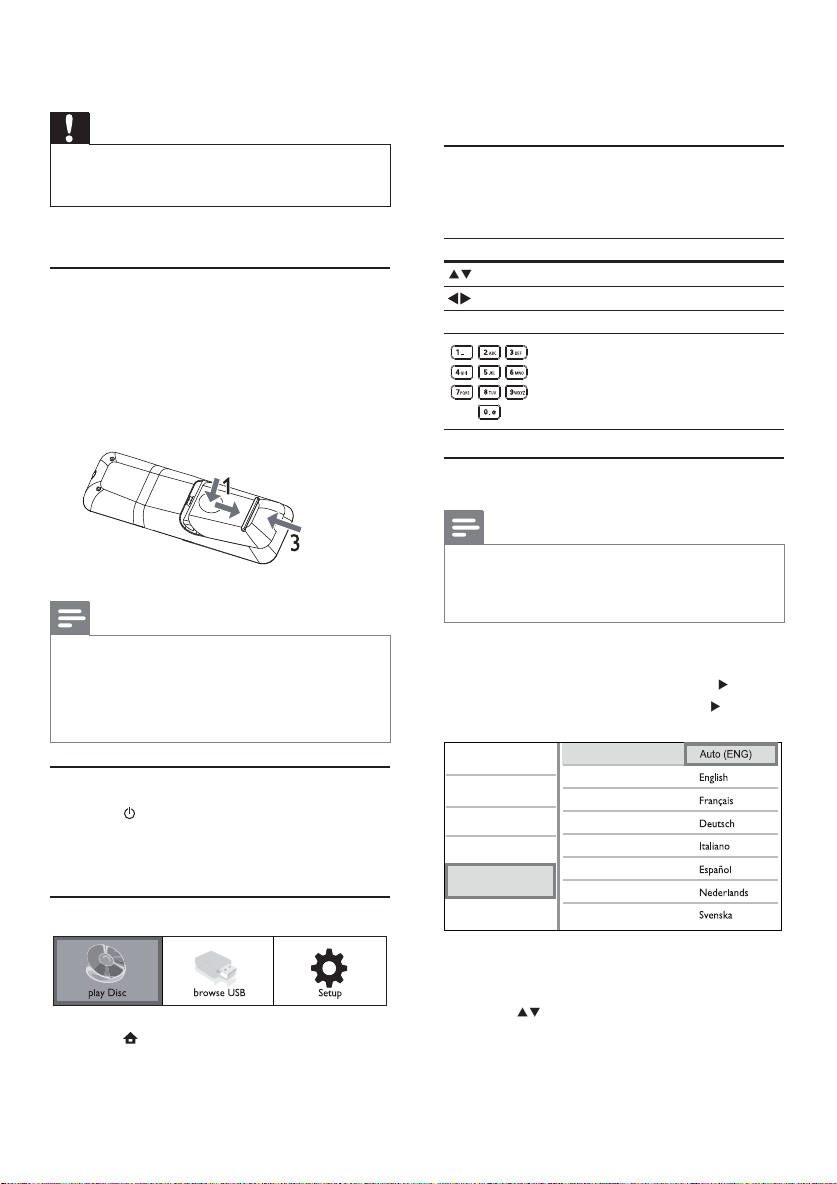
Prepare the remote control
1 Press and push the battery compar tment to
slide it open (see “1” in the illustration).
2 Insert two AAA batteries with correct
polarity (+/-) as indicated.
3 Push and slide back the battery compartment
(see “3” in the illustration).
Note
If you ar e not goi ng to use t he remote control fo r a long •
time , remove the batteries .
•
Do not mix batteries (old and new or carbon and
alkaline, etc.).
•
Batteries contain chemical substances, so they should be
disposed of properly.
Find the TV input
1 Press to turn on this product.
2 Turn on the TV and switch to the video input
(refer to the TV user manual on how to select
the A/V input).
Use the Home menu
1 Press to display the home menu.
To start disc play, select • [play Disc].
To view the USB contents, select •
[browse USB].
To access the setup menus, select •
[Setup].
Navigate the menu
1 When a menu is displayed, press the buttons
on the remote control to navigate.
Button Action
Move up or down.
Move left or right.
OK Confirm a selection.
Enter numbers.
Select menu display language
Note
If this product is connec ted to a H DMI CEC compl iant •
TV, skip this s ett ing. It swit ches au tomatically to th e
same OSD menu language as per your T V set ting (if the
langu age set on TV is supported by this produ ct).
1 In the Home menu, select [Setup] and press
OK.
2 Select [Preference Setup], and press .
3 Select [Menu Language], and press .
Video Setup
Audio Setup
Network Setup
EasyLink Setup
Preference Setup
Advanced Setup
4 Press to select a language, and press OK.
Menu Language
Audio
Subtitle
Disc Menu
Parental Control
Screen Saver
Auto Subtitle Shift
Change Password
The language options may var y from •
different regions.
10
EN
Setup network
To enjoy software updates of this product and
BD-Live for certain Blu-ray discs, set up the network
connection.
Note
Ensur e that the net wor k cable is properl y conne cted and •
the router is switched on.
1 Connect this product to the broadband
modem or router.
2 Press to display the home menu.
3 Select [Setup] and press OK.
Note
To enable the Eas yLink feature, you must turn o n the •
HDMI CEC ope rat ions on t he TV and on other devices
connected to TV. Refe r to the T Vs/dev ices manual for
details.
One-touch play
1
Press (standby) to turn on this product.
The TV (if the TV supports one-touch play) »
automatically turns on and switches to the
correct video-in channel.
If a disc is loaded in this product, disc play »
automatically starts.
English
Video Setup
Audio Setup
Network Setup
EasyLink Setup
Preference Setup
Advanced Setup
Network Installation
View Network Settings
4 Select [Network Setup], and press .
5 Select [Network Installation], and press OK.
6 Follow the on-screen instructions to complete
the network installation.
Once connected, an IP address is obtained »
automatically.
Tip
You can check the status of the wi red connection of t his •
product (see “Adjust s ett ings” > “ Net work S etup” >
[View Network Set ting s]).
Note
Loading BD-Live content from the internet may take •
some time, depending on the file size and the speed of
the internet connection.
Use Philips EasyLink
This product supports Philips EasyLink which uses the
HDMI CEC (Consumer Electronics Control) protocol.
You can use one single remote control to control
EasyLink-compliant devices that are connected
through HDMI connectors.
One-touch standby
1
Press and hold (standby) for more than 3
seconds.
All the connected devices (if the device »
supports one-touch standby) automatically
switch to standby.
Note
Phili ps does not guarantee inte roperab ilit y with other •
HDMI CEC devices.
5 Play
Play a disc
Caution
Do not place any objects other than discs into the d isc •
compartment.
1 Press on the front panel to open the disc
compar tment.
You may also press and hold•
remote control to open/close the disc
compar tment.
2 Insert a disc with its label facing up.
3 Press to close the disc compartment and
start disc play.
To view disc play, turn on the TV to the •
video input.
To stop disc play, press•
on the
.
EN
11
Note
Check disc/file formats supported (see “Your product” > •
“Playable media”).
•
If the password entry m enu is displayed, enter the
pass word before you can play the locked or r estricted
disc (see “Adjust settings” > “ Preference Setu p” >
[Parental Control] ).
•
If you pause or stop a disc, the screen saver appears after
10 minutes of inacti vit y. To deacti vate the screen saver,
press any button .
•
After you pause or stop a disc and no button is pressed
with in 30 minutes, this product au tomatically switches
to standby.
Play from USB device
Play or view media files on the following USB devices:
flash drive•
memory card reader•
HDD (This product can detect only a portable •
hard disc drive with USB power peak current
no more than 500mA.)
1 Connect a USB device to the (USB) jack
of this product.
2 Press , and select [browse USB], and press
OK.
A contents menu is displayed. »
3 Select a file to play, and press OK.
Play starts (see “Play video”, “Play photo”, »
Play music” for details).
To stop play, press •
device.
Note
Phili ps does not guarantee compatibi lity with a ll USB •
devices.
•
Not all d igit al camera s are suppor ted. Digital ca meras
that require PC pr ogramme insta llation are not
supported.
•
NTFS ( New Technology File System) data for mat is n ot
supported.
or remove the USB
Play video
Control video play
1
Play a title.
2 Use the remote control to control the play.
Button Action
Pause play.
Press repeatedly •
forward play frame by frame.
Start or resume play.
Stop play.
/
Change video play
1
Play a title.
2 Use the remote control to change the play.
Button Action
AUDIO Directly select an audio language
SUBTITLE Directly select a subtitle language
Display menu
Skip to a previous/next title or chapter.
Search fast-backward or fast-forward.
/
Press repeatedly to change the search
speed.
Press once •
repeatedly
backward or forward.
Note
For BD discs with Java application, availabilit y of the play •
resume function depends on specific discs.
or channel on a disc.
on a disc.
OPTIONS
Note
Some operations may not work with some d iscs . See the •
infor mation accom panyi ng the disc for details.
Access the above mentioned
actions or more options (e.g.
repeat or shuffle play mode).
to slow
, and then press
/ to slow play
12
EN

BD-video disc
• TOP MENU stop the video play and shows
the disc menu. This feature is disc-dependent.
• POP-UP MENU access to the BD-video disc
menu without interrupting disc play.
DVD-video disc
• TOP MENU display the root menu of a disc.
• DISC MENU display disc information and guide
you through the available functions in the disc.
VCD/SVCD/DivX disc:
• DISC MENU display the content of the disc.
Tip
If the PBC set ting is off, the VCD/S VCD skips the •
menu and starts play from th e firs t title. To display the
menu before play, turn on the PBC set ting (see “Adjust
settings” > [Preference Setup] > [VCD PBC]).
Repeat play for a specific section
1
During play, press OPTIONS .
The play options menu is displayed. »
2 Select [Repeat A-B] in the menu, and press
OK to set the starting point.
3 For ward the video play, and press OK to set
the ending point.
Repeat play starts. »
To cancel repeat play mode, press •
OPTIONS ,and select [Repeat A-B]
and press OK.
Note
The marked section for repeat play is only possible •
within a track/title.
English
Display play information
1
During play, press OPTIONS.
The play options menu is displayed. »
2 Select [Info] in the menu, and press OK.
The current status of disc play is displayed. »
Select title/chapter
1
During play, press OPTIONS.
The play options menu is displayed. »
2 Select [Titles] or [Chapters] in the menu, and
press OK.
3 Select the title or chapter number, and press OK.
Skip play to a specific time
1
During play, press OPTIONS.
The play options menu is displayed. »
2 Select [Time Search] in the menu, and press
OK.
3 Press the Navigation buttons ( ) to change
the time to skip to, and press OK.
Zoom in/out
1
During play, press OPTIONS.
The play options menu is displayed. »
2 Select [Zoom] in the menu, and press OK.
3 Press the Navigation buttons ( )to select a
zoom fac tor, and press OK.
4 Press the Navigation buttons to navigate in
the zoomed picture.
To cancel zoom mode, press •
or OK to display the zoom factor bar,
and press the Navigation buttons (
until the zoom factor [x1] is selected.
BACK
)
View video play from different camera angles
1
During play, press OPTIONS.
The play options menu is displayed. »
2 Select [Angle List] in the menu, and press .
3 Select an angle option, and press OK.
Play changes to the selected angle. »
Note
Applicable only to discs t hat contain multi -angle scenes. •
Manually shift subtitle display
You can manually adjust the subtitle position on the
TV screen.
1 During play, press OPTIONS.
The play options menu is displayed. »
2 Select [Subtitle Shift] in the menu, and press .
3 Press the Navigation buttons ( ) to shif t
the subtitle, and press OK.
Tip
Subtitle shift is not suppor ted for DivX video with •
external subtitles.
Play BD-video
Blu-ray video disc has a larger capacity and supports
features such as high-definition videos, multi-channel
surround sounds, interactive menus and so on.
1 Insert a BD-video disc.
2 Press , select [play Disc] and press OK.
EN
13
3 Play automatically starts, or select a play
option in the menu and press OK.
During play, you can press • TOP MENU
to display additional information, features
or content stored in the disc.
During play, you can press • POP-UP
MENU to display the disc menu without
Enjoy BONUSVIEW
(Applicable only to a disc compatible with the
BONUSVIEW or Picture-in-Picture feature)
You can instantly view additional content (such as
commentaries) in a small screen window.
interrupting disc play.
1 Press OPTIONS .
The play options menu is displayed. »
2 Select [PIP Selection] in the menu, and then
select [PIP], and press OK.
The secondary video window is turned on. »
3 Select [2nd Audio Language] or [2nd Subtitle
Language] in the menu, and press
.
4 Select the language to play, and press OK.
Enjoy BD-LIVE
(Applicable only to a disc that enables BD-Live
bonus content.)
Additional contents (such as movie trailers,
subtitles, etc.,) can be downloaded to this product’s
local storage or a connected USB storage device.
Special video data may be played while they are
being downloaded.
When the disc suppor ting BD-Live is played, this
product or disc’s ID can be sent to the content
provider via the internet. Services and functions to
be provided vary from disc to disc.
Play DivX® video
DivX video is a digital media format that retains
high quality despite a high rate of compression.
1 Insert a disc or USB device that contains the
DivX videos.
2 Press , select [play Disc] or [browse USB],
and press OK.
A contents menu is displayed. »
3 Select a video folder, and press OK.
4 Select a title to play, and press OK.
5 Use the remote control to control the play.
Button Action
AUDIO Select an audio language or
SUBTITLE Select a subtitle language.
channel.
Stop play.
Note
You can only play DivX videos that were rented or •
purchased with the DivX registration cod e of this
product (see “Adjust S ett ings” > [Advanced Set up] >
®
VOD Code]).
[DivX
•
You can play DivX vide o files of u p to 4GB .
This product can d isplay up to 45 charac ter s in the •
subtitle.
Play photo
Play photo as slideshow
You can play JPEG photos (files with .jpeg or .jpg
extensions).
1 Insert a disc or USB device that contains the
JPEG photos.
2 Press , select [play Disc]or [browse USB],
and press OK.
A contents menu is displayed. »
3 Select a photo folder, and press OK to enter.
4 Press to start slideshow play.
Control photo play
1
Set slideshow interval and animation
1
2 Select [Duration per slide] in the menu, and
To select a photo, press the • Navigation
buttons.
To enlarge the selected photo and start •
slideshow, press OK.
Note
It may requir e longer time to display the disc content on •
the T V if lar ge number of songs/photos compiled onto
one disc.
•
This product can o nly display digital camera pi ctures
according to the JPEG-EXIF format, typically used by
most digit al cam era s. It c annot display Motion JPEG,
or pic tures in for mats other t han JP EG, or sound clips
associated with pictures.
•
Folders/files that exceed the supported limit of this
product cannot be displ ayed or played.
Play a photo slideshow.
Press •
OPTIONS to access play
options, select an option, and press OK.
During slideshow play, you may also press •
to flip a photo horizontally/vertically.
If the slideshow stops, press •
continue play.
During play, press OPTIONS.
The play options menu is displayed. »
press OK.
to
EN
14
3 Select a duration, and press OK.
4 Select [Slide Animation] in the menu, and
press OK.
5 Select a type of animation effect, and press OK.
Play musical slideshow
Create a musical slideshow to play simultaneously
MP3/WMA music files and JPEG photo files.
Note
To create a musical slideshow, you must s tore the MP3/ •
WMA an d JPEG fi les on the same disc or U SB dev ice.
Play MP3/WMA music
MP3/WMA is a type of compressed audio file (files
with .mp3, .wma extensions).
1 Insert a disc or USB device that contains the
MP3/WMA music.
2 Press , select [play Disc] or [browse USB],
and then press OK.
A contents menu is displayed. »
3 Select a music folder, and press OK.
4 Select a file to play, and press OK.
To return to the main menu, press •
BACK.
English
1 Play MP3/WMA music.
2 Press BACK to return to the main menu.
3 Navigate to enter a photo folder, and press
OK to start slideshow play.
Slideshow begins and continues till the end »
of the photo folder.
Audio continues to play until the end of »
the disc.
To stop the slideshow play, press•
To stop the music play, press•
.
again.
Play music
Control a track
1
Play a track.
2 Use the remote control to control the play.
Button Action
Pause play.
Start or resume play.
Stop play.
/
Skip to a previous/next track.
Select an item to play.
/
OPTIONS
Search fast-backward or fastforward. Press repeatedly to
change the search speed.
Access the repeat or shuffle
play mode.
Note
For disc recorded in m ultiple sessions, only the fir st •
session is played.
•
For a WMA file that is protected by Digital Rights
Management (DRM), it cannot be played o n this product.
•
This product does not suppor t MP3PRO audio format.
For any special char acter that is present in the MP3 track •
name (ID3) or album name , it might not be displayed
corr ectly on the screen because these cha rac ter s are not
supported.
•
Folders/files that exceed the supported limit of this
product cannot be displ ayed or played.
6 Adjust settings
Note
If the setup option is grayed out, it means the se tti ng •
cannot be changed at the cur rent s tate.
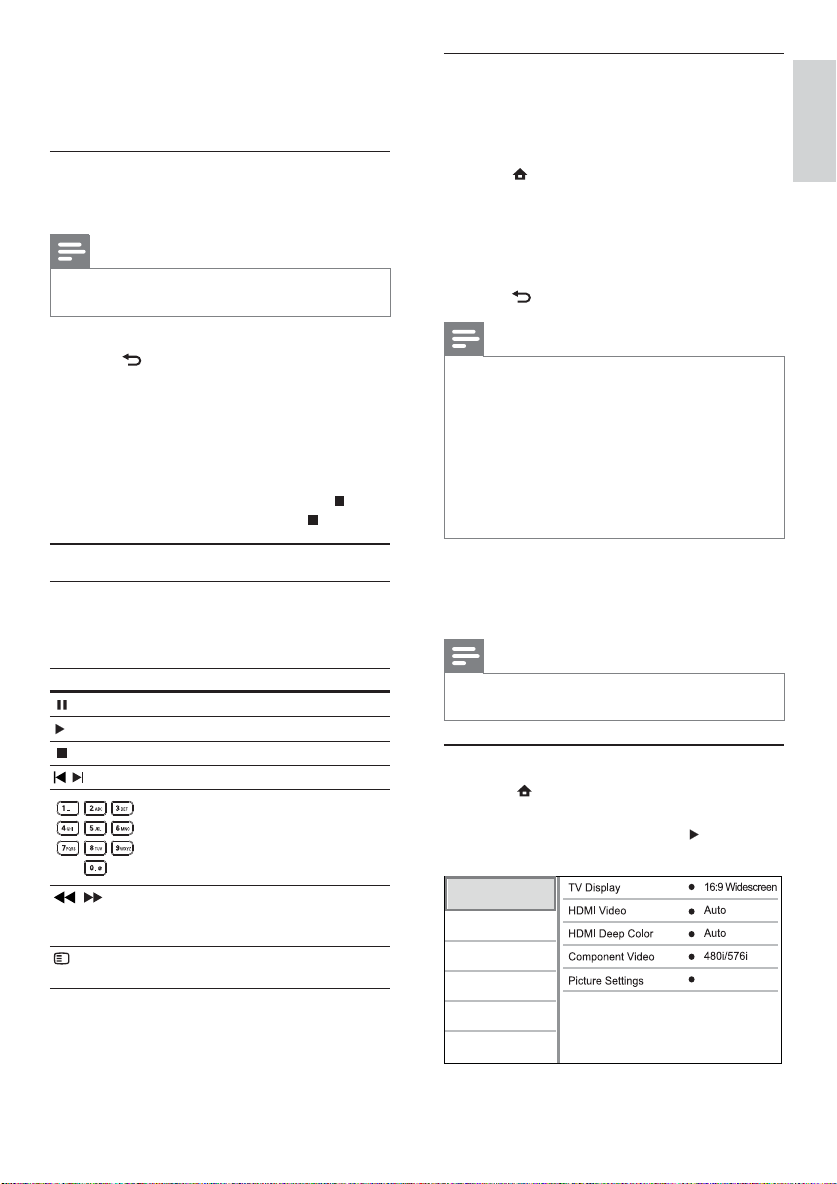
Video setup
1 Press .
2 Select [Setup], and press OK.
3 Select [Video Setup], and press .
Video Setup
Audio Setup
Network Setup
EasyLink Setup
Preference Setup
Advanced Setup
Standard
EN
15
 Loading...