

Page 1
PHILIPS
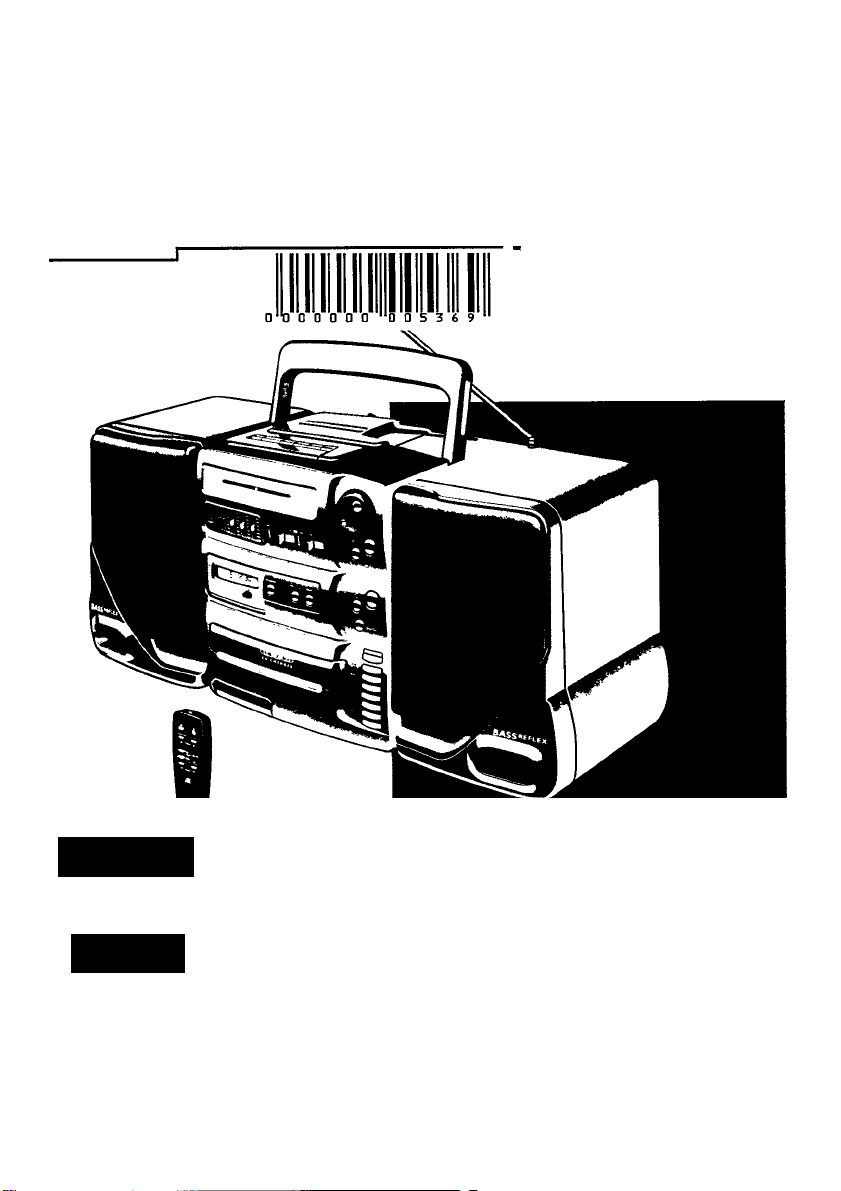
AZ9855 Portable Mini System
^ o* CO
S t DIGITAL ''U
^ morTAL AUDIO
®et frot®
Page 2
INDEX
@ México
PRECAUCIÓN - ADVERTENCIA
No abrir, riesgo de choque eléctrico
A
En caso de requerir servicio, diríjase al personal calificado.
Lea cuidadosamente su instructivo de manejo.
Verifique que el voltaje de alimentación
Para evitar el riesgo de choque eléctrico, no quite la tapa.
sea et requerido para su aparato
A
Australia
Guarantee
.......................
. page 52
New Zealand
Guarantee
...................................................
page 52
Brasil
Garanda
.......................................................
página 53
@ México
Garantía.......................
,page 53
/ \
NOM
English
_ ______
/ \
Frangais
..................
__ _ _
..............
______ _^_____
/ \
Español
............
_____________ __ _____
( \
............................40
L J
page 4
.
____ _
page 16
_ ___
página 28
_ _
£
"5)
c
UJ
_
J
/
*5
o»
c
<0
u.
J
/
o
te
(Q
a
V)
m
V
_
J
/
-e-
Page 3

3. INSTALLATION - see fig. 2 on page 3
POWER SUPPLY
Battery supply
Whenever convenient, use the mains supply if
you want to conserve battery life.
• Open the battery compartment and insert as
shown eight batteries, type R20, UM1 or Dcells.
• Remove the batteries if exhausted or if they
will not be used again for a long period.
The battery supply is switched off when the
set is connected to the mains. To change over
to battery supply, pull out the plug from the
MAINS socket.
Mains supply
• Check if the mains voltage as shown on the
type plate (on the back of the set) corres
ponds to your local mains voltage. If it does
not, consult your dealer or service organisa
tion.
If the set is equipped with a VOLTAGE
selector 19, set this selector to the local
mains voltage.
• Connect the mains lead to the MAINS
socket and the wall socket.
When connected to the mains, the system is
always energised.To switch off the mains
supply completely, pull the mains plug out of
the wall socket.
REMOVABLE SPEAKERS
Taking off the speakers
• Keep the UNLOCK lever pressed and slide
the speaker upwards, see fig. 2.
Attaching the speakers
• Slide the speakers from above in the
sleeves on the sides of the system cabinet.
The speakers will click into position.
POSITIOIMING THE SPEAKERS
You will find the best speaker position by
experimenting. Placing the speakers on the
floor will increase the bass response. Placing
the speakers behind curtains, furniture etc. will
reduce the treble response and the stereo
effect. The ideal position is obtained when the
2 front speakers and the listening position
build an equilateral triangle and the speakers
are at ear-height.
o>
c
u
COIMIMECTIIMG THE SPEAKERS
You can connect the 2 supplied speakers or
others having an impedance of 4 Ohms.
• Connect the black or non-marked wires to
the black terminals © and the red or marked
wires to the red terminals ®.
_________
Page 4
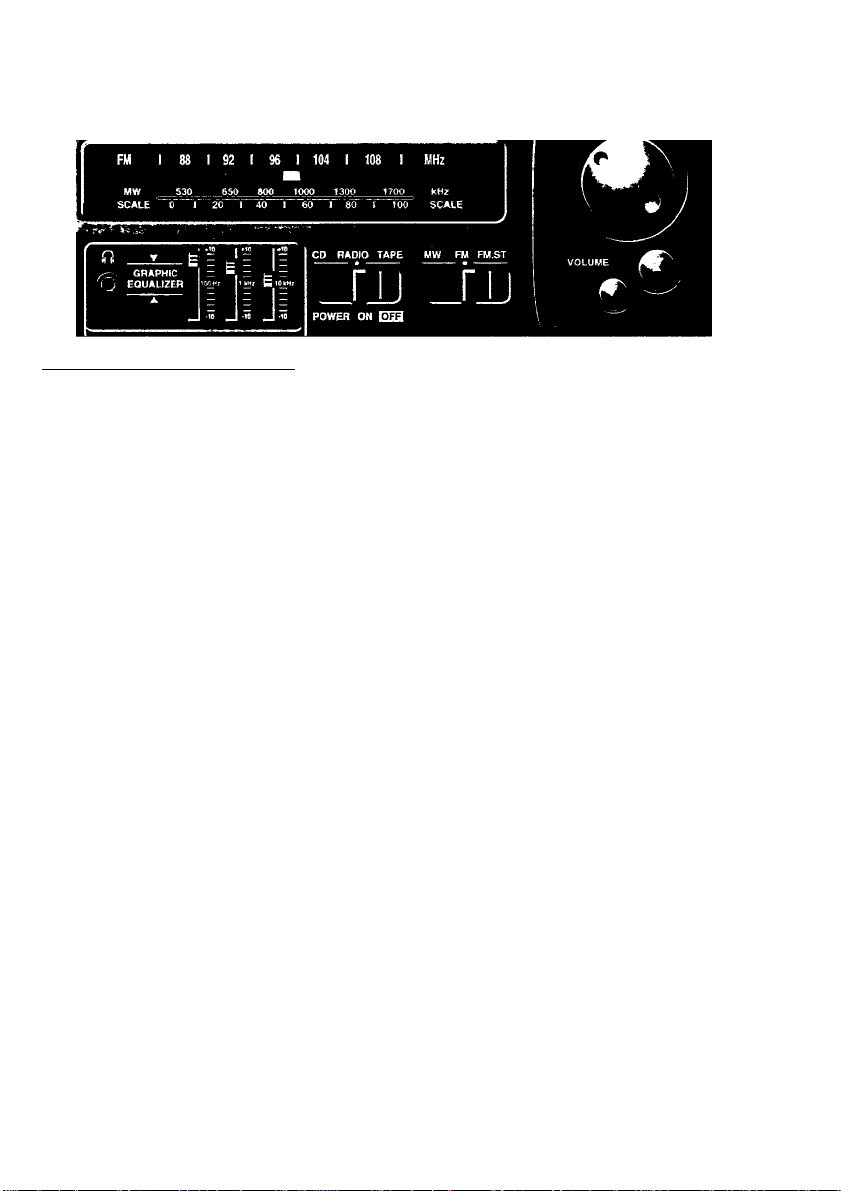
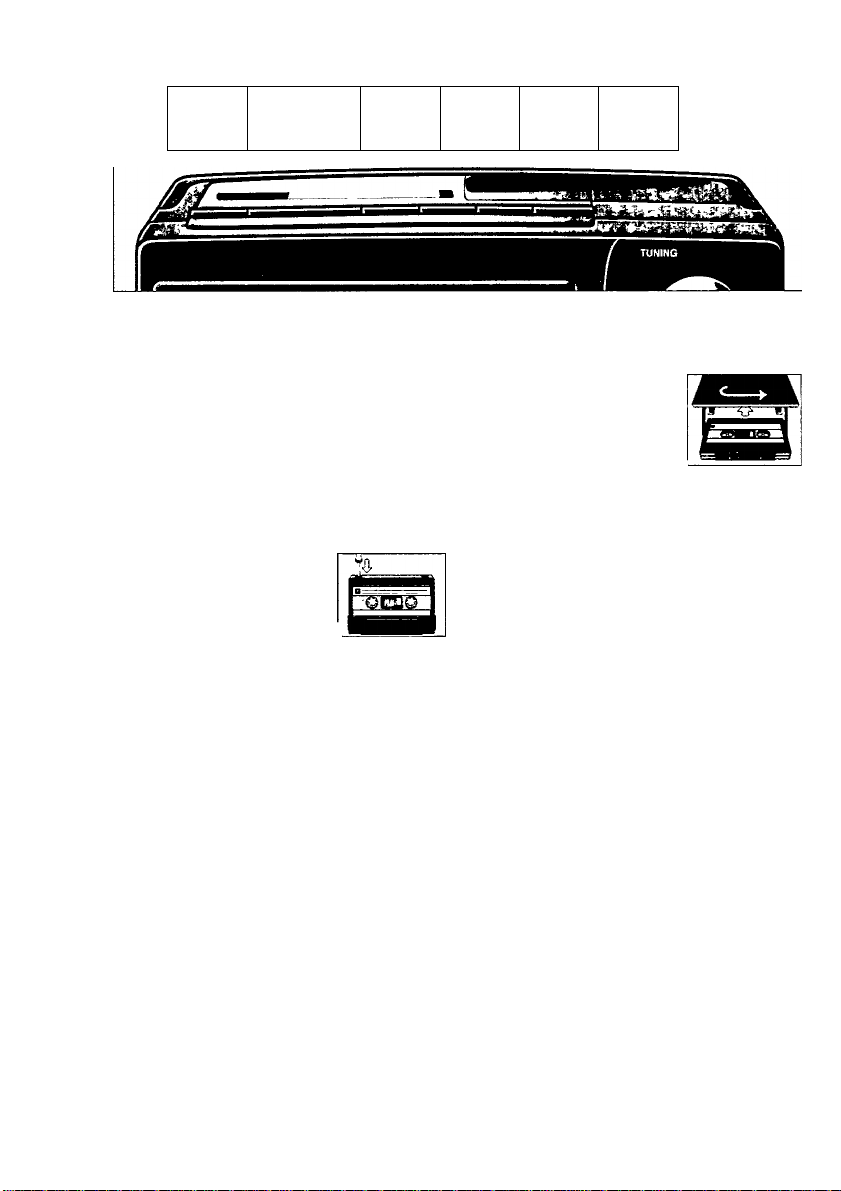
4. CONTROLS - see figs. 1 - 2 on page 3
TOP PANEL
m
3
(O
Recorder buttons
RECORD •
VI
zr
PLAY^
REWIND - fast rewind
F.FWD ►► - fast forward wind
STOP-EJECT« A
PAUSE II
FRONT PANEL
2 GRAPHIC EQUALIZER - tone controls:
100 Hz-bass
1 kHz - mid
10 kHz-treble
3 PHONES - socket for stereo headphones
having a 3.5 mm plug. Inserting the plug
will disconnect the speakers.
4 CD - RADIO - TAPE - function selector.
The system is switched off when the
CD/RADIO/TAPE selector is in position OFF
and the recorder buttons are released.
5 MW - FM (mono) - FM ST (stereo) - wave
band selector
6 CD display
7 PROGRAM - to program CD track numbers
8 REMOTE SENSOR - for receiving infrared
remote control signals
9 SEARCH
- to search for a particular passage within
a CD track
- to return to the start of a CD track or to
select a next or previous track
10 CD tray - for 8 cm and 12 cm CDs
11 TUNING knob - to tune to radio stations
12 VOLUME A/T - to adjust the volume
13 PLAY-PAUSE Wl - CD play and pause
14 STOP «-CD stop
15 SHUFFLE - to play an entire CD or a CD
program in a random order
16 OPEN-CLOSE - to open and close the CD
tray
17 DISC 1...7 - disc-tray selection buttons
BACK PANEL
18 BEAT CUT switch - If during recording of
an MW radio station, a whistling sound is
heard, this can be suppressed by setting
the BEATCUT switch to another position.
19 VOLTAGE selector (not on all versions)
20 AC MAINS - socket for mains lead
21 BATTERIES - battery compartment
22 SPEAKERS - speaker terminals
23 UNLOCK - levers to take off the speakers
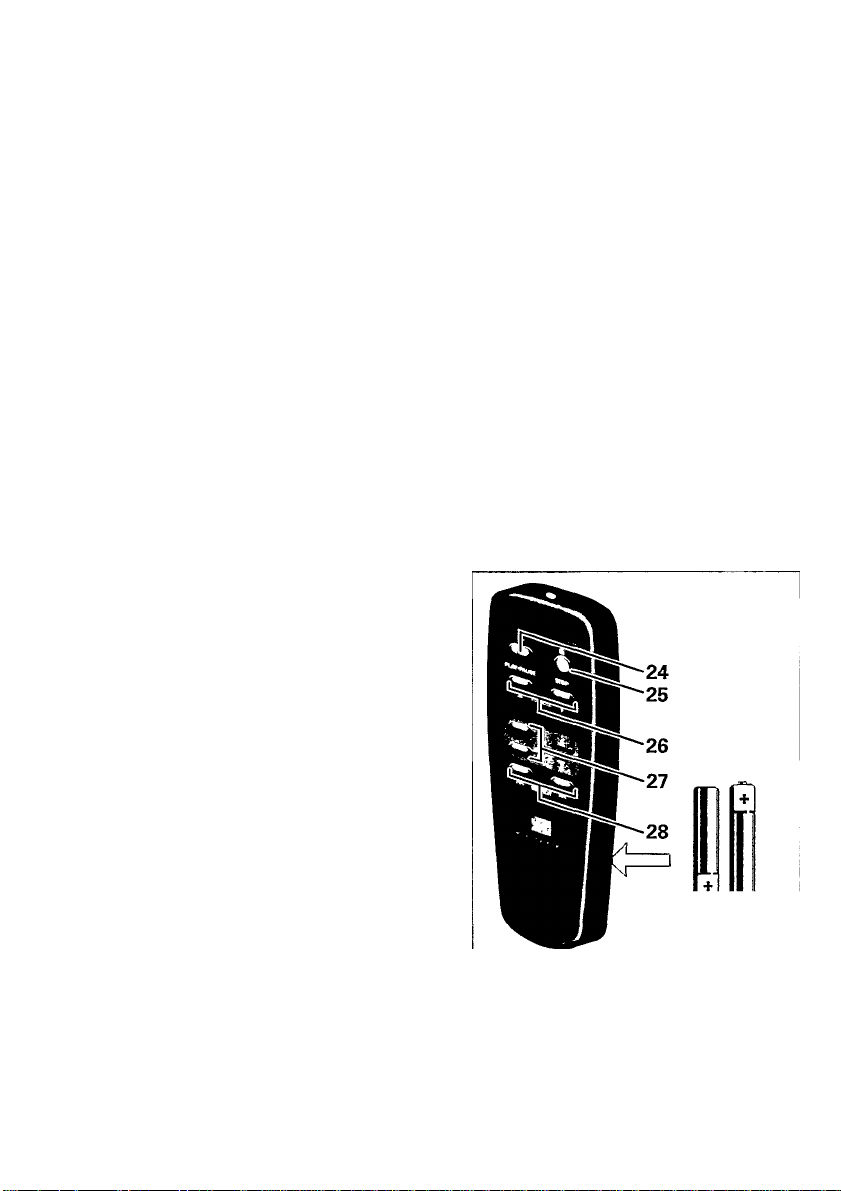
REMOTE CONTROL
24 PLAY-PAUSE All - to start and interrupt
CD-playback
25 STOP ■ - to stop CD-playback
26 VOLUME A/T UP/DOWN - to adjust the
volume
27 DISC A/T UP/DOWN - to select the
desired disc tray 1 ...7
28 SEARCH »t
- to search for a particular passage within
a track
- to return to the start of a track or to
select a next or previous track
2 X type
LR03 - UM4 - AAA
Remote control batteries
• Open the battery compartment and insert
two batteries, type LR03, UM4 or /\AA.
• Remove the batteries when they are ex
hausted or if they will not be used again for
a long period.
Page 5
5. OPERATION 6. RADIO
D)
C
Ili
GENERAL OPERATION OF THE SYSTEM
• Once connected to the mains, the system is
always energised.To switch off the mains
supply completely, pull the mains plug out
of the wall socket.
• To switch on the system, select the sound
source using the CD/RADIO/TAPE selector.
• Adjust the sound using the VOLUME A/T
buttons.
- If headphones are connected, the speakers
are switched off.
• Adjust the tone using the GRAPHIC
EQUALIZER controls;
- 100 Hz - bass
- 1 kHz-mid
- 10 kHz-treble
• The system is switched off when the
CD/RADIO/TAPE selector is in position
TAPE/OFF and the recorder buttons are
released.
• When switching off the unit by setting the
CD/RADIO/TAPE selector to TAPE/OFF, the
CD player mechanism will always need
about 10 seconds to reset. First STRPT
appears, then O-OQ flashes and after that the
CD display goes out.
RADIO RECEPTION
Set the CD/RADIO/TAPE selector to RADIO.
Adjust the sound using the VOLUME A/T
buttons and the GRAPHIC EQUALIZER tone
controls.
Select the wave band using the selector
MW/FM/FM ST (FM=mono, FM ST=stereo).
Tune to a radio station using the TUNING
knob,
- For FM, pull out the telescopic aerial. To
improve FM-reception, incline and turn
the aerial. Reduce its length if the FMsignal is too strong (very close to a
transmitter).
- For MW, the set is provided with a built-in
aerial, so the telescopic aerial is not
needed. Direct the aerial by turning the
whole set.
A disturbing noise, due to a weak FM-stereo
signal, can be suppressed by setting the
MW/FM/FM ST selector to FM (mono).
Mow, you will hear (and record) the FM
station in mono.
Page 6
7. CASSETTE RECORDER
m
3
5)'
sr
RECORD PLAY REW IND
•
COMPACT CASSETTES
For recording, use a NORMAL cassette (lEC
type I) on which the tabs are not broken out.
This deck is not suited for recording on
CHROME (lECn) or METAL (lEC IV)
cassettes.
For playback, any cassette type may be in
serted.
At the very beginning and end of the tape,
no recording will take place during the 6
seconds when the leader tape passes the
recorder heads.
To prevent the accidental erasure of a re
cording, keep the cassette
side to be safeguarded in
front of you and break out
the left tab. Now, recording
on this side is no longer pos-.
sible.
To render this safeguard ineffective, cover
the aperture with a piece of adhesive tape.
Do not expose the cassettes to rain,
moisture, sand, or to excessive heat e.g.
from heating equipment or in motor cars
parked in the sun.
F.FW D STOP-EJECT PAUSE
►
◄◄ ►►
■ ▲ II
CASSETTE PLAYBACK
Set the CD/RADIO/TAPE selector to TAPE.
Press STOP-EJECT ■ A to open the
cassette holder.
Insert a recorded cassette.
For fast winding, press
REWIND or F.FWD
To stop, press STOP ■.
Press PLAY ► and playback
will start.
Adjust the sound using the VOLUME a/t
buttons and the GRAPHIC EQUALIZER tone
controls.
For brief interruptions, press PAUSE II.
To restart piayback, press this button once
more.
To stop, press STOP-EJECT ■ A; the set is
then switched off.
On pressing again, the cassette holder will
open.
When the end of the tape is reached during
playback, the recorder buttons are released.
Page 7

7. CASSETTE RECORDER
CASSETTE RECORDING
Preparation
• The recording level is set automatically.
• Press STOP-EJECT ■ A to open the
cassette holder.
• Insert the cassette with the
full reel on the left-hand
side.
• When monitoring during re
cording, adjust the sound
using the VOLUME buttons
and the GRAPHIC EQUALIZER controls.
These controls do not affect the recording.
• For fast winding, press REWIND « or
F.FWD ►►. To stop, press STOP ■.
Recording from the radio
• Set the CD/RADIO/TAPE selector to RADIO.
• For FM recordings, select FM for mono
recordings and FM ST for stereo recordings.
• If you hear a whistling sound during record
ing of an MW radio station, this can be sup
pressed by setting the BEAT CUT switch
(on the back) to another position.
CD synchro - recording from the CD-player
• Set the CD/RADIO/TAPE selector to CD.
• It's not necessary to start the CD-player se
parately: by pressing RECORD • the CDplayer starts automatically:
- if the CD-player is in position STOP,
recording will start from the beginning of
the CD (or the programmed selection);
- if the CD-player is in position STOP and a
certain track is selected using the r«
SEARCH buttons, recording will start
from the beginning of that track.
- To start a recording in the middle of a
track, play the CD in the normal way. As
soon as the desired passage is reached,
set the CD player to pause by pressing
PLAY-PAUSE HI. By pressing RECORD •
the CD-player and the recording will start.
Starting and stopping the recording
• Start recording by pressing RECORD •.The
PLAY^ button is then automatically pressed
too.
• For brief interruptions, press PAUSE II.
To restart recording, press this button once
more.
• To stop recording, press STOP-EJECT ■ A
the set is then switched off.
On pressing again, the cassette holder will
open.
• VVhen the end of the tape is reached during
recording, the recorder buttons are released.
• To record the other side of the cassette,
turn it over by hand, rewind it to the be
ginning and press RECORD •.
£
"oi
c
lU
Page 8

8. CD PLAYER
CD HANDLING
m
3
Use only Digital Audio CDs.
<a_
To take the CD out of its box easily, press
»■
3"
the centre spindle while lifting the CD.
• Never write on a CD or attach any sticker to
the CD.
• Always hold the CD at the edge and always
store it in its box after use, label facing up.
• To remove dust and dirt
breathe on the CD and wipe
it with a soft, lint-free cloth in
a straight line frorn the centre '
towards the edge. Cleaning
agents may damage the CD.
• Do not expose the CD to rain,
moisture, sand, or to exces
sive heat e.g. from heating equipment or in
motor cars parked in the sun.
CD-DISPLAY
T T T
<o> <e>
OO
uu
TR^
O00O00O - shows the disc trays
<0> - shows that a CD is loaded in disc
tray 1
T shows the selected disc
TRACK - shows:
- in the STOP position the total number of
tracks on the CD or in the CD program
- in the PLAY position the track number
that is playing
MIN/SEC-shows:
- in the STOP position the total playing time
of the CD or the CD program
- in the PLAY position the elapsed playing
time of the running track
PAUSE - lights up when play is interrupted
PROGRAM - flashes during programming,
lights up when a program is being played
SHUFFLE - lights up when the SHUFFLE
function is active
<e> <o>
OO ■
uu ■
MIN
T T T
T
<e> <o> <o>
J—» PROGRAM
1
_
! 1_) SHUFFLE
SEC
LOADING CDs
You can load up to 7 CDs in this CD changer.
When loading 8 cm CDs in the disc trays 2...7,
an adapter ring must be used.
• Set the CD/RADIO/TAPE selector to CD.
• Select the desired disc tray using the DISC
buttons 1 ...7 or the DISC UP/DOWN button
on the remote control.
• Press OPEN-CLOSE. The display shows
OPEiJ and the selected tray number I...1.
• Insert the AUDIO CD, printed side facing up.
To close the CD tray:
- push gently against the front of the CD
tray or
- press OPEN-CLOSE again:
The display first shows CLOSE, 5TRRT, .PERU
and after that, the total number of tracks
and the total playing time of the CD.
T
<o> <e> o e 0 0
<0>
~l
O C ~i • ou
u U 1 ■
L_
- When pressing PLAY, the CD tray is
closed and playback will start.
U 1
10
Page 9

8. CD PLAYER
PLAYING A CD
Set the CD/RADIO/TAPE selector to CD.
Select the desired disc tray using the DISC
buttons 1 ...7 or the DISC UP/DOWN button
on the remote control.
The selected CD will start playing.
If no disc tray is selected, disc 1 will start
playing.
The display shows the selected disc tray,
the current track number and the elapsed
playing time of that track.
T
<0> <Q> <0> O 0 (
I nn-oo
I UU-)
• For brief interruptions, press PLAY-PAUSE
HI.
- PAUSE appears
- To continue playback, press PLAY-PAUSE
►II again.
- PAUSE disappears
• To stop playback, press STOP ■.
- The CD player also goes to position STOP:
- by pressing OPEN-CLOSE;
- when the end of the CD is reached;
- if you move the CD/RADIO/TAPE
selector.
• To play another CD, simply select the
desired disc tray and playback of that CD
will start.
_____
^1
kM SEARCH M-:
Selecting another track
By pressing briefly the SEARCH i-« or »-i but
ton, you can jump to a next or previous title, or
you can select a track before starting playback.
a. During PLAY
»{-goto the next track (title)
You can jump to the next title by pressing ►►i
once.
If you want to skip more than one track,
press more than once until the display
shows the desired track number.
- go to the previous track (title)
If you want to repeat the running title from
the beginning, press i-m once.
If you want to repeat one of the previous
titles, press;-« more than once until the
display shows the required track number.
b. In position STOP
In position STOP with a CD inserted you can
select the desired title using SEARCH ¡« or
»i until the display shows the required track
number.
Press PLAY-PAUSE HI to start playback.
11
Page 10

8. CD PLAYER
Searching a passage within a track
m
You can search for a passage within a track.
3
(O
The CD is played partly and at high speed,
however, the sound is still recognizable.
• During playback, keep the SEARCH button
r« or pressed, and release the button as
soon as you recognize the required passage:
the CD will be played in the normal way
from this passage.
SHUFFLE - PLAY IIM RANDOM ORDER
The SHUFFLE-function plays all tracks of all
loaded CDs in a random order. If a selection of
tracks is programmed, all programmed tracks
will be played in a random order.
• From the PLAY- or STOP-position, press
SHUFFLE.
- The current playback will stop, the display
shows SHUFFLE, and all tracks are played in
a random order.
• If you press SEARCH or ►«, an already
played track is repeated M) or one of the
next (►«) tracks (at random) is played.
• To leave the SHUFFLE-mode, press
SHUFFLE again.
- SHUFFLE disappears from the display.
PROGRAMMIIMG TRACK NUMBERS
You may store at most 70 tracks of different
CDs in the memory in the desired sequence.
You may store any track more than once.
When playing, you will only hear the stored
titles in the selected sequence.
______
Programming
• Select the desired disc tray using the DISC
buttons 1 ...7 or the DISC UP/DOWN button
on the remote control. The selected CD will
start playing.
• Press STOP ■ to stop playback.
• Store the selected disc by pressing
PROGRAM, PROGRAM flashes.
• Select the desired track using SEARCH »< or
►w until the display shows the required track
number.
• Store this track by pressing PROGRAM.
PROGRAM appears for about 1 second.
• Select and store in this way all desired titles
of all desired CDs.
- rULL appears if you try to store more than
70 tracks.
• To play the selection, press PLAY-PAUSE
►II. PROGRAM lights up and playback will
start with the first track of the program.
Playing the selection in random order
(SHUFFLE) is as well possible.
• When pressing STOP ■ and also when all
tracks have been played, playback will stop
and the display shows the total number and
total playing time of programmed tracks.
• Programming will stop automatically when
no buttons are pressed during 10 seconds.
Checking the program
• From the STOP-position, keep PROGRAM
pressed for 2 seconds: the display shows in
sequence all programmed track numbers
and disc trays.
Erasing a program
• You can erase the contents of the memory:
- in the STOP mode by pressing STOP ■
again;
- in the PLAY mode by pressing STOP ■
twice;
- by opening the CD tray using
OPEN-CLOSE.
CLERP appears and the word PROGRAM
disappears.
12
Page 11

9. MAINTENANCE
SYSTEM MAINTENANCE
The mechanical parts of the CD player and
the cassette deck contain self-lubricating
bearings and must not be oiled or lubricated.
A chamois leather slightly moistened with
water is sufficient for cleaning the housing.
Do not use cleaning agents as these may
harm the housing.
Do not leave the set, CDs, batteries or cas
settes for any length of time in direct sunlight
or other places where high temperatures can
occur, such as in the vicinity of heating ap
paratus or in motor cars parked in the sun.
Do not expose the set, CDs, batteries or
cassettes to humidity or rain.
CD PLAYER MAINTENANCE
The lens may cloud over if the CD player is
moved from cold to warm surroundings. The
CD player will not start. Give the player
some time to acclimatise.
Keep the CD tray free of dust using a clean
cloth.
RECORDER MAINTENANCE
To ensure a good recording and playback quali
ty, clean the indicated parts 0®© after every
50 hours of operation or, on average, once a
month.
• Open the cassette holder using
STOP-EJECT« A.
• Use a cotton bud slightly moistened with
alcohol or a special head cleaning fluid.
rollers ©.
• Then press PAUSE II and clean the capstans
0 and the heads 0.
• After cleaning, press STOP-EJECT ■ A.
Cleaning of the heads 0 can also be done by
playing a cleaning cassette through once.
JZ
.12
"5)
c
u
13
Page 12

10. TROUBLESHOOTING
If a fault occurs, first check the points listed
m
below before taking the set for repair.
3
<a_
If you are unable to remedy a problem by
5>'
following these hints, consult your dealer or
3
"
service centre.
WARNING
Under no circumstances should you try to
repair the set yourself, as this would invalidate
the guarantee.
PROBLEM
- POSSIBLE CAUSE
• REMEDY
____________________________
No sound______________________________
- VOLUME is not adjusted
• Adjust the VOLUME
- Headphones are connected
• Disconnect headphones
- Batteries are exhausted
• Insert fresh batteries
- Batteries are incorrectly inserted
• Insert the batteries correctly
- Mains lead is not securely connected
• Connect the mains lead properly
System does not react to any button
- Electrostatic discharge
• Switch off the set, disconnect the mains
plug, reconnect after a few seconds.
Bad sound_____________________________
- Unsuited speakers are used
• Use recommended speakers, impedance
4 Ohms
Poor bass sound
- Speakers are not in phase
• Connect speakers properly, © to ©-pole (red
marked or sleeved cable); © to ©-pole
(unmarked cable)
No sound on left or right side
- Speaker wrongly connected
• Connect speaker properly
________________________
______________
________
Severe radio hum or noise
System too close to TV, VCR or computer
Increase the distance
Poor radio reception
Weak radio aerial signal
FM: aim the telescopixc aerial for best
reception;
MW: rotate the entire set.
Poor cassette sound quality
Dust and dirt on the heads, capstan or
pressure roller
Clean the heads etc., see Maintenance
Recording does not work
- Cassette tab(s) maybe broken out
• Apply a piece of adhesive tape over the
missing tab space
NO DISC or ERROR indication
- CD is badiy scratched or dirty
• Replace or clean the CD, see Maintenance
- No CD inserted
• Insert CD
- CD inserted upside down
• Insert CD with printed side facing up
- Laser lens Is steamed up
• Wait until lens has acclimatized
_______________
The CD skips tracks
- CD is damaged or dirty
• Replace or clean the CD
- PROGRAM is active
• Switch off the PROGRAM function
Remote control does not function properly
- Remote control batteries are incorrectly
inserted
• Insert batteries properly
- Remote control batteries exhausted
• Replace batteries
- Distance to the set is too large
• Reduce the distance
Reversed left and right sound______________
- Speakers are wrongly connected
• Connect speakers properly, L to left, R to
right
14
Page 13

English
Page 14

«
51
Page 15

Australia
New Zealand
GUARANTEE FOR AUSTRALIA
The benefits given to the purchaser by this
warranty are in addition to all other rights and
remedies, which, under the Trade Practices
Act or other Commonwealth or State law, the
purchaser or owner has in respect of the
product.
The Philips product carries the following
warranties:
- C-series HiFi-systems 12 months.
- Compact Disc Players: 12 months.
- Home Audio Systems: 6 months.
- Clock radios, portable radios, cassette
recorders, cassette players and radio
recorders: 90 days.
Any defect in materials or workmanship
occurring within the specified period from the
date of delivery, will be rectified free of charge
by the retailer from whom this product was
purchased.
___________
Note: Please retain your purchase docket to
assist prompt service.
Conditions of this warranty
1. All claims for warranty service must be
made to the retailer from whom this product
was purchased. All transport charges in
curred in connection with warranty service
or replacement will be paid by the
purchaser.
2. These warranties do not cover batteries and
extend only to defects in materials or
workmanship occurring under normal use of
the product where operated in accordance
with our instructions.
Philips
Consumer Products Division
Technology Park
Figtree Drive, Australia Centre
Homebush 2140
New South Wales
GUARANTEE FOR NEW ZEALAND
Thank-you for purchasing this quality Philips
product.
Philips New Zealand Ltd guarantees this
product against defective components and
faulty workmanship for a period of 12 months.
Any defect in materials or workmanship
occurring within 12 months from the date of
purchase subject to the following conditions
will be rectified free of charge by the retailer
from whom this product was purchased.
________
Conditions
1. The product must have been purchased in
New Zealand. As proof of purchase, retain
the original sales docket indicating the date
of purchase.
2. The guarantee applies only to faults caused
by defective components, or faulty
workmanship on the part of the
manufacturer.
3. The guarantee does not cover failures
caused by misuse, neglect, normal wear and
tear, accidental breakage, use on the
incorrect voltage, use contrary to operating
instructions, or unauthorised modification to
the product or repair by an unauthorised
technician.
4. Reasonable evidence (in the form of a sales
docket) must be supplied to indicate that the
product was purchased no more than
12 months prior to the date of your claim.
5. In the event of a failure. Philips shall be
under no liability for any injury, or any loss or
damage caused to property or products
other than the product under guarantee.
This guarantee does not prejudice your rights
under common law and statute, and is in
addition to the normal responsibilities of the
retailer and Philips.
How to claim
Should your Philips product fail within the
guarantee period, please return it to the
retailer from whom it was purchased. In most
cases the retailer will be able to satisfactorily
repair or replace the product.
However, should the retailer not be able to
conclude the matter satisfactorily, or if you
have other difficulties claiming under this
guarantee, please contact.
The Guarantee Controller
Philips New Zealand Ltd.
B P.O. Box 41.021
Auckland
•B (09)84 94160
fax B (09) 84 97 858
52
Page 16

México
Brasil
GARANTÍA PARA MÉXICO GARANTIA PARA BRASIL
Este aparato está fabricado con materiales de
alta calidad y ha sido cuidadosamente
verificado. Philips, por lo tanto, da a usted una
garantía de 12 meses a partir de su fecha de
compra.
La garantiá ampara la reposición de. las piezas
defectuosas debidas a fallas en su montaje o
en los materiales, incluyendo la mano de obra
necesaria para su reemplazo en nuestras Su
cursales o talleres autorizados.
En caso de fallas en su aparato le rogamos se
sirva poner en contacto con su distribuidor.
Esta garantía no cubrirá las averías que
resulten como consecuencia de una insta
lación incorrecta del aparato, manifiesto
maltrato o uso inadecuado del mismo.
Philips se obliga a reparar y devolver a usted
su aparato en un plazo no mayor de 30 días há
biles contados a partir de la fecha de haber in
gresado su aparato a uno de nuestros talleres.
Con la presentación de la factura o remisión de
su aparato podrá hacer efectiva la garantía.
Si usted tiene alguna duda o pregunta que no
le pueda solucionar su distribuidor, por favor
ponerse en contacto con;
Oficinas Centrales de Servicio,
Av. Coyoacán No. 1051,
Col. del Valle,
03100 México, D.F.
ra 5-75-20-22 o 5-75-01-00
Este aparelho é garantido pela Philips do Brasil
Ltda. e a Philips da Amazonia S.A. Indùstria
Eletrônica, por um período superior ao
estabelecido por leí. Porém, para que a garan
tis tenha validade, é imprescindível que, além
deste certificado, seja apresentada a nota
fiscal de compra do produto.
1. Philips do Brasil Ltda. e Philips da Amazonia
S.A. Industria Eletrônica asseguram ao
proprietàrio consumidor deste aparelho a ga
rantía de 180 dias (90 dias legal mais 90 dias
adicional) contados a partir da data de
entrega do produto, conforme expresso na
nota fiscal de compra que passa a fazer
parte deste certificado.
2. Esta garantía perderá sua validade se;
A. O defeito apresentado for ocasionado por
uso indevido ou em desacordó com o seu
manual de instruçôes.
B. О produto for alterado, violado, ajustado
ou consertado por pessoa náo autorizada
pela Philips.
C. O produto for ligado a fonte de energia
(rede elétrica, pilhas, batería, etc.) de
características diferentes das
recomendadas no manual de instruçôes
e/ou no produto.
D. O número de série que identifica o
produto estiver de alguma forma
adulterado ou rasurado.
3. Estáo excluidos desta garantía defeitos
decorrentes do descumprimento do manual
de instruçôes do produto, de casos fortuitos
ou de força maior, bem como aqueles cau
sados por agentes da natureza e acidantes.
4. Excluem-se igualmente desta garantía os
defeitos decorrentes do uso dos produtos
em serviços nao doméstico/residencial
regular ou em desacorde com o uso
recomendado.
5. Nos municípos onde náo exista oficina
autorizada de serviço Philips, as despesas
de transporte do aparelho e/ou do técnico
autorizado correm por conta do sr. consumi
dor requerente do serviço.
Philips do Brasil Ltda. e
Philips da Amazonia S.A. Indùstria
Eletrônica
Para informaçôes adicionáis sobre о produto
ou para eventual necessidade de utilizaçâo da
rede de oficinas autorizadas, ligue para о
centro de informaçâo ao consumidor;
NOM
Э 0800-123123 (discagem direta gratuita)
ou escreva para a caixa postal;
21462 cep 04698-970 - Sâo Paulo
53
Page 17

m
3
S5*
3*
•n
fi>
3
o
fi}
i « J
m
•o
fi)
3t
o
*
Philips AZ 9855 - Portable Mini System
\
/ \
English
. }
—
N
Frangais
V )
\
Español
---------------------------
\
.................
.............
...........
.............................
V J
J
page 4
page 16
página 28
40
Printed in Hong Kong
TCtext9512
44-0101-1
 Loading...