

Philips AZ9214, AZ9111 User Manual
Shockproof CD Player
AZ9111
AZ9113
AZ9141
AZ9142
AZ9143
AZ9213
AZ9214
AZ9225
Toll Free Help Line
Ligne d’assistance en service libre
Linea de ayuda telefónica sin cargo
800-531-0039
Return your Warranty Registration card today to
ensure you receive all the benefits you’re entitled to.
•
Once your Philips purchase is registered,
you’re eligible to receive all the privileges
of owning a Philips product.
• So complete and return the Warranty
Registration Card enclosed with your
purchase at once. And take advantage
of these important benefits.
Warranty
Verification
Registering your product
within 10 days confirms
your right to maximum
protection under the
terms and conditions of
your Philips warranty.
Owner
Confirmation
Your completed Warranty
Registration Card serves
as verification of
ownership in the event of
product theft or loss.
Model
Registration
Returning your Warranty
Registration Card right
away guarantees you’ll
receive all the information
and special offers which
you qualify for as the
owner of your model.
t
This “bolt of lightning”
indicates uninsulated material
within your unit may cause an
electrical shock. For the safety of
everyone in your household, please
do not remove product covering.
s
The “exclamation point” calls
attention to features for
which you should read the enclosed
literature closely to prevent
operating and maintenance problems.
WARNING: TO PREVENT FIRE
OR SHOCK HAZARD,DO NOT
EXPOSE THIS EQUIPMENT TO
RAIN OR MOISTURE.
CAUTION: To prevent electric
shock, match wide blade of plug to
wide slot, and fully insert.
For Customer Use
Enter below the Serial No. which is
located on the rear of the cabinet. Retain
this information for future reference.
Model No. ________________________
Serial No. ________________________
Know these
ssaaffeettyy symbols
CAUTION
RISK OF ELECTRIC SHOCK
DO NOT OPEN
CAUTION: TO REDUCE THE RISK OF ELECTRIC SHOCK, DO NOT
REMOVE COVER (OR BACK). NO USER-SERVICEABLE PARTS
INSIDE. REFER SERVICING TO QUALIFIED SERVICE PERSONNEL.
MAC5097
5
6
4
3
7
8
9
0
!
@
#
DIGITAL
DBB
ESP
PROGRAM
MODE
O
F
F
•
R
E
S
U
M
E
•
H
O
L
D
L
I
N
E
O
U
T/
V
O
L
.
0
0
PEN
O
2
1
^
%
OPT OUT
C
D
V
5
,
4
$
3

IMPORTANT SAFETY INSTRUCTIONS –
Read before operating equipment
This product was designed and manufactured
to meet strict quality and safety standards.
There are, however, some installation and
operation precautions which you should be
particularly aware of.
1. Read these instructions – All the safety
and operating instructions should be read
before the appliance is operated.
2. Keep these instructions – The safety and
operating instructions should be retained for
future reference.
3. Heed all warnings – All warnings on the
appliance and in the operating instructions
should be adhered to.
4. Follow all instructions – All operating
and use instructions should be followed.
5. Do not use this apparatus near water –
for example, near a bathtub, washbowl,
kitchen sink, laundry tub, in a wet basement
or near a swimming pool, etc.
6. Clean only with a damp cloth. The
appliance should be cleaned only as
recommended by the manufacturer.
Install in accordance with the
7.
manufacturers instructions. Do not block
any of the ventilation openings. For
example, the appliance should not be situated
on a bed, sofa, rug, or similar surface or
placed in a built-in installation, such as a
bookcase or cabinet that may impede the flow
of air through the ventilation openings.
8.
Do not install near any heat sources such
as radiators, heat registers, stoves, or other
apparatus (including amplifiers) that produce
heat.
9.
Only use attachments/accessories
specified by the manufacturer.
10.
11.
Refer all servicing to qualified service
personnel. Servicing is required when the
apparatus has been damaged in any way, such
as power-supply cord or plug is damaged,
liquid has been spilled or objects have fallen
into the apparatus, the apparatus has been
exposed to rain or moisture, does not operate
normally, or has been dropped.
Use only with a cart, stand,
tripod, bracket, or table specified
by the manufacturer, or sold with
the apparatus. When a cart is
used, use caution when moving
the cart/apparatus combination
to avoid injury from tip-over.
EL 4562-E004: 99/3
4

English
Safety instructions............................2&4
Controls .................................................6
Quick start .............................................7
Power supply...................................8–10
Headphones.........................................10
CD play..........................................11–12
Features.........................................13–18
In-car connection.................................19
Troubleshooting.............................20–21
General information ............................22
Limited warranty...........................24–25
EnglishFrançais
Français
Conseils de sécurité......................26–27
Commandes.........................................28
Mise en service rapide........................29
Alimentation électrique ................30–32
Ecouteurs.............................................32
Español
Instrucciones sobre seguridad......48–49
Controles .............................................50
Encendido rápido.................................51
Alimentación eléctrica..................52–54
Auriculares ..........................................54
Lecture CD.....................................33–34
Caractéristiques ............................35–40
Raccordement en voiture ....................41
Pannes et remèdes .......................42–43
Informations générales .......................44
Garantie limitée ............................46–47
Reproducción de un CD.................55–56
Características ..............................57–62
Conexión al automóvil.........................63
Localización de averías.................64–65
Información general ............................66
Garantia limitada ..........................68–69
Canada
English: This digital apparatus does not exceed the Class B limits
for radio noise emissions from digital apparatus as set out in the
Radio Interference Regulations of the Canadian Department of
Communications.
Français : Cet appareil numérique n'émet pas de bruits
radioélectriques dépassant les limites applicables aux appareils
numériques de Classe B prescrites dans le Règlement sur le
Brouillage Radioélectrique édicté par le Ministère des
Communications du Canada.
Español
5

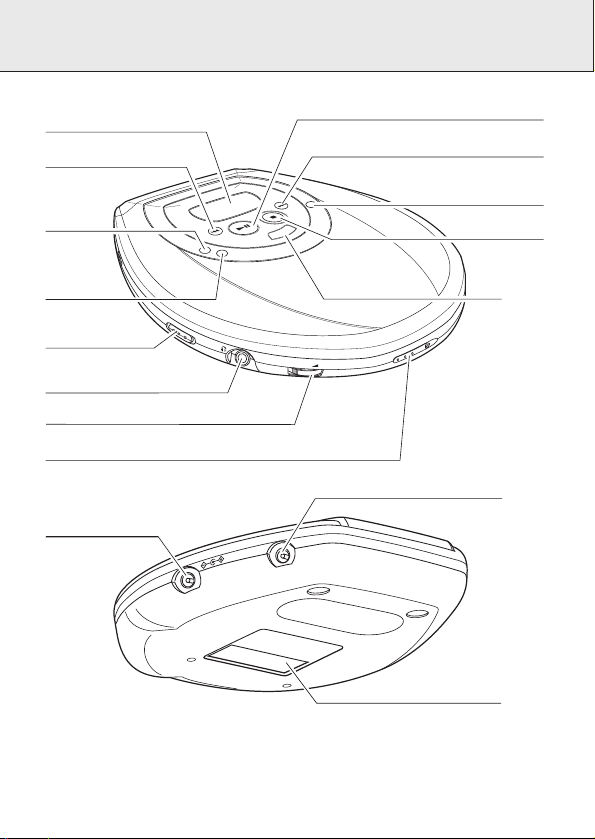
CONTROLS, refer to the illustration on page 3
1 9 .....................stops CD play, clears a program, or switches the player off
2 DIGITAL DBB...DIGITAL DYNAMIC BASS BOOST switches the bass enhancement
English
3 § ....................skips and searches forward to CD tracks
4 2;...................switches the player on, starts or pauses CD play
5 ........................display
6 ∞ ....................skips and searches backward to CD tracks
7 PROGRAM.......programs tracks and reviews the program
8 MODE..............selects the different playing possibilities:
9 RESUME..........stores the last position of a CD track played
HOLD..............locks all buttons
OFF ..................switches off RESUME and HOLD
0 LINE OUT/p ....3.5 mm headphone jack; jack to connect the player to the analog
! VOL E.........adjusts the volume
@ OPEN 2...........opens the CD lid
# 4.5V DC ...........jack for external power supply
$ ........................typeplate
% OPT OUT..........(not on all versions) jack to connect the player to digital equipment
^ ESP ..................ELECTRONIC SKIP PROTECTION ensures continuous CD playback
Note: After every key operation the display is illuminated
for a few seconds (not on all versions).
on and off
SHUFFLE,
SHUFFLE REPEAT ALL, REPEAT, REPEAT ALL and SCAN
audio input of an additional appliance; remote control jack (not on
all versions)
(e.g. a CD recorder) with a DIGITAL OPTICAL IN/AUX jack
regardless of vibrations and shocks
CAUTION
Use of controls or adjustments or performance of
procedures other than herein may result in hazardous
radiation exposure or other unsafe operation.
6
1 OPEN 2
E
DIGITAL
DBB
ESP
PROGRAM
MODE
O
F
F
•
R
E
S
U
M
E
•
H
O
L
D
L
I
N
E
O
U
T/
2.
N
E
P
O
V
O
L
.
0
0
1.
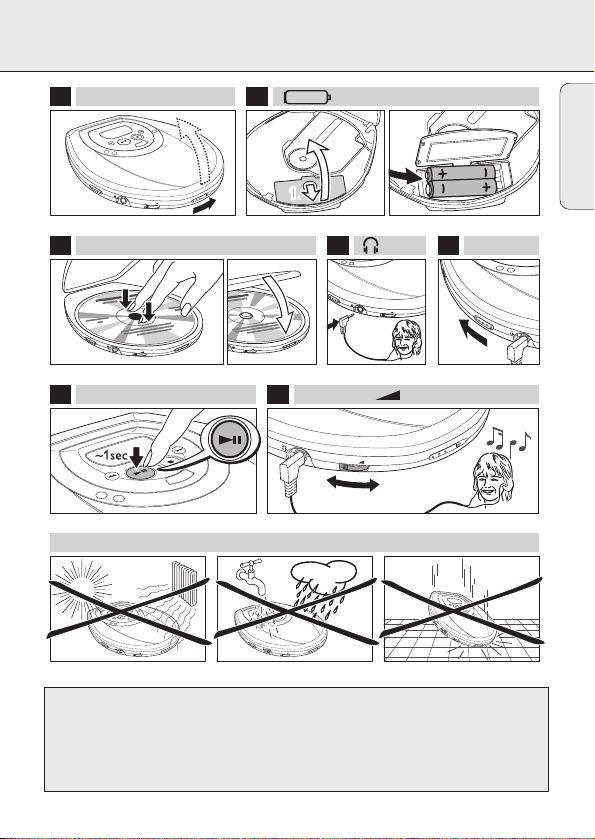
QUICK START
AA
LRG
2.
1.
UM3
English
3 CD 4 5
PROGRAM
MODE
L
I
N
E
O
U
T
/
V
O
L
.
O
F
F
•
R
E
S
U
M
E
•
L
I
N
E
O
U
T
/
N
E
P
O
V
O
L
.
0
N
E
P
O
V
O
L
.
0
0
6 PLAY 7 VOLUME
O
U
T
/
ESP
V
O
L
.
0
PROGRAM
!!!
L
A
T
I
G
I
D
B
B
D
P
S
E
M
A
R
G
O
R
P
E
D
O
M
O
F
F
•
R
E
S
U
M
E
•
H
O
L
D
L
I
N
E
O
U
T
/
N
E
P
O
V
O
L
.
0
0
The set complies with the FCC-Rules, Part 15 and with 21 CFR 1040.10. Operation is
subject to the following two conditions:
1. This device may not cause harmful interference, and
2. This device must accept any interference received, including interference that
may cause undesired operation.
L
A
T
I
G
I
D
B
B
D
P
S
E
M
A
R
G
O
R
P
E
D
O
M
O
F
F
•
R
E
S
U
M
E
•
H
O
L
D
L
I
N
E
O
U
T
/
N
E
P
O
V
O
L
.
0
0
O
F
F
•
OPEN
P
R
O
G
R
A
M
O
F
F
M
O
D
E
•
R
E
S
U
M
E
•
H
O
L
D
L
I
N
E
O
U
T
/
V
O
L.
0
0
HOLD➟OFF
M
A
R
G
O
R
P
E
D
O
M
R
E
S
U
M
E
•
H
O
L
D
L
I
N
E
O
U
T
/
D
IG
IT
A
L
D
B
B
E
S
P
N
PE
O
7
POWER SUPPLY
Batteries (supplied or optionally available)
English
With this player you can use either:
• normal batteries type LR6, UM3 or AA (preferably Philips), or
• alkaline batteries type LR6, UM3 or AA (preferably Philips).
Notes: – Old and new or different types of batteries
should not be used in combination.
– Remove batteries if they are empty or if the
player is not going to be used for a long time.
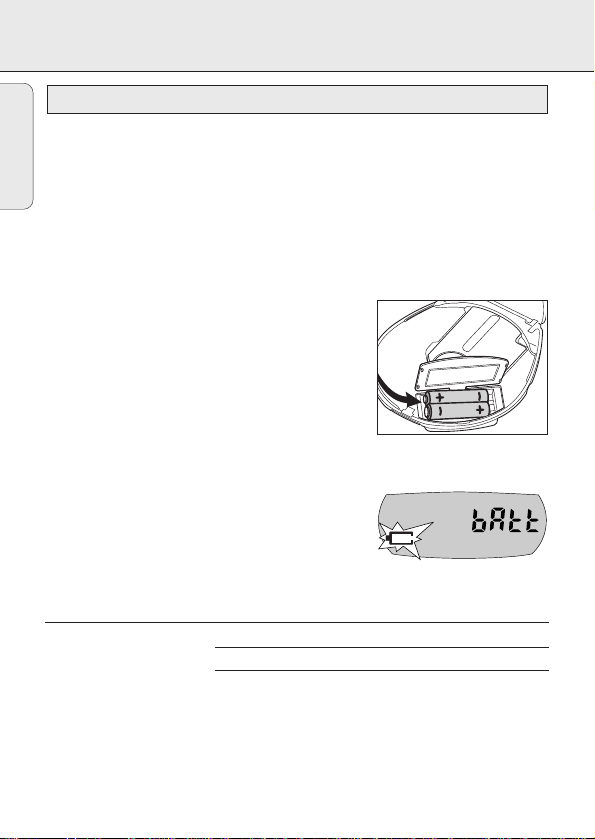
Inserting batteries
1 Push OPEN 2 to open the CD lid.
2 Open the battery compartment and insert either
2 normal or alkaline batteries.
Battery indication
The battery symbol on the display is divided into
3 sections which indicate the approximate power
capacity of the batteries.
• If A is flashing and bAtt is displayed, the
batteries are empty.
Average playing time of batteries under normal conditions
Battery type ESP on ESP off
Normal 7 hours 6 hours
Alkaline 20 hours 18 hours
ECO-PLUS NiMH batteries (not on all versions) 10 hours 9 hours
Batteries contain chemical substances, so they should be disposed of
properly.
8
POWER SUPPLY
ECO-PLUS NiMH battery information
rechargeable ECO-PLUS NiMH batteries AY 3362 only)
Recharging works only on players with supplied rechargeable
ECO-PLUS NiMH batteries AY 3362.
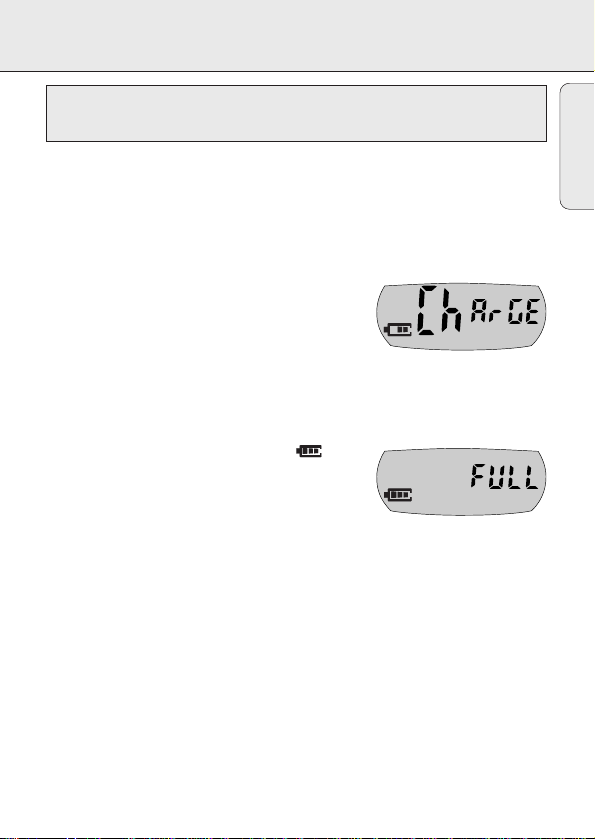
Recharging the ECO-PLUS NiMH batteries on board
1 Make sure you insert the rechargeable ECO-PLUS NiMH
batteries AY 3362.
2 Connect the power adapter to the 4.5V DC jack of
the player and to the wall power outlet.
y A filled with 0–3 sections (depending on the
level of charge) is shown and ChArGE is
displayed.
• Recharging stops when you start playback or when
approximately 7 hours have passed.
3 When the batteries are fully recharged, is
shown and FULL is displayed.
Notes: – It is normal for the batteries to become warm
during recharging.
– If the batteries become too warm, recharging will be interrupted for
approximately 30 minutes and Hot is displayed.
– To ensure proper recharging on board, take care that contacts are clean, and
you are using only the ECO-PLUS NiMH batteries AY 3362.
Rechargeable ECO-PLUS NiMH battery handling
• Recharging already charged or half-charged batteries will shorten their lifetime.
Therefore, after using the rechargeable ECO-PLUS NiMH batteries a few times,
discharge them completely before recharging.
(for versions supplied with
English
• To avoid a short circuit, the batteries should not touch any metal objects.
• When the batteries quickly become empty after recharging, the contacts are dirty
or the end of their lifetime has been reached.
9
POWER SUPPLY/HEADPHONES
H
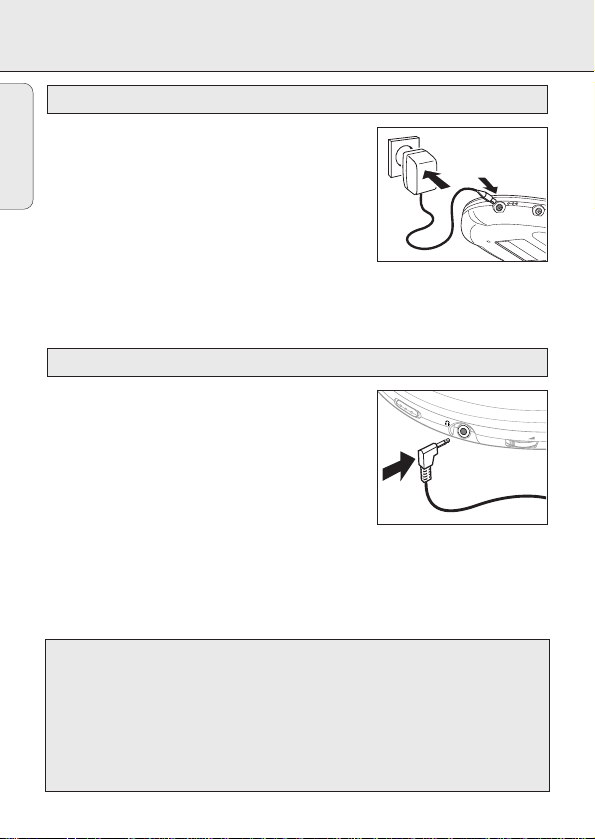
Power adapter (supplied or optionally available)
English
Use only the AY 3170 adapter (4.5 V/300 mA direct
current, positive pole to the center pin). Any other
product may damage the player.
1 Make sure that the local voltage corresponds to the
power adapter´s voltage.
2 Connect the power adapter to the 4.5V DC jack
of the player and to the wall power outlet.
Note: Always disconnect the adapter when you are not using it.
Headphones AY 3682, SBC HP540
• Connect the supplied headphones to the LINE OUT/p
jack.
Note: LINE OUT/p can also be used for connecting your
HiFi system (signal lead) or your car radio
(cassette adapter or signal lead). In both cases,
the volume of the player must be set to position 8.
C
D
V
5
,
4
O
L
D
L
I
N
E
O
U
T/
V
O
L
.
0
Use your head when using headphones
Hearing safety: Do not play your headphones at a high volume. Hearing experts
advise that continuous use at high volume can permanently damage your hearing.
Traffic safety: Do not use headphones while driving a vehicle. It may create a hazard
and it is illegal in many countries. Even if your headphones are an open-air type
designed to let you hear outside sounds, do not turn up the volume so high that you
cannot hear what is going on around you.
10
P
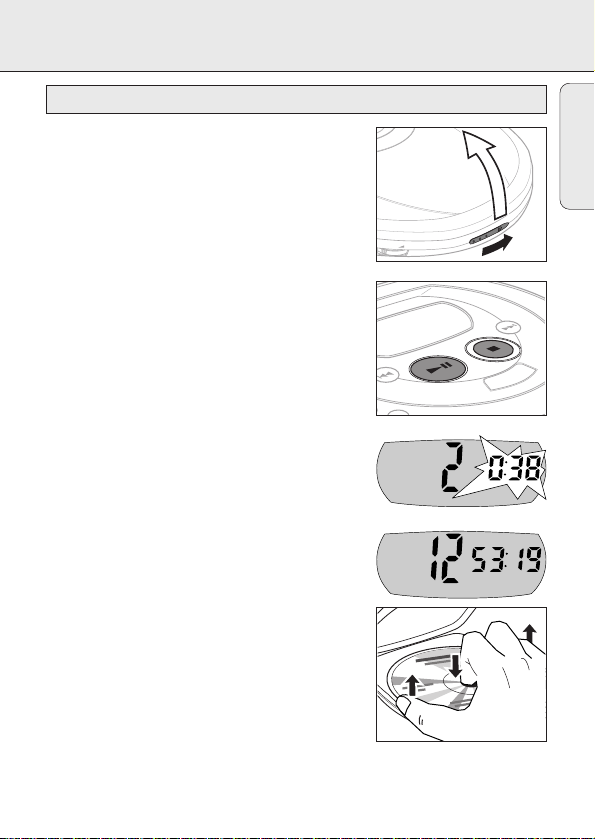
Playing a CD
This CD player can play all kinds of Audio Discs such
as CD-Recordables and CD-Rewritables. Do not try to
play a CD-ROM, CDi, VCD, DVD or computer CD.
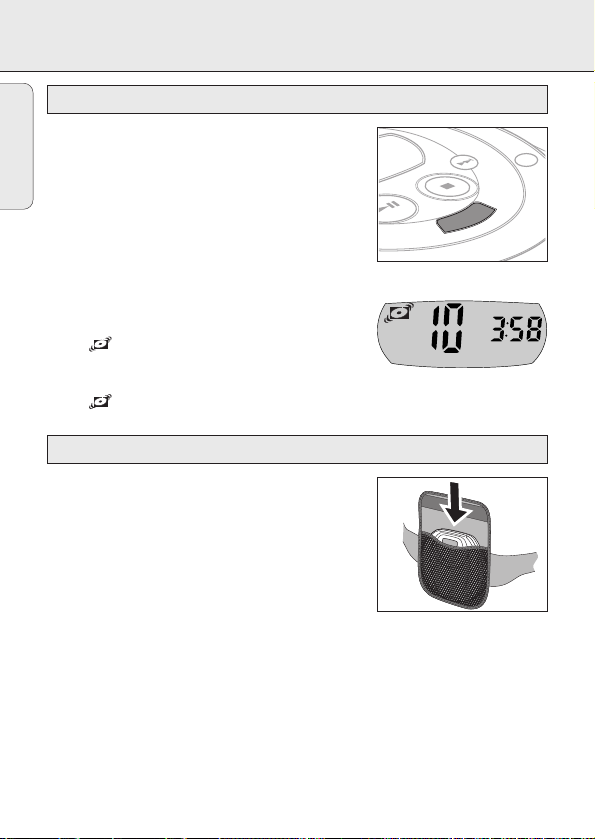
1 Push the OPEN 2 slider.
y The lid opens.
2 Insert an audio CD, printed side up, by pressing
gently on the CD center so that it fits onto the hub.
Close the lid by pressing it down.
3 Press 2; for approximately 1 second to switch the
player on and start CD playback.
y The current track number and the elapsed
playing time are displayed.
• You can pause playback by pressing 2;.
y The time where playback was paused is flashing.
• Continue playback by pressing 2; again.
4 Press 9 to stop playback.
y The total number of tracks and the total playing
time of the CD are displayed.
5 Press 9 again to switch the player off.
CD PLAY
English
EN
P
V
O
L
.
0
0
O
ESP
• To remove the CD, hold it by its edge and press the
hub gently while lifting the CD.
Note: If there is no activity, the player will automatically
switch off after a while to save energy.
0
11
CD PLAY
Playback information
English
• If a recordable CD (CD-R) or a rewritable CD (CD-RW) is not recorded
properly, nF dISC is displayed. In that case, use FINALIZE on your
CD recorder to complete the recording.
• If you want to play a rewritable CD (CD-RW), it takes 3–15 seconds for
sound reproduction to start once you have pressed 2;.
• Playback will stop if you open the CD lid.
• While the CD is being read, 1 -:- is flashing.
Volume and bass
Volume adjustment
• Adjust the volume by using VOL E.
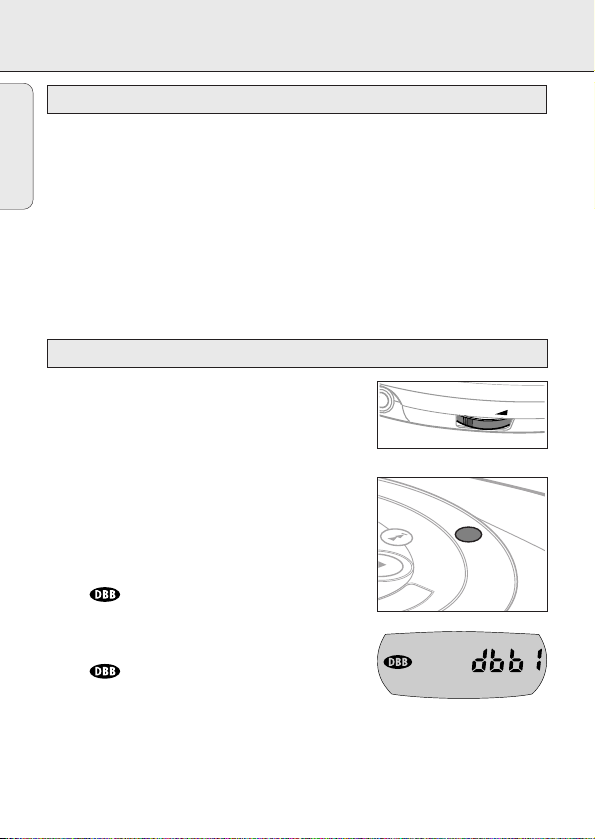
Bass adjustment
You can choose between the bass enhancement
levels dbb1 and dbb2.
1 Press DIGITAL DBB as often as necessary to select
the desired bass intensity.
y dbb1 or dbb2 is displayed for 2 seconds and
2 To switch off dbb1 or dbb2, press DIGITAL DBB
repeatedly.
y goes off.
is shown.
ESP
V
O
L
.
0
DIGITAL
DBB
12
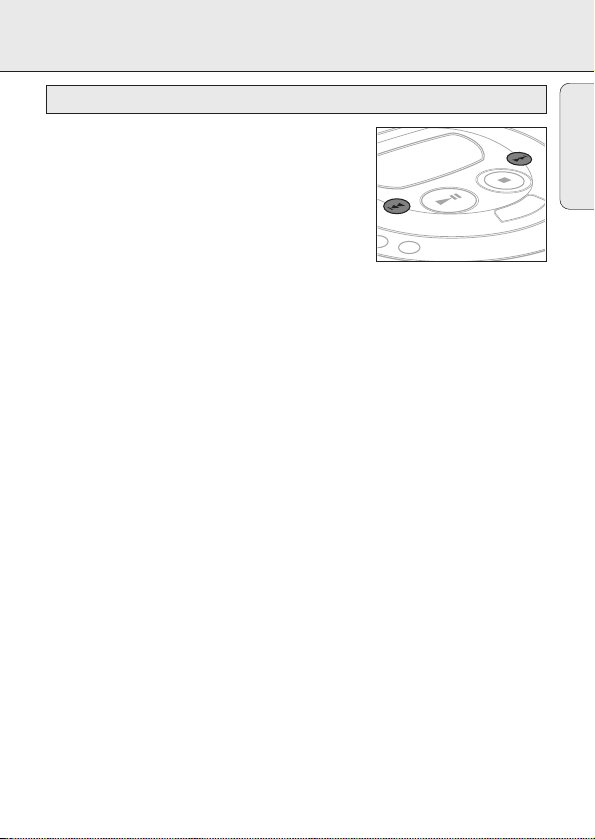
Selecting a track and searching
Selecting a track during playback
• Briefly press ∞ or § once or several times to skip
to the current, previous or next track.
y Playback continues with the selected track, and
its number is displayed.
Selecting a track when playback is stopped
1 Briefly press ∞ or § once or several times.
y The selected track number is displayed.
2 Press 2; to start CD play.
y Playback starts with the selected track.
Searching for a passage during playback
1 Keep ∞ or § pressed to find a particular passage in
a backward or forward direction.
y Searching is started and playback continues at
low volume. After 2 seconds the search speeds up.
2 Release the button when you reach the desired passage.
y Normal playback continues from this position.
Notes: – During SCAN searching is not possible.
– During SHUFFLE, SHUFFLE REPEAT ALL, REPEAT
or while playing a program, searching is only
possible within the particular track.
FEATURES
English
ESP
13
FEATURES
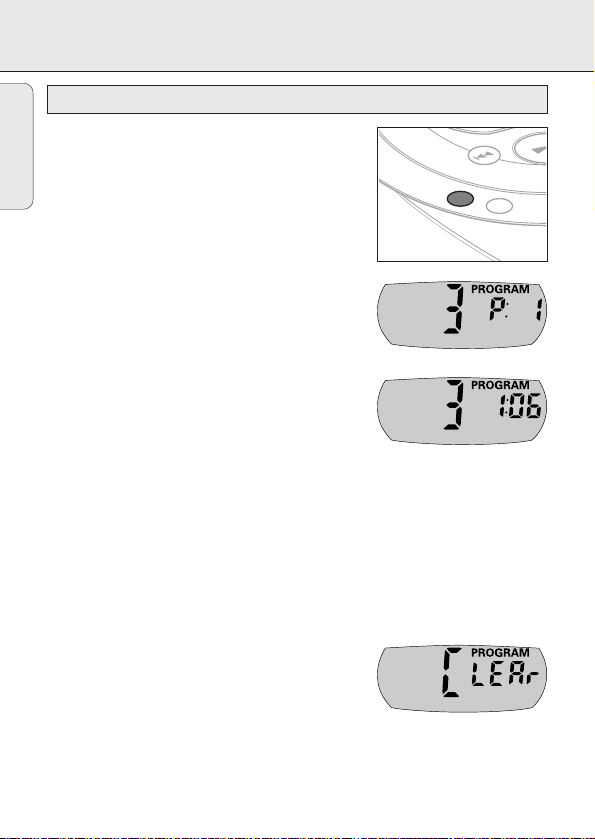
Programming track numbers
English
You can select up to 99 tracks and store them in
memory in a desired sequence. Any track can be stored
more than once.
1 While playback is stopped, select a track with
∞ or §.
2 Press PROGRAM to store the track.
y PROGRAM lights up; the track number
programmed and P with the total number of
stored tracks are displayed.
3 Select and store all desired tracks in this way.
4 Press 2; to start playback of your selected tracks.
y PROGRAM is shown and playback starts.
• You can review the program by pressing PROGRAM for more than 2 seconds.
y The display shows all stored tracks in sequence.
Notes: – If you press PROGRAM and there is no track selected,
SELECt is displayed.
– If you try to store more than 99 tracks, FULL is displayed.
Clearing the program
1 If necessary, press 9 to stop playback.
PROGRAM
MODE
2 Press 9 to clear the program.
y CLEAr is displayed once, PROGRAM goes off,
and the program is cleared.
Note: The program also will be cleared if you
– interrupt the power supply or
– open the CD lid,
– or if the player switches off automatically.
14
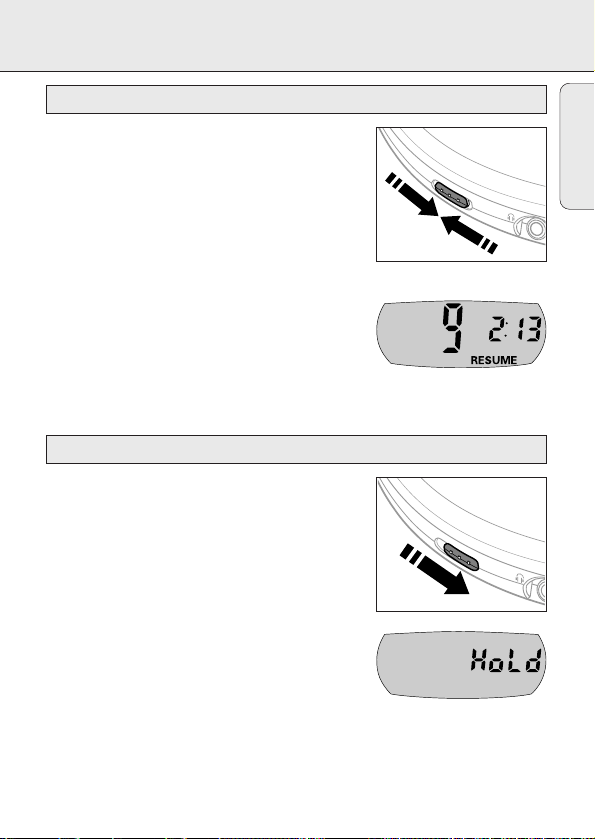
Storing the last position played – RESUME
You can store the last position played. When restarting,
playback continues from where you have stopped.
1 Switch the slider to RESUME during playback to
activate RESUME.
y RESUME is shown.
2 Press 9 whenever you want to stop playback.
3 Press 2; whenever you want to resume playback.
y RESUME is shown and playback continues from
where you have stopped.
• To deactivate RESUME, switch the slider to OFF.
y RESUME goes off.
Locking all buttons – HOLD
You can lock the buttons of the unit. When a key is
pressed, no action will be executed then.
1 Switch the slider to HOLD to activate HOLD.
y All buttons are locked. HoLd is displayed if you
press any key. If the unit is switched off, HoLd
is displayed only if you press 2;.
2 To deactivate HOLD, switch the slider to OFF.
FEATURES
O
F
F
•
R
E
S
U
M
E
•
H
O
L
D
O
F
F
•
R
E
SU
M
E
•
H
O
L
D
English
L
I
N
E
O
U
T/
L
I
N
E
O
U
T
/
Note: When you deactivate HOLD by switching the
slider to RESUME and restart, playback continues
from where you have stopped.
15
FEATURES
ESP
English
With a conventional portable CD player you might
have experienced that the music stopped e.g. when you
were jogging. The ELECTRONIC SKIP PROTECTION
prevents loss of sound caused by light vibrations and
shocks. Continuous playback is ensured.
However, ESP does not prevent playback interruptions
during serious running. It also does not protect the unit
against any damage caused by dropping!
• Press ESP during playback to activate the skip
protection.
y is shown and the protection is activated.
• To deactivate the skip protection, press ESP again.
y goes off and the protection is deactivated.
ESP
Pouch AY 3266
The pouch enables you to carry the player so that you
can listen to music during exercising (e.g. jogging).
1 Make sure ESP is activated.
2 Fasten the belt securely around your waist.
3 Put the CD player in the pouch with the keys
facing away from your body, and close the flap.
Notes: – Make sure the player is not hit by any objects
such as tree limbs or branches during jogging.
– Do not use the pouch if your skin is irritated.
– Do not machine wash the pouch, as it could lose
shape or color.
(supplied or optionally available)
16
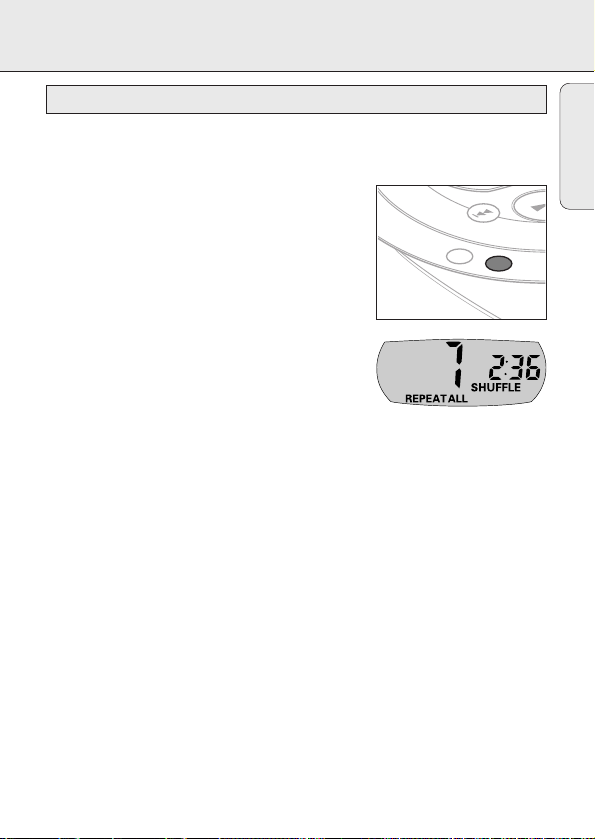
Selecting different playing possibilities – MODE
It is possible to play tracks in random order, to repeat a track
or the entire CD and to play the first few seconds of each track.
1 Press MODE during playback as often as necessary
until the display shows either:
y SHUFFLE: All tracks of the CD are played in
random order until all of them have been played
once.
y SHUFFLE REPEAT ALL: All tracks of the CD are
played repeatedly in random order.
y REPEAT: The current track is played repeatedly.
y REPEAT ALL: The entire CD is played repeatedly.
y SCAN: The first 10 seconds of each of the
remaining tracks are played in sequence.
2 Playback starts in the chosen mode after 2 seconds.
• To return to normal playback, press MODE repeatedly
until the display indicator goes off.
PROGRAM
FEATURES
English
MODE
17

FEATURES
Remote control (not on all versions)
English
Use the AY 3764 cord remote control. The buttons on the remote control have the
same functions as the corresponding buttons on the CD player.
1 If necessary press 9 once or twice until the unit is switched off.
2 Firmly connect the remote control to LINE OUT/p and the headphones to the
remote control’s jack.
3 Turn the volume down with VOL F on the remote control and set VOL E on
the CD player to position 8.
Optical out (not on all versions)
You can connect your CD player to digital equipment (e.g. a CD recorder) with a
DIGITAL OPTICAL IN/AUX jack.
1 Use the power adapter, switch off ESP and turn down the volume of the appliance
that should be connected.
2 Connect an optical cable or signal lead to the OPT OUT jack of your CD player and
to the DIGITAL OPTICAL IN/AUX jack of the other appliance.
• To adjust volume and sound, use the controls of the connected appliance.
Notes: – For analog connections use the LINE OUT/p jack.
– Playback via OPT OUT does not work if the player is powered by batteries.
18
IN-CAR CONNECTION
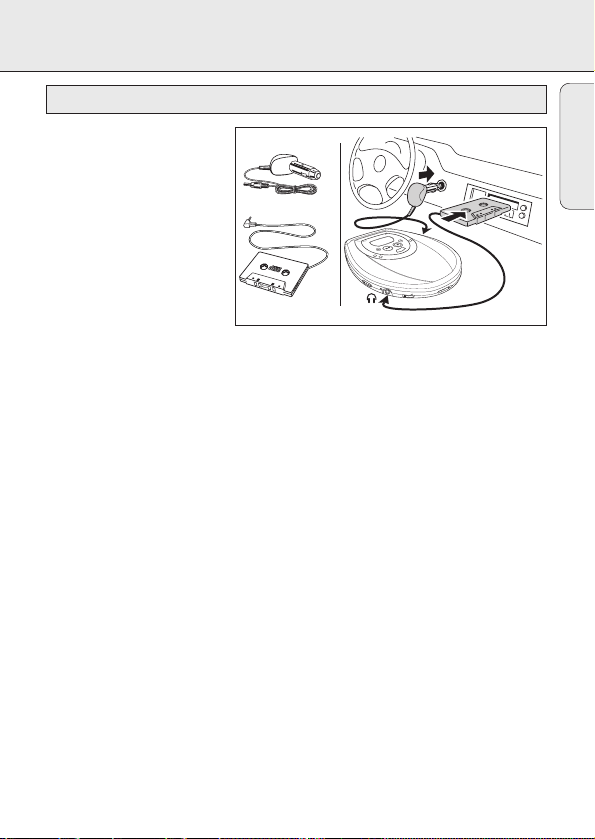
In-car use (connections supplied or optionally available)
Only use the AY 3545 car
voltage converter (4.5 V, DC,
positive pole to the center pin)
and the AY 3501 car cassette
adapter. Any other product may
damage the unit.
1 Put the CD player on a
horizontal, vibration-free and
DIGIT
DIGIT
AL
AL
DIGIT
AL
stable surface. Make sure it
is in a safe place, where the
player is neither a danger
nor obstacle to the driver and passengers.
2 Connect the DC plug of the voltage converter to the 4.5V DC jack of the CD player
(only for a 12 V car battery, negative grounding).
3 Insert the voltage converter into the cigarette lighter jack. If necessary, clean the
cigarette lighter jack to obtain a good electrical contact.
4 Turn down the volume and connect the cassette adapter plug to the LINE OUT/p
jack of the CD player.
5 Carefully insert the cassette adapter into the car radio’s cassette compartment.
6 Make sure the cord does not hinder your driving.
7 Start the CD player, set VOL E to position 8 and adjust the sound with the car
radio controls.
• Always remove the voltage converter from the cigarette lighter jack when the
CD player is not in use.
4,5 V DC
L
A
T
I
G
I
D
B
B
D
ESP
M
A
R
G
O
R
P
E
D
O
M
O
F
F
•
R
E
S
U
M
E
•
H
O
L
D
L
I
N
E
O
U
T
/
OPEN
V
O
L
.
0
0
English
Notes: – Avoid excessive heat from the car heating or from direct sunlight (e.g. in a
parked car in the summer).
– If your car radio has a LINE IN jack, it is better to use it for the car radio
connection instead of the cassette adapter. Connect the signal lead to this
LINE IN jack and to the LINE OUT/p jack of the CD player.
19

TROUBLESHOOTING
WARNING
English
Under no circumstances should you try to repair the set yourself as this
will invalidate the guarantee.
Problem Possible cause Solution
No power, Batteries
playback does Batteries inserted incorrectly Insert the batteries
not start correctly.
Batteries are empty. Change the batteries.
Contact pins are dirty. Clean them with a cloth.
Power adapter
Loose connection Connect the adapter
In-car use
Cigarette lighter is not powered Switch on ignition or insert
when ignition is off. batteries.
nF dISC CD-RW (CD-R) is not recorded Use FINALIZE on the
indication properly. CD recorder to complete
no dISC The CD is badly Replace or clean the CD.
indication scratched or dirty.
CD is not or incorrectly inserted. Insert a CD, label upwards.
The laser lens is steamed up. Wait until the lens has
HoLd indication HOLD is activated. Deactivate HOLD.
and/or no reaction
to controls
Electrostatic discharge Disconnect the set from the
securely.
the recording.
cleared.
power supply or take out
the batteries for
a few seconds.
20

TROUBLESHOOTING
If a fault occurs, first check the points listed, before taking the unit for repair.
If you are unable to solve a problem by following these hints, consult your dealer or
service center.
Problem Possible cause Solution
The CD skips tracks. The CD is damaged or dirty. Replace or clean the CD.
RESUME, SHUFFLE or PROGRAM is Switch RESUME, SHUFFLE
active. or PROGRAM off.
No sound or PAUSE is activated. Press 2;.
bad sound quality
Loose, wrong or dirty Check and clean
connections connections.
Volume is not adjusted. Adjust the volume.
Malfunctions due to closeness Keep the player away from
of active mobile phones active mobile phones.
Strong magnetic fields near Change the player’s position
the player or connections.
In-car use
cassette adapter is Insert the cassette adapter
inserted incorrectly. correctly.
Temperature inside the car Let the player adjust to the
is too high/low. temperature.
Cigarette lighter jack Clean the cigarette
is dirty. lighter jack.
Wrong playback direction of the Change the autoreverse
car cassette player’s direction.
autoreverse feature
English
21
 Loading...