

Philips AJ 3240-00 User Manual
PHILIPS
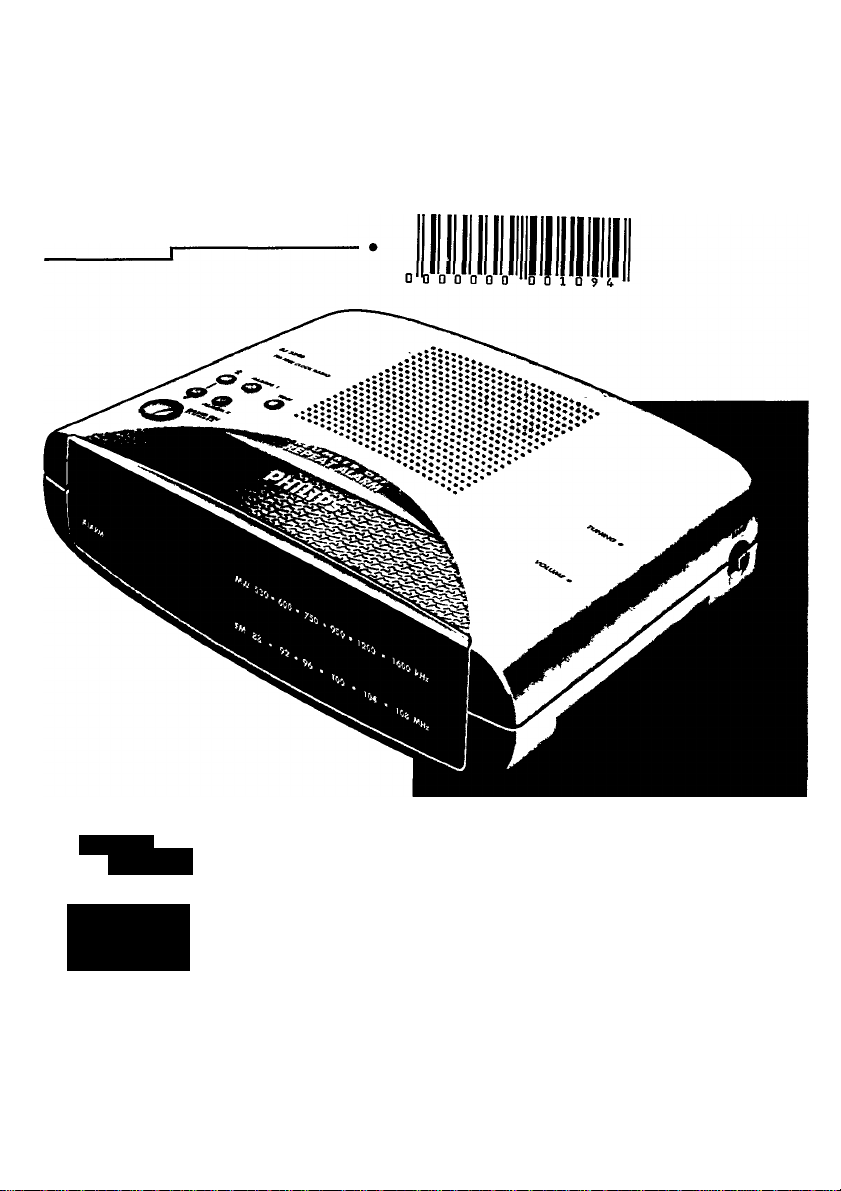
AJ 3240 Clock Radio
OIGITAL ^
^ DIGITAL AUDIO V
"ct frot“

CD España
Declaración de conformidad con normas
El que suscribe, en nombre y representación de:
declara, bajo su propia responsabilidad, que el
equipo:
fabricado por: BU PA Hong Kong
en: Far East
marca: Philips
modelo: AJ 3240
objeto de esta declaración, cumple con la norma
tiva siguiente: Reglamento sobre Perturbaciones
Radioeléctricas, Real Decreto 138/1989, Anexo V.
Hecho en: Hong Kong, 01-04-1995
Consumer Electronics Factory
Philips Hong Kong Ltd.
Radio reloj
English
Français
............................
................
Español........
.....
página 10 g.
INDEX
page 4 |,
UJ
.S2
page? I
ui
*o
UJ
Firma:
Nombre:
Cargo:
T.M. Siu
Quality Manager
(0) Mexico
PRECAUCION > ADVERTENCIA
No abrir, riesgo de choque eléctrico
Verifique que el voltaje de alimentación]
A
I sea el requerido para su aparato
Para evitar el riesgo de choque eléctrico, no quíte la tapa.
En caso de requerir servicio, diríjase al personal calificado.
Es necesario que lea cuidadosamente su
instructivo de manejo.
A
(D Norge
Typeskilt finnes pi apparatens underside.
Observer
Nettbryteren er sekundert innkoplet. Den innebygde netdelen er derfor ikke frakoplet nettet si
lenge apparatet er tilsluttet nettkontakten.
Mounting the set on a shelf
..........................
37
KOM
Deutsch........................................ page 13 a
Nederlands
______________________________________________________Z__
Italiano
Portugués
Dansk
.....................
...... ...
......... .....
...... ...
page 16 ^
pagina 19 :=
página 22 i*
side 25 |
ft)
•o
■a
(O
<A
<3
CU
(O
JC
Svenska............................sida 2S i
co
a
B
ft)
o
O
O
>
Suomi
■ ^a“
..................
sivu 31 I
'EÀÀnViKà..............oeAí5a34 |
co
•<
Ui
TIME <4
ALARM 1-5
FAST UP c
ALARM 2 7
(T RADIO ON/OFF
,2) ALARM switch 2
(3) ALARM switch 1
SLOWDOWN!
RADIO ON/
SLUMBER 6
15 SLUMBER OFF/
REPEAT ALARM
CLOCK DISPLAY
ij BATTERY
Compartment
IMPORTANT NOTES FOR USERS IN THE U.K.
Mains plug
This apparatus is fitted with an approved moulded 13 Amp plug To change a fuse
in this type of plug proceed as follows:
• Remove fuse cover and fuse.
• Fix new fuse which should be a BS1362 5 Amp, A S T.A or BSI approved type
• Refit the fuse cover
If the fitted plug is not suitable for your socket outlets, it should be cut off and an
appropriate plug fitted in its place.
If the mains plug contains a fuse, this should have a value of 5 Amp If a plug
without a fuse is used, the fuse at the distribution board should not be greater
than 5 Amp.
Note: The severed plug must be disposed to avoid a possible shock hazard should it be inserted into a
13 Amp socket elsewhere
How to connect a plug
The wires in the mams lead are coloured with the following code, blue = neutral (N), brown = live (U
As these colours may not correspond with the colour markings identifying the terminals in your plug,
proceed as follows.
• Connect the blue wire to the terminal marked N or coloured blue or black
• Connect the brown wire to the terminal marked L or coloured brown or red
• Do not connect either wire to the earth terminal in the plug, marked E (or i) or coloured green (or
green and yellow).
Before replacing the plug cover, make certain that the cord grip is clamped over the sheath of the lead
- not simply over the two wires.
If in doubt, consult a qualified electrician.

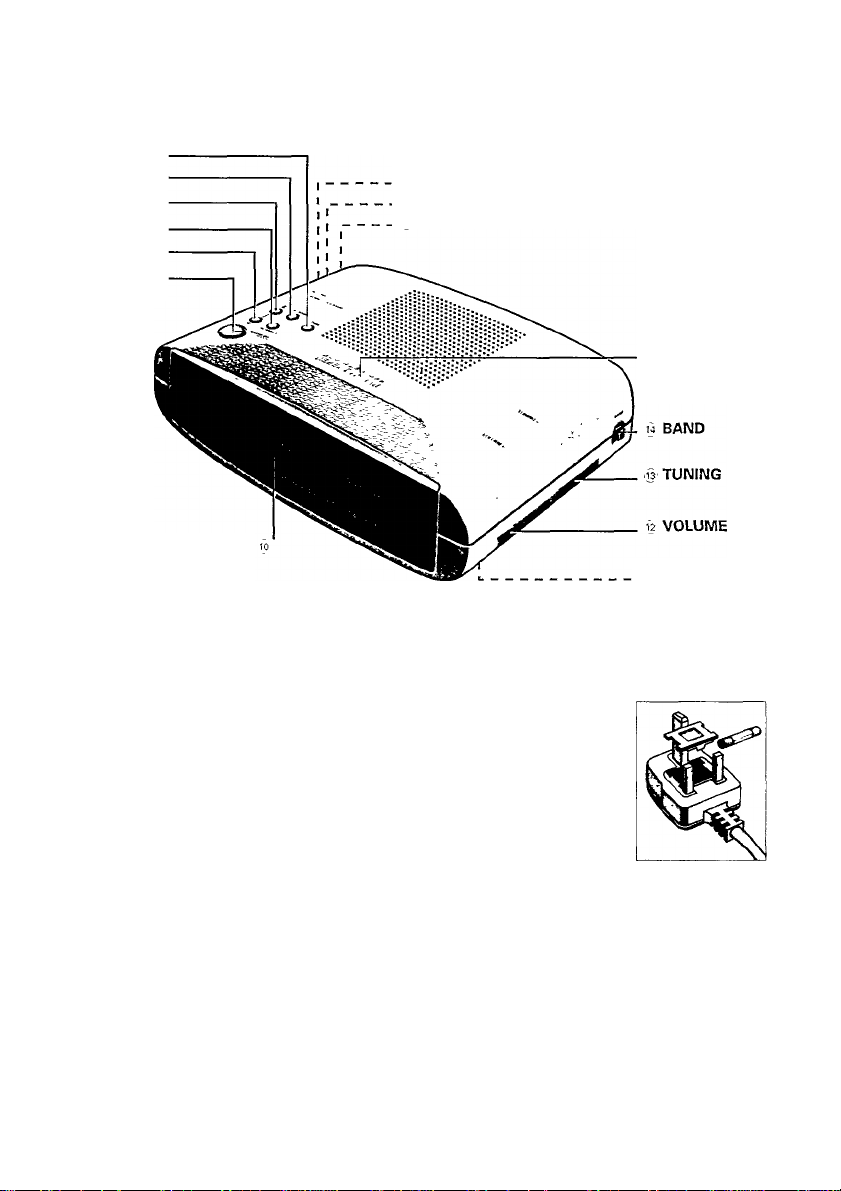
installation
Radio/Clock
BUTTONS
m
3
0 RADIO switch
<a
- ON - the radio is switched on
E)'
- OFF - the radio is switched off
3-
0 ALARM switch 2:
- OFF - alarm off
- RADIO - for waking up by radio
- BUZZER - for waking up by buzzer
0 ALARM switch 1:
- OFF - alarm off
- RADIO - for waking up by radio
- BUZZER - for waking up by buzzer
0 TIME - to set the time
© ALARM 1 - to set alarm time 1
® FAST UP - fast forward
© ALARM 2 - to set alarm time 2
® SLOW DOWN - slow backward
@ RADIO ON/SLUMBER - To switch on the
radio
® CLOCK DISPLAY with ALARM- and PM-
indicator (not for all versions)
® BATTERY Compartment
@ VOLUME control - for adjusting the volume
® TUNING dial - for locating the required station
@ BAND switch - for selecting wavebands
® SLUMBER OFF / REPEAT ALARM button;
- To switch off alarm temporarily
- To switch off the radio
MAINS CONNECTION
Check if the mains voltage as shown on the
type plate on the base of the set corresponds
to your local mains supply.
If it does not, consult your dealer or service
organisation.
As soon as you insert the mains plug into the
wall socket, the figures on the display @ will
blinlc. This means that you must set the correct
time.
To disconnect the set from the mains
completely, withdraw the mains plug from the
wall socket.
RADIO
RADIO ON
• Set the RADIO switch ® to ON.
• Select the waveband using BAND switch iji).
• Select the required station using the TUNING
® knob.
• Adjust the sound level with the VOLUME
switch
RADIO OFF
• Set the RADIO ® switch to OFF.
Aerials
- The AM aerial is built into the appliance. You
may have to adjust the position of the clock
radio slightly for better reception.
- For FM reception, there is an aerial wire at the
rear of the clock radio. This wire must be
extended and if necessary adjusted slightly in
order to obtain good reception.
CLOCK
_________________________________
Clock display
The clock indicates shows the time. The display
also indicates whether you have switched on the
alarm. If alarm 1 is on, the alarm 1 indicator
lights up.
For alarm 2 the alarm 2 •: indicator lights up and
for dual alarm both light up.
Setting the time
• Keep the TIME button ® pressed and set the
correct time as follows:
- Fast forward with the FAST UP ® button.
- Slow backward with the SLOW DOWN button
®.
• Release the TIME button
appears in the display.
0
. The correct time
 Loading...