

Philips AJ3112 - annexe 2 User Manual
lock Radio
Register your product and get support at
ww.philips.com/welcome
User manual
AJ3112
1
1
2
@
!
0
9
3
4
5
678
#%^ $

English
Congratulations on your purchase and welcome to Philips!
To fully benefit from the support that Philips offers, register your
product at www.philips.com/welcome.
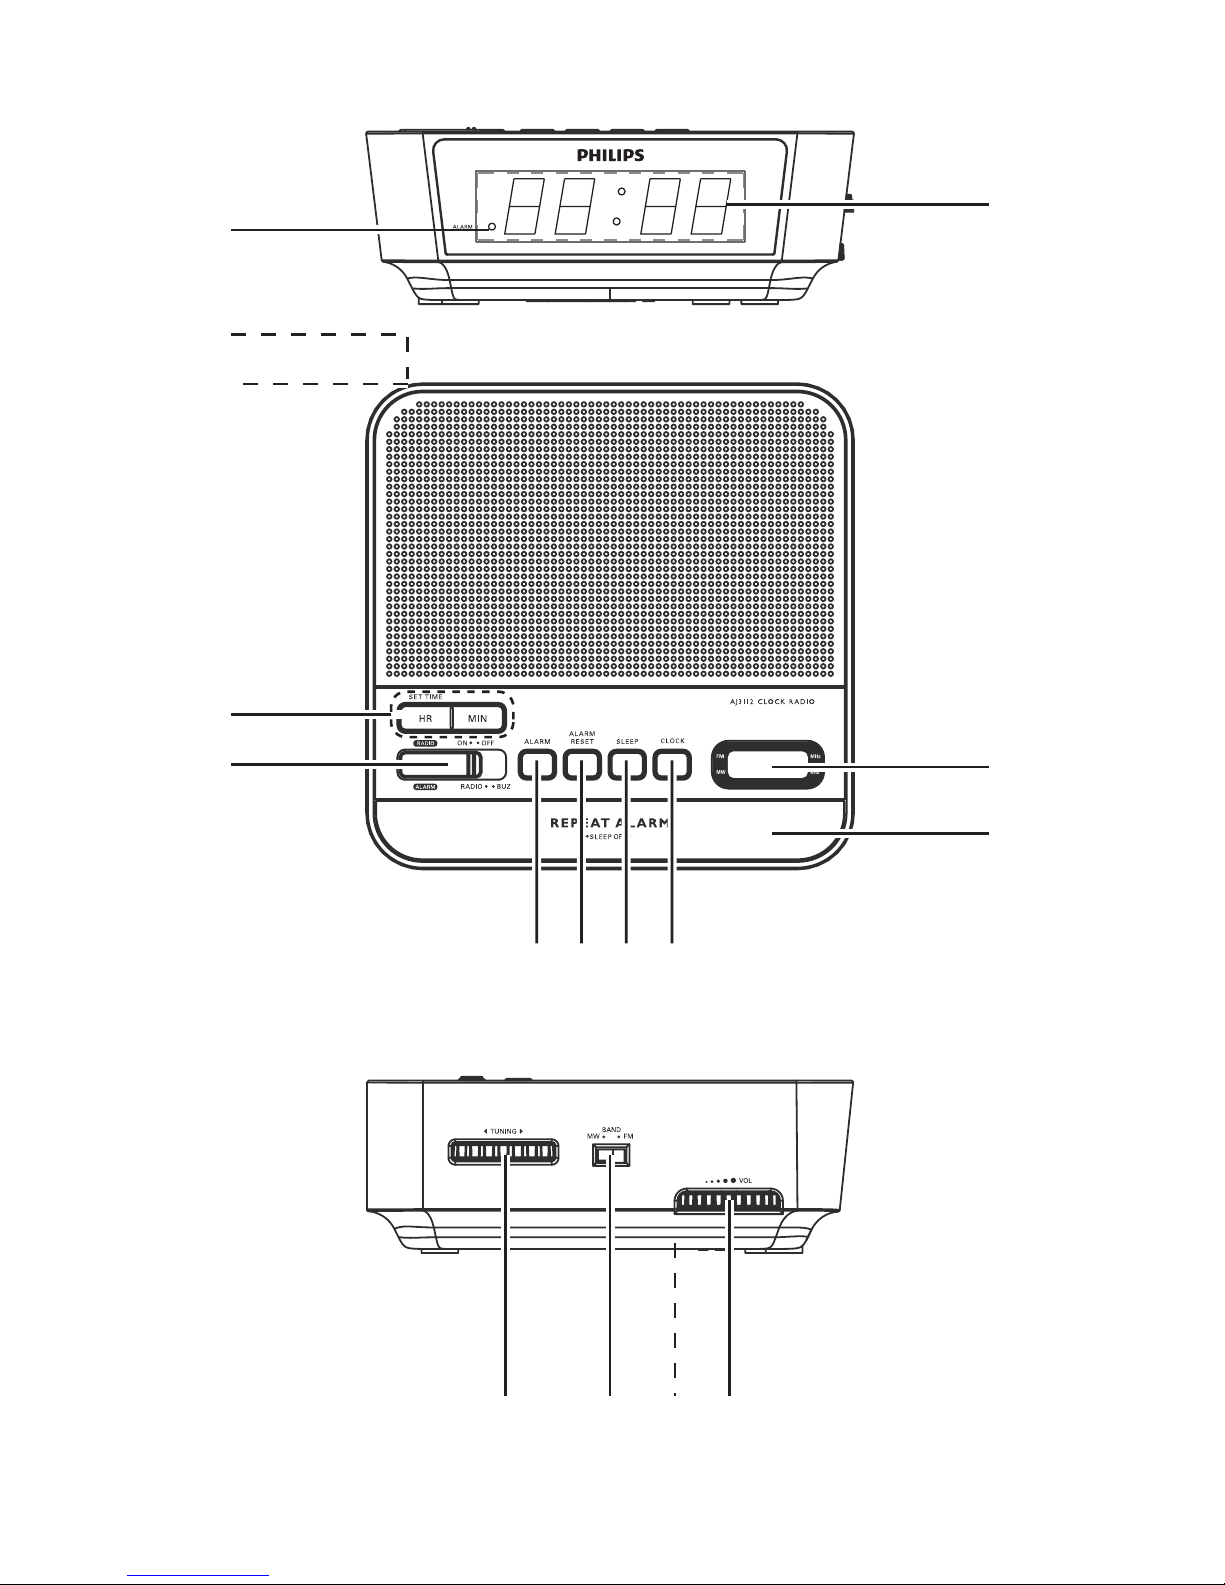
CONTROLS (see fig. 1 )
1 DISPLAY - shows the clock/ alarm time and status of the set
2 ALARM indicator 3 Frequency indicator - shows the radio frequency of your selected waveband
4 REPEAT ALARM / SLEEP OFF
- switches off the active alarm for a 8-9 minute period
- switches off the sleep function
5 CLOCK - sets the clock time
6 SLEEP
- activates the radio for sleep function
- adjusts the sleep period
7 ALARM RESET - stops the active alarm for 24 hours
8 ALARM - sets the alarm function
9 RADIO / ALARM
RADIO ON: switches on the radio
lights up when alarm is activated
RADIO OFF: switches off the radio/alarm
ALARM - RADIO: activates the radio for alarm
ALARM - BUZ: activates the buzzer for alarm
0 SET TIME HR / MIN
- adjusts the hours / minutes for clock / alarm / sleep time
! Power cord @ Pigtail - improve FM reception
# VOLUME - adjusts the sound level
$ Battery door - opens to store a 9 volts 6F22 battery (not included) for clock
% FM/MW - selects FM/MW waveband
^ TUNING - tunes to radio stations
connects to wall outlet
memory backup.

Important notes for users in the U.K.
Mains plug
This apparatus is fitted with an approved 13 Amp plug. To change a fuse in this type
of plug proceed as follows:
1 Remove fuse cover and fuse.
2 Fix new fuse which should be a BS1362 3 Amp, A.S.T.A. or BSI approved type.
3 Refit the fuse cover.
If the fitted plug is not suitable for your socket outlets, it should be cut off and an
appropriate plug fitted in its place. If the mains plug contains a fuse, this should
have a value of 3 Amp. If a plug without a fuse is used, the fuse at the distribution board should not be greater than 5 Amp.
Note: The severed plug must be disposed of to avoid a possible shock hazard
should it be inserted into a 13 Amp socket elsewhere.
How to connect a plug
The wires in the mains lead are coloured with the following code: blue = neutral
(N), brown = live (L). As these colours may not correspond with the colour markings identifying the terminals in your plug, proceed as follows:
• Connect the blue wire to the terminal marked N or coloured black.
• Connect the brown wire to the terminal marked L or coloured red.
• Do not connect either wire to the earth terminal in the plug, marked E (or e) or
coloured green (or green and yellow).
Before replacing the plug cover, make certain that the cord grip is clamped over
the sheath of the lead - not simply over the two wires.
Copyright in the U.K.
Recording and playback of material may require consent. See Copyright Act 1956
and The Performer’s Protection Acts 1958 to 1972.
 Loading...