

Philips AJ3112/96, AJ3112 User Manual

Clock Radio
Register your product and get support at
www.philips.com/welcome
User manual
AJ3112
3
4
1
#%^ $
5
9
0
678
2
!
@

English
Congratulations on your purchase and welcome to
Philips!
To fully benefit from the support that Philips offers,
register your product at www.philips.com/welcome.
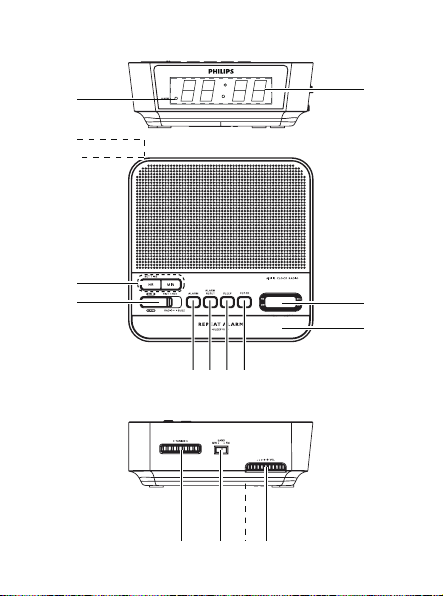
CONTROLS (see fig. 1 )
DISPLAY - shows the clock/ alarm time and status of the set
1
ALARM indicator -
2
Frequency indicator
3
- shows the radio frequency of your selected waveband
REPEAT ALARM / SLEEP OFF
4
- switches off the active alarm for a 8-9 minute period
- switches off the sleep function
CLOCK - sets the clock time
5
SLEEP
6
- activates the radio for sleep function
- adjusts the sleep period
ALARM RESET - stops the active alarm for 24 hours
7
ALARM - sets the alarm function
8
RADIO / ALARM
9
RADIO ON: switches on the radio
RADIO OFF: switches off the radio/alarm
ALARM - RADIO: activates the radio for alarm
ALARM - BUZZ: activates the buzzer for alarm
SET TIME HR / MIN
0
- adjusts the hours / minutes for clock / alarm / sleep time
Power cord -
!
Pigtail - improve FM reception
@
VOLUME - adjusts the sound level
#
lights up when alarm is activated
connects to wall outlet

Battery door - opens to store a 9 volts 6F22 batter y (not included)
$
for clock memory backup.
FM/MW - selects FM/MW waveband
%
TUNING - tunes to radio stations
^
INSTALLATION
POWER SUPPLY
Check if the power supply, as shown on the type plate located
1
on the bottom of the set, corresponds to your local power supply. If it does not, consult your dealer or ser vice center.
2
Connect the plug to the wall outlet.
3
To disconnect the set from the power supply completely,
remove the plug from the wall outlet.
CLOCK MEMORY BACKUP
The clock memor y backup allows your alarm and clock time settings to
be stored for up to a day when there is a power interr uption e.g. power
failure. The complete clock radio and display illumination will be switched
off. As soon as the power supply returns, the display will indicate the correct time.
1
Remove the battery door to inser t a 9 volts 6F22 type battery (not
included) for backup.
2
Replace the batter y door.
NOTE:
If no backup batter y is installed or the power interruption is prolonged, you will need to set the clock and alarm times again.
Batteries contain chemical substances so they should be disposed of properly.
 Loading...