

Page 1

PHILIPS
AJ 3040 Clock Radio
□ 0 0 □
□ □1276
Page 2

(T) España
Declaración de conformidad con normas
El que suscribe, en nombre y representación de:
declara, bajo su propia responsabilidad, que el
equipo: Radio reloj
fabricado por: Consumer Electronics Factory
en: Far East
marca: Philips
modelo: AJ 3040
objeto de esta declaración, cumple con la norma
tiva siguiente: Reglamento sobre Perturbaciones
Radioeléctricas, Real Decreto 138/1989, Anexo V.
Hecho en: Hong Kong, 01-08-1994
Firma:
Nombre:
Cargo:
Consumer Electronics Factory
Philips Hong Kong Ltd.
T.M. Siu
Quality Manager
INDEX
English
Français
Español
Deutsch
Nederlands pagina 16 5
page 4 ni
page?
página 10 g.
Seite 13 1
•O
O
O)
0>
Italiano pagina 19 =
Portugués página 22
Dansk side 25
Svenska
Suomi sivu 31 g
sida 28
co
CO
co
Page 3
Page 4

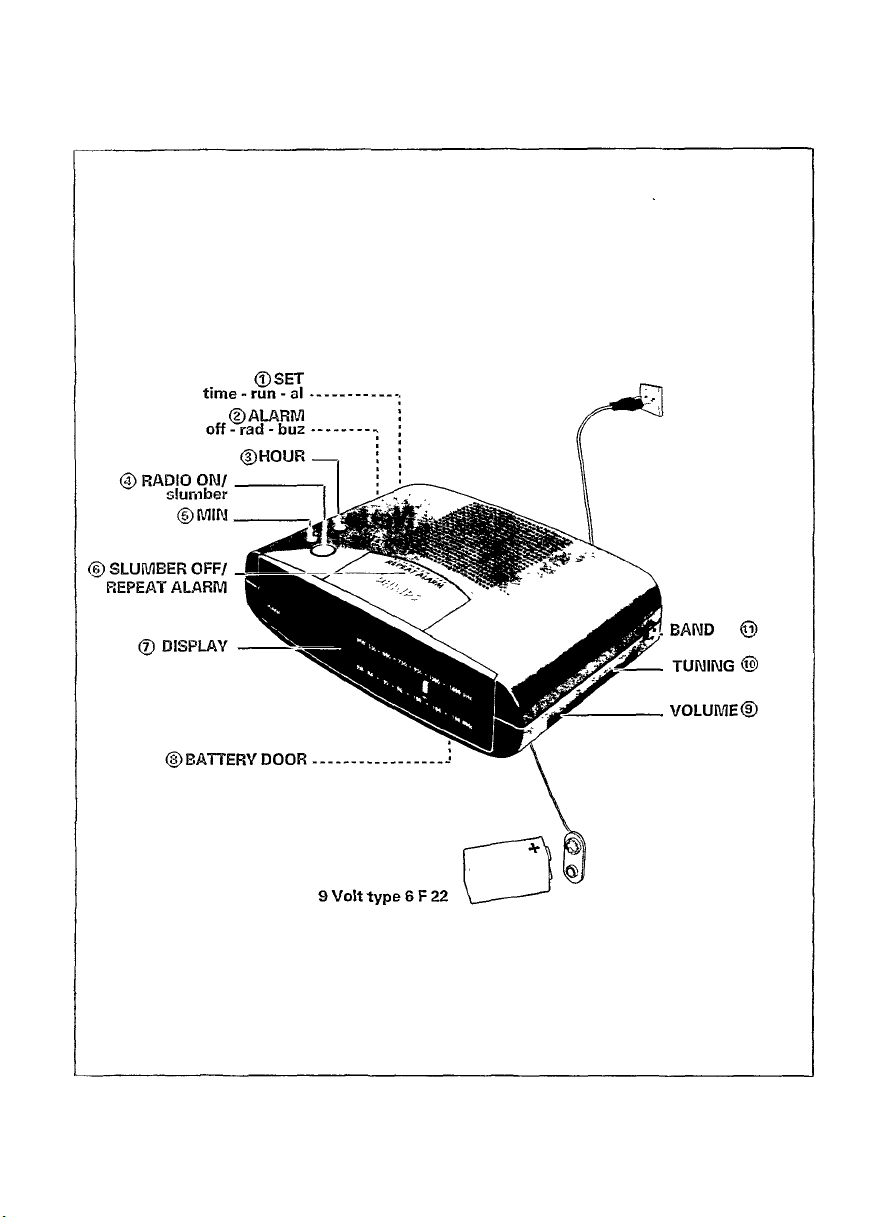
Installation
Radio/Clock
BUTTONS
® TIME SET switch:
- TIME - for setting the time
- RUN - normal position
- ALARM - for setting the alarmtime
d) ALARM svi/itch:
- OFF - alarm off
- RADIO - for waking up by radio
BUZZER - for waking up by buzzer
HOUR button - for setting the hours
0 RADIO ON/SLUMBER - to switch on the radio
® MIN button - for setting the minutes
0 SLUMBER OFF / REPEAT ALARM button:
- To switch off alarm temporarily
- To switch off the radio
0 Clock display with ALARM- and PM- indicator
(not all versions)
(|) BATTERY DOOR
(9; VOLUME control - for adjusting the volume
TUNING dial - for locating the required station
(1$'
(y) BAND switch - for selecting w'avebands
MAINS CONNECTION
• Check if the mains voltage as shown on the
type plate on the base of the set corresponds
to your local mams supply.
If It does not, consult your dealer or service
organisation.
• As soon as you insert the mams plug into the
wall socket, the figures on the display®' will
blink. This means that you must set the correct
time.
• To disconnect the set from the mams
completely, withdraw the mams plug from the
wall socket.
For users in the UK: Please follow the
instructions on page 6.
RADIO
RADIO ON
You can use this clock radio solely as a radio
• Set the TIME SET switch ?! to RUN,
• Press the RADIO OM/SLUMBER button ?) to
switch the radio on. After 59 minutes the radio
will be switched off automatically.
• Select the waveband using the BAND switch
@-
• Locate the required transmitter using the
TUNING dial 0.
• Set the volume using the VOLUME switch ifn
RADIO OFF
You can switch off the radio before the slumber
time (59 minutes) has elapsed:
• Press the SLUMBER OFF/REPEAT ALARM
button
0
.
Aerials
- For FM reception there is an aerial wire at the
rear of the clock radio This wire must be
extended and, if necessary adjusted slightly, in
order to obtain good reception.
- The AM aerial is built into the clock radio. To
obtain optimum reception you may have to
adjust the position of the clock radio slightly
CLOCK
Clock display
The clock indicates the time on the display. In
case of 12-hour clock system, the PM indicator
will light up (on=PM, off=AM). The ALARM
indicator comes on when you switch on the
alarm.
Adjusting the time
• Set the TIME SET switch 0 to TIME
• Set the correct time using the HOUR 15 > and
MINUTE®' outtons.
• Set the TIME SET switch iT' to RUN
__________________________
O CO
U
Page 5

Alarm Slumbering
SETTING THE ALARM
Alarmtime
• Set the TIME SET switch © to ALARM.
• Set the correct alarm time using the HOUR ®
and MINUTE ® buttons.
• Set the TIME SET switch ©to RUN.
ALARM ON
The clock radio can awaken you in two ways:
Wake by radio
• Make sure the volume of the radio is loud
enough to wake you.
• Set ALARM switch @ to RADIO.
• You will be awakened at the set alarm time by
the radio.
Wake by buzzer
• Set ALARM switch © to BUZZER.
• At the set alarm time you will be awakened by
the buzzer.
ALARM OFF
You can switch off the alarm in two ways:
Switching off the aiarm for nine minutes
* Press the SLUMBER OFF/REPEAT ALARM
button ©. With this switch you temporarily
switch off the alarm. After nine minutes the
alarm (radio or buzzer) will sound again. If you
press the SLUMBER OFF/REPEAT ALARM
button © again, the same will happen. If the
SLUMBER OFF/REPEAT ALARM button ® is
not pressed again, the alarm will switch itself
off after 1 hour and 59 minutes. The following
day the alarm signal will sound again at the set
alarm time.
Switching off the alarm completely
• Set the ALARM switch @ to OFF. On the
display the ALARM indicator will disappear and
the alarm will be switched off. If you wish to be
awakened the following day again, you must
reset the ALARM switch to RADIO or BUZZER
before going to sleep.
SLUMBER
The clock radio has a built-in slumber function.
This function enables you to listen to the radio
before you fall asleep. You will not have to switch
off the clock radio yourself. This will take place
automatically.
SLUMBER ON
The time you listen to the radio before you fall
asleep is called the slumber time. The slumber
time is 59 minutes.
If you wish to slumber, carry out the following:
• Make sure the TIME SET switch © is set to
RUN.
• Press the RADIO ON/SLUMBER button ©
only. The display will show that you have a
slumbertime of 59 minutes.
SLUMBER OFF
You can switch off the radio before the slumber
time has elapsed:
• Press the SLUMBER OFF/REPEAT ALARM
button © and the clock radio is switched off.
- If the TIME SET switch © is in position TIME or
ALARM, the slumber function will not work.
- The slumber function does not affect the alarm.
UJ
O)
c
Page 6

Additional
POWER FAILURE
m
- When a power failure occurs, the complete
3
(Q
clock radio will be switched off.
- As soon as the power supply returns, the
numbers on the display will start to flash. This
indicates that you must set the correct time on
the clock.
- You can insert a 9 Volt pack battery (type 6F22)
in the clock radio. Should there be a power
failure, the clock will continue to function. You
will not see this, however, because the battery
does not illuminate the clock display. As soon
as the power is switched on again, the display
will indicate the correct time. For clarity: Alarm,
radio and display do not work on battery.
• Before inserting the battery, connect the power
plug to the wall outlet.
• Place the battery in the compartment on the
bottom of the clock radio.
- Replace the battery once a year. It is not
possible to say precisely how long the battery
will last. The service life depends on how often
and for how long the power supply fails. This
varies according to country and region.
MAINTENANCE
- If you do not intend to use the clock radio for a
long time, it is better to remove the plug from
the wall socket. In addition to this, it is
advisable to remove the battery from the clock
radio. This will prevent any danger of leakage
and the clock radio will not be damaged.
- Fingerprints, dust and dirt on the clock radio
should be removed using a clean and damp
soft cloth or chamois leather. When cleaning do
not use any products wich contain abrasive
agents or solvents (benzine, thinner, alcohol
etc.). These might affect the housing.
- Rain, dampness and extreme heat may damage
the clock radio. For this reason it should not be
placed in full sun or close to heating elements
for any period of time.
The type-plate is located on the bottom of the
clock radio.
This product complies with the radio interference
requirements of the European Community
IMPORTANT NOTES FOR USERS IN THE U.K.
Mains plug
This apparatus is fitted with an approved moulded 13 Amp plug. To change a fuse in this type of plug
proceed as follows;
• Remove fuse cover and fuse.
• Fix new fuse which should be a BS1362 5 Amp. A.S.T.A. or BSI approved type.
• Refit the fuse cover.
If the fitted plug is not suitable for your socket outlets, it should be cut off and an appropriate plug
fitted in Its place.
If the mams plug contains a fuse, this should have a value of 5 Amp. If a plug without a fuse is used,
the fuse at the distribution board should not be greater than 5 Amp.
Note: The severed plug must be disposed to avoid a possible shock hazard should it be inserted into a
13 Amp socket elsewhere
How to connect a plug
The wires in the mains lead are coloured with the following code- blue = neutral (N), brown = live (L),
As these colours may not correspond with the colour markings identifying the terminals in your plug,
proceed as follows:
• Connect the blue wire to the terminal marked M or coloured blue or black.
• Connect the brown w'ire to the terminal marked L or coloured brown or red
• Do not connect either wire to the earth terminal in the plug, marked E (or -fj or coloured green (or
green and yellow).
Before replacing the plug cover, make certain that the cord grip is clamped over the sheath of the lead
- not simply over the tivo wires.
if in doubt, consult a qualified electrician.
Page 7

Notes
34
Page 8

Notes
35
Page 9

Notes
36
Page 10

Mounting the set on a shelf
Make two mounting holes on the shelf as idicated below.
Mount the set on the shelf with two screws.
FRONT
192 mm
E
E
o
Bench thickness + 20 mm Max.
37
Page 11

Philips - AJ 3040 - Clock radio
1 English
Français
m
c/>
•o
Español
I Deutsch
Ë. Nederlands
I Italiano
•o
o
3.
Portugués
page 4
page?
página 10
Seite 13
pagina 16
pagina 19
página 22
ë Dansk
s Svenska
Suomi
3140 115 21561
side 25
sida 28
sivu 31
Printed in Hong Kong
 Loading...