

Page 1

Vacuum Trimmer
QT4045
Page 2

2
Page 3
3
1
A
I
B
C
D
E
F
J
G
H
Page 4

4
Page 5

ENGLISH 6
FRANÇAIS 13
á«Hô©dG 25
v<ñUã 32
QT4045
Page 6

Introduction
Dear customer, you have made the right choice!
Your new maintenance-free Philips vacuum beard trimmer combines
innovative technology and outstanding comfort of use.
The integrated vacuum mechanism absorbs cut-off hairs during use and
guarantees a clean washbasin after use.
The contour-following comb attachment, the self-sharpening cutting unit
and the adjustment ring for selecting hair lengths of 1.5 to 18mm ensure
excellent cutting results and time-saving operation. The ergonomic shape
of the appliance allows pleasant and comfortable handling.
Your new Philips vacuum beard trimmer is excellently suited for cutting
and contouring your beard and sideburns.
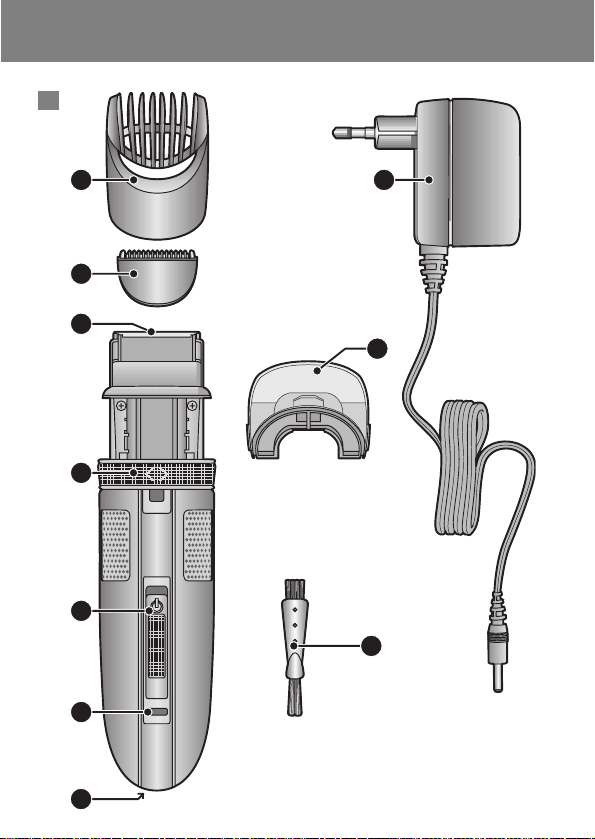
General description (fig. 1)
A Comb attachment
B Detachable cutting unit
C Flexible hair guide
D Hair-collection chamber & filter
E Adjustment ring (Precision Zoom Lock`)
F On/off slide
G Charging light
H Socket for appliance plug
I Powerplug (6V/80mA)
J Cleaning brush
Important
Read these instructions for use carefully before using the appliance and
save them for future reference.
◗ Make sure that the appliance, the cord and the powerplug do not
get wet.
◗ Check if the voltage indicated on the powerplug corresponds to
the local mains voltage before you connect the appliance.
◗ Only use the powerplug supplied.
◗ Keep the appliance out of the reach of children.
ENGLISH6
Page 7

◗ Charge, use and store the appliance at a temperature between
15cC and 35cC.
◗ This appliance is only designed for trimming the human beard.
Do not use the appliance for any other purpose.
◗ Do not use the appliance if the cutting unit is damaged or
broken, as this may cause injury.
◗ If the powerplug is damaged, always have it replaced by one of
the original type in order to avoid a hazard.
◗ If the appliance is subjected to a major change in temperature,
pressure or humidity, let the appliance acclimatise for 30 minutes
before you use it.
Charging
Do not charge the appliance for more than 24 hours.
Charge the appliance for 10 hours before using it for the first time or
after a long period of disuse.
Make sure the appliance is switched off before you start charging it.
The appliance cannot be run directly from the mains.
1 Insert the appliance plug into the appliance and put the
powerplug in the wall socket.
Fully charging the appliance takes approx. 10 hours.
Charge the appliance at least 90 minutes for a single trimming session.
Battery indications
◗ The charging light will go on to indicate that the appliance is
charging, but the charging light will not change colour or will not
go out when the appliance is fully charged (fig. 2).
Preparing for use
Always comb your beard or moustache with a fine comb before you
start trimming.
ENGLISH 7
Page 8

Using the appliance
Absorbing cut hairs
The suction system is activated automatically as soon as you switch the
appliance on. It absorbs cut hairs during every kind of use, i.e. trimming
with and without comb attachment and contouring. The flexible hair
guide follows the contours of the face and directs cut hairs towards the
nozzle of the vacuum mechanism.
We advise you to empty the hair-collection chamber after each
trimming session. When trimming long, dense beards it may also be
necessary to empty the hair-collection chamber during the trimming
session in order to maintain optimal suction performance (see chapter
'Cleaning', section 'Hair-collection chamber').
B
To ensure optimal functioning of the vacuum system, do not cut off
more than approx. 7mm of your overall beard length at a time. If you
want to cut your beard shorter, repeat the process one or more times.
Trimming with comb attachment
1 Turn the adjustment ring (Precision Zoom Lock`) to the desired
hair length setting (see table) (fig. 3).
ENGLISH8
Resulting hair length
1.5 mm
2.5 mm
4 mm
5.5 mm
7.5 mm
9.5 mm
12 mm
15 mm
18 mm
Setting
1
2
3
4
5
6
7
8
9
Page 9

◗ The setting will appear in the window below the adjustment ring
(Precision Zoom Lock`).
If you are trimming for the first time, start with the maximum hair
length setting (9).
2 Switch the appliance on (fig. 4).
3 To trim in the most effective way, move the trimmer against the
direction of hair growth. Do not move the trimmer too fast.
Make smooth and gentle movements and make sure the surface
of the comb attachment always stays in contact with the skin
(fig. 5).
4 Switch the appliance off
Trimming at the unique 'stubble look' setting
◗ Use the trimmer with the comb attachment set to hair length
setting 1. This allows you to create a 'stubble look' (fig. 6).
Trimming without comb attachment
Use the trimmer without comb attachment to trim full beards and
single hairs.
1 Remove the comb attachment (fig. 7).
B
Never pull at the flexible top of the comb attachment. Always pull at
the bottom part.
2 Make well-controlled movements and touch the hair lightly with
the trimmer.
Cleaning
The appliance may only be cleaned dry.
Do not use abrasives, scourers or liquids such as alcohol, petrol or
acetone to clean the appliance.
Never use sharp or hard objects to clean the filter to avoid damaging
it.
ENGLISH 9
Page 10

Hair-collection chamber
1 Switch the appliance off.
2 Remove the hair-collection chamber (fig. 8).
3 Remove the hairs by carefully shaking them out or by brushing
them out with the cleaning brush supplied (fig. 9).
Appliance
1 Remove the comb attachment (fig. 7).
2 Remove the cutting unit (fig. 10).
3 Clean the cutting unit and the inside of the appliance with the
brush supplied (fig. 11).
4 Reattach the cutting unit and the comb attachment to the
appliance (fig. 12).
Replacement
A worn or damaged cutting unit or filter must always be replaced with
an original Philips cutting unit or filter, available at your dealer or at
authorised Philips service centres.
Environment
◗ Do not throw the appliance away with the normal household
waste at the end of its life, but hand it in at an official collection
point for recycling. By doing this you will help to preserve the
environment (fig. 13).
The built-in rechargeable battery contains substances that may pollute
the environment. Always remove the battery before discarding the
appliance and handing it in at an official collection point. Dispose of the
battery at an official collection point for batteries. If you have trouble
removing the battery, you can also take the appliance to a Philips
service centre, which will remove the battery for you and will dispose
of it in an environmentally safe way.
ENGLISH10
Page 11

Removing the battery
Do not connect the appliance to the mains again after it has been
opened.
Follow the steps below to remove the battery.
1 Disconnect the appliance from the mains and let the appliance
run until the motor stops.
2 Remove the two side panels by means of a screwdriver (fig. 14).
3 Remove the front panel by means of a screwdriver (fig. 15).
4 Pull out the printed circuit board (fig. 16).
5 Remove the rechargeable battery by means of a screwdriver and
detach it by bending or turning it several times until the
connections break (fig. 17).
Guarantee & service
If you need information or if you have a problem, please visit the Philips
website at www.philips.com or contact the Philips Customer Care
Centre in your country (you will find its phone number in the
worldwide guarantee leaflet). If there is no Customer Care Centre in
your country, turn to your local Philips dealer or contact the Service
Department of Philips Domestic Appliances and Personal Care BV.
ENGLISH 11
Page 12

Troubleshooting
The trimmer does not work when it is switched on.
1 If the battery is completely empty, the trimmer will not work.
Charge the appliance until it is fully charged (see chapter
'Charging'). Charging will take approx. 10 hours.
If the suction system of the vacuum beard trimmer performs poorly or
does not work at all, check the points listed below.
2 Is the hair-collection chamber empty?
B
We advise you to empty the hair-collection chamber after each
trimming session. When cutting long, dense beards, it may also be
necessary to empty the hair-collection chamber during the trimming
session.
3 Is the hair-collection chamber or the filter wet?
B
Both parts may only be cleaned dry. If these parts become wet, dry
them carefully.
4 Does the flexible hair guide in front of the cutting unit jam?
B
The transparent hair guide needs to be flexible in order to be able to
adjust to the contours of the face. If it jams because hairs have got
stuck in it, remove the hairs carefully with the brush supplied. The
flexible hair guide should yield at the touch of a finger.
5 Do you move the appliance in the optimal direction? (fig. 5).
B
For the best possible trimming and suction performance, we advise you
to move the trimmer upwards, against the direction of hair growth,
making smooth and gentle strokes.
ENGLISH12
Page 13

Introduction
Cher consommateur, vous avez fait le bon choix!
Votre nouvelle tondeuse à barbe Philips avec système d'aspiration ne
demande aucun entretien et combine une technologie innovatrice avec
un incroyable confort d'utilisation.
Comme le système d'aspiration intégré absorbe les poils coupés
pendant l'utilisation, le lavabo reste propre.
Le guide de coupe (qui suit les contours du visage), l'élément de coupe
(qui s'auto-affûte) et la bague de réglage (pour sélectionner une
longueur de coupe allant de 1,5 à 18 mm) assurent résultats excellents
et économie de temps. La forme ergonomique de l'appareil permet
une manipulation souple et aisée.
Votre nouvelle tondeuse à barbe Philips avec système d'aspiration est
parfaite pour faire la taille et le contour de la barbe et des favoris.
Description générale (fig. 1)
A Guide de coupe
B Élément de coupe détachable
C Guide flexible
D Compartiment à poils et filtre
E Bague de réglage (Precision Zoom Lock`)
F Bouton marche/arrêt
G Voyant de charge
H Prise pour petite fiche
I Fiche d'alimentation (6 V/80 mA)
J Brosse de nettoyage
Important
Lisez soigneusement ce mode d'emploi avant d'utiliser l'appareil et
conservez-le pour consultation ultérieure.
◗ Veillez à ce que l'appareil, le cordon d'alimentation et la fiche
d'alimentation ne soient pas exposés à l'humidité.
◗ Vérifiez si la tension mentionnée sur la fiche d'alimentation
correspond à celle du réseau avant de brancher l'appareil.
FRANÇAIS 13
Page 14

14
◗ N'utilisez que la fiche d'alimentation fournie avec l'appareil.
◗ Tenez l'appareil hors de portée des enfants.
◗ Utilisez, chargez et conservez l'appareil à une température
comprise entre 15cC et 35cC.
◗ Cet appareil a été conçu pour tailler la barbe exclusivement.
Toute autre utilisation est à proscrire.
◗ N'utilisez pas l'appareil si l'élément de coupe est endommagé ou
brisé, pour éviter tout accident.
◗ Lorsque la fiche d'alimentation est endommagée, remplacez-la
par une fiche d'origine, pour éviter tout danger.
◗ Si l'appareil est soumis à un changement important de
température, de pression ou d'humidité, laissez-le à la
température ambiante pendant 30 minutes avant de l'utiliser.
Recharge
Ne faites pas recharger l'appareil pendant plus de 24 heures.
Chargez l'appareil pendant 10 heures avant de l'utiliser pour la
première fois ou après une longue période d'inutilisation.
Assurez-vous que l'appareil est éteint avant de le charger.
L'appareil ne peut en aucun cas être branché directement sur une prise
murale.
1 Insérez la fiche de l'appareil dans l'appareil et branchez la fiche
d'alimentation sur la prise de courant.
Il faudra environ 10 heures pour charger complètement l'appareil.
Chargez l'appareil au moins 90 minutes pour une seule utilisation.
Voyants de charge
◗ Le voyant de charge s'allume pour indiquer que la charge de
l'appareil est en cours, mais ne change pas de couleur et ne
s'éteint pas une fois l'appareil complètement chargé (fig. 2).
FRANÇAIS
Page 15

15
Préparation à l'emploi
Peignez toujours la barbe ou la moustache avec un peigne fin avant de
commencer la taille.
Utilisation de l'appareil
Aspiration des poils coupés
Le système d'aspiration est activé automatiquement lorsque vous
mettez l'appareil en marche. Il aspire les poils coupés pendant tout type
d'utilisation: avec ou sans guide de coupe, pendant la taille des
contours, etc. Le guide flexible suit les contours du visage et dirige les
poils coupés vers le suceur du système d'aspiration.
Nous vous conseillons de vider le compartiment à poils après chaque
utilisation. Si la barbe est longue et fournie, il peut être nécessaire de
vider le compartiment pendant la séance de taille pour maintenir une
aspiration optimale (voir le chapitre « Nettoyage », section
« Compartiment à poils »).
B
Pour assurer le fonctionnement optimal du système d'aspiration, ne
taillez pas plus de 7 mm de la longueur de la barbe en une fois.
Répétez l'opération une ou plusieurs fois pour obtenir une barbe plus
courte.
FRANÇAIS
Page 16

Taille avec guide de coupe
1 Tournez la bague de réglage (Precision Zoom Lock`) sur la
longueur de coupe souhaitée (voir tableau) (fig. 3).
◗ Le réglage apparaîtra dans la fenêtre au-dessous de la bague
(Precision Zoom Lock`).
Si vous taillez une barbe pour la première fois, commencez par le
réglage maximal (9).
2 Mettez l'appareil en marche (fig. 4).
3 Pour tailler le plus efficacement possible, déplacez lentement la
tondeuse à barbe dans le sens inverse de la pousse des poils.
Faites des mouvements uniformes et tout en douceur, et
assurez-vous que la surface du guide de coupe est toujours en
contact avec la peau (fig. 5).
4 Éteignez l'appareil.
Taille à l'aide du réglage spécifique pour une barbe de
plusieurs jours
◗ Utilisez la tondeuse à barbe avec le guide de coupe réglé sur la
position 1. Vous obtiendrez ainsi une barbe de plusieurs jours
(fig. 6).
FRANÇAIS16
Longueur de barbe obtenue
1,5 mm
2,5 mm
4mm
5,5 mm
7,5 mm
9,5 mm
12 mm
15 mm
18 mm
Réglage
1
2
3
4
5
6
7
8
9
Page 17

Taille sans guide de coupe
Utilisez la tondeuse sans guide de coupe pour tailler les barbes entières
et les poils rebelles.
1 Retirez le guide de coupe de l'appareil (fig. 7).
B
Ne tirez jamais sur la partie supérieure flexible du guide de coupe.
Tirez toujours sur la partie inférieure.
2 Faites des mouvements précis et touchez légèrement les poils
avec la tondeuse à barbe.
Nettoyage
L'appareil doit être sec lorsque vous le nettoyez.
N'utilisez pas de produits abrasifs, de tampons à récurer ou des
substances telles que l'alcool ou l'acétone pour nettoyer l'appareil.
N'utilisez pas d'objets pointus ou durs pour nettoyer le filtre afin de
ne pas l'endommager.
Compartiment à poils
1 Éteignez l'appareil.
2 Retirez le compartiment à poils (fig. 8).
3 Enlevez doucement les poils en les secouant ou en les balayant à
l'aide de la brosse fournie (fig. 9).
Appareil
1 Retirez le guide de coupe de l'appareil (fig. 7).
2 Retirez l'élément de coupe (fig. 10).
3 Nettoyez l'élément de coupe et l'intérieur de l'appareil à l'aide de
la brosse fournie (fig. 11).
4 Fixez l'élément de coupe et le guide de coupe sur l'appareil
(fig. 12).
FRANÇAIS 17
Page 18

Remplacement
Un élément de coupe ou un filtre usagé ou endommagé doit être
remplacé uniquement par des pièces Philips d'origine, disponibles
auprès de votre revendeur ou dans un Centre Service Agréé Philips.
Environnement
◗ Lorsqu'il ne fonctionne plus, ne jetez pas l'appareil avec les
ordures ménagères; il est préférable de le déposer à un point de
collecte de produits recyclables. Vous contribuerez ainsi à la
protection de l'environnement (fig. 13).
La pile rechargeable intégrée contient des substances qui peuvent nuire
à l'environnement. Veillez à toujours retirer la pile avant de mettre
l'appareil au rebut ou de le déposer à un endroit assigné à cet effet.
Déposez la pile usagée à un endroit assigné à cet effet. Si vous n'arrivez
pas à la retirer, vous pouvez apporter l'appareil dans un Centre Service
Agréé Philips qui prendra toute l'opération en charge.
Retrait de la pile
Ne branchez plus l'appareil dans une prise murale après l'avoir ouvert.
Suivez les étapes ci-dessous pour retirer la pile.
1 Débranchez l'appareil de la prise de courant, puis laissez-le
fonctionner jusqu'à ce que le moteur s'arrête.
2 Retirez les deux panneaux latéraux à l'aide d'un tournevis (fig. 14).
3 Retirez le panneau avant à l'aide d'un tournevis (fig. 15).
4 Retirez la carte de circuit imprimé (fig. 16).
5 Enlevez la pile rechargeable à l'aide d'un tournevis et détachez-la
en la pliant ou en la tournant plusieurs fois jusqu'au bris des
connexions (fig. 17).
FRANÇAIS18
Page 19

Garantie et service
Si vous avez besoin de renseignements ou si vous avez un problème,
veuillez visiter le site Web de Philips à l'adresse www.philips.com ou
communiquer avec le centre d'assistance à la clientèle Philips (vous
trouverez le numéro de téléphone dans le feuillet sur la garantie à l'échelle
mondiale). S'il n'y a pas de centre d'assistance à la clientèle dans votre pays,
communiquez avec le détaillant de produits Philips de votre région ou
avec le service d'entretien de Philips Domestic Appliances and Personal
Care.
Résolution de problèmes
La tondeuse ne fonctionne pas même si elle est allumée.
1 Si la pile est complètement à plat, la tondeuse ne fonctionnera
pas. Chargez l'appareil jusqu'à ce qu'il soit complètement chargé
(voir le chapitre « Recharge »). Cela prend environ 10 heures.
Si le système d'aspiration de la tondeuse à barbe n'offre pas des
résultats satisfaisants ou ne fonctionne pas du tout, vérifiez les points
énumérés ci-dessous.
2 Le compartiment à poils est-il vide?
B
Nous vous conseillons de vider le compartiment à poils après chaque
utilisation. Si la barbe est longue et fournie, il peut être nécessaire de
vider le compartiment pendant la séance de taille.
3 Le compartiment à poils ou le filtre sont-ils humides?
B
Ils doivent être nettoyés lorsqu'ils sont secs. Séchez-les doucement s'ils
ne le sont pas.
4 Le guide flexible à l'avant de l'élément de coupe est-il bloqué?
B
Le guide transparent doit être flexible pour s'adapter aux contours du
visage. S'il est bloqué par des poils coupés, retirez-les délicatement
avec la brosse fournie. Le guide flexible doit céder au plus léger contact.
5 Dirigez-vous l'appareil dans la bonne direction? (fig. 5).
B
Pour obtenir le meilleur rendement possible de taille et d'aspiration,
nous vous conseillons de diriger la tondeuse à barbe vers le haut, dans
le sens inverse de la pousse des poils, en faisant des mouvements
FRANÇAIS 19
Page 20

20
äÓµ°ûŸG πM
.𫨰ûàdG óH QR íàa óæY πª©j ’ Üò°ûŸG
11
π°üa ô¶fCG )πeÉc πµ°ûH RÉ¡÷G øë°TG .πeÉc πµ°ûH ájQÉ£ÑdG PÉØf ádÉM ‘ Üò°ûŸG πª©j ød
.ÉkÑjô≤J äÉYÉ°S ô°ûY RÉ¡÷G øë°T ¥ô¨à°ù«°S .(''øë°ûdG''
.√ÉfOCG IQƒcòŸG •É≤ædG ¢üëaG ,GóHCG πª©j ’ hCG IAGOôH πª©j ô©°ûdG Öjò°ûJ ádB’ §Ø°ûdG Ωɶf ¿Éc GPEG
22
?ÆQÉa ô©°ûdG ™«ªŒ ¿õfl πg
C
á∏jƒ£dG ≈ë∏dG ¢üb óæY .Öjò°ûàdG äGôe øe Iôe πc ó©H ô©°ûdG ™«ªŒ ¿õfl ≠jôØàH ∂ë°üæf
.Öjò°ûàdG á«∏ªY AÉæKCG ô©°ûdG ™«ªŒ ¿õfl ≠jôØJ Ék°†jCG …Qhô°†dG øe ¿ƒµj ób áØ«ãµdGh
33
?Î∏ØdG hCG ô©°ûdG ™«ªŒ ¿õfl øe ÉkjC’ π∏H åM πg
C
,Ú∏àÑe Î∏ØdGh ô©°ûdG ™«ªŒ ¿õfl Ò°üj ÉeóæY .ÚaÉL ɪgh Ú«Fõ÷G Óc ∞«¶æJ §≤a øµÁ
.ɪ¡ë°ùà ÏYG
44
?¢ü≤dG IóMh ábÉYEÉH ¿ôŸG ô©°ûdG π«dO Ωƒ≤j πg
C
ádÉM ‘ .¬LƒdG ±ÉØc •ƒ£N §Ñ°V øe øµªàj ≈àM Ékfôe ô©°û∏d ±ÉØ°ûdG π«dódG ¿ƒµj ¿CG »¨Ñæj
¿ƒµj ¿CG Öéj .IOhõŸG IÉ°TôØdG ΩGóîà°SÉH ájÉæ©H ô©°ûdG ´õfG ,¬∏NGóH ô©°ûdG ºcGôJ ÖÑ°ùH √OGó°ùfG
.™Ñ°UEG á°ùŸ OôÛ ¢SÉ°ùM ¿ôŸG ô©°ûdG π«dO
55
.(5 πµ°T) ?Ö°SÉæŸG √ÉŒ’G ‘ RÉ¡÷G ∂jôëàH Ωƒ≤J πg
C
∫ƒ°üë∏d áFOÉgh á°ù∏°S äÉcôM ‘ ô©°ûdG ƒ‰ √ÉŒG ¢ùµY ‘ ≈∏YCÓd Üò°ûŸG ∂jôëàH ∂ë°üæf
.§Ø°ûdGh Öjò°ûàdG øe øµ‡ AGOCG π°†aCG ≈∏Y
á«Hô©dG
Page 21

21
∫GóÑà°S’G
øe »∏°UCG Î∏a hCG ¢üb IóMƒH ∞dÉàdG hCG πcBÉàŸG Î∏ØdG hCG ¢ü≤dG IóMh ∫GóÑà°SG ÉkªFGO ÖéjPhilips,
áeóN õcGôe ‘ hCG ∂H ¢UÉÿG ´RƒŸG iód IôaƒàŸGhPhilips.Ióªà©ŸG
áÄ«ÑdG
æøµdh ,¬H á°UÉÿG áeóÿG IÎa ájÉ¡f ‘ ájOÉ©dG ∫õæŸG äÉØ∏fl ™e RÉ¡÷G øe ¢ü∏îàJ ’
(13 πµ°T) áÄ«ÑdG ≈∏Y ®ÉØ◊G ‘ ∂dòH óYÉ°ùà°S .√ôjhóàd ᫪°SQ ™«ªŒ á£≤f ¤EG ¬ª∏°S
øe ájQÉ£ÑdG ´õfG .áÄ«Ñ∏d áKƒ∏e ¿ƒµJ ¿CG øµÁ OGƒe ≈∏Y øë°û∏d á∏HÉ≤dG á«∏NGódG ájQÉ£ÑdG …ƒà–
∫ÓN øe ájQÉ£ÑdG øe ¢ü∏îJ .™«ªéà∏d »ª°SQ õcôe ‘ É¡ª«∏°ùàH ºbh ¬æe ¢ü∏îàdG πÑb ÉkªFGO RÉ¡÷G
Ék°†jCG ∂æµÁ ,ájQÉ£Ñ∏d ∂Yõf AÉæKCG πcÉ°ûe …CG ∂àaOÉ°U GPEG .äÉjQÉ£ÑdG ™«ªéàd »ª°SQ õcôe ‘ É¡ª«∏°ùJ
õcGôe óMCG ¤EG RÉ¡÷ÉH ¬LƒàdG Philips.Ék«Ä«H áæeBG á≤jô£H É¡æe ¢ü∏îàdGh ájQÉ£ÑdG ´õæd áfÉ«°ü∏d
ájQÉ£ÑdG ´õf
.¬ëàa ó©H »Hô¡µdG QÉ«àdÉH RÉ¡÷G π«°UƒàH º≤J ’
.ájQÉ£ÑdG ´õæd √ÉfOCG IQƒcòŸG äGƒ£ÿG ™ÑJG
11
.QƒJƒŸG ∞bƒàj ¿CG ¤EG πª©j ¬côJG ºK ô°TÉÑŸG »Hô¡µdG QÉ«àdG øe RÉ¡÷G π°üaG
22
.(14 πµ°T) á«Ñdƒ∏dG ÒeÉ°ùª∏d ∂Øe ΩGóîà°SÉH á«ÑfÉ÷G äÉMƒ∏dG ∂a
33
.(15 πµ°T) á«Ñdƒ∏dG ÒeÉ°ùª∏d ∂Øe ΩGóîà°SÉH á«eÉeC’G áMƒ∏dG ∂a
44
.(16 πµ°T) áYƒÑ£ŸG á«Hô¡µdG IôFGódG áMƒd ´õfG
55
∞∏dG hCG »æãdG ≥jôW øY É¡Yõfh á«Ñdƒ∏dG ÒeÉ°ùŸG ∂Øe ΩGóîà°SÉH øë°ûdG IOÉ©ŸG ájQÉ£ÑdG ∂a
.(17 πµ°T) äÓ°UƒdG ™£≤æJ ≈àM äGôe Ió©d
áfÉ«°üdGh ¿Éª°†dG
ácô°T ™bƒe IQÉjR ≈Lôj ,á∏µ°ûe ∂àaOÉ°U GPEG hCG äÉeƒ∏©ŸG øe ójõª∏dPhilips≈∏Y
www.philips.com AÓªY ájÉYQ áeóN õcôà ∫É°üJ’G hCGPhilips‘ º¡ØJÉg ºbQ óéà°S) ∑ó∏ÑH
´Rƒe ¤EG ¬ŒG ,∂Jó∏H ‘ AÓªY áeóN õcôe ∑Éæg øµj ⁄ GPEG .(QÉ°ûàf’G »ŸÉY ¿Éª°†dG Ö«àcPhilips
Iõ¡LCG áeóN º°ù≤H π°üJG hCG ∂H ¢UÉÿG »∏ÙGPhilips h á«dõæŸG
á«Hô©dG
PersonelCare BV
Page 22

22
''áæ°ûÿG IÒ°ü≤dG'' á«◊ÉH ¢UÉÿG ójôØdG OGóYE’G ≈∏Y Öjò°ûàdG
æá«ë∏dG πªY 1 ô©°ûdG ∫ƒW OGóYEG ≈∏Y §«°ûªàdG ≥ë∏e §Ñ°V ™e Üò°ûŸG ΩGóîà°SG ∂d í«àj
.(6 πµ°T) ''áæ°ûÿG IÒ°ü≤dG''
§«°ûªàdG ≥ë∏e ¿hóH Öjò°ûàdG
.IOôØŸG äGÒ©°ûdGh á∏eɵdG ≈ë∏dG Öjò°ûàd §«°ûªàdG ≥ë∏e ¿hóH Üò°ûŸG Ωóîà°SG
11
.(7 πµ°T) §«°ûªàdG ≥ë∏e ∂a
C
.»∏Ø°ùdG Aõ÷G øe ÉkªFGO ¬YõfG .¿ôŸG …ƒ∏©dG Aõ÷G óæY øe ¬YõæH GkóHCG º≤J ’
22
.≥aôH ô©°ûdG ¢ùª∏j Üò°ûŸG π©LCGh ∂JÉcôM ‘ ÉkªFGO ºµ–
∞«¶æàdG
.±ÉL ƒg h RÉ¡÷G ∞«¶æJ §≤a øµÁ
.RÉ¡÷G ∞«¶æàd ¿ƒà«°SC’G h ∫hÎÑdGh ∫ƒëµdG πãe πFGƒ°S hCG äÉضæe hCG ᣰTÉc OGƒe Ωóîà°ùJ ’
.¬Ø∏J Öæéàd ∂dP h Î∏ØdG ∞«¶æàd á«°SÉb hCG IOÉM äGhOCG GóHCG Ωóîà°ùJ ’
ô©°ûdG ™«ªŒ ¿õfl
11
RÉ¡÷G 𫨰ûJ ∞bhCG
22
.(8 πµ°T) ô©°ûdG ™«ªŒ ¿õfl ∂ØH ºb
33
ΩGóîà°SÉH É¡LGôNEG hCG É¡LGôNE’ ô©°ûdG ™«ªŒ ¿õfl õg ≥jôW øY ¢UôëH äGÒ©°ûdG ádGREÉH ºb
.(9 πµ°T) RÉ¡÷G ™e IOhõŸG IÉ°TôØdG
RÉ¡÷G
11
.(7 πµ°T) §«°ûªàdG ≥ë∏e ∂a
22
.(10 πµ°T) ¢ü≤dG IóMh ∂a
33
.(11 πµ°T) ¬©e IOhõŸG IÉ°TôØdG ΩGóîà°SÉH RÉ¡é∏d á«∏NGódG AGõLC’Gh ¢ü≤dG IóMh ∞«¶æJ
44
.(12 πµ°T) RÉ¡÷ÉH §«°ûªàdG ≥ë∏eh ¢ü≤dG IóMh Ö«côJ óYCG
á«Hô©dG
Page 23

23
C
ô©°ûd »∏µdG ∫ƒ£dG øe ÉkÑjô≤J · 7 øe ÌcCG ¢ü≤H º≤J ’ ,§Ø°ûdG Ωɶæd πãeC’G 𫨰ûàdG ≈∏Y ó«cCÉà∏d
ô°ü≤J ¿CG ójôJ âæc GPEG Iôe øe ÌcC’ hCG iôNCG IôŸ á«∏ª©dG √òg Qôc .IóMGƒdG IôŸG ‘ ∂à«◊
.∂dP øe ÌcC’ ∂à«◊
§«°ûªàdG ≥ë∏à Öjò°ûàdG
11
§Ñ°†dG á≤∏M QOCG(Precision Zoom Lock™)ô©°û∏d ¬∏°†ØJ …òdG ∫ƒ£∏d Ö°SÉæŸG ™°VƒdG ≈∏Y
.(3 πµ°T) (∫hó÷G ô¶fCG)
æ §Ñ°†dG á≤∏M â– ™bGƒdG QÉWE’G ‘ OGóYE’G ô¡¶«°S(Precision Zoom Lock™).
.Iôe ∫hC’ Öjò°ûàdÉH Ωƒ≤J âæc GPEG ádÉM ‘ (9) Öjò°ûà∏d ∫ƒW ≈°übCG OGóYEG ΩGóîà°SÉH CGóHG
22
.(4 πµ°T) RÉ¡÷G 𫨰ûJ CGóHG
33
∑ô– ’ .Öjò°ûàdG ‘ á«∏YÉa ¥ô£dG ÌcCG ≈∏Y ∫ƒ°üë∏d ô©°ûdG ƒ‰ √ÉŒG ¢ùµY Üò°ûŸG ∑ôM
.Iójó°T áYô°ùH Üò°ûŸG
ó∏é∏d ÉkªFGO §«°ûªàdG ≥ë∏e í£°S á°ùeÓe øe ócCÉJh áFOÉgh á°ù∏°S äÉcôM ‘ RÉ¡÷G ∑ôM
.(5 πµ°T)
44
RÉ¡÷G 𫨰ûJ ∞bhCG
á«Hô©dG
OGóYE’G
1
2
3
4
5
6
7
8
9
Öjò°ûàdG ó©H ô©°ûdG ∫ƒW
· 1^5
· 2^5
· 4
· 5^5
· 7^5
· 9^5
· 12
· 15
· 18
ô©°ûdG ∫ƒW ´É°VhCG
Page 24

24
æ.áHÉ°UEG çhóM ‘ ÖÑ°ùàj ób ∂dP ¿C’ IQƒ°ùµe hCG áØdÉJ ¢ü≤dG IóMh âfÉc GPEG RÉ¡÷G Ωóîà°ùJ ’
æ.QÉ£NC’G Öæéàd »∏°UC’G ´ƒædG øe ôNBÉH ÉehO ¬dGóÑà°SÉH ºb ,AÉHô¡µdG ¢ùHÉb ∞∏J ádÉM ‘
æ30 IóŸ ¬côJG ,áHƒWôdG hCG §¨°†dG hCG IQGô◊G áLQO ‘ ÒÑc Ò¨J ¤EG RÉ¡÷G ¢Vô©J ádÉM ‘
.∫ɪ©à°S’G πÑb §«ÙG ƒ÷G ™e º∏bCÉà∏d á≤«bO
øë°ûdG
.áYÉ°S 24 øe ÌcC’ RÉ¡÷G øë°ûJ ’
.á∏jƒW IÎØd Ωóîà°ùe ÒZ ¬côJ ó©H hCG Iôe ∫hC’ ΩGóîà°S’G πÑb äÉYÉ°S ô°ûY IóŸ RÉ¡÷G øë°TG
.øë°ûdG ‘ AóÑdG πÑb ¬∏«¨°ûJ ∞bƒJ RÉ¡÷G ¿CG øe ócCÉJ
.kIô°TÉÑe á«∏ÙG AÉHô¡µdG äÉjò¨e ∫ÓN øe πª©j ¿CG RÉ¡é∏d øµÁ ’
11
.§FÉ◊G ¢ùÑ≤e ‘ AÉHô¡µdG ¢ùHÉb ™°V ºK ¬H ¢UÉÿG ¢ùHÉ≤dÉH RÉ¡÷G π°Uh
.ÉkÑjô≤J äÉYÉ°S ô°ûY Ióe ‘ πeÉc πµ°ûH RÉ¡÷G øë°T ºàj
.Öjò°ûàdÉH É¡«a Ωƒ≤J IóMGh Iôe πµd πbC’G ≈∏Y á≤«bO 90 IóŸ RÉ¡÷G øë°TG
ájQÉ£ÑdG äGô°TDƒe
æÅØ£æj hCG Aƒ°†dG Gòg Ò¨àj ød øµd ,RÉ¡÷G øë°T …ôéj ¬fCG ¤EG IQÉ°TEÓd øë°ûdG Aƒ°V 𪩫°S
.(2 πµ°T)øë°ûdG á«∏ªY ∫ɪàcG óæY
ΩGóîà°SÓd õ«¡éàdG
.Öjò°ûàdG á«∏ªY ‘ AóÑdG πÑb Ò¨°U §°ûe ᣰSGƒH ∂HQÉ°T hCG ∂à«◊ ô©°T §«°ûªàH ÉkªFGO ºb
RÉ¡÷G ΩGóîà°SG
¢Uƒ°ü≤ŸG ô©°ûdG §Ø°T
k
…CG ΩGóîà°S’G AÉæKCG ¢Uƒ°ü≤ŸG ô©°ûdG §Ø°T Ωɶf πª©j .RÉ¡÷G 𫨰ûJ Oôéà Ék«FÉ≤∏J §Ø°ûdG Ωɶf πª©j
.(ɪ¡eGóîà°SG ΩóY hCG ¬LƒdG ±ÉØc •ƒ£N Oófih §«°ûªàdG ≥ë∏e ΩGóîà°SÉH ô©°ûdG Öjò°ûJ) ¬Yƒf ¿Éc
.§Ø°ûdG ádBG ágƒa ¤EG ¢Uƒ°ü≤ŸG ô©°ûdG ¬«LƒJh ¬LƒdG ±ÉØc •ƒ£N ™ÑààH ¿ôŸG ô©°ûdG π«dO Ωƒ≤j
á∏jƒ£dG ≈ë∏dG Öjò°ûJ óæY .Öjò°ûàdÉH É¡«a Ωƒ≤J Iôe πc ó©H ô©°ûdG ™«ªŒ ¿õfl ≠jôØàH ∂ë°üæf
≈°übCG ≈∏Y ®ÉØë∏d Öjò°ûàdG á«∏ªY AÉæKCG ô©°ûdG ™«ªŒ ¿õfl ≠jôØJ …Qhô°†dG øe ¿ƒµj ób ,áØ«ãµdGh
.( ô©°ûdG ™«ªŒ ¿õfl'' º°ùb ''∞«¶æàdG'' π°üa ™LGQ) §Ø°ûdG ‘ IAÉصdG äÉLQO
á«Hô©dG
Page 25

áeó≤e
!QÉ«àN’G âæ°ùMCG ó≤d ,õjõ©dG Éà∏«ªY
∂d Ωó≤JPhilipsIôµàÑe É«LƒdƒæµJ º°†jh ≠jôØJ ádBÉH Ohõeh áfÉ«°üdG ÊÉ› á«ë∏d ójóL Üò°ûe
.∫ɪ©à°S’G ‘ áë°VGƒdG áMGôdGh
ñÉ°ùJG ΩóY ¿Éª°Vh ΩGóîà°S’G AÉæKCG ¥ƒ∏ÙG ô©°ûdG §Ø°T ≈∏Y Üò°ûŸÉH á›óŸG ≠jôØàdG ádBG πª©J
.ô©°ûdÉH √ó©H π°ù¨dG ¢VƒM
§Ñ°†dG á≤∏Mh AɪME’G á«JGP ¢ü≤dG IóMhh ¬LƒdG ±ÉØc •ƒ£N ójóëàd §«°ûªàdG ≥ë∏e øª°†j
ÒaƒJh ¢ü≤dG ‘ á©FGQ èFÉàf · 18 ¤EG 1^5 ÚH Ée ¬dƒW ìhGÎj …òdG ô©°ûdG AÉ≤àf’ á°ü°üıG
.𫨰ûàdG ‘ ¥ô¨à°ùŸG âbƒdG
¢ü≤d ÉkeÉ“ ºFÓe Üò°ûŸG .íjôŸGh ™àªŸG ΩGóîà°S’G ≈∏Y IQó≤dG RÉ¡é∏d ¢UÉÿG πµ°ûdG ∂ëæÁ
.∂ØdGƒ°Sh ∂à«◊ ójó–h
(1 πµ°T) ΩÉ©dG ∞°UƒdG
A§«°ûªàdG ≥ë∏e
Bπ°üØ∏d á∏HÉ≤dG ¢ü≤dG IóMh
CájOÉ©dG äÉHò°ûŸG ¬dƒ£J ’ …òdG ¿ôŸG ô©°ûdG π«dO
DÎ∏ØdGh ô©°ûdG ™«ªŒ ¿õfl
E) §Ñ°†dG á≤∏MPrecision Zoom Lock™(
F±É≤jE’G hCG 𫨰ûà∏d ≥dõæŸG QõdG
Gøë°ûdÉH ¢UÉÿG Aƒ°†dG
H𫨰ûàdG ¢ùHÉb ™°Vƒd ¢ü°üfl ¢ùÑ≤e
I(ÒÑeCG 80/âdƒa6) AÉHô¡µdG ¢ùHÉb
J∞«¶æà∏d √É°Tôa
ΩÉg
.πÑ≤à°ùŸG ‘ ™Lôªc É¡H ßØàMGh RÉ¡÷G ΩGóîà°SG πÑb ájÉæ©H √òg ΩGóîà°S’G äɪ«∏©J CGôbCG
æ.π∏Ñ∏d »Hô¡µdG QÉ«àdG ¢ùHÉbh ∂∏°ùdGh RÉ¡÷G ¢Vô©J ΩóY øe ócCÉJ
æAÉHô¡µdG òNCÉe á«àdƒa πKÉ“ »Hô¡µdG QÉ«àdG ¢ùHÉb ≈∏Y É¡«dEG QÉ°ûŸG á«àdƒØdG ¿CG øe ócCÉJ
.RÉ¡÷G π«°UƒJ πÑb á«∏ÙG
æ.§≤a RÉ¡÷G ™e OhõŸG AÉHô¡µdG ¢ùHÉb Ωóîà°SG
æ.∫ÉØWC’G ∫hÉæàe øY Gkó«©H RÉ¡÷ÉH ßØàMG
æ.ájƒÄe áLQO 35h 15 ÚH É¡JQGôM áLQO ìhGÎJ AGƒLCG ‘ RÉ¡÷G øjõîJh ΩGóîà°SGh øë°ûH ºb
æ¢VôZ …CG ‘ RÉ¡÷G Ωóîà°ùJ ’ .∫ÉLôdG ≈◊ Öjò°ûJ ‘ §≤a ¬eGóîà°S’ RÉ¡÷G Gòg º«ª°üJ ”
.ôNBG
á«Hô©dG 25
Page 26

˘˘
øX<« Áœdë dOÖ ‘d! b4«Ë ÈuK3 ñœ d|cÄ ·UDFï« uî ÈœUÙ U|¬
C
s|« dÖ« ÆbÅU! ·UDFï« XOK!Uè b|U! †ñu `D< U! ÊbÅ o§DMî È«d! b|U! ·UHÅ Èuî ÈœUÙ
ÁbÅ t|«ñ« ”d! “« ÁœUH¶<« U! Xèœ U! «ñ UÙuî ¨bMë dOÖ Ê¬ d|“ ñœ uî ÊbÅ lL3 dÉU‹! g‹!
ÆœuÅ r8 XA~ï« p| ”U9 U! b|U! d|cÄ ·UDFï« Èuî ÈœUÙ ÆbOMë eO9
˚˚
Æ©˚ qJÅ® øbOÙœ vî Xëd4 `Oæ- XN3 ñœ «ñ ÁU~¶<œ U|¬
C
ñœ ¨ôU! t! Ëñ «ñ Ê“ j8 U" rOMë vî tOu" ¨gJî qLà Ë Õö« tºO¶ï s|d¶N! Vfië È«d!
ÆbOÙœ Xëd4 «ñ¬ Ë Âdï †Uëd4 U! uî g|Ëñ XN3 ·ö8
v<ñUã26
Page 27

ÆbOMë «d3« Èd"U! Êœdë “U! È«d! «ñ d|“ q4«dî
±±
ÆœuÅ nèu¶î ʬñu"uî U" bMë ñUë ÁU~¶<œ b|ñ«c~! Ë bOMë «b3 ‚d! “« «ñ ÁU~¶<œ
≤≤
Æ©±˘ qJÅ® bOMë «b3 v¶ÅuÖ êOÄ “« ÁœUH¶<« U! «ñ ÈñUMë qïUÄ Ëœ
≥≥
Æ©±˚ qJÅ® bOMë «b3 v¶ÅuÖ êOÄ “« ÁœUH¶<« U! «ñ uK3 qïUÄ
˘˘
Æ©±˙ qJÅ® bOAJ! ÊËdO! «ñ vÄUÇ ñ«bî d§Oã
˚˚
U| bOMë r8 ñU! bMÇ «ñ ʬ Ë Áñˬ ÊËdO! v¶ÅuÖ êOÄ p| “« ÁœUH¶<« U! «ñ ˛ñUÅ q!Uè Èd"U!
Æ©±∑ qJÅ® œuÅ Áb|d! ‰UB"« U" bOïUâOá!
f|Ëd< Ë XïUL{
vïUAï t! Uî v¶ïd¶M|« X|U< “« ÎUHDì b|bÅ t3«uî vKJAî U! U| t¶Å«œ “UOï †UàöÉ« t! të v"ñu ñœ
www.philips.coms|« ULÅ® b|dO~! ”U9 œu8 ñuAë ñœ Èd¶Aî “« X§è«dî eëdî U| U| Áœdë b|œ“U!
†Uîb8 eëdî ULÅ ñuAë ñœ tâïUMÇ Æ©œdë bOÙ«u8 «bOÄ vïUN3 XïUL{ tÖd! ñœ «ñ sHK" ÁñULÅ
“«uì ÁbMÅËdã t! ¨œñ«bï œu3Ë ÊU|d¶AîPhilips v~ïU8 “«uì g‹! U! U| Áœu/ tF3«dîPhilipsË
Æb|dO~! ”U9 v! ÈË vB‹Å X|UL4
v!U| VOà
ÆbMë v/ ñUë œuÅ vî sÅËñ të vîU~MÙ Ê“ j8
±±
të vîU~MÙ U" «ñ ÁU~¶<œ Æœdë bÙ«u‹ï ñUë Ê“ j8 ¨bÅU! ÁbÅ vìU8 ÎöîUë ÁU~¶<œ Èd"U! dÖ«
XàU< ±∞ œËb4 Êœdë ˛ñUÅ Æ©bOMë tF3«dî ¢Êœdë ˛ñUÅ¢ g‹! t!® bOMë ˛ñUÅ ¨œuÅ ˛ñUÅ ÎöîUë
ÆbîU$« vî ‰uD!
X<« Ábî¬ d|“ ñœ të Èœñ«uî ¨bMJï ñUë Îö« U| bMë qLà nOF{ vAJî g|ñ Ê“ j8 gJî r¶fiO< dÖ«
ÆbOMë v<ñd! «ñ
≤≤
øX<« vìU8 uî Èñˬ lL3 tEHæî U|¬
C
Õö« ÂU~MÙ ÆbOMë tOK‹" Õö« “« bF! ñU! dÙ «ñ uî Èñˬ lL3 tEHæî të rOMë vî tOu"
qLà 54 ñœ rÙ «ñ uî Èñˬ lL3 tEHæî U" bÅU! “UOï X<« sJ2 ¨rë«d¶î Ë bMK! ÈUNA|ñ
ÆbOMë tOK‹" Õö«
≥≥
øX<« fO8 d¶KOã U| uî Èñˬ lL3 tEHæî U|¬
C
U! «ñ UNï¬ ¨bïuÅ fO8 †UFDè s|« dÖ« Æœu/ eO9 pA8 XìU4 ñœ Ê«u" vî jIã «ñ g‹! Ëœ dÙ
ÆbOMë pA8 Xèœ
v<ñUã 27
Page 28

uî Èñˬ lL3 tEHæî
±±
ÆbOMë ‘uîU8 «ñ ÁU~¶<œ
≤≤
Æ©∏ qJÅ® bOMë «b3 «ñ uî Èñˬ lL3 tEHæî
≥≥
Æ©π qJÅ® bOMë ÃñU8 tEHæî “« ÁbÅ t|«ñ« ”d! “« ÁœUH¶<« U! U| Êœ«œ ÊUJ" U! Xèœ U! «ñ UÙuî
ÁU~¶<œ
±±
Æ©∑ qJÅ® bOMë «b3 «ñ tïUÅ ñ«e!«
≤≤
Æ©±∞ qJÅ® bOMë «b3 «ñ tGO" g‹!
≥≥
Æ©±± qJÅ® bOMë eO9 ÁbÅ tz«ñ« ”d! U! «ñ ÁU~¶<œ q8«œ Ë Õö-« g‹!
˘˘
Æ©±≤ qJÅ® bOMë VBï ÁU~¶<œ ÈËñ Ϋœbºî «ñ tïUÅ ñ«e!« Ë ‘d! b4«Ë
i|uF"
vK« d¶KOã U| ‘d! g‹! U! b|U! tAOLÙ «ñ d¶KOã U| Áb|œ VO<¬ Ë Áœu<dã ‘d! g‹!
Philipsñœ të
“Uºî f|Ëd< eë«dî U| ‘Ëdã vÖbM|U/
PhilipsÆbOMë i|uF" ¨X<« œu3uî
Xfi|“ jOæî
æñËœ ÁbÅ 5OF" ÈUNKæî ñœ «ñ ʬ Ë ¨b|e|dï ñËœ v~ïU8 ÈUÙ tìU!“ d|U< bMïUî «ñ ÁU~¶<œ
Æ©±≥ qJÅ® bOMë vî pLë Xfi|“ jOæî kH4 t! ULÅ ñUë s|« ÂU$« U! Æb|e|d!
«ñ Èd"U! tAOLÙ ÆbMë Áœuì¬ «ñ Xfi|“ jOæî bï«u" vî të bMÅU! vî Èœ«uî È«ñ«œ ÁU~¶<œ q8«œ UN|d"U!
ñœ «ñ Èd"U! ÆbOÙœ q|u% vL<ñ Èñˬ lL3 ◊UIï ñœ «ñ ʬ Ë Áœdë ÃñU8 ÁU~¶<œ 78«bï« ñËœ “« q§è
Ëd!Ëñ qJAî U! ÁU~¶<œ “« Èd"U! Êœdë ÃñU8 ñœ dÖ« Æb|e|d!ñËœ UN|d"U! Èñˬ lL3 vL<ñ qæî
†Uîb8 eëdî t! «ñ ÁU~¶<œ bOï«u" vî ¨b|bÅ
PhilipsÁœdë ÃñU8 ÁU~¶<œ “« «ñ Èd"U! U$¬ ñœ të Áœd!
Æbïe|ñ vî ñËb! ¨bÅU! t¶Å«bï ñd{ Xfi|“ jOæî È«d! të v"ñuB! «ñ ʬ Ë
Èd"U! Êœdë «b3
ÆbOMJï q-Ë ‚d! t! «ñ ÁU~¶<œ d~|œ ¨b|œdë “U! «ñ ÁU~¶<œ “« bF!
v<ñUã28
Page 29

≤≤
Æ©˘ qJÅ® bOMë sÅËñ «ñ ÁU~¶<œ
≥≥
«ñ Ê“ j8 ÆbOÙœ Xëd4 uî g|Ëñ XN3 nìU‹î «ñ Ê“ j8 ¨‘Ëñ s|d"d#Rî t! Êœdë V"dî È«d!
ÆbOÙbï Xëd4 Á“«bï« “« gO! Xàd< U!
ñ«dè X<uÄ U! ”U9 ñœ tAOLÙ tïUÅ ñ«e!« të b|uÅ s£LDî Ë bOÙœ ÂU$« «ñ¬ Ë Âdï «ñ †Uëd4
Æ©˚ qJÅ® œñ«œ
˘˘
bOMë ‘uîU8 «ñ ÁU~¶<œ
¢g|ñ t"¢ œdH! dBæMî XìU4 ñœ Êœdë V"dî
æULÅ t! X<« ÁbÅ rOEM" ± Èuî ‰uÉ XìU4 ÈËñ të tïUÅ ñ«e!« U! Á«dLÙ Ê“ j8 “« ÁœUH¶<«
Æ©˙ qJÅ® b|ñˬ œu3u! «ñ eA|ñ t"“ XìU4 U" bÙœ vî Á“U3«
tïUÅ ñ«e!« “« ÁœUH¶<« ÊËb! Êœdë V"dî
ÆbOMë ÁœUH¶<« vJ" ÈUÙuî Ë UNA|ñ qîUë Êœdë V"dî È«d! tïUÅ ñ«e!« ÊËb! Ê“ j8 “«
±±
Æ©∑ qJÅ® bOMë «b3 «ñ tïUÅ ñ«e!«
C
«b3 5|UÄ XLfiè “« «ñ ʬ tAOLÙ ÆbOMJï «b3 ôU! «ñ ñ«œ tïUÅ Èd< ·UDFï« q!Uè XLfiè eÖdÙ
ÆbOMë
≤≤
Æb|d§! Ëdã uî ñœ rë ñ«bI0 «ñ ÁU~¶<œ Ë bOÙœ ÂU$« ÁbÅ ‰d¶Më ÎöîUë «ñ œu8 †Uëd4
Êœdë eO9
Æœu/ eO9 pA8 XìU4 ñœ Ê«u" vî jIã «ñ ÁU~¶<œ
ÁU~¶<œ Êœdë eO9 È«d! Êu¶<« U| s|eM! ¨qJì« bMïUî v"UF|Uî U| v|uÅ ·dÜ rO< ¨ÁbM|U< œ«uî “«
ÆbOMJï ÁœUH¶<«
Æb|d§ï ñUJ! ʬ Êœdë eO9 È«d! «ñ X‹< Ë eO" ¡UOÅ« eÖdÙ ªd¶KOã t! ÊbïU<ñ VO<¬ “« ÈdOÖuK3 È«d!
v<ñUã 29
Page 30

«ñ bïuÅ Õö« b|U! të v|UÙuî Ë Áœdë ‰U§ïœ «ñ †ñu ◊uD8 d|cÄ ·UDFï« uî ÈœUÙ Æg|ñ Êœ«œ
ÆbMë vî X|«bÙ gJî rfiOïUJî pïUÙœ ·dD!
Êœdë V"dî vîU~MÙ ÆbOMë tOK‹" Õö« “« bF! ñU! dÙ «ñ uî Èñˬ lL3 tEHæî të rOMë vî tOu"
ñœ «ñ uî tEHæî U" bÅU! “UOï X<« sJ2 ¨V<UMî gJî œdJKLà kH4 È«d! rë«d¶î Ë ¨bMK! ÈUNA|ñ
Æ©bOMë tF3«dî ¢uî Èñˬ lL3 tEHæî¢ g‹! ¨¢Êœdë eO9¢ qBã t!® bOMë tOK‹" Õö« qLà 54
C
«ñ g|ñ ‰uÉ që “« d¶î vKOî ∑ œËb4 “« gO! ñU! dÙ ñœ ¨gJî r¶fiO< œdJKLà “« ÊUMOLÉ« È«d!
ñ«dJ" d~|œ ñU! bMÇ U| p| «ñ qLà s|« ¨bOÅU! œu8 g|ñ Êœdë d¶ÙU"uë t! q|Uî dÖ« ÆbOMJï ÁU"uë
ÆbOMë
tïUÅ ñ«e!« “« ÁœUH¶<« U! Êœdë V"dî
±±
rOEM" tIK4(Precision Zoom Lock™)tF3«dî ‰Ëb3 t!® bOÙœ ñ«dè Á«u)œ Èuî ‰uÉ ÈËñ «ñ
Æ©≥ qJÅ® ©bOMë
æbÅ bÙ«u8 dÙUÜ œñ«œ ñ«dè rOEM" tIK4 d|“ ñœ të v|« ÁdºMÄ ñœ ÁbÅ »U‹¶ï« XìU4
(Precision Zoom Lock™)
«ñ ñUë dßë«b4 Èuî ‰uÉ XìU4 “« ÁœUH¶<« U! ¨bOÙœ vî ÂU$« «ñ Êœdë V"dî ñU! 5ìË« È«d! ULÅ dÖ«
Æ©π® bOMë ŸËdÅ
v<ñUã30
†ULOEM"
±
≤
≥
˘
˚
˙
∑
∏
π
Ábî¬ X<b! Èuî ‰uÉ
d¶î vKOî ±Ø˚
d¶î vKOî ≤Ø˚
d¶î vKOî ˘
d¶î vKOî ˚Ø˚
d¶î vKOî ∑Ø˚
d¶î vKOî πØ˚
d¶î vKOî ±≤
d¶î vKOî ±˚
d¶î vKOî ±∏
uî ‰uÉ †ULOEM"
Page 31

æsJ2 ÊuÇ bOMJï ÁœUH¶<« ÁU~¶<œ “« ¨X<« ÁbÅ t¶fiJÅ U| Áb|œ tîb- ‘d! g‹! “« vJ| dÖ«
ÆœuÅ tîb- “Ëd! YàU! X<«
æŸuï p| U! «ñ ʬ tAOLÙ dD8 “« »UM¶3« È«d! ¨v|« t8UÅËœ ñu¶Ä«œ¬ Êb|œ tîb- †ñu- ñœ
ÆbOMë i|uF" vK-«
æ“« q§è ¨œdOÖ ñ«dè X!uÉñ U| ñUAã ¨b|bÅ v"ñ«d4 †«dOOG" ÷dFî ñœ ÁU~¶<œ të v"ñu- ñœ
ÆbÙœ oO§D" «uÙ Ë »¬ U! «ñ œu8 ÁU~¶<œ U" bOÙœ Á“U3« ÁU~¶<œ “« ÁœUH¶<«
Êœdë ˛ñUÅ
ÆbOMJï ˛ñUÅ XàU< ≤˘ “« d¶AO! «ñ ÁU~¶<œ
¨bÅU! ÁbAï ÁœUH¶<« ÁU~¶<œ “« të vïôuÉ †bî “« bF! U| ñU! 5ìË« È«d! ÁU~¶<œ ÁœUH¶<« “« q§è
ÆbOMë ˛ñUÅ XàU< ±∞ †b0 «ñ ÁU~¶<œ
ÆX<« ‘uîU8 ÁU~¶<œ të b|uÅ s£LDî ÁU~¶<œ Êœdë ˛ñUÅ ŸËdÅ “« q§è
ÆbMë v/ ñUë dNÅ ‚d! U! rOI¶fiî ñuD! ÁU~¶<œ
±±
gOãÆbOMë q-Ë e|dÄ t! «ñ v|« t8UÅËœ ñu¶Ä«œ¬ Ë Áœ“ U3 ÁU~¶<œ ñœ «ñ ÁU~¶<œ
ÆbîU$« vî ‰uD! XàU< ±∞ œËb4 ÁU~¶<œ qîUë ˛ñUÅ
ÆbOMë ˛ñUÅ tIOèœ π∞ È«d! «ñ ÁU~¶<œ qè«b4 Êœdë V"dî ñU! p| È«d!
Èd"U! ÈUÙd~ïUAï
ætë vîU~MÙ Uî« ¨œuÅ vî sÅËñ ˛ñUÅ ⁄«dÇ ¨X< « ˛ñUÅ ‰U4 ñœ ÁU~¶<œ tJM|« Êœ«œ ÊUAï È«d!
œdë bÙ«u‹ï dOOG" ʬ @ïñ U| Ë bÅ bÙ«u‹ï ‘uîU8 ˛ñUÅ ⁄«dÇ œuÅ ˛ñUÅ ÎöîUë ÁU~¶<œ
Æ©≤ qJÅ®
ÁœUH¶<« È«d! ÁU~¶<œ 78U< ÁœUî¬
ÆbOïe! tïUÅ n|dÜ tïUÅ p| U! «ñ qO§< U| Ë g|ñ tAOLÙ ¨Êœdë V"dî ŸËdÅ “« q§è
ÁU~¶<œ “« ÁœUH¶<«
ÁbÅ Õö-« ÈUÙuî »c3
«ñ UÙuî r¶fiO< s|« ÆbÅ bÙ«u8 ‰UFã pO"Uîu"« ñuD! ¨bOMë sÅËñ «ñ ÁU~¶<œ tJM|« œdº0 gJî r¶fiO<
XìU4 Ë Ê¬ ÊËb! Ë tïUÅ ñ«e!« U! Á«dLÙ Êœdë Õö« vMF| ¨œu/ bÙ«u8 »c3 ¨Õö« Ÿuï dÙ ñœ
v<ñUã 31
Page 32

tîbIî
°X<« Áœu! `Oæ ULÅ »U‹¶ï« ¨vî«dÖ Èd¶Aî
vAJî Ê“ j8
PhilipsVOëd" d~|bJ| U! «ñ ÁœUH¶<« XìuN< Ë Èñˬ sã ULÅ Èñ«bN~ï t! “UOï ÊËb!
ÆX<« Áœdë
“« bF! «ñ ULÅ v|uA¶<œ Ë Áœdë »c3 ÁœUH¶<« 54 ñœ «ñ ÁbÅ ÁU"uë ÈUÙuî tÇñUáJ| vAJî ÂeOïUJî
Æœñ«œ vî ÁU~ï eO9 ÁœUH¶<«
“« Èuî ‰uÉ »U‹¶ï« È«d! rOEM" tIK4 Ë ÁbïuÅ eO" œu8 ‘d! b4«Ë ¨g|ñ j8 U! ÁbïuÅ o§DMî ñ«e!«
pOîuïuÖñ« dÙUÜ ÆbÅU! vî XèË ñœ v|u3 tãd Ë vìUà Õö« ÁbMMë 5LC" d¶î vKOî ±∏ U" ±Ø˚
ÆbÙœ vî ñ«dè ULÅ ñUO¶8« ñœ «ñ X4«ñ Ë bM|UÅu8 œd!ñUë ÁU~¶<œ
vAJî Ê“ j8
PhilipsÆbÅU! vî V<UMî ULÅ ÈUNOHì“UÄ Ë g|ñ t! Êœ«œ qJÅ Ë Õö« È«d! ÎöîUë
©± qJÅ® vKë ÕdÅ
AtïUÅ ñ«e!«
BÁbïuÅ «b3 Õö« b4«Ë
Cd|cÄ ·UDFï« Èuî ÈœUÙ
Dd¶KOã Ë uî Èñˬ lL3 tEHæî
E rOEM" tIK4
(Precision Zoom Lock™)
F‘uîU8ØsÅËñ tLëœ
G˛ñUÅ ⁄«dÇ
HÁU~¶<œ gOã ‰UB"« qæî
I©dáî¬ vKOî ∏∞ ØXìË ˙® v|« t8UÅËœ ñu¶Ä«œ¬
JÁbMMë eO9 ”d!
rNî
ÆbOMë Èñ«bN~ï ÁbM|¬ tF3«dî È«d! Ë bOï«u‹! Xèœ U! ÁU~¶<œ “« ÁœUH¶<« “« q§è «ñ d|“ ÈUNKLFì«ñu¶<œ
æÆbïuÅ v/ fO8 v|« t8UÅËœ ñu¶Ä«œ¬ Ë rO< ¨ÁU~¶<œ të b|uÅ s£LDî
æU! v|« t8UÅËœ ñu¶Ä«œ¬ ÈËñ ÁbÅ h‹Aî ˛U¶ìË të bOMë Xèœ ‚d! t! ÁU~¶<œ ‰UB"« “« q§è
ÆbÅU! t¶Å«œ v~MÙULÙ qæî ‚d!
æÆbOMë ÁœUH¶<« ÁbÅ tz«ñ« v|« t8UÅËœñu¶Ä«œ¬ “« jIã
æÆb|ñ«œ ÁU~ï ñËœ ÊUëœuë ”d¶<œ “« «ñ ÁU~¶<œ
æ 5! †ñ«d4 t3ñœ ñœ «ñ ÁU~¶<œ
°C Ë ±˚°C≥˚ÆbOMë Èñ«bN~ï Ë ÁœUH¶<« ¨˛ñUÅ
æd~|œ œñ«uî È«d! ÁU~¶<œ “« ÆX<« ÁbÅ v4«dÉ ÊUfiï« g|ñ Êœdë V"dî È«d! ÁU~¶<œ s|«
ÆbOMJï ÁœUH¶<«
v<ñUã32
Page 33

33
Page 34

34
2
3 4 5
6 7 8 9
10 11 12 13
14 15 16 17
1
1
1
Page 35

35
Page 36

www.philips.com
u
4203 000 34801
 Loading...