

Philips 42PF7320G, 50PF7320G User Manual

English
1
Thank you for purchasing this television set.
This handbook has been designed to help you install and operate your TV set.
We strongly recommend that you read it thoroughly.
Introduction
Table of Contents
Recycling
The packaging of this product is intended to be recycled. Apply to the local authorities
for correct disposal.
Disposal of your old product
Your product is designed and manufactured with highly quality material and components,
which can be recycled and reused. When this crossed-out wheeled bin symbol is attached
to a product, it means the product is covered by the European Directive 2002/976/EC.
Please inform yourself about the local separate collection system for electrical and
electronic products.
Please act according to your local rules and do not dispose off your old products with
your normal household waste. The correct disposal of your product will help prevent
potential negative consequences for the environment and human health.
English
2
X
X
X
X
10 cm
10 cm
10 cm
X
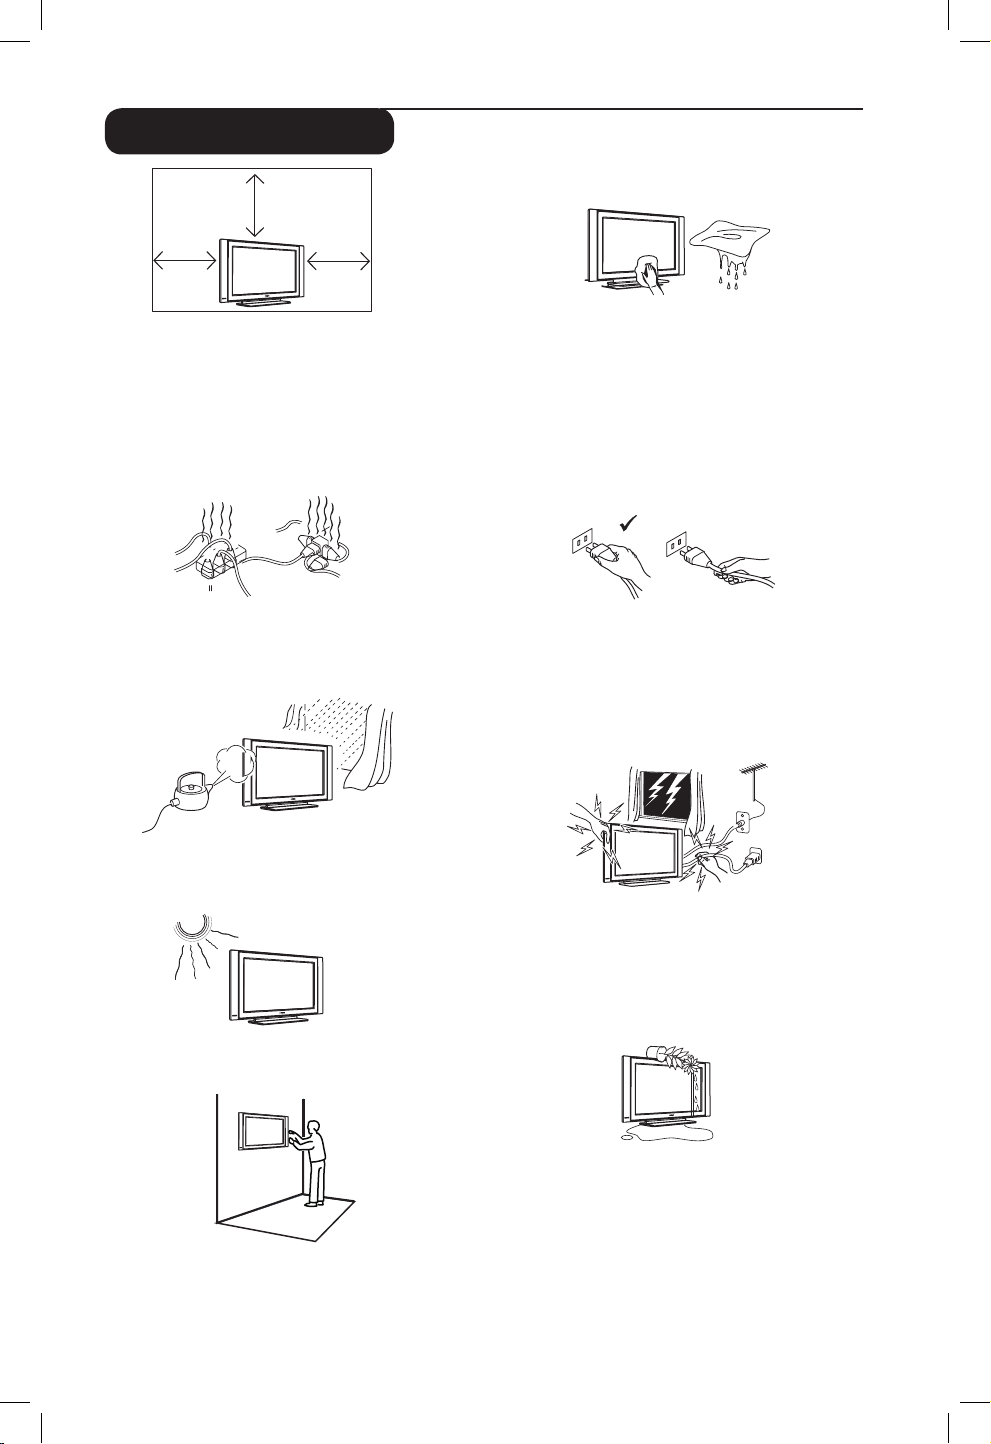
Safety Information
Avoid placing your TV set under direct sunlight
or heat.
To prevent fire or shock hazard, do not expose
your TV to rain or moisture.
Take care not to connect too many equipment
to the same mains socket as it may cause
overloading resulting in fire or electric shock.
Pull the power lead by the plug. Do not pull on
the power lead. Do not use a poor fitting mains
socket. Insert the plug fully into the mains. If it is
loose, it may cause arching and result in fire.
When cleaning the surface or the screen of the
set, wipe gently with absorbent cotton or cloth
or other soft material like chamois. Do not use
too wet a cloth which is dripping with water.
Do not use acetone, toulene or alcohol to
clean the TV. As a safety precaution, unplug the
power cord from the mains.
As a safety precaution, do not touch any part of
the TV, power lead or aerial lead during lightning
storms.
Installation of the TV set on the wall should be
carried out by qualified serviceman. Improper
and incorrect installation may render the set
unsafe.
Avoid placing vase filled with water on the TV.
Water spilled into the set could result in electric
shock. Do not operate set if water is spilled into
it. Have it checked immediately by a qualified
serviceman.
Leave at least 10 cm around each side of the
TV set to allow for proper ventilation. Place
the set on a stable, level surface. Never cover
the ventilation slots of the TV with a cloth or
other material. It may cause overheating. Do not
insert anything in the ventilation holes. If metal
or something flammable is inserted in these
holes, it may result in fire or electric shock.
X
3
2
3
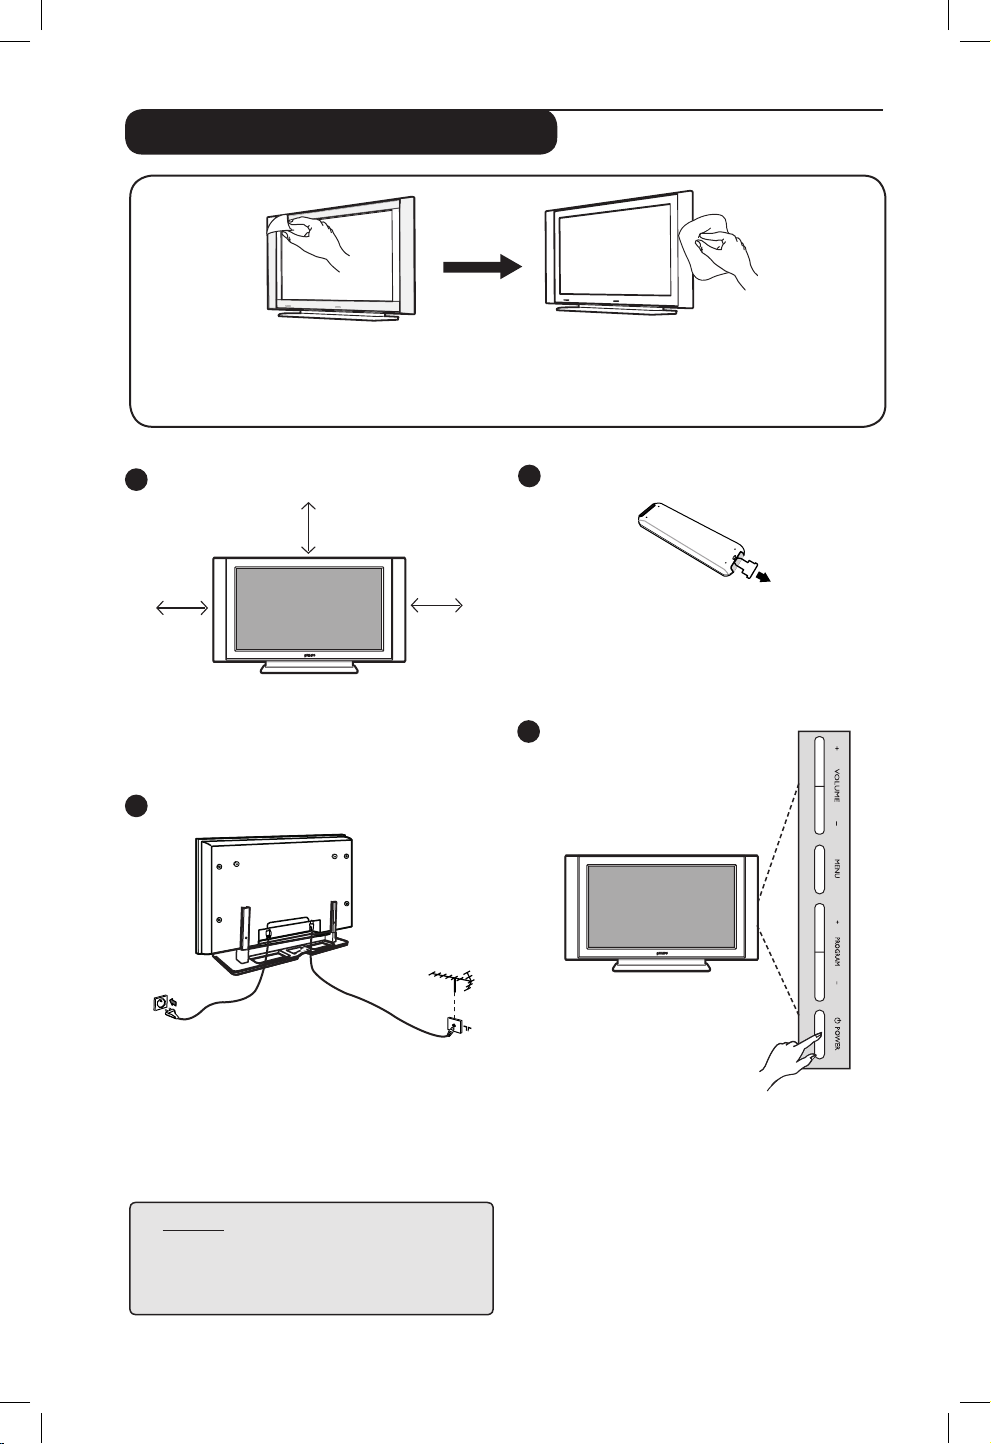
Using the Remote Control
Pull out the plastic sheet from the
battery to
enable the remote control to operate.
Switching on the TV set
• To switch on the TV set, press the POWER
key. A green indicator comes on and the
screen lights up.
• If the TV set remains in standby mode (red
indicator), press the PROGRAM – /
+ key on
the keyboard or the P – / + key on the
remote control.
4
1
Preparation / Getting started
10 cm
10 cm
10 cm
Positioning the TV set
Place your TV set on a solid stable surface,
leaving a space of at 10 cm around the set.
Connections
• Insert the aerial plug into the 75Ω :
socket at the bottom of the set.
• Insert the mains plug into a wall socket
(220-240V / 50/60Hz).
NOTE
For more details on other
connections,
refer to the
connection guide “CONNECT”.
Do not remove the protective sheet until you have completed the stand/wallmounting and
connections. Please handle with care. Use only the soft cloth provided to clean the glossy
black front of the TV.
w
4
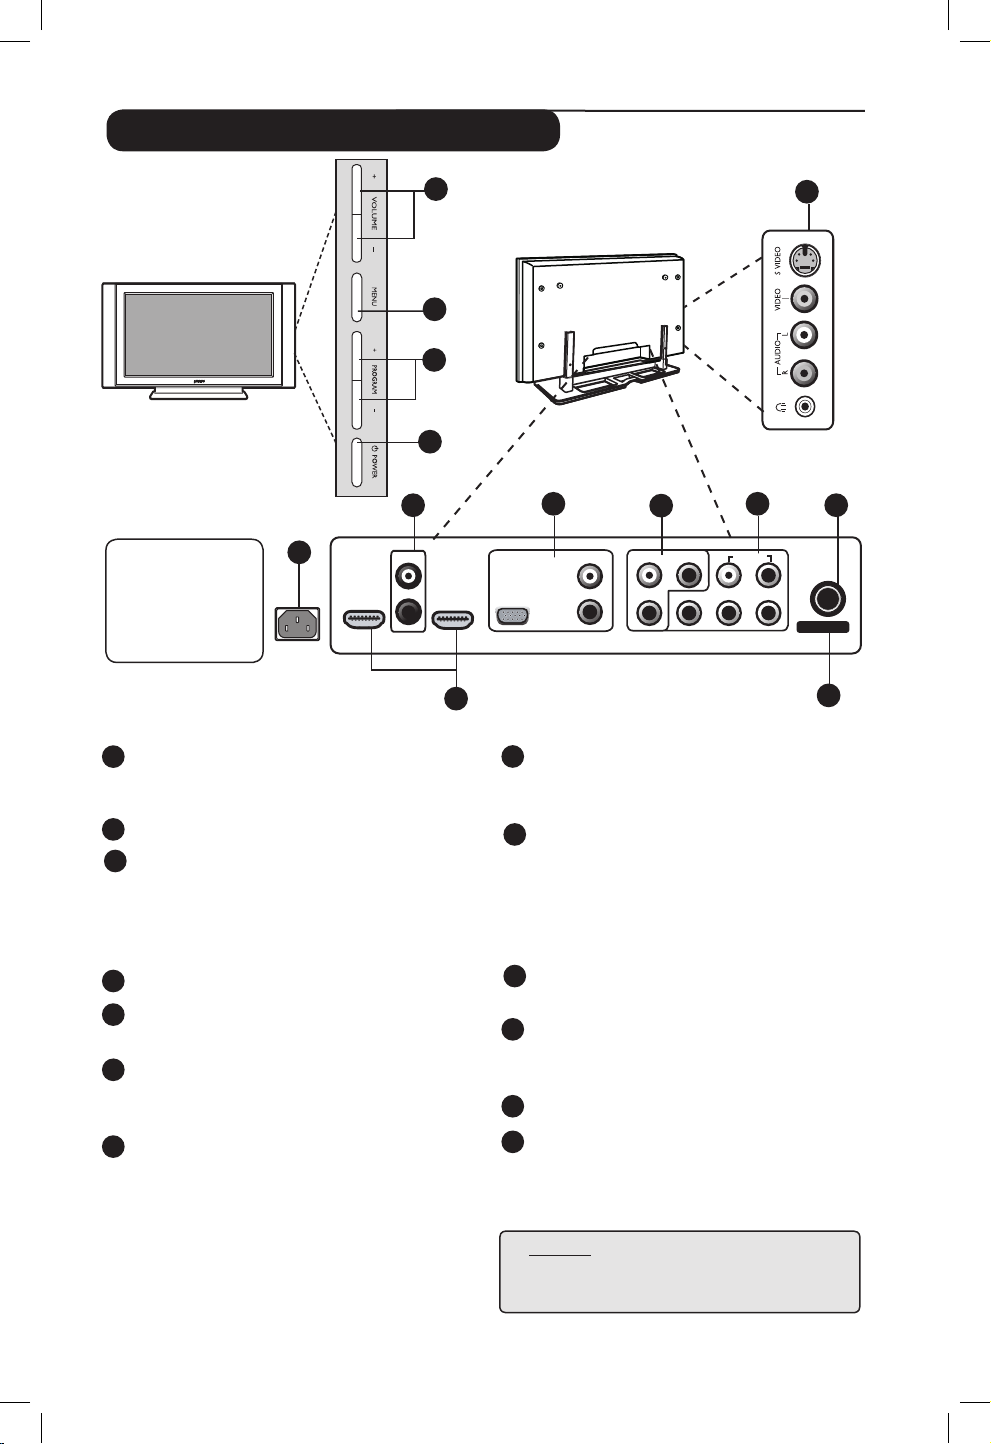
Televison keys and connectors
NOTE
For more details on connections,
refer to the guide “CONNECT”.
1
POWER .key: to switch the TV on and
off. A little power remains on even when the
Power switch is turned off.
2
VOLUME –/+ key: to adjust sound level.
3
MENU key: to access or close menus.
The PROGRAM –/+ keys can be used to
select a menu item and the VOLUME –/+
keys to enter into the selected menu item
and make adjustments.
4
PROGRAM –/+ key: to select programmes.
5
POWER socket :
Insert the mains plug into
a wall socket.
6
DVI Audio In socket: for connecting a HD
(high definition) equipment or computer with
DVI output.
7
Component Video Inputs - 2 / VGA / Audio
In sockets: to connect to equipment like VCR,
Set-Top box, games console and other devices
or to an Analogue PC which have the same
sockets.
8
AV sockets: to connect to equipment like VCR,
Set-Top box, games console and other devices
which have the same sockets.
9
Component Video Inputs - 1 / Audio In
sockets: to connect to equipment like DVD,
Set-Top box which have the same sockets.
Connect the audio inputs of the TV to the
outputs of the device together with the
Component Video Inputs.
10
TV : socket :
Insert the aerial plug into
the 75 Ω : socket.
11
HDMI 1 /HDMI 2 sockets : to connect to
set-top boxes, DVD player/recorder, High
Definition equipment or Personal Computer.
12
For service use only.
13
Side sockets: for connecting to devices like
camera or camcorder. Also allows you to
connect your headphone for your personal
listening pleasure.
13
5
MAINS ~
CAUTION : This
a Class 1
apparatus.
It must be connected
to a MAINS socket
out with a protective
earthing connection.
6
7
10
11
8
TV
CVI-1
AV
(AUDIO IN)CVI-2 / VGA
DVI (AUDIO IN)
HDMI 2 HDMI 1
L
L
R
L
R
L
R
R
Y
Pr Pb
VIDEO IIN
SERV U SERV C
AUDIO IIN
:
9
12
2
3
4
1
5
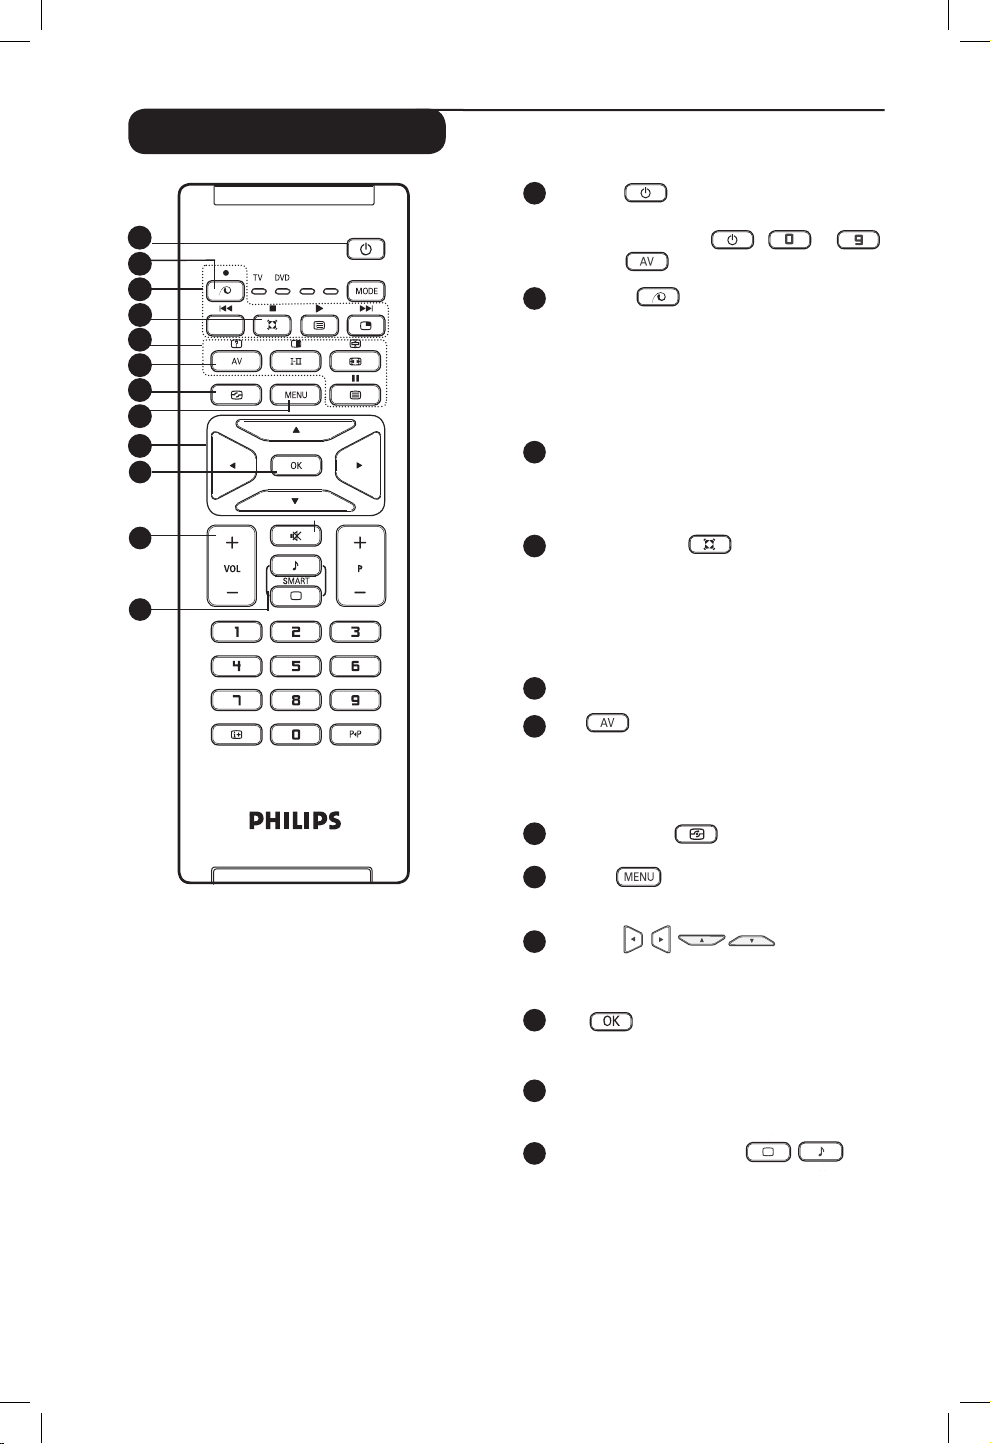
1
Standby
To set the TV to standby mode. To switch the
TV set on again, press
,
to
,
P – / + or
key.
2
Pixel Plus
Offers a unique combination of ultimate
sharpness, increased depth impression, true
natural detail, brilliant and vivid colours. Press
key for a Pixel Plus demonstration. Press key
again to exit demonstration.
3
DVD / AUX
(see “Remote Control (DVD or AUX) on
page 7).
4
Surround Sound
To turn on or off the surround sound effect.
In stereo, this gives an audio experience the
speakers are further apart. For models equipped
with Virtual Dolby Surround, you can enjoy
Dolby Surround Pro Logic sound effects
.
5
Telextext keys (see page 15).
6
AV
To display Source List to select TV or peripheral
equipment connected to AV, SIDE/SVHS, CVI 1,
CVI 2/VGA, HDMI 1 or HDMI 2.
7
Active Control
(
S
ee page 14).
8
MENU
To call up or exit the TV menus.
9
Cursors
These 4 keys are used for selection and adjustment
of menu items.
10
OK
Confirms selection.
11
Volume ( + VOL – )
Increases or decreases the sound level.
12
Smart Picture /Sound
Used to access a series of predefined picture
and sound settings (see page 14).
Remote Control keys
11
AUX
1
2
3
5
6
7
8
9
4
10
12
6
Remote Control keys
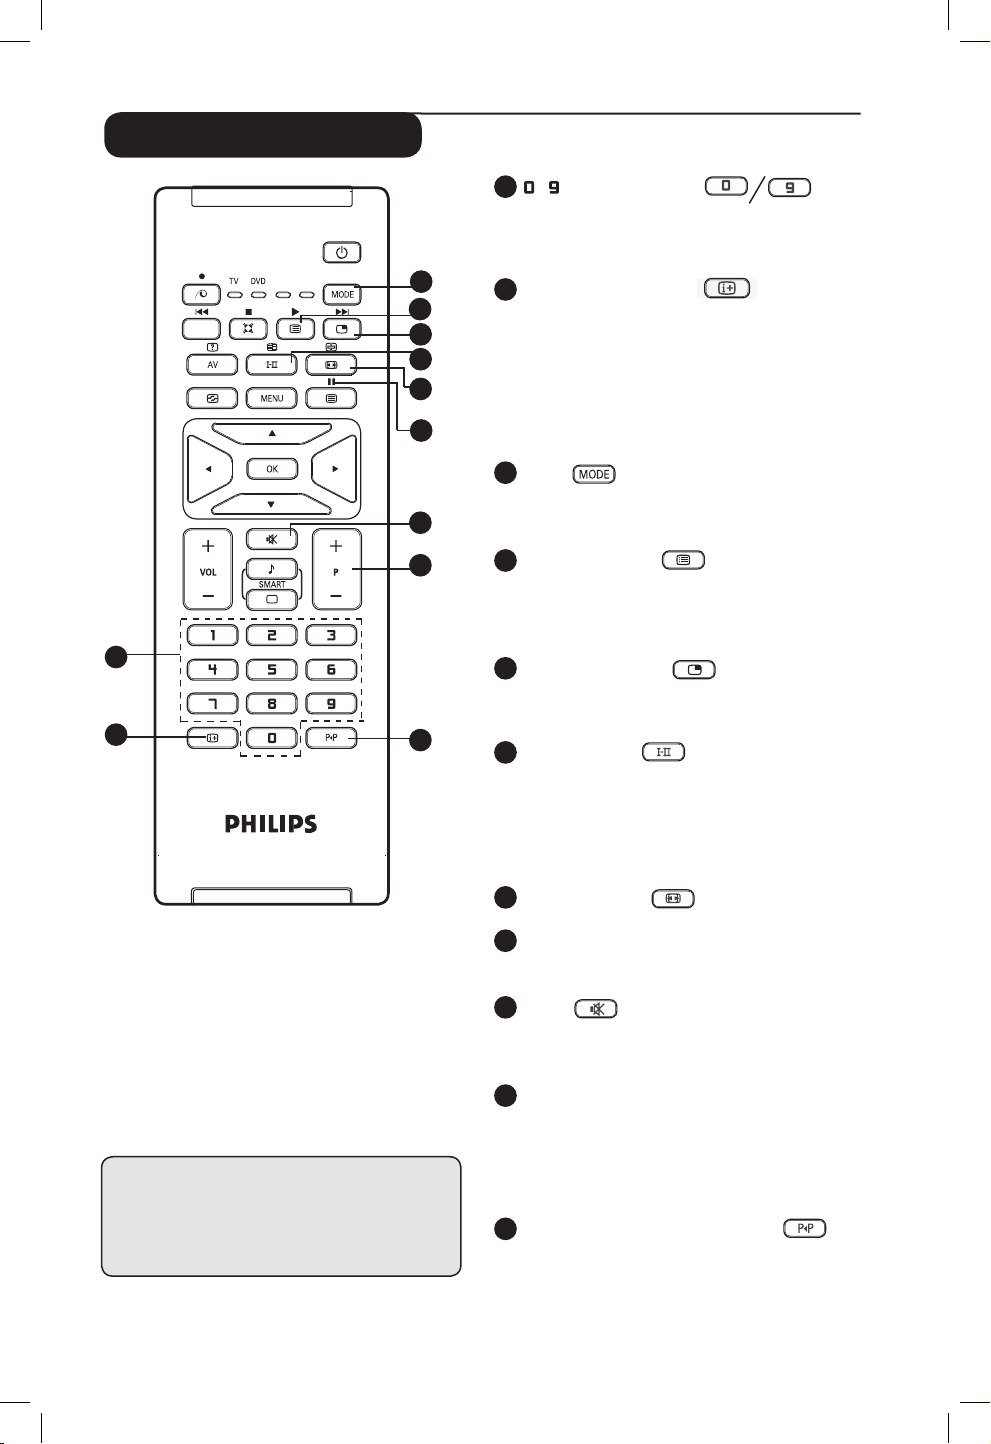
13
/
Numerical keys
For direct selection of channels. For a 2
digit channel number, the 2nd digit must
be entered before the dash disappears.
14
Screen information
To display/remove the channel number,
the sound mode, the remaining time of the
sleeptimer and the *signal strength indicator.
Press key for more than 5 seconds to
permanently display the channel number on
screen. to remove channel number, press key
again for more than 5 seconds.
15
Mode
Select between TV, DVD and AUX mode (see
“Remote Control (DVD or AUX) on page 7).
16
Programme List
To display / clear the list of programmes.
Press Î ï keys to select a programme and
Æ key to display it.
17
Picture-in-Picture
To display a PIP window on the TV screen (see
pages 20-21 on “PIP (Picture-in-Picture) feature”.
18
Sound mode
Used to force programmes in Stereo
and Nicam Stereo to Mono or, for
bilingual programmes, to choose between
Dualå or Dual». The Mono indication is red
when in forced position.
19
Screen Format
(see page 13).
20
DVD / AUX
(See “Remote Control (DVD or AUX) on page 7).
21
Mute
Press key to turn off sound and press again
to turn on sound again.
22
Selecting TV programmes (P – / +)
To select the next or previous programme.
The number and the sound mode
are displayed for a few seconds. For some
TV programmes, the title of the programme appears
at the bottom of the screen.
23
Previous/Present programme
To alternate between the last viewed and
present programme.
* The signal strength indicator shows
the signal strength of the reception
of the programme you are watching.
AUX
13
14
15
16
17
18
19
20
21
22
23

7
Menu Language
Before you proceed to do Auto Store of
channels, select your desired TV menu language.
1
Press key on the remote control
to access the TV menu on the screen.
2
Press Î ï keys repeatedly until Install
is selected.
3
Press Æ /
key to access Install menu.
(Language is highlighted).
4
Press Í Æ keys to select your language.
5
To return to previous menu, press
key.
6
To exit the menu, press the
key.
TV Menu
Picture
Sound
Features
Install
Install
Language
Auto Store
Manual Store
Sort
Name
Channel Edit
Æ
Æ
Æ
Æ
Æ
Æ
English
* Selecting the language
If you have selected the wrong language for one
reason or another and do not understand the
language to operate the set, do the following to
bring you back to your preferred language :
– press
key to exit the existing menu.
– press
key to access the TV menu.
– press
ï key repeatedly until the FOURTH
item in the TV menu is highlighted.
– press
Æ /
key to go into the Install
menu.
– press Í Æ keys to select your preferred
language (the menu will now appear in the
chosen language). You can proceed to install
the TV channels automatically.
Remote Control keys (DVD or AUX)
The remote control also allows you to control the main functions of some Philips DVD players.
Press the
key to select the required mode: DVD or AUX.
The remote control indicator lights up to display the selected mode. It switches off automatically
after 20 seconds if left idle. The mode automatically returns to TV mode.
The following keys are operational, depending on the equipment:
to
standby
fast rewind
stop
play
fast forward
record
pause
display and exit menu
programme selection
navigation and adjustments,
confirms selection
digit keys
Note : Functions not available to DVD-R device.
 Loading...