

Philips 42PF9936/37 Owner’s Manual

l:_i:_i::i!i:V_iiiii_,'T' i_i iii_G _ _I_E EY_._. _ / _I/_ ,_

Registering your model with PHILIPS makes you eligible for all of the valuable benefits
listed below, so don't miss out, Complete and return your Product Registration Card at
once to ensure"
lar;_n_ees
_qUl
S_
Know these
PHILIPS
Congratulations on your purchase, and
welcome to the "family!"
Dear PHILIPS product owner:
Thank you for your confidence in PHILIPS.¥ou've
selected one of the best-built, best-backed
products available today.We'll do everything in
our power to keep you happy with your
purchase for many years to come.
As a member of the PHILIPS "family," you're
entitled to
protection by one of the most comprehensive
warranties and outstanding service networks in
the industry.
What's more, your purchase guarantees you'll
receive all the information and special offers for
which you qualify, plus easy access to accessories
from our convenient home shopping
networl<.
Most importantly, you can count on our
uncompromising commitment to your total
satisfaction.
All of this is our way of saying welcome - and
thanks for investing in a PHILIPS product.
safety symbols
A a,
_IL This "bolt of lightning" indicates
uninsulated material within your unit
may cause an electrical shock. For the safety
of everyone in your household, please do not
remove product covering.
_The"exclamation point" calls attention
to features for which you should read
the enclosed literature closely to prevent
operating and maintenance problems.
WARNING:To reduce the risk of fire or
electric shock, this apparatus should not be
exposed to rain or moisture and objects
filled with liquids, such as vases, should not
be placed on this apparatus.
CAUTION: To prevent electric shock,
match wide blade of plug to wide slot, fully
insert.
ATTENTION : Pour 6viter les choc
61ectriques, introduire la lame la plus large de
la fiche dans la borne correspondante de la
prise et pousser jusqu'au fond.
P.S.
To get the most from your PHILIPS
purchase, be sure to complete and
return your Product Registration
Card at once.
For Customer Use
Enter below the Serial No., which is
located on the rear of the cabinet. Retain
this information for future reference.
Model No.
Serial No.
IMPORTANT SAFETY INSTRUCTIONS
Read before operating equipment
1. Read these instructions.
2. Keep these instructions.
3. Heed all warnings.
4. Follow all instructions.
S. Do not use this apparatus near watch
6. Clean only with a dry cloth.
7. Do not block any of the ventilation openings. Install in
accordance with the manufacturers instructions.
8. Do not install near any heat sources such as radiators, heat
registers, stoves, or other apparatus (including amplifiers) that
produce heat.
9. Do not defeat the safety purpose of the polarized or
grounding-type plug. A polarized plug has two blades with one
wider than the othen A grounding type plug has two blades
and third grounding prong.The wide blade or third prong are
provided for your safety.When the provided plug does not fit
into your outlet, consult an electrician for replacement of the
obsolete outlet.
10. Protect the power cord from being walked on or pinched
particularly at plugs, convenience receptacles, and the point
where they exit from the apparatus.
11. Only use attachments/accessories specified by the
manufacturel_
12. Use only with a cart, stand, tripod, bracket, or
13. Unplug this apparatus during lightning storms or when unused
14. Refer all servicing to qualified service personnel. Servicing is
15. This product may contain lead or mercury. Disposal of these
16. Damage Requiring Service - The appliance should be
A. The power supply cord or the plug has been damaged; or
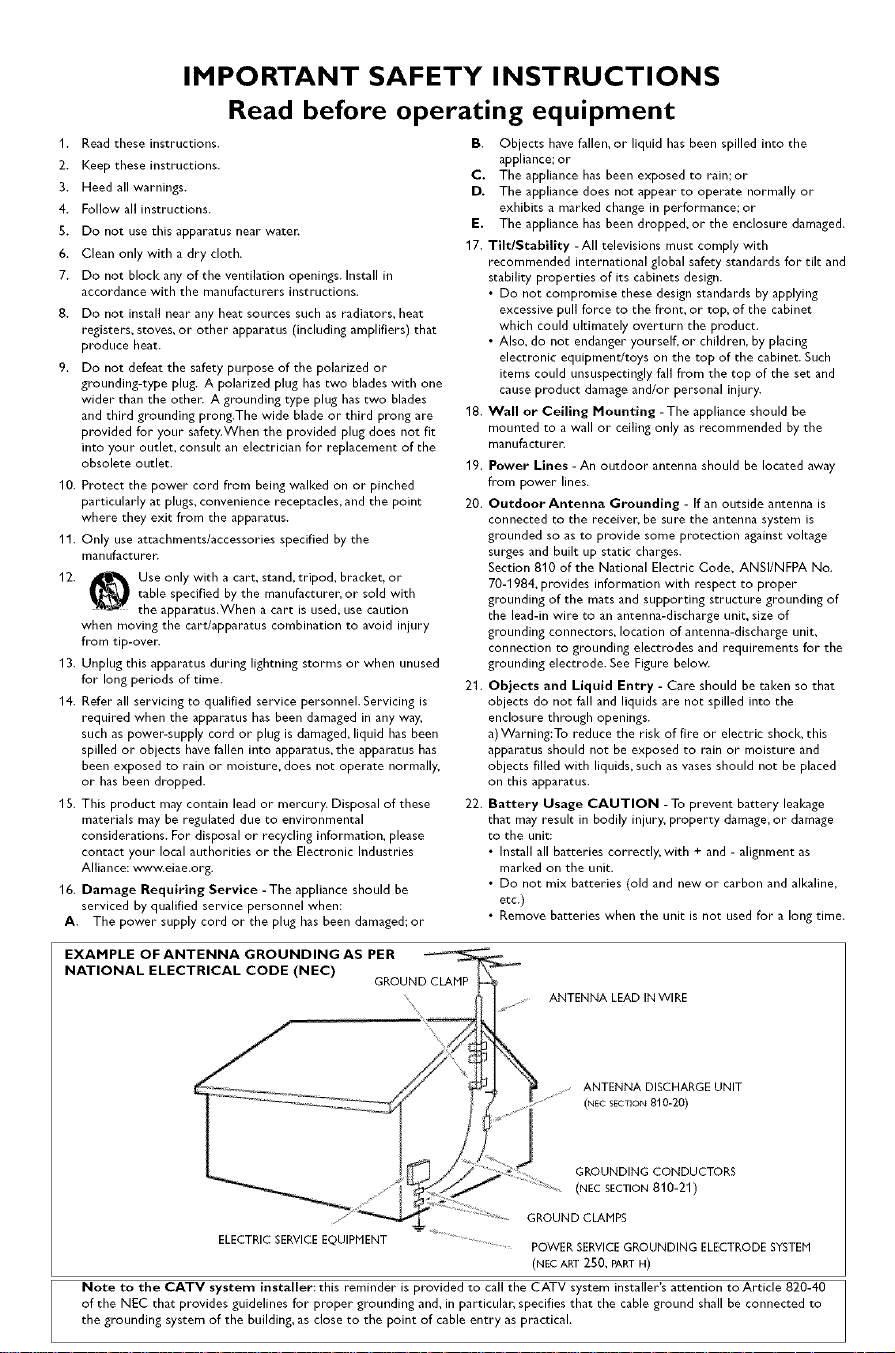
EXAMPLE OFANTENNA GROUNDINGAS PER
NATIONAL ELECTRICAL CODE (NEC)
table specified by the manufacturer, or sold with
the apparatus.When a cart is used, use caution
when moving the cart/apparatus combination to avoid injury
from tip-over.
for long periods of time.
required when the apparatus has been damaged in any way,
such as power-supply cord or plug is damaged, liquid has been
spilled or objects have fallen into apparatus, the apparatus has
been exposed to rain or moisture, does not operate normally,
or has been dropped.
materials may be regulated due to environmental
considerations. For disposal or recycling information, please
contact your local authorities or the Electronic Industries
Alliance: www.eiae.org.
serviced by qualified service personnel when:
GROUND CLAMP
B. Objects have fallen, or liquid has been spilled into the
appliance; or
C. The appliance has been exposed to rain;or
D. The appliance does not appear to operate normally or
exhibits a marked change in performance; or
E. The appliance has been dropped, or the enclosure damaged.
17. Tilt/Stability -All televisions must comply with
recommended international global safety standards for tilt and
stability properties of its cabinets design.
• Do not compromise these design standards by applying
excessive pull force to the front, or top, of the cabinet
which could ultimately overturn the product.
• Also, do not endanger yourself, or children, by placing
electronic equipment/toys on the top of the cabinet. Such
items could unsuspectingly fall from the top of the set and
cause product damage and/or personal injury.
18. Wall or Ceiling Nounting -The appliance should be
mounted to a wall or ceiling only as recommended by the
manLifactLirel_
19. Power Lines -An outdoor antenna should be located away
from power lines.
20. Outdoor Antenna Grounding - If an outside antenna is
connected to the receiver, be sure the antenna system is
grounded so as to provide some protection against voltage
surges and built up static charges.
Section 810 of the National Electric Code, ANSI/NFPA No.
70-1984, provides information with respect to proper
grounding of the mats and supporting structure grounding of
the lead-in wire to an antenna-discharge unit, size of
grounding connectors, location of antenna-discharge unit,
connection to grounding electrodes and requirements for the
grounding electrode. See Figure below.
21. Objects and Liquid Entry - Care should be taken so that
objects do not fall and liquids are not spilled into the
enclosure through openings.
a) Warning:To reduce the risk of fire or electric shock, this
apparatus should not be exposed to rain or moisture and
objects filled with liquids, such as vases should not be placed
on this apparatus.
22. Battery Usage CAUTION -To prevent battery leakage
that may result in bodily injury, property damage, or damage
to the unit:
• Install all batteries correctly, with + and - alignment as
marked on the unit.
• Do not mix batteries (old and new or carbon and alkaline,
etc.)
• Remove batteries when the unit is not used for a long time.
ANTENNA LEAD IN WIRE
N
ANTENNA DISCHARGE UNIT
(NEC SECTION 810-20)
GROUNDING CONDUCTORS
(NEC SECTION 810-2-1)
GROUND CLAMPS
ELECTRIC SERVICE EQUIPMENT POWER SERVICE GROUNDING ELECTRODE SYSTEM
(NECART 250, PARTH)
Note to the CATV system installer:this reminder is provided to call the CATV system installer's attention to Article 820-40
of the NEC that provides guidelines for proper grounding and, in particular, specifies that the cable ground shall be connected to
the grounding system of the building, as close to the point of cable entry as practical.
Help?
If'this instructior manu Ji aoes not g_vean answer or f'Tibs" do not solve vour TV oroblem, _ou can ca vour
Local Phillos _ustomer or Service Centre. See me suoolled World-wide guarantee oooKle_
Please. havc the Model ar :JProduct number wnlcr vou can _indat me DacK of your reJevslon seeor on t _e
packaging, read_ before calling the Philips helollne.
Model; 30PF9946/37; 37/42PF993_ 3. Product No
Care of the screen
Do not mucn _usn or rub or sTriKeme screen wlrn an ruing nara as mls ma scrarcn, mar or aamage me
screen oermanenn_4 Do not rub w_tn aust c_omes wlm cnemlca_ treatment, Do not touc _me surface with bare
nanas or greasy clam some cosmencs are aetnmental _o _r _ screen). Unplug the TV before :_eanlng Tne
screen Vhen the surf-acebecomes dust_xblease wipe gently with absorbent cotton or othe soff r _atenals hke
cnamois soaks. Do nor use acetone, to uene ana alconol oecause me cause cnemlcal aamage,
Do not use Jula aeaners or aemso cleaners, Wibe off sallva _r water arc _s as soon ;s oossible. Their long
time contact wire me screen cause_ aeformanons ana colour fbding,
Warning concerning stationary images on the TV screen
A charactensnc cfPlast a Disblav Panels is th_ alspJaylng me same image for a ong rime can cause a
_ermanenr after-image to remc n on the screen,This s callea onost_nor aura in.
Normal use of the T_/sr _ula involve me snowing of pictures mar contain constant y moving ana cnanglng
images mat TTIIthe screen,
Preparation)
O Wall mounting instructions/Table stand
How to mount the supplied stand and/or wall
mount bracket, see the supplied separate
leaflet. Make sure that the wall mount is being
fixed securely enough so that it meets safety
standards.
The weight of theTV (excL packaging) is about
40 Lbs (30PF9946); 66 Lbs (37PF9946);
92 Lbs (42PF9946).
Note: Other (not supplied) stands are optional
accessories, Consult your dealen
Make sure that air can circulate freely through
the ventilation slots.
To prevent any unsafe situations, no naked
flame sources, such as lighted candles, should
be placed on or in the vicinity.Avoid heat,
direct sunlight and exposure to rain or water:
The equipment shall not be exposed to
dripping or splashing.
O Insert the aerial plug firmly into the aerial
socket -It- at the bottom of the TV. For best
picture quality use the suppressor:aerial cable
supplied.
O Insert the power plug supplied into the mains
at the bottom of theTV and in the wall socket
having a mains voltage of 96-140V.
To prevent damaging the power (AC) cord
which could cause a fire or electric shock, do
not place theTV on the cord.
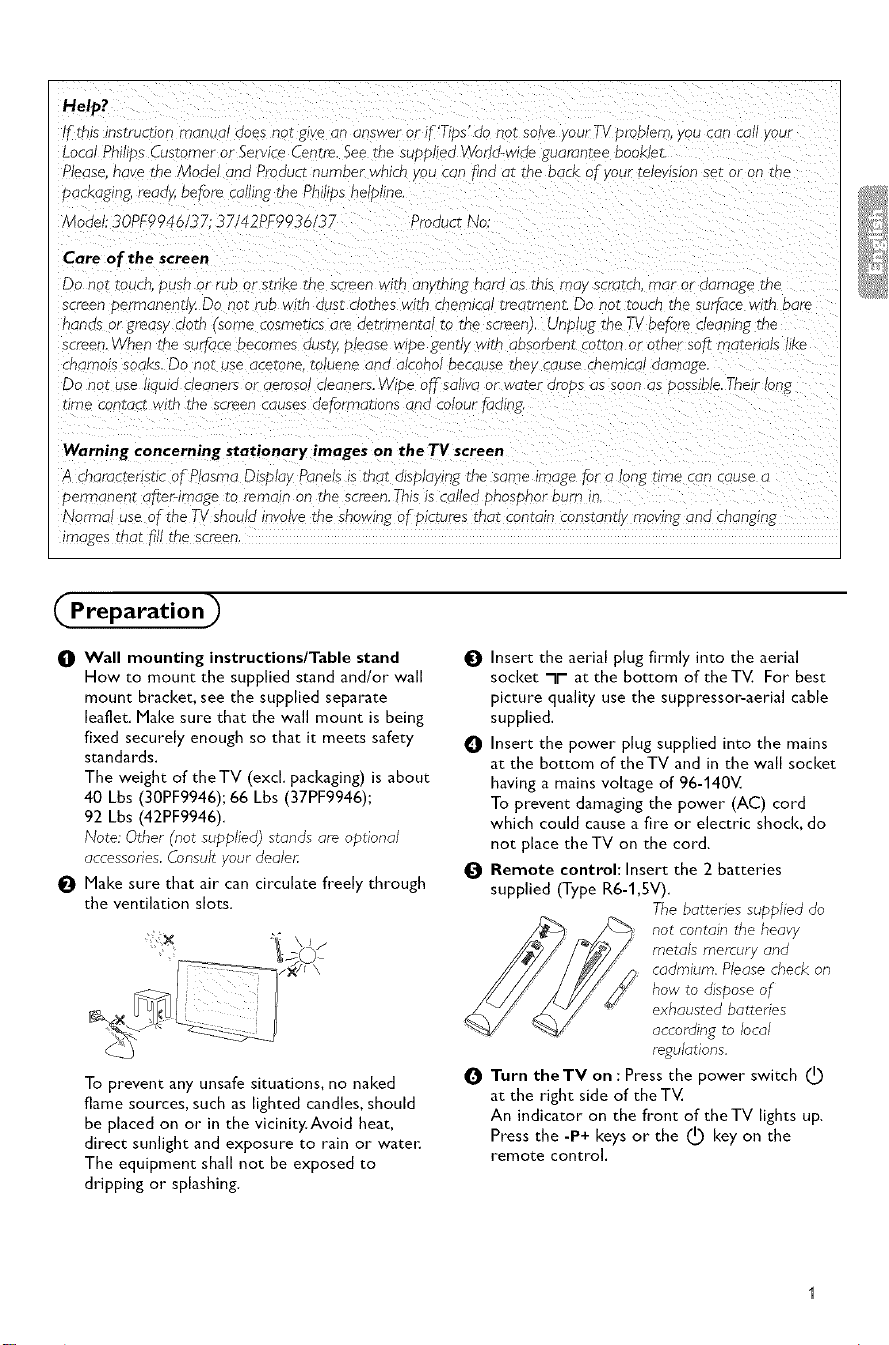
O Remote control: Insert the 2 batteries
supplied (Type R6-1,SV),
The batteries supplied do
not contain the heavy
metals mercury and
cadmium, Please check on
how to dispose of
exhausted batteries
according to local
regulations.
O Turn theTV on : Press the power switch I_
at the right side of theTV.
An indicator on the front of theTV lights up,
Press the -P+ keys or the I_ key on the
remote control,
To use the menus )
O Press the MENU button on the remote control
to summon the main menu.At any moment you
can exit the menu by pressing the MENU
button again.
O Use the cursor up/down to select Picture,
Sound, Features, Install or Mode.
Use the cursor in the right direction to select
the menu item.
TV menu
O Use the cursor up/down again to select the
control you want to select or to adjust,
Press the OK button to activate.
Note: Items temporary not available or not relevant are
displayed in a light grey color and cannot be selected.
f
TV Menu
Picture I1_ Brightness
Sound Color
Features Picture
Install Sharpness
Mode Tint
Picture
Brightness I_ 4_; _
Color
Picture
Sharpness
Tint
Color Temp
f
Sound
Equalizer _ 120 Hz
Balance 500 Hz
AVL 1500 Hz
DolbyVirtual ....
SAP
Sound
Picture menu:
• Brightness: this changes picture brilliance,
• Color: this changes the intensity of the color.
• Picture: this improves the detail of the lightest parts of the
picture.
• Sharpness: this changes the picture definition,
• Tint: this adjusts the picture to obtain natural skintones.
• ColorTemp: this changes the color rendering: Cool (bluer).
Normal (balanced) or Warm (redder),
Sound menu:
• Equalizer: to adjust the sound tone (from bass 120 Hz to
treble 10 kHz).
• Balance: this balances the soun_ on the left and right
speakers
• AVL !'Automatic Volume Leveller): this is used to limit
increases in sound, especially on program change or
J
J
advertising slots,
• DolbyVirtuah simulates the surround sound experience from
2 speakers using Dolby Pro Logic*" providing the listener with
the sensation of being surrounded by additional speakers.
• SAP: is an additional part of the stereo broadcast system:
Sent as a third audio channel, an SAP can be heard apart from
the currentTV program sound.TV channels are free to use
SAP for any number of purposes. (Not available if not present
with a selected program).
• Sound: this allows you to toggle between Stereo or Mona
sound (if stereo is present on a selected TV program).
f
Features
Timer I_ Time
AutoLock Start Time
Contrast+ Stop Time
DNR Channel No
PIP Activate
Display
•Timer, AutoLock and PIP: see p. 10-13_
• Contrast+; automatic adjustment of the picture contrast
which permanently sets th e darkest part of the picture to
black,
• DNR: attenuates picture noise (snow)in difficult reception
conditions.
J
How to search for TV channels
Picture Language
Sound Tuner Mode|
Features Auto Program I
I TV Menu
Install I_ Channel edit I
Mode
J
If you want to re-install yourTV proceed as
follows:
O Press the MENU button on the remote
control.
Use the cursor up/down to select Install.
Press the cursor right to enter the Install
menu.
Select the menu language
O Use the cursor left/right.
Press the cursor up/down to select your
language.
Store TV channels )
Select the Tuner mode
Allows you to change the TV's signal input to cable,
antenna or auto mode.The auto mode setting
helps theTV determine the type of signal or
channels being received when auto program is
activated,
Select Tuner Mode in the Install menu.
0
O
Press the cursor right,
Note: It is recommended to keep the pmdeflned
Automatic way of autopro_rammin_. In case of
di_culties in autopmgrt_mming with the automatic
method choose for Antenna or Cable whether
antenna or cable signals are present.
When Auto is selected, theTV will
automatically detect whether or not cable
signal input is present.
When Antenna is selected, theTV will detect
antenna signals and will search for all antenna
TV channels available in your local area.
When Cable is selected, theTV will detect
cable signals and will search for all cable TV
channels available in your local area.
Auto Program
annel .._. ....
Ih Auto Program 1
0 Select Auto Program in the Install menu.
Note:All channels must be unlocked in order to
autopro_ram. If requested enter your code to unlock
all channels. (See TV,Features, AutoLock, p. 11.)
_1 Press the cursor right.
The autostore option label Start ?appears.
0 Press the cursor right.
0 The progress of autoprogramming is displayed.
Editing of channels
hannel I_
_< Channel Edit )
ipped On/Off
This feature allows you to edit or skip channels
from the channel list which have bad of weak
signals or channels which you do not watch often,
Note: Once a channel is skipped, you cannot select it
with the -P+ button; you can only access the channel
with the digit buttons.
0 Select Channel Edit in the Install menu;
_1 Press the cursor right to enter the channel list.
0 Select the channel you want to skip with the
cursor left/right.
0 Press the cursor down.
Select On or Off,
Press the cursor up/down to select another
channel and repeat steps 0 - O.
Q Press the MENU button to return to the Install
menu.
Note: Toadd back channels to the list, repeat steps
OtoO.
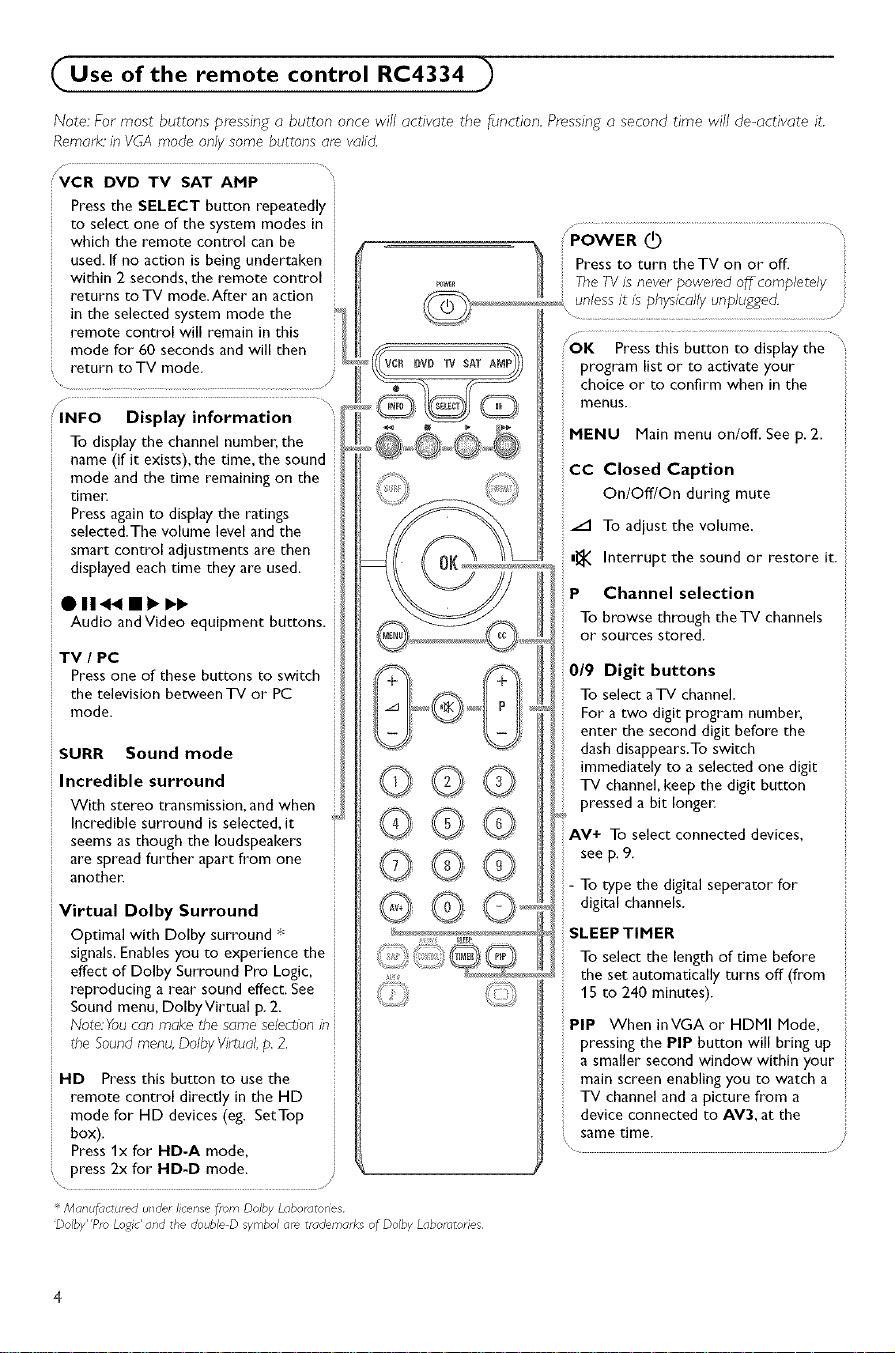
Use of the remote control RC4334 )
Note: For most buttons pressing a button once will activate the function. Pressing a second time will de-activate it.
Remark' in VGA mode only some buttons are vahd,
/ .......
DVD TV SAT AMP
Press the SELECT button repeatedly
to select one of the system modes in
which the remote control can be
used. If no action isbeing undertaken
within 2 seconds, the remote control
returns to "iV mode.After an action
in the selected system mode the
remote control will remain in this
mode for 60 seconds and will then
return to TV mode.
\ .............................................................. z
INFO Display information
To display the channel number, the
name (if it exists), the time, the sound
mode and the time remaining on the
timet_
Press again to display the ratings
selected.The volume level and the
smart control adjustments are then
displayed each time they ate used.
O 1144 mml__
Audio andVideo equipment buttons.
TV I PC
Press one of these buttons to switch
the television between TV or PC
mode.
SURR Sound mode
Incredible surround
With stereo transmission, and when
Incredible surround is selected, it
seems as though the loudspeakers
are spread further apart from one
another.
Dolby Surround
Optimal with Dolby surround _
signals. Enables you to experience the
effect of Dolby Surround Pro Logic,
reproducing a rear sound effect. See
Sound menu, DolbyVirtual p. 2.
Note:Youcan make the sameselectionin
the Soundmenu, DolbyVirtual, p, 2,
HD Press this button to use the
remote control directly in the HD
mode for HD devices (eg. SetTop
box).
Press lx for HD-A mode,
press 2x for HD-D mode.
.... Tne TV Is never powered off completely ::
r_w iv SAT program list or to activate your
©©©
@©©
©@@
®©
POWER (_)
Press to turn the TV on or off.
unless it is physically unplugged.
'OK Pressthis button to displaythe '
choice or to confirm when in the
menus.
MENU Main menu on/off. See p. 2.
CC Closed Caption
On/Off/On during mute
/1 TO adjust the volume.
m_ Interrupt the sound or restore it.
P Channel selection
To browse through the'iV channels
or sources stored.
019 Digit buttons
To select aTV channel.
For a two digit program number,
enter the second digit before the
dash disappears.To switch
immediately to a selected one digit
TV channel, keep the digit button
pressed a bit longer:
AV+ To select connected devices,
see p. 9.
- To type the digital seperator for
digital channels.
SLEEPTIMER
To select the length of time before
the set automatically turns off (from
15 to 240 minutes).
PIP When inVGA or HDMI Node,
pressing the PIP button will bring up
a smaller second window within your
main screen enabling you to watch a
"iV channel and a picture from a
device connected to AV3, at the
same time.
/
Man #actur_d under license from Dolby Laboratones
'Dolby"Pm Logic' and the double D symbol are trademarks of Dolby Laboratories
 Loading...