

Page 1

User manual
Register your product and get support at
www.philips.com/support
Call us:
1-833-978-3323
To obtain assistance, contact Philips customer care center;
In the U.S.A., Canada, Puerto Rico, or the U.S. Virgin Islands
Page 2

Know these safety symbols
equilateral triangle, is intended to alert the user to the
CAUTION
RISK OF ELECTRIC SHOCK
DO NOT OPEN
CAUTION: TO REDUCE THE RISK OF ELECTRIC SHOCK, DO NOT
REMOVE COVER (OR BACK). NO USER-SERVICEABLE PARTS ARE
INSIDE. REFER SERVICING TO QUALIFIED SERVICE PERSONNEL.
The caution marking is located on the rear or bottom of the cabinet.
WARNING: To reduce the risk of e or electric shock, do not expose this apparatus to rain or moisture.
Apparatus shall not be exposed to dripping or splashing and no ob
such as vases, shall be placed on the apparatus.
CAUTION: To prevent electric shock, match wide blade of plug to wide slot, fully insert.
presence of uninsulated “dangerous voltage” within
the apparatus’s enclosure
magnitude to constitute a risk of electric shock to
persons.
The exclamation point within an equilateral triangle
intended to alert the user to the presence of important
operating and maintenance (servicing) instructions in
the literature accompanying the apparatus.
led with liquids,
is
For fastest support visit us online for chat and self service
solutions at www.philips.com/support
CHILD SAFETY:
PROPER TELEVISION PLACEMENT MATTERS
THE CONSUMER ELECTRONICS INDUSTRY CARES
Manufacturers, retailers and the rest of the consumer technology industry are committed to making home
entertainment safe and enjoyable.
As you enjoy your television, please note that all televisions - new and old- must be supported on proper stands or
installed according to the manufacturer's recommendations. Televisions that are inappropriately situated on
TUNE IN TO SAFETY
ALWAYS follow the manufacturer’s recommendations for the safe installation of your television.
ALWAYS read and follow all instructions for proper use of your television.
NEVER allow children to climb on or play on the television or the furniture on which the television is placed.
NEVER place the television on furniture that can easily be used as steps, such as a chest of drawers.
ALWAYS install the television where it cannot be pushed, pulled over or knocked down.
ALWAYS route cords and cables connected to the television so that they cannot be tripped over, pulled or grabbed.
WALL OR CEILING MOUNT YOUR TELEVISION
ALWAYS contact your retailer about professional installation if you have any doubts about your ability to safely
mount your television.
ALWAYS
a Nationally Recognized Testing Laboratory (NRTL).
ALWAYS follow all instructions supplied by the television and mount manufacturers.
ALWAYS make sure that the wall or ceiling where you are mounting the television is appropriate. Some mounts are
contact a professional installer.
Televisions can be heavy. A minimum of two people is required for a wall or ceiling mount installation.
MOVING AN OLDER TELEVISION TO A NEW PLACE IN YOUR HOME
Many new television buyers move their older CRT televisions into a secondary room after the purchase of a
ALWAYS place your older CRT television on furniture that is sturdy and appropriate for its size and weight.
NEVER place your older CRT television on a dresser where children may be tempted to use the drawers to climb.
ALWAYS make sure your older CRT television does not hang over the edge of your furniture.
Page 3
Read these instructions.
1.
Keep these instructions.
2.
Heed all warnings.
3.
Follow all instructions.
4.
Do not use this apparatus near water.
5.
Clean only with dry cloth.
6.
Do not block any ventilation openings. Install in
7.
accordance with the manufacturer’s instructions.
Do not install near any heat sources such as
8.
radiators, heat registers, stoves, or other apparatus
(i
Do not defeat the safety purpose of the polarized
9.
rs) that produce heat.
or grounding-type plug. A polarized plug has two
blades with one wider than the other. A
grounding type plug has two blades and a third
grounding prong. The wide blade or the third
prong are provided for your safety. If the provided
plug does no o your outlet, consult an
electrician for replacement of the obsolete outlet.
.
Protect the power cord from being walked on or
10
pinched particularly at plugs, convenience
receptacles, and the point where they exit from
the apparatus.
11.
Only use attachments/accessories s
manufacturer.
12.
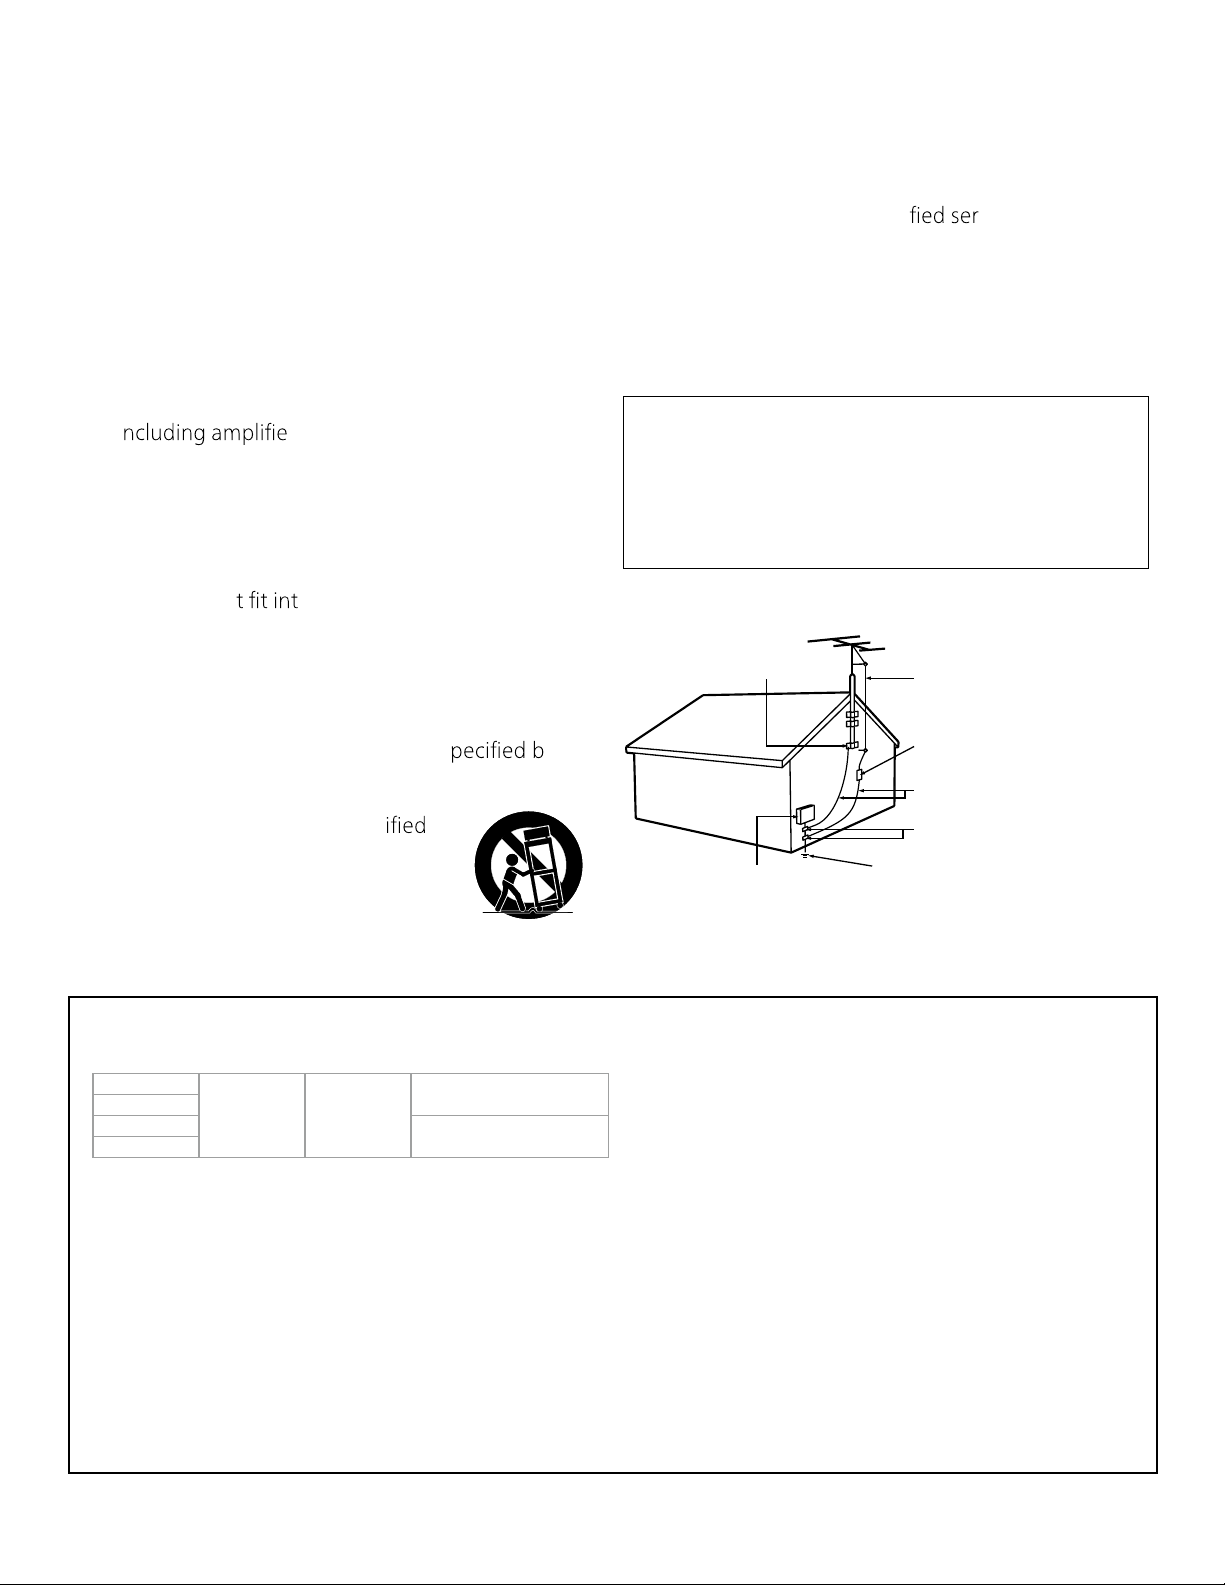
Use only with the cart, stand,
tripod, bracket, or table spec
by the manufacturer, or sold with
the apparatus. When a cart is
used, use caution when moving
the cart/apparatus combination to
avoid injury from tip-over.
y the
snoitcurtsni ytefas tnatropmI
Unplug this apparatus during lightning storms or
13.
when unused for long periods of time.
Refer all servicing to quali
14.
Servicing is required when the apparatus has been
damaged in any way, such as power-supply cord
or plug is damaged, liquid has been spilled or
objects have fallen into the apparatus, the
apparatus has been exposed to rain or moisture,
does not operate normally, or has been dropped.
Note to the CATV system installer:
This reminder is provided to call the CATV system
installer’s attention to Article 820 -40 of the NEC that
provides guidelines for proper grounding and, in
particular, specifies that the cable ground shall be
connected to the grounding s ystem of the building,
as close to the point of cable entry as practical.
Example of antenna grounding as per NEC National Electric Code
ND CLAMP
GROU
ELECTRIC SERVICE EQUIPMENT
ANTENNA LEAD IN WIRE
ANTENNA DISCHARGE UNIT
(NEC SEC TION 810-20)
GROUNDING CONDUCTORS
(NEC SEC TION 810-21)
GROUND CLAMPS
POWER SERVICE GROUNDING
ELECTRODE SYSTEM (NEC ART 250,
PART H)
vice personnel.
Wall mount bracket kit
dnarB # ledoM noisnemid wercS
70”
55”
43”
40”
●
Your TV meets the VESA standard for wall mounting. Consult
with your local dealer for a wall mount bracket which is compatible with your TV model.
●
The recommended wall mount bracket kit (sold separately) allows
the mounting of the TV on the wall.
●
For detailed information on installing the wall mount, refer to the
wall mount Instruction book.
●
Funai Corporation is not responsible for any damage to the prod-
uct or injury to yourself or others if you elect to install the TV wall
mount bracket or mount the TV onto the bracket on your own.
●
The wall mount bracket must be installed by experts.
SANUS VLT6-B1
M6 x 1.378” (35 mm)
M4 x 1.378” (35 mm)
Funai Corporation is not liable for these types of accidents or
injuries noted below.
●
Install the wall mount bracket on a sturdy ver tical wall.
●
If installed onto a ceiling or slanted wall, the TV and wall mount
bracket may fall which could result
●
Do not use screws that are longer or shorter than their speci�ed
length. If screws too long are used this may cause mechanical or
elec trical damage inside the TV set. If screws too short are used
this may cause the TV set to fall.
●
Do not fasten the screws by excessive force. This may damage the
product or cause the produc t to fall, leading to an injury.
●
For safety reasons use 2 people to mount the T V onto a wall
mounting bracket.
●
Do not mount the TV onto the wall mounting bracket while your
TV is plugged in or turned on. It may result in an elec trical shock
injury.
Top : 1 1.8” (30 cm)
: edis thgir dna tfeL 5.9” (15 cm)
mottoB : 3.9” (10 cm)
in a severe injury.
.ecaps hcum siht wolla ,llaw eht no tinu eht gnillatsni nehW
Page 4

Notice
Trademarks are the property of Koninklijke Philips N.V. or their respective
owners.
Funai Corporation reserves the right to change products at any time without being obliged to adjust earlier supplies accordingly.
The material in this Owner’s manual is believed adequate for the intended
use of the system. If the product or its individual modules or procedures
are used for purposes other than those specified herein, confirmation of
their validity and suitability must be obtained. Funai Corporation warrants
that the material itself does not infringe any United States patents. No
further warranty is expressed or implied.
Funai Corporation cannot be held responsible neither for any errors in the
content of this document nor for any problems as a result of the content in
this document. Errors reported to Funai Corporation will be adapted and
published on the Funai Corporation support website as soon as possible.
Pixel characteristics
This LCD product has a high number of color pixels. Although it has effective pixels of 99.999% or more, black dots or bright points of light (red,
green or blue) may appear constantly on the screen. This is a structural
property of the display (within common industry standards) and is not a
malfunction.
Warranty
No components are user serviceable. Do not open or remove covers to
the inside of the product. Repairs may only be done by service centers
and official repair shops. Failure to do so shall void any warranty, stated or
implied.
Any operation expressly prohibited in this manual, any adjustments or
assembly procedures not recommended or authorized in this manual shall
void the warranty.
Federal communications commission notice
This equipment has been tested and found to comply with the limits
for a Class B digital device, pursuant to part 15 of the FCC Rules.
These limits are designed to provide reasonable protection against
harmful interference in a residential installation. This equipment
generates, uses and can radiate radio frequency energy and, if not
installed and used in accordance with the instructions, may cause
harmful interference to radio communications. However, there is no
guarantee that interference will not occur in a particular installation.
If this equipment does cause harmful interference to radio or
television reception, which can be determined by turning the
equipment off and on, the user is encouraged to try to correct the
interference by one or more of the following measures:
●
Reorient or relocate the receiving antenna.
●
Increase the separation between the equipment and the receiver.
●
Connect the equipment into an outlet on a circuit different from that to
which the receiver is connected.
●
Consult the dealer or an experienced radio or television technician for
help.
Modifications
This apparatus may generate or use radio frequency energy. Changes or
modifications to this apparatus may cause harmful interference.
Any modifications to the apparatus must be approved by Funai Corporation.
The user could lose the authority to operate this apparatus if an unauthorized change or modification is made.
Cables
Connections to this device must be made with shielded cables with metallic RFI/EMI connector hoods to maintain compliance with FCC Rules and
regulations.
Canadian notice
CAN ICES-3 (B)/NMB-3 (B)
Analog and digital television receiving apparatus, Canada BETS-7/
NTMR-7.
The following FCC/IC RSS applies to the wireless LAN
adapter included in this product.
FCC caution: Any changes or modifications not expressly approved by the party responsible for compliance could void the
user’s authority to operate this equipment.
This transmitter must not be co-located or operated in conjunction
with any other antenna or transmitter.
FCC/IC RF Exposure Compliance
This equipment complies with FCC/IC radiation exposure limits set
forth for an uncontrolled environment and meets the FCC radio
frequency (RF) Exposure Guidelines and RSS-102 of the IC radio
frequency (RF) Exposure rules.
This equipment should be installed and operated keeping the radiator at least 20cm or more away from your body.
This device complies with Part 15 of FCC Rules and Industry Canada licence-exempt RSS standard(s). Operation is subject to the
following two conditions: (1) this device may not cause interference, and (2) this device must accept any interference, including
interference that may cause undesired operation of this device.
5150-5250 MHz band is restricted to indoor operations only.
High-power radars are allocated as primary users (i.e. priority users) of the bands 5250-5350 MHz and 5650-5850 MHz and that
these radars could cause interference and/or damage to LE-LAN
devices.
Compliance with FCC requirement 15.407(c) and IC
requirement RSS-210 A9.4.4
Data transmission is always initiated by software, which is the
passed down through the MAC, through the digital and analog
baseband, and finally to the RF chip. Several special packets are
initiated by the MAC. These are the only ways the digital baseband
portion will turn on the RF transmitter, which it then turns off at
the end of the packet. Therefore, the transmitter will be on only
while one of the aforementioned packets is being transmitted. In
other words, this device automatically discontinue transmission in
case of either absence of information to transmit or operational
failure.
Page 5
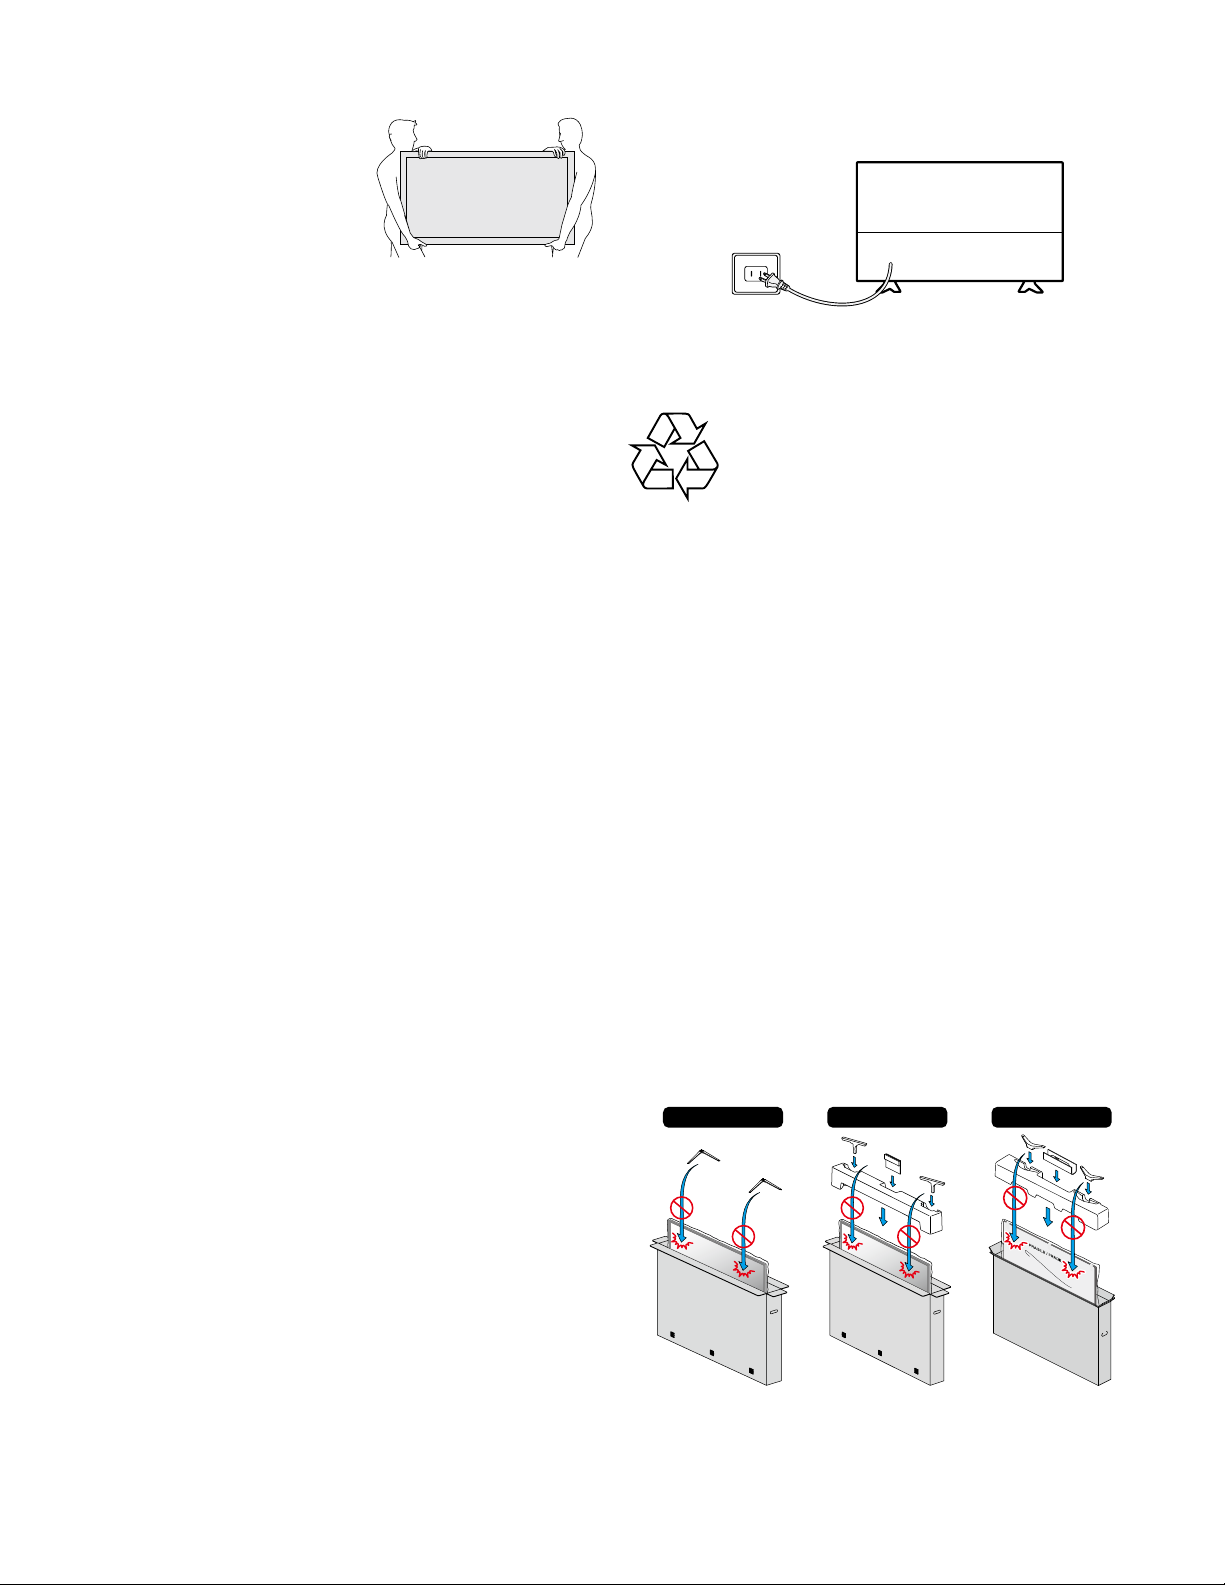
Positioning the TV
●
Large screen TVs are heavy. 2 people are required to carry and handle a
large screen TV.
●
Make sure to hold the upper and
bottom frames of the unit firmly as illustrated.
●
Install the unit in a horizontal and
stable position.
●
Do not install the unit in direct sunlight
or in a place subject to dust or strong
vibration.
●
Depending on the environment, the temperature of this unit may in-
crease slightly. This is not a malfunction.
●
When installing this unit in a temperate environment, avoid a place with
rapid temperature changes.
–
Operating temperature: 41°F (5°C) to 104°F (40°C)
●
This unit should not be used in a tropical environment as it has not been
evaluated under such conditions.
●
No objects should be placed directly on or under this unit, especially
lighted candles or other flaming objects.
●
Depending on your external devices, noise or disturbance of the picture
and/or sound may be generated if the unit is placed too close to them.
In this case, please ensure enough space between the external devices
and the unit.
●
Do not insert the AC power cord into the power socket outlet before all
the connections are made.
●
Ensure that you always have easy access to the AC power cord and out-
let to disconnect the TV from the AC outlet.
●
Before you move the TV, disconnect attached cables to prevent damage
to connectors, especially the TV tuner.
●
Be sure to unplug the AC power plug from the AC outlet before moving
or carrying the unit.
●
When moving the TV and then setting it down, please be careful not to
pinch the AC power cord under the unit.
●
Do not place this unit in an area where it may be exposed to water, oil or
grease such as:
near a bathtub, basin, kitchen sink, washing tub, swimming pool, kitchen
exhaust fan, etc., or in a damp basement.
Regulatory notices
WARNING : To prevent injury, this apparatus must be securely attached
WARNING : Never place a TV in an unstable location. A TV may fall, caus-
If your existing TV is being retained and relocated, the same considerations
as above should be applied.
Do not place the unit on the furniture that is capable of being tilted by
a child and an adult leaning, pulling, standing or climbing on it. A falling
unit can cause serious injury or even death.
In order to avoid interruption of ventilation, this unit should not be placed
in built-in equipment such as a book cabinet, rack, etc., and the vents
of this unit should not be covered with anything such as a tablecloth,
curtain, newspaper, etc. Make sure that there is enough ventilation space
(4 ”/10 cm or more) around this unit.
to the furniture/wall in accordance with the instructions.
Tipping, shaking or rocking the unit may cause injury/death.
ing serious personal injury or death. Many injuries, particularly to children, can be avoided by taking simple precautions
such as:
–
Using cabinets or stands recommended by the manufac-
turer of the TV.
–
Only using furniture that can safely support the TV.
–
Ensuring the TV is not overhanging the edge of the sup-
porting furniture.
–
Not placing the TV on tall furniture (for example, cup-
boards or bookcases) without anchoring both the furniture
and the TV to a suitable support.
–
Not placing the TV on cloth or other materials that may be
located between the TV and supporting furniture.
–
Educating the children about the dangers of climbing on
furniture to reach the TV or its controls.
Press B to turn the unit on and go into standby mode. To completely turn
off the unit, you must unplug the AC power plug from the AC power outlet.
Disconnect the AC power plug to shut the unit off when trouble is found
or not in use. The AC plug shall remain readily available.
AC power plug
Never use a gas duster on this TV.
The gas trapped inside of this unit may cause ignition and explosion.
Environmental care
The packaging of this product is intended to be recycled.
Contact your local authorities for information about how to recycle the
packaging.
For product recycling information, please visit - www.recycle.philips.com
End of life directives
Philips pays a lot of attention to produce environmental-friendly products
in green focal areas. Your new TV contains materials which can be recycled
and reused. At the end of its life, specialized companies can dismantle the
discarded TV to concentrate the reusable materials and to minimize the
amount of materials to be disposed of. Please ensure you dispose of your
old TV according to local regulations.
Batteries usage
#
CAUTION : Danger of explosion if battery is incorrectly replaced. Replace
only with the same or equivalent type.
WARNING : Batteries (battery pack or battery installed) should not be
exposed to excessive heat such as sunshine, fire or the like.
●
Do not mix old and new batteries.
●
Do not mix alkaline, standard (carbon-zinc) or rechargeable (ni-cad,
nimh, Li-ion, etc.) batteries.
Disposal of used batteries
The batteries included do not contain the heavy metals mercury
and cadmium, however in certain localities, disposing batteries with
household waste is not permitted. Please ensure you dispose of batteries according to local regulations.
Preparing to move/ship the unit
Please pack the unit properly by following the diagram on the carton (as
noted below).
50 ”/43 ”/32 ”65 ”/55 ”75 ”
●
To avoid damage to the screen, do not pack the stand on the same side
as the TV screen, refer to the illustration above.
Page 6
thgirypoC
respective owners.
De�nition Multimedia Interface,
and the HDMI Logo are trademarks
or registered trademarks of HDMI
Licensing Administrator, Inc. in the
United States and other countries.
Manufactured under license from
Dolby Laboratories. Dolby, Dolby
Audio, and the double-D symbol are
trademarks of Dolby Laboratories
Licensing Corporation.
-hgiH IMDH dna IMDH smret ehT
(www.freetype.org).
rieht fo ytreporp eht era skramedart deretsigernu dna deretsiger rehto llA
for children younger than two years of age.
download.
nection, �rmware update and/or a minimum bandwidth. Internet
services vary
to any of the services, content, software and advertising. Funai
Corporation Inc. may, in its sole discretion, add or remove access to
any speci�c services, content, software and advertising at any time.
Although Funai Corporation Inc.
will strive to provide a good selection of services, content or software, Funai Corporation Inc. does not warrant continued access to
any speci�c services, and content or software.
Funai Corporation Inc. does not warrant Wireless Screencasting
compatibility with all source devices such as smartphones, tablets,
laptops, etc. due to large variability in hardware, �rmware, drivers,
s
oftware and implementation of wireless casting applications on
these source devices. Although Funai Corporation Inc. will strive to
enhance compatibility and performance across a range of source
devices, Funai Corporation Inc. does not warrant compatibility with
speci�c source devices.
by location.
tcejorP epyTeerF ehT © thgirypoc era erawtfos siht fo snoitroP
gniweiv noisivelet segaruocsid scirtaideP fo ymedacA naciremA ehT
rof deriuqer si noitcennoc tenretni ,dellatsni-erp ton era sppa emoS
-noc tenretni dnabdaorb no-syawla na eriuqer yam serutaef emoS
ro latrop eht ot ssecca tnarraw ton seod .cnI noitaroproC ianuF
noitacificepS lennahC
Channel coverage Antenna DTV (ATSC)
Antenna Analog (NTSC)
Cable DTV (QAM)
Cable Analog (NTSC)
Tuning system Channel frequency synthesized tuning system
VHF: 2-13
UHF: 14- 69
VHF: 2-13
UHF: 14- 69
2-135
2-135
Page 7

Copyright
© 2022 Roku, Inc. All rights reserved. ROKU, the ROKU Logo, and “NOW THIS IS TV” are trademarks and/or registered
trademarks of Roku, Inc. Material in this User Manual is the property of Roku, Inc., and is protected under US and
International copyright and/or other intellectual property laws. Reproduction or transmission of the materials, in whole
or in part, in any manner, electronic, print, or otherwise, without the prior written consent of Roku, Inc., is a violation of
Roku, Inc.’s, rights under the aforementioned laws.
No part of this publication may be stored, reproduced, transmitted, or distributed, in whole or in part, in any manner,
electronic or otherwise, whether or not for a charge or other or no consideration, without the prior written permission
of Roku, Inc.
Requests for permission to store, reproduce, transmit or distribute materials shall be made to the following address:
Roku, Inc.
1155 Coleman Avenue,
San Jose, CA 95110
Product name: Roku TV™
Document name: Roku TV™ User Guide
Document revision: 11.0 – United States and Canada, English
Publication date: 1 April, 2022
Page 8

Contents
Welcome ...................................................................................................................................................1
The new standard in Smart TVs .................................................................................................................................. 1
Get the most out of your new TV .............................................................................................................................. 2
Connections and setup .................................................................................................................... 8
Connecting an antenna, cable, or satellite box .................................................................................................. 8
Connecting external equipment with a composite AV video cable ....................................................... 9
Connecting external equipment with an HDMI® cable .................................................................................. 9
Connecting headphones or analog soundbar ................................................................................................... 10
Connecting headphones to a Roku Voice Remote Pro ................................................................................ 10
Connecting an AV receiver or digital soundbar ................................................................................................ 11
Preparing for Internet connectivity ......................................................................................................................... 11
AC power ............................................................................................................................................................................. 12
Roku remote batteries ................................................................................................................................................... 12
Roku TV remote ................................................................................................................................................................ 13
Panel buttons ..................................................................................................................................................................... 17
Single button ................................................................................................................................................................. 17
Three buttons ................................................................................................................................................................ 18
Game-pad style joystick .......................................................................................................................................... 18
Four buttons .................................................................................................................................................................. 18
Five buttons (with mute) ........................................................................................................................................ 19
Five buttons (without mute) ................................................................................................................................. 19
Seven buttons ............................................................................................................................................................... 19
Guided Setup ....................................................................................................................................... 21
Starting Guided Setup ................................................................................................................................................... 21
Guided Setup ..................................................................................................................................................................... 22
Network connection ................................................................................................................................................. 24
Activation ....................................................................................................................................................................... 29
Connect your devices ............................................................................................................................................. 30
The Home screen .............................................................................................................................. 33
Personalize your Home screen ............................................................................................................................ 34
Benefits of connecting ................................................................................................................... 36
Connecting brings out your TV’s full potential! ............................................................................................... 36
Take advantage of awesome features ................................................................................................................. 37
iii
Page 9

What is streaming? ......................................................................................................................................................... 38
What if I didn’t connect my TV? ............................................................................................................................. 40
Setting up live TV .............................................................................................................................. 41
How do I set up the TV tuner? ................................................................................................................................. 42
Using your TV .................................................................................................................................... 46
Status indicator ............................................................................................................................................................... 46
Standby mode energy savings................................................................................................................................. 47
Getting help ....................................................................................................................................................................... 47
Opting in to Smart TV experience (U.S. only) ................................................................................................. 48
Disable Smart TV experience .............................................................................................................................. 48
Disable Auto Notifications .................................................................................................................................... 49
Watching live TV channels ........................................................................................................................................ 49
Changing channels.................................................................................................................................................... 49
Using the Live TV Channel Guide (U.S. only)................................................................................................... 50
Navigating the Live TV Channel Guide in connected mode (U.S. only) ........................................ 52
Changing channel options in connected mode (U.S. only) .................................................................. 52
Viewing program information .................................................................................................................................. 53
Adjusting settings while watching a program ................................................................................................. 55
Pausing live TV ................................................................................................................................................................. 55
Requirements ............................................................................................................................................................... 55
Enabling Live TV Pause ........................................................................................................................................... 56
Using Live TV Pause ................................................................................................................................................. 56
Notes about Live TV Pause ................................................................................................................................... 58
More Ways to Watch (U.S. only) ............................................................................................................................. 58
Using More Ways to Watch .................................................................................................................................. 59
Getting the most from More Ways to Watch ............................................................................................... 61
Automatic network recommendation ................................................................................................................... 61
Switching TV inputs ....................................................................................................................................................... 62
Auto-detecting devices ........................................................................................................................................... 62
Adjusting audio/video settings ........................................................................................................................... 62
Setting preferred audio language for streaming channels ................................................................... 63
Automatic game console configuration ......................................................................................................... 63
Using Roku Voice commands .................................................................................................................................. 64
Using Roku Voice remotes (select models only) ....................................................................................... 65
Playing content from USB storage devices ....................................................................................................... 67
Auto player launch..................................................................................................................................................... 68
Playing content from local network media servers ....................................................................................... 68
Setting up a payment method .................................................................................................................................69
Using your TV in a hotel or dorm room ...............................................................................................................69
About using your TV on a restricted public network ............................................................................. 70
Getting your Roku TV on line on a restricted public network ........................................................... 70
iv
Page 10

Using Apple AirPlay and the Apple Home app ................................................................. 73
Apple AirPlay ..................................................................................................................................................................... 73
Other AirPlay things to try .................................................................................................................................... 73
Apple Home app ............................................................................................................................................................. 73
Some Apple HomeKit things to try ................................................................................................................... 74
Adjusting TV settings ..................................................................................................................... 75
Main Settings menu ........................................................................................................................................................ 75
TV settings menu ............................................................................................................................................................ 76
Sleep timer .......................................................................................................................................................................... 77
Picture settings................................................................................................................................................................. 77
Fine tune picture menu options ......................................................................................................................... 80
Variable refresh rate (VRR) .................................................................................................................................... 81
Expert Picture Settings (4K models only) ...................................................................................................... 81
Sound settings .................................................................................................................................................................. 82
Roku premium audio devices ............................................................................................................................... 82
Volume mode (select models only) ................................................................................................................. 84
Sound settings – Dolby® Audio Processing (select models only) ..................................................... 85
Sound settings – DTS® TruSurround / DTS® Studio Sound (select models only) .................... 86
Sound settings – Sonic Emotion™ Premium (select models only) ..................................................... 87
Sonic Emotion™ settings......................................................................................................................................... 89
Manage channels (U.S., connected mode) ........................................................................................................ 90
Favorite channels (U.S., connected mode) .................................................................................................. 90
Edit live TV channel lineup (U.S., connected mode) ................................................................................. 91
Hide all streaming TV channels (U.S., connected mode) ....................................................................... 92
Manage channels (Canada/non-connected mode) ....................................................................................... 93
Favorite channels (Canada/non-connected mode) ................................................................................. 93
Surf only favorite channels (Canada/non-connected mode) .............................................................. 93
Edit live TV channel lineup (Canada/non-connected mode) ............................................................. 94
Accessibility & captions ............................................................................................................................................... 95
Accessibility & captions menu settings...........................................................................................................96
Video description through Secondary Audio Program (SAP)............................................................ 97
Picture off ............................................................................................................................................................................ 98
Featured Free (U.S. only) ............................................................................................................ 99
My Feed .............................................................................................................................................. 100
Movies Coming Soon (U.S. only) .......................................................................................................................... 100
Movies, TV programs, and people ....................................................................................................................... 100
Searching for something to watch......................................................................................... 102
How do I search? ........................................................................................................................................................... 102
Keyboard search using the remote ................................................................................................................. 103
Voice Search from a Roku Voice remote ..................................................................................................... 103
v
Page 11

Searching from the Roku mobile app ............................................................................................................ 104
Searching with Google Assistant ..................................................................................................................... 104
Searching with Amazon Alexa .......................................................................................................................... 105
Direct-to-playback search results .................................................................................................................... 105
Searching for free content ................................................................................................................................... 106
I found a program. Now what? .............................................................................................................................. 106
Follow on Roku............................................................................................................................................................... 107
Recent Searches ............................................................................................................................................................ 107
Roku Zones (U.S. only) ............................................................................................................................................... 108
Using the Roku Channel Store ................................................................................................. 109
Automatic Account Link ............................................................................................................................................ 110
Customizing your TV ....................................................................................................................... 111
Add TV inputs .................................................................................................................................................................... 111
Add streaming channels ............................................................................................................................................... 111
Rename inputs .................................................................................................................................................................. 112
Remove unwanted tiles................................................................................................................................................113
Rearrange tiles ................................................................................................................................................................. 114
Change the look and feel with themes ................................................................................................................ 115
Hide streaming TV channels (U.S. only) .............................................................................................................. 115
Change menu volume .................................................................................................................................................. 116
Configure power settings .......................................................................................................................................... 116
Power on settings ..................................................................................................................................................... 116
Auto power savings .................................................................................................................................................. 117
Standby LED On/Off ................................................................................................................................................ 117
Fast TV start ................................................................................................................................................................. 117
Configure accessibility................................................................................................................................................. 118
Captions mode............................................................................................................................................................ 118
Captions preferred language .............................................................................................................................. 118
Captions style .............................................................................................................................................................. 119
Screen reader settings (U.S. only) ................................................................................................................... 120
Customize the Home screen ..................................................................................................................................... 121
Parental controls ............................................................................................................................. 122
Creating a parental control PIN ..............................................................................................................................122
Blocking broadcast TV programs ......................................................................................................................... 123
Enabling parental control of TV programs ................................................................................................. 123
Blocking based on US TV ratings..................................................................................................................... 124
Blocking based on US movie ratings ............................................................................................................. 125
Blocking based on Other ratings ...................................................................................................................... 125
Blocking based on Canadian English ratings ............................................................................................. 126
Blocking based on Canadian French ratings...............................................................................................127
Blocking unrated programs ................................................................................................................................ 128
What happens when a TV program is blocked? ........................................................................................... 129
vi
Page 12

Changing the parental control PIN ........................................................................................................................131
Resetting parental controls........................................................................................................................................131
More settings .................................................................................................................................... 132
Guest Mode ...................................................................................................................................................................... 132
Network settings ........................................................................................................................................................... 134
ZIP Code or postal code ............................................................................................................................................ 135
Time settings ................................................................................................................................................................... 135
Scan again for live TV channels ............................................................................................................................. 136
HDMI® mode (4K models only) .............................................................................................................................. 137
Control by mobile apps.............................................................................................................................................. 137
Changing privacy settings ........................................................................................................................................ 138
Advertising................................................................................................................................................................... 138
Microphone .................................................................................................................................................................. 139
Roku TV premium audio ............................................................................................................................................. 141
Home theater configuration .................................................................................................................................... 142
Controlling audio output ...................................................................................................................................... 142
Setting up a digital audio connection ............................................................................................................ 143
Choosing an audio format ................................................................................................................................... 144
Turning off the TV screen while listening to music ................................................................................ 145
Controlling other devices through CEC ........................................................................................................ 145
Restart the TV ................................................................................................................................................................. 146
Reset the TV .................................................................................................................................................................... 147
Reset audio/picture settings .............................................................................................................................. 147
Factory reset everything ...................................................................................................................................... 147
What if I can’t access the Factory Reset option? .................................................................................... 148
Network connection reset ................................................................................................................................... 148
Roku account PIN ......................................................................................................................................................... 149
Update the TV ................................................................................................................................................................ 150
Checking for updates on a connected TV ................................................................................................... 150
Getting updates on a non-connected TV ...................................................................................................... 151
Other devices .................................................................................................................................... 153
Mirror your phone or tablet ..................................................................................................................................... 153
Roku mobile app............................................................................................................................................................ 154
Private Listening on the Roku mobile app .................................................................................................. 154
Universal remotes ......................................................................................................................................................... 155
FAQ ....................................................................................................................................................... 156
vii
Page 13

Page 14

1
Welcome
Congratulations on the purchase of your new Roku TV! Discover the joy of endless
entertainment. After it’s set up, you’ll be able to access a world of streaming content
channels that may include paid subscription channels and thousands of free channels.
Important:
content and features. This edition of the User Guide describes Roku TV version 11.0. To
determine the current version of your Roku TV, go to Settings > System > About after
you complete Guided Setup. Note also that certain features of the TV might change
from time to time independently of Roku TV updates.
Your TV receives automatic updates from time to time, enabling new
The new standard in Smart TVs
Welcome to TV like you’ve most likely never seen before—a home screen that you can
personalize with your favorite devices and streaming channels. Choose from hundreds
of thousands of streaming movies and TV episodes, plus music, sports, kids, family,
international and much more. You should never run out of things to watch.
A paid subscription or other payments may be required for some channel
Note:
content. Channel availability is subject to change and varies by country.
Page 15

2
Get the most out of your new TV
Follow these steps to get the most out of your new TV.
• Connect to the Internet
• It’s easy, and it will unlock a world of entertainment. All you need is a
network connection. There are hundreds of free streaming channels, paid
subscription services, and convenient ways to rent or buy a favorite movie
or program.
• Pick your favorite streaming channels
• Find the entertainment you love. From the latest blockbuster movies to
your favorite TV programs, with tons of live sports, a broad selection of
music streaming channels, popular programming in a dozen international
languages, 24x7 live news and so much more, your new Roku TV has your
sweet spot. A paid subscription or other payments may be required for
some channels.
• Find live broadcast and streaming TV programs in the Live TV Channel Guide
Only in the United States
•
what’s on TV right now, but what will be on in the coming two weeks. And
for many over-the-air programs, if you start watching the program after it is
already in progress, or you see something you missed in the Live TV
Channel Guide, you can use More Ways to Watch to find streaming
channels where you can see the program from the beginning, find other
episodes, or entire seasons of the program, if applicable.
• Use Roku’s Smart TV experience to discover More Ways to Watch
•
Only in the United States
the program you are watching from the beginning, find more episodes of
the program, discover similar programs and movies, and see the full
description of the program.
• Personalize your Home screen
• Put your favorite streaming channels and TV inputs front-and-center on the
, use the Live TV Channel Guide to see not only
, use this feature to find out how you can stream
Home screen. No more flipping through inputs or wading through
complicated menus. You can even customize the names of each input and
move tiles around so your most-often used devices and streaming channels
are only a click away.
Page 16

3
• Search for your favorite movie, TV program, actor, or director
• Once you’re connected to the Internet, you can easily search across top
streaming channels and live TV channels. Search by movie or TV program
title, actor, or director—all from one place. Search by typing words or
phrases using the on-screen keyboard or on your mobile device, or speak
words or phrases in a conversational tone using Voice Search. Some
channels and content require payment.
Only in the United States
•
genres or subjects. A Roku Zone is a collection of relevant entertainment
organized into browsable rows such as New Releases, Free, and Rent or
Buy. On 4K TVs, include “4K” in your search to see 4K movies and programs
in the 4K Movies & TV Zone.
• Pause live TV
• Pause, resume, fast forward, and rewind TV programs by connecting your
own USB drive to the TV and pause live TV for up to 90 minutes.
Note:
Live TV Pause is available on digital TV programs received on the ANT
input, and only when the TV is linked to a valid Roku account.
• Watch the Roku Tips & Tricks channel
•
Only in the United States
videos and learn more about your TV’s features, new products, and popular
support topics.
, receive a Roku Zone when you search by popular
, tune in to the Roku Tips & Tricks channel to watch
• Control your TV with voice commands
• Use your Roku Voice remote (select models) or the free Roku mobile app to
control your Roku TV. Use conversational voice commands to search for
programs by title, actor, director, or genre. On selected streaming channels,
you can search without leaving the current channel. Your search results
appear in the lower portion of the screen. The current channel’s results
appear first followed by results from other channels.
Page 17

4
Just tap Voice on your remote to see helpful hints about how to use Roku
Voice, and then explore these additional voice features:
Only in the United States
•
, see what’s on TV in the Live TV Channel Guide.
For example, say “Show Guide.” Jump to a specific live or streaming
channel. For example, say “Go to 7 point 3” to open Live TV on channel
7.3. Or say, “Go to Netflix” to open Netflix.
• Use voice commands to launch streaming channels, switch inputs, or
1
change live TV channels.
• Set sleep timers. For example, say “Turn the TV off in 30 minutes”, or
“Go to sleep at 11 p.m.”
• Go directly to playing a program whenever your search command can
be uniquely identified and the requested content is available at no
2
additional cost to you.
Only on 4K TVs
•
, say “Show me 4K movies” to see a list of 4K movies
available across participating streaming channels.
• Use Roku Voice to make on-screen keyboard entries in a variety of on-
screen keyboards. Keyboards that support voice entry have a
microphone icon next to the input field. You can say letters, characters,
and numbers for an easy way to enter the required information. The TV
displays helpful hints at appropriate times to provide guidance.
• Use voice commands to turn the display off (for enjoying streaming
music), turn closed captions on or off, and to replay the last few seconds
of a movie or TV program.
• Control the Roku Media Player to play your personal music and show
movies and photos. Say commands like, “Play classic rock on Roku
Media Player,” “Skip ahead 20 seconds,” or “Play the next song.”
• Open Voice Help from Settings menu or by pressing VOICE and
saying, “Help.”
1 Voice features support English and Spanish languages when the corresponding TV language is selected.
2 Direct-to-playback commands work with selected streaming channels. Direct playback occurs only
when there is a high confidence of match, the content is free or you are already subscribed, and the
channel is already added to your Home screen.
Page 18

5
• Ask Siri on your Apple device to control your Roku TV with just your voice
Say things like “Hey Siri, play jazz on the living room TV” to play music from
your iPhone, iPad, Apple Watch, HomePod Mini, or Mac on your Roku TV.
1
Roku TVs also support Apple HomeKit
, which allows you to easily and
securely control your Roku device while using the Home app or Siri. After
installing your Roku TV, set it up with just a few simple steps within the
Apple Home app. You can even create your own custom automations and
scenes that include HomeKit-enabled accessories such as your Roku TV, to
control your home setting.
• Use Google Home, Google Pixel phone, or the Google Home mobile app to
control your Roku TV. You can search for movies and TV programs, launch
most channels, control playback, adjust the volume, switch inputs, turn the
TV on and off, and more. Control multiple Roku devices by including the
location of the device in your commands. For example, say “Hey Google,
turn off Roku in the bedroom.” For information on linking and controlling
your Roku TV, see https://support.roku.com/article/360009649613-how-
1
.
do-i-control-my-roku-streaming-device-with-the-google-assistant-.
• Use Amazon Echo Dot, Echo Plus, Echo Show, or the Amazon Alexa mobile
app to control your Roku TV. You can search for movies and TV programs,
launch most channels, control playback, adjust the volume, switch inputs,
turn the TV on and off, and more. Control multiple Roku devices by
including the location of the device in your commands. For example, say
“Hey Alexa, pause Roku in the living room.” For information on adding the
Alexa Roku skills and controlling your Roku TV, see:
https://support.roku.com/article/360017961074-how-do-i-use-amazonalexa-with-my-roku-streaming-device-.
1 Apple AirPlay 2 and HomeKit are supported by Roku TVs except for models beginning with “6”
(6
XXXX
) and “5” (5
XXXX
).
Page 19

6
• Use Apple AirPlay 2 with your iOS and MacOS devices
• Effortlessly share videos, photos, music, and more from Apple devices on
Roku TVs
1
. Control AirPlay sessions with pause, rewind, and more using your
iPhone, iPad, or Mac. Play music from your Apple devices on Roku TVs and
other AirPlay 2 enabled speakers in your home at the same time in perfect
sync. Plus, mirror the screen from your iPhone, iPad, or Mac to the big
screen.
• Send your personal media to the big screen
• Send personal photos, videos, and music from your compatible smartphone
or tablet to the TV screen in just a few taps. Plus, with certain channels, you
can send movies, programs, sport highlights, and more directly to your TV.
• Watch for content with My Feed
• Use My Feed to get updates on movies, TV programs, and actors that you
are following, and then watch for alerts each time one of your followed
items becomes available or changes price.
• Take charge with the Roku mobile app
• Control your TV from your compatible smartphone or tablet with the free
®
mobile app for iOS
and Android™ mobile devices2. Browse channels, view
My Feed, listen to audio from live TV and streaming channels. Search more
3
easily using your mobile device’s keyboard and Voice Search.
• Mirror your compatible smartphone or tablet on your TV. Share videos,
photos, web pages, and more from compatible devices.
1 Apple AirPlay 2 and HomeKit are supported by Roku TVs except for models beginning with “6”
(6
XXXX
2 IOS® is a trademark or registered trademark of Cisco in the U.S. and other countries and is used under
) and “5” (5
license. Android™ is a trademark of Google Inc.
3 Voice features support English and Spanish languages when the corresponding TV language is
selected.
XXXX
).
Page 20

7
• Get the best streaming experience with automatic network recommendation
• While you are watching a streaming channel, and during manual wireless
network scans, your TV will recommend the optimal wireless network
connection. You can choose to switch to the recommended network or
continue with the current connection.
• Connect your Roku TV to networks found in hotels and college dorms
• Temporarily link your smartphone or tablet to your TV to agree to any
terms, enter codes, or provide required information before you can get
Internet access in locations that require these additional steps (also known
as
restricted public networks
).
• Note:
Using your Roku TV on a restricted public network requires wireless
availability and use of your network-connected smartphone, tablet, or
computer to
TV remote, and not the Roku mobile app, to initiate the connection process.
Streaming content might be limited due to your geographic location or
because of restrictions imposed by the network host.
Go to support.roku.com for device compatibility information.
Let’s get started.
authenticate
access to your account. You must use your Roku
Page 21

8
Connections and setup
Refer to your TV’s Quick Start Guide or other provided documentation for modelspecific information about attaching the base or a wall mount and making
connections to AC power and to your other audio/video devices.
Connecting an antenna, cable, or satellite box
If you are using an antenna, CATV cable without a set-top box, or a cable or satellite
box that has only an antenna output, connect a 75-ohm coaxial cable (not provided)
from the source to the ANT/CABLE input on the TV.
If you are using an antenna with a 300-ohm twin-lead cable, you need to use a
Tip:
300-to-75-ohm adapter (not provided) to adapt the twin-lead cable to a connection
that is compatible with the TV’s antenna input.
Tip:
If you receive your TV stations through a set top box from a cable or satellite TV
provider, connect it to the TV using the best connection method available. From most
to least desirable:
• HDMI
• AV input – analog SD video
• Antenna input – analog SD video using NTSC
®
input – Digital HD and SD video
Page 22

9
Connecting external equipment with a composite
AV video cable
If the best connection available on your device is AV or composite video output,
connect it to the TV using a composite AV cable (not provided). Composite AV
cables typically have three RCA-type plugs on each end, color coded as follows:
• Yellow – Video
• Red – Audio, right channel
• White or black – Audio, left channel
Connect each plug to the corresponding connector on the device and on the TV.
Note:
breakout cable (included) to adapt this input to the three RCA-type plugs on your
composite cable.
Select models have an AV Input that looks like a headphone jack. Use the
Connecting external equipment with an HDMI®
cable
If possible, connect your devices using HDMI® cables (not provided). They help to
provide the best video quality and also carry audio signals, so that only one cable is
needed. For better picture quality, we recommend that you use cables designated as
®
High Speed HDMI
You might need to configure the device to send its signal through its HDMI®
Tip:
connector.
The connector labeled HDMI (ARC) has the additional ability to use the audio return
channel to send digital audio to a receiver or soundbar, as explained in Connecting an
Cables.
AV receiver or digital soundbar.
(eARC) provides the same functionality as the HDMI ARC connector, plus the ability
to pass through full-resolution sound formats such as Dolby Atmos and DTS:X from
and to devices that support these formats, without additional processing by the TV.
Additional details are provided in Choosing an audio format.
Only on select models:
The connector labeled HDMI
Page 23

Connecting headphones or analog soundbar
You can connect headphones or an analog soundbar (not provided) to the TV’s
headphone jack.
Inserting a plug in the headphone jack disables the sound from the TV’s built-in
Tip:
speakers.
Warning:
lowest volume setting on your headphones that still lets you hear the sound.
Select models also have an audio line out connection that is not affected by TV
volume or mute settings and does not disable the TV speakers. Use this connection
when you want to use your amplifier or soundbar to control the TV volume. To turn
off the TV’s built-in speakers, from the Home screen menu, navigate to Settings >
Audio > TV speakers and change the setting.
Loud noise can damage your hearing. When using headphones, use the
Connecting headphones to a Roku Voice Remote
Pro
Select Roku TVs come with the Roku Enhanced Voice Remote or Roku Voice Remote
Pro. On these models, you can connect headphones to the jack on the left side of the
remote.
Inserting a plug in the remote’s headphone jack disables the sound from the TV’s
Tip:
built-in speakers or attached receiver or soundbar. The volume and mute controls on
the right side of the remote adjust the volume level of the connected headphones.
Warning:
lowest volume setting on your headphones that still lets you hear the sound. You
might notice that connecting headphones to your remote shortens the remote’s
battery life somewhat.
Loud noise can damage your hearing. When using headphones, use the
10
Page 24

Connecting an AV receiver or digital soundbar
You can enjoy Dolby Audio™ multichannel sound from your TV if you connect a digital
amplifier or soundbar (not provided) in any of the following ways:
• Digital optical audio out (S/PDIF) – Connect a TOSLINK optical cable (not
provided) from the TV to the Optical input on your receiver or soundbar.
®
• HDMI® ARC – Connect an HDMI
®
connector to the HDMI
input on your receiver or soundbar. This connection
uses the Audio Return Channel (ARC) feature of HDMI
the TV to a compatible device. To use this feature, you must configure the TV
®
to enable HDMI
ARC, as explained in Setting up a digital audio connection.
cable (not provided) from the HDMI (ARC)
®
to output sound from
• HDMI® eARC –
Select models only:
Connect an HDMI® cable (not provided)
from the HDMI (eARC) connector to the HDMI (ARC) or HDMI (eARC) input on
your receiver or soundbar. If your receiver or soundbar supports HDMI
enhanced ARC (eARC), the TV can pass through full-resolution sound from
programs containing enhanced audio. If your receiver or soundbar does not
support eARC, use the TV’s eARC port to make the connection to the device’s
ARC port. The eARC port is backward compatible with the ARC standard.
Preparing for Internet connectivity
If you want to watch streaming content and take advantage of most of the cool
features of your Roku TV, connect it to the Internet through a wireless modem/router
or a wireless access point (not provided). The TV has a built-in wireless LAN adapter.
Note:
the use of a USB network adapter.
The TV supports only its internal wireless network adapter—it does not support
Select models have both wired and wireless network connectivity. To use the wired
network connection, connect an RJ-45 Ethernet cable (not provided) from the jack on
the back of your TV to your network router or switch. The wired connection
automatically supports both 10 Base-T and 100 Base-T Ethernet.
11
Page 25

AC power
Plug your TV into a power outlet. You can tell that the TV has power because the
status indicator lights up when the TV is off.
The topic Status indicator explains how the status indicator shows what is happening
with the TV.
Roku remote batteries
Open the back of your Roku remote and insert the included batteries, observing the
proper orientation as indicated in the battery compartment. Reattach the back cover.
12
Page 26
Roku TV remote
Use the following information to identify the buttons on your Roku remote.
Note:
Remote buttons and features vary somewhat by model. Your remote might not
have all buttons or features listed.
•
If your remote has a VOICE just below the purple pad, you have a Roku Voice
Remote.
•
If your remote has a headphone jack on its left edge, you have a Roku
Enhanced Voice Remote or Roku Voice Remote Pro.
Roku Voice remotes have additional capabilities as noted in the following table.
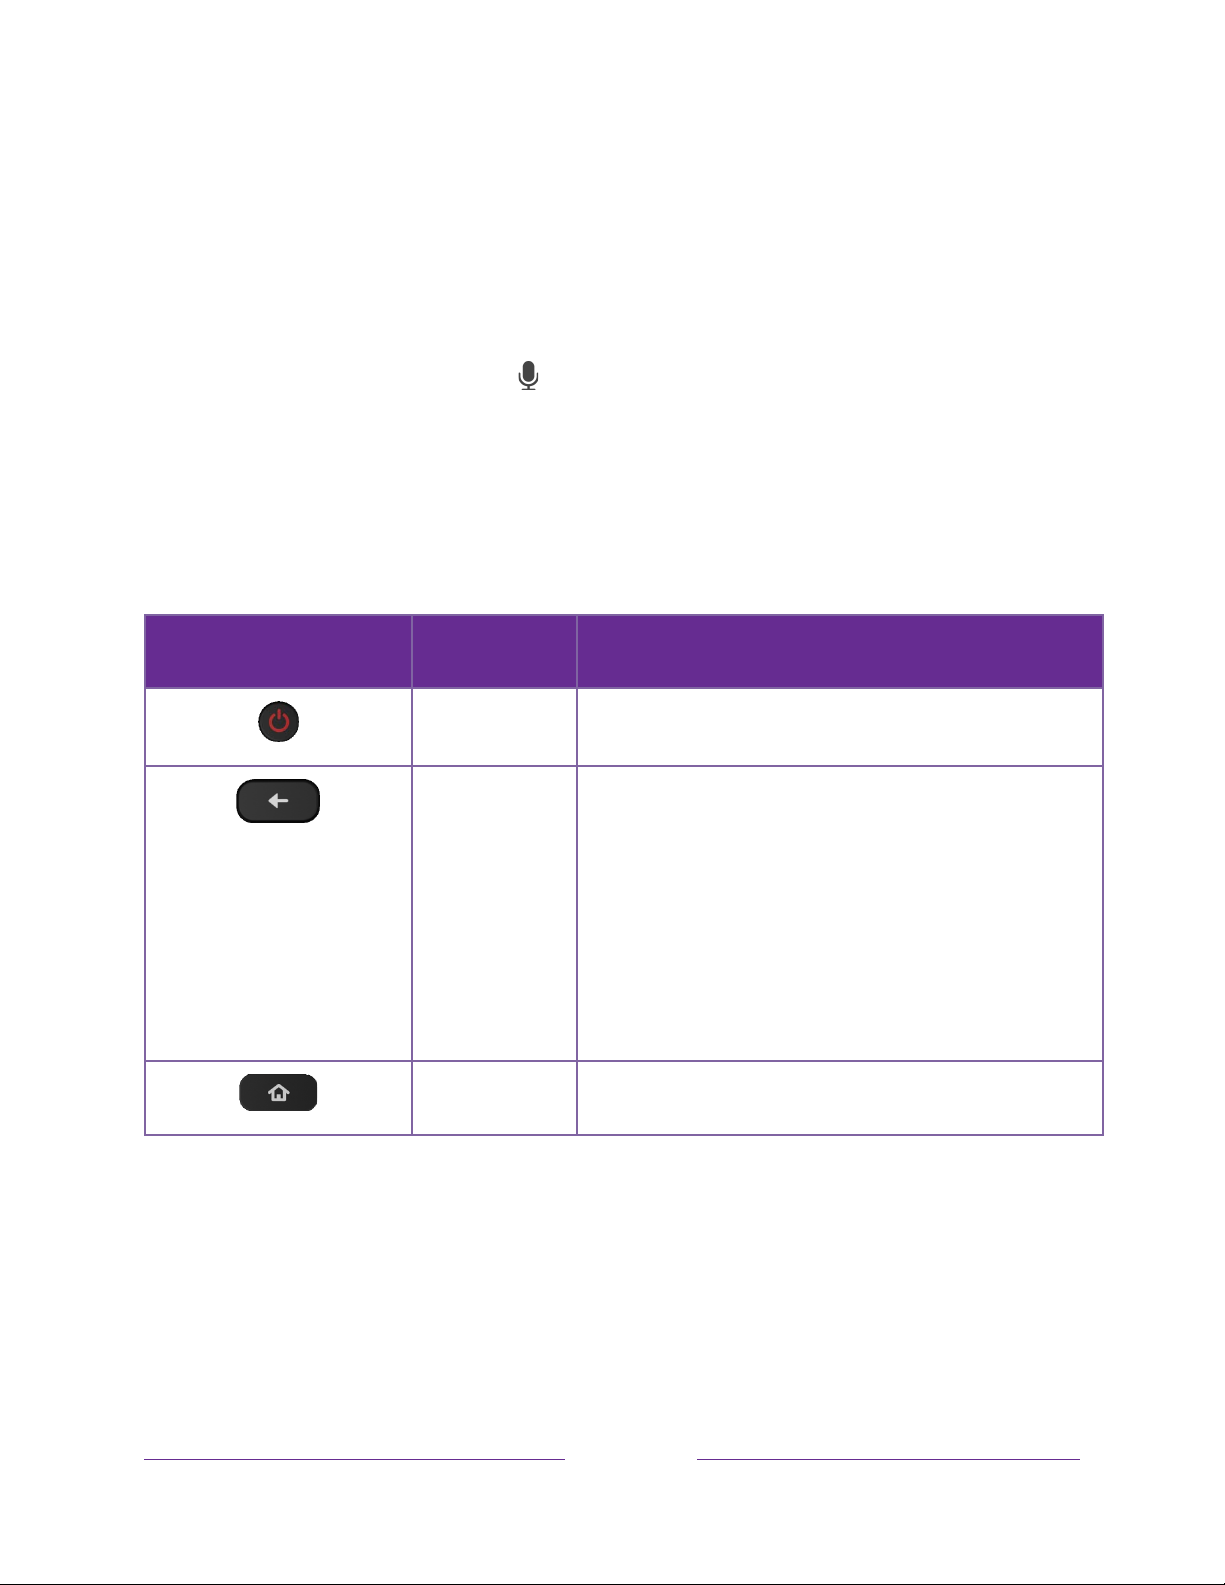
BUTTON FUNCTION DESCRIPTION
POWER
BACK
Turns TV on and off.
• Menu: Goes back to previous menu/screen.
• Home screen tile: Moves highlight back to the Home
screen option.
• Watching live TV or a TV input: Returns to Home
screen.
• Playing streaming content: Stops playing stream
and returns to the previous menu or screen.
• Browsing streaming content: Goes to the previous
level in the content tree.
HOME
Immediately returns to the Home screen.
13
Page 27
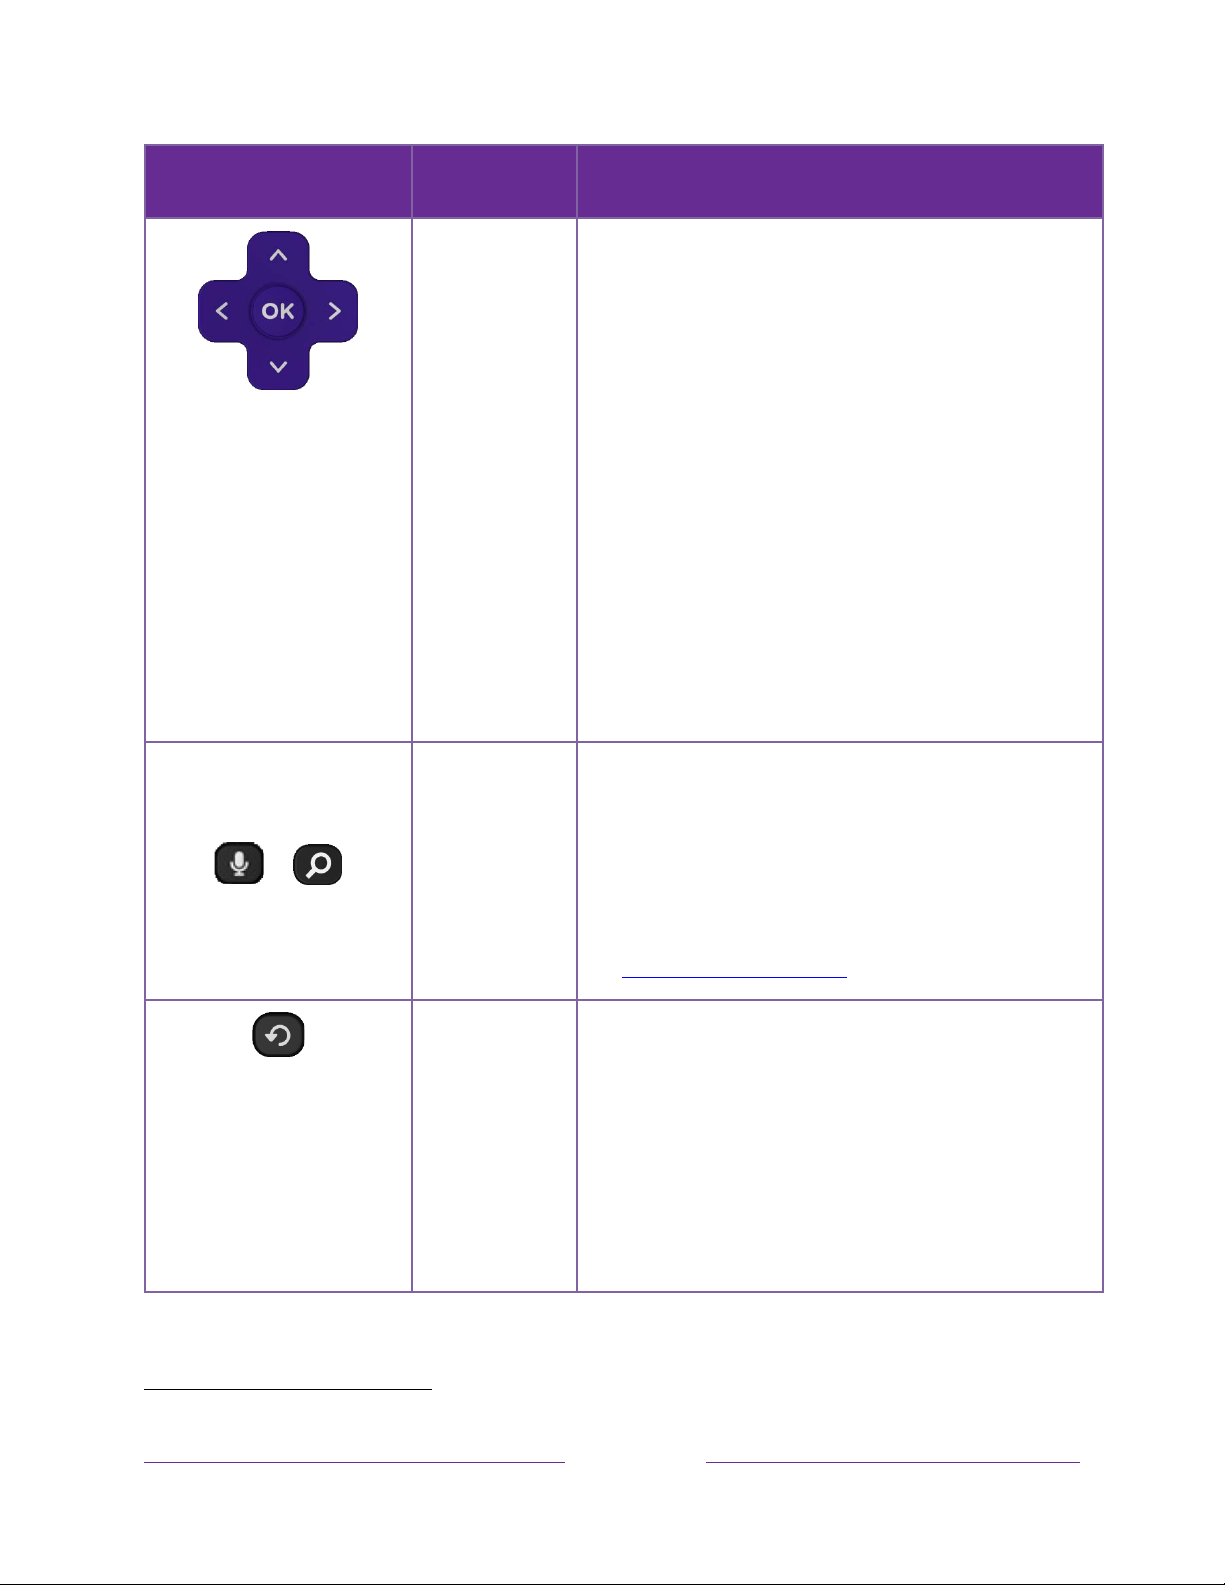
BUTTON FUNCTION DESCRIPTION
or
DIRECTIONAL PAD
VOICE or SEARCH
• Moves the highlight in the corresponding direction.
• OK chooses the highlighted option.
While watching TV:
• UP/DOWN changes channel.
• LEFT displays the Live TV Channel Guide
(connected mode) or channel list (non-connected
mode).
• LEFT/RIGHT
while in the channel list switches between ALL
CHANNELS and FAVORITE CHANNELS.
TVs with Live TV Pause enabled:
is paused, moves backward/forward approximately
10 seconds in the program buffer.
• While in the channel list, OK selects the highlighted
channel. While watching live TV: displays the
program information banner.
Only on select models with Roku Voice remotes
and say the name of a movie, TV program, actor,
director, or genre, including the special genres “free”
and “4K.” Or, say a command to start streaming, change
a channel, and more
TVs operating in non-connected mode
when the program
, hold
1
.
:
For more information, go to:
go.roku.com/voicesearch
REPLAY
Select models
feature and TVs with Live TV Pause enabled, jumps back
a few seconds with each press and resumes playing.
If Live TV Pause is disabled, jumps to previous channel.
When using an on-screen keyboard: Backspaces in the
text you are entering.
In the Live TV Channel Guide2: Returns to the current
day and time.
. Streaming programs that support this
1 Voice features support English and Spanish languages when the corresponding TV language is selected.
2 Live TV Channel Guide is available only in the United States.
14
Page 28
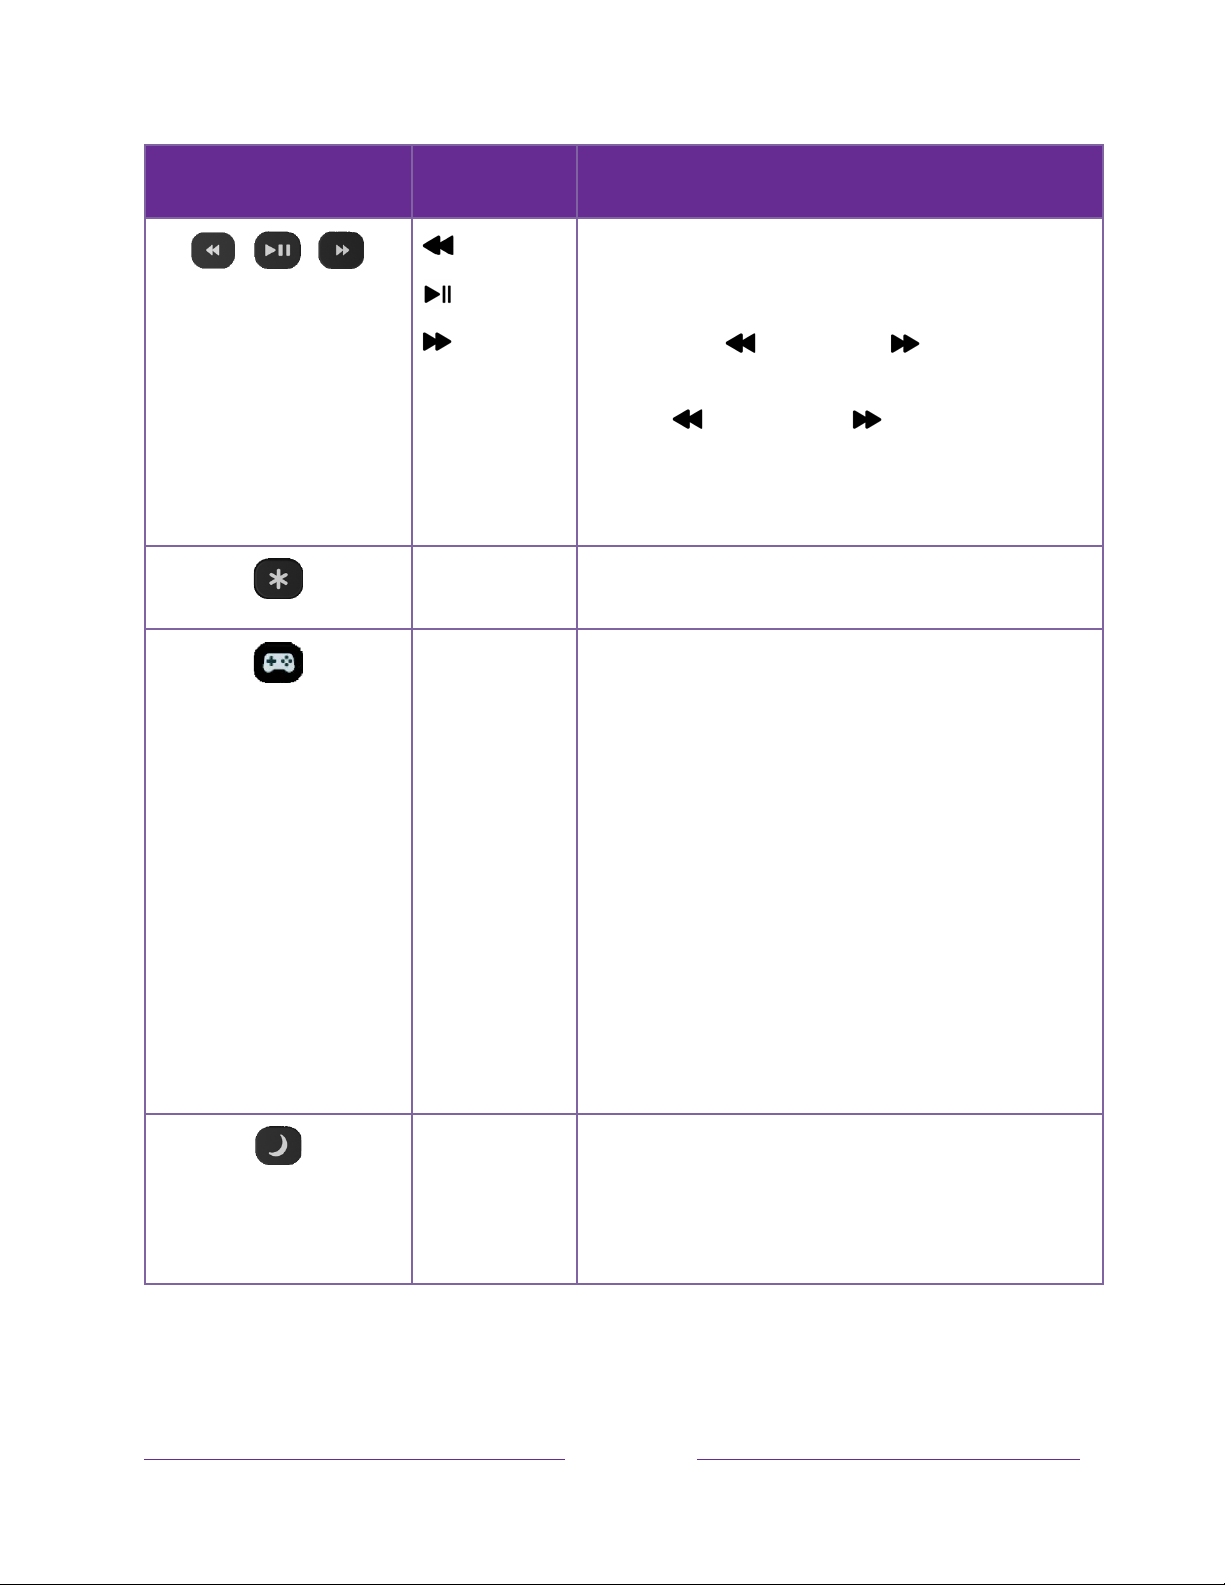
BUTTON FUNCTION DESCRIPTION
REWIND
PLAY/PAUSE
FAST FWD
STAR
GAME MODE
Scan backward, pause, play, and scan forward in
streaming content and live TV channels (if Live TV
Pause is enabled).
Press REWIND or FAST FWD one, two, or three
times to control the speed of the operation.
REWIND and FAST FWD also jump backward
and forward one screen at a time when viewing long
lists, such as when you are browsing programs in the
1
.
channel list or Live TV Channel Guide
Displays additional options when available. On-screen
hints let you know when this button is active.
Only on HDMI and AV inputs on select models
a banner showing whether Game mode is on or off, or
“Not available at this time.” Subsequent presses toggle
Game mode. When On, the TV performs less image
processing and has less input lag, producing a better
experience with action games.
. Displays
Select models.
detects certain game consoles connected to an HDMI
input and automatically switches to the best settings for
action games. When ALLM is active, the manual Game
mode
setting is unavailable.
Select models
compatible game console or computer to control the
refresh rate of the TV. The result is smoother image
animation with a lower instance of stutter or tearing.
SLEEP
Select models
sleep time, if any, or “Sleep timer is off.” Subsequent
presses cycle among the preset sleep time intervals.
Once set, the sleep timer remains in effect unless you
cancel it.
Auto Low Latency Mode (ALLM)
: Variable refresh rate (VRR) allows a
. Displays a banner showing the remaining
15
Page 29
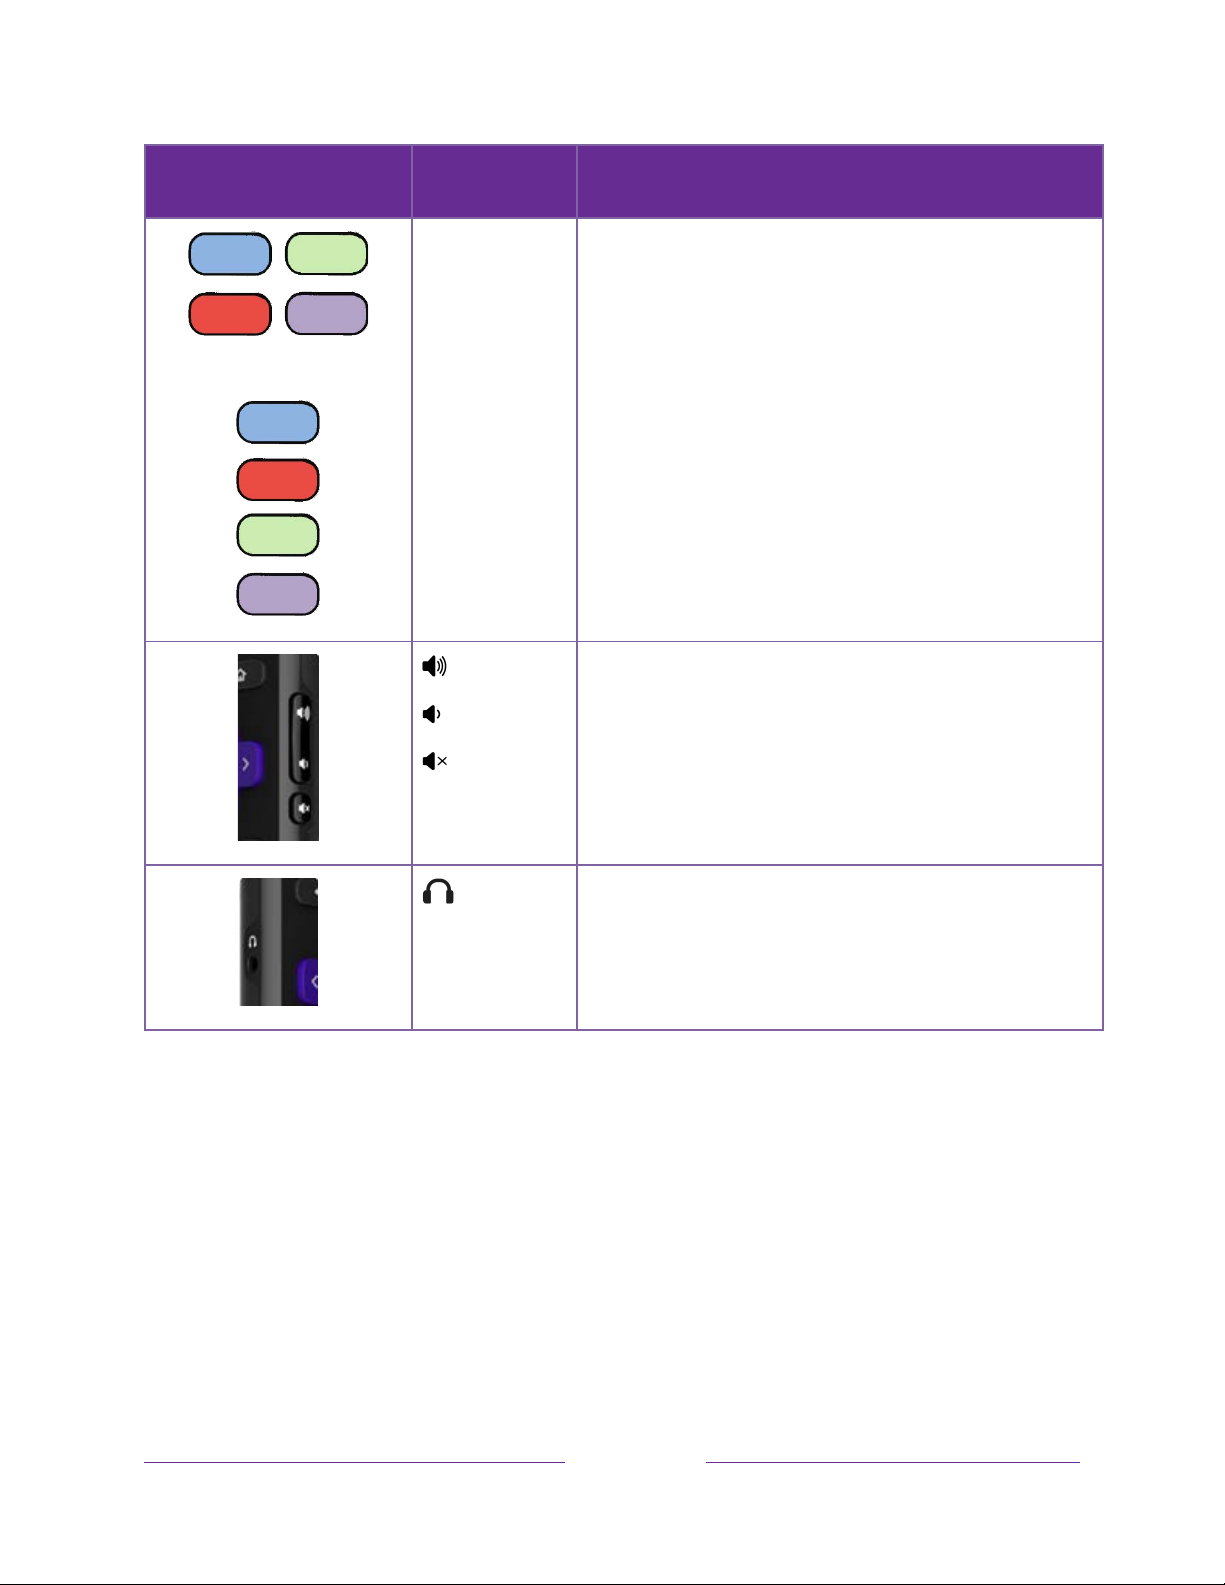
BUTTON FUNCTION DESCRIPTION
or
FACTORY
ASSIGNED
CHANNEL
SHORTCUT
UP
DOWN
MUTE
Dedicated buttons show the logo of a preset streaming
content provider. Dedicated content providers vary by
model and region. Pressing a button:
• Displays the streaming channel’s main page if you
have already added the channel to your Home
screen.
• Displays the streaming channel’s sign-up page if
you have not already added the channel.
Located on the right edge of the remote.
Increases/decreases volume and mutes the TV sound.
Note:
If the TV is muted, pressing VOLUME UP unmutes.
Pressing VOLUME DOWN does not unmute the sound.
HEADPHONE
Select models with Roku Enhanced Voice Remote or
Roku Voice Remote Pro
jack on the left edge of the remote to listen privately.
Plugging in headphones mutes the TV speakers.
. Connect headphones to the
16
Page 30

Panel buttons
Your TV has buttons on its side, bottom, or back panel that perform simple control
functions. The TV panel buttons are not a substitute for the remote, as they do not
give you access to all TV functions.
Depending on model, your TV model has one of several different panel button
designs. Choose the one that applies to your TV from the following list:
• Single button
• Three buttons
• Game-pad style joystick
• Four buttons
• Five buttons (with mute)
• Five buttons (without mute)
• Seven buttons
Single button
If your TV has this style of panel button, you can perform the following functions:
• Turn TV on: short press.
• Display the Input List: short press when TV is on.
• Select the next input in the Input List: short press while the TV is showing the
Input List.
• Dismiss the Input List without changing inputs: no press.
• Turn TV off: long press.
Short press = less than two seconds
Long press = more than two seconds
No press = no press within two seconds
17
Page 31

Three buttons
If your TV has this style of panel buttons, you can perform the following functions:
• Turn TV on: middle button, short or long press.
• Volume up: right button when Input List is not active.
• Volume down: left button when Input List is not active.
• Display Input List: middle button, short press when TV is on.
• Highlight next input in the Input List: right button when Input List is active.
• Highlight previous input in the Input List: left button when Input List is active.
• Select highlighted item in the Input List: middle button, short press, or no
press.
• Turn TV off: middle button, long press.
Short press = less than two seconds
Long press = more than two seconds
No press = no press within four seconds
Game-pad style joystick
If your TV has this style of panel button, you can perform the following
functions:
• Press in: Toggle between power ON and Standby.
• Press up or down: Increase/decrease the volume.
• Press left or right: Switch inputs. Each press moves the highlight up or down
one item. Pausing for a few moments selects the highlighted item.
Four buttons
If your TV has this style of panel buttons, you can perform the following functions:
• Power: Turns the power on and off.
• Input: Selects among TV inputs. Each press moves down one item. Pausing for
a few moments selects the highlighted item.
• Volume +: Increases the volume.
• Volume –: Decreases the volume.
18
Page 32

Five buttons (with mute)
If your TV has this style of panel buttons, you can perform the following functions.
Note that the order of the buttons might vary from model to model. Examine the
panel button labels to determine your TV model’s layout.
• Power: Turns the power on and off.
• Input: Selects among TV inputs. Each press moves down one item. Pausing for
a few moments selects the highlighted item.
• Volume +: Increases the volume.
• Volume –: Decreases the volume.
• Mute: Mutes and unmutes the sound.
Five buttons (without mute)
If your TV has this style of panel buttons, you can perform the following functions.
Note that the order of the buttons might vary from model to model. Examine the
panel button labels to determine your TV model’s layout.
• Power: Turns the power on and off.
• Input +: Selects the next TV input. Each press moves down one item. Pausing
for a few moments selects the highlighted item.
• Input -: Selects the previous TV input. Each press moves up one item. Pausing
for a few moments selects the highlighted item.
• Volume +: Increases the volume.
• Volume –: Decreases the volume.
Seven buttons
If your TV has this style of panel buttons, you can perform the following functions.
Note that the order of the buttons might vary from model to model. Examine the
panel button labels to determine your TV model’s layout.
19
Page 33
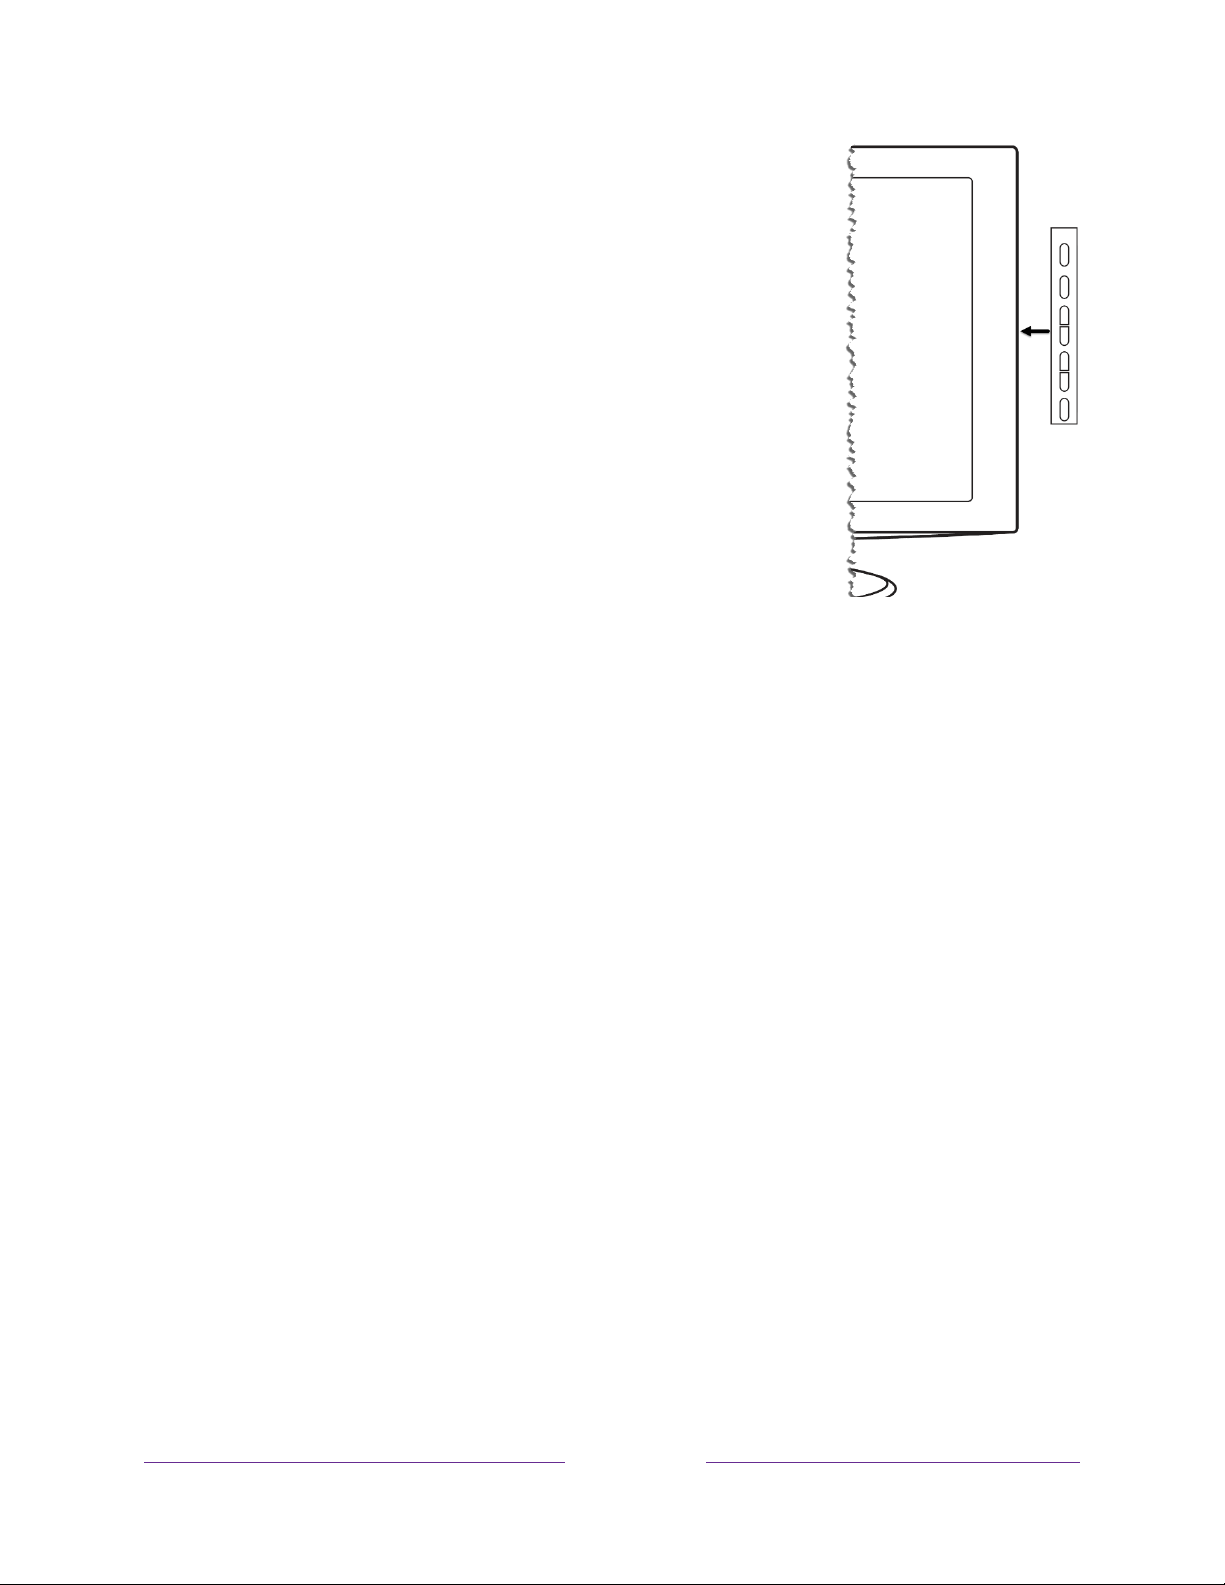
• Input: Selects among TV inputs. Each press moves
down one item. Pressing Channel + or Channel – moves
the highlight up or down. Pausing for a few moments
selects the highlighted item.
• Channel +: Moves the highlighted item up in the current
menu.
• Channel –: Moves the highlighted item down in the
current menu.
• Volume +: Increases the volume.
• Volume –: Decreases the volume.
• Mute: Mutes and unmutes the sound.
• Power: Turns the power on and off.
20
Page 34

Guided Setup
With the preliminaries out of the way, it’s time to turn on your TV. As the TV starts for
the first time, it leads you through Guided Setup, which configures the TV before you
start to use it.
During Guided Setup, you’ll:
• Answer a few questions
• Provide network connection information
• Get a software update
• Link your TV to your Roku account.
• Connect devices such as a DVD player, game console, or cable box.
Starting Guided Setup
To start Guided Setup, press POWER on the remote to turn on your TV.
Note:
need to run Guided Setup again, you must perform a factory reset as explained in
Factory reset everything.
When you first turn on your TV, it will take a few seconds to get itself ready. You’ll
notice the following things happening:
Guided Setup normally runs only once, the first time you turn on your TV. If you
1. The status indicator blinks every time the TV is busy doing something; in this
case it’s powering up and getting ready for you.
2. The splash screen appears and the status indicator blinks slowly for a few more
seconds. The power-on screen shows a brand logo while the TV starts up.
21
Page 35
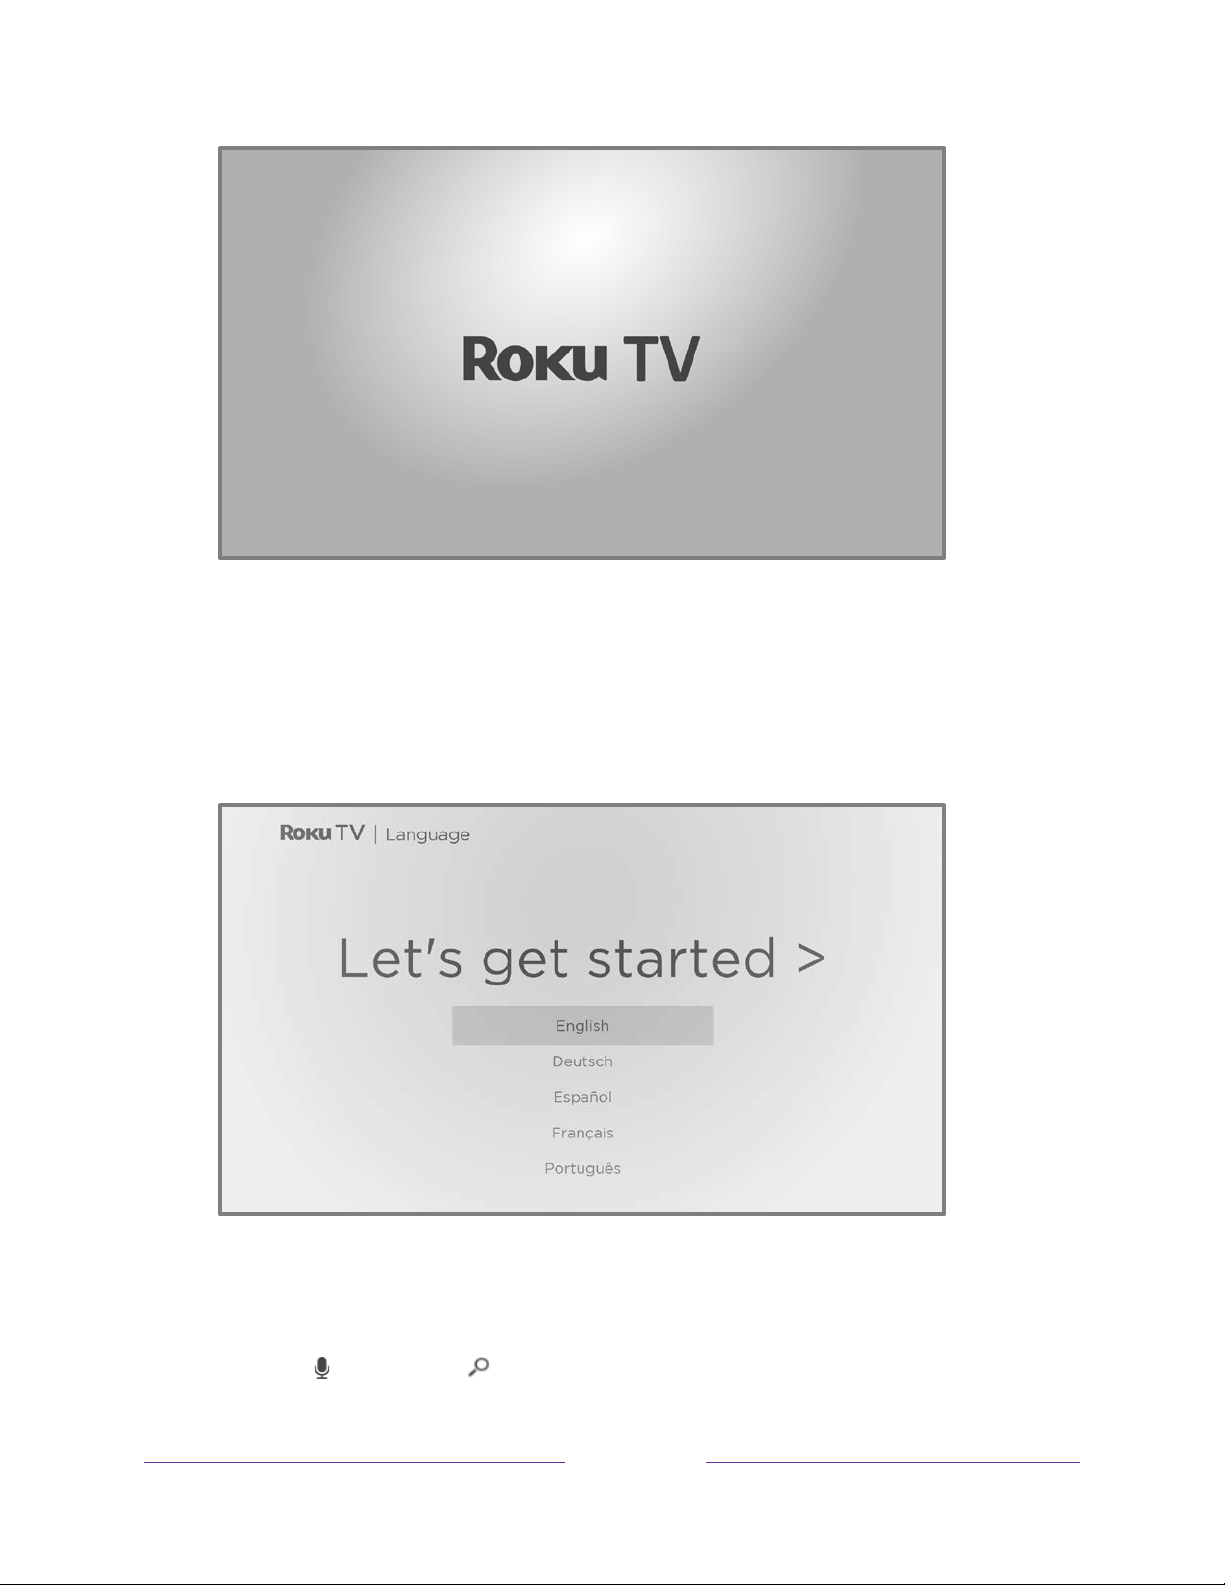
3. After a few seconds, Guided Setup starts.
Guided Setup
At this point, you should be seeing the Language screen.
Only on models that have a Roku Voice remote:
1.
A few moments after the Let’s
get started screen appears, Guided Setup starts the pairing process for the
Roku Voice remote. (You’ll know if you have this type of remote because it has
a VOICE or SEARCH button just below the purple directional pad.) If the
22
Page 36
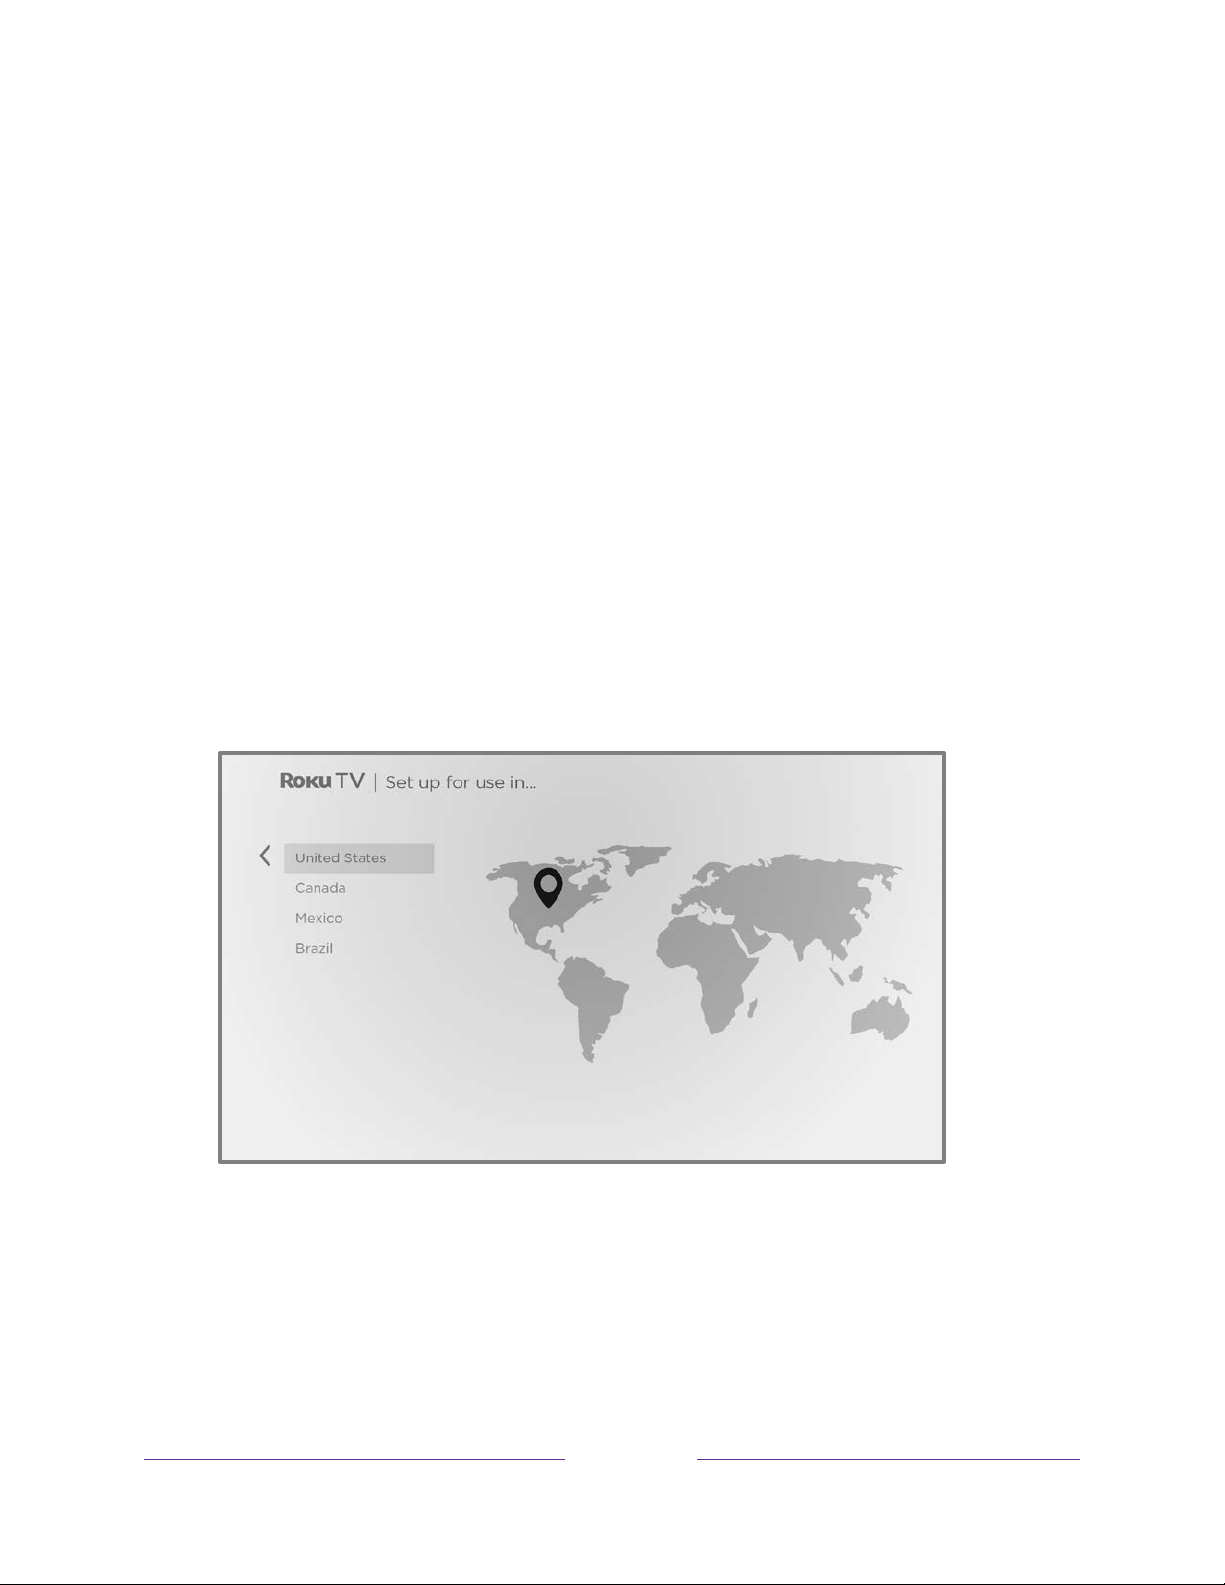
Roku Voice remote does not pair automatically, follow the instructions on the
screen to complete the pairing process.
Accessibility:
If you have selected United States and English language, you can
activate the screen reader, a text-to-speech screen reader to help you navigate
the TV’s menus and commands. To enable the screen reader, press STAR
four times in rapid succession. Repeat to disable the screen reader. (STAR is
located directly below the purple directional pad on the right side of the Roku
remote.)
If you enabled the screen reader, choosing any language other than English
disables it.
2. Press DOWN on the purple directional pad to highlight your preferred
language, and then press OK.
3.
Some models have a country selection screen:
ahead to the next step.
If you don’t see this screen, skip
If you see this screen, select your country, and then press OK.
Accessibility:
If you enabled the screen reader, choosing any country other than
United States disables it.
23
Page 37
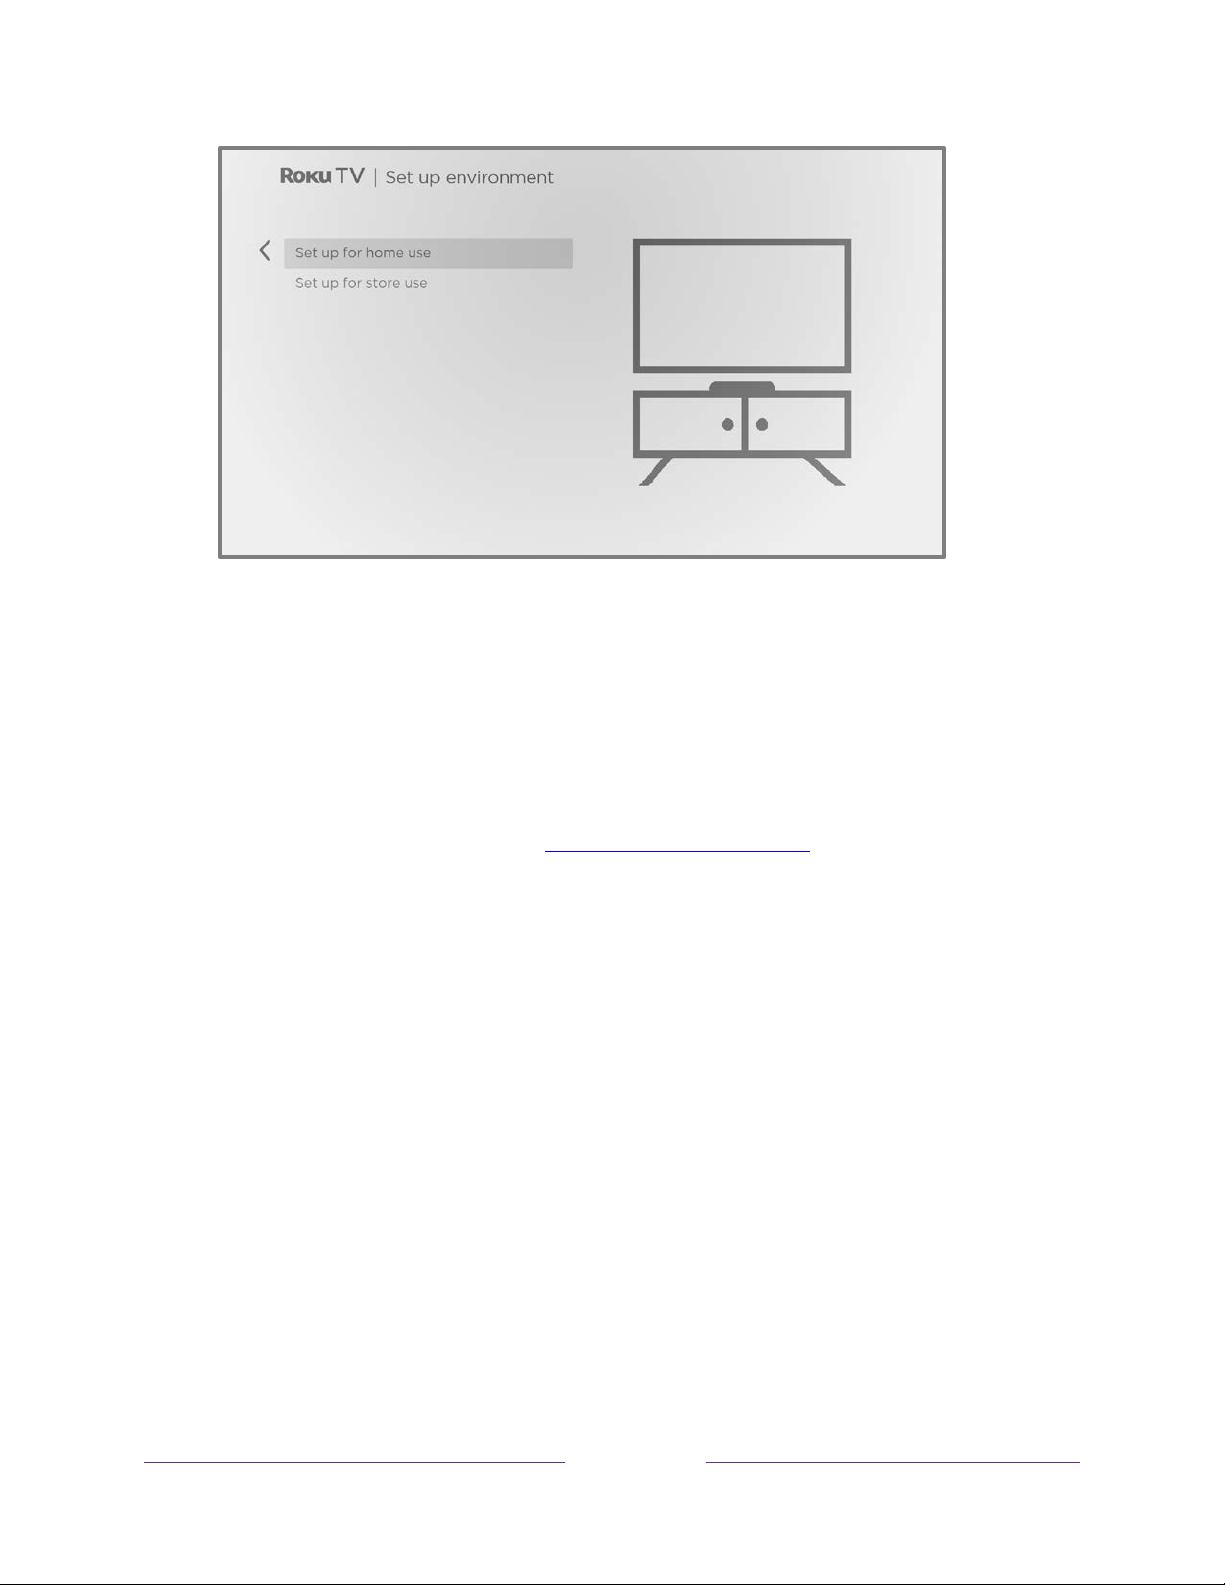
4. Press OK to select Set up for home use. This is the right choice for enjoying
your TV at home. It provides energy saving options as well as access to all
features of the TV.
Set up for store use configures the TV for retail display and is not
Note:
recommended for any other use. In store mode, some features of the TV are
missing or limited. To switch from one mode to the other, you have to perform
a factory reset as explained in Factory reset everything, and then repeat Guided
Setup.
Network connection
After you select Set up for home use, the TV prompts you to make a network
connection. If your TV has both wired and wireless connections, you’ll see the
following screen. If your TV has only wireless connectivity, skip the following
step.
24
Page 38
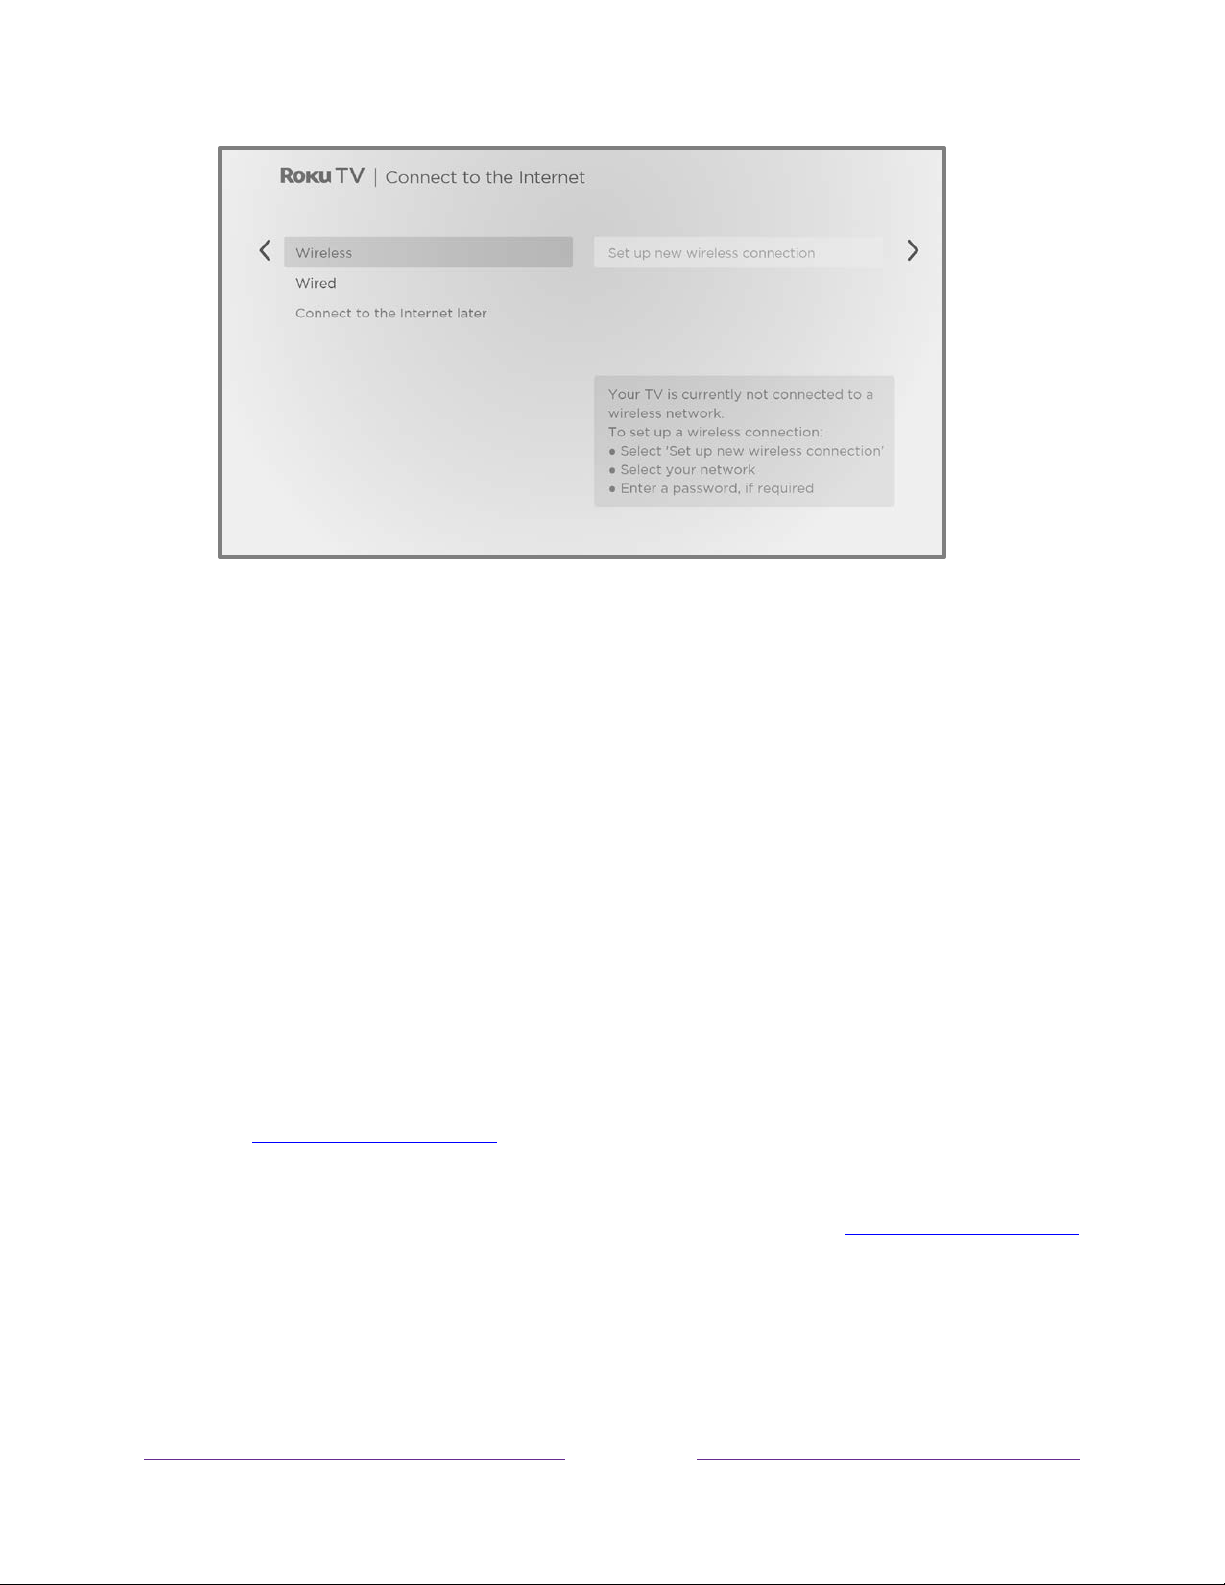
Only on models that display the Connect to the Internet screen:
5.
selection:
• Wireless connection – Highlight Set up new wireless connection and press
OK. The TV prompts you through wireless setup. Skip ahead to the next
step for help with the process.
• Wired connection – Highlight Connect to wired network and press OK. The
TV immediately attempts to connect to your wired network, your local
network, and then the Internet. Go to Step 9 to continue with Guided Setup.
• Connect to the Internet later – If you don’t want to connect to the Internet
right now, you can select this option, and then press OK. You can still use
the TV to watch live TV channels, and connect your devices to play games,
watch DVDs, or watch channels from a cable box or another streaming
device. When you’re ready to connect, it’s easy. We’ll show you how in
Benefits of connecting.
Make a
Note:
If you decide not to connect, Guided Setup skips ahead to setting up the
devices that you’ve connected to your TV. Jump ahead to Connect your devices
to complete Guided Setup.
6.
On models that have wireless only, and models with both wired and wireless
when you’ve selected Wireless:
The TV scans for the wireless networks within
25
Page 39
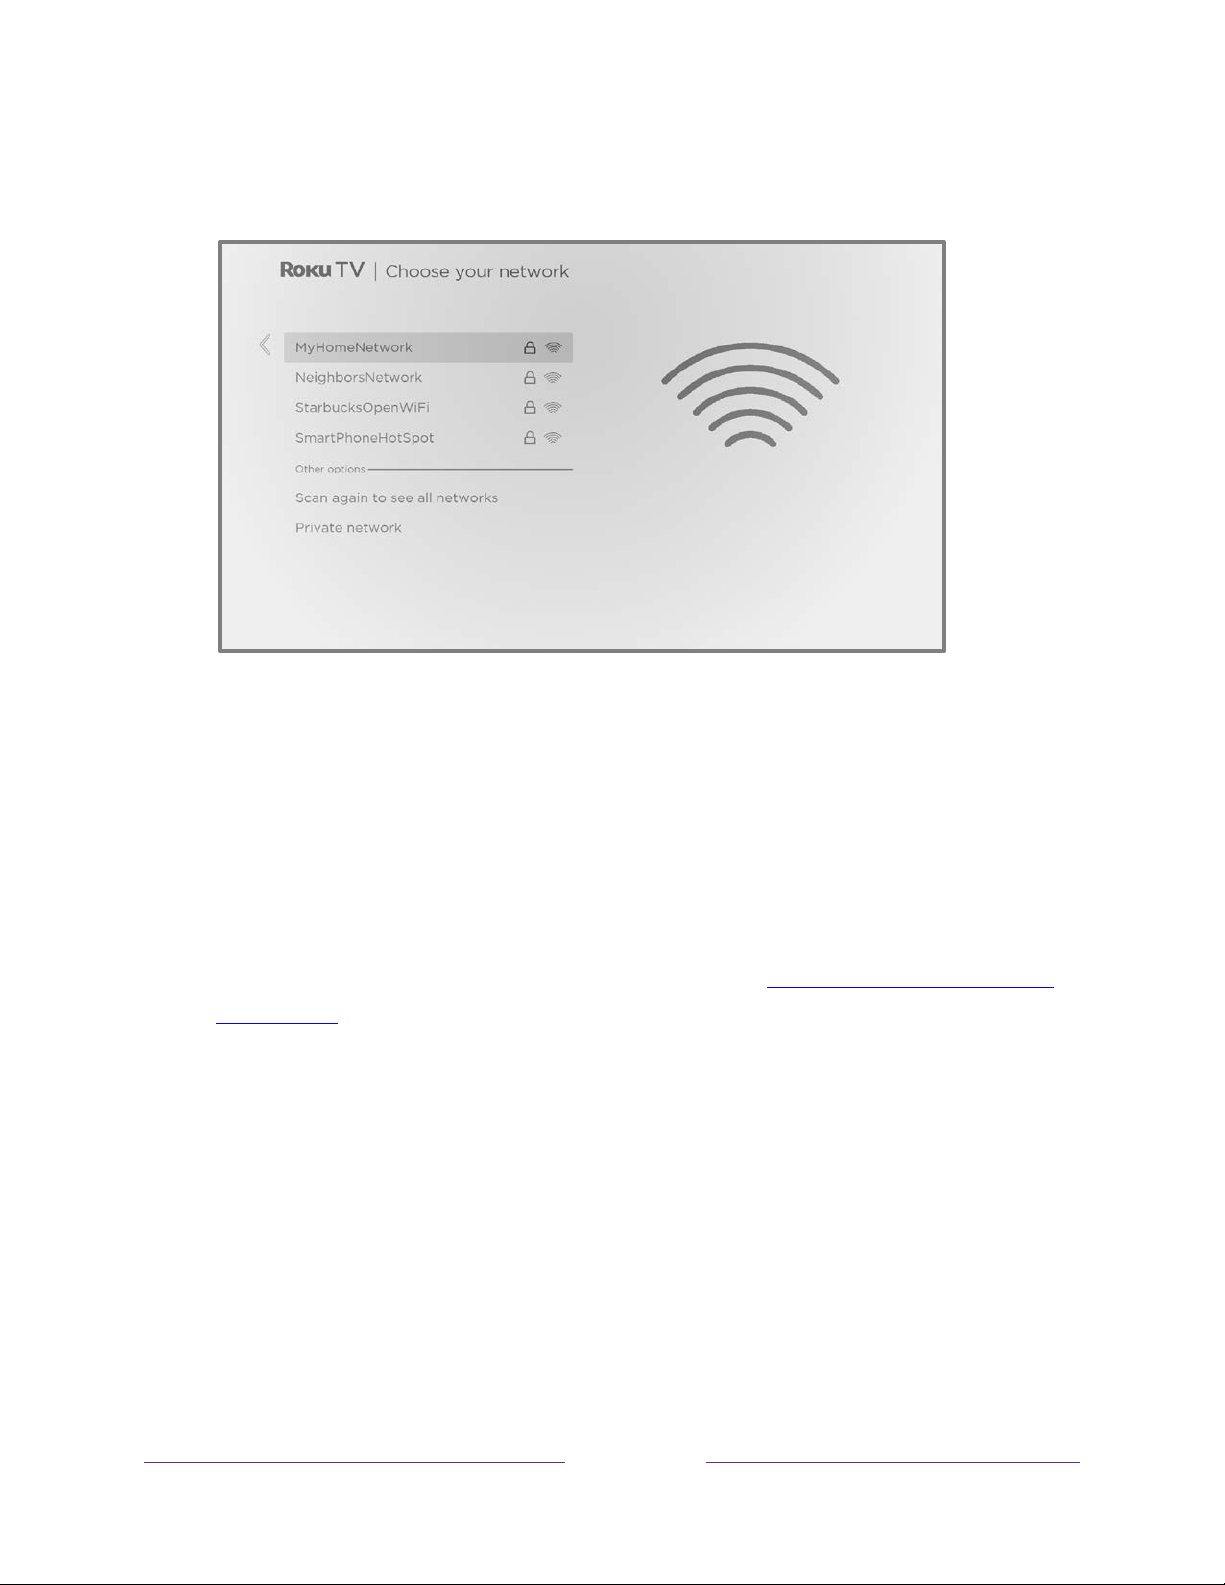
range and displays them in order, with the strongest signals first. In addition to
your own wireless signal, the TV might pick up signals from your neighbors.
Press UP or DOWN to highlight the name of your wireless network, and then
press OK to select it.
Note:
Some networks, such as those often found in dorm rooms, hotels, and
other public places, require you to read and agree to terms, enter a code, or
provide identifying information before letting you connect to the Internet. If
your Roku TV detects that you are connecting to such a network, it prompts
you through the connection process using your smartphone or tablet to provide
the needed information. For more information, see Using your TV in a hotel or
dorm room.
Other options
• Scan again / Scan again to see all networks – The name of this option
depends on the number of wireless networks within range.
• Scan again appears if the list already shows all available wireless
networks within range. If you don’t see your wireless network name in
the list, you might need to adjust the location of your wireless router or
the TV, turn on your router, or make other changes. When everything is
ready, select Scan again to see if your network name now appears in the
list.
26
Page 40
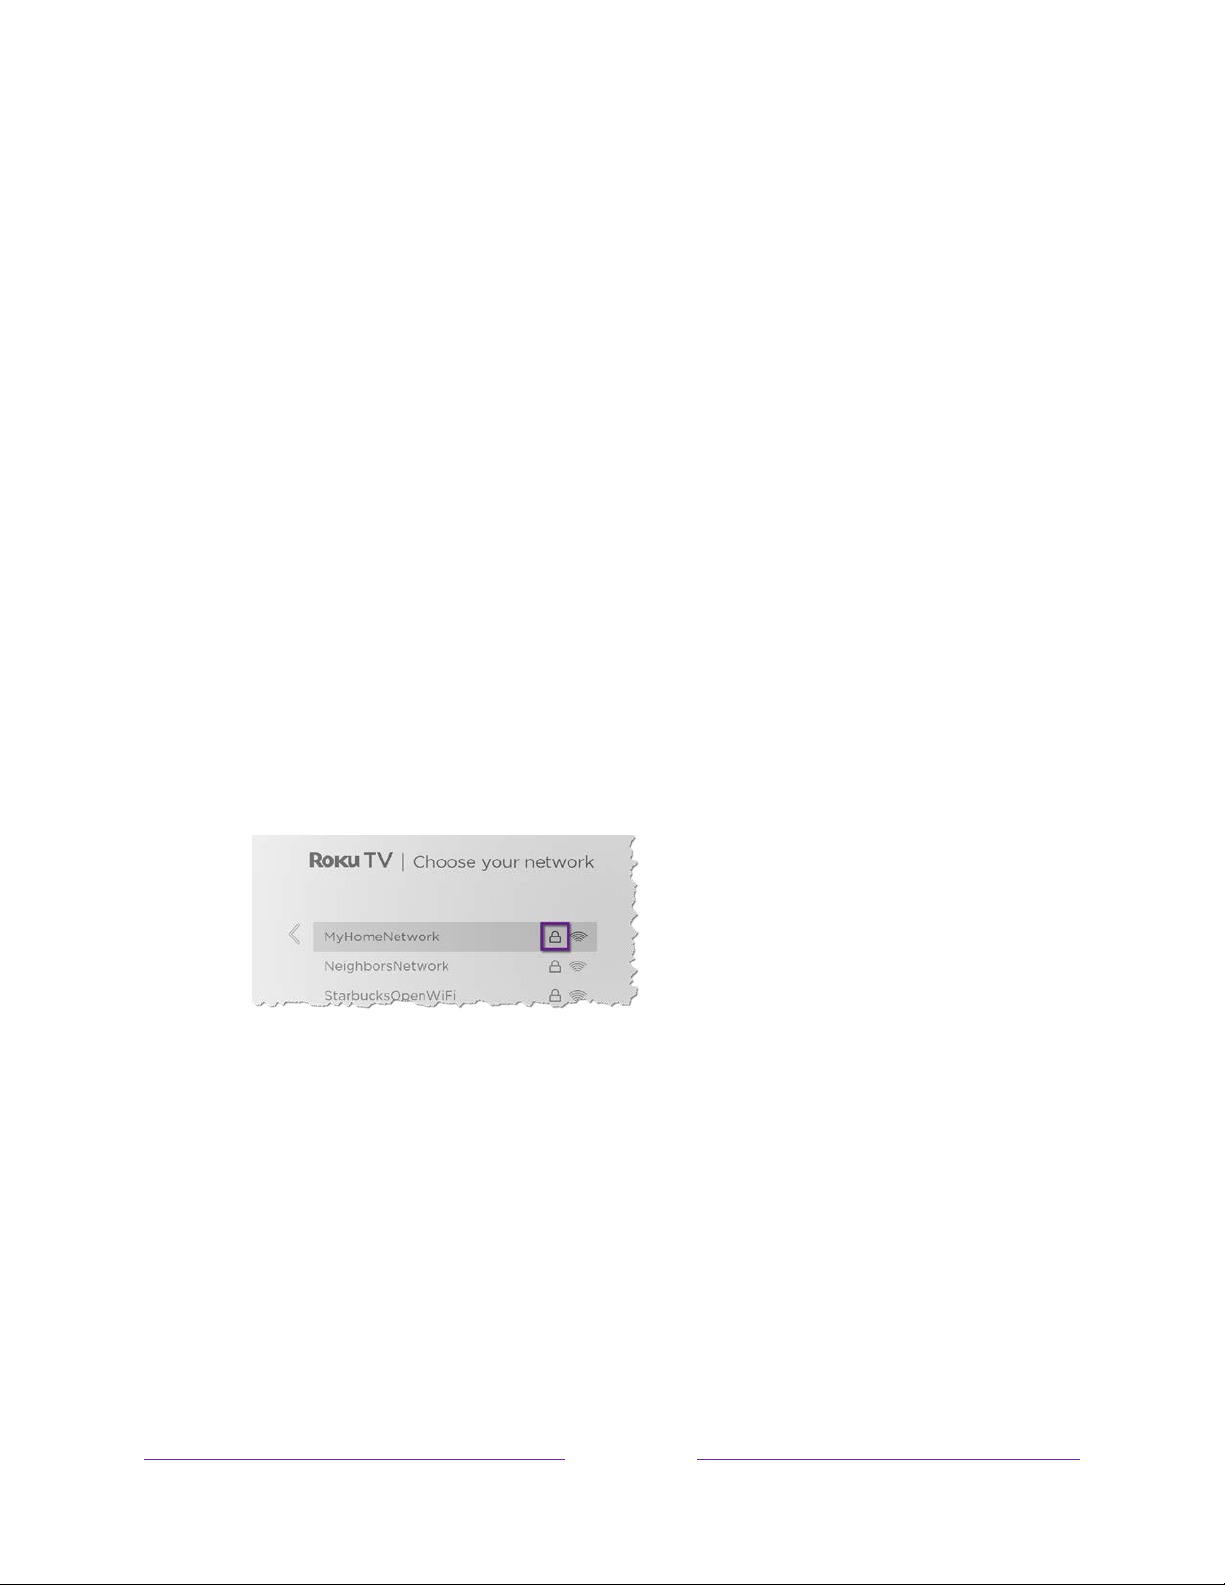
• Scan again to see all networks appears if there are more wireless
networks than the strongest ones it initially listed. If you don’t see your
wireless network name in the list, this option displays the complete list. If
you still don’t see your network name, you might have your router
configured to provide wireless service as a “private network.”
Note:
Highlighting either of these options displays an informational panel
with the unique media access control (MAC) address of your Roku TV.
You will need the MAC address if your wireless router is configured to
use MAC address filtering.
• Private network – If your wireless network name is hidden, it won’t appear
in the list. Select Private network and then press OK to display an on-screen
keyboard. Use the keyboard to enter your network name. Unless you
changed the factory-set network name, you can find the name (also called
SSID) on a label on the router.
Tip:
Wireless networks that are password-protected display a “padlock” icon
adjacent to the name. This icon enables you to know that you are going to
be prompted to enter a password after you select that network.
Only if you select a password protected wireless network:
7.
keyboard appears. Enter your wireless network password by using the purple
directional pad to navigate the keyboard, and pressing OK to select a
highlighted letter, number, or symbol. When you finish, press DOWN to select
Connect, and then press OK.
27
An on-screen
Page 41
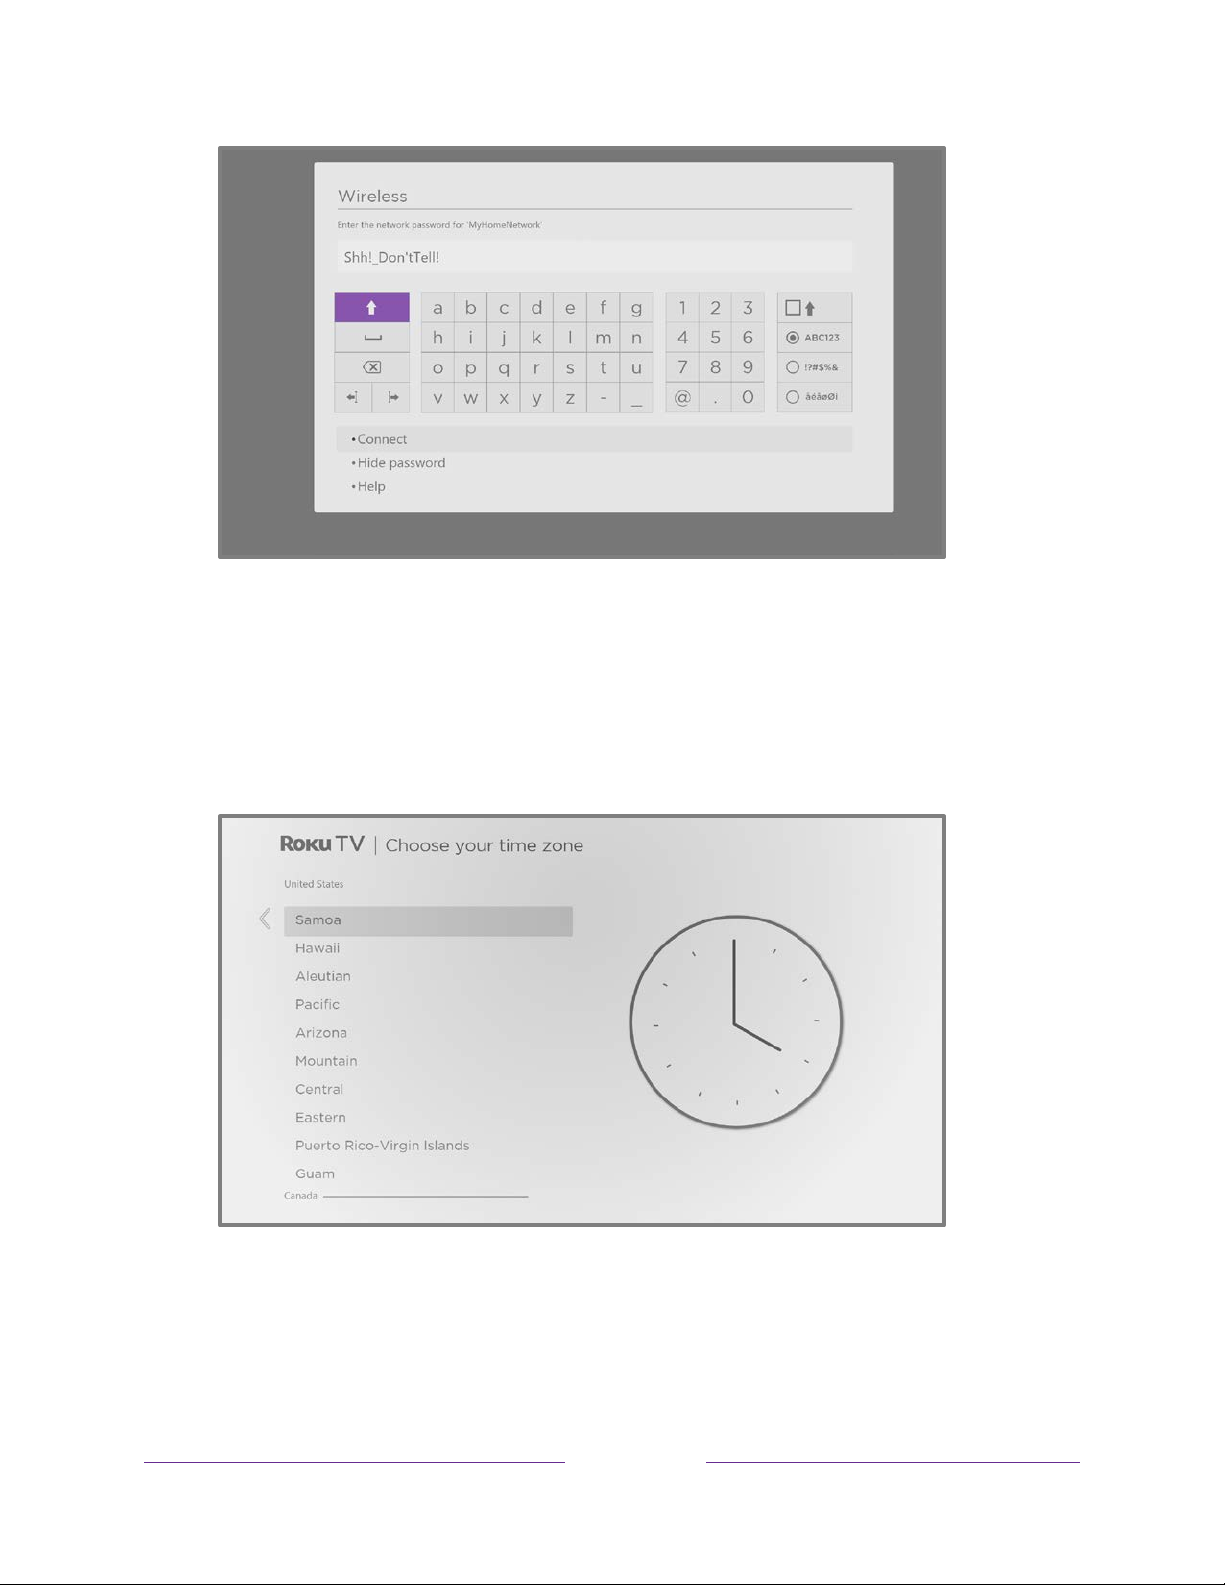
After you select Connect, the TV displays progress messages as it connects to
your wireless network, your local network, and the Internet.
Only if your TV cannot get the correct time zone and current time from your
8.
network service provider:
or DOWN to highlight your time zone, and then press OK.
Your TV needs to know the local time zone so that it can correctly display
Tips:
The Choose your time zone screen appears. Press UP
information about the program you are currently watching.
Your TV automatically checks for updates periodically. These updates provide
new features and improve your overall experience with the TV. After an update,
28
Page 42

you might notice that some options have moved, and that there are new
options or features. This User Guide describes version 11.0. But note also that
certain features of the TV might change from time to time independently of
Roku TV updates.
To determine your current Roku TV software version, go to Settings > System >
About after you complete Guided Setup. You can download an updated User
Guide that matches your Roku TV software version from the Roku TV web site.
Activation
After the TV restarts, it prompts you through activation.
9. Use a computer, tablet, or smartphone with an Internet connection to link to a
new or existing Roku account.
Note: Roku does not charge for activation support – beware of scams. For
detailed information, see this Roku Support web page
Why do I need a Roku account?
You need a Roku account for several reasons:
• It links you, your Roku TV, and your other Roku streaming devices to the Roku
Channel Store and billing service.
• Streaming content providers know that it’s OK to send content you request to your
Roku TV.
• Roku can automatically send updates to your device.
You need a Roku account to activate your device and access entertainment across
thousands of streaming channels. Linking to a Roku account also activates several
advanced features on your TV, such as Guest Mode, the Roku mobile app, and Live TV
Pause, to name just a few. Roku accounts are free, and while a valid credit card number
is not required to create your account, providing your credit card information makes
renting, purchasing, and subscribing to entertainment from the Roku Channel Store
fast and convenient.
After you activate your TV, the TV gets an acknowledgement, and then adds
your newly-selected and pre-existing streaming channels from other Roku
29
Page 43
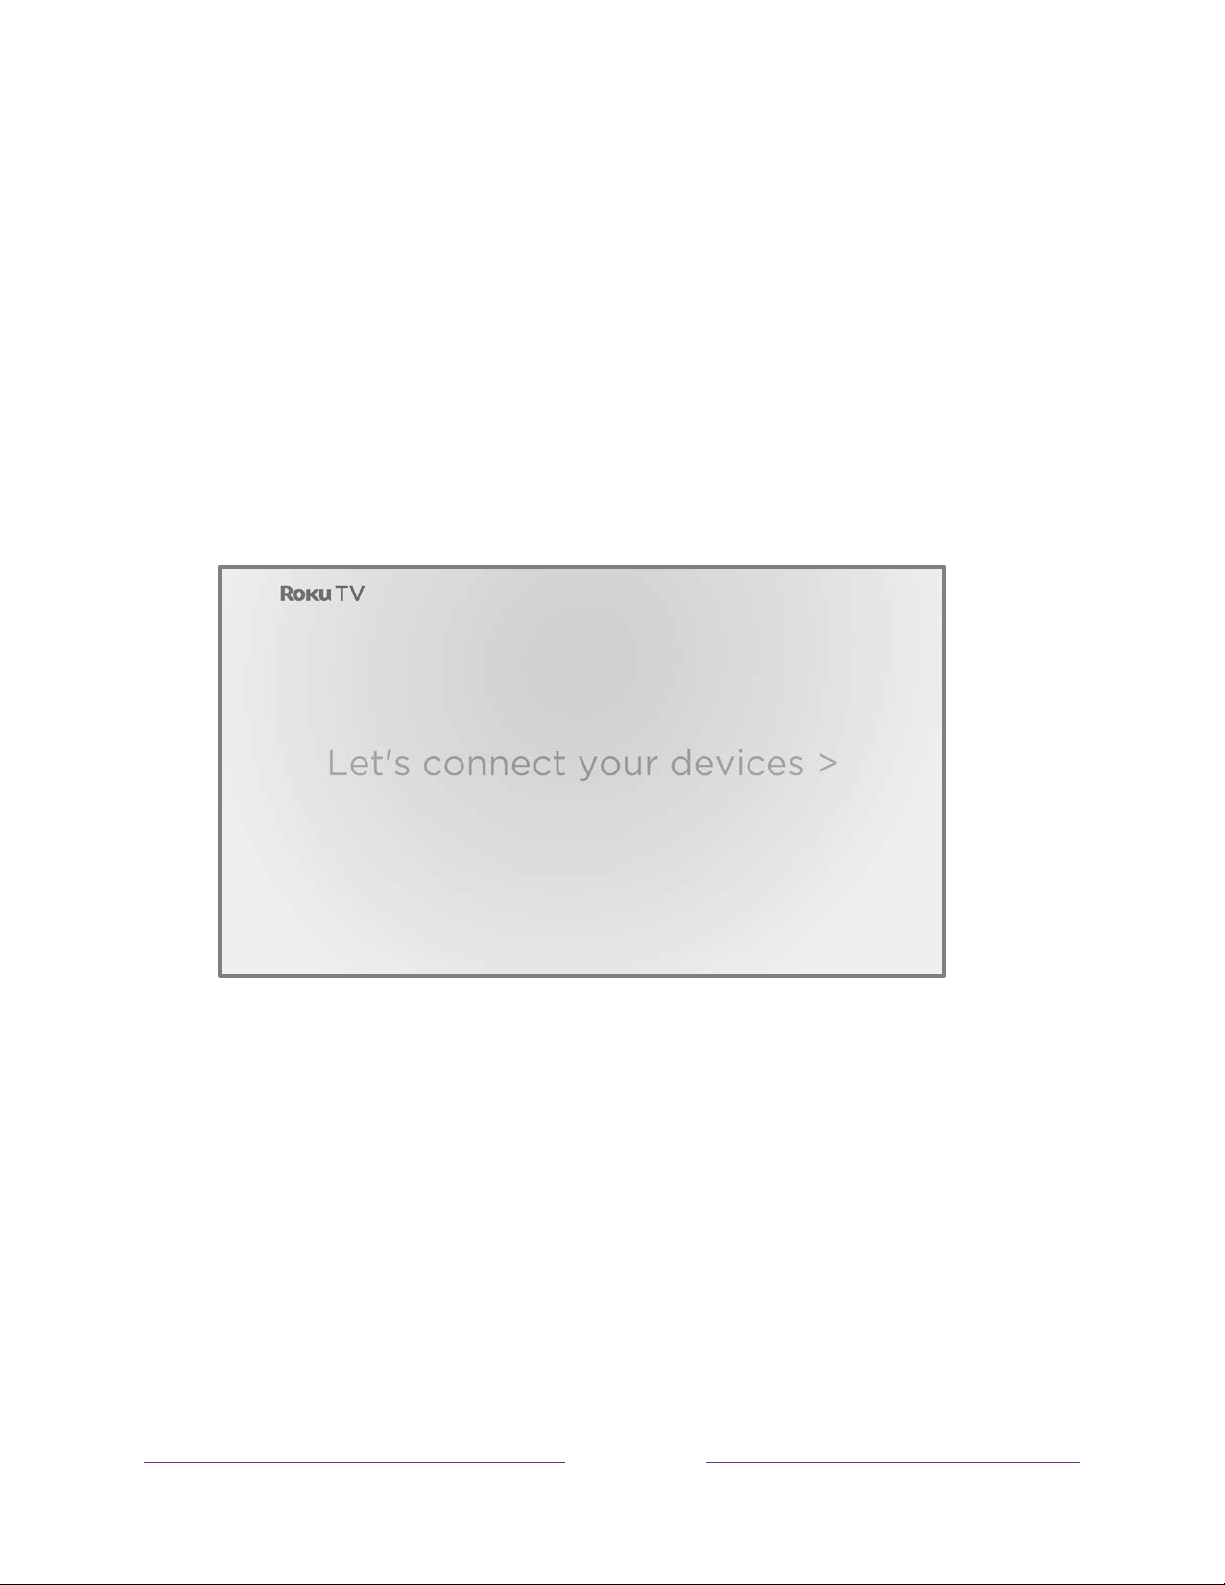
devices on the same account. This process is automatic and takes a few
moments—a little longer if you have added a lot of streaming channels.
Streaming channels from all of the Roku streaming devices associated with
Tip:
your account are synchronized periodically. All of your Roku streaming devices
therefore display the same set of channels (subject to compatibility with the
device).
Connect your devices
Next, Guided Setup helps you set up the external devices that you want to use
with it, such as a cable box, Blu-ray™ player, or game console.
30
Page 44
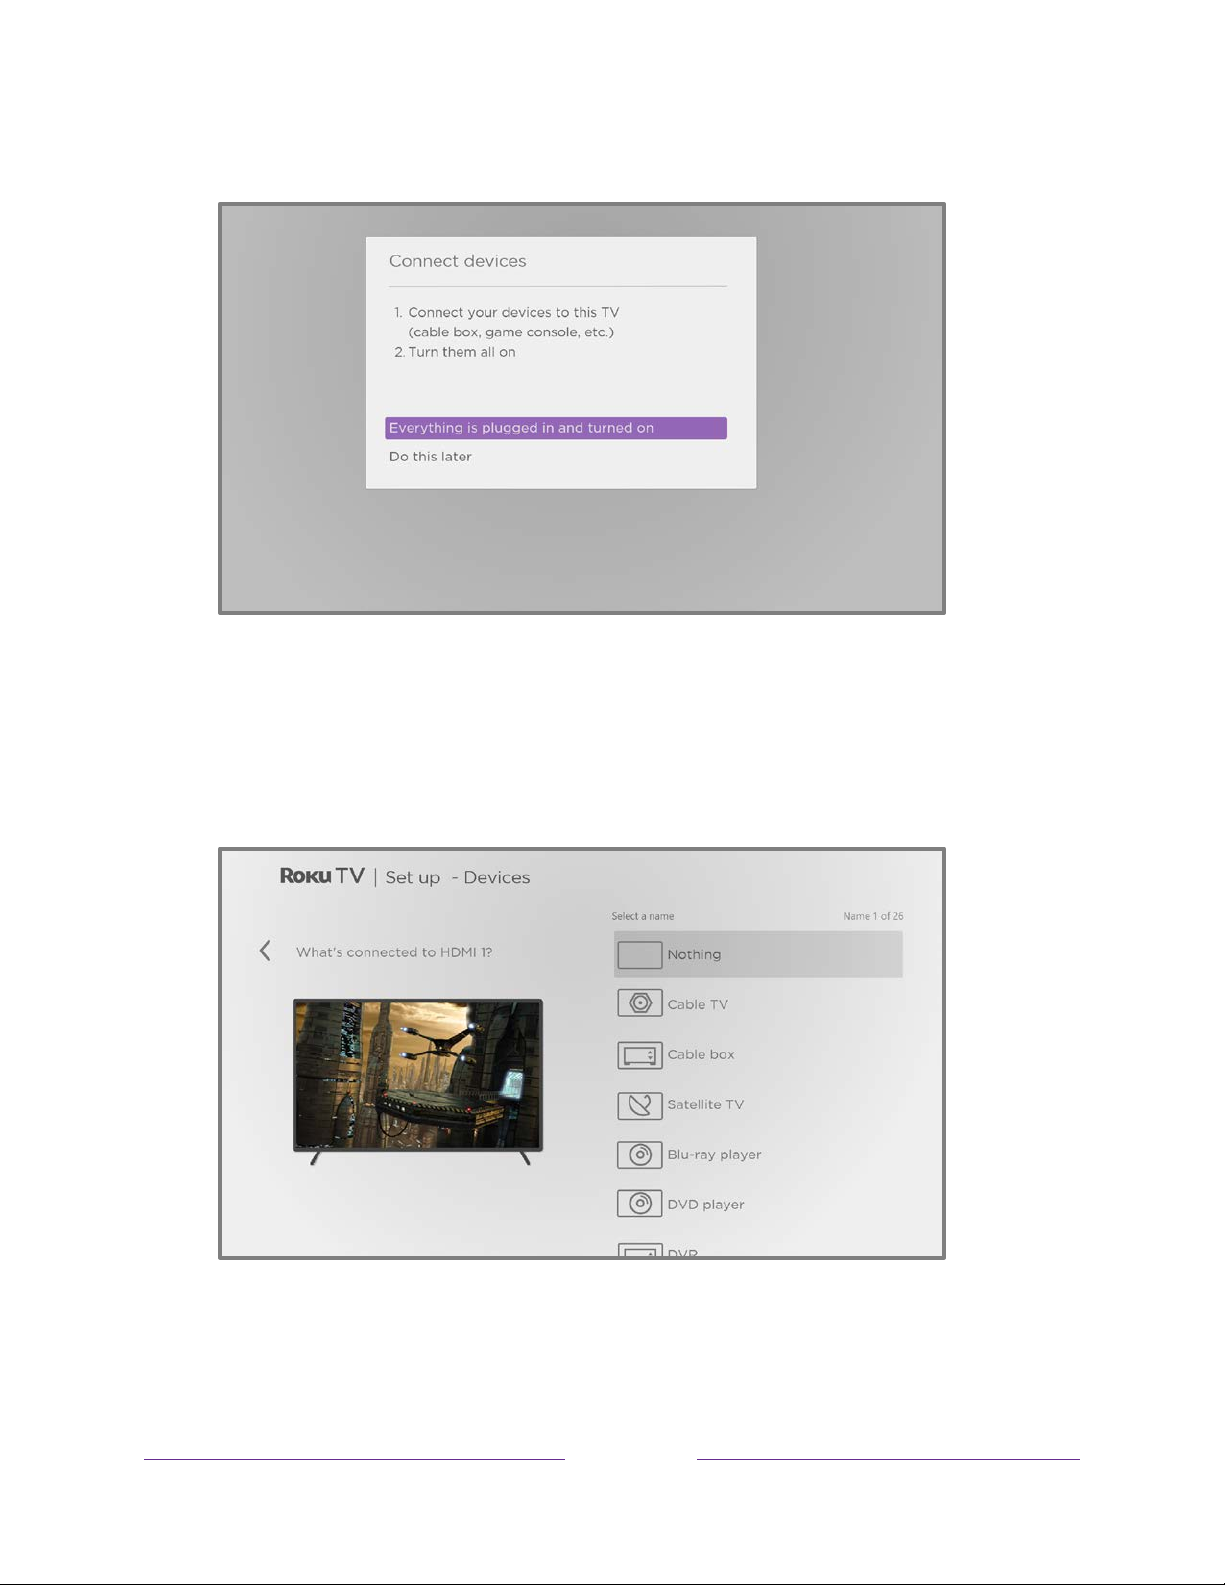
10. Press OK to proceed:
11. Connect all the devices you plan to use with your TV, turn them all on, and then
select Everything is plugged in and turned on. The TV now takes you step by
step through each of its inputs and asks what kind of device you have
connected. For each input that has a connected and active device, you can see
its picture and hear its sound.
12. Press UP or DOWN to highlight the label you want to associate with the input,
and then press OK. If you are not using the input, select Nothing, and the input
won’t appear on the Home screen.
31
Page 45
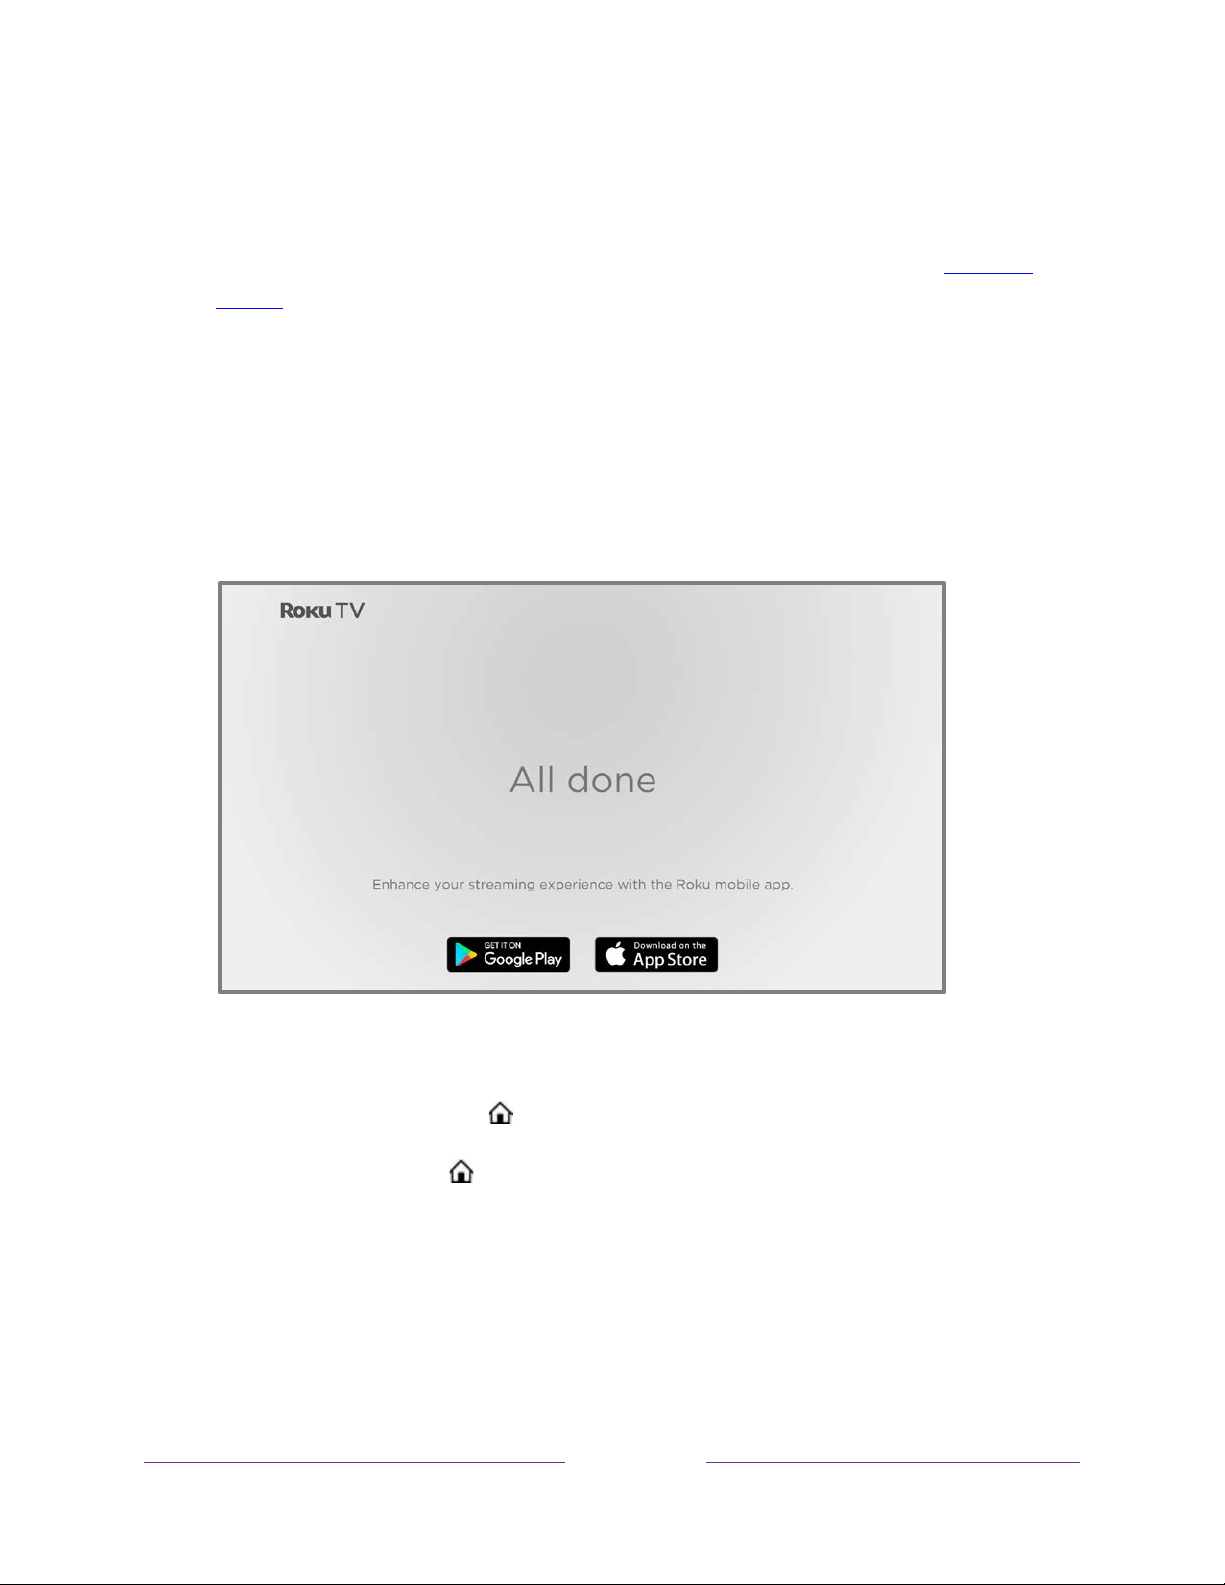
13. While setting up your devices, rather than using the predefined names and
icons, you can set a custom name and icon. To do so, scroll up or down to
highlight Set custom name & icon, and then press OK. Follow the instructions
on the screen to enter a name and select an icon for the input. See Rename
inputs for more information.
Note:
If you specify a custom name for an input, voice commands will not
reliably switch to that input. Voice commands typically can only switch among
inputs that use built-in names, such as “AV,” and “Cable Box,” and “DVR.”
14. Repeat the previous step for each input.
You’re done with Guided Setup.
Note:
Some Roku TVs, depending on where you live and other factors, show you an
introductory video filled with some great hints and tips. If you’re not interested in
viewing this video, press HOME on the remote to go to the Roku TV Home screen.
Whenever you press HOME , the Home screen greets you.
From here, you can explore everything your TV has to offer. Use the purple
directional pad to move around, and then press OK to select a highlighted item.
We’ve designed the TV to encourage you to explore, and you can probably figure out
most of the capabilities and settings on your own. If you have any questions or
difficulties, you can find answers and solutions in this guide.
32
Page 46
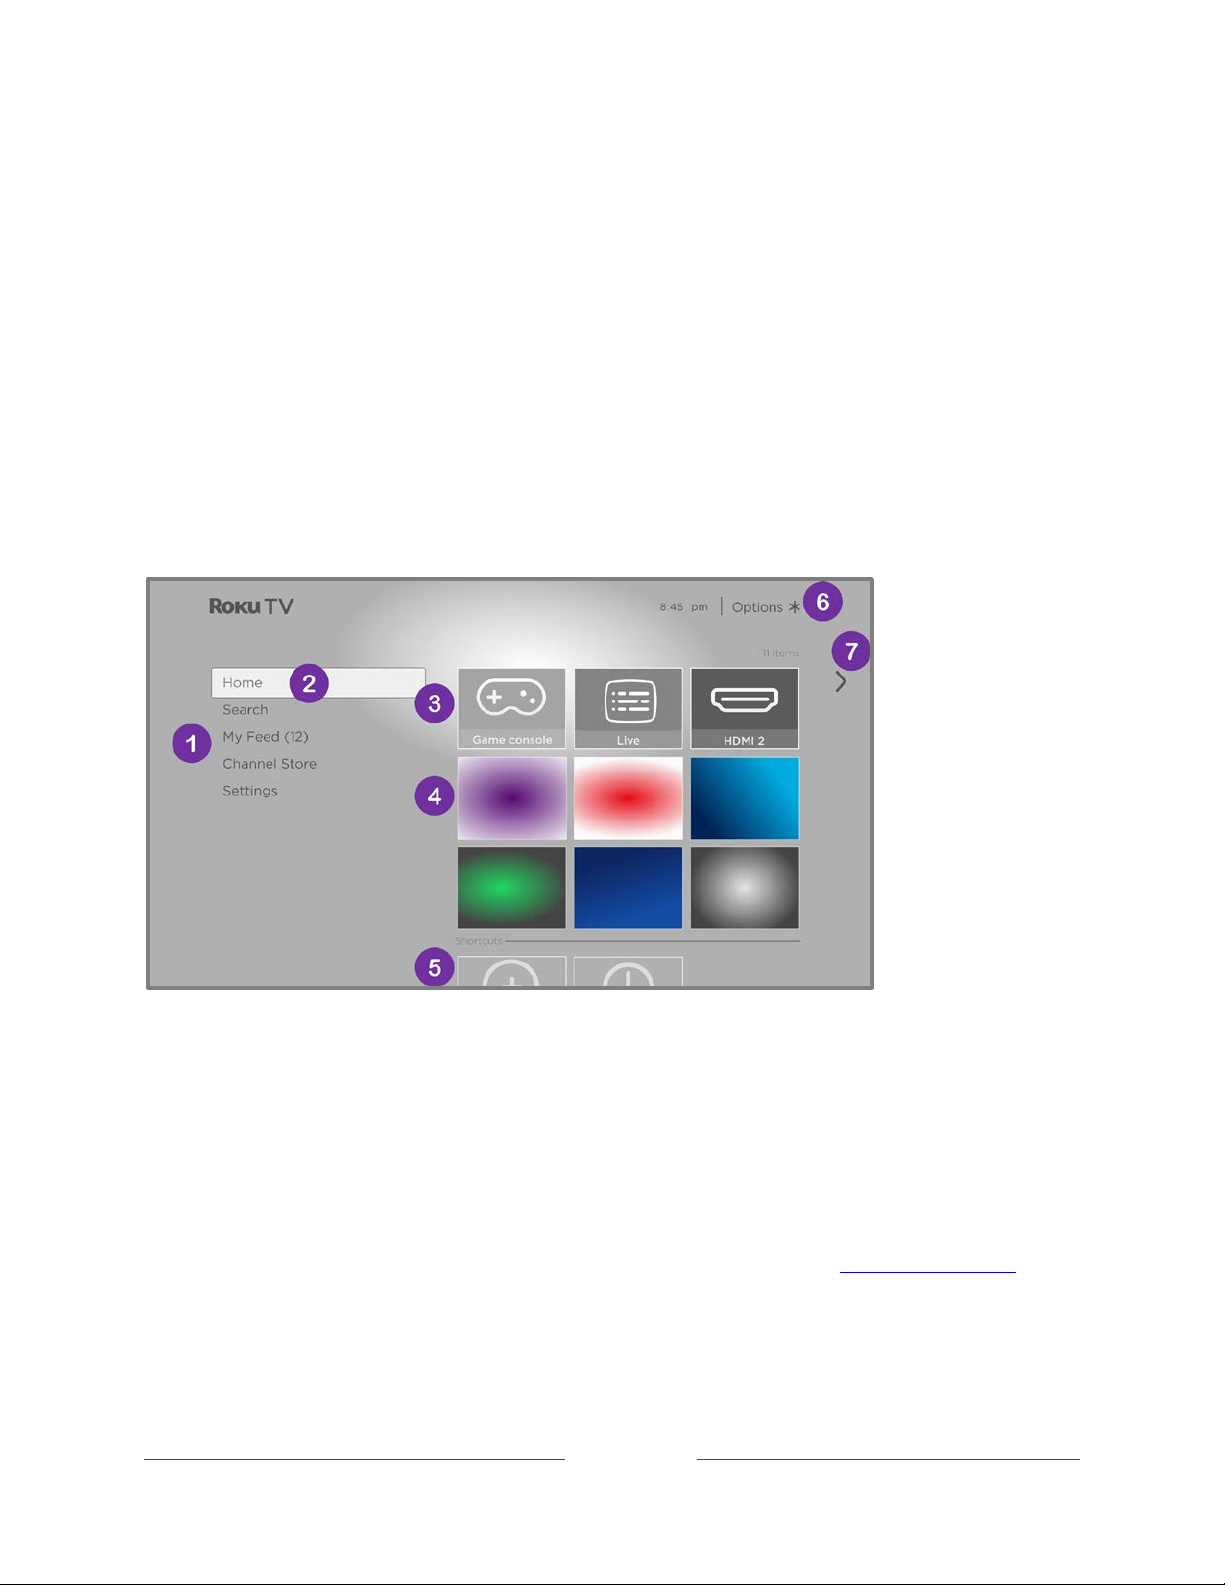
The Home screen
The following illustrations show typical Home screens, which vary depending on
location, connected mode, selected theme, number of TV inputs enabled, and
streaming channels and apps added.
Note:
A paid subscription or other payments may be required for some channel
content. Channel availability is subject to change and varies by country. Not all content
is available in countries or regions where Roku
Typical connected Home screen
®
products are sold.
Note:
and might change from time to time.
The options appearing in the left navigation area vary by geographic location
1. Home screen menu—shows options available to you when you are on the Home screen.
2. Highlighted option—press OK to select.
3. TV input tiles—select an input to watch the connected device.
4. Streaming channel and app tiles—select a tile and press OK to go to the indicated streaming
channel or application. You can add any number of channels from the Roku Channel Store.
5. Direct access tiles – shortcuts to often used features.
6. Options hint—press STAR
7. Next screen hint—press RIGHT to see the next screen.
to see options when this symbol is present.
33
Page 47
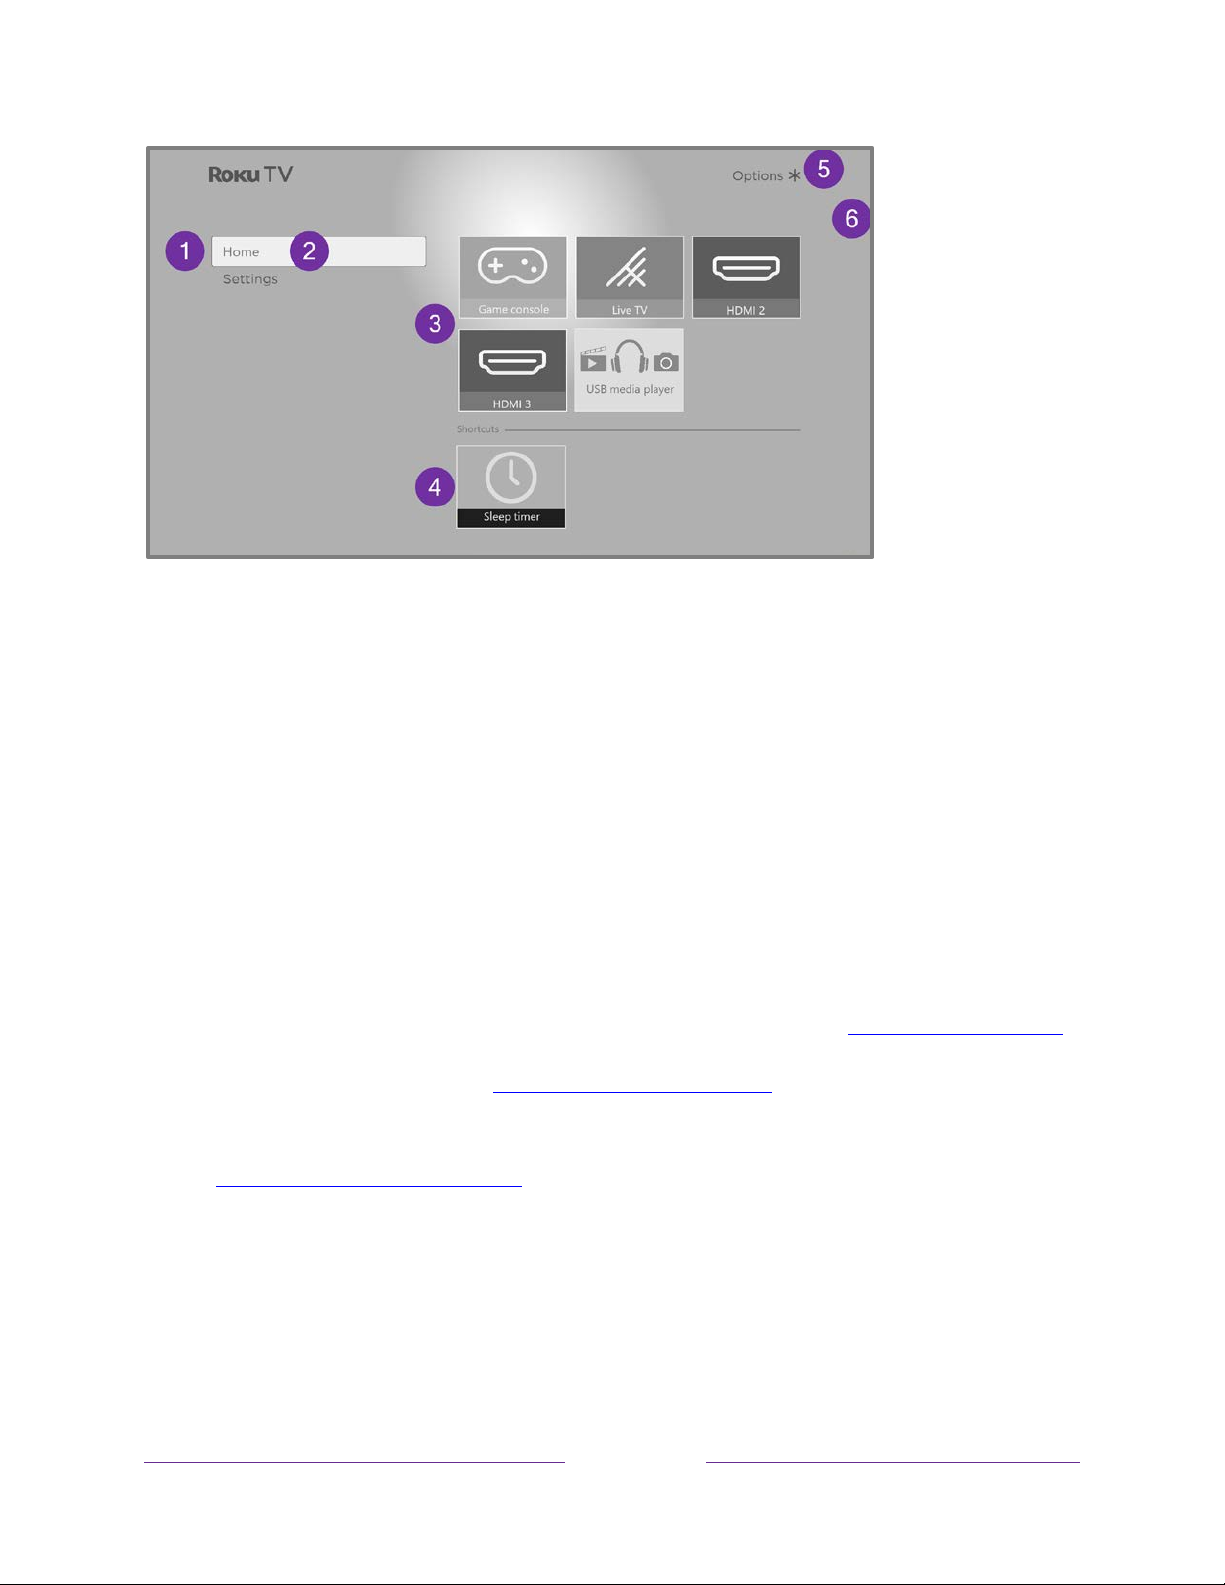
Typical non-connected Home screen
1. Home screen menu—shows options available to you when you are on the Home screen.
2. Highlighted option—press OK to select.
3. TV input tiles—select an input and press OK to watch the connected device.
4. Direct access tiles – shortcuts to often used features.
5. Options hint—press STAR for options when this symbol is present.
6. Next screen hint—press RIGHT to see the next screen.
Personalize your Home screen
There are many things you can do to personalize your Home screen and make it just
right for you and your family:
Only in connected mode:
•
menu option or the Add Channels shortcut to browse the Roku Channel Store.
•
Only in connected mode:
Themes to find and pick one to suit your mood.
• Customize the Home screen. Hide or show the shortcut tiles that appear at the
bottom of your Home screen grid.
States
, hide Featured Free, My Offers, or Movie Store and TV Store.
• Remove a tile by highlighting it and pressing STAR . Then highlight Remove
input or Remove channel and press OK.
Add streaming channels by using the Channel Store
Change the screen theme by going to Settings >
Only in connected mode in the United
34
Page 48

• Move a tile by highlighting it and pressing STAR . Then highlight Move input
or Move channel and press OK. Use the purple directional pad to move the tile,
and then press OK to lock it in its new location. Move the shortcut tiles within
the shortcut area only. Shortcuts are designed to always appear at the very
bottom of the grid, so you can access them quickly by pressing UP once when
you’re at the top of the grid.
Only on
•
manage your subscriptions by highlighting a streaming channel tile and
pressing STAR . Then highlight Manage subscription and press OK. Select
Cancel subscription and then follow the instructions to confirm your
cancellation.
• Rename a TV input tile by highlighting it and pressing STAR . Then highlight
Rename input and press OK. Highlight a new name in the list, and then press
OK to assign that name to the tile.
Rather than using the predefined names and icons, you can set a custom name
and icon. To do so, scroll up or down to highlight Set custom name & icon, and
then press OK. Follow the instructions on the screen to enter a name and select
an icon for the input.
Note:
channels
that you have subscribed through your linked Roku account
If you specify a custom name for an input, voice commands will not
reliably switch to that input. Voice commands typically can only switch among
inputs that use built-in names, such as “AV,” and “Cable Box,” and “DVR.”
,
35
Page 49

Benefits of connecting
Connecting brings out your TV’s full potential!
Make any night a movie night
Thousands of movies to choose from, across all major streaming movie channels1.
You’ll never run out of something new to watch.
Check out The Roku Channel
Use The Roku Channel as your new home page for an ever growing assortment of
free on-demand and streaming movies, programs, live news, and kid’s TV. Use the
Live TV Channel Guide within The Roku Channel. Add premium subscriptions to
watch many of your favorite channels in one place, and manage them all through your
Roku account.
Get in the groove
Stream endless hours of music from free and subscription-based channels. With
almost instant access to thousands of music artists, your favorite beats are just as
close as your remote.
Explore your passions
In addition to the most popular streaming channels, your Roku TV also offers
hundreds of other streaming channels to fuel your passions—including fitness,
cooking, religion, outdoors, international programming and much more.
Enjoy FREE trials of popular channels
Your Roku TV comes loaded with special offers, including free trials (if eligible) from
popular streaming channels. REMEMBER THAT YOU MUST CANCEL BEFORE THE
FREE TRIAL ENDS TO AVOID SUBSCRIPTION FEES.
1 A paid subscription or other payments may be required for some channels. Channel availability is
subject to change and varies by country. Not all content is available in countries or regions where Roku®
products are sold.
36
Page 50

Take advantage of awesome features
Powerful, voice-enabled search lets you use voice commands to find movies and TV
1
programs by title, actor, director, or genre across multiple streaming channels
Additionally, your search commands can include popular movie quotes, and words
like “free” and “4K.” In addition to streaming channels, your search results include live
TV programs airing in your region.
2
Voice commands with multiple device support let you use Apple Siri
, Google
Assistant, or Amazon Alexa to change stations, TV inputs, launch streaming channels,
and more. Include a location in your command such as “in the bedroom” to specify
which Roku device you want to control.
Automatic account linking keeps track of supported streaming subscriptions on other
Roku devices, so that you won’t have to re-enter your user name and password when
3
adding the same channel on your newly-activated Roku TV.
.
Live TV Channel Guide,
only in the United States
, is an electronic program guide that
is available any time you are watching broadcast programs or streaming programs
from the Live TV tile. If you prefer, you can hide streaming channels from the Live TV
Channel Guide.
More Ways to Watch,
only in the United States
, gives you recommendations about
the program you are watching on the Live TV, HDMI, or AV input, gives you options
to stream the current program from the beginning, the entire season, or the entire
series, and recommends other programs with similar themes. It also uses the shows
you watch to display ads that are more relevant to you.
Roku Zones,
only in the United States
, organize your search results into browsable
rows, such as New Release, Free, and Rent or Buy, so you can see at a glance how a
program is offered. If you have a 4K Roku TV, results also include a 4K Spotlight
Zone.
1 Voice features support English and Spanish languages.
2 Roku 4K TVs only.
3 Not all streaming channels currently support automatic account linking.
37
Page 51

4K Spotlight Channel,
navigation to help you find 4K entertainment quickly. Launching the channel takes
you to the 4K Movies and TV Zone, where you’ll find a regularly updated, handcurated selection of 4K entertainment from channels across the Roku platform. You
can browse a wide variety of 4K titles across a number of categories such as Most
Popular, Action, and more, to find the perfect movie or program to enjoy in beautiful
4K resolution.
Live TV Pause lets you connect a USB drive (not provided) and pause live TV for up
to 90 minutes. After pausing, you can play, fast-forward, rewind, and pause again to
any point within the rolling 90-minute window.
Tips & Tricks channel,
Roku to help you learn more about features, new products, and popular support
topics.
My Offers,
eligible for special offers or discounts on Roku products.
only in the United States
only in the United States
only in the United States
, show up in the Home screen menu if you are
, now has a new look and simpler
, is packed with videos created by
Mobile Private Listening on the Roku mobile app lets you listen to streaming
programs and “over-the-air” TV programs from the Live TV input on wired or
®
Bluetooth headphones (not provided) connected to your IOS
device.
or Android™ mobile
What is streaming?
Streaming is viewing or listening to video or audio content that is sent over the
Internet, or located on a network-connected media server or on a USB device
plugged into the TV’s USB port.
With streaming, you can buy or rent most programs on demand, when it’s convenient
for you, and you can also watch live streaming channels and events. Also, you can
play, pause, rewind, and fast forward most on-demand streaming programs.
Some content cannot be paused or skipped. For example, if you are viewing live
Tip:
programming or a program that is supported by ads, you might not be allowed to skip
the ads.
38
Page 52

Your Roku TV lets you choose from thousands of streaming channels that offer a
huge selection of entertainment:
• Thousands of movies and TV episodes, both live and on-demand
• Unlimited music, live and on-demand
• Tons of live and on-demand sports
• Commercial-free programming for kids and family
• International programming in 22 languages
• 24x7 news and in-depth news commentary
Many streaming channels are free. Some streaming channels let you purchase or rent
the latest movie releases or popular TV series. Some channels charge a monthly
subscription fee and others are available at no additional cost if you subscribe to a
companion service through your cable or satellite provider.
If you have an existing subscription to a streaming provider, you can just sign in with
your existing user name and password.
To play streaming content, add one or more streaming channels to your Home screen.
Use the Add Channels shortcut on the Home screen or the Channel Store option on
the Home screen menu to go to the Channel Store, and then select the streaming
channel you want to add. The channel remains on your Home screen unless you
remove it, and you can watch it at any time.
For more information, see Using the Roku Channel Store.
Note:
A paid subscription or other payments may be required for some channels.
Channel availability is subject to change and varies by country. Not all content is
available in countries or regions where Roku
®
products are sold.
39
Page 53

What if I didn’t connect my TV?
What if you went through Guided Setup and chose Connect to the Internet later? No
worries. Your Roku TV makes it easy to connect whenever you want. As you move
around the Home screen, you’ll see several places where you can start the connection
process. For example:
• Now and then you’ll see a message appear on the panel to the right of the
Home screen offering a Connect Now option. You can highlight and select the
Connect Now option to get started.
• Use the Connect and activate now option. From the Home screen menu, select
Settings, then Network, and then Connect and activate now.
• If you want to start over from the beginning, do a Factory reset, and then go
through Guided Setup again. This time, select your home network when
prompted.
40
Page 54

Setting up live TV
In addition to the other entertainment possibilities of your Roku TV, you might want
to watch broadcast channels from an antenna or cable TV provider connected to the
ANT/CABLE input. On your Roku TV, you can watch broadcast TV in much the same
way you watch other entertainment choices: select the Live TV tile from the Home
screen.
The first time you select the Live TV tile, you have to set up the TV tuner. Setting up
the TV tuner scans for active channels and adds them to your Live TV channel list.
Why do I have to set up the TV tuner?
Not everyone needs to use the TV tuner. For example, you might have a set top box provided
by a cable or satellite company that receives all of your channels. Most of these set top boxes
use an HDMI
More and more people are watching only streaming TV and do not have a TV antenna or
cable/satellite service. If you don’t need the TV tuner, you can bypass setting it up and instead
remove it from the Home screen as explained in Remove unwanted tiles.
When you set up live TV, the TV scans the signals on its antenna input for channels with a
good signal, and adds those to the channel list, skipping dead channels and channels with a
very weak signal.
The TV lets you add two analog channels, even if they have no signal, for the purpose of using
an older set top box, VCR, or game console that can only output a signal on analog channel 3
or 4. Typically, you’ll only need one of these channels, but both are provided to make setup
simpler. You can hide the one you don’t want as explained in Edit live TV channel lineup.
®
connection.
41
Page 55
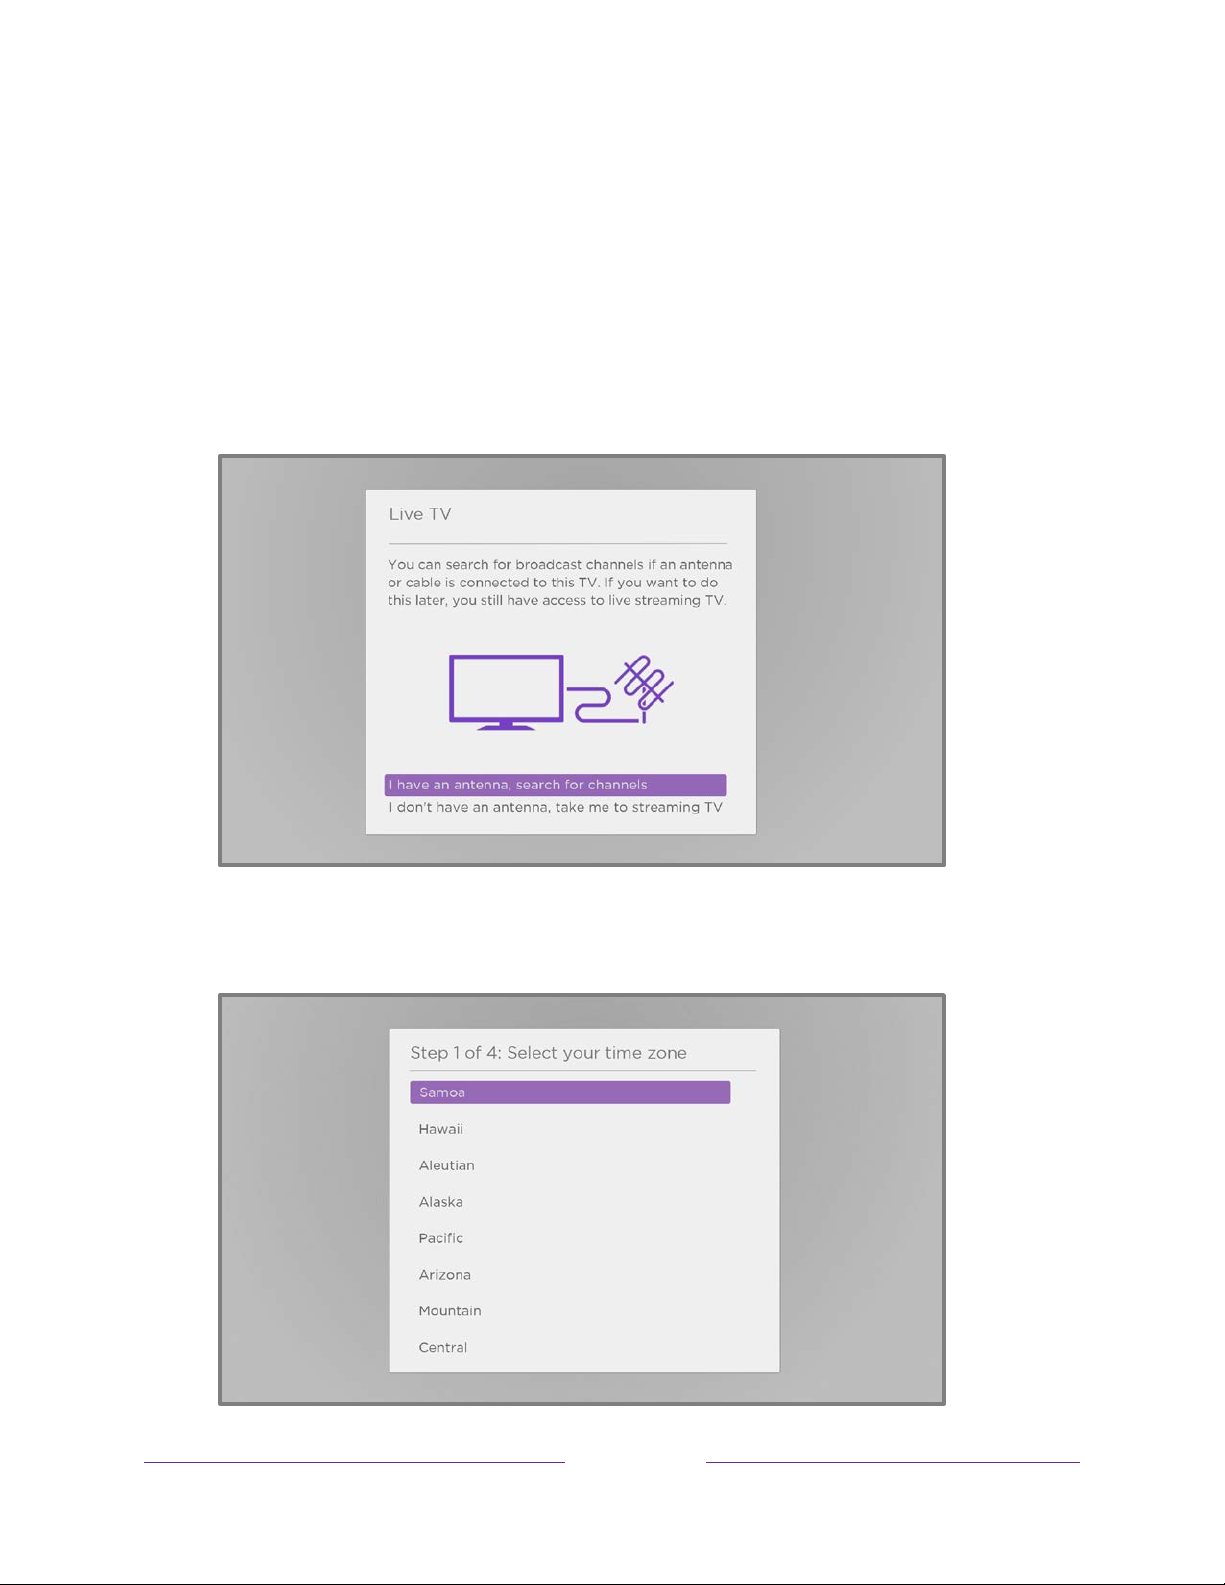
How do I set up the TV tuner?
1. Make sure your antenna or TV cable (not provided) is connected to the TV’s
ANT/CABLE input.
2. On the Home screen, select the Live TV tile. If it is not on your Home screen, go
to Settings > TV Inputs to add it.
3. Read the simple on-screen instructions, and then select Start finding channels.
4. If prompted, select your time zone. You’ll only need to do this if the TV can’t
figure out your time zone from your Internet connection.
42
Page 56
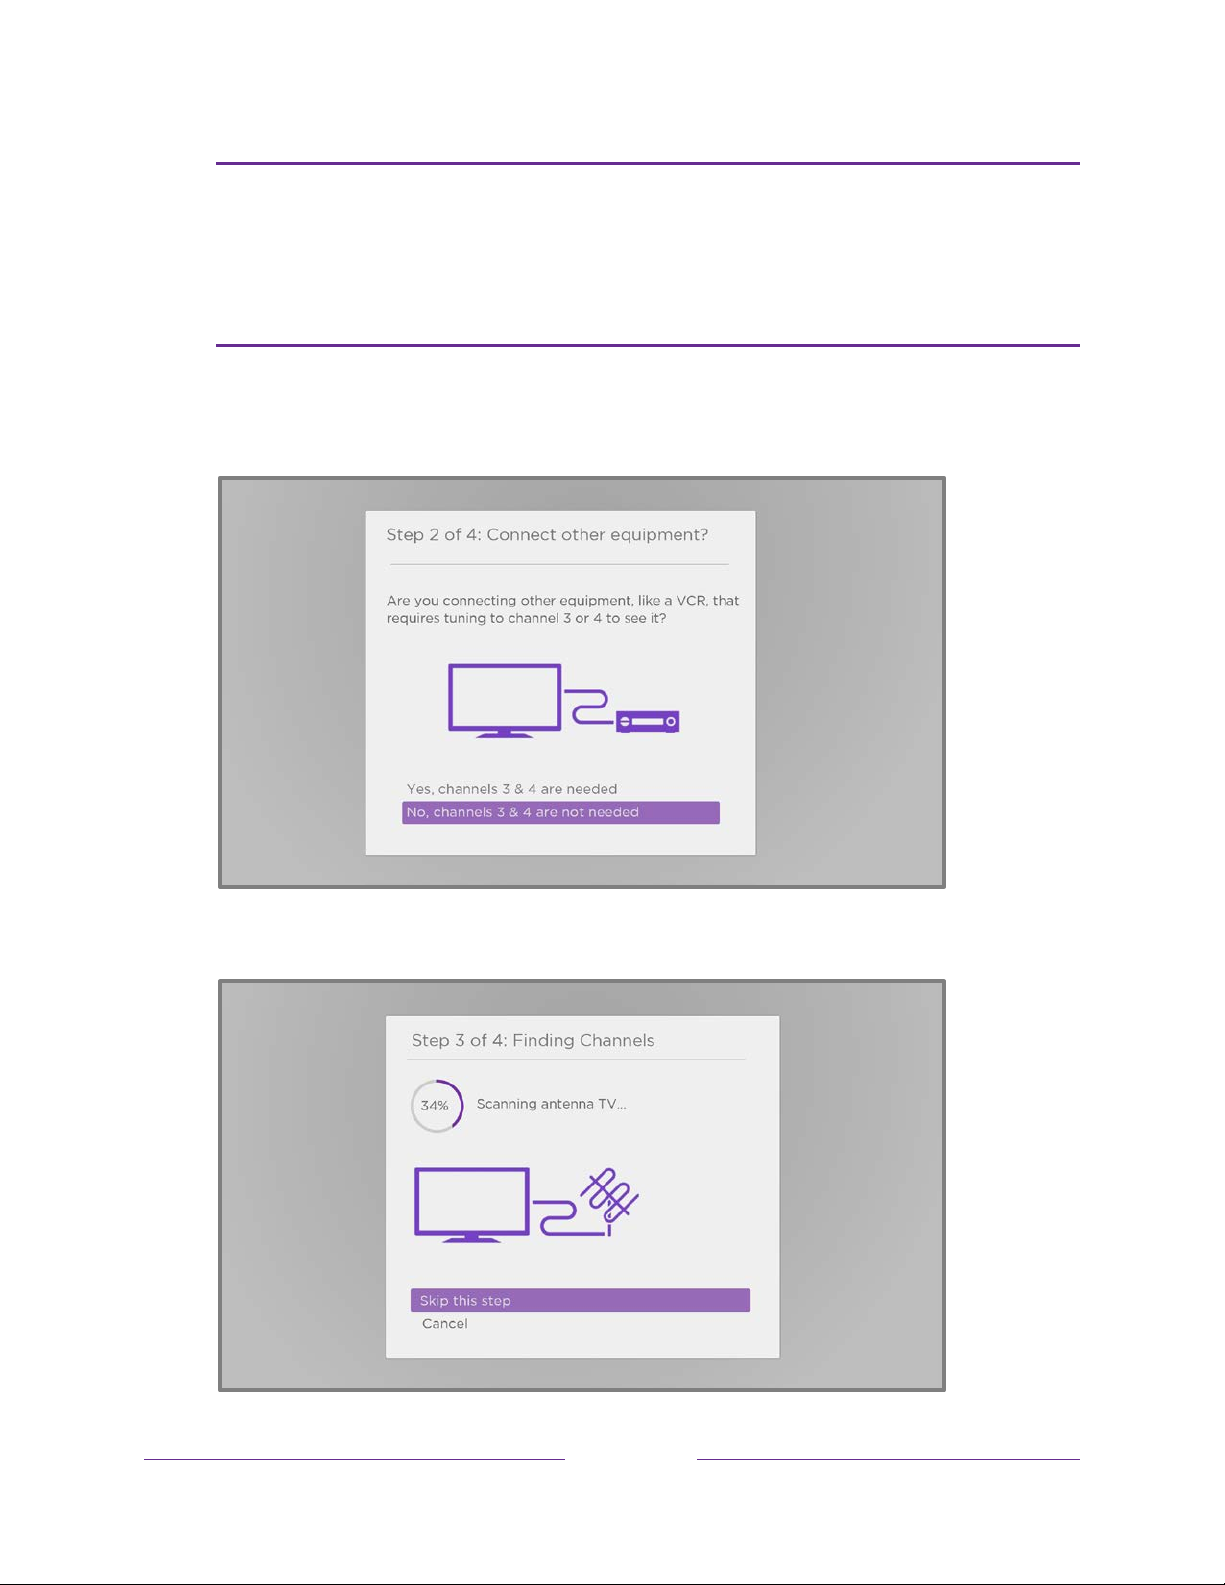
Why does the TV need my time zone?
The TV needs to know your time zone so that it can correctly display time information
about the program you are currently watching. In most cases, it can get the time zone
automatically and skips this step.
5. When prompted, select whether to add analog channels 3 and 4. These
channels enable you to connect older set top boxes, VCRs, or game consoles.
6. Wait while your TV scans for antenna channels …
43
Page 57
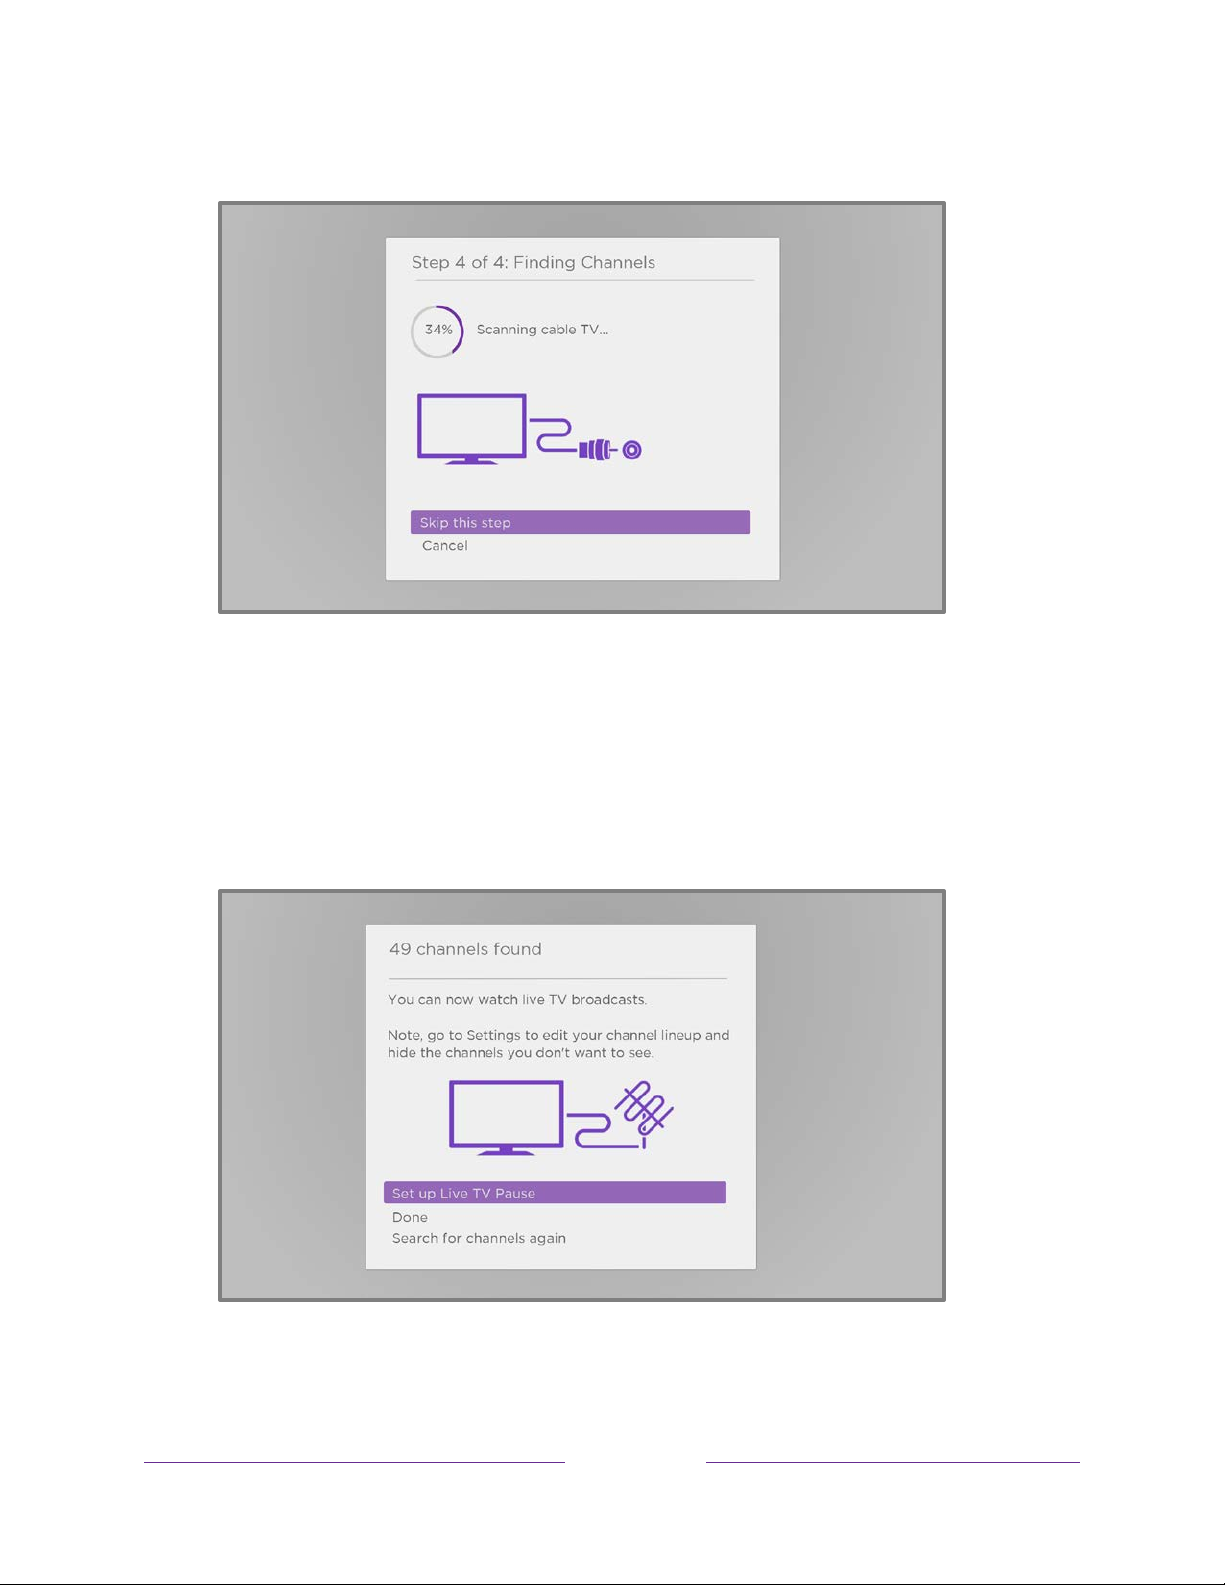
… and then cable TV channels.
Scanning for channels can take several minutes.
If you don’t have a cable TV provider, or if you use a set-top box to receive
Tip:
cable TV channels, you can save time by skipping the cable TV portion of the
channel scan.
7. When the channel scans finish, the TV shows the number of channels it added.
44
Page 58

8.
Only in connected mode
, you have the option of setting up Live TV Pause.
Pausing live TV explains how to set up and use this feature. If you don’t want to
set up Live TV Pause, or if this option is not available to you, select Done to
start watching live TV.
Tip:
Repeat the channel scan from time to time to make sure you are receiving all of
the latest channels. Broadcasters and cable providers add and remove channels, move
channels to different parts of the spectrum, and change the power levels of their
channels periodically. Your reception and picture quality depend on the position of
your antenna and on your location relative to the antennas of broadcasters in your
area. To repeat the channel scan, use the purple directional pad to highlight the Live
TV tile, press STAR , select Scan for channels, and then press OK.
You’ll also have to repeat the channel scan if you remove and re-add the Live TV
tile from the Home screen or perform a factory reset.
Now, you’re ready to watch live TV! While you’re watching, try the following tips:
• Press UP or DOWN to change channels.
• Press LEFT to display the channel list (non-connected mode) or Live TV
Channel Guide (connected mode), and then press UP or DOWN to select a
channel to watch. Or press REWIND or FAST FWD to jump through the
channel list or Live TV Channel Guide
1
a page at a time.
• Press OK to display information about the current program.
• Press STAR to see options for picture and sound settings.
Only in connected mode,
•
use a Roku Voice remote, the Roku mobile app,
Google Assistant, or Amazon Alexa to search for programs by title, actor,
director, or genre
with the streaming channels that offer the requested content.
United States
2
. The TV or the Roku mobile app displays the results along
Only in the
, the results also include Live TV programs.
Note:
If you do not have a Roku Voice remote, you can use the Roku mobile app to
search. For more information, see Roku mobile app.
1 Live TV Channel Guide is available only in the United States.
2 Voice features support English and Spanish languages when the corresponding TV language is
selected.
45
Page 59

Using your TV
This section provides information on using the day-to-day features of your TV.
Status indicator
Your TV has a single status indicator. It goes on and off and blinks in different ways
depending on the status of the TV, as shown in the following table:
TV CONDITION STATUS INDICATOR MEANING
On (screen is active) Off Screen is communicating that TV is on.
Screensaver (screen is active) Off Screen is communicating that TV is on.
Off (no power) Off TV is not connected to power.
Off (standby) On TV is connected to power and is ready
to use.
Starting up from off state Slow pulsing blink until
startup completes
On (receiving update from
USB)
Remote command received Dims on/off once TV has received your command.
Network connection lost Two short blinks, pause,
Slow pulsing blink until
update completes
repeat
TV is doing something.
TV is doing something.
TV was connected and paired with a
Roku account and now has no network
connection.
Powering down to standby
mode
Slow pulsing blink until the TV
reaches standby.
TV is doing something.
46
Page 60

Standby mode energy savings
When you turn off your TV, it remains in a higher power mode for a few minutes, after
which it goes into a very low power standby mode. If you turn on the TV again before
it has entered the very low power mode, it turns on immediately. After the TV goes
into the lower power standby mode, it takes a few seconds longer to start up.
Only in connected mode
enabled, your TV starts up almost immediately regardless of how long it has been
turned off, but uses somewhat more power in standby mode. Fast TV start also gives
you access to some additional features, such as turning on the TV with voice
commands and turning off the screen when listening to music. For more information,
see Fast TV start.
, you can optionally enable Fast TV start. When this option is
Getting help
Only in connected mode
• Tips and tricks videos:
navigate to Settings > Help and select Roku Tips & Tricks.
• Help with Roku voice: Navigate from the Home screen menu to Settings >
Help and select Voice help. Or from your Roku voice remote or the Roku
mobile app, press VOICE and say “Help.”
, you can get two different types of help:
Only in the United States
, from the Home screen menu,
47
Page 61
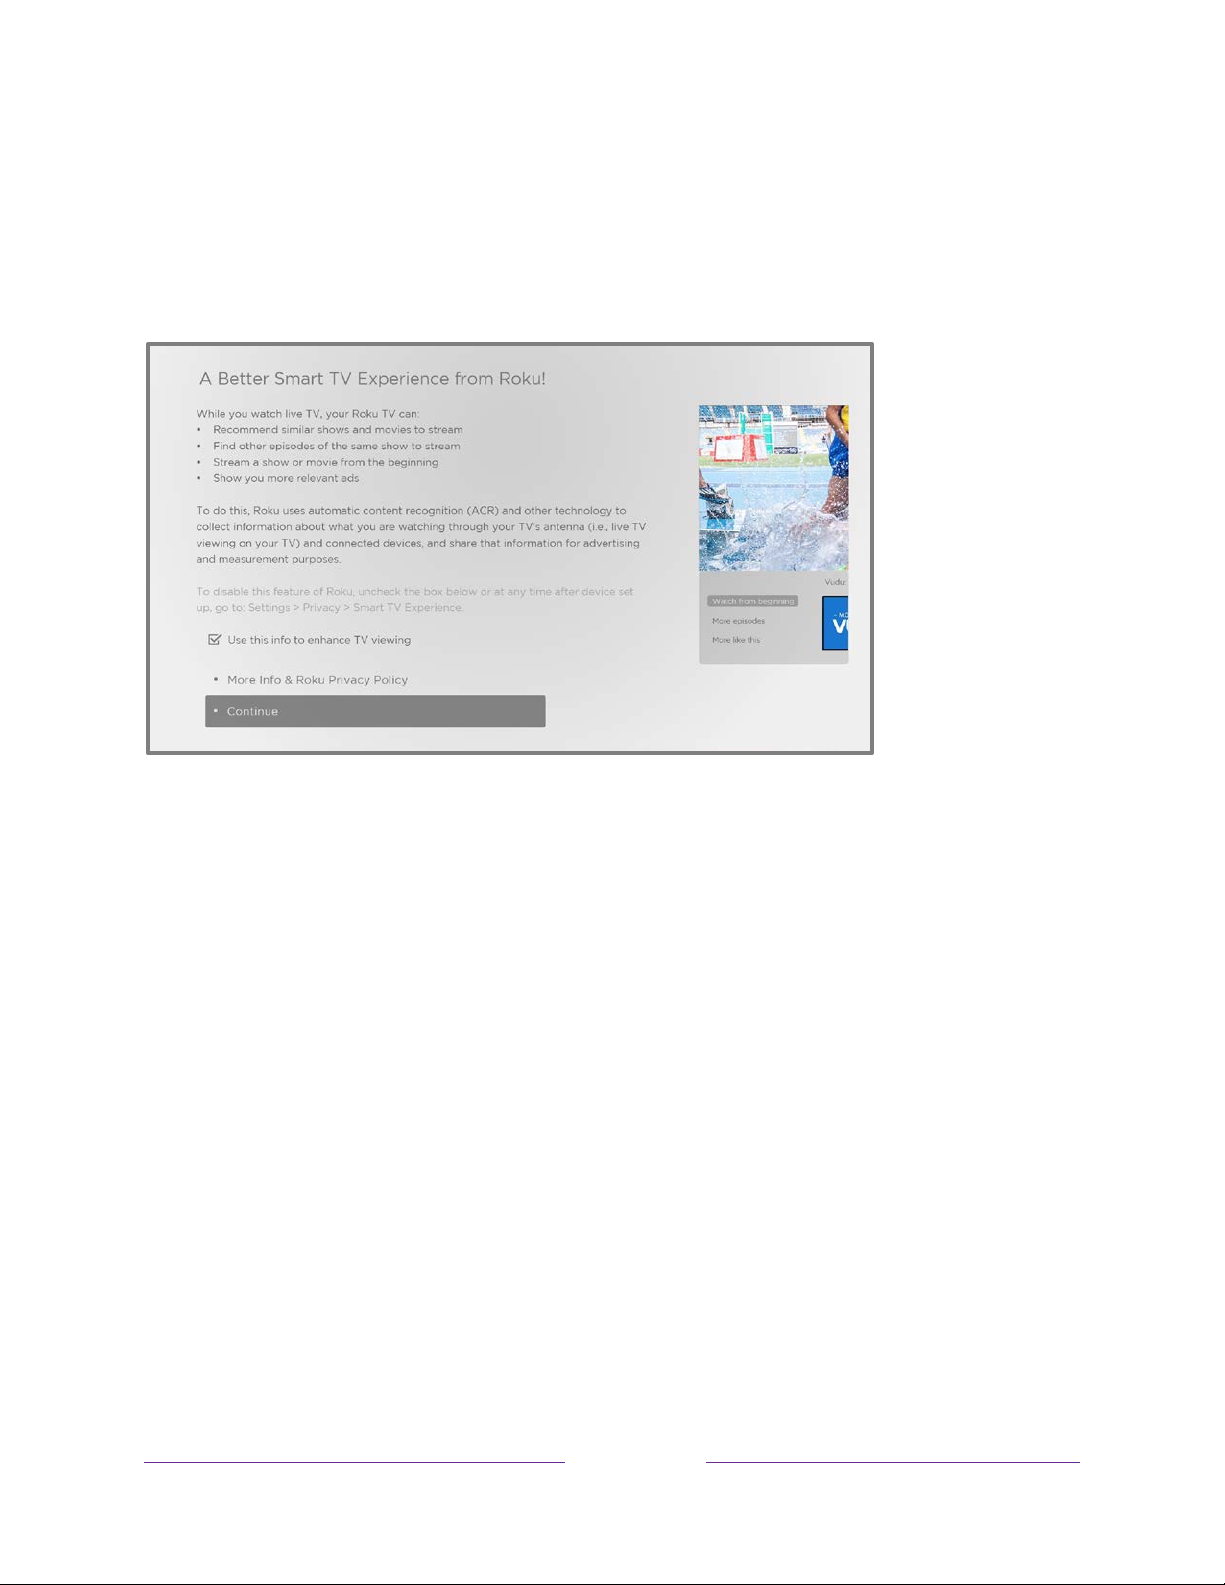
Opting in to Smart TV experience (U.S. only)
Only in connected mode in the United States
input, or AV input, your TV offers to enable the Smart TV experience. If you decide to
enable it at this time, you’re all set to enjoy its recommendations and features.
The Smart TV experience uses automatic content recognition (ACR) and other
, the first time you select live TV, an HDMI
technology to collect information about what you watch on live TV, and on devices
like media players and cable boxes connected to the HDMI or AV inputs. Opting in
means that you give permission to analyze the programs you watch for the purpose
of making recommendations, as well as showing ads that are more relevant to you.
If you decide not to enable the Smart TV experience at this first opportunity, you can
enable it later. Or, if you decide you’d rather not use the feature, you can disable it,
but be aware that previously collected information is retained and not deleted.
Disable Smart TV experience
If you decide you want to disable Smart TV experience, follow these steps:
1. From the Home screen menu, go to Settings > Privacy > Smart TV experience.
2. Navigate to the right to highlight Use info from TV inputs.
3. Press OK on the remote to clear the check box.
48
Page 62

Disable Auto Notifications
If you want to keep the Smart TV experience enabled, but you do not want to see
notifications while you are watching programs, you can disable notifications. To do so,
follow these steps:
1. From the Home screen menu, go to Settings > Privacy > Smart TV experience.
2. Navigate to the right to highlight Use info from TV inputs.
3. Press DOWN to highlight Enable auto notifications.
4. Press OK to clear the check box.
Note:
These settings do not affect recommendations for More Ways to Watch that
you see in the Live TV Channel Guide when watching live TV channels. Those
recommendations show up only in the Live TV Channel Guide and do not rely on ACR
technology.
Watching live TV channels
Select the Live TV tile in the Home screen. Your TV remembers the last channel you
watched and starts with that channel playing.
Changing channels
To change channels, you can do any of the following:
• Press UP to change to the next higher channel.
• Press DOWN to change to the next lower channel.
1
• Press LEFT to display the channel list or Live TV Channel Guide
the arrow keys to select the channel or program you want to watch. Press
REWIND or FAST FWD to move through the list one page at a time.
When you’ve highlighted the channel or program you want to watch, press OK.
(If you decide you don’t want to change channels, press BACK .)
1 Live TV Channel Guide is available only in connected mode and only in the United States.
49
, and then press
Page 63

•
Only if Live TV Pause is not enabled
channel. Press again to return to the channel you were watching before you
pressed REPLAY .
, press REPLAY to jump to the previous
Note:
If REPLAY is not available on your remote, you can use this feature in the
Roku mobile app. For more information, see Roku mobile app.
Using the Live TV Channel Guide (U.S. only)
Only in connected mode in the United States
both over-the-air and live streaming TV programs. The Live TV Channel Guide lets
you scroll through all the TV channels you receive (except those you have hidden, if
any), plus a large number of live streaming programs. You can see what’s on right
now and the upcoming 14 days.
For live, over-the-air TV programs, you can use More Ways to Watch to find the
program you’re watching and start watching it from the beginning from one of your
streaming channels. Your clue that there are More Ways to Watch a program is a
purple star () next to the program name in the guide.
For example, you might turn on your TV at 10 minutes past the hour and discover you
, use the Live TV Channel Guide to find
are missing the current episode of
program title, so you can press STAR and find that there are several streaming
channels where you can watch the current episode from the beginning. You also can
find more episodes of
Note:
A paid subscription or other payments may be required for some streaming
Empire
Empire
, and other programs that have a similar theme.
. But there is a purple star next to the
channels.
50
Page 64
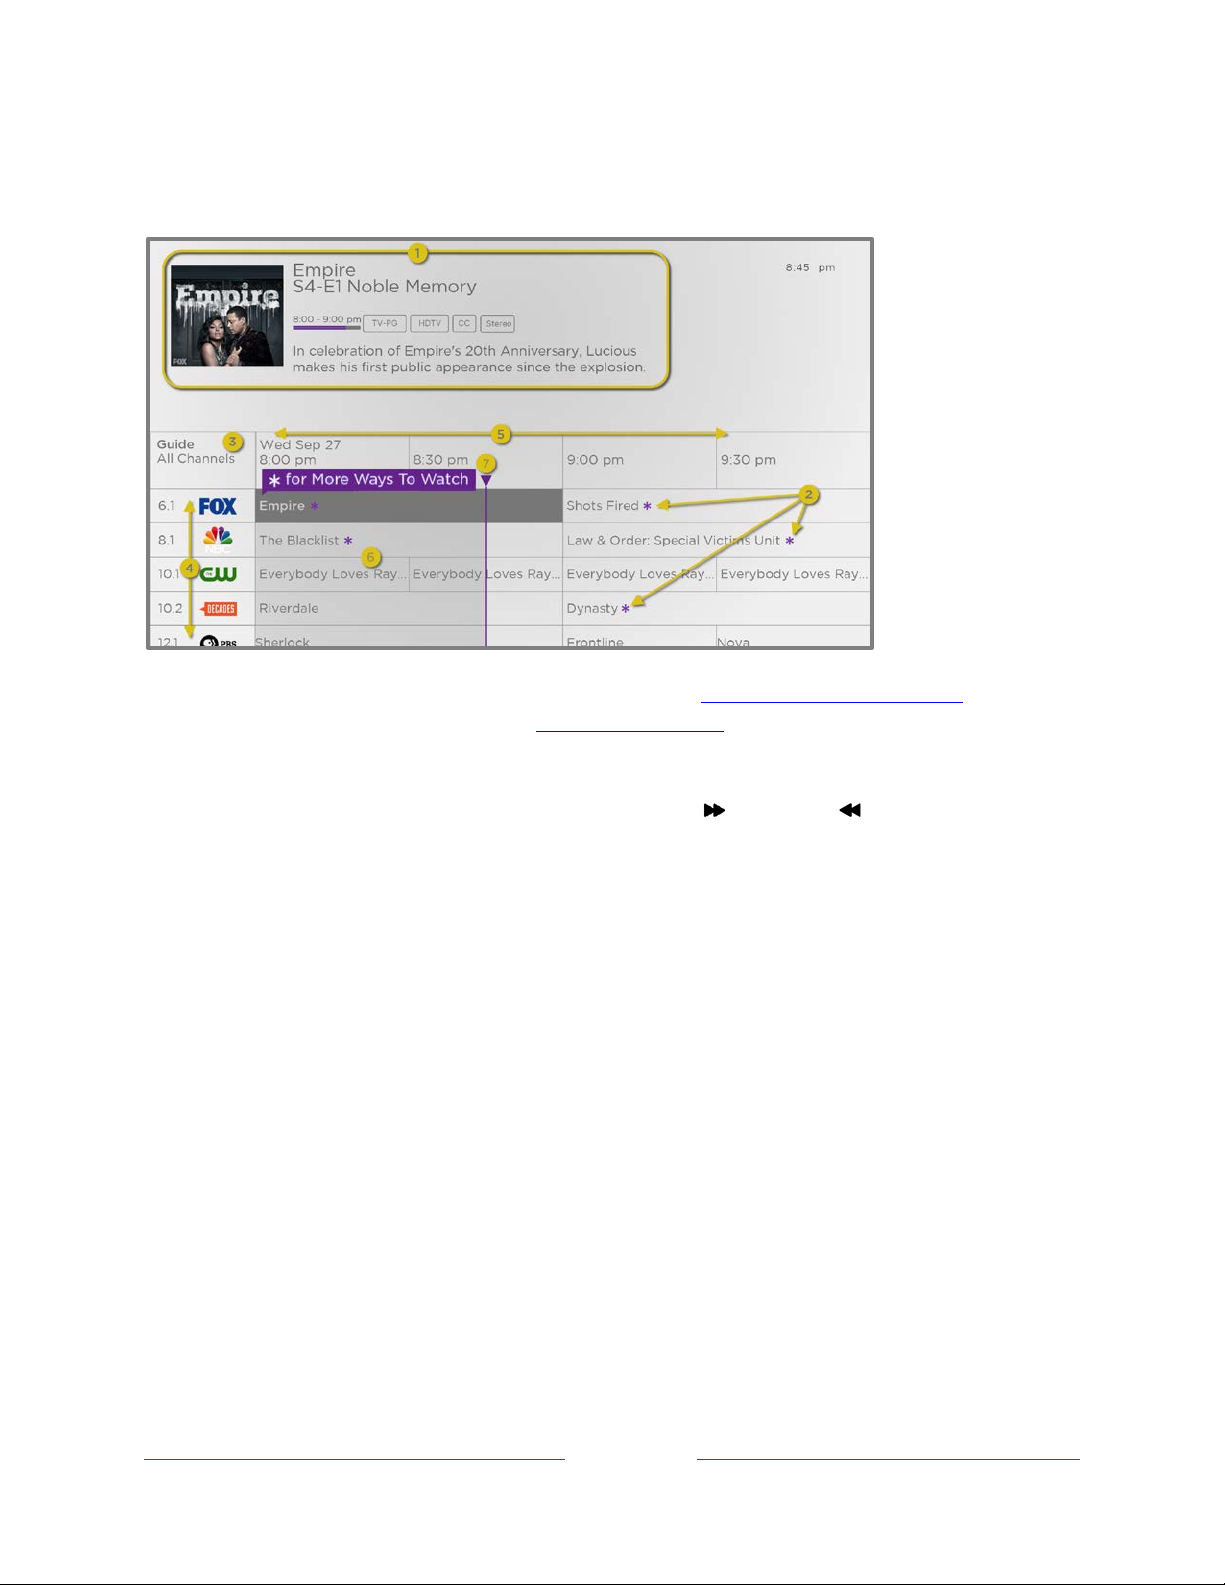
To open the Live TV Channel Guide, press LEFT while watching live TV. It opens with
the name of the current program highlighted, and a lot more information.
1. Program information for the highlighted program. See Viewing program information for details.
2. More Ways to Watch indicator. See More Ways to Watch for more information.
3. Channel filter. Currently set to All Channels.
4. Channel list. Navigate UP or DOWN.
5. Time slots. Navigate LEFT or RIGHT. Press FAST FWD or REWIND to skip ahead or back a
screen at a time.
6. Program list. Shaded area is prior to the current time.
7. Progress bar. Shows the current time within the listed programs.
When you are viewing the current time slot, notice that the Live TV Channel Guide
shows a light gray background for portions of programs before the current time, and
a dark background for programs and portions of programs that have not yet aired.
The line dividing these two zones is the progress bar.
51
Page 65
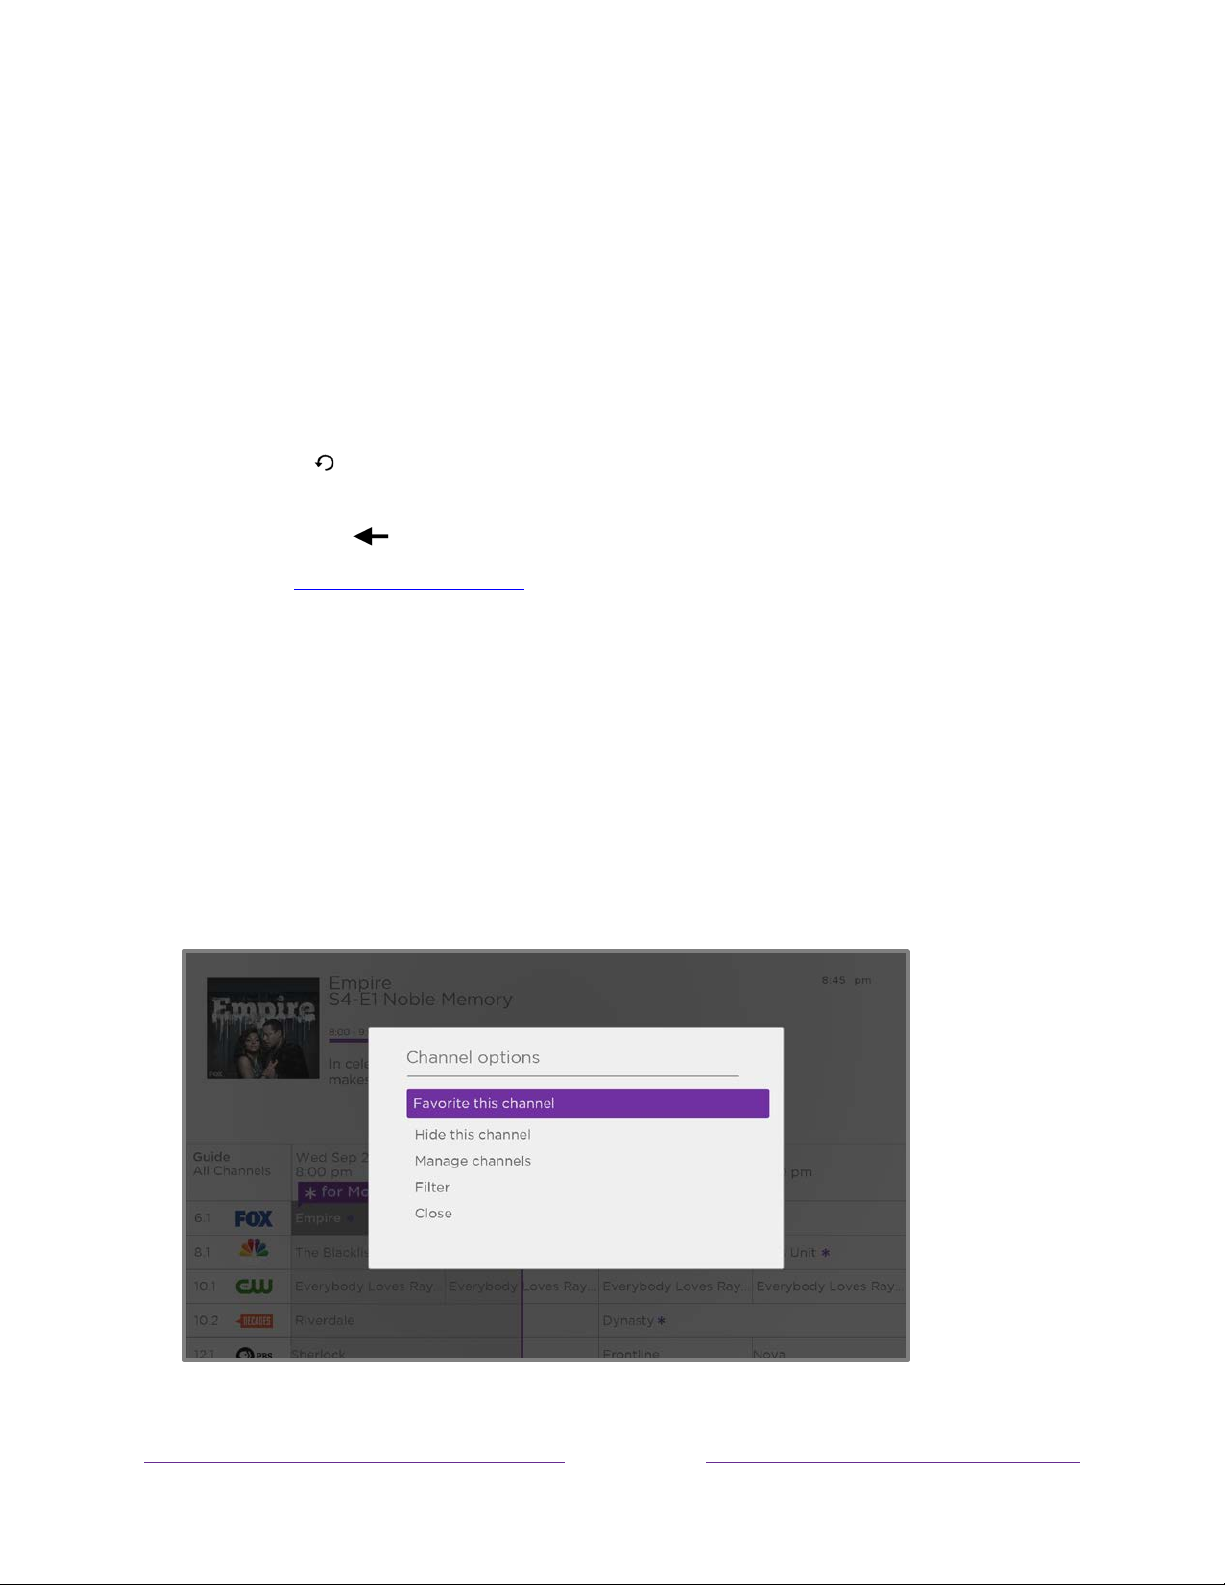
Navigating the Live TV Channel Guide in connected mode (U.S.
only)
Only in connected mode in the United States:
• Use the purple directional pad to move up, down, left, and right.
• To switch to a program that is currently in progress, highlight it, and then press
OK. (Note that pressing OK on a past or future program does nothing.)
• To return to the current time after navigating to a different time slot, press
REPLAY .
• To return to the currently airing program without causing a channel change,
press BACK .
• To see More Ways to Watch, highlight any program that has a purple asterisk
(), and then press STAR .While using the Live TV Channel Guide, navigate
all the way to the left so that a channel number is highlighted, and then press
STAR to open the Channel options dialog.
Changing channel options in connected mode (U.S. only)
Only in connected mode in the United States
Guide, navigate all the way to the left to the channel number column, and then
press STAR to open Channel options.
, while using the Live TV Channel
52
Page 66

Favorite/Unfavorite this channel – Select this option to make the selected channel
a favorite. Select again to remove the channel from your favorites. Use the Filter
option to show only favorite channels.
Hide/Unhide this channel – Select this option to hide the current channel. Select
again before moving on to unhide the channel if you hid it by mistake. But note
that once you close the dialog, you cannot access the channel to unhide it. Instead,
use the Manage channels option to unhide hidden channels.
Manage channels – Opens the Manage Channels menu where you can edit the
channel lineup and mark certain channels as favorites. See Manage channels.
Filter – Opens the Filter dialog where you can choose to see:
• All Channels – Show all channels that you can receive.
• Recents – Show only recently tuned channels in the order in which you
watched them.
• Favorites – Show only channels you have marked as favorites.
Viewing program information
You can view program information in different ways:
• When you are viewing a program and no other guides or menus are open,
press OK to view program information in a banner at the bottom of the screen.
This program information appears both in connected and non-connected
modes. The following illustration shows the information that is available.
53
Page 67
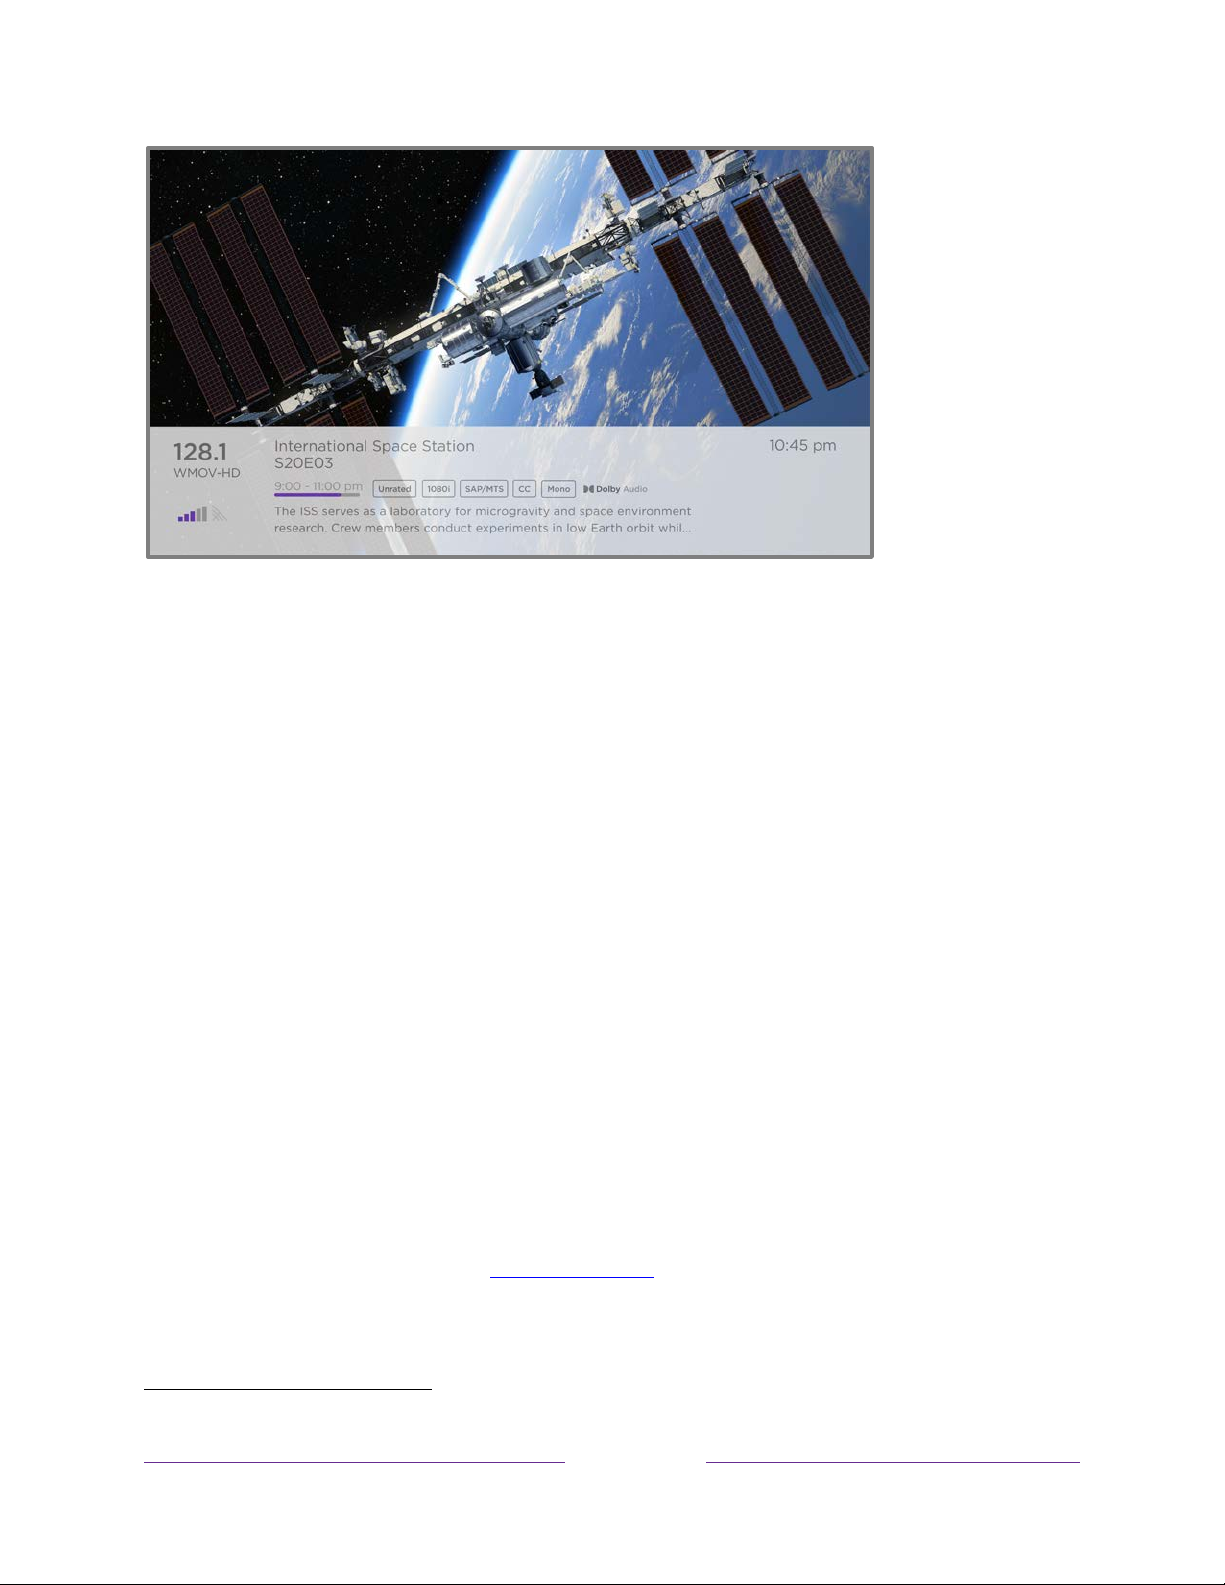
Program information banner
Program information might include any or all of the following, depending on availability within
the broadcast information:
• Channel number
• Channel call sign
• Signal strength
• Program title and episode name/number
• Start time, end time, and graph of program length showing current position
• Content rating
• Video resolution (480i, 480p, 720p, 1080i, 1080p, 4K)
• Frame rate (24Hz, 30Hz, 60Hz for television sources, 60Hz, 70Hz, 72Hz, 75Hz for computer
sources)
• Audio format (Mono, Stereo, Dolby Audio™ logo)
• Audio features (SAP/MTS)
•
Only on select 4K models:
• Closed captioning (CC)
• Current time
• Program description.
Tip:
If you’ve set up Live TV Pause and you’re watching live TV, you’ll also see a
HDR or Dolby Vision™ 1 logo (HDMI® and streaming sources)
progress bar showing the current playback position within the rolling 90-minute pause
time. For more information, see Pausing live TV.
1 The Dolby Vision™ logo appears only on Dolby Vision™-certified models when displaying Dolby Vision™
content.
54
Page 68

•
Only in connected mode in the United States
program listed in the Live TV Channel Guide. Press LEFT while watching live TV
to see the Live TV Channel Guide. For more information, see Using the Live TV
Channel Guide.
, view program information for any
Adjusting settings while watching a program
Press STAR to display the TV settings menu. Press UP or DOWN to highlight an
option, and then press LEFT or RIGHT to change the setting. The topic Adjusting TV
settings explains each of the settings in detail.
Pausing live TV
Live TV Pause gives your Roku TV the ability to pause, play, fast forward, and rewind
live TV received on the ANT input. You can pause live TV for up to 90 minutes.
Requirements
To use this feature, you need to:
1. Connect your TV to the Internet. If you didn’t connect during Guided Setup, see
What if I didn’t connect my TV?.
2. Provide your own dedicated USB flash drive (thumb drive} with the following
minimum specifications.
• 16 GB
• 15 Mbps read/write speed
• USB 2.0 compliant
A USB flash drive (thumb drive) meeting the minimum requirements is highly
recommended over an externally-powered hard disk drive. Note that you can
use any larger size drive—there is no limit to the maximum size—but using a
larger drive does not extend the 90-minute pause time.
Important:
setup, all existing content on your USB drive is erased when you enable this
After warning you and giving you a chance to cancel Live TV Pause
feature.
3. Connect your USB drive to the TV’s USB port.
55
Page 69

Important:
Some TV models have more than one USB port. You can connect
your Live TV Pause USB drive to any port, but make sure that nothing is
connected to other USB ports while enabling Live TV Pause. Reconnect other
USB devices after you have finished enabling Live TV Pause.
4. Enable Live TV Pause, as explained in the following topic.
Enabling Live TV Pause
You can start setting up Live TV Pause in any of the following ways:
• After completing a channel scan, select Set up Live TV Pause from the
available options.
• Press PLAY/PAUSE on the Roku remote while watching a live TV channel.
• Highlight the Live TV tile on the Home screen, press STAR on the remote,
and then select Enable Live TV Pause.
After starting setup of Live TV Pause in any of these ways, the TV prompts you
through the steps needed to enable this feature. Setup takes only a few moments.
Note:
Use of a USB hub is not supported.
Using Live TV Pause
If you have used the Roku remote to watch streaming channels, using Live TV Pause
should be very familiar to you.
• While watching a digital live TV channel, press PLAY/PAUSE to pause or
play the content. After the TV program has been paused for 90 minutes, the
TV resumes playing from the point in the program where you paused it.
• After watching a channel for a while, press REWIND to jump back up to the
point where you first started watching the channel, up to 90 minutes.
• After pausing or rewinding, press FAST FWD to jump ahead up to the point
where you are once again watching the live TV program.
56
Page 70
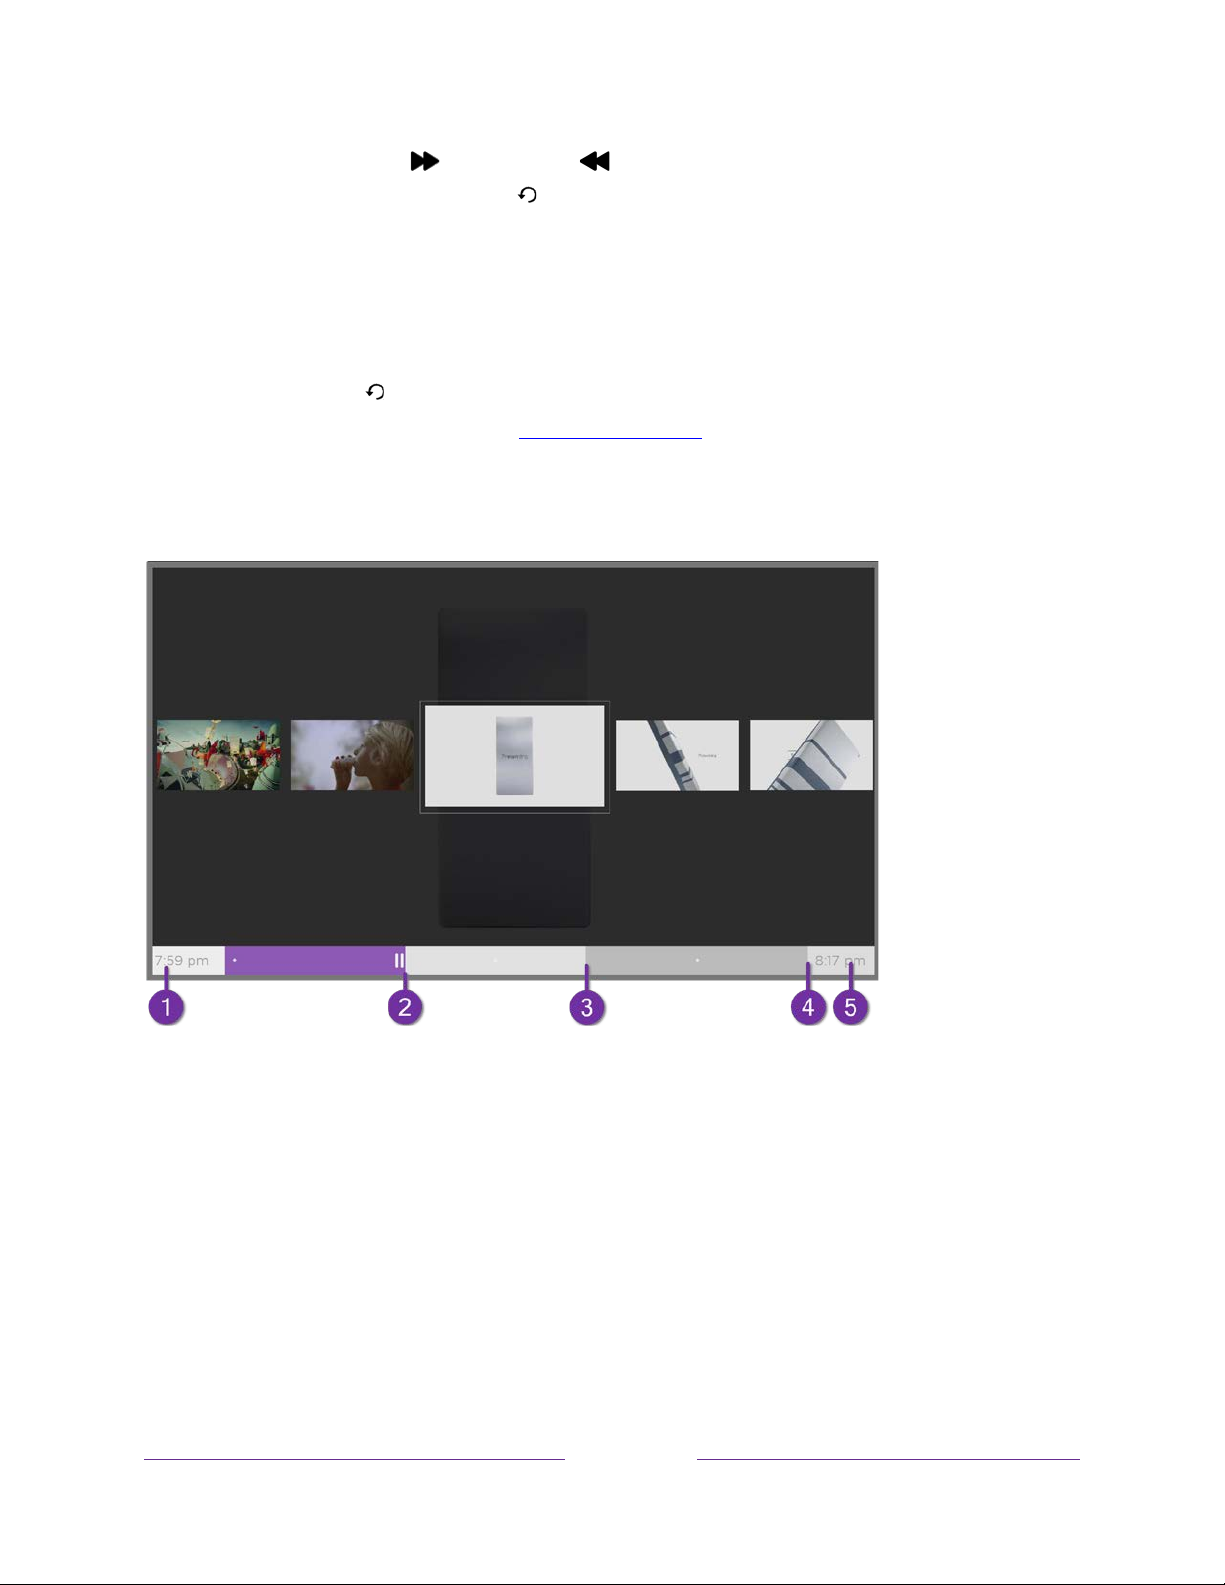
• Press FAST FWD or REWIND repeatedly to cycle through 1x, 2x, and 3x
skip speeds. Press REPLAY to play back the last several seconds of the
program.
• When the program is paused, press LEFT or RIGHT to move backward or
forward through the program approximately 10 seconds per press. Small
frames appear across the screen to identify your location in the program.
Note:
If REPLAY is not available on your remote, you can use the Roku mobile
app. For more information, see Roku mobile app.
Whenever you use any of the Live TV Pause features, the TV momentarily displays a
progress bar:
1. Time at the current playback position.
2. Current playback position
3. Extent of pause time, representing the amount of time this channel has been buffered, up to 90
minutes.
4. 90-minute mark, representing the maximum extent of pause time.
5. Current time.
The progress bar also shows tick marks at each half hour point, to help you locate the
boundaries where one program ends and a new one begins.
57
Page 71

Notes about Live TV Pause
• You can use Live TV Pause only with digital broadcast and cable channels
received through the TV’s ANT input (ATSC and Clear QAM channels).
• Changing channels erases and restarts the Live TV Pause buffer.
• Returning to the Home screen, selecting another input, or turning off the TV
erases and resets the Live TV Pause buffer.
• Disconnecting the USB drive erases the Live TV Pause buffer.
More Ways to Watch (U.S. only)
Only in connected mode in the United States
recommendations about the programs you’re watching on the ANT, HDMI, and AV
inputs. You will automatically get these recommendations in the Live TV Channel
Guide for live TV programs. However, before you can get recommendations for
programs you’re watching through the HDMI or AV inputs, you must opt into the
Smart TV experience to acknowledge that you want to allow the TV to use automatic
content recognition (ACR). See Opting in to Smart TV experience (U.S. only) for
details.
, More Ways to Watch gives you
58
Page 72

Using More Ways to Watch
Not every program provides recommendations. As you use More Ways to Watch, be
aware that you’ll only see suggestions on your TV when all of the following conditions
are met:
• Your TV is operating in connected mode in the United States.
• You have enabled Smart TV experience if you are watching programs through
an HDMI or AV input. (If you are watching live TV from the ANT input, this
setting does not matter.)
• The program you’re watching contains the information needed to identify it.
Note that some programs, such as the daily news, typically do not activate
More Ways to Watch.
• At least one participating streaming channel offers the movie or TV program
you are watching, or other episodes, or more programs like the one you are
watching.
If all of these conditions are met, you can view the suggestions. More Ways to Watch
recommendations appear in two different places:
• When watching the HDMI and AV inputs, you’ll see a More Ways to Watch
notification in the lower right corner of the screen for a few seconds unless you
have disabled Enable auto notifications. Press STAR to see the list of
matching programs.
Note:
prompt by pressing OK.
After this banner disappears, you can restore the More Ways to Watch
59
Page 73
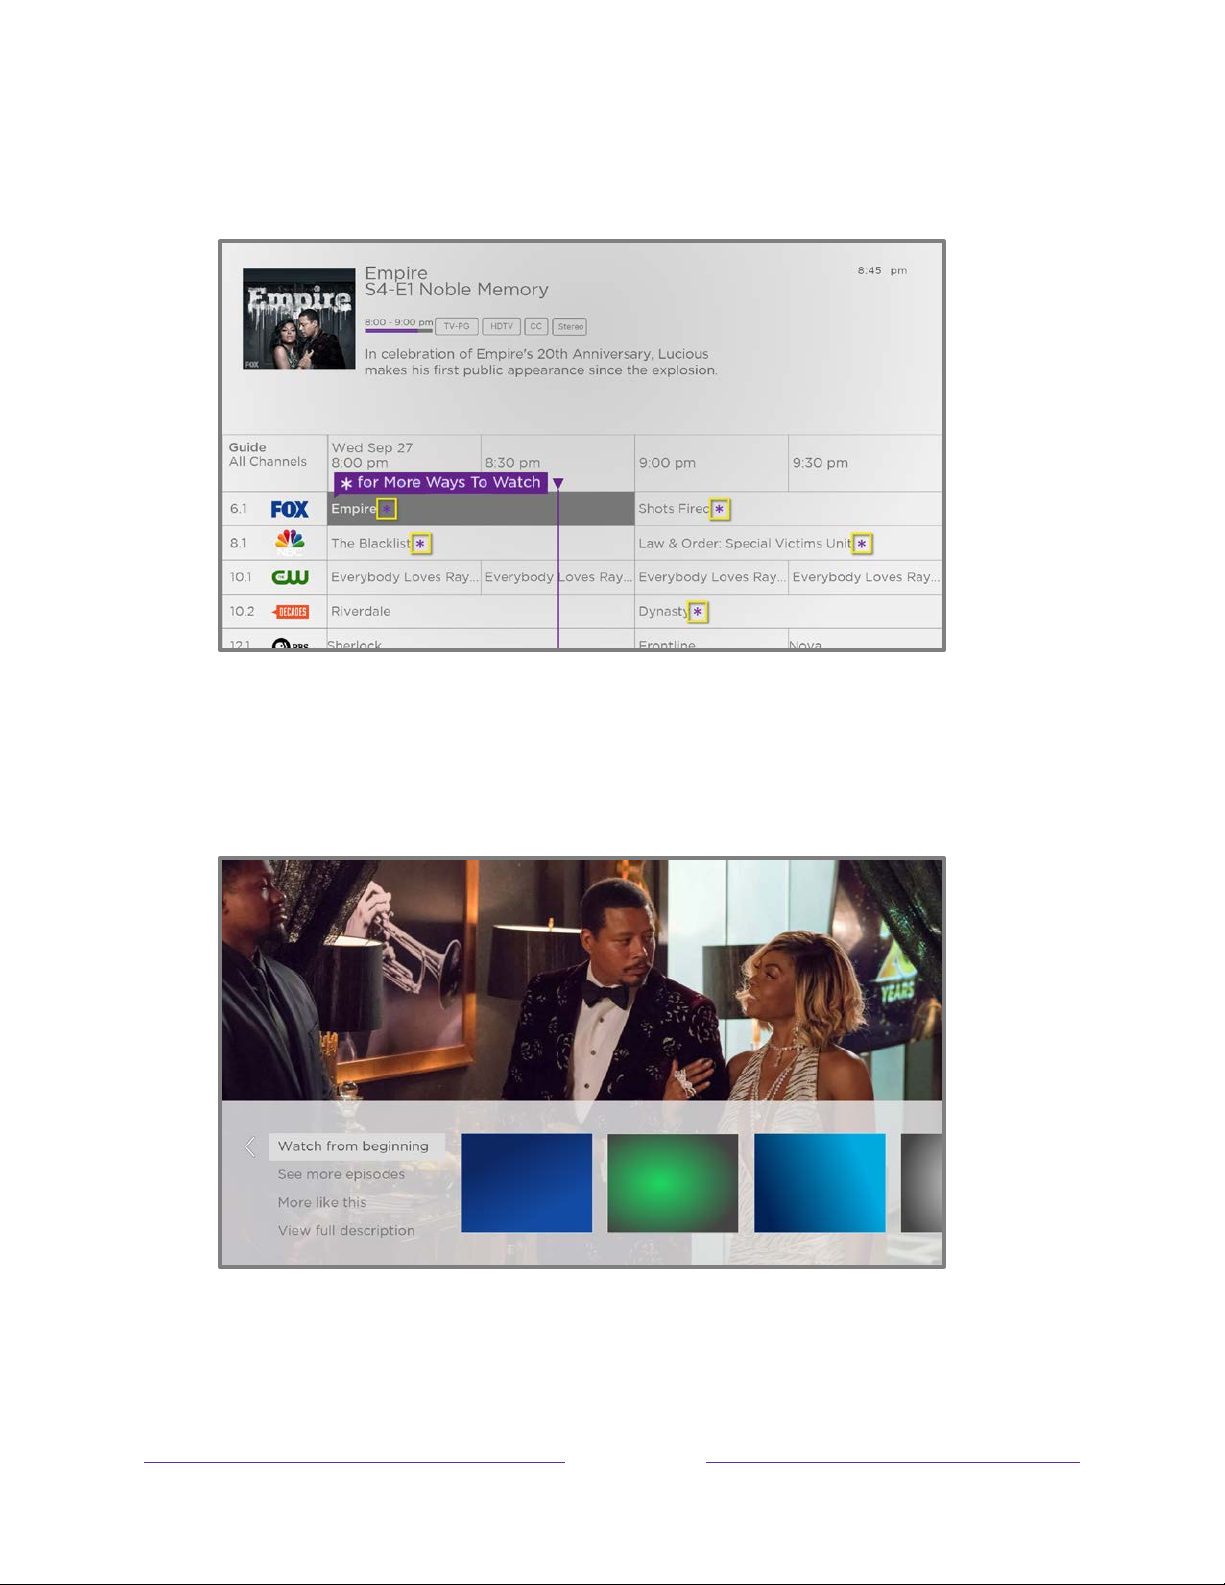
• In the Live TV Channel Guide, all programs that meet the criteria for More Ways
to Watch display a purple asterisk next to their titles:
Highlight the program of interest and press STAR to see recommendations.
Regardless of how you got to this point, the options you’ll see depend on the
type of program you’re watching and the available ways there are to watch, so
you might see any or all of the following:
• Watch from beginning – Streaming channels on which the same TV
program or movie is available. Often, this option does not appear on first
60
Page 74

run programs, because streaming content typically is not available until
some time after the program is first broadcast.
• See more episodes – Streaming channels where you can find other
episodes of the TV program you are watching. Does not apply to movies.
• More like this –TV programs or movies with a similar theme.
• View full description – Full description of the selected program.
Press DOWN to select an option, and then press RIGHT to select the streaming
channel you want to watch.
Assuming you’ve already added the channel and completed any required sign-in,
More Ways to Watch takes you directly to the program in the streaming channel
where you can select and watch the program. Otherwise, it prompts you to add the
channel and, if you do, then takes you to the program.
Getting the most from More Ways to Watch
• Streaming channels you’ve already installed appear first in the list of
suggestions.
• When you select a streaming channel, you leave the program you are currently
watching.
• If you’ve used the Live TV Pause feature to pause the program, your paused
program buffer is deleted. In other words, you cannot return to a live TV
channel and resume watching from where you left off.
Automatic network recommendation
Your home might have multiple wireless networks, each with its own characteristics.
While you are streaming and during manual network scans, your TV checks the
wireless networks nearby to make sure you are getting the optimum viewing
experience.
If your TV determines that a better connection is available while you are watching
streaming content, it recommends that you switch by displaying a message in the
lower portion of the screen:
61
Page 75
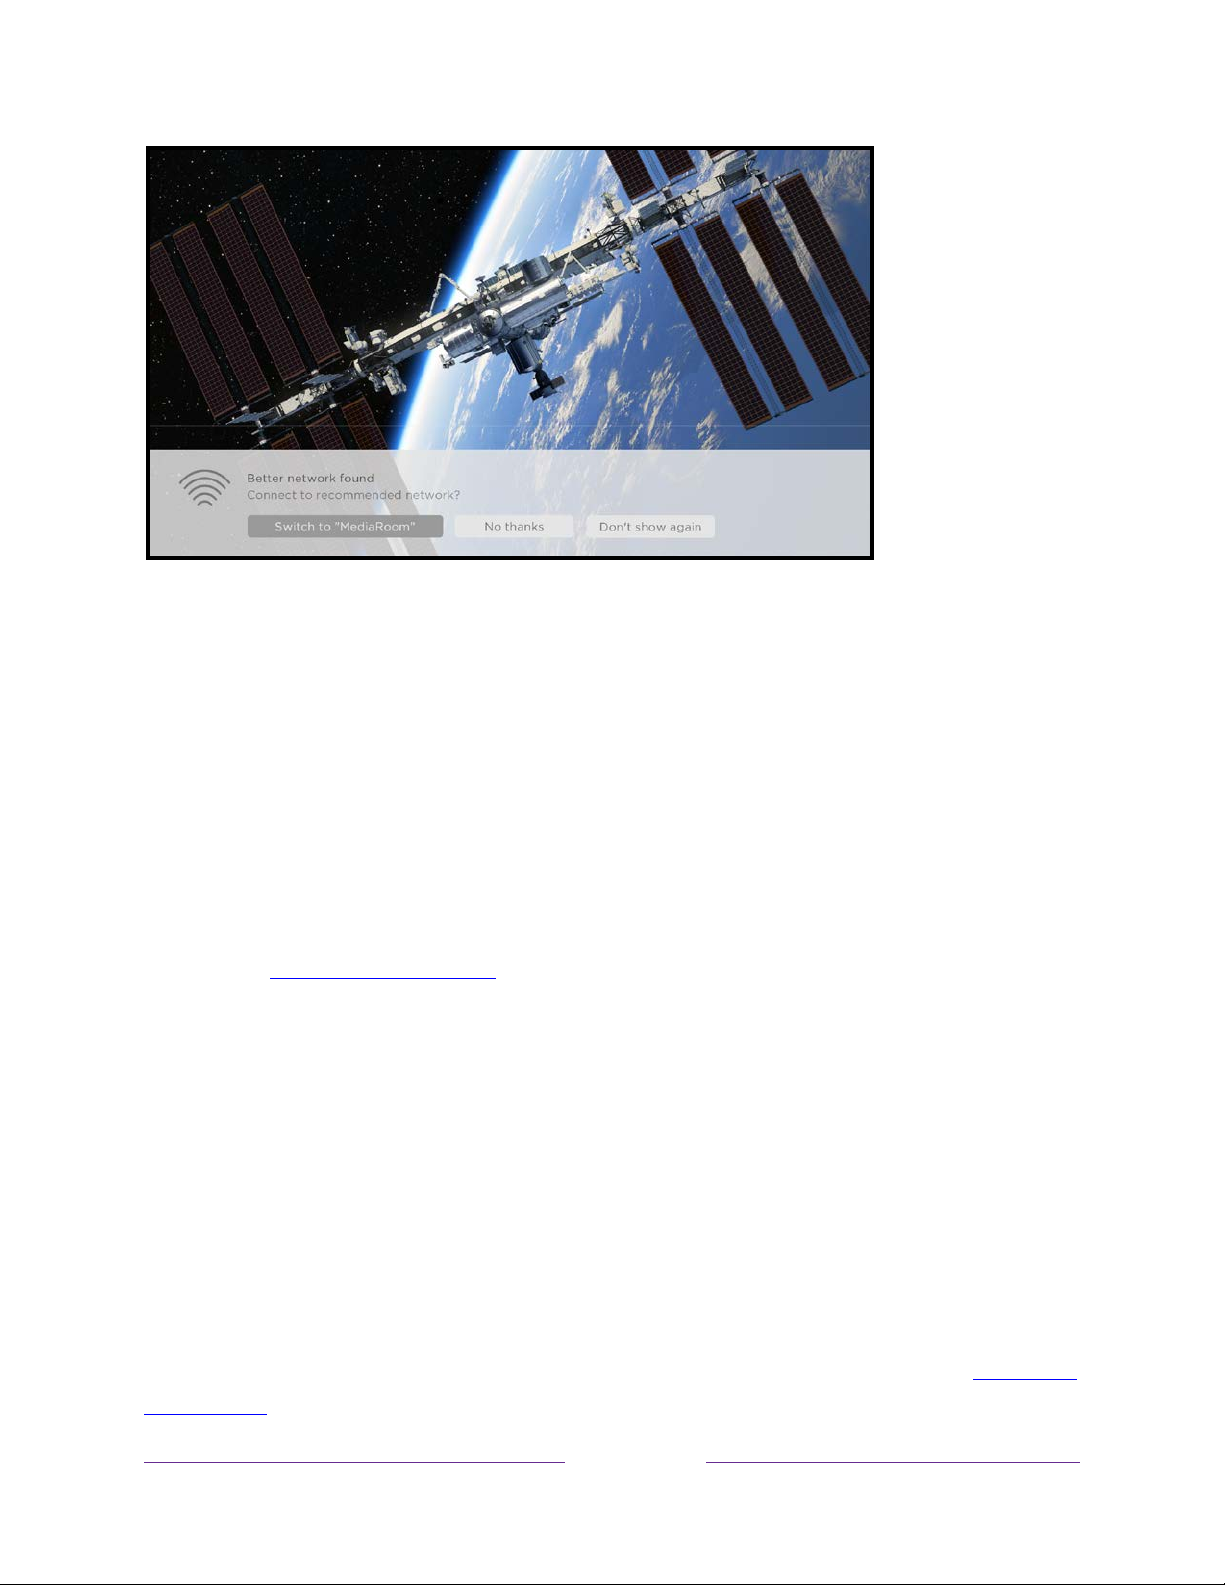
When this happens, you can select the appropriate button to accept or reject the
recommendation, or you can select Don’t show again if you do not want to use this
feature.
Switching TV inputs
Switch TV inputs to access the device connected to that input, for example, a
Blu-ray™ player. Switching inputs is as easy as highlighting the input’s tile in the Home
screen, and pressing OK. The video signal on the input, if any, plays on the screen.
To learn how to add, remove, rename, and rearrange the tiles on your Home
Tip:
screen, see Customizing your TV.
Auto-detecting devices
Your TV automatically detects when you connect a new device to an HDMI input and
turn on its power. The input is automatically added to the Home screen if it isn’t
already present.
Adjusting audio/video settings
While watching video content on any input, press STAR to display the TV settings
menu. Press UP or DOWN to highlight an option, and then press LEFT or RIGHT to
change the setting. To learn about each of the audio and video settings, see Adjusting
TV settings.
62
Page 76

Setting preferred audio language for streaming channels
You can select the preferred language for the audio played by streaming channels. If
the selected language is available in the streaming content, the TV plays that
language.
To set the preferred audio language:
1. From the Home screen menu, navigate to Settings > Audio > Audio preferred
language.
2. Press RIGHT to highlight one of the languages.
3. Press UP or DOWN to highlight the language you want to use.
4. Press OK.
Note:
Many streaming channels have an option to select the language while you
are watching a program. The Audio preferred language setting sets the default
for that option.
Automatic game console configuration
Your TV automatically detects select game consoles and configures the key features
it supports to optimize TV performance while playing video games. When you
®
connect a supported and powered-on game console through an HDMI
1
.
automatically changes the input tile to the game console icon
models with compatible game consoles,
it also enables:
Only on selected
• Automatic low-latency mode (ALLM)
• Variable refresh rate
• HDR gaming
• High frame rate
• Game mode
input, the TV
• THX Certified game mode
1 Certain game consoles, such as the Microsoft Xbox One, do not communicate their identity until you
select the input after connecting the console.
63
Page 77
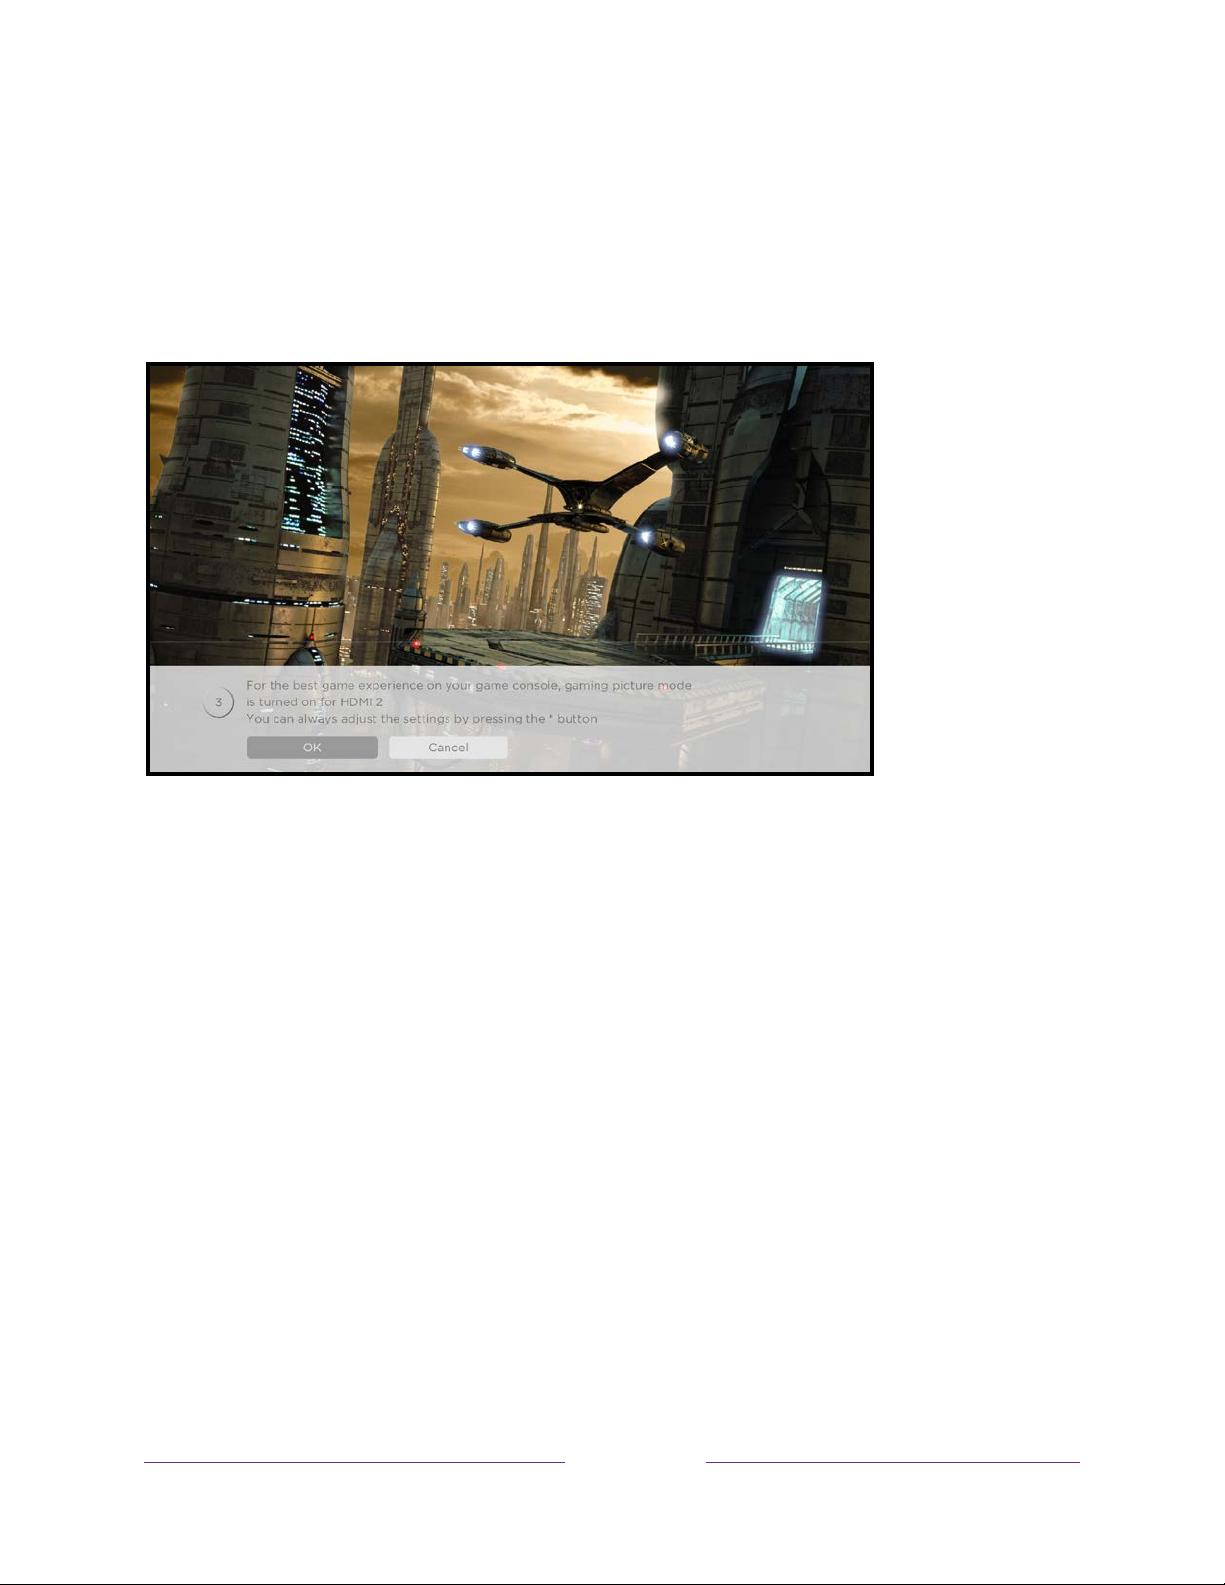
Various combinations of these features are available only on select Roku TV models,
and if present, can be disabled by navigating to Settings > TV inputs and then
selecting the appropriate HDMI input.
When you start playing a game, your TV displays a message at the bottom of the
screen to make you aware of the settings that it will use.
Select Cancel before the timer runs out to keep the current TV picture settings. For
example, you might want to cancel automatic configuration if you are watching a
movie from your game console.
Using Roku Voice commands
Roku Voice commands make it fast and easy to control your TV and find
entertainment with simple voice commands like “show me comedies.” Control your
TV with commands like “switch to game console,” or “watch channel 7.1.” Use your
Roku Voice remote, the Roku mobile app, or a compatible smart speaker to speak
commands. When using a smart speaker, add “on my Roku” or, for example, “on my
bedroom
To learn what commands to use, watch out for hints that appear at appropriate times.
For example, if you are in the TV settings menu with the Sleep timer command
highlighted, a hint might appear explaining how to use a Roku Voice command to set
Roku” to the end of the command.
the sleep timer. You can use a Roku Voice command at any time, without first calling
up a menu.
64
Page 78

Using Roku Voice remotes (select models only)
Only on TVs with the Roku Voice remotes:
most out of your TV when it includes a Roku Voice Remote, Roku Enhanced Voice
Remote, or Roku Voice Remote Pro.
The following topics explain how to get the
Re-pairing your Roku Voice remote
The Roku Voice remotes operate with wireless radio-frequency signals and must be
paired with your TV. You initially paired the remote when you set up your TV during
Guided Setup. But if your remote loses its pairing with the TV for some reason, you
can easily re-pair it using either of the following methods:
1. Remove the battery cover from the back of the remote.
2. Press and hold down the pairing button for 3 seconds or longer, until the
adjacent LED lights up.
3. Do one of the following:
• Turn on the TV using the power button on the TV side or back panel.
Pairing occurs as the TV starts up.
• Use the Roku mobile app or a different remote to navigate to Settings >
Remotes & devices > Pair new device > Remote.
If the remote fails to pair with the TV, try installing new batteries. Also, it’s helpful
Tip:
to hold the remote within two to three feet of the TV to ensure successful pairing.
Checking the Roku Voice remote battery level
You can check the condition of the batteries in your Roku Voice remote at any time
by navigating to Settings > Remotes & devices, and then pressing OK to select your
remote below My paired devices. With your remote selected, navigate right to
About > Remote to view its Battery level. The resulting screen displays not only the
battery level, but also other information that can be useful when you need technical
support with your remote.
When you first turn on the TV, a battery level indicator appears in the upper right
Tip:
corner of the screen for a few seconds.
65
Page 79
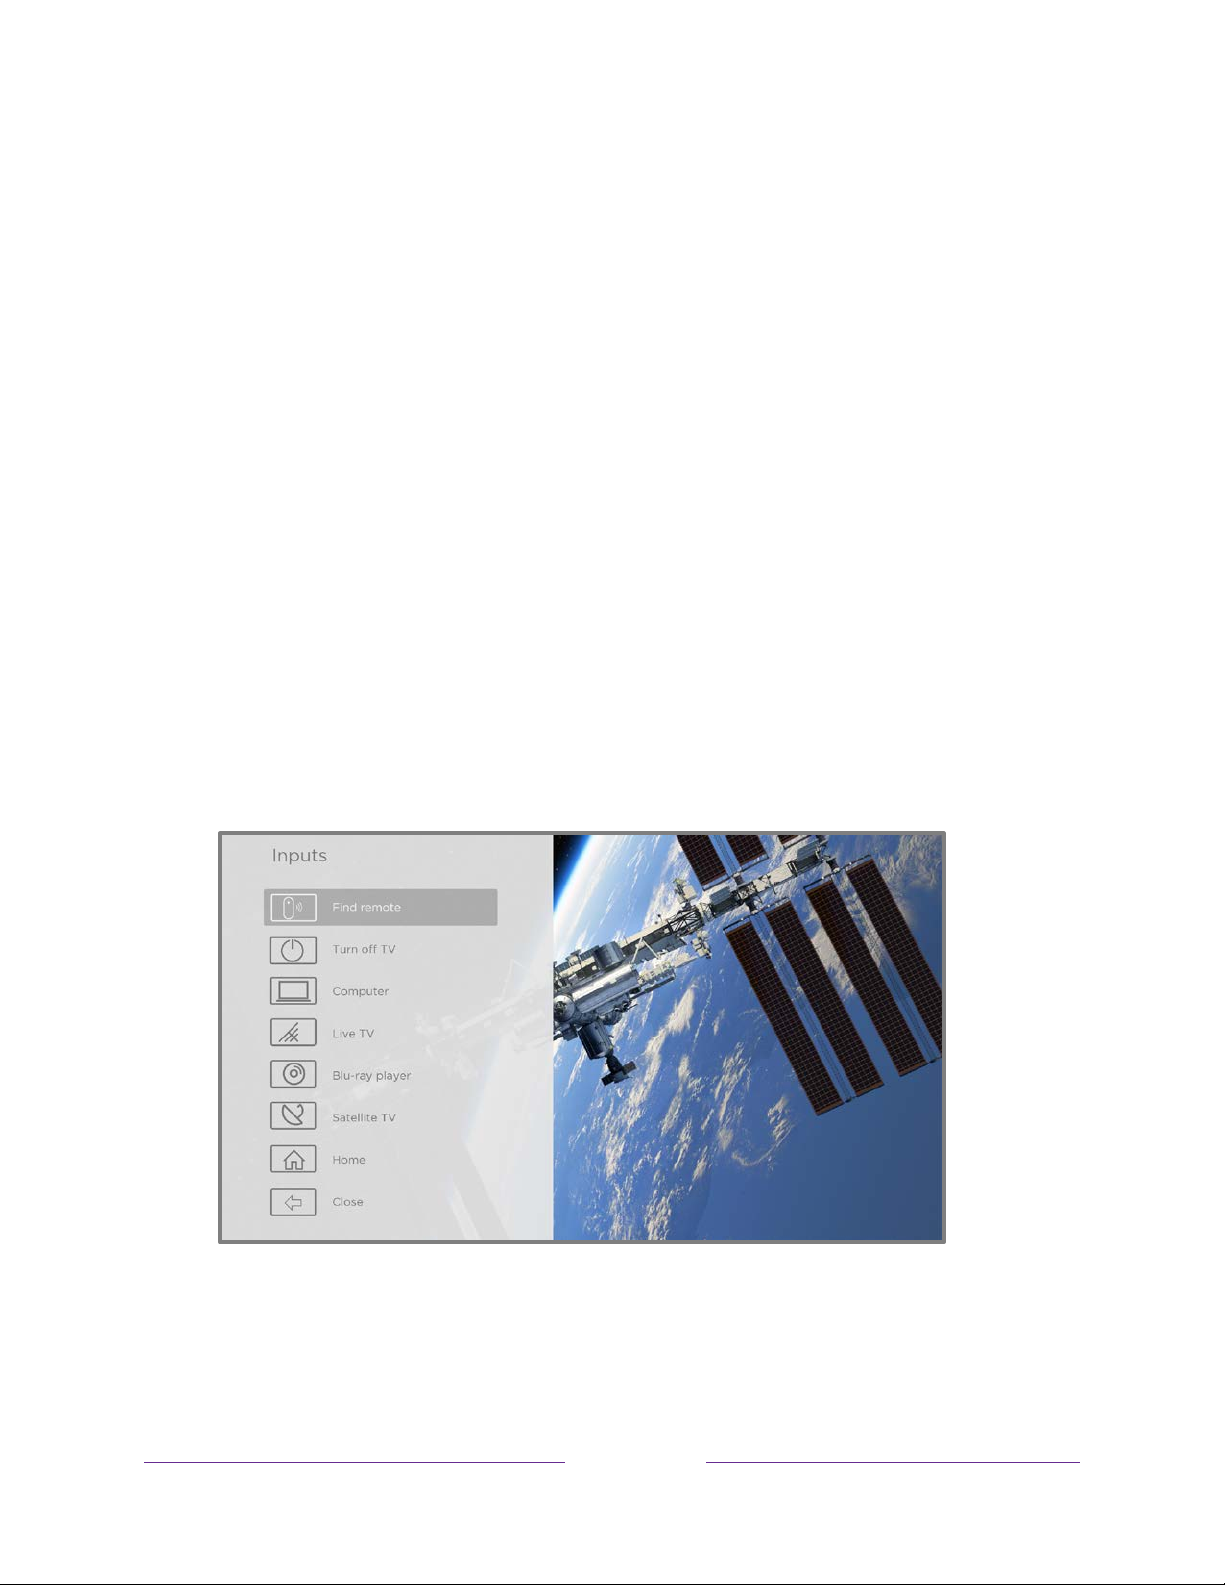
Finding your Roku Enhanced Voice Remote or Roku Voice Remote Pro
Only on TVs with the Roku Enhanced Voice Remote or Voice Remote Pro
remote has found its way down into the sofa cushions or your dog has hidden it in the
corner, you can use the Find Remote feature to find out where it’s hiding. This feature
has a limited range, and is designed to find your Enhanced Voice remote somewhere
in the same room as the TV.
Select Find Remote on the Settings > Remotes & devices > Remote settings menu to
see brief instructions on how to activate the Find Remote feature. Note, however, that
selecting this option doesn’t actually activate the feature. Here are the complete
instructions:
, when your
Activate Find Remote
• If your TV has a joystick-style control, press to the Left or Right to open the
Inputs menu, and then press Right to scroll down to Find Remote.
• If your TV has a column of labeled panel buttons, press the INPUT button to
open the Inputs menu, and then press the INPUT button again until you
highlight Find Remote.
A moment or two after highlighting Find Remote, the remote starts playing your
selected Find Remote sound to let you know where it is hiding. The sound
automatically stops after a minute, or after you find the remote and press any button.
66
Page 80

Changing and previewing the remote finder sound
Only on TVs with the Roku Enhanced Voice Remote or Voice Remote Pro
customize the sound your remote makes when you use the Find Remote feature. To
customize the sound, navigate to Settings > Remotes & devices > Remote settings >
Change remote finder sound. Select the sound you want to use from the available
settings.
To preview the sound you have chosen, select Preview remote finder sound, and
then hold down OK on the remote to play the sound. When you release the OK
button, the sound will stop.
, you can
Playing content from USB storage devices
Only in connected mode
Otherwise, the Home screen has the USB Media Player tile. With either player, you
can play personal music, video, and photo files from a personal USB flash drive or
hard disk connected to the TV’s USB port.
, your Home screen has the Roku Media Player tile.
To use this feature, make sure your media files are compatible with the Roku/USB
Media Player. To see the latest list of supported formats, view Help in the Media
1
Player
types it knows it cannot play.
Note:
. The Roku/USB Media Player displays supported file types only, and hides file
If you do not see the Roku Media Player on your Home screen, it might have
been uninstalled. You can reinstall it from the Roku Channel Store by using the
Channel Store menu option or the Add Channels shortcut. The USB Media Player in
non-connected mode cannot be uninstalled.
For more information about playing back your personal videos, music, and photos, go
to the following link on the Roku web site:
go.roku.com/rokumediaplayer
1 There are many variants of each supported media format. Some variants may not play at all or may
have issues or inconsistencies during playback.
67
Page 81

Auto player launch
Only in connected mode
Player when you connect a USB drive with a recognizable file system (such as
FAT16/32, NTFS, HFS+ or EXT2/3). To configure this setting, from the Home screen
menu, navigate to Settings > System > USB media. At this point, the following
options are available:
• Auto-launch – Select Prompt, On, or Off, as desired.
• Prompt – (default) Display a prompt each time a recognized USB drive is
connected. The prompt provides options to launch the Roku Media Player
as well as to change future auto-play behavior.
• On – Always launch the Roku Media Player whenever you connect a
recognized USB drive.
• Off – Never launch the Roku Media Player automatically.
• Launch channel – Select the app you want to use to play back media files.
, you can set your TV to automatically open the Roku Media
Playing content from local network media servers
Only in connected mode
a media server on your local network. Media servers include personal computers
running media server software such as Plex or Windows Media Player, network file
storage systems that have built-in media server software, and other devices that
implement the specifications of the Digital Living Network Alliance. Some servers do
not fully implement the DLNA specification but are UPNP (Universal Plug and Play)
compatible. The Roku Media Player can connect to them as well.
Some media servers can convert files into Roku compatible formats. Digital Rights
Management (DRM) protected content is not supported.
, your TV can play personal video, music, and photo files from
68
Page 82

Setting up a payment method
For Movie Store, TV Store, and other channels that allow you to pay through your
linked Roku account, you can enter a payment method directly on your TV. Entering a
payment method on your TV means that you don’t need to go to a computer or
mobile device to set up a payment method.
To add a payment method:
1. From the Home screen menu, navigate to Settings > Payment method > Add
payment method.
2. Use the on-screen number pad to enter your credit/debit card number,
expiration date, CVV number, and ZIP Code or postal code.
Note:
If you have already set up a payment method on my.roku.com, that
payment method is identified here in such a way as not to expose any personal
data. You can use this screen to change your payment method, if desired.
3. Select Save card, and then press OK.
To manage your saved payment method and to see other payment methods, log into
your account at go.roku.com/pay.
Using your TV in a hotel or dorm room
Hotels, school dorms, conference facilities, and similar locations with public wireless
Internet access often require you to interact with a web page to authenticate your
access. These types of networks are called
select a network of this type, the TV automatically detects that additional information
is needed and prompts you through using another wireless device to supply the
requested information.
restricted public networks
. When you
69
Page 83
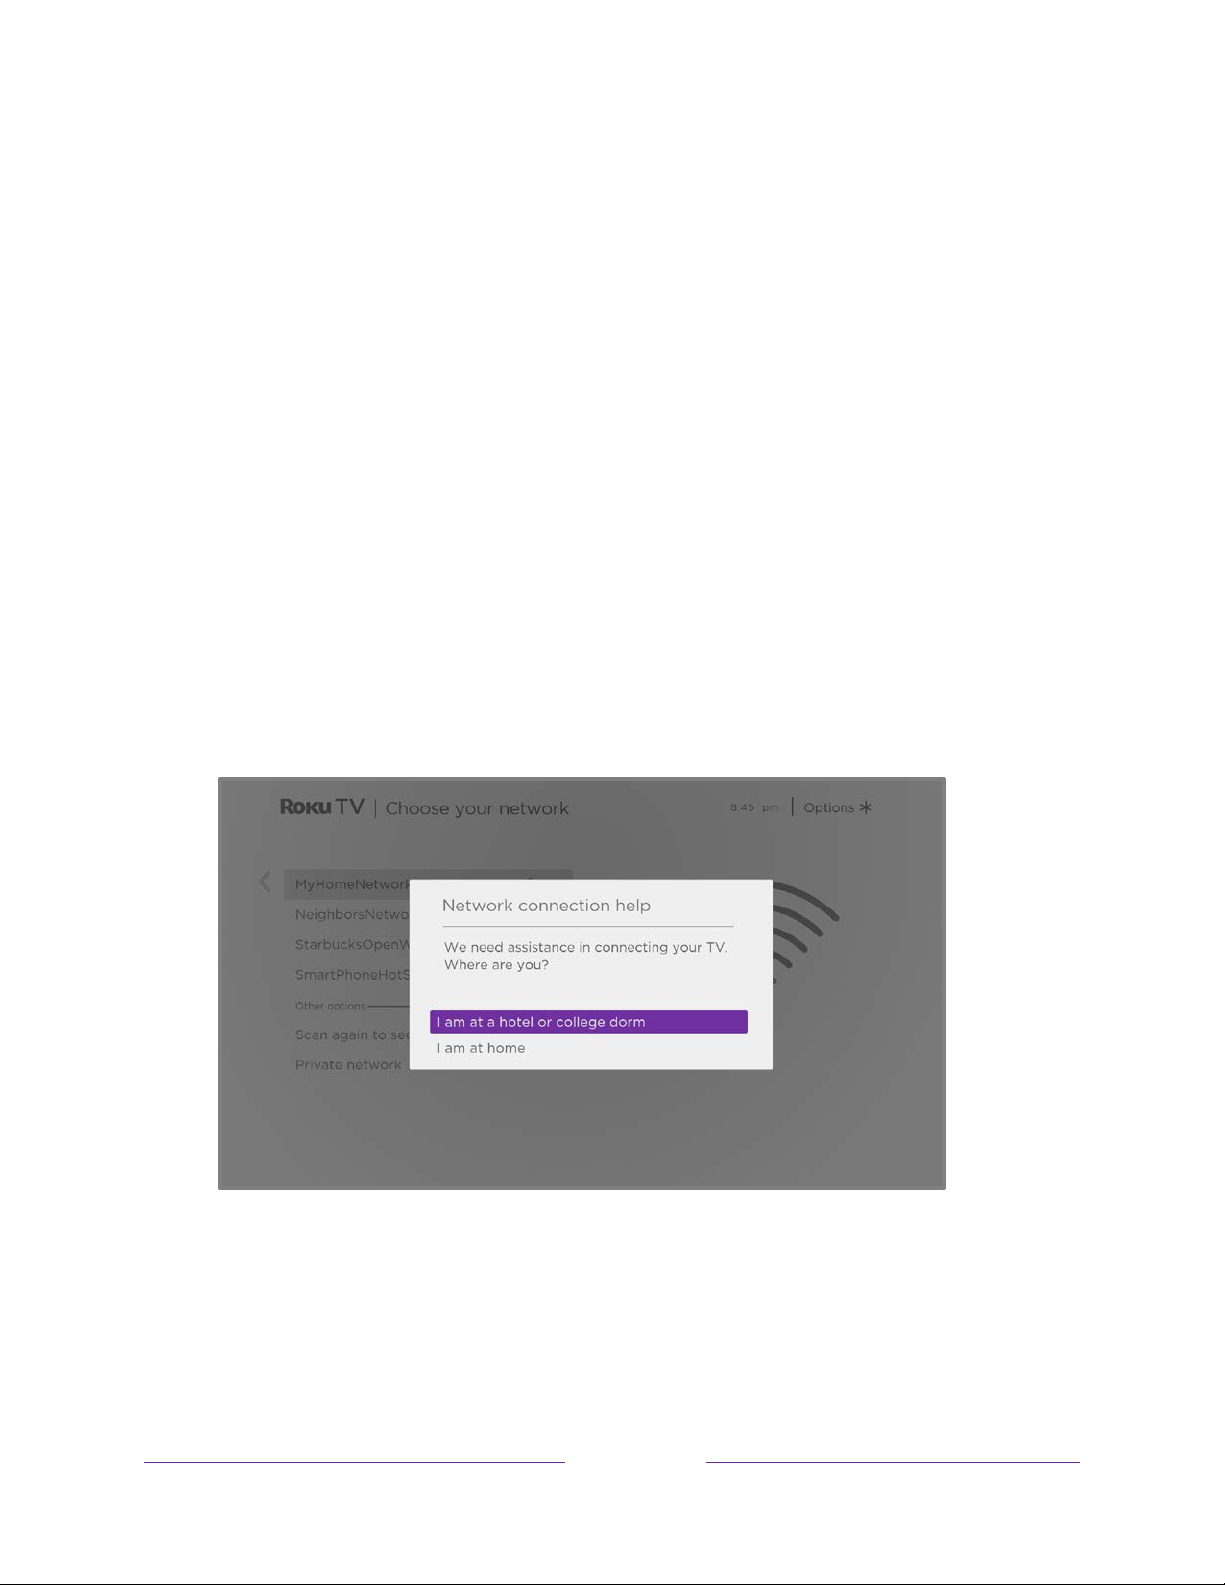
About using your TV on a restricted public network
Here are some points to keep in mind when using your TV on a restricted public
network:
• Using your Roku TV on a hotel or dorm room network requires wireless
availability and a network-connected smartphone, tablet, or computer to
authenticate access to your wireless access point.
• You will need your Roku TV remote.
• Some content might be limited or unavailable if you try to connect outside
your home country due to geo-filtering.
Getting your Roku TV on line on a restricted public network
1. Either during Guided Setup or after using the Settings > Network menu to set
up a new connection, the TV automatically detects that you are connecting to
a restricted network and displays the following prompt:
Your TV can connect to a restricted network only if Enable ‘Device
Tip:
connect’ is selected in Settings > System > Advanced system settings. (Device
connect is enabled by default, but if you have disabled it, the TV cannot
complete the connection.)
Note:
Device connect is not present if the TV is in non-connected mode.
70
Page 84
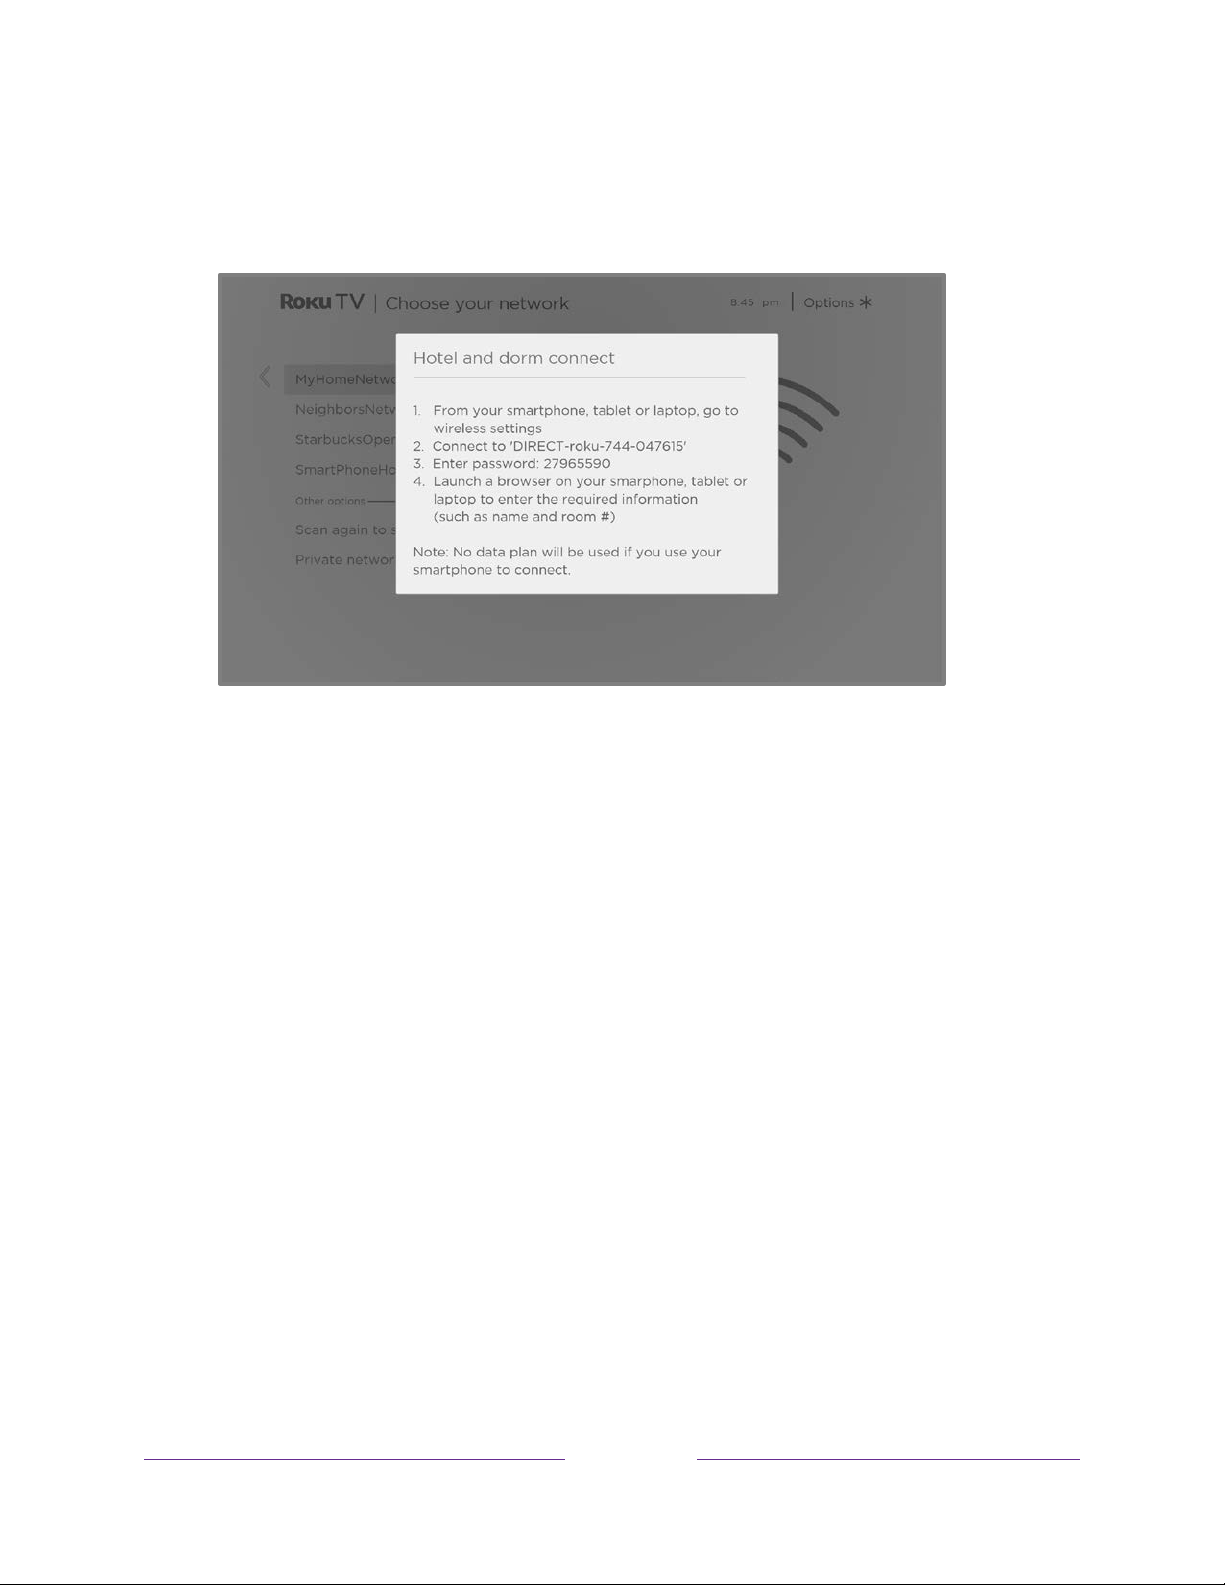
2. After selecting the correct network, highlight I am at a hotel or college dorm,
and then press OK. The TV prompts you to use your smartphone, tablet, or
laptop to complete the connection.
3. Use a mobile phone, tablet, or wireless-enabled computer to detect wireless
networks. In most cases, you can simply open the device’s Wi-Fi Settings or
Network Settings screen to start scanning.
Note:
network to which you are connecting the TV.
4. Connect to the network named on your TV screen. The actual network name
varies.
Note:
The mobile phone, tablet, or computer must be on the same wireless
The previous step connects your smartphone, tablet, or computer directly
to the TV. No connection charges apply and the connection does not impact
your device’s data plan.
5. The wireless connection process prompts you for a password. Enter the
password as shown on the TV screen. The actual password varies.
71
Page 85

6. Start the web browser on your mobile phone, tablet, or computer. When you
attempt to open any web page, the restricted connection will prompt you for
whatever information it needs. In most cases, you must agree to terms and
conditions, provide identifying information, or enter a password, PIN, or room
number to proceed. The information requested depends on the organization
that controls the wireless connection.
7. After you enter the requested information, the TV automatically proceeds to
complete its connection and resumes normal operation.
8. If the TV prompts you to link to your Roku account, use your mobile phone,
tablet, or computer to activate your Roku TV.
72
Page 86

Using Apple AirPlay and the Apple Home app
Apple AirPlay
AirPlay lets you share videos, photos, music, and more from your iPhone, iPad, or Mac.
To use AirPlay, your Roku TV must be on the same wireless network as your Apple
1
device
Apple AirPlay and HomeKit from your Roku TV Home screen. Depending on the
. To configure your preferred AirPlay security settings, navigate to Settings >
AirPlay settings you select, you may be required to enter a password on your Apple
device to initiate an AirPlay session on your Roku TV.
Other AirPlay things to try
• Screen mirroring from an iOS device.
• Screen mirroring from a Mac.
• Using your Roku TV as an extended Mac display.
• Playing synchronized music on multiple AirPlay 2-enabled devices, including
Roku TVs.
Apple Home app
Apple HomeKit controls compatible smart home lights, locks, thermostats, and other
devices, including Roku TVs. The Apple Home app lets you add your Roku TV to your
Apple HomeKit ecosystem. You can also interact with HomeKit-enabled devices by
using Siri from your iPhone, iPad, Apple Watch, HomePod or Mac.
To enable your Roku TV to work with the Apple Home app
1 iPhone, iPad, or iPod touch with iOS 12.3 or later. Mac with macOS Mojave 10.14.5 or later.
73
Page 87

1. From your TV’s Home screen, navigate to Settings > Apple AirPlay and
HomeKit.
2. Under HomeKit, select Set Up. Your TV will display a unique QR code.
3. From your Apple device, open the Apple Home app and select Add Accessory.
4. Use the Apple Home app to scan the QR code displayed on your TV and follow
the instructions.
Some Apple HomeKit things to try
On your Apple device, say:
• “Hey Siri, play jazz in the living room.”
• “Hey Siri, mute the TV in the office.”
• “Hey Siri, turn off the TVs in my home.”
• Add your Roku TV to an Apple Home scene.
Find more ideas at https://www.apple.com/ios/home/.
74
Page 88

Adjusting TV settings
You can adjust most picture and sound settings while you are watching a program by
pressing STAR to open the TV settings menu. There are some additional picture
and sound settings in the main Settings menu.
In most cases, the changes you make apply only to the input you are using. Live TV,
®
each HDMI
when you return to that input. The TV also separately remembers the settings you
specify while viewing streaming content.
input, and the AV input have their own settings that the TV remembers
Main Settings menu
Use the main Settings menu to adjust overall TV settings. Press HOME to go to the
Home screen, and then navigate to Settings > TV picture settings.
You can adjust the following overall TV picture settings from the Settings screen:
• TV brightness – Provide a better viewing experience in darker or brighter
rooms. Increases or decreases the TV’s general brightness across all TV inputs.
Note:
TV settings menu while watching a program.
• HDR/Dolby Vision notification –
TV displays a notification in the upper right corner of the screen for a few
seconds when HDR or Dolby Vision™ content begins to play.
• On – The TV displays a notification when HDR or Dolby Vision™ content
This setting is identical to the TV brightness setting you can access in the
Only on select models:
begins to play.
Controls whether the
• Off – The TV does not display a notification when HDR or Dolby Vision™
content begins to play.
75
Page 89
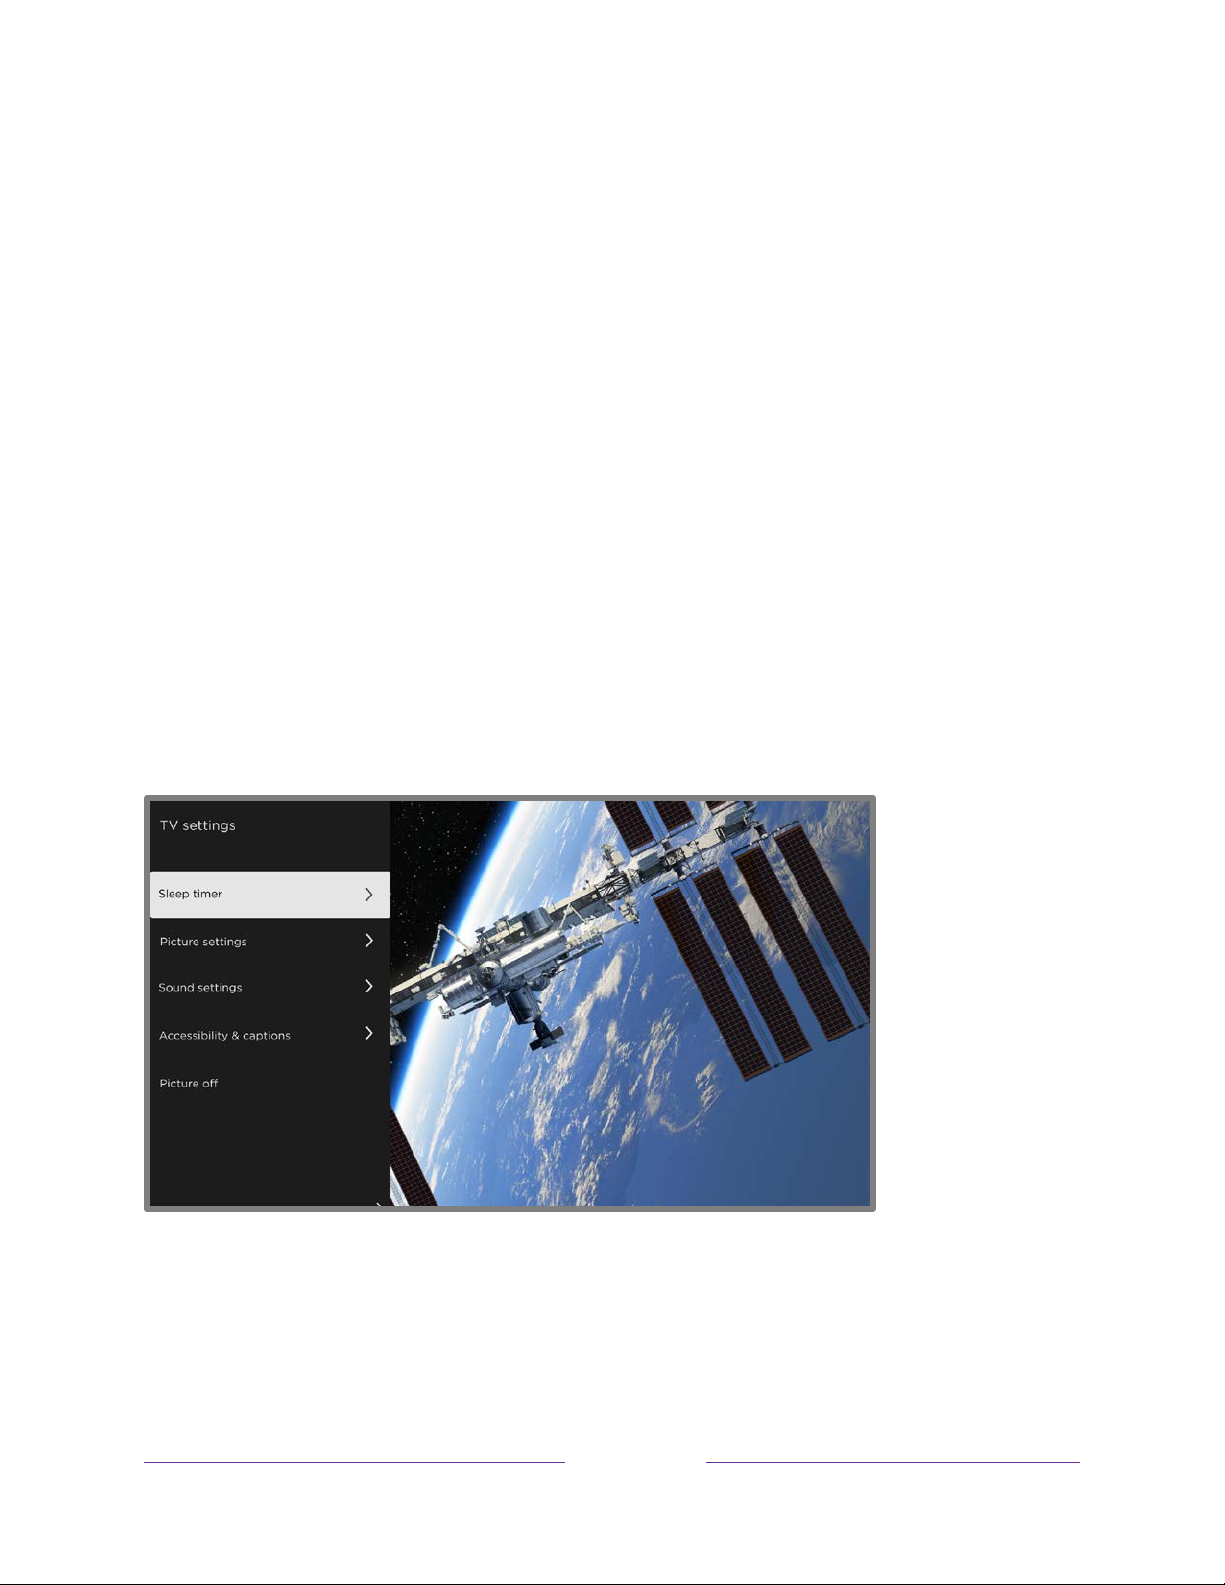
Note:
This setting does not affect the HDR or Dolby Vision™ notification that
always appears in the program information banner. Press OK while watching a
program to open the program information banner.
• Settings per input – Lists each enabled TV input. Select an input, and then
press STAR to display the TV settings menu where you can adjust the
input’s settings while watching the video and listening to the sound from that
input.
Tip:
You don’t have to go to the main Settings menu first—you can display an
input’s TV settings menu and adjust its settings whenever you are watching the
input by pressing STAR
.
TV settings menu
The TV settings menu provides settings for controlling the appearance of the picture
and the quality of the audio for each TV input. To view the TV settings menu, press
STAR whenever you are watching a TV input or streaming a video.
TV settings menu
Tip:
Some streaming channels assign STAR to a different function (or no function at
all), meaning this button will not open the TV settings menu. In these cases, use a
different channel, such as The Roku Channel, to configure options. The selected
settings remain active for all streaming channels.
76
Page 90

Press UP or DOWN to highlight a setting, and then press OK or RIGHT to see the
options for the setting. You’ll see the changes you make right away in picture
appearance or audio quality.
• Sleep timer
• Picture settings
• Sound settings
• Manage channels (U.S., connected mode)
• Manage channels (Canada/non-connected mode)
• Accessibility & captions
• Picture off
Tip:
To dismiss the TV settings menu, just wait a few seconds without pressing any
buttons. Or press STAR again to dismiss the menu immediately.
Sleep timer
Opens the Sleep timer menu where you can set a timer that turns off the TV after the
specific amount of time.
current input.
This setting remains in effect even if you stop watching the
Picture settings
The Picture settings menu adjusts the appearance of the picture for the active input.
77
Page 91

Typical Picture settings menu
• TV brightness – Overall brightness of the picture.
This setting applies to all TV
inputs and is identical to the TV brightness setting under Settings > TV picture
settings.
• Picture mode – Picture presets for various viewing preferences. For example,
selecting Vivid sets Brightness, Contrast, Sharpness, and other values to
produce a very vibrant picture. Selecting Movie changes the settings to
produce a picture suitable for enjoying movies in a darkened room.
Tip:
If you make changes to individual picture settings, these settings are saved
for the current input and the current Picture mode. In this way, you can
individually set the HDMI 1 input’s Movie picture mode to use different settings
than the HDMI 2 input’s Movie picture mode, and different settings than the
Live TV input’s Movie picture mode.
Note:
If you change the settings of a Picture mode, a small purple dot appears
to the right of the Picture mode name.
Use Reset picture settings, described below, to return the input’s selected
picture mode to its default settings.
• Picture size – Aspect ratio of the picture, enabling you to view a picture in its
original format, or zoom or stretch it to fill the screen. The Auto setting has
been found to produce the best picture in most cases.
Note:
Certain picture settings vary by brand and model. Not all settings are
available on all TVs. Names of certain settings also vary by brand and might
differ from the names listed here.
78
Page 92

• Local dimming –
to multiple areas of the screen’s backlight intensity. This setting can make dark
areas darker without affecting the brightness of light areas.
• Dynamic contrast –
level to achieve the optimum contrast and prevent excessive differences
between light and dark areas of the screen.
• Micro contrast –
• Action Smoothing –
name for this option.
video signal. A higher setting results in more smoothing, but can cause
undesirable picture artifacts in certain types of content. Each Picture mode has
a different default setting.
• Natural Cinema –
for this option.
Only on select models:
Only on select models:
Sets the amount of dimming applied
Automatically adjusts the backlight
Only on select models:
Improves image contrast.
Only on select models. Each TV brand uses a different
Adjusts the amount of motion processing applied to the
Only on select models. Each TV brand uses a different name
When enabled, this feature reduces “judder” that is often
present when 24 frame-per-second movies are upscaled to 60Hz TV standards.
Natural Cinema mode is On by default in Movie and HDR Dark picture modes,
and Off by default in other picture modes.
• Action Clarity –
name for this option.
sports.
• LED Motion Clarity –
feature.
blur caused by the refresh rate of the screen. Enabling this feature inserts black
frames between picture frames in a way that improves the clarity of fast
moving objects. It provides an improved viewing experience for video games
and sporting events, but reduces the brightness of the picture. You can select
settings of Low, Medium, High, or Off to achieve the desired picture quality.
• Game mode –
enabled. When On, the TV performs less image processing and has less input
Each TV brand uses a different name for this option.
Only on select 120Hz models. Each TV brand uses a different
Reduces blur, especially for fast-moving images such as
Only on select models that also have the local dimming
Reduces motion
Only on HDMI® and AV inputs:
Controls whether Game mode is
lag. When Off, the TV performs more image processing and has more input lag,
which is less desirable for action games. Also see Variable refresh rate (VRR).
79
Page 93
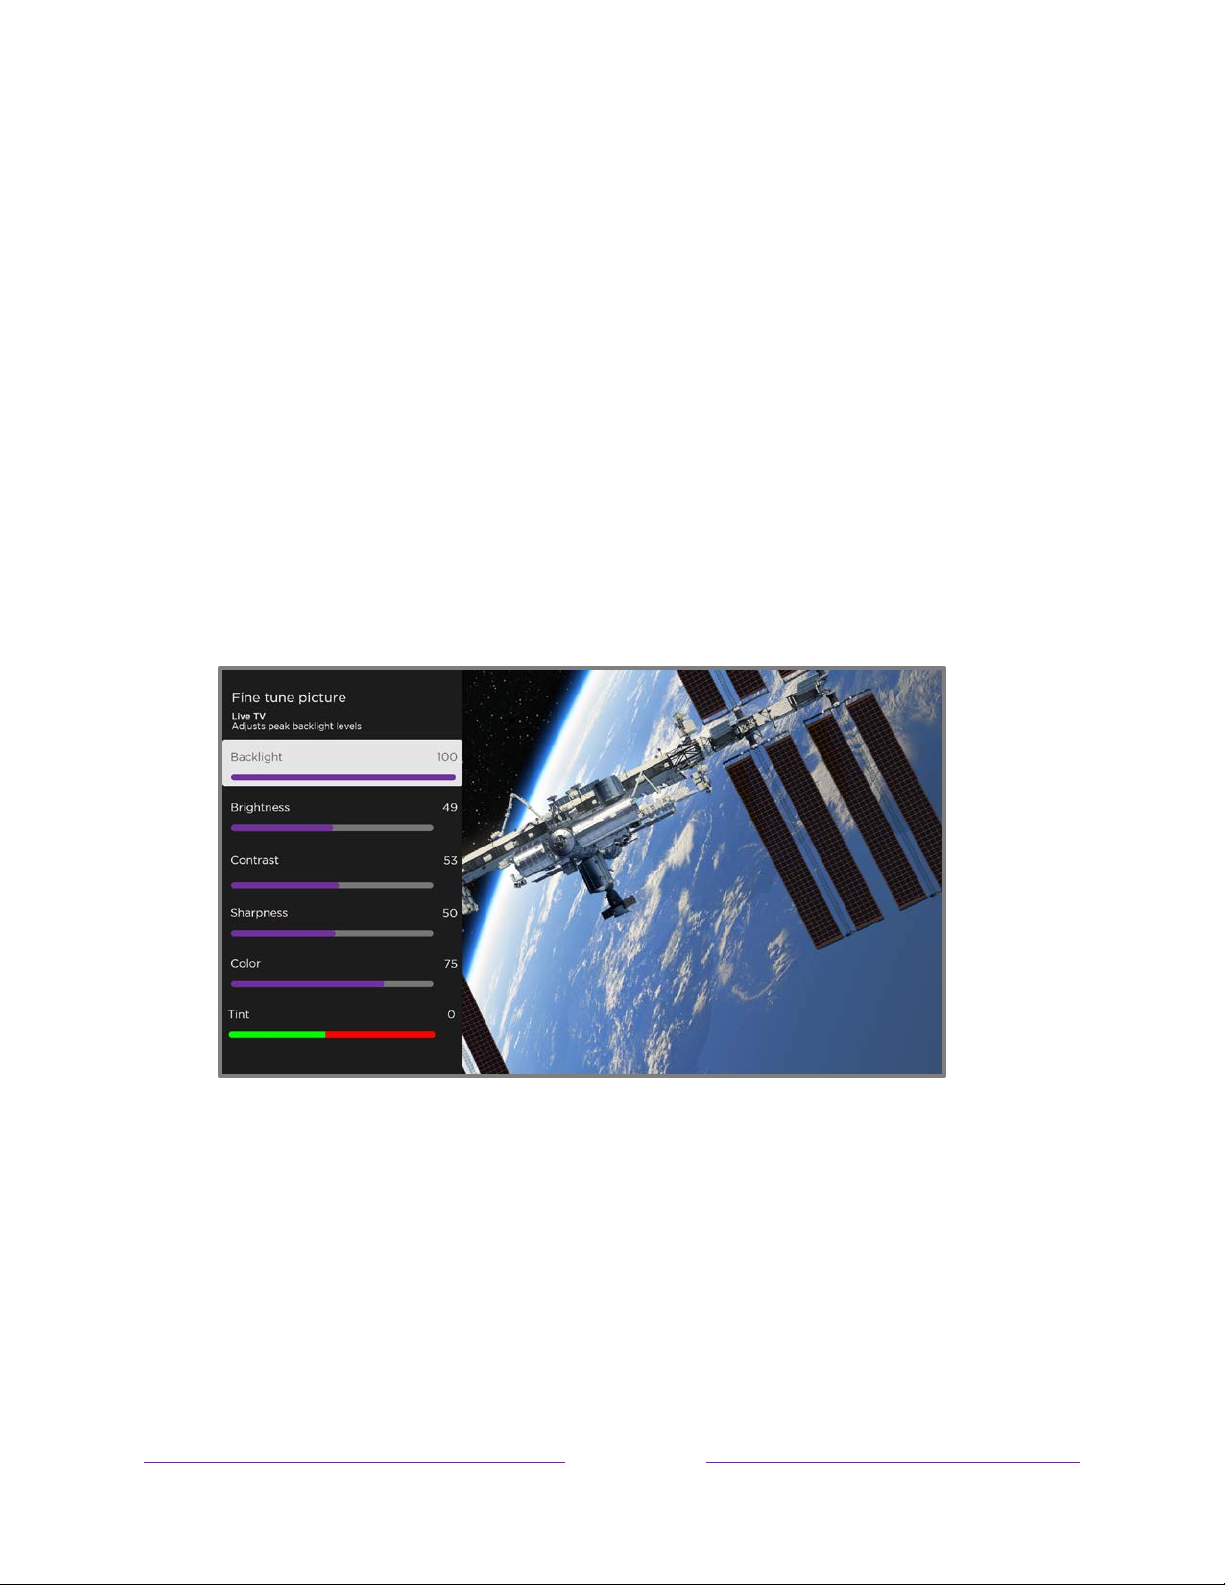
• Auto low latency mode (ALLM) –
Mode (ALLM) detects when certain game consoles are connected to an HDMI
input, and then automatically configures the best settings for action games
when that input is selected. When ALLM is active, the manual Game mode
setting is not available.
• Color temperature – Adjusts the overall color tones in the picture from Normal
to slightly more bluish (Cool) to slightly more reddish (Warm).
• Reset picture settings – Returns all picture settings for the input’s currently-
selected Picture mode to their original values.
• Apply settings to all inputs – Applies the settings of the current Picture mode
to all TV inputs.
• Fine tune picture – Displays the Fine tune picture menu.
The TV does not display an ALLM menu option.
Only on select models:
Auto Low Latency
Fine tune picture menu
Fine tune picture menu options
• Backlight - Adjusts the overall light intensity of the screen.
• Brightness – Adjusts the dark level of the picture.
• Contrast – Adjusts the white level of the picture.
• Sharpness – Adjusts the sharpness of edges in the picture.
80
Page 94

• Color – Adjusts the saturation of colors in the picture. A setting of 0 removes
all color and displays a black and white picture.
• Tint – Adjusts the color balance from green to red to obtain accurate colors in
the picture.
Variable refresh rate (VRR)
Only on select models:
or computer connected via HDMI to control the refresh rate of the TV. This feature
helps to ensure that the TV does not begin to display a video frame until the video
source has completely rendered it. The result is smoother image animation with a
lower instance of stutter or tearing. This feature requires the following conditions:
• Variable refresh rate is turned On in the HDMI settings for the input. This
setting is Off by default.
• The HDMI mode is set to Auto or HDMI 2.0 in the HDMI settings for the input.
• Game mode is enabled.
• The connected device supports VRR.
Variable refresh rate (VRR) allows a compatible game console
Expert Picture Settings (4K models only)
4K (UHD) TV models have additional picture settings for demanding home theater
enthusiasts. Expert Picture Settings include gamma, noise reduction, 11-point white
balance adjustment, and extended color space management.
You can access Expert Picture Settings only by using the Roku mobile app on an iOS
or Android™ mobile device. For more information, go to the following link on the Roku
web site:
go.roku.com/expertpicturesettings
81
®
Page 95

Sound settings
Your TV model might have any one of the following premium sound settings available
in the TV settings menu:
• No Sound settings
• Roku premium audio devices
• Volume mode
• Dolby® Audio Processing
• DTS® TruSurround
• DTS® Studio Sound
• Sonic Emotion™ Premium
Roku premium audio devices
You can purchase and connect a Roku premium audio device, such as a Roku
Streambar™, to the HDMI ARC or HDMI eARC port on any model of Roku TV. When
you do, you can put away the remote control for that device, because the Sound
settings menu on the TV provides direct access to the sound settings of the
connected Roku device. These settings replace the sound settings that might be
available when the Roku premium audio device is not connected.
To access Roku premium audio settings, first press STAR to display the TV settings
menu, then select Sound settings.
Sound settings menu for Roku premium audio devices
82
Page 96

Sound settings menu – Roku premium audio
• Sound mode – Select from among various preset sound modes to make shows
and music sound their best.
all TV inputs.
• Volume mode – Select from among modes for normal listening, volume
leveling, and night listening.
• Speech clarity – Select Off, Low, or High to make voices easier to hear above
the rest of the program.
• Expanded stereo – Select one of the available settings to simulate surround
sound or,
configuration
• Surround level –
only with Roku wireless speakers in a 3.x or 5.x surround
, to play stereo sound from all speakers.
Only if you have Roku wireless speakers in a 3.x or 5.x
surround configuration
your liking.
• Virtual surround –
configuration
simulate surround sound.
When you do not have Roku wireless speakers in a surround
, this option enhances the stereo sound from the soundbar to
This setting applies across the entire TV; that is, to
, this option lets you select the surround volume level to
• Dolby AC-4 Dialog Enhancement –
to enhance the dialog in content that supports the AC-4 audio format.
• Reset sound settings – Returns all sound settings to their defaults.
Only on select models:
Select On for AC-4
83
Page 97
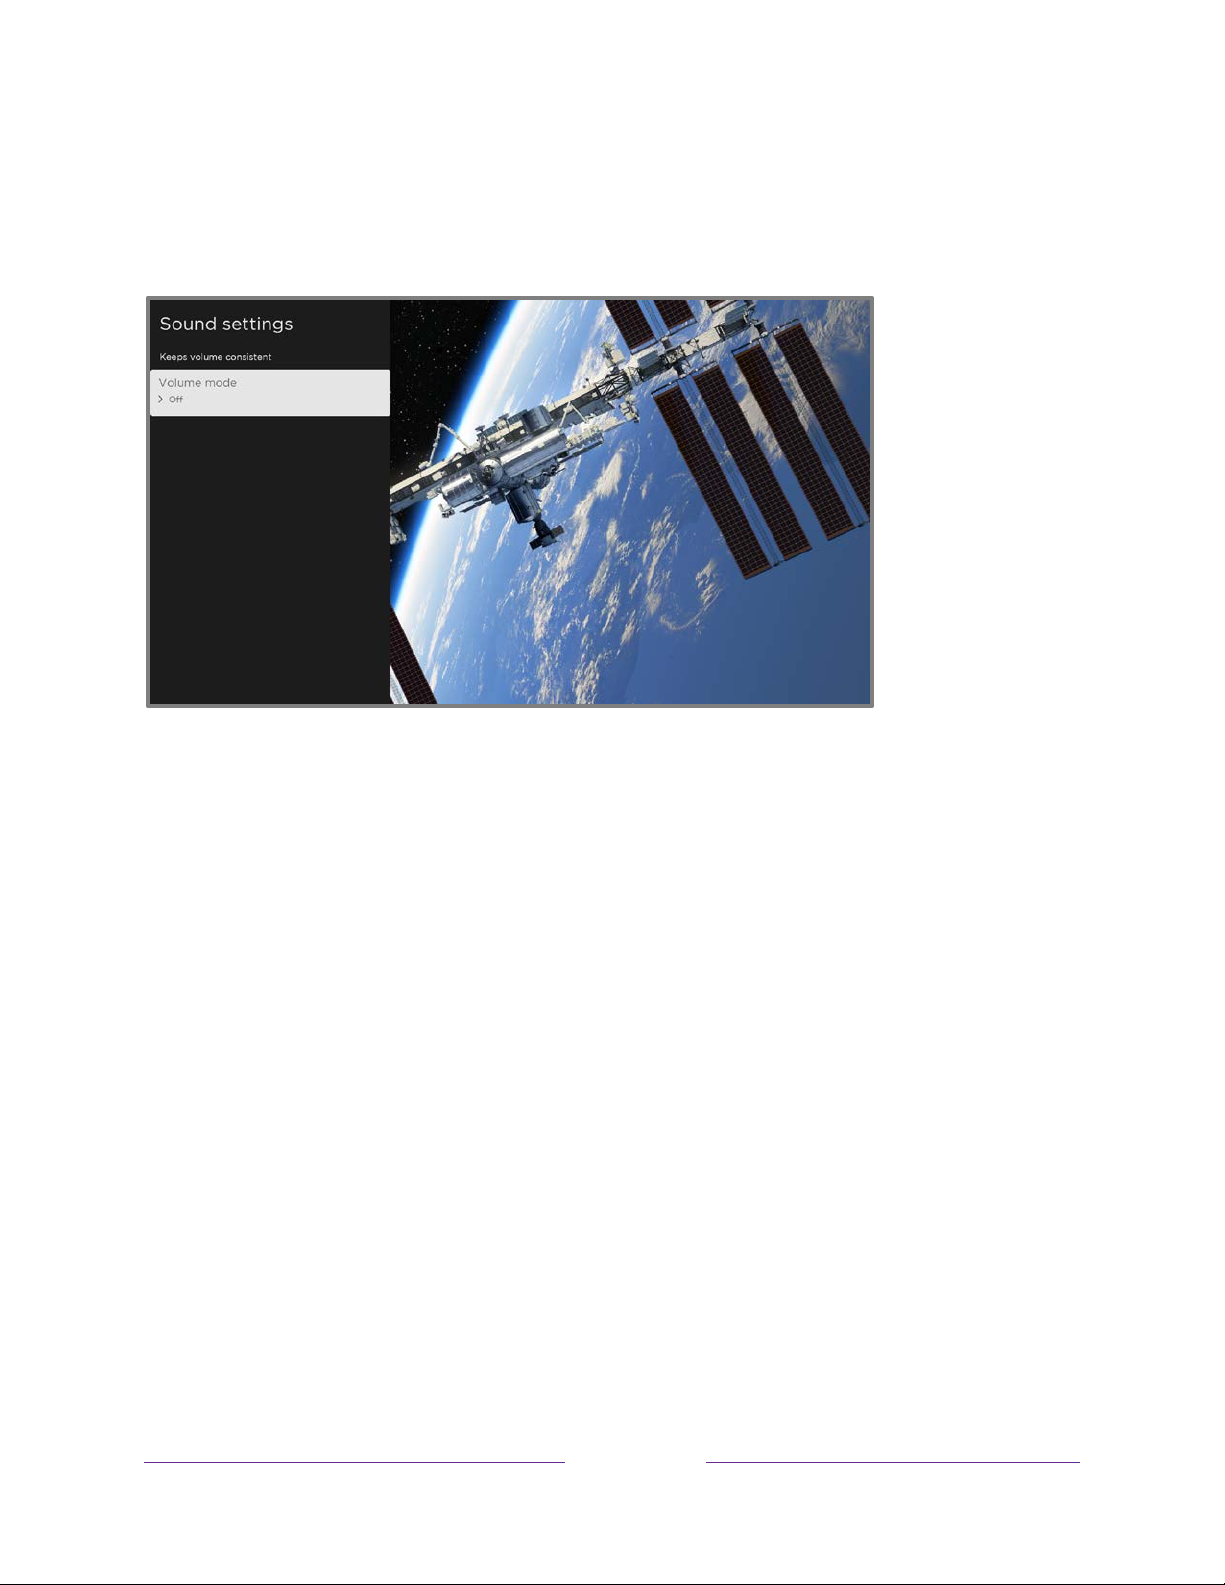
Volume mode (select models only)
To access Volume mode, first press STAR to display the TV settings menu, then
select Sound settings.
Sound settings menu for models with Volume mode
Tip:
Some streaming channels assign STAR to a different function, meaning it will
not open the TV settings menu. In these cases, use a different channel, such as The
Roku Channel, to set the Volume mode. The selected mode remains active for all
streaming channels.
Sound settings menu - Volume mode
• Volume mode
• Off – Volume mode is inactive and content volume is unmodified.
• Leveling – Provides a consistent volume level across different types of
content, so that you need not change the volume every time you switch
channels or when a commercial comes on.
• Night – Soft sounds, such as whispers, are increased while loud sounds,
such as explosions, are decreased, making it easier to hear your TV at night
without disturbing others.
• Dolby AC-4 Dialog Enhancement –
to enhance the dialog in content that supports the AC-4 audio format.
Only on select models:
84
Select On for AC-4
Page 98
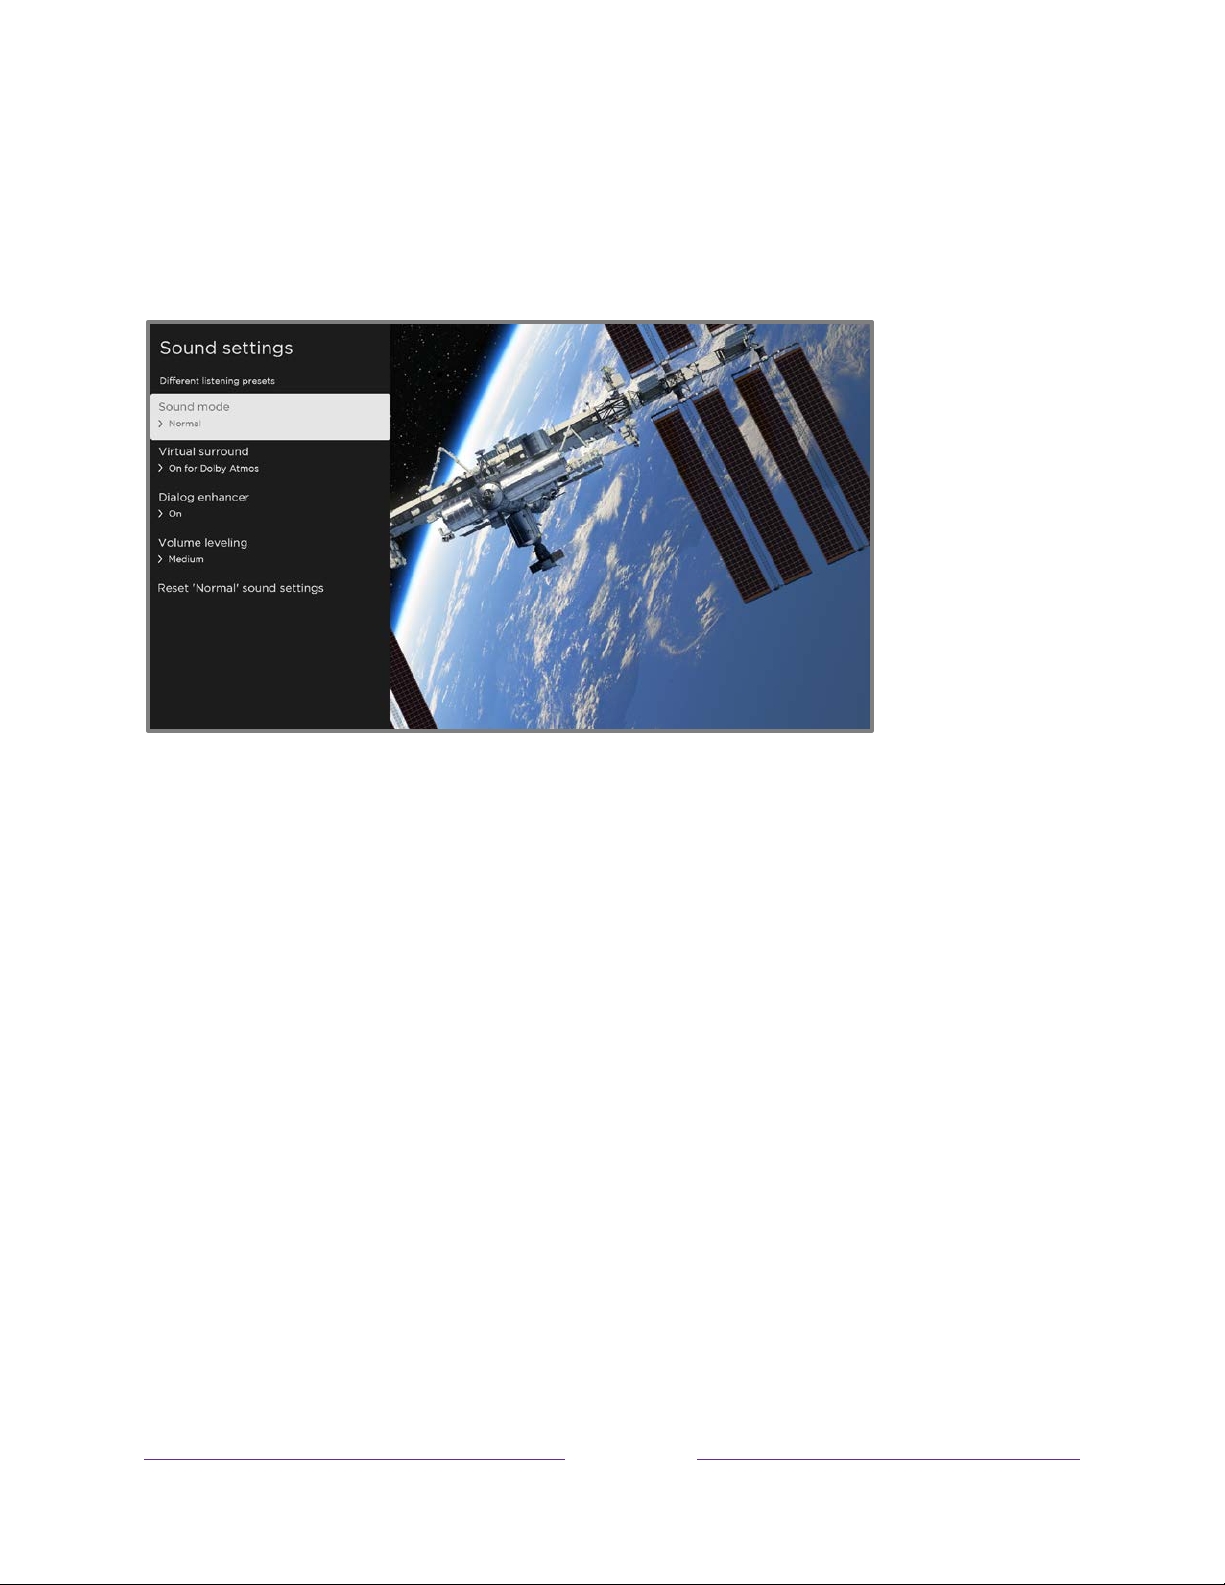
Sound settings – Dolby® Audio Processing (select models only)
Each TV input has separate settings for fine tuning sound quality. All of the settings in
this menu apply only to the currently-selected input. To access the DAP settings, first
press STAR to display the TV settings menu, then select Sound settings.
Sound settings menu for models with Dolby® Audio Processing
Tip:
Some streaming channels assign STAR to a different function, meaning it will
not open the TV settings menu. In these cases, use a different channel, such as The
Roku Channel, to configure Dolby
®
Audio Processing. The selected settings remain
active for all streaming channels.
Sound settings menu– Dolby® Audio Processing
• Sound mode – Select from among various preset sound modes to improve
speech, make music sound its best, boost bass or treble, or simulate a theater.
Use Reset sound settings, described below, to return the input’s current
settings to their original values.
to all TV inputs.
(ARC) HDMI (eARC), or S/PDIF (TOSLINK) connectors.
• Virtual surround (
Simulates surround sound that otherwise would require installation of a
It does not affect the sound quality for headphones, HDMI
Only on select models
This setting applies across the entire TV; that is,
) – Options vary by TV model.
surround sound audio system. Sometimes, the effect interferes with dialog
clarity. Use the Dialog enhancer option to compensate.
• Dialog enhancer – Improves the clarity of speech when on.
85
Page 99
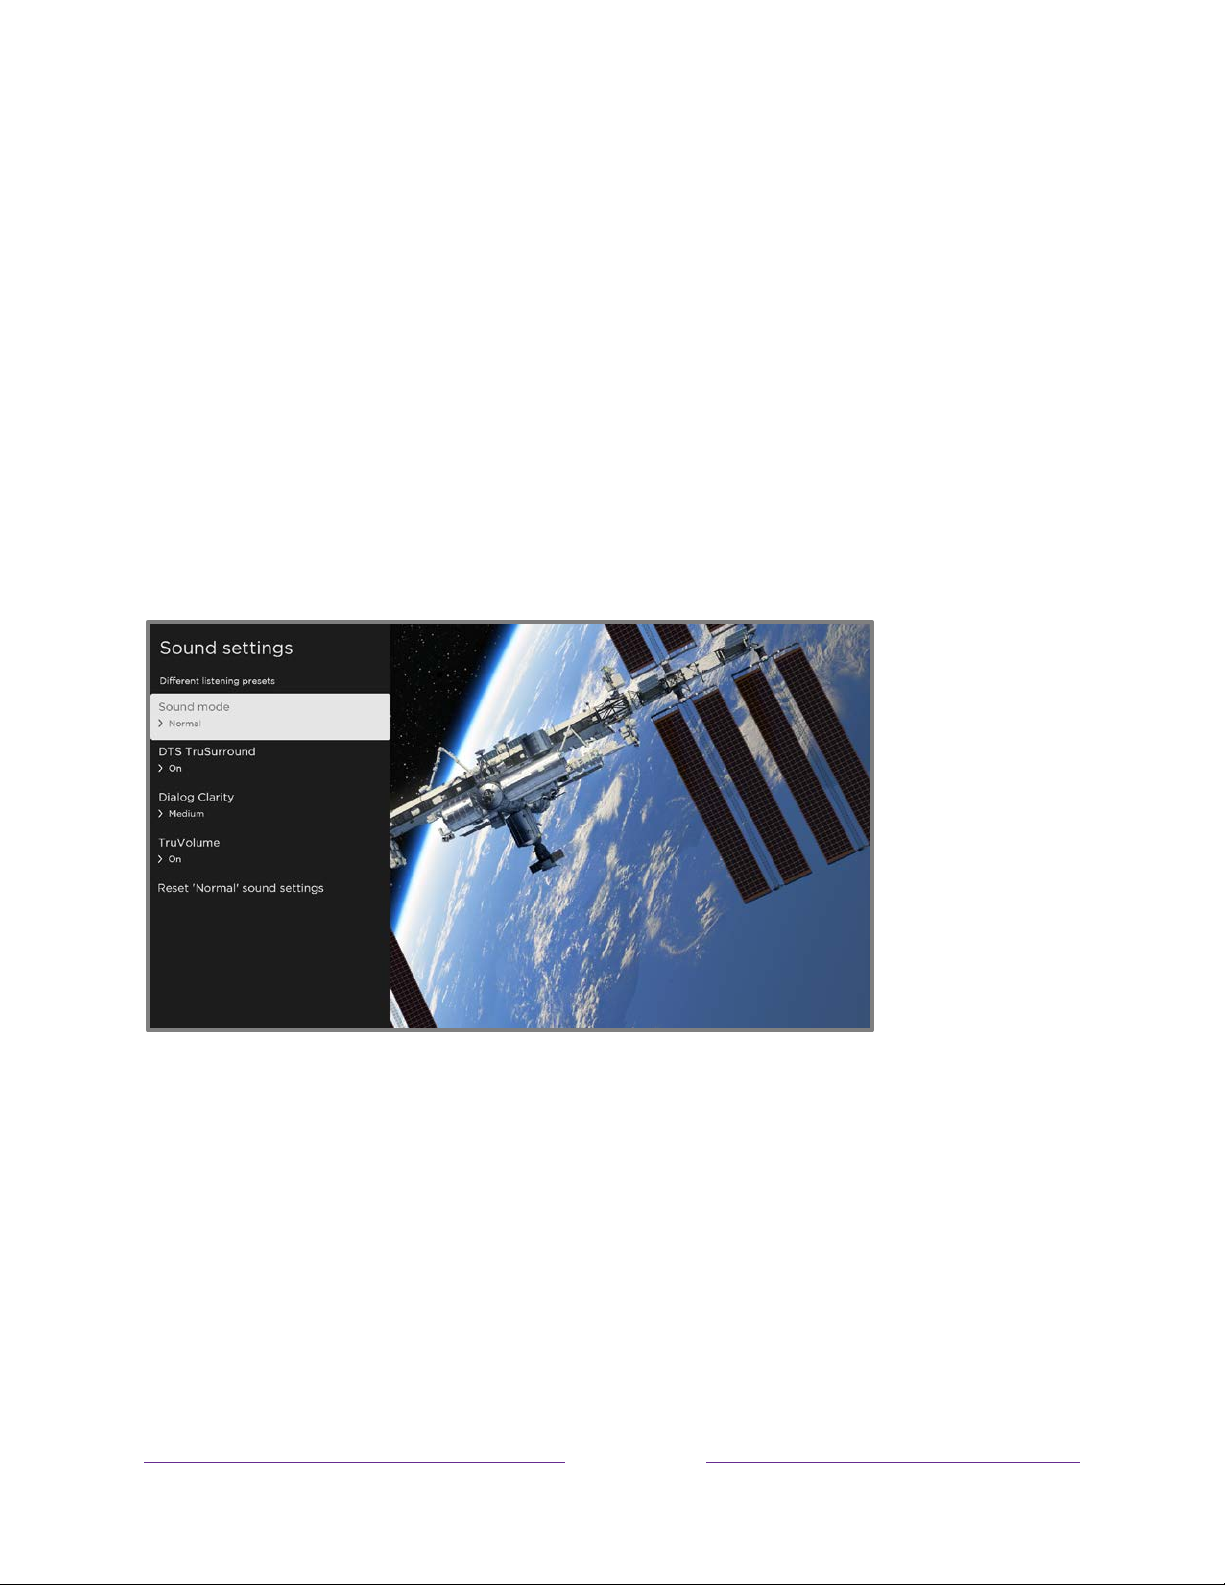
• Volume leveling - Smooths out the high and low sounds.
• Dolby AC-4 Dialog Enhancement –
to enhance the dialog in content that supports the AC-4 audio format.
• Reset sound settings – Returns Virtual surround, Dialog enhancer, and Volume
leveling settings to their default settings for the selected Sound mode.
Only on select models:
Select On for AC-4
Sound settings – DTS® TruSurround / DTS® Studio Sound (select
models only)
Each TV input has separate settings for fine tuning sound quality. All of the settings in
®
this menu apply only to the currently-selected input. To access the DTS
press STAR to display the TV settings menu, then select Sound settings.
settings, first
Sound settings menu for models with DTS® TruSurround/Studio Sound
Tip:
Some streaming channels assign STAR to a different function, meaning it will
not open the TV settings menu. In these cases, use a different channel, such as The
Roku Channel, to configure DTS
®
Studio Sound. The selected settings remain active
for all streaming channels.
86
Page 100

Sound settings menu– DTS® TruSurround / DTS® Studio Sound
• Sound mode – Select from among various preset sound modes to improve
speech, make music sound its best, boost bass or treble, or simulate a theater.
Use Reset audio settings, described below, to return the input’s current
settings to their original values.
to all TV inputs.
(ARC) HDMI (eARC), or S/PDIF (TOSLINK) connectors.
• DTS TruSurround –Simulates surround sound that otherwise would require
installation of a surround sound audio system. Sometimes, the effect interferes
with dialog clarity. Use the Dialog clarity option to compensate.
• Dialog Clarity – Available only when DTS TruSurround is On. Choose among
Low, Medium, and High settings to improve the clarity of dialog when you are
using the TruSurround feature.
• TruVolume – Minimizes annoying volume fluctuations in programs.
• Dolby AC-4 Dialog Enhancement –
to enhance the dialog in content that supports the AC-4 audio format.
• Reset sound settings – Returns DTS TruSurround, Dialog Clarity, and
TruVolume settings, to their default settings for the selected Sound mode.
It does not affect the sound quality for headphones, HDMI
This setting applies across the entire TV; that is,
Only on select models:
Select On for AC-4
Sound settings – Sonic Emotion™ Premium (select models only)
Sonic Emotion™ Premium is an audio technology that enables your TV to produce a
more immersive sound experience. Each TV input has separate settings for fine tuning
sound quality. All of the settings in this menu apply only to the currently-selected
input. To access the Sonic Emotion™ settings, first press STAR to display the TV
settings menu, then select Sound settings.
87
 Loading...