

Page 1

F1 LCD Monitor/TV
Service
Service
Service
Chassis Name: TPF 1.3U LA
15MF500T/37
15MF605T/17
20MF605T/17
20MF500T/17
Horizontal frequencies
15" 30 - 49kHz
20" 30 - 40KHz
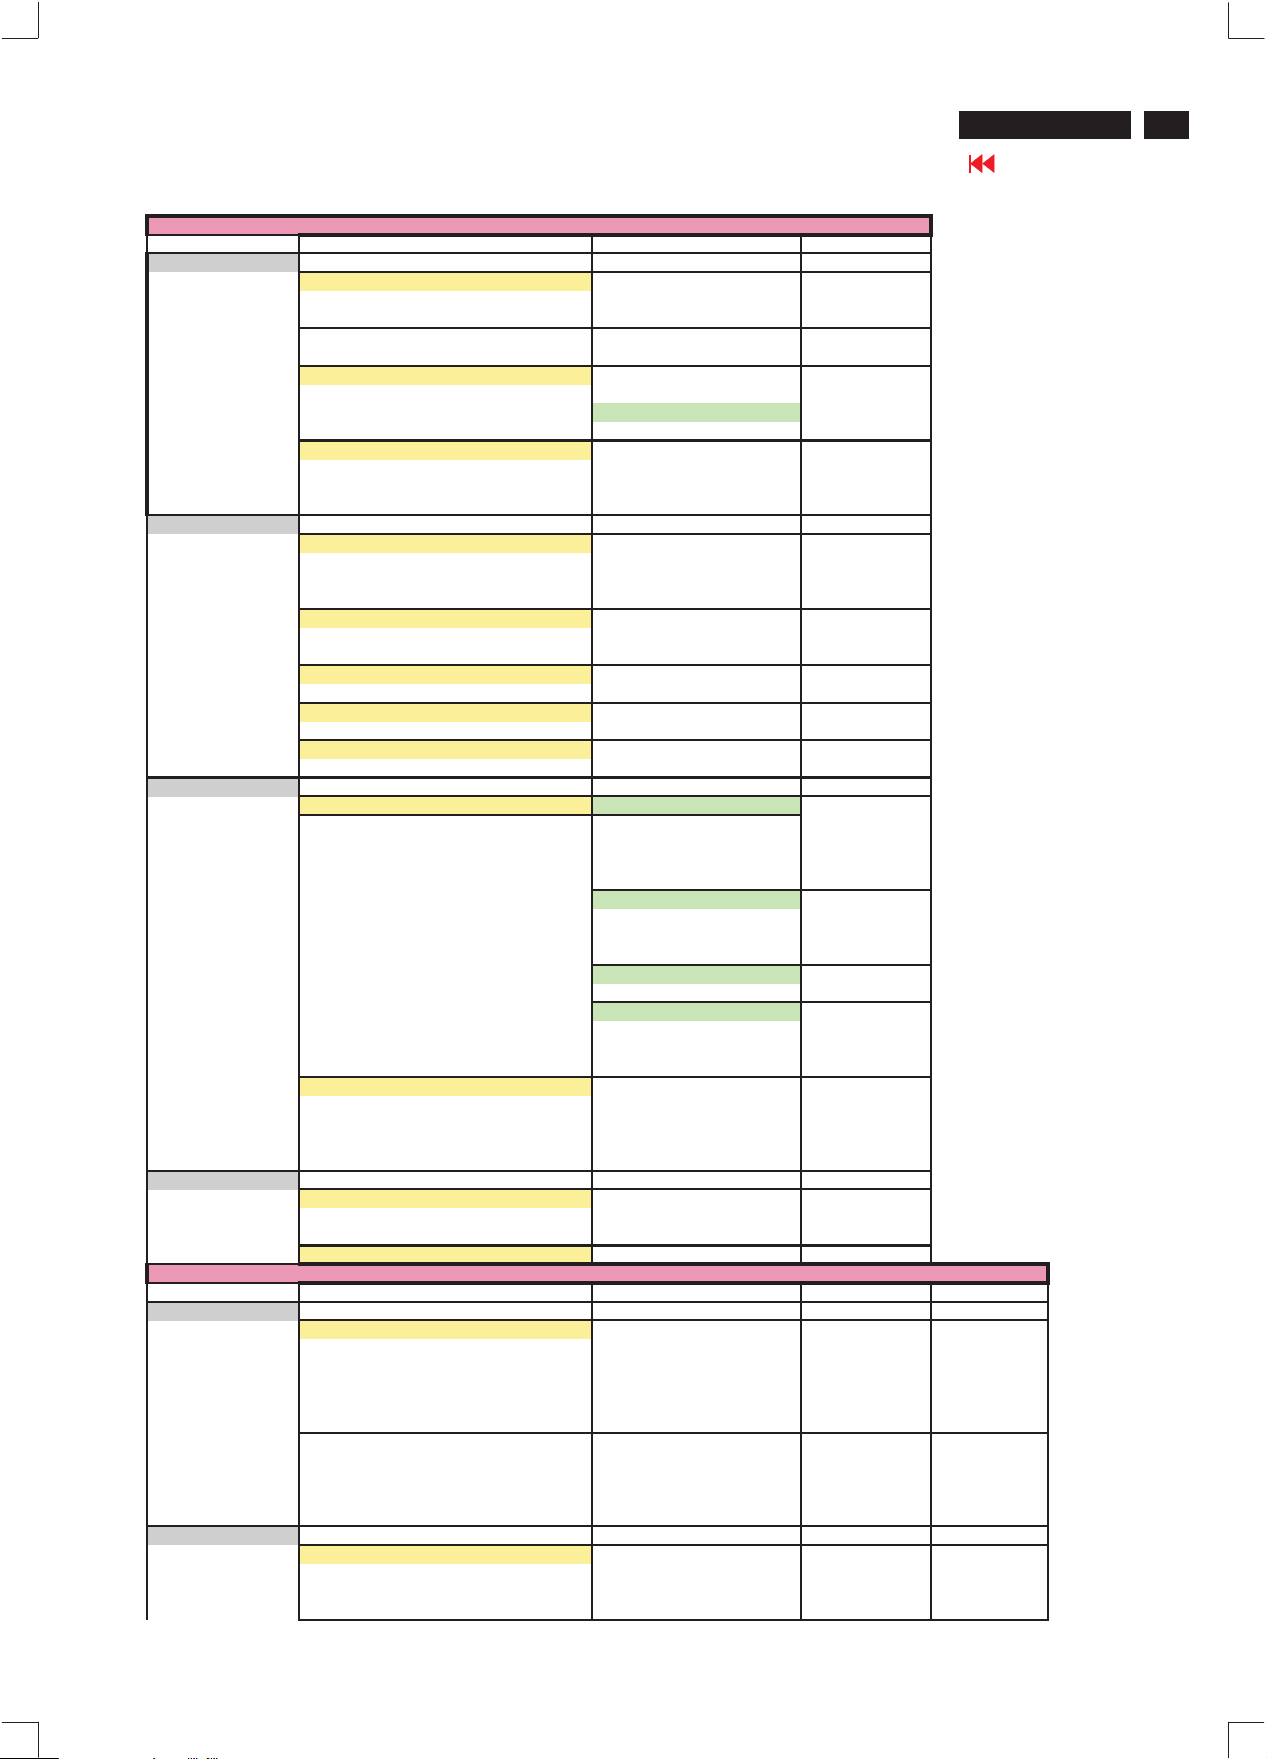
TABLE OF CONTENTS
Description Page
Important Safety Notice------------------------------- 2
Technical Data/Installation------------------------3~8
On-Screen Display/Aging Mode------------------9~11
Warning message/Factory Mode----------------12~13
Trouble shooting--------------------------------------14
Failure Mode Of Panel/Wiring Diagram---------15~16
Mechanical/Electrical Instructions-------------17~22
Display adjustment-------------------------------23~24
DDC DATA/Instructions & Serial NO Definition25~32
ISP Instructions----------------------------------33~34
Block /DC/DC POWER Diagram-----------------35~36
PC-IN/SCART Diagram---------------------------37~38
VIDEO-IN/VIDEO DECODER Diagram----------39~40
SAFETY NOTICE
ANY PERSON ATTEMPTING TO SERVICE THIS CHASSIS MUST FAMILIARIZE HIMSELF WITH THE CHASSIS
AND BE AWARE OF THE NECESSARY SAFETY PRECAUTIONS TO BE USED WHEN SERVICING ELECTRONIC
EQUIPMENT CONTAINING HIGH VOLTAGES.
CAUTION: USE A SEPARATE ISOLATION TRANSFORMER FOR THIS UNIT WHEN SERVICING.
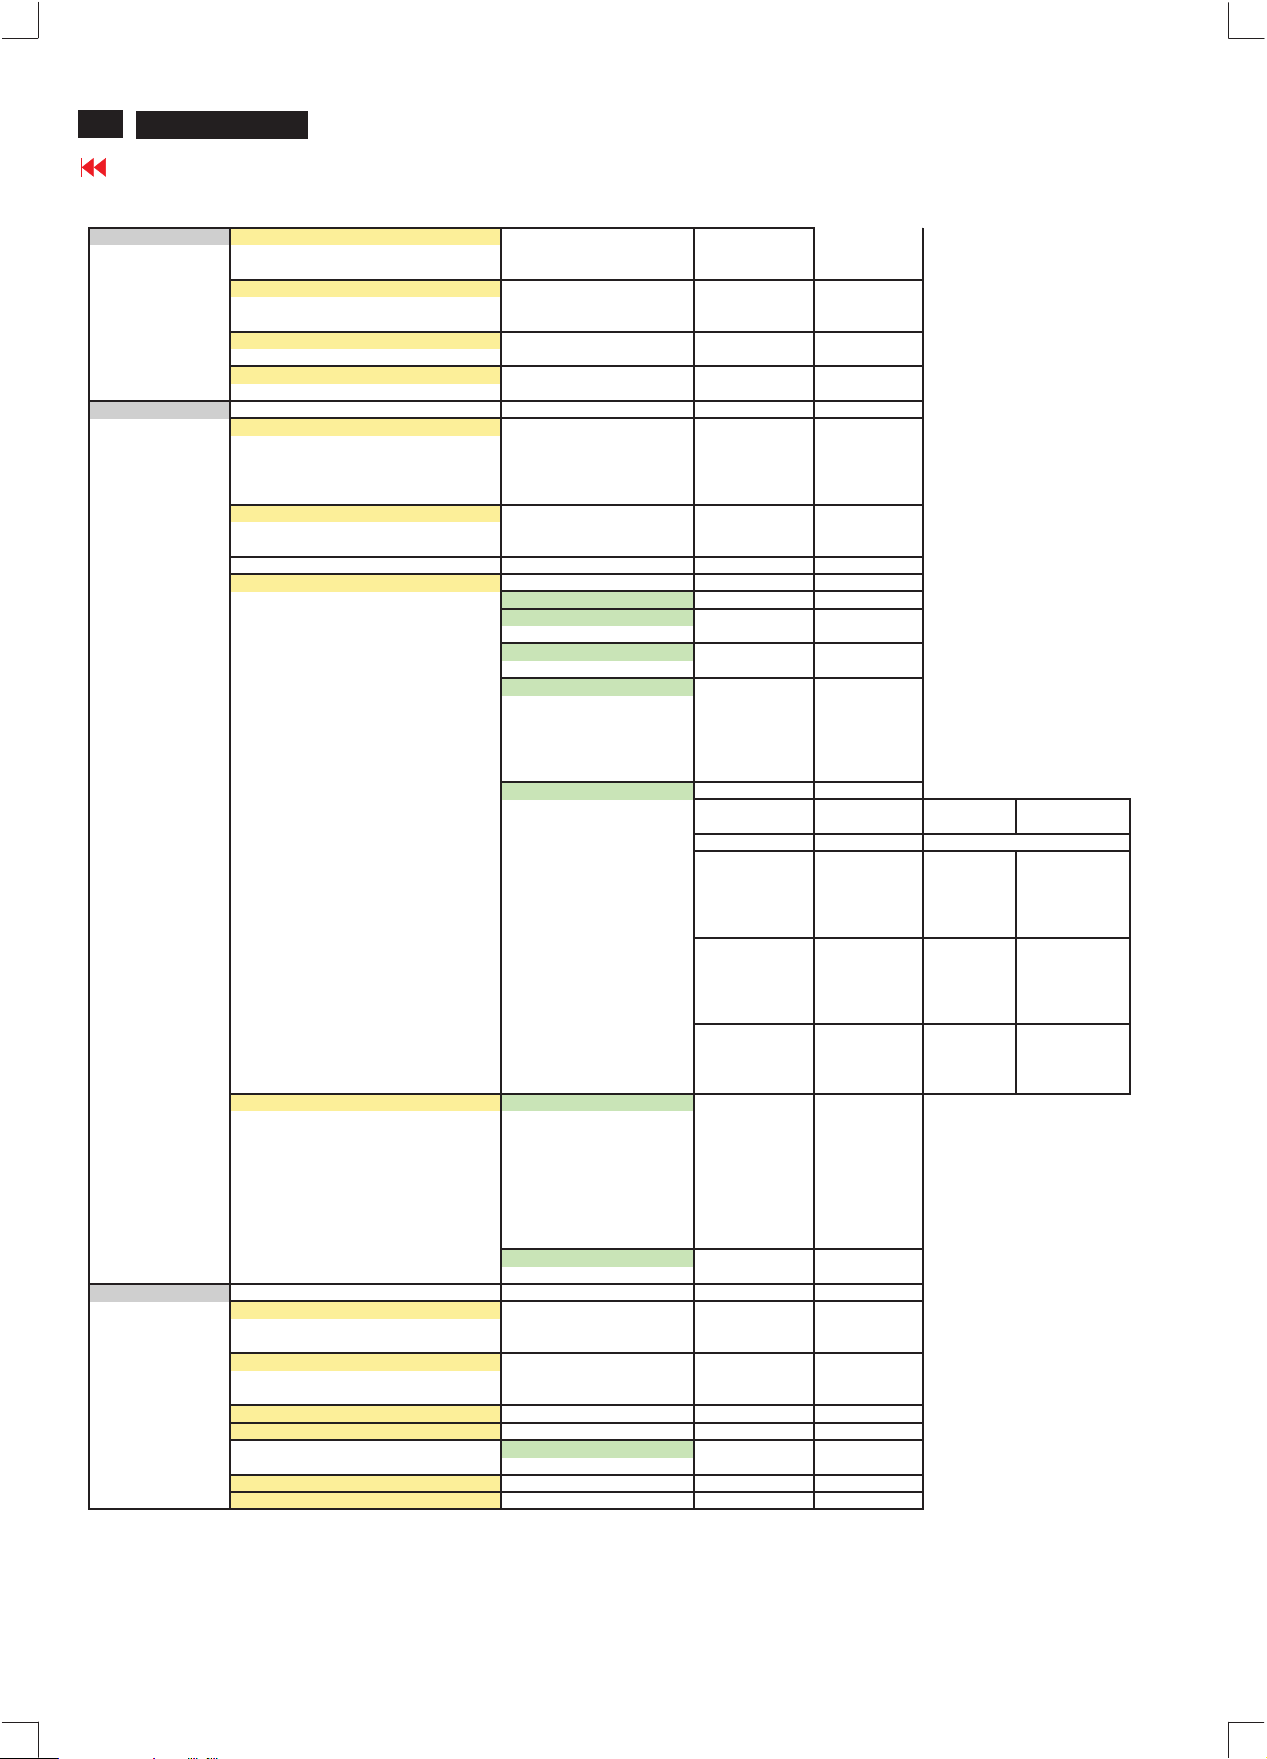
Description Page
T/T DECODER Diagram------------------------------41
MCU/Scaler Diagram----------------------------42~43
SRAM/Panel Interface Diagram----------------44~45
Sound DECODER/Audio Diagram--------------46~47
Scaler Board C.B.A------------------------------48~49
Key And IR Diagram/C.B.A---------------------50~51
YPbPr-IN/Inverter Diagram/C.B.A-------------52~56
Exploded View--------------------------------------- 57
Recommended/Spare/Different parts list----58~62
Repair Tips/Repair Flow Chart-----------------63~66
General product specification------------------67~90
Circuit description-------------------------------90~91
Updated Parts----------------------------------- 92~98
Safety Test Requirements---------------------------99
REFER TO BACK COVER FOR IMPORTANT SAFETY GUIDELINES
F Apr .25 2006
GB
3138 106 10444
Page 2

2
Magnavox LCD TV
Important Safety Notice
Go to cover page
Proper service and repair isimportant to the safe, reliable
operation of all HPConsumer Electronics Company**
Equipment. The service procedures recommended by HP and
described in this service manual are effective methods of
performing service operations. Some ofthese service
operations require the use of tools specially designed for the
purpose. The special tools should be used when and as
recommended.
It is important to note that this manual contains various
CAUTIONS and NOTICES which should be carefully read in
order to minimize the risk of personal injury to service
personnel. The possibility exists that improper service
methods may damage the equipment. It is also important to
understand that these CAUTIONS and NOTICES ARE NOT
EXHAUSTIVE. HP could not possibly know, evaluate and
advise the service trade of all conceivable ways in which
service might be done or of the possible hazardous
consequences of each way. Consequently, HP has not
undertaken any such broad evaluation. Accordingly, a
servicer who uses a service procedure or tool which is not
recommended by HP must first satisfy himself thoroughly that
neither his safety nor the safe operation of the equipment will
be jeopardized by the service method selected.
* * Hereafter throughout this manual, HP Consumer
Electronics Company will bereferred to as HP.
WARNING
Critical components having special safety characteristics are
identified with a bythe Ref. No. inthe parts list and
enclosed within a broken line*
(where several critical components are grouped in one area)
along with the safety symbol on the schematics or
exploded views.
Use of substitute replacement parts which do not have the
same specified safety characteristics may create shock, fire,
or other hazards.
Under no circumstances should the original design be
modified or altered without written permission from Philips.
Philips assumes no liability, express or implied, arising out of
any unauthorized modification of design.
Servicer assumes all liability.
*BrokenLine
FOR PRODUCTS CONTAINING LASER :
DANGER- Invisible laser radiation when open.
AVOID DIRECT EXPOSURE TO BEAM.
CAUTION- Use of controls or adjustments or
performance of procedures other than
those specified herein may result in
hazardous radiation exposure.
CAUTION- The use of optical instruments with this
product will increase eye hazard.
TO ENSURE THE CONTINUED RELIABILITY OF THIS
PRODUCT, USE ONLY ORIGINAL MANUFACTURER'S
REPLACEMENT PARTS, WHICH ARE LISTED WITH THEIR PART
NUMBERS IN THE PARTS LIST SECTION OF THIS
SERVICE MANUAL.
Take care during handling the LCD module with backlight
unit
- Must mount the moduleusing mounting holes arranged infour
corners.
- Do not press onthe panel, edge of theframe strongly or electric
shock as this will result in damage to the screen.
- Do not scratch orpress on the panel withany sharp objects, such
as pencil or pen asthis may result in damage to the panel.
- Protect the module fromthe ESD as it maydamage the electronic
circuit (C-MOS).
- Make certain that treatment person s body are grounded through
wrist band.
- Do not leave themodule in high temperature andin areas of high
humidity for a long time.
- Avoid contact with water as it may ashort circuit within the module.
- If the surface ofpanel become dirty, please wipe it off with a soft
material. (Cleaning with a dirty or rough cloth may damage the
panel.)
Page 3

Technical Data(15MF605T/17)
Magnavox LCD TV
Go to cover page
3
1. General
1.1. Product description
This 15 LCD Monitor/TV is specified as a display peripheral with
analog video signal input and include TV function with 15 TFT
LCD display.
Horizontal scan range is 30
This scan range allows it to display resolution up to1024*768
non-interlaced at60 Hz efresh rate. The image can be adjust through
OSD control, these adjustments can be stored on a board memory
Including 11 factory pre
1.2. Basic data
1.2.1. LCD
1.2.1.1 LPL panel
Type NR. : LC150X02
Display area(mm) : 304.128(H) x 228.096(V) (15.0
Number of Pixels : 1024(H) x 768(V)
Pitch ( mm ) : 0.297(H) x 0.297(V)
Color pixel arrangement : RGB vertical stripes
Displayoperatingmode : Transmissive mode,normally white
Color depth : 16M colors( 6 bitswith FRC)
Brightness (cd/m^2) : 450(cd/m^2)(Cente
Viewing angle
Surface treatment :Hard coating(3H) &Anti-glare (Haze 13%)
Electrical interface : LVDS (1 pixel/clock)
Response Time : 16ms(typ.) (Tr+Tf)
Power Consumption
Contrast ratio : Typical 400 : 1
Module size (mm) : 332.8(W) x 262.8(H) x 18.0(D)
Module weight (g) : 1750
Backlight : 4 CCFL
1.2.1.2.AUO panel
Type NR. : T150XG01
Display area(mm): 304.128
Number of Pixels : 1024(H) x 768(V)
Pitch ( mm ) : 0.297(H) x 0.297(V)
Color pixel arrang
Displayoperatingmode : TN mode, normally white
Color depth : 16M colors( 6 bitswith FRC)
Brightness (cd/m^2) : 450
Viewing angle
Surface treatment :Hard coating(3H) &AG
Electrical interface :1ch LVDS (8bit)
Response Time : 16ms(typ.) (Tr+Tf)
Power Consumption
Contrast ratio : Typical 450 : 1
Module size (mm) : 32 6.5(W) x 253.5(H) x 14.4(D) (typ.)
Module weight (g) : 1350
Backlight : 4 CCFL
1.2.1.3.CPT panel
Type NR. : CLAA150XP03
Display area(mm) :30.4.1(H) x 228.1(V) (15.0-inch diagonal)
Number of Pixels : 1024(H) x 768(V)
Pitch ( mm ) : 0.297(H) x 0.297(V)
Color pixel arra
Displayoperatingmode : Normally white,TN
Color depth : 16.2M colors( 6 bits with FRC)
Brightness (cd/m^2) : 40
Viewing angle
Surface treatment :Anti-glare
Wide viewing angle
technology : Optical Compensation Film
Response Time : 16ms(typ.)
Power Consumption
Contrast ratio : Typical 500 : 1
Module size (mm) : 32 6.5(W) x 253.5(H) x 14.0(D) (typ.)
Module weight (g) : 1300
Backlight : CCFL, 4 tables, edge-light (top/bottom)
1.2.2. Power supply
AC/DC Power adapter: +16V DC/3.75A (100V~240V)
Power consumption: 40 W (typical)
Power cord length and type: 1.8M, USA type
Power indicator : LED (On:Green ,Sleeping mode: Amber )
Auto power saving : EPA
1.2.3. Horizontal scan : 30- 49KHz
1.2.4. Vertical scan : 56 - 62 Hz
(CR>10)
(W) : 16.9
ement : RGB vertical stripes
(CR>10)
(W) :
ngement : RGB vertical stripe
(CR>10)
(W) :
KHz and refresh range is65
49
-
modes.
load
-
-
inch diagonal)
)
@ 6.0mA
r 1 points Typ.
inch diagonal)
: -65 ~ 65 (H), -55 ~ 45 (V)(Typ.)
(typ.)
(H) x 228.
: -70 ~ 70 (H), -60 ~ 60 (V)(Typ.)
22
: -70 ~ 70 (H), -60 ~ 65 (V)(Typ.)
17.1 (typ.)
096(V) (15.0-
nit
(
typ.
(typ.)
@ 6.0mA
(typ.) (center, 6.5mA)
0nit
-
62
)
Hz.
1.2.5. Input signals
1.PC Signal type
Analog Video: 0.7 Vp-p Linear , positive polarity
Sync : TTL level , separate , positive or negative polarity
2.TV signal type
RF signal : Aerial input
Video signal : S-video input
CVBS
YPbPr
3.Audio signal : S-video L/R ,YPbPr L/R audio input
PC line in
1.2.6 Input connectors
(1) Input analog D-sub connector pin assignme
Sync polarity :
-Hori.sync positive/negative
-Vert.sync positive/negative
nt:
Page 4

4
Magnavox LCD TV
Go to cover page
1. General
1.1. Product description
analog video signal input and include TV function with 20 TFT
LCD display. Horizontal scan range is 30-40K Hz and refr esh
rate 56-62Hz.
This scan range allows it to display resolution up to 800*600
non-interlaced at 60 Hz refresh rate. The image can be adjust
through OSD control, these adjustments can be stored on a board
memory including 8 factory pre-load modes.
1.2. Bas ic d ata
1.2.1 LCD panel
1.2.2. Power supply
1.2.3. Horizontal scan : 30 - 40KHz
1.2.4. Vertical scan : 56 - 62 Hz
"
This 20 LCD Monitor/TV is specified as a display peripheral with
Type NR. :A201SN02 (AUO)
Display area(mm) : 408(H) x 306(V) (20.1-inch diagonal)
Display mode : TN type, Normal white + SWV film
Number of Pixels : 800(H) x 600(V)
Pitch ( mm ) : 0.51(H) x 0.51(V)
Color pixel arrangement : RGB vertical stripes
Display mode : normally white TN
Number of color : 16.7M ( 8 bits)
Brightness (cd/m^2) : 450nit(typ.)
Viewing angle : -80
Response time : 16ms typ. (Tr+Tf)
Surface treatment : Hard Coating + AR
Electrical interface : TTL (1 port)
Total module power(W) : 35W(typ.)
Contrast ratio : Typical 500 : 1
Overall dimension (mm) : 448(W) x 347(H) x 23(D)(max.)
Module weight (g) : 3500
Backlight : 6 CCFL
**Income inspection, please refer to panel specification.**
Power consumption : Operating 55 W (typical)
Power cord length : 1.8M
Power cord type : USA type
Power indicator : LED (On: Green ,Sleeping mode: Am ber )
Auto power saving : EPA
~80 (H), -60 ~60 (V)(Typ.)
"
Sync polarity :
-Hori.sync positive/negative
-Vert.sync positive/negative
1.2.5.Input signals
1.PC Signal type
Analog Video: 0.7 Vp-p Linear , positive polarity
Sync : TTL level , separate , positive or negative polarity
2.TV signal type
RF signal : Aerial input
Video signal : S -video input
CVBS
YPbPr
3.Audio signal : S -video L/R ,YPbPr L/R audio input
PC line in
1.2.6 Input connectors
(1) Input analog D-sub connector pin assignment:
Page 5

Installation
Magnavox LCD TV
Go to cover page
5
Before installation
Before proceed to install your newLCDTV
and diagrams as shownto familiarize yourself with the correct and safe
way of unfolding the base.
1.Place the set facing down on a flatsurface and a
2.Unfold the basefollowing the direction as shown on the diagram.
3.Place the setup
INSTALLINGLCD TV ON THE WALL
The stand of your LCD TV is comply with Standard VESA 75 standard,
if you intend to install the LCDTVonthe wall, please consult a
professional technician for proper installing.The manufacture accepts
no liability for installations not performedbyp
right, you LCD TV is now ready for install.
,pleasefollow the steps
protective sheet.
rofessional technician.
Television and remote control
1. Plug the DC adapter into the DC IN 16V jack on the
LCD TV. Plug the power cableinto an outlet.
2. Press POWER to turnonthe LCD TV.
3. Press VOLUME + to increase the sound
press VOLUME
4. Press CH+ or CH-toselect channels.
5. Point theremote control towardonthe
whenoperating theLCD TV with theremote.
Batteryinstallation
6. Remove the battery compartment lid on the back of theremote.
7. Place two AAA batteriesintheremote .
ends of the batteriesline up as mar
battery compartment.
8. Reattach the battery compartment lid.
to lower the sound level.
level. Or,
front of the LCD TV
Be sure the (+) and (
ked inside the
)
-
Page 6

6
Magnavox LCD TV
Go to cover page
Installation
1.Power : Power On/Standby
2.Numerica keys : (0~9) ,Channel setting
3.Mute : Sound mute function
4.Prev-CH : Recall previous CH
5.Menu : Main menu select and OK key
6.VOL- : Left/Volume Down
7.OK : OK
8.Source : Source select for PC,Tuner,CVBS,S-video,HD
9.Closed cap. : Closed caption on/off
10.SAP(2
11.CH- : Down/Channel Down
12.PIP : PIP size select (Small/Medium/Large/PBP)
13.VOL+ : Right/Volume Up
14.CH+ : Up/ Channel Up
15.Display Format : Select display format (4:3, Expand 4:3,
16.Smart Sound : Select sound effect
17.Smart Picture : Select picture effect (Personal/Movie/Sports/
18.Sleep Timer : Sleep timer 15,30,60,120,180,240 OFF
2
nd
audio) : Sound select
Compress 16:9)
(Personal/News/Music/Theatre)
weak signal/multimedia/Night)
1
18
17
ANTENNA CONNECTION
Acombination antenna receives normal broadcast channels
(VHF 2
there is only one 75
your TV, and that
BASIC CABLE TV CONNECTION
Your Cable TV signal into your home may be a single, 75
If so, this connection is very simple. Follow the step below to connect
your Cable TV signal to your new LCD TV.
1.Connect the Cable TV signal to one end of the supplied L-Adapter as
shown, and connect the other end of the adapter to the TV jack on the
LCD TV.
13 and UHF 14 69). Your connection is easy because
(ohm) antenna jack on the back of
s where the antenna goes.
(ohm) cable.
5
13
7
3
16
15
6
4
8
12
11
9
14
10
CABLE BOX CONNECTIONS
If you have a Cable Box, follow either set of these steps to complete
your connections.
Cable Box with RF In/Out Jacks
This connection will not supply Stereo sound to the LCD TV.
1.Connect the Cable TV signal to the IN jack
(or RF IN or CABLE IN) on the Cable Box.
2.Connect an RF coaxial cable (not supplied) to the OUT
jack (or TO TV or RF OUT) of the Cable Box.
3.Connect the other end of the coaxial cable to one end of the supplied
L-Adapter as shown, and connect the other end of the adapter to the TV
jack on the LCD TV.
4.Plug the DC adapter into the DC IN 16V jack on the LCD TV. Plug the
power cable into an outlet.
5.Set the Channel 3/4 (or Output channel) switch of the Cable Box to 3
or 4. Set the TV to the same channel. When watching TV programming,
change channels at the Cable Box, not the LCD TV.
Page 7

Installation
AUDIO/VIDEOINPUT CONNECTIONS
The AUDIO and VIDEO In jacks on the rear of the LCD TV enable
quick connections of other equipment. Connect a VCR, DVD
Player, Video Game, Camcorder,etc., to these jacks. To view the
materialplaying on the other equipment,
Mode.
1. Connect a RCA-style video cable(usually yellowor marked
CVBS) To the VIDEO OUT jacks of the other
Player, Camcorder,etc.) and to the yellow VIDEO jack on the side
of the LCD TV.
2. Connect RCA-style audio cables (usuallyred and white) to the
AUDIO OUT (leftand right) jacks on the other equipment.
the other end of the cables to
LCD TV.
3.Plug the DC Adapter into the DC IN
power cable into an outlet. Turn on the TV and otherequipment.
4.Press the Source button to set the
5.Press PLAY on the other equipment to view its material on the TV.
Magnavox LCD TV
Go to cover page
Set the LCD
equipment (DVD
the AUDIO jack on the side of the
16V jack on the TV. Plug the
TV to AV Mode.
TV to its AV
Connect
7
Cable Box with Audio/Video Out Jacks
Stereo sound to theLCD TV.
Connect the Cable TV signal to the
1.
on theCable Box.
2. Using an RCA-type video cable (not
the Videocable to the Video Out jack of the Cable
other end of the cable tothe yellow VIDEO jack on the side of theTV.
Video cablesare usually marked withyellow and are available from
Magnavox orelectronics retailers. Video jacks on most
are yellow.
3. Using RCA-type, stereo audio cables (not
end of the cablesto the left and right Audio Out jacks of the
Connect the other end of thatcable to the Audio jack on the side of the
LCD TV. Audio cables are usually markedwith red and white and are
available fromMagnavox or electronics retailers
red and the left audio jack is
colors.
4. Plug the DC adapter into the DC IN 16V jack on the LCD
Plug the power cableinto an outlet.
white. Match the cable colors to the jack
This connection will supply
IN jack (or RF IN or CABLE IN)
supplied) connect one end of
Box.
Connect the
pment
equi
supplied), connect one
.The right
Cable Box.
audio jack is
TV.
The S-Video connection on the rear of the
LCD TV can provide you with better LCD
the playbackof accessory sources such as DBS (digital
satellite), DVD (digital video
(videocasse
connections.
Note: The accessory device must have an
in orderfor you to complete the connection
1. Connect an S-Video cable to the S
equipment(DVD Player,Camcorder, etc.) and to the S-VIDEO jack
on the rear of the LCD TV.
2. Connect RCA-style audio cables (usually
red and white) to the AUDIO OUT (left and right) jacks on the other
equipment.Connect the other end of the cables to the
jack on the side of the LCD TV.
3.Plug the DC Adapter into the DC IN 16V
Plug the power cableinto an outlet. Turn on the LCD TV and
other equipment.
4.Press the Source button to setthe LCD TV to its S-VIDEO mode.
5.Press PLAY on the other equipment toview its material on the
LCD TV.
tte recorder) tapes than the normal
discs), video games, and VHS VCR
picture detail and clarity for
broadcast
antenna picture
S-VIDEO OUT (put) jack
on this page.
-
jack of the other
VIDEO
AUDIO
jack on the LCD TV.
Page 8

8
Magnavox LCD TV
Go to cover page
Installation
PC (MONITOR) CONNECTION
This LCD TV can be used as a PC . Your computer will have to be
Equipped with a VGA type video output and VGA cable.
1. Connect one end of the VGA Video cable (not supplied) to the
Monitor(video) output on the computer, while connecting the other ends
to the VGA INPUT jack on the LCD TV.
2. Although audio connections are not required, the LCD TV can
Reproduce the computers audio out by an AUDIO ADAPTER to the
Audio output jack on the computer (if available) while connecting the
other ends of the Audio cables to the PC AUDIO Jacks on the bottom
of the TV.
3.Plug the DC Adapter into the DC IN 16V jack on the LCD TV. Plug the
power cable into an outlet. Turn on the LCD TV and PC.
4.Press the SOURCE button until PC MODE appears on the screen.
COMPONENT (YPBPR) CONNECTIONS
Component Video input provide the highest possible color and picture
resolution in the playback of digital signal source material, such as with
DVD players.
Note: The accessory device must have an component(YPbPr) output
jack in order for you to complete the connection on this page.
1. Connect the component (Y, Pb, Pr) Video OUT jacks from the
DVD player(or similar device) to the COMP(onent) VIDEO Input jacks
on the bottom of the LCD TV.
2.Connect the red and white AUDIO CABLES to the Audio (left ad right)
output jacks on the rear of the accessory device to the AUDIO IN jack.
Connect the other end of the cable to the Audio jack on the rear of
LCD TV.
3. Plug the DC Adapter into the DC IN 16 V jack on the LCD TV.
Plug the power cable into an outlet. Turn on the LCD TV and
other equipment.
4.Press the SOURCE button on the remote control to select HD.
HD will appear in the upper left corner on the TV screen.
5.Insert a DVD disc into the DVD player and press the PLAY button
on the DVD Player.
Page 9
On Screen Display
PC MODE
1st Layer 2nd Layer 3rd Layer
PICTURE
SMART PICTURE NORMAL
WARM
COOL
BRIGHTNESS
CONTRAST
AUTO ADJUST YES
IN PROGRESS
STORE? YES
MANUAL ADJUST PHASE
CLOCK
HORIZONTAL
VERTICAL
AUDIO
SMART SOUND PERSONAL
NEWS
MUSIC
THEATRE
SETTINGS TREBLE
BASS
BALANCE
STEREO STEREO
NO
Magnavox LCD TV
Go to cover page
9
VIRTUAL SURROUND VIRTUAL SURROUND
AVL YES
FEATURES
PIP SIZE OFF
SOURCE PC
INSTALL
LANGUAGE ENGLISH
FACTORY RESET YES?
TV / AV/ S-VIDEO / HDTV MODE
1st Layer 2nd Layer 3rd Layer 4th Layer 5th Layer
PICTURE
SMART PICTURE PERSONAL
BRIGHTNESS
CONTRAST
COLOR
SHARPNESS
TINT
AUDIO
SMART SOUND PERSONAL
OFF
NO
SMALL
MEDIUM
LARGE
PBP
VIDEO TV
AV
S-VIDEO
COMPONENT
AUDIO PC
PIP
DISPLAY ICON1
ICON2
ICON3
ICON4
TV
AV
S-VIDEO
HD
FRANÇ AIS
ESPAÑ OL
MOVIES
SPORTS
WEAK SIGNAL
MULTIMEDIA
NIGHT
NEWS
MUSIC
THEATRE
Page 10
10
Magnavox LCD TV
Go to cover page
On Screen Display
AUDIO SETTINGS TREBLE
STEREO STEREO
VIRTUAL SURROUND VIRTUAL SURROUND
AVL YES
FEATURES
SOURCE PC
PICTURE FORMAT 4:3
PICTURE ALIGNMENT
AUTO LOCK LOCK PROGRAM
CLOSED CAPTION CAPTION MODE CC1
INSTALL
LANGUAGE ENGLISH
TUNER MODE
AUTO PROGRAM START?
CHANNEL EDIT CHANNEL
MANUAL FINE TUNE
FACTORY RESET YES?
BASS
BALANCE
SAP
MONO
OFF
NO
TV
AV
S-VIDEO
HD
EXPAND 4:3
COMPRESS 16:9
CHANGE CODE YES
CLEAR ALL ON
BLOCK OPTION ON
MOVIE RATING G ON/OFF
TV RATING TV Y ON/OFF
CC DISPLAY ON
FRANÇ AIS
ESPAÑ OL
ATENNA
CABLE
AUTO
SKIPPED ACTIVE
OFF
OFF
PG ON/OFF
PG13 ON/OFF
RON/OFF
NC17 ON/OFF
XON/OFF
TV Y7 BLOCK ON/OFF
FV ON/OFF
TV G ON/OFF
TV PG BLOCK ON/OFF
V ON/OFF
S ON/OFF
L ON/OFF
D ON/OFF
TV 14 BLOCK ON/OFF
V ON/OFF
S ON/OFF
L ON/OFF
D ON/OFF
TV MA BLOCK ON/OFF
V ON/OFF
S ON/OFF
L ON/OFF
CC2
CC3
CC4
TXT1
TXT2
TXT3
TXT4
CC MUTE
OFF
SKIPPED
Page 11

Aging Mode
ATTENTION
NO VIDEO INPUT
Access Aging.. Mode
Step 1 :Select the source "PC" and then turnoff LCD-TV, and disconnect
InterfaceCable between Monitor and PC.
Step2:[Push "power " button and then push the "VOL-"and "VOL+"
buttons atthe same timeimmediately and holdit] un
" AGING screen"then releaseall buttons.
Bring up:
AGING...
till comes out
Magnavox LCD TV
Go to cover page
11
After55seconds, bring up:
After5seconds, bring up:
After55seconds, bring up:
AGING...
----------
---------repeatly
Connect Signalcable again=> go back tonormal display
Page 12

12
Magnavox LCD TV
Warning Message
Go to cover page
1.Automatic adjustment (for factory only)
Press Volume+ and Volume- on front key at the same time (PC mode
only). It adjusts PC image to the best and save the screen automatically.
2. OUT OF RANGE
If PC input timing is out of range, it shows OUT OF RANGE warning
message on the center of the screen. The range of horizontal frequency
is between 14 - 63 KHz. The range of vertical frequency is between
45 - 76 Hz. The OSD won t timeout.
3.NO VIDEO INPUT
When PC input timing has either horizontal frequency or vertical
frequency. Or neither has horizontal frequency nor vertical frequency.
It shows on the center of the screen for 30 seconds, then it will enter
sleep mode.
'
""
Page 13

Factory Mode
Access factory. Mode
how to get into factory mode menu
Step 1 :Select the source "PC" and then turn off LCD-TV.
Step2:[Push "power "button and then push the "VOL-"and "VOL+"
buttons at the sametime immediately and hold it] about
then releaseall buttons.
Press "menu"button and bring up factory mode indication asshown in
Fig.1
five seconds
Magnavox LCD TV
Go to cover page
13
MAIN CONTROLS
PICTURE
1024X768@60HZ
SMART PICTURE
AUDIO BRIGHTNESS
FEATURES CONTRAST
INSTALL AUTOADJUST
MANUAL ADJUST
F1/FL1 NAFTA V1.01.05 041208 LG15XGA
Fig.1
UsetheCHNNEL- and CHNNEL+ to select the "F1/FL1 NAFTA V1.01.
05 041208 LG15XGA" and then press the "VOL +" button
MenuItem Description
Scalar Gai n RGB Scalar Gain for Normal/Warm/Coolin PC mode.
Auto-Color
ADC Offset RGB Adjust AD9883 for PC ADC offset.
ADC Gain RGB Adjust AD9883for PC ADC gain.
PC Offset RGB PCanalog scalar offset.
711XSDTV Brightness Adjust SA 7119 SDTV brightness.
Adjustcolor from received signal (either in PCor
HDTV mode).
711XSDTV SAT.
711XSDTV Contrast Adjust SA 7119 SDTV contrast.
711XSDTV TINT Adjust SA 7119 SDTV tint (hue).
TV Shift H V AdjustTVscreen position horizontally/vertically.
HD Shift H V
Show Lock Message ShowOSD lock message.
HDTV ADC Offset RGB Adjust A D9883 for HDTV ADC offset.
HDTV ADC Gain RGB Adjust AD9883 for HDTV ADC gain.
Video Scalar Gain RGB Adjust scalar gain for Video mode.
Scalar Hue Adjust scalar hue.
Adjust SA 7119 SDTV saturation.
Adjust HDTV screen positi on
horizontally/vertically.
Page 14

14
Magnavox LCD TV
Trouble shooting
Go to cover page
No Power
.Check the TV power cord. Disconnect the power cord from the
power outlet for 10 seconds, then reinsert the plug into the outlet.
Press POWER to turn on the TV again.
.Make sure the outlet is not on a wall switch.
.Make sure a fuse has not blown at the power outlet.
No Pi c tur e
.Check the antenna or Cable TV connections. Connect the antenna or
Cable TV signal securely to the TV’s 75ohm jack on the rear of the TV.
.Set TUNER MODE correctly. Details are on page 15.
.Activate AUTO PROGRAM to find all available channels.
In case you hear only sound and don’t see any picture in S-Video or
Video (CVBS) mode. Please check if you have connected Video signal
to S-Video or Video (CVBS) input. Only one of the two video inputs can
be connected to sound. This means that the same sound can be heared
in S-Video and Video (CVBS) mode.
No Sound
.Press the VOL+ and VOL- buttons to adjust the volume.
.Press the MUTE button on the remote control to cancel or restore the
volume.
.If you have connected other equipment to the TV (such as a VCR or
DVD Player), make sure the audio cables are connected securely
between the TV and the other equipment.
.Check the SOUND settings.
.In case you hear wrong sound in S-Video or Video (CVBS) mode.
Please check if you have connected the right sound signal to AV in
(S-Video or Video input). Only one of the two video inputs can be
connected to sound, but both video signals can be connected.
This means that only one of the two sound inputs can be heared in
S-Video and Video (CVBS) mode.
Remote Control does not work.
.Check the batteries. If necessary, replace them with two AAA heavy
duty (zinc chloride) or alkaline batteries.
.Clean the remote control as well as the remote control sensor on the
front of the TV.
.Check the TV power cord. Disconnect the power cord from the power
outlet for 10 seconds, then reinsert the plug into the outlet. Press POWER
to turn on the TV again.
.Make sure the outlet is not on a wall switch.
.Make sure a fuse has not blown at the power outlet.
.Always point the remote control toward the front of the TV (toward the
remote sensor).
.Make sure that you use the supplied Magnavox Remote control, only the
supplied Magnavox Remote control can be used with this LCD-TV set.
TV displays wrong channel or no channels.
.Repeat channel selection.
.Add the channel number(s) into the TV’s memory. Use STORE.
.Make sure TUNER MODE is set correctly.
Then activate AUTO PROGRAM to set up all available channels.
Page 15

Failure Mode Of Panel
Quick reference for failure mode of LCD panel
this page presents problems that could be made by LCD panel.
It is not necessary to repair circuit board. Simply follow the mechanical
instruction on this manual to eliminate failure by replace LCD panel.
Polarizer has bubbles
Magnavox LCD TV
Go to cover page
15
Failure description
Vertical block defect
Vertical dim lines
Vertical lines defect
(Always bright or dark)
Horizontal block defect
Phenomenon
Polarizer has bubbles
Foreign material inside
polarizer. It shows liner or
dot shape.
Concentric circle formed
Horizontal dim lines
Horizontal lines defect
(Always bright or dark)
Has bright or dark pixel
Bottom back light of LCD is
brighter than normal
Back light un-uniformity
Backlight has foreign material.
Black or white color, liner or
circular type
Page 16

16
Magnavox LCD TV
Go to cover page
Wiring diagram
Page 17
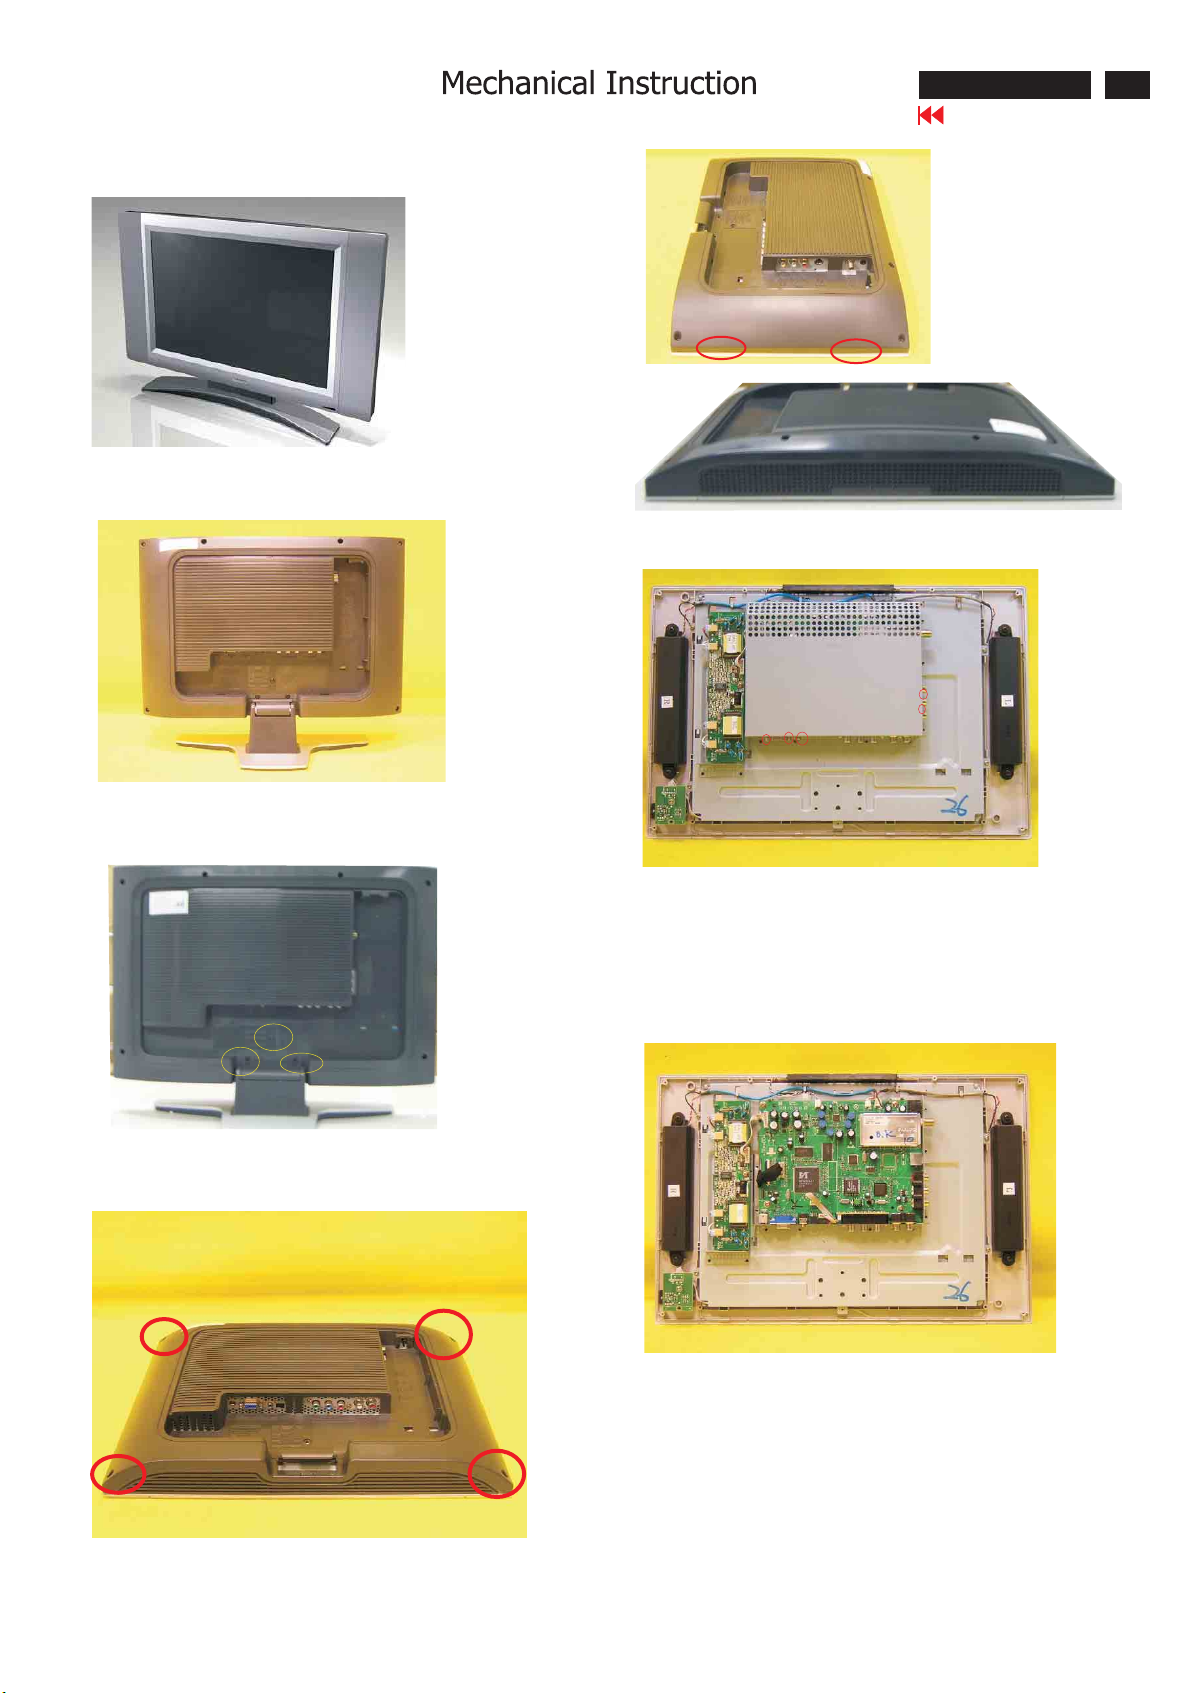
Front view
Back view, removethecover asFig.2
Fig.1
Fig.2
Magnavox LCD TV
Go to cover page
Fig.5
Fig.6
17
Removethebase:
unscrew the screws asFig.3
Removetheback cover,
unscrew the screws asFig.4 andtheopen the
clicks andthen removetheback cover asFig.5 Fig.6 Fig.7
Fig.3
Fig.7
RemovetheMatel frame board
- Removethefive screws
- Removethematel frame board asshown in Fig.8
Fig.8
Fig.4
Removetheinverter board ,YPbPr-inandscaler board
unscrew the screws anddisconnect the connector asshown in Fig.9
Page 18
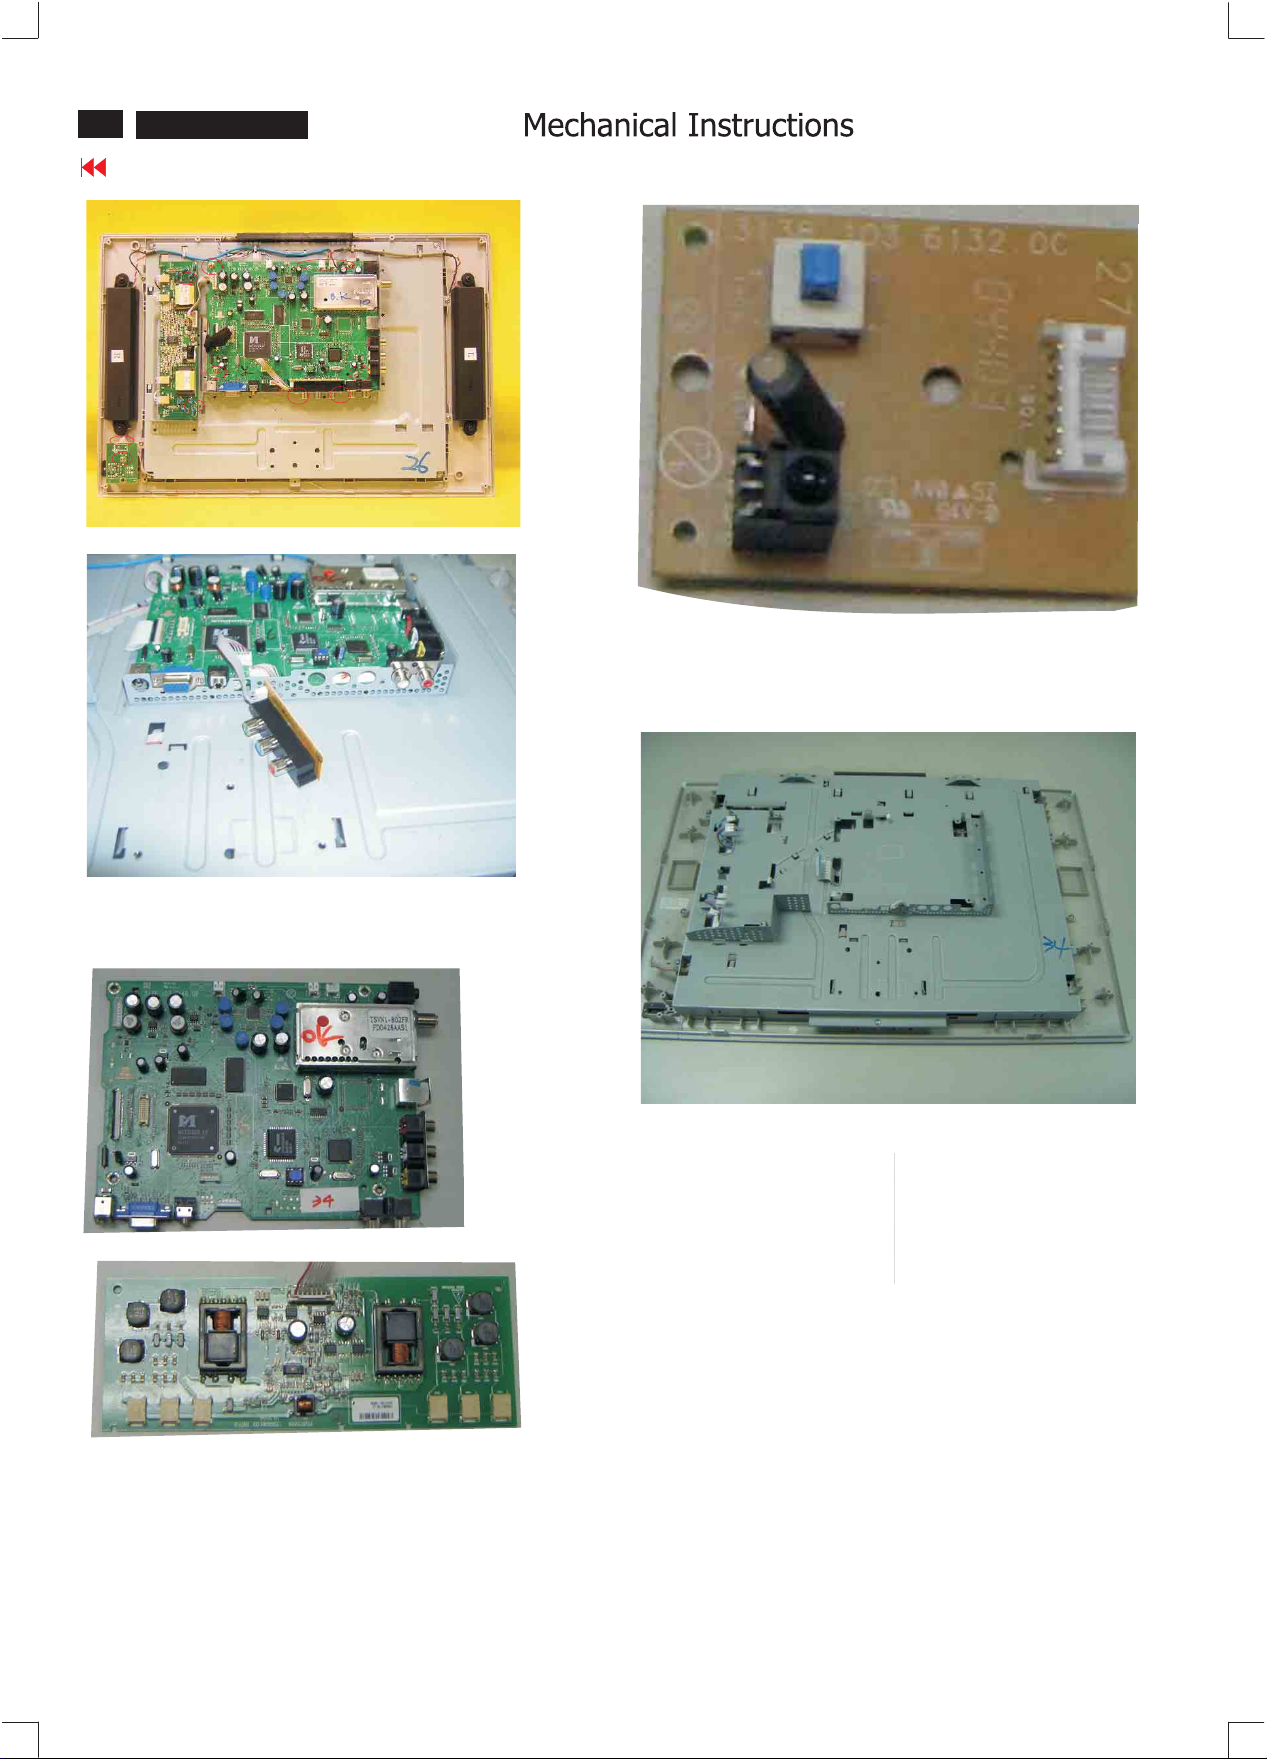
18
Magnavox LCD TV
Go to cover page
Fig.9
Fig.10
Fig.11
Fig.13
Fig.14
Fig.12
Page 19
Electrical instruction(15MF607T/17)
1.General points
1.1 During the test and measuring, supply a distortion free AC mains
Voltage to the apparatus via an isolated transformer with low
Internal resistance.
1.2 All measurements mentioned hereafter are carried out at a normal
mains voltage (90 - 132 VAC for USA version, 195 -264 VAC for
EUROPEAN version, or 90 - 264 VAC for the model with full range
power supply, unless otherwise stated.)
1.3 All voltages are to be measurement or applied with respect to
ground, unless otherwise stated.
1.4 The test has to be done on a complete set including LCD panel in a
room with temperature of 25 +/- 5 degree C.
1.5 All values mentioned in these test instruction are only applicable of
a Well aligned apparatus, with correct signal.
1.6 The letters symbols (B) and (S) placed behind the test instruction
Denotes (B): carried out 100% inspection at assembly line
1.7 The white balance (color temperature), has to be tested in subdued
Lighted room.
1.8 Repetitive power on/off cycle are allowed except it should be
avoided within 6 sec.
2. Input signal
2.1.1 PC Signal type
Analog Video : 0.7 Vp-p linear, positive polarity
Separate Sync. : TTL level, separate, positive or negative polarity
Audio signal : Mini-jack audio input
Input level: 500 mVrms ((Speaker outpout 3W when Input level
Signal source: pattern generator format as attachment
(table 1 to 11) Reference generator : CHROMA 2200 or 2250
2.1.2 TV Signal type
RF Signal : Aerial input, NTSC cable and antenna system.
Video signal : Cinch input, CVBS with NTSC and PAL system.
Component input: Cinch G/B/R-> YPbPr cinch input.
Audio signal : Side cinch R/L for CVBS and S-video
Input level: 500 mVrms ((Speaker outpout 3W when Input level
2.2 PC Input signal mode
PRE-LOAD VIDEO RESOLUTION
Mode 3, 6, 7, 10 are preset modes that should pass QA inspection.
Mode 1, 2, 4, 5, 8, 9, 11 will run auto adjustment only, and W/O QA
checking.
Dot rate (MHz) H.freq
1 25.175 31.469 IBM VGA 640 * 350 70.087
2 28.322 31.469 IBM VGA 720 * 400 70.087
3 25.175 31.469 IBM VGA 640 * 480 59.940
4 30.240 35.000 MACINTOSH 640 * 480 66.667
5 31.500 37.500 VESA 640 * 480 75.000
6 36.000 35.156 VESA 800 * 600 56.250
7 40.000 37.879 VESA 800 * 600 60.317
8 49.500 46.875 VESA 800 * 600 75.000
9 57.300 49.700 MACINTOSH 832 * 624 75.000
10 65.000 48.363 VESA 1024 * 768 60.004
11 78.750 60.023 VESA 1024 * 768 75.029
(S): carried out test by sampling
> 630mVrms and Volume control at 100%))
Level: 1.0Vp-p (0.7V video + 0.3V sync.)
S video input: Y/C signal, NTSC and PAL system.
Level: Y: 1.0Vp-p (0.7V video + 0.3V sync.)
C: +/- 0.3V.
Level: Y: 1.0Vp-p Pb/Pr: +/- 0.35V
Bottom cinch R/L for component input.
> 630mVrms and Volume control at 100%))
Mode Resolution V.freq (Hz)
Magnavox LCD TV
Go to cover page
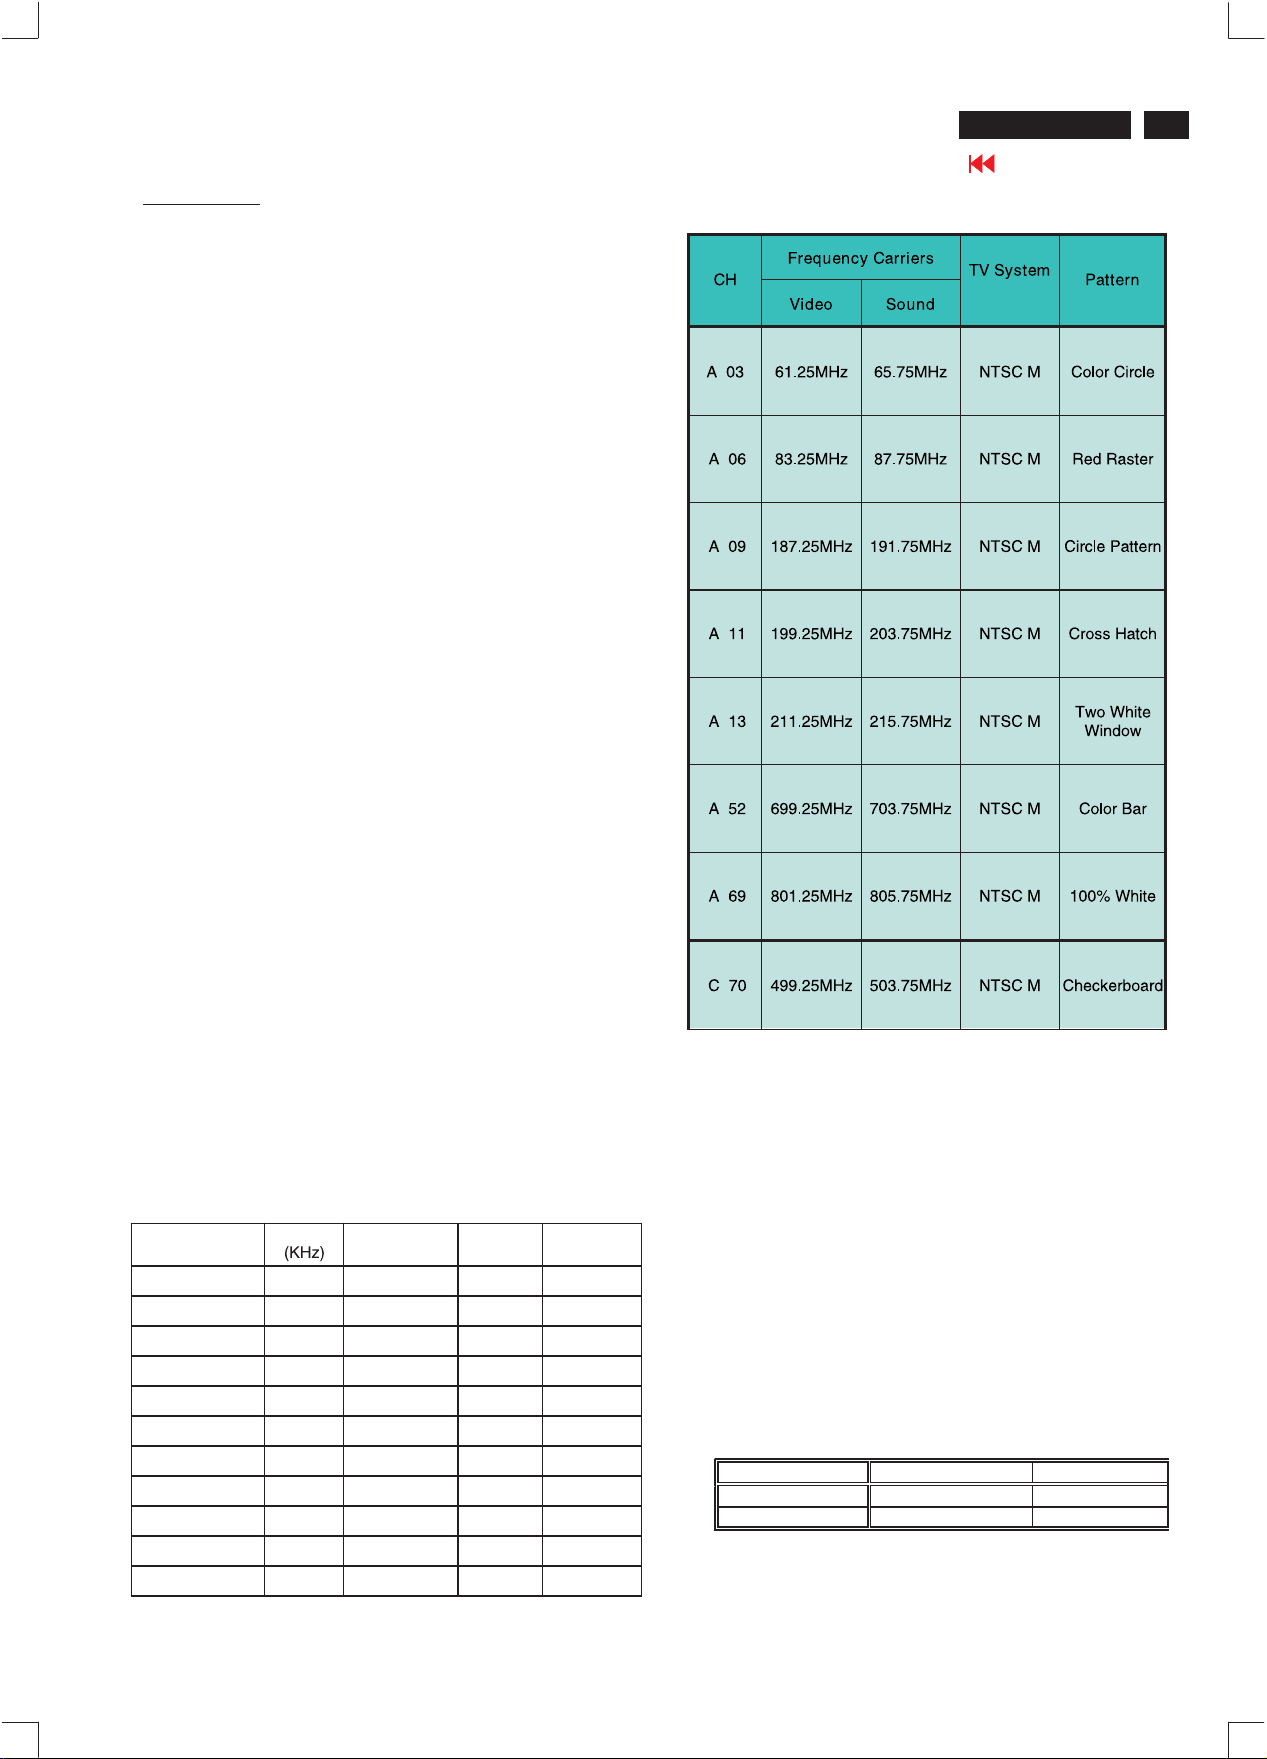
2.3 TV input signal Channel and pattern for Nafta model (Table1)
Signal Distribution Table ( NTSC)
Table 1
3. TV mode display adjust ment
3.1 White balance adjustment (B)
General set-up :
Equipment Requirements: Color analyzer.
Input requirements:
Input Signal Type : CVBS-NTSC signal.
Frequency = 187.25 MHz (CH. 9).
Alignment method:
Initial Set-up :
Set TV (7119) Brightness=124; Contrast=64, Saturate= 70 in
Factory mode (can be fine tuned)
Set Smart picture as Personal (Brightness=50, Color=50,
Contrast=50)
""
Apply 100% Full White/100IRE pattern by TV pattern generator.
Alignment : Adjust the VIDEO SCALER GAIN R G B in Factory
Mode
NORMAL . (See Fig 1.)
[ Enter factory menu : press Volume - and Volume + keys together
around six seconds]
The 1931 CIE chromaticity (X, Y) co-ordinates shall be:
Picture Mode X y
Normal (Original)
""
0.289 ± 0.005 0.304 ± 0.005
Table3.1: Readings with Minolta CA-110.
19
Page 20
20
Magnavox LCD TV
Go to cover page
Electrical instruction
FACTORY ADJUST MENU
NORMAL
SCALER GAIN R G B
AUTO-COLOR (OK)
ADC OFFSET R G B
ADC GAIN R G B
PC OFFSET R G B
7119 SDTV SAT TINT
TV SHIFT H V
HD SHIFT H V
SHOW LOCK MESSAGE
HDTV ADC OFFSET R G B
HDTV ADC GAIN R G B
VIDEO SCALER GAIN R G B
SCALER HUE
EXIT Value
Fig.1
4. PC mode display adjustment
4.1Display quality adjustment
Use timing mode as de
off) patternto adjust the clock until no stripe and adjust the phase until
clear picture.(AUTO ADJUST hot key:press Volume- and Volume+
keys togetherfor 1 second.)
4.2 WHITE-D adjustment (B)
4.2.1 At factory mode apply1024X768/60Hzmode with 64 gray pattern.
Set main controls Brightness at 50% and Contrast to 50%.
Select AUTO-COLORfunction forADC OFFSETand ADC GAINsetup.
4.2.2 Set smart picture as NORMAL
Set SCALER GAIN R G B
done).
The 1931 CIE chromaticity (X, Y) co-ordinates shall be:
s
cribe in 2.2, and use the POPO (pixel on pixel
Check all preset 4 modes.
""
= VIDEO SCALER GAIN R G B (alignment
(Or FLUKE 54200, apply576i, DIGITAL SCAN/DIGI_ADC1 pattern.)
Alignment method:
Initial Set-up : SetSmart picture as Personal, Brightness=50,
Color=50, Contrast=50)Set AUTO-COLOR process.
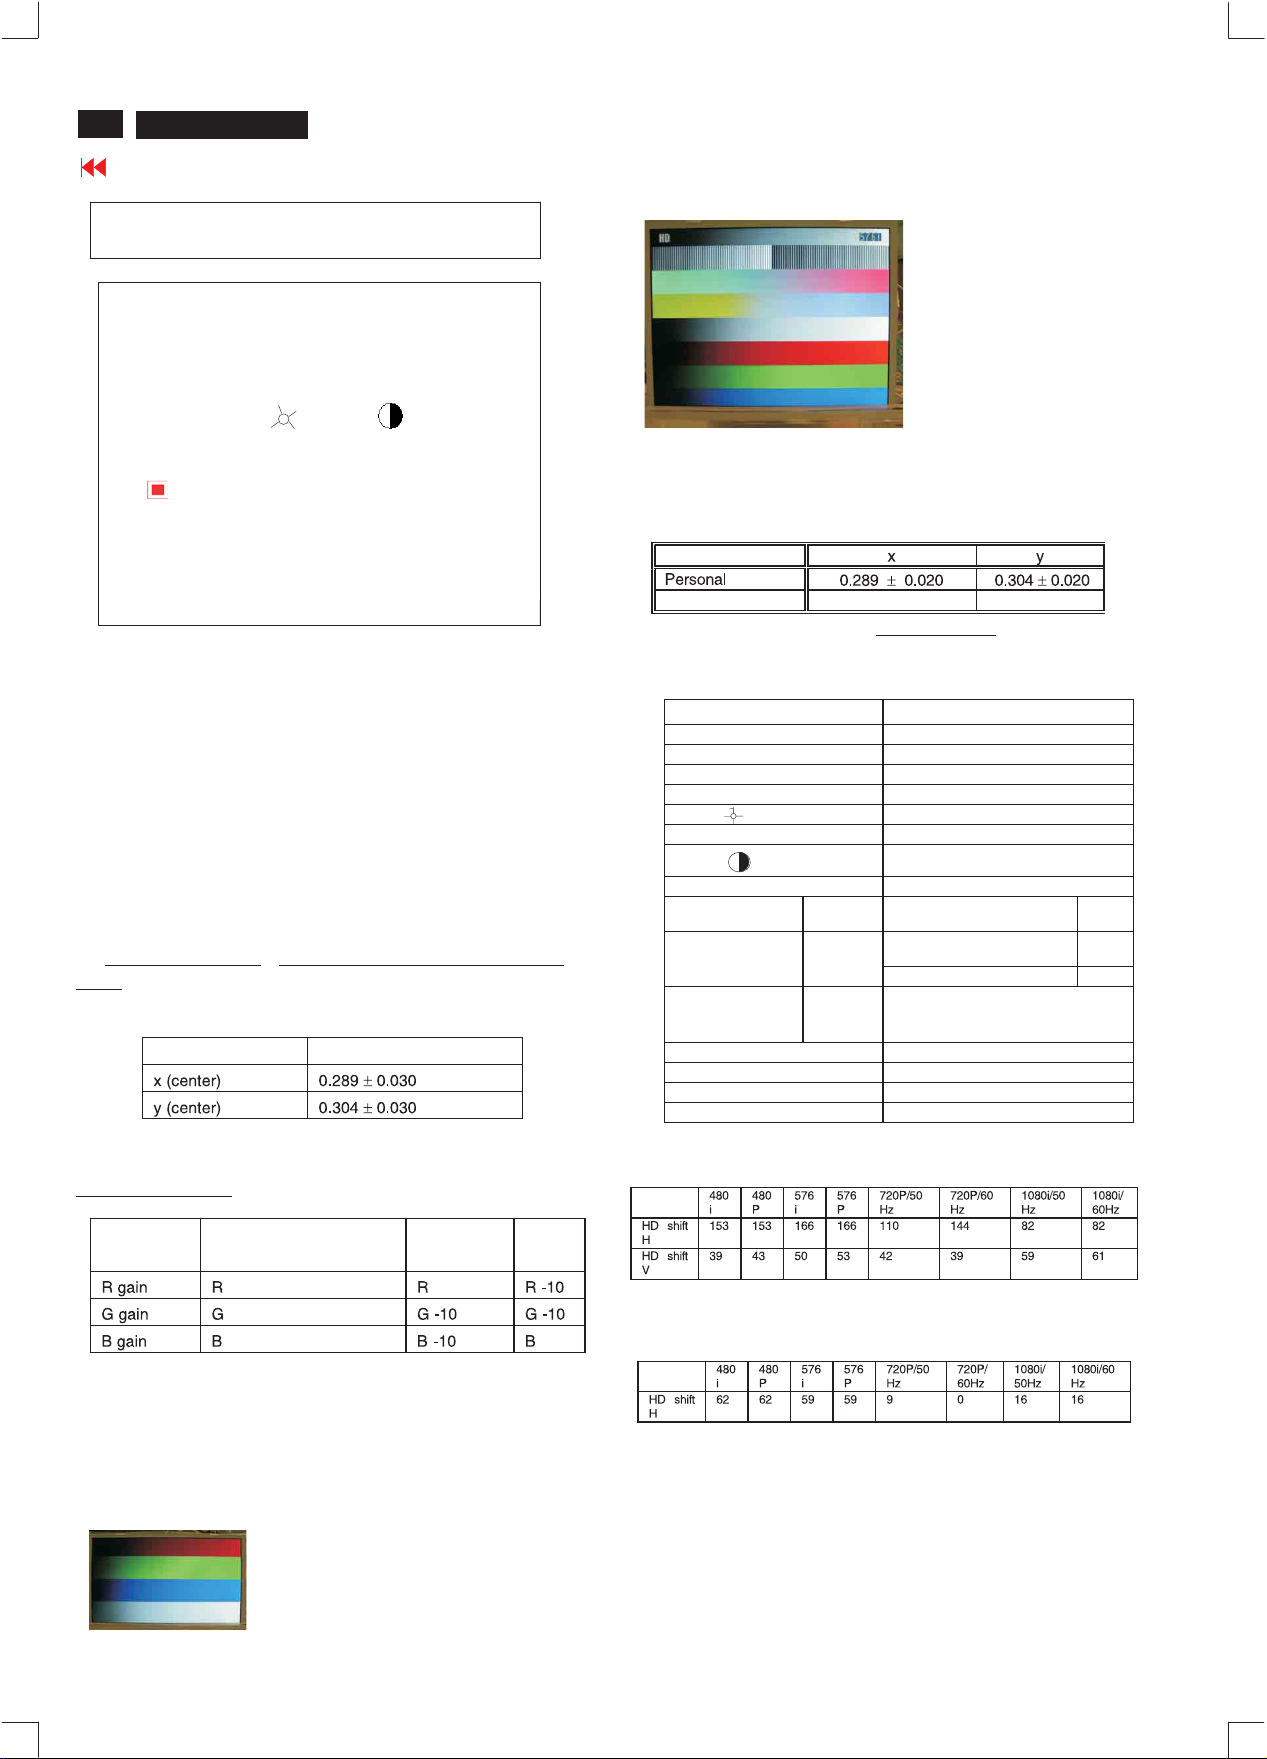
Alignments :Check chromaticity (X, Y) co-ordinates specification:
Picture Mode
If out of specification,fine-tune HDTV ADC Gain
6. Preset EEPROM data
6.1 EEPROM data has to be preset data according following table.
Factory mode preset.
Function
SCALER GAIN
ADC Offset R/G/B
ADC Gain R/G/B
PC OFFset R/G/B
7119 ? brightness
7119 Saturation
7119 contrast
7119 TINT
TV shift H
TV shift V
HD SHIFT H
HD SHIFT V
Regular
124 (TV,AV,S-video,HD)
64 (TV,AV,S-video,HD)
70 (TV,AV,S-video,HD)
24 (TV,AV,S-video,HD)
in factory mode.
Preset value
127 127 127
127 127 127
127 127 127
127 127 127
NTSC PAL
170 181
20 22
See below.
Normal/ (8500°K)
4.2.3 Set Smart picture asWARM , and COOL The
SCALER GAIN RG B
.
4.3 Check the analog interface cable
Check the color poor & noise condition of
5. HDTV mode display adjust ment
5.1 White balance adjustment (B)
General set-up:
Equipment : Quantum Data Pattern Generator 801GD or 802G.
Readings with Minolta CA-
=
Normal/ the R’\G’\B’ are
gain after alignment.
'
'
'
64 gray pattern.
Apply 1080i, RGBWgray pattern.
110 .
WARM COOL
'
'
'
'
'
'
HD ADC OFFset R G B
HD ADC GAIN R G B
Video Scaler Gain
Scaler Hue
Factory mode:
In user Picture alignment
127 127 127
127 127 127
127 127 127
50
Page 21

Electrical instruction
Magnavox LCD TV
Go to cover page
21
6.2 Smart picture &Smart sound:
6.2.1 Final TV mode out box setting.
Smart Picture : Sport
Smart Picture
Smart sound
TIMING FOR F1 15" TFT XGA COLOR LCD MONITOR
(VESA monitor timing standard Version 1.0 Release 0.7)
REFERENCE PATTERN GENERATOR : CHROMA 2200 or2250
TABLE 1: 31.469 KHz/70.087Hz, 640 X 350, pixel=25.175 MHz
Horizontal
Frame border=0 Frame border=0
Total size =31.778 ms Total size =14.268 ms
Display size=25.422 ms Display size=11.122 ms
Rear porch= 1.907 ms Rear porch= 1.907 ms
Sync width= 3.813 ms Sync width= 0.064 ms
Sync polarity=+ Sync polarity= -
TABLE 2: 31.469 KHz/70.087Hz, 7 20 X 400, pixel=28.322 MHz
Horizontal
Vertical
Vertical
Smart Sound : Personal
SOUND VOLUME : 15
BASE : 50
TREBLE : 50
Balance : 0
Virtuel SURROUND: OFF
AVL : NO
Frame border=0 Frame border= 0
Total size =31.778 ms Total size =14.268 ms
Display size=25.422 ms Display size=12.711 ms
Rear porch= 1.907 ms Rear porch= 1.112 ms
Sync width= 3.813 ms Sync width= 0.064 ms
Sync polarity=- Sync polarity=+
TABLE 3: 31.469 KHz/59.940Hz, 640 X 480, pixel=25.175 MHz
Horizontal
Frame border=0 Frame border=0
Total size =31.778 ms Total size =16.683 ms
Display size=25.422 ms Display size=15.253 ms
Rear porch= 1.907 ms Rear porch= 1.049 ms
Sync width= 3.813 ms Sync width= 0.064 ms
Sync polarity=- Sync polarity=-
TABLE 4: 35.000 KHz/66..667Hz, 640 X 480, pixel=30.240 MHz
Horizontal
Frame border=0 Frame border=0
Total size =28.571 ms Total size =15.000 ms
Display size=21.164 ms Display size=13.714 ms
Rear porch= 3.175 ms Rear porch= 1.114 ms
Sync width= 2.116 ms Sync width= 0.086 ms
Sync polarity=- Sync polarity=-
Vertical
Vertical
Page 22
22
Magnavox LCD TV
Go to cover page
Electrical instruction
TABLE 5: 37.500 KHz/75.000Hz, 640 X 480, pixel=31.500 MHz
Horizontal
Frame border=0 Frame border=0
Total size=26.667 ms Total size=13.333 ms
Display size=20.317ms Display size=12.800 ms
Rear porch= 3.810ms Rear porch= 0.427 ms
Sync width= 2.032 ms Sync width= 0.080 ms
Sync polarity=- Sync polarity=-
TABLE 6: 35.156 KHz/56.250Hz, 800 X 600, pixel=36.000 MHz
Horizontal
Frame border=0 Frame border=0
Total size=28.444 ms Total size=17.778 ms
Display size=22.222ms Display size=17.067 ms
Rear porch= 3.556ms Rear porch= 0.626 ms
Sync width= 2.000ms Sync width= 0.057 ms
Sync polarity=+ Sync polarity=+
TABLE 7: 37.879 KHz/60.317Hz, 800 X 600, pixel=40.000 MHz
Horizontal
Frame border=0 Frame border=0
Total size=26.400 ms Total size=16.579 ms
Display size=20.000ms Display size=15.840 ms
Rear porch= 2.200ms Rear porch= 0.607 ms
Sync width= 3.200ms Sync width= 0.106 ms
Sync polarity=+ Sync polarity=+
Vertical
Vertical
Vertical
TABLE 10: 48.363 KHz/60.004Hz, 1024 X 768, pixel=65.000 MHz
Horizontal
Frame border=0 Frame border=0
Total size=20.677 ms Total size=16.666 ms
Display size=15.754ms Display size=15.880 ms
Rear porch= 2.462ms Rear porch= 0.600 ms
Sync width= 2.092ms Sync width= 0.124 ms
Sync polarity=- Sync polarity=-
TABLE 11: 60.023 KHz/75.029Hz, 1024 X 768, pixel=78.750 MHz
Horizontal
Frame border=0 Frame border=0
Total size=16.660 ms Total size=13.328 ms
Display size=13.003ms Display size=12.795 ms
Rear porch= 2.235ms Rear porch= 0.466 ms
Sync width= 1.219ms Sync width= 0.050 ms
Sync polarity=+ Sync polarity=+
Vertical
Vertical
TABLE 8: 46.875 KHz/75.000Hz, 800 X 600, pixel=49.500 MHz
Horizontal
Frame border=0 Frame border=0
Total size=21.333 ms Total size=13.333 ms
Display size=16.162ms Display size=12.800 ms
Rear porch= 3.232ms Rear porch= 0.448 ms
Sync width= 1.616ms Sync width= 0.064 ms
Sync polarity=+ Sync polarity=+
TABLE 9: 49.722 KHz/74.546Hz, 832 X 624, pixel=57.280 MHz
Horizontal
Frame border=0 Frame border=0
Total size=20.110 ms Total size=13.410 ms
Display size=14.520ms Display size=12.550 ms
Rear porch= 3.910ms Rear porch= 0.784 ms
Sync width= 1.117ms Sync width= 0.060 ms
Sync polarity=+ Sync polarity=+
Vertical
Vertical
Page 23

Display adjustment
Display adjustment
Access factory.Mode
how toget intofactorymode menu
Step 1:Selectthesource "PC" and then turn off LCD-TV.
Step 2 :[Push"power"button and then push the "VOL- " and "VOL+"
buttons at the same time immediately and hold it] about fiveseconds
then release all buttons.
Magnavox LCD TV
Go to cover page
23
Fig.3
Press "menu"button and br
Fig.1
MAIN CONTROLS
PICTURE
ing up factorymode indicationasshownin
1024X768@60HZ
SMART PICTURE
AUDIO BRIGHTNESS
FEATURES CONTRAST
INSTALL AUTO ADJUST
MANUAL ADJUST
F1/FL1 NAFTA V1.01.05 041208 LG15XGA
Fig. 1
Use the CHNNEL- and CHNNEL+ to selectthe "F1/FL1 NAFTA V1.01.
05 041208 LG15XGA" and then press the "VOL +" button
2.Apply a 1024x768/60Hzsignal withwhite pattern.Set
brightness controlat50% and contrast controlat50%.Adjust the
R.G.B gain toreach special color temperature on centerof
screen.
2.1 Aim theprobe CA-A30 at the centerofscreen as Fig. 4
2.2 Removethe lens protecti
2.3 Set Measuring/viewing selector toMeasuring position for reset
analyzer. (Zero calibration) as Fig. 5
2.4 Turn onthe colour analyzer (CA-110).
2.5 Press 0-CAL buttonto start reset analyzer. S ee Fig. 6
ve coverofprobe CA-A30.
Measurement viewing selector
Fig.4
Cover (black)
Fig.5
Fig.2
PC mode WHITE-D adjustment (B)
1Apply 1024X768/60Hzmode with5block patternasFig 3.Set
main controls brightness controlat50% and contrast to50% on
User mode.Set color setting at natural color on User mode.Move
cursor to "AUTO-color" item on factorymode, p
to activethis function, then scalerwill adjust RGB and Color
RGB automatically byitself.
ress "menu" key
O-CAL
Fig.6
2.6 Switch lightprobetoViewing position.
2.7 Movethe Lens barrel forward or backwardtoget clear imageas
showninFig. 7
2.8 Switch lightprobetoMeasuring position.Itshould beable to
indicate colourvalue onthe CA-110.
Clear image
Measurement/viewing selector
Fig.7
Page 24

24
Magnavox LCD TV
Go to cover page
Display Adjustment
2.9 Set smart picture as NORMAL
Set SCALER GAIN R G B
The 1931 CIE chromaticity (X, Y) co-ordinates shall be:
x (center) 0.289 ± 0.030
y (center) 0.304 ± 0.030
Readings with Minolta CA-110.
2.10 Set Smart picture as WARM , and COOL The SCALER GAIN R G B
.
Rgain R R R-10
G gain G G -10 G -10
B gain B B -10 B
"
= VIDEO SCALER GAIN R G B(alignment done).
Nor mal/ (8500°K)
"
Nor mal/ the R \G \B are
gain after alignment.
'
'
'
"
"
"
'
"
'
'
WARM COOL
'
'
'
=
'
'
'
Page 25

LPL panel:
**********************************************************************
EDID log file
**********************************************************************
Vendor/Product Identification
ID Manufacturer Name : PHL
ID Product Code : 4650 (HEX.)
ID Serial Number : 1010101 (HEX.)
Week of Manufacture : 0
Year of Manufacture : 2004
EDID Version, Revision
Version : 1
Revision : 3
Basic Display Parameters/Features
Video Input Definition : Analog Video Input
0.700V/0.300V (1.00Vpp)
without Blank-to-Black Setup
Separate Sync
without Composite Sync
without Sync on Green
no Serration required
Maximum H Image Size : 30
Maximum V Image Size : 23
Display Transfer Characteristic : 2.2
(gamma)
Feature Support (DPMS) : Standby
Suspend
Active Off
Display Type : RGB color display
Standard Default Color Space : Primary color space
Preferred Timing Mode : Detailed timing block 1
DDC DATA
Monitor Descriptor #4
Extension Flag : 0
Check sum : F8 (HEX.)
**********************************************************************
EDID data (128 bytes)
**********************************************************************
0: 00 1: ff 2: ff 3: ff 4: ff 5: ff 6: ff 7: 00
8: 41 9: 0c 10: 50 11: 46 12: 01 13: 01 14: 01 15: 01
16: 00 17: 0e 18: 01 19: 03 20: 08 21: 1e 22: 17 23: 78
24: ee 25: b4 26: 43 27: 9e 28: 57 29: 4c 30: 94 31: 26
32: 15 33: 4a 34: 4d 35: 23 36: 08 37: 00 38: 01 39: 01
40: 01 41: 01 42: 01 43: 01 44: 01 45: 01 46: 01 47: 01
48: 01 49: 01 50: 01 51: 01 52: 01 53: 01 54: 00 55: 00
56: 00 57: ff 58: 00 59: 0a 60: 20 61: 20 62: 20 63: 20
64: 20 65: 20 66: 20 67: 20 68: 20 69: 20 70: 20 71: 20
72: 00 73: 00 74: 00 75: ff 76: 00 77: 0a 78: 20 79: 20
80: 20 81: 20 82: 20 83: 20 84: 20 85: 20 86: 20 87: 20
88: 20 89: 20 90: 00 91: 00 92: 00 93: fc 94: 00 95: 50
96: 68 97: 69 98: 6c 99: 69 100: 70 101: 73 102: 20 103: 46
104: 31 105: 20 106: 31 107: 35 108: 00 109: 00 110: 00 111: fd
112: 00 113: 3a 114: 3e 115: 1e 116: 31 117: 07 118: 00 119: 0a
120: 20 121: 20 122: 20 123: 20 124: 20 125: 20 126: 00 127: f8
Magnavox LCD TV
Go to cover page
Monitor Range Limits
Min. Vt rate Hz : 58
Max. Vt rate Hz : 62
Min. Horiz. rate kHz : 30
Max. Horiz. rate kHz : 49
Max. Supported Pixel : 70
No secondary GTF timing formula supported.
25
Color Characteristics
Established Timings
Standard Timing Identification : Unused
Monitor Descriptor #1
Monitor Descriptor #2
Monitor Descriptor #3
Red X coordinate : 0.619
Red Y coordinate : 0.343
Green X coordinate : 0.298
Green Y coordinate : 0.578
Blue X coordinate : 0.149
Blue Y coordinate : 0.082
White X coordinate : 0.289
White Y coordinate : 0.304
Established Timings I : 640 x 480 @60Hz (IBM,VGA)
800 x 600 @56Hz (VESA)
800 x 600 @60Hz (VESA)
Established Timings II : 1024 x 768 @60Hz (VESA)
Manufacturer's timings :
Serial Number :
Serial Number :
Monitor Name : Philips F1 15
Page 26

Magnavox LCD TV
26
Go to cover page
DDC DATA
AUO panel:
**********************************************************************
EDID log file
**********************************************************************
Vendor/Product Identification
ID Manufacturer Name : PHL
ID Product Code : 4650 (HEX.)
ID Serial Number : 1010101 (HEX.)
Week of Manufacture : 0
Year of Manufacture : 2004
EDID Version, Revision
Version : 1
Revision : 3
Basic Display Parameters/Features
Video Input Definition : Analog Video Input
0.700V/0.300V (1.00Vpp)
without Blank-to-Black Setup
Separate Sync
without Composite Sync
without Sync on Green
no Serration required
Maximum H Image Size : 30
Maximum V Image Size : 23
Display Transfer Characteristic : 2.4
(gamma)
Feature Support (DPMS) : Standby
Suspend
Active Off
Display Type : RGB color display
Standard Default Color Space : Primary color space
Preferred Timing Mode : Detailed timing block 1
Color Characteristics
Red X coordinate : 0.604
Red Y coordinate : 0.347
Green X coordinate : 0.283
Green Y coordinate : 0.583
Blue X coordinate : 0.147
Blue Y coordinate : 0.088
White X coordinate : 0.279
White Y coordinate : 0.291
Monitor Descriptor #3
Monitor Name : Philips F1 15
Monitor Descriptor #4
Monitor Range Limits
Min. Vt rate Hz : 58
Max. Vt rate Hz : 62
Min. Horiz. rate kHz : 30
Max. Horiz.rate kHz : 49
Max. Supported Pixel : 70
No secondary GTF timing formula supported.
Extension Flag : 0
Check sum : 44 (HEX.)
**********************************************************************
EDID data (128 bytes)
**********************************************************************
0: 00 1: ff 2: ff 3: ff 4: ff 5: ff 6: ff 7: 00
8: 41 9: 0c 10: 50 11: 46 12: 01 13: 01 14: 01 15: 01
16: 00 17: 0e 18: 01 19: 03 20: 08 21: 1e 22: 17 23: 8c
24: ee 25: b9 26: ea 27: 9a 28: 58 29: 48 30: 95 31: 25
32: 16 33: 47 34: 4a 35: 23 36: 08 37: 00 38: 01 39: 01
40: 01 41: 01 42: 01 43: 01 44: 01 45: 01 46: 01 4 7: 01
48: 01 49: 01 50: 01 51: 01 52: 01 53: 01 54: 00 55: 00
56: 00 57: ff 58: 00 59: 0a 60: 20 61: 20 62: 20 63: 20
64: 20 65: 20 66: 20 67: 20 68: 20 69: 20 70: 20 71: 20
72: 00 73: 00 74: 00 75: ff 76: 00 77: 0a 78: 20 79: 20
80: 20 81: 20 82: 20 83: 20 84: 20 85: 20 86: 20 87: 20
88: 20 89: 20 90: 00 91: 00 92: 00 93: fc 94: 00 95: 50
96: 68 97: 69 98: 6c 99: 69 100: 70 101: 73102: 20 103: 46
104: 31105: 20 106: 31107: 35 108: 00 109: 00 110: 00 111: fd
112: 00 113: 3a114: 3e 115: 1e 116: 31 117: 07 118: 00 119: 0a
120: 20121: 20 122: 20 123: 20 124: 20 125: 20 126: 00 127: 44
Established Timings
Standard Timing Identification : Unused
Monitor Descriptor #1
Monitor Descriptor #2
Established Timings I : 640 x 480 @60Hz (IBM,VGA)
800 x 600 @56Hz (VESA)
800 x 600 @60Hz (VESA)
Established Timings II : 1024 x 768 @60Hz (VESA)
Manufacturer's timings :
Serial Number :
Serial Number :
Page 27

DDC DATA
Magnavox LCD TV
Go to cover page
27
9.3 CPT panel:
**********************************************************************
EDID log file
**********************************************************************
Vendor/Product Identification
ID Manufacturer Name : PHL
ID Product Code : 4650 (HEX.)
ID Serial Number : 1010101 (HEX.)
Week of Manufacture : 0
Year of Manufacture : 2004
EDID Version, Revision
Version : 1
Revision : 3
Basic Display Parameters/Features
Video Input Definition : Analog Video Input
0.700V/0.300V (1.00Vpp)
without Blank-to-Black Setup
Separate Sync
without Composite Sync
without Sync on Green
no Serration required
Maximum H Image Size : 30
Maximum V Image Size : 23
Display Transfer Characteristic : 2.3
(gamma)
Feature Support (DPMS) : Standby
Suspend
Active Off
Display Type : RGB color display
Standard Default Color Space : Primary color space
Preferred Timing Mode : Detailed timing block 1
Monitor Name : Philips F1 15
Monitor Descriptor #4
Monitor Range Limits
Min. Vt rate Hz : 58
Max. Vt rate Hz : 62
Min. Horiz. rate kHz : 30
Max. Horiz. rate kHz : 49
Max. Supported Pixel : 70
No secondary GTF timing formula supported.
Extension Flag : 0
Check sum : DE (HEX.)
**********************************************************************
EDID data (128 bytes)
**********************************************************************
0: 00 1: ff 2: ff 3: ff 4: ff 5: ff 6: ff 7: 00
8: 41 9: 0c 10: 50 11: 46 12: 01 13: 01 14: 01 15: 01
16: 00 17: 0e 18: 01 19: 03 20: 08 21: 1e 22: 17 23: 82
24: ee 25: b2 26: 45 27: a4 28: 55 29: 4c 30: 96 31: 24
32: 14 33: 50 34: 54 35: 23 36: 08 37: 00 38: 01 39: 01
40: 01 41: 01 42: 01 43: 01 44: 01 45: 01 46: 01 47: 01
48: 01 49: 01 50: 01 51: 01 52: 01 53: 01 54: 00 55: 00
56: 00 57: ff 58: 00 59: 0a 60: 20 61: 20 62: 20 63: 20
64: 20 65: 20 66: 20 67: 20 68: 20 69: 20 70: 20 71: 20
72: 00 73: 00 74: 00 75: ff 76: 00 77: 0a 78: 20 79: 20
80: 20 81: 20 82: 20 83: 20 84: 20 85: 20 86: 20 87: 20
88: 20 89: 20 90: 00 91: 00 92: 00 93: fc 94: 00 95: 50
96: 68 97: 69 98: 6c 99: 69 100: 70 101: 73 102: 20 103: 46
104: 31 105: 20 106: 31 107: 35 108: 00 109: 00 110: 00 111: fd
112: 00 113: 3a 114: 3e 115: 1e 116: 31 117: 07 118: 00 119: 0a
120: 20 121: 20 122: 20 123: 20 124: 20 125: 20 126: 00 127: de
Color Characteristics
Established Timings
Standard Timing Identification : Unused
Monitor Descriptor #1
Monitor Descriptor #2
Monitor Descriptor #3
Red X coordinate : 0.643
Red Y coordinate : 0.335
Green X coordinate : 0.297
Green Y coordinate : 0.588
Blue X coordinate : 0.142
Blue Y coordinate : 0.078
White X coordinate : 0.313
White Y coordinate : 0.329
Established Timings I : 640 x 480 @60Hz (IBM,VGA)
800 x 600 @56Hz (VESA)
800 x 600 @60Hz (VESA)
Established Timings II : 1024 x 768 @60Hz (VESA)
Manufacturer's timings :
Serial Number :
Serial Number :
Page 28
28
Magnavox LCD TV
Go to cover page
DDC INSTRUCTIONS
General
DDC Data Re-programming
In case the DDC data memory ICormain EEPROM which storage all
factory settings were replaced due toadefect, the serial numbers have
to be re-programmed" ".
It is advised to re-soldered DDC ICandmain EEPROM fromtheold
board onto the new board if circuit board have been replaced, in this
case the DDC da
Additional information
Additionalinformation about DDC (Display DataChannel) maybe
obtained from Video Electronics Standards Association (VESA). Extended
DisplayIdentification Data(EDID)information maybealsoo
VESA.
Analog DDC IC, & EEPROM
ta does not need to be re-programmed.
btained from
System and equipment requirements
1. An i486(or above) personalcomputer orcompatible.
2. Microsoft operation system Windows 95/98 .
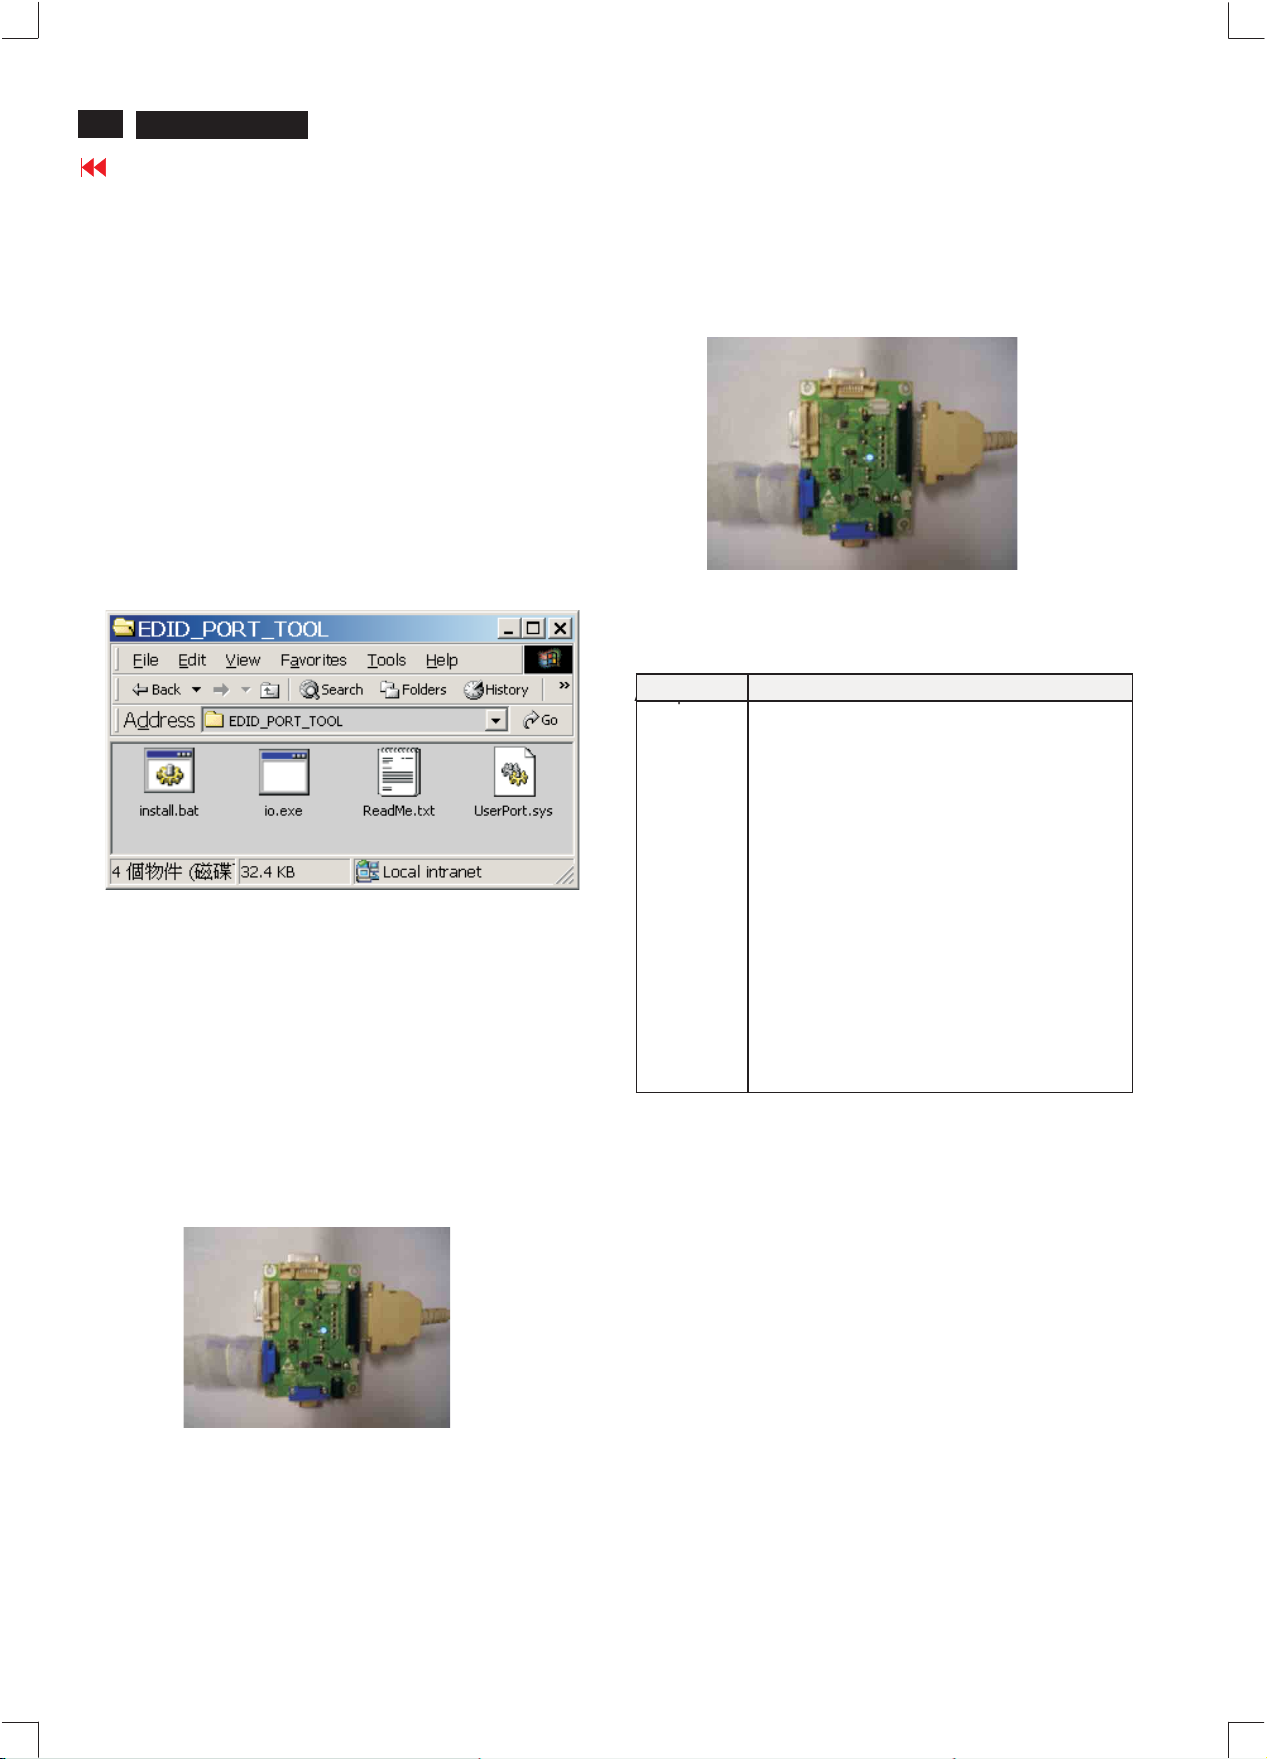
Y o Install the EDID_PORT_To o lunder Win2000/XP . As
ouhavet
Fig.1.
A. Cody the "UserPort.sys" toC:\WINNT\system32\drivers(win2000)
C:\WINDOWS\system32\drivers(winXP)
B. Running
edid data .
"io.exe" everytime, Before youstart to programming
Fig.1Fig. 1
Note: The alignmentbox has already build-inabatteries socket for
using aspower source. Pull out the socket by
batteries (8~12V)
removefour screws attherear ofbox.Please donotforget that
removebatteries after programming. The energy ofbatteries can
only driv
ecircuitsfor a short period oftime.
To M onitor
To Printer port
D-sub cable
To PC
Fig.3Fig. 3
Pin assignment
PIN No. SIGNAL
A. 15-pin D-Sub Connector
1Red
2Green
3Blue
4 GND
5 GND
6RedGND
7GreenGND
8 Blue GND
9 +5V (Supply fromPC)
10 Sync GND
11 GND
12 Bi-directionaldata
13 H-sync
14 V-sync
15 Data clock
3. EDID45.EXE program.
4. A/D Alignment kits (3138 106 10396):
inclusion : a.Alignmentbox x1(asFig. 2)
Fig. 2Fig. 2
b. Printer cable x1
c. (D-Sub) to (D-Sub) cable x1
Page 29

DDC INSTRUCTIONS
3. At the submenu, type the letter ofyour computer's hard disk drive
followed by :EDID45 (forexample, C:\EDID45, asshown in Fig.6).
Magnavox LCD TV
29
Go to cover page
5
Fig.6
1
PC
TP1)
ort (L
Fig.4
To printer p
Printer
Port
2
Method 1: Start on DDC program
1=Power connector
2= D-SUBconnector
To
Monitor
To PC
1
TO VIDEOCARD
----->
----->
2
4. Click button. The main menu appears (asshown in Fig.7).OK
This is for initialize alignment box.
Fig.7
Note 1: Iftheconnection is improper, youwillseethefollowing error
message(asshown in Fig. 8) before entering the main menu.
Meanwhile, the (readEDID)function will be disable. At this
time,
please make sure all cables are connected correctly and
Fig.5
Fig.8
1
Fig. 9
Page 30

30
Magnavox LCD TV
DDC INSTRUCTIONS
Go to cover page
Re-programming DDC IC
Step 1: After initialize alignment box, connecting all cables and
box as shown in Fig. 10
PC
TP1)
ort (L
313810610369
To printer p
Printer
Port
To PCVideo port (D-sub)
Step 2: Read DDC data from monitor
1=Power connector
2=D-SUB connector
To
Monitor
To PC
1
2
----->
----->
Fig.10
Step 3: Modify DDC data (verify EDID version, week, year)
1. Click (new function)icon fromthetoolbar, b r i ng up
Step 1 of9asshown in Fig.14.
EDID45 DDC application provides the function selecti
on and
textchange (select & fill out) fromStep1to Step 9.
1. Click icon asshown in Fig.11fromthetoolbarto bring up
the Channels "Configuration Setup" windows asshown in Fig. 12.
Fig.11
2. Select the DDC2Bi asthecommunication channel.
As shown in Fig. 12.
Fig.12
3. Click OK button to confirm your selection.
4. Click icon (ReadEDID function)to read DDC EDID data from
monitor. The EDID codes will display on screenasshown in Fig
.13.
Fig.14
Step 4: Modify DDC data (Monitor Serial No.)
Next1. Click , bring up Fig. 15.
Fig.15
2. Click , bring up Fig. 16.Next
Fig.13
Don't close this screen. --->
Fig.16
Page 31

DDC INSTRUCTIONS
Magnavox LCD TV
Go to cover page
31
3. Click , bring up Fig. 17.Next
4. Click , bring up Fig. 18.Next
6. Click , bring up Fig. 20.Next
- Serial number can be filled up orbechanged atthismoment.
Fig. 17
Fig.20
7. Click , bring up Fig.21.Next
5. Click , bring up Fig. 19.Next
Fig. 18
Fig. 19
Fig.21
8. Click , bring up Fig. 20.Next
Fig.22
Page 32

32
Magnavox LCD TV
Go to cover page
DDC Instructions & SerialNODefinition
Step 5: Write DDC data
1. Configuration should be asFig. 23.And press OK.
Fig. 23
Access factory. Mode
Step1:Select the source "PC" and then turnoff LCD-TV.
Step 2 : [Push "power " button and then push the "VOL-"and"VOL+"
buttons at the same time immediately andhold it] about five seconds
then release all buttons.
Press "menu"button and bring up factory mode indication
3. Click (Write EDID)icon from the toolbarto write DDC data.
Bring up "Writing 0%~100%, ready" a progressing bar on the left
down corner.
4. Turnoff/on monitor
Step 7: Exit DDC program
Pull down the File menu and select Exit asshown in Fi
Fig. 25
g. 25.
Step 6: Save DDC data
Sometimes, youmay need to save DDC dataas a textfilefor using
inother IC chip. To save DDC data,follow the steps below:
1. Click (Save) icon (or click "file"-> "save as") from the toolbar
And give a file name asshown in Fig. 24.
The file type is EDID45 file (*.ddc) which can be open
By using WordPad, the texts of DDC data &table (128 bytes, hex
code) can be modified. If DDC TEXTS & HEX Ta ble are completely
correct, it can be saved as .ddc flie to re-loaditinto DDC IC for DDC
Dataapplication.
150S5-DDC
150F1-DDC
in WordPad.
Serial Number Definition
2. Click .Save
C:\Mydocuments\150F1-DDC
45
Fig. 24
Page 33

ISP Instruction
Magnavox LCD TV
Go to cover page
33
Configuration and procedure
"Easywriter " The software
firmware of CPU.
It is a windows-based program, which cannot be runinMS-DOS.
DDC2BI_ISP TOOL (3138 106 10396)
"Parallel Port of PC" and"15pin-D-SUB connector of Monitor".
is provided by Novatek to upgrade the
is for the interfacebetween
System and equipment requirements
1. Ani486 (or above) personal computerorcompatible.
2. Microsoftoperation system Windows 95/98/2000/XP.
3. ISP Software"Easywrite "
4. as showninFig.1
DDC2BI_ISP TOOL (3138 106 10396)
Parallel Port to Print Port in PC
D-SUB to monitor
Fig.1
Fig.4
Step5:Copy the .hexcode to C:\easywrite as showninFig.5.
170S5
Fig.5
Update the firmware
1. Press the loadhexthenselect the .hexcode as showninFig.6
5 Connect and Mains cord to Monitor as shown
. DDC2BI_ISP TOOL
in Fig.2.
150F1 LCD TV(B)
D-Sub
Connect to Mains
cord at this moment.
------------------------------->
PC
Monitor (A)
d
TP1)
To printer port (L
Connect to
Mains cord
To v i deocar
Videocable
Fig.2
ISP box
6. Run the Easywriter program
Step1:Make a folderinyour PC as showninFig. 3.
For example : C:\easywrite
Step2:Copy ISP SoftwareEasywriterintoyour folder
.zip
as showninFig.3.
Step 3 :Unz
ipEasywriter.zip into your folderasshowninFig. 3.
Step4:Double click the EasywriterV2.07.exe icon to run the
Application as Fig.4.
Fig.6
2. Press the AUTO to run the program,the firmwarebeupdated as
showninFig7`Fig.8
Fig.7
170S5
9
Fig.8
Page 34

34
Magnavox LCD TV
ISP Instruction
Go to cover page
Press the file exit to endprogram, as showninFig.9
Fig.9
If there is a warring message coming as shown in Fig 10. , you
have to check the AC power, Video cable, or Novatek MCU.
Page 35

BLOCK DIAGRAM
Magnavox LCD TV
Go to cover page
35
Page 36

Go to cover page
Page 37

Go to cover page
Page 38

Go to cover page
Page 39

Go to cover page
Page 40

40
Go to cover page
Page 41

Go to cover page
Page 42

Go to cover page
Page 43

Go to cover page
Page 44

Go to cover page
Page 45

Go to cover page
Page 46

Go to cover page
Page 47

Go to cover page
47
Page 48

48
Go to cover page
Page 49

Go to cover page
49
Page 50

Go to cover page
Page 51

Go to cover page
Page 52

Go to cover page
Page 53

Go to cover page
Page 54

Go to cover page
Page 55

Go to cover page
55
Page 56

Go to cover page
Page 57

41
313815414981
DOOR-CABLE
Exploded View
7
313815758301
BASE ASSY
40
313815414881
BACK COVER
93
3138 15136441
SHIELD SCALER
Magnavox LCD TV
Go to cover page
823827717261
DC-AC INVERTER(LIVP-2001A)
823827717271
DC-AC INVERTER(LIVP-2001 A)
313815862151
MAIN FRAME+WIRE ASSY
313815862291
1183
MAIN FRAME+WIRE ASSY
1180
1051
313815860781
SCALER PCB ASSY(NAFT)15"LPL
313815862131
SCALER PCB ASSY(NAFT)15"AUO
1050
823827717371
LCD LC150X02(series)
823827717471
TFT-LCD MOD T150XG01 V_0(AUO0)
1185
823827717441
LSP BOX8R3W-L/R(P150B)
91
313815414931
CONTROL BUTTON
1054
313815860881
KEY BOARD ASSY
1053
11
313815758281
313815860811
BEZEL ASSY
IR PCB ASSY
Page 58

58
Magnavox LCD TV
Go to cover page
0011 313815758281 BEZEL ASSY
0030 313815414871 BEZEL
0031 313815414921 LENS-IR
0032 313815414911 POWER BUTTON
0007 313815758301 BASE ASSY
0040 313815414881 BACK COVER
0090 313815523361 PLASTIC COVER
0091 313815414931 CONTROL BUTTON
0092 313815522331 SMART TIPS-WALL MOUNTING
7901 932217439685 TRA SIG SM BC857C (KEC0) R
6901 313815862261 IR + HOLDER ASSY
6901 932220313667 IR RECEIVER TSOP34136SB1 L
6902 313815862171 LED + HOLDER ASSY
6902 932214603682 LED VS L-3WYGW (KIEL) B
6001 932221745685 DIO REC SM SSA34 (VISH) R
6002 932220347685 DIO REG SM BZX84-B16 (VISH) R
6003 932221745685 DIO REC SM SSA34 (VISH) R
6006 933913910115 DIO SIG SM BAS32L (PHSE) R
6101 933913910115 DIO SIG SM BAS32L (PHSE) R
6201 933913910115 DIO SIG SM BAS32L (PHSE) R
6202 933913910115 DIO SIG SM BAS32L (PHSE) R
7001 932219076668 IC SM L5972D (ST00) R
7002 932217438685 TRA SIG SM BC847C (KEC0) R
7003 932217438685 TRA SIG SM BC847C (KEC0) R
7004 932219076668 IC SM L5972D (ST00) R
7005 932217438685 TRA SIG SM BC847C (KEC0) R
7006 932216638668 FET POW SM SI5441DC-E3 (VISH)R
7009 932217438685 TRA SIG SM BC847C (KEC0) R
7011 932217438685 TRA SIG SM BC847C (KEC0) R
7012 932216638668 FET POW SM SI5441DC-E3 (VISH)R
7101 932219412671 IC SM MSP3445G-QI-B8V3(MIAS) Y
7102 933714830653 IC SM 74HC4052D (PHSE) R
7151 932222035668 IC SM TPA3005D2PHP (TI00) R
7201 935245720165 IC SM 74HCT1G14GW (PHSE) R
7202 932216972682 IC SM AT24C02N-10SC-2.7(ATME)L
7301 313815862181 CPU ASSY (LPL -F1 15")
7301 823827716771 NT68F632AL CPU
7302 932217438685 TRA SIG SM BC847C (KEC0) R
7303 932219183685 IC SM LM809M3-2.93 NOPB(NSC0)R
7304 932222076668 IC SM AME1117CCGTZ (ST00) R
7305 313815862211 EEPROM ASSY (LPL-F1 15")
7305 932218650682 IC AT24C16A-10PI-2.7 (ATME) L
7401 932222013671 IC SM MST51512L-LF (MSTA) Y
7402 932222075668 IC SM AME1117BCGTZ (ST00) R
7403 932222076668 IC SM AME1117CCGTZ (ST00) R
7404 932222076668 IC SM AME1117CCGTZ (ST00) R
7502 932216677682 IC SM M12L16161A-7T (ESMT) L
7501 932216677682 IC SM M12L16161A-7T (ESMT) L
7621 935276561518 IC SM SAA7119E/V2/G (PHSE) R
7622 932222077668 IC SM AME1117ECGTZ (ST00) R
7623 932222076668 IC SM AME1117CCGTZ (ST00) R
Page 59

Magnavox LCD TV
Go to cover page
59
Model: 15MF605T/17
Mechanical parts
0011 313815758281 BEZEL ASSY
0030 313815414871 BEZEL
0031 313815414921 LENS-IR
0032 313815414911 POWER BUTTON
0007 313815758301 BASE ASSY
0040 313815414881 BACK COVER
0090 313815523361 PLASTIC COVER
0091 313815414931 CONTROL BUTTON
0092 313815522331 SMART TIPS-WALL MOUNTING
LCD Panel
1050 823827717371 LCD LC150X02 (series)
PACKING
0450 313815639351 CARTON
0451 313815639341 CUSHION-LEFT
0452 313815639331 CUSHION-RIGHT
0453 313815621481 P.E.BAG
0458 313815636361 P.E.BAG 275x320 mm
Accessory
Assessory
4444 313810610443 CD ROM - SERVICE MANUAL
4444 313810610444 SERVICE MANUAL
0291 313815565881 LABEL-EEPROM-LPL
0615 313811708201 HEX CODE OF F/W (NO MATL REQ)
0292 313815565881 LABEL-EEPROM-LPL
0145 313815523431 Owner's manual
0041 313815414891 DOOR-CABLE
PCB ASSY
1051 313815860781 SCALER PCB ASSY (NAFT)15"LPL
1052 313815860801 YPbPr-IN PCB ASSY
1053 313815860811 IR PCB ASSY
1054 313815860881 KEY BOARD ASSY
Miscellanea
1305 243803100435 SOC IC V 8P F 2.54 DIL L
8175 313819874531 CBLE -018 8/100/8-018 AWG28
1001 242202518821 CON V 8P M 2.00 63388 B
1002 242208611053 FUSE SM F 7A 125V UL R
1003 242202605309 SOC SUPP H 1P M DC 2.5MM L
1101 242254301364 RES XTL SM 18M432 16P SMD-49 R
1151 242202518888 CON H 2P M 2.50 69072 B
1152 313816877251 EARPHONE JACK
1153 242202518894 CON H 2P M 2.00 63362 B
1201 242202518053 SOC SUBD H 15P F BU 1216 B
1211 243803100429 SOC PHONE H 1P F 3.5 ST B
1251 242202518817 CON V 5P M 2.00 63385 B
1253 242202605451 SOC CINCH H 2P F 1L2 WHRD B
1254 242202605452 SOC CINCH H 3P F 1L3 YEWHRD B
1301 823827716691 CRYSTAL 11.0592MHZ
1302 242202518818 CON V 6P M 2.00 63386 B
1303 242202518894 CON H 2P M 2.00 63362 B
1401 243854300086 RES XTL SM 14M318 18P HC49/S R
1501 313815862241 SDRAM ASSY(ESMT)
1172 313818870491 MAINSCORD UL 10A 1M8 DET BK
1175 908210090002 BAT ZNC 1.5V 820MAH AA 2-PACK
1176 823827717511 REMOTE CONTROL RC1112713/17
1177 313818876621 CON ACC ADP V 01P M 0.00/NTSC
1180 313815862151 MAIN FRAME + WIRE ASSY
8161 313819874541 CBLE -266 6/290/6-266 AWG28
313819875831
1183 823827717261 DC-AC INVERTER
1184 823827717461 AC/DC ADAPTER 16V 60W
313819876051
1185 823827717441 LSP BOX 8R 3W-L/R (P150B)
8174 313819874571 CBLE - 104 20/230/20 -032AWG28
8176 313819874581 CBLE - 012 2/100/2-001 AWG28
1551 242202505567 CON V 20P M 1.25 SM 60947 R
1601 313914722661 FRONTEND FQ1236/F H-5
1621 243854300089 RES XTL SM 24M576 16P HC49/S R
PCB ASSY
1051 313815860781 SCALER PCB ASSY (NAFT)15"LPL
2001 223858619812 CER2 0603 Y5V 50V 100N P8020 R
2002 223858619812 CER2 0603 Y5V 50V 100N P8020 R
2009 223891619849 CER2 0603 Y5V 25V 100N P8020 R
2113 222224119876 CER2 1206 Y5V 10V 10U P8020 R
2121 223886715159 CER1 0603 NP0 50V 15P PM5 R
2122 223886715159 CER1 0603 NP0 50V 15P PM5 R
2131 222224119876 CER2 1206 Y5V 10V 10U P8020 R
2132 223878615649 CER2 0603 X7R 16V 100N PM10 R
2133 223878615649 CER2 0603 X7R 16V 100N PM10 R
2134 223878615649 CER2 0603 X7R 16V 100N PM10 R
(LPL PANEL)
2135 223878615649 CER2 0603 X7R 16V 100N PM10 R
2152 223891619849 CER2 0603 Y5V 25V 100N P8020 R
2154 223886715101 CER1 0603 NP0 50V 100P PM5 R
2155 223858119716 CER2 1206 Y5V 50V 470N PM20 R
2156 223886715101 CER1 0603 NP0 50V 100P PM5 R
2157 223891619849 CER2 0603 Y5V 25V 100N P8020 R
2169 223891619849 CER2 0603 Y5V 25V 100N P8020 R
2172 223886715101 CER1 0603 NP0 50V 100P PM5 R
2173 223858119716 CER2 1206 Y5V 50V 470N PM20 R
2174 223886715101 CER1 0603 NP0 50V 100P PM5 R
2176 223891619849 CER2 0603 Y5V 25V 100N P8020 R
2181 223886115221 CER1 0805 NP0 50V 220P PM5 R
2182 223878615649 CER2 0603 X7R 16V 100N PM10 R
2186 223891619849 CER2 0603 Y5V 25V 100N P8020 R
2187 223891619849 CER2 0603 Y5V 25V 100N P8020 R
2191 223891619849 CER2 0603 Y5V 25V 100N P8020 R
2194 223891619849 CER2 0603 Y5V 25V 100N P8020 R
2201 223878615649 CER2 0603 X7R 16V 100N PM10 R
2209 223878615649 CER2 0603 X7R 16V 100N PM10 R
2211 223886715331 CER1 0603 NP0 50V 330P PM5 R
2212 223886715331 CER1 0603 NP0 50V 330P PM5 R
2213 223886715331 CER1 0603 NP0 50V 330P PM5 R
2214 223886715331 CER1 0603 NP0 50V 330P PM5 R
2215 222224119876 CER2 1206 Y5V 10V 10U P8020 R
2251 223886715331 CER1 0603 NP0 50V 330P PM5 R
2252 223886715331 CER1 0603 NP0 50V 330P PM5 R
2253 223886715101 CER1 0603 NP0 50V 100P PM5 R
2254 223886715331 CER1 0603 NP0 50V 330P PM5 R
2255 223886715331 CER1 0603 NP0 50V 330P PM5 R
2256 223886715331 CER1 0603 NP0 50V 330P PM5 R
2257 223886715331 CER1 0603 NP0 50V 330P PM5 R
2258 223886715101 CER1 0603 NP0 50V 100P PM5 R
2259 223886715229 CER1 0603 NP0 50V 22P PM5 R
2261 223886715101 CER1 0603 NP0 50V 100P PM5 R
2262 223886715229 CER1 0603 NP0 50V 22P PM5 R
2302 223878615649 CER2 0603 X7R 16V 100N PM10 R
2303 223886715229 CER1 0603 NP0 50V 22P PM5 R
2304 223886715229 CER1 0603 NP0 50V 22P PM5 R
2306 223886715109 CER1 0603 NP0 50V 10P PM5 R
2317 223878615649 CER2 0603 X7R 16V 100N PM10 R
2318 223878615649 CER2 0603 X7R 16V 100N PM10 R
2321 223886715229 CER1 0603 NP0 50V 22P PM5 R
2322 223886715229 CER1 0603 NP0 50V 22P PM5 R
2415 223858615636 CER2 0603 X7R 50V 10N PM10 R
2416 223878615649 CER2 0603 X7R 16V 100N PM10 R
2417 223886715229 CER1 0603 NP0 50V 22P PM5 R
2418 223886715229 CER1 0603 NP0 50V 22P PM5 R
2421 223878615649 CER2 0603 X7R 16V 100N PM10 R
2425 223878615649 CER2 0603 X7R 16V 100N PM10 R
2426 222224119876 CER2 1206 Y5V 10V 10U P8020 R
2431 222224119876 CER2 1206 Y5V 10V 10U P8020 R
2432 223878615649 CER2 0603 X7R 16V 100N PM10 R
2433 223878615649 CER2 0603 X7R 16V 100N PM10 R
2434 223878615649 CER2 0603 X7R 16V 100N PM10 R
2435 223878615649 CER2 0603 X7R 16V 100N PM10 R
2436 223878615649 CER2 0603 X7R 16V 100N PM10 R
2437 223878615649 CER2 0603 X7R 16V 100N PM10 R
2438 223878615649 CER2 0603 X7R 16V 100N PM10 R
2441 222224119876 CER2 1206 Y5V 10V 10U P8020 R
2442 223878615649 CER2 0603 X7R 16V 100N PM10 R
2443 223878615649 CER2 0603 X7R 16V 100N PM10 R
2444 223878615649 CER2 0603 X7R 16V 100N PM10 R
2445 223878615649 CER2 0603 X7R 16V 100N PM10 R
2446 223878615649 CER2 0603 X7R 16V 100N PM10 R
2447 223878615649 CER2 0603 X7R 16V 100N PM10 R
2452 223878615649 CER2 0603 X7R 16V 100N PM10 R
2453 223878615649 CER2 0603 X7R 16V 100N PM10 R
2454 223878615649 CER2 0603 X7R 16V 100N PM10 R
2455 223878615649 CER2 0603 X7R 16V 100N PM10 R
2456 222224119876 CER2 1206 Y5V 10V 10U P8020 R
2457 223878615649 CER2 0603 X7R 16V 100N PM10 R
2458 223878615649 CER2 0603 X7R 16V 100N PM10 R
2655 223878615649 CER2 0603 X7R 16V 100N PM10 R
2658 223878616641 CER2 0603 X7R 16V 22N PM10 R
2461 222224119876 CER2 1206 Y5V 10V 10U P8020 R
2462 223878615649 CER2 0603 X7R 16V 100N PM10 R
2463 223878619854 CER2 0603 Y5V 16V 220N P8020 R
2464 223878619854 CER2 0603 Y5V 16V 220N P8020 R
2465 223878619854 CER2 0603 Y5V 16V 220N P8020 R
2466 223878619854 CER2 0603 Y5V 16V 220N P8020 R
2501 223878615649 CER2 0603 X7R 16V 100N PM10 R
2502 223878615649 CER2 0603 X7R 16V 100N PM10 R
2504 223878615649 CER2 0603 X7R 16V 100N PM10 R
2505 223878615649 CER2 0603 X7R 16V 100N PM10 R
2506 223878615649 CER2 0603 X7R 16V 100N PM10 R
2507 223878615649 CER2 0603 X7R 16V 100N PM10 R
2555 223891619849 CER2 0603 Y5V 25V 100N P8020 R
2601 223886715229 CER1 0603 NP0 50V 22P PM5 R
2603 223886715101 CER1 0603 NP0 50V 100P PM5 R
2604 223886715479 CER1 0603 NP0 50V 47P PM5 R
2606 223891619849 CER2 0603 Y5V 25V 100N P8020 R
2607 223891619849 CER2 0603 Y5V 25V 100N P8020 R
2621 222224119876 CER2 1206 Y5V 10V 10U P8020 R
2622 223891619849 CER2 0603 Y5V 25V 100N P8020 R
2623 223891619849 CER2 0603 Y5V 25V 100N P8020 R
2624 223891619849 CER2 0603 Y5V 25V 100N P8020 R
2625 223891619849 CER2 0603 Y5V 25V 100N P8020 R
2626 223891619849 CER2 0603 Y5V 25V 100N P8020 R
2627 223891619849 CER2 0603 Y5V 25V 100N P8020 R
2628 223891619849 CER2 0603 Y5V 25V 100N P8020 R
2631 223891619849 CER2 0603 Y5V 25V 100N P8020 R
2632 223891619849 CER2 0603 Y5V 25V 100N P8020 R
2633 223891619849 CER2 0603 Y5V 25V 100N P8020 R
2003 202203100173 ELCAP EB 25V S 470U PM20 B
2004 223891619849 CER2 0603 Y5V 25V 100N P8020 R
2005 202203100173 ELCAP EB 25V S 470U PM20 B
2006 223858015641 CER2 0805 X7R 50V 22N PM10 R
2007 223891619849 CER2 0603 Y5V 25V 100N P8020 R
2008 223858015641 CER2 0805 X7R 50V 22N PM10 R
2011 223858015614 CER2 0805 X7R 50V 220P PM10 R
2012 202203100173 ELCAP EB 25V S 470U PM20 B
2013 223891619849 CER2 0603 Y5V 25V 100N P8020 R
2014 223858015614 CER2 0805 X7R 50V 220P PM10 R
2015 223858619805 CER2 0603 Y5V 50V 10N P8020 R
2016 223858619812 CER2 0603 Y5V 50V 100N P8020 R
2019 202203100367 ELCAP SK 16V S 47U PM20 B
2021 223891619849 CER2 0603 Y5V 25V 100N P8020 R
2022 223891619849 CER2 0603 Y5V 25V 100N P8020 R
2023 223891619849 CER2 0603 Y5V 25V 100N P8020 R
2024 202203100367 ELCAP SK 16V S 47U PM20 B
2025 223858619805 CER2 0603 Y5V 50V 10N P8020 R
2101 223824619863 CER2 0603 Y5V 10V 1U P8020 R
2102 223824619863 CER2 0603 Y5V 10V 1U P8020 R
2103 223824619863 CER2 0603 Y5V 10V 1U P8020 R
2104 223824619863 CER2 0603 Y5V 10V 1U P8020 R
2105 223886715159 CER1 0603 NP0 50V 15P PM5 R
2106 223886715479 CER1 0603 NP0 50V 47P PM5 R
2107 223878615649 CER2 0603 X7R 16V 100N PM10 R
2108 222224119876 CER2 1206 Y5V 10V 10U P8020 R
2109 223824615654 CER2 0603 X7R 10V 220N PM10 R
2111 223878615649 CER2 0603 X7R 16V 100N PM10 R
2112 222224119876 CER2 1206 Y5V 10V 10U P8020 R
2114 222224119876 CER2 1206 Y5V 10V 10U P8020 R
2115 223858615632 CER2 0603 X7R 50V 4N7 PM10 R
2116 223858615632 CER2 0603 X7R 50V 4N7 PM10 R
2123 222224119876 CER2 1206 Y5V 10V 10U P8020 R
2124 222224119876 CER2 1206 Y5V 10V 10U P8020 R
2136 223824619863 CER2 0603 Y5V 10V 1U P8020 R
2137 223824619863 CER2 0603 Y5V 10V 1U P8020 R
2138 223824619863 CER2 0603 Y5V 10V 1U P8020 R
2139 223824619863 CER2 0603 Y5V 10V 1U P8020 R
2153 223891019854 CER2 0805 Y5V 25V 220N P8020 R
2158 223891019854 CER2 0805 Y5V 25V 220N P8020 R
2161 223858615623 CER2 0603 X7R 50V 1N PM10 R
2162 223858615623 CER2 0603 X7R 50V 1N PM10 R
2163 223858119716 CER2 1206 Y5V 50V 470N PM20 R
2164 223824619863 CER2 0603 Y5V 10V 1U P8020 R
2165 223824619863 CER2 0603 Y5V 10V 1U P8020 R
2166 223824619863 CER2 0603 Y5V 10V 1U P8020 R
2167 223858119716 CER2 1206 Y5V 50V 470N PM20 R
2168 223891019854 CER2 0805 Y5V 25V 220N P8020 R
2175 223891019854 CER2 0805 Y5V 25V 220N P8020 R
2177 223891619849 CER2 0603 Y5V 25V 100N P8020 R
2178 202203100366 ELCAP SK 50V S 10U PM20 B
2179 223891619849 CER2 0603 Y5V 25V 100N P8020 R
2183 202203100366 ELCAP SK 50V S 10U PM20 B
2184 202203100366 ELCAP SK 50V S 10U PM20 B
2185 202203100366 ELCAP SK 50V S 10U PM20 B
2192 202203100173 ELCAP EB 25V S 470U PM20 B
2193 202203100173 ELCAP EB 25V S 470U PM20 B
2195 223891619849 CER2 0603 Y5V 25V 100N P8020 R
2202 223886715109 CER1 0603 NP0 50V 10P PM5 R
2203 223886715339 CER1 0603 NP0 50V 33P PM5 R
2204 223886715101 CER1 0603 NP0 50V 100P PM5 R
2205 223886715568 CER1 0603 NP0 50V 5P6 PM0P5 R
2206 223886715568 CER1 0603 NP0 50V 5P6 PM0P5 R
Page 60

60
Magnavox LCD TV
Go to cover page
2207 223886715568 CER1 0603 NP0 50V 5P6 PM0P5 R
2269 223886715331 CER1 0603 NP0 50V 330P PM5 R
2272 223886715331 CER1 0603 NP0 50V 330P PM5 R
2301 202203100367 ELCAP SK 16V S 47U PM20 B
2305 223858615623 CER2 0603 X7R 50V 1N PM10 R
2307 222224119876 CER2 1206 Y5V 10V 10U P8020 R
2308 223824619863 CER2 0603 Y5V 10V 1U P8020 R
2312 223858615636 CER2 0603 X7R 50V 10N PM10 R
2313 223858615636 CER2 0603 X7R 50V 10N PM10 R
2314 223858615636 CER2 0603 X7R 50V 10N PM10 R
2401 223878615649 CER2 0603 X7R 16V 100N PM10 R
2402 223878615649 CER2 0603 X7R 16V 100N PM10 R
2403 223878615645 CER2 0603 X7R 16V 47N PM10 R
2404 223878615645 CER2 0603 X7R 16V 47N PM10 R
2405 223858615623 CER2 0603 X7R 50V 1N PM10 R
2406 223878615645 CER2 0603 X7R 16V 47N PM10 R
2407 223878615645 CER2 0603 X7R 16V 47N PM10 R
2408 223878615645 CER2 0603 X7R 16V 47N PM10 R
2409 223878615645 CER2 0603 X7R 16V 47N PM10 R
2411 223878615645 CER2 0603 X7R 16V 47N PM10 R
2412 223858615623 CER2 0603 X7R 50V 1N PM10 R
2413 223878615645 CER2 0603 X7R 16V 47N PM10 R
2414 223878615645 CER2 0603 X7R 16V 47N PM10 R
2419 223886715568 CER1 0603 NP0 50V 5P6 PM0P5 R
2422 202203100367 ELCAP SK 16V S 47U PM20 B
2423 223878615649 CER2 0603 X7R 16V 100N PM10 R
2424 202203100367 ELCAP SK 16V S 47U PM20 B
2427 202203100367 ELCAP SK 16V S 47U PM20 B
2451 222224119876 CER2 1206 Y5V 10V 10U P8020 R
2503 222224119876 CER2 1206 Y5V 10V 10U P8020 R
2551 202203100365 ELCAP SK 50V S 1U PM20 B
2605 202203100074 ELCAP KM 16V S 1000U PM20 B
2634 223886715279 CER1 0603 NP0 50V 27P PM5 R
2635 223886715279 CER1 0603 NP0 50V 27P PM5 R
2636 223878615649 CER2 0603 X7R 16V 100N PM10 R
2637 223878616641 CER2 0603 X7R 16V 22N PM10 R
2638 223878616641 CER2 0603 X7R 16V 22N PM10 R
2639 223878616641 CER2 0603 X7R 16V 22N PM10 R
2641 223878616641 CER2 0603 X7R 16V 22N PM10 R
2642 223878616641 CER2 0603 X7R 16V 22N PM10 R
2644 223878616641 CER2 0603 X7R 16V 22N PM10 R
2646 223878616641 CER2 0603 X7R 16V 22N PM10 R
2647 223878616641 CER2 0603 X7R 16V 22N PM10 R
2649 223878616641 CER2 0603 X7R 16V 22N PM10 R
2651 223878616641 CER2 0603 X7R 16V 22N PM10 R
2652 223878616641 CER2 0603 X7R 16V 22N PM10 R
2653 223878616641 CER2 0603 X7R 16V 22N PM10 R
2654 223878616641 CER2 0603 X7R 16V 22N PM10 R
2656 222224119876 CER2 1206 Y5V 10V 10U P8020 R
2657 202203100367 ELCAP SK 16V S 47U PM20 B
3001 232270260562 RST SM 0603 RC21 5K6 PM5 R
3002 232270260101 RST SM 0603 RC21 100R PM5 R
3003 212211805669 RST SM 0603 RC0603 10K PM5 R
3004 232270260223 RST SM 0603 RC21 22K PM5 R
3005 232270260562 RST SM 0603 RC21 5K6 PM5 R
3006 232270260101 RST SM 0603 RC21 100R PM5 R
3007 232270260472 RST SM 0603 RC21 4K7 PM5 R
3008 212211805669 RST SM 0603 RC0603 10K PM5 R
3009 232270260362 RST SM 0603 RC21 3K6 PM5 R
3011 232270260102 RST SM 0603 RC21 1K PM5 R
3012 232270260102 RST SM 0603 RC21 1K PM5 R
3013 232270260101 RST SM 0603 RC21 100R PM5 R
3014 232270260472 RST SM 0603 RC21 4K7 PM5 R
3015 212211805669 RST SM 0603 RC0603 10K PM5 R
3016 232270260332 RST SM 0603 RC21 3K3 PM5 R
3017 232270260223 RST SM 0603 RC21 22K PM5 R
3018 232270260562 RST SM 0603 RC21 5K6 PM5 R
3019 232270260223 RST SM 0603 RC21 22K PM5 R
3021 232270260223 RST SM 0603 RC21 22K PM5 R
3022 232270260223 RST SM 0603 RC21 22K PM5 R
3023 232270260102 RST SM 0603 RC21 1K PM5 R
3027 232270260562 RST SM 0603 RC21 5K6 PM5 R
3024 232270260223 RST SM 0603 RC21 22K PM5 R
3031 232270260223 RST SM 0603 RC21 22K PM5 R
3032 232270260223 RST SM 0603 RC21 22K PM5 R
3034 232270260223 RST SM 0603 RC21 22K PM5 R
3101 232270260101 RST SM 0603 RC21 100R PM5 R
3104 232270260273 RST SM 0603 RC21 27K PM5 R
3105 232270260101 RST SM 0603 RC21 100R PM5 R
3151 232270260104 RST SM 0603 RC21 100K PM5 R
3152 212211805672 RST SM 0603 RC0603 15K PM5 R
3153 232270260101 RST SM 0603 RC21 100R PM5 R
3154 232270260101 RST SM 0603 RC21 100R PM5 R
3155 232270260104 RST SM 0603 RC21 100K PM5 R
3156 212211805672 RST SM 0603 RC0603 15K PM5 R
3157 212211805944 RST SM 0603 RC0603 120K PM5 R
3158 212211805639 RST SM 0603 RC0603 47R PM5 R
3161 232270260471 RST SM 0603 RC21 470R PM5 R
3162 232270260471 RST SM 0603 RC21 470R PM5 R
3201 232270260101 RST SM 0603 RC21 100R PM5 R
3202 232270260472 RST SM 0603 RC21 4K7 PM5 R
3203 232270260101 RST SM 0603 RC21 100R PM5 R
3204 232270260472 RST SM 0603 RC21 4K7 PM5 R
3205 232270260101 RST SM 0603 RC21 100R PM5 R
3206 232270260472 RST SM 0603 RC21 4K7 PM5 R
3207 232270260472 RST SM 0603 RC21 4K7 PM5 R
3208 232270260101 RST SM 0603 RC21 100R PM5 R
3211 232270260689 RST SM 0603 RC21 68R PM5 R
3213 212211805642 RST SM 0603 RC0603 75R PM5 R
3214 232270260689 RST SM 0603 RC21 68R PM5 R
3215 232270260689 RST SM 0603 RC21 68R PM5 R
3217 212211805642 RST SM 0603 RC0603 75R PM5 R
3218 232270260689 RST SM 0603 RC21 68R PM5 R
3221 232270260689 RST SM 0603 RC21 68R PM5 R
3223 212211805642 RST SM 0603 RC0603 75R PM5 R
3224 232270260689 RST SM 0603 RC21 68R PM5 R
3225 232270260101 RST SM 0603 RC21 100R PM5 R
3231 232270260102 RST SM 0603 RC21 1K PM5 R
3232 232270260273 RST SM 0603 RC21 27K PM5 R
3233 232270260102 RST SM 0603 RC21 1K PM5 R
3234 232270260273 RST SM 0603 RC21 27K PM5 R
3235 232270260472 RST SM 0603 RC21 4K7 PM5 R
3251 232270260279 RST SM 0603 RC21 27R PM5 R
3252 212211805639 RST SM 0603 RC0603 47R PM5 R
3253 232270461002 RST SM 0603 RC22H 1K PM1 R
3254 232270260273 RST SM 0603 RC21 27K PM5 R
3255 232270461002 RST SM 0603 RC22H 1K PM1 R
3256 232270260273 RST SM 0603 RC21 27K PM5 R
3257 232270260279 RST SM 0603 RC21 27R PM5 R
3258 212211805639 RST SM 0603 RC0603 47R PM5 R
3261 232270260279 RST SM 0603 RC21 27R PM5 R
3262 212211805639 RST SM 0603 RC0603 47R PM5 R
3264 212211805635 RST SM 0603 RC0603 10R PM5 R
3265 212211805635 RST SM 0603 RC0603 10R PM5 R
3266 212211805635 RST SM 0603 RC0603 10R PM5 R
3281 232270260102 RST SM 0603 RC21 1K PM5 R
3282 232270260273 RST SM 0603 RC21 27K PM5 R
3283 232270260102 RST SM 0603 RC21 1K PM5 R
3289 232270260273 RST SM 0603 RC21 27K PM5 R
3301 232270461005 RST SM 0603 RC22H 1M PM1 R
3302 232270260332 RST SM 0603 RC21 3K3 PM5 R
3303 232270260332 RST SM 0603 RC21 3K3 PM5 R
3304 232270260332 RST SM 0603 RC21 3K3 PM5 R
3305 232270260332 RST SM 0603 RC21 3K3 PM5 R
3306 232270260332 RST SM 0603 RC21 3K3 PM5 R
3307 232270260332 RST SM 0603 RC21 3K3 PM5 R
3308 232270260332 RST SM 0603 RC21 3K3 PM5 R
3309 232270260332 RST SM 0603 RC21 3K3 PM5 R
3311 232270260222 RST SM 0603 RC21 2K2 PM5 R
3312 232270260472 RST SM 0603 RC21 4K7 PM5 R
3313 232270260472 RST SM 0603 RC21 4K7 PM5 R
3314 232270260223 RST SM 0603 RC21 22K PM5 R
3315 232270260332 RST SM 0603 RC21 3K3 PM5 R
3316 232270260332 RST SM 0603 RC21 3K3 PM5 R
3317 232270260332 RST SM 0603 RC21 3K3 PM5 R
3327 232270461002 RST SM 0603 RC22H 1K PM1 R
3329 232270260101 RST SM 0603 RC21 100R PM5 R
3331 232270260101 RST SM 0603 RC21 100R PM5 R
3402 232270463901 RST SM 0603 RC22H 390R PM1 R
3403 232270260471 RST SM 0603 RC21 470R PM5 R
3404 232270260471 RST SM 0603 RC21 470R PM5 R
3405 232270260101 RST SM 0603 RC21 100R PM5 R
3406 235003510101 RST NETW SM ARV24 4X100R PM5 R
3407 235003510101 RST NETW SM ARV24 4X100R PM5 R
3409 232270461002 RST SM 0603 RC22H 1K PM1 R
3411 232270260101 RST SM 0603 RC21 100R PM5 R
3412 235003510229 RST NETW SM ARV24 4X 22R PM5 R
3413 235003510229 RST NETW SM ARV24 4X 22R PM5 R
3414 235003510229 RST NETW SM ARV24 4X 22R PM5 R
3415 235003510229 RST NETW SM ARV24 4X 22R PM5 R
3416 235003510229 RST NETW SM ARV24 4X 22R PM5 R
3417 235003510229 RST NETW SM ARV24 4X 22R PM5 R
3418 235003510229 RST NETW SM ARV24 4X 22R PM5 R
3419 232270461005 RST SM 0603 RC22H 1M PM1 R
3421 212211805639 RST SM 0603 RC0603 47R PM5 R
3422 212211805635 RST SM 0603 RC0603 10R PM5 R
3424 232270260689 RST SM 0603 RC21 68R PM5 R
3425 232270260689 RST SM 0603 RC21 68R PM5 R
3426 232270260689 RST SM 0603 RC21 68R PM5 R
3501 235003510229 RST NETW SM ARV24 4X 22R PM5 R
3502 232270260472 RST SM 0603 RC21 4K7 PM5 R
3503 232270260472 RST SM 0603 RC21 4K7 PM5 R
3504 235003510229 RST NETW SM ARV24 4X 22R PM5 R
3505 235003510229 RST NETW SM ARV24 4X 22R PM5 R
3506 235003510229 RST NETW SM ARV24 4X 22R PM5 R
3609 212211805639 RST SM 0603 RC0603 47R PM5 R
3611 232270260279 RST SM 0603 RC21 27R PM5 R
3624 232270260472 RST SM 0603 RC21 4K7 PM5 R
3625 232270260101 RST SM 0603 RC21 100R PM5 R
3627 235003510101 RST NETW SM ARV24 4X100R PM5 R
3628 235003510101 RST NETW SM ARV24 4X100R PM5 R
3632 212211805639 RST SM 0603 RC0603 47R PM5 R
3633 212211805639 RST SM 0603 RC0603 47R PM5 R
3634 212211805639 RST SM 0603 RC0603 47R PM5 R
3635 212211805639 RST SM 0603 RC0603 47R PM5 R
5001 313818875691 COI CHOKE 35UH 82M OHM DR10X8
5002 313818875691 COI CHOKE 35UH 82M OHM DR10X8
5003 243853598058 IND FXD BEAD EMI 100MHZ 80R A
5004 242254944197 IND FXD 0805 EMI 100MHZ 220R R
5005 242254944197 IND FXD 0805 EMI 100MHZ 220R R
5101 242253595853 IND FXD SM 0603 0U10 PM10 R
5102 242253595853 IND FXD SM 0603 0U10 PM10 R
5151 242253600782 IND FXD TSL0808 S 33U PM10 B
5152 242254900126 IND FXD 0805 EMI 100MHZ 120R R
5153 242254900126 IND FXD 0805 EMI 100MHZ 120R R
5154 242253600782 IND FXD TSL0808 S 33U PM10 B
5155 242253600782 IND FXD TSL0808 S 33U PM10 B
5156 242253600782 IND FXD TSL0808 S 33U PM10 B
5157 242254900126 IND FXD 0805 EMI 100MHZ 120R R
5158 242254900126 IND FXD 0805 EMI 100MHZ 120R R
5161 242254944194 IND FXD 0805 EMI 100MHZ 200R R
5162 242253600428 IND FXD TSL0808 S 10U PM10 B
5201 242254942893 IND FXD 0603 EMI 100MHZ 120R R
5202 242254942893 IND FXD 0603 EMI 100MHZ 120R R
5203 242254942893 IND FXD 0603 EMI 100MHZ 120R R
5204 242254944197 IND FXD 0805 EMI 100MHZ 220R R
5253 242253595853 IND FXD SM 0603 0U10 PM10 R
5254 242253595853 IND FXD SM 0603 0U10 PM10 R
5301 242254944197 IND FXD 0805 EMI 100MHZ 220R R
5401 242254944197 IND FXD 0805 EMI 100MHZ 220R R
5402 242254944197 IND FXD 0805 EMI 100MHZ 220R R
5403 242254944197 IND FXD 0805 EMI 100MHZ 220R R
5404 242254944197 IND FXD 0805 EMI 100MHZ 220R R
5405 242254944197 IND FXD 0805 EMI 100MHZ 220R R
5406 242254944197 IND FXD 0805 EMI 100MHZ 220R R
5407 242254944197 IND FXD 0805 EMI 100MHZ 220R R
5408 242254944197 IND FXD 0805 EMI 100MHZ 220R R
5551 242254944197 IND FXD 0805 EMI 100MHZ 220R R
5601 242254944197 IND FXD 0805 EMI 100MHZ 220R R
5621 242254944197 IND FXD 0805 EMI 100MHZ 220R R
5622 242254944527 IND FXD 0603 EMI 100MHZ 600R R
5623 242254944527 IND FXD 0603 EMI 100MHZ 600R R
5624 242254944527 IND FXD 0603 EMI 100MHZ 600R R
5625 242254944527 IND FXD 0603 EMI 100MHZ 600R R
5626 242254944527 IND FXD 0603 EMI 100MHZ 600R R
6001 932221745685 DIO REC SM SSA34 (VISH) R
6002 932220347685 DIO REG SM BZX84-B16 (VISH) R
6003 932221745685 DIO REC SM SSA34 (VISH) R
6006 933913910115 DIO SIG SM BAS32L (PHSE) R
6101 933913910115 DIO SIG SM BAS32L (PHSE) R
6201 933913910115 DIO SIG SM BAS32L (PHSE) R
6202 933913910115 DIO SIG SM BAS32L (PHSE) R
7001 932219076668 IC SM L5972D (ST00) R
7002 932217438685 TRA SIG SM BC847C (KEC0) R
7003 932217438685 TRA SIG SM BC847C (KEC0) R
7004 932219076668 IC SM L5972D (ST00) R
7005 932217438685 TRA SIG SM BC847C (KEC0) R
7006 932216638668 FET POW SM SI5441DC-E3 (VISH)R
7009 932217438685 TRA SIG SM BC847C (KEC0) R
7011 932217438685 TRA SIG SM BC847C (KEC0) R
7012 932216638668 FET POW SM SI5441DC-E3 (VISH)R
7101 932219412671 IC SM MSP3445G-QI-B8V3(MIAS) Y
7102 933714830653 IC SM 74HC4052D (PHSE) R
7151 932222035668 IC SM TPA3005D2PHP (TI00) R
7201 935245720165 IC SM 74HCT1G14GW (PHSE) R
Page 61

Magnavox LCD TV
2
Go to cover page
61
7202 932216972682 IC SM AT24C02N-10SC-2.7(ATME)L
7301 313815862181 CPU ASSY (LPL-F115")
7301 823827716771NT68F632ALCPU
7302 932217438685 TRA SIG SM BC847C (KEC0) R
7303 932219183685 IC SM LM809M3-2.93 NOPB(NSC0)R
7304 932222076668 IC SM AME1117CCGTZ (ST00) R
7305 313815862211 EEPROM A
7305 932218650682 IC AT24C16A-10PI-2.7(ATME) L
7401 932222013671ICSMMST51512L-LF(MSTA) Y
7402 932222075668 IC SM AME1117BCGTZ (ST00) R
7403 932222076668 IC SM AME1117CCGTZ (ST00) R
7404 932222076668 IC SM AME1117CCGTZ (ST00) R
7502 932216677682 IC SM M12L16161A-7T (ESMT) L
7501 932216677682 IC SM M12L16161A
7621 935276561518 IC SM SAA7119E/V2/G (PHSE) R
7622 932222077668 IC SM AME1117ECGTZ (ST00) R
7623 932222076668 IC SM AME1117CCGTZ (ST 00) R
1052 313815860801YPbPr-IN PCB ASSY
1931 823827716831 1 X 3 OIN JACK VERTICALTYPE
8931 313819874521 CBLE -015 5/70/5-915AWG28
5931 242253595588 IND FXD SM 0
5932 242253595588 IND FXD SM 0805 0U56 PM10 R
5933 242253595588 IND FXD SM 0805 0U56 PM10 R
5934 242253595588 IND FXD SM 0805 0U56 PM10 R
5935 242253595588 IND FXD SM 0805 0U56 PM10 R
5936 242253595588 IND FXD SM 0805 0U56 PM10 R
2931 2238867
2932 223886715121 CER1 0603NP0 50V120P PM5 R
2933 223886715689 CER1 0603NP0 50V68PPM5 R
2934 223886715689 CER1 0603NP0 50V68PPM5 R
2935 223886715121 CER1 0603NP0 50V120P PM5 R
2936 223886715689 CER1 0603NP0 50V68PPM5 R
2937 223886715689 CER1 0603N
2938 223886715121 CER1 0603NP0 50V120P PM5 R
2939 223886715689 CER1 0603NP0 50V68PPM5 R
3931 232270260339 RST SM 0603 RC21 33R PM5 R
3932 212211805964 RST SM 0603RC0603 75R PM1 R
3933 232270260339 RST SM 0603 RC21 33R PM5 R
3934 212211805964 RST SM 0603RC0603 75R PM1 R
3935 232270260339 RST SM 06
3936 212211805964 RST SM 0603RC0603 75R PM1 R
1053 313815860811 IR PCB ASSY
1902 243812800224 SWI PUSH 2P0.2A 20VSFPC12 B
2901223878615649 CER2 0603X7R 16V 100N PM10 R
2902222278019763 CER2 0805 Y5V 16V 1UPM20 R
2903223858015636 CER2 0805 X7R 50
3901 212211805669 RST SM 0603RC060310K PM5 R
3902232270260101RSTSM0603 RC21 100R PM5 R
3904 212211805647 RST SM 0603RC0603220R PM5 R
3905 212211805647 RST SM 0603RC0603220R PM5 R
7901 932217439685 TRA SIG SM BC857C (KEC
6901 313815862261 IR + HOLDER ASSY
6901 932220313667 IR RECEIVER TSOP34136SB1 L
6902 313815862171LED+HOLDER ASSY
6902 932214603682 LED VS L-3WYGW (KIEL) B
1054 313815860881 KEY BOARD ASSY
1903 242212803035 SWI TACT SM 1P 1POS SKQGABR
1904 242212803035 SWI TACT SM 1P 1POS SKQGABR
1906 242212803035 SWI TACT SM 1P 1POS SKQGA
1907 242212803035 SWI TACT SM 1P 1POS SKQGABR
1908 242212803035 SWI TACT SM 1P 1POS SKQGABR
1921 823827716481 CONBMH2P M1.25
2904223858615636 CER2 0603X7R 50V10N PM10 R
3906232270260471RSTSM0603 RC21 470R PM5 R
3907 232270260222 RST SM 0603 RC21 2K2 PM5 R
39092322
3910 232270260472RSTSM0603 RC21 4K7PM5 R
3911 232270260102RSTSM0603 RC21 1K PM5 R
Diversity of 15MF605T/17(AUO Panel) compared with
15MF605T/17(LPL Panel)
1050 823827717471TFT-LCD MODT150XG01V.0(AUO0)
1051 313815862131 SCALER PCB ASSY (NAFT)15"AUO
2026 223878615647 CER2 0603X7R 16V 68N PM10 R
2163 223824619858CER20603Y5V10V470N P8020 R
2164 223824619858CER20603Y5V10V470N P8020 R
2165 223824619858CER20
2166 223824619858CER20603Y5V10V470N P8020 R
2167 223824619858CER20603Y5V10V470N P8020 R
2315 223858615636 CER2 0603X7R 50V10N PM10 R
3016 212211805976 RST SM 0603RC06033KPM5 R
15689 CER1 0603NP0 50V68PPM5 R
70260332 RST SM 0603 RC21 3K3 PM5 R
SSY (LPL-F115")
-7T (ESMT) L
805 0U56 PM10 R
P0 50V68PPM5 R
03 RC21 33R PM5 R
V10N PM10 R
0) R
603Y5V10V470N P8020 R
3019 232270260473 RST SM 0603 RC21 47K PM5 R
3022 212211805669 RST SM 0603RC060310K PM5 R
3025 212211805651 RST SM 0603RC0603390R PM5 R
3026 232270260241 RST SM 0603 RC21 240R PM5 R
3032 212211805669 RST SM 0603RC060310K PM5 R
3606 2312915
5302 242254944197 IND FXD 0805 EMI 100MHZ 220RR
5303 242254944197 IND FXD 0805 EMI 100MHZ 220RR
7007 932220212685 IC SM LM217D2 (ST00) R
7301 313815862191 CPU ASSY (AUO F115")
0291 313815566091 LABEL-EEPROM-AUO
0615 313811708191 HEX CODE OF F/W (NO MA
7305 313815862221 EEPROM ASSY (AUO-F115")
0292 313815566091 LABEL-EEPROM-AUO
7621 935276561557 IC SM SAA7119E/V2/G (PHSE) Y
1931 242202605741 SOC CINCH V 3PF1L3 GNBURD Y
2933 223886715229 CER1 0603NP0 50V22PPM5 R
2936 223886715229 CER1 0603NP0 50V22PPM5 R
2939 223886715229 CER1 0
1180 313815862291 MAIN FRAME+ WIRE ASSY
8161 313819874542 CBLE -266 6/290/6-266 AWG28
1183 823827717271 DC-AC INVERTER(LIVP-2001 A)
1186 823827717661 LSP BOX8R3W-L(P150BL)
Diversity of 15MF605T/17(CPT PA NEL)compared with
Diversity of 150F1(CPT Panel) compared with 150F1(LPL Panel)
15MF605T/17(LPL PANEL)
1050 823827717481 TFT-LCD CLAA150XP03
1051 313815863201SCALER PCB ASSY(NAFT)15 CPT
2026 223858619805 CER2 0603Y5V 50V10N P8020 R
2315 223858615636 CER2 060
3016 212211805976 RST SM 0603RC06033KPM5 R
3019 232270260473 RST SM 0603 RC21 47K P M5 R
3022 212211805669 RST SM 0603RC060310K PM5 R
3023 232270260472 RST SM 0603 RC21 4K7PM5 R
3025 212211805651 RST SM 0603RC060
3026 232270260241 RST SM 0603 RC21 240R PM5 R
3032 212211805669 RST SM 0603RC060310K PM5 R
3606 231291511808RSTMFLM MBB0207 A 1R8 PM1 A
5302242254944527 IND FXD 0603EMI100MHZ 600RR
5303242254944527 IND FXD 0603EMI100MHZ 600RR
7007 93222
7301 313815863221 CPU ASSY(CPT)
0291 313815566611 LABEL-CPT
0615 313811708181 HEX CODE OF F/W (NO MATL REQ)
7301 932222010682 IC SM NT68F632ALG (NOVA) L
7305 313815863231 EEPROM ASSY(CPT)
0292 313815566611 LABEL-CPT
7621 935276561557 IC SM S
2163 223824619858CER20603Y5V10 V470N P8020 R
2164 223824619858CER20603Y5V10 V470N P8020 R
2165 223824619858CER20603Y5V10V470N P8020 R
2166 223824619858CER20603Y5V10 V470N P8020 R
2167 223824619858CER20603Y5V10V4
1931 242202605741 SOC CINCH V 3PF1L3 GNBURD Y
2933 223886715229 CER1 0603NP0 50V22PPM5 R
2936 223886715229 CER1 0603NP0 50V22PPM5 R
2939 223886715229 CER1 0603NP0 50V22PPM5 R
1180 313815862292 MAIN FRAME+ WIRE ASSY
0051 313815136412 MAIN FRAME(AUO)
8161 313819874542 CBLE -266 6/290/6-266 AWG28
1185
BR
1186 313819875031 LSP BOX8R3W-L(P150BL)
8174 313819875381 CBLE -10420/230/20-032 AWG28
0126 313815565871RATING LABEL
0145 313815523432 OWNER'S MANUAL
0450 313815639352CARTON
0453 313815640091 P.E. BAG
Diversity of 15MF605T/17(AUO Panel)
compared with 15MF605T/17(LPL Panel)
0001 313810361462 SCALER PCB
0001 313810361342 YPBPR-IN PCB
0001 313810361322 IR PCB
0051 313815138001MAIN FRAME(AUO)
0110 313815040301 SCREW TAPPING M3X0.5X6+SW
0126 313815565872RA
0130 313815566132 CARTONSTICKER
0131 313815566493 CARTONLABEL
0141 313815523293 QUICK SETUP GUIDE
0145 313815523434 OWNER'S MANUAL
0291 313815568871LABEL-AUOV2
0292 313815568871LABEL-AUOV2
0450 313815639353CARTON
0453 313815640091 P.E. BAG
11808RSTMFLM MBB0207 A 1R8 PM1 A
603NP0 50V22PPM5 R
3X7R 50V10N PM10 R
3390R PM5 R
0212685 IC SM LM217D2 (ST00) R
AA7119E/V2/G (PHSE) Y
70N P8020 R
313819875021 LSP BOX8R3W-R(P150BR)
TING LABEL
TL REQ)
0458 313815636362 P.E.BAG275x320mm
0506 313815639353CARTON
0523 313815639353CARTON
0615 313811709271HEXCODE OF F/W (NO MATL REQ)
1050 932222953682 TFT-LCD T150XG01V2 (AUOP) B
1051 313815866691 SCALER PCB ASSY(NAFT)15" AUOV
1180 313815862293 MAIN FRAME+ WIRE ASSY
1183 823827718331 PSUOPENFRINVBL4
1184 313819876051 PSUADAPT16V60W (EADP-60BB B
1185 313819875021 LSP BOX8R3W-R(P150BR)
1186 313819875031 LSP BOX8R3W-L(P150BL)
1301242254301501 RES XTL SM 11M05920P HC49/SR
1931 242202605741 SOC CINCH V 3PF1L3 GNBURD Y
2026 223878615
2163 223824619858CER20603Y5V10 V470N P8020 R
2164 223824619858CER20603Y5V10 V470N P8020 R
2165 223824619858CER20603Y5V10V470N P8020 R
2166 223824619858CER20603Y5V10 V470N P8020 R
2167 223824619858CER20603Y5
2315 223858615636 CER2 0603X7R 50V10N PM10 R
2933 223886715229 CER1 0603NP0 50V22PPM5 R
2936 223886715229 CER1 0603NP0 50V22PPM5 R
2939 223886715229 CER1 0603NP0 50V22PPM5 R
3016 212211805976RSTSM0603RC06033KPM5 R
3019 23227026
3022 212211805669 RST SM 0603RC060310K PM5 R
3023 232270260472RSTSM0603 RC21 4K7PM5 R
3025 212211805651RSTSM0603RC0603390R PM5 R
3026 232270260241 RST SM 0603 RC21 240R PM5 R
3032 212211805669 RST SM 0603RC06
3606 231291511808RSTMFLM MBB0207 A 1R8 PM1 A
5302242254944527 IND FXD 0603EMI100MHZ 600RR
5303242254944527 IND FXD 0603EMI100MHZ 600RR
7007 932220212685 IC SM LM217D2 (ST00) R
7301 313815866701CPU ASSY(AUOV2 F115")
7301 932222010682 IC SM NT68
7305 313815866711 EEPROM ASSY(AUOV2 F115")
7621 935276561557 IC SM SAA7119E/V2/G (PHSE) Y
8161 313819874542 CBLE -266 6/290/6-266 AWG28
647 CER2 0603X7R16V 68NPM10 R
V10V470N P8020 R
0473RSTSM0603 RC21 47K PM5 R
0310K PM5 R
F632ALG (NOVA) L
Page 62

Magnavox LCD TV
62
Go to cover page
Different parts list
Diversity of 20MF605T/17 comparedwith15MF605T/17(LPL)
Item12NCDescription
863900016038 20MF605T/17
0011 313815758321 BEZ EL ASSY
0030 313815414951 BEZEL
0040 313815414961BACK COVER
0041 313815414971 DOOR-CABLE
0291 313815565901 LABEL- EEPROM-AUO
0292 313815565901 LABEL-EEPROM-AUO
0450 313815639381 CARTON
0451 313815639371 CUSHION-L
0452 313815639361 CUSHION-R
0453 313815640141 P.E. FOAM BAG(750 X 800)
0615 313811708241 HEX C
1050 823827717611 TFT-LCD MOD A201SN02V2(AUO0)
1051 313815862141 SCALER PCB ASSY (NAFT)20"AUO
1101 242254301372 RES XTL SM 18M432 16PHC49/S R
1180 313815862161 MAIN FRAME+WIRE ASSY(AUO)
1183 823827717601 DC-AC INVERTER (T50I061.00)
1185 823827717451 LSP BOX 8R 3W-R(P150CR)
1186 82382
1301 242254301501 RES XTL SM 11M059 20P HC49/S R
1553 242202518229 CON H 50P F 0.50 SM FPC 0.3 R
2552223886715108 CER1 0603 NP0 50V 1P PM0P25R
2553 223886715109 CER1 0603 NP0 50V 10P PM5R
2554 223858615623 CER2 0603 X7R 50V 1N PM10 R
2556223891619849 CER2 0603 Y5V25
3551 235003510479 RST NETWSM ARV24 4X 47R PM5R
3552235003510479 RST NETWSM ARV24 4X 47R PM5R
3553 235003510479 RST NETWSM ARV24 4X 47R PM5R
3554 235003510479 RST NETWSM ARV24 4X 47R PM5R
3555 235003510479 RST NETWSM ARV24 4X 47R PM5R
3556235003510479 RST NETWSM ARV24 4X 47R PM5R
3557 212211805639 RST SM 0603 RC0603 47R PM5R
3558 212211805635 RST SM 0603 RC0603 10R PM5R
3561 212211805639 RST SM 0603 RC0603 47R PM5R
3562 212211805639 RST SM 0603 RC0603 47R PM5R
4602212211805631 RST SM 0603 JUMP. MAX 0R05 R
4623 212211805631 RST SM 0603 JUMP. MAX 0R05 R
5931 2422
5932242253595313 IND FXD SM 0805 0U56 PM10 R
5933 242253595313 IND FXD SM 0805 0U56 PM10 R
5934 242253595313 IND FXD SM 0805 0U56 PM10 R
5935 242253595313 IND FXD SM 0805 0U56 PM10 R
5936242253595313 IND FXD SM 0805 0U56 PM10 R
7002 933967270685 TRA SIG SM BC847
7003 933967270685 TRA SIG SM BC847CLG (ONSE) R
7005 933967270685 TRA SIG SM BC847CLG (ONSE) R
7009 933967270685 TRA SIG SM BC847CLG (ONSE) R
7011 933967270685 TRA SIG SM BC847CLG (ONSE) R
7202 932214526668IC SMM24C02-WMN6 (ST00) R
7301 313815862201 CPU ASSY (F1-20")
7302 933967270685
7303 823827716381 REGULATOR
7305 313815862231 EEPROM ASSY (AUO-F1 20")
7401 932222015671 IC SMMST51502L-LF(MSTA) Y
7621 935276561557 IC SM SAA7119E/V2/G (PHSE) Y
8161 313819874661 CBLE-0166/360/6-016 AWG28
8174 313819874641 FFC 50/270/50 PITCH 0.5mm
8175 313819874691 CBLE-268 8/180/8-268AWG28
8176 313819874681 CBLE-262 2/180/2-042 AWG28
Diversity of 20MF500T/17 comparedwith
15MF605T/17(LPL Panel)
Item12NCDescription
0007 313815758341 BASE ASSY
0011 313815758322 BEZEL ASSY
0030 313815414952 BEZEL
0040 313815414961BACK COVER
0041 313815414971 DOOR-CABLE
0051 313815136512MAIN FRAME
0053 313815414981 GASKET(20x20x30L)
0099 313815417332 GASKET
0126 313815569701 RATING LABEL
0129 313810650281 P.E. BAG (INSTR. BOOK)
0130 313815569711 CARTON STICKER
0133 313501512031 WARRANTY LABEL
0134 312123522611 In-Box Brochure Marketing Mate
0140 313800991371 PROCESS BOX
0141 313815523293 QUICKSETUP GUIDE
0142 313815523592 QUICKSETUP GUIDE
7717651 LSP BOX 8R 3W-L(P150CL)
53595313 IND FXD SM 0805 0U56 PM10 R
863900017134 20MF500T/17
ODEOFF/W(NOMATL REQ)
V 100N P8020R
CLG (ONSE) R
TRA SIG SM BC847CLG (ONSE) R
0143 313815522911 MAGNAVOX WARRANTY CARD
0144 313815523583 D.F.U.
0145 313815523434 OWNER'S MANUAL
0291 313815569741 LABE
0292 313815569741 LABEL - CPT
0300 282206240595 INK CARTRIDGE -EP-T
0450 313815642351 CARTON
0451 313815639371 CUSHION-L
0452 313815639361 CUSHION-R
0453 313815640141 P.E. FOAM BAG(750 X 800)
0458 313815636362 P.E.BAG 275x320mm
0506 313815642351 CARTON
0523 313815642351 CARTON
0615 3138117096
1050 823827719041 TFT-LCD MODCLAA201VA07
1051 313815866921SCALER PCB ASSY(NAFT)20"CPT
1101 242254301372 RES XTL SM 18M432 16PHC49/S R
1176 313923810292 PROD ASSY RC1112713/17B PKD
1180 313815862162 MAIN FRAME+WIRE ASSY(AUO)
1183 313819875691 PSUOPENFRINVBL6(T50I061.00)
1184 313819876051 PSU AD
1185 313819875451 LSPBOX8R3W-R(P150CR)
1186 313819875441 LSPBOX8R3W-R(P150CL)
1301 242254301501 RES XTL SM 11M059 20P HC49/S R
1553 242202518229 CON H 50P F 0.50 SM FPC 0.3 R
1931 242202605741 SOCCINCH V 3P F 1L3 GNBURD Y
2026 223878619856CER2 0603 Y5V 16V 330N P8020R
2163 223824619858 CER2 06
2164 223824619858 CER2 0603 Y5V 10V 470N P8020R
2165 223824619858 CER2 0603 Y5V 10V 470N P8020R
2166 223824619858 CER2 0603 Y5V 10V 470N P8020R
2167 223824619858 CER2 0603 Y5V 10V 470N P8020R
2315 22385861563
2552223886715108 CER1 0603 NP0 50V 1P PM0P25R
2553 223886715109 CER1 0603 NP0 50V 10P PM5R
2554 223858615623 CER2 0603 X7R 50V 1N PM10 R
2556223891619849 CER2 0603 Y5V25V 100N P8020R
2933 223886715229 CER1 0603 NP0 50V22PPM5R
2936223886715229 C
2939 223886715229 CER1 0603 NP0 50V22PPM5R
3019 212211805678 RST SM 0603 RC0603 47K PM5R
3022 212211805669RST SM 0603 RC0603 10K PM5R
3023 232270260472 RST SM 0603 RC214K7PM5R
3032212211805669RST SM 0603 RC0603 10K PM5R
3551 235003510479 RST NETWSM ARV244X47RPM5R
3552235003510479 RST NETWSM ARV244X47RPM5R
3553 235003510479 RST NETWSM ARV244X47RPM5R
3554 235003510479 RST NETWSM ARV244X47RPM5R
3555 235003510479 RST NETWSM ARV244X47RPM5R
3556235003510479 RST NETWSM ARV244X47RPM5R
3557 212211805639 RST SM 0603 RC0603 47R PM5R
3558 2122
3561 212211805639 RST SM 0603 RC0603 47R PM5R
3562 212211805639 RST SM 0603 RC0603 47R PM5R
4602212211805631 RST SM 0603 JUMP. MAX 0R05 R
4623 212211805631 RST SM 0603 JUMP. MAX 0R05 R
5302242254944527IND
5303 242254944527IND FXD 0603 EMI100MHZ 600R R
5304 242254944197 IND FXD 0805 EMI100MHZ 220R R
7002 933967270685 TRA SIG SM BC847CLG(ONSE)R
7003 933967270685 TRA SIG SM BC847CLG(ONSE)R
7005 933967270685 TRA SIG SM BC847CLG(ONSE)R
7009 933967270685 TRA SIG S
7011 933967270685 TRA SIG SM BC847CLG(ONSE)R
7202 932214526668IC SMM24C02-WMN6 (ST00) R
7301 313815866931 CPU ASSY(CPT)
7301 932222010682 IC SM NT68F632ALG(NOVA) L
7302 933967270685 TRA SIG SM BC847CLG(ONSE)R
7303 823827716381 REGULA
7305 313815866941 EEPROM ASSY (CPT)
7401 932222015671 IC SMMST51502L-LF(MSTA) Y
7621935276561557 IC SM SAA7119E/V2/G (PHSE) Y
8161 313819874661 CBLE-0166/360/6-016 AWG28
8174 823827736057 89G176E 50904
8175 313819874671 CBLE-018 8/180/8-018 AWG28
8176 313819874681 CBLE-262 2/180/2-042 AWG28
11805635 RST SM 0603 RC0603 10R PM5R
L - CPT
51 HEX CODEOFF/W(NOMATL REQ)
APT 16V 60W (EADP-60BB B
03 Y5V 10V 470N P8020R
6CER2 0603 X7R 50V 10N PM10 R
ER1 0603 NP0 50V22PPM5R
FXD 0603 EMI100MHZ 600R R
M BC847CLG(ONSE)R
TOR
Diversiy of 15MF500T/37(CPT Panel)comparedwith
15MF605T/17(LPL PANEL)
Item12NCDescription
863900016222 15MF500T/37
0007 313815759711 BASE ASSY
0051 313815136412MAIN FRAME(AUO)
0126 313815566871 RATING LABEL
0145 313815523581 D.F.U.
0291 313815566611 LABEL-CPT
0292 313815566611 LABEL-CPT
0450 313815640312CARTON
0453 313815640091 P.E. BAG
0458 313815636362 P.E.BAG 275x320mm
0615 313811708181 HEX CODEOFF/W(NOMATL REQ)
1050 82
3827717481 TFT-LCD CLAA150XP03
1051 313815863201 SCALER PCB ASSY(NAFT)15 CPT
1180 313815862292MAIN FRAME+ WIRE ASSY
1185 313819875021 LSP BOX 8R 3W - R (P150BR)
1186 313819875031 LSP BOX 8R 3W - L (P150BL)
1931 242202605741 SOCCINCH V 3P F 1L3GNBURD Y
2026 223858619805 CER2 0603 Y5V 50V 10N P8020R
2163 223824619858 CER2 0603 Y5V 10V 470N P80
2164 223824619858 CER2 0603 Y5V 10V 470N P8020R
2165 223824619858 CER2 0603 Y5V 10V 470N P8020R
2166 223824619858 CER2 0603 Y5V 10V 470N P8020R
2167 223824619858 CER2 0603 Y5V 10V 470N P8020R
2315 223858615636CER2 06
2933 223886715229 CER1 0603 NP0 50V22PPM5R
2936223886715229 CER1 0603 NP0 50V22PPM5R
2939 223886715229 CER1 0603 NP0 50V22PPM5R
3016212211805976 RST SM 0603 RC0603 3K PM5R
3019 232270260473 RST SM 0603 RC21 47K PM5R
3022 212211805669RST SM 06
3023 232270260472 RST SM 0603 RC214K7PM5R
3025 212211805651 RST SM 0603 RC0603 390R PM5R
3026 232270260241 RST SM 0603 RC21 240R PM5R
3032212211805669RST SM 0603 RC0603 10K PM5R
3606231291511808 RSTMFLM MBB02
5302242254944527IND FXD 0603 EMI100MHZ 600R R
5303 242254944527IND FXD 0603 EMI100MHZ 600R R
7007 932220212685 IC SMLM217D2 (ST00) R
7301 313815863221 CPU ASSY(CPT)
7301 932222010682 IC SM NT68F632ALG(NOVA) L
7305 313815863231 EEPROM ASSY(CPT)
7
621935276561557 IC SM SAA7119E/V2/G (PHSE) Y
8161 313819874542CBLE-266 6/290/6-266 AWG28
8174 313819875381 CBLE-10420/230/20-032 AWG28
Diversiy of 15MF500T/37(LPL Panel)comparedwith
15MF605T/17(LPL PANEL)
Item12NCDescription
863900016222 15MF500T/37
0007 313815759711 BASE ASSY
0145 313815523432 OWNER'S MANUAL
0450 313815640311 CARTON
0453 313815640091 P.E. BAG
1185 313819875021 LSP BOX 8R 3W - R (P150BR)
1186 313819875031 LSP BOX 8R 3W - L (P150BL)
1931 242202605741 SO
2026 223858619805 CER2 0603 Y5V 50V 10N P8020R
2163 223824619858 CER2 0603 Y5V 10V 470N P8020R
2164 223824619858 CER2 0603 Y5V 10V 470N P8020R
2165 223824619858 CER2 0603 Y5V 10V 470N P8020R
2166 2238246
2167 223824619858 CER2 0603 Y5V 10V 470N P8020R
2315 223858615636CER2 0603 X7R 50V 10N PM10 R
2933 223886715229 CER1 0603 NP0 50V22PPM5R
2936223886715229 CER1 0603 NP0 50V22PPM5R
2939 223886715229 CER1 0603 NP0 50V22PPM5R
3019 232270260473 RST SM 0603 RC21 47K PM5R
3022 212211805669RST SM 0603 RC0603 10K PM5R
3032212211805669RST SM 0603 RC0603 10K PM5R
5302242254944197 IND FXD 0805 EMI 100MHZ 220R R
5303 242254944197 IND FXD 0805 EMI 100MHZ 220R R
7621 935276561557 IC SM SAA7119E/V2/G (PHSE) Y
61 313819874542CBLE-266 6/290/6-266 AWG28
81
19858 CER2 0603 Y5V 10V 470N P8020R
03 X7R 50V 10N PM10 R
03 RC0603 10K PM5R
07 A 1R8 PM1A
CCINCH V 3P F 1L3 GNBURD Y
20R
Page 63

Repair Tips
Magnavox LCD TV
Go to cover page
63
0. Warning
All ICs and many other semi-conductors are susceptible to
electrostaticdischarges (ESD). Careless handling during
repair can reduce life drastically. When repairing, makesure
that you are connectedwith thesamepotential as the mass
of the unitviaawristw
and tools alsoatthesamepotential !
rap with resistance.Keep components
1. Servicing of SMDs (Surface MountedDevices)
1.1 General cautions on handling and storage
-Oxidation on the terminals of SMDsresultsin poorsoldering.
Do not handle SMDs with bare hands.
-Avoidusing storageplaces that are sensitive to oxidation
such asplaces with sulphur or chlorine gas,direct sunlight,
high temperatures or ahigh de
capacitance or resistance value of the SMDs may be
affectedbythis.
- Rough handling of circuit boards containing SMDs may
cause damage to the components as well as the circuit
boards.Circuit boards containing SMDsshould never be
bent or flexed. Different circuit boardmaterialsexpand and
contract at different rates whenheatedor cooled and the
components and/orsolder connections may be damaged
due to thestress.Never rub orscrape chip components as
this may cause the valu
Similarly, do not slide the circuit boardacross any surface.
1.2 Removal of SMDs
-Heat thesolder (for 2-3 seconds)ateach terminal of the
chip.Bymeans of litz wire and a slight horizontal force,
small components can beremovedwith thesoldering iron.
They can alsoberemovedwith a solder sucker (see Fig.
1A)
gree of humidity. The
e of the component to change.
preferably beequippedwithathermal control (soldering
temperature: 225 to 250 C).
-The chip, onceremoved, mustnever bereused.
1.4 Attachment of SMDs
- Locate the SMDonthesolder lands by means of tweezers
and solder the component on oneside.Ensure that the
component is positionedcorrectly on thesolder lands (see Fig.2A).
-Next complete thesoldering of the terminals of the
component (see Fiq. 2B).
2. Caution when attaching SMDs
-When soldering the SMD terminals, do not touch them
directly with thesoldering iron. Thesoldering should be
done as quickly aspossible,care mustbe takentoavoid
damage to the terminals of the SMDs themselves.
-Keep the SMD's body in contact with theprinted boardwhen
solderi
ng.
-Thesoldering iron to be used(approx. 30 W ) should
preferably beequippedwithathermal control (soldering
temperature: 225 to 250 C).
- Soldering should not be done outside thesolder land.
- Soldering flux (of rosin) may be used, but should not be
acidic.
-After soldering, letthe SMD cool down gradually at room
temperature.
-The quanti
solder land. If the quantity is too great, the SMD might
crack or thesolder lands might be tornloose from the
printed board(see Fig. 3).
ty of solder mustbeproportional to thesize of the
While holding the SMD with a pair of tweezers,takeitoffgently using the
soldering iron's heat appliedtoeach terminal (see Fig. 1 B).
- Remove theexcess solder on thesolder lands by means of
litz wire or a solder sucker (see Fig. 1C).
1.3 Caution on removal
-When handling thesoldering.iron. use suitable pressure and be careful.
-When removing the chip, do not use undue force with thepair of tweezers.
-Thesoldering iron to be used(approx. 30 W) should
Right
Fig.3 Examples
Page 64

Magnavox LCD TV
64
Repair Tips
Go to cover page
3. Lead-free product i dentifi cation
Youcan identify lead-free product by Philips-lead-free logo on PCB.
P
b
4. Lead-free product repair instruction
4.1 Use only lead-free Solder Alloy0622 14900106(1.2mm SAC305) or 0622 149
00108(1.0mm SAC305).
Remark: For leadfree soldering material, pl
details. This is recommendedbyPhilips.
4.2 Use only adequatesolder toolsapplicable for lead-free soldering-tin. Thesolder toolmustbeable toreach atleast a
solder-temperature of 400 ,tostabilize theadjustedtemperature atthesolder-tip andtoexchange solder-tips for different
applications.
Small Passives/Actives to beremovedwith thermaltweezers
Automated systemfor ICandBGArepair (Microscope, Camera
controllers, Vacuum system, Laser pointer)
Solder Hand-Tool(Adjustableintemperature height, Temperature shall be held constant,
Flexible tips)
ease visit www.alphametals.com website for
,Beam split optics, Computer,Programmer,Heat
4.3 Adjustyoursolder too
Heating-timeofthesolder-joint should not exceed~4sec. Avoidtemperatures above 400
rise drastically andflux-fluidwill be destroyed.
Corrosion of Tool-Spikes can beavoidedwhen using SAC305 and a temperature ofless than 400
4.4Mixoflead-free solder-tin/parts with leaded soldering-tin/parts is possible but not recommended. If nottoavoidclean
carefully thesolder-jointfrom old tin and re-solder with newtin.
4.5 Use only original spare-parts listed in the Service(consumables)can also bepurchased at externalcompanies.
4.6 Special information for lead-free BGA-ICs:this ICs will be delivered in so-called
dry-packaging toprotect the IC againstmoisture an
packaging may only be opened shortly before it is used(soldered). Otherwise the
body ofthe ICgets wet insideandduring the heating time thestructure ofthe IC
will be destroyeddue to high(stea
usage the IC has to be heatedup for some hours (around90
attention for ESD-protection!)
5. Rework on BGA (Ball GridArray) ICs
General
Although(LF)BGA assembly yieldsareveryhigh, there may still bearequirementfor component rework. By rework, we
mean theprocess of removing the co
removedfrom a PWB, thesolder ballsofthe component are deformeddrastically so theremoved(LF)BGA has to be
discarded.
Devi ceRemoval
Asisthe case with anyc
surrounding componentsarenotdamaged. To remove an (LF)BGA, the boardmustbe uniformly heatedtoatemperature
close to thereflow soldering temperature.Au
To do this,werecommendthatthe board is heateduntil it is certain that all the jointsaremolten. Then carefully pull the
component off the boardwith avacuum nozzle.For
Area Preparation
When the componenthas been removed, thevacantICareamustbe cleanedbefore replacing the (LF)BGA.
Removing an ICoften leaves varying amountsof solder on the mounting
either a solder sucker or solder wick. Theremaining flux can beremovedwith a brush andcleaning agent. After the board
is properly cleaned and inspected, apply fluxonthesolder landsand on the connection ballsofthe(
Note: Do not apply solder paste, as this has shown toresult in problems during re-soldering.
Devi ceReplacement
The last step in the repair process is tosolder thenewcomponent on the board. Ideally, the (LF)BGA should be
alignedunder a mi
To reflowthesolder, apply a temperature profileaccording to the IC datasheet. Soasnotto damage neighbouring
components, itmaybenecessaryt
More In formation
For more information on howto handle BGA devices, visitthis URL: http://www.atyourservice.ce.philips.com (needs
subscription). After login, select Magazine ,then go t
.to deal with BGA-ICs.
l so that a temperature around360 -380 is reached and stabilized atthesolder joint.
otherwise wear-out oftips will
.
Manuals.Standard-material
dwith lead-free logo on it. This
"
"
m-)pressure.Ifthepackaging was openedbefore
mponentfromthe PWB and replacing itwith anewcomponent. If an (LF)BGA is
omponentthat, it is essentialwhen removing an (LF)BGA, the board, tracks, solder lands, or
niformtemperature reduces the chanceofwarping the PWB.
theappropriate temperature profiles, see the IC datasheet.
croscope or magnifying glass.Ifthis is not possible,trytoalign the (LF)BGA with anyboardmarkers.
oreducesome temperatures andtimes.
""
"
"
o Workshop Information .Here youwill findInformation on how
)for drying (Take
lands. This excessive solder can beremovedwith
LF)BGA
Page 65

Repair Flow Chart
Magnavox LCD TV
Go to cover page
65
1.No Work/LED is off
Check if
power switch
is normal
Yes
Check if AC
adaptor output
=16V
Yes
Check the inverter board
Pin1.2.3=16V
Pin5=0~4.7V
No
No
Replace power switch
Replace power adaptor
3.No picture/LED
is green
Check if working voltage
pin3=3.3Vof 7303
3307=3.3V 3313=5V
1304 Pin1=5V
Check if clock source
1401,1301,1621
Yes
Check if scaler 7401
RGB,clk,H/Vand
DEsignal output
48 bits TTL
Yes
Check circuit around
No
each regulator and
eliminate short and
open situation
No
Replace 1401,1301,1621
Try to replace
CPU or CPU'Sflash Rom
No
CPU'S EEPROM
Painter
Painter's EEPROM
2.No raster/picture
too dim
Check if 1801 on
inverter board
pin1,2,3=16V
pin5=0~4.7V
Yes
Check if 1302 on
scaler board
pin3=3.3V
No
No
Check working
age, backlight
volt
controlsignal and
brightness control
signal on scaler board
Check IR board
Check resistors-
network
Yes
Replace LVDScable
No
Replace LCD panel
4.NoD-Sub picture
Check if H/V
signals input to
schmitt trigger
7201
Yes
Check if schmitt
trigger 7201
output H/V signals
to JAGASM
No
No
No
Replace badresistors-
network
Check input path
Replace 7201
Yes
Go to 3.No picture/LED is green
Page 66

Magnavox LCD TV
66
Go to cover page
5.no TV sound
Repair Flow Chart
8.LED and
function key poor
Check if tuner 1501
pin 10 output 2nd IF
signal
Yes
Chenck 7901
6. No earphone
sound
Check TPA3005D2
7151 5162=16V
Yes
Check TPA3005D2 7151
PIN 2=MSP-OUT-R
PIN 6=MSP-OUT-L
No
No
Eliminate short and open
situation
No
Replace 1501
Check circuit around
control board and
cable between
control board and
scaler board
Replace 7151
Yes
Replace phone Jack Board
7. No remote
function
Try another remote
control
No
Check IR receiver
Yes
Replace one good
remote control
Page 67

GENERAL PRODUCT SPECIFICATION
GENERAL PRODUCT SPECIFICATION
"
. 20 Multifunction LCD monitor.
. PC 15 pins D-SUB analog interface.
. PC audio line in withmini-Jack
. TV Tuner, S-Video, RCA AV inputinterface with R/L Audio-in.
. RCA connectorsfor YPbPr input
. NTSC, PAL TV system.
Magnavox LCD TV
Go to cover page
67
. PC graphic auto pictur
. 14 user modes
. User friendly OSD menu
. User friendly remotecontroller
. DDC2Bcommunication capability
. MAX. resolution 800 x 600 non-interlace at 60 Hz
. SVGA 20 color TFT LCD flat panel
. Easy tilt base
. Anti-glare
. Power management capability
"
to reduce lightreflection
e adjustment
2004-12-15
ISON KUO
20" F1 TFT LCD Monitor/TV
TYPE :20MF605T/17
BRAND : Magnavox
2004-12-15
23
8639 000 16038
590
1
Page 68

Magnavox LCD TV
68
Go to cover page
CONTENTS
2.0Product profile
GENERAL PRODUCT SPECIFICATION
1.0Foreword
2.1LCD
2.2Scanning frequencies
2.3Video dot rate
2.4Powerinput
2.5Power consumption
2.6Dimensions
2.7 Weight
2.8Side speaker
2.9Functions
2.10 Ambient temperature
2.11 Regul
3.0Electricalcharacteristics
3.1Interface signals cables
3.2Userinterface
3.2.1Keypaddefinition
3.2.2Key Function definition
3.2.3Remotecontrol
3.3PC, TV requirement
3.3.1PCinterface
3.3.1.
3.3.1.2 Horizontalscanning
3.3.1.3Verticalscanning
3.3.1.4Input connectors
3.3.1.5Available timings
3.3.2TVinterface
3.3.2.1TVspecialsetting
3.3.3Electriccharacteristics
3.4Powerinput connection
3.5Power management
3.6Display identification
atorycompliance
1Mode storing capacity
of I/O
4.0Visualcharacteristics
4.1Test conditions
4.2Resolution
4.3 Brightness
4.4Imagesize
4.4.1Actualdisplaysize
4.
5 Brightness uniformity
4.6PCwhitecolor adjustment
4.7 TV whitecolor adjustment
4.8TVpicturecentering
2004-12-15
ISON KUO
20" F1 TFT LCD Monitor/TV
TYPE :20MF605T/17
BRAND : Magnavox
2004-12-15
23
8639 000 16038
590
2
Page 69

GENERAL PRODUCT SPECIFICATION
5.0Mechanicalcharacteristics
5.1Controls
5.2Unitdimension / weight
5.3Tiltandswivel base
5.4Transportation packages
5.4.1Shipping dimension / weight
5.4.2 Block unit / palletization
6.0 Environmentalcharacteristics
6.1Susceptibility ofdisplay to externalenvironment
6.2Transportation tests
6.3Displaydisturbances fromexternalenvironment
7.0Reliability
7.1Mean time between failures
8.0 Quality assurance requirements
8.1Acceptan
9.0Serviceability
ce test
Magnavox LCD TV
Go to cover page
69
2004-12-15
ISON KUO
20" F1 TFT LCD Monitor/TV
TYPE :20MF605T/17
BRAND : Magnavox
2004-12-15
23
8639 000 16038
590
3
Page 70

Magnavox LCD TV
70
Go to cover page
1.0FOREWORD
GENERAL PRODUCT SPECIFICATION
Thisspecification describes a 20" multifunction LCD Monitor,maximum resolution up to
800x600/60Hz non-interlaced.
2.0 PRODUCT PROFILE
Philips 20 multifunction LCD Monitor can connecttoPC sanalog D-SUBconnector,and
also support TV, S-Video,,YPbPr/HD,and AV interface .
Mee
2.1LCDPanel:
** Income inspection,pleaserefertopanel specification.**
2.2Scanningfrequencies : Hor.:30 - 40KHz Ver.: 56 - 62 Hz
"
t world wide major TV system: NAFTA
Type NR.:A201SN02 (AUO)
Display area(mm) : 408(H) x 306(V)(20.1-inch diagonal)
Display mode : TN type, Normal white+SWV film
Numberof Pixels : 800(H) x 600(V)
Pitch ( mm ) : 0.51(H) x 0.51(V)
Color pixel arrangement : RGBvertical stripes
Display mode : normally white TN
Numberofcolor : 16.7M (8bits)
Brightness (cd/m^2):450nit(typ.)
Viewingangle : -80 ~80 (H), -60 ~ 60 (V)(Typ.)
Response time : 16ms typ. (Tr+Tf)
Surface treatment :Hard Coating+AR
Electrical interface : TTL (1 port)
Total module power(W) : 35W(typ.)
Contrastratio : Typical 500 : 1
Overall dimension (mm) : 448(W) x 347(H) x 23(D)(max.)
Module weight (g) : 3500
Backlight : 6 CCFL
'
2.
3Video dot rate:<41 MHz
2.4Powerinput : 90 - 264 Vac, 50/60 ± 2 Hz for AC/DC adapter (16V DC/ 3.75A)
2.5Power consumption : typ 55 W
2.6UnitDimensions:mmWxmmHxmmD (Incl. Pedestal)
2.7UnitWeight : 3.5Kg
2.8 Chin speaker : 2 x 3 W
20" F1 TFT LCD Monitor/TV
2004-12-15
ISON KUO
TYPE :20MF605T/17
BRAND : Magnavox
23
2004-12-15
8639 000 16038
590
4
Page 71

GENERAL PRODUCT SPECIFICATION
2.9Func tions:
PC 15 pins D-sub analog interface with audio mini jack input (PC line in).
TV Tuner, S-Video ,RCA AV with L/R Audio-in andYPbPr with audio.
2.10 Ambient tem perature: 0-35°C
2.11 Regulatorycompliance :
Magnavox LCD TV
Go to cover page
71
Safety:
EMI : FCC
3.0Electricalcharacteristics
3.1Interface signals cables
VGA Interface Cable (option)
Length:1.8 M +/- 50 mm
Stereo RCA R/L audio cable (option)
Length:1.5M+/- 50 mm
S-vide
Length:1.5M+/- 50 mm
AV cable (option)
Length:1.5M +/- 50 mm
Mini Jack stereo cable (option)
Length:1.5M+/- 50 mm
Ypbpr cable (option)
Length:1.5M +/- 50mm
CUL and /orCSA , NOM
UL 60950 and UL 60065 and /or CSA C22.2NO. 950 , 065
FCC part 15 Class B
o cable (option)
2004-12-15
ISON KUO
20" F1 TFT LCD Monitor/TV
TYPE :20MF605T/17
BRAND : Magnavox
2004-12-15
23
8639 000 16038
590
5
Page 72

Magnavox LCD TV
72
Go to cover page
GENERAL PRODUCT SPECIFICATION
3.2Userinterface
On screen displayuser control via keypad and remotecontrolfor PC, and TV OSD.
3.2.1Keypaddefinition
Top:
B
Left
Front: RC andpower switch
C
Right
D
Menu
E
Down
A
Power
LED
IR
switch
3.2.2Key Function definition:
Key Function VGA mode TV/video m ode
F
Up
<A> PowerSoftPowerSoftPower
<B> LeftLeft/Volume downLeft/Volume down
<C> RightRight/Volume up Right/Volume up
<D> Menu Call OSD menu Call OSD menu
<E> Down/channel downDownDown/Channel Down
<F> Up/Channel up Up Up/Channel up
PC mode Auto adjustment hot key:Press <B> and<C> at the same time
for 1 seconds.
andhold
2004-12-15
ISON KUO
20" F1 TFT LCD Monitor/TV
TYPE :20MF605T/17
BRAND :Magnavox
2004-12-15
23
8639 000 16038
590
6
Page 73

GENERAL PRODUCT SPECIFICATION
H
/
Magnavox LCD TV
Go to cover page
73
1. Press MENU key to call main menu
2.ByUp/Downtoselect function and Left/Righttoadjust.
3. Left/Rightalsois Volume Hot Key (TV and PC mode)
4. Up/Downalsois Channel Hot Key (TV mode)
5. Press hot Key <B> and<C>can auto-adjust pictureposition
6. Source key isfor switching input signalfrom PC/TV/AV/S-Video/HD.
PowerLED:
Normalworking: Green
Power saving: Amber.
"
"
""
"
3.2.1Remotecontrol
2
4
316
5
6
7
8
910
"
"
"
,phase andclock in PC mode.
1.Power : PowerOn/Standby
2.Numerica keys : (0~9),Channel setting
1
3.Mute:Soundmutefunction
4.Prev-CH:Recall previous CH
18
5.Menu:Main menuselectand OK key
17
6.VOL- : Left/Volume Down
7.OK : OK
8.Source : Source select for PC,
9.Closed cap. : Closed caption on/off
13
11
15
10.SAP(2
11.CH- : Down/Channel Down
14
12.PIP : PIP size select (Small/Medium/Large/PBP)
13.VOL+:Right/Volume Up
14.CH+ : Up/Channel Up
12
15.Display Format : Select displayformat (4:3, Expand 4
16.Smart Sound:Select sound effect
17.Smart Picture:Select picture effect (Personal/Movie/Sports
18.Sleep Timer : Sleep timer15,30,60,120,180,240 OFF
nd
audio):Soundselect
Compress 16:9)
(Personal/News/Music/Theatre)
weaksignal/multimedia/Night)
Tuner,CVBS,S-video,
:3,
All PC or TV OSD menufunction could be accomplished by remotecontrol.
20" F1 TFT LCD Monitor/TV
TYPE :20MF605T/17
BRAND : Magnavox
2004-12-15
ISON KUO
2004-12-15
23
8639 000 16038
590
7
Page 74

Magnavox LCD TV
74
Go to cover page
3.3PCand TV req uirement
3.3.1PCinterface
GENERAL PRODUCT SPECIFICATION
3.3.1.1Mode storing capacity
Pre-load:8
User modes : 14
3.3.1.2 Horizontalscanning
Syncpolarity:Positive or Negative
Scanning frequency : 30 - 40 KHz
3.3.1.3Verticalscanning
Syncpolarity:Positive or Negative
Scanning frequency : 56 - 62 Hz
3.3.1.4Input connectors
(1) Inputanalog D-sub connector pin assignment:
PIN
No.
SIGNAL b(PC)
1Red
2Green
3 Blue
4GND
5GND
6Red GND
7GreenGND
8 Blue GND
9 +5V (Supply from PC)
10 Sync GND
11 GND
12 Bi-directionaldata
13 H-sync
14 V-sync
15 Data clock
2004-12-15
ISON KUO
20" F1 TFT LCD Monitor/TV
TYPE :20MF605T/17
BRAND : Magnavox
2004-12-15
23
8639 000 16038
590
8
Page 75

GENERAL PRODUCT SPECIFICATION
Magnavox LCD TV
Go to cover page
75
3.3.1.5Available timings
Factorypre-load timing,size andcentering are according to
the reference timing charts. Listas below
Mode 3, 6, 7arepreset modes that should pass QAinspection.
Mode 1, 2, 4, 5,8will ru
MODE NO. 1 * 2 * 3
RESOLUTION 640 x 350 720 x 400 640 x 480
Dot clock(MHz) 25.175 28.321 25.175
fh 31.469kHz 31.469kHz 31.469kHz
A (us) 31.78(800 dots) 31.78(900dots) 31.778(800 dots)
B(us) 3.813(96 dots) 3.813(108dots) 3.813 ( 96 dots)
C (us) 1.907(48dots) 1.907(54dots) 1.907 ( 48dots)
D (us) 25.42(640 dots) 25.42(720dots) 25.422 (640 dots)
E (us) 0.636(16 dots) 0.636(18dots) 0.636 ( 16 dots)
f v70Hz(70.09) 70Hz(70.087) 60Hz ( 59.940 )
O (ms ) 14.27(449 lines) 14.27(449 lines) 16.683 (525 lines )
P (ms) 0.064(2 lines) 0.064(2 lines) 0.064 ( 2 lines )
Q(ms) 1.875(59 lines) 1.080(34 lines) 1.049 ( 33 lines )
R (ms) 11.12(350 lines) 12.71(400 lines) 15.253 (480 lines )
S (ms) 1.208(38lines) 0.413(13 lines) 0.317 ( 10 lines)
SYNC.H/V +/- -/+ -/-
POLARITY
SEP . SYNC YY Y
MODE NO. 45
RESOLUTION 640x480640x480
nau to adjustment only, andW/O QA checking.
Dot clock(MHz) 30.240 31.500
fh 35.0kHz 37.500kHz
A (us) 28.571(864 dots) 26.667 (840 dots)
B(us) 2.116( 64 dots) 2.032 ( 64 dots)
C (us) 3.175( 96 dots) 3.810 ( 120 dots)
D (us) 21.164(640 dots) 20.317 ( 640 dots)
E (us) 2.116( 64 dots) 0.508( 16 dots)
f v66.7 HZ( 66.667 ) 75Hz (75 )
O (ms ) 15.000(525 lines ) 13.333 (500 lines)
P (ms) 0.086( 3 lines ) 0.080 ( 3 lines)
Q(ms) 1.114( 39 lines ) 0.427 ( 16 lines)
R (ms) 13.714(480 lines ) 12.80 (480 lines)
S (ms) 0.086( 3 lines ) 0.027 ( 1 line)
SYNC.H/V +/+ -/-
POLARITY Or -/-
SEP . SYNC YY
A :H-Total O : V-Total
B:H-Syncwidth P : V- Syncwidth
C :H- Back porch Q :.V- Back porch
D :H-Video width R : V- Video length
2004-12-15
ISON KUO
20" F1 TFT LCD Monitor/TV
TYPE :20MF605T/17
BRAND : Magnavox
2004-12-15
23
8639 000 16038
590
9
Page 76

Magnavox LCD TV
76
Go to cover page
E :H-Frontporch S :.V- Front porch
Dot clock(MHz) 36.000 40.000 49.500
GENERAL PRODUCT SPECIFICATION
MODE NO. 67 8
RESOLUTION 800 x 600 800 x 600 800 x 600
fh 35.156kHz 37.879kHz 46.875kHz
A (us) 28.44 (1024 dots) 26.40 (1056 dots) 21.333 (1056dots)
B(us) 2.000 ( 72 dots) 3.200 ( 128dots) 1.616 (80 dots)
C (us) 3.556 ( 128dots) 2.200 (88dots) 3.232 ( 160 dots)
D (us) 22.22 (800 dots) 20.00 (800 dots) 16.162 (800 dots)
E (us) 0.667 ( 24 dots) 1.000 ( 40 dots) 0.323 ( 16 dots)
f v56Hz (56.25 ) 60Hz ( 60.316) 75Hz ( 75.000)
O (ms ) 17.78(625 lines) 16.58(628lines) 13.333 (625lines)
P (ms) 0.057 ( 2 lines) 0.106 ( 4 lines) 0.064 ( 3 lines)
Q(ms) 0.626 ( 22 lines) 0.607 ( 23 lines) 0.448(21 lines)
R (ms) 17.07 (600 lines) 15.84 (600 lines) 12.80 (600lines)
S (ms) 0.028(1 line) 0.026 ( 1 line) 0.021 ( 1 line)
SYNC.H/V + / ++/ ++/ +
POLARITY
SEP . SYNC YY Y
2004-12-15
ISON KUO
20" F1 TFT LCD Monitor/TV
TYPE :MF605T/17
BRAND : Magnavox
2004-12-15
23
8639 000 16038
590
10
Page 77

3.3.2TVinterface:
GENERAL PRODUCT SPECIFICATION
Magnavox LCD TV
77
F1-20” TV function include
1. Tuner
2. S-video
3. CVBS (or AV)(RCA)
4.YPbPr and audio(RCA)
5. Audio R/L input (RCA)
Location:
Tuner
S-video
R
L
Pb
Following table is the deviation ofmain TV system.
Item W EUROPE AmericaAPChina
TV Color system PAL, SECAM NTSC PAL/NTSC, PAL
TV system B/G, D/K, I, LM B/G , NTSC-M D/K
Tuner
Sound decoder MSP3415G MSP3445G MSP3415G MSP3415G
CVBS,YC
Color system
ScalerMCU WEversion NAFTA version AP version China version
Closed caption N Y NN
V-chip N Y NN
Teletext N N N N
Remotecontroller(RC5) NAFTA version NAFTA version NAFTA version NAFTA version
Channel number 100 US Air 68, cable 125 100 100
FQ1216ME/I
Picturecarrier
38.9MHz
Multi Multi Multi Multi
Pr
FQ1236/F
Picturecarrier
45.75MHz
AudioY
FQ1216PN
Picturecarrier
38.9MHz
Audio
CVBS
FQ1256/I H-3
Picturecarrier
38MHz
2004-12-15
ISON KUO
20" F1 TFT LCD Monitor/TV
2004-12-15
23
590
11
Page 78

Magnavox LCD TV
78
Go to cover page
Following table is the detail TV System list.
GENERAL PRODUCT SPECIFICATION
TV system Position ofsoundcarrier
M
N4.5 BTSC-stereo+SAP PAL Argentina
B/G
L6.5/5.85 AM-Mono/
I6.0/6.552 FM-Mono/
D/K
3.3.2.1TVspecialsetting:
(MHz)
4.5/4.724212 FM-Stereo(A2) NTSC Korea
4.5FM-FM(EIA-J) NTSC Japan
4.5 BTSC-stereo+SAP NTSC USA
5.5/5.7421875 FM-stereo(A2) PAL Germany, Austria,
5.5/5.85 FM-Mono/
6.5/6.2578125 FM-Stereo
6.5/6.7421875 FM-Stereo
6.5/5.7421875 FM-Stereo
6.5/5.85 FM-Mono/
Close Caption, V-chip(NAFTA Tuner ,CVBSinput sou rce only)
- CC-1 .. CC-4 decoding anddisplay
-TXT1..TXT4 Text mode
-NoExtended Data Services (EDS)
- support violence rating and checking
-Automatic CC-1 selection at user mute
Soundsystem Color system Country
PAL Belgium, Spain,
NICAM
SECAM-L France
NICAM
PAL Great Britain,Hong
NICAM
SECAM-EastSlovak. Rep.
(A2,D/K1)
PAL None
(A2,D/K2)
SECAM-EastPoland
(A2,D/K3)
PAL China,Hungary
NICAM(D/K,NICAM)
Switzerland, Italy,
Netherlands,
Denmark, Finland,
Norway, Sweden.
Kong, Ireland
3.
3.3Electriccharacteristi cs of I/O
D-sub 15 pins:
PC mode
2004-12-15
ISON KUO
.
-Impedance: 75ohm.
20" F1 TFT LCD Monitor/TV
BRAND : Magnavox
- Level: 700mV
- Sync: TTL level, separatesync, + or - polarity.
TYPE :20MF605T/17
23
2004-12-15
8639 000 16038
590
12
Page 79

GENERAL PRODUCT SPECIFICATION
PC-stereoinput (For PC )
-Audio: Impedance > 10 k.
Magnavox LCD TV
Go to cover page
InputLevel: 500 mVrms (Speakeroutpout3WwhenInput level
> 630mVrms and Volume control at 100%)
79
RCA A /V, and audio R+Linput
-Location: Rear side
-CVBS: 75? impedance.
DC coupled signals 1V
(Sync:300mV, video:700mV)
-Audio: Impedance > 10 k.
-ESD-protected : 15 kV
HEADPHONE
-Location : On scaler board.
- Peripherals : He
- -Features :When headphoneplugisconnected, loudspeaker
- sound ismuted.
-Volume control: with the loudspeakervolume.
-Connector type : 3.5 mm stereo Jack, withswitch
-Specifications:-Output: 32ohm>10
-Sound is the same asfrom the loudspeakers.
- ESD-protected : 15 kV
YPbPr:
-Location : Rear side
- Connector type: RCA Jack
- Input : 75ohm.
S-video:
-Location : Rear side
-Input : 75ohm.
pp
InputLevel: 500 mVrms (Speakeroutpout3WwhenInput level
> 630mVrms and Volume control at 100%)
adphones with impedance between 8 -600ohm
mW
3.2Powerinput con nection
AC/DC adapter:+
Power cordlength:1.8 M
Power cord type : 3 leads power cordwithprotectiveearthplug.
TYPE :20MF605T/17
BRAND : Magnavox
2004-12-15
ISON KUO
16V DC/ 3.75A (AC input100~240V)
20" F1 TFT LCD Monitor/TV
2004-12-15
23
8639 000 16038
590
13
Page 80

Magnavox LCD TV
80
Go to cover page
3.5Power man agement
GENERAL PRODUCT SPECIFICATION
PC m ode
The power consumption and the status indication of the set
withpower management function are asfollows,
STATUS
On Pulse Pulse Typical 55 W Green
Sleep No Pulse No Pulse < 1 W<1 W Amber
Power switch off --< 1 W<1 W -
TV mode
withpower management function are asfollows,
STATUS
Active Typical 55 W Green
Sleep < 1 W<1 W Amber
Power switch off < 1 W<1 W -
Horizontal
The power consumption and the status indication of the set
120VAC230V
Vertical
PowerSpec
AC
PowerSpec
120VAC230V
LED
LED
AC
In Moni tor power saving mode
monitor will enter Monitor saving mode . The way to wake up or changesource:
"
1. Source key on remotecontrolà change to TV source directly.
In TV power saving mode
30 minutes, the monitor will enterTVstandby mode , and LED shows amber color. The way to wake up:
"
1. Source key on remotecontrolà change to TV source directly.
"
2. Standby key on remotecontrol.
.6Display identificati on
3
"
"
"
"
In accordance with DDC requirement - DDC2B.
,which no H&V sync, or absent either H-sync or V-sync inputviaVGAconnector. The
"
,which switched off by RC Standby key, SLEEP TIMER function or no TV signal input for
"
"
"
"
2004-12-15
ISON KUO
20" F1 TFT LCD Monitor/TV
TYPE :MF605T/17
BRAND : Magnavox
2004-12-15
23
8639 000 16038
590
14
Page 81

GENERAL PRODUCT SPECIFICATION
4.0Visualcharacteristics
4.1Test conditions
Unless otherwise specified, thisspecification isdefined underthe following conditions.
Magnavox LCD TV
Go to cover page
81
(1) Input signal:As defined in 3.3.1.2, 800 x 600
(2) Luminance setting:controls to be setto450Nits(typical) with
(3)Warmup:more than 30 minutes after poweronwithsignal supplied.
(4) Ambient light: 400 -- 600 lux.
Ambient temperature: 25 +/- 2 °C
(5)
4.2Resoluti on
Mode 3, 6, 7arepreset modes that should pass QAinspection.
Mode 1, 2, 4, 5, 8 will runauto adjustment only, andW/O QA checking.
# Resolution Frequency Pixel rate Sync Comment
1640X350 31.5K/70HZ 25.175 (+/-) IBMVGA
2720X400 31.5K/70HZ 28.322 (-/+) IBMVGA
3640X480 31.5K/60HZ 25.175 (-/-) IBMVGA
4640X480 35.0K/67HZ 30.24 (-/-) MAC
5640X480 37.5K/75HZ 31.501 (-/-) VESA
6800X600 35.2K/56HZ 36 (+/+) VESA
7800X600 37.9K/60HZ 40 (+/+) VESA
8800X600 46.9K/75HZ 49.498 (+/+) VESA
non-interlaced mode (37.9KHz), signal
sou
rces must have 75 ohm outputimpedance.
full screen 100 %dutycyclewhitesignal.
4.3 Brightness:
Typical 450 nits at maximum contrastandBrightness. (at centerof the screen, Fig. 1 )
4.4Imagesize
4.4.1Actualdisplaysize 408 x 306 mm
20" F1 TFT LCD Monitor/TV
TYPE :20MF605T/17
BRAND : Magnavox
2004-12-15
ISON KUO
2004-12-15
23
8639 000 16038
590
15
Page 82

Magnavox LCD TV
82
Go to cover page
4.5 Bri ghtness uniformity
GENERAL PRODUCT SPECIFICATION
Set contrast at 100% and turn the brightness to Max.(At originalcolor)
Apply the Fig 1, it should comply with the following formula:
4.6PCWh
4.7TVWhitecolor adjustment
There is onefactorypreset whitecolor x=0.289 ± 0.030;y=0.304 ± 0.030 for TV RF signal
with the 1931 CIE Chromaticitydiagram(x,y) coordinate,FLUKE54200 co
Smart picture is Personal.
4.8TVpi cturecentering.
Use CVBS (PAL and NTSC) input withcross hatch pattern to check the picture
centering andshould be
itecolor adjustment
There are three factorypreset whitecolor 8500K
Apply full whitepattern,withbrightness in 50 %position
and the contrast control at 50%position.
The 1931 CIE Chromaticity(color triangle) diagram(x,y)
coordinatefor the screen center sho
8500K CIE coordinates X = 0.289 ± 0.030
Left(size)-right(size) < +/- 3mm.
Up(size)-down
Minimum luminance offivepoints(brightness)
> 75%
Maximum luminance offivepoints(brightness)
uld be:
Y=0.304 ± 0.030
lor temp pattern,
(size) < +/- 3mm.
2004-12-15
ISON KUO
20" F1 TFT LCD Monitor/TV
TYPE :20MF605T/17
BRAND : Magnavox
2004-12-15
23
8639 000 16038
590
16
Page 83

GENERAL PRODUCT SPECIFICATION
5.0Mechanicalcharacteristics
Magnavox LCD TV
Go to cover page
83
5.1Controls
Top Control:
-Upkey
-Down key
-Menukey
-Right key
-Left key
Front - RC sensor
-DCpower switch
Rear I/O :
-DCinlet
-PCD-sub
-Tunerinput
-Cinch CVBSinput (AV)
-Cinch Audio input
(S-videoand CVBS use same aud
-S-Videoinput
-Minijack PC audio input
- Ypbpr,
-Audio for YPbPr
5.2Unitdimension / Weight
Set dimension (incl. pedestal): 590mm W x 448.5mm H x196mm D
Net weight: 8Kg
5.3Tilt base
tiltangle : 0to20degree
5.4Transportation packages
io)
5
.4.1Shipping dimension/Weight
5.4.2 Block unit / Palletization (Air shipment)
Carton dimension : 680mm W x533mm H x235mm D
Gross weight : 9.2Kg
layers/block
94 36
sets/layer
sets/block unit
2004-12-15
ISON KUO
20" F1 TFT LCD Monitor/TV
TYPE :20MF605T/17
BRAND : Magnavox
2004-12-15
23
8639 000 16038
590
17
Page 84

Magnavox LCD TV
84
Go to cover page
GENERAL PRODUCT SPECIFICATION
6.0Environmentalcharacteristics
The following sections define the interference andsusceptibilitycondition limits
that mightoccur between externalenvironment and the displaydevice.
6.1Susceptibil ity ofdisplay to ext
Operating
-Temperature:0to35
- Humidity:80%max
-Altitude : 0-3658m
Storage
-Temperature:-20 to 60
- Humidity:95%max (<40
-Altitude : 0-12192m
-Airpressure:300-1100 mBAR
Note: recommend at 0 to 35°C,Humiditylessthan 60 %
6.2Transportation tests
Standard ISTA-1A
Height61cm
Drop Sequence 1C-3E-6F (10 drops)
Test
TestMechanicalfunction ok
ResultNoserious damage on setappearance
Sequence --- PACKAGING
Vibration 5~500 Hz , 0.73Gms , 30 min.for Each axis(X,Y.Z)
TestTestElectricalfunction ok
ResultMechanicalfunction ok
ernalenvironment
-Airpressure:600-1100 mBAR
)
Electricalfunction ok
(room temp./-10
No serious damage on setappearance
,humidity 70 %)
6.3Displaydisturbances fromexternalenvironment
7.0Reliability
2004-12-15
ISON KUO
According to IEC 801-2 for ESD disturbances
7.1Mean Time BetweenFailures
System MTBF (Excluding the LCD panel and CCFL):50,000 hrs
CCFL MTBF : 40,000 hrs
20" F1 TFT LCD Monitor/TV
TYPE :20MF605T/17
BRAND : Magnavox
2004-12-15
23
8639 000 16038
590
18
Page 85

GENERAL PRODUCT SPECIFICATION
8.0 Quality assurance requirements
Magnavox LCD TV
Go to cover page
85
8.1Acceptance test
9.0Serviceability
The serviceability of thi
Fig 1:Bri ghtness and Un iformitymeasurepoi nt s
V
accordingtoMIL-STD-105D Control II level
AQL : 0.65 (major)
(please alsorefertoannualquality agreement)
requirementswhich areprescribed in UAW-0346 andmust
be checked with the check list UAT-0361.
b
2.5 (minor)
smonitor should fulfill the
H/10
H/2
9H
/10
a
1
5
2
b
a
V/
10
V/2
2004-12-15
ISON KUO
3
a
b
20" F1 TFT LCD Monitor/TV
TYPE :20MF605T/17
BRAND : Magnavox
2004-12-15
4
9V/
10
a
b
H
8639 000 16038
23
590
19
Page 86

Magnavox LCD TV
86
Go to cover page
Table 1.
NAFTATVChannels
US- Air broadcast channel
Broadcast
Channel
255.25 59.75 54-60
361.25 65.75 60-66
467.25 71.75 66-72
577.25 81.75 76-82
683.25 87.75 82-88
7175.25 179.75 174-180
8181.25 185.75 180-186
9187.25 191.75 186-192
10 193.25 197.75 192-198
11 199.25 203.75 198-204
12 205.25 209.75 204-210
13 211.25 215.75 210-216
14 471.25 475.75 470-476
15 477.25 481.75 476-482
16 483.25 487.75 482-488
17 489.25 493.75 488-494
18 495.25 499.75 494-500
19 501.25 505.75 500-506
20 507.25 511.75 506-512
21 513.25 517.75 512-518
22 519.25 523.75 518-524
23 525.25 529.75 524-530
24 531.25 535.75 530-536
25 537.25 541.75 536-542
26 543.25 547.75 542-548
27 549.25 553.75 548-554
28 555.25 559.75 554-560
29 561.25 565.75 560-566
30 567.25 571.75 566-572
31 573.25 577.75 572-578
32 579.25 583.75 578-584
33 585.25 589.75 584-590
34 591.25 595.75 590-596
35 597.25 601.75 596-602
36 603.25 607.75 602-608
37 609.25 613.75 608-614
38 615.25 619.75 614-620
39 621.25 625.75 620-626
40 627.25 631.75 626-632
41 633.25 637.75 632-638
42 639.25 643.75 638-644
43 645.25 649.75 644-650
44 651.25 655.75 650-656
45 657.25 661.75 656-662
46 663.25 667.75 662-668
47 669.25 673.75 668-674
48 675.25 679.75 674-680
49 681.25 685.75 680-686
50 687.25 691.75 686-692
Video Carrier (MHz) Audio Carrier
GENERAL PRODUCT SPECIFICATION
(MHz)
Range
(MHz)
2004-12-15
ISON KUO
20" F1 TFT LCD Monitor/TV
TYPE :20MF605T/17
BRAND : Magnavox
2004-12-15
23
8639 000 16038
590
20
Page 87

51 673.25 697.75 692-698
52 699.25 703.75 698-704
53 705.25 709.75 704-710
54 711.25 715.75 710-716
55 717.25 721.75 716-722
56 723.25 727.75 722-728
57 729.25 733.75 728-734
58 735.25 739.75 734-740
59 741.25 745.75 740-746
60 747.25 751.75 746-752
61 753.25 757.75 752-758
62 759.25 763.75 758-764
63 765.25 769.75 764-770
64 771.25 775.75 770-776
65 777.25 781.75 776-782
66 783.25 787.75 782-788
67 789.25 793.75 788-794
68 795.25 799.75 794-800
69 801.25 805.75 800-806
US-Cable channel
GENERAL PRODUCT SPECIFICATION
Magnavox LCD TV
Go to cover page
87
Cable
Channel
255.25 59.75 54-60
361.25 65.75 60-66
467.25 71.75 66-72
173.25 77.75 72-78
579.25 83.75 76-82
685.25 89.75 82-88
95 91.25 95.75 90-96
96 97.25 101.75 96-102
97 103.25 107.75 102-108
98 109.25 113.75 108-114
99 115.25 119.75 114-120
14 121.25 125.75 120-126
15 127.25 131.75 126-132
16 133.25 137.75 132-138
17 139.25 143.75 138-144
18 145.25 149.75 144-150
19 151.25 155.75 150-156
20 157.25 161.75 156-162
21 163.25 167.75 162-168
22 169.25 173.75 168-174
8181.25 185.75 180-186
9187.25 191.75 186-192
10 193.25 197.75 192-198
11 199.25 203.75 198-204
12 205.25 209.75 204-210
13 211.25 215.75 210-216
23 217.25 221.75 216-222
24 223.25 227.75 222-228
25 229.25 233.75 228-234
Video carrier
MHz
Audio carrier
MHz
Range
MHz
2004-12-15
ISON KUO
20" F1 TFT LCD Monitor/TV
TYPE :20MF605T/17
BRAND : Magnavox
2004-12-15
23
8639 000 16038
590
21
Page 88

Magnavox LCD TV
88
Go to cover page
GENERAL PRODUCT SPECIFICATION
26 235.25 239.75 234-240
27 241.25 245.75 240-246
28 247.25 251.75 246-252
29 253.25 257.75 252-258
30 259.25 263.75 258-264
31 265.25 269.75 264-270
32 271.25 275.75 270-276
33 277.25 281.75 276-282
34 283.25 287.75 282-288
35 289.25 293.75 288-294
36 295.25 299.75 294-300
37 301.25 305.75 300-306
38 307.25 311.75 306-312
39 313.25 317.75 312-318
40 319.25 323.75 318-324
41 325.25 329.75 324-330
42 331.25 335.75 330-336
43 337.25 341.75 336-342
44 343.25 347.75 342-348
45 349.25 353.75 348-354
46 355.25 359.75 354-360
47 361.25 365.75 360-366
48 367.25 371.75 366-372
49 373.25 377.75 372-378
50 379.25 383.75 378-384
51 385.25 389.75 384-390
52 391.25 395.75 390-396
53 397.25 401.75 396-402
54 403.25 407.75 402-408
55 409.25 413.75 408-414
56 415.25 419.75 414-420
57 421.25 425.75 420-426
58 427.25 431.75 426-432
59 433.25 437.75 432-438
60 439.25 443.75 438-444
61 445.25 449.75 444-450
62 451.25 455.75 450-456
63 457.25 461.75 456-462
64 463.25 467.75 462-468
65 469.25 473.75 468-474
66 475.25 479.25 474-480
67 481.25 485.75 480-486
68 487.25 491.75 486-492
69 493.25 497.75 492-498
70 499.25 503.75 498-504
71 505.25 509.75 504-510
72 511.25 515.75 510-516
73 517.25 521.75 516-522
74 523.25 527.75 522-528
75 529.25 533.75 528-534
76 535.25 539.75 534-540
77 541.25 545.75 540-546
78 547.25 551.75 546-552
79 553.25 557.75 552-558
80 559.25 563.75 558-564
81 565.25 569.75 564-570
2004-12-15
ISON KUO
20" F1 TFT LCD Monitor/TV
TYPE :20MF605T/17
BRAND : Magnavox
2004-12-15
23
8639 000 16038
590
22
Page 89

GENERAL PRODUCT SPECIFICATION
82 571.25 575.75 570-576
83 577.25 581.75 576-582
84 583.25 587.75 582-588
85 589.25 593.75 588-594
86 595.25 599.75 594-600
87 601.25 605.75 600-606
88 607.25 611.75 606-612
89 613.25 617.75 612-618
90 619.25 623.75 618-624
91 625.25 629.75 624-630
92 631.25 635.75 630-636
93 637.25 641.75 636-642
94 643.25 647.75 642-648
100 649.25 653.75 648-654
101 655.25 659.75 654-660
102 661.25 665.75 660-666
103 667.25 671.75 666-672
104 673.25 677.75 672-678
105 679.25 683.75 678-684
106 685.25 689.75 684-690
107 691.25 695.75 690-696
108 697.25 701.75 696-702
109 703.25 707.75 702-708
110 709.25 713.75 708-714
111 715.25 719.75 714-720
112 721.25 725.75 720-726
113 727.25 731.75 726-732
114 733.25 737.75 732-738
115 739.25 743.75 738-744
116 745.25 749.75 744-750
117 751.25 755.75 750-756
118 757.25 761.75 756-762
119 763.25 767.75 762-768
120 769.25 773.75 768-774
121 775.25 779.75 774-780
122 781.25 785.75 780-786
123 787.25 791.75 786-792
124 793.25 797.75 792-798
125 799.25 803.75 798-804
Magnavox LCD TV
Go to cover page
89
2004-12-15
ISON KUO
20" F1 TFT LCD Monitor/TV
TYPE :20MF605T/17
BRAND : Magnavox
2004-12-15
23
8639 000 16038
590
23
Page 90

90
Magnavox LCD TV
Circuit Description
Go to cover page
1. General Description
This LCD-TV-F1 support PC analog input up to 1280X768 75Hz mode for WXGA panel, and support TV (RF), YC, CVBS, and SCART. Also for
Y Pb Pr signal input from SDTV to HDTV (480I, 480P, 720P, 1080i 60Hz and 576I, 576P, 720P, 1080I 50H z).
This LCD - TV use MST51510 as Scaler engine, which has embedded Analog D-sub, digital DVI decoder, scaling input signal to panel OSD
mapping and simple 3D de-interlacer. The extra SDRAM is to accomplish video frame rate conversion and PIP function.
The external CPU can be used to back light control, RC, keypad input, IIC I/O communication and. TV tuning control, sound control, and
SAA7119A video decoder.
Video decoder SAA7119 is used for TV video processing and convert it with CCIR 601/16bits or 656/8bits digital format and send to Scaler for
de-interlace process, and also CC,V-chip data decode.
One audio decoder MSP34XXG is used for TV sound processing, and output to post amplifier and SCART out.
An option function in WE model Telttext display . Data decode is done by SAA5360, output RGB/FB is to video decoder input for text
overlapping. In non-text model, this chip is N.C.
2. System block diagram
IF
MM Tuner
Tuner_CVBS
2nd_IF
PC_AUD_in
CVBS_AUD_in
SC_AUD_in
YPbPr_AUD_in
SC_AUD_OUT
M
U
X
Y/C
SC_R/G/B or YPbPr
AV_CVBS_RCA
AV_CVBS_SC
TEXT
SAA5360
/1
MSP34X5
SSAAAA77111199++MMSST
SAA7119
TEXT
FB/FR/FG
SATPA
3005D2
SPEAKER
T
PC_input
YPbPr( HD )
8Bits ITU656
SCL/SDA
1Mx1
6
AD VIDEO
AD
MST515X2
EEPROM
24C32
1Mx16
MCU
128K
LVDS / TTL
PANEL
DDC_SDA/
DDC_SCL
(ISP)
DDC
24C02
Scaler choice:
If the panel interface is TTL type: 20 use MST51502L.
If the panel interface is LVDS type: 14 15 17 use MST51512L
"
""
"
Page 91

Circuit Description
Magnavox LCD TV
Go to cover page
Tuner & sound decoder deviation.
WE NA FT AP Chi na
1601 Tuner FQ1216MK3 FQ1236 FQ1216 PN FQ1256
3139 147 18291 3139 147 18351 3139 147 20401 3139 147 20131
7101 Msp Msp3415 Msp3445 Msp3415 Msp3415
9322 194 13671 9322 194 12671 9322 194 13671 9322 194 13671
3. Function description:
MM tuner is used to receive RF wave and output CVBS and 2nd IF signal. CVBS is to video decoder
(SAA7119) for color process, 2nd IF is to sound decoder (MSP34x5) for audio process. The tuner control is via IIC ex. channel tuning.
For different TV system, tuner and sound decoder have diversity as above.
Standard TV input (Tuner, S-video, CVBS, SCART) is processed by SAA7119, But YPbPr, SDTV and HDTV(480i, 576i,
480p,576p,720p,1080i), is done by scaler MST51512L/502L ADC. But the signal is still link to SAA7119 if PIP (video in graph) function
is requested. Then all YPbPr signal processed by SAA7119 could be the PIP video source. (* May use down sampling in HD0)
MV protect is decoded by scaler.
Vid eo decoder SAA7119, is in charge of color decoding, could support PAL, NTSC and SECAM world wide
system. Compare to SAA7118, SAA7119 improve some picture quality, like V-chip CC I2C read-back, LTI, CTI, skin tone
correction(see task A), also the HD0 is supported, so if F1 need PIP function then the The
Teltext f unc tion is for WE model, need a extra IC SAA5360. CVBS input, R/G/B, FB, out. Due to the SAA5360 request input signal
1Vrms and only one input channel, so the CVBS input source is from SAA7119 AOUT (CVBS out with 1Vrms). The R/G/B FB output
into SAA7119 by AI22/AI32/AI42, and AI44 could overlay on any video source.
Sou nd d ecoder MSP3415/45 is responsible to sound decode of tuner 2
And one loudspeaker, one scart out. Due to the input port limitation, a MUX is added for AV source select( PC audio in is fix in SC1). If
the post audio amplifier is gain fixed type then the volume adjust will be on MSP34x5.
Scal er MST51502L/51512L besides scaling function, PIP, 3D de-interlacer, color enhance are major feature.
Even de-interlacer is not so good but for static picture is enough to avoid image sticking.
In America market, to avoid patent issue, two SDRAM is necessary for graph frame buffer. But in else region one SDRAM is
enough. Of course, if no PC mode in spec, then one SDRAM for all model.
The scaler structure limitation, the PIP source only from video port , 8 bits or 16 bits. The sub window /PIP size can enlarge to half
screen.
MCU, NT68F632AL, is 128K flash ROM inside. Power control, RC5 I/O, and key function all done by here.
All chip communication is by IIC (SDA/SCL), and ISP is via DDCIIC, but if PC mode un-supported, then a reserved 6pin connector is
for same application.
""
nd
IF. It has one 2nd IF, two selectable audio sources input.
91
Page 92

92
Magnavox LCD TV
Go to cover page
1. According to ECO CA005556,there is new source. Following is the spare parts.
For 15MF605T/17&15MF500T/37
Action Item 12NC Description
From 1184 313819876051 PSU ADAPT 16V 60W (EADP-60BB B
To 1184 823827732046 PSU ADAPT 16V 45W (EADP-45AB B
For 20MF605T/17
Action Item 12NC Description
From 1183 313819875691 PSU OPENFR INVBL6(T50I061.00)
To 1183
2. According to the ECO-CA005779,designer changed the FFC wire for CPT/AUO panel, the details as below:
For 15MF605T/17 and 15MF500T/37
Acti on Item 12NC Descr ipt ion
Del 1551 242202505567 CON V 20P M 1.25 SM 60947 R
New 1552 242202519132 CON H 20P F 1.25 SM FFC 0.3 R
313819875691 PSU OPENFR INVBL6(T50I061.00)
313819876641 PSU OPENFR INVBL6 (DAC-16T003
Ac t i o n It em 12NC Descript ion
From 8174 313819874571 CBLE - 104 20/230/20 -032A WG28
To 8174 823827732088 FFC 20/213/20 PITCH 1.25m m
From 8174 313819875381 CBLE -104 20/230/20-032 AWG28
To 8174 823827732087 FFC 20/248/20 PITCH1.25mm
3. According to the ECO-CA005931,designer changed the control board of 20MF500T/17,following is the detail
Acti on Item 12NC Descripti on
From 1054 313815860881 KEY BOARD ASSY
To 1054 313815867881 CONTROL PCB ASSY(F2 20" )
Affected sets
Item 12NC Description
0001 313810363361 CONTROL PCB
0289 313800992061 PROCESS BOX
BOM
1903 242212803035 SWI TACT SM 1P 1POS SKQGAB R
1904 242212803035 SWI TACT SM 1P 1POS SKQGAB R
1906 242212803035 SWI TACT SM 1P 1POS SKQGAB R
1907 242212803035 SWI TACT SM 1P 1POS SKQGAB R
1908 242212803035 SWI TACT SM 1P 1POS SKQGAB R
1921 242202518985 CON H 2P M 1.25 SM 60922 R
2904 223858615636 CER2 0603 X7R 50V 10N PM10 R
3906 232270260471 RST SM 0603 RC21 470R PM5 R
3907 232270260222 RST SM 0603 RC21 2K2 PM5 R
3909 232270260332 RST SM 0603 RC21 3K3 PM5 R
3910 232270260472 RST SM 0603 RC21 4K7 PM5 R
3911 232270260102 RST SM 0603 RC21 1K PM5 R
REF 12NC Descri ption
1 863900016036 15MF605T/17
REF 12NC Descri pti on
1 313815860781 SCALER PCB ASSY (NAFT)15"LPL
2 313815862131 SCALER PCB ASSY (NAFT)15"AUO
3 313815862141 SCALER PCB ASSY (NAFT)20"AUO
4 313815863201 SCALER PCB ASSY(NAFT)15 CPT
5 313815864011 SCALER ASSY(CHINA 20 A UO)
6 313815866691 SCALER PCB ASSY(NAFT)15" AUOV2
2 863900016036 15MF605T/17
4 863900016036 15MF605T/17
6 863900016036 15MF605T/17
3 863900016038 20MF605T/17
1 863900016222 15MF500T/37
4 863900016222 15MF500T/37
5 863900016853 20TA1000/93
REF Actio n Item 12NC Descri pti on
1, 2, 4, 6 New 4551
212211805631 RST SM 0603 JUMP. MAX 0R05 R
232270296001 RST SM 0603 JUMP. MAX 0R05 R
ALL New 5304
242254900211 IND FXD 0805 EMI 100MHZ 220R R
242254944197 IND FXD 0805 EMI 100MHZ 220R R
Page 93

Updated Parts
4. According to the ECO-CA005798,F1 20MF500T/17 sheet132 has been changed. Following is the detail:
REF Action Item 12NC Description
ALL Del 108 122210398158 TAPE S-ADH AC CLOTH WH 12MM
ALL
ALL Del 116 313815320271 REINFORCED TAPE
Affected sets
REF 12NC Descr iptio n
From 115 313815161291 ALUMINUM FOIL 4.X25
To 115 313815161291 ALUMINUM FOIL 4.X25
REF 12NC Descr iptio n
1 313815862162 MAIN FRAME+WIRE ASSY(AUO)
2 313815866981 MAIN FRAME+WIRE ASSY
REF Action Item 12NC Description
1
From 0051 313815136512 MAIN FRA ME
To 0051 313815136513 MAIN FRA ME
2 New 0051 313815136513 MAIN FRAME
2 New 0052 313816877281 ACETATE TAPE
2 New 0053 313815414981 GASKET(20x20x30L )
2 New 0054 313815416801 SPONGE
2 New 0055 313815320271 REINFORCED TAPE
New 8161
2
2 New 8175
2 New 8176
1 863900016038 20MF605T/17
1 863900016853 20TA1000/93
2 863900017134 20MF500T/17
313819874661 CBL E-016 6/360/6-016 AWG28
313819874701 CBL E-266 6/360/6-266 AWG28
313819875101 CBL E -266 6/360/6-266 AWG28
313819874671 CBL E-018 8/180/8-018 AWG28
313819874691 CBL E-268 8/180/8-268 AWG28
313819875091 CBL E -268 8/180/8 -268 AWG28
313819874651 CBL E-012 2/180/2-001 AWG28
313819874681 CBL E-262 2/180/2-042 AWG28
Magnavox LCD TV
Go to cover page
93
REF 12NC Description
1 863900017134 20MF500T/17
REF Action Item 12NC Description
ALL
From 1180 313815862162 MAIN FRAME+WIRE ASSY(AUO)
To 1180 313815866981 MAIN FRAME+WIRE ASSY
5. According to ,15MF605T/17 add new source.
Following is the spare parts.
Item 12NC TPV NO. DESCRIPTION
10 9965 000 31271 65T080510522 CHIP 1UF 25V Y5V 0805
20 9965 000 31271 65T080510527 CHIP 1UF 25V Y5V 0805
30 9965 000 31076 65T080510422 0.1UF -10% 25V X7R 080
40 9965 000 39274 65G080539131 CHIP 390PF 50V NPO 0805
50 9965 000 31270 65T080510322 CHIP 0.01UF 25V X7R 080
60 9965 000 39275 65T080510532 CHIP 1UF 50V X7R
80 9965 000 31271 65T080510527 CHIP 1UF 25V Y5V 0805
90 9965 000 39276 65T080515232 CHIP CAP 1500PF 50V X7R
100 9965 000 39276 65T080515232 CHIP CAP 1500PF 50V X7R
110 9965 000 31084 65T080533422 0.33UF 1/5V
120 9965 000 31076 65T080510422 0.1UF -10% 25V X7R 080
130 9965 000 39277 65T080582121 CHIP 820PF 25V NPO
140 9965 000 39278 65G080510532 CHIP 1UF 50V X7R
CP - CL60001
Page 94

94
Magnavox LCD TV
Updated Parts
Go to cover page
150 9965 000 39279 65G080515232 CHIP CAP 1500PF 50V X7R
160 9965 000 39279 65G080515232 CHIP CAP 1500PF 50V X7R
170 9965 000 39278 65G080510532 CHIP 1UF 50V X7R
180 9965 000 31271 65T080510527 CHIP 1UF 25V Y5V 0805
190 9965 000 39280 65G080522322 CHIP 0.022UF 25V X7R 0805
200 9965 000 39281 65G080522131 CHIP 220PF 50V NPO 0805
210 9965 000 39281 65G080522131 CHIP 220PF 50V NPO 0805
220 9965 000 39277 65T080582121 CHIP 820PF 25V NPO
230 9965 000 39282 65G080533332 CHIP 0.033UF 50V X7R 0805
240 9965 000 39278 65G080510532 CHIP 1UF 50V X7R
250 9965 000 31271 65T080510527 CHIP 1UF 25V Y5V 0805
260 9965 000 39283 65G080510422 CHIP 0.1UF 25V X7R 0805
270 9965 000 39284 65G080510322 CHIP 0.01UF 25V X7R 0805
280 9965 000 39284 65G080510322 CHIP 0.01UF 25V X7R 0805
290 9965 000 39284 65G080510322 CHIP 0.01UF 25V X7R 0805
300 9965 000 39284 65G080510322 CHIP 0.01UF 25V X7R 0805
310 9965 000 39285 93G6433 DIODE BAV99 BY PHILIPS
320 9965 000 39286 93G6442PP BAV70 SOT-23 BY PHILIPS
330 9965 000 39285 93G6433 DIODE BAV99 BY PHILIPS
340 9965 000 39286 93G6442PP BAV70 SOT-23 BY PHILIPS
350 9965 000 39287 93G6444S LL4148WP BY SHAWELL
360 9965 000 39287 93G6444S LL4148WP BY SHAWELL
370 9965 000 39287 93G6444S LL4148WP BY SHAWELL
380 9965 000 39287 93G6444S LL4148WP BY SHAWELL
390 9965 000 39288 57G76314 AM9945N-T1-PF SOIC-8
400 9965 000 39289 57T7636 AO4828L SOIC-8 BY AOS
410 9965 000 39288 57G76314 AM9945N-T1-PF SOIC-8
420 9965 000 39289 57T7636 AO4828L SOIC-8 BY AOS
430 9965 000 39290 57G7592 2N7002
440 9965 000 39291 57G7604B PDTA144WK SOT346 PHILIPS
450 9965 000 39292 57G41712T PMBS3904 SOT23 CHIP
460 9965 000 39290 57G7592 2N7002
470 9965 000 39290 57G7592 2N7002
480 9965 000 39290 57G7592 2N7002
490 9965 000 39290 57G7592 2N7002
500 9965 000 39290 57G7592 2N7002
510 9965 000 39293 61L0805103 CHIP 10KOHM 1/10W
520 9965 000 39294 61A0805103 CHIP 10KOHM 1/10W
530 9965 000 39295 61L0805335 CHIP 3.3MOHM 5% 1/10W
540 9965 000 39296 61L0805624 CHIP 620KOHM 1/10W
550 9965 000 39297 61L08054702F CHIP 47KOHM 1/10W 1%
560 9965 000 39298 61L0805303 CHIP 30KOHM 1/10W
570 9965 000 39299 61L0805203 CHIP 20KOHM 1/10W
580 9965 000 39300 61L0805105 CHIP 1MOHM 5% 1/10W
590 9965 000 39301 61L0805270 CHIP 27OHM 5% 1/10W
600 9965 000 39301 61L0805270 CHIP 27OHM 5% 1/10W
610 9965 000 39301 61L0805270 CHIP 27OHM 5% 1/10W
620 9965 000 39301 61L0805270 CHIP 27OHM 5% 1/10W
630 9965 000 39302 61L08058201F CHIP 8.2KOHM 1% 1/10W
640 9965 000 39303 61L0805000 CHIP 0OHM 5% 1/10W
650 9965 000 39304 61L0805102 CHIP 1K OHM 1/10W
660 9965 000 39305 61L0805122 CHIP 1.2K OHM 1/10W
670 9965 000 39306 61L08051002F CHIP 10KOHM 1/10W 1%
680 9965 000 39306 61L08051002F CHIP 10KOHM 1/10W 1%
690 9965 000 39302 61L08058201F CHIP 8.2KOHM 1% 1/10W
700 9965 000 39301 61L0805270 CHIP 27OHM 5% 1/10W
710 9965 000 39301 61L0805270 CHIP 27OHM 5% 1/10W
720 9965 000 39301 61L0805270 CHIP 27OHM 5% 1/10W
730 9965 000 39301 61L0805270 CHIP 27OHM 5% 1/10W
740 9965 000 39303 61L0805000 CHIP 0OHM 5% 1/10W
750 9965 000 39304 61L0805102 CHIP 1K OHM 1/10W
760 9965 000 39305 61L0805122 CHIP 1.2K OHM 1/10W
770 9965 000 39306 61L08051002F CHIP 10KOHM 1/10W 1%
Page 95

Updated Parts
780 9965 000 39306 61L08051002F CHIP 10KOHM 1/10W 1%
790 9965 000 39307 61L08052260F CHIP 226OHM 1/10W 1%
800 9965 000 39308 61L0805104 CHIP 100KOHM 1/10W
810 9965 000 39309 61L0805272 CHIP 2.7KOHM 1/10W
820 9965 000 39310 61L0805331 CHIP 330 OHM 5% 1/10W
830 9965 000 39308 61L0805104 CHIP 100KOHM 1/10W
840 9965 000 39304 61L0805102 CHIP 1K OHM 1/10W
850 9965 000 39308 61L0805104 CHIP 100KOHM 1/10W
860 9965 000 39304 61L0805102 CHIP 1K OHM 1/10W
870 9965 000 39308 61L0805104 CHIP 100KOHM 1/10W
880 9965 000 39304 61L0805102 CHIP 1K OHM 1/10W
890 9965 000 39308 61L0805104 CHIP 100KOHM 1/10W
900 9965 000 39304 61L0805102 CHIP 1K OHM 1/10W
910 9965 000 39311 56G60810 OZ9938GN SOIC-16
920 9965 000 39312 93G39S24T RLZ5.6B ROHM
930 9965 000 39313 84G552 FUSE 2.5A 250V 0663005 BY CONQUE
940 9965 000 39314 84G555 FUSE 2.5A 250V
950 9965 000 39315 61G212Y625KT MATEL GLAZE 6.2M OHM 1/2
960 9965 000 39316 61G212Y625FT RST MATEL GLAZE 6.2M OHM 1/2W
970 9965 000 39315 61G212Y625KT MATEL GLAZE 6.2M OHM 1/2
980 9965 000 39316 61G212Y625FT RST MATEL GLAZE 6.2M OHM 1/2W
990 9965 000 39317 61G20013452T 130KOHM 1% 1/4W
1000 9965 000 39318 61G203S13452T RST MFLM 130K 0.6W 1%
1010 9965 000 39319 61G20024357 24KOHM 1% 1/4W
1020 9965 000 39320 61G203S24352T RST MFLM 24K 0.6W 1%
1030 9965 000 39321 61T17210351 10KOHM 5% 1/4W
1040 9965 000 39322 61G17210352T 10KOHM 5% 1/4W
1050 9965 000 39321 61T17210351 10KOHM 5% 1/4W
1060 9965 000 39322 61G17210352T 10KOHM 5% 1/4W
1070 9965 000 39323 65T3J1006ET 10PF 5% SL 3KV
1080 9965 000 39324 65T3J5096ET 5PF 5% SL 3KV TDK
1090 9965 000 39324 65T3J5096ET 5PF 5% SL 3KV TDK
1100 9965 000 39323 65T3J1006ET 10PF 5% SL 3KV
1110 9965 000 39324 65T3J5096ET 5PF 5% SL 3KV TDK
1120 9965 000 39324 65T3J5096ET 5PF 5% SL 3KV TDK
1130 9965 000 39325 67T215S4714KL LOW ESR EC 470UF 25V
1140 9965 000 39325 67T215S4714KL LOW ESR EC 470UF 25V
1150 9965 000 39326 33L80212DE CONN.2P DIP R/A ENTERY 4100-D02
1160 9965 000 39326 33L80212DE CONN.2P DIP R/A ENTERY 4100-D02
1170 9965 000 39326 33L80212DE CONN.2P DIP R/A ENTERY 4100-D02
1180 9965 000 39326 33L80212DE CONN.2P DIP R/A ENTERY 4100-D02
1190 9965 000 39327 80TL15T900DN INVERTER TRANSFORMER(TK.2043M.10
1200 9965 000 39327 80TL15T900DN INVERTER TRANSFORMER(TK.2043M.10
Magnavox LCD TV
Go to cover page
95
6.According to CP-CL60024,Fl family 20MF500T model add second source,following is the detail:
Action Item Component Code Description Philips 12nc
New 1183 INPCA62CR1P Inverter 996500042584
Page 96

96
5
Magnavox LCD TV
4
3
2
1
Updated Parts
PN : 715T1939-1
1
CN821
2
CONN_NC
F1 15" TV 4-lamp inverter
C820
470uF/25V
+16V
C840
470uF/25V
+16V
12
Q821
1
S1
D1
2
G1
D1
3
S2
D2
4 5
G2 D2
AM9945N
Q841
1
S1
D1
2
G1
D1
3
S2
D2
4 5
G2 D2
AM9945N
1uF
1 2
8
7
6
12
C841
1uF
C842
1.5nF
8
7
6
R822
27R
C822
1.5nF
12
1 2
R842
27R
1 2
1 2
1 2
1 2
R821
27R
C824
5PF/NC
C825
5PF/NC
12
C844
5PF/NC
C845
5PF/NC
R841
27R
1 2
1 2
1 2
1 2
C823
1.5nF
R823
27R
C843
1.5nF
R843
27R
12
12
R820
27R
R844
27R
12
12
C821
R816
20K
VDD
12
C811
1uF
U811
1
DRV1
2
VDDA
3
TIMER
4
DIM
5
ISEN
6
VSEN
7
OVPT
8 9
NC1 NC2
OZ9938GN
VDD
12
0.01uF/25V
SSTCMP
R807
10Kȍ 1/10W
C819
PGND
DRV2
GNDA
LCT
ENA
C832
0.1uF
12
CT
R819
1Mȍ
12
R811
3M3
16
15
14
13
12
11
10
C812
0.1uF
12
12
12
R812
620Kȍ 1/10W
C847
0.022uF/25V
R813
47K_1%
C813
390pF
D D
VDD
R801
BRIGHTNESS
C C
10K_1/4W_NC
12
R806
100K_NC
1 2
12
12
R804
10Kȍ
C826
0.01uF/NC
C831
0.33uF
R815
30K
12
C846
1uF
PT801
1
7
2
3
4
85
6
80TL15T900 DN
PT802
1
7
2
3
4
85
6
80TL15T900 DN
12
C801
10pF/3KV
C806
12
10pF/3KV
12
C802
5pF/3KV
12
C803
5pF/3KV
C838
820pF
12
R837
8.2K_1%
12
C805
5pF/3KV_NC
12
C804
5pF/3KV_NC
12
R854
6.2M_NC
R857
7.5K_NC
C858
220pF
12
C810
5pF/3KV_NC
12
C809
5pF/3KV_NC
12
R834
6.2Mȍ 1/2W_NC
1 2
R824
7.5K_1%_NC
1 2
12
C860
220pF
12
R839
6.2Mȍ 1/2W
12
C807
5pF/3KV
12
C808
5pF/3KV
12
C861
820pF
R825
8.2K_1%
1 2
12
R859
6.2Mȍ 1/2W
R835
10K_1%
R829
0ȍ 1/10W
R855
10K_1%
R849
1 2
0ȍ 1/10W
12
R836
10K_1%
12
R830
10K_1%_NC
12
R856
10K_1%
12
R850
10K_1%_NC
D833
BAV70/SOT23B
2
1
D853
BAV70/SOT23B
1
2
1
OP1
R831
1Kȍ
3
D831
BAV99
1
3
OP2
OP3
3
OP4
2
R833
1.2Kȍ
R851
1Kȍ
3
D851
BAV99
1
2
R853
1.2Kȍ
CN831
2
CONN
1
CN823
2
CONN_NC
2
CN833
1
CONN
1
CN851
2
CONN
1
CN824
2
CONN_NC
1
CN825
2
CONN_NC
2
CN853
1
CONN
130K_1%_1/4W
+16V
BL_CTL
R861
12
R871
10K_1/4W
Isen
Q880
2N7002
+16V
Q873
2
PDTA144EU
32
Q871
12
R872
100K
1 2
C871
0.1uF_NC
2N7002
1
3 1
R873
2.7Kȍ
ZD874
RLZ5.6B
1 2
R874
330ȍ 1/10W
32
1 2
Q874
1
2N3904
12
C874
1uF
BRIGHTNESS Isen
B B
2422-025-18821
8-pin connector
8
7
6
5
4
3
2
1
CN952
A A
F901 2.5A/250V
F903
BL_CTL
BRIGHTNESS
3A/NC
R863
24K_1%_1/4W
32
1
VDD
12
C880
0.1uF/25V
Q881
2N7002
Q883
2N7002
Q885
2N7002
Q886
2N7002
VDD
12
R880
10K_1/4W
32
32
32
32
12
1
1
1
1
C881
0.01uF
C883
0.01uF
C885
0.01uF
C887
0.01uF
12
R881
100Kȍ 1/10W
12
R883
100Kȍ 1/10W
12
R885
100Kȍ 1/10W
12
R887
100Kȍ 1/10W
R882
1Kȍ 1/10W
R884
1Kȍ 1/10W
R886
1Kȍ 1/10W
R888
1Kȍ 1/10W
D881
12
IN4148
D883
12
IN4148
D885
12
IN4148
D887
12
IN4148
OP1
OP2
OP3
OP4
C865
33nF
R865
226ȍ_1%
12
R866
100K/NC
5
4
3
2
1
Page 97

Inverter Layout-1
Updated Parts
Magnavox LCD TVMagnavox LCD TV
Go to cover page
97
Inverter Layout-2
Page 98

Magnavox LCD TV
98
Go to cover page
Inverter Layout-3
Updated Parts
Page 99

Magnavox LCD TV
Go to cover page
99
All units that are returned for service orrepair must pass the
originalmanufactures safety tests. Safety testing requires both
and testing.Hipot Ground Continuity
HI-POT TEST INSTRUCTION
1.Application requirements
1.1 All mains operated products must pass the Hi-Pot test as
described in this instruction.
1.2 This test must be performed againafter the covers have
been refitted following the repair, inspection ormodification
of the product.
Test method
2.
2.1 Connecting conditions
2.1.1 The test specified must be applied between the parallel-
blade plugof the mainscord and all accessible metal
arts of the product.
p
2.1.2 Before carrying out the test, reliable conductive
connections must be ensured and thereafter be
maintained throughout the test period.
2.1.3 The mains switch(es) must be in the "ON" position.
2.2 Test Requirements
All products should be HiPot andGround Continuity tested as
follows:
3. Equipments and Connection
3.1. Equipments
Forexample :
- ChenHwa9032 PROGRAMMABLEAUTO SAFETY
TESTER
- ChenHwa 510B DigitalGrounding Continuity Tester
- ChenHwa901 (AC Hi-pot test), 902 (AC, DC Hi-pot test)
Withstanding Tester
3.2. Connection
* Turnonthe power switch ofmonitor before Hipot and
Ground Continuity testing.
Clip
Clip
Condition HiPot Test for HiPot Test forGround Continuity
products where products where Test requirement
the mainsinput the mainsinput is
range is Full 110V AC(USA
range(or 220V type)
AC)
Test 2820VDC 1700VDC Test current:
voltage (2000
VAC) (1200VAC) 25A,AC
Test time:
Test time 3 seconds 1 second 3 seconds(min.)
(min.) Resistance
required:
Trip set at 100 uA 5 mA <=0.09+Rohm,
currentfor Max. R is the
(Tester) limitation; set resistance of
at 0.1 uA for the mainscord.
Min. Limitation
Ramp set at2
time seconds
(Tester)
2.2.1 The minimum test duration forQuality ControlInspector
must be 1 minute.
2.2.2 The test voltage must be maintained within the specified
voltage + 5%.
(ChenHwa 9032 tester)
Video cable
Connect the "video cable"
or "grounding screw"
to the CLIP onyourtester.
Grounding screw
Connect thepower cord
to the monitor.
2.2.3 There must be no breakdown during the test.
2.2.4 The grounding blade orpinofmains plug must be
conducted with accessible metalparts.
Power outlet
4. Recording
(Rear view of monitor)
Hipot andGround Continuity testing records haveto be kept
for a period of10years.
Page 100

TELEVISION/MONITOR SAFFTY GUIDELINES FOR THE PROFESSIONAL SERVICE TECHNICIAN
Safety Checks
After the original service problem has been corrected,a complete safety check
shouldbemade.Besuretocheckovertheentireset,notjusttheareas
where you have worked. Some previous servicer may have left an unsafe
condition,which could be unknowingly passed on to your customer. Be sure
tocheckallofthefollowing:
Fire and Shock Hazard
1. Be sure all components are positioned in such a way as to avoid the
possibility of adjacent component shorts. This is especially important
on those chassis which are transported to and from the service shop.
2. Never release a repaired unit unless all protective devices such as
insulators, barries, covers, strain reliefs, and other hardware have been
installed in accordance with the original design.
3. Solderingandwiringmustbeinspectedtolocatepossiblecoldsolder
joints,solder splashes,sharp solder points, frayed leads, pinched leads,
or damaged insulation ( including the ac cord).Be certain to remove
loose solder balls and all other loose foreign particles.
4. Check across-the-line components and other components for physical
evidence of damage or deterioration and replace if necessary. Follow
original layout,lead length, and dress.
5. No lead or component should touch a receiving tube or a resistor rated
at1wattormore.Leadtensionaroundprotrudingmetalsurfacesor
edges must be avoided.
6. Critical components having special safety characteristics are identified
withansbytheRef.No.inthepartslistandenclosedwithinabrokenline
* (where several critical components are grouped in one area) along with
the safety symbols on the schematic diagrams and/or exploded views.
7. When servicing any unit, always use a separate isolation transformer
forthechassisFailuretouseaseparateisolationtransformermay
expose you to possible shock hazard, and may cause damage to
servicing instruments.
8. Many electronic products use a polarized ac line cord (one wide pin on
theplug.)Defeatingthissafetyfeaturemaycreateapotentialhazardto
theserviceandtheuser.Extensioncordswhichdonotincorporatethe
polarizing feature should never be used.
9. After reassembly of the unit, always perform an leakage test or resistance
testfromthelinecordtoallexposedmetalpartsofthecabinet.Alsocheck
all metal control shafts(with knobs removed), antenna terminals, handles,
screws,etc.tobesuretheunitmaybesafetyoperatedwithoutdangerof
electrical shock.
*Brokenline
Implosion
1. All picture tubes used in current model receivers are equipped with an
integral implosion system. Care should always be used, and safety
glasses worn,whenever handling any picture tube. Avoid scratching or
otherwise damaging the picture tube during installation.
2. Use only replacement tubes specified by the manufacturer.
X-radiation
1. Be sure procedures and instructions to all your service personnel cover
the subject of X-radiation. Potential sources of X-rays in TV receivers are
the picture tube and the high voltage circuits. The basic precaution which
must be exercised is to keep the high voltage at the factory recommended
level.
2. ToavoidpossibleexposuretoX-radiationandelectricalshock,onlythe
manufacturer's specified anode connectors must be used.
3. It is essential that the service technician has an accurate HV meter
availableatalltimes.Thecalibrationofthismetershouldbechecked
periodically against a reference standard.
4. When the HV circuitry is operating properly there is no possibility of an xradiation problem. High voltage should always be kept at the
manufacturer's
ratedvalue-nohigher-foroptimumperformance.Everytimeacolorsetis
serviced, the brightness should be run up and down while monitoring the
HV with a meter to be certain that the HV is regulated correctly and does
not exceed the specified value. We suggest that you and your technicians
review test procedures so that HV and HV regulation are always checked as
a standard servicing procedure, and the reason for this prudent routine is
clearly understood by everyone. It is important to use an accurate and
reliable HV meter. It is recommended that the HV recorded on each
customer'sinvoice,whichwilldemonstrateaproperconcernforthe
customer's safety.
5. When troubleshooting and making test measurements in a receiver with
a problem of excessive high voltage, reduce the line voltage by means of
aVariactobringtheHVintoacceptablelimitswhiletroubleshooting.Do
WARNING OFF
SERVICE NOTE
:
Before removing the CRT anode cap, turn the unit and short the HIGH VOLTAGE to the CRT DAG ground.
The CRT DAG is not at chassis ground.
:
6. New picture tubes are specifically designed to withstand higher operathng
voltages without creating undesirable X-radiation. It is strongly
recommended that any shop test fixture which is to be used with the new
higher voltage chassis be equipped with one of the new type tubes
designed for this service. Addition of a permanently connected HV meter
totheshoptestfixtureisadvisable.TheCRTtypesusedin thesenew
sets should never be replaced with any other types, as this may result in
excessive X-radiation.
7. It is essential to use the specified picture tube to avoid a possible X-diation
problem.
8. MostTVreceiverscontainsometypeofemergency"HoldDown"circuitto
prevent HV from rising to excessive levels in the presence of a failure
mode. These various circuits should be understood by all technicians
servicing them, especially since many hold down circuits are inoperative
as long as the receiver performs normally.
Leakage Current Cold Check
1. Unplugtheaclinecordandconnectajumperbetweenthetwoprongsof
the plug.
2. Turn on the power switch.
3. Measuretheresistancevaluebetweenthejumperedacplugandall
exposed cabinet parts of the receiver, such as screw heads, antennas,
andcontrolshafts.Whentheexposedmetallicparthasareturnpathto
the chassis, the reading should be between 1 megohm and 5.2 megohms.
Whentheexposedmetaldoesnothaveareturnpathto thechassis,the
reading must be infinity. Remove the jumper from the ac line cord.
TO
INSTRUMENTS
EXPOSED
METAL PARTS
Leakage Current Hot Check
1. Donotuseanisolationtransformerforthistest.Plugthecompletely
reassembled receiver directly into the ac outlet.
2. Connect a 1.5k, 10w resistor paralleled by a 0.15uf. capacitor between
each exposed metallic cabinet part and a good earth ground such as a
water pipe, as shown above.
3. Useanacvoltmeterwithatleast5000ohmsvoltsensitivitytomeasure
the potential across the resistor.
4. Thepotentialatanypointshouldnotexceed0.75volts.Aleakagecurrent
tester may be used to make this test; leakage current must not exceed
0.5milliamps.Ifameasurementisoutsideofthespecifiedlimits,thereis
apossibilityofshockhazard. Thereceivershouldberepairedand
rechecked before returning it to the customer.
5. Repeat the above procedure with the ac plug reversed.( Note: An ac
adapter is necessary when a polarized plug is used. Do not defeat the
polarizing feature of the plug.)
Picture Tube Replacement
The primary source of X-radiation in this television receiver is the picture
tube. The picture tube utilized in this chassis is specially constructed to limit
X-radiation emissions. For continued X-radiation protection, the replacement
tube must be the same type as the original, including suffix letter, or a Philips
approved type.
Parts Replacement
Many electrical and mechanical parts in Philips television sets have special
safety related characteristics. These characteristics are often not evident from
visual inspection nor can the protection afforded by them necessarily be
obtained by using replacement components rated for higher voltage, wattage,
etc. The use of a substitute part which does not have the same safety
characteristics as the Philips recommended replacement part shown in this
service manual may create shock, fire, or other hazards
0.15 uF
1500 ohm, 10W
WATER
PIPE
EARTH
GROUND
 Loading...