

Page 1

LCD
20”
LCD
20”
Page 2

Help?
If this instruction manual does not
give an answer or if ‘Tips’ do not
solve your TV problem, you can call
your Local Philips Customer or
Service Centre. See the supplied
World-wide guarantee booklet.
Please, have the Model and
Product number which you can
find at the back of your television
set or on the packaging, ready,
before calling the Philips helpline.
Contents
Installation
Your remote control 2
Preparation 3
To use the menus 4
Store TV channels 4
Select the menu language 4
Automatic installation 5
Manual installation 6
Reshuffle the programme list 7
Displaying the programme list 7
Operation
Use of the remote control 8-9
Keys in front of the TV 10
Picture menu 11
Sound menu 11
Special menu 12
Teletext 13-14
Connect peripheral equipment
Connecting and selecting equipment 15-17
Video recorder keys 18
English
Model:
Product No:
Tips 19
Index 20
1
Page 3

B
AUTO
AUTO
PV
w
C
B
2
1
3
54 6
87 9
0
OK
MENU
¬
Ò
‡
π
†
®
M
a
Y-Z
D
0
LIST
h
U
fg
c
e
k
b
Installation
w Peripherals p. 8
selection of TV or
AV mode
X bilingual choice/sound
info p. 8
M auto sound p. 8
a auto picture p. 8
D set the sleeptimer p. 9
MENU main menu on/off
p. 9
V volume up/down p. 9
¬ sound mute p.9
P programme selection
p. 9
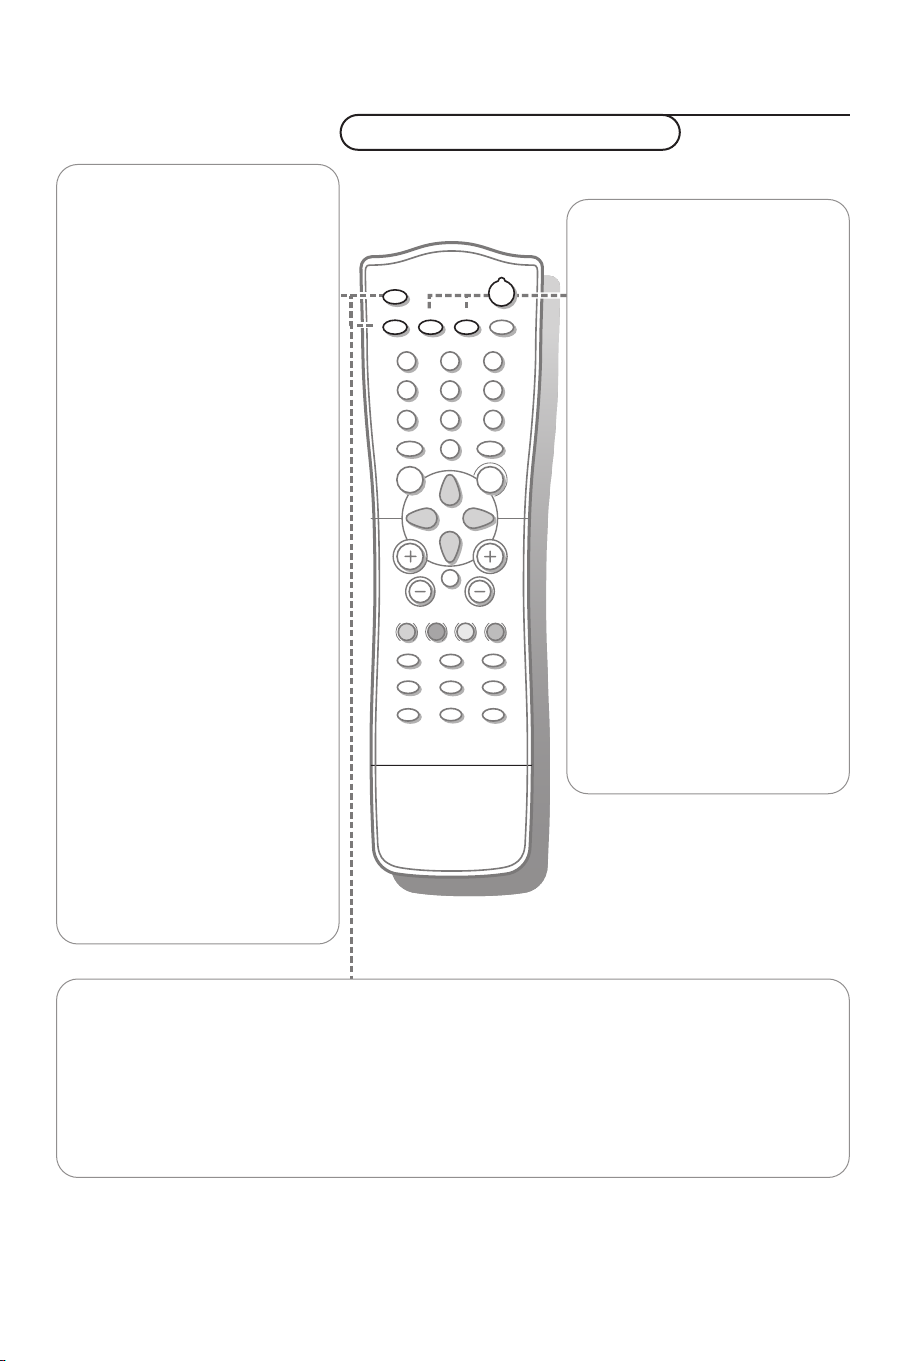
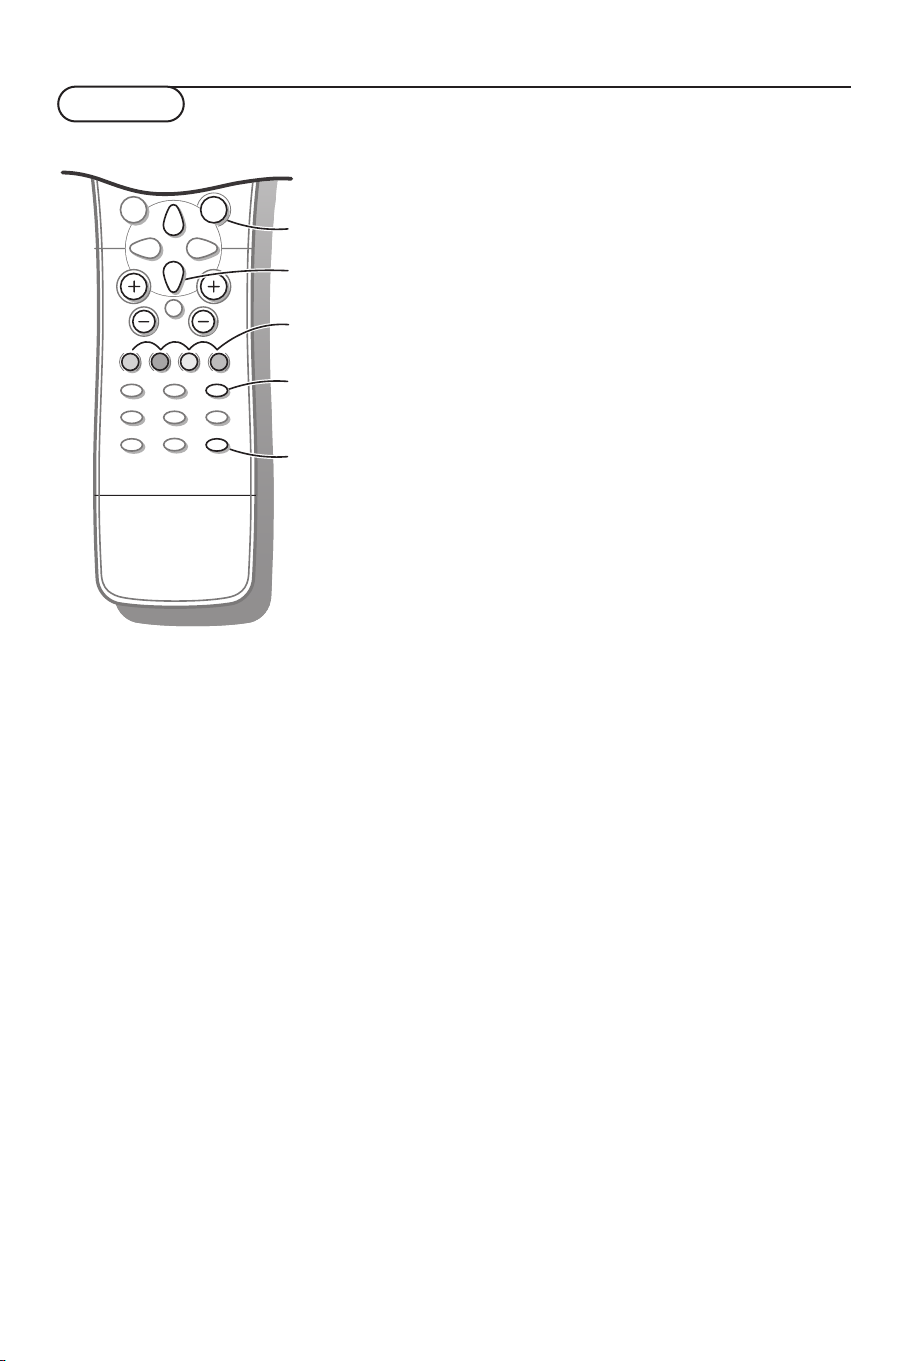
Your remote control
B switch to standby p. 8
previous programme p. 9
0
LIST programme list p. 9
Cursor to select
your choice
OK activate your choice
Colour keys
- direct teletext page or
subject selection, p. 9
- video recorder functions
p. 18
® record
Ò rewind
‡ stop
π play
† wind
C VCR timer
2 Your remote control
Teletext p. 14
h enlarge
b teletext on/off
U time display
subpage selection
f solution to puzzles
g hold
c mix tv/txt picture
e interrupt
k main index
Page 4
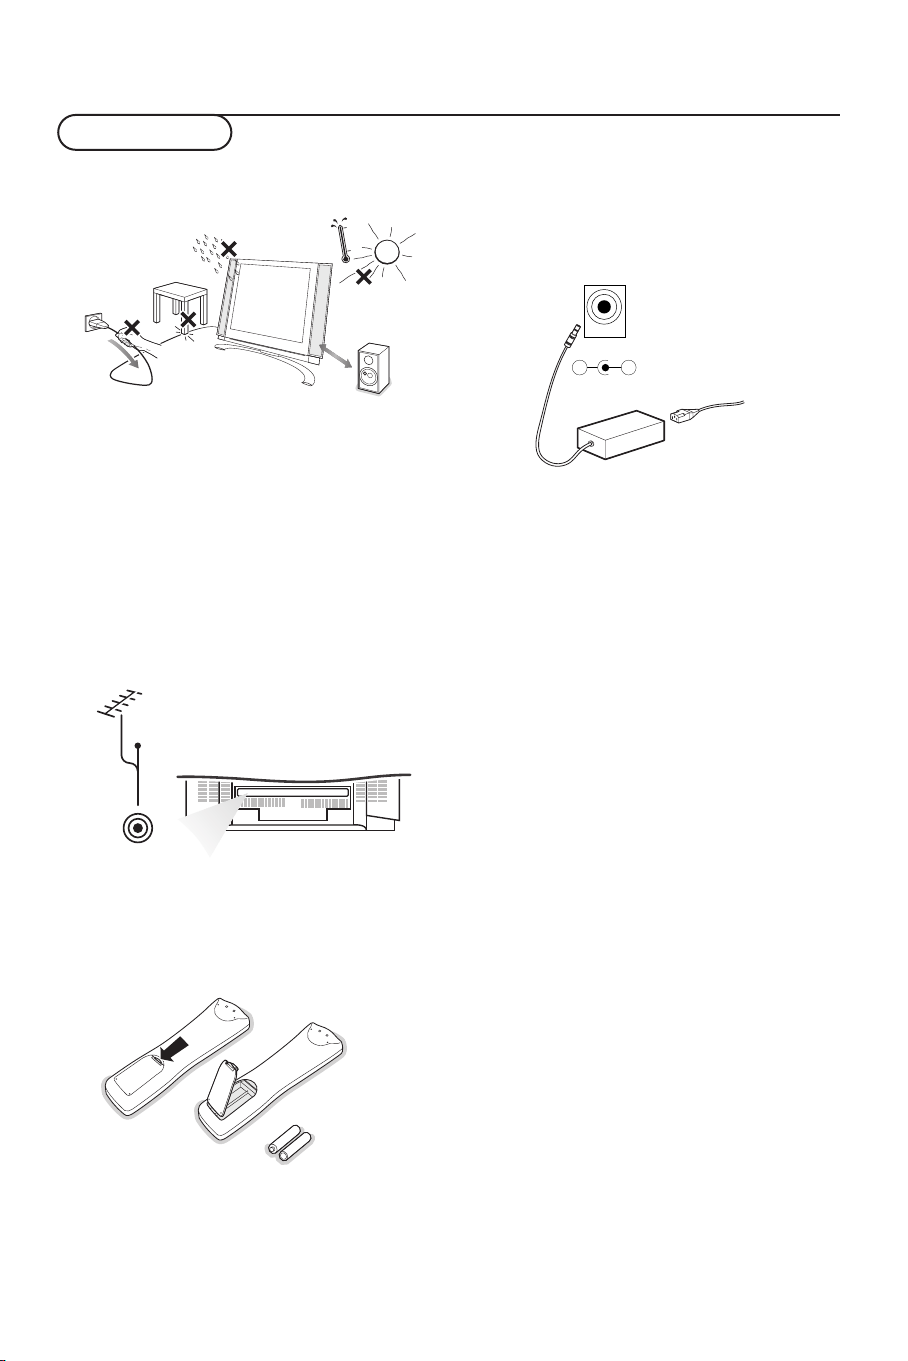
Preparation
Place the TV on a solid surface.
&
min.
1m
Ensure that the TV is placed in a position
to allow free flow of air. Do not cover the
ventilation openings on the back cover.
To prevent any unsafe situations, no naked
flame sources, such as lighted candles,
should be placed on or in the vicinity.
Avoid heat, direct sunlight and exposure to
rain or water.The equipment shall not be
exposed to dripping or splashing.
Insert the aerial plug firmly into the
é
aerial socket
ANT IN x 75 Ω at the back
of the TV.
CABLE
.
ANT IN
x
75
Ω
“ Remote control: Remove the cover of the
battery compartment. Insert the 2
batteries supplied (Type R6-1.5V).
Power:This TV operates on a DC supply
‘
provided by the AC-DC adaptor.The
voltage is as indicated on the label on the
back cover.
DC 15V
_
+
Only use the AC-DC adaptor supplied
with the TV and never apply an AC mains
to the TV directly. The AC-DC adaptor
operates on an AC mains supply, the
voltage is as indicated on the label of the
AC-DC adaptor.
Connect the DC plug of the AC-DC
adaptor to the DC 15V socket at the back
of the TV.
Connect the AC-DC adaptor and its mains
cord.
Insert the mains plug in the wall socket
having a mains voltage of 110V-240V.
( Switch the TV on: Press the power key
at the front side of the TV to switch it on
or off.
If the TV is in standby mode, the standby
indicator in front of the TV illuminates brightly.
Press the standby key B again or the – P +
key or one of the digit keys on the remote
control to switch the TV on.
R6 / 1,5 V
3Preparation
Page 5
B
M
a
AUTO
AUTO
w
Y-Z
Ò
‡
π
®
D
1
2
9
3
6
5
7
4
8
0
0
LIST
P
¬
V
MENU
OK
To use the menus
& Press the MENU key repeatedly to display each menu.
é Use the cursor up/down to select a menu item.
“ Use the cursor left/right to adjust the setting of a menu item or press the OK key to enter a
submenu.
Auto programme
Automatic installation
switch menu on/off
activate
select menu item
Manual installation
Reshuffle
Language
oœ
OK MENU
Store TV channels
Select the menu language
Automatic installation
Manual installation
Reshuffle
Language
Language
oœ
OK MENU
& Press the MENU key on the remote control
once to select the installation menu.
é Use the cursor down to select Language.
“ Press the OK key.
‘ Press the cursor up/down to select your
language.
( Press the OK key.
You can search for and store the TV channels in
two different ways: using Automatic installation,
see p. 5 or Manual installation (tuning-in channel
by channel), see p. 6.
Select your choice and press the OK key.
Installation
4
Page 6

Automatic installation
Auto programme
Automatic installation
Manual installation
Reshuffle
Language
oœ
OK MENU
System BG
System BG
Storage from 1
Search C 15
1
‡ 2%
MENU
& Select the TV system.
é Press the cursor left/right to select the TV
system of the country or part of the
world from where you want to receive the
TV channels.
If you are connected to a cable system,
select the TV system of your country or
part of the world you are now located.
DK: PAL D/K, SECAM D/K (East Europe)
BG: PAL B/G, SECAM B/G
(Europe/East Europe/France)
I: PAL I/II ( U.K./Ireland)
L (if provided) (France)
“ Press the cursor up/down to select
Storage from.
‘ Press the cursor left/right to select a
channel number or enter the channel
number with the digit keys from where
you want to start searching for new
channels. If e.g. you want to keep the
channels 1 to 11 stored earlier, enter
channel number 12.
Your TV will search for new channels from
number 12 onwards.
( Press the cursor up/down to select
Search.
§ Press the OK key to start Automatic
programming.
All available TV channels are searched for
and stored automatically.
The names of the TV channels are stored
as well if the TV channels broadcast VPS
(Video Programme Service), PDC
(Programme Delivery Control) or
Teletext.
If no name can be assigned to the TV
channel, the channel number only is
assigned and stored as C-channel (V/UHF
01-69) or S-channel (Cable 01-47),
followed by a number.
To stop auto programming, press the
MENU key.
When auto programming is completed, the
Programme reshuffle menu appears. See
further on.
è Press the MENU key repeatedly if you
want to exit the menu.
5Installation
Page 7

Manual installation
Automatic installation
Manual installation
Manual installation
Reshuffle
Language
oœ
OK MENU
System BG
Channel S-ch/C-ch
Fine tune πππ
Search
Name C 01
Store 1
oœ p π
OK MENU
Searching for and storing TV channels is
done channel by channel.Also you can
assign a name to a TV channel with up to
5 letters or numbers.
You must go through every step of
the manual programme menu.
& Select Manual installation in the
installation menu.
é Press the OK key to enter the Manual
installation menu.
“ Press the cursor left/right to select the TV
system of the country or part of the
world from where you want to receive the
TV channel.
If you are connected to a cable system,
select the TV system of your country or
part of the world you are now located.
DK: PAL D/K, SECAM D/K (East Europe)
BG: PAL B/G, SECAM B/G
(Europe/East Europe/France)
I: PAL I/II ( U.K./Ireland)
L (if provided) (France)
‘ Press the cursor up/down to select
Channel.
( Press the cursor left/right to select C-ch
for aerial channels or S-ch for cable
channels.
If you know the C- (01-69) or S-channel
number (01-47), enter it directly with the
digit keys 0 to 9.
§ Press the cursor up/down to select
Search.
è Press the cursor left/right to start
searching. If a channel is found the search
will stop.
Fine tune
In case of poor reception, you can
improve the reception by fine tuning.
Press the cursor up/down to select
.
tune
Fine
Press the cursor left/right to fine tune for
the best picture and sound.
Assigning a channel name
It is possible to change the name stored in
the memory or to assign a name to a TV
channel which has not yet been entered.A
name with up to five letters or numbers
can be given to the programme numbers 0
to 99.
Press the cursor up/down to select
Name.
Select the character with the cursor
left/right.
Space, numbers and other special
characters are located between Z and A.
Press the OK key.
Select a following character.
Proceed with the following steps.
! If the channel is the one required, press
the cursor up/down to select
Store.
ç Press the cursor left/right to select a
channel number or enter the channel
number with the digit keys.
0 Press the OK key to store the TV channel.
Repeat steps 4 to 10 to store another TV
channel.
Press the
want to exit the menu.
MENU key repeatedly if you
Ask for a list from your cable company or
dealer.
Installation
6
Page 8

Reshuffle the programme list
Auto programme
Automatic installation
Manual installation
Reshuffle
Language
oœ
OK MENU
0ARD
1ZDF
1 ZDF
2C12
3S 4
4 CH-5
Delete
•
Move
•
oœ p π
OK MENU
5 ARD1
6 ZDF1
7 C12
8S 44
9 CH-5
Copy
•
Skip
•
According to your preference you can
delete or skip the stored TV channels.You
can also change the order of the stored
TV channels or insert a blank data into
the selected channel number.
& Press the cursor up/down to select
Reshuffle in the Installation menu.
é Press the OK key to enter the Reshuffle
menu.
Deleting a TV channel
& Press the cursor up/down, left/right to
select a TV channel to be deleted.
é Press the red key on the remote control
twice.
The selected TV channel number is
deleted, all the following channels are
shifted up one position.
Copying a TV channel
& Press the cursor up/down, left/right to
select a TV channel to be copied.
é Press the green key on the remote
control.
All the following channel numbers are
shifted down one position.
Moving a TV channel
& Press the cursor up/down, left/right to
select a channel number to be moved.
é Press the yellow key on the remote
control.
“ Press the cursor up/down, left/right to
move the TV channel to the desired
channel number.
‘ Press the yellow key again to release this
function.
Skipping a channel number
& Press the cursor up/down, left/right to
select a channel number to be skipped.
é Press the blue key on the remote control.
The skipped TV channel is displayed in
blue.
“ Press the blue key again.
After leaving the installation you can
browse through the TV channels by
pressing the cursor keys up/down. Only
those TV channels which are not skipped
can be selected. Skipped TV channels can
still be selected with the digit keys or in
the programme list in which they will be
displayed in blue.
Displaying the programme list
0ARD
1ZDF
1 ZDF
2C12
3S 4
4 CH-5
oœ p π
OK MENU
5 ARD1
6 ZDF1
7 C12
8S 44
9 CH-5
Press the
MENU key repeatedly to exit
the menu.
& Press the LIST key on the remote control
to display the programme list.
é Press the cursor up/down, left/right to run
through the list of 100 channel numbers.
“ Press the OK key to select the desired TV
channel.
Note:TV channels displayed in blue have been
set up to be skipped in the Reshuffle
menu.
7Installation
Page 9
Operation
MENU
OK
PV
¬
5
1
3
2
4
6
7
9
8
0
0
LIST
h
fg
Ò
‡
π
c
b
®
†
U
e
k
C
a
D
B
M
AUTO
AUTO
w
Y-Z
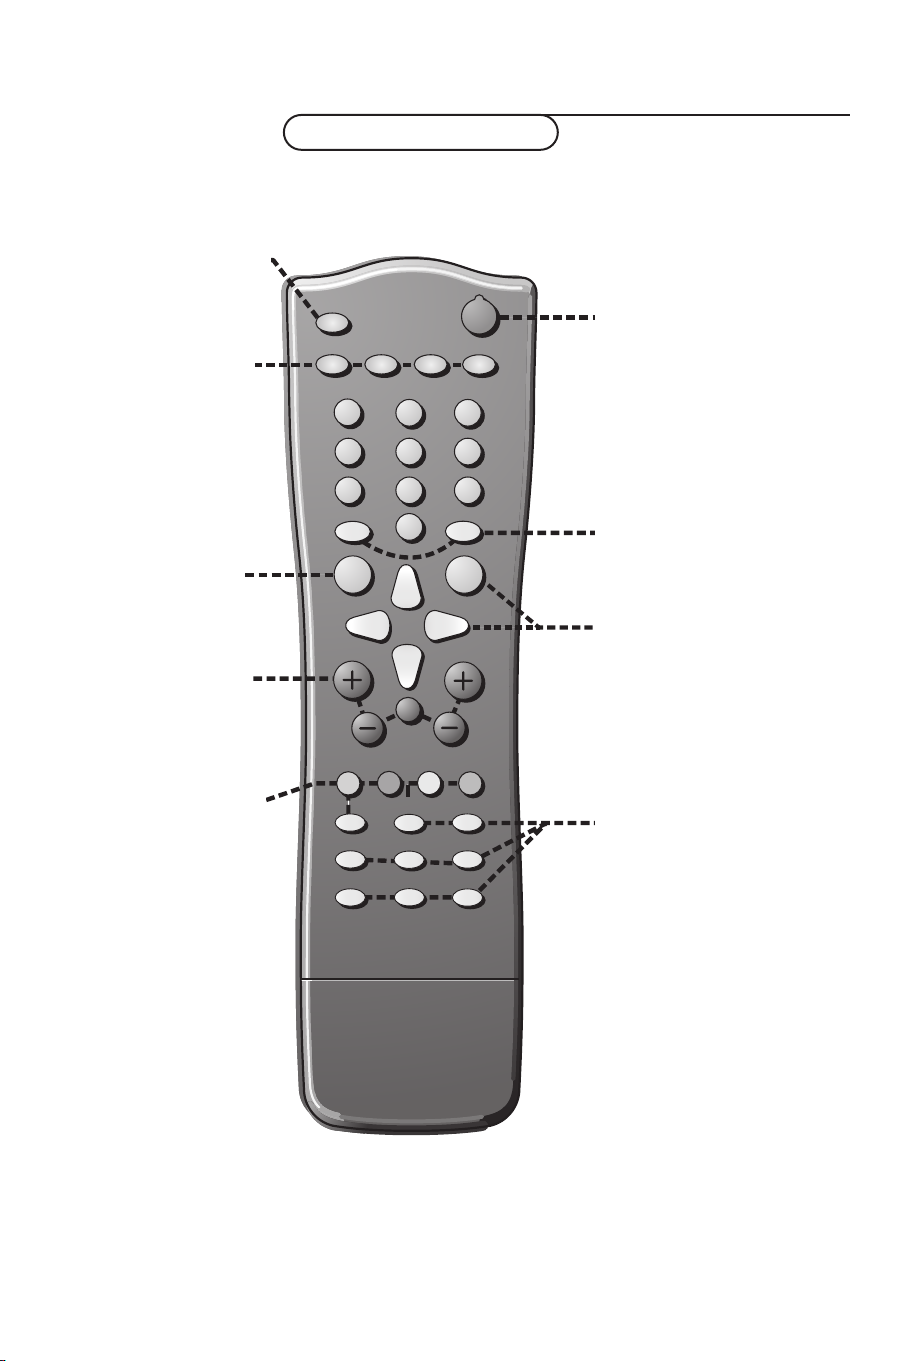
w Source
Select other peripherals: press
repeatedly to select
AV2 or S-VIDEO mode.
X Bilingual choice and
sound mode selection
Press this key
• to switch from
Mono sound in case of
stereo transmission, or from
Nicam Stereo to Nicam
, in case of digital
Mono
transmission
• to switch from
Y to Nicam Dual Z or
Nicam Dual X in case of
Nicam Dual transmission
• to choose between
Dual Z or Dual X in case
of bilingual transmission:
Dual Y sends the primary
broadcast language to the
loudspeakers;
Dual Z sends the secondary
broadcast language to the
loudspeakers;
Dual X sends a separate
language to each loudspeaker.
Note: in case of weak stereo
sound signals, with stereo or
Nicam stereo transmission, select
mono reception.
TV, AV1,
Stereo to
Nicam Dual
Dual Y,
Use of the remote control
B Standby
Switches the TV on from
standby or off to standby.
AUTO keys
To select predefined picture
and sound settings.
a
AUTO picture
Each time it is pressed, a
different picture setting is
selected, corresponding with
specific factory settings of
Contrast, Brightness, Colour
and Sharpness.
M
AUTO
Each time it is pressed, a
different sound setting is
selected, corresponding with
specific factory settings of
treble and bass.
Personal refers to the personal
preference settings of picture
and sound selected and stored
in the picture and sound menu.
sound
Sound output selection in AV mode
In AV mode, you can select the output sound for the left and right loudspeakers.
Press the X key repeatedly to select:
• L+R: the audio signal from the audio L input is sent to the left loudspeaker, the audio signal
from the audio R input to the right loudspeaker
• L+L: the audio signal from the audio L input is sent to the left and right loudspeakers
• R+R: the audio signal from the audio R input is sent to the left and right loudspeakers.
Use of the remote control
8
Page 10

B
M
a
AUTO
AUTO
w
Y-Z
C
h
fg
c
b
e
k
Ò
‡
π
®
†
U
D
1
2
9
3
6
5
7
4
8
0
0
LIST
MENU
OK
P
¬
V
MENU Press repeatedly to
display each menu.
OK Press this key to activate
your choice, when in the menus.
V Volume
Press + or - to adjust the
volume.
¬ Mute
Temporarily interrupt the
sound or restore it.
P Programme selection
• to browse through the TV
channels which are not
skipped
• to switch the TV on from
standby.
®Ò‡π† Video
recorder keys see p. 18.
U Time display
The time, downloaded from the
TV channel (with teletext
broadcast) stored on
programme number 1 or the
lowest not skipped programme
number, is displayed on the
screen.
D Sleeptimer
With this key you can set a
time period after which the
TV should switch itself to
standby.
Press the key repeatedly to
select the number of minutes.
The counter runs from B 0,
10, 20, 30.... to 240 minutes.
The timer begins to count
down from the number of
minutes selected.
Note:To view the remaining time,
press the
D key once. To cancel
the sleep time, repeatedly press
the
D key until B 0 appears.
0/9 Digit keys
To select a TV channel.
For a channel number under
10, first enter a 0, e.g. 05 for 5.
0 Previous programme
To display the previously
selected TV channel.
LIST Programme list
To display the programme list.
b Teletext on/off
see p. 13.
Teletext functions see p. 14.
hUfgcek
9Use of the remote control
Page 11

Keys in front of the TV
TV / VIDEO
MENU
OK
_
VOL
+
_
CH / PR
+
B
ON / OFF
Should your remote control be lost or broken you can still operate your TV with the keys
in front of the TV.
ON/OFF: Press the power ON/OFF key to switch the TV on or off
TV/VIDEO: Press repeatedly to select TV or AV mode
MENU: Press repeatedly to display each menu
OK: - Press this key to activate your choice when in the menu
Auto demonstration: Keep the OK key pressed for about 10 seconds.
All the menus are being displayed automatically one after the other.
To stop Auto demonstration, press any key on the front panel.
- VOL + : - Press - or + to select a menu item;
- Press - or + to adjust the volume;
- Press - or + to adjust the menu settings.
- CH/PR +:- Press - or + to browse through the TV channels which are not skipped;
- Press - or + to select a menu item;
- To switch the TV on from standby.
B: Switches the TV on from standby or off to standby.
The B indicator lights up brightly when the TV is in standby, dims when the TV is
switched on.
Keys in front of the TV
10
Page 12
B
M
a
AUTO
AUTO
w
Y-Z
D
1
2
9
3
6
5
7
4
8
0
0
LIST
P
¬
V
MENU
OK
Use of the menus
switch menu on/off
activate
select menu item
Picture menu
Contrast 100
Contrast
Brightness 95
Colour 85
Sharpness 80
Tint
oœ p π
OK MENU
100
& Press the MENU key repeatedly to display
the picture, sound or special menu.
é Use the cursor up/down to select a menu
item.
“ Use the cursor left/right to adjust the
setting of a menu item or press the OK
key to enter a submenu.
‘ Press the MENU key repeatedly if you want
to exit the menu.
You can adjust picture contrast, brightness,
colour, sharpness and tint (NTSC AV only) to
the levels you prefer.
Press the OK key to store the adjustments.
The message
Now your picture settings are stored and can
be recalled with the
remote control, selecting
To select one of the predefined factory picture
settings, press the
control.
Stored appears.
AUTO a key on the
Personal.
AUTO a key on the remote
Sound menu
Equalizer
Equalizer
Balance 0
AVL On/Off
oœ
OK MENU
Flat
Natural
Music
Movie
Speech
Personal
oœ p π
You can select your preferred sound setting or
you can also adjust the sound frequency of
equalizer and the balance of the right and left
speaker’s sound output.
AVL On to maintain constant volume
Switch
levels when switching TV channels.
0.1 0.5 1.5 5.0 10 kHz
MENU
Press the
MENU key repeatedly to exit the
menu
Equalizer
& Select Equalizer and press the OK key to
enter the Equalizer menu.
é Select one of the predefined factory sound
settings or select
personal sound settings of treble and bass.
Setting the equalizer Personal
Personal to adjust your
& Select Personal with the cursor up/down.
é Press the cursor left/right to select a
sound band.
“ Press the cursor up/down to adjust the
appropriate sound level.
‘ Press the OK key to store the Personal
adjustments.
The message
Press the
the menu.
Stored appears.
MENU key repeatedly to exit
11Use of the menus
Page 13

Special menu
Input TV
Source TV
Child lock Off
Auto off Off
oœ p π
MENU
Select TV or AV mode
& Select Source in the Special menu.
é Press the cursor left/right to select TV,
AV1 , AV 2 or S-VIDEO.
AV1 for a VCR connected to the w 1
•
euroconnector. (See Connect Peripheral
equipment, p. 15)
AV2 for a VCR connected to the AV2
•
connector of the TV.
S-VIDEO for a S-Video VCR connected
•
to the S-Video connector of the TV.
Note:When a VCR is connected via the aerial
socket, the TV is used in TV mode.
Alternatively you can select the TV or AV mode
with the source key on the remote control.
Auto AV switching
If your VCR is connected to the
euroconnector and the VCR is switched to
playback, the TV is automatically switched
AV1 mode. If you want to keep on
to
watching in TV mode, press the cursor
+ P -
up/down,
hild lock
C
or press the digit keys.
If the child lock is on, the TV can only be
switched on and operated with the
remote control.The keys in front of the
TV cannot be used. In this way you can
prevent unauthorised use of your TV.
If the message
Child lock On appears, the
child lock must be switched off before you
can use the front panel keys to select a TV
channel.
& Select Child lock in the Special menu.
é Press the cursor left/right to select Child
lock On
.
“ Press the MENU key repeatedly to exit
the menu.
To return to TV mode, press the cursor
up/down or the digit keys.
Auto off
If Auto off is switched
On, the TV
automatically switches to standby if for a
period of about 12 minutes no aerial signal
is received.
& Select Auto off in the Special menu.
é Press the cursor left/right to select Auto
On.
off
“ Press the MENU key repeatedly to exit
the menu.
12 Use of the menus
Page 14
Teletext
C
h
fg
c
e
Ò
‡
π
®
†
U
9
7
8
0
0
LIST
P
¬
V
MENU
OK
b
k
b
k
OK key to activate
cursor to select
pages
colour keys
to select
Most TV channels broadcast information via
teletext.
Each channel which broadcasts teletext
transmits a page with information on how to
use its teletext system. Look for the teletext
page with the main index (usually page 100).
Depending on the TV channel, teletext is
transmitted in different systems:
teletext
•
•
, TOP and FASTEXT.
Standard teletext consists of a number of
pages which are selected by directly entering
the corresponding page number.
TOP and FASTEXT make use of the colours
along the bottom line, corresponding with
the colour keys of your remote control, to
select teletext information
Standard
Switch Teletext on and off
Press b to switch the teletext on or off.
The main index page or the last selected page
appears on the screen together with an
information headline and an option line at the
bottom of the screen.
Select a Teletext page
With the digit keys
Enter the desired page number with the digit
keys.
The page counter seeks the page.
A message appears when you have entered a non
existent or incorrect page number. Complete the
3- digit number and then re-enter the correct
page number. Page numbers beginning with 0 or 9
do not exist.
With the bottom option line
Select with the colour keys, corresponding to
the coloured options at the bottom of the
screen, the desired subject.
With the cursor up/down
Press the cursor up/down to select the
previous or the following page.
Select the index teletext page
Press the k key to display the main index
(usually p.100).
Only for TOP teletext broadcasts:
Not all TV channels broadcast TOP teletext.
TOP orders the pages in categories and adds
other possibilities of enhancing ease of use.
Press the k key. A TOP overview of the
teletext subjects available is displayed.
Make use of the colour keys to select teletext
information or directly select the teletext
pages with the digit keys.
13Use of the menus
Page 15

C
h
fg
c
b
e
k
Ò
‡
π
®
†
9
7
8
0
0
LIST
P
¬
V
OK
MENU
MENU
U
U
c
h
f
e
b
g
OK to activate
cursor to select
subpages
Special teletext functions
Enlarge
Press h repeatedly to display the upper
part, the lower part and then to return to the
normal page size.When the upper part is
displayed, you can scroll the text, line by line
using the cursor up/down.
Reveal
Press f to reveal/conceal the hidden
information, such as solutions to riddles and
puzzles.
Hold
Press g to stop the automatically rotating of
the subpages if these are available.
The g icon is displayed at the top of the
screen.
Press the g key again to continue the
automatic rotating again
Select subpages
If subpages are available you can stop them
from automatically rotating or select the
described subpage yourself.
Press the U key.
The subpage number is displayed at the
bottom of the screen.
Press the red or green key to select the
previous or following subpage, or change the
subpage with the cursor up/down or with the
digit keys.
Press the U key again to exit this function.
Mix
Press the c key to display the teletext pages
superimposed on the TV picture.
Press the c key again to switch the TV
picture off again.
Interrupt
Press e.
The TV programme appears.
b at the top of the screen indicates that you
are still in the teletext mode.
Before interrupting teletext, you may select a
page number.
When the page has been found, the
information line appears briefly on your
screen.
Press e again.
Teletext reappears.
14 Teletext
Page 16

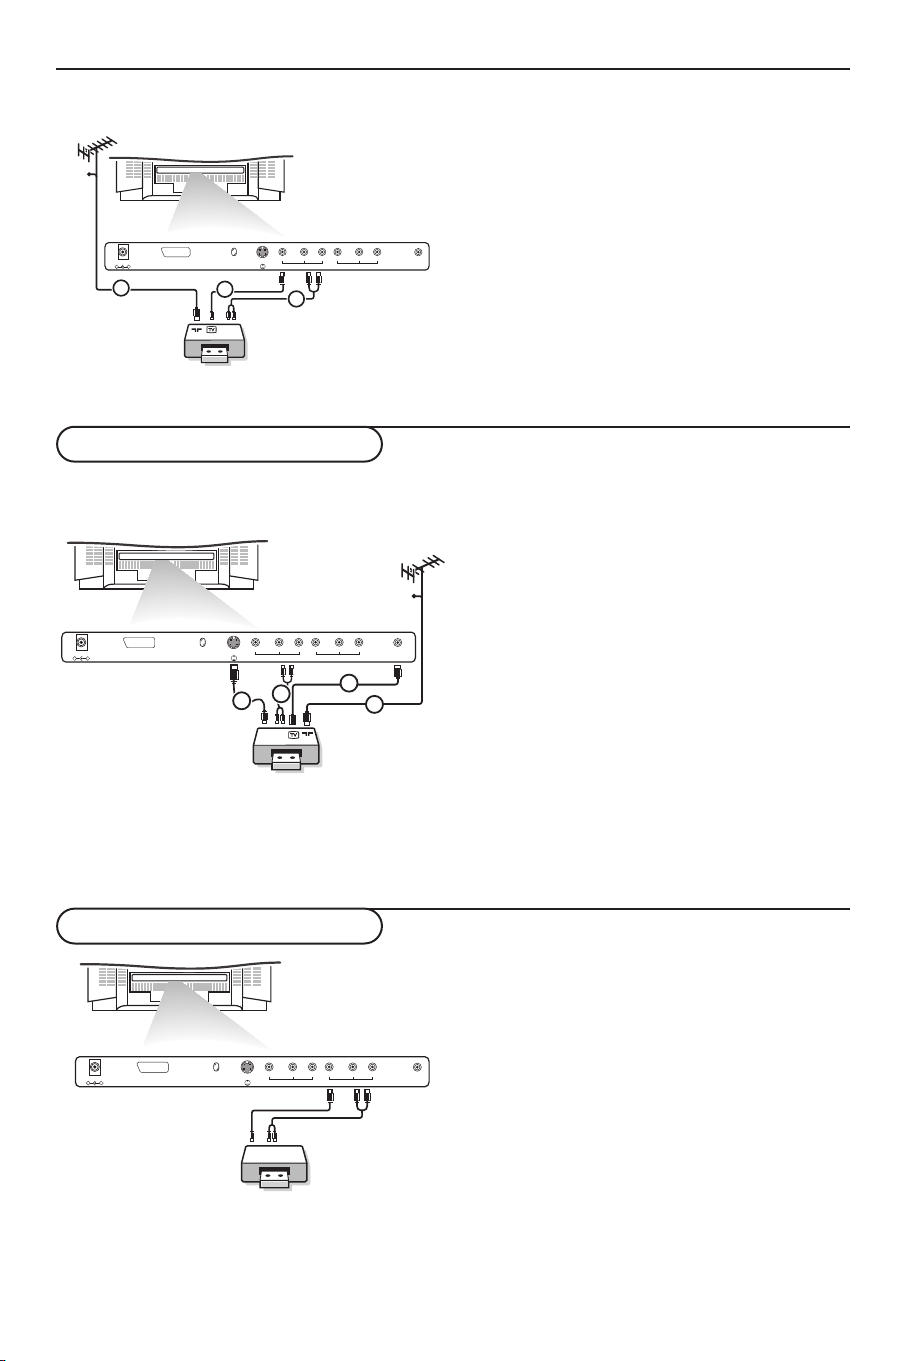
Connect Peripheral Equipment
There is a wide range of video and audio
equipment that can be connected to your TV.
The following connection diagrams show you
how to connect them.
Preparation
Remove the backplate at the back of the TV as
shown on the illustration opposite.
Lay the LCD TV with the screen down on a
table as it will be easier to connect your
peripheral equipment. Please take your
precautions not to damage the screen.
Video recorder
With a eurocable
CABLE
............
...........
w 1
DC 15V
_
+
1
3
VCR
VIDEO (MONO) L AUDIO R
L
S-VIDEO
•
•
•
•
•
•
VIDEO L AUDIO R
AV2
MONITOR OUT
2
ANT IN
x
5
7
With a eurocable you will obtain a better
picture quality than with an aerial cable
only.
& Connect the aerial cables 1, 2 and the
eurocable 3 as shown opposite.
é Press the π key on the VCR.
The TV will switch to
automatically.
If you want to keep on watching in TV
mode, press the cursor up/down,
press the digit keys
AV1 mode
+ P - or
With an aerial cable only
CABLE
............
...........
w 1
Ω
DC 15V
_
+
1
VIDEO (MONO) L AUDIO R
L
S-VIDEO
•
•
•
•
AV2
•
•
VCR
& Connect the aerial cables 1 and 2 as
shown opposite.
é Search for and store the test signal
of the VCR.
• Unplug the aerial cable 1 from the aerial
socket x of your VCR.
• Switch on your TV and put the VCR on
the test signal. (See the handbook for your
VCR)
• Search for the test signal of your VCR in
the same way as you searched for and
stored TV channels. See Manual
programme tuning, p. 6.
• Store the test signal under a programme
number.
• Replace the aerial cable in the aerial
socket x of your VCR after you have
stored the test signal.
“ Select the programme number under
which the VCR is stored.
‘ Press the π key on the VCR.
VIDEO L AUDIO R
MONITOR OUT
2
ANT IN
x
5
7
Ω
15Connect Peripheral Equipment
Page 17
CABLE
With Audio/Video cables
& Connect the aerial cable 1 and the
Audio/Video cables 2 and 3 as shown
opposite.
é Press the w key on the remote control
or select
............
...........
w 1
DC 15V
_
+
1
VIDEO (MONO) L AUDIO R
L
S-VIDEO
•
•
•
•
•
•
2
VIDEO L AUDIO R
AV2
MONITOR OUT
ANT IN
x
75
Ω
3
p. 12) to select
“ Press the π key on the VCR.
Note: If you have a mono VCR, connect the
audio cable from the VCR to the
VCR
(MONO) L connector only at the back of the
TV.
Source in the Special menu (See
AV2 .
AUDIO
S-VHS video recorder
O
IDE
EO
V
ID
S•
............
...........
DC 15V
_
w 1
+
VIDEO (MONO) L AUDIO R
L
S-VIDEO
•
•
•
•
•
•
4
MONITOR OUT connections
............
...........
DC 15V
_
w 1
+
L
S-VIDEO
•
•
•
•
•
•
AV2
3
VCR
VIDEO (MONO) L AUDIO R
AV2
VCR
V
VIDEO L AUDIO R
MONITOR OUT
VIDEO L AUDIO R
MONITOR OUT
2
AUDIO
1
CABLE
ANT IN
x
With an S-VHS VCR you will obtain a
better picture quality.
& Connect the aerial cables 1 and 2 as
shown opposite.
é Connect the S-Video cable 3 to the
S-VIDEO socket of the TV.
“ Connect the audio cable 4 as shown
5
7
Ω
opposite.
Note: Never connect to the same TV one VCR
with S-VHS cables at the same time as one
VCR with a euroconnector.
‘ Press the w key on the remote control
or select
p. 12) to select S-Video.
Source in the Special menu (See
( Press the π key on the VCR.
The MONITOR OUT connections can be
used for daisy chaining or to record
programmes from your TV.
Only when a VCR is connected to
MONITOR OUT it is possible to record a
ANT IN
x
75
Ω
programme from other equipment
connected to the TV.
When a video recorder is not connected
MONITOR OUT you can only record a
to
programme from the aerial or from the
cable system.
16 Connect Peripheral Equipment
Page 18

L
•
•
•
•
•
•
S-VIDEO
DC 15V
_
+
VIDEO (MONO) L AUDIO R
AV2
L
VIDEO L AUDIO R
MONITOR OUT
ANT IN
x
7
5
Ω
w 1
............
...........
Camera & camcorder
AUDIO
VIDEO
S•VIDEO
3
2
1
•
•
•
•
•
•
S-VIDEO
DC 15V
_
+
VIDEO (MONO) L AUDIO R
AV2
L
VIDEO L AUDIO R
MONITOR OUT
ANT IN
x
7
5
Ω
w 1
............
...........
& Connect your camera or camcorder to the
VIDEO socket 2 and AUDIO (MONO) L
3 for mono equipment.
é For stereo equipment also connect
AUDIO R 3.
S-VHS quality with an S-VHS camcorder is
obtained by connecting the S-VHS cables
with the
input 3.
S-VIDEO input 1 and AUDIO
Headphone
& Insert the plug into the headphone socket
L at the back of the TV.
é Press the ¬ key on the remote control
to switch off the sound from the
headphone and the internal loudspeakers
of the TV.
“ Press the cursor left/right to adjust the
volume.
17Connect Peripheral Equipment
Page 19

B
a
M
AUTO
AUTO
w
Y-Z
D
C
h
f
c
e
Ò
‡
π
®
†
U
1
2
9
3
6
5
7
4
8
0
0
LIST
¬
V
MENU
OK
b
k
VCR
M
a
AUTO
AUTO
w
Y-Z
D
g
®
Ò
‡
π
†
C
P
P
B
BB
Video recorder keys
Most of the video equipment from our range of
products can be operated with the remote
control of your TV.
Keep the VCR key on the left side of the
remote control pressed and simultaneously
press:
® for record
Ò for rewind
‡ for stop
π for play
† for fast forward
C for VCR timer
- P + for sequential programme selection from
the VCR tuner
0 to 9 to select a programme number from
your VCR tuner
B to switch the VCR to standby
18 Video recorder keys
Page 20

Tips
Care of the screen
Do not rub or strike the screen with anything
hard as this may scratch, mar, or damage the
screen permanently.
Unplug the screen before cleaning the screen.
Dust the TV by wiping the screen and the
cabinet with a soft, clean cloth. If the screen
requires additional cleaning, use a clean, damp
cloth. Do not use liquid cleaners or aerosol
cleaners.
Mobile telephone warning
To avoid disturbances in picture and sound,
malfunctioning of your TV or even damage to
the TV, keep away your mobile telephone from
the TV.
Poor Picture
• Have you selected the correct TV system?
• Are the cables connected properly? (The
aerial cable to the TV or VCR, the VGA cables
to the TV, the power cable.)
• Is your TV or house aerial located too close
to loudspeakers, non-earthed audio equipment
or neon lights, etc.?
• Mountains or high buildings can cause double
pictures or ghost images. Sometimes you can
improve the picture quality by changing the
direction of the aerial.
• Are brightness and contrast out of
adjustment? Press the
restore the predefined factory settings.Try
another channel, perhaps the received signal is
too weak
• Sometimes poor picture quality is possible
when having an S-VHS VCR, camera or
camcorder connected and another peripheral
is connected to
In this case switch off one of the other
peripherals.
AUTO M or a key to
AV1 or AV 2 at the same time.
No sound
No sound on any channel? Check the volume
isn’t at minimum. Is the sound interrupted
with the mute key ¬?
Remote control
• If your TV no longer responds to the remote
control, the batteries may be dead.
You can still use the keys in front of the TV.
• Has the child lock been switched off?
No solution
Switch your TV off and on again once.
Never attempt to repair a defective TV
yourself.
Never remove the back cover of the TV.
If the TV does not operate properly, unplug it
and call your dealer or a TV technician.
End of life directives
We are paying a lot of attention to produce
environmentally-friendly in green focal areas.
Your new TV contains materials which can be
recycled and reused.
At the end of its life specialised companies
can dismantle the discarded TV to
concentrate the reusable materials and to
minimise the amount of materials to be
disposed of.
Please ensure you dispose of your old TV
according to local regulations.
How to dispose of batteries?
The batteries supplied do not contain the
heavy metals mercury and cadmium.
Nevertheless in many countries batteries may
not be disposed of with your household
waste. Please ensure you dispose of batteries
according to local regulations.
No picture
• Is the TV switched on
• Is the aerial connected properly? Are the
plugs tightly connected in the aerial socket?
• Is the aerial cable in good condition and does
it have suitable plugs?
19Tips
Page 21

Index
a auto picture, 8
auto sound, 8
automatic installation, 5
AVL, 11
b balance, 11
bass, 11
bilingual broadcast, 8
brightness, 11
c camcorder, 17
C-channels, 6
child lock, 12
colour, 11
e equalizer, 11
eurocable, 15
f factory settings, 8
fine tune, 6
h headphone, 17
l language, 4
m manual installation, 6
menu language, 4
mono, 8
mute, 9
n name, 6
nicam, 8
p programme list, 7
s S-channels, 6
search, 5
search for tv channels, 5
sharpness, 11
sleeptimer, 9
source, 12
sound adjustments, 11
stereo, 8
store TV channels, 4
S-VHS, 16
s-video, 16
switch TV on, 3
system, 5
t teletext, 13
tint, 11
treble, 11
v video recorder, 15
volume, 9
20 Index
Page 22

Hilfe?
Falls Sie in der Bedienungsanleitung
keine Antworten auf Ihre Fragen
finden sollten, oder die genannten
‘Nützliche Hinweise’ Ihre Probleme
nicht lösen, dann können Sie beim
örtlichen Philips Info- oder Service
Center anrufen. Siehe dazu auch die
beiliegende World-Wide Guarantee
Broschüre.
Bitte halten Sie die
Produktbezeichnung und
Modellnummer bereit - welche Sie
an der Rückwand des
Fernsehgerätes oder an der
Verpackung finden - bevor Sie bei
der Hotline anrufen.
Model: .................................................................
Product No: ......................................................
Inhaltsverzeichnis
Einstellung
Ihre Fernbedienung 2
Vorbereitung 3
Benutzung der Menüs 4
Speichern der Fernsehsender 4
Wahl der Menüsprache 4
Automatische Einstellung 5
Manuelle Einstellung 6
Umprogrammieren 7
Anzeige der Programmliste 7
Deutsch
Bedienung
Benutzung der Fernbedienung 8-9
Tasten vorne am Fernsehgerät 10
Bildmenü 11
Tonmenü 11
Menü der Sonderfunktionen 12
Videotext/Teletext 13-14
Periphere A/V-Geräte anschließen
Anschluß und Wahl der Geräte 15-17
Videorecordertasten 18
Nützliche Hinweise 19
Inhaltsverzeichnis 20
1
Page 23
B
AUTO
AUTO
PV
w
C
B
2
1
3
54 6
87 9
0
OK
MENU
¬
Ò
‡
π
†
®
M
a
Y-Z
D
0
LIST
h
U
fg
c
e
k
b
Einstellung
w Periphere Geräte S. 8
Wahl von TV oder AVModus
X Wahl des Zweikanal-
tons und des Tonmodus
S. 8
M auto Ton S. 8
a auto Bild S. 8
D automatischen
Abschaltung S. 9
MENU Hauptmenü ein/aus
S. 9
V Lautstärke auf/ab S. 9
¬ Tonunterbrechung S. 9
P Programmwahl S. 9
Ihre Fernbedienung
B Bereitschaft S. 8
vorheriges Programm S. 9
0
LIST Programmliste S. 9
Wahl abrufen
OK Wahl aktivieren
Farbtasten
- direkte VT/TXT-Seite oder
Thema, S. 9
- Videorecorderfunktionen _
S. 18
® Aufnahme
Ò Zurückspulen
‡ Stopp
π Wiedergabe
† Vorwärtsspulen
C VCR Programmierung
Videotext S. 14
h Vergrößern
b Videotext ein/aus
U Zeitanzeige
Subseiten
f Verborgene Information
g Seitenstopp
c Mix
e Unterbrechen
k Inhaltsverzeichnis
2 Ihre Fernbedienung
Page 24

Vorbereitung
Stellen Sie das Fernsehgerät auf
&
einen festen Untergrund.
min.
1m
Lassen Sie zur Belüftung an allen Seiten
genügend Platz um das Gerät herum frei.
Bedecken Sie die Luftlöcher auf der
Hinterseite nicht. Zur Vermeidung
möglicher Gefahren, bitte keine
ungeschützten Feuerquellen, wie zum
Beispiel brennende Kerzen, auf das Gerät
oder in der Nähe stellen.Vermeiden Sie,
daß das Fernsehgerät in der Nähe einer
Hitzequelle oder an einem Platz in der
prallen Sonne aufgestellt wird, und jeden
direkten Kontakt mit Regen oder Wasser.
Es darf keinen triefenden oder aufspritzenden Flüssigkeiten ausgesetzt werden.
Stecken Sie den Antennenstecker fest
é
in die Antennenbuchse
ANT IN x 75 Ω
an der Rückseite des Fernsehgerätes.
CABLE
.
ANT IN
x
75
Ω
“ Fernbedienung: Nehmen Sie den Deckel
des Batteriefaches ab. Legen Sie die beiden
mitgelieferten Batterien (Typ R6-1.5V).
Spannung: Die Speisung dieses
‘
Fernsehgerätes erfolgt mit DC über einen
AC-DC-Adapter. Die Spannung wird auf
dem Label auf der Hinterseite angegeben.
DC 15V
_
+
Benutzen Sie nur den mit dem
Fernsehgerät mitgelieferten AC-DCAdapter und machen Sie nie einen ACNetzanschluß direkt ans Fernsehgerät. Die
Speisung des AC-DC-Adapters erfolgt mit
AC, die Spannung wird auf dem Label des
AC-DC-Adapters angegeben.
Stecken Sie den DC-Stecker des AC-DCAdapters in die DC-Buchse 15V auf der
Hinterseite des Fernsehgerätes.
Schließen Sie den AC-DC-Adapter und
seine Netzschnur an.
Stecken Sie den Netzstecker in die
Wandsteckdose mit Netzspannung 110V240V.
( Fernsehgerät einschalten:Drücken Sie
die Netztaste vorne am Fernsehgerät, um
es ein- oder auszuschalten.
Wenn das Fernsehgerät sich in
Bereitschaftsposition befindet, leuchtet die
Bereitschaftsanzeige vorne am Fernsehgerät
auf. Drücken Sie die Bereitschaftstaste B
nochmals oder die – P + oder eine der
Zifferntasten auf der Fernbedienung, um das
Fernsehgerät einzuschalten.
R6 / 1,5 V
3Vorbereitung
Page 25

B
M
a
AUTO
AUTO
w
Y-Z
Ò
‡
π
®
D
1
2
9
3
6
5
7
4
8
0
0
LIST
P
¬
V
MENU
OK
Benutzung der Menüs
& Drücken Sie mehrmals die MENU-Taste, um jeden Menüpunkt zu sehen.
é Benutzen Sie die Cursortasten auf/ab, um einen Menüpunkt zu wählen.
“ Benutzen Sie die Cursortasten links/rechts, um einen Menüpunkt einzustellen oder drücken Sie
die OK-Taste, um ein Submenü zu wählen.
Auto programme
Automatische Einstellung
Menü ein/ausschalten
Aktivierung
Menüpunkt wählen
Manuelle Einstellung
Umprogrammieren
Sprache
oœ
OK MENU
Speichern der Fernsehsender
Wahl der Menüsprache
Automatische Einstellung
Manuelle Einstellung
Umprogrammieren
Language
Sprache
oœ
OK MENU
& Drücken Sie einmal die Taste MENU auf der
Fernbedienung, um das Menü Einstellung zu
wählen.
é Benutzen Sie die Cursortaste ab, um Sprache zu
wählen.
“ Drücken Sie die OK-Taste.
‘ Drücken Sie die Cursortasten auf/ab, um Ihre
Sprache zu wählen.
( Drücken Sie die OK-Taste.
Jetzt gibt es zwei Möglichkeiten, um die
Fernsehsender zu suchen und zu speichern :
durch Automatische Einstellung, siehe S. 5 oder
durch Manuelle Einstellung (einen Sender nach
dem anderen suchen), siehe S. 6.
Treffen Sie Ihre Wahl und drücken Sie die
OK-Taste.
Einstellung
4
Page 26

Automatische Einstellung
Auto programme
Automatische Einstellung
Manuelle Einstellung
Umprogrammieren
Sprache
oœ
OK MENU
System BG
TV-System BG
Speichern ab 1
Suchen C 15
1
‡ 2%
MENU
& Wählen Sie das TV-System.
é Drücken Sie die Cursortasten links/rechts,
um das Fernsehsystem des Landes/der
Region, aus dem/der Sie die Fernsehsender
empfangen möchten, zu wählen.
Sind Sie an das Kabelfernsehnetz
angeschlossen, wählen Sie das jeweilige
Land/die jeweilige Region, in dem/der Sie
sich jetzt befinden.
DK: PAL D/K, SECAM D/K (Osteuropa)
BG: PAL B/G, SECAM B/G
(Europa/Osteuropa/Frankreich)
I: PAL I/II (V.K./Irland)
L (falls vorhanden) (Frankreich)
“ Drücken Sie die Cursortasten auf/ab, um
Speichern ab zu wählen.
‘ Drücken Sie die Cursortasten links/rechts,
um eine Kanalnummer zu wählen oder
geben Sie mittels der Zifferntasten die
Kanalnummer, ab der Sie den Suchlauf
nach neuen Fernsehsendern starten
wollen, ein.Wenn Sie zum Beispiel die
zuvor gespeicherten Fernsehsender 1 bis
11 behalten möchten, geben Sie
Kanalnummer 12 ein.
Ihr Fernsehgerät wird ab Nummer 12
neue Fernsehsender suchen.
( Drücken Sie die Cursortasten auf/ab, um
Suchen zu wählen.
§ Drücken Sie die OK-Taste, um
Automatische Einstellung zu starten.
Sämtliche Fernsehsender werden
automatisch gesucht und gespeichert.
Die Namen der Fernsehsender werden
gespeichert, auch wenn die Fernsehsender
VPS (Video Programme Service), PDC
(Programme Delivery Control) oder
Videotext/Teletext ausstrahlen.
Wenn dem Fernsehsender kein Name
gegeben werden kann, wird nur die
Kanalnummer gegeben und gespeichert als
C-Sender (V/UHF 01-69) oder S-Sender
(Cable 01-47) mit danach einer Nummer.
Drücken Sie die
MENU-Taste, um die
Automatische Einstellung zu beenden.
Wenn die automatische Einstellung
beendet wurde, erscheint das Menü
Umprogrammieren. Siehe weiter.
è Drücken Sie mehrmals die MENU-Taste,
um das Menü zu verlassen.
5Einstellung
Page 27

Manuelle Einstellung
Automatische Einstellung
Manual installation
Manuelle Einstellung
Umprogrammieren
Sprache
oœ
OK MENU
TV-System BG
Kanal S-Kan./C-Kan.
Feinabst. πππ
suchen
Name C 01
Speichern 1
oœ p π
OK MENU
Das Suchen und Speichern von
Fernsehsendern wird Sender für Sender
vorgenommen. Sie können dem
Fernsehsender auch einen Namen mit
höchstens 5 Buchstaben oder Ziffern
geben. Sie müssen jeden Schritt des
Menüs Manuelle Einstellung durchlaufen.
& Wählen Sie Manuelle Einstellung im Menü
Einstellung.
é Drücken Sie die OK-Taste, um das Menü
Manuelle Einstellung aufzurufen.
“ Drücken Sie die Cursortasten links/rechts,
um das Fernsehsystem des Landes/der
Region, aus dem/der Sie die Fernsehsender
empfangen möchten, zu wählen.
Sind Sie an das Kabelfernsehnetz
angeschlossen, wählen Sie das jeweilige
Land/die jeweilige Region, in dem/der Sie
sich jetzt befinden.
DK: PAL D/K, SECAM D/K (Osteuropa)
BG: PAL B/G, SECAM B/G
(Europa/Osteuropa/Frankreich)
I: PAL I/II (V.K./Irland)
L (falls vorhanden) (Frankreich)
‘ Drücken Sie die Cursortasten auf/ab, um
Kanal zu wählen.
( Drücken Sie die Cursortasten links/rechts,
C-Kan für über Antenne zu
um
empfangende Kanäle oder
Kabel zu empfangende Kanäle zu wählen.
Wenn Sie die C- (01-69) oder S-Kanalnummer (01-47) kennen, geben Sie sie
mittels der Zifferntasten 0 bis 9 direkt ein.
Besorgen Sie sich eine Liste bei Ihrer
Kabelfernsehgesellschaft oder beim
S-Kan für über
Fachhändler.
§ Drücken Sie die Cursortasten auf/ab, um
Suchen zu wählen.
è Drücken Sie die Cursortasten links/rechts,
um das Suchen zu starten.Wenn ein
Fernsehsender gefunden ist, stoppt das
Suchen.
Feinabstimmung
Im Fall eines schlechten Empfangs können
Sie den Empfang durch Feinabstimmung
nachbessern.
Drücken Sie die Cursortasten auf/ab, um
Feinabstimmung zu wählen. Drücken Sie
die Cursortasten links/rechts, um das
beste Bild und den besten Ton einzustellen.
Namen geben
Es ist möglich, einen gespeicherten
Sendernamen zu ändern, oder jenem Kanal
einen Namen zu geben, für den noch
keiner vergeben wurde. Den
Programmnummern 0 bis 99 kann ein
Name von höchstens fünf Buchstaben
oder Ziffern zugeordnet werden.
Drücken Sie die Cursortasten auf/ab, um
Namen geben zu wählen.
Wählen Sie das Zeichen mit den
Cursortasten links/rechts. Die Leerstelle,
die Zahlen und andere Sonderzeichen
befinden sich zwischen Z und A.
Drücken Sie die OK-Taste.
Wählen Sie das nächste Zeichen.
Unternehmen Sie weiter folgende Schritte.
! Wenn Sie den gewünschten Fernsehsender
haben, drücken Sie die Cursortasten
auf/ab, um
Speichern zu wählen.
ç Drücken Sie die Cursortasten links/rechts,
um eine Kanalnummer zu wählen, oder
geben Sie die Kanalnummer mit den
Zifferntasten ein.
0 Drücken Sie die OK-Taste, um den
Fernsehsender zu speichern.
Wiederholen Sie Schritte 4 bis 10, wenn
Sie einen anderen Fernsehsender
speichern wollen.
Drücken Sie mehrmals die
um das Menü zu verlassen.
MENU-Taste,
Einstellung
6
Page 28

Änderung der Programmliste
Auto programme
Automatische Einstellung
Manuelle Einstellung
Umprogrammieren
Sprache
oœ
OK MENU
0ARD
1ZDF
1 ZDF
2C12
3S 4
4 CH-5
Löschen
•
Verschieben
•
oœ p π
OK MENU
5 ARD1
6 ZDF1
7 C12
8S 44
9 CH-5
Kopieren
•
Überspr.
•
Die gespeicherten Fernsehsender können
nach eigener Wahl gelöscht oder
übersprungen werden. Sie können die
gespeicherten Fernsehsender neu ordnen
oder die gewählte Programmnummer mit
einer blanko Angabe versehen.
& Drücken Sie die Cursortasten auf/ab, um
Umprogrammieren im Menü Einstellung
zu wählen.
é Drücken Sie die OK-Taste, um das Menü
Umprogrammieren aufzurufen.
Einen Fernsehsender löschen
& Drücken Sie die Cursortasten auf/ab,
links/rechts, um den Fernsehsender,den
Sie löschen wollen, zu wählen.
é Drücken Sie zweimal die rote Taste auf
der Fernbedienung.
Die gewählte Nummer des Fernsehsenders wird gelöscht, alle folgenden
Sender verschieben sich um eine Position
nach oben.
Einen Fernsehsender kopieren
& Drücken Sie die Cursortasten auf/ab,
links/rechts, um den Fernsehsender,den
Sie kopieren wollen,zu wählen.
é Drücken Sie die grüne Taste auf der
Fernbedienung.Alle folgenden
Sendernummern verschieben sich um eine
Position nach unten.
Einen Fernsehsender verschieben
& Drücken Sie die Cursortasten auf/ab,
links/rechts, um die Sendernummer, die Sie
verschieben wollen, zu wählen.
é Drücken Sie die gelbe Taste auf der
Fernbedienung.
“ Drücken Sie die Cursortasten auf/ab,
links/rechts, um den Fernsehsender zur
gewünschten Sendernummer zu
verschieben.
‘ Drücken Sie nochmals die gelbe Taste, um
diese Funktion freizugeben.
Eine Sendernummer überspringen
& Drücken Sie die Cursortasten auf/ab,
links/rechts, um die Sendernummer, die Sie
überspringen wollen, zu wählen.
é Drücken Sie die blaue Taste auf der
Fernbedienung. Der übersprungene
Fernsehsender wird in blau angegeben.
“ Drücken Sie nochmals die blaue Taste.
Nach der Einstellung können Sie die
Fernsehsender durchlaufen, indem Sie die
Cursortasten auf/ab drücken. Nur die nicht
übersprungenen Fernsehsender können
gewählt werden. Übersprungene Fernsehsender können trotzdem gewählt werden mit
den Zifferntasten oder in der Programmliste,
in der sie in blau angegeben werden.
Drücken Sie mehrmals die
das Menü zu verlassen.
MENU-Taste, um
Anzeige der Programmliste
0ARD
1ZDF
1 ZDF
2C12
3S 4
4 CH-5
oœ p π
OK MENU
5 ARD1
6 ZDF1
7 C12
8S 44
9 CH-5
& Drücken Sie die LIST-Taste auf der Fern-
bedienung, um die Programmliste anzuzeigen.
é Drücken Sie den Cursortasten auf/ab,
links/rechts, um durch die Liste von 100
Kanalnummern zu laufen.
“ Drücken Sie die OK-Taste, um den
gewünschten Fernsehkanal auszuwählen.
Bemerkung: Fernsehsender, die im blau angezeigt
werden, sind im Umprogrammieren-Menü eingestellt
zu werden übersprungen.
7Installation
Page 29
Bedienung
MENU
OK
PV
¬
5
1
3
2
4
6
7
9
8
0
0
LIST
h
fg
Ò
‡
π
c
b
®
†
U
e
k
C
a
D
B
M
AUTO
AUTO
w
Y-Z
Benutzung der Fernbedienung
w Quelle
Wählen Sie andere periphere
Geräte : Drücken Sie mehrmals,
um
TV, AV1, AV2 oder
S-VIDEO zu wählen.
X Wahl des Zweikanaltons
und des Tonmodus
Drücken Sie diese Taste, um
• von
Stereo auf Mono umzu-
schalten, wenn stereo
gesendet wird, oder von
Nicam Stereo auf Nicam
, im Falle einer
Mono
Digitalsendung
• von
Nicam Dual Y auf Nicam
Z umzu-schalten, oder
Dual
auf
Nicam Dual X im Falle
einer Nicam-Dual-Sendung
• eine Auswahl zu treffen
zwischen
oder
Zweikanalton gesendet wird:
Dual Y sendet den ersten
Sendeton zu den
Lautsprechern;
Dual Z sendet den zweiten
Sendeton zu den
Lautsprechern;
Dual X sendet einen
separaten Ton zu jedem
Dual Y, Dual Z
Dual X , wenn im
Lautsprecher.
Bemerkung : Bei schwachen
Stereotonsignalen, im Falle einer
Stereo- oder Nicam-Stereosendung,
wählen Sie Mono Empfang.
Wahl des Tonausgangs in AV-Modus
In AV-Modus können Sie den Ausgangston für die Lautsprecher links und rechts wählen.
Drücken Sie mehrmals die Taste X, um :
• L+R: das Tonsignal vom Audio-Eingang L wird zum Lautsprecher links gesendet, das Tonsignal
vom Toneingang R zum rechten Lautsprecher
• L+L: das Tonsignal vom Audio-Eingang L wird zu den Lautsprechern links und rechts gesendet.
• R+R: das Tonsignal vom Auido-Eingang R wird zu den Lautsprechern links und rechts gesendet.
B Bereitschaft
Um das Fernsehgerät erneut
einzuschalten oder in den
Bereitschaftsstand zu schalten.
AUTO Tasten
Um vorprogrammierte Bildund Toneinstellung zu wählen.
a
AUTO Bild
Jedes Mal, wenn diese Taste
gedrückt wird, wird eine neue
Bildeinstellung gewählt, die
einer ganz bestimmten,
werkseitig festgelegten
Einstellung des Kontrastes, der
Helligkeit, der Farbe und der
Schärfe entspricht.
M
AUTO To n
Jedes Mal, wenn diese Taste
gedrückt wird, wird eine neue
Toneinstellung gewählt, die
einer bestimmten, werkseitig
festgelegten Toneinstellung des
Equalizers entspricht.
PP-Werte bezieht sich auf die
persönlichen Bild- und
Toneinstellungen, die Sie selbst
im Bild- und Tonmenü gewählt
haben.
Benutzung der Fernbedienung
8
Page 30

B
M
a
AUTO
AUTO
w
Y-Z
C
h
fg
c
b
e
k
Ò
‡
π
®
†
U
D
1
2
9
3
6
5
7
4
8
0
0
LIST
MENU
OK
P
¬
V
MENU Drücken Sie mehrmals,
um jeden Menüpunkt zu sehen.
OK Drücken diese Taste, um
Ihre Wahl in den Menüs zu
aktivieren.
V Lautstärke
Drücken Sie + oder -, um die
Lautstärke zu regeln.
¬ Tonunterbrechung
Unterbricht den Ton
vorübergehend oder schaltet
ihn wieder ein.
P Fernsehsender wählen
• um die nicht übersprungenen
Fernsehsender zu durchlaufen
• um das Fernsehgerät vom
Bereitschaftsstand erneut
einzuschalten.
®Ò‡π† Videorecordertasten siehe S. 18.
U Zeitanzeige
Die vom Sender (mit Videotext)
abgeleitete und auf
Programmnummer 1 oder
unter der niedrigsten nicht
übersprungenen
Programmnummer eingegebene
Zeit erscheint auf dem
Bildschirm.
D Autom. Abschaltung
Mit der automatischen
Abschaltung können Sie selbst
die Zeitdauer bestimmen, nach
der das Fernsehgerät in den
Bereitschaftsstand schalten soll.
Drücken Sie die Taste
mehrmals, um die Zahl der
Minuten zu wählen. Der Zähler
läuft von B 0, 10, 20, 30... bis
240 Minuten. Er fängt ab der
gewählten Zahl der Minuten zu
zählen an.
Bemerkung: Um die übrigen
Minuten zu sehen, drücken Sie
einmal die D-Taste. Um die
automatische Abschaltung auszuschalten, drücken Sie mehrmals
die D–Taste, bis B 0 erscheint.
0/9 Zifferntasten
Um einen Fernsehsender zu
wählen.
0 Vorheriges Programm
Der vorher gewählte
Fernsehsender erscheint
wieder.
LIST Programmliste
Die Programmliste erscheint.
b Videotext ein/aus
siehe S. 13.
Videotextfunktionen S. 14.
hUfgcek
9Benutzung der Fernbedienung
Page 31

Tasten vorne am Fernsehgerät
TV / VIDEO
MENU
OK
_
VOL
+
_
CH / PR
+
B
ON / OFF
Wenn Ihre Fernbedienung verlorengegangen oder gebrochen ist, können Sie immer noch Ihr
Fernsehgerät bedienen mit den Tasten vorne am Fernsehgerät.
ON/OFF:Drücken Sie die Netztaste ON/OFF, um das Fernsehgerät ein- oder auszuschalten
TV/VIDEO:Drücken Sie mehrmals, um TV- oder AV-Modus zu wählen
MENU:Drücken Sie mehrmals, um jeden Menüpunkt zu sehen
OK:- Drücken Sie diese Taste, um Ihre Wahl im Menü zu aktivieren
-
Demo (automatische Anzeige): Halten Sie die OK-Taste etwa 10 Sekunden lang
gedrückt.
Alle Menüs erscheinen eins nach dem anderen automatisch auf dem Bildschirm.
Um die Automatische Anzeige zu stoppen, drücken Sie irgendwelche Taste der
Fernbedienung.
- VOL + :- Drücken Sie - oder +, um einen Menüpunkt zu wählen;
- Drücken Sie - oder +, um die Lautstärke zu regeln;
- Drücken Sie - oder +, um die Menüeinstellungen zu regeln.
- CH/PR +:- Drücken Sie - oder +, um die nicht übersprungenen Fernsehsender zu
durchlaufen;
- Drücken Sie - oder +, um einen Menüpunkt zu wählen;
- um das Fernsehgerät vom Bereitschaftsstand erneut einzuschalten.
B: Um das Fernsehgerät erneut einzuschalten oder in den Bereitschaftsstand zu
schalten.
Die B LED leuchtet auf, wenn das Fernsehgerät sich in Bereitschaftsposition
befindet, und erlischt, wenn das Fernsehgerät eingeschaltet wird.
Tasten vorne am Fernsehgerät
10
Page 32

B
M
a
AUTO
AUTO
w
Y-Z
D
1
2
9
3
6
5
7
4
8
0
0
LIST
P
¬
V
MENU
OK
Benutzung der Menüs
Menü ein/ausschalten
Aktivierung
Menüpunkt wählen
& Drücken Sie mehrmals die MENU-Taste, um das
Menü Bild,Ton oder Sonderfunktionen zu
wählen.
é Benutzen Sie die Cursortasten auf/ab, um einen
Menüpunkt zu wählen.
“ Benutzen Sie die Cursortasten links/rechts, um
einen Menüpunkt einzustellen, oder drücken Sie
die OK-Taste, um ein Submenü zu wählen.
‘ Drücken Sie mehrmals die MENU-Taste, wenn
Sie das Menü verlassen wollen.
Bildmenü
Contrast 100
Kontrast
Helligkeit 95
Farbe 85
Schärfe 80
Farbweiss
oœ p π
OK MENU
Tonmenü
Equalizer
Equalizer
Balance 0
AVL Ein/Aus
oœ
OK MENU
Flat
Neutral
Musik
Film
Sprache
PP-Werte
oœ p π
Sie können die von Ihnen bevorzugte
Toneinstellung wählen oder Sie können
auch die Tonfrequenz des Equalizers und
die Balance des Tonausgangs des rechten
und des linken Lautsprechers regeln.
Schalten Sie
Lautstärke-Balance zu behalten, wenn Sie
einen anderen Fernsehsender wählen.
0.1 0.5 1.5 5.0 10 kHz
MENU
AVL Ein, um eine konstante
100
Sie können Kontrast, Helligkeit, Farbe, Schärfe und
Farbweiß (nur NTSC AV) des Bildes nach Belieben
einstellen.
Drücken Sie die OK-Taste, um die Einstellungen zu
speichern. Die Einblendung
Gespeichert erscheint.
Jetzt sind Ihre Bildeinstellungen gespeichert. Sie
können mit der
AUTO a Taste auf der
Fernbedienung wieder aufgerufen werden,indem Sie
PP-Werte wählen.
Um eine der Werksvoreinstellungen zu wählen,
drücken Sie die
AUTO a Taste auf der
Fernbedienung.
Drücken Sie mehrmals die
MENU-Taste, um das
Menü zu verlassen.
Equalizer
& Wählen Sie Equalizer und drücken Sie die OK-
Taste.
é Wählen Sie eine der Werksvoreinstellungen
oder wählen Sie
persönlichen Toneinstellungen des Equalizers zu
regeln.
Einstellung der PP-Werte des Equalizers
PP-Werte, um Ihre
& Wählen Sie PP-Werte mit den Cursortasten
auf/ab.
é Drücken Sie die Cursortasten links/rechts, um
ein Tonband zu wählen.
“ Drücken Sie die Cursortasten auf/ab, um die
gewünschte Lautstärke einzustellen.
‘ Drücken Sie die OK-Taste, um die eingestellten
PP-Werte zu speichern.
Die Einblendung
Drücken Sie die
verlassen.
Gespeichert erscheint.
MENU-Taste, um das Menü zu
11Benutzung der Menüs
Page 33

Menü der Sonderfunktionen
Input TV
Quelle TV
Kindersicherung Aus
Auto aus Aus
oœ p π
MENU
Wählen Sie TV oder AV-Modus
& Wählen Sie Quelle im Menü
Sonderfunktionen.
é Drücken Sie die Cursortasten links/rechts,
TV, AV1, AV2 oder S-VIDEO zu
um
wählen.
AV1 für einen VCR, der an den w 1
•
Eurokonnektor-Eingang angeschlossen ist
(Siehe Periphere Geräte anschließen,
S. 15)
AV2 für einen VCR, der an den AV2-
•
Konnektor des Fernsehgerätes
angeschlossen ist.
S-VIDEO für einen S-Video VCR, der an
•
den S-Video-Konnektor des
Fernsehgerätes angeschlossen ist.
Bemerkung: Wenn ein VCR über die
Antennenbuchse angeschlossen ist, wird das
Fernsehgerät im TV-Modus benutzt.
Sonst können Sie TV- oder AV-Modus mit der
Taste Quelle auf der Fernbedienung wählen.
Um zum TV-Modus zurückzukehren,
drücken Sie die Cursortasten auf/ab oder
die Zifferntasten.
Auto AV Umschaltung
Wenn Ihr VCR an den Eurokonnektor
angeschlossen ist und auf Wiedergabe
umgeschaltet wird, wird das Fernsehgerät
automatisch auf
AV1 -Modus umgeschaltet.
Wenn Sie diesen TV-Modus behalten
wollen, drücken Sie die Cursortasten
+ P -
auf/ab,
oder die Zifferntasten.
Kindersicherung
Falls die Kindersicherung aktiviert ist, kann
das Fernsehgerät nur mit der
Fernbedienung eingeschaltet und bedient
werden. Die Tasten vorne am Fernsehgerät
können nicht benutzt werden.Auf diese
Art und Weise können Sie einer
unerwünschten Benutzung Ihres
Fernsehgerätes vorbeugen.
Wenn die Einblendung
erscheint, soll die Kindersicherung
Ein
Kindersicherung
ausgeschaltet werden, damit die Tasten
vorne am Fernsehgerät benutzt werden
können.
& Wählen Sie Kindersicherung im Menü
Sonderfunktionen.
é Drücken Sie die Cursortasten links/rechts,
Kindersicherung Ein zu wählen.
um
“ Drücken Sie mehrmals die MENU-Taste,
um das Menü zu verlassen.
Auto aus
Wenn Auto Aus eingeschaltet ist, schaltet
sich das Fernsehgerät automatisch in den
Bereitschaftsstand, wenn während etwa 12
Minuten kein Antennensignal empfangen
wird.
& Wählen Sie Auto Aus im Menü
Sonderfunktionen.
é Drücken Sie die Cursortasten links/rechts,
um Auto Aus
auszuschalten.
“ Drücken Sie mehrmals die MENU-Taste,
um das Menü zu verlassen.
12 Benutzung der Menüs
Page 34

Videotext/Teletext
C
h
fg
c
e
Ò
‡
π
®
†
U
9
7
8
0
0
LIST
P
¬
V
MENU
OK
b
k
b
k
OK-Taste zum
Aktivierung
Cursor-Tasten, um
Seiten zu wählen
Farbtasten zur Wahl
Die meisten Fernsehsender strahlen
Informationen über Videotext/Teletext aus.
Jeder Fernsehsender, der Videotext ausstrahlt,
übertragt eine Seite mit Informationen über
die Benutzungsweise seines Videotextsystems.
Suchen Sie die Videotext/Teletext-Seite mit
dem Inhaltsverzeichnis (üblicherweise S. 100).
Je nach Fernsehsender wird Videotext/Teletext
in unterschiedlichen Systemen ausgestrahlt:
Standard Teletext, TOP und FASTEXT.
• Bei
wählen, indem Sie die entsprechende
Seitennummer eingeben.
• Bei
Videotextinformation mit den Farbtasten auf
Ihrer Fernbedienung, die den Farboptionen
unten im Bildschirm entsprechen.
Standard Teletext könne Sie eine Seite
TOP und FASTEXT wählen Sie
Videotext/Teletext ein- und
ausschalten
Drücken Sie b, um Videotext/Teletext einoder auszuschalten.
Das Inhaltsverzeichnis oder die zuletzt
gewählte Videotextseite erscheint auf dem
Bildschirm, zusammen mit einer
Informationszeile und einer Optionszeile am
unteren Rand.
Eine Videotext-/Teletextseite
wählen
Mit den Zifferntasten
Geben Sie die gewünschte Seitennummer mit
den Zifferntasten ein.
Der Seitenzähler sucht die Seite.
Eine Nachricht erscheint, wenn Sie eine nicht
vorhandene oder falsche Seitennummer
eingegeben haben. Bilden Sie eine dreistellige
Nummer und geben Sie dann wiederum die
richtige Seitennummer ein. Es gibt keine
Seitennummern, die mit 0 oder 9 anfangen.
Mit der Optionszeile am unteren Rand
des Bildschirms
Wählen Sie mit den Farbtasten, die den
Farboptionen unten im Bildschirm
entsprechen, das gewünschte Thema.
Mit den Cursortasten auf/ab
Drücken Sie die Cursortasten auf/ab, um die
vorige oder die nächste Seite zu wählen.
Das Inhaltsverzeichnis wählen
Drücken Sie die k taste, um das
Hauptinhaltsverzeichnis (normalerweise S.100)
auf dem Bildschirm erscheinen zu lassen.
Nur für TOP-Videotext-Sendungen :
Nicht alle Fernsehsender strahlen TOPVideotext aus.
TOP ordnet die Seiten in Kategorien ein und
fügt andere Möglichkeiten einer erheblich
leichteren Bedienung hinzu.
Drücken Sie die k Taste. Ein TOP-Überblick
von den vorhandenen Themen erscheint.
Benutzen Sie die Farbtasten, um
Videotextinformationen zu wählen oder
wählen Sie unmittelbar die Videotext/TeletextSeiten mit den Zifferntasten.
13Videotext/Teletext
Page 35

C
h
fg
c
b
e
k
Ò
‡
π
®
†
9
7
8
0
0
LIST
P
¬
V
OK
MENU
MENU
U
U
c
h
f
e
b
g
OK-Taste zum
Aktivierung
Cursor-Tasten, um
Mehrfachseiten zu
wählen
Mehrfachseiten wählen
Wenn die gewählte Videotext/Teletext-Seite
Subseiten enthält, können Sie das
automatische Wechseln der Subseiten stoppen
oder die gewünschte Subseite selber wählen.
Drücken Sie die U Taste.
Die Nummer der Subseite erscheint unten am
Schirm.
Drücken Sie die rote oder grüne Taste, um die
vorige oder die nächste Subseite zu wählen,
oder ändern Sie die Subseite mit den
Cursortasten auf/ab oder mit den
Zifferntasten.
Drücken Sie wiederum die U Taste, um diese
Funktion zu verlassen.
Besondere Videotext-Funktionen
Vergrößern
Drücken Sie wiederholt h, um den oberen
Teil oder den unteren Teil auf dem Bildschirm
erscheinen zu lassen, und nachher um zur
normalen Seitengröße zurückzukehren.Wenn
der obere Teil gezeigt wird, können Sie den
Text Zeile pro Zeile weiter rollen lassen,
indem Sie die Cursortasten auf/ab benutzen.
Verborgene Information
Drücken Sie f, um die verborgenen
Informationen zu enthüllen/verbergen, wie z.B.
Lösungen für Rätsel und Aufgaben.
Seitenstopp
Drücken Sie g, um das automatische
Wechseln der Subseiten zu stoppen, wenn
diese vorhanden sind.
Das g Zeichen erscheint oben auf dem
Bildschirm.
Drücken Sie wiederum die g Taste, um das
automatische Wechseln wiederum zu starten.
Mix
Drücken Sie die c Taste, um die
Videotext/Teletextseiten geschichtet auf dem
Bildschirm erscheinen zu lassen.
Drücken Sie wiederum die c Taste, um diese
Funktion auszuschalten.
Unterbrechen
Drücken Sie e.
Das Fernsehprogramm erscheint.
b oben auf dem Bildschirm gibt an, daß sich
das Fernsehgerät nach wie vor im
Teletextmodus befindet.
Bevor Sie Teletext unterbrechen, können Sie
eine Seitennummer wählen.
Wenn die Seite gefunden wurde, erscheint die
Informationszeile kurz auf Ihrem Schirm.
Drücken Sie wiederum e.
Teletext erscheint wiederum.
14 Videotext/Teletext
Page 36

Periphere Geräte anschließen
Es gibt eine große Auswahl an elektronischen A/VGeräten, die an Ihr Fernsehgerät angeschlossen werden
können. Den nächsten Anschlußschemen können Sie
entnehmen, wie angeschlossen werden muß.
Vorbereitung
Entfernen Sie die Platte auf der Hinterseite des
Fernsehgerätes, wie auf der Zeichnung hierneben gezeigt
wird.Legen Sie das LCD TV mit dem Schirm nach unten
auf einen Tisch. Auf diese Weise können Sie Ihr
peripheres Gerät einfacher anschließen.Treffen Sie die
notwendigen Vorkehrungen, so daß der Schirm
nicht beschädigt wird.
Videorecorder
Nur mit Antennenkabeln
Mit einem Eurokabel
CABLE
............
•
•
ANT IN
DC 12V
_
+
x
75
Ω
2
1
VCR
w 1
3
...........
PC INPUT
VIDEO (MONO) L AUDIO R
L
S-VIDEO
•
•
•
•
AV2
•
•
Mit einem Eurokabel bekommen Sie eine
bessere Bildqualität als nur mit einem
Antennenkabel.
& Schließen Sie die Antennenkabel 1, 2
und das Eurokabel 3, so wie hierneben
gezeigt, an.
é Drücken Sie die π Taste des
Videorecorders.
Das Fernsehgerät wird automatisch auf
AV1 -Modus umschalten.
Wenn Sie nach wie vor den TV-Modus
behalten wollen, drücken Sie die
Cursortasten auf/ab,
Zifferntasten.
+ P - oder die
CABLE
............
•
•
ANT IN
DC 12V
_
+
x
75
Ω
2
1
VCR
w 1
...........
PC INPUT
VIDEO (MONO) L AUDIO R
L
S-VIDEO
•
•
•
•
AV2
•
•
& Schließen Sie die Antennenkabel 1 und 2,
so wie hierneben gezeigt, an.
é Suchen und speichern Sie das Testsignal
des Videorecorders
• Ziehen Sie das Antennenkabel 1 aus der
Antennenbuchse x Ihres Videorecorders.
• Schalten Sie Ihr Fernsehgerät ein und stellen
Sie den Videorecorder auf Test-signal.
(Schauen Sie zunächst in der Bedienungsanleitung Ihres Videorecorders nach.)
• Suchen Sie das Testsignal Ihres
Videorecorders auf dieselbe Weise, wie bei
einem Fernsehsender. Siehe Manuelle
Einstellung, S. 6.
• Speichern Sie das Testsignal unter einer
Programmnummer.
• Schließen Sie das Antennenkabel erneut fest
an die Antennenbuschse x Ihres
Videorecorders an, nachdem Sie das
Testsignal gespeichert haben.
“ Wählen Sie die Programmnummer, unter der
der Videorecorder gespeichert ist.
‘ Drücken Sie die π Taste Ihres
Videorecorders.
15Periphere Geräte anschließen
Page 37

CABLE
............
...........
DC 15V
_
+
1
L
w 1
S-VIDEO
•
•
•
•
•
•
2
VCR
S-VHS Videorecorder
............
...........
DC 15V
_
w 1
+
VIDEO (MONO) L AUDIO R
L
S-VIDEO
•
•
•
•
•
•
4
VIDEO (MONO) L AUDIO R
AV2
3
V
S•
AV2
3
VCR
VIDEO L AUDIO R
O
IDE
EO
ID
V
VIDEO L AUDIO R
MONITOR OUT
MONITOR OUT
AUDIO
2
1
CABLE
ANT IN
x
Mit A/V-Kabeln
& Schließen Sie das Antennenkabel 1 und die
A/V-Kabeln 2 und 3, so wie hierneben
gezeigt, an.
é Drücken Sie die w Taste der Fernbedienung
oder wählen Sie
Sonderfunktionen (Siehe S. 12), um
ANT IN
x
75
Ω
wählen.
“ Drücken Sie die π Taste Ihres
Videorecorders.
Bemerkung: Wenn Sie über einen Monovideorecorder verfügen, schließen Sie das Audiokabel
des Videorecorders nur auf der Hinterseite des
Fernsehgerätes an den
Konnektor an.
Mit einem S-VHS-Videorecorder
bekommen Sie eine bessere Bildqualität..
Quelle im Menü
AUDIO (MONO) L
& Schließen Sie die Antennenkabel 1 und
2, so wie hierneben gezeigt, an.
é Schließen Sie das S-Videokabel 3 an die
S-VIDEO-Buchse des Fernsehgerätes an.
“ Schließen Sie das Audio-Kabel 4, so wie
hierneben gezeigt, an.
5
7
Ω
Bemerkung : Schließen Sie nie gleichzeitig
einen Videorecorder mit S-VHS-Kabeln und
einen Videorecorder mit einem Eurokonnektor
an dasselbe Fernsehgerät an.
‘ Drücken Sie die w Taste auf der
Fernbedienung oder wählen Sie
Menü Sonderfunktionen (Siehe S. 12), um
S-Video zu wählen.
( Drücken Sie die π Taste des
Videorecorders.
AV2 zu
Quelle im
MONITOR OUT Anschlüsse
Die MONITOR OUT Anschlüsse können
benutzt werden, um eine Serienschaltung
vorzunehmen oder um Programme von
Ihrem Fernsehgerät aufzunehmen.
Nur wenn ein Videorecorder an
............
...........
DC 15V
_
w 1
+
VIDEO (MONO) L AUDIO R
L
S-VIDEO
•
•
•
•
•
•
AV2
VIDEO L AUDIO R
MONITOR OUT
ANT IN
x
75
Ω
MONITOR OUT angeschlossen ist, ist es
möglich ein Programm von anderen
Geräten aufzunehmen.
Wenn kein Videorecorder an
OUT angeschlossen ist, kann nur ein
Programm von der Antenne oder vom
VCR
Kabelsystem aufgenommen werden.
16 Periphere Geräte anschließen
MONITOR
Page 38

L
•
•
•
•
•
•
S-VIDEO
DC 15V
_
+
VIDEO (MONO) L AUDIO R
AV2
L
VIDEO L AUDIO R
MONITOR OUT
ANT IN
x
7
5
Ω
w 1
............
...........
Kamera & Camcorder
AUDIO
VIDEO
S•VIDEO
3
2
1
•
•
•
•
•
•
S-VIDEO
DC 15V
_
+
VIDEO (MONO) L AUDIO R
AV2
L
VIDEO L AUDIO R
MONITOR OUT
ANT IN
x
7
5
Ω
w 1
............
...........
& Verbinden Sie Ihre Kamera oder Ihren
Camcorder mit
(MONO) L 3 für Monogeräte.
VIDEO 2 und AUDIO
é Für Stereogeräte schließen Sie auch
AUDIO R 3 an.
S-VHS-Qualität wird bei einem S-VHSCamcorder erreicht, wenn die S-VHSKabel an den
AUDIO-Eingang 3 angeschlossen
den
werden.
S-VIDEO-Eingang 1 und
Kopfhörer
& Schließen Sie den Stecker an den
Kopfhöreranschluß L auf der Hinterseite
des Fernsehgerätes an.
é Drücken Sie die ¬ Taste auf der
Fernbedienung, um den Ton des Kopfhörers
und der internen Lautsprecher des
Fernsehgerätes auszuschalten.
“ Drücken Sie die Cursortasten links/rechts,
um die Lautstärke zu regeln.
17Periphere Geräte anschließen
Page 39

B
a
M
AUTO
AUTO
w
Y-Z
D
C
h
f
c
e
Ò
‡
π
®
†
U
1
2
9
3
6
5
7
4
8
0
0
LIST
¬
V
MENU
OK
b
k
VCR
M
a
AUTO
AUTO
w
Y-Z
D
g
®
Ò
‡
π
†
C
P
P
B
BB
Videorecordertasten
Die meisten Videogeräte unserer Produktreihe
können mit der Fernbedienung Ihres
Fernsehgerätes gesteuert werden.
Halten Sie die VCR-Taste auf der linken Seite
der Fernbedienung gedrückt und drücken Sie
gleichzeitig :
® für Aufnahme
Ò für Zurückspulen
‡ für Stopp
π für Wiedergabe
† für Vorwärtsspulen
C für Videorecorder Programmierung
- P + für eine schnelle Wahl von Fernseh-
sendern, durch den Videorecorder-Tuner
0 bis 9 um den Fernsehsender des
Videorecorder-Tuners zu wählen
B um den Videorecorder vorübergehend
abzuschalten.
18 Videorecordertasten
Page 40

Nützliche Hinweise
Pflege des Bildschirms
Scheuern oder reiben Sie den Fernsehbildschirm
nicht mit harten Gegenständen, da diese ihn
endgültig kratzen, verunstalten oder beschädigen
können. Ziehen Sie den Stecker des Schirms
heraus, bevor Sie ihn reinigen. Entstauben Sie das
Fernsehgerät, indem Sie den Schirm und das
Gehäuse mit einem weichen, sauberen Tuch
abwischen.Wenn der Schirm zusätzlich gereinigt
werden soll, benutzen Sie dann ein sauberes,
feuchtes Tüchlein.Verwenden Sie keine flüssigen
Reinigungsmittel oder Reinigungsmittel in
Spraydosen.
Warnung :Mobiltelefone
Halten Sie Ihr Mobiltelefon außer Reichweite
vom Fernsehgerät, um Störungen in Bild und Ton,
Funktionsstörungen Ihres Fernsehgerätes oder
sogar Beschädigungen zu vermeiden.
Schlechtes Bild
• Haben Sie das richtige Fernsehsystem gewählt?
• Sind die Kabel richtig angeschlossen? (das
Antennenkabel für Fernsehgerät oder Videorecorder, die VGA-Kabel für Fernsehgerät, das
Netzkabel.)
• Befindet sich Ihr Fernsehgerät oder Ihre
Hausantenne nicht zu nahe an Lautsprechern,
nicht geerdeten Audiogeräten oder
Leuchtstofflampen usw.?
• Berge oder hohe Gebäude können Doppelbilder
oder Geisterbilder verursachen. Manchmal
können Sie die Bildqualität durch eine
Richtungsänderung der Außenantenne
verbessern.
• Sind Helligkeit und Kontrast nicht richtig
eingestellt ? Drücken Sie die AUTO M oder
a Taste, um zu den Werksvoreinstellung
zurückzukehren.Versuchen Sie einen anderen
Sender, vielleicht ist das empfangene Signal zu
schwach.
• Die Bildqualität kann manchmal schlecht sein,
wenn ein S-VHS-Videorecorder, eine Kamera
oder ein Camcorder ans Fernsehgerät
angeschlossen ist und gleichzeitig auch ein
anderes peripheres Gerät an AV1 oder AV2
angeschlossen ist. In diesem Fall eines der beiden
peripheren Geräte ausschalten.
Kein Bild
• Ist das Fernsehgerät eingeschaltet?
• Ist die Antenne sorgfältig angeschlossen ? Sind
die Stecker gut in der Antennenbuchse befestigt?
• Ist das Antennenkabel in gutem Zustand und mit
den richtigen Steckern versehen?
Kein Ton
Kein Ton bei egal welchem Fernsehsender ?
Überprüfen Sie, ob die Lautstärke nicht auf
Minimum eingestellt ist.Wird der Ton nicht
unterbrochen durch die Ton AUS-Taste ¬?
Fernbedienung
• Wenn Ihr Fernsehgerät nicht mehr auf die
Befehle der Fernbedienung reagiert, könnten die
Batterien leer sein. Sie können immer noch die
Tasten vorne am Fernsehgerät benutzen.
• Wurde die Kindersicherung ausgeschaltet?
Keine Lösung
Schalten Sie Ihr Gerät aus und sofort wieder ein.
ersuchen Sie niemals, ein defektes Fernsehgerät
selbst zu reparieren. Entfernen Sie nie die
Hinterseite des Fernsehgerätes.Wenn das
Fernsehgerät nicht gut funktioniert, ziehen Sie
den Stecker heraus und rufen Sie Ihren
Fachhändler oder einen Fernsehtechniker an.
Entsorgungs-Richtlinien
Philips kümmert sich besonders um eine
unweltfreundliche Herstellung.
Ihr neues Fernsehgerät enthält Materialien, die
rückgewonnen und wiederverwertet werden
können. Spezialbetriebe können die
ausrangierten Geräte in Ihre Bestandteile
zerlegen und die wiederverwertbaren
Materialien sammeln. Damit verringert sich die
Menge der Materialien, die entsorgt werden
müssen. Bitte, erkundigen Sie sich nach den
örtlichen Bestimmungen, hinsichtlich der
Entsorgung Ihres alten Gerätes.
Wie entsorgen Sie leere Batterien?
Die für die Fernbedienung Ihres neuen
Fernsehgerätes mitgelieferten Philips-Batterien
enthalten nicht die Schwermetalle Quecksilber
und Kadmium.Trotzdem dürfen in verschiedenen
Ländern, leere Batterien nicht in den Hausmüll
gegeben werden. Bitte, erkundigen Sie sich, wie
leere Batterien den örtlichen Vorschriften
entsprechend zu entsorgen sind.
Nützliche Hinweise
19
Page 41

Inhaltsverzeichnis
a Auto Bild, 8
Auto Ton, 8
Automatische Abschaltung, 9
Automatische Einstellung, 5
AVL, 11
b Balance, 11
c C-Kanale, 6
Camcorder, 17
e Equalizer, 11
Euro-A/V-Kabel, 15
f Farbe, 11
Farbweiss, 11
Feinabstimmung, 6
Fernsehgerät einschalten, 3
Fernsehsender suchen, 5
Fernsehsender speichern, 4
h Helligkeit, 11
Höhen, 11
k Kindersicherung, 12
Kopfhörer, 17
l Lautstärke, 9
m Manuelle Einstellung, 6
Menüsprache, 4
Mono, 8
n Name, 6
Nicam, 8
p PC input, 17
PC Menü, 18
Programmliste, 7
q Quelle, 12
s S-Kanale, 6
Suchen, 5
Schärfe, 11
Stereo, 8
S-VHS, 16
S-video, 16
Sprache, 4
System, 5
t Teletext, 13
Tiefen, 11
Toneinstellungen, 11
Tonunterbrechung, 9
v Videorecorder, 15
w Werksvoreinstellung, 8
Wiedergabemodus des Bildschirms, 17
z Zweikanalton, 8
20 Inhaltsverzeichnis
Page 42

Aide?
Si dans le mode d'emploi vous
n'avez pas la réponse à votre
question ou si les ‘Conseils’ donnés
ne vous ont pas aidé à résoudre
votre problème de TV, vous devez
téléphoner au service
consommateur de votre pays, voir
le document 'World-wide
guarantee'.
Avant de téléphoner au Service
Consommateurs de Philips, notez
le modèle et le numéro de série
complet de votre TV, lesquels sont
inscrits sur une étiquette collée au
dos de l'appareil, ou bien vous
trouverez ces informations sur une
étiquette collée sur 2 cotés au bas
de l'emballage.
Table des matières
Installation
Votre télécommande 2
Préparation 3
Utilisation des menus 4
Mise en mémoire des chaînes 4
Sélectionnez votre menu de langage 4
Installation automatique 5
Installation manuelle 6
Modifier la liste des programmes 7
Afficher la liste des programmes 7
Utilisation
Utilisation de la télécommande 8-9
Les touches à l'avant du téléviseur 10
Menu image 11
Menu son 11
Menu options 12
Télétexte 13-14
Branchement des périphériques
Branchement et sélection des périphériques 15-17
Les touches de commande du magnétoscope 18
Conseils 19
Index 20
Français
Modèle: ..........................................................
N° de série:" ...............................................
1
Page 43

B
AUTO
AUTO
PV
w
C
B
2
1
3
54 6
87 9
0
OK
MENU
¬
Ò
‡
π
†
®
M
a
Y-Z
D
0
LIST
h
U
fg
c
e
k
b
Installation
w Périphériques p. 8
sélection du mode TV
ou AV.
X sélection son ou
langage p. 8
M auto son p. 8
a auto image p. 8
D l'option arrêt
programmé p. 9
MENU menu principal
marche/arrêt p. 9
V volume haut/bas p. 9
¬ suppression du son p. 9
P sélection des
programmes p. 9
Votre télécommande
B position veille p. 8
programme précédent
0
LIST liste des programmes p. 9
curseur pour sélectionner
votre choix
OK valider votre sélection
p. 9
Touches colorées
- sélection directe d’une page de
txt ou d’un sujet, p. 9
- fonctions pour magnétoscope
p. 18
® enregistrer
Ò rembobinage
‡ arrêt
π mode lecture
† bobinage
C timer du magnétoscope
2 Votre télécommande
Télétexte p. 14
h double hauteur
b télétexte marche/arrêt
U heure
sélection des sous-pages
f informations cachées
g arrêt
c mix image tv/ txt
e interruption
k index
Page 44

Préparation
& Placez le téléviseur sur une surface
solide et stable.
min.
1m
Placez le téléviseur de telle sorte que l'air
puisse circuler librement. Ne couvrez pas
les fentes de ventilation sur la couverture
de dos. Pour éviter les situations
dangereuses, il est recommandé de ne
placer aucune source de flamme nue,
comme une bougie allumée, sur ou à
proximité du téléviseur. Evitez la chaleur, la
lumière du soleil directe et l'exposition à la
pluie ou à l'eau. Evitez également d'exposer
l'appareil à l'égouttement et aux
éclaboussures.
Introduisez la fiche d'antenne dans
é
l'entrée d'antenne
l'arrière du téléviseur.
CABLE
ANT IN x 75 Ω à
Alimentation: Ce téléviseur fonctionne
‘
sur une alimentation DC fournie par
l'adaptateur AC-DC. La tension est
indiquée sur l'étiquette sur la couverture
de dos.
DC 15V
_
+
Utilisez uniquement l'adaptateur AC-DC
fourni avec le téléviseur et n'utilisez jamais
une alimentation AC directement sur le
téléviseur. L'adaptateur AC-DC fonctionne
sur une alimentation secteur AC, la
tension est celle indiquée sur l'étiquette
de l'adaptateur AC-DC.
Branchez la fiche DC de l'adaptateur ACDC dans la prise CD 15V à l'arrière du
téléviseur.
Branchez l'adaptateur AC-DC et son
cordon d'alimentation secteur.
Introduisez la fiche dans la prise de
courant avec une tension de secteur de
110V-240V.
.
ANT IN
x
75
Ω
“ Télécommande: Enlevez le couvercle du
compartiment à piles. Mettez les deux piles
fournies (type R6-1,5V).
R6 / 1,5 V
( Mise en service du téléviseur:Appuyez
sur la touche
téléviseur pour la mise en et hors service.
Si le téléviseur est en position veille,
l'indicateur veille situé à l'avant du téléviseur
s'illumine. Appuyez à nouveau sur la touche
veille B ou sur la touche – P + ou sur l'une
des touches chiffrées de la télécommande
pour la mise en service du téléviseur.
ON/OFF sur la face avant du
3Préparation
Page 45

B
M
a
AUTO
AUTO
w
Y-Z
Ò
‡
π
®
D
1
2
9
3
6
5
7
4
8
0
0
LIST
P
¬
V
MENU
OK
Utilisation des menus
& Appuyez sur la touche MENU à plusieurs reprises pour afficher chaque menu.
é Utilisez le curseur de direction haut/bas pour sélectionner un sujet des menus.
“ Utilisez le curseur de direction gauche/droite pour mettre au point le réglage d'un sujet des
menus ou appuyez sur la touche OK pour entrer dans un sous-menu.
Auto programme
Installation automatique
mettre en/hors service
le menu
valider
sélectionner un sujet
Installation manuelle
Modifier n° des programmes
Langage
oœ
OK MENU
Mémoriser les chaînes de télévision
Sélectionnez votre langage
Installation automatique
Installation manuelle
Modifier n° des programmes
Language
Langage
oœ
OK MENU
& Appuyez sur la touche MENU de la
télécommande une fois pour sélectionner le
menu installation.
é Utilisez le curseur vers le bas pour sélectionner
Langage.
“ Appuyez sur la touche OK.
‘ Appuyez sur le curseur de direction haut/bas
pour sélectionner le langage de votre choix.
( Appuyez sur la touche OK.
Vous pouvez rechercher et mémoriser les
chaînes de télévision de deux façons différentes:
en utilisant installation automatique, voir p. 5 ou
installation manuelle (introduire chaîne par
chaîne), voir p. 6.
Sélectionnez votre choix et appuyez sur la
touche OK.
Installation
4
Page 46

Installation automatique
Auto programme
Installation automatique
Installation manuelle
Modifier n° des programmes
Langage
oœ
OK MENU
System BG
Système BG
Mémoriser dès 1
Recherche C 15
1
‡ 2%
MENU
& Sélectionnez le système de télévision.
é Appuyez sur le curseur de direction
gauche/droite pour sélectionner le
système de télévision du pays ou de la
partie du monde pour lequel vous voulez
sélectionner les émetteurs.
Si vous êtes raccordé à la télévision par
câble, sélectionnez le système de télévision
du pays ou de la partie du monde où vous
vous trouvez en ce moment.
DK: PAL D/K, SECAM D/K
(Europe de l'Est)
BG: PAL B/G, SECAM B/G
(Europe/ Europe de l'Est/France)
I: PAL I/II (U.K./Irlande)
L: (si disponible) (France)
“ Appuyez sur le curseur de direction
haut/bas pour sélectionner
.
dès
Mémoriser
‘ Appuyez sur le curseur de direction
gauche/droite pour sélectionner un
numéro de chaîne ou introduisez à l'aide
des touches chiffrées le numéro de chaîne
à partir duquel vous voulez poursuivre la
recherche d'autres chaînes. Si vous voulez
par ex. conserver les chaînes 1 à 11
mémorisées auparavant, entrez le numéro
de chaîne 12.
Votre téléviseur recherchera de nouvelles
chaînes à partir du numéro 12.
( Appuyez sur le curseur de direction
haut/bas pour sélectionner
Recherche.
§ Appuyez sur la touche OK pour
déclencher la recherche.
Toutes les chaînes disponibles sont
recherchées et mémorisées
automatiquement.
Les noms des chaînes sont mémorisées
également si les chaînes de télévision
transmettent VPS (Video Programme
Service), PDC (Programme Delivery
Control) ou Télétexte.
Si aucun nom ne peut être attribué à une
chaîne de télévision, seul le numéro de
chaîne est attribué et mémorisé comme
canal C (V/UHF 01-69) ou canal S (Câble
01-47), suivi d'un chiffre.
Pour terminer la Programmation
automatique, appuyez sur la touche
MENU.
Une fois la Programmation automatique
terminée, le menu
programmes
Modifier n° des
apparaît.Voir plus loin.
è Appuyez plusieurs fois sur la touche
MENU pour quitter le menu.
5Installation
Page 47

Installation manuelle
Installation automatique
Manual installation
Installation manuelle
Modifier n° des programmes
Langage
oœ
OK MENU
Système BG
Canal Can. S/Can. C
Régl. fin πππ
Recherche
Nom C 01
Mémoriser 1
oœ p π
OK MENU
La recherche et la mise en mémoire des
chaînes de télévision est exécutée chaîne
par chaîne.Vous pouvez également
attribuer à une chaîne de télévision un
nom de 5 lettres ou chiffres maximum.
Vous devez passer par toutes les
étapes du menu Installation manuelle.
& Sélectionnez Installation manuelle dans le
menu Installation.
é Appuyez sur la touche OK pour entrer
dans le menu Installation manuelle.
“ Appuyez sur le curseur de direction
gauche/droite pour sélectionner le
système de télévision du pays ou de la
partie du monde pour lequel vous voulez
sélectionner l'émetteur.
Si vous êtes raccordé à la télévision par
câble, sélectionnez le pays ou la partie du
monde où vous vous trouvez en ce
moment.
DK: PAL D/K, SECAM D/K
(Europe de l'Est)
BG: PAL B/G, SECAM B/G
(Europe/Europe de l'Est/France)
I: PAL I/II ( U.K./Irlande)
L (si disponible) (France)
‘ Appuyez sur le curseur haut/bas our
sélectionner
Canal.
( Appuyez sur le curseur de direction
gauche/droite pour sélectionner
pour canaux par antenne ou Can. S pour
canaux par câble. Si vous connaissez le
numéro de canal C (01-69) ou S (01-47),
vous pouvez l'introduire directement à
l'aide des touches chiffrées 0 à 9.
Demandez une liste des fréquences à
Can. C
votre société de télédistribution ou à
votre revendeur.
§ Appuyez sur le curseur haut/bas pour
sélectionner
Recherche.
è Appuyez sur le curseur gauche/droite pour
déclencher la recherche. La recherche
s'arrêtera lorsqu'une chaîne a été trouvée.
Réglage fin
Si la réception est mauvaise, vous pouvez
améliorer la réception en réglant la
fréquence.
Appuyez sur le curseur haut/bas pour
sélectionner
Régl. fin.
Appuyez sur le curseur de direction
gauche/droite pour obtenir une image et
un son optimaux.
Attribuer un nom à une chaîne
Il est possible de modifier le nom de la
chaîne déjà mémorisé ou d'attribuer un
nom à une chaîne encore dépourvue de
nom.Vous pouvez donner un nom de 5
lettres ou chiffres au maximum aux
numéros de programme 0 à 99.
Appuyez sur le curseur haut/bas pour
sélectionner
Nom.
Sélectionnez le signe avec le curseur
gauche/droite.
L’espace, les chiffres ou autres signes
spéciaux se trouvent entre Z et A.
Appuyez sur la touche OK.
Sélectionnez le signe suivant.
Poursuivez avec les étapes suivantes.
! Si vous avez trouvé la chaîne souhaitée,
appuyez sur le curseur de direction
haut/bas pour sélectionner
Mémoriser.
ç Appuyez sur le curseur de direction
gauche/droite pour sélectionner un
numéro de chaîne ou introduisez le
numéro de chaîne à l'aide des touches
chiffrées.
0 Appuyez sur la touche OK pour
mémoriser la chaîne de télévision.
Répéter les étapes 4 à 10 pour mémoriser
une autre chaîne.
Appuyez plusieurs fois sur la touche
MENU pour quitter le menu.
Installation
6
Page 48

Modifier la liste des programmes
Auto programme
Installation automatique
Installation manuelle
Modifier n° des programmes
Langage
oœ
OK MENU
0ARD
1ZDF
1 ZDF
2C12
3S 4
4 CH-5
Eliminer
•
Déplacer
•
oœ p π
OK MENU
5 ARD1
6 ZDF1
7 C12
8S 44
9 CH-5
Copier
•
Sauter
•
Vous pouvez, à votre guise, éliminer ou
sauter les chaînes mémorisées.Vous
pouvez également reclasser les chaînes
mémorisées ou insérer un blanc parmi
les numéros de chaîne sélectionnés.
& Appuyez sur le curseur haut/bas pour
sélectionner
programmes
Modifier n° des
dans le menu Installation.
é Appuyez sur la touche OK pour entrer
dans le menu Modifier n° de
programme.
Eliminer une chaîne de télévision
& Appuyez sur le curseur haut/bas,
gauche/droite pour sélectionner la
chaîne que vous voulez effacer.
é Appuyez deux fois sur la touche rouge
de la télécommande.
Le numéro de chaîne sélectionné est
effacé, toutes les chaînes suivantes
remontent d'une position.
Copier une chaîne de télévision
& Appuyez sur le curseur de direction haut/bas,
gauche/droite pour sélectionner la chaîne que
vous voulez copier.
é Appuyez sur la touche verte de la
télécommande.Tous les numéros de chaînes
suivants descendent d'une position.
Déplacer une chaîne de télévision
& Appuyez sur le curseur haut/bas,
gauche/droite pour sélectionner le numéro
de chaîne que vous voulez déplacer.
é Appuyez sur la touche jaune de la
télécommande.
“ Appuyez sur le curseur de direction haut/bas,
gauche/droite pour déplacer la chaîne
jusqu'au numéro désiré.
‘ Appuyez à nouveau sur la touche jaune pour
déclencher cette fonction.
Sauter une chaîne de télévision
& Appuyez sur le curseur haut/bas,
gauche/droite pour sélectionner le numéro
de chaîne que vous voulez sauter.
é Appuyez sur la touche bleue de la
télécommande. La chaîne de télévision qui a
été sautée est affichée en bleu.
“ Appuyez à nouveau sur la touche bleue.
Après avoir quitté l'installation, vous pouvez
parcourir les chaînes de télévision en utilisant
les touches du curseur de direction haut/bas.
Seules les chaînes que l'on a pas sautées
peuvent être sélectionnées ainsi. Les chaînes
que l'on a sautées peuvent être sélectionnées
avec les touches chiffrées ou dans la liste des
programmes où elles apparaîtront en bleu.
Appuyez plusieurs fois sur la touche
pour quitter le menu.
MENU
Visualiser la liste des programmes
0ARD
1ZDF
1 ZDF
2C12
3S 4
4 CH-5
oœ p π
OK MENU
5 ARD1
6 ZDF1
7 C12
8S 44
9 CH-5
& Appuyez sur la touche LIST de la
télécommande pour visualiser la liste des
programmes.
é Utilisez le curseur de direction haut/bas,
gauche/droite pour parcourir la liste de 100
numéros de programmes.
“ Appuyez sur la touche OK pour
sélectionner la chaîne désirée.
Note: Les chaînes TV affichées en bleu ont été
installées pour être sautées dans le menu
Modifier n° des programmes.
7Installation
Page 49

Utilisation
MENU
OK
PV
¬
5
1
3
2
4
6
7
9
8
0
0
LIST
h
fg
Ò
‡
π
c
b
®
†
U
e
k
C
a
D
B
M
AUTO
AUTO
w
Y-Z
Utilisation de la télécommande
w Source
Sélectionnez d'autres
périphériques : appuyez
plusieurs fois sur cette touche
pour sélectionner le mode
AV1, AV2 ou S-VIDEO.
TV,
X Emission bilingue et
sélection du son
Appuyez sur cette touche
• pour choisir entre son
Stéréo
ou Mono, si la chaîne
transmet le son en stéréo, ou
entre
Nicam Stéréo ou
Nicam Mono, si la chaîne
transmet le son en numérique
• pour choisir entre
Langage
Y et Nicam Langage
Nicam
Z ou Nicam Langage X si
la chaîne transmet le son en
Nicam Dual.
• pour choisir entre
Langage Z ou Langage X
en cas d’émission bilingue:
Langage Y envoie le langage
d'émission primaire aux hautparleurs;
Langage Z envoie le langage
d'émission secondaire aux
haut-parleurs;
Langage X envoie un
langage différent à chaque
Langage Y,
haut-parleur.
Remarque : en cas de signaux
sonores stéréo faibles avec
transmission stéréo ou Nicam
stéréo, sélectionnez Mono.
Sélection sortie sonore en mode AV
En mode AV, vous pouvez sélectionner le volume de sortie pour les haut-parleurs gauche et
droite.Appuyez plusieurs fois sur la touche X pour sélectionner:
• L+R: le signal audio provenant de l'entrée audio L est envoyé au haut-parleur de gauche, le
signal audio provenant de l'entrée audio R au haut-parleur de droite
• L+L: le signal audio provenant de l'entrée audio L est envoyé aux haut-parleurs gauche et
droite
• R+R: le signal audio provenant de l'entrée audio R est envoyé aux haut-parleurs gauche et
droite.
B Position veille
Met le téléviseur en service à
partir de la position veille ou
fait passer en veille le
téléviseur hors service.
Touches
AUTO
Pour sélectionner des
paramètres définis de l’image
et du son.
a
AUTO image
Chaque fois que cette touche
est activée, un paramétrage
d’image différent est
sélectionné, correspondant à
un préréglage spécifique du
Contraste, de la Lumière, de la
Couleur et de la Définition.
AUTO son
M
Chaque fois que vous appuyez
sur cette touche, vous
sélectionnez un réglage du son
différent, correspondant à un
réglage spécifique d’aigus et de
graves, préalablement défini en
usine.
Préférent. renvoie aux réglages
personnels de l’image et du
son sélectionnés dans le menu
image et son.
Utilisation de la télécommande
8
Page 50

B
M
a
AUTO
AUTO
w
Y-Z
C
h
fg
c
b
e
k
Ò
‡
π
®
†
U
D
1
2
9
3
6
5
7
4
8
0
0
LIST
MENU
OK
P
¬
V
MENU Appuyez plusieurs fois
sur cette touche pour afficher
chaque menu.
OK Appuyez sur cette touche
pour activer le choix que vous
avez effectué dans les menus.
V Volume
Appuyez sur + ou - pour régler
le volume.
¬ Suppression du son
Pour supprimer
momentanément ou pour
rétablir le son.
PSélection des chaînes
• pour parcourir les chaînes de
télévision qui n'ont pas été
sautées
• pour mettre le téléviseur en
service à partir de la position
veille.
D Arrêt programmé
Grâce à cette touche, vous
pouvez programmer une
durée après laquelle le TV
passera en position de veille.
Appuyez sur cette touche
plusieurs fois pour sélectionner le nombre de minutes. Le
compteur compte à partir de
B 0, 10, 20, 30... jusqu'à 240
minutes. Le compte à rebours
commence au nombre de
minutes choisi.
Note: Pour voir le temps qui
reste, appuyez une fois sur la
touche D. Pour annuler le
temps d'arrêt programmé,
appuyez plusieurs fois sur la
touche D jusqu'à ce que B 0
apparaisse.
0/9 Touches chiffrées
Pour choisir une chaîne de
télévision.
®Ò‡π†
Magnétoscope voir p. 18.
U Demander l’heure
L'heure est donnée par le
télétexte de la chaîne affectée
au numéro de programme 1 ou
au numéro le plus bas de
programme non sauté.
0 Programme précédent
La chaîne de télévision
sélectionnée auparavant
réapparaît à l’écran.
LIST Liste des programmes
Pour afficher la liste des
programmes
b Télétexte marche/arrêt
voir p. 13.
Fonctions télétexte
voir p. 14.
hUfgcek
9Utilisation de la télécommande
Page 51

Les touches sur la face avant du téléviseur
TV / VIDEO
MENU
OK
_
VOL
+
_
CH / PR
+
B
ON / OFF
Si votre télécommande est perdue ou cassée, vous pouvez toujours modifier quelques réglages
de base de l’image et du son avec les touches sur la face avant du téléviseur.
ON/OFF:Appuyez sur la touche ON/OFF pour mettre le téléviseur en ou hors service
TV/VIDEO:Appuyez plusieurs fois sur cette touche pour sélectionner TV ou AV
MENU:Appuyez plusieurs fois sur cette touche pour afficher chaque menu
OK: - Appuyez sur cette touche pour valider votre choix lorsque vous êtes dans le menu
Démonstration automatique: gardez la touche OK enfoncée pendant environ
10 secondes. Tous les menus s'affichent automatiquement l'un après l'autre.
Pour terminer la Démonstration automatique, appuyez sur une des touches du panneau
avant.
- VOL + : - Appuyez sur - ou + pour sélectionner un sujet des menus;
- Appuyez sur - ou + pour régler le volume;
- Appuyez sur - ou + pour régler les réglages menu.
- CH/PR +:- Appuyez sur - ou + pour parcourir les chaînes de télévision qui n'ont pas été
sautées;
- Appuyez sur - ou + pour sélectionner un sujet du menu;
- Pour mettre le téléviseur en service à partir de la position veille.
B: Met le téléviseur en service à partir de la position veille ou fait passer en veille le
téléviseur hors service.
L'indicateur B est très lumineux lorsque le téléviseur est en position veille et baisse
d'intensité lorsque le téléviseur est en marche.
Touches à l’avant du téléviseur
10
Page 52

B
M
a
AUTO
AUTO
w
Y-Z
D
1
2
9
3
6
5
7
4
8
0
0
LIST
P
¬
V
MENU
OK
Utilisation des menus
mettre en/hors service
le menu
valider
sélectionner un sujet
& Appuyez plusiers fois sur la touche MENU pour
sélectionner le menu image, son ou options.
é Utilisez le curseur de direction haut/bas, pour
sélectionner un sujet des menus.
“ Utilisez le curseur de direction gauche/droite
pour régler les paramètres d'un sujet du menu
ou appuyez sur la touche OK pour entrer dans
un sous-menu.
‘ Appuyez plusieurs fois sur la touche MENU
pour quitter le menu.
Menu image
Contrast 100
Contraste
Lumière 95
Couleur 85
Définition 80
Teinte
oœ p π
OK MENU
Menu de son
Equalizer
Egaliseur
Balance 0
AVL On/Off
oœ
OK MENU
Flat
Neutre
Musique
Film
Parole
Préférent.
oœ p π
Vous pouvez sélectionner vos paramètres son
préférés ou régler la fréquence son de
l'égaliseur et régler la balance de la sortie audio
des haut-parleurs gauche et droite.
l'option AVL pour maintenir un niveau de
volume constant lorsque vous changez de
chaîne.
0.1 0.5 1.5 5.0 10 kHz
MENU
100
Activez
Vous pouvez régler le Contraste, la Lumière, la
Couleur, la Définition et la Teinte (seulement avec
périphérique NTSC AV) de l'image selon vos
préférences.
Appuyez sur la touche OK pour valider les réglages.
Le message
Mémorisé apparaît.
Vos réglages menu sont à présent mémorisés et
peuvent être demandés à nouveau avec la touche
AUTO a de la télécommande, sous l'option
Préférentiel.
Pour sélectionner un des paramètres image préréglés
en usine, appuyez sur la touche
AUTO a de la
télécommande.
Appuyez plusieurs fois sur la touche
MENU pour
quitter le menu
Egaliseur
& Sélectionnez Egaliseur et appuyez sur la
touche OK pour entrer dans le menu
Egaliseur.
é Sélectionnez un des paramètres son
préréglés en usine ou choisissez
Préférentiel pour régler vos paramètres
Préférentiels des graves et des aigus.
Régler l'égaliseur Préférentiel
& Sélectionnez Préférentiel avec le curseur
de direction haut/bas.
é Appuyez sur le curseur de direction
gauche/droite pour sélectionner une
bande-son.
“ Appuyez sur le curseur haut/bas pour
régler le niveau sonore adéquat.
‘ Appuyez sur la touche OK pour
mémoriser les réglages préférentiels.
Le message
Appuyez sur la touche
le menu.
Mémorisé apparaît.
MENU pour quitter
11Utilisation des menus
Page 53

Menu Options
Input TV
Source TV
Verrouillage Arrêt
Auto arrêt Arrêt
oœ p π
MENU
Sélectionnez le mode TV ou AV
& Sélectionnez Source dans le menu
Options.
é Appuyez sur le curseur de direction
gauche/droite pour sélectionner
AV2 ou S-VIDEO.
AV1 pour un VCR branché sur la prise
•
péritel w 1 (Voir Branchement des
périphériques, p. 16)
AV2 pour un VCR branché sur le
•
connecteur
S-VIDEO pour un VCR S-Video branché
•
AV2 du téléviseur.
sur le connecteur S-Video du téléviseur.
Remarque: Lorsqu'un VCR est branché par le
biais de l'entrée d'antenne, le téléviseur est
utilisé en mode TV.
Vous pouvez sélectionner autrement le mode
TV ou AV avec la touche source de la
télécommande.
Pour revenir en mode TV, appuyez sur le
curseur de direction haut/bas ou les
touches chiffrées.
TV, AV1,
Passage automatique en mode AV
Si votre VCR est branché sur la prise
péritel et si le VCR est mis en mode
lecture, le téléviseur passera
automatiquement en mode
AV1 . Si vous
voulez continuer à regarder en mode TV,
appuyez sur le curseur de direction
haut/bas,
+ P - ou utilisez les touches
chiffrées.
Verrouillage
Si l'option Verrouillage est activée, le
téléviseur peut être mis en marche et
actionné uniquement à l'aide de la
télécommande. Les touches qui se
trouvent à l'avant de votre téléviseur ne
peuvent être utilisées.Vous pouvez ainsi
empêcher que l'on utilise votre TV sans
autorisation.
Si le message
Verrouillage Arrêt apparaît,
il faut désactiver le Verrouillage avant de
pouvoir utiliser des touches qui se
trouvent à l'avant de votre téléviseur pour
sélectionner une chaîne de télévision.
& Sélectionnez Verrouillage dans le Menu
particularités.
é Appuyez sur le curseur de direction
gauche/droite pour activer l'option
Verrouillage (Marche).
“ Appuyez plusieurs fois sur la touche
MENU pour quitter le menu.
Auto arrêt
Si l'option
Auto arrêt est activée,le
téléviseur se met automatiquement en
position veille si aucun signal antenne n'est
reçu pendant une période d'environ 12
minutes.
& Sélectionnez Auto arrêt dans le Menu
options.
é Appuyez sur le curseur de direction
gauche/droite pour sélectionner
arrêt Marche
.
Auto
“ Appuyez plusieurs fois sur la touche
MENU pour quitter le menu
12 Utilisation des menus
Page 54

Télétexte
C
h
fg
c
e
Ò
‡
π
®
†
U
9
7
8
0
0
LIST
P
¬
V
MENU
OK
b
k
b
k
OK pour activer
curseur pour
sélectionner les pages
touches colorées
pour sélectionner
Mise en et hors service du
télétexte
Appuyez sur b pour mettre le télétexte en
ou hors service.
Le contenu ou la dernière page sélectionnée
apparaît à l'écran ainsi qu'un titre
d'information et une ligne d'options en bas de
l'écran.
Sélection d’une page de
télétexte
A l’aide des touches chiffrées
Introduisez le numéro de page désirée avec
les touches chiffrées.
Le compteur de pages cherche la page.
Un message apparaîtra si vous avez introduit un
numéro non existant ou mauvais. Remplissez le
nombre à 3 chiffres et introduisez le numéro de
page correct. Des numéros de pages commençant
par 0 ou 9 n’existent pas.
Certaines chaînes de télévision transmettent
des informations au moyen d'un système
télétexte. Chaque chaîne qui dispose d'un
télétexte transmet une page d'informations
sur l'utilisation du système télétexte.
Cherchez la page télétexte à l'aide de l'index
(en général, il se trouve à la page 100).
Les chaînes de télévision peuvent transmettre
le télétexte de manières différentes:
Standard
Le télétexte standard consiste en un certain
•
nombre de pages que l'on sélectionne en
introduisant directement le numéro de la
, TOP and FASTEXT.
Télétexte
page correspondant.
TOP et FASTEXT utilisent les couleurs sur
•
la ligne en bas de l'écran, correspondant aux
touches colorées de votre télécommande,
pour sélectionner les informations télétexte.
A l’aide de la ligne d’options en bas
Choisissez le sujet souhaité à l’aide des
touches colorées correspondant aux options
en bas de l’écran.
A l’aide du curseur haut/bas
Appuyez sur le curseur de direction haut/bas
pour sélectionner la page précédente ou
suivante.
Sélection de l’index du système
télétexte
Appuyez sur la touche k pour faire
apparaître l’index (en général p. 100).
Uniquement pour les diffuseurs utilisant
les systèmes télétexte T.O.P:
Toutes les chaînes de télévision ne
transmettent pas le télétexte T.O.P.
T.O.P trie les pages en catégories et ajoute
d’autres possibilités pour améliorer la facilité
d’utilisation.
Appuyez sur la touche k. Un aperçu T.O.P.
des divers sujets apparaît. Utilisez les touches
colorées pour sélectionner les informations
télétexte ou choisissez directement les pages
télétexte à l'aide des touches chiffrées.
13Télétexte
Page 55

C
h
fg
c
b
e
k
Ò
‡
π
®
†
9
7
8
0
0
LIST
P
¬
V
OK
MENU
MENU
U
U
c
h
f
e
b
g
OK pour valider
curseur pour
sélectionner les
sous-pages
Sélection des sous-pages
Lorsque des sous-pages sont disponibles, vous
pouvez arrêter la rotation automatique des
sous-pages ou choisir vous-même la
sous-page décrite.
Appuyez sur la touche U.
Le numéro de la sous-page apparaît dans le
bas de l'écran.
Appuyez sur la touche rouge ou verte pour
choisir la sous-page précédente ou suivante,
ou changez de sous-page à l'aide du curseur
haut/bas ou avec les touches chiffrées .
Appuyez à nouveau sur la touche U pour
quitter cette fonction.
Fonctions télétexte spéciales
Double hauteur
Appuyez plusieurs fois sur h pour afficher la
partie supérieure, inférieure et pour retourner
au format d’image normal. Quand la fonction
Double hauteur est activée, vous pouvez faire
défiler le texte ligne par ligne en utilisant le
curseur haut/bas.
Informations cachées
Appuyez sur f pour appeler/effacer des
informations cachées, comme des solutions de
jeux ou des réponses à des questions.
Arrêt
Appuyez sur g pour arrêter la rotation
automatique des sous-pages si celles-ci sont
disponibles.
L'icône g apparaît en haut de l'écran.
Appuyez à nouveau sur la touche g pour
réactiver la rotation automatique des souspages.
Mix
Appuyez sur la touche c pour afficher les
pages télétexte superposées sur l'image TV.
Appuyez à nouveau sur la touche c pour
éteindre à nouveau l'image TV.
Interruption
Appuyez sur e.
Le programme TV apparaît.
b en haut de l'écran indique que vous êtes
toujours en mode télétexte.
Avant d'interrompre le télétexte, vous pouvez
choisir un numéro de page.
Une fois la page trouvée, la ligne d'information
apparaît brièvement sur votre écran. Poussez
à nouveau sur e.
Télétexte réapparaît.
14 Télétexte
Page 56

Brancher les périphériques
Vous pouvez brancher une large gamme d’appareils
électroniques sur votre téléviseur. Les diagrammes de
connexion suivants vous décrivent le mode de
connexion.
Préparation
Enlevez le panneau à l'arrière du téléviseur de la façon
indiquée sur l'illustration en regard.
Couchez le téléviseur LCD sur une table, l'écran vers le
bas, pour faciliter le branchement des périphériques.
Prenez grand soin de ne pas endommager l'écran.
Magnétoscope
Avec un câble péritel
CABLE
............
•
•
ANT IN
DC 12V
_
+
x
75
Ω
2
1
VCR
w 1
3
...........
PC INPUT
VIDEO (MONO) L AUDIO R
L
S-VIDEO
•
•
•
•
•
•
Vous obtiendrez une meilleure qualité
d'image avec un câble péritel qu'avec
un câble d'antenne uniquement.
& Branchez les câbles d'antenne 1, 2
et le câble péritel 3 tel qu'indiqué
en regard.
é Appuyez sur la touche π de votre
magnétoscope. Le téléviseur passera
automatiquement en mode
Si vous voulez continuer à regarder en
mode TV, appuyez sur le curseur de
direction haut/bas,
+ P - ou utilisez les
touches chiffrées.
AV1 .
Avec un câble d'antenne uniquement
CABLE
............
•
•
...........
PC INPUT
ANT IN
DC 12V
_
+
x
75
Ω
AV2
2
1
VCR
L
w 1
& Branchez les câbles d'antenne 1 et 2 tel
qu'indiqué en regard.
é Recherche et mise en mémoire du signal
de teste de votre magnétoscope.
• Retirez le câble d’antenne 1 de l’entrée
d’antenne x de votre magnétoscope.
• Mettez votre téléviseur en service et
branchez le magnétoscope sur signal test.
(Consultez le manuel de votre
magnétoscope.)
• Cherchez le signal test de votre
magnétoscope comme vous avez recherché
et mis en mémoire les chaînes de télévision.
Voir Installation manuelle, p. 6
• Mémorisez le signal test sous un numéro de
programme.
• Introduisez de nouveau la fiche d'antenne
dans l'entrée d'antenne x de votre
magnétoscope après avoir mémorisé le signal
test.
“ Sélectionnez le numéro de programme sous
lequel le magnétoscope est mémorisé.
‘ Appuyez sur la touche π du magnétoscope.
S-VIDEO
•
•
•
•
•
•
VIDEO (MONO) L AUDIO R
AV2
15Branchement des Périphériques
Page 57

CABLE
Avec des câbles audio/vidéo
& Branchez le câble d'antenne 1 et les
câbles audio/vidéo 2 et 3 tel
qu'indiqué en regard.
é Appuyez sur la touche w de la
télécommande ou choisissez
............
•
•
ANT IN
DC 12V
_
+
x
75
Ω
1
w 1
2
...........
PC INPUT
VIDEO (MONO) L AUDIO R
L
S-VIDEO
•
•
•
•
AV2
•
•
3
le Menu options (voir p. 12) pour
sélectionner
AV2 .
“ Appuyez sur la touche π du
magnétoscope.
Note: Si vous avez un magnétoscope mono,
connectez le câble audio du magnétoscope au
VCR
connecteur
l'arrière du téléviseur.
AUDIO (MONO) L seulement à
Source dans
Magnétoscope S-VHS
CABLE
............
•
•
...........
PC INPUT
ANT IN
DC 12V
_
+
x
75
Ω
2
1
VCR
Branchements
MONITOR OUT
Vous obtiendrez une meilleure qualité
d'image avec un magnétoscope S-VHS.
& Branchez les câbles d'antenne 1 et 2
tel qu'indiqué en regard.
é Connectez le câble S-vidéo à l'entrée
S-VIDEO du téléviseur.
EO
S•VID
VIDEO
VIDEO (MONO) L AUDIO R
L
w 1
S-VIDEO
•
•
•
•
AV2
•
•
“ Branchez le câble audio 4 tel qu'indiqué
AUDIO
en regard.
Note: Ne branchez jamais simultanément sur
le même téléviseur un magnétoscope avec
des câbles S-VHS et un magnétoscope avec
une prise péritel.
3
4
‘ Appuyez sur la touche w de la
télécommande ou choisissez
Source dans
le Menu particularités (voir p. 12) pour
sélectionner S-Video.
( Appuyez sur la touche π du
magnétoscope.
Les connecteurs MONITOR OUT peuvent
être utilisés pour des chaînes bouclées ou
pour l’enregistrement de programmes de
votre téléviseur.
Ce n’est que si un magnétoscope est
............
...........
DC 15V
_
w 1
+
VIDEO (MONO) L AUDIO R
L
S-VIDEO
•
•
•
•
•
•
AV2
VIDEO L AUDIO R
MONITOR OUT
ANT IN
x
75
Ω
raccordé à
possible d’enregistrer un programme
provenant d’un autre équipment branché
sur le téléviseur.
Si aucun magnétoscope n’est connecté à
MONITOR OUT vous ne pouvez
VCR
enregister qu’un programme transmis par
antenne ou par câble.
16 Branchement des Périphériques
MONITOR OUT qu’il est
Page 58

PC INPUT
w 1
•
•
•
•
•
•
S-VIDEO
DC 12V
_
+
ANT IN
x
75
Ω
VIDEO (MONO) L AUDIO R
AV2
L
•
•
............
...........
L
Caméra et caméscope
PC INPUT
w 1
•
•
•
•
•
•
S-VIDEO
DC 12V
_
+
ANT IN
x
75
Ω
VIDEO (MONO) L AUDIO R
AV2
L
•
•
............
...........
AUDIO
VID
E
O
S•
VIDEO
3
2
1
& Branchez votre caméro ou caméscope sur
VIDEO 2 et AUDIO (MONO) L 3 pour
un appareil mono.
é Branchez également sur AUDIO R 3
pour un appareil stéréo.
Vous obtiendrez la qualité S-VHS avec un
caméscope S-VHS en branchant les câbles
S-VHS sur
S-VIDEO 1 et sur AUDIO 3.
Casque
& Introduisez la fiche dans la prise du casque L à
l’arrière du téléviseur.
é Appuyez sur ¬ sur la télécommande pour
mettre hors service le son du casque et les
haut-parleurs de votre téléviseur.
“ Appuyez sur le curseur de direction
gauche/droite afin de régler le volume.
17Branchement des Périphériques
Page 59

B
a
M
AUTO
AUTO
w
Y-Z
D
C
h
f
c
e
Ò
‡
π
®
†
U
1
2
9
3
6
5
7
4
8
0
0
LIST
¬
V
MENU
OK
b
k
VCR
M
a
AUTO
AUTO
w
Y-Z
D
g
®
Ò
‡
π
†
C
P
P
B
BB
Touches pour le magnétoscope
La plupart des appareils électroniques qui font
partie de notre gamme de produits fonctionnent
à partir de la télécommande de votre téléviseur.
Maintenez la touche
VCR (située à gauche sur
votre télécommande) enfoncée et appuyez
simultanément sur:
® pour enregistrer
Ò pour le rembobinage
‡ pour l’arrêt
π pour le mode lecture,
† pour le bobinage
C pour le timer du magnétoscoper
- P + pour visualiser rapidement les chaînes de
télévision du récepteur de votre
magnétoscope
0 à 9 pour sélectionner une chaîne de télévision
à partir de votre magnétoscope
B pour mettre le magnétoscope en veille
18 Touches pour le magnétoscope
Page 60

Conseils
Entretien de l’écran
Ne frottez et ne grattez jamais l'écran avec un
objet dur car vous risqueriez de griffer,
d'abîmer ou d'endommager l'écran de façon
permanente.
Débranchez l'écran avant de le nettoyer. Pour
épousseter le téléviseur, essuyez l'écran et le
meuble avec un chiffon doux propre. Si l'écran
nécessite un nettoyage supplémentaire, utilisez
un chiffon propre humide. Evitez d'utiliser des
produits d'entretien liquides ou en spray.
Avertissement concernant les
téléphones portables
Pour éviter des perturbations au niveau de
l'image et du son, des dysfonctionnements de
votre téléviseur et même des dégâts causés à
votre téléviseur, n'approchez pas votre
téléphone portable du téléviseur.
Mauvaise image
• Avez-vous choisi le bon système de télévision?
• Les câbles sont-ils branchés correctement?
(Le câble d'antenne au téléviseur ou au
magnétoscope, les câbles VGA au téléviseur, le
câble de puissance.)
• Votre téléviseur et/ou votre antenne interne
se trouvent-ils trop près des haut-parleurs,
d'une installation audio sans prise de terre, de
tubes néon, etc.?
• La proximité de montagnes ou de hauts
immeubles peut être à l'origine d'images
dédoublées ou d'ombres. Parfois, on obtient
une meilleure qualité d'image en changeant la
direction de l'antenne externe.
• La lumière et le contraste sont-ils déréglés?
Appuyez sur la touche
AUTO M ou a pour
rétablir les réglages préréglés en usine.
Essayez une autre chaîne, peut-être la
réception du signal est-elle trop faible.
• Une mauvaise qualité d'image est parfois
possible quand un magnétoscope S-VHS, une
caméra ou un caméscope raccordé fonctionne
alors qu'un autre appareil est connecté à
AV1
ou AV2. Dans ce cas, mettez un des appareils
hors service.
Absence d’image
• Le téléviseur est-il allumé?
• L'antenne est-elle correctement raccordée?
Les fiches sont-elles fermement enfoncées
dans la prise d'antenne?
• Le câble d'antenne est-il en bon état et muni
des fiches adéquates?
Absence de son
Aucune des chaînes captées par votre
téléviseur ne diffuse du son? Vérifiez si le
volume n’est pas réglé sur sa position
minimum.Le son est-il interrompu par la
touche ¬?
Télécommande
• Si votre TV ne répond plus à la
télécommande, les piles peuvent être
déchargées.Vous pouvez toujours utiliser les
touches qui se trouventà l’avant du téléviseur.
• L'option de verrouillage est-elle désactivée?
Toujours pas de résultats ?
Mettez votre téléviseur hors service.
Remettez-le en service. N'essayez jamais de
réparer vous-même une panne de téléviseur.
N'enlevez jamais la couverture de dos du
téléviseur. Si le téléviseur montre des
dysfonctionnements, débranchez-le et
consultez votre revendeur ou un technicien.
Que faire lorsque votre téléviseur est
usagé ?
Votre nouveau téléviseur contient des parties
et matériaux recyclables et réutilisables. Des
entreprises spécialisées démontent les
téléviseurs arrivés en fin de cycle de vie pour
récupérer les parties et matériaux
réutilisables de manière à réduire au minimum
les déchets. Informez-vous sur les dispositions
de votre pays concernant les vieux téléviseurs.
Que faire avec les piles usagées
Même si les piles livrées avec la
télécommande ne contiennent pas de métaux
lourds tels que le mercure ou le cadmium, la
législation de certains pays peut cependant
interdire la dépose de piles usagées dans les
déchets ménagers.
Informez-vous pour connaître les dispositions
en vigueur dans votre pays.
19Conseils
Page 61

Index
a aigus, 11
arrêt programmé, 9
auto image, 8
auto son, 8
AVL, 11
b balance, 11
c câble péritel, 15
caméscope, 17
canaux C, 6
canaux S, 6
casque, 17
couleur, 11
d définiton, 11
e égaliseur, 11
émission bilingue, 8
g graves, 11
i installation automatique, 5
installation manuelle, 6
interruption de son, 9
l langage, 4
langage du menu, 4
liste des programmes, 7
lumière, 11
m magnétoscope, 15
mémoriser les chaînes de télévision, 4
mise en service du téléviseur, 3
mono, 8
n nom, 6
nicam, 8
p préréglages d’usine, 8
r réglage fin, 6
recherche, 5
rechercher les chaînes de télévision, 5
réglages du son, 11
s source, 12
stéréo, 8
système, 5
S-VHS, 16
s-vidéo, 16
t télétexte, 13
teinte, 11
v verrouillage, 12
volume, 9
20 Index
Page 62

Help?
Indien deze handleiding geen
antwoord geeft op uw vraag of
indien ‘Tips’ uw TV-probleem niet
oplost, kunt u de Lokale Philips
Klantendienst of Servicecentrum
bellen. Zie het bijgevoegde Worldwide guarantee boekje.
Gelieve het Model en Product
nummer dat u kan vinden op de
achterzijde van uw televisietoestel
of op de verpakking, klaar te
houden vooraleer de Philips
helplijn te bellen.
Model: . . . . . . . . . . . . . . . . . . . . .
Product No: . . . . . . . . . . . . . . . . .
Inhoud
Installatie
Uw afstandsbediening 2
Voorbereiding 3
Gebruik van de menu’s 4
TV-zenders vastleggen 4
Bedienen
Gebruik van de afstandsbediening 8-9
Toetsen vooraan op het toestel 10
Beeldmenu 11
Geluidsmenu 11
Speciaal menu 12
Teletekst 13-14
Randapparatuur aansluiten
Randapparatuur aansluiten en selecteren 15-17
Toetsen van de videorecorder 18
Tips 19
Index 20
Uw menutaal kiezen 4
Automatische installatie 5
Handmatige installatie 6
Herschikken 7
Programmalijst weergeven 7
Nederlands
1
Page 63

B
AUTO
AUTO
PV
w
C
B
2
1
3
54 6
87 9
0
OK
MENU
¬
Ò
‡
π
†
®
M
a
Y-Z
D
0
LIST
h
U
fg
c
e
k
b
Installatie
w Randapparatuur p. 8
keuze van TV of AV
mode
X tweetalige keuze/
geluidsinfo p. 8
M auto geluid p. 8
a auto beeld p. 8
D standby-klok instellen
p. 9
MENU hoofdmenu aan/uit
p. 9
V volumeregeling p.9
¬ geluid onderbreken p. 9
P tv-zenders kiezen p. 9
Uw afstandsbediening
B standby stand p. 8
vorig programma p.9
0
LIST programmalijst p. 9
Cursor om uw keuze te
selecteren
OK keuze activeren
Kleurtoetsen
- directe teletekstpagina of
onderwerp, p. 9
- videorecorderfuncties
p. 18
® opname
Ò terugspoelen
‡ stop
π weergave
† vooruitspoelen
C VCR timer
Teletekst p. 14
h vergroten
b teletekst aan/uit
U tijdsweergave
subpagina kiezen
f oplossing raadsels
g vasthouden
c mix tv/txt beeld
e onderbreken
k hoofdindex
2 Uw afstandsbediening
Page 64

Voorbereiding
Plaats uw toestel op een harde
&
ondergrond.
‘ Vermogen: Deze TV werkt via DC-
voeding die wordt geleverd door de ACDC adapter. De stroomspanning is
aangegeven op het label aan de
achterzijde.
Gebruik enkel de AC-DC adapter die
min.
1m
Zorg ervoor dat de positie van het
televisietoestel een vrije luchtstroom
mogelijk maakt. Laat de ventilatieopeningen
aan de achterzijde vrij. Om onveilige
situaties te voorkomen, mogen geen open
vlammen - zoals brandende kaarsen - op of
in de nabijheid van het televisietoestel
worden geplaatst.Vermijd warmte en
rechtstreeks zonlicht en stel het
televisietoestel niet bloot aan regen of
water. Het toestel mag niet worden
blootgesteld aan gedruppel of gespat.
Sluit de antenne goed aan op de
é
antenne-ingang
ANT IN x 75 Ω aan de
achterzijde van de TV.
CABLE
.
ANT IN
x
75
Ω
“ Afstandsbediening: Verwijder het klepje
van de batterijhouder.
Plaats de 2 meegeleverde batterijen (Type
R6-1.5V) in het batterijvak).
DC 15V
_
+
werd meegeleverd met het televisietoestel
en sluit nooit een wisselstroom
rechtstreeks aan op het televisietoestel.
De AC-DC adapter werkt via AC-voeding,
de stroomspanning is aangegeven op het
label van de AC-DC adapter.
Stop de DC-stekker van de AC-DC
adapter in de DC-contrastekker met een
spanning van 15V aan de achterzijde van
het televisietoestel.
Koppel de AC-DC adapter en de
stroomkabel aan.
Stop de stekker in het stopcontact met
een netspanning van 110V-240V.
( TV inschakelen: Druk op de schakelaar
aan de voorzijde van uw TV om het
toestel in of uit te schakelen.
Wanneer de TV in de standby stand staat, licht
het standby lampje aan de voorzijde van het
televisietoestel helder op. Druk nogmaals op
de standby toets B of op de toets – P + of
op één van de cijfertoetsen op de
afstandsbediening om de TV in te schakelen.
R6 / 1,5 V
Niet weggooien
maar inleveren
NL
als KCA.
3Voorbereiding
Page 65

B
M
a
AUTO
AUTO
w
Y-Z
Ò
‡
π
®
D
1
2
9
3
6
5
7
4
8
0
0
LIST
P
¬
V
MENU
OK
Gebruik van de menu’s
& Druk herhaaldelijk op de MENU toets om elk menu weer te geven.
é Beweeg de cursor op en neer om een keuze te maken in de menu’s.
“ Beweeg de cursor links en rechts om de instelling van een menu-item te wijzigen of druk op de
OK toets om toegang te krijgen tot een submenu.
Auto programme
Automatische installatie
menu aan/uitschakelen
activeren
menu item kiezen
Handmatige installatie
Herschikken
Taal
oœ
OK MENU
TV zenders vastleggen
Uw menutaal kiezen
Automatische installatie
Handmatige installatie
Herschikken
Language
Taal
oœ
OK MENU
& Druk eenmaal op de MENU toets op de
afstandsbediening om het Installatie menu te
selecteren.
é Beweeg de cursor neer om het menu Taal te
kiezen.
“ Druk op de OK toets.
‘ Beweeg de cursor op en neer om uw taal te
kiezen.
( Druk op de OK toets.
U kunt uw TV-zenders zoeken en vastleggen op
twee manieren: met Automatische installatie, zie
p. 5 of Handmatige installatie (TV-zender per
TV-zender ingeven), zie p. 6.
Maak uw keuze en druk op de OK toets.
Installatie
4
Page 66

Automatische installatie
Auto programme
Automatische installatie
Handmatige installatie
Herschikken
Taal
oœ
OK MENU
System BG
Systeem BG
Vastleggen vanaf 1
Zoeken C 15
1
‡ 2%
MENU
& Kies het TV-systeem.
é Beweeg de cursor links en rechts om het
TV-systeem te selecteren van het land of
werelddeel waarvan u de TV-zenders wilt
kiezen.
Als u een aansluiting hebt op het kabelnet,
selecteer dan het TV-systeem van het land
of werelddeel waar u zich nu bevindt.
DK: PAL D/K, SECAM D/K (Oost-Europa)
BG: PAL B/G, SECAM B/G
(Europa/Oost-Europa/Frankrijk)
I: PAL I/II ( U.K./Ierland)
L: (indien aanwezig) (Frankrijk)
“ Beweeg de cursor op en neer om
Vastleggen vanaf te kiezen.
‘ Beweeg de cursor links en rechts om een
kanaalnummer te selecteren of voer het
kanaalnummer in met de cijfertoetsen
vanaf de plaats waar u wilt zoeken naar
nieuwe TV-zenders. Indien u bijvoorbeeld
de TV-zenders 1 tot 11 die u voordien
hebt vastgelegd, wilt behouden, moet u
kanaalnummer 12 ingeven.
Uw TV zal nieuwe zenders zoeken vanaf
nummer 12.
( Beweeg de cursor op en neer om Zoeken
te selecteren.
§ Druk op de OK toets om de
Automatische programmering te beginnen.
Alle beschikbare TV-zenders worden
automatisch gezocht en vastgelegd.
De namen van de TV-zenders worden
vastgelegd, ook wanneer de TV-zenders
VPS (Video Programme Service), PDC
(Programme Delivery Control) of
Teletekst uitzenden.
Indien geen naam kan worden toegekend
aan de TV-zender, wordt enkel het
kanaalnummer toegekend en vastgelegd als
C-kanaal (V/UHF 01-69) of S-kanaal (Cable
01-47), gevolgd door een nummer.
Druk op de
MENU toets om de
automatische programmering te
beëindigen.
Wanneer de automatische programmering
voltooid is, verschijnt het Programmamenu
Herschikken. Zie verder.
è Druk herhaaldelijk op de MENU toets
indien u het menu wilt verlaten.
5Installatie
Page 67

Handmatige installatie
Automatische installatie
Manual installation
Handmatige installatie
Herschikken
Taal
oœ
OK MENU
Systeem BG
Kanaal S-ch/C-ch
Fijnafstemming πππ
Zoeken
Naam C 01
Vastleggen 1
oœ p π
OK MENU
TV-zenders zoeken en vastleggen gebeurt
zender per zender. U kunt eveneens een
naam van max. 5 letters of cijfers
toekennen aan een programma.
U moet alle stappen van het
Handmatige Installatie menu doorlopen.
& Kies Handmatige installatie in het
Installatie menu.
é Druk op de OK toets om toegang te
krijgen tot het Handmatige Installatie
menu.
“ Beweeg de cursor links en rechts om het
TV-systeem te selecteren van het land of
werelddeel waarvan u de TV-zenders wilt
kiezen.
Als u een aansluiting hebt op het kabelnet,
selecteer dan het TV-systeem van het land
of werelddeel waar u zich nu bevindt.
DK: PAL D/K, SECAM D/K (Oost-Europa)
BG: PAL B/G, SECAM B/G
(Europa/Oost-Europa/Frankrijk)
I: PAL I/II ( U.K./Ierland)
L: (indien aanwezig) (Frankrijk)
‘ Beweeg de cursor op en neer om Kanaal
te kiezen.
( Beweeg de cursor links en rechts om
kanalen te selecteren (
via de antenne of
kabel).
Als u het C- (01-69) of S-kanaalnummer
(01-47) kent, kunt u deze direct ingeven
met de cijfertoetsen 0 tot 9.Vraag een lijst
bij uw kabelexploitant of handelaar.
C-ch voor kanalen
S-ch voor kanalen via de
§ Beweeg de cursor op en neer om Zoeken
te selecteren.
è Beweeg de cursor links en rechts om te
beginnen zoeken.Wanneer een TV-zender
gevonden is, wordt het zoeken stopgezet.
Fijnafstemming
Bij slechte ontvangst, kunt u deze
verbeteren met behulp van fijnafstemming.
Beweeg de cursor op en neer om
Fijnafstemming te selecteren.
Beweeg de cursor links en rechts om het
beste beeld en geluid in te stellen.
Een programmanaam toekennen
U kunt de reeds ingevulde
programmanaam veranderen of een naam
geven aan een programma waarvan nog
geen naam is ingevuld.
Aan de programmanummers 0 tot 99 kunt
u een naam toekennen van max. 5 letters
of cijfers.
Beweeg de cursor op en neer om
Naam
te selecteren.
Beweeg de cursor links en rechts om het
karakter te selecteren.
De spatie, de cijfers en andere speciale
tekens bevinden zich tussen Z en A.
Druk op de OK toets.
Kies het volgende karakter. Ga verder met
de volgende stappen.
! Indien de naam werd ingegeven voor het
vereiste kanaal, beweeg dan de cursor op
en neer om
Vastleggen te selecteren.
ç Beweeg de cursor links en rechts om een
kanaalnummer te selecteren of geef het
kanaalnummer in met de cijfertoetsen.
0 Druk op de OK toets om de TV-zender
vast te leggen.
Herhaal stappen 4 tot 10 om een andere
TV-zender vast te leggen
Druk herhaaldelijk op de
indien u het menu wilt verlaten.
MENU toets
6
Installatie
Page 68

De programmalijst herschikken
Auto programme
Automatische installatie
Handmatige installatie
Herschikken
Taal
oœ
OK MENU
0ARD
1ZDF
1 ZDF
2C12
3S 4
4 CH-5
Wissen
•
Rangschikken
•
oœ p π
OK MENU
5 ARD1
6 ZDF1
7 C12
8S 44
9 CH-5
Kopiëren
•
Overslaan
•
U kunt, volgens uw eigen keuze, de
vastgelegde TV-zenders wissen of
overslaan. U kunt eveneens de toegewezen
nummers van de TV-zenders herschikken
of het gekozen kanaalnummer vervangen
door spaties.
& Beweeg de cursor op en neer om
Herschikken te selecteren in het Installatie
menu.
é Druk op de OK toets om toegang te
krijgen tot het Herschikken menu.
Een TV-zender wissen
& Beweeg de cursor op en neer, links en
rechts om een TV-zender te kiezen die u
wilt wissen.
é Druk tweemaal op de rode toets op de
afstandsbediening.
Het gekozen kanaalnummer wordt gewist,
alle volgende kanalen verschuiven één
positie omhoog.
Een TV-zender kopiëren
& Beweeg de cursor op en neer, links en
rechts om een TV-zender te selecteren die
u wilt kopiëren.
é Druk op de groene toets op de afstands-
bediening.Alle volgende kanaalnummers
verschuiven één positie omlaag.
Een TV-zender rangschikken
& Beweeg de cursor op en neer, links en
rechts om een kanaalnummer te
selecteren dat u wilt rangschikken.
é Druk op de gele toets op de
afstandsbediening.
“ Beweeg de cursor op en neer, links en
rechts om de TV-zender te rangschikken
op het gewenste kanaalnummer.
‘ Druk nogmaals op de gele toets om deze
functie uit te schakelen.
Een kanaalnummer overslaan
& Beweeg de cursor op en neer, links en
rechts om een kanaalnummer te
selecteren dat u wilt overslaan.
é Druk op de blauwe toets op de afstands-
bediening. De overgeslagen TV-zender
wordt weergegeven in een blauwe kleur.
“ Druk nogmaals op de blauwe toets.
Als u na het installeren snel de TV-zenders
doorloopt met de cursortoetsen op/neer,
kunnen enkel deze TV-zenders worden
geselecteerd die niet werden overgeslagen.
TV-zenders die werden overgeslagen,
kunnen nog steeds worden geselecteerd
met de cijfertoetsen of in de
programmalijst, waar ze in een blauwe
kleur worden weergegeven.
Druk herhaaldelijk op de
het menu te verlaten.
MENU toets om
Programmalijst weergeven
0ARD
1ZDF
1 ZDF
2C12
3S 4
4 CH-5
oœ p π
OK MENU
5 ARD1
6 ZDF1
7 C12
8S 44
9 CH-5
& Druk op de LIST toets op de afstands-
bediening om de programmalijst weer te geven.
é Gebruik de cursor op/neer, links/rechts om de
lijst van 100 zendernummers te doorlopen.
“ Druk op de OK toets om de gewenste TV-
zender te selecteren.
Opmerking:TV zenders die in het blauw worden
weergegeven, worden overgeslagen in het
Herschikken menu.
7Installatie
Page 69

Bedienen
MENU
OK
PV
¬
5
1
3
2
4
6
7
9
8
0
0
LIST
h
fg
Ò
‡
π
c
b
®
†
U
e
k
C
a
D
B
M
AUTO
AUTO
w
Y-Z
w Bron
Andere randapparatuur kiezen:
druk herhaaldelijk om
AV2 of S-VIDEO mode te
kiezen.
TV, AV1,
Gebruik van de afstandsbediening
B Standby
Schakelt de TV aan vanuit de
standby stand of in de standby
stand vanuit de uit-stand.
X Tweetalige uitzending
en geluidsmode
Druk op deze toets
• om te kiezen tussen
Stereo
en Mono als de TV-zender
stereogeluid uitzendt, of
tussen
Nicam Stereo en
Nicam Mono als de TV-
zender digitaal geluid
uitzendt
• om over te schakelen van
Nicam Dual Y op Nicam
Z of Nicam Dual X
Dual
indien een TV-zender Nicam
Dual geluid uitzendt
• om te kiezen tussen
Dual Z of Dual X II bij een
TV-zender die in twee
verschillende talen uitzendt:
Dual Y zendt de primaire
omroeptaal naar de
luidsprekers;
Dual Z zendt de secundaire
omroeptaal naar de
luidsprekers;
Dual X zendt een
Dual Y,
AUTO toetsen
Om voorgeprogrammeerde
beeld- en geluidsinstellingen te
kiezen.
a
AUTO beeld
Telkens u deze toets indrukt,
verschijnt een verschillende
beeldinstelling die overeenstemt met een bepaalde
fabrieksinstelling van Contrast,
Helderheid, Kleur en Scherpte.
M
AUTO
geluid
Telkens u deze toets indrukt,
verschijnt een verschillende
geluidsinstelling die overeenstemt met een bepaalde
fabrieksinstelling van treble
(hoge tonen) en bass (lage
tonen).
Persoonlijk verwijst naar de
persoonlijke beeld- en
geluidsinstellingen die u in het
Beeld- en Geluidsmenu heeft
gekozen en vastgelegd.
verschillende taal naar elke
luidspreker.
Opmerking: selecteer monoontvangst in geval van zwakke
stereogeluidssignalen met stereo
of Nicam stereotransmissie.
Keuze geluidsuitgang in AV mode
In de AV mode kunt u het uitgaand geluid kiezen voor de linkse en rechtse luidsprekers.
Druk herhaaldelijk op de X toets om te kiezen tussen:
• L+R: het audiosignaal van de audio L input wordt verstuurd naar de linkse luidspreker, het
audiosignaal van de audio R input naar de rechtse luidspreker
• L+L: het audiosignaal van de audio L input wordt verstuurd naar de linkse en rechtse
luidspreker
• R+R: het audiosignaal van de audio R input wordt verstuurd naar de linkse en rechtse
luidspreker.
Gebruik van de afstandsbediening
8
Page 70

B
M
a
AUTO
AUTO
w
Y-Z
C
h
fg
c
b
e
k
Ò
‡
π
®
†
U
D
1
2
9
3
6
5
7
4
8
0
0
LIST
MENU
OK
P
¬
V
MENU Druk herhaaldelijk om
elk menu weer te geven.
OK Druk op deze toets om
uw keuze in de menu’s te
activeren.
V Volume
Druk + of - om de
geluidssterkte te regelen.
¬ Geluid onderbreken
Om het geluid tijdelijk te
onderbreken of om het geluid
terug te krijgen.
P TV-zenders kiezen
• om snel de TV-zenders te
doorlopen die niet werden
overgeslagen
• om de TV aan te zetten
vanuit de standby stand.
D Standby-klok
Met deze toets kunt u een
tijdsduur instellen waarna de
TV automatisch naar standby
schakelt.
Druk herhaaldelijk op de toets
om het aantal minuten te
kiezen. De teller loopt vanaf
B 0, 10, 20, 30... tot 240
minuten. De klok begint af te
tellen vanaf het aantal gekozen
minuten.
Opmerking: Om de resterende
tijd te bekijken, moet u éénmaal
op de toets D drukken. Om de
slaaptijd op te heffen, moet u
herhaaldelijk op toets D
drukken tot B 0 verschijnt.
0/9 Cijfertoetsen
Om een TV-zender te kiezen.
®Ò‡π† Video
recorder toetsen zie p. 18.
U Tijdsweergave
De tijd, afgeleid van een TVzender met teletekst vastgelegd
op programmanummer 1 of
onder het laagste niet
overgeslagen programmanummer, verschijnt op het
scherm.
0 Vorig programma
Om de vorige gekozen TVzender opnieuw te doen
verschijnen.
LIST Programmalijst
Om de programmalijst weer
te geven.
b Teletekst aan/uit
zie p. 13.
Teletekst functies zie p. 14.
hUfgcek
9Gebruik van de afstandsbediening
Page 71

Toetsen vooraan op het televisietoestel
TV / VIDEO
MENU
OK
_
VOL
+
_
CH / PR
+
B
ON / OFF
Wanneer uw afstandsbediening zoek of defect is,kunt u uw TV nog altijd bedienen met de
toetsen vooraan op het toestel.
ON/OFF: Druk op de toets ON/OFF om de TV in of uit te schakelen
TV/VIDEO: Druk herhaaldelijk om de TV of AV mode te kiezen
MENU: Druk herhaaldelijk om elk menu weer te geven
OK: - Druk op deze toets om uw keuze in het menu te activeren
Auto demonstratie: Houd de OK toets ingedrukt gedurende ongeveer
10 seconden.
Alle menu’s worden automatisch één na één weergegeven.
Om de Auto demonstratie te stoppen, volstaat het op eender welke toets op het
frontpaneel te drukken.
- VOL + : - Druk - of + om een keuze te maken in de menu’s;
- Druk - of + om de geluidssterkte te regelen;
- Druk - of + om de menu-instellingen te regelen.
- CH/PR +:- Druk - of + om de TV-zenders die niet werden overgeslagen snel te doorlopen;
- Druk - of + om een keuze te maken in de menu’s;
- De TV in te schakelen vanuit de standby stand.
B: Schakelt de TV in of uit de standby stand.
Het B lampje licht helder op wanneer de TV in de standby stand staat, en zwakt
af wanneer de TV is ingeschakeld.
Toetsen vooraan op het televisietoestel
10
Page 72

B
M
a
AUTO
AUTO
w
Y-Z
D
1
2
9
3
6
5
7
4
8
0
0
LIST
P
¬
V
MENU
OK
Gebruik van de menu’s
menu aan/uitschakelen
activeren
menu item kiezen
& Druk herhaaldelijk op de MENU toets om het
beeld-, geluids- of speciaal menu weer te geven.
é Beweeg de cursor op en neer om een keuze te
maken in de menu’s.
“ Beweeg de cursor links en rechts om de
instelling van een menu-item te wijzigen of druk
op de OK toets om toegang te krijgen tot een
submenu.
‘ Druk herhaaldelijk op de MENU toets indien u
het menu wilt verlaten.
Beeldmenu
Contrast 100
Contrast
Helderheid 95
Kleur 85
Scherpte 80
Tint
oœ p π
OK MENU
Geluidsmenu
Equalizer
Equalizer
Balans 0
AVL On/Off
oœ
OK MENU
Flat
Neutraal
Muziek
Film
Spraak
Persoonlijk
oœ p π
U kunt de geluidsinstelling van uw voorkeur
selecteren of u kunt de geluidsfrequentie van
de equalizer en de balans voor de
geluidsuitgang van de rechtse en linkse
luidspreker instellen.
Schakel AVL
te behouden wanneer u een andere
TV-zender kiest.
0.1 0.5 1.5 5.0 10 kHz
MENU
Aan om een constant volume
100
U kunt het contrast, de helderheid, de kleur, de
scherpte en de tint van het beeld (enkel NTSC AV)
instellen volgens uw eigen behoeften.
Druk op de OK toets om de instellingen vast te
leggen.
De vermelding
Vastgelegd verschijnt op het scherm.
Uw beeldinstellingen zijn nu vastgelegd en kunnen
worden teruggehaald met de
afstandsbediening, onder de toets
AUTO a toets op de
Persoonlijk.
Om een van de voorgeprogrammeerde
fabrieksinstellingen van Beeld te kiezen, moet u de
AUTO a toets op de afstandsbediening indrukken.
Druk herhaaldelijk op de
MENU toets indien u het
menu wilt verlaten.
Equalizer
& Kies Equalizer en druk op de OK toets om
toegang te krijgen tot het Equalizer menu.
é Kies een van de voorgeprogrammeerde
fabrieksinstellingen van Geluid of kies
Persoonlijk om uw persoonlijke geluids-
instellingen voor treble en bass te regelen.
De equalizer Persoonlijk instellen
& Kies Persoonlijk met de cursor op/neer.
é Beweeg de cursor links en rechts om een
geluidsband te kiezen.
“ Beweeg de cursor op en neer om het geschikte
geluidsniveau in te stellen.
‘ Druk op de OK toets om de Persoonlijke
instellingen vast te leggen. De vermelding
Vastgelegd verschijnt op het scherm.
Druk op de
wilt verlaten.
MENU toets indien u het menu
11Gebruik van de menu’s
Page 73

Speciaal menu
Input TV
Bron TV
Kinderslot Uit
Auto uit Uit
oœ p π
MENU
Kies de TV of AV mode
& Kies Bron in het Speciaal menu.
é Beweeg de cursor links en rechts om TV,
AV1 , AV 2 of S-VIDEO te kiezen.
AV1 voor een VCR aangesloten op de
•
w 1 euroconnector (Zie
Randapparatuur aansluiten, p. 16)
AV2 voor een VCR aangesloten op de
•
AV2 connector van de TV.
S-VIDEO voor een S-Video VCR
•
aangesloten op de S-Video connector
van de TV.
Opmerking: Wanneer een videorecorder is
aangesloten via de antennebus, wordt de TV
gebruikt in de TV mode.
In het andere geval kunt u de TV of AV mode
kiezen met de brontoets op de afstandsbediening.
Druk op de cursor op/neer of op de
cijfertoetsen om terug te keren naar de
TV mode.
Auto AV omschakeling
Wanneer uw videorecorder is aangesloten
met de eurokabel en de videorecorder
een band begint af te spelen, schakelt de
TV automatisch om in de
AV1 mode.
Indien u wilt verder kijken in de TV mode,
moet u de cursor op en neer bewegen,
+ P - of drukken op de cijfertoetsen.
Kinderslot
Staat het kinderslot aan, dan kan de TV
alleen worden ingeschakeld en bediend
met de afstandsbediening. De toetsen
vooraan op het televisietoestel kunnen
niet worden gebruikt. Op die manier belet
u dat de kinderen ongecontroleerd TV of
video kijken.
Als de vermelding
Kinderslot Aan
verschijnt, moet u eerst het kinderslot
uitschakelen voor u de toetsen op het
frontpaneel van uw televisietoestel kunt
gebruiken om een TV-zender te kiezen.
& Kies Kinderslot in het Speciaal menu.
é Beweeg de cursor links en rechts om
Kinderslot Aan te kiezen.
“ Druk herhaaldelijk op de MENU toets om
het menu te verlaten.
Auto uit
Wanneer
Auto Uit is ingeschakeld,
schakelt de TV automatisch in de standby
stand indien gedurende ongeveer 12
minuten geen antennesignaal wordt
ontvangen.
& Kies Auto Uit in het Speciaal menu.
é Beweeg de cursor links en rechts om Auto
Uit te kiezen.
“ Druk herhaaldelijk op de MENU toets om
het menu te verlaten.
12 Gebruik van de menu’s
Page 74

Teletekst
C
h
fg
c
e
Ò
‡
π
®
†
U
9
7
8
0
0
LIST
P
¬
V
MENU
OK
b
k
b
k
OK toets om te
activeren
cursor om de
pagina’s te selecteren
kleurtoetsen om
te selecteren
De meeste TV-zenders verschaffen informatie
via teletekst.
Elke zender die teletekst uitzendt, biedt een
pagina aan met teletekst gebruikersinformatie.
Zoek de teletekstpagina met de inhoud
(gewoonlijk pagina 100).
Afhankelijk van de TV-zender wordt teletekst
in verschillende systemen aangeboden:
Standaard teletekst, TOP en FASTEXT.
• Standaard teletekst bestaat uit een aantal
pagina’s die u kunt selecteren door
rechtstreeks het overeenkomstige
paginanummer in te geven.
TOP en FASTEXT maken gebruik van de
•
kleuren op de onderste lijn, die
overeenstemmen met de kleurtoetsen van
uw afstandsbediening, om teletekstinformatie
op te vragen
Teletekst in- en uitschakelen
Druk op b om teletekst in of uit te
schakelen.
De inhoudspagina of de laatst gekozen pagina
verschijnt op het scherm, samen met een
informatieregel en een keuzeregel onderaan
het scherm.
Een Teletekstpagina kiezen
Met de cijfertoetsen
Geef het gewenste paginanummer in met de
cijfertoetsen.
De paginateller zoekt de pagina.
Er verschijnt een boodschap wanneer u een
verkeerd of niet bestaand paginanummer hebt
ingegeven.Vervolledig het nummer (3 cijfers) en
geef daarna het correcte paginanummer in.
Paginanummers die beginnen met 0 of 9 bestaan
niet.
Met de keuzeregel onderaan
Kies het gewenste onderwerp met de
kleurtoetsen die overeenstemmen met de
gekleurde opties onderaan het scherm.
Met de cursor op/neer
Druk op de cursor op/neer om de vorige of
volgende pagina te kiezen.
De Teletekst inhoudspagina
kiezen
Druk op de k toets om de inhoudspagina te
laten verschijnen (gewoonlijk p.100).
Enkel voor TOP teletekst uitzendingen:
Niet alle TV-zenders zenden het TOP
teletekst-systeem uit.
Bij TOP teletekst worden de pagina’s in
rubrieken en onderwerpen ingedeeld om het
gebruik te vergemakkelijken.
Druk op de k toets. Een TOP overzicht van
de beschikbare rubrieken en onderwerpen
verschijnt.
Maak gebruik van de kleurtoetsen om
teletekstinformatie op te vragen of kies de
teletekstpagina’s rechtstreeks met behulp van
de cijfertoetsen.
13Teletekst
Page 75

C
h
fg
c
b
e
k
Ò
‡
π
®
†
9
7
8
0
0
LIST
P
¬
V
OK
MENU
MENU
U
U
c
h
f
e
b
g
OK om te
activeren
subpagina’s
kiezen
Subpagina’s kiezen
Indien subpagina’s beschikbaar zijn, kunt u de
automatische wisselende pagina’s stoppen of
de gewenste subpagina zelf kiezen.
Druk op de U toets.
Het subpaginanummer verschijnt onderaan
het scherm.
Druk op de rode of groene toets om de
vorige of volgende subpagina te kiezen, of
wijzig de subpagina met de cursor op/neer of
met de cijfertoetsen.
Druk opnieuw op de U toets indien u deze
functie wilt verlaten.
Speciale teletekstfuncties
Vergroten
Druk herhaaldelijk op h om de bovenste of
onderste helft van de pagina te vergroten en
om daarna terug te keren naar de normale
paginagrootte.Wanneer de bovenste helft
wordt weergegeven, kunt u de tekst regel per
regel doorlopen met behulp van de cursor
op/neer.
Verborgen informatie
Druk op f om verborgen informatie, zoals
antwoorden op vragen en spelletjes, op te
roepen of te doen verdwijnen.
Vasthouden
Druk op g om de automatisch wisselende
subpagina’s te stoppen indien deze
beschikbaar zijn.
Het icoon g wordt weergegeven bovenaan
het scherm weergegeven.
Druk nogmaals op de g toets om de
subpagina’s opnieuw automatisch te laten
wisselen
Mengen
Druk op de c toets om de teletekstpagina’s
over het TV-beeld heen weer te geven.
Druk nogmaals op de c toets om het TVbeeld opnieuw uit te schakelen.
Onderbreken
Druk op e.
Het TV-programma verschijnt.
b bovenaan het scherm duidt aan dat
teletekst nog steeds is ingeschakeld.
Voor u teletekst onderbreekt, kunt u een
paginanummer kiezen.
Wanneer de pagina is gevonden, verschijnt de
informatieregel kort op uw scherm.
Druk nogmaals op e.
Teletekst verschijnt opnieuw.
14 Teletekst
Page 76

Randapparatuur aansluiten
Op uw TV kunt u heel wat video- en audioapparatuur aansluiten.
Op de volgende aansluitschema’s ziet u hoe
deze apparatuur moet worden aangesloten.
Voorbereiding
Verwijder de plaat aan de achterzijde van het
televisietoestel, zoals op de tekening hiernaast.
Leg de LCD TV met het scherm naar beneden
op een tafel, zodat het makkelijker wordt om
uw randapparatuur aan te sluiten. Neem de
nodige voorzorgen zodat het scherm niet wordt
beschadigd.
Videorecorder
Met een eurokabel
CABLE
............
•
•
ANT IN
DC 12V
_
+
x
75
Ω
2
1
VCR
w 1
3
...........
PC INPUT
VIDEO (MONO) L AUDIO R
L
S-VIDEO
•
•
•
•
AV2
•
•
Met een eurokabel zult u een betere
beeldkwaliteit verkrijgen dan enkel met
een antennekabel.
& Sluit de antennekabels 1, 2 en de
eurokabel 3 aan zoals op de tekening
hiernaast.
é Druk op de π toets op de videorecorder.
De TV zal automatisch in de
schakelen.
Indien u wilt verder kijken in de TV mode,
moet u de cursor op en neer bewegen,
+ P - of op de cijfertoetsen drukken.
AV1 mode
Enkel met een antennekabel
CABLE
............
•
•
ANT IN
DC 12V
_
+
x
75
Ω
2
1
VCR
w 1
...........
PC INPUT
VIDEO (MONO) L AUDIO R
L
S-VIDEO
•
•
•
•
AV2
•
•
& Sluit de antennekabels 1 en 2 aan zoals
op de tekening hiernaast.
é Zoek het testsignaal van uw
videorecorder en leg het vast.
• Haal de antennekabel 1 uit de antenne-
ingang x van uw videorecorder.
• Schakel uw TV in en stel de videorecorder
op het testsignaal in. (Zie ook de
handleiding van uw videorecorder)
• Zoek het testsignaal van uw videorecorder
zoals u de TV-zenders hebt gezocht en
vastgelegd. Zie Handmatige installatie, p. 6
• Leg het testsignaal vast onder een
programmanummer.
• Stop de antennekabel opnieuw in de
antenne-ingang x van uw videorecorder
zodra u het testsignaal hebt vastgelegd.
“ Kies het programmanummer waaronder de
videorecorder wordt vastgelegd.
‘ Druk op de π toets op uw videorecorder.
15Randapparatuur aansluiten
Page 77

CABLE
Met Audio/Video kabels
& Sluit de antennekabel 1 en de
Audio/Video kabels 2 en 3 aan zoals
op de tekening hiernaast.
é Druk op de w toets op de
afstandsbediening of kies
............
•
•
ANT IN
DC 12V
_
+
x
75
Ω
1
w 1
2
...........
PC INPUT
VIDEO (MONO) L AUDIO R
L
S-VIDEO
•
•
•
•
AV2
•
•
3
Speciaal menu (Zie p. 12) om
kiezen.
“ Druk op de π toets op de videorecorder.
Opmerking: Indien u een monovideorecorder
hebt, mag u de audiokabel van de
videorecorder enkel aan de achterzijde van de
VCR
TV aansluiten op de
Bron in het
AV2 te
AUDIO (MONO) L kabel.
S-VHS videorecorder
CABLE
•
•
PC INPUT
ANT IN
DC 12V
_
+
x
75
Ω
2
1
VCR
MONITOR OUT
aansluitingen
............
...........
w 1
Met een S-VHS videorecorder zult u een
betere beeldkwaliteit verkrijgen.
& Sluit de antennekabels 1 en 2 aan
zoals op de tekening hiernaast.
é Sluit de S-Video kabel 3 aan op de
S-VIDEO ingang van de TV.
EO
S•VID
VIDEO
VIDEO (MONO) L AUDIO R
L
S-VIDEO
•
•
•
•
AV2
•
•
“ Sluit de audiokabel 4 aan zoals op de
AUDIO
tekening hiernaast.
Opmerking: Sluit nooit een videorecorder met
S-VHS kabels en een videorecorder met een
Eurokabel tegelijkertijd op dezelfde TV aan.
3
4
‘ Druk op de w toets op de
afstandsbediening of kies
Bron in het
Speciaal menu (Zie p. 12) om S-Video te
kiezen.
( Druk op de π toets op de videorecorder.
Die MONITOR OUT aansluitingen kunnen
gebruikt worden voor een serieschakeling
of om programma’s op te nemen van uw
TV.
............
...........
DC 15V
_
w 1
+
VIDEO (MONO) L AUDIO R
L
S-VIDEO
•
•
•
•
•
•
VCR
AV2
VIDEO L AUDIO R
MONITOR OUT
ANT IN
x
75
Ω
16 Randapparatuur aansluiten
Alleen wanneer een VCR aan
MONITOR
OUT aangesloten is, is het mogelijk
programma’s op te nemen van aangesloten
randapparatuur.
Wanneer een VCR niet aangesloten is aan
MONITOR OUT kunnen enkel
programma’s opgenomen worden via een
antenne- of kabelsysteem.
Page 78

PC INPUT
w 1
•
•
•
•
•
•
S-VIDEO
DC 12V
_
+
ANT IN
x
75
Ω
VIDEO (MONO) L AUDIO R
AV2
L
•
•
............
...........
L
Camera & camcorder
PC INPUT
w 1
•
•
•
•
•
•
S-VIDEO
DC 12V
_
+
ANT IN
x
75
Ω
VIDEO (MONO) L AUDIO R
AV2
L
•
•
............
...........
AUDIO
VID
E
O
S•
VIDEO
3
2
1
& Sluit uw camera of camcorder aan op
VIDEO ingang 2 en AUDIO (MONO) L
3 voor mono-apparatuur.
é Sluit ook AUDIO R 3 aan voor stereo-
apparatuur.
Met een S-VHS camcorder krijgt men
S-VHS kwaliteit door de S-VHS kabels aan
te sluiten op de
AUDIO ingang 3.
S-VIDEO ingang 1 en de
Hoofdtelefoon
& Stop de stekker in de aansluiting voor de
hoofdtelefoon L aan de achterzijde van de TV.
é Druk op de ¬ toets op de afstandsbediening
om het geluid van de hoofdtelefoon en de
interne luidsprekers van de TV uit te schakelen.
“ Beweeg de cursor links en rechts om de
geluidssterkte te regelen.
17Randapparatuur aansluiten
Page 79

B
a
M
AUTO
AUTO
w
Y-Z
D
C
h
f
c
e
Ò
‡
π
®
†
U
1
2
9
3
6
5
7
4
8
0
0
LIST
¬
V
MENU
OK
b
k
VCR
M
a
AUTO
AUTO
w
Y-Z
D
g
®
Ò
‡
π
†
C
P
P
B
BB
Videorecorder toetsen
Met de afstandsbediening van uw TV kunt u de
meeste video-apparatuur uit ons
productassortiment bedienen.
Houd de VCR toets links op de
afstandsbediening ingedrukt en druk
tegelijkertijd op:
® voor opname
Ò voor terugspoelen
‡ voor stop
π voor weergave
† voor vooruitspoelen
C voor VCR timer
- P + om snel de TV-zenders van de tuner van
uw videorecorder te doorlopen
0 - 9 om TV-zenders te kiezen van de tuner
van uw videorecorder
B om uw videorecorder tijdelijk uit te
schakelen
18 Videorecorder toetsen
Page 80

Tips
Onderhoud van het scherm
Schuur of wrijf het scherm niet met een hard
voorwerp,aangezien dit uw scherm
permanent kan krassen, ontsieren of
beschadigen.
Schakel het scherm uit voor u het reinigt.Stof
de TV af door het scherm en de omkasting af
te vegen met een zacht en proper doekje.
Indien u het scherm grondig moet reinigen,
gebruik dan een proper, vochtig doekje.
Gebruik geen vloeibare reinigingsmiddelen of
reinigingsmiddelen in een spuitbus.
Waarschuwing voor mobiele telefoons
Houd uw mobiele telefoon uit de buurt van
de TV om storingen in het beeld en het geluid,
defecten aan uw televisietoestel of zelfs
schade aan het televisietoestel te voorkomen.
Slecht beeld
• Hebt u het juiste TV-systeem gekozen?
• Zijn de kabels goed aangesloten? (De
antennekabel op de TV of videorecorder, de
VGA kabels op de TV, de stroomkabel.)
• Staat uw televisietoestel of huisantenne te
dicht bij luidsprekers, niet geaarde audioapparatuur of neonlichten, e.d.?
• Bergen of hoge gebouwen kunnen dubbel
beeld of spookbeelden veroorzaken. Soms
kunt u de beeldkwaliteit verbeteren door de
richting van de antenne te wijzigen.
• Zijn helderheid en contrast ontregeld? Druk
AUTO M of a toets om de
op
voorgeprogrammeerde fabrieksinstelling
opnieuw vast te leggen. Kies een andere
zender, misschien is het ontvangen signaal te
zwak.
• Soms is slechte beeldkwaliteit mogelijk
wanneer een S-VHS videorecorder, een
camera of een camcorder is aangesloten
terwijl ook andere randapparatuur is
aangesloten op
AV1 of AV 2. Schakel in dit
geval één van de apparaten uit.
Geen beeld
• Is de TV ingeschakeld?
• Is de antenne goed aangesloten? Zit de
antennestekker stevig vast op de antenneingang?
• Is de antennekabel van goede kwaliteit en
heeft die de geschikte antennestekker?
Geen geluid
Geen geluid op geen enkele zender?
Controleer of het volume niet op de
minimumwaarde staat.Werd het geluid niet
onderbroken met de toets ¬?
Afstandsbediening
• Indien uw TV-toestel niet meer reageert op de
afstandsbediening, zijn de batterijen misschien
leeg. U kunt nog steeds de toetsen vooraan
op het televisietoestel gebruiken.
• Werd het kinderslot uitgeschakeld?
Geen oplossing
Schakel eenmaal uw toestel uit en opnieuw in.
Probeer nooit zelf een defect televisietoestel
te herstellen.
Verwijder nooit de achterzijde van de TV.
Indien de TV niet goed functioneert, trek dan
de stekker uit en raadpleeg uw handelaar of
een TV-technicus.
Richtlijnen voor einde levensduur
Wij besteden veel aandacht aan het milieuvriendelijk aspect.
Uw nieuwe TV bevat materialen die voor
hergebruik geschikt zijn. Aan het eind van
de levensduur van de TV kunnen
gespecialiseerde bedrijven de afgevoerde TV
ontmantelen om het voor hergebruik
geschikte materiaal te verzamelen, en zo
weinig mogelijk materiaal te hoeven
wegdoen. Informeer a.u.b. naar de
plaatselijke voorschriften voor het wegdoen
van uw oude TV-toestel.
Wat met lege batterijen
De bijgeleverde batterijen bevatten niet de
zware metalen kwik en cadmium.Toch
mogen in veel landen de lege batterijen niet
met het huisvuil weggegooid worden.
Informeer a.u.b. naar de plaatselijke
voorschriften voor het wegdoen van lege
batterijen.
Niet weggooien
maar inleveren
NL
als KCA.
19Tips
Page 81

Index
a auto beeld, 8
auto geluid, 8
automatische installatie, 5
AVL, 11
b balans, 11
bass, 11
bron, 12
c camcorder, 17
C-kanalen, 6
e equalizer, 11
eurokabel, 15
f fabrieksinstelling, 8
fijnafstemming, 6
g geluid onderbreken, 9
geluidsinstellingen, 11
h handmatige installatie, 6
helderheid, 11
hoofdtelefoon, 17
k kinderslot, 12
kleur, 11
m menutaal, 4
mono, 8
n naam geven, 6
nicam, 8
p programmalijst, 7
s S-kanalen, 6
scherpte, 11
sleeptimer, 9
stereo, 8
S-VHS, 16
s-video, 16
systeem, 5
t taal, 4
teletekst, 13
tint, 11
treble, 11
TV inschakelen, 3
TV-zenders vastleggen, 4
TV-zenders zoeken, 5
tweetalige uitzending, 8
v video recorder, 15
volume, 9
z zoeken, 5
20Index
Page 82

Aiuto?
Se questo manuale d'istruzioni,
non dà una risposta alle vostre
domande, o se i ‘Consigli’ scritti
non risolvono i problemi del vostro
TV, potete contattare il Servizio
Consumatori Philips o il Centro di
Assistenza Philips più vicino.Vedere
libretto 'World-wide guarantee'.
Prima di contattare uno dei servizi
sopra menzionati, si consiglia di
munirsi della descrizione e del
numero di matricola del modello
presenti sul retro del TV e
sul'imballo dello stesso.
Model: .............................................................
Product No: ..................................................
Indice
Predisposizione
Utilizzo
Collegare apparecchiature accessorie
Il telecomando 2
Preparazione 3
Uso dei menu 4
Memorizzazione canali TV 4
Selezione lingua menu 4
Predisposizione automatica 5
Predisposizione manuale 6
Riordinamento lista programmi 7
Visualizzazione lista programmi 7
Uso del telecomando 8-9
Tasti davanti al TV 10
Menu immagine 11
Menu suono 11
Menu speciale 12
Televideo 13-14
Collegamento e selezione apparecchiatura 15-17
Tasti videoregistratore 18
Consigli 19
Indice 20
Italiano
1
Page 83

B
AUTO
AUTO
PV
w
C
B
2
1
3
54 6
87 9
0
OK
MENU
¬
Ò
‡
π
†
®
M
a
Y-Z
D
0
LIST
h
U
fg
c
e
k
b
Predisposizione
Vostro telecomando
w Periferiche p. 8
selezione modalità TV
o AV
X scelta bilingue/info
suono p. 8
M auto suono p. 8
a auto immagine p. 8
D regolazione sleeptimer
p. 9
MENU menu principale
acceso/spento p. 9
V volume alto/basso p. 9
¬ muto audio p. 9
P selezione programma
p. 9
B tasto di attesa p. 8
programma precedente p.9
0
LIST lista programmi p. 9
Cursore per selezionare la
vostra scelta
OK attivare la vostra scelta
Tasti colore
- pagina televideo diretta
oppure selezione
argomento, p. 9
- funzioni videoregistratore
p. 18
® registrazione
Ò riavvolgimento
‡ arresto
π riproduzione
† avvolgimento
C VCR timer
2 Vostro telecomando
Televideo p. 14
h ingrandimento
b televideo acceso/spento
U visualizzazione ora
selezione sottopagina
f rivelazione
g arresto
c simultaneo tv/immagine
televideo
e interruzione
k indice principale
Page 84

Preliminari
Sistemate il TV su una superficie
&
sicura.
‘ Alimentazione: Questo TV funziona con
corrente continua fornita da un adattatore
AC-DC. Il voltaggio è quello indicato
sull’etichetta che si trova sul coperchio
posteriore.
min.
1m
Assicuratevi che il TV sia messo in una
posizione che permetta la ventilazione.
Non coprite le aperture per la ventilazione
che si trovano sulla superficie posteriore.
Per evitare situazioni pericolose, nessuna
fonte di fiamma scoperta, come candele
accese, deve trovarsi sull’apparecchio o
nelle sue vicinanze. Evitate il calore, la luce
solare diretta e l’esposizione alla pioggia o
all’acqua. L’apparecchio non deve venire
esposto a gocciolamento o spruzzi.
Inserite bene la spina dell’antenna nella
é
presa dell’antenna
ANT IN x 75 Ω sul
retro del TV.
CABLE
.
ANT IN
x
75
Ω
“ Telecomando: Rimuovete il coperchio dello
scomparto batterie. Inserite le 2 batterie
messe a disposizione (Tipo R6-1.5V).
DC 15V
_
+
Usate unicamente l’adattatore AC-DC
fornito insieme al TV e non mettete mai il
TV in contatto diretto con una rete di
distribuzione di corrente alternata.
L’adattatore AC-DC funziona con
un’alimentazione di corrente alternata, il
voltaggio è quello indicato sull’etichetta
dell’adattatore AC-DC.
Collegate la spina della corrente continua
dell’adattatore AC-DC alla presa DC 15V
che si trova dietro al TV.
Collegate l’adattatore AC-DC e il suo cavo
di alimentazione.
Inserite la spina dell’alimentazione in una
presa a mura con voltaggio 110V-240V.
( Accendete il TV: Premete il tasto di
accensione che si trova sul lato anteriore
per accendere o spegnere.
Se il TV è in modalità standby, l’indicatore di
standby sul lato anteriore del TV si illumina
vivamente. Premete ancora una volta il tasto
standby B oppure il tasto – P + o uno dei
tasti numerici sul telecomando per accendere
il TV.
R6 / 1,5 V
3Preliminari
Page 85

B
M
a
AUTO
AUTO
w
Y-Z
Ò
‡
π
®
D
1
2
9
3
6
5
7
4
8
0
0
LIST
P
¬
V
MENU
OK
Per usare i menu
& Premete il tasto MENU più volte per visualizzare ciascun menu.
é Usate il cursore alto/basso per selezionare una voce di menu.
“ Usate il cursore sinistra/destra per regolare le impostazioni di una voce di menu oppure
premete il tasto OK per attivare un sottomenu.
Auto programme
tornare o spegnere il
menù
attivare
selezionare una
voce del menù
Predispos. automatica
Predispos. manuale
Riordina
Lingua
oœ
OK MENU
Memorizzare i canali TV
Selezionate la lingua del menu
Predispos. automatica
Predispos. manuale
Riordina
Language
Lingua
oœ
OK MENU
& Premete il tasto MENU sul telecomando una
volta per selezionare il menu di predisposizione.
é Usate il cursore verso il basso per selezionare
Lingua.
“ Premete il tasto OK.
‘ Premete il cursore alto/basso per selezionare la
vostra lingua.
( Premete il tasto OK.
Potete ricercare e memorizzare i canali TV in
due modi diversi: usando la predisposizione
Automatica, vedi p. 5 oppure la predisposizione
Manuale (sintonizzando un canale alla volta),
vedi p. 6.
Selezionate la vostra scelta e premete il tasto
OK.
Predisposizione
4
Page 86

Predisposizione automatica
Auto programme
Predispos. automatica
Predispos. manuale
Riordina
Lingua
oœ
OK MENU
System BG
Sistema BG
Memorizzaz. dal 1
Ricerca C 15
1
‡ 2%
MENU
& Selezionate il sistema TV.
é Premete il cursore sinistra/destra per
selezionare il sistema TV del paese o della
zona del mondo dai quali desiderate
ricevere i canali TV.
Se siete collegati ad un sistema via cavo,
selezionate il sistema TV del vostro paese
o della parte del mondo in cui vi trovate
ora.
DK: PAL D/K, SECAM D/K
(Europa orientale)
BG: PAL B/G, SECAM B/G
(Europa/Europa orientale/Francia)
I: PAL I/II ( U.K./Irlanda)
L (se disponibile) (Francia)
“ Premete il cursore alto/basso per
selezionare
Memorizzaz. dal.
‘ Premete il cursore sinistra/destra per
selezionare un numero di canale oppure
inserite il numero di canale con i tasti
numerici a partire dal quale desiderate
iniziare la ricerca di nuovi canali. Se ad
esempio volete conservare i canali da 1 a
11, memorizzati in precedenza, inserite
come numero di canale il 12.
Il vostro TV effettuerà la ricerca dei nuovi
canali a partire dal numero 12.
( Premete il cursore alto/basso per
selezionare
Ricerca.
§ Premete il tasto OK per avviare la
programmazione automatica.
Tutti i canali TV disponibili vengono
ricercati e memorizzati automaticamente.
Anche i nomi dei canali TV vengono
memorizzati se i canali TV trasmettono
VPS (Video Programme Service), PDC
(Programme Delivery Control) o
Televideo.
Se non è possibile assegnare un nome al
canale TV, soltanto il numero del canale
verrà assegnato e memorizzato come
canale C (V/UHF 01-69) oppure canale S
(Cable 01-47), seguito da un numero.
Per interrompere la programmazione auto,
premete il tasto
MENU.
Quando la programmazione automatica è
completata, appare il menu
programma
.Vedi più avanti.
Riordina
è Premete più volte il tasto MENU se volete
lasciare il menu.
5Predisposizione
Page 87

Predisposizione manuale
Predispos. automatica
Manual installation
Predispos. manuale
Riordina
Lingua
oœ
OK MENU
Sistema BG
Canale Can S/Can C
Sint. fine πππ
Ricerca
Nome C 01
Memorizzaz. 1
oœ p π
OK MENU
La ricerca e la memorizzazione dei canali
TV sono effettuate canale per canale.
Anche in questo caso potete assegnare un
nome ad un canale TV, della lunghezza
massima di 5 lettere o numeri.
Dovete passare attraverso tutte le
fasi del menu programma manuale.
& Selezionate Predispos. manuale nel menu
di predisposizione.
é Premete il tasto OK per avviare il menu di
predisposizione manuale.
“ Premete il cursore sinistra/destra per
selezionare il sistema TV del paese o della
parte del mondo dai quali desiderate
ricevere il canale TV.
Se siete collegati ad un sistema via cavo,
selezionate il sistema TV del vostro paese
o della parte del mondo in cui vi trovate
ora.
DK: PAL D/K, SECAM D/K
(Europa orientale)
BG: PAL B/G, SECAM B/G
(Europa/Europa orientale/Francia)
I: PAL I/II ( Irlanda)
L (se disponibile) (Francia)
‘ Premete il cursore alto/basso per
selezionare
Canale.
( Premete il cursore sinistra/destra per
selezionare
Can S per canali via cavo.
Se conoscete il numero del canale C (01-
69) o del canale S (01-47), introducetelo
direttamente con i tasti numerici da 0 a 9.
Domandate un elenco alla vostra società
Can C per canali via etere o
di distribuzione via cavo o al rivenditore.
§ Premete il cursore alto/basso per
selezionare
Ricerca.
è Premete il cursore sinistra/destra per
avviare la ricerca. Se un canale è stato
trovato, la ricerca si arresterà.
Sintonizzazione fine
In caso di cattiva ricezione, potete
migliorarne la qualità con sintonizzazione
fine.
Premete il cursore alto/basso per
selezionare
Sint. fine.
Premete il cursore sinistra/destra per
sintonizzare nel modo migliore l’immagine
e il suono.
Assegnare un nome al canale
È possibile modificare il nome
memorizzato o assegnare un nome ad un
canale TV che non è stato ancora
introdotto. Potete assegnare un nome con
un massimo di cinque lettere o numeri ai
numeri programma da 0 a 99.
Premete il cursore alto/basso per
selezionare
Nome.
Selezionate il carattere con il cursore
sinistro/destro.
Spazio, numeri ed altri caratteri speciali si
trovano fra Z e A.
Premete il tasto OK.
Selezionate il carattere successivo.
Procedete con i punti seguenti.
! Se il canale è quello richiesto, premete il
cursore alto/basso per selezionare
Memorizzaz.
ç Premete il cursore sinistra/destra per
selezionare un numero di canale oppure
introducete il numero di canale con i tasti
numerici.
0 Premete il tasto OK per memorizzare il
canale TV.
Ripetete i punti da 4 a 10 per
memorizzare un altro canale TV.
Premete il tasto
volete lasciare il menu.
MENU più volte quando
Predisposizione
6
Page 88

Riordinamento della lista programmi
Auto programme
Predispos. automatica
Predispos. manuale
Riordina
Lingua
oœ
OK MENU
0ARD
1ZDF
1 ZDF
2C12
3S 4
4 CH-5
Cancel.
•
Sposta
•
oœ p π
OK MENU
5 ARD1
6 ZDF1
7 C12
8S 44
9 CH-5
Copia
•
Salta
•
A seconda delle vostre preferenze
potete cancellare o saltare i canali TV
memorizzati. Potete anche modificare
l’ordine dei canali TV memorizzati
oppure inserire dei dati vuoti nel
numero di canale selezionato.
& Premete il cursore alto/basso per
selezionare
Predisposizione.
Riordina nel menu
é Premete il tasto OK per avviare il menu
Riordina.
Cancellare un canale TV
& Premete il cursore alto/basso,
sinistra/destra per selezionare un canale
TV da cancellare.
é Premete il tasto rosso sul telecomando
due volte.
Il numero di canale TV selezionato viene
cancellato, tutti i canali seguenti vengono
spostati in avanti di una posizione.
Copiare un canale TV
& Premete il cursore alto/basso,
sinistra/destra per selezionare un canale
TV da copiare.
é Premete il tasto verde sul telecomando.
Tutti i numeri di canale seguenti vengono
spostati in basso di una posizione.
Spostare un canale TV
& Premete il cursore alto/basso,
sinistra/destra per selezionare il numero di
canale da spostare.
é Premete il tasto giallo sul telecomando.
“ Premete il cursore alto/basso,
sinistra/destra per spostare il canale TV al
numero di canale desiderato.
‘ Premete il tasto giallo di nuovo per
disattivare questa funzione.
Saltare un numero di canale
& Premete il cursore alto/basso,
sinistra/destra per selezionare un numero
di canale da saltare.
é Premete il tasto blu sul telecomando. Il
canale TV saltato viene visualizzato in blu.
“ Premete di nuovo il tasto blu.
Dopo avere lasciato la predisposizione,
potete passare in rassegna i canali TV
premendo i tasti cursore alto/basso.
Soltanto i canali TV che non sono stati
saltati possono venire selezionati. I canali
TV saltati si possono ancora selezionare
con i tasti numerici o nella lista
programmi, dove sono visualizzati in blu.
Premete il tasto
uscire dal menu.
MENU più volte per
Visualizzazione lista programmi
0ARD
1ZDF
1 ZDF
2C12
3S 4
4 CH-5
oœ p π
OK MENU
5 ARD1
6 ZDF1
7 C12
8S 44
9 CH-5
& Premetre il tasto LIST sul telecomando
per visualizzare la lista di programma.
é Premete il cursore alto/basso,
sinistra/destra per passare in rassegna la
lista de 100 numeri de canales.
“ Premete il tasto OK per selezionare il
canale TV desiderato.
Nota: i canali TV visualizzate in blu sono state
installate per essere saltate nel menu
Riordina.
7Predisposizione
Page 89

Utilizzo
MENU
OK
PV
¬
5
1
3
2
4
6
7
9
8
0
0
LIST
h
fg
Ò
‡
π
c
b
®
†
U
e
k
C
a
D
B
M
AUTO
AUTO
w
Y-Z
Uso del telecomando
w Fonte
Selezionate altre periferiche:
premete più volte per
selezionare
S-VIDEO.
X Scelta bilingue e
selezione modalità suono
Premete questo tasto
• per passare da suono
a Mono in caso di
trasmissione Stereo, o da
Nicam Stereo a Nicam
Mono
digitale
• per passare da
a
Nicam Dual Z o Nicam
Dual
trasmissione Nicam Dual
• per scegliere fra
Z o Dual X in caso di
trasmissione bilingue:
Dual Y invia la lingua
principale di trasmissione agli
altoparlanti;
Dual Z invia la lingua
secondaria di trasmissione agli
altoparlanti;
Dual X invia una lingua
distinta a ciascun altoparlante.
Nota: in caso di segnali stereo
deboli, con una trasmissione stereo
o Nicam stereo, selezionate la
ricezione mono.
TV, AV1, AV2 o
Stereo
, in caso di trasmissione
Nicam Dual Y
X in caso di
Dual Y, Dual
B Attesa
Accende il TV dalla modalità
attesa o lo riporta nella
modalità attesa.
Tasti
AUTO
Per selezionare un’immagine
predefinita e le impostazioni
del suono.
a
AUTO immagine
Ogni volta che si preme
questo tasto, viene selezionata
un’impostazione di immagine
differente, corrispondente alle
impostazioni di fabbrica per
Contrasto, Luminosità, Colore
e Nitidezza.
M
AUTO suono
Ogni volta che si preme
questo tasto, viene selezionata
un’impostazione di suono
differente, corrispondente ad
una regolazione specifica di
fabbrica per alti e bassi.
Personale si riferisce alle
impostazioni personali
preferite per l’immagine e il
suono selezionate e
memorizzate nel menu
immagine e suono.
Selezione uscita suono in modalità AV
Nella modalità AV potete selezionare l’uscita suono per gli altoparlanti sinistro e destro.
Premete ripetutamente il tasto X per selezionare:
• L+R: il segnale audio proveniente dalla fonte audio L è inviato all’altoparlante sinistro, il
segnale audio proveniente dalla fonte audio R è inviato a quello destro
• L+L: il segnale audio proveniente dalla fonte audio L è inviato agli altoparlanti sinistro e
destro
• R+R: il segnale audio proveniente dalla fonte audio R è inviato agli altoparlanti sinistro e
destro.
Uso del telecomando
8
Page 90

B
M
a
AUTO
AUTO
w
Y-Z
C
h
fg
c
b
e
k
Ò
‡
π
®
†
U
D
1
2
9
3
6
5
7
4
8
0
0
LIST
MENU
OK
P
¬
V
MENU Premete ripetutamente
per visualizzare ciascun menu.
OK Premete questo tasto per
attivare la vostra scelta, quando
vi trovate nei menu.
V Volume
Premete + oppure – per
regolare il volume.
¬ Tasto muto audio
Interrompe temporaneamente il
suono o lo ripristina.
P Selezione programma
• per passare in rassegna i
canali TV che non sono stati
saltati
• per accendere la TV dalla
modalità di attesa.
D Timer spegnimento
Con questo tasto potete
impostare un periodo di
tempo dopo il quale il TV
passerà automaticamente alla
modalità standby.
Premete il tasto ripetutamente
per selezionare il numero dei
minuti. Il contatore passa da
B 0, 10, 20, 30... fino a 240
minuti. Il timer incomincia il
conto alla rovescia a partire
dal numero di minuti
selezionato.
Nota: Per visualizzare il tempo
rimanente, premete il tasto D
una volta. Per annullare il tempo
sleep, premete ripetutamente il
tasto D fino a quando non
apparirà B 0.
0/9 Tasti numerici
Per selezionare un canale TV.
®Ò‡π† Tasti
videoregistratore vedi p. 18.
U Visualizzazione ora
L’ora, ripresa dal canale TV (con
trasmissione televideo)
memorizzato nel numero di
programma 1 o il numero più
basso di programma che non è
stato saltato, viene visualizzata
sullo schermo.
0 Programma
precedente
Per visualizzare il canale TV
precedentemente selezionato.
LIST Lista programmi
Per visualizzare la lista dei
programmi.
b Televideo acceso/spento
vedi p. 13.
Funzioni televideo vedi p. 14.
hUfgcek
9Uso del telecomando
Page 91

Tasti sul lato anteriore del TV
TV / VIDEO
MENU
OK
_
VOL
+
_
CH / PR
+
B
ON / OFF
Se doveste perdere il telecomando o se il telecomando dovesse rompersi, potete ancora far
funzionare il TV con i tasti che si trovano sul lato anteriore.
ON/OFF: Premete il tasto interruttore ON/OFF per accendere o spegnere il TV
TV/VIDEO: Premete ripetutamente per selezionare la modalità monitor TV o AV
MENU: Premete ripetutamente per visualizzare ciascuno dei menu
OK: - Premete questo tasto per attivare la vostra scelta quando vi trovate nel menu
Dimostrazione auto:Tenete il tasto OK premuto per circa 10 secondi.
Tutti i menu vengono visualizzate automaticamente, uno dopo l’altro.
Per interrompere la dimostrazione auto premete un qualsiasi tasto sul pannello
anteriore.
- VOL + : - Premete - oppure + per selezionare una voce di menu;
- Premete - oppure + per regolare il volume;
- Premete - oppure + per regolare le impostazioni del menu.
- CH/PR +:- Premete - oppure + per passare attraverso i canali TV che non sono stati
saltati;
- Premete - oppure + per selezionare una voce di menu;
- Per accendere il TV dalla modalità di attesa.
B: Accende il TV dalla modalità standby o lo riporta nella modalità di attesa.
L’indicatore B si illumina vivamente quando il TV è in standby, la luce si smorza
quando il TV viene acceso.
Tasti sul lato anteriore del TV
10
Page 92

B
M
a
AUTO
AUTO
w
Y-Z
D
1
2
9
3
6
5
7
4
8
0
0
LIST
P
¬
V
MENU
OK
Uso dei menu
tornare o spegnere
il menù
attivare
cursore per selezionare
regolazioni
& Premete ripetutamente il tasto MENU per
visualizzare il menu immagine, suono o il menu
speciale.
é Usate il cursore alto/basso per selezionare una
voce di menu.
“ Usate il cursore sinistra/destra per regolare le
impostazioni di una voce di menu oppure
premete il tasto OK per avviare un sottomenu.
‘ Premete il tasto MENU ripetutamente quando
volete lasciare il menu.
Menu immagine
Contrast 100
Contrasto
Luminosità 95
Colore 85
Nitidezza 80
Immagine
oœ p π
OK MENU
Menu suono
Equalizer
Equalizzatore
Bilanciamento 0
AVL Acceso/Spento
oœ
OK MENU
Flat
Neutro
Musica
Film
Parlato
Personale
oœ p π
Potete selezionare le vostre impostazioni
preferite per il suono oppure potete
anche regolare la frequenza del suono
dell’equalizzatore e il bilanciamento
dell’uscita suono degli altoparlanti destro e
sinistro.
Accendete AVL per mantenere il livello di
volume costante mentre passate da un
canale TV all’altro.
0.1 0.5 1.5 5.0 10 kHz
MENU
100
Potete regolare il contrasto dell’immagine, la sua
luminosità, colore, nitidezza e il tono (solo NTSC AV)
ai livelli da voi preferiti.
Premete il tasto OK per memorizzare le regolazioni.
Compare il messaggio
Memorizzato.
Adesso le vostre regolazioni per l’immagine sono
state memorizzate e possono venire richiamate con il
AUTO a sul telecomando, selezionando
tasto
Personale.
Per selezionare una delle impostazioni predefinite di
fabbrica per l’immagina, premete il tasto
AUTO a
sul telecomando.
Premete più volte il tasto
MENU per lasciare il menu.
Equalizzatore
& Selezionate Equalizzatore e premete il tasto
OK per accedere al menu Equalizzatore.
é Selezionate una delle impostazioni predefinite di
fabbrica oppure selezionate
regolare le vostre impostazioni personali per il
suono di alti e bassi.
Impostazione dell’equalizzatore Personale
Personale per
& Selezionate Personale con il cursore alto/basso.
é Premete il cursore sinistra/destra per
selezionare una banda di suono.
“ Premete il cursore alto/basso per regolare il
livello di suono appropriato.
‘ Premete il tasto OK per memorizzare le
regolazioni Personali.
Compare il messaggio
Premete il tasto
Memorizzato.
MENU per lasciare il menu.
11Uso dei menu
Page 93

Menu speciale
Input TV
Fonte TV
Blocco accensione Spento
Spento auto Spento
oœ p π
MENU
Selezionate la modalità TV oppure
AV
& Selezionate Fonte nel menu Speciale.
é Premete il cursore sinistra/destra per
selezionare
AV1 per VCR collegato all’euro-
•
connettore w 1 (Vedi Collegamento
apparecchiature periferiche, p. 16))
AV2 per un VCR collegato al connettore
•
AV2 del TV.
S-VIDEO per un VCR S-Video collegato
•
al connettore S-Video del TV.
Nota: Quando un VCR è collegato con una
presa antenna, il TV viene usato in modalità
TV.
Alternativamente potete selezionare la
modalità TV oppure AV con il tasto fonte sul
telecomando.
Per ritornare alla modalità TV, premete il
cursore alto/basso oppure i tasti numerici.
TV, AV1, AV2 o S-VIDEO.
Passaggio Auto AV
Se il vostro VCR è collegato
all’euroconnettore e il VCR è passato a
playback, il TV passa automaticamente alla
modalità
AV1 . Se volete continuare a
guardare in modalità TV, premete il
+ P -
cursore alto/basso,
oppure i tasti
numerici.
Blocco accensione
Se il blocco accensione è attivo, il Tv può
venire acceso e utilizzato soltanto con il
telecomando. I tasti che si trovano sul lato
anteriore del TV non possono venire
utilizzati. In questo modo potete evitare
che il TV venga utilizzato senza
autorizzazione.
Se compare il messaggio
accensione Acceso
Blocco
, il blocco accensione va
spento prima che possiate usare i tasti del
pannello anteriore per selezionare un
canale TV.
& Selezionate Blocco accensione nel menu
Speciale.
é Premete il cursore sinistra/destra per
selezionare
Blocco accensione Acceso.
“ Premete ripetutamente il tasto MENU per
lasciare il menu.
Spento Auto
Se Spento Auto è acceso, il TV passa
automaticamente alla modalità standby se
non riceve un segnale da antenna per un
periodo di circa 12 minuti.
& Selezionate Spento Auto nel menu
Speciale.
é Premete il cursore sinistra/destra per
selezionare Spento Auto
Spento.
“ Premete il tasto MENU ripetutamente per
lasciare il menu.
12 Uso dei menu
Page 94

Televideo
C
h
fg
c
e
Ò
‡
π
®
†
U
9
7
8
0
0
LIST
P
¬
V
MENU
OK
b
k
b
k
OK per attivare
cursore per
selezionare pagine
tasti dei colori per
selezionare
La maggior parte dei canali TV trasmette
informazioni tramite televideo.
Ogni canale che trasmette televideo invia una
pagina contenente informazioni sull’uso del
suo sistema televideo. Cercate la pagina
televideo con l’indice principale (di solito
pagina 100).
A seconda del canale TV, televideo è
trasmesso in sistemi differenti:
Standard
Televideo Standard consiste di un certo
•
numero di pagine che sono selezionate
introducendo direttamente il numero di
, TOP e FASTEXT.
pagina corrispondente.
TOP e FASTEXT utilizzano dei colori sulla
•
linea in fondo allo schermo, corrispondenti ai
tasti colorati del telecomando, per
selezionare le informazioni televideo.
Televideo
Accendere e spegnere Televideo
Premete b per accendere o spegnere il
televideo.
La pagina dell’indice principale o l’ultima
pagina selezionata compare sullo schermo, con
una prima pagina di informazione e una linea
opzionale in fondo allo schermo.
Selezionare una pagina
televideo
Con i tasti numerici
Introducete il numero di pagina desiderato
con i tasti numerici.
Il contatore delle pagine ricerca la pagina.
Se avete inserito un numero di pagina inesistente
o errato compare un messaggio. Completate il
numero a 3 cifre e reinserite il numero di pagina
corretto. I numeri di pagina non incominciano mai
con 0 o 9.
Con la linea opzionale in fondo allo
schermo
Selezionate il soggetto desiderato con i tasti
colorati, corrispondenti alle opzioni colorate
in fondo allo schermo.
Con il cursore alto/basso
Premete il cursore alto/basso per selezionare
la pagina precedente o seguente.
Selezionare la pagina indice
televideo
Premete il tasto k per visualizzare l’indice
principale (di solito p.100).
Solo per trasmissioni televideo TOP:
Non tutti i canali TV trasmettono televideo
TOP.TOP dispone le pagine in categorie e
possiede altre possibilità per facilitare l’uso del
televideo.
Premete il tasto k.Verrà visualizzata una
rassegna TOP degli argomenti televideo
disponibili.
Utilizzate i tasti colorati per selezionare le
informazioni televideo o selezionate
direttamente le pagine televideo con i tasti
numerici.
13Televideo
Page 95

C
h
fg
c
b
e
k
Ò
‡
π
®
†
9
7
8
0
0
LIST
P
¬
V
OK
MENU
MENU
U
U
c
h
f
e
b
g
OK per attivare
cursore per
selezionare
sottopagine
Funzioni televideo speciali
Ingrandimento
Premete ripetutamente h per visualizzare la
parte superiore, inferiore e poi ritornare alla
dimensione normale della pagina. Quando la
parte superiore viene visualizzata, potete
navigare nel testo, linea per linea, usando il
cursore alto/basso.
Rivela
Premete f per rivelare/nascondere
informazioni nascoste, come ad esempio le
soluzioni di indovinelli e rompicapi.
Arresto
Premete g per interrompere la rotazione
automatica delle sottopagine, se disponibili.
L’icona g viene visualizzata in cima allo
schermo.
Premete di nuovo il tasto g per riprendere
la rotazione automatica.
Selezione sottopagine
Se delle sottopagine sono disponibili, potete
farle fermare durante la loro rotazione
automatica oppure selezionare voi stessi la
sottopagina descritta.
Premete il tasto U.
Il numero di sottopagina è visualizzato in
fondo allo schermo.
Premete il tasto rosso o verde per selezionare
la sottopagina precedente o successiva,
oppure cambiate la sottopagina con il cursore
alto/basso o con i tasti numerici.
Premete di nuovo il tasto U per uscire da
questa funzione.
Mix
Premete il tasto c per visualizzare le pagine
televideo sovrapposte all’immagine TV.
Premete di nuovo il tasto c per spegnere di
nuovo l’immagine TV.
Interrompi
Premete e.
Compare il programma TV.
b in cima allo schermo indica che vi trovate
ancora nella modalità televideo.
Prima di interrompere il televideo, potete
selezionare un numero di pagina.
Quando la pagina viene trovata, la linea di
informazione compare brevemente sullo
schermo.
Premete di nuovo e.
Il televideo ricompare.
14 Televideo
Page 96

Collegamento dell’apparecchiatura periferica
Un’ampia gamma di apparecchiature video e audio
possono venire collegate al vostro TV.
Gli schemi di collegamento che seguono vi mostrano
come collegarle.
Preparazione
Rimuovete il pannello posteriore del TV come
mostrato nell’illustrazione opposta.
Adagiate il TV LCD con lo schermo verso il basso su
di un tavolo; in questo modo sarà più semplice
collegare la vostra apparecchiatura periferica. Fate
molta attenzione a non danneggiare lo schermo.
Videoregistratore
Con eurocavo
CABLE
............
•
•
ANT IN
DC 12V
_
+
x
75
Ω
2
1
VCR
w 1
3
...........
PC INPUT
VIDEO (MONO) L AUDIO R
L
S-VIDEO
•
•
•
•
AV2
•
•
Con un eurocavo otterrete un’immagine di
qualità migliore che con un semplice cavo
antenna.
& Collegate i cavi antenna 1, 2 e
l’eurocavo 3 come mostrato di fronte.
é Premete il tasto π sul videoregistratore.
Il TV passerà automaticamente alla
modalità
Se desiderate continuare a guardare in
modalità TV, premete il cursore alto/basso,
+ P - oppure premete i tasti numerici.
AV1 .
Soltanto con un cavo antenna
CABLE
............
•
•
ANT IN
DC 12V
_
+
x
75
Ω
2
1
VCR
w 1
...........
PC INPUT
VIDEO (MONO) L AUDIO R
L
S-VIDEO
•
•
•
•
AV2
•
•
& Collegate i cavi antenna 1 e 2 come
mostrato di fronte.
é Ricerca e memorizzazione segnale
test del videoregistratore
• Staccate il cavo antenna 1 dalla presa
antenna x del videoregistratore.
• Accendete il TV e mettete il
videoregistratore sul segnale test. (Vedi il
manuale per il videoregistratore)
• Ricercate il segnale test del
videoregistratore nello stesso modo in cui
avete ricercato e memorizzato i canali TV.
Vedi Predisposizione manuale, p. 6.
• Memorizzate il segnale test con un
numero di programma.
• Rimettete il cavo antenna nella presa
antenna x del videoregistratore dopo
avere memorizzato il segnale test.
“ Selezionate il numero di programma in cui
desiderate memorizzare il VCR.
‘ Premete il tasto π del videoregistratore.
15Collegamento dell’apparecchiatura periferica
Page 97

CABLE
Con cavi Audio/Video
& Collegate il cavo antenna 1 e i cavi
Audio/Video 2 e 3 come mostrato di
fronte.
é Premete il tasto w sul telecomando
oppure selezionate
............
•
•
ANT IN
DC 12V
_
+
x
75
Ω
1
w 1
2
...........
PC INPUT
VIDEO (MONO) L AUDIO R
L
S-VIDEO
•
•
•
•
AV2
•
•
3
Speciale (Vedi p. 12) per selezionare
“ Premete il tasto π sul videoregistratore.
Nota: Se avete un videoregistratore mono,
collegate il cavo audio del videoregistratore al
AUDIO (MONO) L soltanto sul
VCR
connettore
retro del TV.
Fonte nel menu
AV2 .
Videoregistratore S-VHS
CABLE
............
•
•
...........
PC INPUT
ANT IN
DC 12V
_
+
x
75
Ω
2
1
Connessione uscita
............
...........
DC 15V
_
w 1
+
L
VCR
S-VIDEO
w 1
MONITOR OUT
VIDEO (MONO) L AUDIO R
•
•
•
•
AV2
•
•
L
S-VIDEO
3
VIDEO L AUDIO R
MONITOR OUT
EO
S•VID
•
•
•
•
•
•
VIDEO
VIDEO (MONO) L AUDIO R
AV2
4
Con un videoregistratore S-VHS otterrete
un’immagine di qualità migliore.
& Collegate i cavi antenna 1 e 2 come
mostrato di fronte.
é Collegate il cavo 3 S-Video alla presa
S-VIDEO del TV.
“ Collegate il cavo audio 4 come mostrato
AUDIO
di fronte.
Nota: Non collegate mai allo stesso TV un
videoregistratore con cavi S-VHS allo stesso
tempo di un videoregistratore con un
euroconnettore.
‘ Premete il tasto w sul telecomando
oppure selezionate
Speciale (Vedi p. 12) per selezionare
S-Video.
Fonte nel menu
( Premete il tasto π del videoregistratore.
La connessione MONITOR OUT può
essere usata per collegamenti in cascata o
per registrare i programmi dal TV.
E’ possibile registrare un programma
proveniente da altre fonti collegate al TV,
ANT IN
x
75
Ω
solo quando all’uscita
collegato un VCR.
Se sull’uscita
MONITOR OUT non vi è
collegato alcun VCR, è possibile registrare
solo programmi provenienti dall’antenna.
MONITOR OUT è
VCR
16 Collegamento dell’apparecchiatura periferica
Page 98

PC INPUT
w 1
•
•
•
•
•
•
S-VIDEO
DC 12V
_
+
ANT IN
x
75
Ω
VIDEO (MONO) L AUDIO R
AV2
L
•
•
............
...........
L
Videocamera & camcorder
PC INPUT
w 1
•
•
•
•
•
•
S-VIDEO
DC 12V
_
+
ANT IN
x
75
Ω
VIDEO (MONO) L AUDIO R
AV2
L
•
•
............
...........
AUDIO
VID
E
O
S•
VIDEO
3
2
1
& Collegate la vostra videocamera o
camcorder alla presa
(MONO) L 3 per apparecchi mono.
VIDEO 2 e AUDIO
é Per apparecchi stereo collegate anche
AUDIO R 3.
La qualità S-VHS con un camcorder S-VHS
si ottiene collegando i cavi S-VHS con la
S-VIDEO 1 e la fonte AUDIO 3.
fonte
Cuffie
& Inserite la spina nella presa per le cuffie L sul
retro del TV.
é Premete il tasto ¬ sul telecomando per
spegnere il suono delle cuffie e degli altoparlanti
interni del TV.
“ Premete il cursore sinistra/destra per regolare il
volume.
17Collegamento dell’apparecchiatura periferica
Page 99

B
a
M
AUTO
AUTO
w
Y-Z
D
C
h
f
c
e
Ò
‡
π
®
†
U
1
2
9
3
6
5
7
4
8
0
0
LIST
¬
V
MENU
OK
b
k
VCR
M
a
AUTO
AUTO
w
Y-Z
D
g
®
Ò
‡
π
†
C
P
P
B
BB
Tasti videoregistratore
La maggior parte degli apparecchi video della
nostra gamma di prodotti può essere fatta
funzionare con il telecomando del TV.
Tenete premuto il tasto
VCR sul lato sinistro del
telecomando e contemporaneamente premete:
® per registrare
Ò per riavvolgere
‡ per arresto
π per riproduzione
† per avvolgimento
C per il timer del videoregistratore
- P + per la selezione in sequenza di
programmi dal sintonizzatore del
videoregistratore
0 a 9 per selezionare un numero di programma
dal sintonizzatore del videoregistratore
B per spegnere provvisoriamente il
videoregistratore
18 Tasti videoregistratore
Page 100

Consigli
Cura dello schermo
Non sfregate né colpite lo schermo con
oggetti duri che potrebbero graffiare,
raschiare o danneggiare in modo permanente
lo schermo. Scollegate lo schermo prima di
pulirlo. Spolverate la TV passando un panno
morbido e pulito sullo schermo e
l’armadietto. Se occorre pulire lo schermo in
modo più profondo, usate un panno pulito e
inumidito. Non usate detergenti liquidi o
detergenti aerosol.
Avvertimento telefonia mobile
Per evitare disturbi all’immagine e al suono,
disfunzioni del TV o persino danni al TV,
tenete il telefonino lontano dal TV..
Immagini di qualità scadente
• Avete selezionato il sistema TV corretto?
• I cavi sono collegati correttamente? (Il cavo
antenna al TV o videoregistratore, i cavi VGA
al TV, il cavo di alimentazione.)
• Il vostro TV o l’antenna di casa sono troppo
vicini agli altoparlanti, ad un’apparecchiatura
audio non messa a terra o a luci al neon, ecc.?
• Montagne o edifici alti possono causare
immagini doppie o immagini fantasma.A volte
potete migliorare la qualità dell’immagine
cambiando la direzione dell’antenna.
• Luminosità e contrasto sono sregolati?
Premete
AUTO M oppure a per ripristinare
le regolazioni predefinite di fabbrica. Provate
un altro canale, forse il segnale ricevuto è
troppo debole.
• A volte si nota una qualità scadente
dell’immagine quando un videoregistratore SVHS, una videocamera o un camcorder sono
collegati ed un’altra periferica è collegata a
AV1 o AV 2 nello stesso tempo. In questo caso
vi consigliamo di spegnere una delle altre
periferiche.
Assenza di immagine
• Il TV è acceso?
• L’antenna è collegata correttamente? Le spine
sono ben collegate nella presa antenna?
• Il cavo antenna è in buone condizioni ed è
dotato di spine adatte?
Assenza di suono
Assenza di suono in tutti i canali? Controllate
che il volume non sia al minimo. Il suono è
stato interrotto con il tasto mute ¬?
Telecomando
• Se il TV non risponde più al telecomando, le
batterie potrebbero essere scariche.
Potete ancora usare i tasti situati sul lato
anteriore del TV.
• Avete disinserito il blocco accensione?
Nessuna soluzione
Spegnete e accendete il TV ancora una volta.
Non provate mai a riparare un TV difettoso
da soli.
Non rimuovete mai il coperchio posteriore
del TV. Se il TV non funziona come dovuto,
scollegatelo dalla corrente e chiamate il
vostro rivenditore o un tecnico TV.
Direttive di fine uso
Philips si preoccupa molto di una produzione
rispettosa dell’ambiente. Il vostro nuovo
televisore contiene materiali che possono
essere riciclati e impiegati di nuovo. Esistono
ditte specializzate nel riciclaggio, le quali sono
in grado di smantellare l’apparecchio usato
per ricuperarne i materiali riutilizzabili
riducendo in tal modo al minimo i pezzi e
materiali da buttare.Vi preghiamo di
informarvi sulla normativa locale su dove
lasciare il vostro vecchio televisore usato.
Cosa ne fate delle batterie esaurite ?
Le pile in dotazione con il telecomando del
vostro nuovo televisore non contengono
metalli nocivi quali mercurio e cadmio. Ciò
nonostante, in molti paesi le pile usate non si
possono buttare via insieme ai rifiuti
domestici.Vi pregiamo di informarvi sulla
normativa locale su dove lasciare le pile usate.
19Consigli
 Loading...