

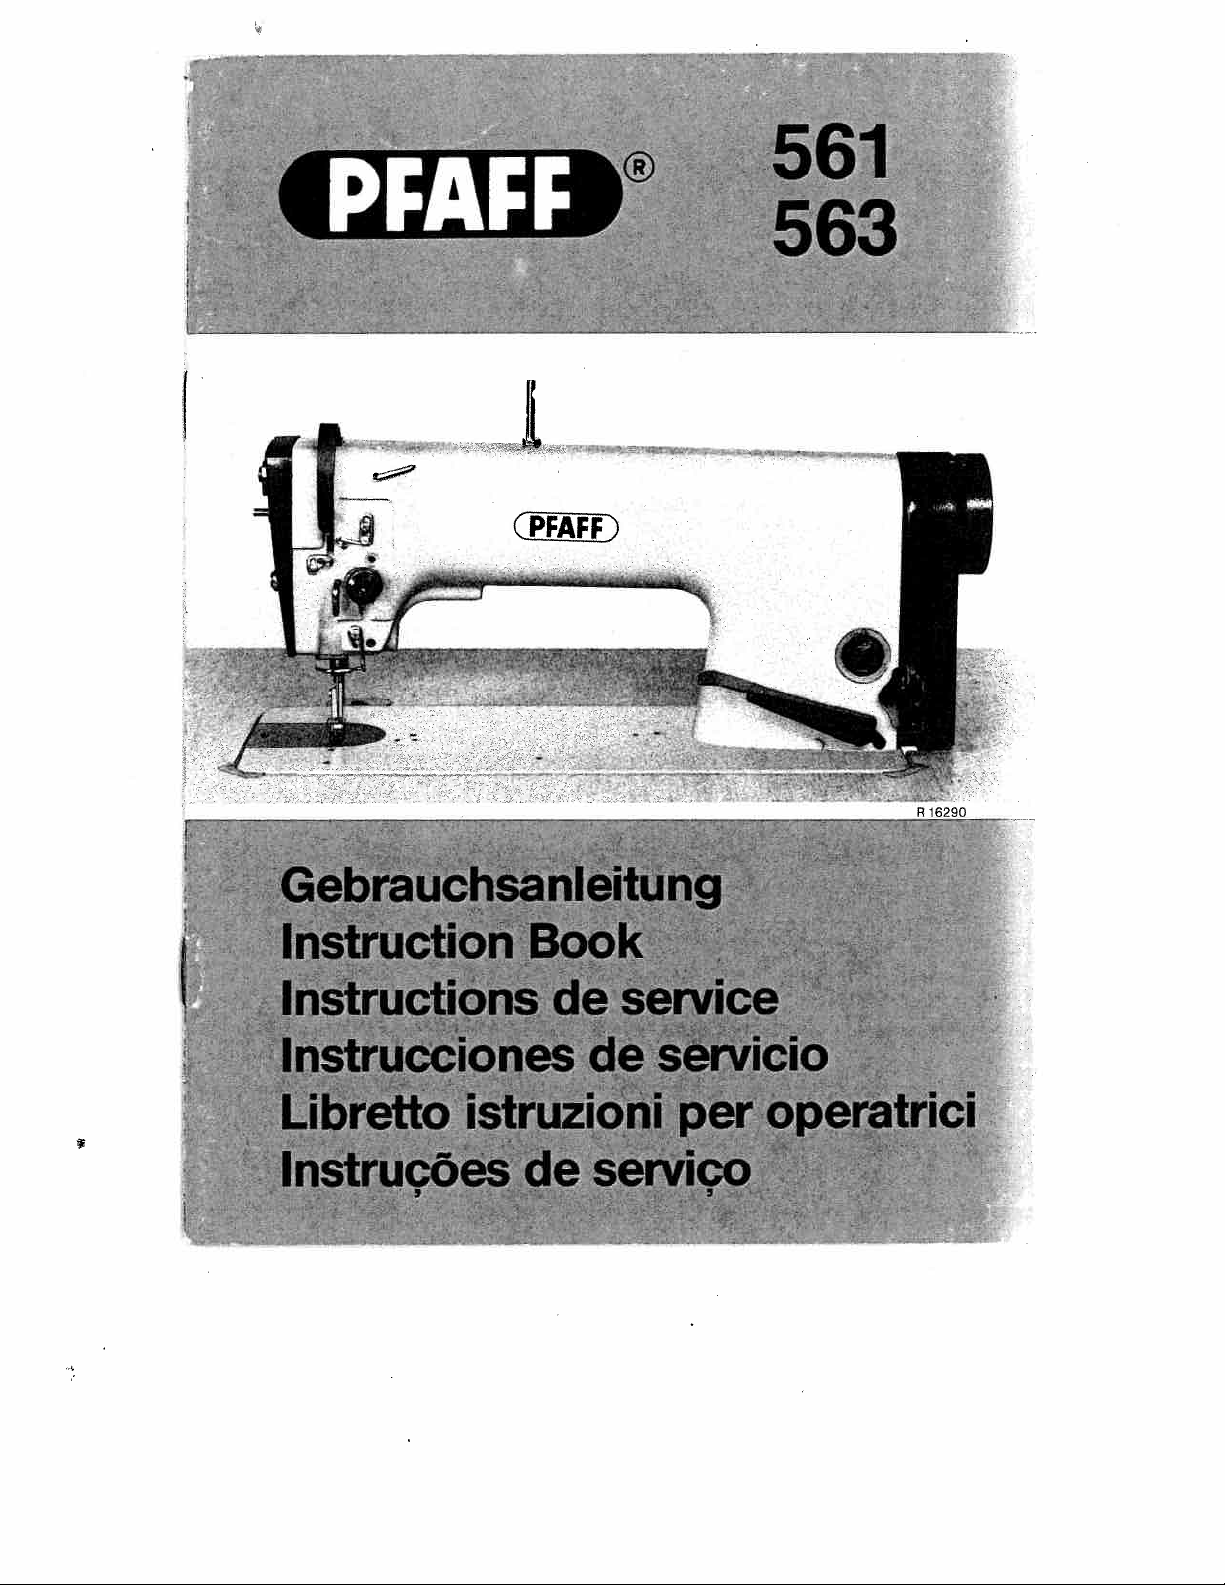
Page 1
Page 2
Zur
besonderen
ersten
•
Die
•
Zur
Na.hgutentnahme
ertolgt
Storungen
•
Urn
beachten.
Wochen
2
Fadenhebelhochposition
zu
Sicherheits-Hinweise
•
Die
Maschine
sind
gen
•
Em
Betrieb
•
Das
Einschalten
erfolgen.
son
Wechseln
•
Beim
Einfädeln,
schalten,
Bei
mechanisch
•
Bei
Wartungs-
schen
Versorgungsnetzzutrennen.
Ausnahmen
Fachkräfte
•
Arbeiten
wiesene
Arbeiten
chungen
gultigen
alle
der
bei
Verlassen
h,
d.
durch
sind nur
zulassig.
an
der
Personen
an
unter
gemal3
dart
Maschine
und
von
betatigten
und
elektrlschen
durchgefUhrt
Spannung
DIN
Beachtung
Maschine
Fadenhebel
vermeiden,
nur
ihrer
Schutzbestimmungen
Betreiben
Nahwerkzeugen,
des
Betatigen
Reparaturarbeiten
bei
Justierarbeiten
57105,
nur
automatisch).
Maschine
Bestimmung
ohne
die
derMaschine
Arbeitsplatzes
Hauptschalters
des
Kupplungsmotoren
Ausrostung
werden.
stehenden
bzw.
VDE
mit
3/4
ihrer
HOchstgeschwindigkeit
immer
in
die
hOchste
regelmaBig
gemal3
verwendet
zu
berucksichtigen.
vom
Werk
angebrachten
darf
nurdurch
wie
B.
z.
Nadel,
und
bei
Wartungsarbeiten,
oder
ist
der
pneumatischen
an
und
Funktionsuberprufungen
dUrfen
nur
Teilen
und
Einrichtungen
nicht
0105
erlaubt.
Stellung
reinigen
NähfuB,
durch
Stillstand
Einrichtungen
durch
Elektrofachkrãfte
bringen
(Seite
22)
werden.
die
Beim
Umbau
Schutzvonichtungen
entsprechend
Stichplatte,
Herausziehen
des
sind,
Stoffschieber
ist
die
Motors
die
st
durch
abgesehen
laufen
lassen.
(bei
Maschine
und
Olvorschriften
in
andereAusfuhrun
unterwiesene
Maschine
des
Netzsteckers.
abzuwarten.
Maschine
entsprechend
oder
entsprechend
von
st
nicht
Bedienper
Spule,
und
elektrisch
vom
unterwiesene
zulassigen
mit
-900/..
(Seite
erlaubt.
beim
abzu
pneumati
unter
Abwei
5)
Important
•
During
•
Always
machines
•Toavoid
Safety
•
The
machine
version
all
not
•
Do
•
The
machine
•
When
machine
actuating
In
case
of
•
When
carrying
from
only
Work
have
from
is
the
on
not
ed
The
•
who
Apart
ment
2
notes
the
first
make
the
trouble,
two
sure
take-up
weeks
the
clean
take-up
lever
instructions
must
valid
operate
exchanging
or
leaving
the
mechanically-actuated
pneumatic
exceptions
the
been
the
permitted.
only
safety
the
must
only
gauge
it,
master
switch
out
maintenance-
permitted
electrical
instructed
permissible
instructions
machine
be
and
supply
equipmentof
run
the
lever
is
positioned
machine
the
be
used
without
switched
parts
(e.g.
when
making
or
by
clutch
source.
are
accordingly.
deviations
machine
is
its
at
up
regularly
for
the
purpose
have
to
the
and operated
on
needle,
maintenance
removing
motors
or
repairworkon
adjustments
machine
the
according
at
3/4
of
highest
point
automatically).
22)
(p.
it
considered.
devices
presserfoot,
the
mains
wait
and
must
to
DIN
was
work,
for
pneumatic
performance
be
safety
its
top
before
and
note
designed
itisequipped
persons
by
needle
the
plug.
the
motor
only
be
57105
speed
you
machine
devices
carried
and
remove
the
for.
who
plate,
to
checks
VDE
only.
the
lubricating
In
case
with.
have
been
dog,
feed
must
stand
still.
the machine
made
out
by
electricians
work
0105
material
instructions
of
conversion
instructed
bobbin),
be
disconnected
must
by
competent
on
live
subcl.
(on
be
orotherpersons
parts
-900/..
5).
(p.
into
another
accordingly.
threading
either
disconnect
personnel.
and
equip
the
by
Page 3
Conseis
Pendant
•
A
•
machines
les
quement).
Pour
•
relatives
importants
les
I’enlevement
êviter
au
en
es
graissage
premieres
2
de
-900/.,
derangements,
Recommandations
pas
l’operatrice
le
canette,
hors
es
exceptions
travaux
ou
machine
respecter
Ia
utiliser
changement
avant
circuit
mecaniques,
travaux
aux
pièces
aux
0105.
VDE
N’utiliserla
•
version,
tre
Ne
•
Seule
•
Avant
•
Ia
et
mettre
metteurs
Pour
•
pneumatique.
Seules
Les
•
travaux
Les
57105
semaines,
I’ouvrage,
positionnement
le
(page
de
pour
que
toutes
machine
instruite
d’organes
I’enfilage,
l’interrupteur
a
attendre
d’entretien
admises:
equipements
dispositifs
et
levier
le
nettoyer
5).
sécurité
travaux
Ies
prescriptions
les
les
sans
consequence
en
de
avant
general
I’arret
de
et
reglages
eIectriques
faire
ne
releveurdefil
du
regulierement
auxquels
dispositifs
couturetels
quitter
de
ou
moteur.
du
reparation
contrOles
et
soustension
machine
Ia
toumer
toujours
dolt
levierreleveurde
Ia
est
elle
sècuritê
de
sécurité.
de
mettre
devra
l’aiguille,
que
machine
Ia
enlèvement
par
système
au
du
par
confier
a
sent
pas
sont
ne
se
fil
au
machine
destinee.
valables.
machine
Ia
le
avant
et
de
pneumatique,
personnel
electricien
un
a
admis,
qu’aux
trouverau
point
(page
pied
travaux
es
fiche
Ia
sauf
3/4
de
haut
etobserver
22)
de
En
cas
circuit
en
presseur,
secteur.
couper
competent.
ou
exceptions
les
vitesse
sa
de
haut
point
course
sa
transformation
coudre.
et
plaque
ía
d’entretien,
Pour
machine
Ia
personnel
du
a
maximale.
sacourse
de
lieu
a
prescriptions
es
aaiguille,
machine
ía
moteurs-trans
les
competent.
ía
selon
automati
une
en
Ia
réseau
du
norme
(sur
au
griffe
est
DIN
a
Observaciones
2
Durante
•
maxima.
Al
•
nas
•
instruciones
Normas
•
tenganse
•
•
•
que
rá
En
•
alimentacion
Solo
•
instruido
No
nes
las
el
retirar
-900/..,
con
elfin
Con
de
utilice
No
en
permitido
está
No
maquina
La
cambiarOrganos
Al
enhebrar,
al
desconectarse
motores
efectuar
Al
admiten
se
trabajos
Los
al
permitido
esta
norma
Ia
de
material
de
para
Ia
maquina
cuenta
solo
de
trabajos
neumatica.
case.
importantes
primeras
de
posicion
Ia
posibles
evitar
engrase
el
seguridad
mas
todas
usar
deberä
de
abandonarel
al
electricamente
embrague
de
excepciones
equipo
el
en
realizar
57105
DIN
semanas
costura,
superior
(pagina
que
las
maquina
Ia
ser
costura
accionados
reparaciOn
eléctrico
trabajos
0
de
coloque
de
averias,
los
para
normas
conectada
(aguja,
puesto
con
caso
el
en
en
0105.
VDE
no
rodaje
5).
de
sin
el
mecänicamente
y
deberán
piezas
debera
siempre
palanca
Ia
engrase
trabajos
seguridad
dispositivos
los
manejada
y
prensatelas,
costura
de
interrupter
mantenimiento,
ajustes
de
ser
dispositivos
y
paianca
Ia
tirahilos
mäquina
Ia
los
para
vigentes.
placa
hacertrabajos
al
y
general
a
realizados
marchar
tirahilos
tiene
con
que
proteccion
de
Ia
per
de
o
que
hay
habra
controles
per
que
maquina
Ia
Iugar
regularidad
destinada.
esté
persona
aguja,
retirando
esperar
que
efectuados
electricistas
estèn
más
posiciOn
su
en
automaticamente).
(pagina
Al
montados
instruida
transportador,
mantenimiento,
de
enchufe
eI
que
a
desconectar
por
competentes
tension,
baja
de
de
3/4
superior
22)
transformarla
fabrica.
en
respecto.
al
canilla,
Ia
Ia
de
el
pare
se
maquina
Ia
personal
en
salvo
velocidad
su
maqui
(en
observe
y
otro
en
misma
lo
etc.)
maquinadebe
red.
motor.
red
Ia
de
especializado.
personal
por
o
excepcio
las
las
tipo,
de
3
Page 4
Importante
•
Durante
•
Prima
-900/.
•
cazione
di
.
Is
Perevitare
(pag.
prime
le
estarre
leva
guasti,
tirafilo
5).
due
1
tessuto
viene
bisogna
settimane
assicurarsi
portata
pulire
fare
funzionare
chealeva
automaticamente
Ia
macchina
regolarmente
macchina
Ia
tirafilo
nella
sia
nella
posizione
(pag,
solo
a
3/4
posizione
piQ
22)eosservare
della
alta).
piu
velocitä
alta
(nelle
le
istruzioni
massima.
macchine
per
a
lubrifi
con
Norme
•
E’
vietato
dovranno
•
vietato
E’
•
macchina
La
•
Prima
di
‘ago
eseguire
mente
con
Nelle
macchine
•
Per
effettuare
macchina
eseguiti
•
sone
E’vietato
DIN
da
I
lavoni
sulI’equipaggiamento
istruiti
lavorare
57105
Observaçoes
•
Durante
maxima
•
retirar
Ao
com
-900/.
Para
•
evitaravanias,
(pag.
5).
Normas
•
Utilize
Nao
permitida
e
maquina
A
Quando
durante
a
da
Quando
funcao,
Trabalhos
salvo
a
todas
maquina
do
observe
•
fabnica
•
•
bobina,
tencao,
tomada
•
desligada
do
•
devidamente
tonsao,
4
di
sicurezza
utilizzare
rispettare
adoperare
soltanto
cambiare
avon
l’intemjttore
con
avon
dalla
rote
lavoratori
a
questo
a
VDE
pnimeiras
as
material
o
.
a
posicionamento
de
segurança
maquina
normas
as
a
devera
da
troca
a
colocacao
dove
redo.
Em
trabalhos
de
sistema
realizados
instalacao
na
instruldas.
nas
oxcoçoes
Ia
macchina
tutte
le
norme
macchina
Ia
dovrà
organi
di
di
manutenzione
principale
motore
a
di
manutenzione
d’alimentazione
specializzati.
scopo.
pezzi
su
0105.
o
dispositivi
importantes
semanas
2
do
costura,
limpe
a
maquina
sOmente
utilizacao
do
motores
nos
de
segurança
da
ser
ligada
algumaferramenta
do
serdosligada
do
de
manutençao
pnoumatico.
por
tecnicos
oletrica
Náo
penmitido
e
confonme
altro
che
di
sicurezza
senza
essere
cucitura
o
oppure
frizione
pneumatica.
elettrico
trabalho,
de
coloque
do
levantador
corn
trabalhos
maquina
operada
e
fio,
afastamento
da
acoplamento
Exceçoes
ospecializados.
devem
realizartrabalhos
a
peril
dispositivi
i
manovrata
(ago,
piedino,
lasciare
togliendo
di
comando
e
niparazione
dovranno
che
si
sempre
em
negulanidade
pars
vigentes.
sem
as
sOmente
do
costura,
corronte
mecânico
conserto
ou
são
realizados
ser
norma
suo
scopo.
valide.
dalla
II
posto
Ia
meccanico
su
Si
eccettuano
essere
trovano
a
maquina
levantador
a
posiçao
quais
os
dispositivos
por
p.ex.
local
do
eletrica,
em
admitidas
DIN
57105
In
di
sicurezza
persona
placca
di
lavoro,
spina
dispositivi
eseguiti
sotto
não
superior
(pag.
ela
uma
agulha,
de
trabalho
isto
dove-se
instalaçOos
somento
sOmento
peças
em
ou
caso
trasformazione
di
montati
istruita
d’ago,
griffa,
bisogna
dalla
rete.
bisogna
pneumatici
soltanto
soltanto
tensione,
deverã
rodar
do
fio
na
ocorre
22)eobserve
foi
prevista.
do
proteçao,
pessoa
devidamente
calcador,
do
e,
desligarachavo
osperar
pneumaticas,
em
por
dispositivos
ou
VDE
0105.
da
fabbrica.
a
questo
spolina,
disinsenire
aspettare
bisogna
i
lavoni
di
elettricisti
da
salvo
nei
casi
mais
de
posiçao
Transformando-a
operadorou
trabalhos
têcnicos
superior
automaticamente).
as
instruçOes
corn
os
quals
chapa
de
geral
a
paragem
do
eletnicistas
quo
in
un’altraversione,
scopo.
0cc.),
e
macchina
Ia
I’arresto
disirisenire
regolazione
specializzati
previsti
da
3/4
suavelocidade
(em
do
em
ela
e
treinada.
agulha,
operacOes
ou
tirando
do
motor.
maquina
a
ajustagem
so
encontram
prima
d’infilare
elettrica
del
motore.
prima
controllo
e
nella
maquinas
lubrificacao
outro
expedidada
arrastadore
de
manu
plug
o
dove
ou
testes
ou
pessoas
per
o
norma
tipo,
da
ser
sob
si
Ia
Page 5
Olen
Oiling
Huiler
Engrase
Lubrificazione
Lubrificacao
you
hole
the
(see
with
use
oil
Before
Pfaff
mend
chaque
superieur,
repère
22,0mm2
/s
280-1-120144.
Avant
start
the
arrowinFig.
viscosity
a mean
sewing
machine
mise
parletrou
a
40°Cet
machine,
1)
service,
en
d’une
always
with
sewing
mm2/sec
of
22.0
oil
No.
280-1-120
verifierleniveau
(flèche,
densite
check
machine
fig.
de
the
at
1).
0,865
oil
level
oil
until
40°C
144.
l’huile
de
N’utiliSer
g/cm
3
jeder
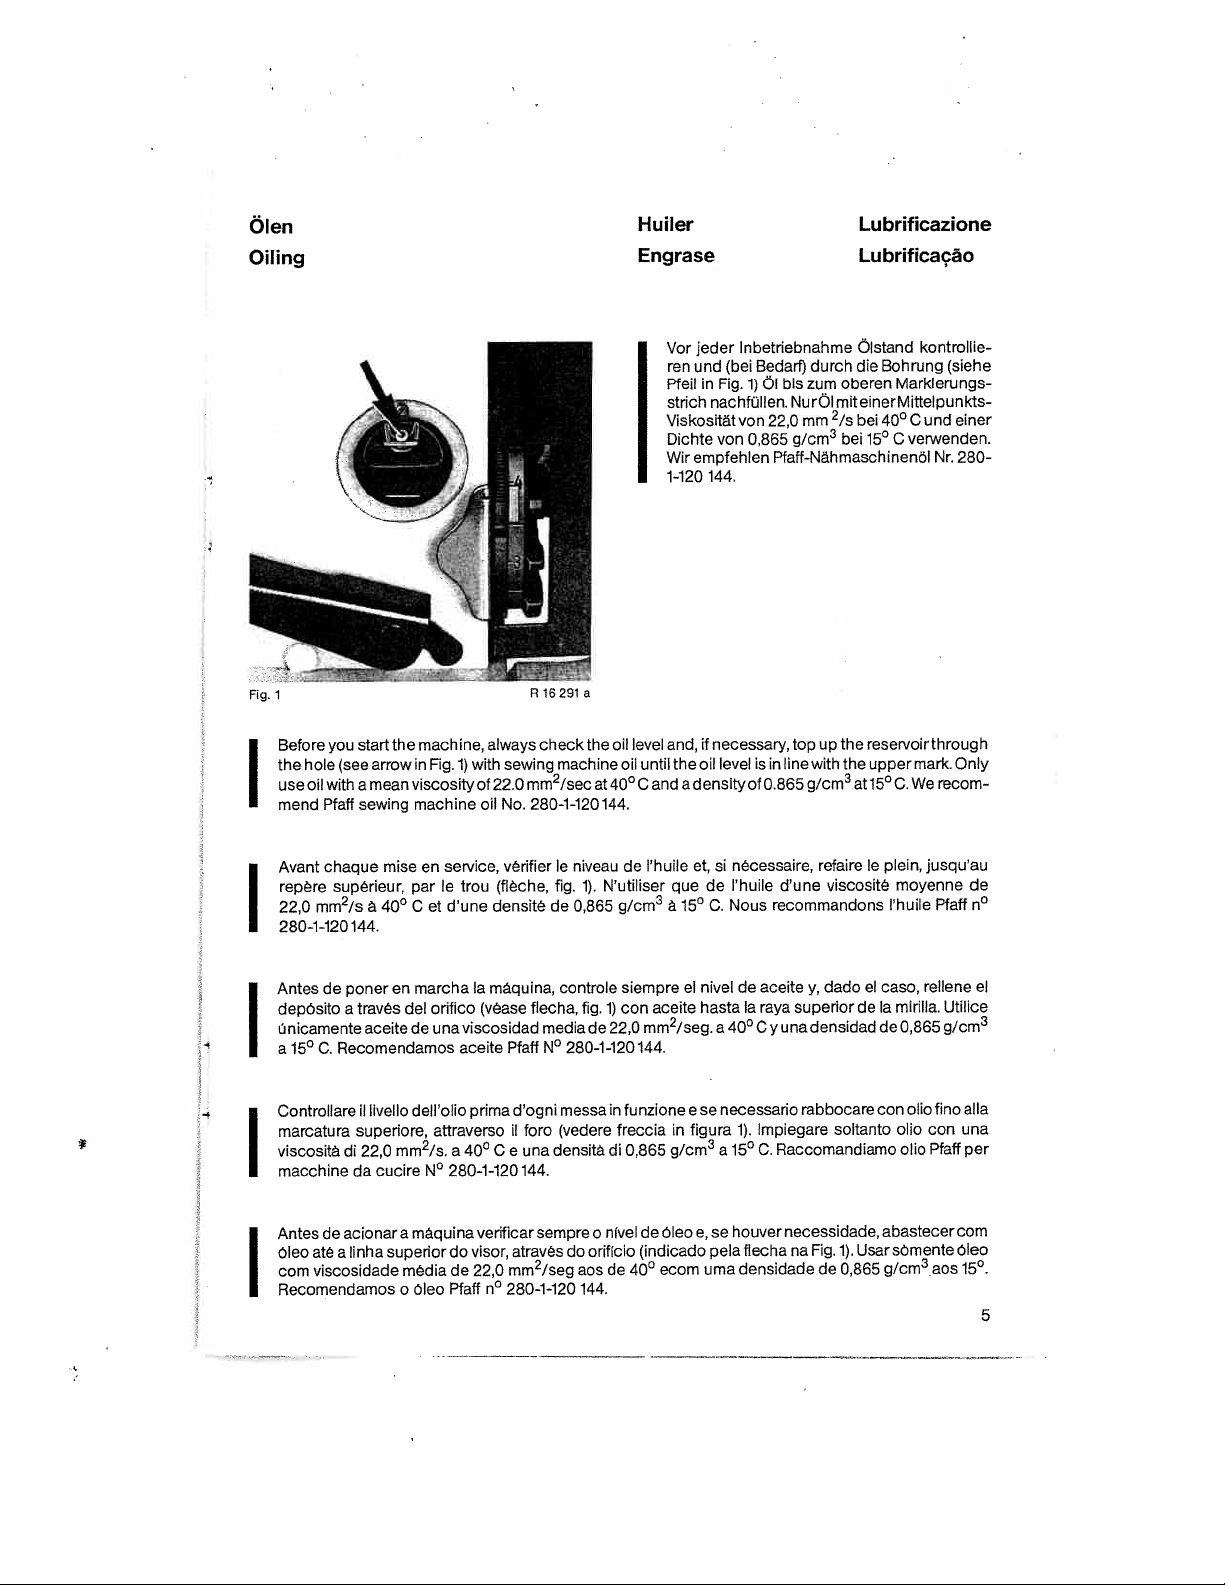
Vor
ren
und
in
Pfeil
nachfOllen.
strich
Viskositflt
Dichte
Wirempfehien
144.
1-120
if
necessary,
and,
oil
the
density
and
a
Si
et,
de
que
a
15°
C.
lnbetriebnahme
(bei
Bedari)
Fig.1)Ol
von
level
bis
NurOl
22,0mm21s
von
glcm3bei
0,865
Pfaff-Nähmaschinenöl
top
is
inline
of
0.865
necessaire,
d’une
l’huile
recommandons
Nous
durch
oberen
zum
mit
the
up
with
the
g/cm3at
refaire
viscositê
Bohrung
Markierungs
400
verwenden.
15°
C
reservoir
upper
15°C.
le
plein,
moyenne
l’huile
kontrollie
(siehe
C
und
Nr.
through
mark.
We
recom
jusqu’au
Pfaft
einer
Only
Olstand
die
einerMittelpurrkts
bei
280-
de
n°
Antes
depOsito
Onicamente
a
marcatura
viscosita
macchine
Controllare
OIeo
corn
Recomendarnos
Antes
C.
15°
de
ate
viscosidade
a
traves
aceite
Recomendamos
il
superiore,
di
22,0mm2
da
acionar
linha
a
ponerenmarcha
de
livello
cucire
superior
del
de
dell’olio
/s.
maquina
a
media
o Oleo
orifico
viscosidad
una
aceite
attraverso
a
40°
280-1-120
N°
do
de
Pfaff
a
maquina,
(vease
prima
C
verificar
visor,
22,0
n°
controle
flecha,
media
N°
Pfaff
d’ogni
il
foro
(vedere
una
densita
e
144.
sempre
atraves
mm2/seg
280-1-120
siempre
con
fig.
1)
de
22,0mm2
280-1-120144.
funzione
in
messa
frecciainfigura
di
0,865
niveldeOleo
o
do
oriflcio
aos
de
40°
144.
el
aceite
/seg.
g/cm
3
(indicado
ecom
nivel
de
hastaIaraya
a 40°Cy
necessario
e
Se
1).
a15°
houver
se
e,
flechanaFig.
pela
urna
densidade
aceite
Impiegare
C.
dado
y,
superior
densidad
una
rabbocare
Raccomandiamo
necessidade,
de
el
caso,
deamirilla.
de
con
soltanto
1).
Usar
0,865
rellene
0,865
fino
0110
olio
con
olio Pfaff
abastecer
sOmente
g/cm3aos
Utilice
g/cm
3
ella
una
per
com
Oleo
15°.
el
5
Page 6
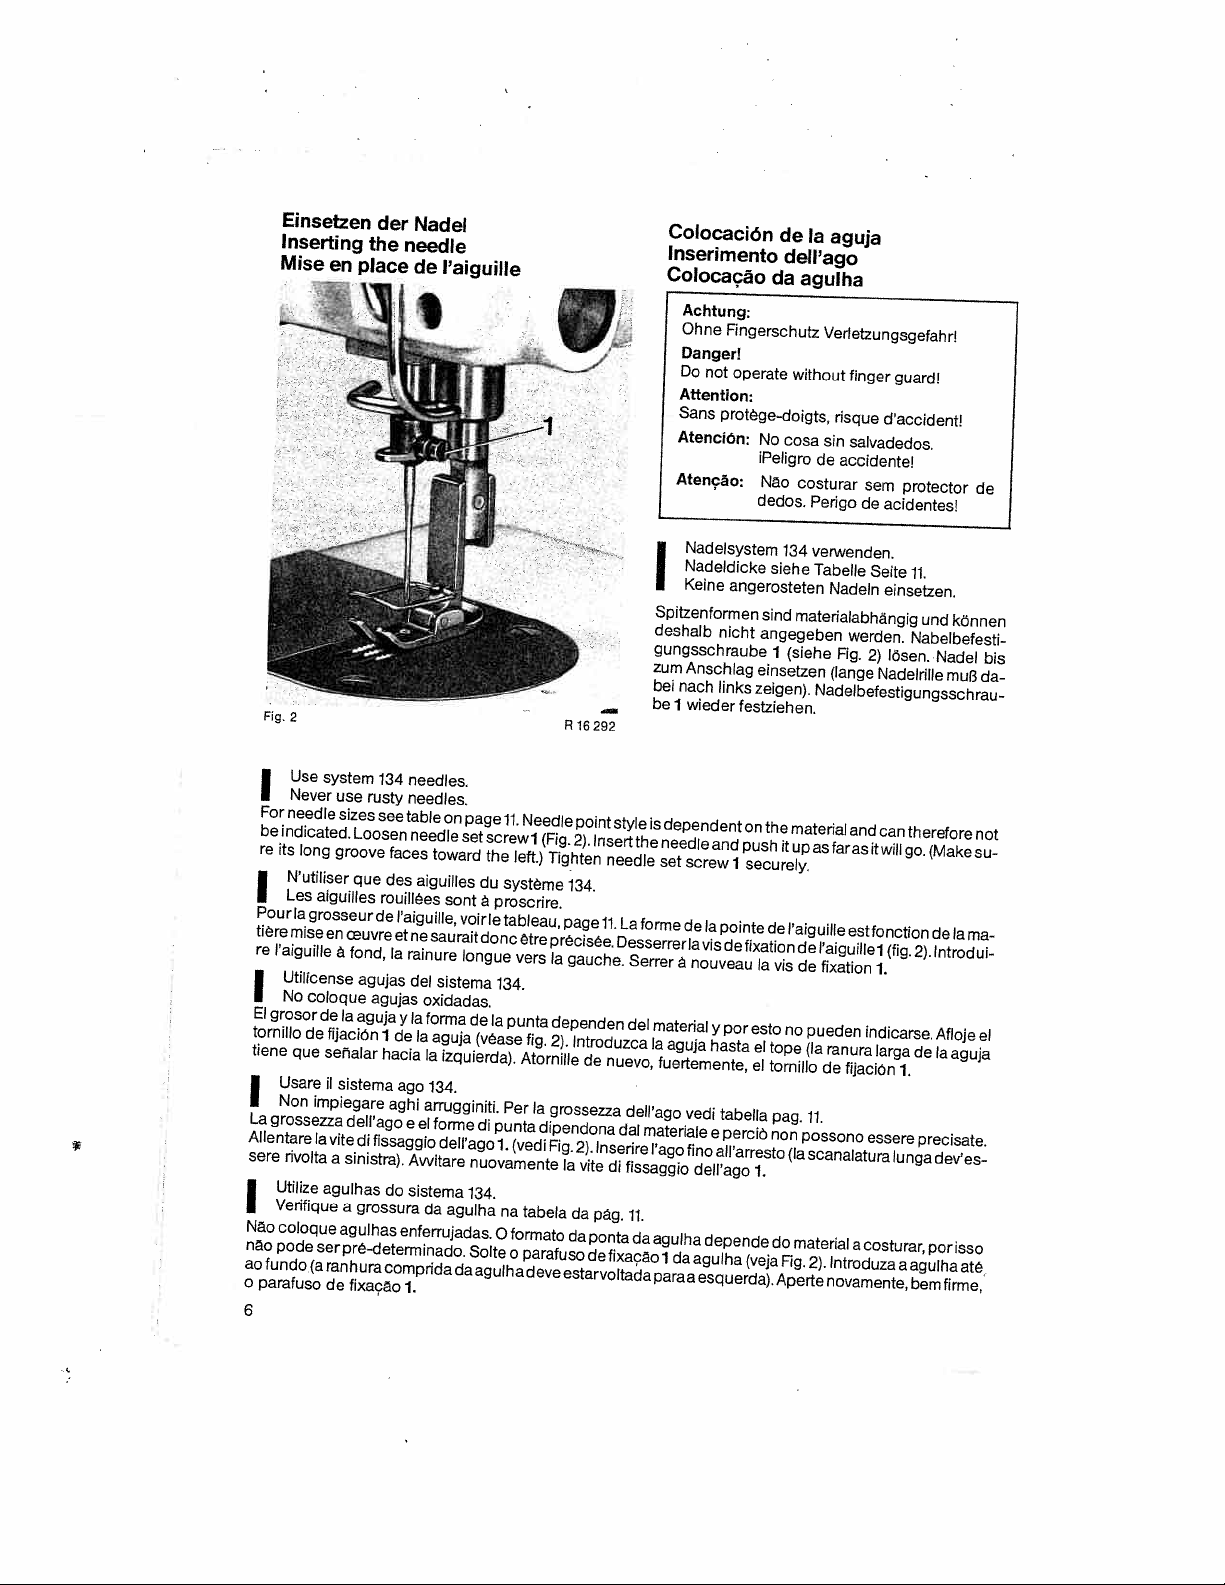
Einsetzen
Inserting
Mise
en
der
the
place
Nadel
needle
de
I’aiguille
-1
Colocación
Inserimento
Colocaçao
Achtung:
Ohne
Fingerschutz
Danger!
Do
not
operate
Attention:
Sans
protege-doigts,
AtenciOn:
Atençäo:
de
dell’ago
da
without
No
cosa
iPeligro
Nao
dedos.
Ia
aguja
aguiha
Verletzungsgefahrl
finger
risque
sin
salvadedos.
de
accidente!
costurar
Perigo
sem
de
guard!
d’accident!
protector
acidentes!
de
Fig.
I
For
be
indicated.
re
its
I
Pour
tière
re
l’aiguille
Utilicense
No
I
El
grosorde
tornillo
tiene
Usare
Non
I
La
grossezza
Allentare
sere
Utilize
Verifique
I
No
coloque
nao
pode
ao
fundo
parafuso
o
6
2
Use
system
Never
needle
long
N’utiliser
Les
aiguilles
a
grosseur
mise
en
coloque
de
fijaciOn
que
senalar
il
impiegare
Ia
vite
rivolta
agulhas
ser
(a
ranhura
de
134
rusty
see
Loosen
que
roulllees
de
fond,
agujas
agujas
aguja
di
fissaggio
grossura
fixaçao
needles.
needles.
table
needle
faces
des
l’aiguille,
et
ne
Ia
rainure
del
Ia
y
1
de
hacia
ago
aghi
eel
Awitare
do
sistema
enferrujadas.
comprida
1.
use
sizes
groove
uvre
a
Ia
sistema
deltago
a
sinistra).
a
aguihas
pre-determinado.
on
page
set
toward
aiguilles
sent
voir
sauraitdonc
Tongue
sistema
oxidadas.
forma
Ia
aguja
la
izquierda).
134.
arrugginiti.
forme
dell’ago
da
agulha
daagulhadeve
11.
Needle
screwl
the
left.)
du
système
a
proscrire.
le
tableau,
être
vers
134.
de
Ia
punta
(vease
fig.
Atornille
Per
di
punta
(vedi
1.
nuovamente
134.
na
tabela
formato
0
Solte
parafuso
o
R
16292
point
(Fig.
2).
Tighten
134.
page
precisee.
Ia
gauche.
dependen
2).
lntroduzca
Ia
grossezza
dipendona
Fig.
2).
Ia
vite
da
da
estarvoltada
style
Insert
needle
11.
La
Desserrerlavis
del
de
nuevo,
dell’ago
dal
Insetire
di
fissaggio
päg.
ponta
de
fixaçao
Nadeldicke
Keine
I
Spitzentormen
deshalb
gungsschraube
zum
bei
nach
be
I
is
dependent
the
needle
set
forme
de
Serrer
a
material
Ia
aguja
fuertemente,
materiale
l’ago
11.
da
agulha
1daagulha
paraa
Nadelsystem
angerosteten
nicht
Anschlag
links
wieder
festziehen.
on
and
push
screw
1
securely.
Ia
pointe
de
fixation
nouveau
y
per
esto
hasta
el
el
vedi
tabella
perciO
e
fine
all’arresto
dell’ago
1.
depende
(veja
esquerda).
verwenden.
134
siehe
Tabelle
Nadeln
sind
materialabharigig
angegeben
1
(siehe
einsetzen
zeigen).
the
de
Ia
vis
tope
tornillo
pag.
non
do
Aperte
fig.
(lange
Nadelbefestigungsschrau
material
it
up
as
faras
l’aiguille
de
l’aiguillel
de
fixation
no
pueden
(Ia
ranura
de
fijaciOn
11.
possono
(Ia
scanalatura
material
Fig.
Introduza
2).
novamente,
Seite
einsetzen.
werden.
2)
lösen.
Nadeltille
and
can
itwill
estfonction
(fig.
1.
indicarse.
Targa
1.
essere
lunga
a
costurar,
a
11.
und
konnen
Nabelbefesti
Nadel
mul3
therefore
go.
(Make
de
Ia
2).
lntrodui
Afloje
de
Ia
aguja
precisate.
dev’es
por
isso
agulha
ate
bem
firme,
bis
da
not
su
ma
el
Page 7
Einfädeln
Threading
Enfilage
Oberfaden
Die
Positionen
einfadelung
fftdeln
darauf
oben
durch
von
2,
rechts
uber
die
das
NadelOhr
durchziehen.
einrichtung
stehender
Thread
the
Numbers
ding.
Switch
Make
particularly
bottom
through
from
the
through
right
of
On
thread
drawing
the
through
thread
machines
through
above.
des
Oberfadens
the
needle
du
fib
supérieur
nach
Fig.
einfftdeln.
3
geben
2-11
Maschine
an.
achten,
drei
Bohrungen
gefuhrt
Maschinen
.
Vorspannung
einfftdeln!
as
indicate
the
machine.
sure
thethree
between
check
needle
the
thread
the
thread
daI3
die
wird.
illustrated
the
the
eye.
needle
die
zwischen
Fadenanzugsfeder
Bei
-900/.
Skizze
needle
2-11
off
right
thread
the
through
with
Ablauf
den
ausschalten.
der
Faden
derFadenfuhrung
Spannung
4
und
von
Faden
mitFadenabschneid
gemal3
Fig.
in
order
of
needle
thread
holes
the
spring
trimmer
retainer
ofthread
discs
4
Pull
abt.
eye.
is
led
of
and
three
-900/..lead
as
shown
der
Beim
immer
3,von
links
cc.
6—7
3.
from
retainer2,
tension
from
Faden
Em
von
rechts
durch
neben
threa
top
left
inches
the
in
the
cm
to
3,
to
Enhebrado
Infilatura
Cobocacão
del
del
do
hilo
fib
fib
superior
superiore
superior
Enfiler
Los
toujours
tension
l’aiguille.
Sur
Enhebre
Las
NOtese
desde
dor
En
mostrado
Infilare
Le
Nell’infilature
da
Ia
Da
Coloque
maquina.
pela
da
Em
le
positions
los
posiciones
quo
Ia
del
hilo
maquinas
ii
posizioni
destra,
cruna
macchine
direita,
enfie
maquinas
fil
introduire
3,
Laisser
machines
el
derecha
aqui.
fib
tra
dell’ago.
fio
o
Na
na
d’aiguille
2
all
dftpasser
hilo
superior
2
all
el
hilo
par
y,
finalmente,
4
con
cortahilos
superiore
da2all
badare
i
due
dischi
Tirare
rasafili
col
conforme
colocaçao
nos
Puxar
com
corta-fios
le
avec
debe
doIadroite
entre
agulha
selon
jalonnent
fil
d’en
egalement
coupe-fil
de
indican
ser
entre
come
indicano
affinche
di
il
capo
-900/.
Fig.
do
fio,
pratos
tensores
fib
o
Ia
figure
les
passages
haut
dans
sousleressort
ft
6
7cmdo
-900,
acuerdo
el
recorndo
conducido
platillos
los
se
enhebra
automatico
si
vede
il
percorso
il
fib
tensione
del
.,
infilare
posicOes
As
3.
cuide
para
mais
por
automfttico
3.
es
trois
fil.
enfiler
con
siempre
tensiores
Ia
aguja
-900/..,
in
figura
venga
sempre
3;dadestra
per
fib
(a
2
que
pela
direita,
3;
ou
menos
-900/..enfie
fil.
du
Mettre
trous
du
contreleur
Ia
pretension
Ia
fig.
3.
del
hilo.
Desconecte
desde
y
tambiftn
3
desde
enhebre
3.
dell’infilatura
guidato
attraverso
circa
6-7
pretensione
all
mostram
este
seja
enfiado
sobrea
6
—
7
a
Ia
machine
guide-fil
do
comme
arriba
Ia
izquierda
el
tensahilos
Disinserire
dall’alto
Ia
molla
cm.
come
a
sequencia
porcima
mola
tensors
cm.
pre-tensao
2,
fil
par
desde
si
hors
de
Ia
4
et,
de
curleschema
Ia
maquina.
los
tres
Ia
derecha
Deje
previo
Ia
attraverso
tendifilo
mostra
de
pebos
do
fio4epor
conforme
circuit.
droite
entre
Ia
gauche,
agujeros
un
cabo
conforme
macchina.
i
tre
40
nelbo
co!ocaçao
tres
orificios
esquema
A
l’enfilage,
los
par
el
do
hilo
fori
da
sinistra
schizzo.
do
Ultimo.
no
disques
parlechas
ci-dessus.
del
guiahilos
muelle
de
6
al
esquema
del
guidafilo
attraverso
fio.
Desligue
guia-flos
do
pelaesquer
circulo.
veiller
de
regula
a
7
cm.
a
Ia
de
2,
2;
a
2;
7
Page 8

Aufspulen
Winding
Fig.
des
the
Unterfadens
bobbin
/.
C
V
I
16294
F
derGarnrolle
von
Den
Uhrzeigersinn
Windungen,
einigen
Maschine
Die
stellung
Fadenspannung
Lead
tension
winder
The
higher
looser
durch
Fulimenge
des
thread
the
Place
4.
engaged
is
amount
lower
or
tension
a
kommenden
Spulenfadenspannung
die
urn
ebenfalls
Niederdrucken
derSpule
Schaltnockens
fester
the
from
bobbin
while
to
thread
of
may
as
counter-clockwise
or
kann
bzw.
on
5
the
be
be
spool
im
des
nach
korrigiert
8
durch
down
spindle
machine
wound
required.
zuerst
Faden
Uhrxeigersinn,
LOsen
Rechtsdrehen
on
The
4
Schaltnockens
derBefestigungsschraube
werden.
through
and
wind
and
6
running
is
bobbin
the
thread
tighter
a
for
die
über
fQhren.
aufwickeln.
8.
An
loser
thread
afewturns
depressing
by
be
can
tension
tension
eingezeichneten
5
Spule
Das
Rändelscheibe
der
(siehe
guides
it,
on
regulated
regulated
is
(Fig.
Spindel
auf
Einschalten
4).
Fig.
1,2
again
stop
by
by
4).
Positionen
6
durch
9
7
and
3
clockwise
in
a
8.
latch
loosening
turning
stecken
geschieht
Verändern
durch
wird
clockwise
and
screw
thumb
und
1,2
den
und
derHOhenein
Linksdrehen
direction.
and
9
clockwise
7
nut
bei
round
The
setting
sowie
3
Faden
laufender
thread
bobbin
cam
mit
die
for
rn
8
a
Page 9

Bobinage
Bobinado
du
del
Avvolgimento
Bobinagem
flu
do
inférieur
hilo
del
fib
inferior
inferiore
fib
inferior
Enfiler
montre,
Placer
sur
Le
mont
Pour
reduire
En
las
enrollan
en
La
do
aumenta;
Guidare
attomo
pre
fil,
le
autour
Ia
canette
Ia
canette.
remplissage
vertical
augmenter
tension
Ia
lugar,
primer
del
agujas
unas
marcha,
cantidad
ajuste
el
girandolo
fib,
1
gruppo
al
senso
in
mutazione
quantita
La
posizione
Girando
del
Em
ros
algumasvoltas
em
A
parafuso
Girando
disco
il
fib
(vedi
primeiro
rekgio,
do
movimento
quantidade
de
o
venant
de
Embrayer
de
de
el
reloj
vueltas
efectüa
se
hilo
de
vertical
proveniente
orario.
8.
fib
di
altezza
in
zigrinato
fig.
lugar,
passando-o
de
pressionando
de
fixacao
disco
bobine,
Ia
de
tension
a
broche
Ia
sur
5
canette
Ia
Ia
came
pretension,
Ia
(fig.
fil
du
hilo
procedente
el
tensahilos
por
hiloenIa
de
presionando
debe
quo
Ia
de
derecha,
Ia
a
tensione
L’inserimento
avvolgere
da
della
7,
4>,
coloque
fio
bobina,
na
a
fib
ser
9.
recartilhado
par
dabord
4.
enrouler
et
6
peut
tourner
4).
bobina
bobinarse
mando
do
avviene
nella
sinistra
tb
que
tensorde
no
a
peça
a
esquerda,
7
pendant
modifiê,
être
le
carrete
del
bobina
a
de
levadomando
Ia
puede
8.
tensiOn
dicha
spolina
do
vem
fio
sentido
para
8
regulada,
e
en
Infilare
con
o
canette,
Ia
8.
leva
dallaspolafilato,
dellaspolina4.
evadicommutazione
verso
o
no
bobinado
los
le
Ia
disque
se
sentido
el
Girando
prima
macchina
puO
verso
carretel
bobina
da
dos
baixo.
atensao
positions1,2
danslesens
fil,
marche
desserrage
le
aprês
molete
porlas
lleva
continuaciOn
A
4.
de
8.
regularse,
disco
el
disminuye
attraverso
laspolina
variate
essere
8.
rispettivamente
destra,
posiçOes
nas
Em
4.
ponteiros
posicionando
fio
do
a
do
vers
7
posiciones
agujas
las
despues
moleteado
(vêase
posizioni
le
suII’asseed
5
in
moto
seguida,
relOgio.
do
aumenta;
et
3,
aiguilles
des
machine,
gauche;
a
Se
de
fig.
per
svitando
marcadas
peça
a
puis,
de
Ia
marcadas
coloca
reloj.
del
aflojar
7
4).
indicatel,
mezzo
lavite
coloque
A
conex5o
8
girando
dans
en
awolgere
aumenta
na
sons
le
montre,
de
abaissant
visdefixation
toumer
le
1,2,3
Ia
bobina
conexiOn,
La
el
tornillo
ala
izquierda,
2,3e
alcunespire
pressione
di
fissaggio
di
diminuisce
o
no
1,2,3e
bobina
a
efectua-se
altura
desejada,
a
direita,
des
de
came
Ia
9,
vers
yen
en
5
fijaciOn
do
Ia
poi,
sulla
9
sentido
no
5
diminui
aiguilles
quelques
8.
le
par
Ia
droite
sentido
el
el
husillo
Ia
con
tensiOn
senso
in
di
levadicom
per
cam
Ia
dos
eixo
6
a
com
apos
(veja
d’une
tours
deplace
pour
y
6
maquina
varian
9,
del
orario,
sem
fib
biare
tensione
pontei
enrole
e
maquina
soltar
Fig.
de
se
hilo
Ia
o
4).
9
Page 10

Einsetzen
Inserting
Spulenkapsel
der
the
bobbin
case
Miseenplace
Colocaciôn
de
Ia
bolteacanette
de
cápsula
Ia
de
Ia
bobina
Fig.
6
Die
gefullte
Fig.
I
Bei
leichtem
hindurchziehen,
sen.
Maschine
Oberkapsel
Insertthe
direötion
se
I
Hold
the
tip.
Pull
Turn
the
Place
the
IntroduireIacanette
aiguilles
I
Toutenretenant
cequ’il
reapparaisse
ne
hors
PlacerIaboiteacanette
Coloque
(vease
I
Sujetando
hasta
que
Desconecte
lntroduzca
10
Spulesoin
5).
Festhalten
biserhinter
ausschalten.
in
Greifer
full
bobbin
(see
bobbin
fast
out
balance
bobbin
circuit
flecha,
ligeramenteIabobina,
aparezcadenuevo
Ia
and
abt2inchesofthread.
wheeltobring
case
montre
d’une
legerementIacanette,
derriereIalanguetteduressort2.
Tournerlevolant
Ia
bobina
fig.
Ia
méquina.
bobina
die
Oberkapsel
der
Spule
der
Durch
einsetzen
into
the
arrowinFig.
pull
the
into
the
garnie
(flèche,
gamie
Ilena
en
5).
por
Gireelvolante
liena
enIacapsula
R
9783
einsetzen,
den
Fadeninden
Federzunge
DrehenamHandrad
(Fig.
6).
bobbin
casesothatwhen
5).
into
thread
the
sewing
dansIabofle
fig.
jusqu’è
danslecrochet
capsuladeforma
Ia
enganche
detras
Switch
take-up
hook
5).
faire
ce
hasta
slot1and
off
passer
quelelevier
de
colOquela
y
b Fig.
2
wieder
the
lever
(Fig.
6).
canette,demanière
a
(fig.
el
hilo
IengOeta
Ia
queIapalanca
6
der
daB
Schlitz1einhangen
hervorkommt
FadenhebelinhOchste
you
under
machine.
to
its
highest point
01
depuis
le
Laisserdépasserenviron
releveurde
6).
queelhilo
en a
ranura
elastica2,dejando que
enelgarfio
im
Faden
Fadenende
pull
the
thread the
the
tension
quelefil
lafentel
tirahilosdehalle
corra
1
(fig.
fil
y
sousleressort
trouve au
se
enelsentido
paselo
6).
Uhrzeigersinn
und
unter
ca.
Stellung
bobbintums
spring
untilitemerges
2
deroule
Se
5cm
point
por
debajo
sobresalga
ensuposiciOn
abläuft
der
Spannungsfeder
uberstehen
5cm
bringen.
danslesens
tension,jusqu’a
de
defil. Mettre
haut
las
agujas
de
del
muelle
Fl
(siehe
aclockwi
in
at
its
machi
Ia
course.
de sa
del
tensor
unos5cm.
superior.
16301
Pfeil
las
rear
des
reloj
Page 11

Inserimento
Coloçao
La
spotina
I
Tenendo
fino
macchina.
capsula
ache
leggermente
non
Girando
ed
da
capsula
piena
fuoriesce
inserire
della
ii
net
capsula
da
va
inserita
a
spolina,
nuovamente
volantino,
chrochet
bobina
netla
agganciare
dietro
portare
(fig.
capsula
ii
tendifilo
6).
in
ii
fib
Ia
linguetta
modo
nella
nella
che
fessura
delta
posizione
ii
fib
1
molla2.
scorra
e
tirarbo
Tirare
plO
in
atta.
senso
at
di
ca.
Mettere
sotto
5cm
orarlo
delta
di
fib
Ia
spolina
(vedi
molla
fuori.
freccia
di
tensione
Disinserire
piena
fig.
5).
Ia
nella
I
Segurando
gueta
o
volante,
NadelNeedle
Tableau
0)
C
2
.0
‘.2
•°
<>l=wb
A*
B*
**Nm
*8
**Nm
**Nm
Introduza
gb
(veja
da
mola
und
and
0)
C
•0
C
N
D
°
=
für
feine
=
für
mittlere
=
Nadeldicke
=
for
tight-weight
=
for
medium-weight
=
Needle
=
pour
=
pour
=
Grosseur
a
bobina
Fig.
bobina,
a
Deixarofio
2.
ponha
Garntabelle
thread
des
aiguilles
?>
_a)•5a)
oø
a)a)-a)D
Z(3CL,(!3C
{
Materialien
size
matières
matières
de
cheia
—
seta).
6
passe
elevador
o
chart
.
0)Z
=.
*
O.C
0
,0>.0t0
C0°
60
70
80
90
100
Materialien
in
hundertstel
materials
hundredths
in
fines
moyennes
l’aiguilte
na
cäpsula
oSopeta
ranhural,
sobressairpormais
do
fio
na
posiçao
et
fils
a)
.
•
0
0’*0
c
Eo0°0°
aOQ<O<
100—80
70—60
60-50
50—40
40—30
mm
materials
of
mm
en
mm
de
0
forma
tat
por
ou
mais
0
U)U)øC/)CD(J)
120
100
baixo
menos
alta
140
80
70
que
Introduza
fio
0
desenrole
da
moIadetenso
5cm.
00
CoC0LtQ)ø
200—150
180—120
120-100
100—80
80—60
*A
**Nm
*A
*8
**Nm
*A
*B
**Nm
=
Desligara
bobina
o
a)
D
—
0•
Ø
Ca)CCCCC
=
para
=
para
=
Grosor
=
Tessuti
=
Tessuti
=
Grossezza
=
para
=
para
grossura
no
sentido
ate
maquina.
cäpsula
e
Tabia
Tabella
Tabela
0
C
CO
J]I
materiales
materiales
de
leggeri
medi
materiais
materlais
da
que
70
60
a
aguja
d’ago
finos
médios
agulha
dos
ponteiros
apareça
Girando
na
Iançadeira
de
agujas
d’aghi
de
aguihas
0
C
0
o
O.C
finos
semifinos
en
1/
in
em
do
portras
manualmente
(Fig.
hilos
e
e
flu
a)
Eoc
—>
0
,
0
0)
ZZCOC000Ø
134
134
de
mm
mm
de
mm
da
e
relO
tin
fio
.0
.5
c’
11
6).
Page 12

Heraufholen
Drawing
up
des
the
bobbin
Unterfadens
thread
Remonter
Extracción
Estrazione
Extraçao
do
le
del
del
inférieur
fit
hilo
fib
fib
inferior
inferiore
inferior
off
Switch
the
Hold
comes
thread
needle
the
Pull
under
back
(Disregard
Mettre
Ia
fil
le
Tenir
fomte
de
le
Tendre
l’arrière,
machines
lea
(Sur
Desconecte
el
Sujete
lazada
de
del
Tire
coloque
mente
operaciOn
(Esta
Disinserire
fermo
Tenere
viene
fuori
Tirando
piedino
operszione
(Quests
Deslique
Segure
o
de
chapa
seguir,
A
operacao
(Esta
12
the
end
the
above
the
machine
supérieur
boucle
d’aiguille
fil
sous
hilo
por
superior
hilo
Ia
dal
fib
il
verso
a
maquina.
superior
tb
ponto,
ponha
I
machine.
the
of
through
up
thread
presser
steps
hors
par
semelle
Ia
équipêes
maquina.
Ia
superior
agujero
el
las
elimina
Se
macchina.
superiore
1
fib
foro
superiore,
retro.
manca
forma
em
ambas
desneceasaria
e
‘I7
needle
to
if
tourner
et
le
et
du
y
hasta
puntas
en
cucitura
di
nelle
a
gire
as
P
thread
the
draw
foot.
machine
your
circuit.
trou
ainsi
tirer
du
coupe-fil
el
gire
de
que
de
maquinas
estrarre
macchine
0
Iaçada.
de
pontas
em
needle
the
volant
le
Ia
de
pied
volante
placa
Ia
haya
ambos
equipadas
girare
e
in
il
vo(ante
para
maquinas
and
hole
bobbin
is
equipped
den
plaque
infèrieur
fil
le
presseur.
-900/.
en
de
salido
hilos
volantino
il
forma
inferiore
fib
con
no
Puxe
trâs
cow
-.
—
the
turn
in
thread
haut
aiguille.
a
.,
cette
sentido
aguja.
el
hacia
con
cappic.
di
dispositivo
sentido
superiorate
fio
o
sob
dispositivo
balance
loop.
a
up
a
with
vers
hors
operation
normal
hilo
atras
el
cortahilos
direzione
in
foro
dal
rssafili
maquina
da
o
calcador.
Maschine
Oberfaden
rIchtung
als
Durch
aus
ten
through
subclass
inferior
ausschalten.
festhalten
Maschine
der
Schtinge
Anziehen
Stichioch
dem
Fadenenden
beide
legen.
Arbeitsvorgang
(Dieser
schneidvorrichtung
in
wheel
the
-900/.
jusqu’e
soi
plaque.
Ia
de
superflue,)
eat
que
hasta
el
por
debajo
por
automätico
normale
cucitura
di
-900/.
.),
qua
ate
inferiorpasse
que
o
fio
de
cortador
aus
des
-900/.
sewing
needle
.
thread
ce
Coucher
aparezca
agujero
del
-900/.
Quindi
o
-900/.
und
drehen,
Stichloch
dem
Oberfadens
herausziehen.
unterdem
entfãllt
.)
direction
hole.
trimmer.)
fil
le
que
ensuite
de
pie
.).
a
quando
fino
disporre
inferior
fio
completamente
.).
Handrad
das
bis
kommt
den
Steppfu{3
Maschinen
bei
until
lay
Finally
inférieur
les
inferior
hilo
el
de
placa
Ia
prensatelas.
il
fib
capi
i
apareca
in
Dreh
Unterfaden
der
Unterfaden
Anschliei3end
nach
Fadenab
mit
bobbin
the
threads
both
paraisse
deux
en
aguja.
sous
fils
forma
Final
inferiore
sotto
flu
dei
orifbcio
no
orificio.
no
hin
vers
non
ii
da
Page 13

Regulieren
Regulating
Reglage
de
Fadenspannung
der
thread
the
tension
Ia
I
tensions
fils
des
hilo
do
del
fib
del
fib
tension
Regulación
Regolazione
Regulagem
/
de
della
da
Ia
tensione
tensão
I
Fig
8
Nach
rechts
right
Turn
Rotation
Girando
Girando
Girando
Ober-
die
mid
Regulate
stitches
Regler
La
tensiOn
lazada
y
Ia
Regolare
centro
in
Ajuste
forme
drehen:
tighter
for
a
tension
droite:
a
Ia
derecha:
a
plO
destra:
a
para
a
direita:
und
Unterfaderispannung
Verschlingung
both
tensions
tightly
are
tensions
ces
de
ambos
se
forme
reciprocamente
del
materiale
do
do
tecido.
flo
a
tensao
dentro
fester.
tension.
Ia
forte.
set
de
hilos
dentro
superior
plus
tensiOn
tensâo
a
der
in
so
that
manière
tiene
le
cucire.
da
Nach
Turn
forte.
Girando
aumento.
Mitte
the
que
del
tejido.
tensioni
inferior
e
-
links
left
Rotation
aumenta.
a
sinistra:
aufeinander
so
des
needle
les
que
estar
superiore
R16293b
drehen:
for
a
Girando
Girando
Nahgutes
and
fils
regulada
de
tal
loser
weaker
gauche:
a
plO
abstimmen,
bobbin
soient
inferiore
e
forma
Fig.
tension.
a
Ia
leggera.
para
erfolgt.
threads
bien
tal
de
que
9
tension
izquierda:
a
esquerda:
daI3
interlock
rentrês
forma,
in
modo
pontos
os
plus
que
Ia
tensiOn
die
se
et
las
che
estejam
faible.
a
tensao
beiden
in
the
nouent
puntadas
entrambi
disrninuye.
dirninui.
Fâden
centerof
dans
queden
fill
I
assentados
bern
gut
the
l’ouvrage.
siano
eingezogen
material
asentadas
bien
tirati
ben
a
laçada
e
sind
and
the
proprio
se
13
Page 14

Einstellen
Stitch
length
/
der
3
Stichlange
regulation
1
R
16291
b
Reglage
de
Regulaciôn
Regolazione
Regulagem
Ia
longueur
del
largo
della
lunghezza
do
comprimento
de
du
point
puntada
punto
do
ponto
Sperrblech
Zum
Ruckwärtsnahen
Press
in
sew
Ia
coser
costura
locking
in
reverse,
sure
couture
a
il
lamierino
a
To
Appuyer
dêsirée.
Pour
Presione
Para
Premere
rata.
PerIacucitura
Pressione
Para
14
1
drucken
chapa
en
retroceso
chapa
em
lever
operate
verrou
arriêre,
en
de
di
in
retromarcia
de
retrocesso,
und
am
Umschalttaste
and
1
tum
finger-tip
et
tourner
1
abaisser
bloqueo
sbarramento
bloqueio
1
presione
azionare
1
acionar
Einstellrad
3
control
control
le
disque
le
levier
gire
y
el
simplemente
inserire
1
e
ii
e
ajuste
alavanca
a
gewunschte
2
betatigen
to
desired
2
3
de
3
disco
sul
tasto
di
porito
0
(siehe
stitch
(see
Fig.
10>.
reglage
(fig.
regulador
jusqu’à
2
10).
a
palanca
volantino
commutazione
no
comprimento
inversáo
de
Stichiange
Fig.
10).
length.
ce
hasta
2
para
inversiOn
di
regolazione
3
(Fig.
3
einstellen.
que
soit
obtener
(vede
desejado,
10).
de
2
fig.
obtenue
el
largo
costura
Ia
lunghezza
10).
girando
de
o
Ia
Iongueur
puntada
(fig.
3
di
disco
10).
punto
regulador
point
do
deseado.
deside
2.
Page 15

Anheben
Lifting
the
des
Stoffdrückerfu(3es
presser
foot
Relevage
Elevación
du
del
Sollevamento
Elevacäo
do
pied
presseur
pie
prensatelas
del
piedino
calcador
premistoffa
ZumAnheben
ne
ausschalten,
ten,
daB
Raise
the
machine,
enters
the
Du
genou,
machine,
Ia
genouillere
Pam
elevar
hacia
aträs,
cuidese
Peril
sollevamento
Per
ii
ribaltamento
bullone
1
Para
elevar
gue-a
puxe
e
qua
pino
o
der
Bolzen
presser
pull
the
groove
pousser
mettre
en
el
pie
desconêctela,
de
que
si
inserisca
o
calcador
a
alavanca
encaixe
1
des
Stoffdruckerful3es
den
Kniehebel
in
1
die
foot
by
knee
lever
coupling
in
Ia
genouillere
lamachine
place,
veiller
prensatelas
el
perno
1
del
piedino
della
testa
nella
do
tecido,
de
na
ranhura
mit
Nut
der
pressing
sharply
sleeve
horscircuit,
a
ce
presione
y
quite
encaje
premistoffa,
tirare
scanalatura
acione
joelho
corn
da
Kniehebel
einem
kleinen
Kupplungsmuffe
the
knee
lever
towards
the
(see
2
Fig.
vers
Ia
droite
enleverlagenouillere
que
le
boulon
Ia
palanca
Ia
palanca
en
Ia
muesca
premere
un
po’in
avanti
del
manicotto
alavanca
a
um
pouco
lu
va
acoplamento
de
nach
Ruck
front.
11).
pour
de
de
del
deforca
to
the
lever
s’engage
1
rodilla
rodilla
manguito
verso
Ia
de
joelho
rechts
nach
eingreift
2
right.
When
le
hacia
tirando
destra
predetta
d’innesto
para
pam
2.
drUcken.Zum
yarn
abziehen.
(siehe
To
tilt
back
mounting
pied
d’un
the
presseur.
legercoup
dans
Ia
rainure
Ia
derecha.
de
ella
de
acoplamiento
Ia
ginocchiella
ginocchiella.
2
(vedi
direita.
a
a
frente.
fig.
Ao
Umlegen
Beim
Ag.
11).
the
knee
Avant
sec
Antes
hacia
Nella
11).
Para
recoloc-la
Einschieben
sewing
lever
de
vers
du
manchon
de
adelante.
(vèase
2
Disinserire
spinta,
inclinar
des
head,
make
coucher
l’avant.
inclinar
a
no
Oberteils
daraufach
switch
sure
En
(fig.
2
Ia
Al
introducirla,
fig.
11).
Ia
macchina.
badare
maquina,
lugar,
Maschi
off
the
that
pin
Ia
tête
remettant
11).
maquina
che
desli
observe
15
1
de
ii
Page 16

Regulieren
Regulating
Fig
12
Steppful3druckes
des
pressure
the
R16
303
Reglage
de
presseur
Regulación
prensatelas
Regolazione
piedino
Regulagem
pression
Ia
Ia
de
della
pressao
da
presión
pressione
du
del
do
pied
pie
del
calcador
Durch
Rechtsdrehen
Linksdrehen
durch
screw
vis
Ia
el
tornillo
hacia
verso
Ia
vite
is
1
de
a
gauche,
destra
predetta
Ia
screw
When
the
When
Tourner
rotation
Par
Girando
girandolo
Girando
Girando
Gfrandooparafuso
16
Stellschraube
der
entsprechend
turnedtothe
turned
is
reglage
1
cette
regulador
izquierda,
Ia
vite
verso
regulador
to
vers
1
verringert.
left,
a
para
the
it
droite
Ia
presiOn
a
pressureonthe
is
decreased.
pour
diminue.
derecha,
direita,
right,
the
pression
hacia
1
dicha
di
posizionamento
sinistra.siottiene
1
der
wird
augmenter
disminuye.
1,
pressao
a
Druck
presiOn
Ia
viene
I’inverso.
auf
den
material
pression
Ia
del
aumentata
aumenta;
Steppful3
is
prensatelas
pie
Ia
increased.
sur
le
pressione
girando
verstârkt;
presseur.
pied
aumenta;
sul
esquerda,
a
piedino.
diminui.
Page 17

Kantenbeschneideinrichtung
Edge
trimmer
-731/01
-731/01
Dispositif
Dispositivo
Dispositivo
Dispositivo
les
raser
a
recortador
tagliamargini
cortador
bords
-731/01
-731/01
-731/01
-731/01
Fig.
13
control1down:
Push
Danger!
Changing
Switch
point,
lowest
Abaisser
Attention:
Echange
Arrêter
position
Keep
off
le
basse,
the
the
it
touche
Ia
Ne
du
couteau
moteur
fingers
knife
motor
should
pas
et
se
The
away
and
be
couteau
1:
mettre
debrayer
trouver
trimmer
from
the
edge
positioned
main
a
le
environ
é
is
engaged.
moving
trimmer.
embraye.
dans
couteau.
1
16298
F
knife!
Loosen
abt1mm
Pousser
couteau
le
Desserrer
mm
plus
Taste
eingeschaltet.
Schneideinrichtung
Nichtindas
gefahr!
Messer
Motor
Schrauben
Messer
ter
Push
control
screw2and
the
below
touche
a
en
action.
vis
Ia
que
bas
nach
unten
1
der Gegenschneide
1
stationary
vers
1
Risque
sortir
et
2
contre-couteau
le
Taste
laufende
auswechseln
Schneideinrichtung
und
losen
2
soil
im
unteren
up:
The
change
cutting
le
haut:
d’accident!
le
couteau.
drücken:
und
trimmer
knife.
the
couteau
(voir
Schneideinhichtung
nach
(siehe
is
disengaged.
the
When
(see
debraye.
couteau
medaillon).
oben
encircled
1
ausgeschaltet.
Messergreifen,Verletzungs
Messerauswechseln;
Umkehrpunktca.
stehen
edge
Le
driicken:
Achtung:
ausschalten.
1mm
Kreis).
knife
is
devra,
neuf
das
un
at
its
view).
en
Pulsando
necta.
Camblo
Desconecte
deberä
Per inserire
alto.
Cam
Disinserire
coltello
Pressionando
dispositivo
Troca
Desligue
tancia
Ia
Atención:
de
quedar,enel
Atenzione:
bio
del
Si
de
o
de
1
No
cuchilla
ye! dispositivo
motor
dispositivo
Non
ediidispositivo
nel
punto
a
tecla
desligado.
hacia
acorque
punto
tagliamargini,
toccare
morto
para
1
palanca
Ia
el
ii
coltello
ii
motore
trovi
estä
facas:
motoreodispositivo
aproximadamente
el
dispositivo
abajo,
a
manoaIa
recortador.
muerto
inferior,
premere
coltello
tagliamargini,
inferiore,
Nao
cortador.
abaixo
funzionante,
dovrà
colocar
Soite
ii
baixo:odispositivo
Atenção:
mm
1
cuchilla
a1mm
contrafaca
da
recortador
en
Afloje
aprox.
tasto
ii
Allentare
restare
cortador
a mao
os
parafuSoS
se
conecta:
marcha.
los
1
rischio
Peligrodeaccidente!
tornillos
2
y
por
debajodeIa
ii
verso
basso:
d’incidente!
viti
le
e
2
ca.1mm
estä
na
no
solo
ligado.
faca,emfuncionamento.
etroque afaca;
2
de
ponto
pulséndola
cambieIacuchilla.
per
cambiare
controcolteilo
ii
Pressionando
inversão
hacia
contracuchilla
disinserirlo,
ii
coltello.
a
afaca
deveraficara
inferior
nueva
(v.
para
1
circulo).
desco
se
cuchilla
circulo).
verso
ii
nuevo
circolo).
cima:
umadis
aniba,
La
premerlo
Cuando
(vedi
tecla
Perigodeacidente!
(veja
ii
o
17
Page 18

Funktionen
Functions
Fig.
14
Nähen
bis
abschneiden
anheben
DrUcken
1
(-911/03;/05).
1
und
DrOcken
zur
Stellung
nach
Ruhestellung:
Nähfäden
Nähfu8
sprechender
Rückwärtsnähen
(-911/01).
lung
Automatisches
der
Tretplatte
Zwischenverriegeln
lung
der
Tretplatte(n)
of
pedal(s)
max,
Stichzahl.
Zurücknehmen
(-900/..):
(-910/..):
des
Kippschalters
bzw.
Verriegeln
der
Handtaste
Verriegein
vorn
in
Steflung
innerhaib
der
Handtaste
und
and
switch
Betatigen
der
Ruckwartsbetatigen
am
Nahtanfang
der
der
Tretplatte
Ruckwartsbetatigen
am
(-9111..):
am
Maschinenkopf
1
bzw.
nach
Naht
(-911/35;/37;195):
am
Maschinenkopf.
Schalter
1
Tretplatte
von
Stellung
der
Tretplatte
Steuerkasten
Betatigen
bzw.
Nahtende
hinten
bis
Stellung
1
bzw.
der
Tretplatte
bis
bei
jeder
beider
Tretplatten
und
Betätigen
(-911/15;/17;/35V37
in
Stellung
Betatigen
1.
2
oder
3
in
bis
Stellung
Stellung
2
odor
Nähunterbrechung
nach
der
rechten
3.
der
Tretplatte
0.
vorn
3.
3,
aul3erdem
in
Stellung
Tretplatte
und
/95):
nach
(Stellung
bis
Betatigen
vom
1
in
bel
und
Stel
Stel
ent
0).
4
Sewing
Rest
position:
Cutting
Lifting
the
sponding
Reserve
switch
on
Automatic
position
Intermediate
knuckle
18
1,
switch
up
to
the
sewing
presser
position
sewing
machine
backtacking
or
backwards
backtacking
max.
Depress
foot
of
or
backtacking
head
on
machine
speed:
the
threads
(-910/..):
the
at
to
Press
pedal
(-900/..):
toggle
and
press
beginning
position
within
head.
the
from
Press
switch
(-911/..):
light
and
3.
seam
pedal
to
position
position
Press
the
on
(-911/35/37/95):
pedal
the
Press
pedal
end
1,
the
pedal
backwards
control
both
to
of
seam
2
position
1.
or
3,
to
0.
backwards
box
at
pedals
1
(-911/15/17/35/37/95):
Press
to
to
position
each
sewing
to
positions
(-911/03/05).
pedal
position
2
or
1
and
forwards
3.
it
3;
is
also
interruption
4
(-911/01).
Press
to
position
lifted
(position
Press
pedal
1,
at
the
knuckle
forwards
and
actuate
corre
0).
to
Page 19

Fonctions
Funciones
Fig
14
Couture
Position
Coupe
Relevage
teur
bascule
a
Couture
(-911/
01).
(-911/03/05).
Bridage
en
position
Arrêts
intermédiaires
tête
de
Costura
Posiciôn
Carte
de
Elevaciôn
siempre
vez
que
Costura
Con
-911/03
ciOnl.
Rematado
hasta
a
Rematado
cabeza
de
des
jusqu’a
de
repos:
des
Ills
du
pied
de
en
marche
Appuyer
automatique
ou
1
Ia
machine.
hasta
Ia
neutra:
los
hilos
del
prensatelas
que
el
interruptor
se
interrumpa
en
retroceso
O
/05:
automático
posiciOn
intermedia
Ia
máquina.
pedales
de
los
pedales
vitesse
Ia
Faire
(-900/..):
(-910/..):
Ia
bofle
arriêre
sur
le
au
Ia
talonner
(-911/35;137;195):
velocidad
Haga
volver
(-900/..):
basculante
Ia
costura
a
rematado
pulse
el
al
1
O
3.
(-911/35,/37
et
maximale:
revenir
Ia
Talon
ner
Talonner
du
moteur,
et
points
manocontact
debut
eta
en
position
maxima:
el
pedal
Pise
el
(-910/..):
(posiciOn
(-911/..):
microrruptor
comienzo
interrupteurs
des
interruptores
e
Abaisser
pedale
des
a
pedale
Ia
pedale
a
chaque
d’arrèt
sur
Ia
Ia
fin
de
3.
Abaisser
Pise
el
de
Ia
pedal
hasta
Pise
pedal
el
de
Ia
caja
0).
Con
en
cabeza
a
final
al
y
y
/95):
Pise
Ia
positions
en
position
position
en
interruption
(.911/..):
tête
deJa
Ia
couture
pedal
posiciOn
Ia
hasta
de
mandos
-911/01:
de
Ia
el
pedal
pëdale
machine
(-911/1
a
pedale
hasta
1,
2
posiciOn
Ia
pise
de
Ia
costura
hasta
position
en
1,
2
ou
en
3
3.
ou
2
De
plus,
3.
de
couture
Abaisser
Ia
O
posiciOn
se
maquina
es
et
abaisser
5;Il
7;/35;/37
en
positionl
posiciOn
Ia
a
3
posiciOn
3.
O
2
3.
hate
enIaposiciOn
los
dos
pedales
pise
y
(-911/15,I17J35,I3T
Ia
posicin
1.
position
suivant
(position
deux
et
agirsur
1.
prensatelas
El
el
pedal
1
y
0.
Ia
position
0).
pedales
Ia
pédale
et
/95):
le
0.
correspondiente,
hasta
las
derecho
y
/95):
pulse
el
de
en
position
droite
en
Abaisser
manocontact
Se
eleva
posicionesl
hasta
Pise
microrruptor
l’interrup
et
1
position
Ia
pêdale
sur
ademas,
cada
y4.
posi
a
pedal
el
Ia
en
4
1
Ia
19
Page 20

Funzioni
Funçoes
Fig.
14
del
pedaliedel
dos
pedalseda
interruttore
tecla
1
2
Cucitura
Posizionediriposo:
Taglio
Sollevamento
alzato
nella
Cucitura
posizione1e4.Con
dale
Fermatura automaticaalinizioedal
le
Fermature
mere
Costura
Posiçao
Corte
Elevaçao do
tor
(pos.
Costuraemretrocesso
no
Remate
pamafrenteempos.1respectivamente
Remate
da
20
fina
alla
velocitá
del
fill
(-900/..):
piedino
ancheadogni
cassa
destro
fino
II
de
basculantedacaixadecomando
0).
cabeçotedamaquina e
maquina.
del
di
comando.
indietroofermatura
fino
alla
alla
posizione1oppure
intermedie
manuale
tasto
ateavelocidade
neutra:
retomodopedal
fios
(-900/.
calcador
automãtico
intermediário
massima:
Mettere
indietroelpedale
Abbassare
(-910/..):
interruzione
(-911/03,/05)
posizione
4:
ao
1.
fino
della
cucitura
nella
testa
maxima: piseopedal ate
pise
pedal
o
(-910/..):
ou
remate
piseopedal
inIcio,eao
(-911/35;
ii
della
della
premereiitasto
alla
della
das
Retornaro
(-911/.
finaldacostura
/37;
Abbassareiipedale
dalle
fino
pedale
Abbassareiipedale
cucitura
cucitura
fine
posizione
(-911/35,/37,/95):
macchina.
posiçOes
para
èstivernaposiçao
direito
pars
/95):
alla
(posizione
(-911/..):
manuale
della
cucitura
3.
1,
2e3a0.
tras
ateaposicao
pedal ateaposiçao2ou3,Alem
Pise
nos
.):
ate
pos.
träs
em
Piseopedal
fino
posizioni
posizione
fino
0)
secondo
Con
nella
(-911/15;/17;/35;/37
Abbassareiipedale
pos
1.
correspondente,
dois
pedais
1
(-911/03;
(-911/15;
pos.
3.
frente
pars
alla
posizione
1,2oppure3alla
3.
alla
posizione2oppure3.II
a
posizione
testa
posiçoes
/05).
/35;
na
abbassare
della
macchina
disso,
a
1e4
/37
e/95:
pos.1e
cada
acioneateds
(-911/01)
3.
/17;
1.
posizione
dell’interruttore
entrambi
e/95):
fino
alla
sempre
interrupcaodecostura
(-911/01).
Pise
0.
piedino
le
ed
Abbassareiipeda
0
pedali
abbassareIIpe
posizione1e
interrup
que
o
Acione
pedal
acionando
no
cabeçote
viene
situato
alla
pre
a
tecla
Page 21

Riemenschutz
Belt
guard
Garde-courroie
Maschine
Linke
schieben
Gewindebohrung5eindrehen.
hulse3kommt,
Abschliel3end
Riemenschutz
laufen
ausschalten.
und
rechte
(siehe
und
in
dieser
durch
unterhaib
Schutzhalfte
Fig.
15).
Riemenschutz
den
die
Stellung
Riemenschutz
Distanzhulse
Bohrungen8und9die
derTischplattesoausrichten,
wie
mit
ihren
Schlitzen
auf
3
Unterseachtung,
ausrichten
festschrauben.
Achtung:
Unfallgefahr!
Danger!Donot
guard!
Attention:Nepas
courroie.
folgt
anschrauben:
hinter
die
Befestigungsschraube4stecken
und
die
die
Lasche6hinterden
daB
die
Schraube
Schrauben
daB
Nicht
Risque d’accident!
der Befestigungsschrauben1und
KOpfe
4
fest
urid2ebenfalls festziehen.
1
Motorscheibe
sowohl
ohne
Riemenschutz
machine
run
faire
Schlitz
anziehen.
marcher
und
die
7
und
als
auch
betreiben,
without
belt
garde
sans
Schraubeindie
vordie
Distanz
Keilriemen
2
frei
Switch
off
Attach
the
wall
of
the
turns.
I
I
Make
tighten
screw4securely.
Align
the
wing
nut.
MettreIamachine
Mettreenplace
(fig.
2
15>.
En
veillant
courroieetserrer
AjusterIegarde-courroie
meuvent
the
machine.Toscrewonthe
right
and
left
belt
guard
sure
belt
guard
Placeradouille
ce
belt
(Fig.
is
lug
6
sectionsothat
hors
es
deux
queIalang
Ia
vis
4.
15).
positioned
Then
circuit.
parties
Pour terminer,
inferieurdemanière
librement
fixer
et
le
belt
guard
sectionssothat
Push
spacing
behind
tighten
the
Monterlegarde-courroie
du
garde-courroieenen
d’ecartement3surIavis
prenne
uette
6
dans
cette
guard,
sleeve
slot
7
screws1and2which
motor
pulley
appui
derriere
bloquer
queapoulie motrice,
position.
proceedasfollows:
screws1and2enterthe
screw4and
onto
3
andinfrontofspacing
and
4
es
vis1et2ft
are
V-belt
move
celle-ci
fente7et
travers
accessible
comme
the
superleur
engageant Iesfentes
visser
et
Ia
appropriate
screw
this
through
In
suit:
derriere
le
trou
orifices
bien
screw
this
que
the
holes
position,
estêtes
taraude
8et9.
a
sleeve3,align
freely.
dans
devantIadouille3,ajusterlegarde
les
aussi
slots
into
hole5a
belt
5.
courroie
the
in
guard and
and
8
tighten
des
vis1et
enV,se
back
9.
few
the
21
Page 22

Guardacorreas
Copricinghia
Protecão
Atenciôn:
guardacorreas.
Aftenzone:
senza
Atençäo:
de
correia
Fig.
15
Desconecte
La
mitad
tomillos
y
se
atomilla
Teniendo
alineael
y
2.
Coloque
bremente
Disinserire
Spingere
2
(vedi
fig.
Facendo
nare
Posizionare
trapezoidale
*
Desligue
esquerda
tanciador
Observanda
pratecao
A
seguir,
Embaixa
a
carreia
22
attenzione
il
copricinghia
a
maquina.
do
protetor
3
sabre
para
da
correia
pelas
do
tampa
em
V
tenham
Ia
izquierda
de
fijaciOn
éste
cuidado
guardacorreas
el
guardacorreas
y,
en
esa
Ia
macchina.
le
metfi
sinistra
15).
Infilare
II
furacOes
e
copricinghia
scorrano
Parafuse
cam
a
parafuso
que
a
manilha
e
aperte
da
mesa,
um
maquina.
y
1
en
de
posiciOn,
Ia
boccola
che
stringere
liberamente,
as
8
e
alinhara
percurso
derecha
y
2
el
que
yse
Avvitare
e
destra
Ia
fascetta
al
di
ranhuras
de
6
a
parafusa
9
aperte
:36
El
guardacorreas
del
(véase
fig.
agujero
a
oreja
aprieta
inferior
apriètela
II
della
distanziatrice
6
le
vite
sotto
della
e
a
proteçao
aträs
fixaçao
esteja
as
prateçaa
Iivre
guardacorreas
15).
Se
roscado
6
queda
el
tomillo
de
forma
fuertemente.
copricinghia
protezione
3
arrivi
dietro
4.
Finalmente,
piastra
in
questa
da
correia
das
cabeças
4,
colocanda
colocada
4.
parafusos
da
carreia
e
depois
R
16297
se
coloca
se
introduce
5.
detrfls
4.
Finalmente,
qua
tanto
come
con
sullavite
Ia
fessura
avvitare
base
in
posizione,
conforme
0
atras
dafenda
1
e
2.
de
parafuse-a
1
introducen
el
mangiuto
de
Ia
ranura
Ia
polea
segue:
Ia
bra
di
fissaggio
7
modo
awitare
dos
parafusas
parafuso
tal
maneira
nesta
y
atornilla
apriete
fessure
e
davanti
le
viti
che,
segue:
no
7
e
antes
posiçao.
de
Ia
con
sus
distanciador3
7
y
delante
através
del
motor
dietro
4
ed
awitare
Ia
boccola
1
e
2
attraverso
sia
Ia
puleggia
saldamente
Introduza
1
e
2
fura
rasqueado
do
tuba
qua,
tanto
forma
ranuras
del
de
coma
le
taste
(Ag.
distanciador3,
a
polia
da
No
ponga
iPeligra
Non
guardacinghia,
Nao
use
Perigo
siguiente:
detrfls
de
sabre
el
manguito
los
orificos
Ia
correa
delle
viti
questa
nel
distanziatrice
i
fori
motore,
as
metades
Coloque
5.
do
8
matorquanta
del
it
copricinghia.
15).
correia
Ia
de
far
funzionare
rischia
a
maquina
de
acidente!
las
cabezas
tornillo
distanciador
8
y9
tostornillosi
en
‘CV”
marchen
di
fissagglo
forofilettato
3,
posizio
e
9.
sia
lacinghia
direita
a
tuba
alinhe
maquina
accidente!
d’incidente!
sem
de
fijaciOn
1
5.
e
dis
a
en
Ia
macchina
pratecoes
de
los
3,
se
Ii
a
S
marcha
4
*
sin
Page 23

Table
Conseils
Recommandations
Huller
I
Mise
Enfilage
Bobinage
Mise
1
Tableau
Remonter
Reglage
Reglage
Relevage
Reglage
Dispositif
Fonctions
interrupteurs
Garde-courroie
Entretien
lnhaltsverzeichnis
Zur
besonderen
Sicherheits-Hinweise
Olen
Einsetzen
EinfSdeln
Aufspulen
Einsetzen
Nadel-
und
Heraufholen
Regulieren
Einstellen
Anheben
Regulieren
Kantenbeschneideinrichtung
Funktionen
Riemenschutz
Pfiege
Beachtung
der
Nadel
des
Oberfadens
des
Unterfadens
derSpulenkapsel
Garntabelbe
des
Unterfadens
der
Fadenspannung
der
Stichlange
des
StoffdrUckerfuf3es
des
Steppfuf3druckes
der
Tretplatte(ri)
Contents
Important
Safety
Ofling
Inserting
Threading
Winding
Inserting
Needle
Drawing
Regulating
Stitch
Lifting
Regulating
Edge
Functions
Belt
Machine
instructions
and
length
the
trimmer
guard
des
importants
en
place
du
en
place
des
de
de
du
de
des
notes
the
the
the
the
up
the
presser
the
of
care
SI
du
aiguilles
le
fil
Ia
a
pied
Ia
raser
thread
the
fil
pression
needle
needle
bobbin
bobbin
chart
bobbin
thread
regulation
foot
presser
-731/01
pedal(s)
matières
de
de
I’aiguille
supërieur
infêrieur
de
Ia
boite
et
infèrieur
tension
Iongueur
presseur
es
bords
pêdales
case
and
des
thread
tensions
foot
switch
sécurité
a
canette
fils
fils
du
point
du
pied
-731/01
et
des
-731/01
und
pressure
presseur
Schalter
page
Pages
10
11
12
13
14
15
16
17
19
21
24
Seite
10
11
12
13
14
15
16
17
18
20
24
5
6
7
8
10
11
12
13
14
15
16
17
18
20
24
3
3
5
6
7
9
Indice
Observaciones
2
Normas
2
Engrase
CobocaciOn
6
Enhebrado
Bobinado
8
ColocaciOn
Tabla
ExtracciOn
RegulaciOn
RegulaciOn
ElevaciOn
RegulaciOn
pie
Dispositivo
Funciones
interruptores
Guardacorreas
Limpieza
Ia
Indice
lmportante
Nomie
Lubrificazione
Inserimento
Infilatura
Awolgimento
Inserimento
Tabella
Estrazione
Regolazione
Regolazione
Sollevamento
Regolazione
Dispositivo
Funzioni
Copricinghia
Manutenzione
Indice
ObservaçOes
Normas
Lubrificaçao
Cobocaçao
Colocaçao
Bobinagem
Cobocaçao
Tabela
Extraçao
Regulagem
Regulagem
Etevaçao
Regulagem
Dispositivo
Funçees
ProteçOes
Limpeza
de
prensatelas
maquina
di
del
d’aghi
del
de
de
agulhas
do
do
cortador
dos
da
e
manutençao
importantes
de
seguridad
de
a
del
hilo
del
hilo
de
Ia
agujas
e
del
hilo
de
Ia
del
argo
del
pie
de
Ia
recortador
de
los
y
mantenimiento
sicurezza
deirago
fib
superiore
del
fib
della
capsula
e
fili
del
fib
inferiore
della
tensbone
della
Iunghezza
del
piedino
delta
pressione
tagliamargini
pedali
importantes
segurança
da
agulha
do
fio
superior
do
fio
inferior
da
capsula
efios
fio
interior
da
tensao
comprimento
do
calcador
da
pressao
-731/01
pedals
correba
aguja
superior
inferior
capsula
hibos
inferior
tensiOn
de
puntada
prensatelas
presion
-731/01
pedales
inferiore
premistoffa
-731/01
e
del
interruttore
da
bobina
do
So
do
calcador
e
da
tecla
da
maquina
de
del
del
e
de
del
do
punto
del
ponto
a
bobina
hilo
fib
piedino
pagina
3
3
5
6
7
9
11
11
12
13
14
15
16
17
19
21
24
pag.
4
4
5
6
7
9
11
11
12
13
14
15
16
17
19
21
24
pagina
3
3
5
6
7
9
11
11
12
13
14
15
16
17
19
21
24
23
Page 24

Pflege
Machine
Entretien
care
Limpieza
y
mãquina
Manutenzione
Manutençao
mantenimiento
da
máquina
de
Ia
Mindestens
Maschine
Greifer
Clean
the
Switch
Clean
the
Nettoyer,
Mettre
A
l’aide
La
maquina
Desconecte
El
garfio
Almeno
Disinserire
Pulire
giornalmente
ausschalten.
und
Greiferraum
machine
off
the
hook
au
a
machine
dun
debe
Ia
Ia
zona
y
una
volta
a
einmal
machine.
and
moms
hors
pinceau,
limpiarse
maquina.
del
Ia
macchina
con
in
der
Woche
taglich
thoroughly
hook
raceway
une
fois
circuit
nettoyer
mismo
settimana
penello
un
par
a
debe
mit
at
semaine,
le
forido,
pulire
die
Maschine
einem
least
once
crochet
por
limpiarse
a
fondo
ii
crochet
Pinsel
once
every
Ia
et
Ic
gruridlich
reinigen.
week.
a
day
machine
ses
alentours
menos,
diariamente
Ia
macchina.
e
a
sua
with
una
fond.
vez
sede.
reinigen.
a
soft
chaque
a
con
brush.
Ia
semana.
un
jour.
pincel.
Limpar
Desligar
Limpar
cuidadosamente
a
maquina.
diariamente
corn
maquina,
a
urn
pincel
no
minimo
lançadeira
a
CPFAFF)®
Pfaff,
D
6750
Kaiserslautern
Postfach
Telex
Nr.
3020
45753,
296-12-16309
3040,
/
Telefax
Telefon
(06
31)17202
(06
31)
200-0,
uma
e
espaço
o
vez
por
semana.
ao
redor.
Druckhaus
Gedruckt
Printed
Imprimé
Impreso
Stampato
deutsch/engl/franz./span/ital./port.
in
in
West
en
en
in
Roch
oHG,
Bundesrepublik
der
Germany
R.F.A.
Ia
RFA.
RF.G
D-6750
Kaiserslautern
Deutschland
8/87
 Loading...