

Page 1
BOOK
iNSTRUCTION
w
Page 2
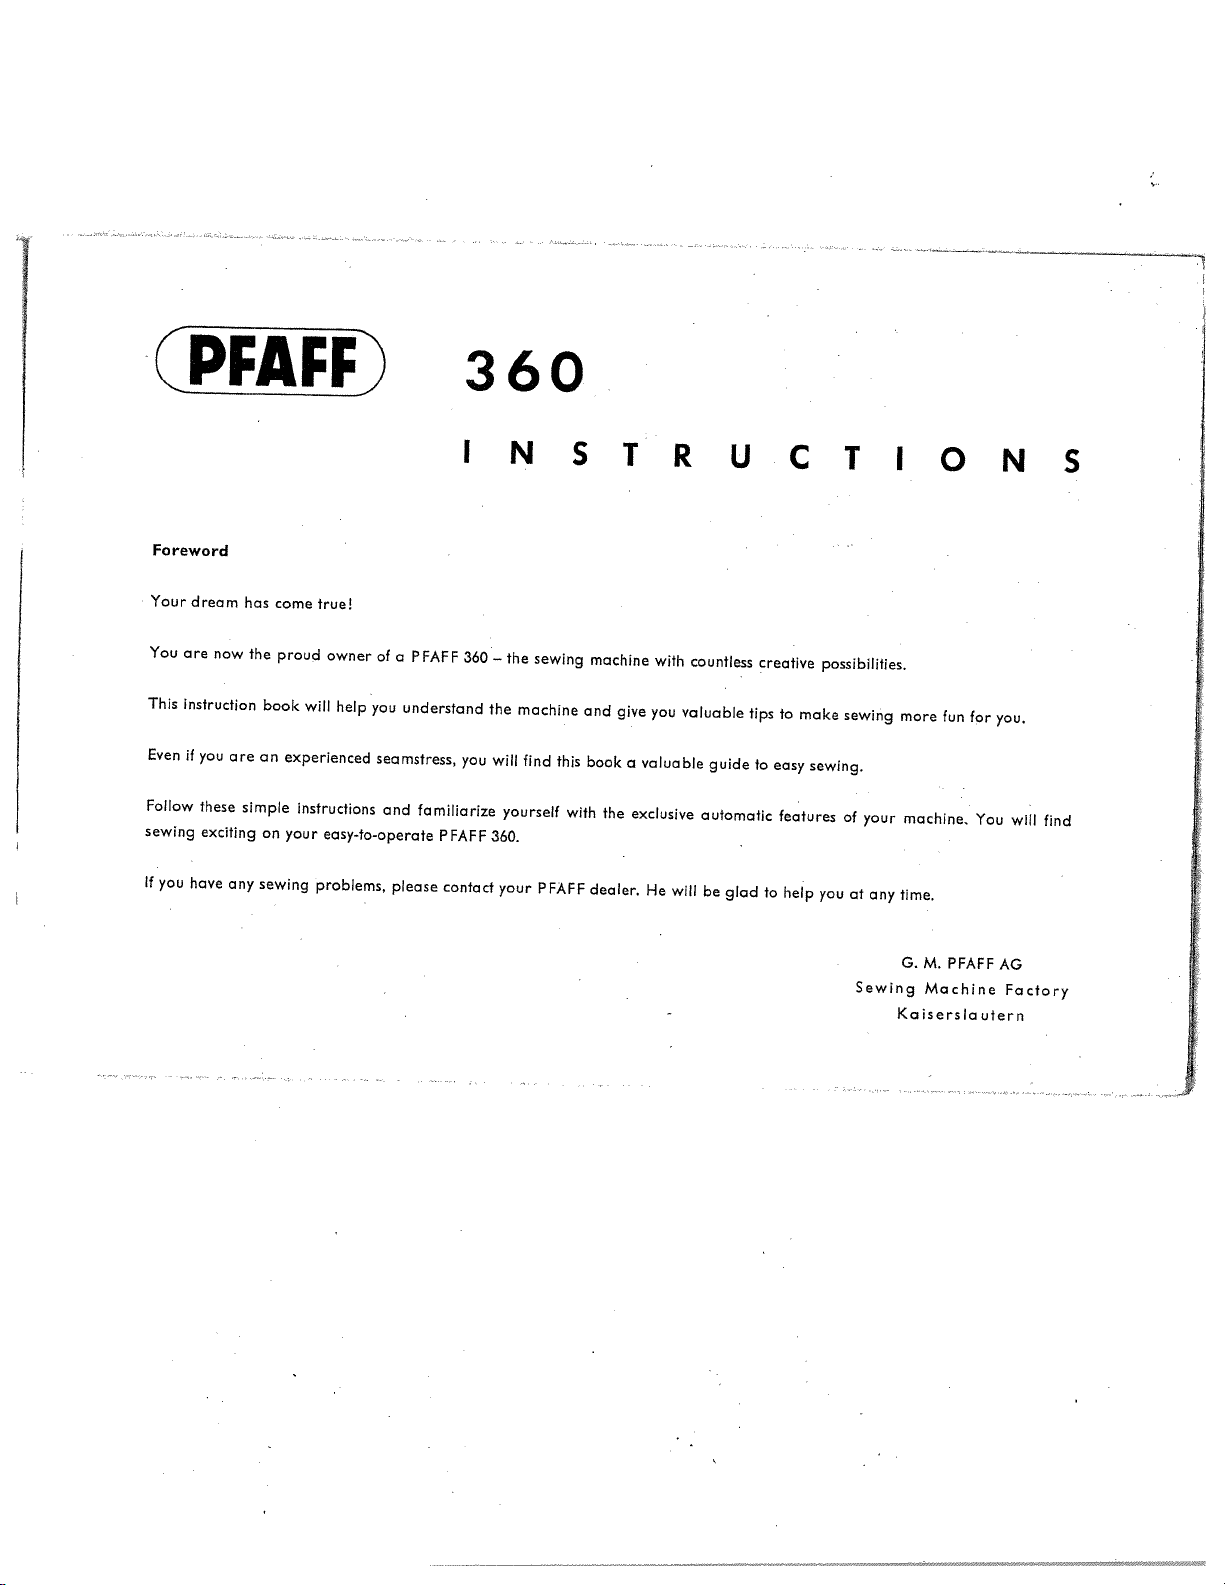
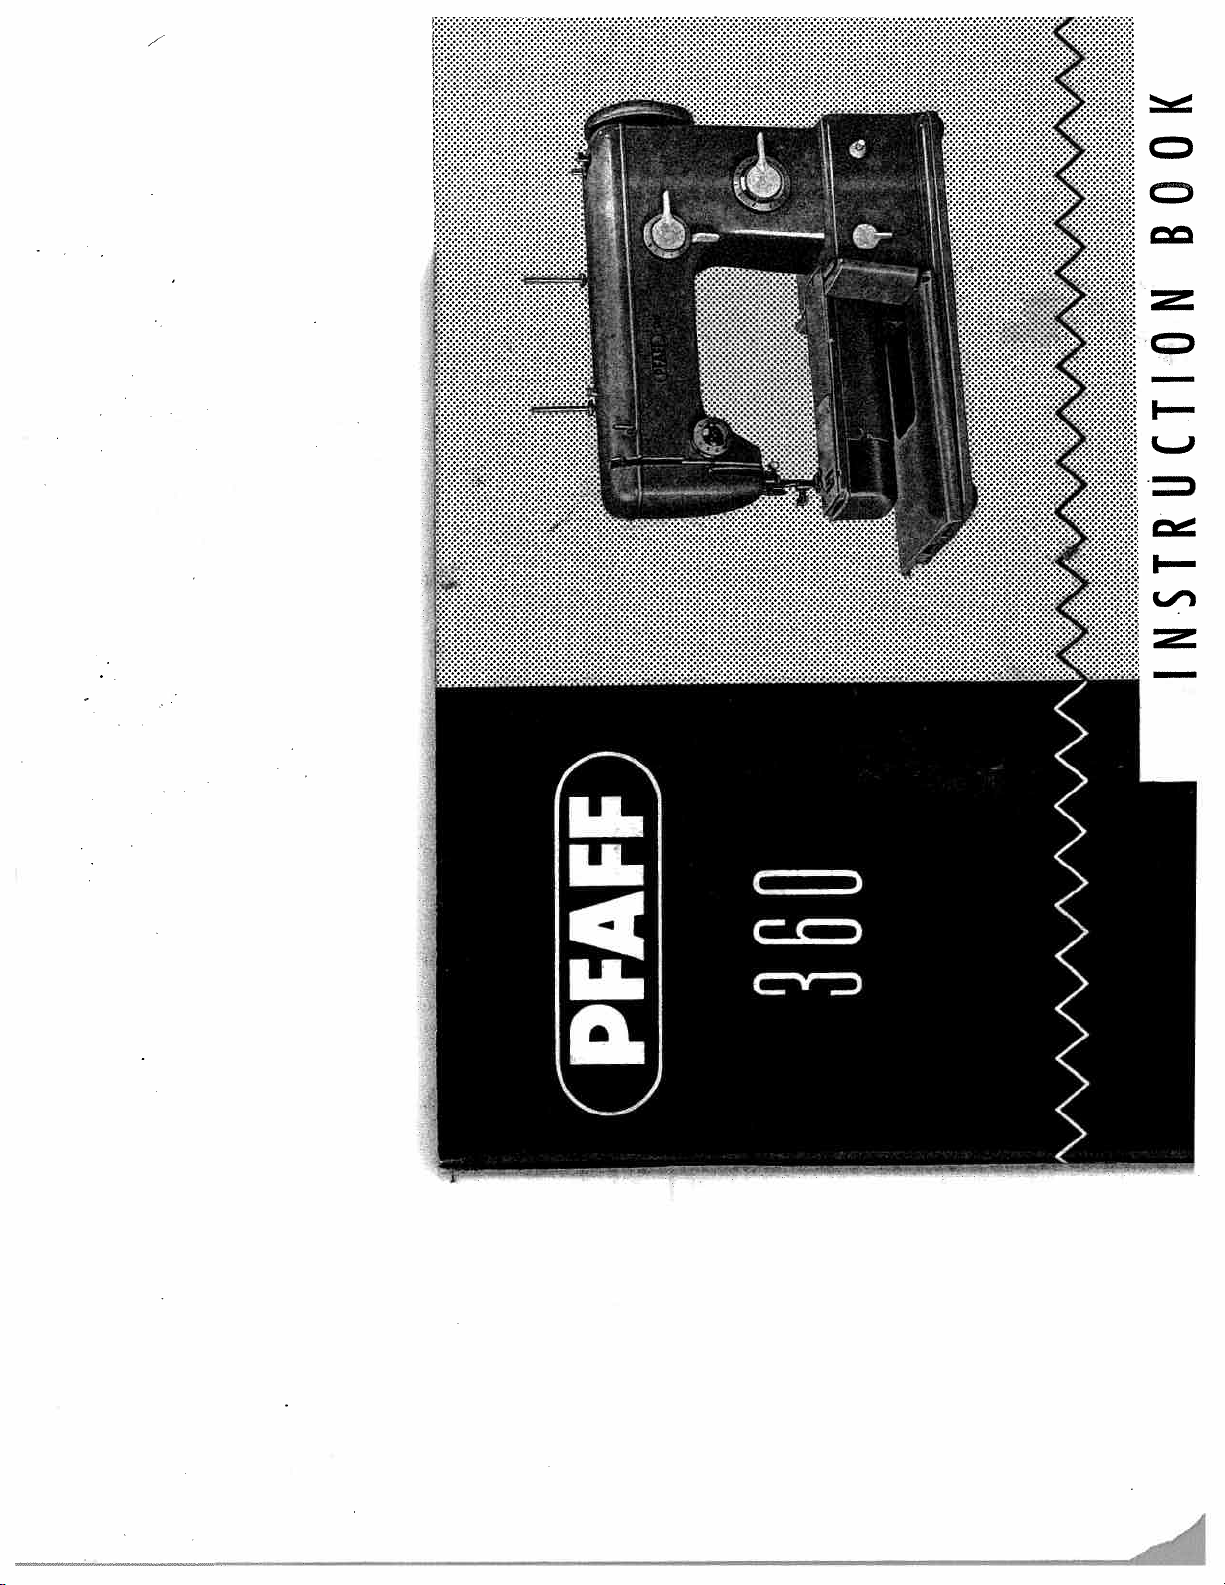
CPFAFFD
Foreword
Your
dream
has
come
true!
You
are
now
the
proud
owner
of
a
PFAFF
This
Even
Follow
sewing
If
you
instruction
if
you
these
exciting
have
are
any
book
an
simple
on
sewing
will
help
experienced
instructions
your
easy-to-operate
problems,
you
understand
seamstress,
and
familiarize
please
PFAFF
contact
360
INSTRUCTIONS
360
—
the
sewing
you
the
will
yourself
360.
your
machine
find
PFAFF
this
machine
and
book
with
dealer.
give
the
with
you
valuable
a
exclusive
He
valuable
will
countless
guide
automatic
be
glad
creative
tips
to
to
to
make
easy
features
help
possibilities.
sewing
sewing.
of
you
at
Sewing
more
your
machine.
any
time.
G.M.
Kaiserslautern
fun
PFAFF
Machine
for
You
you.
will
AG
Factory
find
Page 3
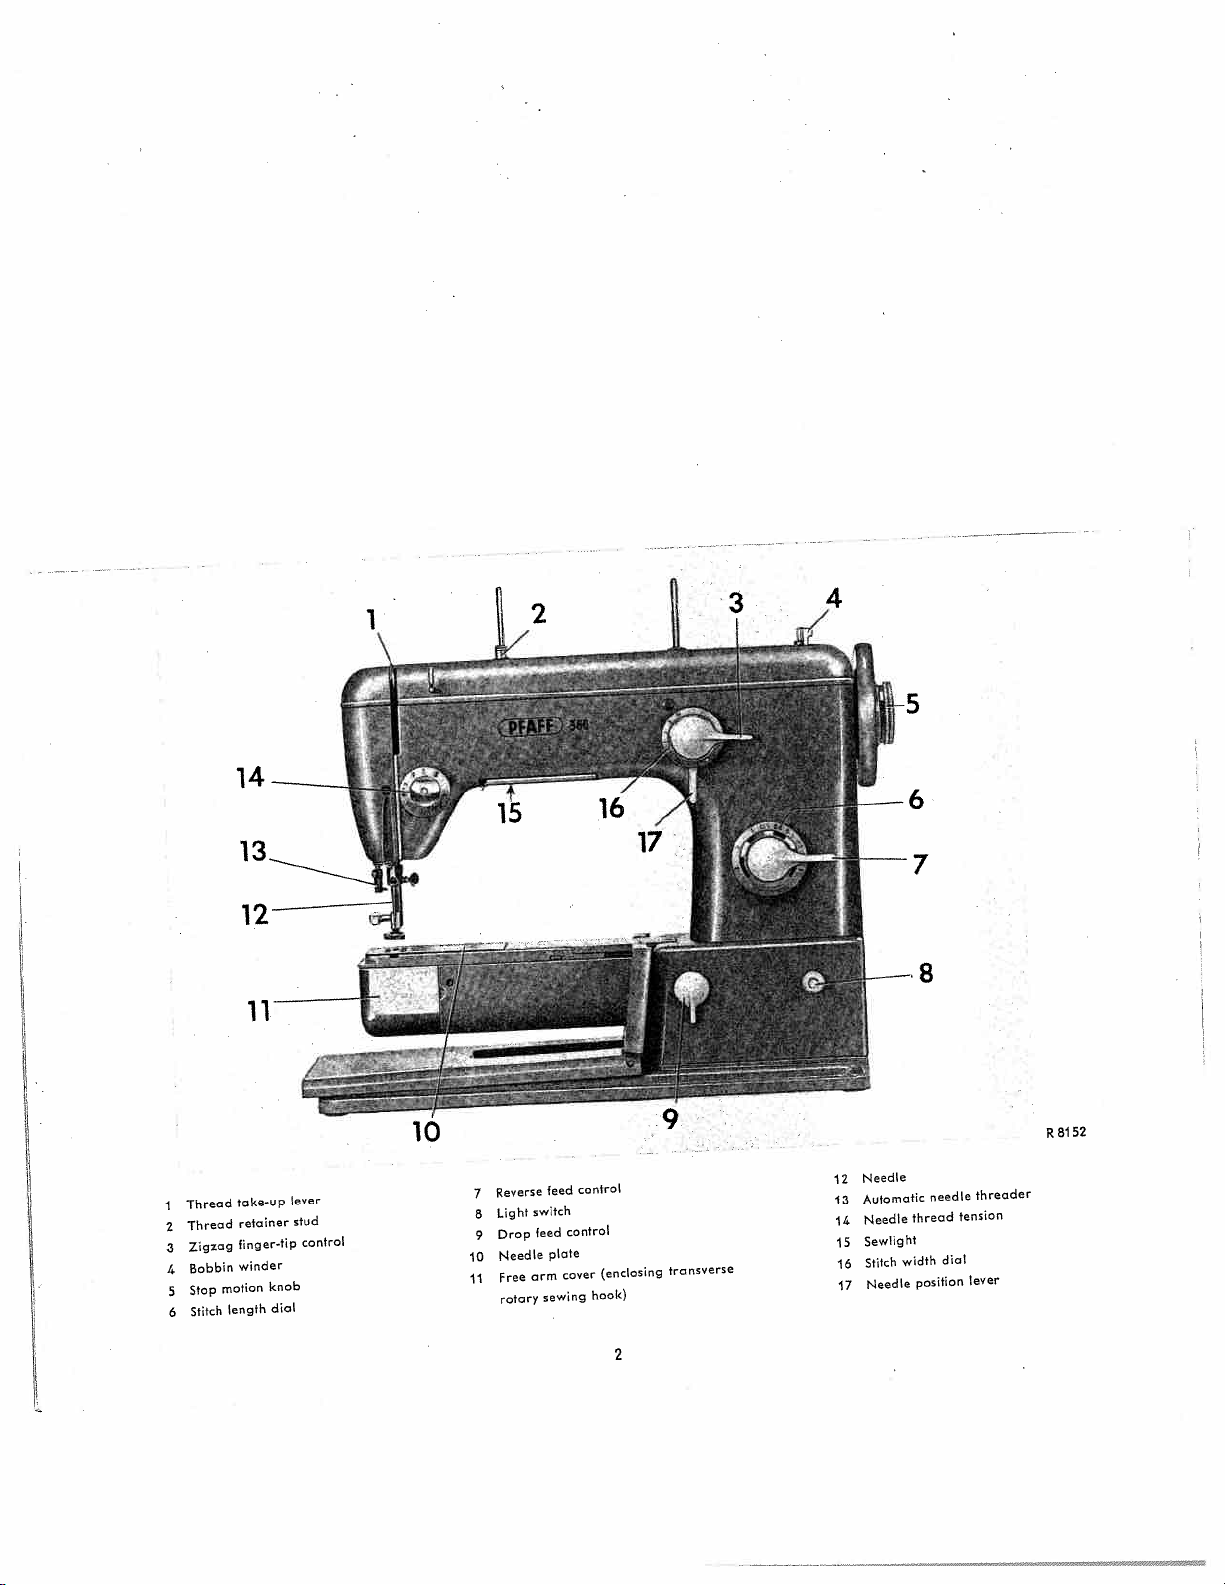
I
2
3
4
S
6
Thread
Thread
Zigzag
Bobbin
Step
Stitch
take-up
retainer
finger-tip
winder
motion
length
knob
dial
ever
stud
control
10
11
7
6
9
Reverse
Light
Drop
Needle
Free
rotary
feed
switch
feed
arm
sewing
plate
control
central
cover
(enclosing
hook)
2
transverse
12
13
14
15
16
17
Needle
Automatic
Needle
Sewlight
width
Stitch
Needle
needle
thread
position
dial
threader
tension
lever
8152
R
Page 4
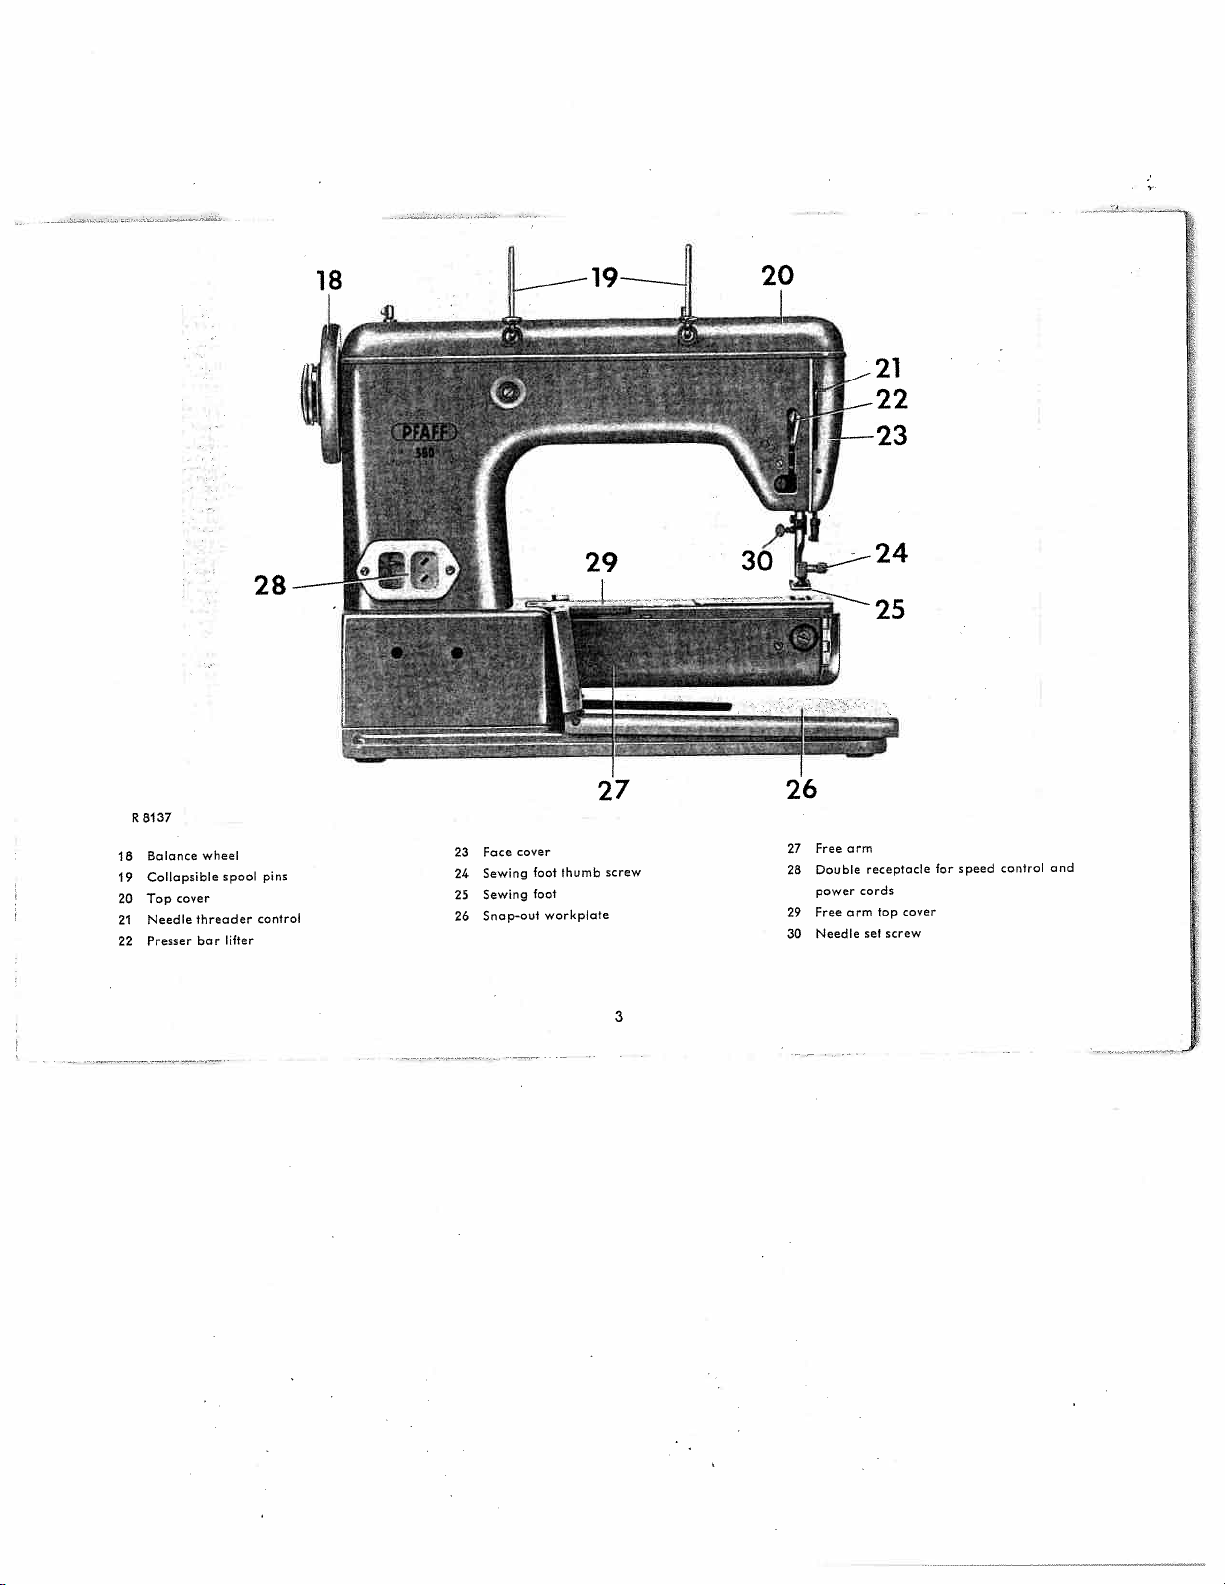
R
18
19
20
21
22
8137
Balance
Collapsible
cover
Top
Needle
Presser
wheel
spool
threoder
bar
lifter
28—
pins
control
23
24
25
26
Face
Sewing
Sewing
Snap-out
cover
thumb
foot
foot
workplote
screw
3
orm
27
Free
for
receptacle
Double
28
power
cords
arm
fop cover
screw
set
Free
29
Needle
30
speed
control
and
Page 5
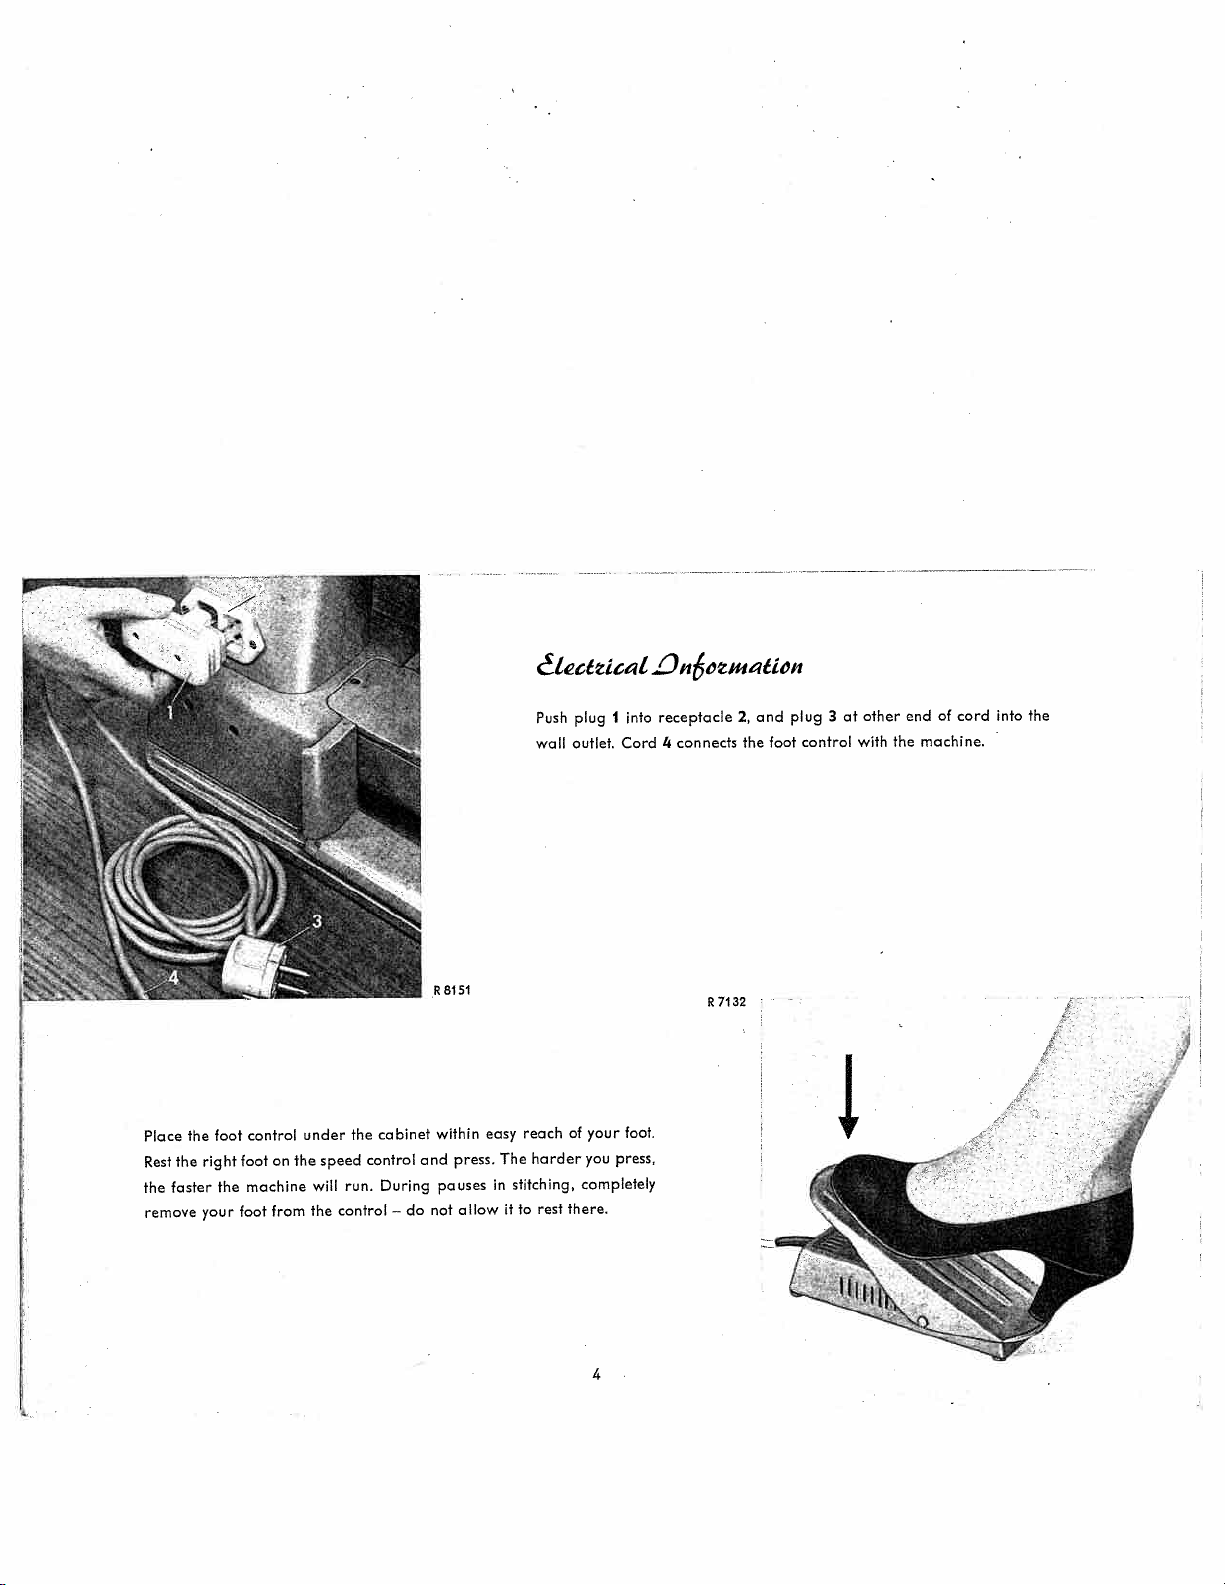
Push
wall
plug
outlet.
I
into
Cord
receptacle
4
connects
the
endofcord
other
3
plug
2,
the
and
foot
control
at
machine.
the
with
into
Place
Rest
faster
the
remove
the
the
foot
right
your
the
control
foot
machine
foot
on
from
the
under
speed
will
the
the
control
run.
control
cabinet
During
do
—
and
R81S1
within
pauses
not
press.
allow
easy
The
in
reach
harder
stitching,
rest
it
to
of
your
you
completely
there.
4
R7132
foot,
press,
Page 6
7506
R
9un’auntaLc
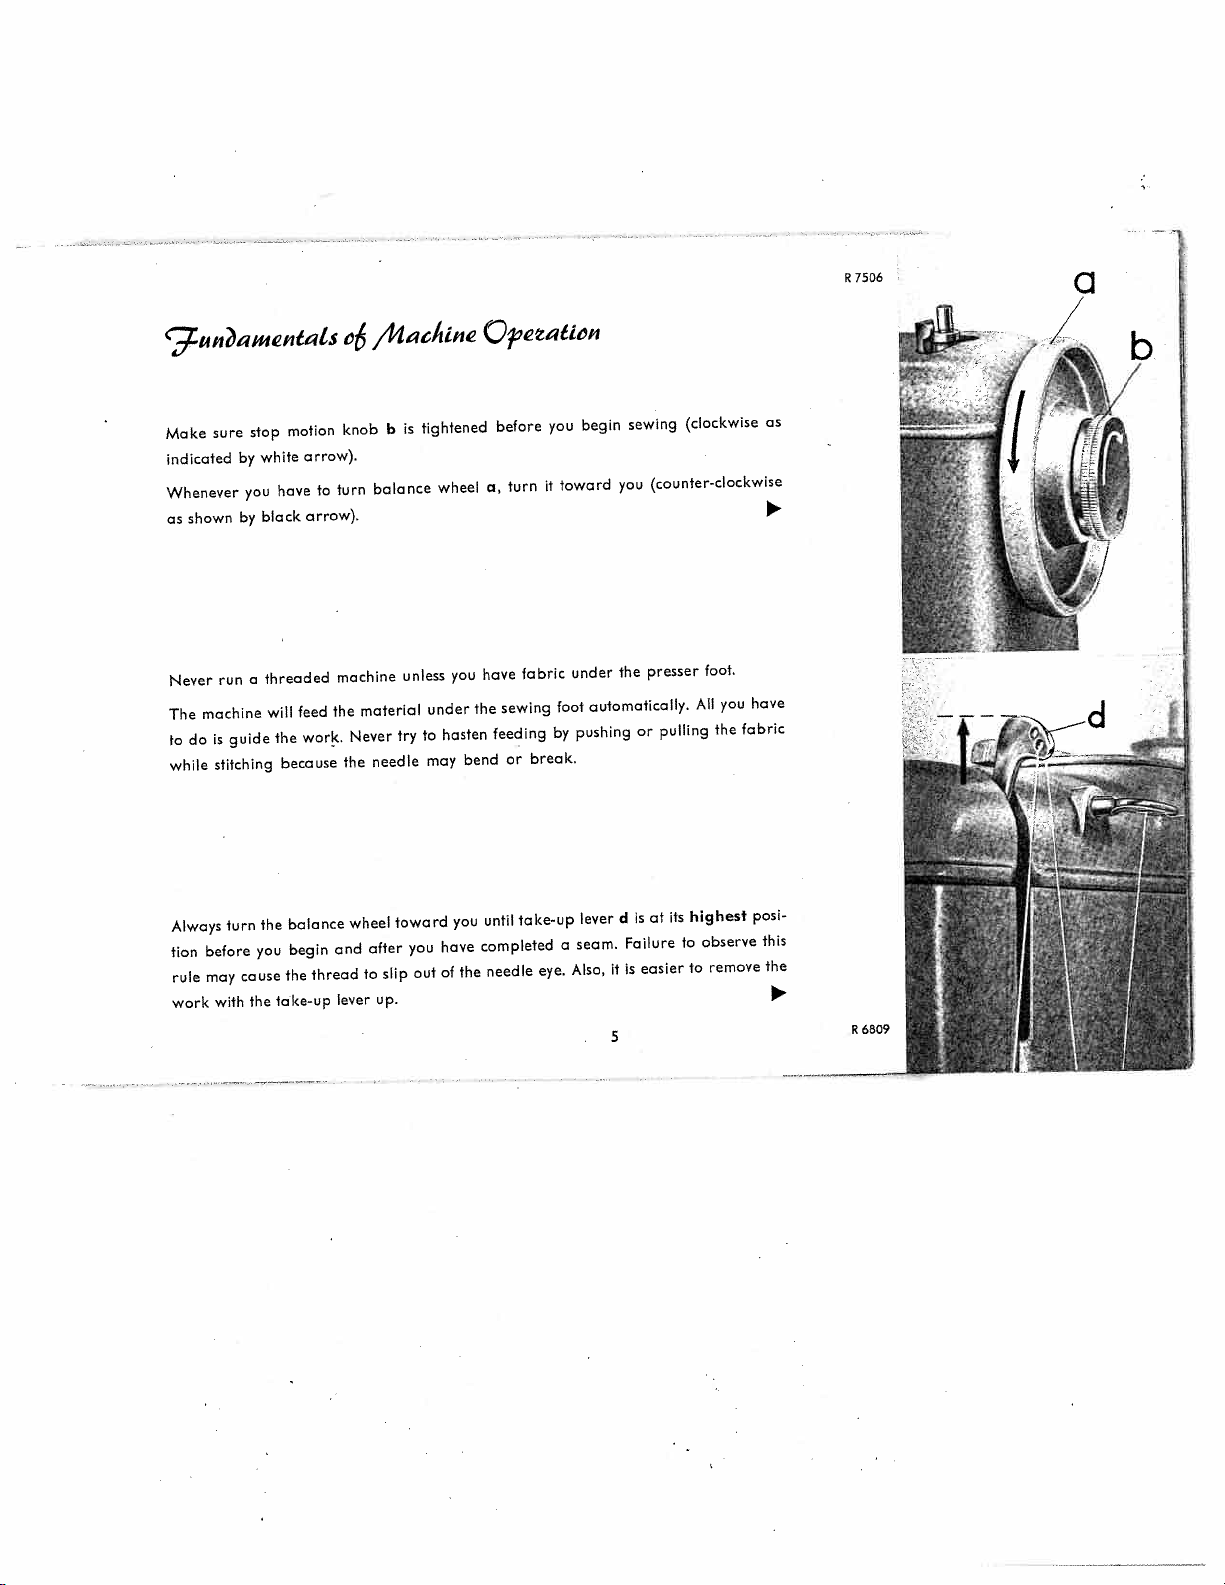
stop
sure
Make
shown
machine
is
do
stitching
run
by
you
by
o
guide
indicated
Whenever
as
Never
The
to
while
motion
white
hove
black
threaded
will
the
because
arrow).
to
orrow).
feed
work.
c6
knob
turn
machine
material
the
Never
the
/ilahilu
tightened
is
b
balance
unless
under
to
try
may
needle
wheel
you
boston
Qiatiô,,
before
a,
have
the
feeding
bend
turn
fabric
sewing
break.
or
you
it
foot
by
toward
under
pushing
sewing
begin
you
presser
the
automatically.
or
(clockwise
(counter-clockwise
foot.
have
you
All
fabric
the
pulling
as
•1
-
Always
tion
rule
work
turn
before
may
with
you
cause
the
the
balance
begin
the
take-up
thread
and
lever
wheel
after
to
slip
up.
toward
you
out
you
have
of
until
completed
the
needle
take-up
eye.
lever
seam.
a
Also,itis
d
5
is
at
Failure
easier
its
highest
observe
to
to
remove
posi
this
the
R
6609
Page 7
R
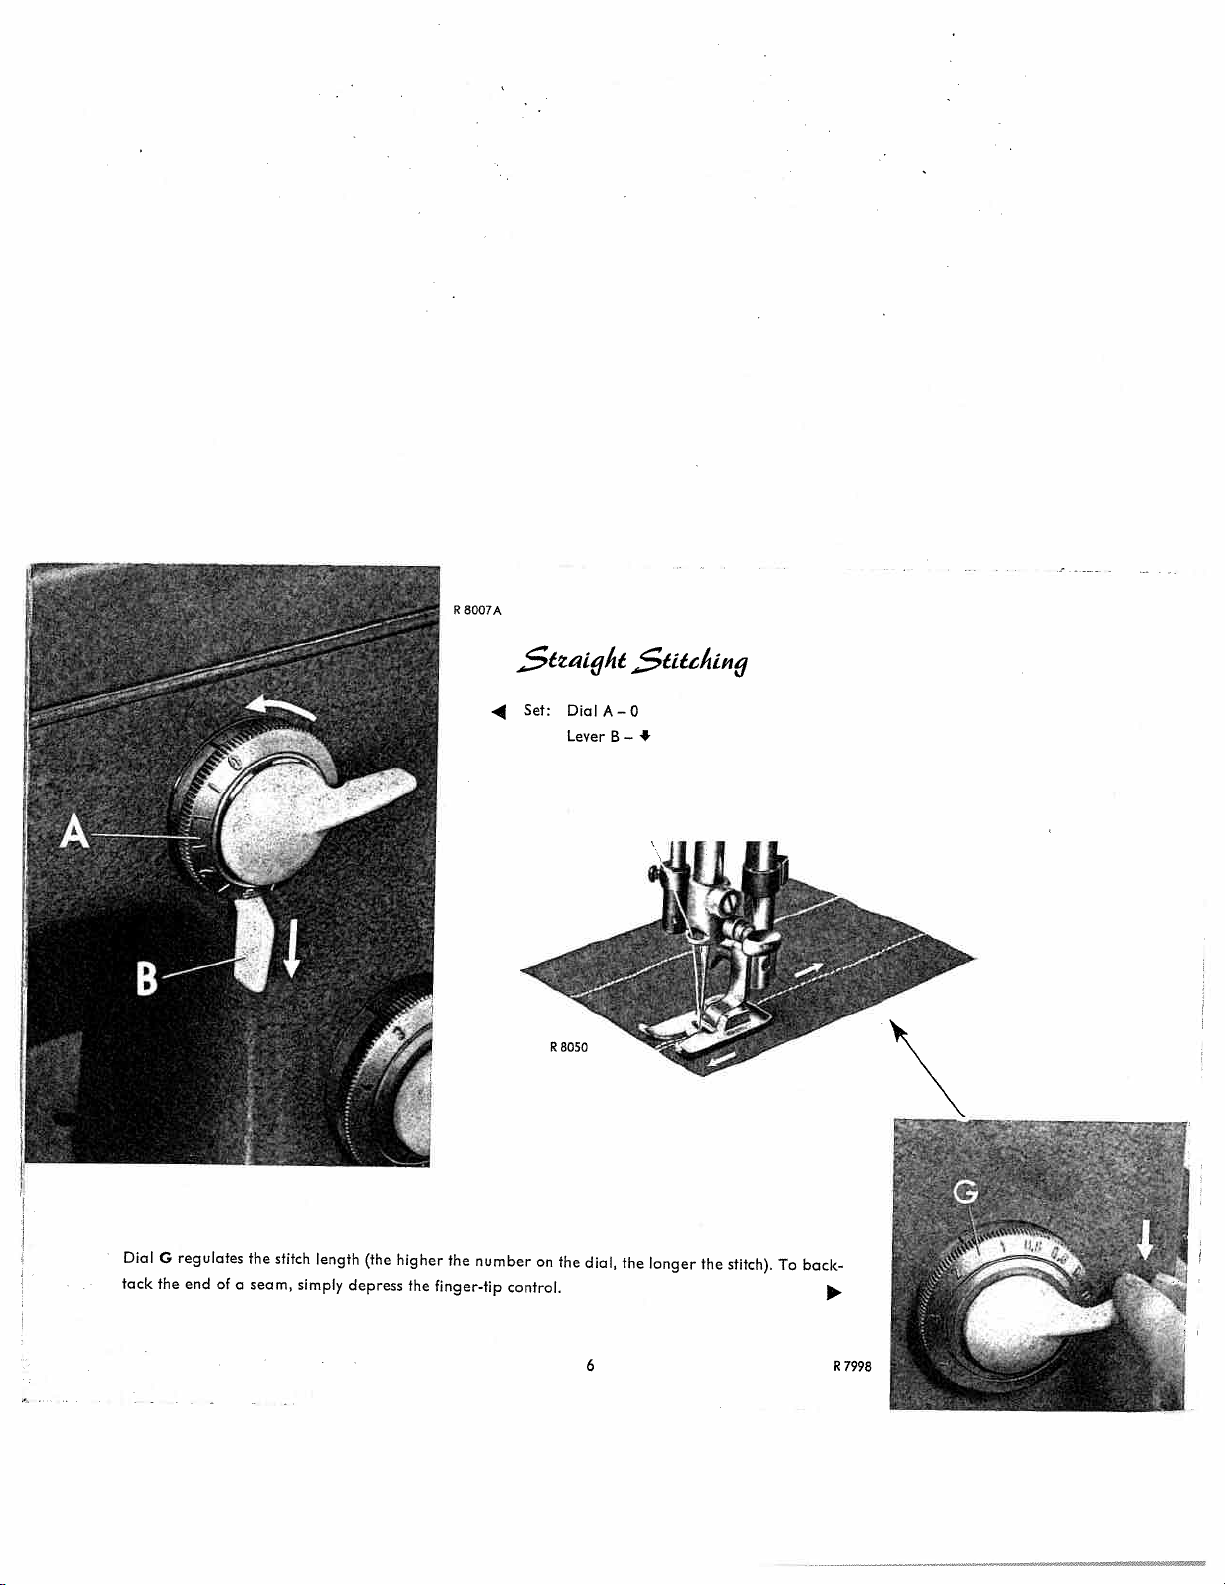
8007A
$&4if/ht
Set:
.4
DiolA—O
Lever
B
$iuhiq
—
DialGregulates
tack
the
end
ofaseam,
the
stitch
length
simply
(the
depress
higher
the
the
number
finger-tip
on
control.
the
dial,
6
the
longer
the
stitch).
To
bock-
R
7998
Page 8
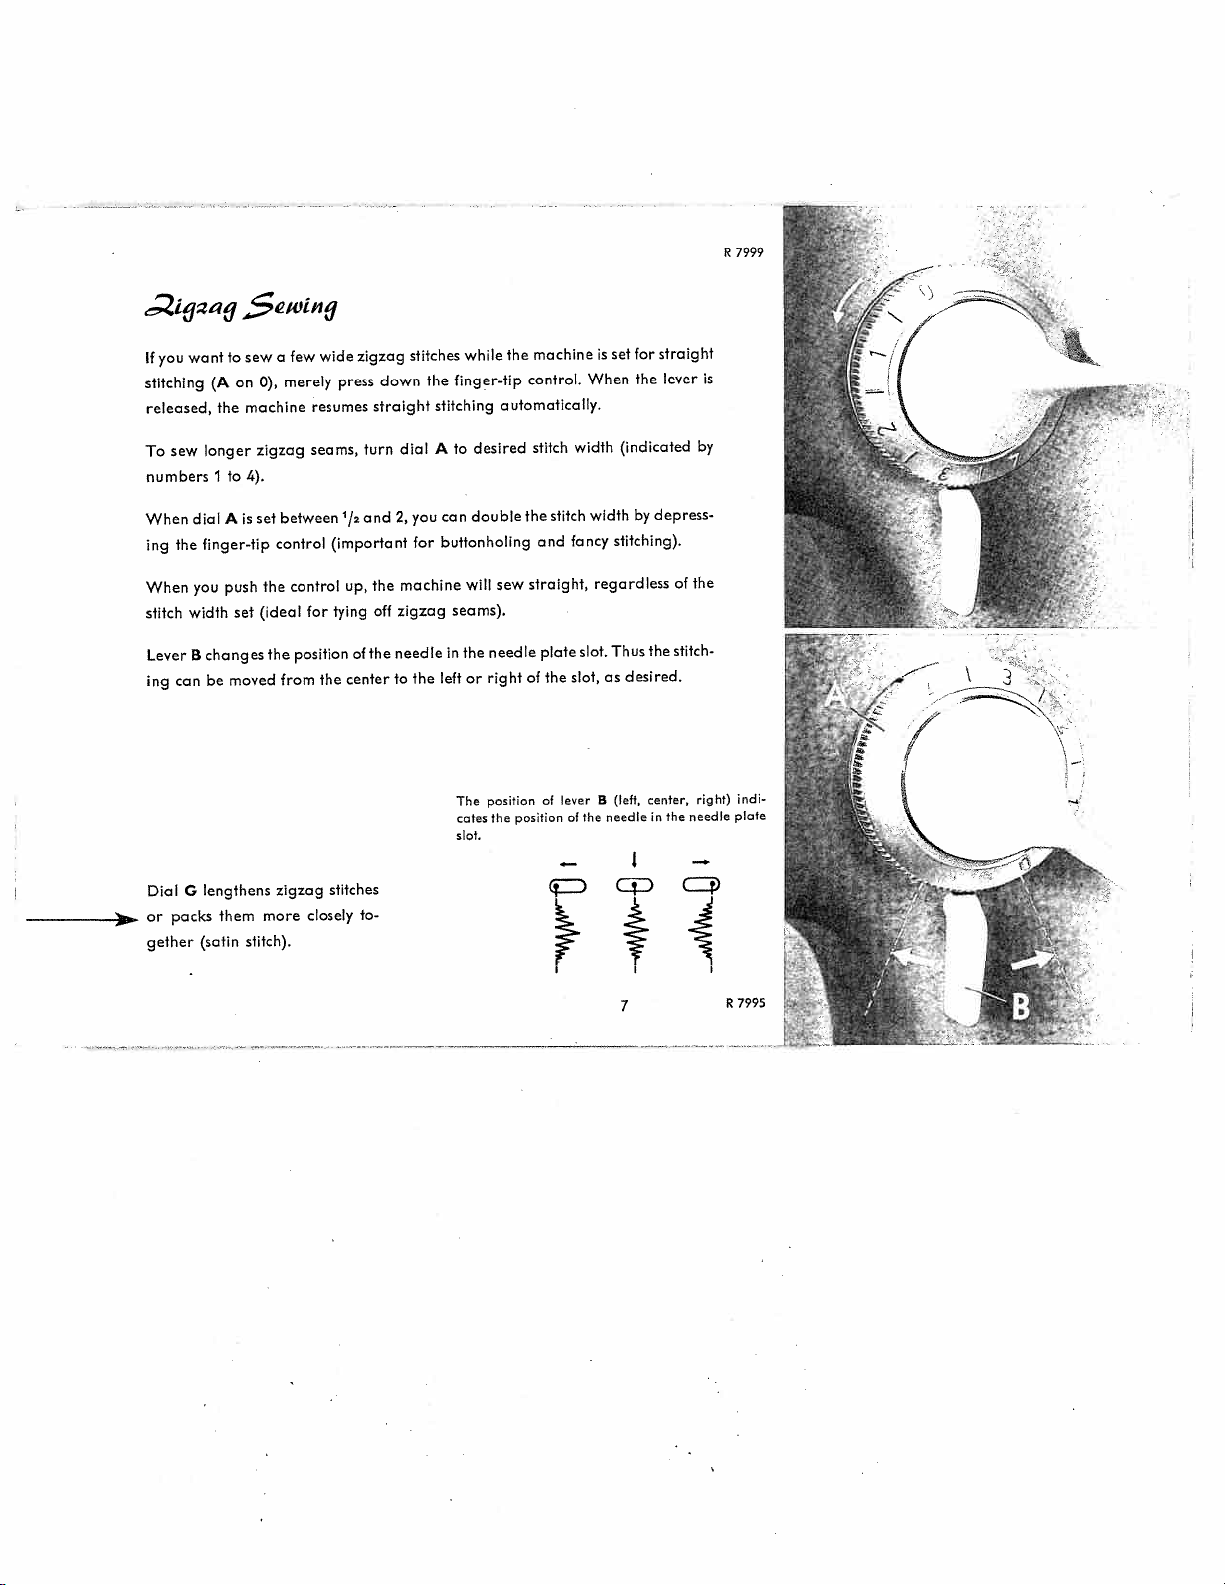
If
you
stitching
released,
want
(A
the
to
sew
on
a
0),
machine
few
merely
resumes
wide
press
zigzag
down
straight
stitches
the
stitching
while
finger-tip
machine
the
control.
automatically.
is
When
set
for
the
straight
lever
R
7999
is
sew
To
numbers
dial
When
the
ing
you
When
width
stitch
B
Lever
canbemoved
ing
G
Dial
or
packs
gether
longer
to
I
A
finger-tip
push
set
changes
lengthens
them
(satin
zigzag
4).
set
is
the
(ideal
more
stitch).
between
control
control
the
from
zigzag
seams,
for
position
the
stitches
closely
turn
1/2
and
(important
up,
the
off
tying
the
of
centertothe
to
dial
you
2,
for
machine
zigzag
needle
desired
A
to
double
can
buttonholing
will
seams).
needle
in
the
right
or
left
position
The
cafes the
slot.
sew
stitch
the
and
straight,
plate
of
position
width
stitch
fancy
slot.
slot,
the
leverB(left,
of
the
of
(indicated
by
width
stitching).
regardless
Thus
desired.
as
needle
cp
7
depress
the
center,
in
the
the
of
stitch
needle
cip
by
right)
mdi
plate
R7995
Page 9

R
8064
fJOifl1119
Hold
(counter-clockwise).
Place
always
thread
Pull
crossing
th
balance
spool
be
the
7366z
wheel
thread
of
some
the
spool
from
thread.
a
on
size
and
and
right-hand
as
turn
that
lead
stop
used
clockwise
it
motion
spool
on
the
knob
pin.
spool,
around
The
b
thread
the
all
bobbin
a
or
way
thread
little
retainer
to
finer.
the
should
stud
left
g,
I
6036
R
R
7101
2
7219
R
Page 10
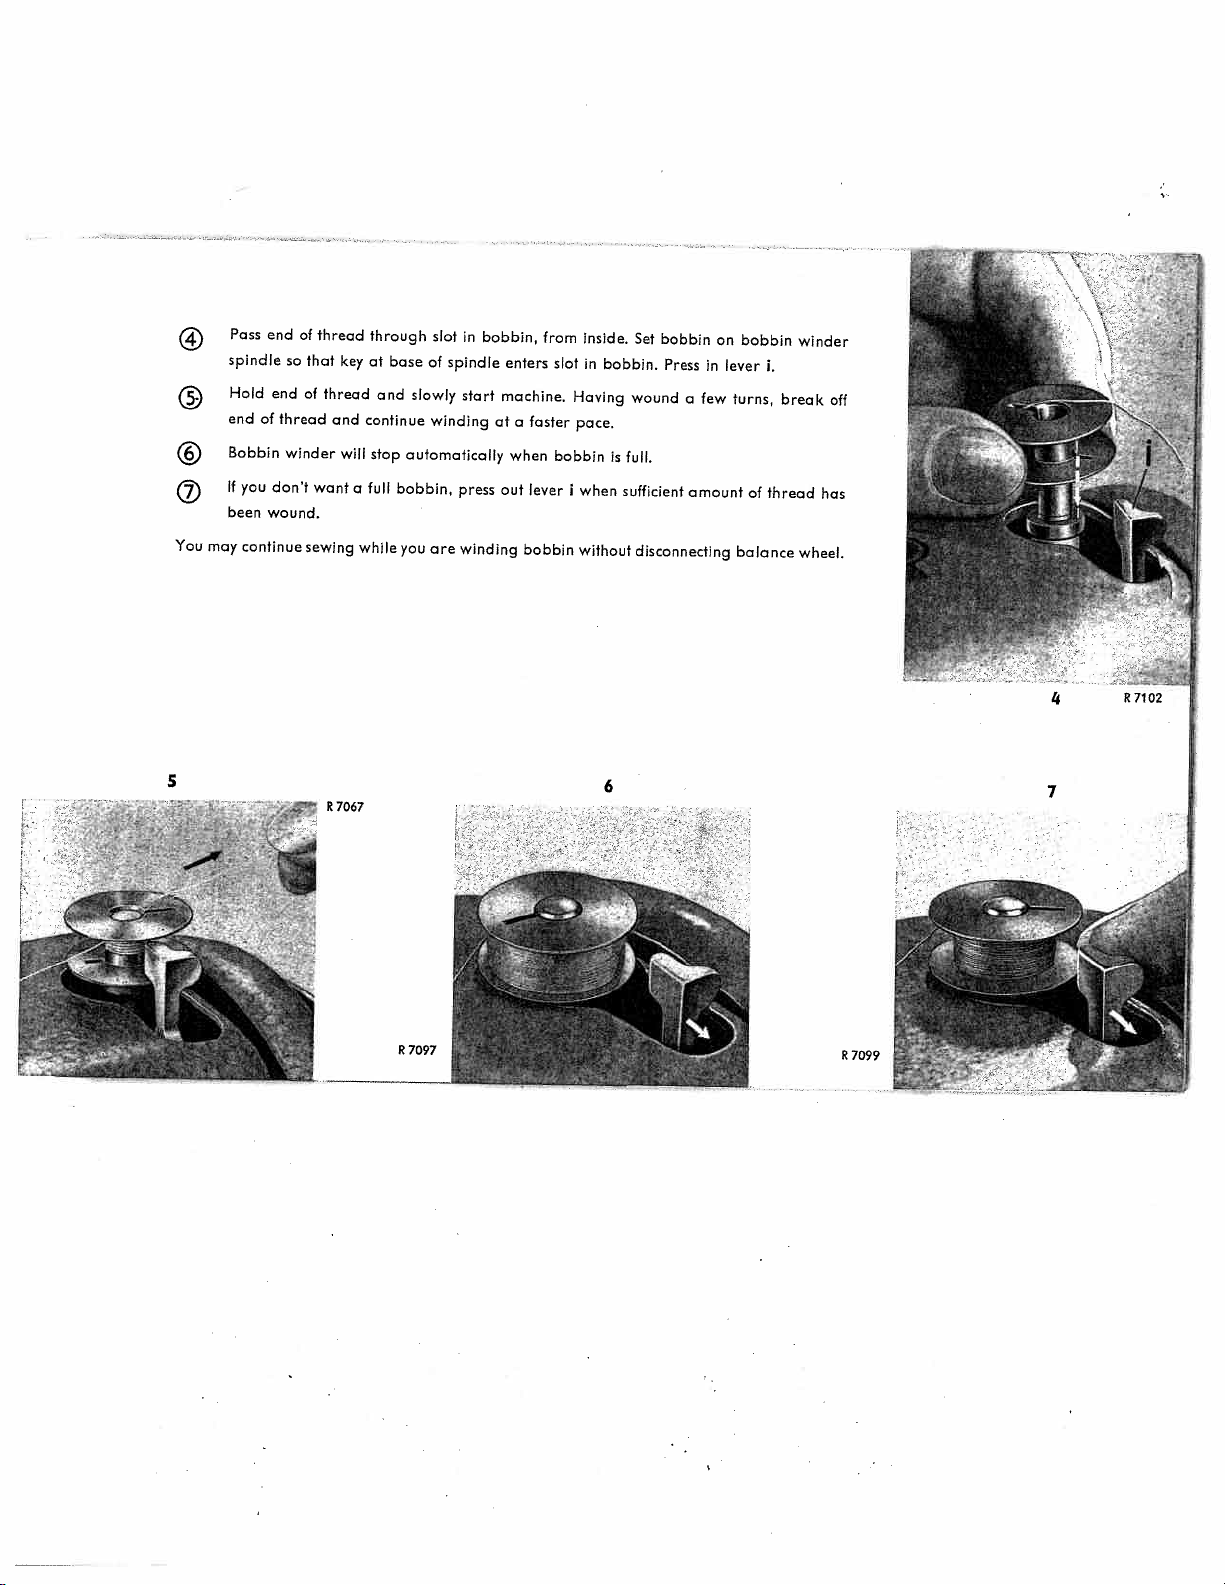
You
may
Pass
spindle
Hold
end
Bobbin
you
If
been
continue
end
end
of
thread
don’t
wound.
of
that
so
of
winder
sewing
thread
thread
and
want
key
will
a
through
at
and
continue
stop
full
while
slot
base
of
slowly
winding
automatically
bobbin,
you
are
in
spindle
start
press
winding
bobbin,
enters
machine.
atafaster
when
out
from
lever
bobbin
slot
Having
pace.
bobbin
I
when
without
inside.
bobbin.
in
Set
wound
full.
is
sufficient
disconnecting
bobbin
Press
a
amount
in
few
on
lever
bobbin
turns,
of
balance
i.
break
thread
winder
off
has
wheel.
5
R7067
R
7097
6
7099
R
7
Page 11

R
8157
L?n3etinfy
As
showninillustration1,hold
from
Hold
Pull
the
the
end
bobbin
Hold
the
top
the
bobbin
thread
of
case.
the
casebyits
R5867
a
9u11
the
down
under
spring.
toward
firmly
open
73c661n
you,
in
the
the
tension
Leave
latch,sothat
I
bobbininleft
bobbin
about
intt
and
spring
73c66i,i
bobbin
insert
case
and
untilitemerges
three
inchesofthread
bobbin
the
hand
pull
Caie
so
into
the
cannot
5869
R
that
bobbin
thread
fall
the
from
thread
case.
into
the
hanging
out.
the
opening
end
case
from
2
falls
slot.
at
the
V
A
the73c66in
Ca$e
Raise
needle
latchkwith
by
holding
bobbin
drops
its
to
your
the
latch. When
out.
highest point
forefinger.
Pull
you
and
out
open free
bobbin
release
case
latchk,
arm
with
cover.
the
Lift
bobbin
empty
10
Page 12
8159
R
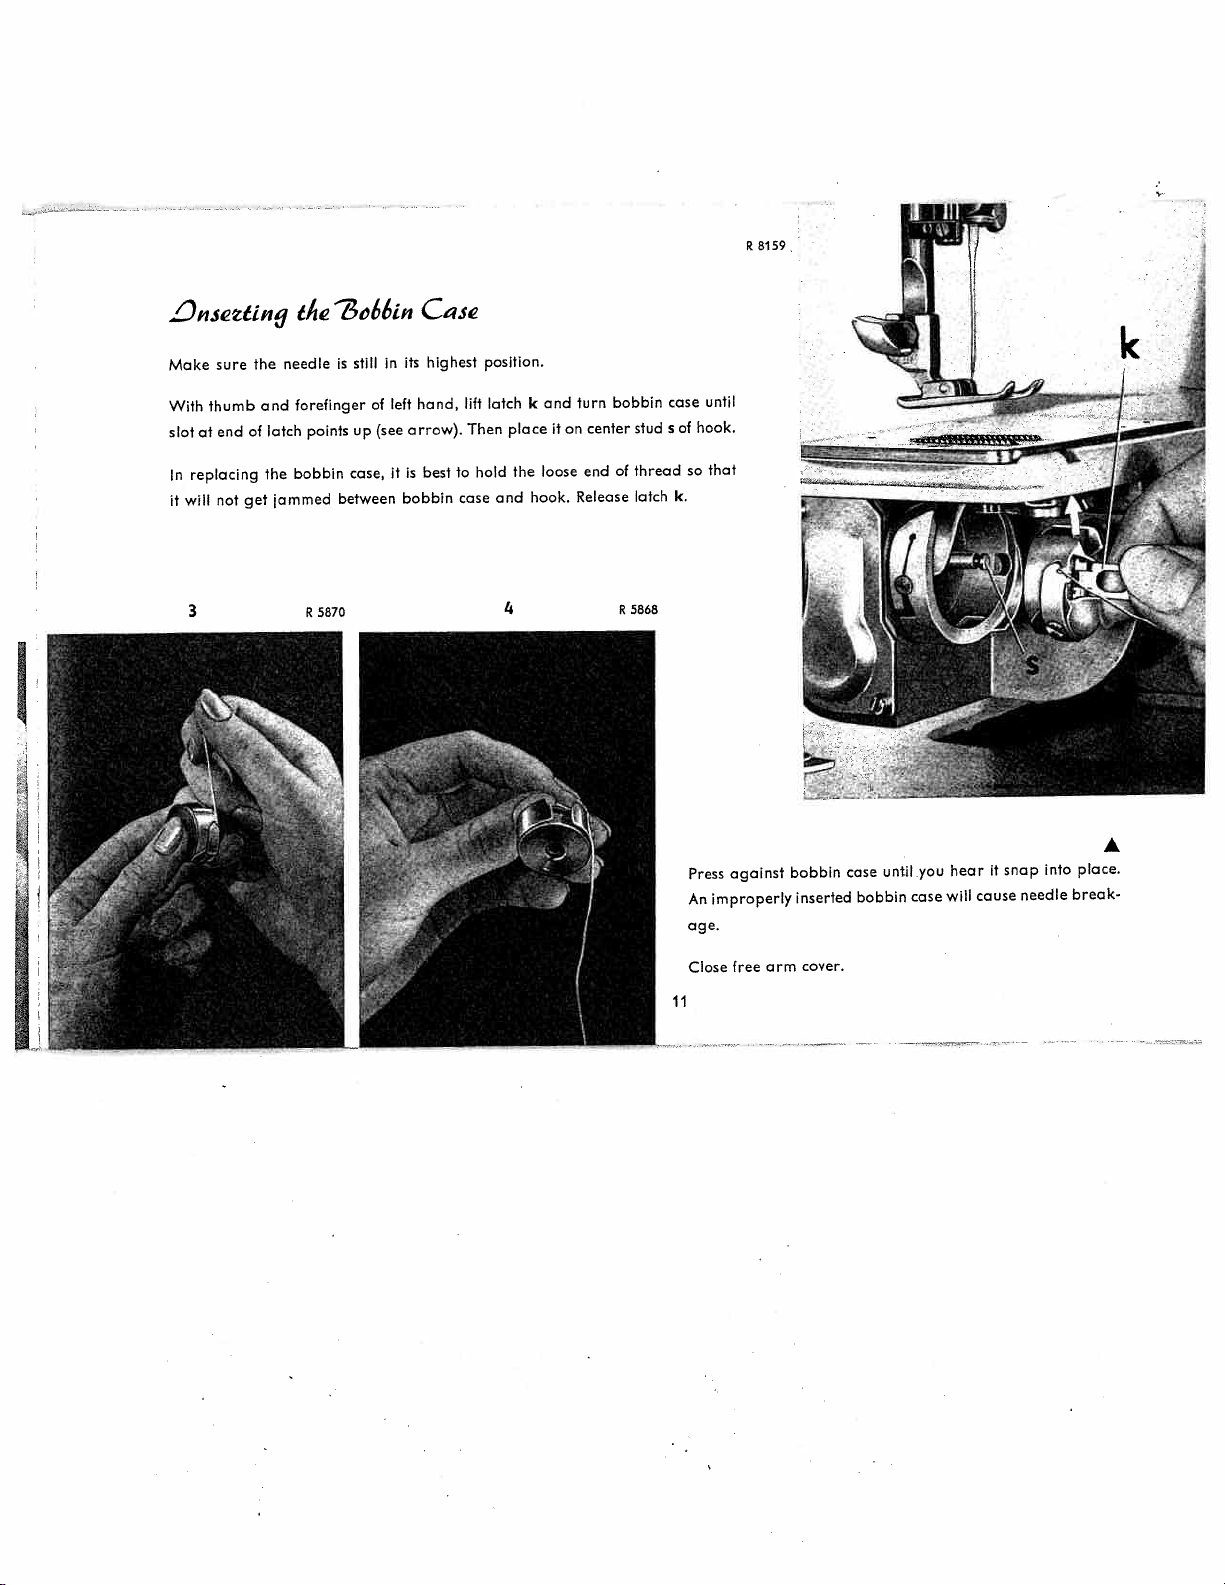
L3n.c&tin
9
Make
sure
thumb
With
end
slot
at
replacing
In
will
not
it
3
get
the
of
and
latch
the
jammed
th
needle
forefinger
points
bobbin
R5870
73c6L4
mn
still
is
up
case,
between
of
(see
in
left
it
C43e
highest
its
hand,
arrow).
best
is
bobbin
lift
to
case
position.
Then
hold
latch
placeiton
the
and
4
k
and
loose
hook.
turn
center
end
Release
bobbin
stud
thread
of
latch
R5868
case
s
k.
of
hook.
so
Press
An
age.
until
that
against
improperly
bobbin
inserted
case
bobbin
until
you
case
hear
will
it
cause
snap
into
needle
A
place.
break
11
Close
free
arm
cover.
Page 13
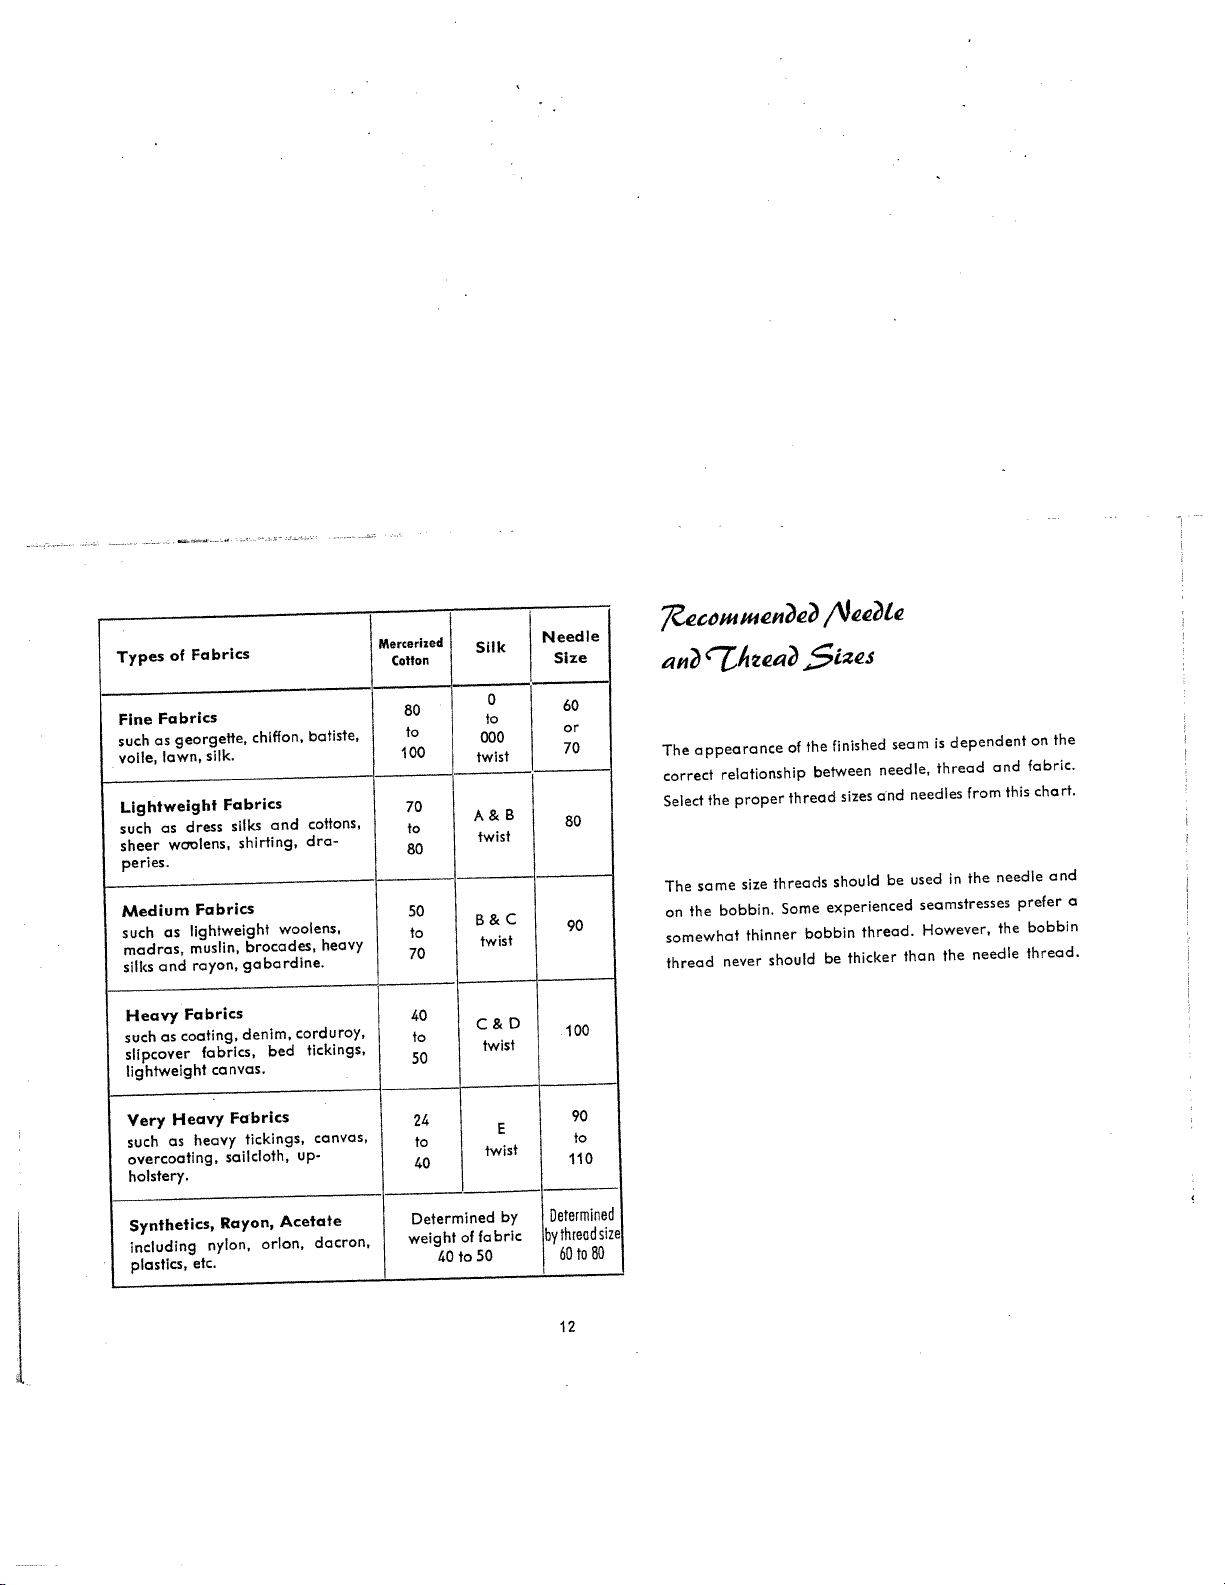
of
Types
Fabrics
Fine
as
such
lawn,
voile,
Lightweight
as
such
woolens,
sheer
peries.
Medium
as
such
madras,
and
silks
Fabrics
georgette,
silk.
dress
Fabrics
lightweight
muslin,
rayon,
chiffon,
Fabrics
silks
shirting,
brocades,
gabardine.
and
woolens,
batiste,
cottons,
dra-
heavy
Mercerized
Cotton
80
to
100
70
to
80
50
to
70
Silk
000
twist
A
twist
B
twist
Needle
i’ssmene
Size
j
0
to
&
&
60
or
70
B
80
C
90
an’
appearance
The
correct
Select
some
The
the
on
somewhat
thread
‘7ha?
relationship
proper
the
bobbin.
never
size
thinner
of
thread
threads
Some
should
$ies
finished
the
between
should
experienced
bobbin
be
sizes
thicker
needle,
and
be
thread.
seam
needles
used
seamstresses
However,
than
dependent
is
thread
from
the
in
the
and
needle
the
needle
this
on
fabric.
chart.
prefer
bobbin
thread.
the
and
a
Heavy
coating,
as
such
slipcover
lightweight
Heavy
Very
as
such
overcoating,
holstery.
Synthetics,
including
plastics,
Fabrics
fabrics,
canvas.
heavy
nylon,
etc.
denim,
Fabrics
tickings,
sailcloth,
Rayon,
bed
Acetate
orIon,
corduroy,
tickings,
canvas,
up-
dacron,
40
to
50
24
to
40
Determined
of
weight
to
40
&
C
twist
twist
fabric
50
D
E
by
100
90
to
110
Determined
bythreodsize
80
60
to
12
Page 14
Lmi,tant
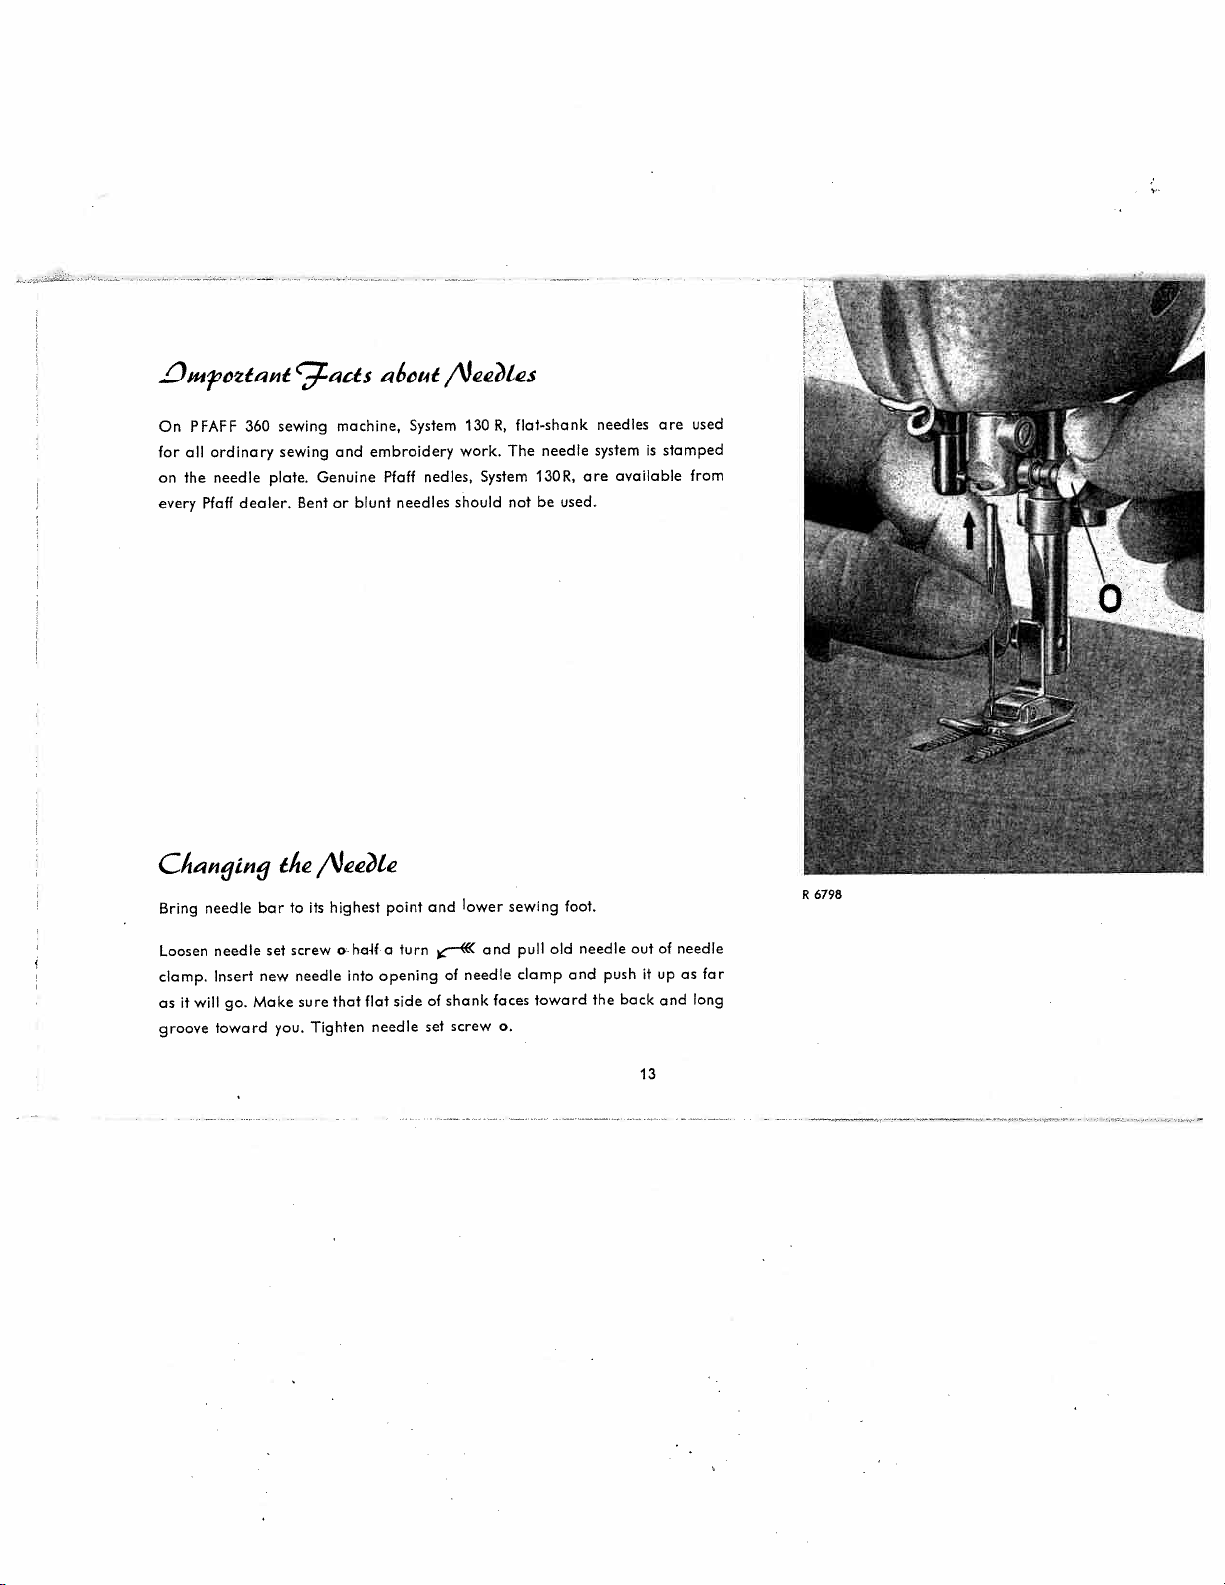
On
PFAFF
all
ordinary
for
needle
on
the
Pfaff
every
Cnjtnj
needle
Bring
sewing
360
sewing
plate. Genuine
dealer.
the
to
bor
9atts
machine,
and
embroidery
Bentorblunt
/Vee?te
highest
its
a6,ut
Pfaff
point
/Vee?1e5
System
nedles,
needles
and
130
work.
System
should
lower
flat-shank
R,
The
not
sewing
needle
130R,
be
used.
foot.
needles
system
are
is
available
are
stamped
from
used
R6798
Loosen
clamp,
as
it
groove
will
needle
Insert
go.
toward
set
new
Make
you.
screw
needle
sure
Tighten
oholfa
into
that
turn
opening
flat side
needle
set
of
of
shank
screw
and
needle
faces
o.
pull
clamp
toward
old
needle
and
the
push
back
outofneedle
up
as
it
long
and
13
for
Page 15
t1heain
9
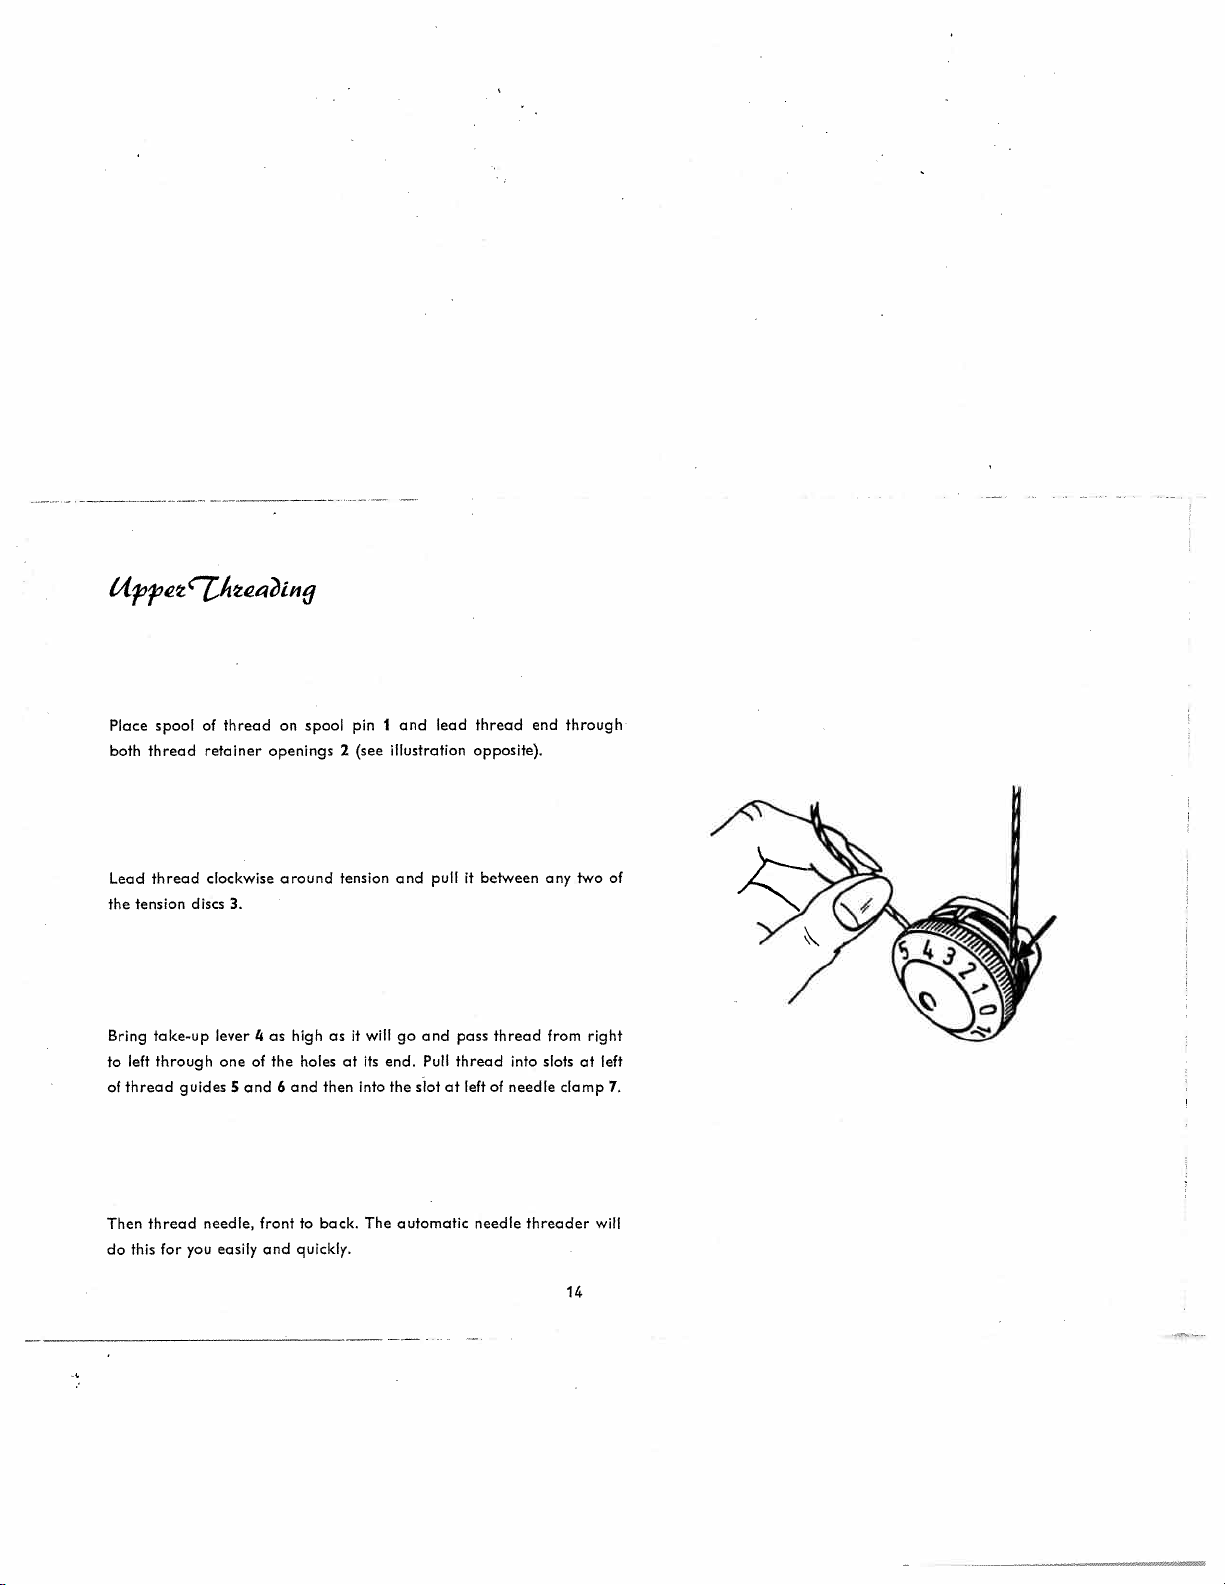
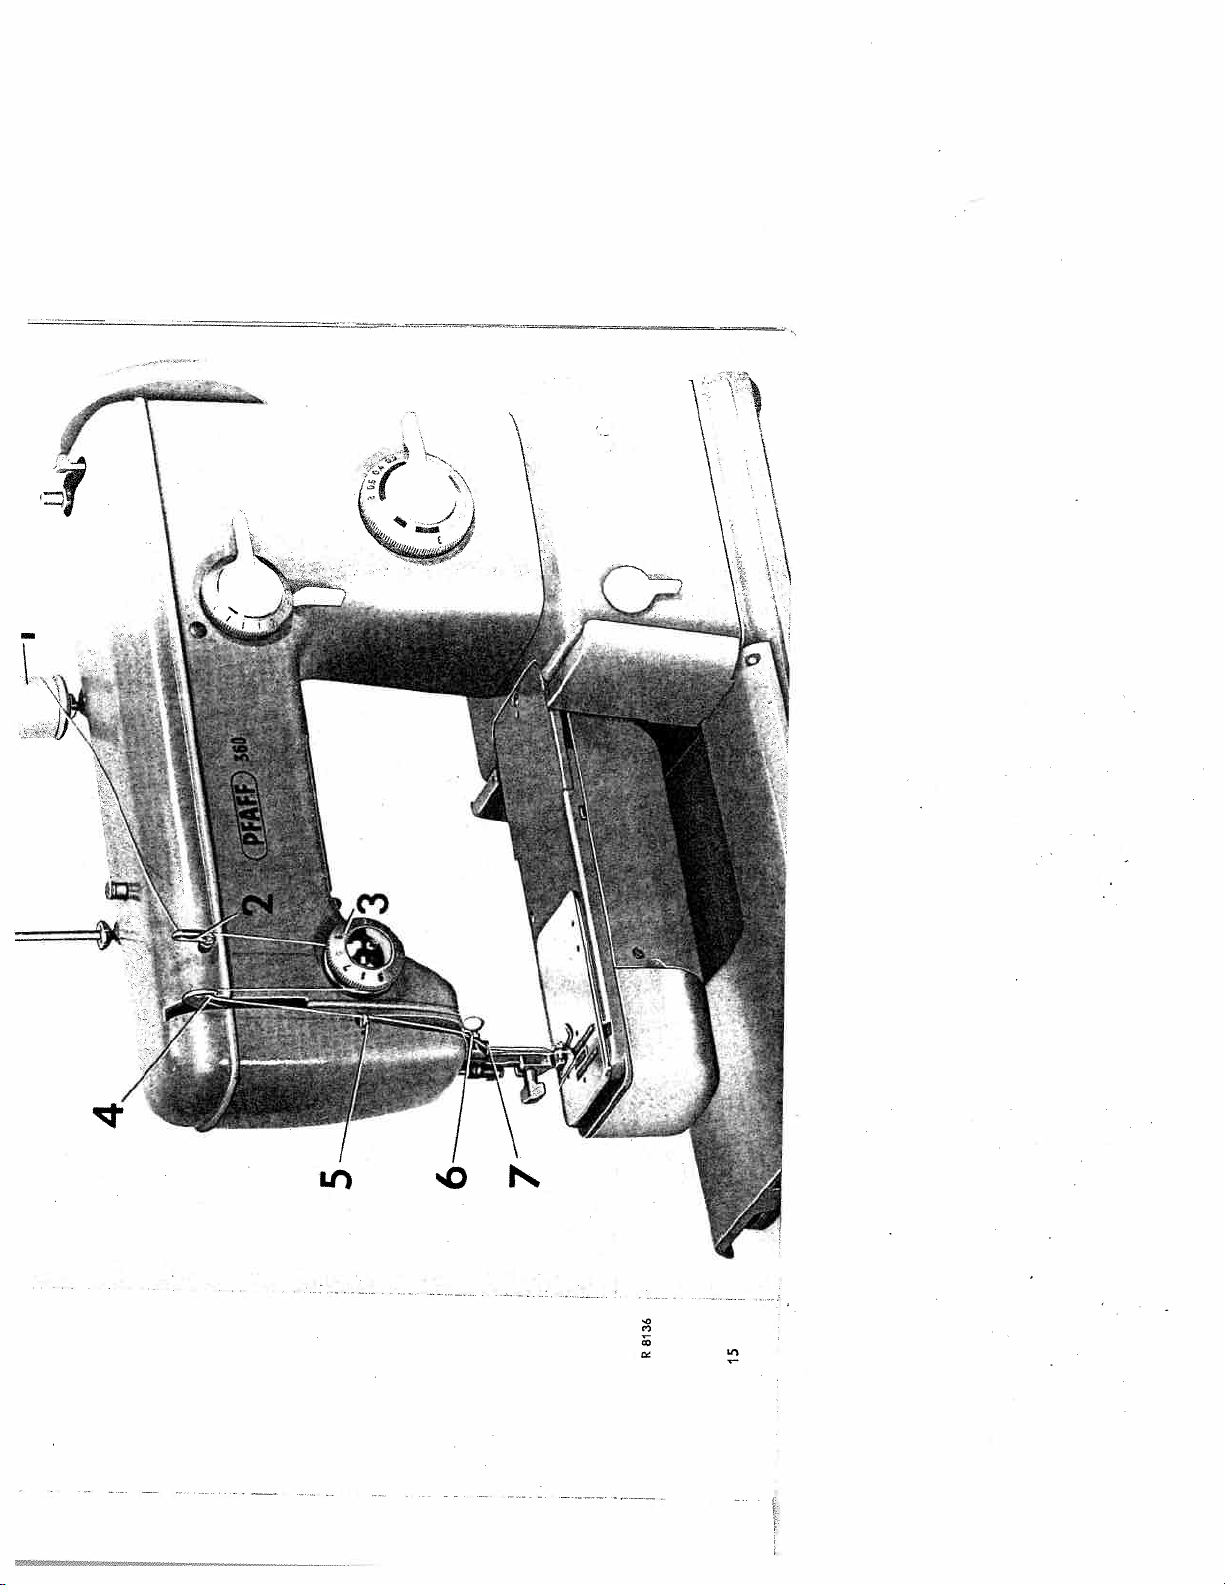
Place
both
thread
thread
Lead
tension
the
spoolofthread
retainer
clockwise
3.
discs
on
spool
openings
around
pinIand
2
(see
illustration opposite).
tension
and
lead
pull
thread
it
between
end
any
through
two
of
Bring
to
thread
of
Then
do
left
this
take-up
through
thread
for
guides
needle,
you
4ashighasit
lever
one
of
5
and
fronttoback.
easily
and
the
holesatits
and
6
quickly.
then
will
into
The
go
end.
the
stotatleft
automatic
and
Pull
pass
thread
needle
thread
into
slots
of
needle clamp
threader
from
right
left
at
7.
will
14
Page 16
—I
I,
I
I
‘I
Ii
I
8136
I?
Is
Page 17
Ceatin9
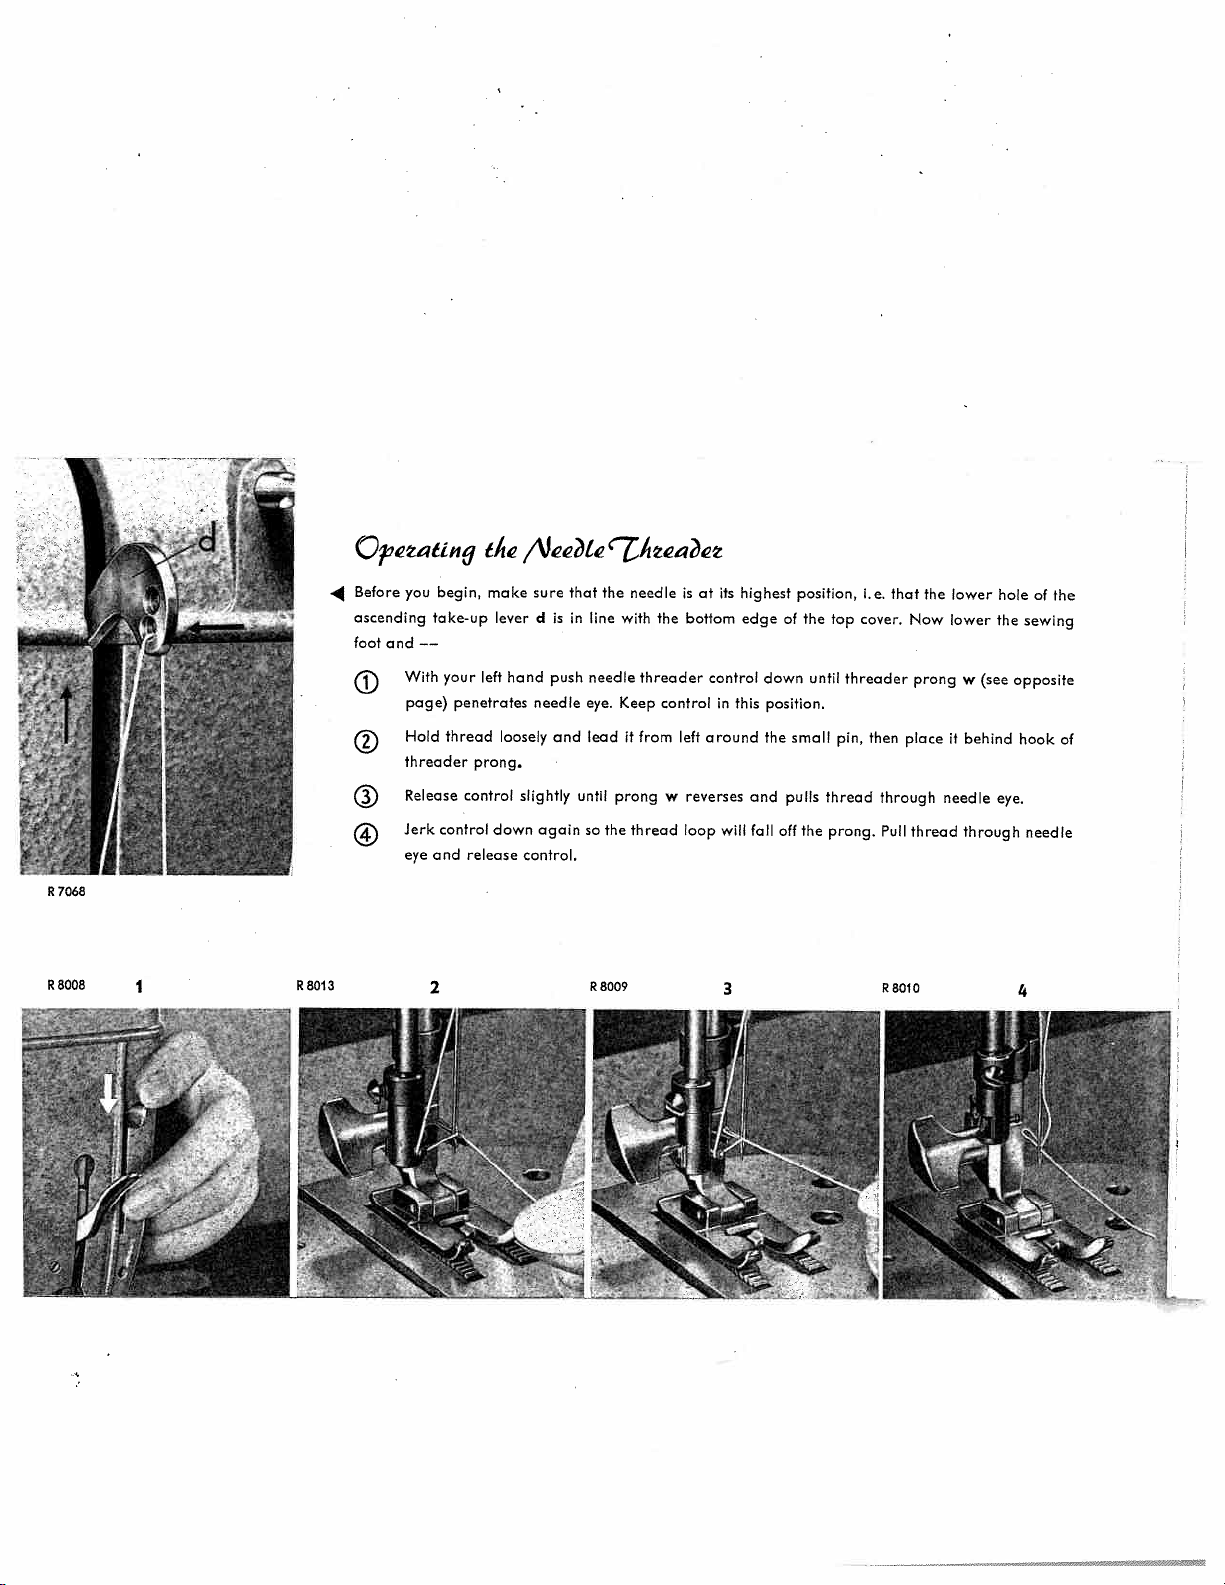
Before
you
ascending
footand——
With
page)
Hold
threader
Release
Jerk
eye
begin
take-up
your
penetrates
thread
control
and
the
make
left
prong.
control
release
1
’Vee?te
sure
leverdis
hand
needle
loosely
slightly
again
down
control.
that
in
push
and
until
‘heae
the
needle
line
with
threader
needle
eye.
Keep
leaditfrom
prong
so
the
thread
the
control
left
w
is
at
bottom
control
around
reverses
loop
in
its
will
highest
edge
this
and
fall
of
down
position.
small
the
pulls
off
position,
the
top
until
thread
the
prong.
cover.
threader
pin,
i.e.
then
that
place
through
Pull
the
Now
prong
thread
lower
lower
w
it
behind
needle
through
(see
hole
the
eye.
of
sewing
opposite
hook
needle
the
of
R8008
I
R8013
2
R8009
3
R8010
4
Page 18

When
shorten
Push
so
w
teose
toop
Since
needle,
you
V
you
needle
thai
control.
—
take-up
begin
have
procedure
the
threader
its
through
pull
sewing.
end
Prong
lever
about
had
about
is
needle
four
sufficient
as
control
now
w
eye.
is
d
inches
follows:
down.
1/
inch
pulls
at
not
needle
its
of
Place
to
end
highest
thread
the
threading
thread
right
the
of
point
through
behind
of
the
thread
when
the
practice,
hook
prong.
—
you
needle
Slowly
instead
thread
eye
you
of
may
prong
of
before
re
the
the
R
8158
w
Z’awinq
needle
Hold
needle
the
pull
Lightly
threads
both
thread
moves
needle
back
t4
down
thread
under
17
73’66in’7hea?
tk
left
your
in
lightly
again
up
and
bobbin
draw
to
foot
sewing
hand.
and
before
Turn
take-up
thread
you
lever
up
put
balance
through
fabric
whe&
reaches
into
needle
machine.
toward
its
highest
plate
you
position.
slot.
A
until
Place
Page 19

R
8150
A
To
check
anced,
sew
a
straight
of
the
correct.
examining
equally
fabric,
the
zigs
ment
is
take
few
stitches
fabric
The
wide
that
and
correct.
whether
a
straight
(see
surest
a
zigzag
on
if
is,
zags
closely
are
seam
way
surface
the
of
the
woven
and
tightly
sketch
seam.
threads
the
tensions
zigzag
drawn
to
double-check
If
and
are
seam,
are
piece
in
III),
the
the
zigzag
underside
locked
the
tension
correctly
of
fabric
seams.
on
bath
tensions
this
exactly
If
seam
of
adjust
bol
and
the
sides
are
is
the
Ccea.t
Balanced
have
Cause:
Cause:
by
is
at
perfect
Sketch
Upper
7n.cicn
tensions
seams
Sketch
Upper
are
as
—
I
The
tension
II
—
The
tension
9
tdatj,n
essential
sketched
threads
too
loose
threads
too
tight
for
sewing.
below
interlock
or
lower
interlock
or
lower
(III).
If
on
the
tension
on
the
tension
your
underside
surface
too
tension
too
loose.
tight.
of
is
of
the
correct,
the
fabric.
fabric.
you
will
‘V
18
Page 20

8003
2?9titun
9
bobbin
The
should
ii
small
a
tip.
Determine
forefinger
and
strong
weight.
slide
ually
V
thread
be
knurled
correct
enough
However,
down.
for
bobbin
bobbin
your
needs
E(
by
hand
‘7nsun
adjusting,
ordinary
case
for
for
holding
case
from
case
slightly,
which
looser
tighter
hang
except
sewing.
can
tension.
tension.
thread
the
freely.
being
the
for
Adjustment
turned
be
end
The
pulled
bobbin
embroidery
is
with
between
tension
by
down
should
case
made
the
should
its
when
by
thumb
thumb
be
own
grad
‘7;4e
rarely
tension
than
tighter
little
a
the
on
screw
left
it
Turn
right
it
Turn
tension
bobbin
the
letting
and
bobbin
the
keep
to
jerk
you
as
A
upper
the
with
on
The
3
disc
tension.
tension.
grades
all
the
higher
and
for
by
complete
one
tension
the
sewing,
5.
two-needle
of
ten
dial
num
the
Thefinal
tension
The
sion
turn
indicate
ber,
upper
Your
work.
upper
loose
—
of
the
tension
upper
stitch
dial,
Turn
Turn
tension
tension
the
different
greater
appearance
follows:
as
left
right
tight
to
should
tension
so
is
—
dial.
degrees
the
be
has
can
designed
be
con
The
of
tension.
set
third
a
be
looser
for
tighter
for
covered
numbers
tension.
For
between
tension
regulated
thot
ordinary
R8029
19
Page 21

7996
R
4
i&h
dial
Turn
mark
the
regulate
facilitate
Ta
section.
1—4
normal
For
backtack
To
When
down.
automatically.
foot.
this,
do
To
way,
this
In
reverse
The
G
on
stitch
iqth
until
the
length
satin
The
satin
the
the
operate
one
stitches
the
dial
stitching,
setting
stitching,
beginning
control
This
the
seam
7J1.14titn
number
housing
required.
as
the
depends
set
or
is
is
feature
control
placed
is
about
be
will
indicating
straight
(see
0—I
on
on
dial
of
end
released,
ideal
rhythm
in
neatly
the
range
the
0.2.
a
for
same
the
on
type
seam,
the
darning
and
beside
desired
arrow).
the
of
simply
machine
move
the
length
Or
scale
fabric
rips
the
other.
as
stitch
sew
is
and
press
resumes
with
fabric
forward
length
a
just
the
the
few
as
thread
finger-tip
forward
ordinary
slightly
stitches.
opposite
is
stitches
large
size
sideways.
and
the
as
used.
control
sewing
sewing
7998
R
20
Page 22

of
sewing.
button
and
embroidery
hoop
9e?
darning
for
/i1.uhuw
dropped
is
£h
12
feed
machine
The
‘711mn9
clockwise,
control
feed
drop
turn
plate,
needle
the
feeding.
below
cease
feed
will
lower
Fabric
To
feeding
go
will
it
sewing.
as
start
far
as
you
right
when
the
to
turned
automatically
is
resumes
control
the
fabric
When
the
21
Page 23

7086
R
Remove
Hold
tighten
when
in
position.
upper
the sewing
spring
screw
lower
you
tension
clipnso
Attach
c.
presser
Remember
activated.
is
foot.
thatitis
darning
bar
to
Attach
lifter
lower
darning
behind
hook
presser
Chaqinfy
needle
both
Lift
turn
and
sideways
screw
the
and
securely.
th
and
sewing
pull
$win9
presser
foot
it
down.
thumb
9ôôe
barstotheir
screw
Slip
on
new
positions
highest
the
Tilt
tighten
foot
the
left.
to
the
foot
and
.4
R
R
8005
foot
the
screw,
will
that
rear.
and
so
that
stay
the
from
foot
needle
as
darning
bar
set
illustrated
liftereso
the
d
e,
the
8147
22
Page 24

8143
R
Ca
Longevity
proper
Use
Pfaff
vegetable
All
moving
establish
plate
and
are
marked
V
4,,?
/biainEenasue
and
smooth
cleaning
sewing
oils.
Remove
and
pattern
a
oiling
by
arrows.
and
machine
rotating
when
the
machine
oiling.
oil
all
lint
parts
oiling
mechanism
performance
only.
Never
before
require
your
machine.
in
the
oiling.
regular
free
are
lubricate
lubrication.
Begin
arm.
dependent
machine
by
The
principal
on
with
is
It
removing
regular
animal
advisable
the
oiling
and
needle
points
or
to
The
oiling
day
Don’t
holes
hook
raceway
point.
you
forget
behind
shaft
sew.
to
the
bearing
Put
in
put
the
one
A
dry
sewing
sewing
drop
a
drop
oiled.
of
raceway
of
foot.
hook
oil
oil
This
into
will
into
is
the
is
the
cause
each
essential
most
raceway
rapid
of
to
important
the
two
keep
A
each
wear.
oil
the
R
8261
23
Page 25

R
8061
I)
The
top
the
wilt
To
oiling
cover.
work
suffice.
pull
Oil
and
cover
points
up,
should
cause
in
tilt
the
be
machine
back
it
machine
applied
and
can
arm
sparingly.
sluggishness.
lift.
reached
be
Excessive
One
or
easily
quantities
drops
two
by
of
removing
may
oil
oil
of
the
soil
usually
8142
R
Oiling
points
machine
the
in
24
L
Page 26
A
has
and
noisy
plate
cause
needle
the
feed
the
of
remove
rows
time,
to
tooth
time
the
from
between
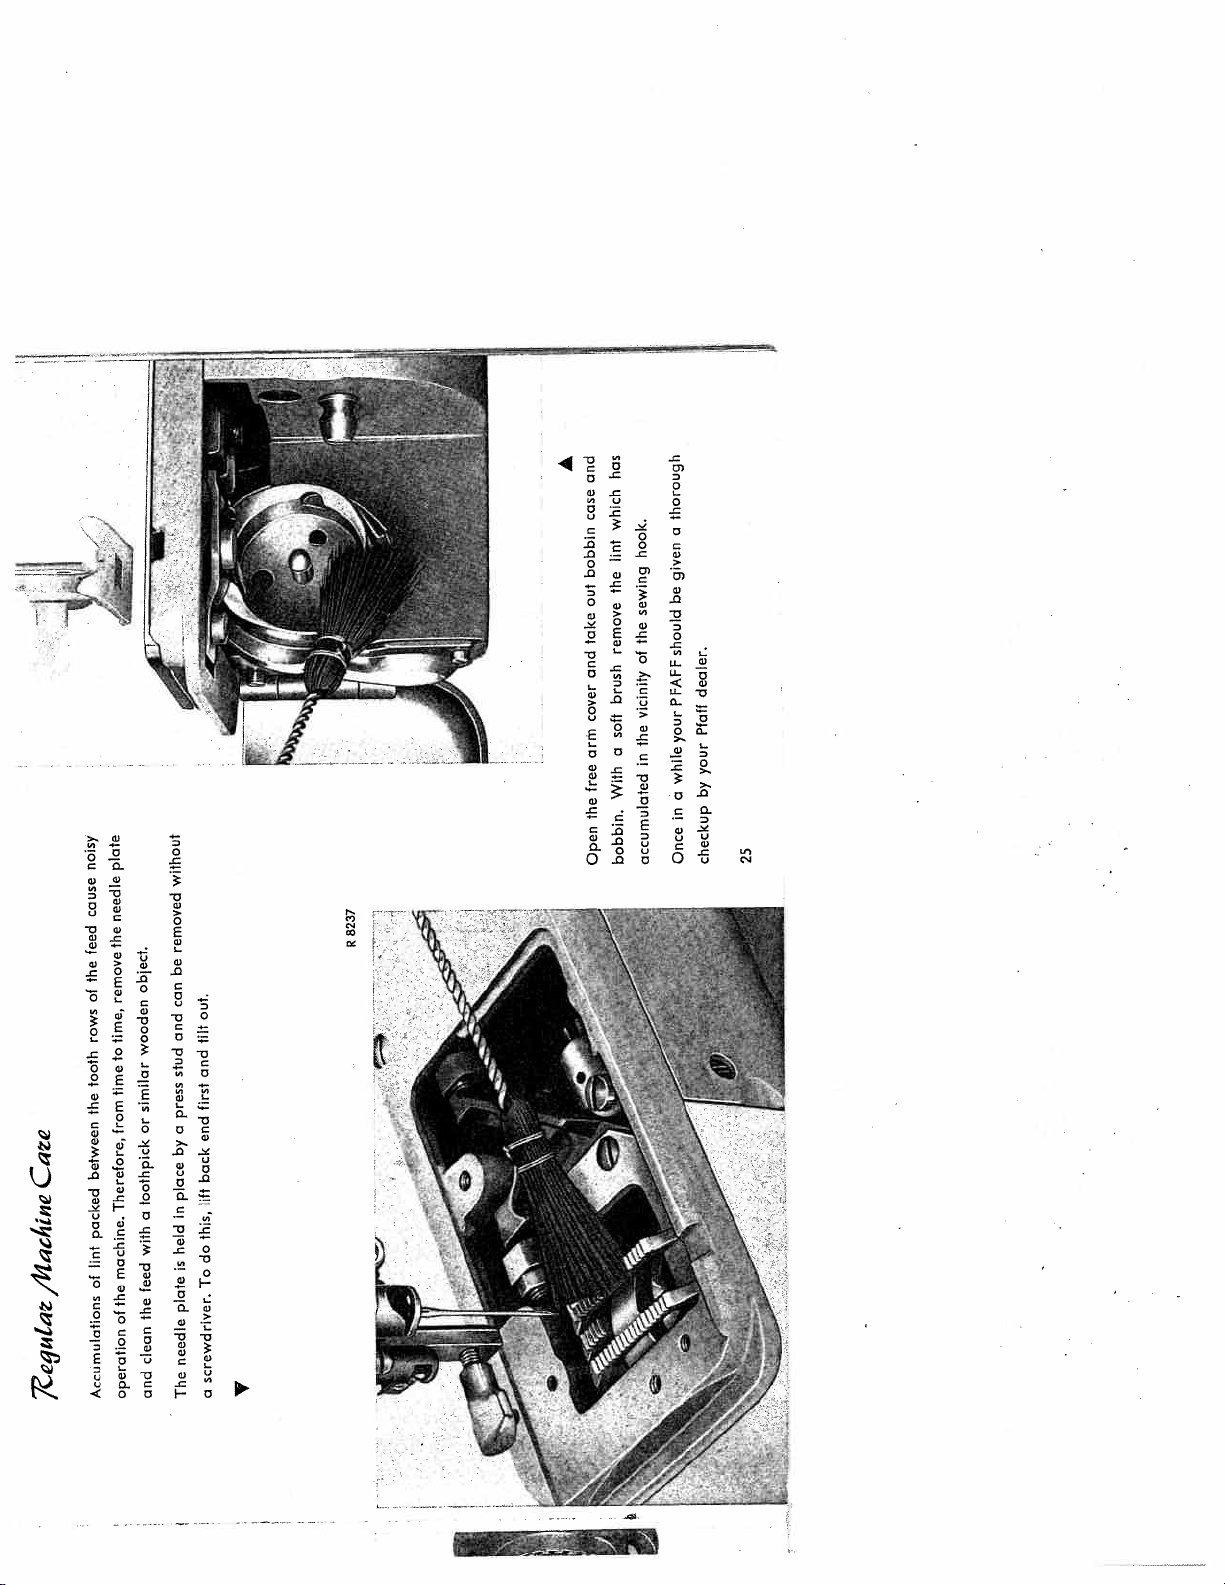
Care
Therefore,
packed
lint
machine.
of
/ilathine
the
of
without
removed
be
object.
can
and
wooden
stud
similar
press
or
a
by
place
toothpick
in
a
held
with
is
feed
plate
the
out.
tilt
and
first
end
back
lift
this,
do
To
8237
R
case
which
lint
bobbin
the
out
take
remove
and
brush
cover
soft
a
arm
free
With
the
bobbin.
Open
thorough
a
hook.
given
be
sewing
the
should
of
dealer.
PFAFF
vicinity
Pfatf
your
the
in
your
while
by
a
in
Once
checkup
accumulated
25
Zyuta
Accumulations
clean
and
operation
needle
screwdriver.
a
The
V
Page 27

$Otifjht
15-watt
The
change
To
bulb
Push
When
bulb
Press
into
inserting
in
91Wt5
sewlight
the
socket,
new
and
light
turn
is
recessed
bulb:
turn
PFAFF
right.
left,
light
and
Close
under
bulb,
grille.
pull
the
be
machine
out.
sure
Note
slide
to
voltage
arm
bulb
of
and
electric
can
pins
be
into
circuit.
swung
bayonet
out
by
socket
pulling
slots.
down
the
grille.
R8160A
Press
of
the
the button
the
machine
sewlight
26
front
on
the
to
switch
base
on
and
off.
Page 28

4
‘7h
$nai-Qui
Your
PFAFF
you
a full-size
pullitouttothe
plote. Now
let
360
work
leftosfor
it
snop
has
oreo
into
fOckr1at
snap-out
a
for
fbi
ositwill
position.
workplaie
sewing
go,
ond
liftituntilitis
then
which can
embroidery.
be
To
flush
raised
raise
with
to
give
workplate,
the
needle
R
6085
When
ing
Larger
sewing
Swing
in
you
wonttouse
reverse
articles
area,
out
the
order.
may
attach
collapsible
the
require
the
arm
free
larger
o
workpbote
legs.
for
doming,
work surface.Tofurther
extension
lower
whichisin
the
workplote,
the
carrying
27
proceed
increase
the
case.
R
6084
R
6063
Page 29

tion,
placed
except
after
that
400
hours
the
brushes
of
service.
should
be
re
The
electric
motor
requires
no
special
atten
When
you
tighten
screw
x,
make
sure
the
washer
is
in
the
correct
position.
and
Idler
revolves
r
should
evenly.
be
set
just
far
enough
left
that
it
synchronizes
with
the
belt
clips
and
If
the
remove.
driving
Loosen
belt
tension
screw x
needs
and
adjustment,
adjust
idler
take
r
until
out
correct
the
four
tension
screws
is
obtained.
in
cover
t
belt.
Your
is
housed
PFAFF
in
the
360
machine
is
equipped
base and
with
a
drives the
30-watt
electric
main shaft
motor
by
(Type
means
PE
of
360),
a driving
which
t.cunj
th
11tc
&tt
7i.cicn
Page 30

‘7cut1e
1.
Machine
$hotItinfJ
Skips
Stitches
Cause:
Needle
Wrong
Needle
Machine
Needle
2.
Needle
Cause:
The
Thread
Poor
above
or
incorrectly
needle.
bent.
threaded
too
fine
Thread
mentioned
tension
knotty
or
too
thread
inserted.
improperly.
too
thick
Breaks
may
cause
tight.
used.
for
the
thread
thread.
breakage.
Remedy:
Push
faces
The
sewing,
Insert
Check
Use
Remedy:
See
remedies
Adjust
Use
good
needle
toward
correct
new
and
correct
tensions
29
use
needle.
correct
needle
quality
up
you,
needle
System
listed
as
threads
as
far
and
system
130R
threading
and
under
instructed.
as
it
flat
needles.)
thread.
1.
only.
will
side
is
stamped
as
above.
go
and
of
shank
instructed
be
sure
that
the
long
groove
away
from
you.
on
needle
plate.
(For
ordinary
on
pages
14
and
15.
Page 31
Hook
oiling.
Burrs
3.
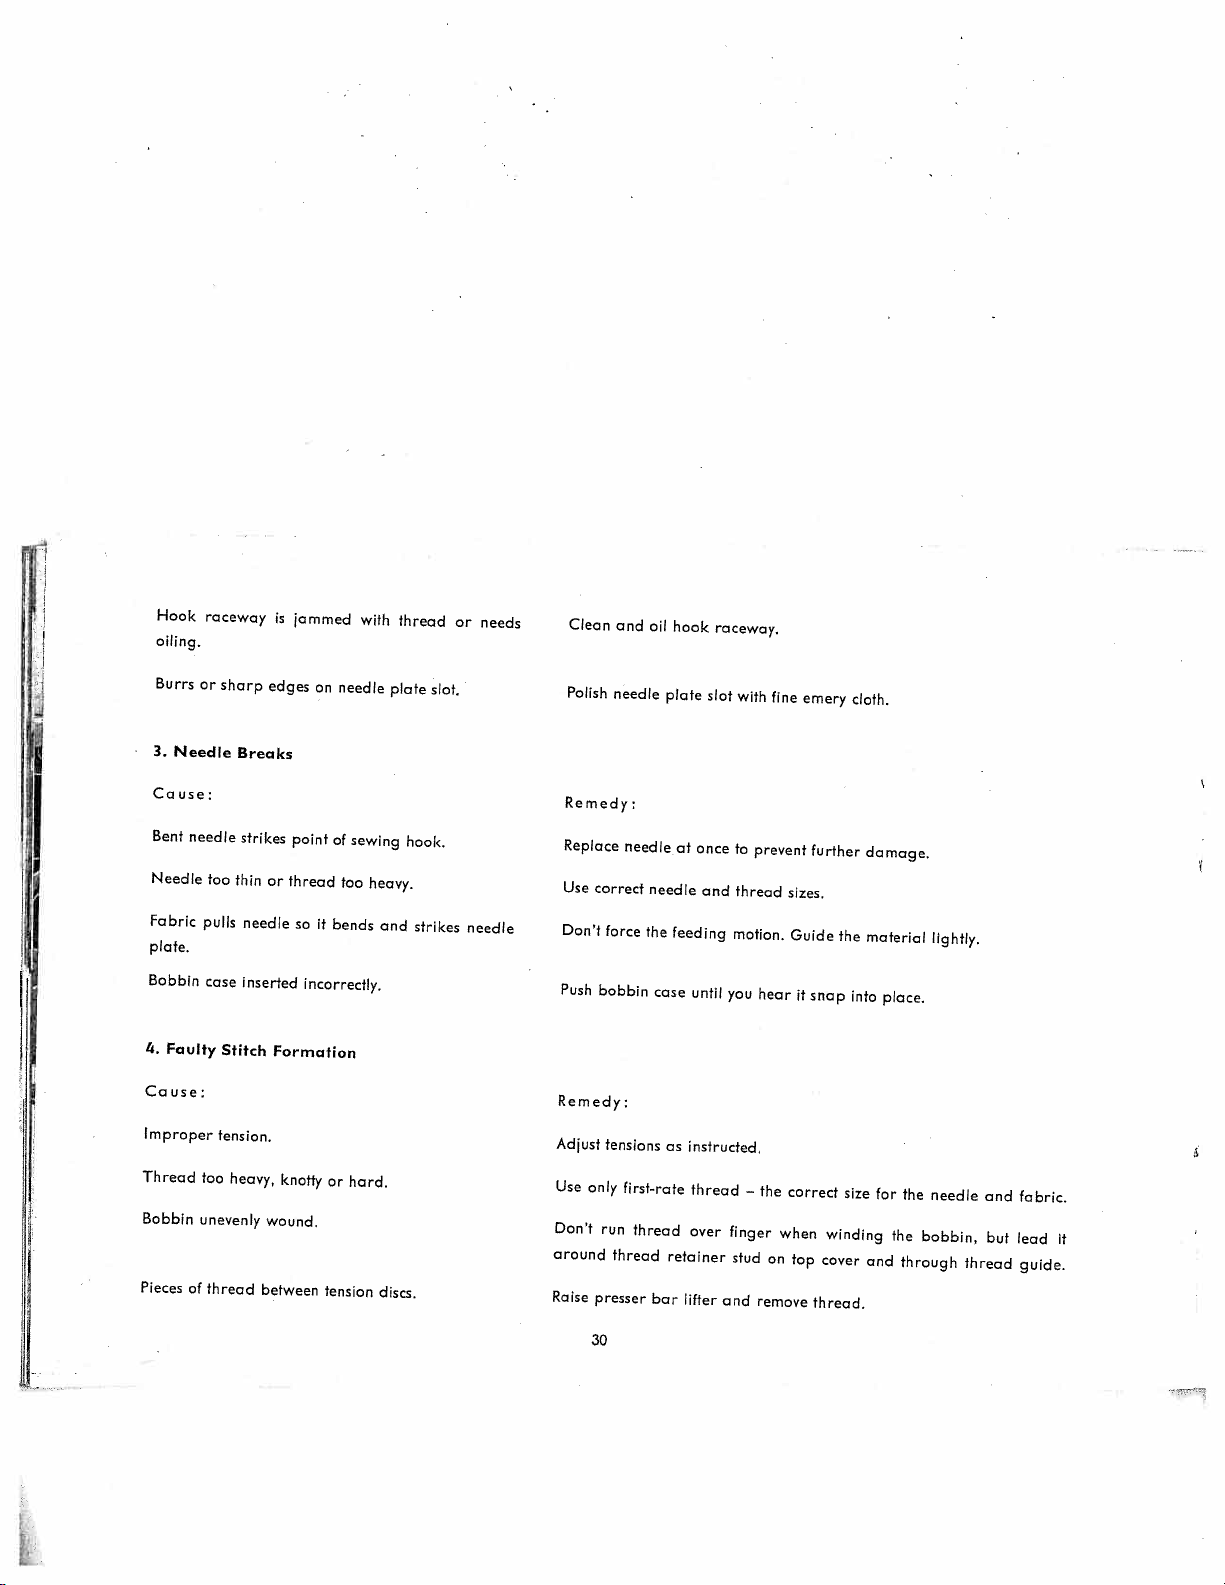
Ca
Bent
Needle
Fabric
plate.
Bobbin
4.
Faulty
or
Needle
use:
needle
pulls
raceway
sharp
Breaks
strikes
too
thin
needle
case
inserted
Stitch
jammed
is
edges
point
or
thread
so
incorrectly.
Formation
on
it
needle
of
sewing
too
bends
with
heavy.
and
thread
plate
hook.
strikes
slot.
or
needs
needle
Clean
Polish
Remedy:
Replace
Use
correct
Don’t
Push
bobbin
and
needle
force
needle
the
oil
hook
plate
needle
feeding
case
at
once
and
until
raceway.
slot
with
to
thread
motion.
you
fine
prevent
hear
emery
sizes.
Guide
it
further
snap
the
cloth.
damage.
material
into
lightly.
place.
il[.
Cause:
Improper
Thread
Bobbin
Pieces
tension.
too
unevenly
of
thread
heavy,
knotty
wound.
between
or
hard.
tension
discs.
Remedy:
Adjust
Use
only
Don’t
around
Raise
tensions
run
thread
presser
30
first-rate
thread
bar
as
instructed.
thread
over
retainer
lifter
finger
stud
and
—
the
remove
on
correct
when
top
winding
cover
thread.
size
and
for
the
the
through
needle
bobbin,
and
but
thread
fabric.
lead
guide.
it
Page 32

Machine
5.
Cause:
dog
Feed
plate
needle
Accumulations
Machine
6.
Cause:
belt
Motor
bearings.
on
raceway
Hook
thread.
Mechanism
Bobbin
bobbin
set
has
winder
is
Feeds
too
level.
of
Works
shrunk
clogged
not
Improperly
does
low,
lint
lacks
working
being
not
pocked
Heavily
and
or
oil
inferior
by
filled.>
rise
between
causes
obstructed
is
while
enough
up
excessive
oil.
sewing
feed
by
obove
teeth.
pressure
pieces
(when
Remedy:
with
adjustment.
brush.
stiff
a
Hove
Take
your
off
Pfoff
needle
dealer
plate
and
make
the
remove
necessary
lint
Remedy:
28).
page
(see
adjusting
by
belt
motor
Loosen
raceway.
hook
oil
and
of
Clean
machine
sewing
Pfaff
only
Use
winder.
bobbin
Stop
a
idler
oil
—
never
salad
oil
glycerine.
or
Thread
The
thread
If
come
Thread
new
hard
Jamming
PFAFF
should
working
jamming
rotary
happen
can
of
hook
to
the
be
will
jam
mechanisiii.
avoided,
not
the
in
however,
normally
raceway
of
following
by
Earn,
the
even
sewing
the
the
if
31
machine
the
hook,
instructions
should
power
on
of
page
the
be
5.
handled
motor
improperly.
be
will
sufficient
over
to
Page 33

Zipper
Machine
or
Pin
of
fabric.
whether
fabric
right
to
edge
left
the
up
Use
tion.
other
tions
baste
to
other
types
in
Insertion
Setting:
Position
not
or
overlap
side.
of
zipper,
right
of
your
closed
Run
side
edge
zipper
zipper
you
a
in
.
A—0
zipper
zipper
of
want
zipper.
the
straight
stitch
one
footasa
of
insertion,
packoge.
V
.
wrong
on
depends
edge
the
Turn
seam
across
continuous
follow
close
end
guide.
of
fabric
opera
direc
side
the
and
For
Stitching
Edge
4
—
or
from
edge
The
machine
For
edge
as
a
B
zigzag
the
seam
stitcher
seam
bed
wider
guide
guide.
—0to4
rows
various
using
by
53077
thumb
stitching,
use
and
A
of
distances
and
gauge).
to
low
straight
adlustable
the
the
screw.
turn
end
Machine
Sew
on
stitches
fobric
guide
to
(without
guide
with
Setting:
parallel
at
edge
No.
is
the
quilting
fastened
long
marginal
turn
half
a
Quilting
4
—
B
.
2
or
—0
No.
sews
the
guide
preceding
cosies,
be
can
A
350
41
parallel
entire
the
row
slippers
quilted.
used
surface
gauge
stitches.
of
with
seat
rows
of
finger
the
of
the
pads
Machine
stitcher
Edge
quilting
stitching
fabric.
along
Attractive
covers
and
Setting:
gauge
over
Always
the
teo
R8033
8032
32
R
Page 34

41242
Flat
Felled
Seams
Second
Open
into
placed
The
the
felling
close
felling
Seam
two
foot
foot
pieces,
to
opening,
the
edge
has
a
place
but
needle
and
them
stitch
not
slot,
under
down
beyond
rather
the
it.
than
to
4
needle
the
a
needle
Machine
Flat
two
Flat
felling
First
Lay
1
/a
folded
stitched
truding
twice.
right
left.
felled
operations.
felled
on
Seam
pieces
inch.
over
down. Make
seam
side
Make
hole,
Setting:
seams
seams
elasticized
together
Feed
edge
allowance
up,
sure
to
permit
both
that
are
usually
pieces
of
insert
A
—0
used
fabrics
with
top
sure
seam
second
zigzag
is
or2(optional)
durably
to
are
straight
only.
wrong
the
into
felling
piece
and
that
pro
notfolded
ridge
seam
is
felling.
join
stitched.
sides
foot,
—
B
two
facing
as
illustrated,
4
pieces
Narrow
and
of
zigzag
the
so
fabric.
bottom
that
They
stitches
piece
the
bottom
are
made
are
used
protruding
fabric
in
far
is
33
R7154
Page 35

46267
1248
h
Machine
Rolled
fabrics.
thread
hem
tricot
widest
effect.
V
Rolled
Setting:
hems
are
Forasmooth,
slightly
tension
fabrics,
stitch so
zigzag
Hems
A—2to4
usedtofinish
unpuckered
and
set
increase
the
the
hem
4
.
B—
hem,
and
delicate
ease
use
shell
the
sheer or
dialAon2or3,To
tension
hasarolled
Machine
The
want
with
on
the
tion
that
edge
feed
and
ends
press
on
to
Setting:
hemmer
to
sew
straightorzigzag
typeoffabric
the
corner
into
the
the
raw
of
the
less,
the
the
raw
by
slowing down
the
the
left
endofthe
the
Hemming
foot
a
the
of
hemmer
edgeisin
hemmer
fabric
edge
fabric
side
uniform
against
of
A—Oor2to4
is
indispensableifyou
hem.
You
depending
stitches,
are
foot.
Feed
line
foot
opening.Ifyou
not be
show.
feeding.
the
foot
before
using.
with
folded
Avoid
To
needle
you
fabrictofacilitate
will
will
the
hem.
.
can
Clip
fabric
the
do
you
B—
hem
inser
twice
ugly
this,
plate
come
4
off
so
left
*
34
R5915
Page 36

57378
Two
loined
center
foot
wide
similar
with
strip.
so
zigzag
that
pieces
zigzag
Place
the
stitches.
of
stitches.
the
abutted
fabric
selvaged
edges
Hem
MachineSetting:
which
Worn
edges
are
raw
edges
do
bed
of
centered
of
not
sheets
the
sheet.
.4
ravel
may
remaining
under
Machine
Overcasting
the
cast
A—3or4
easily
be
mended
pieces
the
needle
edges
Butt
may
needle.
Setting:
taking
after
Seaming
be
this
of
sheet
Join
Overcasting
prevents
one
fabric
butted
way.
under
them
A—
2
frayed
stitch
together
Cut
the
with
to
is
out
Edges
4
edges.
into
cut
and
51378
and
worn
sewing
closes
B—
the
Use
fabric
before
4
a
long,
wide
zigzag
stitch
and
sew
edge
the
and
the
pieces
other
are
over
loined.
its
edge.
You
may
over-
7169
R
with
35
Page 37

Attaching
Lace
51378
R7161
—
Machine
You
First
Press
with
narrow
side
close
V
con
fold
fold.
Setting:
attach
fabric
Overlap
zigzog
to
seam.
A—Ito
lace
down
stitches.
lace
edging
/e
on
3
inch
Trim
in
folded
B—
one
with
excess
4
simple
the
edge.
fobric
operation.
fabric
Sew
together
on
wrong
groin.
Machine
This
the
and
along
work
way
the
and
Turn
narrow
and
seam.
lined
Setting:
sewing
lace
over
attach
both
over
between
insertion.
press.
work
zigzag
overcast
Trim
in
the
Inserting
job
takes
the
with
a
edges
and
slit
the
two
Fold
to
right
stitch
edges,
away
preceding
A—I
desired
line
of
the
rows
edges
side,
making
excess
Lace
to
two
area
of
the
fabric
of
of
set
of
material
section.
3
operations.
of
straight
lace.
about
stitching
material
machine
medium
a
firm,
B—
the
fabric
stitching
Turn
under
back
for
length,
elastic
as
4
Place
the
half
a
r
out
R7170
36
R7177
Page 38

5137
-
For
additional
strength
stitch
over
corners
twice.
Machine
Large
fabrics.
over
Turn
the
over
Setting
holes
Cut
damaged
and
tnserting
can
patch
trim
A—4
be
so
patched
that
area.
close
Patches
B
its
Sew
seams.
to
—
quickly.
grain
down
it
will
The
following
match
with
jersey
for
used
be
of
zigzag
the
may
fabric.
stitch
of
Place
medium
the
patch
length.
method
rest
the
wide
a
‘CS
“I
37
R7157
Page 39

SingIeNeedIe
Machine
Trace
through
your
lightly.
added
thread.
Setting:
cording
the
pattern
The
effects
Set
V
pattern
groove
with
satin
stitch
Cording
A
a
stitch
sew
length
—2
in
satin
over
on
the
used
is
between
stitch
4
—
B
and
fabric
the
sole
of
and
for
embroidery
1/2
hold
many
pull
sewing
with
and
a
the
sewing
1.
filler
thread
foot.
Follow
filler
thread
lobs,
contrasting
For
46121
Machine
Follow
filler
place
top
of
both
are
Width
thread
filler
When
slide
material
distribute
line
of
a
Leave
it
out,
piece
depending
ing
will
above
the
of
you
filler
be
Setting:
thread
fabric.
guided
zigzag
used.
have
fullness.
straight
thread
by
on
exposed.
Shirring
—2
A
directions
under
Fabric
the
in
depends
finished
along
the
Finish
stitching.
the
in
piece,asyou
stresstowhich
the
2hz
to
for
and
shirring,
rather
.
than
filler
grooveofthe
on
thickness
the
zigzag
thread
filler
shirring
the
shirring
straight-stitch,
the
—
B
thread
foot.
seam,
with
or
shirr
4
but
on
of
to
pull
R
7159
38
Page 40

R
7163
6121
Machine
Appliqusing
Trace
of
contrasting
wrong
will
appear
Trim
excess
edges
of
want
to
a
filler
thread.
Setting:
design
side
applique
give
Applique
is
easy
on
material
with
on
material
the
wrong
a
the
with
design
A
—
and
narrow
right
close
Work
11
Jz
to
2
modern,
side
of
to
right
zigzag
side.
to
a
medium-wide
a
plastic
-
fabric
side.
the
B
stitch
seam
effect,
—
and
Outline
——
and
satin
satin-stitch
baste
and
stitch.
a
design
the
sew
piece
motif
over
If
over
you
on
Applique
pinafores,
ings,
Fill
in
design
V
or
small,
with
is
very
bibs,
wherever
but
granite
effective
frocks,
a
essential
covers,
gay
stitches.
on
note
sections
buster
wall
is
suits,
hang
desired.
of
the
R7167
39
R7220
Page 41

46121
R
7166
There
in
appearance
the
25
-square
stitches.
sure
that
are
hundreds
Then
your
Openwork
Machine
to
applique,
box
illustrated.
sew
over
rows
of
Setting:
ef
patterns
straight-stitch
satin
Embroidery
A
—0
excellent
openwork
First,
sew
stitching
and
embroidery
over
lines
are
even
21/a
for
all
openwork
traced
with
a
so
the
When
4
the
Flowers
4
B—
embroidery.
is
much
lines
twice,
medium-wide
corners
of
you
seams.
or
simpler.
your
finish
free
Although
Let’s
using
satin
squares
sewing,
forms
embroider
short
stitch.
look
cut
make
similar
straight
Make
neat.
out
very
every
attractive
other
square.
designs.
Be
C
careful
that
you
don’t
injure
I
9
9
-‘
V
7
R7179
Page 42

R
7221
51378
Machine
animals
Stuffed
they
and
or
fabric
need
all
you
Outline
withoutaseam
wadding
them
with
by
pieces
stitch,
satin
glue
tusks,
with
cotton,
of
and
tip
covered
with
Making
Setting:
are
so
oilcloth
for
pattern
into
the
zigzag
a
overcasting
leaving
on
eyes
inserting
trunk.
oilcloth.
Stuffed
—
VJz
A
wonderful
are
easytomake.
and
a
elephant,
this
material
on
allowance.
before
ears
seam.
edges
openings
tack
and
wadding
openings
Close
piece
Attach
with
on
Animals
B—
toys
Some
of
for
and
Insert
you
a
the
for
tail.
through
with
+
for
the
little
scraps
cardboard
instance.
out
cut
some
fold
and
ears
and
medium-wide
tusks.
elephant
Stuff
open
cardboard
folk
pieces
cotton
close
oin
Set
soles
MachineSetting:
Draw
broidery
of
work
is
right,
directionofyour
be
in
46121
outline
added
design
then
Scroliwork
A—4
on
fabric.
hoops.
As
you
wide
with
a
left,
alternating
movements.Anexciting
using
variegated
by
.
Clamp
are
satin
B—I-
following
stitch,
rhythm
the
thread.
work
the
move
into
and
note
em
scrollhoops
the
may
R7222
41
R7150
Page 43

51378
(mitation
Hemsfifcbing
Beautiful
with
Pfaff’s
fabrics,
fabrics
needle
insertion.
Hemstitching
I
Sew
2
Stop
3
Lift
sewing
4
Sew
penetrates
S
If
you
on
the
above.
hemstitching
such
are
has
a
The
first
raw
machine
second
are
making
left
Machine
System
as
batiste,
not
recommended
slightly
hemstitching
is
very
on
when
foot,
turn
row
needle
and
right
130
thicker
simple
the
as
holes
more
Setting:
effects
(wing)
organdy,
left
needle
fabric
shown
at
shank,
needle
(see
of
the
is
in
of
previous
than
turning
A
—
Stitch
on
handkerchiefs,
needle
georgette,
because
the
cannot
sketch).
area
in
fabric
in
the
direction
sketch,
two
lines
points,
V/s
Length:
available
needle
needle
to
be
on
guiding
zigzag
of
pivot
.
B—4
11
/s
blouses,
at
etc.,
are
penetrations
set
screw
be
threaded
hemstitched.
the
right.
of
arrow,
material
stitches
hemstitching,
fabric
Pfaff
well
as
on
Increase
dresses,
stores
suited
must
with
and
parallel
it
descends
alternately
needle,
close
be
the
lower
Tension
and
at
extra
to
hemstitching
up.
turned
automatic
foot
to
first
on
leave
and
so
forth,
cast.
Since
out
again.
row
the
right.
needle
proceed
Loosely
the
far
needle
so
can
while
that
as
be
mode
woven
woolly
hemstitching
enough
threader.
needle
in
fabric
directed
for
1
R
7138
r
42
R
7140
Page 44

R
7173
Hemstitching
.4
Hemstitching
an
Draw
stitch
in
thread
the
ordinary
several
and
both
bar
length
sew
rows
you
is
needle.
threads
along
are
width
wont.
successful
both
exactly
you
Zigzag
on
out
edges
desire.
linen
of
the
opposite
Draw
along
and
fabric.
of
the
strip,
each
threads
this
twilled
Set
other.
line
fabrics.
machine
making
from
——
and
Set
for
sure
stitch
the
you
this
For
medium-wide
a
that
“zigs”
length
until
edge
have
will
type
your
of
work
zigzag
and
according
fringe
edging.
picot
use
zags”
to
is
R7139
45669
Biindstitching
task.
once
hem.
the
will
Maximum
You
foot
Pfaff
foot
slot.
(Fig.
Guide
blindstitch
and
be
not
condoit
No.
store.
Use
uriselvaged
1),
work
stitch
right
visible
51378
Attach
a
guide.
easily
with
the
No.
evenly,
Set
up
top
on
70
to
Stitch
Length:
laborious
Use
buyatyour
sewing
the
needle.
in
material
baste
or
flange
folded
stitches
zigzag
of
edge
and
medium
on
No.
vertical
upper
procedure:
2).
edge
needle
edge.
skirts
46669,
tension
sidel
It
takes
When
Setting:
flange
is
against
Machine
your
over
so
a
follow
fabric
twice
A
so
dresses
PFAFF
guide
that
loose
top
that
hem
the
its
this
wrong
(Fig.
hem
Hemming
I
on
blindstitch
guide
needle,
Next
Turn
2
fabric
holding
dial
or
by
and
which
and
Fold
up.
advisable
left
hem
B—
hand
heavy
goes
the
stitch
is
fabrics.
can
you
through
thread
thin
selvaged
to
press
vertical
in
finished,
is
a
the
side.
43
Page 45

Sewing
Buttonholes
R
8145
Machine
Attach
length
red
end
The
settings
V
buttonhole
desired.
basic
are
Setting:
of
slide
machine
made
A
foot
The
indicator
settings
by
—
11/2
No.
buttonhole
(see
simply
.
B
51016
is
arrow).
need
pushing
the
—
not
and
right
lever
be
Stitch
set
slide
length
changed
F
up
Length:
on
when
in
(for
tying
If
you
tonholes,
the
correct
of
scrap
to
place
and
layers.
buttonhole
beginning
sewing
oft)
prefer
hole
in
stitch
material.
a
knit
0.2
a
or
pull
left
length,
piece
fabrics,
gouge
of
first
buttonhole.
down
(for
more
prominent
a
filler
toe
of
foot.
sew
In
making
of
tissue
insert
to
buttonhole
seam
All
bartacking).
cord
through
To
on
a
paper
a
piece
reaches
special
but
get
the
piece
buttonholes
under
of
firmly
the
in
soft
material.
woven
or
loosely
To
cotton
woven
strengthen
material
fabrics,
buttonholes
between
it
is
R
advisable
in
tricot
the
fabric
8042
R7994
44
Page 46

Instructions
for
Buttonholing
4
5
6
0
Release
row
Press
Push
leverF.Trim
and
stop
lever
F
lever
Fupand
filler
cord
about4to6stitches
down. Make
make
second
3to4
p
0
at
end
of
first
from
end
of
tack,asinstructed
tying
stitches.
stitch
first
row.
row.
above.
Sew
second
I
Sew
first
seam
reaches
the
right
its
throw.
2
Lift
foot,
a
pivot.
cord
taut
ing.
3
Press
leverFdown.
ly
closing
bar.
side
length.
turn
Lower
and
together
over
slide
fabric
foot,
lay
a
indicator
Leave
around
take
parallel
ii
Make4to
buttonhole
filler
needle
one
cord.
When
on
buttonhole
in
fabric
clockwise,
stitch to
to
completed
bortack
6
end
to
on
using
the
stitches,
reduce
beginning
gauge,
right
needle
left,
pull
line
of
length
side
filler
stitch
slight
of
it
is
of
as
of
7
Trim
both
the
sewing
and
filler
your
seam
ripper.
Be
careful
not
threads.
to
injure
Open
the
the
bartacks.
buttonhole
with
45
Page 47

46120
Button
R7160
Sewing
Don’tbeofroidtosew
Attach
Mochine
Place
or
two
right
make
button
Setting
button
under
tying
stitches.
hole.
Start
twoorthree
sewing
machine
A
—0
button
tying
foot
Roise
When sewingonfour-hole
of
holes.
Hooks,
eyesorrings
are
buttons,
on
No.
B
sewing
needle.
and
stitches.
buttons,
attached
46120
—
foot
sew as
Turn
lift
in
the
hooks,
ond
drop
and align
dialAto
many
zigzag
foot,
same
eyesorrings
machine
so
thot needle
the
stitches
reposition
manner.
feed.
right,
as
button
with
your
will
enter
usuallyto3,
deem
you
repeat
and
PFAFF.
left
hole.
Let
until
needleonthe
necessarytofasten
the
above
process,
needle
titch
rightofits
button
stitching
through
securely.
through
hole
and
make
throwiscentered
Push
leverFup
the
second
one
over
and
pair
46
Page 48

Attach
of
the
ed,
will
the
be
darning
face
presser
released
footasinstructed
cover
with
bar
—
and
darning
lifter
the
must
thread
hook
be
on
page
No.46128.
lowered
will
24,
and
activate
to
jaminthe
tautness
Ta
in
as
Even
machine.
Remove
movement.
fasten
machine,
the
front
illustrated.
suspend
though
the
tension,
presser
of
fabric
the
slip
edge
presser
the
Darning
You
darn
foot
feed
its
presser
or
will
and
cover
spring
the
of
bar
the
really
sleeves
and
permit
into
needle
from
bar
upper
drop
plate
the
suspend
is
appreciate
and
machine
to
the
plate,
rear
tension
socks.
free
the
slot
feed.
the
Use
free
feed
arm
cover
of
your
PFAFF
360
when
you
plate
No.60407
to
increase
R
6121
Machine
Use
special
sweater
foot.
unworn
in
Place
Setting:
darning
sleeves
thread
area.
and
Sew
A
foot
back
—3
other
across
.
B
—
No.51050
woolen
forth
and
filler
4’
(available
articles.
across
thread
at
Lace
damaged
with
extra
filler
zigzag
cost)
thread
spot
stitches
(top
for
through
(bottom
darning
picture)
47
woolen
the
hole
and
picture).
socks,
in
anchor
the
if
R6122
Page 49

R6115
5913
R
R
5924
Tubular
Machine
Drop
You
need
trouser
Simply
back
wise,
Use
a
feed.
and
then
thin
Articles
Setting
no
legs
slip
forth
crosswise.
No.
darning
or
them
70
socks
over
across
needle.
Thin
Spots
A
—0
hoop
on
the
the
to
your
free
hole,
—
B
mend
4
sleeves.
PFAFF
arm.
first
360.
Stitch
length
Remember
and
reinforce
short
stitches
worn
section.
hoop
and
rips
Long
sewing
chine
feed
foot
that
move
may
and
and
“a
spots
made
Clamp
it
be
use
stitch
that
freely
darned
without
in
time
saves
have
worn
lengthwise
fabric
under
with
and
into
the
the
hoop.
forward-reverse
nine”
thin
across
darning
needle.
normal
Raise
stitch
control.
with
ma
Small
Darn
trimming
grain.
hale
from
machine
fabric
the
forth
stitches.
area
around
Holes
small
First
over
This
ragged
stitch
one
running
at
right
preceding
anchors
the
and
back
side
at
angles
hole.
medium-size
edges
with
and
forth
to
the
other
speed.
high
and
work
threads
sew
in
the
with
the
holes
across
with
Then
back
unworn
by
fabric
the
the
turn
and
short
48
Page 50

R
5926
46121
Sewing
Machine
procedure
The
machine for satin
seamsdonot
that
Ask
your
Pfaff
ly
at
to
designed
its
your
monogram
versatility
Automatic.
Monogram
Machine
Script
4
little
the
materialata
bar
suspended
into
fabric at
fabric.
give
To
closely
are
Monograms
Setting:
belowisprimarily
Attach
stitch.
A
cord
used
21/2
for
stitcher
to
—
3.B
block letters.
and
sew
4
outlinesofmonogram.
—
overlapatjointsofletters.Toraise monogram,
dealertoshow
and
and delightinthe
you
PFAFF’s
ornamental
countless
Ornamentograph,
stitch
attachment.
creative
Setting:
letters
practice.
Hold
both
your
spaced.
Raise
machine
insert
possibilities
Embroidery
—
accordingtodesired
A
are
best
for
You
will
soon
uniform
and
the
the
beginningofyour
thread
monogram
feed
filler
a
the ingenious.
You
will
whichitadds
monogram embroidery
enjoy
creative
rote.
The
fabric
should
presser
bar
lifter
lowered,
design
ends
and
sew
over
dimensional
and
quality,
set
Watch
thread.
marvel
width
without
embroidery
be held
and
draw
outline,
embroider
Drop
moving
4
B
—
a
once
tautinthe
machine
bobbin
outline
sewing
you
have
thread
hoops
twice.Besure
foot.Itrequires
learnedtomove
hoops,
the
feed,
Lower
up
through
slowly
and
a
presser
needle
the
evenly.
stitches
49
R7165
Page 51

Cording
card
Ta
Cording
extra
at
on
Kit
cost.
your
No.
PFAFF
50177
Automatic,
which
available
is
comprises:
Cording
The
double-needle
use
R
8146
4
tances
cording
3
cord
package
1
screwdriver.
I
heavier
cost.
The
holder
Kit
holders
‘/io,
°/e,
of
3
carding
feet;
I
and
ducts
System
af
Additional
are
cording
interchangeable
ta
easy
is
/a
with
130B
available
attach.
needle
for
7/
plates
needles;
parts
(2
claw>;
at
inch;
extra
and
center
double-needle
dis
with
and
for
R
7370
I
Changing
Bring
Tighten
right.
Use
and
To
7373
R
take-up
System
System
attach
set
carding
the
lever
screw
130
130
Needle
highest
to
securely.
round-shank
B
flat-shank
R
plate,
50
refer
Holder
point,
The
needles
to
loosen
needle
large
needles
in
instructions
in
3/
small
1/to
an
set
and
page
setscrew
screw
5
/64-inch
and
7
/oa-inch
47
and
must
for
change
always
double-needle
needle
mounting
needle
point
holders.
feed
holders.
toward
holders,
cover
the
plate.
Page 52

Increase
cording
size
you
Only
Machine
very
the
so
it
want.
narrow
Setting:
bobbin
keeps
To
thread
its
sew
tucks
A—0
shape
filled
are
tension
in
the
cording,
made
B—.
+
slightly
laundry.
use
without
for
the
filler
cording.
Filler
two
cord
cord.
Pfaff
thickness
cording
recommends
depends
plates
with
you
on
cord
fill
your
cording
ducts.
Cording
serve
Pin
tucks
Cording
Cording
the
cord
also
guide
ing
seam
insures
foot
to
make
also
plate
height
diameter
influence
the
to
into
uniform
No.
narrow
are
No.
and
cording
cording
one
and
41792
made
60415
width
and
foot.
of
parallel
air
size.
the
ond
with
with
the
When
grooves
plate
tucks
are
height
For
rows
No.60417
in
lightweight
cording
high
center
determined
of
uniform
space
of
of
foot
the
ridge
spacing
between
the
foot
cording.
No.
claw
by
R
8156
(with
material.
41792,
is
the
on
of
tucks
and
Additional
Ordinary
cording
For
thicker
center
but
used
chiefly
distance
the
cording
parallel
is
very
use
it
plate
claw,
without
tucks,
narrow,
as
Information
cording
No.
cording
but
for
between
plate.
attach
a
guide.
in
60417.
without
cording
cording
the
Thread
place
This
51
on
medium-heavy
use
foot
No.
cord
plate.
in
thick
two
needles,
tensions.
an
adjustable
the
preced
procedure
duct)
felt.
Cording
fabric
41790
R6945
with
is
made
cording
with
plate
cording
No.
foot
60419.
No.
41791
and
Page 53

-
5137Q
You
can make
stitching,
F
Some
Surely
PFAFF
do
beautiful
varying
downinrhythm.
of
these
you
will
360-261
this
lob
decorative
V
Ornamental
exciting
stitch
designs
are
be
pleasedtoknow
Automaticatany
for
you.
With
designs
fashion
length,
illustrated
the
Sewing
stitch
stitch
time. Just
PFAFF
completely
designsbyalternating
width
or needle
below.
that
your
PFAFF
see
your
Automatic
you
automatically
R
5414
straight
position.
Pfaff
Todothis,
360
canbeconverted
dealer
can
sewanendless
who
andassimplyasany
The
PFAFF36O-261
Operationofthis
special
skill.
With
the
aidofthe
be
set
for any
desired
Picturedonboth
In
addition,
using
countless
oneortwo
imagine.
and
press
willbeglad
variety
plain
Automatic
versatile
embroidery
stitch
sides
of
variations
needles.
zigzag
control
into
a
to
of
seam.
machine
design
matterofseconds.
in
a
the
dial
are
The
rangeofpossible
R
8069
is
surprisingly
dial
(see
above
only
the
are
primary
possiblebychanging
combinationsisstaggering
simple
and
illustration) the
designs
the
does
not
the
machine can
lengthofthe
require
machine
pattern
even
A
any
can
do.
or
to
52
Page 54

The
Transverse
Spool
Holder
To
ensure
that
transverse
the
machine.
To
attach
the
the
on spool
slot. With
portionofthe
bent
pin
the
2.
pin,asrequired.
in
place
firmly. Pass
instructed.
ihe
spool
spooi
Press
spring
thread
the
When
holder
holder,
spring
position
pressed
you
the
will
release
thread
unwind
which
slip
position
pointing
spring
together,
through
evenly
is
partofthe
toward
together,
adjust
spring,
the
fromacrosswound
standard
springIover
you. Push
and
its
positiononthe
the
transverse
eyelet
3,
and
push
thread
equipment
the
vertical
the
pin2into
spool,
your
of
spooi
spoolofthread
the
spring
vertical
spool
pin
will
be held
the
machine as
use
pin,
R
6533
53
Page 55

Foreword
Essential
Electrical
Fundamentals
Straight
Zigzag
Winding
Inserting
Removing
Inserting
Recommended
Important
Upper
Threading
Operating
Drawing
Correct
Regulating
Stitch
Length
Reverse
Dropping
Changing
The
Darning
Care
and
Regular
Sewlight
The
Snap-Out
Adjusting
Trouble
Zipper
Shooting
Insertion
.
Ports
Information
Stitching
Sewing
the
Bobbin
Full
a
the
Bobbin
the
Bobbin
Facts
the
Needle
Up
the
Tension
the
Thread
Regulation
Sewing
the
Machine
the
Sewing
Foot
Maintenance
Machine
Facts
Workplate
the
Motor
of
Machine
of
Machine
Bobbin
Case
Needle
about
Bobbin
Regulation
Care
Belt
into
Case
and
Needles
Threader
Thread
Tension
Feed
Foot
Tension
Operation
Bobbin
Thread
Case
Sizes
Page
.2
.6
.7
.8
10
10
11
12
13
Contents
4
5
Edge
Stitching
Quilting
Flat
Felled
Rolled
Hemming
Overcasting
Butt
Seaming
Attaching
Inserting
Inserting
Single-Needle
Shirring
Applique
Openwork
Making
Scrollwork
Imitation
Hemstitching
Blindstitching
Sewing
Buttonholes
Button
Sewing
Darning
Monogram
Sewing
Monograms
Cording
Ornamental
The
PFAFF
The
Transverse
Seams
Hems
Edges
Lace
Lace
Patches
Cording
Work
Embroidery
Stuffed
Animals
Hemstitching
Embroidery
Sewing
360-261
Spool
.
.
.
.
.
.
.
.
.
.
.
.
Automatic
Holder
Page
32
32
33
34
34
35
35
36
36
37
38
38
39
40
41
41
42
43
43
44
46
47
49
49
50
52
52
 Loading...