

Page 1
Instruction
book
Pfaff
3516-1/24;
-1/25;
-1/24-928/01;
-1/25-928/01;
-1/28-928/01
No.
29M2-13
097
engl.
HO
97^
Page 2
Contents
Page
1.
2.
3.
4.
5.
6.
7.
8.
9.
General
flaking
Inserting
Winding
Removing
Inserting
Regulating
Inserting
Threading
Regulating
Instructions
the
the
the
the
the
the
the
machine
needle
bobbin
bobbin
bobbin
the
bobbin
bobbin
needle
the
needle
ready
case
case
for
thread
thread
operation
tension
tension
3
3
4
7
7
^
8
8
11
10.
11,
12.
13.
14.
15*
16.
17.
Inserting
Enlarging
Setting
selector
Adjusting
dart
blade
Sewing
Switching
Needle
Machine
and
and
care
and
the
changing
the
off
thread
removing
dart
front
the
depth
machine
breakage
the
the
position
dart
dart
length
stop
blade
of
the
11
12
1
13
13
l4
17
17
o
Page 3
Additional
Instructions
^
18,
18.1.
19•
Additional
Pfaff
3516-1/2^
Threading
with
Additional
Pfaff
new-type
3516-1/24-928/01
instructions
the
needle
thread
instructions
and
-1/25
(Pfaff
monitor)
and
for
for
the
463
the
-1/25-
sewing
head
Page
21
23
928/01
19»1*
2O0
20.1,
21.
Winding
Additional
-1/25
Switching
Additional
the
instructions
and
-1/25-928/01
on
instructions
bobbin
the
start
(Pfaff
for
for
and
the
433
finish
the
Pfaff
sewing
Pfaff
bar
head)
3516
tacks
24
3516-1/28-928/01
Page 4

General
instructions
Page 5
' V
Page 6

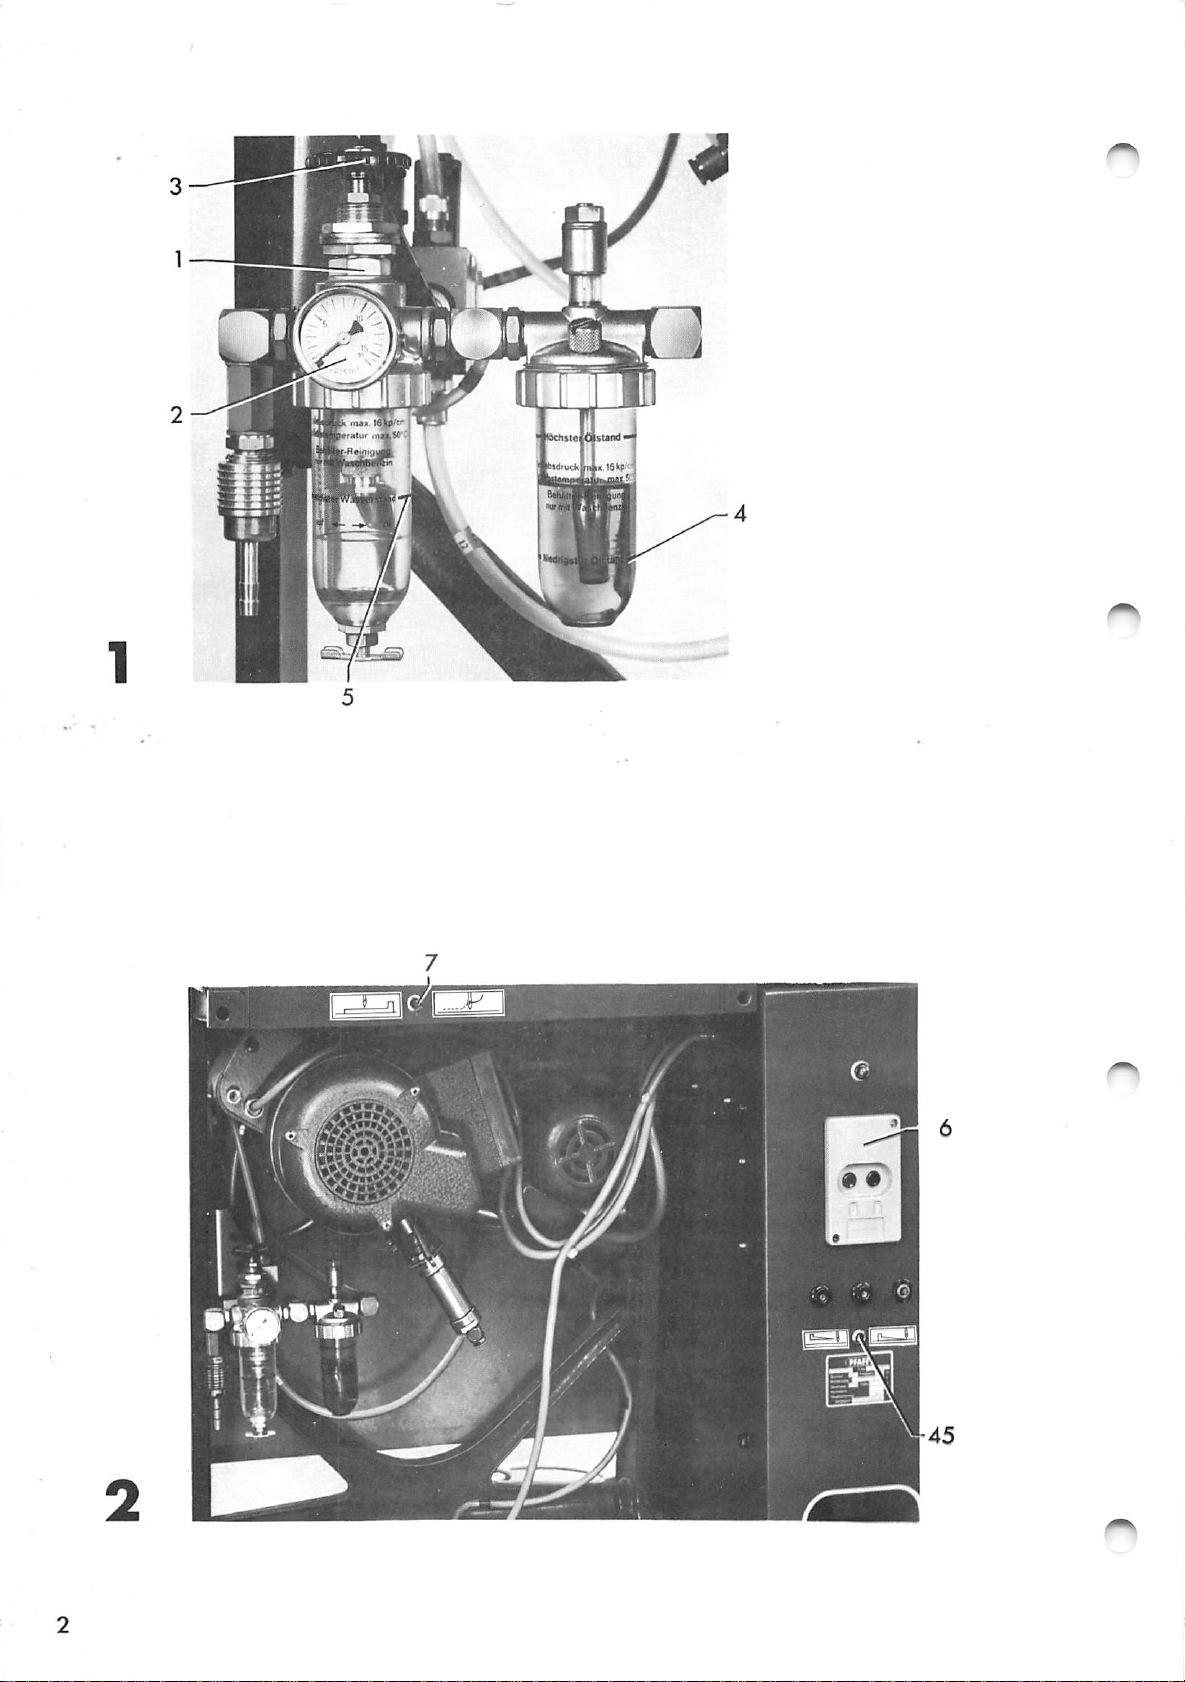
1»
Making
the
machine
ready
for
operation
(Fiia:s«
1
and
2)
1.1.
Compressed
It
is
best
at
the
unit
•
Open
the
ditioning
cates
sary,
valve
a
adjust
3.
V.^henever
check
unit
5.
For
the
lo
and
further
main
valve
unit
working
you
oil
The
the
air
to
line
this
switch
oil
water
details,
(Fig,
switch
rather
at
1
whether
pressure
and
level
level
l)
the
the
main
pressure
on
water
must
please
air
than
presstire
of
the
levels
must
supply
at
line
6
kg/cm
at
pressure
machine,
in
not
drop
not
refer
on
the
conditioning
and
check
gauge
.
make
conditioning
below
rise
to
and
2
If
regulating
above
Section
off
at
indi-
neces
sure
mark
mark
con
to
17
1.2.
2.
"Machine
Electric
Tress
machine
Inserting
Switch
As
a
the
needle
If
a
as
follows:
and
loosen
needle
The
automatic
the
toggle
result,
needle
out
care".
power
is
black
now
the
bar
the
of
the
has
Hold
(Fig.
button
ready
needle
switch
work
raised
already
it
needle
the
dart
between
needle
sewer
2)
of
for
7
holder
to
set
master
operation.
(Fig.
its
been
screw.
holder.
uses
2)
bar
highest
inserted,
thumb
only
switch
to
is
and
Tiieii
System
6.
L-i—^ .
lowered
point.
remove
forefinger
pull
13^
The
and
it
the
kK
needles
When
as
faces
set
it
screw.
in
inserting
will
toward
sizes
go
the
and
a
90f
new
tvirn
front.
1^0
needle,
it
Then
and
so
110.
push
that
tighten
it
its
up
the
long
as
needle
far
groove
Page 7

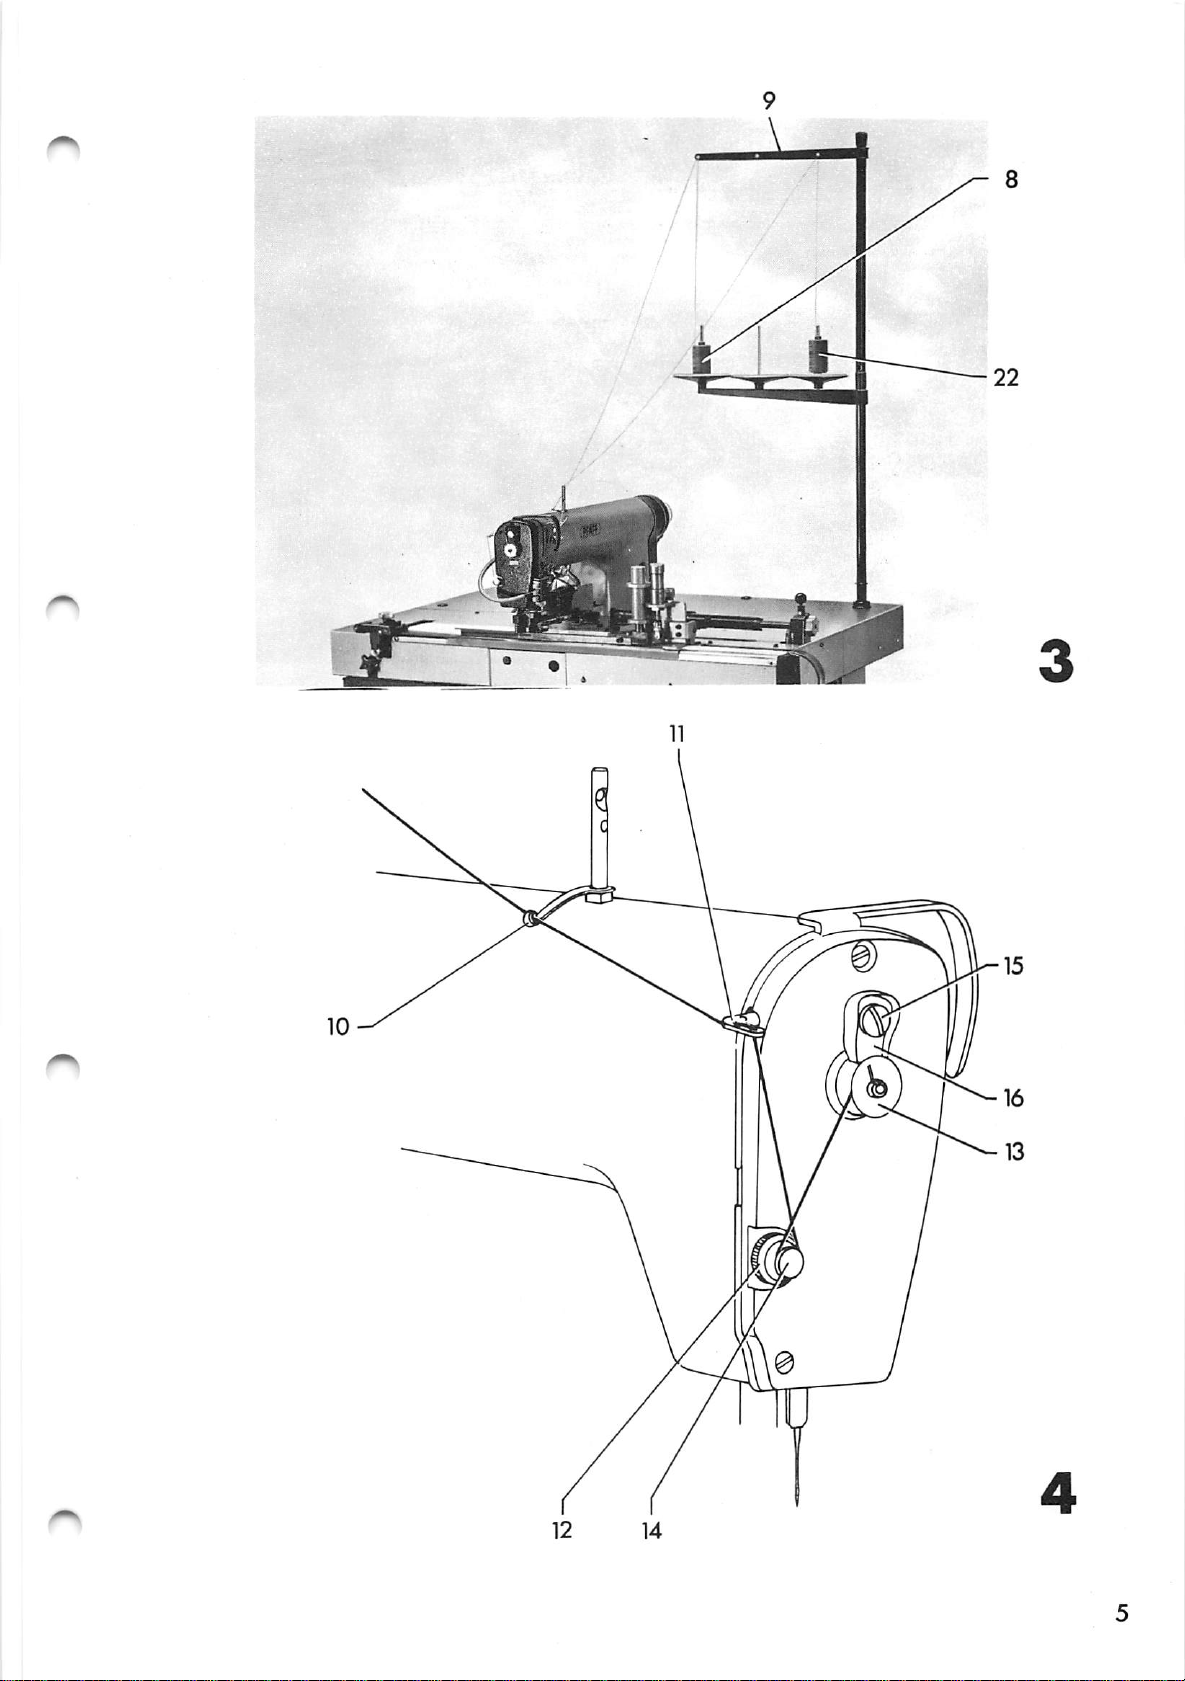
3•
Winding
In
order
the
to
bobbin
avoid
(Pfaff
unnecessary
^63
sewing
interruptions
head)
of
the
3.1«
3o2.
sewing
available
Important
Pfaff
are
operation
3516-1/?!^-928/01
equipped
Threading
Pass
of
both
tension
bobbin
tlie
the
holes
Regulating
operation
at
note
is
the
thread
upper
of
12.
13.
the
all
with
described
machine
thread
thread
Then
thread
it
times.
a
from
wind
is
advisable
and
different
in
for
spool
9,
through
guide
a
tension
-1/23-928/01
Section
bobbin
(Fig.
11
few
turns
bobbin
guide
and
(Fig.
to
have
winder.
19.
winding
3)
through
clockwise
of
4)
10
thread
a
full
machines
Its
(figs.
a
(Fig.
around
clockwise
hole
^),
bobbin
3
and
through
on
30.
The
thread
disc
l^u
tension,
For
sewing
the
tension
Adjusting
Tension
runs
an
If
out
To
onto
even
adjustment
by
adjust
bobbin,
vertically.
Set
the
tension
Turn
or
counter-clockwise,
monofil
to
and
12
should
the
distribution
a
mechanic.
the
loosen
stop
this
a
starting
middle
is
amount
screw
dog
is
disc
and
minimum.
be
so
of
of
required,
of
15
higher
regulated
cloclcwise
transparent
the
bobbin
adjusted
the
the
this
thread
and
for
bobbin.
thread
adjust
more
by
to
that
will
to
thread,
turning
to
decrease
increase
threads
winder
the
This
on
the
be
be
wound
stop
knurled
it.
reduce
(Fig,
thread
ensures
bobbin.
carried
on
dog
or
the
k)
the
l6
lower
for
screw
Push
If
resistance
The
desired
less
bobbin
15.
down
thread.
stop
winder
amount
is
dog
of
After
l6
felt,
stops
thread
the
adjustment,
to
start
turn
the
automatically
has
been
the
bobbin
wound
bobbin
when
tighten
winder.
slightly.
the
on
the
bobbin.
Page 8
I
I
Page 9

Page 10

^•
Removing
the
bobbin
case
(Fig.
3)
5•
Switch
open
Open
out
of
bin
fall
that
by
Hold
slot
emerges
of
your
case
Inserting
Insert
an
toggle
cover
latch
the
out.
the
the
arrow
the
19
left
by
the
bobbin
bobbin
and
at
switch
17
at
l8
(Fig.
sewing
hand.
its
bobbin
full
when
under
its
rear
the
hook
As
open
bobbin
turns
you
fast
the
7
front
5)
latch,
(Fig.
pull
and
end
(Fig.
and
with
long
into
in
the
pull
tension
20.
of
pull
as
6)
the
10)
the
thumb
you
the
the
direction
thread.
the
spring
toI•••
machine
the
and
hold
bobbin
bobbin
thread
bobbin
forefinger
the
cannot
case
indicated
until
I
and
into
(Fig.
case
bob
so
it
5).
Page 11

6.
he.gulatin.g:
the
bobbin
thread
tension
(Fig.
7)
7 o
Turn
or
The
ance
be
threads
(Fig,
Inserting
Open
bobbin
screw
counter-clockwise,
final
of
balanced
8).
the
between
into
the
against
placcc
Then
tension
the
interlock
the
latch
from
thumb
sewing
the
21
clockwise
finished
properly
bobbin
falling
and
bobbin
close
regulation
in
l8
of
forefinger,
hook
cover
out
case
to
seam.
so
the
case
the
and
to
increase
decrease
Both
that
center
(Fig.
bobbin
of
the
close
until
1?
at
depends
tensions
the
needle
of
3)
case.
case.
insert
the
you
the
it.
the
latch.
hear
front
the
on
Hold
the
thread
the
and
material
This
it
of
appear
should
bobbin
keeps
the
bobbin
Push
snap
the
tension,
the
latch
case
lightly
into
machine.
Threading
Pfaff
Switch
a
result,
for
easy
Important
For
threading
thread
Instructions
Pass
the
hole
thread
the
upper
of
463
toggle
threading.
monitor,
thread
thread
guide
the
sewing
the
note
at
thread
2ko
needle
head
switch
needle
machines
please
the
from
guide
guide
Then
on
?
is
end
spool
23
machines
(Fig,
(Fig,
raised
fitted
refer
of
9
(Figo
and
draw
9)
this
22
the
it
10)
to
with
to
the
booklet.
through
3),
three
into
equipped
to
fr—.
its
highest
a
different
Additional
a
through
holes
thread
with
hole
As
point
of
the
of
retainer
25
(to
do
this,
8
push
the
spring-loaded
sleeve
26
Page 12

Page 13

Page 14

to
the
left
slightly),
from
below
between
tension
under
30
and
"t^ke—up
eyelet
monitor
thread
to
right.
Draw
eye
sewing
In
when
abt.
to
order
using
these
2.k
only.
discs
thread
from
lever
30
so
is
eyelet
2
prevent
begins.
to
threads
27,
regulator
right
31*
that
held
33
inches
unthreading
keep
monofil
through
by
over
to
Lead
finger
and
the
left
the
thread
of
tension
and
thread
one
thread
29,
check
through
through
the
thread
32
of
thread.
the
through
of
the
as
transparent
hole
the
Now
needle
low
of
spring
thread
the
hole
through
thread
pass
the
needle
as
threads,
thread
28,
eyelet
of
thread
it
through
from
needle
when
possible
pass
guide
left
9•
10•
10.1.
10.1.1.
10.1.2.
Regulating
The
needle
ing
nut
cated
The
pearance
Inserting
Insertion
Push
into
Loosen
as
again.
on
final
dart
bracket
far
3^»
a
of
knob
as
the
thread
The
scale.
tension
the
and
removing
blade
36
71
it
will
needle
tension
amount
regulation
finished
35
as
and
go.
with
far
pull
thread
of
seam
the
its
as
bracket
Then
tension
is
regulated
tension
depends
dart
two
it
will
tighten
(see
set
Section
blade
guide
go.
36
the
(Fig.
by
is
on
(Fig.
studs
forward
knob
indi
the
9)
turn
ap
6).
10)
10ol.3*
The
and
machine
length
will
determined
now
sew
by
the
the
dart
dart
at
blade.
the
depth
11
Page 15

10.2,
Removal
10.2,1.
11 •
11.1,
11-1,1,
12.
12.1.
Push
35
Enlarsin.g;
Dart
to
every
unchanged,
lever
forward
blade
bracket
enlarge
dart
37
out
the
35
the
blade
backwards
of
bracket
dart
can
36
dart
depth
be
to
depth
used.
turned
the
Loosen knob 71 and push
distance.
s-etting
Setting
and
Then
changing
tighten
the
and
pull
36.
(FIk,
through
rear.
within
However
bracket
the
knob
dart
dart
10)
This
certain
the
36
again.
length
7^
makes
dart
back
selector
blade
by
length
the
it
limits
required
possible
with
r©mains
(Fig.
11)
-
12.2,
The
hexagonal
with
numbers
Every
To make
selected
blades
To
set
dart
length,
indicated
Changing
owitch
of
master
number
sure
for
are
dart
on
the
switch
dart
1
through
stands
that
every
numbered
length
turn
the
dart
machine
6
length
6
for
a
the
correct
dart
blade
accordingly.
selector
knob
39
blade
off
by
(Fig,
selector
at
its
certain
38
until
is
pushing
13),
right
dart
used,
at
the
at
is
dart
length
all
the
number
the
the
marked
end.
length
dart
correct
top.
red
is
button
12
Page 16

Lift
Swing
ball
the
stud
'lO
rectangular
and
pull
end
knob 39
of
the
towards
hexagonal
the
bar
right.
out
^
13.
of
support
the
right
Push
the
bearing
the
hexagonal
knob
Then
selector
Ad.justing
In
the
depth
stroke
the
Press
39
switch
order
full
front
bracket
toward
of
can
pedal
'il
out
new
on
as
the
to
avoid
length
the
be
edge
43
and
of
bearing
dart
bar
the
the
instructed
front
of
dart
set
of
(Fig#
pull
length
swing
back
left
machine
position
that
its
being
at
four
the
13)
dart
into
again.
in
the
stroke,
sewn,
table.
length
bracket
selector
the
support
and
Section
dart
different
down
into
rectangular
set
12.1.
stop
of
blade
regardless
the
front
to
its
selector
the
'il,
and
the
dart
the
has
end
distances
first
end
dart
to
of
38
left
of
push
length
blade
travel
the
of
from
switch
to
its
•
l4.1.
l4.1.1.
14.1.2.
position.
its
central
and
engage
tive
Care
ficient
its
foremost
slipped
Sewing
Before
toggle
Sewing
Switch
Slip
lustrated
dart
should
space
onto
you
switch
with
toggle
the
This
causes
position.
the
stop
depth.
be
taken,
between
position
the
start
7
dart
switch
workpiece
in
Fig.
blade
sewing,
(Fig.
blade
12,
most
onto
the
Now
suitable
however,
tabletop
to
allow
without
check
13)
at
45
(Fig,
the
and
dart
turn
is
front
dart
press
blade
knob
that
and
the
difficulty.
to
at
I I .
position
13)
pedal
44
for
there
dart
workpiece
make
to
blade
to
(Fig.
the
sure
as
43
move
respec
is
blade
il
(Fig.
to
10)
suf
to
that
in
be
13)
down
dart
pedal
its
number
to
blade
front
is
of
the
moves
released,
position.
times
first
switch
to
to
its
the
dart
This
reposition
position.
central
process
blade
the
position.
again
can
workpiece.
As
be
a
result,
returns
repeated
When
the
the
to
any
13
Page 17

Start
the
machine
by
pushing
pedal
^3
(Fig*
13)
1^,1,6,
1^*2,
down
clamped
strip
dart
Shortly
of
its
is
started,
At
the
bar
reverses
returns
Remove
the
next
pedal
Sewing
as
k7
blade.
travel,
extreme
the
again,
with
far
as
between
and
before
and
to
its
sewn
workpiece
dart
it
work
pulled
the
its
the
right
its
front
part
will
holder
toward
work
speed
bartack
of
direction
position
from
onto
blade
go.
holder
its
the
at
is
the
rear
The
bar
the
reduced,
sewn.
travel,
of
feed,
and
machine,
dart
workpiece
^i6
and
right
bar
reaches
the
the
the
blade
position
off
the
carrier
work
dart
dart
stack
and
is
the
the
sewing
is
depress
end
machine
holder
blade
sewn,
it,
slip
the
1^,2,1,
14.2,2,
15*
Switch
With
cycle
for
However
position
position•
Only
the
the
position),
Switching
When
is
the
sewing
after
work
dart
the
pressed,
toggle
up
the
toggle
to
par,
with
dart
right
the
holder
blade
off
red
the
switch
switch
dart
away,
sewing
bar
return
the
button
machine
14,1,5*
blade
has
machine
of
45
in
blade
does
but
cycle
to
master
(Fig,
this
is
the
at
not
first
has
released
its
(Fig,
is
switched
13)
position,
same
front
return
moves
been
the
starting
13)
switch
to
as
position.
to
completed
workpiece
6
off
the
that
to
its
its
position
(Fig,
instantly.
work
described
front
rear
and
does
(front
13)
14
Page 18

47
46
12
a
13
Page 19

i
m
S"
Page 20

16•
Needle
and
thread
breakage
17•
V;hen
in
the
thread
cycle,
has
completed
(Fig.
Then
13)
insert
Section
instructions
has
been
The
machine
Machine
Conditioning
When
conditioning
The
the
the
oil
water
needle
monitor
however,
to
3,
or
eliminated,
care
machine
level
level
its
a
new
rethread
given
is
unit
unit
must
or
is
now
must
the
^8
not
cycle,
needle,
in
ready
(Fig,
is
every
not
thread
(Fig,
interrupted.
switch
the
Section
switch
for
l^i)
constantly
day.
drop
not
rise
12)
as
needle
toggle
below
breaks,
lights
toggle
instructed
according
9.
After
sewing
in
use,
mark
above
the
up.
When
switch
again.
mark
red
The
the
switch
in
the
7
check
,
and
5*
lamp
sewing
machine
7
to
trouble
to
the
the
17»2.
17*3»
To
drain
three
tighten
If
required,
container
Oiling
There
tion
between
(Fig.
No.
On
28O-I-12O
machines
apply
foam
intervals
Cleaning
turns.
the
should
system
16).
a
plastic
the
drain
50•
the
few
the
water,
When
screw
have
machine
be
so
two
If
required,
equipped
drops
pad
(see
hiachine
enough
that
marks
ikk)
arrows
the
a
through
of
of
open
water
^9
securely
mechanic
(Figs.
oil
the
on
with
oil
the
in
drain
13
oil
oil
top
Pfaff
to
needle
Fig,
has
in
level
up
hole
the
top
and
the
sight
15)*
screw
been
again.
up
16)
the
52.
^63
upper
bar
hook
is
glass
oil
at
'19
drained,
the
lubrica
located
sewing
and
regular
two
oil
51
(Order
lower
to
in
head,
Regularly
of
the
To
get
the
front
remove
sewing
at
the
of
hook
hook,
the
the
with
open
machine.
lint.
a
cover
Clean
soft
the
brush
17
vicinity
every
(Fig.
day.
5)
17
Page 21

o
Additional
Instructions
Page 22

18,
Additional
and
-1/25
instructions
for
the
Pfaff
3516-1/24
l8,l.
Threading
new-type
Switch
Pass
a
then
17.
Make
tainer
sleeve
front
is
right.
Then
the
hole
thread
sure
of
drawn
switch
thread
toggle
thread
of
25
26
wire
through
the
the
the
the
(to
to
toggle
needle
switch
thread
thread
do
the
32
monitor
from
machine
this,
left
of
the
the
svritch 7
(Pfaff
7
(Fig.
the
spool
guide
as
is
drawn
push
slightly),
thread
needle
463
sewing
13)
to
up
on
the
illustrated
into
the
spring-loaded
monitor,
eye
from
(Fig.
I 1**n|
and
thread
thread
passes
13)
head
through
in
in
and
left
to
with
stand,
Fig.
re
to
\
21
Page 23

Page 24

19
•
Additional
and
-1/25-928/01
instructions
for
the
Pfaff
3516-1/2^-928/01
19.1.
19*I*1*
19.1.2.
^
19.1.3.
19.1.^i.
Windinjz;
Pass
hole
then
the
of
thread
illustrated
thread
sure
1.1
loaded
The
kniirled
to
wise,
To
the
(to
thread
decrease
start
spindle
IP
the
bobbin,
the
bobbin
thread
the
thread
the
in
counter-clockwise
thread
do
this,
sleeve
1.2).
tension
disc
to
with
thread
the
increase
the
your
1.3.
bobbin
piles
adjust
from
machine
Fig.
is
slightly
Turn
tension,
it.
thumb
thread
(Pfaff
the
guide
18,
drawn
is
winder,
up
483
spool
on
for
Wind
on
into
push
regulated
this
or
(see
on
one
guide
sewing
up
and
the
thread
bobbin
a
bobbin
thread
few
winding
turns
13.
down
by
turning
disc
counter-clock-
push
clockwise
in
arrow).
side
1.4
of
accordingly.
head)
through
retainer
the
the
the
a
stand,
as
of
Make
spring-
winder
19.2.4.
19.2.
19.2.1.
The
amount
bin
is
adjusting
Threading
Switch
Pass
a
then
19.
Make
tainer
sleeve
front
is
r
the
hole
thread
sure
drawn
ight.
regulated
toggle
thread
of
25
26
of
wire
through
of
stud
the
the
the
(to
to
thread
needle
the
the
by
1.6.
switch
from
thread
machine
thread
do
this,
left
32
of
the
to
be
loosening
(Pfaff
7
(Fig,
the
guide
as
is
drawn
push
slightly),
the
thread
needle
wound
spool
on
illustrated
screw
483
13)
up
the
into
the
monitor,
eye
on
the
1.5
sewing
to
and
thread
spring-loaded
head)
I' "
through
in
thread
passes
from
left
bob
and
^1
stand,
Fig.
re
in
and
to
Then
switch
toggle
switch
7
(Fig.
13)
to
23
Page 25

20.
Additional
and
-l/25-92fi/01
instructions
for
the
Plaff
3516-1/25
20.1.
20.1.1.
20.1.2.
Swiichin.G;
Switch
In
this
the
beginning
Switch
In
this
and
end
on
tlie
toggle
position of
toggle
position
of
switch
of
switch
the
start
the
of
seam
the
the
and
1.7
$eam
1.7
are
finish
to
switch,
only.
IP 1I •
switch,
backtacked.
bartacks
1f~~11
a
the
tack
beginning
(Fi
.
is
made
at
Page 26

PFAFF
INDUSTRIEMASCHINEN
GMBH
r^
KAISERSLAUTERN
Gedrucktinder
Bundesrepublik
Deutschland-PrintedinWest
Germany-ImprimeenR.F^.•Impresoenla
R.F.A.
 Loading...