

Page 1
£
268
269
CPFMD
Instruction
Mode
Instrucciones
Manual
d'emploi
de
Book
de
servicio
instru96es
trmsr
Page 2
General
It is
recommended
to
run
the
Pfaff
268
and
269ata
maximum
speed
When sewing tightly woven and heavily dressed materials, the sewing
reducedinordertoprevent
To
avoid
troubleinthe
until
all
partsinmovable
This
should
normallybethe
All
machines
steady
hand.
The
presser
On
machines
by
meansofthis
with
your
are
shipped
left
footisraised
equipped
lever.
the
mechanism,
contact
case
with
hand
and
by
with
needle
have
after
the
means
knee
overheating.
run
become
about
balance
turn
the
lever
the
machineatabout75per
thoroughly
two
weeks'
constant
wheel
disengaged.Toengage
large
stop
motion
of a
hand
lever
(special
version)
glazedbytheir
use.
knob
(on
the
backofthe
the
presser
cent
actiononone
clockwise
foot
of
2300
speed
of its
the
wheel, hold it
with
machine
can
alsoberaised
s.p.m.
should be
top
speed
another.
your
right
head).
Fundamentals
Before
you
the
machine
Use a
resin-
Checktomake
Never
run
the
Before
you
To
prevent
Do
not
pull
Use
System
Never
use
rusty
Use
high-quality
Always
bring
Cleaning
Careful
cleaning
On
new
machines
few
drops
raise
the
run briefly.
of
put
the
thoroughly
and
acid-free
sure
the
machine
start
sewing,
thread
jamming,
the
material
130Rneedles
needles.
thread
the
take-up
and
oiling
and
of
kerosene
presser
foot,
Following
machine
machine
regular
takeaclean
(Section
sewing
finger,
unless
lay
during
only.
only.
lever
to all
unthread
this,
into
take-up
you
both
hold
sewing:
to its
oiling
apply
operation
operation
3).
machine
lever
have
fabric
threads
both
highest
will
rag
oiling
the
back
thread
the
increase
and
points
needle,
a few
for
oil only.
and
under
under
ends
machine
point
the
remove
drops
the
belt
the
will
before
service
marked
remove
first
guards
presser
the
until
feed
you
the
of
time,
are
presser
the
the
remove
life of
grease
with
the
resin-
carefully
properly
foot.
foot.
machine
fabric
your
arrows
bobbin
and
remove
fitted.
has
automatically.
the
material.
machine.
from all
in Figs. 1, 2, 3
case,
acid-free
made
bright
and
all
dust,
a few
parts.
let
the
oil to all
then
stitches.
Apply a
and
machine
points
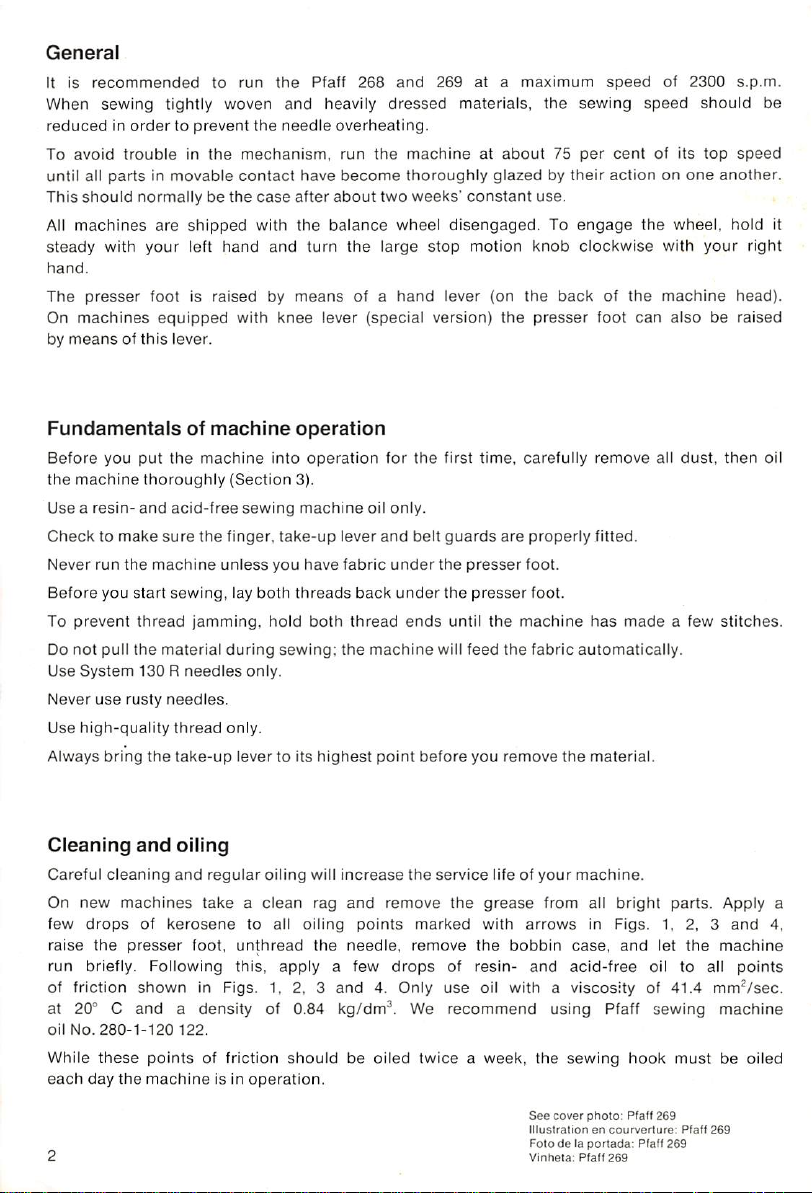
of friction shown in Figs. 1, 2, 3 and 4. Only use oil with a viscosity of 41.4 mm^/sec.
at 20° C and a density of 0.84 kg/dm^. We recommend using Pfaff sewing machine
oil
No.
280-1-120122.
While
these
points
each
day
the
machine
of friction
is in
shouldbeoiled
operation.
twiceaweek,
the
sewing
hook
mustbeoiled
oil
4,
See
cover
photo:
Illustrationencourverture:
Fotodefa
2 Vinheta: Pfaff269
portada:
Pfaff
Pfaff 269
269
Pfaff
269
Page 3
Gen^ralites
Pour
les Pfaff 268 et 269,
Pour
^viterlasurchauffederaiguilleencas
convlent
Au
qu'aux
d'emploi
Les
la
Le
comporte
cependantder§duire
commencement,
3/4desa
journalier,
machines
main
pieddebicheserelivehI'aidedulevier
sont
gaucheetdelamain
une
genouilldre
et
vitesse
ceia
Iivr6es le
nous
recommandons
pour
pr6venir
maximale,
devrait
volant
droite,
(en
option),lepied
cette
etrelecasen2
une
d'^toffesdtexture
vitesse.
d'§ventuelles
jusqu'au
non
bloquerlegrand
bloqu6.
releveur
rodage
semaines
Pour
presseur
vitesse
maximale de 2300
denseoufortement
perturbations,nelalsser
parfait
des
piecesenmouvement.
environ.
embrayerlamachine,
6crou
molet^.
disposeaudosdela
pourra
§tre
relev6
points/mn.
tournerlamachine
maintenirlevolant
machine.
aussi
Si la
parlagenpuill^re.
appret6es,
En
machine
il
cas
de
Quelques
Avant la premifere
effet,
Verifier si le
Ne
mettrelamachineenmarche
place
Pour
couture,nepas
N'utiliserquedes
du fildequality.
Pour
Nettoyageetgraissage
Le
nettoyage
Sur
les
enlever, & I'aide
Rincer
machine
les paliers et points de
regies
n'employer
garde-doigt,legarde-releveurdefiletle
du travail
6viter la
enlever
fondamentales
miseenservice,
quedeI'huile
souslepieddebiche,
prise
des
fils
danslecrochet,
tirer
sur
I'ouvrage:lesysteme
aiguillesdusystdme
le travail,
toujours
nettoyer
exempteder^sineetd'acides
que
amenerlereleveurdefil en
delamachine
minutieux et le
machines
neuves,
d'un
ensuite
tous
les
bri6vement6pieddebiche
graissage
essuyer
chiffon
d'abordlapoussi^re
propre,lacouchedegraisse
pointsdegraissage
contact
des
piecesenmouvement
soigneusementlamachineetla
garde-courroie
si du
tissu
est
lissertoujours
les
reteniraucommencementdela
d'entralnement
130 R. Ne
pas
regulierdela
engage
les
employer
machineenaugmentent
souslepieddebiche.
deux
6quipantlamachine
position
qui
s'est
(voir fifeches, fig. 1, 2 et 3) au
relev6,
sans
fil et
sans
boTte h
(fig. 1, 2 et 3)
huiler
ensuite.Acet
(huile
pour
machinesacoudre).
sont
correctement
Avant
boutsdefil
vers
I'arriere.
couture.Encours
suffit
des
aiguilles
haute.
rouillees.
N'utiliserque
la longevite.
amasseeencoursdetransport
anticorrosive
canette.
p6trole
avec
sur
les
et faire
Pour
finir,
de I'huile
pieces
months.
mise
largement.
polies.
tourner
huiler
exempte
en
de
tous
de
resine et d'acides. N'y employer que de I'huile d'une viscosity de 41,4 mm^/s a 20°C ou de 5,5° E
a 20°Cet d'une densite de 0,84kg/dm^. Nous recommandons I'huile Pfaffpour machines a coudre,
n°
280-1-120
Les
paliersetles
122.
endroits
lisses
sont^huiler2fois
par
semalne,lecrochet
chaque
jour.
et
la
Page 4
Oiling
points
Pointsdegraissage
Puntosdeengrase
Pfaff
Pfaff269
268
Pontos
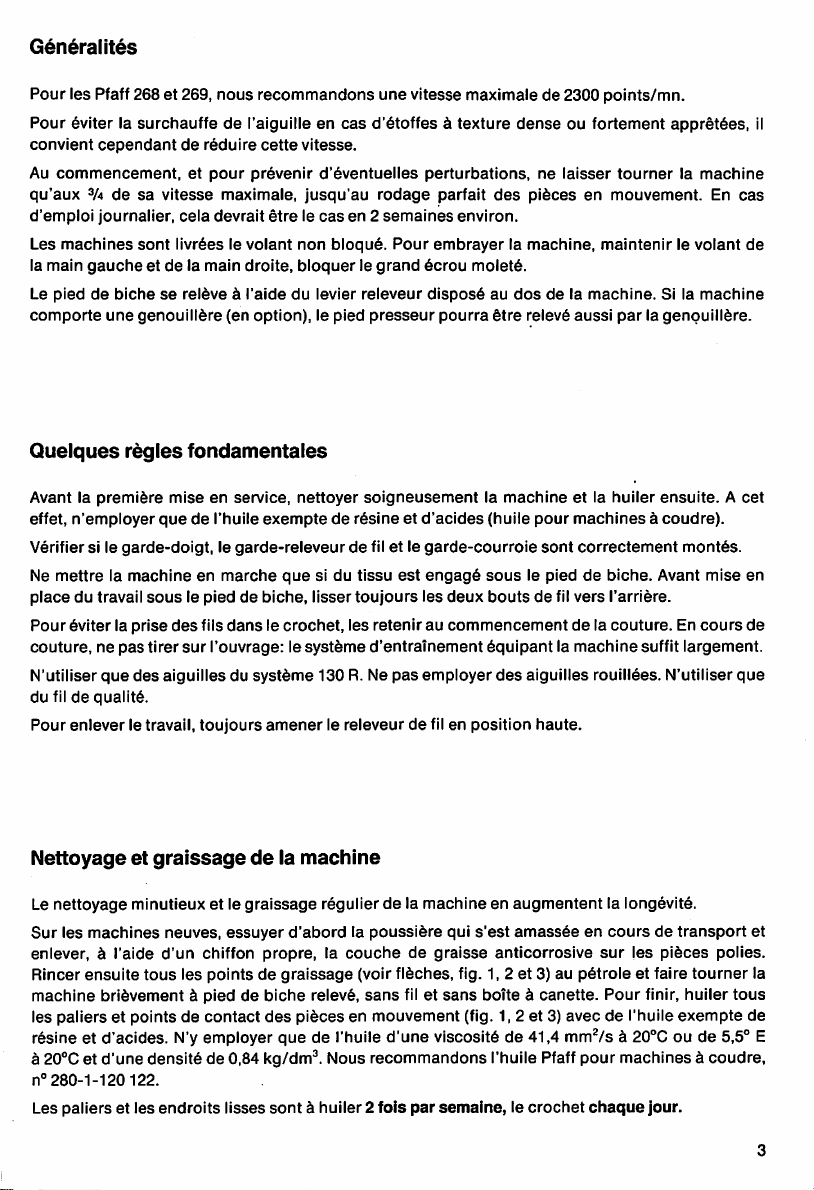
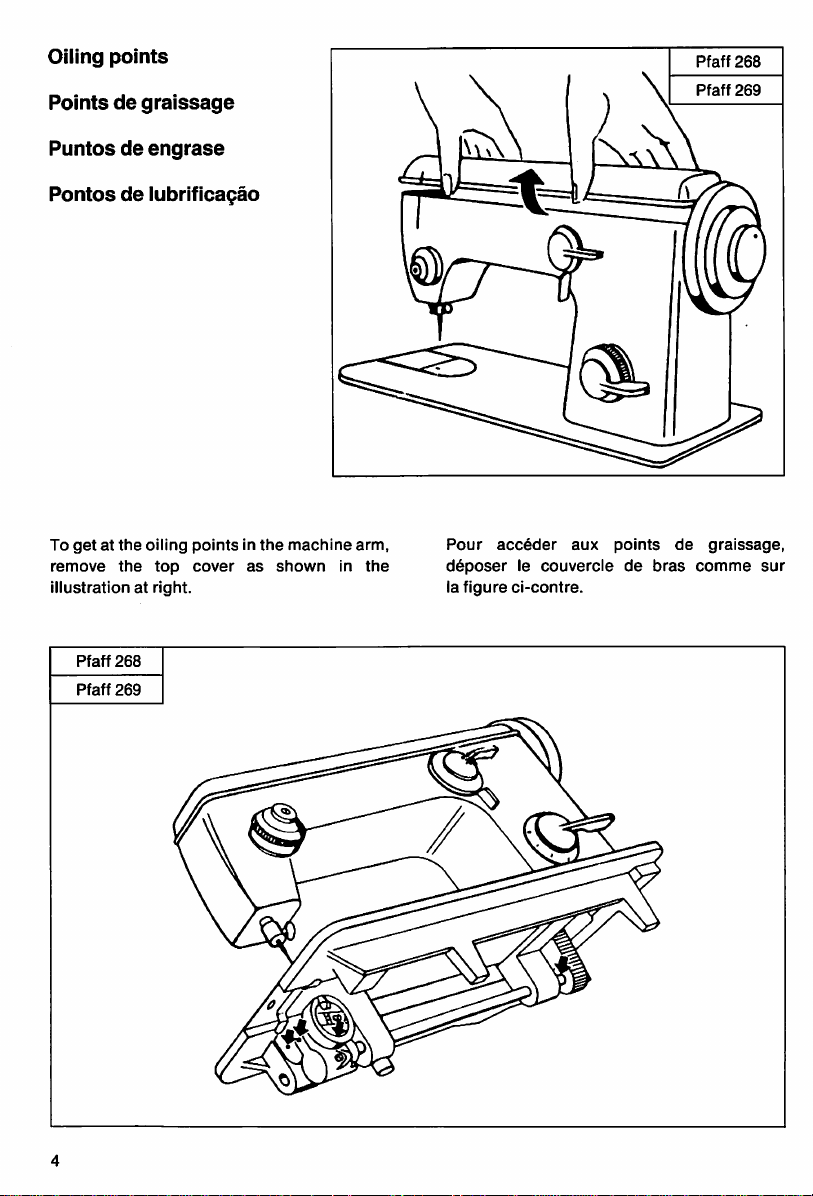
To
remove
illustrationatright.
de
getatthe
the
Pfaff
268
Pfaff
269
lubrifica9ao
oiling
top
pointsinthe
cover
as
machine
shown
Pour
d§poser
la
figure
acceder
ci-contre.
arm,
in
the
le
couvercle
aux
points
de
bras
de
graissage,
comme
sur
Page 5
Pfaff
Pfaff
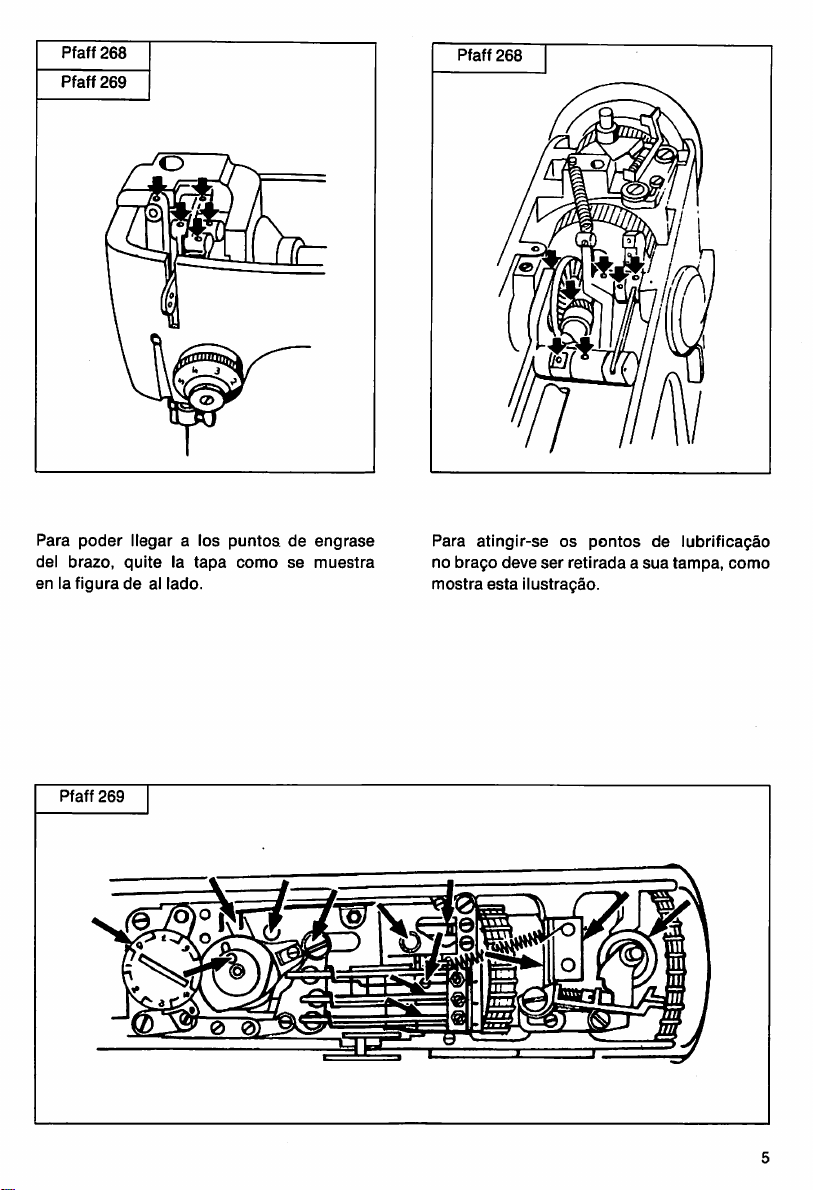
Para
del
en la
268
269
poder
llegar
brazo,
quitelatapa
figuredeal
a los
lado.
puntosdeengrase
comosemuestra
Pfaff
Para
brafo
no
mostra
268
atingir-se
deve
esta
ilustragao.
os
pontos
ser
retiradaasue
de
lubrificagao
tampa,
como
Pfaff
269
Page 6
Caracteristicas
generales
Para las
pormlnuto.
Pfaff
268 y 269 recomendamos como velocidad
maxima
de costura 2300 puntadas
En el caso de materlales compactos y de mucho apresto conviene reducir la velocidad de
costura
con
el findeevitaruncalentamiento
excesivodela
aguja.
Para evitar poslbles danos, se aconseja no sobrepasar al prlnclplo el 75 % de la velocidad
mdxima de la mdqulna,
complete,loqueselograrS
hasta
que
las plezas sujetas a frlcclbn
despu^sdeunas2semanasdeuse
diario.
se
hayan suavlzado por
Todas las mdqulnassesumlnlstran con el volante de maniobra desembragado. Para embragar
la mdqulna
de
desembrague
el volante con la mano Izqulerda y con la
girdndola
a la
derecha.
derechaseaprleta la tuerca
se
sujeta
El prensatelassealza medlante la palanca manual (detrds de la cabeza de la maquina).
En mSqulnas con palanca de rodllla (tipo especial), el prensatelas puede alzarse con la palanca
manualoconlade
Normas
Antes
culdadosamente
fundamentales
de
Use excluxivamente
de
queelsalvadedos,elcubretlrahllos
La
maquina
Antes
de
colocarelmaterial
atascamlentosdelos
rodllla.
poner
(v6ase
solamente
la mdqulna en
cap.
37).
acelte
para
debe
ponerseenmarcha
de
hllos
sujete
slempre
marcha
por
primera vez, llmpiela blen y
mdqulnasdecoser,
y el
guardacorreas
con
materialdecostura.
costura,
deben
echarse
ambas
puntasalcomenzaracoser.
llbre de
los
reslnas
estdn
hilos
y ^cldos. AsegOrese
debldamente
hacia
atr^s.
colocados.
Para
engr^sela
evitar
No
tire
del
material
Utillce
Onlcamente
No
ponga
jamds
Utillce
solamente
Antesdesacarelmaterial,
Engraseylimpiezadela
Una
buena
limpieza
En el
caso
de
acumulado
A
contlnuacldn
con
cdpsulanibobina,seponelamdqulnaenmarcha
debldamente
duranteeltransporte
flechas
en
todos
durante
agujas
una
aguja
hllosdecoserdegran
del
sistema
oxidada.
coloque
la
maquina
y un
engrase
m^quinas
se
echa
las
los
figuras
puntos
nuevas,
un
poco
1, 2 y 3) y,
de
costura,
130R.
slemprelapalanca
hecho
primeramente
y la
de
friccldnyde
calldad.
con
grasa
petrdleo
la
regularldad
anticorroslva
en
conelpie
maquina
tirahllos
se
todos
durante
apoyo
lo
hace
avanzar
en su
poslclon
prolonganlavidadela
quita
con
un
trapo
apllcadaalas
los
puntos
prensatelas
corto
(v. figs. 1, 2 y 3)
levantado,
tiempo.
de
Despuesseengrasan
suflcientemente.
superior.
maquina.
llmpioelpolvo
plezas
brillantes.
engrase
con
sin
acelte
(marcados
hilo y
sin
exento
de reslnas y de dcldos. Utillceexcluslvamente acelte con una viscosldad de 41,4 mmVs a 20°Cy
una densldad de 0,84 kg/dm^. Recomendamos acelte Pfaff para maquinas de coser,
N"
280-1-120122.
6
Page 7
Informagoes
Como
maior
pontos
por
Na utilizagaodetecidos
velocidadedecostura,
Para
evitar
3/4dasua
diariamente
As
mdquinas
o
volante
grandededesligamento
gerais
velocidadedecostura
minuto.
a fimdeevitar urn
contratempos
velocidade
isto
ocorreamaproximadamente
sao
fornecldas
ser
segurado
muito
mecinicos
maxima,
at6
comovolante
comamao
paraadireita.
admissivel
tramados
para
ou
engomados
superaquecimento
pedimos
que
a princlpiosedeixeam^quina
queaspegasematrlto
duas
semanas.
desligado.
esquerda
enquanto
as Pfaff 268 e 269
hd
necessidade
da agulha.
flquem
bem
Para
procederaoseu
queamao
recomendamos
desereduzir
trabalhar
amaciadas.
llgamento,
direita
apertaaporca
2300
a
com
Usando-a
deve
Regras
Antesdese
provienientedesua
Usar,
e
acldos.
Controiarseos
sua
S6
iniclar
Para
Duranteacostura
suficiente
Sd
Nao
S6
Paraaretiradadapega
fundamentals
pdramdquina
embalagem.
paraasua
devlda
pdramSquinaemfuncionamento
uma
evitaraentradadelinhanalangadeira,
capacidadedetransporte.
usar
agulhasdosistema
usar
agulhas
trabalhar
lubrlficagao,
protetores
poslgao.
costura
puxarasduas
nao
com
com
linhasdequalldade.
vestlglosdeferrugem.
costurada
em
funcionamento,
Depois a
apenas
dos
debos,daalavanca
pontasdelinha
puxaromaterial
130.
sempre
dleo
quando
Lubrlflca^aoellmpezadamaquina
Lubrificagao
a
durabiiidadedeu'a
Nas
mdquinas
acumulou
suas
partes
de lubrificagao (vide
momentos,
todosOSpontos
Usar
somente
densidade de 0,84
E'
recomendavel
A
langadeira,
periddicaelimpeza
mdquina.
novas
devem
ser
duranteoseu
nao
envernizadas.
comocalcador
em
dleo
kg/dm®.
queaspartesematritoeos
pordm,
transporte
flechas
atritoeos
com
nas
levantado,
uma
viscosidadede41,4
Recomendamos o dleo Pfaff para mdquina de
deve
receber
meticulosa
primeiramente
e a
Depois,
fig. 1, 2 e 3),
mancais
diariamenteumpoucodedleo.
mdquina
especlai
houver
para
segurarasduas
que
estd
lever a
alavanca
sao
removidos,
graxa
pdr
aigumas
pondoamdquina
mas
sem
linhaesem
com
dleo
mancais
deve
ser
cuidadosamente
deve
ser
bem
lubrlflcada.
para
mdquinadecostura,
puxa-fioeda
materiai
trds,
sendo
de
antiferrugem
gotasdequerosene
livrederesinaede
mm
soboseu
ageitando-as
pontasdelinhaaocomegodacostura.
costurado;amSquina
puxa-fio
importdncia
com
com
cdpsuladebobina.
2/s
a 20° C,
sejam
lubrificados2vezes
removido
livrederesinas
correiaseencontram
calcador.
por
debaixodocalcador.
paraasua
um
relevante
pano
que
foram
em
posigao
iimpo, o pd
todosospontos
em movimento,
dcido
resp.
5,5° E a 20° C e
costura
n°280-1-120122.
o p6
Antesdese
dispoe
mals
alta.
para
aumentar
que
protegidas
por
alguns
Afinal,
prover
(fig. 1, 2 e 3).
uma
por
semana.
em
de
se
as
Page 8
Pfaff
Pfaff
268
269
Inserting
the
needle
MIseenplacederaiguille
Colocacidndela
aguja
Colocagaodaaguiha
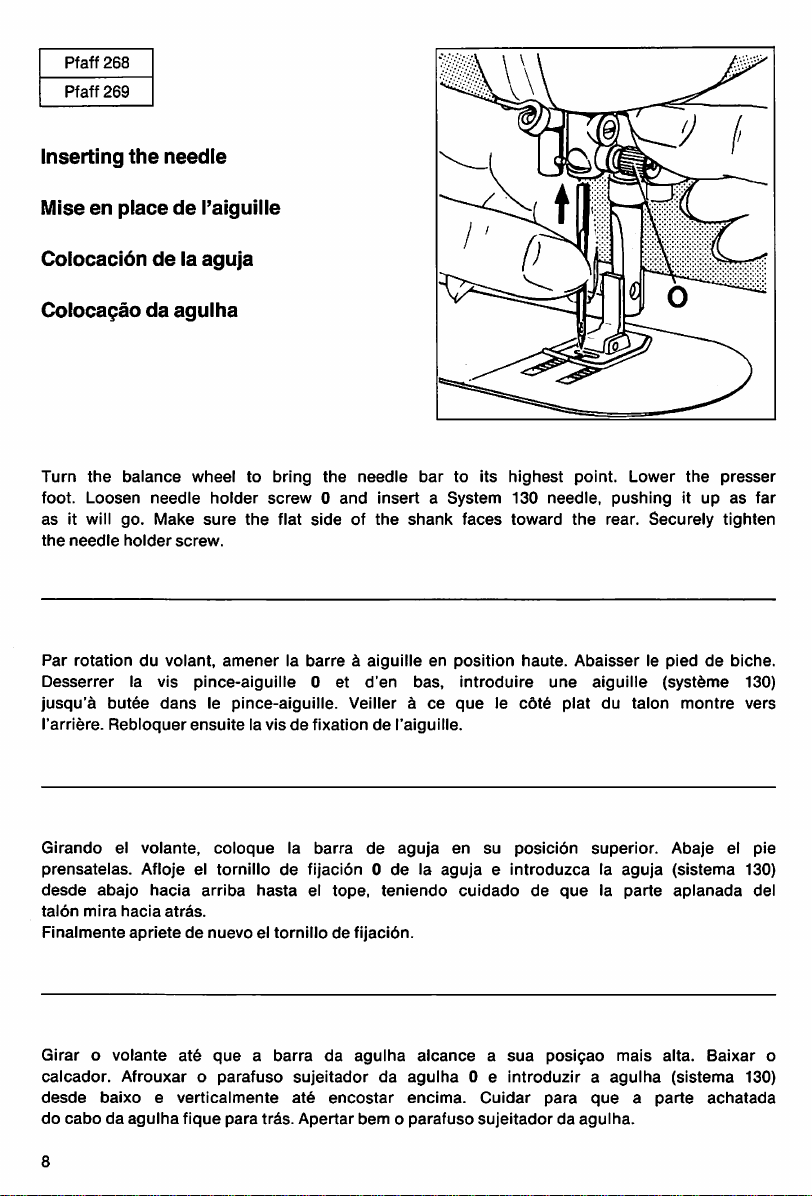
Turn
the
balance
foot.
Loosen
as
it will go. Make
the
needle
holder
Par
rotationduvolant,
Desserrer
jusqu'a
I'arriere.
la
butee
Rebloquer
wheeltobring
needle
holder
sure
screw.
vis
pince-aiguille
dans
le
ensuite
the
amenerlabarrekaiguilleenposition
pince-aiguille.
la visdefixationdeI'aiguille.
the
screw0and
flat
sideofthe
0
et
needle
bar
insertaSystem
shank
d'en
bas,
Veiller k
to its
faces
introduire
ce
quelecdt^
highest
130
toward
haute.
point.
Lower
the
needle,
pushingitupasfar
the
rear. Securely tighten
Abaisserlepieddebiche.
une
plat
aiguille
du
talon
(syst6me
montre
presser
130)
vers
Girando
prensatelas.
desde
talon
Finalmente
el
volante,
Afloje el
abajo
mira
hacia
aprietedenuevoeltornillodefijacibn.
Girarovolante
calcador.
desde
do
8
Afrouxaroparafuso
baixoevertlcalmente
cabodaaguiha
hacia
atras.
coloque
tornillodefijacion0delaagujaeintroduzcalaaguja
arriba
atb
queabarra
fique
para
la
barra
hastaeltope,
da
sujeitador
atb
encostar
trbs.
Apertar
de
aguja
teniendo
aguiha
alcanceasua
da
aguiha
encima.
bemoparafuso
en
su
posicidn
cuidado
de
posigao
0 e
Introduziraaguiha
Cuidar
sujeitadordaaguiha.
para
quelaparte
superior.
mais
Abaje el pie
(sistema
aplanada
alta.
(sistema
queaparte
130)
Baixar
130)
achatada
del
o
Page 9

Pfaff
268
Threading
the
needle
Enfllage du filsuperleur
Enhebrado
Enflaralinha
6—
Turn
the
spool
under
thread
balance
through
thread
guides
del
hilo
de
cima
11
wheel to bring
both
check
spring
8,9
and
superior
\
• »
• 1 y * f
1
fm
holesinthread
10.
Thread
V"\
6, up
''
• /
\ A f
V"
* i
\ # /
//'
/
the
take-up
guide
and
through
the
needle
lever to its
4, clockwise
the
hole In
from
front
\
highest
around
take-up
to back.
point.
and
lever 7,
Pass
the
between
then
thread
tension
down
and
0
from
discs
through
the
5,
Par
rotationduvolant,
Faire
passer
le fil, en
les
par
disques
les
de la
ceilletsdeguidage
Gire el volante
se Neva
desdeelportacarretes
amenerlereleveurdefilenposition
provenance
tension5,sousleressort
8,9et10etenfiler I'aiguillede I'avant.
hasta
que la palahca tirahilossehalle en su posicibn superior. El hilo
de la bobine,
por
los
dos
contrdleur6,par
agujeros
haute.
par
les
del guiahilos 4,
deux
trous
dans
le trou
le guide-fil 4,
dans
por
entre
entre
le releveur 7,
los
discos
del tensahilos 5 y por debajo del muelle regulador del hilo 6, a trav§s del agujero de la palanca
tirahilos 7,
Girar o volante at§
por
los
agujeros
8,9
y10. El hiloseenhebra
que
a alavanca puxa-fio alcance a
desde
el frente
sua
posigao mais alta.
hacia
atrds.
Passar
a linha,
desde o carretel, por ambos os furos do condutor 4 entre os discos de tensao da linha 5; depois
passd-lo
puxa-fio 7 e pelos colchetesguia-fios
por
debaixo da mola de
tensao
6, enfiando-o em seguida pelos furos da alavanca
8,9
e 10. Enfiar na aguihada frente para trds.
Page 10
Pfaff
269
Threading
the
needle
Enfllage
du
fil
superieur
Enhebrado
del
hllo
superior
Enflar
a
llnha
de
cima
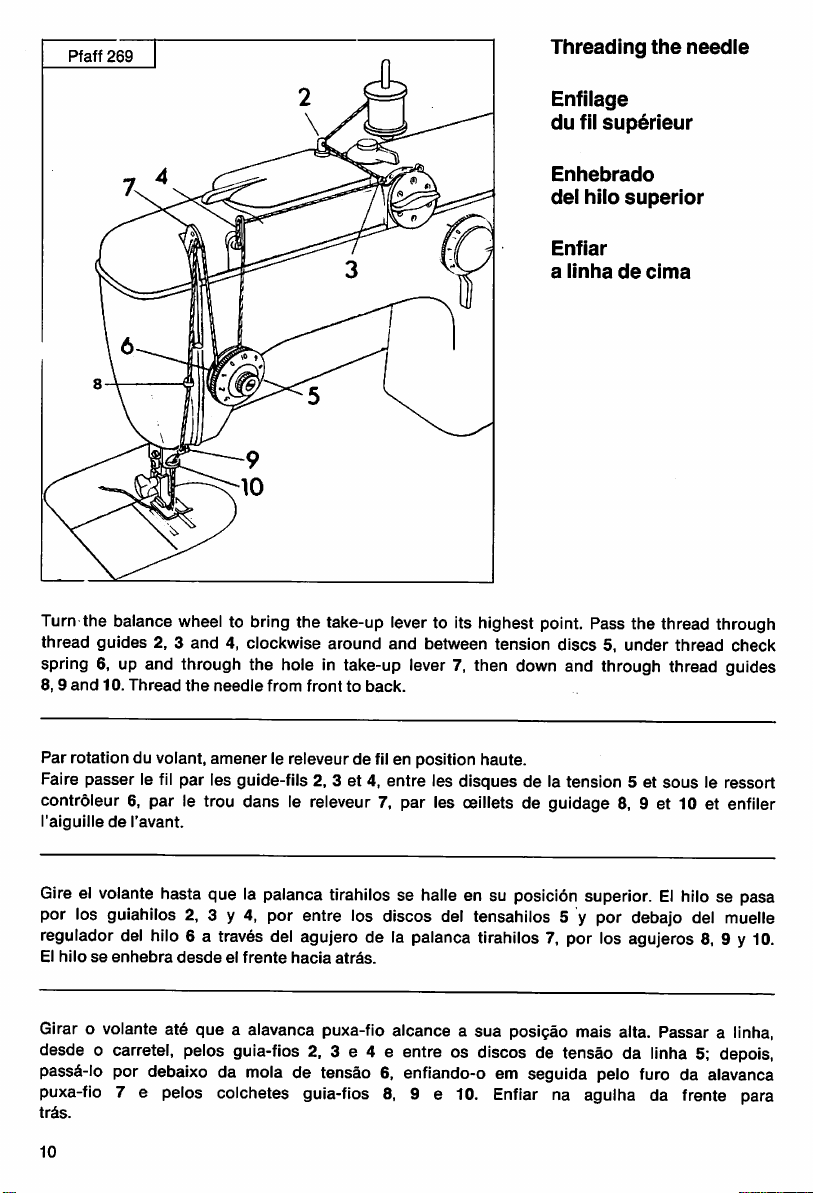
Turn the balance wheel to bring the take-up lever to its highest point. Pass the thread through
thread
guides
2, 3 and 4, clockwise
around
and
between tension
discs5,under
thread
check
spring 6, up and through the hole in take-up lever 7, then down and through thread guides
8,9
and
10.
Thread
the
needle
from
fronttoback.
Par
rotation du volant,
Faire
passer
le fil par les guide-fils 2, 3 et 4, entre les
amener
le releveur de filen position haute.
disques
de la tension 5 et
sous
le ressort
contrdleur 6, par le trou dans le releveur 7, par les ceillets de guidage 8, 9 et 10 et enfiler
raiguilledel'avant.
Gire el volante hasta que la palanca tirahilos se halle en su posicidn superior.Elhilo se pasa
por los guiahilos 2, 3 y 4, por entre los discos del tensahilos 5 y por debajo del muelle
regulador del hilo 6 a traves del agujero de la palanca tirahilos 7, por los agujeros 8, 9 y 10.
El
hiloseenhebra
desdeelfrente
hacia
atras.
Girar o volante ate que a alavanca puxa-fio alcance a sua posigao mais alta. Passar a linha,
desde o carretel, pelos guia-fios 2, 3 e 4 e entre os discos de tensao da linha 5; depois,
passd-lo por debaixo da mola de tensao 6, enfiando-o em seguida pelo furo da alavanca
puxa-fio
trds.
10
7 e pelos colchetes guia-fios 8, 9 e 10.
Enfiar
na aguiha da frente para
Page 11

Pfaff
268
Hold
the
on
the
crossing
the
bobbin
balance
spool
the
wheel
pin. Draw
thread.
winder
fast
the
Draw
spindle.
and
turn
stop
motion
thread
from
the
spool
the
thread
end
(Continuedonpage
knobbcounter-clockwise.
and
leaditclockwise
through
13.)
the
slotinthe
Winding
the
Bobinagedufii
Bobinado
Bobinaraiinha
around
bobbin,
del
Placeaspoolofthread
thread
and
place
bobbin
infdrieur
hiio
de
retainer
the
bobbin
inferior
baixo
stud
g,
on
Maintenirlevolantetdebloquer
Tirer
le fildela
gdemaniere
celle-ci
Sujeteelvolanteygireeldiscodedesconexidnbhacialaizquierda.
portacarretes.
se
cruce
bobinadora.
Segurarovolanteetorceraporcadedesligamentobparaaesquerda.
paraocarretel.
guia
para
da
bobinaecolocarabobina
bobineetle
que
le filsecroise.
surlabrochededevidoir.
El hiloselleva
el hilo.
Metalapunta
Continuaenla
Puxar
a Iinhadocarretelecondzl-la,nosentidodoponteirodoreldgio,aoredor
o fio g,demaneira
la vis
moleteeb.Placerlabobine
faire
passer
danslesens
Enfiler le fil
Suite,
page
desdeelcarrete,enel
del hilo en la
pagina
13.
que
hajaumcruzamento
sobreofuso
ranuradela
paraabobina.
des
danslafente
13.
sentidodereloj,
surlabroche.
aiguilles
d'une
pratiquSe
porelguiahilosgde
bobinaeintroduzca
dos
fios.
EnfiarapontadaIinha
Continuanapagina
montre
autourduguide-fil
danslacanetteetengager
Introduzcaelcarreteenel
forma
§staenel
Colocarocarretelnopino
husillodela
pela
fenda
13.
que
o
11
Page 12

Pfaff269
Hold
of
thread
through
on
the
the
guide
bobbin
balance
on
the
winder
wheel
spool
h. Draw
fast
pin. Lead
the
spindle.
and
turn
stop
the
thread
thread
end
through
(Continuedonpage
motion
clockwise
the
13.).
Winding
Bobinage
Bobinado
Bobinar
knobbcounter-clocKwise.
around
slotinthe
bobbin,
thread
the
du
del
a
linha
retainer
and
bobbin
fil
inferieur
hilo
de
Placeaspool
studgand
place
the
inferior
baixo
bobbin
Maintenirlevolantetd^bloquer
le fil
danslesens
Enfiler le fil
Suite,
Sujeteeivolanteygireeldiscodedesconexidnbhacialaizquierda.
de
reloj
de la
Segurarovolanteetorceraporcadedesligamentobparaaesquerda.
no pino
guia
danslafente
page
13.
porelguiahilos
bobinaeintroduzca
para
para
o fio g e enfi^-la atrav^sdaguia
des
o carretel.
aiguilles
pratiqu^e
fendadabobinaecolocarabobina
12
la vis
d'une
danslacanetteetengager
g y a
trav^s
§sta
en el husillo de la
Conduzir
a linha no
sobreofuso
molet^eb.Placerlabobine
montre
del
autour
du guide-fil g et ^
celle-ci
agujeroh.Metalapunta
boblnadora.
sentido
para
para
do ponteiro de relogio ao
o fio h. Enfiar a
a bobina.
Continua
surlabroche.
surlabrochededevidoir.
Lleve el hilo en el
Continua
na pdgina 13.
Faire
travers
del hilo
Colocarocarretel
ponta
enlaranura
en la
pagina
da
I'ceillet h.
linha
passer
sentido
redor
13.
da
pela
Page 13

Pfaff268
Pfaff269
3
When
youe
place
the
bobbin on
enters
the
slotInthe
and
start
the
automatically
push
leveraoutwards
A la
miseenplacedeia
danslafentedecanette
I'extremite
du fii (fig. 2)etmettrelamachineenmarche.
toursetterminerIebobinage.
(fig. 3). Si Ton
colocar
Al
(fig. 1).
la
maquinaenmarcha
la
bobina,labobinadorasedesconecta
antesdequeseilenelabobina,
ia bobina, asegCirese de
Presionelapalancadeconexionacontra
machine.
when
souhaite
bobbin
(Fig. 1).
Break
the
bobbin
with
your
canette,
(fig. 1).
Le devidoir
arrSter le devidoir avant, sortir ie levier
(fig. 2).
Despu6sdeaigunas
„
is-.or'
the
winder spindle,
Push
lever a
toward
off
the
thread
end
is full (Fig. 3). if you
finger
(Fig. 4).
veilier acequeietaquet
Pousser
ie levier
d6braye
quelaespiga
automatiquement
del husillo
vueltas,
autom^ticamente
retirelapalanca
conlamano
4
^ .
make
sure
the
key at
the
baseofthe
the
bobbin.
afterafew
wanttostop
suriabrocheded§vidoir
d'embrayageacontreiacanette.
ArracherIeboutdefii
ia bobina.
rompalapunta
(fig. 3).
(fig. 4).
Hold
the
thread
turns.
The
bobbin
the
bobbin
des
quelacanette
d'embrayage
encaja
en la
ranura
Sujetelapunta
del hilo. Una vez llena
Para
desconectarlabobinadora
winder
apr§s
du doigt (fig. 4).
del hilo y
end
winder
s'engage
Maintenir
quelques
est
de la
spindle
(Fig. 2)
stops
earlier,
garnie
bobina
ponga
Observar,aocolocarabobina,
a
alavancadeengateacontra
em movimento.
a bobina, o
prematuro
Arrancarapontadalinha
enchedordebobina
basta
desligar-seaalavanca
que
o pino do
a bobina.
desliga
com o
fuso
engatenafendadabobina
Segurarapontadalinha (fig. 2) e
apos
algumas
automaticamente
dedo
(fig. 4).
rotagoes
(fig. 3).
da bobina. Uma vez
Para
(fig. 1).
por
Apertar
a mSquina
enchida
provocarumdesiigamento
13
Page 14

Pfaff268
Pfaff269
Inserting
into
the
the
bobbin
bobbin
case
Miseenpiecedela
canette
garnle
Colocacion de lacapsule
delabobina
Colocagaodacapsule
de
bobina
Insert
the
bobbin
Into
the
bobbin
Hold
the
bobbin
steadyinthe
under
tension
springaand
Introduirelacanette
Maintenir la canette
Tirer le fil de mani^re qu'il
de
fil.
leave 6to 7 cm of
commelemontre
dans
la bolte et faire
case,asillustrated.
bobbin
case
and
la fig.
passe
sous
draw
thread
ci-dessus.
passer
le
ressort
the
thread
into
the
case
hanging
from
the
bobbin
le fil par la fente pratiqu§e
a. Faire
depasser
slot. Pull
case.
entre
the
thread
danslaboTte.
6 et 7 cm
Coloque la bobina rellena en la cdpsula como se muestra en la figura. Sujete la bobina
y
pase
el hilo por la ranura de
de
hilodeunos
6 a 7
cm.
Introduzir a bobina - conforme mostra a gravura - na capsula de bobina.
enhebrado
y por debajo del muelle
tensor
a. Deje un cabo
Segurar
a bobina
na cdpsula e puxar o fio atraves da fenda de enfiamento. Traspassar a linha por debaixo da mola
de
tensaoa.Fazer
14
com
queapontadalinha
fique
sobressaindode6 a 7
cm.
Page 15

Pfaff
268
Pfaff
269
Regulating
the
bobbin
thread
tension
R^giage
delatension
du
fii
Regulacidn
delatensidn
del
hilo
Reguiagemdatensao
da
iinha
inferior
To
regulate
Turnitcounter-clockwise
To
checkifthe
hang
freely.
the
bobbin
tensioniscorrect,
The
bobbin
inf^rieur
inferior
thread
foraweaker
case
should
tension
hold
turn
tension,orclockwise
the
thread
then
descend
the
knurled
end
and
slowly by its
screw
foratighter
let
the
bobbin
own
with
tension.
case
weight.
the
tip of
(with
the
V
your
full
thumb.
bobbin)
R6gler la
verslagauche,
Pour
descendrelentement.
tension
elle
verification,
du fil inferieur d la petite vis molet§e. Vers la droite, la
devient
plus
forte.
laisser
pendre
librement
la boTte e
canette
garnie; celle-ci devrait
tension
diminue;
alors
La tensidn del hilo inferiorseregula girando el tornillo estriado con el pulgar. GirSndolo hacia
la izquierda,
La
tensibn
enhebrada
Regular a
Torcendo para a
Para
penduradadaponta
latensidn
disminuye;
del hilo inferior
del hilo,
tensao
descienda
do fio inferior pelo parafuso de
esquerda
efeitosdecontrole
do fio,
girdndolo
debe
estar
lentamente
hacialaderecha,
regulada
porsupropio
de tal forma, que, al
cabega
- a
tensao
e reduzida, torcendo
verificarsea
cdpsula
de
estaemcondigdesdedescer
aumenta.
suspender
peso.
la cSpsula
estriada, por meio da ponta do polegar.
para
bobina,
lentamente, pelo
a direita - a
com
bobina
tensao
6 aumentada.
cheiaelivremente
seu
prdprio peso.
15
Page 16

Pfaff
Pfaff
268
269
Inserting
Miseenplacedela
Colocacldndela
the
bobbin
boitekcanette
cdpsuladela
case
bobina
Coloca^aodacdpsuladebobina
Bring
the
needle
to its
highest
and
push
the
bobbin
case
Do
not
pinch
the
thread
end.
Amener raiguille en position haute. Ouvrir la glissi^re
k et
glisserlaboftekcanette
queladecoupure
la bofte k
Coloquelaaguja
la bisagrita k
s,deforma
aprisionarelcabo
perceptiblemente.
canette
(voir fl^che)
danslecrochet
en su
conelpulgar
quelaentalladela
de hilo suelto!
point. Open
(with bobbin)
Press
against
aveclacanette
soit
orlentde
jusqu'^
posicidn
superior. Abra la
y el indice e
cdpsula
Presionelacapsula
the
bed
onto
stud
s, making
the
bobbin
surletourillonsdelacapsule
vers
le haut. Ne
encliquetage
introduzcalacapsula
(v. flecha) mire
slide. Lift latch k with
sure
its
slot
case
until you
sur
le plateau fundamental. Guvrir le loquet
pas
coihcerleboutdefill
perceptible.
tapa
corrediza
hacia
arriba.
contra
el garfio
thumb
(see
arrow)
hearitsnap
inferieuredemani^re
de la
placa
hastaeltope
Tenga
hasta
and
points
into place.
base.
en la
cuidadodeno
que
forefinger
upwards.
Pousser
Levante
espiga
^sta
encaje
Poraaguiha
capsula
sub-cdpsula, de maneira
em
posigao
de bobina k com o
alta. Abrir a
polegar
que
o recorte da
dicularmente para cima. Cuidar
a
capsula
16
de bobina
contra
a langadeira, at§
chapa
corrediga
da
base.
Levantar a
charneira
e o indicador. Enfiar a cdpsula com a bobina no pino s da
capsula
para
que a ponta solta da linha nao flque trancada. Apertar
que
de bobina (vide flecha) fique virada perpen-
engate
audivelmente.
da
Page 17

Pfaff268
Pfaff269
Drawingupthe
Remonter
Extraccidn
le
del
fit
hilo
bobbin
inf^rieur
Extragaodalinha
Hold
the
needle
thread
moves
down
and
up
threadupthrough
Malntenirlebout
de
manl^re
sous
I'arrl^re,
k faire faire k
formedeboucle,entirant
souslepleddebiche.
thread
inferior
inferior
taut.
Turn
the
again.
Slightly pull
the
needle
hole
In a
de
fll
sup§rieur.
ralgullleunalleretretour
l^g^rement
balance
the
loop.
Tourner
wheelinIts
endofthe
Lay
both
le
volant
complet.
sur
le fll
normal
needle
threads
dans
Faire
remonter
d'aigullle.
direction
threadtodraw
back
under
le
sens
de
ensulte
Coucher
les
until
the
needle
the
bobbin
the
presser
rotation
le flldecanette,
deux
normal
flls
foot.
vers
Sujetelapunta
bajadoysubido
del hilo
una
superior
vez. A
contlnuacldn
apareclendoenformadelazada
se
pasan
hacia
atrds
por
debajo
Segurar
queaaguiha
at§
entao
tesaapontadalinha superior. GIrar o volante em dlrepaodefunclonamento,
tenha
descldoenovamente
que
o flo Inferior
ambasaspontas
aparega
de linha
y gire el
porelagujerodela
del pie
volanteensentldo
tire del hilo
prensatelas.
subido.
superior
placadeaguja.
Puxar
pelo furodachapadeponto
para
trds
de forma a ficarem
normal
hasta
Las
levemente a
em forma de
por
hasta
quelaaguja
que
el hilo inferior vaya
puntasdeambos
ponta
do flo superior,
uma
lagada. Deltar
debalxo
do
haya
hllos
ate
calcador.
17
Page 18

Pfaff
268
Pfaff269
Regulating
the
needle
R^glage
delatension
Reguiacidn
deiatensidn
thread
du
del
tension
fii
superieur
hllo
superior
Regulagem
da
linha
No. 5 on
turn
the
Le
reglage
sur
i'echelle
Si Ton d§sirait
la
tension
El
ajuste
delaescala.
Para
disminuir la tension,segira el
hacialaderecha,latension
da
tensao
superior
the
dial
indicatesanaverage
dial
counter-clockwise,toincrease
correctdeia
gradu^e.
une
tension
augmente.
correcto
de la
tension
plus
tension
aumenta.
amountofneedle
it,
du fil d'aiguilie
faible,
tournerledisque
del hilo
superiorsehalla
discodela
clockwise.
correspond
escala
thread
tension.Todecrease
approximativement au chiffre 5
gradu§
vers la
aproximadamente
hacia
la izquierda. Girando el
gauche.
the
tension,
Vers la droite,
en el
numero
5
disco
Aregulagem da tensao da linha superiorfica mais ou menos no nOmero5 da escala de regulagem.
Caso se desejar uma tensao mais frouxa, deve a escala
a
mesma
paraadireita,atensaosetorna
18
mais
forte.
ser
girada para a esquerda. Girando
Page 19

upper
too
ioose.
tension
too
tight
or iower
tension
Tension
du fii
Tensibn
tensibn
Tensao
forteoutensao
mente
Upper
too
du fii
inferieur
dei hilo
dei hilo inferior
da
frouxa.
tension
tight.
Tensiondufii
du fii
inf6rieurtrop
Tensidn
tensibn
Tensao
frouxaoutensao
mente
dei hilo
dei
da
forte.
supdrieur
trop
superior
linha
da
too
sup6rieur
superior
hiio
iinha
da
faible.
inferior
linha
loose
forte.
inferior
superior
iinha
trop
forteoutension
demasiado
demasiado
demasiadamente
inferior
or
lower
trop
faibieoutension
demasiado
demasiado
demasiadamente
inferiordemasiada-
fuerte
fioja.
demasiada
tension
fioja o
fuerte.
o
Correct
and
Tensionsdefii
Adapter
au
Tensidn
asentadosyqueeientrelazado
Tensao
tension:
Regulate
the
both
stitches
ies
tensions
milieudei'ouvrage.
correcta
La
tension
del
correta:
Regularasduas
tensionssothat
are
tightly
set.
correctement
de
mani^re
de
ambos
hilos:
hiio
superioreinferior
tensdes
de
the
r6gl6es
tenga
tal
maneira
dentrodomaterialequeospespontos
needle
que
lugar
and
bobbin
threads
ies
deux
fiisnetorment
debe
coordinarse
dentro
del
material.
quealinhadaaguiha
fiquem
bem
assentados.
interlockinthe
de
forma
centerofthe
pasdebouciesetse
que
ambos
hilos
queden
material
nouent
bien
e adabobinaseentrelacem
Page 20

Pfaff
Pfaff
268
269
Stitch
Ajuste
length
R^glagedela
del
largodepuntada
regulation
longueurdupoint
Ajustedotamanho
do
pesponto
The
numbers
for
satin
dial G until
L'echelle
Un
reglagedeprecision
de
r§glage
correspondent
on dial G
stitching,
the
number
graduee
0 a 1
mm.
k la
the
surledisque
longueurdepoint
indicate
indicating
sector
the
stitch
0 to 1
the
has
desired
moleteGindiquelalongueur
pour
les
points
denses
Pour
reglerlalongueurdepoint,
souhaitiesetrouve
length
in millimeters. To facilitate
smaller
sub-divisions.Toset
stitch
lengthisopposite
(pointdebourdon)
tournerledisqueGjusqu'dceque
face
stitch
length
the
stitch
the
setting
mark
approximativedupoint
peut
etre
obtenu
k I'index (voir fl^che).
regulation
length,
(see
turn
arrow).
en mm.
danslaplage
le chiffre
La
escala
sobreeldisco
de
precision
subdivididolazonedeajuste
G
hasta quelacifra
A
escala
cuandosetratedepuntadas
n&disco
ajustagemdepespontos
ainda
apresenta
G
ate
queocomprimentodoponto
20
moleteadoGindicaellargodepuntada
del
serrilhadoGindica
muito
subdivis5es.
aproximadoenmm.
muy
densas
0-1
mm.
Para
regularellargodepuntada,
largo
de
puntada
maisoumenosocomprimentodopesponto
unidos
(costura
Paraaajustagemdotamanhodopesponto
desejado
deseado
tipo
coincida
(costura
coincida
lagarta)osegmentododisco
comamarcagao
de
los
lados
gireeldisco
conlamarca
girarodisco
(vide
flecha).
Paraelajuste
del
ojal),seha
moleteado
(v^ase
flecha).
em
mm.
entre
Gel
serrilhado
Para
a
mm
Page 21

Pfaff
Pfaff269
268
Reverse
Couture
Costura
Costura
To
If a longer
(1or2 in
stitches,
Pour
d'inversion
sewing
arriere
Inversa
para
tras
sewashort
mark 2 for long reverse
inverser
seam
above
de
seam
un
marche
reglerledisqueGsur
Inutile
d'y
abaisserlelevier
in reverse,
push
down
the
spring-loaded
is to be sewn in reverse, turn dial G until
ill.) is
opposite
court
instantlesens
(voir fig.). Si Ton
I'un
des
d'inversiondemarche.
the
setting
stitches.Inthis
traitsderep^re
mark.
Graduation
case,
the
d'entrainement
veut
coudre
1 ou
2.1=point
finger-tip control
delamachine,
plus
finger-tip control
oneofthe
mark
1 is for
need
longtemps
arridre fin; 2 =
(see
graduation lines
short
not be
depressed.
abaisser
en
marche
point
arriere
reverse
le
arridre,
ill.).
levier
gros.
Para
coser
en
retroceso
(v. la figura).
correspondientealnOmero
del nOmero 2 =
Para
costuras
mola.
de
graduagdo1ou2.Marcadegradua^ao
2 =
costura
Para
Para
coserenretroceso
punto
instantdneas
executar
para
tr6s
momentdneamente,
162
inverse
paratr6s,
uma
costura
com
ponto
coincida
largo.Eneste
inversa
por
mds
tiempo,
conlamarca.
case,noes
calcaraalavanca
mais
ionga,
1 =
graudo.
Neste
presionelapalanca
gireeldisco
Raya
del
numero
necesario
(vide
graduarodisco
costura
case
para
torna-se
pulsarlapalanca
gravura);amesma
trds
desnecess6rio
recuperadora
moleteadoGhasta
1 =
punto
inverse
recuperadora.
retorna
serrilhadoGnuma
com
ponto
miudo;
caicaraalavanca.
hacia
que
la raya
fino; raya
pora^ao
das
marcas
graduagao
abajo
de
21
Page 22

Pfaff
Pfaff269
268
Dropping
Effacementdela
Sumersidn
Submersao
For
sewing
the
machine
del
transportador
do
transportador
operations
griffe
requiring no
do this, swing lever V toward
is
raised
again.
Danslecas
Levier V
Levier V
d'operationsnenecessitant
verslagauche:
versladroite:
griffe
griffe
feed
machine
the
left. When you swing
pas
effacee.
remiseenposition
feed,
the
latter
the
d'entratnement,
d'entratnement.
canbedroppedbymeans
lever toward
effacer
the
right,
la griffe e I'aide du levier V.
of lever V.To
the
machine
feed
En
procesosdecostura
transportador
Accionando
palancaVhacialaderechaenla
Em
casodeoperagoes
transportador
paraaesquerda.
Para
novamente
partida.
22
mediantelapalanca
dicha
(arrastador
ligarotransportador:
palanca
en los
hacialaizqulerda.
que
dentado)
quenoes
V:
posicion
dispensamaalimentagao,
ser
necesario
Para
conectardenuevoeltransportador,
inicial.
desligado
moveraalavancaVpara
por
meiodaalavancaV:basta
ningun
transporte,
resp.otransporte
a direita, i. e
puede
desconectarse
do
material,
moveraalavanca
paraasua
accione
pode
posigao
el
la
o
V
de
Page 23

Pfaff
268
Straight
zigzag
Coutureaupoint
coutureaupoint
Costuraenpunto
costuraenpunto
Costuraempesponto
costura
The
Indicating
the mark (straight stitch), the machine can be switched to
fInger-tIp control F. If you
of 2
upwards, always switches the machine to straightstitching.
L'echelle gradu§e
stitching
sewing
droit
zigzag
recto
zigzag
reto,
em
numbers
the desired
ponto
on dial A Indicate
ziguezague
the
width
Is opposite the setting
stitch width In millimeters. Turn dial A until
mark
(see
arrow).
zigzag
depress
mm,
the machine sews a zigzag seam twice the width set. Pushing the
sur
le disque molete A Indlque la jetee d'algullle en mm. A cet effet, tourner
the fInger-tIp control with the dial
the
number
When
"0" Is set opposite
stitching by depressing
set
at a stitch width
fInger-tIp
control
le disque A jusqu"^ ce que le chlffre correspondent k la jet§e d'algullle souhalt6e se trouve
face a I'lndex (voir
fl6che).
Sur 0 (point
drolt),
on pourra passagerement passer sur point
zigzag en abalssant la touche F. SI, pour un reglage de la jet^e d'algullle sur 2 mm,
par example, on abalsse ce levler en plus, la jetee d'algullle reglee est doublSe. En
soulevant ce m§me levler, la machine coud cependant toujoursau "point drolt".
La
escala
del disco moleteado A, Indica el
que el
ancho
de zigzag
sobre
0 (puntada recta),
tanea) pulsando simplemente la palanca F. SIsepulsa la palanca recuperadora, estando
deseado
entoncessepuede
colnclda con la marca (f. flecha). SI la marcasehalla
ancho
de zigzag en mm: GIre el disco A
pasarapuntada
zigzag (conmutacldn momen-
hasta
el ancho de zigzag ajustado a 2 mm, entonces se duplica el ancho de zigzag ajustado.
No obstante, al soltar la palanca recuperadora, el resultado sera slempre "punto recto"..
A escala no disco serrllhado A Indica a largura du ponto em ziguezague em mm: girar o
disco A at^ que a largura desejada colnclda com a marcagao (vide flecha). Quando a
marcagao Indlcar 0 (pesponto reto), pode passar-se ^ costura em ziguezague (regulagem
momentanea)
graduagao de largura do ziguezague de at6 2 mm, a largura ajustada do ziguezague 6
dupllcada. Ao retornar-se a alavanca, por6m, o resultado 6
medlante
simples
calcar
da
alavancaF.Seaalavanca
sempre
"pesponto
for
calcada
reto".
com
uma
23
Page 24

Pfaff
269
Straight
zigzag
Coutureaupoint
coutureaupoint
Costura
costura
Costura
costura
The n.umbers on dial A indicate the stitch width in miiiimeters. Turn dial A until the number
stitching
sewing
en
punto
en
punto
em
em
ponto
droit
zigzag
recto
zigzag
pesponto
ziguezague
(9
reto,
indicating the desired width is opposite the setting mark (see arrow). When "0" is set ipposite
the
mark and dial C is also
setat"0"
(straight stitch),
the
machine can be switched to zigzag
stitching by depressing finger-tip control F. If you depress the finger-tip control with the dial
set
at a stitch width of2 mm,
controi upwards always switches
Les chiffres
sur
I'^chelie graduee A correspondent k la jet§e en mm de I'aiguille. A cet effet,
the
machine
sews
a zigzag seam twice the width. Pushing the finger-tip
the
machine to straight stitching.
tourner le disque Ajusqu'ii ce que le chiffre correspondentd la jet§e d'aiguille souhait^e se trouve
face k I'index (voir fl6che). Quand repere et disque de r^glage C sont r^gl^s
sur
O(point droit),
on pourrapassagerementpassersur point zigzag. Si,pour un r6giagede lajet^e d'aiguille sur2 mm,
par example, on abaisse ce levier en plus, la jet6e d'aiguille r6gl6e est doubl^e. En soulevant ce
meme
levier, la
machine
coud
cependant
toujoursau"point
droit".
Los
numerosdela
de zigzag deseado se halle
tambien
moment^nea)
el
al
Os algarismos da escala A indicam a largura do ponto ziguezague em mm. Girar o disco
serrilhado
da marcagao indicar 0 e
pode
alavancaF.Se
ziguezague 6 duplicada. Ao retornarse a alavanca, por§m, o resultado 6
24
sobre
ancho
de zigzag ajustado a 2 mm,
soltarlapalanca
ate
passar-se k
escala,
indicanelanchodezigzag en mm: Gire el
sobre
0 (puntada recta),
pulsando
que
com
simplemente la
recuperadora,elresultado
a largurado
costura
uma
ziguezague
encontrar-seodisco
em ziguezague (regulagem momentanea) mediante simples calcar da
graduagaodoziguezaguedeat6 2 mm, a
discoAhasta
queelancho
la marca (v.flecha). Si la marca se halla sobre 0y el disco 0 estd
entoncessepuede
palanca
entoncesseduplica el
F. Sisepulsalapalanca
serd
desejada
de ajuste C tamb6m na marcagao 0
pasarapuntada
ancho
siempre
"punto
coincida
zigzag (conmutacidn
recuperadora,
de zigzag ajustado. No obstante,
recto".
comamarcagao
alavancakcalcada,
(vide flecha). No
(pesponto
sempre
"pesponto
estando
caso
reto),
a largura do
reto".
Page 25

Pfaff268
Pfaff
269
Changing
the
Deportdupoint
Posicidndela
Desiocamentos
Needle
position
leverBservestoalter
needle
puntada
da
position
costura
the
positionofthe
seam,asillustrated
above.
Le
levierBpermetded^porterlepoint
MediantelapalancaBse
figura
superior.
Comaalavanca
de
acordo
deslocadora
comagravura
acima.
selonlafigure
puede
variarlaposicidn
do
posicionamentodacosturaB,podeacostura
ci-dessus.
delapuntada
como
se
indica
ser
en
deslocada
la
25
Page 26

Pfaff
269
Automatic
Points
Ajuste
automation
Regulagem
automation
Turn
The
machine
be
set
A -
Stitch
B-
Needle
C -
Stitch
D-
Pattern
Tourner
souhalt§.
les
leviersenconsequence
A-
Reglage
B-
Deportdupoint<—e
C -
seiecteurdupoint
D -
Commandedupoint
settings
automatiques
dei
mecanismo
do
the
selector
settings
accordingly
width
position
width
cam
ce
disque
Dans
zigzag
dispositivo
dial
(see
ill.
setting
(<—
variation
selector
de
cette
lumiere,
fantalsle
until
the
arrow
above
can
thenberead
opposite).
off in
left,J,center,—>right)
setting
setting
mani^re
gauche,J,au
fantalsle
quelafidche
relever^present
(voir
figure).
centre,—>e
the
window
the
window
au-dessus
les
valeursder^glage
delalumiere
droite
PFAFF-AUTOMATIC
pointsatthe
and
the
controlsofthe
correspondantesetr^gler
i
desired
montre
pattern.
machine
surlemotif
Gireeldisco
deseado.
las
palancas
A-Ajuste
B-
Posicidndepuntada
C -
Ajuste
D -
Mando
Girarodisco
Pela
janelinhaefeitaaleitura
as
alavancas
A-
Graduagaodoziguezague
B-
Posicionamentodacostura
C -
Ajustedoautometico
D-
Ajustedocomandodoautometico
26
selectordeforma
Ahora
deben
(v. la
figuradeal
zigzag
del
Automatik
del
Automatik
selecionador
(vide
gravuranapSgina
leerseenla
<—izquierda,J,central,—>derecha
para
para
para
quelaflechadeencima
ventanita
lado).
puntadadeadorno
puntadadeadorno
ate
queaflechaaoaltodajanelinha
das
regulagens
oposta).
los
valoresdeajusteyajustar
necesserias,
esquerdoJ,centre—> direito
ponto-fantasia
para
ponto-fantasia
delaventana
indiqueodesenho
pelas
quais
coincida
convenientemente
devem
conelmotive
desejado.
ser
ajustadas
Page 27

Pfaff269
Read
off
of
the
machine
selector
pattern,
the
positionofthe
the
settings
accordingly.
dialIsopposite
7 =
longest
seam
In
the
pattern;
(ill. In
the
windowofthe
Turn
dial D until
red
mark.
see
III.atleft). Lever B
the
middle).
pattern
the
number
LeverEdetermines
serves
Use
the
shortest
possible
selector
indicated
the
to vary
dial
for
pattern
stitch
and
set
the
that
dial In
the
length
(1 =
the
patternbyaltering
length
(see
p. 20).
controls
pattern
shortest
Relever
rigler
D
(sur
parlelevlerBpermet
le
Lea
correspondientes.
la
mas
el
Procederaleitura
as
combiner
comprlmento
comprldo,
alavanca
menor
les
valeurs
les
levlers
devrasetrouver
1 = motif le
plus
petit,
voir
los
valores
palancaEse
de
en
cons§quence.
face
plus
court;
page
20.
de
El
valor
determineellargodemotlvo
largo, v. la fig. Izqulerda). Al
motivo
(fig.
central).
correspondentes
com
do
conf.
B o
posslvel,
Elija el
dos
alavancas
a
marcagao
desenho
gravura^esquerda).
desenhokalterado
vide
p^glna
r^glage
au
rep§re
sur
de
varlerlemotif
ajuste
en
ajustado
largodepuntada
dados
vermelha.
(poslgao
20.
dans
la
luml^re
La
valeurdr^glerkI'alde
rouge.
Le
7 = motif le
cholsl
la
ventanlta
del
discoDdebe
poslclonarlapuntada
mds
que
aparecem
de
acordo.Ovalor
Comaalavanca
1 =
desenho
Comodeslocamento
(gravuradomelo).
sur
le
disque
levlerEsertkr6glerlalongueur
plus
long,
voir
fig.
(fig.
du
centre).
del
disco
selector
colncldir
(poslcldn
1 =
s6lecteur
du
disque
gauche).Led6portdupoint
Choislr
con
motivo
toujourslepoint
y
ajuste
la
marca
mdis
corto,
medlantelapalancaB,se
corto
na
poslble,
janellnha
ajustado
mals
do
de
curto;
vSase
no
da
la pdg. 20.
disco
selecionadoreregular
disco
de
comandoDdeve
ajuste
E k
poslgao
poslgao
7 =
do
Manterocomprlmento
de
motifs
de
commande
du
las
palancas
roja.
7 =
determlnado
desenho
desenho
do
pesponto
dessin
Con
motlvo
varia
mals
com
27
et
o
a
o
Page 28

Pfaff
Pfaff
268
269
Machine
Entretlen
care
Limplezadela
maquina
Limpezadamaquina
From
timetotime
lint
that
screw
showninthe
plate.
Packed
toothpick.
To
clean
with
the
28
has
accumulated
lint
the
vicinity of
bobbin.
remove
illustration
which
the
there
has
accumulated
the
sewing
needle
with a
above,
plate
soft
brush.Toremove
drop
the
between
hook,
tilt
and
feed dog
the
clean
the
sewing
the
and
tooth
vicinity of
the
lift, swing
rowsofthe
head
needle
back
and
the
out
feed
feed
plate,
and
take
dog,
removing
take
out
the
remove
the
dogisremoved
out
the
bobbin
the
knurled
needle
with a
case
Page 29

Enleverde temps en temps la plaque a aiguille et k I'aide du pinceau, nettoyer le compartiment
crochet.
Pour ddposer la plaque k aiguille, devisser la vis molet^e comme le montre la fig. du haut,
abaisser la griffe, soulever l^g^rement et sortir la plaque en la faisant pivoter vers le c6t6.
Si Ton devait
les
enlever
Pour nettoyer le compartiment crochet,
k
canetteaucomplet.
k I'aide
constater
d'un
morceaudebois
des
bourres
entass^es
pointu.
coucher
entre les rang§es de
dents
de la griffe,
la machine vers I'arriere et d§poser la
boTte
Quitede vezen cuando la placa de aguja y
en la
zona
del
transportador.
li'mpie
con el pincel la pelusillayel polvoacumulados
Para quitar la placa de aguja, afloje el tornillo moleteado mostrado en la figura superior,
oculteeltransportador,
de
costura
es
sacarlo
Para
De
vezemquando
areadodente
Paraaremogaodachapadeponto
acima,
retir^-la
em
estado
Para
de
bobina
quesehaya
con
un palillo.
limpiar la
zona
transportador.
submergirotransportador,
por
completo.
pastoso,
a limpeza da
inclusiveabobina.
levante ligeramente la
placadeagujaysequela
acumuladoyendurecido.entre
del garfio, incline el cabezal
retirarachapadepontoeremover
desaparafusaroparafuso
desviarachapa
Caso
encontrar-se
deveomesmo
krea
ser
retirado
da langadeira, inclinar o
hacia
entreascarreirasdotransportador
por
meiodeum palito.
los
dientes
atrasysaque
com
de
ponto
cabegote
del todo. El polvo
del transportador, lo mejor
la cdipsula
um pincdl op6eosfiapos
serrilhado
apos
para
con
la bobina.
mostradonagravura
levanta-la
tras
levemente
algum
p6 de
e retirar a cSpsula
costura
na
e
29
Page 30

Sewing
Confection
Costuradeojaies
buttenholes
de
boutonnidres
Pfaff
Pfaff
268
269
Confecgaodecasas
para
botdes
© @ @ ® ® © @
For buttonhole
length. Turn dial A to 1.5, flick needle position iever B to the left, turn dial C to 0, pattern
length lever E to 0
O
Sew
the
the
materiai at
(2) the
0
0
foot
it
paralleltothe
Depress
reduce
the
Sew
the
first
buttenhole
again.
finger-tip
length of
second
sewing
attach
a buttenhole foot
and
the
stitch length control to 0.2. Use
seambystitching
the
right of
Let
the
first
seam.
controiF,sew4 to 6
the
seam
the
machine
bartack. Then
and
stop1mm
seam.
take
Raise
one
bartacking
release
before
and
set
over
the
fiiier
the
buttenhole
stitch
to the
ieft.
stitches,
finger-tip control F.
the
end.
the
gaugetothe
cotton
thread.
foot,
Pull
slightly
desired
threadasfiller
Leave
the
turn
the
fabric
the
filler
thread
gathering
thread.
needie
tautand
the
buttenhole
down
and
iower
lay
fabric
in
to
§
Depress
the
stitches.
Commencer
sur
de
et le r6gle-point
0
Coudrelapremiere
k
0
Soulever
Ex6cuterunpoint
boutonnifere.
30
the
bar
covers
Trim
la longueurde boutonni^re souhaitee. R^gler ensuite le rdgle-zigzag Asur 1,5 mm,1elevier
deport
du point B vers la
droitedela
quelque
finger-tip
the
par
l^vre
control.
both
seam
threads
mettreenplacelepied
sur
0,2 mm env. Comme filde
Ifevreensurpiquantlefildepasse.
dansletissu.
peule
verslagauche.
and
pied
ends,
gauche
pour
Sew
the
push
cut
the
buttenhole
boutonni^res,
Tirer
second
tack,
again
finger-tip control F
open
between
pour
boutonni6resetpar
le
disque
de r^glage
passe
utillser un fil
ArrfeterlapiqOre
tournerietravailde180°etrabaisserlepied.
sur
le fildepasse
gathering
upwards,
the
the
seams.
r^glerleguide
des
points
coton
pour
fabric
slightly.
and
make
3 to 4 tying
correspondent
automatiquesEsur
(coton perl6).
raiguillesetrouvant
le faire
entrer
When
0
dans
la
Page 31

(s)
Manoeuvrerlelevier
I'arrdt ne
0
R6aliserlaseconde
0
Abaisserdenouveaulelevier
0
Quand
effectuer3ou4points
0
Couper
Para
de ojal deseada. Coloque el regulador de puntada zigzag a 1,5 mm, accione la palanca
B hacia la izquierda,
de
oderefuerzo,
0
La
Deje
0
Levanteelpie
puntada
0
Presione
ligeramente la pieza de
la
0
Cosa
0
Haga
0
Una
de
0
Corte
devlenne
les
les
filsetouvrirlaboutonnifere
coser
ojales
motivesEsobre
costura
del
clavadalaaguja
hacia
hacia
palanca
F.
ahoraelsegundo
descenderlapalanca
vez
cubiertos
fijacion.
ahora
los
Fet
ex§cuter
pas
trop long. Lecher le levier F.
Ifevre
jusqu'^1mm
deux
extr^mites
d'attache.
coloque
ponga
0 y
ajuste
utilice hilodealgoddn
primer
lado
en el material a la
para
ojales,
la izquierda. Tire del hilodealmaycoldquelo
abajolapalancaF.Haga
costura
lado
los
lados
hilos
yabrael
4^6
points
d'arr&t.Yretenir
dela
fin.
Fet
r6aliser
TarrSt
final.Yretenir
de
Ifevres
sont
bien
entre
les
I6vres.
primeramente el pie para ojales y ajuste la guia para la largura
el disco del Automatik C
el largodepuntada
(hilo perle).
del
ojalserealiza
sobrehilandoelhilodealma.
derecha
del lado del ojal.
gireelmaterialyvuelvaabajarelpie
ahorade4 a 6
para
que
la presilla no resulte
del
ojal
hastaunmilfmetro
F y
hagaelpresillado
del
ojal,
levantelapalanca
ojal
entre
losdos
lados
del
queique
peuletissu
aussiletissu.
reoouvertes,
sobre
a 0,2 mm
releverlelevier
0, la
palanca
aprox.
Como
hilodealma
para
ojales.
paralelo al primer lado del ojal.
puntadasdepresillado.
demasiado
antesdellegaralfinal.
final
sujetandounpocoelmaterial.
F y
haga
mismo.
larga y
de 3 a 4
pour
para
largo
Haga
Sujete
suelte
puntadas
que
F et
una
Para
confeccionar
r^gua de
disco
a
esquerda,
desenhoEem
(para
0
Costuradaprimeira
Deixaraaguiha
0
Levantarocalcador
Executar
poslcionaramesmaemparalelo
0
Calcaraalavanca
o
tecido
Depois
0
Executarasegunda
0
Calcar
0
Uma
acordo
reguladordoziguezague
cordonaracasa)
um
deve
soltar
novamenteaalavanca.
vez
que
uma
casa
para
botao,
montar
com o comprimento desejado.
A em 1,5 mm,
disco
reguladordoautomatico
0 e
comprimentodopespontoemaproximadamente
uma
linhadealgodao.
parte
de casa
dentrodotecidokdireitadaprimeira
para
casear,
pesponto
ser
novamenteaalavanca
paraaesquerda.
F e
executar
levemente
costura
pesponteando
virarotecidoebaixar
comaprimeira
de 4 a 6
segurado,
at^
maisoumenos1mm
a fimdequeoremate
F.
Proceder
alavanca
0 em 0,
por
Esticaraponta
costura.
pespontoskguisadetravete.
Executarotravete
ambososextremesdacostura
estejam
primeiro o
depoisksseguintes
posicionadoradacosturaBpara
alavanca
cimadalinha
costuradefixagao.
novamenteocalcador.
da
antesdoseu
final.
recobertos,
(7) executar mais 3 y 4 pespontos rematadores. Cottar os fios.
costuras.
calcador
reguladoradocomprimento
linha
naosetorne
0,2
para
mm.
Utilizar
que
serve
que
servedealma
caseados
Nesta
muito
regulagens:
como
como
operagao
comprido.
final.
Segurar
levementeotecido.
levantaraalavanca
Abrir
a casa entre as duas
e a
do
alma
alma.
e
F e
31
Page 32

Ml
(PMFF)
Pfaff,D6750
Postfach
296-12-14014
Kaisersiautern
3020/3040,
Telex
045753
MengelDerg OffsetdrucKGrnbH, 0
Printed inWest Germany
ImprimeenR. F. A.
Impresoenla R. F. A.
ImprimadasemR. F. A.
engl./franz./span,/port.
12/78
6710
Frankenthal
 Loading...