

Page 1

9L-
I
Page 2
Dear
last
At
for
Sewing
The
machine
you
ore
to
the
edonit,
Although
possible
to
you
escape
will
you
rent
sewing
We
have
ristiuctions,
of
guide.
glance
will
you
help
you
chapters.
It
is
ci
the
information
in
conjunction
various
and
numbered
on
pages
clarity
Moreover,
chapters
have
become
ing
principle
look
upon
under
your
The
more
con
you
ciation
Housewife,
you
are
the
Machine.
wos
now
looking
great
variety
everything
that
in
time
making
for
your
memory
immediately
work
therefore
Before
briefly
good
parts
and
do
of
and
using
ot
have
a
when
reverting
plan
given
with
named
in
and
2
understanding
your
1,
and
2
thoroughly
of
as
it
a
care
you
understand
with
its
scope.
rough
attention
and
it,
proud
explained
of
is
some
the
—
try
which
prepared
hope
your
the
pages
to
open
on
the
in
page
are
3
After
5.
your
living
protection.
the
owner
forward
work
still
quite
of
various
because,
your
your
you
maclime
of
idea
of
later
out
that
contents
the
text
The
1.
also
of
is
reading
ocquointed
sewing
thing
your
greater
of
to
you
with
that
the
hand
machine
this
will
this
its
contents,
on
to
to
page
of
are
illustrations
provided
these
drown
machine;
that
machine,
will
the
much
in
detoil,
much
can
be
clear
to
directions
adjustments
it
is
unlikely
at
a
tt
con
informative
find
it
we
advise
booklet,
any
one
the
left
should
the
book,
clearly
for
instructions.
particularly
these
with
the
has
been
and
be
your
longed
pleasure
perform
you,
given
the
diffe
do.
Book
useful
a
you
so
This
of
page
he
marked
shown
greater
you
work
you
placed
what
appre
and
it
may
that
that
will
the
read
The
will
will
is
to
1;
to
Page 3
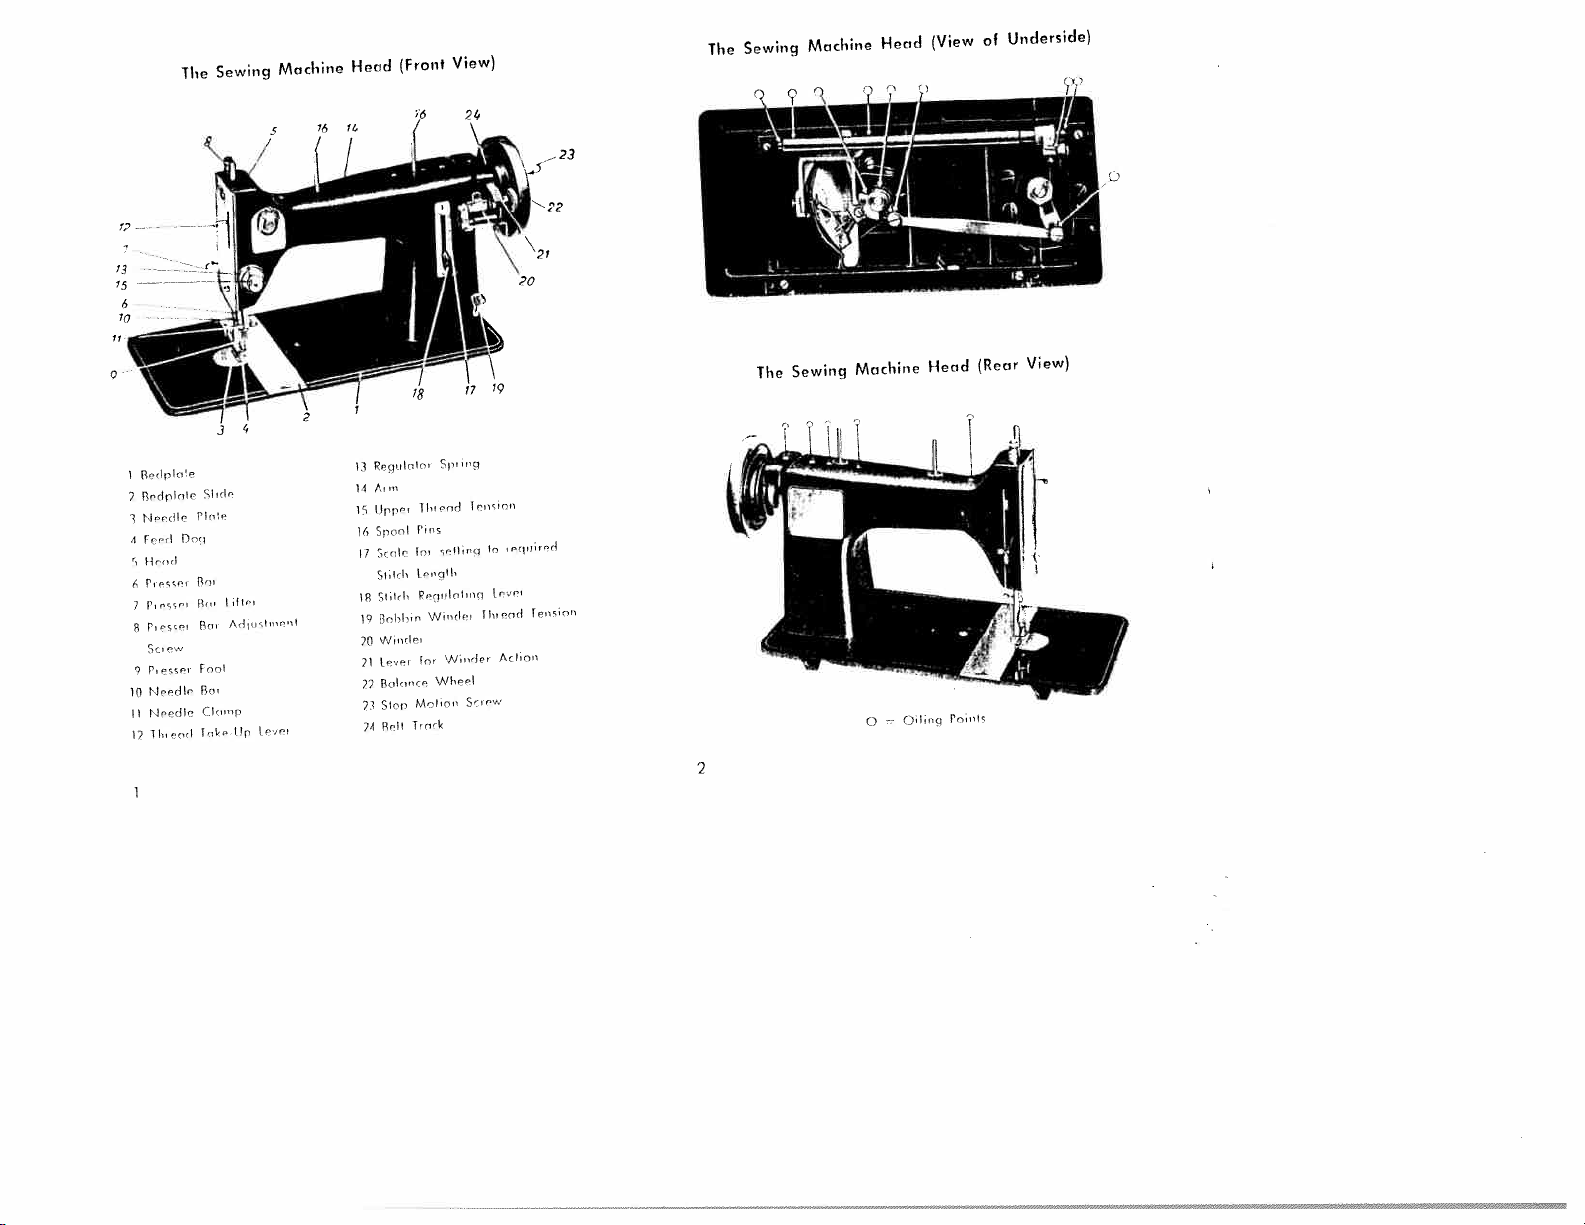
I
BcrIpIc,i
R’,l,lcl,’
7
9
6
7
‘
in
7
i’dlc
Prnsce,
0,
0,
Sc,
P
cc,’,
r3,1l
IIrr,IIc
II,,
Head
Machine
0
0lccq
Head
Vew)
(Rear
r0hl
The
Machine
Sewing
Sewing
Sewing
The
0,,
Sl,rl’
Plr,i
fl,,,
Il’’
c’,
R’r
cv,
Prof
0,
Cl
I,3r
errl
Machine
A1
lf
Head
3
14
17
16
I)
Ill
19
70
21
22
27
74
Rrqclrlcc
Ac,
lJpp
pr
S
Scolc
Sl,I,h
SIH,I,
Rr,bl-,,,,
Vc’,,,1’,
Lcv’,
R,,l,,,,cc
Sb,,
Bll
S
cccl
TI,,
crff,,c,
Iv,
Ir,,cjll,
Pcrcclof’’’cf
‘cJ,,,Ir,
Wo,de,
for
\‘Vhc’I
T,ccl,
Ie,,
lo
‘‘‘‘‘
3
[rv,’r
Ir,,c,,,,
II,.
nd
Acf,o,,
C
SO
View)
(Front
The
Underside)
of
(View
2
Page 4
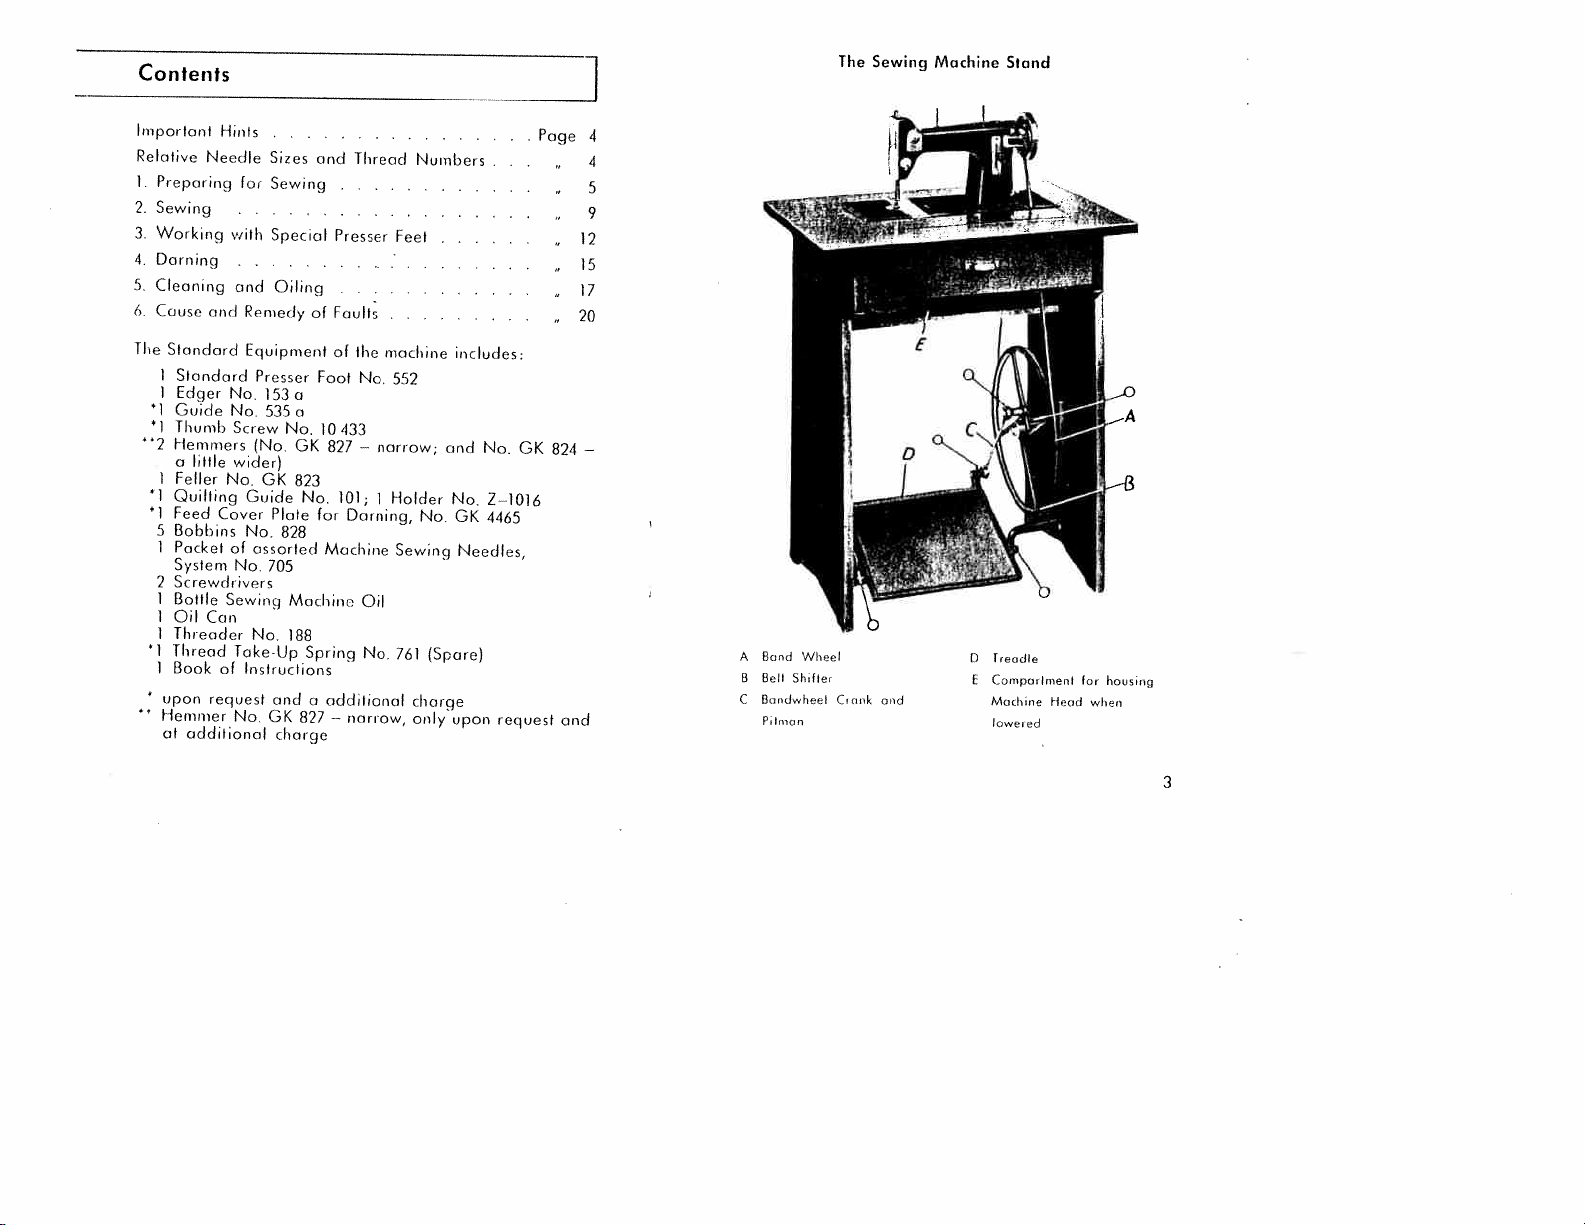
Contents
1
The
Sewing
Machine
Stand
Important
Relative
Preparing
1.
2.
Sewing
Working
3.
4.
Darning
5.
Cleaning
(S
Cause
The
Standard
1
1
‘1
Guide
1
Thumb
“2
Hemmers
a
1
Feller
‘1
Quilting
1
Feed
Bobbins
5
1
Packet
System
Sci’ewdi’ivers
2
1
Battle
Oil
1
1
Threader
1
Thread
Book
1
upon
Hemmer
at
Needle
and
Standard
Edger
little
Cover
Can
request
additional
Hints
fec
with
and
Remedy
Equipment
Presser
Na,
No.
Screw
(No.
wider)
No,
Guide
No.
assorted
of
No.
Sewing
No,
Take.Up
of
Instructions
Na.
Sizes
Sewing
Special
Oiling
153a
5350
No.
GK
Plate
828
705
Machine
188
ond
GK 821
charge
of
OK
823
No.
Spring
a
and
Thread
Presser
Faults
of
Foot
10433
827
101;
for
Darning,
Machine
additional
—
narrow,
the
No.
‘—
Oil
No.
Feet
machine
552
narrow;
Holder
1
Sewing
761
Numbers
and
No.
No.
(Spare)
charge
only
upon
includes:
No.
Z-l016
GK
4465
Needles,
request
OK
Page
824
and
20
12
15
17
4
4
5
9
—
Bard
A
B
C
Wheel
Shi(ier
Bell
Bondwheel
Prlrrrorr
Crank
and
Treadle
D
Coreporirneni
E
Machine
lowered
Head
tor
housrng
when
3
Page 5
Important
Sewing
from
hers
of
cotinq
your
machine.
The
system
the
machine
plate
Ii
it
is
let
only
work.
Relative
Closs
ot
Fine
jeers
[
Mediu,n-W,oqhi
I
Irony
Wool
Before
materials,
For
the
slightly
For
the
silk;
for
should
We
recommend
los
the
No.
60—70.
4
hints
Machine
Sewing
a
your
oil
slide
of
necessory
Needle
Work
,nnd
en
sewiisg
try
under
softer
under
woi
be
alike.
upper
Oil
Machine
machine.
if
you
number
is
705;
your
to
sewing
sizes
Colic,,
Goods
linen
ned
Goods,
F
exceptionally
out
the
thread
and
finer
thread
of
k
this
that
cinci
and
Expert
Never
cjo,
it
of
the
this
machine.
have
your
machine
and
Coiton
,,e
Leo
needle
(bobbin
thread
(bobbin
kind
for
darning,
under
Needles
will
sewing
number
thread
Goods
I
her,
Co,
heavy
and
the
thread,
Dealer,
use
just
gum
is
machine
numbers:
sri
is
thread
thread)
than
thread)
upper
cotton
together
are
any
the
needle
stamped
repaired,
experts
Tlsreod
or
very
preferably
for
the
preferably
and
or
woi
60-100
40-30--
on
No.
best
from
kind
king
to
No
60
40
upper
under
with
purchased
the
of
be
on
the
pIe
do
Needle
fine
a
remnant.
50
he
Supp
lubri
parts
used
bed-
a
the
60-
70
70—
90
90-110
texture
use
thread.
use
thread
used
needle
[1.
I
Ike
of
tIlt
the
open
Treadle
the
on
ment.
the
belt
pitmon
Itont
s
e
firmly
with
the
shifter,
eLse
belt
Sewing
aver
to
tfie
No
Treadling
‘Jhen
rind,
loot,
otherwise
1)0th
hand
ti
eadling
be
exerted
to
a
a
obtain
Setting
Raise
nnd
your
ihe
left.
up
as
take
left
needle
Now
thumb
sewing
bell
through
The
where
joined
aid
turn
mount
Machine
towards
right
proct
so
long
the
presser
the
feet,
turn
with
steady
the
the
needle
hand,
insert
it
will
screw
Mechanism
ovei
belt
end
and
both
by
of
the
you,
thol
so
ising
as
teeth
side
the
balance
an
alternately
Needle
the
needle
making
to
is
go.
on
heud
the
balance
the
at
the
ends
means
pliers.
hondwheel
the
Head
and,
it
treadling,
there
bar
of
by
side,
even
running
bar
to
the
tfse
needle
Finally,
the
needle
Preparing
from
its
holes
in
the
back
bandwheel,
ore
of
flattening
Next,
place
wheel,
out
at
will
caine
no
is
must
the
feed
on
wheel
rhythm.
by
of
its
between
sure
right,
with
When
of
the
leave
be
the
your
the
highest,
that
and
into
clamp.
comportment,
wheel.
then
the
must
Draw
bedplate
then
and
hooked
be
the
the
over
belt
towards
wishing
the
way
turn
same
time,
off
lfse
wfseel.
the
maclone
material
kept
in
dog
the
will
treadle.
over
towards
An
even
toes
and
machine.
lower
thumb
and
the
flat
the
long
the
neecfle
your
right
be
metal
under
get
With
pressure
the
on
hood
for
and
both
and
taken
brought
together,
connection
under
you,
to
the
bandwheel
press
unthm
the
lifted
blunted.
your
you,
beefs
presser
forefinger
the
groove
clomp,
tighten
sewing
place
ends
comport
between
to
and
the
belt
and
drop
the
belt
eoded,
presser
position,
Place
right
and
start
should
in
order
bar,
shank
to
the
as
far
the
the
of
the
let
the
of
of
5
Page 6

Attaching
Fç
1
1
Upper
Under
Removing
the
berlplote
balance
in
front
the
shuttle
1)
the
Threading
Threading
slide
wheel
of
you.
coi
Presser
the
over
Press
ncr
For
dard
the
the
foot
low
the
your
driver
Shuttle
to
the
towards
(Fig.
Foot
all
presser
needle
presser
with
push
screw.
left
for
Plcice
pin
through
to
discs
spring
buck
lever
guide
needle
to
needle
front,
to
the
3),
normal
your
it
on
First
hand,
finol
a
(Fig.
the
b,
r
through
d,
e,
clamp,
right
you
right
thus
sewing
loot
to
its
bar
right
to
lightening.
reel
2),
guide
left
then
and
down
through
through
and
as
for
until
the
releasing
No.
highest
lifter.
the
presser
tighten
and
of
cotton
and
ii,
between
under
up,
the
and
and
Bobbin:
as
the
small
work
552,
hand
then
draw
hen
it
point,
Take
the
then
the
thread
behind
the
finally
the
will
shuttle
latch
the
use
(Fig.
the
and
bar,
screw
use
on
the
down
the
from
eyelet
eye
go.
shuttle
the
stan
1).
Raise
and
presser
Ii
orn
against
with
screw
a
the
spool
thread
and
tension
regulator
front
take-up
thread
I
from
left
of
Pullout
Turn
the
is
right
fitted
and
on
the
to
be
lift
to
llowiiig
this
In
ly.
Ihe
shuttle
tciFen
out.
op-side-down,
bobl,in
hand.
Before
winding
an
to
the
ihg
mechanism
by
holding
loosening
centre
of
turning
di
through
tension
one
When
sure
The
means
enable
of
as
been
tioned
drown
act
firmly
bobbin
Now
bring
contact
lance
towards
outomoticalfy
nally
restore
ow
the
ion
the
of
inserting
that
left
of
bobbin.
the
correctly
the
inwards
of
press
the
wheel,
the
the
the
cjuicfe
ii,
the
easy
a
retaining
in
with
you,
stop
it
to
raised
can
Turn
and
fall
bobbin
the
the
stop
the
holonce
screw
thread
a
and
then
smrill
the
small
winder
lever
insertion
As
bobbin
bearing
by
spring,
position.
lever
winder
the
ann
and
as
motion
connection
rise
slight
position
easily
the
shuttle
let
into
the
thread
the
must
balance
motion
outwards,
am
Ii
---
see
insert
holes
the
bobbin
centre
hearing
a,
to
soon
has
posi
is
the
thus
the
a,
to
into
ba
set
commence
soon
screw
your
sew
be
the
as
with
be
the
put
wheel
wheel,
the
Fig
in
latter
the
out
screw,
with
as
reel
4,
through
the
end
the
into
on
bobbin
con
he
into
treodliag.
bobbin
must
he
the
stitch-forming
of
action,
with
your
which
your
far
as
mouriterf
of
shoulder
the
bobbin
plate
pressed
motion
is
retightened
the
the
The
it
of
fully
left
is
right
wilt
on
winder
thread
winder,
is
by
winder
This
is
hand
fitted
in
hand,
go.
spool
thread
through
the
bobbin.
on
the
outwards
turning
stops
loaded.
in
order
mechanism.
Fiq
clone
and
the
Next
pin
make
left.
Fg
Fi
to
3
by
by
n
0
4
it
7
Page 7

Fiq,
8
Threading
Tal<o
your
hand
ts
the
off
is
the
is
near
then
the
From
the
shown
perly
be
drawn
Replacing
When
machine
spring
turned
Drawing
through
Hold
leaving
balance
let
the
again
so
it
and
draw
pfate
can
then
together
placed
S
car
foot.
the
left
insert
point
shuttle,
from
thread
to
point
there
spring
in
threaded
returning
towards
the
needle
to
will
(Fig.
under
hand
the
the
of
Fig.
make
is
the
the
end
the
wheel
its
it
8).
be
with
the
shuttle,
he
down,
so
left
through
edge
delivery
the
take
i
out
the
Shuttle
on
Under
Needle
of
thread
travel
highest
loop
up
The
drawn
the
and
Shuttle
and
bobbin,
that
to
right
of
shuttle
the
and
The
7.
if
freely.
the
sure
top,
you.
the
over
the
through
end
upper
behind
point
with
from
the
the
the
the
that
and
Thread
Plate
upper
slack.
towards
down
point.
under
out
down,
obove
(Fig.
slot
shuttle,
hole
—
tfsread
up
shuttle
thread
Shuttle
the
of
the
fully,
thread,
your
also
thread
5).
a,
see
again,
the
the
thread,
Turn
you
and
In
tfiread
needle
thread
the
Dra’N
which
Ii
Fig.
uncfer
is
to
small
point
doing
and,
pres
into
right
with
into
let
and
near
as
pro.
con
the
the
to
up
be
to
Do
hove
Before
sewing
sew
before
sew
svciy
be
Sewmçj
presser
its
foot,
not
stitch
to
the
by
This
along
while
any
prevented.
foot,
highest
lower
pull
practised
runs
ensure
fabric
or
when
carefully
will
pro.
sewing
needle
one
turning,
hold.
stop.
the
to
to
9
L2L
eneral
0
Fr
all
552.
presser
the
they
sewn.
the
corner
thread
then
bath
which,
machine
right
9)
on
neutral
by
pushing
the
Place
sewing
the
Turn
to
the
the
turning
lever
you
normal
stitch
needle
lower
ends
the
F’Jo
point.
the
6.
muterial,
sufficiently
t
est
that
be
When
stitching
turning
vent
the
a
edge.
and
ing
page
Adjusting
The
the
(Fig.
which
set
cafes
shtch
aid
decrease
pull
sctiiig
Move
the
bar
but
on
are
lioi
aci
oss
balance
of
through
t
he
otherwise,
the
Lenqth
a
stitch
“,hich
rnquirerl
scale
position.
the
length
up
must
sewing
the
thread
material
lifter,
only
guide
some
reninants,
length
satisfactory
cI
or
seams,
wheel
from
bending
ci
seam
the
corner
it
again),
of
the
of
has
regulating
is
fitted
stitch
r.
“0”
on
the
knob
lever
of
towards
slightly
warts
under
and
start
it.
and
the
and
thick
ports
assist
with
draw
material,
ft
(Ii
the
and
tacking
can
easily
Stitch
in
front—on
a
knob
length
the
You
increase
anti.clockwise
downwards.
stitch
“0”.
After
tighten
use
toke.up
Alter
make
threcid
suitoble
the
your
or
with
and
presser
continue
thread.
lever
b
can
scale
you
standard
lever
the
presser
to
sew.
you
ci
of
the
needle
hand.
breaking.
a
hand
then
bai
This
occur
ii
with
be
mdi
the
To
must
each
the
few
tension,
for
mnteriol,
to
will
Page 8
knob
by
reverse
to
do
and
‘0”
Regulating
upper
The
thumb
the
turning
ment
will
The
under
the
small
Here,
too,
wise,
and
turning
sewing
right
up
Thread
the
threod
nut
of
ucreuse
Wi
11
reduce
thread
screwii(Fig.
tension
the
dcci
eases
tO
Fc
1
in
you
the
Tensions
the
the
clockwise
a
must
top.
tension
thread
tension;
it
to
ii.
tension
with
7)
incredses
od1usting
when
direction.
push
first
is
tension
anti-clockwise
is
aid
the
when
If
lever
the
regulated
discs.
regulated
screwdriver.
of
n
adjusting
anti-clockwise.
wish
you
passed
turning
by
Clockwise
adlust
turning
by
clock
If
however
(Fig.
11)
more
tension
in
ci
clockwise
thread
underside
thread
slacken
slightly
Loops
owing
tension
the
left.
Only
if
the
stitch-forming,
tension,
the
tension
of
lbs
it
off
to
the
forming
to
excessive
by
none
by
turning
stitches
upper
by
the
the
been
a
little
left,
on
turning
of
loop
thread
turning
direction.
loops
material,
tensioned
by
.
e.
top
upper
the
the
above-named
should
the
screw
on
is
the
continue
turning
in
on
of
thumb
the
If
the
the
underside
too
slack,
thumb
nut
after
adiusting
to
it
is
possible
too
severely,
the
small
anti-clockwise
material
thread
nut
tension.
on
odtustments
under
thread
i/
(Fig.
7)
and
he
to
must
to
the
formed
that
and
screw
direction.
(Fig.
tension
be
the
of
the
right,
the
the
you
i/
12)
Correct
given
right.
work
be
given
upper
an
under
must
(Fig.
may
discs
corrects
more
i.
e.
the
7)
be
the
to
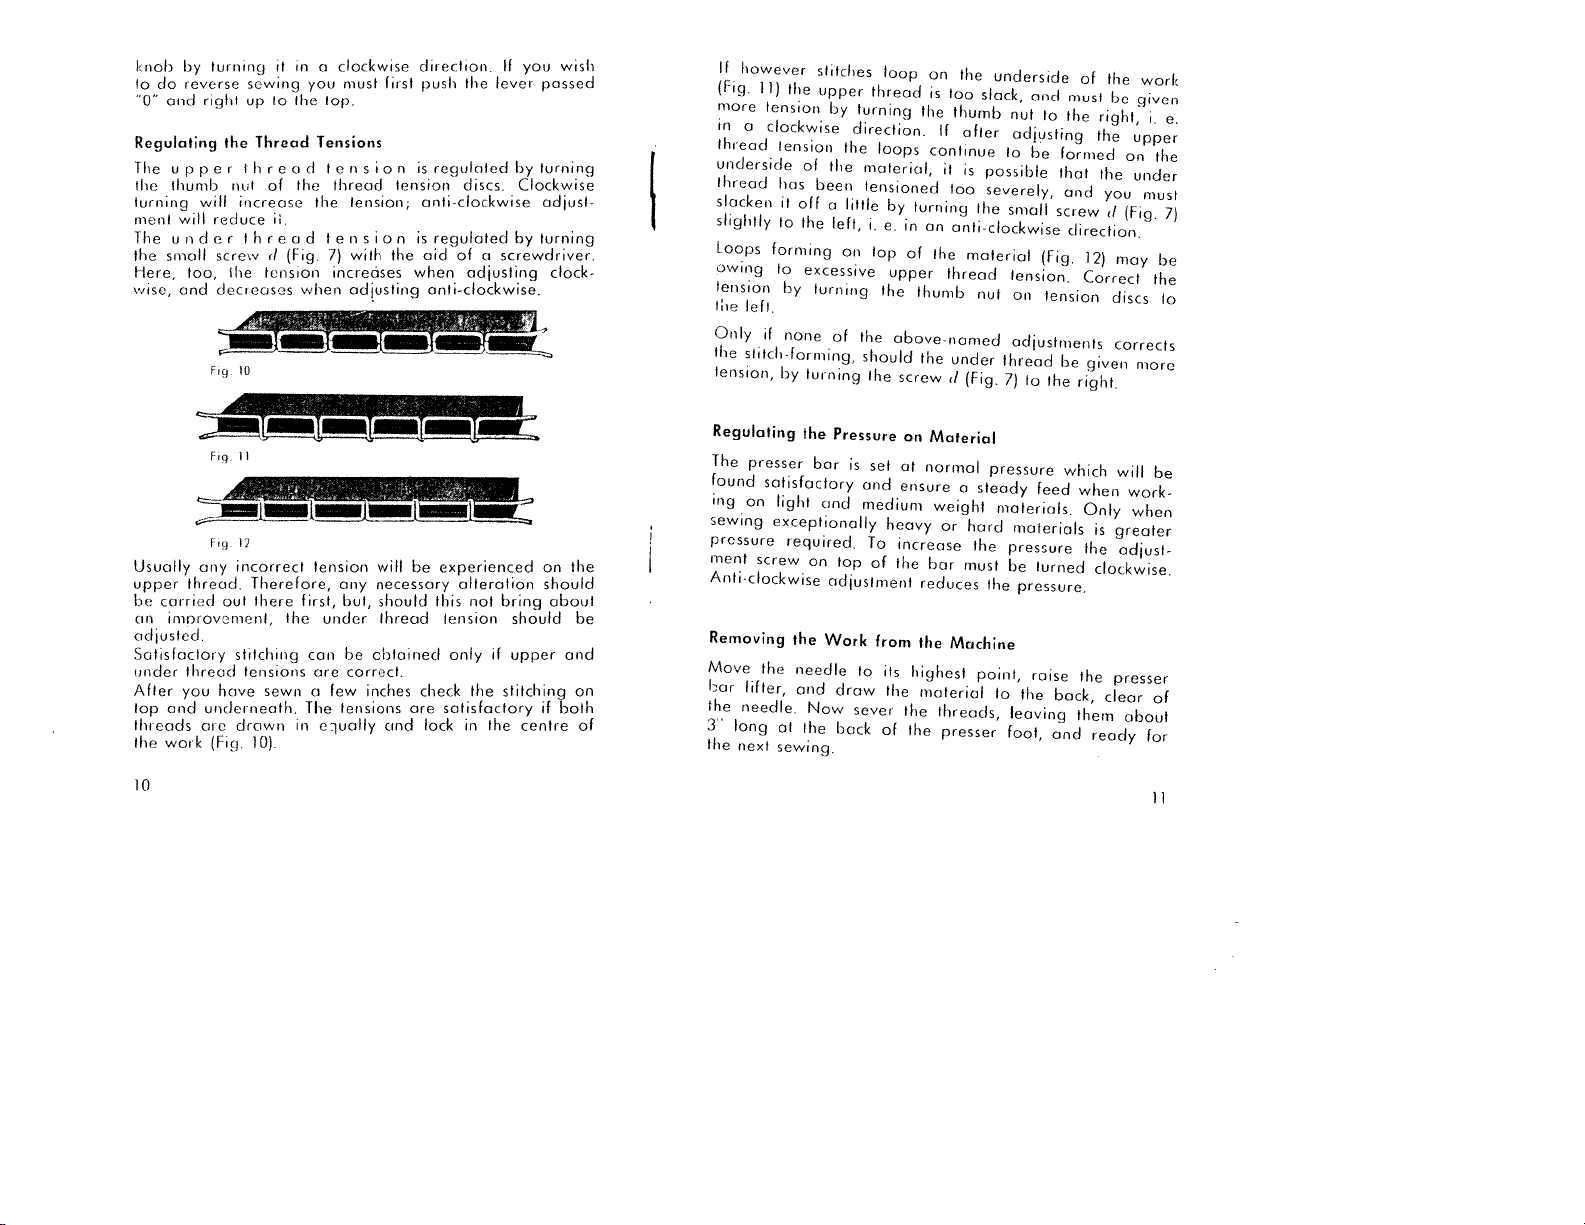
Usually
upper
thread.
carrier]
be
imorOvCmcnt,
(in
acl1usted.
Satisfactory
thread
under
After
you
top
and
threads
work
the
10
it
Fig
incorrect
any
Therefore,
out
there
stitching
tensions
hrive
underneath.
drown
are
(Fig.
10).
r-rzztEEE
tension
first,
the
under
can
are
sewn
in
a
The
few
eualfy
necessary
any
but,
ohtuinecf
ho
correct.
inches
tensions
will
should
thread
cind
experienced
be
this
tension
check
satisfactory
are
lock
alteration
not
only
the
in
bring
should
ii
upper
stitching
tfse
on
should
if
centre
about
and
both
the
be
on
Regulating
The
found
ing
sewing
pressure
ment
Anti-clockwise
Removing
Move
bar
the
needle.
of
3’
the
long
next
presser
satisfactory
on
light
exceptionally
required.
screw
the
lifter,
at
sewing.
the
bar
on
the
needle
and
Now
the
Pressure
is
set
and
rind
medium
To
top
adlustment
Work
to
draw
sever
back
of
from
of
on
at
ensure
heavy
increase
the
its
the
the
the
Material
normal
weight
bar
reduces
the
highest
material
threads,
a
or
hard
the
must
Machine
presser
pressure
steady
materials.
the
point,
to
foot,
feed
materials
pressure
be
turned
pressure.
raise
the
leaving
which
bock,
and
when
Only
is
the
clockwise.
the
clear
them
ready
will
work
when
greater
adjust
presser
about
be
of
for
11
Page 9

Working
Edge
Stitching
Foot
No.
No.
10433
14
Iv
12
Z
(Fig.
with
.153(1
(Edger).
13).
Special
Guide
Presser
No,
With
the
distance
of
the
of
stitching
working
seams,
loge.
suitable
fasteners,
veral
side
case,
be
used,
the
in
Nirrow
No.
GK
No.
OK
Fold
the
edge
ing
a
At
the
the
material
attach
dravi
curl
of
535a.Thumb
the
guide
material
on
is
of
This
loot
tar
or
stitch
by
side
the
guide
hecnuse
way.
Hems
824
and
827
(Fig.
over
to
ol
the
fold
about
commencement
ci
thread
the
material
the
hemmer
Feet
you
from
which,
wide
great
is
attaching
br
lines
but,
;
the
wrong
fabric,
insert
and
the
to
and
also
laying
in
must
it
14).
h’
a
into
Sciew
can
edge
the
when
cidvan
closely
either
will
mak
wide.
pin
with
w[iere
3.
line
long
very
zip
se
not
side
the
it
automatically
is
bar
and
commence
to
feed
the
materials,
that
you
freely
cui
filling
lure
ed
set
use
into
I.
Foot
but
turned
to
the
OK
for
hemmer
under
sew
heniiner
827
heavier
foot
twice.
carefully.
without,
is
very
materials
No
OK
Lower
Allow
suitable
it
824.
the
the
however,
for
is
recommend
presser
nsateriol
over-
line
tex
eHing
Foot
No.
OK
two
over
protecting
the
together
I
the
of
(lot
Next,
once
sewing
Presser
No,
mater
guide
823
pieces
the
right.
cinch
ito
feller
cloth
over
open
run
more
Z-1016
icil
No.
other,
at
the
the
the
con
of
Pin
the
insert
The
is
through
the
Foot
(Fig.
101,
mate
about
corn
slotted
sewn
upper
up
raised
edge
be
with
both
the
lov’
the
No.
16).
sewn
which
552;
effectively
enables
Quilting
you
Guide
with
to
lay
No.
the
101;
aid
pcrrollel
of
Fig.
15)
Lay
the
no
t
one
the
lower
to
pieces
mene’.;nient,
mcitoiicil
rnuth
be
er
down
of
piece
piece.
do;
h
ansi
cecirn
the
feller,
clove
flat.
of
or
it
Qajilting
Standard
Holder
Padded
quilting
13
Page 10

right
the
screws,
lie
material
between
second
tine
give
to
as
a
to
of
guide
left
Make
st
hi
row
stitches,
the
for
thi
ouqh
to
rind
01
stitches
desired
the
the
i.
your
right
ecaisd
e.
after
spacing.
third
the
let
and
first
holes
to
stitch
the
you
rows
ed
viously
no1.
support
bar
tely
encircles
straight
ro,v
give
guide
hove
The
fourth
of
direction,
Fix
so
above
ri
the
of
the
row.
second
row,
stitches
niark
the
over
that
it.
guide
bow,
stitches,
required
When
glide
adjusted
etc.
without
rig
quilter
it
the
Now
making
over
‘ow
iii
the
is
and
any
the
rod
then
the
desir
mate
guide
presser
immedia
foot
push
from
tighten
move
spacing
your
the
guide
then
pre
and
the
first
acts
I
4.
1
Feed
Caver
(Darning
(Fig.
17).
Embroidery
No
Presser
Open
mg
plate
slide
with
bedplnte
ant
if
it
and
i
slides.
Move
presser
hoop,
under
thread
ends
of
es,
Start
edge
of
even
rhythm,
di
to
ly
sely
side
the
right
ninke
I
ro
pa
the
the
covers
clip
the
bar
and
both
the
and
edge.
ai
I.
Plate
Plate)
Hoop
Foot
front
in
your
the
slide.
aver
stitch
lifter.
place
upwards
tlsreads
the
line
hale.
and,
Ira
by
side
crass-stitches,
2
No.
and
right
small
Swivel
the
needle
the
regulating
Draw
the
of
Work
at
under
across
At
the
OK
rear
lug
while
the
4465
hand,
ii
the
plate.
the
work
through
stitches
the
some
the
the
start
hedplnte
inserted
darning
plate,
Then
lever
part
under
you
machine
time,
needle,
hale,
and
to
ensure
V
slides,
and
place
into
and
close
to
to
he
the
the
material
make
about
move
laying
and
finish
plate
the
“0”,
darned
needle.
the
/r
fast
about
of
the
—
Darning
C
take
the
it
next
the
left
anti-clockwise
small
catches
both
bectplate
and
tower
over
Draw
and
hold
first
few
from
and
the
hoop
the
stitches
i/4
erich
stitch
lines
(ire
to
hole
st
the
with
beyond
ii
Fq
clam
tlse
the
the
the
itch
left
stea
clo
line
laid
t7
the
in
6
an
I
4
15
Page 11

Continue
stitching,
Rents
darned
employing
can
((ruse
cloth.
of
aid
lever
reverse
16
and
use
collars
place
up
in
until
badly
without
the
the
Set
the
and
sewing.
the
some
the
the
darning
standard
and
the
sritch
down
hole
worn
cuffs
stitch
manner
edges
aid
regulating
lines
to
is
completely
of
the
hoop.
presser
ore
obtain
a
on
darning
For
foot.
usually
close
alternately
r
c
o
collars
this
lever
together,
s
s
the
mended.
and
plate
class
This
made
for
of
is
of
a
Imward
first
culls
ond
work
possible
2—3
short
moving
lines
can
without
you
be-
layers
stitch,
the
and
of
5.
be
To
keep
the
care
must
surface
in
the
lubricating
interfere
It
is
necessary
after
a
mg
metal
needles,
delicate
a
small
piece
o
After
you
best
grade
resin
nor
right
places
After
oiling,
two,
but
and
that
oil
to
After
this
while,
all
superfluous
II
the
machine
or,
if
you
rough
will
working
with
regular,
If
stitch
wooden
of
soft,
have
acid,
first
the
flaw
short
and,
have
cleaning
machine
be
taken
not
oil,
the
instruments,
you
forming
sewing
will
treadle
make
presser
to
before
ail,
has
of
suffice,
mechanism
and
gradually
smooth
therefore
thorough
do,
you
stick,
smooth
wiped
machine
and
is
pi
ave
the
sure
every
run
let
working
not
used
it
necessary,
at
point
bar
Cleaning
a
high
it.
Mere
Fluff,
thread
where
form
running
to
give
cleaning.
such
as
may
mechanism,
it,
and
material.
ports
all
oil
crystal
ample.
working
the
been
clear.
machine
that
the
lifter
machine
it
again,
used
continuously
first
of
pitch
of
dusting
ends,
they
combine
into
small
of
the
all
parts
Never
scissors,
accidentally
It
is
best
wrap
clean,
oil
which
A
few
rapidly
needle
is
raised,
part
of
stand
carefully
for
any
thus
all
apply
and
efficiency
of
the
and
dust
lumps
machine.
specified
use
for
screwdrivers
domage
that
round
the
them.
contains
drops
far
a
minute
is
riot
threaded,
to
enable
the
mechanism.
idle
for
wipe
length
rendering
a
few
oiling
good
machine
seitle
with
which
here
cIeon
you
point
Use
neither
at
o
short
away
of
time,
drops
the
or
the
take
only
the
or
the
tho
Page 12

of
parafhn
machine
a
film
All
points
must
be
of
cleaned
apidly
lresh
marked
(-5
lb
•
e
H
eacI
(Fig.
2.
retaining
T
IieA
sciew
and
r
screw
m
sliding
(Fig.
upwards.
3.
1
h
e
N
cc
I
d
i
doming
h
t
u
the
throwing
head
forget
to
to
bandwheel
e
t
I
needle
cleaning
the
macirked
off
the
Tb
4.
e
S
raising
shuttle,
tilting
the
Do
sot
uttended
addition
In
oil
all
to
the
lubrication
(see
above>,
oil,
thus
“a
and
oiled
(-5
‘1
in
wipe
on
proper
1
points.
the
Then
all
ports,
ad1acent
sequence.
work
and
apply
illustrations
ii
the
cluding
there
e
points
the
is
movement,
cind
18,
the
P
Ia
screws
eCa
the
to
the
to
above
page
18,
removing
page
nickel-finished
te(Fig.
and
r
r
bcir
to
strap
back.
retighten
and
specified
thus
and
18),
18>,
removing
r
e
its
from
oiling.
‘a”
the
page
(Fig.
all
after
the
alter
highest,
ports
ports
in
treadle,
dadsening
head
slackening
plate
1>,
19,
the
the
cover
at
after
slackening
the
plate.
page
18),
removmnq
bandwheel,
oftei
you
you
must
illustrations,
and
wherever
off
plate.
all
he
the
the
back
after
the
and
have
also
in
18
hg
t9
19
Page 13

Cause
Please
merely
Machine
1.
The
en
one
2.
Some
apply
3.
The
4.
The
oil
Machine
1.
Some
once
c
Screws
2,
screw
always
by
works
driving
or
to
of
a
machine
machine
—
clean
is
of
ii
r
-driver.
and
cleaning
strop
shorten
the
machine.
the
few
the
noisy
the
ed.
ore
remedy
remember:
and
heavily
is
the
working
drops
is
dirty
gummed
is
machine
working
loose
—
oiling
either
strap,
ports
oiltothe
of
clean
tighten
of
many
too
owing
with
ports
faults
the
tight
or,
-
-the
of
it.
paraffin.
are
them
faults
machine.
or
necessary,
if-
mechanism
parts
to
the
dry
with
can
be
too
slack
concerned.
use
of
—
oil
the
f6.
remedied
—
length
fit
a
new
are
dry
unsuitoble
the
parts
aid
of
The
4.
eye
of
the
the
needle.
.
Dirt
and
fluff
feed
remove
in
are
dog,
needle
the
thread
6.
of
the
material
the
feed.
The
hole
and
catches
expert.
needle
The
Under
(see
better
a
tension
page
tension
screw
Thread
quality,
--
1.
Inferior
use
2.
The
it
3.
The
the
breaks
quality.
of
shuttle
10:
“Regulating
of
shuttle
(see
knotty
page
Tensians”).
4.
The
hole
in
catches
needle
the
thread
a
and
expert.
interfering
causing
needle
plate
sewing
thread
thread
10:
plate
has
—
has
a
with
intermittent
plate
has
developed
—
consult
is
the
“Regulating
developed
consult
knife
and
thread
too
Thread
is
too
edqe
the
thoroughly
sewing
a
breaks
strong
Tensions”).
weak
a
a
sewing
free
feeding
a
rough
the
rough
—
change
movement
of
the
clean
edge
machine
easily
—
loosen
—
tighten
Thread
edge,
machine
The
1.
2.
3.
20
Upper
Inferior
use
a
The
use
Sizes
The
tension
better
needle
thicker
a
and
Upper
(see
Thread
quality,
is
Thread
thread
page
breaks
knotty
quality.
too
needle
sewing
fine
for
(see
Numbers”).
tension
“Regulating
10:
the
page
is
thread
thread
too
4:
strong
the
breaks
fabric
or
“Relative
Thread
easily
used
Needle
loosen
the
Tensions”).
Stitches
—
1.
2.
The
it
is
(see
The
used
to
comply
Relative
(“
are
needle
bent
page
needle
—
skipped
has
or
5:
is
change
with
Needle
been
blunt
“Setting
either
the
the
—
straighten
too
needle
details
Sizes
set
the
and
either
Needle”).
thin
or
or
given
Thread
too
it
too
use
in
or
the
high
or
use
a
thick
for
a
different
chart
Numbers”).
too
new
the
on
low,
needle
thread
thread
page
or
4:
21
Page 14

The
3.
and
The
4.
bedplate
needle
The
Needle
1
The
it
(see
The
2.
thicker
a
and
The
3.
sion
Faulty
Dirt
1.
of the
material
the
2.
The
stitch
The
Material
1.
Both
“Regulating
The
2.
reduce
ment
thread
glossed
needle
stide
from
curls
for
used
the
owing
your
is
of
suppliers
breaks
needle
page
needle
is
5:
is
needle
wrongly
“Setting
too
(see
Thread Numbers”).
thread
tension
“Regulating
10:
upper
(see
page
Feeding
and
fluff
are
feed
—
unscrew
dog,
causing
feed.
stitch
lengthistoo
reguloting
lever,
puckers
tensions
pressure
screw
are
the
exerted
the
pressure
anticlockwise.
too
Thread
to
its
purpose
not
of
the
your
machine
of
your
inserted,
the
Needle”).
fine for
the
page4:“Relative
is
too
interfering
with
intermittent
needle
plate, and
small
tight
-.-
loosen
Tensions”).
by
the
presser
by
turning
being
change
system
or
thread
strong
the
—
correct
unsuitably
—
obtain
machine.
it
is
or
—
Thread
the
thoroughly
them
bar
the
pressure
the
thread.
marked
the
on
correct
bent—change
—
fabric
Needle
loosen
Sizes
the
Tensions”).
free
movement
feeding
of
clean
the
setting
(see
page
is
too
severe
adust
spun
the
use
ten
the
on
10:
The
3.
Uneven
1.
2.
3.
4.
presser
ittoits
Presser
of
correct
Foot”).
a
screwdriver.
Stitching
The
thread
useadifferent
The
tension
(see
page
10:
Upper
and
a
dirty
tension
parts
affected.
The
needle
foot
position;
Tighten
is
not
thread.
is
wrong
“Regulating
under
disc
is
either
has
been
the
uniformly
—
thread
or
blunt
attached
(see
retaining
spun,
regulate
the
Threod
let-off
clogged
or
wrongly
page
6:
“Attaching
screw
or
it
the
thread
Tensions”).
ore
unequal
shuttle
bent—insert
-.-
reset
the
with
the
aid
is
too
thick
—
tension
owing
to
—
clean
the
a
new
needle.
The
5.
shuttle
has
been
threaded
bobbin
making
(see
—
page
from the
sure
that
8:
“Under
shuttle
the
Threading”),
and
thread
incorrectly
then
replace
is
correctly
—
remove
the
positioned
the
former,
22
23
Page 15

you
If
of
spite
directions
the
with
to
glod
hove
the
conjoined
suppliers
help
ony
(oct
you.
trouble
thot
in
of
you
this
your
with
hove
book,
mochine.
your
corefully
then
They
sewing
pleose
mochine,
corned
get
will
out
in
olwoys
in
the
touch
be
 Loading...