

Operating instructions
Gebruiksaanwijzing
Mode d’emploi
Modo de empleo
Bedienungsanleitung
Istruzioni per l’uso
Manual do usuário
用户指南
e-Kick

Index
INTRODUCTION
WARNINGS
QUICK START
FOR LASTING RIDING ENJOYMENT - DO’S AND DONT’S
OPERATION
Side stand
Unfolding and folding up
Charging the battery and displaying the charge status
The «Motion Control» system
The three riding programs
Changing the riding programs
Bluetooth Pairing of your Scooter
Switching off the motor support
MAINTENANCE
Maintenance of the battery pack
Maintenance of the folding mechanism
Maintenance of the quick clamp lever
Maintenance of the push knobs
TECHNICAL INFORMATION
INSTRUCTIONS FOR DISPOSAL
WARRANTY
DECLARATION OF EU CONFORMITY
Page 3
Page 4
Page 7
Page 8
Page 9
Page 9
Page 10
Page 12
Page 14
Page 15
Page 16
Page 18
Page 19
Page 20
Page 20
Page 21
Page 21
Page 22
Page 23
Page 27
Page 28
Page 31
2
EN

Introduction
We are delighted to welcome you into the community of e-Kick riders and are certain that you will really enjoy the most innovative
electric scooter in the world.
This operating manual explains the most important instructions to be followed. It provides you with tips on the maintenance and use
of your e-Kick and describes how to operate the vehicle correctly for safe and long-term use.
All data are based on the technical status at the time of writing this operating manual. Any modications and additions made in the
meanwhile are not included in this version. The latest version of the operating manual can be found online at www.micro.ms.
Our global dealer network will be pleased to help you with any questions or problems. Please contact your local dealer and we will
do our utmost to provide rapid and straightforward assistance.
Warning
• Please note that riding with electrical support takes getting used to. The acceleration and hence the forward force is much
greater than with a normal kick movement. With inexperienced riders, this unfamiliar acceleration can lift the front wheel off
the ground and lead to falls. Begin carefully and always ensure some room for manoeuvre. Never bend backwards while riding.
• As well as the normal braking performance due to friction, pressing the foot brake also brakes the e-Kick with an electrical
motor brake. This greatly improves the braking performance and results in a shorter braking distance. But please be aware
that the motor brake is not supported if :
- The battery is discharged and you are riding with muscle power alone.
- The battery is 100% charged and hence energy cannot be regenerated.
- The additional braking performance of the motor brake is enormous and greatly shortens the braking distance. Always be
aware of this, especially if the additional braking performance is not present in the situations mentioned above.
• Always use the rear wheel brake to slow down and stop. Never brake by rubbing the soles of the feet on the ground! This activates the ‘Motion Control’ system and you will not stop. It’s like attempting to drive a car with the accelerator and brake pedal
pressed at the same time.
• Always comply with the applicable national laws and regulations relevant to road trafc and vehicle class when using e-Kick. You
are required to inform yourself regarding the law and regulations in your country because legislations can differ from country to
country. Non-compliance of the directives is at your own risk and without liability of the manufacturer.
• Note in particular that :
- e-Kick is not approved for general use on public road
- Electric assistance (See Motion Control system) cannot be used on sidewalks
- Such uses are not only dangerous for you and others but also illegal in many countries.
4
EN

• Only ride on dry, clean and at surfaces. Driving on wet surfaces can be very dangerous and must be avoided.
• For reasons of safety, we recommend not to ride in the dark.
• Always wear protective equipment, especially a helmet suitable for protection against head injuries.
• Always wear shoes when using the e-Kick.
• The e-Kick is designed for transporting a single person up to a maximum weight of 100 kg and should only be used for this purpose. Ignoring this instruction is deemed improper use and is at the sole risk of the user.
• Any interventions for increasing the performance or speed and, in general, modifying the features of the e-Kick are actionable
and will be prosecuted by law. They will invalidate the warranty.
• Caution on steep descents! The braking performance is not sufcient to guarantee safe riding on steep, rapid descents.
• The brake gets hot from continuous use. Do not touch the brake after braking.
• Before every ride, check that the steering system is correctly adjusted and that all connection components are rmly secured
and not broken.
• In the rain or after cleaning the vehicle, the braking action may be delayed due to moisture. For this reason the brakes should be
«braked dry» on safe, private property after cleaning the e-Kick.
• Do not park or store the e-Kick in living spaces and/or close to easily ammable objects at all times.
• Only charge the battery with the charger supplied and only at temperatures between 5 and 35° Celsius.
• Never charge the battery unattended.
• When charging the battery, ensure proper plug connection, adequate ventilation and a dry environment.
• Never bring the charger, the mains and connection cables into contact with water as there is danger of an electric shock. Do not
touch with damp hands.
• Check the connecting plug and charger at regular intervals. If there is any damage, have them replaced to avoid injuries and
damage to property.
• Only use the supplied or integrated battery or original spare parts.
• Never ride the e-Kick without the battery connected as this can destroy all the electronics.
• Do not carry out your own repairs to the battery or charger.
• Store the battery at temperatures between 5° and 35° Celsius at all times.
• The e-Kick is not a toy. It is not designed for the weight of children. We recommend a minimum age of 18 years.
• Safety of children and vulnerable persons:
- Children older than 16 years and persons with limited physical, sensory or mental capacity or lacking experience and/or
expertise may use this device only when they are supervised by a person responsible for their safety or if they have been
trained in the safe operation of the device and understand the risks associated with the device.
- Children must not play with the unit.
- Children may not maintain or clean the unit without proper supervision.
- Keep all packaging material out of children’s reach.
6
EN

• BATTERY: The battery is only partially charged when the e-Kick is delivered. Before using for the rst time, fully charge the bat-
tery using the charger provided.
• UNFOLDING: Have a look at the illustrations on the packaging to learn how to unfold the e-Kick.
• The vehicle is delivered by the manufacturer fully ready for use. Because defects potentially impairing the function of the vehicle
can occur during transport as well as any periods off the road, we ask you to always pay attention to the following points before
using for the rst time - as well as before each trip:
- BRAKE: Check that the brake is working correctly. In particular, you must know whether you are setting off with or without
electronic brake assistance (motor brake) as this makes a huge difference to the braking power (see Warning chapter).
- GENERAL CONDITION: Before each trip, check the e-Kick to make sure that all screws are tight and there are no loose
components.
- FOLDING MECHANISM: Before each trip, check the blue lever must be clicked in place
- SIDE STAND: The side stand is correctly folded in under the footboard.
- BATTERY CHARGE STATUS: Check the charge status of the battery by means of the LED display on the footboard.
You have to recharge the e-Kick within three days if you have completely drained the battery by riding the scooter. Mistreatment will
invalidate the warranty!
Quick Start
Protecting the e-Kick against unnecessary damage and lasting riding joy:
• Immediately after your purchase, fully charge the battery.
• When you store the scooter, charge the battery every three months.
• You have to recharge the e-Kick within three days if you have completely drained the battery by riding the scooter. Mistreatment
will invalidate the warranty!
• Batteries are sensitive to temperatures. Do not park your scooter in direct sunlight or in a very cold environment. Store the e-Kick
at temperatures between 5°C and 35°C at all times.
• Do not jump with the scooter as this causes excessive stresses and ultimately damage to the scooter which is not covered by
the warranty.
• Make sure you always avoid potholes and ride at a right angle over curbstones and other obstructions.
• The e-Kick is splash-proof and occasional riding on damp grounds should not damage the electronics. However, you should
avoid any contact with water.
• Do not carry out your own repairs. Always contact your service centre. Opening the footboard will automatically invalidate the
warranty. In individual cases, Micro allows opening of the footboard under certain preconditions in consultation with the customer.
• «Tuning» the e-Kick is forbidden. This endangers your personal safety and operating safety, as well as decreasing the operating
life of your vehicle. This will also invalidate the warranty.
8
For lasting riding enjoyment – Do’s and Don’ts
EN
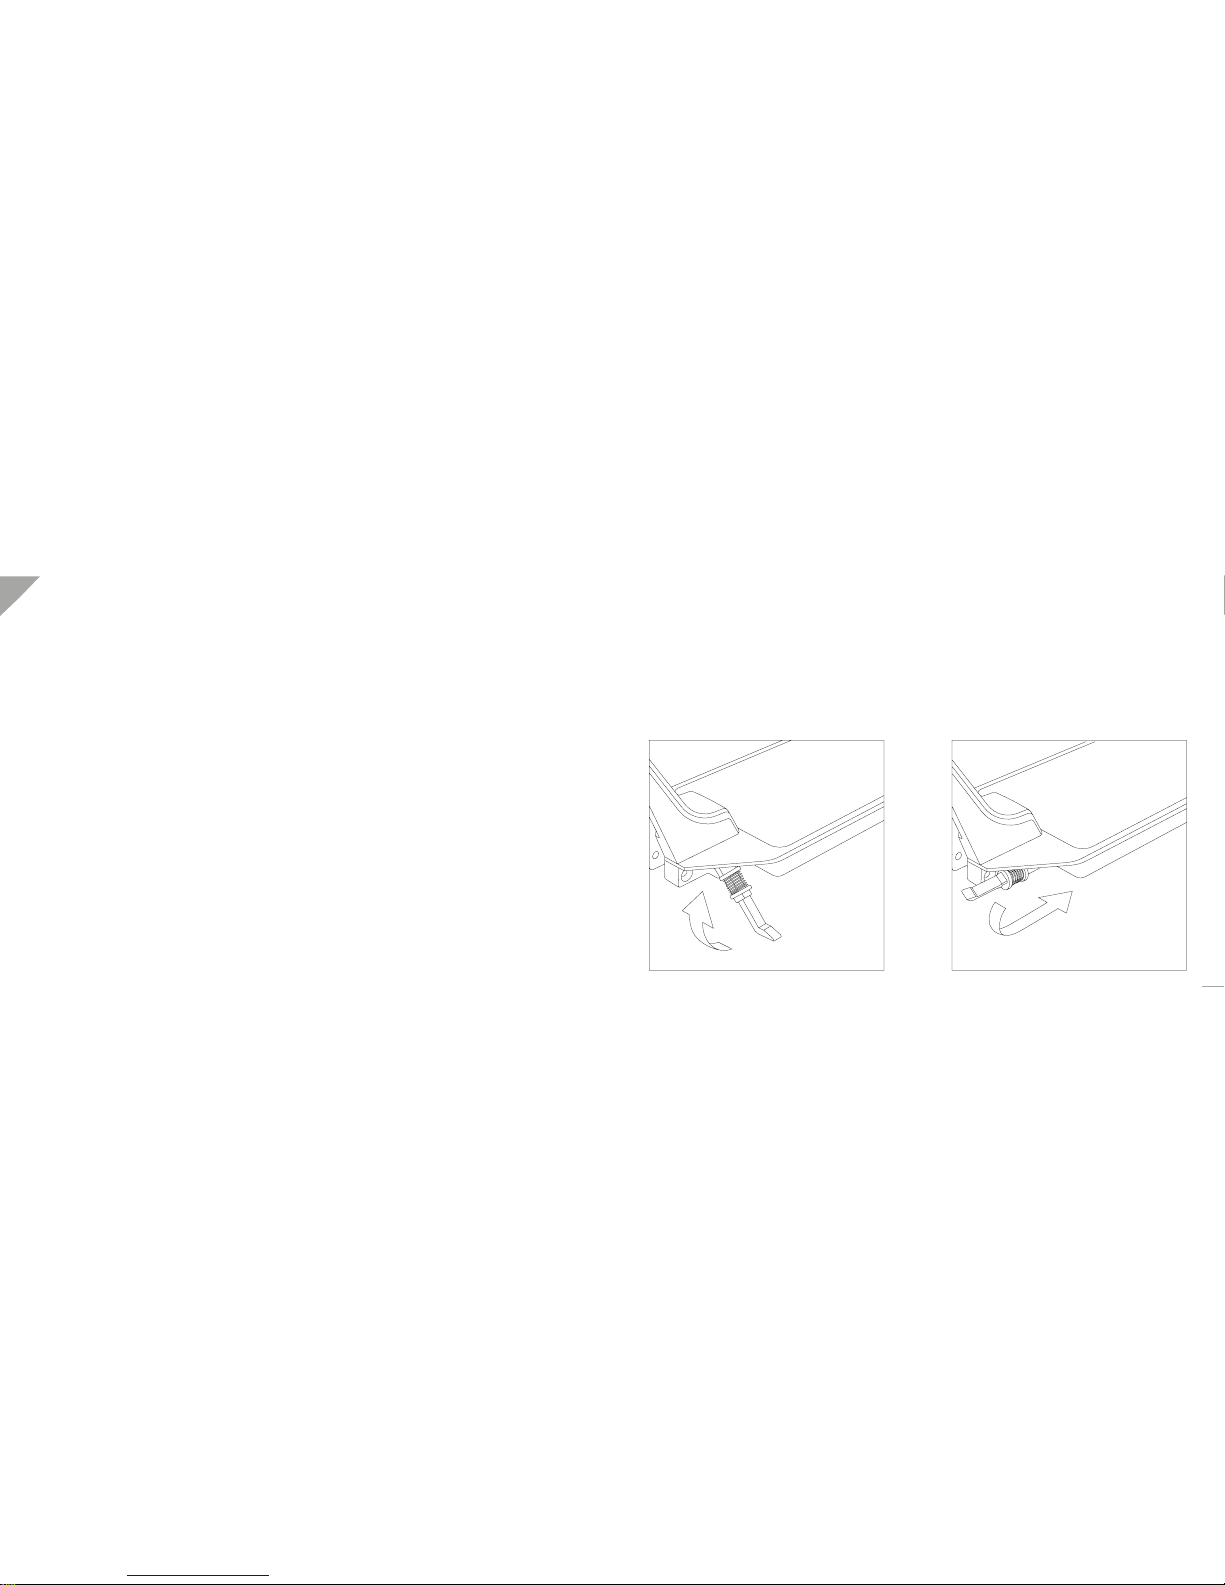
Using the Side stand
The e-Kick has a side stand. This is located under the footboard next to the folding mechanism.
Always fold in the stand forwards so it can be folded down again with the toes when required.
Operation
10
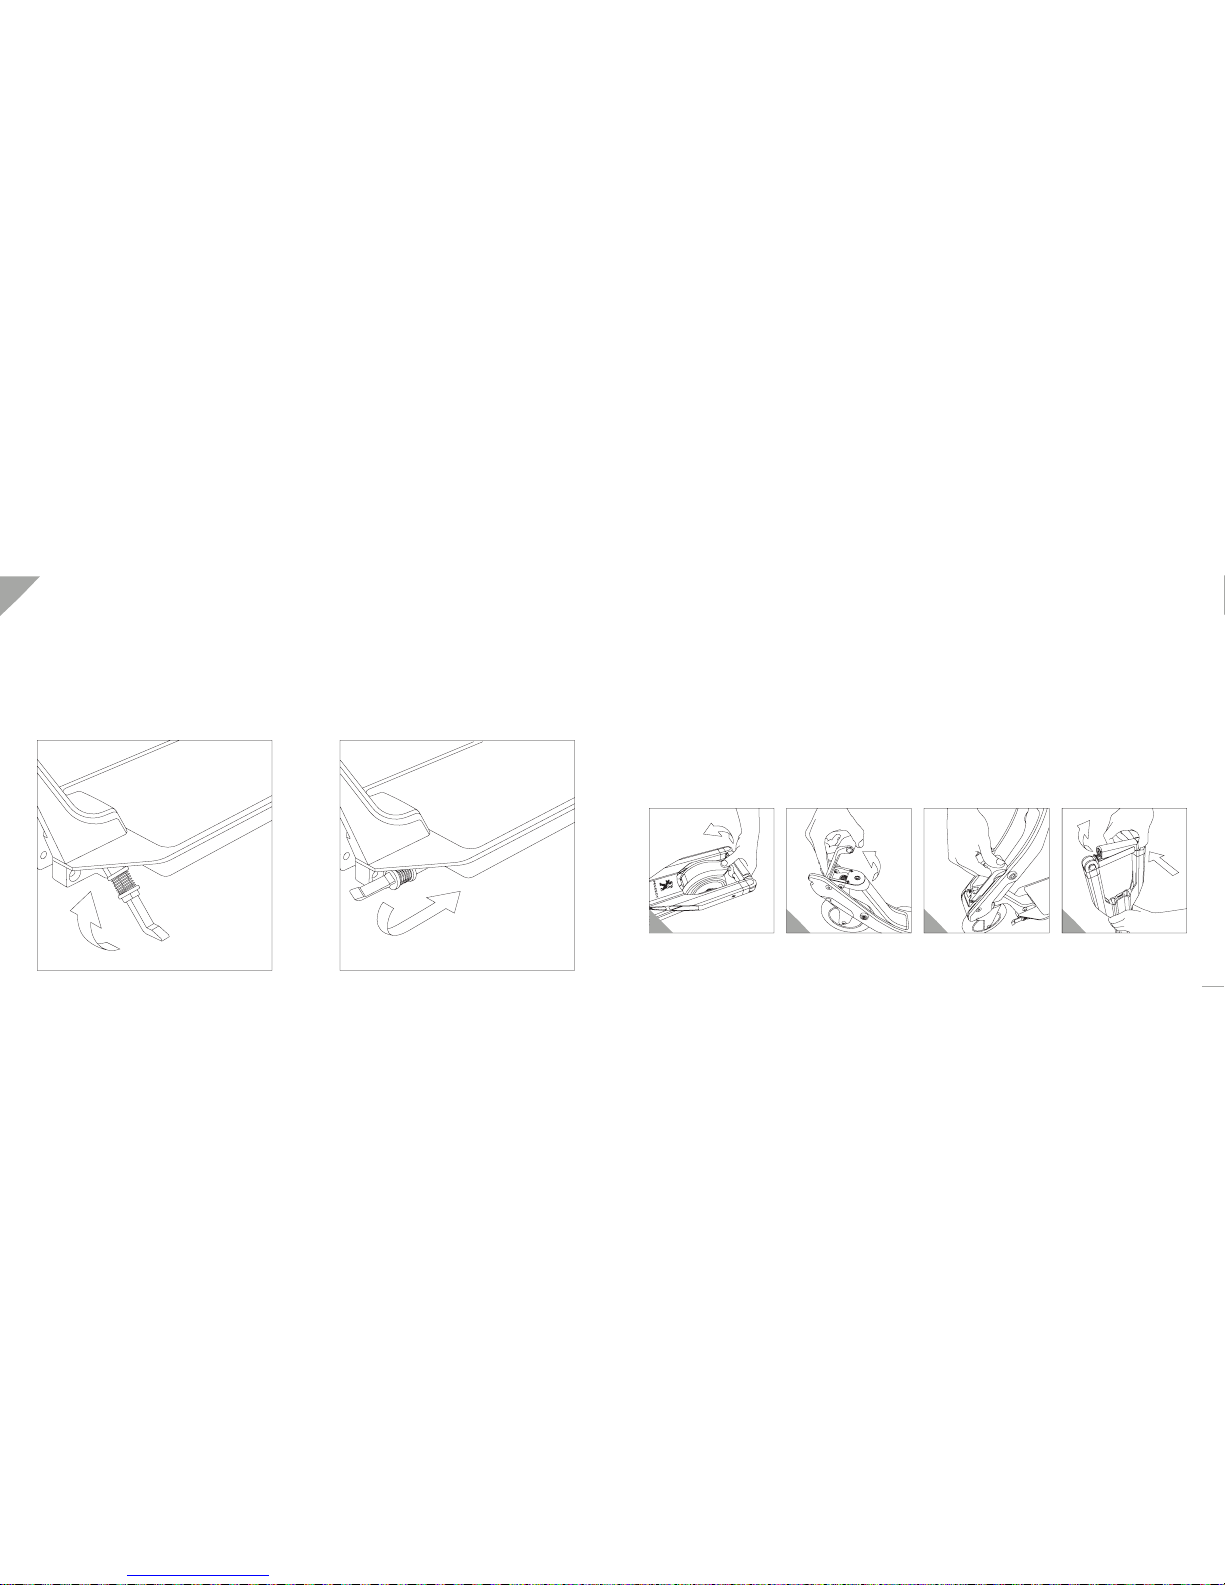
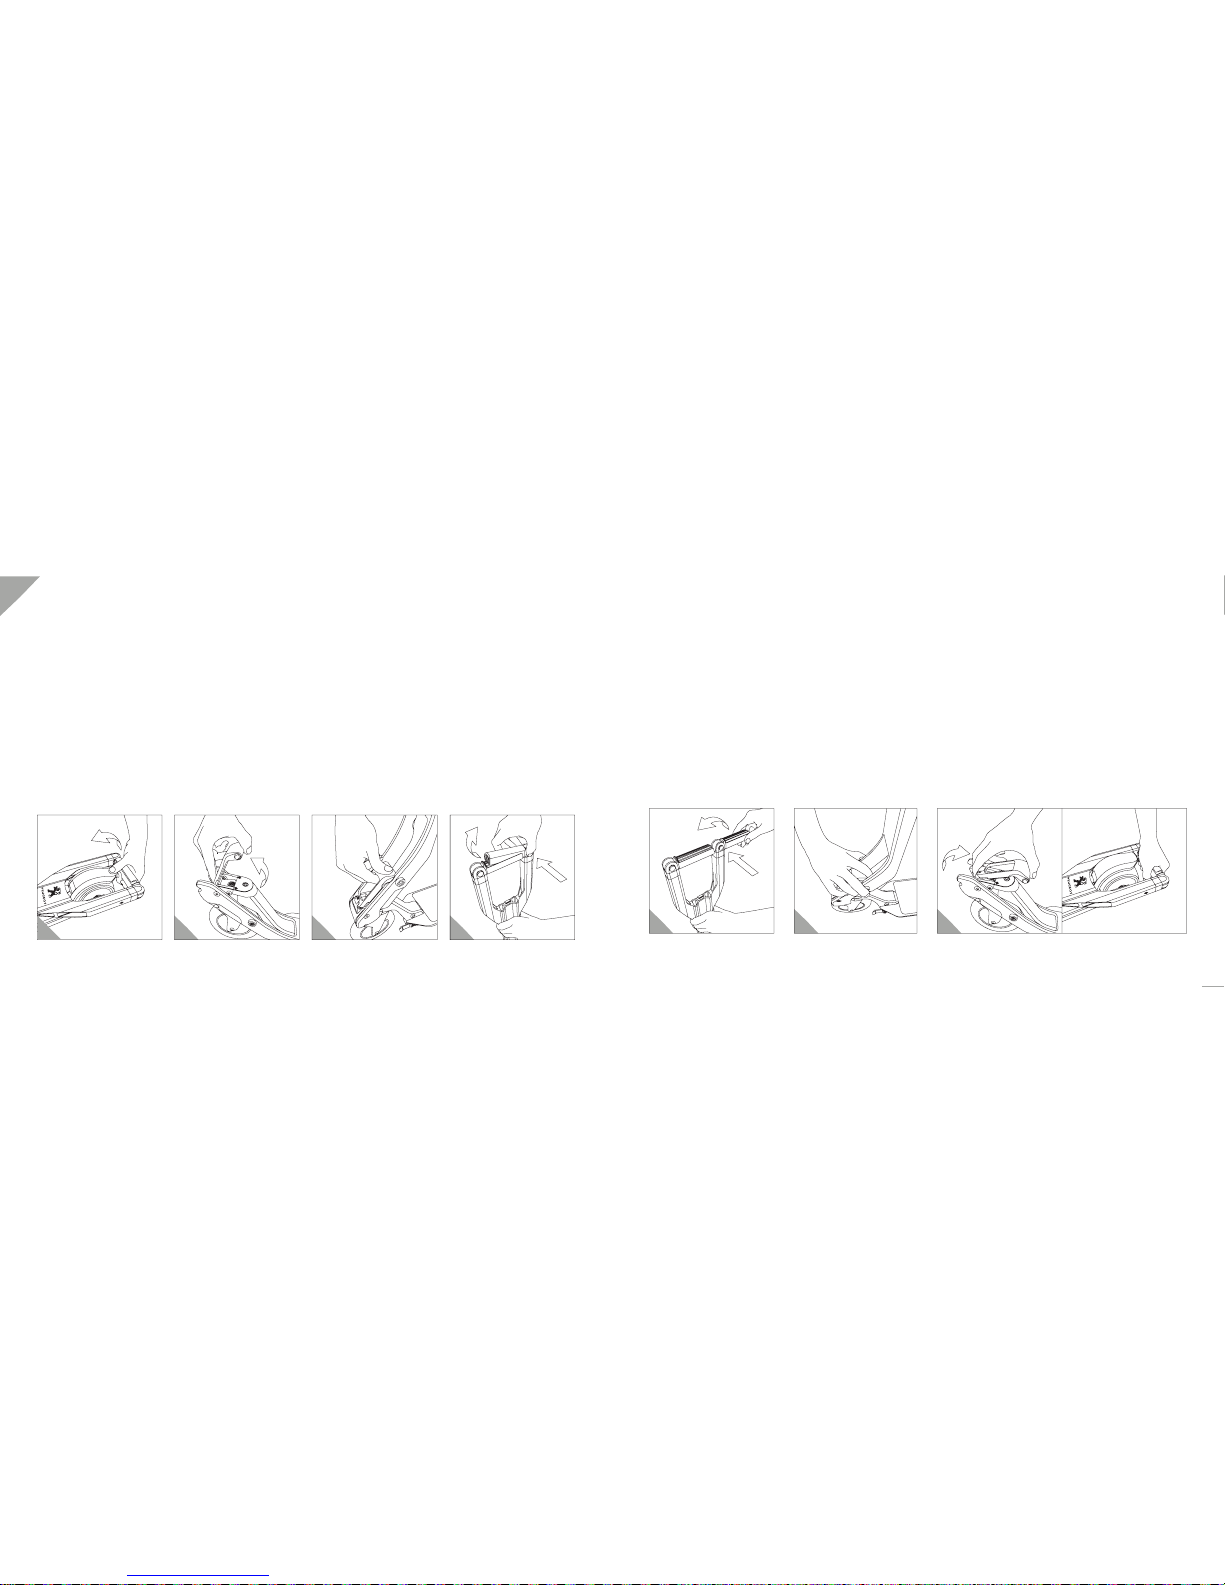
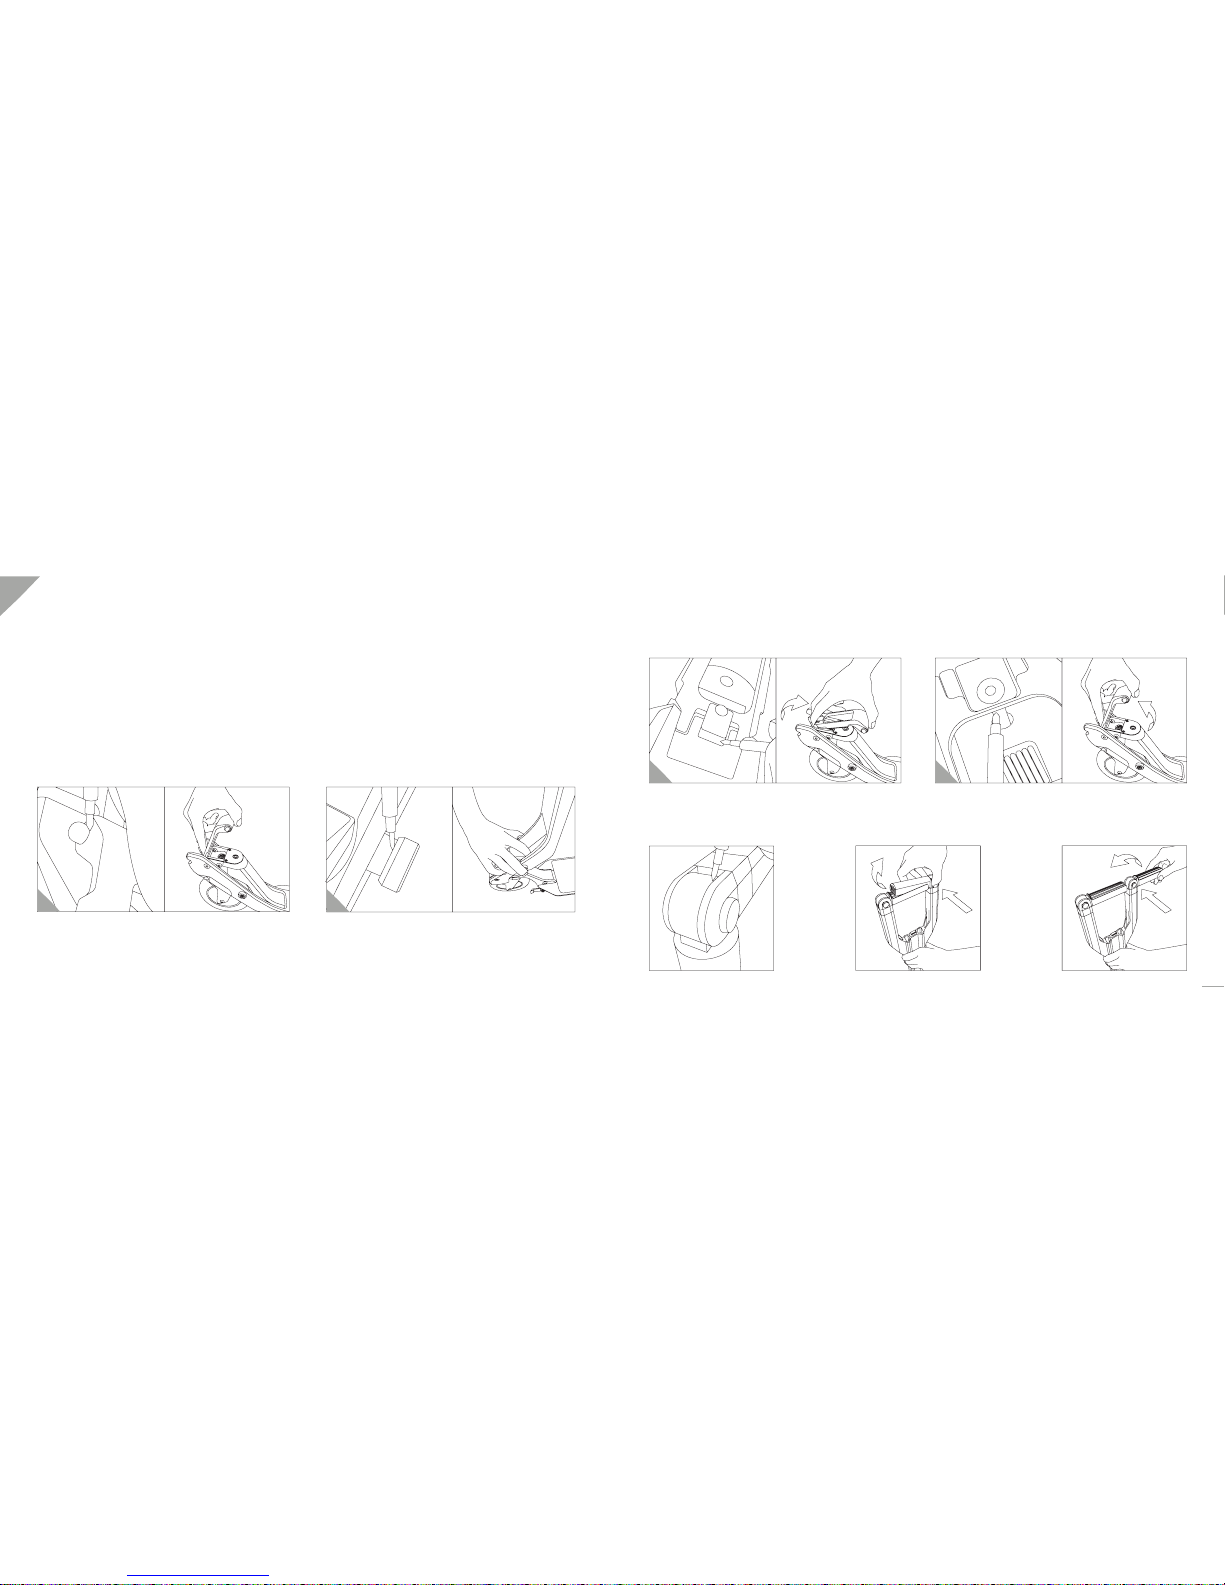
Strictly keep both hands on the positions shown on the illustrations at any time during folding and unfolding until the scooter is locked
in its position.
2 3 41
Unfolding the e-kick
Your e-kick is delivered folded. It is unfolded and ready to ride in a few simple steps. How to unfold the e-kick is described below :
1. Press the rear brake pedal to disengage the locking tab.
2. Pivot the blue lever towards the front to release the folding mechanism and unfold the arm.
3. Lift the arm to the vertical position in order to lock the articulation mechanism, snap the two silver bolts positioned on
the blue lever into the arm (a click indicates that the locking of the arm in the unfolded position is effective)
4. Push successively the two blue buttons positioned at the top of the arm to release and deploy the handle bars. (Click indicates
that the lock in the open position is effective)
EN
3
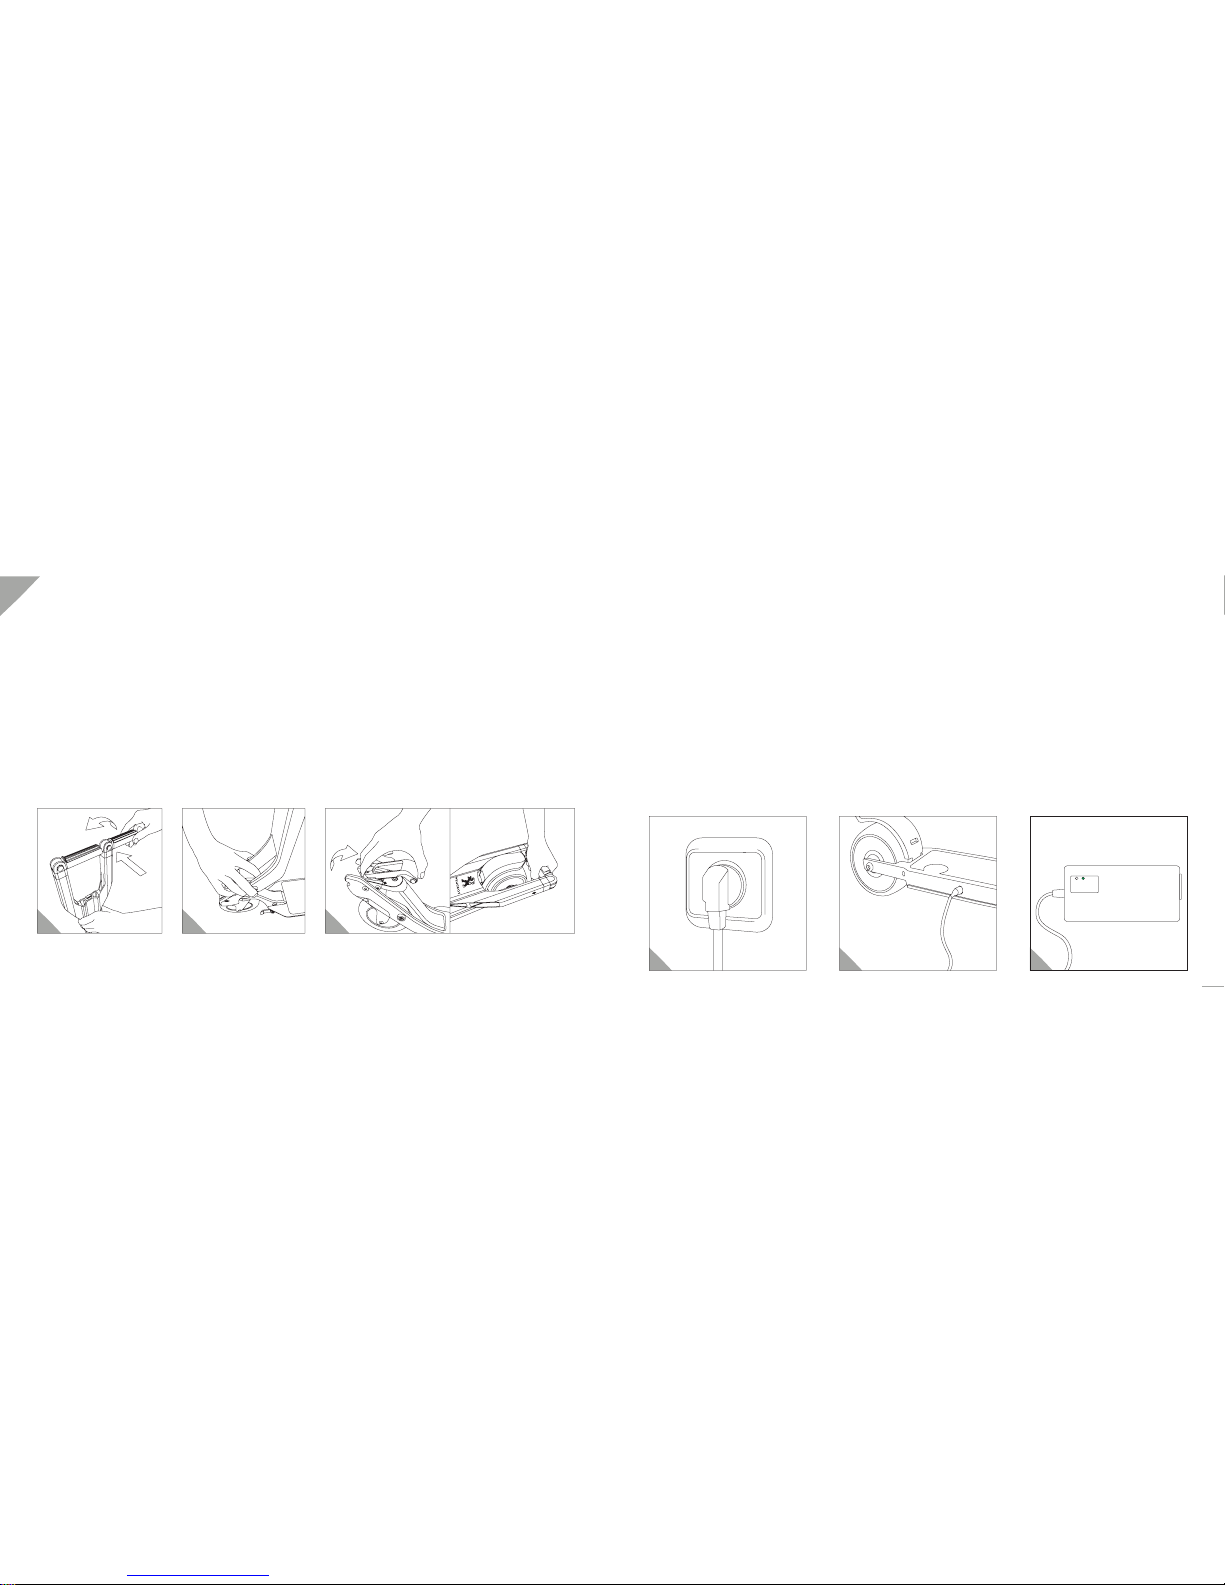
Strictly keep both hands on the positions shown on the illustrations at any time during folding and unfolding until the scooter is locked
in its position.
1 2
Folding the e-Kick
Fodling the e-Kick is just as simple as unfolding it :
1. Press the two blue buttons positioned at the top of the front part of the scooter in order to release the handlebars and refold
each handle.
2. Simultaniuosly press the two blue push knobs positioned at the bottom of the front part to release the blue lever.
3. Pivot the blue lever forward to release the hinge mechanism and fold the front part at against the footboard until the tab at the
rear engages into the brakes pedal.
12
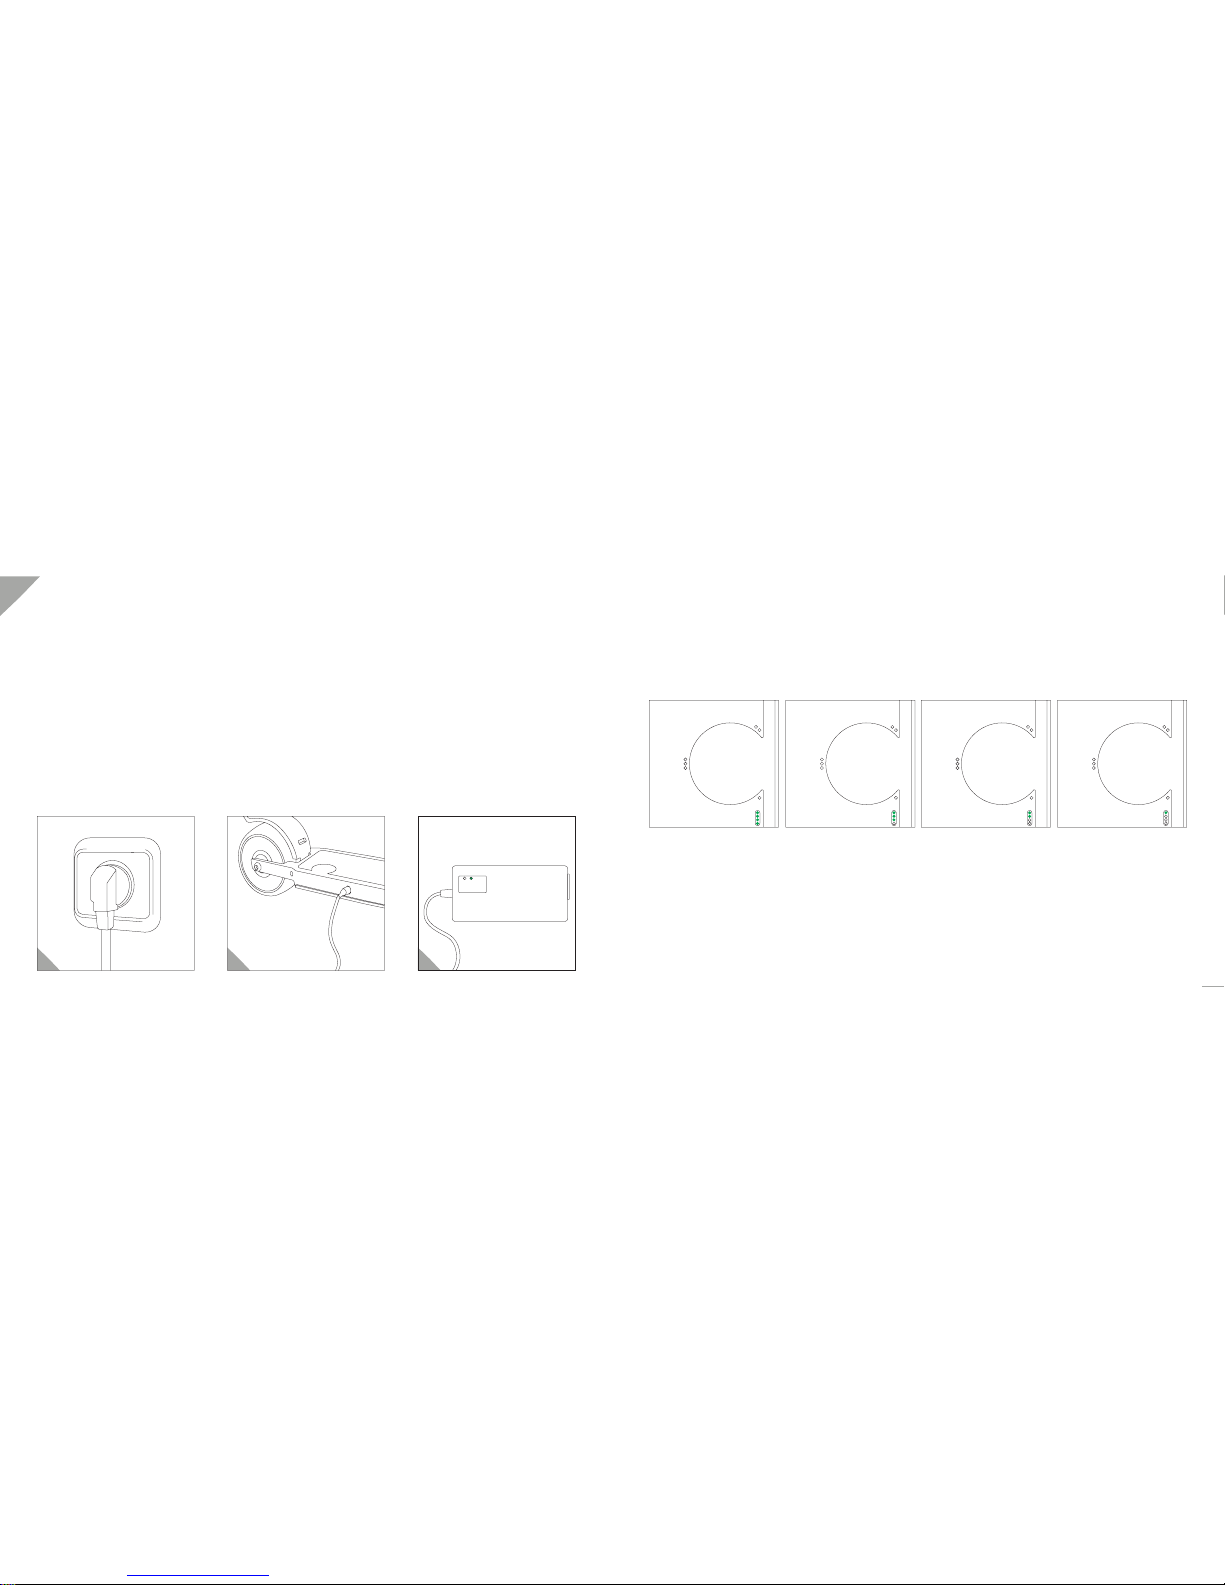
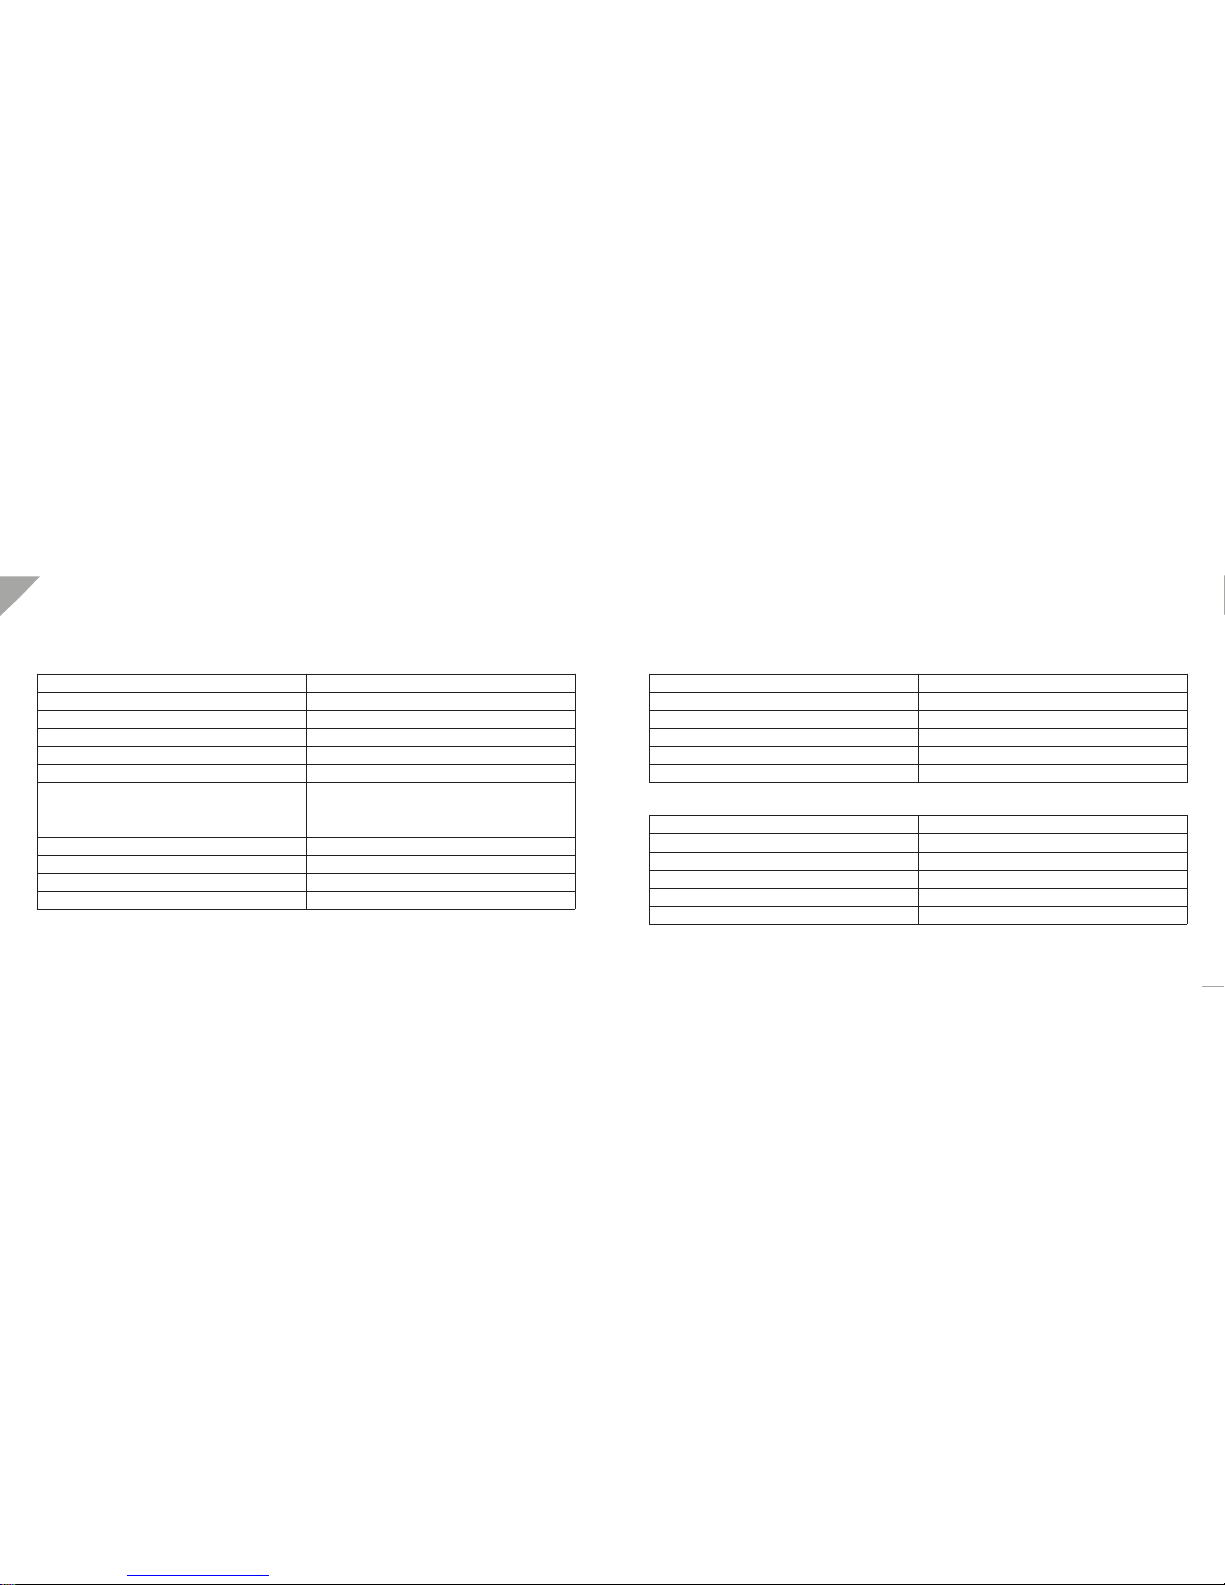
Charging the battery and displaying the charge status
The charging process is described below :
1. Connect the charger to a power socket. The lamp on the charger should show a light green.
2. Now connect the e-Kick to the charger. You can see that the charger and scooter are connected correctly when the lamp on the
power supply unit changes to red (can take a few seconds). Also the LED lights on the e-Kick indicate the charging by
lightning two times in sequence.
3. When the e-Kick is fully charged, the display on the charger changes back to green.
In order to see the current charge status, switch on the scooter by turning the rear wheel. The same applies to checking the charge
status during the charging process.
1 2 3
EN
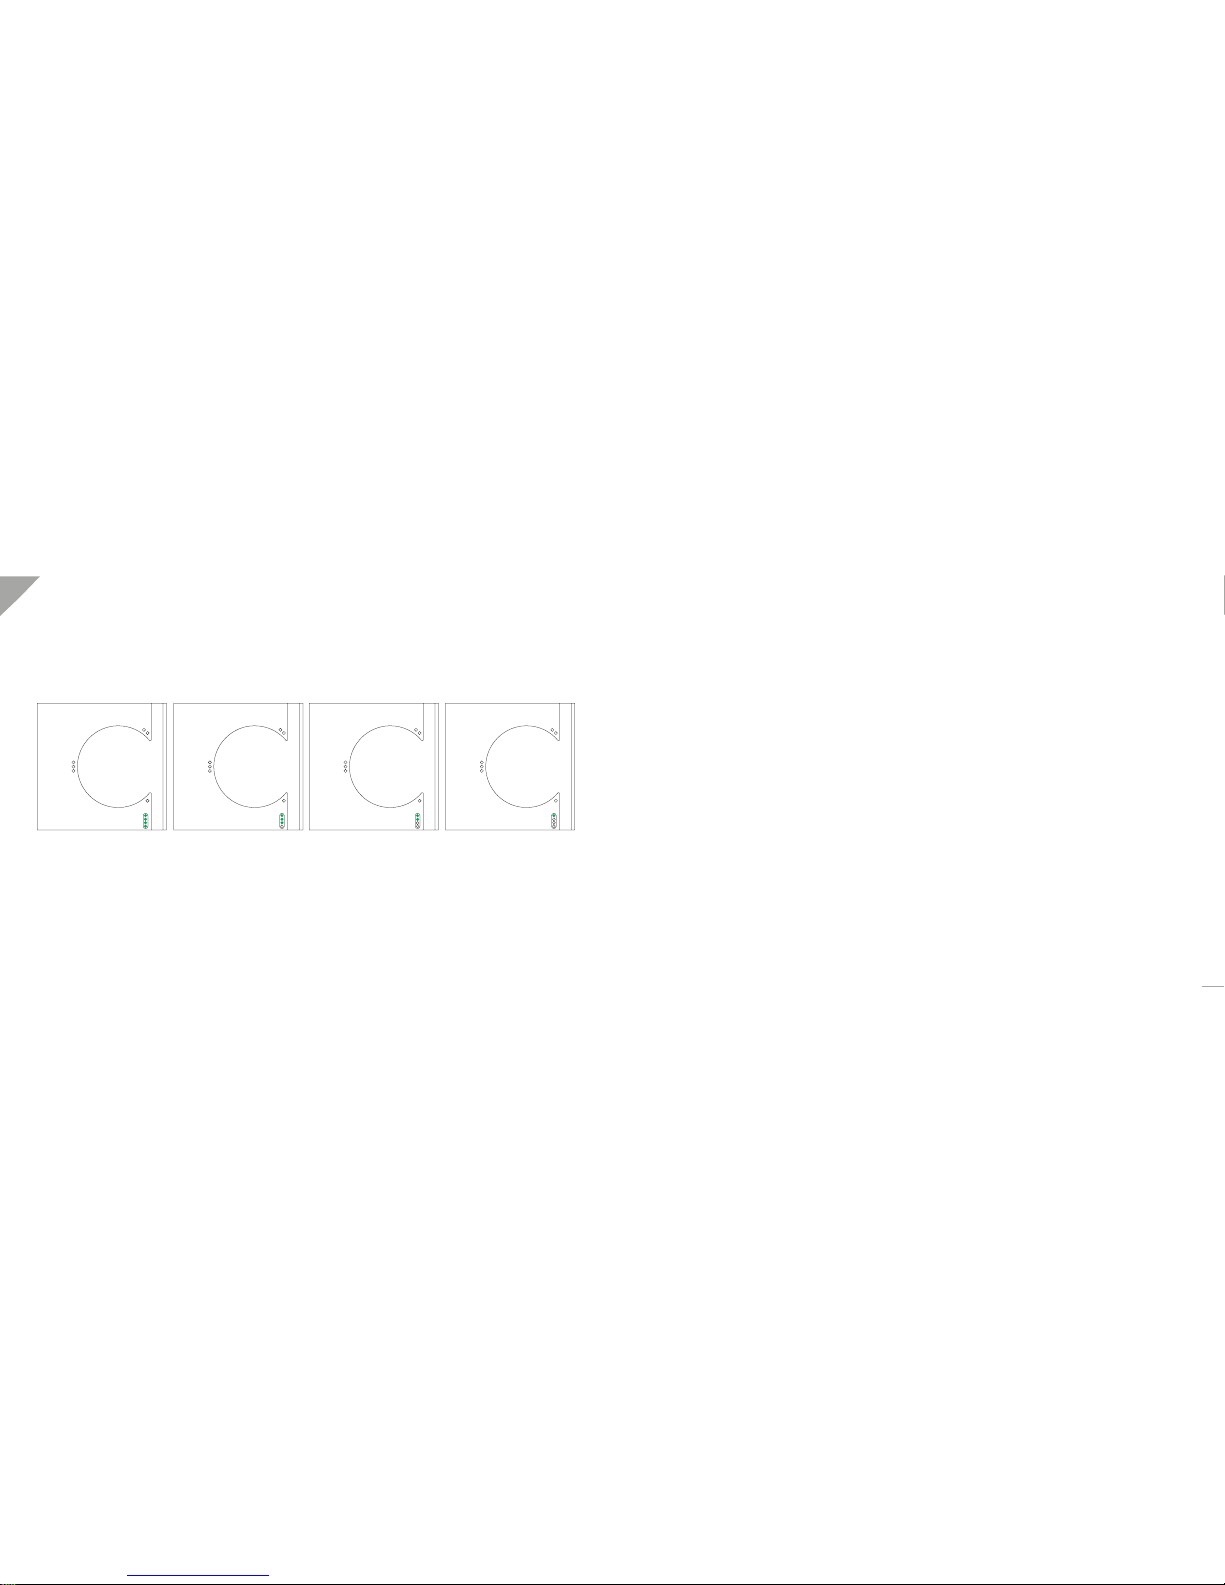
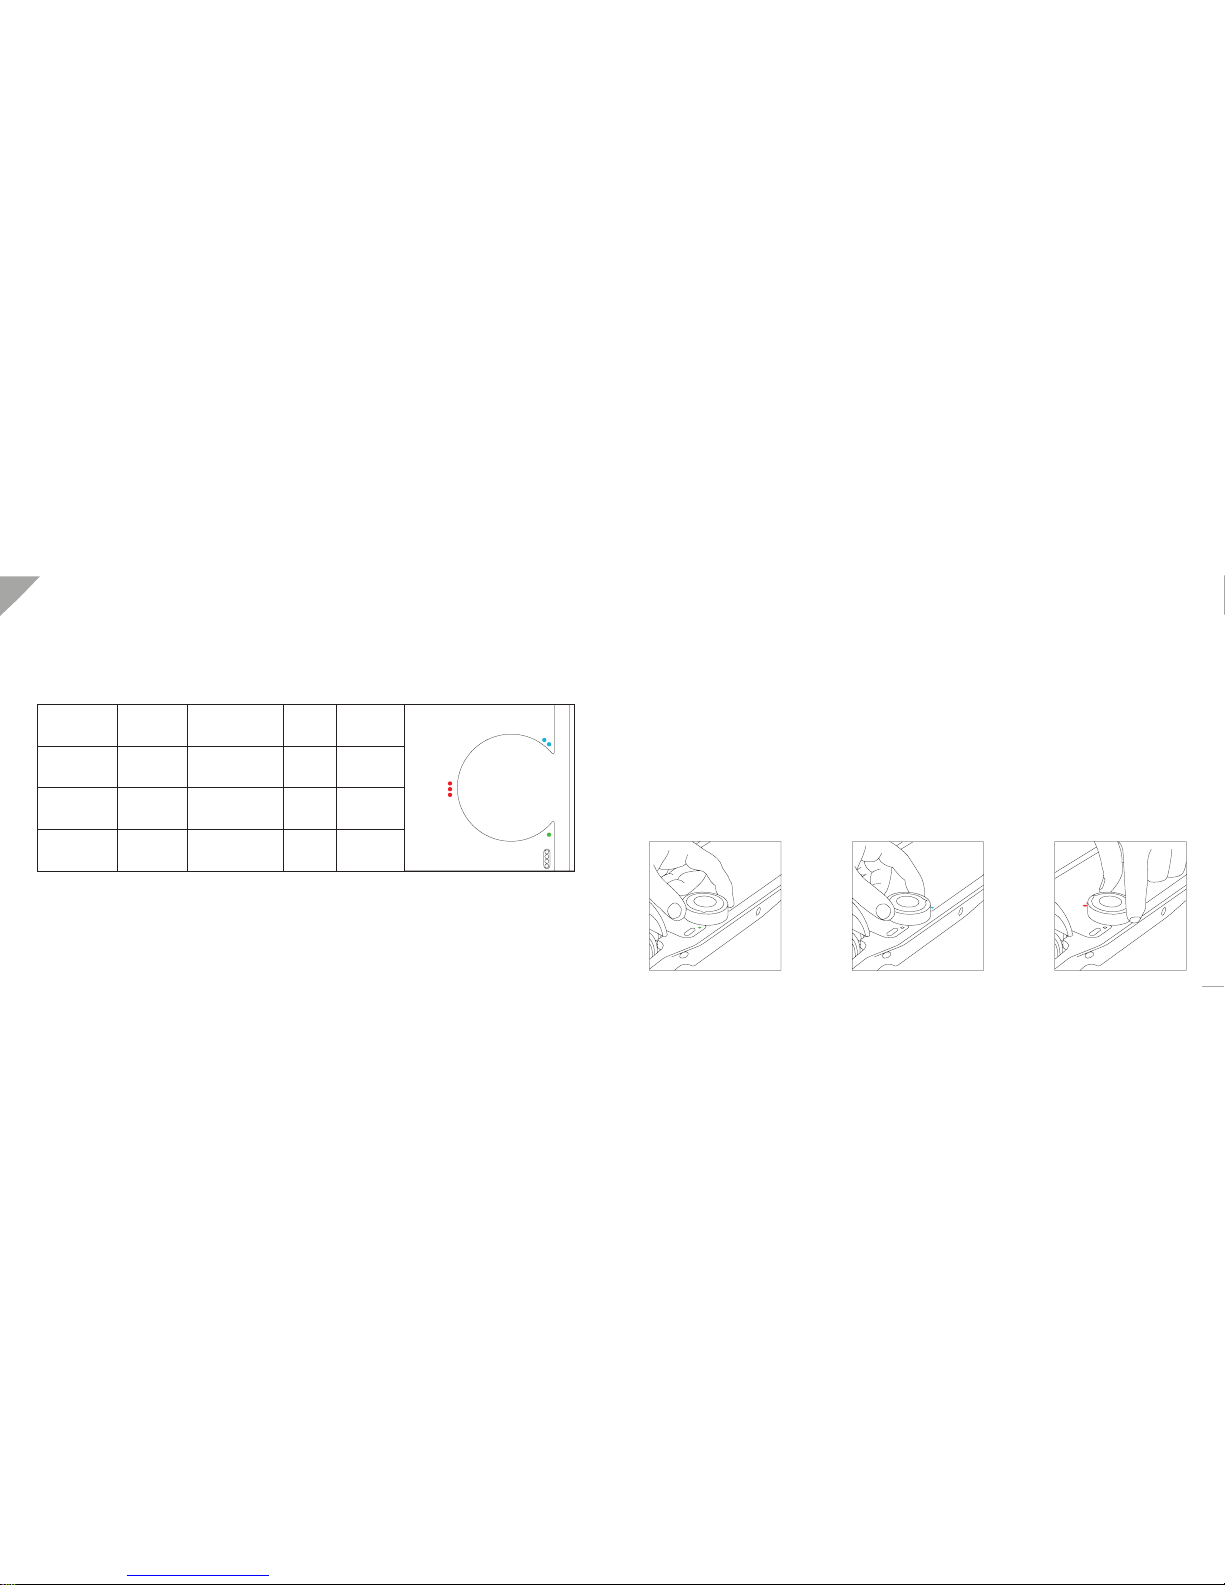
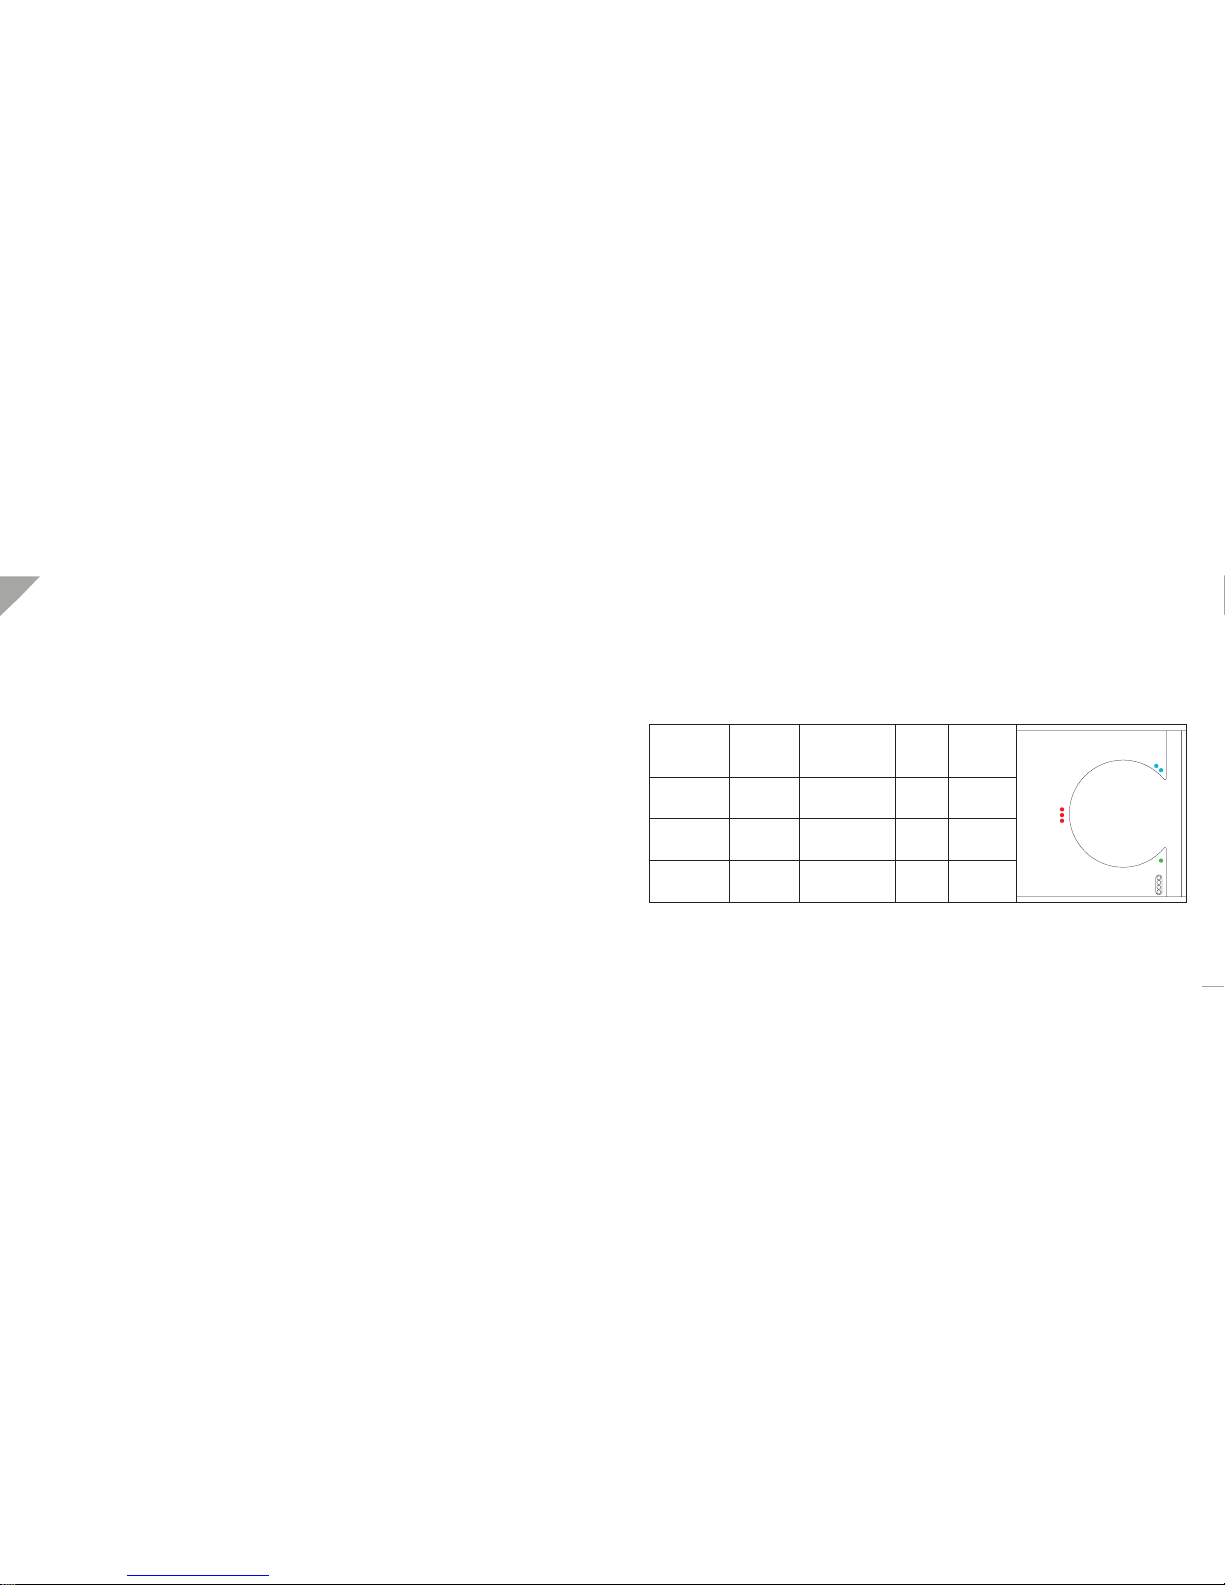
Check the level of battery charge on the e-Kick
The state of battery charge is indicated directly on the e-Kick by the 4 LED lights positioned on the foot stand, as below :
LED provide information when the e-Kick is «awake». To wake the e-Kick simply rotate the rear wheel.
You can also receive information regarding the charge status (and the remaining range) on your smartphone by downloading MyPeugeot application available on App Store (iOS) and Google play Store.
(*)Remember that measuring the level of charge depends on the current intensity. Under load during the journey, the display shows
a lower level of charge than when stopped.
4 LED illuminated =
75 - 100 % of charge
3 LED illuminated =
50 - 75 % of charge
2 LED illuminated =
25 - 50% of charge
1 LED illuminated =
0 - 25% of charge
The ‘Motion Control’ system
The ‘Motion Control’ system makes riding with the e-Kick an unforgettable experience.
Some brief information on the ‘Motion Control’ is given below:
• ‘Motion Control’ only becomes active from approx 5 km/h. This means the rider must use muscle power alone to accelerate to 5
km/h before the initial support is noticeable.
• The stronger and more intensive the kick (pulse), the stronger and longer lasting the support of the motor.
• A few powerful kicks are more economical and efcient than many small kicks.
Please note that riding with electrical support takes getting used to. The acceleration is much greater than with a normal kick move-
ment. This unfamiliar acceleration comes unexpectedly. When riding for the rst time, be extremely cautious and at the same time
learn how to brake properly with the foot brake at the very beginning.
If you do not feel any acceleration, try triggering the assistance by switching to the sport mode and kicking more powerful. The
motion-control offers more support at higher speeds. Try to reach a higher speed by kicking strongly and you will feel more support.
14
EN
The three riding programs
The e-Kick has three rideing programs. This allows optimum riding performance and correct programming in a wide range of situations as well as conformity to the applicable legislation.
Only ride with with the scooter using the riding program with which you feel safe and that complies with the relevant legislation in
your country.
• Ride slowly to become used to the novel riding sensation, especially when riding for the rst time. Do not forget that a higher
speed also needs a longer braking distance.
• Please also note that, depending on the country, different maximum speeds and restrictions in terms of maximum power apply
to electrically supported vehicles. It is your responsibility to be aware of these values accordingly and to adhere to them.
• The setting tool contains strong magnets. Be careful never to hold the setting tool close to electronic devices such as your mobile
phone or close to credit cards as they could be damaged.
STANDARD
ECO
SPORT
Riding program
ECO Mode O 1 250 Watt 15 km/h
25 km/h
25 km/h
250 Watt
500 Watt
OO 2
OOO 3
STANDARD Mode
SPORT Mode
Position in the
circle on the
footboard
Number of LEDs
blinking when setting
the new mode
Power of
force
Maximum
support speed
16
STANDARDECO SPORT
Changing the riding program
Changing the program is very simple and takes no time at all. You can either change the setting by pressing on the brake consecutively or with the setting tool.
Changing the riding program with the setting tool
The setting tool included in the scope of delivery is needed for this.
Hold the setting tool on the circular cut-out on the footboard. The tool must be aligned to the small arrow head engraved on the
setting tool.
Now you can switch between the three programs by turning the setting tool and aligning the arrow to the empty circles. The LED
display shows which riding program is set by ashing dimly during two seconds, followed by ashing brightly. One LED ashes in
Eco mode, two LEDs ash in Standard mode and three LEDs in Sport mode.
EN
Changing the riding program by pressing the brake
You can also change the riding program without the setting tool but by pressing on the brake pedal consecutively.
By pressing the brake four times, the LED lights in the footboard indicate the current setting by blinking in the corresponding number
of LEDs during four seconds.
For example, if you are in setting 2 (standard mode), two LEDs will blink to indicate your scooter is currently in standard mode.
Now you can change the setting by pressing on the brake four times again. Each time you do four taps on the brake, your scooter
will go up one setting.
Please note you must start the consecutive brake pressing within four seconds of the previous one in order to change settings.
For example:
-> 4 press on the brake -> 2 LEDs blink setting -> 2 (standard mode)
-> 4 press on the brake -> 3 LEDs blink setting -> 3 (sport mode)
-> 4 press on the brake -> 1 LED blinks setting -> 1 (eco mode)
-> 4 press on the brake -> 2 LEDs blink setting -> 2 (standard mode)
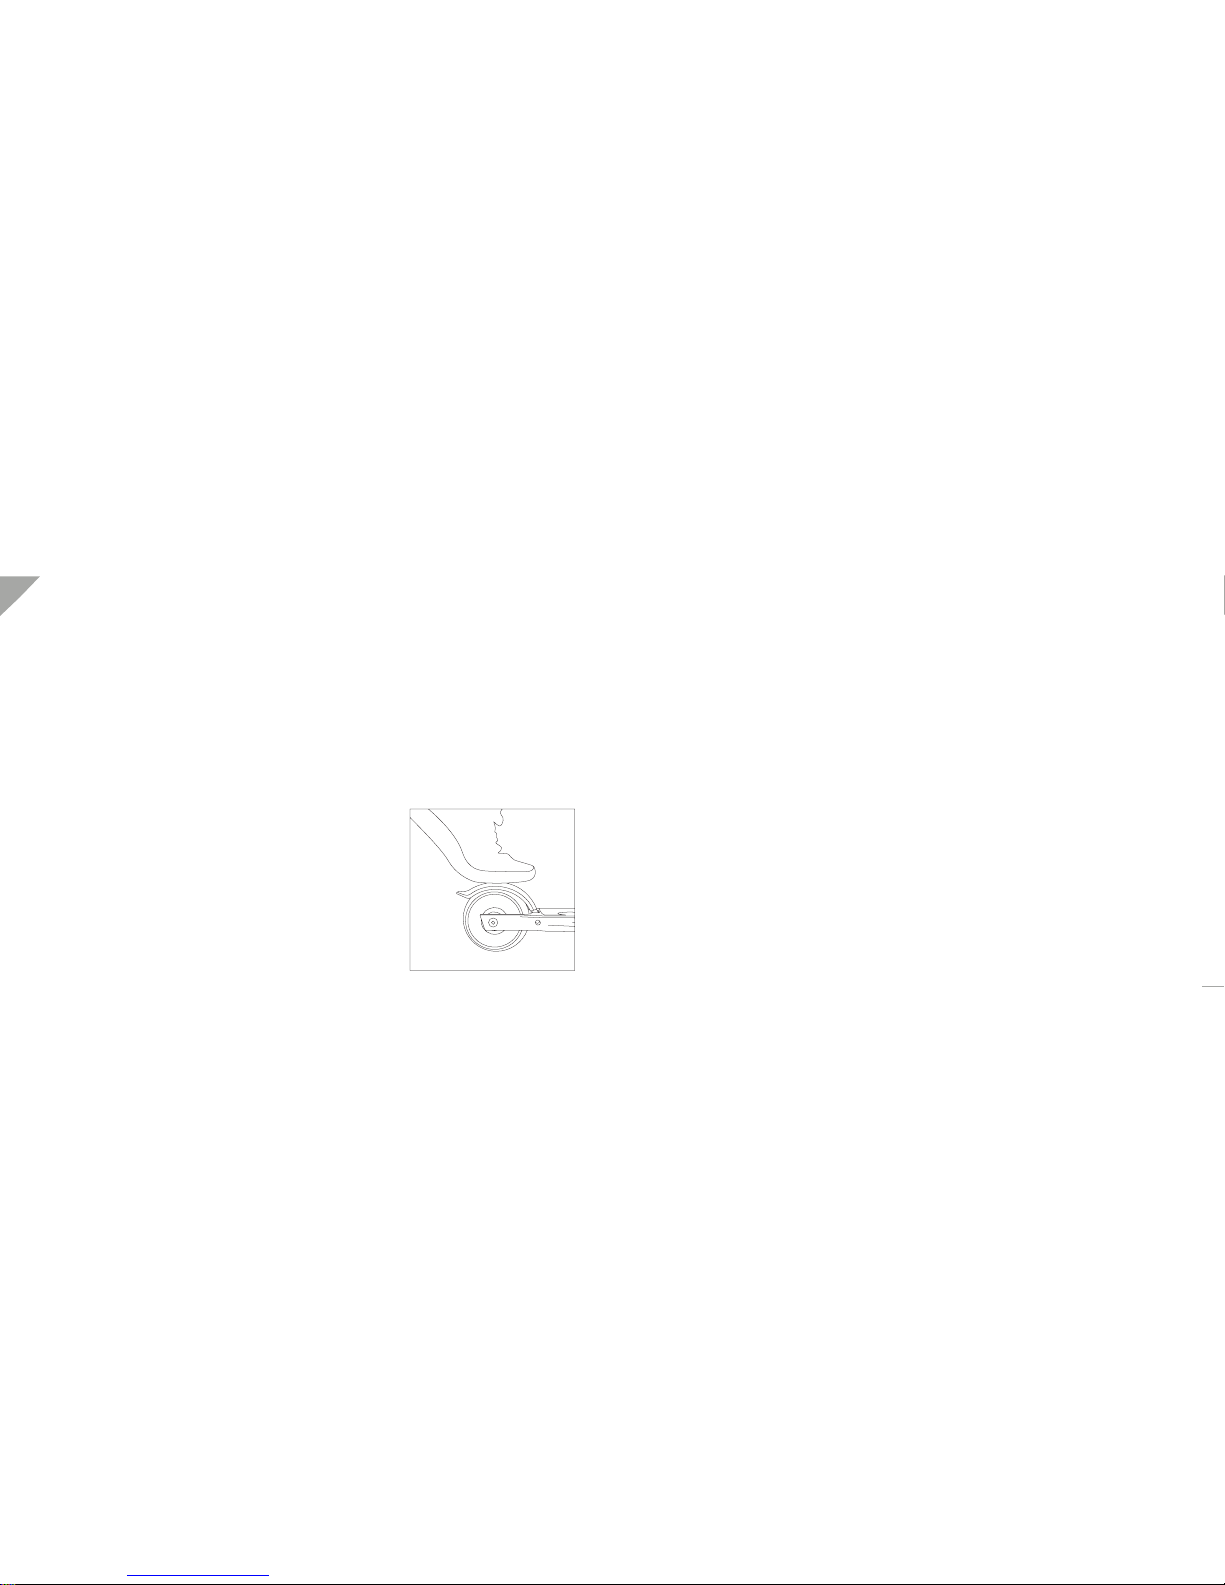
Pressing the brake only 3 times consecutively switches off the motor support
and the LED lights become dimmer (see below: ‘Switching off the motor’)
18
Bluetooth Pairing of your Scooter
You can pair your scooter to your smartphone after downloading the MyPeugeot application available on App Store (iOS) or Google
Play Store.
In order to connect the scooter with your smartphone please activate Bluetooth on your smartphone or tablet, download the application and open it on your device.
To pair your scooter, please press the brake four times consecutively (same as to change the riding program). The scooter goes into
pairing mode and searches for Bluetooth devices to pair with. The scooter stays in pairing mode for 30 seconds and should become
visible in the app on your device. You can now click on the scooter icon in the app and the app will indicate if the pairing was successful.
e -Kick uses Bluetooth Low Energy protocol to communicate with a smartphone.
EN

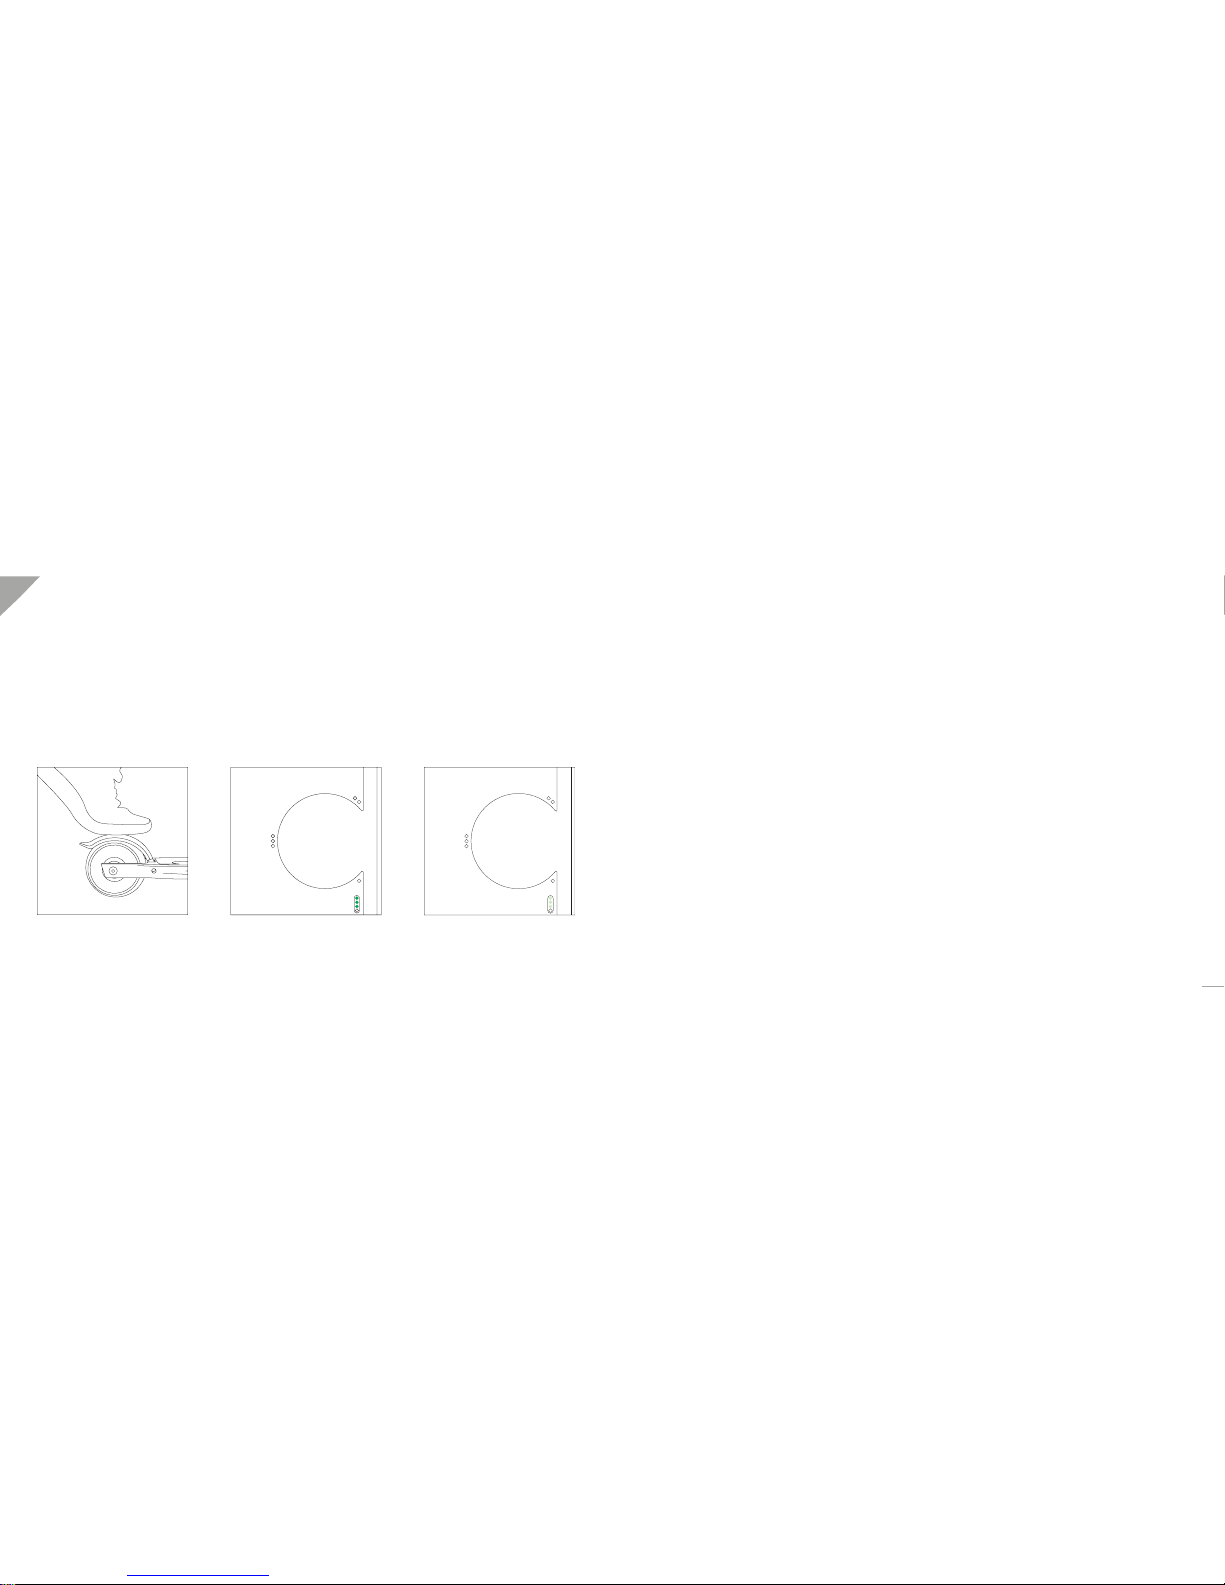
Switching off the motor support
The motor support on the e-Kick can be switched off at any time and the vehicle ridden as a conventional scooter. To switch off the
support, the brake pedal must be pressed brie y three times consecutively. You can see that the support is switched off by the LED
display becoming dimmer.
The motor support now remains switched off until the brake is pressed brie y again three times consecutively.
Press 3 times ON : LED brighter OFF : LED dimmer
20
Maintenance of the battery pack
Please obey the following care instructions for a long lifetime of your battery pack :
• Store the battery at temperatures between 5° and 35° Celsius at all times
• Immediately after your purchase, fully charge the battery.
• When you store the scooter, charge the battery every three months.
• You have to recharge the e-Kick within three days if you have completely drained the battery by riding the scooter.
Any damage caused by non-compliance with above care instructions will not be covered by the warranty.
Maintenance
EN

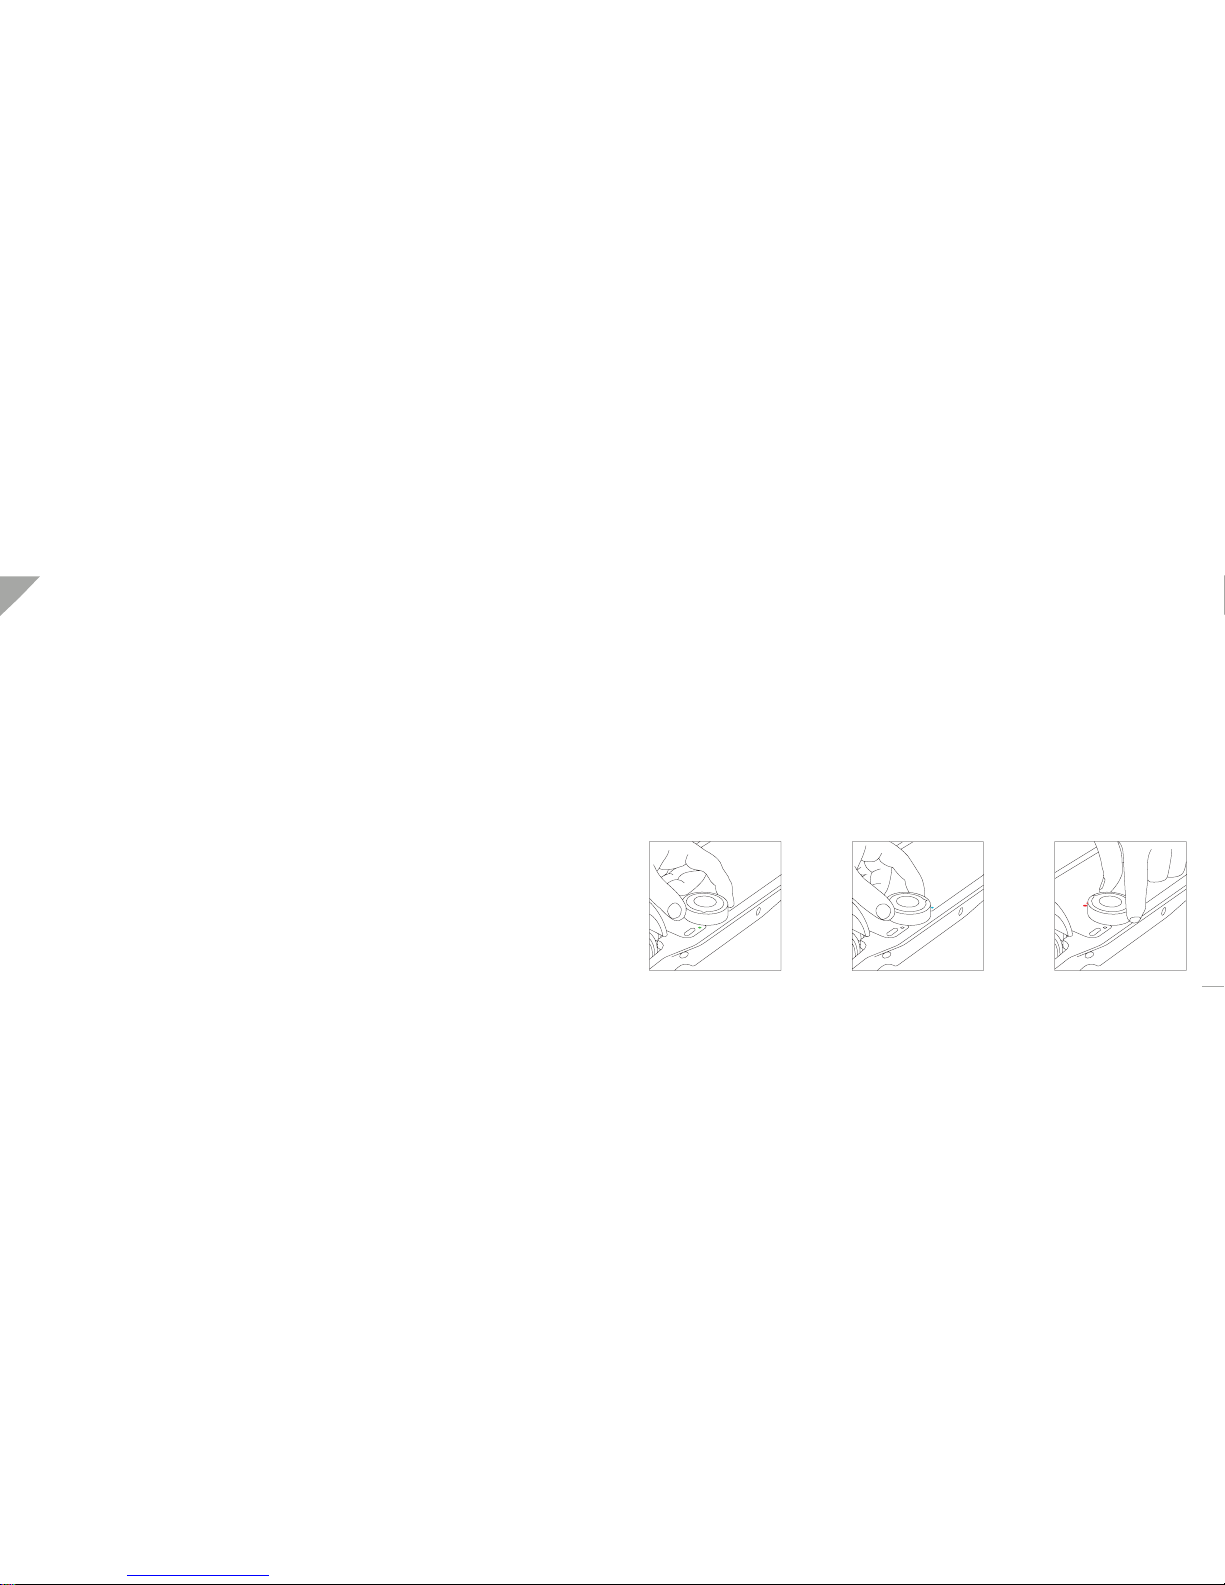
Maintenance of the folding mechanism
Your e-Kick can be folded up. Because of the usual load, some hardness and noises can appear on the folding pieces. In order to
ensure that you enjoy your scooter for the longest time, we show you here how to practically remove those disturbing noises and
improve the smoothness of your folding mechanism in a few simple steps:
1. On the blue folding lever, apply lubricant on the two silver bolts and press them a couple of times to spread the lubricant.
2. On the main folding part, apply lubricant to the two blue push knobs and push them to spread the lubricant.
3. In the blue folding lever, apply lubricant to the spring and lift the blue folding lever a couple of times to spread the lubricant.
4. Inside the blue lever, apply lubricant to the center axle and lift the blue folding lever a couple of times to spread the lubricant.
1
2
Maintenance of the handles
Apply lubricant in the groove on the rotation area of the handles, and fold/unfold them a couple of times to spread the lubricant.
22
3
4
EN

Technical information
Lightweight 8.5 kilograms
Range 10 - 15 kilometer
Fast Charging 60 minutes recharge
Speed 15 / 25 km/h
Powerful 250 / 500 watts power
Recuperation braking
Dual core wheel
Auto on/off
Water protection
Every braking action generates energy
Soft core / Solid shell
Scooter wakes up automatically
100% splash protected
15km/h - 250W
3 speed settings 25km/h - 250W
25km/h - 500W
Assistance switch Tap the brake 3 times to switch the assistance on/off
Features
24
Height Handlebar
Scooter body
950 mm
Aluminum alloy
Overall Length
Front wheel
760 mm
Dual core rubber
Dimensions folded
Rear wheel
815 x 175 x 225 mm
2 components: motor / replaceable tire
Length Footboard (useable area)
Motor
370 mm
Brushless DC motor
Width Footboard (widest/narrowest)
Footboard
138 mm / 120 mm
One piece aluminum (1100 gram)
Width Handlebar
Grip tape
380mm
Rubber
Dimensions
Materials
EN
Warning: The installed batteries are rechargeable lithium-ion batteries. Never charge batteries that are not intended to be recharged.
Please note that measurement of the charge status depends on the current. Thus, the display under load while riding always shows
a lower charge status than in idle.
Technology Lithium-ion
Voltage 36 Volt
Capacity
Cell type
Cell setup
2.5 Ah (=90 watthours = airplane compatible)
Lithium-Ion Cells
10S1P (10 cells)
Charge time 60 minutes
Lifetime 60% of original capacity after one year (or 1000 charging cycles)
Weight 700 grams
1 LED: 0 - 25% SOC
4 LED lamps in footboard:
Display of charge status
4 LEDs: 75 - 100% SOC
3 LEDs: 50% - 75% SOC
2 LEDs: 25% - 50% SOC
Battery
26
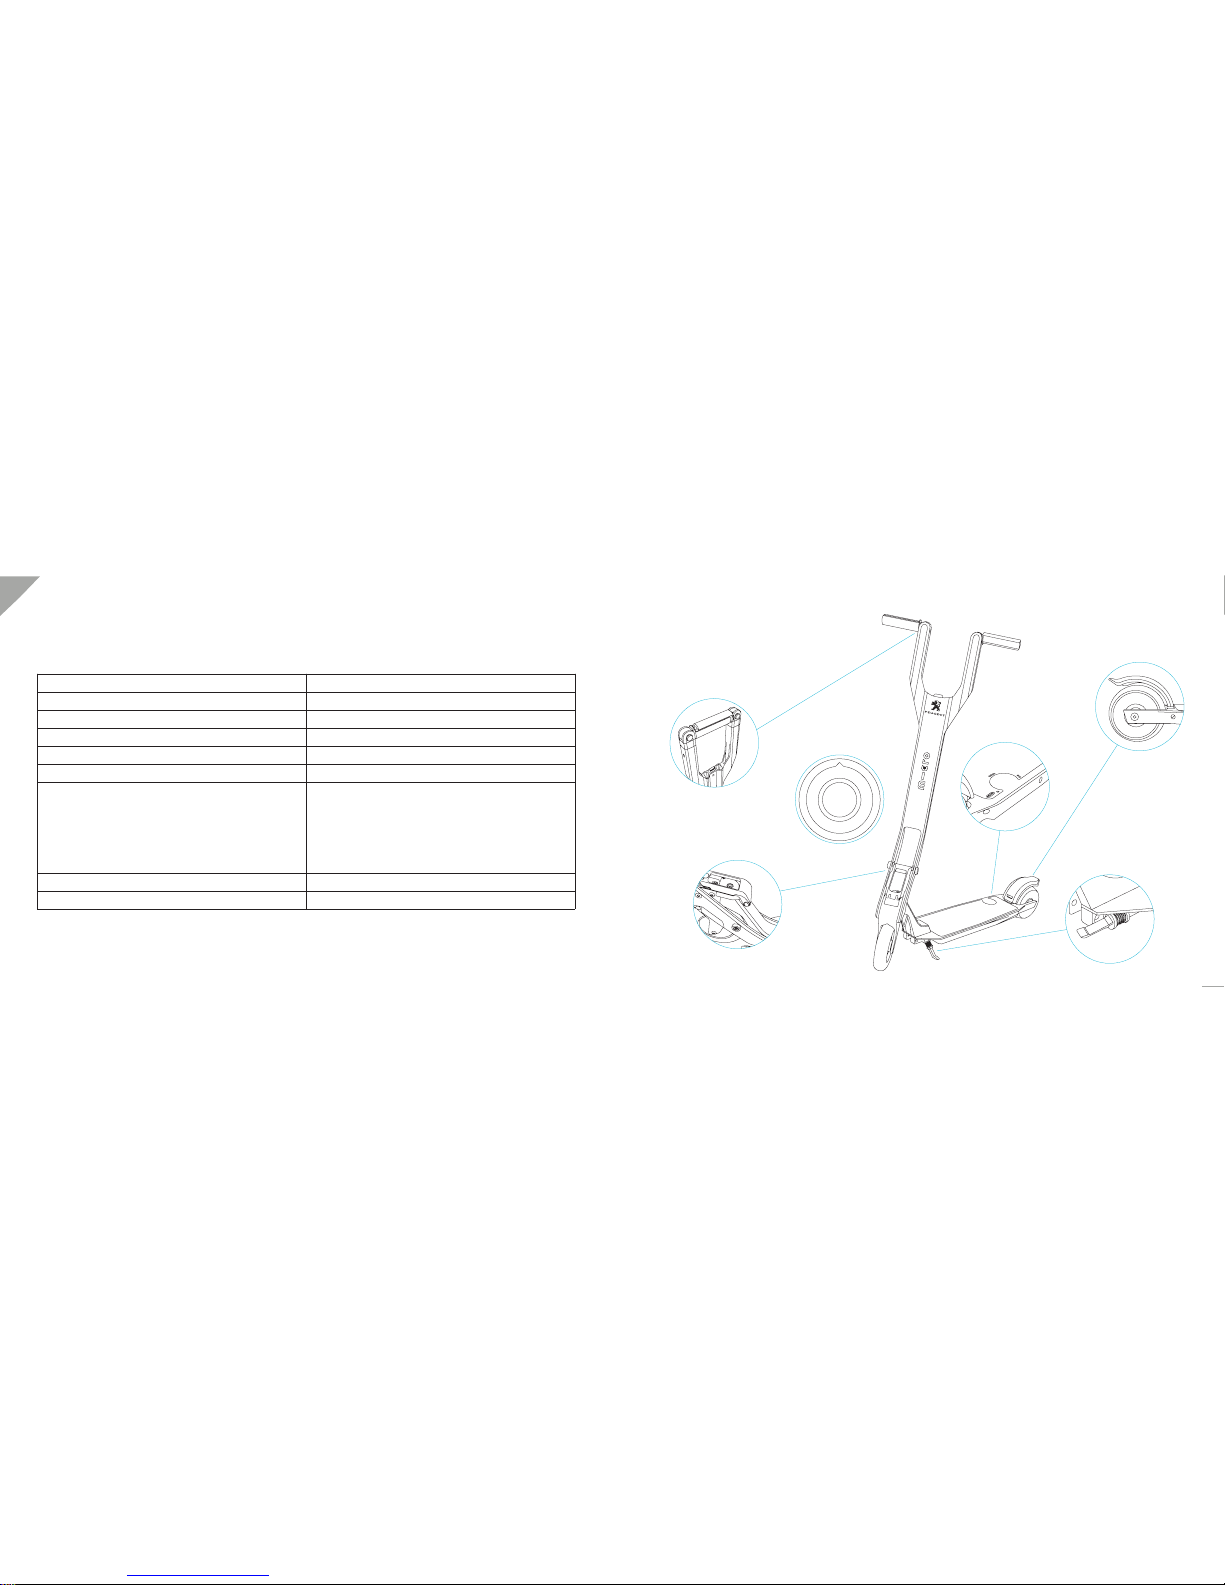
Component parts
LED Display
Side stand
Foldable handlebars
Folding mechanism
Foot brake
Setting tool
EN
You are already contributing to environmental protection with the e-Kick. Also pay attention to your environment during disposal and
heed the following instructions:
• Only dispose of the e-Kick and associated components (e.g. battery) at an approved disposal company or via the community
disposal facility.
• Heed the currently applicable regulations. If in doubt, ask your disposal facility about environmentally friendly disposal.
Instructions for disposal
Batteries and electrical devices must not be placed in the household waste.
28
You can expect the following warranty service from us:
• 2 years warranty on the e-Kick Scooter components : Footboard, complete front assembly and brake pedal. Excluded from this
are all wear parts, small parts and screws.
• 1 year warranty on electrical and electromechanical components, namely the motor and motor controller.
• 1 year warranty on the battery (60% of the original rated capacity) or 1000 full charge cycles (whichever occurs rst).
Scope of warranty services
Based on this warranty, Micro commits to the following services during the respective warranty periods:
At the discretion of Micro, repair or replacement by equivalent parts/components where the replacement can vary from the original
in terms of model and/or colour;
Services that do not fall under warranty and lie in the sphere of competence of the dealer as well as the cleaning of scooters delivered
in a dirty condition will be billed at the standard hourly rate with all arising costs for material and transport;
• Any service rendered under warranty (repair/replacement) does not extend the original warranty.
• Any other claims than those mentioned above do not apply.
Warranty
EN

The warranty does not cover damage caused by the following:
• Damage in causal connection with non-existing or untimely recharge of the battery pack (See maintenance of battery pack)
• Damage as a result of storing, charging or discharging the scooter or battery out of the specied temperature range for storage
• Improper use, inappropriate application or negligent operation (jumps, for example).
• Improper alteration by third parties (e.g. by opening the footboard).
• Improper charging (e.g. by charging with a different charger than the one provided).
• Exceeding the maximum speed of 40 km/h on downhill rides.
• If the vehicle is technically modied without the agreement of the manufacturer.
• Subsequent conversion/installation of non-compatible or non-original parts.
• Wear parts such as ball bearings, sliding bearings, bearing bolts and bearing screws, etc.
• Modication of the scooter with third-party parts/components.
• Lack of warranty inspection within the appropriate period.
• Damage as a result of missing or incorrect setting(s) or worn components.
• Consequences of falling
• Any personal or impersonal damage caused to third parties by riding the scooter.
• Damage as a result of unsuitable cleaning agents, utensils such as high pressure cleaners or additives used.
• Commercial leasing/hiring out
• Any service work or other work arising from wear, accident or operational conditions or riding while ignoring the manufacturer’s
instructions.
• Damages that can be traced to negligence by the user in respect to water protection (the e-Kick is splash-proof but not water-tight).
Severability clause
If any provision of this warranty is or becomes invalid, or has a loophole that needs to be closed, this will not affect the effectiveness
of the other provisions. The provision that is missing or invalid shall be replaced by a provision that comes as close as possible to the
intent and purpose of the original provision.
Applicable law and jurisdiction
In the event of any dispute resulting from this warranty (also with regard to the question of its existence or validity), it is agreed that
the exclusive venue shall be the Zurich Canton Court . This purchase contract is subject to Swiss law with the exclusion of conict
laws as well as the United Nations Convention on Contracts for the International Sale of Goods is excluded (UN Sales Convention).
30
EN
Manufacture and technical documentation: Micro Mobility Systems AG, Bahnhofstrasse 10, 8700 Küsnacht, Switzerland, Managing
Director: Wim Ouboter
Hereby declares that the e-Kick electric scooter complies with the provisions of the following directives:
• EU Toy Safety Directive (2009/48/EC)
• EU Electromagnetic Compatibility Directive (2004/108/EC)
Küsnacht, Switzerland in June 2016
Micro Mobility Systems AG
Declaration of EU Conformity
e-Kick is approved to bear the CE label as shown below. The manufacturer con rms that the e-Kick complies with all ‘CE’ marking
requirements.
32
EN

Index
INTRODUCTION
AVERTISSEMENTS
GUIDE DE DÉMARRAGE RAPIDE
PROLONGEZ L’EXPÉRIENCE – CONSEILS D’UTILISATION
UTILISATION
Béquille
Pliage et dépliage
Mise en charge de la batterie et afchage du niveau de charge
Dispositif d’assistance électrique «Motion Control»
Trois programmes d’utilisation
Changement de programme d’utilisation
Connexion au Bluetooth de votre trottinette
Mise à l’arrêt de l’assistance moteur
ENTRETIEN
Entretien du bloc-batterie
Entretien du mécanisme de pliage
Entretien du levier de serrage rapide
Entretien des boutons-poussoirs
INFORMATIONS TECHNIQUES
CONSIGNES D’ÉLIMINATION
GARANTIE
DÉCLARATION DE CONFORMITÉ AUX NORMES EUROPÉENNES
Page35
Page36
Page40
Page41
Page42
Page42
Page43
Page45
Page47
Page48
Page50
Page52
Page53
Page54
Page54
Page55
Page55
Page55
Page57
Page61
Page62
Page65
34
FR
Introduction Avertissement
Bienvenue dans la communauté e-Kick. Nous sommes convaincus que vous adorerez cette trottinette électrique – la plus innovante
au monde.
Ce mode d'emploi contient les consignes les plus importantes. Il vous offre des astuces concernant l’entretien et l’utilisation de votre
e-Kick et vous explique comment utiliser cet appareil en toute sécurité, et de manière à prolonger sa durée de vie.
Toutes les données se basent sur les spécications techniques du produit au moment de la création du présent mode d'emploi.
L’ensemble des modications et ajouts effectués entre-temps ne sont pas inclus dans cette version. Vous pouvez trouver la dernière
version de ce mode d'emploi en ligne, sur www.micro.ms.
Si vous avez des questions ou en cas de problème, notre réseau mondial de concessionnaires se fera un plaisir de vous aider. Veuillez contacter votre concessionnaire local et nous ferons de notre mieux pour vous fournir une assistance directe, dans les plus brefs
délais.
• Veuillez noter qu'une période d'adaptation sera nécessaire pour vous habituer à vous déplacer à l’aide d’un dispositif d’assistance
électrique. L’accélération et, par conséquent, l’effort moteur fournis sont bien plus importants que ceux d’une poussée du pied
normale. Cette accélération inhabituelle peut entraîner le soulèvement de la roue avant et faire chuter les utilisateurs inexpéri-
mentés. Soyez prudent au départ et veillez à toujours avoir sufsamment de place pour manœuvrer en toute sécurité. Ne vous
penchez jamais en arrière lorsque vous utilisez la trottinette.
• Outre le freinage normal dû aux frottements, il est possible de freiner à l’aide du frein à pied de l’e-Kick. Celle-ci actionne un frein
moteur électrique. Ce système améliore considérablement les performances et distances de freinage. Toutefois, veuillez noter
que le frein moteur électrique ne fonctionne pas dans les cas suivants:
- La batterie est déchargée et vous vous propulsez en avant à l’aide du pied.
- La batterie est entièrement chargée, ce qui exclut toute régénération de l’énergie.
- Les performances de freinage supplémentaires du frein moteur sont disproportionnées et réduisent considérablement la
distance de freinage. Il est essentiel de garder ces informations à l’esprit, notamment si vous ne bénéciez pas d’une as-
sistance de freinage supplémentaire en raison des éléments susmentionnés.
• Utilisez toujours le frein de roue arrière pour ralentir et vous arrêter. Ne freinez jamais en mettant le pied au sol! Vous activerez
le dispositif d’assistance électrique «Motion Control» et ne vous arrêterez pas. Vous ne conduiriez pas une voiture en appuyant
simultanément sur la pédale de frein et l’accélérateur!
• Respectez systématiquement les lois et réglementations nationales ayant trait au Code de la route et à la catégorie de véhicule
concernée lorsque vous utilisez votre e-Kick. Vous avez la responsabilité de vous tenir informé(e) des lois et réglementations en
vigueur dans votre pays, car ces dernières peuvent différer d’un pays à l’autre. Tout non-respect de ces consignes de votre part
sera entièrement à vos risques et périls et n’engagera en aucun cas la responsabilité du fabricant.
• Nous vous demandons notamment de prendre note des consignes suivantes:
- Il est interdit d’utiliser l’e-Kick sur la voie publique.
36
FR

- L’utilisation du dispositif d’assistance électrique (cf. Dispositif d’assistance électrique «Motion Control») sur le trottoir est
prohibée.
- Ces usages présentent un danger pour vous-même et pour autrui; de plus, ils sont illégaux dans de nombreux pays.
• Utilisez uniquement votre trottinette sur des surfaces sèches, propres et plates. En faire usage sur des surfaces mouillées peut
s’avérer très dangereux et doit absolument être évité.
• Pour des raisons de sécurité, nous vous recommandons de ne pas utiliser votre trottinette dans des conditions d’éclairage insuf-
santes.
• Veillez à toujours porter un équipement de protection, notamment un casque qui vous protègera adéquatement contre les
risques de traumatisme crânien.
• Le port de chaussures est obligatoire lorsque vous utilisez votre e-Kick.
• L’e-Kick a été conçue pour transporter une seule personne et supporter une charge maximale de 100kg. Il est fortement décon-
seillé de l’utiliser à d’autres ns. Tout non-respect de cette consigne de la part de l’utilisateur sera à ses propres risques et périls.
• Les interventions visant à augmenter les performances ou la vitesse de l’e-Kick et les modications des caractéristiques du
produit donnent matière à des poursuites et seront punies par la loi. Elles entraîneront également l’annulation de la garantie.
• Prenez garde dans les descentes rapides! Les performances de freinage ne sont pas sufsantes pour garantir la sécurité de l’uti-
lisateur dans les descentes rapides, en pentes escarpées.
• Le frein s’échauffera s’il est utilisé en continu. Ne touchez pas le frein après l’avoir utilisé.
• Avant chaque utilisation, vériez que le système de direction est correctement ajusté et que tous les composants de raccorde-
ment sont solidement xés et en bon état.
• S’il pleut ou si la trottinette a été nettoyée, le freinage sera moins réactif en raison de l’humidité. Il est donc recommandé de
tester les freins sur un terrain privé et sécurisé jusqu’à ce qu’ils fonctionnent comme prévu, après avoir nettoyé l’e-Kick.
• Il est défendu de stationner ou de ranger l’e-Kick dans des lieux de vie ou à proximité d’objets inammables.
• Ne rechargez la batterie qu’à l’aide du chargeur fourni, à des températures comprises entre 5 et 35°C.
• Ne laissez jamais la batterie sans surveillance lors de la mise en charge.
• Pour des raisons de sécurité, veillez à ce que la prise électrique soit correctement branchée et placez la batterie dans un endroit
sec et bien ventilé lors de la mise en charge.
• Évitez tout contact du chargeur, de l’alimentation secteur et des câbles de connexion avec de l’eau, en raison du risque d’électrocution. Ne touchez pas l’équipement avec les mains mouillées.
• Vériez régulièrement la prise de branchement et le chargeur. S’ils sont endommagés, faites-les remplacer pour éviter les blessures corporelles et les dommages matériels.
• Utilisez uniquement la batterie fournie ou intégrée, ainsi que les pièces de rechange d’origine.
• Il est défendu d’utiliser l’e-Kick si la batterie n’est pas connectée, sous peine de détruire tous les composants électroniques.
• Ne tentez pas de réparer la batterie ou le chargeur vous-même.
• Conservez toujours la batterie à des températures comprises entre 5 et 35°C.
• L’e-Kick n’est pas un jouet. Elle n’est pas conçue pour être utilisée par des enfants. Nous recommandons que les utilisateurs
soient âgés de 18ans au minimum.
• Sécurité des enfants et des personnes vulnérables:
38
FR

• BATTERIE: À réception de la livraison, la batterie de l’e-Kick ne sera que partiellement chargée. Avant la première utilisation,
chargez entièrement la batterie à l’aide du chargeur fourni.
• DÉPLIAGE: Les illustrations fournies sur l’emballage vous indiquent comment déplier l’e-Kick.
• L’appareil est livré prêt-à-l’emploi par le fabricant. Compte tenu des risques de vices potentiels résultant du transport et du
stockage de l’appareil en transit, nous vous invitons à vérier les points suivants avant votre première utilisation (ainsi qu’avant
chaque usage):
- LES FREINS: Vériez que les freins fonctionnent correctement. Vériez tout particulièrement si l’assistance électrique de
freinage (le frein moteur) est active, car cette fonction ajoute considérablement à la puissance de freinage (cf. le chapitre
Avertissement).
- L’ÉTAT GÉNÉRAL: Inspectez votre e-Kick avant chaque utilisation, pour veiller à ce que les vis soient bien serrées et tous
les autres composants solidement xés.
- MÉCANISME DE PLIAGE: Avant chaque utilisation, vériez que le levier bleu est bien enclenché.
- BÉQUILLE: La béquille doit être correctement repliée sous la planche.
- NIVEAU DE CHARGE DE LA BATTERIE: Contrôlez le niveau de charge de la batterie à l’aide de l’afchage à LED qui se
trouve sur la planche.
Si la batterie de l’e-Kick arrive en n d’autonomie en raison d’une utilisation régulière de l’appareil, rechargez-la dans un délai de trois
jours. Les mauvaises manipulations entraîneront l’annulation de la garantie!
Guide de démarrage rapide
- Pour des raisons de sécurité, les enfants de plus de 16ans, les personnes dont les facultés physiques, mentales ou
sensorielles sont limitées, ainsi que les personnes inexpérimentées ou peu compétentes ne peuvent utiliser cet appareil
que sous la supervision d’une personne responsable ou après avoir appris comment l’utiliser en toute sécurité et compris
les risques y étant associés.
- Il est défendu de laisser des enfants jouer avec cet appareil.
- Il est interdit de laisser des enfants entretenir ou nettoyer l’appareil sans supervision adéquate.
- Conservez les matériaux d’emballage hors de la portée des enfants.
40
FR
Protégez votre e-Kick des dommages inutiles pour en prolonger la durée de vie:
• Chargez entièrement la batterie à réception de votre achat.
• Si vous n’utilisez pas l’appareil, rechargez la batterie tous les trois mois.
• Si la batterie de l’e-Kick arrive en n d’autonomie en raison d’une utilisation régulière de l’appareil, rechargez-la dans un délai de
trois jours. Les mauvaises manipulations entraîneront l’annulation de la garantie!
• Les batteries sont sensibles au froid ou à la chaleur. N’exposez pas votre trottinette aux rayons du soleil ou à un environnement
très froid. Conservez toujours l’e-Kick à des températures comprises entre 5 et 35°C.
• Ne faites pas de sauts avec la trottinette, car les contraintes excessives peuvent entraîner des dommages qui ne seront pas couverts par la garantie.
• Veillez à toujours éviter les nids-de-poule ainsi qu’à traverser les bordures et autres obstacles dans le sens perpendiculaire.
• L’e-Kick est résistant aux éclaboussures. Il est donc possible de l’utiliser occasionnellement sur des sols humides, sans endommager les composants électroniques. Toutefois, évitez tout contact avec l’eau.
• Ne tentez pas de réparer l’appareil vous-même. Veuillez contacter votre centre de service en cas de problème. La garantie sera
automatiquement annulée si vous ouvrez la planche. Dans des cas individuels et dans le respect de certaines conditions préalables, Micro peut vous permettre d’ouvrir la planche après en avoir discuté avec vous.
• Il est défendu de personnaliser l’e-Kick. Outre la mise en péril de votre sécurité personnelle et de la sécurité d’utilisation, ces
pratiques réduisent la durée de vie de votre appareil. De plus, elles entraîneront l’annulation de la garantie.
Prolongez l’expérience – Conseils d’utilisation
Utilisation de la béquille
L’e-Kick est munie d’une béquille. Elle se trouve sous la planche, à côté du mécanisme de pliage.
Repliez la béquille vers l’avant, de sorte à pouvoir la déplier de la pointe du pied si nécessaire.
Utilisation
42
FR
Veuillez garder les deux mains dans les positions indiquées sur les illustrations lors du pliage et du dépliage de la trottinette, jusqu’à
ce qu’elle soit verrouillée en position.
2 3 41
Dépliage de l’e-Kick
Votre e-Kick vous sera fourni plié. Quelques étapes simples sufsent à le déplier. La méthode de dépliage de l’e-kick est détaillée
ci-dessous:
1. Appuyez sur la pédale de frein arrière pour déverrouiller la languette de sûreté.
2. Faites pivoter le levier vers l’avant, an de déverrouiller le mécanisme de dépliage et de déplier le bras.
3. Mettez le bras en position verticale pour verrouiller le mécanisme d’articulation et enfoncez les deux boulons argentés situés sur
le levier bleu dans le bras (vous entendrez un clic lorsque le bras sera correctement verrouillé en position dépliée).
4. Appuyez successivement sur les deux boutons bleus situés sur la par tie supérieure du bras, an de déverrouiller et déployer les
tiges de poignée. (Vous entendrez un clic lorsque les tiges de poignée seront verrouillées en position déployée.)
3
Veuillez garder les deux mains dans les positions indiquées sur les illustrations lors du pliage et du dépliage de la trottinette, jusqu’à
ce qu’elle soit verrouillée en position.
1 2
Pliage de l’e-Kick
L’e-Kick est aussi facile à plier qu’à déplier:
1. Appuyez sur les deux boutons bleus situés sur le dessus de la partie avant de la trottinette an de déverrouiller les tiges de poignée et de les replier.
2. Appuyez simultanément sur les deux boutons-poussoirs bleus situés sur le dessous de la partie avant de l’appareil, an de déverrouiller le levier bleu.
3. Faites pivoter le levier bleu vers l’avant pour déverrouiller le mécanisme de charnière, puis repliez la partie avant de sorte qu’elle
repose à plat contre la planche et que la languette arrière s’enclenche dans la pédale de frein.
44
FR
Mise en charge de la batterie et afchage du niveau de charge
Le processus de charge est détaillé ci-dessous:
1. Connectez le chargeur à une prise électrique. Normalement, la LED du chargeur émettra un éclairage vert.
2. Si c’est le cas, connectez l’e-Kick au chargeur. La LED du bloc d’alimentation émettra un éclairage rouge (ce qui peut prendre
quelques secondes) pour indiquer que le chargeur est bien connecté à la trottinette. De plus, les LED situées sur l’e-Kick émettront deux clignotements consécutifs indiquant que le processus de charge est en cours.
3. Une fois l’e-Kick entièrement chargé, l’afchage du chargeur émettra à nouveau un éclairage vert.
Faites tourner la roue arrière pour mettre la trottinette en marche, an de vérier le niveau de charge. Cette manœuvre vous permettra également de vérier ce niveau durant le processus de charge.
1 2 3
Vérication du niveau de charge de la batterie de l’e-Kick
Les 4LED situées sur la planche de l’e-Kick servent à indiquer le niveau de charge de la batterie, comme illustré ci-dessous:
La LED fournit des informations lorsque le l’e-Kick n'est pas en «veille». Pour désactiver le mode veille de l’e-Kick, il vous suft de faire
tourner la roue arrière.
Vous pouvez également recevoir des informations concernant le niveau de charge (et la distance d’autonomie restante) sur votre smartphone, en téléchargeant l’application MyPeugeot depuis l’App Store (iOS) et Google Play Store.
(*)Veuillez noter que la mesure du niveau de charge dépend de l’intensité du courant. Étant donné que l’appareil est en charge au
cours du trajet, l’afchage indique un niveau de charge plus faible qu’à l’arrêt.
4LED allumées =
75 à 100% de charge
3LED allumées =
50 à 75% de charge
2LED allumées =
25 à 50% de charge
1LED allumées =
0 à 25% de charge
46
FR
Le dispositif d’assistance électrique «Motion Control»
Le dispositif d’assistance électrique «Motion Control» de l’e-Kick vous offre une expérience incomparable.
Vous trouverez ci-dessous des informations concises concernant le dispositif «Motion Control»:
• Le dispositif « Motion Control» s’active à partir d’une vitesse approximative de 5km/h. En d’autres termes, l’utilisateur doit se
propulser lui-même jusqu’à une vitesse de 5km/h, avant que le dispositif d’assistance ne fasse effet.
• Plus la poussée du pied (l’impulsion) est vigoureuse, plus l’assistance fournie par le moteur est puissante et durable.
• Vous obtiendrez de meilleurs résultats en effectuant un nombre limité de poussées vigoureuses du pied qu’un grand nombre de
petites poussées.
Veuillez noter qu'une période d'adaptation sera nécessaire pour vous habituer à vous déplacer à l’aide d’un dispositif d’assistance électrique. L’accélération fournie sera bien plus importante que celle d’une poussée du pied normale. Cette accélération inhabituelle peut
prendre les utilisateurs de court. Montrez-vous extrêmement prudent lors de votre première utilisation de la trottinette et apprenez à
freiner correctement à l’aide du frein à pied dès le départ.
Si vous ne ressentez aucune accélération, essayez de déclencher le dispositif d’assistance électrique en activant le mode Sport et
en effectuant des poussées plus vigoureuses. Le dispositif «Motion Control» offre une assistance plus performante à des vitesses
plus importantes. Essayez d’atteindre une vitesse plus élevée en effectuant des poussées plus vigoureuses et vous ressentirez une
accélération plus importante.
Trois programmes d’utilisation
L’e-Kick offre trois programmes d’utilisation. Vous pouvez donc bénécier d’une expérience optimale en utilisant le programme le
mieux adapté à l’une des nombreuses situations auxquelles la trottinette peut être confrontée, tout en restant conforme aux lois en
vigueur.
Pour des raisons de sécurité, utilisez uniquement le programme avec lequel vous vous sentez le plus à l’aise, tout en veillant à respecter
les lois en vigueur dans votre pays.
• Roulez doucement lors de votre première utilisation, an de vous habituer aux nouvelles sensations fournies par la trottinette.
N’oubliez pas que plus vous allez vite, plus la distance de freinage augmentera.
STANDARD
ECO
SPORT
Programme
d’utilisation
Mode ECO O 1 250Watt 15km/h
25km/h
25km/h
250Watt
500Watt
OO 2
OOO 3
Mode STANDARD
Mode SPORT
Positionnement
sur le cercle de
la planche
Nombre de LED qui
clignotent lors de la
sélection du nouveau
mode
Puissance
de la force
Vitesse max
autorisée
48
FR
50
STANDARDECO SPORT
Changement de programme d’utilisation
Changer de programme d’utilisation est un processus simple et rapide. Vous pouvez modier le réglage en appuyant sur le frein plusieurs fois de suite ou vous servir de l’outil de réglage.
Changement de programme d’utilisation à l’aide de l’outil de réglage
Vous aurez besoin de l’outil de réglage inclus dans la livraison.
Placez l’outil de réglage sur la découpe circulaire située sur la planche. Il vous suft d’aligner l’outil avec la pointe de èche qui y est
gravée.
Vous pourrez alors passer d’un programme à l’autre, en faisant tourner l’outil de réglage et en alignant la èche sur les cercles vides.
L’afchage à LED vous indiquera le programme sélectionné en émettant un clignotement de faible intensité pendant deux secondes,
suivi d’un clignotement de forte intensité. Une seule LED clignotera pour le mode Eco, deux LED pour le mode Standard et trois LED
pour le mode Sport.
• Veuillez également noter que les limites de vitesse et les restrictions en matière de puissance maximale autorisée dans le cadre
de l’utilisation de véhicules à assistance électrique diffèrent selon les pays. Vous avez la responsabilité de vous tenir informé(e)
de ces limites et restrictions et de les respecter.
• L’outil de réglage est muni d’aimants puissants. Veillez à ne jamais le placer à proximité d’appareils électroniques, tels que votre
téléphone portable ou vos cartes de crédit, sous peine de les endommager.
FR

Changement de programme d’utilisation par le biais du frein
Vous pouvez également changer de programme d’utilisation sans l’outil de réglage, en appuyant sur la pédale de frein plusieurs fois
de suite.
Si vous appuyez à quatre reprises sur la pédale de frein, l’afchage à LED de la planche indiquera le mode sélectionné en faisant
clignoter quatre fois le nombre de LED correspondant.
Si, par exemple, vous sélectionnez le programme2 (le mode Standard), deux LED clignoteront pour indiquer que la trottinette est en
mode Standard.
Vous pourrez alors changer de programme en appuyant à nouveau quatre fois sur le frein. Chaque fois que vous appuierez quatre fois
sur la pédale de frein, la trottinette changera de programme.
Veuillez noter qu’il vous faudra recommencer à actionner la pédale de frein dans un délai de quatre secondes suivant la dernière
séquence an de changer de programme.
Par exemple:
-> 4appuis sur la pédale de frein -> 2LED clignotent -> 2 (mode Standard)
-> 4appuis sur la pédale de frein -> 3LED clignotent -> 3 (mode Sport)
-> 4appuis sur la pédale de frein -> 1LED clignote -> 1 (mode Eco)
-> 4appuis sur la pédale de frein -> 2LED clignotent -> 2 (mode Standard)
Si vous appuyez 3fois de suite sur la pédale de frein, l’assistance moteur se mettra à l’arrêt
et l’éclairage de l’afchage à LED sera réduit (cf. ci-dessous: «Mise à l’arrêt du moteur»)
52
Connexion au Bluetooth de votre trottinette
Vous pouvez connecter votre trottinette à votre téléphone portable en téléchargeant l’application MyPeugeot disponible sur l’App Store
(iOS) ou sur Google Play Store.
Pour ce faire, veuillez activer le Bluetooth sur votre smartphone ou tablette, télécharger l’application et l’ouvrir sur votre appareil.
Pour connecter votre trottinette, appuyez quatre fois de suite sur le frein (comme pour changer de programme). La trottinette se
mettra en mode connexion et cherchera les appareils Bluetooth à proximité. Elle restera en mode connexion pendant 30secondes,
an de permettre à votre smartphone de la détecter. Dans l’application, cliquez sur le symbole de la trottinette; l’application vous
indiquera si la connexion a eu lieu.
L’e-Kick emploie le protocole Bluetooth Low Energy pour communiquer avec les smartphones.
FR
Mise à l’arrêt de l’assistance moteur
L’assistance moteur de l’e-Kick peut être arrêtée à tout moment, a n de vous permettre d’utiliser l’appareil comme une trottinette
traditionnelle. Pour arrêter l’assistance moteur, appuyez brièvement sur la pédale de frein à trois reprises. L’éclairage de l’af chage à
LED sera réduit pour indiquer l’arrêt de l’assistance moteur.
L’assistance moteur sera désactivée jusqu’à ce que l’utilisateur appuie à nouveau trois fois de suite sur le frein.
Appuyer à 3reprises
EN MARCHE: l’éclairage
des LED est intense
À L’ARRÊT: l’éclairage des
LED est réduit
54
Entretien du bloc-batterie
Veuillez suivre les consignes d’entretien suivantes pour assurer la longévité de votre bloc-batterie:
• Conservez toujours la batterie à des températures comprises entre 5 et 35°C.
• Chargez entièrement la batterie à réception de votre achat.
• Si vous n’utilisez pas l’appareil, rechargez la batterie tous les trois mois.
• Si la batterie de l’e-Kick arrive en n d’autonomie en raison d’une utilisation régulière de l’appareil, rechargez-la dans un délai
de trois jours.
Tous les dommages résultant du non-respect des consignes susmentionnées ne seront pas couverts par la garantie.
Entretien
FR
Entretien du mécanisme de pliage
Votre e-kick peut être replié. En raison de la charge habituelle, il se peut que les pièces pliantes deviennent légèrement rigides ou
bruyantes. An de prolonger l’expérience fournie par votre trottinette, nous avons illustré ci-dessous la procédure à suivre pour éliminer ces bruits dérangeants et améliorer la uidité du mécanisme de pliage, en quelques étapes simples:
1. Appliquez du lubriant sur les deux boulons argentés du levier pliant bleu et appuyez dessus à deux reprises pour bien répartir
le produit.
2. Appliquez du lubriant sur les deux boutons-poussoirs bleus de la pièce pliante principale et appuyez dessus pour répartir le
produit.
3. Appliquez du lubriant sur le ressort du levier pliant bleu et soulevez ce dernier à deux reprises pour répartir le produit.
4. Appliquez du lubriant sur l’axe central situé à l’intérieur du levier pliant bleu et soulevez ce dernier à deux reprises pour répartir
le produit.
1
2
Entretien des tiges de poignée
Appliquez du lubriant dans la rainure de la zone pivotante des tiges de poignées, puis pliez/dépliez-les à deux reprises pour répartir
le produit.
56
3
4
FR
Informations techniques
Légère 8,5kilogrammes
Distance d’autonomie 10 à 15kilomètres
Charge rapide Recharge effectuée en 60minutes
Vitesse 15 à 25km/h
Puissance 250/500Watts
Freinage de récupération
Roue noyau double
Mise en marche/à l’arrêt automatique
Résistance à l’eau
Chaque freinage génère de l’énergie
Noyau souple/carcasse dure
Le mode veille de la trottinette se désactive automatiquement
100%résistante aux éclaboussures
15km/h - 250W
3programmes de vitesse 25km/h - 250W
25km/h - 500W
Mise en marche/à l’arrêt de l’assistance Appuyer 3 fois sur le frein pour mettre l’assistance ON/OFF
Caractéristiques
58
Hauteur de la tige de poignée
Corps de la trottinette
950mm
Alliage d’aluminium
Longueur hors tout
Roue avant
760mm
Caoutchouc noyau double
Dimensions une fois repliée
Roue arrière
815 x 175 x 225mm
2composants: moteur/pneu remplaçable
Longueur de la planche (aire utilisable)
Moteur
370mm
Moteur CC sans balais
Largeur de la planche (point le plus large/le plus étroit)
Planche
138mm/120mm
Aluminium monobloc (1100grammes)
Largeur de la tige de poignée
Bande antidérapante
380mm
Caoutchouc
Dimensions
Matériaux
FR

Avertissement: La trottinette est équipée de batteries Lithium-Ion rechargeables. Il est défendu de charger des batteries n’étant pas
prévues à cet effet.
Veuillez noter que la mesure du niveau de charge dépend du courant. Par conséquent, l’afchage en charge lors de l’utilisation de la
trottinette indique toujours un niveau de charge plus faible qu’à l’arrêt.
Technologie Lithium-ion
Tension 36Volt
Capacité
Type de cellule
Conguration des cellules
2,5Ah (= 90watts heure = transportable en avion)
Cellules Lithium-Ion
10S1P (10cellules)
Temps de charge 60minutes
Durée de vie
60% de la capacité originale après un an (ou 1000cycles de
charge)
Poids 700grammes
1LED: 0 à 25% de charge
4LED intégrées à la planche:
Afchage du niveau de charge
4LED: 75 à 100% de charge
3LED: 50 à 75% de charge
2LED: 25 à 50% de charge
Batterie
60
Pièces constituantes
Afchage à LED
Béquille
Tiges de poignée pliantes
Mécanisme de pliage
Pédale de frein
Outil de réglage
FR

L’e-Kick est un choix respectueux de l’environnement. Pensez également à l’environnement lorsque vous éliminez votre trottinette et
suivez les consignes suivantes à la lettre:
• Lors de l’élimination de l’e-Kick et des composants y étant associés (p. ex., la batterie), faites appel à une société agréée ou
utilisez la déchetterie de votre localité.
• Respectez les réglementations actuellement en vigueur. Dans le doute, adressez-vous à la déchetterie de votre localité pour en
savoir plus sur l’élimination de votre e-Kick dans le respect de l’environnement.
Consignes d’élimination
Ne pas jeter les batteries et appareils électriques avec les déchets ménagers.
62
Nous vous offrons le service de garantie suivant:
• 2ans de garantie sur les composants de la trottinette e-Kick: la planche, y compris l’ensemble avant et la pédale de frein. Les
pièces d’usure, les petits composants et les vis sont exclus de la garantie.
• 1an de garantie sur les composants électriques et électromécaniques, notamment le moteur et la commande moteur.
• 1an de garantie sur la batterie (60% de la capacité nominale d’origine) ou 1000cycles de charge (selon la première éventualité).
Portée des services de garantie
En vertu de la présente garantie, Micro s’engage à fournir les services suivants au cours des périodes de garantie respectives:
À l’entière discrétion de Micro, la réparation et le remplacement à l’aide de pièces ou composants équivalents (le modèle ou la couleur
du remplacement peut différer de l’original).
Les services exclus de la garantie et faisant partie du domaine de compétences du concessionnaire ainsi que le nettoyage des trottinettes livrées sales seront facturés au tarif horaire usuel, auquel seront ajoutés les frais liés aux matériaux et au transport.
• Les services effectués en vertu de la garantie (réparation ou remplacement) ne prolongeront pas la garantie originale.
• Aucune revendication autre que celles susmentionnées ne s’applique.
Garantie
FR

La garantie ne couvre pas les dommages résultant de ce qui suit:
• Les dommages attribuables à l’absence de mise en charge ou à la mise en charge en dehors des délais prescrits du bloc-batterie
(cf. Entretien du bloc-batterie).
• Les dommages résultant du stockage, ainsi que de la mise en charge ou de la décharge de la trottinette à des températures non
comprises dans la plage de valeurs prescrite à cet effet.
• Le mauvais usage, l’application inadéquate ou l’utilisation négligente de l’appareil (pour réaliser des sauts, par exemple).
• L’apport de modications incorrectes par des tiers (p. ex., en ouvrant la planche).
• La mise en charge inadéquate de la batterie (p. ex., en chargeant la batterie à l’aide d’un chargeur autre que celui fourni).
• Le dépassement de la vitesse maximale de 40km/h ou l’utilisation de la trottinette dans des descentes rapides.
• Les modications techniques de l’appareil réalisées sans l’accord du fabricant.
• La conversion ou l’installation ultérieure de pièces incompatibles ou non originales.
• Les pièces d’usure, telles que les bagues de roulement, les paliers à glissement, les boulons d’appui et les vis de butée, etc.
• La modication de la trottinette à l’aide de pièces ou composants tiers.
• L’absence d’inspection aux ns de la garantie au cours de la période adéquate.
• Les dommages résultant d’un ou de plusieurs réglages manquants ou incorrects, ainsi que de composants usés.
• Les problèmes résultant de chutes.
• Les dommages personnels et réels subis par des tiers dans le cadre de l’utilisation de la trottinette.
• Les dommages résultant de l’utilisation de produits d’entretien inadaptés, d’ustensiles inadéquats (tels que des nettoyeurs à
haute pression) ou d’additifs inappropriés.
• Le prêt ou la location de l’appareil à des ns commerciales.
• Les travaux de révision ou autres résultant de l’usure, d’accidents, des conditions d’utilisation ou du non-respect des consignes
du fabricant lors de l’utilisation de l’appareil.
• Les dommages imputables à la négligence de l’utilisateur en ce qui concerne la résistance à l’eau de l’appareil (l’e-Kick est résis-
tant aux éclaboussures; il n’est pas étanche).
Clause de responsabilité non partagée
En cas de nullité de l’une des dispositions de la présente garantie (avant ou après sa mise en vigueur) ou en cas de lacune à combler,
les autres dispositions ne seront pas affectées. La disposition manquante ou frappée de nullité sera remplacée par une disposition
dont l’intention et le but se rapprochent au mieux de l’original.
Droit applicable et compétence
En cas de litige résultant de la présente garantie (ainsi qu’en ce qui concerne son existence ou sa validité), les parties conviennent
de se soumettre à la compétence exclusive du Tribunal du canton de Zurich. Le présent contrat d’achat est régi par le droit suisse, à
l’exclusion du conit de lois ainsi que de la Convention des Nations Unies sur les contrats de vente internationale de marchandises
(CVIM).
64
FR

Fabrication et documentation technique: Le directeur général de Micro Mobility Systems AG, Bahnhofstrasse 10, 8700 Küsnacht ,
Suisse: Wim Ouboter
déclare par les présentes que la trottinette électrique e-Kick se conforme aux dispositions des directives suivantes:
• La directive européenne relative à la sécurité des jouets (2009/48/CE).
• La directive européenne relative à la compatibilité électromagnétique (2004/108/EC).
Küsnacht, Suisse, juin2016
Micro Mobility Systems AG
Déclaration de conformité aux normes
européennes
L’e-Kick est habilitée à porter le marquage CE, comme illustré ci-dessous. Le fabricant con rme que l’e-Kick satisfait à toutes les
exigences relatives au marquage «CE».
66
FR

Index
EINLEITUNG
WARNHINWEISE
SCHNELLSTART
TIPPS FÜR EIN ANDAUERNDES FAHRVERGNÜGEN
BETRIEB
Seitenständer
Aus- und Einklappen
Laden des Akkus und Anzeige des Ladestatus
Das „Motion-Control“-System
Die drei Fahrprogramme
Wechseln der Fahrprogramme
Bluetooth-Pairing Ihres Rollers
Ausschalten des Motorassistenten
WARTUNG
Wartung des Akku-Packs
Wartung des Faltmechanismus
Wartung des Schnellspannhebels
Wartung der Druckknöpfe
TECHNISCHE DATEN
ANWEISUNGEN FÜR DIE ENTSORGUNG
GARANTIE
EU-KONFORMITÄTSERKLÄRUNG
Seite 69
Seite 70
Seite 74
Seite 75
Seite 76
Seite 76
Seite 77
Seite 79
Seite 81
Seite 82
Seite 83
Seite 85
Seite 86
Seite 87
Seite 87
Seite 88
Seite 88
Seite 89
Seite 90
Seite 94
Seite 95
Seite 98
68
DE

Einleitung Warnung
Wir freuen uns, Sie in der e-Kick Fahrergemeinschaft begrüßen zu können und sind davon überzeugt, dass Sie das Fahren mit dem
innovativsten Elektroroller der Welt genießen werden.
Diese Betriebsanleitung erklärt die wichtigsten zu beachtenden Anleitungen. Sie erhalten Tipps zur Wartung und Nutzung Ihres
e-Kick und nden Beschreibungen zum richtigen Umgang mit dem Fahrzeug für eine sichere und langfristige Nutzung.
Alle Angaben basieren auf dem Stand der Technik zum Zeitpunkt der Erstellung dieser Betriebsanleitung. Alle Änderungen und Ergänzungen, die in der Zwischenzeit vorgenommen wurden, sind in dieser Version nicht enthalten. Die aktuelle Version der Betriebsanlei-
tung nden Sie online unter www.micro.ms.
Unser weltweites Händlernetzwerk steht Ihnen bei Fragen oder Problemen gerne zur Verfügung. Bitte kontaktieren Sie Ihren Händler
vor Ort. Wir werden unser Bestes tun, um schnelle und direkte Unterstützung zu leisten.
• Bitte beachten Sie, dass das Fahren mit elektrischer Unterstützung eine Gewöhnungsphase erfordert. Die Beschleunigung
und damit die Bewegungskraft ist viel größer als bei einer normalen Pedalbewegung. Bei unerfahrenen Fahrern kann diese
ungewohnte Beschleunigung das Vorderrad vom Boden abheben lassen und zu Stürzen führen. Fangen Sie vorsichtig an und
lassen Sie immer ausreichend Platz zum Manövrieren. Lehnen Sie sich beim Fahren niemals nach hinten.
• Zusätzlich zur normalen Bremsleistung bremst die Fußbremse aufgrund der Reibung dene-Kick auch mit einer elektrischen Motorbremse. Dies sorgt für eine deutliche Verbesserung der Bremsleistung und für einen kürzeren Bremsweg. Beachten Sie bitte
jedoch, dass die Motorbremse nicht funktioniert, wenn:
- die Batterie entladen ist und Sie nur mit Muskelkraft fahren.
- die Batterie zu 100% geladen ist und daher keine Energie gewonnen werden kann.
- Die zusätzliche Bremsleistung des Motors ist enorm und verkürzt den Bremsweg erheblich. Seien Sie sich dessen immer
bewusst, besonders, wenn in den oben genannten Situationen die zusätzliche Bremsleistung nicht verfügbar ist.
• Verwenden Sie immer die Hinterradbremse, um langsamer zu werden und zu stoppen. Bremsen Sie nie durch Aufsetzen der Fußsohlen auf der Erde! Dies aktiviert das „Motion-Control“-System und Sie halten nicht an. Das ist, als ob Sie beim Fahren eines
Autos Gas- und Bremspedal gleichzeitig betätigen.
• Halten Sie beim Fahren mit deme-Kickimmer die gültigen nationalen Gesetze und Regelungen zum Straßenverkehr und der
Fahrzeugklasse ein. Sie sind dazu verpichtet, sich selbst bezüglich der Gesetze und Bestimmungen in Ihrem Land zu informieren, da die Bestimmungen in unterschiedlichen Ländern voneinander abweichen können. Nichtbeachtung der Richtlinien
geschieht auf Ihr eigenes Risiko und ohne Haftung des Herstellers.
• Bitte beachten Sie insbesondere, dass:
- e-Kick nicht für den allgemeinen Einsatz auf öffentlichen Straßen zugelassen ist
- der Elektroassistent (siehe Motion-Control-System) nicht auf Fußwegen verwendet werden kann
70
DE

- Ein solcher Einsatz nicht nur mit Gefahren für Sie und andere verbunden ist, sondern in vielen Ländern auch illegal ist.
• Fahren Sie nur auf trockenen, sauberen und achen Oberächen. Das Fahren auf nassen Oberächen kann sehr gefährlich sein
und sollte vermieden werden.
• Aus Sicherheitsgründen empfehlen wir, nicht im Dunkeln zu fahren.
• Tragen Sie immer Schutzkleidung, insbesondere einen Helm, der als Schutz vor Kopfverletzungen geeignet ist.
• Tragen Sie bei der Verwendung des e-Kickimmer Schuhe.
• Der e-Kick ist dafür gedacht, eine einzelne Person mit einem Gewicht von maximal 100 kg zu transportieren und sollte nur zu
diesem Zweck verwendet werden. Die Nichtbeachtung dieser Anweisung wird als unsachgemäße Verwendung betrachtet und
geschieht auf ausschließliches Risiko des Benutzers.
• Jeder Eingriff zur Erhöhung der Leistung oder Geschwindigkeit und im Allgemeinen Änderungen an den Eigenschaften des e-Kick
sind strafbar und werden strafrechtlich verfolgt. Sie lassen die Gewährleistung erlöschen.
• Achtung bei steilen Abwärtsfahrten! Die Bremsleistung ist nicht ausreichend, um sicheres Fahren auf steilen, schnellen Abfahrten
zu garantieren.
• Die Bremse läuft bei Dauerbenutzung heiß. Berühren Sie die Bremse nach dem Bremsen nicht.
• Prüfen Sie vor jeder Fahrt, ob das Steuersystem korrekt ausgerichtet ist und alle Verbindungskomponenten gut gesichert und
nicht gebrochen sind.
• Im Regen oder nach der Reinigung des Fahrzeugs kann die Bremswirkung aufgrund der Feuchtigkeit verzögert einsetzen. Aus
diesem Grund sollten die Bremsen auf sicherem, privatem Grund nach dem Reinigen des e-Kick„trockengebremst“ werden.
• Parken oder lagern Sie den e-Kick niemals in Wohnräumen bzw. in der Nähe von leicht entzündlichen Objekten.
• Laden Sie den Akku nur mit dem mitgelieferten Ladegerät und nur bei Temperaturen zwischen 5 und 35° Celsius.
• Laden Sie den Akku niemals unbeaufsichtigt.
• Stellen Sie beim Laden des Akkus eine sichere Steckerverbindung, ausreichende Lüftung und eine trockene Umgebung sicher.
• Bringen Sie das Ladegerät, den Netzstrom und die Verbindungskabel niemals in Kontakt mit Wasser, da die Gefahr eines
Stromschlags besteht. Berühren Sie die Teile nicht mit feuchten Händen.
• Prüfen Sie den Verbindungsstecker und das Ladegerät in regelmäßigen Abständen. Sollte ein Schaden entstehen, tauschen Sie
diese Teile aus, um Verletzungen und Sachschäden zu vermeiden.
• Verwenden Sie nur den mitgelieferten oder eingebauten Akku oder Originalersatzteile.
• Fahren Sie den e-Kick nie ohne angeschlossenen Akku, da dies die Elektronikbauteile zerstören kann.
• Führen Sie keine Eigenreparatur des Akkus oder des Ladegeräts durch.
• Lagern Sie die Batterie stets bei Temperaturen zwischen 5° und 35° Celsius.
• Der e-Kick ist kein Spielzeug. Er ist nicht für das Gewicht von Kindern geeignet. Wir empfehlen ein Mindestalter von 18 Jahren.
• Sicherheit von Kindern und schutzbedürftigen Personen:
- Kinder über 16 Jahren und Personen mit eingeschränkten körperlichen, geistigen oder Wahrnehmungsfähigkeiten oder
man gelnder Erfahrung bzw. mangelnden Kenntnissen dürfen dieses Gerät nur unter Beaufsichtigung durch eine für ihre
Sicherheit verantwortliche Person verwenden, oder wenn sie eine Schulung zum sicheren Umgang mit dem Gerät erhalten
haben und die mit dem Gerät verbundenen Risiken verstehen.
- Kinder dürfen mit dem Gerät nicht spielen.
72
DE

• AKKU Der Akku ist bei Auslieferung dese-Kick nur teilgeladen. Laden Sie vor der ersten Benutzung den Akku mit dem mitgelieferten Ladegerät.
• AUSKLAPPEN: Bitte betrachten Sie die Zeichnungen auf der Verpackung, um das Auseinanderklappen des e-Kickzu erlernen.
• Das Fahrzeug wird vom Hersteller betriebsbereit geliefert. Da Defekte, die die Funktionsweise des Fahrzeugs möglicherweise
beeinträchtigen, während des Transports ebenso wie bei Standzeiten auftreten können, bitten wir Sie, die folgenden Punkte vor
der Erstbenutzung sowie vor jeder Fahrt zu beachten:
- BREMSE: Prüfen Sie, ob die Bremse ordnungsgemäß funktioniert. Sie müssen insbesondere wissen, ob Sie die Fahrt mit
oder ohne elektronischen Bremsassistent (Motorbremse) antreten, da dies enorme Auswirkungen auf die Bremskraft hat
(siehe das Kapitel zu Warnungen).
- ALLGEMEINZUSTAND: Prüfen Sie vor jeder Fahrt den e-Kick, um sicherzustellen, dass alle Schrauben fest angezogen sind
und keine Bauteile lose sind.
- FALTMECHANISMUS: Prüfen Sie vor jeder Fahrt , ob der blaue Hebel eingerastet ist
- SEITENSTÄNDER: Der Seitenständer ist richtig unterhalb des Trittbretts eingeklappt.
- AKKULADESTATUS: Prüfen Sie den Ladestatus des Akkus anhand der LED-Anzeige auf dem Trittbrett.
Sie müssen den e-Kick innerhalb von drei Tagen auaden, wenn der Akku durch das Fahren des Rollers vollständig leergefahren ist .
Nichteinhaltung läßt die Gewährleistung erlöschen!
Schnellstart
- Kinder dürfen das Gerät nicht ohne angemessene Beaufsichtigung warten oder reinigen.
- Bewahren Sie alle Verpackungsmaterialien außerhalb der Reichweite von Kindern auf.
74
DE

Schutz des e-Kick gegen unnötige Beschädigungen und für ein andauerndes Fahrvergnügen:
• Laden Sie den Akku unmittelbar nach dem Kauf vollständig auf.
• Laden Sie den Akku alle drei Monate, wenn Sie den Roller einlagern.
• Sie müssen den e-Kick innerhalb von drei Tagen auaden, wenn der Akku durch das Fahren des Rollers vollständig leergefahren
ist. Nichteinhaltung läßt die Gewährleistung erlöschen!
• Akkus sind temperaturempndlich. Parken Sie Ihren Roller nicht in der prallen Sonne oder in einer sehr kalten Umgebung. Lagern
Sie den e-Kick stets bei Temperaturen zwischen 5° und 35° Celsius.
• Machen Sie keine Sprünge mit dem Roller, da dies zu übermäßiger Belastung und letztendlich zur Beschädigung des Rollers führt,
die nicht von der Garantie abgedeckt ist.
• Vermeiden Sie stets Schlaglöcher und fahren Sie im rechten Winkel über Bordsteine und andere Hindernisse.
• Der e-Kick ist gegen Spritzwasser geschützt. Gelegentliches Fahren über feuchten Boden sollte die Elektronik nicht beschädigen. Sie sollten jedoch jeden Kontakt mit Wasser vermeiden.
• Führen Sie keine Eigenreparaturen durch. Kontaktieren Sie stets Ihren Kundendienst. Das Öffnen des Trittbretts führt automatisch
zum Erlöschen der Garantie. In Einzelfällen gestattet Micro das Öffnen des Trittbretts unter bestimmten Vorbedingungen und in
Absprache mit dem Kunden.
• Das „Tunen“ des e-Kick ist nicht gestattet . Dies gefährdet Ihre persönliche Sicherheit und die Betriebssicherheit und verkürzt die
Lebensdauer Ihres Fahrzeugs. Es führt auch zum Erlöschen der Gewährleistung.
Tipps für ein andauerndes Fahrvergnügen
Verwendung des Seitenständers
Der e-Kick verfügt über einen Seitenständer. Dieser bendet sich unter dem Trittbrett neben dem Klappmechanismus.
Klappen Sie den Ständer immer nach vorne ein, so dass er mit den Fußspitzen bei Bedarf wieder ausgeklappt werden kann.
Betrieb
76
DE

Halten Sie die Hände unbedingt während des Aus- und Einklappens des Rollers an den in den Abbildungen gezeigten Stellen, bis der
Roller eingerastet ist.
2 3 41
Ausklappen des e-Kick
Ihre-Kick wird zusammengeklappt geliefert. Er wird in wenigen einfachen Schritten ausgeklappt und ist fahrbereit. Unten nden sie
die Beschreibung zum Ausklappen des e-Kick:
1. Drücken Sie das hintere Bremspedal, um die Arretierung zu lösen.
2. Bewegen Sie den blauen Hebel nach vorne, um den Klappmechanismus zu lösen und den Arm auszuklappen.
3. Heben Sie den Arm in eine vertikale Position, um den Gelenkmechanismus einzurasten, klicken Sie die beiden silberfarbenen
Bolzen auf dem blauen Hebel in den Arm (ein Klick zeigt an, dass der Arm in aufgeklappter Stellung effektiv eingerastet ist).
4. Drücken Sie nacheinander die beiden blauen Knöpfe auf der Oberseite des Arms, um die Lenkgriffe zu lösen und in Position zu
bringen. (Ein Klick zeigt an, dass die Arretierung in aufgeklappter Stellung erfolgt ist).
3
Halten Sie die Hände unbedingt während des Aus- und Einklappens des Rollers an den in den Abbildungen gezeigten Stellen, bis der
Roller eingerastet ist.
1 2
Einklappen des e-Kick
Das Einklappen des e-Kick ist ebenso einfach wie das Ausklappen:
1. Drücken Sie die beiden blauen Knöpfe auf der Oberseite des vorderen Teils des Rollers , um die Lenkgriffe zu lösen und jeden Griff
einzuklappen.
2. Drücken Sie gleichzeitig die beiden Druckknöpfe auf der Unterseite des Vorderteils, um den blauen Hebel zu lösen.
3. Bewegen Sie den blauen Hebel nach vorne, um den Scharniermechanismus zu lösen und klappen Sie den Vorderteil ach gegen
das Trittbrett, bis die Lasche am hinteren Teil in das Bremspedal einrastet.
78
DE

Laden des Akkus und Anzeige des Ladestatus
Der Ladevorgang wird unten beschrieben:
1. Verbinden Sie das Ladegerät mit einer Netzsteckdose. Die Lampe auf dem Ladegerät sollte hellgrün leuchten.
2. Verbinden Sie nun den e-Kick mit dem Ladegerät. Sie können sehen, dass das Ladegerät und der Roller richtig verbunden sind,
wenn die Lampe auf dem Netzgerät rot wird (dies kann einige Sekunden dauern). Auch die LED-Leuchten am e-Kick zeigen den
Ladevorgang an, indem sie zweimal nacheinander aueuchten.
3. Wenn der e-Kick vollständig geladen ist, wechselt die Anzeige auf dem Ladegerät zurück auf grün.
Um den aktuellen Ladestatus zu sehen, schalten Sie den Roller durch Drehen des Hinterrades ein. Das Gleiche gilt für das Prüfen des
Ladestatus während des Ladevorgangs.
1 2 3
Prüfen des Akkuladestatus am e-Kick
Der Akkuladestatus wird direkt am e-Kick anhand der 4 LED-Leuchten angezeigt, die sich auf dem Trittbrett benden, siehe unten:
Die LED bieten Informationen dazu, wann der e-Kick „aktiv“ ist. Um den e-Kick zu aktivieren, drehen Sie einfach das Hinterrad.
Sie können auch Informationen zum Ladestatus (und der verbleibenden Reichweite) über Ihr Smartphone empfangen, indem Sie die
MyPeugeot-App aus dem App Store (iOS) oder Google Play Store herunterladen.
(*) Bedenken Sie, dass die Messung des Ladestatus von der Stromstärke abhängt. Unter Belastung während der Fahrt zeigt die
Anzeige einen geringeren Ladestatus an als im Stand.
4 LED leuchten auf =
75 - 100% Ladestatus
3 LED leuchten auf =
50 - 75% Ladestatus
2 LED leuchten auf =
25 - 50% Ladestatus
1 LED leuchtet auf =
0 - 25% Ladestatus
80
DE

Das „Motion-Control“-System
Dank des „Motion-Control“-Systems wird das Fahren mit deme-Kick zu einer unvergesslichen Erfahrung.
Einige kurze Information zur „Motion-Control“ nden Sie unten:
• „Motion-Control“ wird erst ab 5 km/h aktiv. Das bedeutet, dass der Fahrer allein mit Muskelkraft bis auf 5 km/h beschleunigen
muss, bevor die Unterstützung spürbar einsetzt.
• Je stärker und intensiver der Kick (Puls) ist, desto stärker und länger dauert die Motorunterstützung.
• Wenige kräftige Pedaltritte sind wirkungsvoller und efzienter als viele kleine Tritte.
Bitte beachten Sie, dass das Fahren mit elektrischer Unterstützung eine Gewöhnungsphase erfordert. Die Beschleunigung ist viel
größer als bei einer normalen Pedalbewegung. Diese ungewohnte Beschleunigung erfolgt unerwartet . Seien Sie beim ersten Fahren
besonders vorsichtig und lernen Sie gleichzeitig von Beginn an, wie Sie mit der Fußbremse richtig bremsen.
Wenn Sie keine Beschleunigung spüren, versuchen Sie, den Assistenten zu starten, indem Sie auf Sportmodus schalten und kräftiger
treten. Die Motion-Control bietet mehr Unterstützung bei höheren Geschwindigkeiten. Versuchen Sie, eine höhere Geschwindigkeit
zu erreichen, indem Sie kräftig treten. Sie spüren mehr Unterstützung.
Die drei Fahrprogramme
Der e-Kick verfügt über drei Fahrprogramme. Auf diese Weise können Sie die beste Fahrleistung erzielen und in einer großen
Bandbreite von Situationen die richtige Programmierung wählen, sowie auch die jeweiligen Gesetze einhalten.
Fahren Sie nur mit dem Roller, wenn ein Fahrprogramm eingestellt ist , mit dem Sie sich sicher fühlen, und das der entsprechenden
Gesetzgebung in Ihrem Land entspricht.
• Fahren Sie langsam, um sich an das neue Fahrgefühl zu gewöhnen, insbesondere bei der ersten Fahrt. Vergessen Sie nicht, dass
Sie bei einer höheren Geschwindigkeit auch einen längeren Bremsweg brauchen.
• Bitte beachten Sie auch, dass Sie je nach Land unterschiedliche Höchstgeschwindigkeiten und Einschränkungen bezüglich der
Maximalleistung von elektrisch unterstützten Fahrzeugen einhalten müssen. Sie sind dafür verantwortlich, diese Werte entsprechend zu beachten und einzuhalten.
• Das Einstellinstrument enthält starke Magneten. Achten Sie darauf, dass Einstellinstrument niemals in der Nähe von elektronischen Geräten wie Ihrem Mobiltelefon abzulegen oder in der Nähe von Kreditkarten, da diese beschädigt werden könnten.
STANDARD
ECO
SPORT
Fahrprogramm
ECO-Modus O 1 250 Watt 15 km/h
25 km/h
25 km/h
250 Watt
500 Watt
OO 2
OOO 3
STANDARD-
Modus
SPORT-Modus
Positionierung
im Kreis auf
dem Trittbrett
Anzahl der blinkenden
LEDs bei der Auswahl
des neuen Modus
Kraftleis-
tung
Maximale
Unterstützungsgeschwindigkeit
82
DE

STANDARDECO SPORT
Wechseln der Fahrprogramme
Das Wechseln der Programme ist sehr einfach und geht sehr schnell. Sie können die Einstellung entweder ändern, in dem Sie mehrfach auf die Bremse treten, oder das Einstellinstrument verwenden.
Ändern des Fahrprogramms mit dem Einstellinstrument
Das mitgelieferte Einstellinstrument wird hierfür benötigt.
Halten sie das Einstellinstrument in die runde Aussparung des Trittbretts. Das Instrument muss an dem kleinen, auf dem Instrument
eingravierten Pfeilsymbol ausgerichtet werden.
Sie können nun zwischen den drei Programmen wechseln, indem Sie das Einstellinstrument drehen und den Pfeil an den leeren
Kreisen ausrichten. Die LED-Anzeige zeigt das ausgewählte Fahrprogramm durch schwaches Blinken für zwei Sekunden an, danach
erfolgt ein starkes Blinken. Ein LED blinkt im Eco-Modus, zwei LEDs im Standardmodus und drei LEDs im Sportmodus.
Wechseln des Fahrprogramms durch Drücken der Bremse
Sie können das Fahrprogramm auch ohne das Einstellinstrument wechseln, sondern durch wiederholtes Betätigen des Bremspedals.
Durch viermaliges Betätigen der Bremse zeigen die LED-Leuchten im Trittbrett die aktuelle Einstellung an, indem für vier Sekunden die
entsprechende Anzahl von LEDs aueuchtet.
Wenn Sie beispielsweise in Einstellung 2 (Standardmodus) sind, blinken zwei LEDs, um anzuzeigen, dass sich Ihr Roller aktuell im
Standardmodus bendet.
Sie können nun die Einstellung ändern, indem Sie die Bremse erneut viermal betätigen. Jedes Mal, wenn Sie viermal auf die Bremse
tippen, schaltet Ihr Roller eine Einstellung nach oben.
Bitte beachten Sie, dass Sie die aufeinanderfolgenden Bremsbetätigungen innerhalb von vier Sekunden nacheinander ausführen
müssen, um die Einstellungen zu ändern.
Ein Beispiel:
-> 4malige Betätigung der Bremse -> 2 LEDs blinken Einstellung -> 2 (Standardmodus)
-> 4malige Betätigung der Bremse -> 3 LEDs blinken Einstellung -> 3 (Sportmodus)
-> 4malige Betätigung der Bremse -> 1 LEDs blinkt Einstellung -> 1 (Eco-Modus)
-> 4malige Betätigung der Bremse -> 2 LEDs blinken Einstellung -> 2 (Standardmodus)
Wenn Sie die Bremse nur dreimal hintereinander betätigen, schalten Sie damit die Motorunterstützung abund die LED-Leuchten werden schwächer (siehe unten: „Einschalten des Motors“)
84
DE

Bluetooth-Pairing Ihres Rollers
Sie können Ihren Roller mit Ihrem Smartphone verbinden (Pairing), indem Sie die im App Store (iOS) oder im Google Play Store verfüg-
bare MyPeugeot-App herunterladen.
Um den Roller dann mit Ihrem Smartphone zu verbinden, aktivieren Sie Bluetooth auf Ihrem Smartphone oder Tablett, laden die App
herunter und öffnen sie auf Ihrem Gerät.
Um das Pairing mit Ihrem Roller durchzuführen, betätigen Sie die Bremse viermal hintereinander (wie beim Ändern des Fahrprogramms). Der Roller schaltet in Pairing-Mode und sucht nach einem Bluetooth-Gerät für eine Verbindung. Der Roller bleibt 30 Sekunden lang im Pairing-Modus und sollte in der App auf Ihrem Gerät sichtbar sein. Sie können nun auf das Roller-Icon in der App klicken
und die App zeigt Ihnen an, ob das Pairing erfolgreich war.
e -Kick verwendet das Bluetooth Low Energy-Protokoll zur Kommunikation mit einem Smartphone.
Ausschalten des Motorassistenten
Die Motorunterstützung des e-Kick kann jederzeit abgeschaltet werden und das Fahrzeug kann dann als herkömmlicher Roller gefahren werden. Um die Unterstützung abzuschalten muss das Bremspedal kurz dreimal hintereinander betätigt werden. Sie können
erkennen, dass die Unterstützung abgeschaltet ist, wenn die LED-Anzeige schwächer wird.
Die Motorunterstützung bleibt nun abgeschaltet, bis die Bremse erneut dreimal nacheinander kurz betätigt wird.
Drücken Sie3-mal EIN: LED heller AUS: LED schwächer
86
DE

Wartung des Akku-Packs
Bitte beachten Sie die folgenden Pegehinweise, um eine lange Lebensdauer Ihres Akku-Packs zu garantieren:
• Lagern Sie den Akku stets bei Temperaturen zwischen 5° und 35° Celsius.
• Laden Sie den Akku unmittelbar nach dem Kauf vollständig auf.
• Laden Sie den Akku alle drei Monate, wenn Sie den Roller einlagern.
• Sie müssen den e-Kick innerhalb von drei Tagen auaden, wenn der Akku durch das Fahren des Rollers vollständig leergefahren
ist.
Jegliche Schäden durch Nichteinhalten der obengenannten Pegehinweise werden nicht von der Garantie abgedeckt.
Wartung
Wartung des Faltmechanismus
Ihre-Kick kann zusammengeklappt werden. Aufgrund der normalen Belastung können die Klappelemente etwas schwergängig sein
und es können Geräusche auftreten. Um sicherzustellen, dass Sie möglichst lange Freude an Ihrem Roller haben, zeigen wir Ihnen
hier, wie Sie diese störenden Geräusche praktisch entfernen und den Klappmechanismus mit wenigen einfachen Schritten reibungsloser durchführen können.
1. Bringen Sie Schmiermittel auf die beiden silberfarbigen Bolzen auf dem blauen Klapphebel auf und drücken Sie sie einige Male,
um das Schmiermittel zu verteilen.
2. Bringen Sie Schmiermittel auf die beiden blauen Druckknöpfe am Hauptklapppunkt auf und drücken Sie sie, um das Schmiermittel zu verteilen.
3. Bringen Sie in dem blauen Klapphebel Schmiermittel auf die Feder auf und heben Sie den blauen Klapphebel einige Male an, um
das Schmiermittel zu verteilen.
4. Bringen Sie in dem blauen Klapphebel Schmiermittel auf Mittelachse auf und heben Sie den blauen Klapphebel einige Male an,
um das Schmiermittel zu verteilen.
1
2
88
DE

Wartung der Griffe
Bringen Sie Schmiermittel in die Vertiefung im Drehbereich der Griffe ein und klappen Sie sie einige Mal ein und aus, um das Schmiermittel zu verteilen.
3
4
Technische Daten
Leichtgewicht 8,5 Kilogramm
Reichweite 10 - 15 Kilometer
Schnellladen 60 Minuten Wiederauadezeit
Geschwindigkeit 15 / 25 km/h
Leistungsstark 250 / 500 Watt Leistung
Bremsenergierückgewinnung
Dual-Core-Rad
Auto Ein/Aus
Wasserschutz
Jeder Bremsvorgang erzeugt Energie
weicher Kern / solide Hülle
Roller schaltet sich automatisch ein
100% spritzwassergeschützt
15km/h - 250W
3 Geschwindigkeitseinstellungen 25km/h - 250W
25km/h - 500W
Assistenzschalter
Tippen Sie die Bremse dreimal an, um den Assistenten ein- bzw.
auszuschalten
Eigenschaften
90
DE

Höhe des Lenkers
Rollerkarosse
950 mm
Aluminiumlegierung
Gesamtlänge
Vorderrad
760 mm
Dual-Core-Gummi
Abmessungen wenn zusammengelegt
Hinterrad
815 x 175 x 225 mm
Zweikomponenten: Motor / austauschbarer Reifen
Trittbrettlänge (verwendbarer Bereich)
Motor
370 mm
bürstenloser Gleichstrommotor
Trittbrettbreite (breiteste/schmalste Stelle)
Trittbrett
138 mm / 120 mm
Einteiliges Aluminium (1100 Gramm)
Breite des Lenkers
Griffband
380mm
Gummi
Abmessungen
Materialien
Warnung: Die installierten Akkus sind wiederauadbare Lithium-Ionen-Batterien. Laden Sie keine Batterien, die nicht für das Wiederauaden konstruiert sind.
Bitte beachten Sie , dass die Messung des Ladestatus vom Strom abhängt. Daher zeigt die Anzeige beim Laden während der Fahrt
immer einen niedrigeren Ladestatus als im Leerlauf.
Technologie Lithium-Ionen
Spannung 36 Volt
Kapazität
Zelltyp
Zelleneinrichtung
2,5 Ah (=90 Wattstunden = ugzeugkompatibel)
Lithium-Ionen-Zellen
10S1P (10 Zellen)
Ladezeit 60 Minuten
Lebensdauer
60% der ursprünglichen Kapazität nach einem Jahr (oder 1000
Ladezyklen)
Gewicht 700 Gramm
1 LED: 0 - 25% SOC
4 LED-Lampen im Trittbrett:
Anzeige des Ladestatus
4 LEDs: 75 - 100% SOC
3 LEDs: 50% - 75% SOC
2 LEDs: 25% - 50% SOC
Batterie
92
DE

Komponententeile
LED-Anzeige
Seitenständer
Faltbarer Lenker
Faltmechanismus
Fußbremse
Einstellinstrument
Mit dem e-Kicktragen Sie bereits zum Schutz der Umwelt bei. Denken Sie auch bei der Entsorgung an Ihre Umwelt und beachten Sie
die folgenden Anleitungen:
• Entsorgen Sie den e-Kick und die dazugehörigen Komponenten (z.B. Batterie) bei einem zugelassenen Entsorgungsunternehmen
oder über die kommunale Entsorgungsstelle.
• Beachten Sie die jeweils anwendbaren Bestimmungen. Im Zweifel befragen Sie Ihr Entsorgungsunternehmen nach einer umweltfreundlichen Entsorgung.
Anweisungen für die Entsorgung
Batterien und Elektrogeräte dürfen nicht mit dem Hausmüll entsorgt werden.
94
DE

Sie können die folgenden Garantiserviceleistungen von uns erwarten:
• 2 Jahre Garantie auf die Komponenten des e-Kick Rollers: Trittbrett, gesamter Vorderteil und Bremspedal. Alle Verschleißteile,
Kleinteile und Schrauben sind von der Garantie ausgeschlossen.
• 1 Jahr Garantie auf elektrische und elektromechanische Komponenten, d.h. den Motor und die Motorsteuerung.
• 1 Jahr Garantie auf die Batterie (60% der ursprünglichen Nennkapazität) oder 1000 vollständige Ladezyklen (jeweils der früher
eintretende Fall).
Umfang der Garantieleistungen
Aufgrund dieser Garantie erfüllt Micro während der jeweiligen Garantiezeit die folgenden Dienstleistungen:
Reparatur oder Ersatz durch gleichwertige Teile/Komponenten nach Ermessen der Firma Micro, wobei die Ersatzteile in Modell bzw.
Farbe vom Original abweichen können;
Dienstleistungen, die nicht unter die Garantie fallen und zu den Aufgaben des Händlers gehören sowie das Reinigen von in schmutzigem Zustand abgelieferten Rollern wird nach Standardstundensätzen zuzüglich aller entstehenden Kosten für Material und Transport
berechnet.
• Alle unter den Garantiebedingungen geleisteten Arbeiten (Reparaturen/Ersatz) verlängern nicht die ursprüngliche Garantiezeit.
• Außer den oben genannten gelten keine weiteren Ansprüche.
Garantie
Die Garantie schließt keine durch folgende Umstände entstandenen Schäden ein:
• Schäden in kausalem Zusammenhang mit einer nicht erfolgten oder zu späten Auadung des Akkupacks (siehe Wartung des
Akkupacks).
• Schäden aufgrund der Lagerung, Auadung oder Entladung des Rollers oder des Akkus in einem Bereich außerhalb der für die
Lagerung angegebenen Temperaturspanne.
• Unsachgemäße Verwendung, unangemessene Verwendung oder fahrlässige Handhabung (z.B. Sprünge).
• Unsachgemäße Änderungen durch Dritte (z.B. durch Öffnen des Trittbretts).
• Unsachgemäßes Auaden (z.B. durch Auaden mit einem anderen als dem mitgelieferten Ladegerät).
• Überschreiten der maximalen Geschwindigkeit von 40 km/h bei Fahrten bergab.
• Wenn ein Fahrzeug ohne Zustimmung des Herstellers technisch modiziert wurde.
• Spätere Umbauten/Installation von nicht kompatiblen oder nicht originalen Teilen.
• Verschleißteilen wie Kugellagern, Gleitlagern, Lagerbolzen und Lagerschrauben usw.
• Modikation des Rollers durch Teile/Komponenten Dritter.
• Nicht erfolgte Garantieinspektion innerhalb der vorgegebenen Frist.
• Schäden aufgrund von fehlenden oder fehlerhaften Einstellungen oder abgenutzter Komponenten.
• Folgen von Stürzen
96
DE

• Alle Personen- oder Sachschäden, die durch das Fahren des Rollers Dritten entstehen.
• Schäden aufgrund ungeeigneter Reinigungsmitteln und -geräte wie Hochdruckreinigern oder verwendeter Zusatzstoffe.
• Kommerzielle(s) Leasing/Vermietung
• Alle Servicearbeiten oder sonstigen Arbeiten, die aufgrund von Verschleiß, Unfall oder Betriebsbedingungen entstehen oder
durch das Fahren ohne Beachtung der Herstelleranweisungen.
• Schäden, die aufgrund der Fahrlässigkeit auf Seiten des Benutzers in Bezug auf Schutz vor Nässe entstehen (der e-Kick ist
spritzwasserfest aber nicht wasserdicht).
Salvatorische Klausel
Sollte eine Bestimmung dieser Garantie ungültig sein oder werden oder eine zu schließende Lücke enthalten, ist die Gültigkeit der
verbleibenden Bestimmungen dadurch nicht beeinträchtigt. Die fehlende oder ungültige Bestimmung wird durch eine Bestimmung
ersetzt, die der Absicht und dem Zweck der ursprünglichen Bestimmung so weit wie möglich entspricht.
Geltendes Recht und Gerichtsstand
Sollte ein Streitfall aufgrund dieser Garantie entstehen (auch im Hinblick auf ihre Existenz oder Gültigkeit), so wird als ausschließlicher
Gerichtsstand das Gericht des Kantons Zürich vereinbart. Dieser Kaufvertrag unterliegt Schweizer Recht unter Ausschluss des Kollisionsrechts sowie des Übereinkommens der Vereinten Nationen über Verträge über den internationalen Warenkauf (UN-Kaufrecht).
Herstellungs- und technische Dokumentation Micro Mobility Systems AG, Bahnhofstrasse 10, 8700 Küsnacht, Switzerland,
Geschäftsführer: Wim Ouboter
erklärt hiermit, dass der Elektro-Roller e-Kick die Bestimmungen der folgenden Richtlinien erfüllt:
• EU Spielzeugsicherheitsrichtlinie (2009/48/EG)
• EU Maschinenrichtlinie (2004/108/EG)
Küsnacht, Schweiz, im Juni 2016
Micro Mobility Systems AG
EU-Konformitätserklärung
e-Kick wurde die CE-Kennzeichnung zuerkannt wie unten dargestellt. Der Hersteller bestätigt, dass der e-Kick alle Anforderungen
für eine CE-Kennzeichnung erfüllt.
98
DE

NL
Index
INLEIDING
WAARSCHUWINGEN
AAN DE SLAG
VOOR EEN BLIJVEND RIJPLEZIER - DO'S EN DONT'S
GEBRUIK
Zijstandaard
Openklappen en opvouwen
De batterij laden en de laadstatus weergeven
Het "Motion Control"-systeem
De drie rijprogramma's
Rijprogramma's wijzigen
Bluetooth-koppeling van uw scooter
De motorische ondersteuning uitschakelen
ONDERHOUD
Onderhoud van de accu
Onderhoud van het klapmechanisme
Onderhoud van de snelklemhendel
Onderhoud van de drukknoppen
TECHNISCHE INFORMATIE
INSTRUCTIES VOOR VERWIJDERING
GARANTIE
EU-CONFORMITEITSVERKLARING
Pagina 101
Pagina 102
Pagina 105
Pagina 106
Pagina 107
Pagina 107
Pagina 108
Pagina 110
Pagina 112
Pagina 113
Pagina 114
Pagina 116
Pagina 117
Pagina 118
Pagina 118
Pagina 119
Pagina 119
Pagina 120
Pagina 121
Pagina 125
Pagina 126
Pagina 129
100

Inleiding Waarschuwing
We zijn blij u te mogen verwelkomen in de gemeenschap van e-Kick-gebruikers en zijn ervan overtuigd dat u zal genieten van de
meest innovatieve elektrische scooter ter wereld.
Deze handleiding licht de belangrijkste instructies toe. Deze verschaft tips over het onderhoud en gebruik van uw e-Kick en beschrijft
hoe u het voertuig correct hanteert voor een veilig en langdurig gebruik.
Alle gegevens zijn gebaseerd op de technische status op het moment van schrijven van deze handleiding. Alle wijzigingen en aanvullingen die ondertussen zijn aangebracht, zijn niet opgenomen in deze versie. De laatste versie van de handleiding kan online worden
gevonden op www.micro.ms.
Ons wereldwijde dealernetwerk staat voor u klaar om u te helpen met eventuele vragen of problemen. Neem contact op met uw
lokale dealer en wij zullen ons uiterste best doen om u zo snel en goed mogelijk te helpen.
• Merk op dat rijden met elektrische ondersteuning gewenning vergt. De acceleratie en dus de voorwaartse kracht is veel groter
dan met een normale trapbeweging. Bij onervaren gebruikers kan deze onbekende acceleratie ertoe leiden dat het voorwiel van
de grond komt, waardoor u kunt vallen. Begin voorzichtig en zorg ervoor dat u altijd wat speelruimte hebt. Buig nooit achterover
terwijl u rijdt.
• Naast het normale remvermogen als gevolg van wrijving, wordt de e-Kick ook afgeremd met een elektrische motorrem wanneer
u de voetrem intrapt. Dit verbetert de remprestaties aanzienlijk en resulteert in een kortere remweg. Maar wees u ervan bewust
dat de motorrem niet ondersteund wordt als:
- De batterij is ontladen en u alleen op spierkracht rijdt.
- De batterij 100% opgeladen is en er dus geen energie kan worden geregenereerd.
- De aanvullende remprestatie van de motorrem is enorm en verkort de remweg aanzienlijk. Houd dit altijd in gedachten,
vooral als de aanvullende remprestatie niet beschikbaar is in de bovengenoemde situaties.
• Gebruik altijd de rem van het achterwiel om te vertragen en te stoppen. Rem nooit door de zolen van de voeten op de grond te
schuren! Dit activeert de "Motion Control" systeem en u zal niet stoppen. Dat is als proberen te rijden met een auto en het gaspedaal en rempedaal op hetzelfde moment in te trappen.
• Leef steeds de toepasselijke nationale wetten en regelgeving na met betrekking tot het wegverkeer en de voertuigklasse wanneer
u de e-Kick gebruikt. U moet inlichtingen inwinnen over de wet en regelgeving in uw land, omdat wetgeving kan verschillen van
land tot land. Niet-naleving van de richtlijnen is op eigen risico en zonder aansprakelijkheid van de fabrikant.
• Merk in het bijzonder op dat:
- de e-Kick niet goedgekeurd is voor algemeen gebruik op de openbare weg
- Elektrische assistentie (zie "Motion Control"-systeem) niet op de stoep kan worden gebruikt
- Zulk gebruik is niet alleen gevaarlijk voor u en anderen maar ook illegaal in vele landen.
102
NL

• Rijd alleen op droge, schone en gladde oppervlakken. Rijden op nat wegdek kan erg gevaarlijk zijn en moet worden vermeden.
• Omwille van de veiligheid, raden we aan om niet te rijden in het donker.
• Draag altijd beschermende uitrusting, met name een helm die u beschermt tegen verwondingen aan het hoofd.
• Draag altijd schoenen wanneer u de e-Kick gebruikt.
• De e-Kick is ontworpen voor het vervoer van één persoon tot een maximaal gewicht van 100 kg en mag alleen worden gebruikt
voor dit doel. Het negeren van deze instructies wordt beschouwd als oneigenlijk gebruik en is uitsluitend op risico van de gebruiker.
• Alle ingrepen om de prestaties of snelheid te verhogen en, in het algemeen, de kenmerken van de e-Kick te wijzigen, zijn strafbaar
en zullen wettelijk worden vervolgd. Deze zullen de garantie ongeldig maken.
• Wees voorzichtig op steile afdalingen! De remprestatie is onvoldoende om veilig te rijden op steile afdalingen.
• De rem wordt heet bij continu gebruik. Raak de rem niet aan na het remmen.
• Controleer voor elke rit of de stuurinrichting, correct is aangepast en of alle componenten stevig verbonden en niet gebroken zijn.
• In de regen of na het reinigen van het voertuig kan de remwerking worden vertraagd als gevolg van vocht. Bijgevolg moeten de
remmen "droog geremd" worden op een veilig privéterrein nadat de e-Kick is gereinigd.
• Parkeer of bewaar de e-Kick niet in bewoonde ruimten en/of in de buurt van licht ontvlambare objecten.
• Laad de batterij alleen op met de bijgeleverde lader en alleen bij temperaturen tussen 5 en 35° Celsius.
• Laad de batterij nooit onbeheerd op.
• De batterij mag alleen worden opgeladen als de stekker correct is ingestoken en er voldoende ventilatie en een droge omgeving
beschikbaar is.
• Breng nooit de lader, de stroomtoevoer en de kabels in aanraking met water bij gevaar voor een elektrische schok. Niet aanraken
met vochtige handen.
• Controleer de stekker en lader op gezette tijden. Als er schade is, moet u deze laten vervangen om verwondingen en schade aan
eigendommen te voorkomen.
• Gebruik alleen de bijgeleverde of geïntegreerde batterij of originele reserveonderdelen.
• Rijd nooit met de e-Kick zonder aangesloten batterij, omdat alle elektronica hierdoor vernield kunnen raken.
• Voer zelf geen reparaties uit aan de batterij of lader.
• Bewaar de batterij bij temperaturen tussen 5°en 35° Celsius.
• De e-Kick is geen speelgoed. Het is niet ontworpen voor het gewicht van kinderen. Wij adviseren een minimumleeftijd van 18
jaar.
• Veiligheid van kinderen en kwetsbare personen:
- Kinderen ouder dan 16 jaar en personen met beperkte fysieke, zintuiglijke of geestelijke mogelijkheden of zonder ervaring
en/of expertise mogen dit apparaat alleen gebruiken wanneer zij onder toezicht staan van een persoon die instaat voor hun
veiligheid of als ze opgeleid zijn in het veilige gebruik van het apparaat en de risico's die samenhangen met het apparaat.
- Kinderen mogen niet spelen met de eenheid.
- Kinderen mogen de eenheid niet onderhouden of reinigen zonder begeleiding.
- Houd alle verpakkingsmateriaal buiten het bereik van kinderen.
NL
104

• BATTERIJ: de batterij is slechts gedeeltelijk opgeladen wanneer de e-Kick wordt geleverd. Voorafgaand aan het eerste gebruik,
moet de batterij volledig opgeladen worden met de bijgeleverde lader.
• UITKLAPPEN: bekijk de illustraties op de verpakking om te leren hoe u de e-Kick uitklapt.
• Het wordt volledig gebruiksklaar geleverd door de fabrikant. Aangezien er tijdens het transport of periodes waarin het voertuig
stilstaat mogelijk storingen kunnen optreden die de werking van het voertuig kunnen belemmeren, dient u altijd aandacht te
besteden aan de volgende punten vóór het eerste gebruik, evenals vóór iedere trip:
- REM: controleer of de rem goed werkt. U moet in het bijzonder weten of de elektronische remassistentie (motorrem) is
ingeschakeld wanneer u vertrekt, omdat dat een groot verschil in remkracht oplevert (zie het hoofdstuk Waarschuwing).
- ALGEMENE TOESTAND: controleer voor iedere trip de e-Kick om er zeker van te zijn dat alle schroeven aangehaald zijn
en dat er geen losse onderdelen zijn.
- KLAPMECHANISME: controleer voor iedere trip of de blauwe hendel correct is vastgeklikt
- ZIJSTANDAARD: de zijstandaard is correct onder het voetbord geklapt.
- BATTERIJLAADSTATUS: controleer de laadstatus van de batterij door middel van het leddisplay op het voetbord.
U moet de e-Kick binnen drie dagen opladen als de batterij helemaal leeg is door met de scooter te rijden. Een verkeerde behandeling
maakt de garantie nietig.
Bescherm de e-Kick tegen onnodige schade en zorg voor een langdurig rijplezier:
• Laad onmiddellijk na uw aankoop de batterij volledig op.
• Laad de batterij om de drie maanden op wanneer u de scooter niet gebruikt.
• U moet de e-Kick binnen drie dagen opladen als de batterij helemaal leeg is door met de scooter te rijden. Een verkeerde behandeling maakt de garantie nietig.
• Batterijen zijn gevoelig voor temperaturen. Parkeer uw scooter niet in direct zonlicht of in een zeer koude omgeving. Bewaar de
e-Kick bij temperaturen tussen 5°C en 35°C.
• Spring niet met de scooter omdat dat leidt tot overbelasting en uiteindelijk schade aan de scooter die niet wordt gedekt door de
garantie.
• Vermijd gaten in het wegdek en rijd in een gepaste hoek over stoepranden en andere obstakels.
• De e-Kick is spatbestendig en incidenteel rijden op vochtige ondergronden brengt geen schade toe aan de elektronica. U moet
echter elk contact met water vermijden.
• Voer zelf geen reparaties uit. Neem altijd contact op met uw servicecentrum. De garantie vervalt automatisch wanneer het
voetbord is opengemaakt. In afzonderlijke gevallen staat Micro toe dat het voetbord wordt geopend onder bepaalde voorwaarden en in overleg met de klant.
• De e-Kick 'tunen' is verboden. Dat brengt uw persoonlijke veiligheid en het veilige gebruik in het gedrang en verlaagt de levensduur van uw voertuig. Dit zal ook de garantie ongeldig maken.
Aan de slag Voor een blijvend rijplezier - Do's en Dont's
NL
106

De zijstandaard gebruiken
De e-Kick heeft een zijstandaard. Deze bevindt zich onder het voetbord naast het klapmechanisme.
Vouw de standaard altijd vooruit zodat deze, indien nodig, opnieuw kan worden neergeklapt met de tenen.
Gebruik
Houd beide handen altijd op de afgebeelde posities tijdens het open- en dichtklappen tot de scooter is vergrendeld.
2 3 41
De e-Kick openklappen
Uw e-Kick wordt ingeklapt geleverd. In een paar simpele stappen is deze uitgeklapt en klaar om te rijden. Hieronder wordt beschreven hoe de e-Kick wordt uitgeklapt:
1. Druk op het achterste rempedaal om het vergrendellipje te ontgrendelen.
2. Draai de blauwe hendel naar voren om het klapmechanisme los te maken en de arm open te klappen.
3. Til de arm naar de verticale positie om het scharniermechanisme te vergrendelen. Klik de twee zilveren bouten op de blauwe
hendel in de arm (wanneer u een klik hoort, is de arm in de uitgeklapte positie vergrendeld)
4. Druk achtereenvolgens op de twee blauwe knoppen aan de bovenkant van de arm om de handgrepen gereed te maken. (wanneer
u een klik hoort, is deze in de open positie vergrendeld)
NL
108

3
Houd beide handen altijd op de afgebeelde posities tijdens het open- en dichtklappen tot de scooter is vergrendeld.
1 2
De batterij laden en de laadstatus weergeven
Het laadproces wordt hieronder beschreven:
1. Sluit de lader aan een stopcontact. De lamp op de lader moet groen oplichten.
2. Sluit nu de e-Kick aan op de lader. U kunt zien dat de lader en scooter correct zijn aangesloten als de lamp op de voedingseenheid rood oplicht (dit kan enkele seconden duren). Ook de ledlampen op de e-Kick geven het opladen aan door tweemaal te
knipperen.
3. Wanneer de
e-Kick volledig is opgeladen, verandert de weergave van de lader terug naar groen.
Schakel de scooter in door aan het achterwiel te draaien om de huidige laadstatus te zien. Hetzelfde geldt om te de laadstatus tijdens
het laadproces te controleren.
1 2 3
De e-Kick inklappen
De
e-Kick inklappen is net zo eenvoudig als deze openklappen:
1. Druk op de twee blauwe knoppen aan de bovenkant van het voorste gedeelte van de scooter om de handgrepen te lossen en
iedere handgreep in te klappen.
2. Druk tegelijkertijd op de twee blauwe drukknoppen aan de onderkant van het voorste gedeelte om de blauwe hendel los te
zetten.
3. Draai de blauwe hendel om het scharniermechanisme los te zetten en klap het voorste gedeelte tegen het voetbord tot het lipje
achteraan in het rempedaal klikt.
NL
110

Het "Motion Control"-systeem
Het "Motion Control"- systeem maakt rijden met de e-Kick tot een onvergetelijke ervaring.
Hieronder vindt u wat korte informatie over de "Motion Control":
• "Motion Control" wordt pas actief vanaf ongeveer 5 km/u. Dat betekent dat de bestuurder alleen spierkracht moet gebruiken om
te versnellen tot 5 km/u voordat de initiële ondersteuning kan worden opgemerkt.
• Hoe sterker en intensiever de trapbeweging (puls), hoe sterker en langduriger de ondersteuning van de motor.
• Een paar krachtige trappen zijn economischer en efciënter dan vele kleine.
Merk op dat rijden met elektrische ondersteuning gewenning vergt. De acceleratie is veel groter dan met een normale trapbeweging.
Deze onbekende acceleratie komt onverwachts. Wanneer u voor de eerste maal rijdt, moet u uiterst voorzichtig zijn. U moet immers
leren hoe u correct remt met de voetrem.
Als u geen enkele acceleratie voelt, probeer dan de assistentie te activeren door naar de sportmodus te schakelen en krachtiger te
trappen. De bewegingscontrole biedt meer ondersteuning bij hogere snelheden. Probeer tot een hogere snelheid te komen door
krachtig te trappen en u zal meer ondersteuning gewaarworden.
Controleer het niveau van de batterijen van de e-Kick
De status van de batterijlading wordt rechtstreeks op de e-Kick aangegeven door de 4 leds op de voetstandaard, zoals hieronder:
De leds geven informatie wanneer de e-Kick "wakker" is. Om de e-Kick in te schakelen, volstaat het om aan het achterwiel te draaien.
U kunt ook informatie krijgen over de laadstatus (en het resterende bereik) op uw smartphone door de MyPeugeot-applicatie te downloaden op de App Store (iOS) en de Google Play Store.
(*)Vergeet niet dat de meting van het laadniveau afhangt van de huidige intensiteit. Onder belasting tijdens het rijden toont het display
een lager laadniveau dan bij stilstand.
4 leds branden =
75 - 100% lading
3 leds branden =
50 - 75 % lading
2 leds branden =
25 - 50% lading
1 leds branden =
0 - 25% lading
NL
112

De drie rijprogramma's
De e-Kick heeft drie rijprogramma's. Dit maakt optimale rijprestaties en een correcte programmering mogelijk in uiteenlopende
situaties en in overeenstemming met de toepasselijke wetgeving.
Rijd alleen met de scooter met het rijprogramma waarmee u zich veilig voelt en dat voldoet aan de relevante wetgeving programma
in uw land.
• Rijd langzaam zodat u gewend raakt aan het nieuwe rijgevoel, vooral wanneer u voor de eerste maal rijdt. Vergeet niet dat een
hogere snelheid ook een langere remweg vereist.
• Merk ook op dat, afhankelijk van het land, er verschillende maximumsnelheden en beperkingen gelden m.b.t. de maximale kracht
van elektrisch ondersteunde voertuigen. Het is uw verantwoordelijkheid om u bewust te zijn van deze waarden en ze te volgen.
• Het instelgereedschap bevat krachtige magneten. Houd het instelgereedschap nooit dicht bij elektronische apparaten zoals uw
mobiele telefoon of kredietkaarten, want die kunnen beschadigd raken.
STANDAARD
ECO
SPORT
Rijprogramma
ECO-modus O 1 250 Watt 15 km/u
25 km/u
25 km/u
250 Watt
500 Watt
OO 2
OOO 3
STANDAARD-mo-
dus
SPORT-modus
Plaats deze in
de cirkel op het
voetbord
Aantal knipperende
leds bij het instellen
van de nieuwe modus
Kracht
Maximale
ondersteu-
ningssnelheid
STANDAARDECO SPORT
Het rijprogramma wijzigen
Het programma wijzigen is erg eenvoudig en neemt nauwelijks tijd in beslag. U kunt de instelling wijzigen door de rem meermaals in
te drukken of met het instelgereedschap.
Het rijprogramma wijzigen met het instelgereedschap
U hebt hiervoor het bijgeleverde instelgereedschap nodig.
Houd het instelgereedschap op de ronde uitsparing op het voetbord. Het gereedschap moet worden afgestemd op de kleine pijl die
op het instelgereedschap is gegraveerd.
Nu kunt u schakelen tussen de drie programma's door het instelgereedschap te draaien en de pijl uit te lijnen met de lege cirkels. Het
leddisplay toont welk rijprogramma is ingesteld door zwak te knipperen gedurende twee seconden, gevolgd door fel te knipperen. Eén
led knippert in ecomodus, twee leds knipperen in standaardmodus en drie leds in sportmodus.
NL
114

Rijprogramma wijzigen met de rem
U kunt ook het rijprogramma wijzigen zonder het instelgereedschap, maar door meerdere keren op het rempedaal te duwen.
Door vier maal op de rem te duwen, geven de ledlampen in het voetbord de huidige instelling aan door het overeenkomstige aantal
leds gedurende vier seconden te knipperen.
Als u zich bijv. in instelling 2 (standaardmodus) bevindt, dan gaan er twee leds knipperen om aan te geven dat uw scooter zich in de
standaardmodus bevindt.
Nu kunt u de instelling wijzigen door nogmaals vier keer op de rem te duwen. Telkens als u vier keer op de rem tikt, gaat uw scooter
één instelling omhoog.
Merk op dat u de rem meermaals moet indrukken binnen vier seconden nadat u de rem hebt ingedrukt om de instellingen te wijzigen.
Bijv.:
-> 4 keer op de rem duwen -> 2 leds knipperen -> 2 (standaardmodus)
-> 4 keer op de rem duwen -> 3 leds knipperen -> 3 (sportmodus)
-> 4 keer op de rem duwen -> 1 led knippert -> 1 (ecomodus)
-> 4 keer op de rem duwen -> 2 leds knipperen -> 2 (standaardmodus)
Door slechts 3 keer op de rem te drukken, wordt de motorondersteuning uitgeschakeld
en gaan de ledlampjes zwakker branden (zie hieronder: "De motor uitschakelen")
Bluetooth-koppeling van uw scooter
U kunt uw scooter met uw smartphone koppelen nadat u de MyPeugeot-applicatie hebt gedownload op de App Store (iOS) en Google
Play Store.
Om de scooter te verbinden met uw smartphone, moet u Bluetooth inschakelen op uw smartphone of tablet en de applicatie downloaden en openen op uw apparaat.
Om uw scooter te koppelen, drukt u vier keer op de rem (net alsof u het rijprogramma wilt wijzigen). De scooter gaat in koppelmodus
en zoekt naar Bluetooth-apparaten. De scooter blijft gedurende 30 seconden in koppelmodus en moet zichtbaar worden in de applicatie op uw apparaat. U kunt nu op het scooterpictogram in de applicatie klikken en de app zal aangeven of de koppeling is geslaagd.
e -Kick gebruikt het Bluetooth Low Energy-protocol om met een smartphone te communiceren.
NL
116

De motorische ondersteuning uitschakelen
De motorische ondersteuning van de e-Kick kan worden uitgeschakeld om het voertuig te gebruiken als een conventionele scooter.
Druk het rempedaal drie maal kortstondig in om de ondersteuning uit te schakelen. U kunt zien dat de ondersteuning is uitgeschakeld
doordat de led zwakker gaat branden.
De motorische ondersteuning blijft nu uitgeschakeld tot de rem opnieuw kortstondig drie keer wordt ingedrukt.
Druk 3 keer AAN: led feller UIT: led zwakker
Onderhoud van de accu
Neem de volgende instructies in acht voor een lange levensduur van uw accu:
• Bewaar de batterij te allen tijde tussen 5° en 35° Celsius.
• Laad onmiddellijk na uw aankoop de batterij volledig op.
• Laad de batterij om de drie maanden op wanneer u de scooter niet gebruikt.
• U moet de e-Kick binnen drie dagen opladen als de batterij helemaal leeg is door met de scooter te rijden.
Alle schade veroorzaakt door niet-naleving van de instructies zal niet worden gedekt door de garantie.
ONDERHOUD
NL
118

Onderhoud van het klapmechanisme
Uw e-Kick kan worden ingeklapt. Vanwege de gebruikelijke belasting kunnen wat hardheid en geluiden optreden aan de inklappende
onderdelen. Om zo lang mogelijk te kunnen genieten van uw scooter, tonen we u hier in enkele stappen hoe u storend lawaai praktisch kunt vermijden en het klapmechanisme zo vlot mogelijk kunt gebruiken:
1. Breng op de blauwe hendel smeermiddel aan op de twee zilveren bouten en druk ze een paar keer in om het smeermiddel te
verspreiden.
2. Breng op de belangrijkste klaplijn smeermiddel aan op de twee blauwe drukknoppen en druk deze in om het smeermiddel te
verspreiden.
Onderhoud van de handgrepen
Breng smeermiddel aan in de groef van het roterende deel van de handgrepen en klap deze enkele keren in en uit om het smeermiddel
te verspreiden.
3. Breng in de blauwe hendel smeermiddel aan op de veer en breng de blauwe hendel enkele keren omhoog om het smeermiddel
te verspreiden.
4. Breng in de blauwe hendel smeermiddel aan op de middelste as en breng de blauwe hendel enkele keren omhoog om het smeer-
middel te verspreiden.
1
2
3
4
NL
120

Technische informatie
Lichtgewicht Hoogte stuurstang
Scooterromp
8,5 kg 950 mm
Aluminiumlegering
Bereik Totale lengte
Voorwiel
10 - 15 kilometer 760 mm
Rubber met dubbele kern
Snel laden Afmetingen ingeklapt
Achterwiel
60 minuten opladen 815 x 175 x 225 mm
2 onderdelen: motor/ vervangbare band
Snelheid Lengte voetbord (bruikbare oppervlakte)
Motor
15/ 25 km/u 370 mm
Borstelloze gelijkstroommotor
Krachtig Breedte voetbord (breedst/smalst)
Voetbord
250/ 500 watt stroom 138 mm/ 120 mm
Aluminium uit één stuk (1100 gram)
Recuperatieremmen Breedte stuurstang
Griptape
Wiel met dubbele kern
Automatisch aan/uit
Waterdichtheid
Iedere remactie genereert energie 380mm
Rubber
Zachte kern / vaste schaal
Scooter schakelt automatisch in
100% spatdicht
15km/u - 250 W
3 snelheidsstanden 25km/u - 250 W
25km/u - 500W
Assistentieschakelaar Duw 3 keer op de rem om de assistentie in of uit te schakelen
Kenmerken Afmetingen
Materialen
NL
122

Waarschuwing: de geïnstalleerde batterijen zijn oplaadbare lithium-ionbatterijen. Laad nooit batterijen die niet geschikt zijn om opgeladen te worden.
Merk op dat de meting van de laadstatus van de stroom afhangt. Bijgevolg toont het display onder belasting tijdens het rijden altijd
een lagere laadstatus dan in stilstand.
Technologie Lithium-ion
Spanning 36 Volt
Capaciteit
Celtype
Celuitvoering
2,5 Ah (= 90 Wattuur = vliegtuigcompatibel)
Lithium-ioncellen
10S1P (10 cellen)
Laadtijd 60 minuten
Levensduur
60% van de oorspronkelijke capaciteit na 1 jaar (of 1000 laadcy-
cli)
Gewicht 700 gram
1 led: 0 - 25% SOC
4 ledlampen in het voetbord:
Weergave van laadstatus
4 leds: 75 - 100% SOC
3 leds: 50% - 75% SOC
2 leds: 25% - 50% SOC
Batterij
Componenten
Led-display
Zijstandaard
Inklapbare handgrepen
Klapmechanisme
Voetrem
Instelgereedschap
NL
124

U draagt reeds bij tot de bescherming van het milieu met de e-Kick. Besteed ook aandacht aan het milieu bij verwijdering en neem
de volgende instructies in acht:
• Verwijder de e-Kick en bijbehorende onderdelen (bijv. batterij) alleen bij een erkend afvalverwerkingsbedrijf of via de gemeentelijke afvaldiensten.
• Neem de thans van toepassing zijnde regelgeving in acht. Vraag in geval van twijfel raad aan uw afvalverwerkingsbedrijf m.b.t.
milieuvriendelijke verwijdering.
Instructies voor verwijdering
Batterijen en elektrische apparaten mogen niet met het huishoudelijk afval worden weggegooid.
U kunt de volgende garantie verwachten van ons:
• 2 jaar garantie op de e-Kick-scooteronderdelen: voetbord, volledig voorstel en rempedaal. Uitgesloten van de garantie zijn alle
slijtstukken, kleine onderdelen en schroeven.
• 1 jaar garantie op elektrische en elektromechanische componenten, namelijk de motor en motorcontroller.
• 1 jaar garantie op de batterij (60% van de oorspronkelijke nominale capaciteit) of 1000 volledige laadcycli (wat het eerst wordt
bereikt).
Reikwijdte van de garantie
Op basis van deze garantie verbindt Micro zich ertoe om de volgende diensten aan te bieden tijdens de respectieve garantietermijnen:
De reparatie of vervanging door gelijkwaardige onderdelen/componenten naar goeddunken van Micro, waarbij de vervanging kan
afwijken van het origineel qua model en/of kleur;
Diensten die niet onder garantie vallen en tot de bevoegdheid van de dealer behoren evenals de reiniging van scooters geleverd in een
vuile toestand zullen gefactureerd worden aan het standaard uurtarief met alle voortvloeiende kosten voor materiaal en transport;
• Alle geleverde diensten onder garantie (reparatie/vervanging) verlengen de oorspronkelijke garantie niet.
• Alle andere vorderingen dan de bovengenoemde zijn niet van toepassing.
Garantie
NL
126

De garantie dekt geen schade veroorzaakt door:
• Schade in causaal verband met onbestaand of niet tijdig opladen van de batterij (zie onderhoud van batterij)
• Schade als gevolg van opslag, opladen of ontladen van de scooter of batterij buiten het gespeciceerde temperatuurbereik voor
opslag
• Onjuist gebruik, onjuiste toepassing of nalatig gebruik (bijvoorbeeld sprongen).
• Onjuist wijziging door derden (bijv. openen van het voetbord).
• Onjuist opladen (bijv. door opladen met een andere dan de bijgeleverde lader).
• Overschrijding van de maximumsnelheid van 40 km/u bergaf.
• Als het voertuig technisch gewijzigd is zonder toestemming van de fabrikant.
• Latere conversie/installatie van niet-compatibele of niet-originele onderdelen.
• Slijtstukken als kogellagers, rollagers, lagerbouten en lagerschroeven, enz.
• Wijzigingen van de scooter met onderdelen/componenten van derden.
• Gebrek aan garantie-inspectie binnen een gepaste termijn.
• Schade ten gevolge van een ontbrekende of onjuiste instelling of versleten onderdelen.
• Gevolgen van vallen
• Alle persoonlijke of onpersoonlijke schade aan derden door met de scooter te rijden.
• Schade ten gevolge van ongeschikte reinigingsmiddelen, gereedschappen, zoals hogedrukreinigers of additieven.
• Commerciële leasing/verhuring
• Alle servicewerken of andere werken die voortvloeien uit slijtage, ongevallen of bedrijfscondities of rijden waarbij de instructies
van de fabrikant worden genegeerd.
• Schade die voortvloeien uit nalatigheid van de gebruiker m.b.t. waterdichtheid (de e-Kick is spatbestendig maar niet waterdicht).
Scheidbaarheidsclausule
Indien een bepaling van deze garantie ongeldig is of wordt, of een leemte vertoont die gesloten moet worden, heeft dat geen invloed
op de effectiviteit van de overige bepalingen. De ontbrekende of ongeldige bepaling moet vervangen worden door een bepaling die
zo dicht mogelijk aanleunt bij het doel en opzet van de oorspronkelijke bepaling.
Toepasselijke wetgeving en bevoegdheid
In geval van geschillen die voortvloeien uit deze garantie (tevens m.b.t. de kwestie van diens bestaan of geldigheid), is alleen de kantonrechtbank van Zürich bevoegd. Deze aankoopovereenkomst is onderworpen aan het Zwitserse recht met uitsluiting van conictwetten evenals het verdrag van de Verenigde Naties betreffende internationale koopovereenkomsten van goederen (VN-koopverdrag).
NL
128

Productie- en technische documentatie: Micro Mobility Systems AG, Bahnhofstrasse 10, 8700 Küsnacht, Zwitserland, Managing
Director: Wim Ouboter
Verklaart hiermede dat de e-Kick elektrische scooter voldoet aan de bepalingen van de volgende richtlijnen:
• EU-Speelgoedveiligheidsrichtlijn (2009/48/EG)
• EU-Elektromagnetischecompatibiliteitsrichtlijn (2004/108/EG)
Küsnacht, Zwitserland in juni 2016
Micro Mobility Systems AG
EU-conformiteitsverklaring
De e-Kick mag het CE-label dragen zoals hieronder getoond. De fabrikant bevestigt dat de e-Kick voldoet aan alle ‘CE’-markeringsvereisten.
NL
130

ES
Índice
INTRODUCCIÓN
ADVERTENCIAS
GUÍA DE INICIO RÁPIDO
PARA UNA DIVERSIÓN SIN LÍMITES - LO QUE SE DEBE Y NO SE DEBE HACER
FUNCIONAMIENTO
Soporte lateral
Desplegado y plegado
Carga de la pila y visualización del estado de carga
El sistema «Motion Control»
Los tres programas
Cambiar los programas
Emparejamiento de su patinete por Bluetooth
Apagado de la asistencia del motor
MANTENIMIENTO
Mantenimiento del paquete de pilas
Mantenimiento del mecanismo de plegado
Mantenimiento de la palanca de sujeción rápida
Mantenimiento de los botones giratorios
INFORMACIÓN TÉCNICA
INSTRUCCIONES DE ELIMINACIÓN
GARANTÍA
DECLARACIÓN DE CONFORMIDAD UE
Página 133
Página 134
Página 138
Página 139
Página 140
Página 140
Página 141
Página 143
Página 145
Página 146
Página 147
Página 149
Página 150
Página 151
Página 151
Página 152
Página 152
Página 153
Página 154
Página 158
Página 159
Página 162
132

134
ES
Introducción Advertencia
Nos complace darle la bienvenida a la comunidad de patinetes e-Kick y estamos seguros de que disfrutará un montón del patinete
eléctrico más innovador del mundo.
En este manual de uso se explican las instrucciones más importantes. Ofrece consejos de uso y mantenimiento del patinete e-Kick
y explica cómo utilizar correctamente el vehículo para que sea seguro y dure mucho tiempo.
Toda esta información se basa en los conocimientos técnicos disponibles en la fecha de edición de este manual de uso. Por lo tanto,
esta versión no incorpora las modicaciones y los añadidos que se hayan producido desde entonces. Puede encontrar la versión más
reciente del manual de uso por Internet en www.micro.ms.
Nuestra red mundial de distribuidores le ayudará con mucho gusto a resolver cualquier pregunta o problema que tenga. Póngase en
contacto con su distribuidor local y haremos todo lo posible para darle una solución sencilla lo antes posible.
• Tenga en cuenta que se tarda un tiempo en habituarse a montar con asistencia eléctrica. La aceleración y, por lo tanto, la fuerza
de avance es mucho mayor que con el movimiento normal de darse impulso con el pie. En usuarios no experimentados, esta
aceleración inusual puede hacer que la rueda delantera se levante del suelo y provocar caídas. Empiece poco a poco y asegúrese
de disponer de cierto margen de maniobra. Nunca se doble hacia atrás cuando esté montado sobre el patinete.
• Además de la ecacia de la frenada normal debida a la fricción, al pisar el freno de pie se frena también el e-Kick con un freno
de motor eléctrico. Esto mejora mucho la ecacia de la frenada y acorta la distancia de frenado. Pero tenga en cuenta que el
freno del motor no funciona si:
- La pila se descarga y monta utilizando sólo la energía muscular.
- La pila está cargada al 100% y no se puede regenerar energía.
- La ecacia de frenada del freno del motor es muy fuerte y acorta considerablemente la distancia de frenado. Téngalo en
cuenta, sobre todo si no hay una ecacia de frenado adicional en las situaciones mencionadas más arriba.
• Utilice siempre la rueda de freno trasera para reducir la velocidad y parar. ¡No frene nunca arrastrando las suelas de los zapatos
por el suelo! Esto activa el sistema de «Motion Control» y no parará. Es como intentar conducir un coche pisando a la vez los
pedales del acelerador y del freno.
• Cumpla siempre la legislación nacional aplicable y los códigos de la circulación cuando utilice el e-Kick. Deberá informarse
sobre la legislación y la normativa nacional, puesto que pueden variar de un país a otro. El incumplimiento de las directivas es
responsabilidad exclusiva suya y el fabricante no se hace responsable.
• Tenga en cuenta en concreto que:
- El e-Kick no está aprobado para utilizarlo en vías públicas
- En las aceras no se puede utilizar la asistencia eléctrica (Véase el sistema «Motion Control»)

- Estos usos no solo son peligros para usted y los demás, sino que además son ilegales en muchos países.
• Monte solo sobre supercies secas, limpias y llanas. Montar en supercies húmedas puede ser muy peligroso, por lo que debe
evitarse.
• Por motivos de seguridad, recomendamos no montar a oscuras.
• Lleve siempre equipos de protección, sobre todo un casco adecuado para protegerse de lesiones en la cabeza.
• Siempre que utilice el e-Kick lleve calzado.
• El e-Kick está diseñado para transportar a una sola persona de hasta 100kg de peso como máximo y solamente deberá uti-
lizarse para este n. El incumplimiento de esta instrucción se considera un uso inadecuado y es responsabilidad exclusiva del
usuario.
• Cualquier intervención encaminada a aumentar el rendimiento o la velocidad y, en general, modicar las características del
e-Kick es punible y será perseguida por la ley. Además, anulará la garantía.
• ¡Tenga cuidado en las bajadas pronunciadas! No basta con frenar para garantizar un manejo seguro en bajadas rápidas y pronunciadas.
• El freno se calienta si se utiliza de forma prolongada. No toque el freno después de frenar.
• Siempre que monte en el patinete, asegúrese antes de que el sistema de la dirección está correctamente ajustado y que todas
las conexiones están rmemente sujetas y no están rotas.
• Cuando llueve o después de limpiar el patinete, la acción del freno puede verse retardada debido a la humedad. Por este motivo,
después de limpiar el e-Kick los frenos deben accionarse «frenando en seco» sobre un suelo seguro de una propiedad particular.
• No aparque ni guarde permanentemente el e-Kick en espacios de vivienda y/o cerca de objetos fácilmente inamables.
• Cargue la pila únicamente con el cargador suministrado y a temperaturas comprendidas entre 5º y 35º Celsius.
• No deje nunca la pila desatendida mientras se carga.
• Cuando cargue la pila, asegúrese de que el enchufe esté correctamente conectado, que la ventilación es adecuada y el ambiente
está seco.
• No deje nunca que el cargador, la red eléctrica ni los cables de conexión estén en contacto con agua, por el peligro de descarga
eléctrica que entraña. No toque el cargador con las manos húmedas.
• Compruebe periódicamente el enchufe de conexión y el cargador. Si hay algún daño, sustitúyalos para evitar lesiones y daños
al material.
• Utilice solamente la pila suministrada o integrada o piezas de recambio originales.
• No monte nunca en el e-Kick sin la pila conectada, ya que esto puede destruir toda la electrónica.
• No repare usted mismo la pila o el cargador.
• Guarde la pila a temperaturas comprendidas entre 5º y 35º Celsius en todo momento.
• El e-Kick no es un juguete. No está diseñado para el peso de los niños. Recomendamos una edad mínima de 18 años.
• Por la seguridad de los niños y otras personas vulnerables:
- Los niños mayores de 16 años y las personas con discapacidad física, sensorial o mental o a las que le falte experiencia
y/o conocimientos técnicos solo pueden utilizar este aparato bajo la supervisión de una persona responsable de su seguri
dad o si se les ha explicado la forma de usar el aparato con seguridad y comprenden los riesgos que entraña el patinete.
- Los niños no deben jugar con el patinete.
ES
136

• PILA: El e-Kick se suministra con la pila parcialmente cargada. Antes de utilizar la pila por primera vez, cárguela por completo
con el cargador suministrado.
• DESPLEGAR: Observe las ilustraciones del embalaje para saber cómo desplegar el e-Kick.
• El fabricante suministra el vehículo listo para usar. Como pueden producirse fallos que impidan el funcionamiento del vehículo
durante el transporte o durante periodos de inactividad, le rogamos que preste siempre atención a los siguientes aspectos antes
de utilizar el patinete por primera vez, así como antes de cada uso:
- FRENO: Compruebe que el freno funciona correctamente. Concretamente, debe saber si está arrancando con o sin la
asistencia electrónica del frenado (freno de motor), ya que la potencia de frenado cambia mucho (véase el capítulo de
Advertencia).
- ESTADO GENERAL: Antes de cada uso, compruebe el e-Kick para asegurarse de que todos los tornillos estén apretados y
no haya componentes sueltos.
- MECANISMO DE PLEGADO: Antes de cada uso, compruebe que la palanca azul esté enganchada en la posición correcta.
- SOPORTE LATERAL: El soporte lateral está correctamente plegado bajo la base.
- ESTADO DE CARGA DE LA PILA: Compruebe el estado de carga de la pila en la pantalla LED de la base.
Cuando se agote por completo la pila por usar el patinete , debe recargar el e-Kick antes de tres días. ¡Si no lo cuida adecuadamente,
se anulará la garantía!
Guía de inicio rápido
- Los niños no pueden realizar el mantenimiento o la limpieza del patinete sin una supervisión adecuada.
- Guarde todo el material de embalaje fuera del alcance de los niños.
ES
138

Cómo proteger el e-Kick contra daños innecesarios para disfrutar de él durante mucho tiempo:
• Cargue completamente la pila inmediatamente después de comprar el patinete.
• Cuando guarde el patinete, cargue la pila cada tres meses.
• Cuando se agote por completo la pila por el uso del patinete, debe recargar el e-Kick antes de tres días. ¡Si no lo cuida adecuadamente, se anulará la garantía!
• Las pilas son sensibles a la temperatura. No aparque el patinete bajo la luz directa del sol ni en lugares demasiado fríos. Guarde
el
e-Kick a temperaturas comprendidas entre 5º y 35º Celsius en todo momento.
• No salte con el patinete ya que esto provoca una tensión excesiva y, al nal, puede dañar el patinete y este uso no está cubierto
por la garantía.
• Evite siempre los baches y monte con el ángulo adecuado sobre los bordillos y otros obstáculos.
• El e-Kick está hecho a prueba de salpicaduras de agua y su uso ocasional sobre suelos mojados no debería dañar la electrónica.
De todos modos, evite cualquier contacto con agua.
• No realice las reparaciones usted mismo. Diríjase siempre al centro de asistencia técnica más cercano. Si se abre la base, la
garantía se anulará automáticamente. En casos aislados, Micro permite la apertura de la base en determinadas circunstancias
tras comentárselo previamente al cliente.
• Está prohibido «tunear» el e-Kick, ya que esto puede ser perjudicial para su seguridad personal y para la seguridad de uso,
además de reducir la vida útil del vehículo. Tenga en cuenta que además anularía la garantía.
Para una diversión sin límites - Lo que se debe y
no se debe hacer
Utilización del soporte lateral
El e-Kick tiene un soporte lateral, que se encuentra bajo la base, junto al mecanismo de plegado.
Pliegue siempre el soporte hacia adelante para poder desplegarlo de nuevo con los dedos de los pies cuando sea necesario.
Funcionamiento
ES
140

Mantenga rigurosamente ambas manos en las posiciones mostradas en las ilustraciones en todo momento mientras pliega y despliega
el patinete hasta que éste esté bloqueado en su posición.
2 3 41
Desplegado del e-Kick
El e-Kick se suministra plegado. Se despliega y está listo para montar en él en unos pocos pasos sencillos. A continuación se explica
cómo desplegar el e-Kick:
1. Pise el pedal de freno trasero para liberar la pestaña de bloqueo.
2. Haga pivotar la palanca azul hacia delante para soltar el mecanismo de plegado y desplegar el brazo.
3. Levante el brazo para ponerlo en posición vertical con el n de bloquear el mecanismo de ar ticulación, encaje los dos pernos
plateados que se encuentran en la palanca azul dentro del brazo (un clic indica que el brazo se ha bloqueado correctamente en
la posición desplegada).
4. Empuje sucesivamente los dos botones azules que se encuentran en la parte superior del brazo para soltar y desplegar los lados
del manillar. (Un clic indica que se ha bloqueado correctamente en posición abierta.)
3
Mantenga rigurosamente ambas manos en las posiciones mostradas en las ilustraciones en todo momento mientras pliega y despliega
el patinete hasta que éste esté bloqueado en su posición.
1 2
Plegado del e-Kick
Plegar el e-Kick es tan sencillo como desplegarlo:
1. Pulse los dos botones azules que se encuentran en la parte superior delantera del patinete para soltar ambos lados del manillar
y plegarlos de nuevo.
2. Pulse simultáneamente los dos botones giratorios situados en la parte inferior delantera para soltar la palanca azul.
3. Haga pivotar la palanca azul hacia delante para soltar el mecanismo de bisagra y pliegue la parte delantera contra la base hasta
que la pestaña de atrás se enganche en el pedal de freno.
ES
142

Carga de la pila y visualización del estado de carga
A continuación se describe el proceso de carga:
1. Conecte el cargador a la toma de corriente. La lámpara del cargador debe mostrar una luz verde.
2. Ahora conecte el e-Kick al cargador. Puede ver que el cargador y el patinete están correctamente conectados cuando el piloto
de la fuente de alimentación se pone en rojo (puede tardar unos segundos). Además, las luces LED del e-Kick indican que se está
cargando cuando se iluminan dos veces seguidas.
3. Cuando el e-Kick está totalmente cargado, la pantalla del cargador vuelve a ponerse en verde.
Para ver el estado de carga actual, ponga en marcha el patinete girando la rueda trasera. Haga lo mismo para comprobar en qué
estado se encuentra el proceso de carga.
1 2 3
Comprobación del nivel de carga de la pila en el e-Kick
El estado de carga de la pila se indica directamente en el e-Kick mediante 4 luces LED ubicadas en la base, de la siguiente manera:
Los LED informan cuando el e-Kick está «despierto». Para «despertar» el e-Kick solamente tiene que girar la rueda trasera.
También puede recibir información sobre el estado de carga (y la autonomía restante) en su smartphone, para lo cual deberá descargarse la aplicación MyPeugeot disponible en el App Store (iOS) y Google Play Store.
(*)Recuerde que la medición del nivel de carga depende de la intensidad de la corriente. Con una persona montada encima mientras
está en marcha, la pantalla muestra un nivel de carga menor que en parado.
4 LED iluminados =
75 - 100% de carga
3 LED iluminados =
50 - 75% de carga
2 LED iluminados =
25 - 50% de carga
1 LED iluminados =
0 - 25% de carga
ES
144

El sistema «Motion Control»
Gracias al sistema «Motion Control», montar en el e-Kick se convierte en una experiencia inolvidable.
A continuación encontrará un breve resumen de cómo funciona el sistema «Motion Control»:
• El sistema «Motion Control» solamente se activa a partir de 5km/h aproximadamente. Esto signica que el usuario debe utilizar
solamente la energía muscular para acelerar hasta los 5km/h antes de que pueda notar la asistencia inicial.
• Cuanto más fuerte e intensamente dé las patadas (se impulse con el pie), más fuerte y duradera será la asistencia del motor.
• Resulta más económico y ecaz dar unas cuantas patadas fuertes que muchas patadas pequeñas.
Tenga en cuenta que se tarda un tiempo en habituarse a montar con asistencia eléctrica . La aceleración es mucho mayor que con el
movimiento normal de impulso con el pie. Esta aceleración —desconocida todavía— se produce de repente. Cuando monte por primera vez, tenga mucho cuidado. Es importante que aprenda cómo frenar correctamente con el freno de pie desde el principio.
Si no nota ninguna aceleración, trate de activar la asistencia pasando a modo Sport y dando patadas con más fuerza. El sistema
«Motion Control» ofrece más asistencia cuanto más alta es la velocidad. Trate de alcanzar una velocidad mayor dando patadas con
fuerza y notará más asistencia.
Los tres programas
El e-Kick tiene tres programas. Esto permite garantizar una ecacia óptima al montar y una programación adecuada en muy diver-
sas situaciones, así como la conformidad a la legislación aplicable.
Al montar en el patinete utilice solamente el programa con el que se sienta seguro y que cumpla la legislación relevante de su país.
• Monte despacio para acostumbrarse a la nueva sensación, sobre todo cuando lo haga por primera vez. No olvide que una velocidad más alta requiere también una distancia de frenado más larga.
• Tenga en cuenta además que, en cada país se aplican distintas velocidades máximas y restricciones en cuestión de potencia
máxima a los vehículos con asistencia eléctrica. Así pues, usted es el responsable de conocer estos valores y cumplirlos.
• La herramienta de ajuste contiene imanes fuertes. Tenga cuidado de no sujetar la herramienta de ajuste cerca de dispositivos
electrónicos, tales como su teléfono móvil, o cerca de tarjetas de crédito, ya que podrían dañarse.
ESTÁNDAR
ECO
SPORT
Programa
Modo ECO O 1 250Watt 15km/h
25km/h
25km/h
250Watt
500 Watt
OO 2
OOO 3
Modo ESTÁNDAR
Modo SPORT
Posición en el
círculo de la
base
Número de LEDs que
parpadean al congu-
rar el nuevo modo
Potencia de
fuerza
Velocidad
máxima con
asistencia
ES
146

ESTÁNDARECO SPORT
Cambiar el programa
Cambiar el programa es muy fácil y no se tarda nada. Puede cambiar de programa pisando el freno varias veces seguidas o con la
herramienta de ajuste.
Cambiar el programa con la herramienta de ajuste
Para esto es necesaria la herramienta de ajuste suministrada con el producto.
Mantenga pulsada la herramienta de ajuste en el hueco circular que está sobre base de los pies. La herramienta debe alinearse con
la cabeza de la echa pequeña que está grabada sobre la herramienta de ajuste.
Ahora puede cambiar entre tres programas girando la herramienta de ajuste y alineando la echa con los círculos vacíos. La pantalla
LED muestra cuál es el programa congurado con un parpadeo tenue durante dos segundos, seguido de un parpadeo brillante. Un
LED parpadea en modo Eco, dos LEDs parpadean en modo Estándar y tres LEDs parpadean en modo Sport.
Cambiar el programa pisando el freno
También puede cambiar el programa sin la herramienta de ajuste pisando el pedal de freno varias veces seguidas.
Pisando el freno cuatro veces, las luces LED de la base indican la conguración actual con un parpadeo del número correspondiente
de LEDs durante cuatro segundos.
Por ejemplo, si está en la posición 2 (modo estándar), parpadearán dos LEDs para indicar que el patinete está actualmente en modo
estándar.
Ya puede cambiar de posición pisando el freno cuatro veces seguidas de nuevo. Cada vez que presione suavemente cuatro veces el
freno, el patinete subirá una posición.
Nótese que debe pisar de nuevo el freno antes de que pasen cuatro segundos de la vez anterior para cambiar de posición.
Por ejemplo:
-> 4 pisadas del freno -> 2 LEDs parpadeando -> 2 (modo estándar)
-> 4 pisadas del freno -> 3 LEDs parpadeando -> 3 (modo sport)
-> 4 pisadas del freno -> 1 LED parpadeando -> 1 (modo eco)
-> 4 pisadas del freno -> 2 LEDs parpadeando -> 2 (modo estándar)
Pisando el freno solo 3 veces seguidas se apaga la asistencia del motor
y las luces LED se atenúan (véase más abajo: «Apagado del motor»).
ES
148

Emparejamiento de su patinete por Bluetooth
Puede emparejar su patinete con su smartphone descargándose la aplicación MyPeugeot disponible en el App Store (iOS) o en Google
Play Store.
Para conectar el patinete con su smartphone, active el Bluetooth en su smartphone o tableta, descárguese la aplicación y ábrala en
su dispositivo.
Para emparejar su patinete, pise el freno cuatro veces seguidas (igual que para cambiar el programa). El patinete pasa a modo emparejamiento y busca los dispositivos Bluetooth con los que se puede emparejar. El patinete permanece en modo emparejamiento
durante 30 segundos y deberá estar visible en la aplicación de su dispositivo. Una vez visible, puede hacer clic en el icono del patinete
en la aplicación y ésta indicará si el emparejamiento se ha realizado satisfactoriamente.
Ele -Kick utiliza el protocolo Bluetooth Low Energy para comunicarse con un smartphone.
Apagado de la asistencia del motor
La asistencia del motor del e-Kick puede apagarse en cualquier momento y puede usarlo como un patinete convencional. Para
apagar la asistencia, se debe pisar brevemente el pedal de freno tres veces seguidas. Puede comprobar que la asistencia está desactivada porque la pantalla LED se atenúa.
La asistencia del motor permanece ahora apagada hasta que pise brevemente el freno de nuevo tres veces seguidas.
Pisar 3 veces ENCENDIDO: LED más brillante APAGADO: LED más tenue
ES
150

Mantenimiento del paquete de pilas
Por favor, cuide la pila siguiendo estas instrucciones para prolongar su vida útil:
• Guarde la pila a temperaturas comprendidas entre 5º y 35ºCelsius en todo momento.
• Cargue completamente la pila inmediatamente después de comprar el patinete.
• Cuando guarde el patinete, cargue la pila cada tres meses.
• Cuando se agote por completo la pila por el uso del patinete, debe recargar el e-Kick antes de tres días.
Cualquier daño provocado por no cumplir estas instrucciones de mantenimiento no está cubierto por la garantía.
Mantenimiento
Mantenimiento del mecanismo de plegado
El e-Kick puede plegarse. Debido a la carga que soporta habitualmente, pueden aparecer algunas durezas y ruidos en las piezas por
las que se pliega el patinete. Con el n de asegurarse de disfrutar de su patinete el mayor tiempo posible, aquí le mostramos cómo
eliminar prácticamente estos ruidos molestos y mejorar la uidez del mecanismo de plegado en unos cuantos sencillos pasos:
1. Aplique lubricante sobre los dos pernos plateados que se encuentran en la palanca azul de plegado y apriételos un par de veces
para repartir el lubricante.
2. En el lugar principal de plegado, aplique lubricante en los dos botones pulsadores azules y empújelos para repartir el lubricante.
3. En la palanca azul de plegado, aplique lubricante en el muelle y levante un par de veces la palanca azul de plegado para
repartir el lubricante.
4. Dentro de la palanca azul de plegado, aplique lubricante en el eje central y levante un par de veces la palanca azul de plegado
para repartir el lubricante.
1
2
ES
152

Mantenimiento del manillar
Aplique lubricante en la ranura de la zona de rotación que hay a ambos lados del manillar, y pliéguelos/despliéguelos un par de veces
para repartir el lubricante.
3
4
Información técnica
Peso 8,5kilogramos
Autonomía 10 - 15kilómetros
Carga rápida 60minutos de recarga
Velocidad 15 / 25km/h
Potencia 250 / 500vatios
Recuperación del frenado
Rueda de doble núcleo
Encendido/apagado automático
Protección contra agua
Cada accionamiento del freno genera energía
Núcleo suave / revestimiento duro
El patinete se enciende automáticamente
100% protegido contra salpicaduras de agua
15km/h - 250W
3 posiciones de velocidad 25km/h - 250W
25km/h - 500W
Interruptor de asistencia
Pise suavemente el freno 3 veces para encender y apagar la
asistencia
Características
ES
154

Altura del manillar
Cuerpo del patinete
950mm
Aleación de aluminio
Longitud total
Rueda delantera
760mm
Goma de doble núcleo
Dimensiones plegado
Rueda trasera
815 x 175 x 225mm
2 componentes: motor / llanta reemplazable
Longitud de la base (supercie útil)
Motor
370mm
Motor CC sin escobillas
Anchura de la base (parte ancha/ parte estrecha)
Base
138mm / 120mm
Aluminio de una pieza (1100gramos)
Anchura del manillar
Cinta antideslizante
380mm
Goma
Dimensiones
Materiales
Advertencia: Las pilas instaladas son pilas recargables de ion-litio. No cambie nunca pilas que no sean recargables.
Tenga en cuenta que la medición del estado de carga depende de la corriente. Así pues, la pantalla muestra un estado de carga más
bajo con una persona montada encima que cuando está parado.
Tecnología Ion-litio
Tensión 36voltios
Capacidad
Tipo de pila
Conguración de la pila
2,5Ah (=90 vatios/hora = compatible para avión)
Pilas de ion-litio
10S1P (10 pilas)
Tiempo de carga 60minutos
Vida útil
60% de la capacidad original al cabo de un año (o 1000 ciclos de
carga)
Peso 700gramos
1 LED: 0 - 25% SOC
4 bombillas LED en la base:
Pantalla del estado de carga
4 LEDs: 75 - 100% SOC
3 LEDs: 50% - 75% SOC
2 LEDs: 25% - 50% SOC
Pila
ES
156

Piezas de los
componentes
Pantalla LED
Soporte lateral
Manillar plegable
Mecanismo de plegado
Pedal de freno
Herramienta de ajuste
Usted contribuye ya a la protección del medio ambiente usando el e-Kick. Cuando tenga que deshacerse de él cuide el medio ambiente y preste atención a las siguientes instrucciones:
• Elimine el e-Kick y los componentes asociados (p.ej. la pila) entregándolos solamente a una empresa o un centro de recogida
de residuos autorizado.
• Siga la reglamentación aplicable vigente. En caso de duda, pregunte en su punto de recogida más cercano cuál es la forma más
respetuosa con el medio ambiente de deshacerse del patinete.
Instrucciones de eliminación
Las pilas y los dispositivos eléctricos no deben tirarse junto con la basura doméstica.
ES
158

La garantía que ofrecemos es la siguiente:
• 2 años de garantía de los componentes del patinete e-Kick: Base, conjunto frontal completo y pedal de freno. Quedan excluidas
de esta garantía todas las piezas sujetas a desgaste, piezas pequeñas y tornillos.
• Un año de garantía para los componentes eléctricos y electromecánicos: el motor y el controlador del motor.
• Un año de garantía para la pila (60% de la capacidad nominal original) o 1000 ciclos de carga completos (lo que suceda primero).
Servicios cubiertos por la garantía
Sobre la base de esta garantía, Micro se obliga a prestar los siguientes servicios durante los respectivos periodos de garantía:
A discreción de Micro, reparar o sustituir por piezas o componentes equivalentes cuando la sustitución pueda variar respecto del
original en cuanto a modelo y/o color;
Los servicios que no están cubiertos por la garantía y sean competencia del distribuidor, así como la limpieza de patinetes entregados sucios se facturarán a la tarifa horaria normal incrementada con todos los costes de material y transporte oportunos;
• Cualquier servicio prestado de acuerdo con la garantía (reparación/sustitución) no amplía la garantía original.
• No se aceptarán reclamaciones de servicios distintos de los mencionados más arriba.
Garantía
La garantía no cubre daños causados por los siguientes motivos:
• Daños provocados por no cargar o cargar tarde el paquete de pilas (véase el mantenimiento del paquete de pilas)
• Daños provocados por guardar, cargar o descargar el patinete o la pila a temperaturas que no sean las indicadas en el rango de
temperaturas de almacenamiento.
• Un uso inadecuado, una aplicación inadecuada o un uso negligente (saltos, por ejemplo).
• Una modicación inadecuada por terceros (p.ej. abrir la base).
• Una carga inadecuada (p.ej. cargar con un cargador diferente del suministrado).
• Superar la velocidad máxima de 40km/h en bajadas.
• La modicación de las características técnicas del vehículo sin la autorización del fabricante.
• La conversión/instalación subsiguiente de piezas no compatibles o no originales.
• Las piezas de desgaste tales como cojinetes de bolas, cojinetes deslizantes, pernos de cojinetes y tuercas de cojinetes, etc.
• Una modicación del patinete con piezas o componentes de otros fabricantes.
• La ausencia de inspección conforme a la garantía durante el periodo establecido.
• Los daños provocados por no ajustar el patinete o por ajustarlo incorrectamente o por componentes desgastados.
• Las consecuencias de una caída
• Cualquier lesión o daño material provocado a terceros al montar en el patinete.
ES
160

• Los daños provocados por usar productos de limpieza inadecuados o utensilios tales como limpiadores a alta presión o aditivos.
• Un alquiler o arrendamiento comercial
• Cualquier trabajo de reparación o de otro tipo derivado de un desgaste, de un accidente o de las condiciones de funcionamiento
o por montar ignorando las instrucciones del fabricante.
• Los daños que puedan ser identi cados como una negligencia del usuario respecto a la protección del agua (el e-Kick soporta
salpicaduras pero no es estanco al agua).
Cláusula de separabilidad
Si alguna de las disposiciones de esta garantía resultase ine caz, o tuviera alguna laguna que hubiera que corregir, no afectará a la
e cacia de las demás disposiciones. La disposición que falte o sea inválida deberá ser sustituida por una disposición que se aproxime
lo máximo posible a la intención y el propósito de la disposición original.
Derecho aplicable y jurisdicción
En caso de que surja cualquier con icto como resultado de esta garantía (así como en relación con la cuestión de su existencia o
validez), se acuerda que será competencia exclusiva del tribunal del cantón de Zúrich. Este contrato de compra está sujeto al derecho
suizo con exclusión de las normas de con icto, así como de la Convención de las Naciones Unidas sobre los Contratos de Compra-
venta Internacional de Mercaderías (Convención de la ONU sobre Compraventa).
Fabricación y documentación técnica: Micro Mobility Systems AG, Bahnhofstrasse 10, 8700 Küsnacht (Suiza), Director general: Wim
Ouboter
Por la presente declara que el patinete eléctrico e-Kick cumple lo dispuesto en las siguientes directivas:
• Directiva europea sobre la seguridad de los juguetes (2009/48/CE)
• Directiva europea sobre compatibilidad electromagnética (2004/108/CE)
Küsnacht (Suiza), junio de 2016
Micro Mobility Systems AG
Declaración de conformidad UE
El e-Kick tiene la autorización necesaria para llevar la etiqueta CE tal como se muestra a continuación. El fabricante con rma que el
e-Kick cumple todos los requisitos de marcado «CE».
ES
162

164
IT
Indice
INTRODUZIONE
AVVERTENZE
GUIDA RAPIDA
COSA FARE E COSA NON FARE PER GODERE DEL PRODOTTO PIÙ A LUNGO
UTILIZZO
Cavalletto laterale
Apertura e chiusura
Caricamento della batteria e visualizzazione dello stato di carica
Sistema "Motion Control"
Informazioni sui tre programmi di guida
Modica del programma di guida
Associazione del monopattino tramite Bluetooth
Disabilitare l'assistenza del motore
MANUTENZIONE
Manutenzione della batteria
Manutenzione del meccanismo di chiusura
Manutenzione della leva a serraggio rapido
Manutenzione delle manopole a spinta
INFORMAZIONI TECNICHE
ISTRUZIONI PER LO SMALTIMENTO
GARANZIA
DICHIARAZIONE DI CONFORMITÀ UE
Pagina 165
Pagina 166
Pagina 170
Pagina 171
Pagina 172
Pagina 172
Pagina 173
Pagina 175
Pagina 177
Pagina 178
Pagina 179
Pagina 181
Pagina 182
Pagina 183
Pagina 183
Pagina 184
Pagina 184
Pagina 185
Pagina 186
Pagina 190
Pagina 191
Pagina 194

IT
166
Introduzione Avvertenze
Benvenuto nella comunità di utenti e-Kick. Siamo certi che ti divertirai un mondo a utilizzare il monopattino elettrico più innovativo
al mondo.
Il presente manuale utente contiene le istruzioni più importanti a cui è necessario prestare attenzione. Il documento contiene anche
suggerimenti sulla manutenzione e l'utilizzo del tuo e-Kick e illustra come adoperare correttamente il veicolo per garantirne un utilizzo sicuro e prolungato nel tempo.
Tutti i dati qui riportati si riferiscono alle condizioni tecniche del veicolo al momento della stesura del presente manuale. Eventuali
modiche e aggiunte introdotte in fasi successive non saranno dunque incluse in questa versione del documento. La versione più
recente del manuale utente può essere consultata all'indirizzo www.micro.ms.
La nostra rete globale di concessionarie sarà lieta di fornire assistenza in caso di domande o problemi. Si raccomanda dunque di
rivolgersi al proprio rivenditore di riferimento; faremo il possibile per garantire un'assistenza rapida e trasparente.
• Potrebbe essere necessario un po' di tempo per abituarsi a utilizzare agevolmente veicoli ad assistenza elettrica. L'accelerazione
(e dunque lo sforzo motore) risulta molto più accentuata rispetto alla normale spinta in avanti. Quando il prodotto è adoperato
da utenti inesperti, la maggiore spinta di accelerazione può provocare il sollevamento della ruota anteriore e dar luogo a cadute.
Esercitare cautela quando si inizia a utilizzare l'apparecchio e accertarsi sempre di avere lo spazio per effettuare eventuali manovre. Evitare di piegarsi all'indietro durante la corsa.
• Oltre alla normale azione frenante ad attrito, la pressione del pedale del freno consente all'e-Kick di frenare innestando il freno
del motore elettrico. Tale sistema accresce sensibilmente l'efcacia dell'azione frenante, con conseguente riduzione dello spazio
di frenata. Tuttavia, si raccomanda di tenere presente che il freno motore non può essere innestato in presenza delle seguenti
condizioni:
- La batteria è scarica e l'utilizzo del veicolo avviene con l'ausilio della sola forza muscolare.
- La batteria è carica al 100% e dunque l'energia non può essere rigenerata.
- L'azione frenante erogata dal freno motore è molto intensa e riduce in maniera signicativa lo spazio di frenata. Tenere
sempre a mente tale caratteristica, specie nei casi in cui non si possa fare afdamento sull'azione frenante del motore
nelle situazioni appena descritte.
• Utilizzare sempre il freno della ruota posteriore per rallentare e arrestare il veicolo. Non tentare mai di frenare appoggiando i
piedi a terra! Tale comportamento provocherebbe infatti l'attivazione del sistema "Motion Control" e il veicolo non si arresterebbe. Sarebbe un po' come tentare di guidare un'automobile tenendo premuti contemporaneamente i pedali dell'acceleratore e
del freno.
• Osservare sempre le leggi e le normative nazionali vigenti in materia di circolazione stradale e classi di veicoli autorizzati quando
si utilizza l'e-Kick. L'utente ha la responsabilità di informarsi in merito alle leggi e normative vigenti nel proprio paese di residenza, poiché queste potrebbero differire da un paese all'altro. Il produttore declina ogni responsabilità connessa alla mancata
conformità alle direttive.
• Si raccomanda in particolar modo di tenere presente quanto segue:

- e-Kick non è approvato per l’utilizzo generale su strade pubbliche
- L’assistenza elettrica (vedere sistema «Motion Control») non può essere utilizzata su marciapiedi
- Ignorare tali indicazioni non solo mette in pericolo l’incolumità di chi utilizza il prodotto e degli altri utenti della strada, ma
costituisce anche una pratica illecita in numerosi paesi.
• Utilizzare il prodotto esclusivamente su superci asciutte, pulite e piane. La guida del monopattino su superci umide può essere
estremamente pericolosa e si raccomanda dunque di evitarla.
• Per ragioni di sicurezza, si raccomanda anche di non guidare in assenza di illuminazione.
• Indossare sempre equipaggiamento protettivo, in particolare un casco idoneo a prevenire lesioni alla testa.
• Indossare sempre le scarpe quando si utilizza l'e-Kick.
• L'e-Kick è progettato per il trasporto di un utente singolo con peso massimo di 100 Kg, e dovrebbe essere utilizzato solo per tale
nalità. La mancata osservanza di tale indicazione costituisce un utilizzo improprio ed è a esclusivo rischio dell'utente.
• L'eventuale introduzione di alterazioni nalizzate ad accrescere le prestazioni o la velocità del prodotto o, in generale, a modi-
care le caratteristiche dell'e-Kick costituisce un atto perseguibile a norma di legge e rende nulla la garanzia.
• Prestare attenzione alle discese ripide! L'azione frenante del veicolo non è sufciente a garantire una guida sicura su discese
ripide a velocità sostenuta.
• Il freno tende a surriscaldarsi a seguito di utilizzo intenso. Evitare di toccare il freno subito dopo l'azionamento.
• Prima di ogni utilizzo, vericare che il sistema sterzante sia regolato correttamente e che tutti i componenti di collegamento
siano ssati saldamente e non presentino rotture.
• In presenza di pioggia o subito dopo la pulizia del veicolo, l’azione frenante può risultare ritardata per via della presenza di umidità. Per questo motivo, si raccomanda di «frenare a secco» all’interno di un’area sicura e privata dopo la pulizia dell’e-Kick.
• Non parcheggiare o conservare l’e-Kick in ambienti domestici e/o in prossimità di oggetti inammabili in nessuna circostanza.
• Caricare la batteria utilizzando esclusivamente il trasformatore in dotazione, e svolgere l’operazione soltanto a temperature
comprese tra 5 e 35° C.
• Non lasciare mai la batteria incustodita quando il caricamento è in corso.
• Caricare la batteria in ambiente secco e dotato di ventilazione adeguata, avendo cura di vericare che il cavo sia collegato correttamente.
• Tenere il trasformatore, l'alimentazione e i cavi di collegamento lontano da fonti d'acqua per evitare il rischio di elettrocuzione.
Non toccare il trasformatore, l'alimentazione o i cavi con mani bagnate.
• Vericare periodicamente la spina elettrica e il trasformatore. In caso di danni, provvedere alla sostituzione del componente
interessato per evitare il rischio di infortuni e danni a proprietà private.
• Utilizzare esclusivamente la batteria fornita in dotazione o preinstallata o componenti di ricambio originali.
• Non utilizzare mai l'e-Kick con la batteria non installata poiché ciò potrebbe arrecare danni irreparabili alle componenti elettroniche.
• Non tentare di riparare personalmente la batteria o il trasformatore.
• Conservare sempre la batteria a temperature comprese tra 5 e 35° C.
• L' e-Kick non è un giocattolo e non è adatto al peso dei bambini. Questo prodotto è riservato a utenti di almeno 18 anni di età.
IT
168

• BATTERIA: La batteria è caricata solo parzialmente alla consegna dell'e-Kick. Prima di utilizzare il prodotto per la prima volta,
caricare completamente la batteria utilizzando il trasformatore in dotazione.
• APERTURA: Dare uno sguardo alle immagini sulla confezione per informazioni su come aprire l'e-Kick.
• Il veicolo è consegnato dal produttore pronto per l'uso. Durante il trasporto del dispositivo (o in altre circostanze in cui questo
non è in uso) potrebbero essere introdotti difetti potenzialmente in grado di comprometterne il funzionamento. Si raccomanda
pertanto di prestare attenzione ai punti seguenti prima di utilizzare il veicolo per la prima volta e prima di ogni utilizzo successivo:
- FRENO: Vericare il corretto funzionamento del freno. In particolare, prima della partenza è necessario vericare che la
frenata assistita (freno motore) sia inserita o disinserita, in quanto tale condizione ha l'effetto di alterare in misura
signicativa la forza frenante (vedere capitolo "Avvertenze").
- CONDIZIONE GENERALE: Prima di ogni utilizzo, vericare l'e-Kick per assicurarsi che tutte le viti siano serrate
correttamente e che non vi siano componenti allentati.
- MECCANISMO DI CHIUSURA: Prima di ogni utilizzo, accertarsi che la leva blu sia correttamente bloccata in posizione
- CAVALLETTO LATERALE: Il cavalletto laterale deve essere correttamente riposto sotto la pedana.
- STATO DI CARICA DELLA BAT TERIA: Controllare lo stato di carica della batteria vericando il display LED sulla pedana.
È necessario ricaricare l'e-Kick entro tre giorni se la batteria risulta completamente scarica dopo l'utilizzo del dispositivo. L'utilizzo
improprio del prodotto ha l'effetto di rendere nulla la garanzia.
Guida rapida
• Sicurezza di bambini e soggetti vulnerabili:
- Il dispositivo può essere utilizzato da ragazzi di età superiore a 16 anni e da soggetti dotati di limitate capacità siche,
sensoriali o cognitive, oppure che non dispongono di un adeguato livello di conoscenza e/o di esperienza, soltanto sotto la
supervisione di un adulto responsabile della loro incolumità, o nei casi in cui tali soggetti abbiano ricevuto adeguata
formazione in merito all'utilizzo sicuro del dispositivo e comprendano i rischi associati all'utilizzo dello stesso.
- Non lasciare che i bambini giochino con l'unità.
- Non lasciare che i bambini eseguano attività di pulizia o manutenzione dell'unità in assenza di adeguata supervisione.
- Tenere tutti i materiali da imballaggio fuori dalla portata dei bambini.
IT
170

Di seguito riportiamo le azioni da intraprendere per proteggere l'e-Kick da eventuali danni e garantirne un funzionamento duraturo:
• Ricaricare la batteria subito dopo l'acquisto del prodotto.
• Provvedere a ricaricare la batteria ogni tre mesi quando il dispositivo non è in uso.
• È necessario ricaricare l'e-Kick entro tre giorni se la batteria risulta completamente scarica dopo l'utilizzo del dispositivo. L'utilizzo improprio del prodotto ha l'effetto di rendere nulla la garanzia.
• Le batterie sono sensibili alle temperature estreme. Evitare di parcheggiare il monopattino elettrico sotto la luce solare diretta o
in ambienti estremamente freddi. Conservare l'e-Kick a temperature comprese tra 5 e 35° C in qualsiasi circostanza.
• Evitare di eseguire salti durante la guida del monopattino in quanto ciò può dar luogo a sollecitazioni eccessive e arrecare danni
non coperti dalla garanzia.
• Evitare sempre le buche e affrontare superci sconnesse quali cordoli o altri ostacoli dalla giusta angolazione.
• L'e-Kick è protetto contro gli spruzzi d'acqua e la guida sporadica su superci bagnate non dovrebbe danneggiare i componenti
elettronici. Si raccomanda in ogni caso di evitare qualsiasi contatto con l'acqua.
• Non tentare di svolgere autonomamente eventuali operazioni di riparazione. Rivolgersi sempre al centro di assistenza di riferimento. L'apertura della pedana rende automaticamente nulla la garanzia. In alcune circostanze, Micro autorizza l'apertura della
pedana laddove sussistano condizioni speciche preconcordate con il cliente.
• È vietato apportare alterazioni all'e-Kick. Tale condotta mette in pericolo l'incolumità dell'utente e compromette l'utilizzo sicuro
del prodotto, oltre a ridurre la vita utile del veicolo. e rendere nulla la garanzia.
Cosa fare e cosa non fare per godere del prodotto più a lungo
Utilizzo del cavalletto laterale
L' e-Kick è provvisto di cavalletto laterale. Il cavalletto è ubicato sotto la pedana in prossimità del meccanismo di chiusura.
Richiudere sempre il cavalletto piegandolo in avanti in modo da consentirne l'innesto con un movimento del piede all'occorrenza.
Utilizzo del dispositivo
IT
172

Si raccomanda di tenere le mani alle posizioni indicate nelle gure durante l'esecuzione della procedura no a quando il monopattino
non risulti saldamente bloccato alla congurazione desiderata.
2 3 41
Apertura dell'e-kick
L'e-kick è venduto piegato ma può essere aperto e utilizzato in alcuni semplici passi. La procedura di apertura dell'e-kick è descritta
di seguito:
1. Premere sul pedale del freno posteriore per consentire il disinnesto della linguetta di chiusura.
2. Ruotare la leva blu in avanti per rilasciare il meccanismo di chiusura e consentire l'apertura del braccio.
3. Portare il braccio in posizione verticale al ne di bloccare il meccanismo di articolazione, quindi spingere i bulloni argentati ubicati sulla leva blu all'interno del braccio (uno scatto segnalerà che il braccio è stato effettivamente bloccato nella posizione di
apertura)
4. A questo punto, premere i due pulsanti blu ubicati sull'estremità superiore del braccio per consentire il rilascio e l'apertura del
manubrio. (Uno scatto segnalerà che il componente è stato effettivamente bloccato nella posizione di apertura)
3
Si raccomanda di tenere le mani alle posizioni indicate nelle gure durante l'esecuzione della procedura no a quando il monopattino
non risulti saldamente bloccato alla congurazione desiderata.
1 2
Chiusura dell'e-kick
Richiudere l'e-Kick è un'operazione altrettanto semplice:
1. Premere i due pulsanti selezionati all'estremità superiore dell'area anteriore del monopattino, al ne di rilasciare il manubrio e
piegare ciascuna impugnatura.
2. Premere contemporaneamente le manopole a spinta posizionate sull'estremità inferiore della sezione anteriore per consentire
il rilascio della leva blu.
3. Ruotare la leva in avanti per rilasciare il meccanismo di articolazione, quindi richiudere la sezione anteriore posizionandola
contro la pedana no a consentire l'innesto della linguetta ubicata sul retro con il pedale del freno.
IT
174

Caricamento della batteria e visualizzazione dello stato di carica
Il processo di carica della batteria è illustrato di seguito:
1. Collegare il trasformatore a una presa di corrente. Così facendo, la spia verde del caricatore dovrebbe accendersi.
2. A questo punto, collegare l'e-Kick al trasformatore. Il collegamento del dispositivo al trasformatore è eseguito correttamente
se la spia dell'unità di alimentazione diventa rossa (potrebbe essere necessario attendere alcuni secondi). Le spie LED ubicate
sull'e-Kick si illuminano due volte in sequenza per indicare che la ricarica della batteria è in corso.
3. Quando la ricarica dell'e-Kick è completata, la spia verde del trasformatore si illumina nuovamente.
Per visualizzare il livello di carica residua, accendere il monopattino girando la ruota posteriore. Eseguire la medesima operazione per
vericare lo stato di carica durante la ricarica della batteria.
1 2 3
Vericare il livello di carica residua dall'e-Kick
Il livello di carica residua è indicato direttamente sull'e-Kick per mezzo delle 4 spie LED ubicate sulla pedana, come mostrato di seguito:
Le spie LED forniscono informazioni quando l'e-Kick è in funzione. Per azionare l'e-Kick è sufciente fare girare la ruota posteriore.
È possibile anche ricevere informazioni sullo stato di carica (e sull'autonomia residua) della batteria direttamente sul proprio smartphone scaricando l'applicazione MyPeugeot disponibile su App Store (iOS) e Google Play Store.
(*) Ricordare che la misurazione del livello di carica dipende dall'intensità della corrente. Quando il veicolo è in marcia e sotto carico,
il display mostra un livello di carica inferiore rispetto a quello visualizzato a veicolo fermo.
4 LED illuminati =
75 - 100 % di carica
3 LED illuminati =
50 - 75 % di carica
2 LED illuminati =
25 - 50% di carica
1 LED illuminati =
0 - 25% di carica
IT
176

Sistema "Motion Control"
Il sistema "Motion Control" rende l'utilizzo dell'e-Kick un'esperienza indimenticabile.
Di seguito sono riportate alcune informazioni sul sistema "Motion Control":
• Questa funzionalità si attiva a partire da una velocità di circa 5 km/h. Ciò signica che l'utente dovrà fare afdamento esclusi-
vamente sulla propria forza muscolare per raggiungere un'accelerazione no a 5 km/h afnché gli effetti iniziali dell'assistenza
motore possano essere percepiti.
• L'intensità e la durata dell'assistenza del motore saranno direttamente proporzionali al livello di sforzo muscolare (battito)
dell'utente.
• Alcune spinte decise sono molto più efcaci rispetto a numerose spinte di minore intensità.
Potrebbe essere necessario un po' di tempo per abituarsi a utilizzare agevolmente veicoli ad assistenza elettrica. L'accelerazione risulta
molto più accentuata rispetto alla normale spinta in avanti e avviene improvvisamente. Esercitare estrema cautela quando si utilizza
il veicolo per la prima volta e imparare sin dall'inizio a frenare in maniera efcace utilizzando il pedale del freno.
Se non si avverte alcuna accelerazione, provare ad azionare l'assistenza passando in modalità "Sport" e dare una spinta più intensa.
Il sistema "Motion Control" intensica l'assistenza a velocità più elevate. Provare a incrementare la velocità intensicando lo sforzo
muscolare per beneciare di maggiori livelli di assistenza.
Informazioni sui tre programmi di guida
L'e-Kick è dotato di tre programmi di guida. Tale caratteristica consente di ottimizzare le prestazioni di guida impostando le congurazioni adatte a un'ampia varietà di situazioni, permettendo anche di adeguare le funzionalità del veicolo in base alla normativa
applicabile.
Utilizzare il monopattino elettrico esclusivamente nella modalità con cui ci si sente più sicuri e le cui caratteristiche siano conformi alle
norme di circolazione vigenti nel paese di residenza.
• Si raccomanda di guidare lentamente per abituarsi al nuovo stile di guida, specie durante il primo utilizzo. Ricordare che guidare
a velocità sostenute richiede uno spazio di frenata maggiore.
• Tenere presente che i limiti di velocità e le restrizioni sulla potenza massima vigenti nei vari paesi si applicano anche ai veicoli ad
assistenza elettrica. È responsabilità dell'utente conoscere e osservare le restrizioni applicabili.
• Lo strumento di congurazione contiene potenti magneti. Si raccomanda pertanto di tenerlo lontano da dispositivi elettronici
quali telefoni cellulari o carte di credito per evitare di danneggiarli.
STANDARD
ECO
SPORT
Programma di
guida
Modalità ECO O 1 250 Watt 15 km/h
25 km/h
25 km/h
250 Watt
500 Watt
OO 2
OOO 3
Modalità STAN-
DARD
Modalità SPORT
Posizione nel
cerchio della
pedana
Numero di LED
intermittenti all’inse-
rimento della nuova
modalità
Potenza
Velocità massima supportata
IT
178

STANDARDECO SPORT
Modica del programma di guida
La modica del programma di guida è un'operazione molto semplice che può essere eseguita istantaneamente. È possibile modicare le impostazioni premendo ripetutamente sul pedale del freno o utilizzando lo strumento di congurazione.
Modica del programma di guida con lo strumento di congurazione
Per eseguire l'operazione è necessario adoperare lo strumento di congurazione fornito in dotazione.
Posizionare lo strumento di congurazione in corrispondenza dell'incavo circolare ubicato sulla pedana. Lo strumento deve essere
allineato nella direzione indicata dalla freccia incisa su di esso.
Ora è possibile passare da un programma di guida all'altro ruotando lo strumento di congurazione e allineando la freccia in corrispondenza dei cerchi vuoti. Il display LED mostra il programma di guida selezionato illuminandosi evolmente per due secondi e
quindi emettendo una luce intermittente e intensa. Una sola spia intermittente indica che è stata impostata la modalità "Eco", due
spie intermittenti segnalano l'innesto della modalità "Standard" e tre spie indicano la modalità "Sport".
Modica del programma di guida con l'ausilio del freno
È possibile modicare il programma di guida anche premendo ripetutamente sul pedale del freno, e dunque senza ricorrere allo strumento di congurazione.
Premendo sul pedale del freno quattro volte, il numero di LED sulla pedana corrispondente alla modalità di guida attualmente impostata si illumina a intermittenza per quattro secondi.
Ad esempio, se in precedenza è stato impostato il programma 2 (modalità "Standard"), due LED intermittenti segnaleranno che il
monopattino si trova in modalità "Standard".
È possibile modicare l'impostazione premendo sul pedale del freno altre quattro volte. Ogni quattro tocchi sul pedale del freno, il
monopattino passerà alla modalità immediatamente successiva.
Ricordare però che quando si utilizza il pedale del freno per passare da una modalità all'altra, ogni serie di quattro tocchi sul pedale
dovrà avvenire a un massimo di quattro secondi dalla precedente.
Ad esempio:
-> 4 tocchi sul pedale -> 2 LED intermittenti -> 2 (modalità "Standard")
-> 4 tocchi sul pedale -> 3 LED intermittenti -> 3 (modalità "Sport")
-> 4 tocchi sul pedale -> 1 LED intermittente -> 1 (modalità "Eco")
-> 4 tocchi sul pedale -> 2 LED intermittenti -> 2 (modalità "Standard")
Premere sul pedale del freno solo 3 volte ha l'effetto di disabilitare l'assistenza del motore;
in questo caso, i LED saranno caratterizzati da un'illuminazione più evole (vedere di seguito:
"Disabilitare l'assistenza del motore")
IT
180

Associazione del monopattino tramite Bluetooth
È possibile associare il monopattino allo smartphone dopo aver scaricato l'applicazione MyPeugeot, disponibile da App Store (iOS) o
Google Play Store.
Per collegare il monopattino elettrico al proprio dispositivo, attivare per prima cosa la connessione Bluetooth dallo smartphone o
tablet, quindi scaricare e aprire l'applicazione.
Per eseguire l'associazione, premere quattro volte consecutive sul pedale del freno (proprio come se si dovesse passare a un programma di guida differente). Il monopattino passa in modalità di associazione e inizia a cercare i dispositivi Bluetooth disponibili. Il
monopattino rimane in modalità di associazione per 30 secondi e dovrebbe diventare visibile dalla app installata sul dispositivo. A
questo punto, sarà possibile selezionare l'icona del monopattino dall'applicazione e veri care che l'associazione sia stata eseguita
correttamente.
e -Kick sfrutta il protocollo Bluetooth Low Energy per comunicare con dispositivi smartphone.
Disabilitare l'assistenza del motore
È possibile disabilitare l'assistenza del motore dell'e-Kick in qualsiasi momento e utilizzare il veicolo come un monopattino tradizionale. Per disabilitare la funzione di assistenza, premere brevemente sul pedale del freno tre volte consecutive. Se l'assistenza è stata
disabilitata correttamente, il display LED sarà caratterizzato da un'illuminazione più evole.
L'assistenza del motore rimane disabilitata no a quando non si preme sul pedale del freno altre tre volte consecutive.
Premere 3 volte ACCESO: LED più intensi SPENTO: LED più evoli
IT
182

Manutenzione della batteria
Si raccomanda di osservare le seguenti indicazioni di manutenzione al ne di massimizzare il ciclo di vita del gruppo batteria:
• Conservare la batteria a temperature comprese tra 5 e 35° C in qualsiasi circostanza.
• Ricaricare la batteria subito dopo l'acquisto del prodotto.
• Provvedere a ricaricare la batteria ogni tre mesi quando il dispositivo non è in uso.
• È necessario ricaricare l'e-Kick entro tre giorni se la batteria risulta completamente scarica dopo l'utilizzo del dispositivo.
Eventuali danni provocati dalla mancata osservanza di tali indicazioni non saranno coperti dalla garanzia.
Manutenzione
Manutenzione del meccanismo di chiusura
L'e-kick può essere ripiegato. Il carico a cui è normalmente sottoposto il veicolo potrebbe introdurre una certa rigidità a livello dei
componenti richiudibili, i quali potrebbero dunque risultare rumorosi. Al ne di garantire un utilizzo il più possibile prolungato del monopattino, riportiamo di seguito una serie di indicazioni che illustrano come eliminare quei fastidiosi rumori e migliorare l'efcienza
del meccanismo di chiusura in alcuni semplici passi:
1. Lubricare i due bulloni argentati ubicati sulla leva blu del meccanismo di chiusura, quindi premerli un paio di volte per consentire
una distribuzione uniforme del lubricante.
2. Lubricare le due manopole a spinta del meccanismo di chiusura principale, quindi premerle per consentire una distribuzione
uniforme del lubricante.
3. Lubricare la molla della leva blu del meccanismo di chiusura, quindi sollevare la leva un paio di volte per consentire una distri-
buzione uniforme del lubricante.
4. Lubricare l'asse centrale all'interno della leva blu del meccanismo di chiusura, quindi sollevare la leva un paio di volte per
consentire una distribuzione uniforme del lubricante.
1
2
IT
184

Manutenzione del manubrio
Lubricare la scanalatura nell'area di rotazione di ciascuna impugnatura, quindi piegarle/aprirle un paio di volte per consentire una
distribuzione uniforme del lubricante.
3
4
Informazioni tecniche
Leggero 8,5 chilogrammi
Autonomia 10-15 chilometri
Ricarica veloce Tempo di ricarica di 60 minuti
Velocità 15 / 25 km/h
Potente Potenza pari a 250/500 watt
Recupero energia di frenata
Ruota doppio nucleo
Accensione automatica accesa/spenta
Impermeabile
Ogni azione di frenata genera energia
Nucleo morbido/rivestimento resistente
Il monopattino si accende automaticamente
Protezione al 100% contro gli spruzzi d'acqua
15 km/h - 250 W
3 impostazioni di velocità 25 km/h - 250 W
25 km/h - 500W
Abilitazione assistenza
Premere 3 volte sul pedale del freno per abilitare/disabilitare
l'assistenza del motore
Caratteristiche
IT
186

Altezza manubrio
Struttura monopattino
950 mm
Lega di alluminio
Lunghezza complessiva
Ruota anteriore
760 mm
Gomma doppio nucleo
Dimensioni da piegato
Ruota posteriore
815 x 175 x 225 mm
2 componenti: motore/pneumatico sostituibile
Lunghezza pedana (area utilizzabile)
Motore
370 mm
Motore DC brushless
Ampiezza pedana (sezione più ampia/più stretta)
Pedana
138 mm / 120 mm
Monoblocco in alluminio (1100 grammi)
Ampiezza manubrio
Nastro antiscivolo
380 mm
Gomma
Dimensioni
Materiali
Avvertenza: Il veicolo è dotato di batterie ricaricabili agli ioni di litio. Non tentare di ricaricare batterie che non sono destinate a essere
ricaricate.
La misurazione dello stato di carica dipende dalla corrente. Per tale ragione, quando il veicolo è in marcia e sotto carico il display mostra sempre un livello di autonomia residua inferiore rispetto a quello visualizzato quando il monopattino è in standby.
batteria Ioni di litio
Tensione 36 Volt
Capacità
Tipo di celle
Congurazione celle
2,5 Ah (= 90 wattora = adatto al trasporto aereo)
Celle agli ioni di litio
10S1P (10 celle)
Tempo di ricarica 60 minuti
Vita utile
In grado di preservare il 60% della capacità iniziale dopo un anno
di utilizzo (o 1000 cicli di ricarica)
Peso 700 grammi
1 LED: Stato di carica 0 - 25%
4 spie LED integrate alla pedana:
Visualizzazione dello stato di carica
4 LED: Stato di carica 75% - 100%
3 LED: Stato di carica 50% - 75%
2 LED: Stato di carica 25% - 50%
Tipologia
IT
188

Componenti
Display a LED
Cavalletto laterale
Manubrio richiudibile
Meccanismo di chiusura
Pedana
Strumento di con gurazione
L'utilizzo dell'e-Kick costituisce di per sé un contributo alla tutela dell'ambiente. Si raccomanda però di osservare anche le seguenti
indicazioni al ne di garantire un corretto smaltimento del prodotto:
• Smaltire l'e-Kick e i relativi componenti (es. la batteria) rivolgendosi a un ente approvato incaricato dello smaltimento o utilizzando un impianto di smaltimento pubblico.
• Agire nell'osservanza delle normative applicabili. In caso di dubbi, rivolgersi al proprio ente di competenza per ottenere informazioni relative allo smaltimento ecocompatibile del prodotto.
Istruzioni per lo smaltimento
Le batterie e i dispositivi elettrici non devono essere smaltiti con i normali ri uti domestici.
IT
190

I servizi di assistenza forniti nell'ambito della garanzia includono quanto segue:
• 2 anni di garanzia sui componenti del monopattino elettrico e-Kick: Pedana, gruppo anteriore e pedale del freno. Dalla garanzia
sono esclusi eventuali componenti usurati, le viti e le parti di piccole dimensioni.
• 1 anno di garanzia sui componenti elettrici ed elettromeccanici, tra cui il motore e la centralina motore.
• 1 anno di garanzia sulla batteria (60% della capacità nominale iniziale o 1000 cicli di ricarica, a seconda della condizione che si
verica per prima).
Ambito dei servizi oggetto della garanzia
In base alla presente garanzia, Micro si impegna a fornire i seguenti servizi durante i periodi applicabili:
Riparazione o sostituzione di componenti/parti (a descrizione di Micro) con parti equivalenti che potranno differire dal prodotto originale in termini di modello e/o colorazione;
I servizi non coperti dalla garanzia ma che rientrano nella sfera di competenze del rivenditore, unitamente a eventuali servizi di pulizia
del prodotto, saranno addebitati come da normale tariffa oraria e l'utente sarà chiamato a farsi carico anche dei costi associati al
materiale e al trasporto;
• Eventuali servizi prestati nell'ambito della garanzia (riparazioni/sostituzioni) non estendono la durata della garanzia originale.
• I servizi che non rientrino nei punti appena descritti sono da considerarsi non applicabili ai ni della garanzia.
Garanzia
La garanzia non copre le fattispecie di danni provocati dai comportamenti seguenti:
• Danni derivanti dal mancato caricamento o da un caricamento non tempestivo del gruppo batteria (vedere "Manutenzione della
batteria")
• Danni derivanti dalla conservazione, dal caricamento o scaricamento o della batteria al di fuori dell'intervallo di temperatura
raccomandato
• Utilizzo improprio o inappropriato o comportamenti negligenti alla guida (es. l'esecuzione di salti).
• Alterazione impropria ad opera di terze parti (es. apertura della pedana).
• Caricamento improprio (es. caricamento eseguito con trasformatore diverso da quello fornito in dotazione).
• Superamento della velocità massima di 40 km/h o guida su superci in discesa.
• Alterazioni tecniche apportate al veicolo senza l'accordo del produttore.
• Conversione/installazione successiva di parti non compatibili o non originali.
• Normale usura di componenti quali cuscinetti a sfera, cuscinetti a manicotto, perni di supporto e viti di ssaggio ecc.
• Modica del prodotto con l'ausilio di parti/componenti di terze parti.
• Mancata ispezione a ni di garanzia entro il periodo di applicazione della stessa.
• Danni provocati da congurazioni mancanti o errate o da componenti usurati.
• Danni derivanti dalla caduta del prodotto
IT
192

• Danni arrecati a persone o proprietà di terzi connessi all’utilizzo del monopattino.
• Danni provocati dall'impiego di detergenti non idonei alla pulizia del prodotto, apparecchiature quali pulitori ad alta pressione
o additivi.
• Leasing commerciale/cessione in af tto del prodotto
• Eventuali attività di manutenzione o di altra tipologia derivanti da usura, incidenti, condizioni di utilizzo o guida non conforme alle
indicazioni del produttore.
• Danni riconducibili alla negligenza dell'utente in riferimento alla protezione del prodotto dall'acqua (l'e-Kick è in grado di resistere agli spruzzi d'acqua ma non è impermeabile).
Clausola di separabilità
L'invalidità di una o più disposizioni contenute nella presente garanzia o l'eventuale presenza di lacune da colmare non avrà l'effetto
di rendere nulle le altre disposizioni. Le eventuali disposizioni mancanti o invalide dovranno essere sostituite da nuove disposizioni
che si avvicinino quanto più possibile a quelle originali.
Leggi e giurisdizione applicabili
Si concorda che eventuali controversie connesse alla presente garanzia (ivi comprese le controversie che abbiano come oggetto
l'esistenza o la validità della garanzia stessa) saranno risolte presso il Tribunale del Canton Zurigo. Il presente contratto di acquisto è
soggetto al diritto svizzero, con l'esclusione delle norme di con itto e la Convenzione delle Nazioni Unite sui contratti di compraven-
dita internazionale di beni (Convenzione delle Nazioni Unite).
Documentazione di produzione e tecnica: Micro Mobility Systems AG, Bahnhofstrasse 10, 8700 Küsnacht, Svizzera, Direttore Generale: Wim Ouboter
Si attesta che il monopattino elettrico e-Kick è conforme alle disposizioni contenute nelle seguenti direttive:
• Direttiva UE sulla sicurezza dei giocattoli (2009/48/EC)
• Direttiva UE sulla compatibilità elettromagnetica (2004/108/EC)
Küsnacht, Svizzera, giugno 2016
Micro Mobility Systems AG
Dichiarazione di conformità UE
e-Kick ha ottenuto la certi cazione del marchio CE riportata di seguito. Il produttore conferma che l'e-Kick è conforme a tutti i requi-
siti legati all'attribuzione della marcature "CE".
IT
194

Índice
INTRODUÇÃO
ADVERTÊNCIAS
INÍCIO RÁPIDO
PARA UM PRAZER DE UTILIZAÇÃO DURADOURO - O QUE FAZER E O QUE NÃO FAZER
FUNCIONAMENTO
Descanso lateral
Desdobrar e dobrar
Carregar a bateria e exibir o estado da carga
O sistema "Motion Control"
Os três programas de condução
Alterar os programas de condução
Emparelhamento Bluetooth da Trotineta
Desligar a assistência do motor
MANUTENÇÃO
Manutenção da bateria
Manutenção do mecanismo de dobragem
Manutenção da alavanca de xação rápida
Manutenção dos botões de pressão
DADOS TÉCNICOS
INSTRUÇÕES DE ELIMINAÇÃO
GARANTIA
DECLARAÇÃO DE CONFORMIDADE UE
Página 197
Página 198
Página 201
Página 202
Página 203
Página 203
Página 204
Página 206
Página 208
Página 209
Página 210
Página 212
Página 213
Página 214
Página 214
Página 215
Página 215
Página 216
Página 217
Página 221
Página 222
Página 225
PT
196

PT
198
Introdução Advertência
É com o maior prazer que o convidamos a aderir à comunidade de condutores e-Kick, certos de que irá desfrutar verdadeiramente a
trotineta elétrica mais inovadora do mundo.
Este manual de utilização contém as instruções mais importantes a seguir. Presta-lhe conselhos sobre a manutenção e o uso da sua
e-Kick e descreve como operar corretamente o veículo para uma utilização segura e duradoura.
Todos os dados são baseados no estado da arte no momento da redação do presente manual. Quaisquer modicações e adições
efetuadas entretanto não estão incluídas nesta versão. A versão mais recente do manual de utilização está disponível em linha em
www.micro.ms.
A nossa rede global de revendedores terá o maior prazer em ajudá-lo, caso tenha dúvidas ou problemas. Não hesite em contactar o
seu revendedor local e nós faremos todos os possíveis por prestar assistência rápida e simples.
• Tenha em atenção que conduzir com assistência elétrica exige habituação. A aceleração e, por conseguinte, a força motriz é
muito maior do que com um movimento normal de impulsão com o pé. Com condutores inexperientes, esta aceleração pouco
familiar pode levantar a roda dianteira do chão e resultar em quedas. Comece cautelosamente e assegure-se sempre de que
dispõe de algum espaço de manobra. Nunca se incline para trás durante a condução.
• Além da função de travagem normal causada pelo atrito, a pressão sobre o travão de pé também trava a e-Kick por meio de um
travão do motor elétrico. O desempenho de travagem é, assim, extremamente melhorado e resulta numa distância de travagem
mais curta. No entanto tenha em atenção que o travão do motor não é acionado se:
- A bateria estiver descarregada e estiver a conduzir utilizando unicamente a força muscular.
- A bateria estiver 100% carregada e não for possível, por esta razão, regenerar a energia.
- A função de travagem adicional do travão do motor for muito elevada e encurtar consideravelmente a distância de
travagem. Tenha sempre este aspeto em conta, especialmente se a função de travagem adicional não estiver ativa nas
situações supramencionadas.
• Use sempre o travão da roda traseira para abrandar e parar. Nunca trave roçando as plantas dos pés no solo! Esta ação ativa
o sistema "Motion Control" e não lhe permite parar. É como tentar conduzir um automóvel com os pedais do acelerador e do
travão pressionados ao mesmo tempo.
• Respeite sempre as leis e os regulamentos nacionais aplicáveis ao tráfego rodoviário e à classe do veículo quando utiliza a
e-Kick. É sua obrigação informar-se sobre a lei e os regulamentos do seu país uma vez que as legislações mudam de país para
país. O não cumprimento das diretivas corre por sua conta e risco e não implica responsabilidade para o fabricante.
• Note em particular que:
- a e-Kick não se encontra aprovada para utilização geral nas vias públicas
- A assistência elétrica (consulte o sistema Motion Control) não pode ser usada nos passeios
- Tais utilizações não só são perigosas para si e para terceiros, mas também ilegais em muitos países.
 Loading...