

Handbook
On-line handbook
Select one of the following means of access to view your
handbook on-line...
Find your handbook on the PeugeOt website, under
"MyPeugeOt".
Scan this code for direct access to your handbook.
If the "MyPeugeOt" function is not available on the
PeugeOt public website for your country, you can find your
handbook at the following address:
http://public.servicebox.peugeot.com/ddb/
Referring to the handbook on-line also gives you access to the latest information available, easily identified by the bookmark, associated
with this symbol:
Select:
the language,
the vehicle, its body style,
the print edition of your handbook appropriate for the date of
registration of your vehicle.
IntroductIon
Within each section, symbols draw your attention to specific
information:
directs you to the section and part which contains detailed
information concerning a function,
indicates important information relating to use of the
equipment,
alerts you to the safety of individuals and on-board
equipment.
the equipment presented may be standard, an option or not
available, depending on the model and can vary from one
country to another or not be available in all countries of sale.
WeLCOMe
this new vehicle has been designed to satisfy all your
requirements in terms of practicality, comfort, safety and
aesthetics.
In order to get the most out of your vehicle, we suggest that you
take a tour of it with the "Handbook" to hand.
this document presents the operation of the equipment fitted to
your vehicle in detail.
PeugeOt thanks you for your confidence and wishes you very
happy motoring.
For any work on your vehicle, use a qualified workshop that has
the technical information, competence and equipment required,
which a PeugeOt dealer is able to provide.
Contents
2
oVErVIEW
1. 4-13
Presentation 4
exterior 6
Interior 7
Instruments and controls 8
technical data -
Maintenance 10
environment 11
eco-driving 12
2.
rEAdY to SEt oFF
14-43
Remote control 14
Key 16
Alarm 19
Front / rear doors 20
Load space 22
Instrument panel 23
Warning/indicator lamps 24
Fuel gauge 32
temperature
indicator 32
Tyre under-ination
detection 33
Service indicator 35
gearbox and steering
wheel 36
gear shift
indicator 36
Starting and stopping 38
Hill start assist 39
Stop & Start 40
Driving recommendations 43
EASE oF uSE
3.
and coMFort
44-86
Lighting control
stalk 45
wipers 48
Cruise control 49
Speed limiter 55
Demisting and
defrosting 59
Manual heating / Air
conditioning 61
Digital air conditioning 63
Additional heating
systems 65
Rear Heating / Air
Conditioning 65
Programmable additional
heating 67
Front seats 71
Front bench seat 73
Rear seats 74
Front ttings 76
Rear ttings 81
Exterior ttings 84
Mirrors 85
electric windows 86
tEcHnoLoGY on
4.
BoArd
87-97
Vehicle
conguration 87
trip computer 92
tachograph 93
Rear parking
sensors 94
Reversing camera 95
Pneumatic
suspension 96
this symbol informs you
of equipment which is
specific to the Combi /
Minibus model.
Child lock.
Rear heating / air
conditioning / Rear
seats / bench seats.
Reading lamps. Sliding
side windows.
SAFEtY
5. 98-120
Parking brake 98
Hazard warning lamps 98
Horn 99
Braking assistance
systems 99
trajectory control
systems 101
Lane departure
warning system 105
Seat belts 106
Airbags 110
Deactivating the
passenger's front
airbag 111
Child seats 113
ISOFIX seats 117
AccESSorIES
6.
121-125
towing a trailer 121
Roof carrying
systems 123
Other accessories 124
Snow chains 125
7.
cHEcKS
126-141
Opening the bonnet 127
underbonnet 128
Levels 129
Checks 131
Fuel 134
BlueHDi and
AdBlue
®
additive 136
QuIcK HELP
8.
142-171
Battery 142
Changing a fuse 145
Changing a bulb 149
Changing a wiper
blade 155
Changing a wheel 156
Puncture repair kit 161
towing
the vehicle 163
Detachable tow
ball 164
glossary of
labels 168
9.
tEcHnIcAL
172-182
dAtA
Dimensions 172
engines 177
Weights 179
Identication
markings 182
Contents
AudIo EQuIPMEnt
10.
and tELEMAtIcS
touch screen
Audio-telematic
system 183
Audio system 231
SPEcIAL FEAturES
Crew cab 249
Chassis Cab / Floor
Cab 251
Double cab 254
tipper body 258
3
Rear seat belts.
Child seats / ISOFIX
mountings at the rear
contEntS
Presentation
4
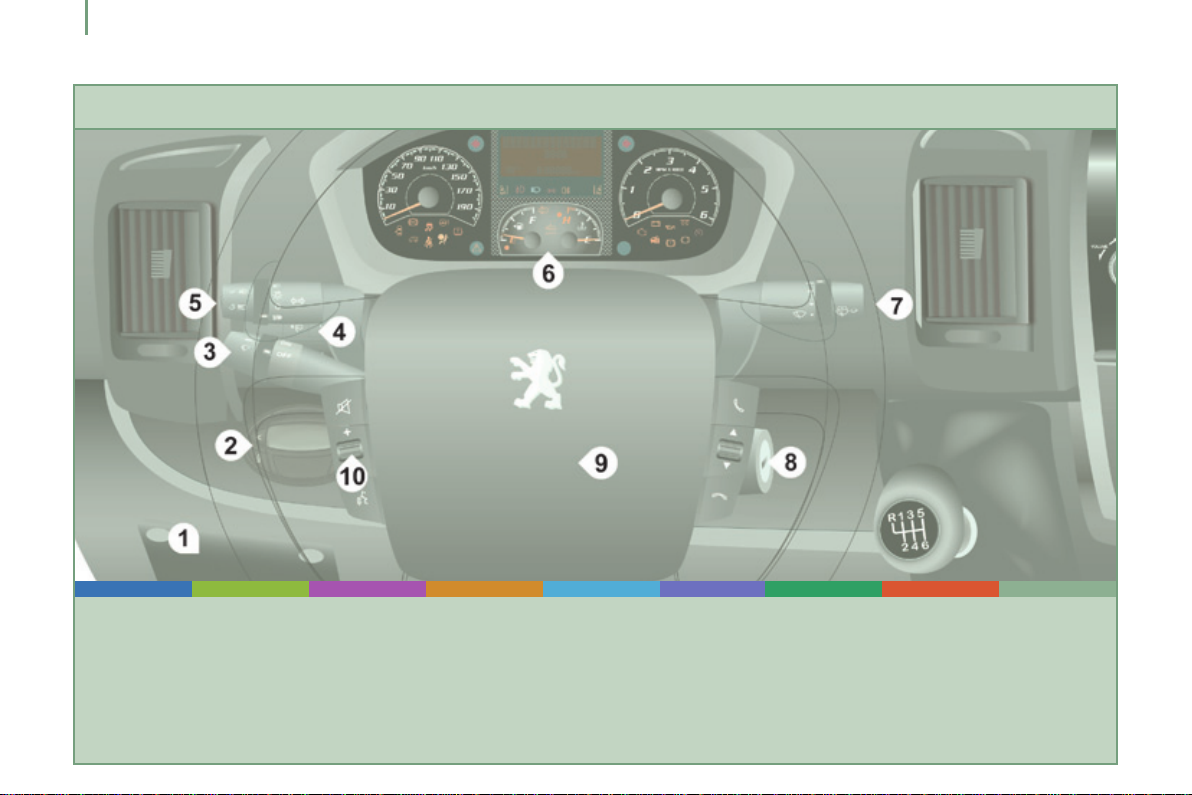
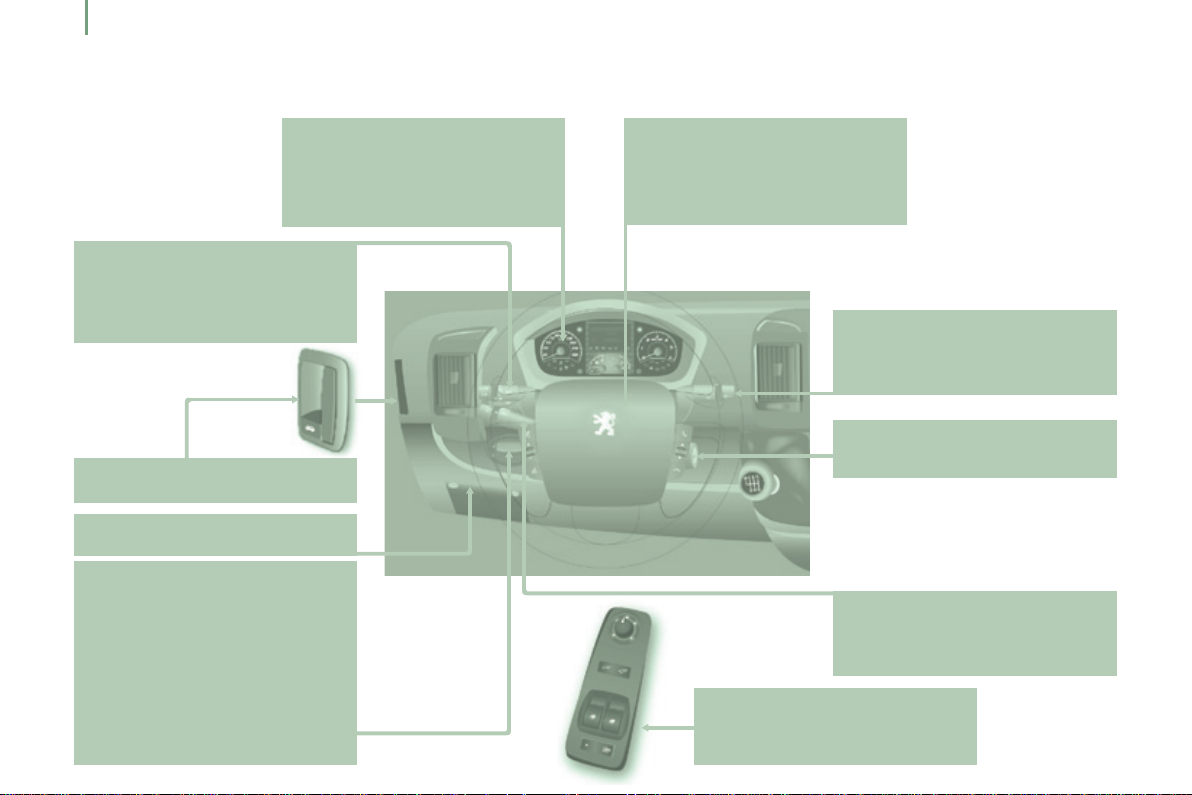
InStruMEntS And controLS
1. Fusebox.
2. Additional programmable heating.
3. Cruise control / sped limiter controls.
4. Vehicle configuration / Headlamp beam
height / Front/rear foglamps.
5. Lighting and direction indicator
control stalk.
6. Instrument panel with screen.
7. Wiper / screenwash / trip computer
control stalk.
8. Ignition switch.
9. Driver's front airbag / Horn.
10. Steering mounted audio system
controls.
Presentation
5
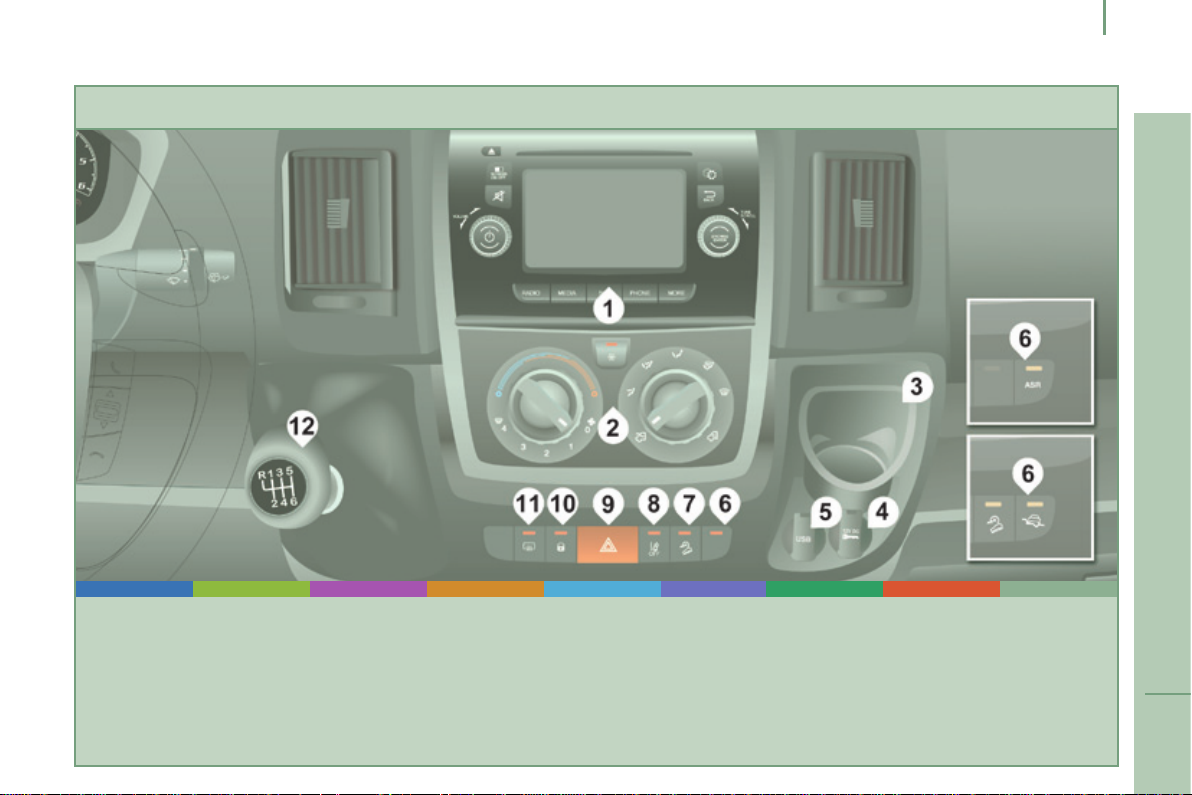
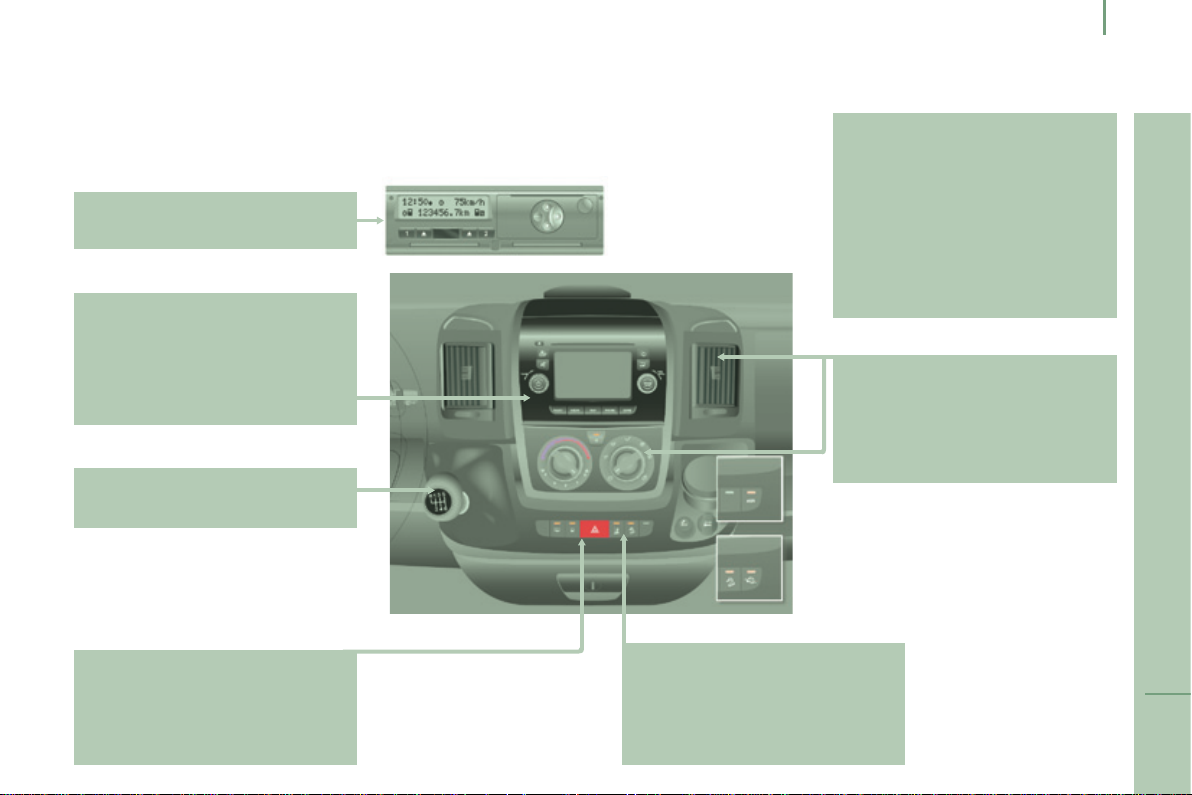
cEntrE conSoLE
1. Audio / Navigation system.
2. Heating / Air conditioning.
3. Storage / portable ashtray.
4. 12 volt accessory socket (180 W max).
5. uSB port / Cigarette lighter.
6. Dynamic stability control (DCS/ASR) /
Intelligent traction control.
7. Hill descent control.
8. Lane departure warning system.
9. Hazard warning lamps.
10. Central locking / Locking indicator
lamp.
11. Demisting / Defrosting.
12. gear lever.
OVERVIEW
1

Location
6
ExtErIor
Left-hand side:
Fuel ller cap, fuel tank 134
Fuel cut-off 135
AdBlue ller cap, tank 136-139
topping-up the AdBlue additive
Load space 81-83
Rear doors 21
Reversing camera 95
rd
3
brake lamp 149, 154
140-141
Dimensions 172-176
Accessories 124
Roof rack, roof bars 123
Key, remote control, battery 14-17
Starting 18, 38-39
Central locking 22
Condential card 18
Alarm 19
Rear lamps, direction indicators,
foglamps 45, 149, 153-154
Number plate lamp 154
Rear parking sensors 94
Spare wheel, changing a wheel,
jack, tools 156-160
Inating, pressures 162, 182
Snow chains 125
towing, lifting 163
towbar 121-122
Removable towball 164-167
Brakes, pads 129, 132
tyres, pressures 162, 182
Braking assistance systems 99-100
trajectory control 101-104
Pneumatic suspension 96-97
Wiper blade 155
Door mirror 85
Side repeater 152
Front lamps, direction indicators,
front foglamps 45, 149-152
Headlamp beam height
adjustment 47
Headlamp wash 48
Changing bulbs 149-152
Opening/closing doors 20-22
Remote control 14-15
Autoclose 87, 90
temporary puncture
repair kit 161-162
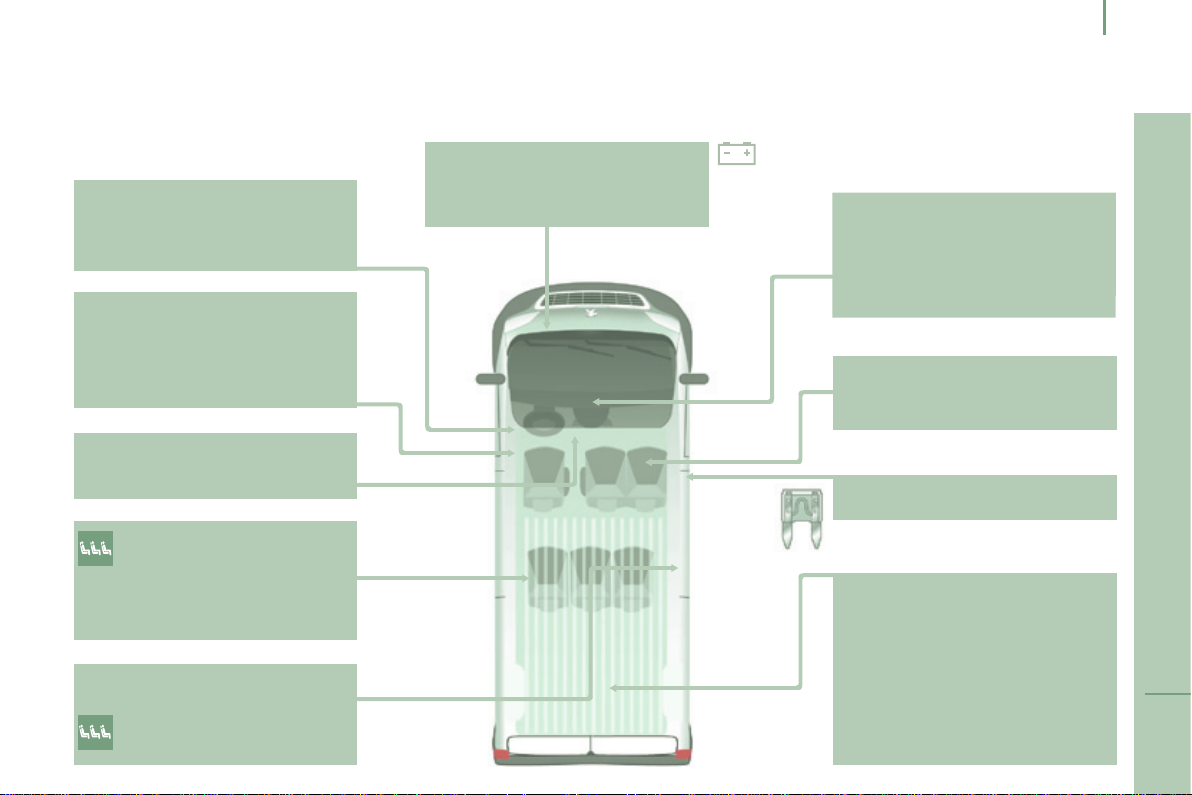
IntErIor
Seat belts 106-108
Airbags 110-112
Deactivating the
passenger's front airbag
Parking brake,
handbrake 98
Front seats, adjustments 71-72
Seat with variable damping 72
2-seat bench 73
12 volt socket,
uSB port 79, 81-82
Seats / rear bench
seats 74-75
Rear heating / air
conditioning 65-66
ISOFIX mountings
Sliding side door 20
Folding foot board 84
Sliding side windows 83
111, 114
117-118
Battery (+), charging,
starting 142-144
earth point (-) 128, 142
Location
Rear view mirror 85
Lane departure warning
system 105
Cab courtesy lamp 80, 152
Changing a courtesy
lamp bulb 149, 152
tools, jack 76, 156
Child seats 113-116, 119-120
Fuses in the right hand door pillar
Load space 81-82
● stowing rings,
● load retainer,
● interior roof box,
● side trims,
● 12 volt socket,
● courtesy lamp,
torch 83
Accessories 124
145, 147
7
OVERVIEW
1
Location
8
InStruMEntS And controLS
Instrument panels, screens,
speedometer 23
Warning lamps, indicator
lamps 24-31
gauges, indicators 32, 35
gear shift indicator 36-37
Lighting controls 45-47
Automatic illumination
of headlamps 46
guide-me-home lighting 46
Parking lamps 47
Opening the bonnet 127
Dashboard fuses 145-146
Vehicle conguration 87-89
Setting the time 88
Headlamp beam height
adjustment 47
Front/rear fog lamps 45
Pneumatic suspension 96-97
Stop & Start 40-42
Additional heating, rear air
conditioning 65-66
Programmable additional
heating 67-70
Instruments and controls 4-5
Steering wheel, reach adjustment
Horn 99
Steering mounted radio
controls 186, 233
Mirrors, electric windows 85-86
Locking the load space 22
37
Front/rear wipers 48
Screenwash/headlamp wash 48
trip computer 92
Starter, ignition switch 38
Hill start 39
Cruise control 49-51, 52-54
Speed limiter 55-57
Fixed speed limiter 58
tachograph 93
Vehicle conguration 90-91
Setting the time 91
Reversing camera 95
touch screen audio
system 183-230
Audio system 231-247
gearbox 36-37
Parking sensors 94-95
Location
9
Cab ttings 76-80
● cigarette lighter,
● glove box - cooled,
● overhead storage,
● portable ashtray,
● courtesy lamps,
● 12 volt socket / USB port,
● writing table / multifunction
support,
● storage compartments.
Ventilation, heating,
A/C 60-62, 63-64
● manual air conditioning,
● mono-zone digital air
conditioning,
● air recirculation.
Demisting-defrosting 59
Central locking 22
Locking indicator lamp 22
Hazard warning lamps 98
Lane departure warning
system 105
Hill descent control 104
Intelligent traction Control 103
ASR, DSC 101-102
OVERVIEW
1
Location
10
tEcHnIcAL dAtA - MAIntEnAncE
Levels 129-130
● dipstick,
● brake fluid,
● screenwash / headlamp wash
fluid
● power steering fluid,
● coolant.
Bulbs, lighting, changing
bulbs 149-154
Very cold conditions protectors 84
Opening the bonnet, stay 127
under the bonnet 128
Labels / Precautions 168-171
engines 177-178
Changing a wiper blade 155
Water bleed, Diesel lter 131
Particle lter 133
emission control 33, 139
Checks 131-133
● battery,
●
air/passenger compartment filter,
● oil filter,
● manual gearbox,
● parking brake,
● brake discs and pads.
Identication markings, serial
number, paint, tyres 182
engine fuses 145, 148
Dimensions 172-176
Weights 179-181
EnVIronMEnt
Motoring & the Environment
11
With you, PeugeOt acts to protect
the environment.
We invite you to visit the www.peugeot.co.uk
website.
As the driver, you also can contribute to
protecting the environment in the following
way:
- drive smoothly, without frequent and
harsh acceleration,
- observe the service intervals;
we recommend that services are carried
out by a PeugeOt dealer, authorised
to collect used batteries and fluids,
- in order to preserve the reliability of the
engine and emission control systems,
do not use engine oil additives.
Refer to information on eco-driving at
the end of this section.
OVERVIEW
1

Motoring & the Environment
12
Eco-drIVInG
eco-driving is a range of everyday practices that allow the motorist to optimise their fuel consumption and CO
optimise the use of your gearbox
With a manual gearbox, move off gently and change up without
waiting. While accelerating changing up early. If your vehicle has
the system, the gear shift indicator invites you to engage the most
suitable gear; follow its instructions as soon as it is displayed in
the instrument panel.
control the use of your electrical equipment
Before moving off, if the passenger compartment is too warm,
ventilate it by opening the windows and air vents before using the
air conditioning.
Above 30 mph (50 km/h), close the windows and leave the air
vents open.
Remember to make use of equipment that can help keep the
temperature in the passenger compartment down (window
blinds...).
Switch off the air conditioning, unless it has automatic digital
regulation, as soon as the desired temperature is attained.
Switch off the demisting and defrosting controls, if not automatic.
drive smoothly
Maintain a safe distance between vehicles, use engine
braking rather than the brake pedal, and press the accelerator
Switch off the heated seat as soon as possible.
Switch off the headlamps and front foglamps when the level of
light does not require their use.
progressively. these practices contribute towards a reduction in
fuel consumption and CO
background traffic noise.
emissions and also helps reduce the
2
If your vehicle has cruise control, make use of the system at
speeds above 20 mph (30 km/h) when the traffic is flowing well.
Avoid running the engine before moving off, particularly in winter;
your vehicle will warm up much faster while driving.
As a passenger, if you avoid connecting your multimedia devices
(film, music, video game...), you will contribute towards limiting the
consumption of electrical energy, and so of fuel.
Disconnect your portable devices before leaving the vehicle.
emissions.
2

Motoring & the Environment
13
Limit the causes of excess consumption
Spread loads throughout the vehicle; place the heaviest items in
the bottom of the boot, as close as possible to the rear seats.
Limit the loads carried in the vehicle and reduce wind resistance
(roof bars, roof rack, trailer...).
At the end of winter, remove snow tyres and refit your summer
tyres.
observe the recommendations on maintenance
Check the tyre pressures regularly, when cold, referring to the
label in the door aperture, driver's side.
Carry out this check in particular:
- before a long journey,
- at each change of season,
- after a long period out of use.
Don't forget the spare wheel and the tyres on any trailer or
caravan.
Have your vehicle serviced regularly (engine oil, oil filter, air
filter, cabin filter...) and observe the schedule of operations in the
manufacturer's service schedule.
With a BlueHDi Diesel engine, if the SCR has a fault your vehicle
becomes polluting; go to a PeugeOt dealer or a qualified
workshop as soon as possible to bring the levels of nitrous oxide
emissions back into line with the regulations.
When refuelling, do not continue after the 3
to avoid any overflow.
At the wheel of your new vehicle, it is only after the first
1 800 miles (3 000 kilometres) that you will see the fuel
consumption settle down to a consistent average.
rd
cut-off of the nozzle
OVERVIEW
1
14
Access
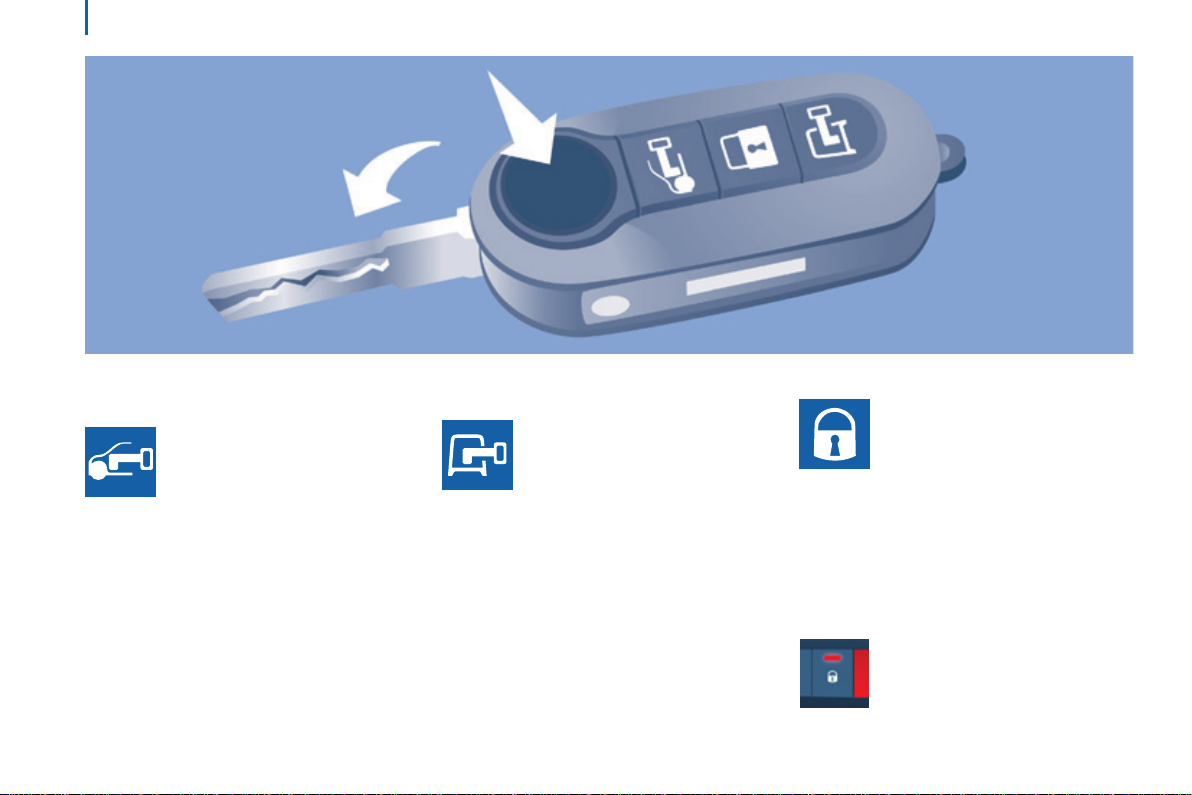
3-Button rEMotE controL
unlocking the cab
Pressing this button unlocks your
vehicle's cab.
the interior courtesy lamp comes
on briefly and the direction
indicators flash twice.
the indicator lamp in the central locking
button, located in the dashboard, goes off.
unlocking the
load space
Pressing this button unlocks the
side door and the rear doors of
the load space.
The direction indicators ash twice.
If your vehicle has an alarm, pressing this
button deactivates it.
central locking
Pressing this button briefly locks
all of your vehicle's doors, cab
and load space. If one of the
doors is open or is not closed
correctly, the central locking will not work.
the direction indicators flash once. the
indicator lamp on the control on the centre
console comes on then flashes.
If your vehicle has an alarm, pressing this
button sets it.
the indicator lamp in the central
locking button, located in the
dashboard, comes on and
flashes.

Access
2-Button rEMotE controL
central unlocking
Pressing this button
simultaneously unlocks all of your
vehicle's doors.
the interior courtesy lamp comes
on for a moment and the direction indicators
flash twice.
If your vehicle has an alarm, pressing this
button deactivates it.
the indicator lamp in the central locking
button, located in the dashboard, goes off.
central locking
Pressing this button
simultaneously locks all of your
vehicle's doors. If one of the
doors is open or not fully closed,
the central locking does not take place.
the direction indicators flash twice.
If your vehicle has an alarm, pressing this
button sets it.
the indicator lamp in the central
locking button, located in the
dashboard, comes on and
flashes.
deadlocking
Pressing this button twice in
succession deadlocks the
vehicle. It is then impossible to
open the doors from the inside or
the outside.
the direction indicators flash three times.
Never leave anyone inside the vehicle
when it is deadlocked.
Folding / unfolding the key
Press this button to release the
key from its housing.
to fold the key, press the button
then fold the key into the housing.
If you do not press the button, there is
a risk of damaging the mechanism.
15
READY TO SET OFF
2
16
Access
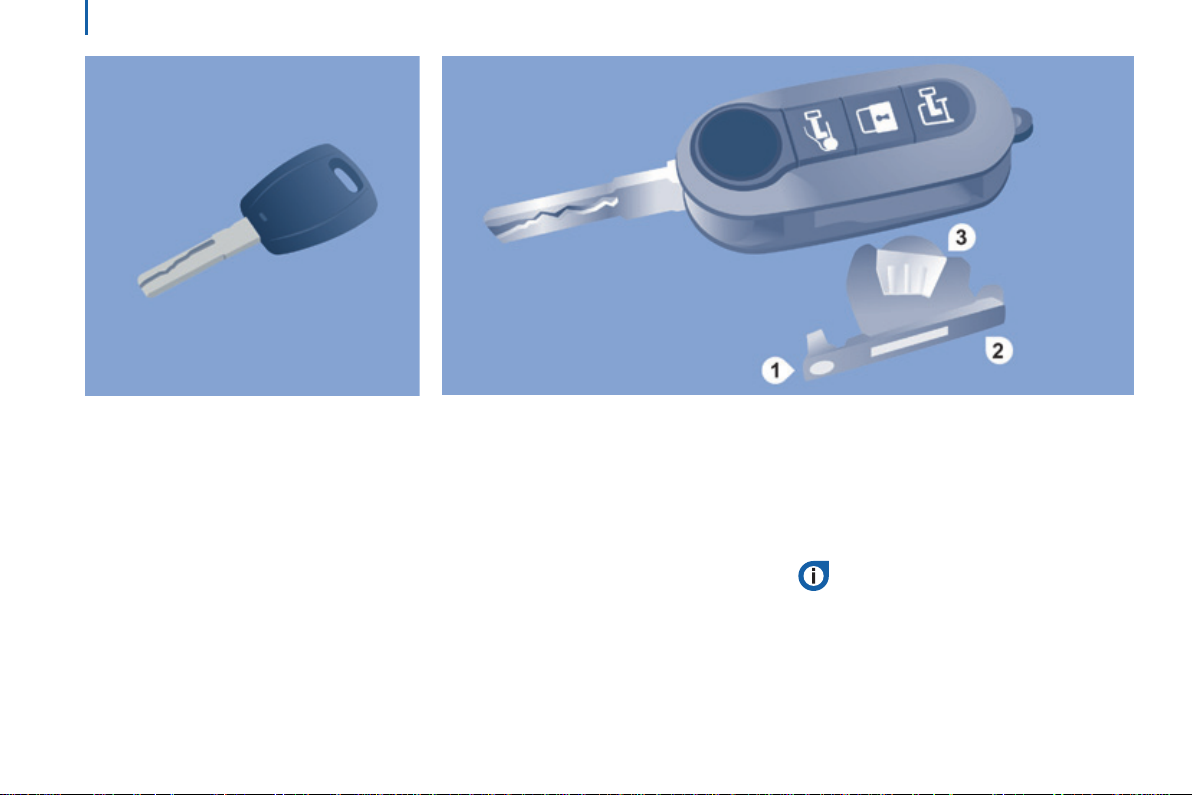
KEY
this locks and unlocks the vehicle's doors,
opens and closes the fuel filler cap, as well
as starting and stopping the engine.
rEMotE controL BAttErY
Reference: CR 2032/3 volts.
changing the battery
- Press the button to eject the key.
- turn the screw 1 from the closed
padlock to the open padlock using a
screwdriver with a thin lip.
- use the screwdriver as a lever to extract
the battery holder housing 2.
- Remove the housing and change the
battery 3 observing the polarities.
- Put the battery holder housing 2 back
inside the key and secure it by turning
the screw 1.
there is a risk of damage if the
replacement battery is not of the
correct type.
Only use batteries which are identical or of
an equivalent type to those recommended
by a PeugeOt dealer. take used batteries
to an authorised collection point.
Access
MAIn FunctIonS oF tHE KEY
type of key unlocking the cabin Locking the doors unlocking the rear doors
Mechanical key
Remote control -
Signalling
Direction indicators 2 flashes. 1 flash. 2 flashes.
Indicator lamp in the central
locking control button on the
dashboard
using the mechanical key in the drivers' door lock barrel does not activate (set) or deactivate the alarm.
turn anti-clockwise (driver's
side).
Off.
turn clockwise (driver's side).
On for about 3 seconds, then
flashing.
17
-
Flashing.
READY TO SET OFF
2
Access
ELEctronIc IMMoBILISEr
18
All of the keys contain an electronic
immobiliser device.
this device locks the engine supply system.
It is activated automatically when the key is
removed from the ignition.
After the ignition is switched on, a dialogue
is established between the key and the
electronic immobiliser system.
Operating the remote control, even when it
is in your pocket, may result in involuntary
unlocking of the doors.
the simultaneous use of other high
frequency equipment (mobile telephones,
domestic alarms…), may interfere with the
operation of the remote control temporarily.
the remote control does not operate while
the key is in the ignition, even if the ignition
is off, except for reinitialisation.
this warning lamp is switched off
after the ignition is switched on
and the key has been recognised,
the engine can be started.
If the key is not recognised, the engine
cannot be started. use another key and
have the faulty key checked by a PeugeOt
dealer.
Good practice
Make a careful note of the key number. If the
keys are are lost, it will be easier for your
PeugeOt dealer to help if you can supply
this number and the confidential card.
Do not make any modifications to the
electronic immobiliser system.
When purchasing a second-hand vehicle:
- ensure that you are given the
confidential card,
- have the keys memorised by a
PeugeOt dealer to ensure that the
keys in your possession are the only
ones which can start the vehicle.
Driving with the doors locked may
make access to the passenger
compartment by the emergency services
more difficult in an emergency.
As a safety precaution (with children on
board), remove the key from the ignition
when leaving the vehicle, even for a short
time.
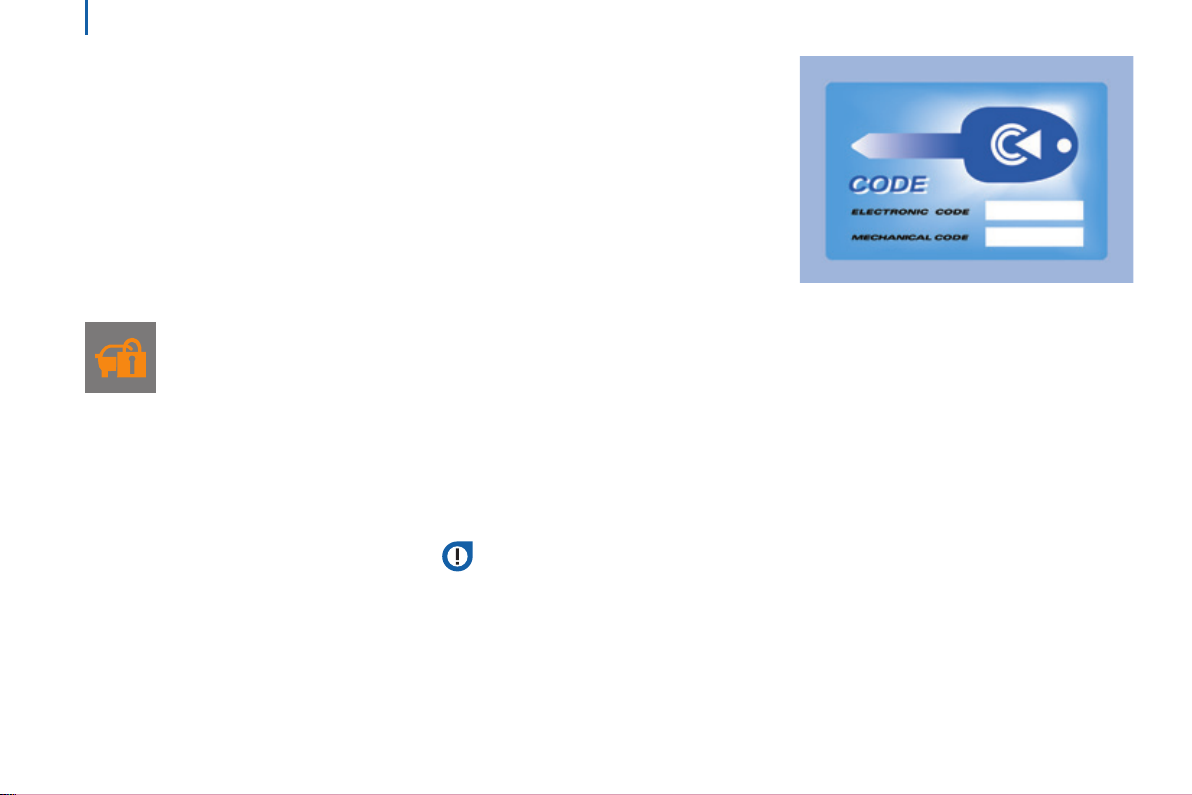
conFIdEntIAL cArd
this is given to you on delivery of your
vehicle with the duplicate keys.
It contains the identification code necessary
for any work carried out by a PeugeOt
dealer on the electronic immobiliser system.
this code is hidden by a film, which should
be removed only if necessary.
Keep your card in a safe place, never inside
the vehicle.
When undertaking a long trip or journey,
however, it is advisable to take it with you
along with your personal papers.
Access
ALArM
If your vehicle is fitted with an anti-theft
alarm.
this provides:
- exterior perimeter protection by
detectors on the openings (doors,
bonnet) and on the electrical power
supply,
- anti-tilt protection*.
Activation of the alarm
First ensure that all of the doors and bonnet
are closed correctly.
the alarm is set by pressing this
padlock, the protection is active
after a few seconds.
While the alarm is monitoring,
any intrusion triggers the siren for
approximately 30 seconds, accompanied by
illumination of the direction indicators.
the alarm then returns to
monitoring mode but the
triggering event is stored and is
indicated by illumination of the
electronic immobiliser warning lamp for about
10 seconds when the ignition is switched on.
the alarm is also triggered following an
electrical supply cut-off, when the supply is
restored.
remote control fault
unlock the doors by using the key in the
door lock; the alarm is triggered.
Switch on the ignition, recognition of the
key's code turns off the alarm.
Locking the doors by using the key in
the door lock does not set the alarm.
deactivation using the remote control
When this button is pressed, the
alarm is deactivated when the
vehicle is unlocked.
deactivation of the anti-tilt
protection*
Press this control to deactivate
the protection (when towing the
vehicle with the alarm on, for
example).
the protection remains active
until the doors are unlocked with the central
locking.
* Depending on engine.
Good practice
to deactivate the siren quickly following
a false alarm:
- switch on the ignition, recognition of the
key's code will switch off the alarm,
- press the unlocking button (cab and key)
on the remote control.
to avoid setting the alarm, when washing
the vehicle for example, lock the vehicle
using the key.
unlocking the vehicle using the remote
control deactivates the siren automatically.
19
READY TO SET OFF
2
20
Access
Front doorS
use the corresponding button on the remote
control or use the key in the driver's door
lock barrel to unlock.
Pull the handle towards you.
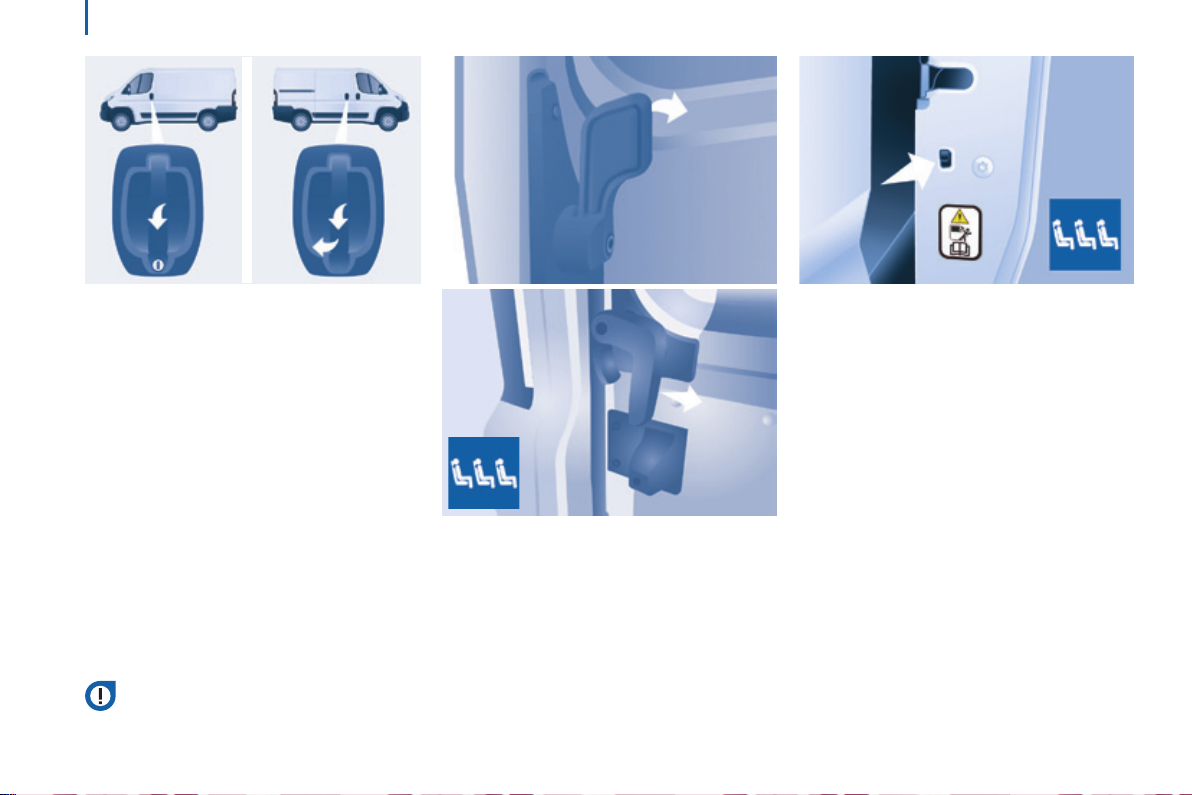
SLIdInG SIdE door
take care not to obstruct the guide space
on the floor in order for the door to slide
correctly.
From outside
Pull the handle towards you then towards
the rear.
Do not drive with the sliding side door
open.
child lock
this prevents opening of the sliding side
door from the inside.
Press the control located on the edge of the
side door.
From inside
to unlock and open, push the handle
towards the rear.
ensure that the door opens fully in order
for the latch at the bottom of the door to
engage.
to release and close, pull the handle while
sliding the door.
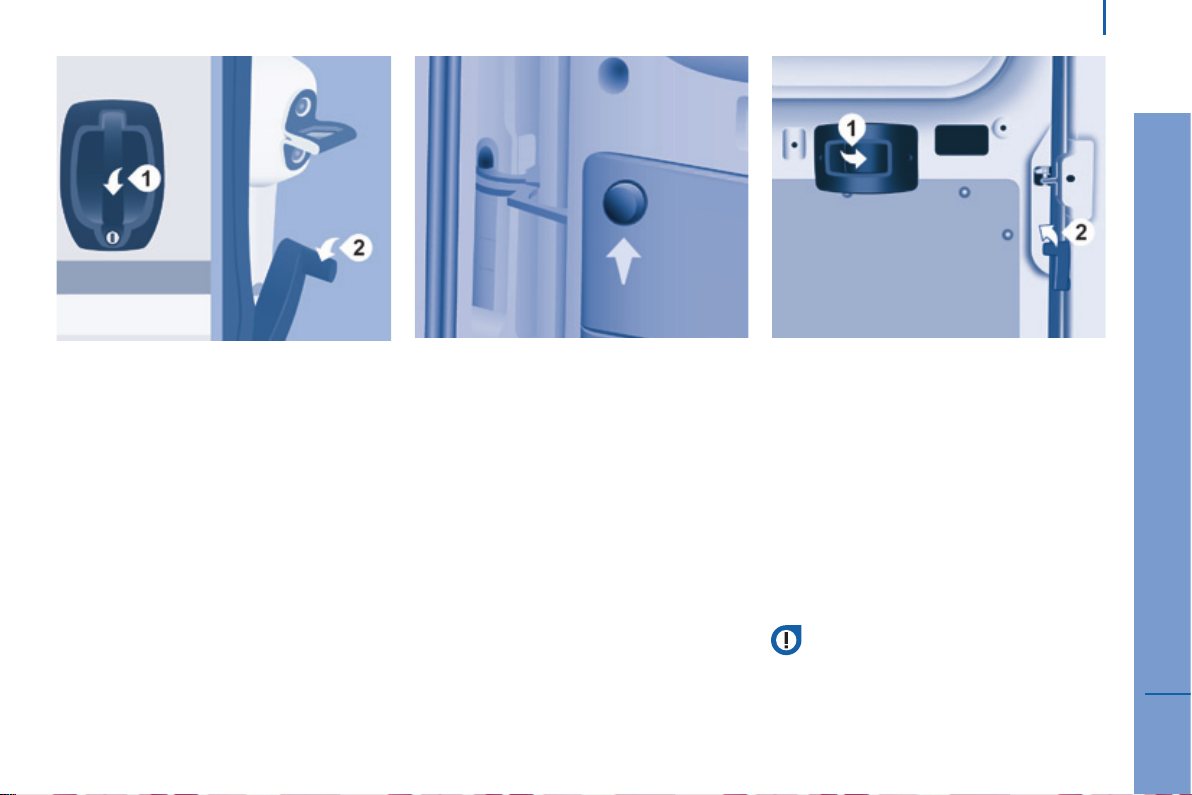
rEAr doorS
From outside
opening / closing
to open, pull the handle towards you then
pull the lever to open the left-hand door.
the two hinged doors open to 96°.
to close, start with the left-hand door then
close the right-hand door.
opening to 180°
If your vehicle is fitted with this equipment,
a retractable check strap system permits
extending of the opening from 96° to 180°.
Press the button, located on the door trim
pad, to widen the angle of the door.
the check strap will take up its normal
position again automatically on closing.
Access
21
From inside
Pull the handle on the door panel towards
you, then push to open the right hand door.
Push the lever to open the left hand door.
to close, start with the left hand door, then
close the right hand door.
Do not drive with a rear door open.
READY TO SET OFF
2
Access
22
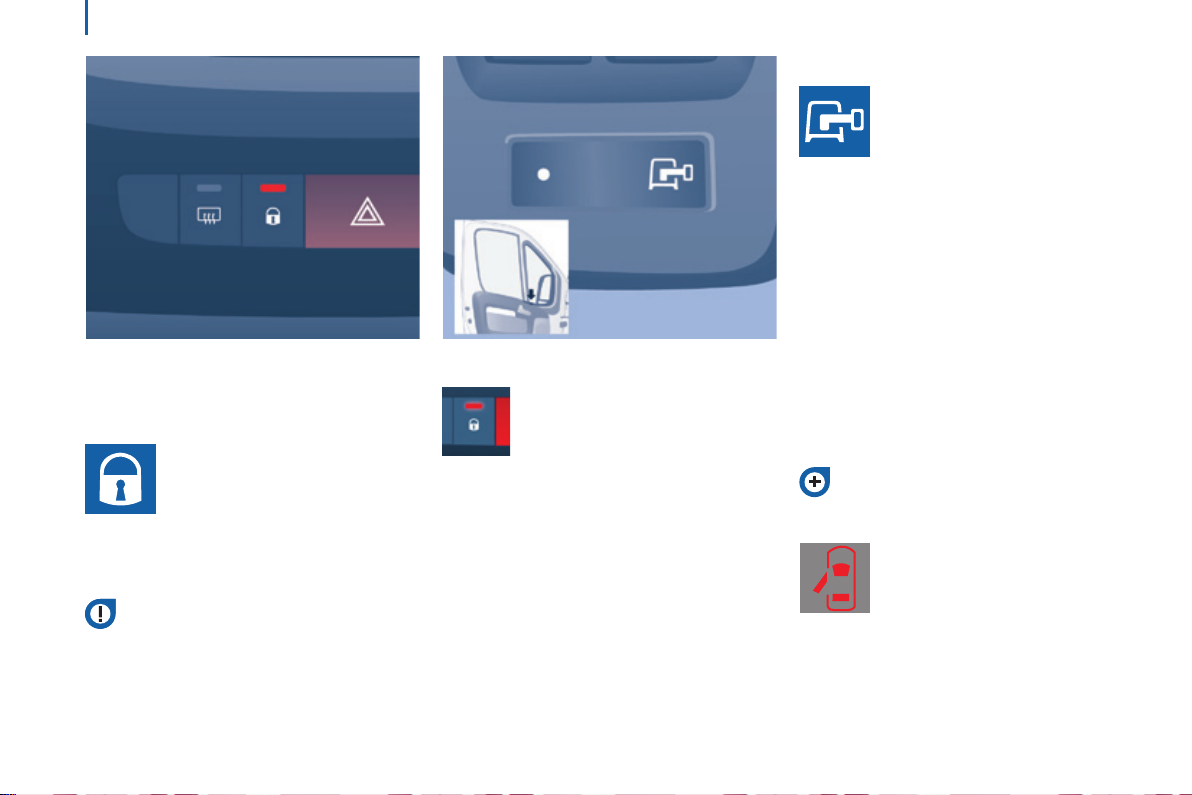
LocKInG / unLocKInG FroM InSIdE
cab and load space
Pressing permits electric central
locking and unlocking, when the
doors are closed.
the doors can still be opened from the
inside.
If one of the doors is open or is not
closed correctly, the central locking
does not work.
the indicator lamp in the control:
- comes on when the doors
are locked and the ignition is
switched on,
- then flashes when the doors
are locked when stationary
with the engine off.
the control is not active when the vehicle
has been locked using the remote control or
the key from the outside.
Good practice
If you decide to drive with the doors locked,
be aware that this could make access to the
vehicle by the emergency services more
difficult in an emergency.
Load space
Press to lock or unlock the side
door and rear doors from the cab.
the indicator lamp remains on
when locked
Anti-intrusion security
When the vehicle is started, the system
locks the cab and load space doors
automatically when you reach approximately
12 mph (20 km/h).
If none of the doors is opened during the
journey, the locking remains active.
Activation/deactivation of the system
the system setting is made with the ModE
button: in the "Autoclose" menu, select "ON"
or "OFF".
Refer to the "technology on board Vehicle configuration" section.
door open warning lamp
If this warning lamp comes on,
check that all of the doors and
the bonnet are closed correctly.
reversing camera
With the vehicle stationary, opening the rear
doors activates the camera and sends the
image to the screen fitted in the cab.
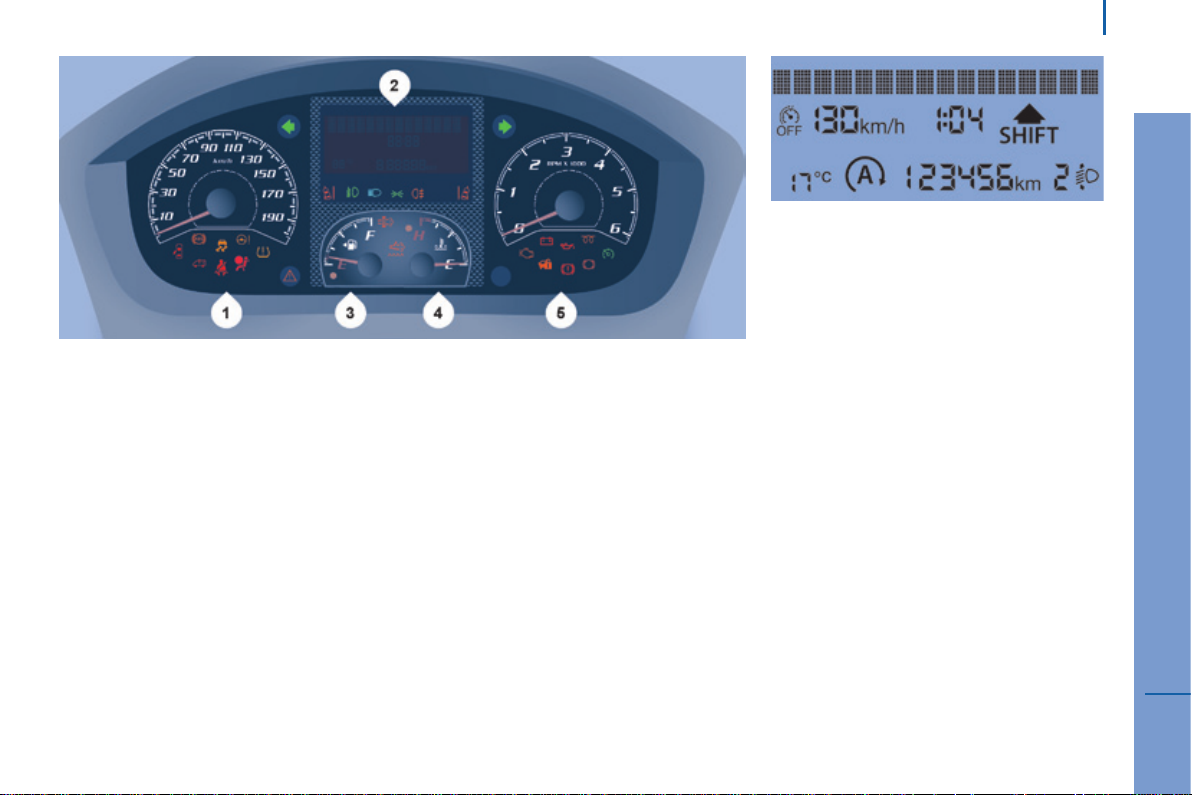
InStruMEnt PAnEL
1. Distance recorder in miles / kilometres.
2. Screen.
3. Fuel gauge.
4. Coolant temperature.
5. Rev counter.
Instruments and controls
23
display screen
In the lower part:
- time,
- Ambient temperature,
- Miles / Kilometres travelled,
- trip computer (range, fuel
consumption...),
- Headlamp beam height,
- Programmable overspeed warning,
- Cruise control or speed limiter,
- gear shift indicator,
- Stop & Start.
In the upper part:
- Date,
- Service indicator,
- Alert messages,
- System status messages,
- Vehicle configuration.
READY TO SET OFF
2
Instruments and controls
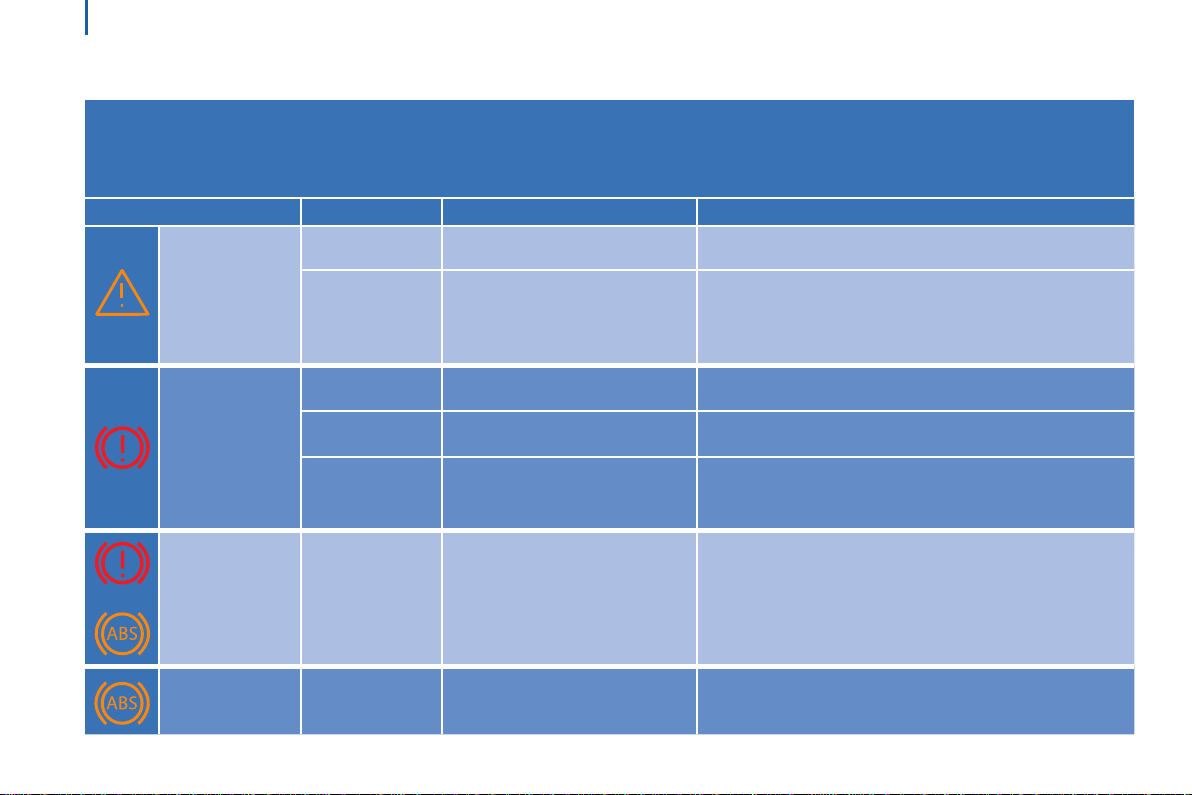
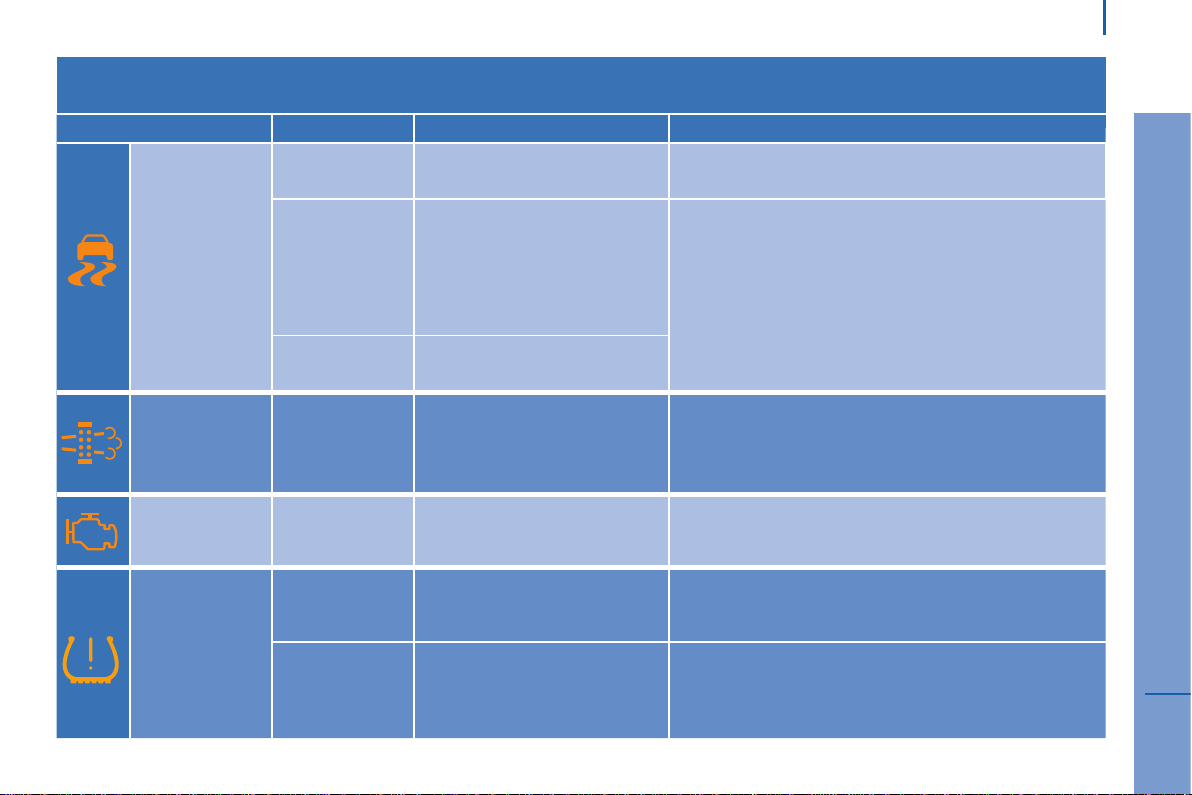
WArnInG/IndIcAtor LAMPS
24
every time the engine is started: a series of warning lamps comes on, applying a self-checking test. they go off almost immediately.
When the engine is running: a warning lamp becomes an alert if it remains on continuously or flashes. this initial warning may
be accompanied by an audible signal and a message in the screen. "Do not ignore these warnings."
Warning/indicator lamp is indicates Solution - action
on temporarily. minor faults. Contact a PeugeOt dealer or a qualified workshop.
Service
Parking brake Brake fluid level
electronic brake
+
force distribution
Anti-lock braking
system
continuously on,
accompanied by
a message on
the screen.
on.
on. that the fluid level is too low. top up with a fluid listed by PeugeOt.
continuously on,
even though the
level is correct.
on. a fault with the system.
on. a fault with the system.
major faults.
that the parking brake is applied
or has not been released correctly.
Make a note of the warning message and contact a
PeugeOt dealer or a qualified workshop.
Releasing the parking brake switches off the warning
lamp.
Stop as soon as it is safe to do so. Park, switch off
the ignition and contact a PEuGEot dealer or a
qualified workshop.
Stop as soon as it safe to do so. Contact a PeugeOt
dealer or a qualified workshop.
the vehicle retains conventional braking without
assistance. However, we recommend that you stop and
contact a PeugeOt dealer or a qualified workshop.
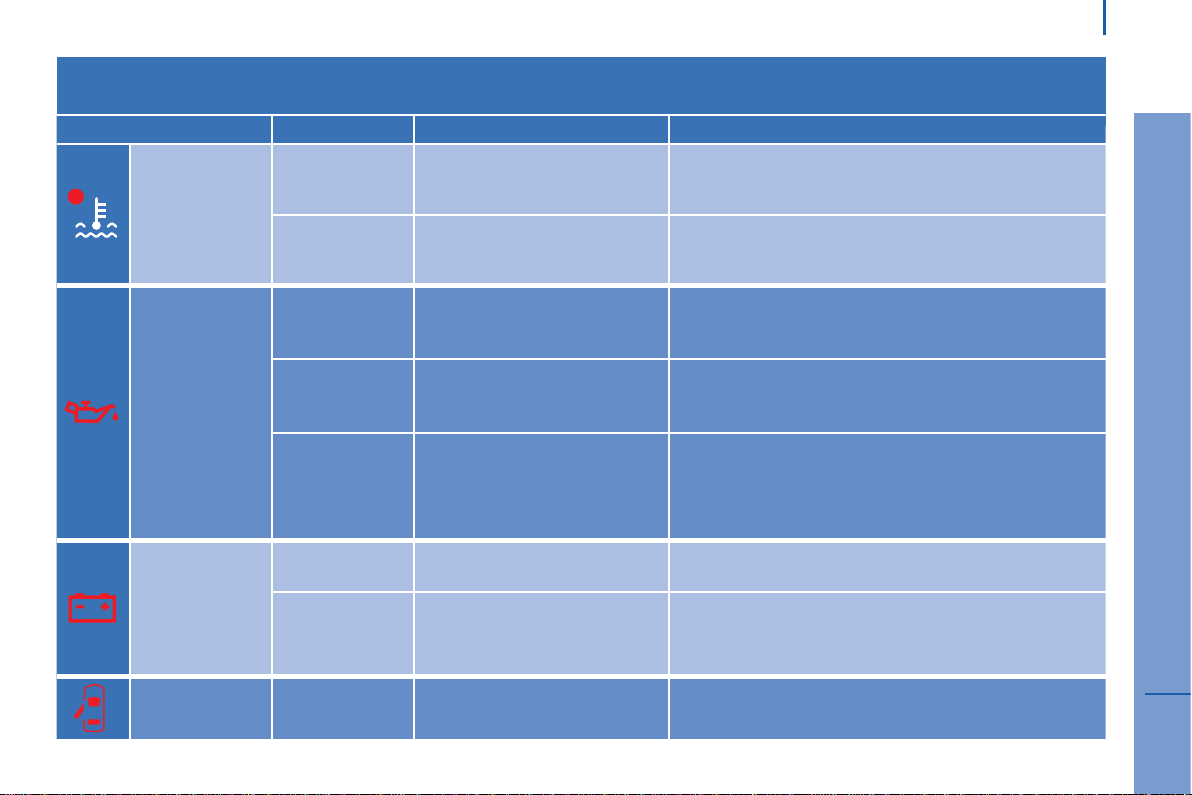
Warning/indicator lamp is indicates Solution - action
Coolant
temperature
engine oil
pressure
on with the
needle in the red
zone.
on H in the red
zone.
on while driving. that the pressure is too low.
continuously on,
even though the
level is correct.
flashing, for a
few seconds,
with a message
in the screen.
an abnormal increase.
the coolant temperature is too
high.
a major fault. Contact a PeugeOt dealer or a qualified workshop.
a high level of deterioration of
the engine oil.
Park and switch off the ignition. Allow the system to cool
sufficiently. Visually check the level.
"Checks - Levels and checks" section.
Contact a PeugeOt dealer or a qualified workshop.
Park and switch off the ignition. Allow the lubrication
system to cool in order to check its level.
"Checks - Levels and checks" section.
Have the engine oil changes as soon as possible. After
the second level of alert, engine performance will be
limited. Your vehicle's programmed service schedule is
not altered.
Instruments and controls
25
Battery charge
Door or bonnet
open detection
on.
continuously on,
fixed or flashing
in spite of the
checks.
on.
a fault with the charging
system.
an ignition or injection fault.
that a door or the bonnet is not
closed correctly.
Check the battery terminals…
"Quick help - Flat battery" section.
Have it checked by a PeugeOt dealer or a qualified
workshop.
Check that the cab doors, the rear and side doors and
the bonnet are closed.
READY TO SET OFF
2
Instruments and controls
26
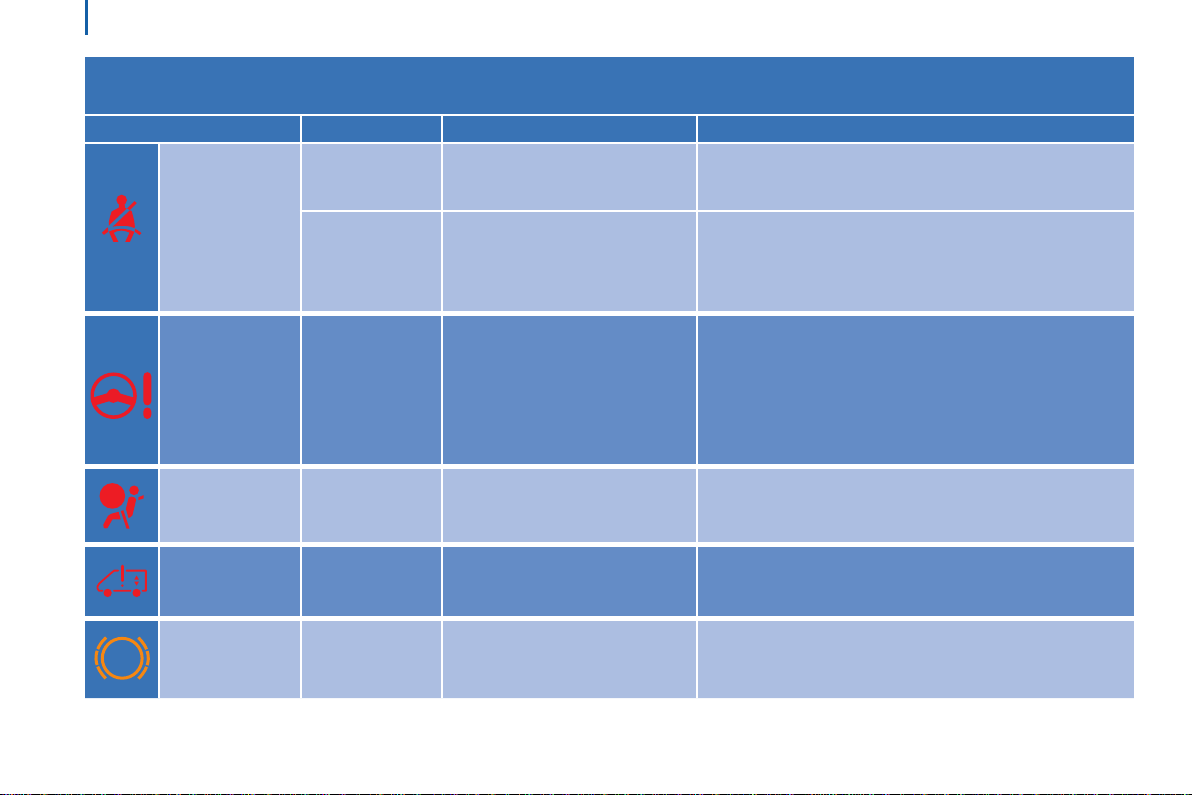
Warning/indicator lamp is indicates Solution - action
on then flashes.
Seat belt not
fastened
Power steering
Front/lateral
airbag
Pneumatic
suspension
Brake pads on. front brake pads worn.
accompanied
by an audible
signal then
remains on.
on,
accompanied
by an audible
signal and a
message in the
screen.
flashing or
continuously on.
on. a fault with the system.
that the driver has not fastened
his seat belt.
that the vehicle is moving
with the driver's seat belt
unfastened.
a fault with the system.
a fault with an airbag or a seat
belt pretensioner.
Pull the strap then insert the tongue in the buckle.
Check that the seat belt is fastened correctly by pulling
the strap.
"Safety - Seat belts" section.
the vehicle retains conventional steering without
assistance.
Have it checked by a PeugeOt dealer or a qualified
workshop.
Have it checked by a PeugeOt dealer or a qualified
workshop.
"Safety - Airbags" section.
Have it checked by a PeugeOt dealer or a qualified
workshop.
Have the brake pads replaced by a PeugeOt dealer or
a qualified workshop.
Warning/indicator lamp is indicates Solution - action
flashing. that it is in operation.
on,
accompanied
DSC/ASR
Particle filter on.
by an audible
signal and a
message in the
screen.
on.
a fault with the system or the
hill start assist.
a fault with the Intelligent
traction Control.
the regeneration of the particle
filter.
the system optimises traction and allows improved
directional stability of the vehicle.
Contact a PeugeOt dealer or a qualified workshop.
"Safety - Driving safely" section.
It is recommended that you leave the engine running
until the warning lamp goes off so that regeneration can
be completed.
"Checks - Levels and checks" section.
Instruments and controls
27
emission control
system
tyre underinflation
detection
on. a fault with the system.
on. a tyre deflated or punctured.
on,
accompanied
by the service
warning lamp.
a faulty sensor.
Have the system checked by a PeugeOt dealer or a
qualified workshop without delay.
Park and switch off the ignition. Change or repair the
wheel.
Have it checked by a PeugeOt dealer or a qualified
workshop.
READY TO SET OFF
2
Instruments and controls
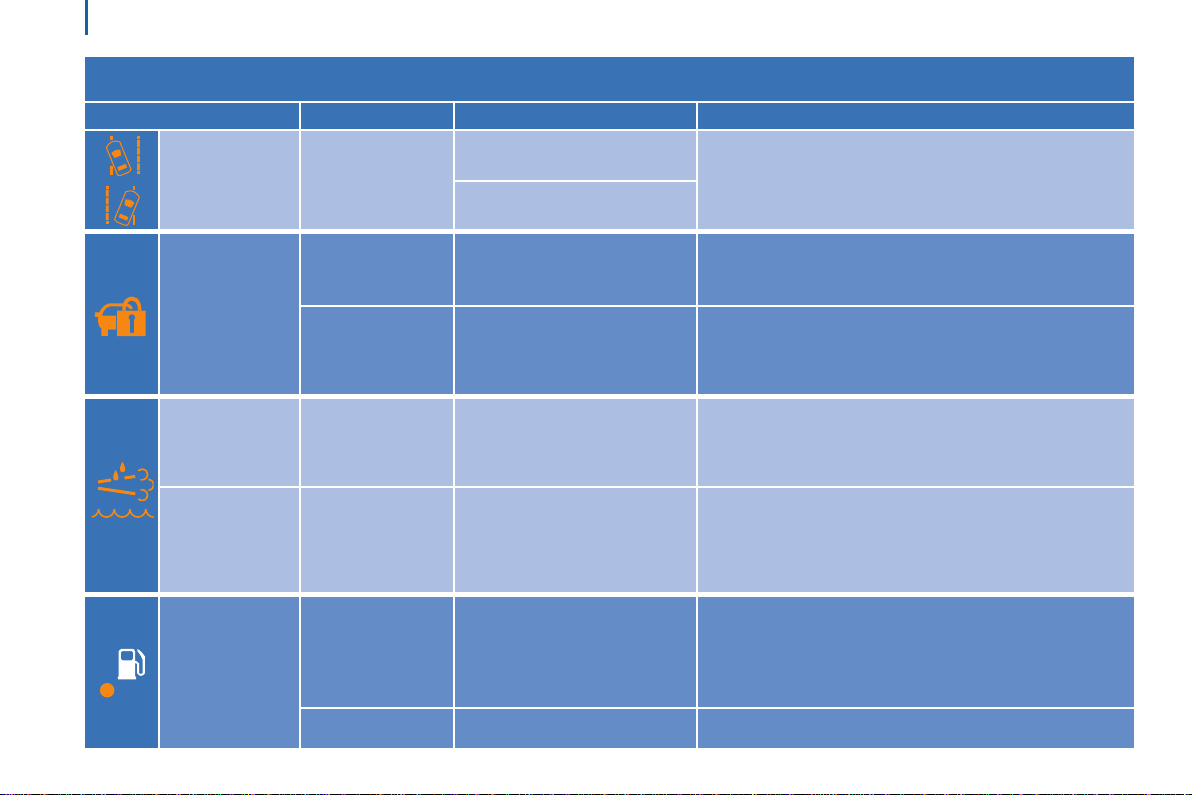
28
Warning/indicator lamp is indicates Solution - action
Lane departure
warning
electronic
immobiliser
Water in Diesel
fuel filter
AdBlue additive
Low fuel level
flashing,
accompanied by
an audible signal.
on.
on for 10 seconds
when switching on
the ignition.
on, accompanied
by a message in
the screen.
on, then flashing,
accompanied by
a message in the
screen.
on with the needle
in zone e.
flashing. a fault with the system. Contact a PeugeOt dealer or a qualified workshop.
unintended wander to the left.
unintended wander to the
right.
the ignition key introduced
has not been recognised
Staring is not possible.
triggering of the alarm.
that there is water in the fuel
filter.
reduced driving range.
that the fuel reserved is being
used.
turn the steering wheel in the other direction to return
to the correct trajectory.
Change the key and have the faulty key checked by a
PeugeOt dealer.
"Ready to set off - Access" section.
Have the state of the locks checked by a PeugeOt
dealer or a qualified workshop.
Have the filter bled by a PeugeOt dealer or a qualified
workshop.
"Checks - Levels and checks" section.
Have the AdBlue topped-up without delay.
Do not wait until the remaining range is 0 miles, you will
not be able to restart the engine!
"Checks - AdBlue" section.
Fill up with fuel without delay. the calculation of the
remaining fuel depends on the style of driving, the
profile of the road, the time elapsed and the distance
travelled since the warning lamp first came on.

Warning/indicator lamp is indicates Solution - action
Instruments and controls
29
Diesel
pre-heater
Dipped beam
Main beam
Direction
indicators
Front foglamps on.
Rear foglamps on.
Cruise control on.
on.
on.
flashing with
buzzer.
the ambient temperature
necessitates pre-heating.
a manual selection.
that the control stalk has been
pulled towards you.
a change of direction using the
lighting stalk.
that the button on the MODe
control panel has been pressed.
that the button on the MODe
control panel has been pressed.
that the cruise control has been
selected.
Wait until the lamp goes off before operating the starter.
turn the lighting control stalk ring to the second
position.
Pull the lighting control stalk again to return to dipped
beam.
to the Right: press the stalk upwards.
to the Left: press the stalk downwards.
Manual selection.
the foglamps only operate if the dipped beam
headlamps are on.
Manual selection.
the lamps only operate if the dipped beam headlamps
are on. When visibility is normal, please switch them off.
Manual selection.
"ease of use and comfort - Steering mounted controls"
section.
READY TO SET OFF
2

Instruments and controls
30
Screen displays indicates Solution - action
temperature /
Ice
Date / time
Headlamp beam
height
Service spanner
Stop & Start
the ice warning,
the temperature
flashing
accompanied by
a message in
the screen.
a setting: date,
time.
a headlamp
height setting.
a service
spanner which
remains on.
on.
flashes for a few
seconds, then
goes off.
weather conditions which could
result in ice on the road.
a configuration via the "MODe"
menu.
a position from 0 to 3
depending on the load carried
that a service will soon be due.
engine going into StOP mode
after the the vehicle stops.
StOP mode temporarily
unavailable or automatic
operation of StARt mode.
Be particularly vigilant and do not brake sharply.
"Safety - Driving safely".
"technology on board - Vehicle configuration" section.
Adjust using the buttons on the MODe control panel.
"ease of use and comfort - Steering mounted controls"
section.
Refer to the list of checks in the warranty and
maintenance record, then have the service carried out.
As soon as you want to move off, the warning lamp
goes off and the engine restarts automatically in StARt
mode.
Special cases for StOP mode and StARt mode.
"Ready to set off - Starting and stopping" section.

Instruments and controls
31
Screen displays indicates Solution - action
gear shift
indicator
Speed limiter
an up arrow. the possibility of changing up. "Ready to set off - gearbox and steering wheel" section.
on with "OFF".
on. that the limiter is on.
that the limiter selected is not
active.
Manual selection.
"ease of use and comfort - Steering mounted controls"
section.
READY TO SET OFF
2

Instruments and controls
32
FuEL GAuGE
the fuel level is tested every time the
ignition is turned on.
the gauge is positioned on:
- F (Full): the fuel tank is full.
- E (Empty): the reserve is now being
used, the low fuel warning lamp comes
on continuously.
the reserve when the warning first comes
on is approximately:
- 10 litres for 60 and 90 litre tanks,
- 12 litres for 120 litre tanks.
Fuel tanks of different capacities (60 and
120 litres) are available as an option.
cooLAnt tEMPErAturE
the needle is positioned between
c (cold) and H (Hot): normal operation.
In arduous conditions of use or hot climatic
conditions, the needle may move close to
the red graduations.
If the needle enters the red zone or if the
warning lamp comes on:
- stop immediately, switch off the ignition.
the fan may continue to operate for
a certain time up to approximately
10 minutes.
- wait for the engine to cool down in
order to check the level and top it up if
necessary. Follow this advice:
the cooling system is pressurised. In order
to avoid any risk of scalding, unscrew the
cap by two turns to allow the pressure to
drop.
When the pressure has dropped, check the
level and remove the cap to top-up.
If the needle remains in the red zone,
contact a PeugeOt dealer or a qualified
workshop.
Refer to the "Checks - Levels and
checks" section.
Refer to the "Checks - Fuel" section.

Instruments and controls
EMISSIonS controLS
eOBD (european On Board Diagnosis)
is a diagnostics system which complies
with, among others, the standards on the
authorised emissions of:
- CO (carbon monoxide),
- HC (unburnt hydrocarbons),
- NOx (nitrous oxides) or particles,
detected by oxygen sensors placed
upstream and downstream of the
catalytic converters.
the driver is warned of any
malfunction of this emission
control system by the illumination
of this specific warning lamp in
the instrument panel.
there is a risk of damage to the catalytic
converter. Have it checked by a PeugeOt
dealer or a qualified workshop.
tYrE undEr-InFLAtIon dEtEctIon
System which automatically checks the
pressures of the tyres while driving.
the system continuously monitors the
pressures of the four tyres, as soon as the
vehicle is moving.
A pressure sensor is located in the valve of
each tyre.
the system triggers an alert if a drop in
pressure is detected in one or more tyres.
this system does not avoid the need
33
to check the tyre pressures regularly
(including the spare wheel) and before a
long journey.
Driving with under-inflated tyres
adversely affects road holding, extends
braking distances and causes premature
tyre wear, particularly under arduous
conditions (vehicle loaded, high speed, long
journey).
Driving with under-inflated tyres increases
fuel consumption.
the tyre pressures must be checked
when the tyres cold (vehicle stopped
for 1 hour or after driving for less then
6 miles (10 km) at moderate speed).
Otherwise, add 0.3 bar to the values
indicated on the label.
the tyre pressures for your vehicle can be
found on the tyre pressure label.
the tyre under-inflation detection
system is an aid to driving which does
not replace the need for vigilance on
the part of the driver.
to locate it, refer to the "technical
data - Identification markings" section.
READY TO SET OFF
2

Instruments and controls
under-inflation alert
34
In the event of a problem on one of the
tyres, the symbol or the message appears,
according to equipment, to identify it.
- Reduce speed, avoid sudden steering
- Stop as soon as it is safe to do so.
- In the event of a puncture, use the
- In the event of under-inflation:
The alert is given by the xed
illumination of this warning lamp,
accompanied by an audible signal,
and depending on equipment, the
display of a message.
movements or harsh brake applications.
temporary puncture repair kit or the
spare wheel (according to equipment).
● if you have a compressor, the one
in the temporary puncture repair
kit for example, check the four tyre
pressures when cold,
or
● if it is not possible to check the
tyre pressures at the time, drive
carefully at reduced speed and go to
the nearest PeugeOt dealer or a
qualified workshop.
the loss of pressure detected does not
always lead to visible deformation of
the tyre.
Do not rely on just a visual check.
the alert is maintained until the tyre or
tyres concerned is reinflated, repaired
or replaced.
operating fault
the flashing and then fixed
illumination of this warning lamp
accompanied by the illumination
of the service warning lamp, and
depending on equipment, the display of a
message indicates a fault with the system.
In this case, monitoring of the tyre pressures
is not assured.
this alert is also displayed when one or
more wheels is not fitted with a sensor.
go to a PeugeOt dealer or a qualified
workshop to have the system checked or,
following the repair of a puncture, to have
the original wheel, equipped with a sensor,
refitted.

Instruments and controls
SErVIcE IndIcAtor
For a few seconds after the ignition is
switched on, the spanner symbolising the
service indicator comes on: the screen
informs you when the next service is due,
in accordance with the servicing schedule
indicated in the warranty and maintenance
record. this information is determined in
relation to the distance travelled since the
previous service.
After a few seconds, the display returns to
its usual functions.
reminder of servicing information
At any time, to access the service indicator,
press briefly on the ModE button.
use the up/down arrows to see the
scheduling and engine oil wear information.
Pressing the ModE button again allows you
to return to the various display menus.
A long press returns you to the main menu.
Menu... choose...
Service
(miles/
km before
service)
11
Service
Oil (miles/
km before
oil change)
Refer to the "technology on board Vehicle configuration" section.
Allows you to...
Display the
distance
remaining
before the
next service.
Display
the miles/
kilometres to
the next oil
change.
deterioration of the engine oil
the warning lamp flashing and,
if your vehicle has the function,
a message displayed at every
engine start: the system has
detected deterioration of the engine oil.
Have the oil changed as soon as possible.
nd
this 2
warning lamp, coupled
with the 1
instrument panel when the oil
has not been changed and the
deterioration of the oil has reached another
threshold. to avoid the risk of damage, have
the oil changed without waiting for this level.
For 3.0 litre HDi engines, the engine speed
is restricted to 3 000 rpm, then 1 500 rpm
until the oil change is done. Have the engine
oil changed to avoid any risk of damage.
st
, comes on in the
resetting to zero
the continuous flashing of the indicator is
stopped by a qualified workshop using a
diagnostic tool.
Refer to the list of checks in the
warranty and maintenance record
which was given to you on handover of
the vehicle.
35
READY TO SET OFF
2

Gearbox and steering wheel
36
MAnuAL GEArBox
to change gear easily, always depress the
clutch pedal fully.
to prevent the mat from becoming caught
under the pedal:
- ensure that the mat is positioned
correctly,
- never fit one mat on top of another.
Avoid leaving your hand on the gear knob as
the force exerted, even if slight, may wear
the internal components of the gearbox over
time.
reverse gear
Raise the collar under the gear knob to
engage reverse gear.
Never engage reverse gear before the
vehicle is completely stationary.
the lever should be moved slowly to reduce
the noise on engaging reverse gear.
If your vehicle is fitted with parking
sensors, the system comes into
operation when reverse gear is engaged; an
audible signal is heard.
Refer to the "technology on board -
Parking sensors" section.
GEAr SHIFt IndIcAtor
Depending on the engine or version, this
system allows fuel consumption to be
reduced by suggesting when to change up.
the gear engagement recommendations
should not be considered to be compulsory.
this because the configuration of the
road, the traffic density and safety remain
determining factors when choosing the
best gear. therefore, the driver remains
responsible for deciding whether or not to
follow the advice given by the system.
the system never recommends engaging
first gear or reverse, or changing down.

Gearbox and steering wheel
operation
the information appears in the
instrument panel screen in the
form of the SHIFt indicator,
accompanied by an upward arrow
to signal to the driver that they can change up.
the system adapts its gear change
recommendations according to the driving
conditions (slope, load, ...) and demands
from the driver (for power, acceleration,
braking, ...).
Switching off
this system cannot be deactivated by the
driver.
37
StEErInG WHEEL AdjuStMEnt
With the vehicle stationary, first adjust your
seat to the most suitable position.
Release the steering wheel adjustment
mechanism by pulling the lever towards you.
Adjust the reach of the steering wheel, then
lock the mechanism by pushing the lever
fully forwards.
As a safety measure, these operations
must not be carried out while driving.
READY TO SET OFF
2
Starting and switching off
38
With the engine hot, the warning lamp comes
on for a few moments, you can start the engine
without waiting.
As soon as the engine is running, release the key.
door or bonnet open warning
lamp
If this warning lamp comes on,
check that the doors and bonnet
are closed correctly.
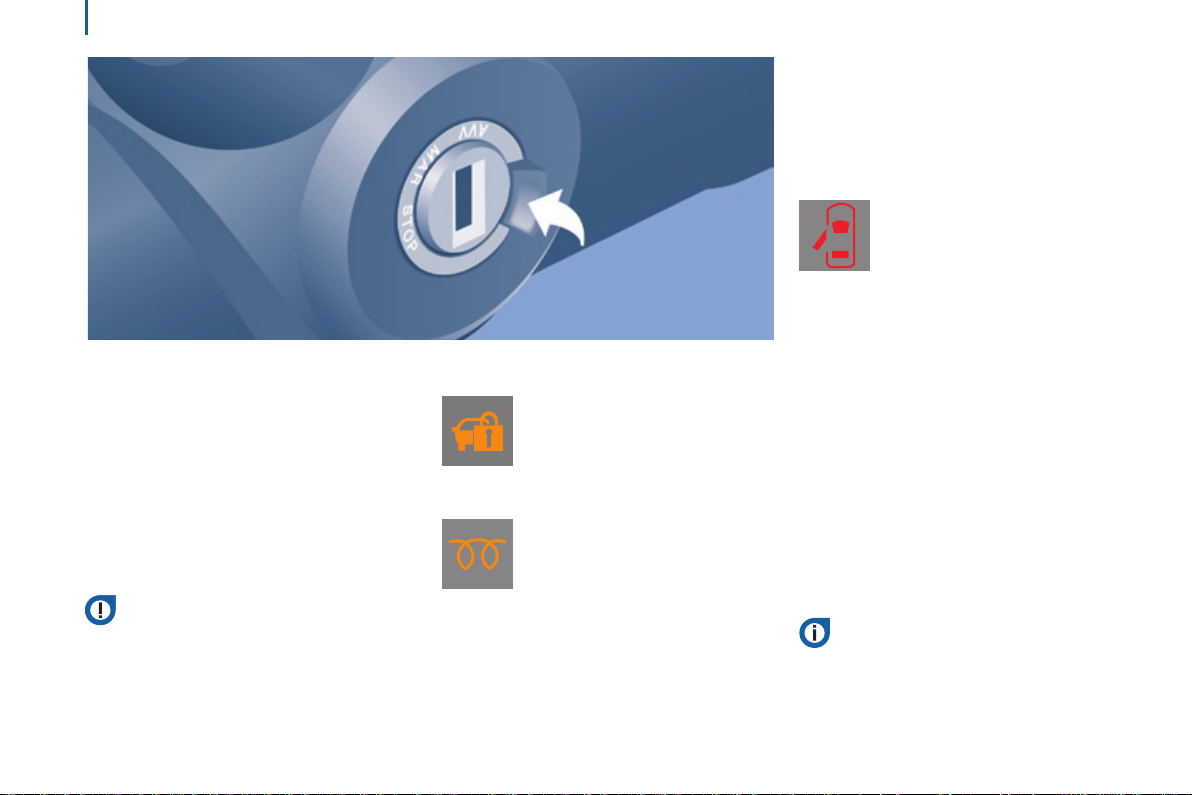
IGnItIon SWItcH
StoP position: steering lock.
the ignition is off.
MAr position: ignition on.
Certain accessories can be used.
AVV position: starter.
the starter is operated.
Avoid attaching heavy objects to the
key or the remote control, which would
weigh down on its blade in the ignition
switch and could cause a malfunction.
It could adversely affect the deployment of
the front airbag.
Starting the engine
Engine immobiliser warning lamp
If this warning lamp comes
on, use another key and have
the faulty key checked by a
PeugeOt dealer.
diesel pre-heating warning lamp
With the parking brake applied
and the gearbox in neutral, turn
the key to the MAr position.
Wait for this warning lamp to go off then
operate the starter (AVV position) until the
engine starts.
the period of illumination of the warning
lamp depends on the climatic conditions.
Switching off the engine
Stop the vehicle and apply the parking
brake, then, with the engine at idle, return
the key to the StoP position.
In low temperatures
In mountainous and/or cold areas, it is
advisable to use a "winter" type fuel suited
to low or minus temperatures.

HILL StArt ASSISt
this system (also called HHC - Hill Holder
Control), linked to the dynamic stability
control system, makes hill starts easier and
is activated in the following conditions:
- the vehicle must be stationary, engine
running, foot on the brake,
- the gradient of the road must be steeper
than 5%,
- uphill, the gearbox must be in neutral or
in a gear other than reverse,
- downhill, reverse gear must be engaged.
the Hill Start Assist system is a driving
aid. It is not an automatic vehicle parking
function or an automatic parking brake.
operation
With the brake pedal and clutch pedal
pressed, from the time you release the brake
pedal, without using the parking brake, you
have approximately 2 seconds to move off
before the vehicle starts to roll back.
During the moving off phase, the function
is deactivated automatically, gradually
releasing the braking pressure. During
this phase, the characteristic noise of
mechanical release of the brakes may be
heard, indicating the imminent movement of
the vehicle.
Starting and switching off
Hill start assist is deactivated in the following
situations:
- when the clutch pedal is released,
- when the parking brake is applied,
- when the engine is switched off,
- when the engine stalls.
operating fault
If a malfunction of the system
occurs, this warning lamp comes
on accompanied by an audible
signal and conrmed by a message
in the screen. Have the system checked by at
a PEUGEOT dealer or a qualied workshop.
39
READY TO SET OFF
2

Starting and switching off
StoP & StArt
40
the Stop & Start system puts the engine
temporarily into standby - StOP mode during stops in the traffic (red lights, traffic
jams, or other...). the engine restarts
automatically - StARt mode - as soon as
you want to move off. the restart takes
place instantly, quickly and silently.
Perfect for urban use, the Stop & Start
system reduces fuel consumption and
exhaust emissions and offers the comfort of
complete silence when stationary.
operation
Going into engine StoP mode
With the vehicle stationary, put the gear
lever into neutral, then release the clutch
pedal.
- this indicator lamp comes on
in the instrument panel and
the engine goes into standby.
Automatic stopping of the engine is
only possible after the vehicle has
exceed a speed of about 6 mph (10 km/h),
to avoid repeated stopping of the engine
when driving slowly.
Never leave your vehicle with out first
turning off the ignition with the key.
Never refuel with the engine in
StOP mode; you must switch off the
ignition with the key.
Special cases: StoP mode unavailable
the StOP mode is not invoked when:
- the system is initialising,
- the driver's door is open,
- the driver's seat belt is not fastened,
- the air conditioning is running,
- the heated rear screen is on,
- the windscreen wiper is on fast wipe,
- reverse gear is engaged, for a parking
manoeuvre,
- some special conditions (battery
charge, engine temperature, particle
filter regeneration, braking assistance,
ambient temperature...) where the
engine is needed to assure control of a
system.
this indicator lamp in the
instrument panel flashes for a
few seconds, then goes off.
this operation is perfectly normal.

Starting and switching off
Going into engine StArt mode
With the vehicle in gear, automatic engine
restarting is only allowed by fully depressing
the clutch pedal.
- this indicator lamp goes off
and the engine restarts.
If following an automatic restart in StARt
mode, the driver takes no action on the
the vehicle during the next 3 minutes, the
system stops the engine definitively. the
engine can then only be restarted using
the key.
Special cases: StArt invoked
automatically
the StARt mode is invoked automatically
when:
- the vehicle's is free wheeling on a slope,
- the windscreen wiper is on fast wipe,
- the air conditioning is running,
- the engine has been stopped for around
3 minutes with Stop & Start,
- some special conditions (battery charge,
engine temperature, braking assistance,
ambient temperature...) where the
engine is needed to assure control of a
system.
In this case, a message appears
in the instrument panel screen,
accompanied by this indicator
lamp, which flashes for a few
seconds, then goes off.
this operation is perfectly normal.
Good practice
With a manual gearbox in StOP mode, if a
gear is engaged without fully depressing the
clutch pedal, restarting may not take place.
An indicator lamp and/or message is
displayed in the instrument panel asking
you to fully depress the clutch pedal to allow
restarting.
With the engine stopped in StOP
mode, if the driver unfasten's
their seat belt and opens a front
door, the engine can only be
restarted using the ignition key. there is
an audible signal, accompanied by flashing
of this indicator lamp and the display of a
message.
41
READY TO SET OFF
2

Starting and switching off
42
deactivation
At any time, press the "A - oFF" switch to
deactivate the system.
Illumination of the switch indicator lamp,
accompanied by a message in the
instrument panel screen, confirms the the
instruction has been registered.
If the system has been deactivated
in StOP mode, the engine restarts
immediately.
It is necessary to deactivate the
Stop & Start system if you want
to allow continuous operation of the air
conditioning.
the switch indicator lamp stays on.
reactivation
Press the "A - oFF" switch again.
the system is active again; the switch
indicator lamp going off and a message
in the instrument panel screen confirm
reactivation.
operating fault
In the event of a fault with the system,
the Stop & Start system is deactivated
and this warning lamp comes on,
accompanied by a message in the
instrument panel screen.
Have it checked by a PeugeOt dealer or
a qualified workshop.
In the event of an operating fault with StOP
mode, it is possible to restart the engine by
depressing the clutch pedal fully and putting
the gear lever into neutral.
Maintenance
Before working under the bonnet, you
must switch off the ignition with the
key to avoid any risk of injury resulting from
automatic operation of StARt mode.
this system requires a specific battery
with a special specification and technology
(reference numbers available from a
PeugeOt dealer or a qualified workshop).
Fitting a battery not listed by
PeugeOt introduces the risk of malfunction
of the system.
Refer to the "Quick help - Flat battery"
section.
the Stop & Start system makes use
of advanced technology. Specialist
knowledge is needed for any work on the
system, which can only be assured by
PeugeOt dealers.

Starting and switching off
drIVInG rEcoMMEndAtIonS
Observe the driving regulations and remain
vigilant whatever the traffic conditions.
Pay close attention to the traffic and keep
your hands on the wheel so that you are
ready to react at any time to any eventuality.
On a long journey, a break every two hours
is strongly recommended.
In difficult weather, drive smoothly, anticipate
the need to brake and increase the distance
from other vehicles.
driving on flooded roads
We strongly advise against driving on
flooded roads, as this could cause serious
damage to the engine or gearbox, as well as
to the electrical systems of your vehicle.
If you are obliged to drive through water:
- check that the depth of water does not
exceed 15 cm, taking account of waves
that might be generated by other users,
- deactivate the Stop & Start system,
- drive as slowly as possible without
stalling. In all cases, do not exceed
6 mph (10 km/h),
- do not stop and do not switch off the
engine.
On leaving the flooded road, as soon as
circumstances allow, make several light
brake applications to dry the brake discs and
pads.
If in doubt on the state of your vehicle,
contact a PeugeOt dealer or a qualified
workshop.
Important!
43
Never drive with the parking brake applied -
Risk of overheating and damage to the
braking system!
Do not park or run the engine when
stationary in areas where inflammable
substances and materials (dry grass, dead
leaves...) might come into contact with the
hot exhaust system - Risk of fire!
Never leave a vehicle unsupervised with
the engine running. If you have to leave
your vehicle with the engine running, apply
the parking brake and put the gearbox into
neutral.
READY TO SET OFF
2

Improved comfort
44
Sound control
Your vehicle benefits from technical
suspension choices which contributes to
improving general comfort.
these developments also contribute to
reducing noise disturbance.
Acoustic comfort
the underseal under the body, on the body
sills and on the wheel arches considerably
reduces noise and protects the body from
external wear.

Steering mounted controls
45
LIGHtInG controL StALK
Selection is by rotation of the white mark on
the ring.
Sidelamps on
dipped/main beam
headlamps on
Switching between dipped and main
beam
Pull the control stalk fully towards you.
Headlamp flash
Pull the control stalk towards you,
regardless of the position of the ring.
"Motorway" function
Pull the lever towards the steering wheel with
a press, without passing the point of resistance
of the lighting stalk; the corresponding direction
indicators will ash ve times.
direction indicators (green
flashing)
Left: downwards.
Right: upwards.
Front foglamps
rear foglamps
If your vehicle is fitted with foglamps, these
operate with the dipped or main beam
headlamps.
Press one of these controls to switch on the
lamps.
the foglamps should only be used in
fog or when snow is falling.
In clear weather or in rain, both day and
night, rear foglamps dazzle and their use is
prohibited.
Do not forget to switch them off when they
are no longer necessary.
EASE OF USE and COMFORT
3

Steering mounted controls
LEd dAYtIME runnInG LAMPS
46
On starting the vehicle, in daylight the LeD
daytime running lamps come on automatically.
If the sidelamps and headlamps are switched
on manually or automatically, the daytime
running lamps go off.
Programming
For countries where exterior lighting by
day is not a legal requirement, you can
activate or deactivate the function via the
configuration menu.
AutoMAtIc ILLuMInAtIon
If your vehicle is fitted with this function, the
dipped beam headlamps are switched on
automatically if the light is poor.
In fog or snow, the sunshine sensor may
detect sufficient light. therefore, the lamps
will not be switched on automatically. If
necessary, you must switch on the dipped
beam headlamps manually.
they are switched off when the light returns
to a sufficient level.
Do not cover the sunshine sensor at
the top centre of the windscreen.
You can adjust the sensitivity of the
sunshine sensor.
Refer to the "technology on board Vehicle configuration" section.
Activation
turn the ring to this position.
the lamps are switched off automatically
when the ignition is switched off.
GuIdE-ME-HoME LIGHtInG
If your vehicle is fitted with this function:
when you leave your vehicle, the dipped
beam headlamps remain on for the selected
duration (when leaving a car park for
example).
Ignition off or key in the StoP position.
Within 2 minutes after switching off the
engine, position the ignition key in the StOP
position or remove it.
Pull the lighting stalk towards the steering
wheel.
the indicator lamp comes on in
the instrument panel.
each action on the lighting stalk,
pulled towards the steering
wheel, prolongs the guide me home
lighting by 30 seconds up to approximately
3 minutes. When this time has elapsed, the
lamps are switched off automatically.
Deactivate this control by keeping the stalk
pulled towards the steering wheel for more
than 2 seconds.

Steering mounted controls
travelling abroad
If using your vehicle in a country
that drives on the other side of the road,
the headlamps must be adjusted to avoid
dazzling on-coming drivers.
Contact a PeugeOt dealer or a qualified
workshop.
47
PArKInG LAMPS
this system enables you to leave the lamps
on when parked; with the ignition off, key in
the StOP position or key removed.
Move the ring on the lighting stalk to
position O then to dipped or main beam
headlamps.
the indicator lamp in the
instrument panel comes on.
the lamps will remain on while
you are parked.
Leaving the lighting on for long periods may
significantly reduce the state of charge of
your vehicle's battery.
HEAdLAMP BEAM
You are advised to adjust the height of the
headlamp beams in accordance with the
load in your vehicle.
this function works in the dipped and main
beam headlamps position.
Press these controls, located
on the dashboard, several times
in succession to adjust the
headlamps.
An indicator in the screen shows
the adjustment position selected
(0, 1, 2, 3).
EASE OF USE and COMFORT
3

Steering mounted controls
48
WIPEr controL StALK
Windscreen wipers
Wiping is only active when the ignition key is
in the runnInG position.
the control stalk has five different positions:
Wipers off.
Intermittent wiping: 1 notch downwards.
In this position, four wiping frequencies can
be selected by turning the ring:
- very slow frequency
- slow frequency
- standard frequency,
- fast frequency.
Slow continuous wiping: 2 notches downwards.
Fast continuous wiping: 3 notches
downwards.
Single wipe: pull the control stalk towards
the steering wheel.
Automatic rain sensitive windscreen
wipers
If your vehicle is fitted with this system, the
wiping speed is adapted automatically to the
intensity of the rainfall.
Automatic wiping: 1 notch downwards.
this is confirmed by one wipe. Must
be reactivated each time the ignition is
switched on.
In this position, the sensitivity of the rain
sensor can be increased by turning the ring.
Do not cover the rain sensor, located at
the top centre of the windscreen.
When washing the vehicle, switch off the
ignition or deactivate the automatic rain
sensitive wipers.
Good practice
Check that the windscreen wiper blades can
operate freely when using the wipers in icy
weather.
use the step in the front bumper, to remove
any accumulation of snow at the base of the
windscreen and on the blades.
You can change the wiper blades.
Refer to the "Quick help - Worn wiper
blade" section.
With Stop & Start, when the wiper
control stalk is in the fast wipe position,
the StOP mode is not available.
Screenwash and headlamp wash
Pull the wiper control stalk towards you,
the screenwash is accompanied by a timed
operation of the wipers.
Depending on version, the headlamp wash is
coupled with the screenwash, it is triggered if
the dipped beam headlamps are on.
You can check the fluid level.
Refer to the "Checks - Levels and
checks" section.

Steering mounted controls
cruISE controL
(3 LItrE HdI EnGInE)
"this is the speed at which the driver wishes to
travel".
This aid to driving in free-owing trafc conditions
enables the vehicle to maintain a constant
speed programmed by the driver, except when a
considerable load is carried on a steep gradient.
In order to be programmed or activated,
the vehicle speed must be greater than
approximately 18 mph (30 km/h), with 2nd gear
or higher engaged.
If your vehicle is fitted with cruise control,
this is displayed on the instrument panel by
an indicator located in the rev counter.
Function selected.
Function deactivated.
49
EASE OF USE and COMFORT
3

Steering mounted controls
50
Selecting the function - on
Selecting on switches the function on. A
message appears in the instrument panel
screen to confirm the action.
Programming a speed
Accelerate to the required speed,
with 2nd to 6th gear engaged.
Move the control upwards (+), for
approximately one second, to store this
speed.
Release the pressure on the accelerator
pedal, the vehicle will maintain this speed.
temporarily exceeding the
programmed speed
When the cruise control is active, it is still
possible to exceed the programmed speed
by depressing the accelerator pedal (to
overtake another vehicle for example).
changing the programmed speed
while the cruise control is in operation
You can:
- increase the speed in steps, by means
of brief presses, or continuously by
pressing and holding the control
upwards (+ sign),
- decrease the speed continuously
by pressing and holding the control
downwards (- sign).
Switching off / deactivating the
function
Press the brake or clutch pedal or place
the ring in the oFF position, the indicator
goes off.
If the dynamic stability control system comes
into operation, the cruise control system is
deactivated temporarily.
restore - rES
to restore the vehicle's
programmed speed (for example
after pressing the brake or clutch
pedal), gradually return to the chosen speed
and press rES.
the indicator lamp comes on, the cruise
control function is restored.

Steering mounted controls
cancelling the programmed speed
When the vehicle stops, after the ignition is
switched off, the system no longer stores
any speed.
operating fault
In the event of a fault, the system
is switched off and the indicator
goes off.
Contact a PeugeOt dealer or a qualified
workshop to have the system checked.
Good practice
When changing the programmed reference
speed by pressing and holding the control,
take care as the speed may increase or
decrease rapidly.
Do not use the cruise control on slippery
roads or in heavy traffic.
On a steep gradient, the cruise control will
not be able to prevent the vehicle from
exceeding the programmed speed.
the cruise control cannot, in any
circumstances, replace the need to comply
with speed limits or vigilance on the part of
driver.
It is advisable to leave your feet near the
pedals.
to prevent the mat from becoming caught
under the pedals:
- ensure that the mat is positioned
correctly,
- never fit one mat on top of another.
51
EASE OF USE and COMFORT
3

Steering mounted controls
52
the status of the cruise control is given
by an indicator in the rev counter and
messages in the instrument panel screen.
Function selected.
Function deactivated.
cruISE controL
"this is the speed at which the driver wishes
to drive".
this aid to driving in free-flowing traffic
enables the vehicle to maintain the speed
programmed by the driver, unless a
steep gradient or heavy load makes this
impossible.
In order for it to be programmed or
activated, the vehicle speed must be greater
than 18 mph (30 km/h) with 2
higher engaged.
nd
gear or
Selecting the function
- turn the ring fully upwards. the cruise
control is selected but is not yet active
and no speed has been programmed.
the indicator comes on in the instrument
panel

Steering mounted controls
53
First activation /
programming a
speed
- Reach the chosen speed by pressing
the accelerator.
- Move the switch up (+) or down (-)
to memorise the speed. A message
appears in the instrument panel screen
to confirm the operation.
the vehicle will maintain this speed setting.
temporarily exceeding the speed
setting
It is possible to accelerate and drive
momentarily at a speed greater than the
programmed speed.
When the accelerator pedal is released, the
vehicle will return to the programmed speed.
deactivation (off)
- Press this button or the brake or clutch
pedal. A message appears in the
instrument panel screen to confirm the
deactivation.
reactivation
- Following deactivation of the cruise
control, press this button. A message
appears in the instrument panel screen
to confirm the reactivation.
Your vehicle will return to the last
programmed speed.
Alternatively, you can repeat the "first
activation" procedure.
EASE OF USE and COMFORT
3

Steering mounted controls
54
changing the
programmed
speed
there are two methods of memorising a
speed higher than the previous one:
Without using the accelerator:
- Move the switch up (+).
A brief press increases the speed by
1 mph (km/h).
A maintained press increases the speed in
steps of 5 mph (km/h).
using the accelerator:
- exceed the memorised speed until the
speed required is reached,
- move the switch up (+) or down (-).
to memorise a speed lower than the
previous one:
- move the switch down (-).
A brief press decreases the speed by
1 mph (km/h).
A maintained press decreases the speed in
steps of 5 mph (km/h).
Switching the system off
- Place the ring in the central o position
or switch off the ignition to switch the
system off.
When the vehicle becomes stationary, after
switching off the ignition, the system no
longer memorises a speed.
operating fault
In the event of a fault, the system
switches off and the indicator
goes off. Contact a PeugeOt
dealer or a qualified workshop to
have the system checked.
Good practice
When changing the programmed reference
speed by means of a maintained press,
pay attention as the speed can increase or
decrease rapidly.
Do not use the cruise control on slippery
roads or in heavy traffic.
In the event of a steep slope, the cruise
control cannot prevent the vehicle from
exceeding the programmed speed.
In any event, the cruise control cannot
replace the need to observe the speed
limits, nor can it replace the need for
vigilance on the part of the driver.
It is advisable to leave your feet near the
pedals.
to avoid any jamming under the pedals:
- ensure that the mat and its fixings on the
floor are positioned correctly,
- never place one mat on top of another.

Steering mounted controls
this speed limiter shows the status of the
system and the programmed speed in the
instrument panel screen:
System selected,
display of the "Speed
Limiter" indicator.
System deactivated,
last programmed speed - oFF
(example at 65 mph
(107 km/h)).
System activated
(example at 65 mph (107 km/h)).
55
SPEEd LIMItEr
"this is the selected speed which the driver
does not wish to exceed".
this selection is made with the vehicle
stationary and the engine running or with the
vehicle moving and 2
the lowest speed that can be programmed
is 20 mph (30 km/h).
the speed of the vehicle responds to the
pressure of the driver's foot as far as the
accelerator pedal point of resistance which
indicates that the programmed speed has been
reached.
nd
gear or higher engaged.
However, pressing the pedal beyond this
point of resistance to the floor permits
exceeding of the programmed speed. to
resume use of the limiter, simply reduce
the pressure on the accelerator pedal
gradually and return to a speed below that
programmed.
the operating actions may be carried out
with the vehicle stationary and the engine
running, or with the vehicle moving.
Vehicle speed above
(example 70 mph (118 km/h))
the programmed speed is
displayed ashing.
Operating fault detected,
oFF - the dashes flash.
EASE OF USE and COMFORT
3

Steering mounted controls
56
Selecting the function
- turn the ring fully downwards. the
speed limiter is selected but is not yet
active. the display indicates oFF and
the last programmed speed.
Programming a speed
A speed can be programmed without
activating the limiter but with the engine
running.
to memorise a speed higher than the
previous one:
- move the switch up (+).
A brief press increases the speed by
1 mph (km/h).
A maintained press increases the speed in
steps of 5 mph (km/h).
to memorise a speed lower than the
previous one:
- move the switch down (-).
A brief press decreases the speed by
1 mph (km/h).
A maintained press decreases the speed in
steps of 5 mph (km/h).
Activation/deactivation
Pressing this button once activates the
speed limiter, oFF disappears from the
screen and a message appears to confirm
the activation.
A second press deactivates it, oFF
reappears in the screen and a message
appears to confirm the deactivation.

Steering mounted controls
57
Exceeding the programmed
speed
Pressing the accelerator pedal in order to
exceed the programmed speed will have
no effect unless you press the pedal firmly
beyond the point of resistance.
If the limiter is unable to prevent an increase
in the speed of the vehicle because of the
profile of the road or when going down a
step hill, the programmed speed may be
exceeded.
the limiter is deactivated temporarily and
the programmed speed flashes.
to return to the limiter function, reduce your
speed to below the programmed speed.
Switching the system off
- Place the ring in the central o position
or switch off the ignition to switch the
system off.
the last programmed speed remains in the
memory.
operating fault
the programmed speed is cleared then
replaced by dashes.
Contact a PeugeOt dealer or a qualified
workshop to have the system checked.
Good practice
In any event, the speed limiter cannot
replace the need to observe speed limits,
nor can it replace the need for vigilance on
the part of the driver.
Always pay attention to the profile of the
road and sharp acceleration and stay in
complete control of your vehicle.
to avoid any jamming under the pedals:
- ensure that the mat and its fixings on the
floor are positioned correctly,
- never place one mat on top of another.
EASE OF USE and COMFORT
3

Steering mounted controls
58
FIxEd SPEEd LIMItEr
If your vehicle is fitted with this function, the
speed of your vehicle can be limited to a
fixed speed of approximately 55 mph
(90 km/h) or 60 mph (100 km/h).
A label in the passenger compartment
indicates this maximum speed.
the fixed speed limiter is not a function
of the cruise control type. It cannot be
activated or deactivated by the driver while
driving.
the maximum speed set in the factory
depends on the legislation in force in
the country of sale.
this maximum speed cannot be modified by
the driver.
If you want the maximum speed modified, go
to a PeugeOt dealer.

dEMIStInG And dEFroStInG
Windscreen and side windows
the ventilation outlets located at the base
of the windscreen and the side vents for the
side windows increase the effectiveness
of the demisting and defrosting. Do not
obstruct these air outlets.
the pollen filter continuously and effectively
filters dust.
Air recirculation (which can be activated by
the driver or the passenger) isolates the
passenger compartment from the exterior
atmosphere. However, this position should
only be used temporarily, normal use is to
drive with the control positioned with the
exterior air intake open.
Manual mode
Direct the control to this air
distribution setting.
For faster and more effective
demisting and defrosting of the
windscreen:
- increase the air flow setting,
- move the exterior air intake
control temporarily to air
recirculation.
Returning to the exterior air
intake position permits renewal
of the air in the passenger
compartment.
Ventilation
defrosting the rear screen
and mirrors
Only operates when the engine
is running. Pressing this button
activates the rapid demistingdefrosting of the rear screen
and door mirrors.
this function switches off automatically to
prevent excessive energy consumption. It
stops when the engine is switched off but
resumes when the engine is started again.
Pressing this button switches the
function off.
With Stop & Start, when the heated
rear screen is switched on, the StOP
mode is not available.
59
EASE OF USE and COMFORT
3

Ventilation
60
corrEct uSE oF tHE AIr
condItIonInG
In order to be effective, the air conditioning
should only be used with the windows
closed. However, if the interior temperature
remains high after a prolonged period
parked in the sun, first ventilate the
passenger compartment for a few minutes.
For even air distribution, ensure that the
exterior air intake grille located at the base
of the windscreen, the side and central
vents, the air outlets on the floor and the air
extractor at the rear are not obstructed.
the air conditioning is useful in all seasons
as it eliminates condensation and air
humidity.
Operate the air conditioning system for
5 to 10 minutes, once or twice a month,
to keep it in good working order.
Have the filter elements (air filter and
passenger compartment filter) replaced
regularly. If you drive in a dusty environment,
have them replaced twice as often.
It is normal that the condensation created by
the air conditioning system results in a flow
of water which may form a puddle under the
vehicle when parked.
If the system does not produce cold air,
do not use it and have it checked by a
PeugeOt dealer or a qualified workshop.
Vents
"Leave them open"
For optimum distribution and diffusion of hot
or cool air in the passenger compartment,
there are: 4 adjustable central vents, of
which 2 can be directed sideways (right
or left) towards the top of the body and
4 side vents which can be directed towards
the passengers. the air vents directed
towards the floor of the vehicle complete
the equipment.

Ventilation
HEAtInG / MAnuAL AIr
condItIonInG
If your vehicle is fitted with these controls,
they are located on the dashboard on the
centre console control panel.
Air conditioning
the air conditioning can only operate with
the engine running.
the fan must be set to at least 1.
Pressing the button triggers the
operation of the air conditioning;
the LeD is on. Pressing the
button again switches the function off; the
LeD goes off.
comfort value adjustment
Control positioned:
- in the blue zone provides
cool air,
- in the red zone provides
heating of the interior
ambient air.
Air flow
the rate of air flow from the
vents, varies from 1 to the
strongest 4. Remember to adjust
this control in order to reach the
ambient air comfort level. to switch off the
blower, place the control in position 0.
Air distribution
the air supply distribution is directed by the
control turned towards:
the side vents and the central
vents,
the side vents, the central vents
and the footwells,
the footwells,
the windscreen, the footwells and
the side windows,
the windscreen and the side
windows.
61
EASE OF USE and COMFORT
3

Ventilation
Intake of exterior air
62
this is the preferred operating
position.
recommended settings for the manual air conditioning
For optimum operation of this system, the settings below are recommended:
recirculation of interior air
this position should only be
temporary.
used with the air conditioning
switched on and the fan setting
(from 1 to 4), recirculation enables you to
obtain the required ambient air comfort level
with both hot or cold settings.
Recirculation temporarily prevents exterior
odours and smoke from entering the
passenger compartment.
When your ambient air comfort level has
been reached, return to the intake of exterior
air position to permit renewal of the air in the
passenger compartment and demisting. this
is the preferred operating mode.
If I require...
Heating -
Cooling
Demisting
Defrosting
Air
distribution
temperature Air flow
Air
recirculation
AC

Ventilation
dIGItAL AIr condItIonInG -
Mono-zonE
If your vehicle is fitted with this system,
the controls are located in the middle of
the dashboard.
Control screen for your digital air
conditioning system.
When the engine is running and the air
conditioning is on, this symbol and the
message FuLL Auto are displayed.
the other components are displayed according
to the settings selected by the user.
Auto mode
Switching on FuLL Auto mode:
pressing the Auto control switches
on the system's functions, conrmed
by the display of FuLL Auto. this
is the normal operating mode for the digital air
conditioning system.
using the moving ring surrounding the AutO
control, set the comfort temperature to be reached
according to a setting between:
- HI (High to ≈ 32) and,
- LO (Low to ≈ 16).
The system controls the distribution, ow and
intake of air to ensure comfort equivalent to the
setting displayed and sufcient recirculation of air
in the passenger compartment.
No further adjustments are required.
Auto mode with personalisation
Switch on in Auto mode, certain
settings can be modified: the
distribution, the air flow, the air
conditioning and the air intake/
recirculation.
the display changes from FuLL Auto to
Auto.
to return to fully automatic operation, press
this button again. the display on the control
panel changes from Auto to FuLL Auto.
If the system is not able to maintain
the setting selected following manual
adjustments, the setting flashes then Auto
is cleared. Press the Auto control to return
to the automatic settings.
Switching off the air conditioning
Pressing this control switches
off the air conditioning functions.
the snowflake is cleared from the
screen.
complete switch-off
Pressing this control switches
the system off. the LeD and the
screen switch off.
63
EASE OF USE and COMFORT
3

Ventilation
comfort value adjustment ring
64
the settings range between:
- increasing the interior ambient air
temperature HI (High) which goes up to
to a maximum setting of 32,
- cooling the interior ambient air
temperature LO (Low) which goes down
to a setting of 16.
Air distribution
A press illuminates the LeD on the buttons
which distribute the air flow towards:
the windscreen and front side
window vents (demisting/
defrosting the windows),
the central and side vents (chest
and face),
the vents in the front and rear
areas (feet).
the combination of buttons permits
improvement of air distribution.
Air flow
Successive presses of this button
increase (+) or reduce (-) the
force of the air flow to the interior.
Intake of exterior air /
recirculation of interior air
When the LeD is on, the air
recirculates inside the passenger
compartment to prevent the entry of exterior
odours and smoke. this position should be
temporary.
When the ambient air comfort level has been
reached, pressing the button switches the
LeD off and reopens the exterior air intake.
Pressing the Auto button also restores
the intake of exterior air. Returning to this
position permits renewal of the air in the
passenger compartment and demisting.
Pressing the Auto button again restores
the FuLL Auto function.
rapid demisting /
defrosting
Pressing this control permits
rapid clearing of the windows.
the LeD is on.
the system manages the air conditioning,
the flow and intake of air, the defrosting
of the rear screen and provides optimum
distribution of the air to the windscreen and
front side windows.
If your vehicle is fitted with additional
heating, switch it off to ensure rapid and
effective demisting/defrosting.
AddItIonAL rEAr VEntILAtIon
the controls for this system, additional to
the standard cabin ventilation system, are
on the lower dashboard, to the left of the
steering wheel.
Air outlet
A press on this control activates
the extraction of air to the
outside; the LeD comes on.
Press again to switch off.
Air inlet
A press on this control activates
the entry of air into the cabin; the
LeD comes on. Press again to
switch off.

Ventilation
AddItIonAL HEAtInG SYStEMS
Additional heating
this is passenger compartment heating,
additional to the standard equipment.
It can operate independently of the engine.
Additional heater or programmable
additional heating
this is an additional, programmable and
separate system which heats the Diesel
engine hot coolant loop to make starting
easier.
It improves the demisting and defrosting
performance and that of the heated seats, if
fitted to the vehicle.
the passenger compartment heating is
brought up to temperature more rapidly.
this system must be programmed to start up
before you enter the vehicle.
Automatic additional heating
this is an additional system which starts
automatically when the ignition is switched
on. Its activation depends on the ambient
temperature and the temperature inside the
vehicle.
It switches off automatically once the
heating system is started manually.
Supplementary heating
On the 2-3 seats version, this is located
under the seat on the driver's side with air
diffusion directed forwards.
On the 5-9 seats version, it is
located at the rear. Depending
on the model version, the air
diffusion is either direct from the
rear or comes from the rail located under
each of the two rows of seats.
Press this control to activate/
deactivate the heating. the LeD
is on if the heating is activated.
When rapid demisting and
defrosting is required, switch off the control.
65
rEAr HEAtInG And / or AIr
condItIonInG
If your vehicle is fitted with an additional
air conditioning unit, located in the rear of
the vehicle: the distribution rail located in
the roof and the individual diffusion vents
provide a perfect diffusion of cold air.
the warm air diffused at the floor, from the
front air conditioning unit, is distributed at
the feet of the rear passengers of rows 2
and 3.
A warm air diffusion vent, located on the rear
left wheelarch, may complete the assembly
for the feet of the rear passengers of row 3.
EASE OF USE and COMFORT
3

Ventilation
66
Activation/deactivation
this control, located on the
control panel at the left-hand end
of the dashboard, enables you to
activate/deactivate the operation
of the rear controls from the driver's seat.
the first press activates (LeD on).
A second press deactivates (LeD off).
Air flow
the force of the fan blown air,
via the vents, varies from 1 to the
strongest 4.
to obtain a comfortable level of
ambient air, remember to adjust
this control.
to deactivate the fan, place the control in
position 0.
comfort value adjustment
Control positioned:
- on the blue, delivers cool air,
- on the red, delivers heating of
the ambient air.
the OFF control on the "Mono-zone" central
control panel switches the function off.
However, a safety device will ventilate the
rear circuit automatically, even if the control
is in position 0, to prevent the formation of
condensation.

ProGrAMMABLE AddItIonAL HEAtInG
If your vehicle is fitted with separate
programmable heating, it gradually brings
the engine up to a good temperature to
facilitate starting.
An integrated clock permits programming of
its start time. the passenger compartment
will be heated more quickly.
digital programming control
the programmable heating control panel
is located to the side of the steering wheel
below the ModE switch panel.
time display
Heating cycle indicator
time setting and reading indicator
Display of the programme number
selected
Ventilation indicator
time setting buttons
Programme selection button
Button for immediate switching on
of the heating
Ventilation
Setting the time of the internal clock
Set the clock on the control panel before
programming the deferred switching on of
the heating.
Press and hold the "set" button.
the time setting screen and
indicator come on.
Within ten seconds, press one of the two
setting buttons until the correct time is
displayed:
- ">" to increase the time,
or
- "<" reduce the time.
Press and hold the button for more rapid
scrolling of the digits.
Release the"set" button.
When the screen is off, the time is
memorised.
reading the time
Press the "<" or ">" button.
this time reading indicator comes
on and the time is displayed for
approximately ten seconds.
67
EASE OF USE and COMFORT
3

Ventilation
Immediate heating
68
Before switching on the heating, check that:
- the temperature setting control is in the
"Hot air" position (red),
- the air flow setting control is in
position "2".
Press this button.
the screen and the heating cycle
indicator come on and remain
on throughout the duration of
operation.
deferred heating
Switching on can be programmed between
one minute and twenty-four hours in
advance.
You can store up to three different start
times, but programme one deferred start
only.
note: if you wish to start the heating at a
fixed time each day, simply reprogramme
the stored time each day.
Press the "set" button, the screen
comes on.
the "- -:- -" symbol or the
previous stored time and the
number (1, 2 or 3) corresponding
to the recalled pre-selection are
displayed for ten seconds.
note: if you wish to recall the other pre-
selected times, press the "set" button
repeatedly before the ten seconds have
elapsed.
Within ten seconds, press the "<"
or ">" setting button to select the
required start time.
Setting of the stored time is confirmed by
clearing of the start time, displaying of
the pre-selection number (1, 2 or 3) and
illumination of the screen.
By default, pre-selected times are
already memorised in the system
(1 = 6 hours; 2 = 16 hours; 3 = 22 hours).
Any modification cancels and replaces the
previous pre-selected time.
If the battery is disconnected, the default
pre-selected times are restored.
cancelling the programming
Press the "set" button briefly
to clear the programmed start
time.
the screen illumination and the
pre-selection number (1, 2 or 3) go off.
recalling one of the pre-selected
start times
Press the "set" button as many
times as necessary until the
number corresponding to the
required pre-selected start time
(1, 2 or 3) appears.
After ten seconds, the time disappears but
remains stored while the corresponding
number (1, 2 or 3) and the screen
remain on.

Setting the operating period
the period of operation can be set to
between 10 and 60 minutes.
Press and hold the "set" button.
At the same time press the "<"
or ">" button.
the time and the time setting
indicator come on.
Press and hold the "set" button again.
At the same time press the "<" or ">" button
again.
the programmed operating period is
displayed and the heating or ventilation
cycle indicator flashes.
Adjust the period by pressing the "<" or
">" button.
the setting is confirmed by the period
disappearing from the screen or by pressing
the "set" button again
Switching off the heating
In the case of deferred operation, the
heating stops at the end of the programmed
period.
In the case of immediate
operation, press this button again
to switch off manually.
the heating cycle indicator and
the screen go off.
Good practice
to avoid any risk of poisoning or
asphyxiation, the additional heating must
not be used, even for short periods, in
an enclosed space such as a garage or
workshop which is not fitted with an exhaust
gas extraction system.
the additional heating switches off when the
battery voltage is low, so as to allow engine
starting.
the additional heating is supplied by the
vehicle's fuel tank. ensure that the low fuel
warning lamp is not on.
Always switch off the additional heating
when filling with fuel to avoid any risk of fire
or explosion.
Ventilation
the temperature near the heater must not
exceed 120 °C. A temperature higher than
this (for example in the case of painting in
an oven) could damage the components of
the electronic circuits.
the additional heating is fitted with
a temperature limiter which cuts off
the combustion in the event of engine
overheating due to a lack of coolant. Check
the level and if necessary top-up following
the advice given in the "Checks - Levels"
section. then press the programme
selection button before switching the heating
on again.
Have the additional heating checked at
least once a year at the beginning of
winter. Maintenance and repairs should only
be carried out by a PeugeOt dealer or a
qualified workshop.
use only genuine replacement parts.
69
EASE OF USE and COMFORT
3

Ventilation
two additional uses
70
the additional heating is separate and
programmable. Before you enter the vehicle,
it gradually increases the temperature of the
engine to make starting easier. this also
facilitates passenger compartment heating,
demisting and defrosting.
Also, the additional passenger compartment
heating system supplements the standard
system. Its operation may be independent of
the engine. Switching on of the heating may
be programmable.

Seats
drIVEr'S SEAt
Head restraint
Press the tab to adjust the height of the
head restraint.
to remove the head restraint, press the tabs
and raise the head restraint.
Adjustable armrest
Raise or, lower the armrest.
turn the wheel located under the end of the
armrest to lock it in the desired position.
71
EASE OF USE and COMFORT
3

Seats
72
Lumbar support
turn the control.
Seat cushion height
Lift the handle 1 to raise or lower the front of
the seat.
Lift the handle 2 to raise or lower the rear of
the seat.
Heated seat
use this control to switch the heating of the
seat on or off.
Seat with variable damping
If your seat is fitted with this system, turn the
control to adjust the level of damping to suit
the driver's weight.
Seat backrest angle
turn the control to adjust the angle of the
seat backrest.
Forwards-backwards
Lift the control bar, located under the seat,
and adjust to the required position.
rotating seat
If fitted on your seat, press the control to
rotate the seat by 180°.

Seats
2-SEAt Front BEncH
this is equipped with two seat belts.
Grab handle
this is located above the centre passenger.
Writing table
the back of the centre seat folds to form a
writing table.
Pull the strap located at the top of the seat
backrest.
73
EASE OF USE and COMFORT
3

74
Seats
rEAr SEAtS
Seat backrest angle
turn the control to adjust the angle of the
seat backrest.
Access to the rear seats
to gain access to row 3, manoeuvre the
control on the outer seat of row 2 and tilt the
seat back forwards.
to return the seat backrest to its initial
position, bring it to the vertical position
without touching the control.
Seat backrest folded position of the
central seat (rows 2 and 3)
the backrest of the central seat can be
folded fully onto the cushion and used as a
cup holder table.
Lower the head restraint then raise the
control and fold the seat backrest forwards.
to return the seat backrest to its initial
position, raise the control again.
to understand the significance of the
precautions mentioned on the labels,
refer to the "Quick help - glossary of labels"
section.

rEAr BEncH SEAtS
Access to the rear seats
Lower the head restraints then raise the first
lever and tilt the seat back forwards.
Seat backrest folded position
Remove the head restraints then tilt the seat
backrest as described above.
With your right hand, raise the second lever
then tilt the seat backrest 5° towards the
rear.
With your left hand, tilt the seat backrest
fully forwards onto the cushion.
removing the bench seat
At least two people are required to
remove the bench seat.
Fold the seat backrest onto the cushion as
described above.
turn the two grips forward to release the
rear anchorages.
tilt the base of the bench seat forwards to
place the assembly in the vertical position.
Seats
turn the two levers upwards to release the
front anchorages.
Raise the bench seat and remove it.
Good practice
ensure that the seat belts are always
accessible and easy for the passenger to
fasten.
Passengers must correctly adjust the head
restraint of their seat, before adjusting and
fastening their seat belt.
Removed head restraints must be stowed
securely.
Do not travel in row 3 with the row 2 bench
in the vertical position.
Do not leave objects on the folded row 2
backrest.
75
EASE OF USE and COMFORT
3

Practical information
76
cABIn FIttInGS
central glove box
If fitted with a lock, you can lock it using
the key.
It gives access to the auxiliary sockets (Jack
and uSB) intended for the transfer of data to
the audio system.
Front seat storage
there is a fixed storage tray under the
driver's seat.
If your vehicle is fitted with a seat with
variable damping, it does not have any
storage compartments.
the space under the passenger's seat is
used to store the tool box containing the
tools required to change a wheel or bulb or
to tow the vehicle.
to take out the box, turn the control a
quarter turn to unlock it, then pull the box
forward.
When putting it back, don't forget to turn the
control a quarter turn in the other direction to
lock the box in its housing.

Practical information
77
Folding writing table
this is located in the centre of the
dashboard.
the clip can be used to secure documents,
slips, ...
Pull or push the top of the table to unfold or
fold it.
to insert or extract a CD, you must first
fold the table.
If your vehicle is fitted with a two-seat front
bench and a passenger front airbag, the
table cannot be raised.
Multifunction carrier
this can be used to support a portable
device, such as a smartphone in a vertical
position or a touch screen tablet in a
horizontal position.
Pull the top of the carrier to unfold it.
turn the side lever to release the upper and
lower clamps.
Spread the clamps to fit the portable device.
Raise the side lever to lock the clamps.
Before folding the carrier, remove the
portable device by repeating the same
operations.
Push the top of the carrier to fold it.
EASE OF USE and COMFORT
3

Practical information
78
Depending on the country of sale, one of
the door pockets may house the temporary
puncture repair kit.
Passenger glove boxFront door pockets
cooled glove box
this is located in the top right of the
dashboard, passenger side.
the air delivered to the glove box is the
same as that from the vents.

Practical information
79
Sun visor
to avoid glare from ahead, fold the sun visor
down.
Pockets are arranged in the sun visors for
storing toll cards, tickets, ...
Storage boxes
uSB port
this port is used only to power or recharge
the portable device connected.
12 volt socket
Maximum power: 180 W.
Portable ashtray
After opening the ashtray, pull it upwards
then empty it into a bin.
cigarette lighter
Press and wait a few moments until the
lighter pops out automatically.
EASE OF USE and COMFORT
3

Practical information
80
overhead storage compartment
this is located above the sun visors.
Maximum load: approximately 20 kg.
courtesy lamp
It can be activated by means of:
- the switches located on the
courtesy lamp, with the ignition on runnInG position,
- opening or closing one of the front
doors,
- locking/unlocking the vehicle.
It switches off automatically:
- if the switch is not pressed to the right or
to the left,
- in all cases after 15 minutes, if the doors
remain open,
- or when the ignition is switched on.
reading lamps
these are controlled by the switches.
the driver's switch controls both reading
lamps simultaneously.
the passenger switch controls either the
driver's reading lamp or the passenger's
reading lamp.
Controls located at the bottom
of the dashboard on the driver's
side allow the driver to switch the
passenger spotlamp on or off.

Practical information
81
LoAd SPAcE FIttInGS Support for stowing rail
Lashing rings
Lashing rings are provided on the floor to
secure and make safe your loads: 8 for
L1 and L2 length vehicles, 10 for L3 and
L4 length vehicles.
two additional rings are located on the
partition behind the cab.
Maximum load: 500 kg.
As a safety precaution in case of sharp
braking, you are advised to place
heavy objects as far forwards towards the
cab as possible.
Supports for securing a stowing rail are
available above the trims, on each side of
the vehicle.
Maximum load: 200 kg.
Side trim
the lower parts of the sides are fitted with
load protection trims.
12 volt socket
Maximum power: 180 W.
EASE OF USE and COMFORT
3

Practical information
82
uSB port
this port is used only to power or recharge
the portable device connected.
cigarette lighter
Press and wait a few moments until the
lighter pops out automatically.
courtesy lamps
If fitted on your vehicle, one or two courtesy
lamps are located above the rear and side
doors.
they can be activated by:
- tilting the courtesy lamp (to the left or to
the right),
- opening or closing the rear or side
doors.
this lighting switches off automatically, after
a few minutes, if the doors are left open.
reading lamps
they are located above each row
of seats.
Inetrior roof storage
this is a storage compartment located in
the load space, above the cab. Its capacity
varies depending on the height of the van
(type H2 or H3).
As a safety measure, do not place
heavy objects in the roof storage
space.
Load retainer
On the floor, behind the front seats, a
horizontal partition protects the driver and
front passengers against the risk of load
movement.
Ladder type vertical partition
Depending on the country of sale, behind
the driver's seat, a ladder type vertical
partition protects the driver against the risk
of load movement.
Glazed partition
Depending on the country of sale, a glazed
partition separates the cabin from the load
space.
However, you can use the control to open/
close its sliding window.

to put the torch back in place, engage
it in the notches on the base and pivot it
upwards.
With the vehicle stationary, key in the
ignition switch or removed, recharging
and lighting from the torch stops after
around 15 minutes.
the torch batteries recharge automatically
while driving.
Practical information
83
torch
If your vehicle has one, the magnetic torch is
located at the rear courtesy lamp.
A lamp is locatred in the centre of the torch
base.
Remove the torch from its base by
pressing the button then pivoting the torch
downwards by 90 degrees.
to switch on the torch, slide the switch
forwards.
to change the 4 batteries (NiMH type),
remove the protective cover, located on the
torch.
Sliding side windows
Depending on the vehicle's equipment, the
side windows of row 2 can be opened.
Squeeze the two controls then slide the
window.
While driving, the window must be
closed or secured in an intermediate
position.
Do not extend long objects outside the
vehicle via the window.
EASE OF USE and COMFORT
3

Practical information
84
ExtErIor FIttInGS
Protective grille
Depending on the country of sale, a
protective grille fitted to the inside of
the front bumper provides protection for
underbonnet components against flying
stones...
Very cold conditions protectors
Depending on the country of sale, protective
foam pads are present to avoid the ingress
of cold or snow to the upper part of the
underbonnet.
Located at the edge of each headlamp,
they are fitted to the front panel above the
radiator.
Slide them towards the outisde of the
vehicle to remove them.
Folding foot board
to faciltate the entry and exit of rear
passengers, your vehicle may be fitted with
a foot board, which is deployed on opening
the sliding side door.

MIrrorS
rear view mirror
the lever located on the lower edge moves
the mirror into two positions.
For the day position, the lever is pushed.
For the night position to prevent dazzle, pull
the lever towards you.
door mirrors
these are divided into two zones:
A - upper mirror
B - Lower mirror
the mirror glass is spherical in order to
widen the lateral field of vision. Objects
seen in the mirror are in reality closer than
they appear. therefore, this must be taken
into account in order to assess the distance
correctly.
the shell incorporates the direction indicator
side repeater and the aerials, according to
the equipment available on board (gPS,
gSM, Radio, ...).
Mirrors and windows
Electrical controls
the ignition switch must be in the MAr position.
turn the control to select the mirror zone.
1 Driver's mirror:
A1 - upper mirror
B1 - Lower mirror
then move the control in the direction of the
adjustment required.
2 Passenger mirror:
A2 - upper mirror
B2 - Lower mirror
then move the control in the direction of the
adjustment required.
Electric folding
Press this control.
defrosting the mirrors
Press the rear screen defrosting
button.
85
EASE OF USE and COMFORT
3

Mirrors and windows
86
ELEctrIc WIndoWS
A. driver's electric window
B. Passenger's electric window
You have two options:
Automatic operation
Press or pull control switch A, beyond the
point of resistance: the window opens or
closes fully when the control is released.
Pressing the control switch again stops the
movement of the window.
Manual operation
Press or pull control switch A/B, without
passing the point of resistance.
the window stops when you release the
control switch.
Good practice
Always remove the key from the ignition
when leaving the vehicle, even for a short
time.
If the electric windows meet an obstacle
during operation, you must reverse the
movement of the window. to do this, press
the control switch in question.
When the driver operates the passenger
electric windows, they must ensure that
no one is preventing correct closing of the
windows.
the driver must ensure that the passengers
use the electric windows correctly.
Be particularly aware of children when
operating the windows.

Vehicle configuration
PErSonALISAtIon - conFIGurAtIon
using the ModE control panel
this control panel located alongside the
steering wheel provides access to menus for
the personalisation of some of the vehicle
systems.
the corresponding information appears in
the instrument panel screen.
eleven languages are offered: Brazilian,
Dutch, english, French, german, Italian,
Polish, Portuguese, Russian, Spanish and
turkish.
You have access to all the menus if your
vehicle is fitted with an audio system.
If your vehicle is fitted with a touch screen
audio system, certain menus are only
accessible using the audio system control
panel.
As a safety precaution, some menus
can only be accessed when the ignition
is off.
this ModE button enables you to:
- access the menus and sub-menus,
- confirm your selections, within
a menu,
- exit from the menus.
A long press enables you to return to
the welcome screen.
this button enables you to:
- scroll up through a menu,
- increase a value.
this button enables you to:
- scroll down through a menu,
- decrease a value.
87
TECHNOLOGY ON BOARD
4

Vehicle configuration
88
Menu... Press... Sub-menu… Press... Select…
ON Increase
1 Speed beep
OFF
2 Headlamp
sensor
3 Activation
trip B
Hours/
4 Setting the
time
5 Setting the
date
6 Autoclose While moving
Minutes
time format
Year/Month/
Day
Decrease
Increase
Decrease
Activate
Deactivate
Increase
Decrease
24
12
Activate
Deactivate
ON
OFF
confirm
and exit
Enables you to...
Activate/deactivate the audible
signal indicating exceeding of
the programmed speed and
select the speed.
Set the sensitivity of the
sunshine sensor (1 to 3).
Display a second distance
"trip B".
Set the clock.
Select the clock display mode.
Set the date.
Activate/Deactivate automatic
door locking above approx
12 mph (20 km/h).

Vehicle configuration
Menu… Press... Sub-menu… Press... Select…
Km
Miles
km/l
l/100 km
°C
°F
List of languages
available
Increase
Decrease
ON
OFF
Service (Miles/km
before service)
Oil (Miles/Km
before oil change)
Yes
No
Yes
No
7
Measurement
unit (unit)
8 Languages
9
Volume of
annou ncements
(Buzz)
Daytime
10
running lamps
11 Service
12 Passenger
airbag
(BAg P)
13 exit from
menu
Distance
Fuel
consumption
temperature
ON
OFF
confirm
and exit
Enables you to...
Select the distance display unit.
Select the fuel consumption
display unit.
Select the temperature display
unit.
Select the display language.
Increase/decrease the volume
of the announcements or of the
audible warning.
Activate/deactivate daytime
running lamps.
Display the miles/kilometres
remaining before the next
service.
Display the miles/kilometres to
the next oil change.
Activate the passenger airbag.
Deactivate the passenger
airbag.
exit from the menu. Press the
arrow at the bottom to go to the
first menu.
89
TECHNOLOGY ON BOARD
4

Vehicle configuration
90
using the touch screen audio
system
this audio system control panel, located in
the middle of the dashboard, gives access to
personalisation menus for certain systems.
the corresponding information appears in
the touch screen.
Nine languages are offered: Dutch, english,
French, german, Italian, Polish, Portuguese,
Spanish and turkish.
As a safety precaution, some menus
can only be accessed when the ignition
is off.
this control panel button gives
access to the "Settings" menu.
this button in the screen allows
you to go up a level in a menu or
increase a value.
this button in the screen allows
you to go down a level in a menu
or decrease a value.
"Settings" menu
1. "Display".
2. "Voice commands".
3. "time and Date".
4. "Safety / Help".
5. "Lighting".
6. "Doors & locking".
7. "Audio".
8. "telephone / Bluetooth".
9. "Radio settings".
10. "Restore Settings" to return to factory
settings.
11. "Del. pers. data" to delete all of your
personal data, related to the Bluetooth
equipment in the audio system.
For more information on the audio
system, the telephone, the radio and the
navigation system, the sub-menus 2, 7,
8, 9 and 11 are described in detail in the
"Audio equipment and telematics" section.
the settings for sub-menus 4, 5 and
6 vary according to the equipment
installed on the vehicle.

From the "Display" sub-menu, you can:
- select "Languages" and choose one of
the languages listed above,
- select "units of measurement" to choose
the units for fuel consumption
(l/100 km, mpg), distance (miles, km)
and temperature (°C, °F),
- select "Display trip B" to switch trip B
On or Off in the trip computer.
From the "Safety / Help" sub menu, you can:
- select "Parkview Camera", then
"Reversing camera" to activate or
deactivate its use (On, Off),
- select "Parkview Camera", then
"Camera delay" to activate or deactivate
the maintaining of the display for
10 seconds or up to 11 mph (18 km/h)
(On, Off),
- select "Passenger airbag" to activate or
deactivate its use (On, Off).
Vehicle configuration
91
From the "time and Date" sub-menu, you
can:
- select "Adjust time and format" to set the
hour, minutes and seconds and choose
the format (24 h, 12 h with am or pm),
- select "Adjust Date" to set the day,
month and year.
to set the time manually, "Synch time"
must be Off.
From the "Lighting" sub-menu, you can:
- select "Day lamps" to activate or
deactivate their use (On, Off),
- select "Headlamp sensor" to adjust its
sensitivity (1, 2, 3).
From the "Doors & locking", you can:
- select "Autoclose" to activate or
deactivate its use (On, Off).
TECHNOLOGY ON BOARD
4

Vehicle data
92
trIP coMPutEr
the trIP button, located at the end of the
wiper control stalk, gives access to the
following information:
- range
this indicates the distance that can still
be travelled with the fuel remaining in
the tank on the basis of the average
consumption over the last few miles
(kilometres) travelled.
- distance A
this indicates the distance travelled
since the last trip computer zero reset.
- Average fuel consumption A
this is the average quantity of fuel
consumed since the last trip computer
zero reset.
- current fuel consumption A
this is the average quantity of fuel
consumed during the last few seconds.
- Average speed A
this is the average speed calculated
since the last trip computer zero reset
(with the ignition on).
- trip duration A
this indicates the total time since the
last trip recorder zero reset.
If tRIP B is activated in the ModE menu:
- Distance B
- Average fuel consumption B
- Average speed B
- trip duration B

tAcHoGrAPH
If your vehicle is fitted with a tachograph,
this permits storing of all of the data relating
to the vehicle in the unit and on a card
inserted in it.
example: at the beginning of each journey
or change of team.
When the card is inserted, all of the data
can be:
- displayed on the tachograph screen,
- printed,
- transferred to external storage media via
an interface.
Vehicle data
93
For further information, refer to the
documents supplied by the manufacturer of
the tachograph.
If your vehicle is fitted with a
tachograph, disconnection of the
negative (-) terminal of the battery (located
under the floor on the left-hand side, in the
cab) is recommended if the vehicle is not to
be used for a period of more than 5 days.
TECHNOLOGY ON BOARD
4

Parking sensors
94
AudIBLE rEAr PArKInG SEnSorS
If fitted on your vehicle, the system consists
of four proximity sensors, installed in the
rear bumper.
they detect any obstacle: person, vehicle,
tree, fence, behind the vehicle during the
manoeuvre.
However, objects the size or thickness of
which are detected at the beginning of the
manoeuvre will no longer be detected at the
end of the manoeuvre: blind spots between
and below the sensors. examples: stake,
roadworks cone or pavement post.
the rear parking sensor system may be
coupled with a reversing camera.
operation
engage reverse gear with the gear lever.
the proximity information is indicated by an
audible signal of increasing frequency as the
vehicle approaches the obstacle.
When the distance between the rear of
the vehicle and the obstacle is less than
approximately thirty centimetres, the audible
signal becomes continuous.
Switching off
Come our of reverse gear into neutral.
operating fault
If this warning lamp comes
on in the instrument panel
accompanied by a message in
the screen, contact a PeugeOt
dealer or a qualified workshop.
Good practice
the system cannot, in any circumstances,
replace the need for vigilance on the part of
the driver.
take even greater care if you reverse with a
rear door open.
In bad weather or in winter, ensure that the
sensors are not covered with mud, ice or
snow.

Parking sensors
rEVErSInG cAMErA
If your vehicle is fitted with this camera, it is
located at the rear, next to the third brake
lamp.
It sends images to the screen installed
in the cab. this rear vision is an aid to
manoeuvring.
the reversing camera may be coupled with
rear parking sensors.
Screen
the camera sends the images to a 5 inch
LCD colour screen. this screen is also
the one used by the touch screen audiotelematic system.
Activation and deactivation of the system
is done in the settings menu of the touch
screen audio-telematic system.
operation
the camera comes into operation when
reverse gear is engaged and remains active
up to approximately 9 mph (15 km/h). It is
deactivated above 11 mph (18 km/h).
the camera also comes on, with the vehicle
stationary, when the rear doors are opened.
Switching off
When a forward gear is engaged, the last
image remains displayed for approximately
5 seconds then switches off.
In the same way, the last image also
remains displayed, with the vehicle
stationary, when the rear doors are closed.
Good practice
With optimum vehicle conditions (position
on the road, loading level) the maximum
area of visibility covered by the camera has
a field depth approximately 3 m long and
5.5 m wide.
the area of visibility may vary depending on
the external weather conditions (brightness,
rain, snow, fog, ...), the load in the vehicle
and the position of the vehicle on the road.
When cleaning the camera and the screen,
avoid using a detergent or a tool which may
scratch the glass.
use a non-abrasive cloth or a small brush.
95
TECHNOLOGY ON BOARD
4

Loading assistance
96
PnEuMAtIc SuSPEnSIon
If your vehicle is fitted with pneumatic
suspension, you can adjust the height of
the rear of the vehicle to make loading and
unloading easier.
the controls are located alongside the
steering wheel in a ModE control panel.
there is a nominal level as well as 6 height
adjustment levels, raising (from +1 to +3)
or lowering (from -1 to -3). the levels are
indicated in the instrument panel screen.
Manual adjustment of the loading
height
raise: upwards adjustment of the load
floor
Make a quick press on the control
to select the next level up. each
press (LeD on) raises the floor by
one level: +1 to +3.
A long press selects the highest level (+3).
Lower: downwards adjustment of the
load floor
Make a quick press on the control
to select the next level down.
each press (LeD on) lowers the
floor by one level: -1 to -3.
A long press selects the lowest level (-3).

return to the nominal floor height
Press the same number of times in reverse
as the level of the position displayed.
operating fault
If a fault occurs with the system,
this warning lamp comes on.
Loading assistance
97
deactivation
Make a long press on both controls
simultaneously to deactivate the system.
the LeDs remain on.
reactivation
A second long press on both controls
simultaneously reactivates the system.
the LeDs go off.
Above 3 mph (5 km/h), the system
reactivates automatically.
Automatic correction of loading
floor height
Above 12 mph (20 km/h), the system
automatically returns the rear height to its
nominal value.
Have the system checked by a
PeugeOt dealer or a qualified workshop.
Good practice
Driving with the suspension set too high or
too low risks damaging components under
the body.
the height may be adjusted automatically to
take account of changes of temperature or
loading.
You must avoid using this control in the
following circumstances:
- when working underneath the vehicle,
- when changing a wheel,
- when the vehicle is being transported by
lorry, train, ferry, boat, ...
to avoid damaging the vehicle or injuring
anyone, check that there is nothing or no
person that might be close to or come into
contact with the vehicle, before raising or
lowering the suspension.
TECHNOLOGY ON BOARD
4

Driving safely
98
PArKInG BrAKE HAzArd WArnInG LAMPS Applying
Pull the parking brake lever up to immobilise
your vehicle.
Check that the parking brake is applied
firmly before leaving the vehicle.
If the parking brake is still on or has
not been released properly, this is
indicated by this warning lamp which
comes on in the instrument panel.
When parking on a slope, direct your wheels towards
the pavement and pull the parking brake lever up.
there is no advantage in engaging a gear after
parking the vehicle, particularly if the vehicle is loaded.
Pull on the parking brake lever, only
with the vehicle stationary.
In the exceptional case of use of the
parking brake when the vehicle is
moving, apply the brake by pulling gently
to avoid locking the rear wheels (risk of
skidding).
releasing
Pull the lever up slightly and press the
button to lower the parking brake lever.
Press this button, the direction indicators
flash.
they can operate with the ignition off.
the hazard warning lamps should only
be used in dangerous situations, when
stopping in an emergency or when
driving in unusual conditions.
 Loading...