

Page 1

GPS HANDBOOK
Page 2
7-inch touch screen
GPS satellite navigation - Multimedia audio - Bluetooth® telephone
First steps 226
Steering mounted controls 228
Menus 229
Navigation 230
Navigation - Guidance 238
Tra f c 242
Radio Media 244
Radio 250
DAB (Digital Audio Broadcasting) radio 252
Media 254
Settings 258
Connected services 266
Internet browser 267
MirrorLink
CarPlay
Telephone 278
Frequently asked questions 286
Audio and Telematics
Contents
TM
270
®
274
10
The system is protected in such a way that it will only operate in
your vehicle.
As a safety measure, the driver should only carry out operations
which require prolonged attention while the vehicle is stationary.
The display of an energy economy mode message signals that
electrical systems operating are going into standby.
Refer to the energy economy mode section.
225
Page 3
Audio and Telematics
First steps
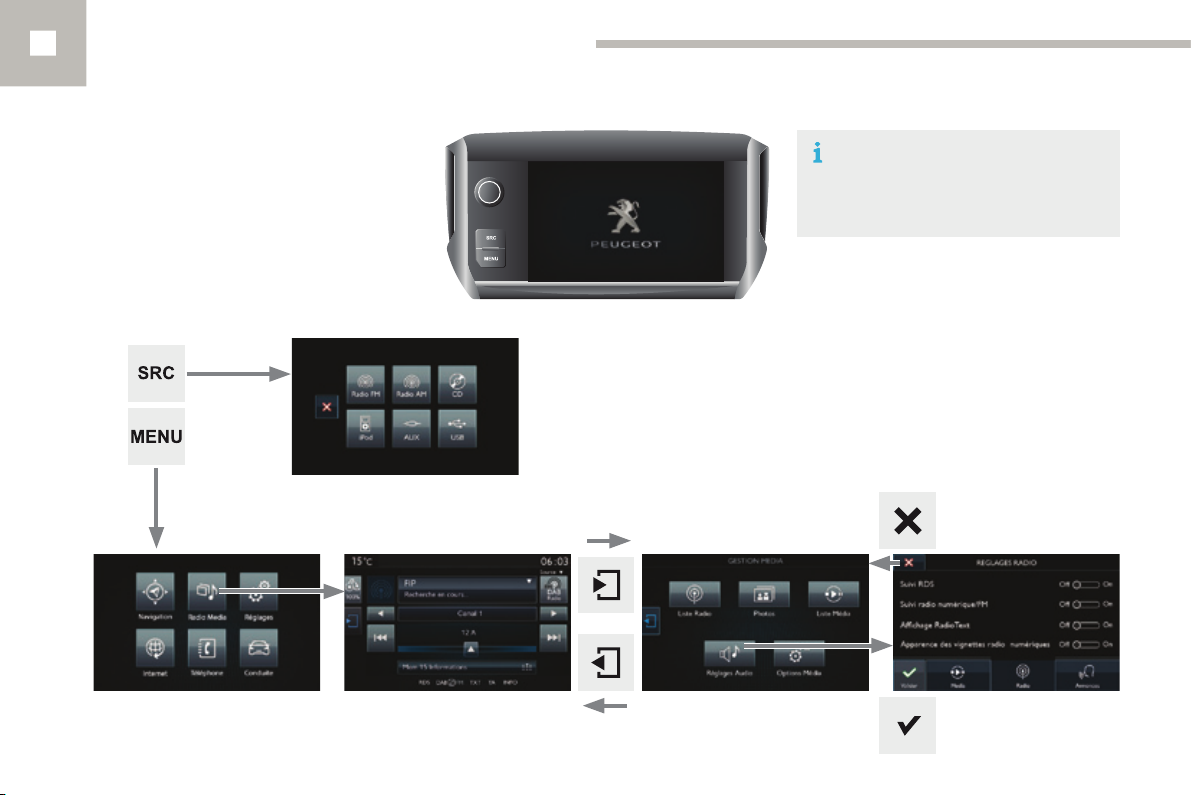
Use the buttons to the left of the touch screen
for access to the menu carousels, then press
the virtual buttons in the touch screen.
Each menu is displayed in one or two pages
(primary page and secondary page).
In very hot conditions, the system may
go into stand-by (screen and sound
completely off) for a minimum period
of 5 minutes.
Secondary pagePrimary page
226
Page 4
Audio and Telematics
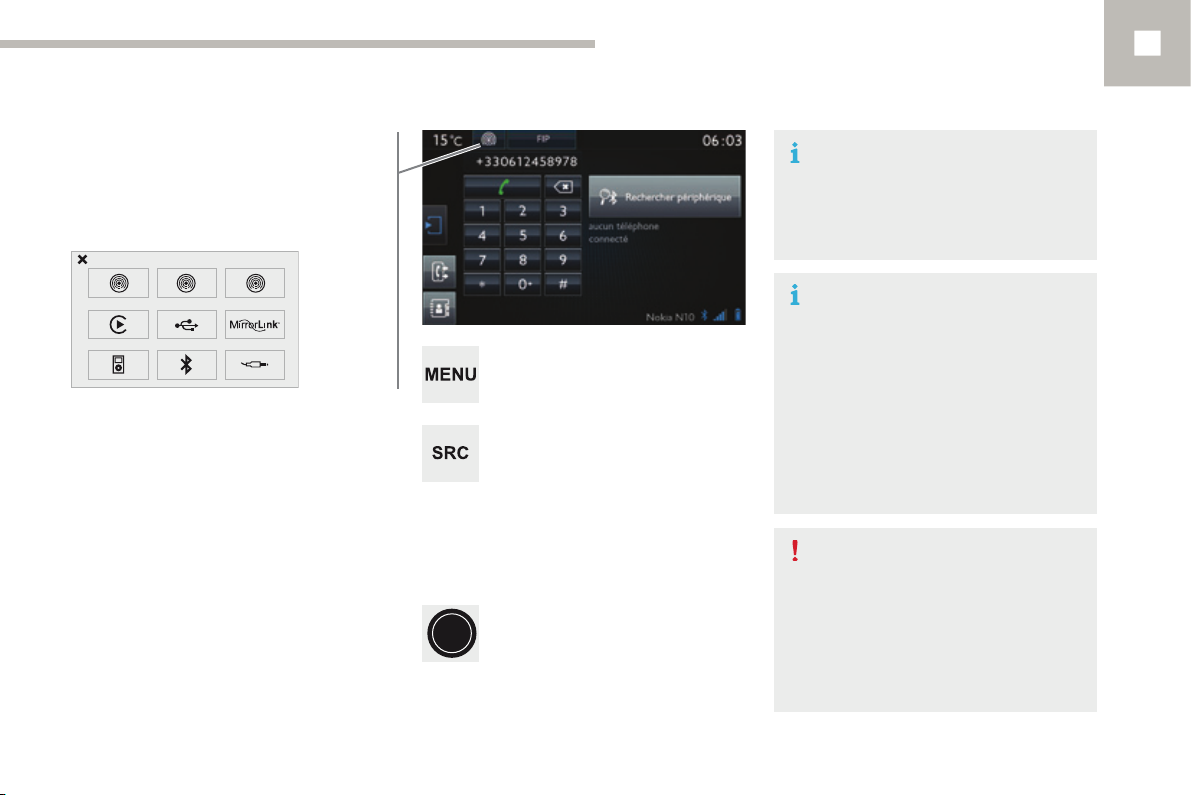
Short-cuts: using the touch buttons in the upper
band of the touch screen, it is possible to go
directly to the selection of audio source, the list
of stations (or titles, depending on the source).
Selection of audio source (depending on
version):
- FM /DAB* /AM stations.
- USB memory stick.
- CD player (located in the glove box)*.
- Smartphone via MirrorLink
- Telephone connected by Bluetooth* and
with Bluetooth* audio streaming.
- Media player connected to the auxiliary
socket (jack, cable not supplied).
- Jukebox*, after first copying audio files to
the internal memory of the system.
TM
or CarPlay®.
Press on Menu to display the menu
carrousel.
Press on SRC to display the audio
sources carrousel.
Volume adjustment (each source is
independent, including traffic announcements
(TA) and navigation instructions).
With the engine running, press to
mute the sound.
With the ignition off, press to switch
the system on.
In very hot conditions, the volume may
be limited to protect the system. The
return to normal takes place when
the temperature in the passenger
compartment drops.
The screen is of the "resistive" type, it
is necessary to press firmly, particularly
for "flick" gestures (scrolling through a
list, moving the map...). A simple wipe
will not be enough. Pressing with more
than one finger is not recognised.
The screen can be used when wearing
gloves. This technology allows use at
all temperatures.
To clean the screen, use a soft
non-abrasive cloth (spectacles cloth)
without any additional product.
Do not use pointed objects on the
screen.
Do not touch the screen with wet
hands.
10
* Depending on equipment.
227
Page 5
Audio and Telematics
Steering mounted controls
228
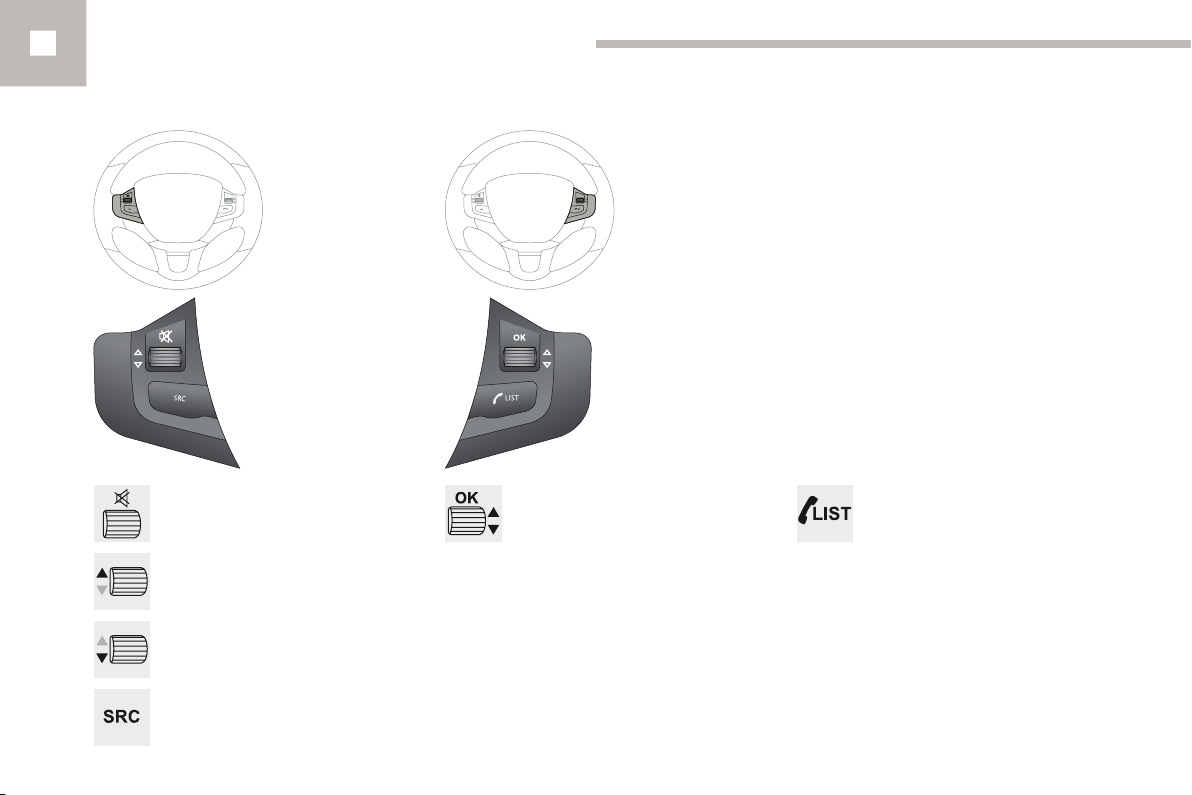
Press: mute on / off.
Increase volume.
Decrease volume.
Change audio source: radio, media.
Radio, rotate: automatic search for
the previous / next station.
Radio, press: preset stations.
Media, rotate: previous / next track.
Press: confirm a selection.
Telephone: start or answer a call.
Call in progress: telephone menu
(end call, secret mode, hands-free
mode).
Telephone, press and hold: reject an
incoming call, end a call in progress;
other than call in progress, telephone
menu.
Radio: display the list of stations.
Media: display the list of tracks.
Radio, press and hold: update the list
of stations received.
Page 6
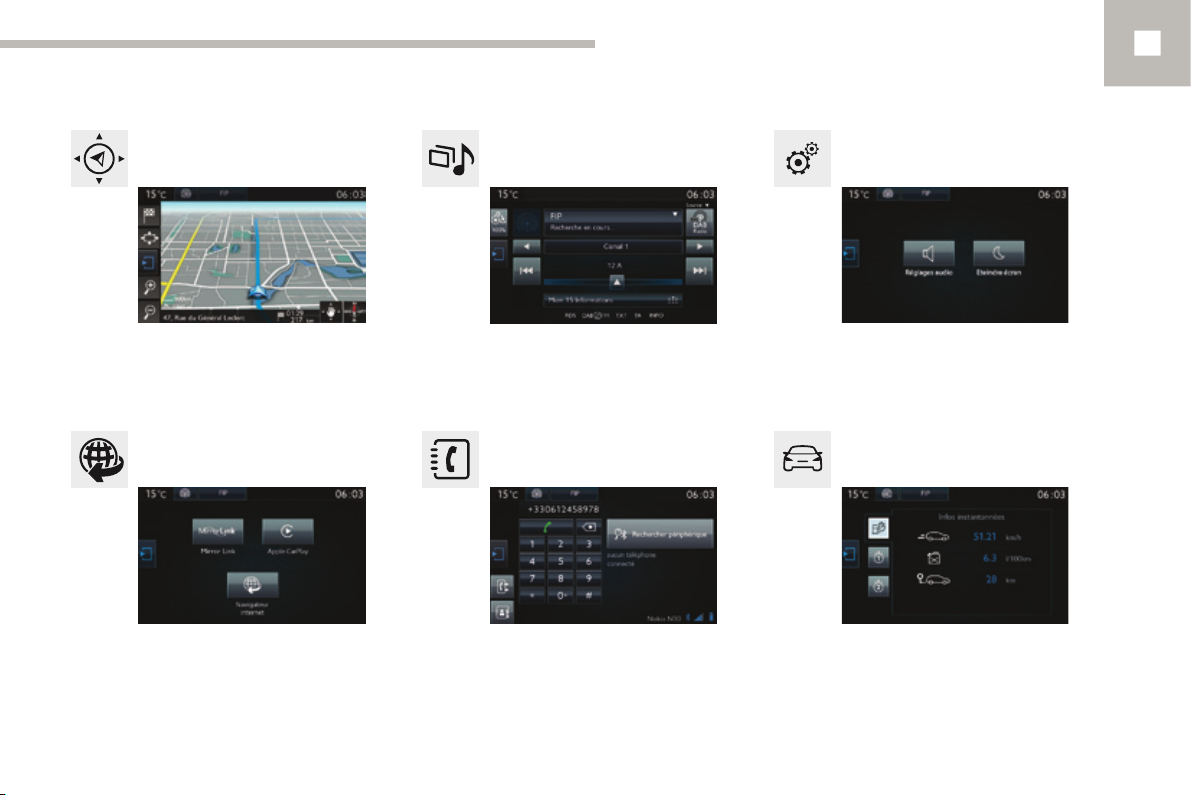
Menus
Audio and Telematics
Navigation
(Depending on equipment)
Enter navigation settings and choose a
destination.
(Depending on equipment)
Connect using the "Internet browser".
Operate certain applications on your
smartphone via MirrorLink
TM
or CarPlay®.
Radio Media
Select an audio source, a radio station, display
photographs.
®
Connect a telephone by Bluetooth
Access to the CarPlay
connection of your smartphone by USB cable.
®
function after
.
Settings
10
Adjust the settings for sound (balance,
ambience, ...) and the display (language, units,
date, time, ...).
DrivingConnected services Telephone
Access to the trip computer.
Activate, deactivate or enter settings for certain
vehicle functions.
229
Page 7
Audio and Telematics
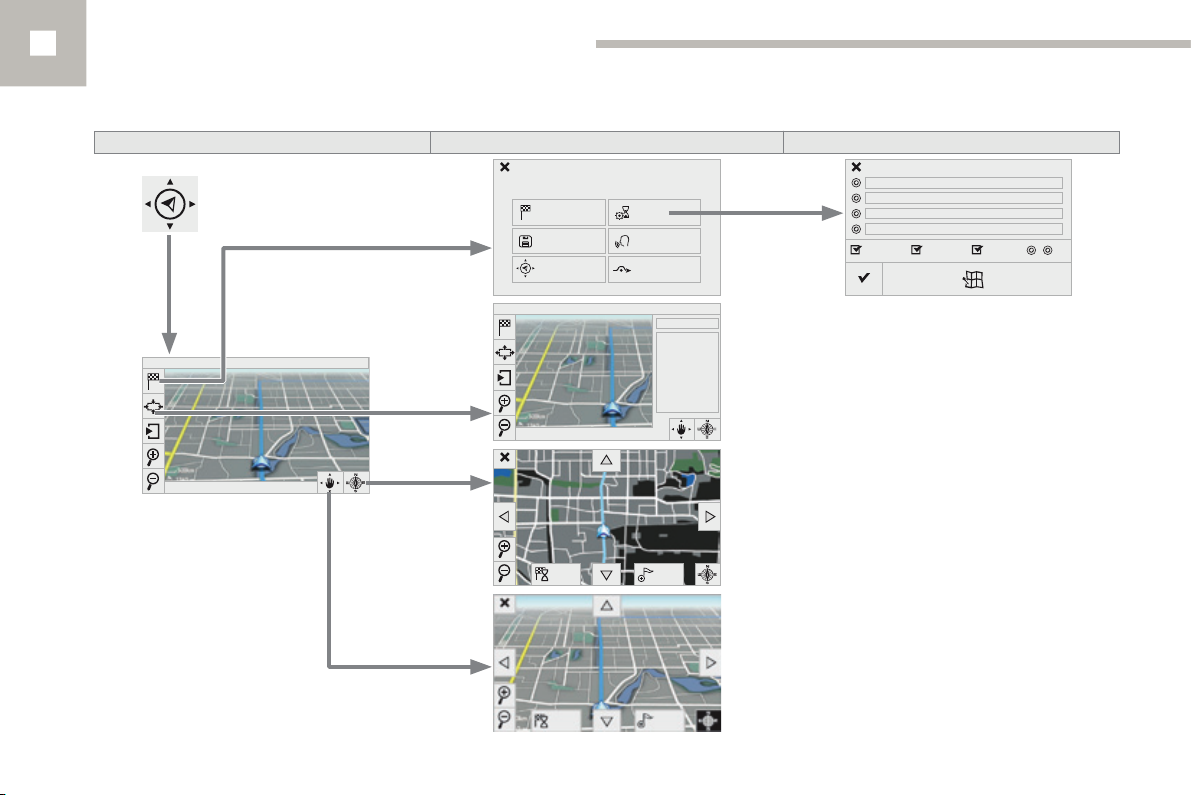
Navigation
Level 1 Level 2 Level 3
Navigation Route settings
230
Page 8
Audio and Telematics
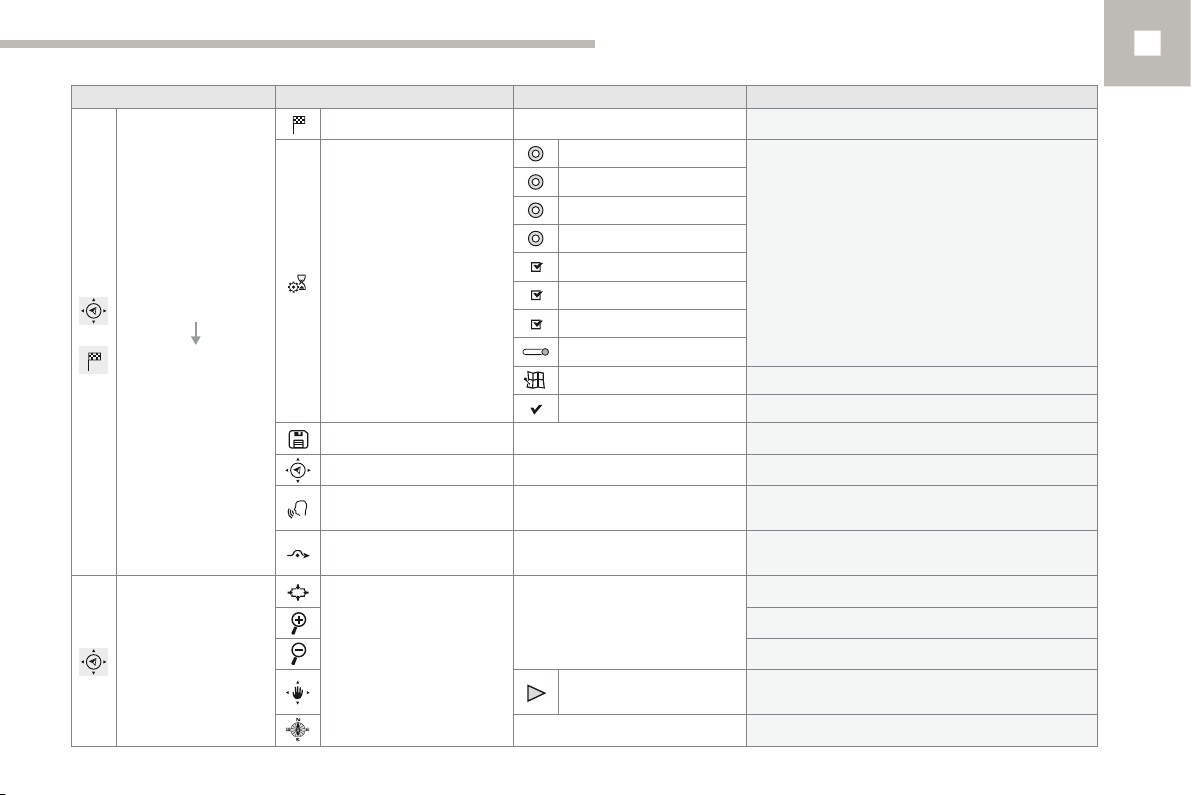
Level 1 Level 2 Level 3 Comments
Enter destination Display recent destinations
Fastest
Shortest
Time/distance
Choose the navigation criteria.
The map displays the route chosen according to
these criteria.
Choose the volume for voice and announcement
of street names.
Detour from your initial route by a determined
distance.
Display in text mode
Zoom in.
Zoom out.
Display in full screen mode.
Use the arrows to move the map.
Switch to 2D map.
Navigation
Settings
Navigation
Navigation
Ecological
Route settings
Save current location Save the current address.
Stop navigation Delete the navigation information.
Voice synthesis
Diversion
Tolls
Ferries
Traffic
Strict-Close
Show route on map Display the map and start navigation.
Confirm Save the options.
10
231
Page 9
Audio and Telematics
Level 1 Level 2 Level 3
Navigation
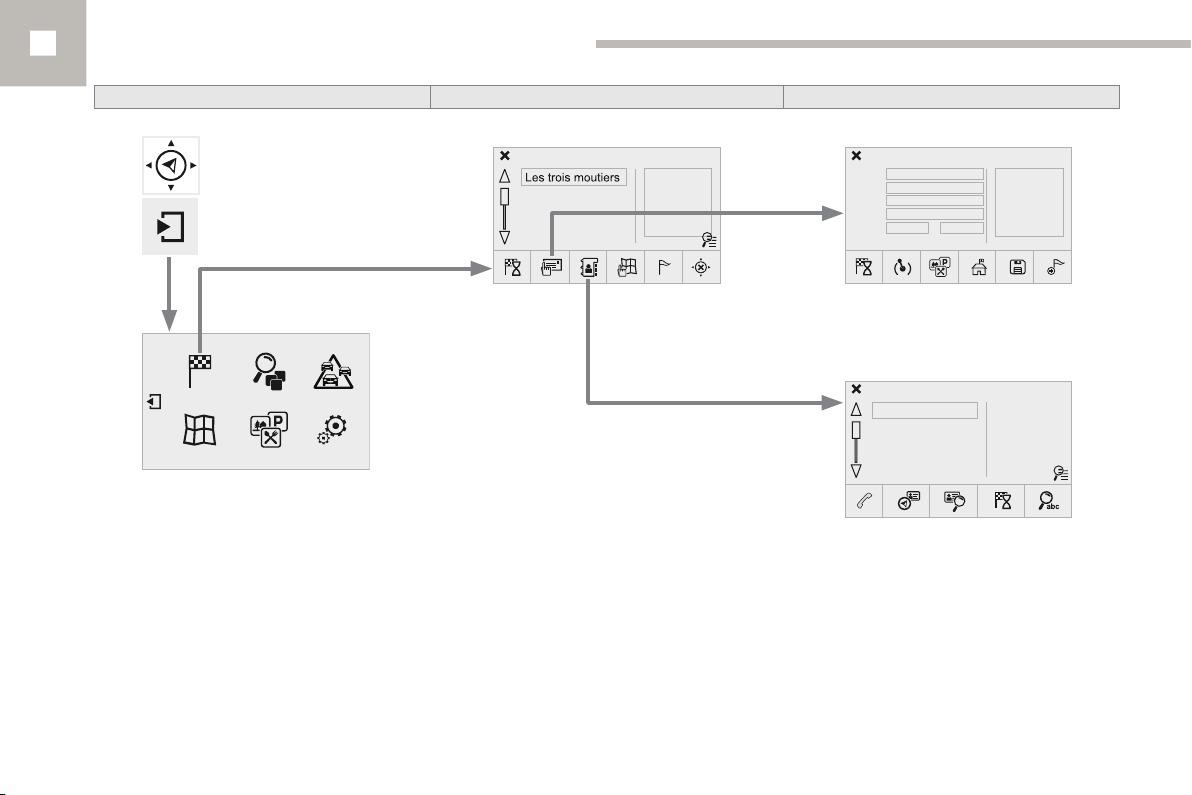
Enter destination
Address
For managing contacts and
their addresses, refer to the
"Telephone" section.
Contacts
To use the telephone functions,
refer to the "Telephone" section.
232
Page 10
Audio and Telematics
Level 1 Level 2 Level 3 Comments
Current loc.
Navigation
Secondary page
Enter destination
Address settingsPoint of interest
Address
Contacts
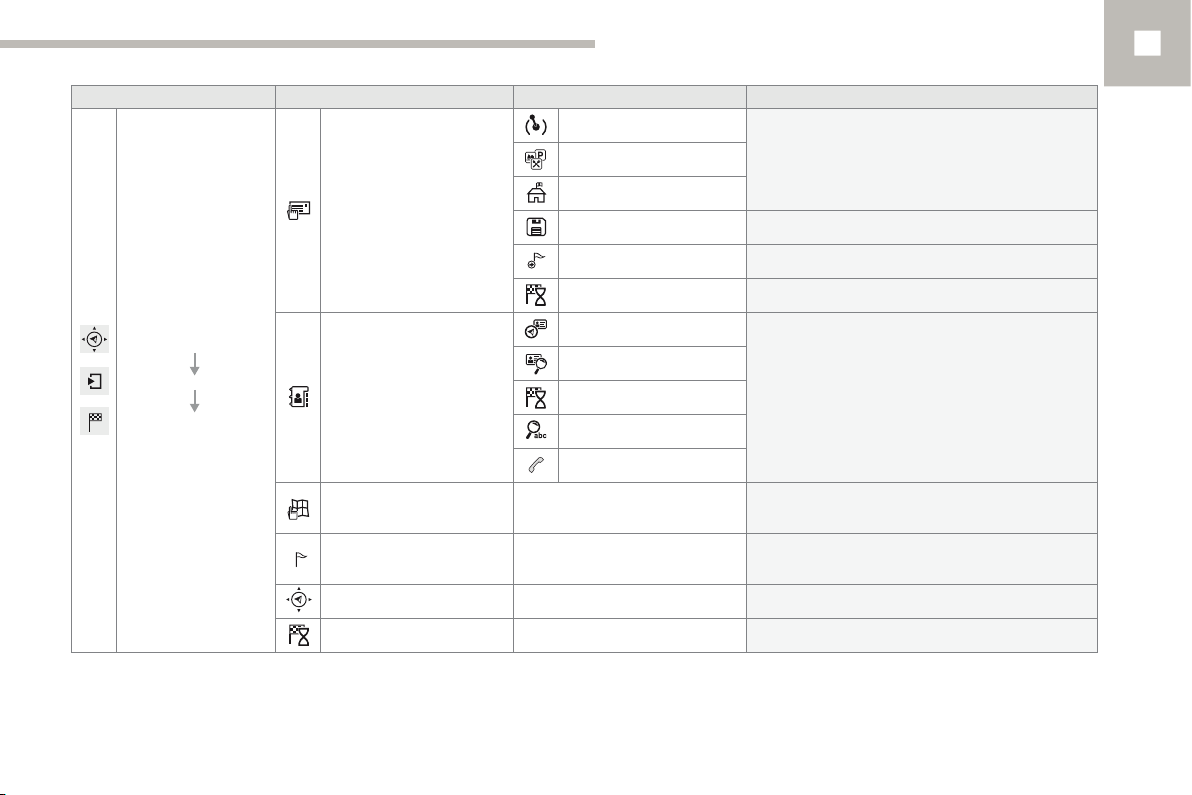
On the map Display the map and zoom to view the roads.
Itinerary
Stop Delete navigation information.
Navigate to Press to calculate the route.
Town center
Save Save the current address.
Add waypoint Add a waypoint to the route.
Navigate to Press to calculate the route.
Addresses
View
Navigate to
Search for contact
Call
Select a contact then calculate the route.
Create, add or delete a waypoint or view the
itinerary.
10
233
Page 11
Audio and Telematics
Level 1 Level 2 Level 3
234
Navigation
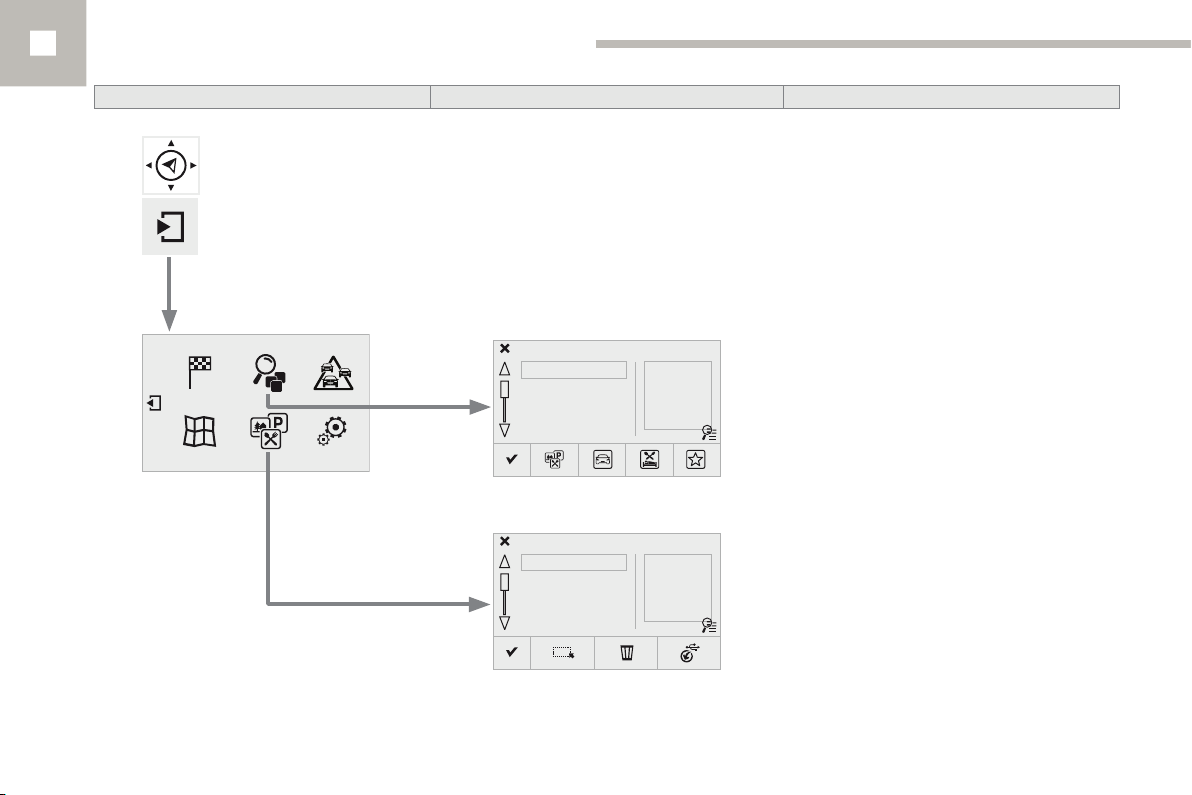
Search for a point of interest
Point of interest displayed on the map
Page 12
Level 1 Level 2 Level 3 Comments
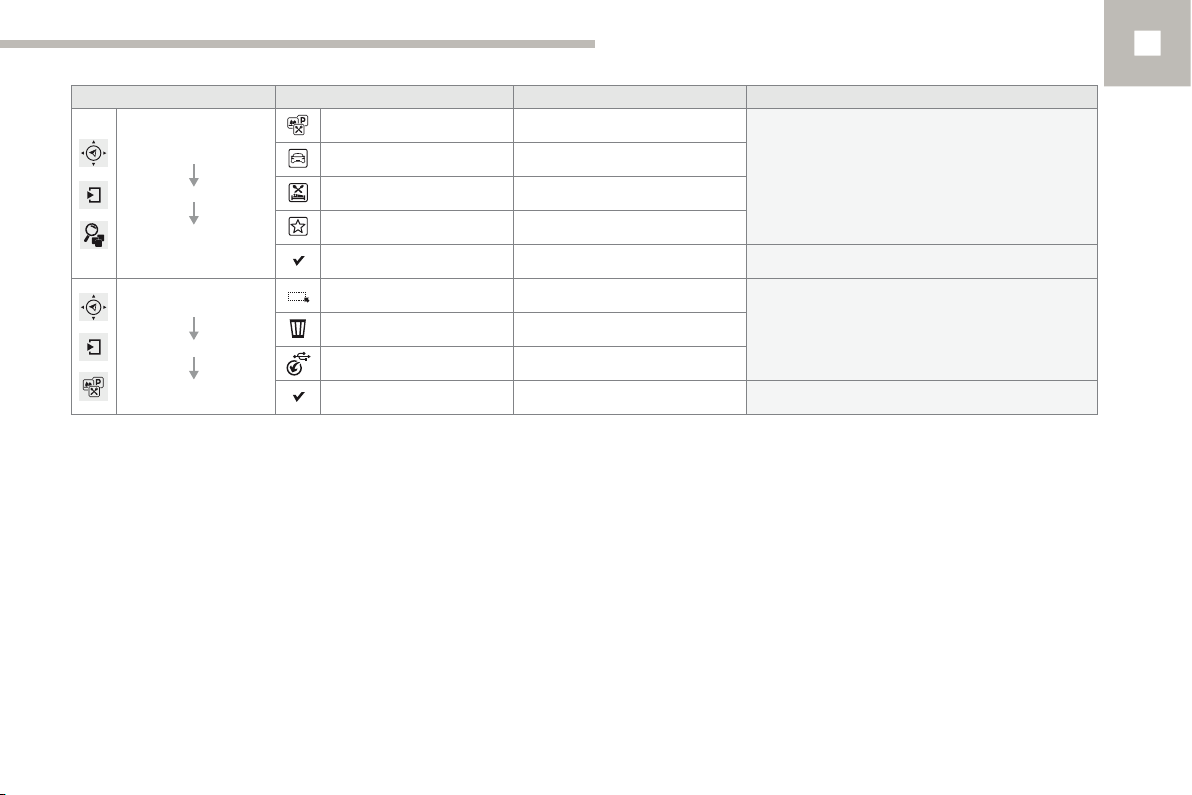
All POIs
Navigation
Secondary page
Search for POI
Motor
Dining/hotels
Personal
Search Save the settings.
List of categories available.
After choosing the category, select the points of
interest.
Audio and Telematics
10
Navigation
Secondary page
Show POIs
Select all
Choose the display settings for POIs.Delete
Import POIs
Confirm Save the options.
235
Page 13
Audio and Telematics
Level 1 Level 2 Level 3
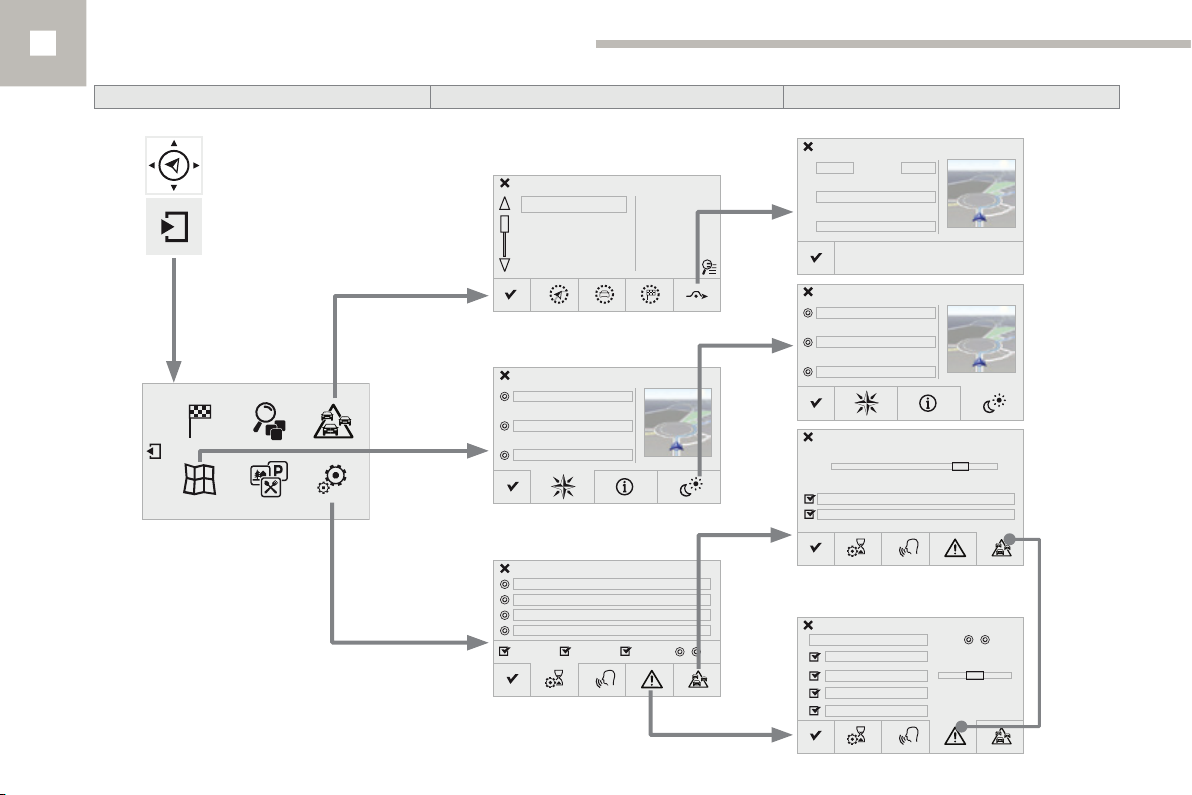
Diversion
Traffic messages
Map settings
236
Navigation
Map settings
Settings
Settings
Settings
Moving
between
the two
menus.
Page 14
Audio and Telematics
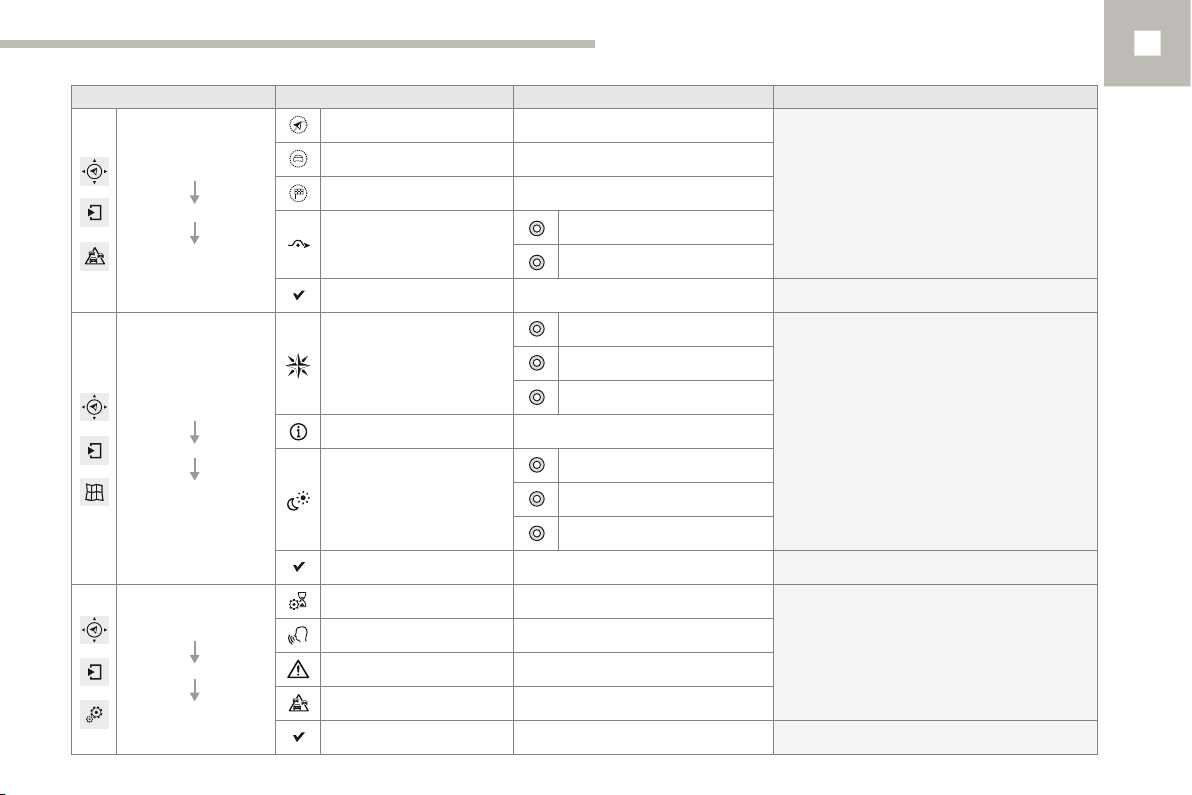
Level 1 Level 2 Level 3 Comments
On the route
Navigation
Secondary page
Traffic messages
Navigation
Secondary page
Map settings
Navigation
Secondary page
Settings
Around vehicle
Near destination
Detour
Finish Save your selections.
Orientation
Maps
Aspect
Confirm Save the settings.
Route settings
Voice
Alarm!
Traffic options
Confirm Save your selections.
Detour over a distance
Recalculate route
Flat view north heading
Flat view vehicle heading
Perspective view
"Day" map colour
"Night" map colour
Auomatic day/night
Settings for the choice of messages and the
filter radius.
Choose the display and orientation of the
map.
Enter settings and choose the volume for the
voice and announcement of street names.
10
237
Page 15
Audio and Telematics
Navigation - Guidance
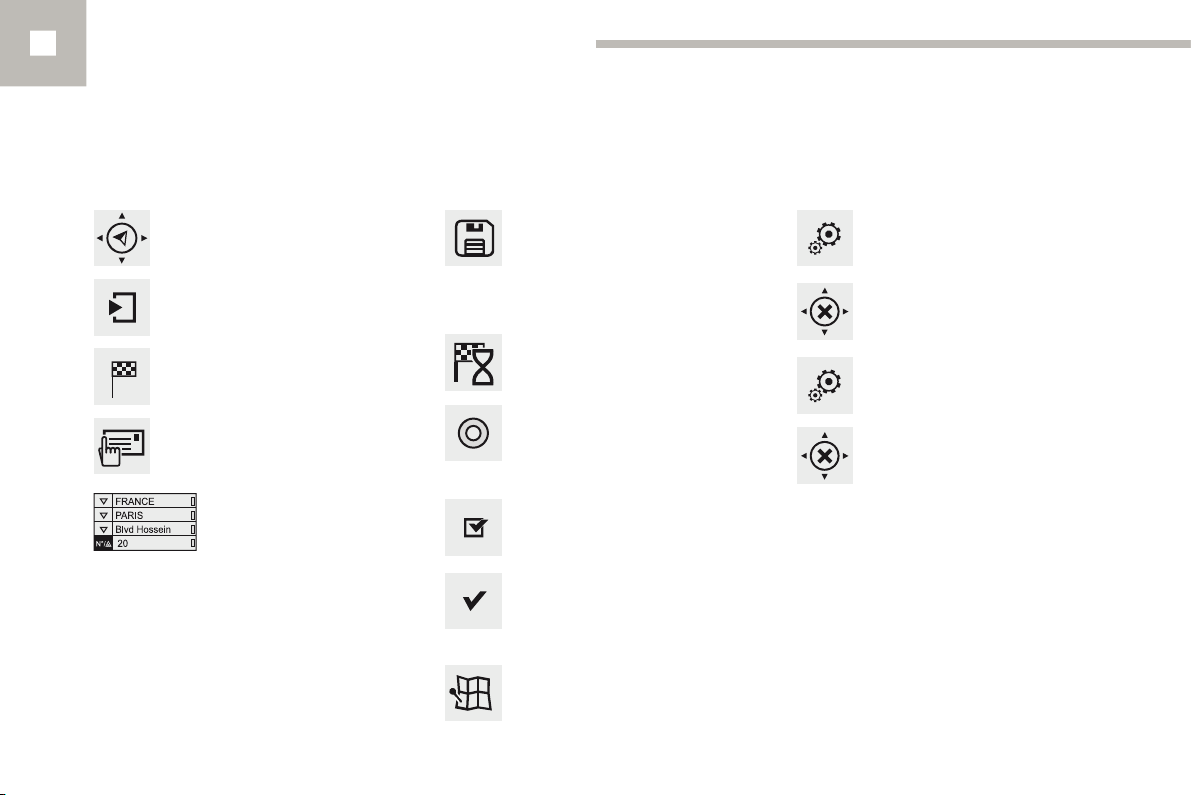
Choosing a new destination
Towards a new destination
238
Press on Navigation to display the
primary page.
Press on the secondary page.
Select "Enter destination".
Select "Address".
Select the "Country:" from the
list offered, then in the same
way the "City:" or its post
code, the "Road:", the "N°:".
Confirm each time.
Or
Select "Save" to save the address
entered as a contact entry.
The system allows up to 200 entries.
Select "Navigate to".
Choose the navigation criteria:
"Fastest" or "Shortest" or "Time/
distance" or "Ecological".
Choose the restriction criteria:
"Tolls", "Ferries", "Traffic", "Strict",
"Close".
Select "Confirm".
Press on "Show route on map" to
start navigation.
To delete navigation information,
press on "Settings".
Press on "Stop navigation".
To resume navigation press on
"Settings".
Press on "Resume guidance".
Page 16
Audio and Telematics
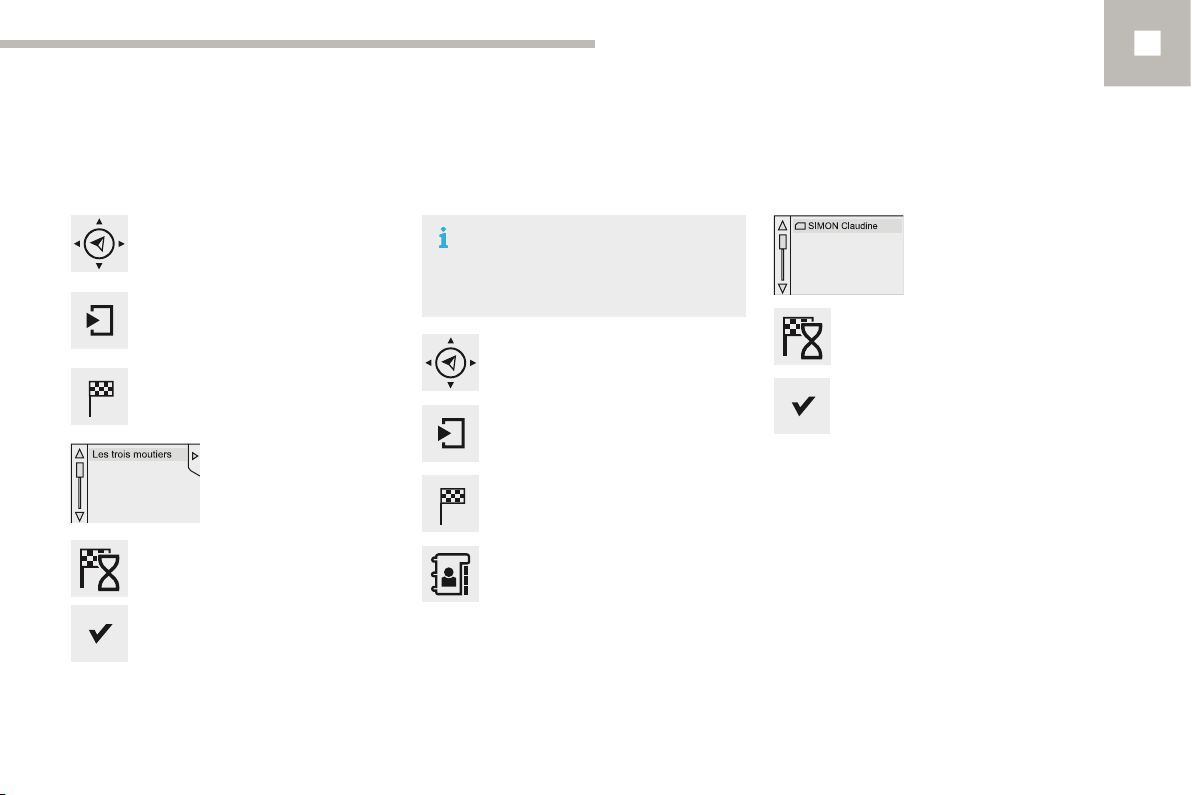
Towards a recent destination
Press on Navigation to display the
primary page.
Press on the secondary page.
Select "Enter destination".
Select an address from
the list offered.
Select "Navigate to".
Select the criteria then "Confirm" or
press "Show route on map" to start
navigation.
Towards a contact
To be able to use navigation "towards
a contact in the directory", it is first
necessary to enter the address for your
contact.
Press on Navigation to display the
primary page.
Press on the secondary page.
Select "Enter destination".
Select "Contacts".
10
Select a destination from
the contacts in the list
offered.
Select "Navigate to".
Select the criteria then "Confirm" to
start navigation.
239
Page 17
Audio and Telematics
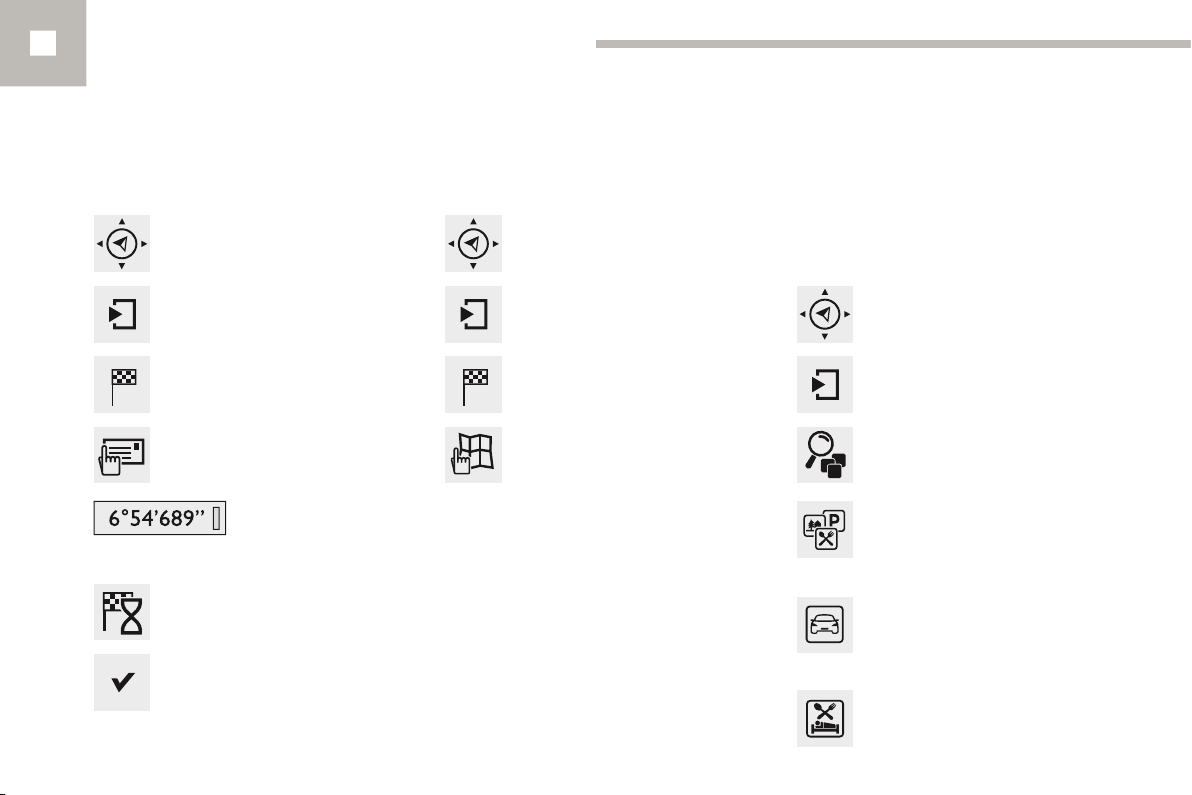
Towards GPS coordinates
Press on Navigation to display the
primary page.
Press on the secondary page.
Select "Enter destination".
Select "Address".
Enter the "Longitude:"
then the "Latitude:".
Select "Navigate to".
Select the criteria then "Confirm" or
press "Show route on map" to start
navigation.
Towards a point on the map
Press on Navigation to display the
primary page.
Press on the secondary page.
Select "Enter destination".
Select "On the map".
Zooming in on the map shows points with
information.
A long press on a point opens its content.
Towards points of interest (POI)
Points of Interest (POI) are listed in different
categories.
Press on Navigation to display the
primary page.
Press on the secondary page.
Select "Search for POI".
Select "All POIs",
Or
"Motor",
Or
"Dining/hotels".
240
Page 18

An annual mapping update allows new
points of interest to be presented to you.
You can also update the Risk areas /
Danger areas every month.
The detailed procedure is available on:
http://peugeot.navigation.com.
Audio and Telematics
10
241
Page 19
Audio and Telematics
Traf c
Risk areas / Danger zone
alert set tings
Press on Navigation to display the
primary page.
Press on the secondary page.
Select "Settings".
Select "Alarm!" (Alert).
It is then possible to activate Risk areas alerts
then:
- "Audible warning"
- "Alert only when navigating"
- "Alert only for overspeed"
- "Display speed limits"
- Timing: the choice of timing allows the
time before giving a Risk areas alert to be
defined.
Select "Confirm".
This series of alerts and displays is
only available if Risk areas have first
been downloaded and installed on the
system.
Traffic informat ion
Display of messages
Press on Navigation to display the
primary page.
Press on the secondary page.
Select "Traffic messages".
Choose filter settings for:
"On the route",
"Around",
"Near destination", filters to finetune the list of messages.
Press again to remove the filter.
242
Page 20

Audio and Telematics
Select the message from
the list offered.
Select the magnifying glass to have
voice information.
TMC (Traffic Message Channel)
messages on GPS-Navigation contain
traffic information transmitted in real
time.
Setting lters
Press on Navigation to display the
primary page.
Press on the secondary page.
Select "Settings".
Select "Traffic options".
Select:
- "Be advised of new messages",
- "Speak messages".
Then enter the filter radius.
Select "Confirm".
We recommend a filter radius of:
- 12 miles (20 km) in urban areas,
- 30 miles (50 km) on motorways.
Receiving TA messages
Press on Navigation to display the
primary page.
Press on the secondary page.
Select "Settings".
Select "Voice".
Activate / Deactivate "Traffic
(TA)".
The TA (Traffic Announcement)
function gives priority to TA alert
messages. To operate, this function
needs good reception of a radio station
transmitting this type of message.
When a traffic report is transmitted,
the current audio source is interrupted
automatically to play the TA message.
Normal playback of the audio source
resumes at the end of the transmission
of the message.
10
243
Page 21
Audio and Telematics
Radio Media
Level 1 Level 2
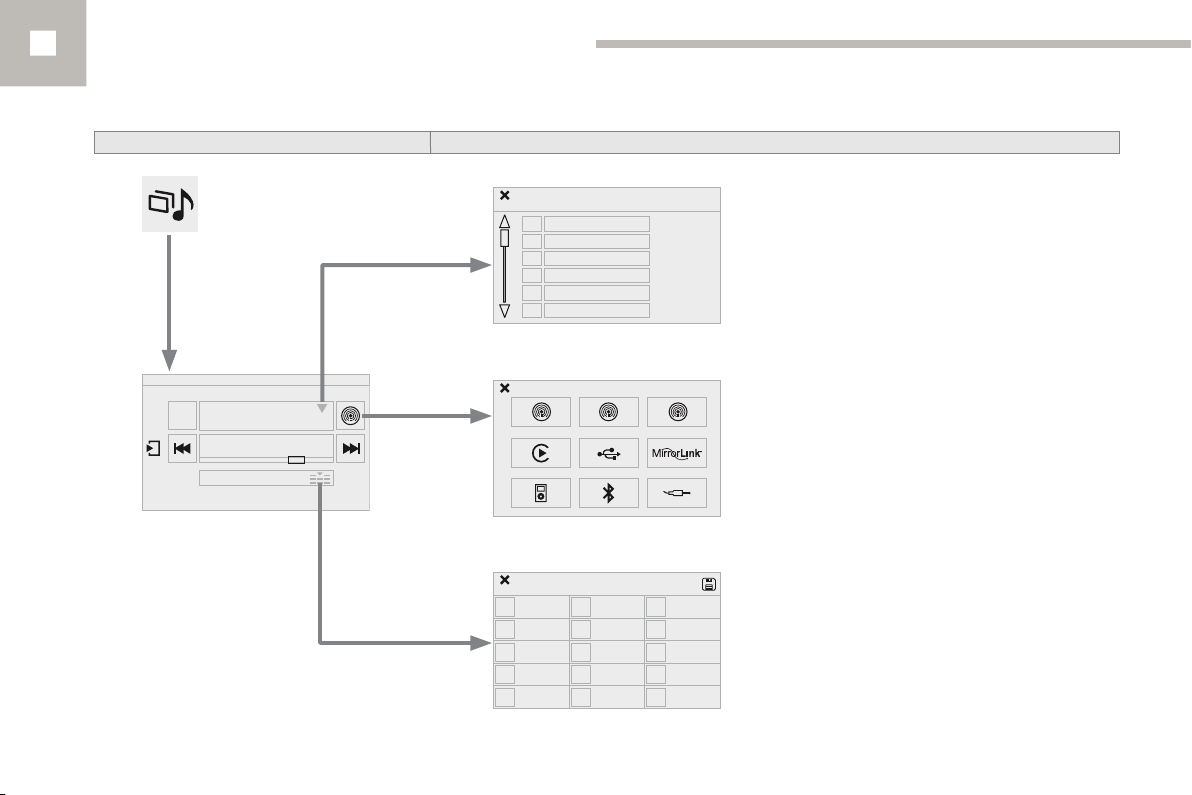
List of FM stations
Save
244
Page 22
Audio and Telematics
Level 1 Level 2 Comments
Radio Media
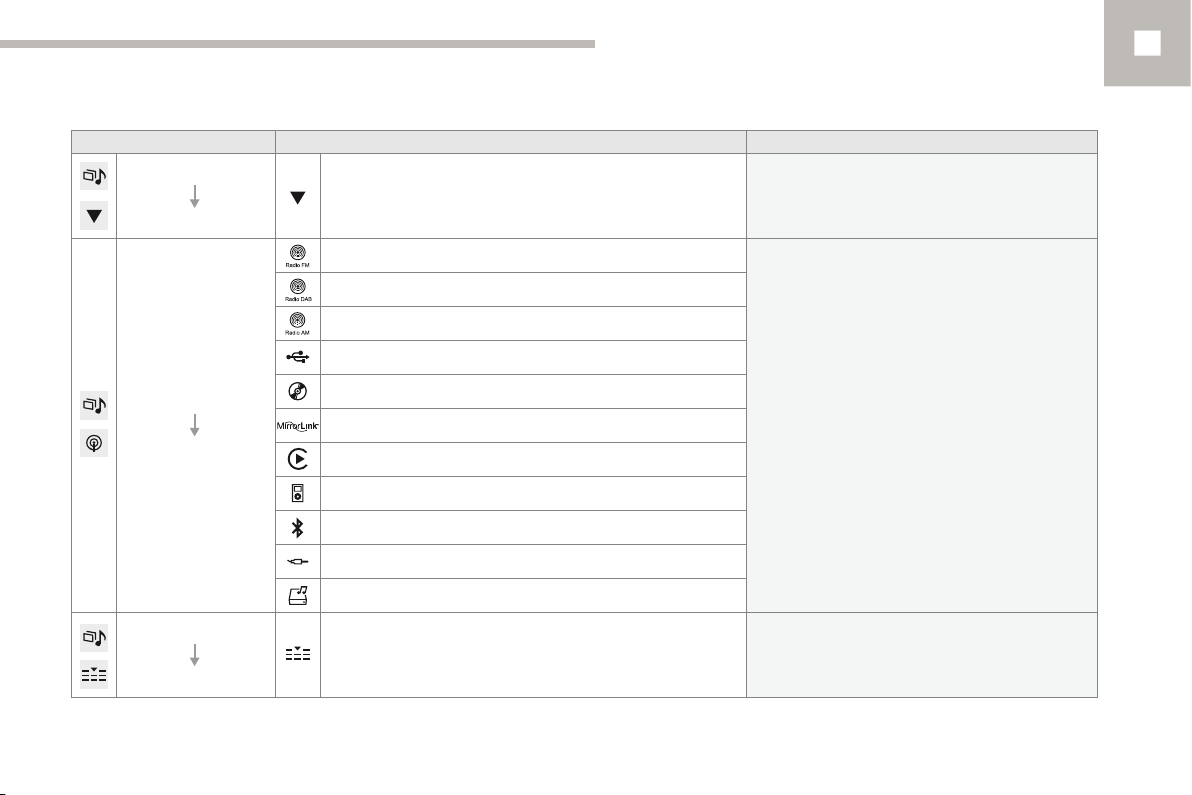
List of FM stations Press on a radio station to select it.
List
FM Radio
DAB Radio
AM Radio
USB
10
Radio Media
Source
Radio Media
Save
CD
MirrorLink
®
CarPlay
iPod
Bluetooth
AUX
Jukebox
TM
Select change of source.
Press an empty location to Save it.
245
Page 23
Audio and Telematics
Level 1 Level 2 Level 3
List of FM stations
246
Media
Photos
Copy to Jukebox
Manage Jukebox
Page 24
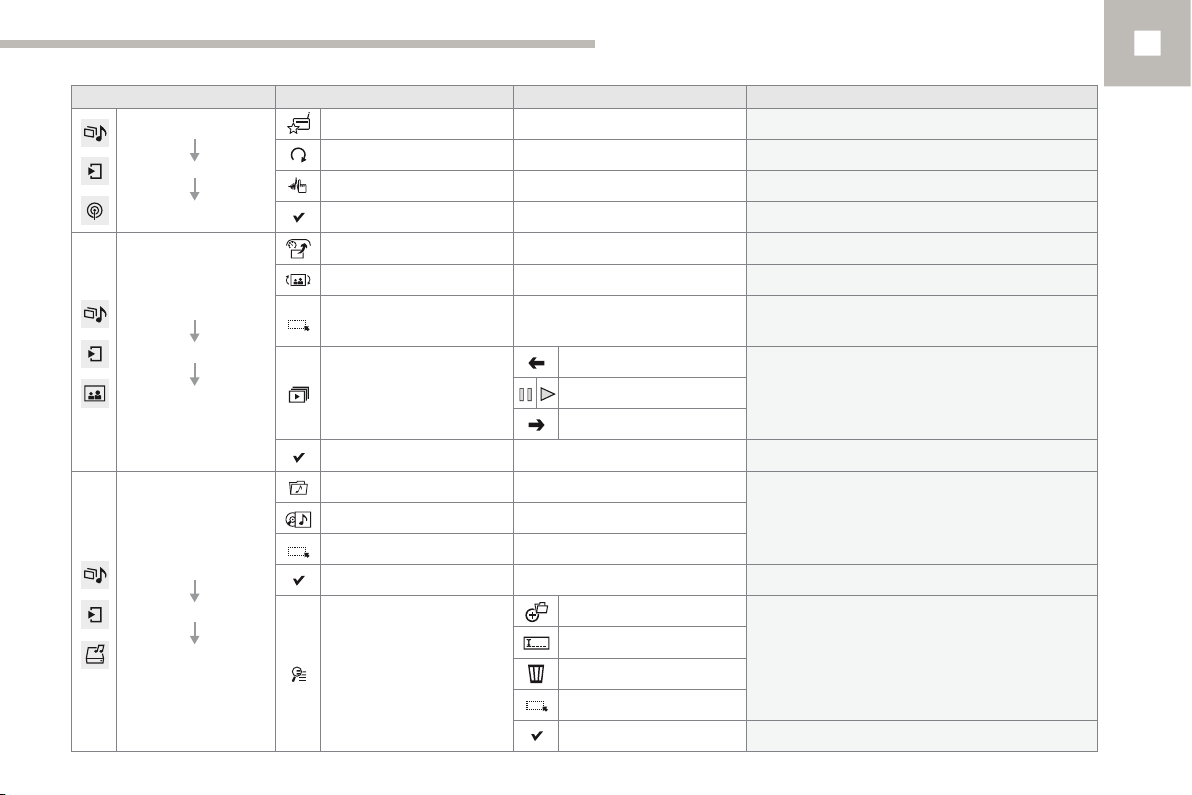
Level 1 Level 2 Level 3 Comments
Radio Media
Secondary page
Radio list
Radio Media
Secondary page
Photos
Radio Media
Secondary page
Manage Jukebox
Save Press a radio station to select it.
Update list Update the list of stations received.
Frequency Enter the desired radio frequency.
Confirm Save the settings.
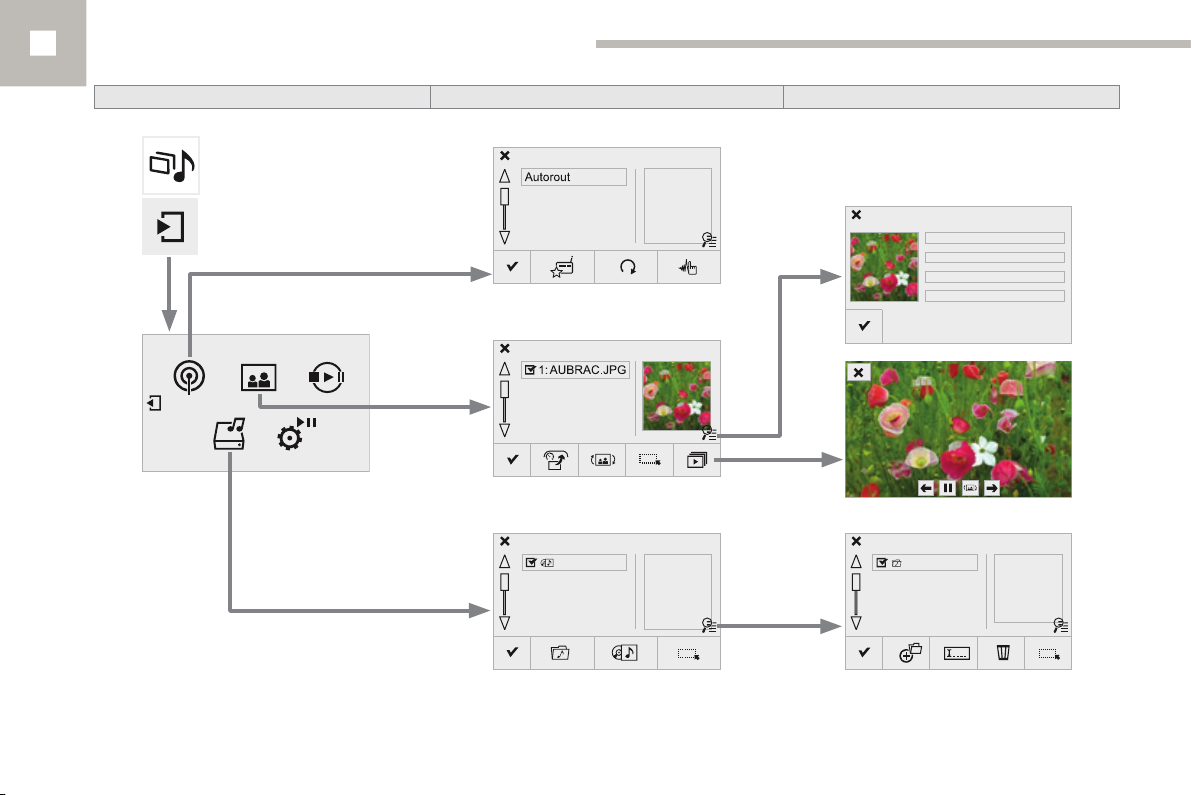
Home screen Display the selected photo in the home page.
Rotate Rotate the photo 90°.
Select all
Previous photo.
Slideshow
Full screen Display the selected photo full-screen.
Sort by folder
Select all
Copy Copy files to the Jukebox.
Magnifying glass
Pause / Play.
Next photo.
Create folder
Rename
Delete
Select all
Confirm Save the settings.
Select all the photos in the list.
Press again to deselect.
Display the photos in sequence, full screen.
The system supports the following image formats:
.gif, .jpg, .bmp, .png.
Choose a selection mode.Sort by album
Choose the desired function.
Audio and Telematics
10
247
Page 25
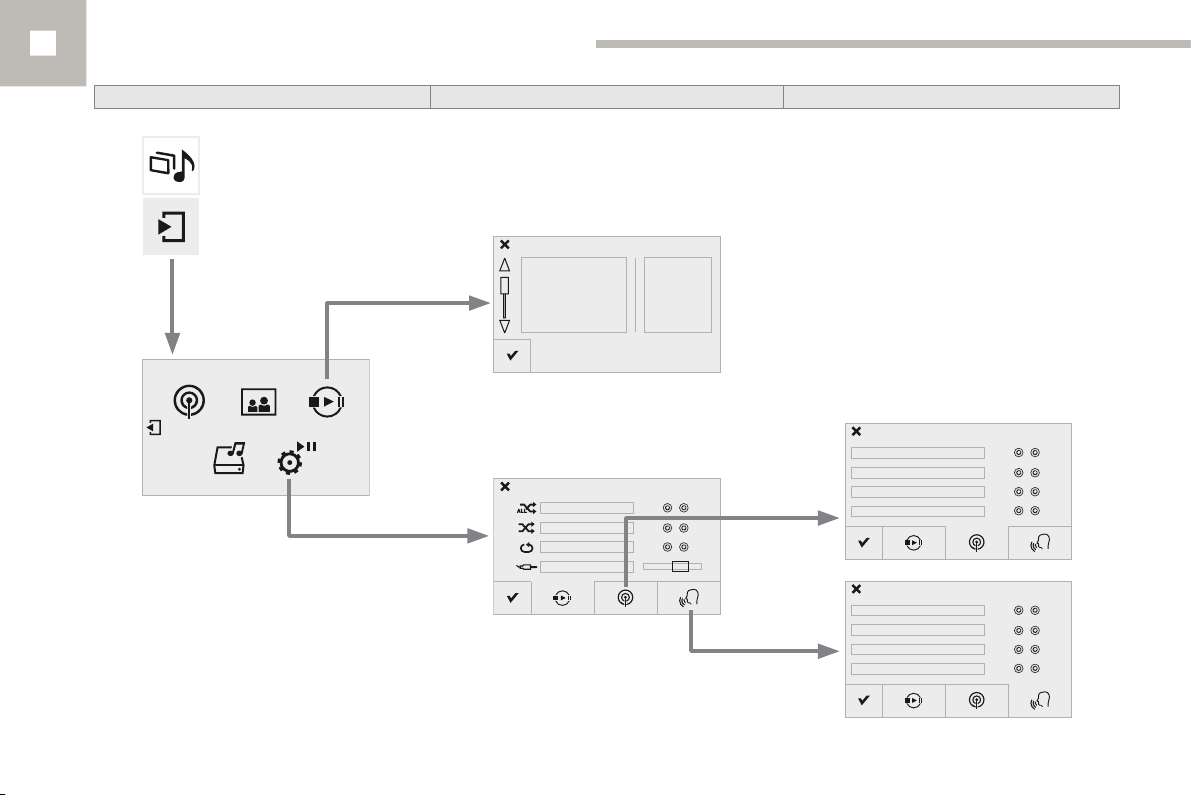
Audio and Telematics
Level 1 Level 2 Level 3
Media
Settings
Settings
Settings
248
Page 26
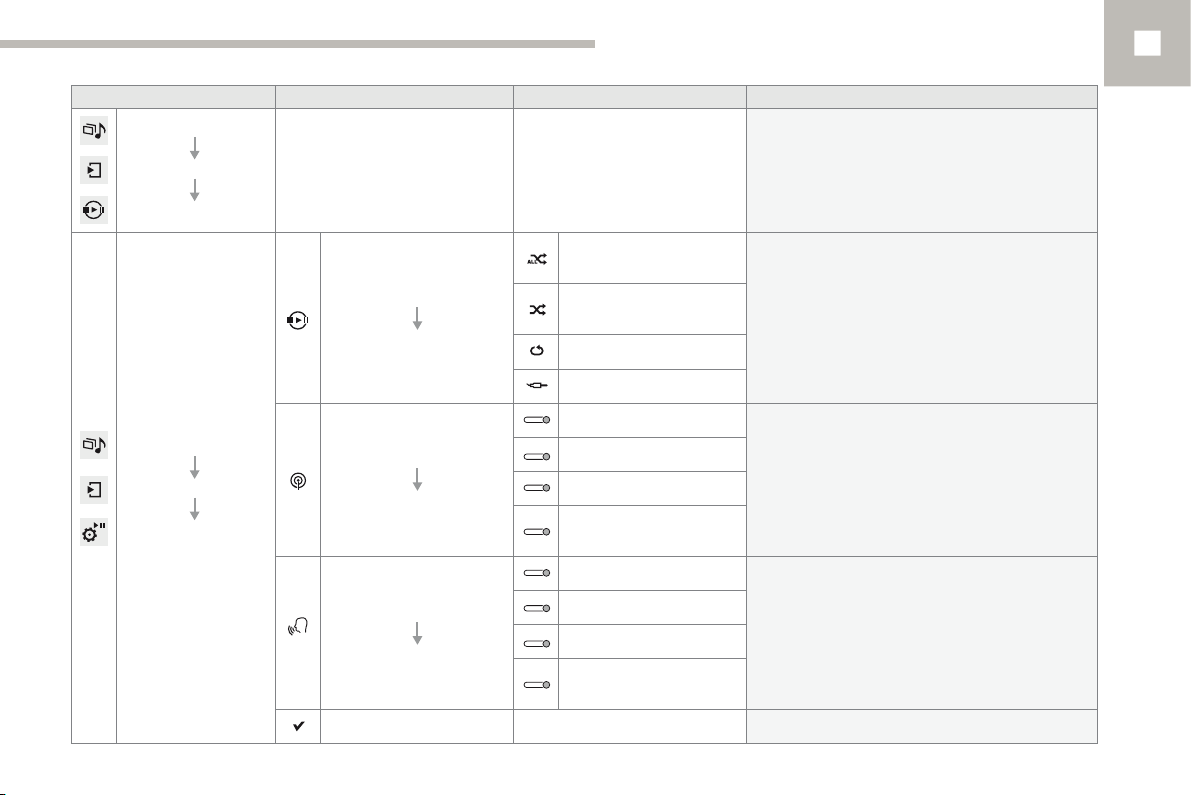
Audio and Telematics
Level 1 Level 2 Level 3 Comments
Radio Media
Secondary page
Media list
Radio Media
Secondary page
Settings
Presentation of the last media used.
Shuffle (all tracks)
Media
Settings
Radio
Settings
Announcements
Settings
Confirm Save the settings.
Shuffle (current album)
Repeat
Aux. amplification
RDS options
DAB/FM station tracking
Display Radio Text
Digital radio slideshow
display
Traffic announcements (T A )
News - Weather
Sport - Programm info
Flash - Unforeseen
events
Choose the play settings.
Activate or deactivate the settings.
Activate or deactivate the settings.
10
249
Page 27
Audio and Telematics
Radio
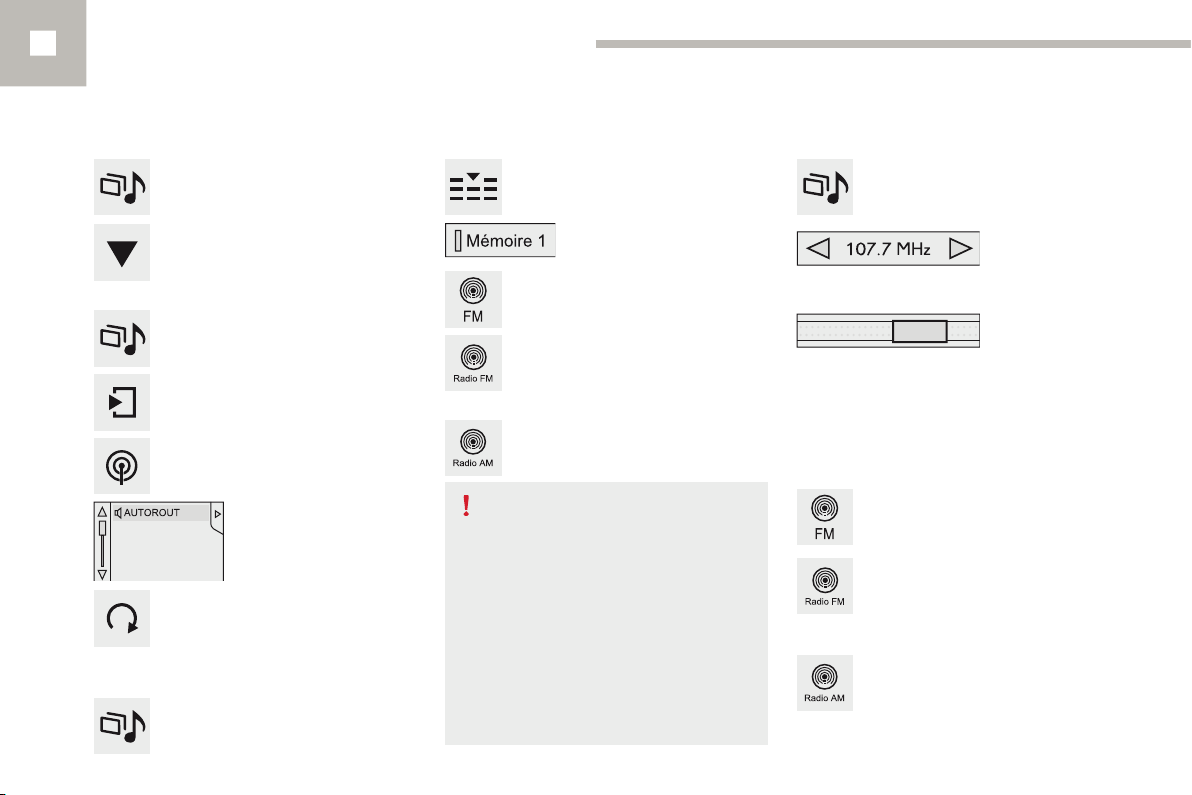
Press on Radio Media to display the
primary page.
Select "Save".
Changing a radio frequencySelecting a station
Press on Radio Media to display the
primary page.
250
Select "List" in the primary page.
Or
Press on Radio Media to display the
primary page.
Press on the secondary page.
Select "Radio list" in the secondary
page.
Select a radio station from
the list offered.
Select "Update list" to refresh the
list.
To select a preset radio station.
Press on Radio Media to display the
primary page.
Select a preset radio station
in the list.
If necessary, select change of
source.
Select "FM Radio".
Or
"AM Radio".
Radio reception may be affected by
the use of electrical equipment not
approved by PEUGEOT, such as a USB
charger connected to the 12 V socket.
The exterior environment (hills,
buildings, tunnel, car park, below
ground...) may prevent reception,
even in RDS station tracking mode.
This phenomenon is normal in the
propagation of radio waves and is in no
way indicative of a fault with the audio
system.
By automatic frequency search
Press 3 or 4 to move the cursor for an
automatic search down or up for a radio
frequency.
THEN
Select change source.
Select "FM Radio".
Or
"AM Radio".
Page 28
OR
Press on Radio Media to display the
primary page.
Press on the secondary page.
Press on Frequency.
Audio and Telematics
Presetting a station Activating / Deactivating RDS
Select a radio station or frequency (refer to the
corresponding section).
Press on "Save" (preset).
Select a number in the list to preset the
previously chosen radio station.
A long press on a number saves (presets) the
station.
Press on Radio Media to display the
primary page.
Press on the secondary page.
Select "Settings".
Select "Radio".
10
THEN
Enter the frequency in full (e.g.:
92.10 MHz) using the keypad then
"Confirm".
Changing radio station
Pressing the name of the current radio station
brings up a list.
To change radio station press the name of the
desired station.
Or
A press on this button presets all of
the stations one after the other.
Recalling preset stations
Press on Radio Media to display the
primary page.
Select "Save" (preset).
Activate/deactivate "RDS
options".
RDS, if activated, allows you to continue
listening to the same station by automatic
retuning to alternative frequencies.
However, in certain conditions, coverage
of an RDS station may not be assured
throughout the entire country as radio
stations do not cover 100 % of the
territory. This explains the loss of
reception of the station during a journey.
251
Page 29
Audio and Telematics
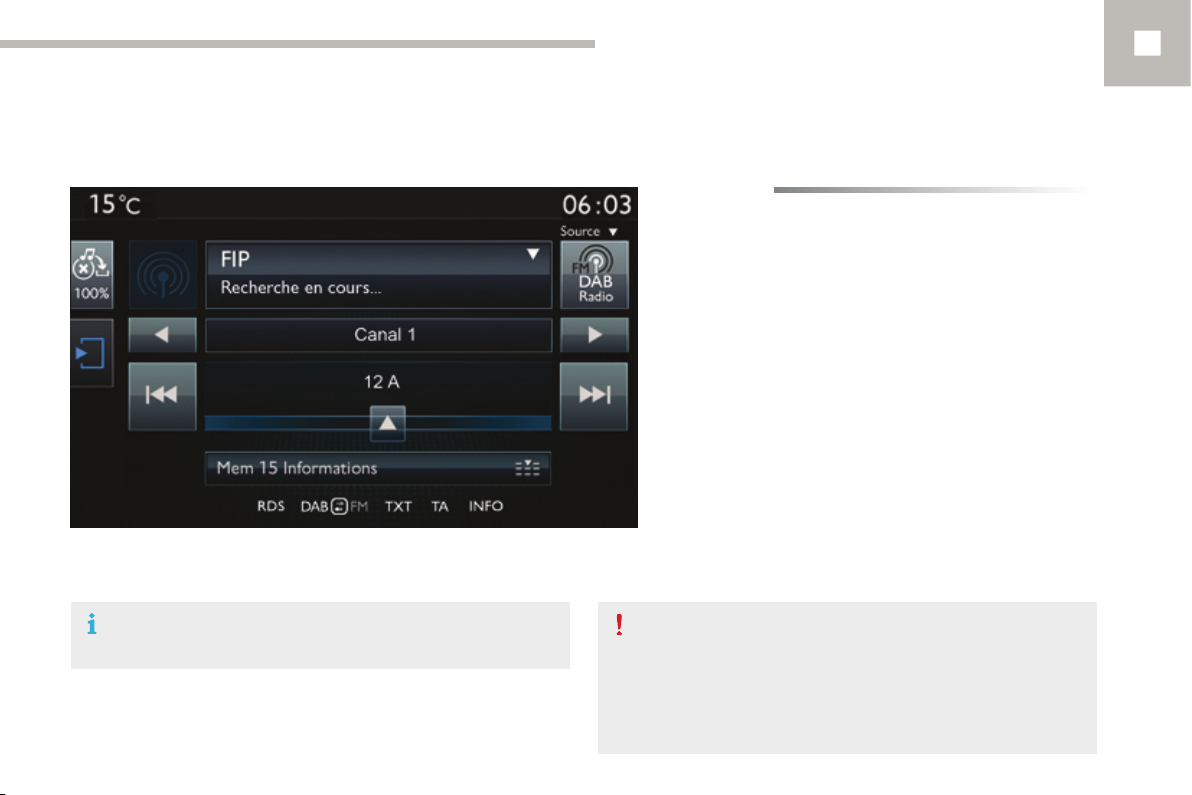
DAB (Digital Audio Broadcasting) radio
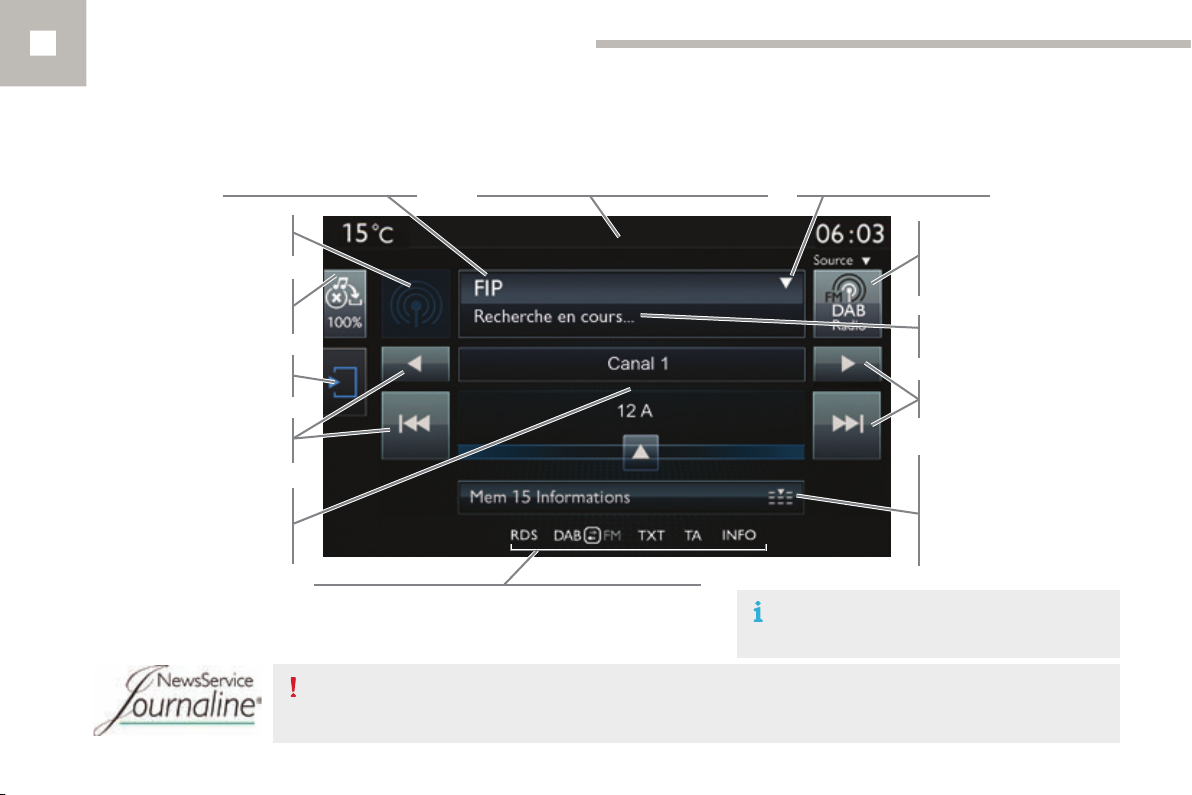
Short-cut: access to the choice of audio
Display of the name of the
current station.
Any thumbnail broadcast by
the station.
Manage the Jukebox.
Display current action.
Secondary page.
Previous "Multiplex".
Previous radio station.
Display the name and
number of the multiplex
service being used.
source and the list of stations (or titles,
depending on the source). Select the radio station.
Select the audio source.
Display the "DAB" band.
Display of "Radiotext" for
the current station.
Next "Multiplex".
Next radio station.
Preset stations, buttons 1
to 15.
Short press: select the
preset radio station.
Long press: preset a radio
station.
252
Display of options:
if active but not available, the display will be greyed out,
if active and available, the display will be blank.
Journaline® is a text-based information service designed for digital radio systems.
It provides text-based information structured around topics and sub-topics.
This service is available from the "LIST OF DAB STATIONS" page.
If the "DAB" radio station being listened to is not
available on "FM", the "DAB FM" option is greyed out.
Page 30
Audio and Telematics
DAB / FM auto trackingDigital radio
Digital radio provides higher quality
reception and also the graphical display
of current information on the radio
station being listened to. Select "List" in
the primary page.
The range of multiplexes available is
displayed in alphabetical order.
Press on Radio Media to display the
primary page.
Select change of source.
Select "DAB Radio".
Select "List" in the primary page.
or
Select "Radio list" in the secondary
page.
Select the radio station from the list offered.
"DAB" does not cover 100% of the
territory.
When the digital radio signal is poor,
"DAB/FM station tracking" allows you to
continue listening to the same station,
by automatically switching to the
corresponding "FM" analogue station
(if there is one).
Press on Radio Media to display the
primary page.
Press on the secondary page.
Select "Settings".
Select "Radio".
Select "Digital/FM auto
tracking" then "Confirm".
If "DAB/FM station tracking" is
activated, there is a difference of a
few seconds when the system switches
to "FM" analogue radio with sometimes
a variation in volume.
When the digital signal is restored, the
system automatically changes back to
"DAB".
If the "DAB" station being listened to
is not available on "FM" ("DAB/FM"
option greyed out), or "DAB/FM station
tracking" is not activated, the sound
will cut out while the digital signal is too
weak.
10
253
Page 31
Audio and Telematics
Media
USB player Selecting the source
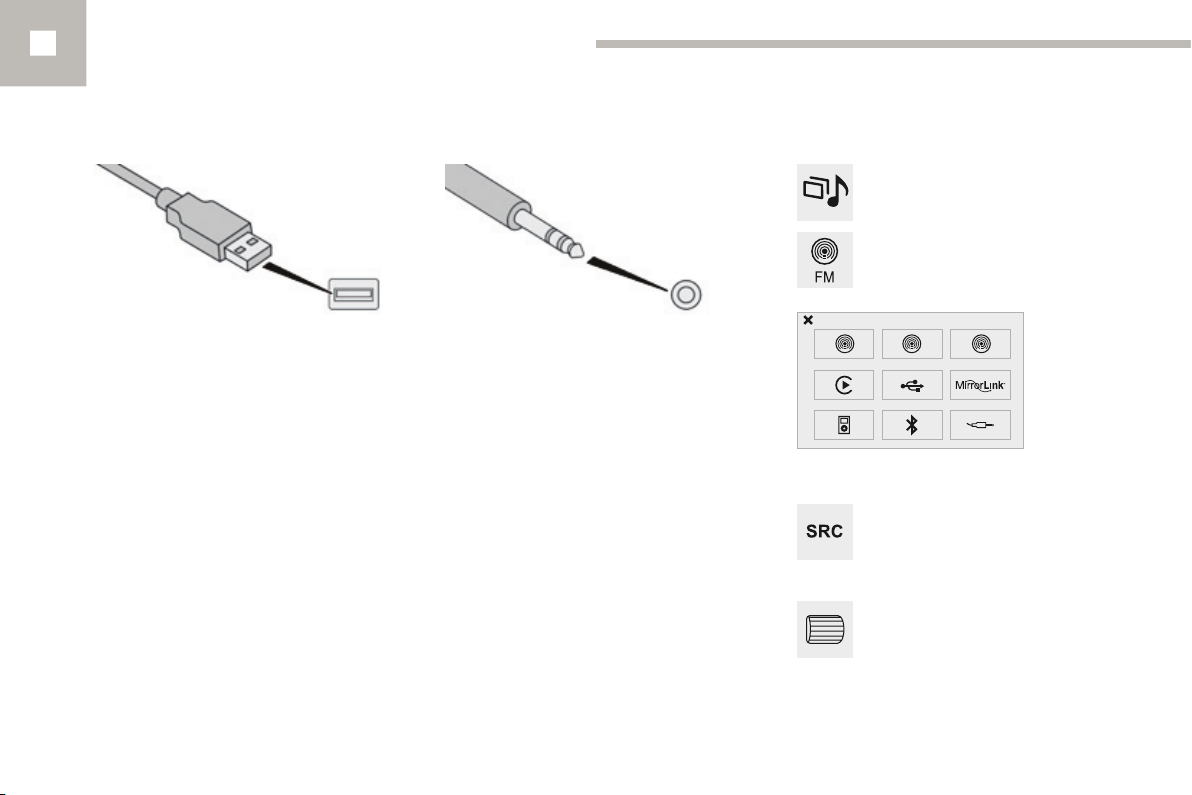
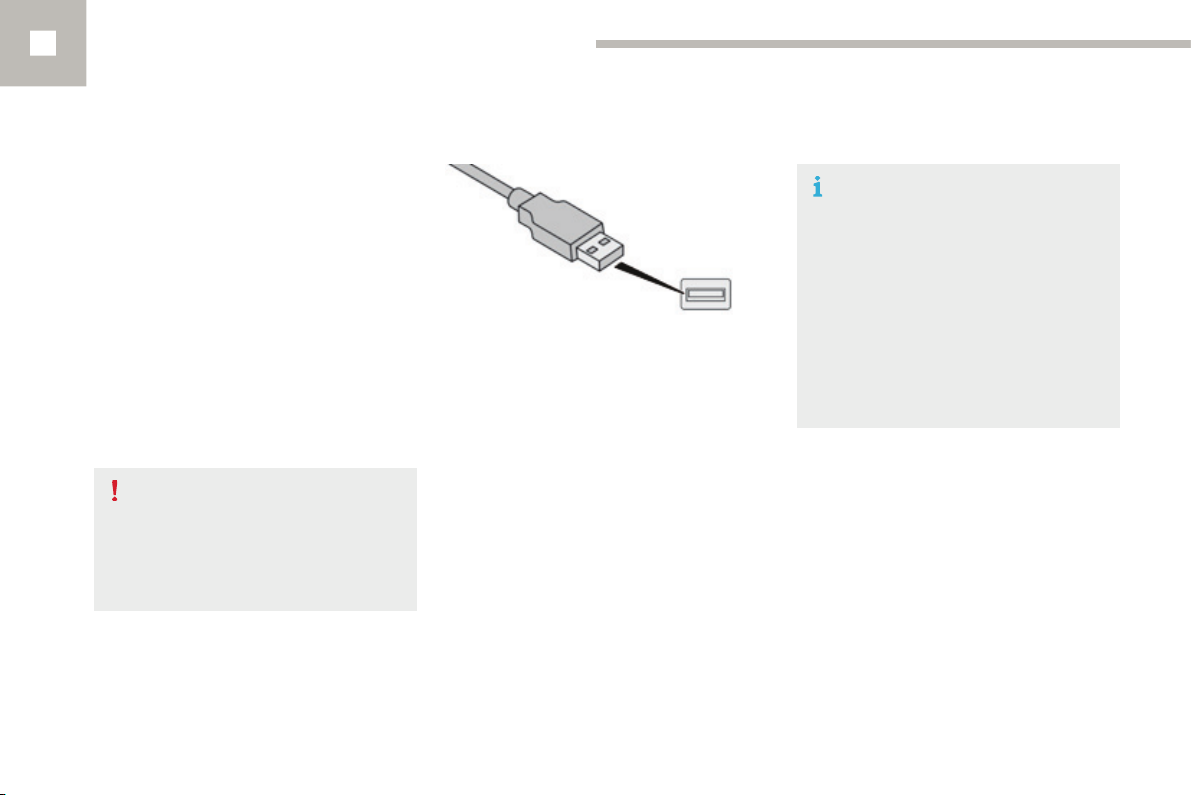
Insert the USB memory stick into the USB port
or connect the USB device to the USB port
using a suitable cable (not supplied).
The system builds playlists (in temporary
memory), an operation which can take from
a few seconds to several minutes at the first
connection.
Reduce the number of non-music files and the
number of folders to reduce the waiting time.
The playlists are updated every time the
ignition is switched off or connection of a USB
memory stick. The lists are memorised: if they
are not modified, the subsequent loading time
will be shorter.
Auxiliary (AUX) socket
Connect the portable device (MP3 player…) to
the auxiliary Jack socket using an audio cable
(not supplied).
First adjust the volume of your portable device
(to a high level). Then adjust the volume of your
audio system.
Display and management of the controls are
via the portable device.
CD player
Insert the CD in the player.
Press on Radio Media to display the
primary page.
Select change of source.
Choose the source.
The steering mounted SRC (source)
button can be used to go to the next
media source, available if the source
is active.
Press on OK to confirm the selection.
254
Page 32
Information and advice
The audio equipment will only play audio
files with".wma, .aac, .flac, .ogg and. mp3"
file extensions and with a bit rate of between
32 Kbps and 320 Kbps.
It also supports VBR (Variable Bit Rate) mode.
No other type of file (.mp4, ...) can be played.
".wma" files must be of the standard wma 9 type.
The sampling rates supported are 32, 44 and
48 KHz.
It is advisable to restrict file names to
20 characters, without using of special
characters (e.g.: " " ? ; ù) to avoid any playing
and displaying problems.
In order to be able to play a recorded CDR or
CDRW, when recording it is preferable to select
the ISO 9660 level 1, 2 or Joliet standard.
If the disc is recorded in another format it may
not be played correctly.
It is recommended that the same recording
standard is always used for an individual disc,
with as low a speed as possible (4x maximum)
for optimum sound quality.
In the particular case of a multi-session CD, the
Joliet standard is recommended.
The system supports USB mass
storage devices, BlackBerry
®
or Apple
adaptor cable is not supplied.
Control of the peripheral device is with
the audio system controls.
Other peripherals, not recognised on
connection, must be connected to the
auxiliary socket using a Jack cable (not
supplied).
players via USB ports. The
®
devices
Audio and Telematics
Use only USB memory sticks formatted FAT 32
(file allocation table).
The system does not support the
simultaneous connection of two
identical devices (two memory sticks,
two Apple
to connect one memory stick and one
Apple
It is recommended that the USB cable
for the portable device is used.
®
players) but it is possible
®
player at the same time.
10
255
Page 33
Audio and Telematics
Bluetooth® audio streaming
Streaming allows audio files on your telephone
to be played through the vehicle's speakers.
Connect the telephone: see the "Telephone"
section, then "Bluetooth".
Choose the "Audio" or "All" profile.
If play does not start automatically, it may be
necessary to start the audio playback from the
telephone.
Control is from the peripheral device or by
using the audio system buttons.
Once connected in streaming mode,
the telephone is considered to be a
media source.
It is recommended that you activate
"Repeat" on the Bluetooth peripheral.
Connecting Apple® players
Connect the Apple® player to the USB port
using a suitable cable (not supplied).
Play starts automatically.
Control is via the audio system.
The classifications available are those
of the portable device connected
(artists / albums / genres / playlists /
audiobooks / podcasts).
The default classification used is by
artist. To modify the classification used,
return to the first level of the menu
then select the desired classification
(playlists for example) and confirm
to go down through the menu to the
desired track.
The version of software in the audio system
may not be compatible with the generation of
your Apple
®
player.
256
Page 34
Managing the Jukebox
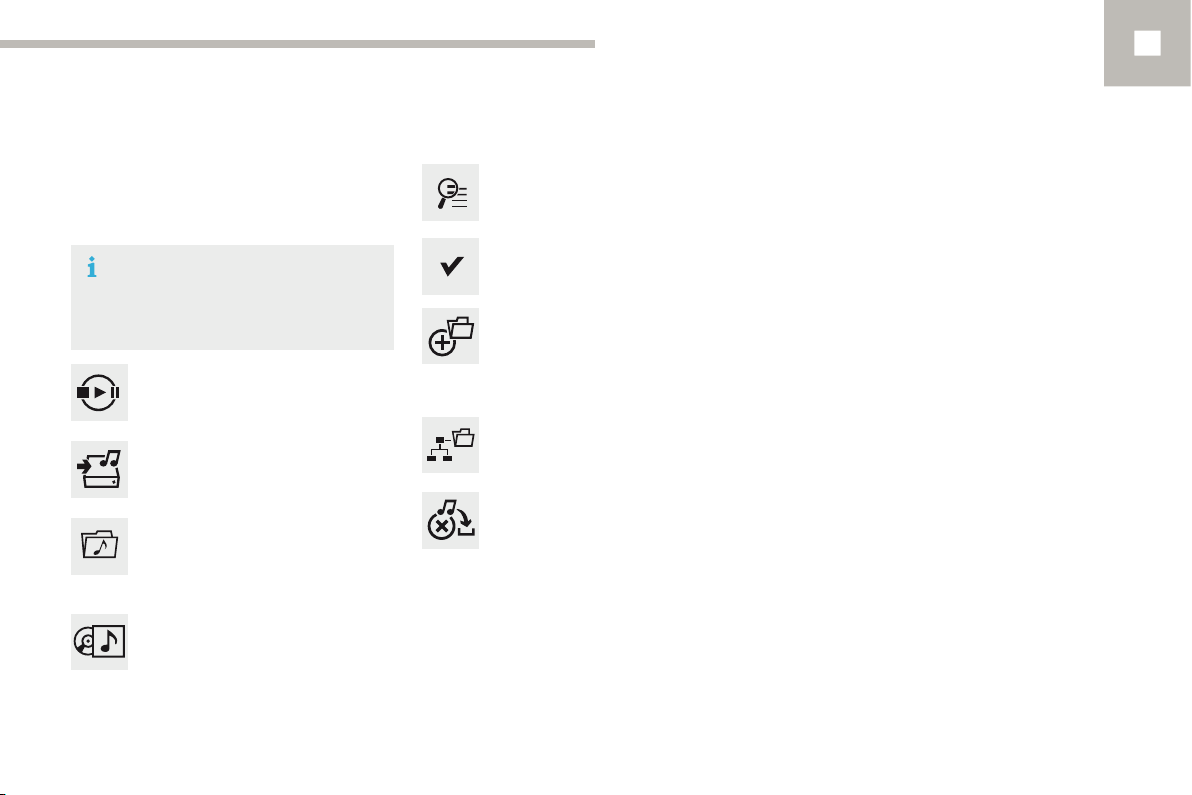
Connect the device (MP3 player...) to the USB
port or auxiliary Jack socket using a suitable
audio cable.
When no audio file is copied to the
system, which has a capacity of 8 GB,
all of the Jukebox function symbols are
greyed and are not available.
Select the magnifying glass to enter
the folder or album and select audio
file by audio file.
Select "Confirm" then "Copy".
Select "New folder" to create a
folder structure in the Jukebox.
Audio and Telematics
10
Or
Select "Media list".
Select copy "Copy Jukebox".
Select "Sort by folder".
"Sort by album".
Or
Select "Keep structure" to retain the
structure from the device.
While copying the system returns
to the primary page; you can go
back to the copy view at any time by
selecting this button.
257
Page 35
Audio and Telematics
Settings
Level 1
Level 2 Level 3
Audio settings
Audio settings
Audio settings
258
Page 36
Audio and Telematics
Level 1 Level 2 Level 3 Comments
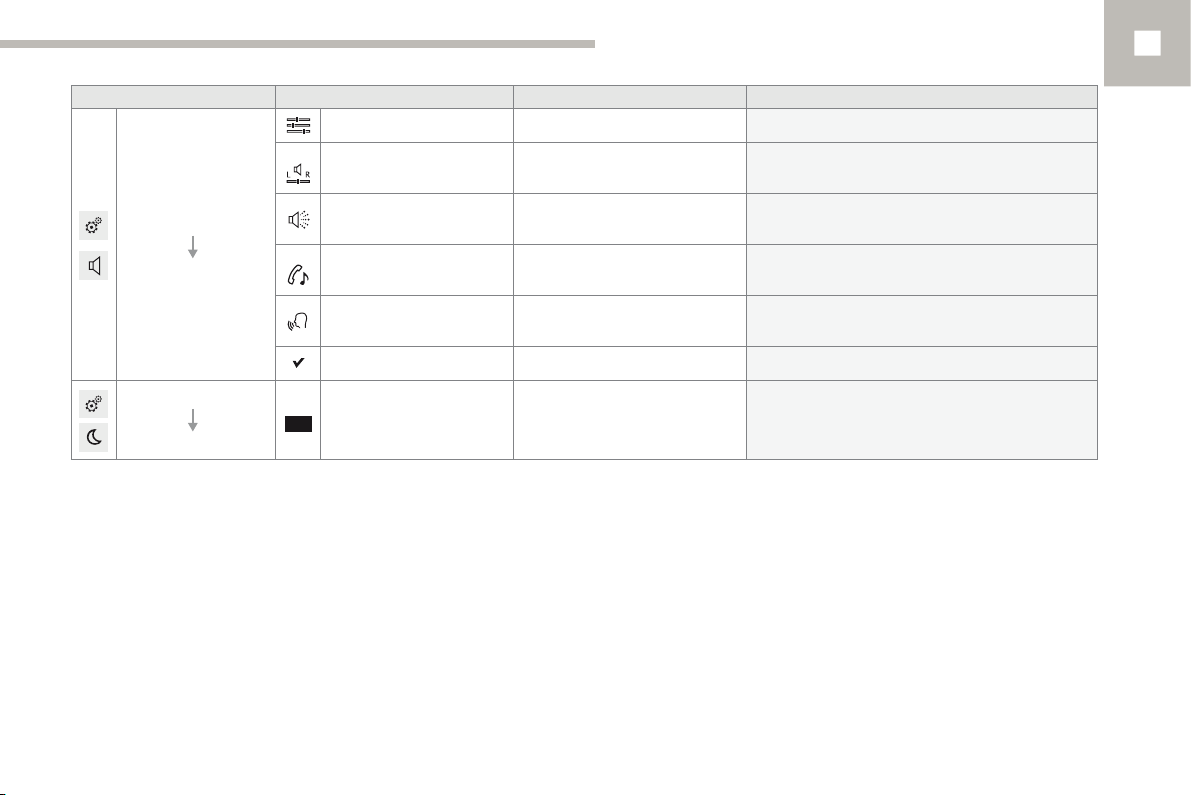
Ambience Choose the sound ambience.
Balance Sound distribution using the Arkamys
Settings
Sound effects
Set the volume or activate the link to vehicle
speed.
®
system.
10
Audio settings
Settings
Turn off screen
Ringtones Set the telephone ringtone and volume.
Voice
Confirm Save your settings.
Set the volume and voice for speaking street
names
Function that turns off the display.
Pressing the screen reactivates it.
259
Page 37
Audio and Telematics
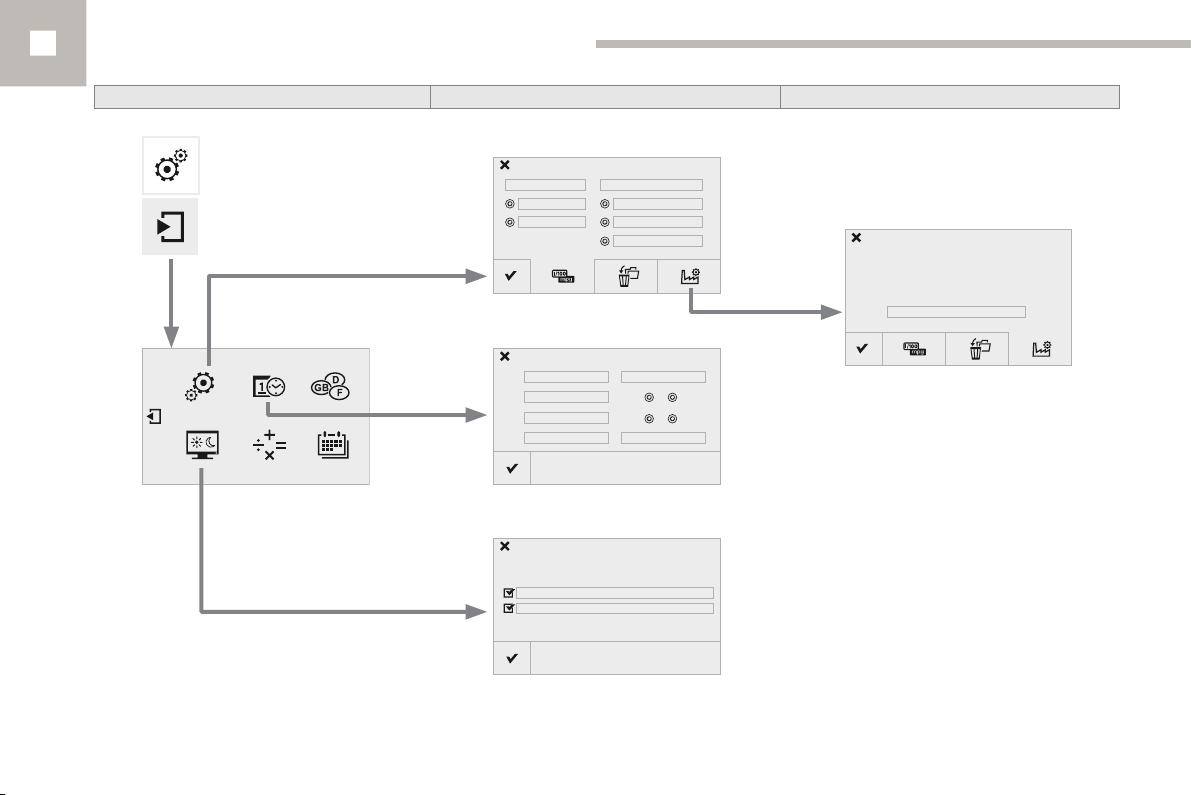
Level 1 Level 2
Units
Factory settings
260
Configuration
Adjust date and time
Display screen
Page 38
Level 1 Level 2 Comments
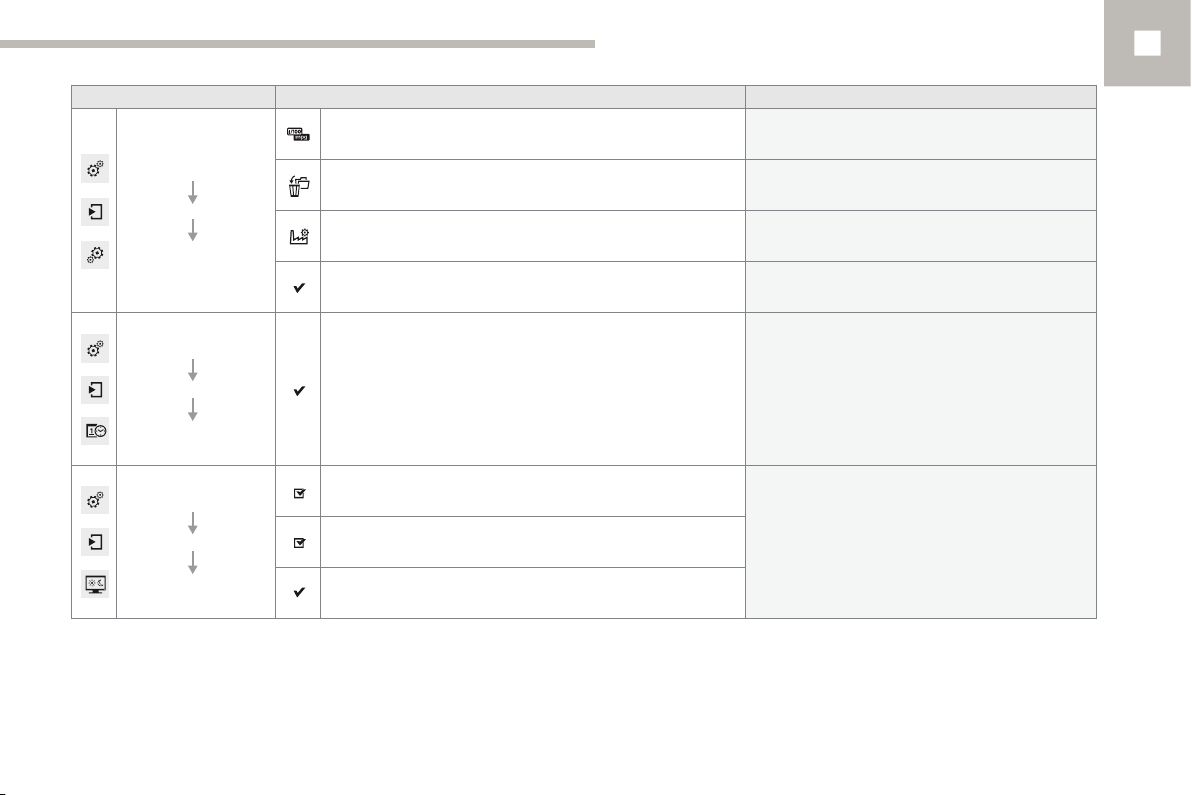
Set the units used to display distance, fuel
consumption and temperature.
Select the desired data in the list then press
Delete.
Settings
Secondary page
System Settings
Settings
Units
Delete data
Factory settings Return to factory settings.
Confirm Save the settings.
Audio and Telematics
10
Secondary page
Time/Date
Settings
Secondary page
Screen settings
Confirm Set the date and time then confirm.
Activate automatic text scrolling
Activate or deactivate the setting then confirm.Activate animations
Confirm
261
Page 39
Audio and Telematics
Level 1 Level 2
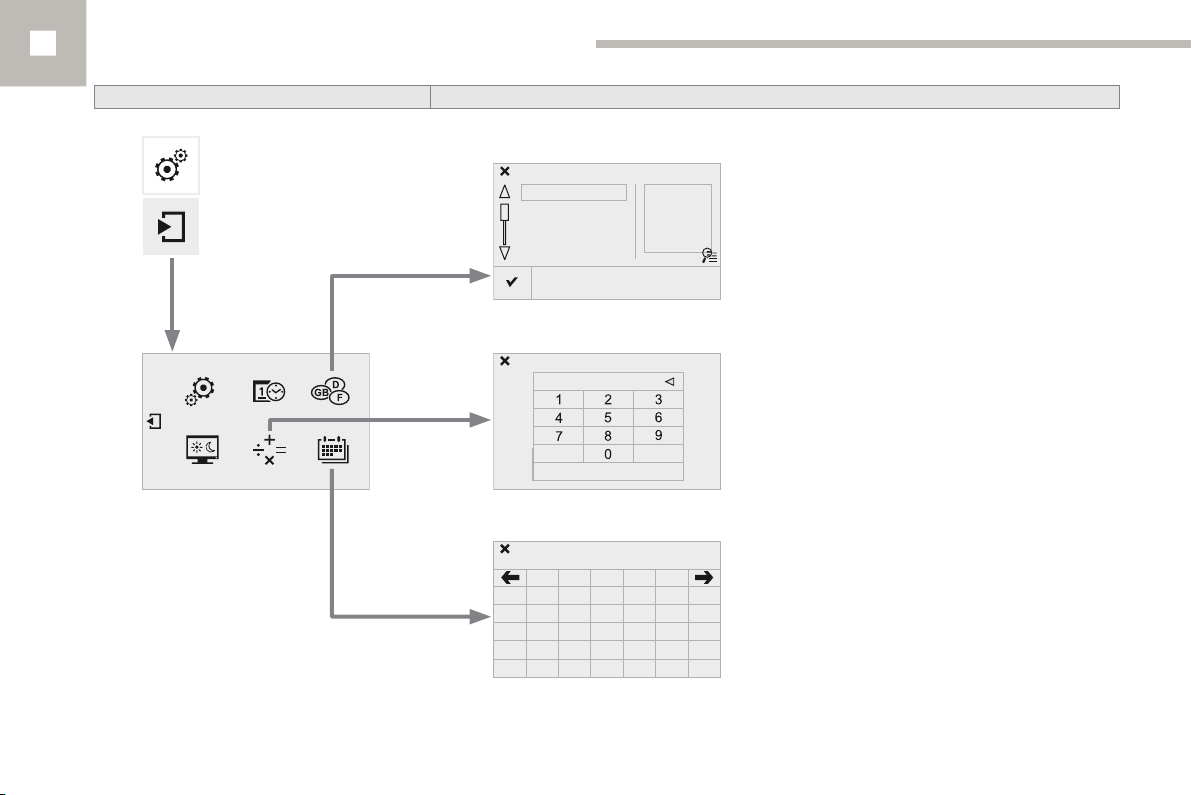
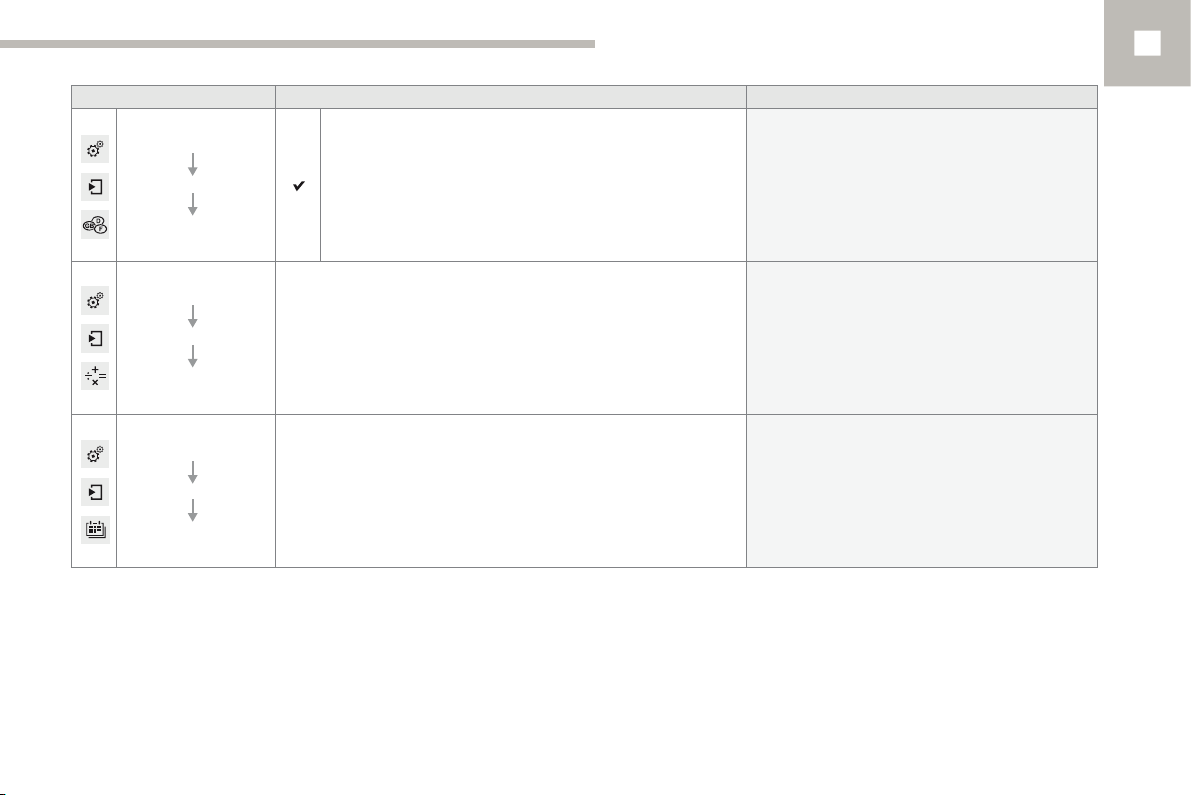
Choice of language
CalculatorConfiguration
Calendar
262
Page 40
Audio and Telematics
Level 1 Level 2 Comments
Settings
Secondary page
Languages
Settings
Secondary page
Calculator
Settings
Secondary page
Calendar
Confirm Select the language then confirm.
Select the calculator.
Select the calendar.
10
263
Page 41
Audio and Telematics
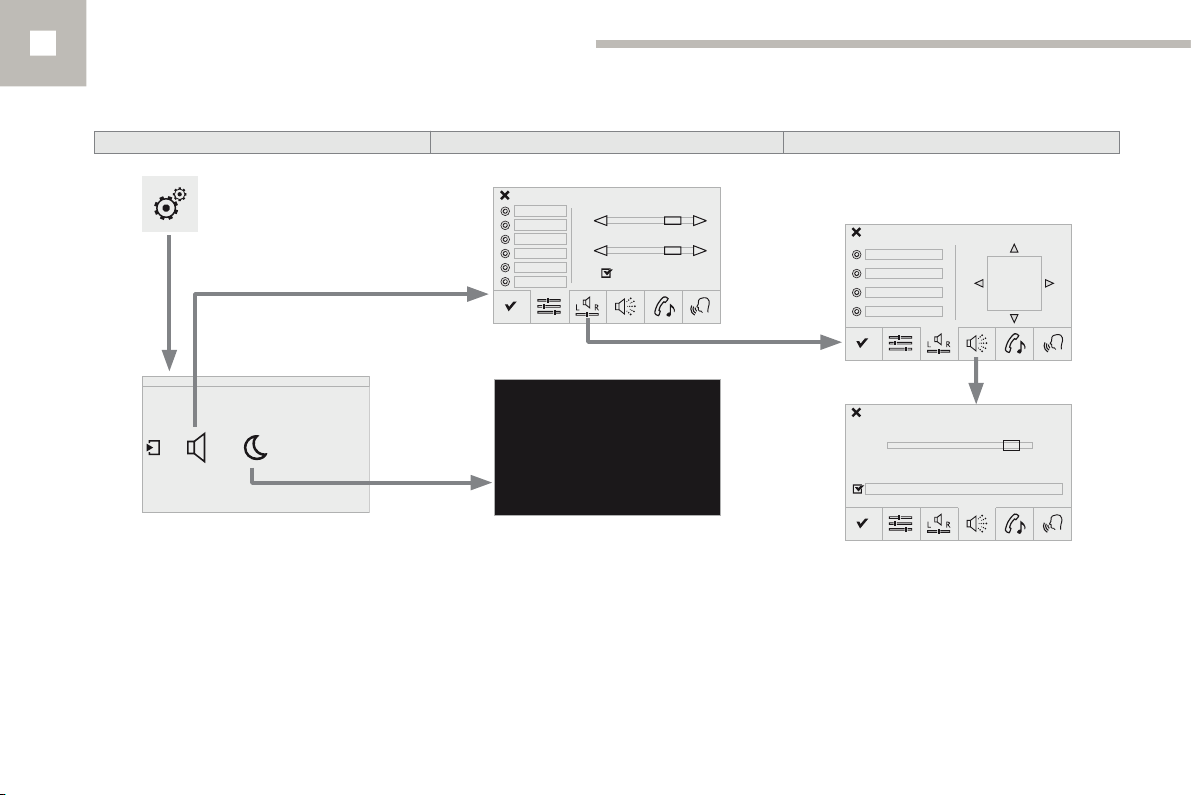
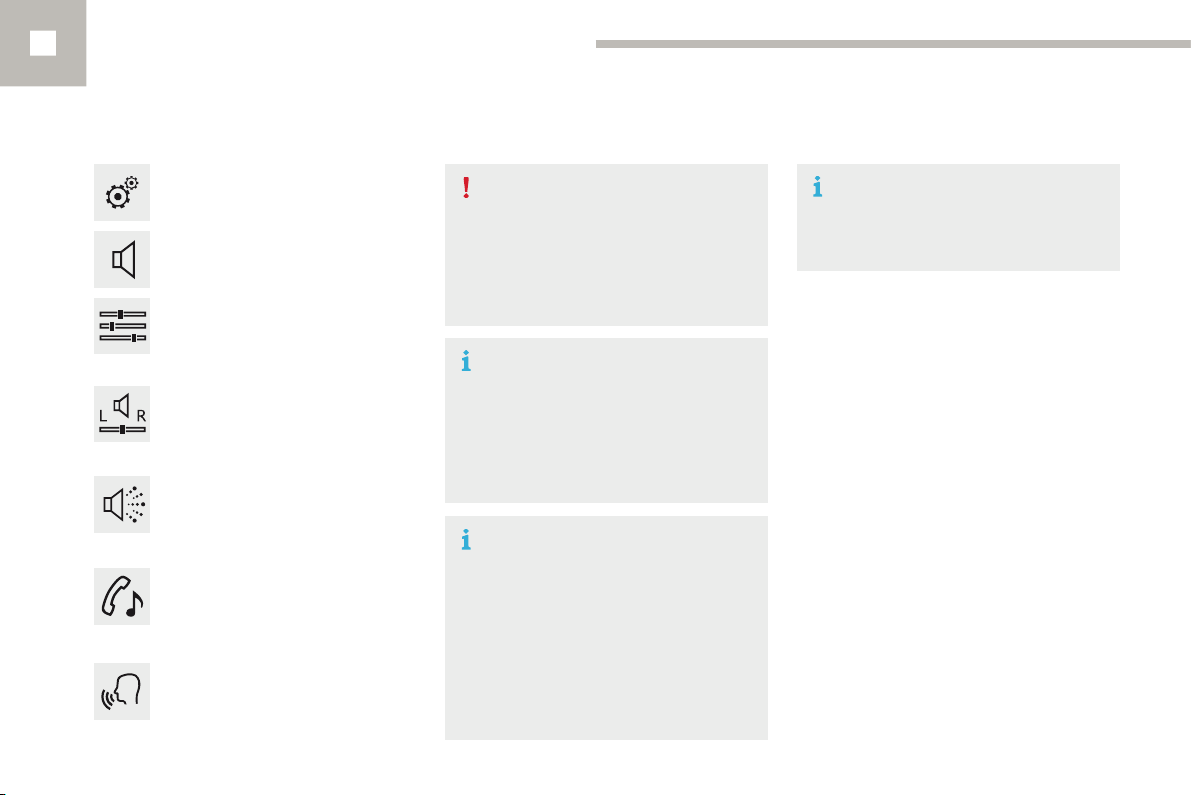
Audio settings
Press on Settings to display the
primary page.
Select "Audio settings".
Select "Ambience"
The distribution (or spatialisation using
the Arkamys
®
system) of sound is an
audio process that allows the audio
quality to be adapted to the number of
passengers in the vehicle.
Available only with the 6-speaker
configuration.
On-board audio: Arkamys
©
Sound
Staging optimises sound distribution in
the the passenger compartment.
264
Or
Or
Or
Or
"Balance"
"Sound effects"
"Ringtones"
"Voice".
The audio settings (Ambience, Bass:,
Treble: and Loudness) are different
and independent for each sound
source.
The settings for Distribution and
Balance are common to all sources.
- "Ambience" (choice of 6 musical
ambiences)
- "Bass:"
- "Treble:"
- "Loudness" (Activate/Deactivate)
- "Distribution" ("Driver", "All
passengers", "Front only")
- "Audible response from touch
screen"
- "Volume linked to speed"
(Activate/Deactivate)
Page 42
Modifying system settings
Audio and Telematics
Press on Settings to display the
primary page.
Press on the secondary page. Press on the secondary pagePress on the secondary page.
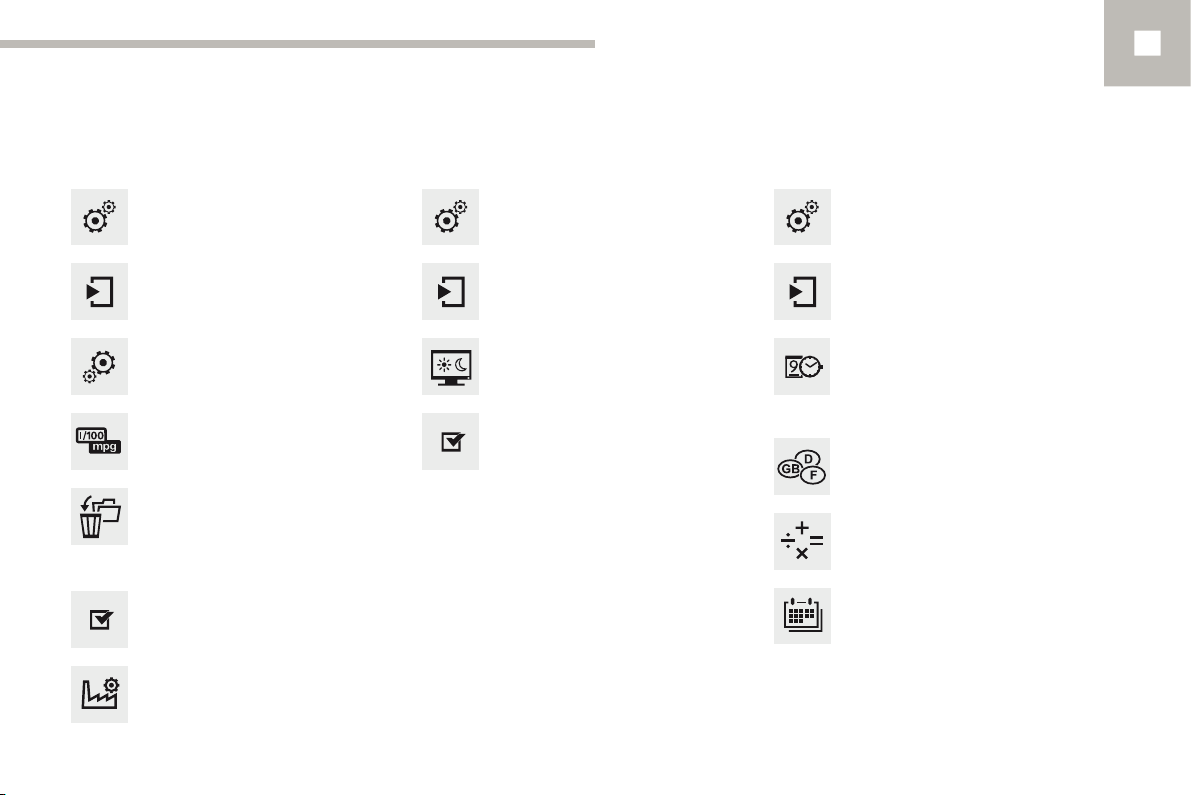
Select "System Settings". Select "Time/Date" to change the
Select "Units" to change the units
of distance, fuel consumption and
temperature.
Select "Delete data" to delete the
list of recent destinations, personal
points of interest, contacts in the list.
Choose the item then select "Delete".
Select "Factory settings" to return
to the original settings.
Press on Settings to display the
primary page.
Select "Screen settings".
Activate or deactivate "Activate
automatic text scrolling" and
"Activate animations".
Press on Settings to display the
primary page.
time zone, synchronisation with GPS,
the time and its format, then the date.
Select "Languages" to change
language.
Select "Calculator" to display a
calculator.
Select "Calendar" to display a
calendar.
10
265
Page 43
Audio and Telematics
Connected services
Level 1 Level 2 Level 3
266
Page 44
Internet browser
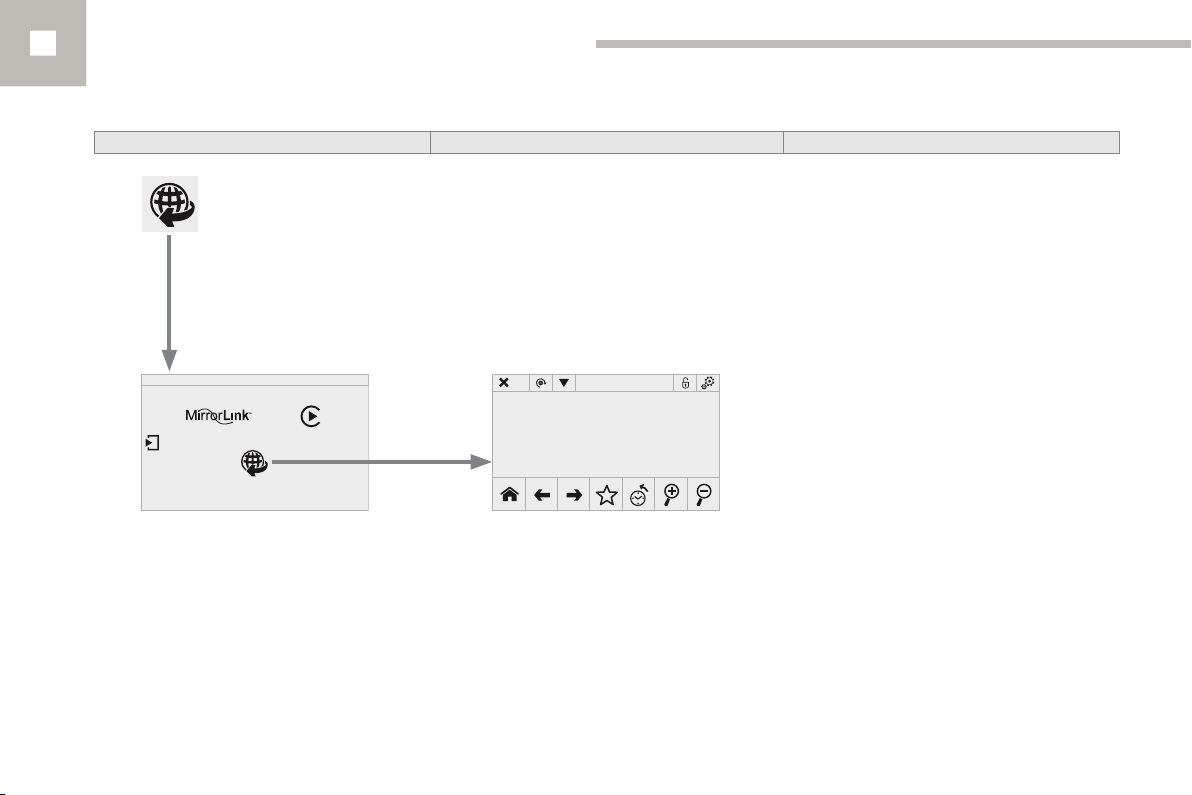
Press on Connected services to
display the primary page.
Press on "Internet browser" to
display the browser home page;
first connect your smartphone by
Bluetooth, "Internet" option, see the
"Telephone" section.
Authentication for Internet browsing via
a smartphone is done using the Dial-Up
Networking (DUN) standard.
Some smartphones of the latest
generation do not support this
standard.
Audio and Telematics
10
267
Page 45
Audio and Telematics
Level 1 Level 2
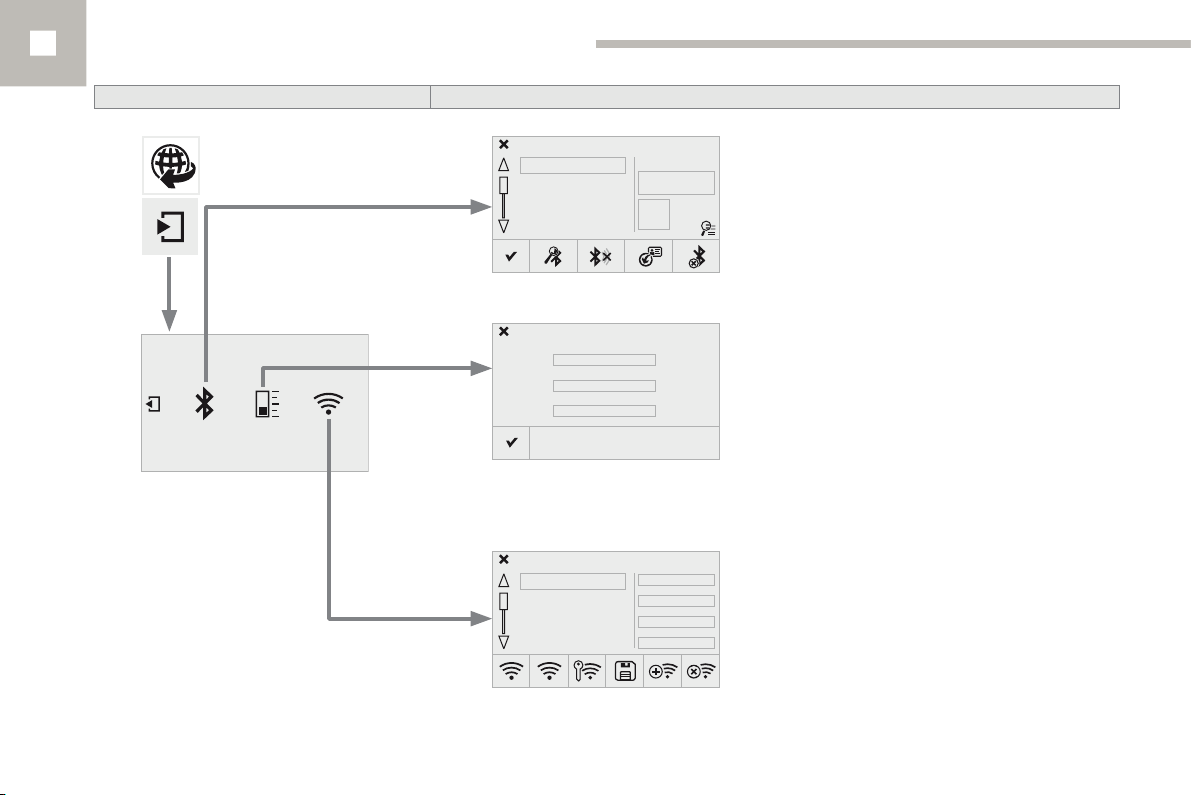
Bluetooth (devices)
268
Internet connection settings
Usage monitor
Wi-Fi connection
Page 46
Audio and Telematics
Level 1 Level 2 Comments
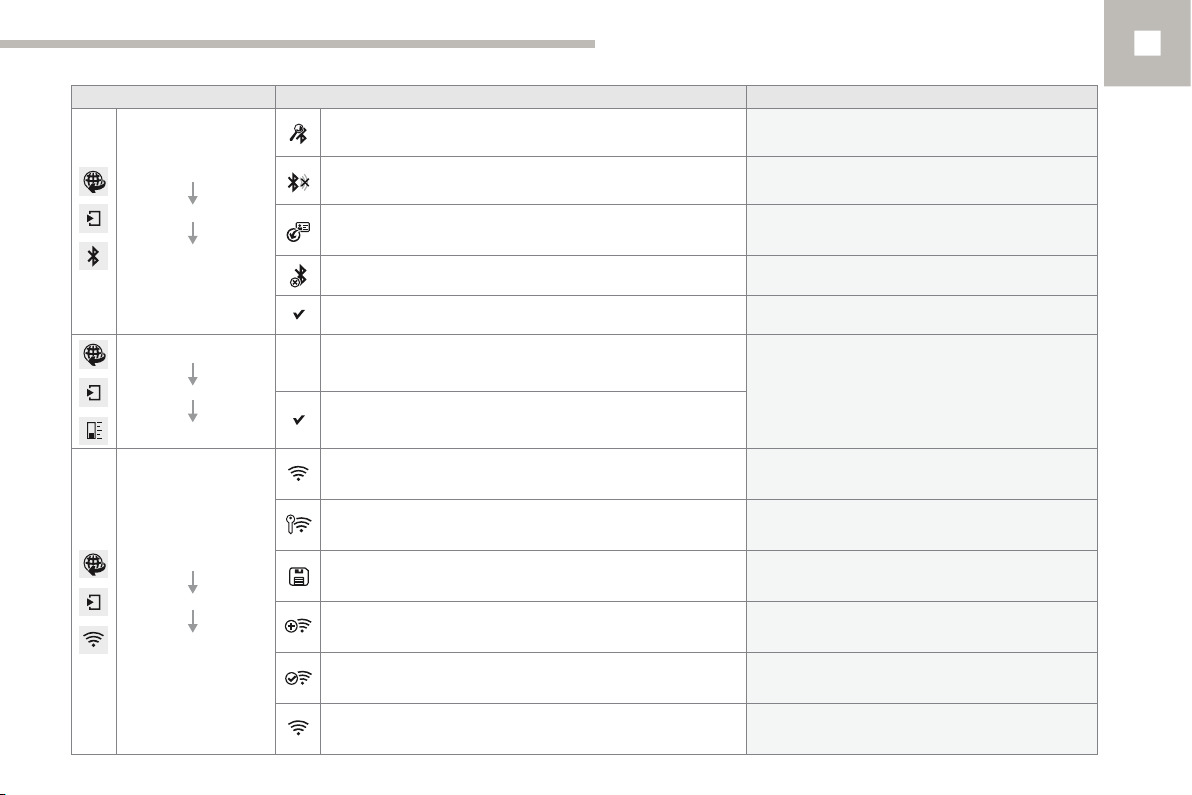
Search Start the search for a device to connect.
Connected services
Secondary page
Bluetooth
connections
Connected services
Secondary page
Transfer rate
Connected services
Secondary page
Wi-Fi connection
Connect /Disconnect
Update
Delete Delete the selected telephone.
Confirm Save the settings.
Reset
Confirm
All Display all Wi-Fi networks.
Secure Display secure Wi-Fi networks.
Remember Memorise the selected Wi-Fi network(s).
Add Add a new Wi-Fi network.
On/ Off Activate or deactivate a Wi-Fi network.
Connect
Start or end the Bluetooth connection to the
selected device.
Import contacts from the selected telephone to
save them in the audio system.
Reset the usage monitor, them confirm.
Select a Wi-Fi network found by the system and
connect to it.
10
269
Page 47
Audio and Telematics
MirrorLink
TM
Optional depending on the
smartphone and operating system.
270
Page 48
Audio and Telematics
MirrorLinkTM smartphone
connection
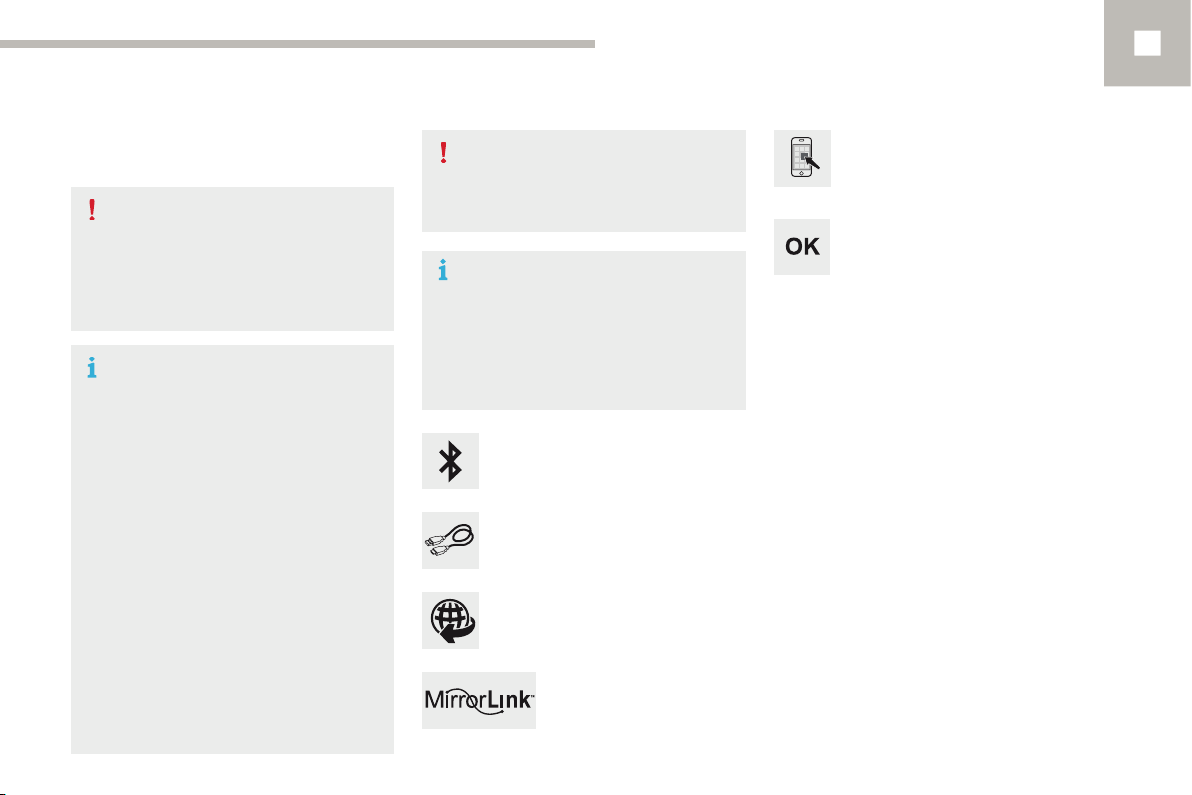
As a safety measure and because it
requires sustained attention by the
driver, using a smartphone when
driving is prohibited.
All operations must be done with the
vehicle stationary.
The synchronisation of a
smartphone allows applications on a
smartphone that are adapted to the
MirrorLink
in the vehicle's screen.
The principles and standards
are constantly evolving. For the
communication process between the
smartphone and the system to work
correctly, the smartphone must be
unlocked; update the operating system
of your smartphone as well as the date
and time in the smartphone and the
system.
For the list of eligible smartphones,
connect to the brand's internet website
in your country.
TM
technology to be displayed
As a safety measure, applications
can only be viewed with the vehicle
stationary; display is interrupted once
the vehicle is moving.
Please note:
- if your smartphone is supported, to
make it "MirrorLink
some phone manufacturers
nevertheless invite you to first
download a dedicated application.
When connecting a smartphone to
the system, it is recommended that
®
Bluetooth
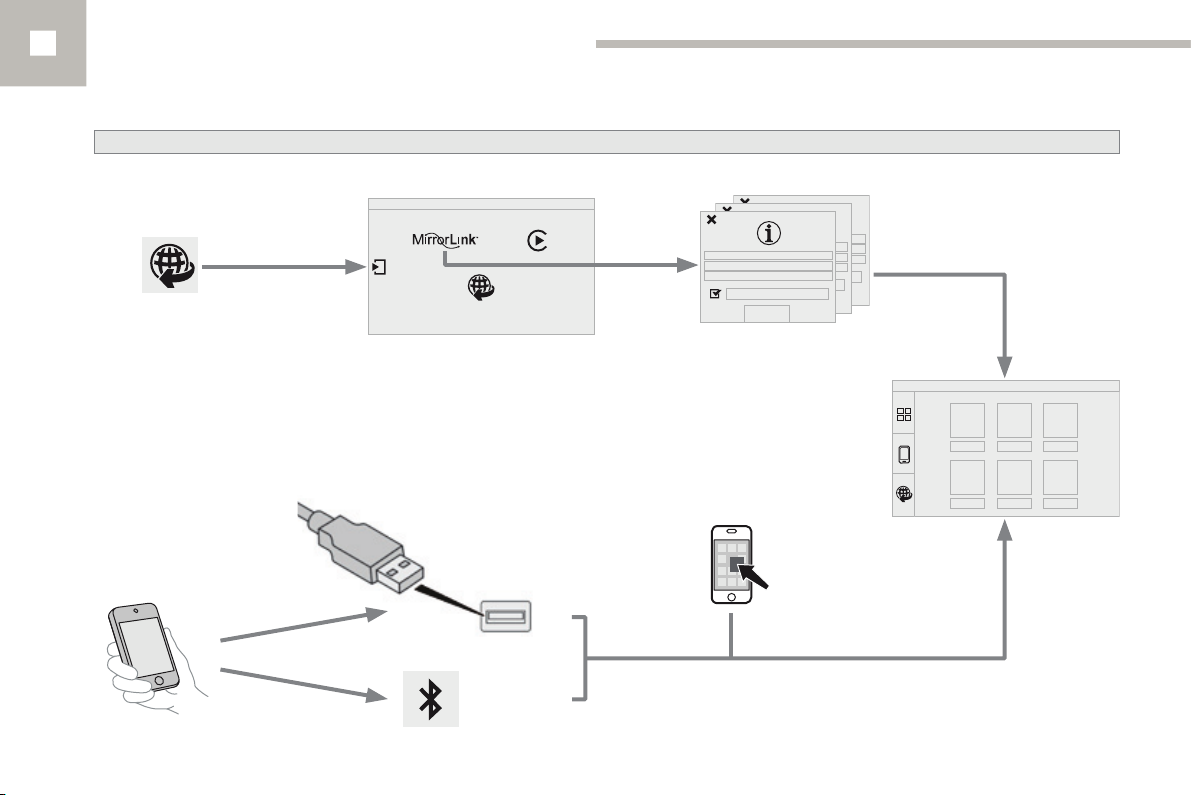
Connect a USB cable. The
smartphone charges when
connected by a USB cable.
From the system, press on
"Connected services" to display the
primary page.
be started on the smartphone.
Press on "MirrorLink
start the application in the
system.
TM
" compatible,
TM
" to
Start the application on the
smartphone (optional, depending
on the smartphone and operating
system).
During the procedure, several screen
pages relating to certain functions
are displayed.
Accept to start and end the
connection.
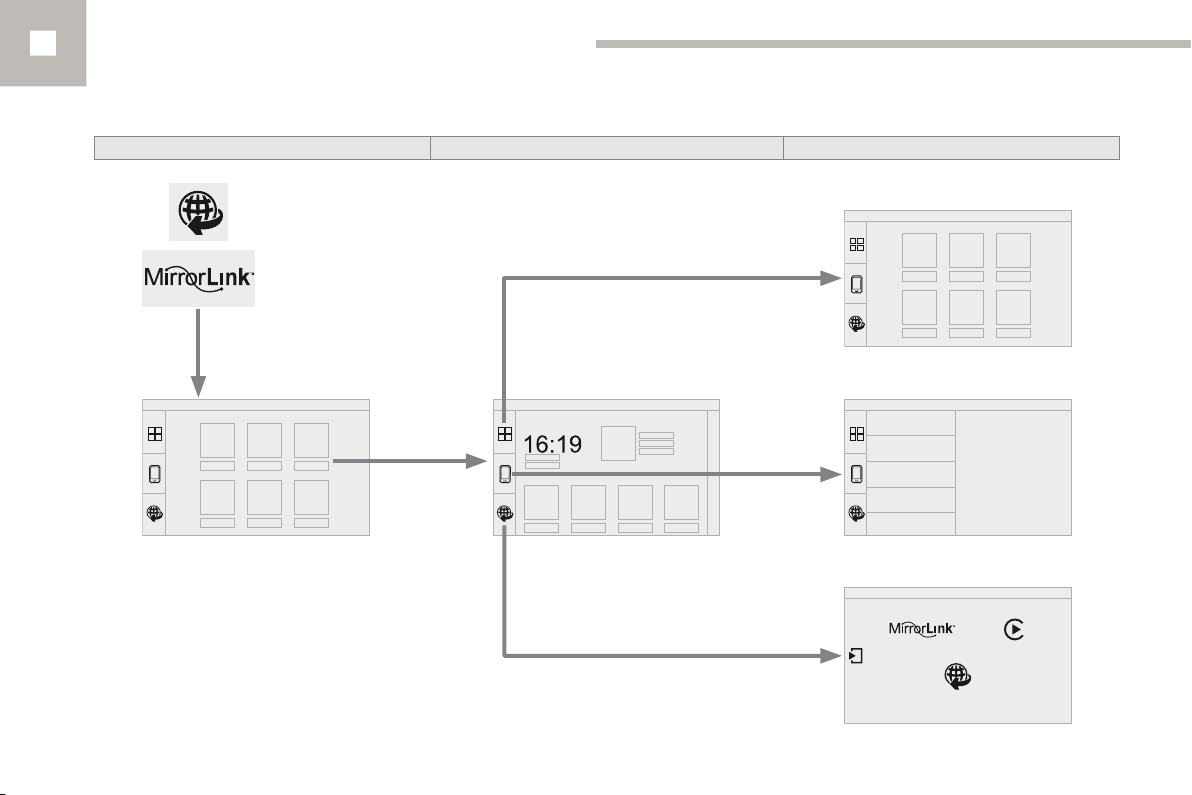
Once connection is established, an page
is displayed with the applications already
downloaded to your smartphone and adapted
to MirrorLink
If only one application has been downloaded to
the smartphone, it starts automatically.
Access to the different audio sources remains
accessible in the margin of the MirrorLink
display, using touch buttons in the upper bar.
Access to the menus for the system is possible
at any time using the dedicated buttons
TM
technology.
TM
Voice recognition
Press the end of the lighting control stalk to
start voice recognition of your smartphone via
the system.
Voice recognition requires a compatible
smartphone connected to the vehicle by
Bluetooth.
10
271
Page 49
Audio and Telematics
Level 1 Level 2 Level 3
272
Page 50
Audio and Telematics
Level 1 Level 2 Level 3 Comments
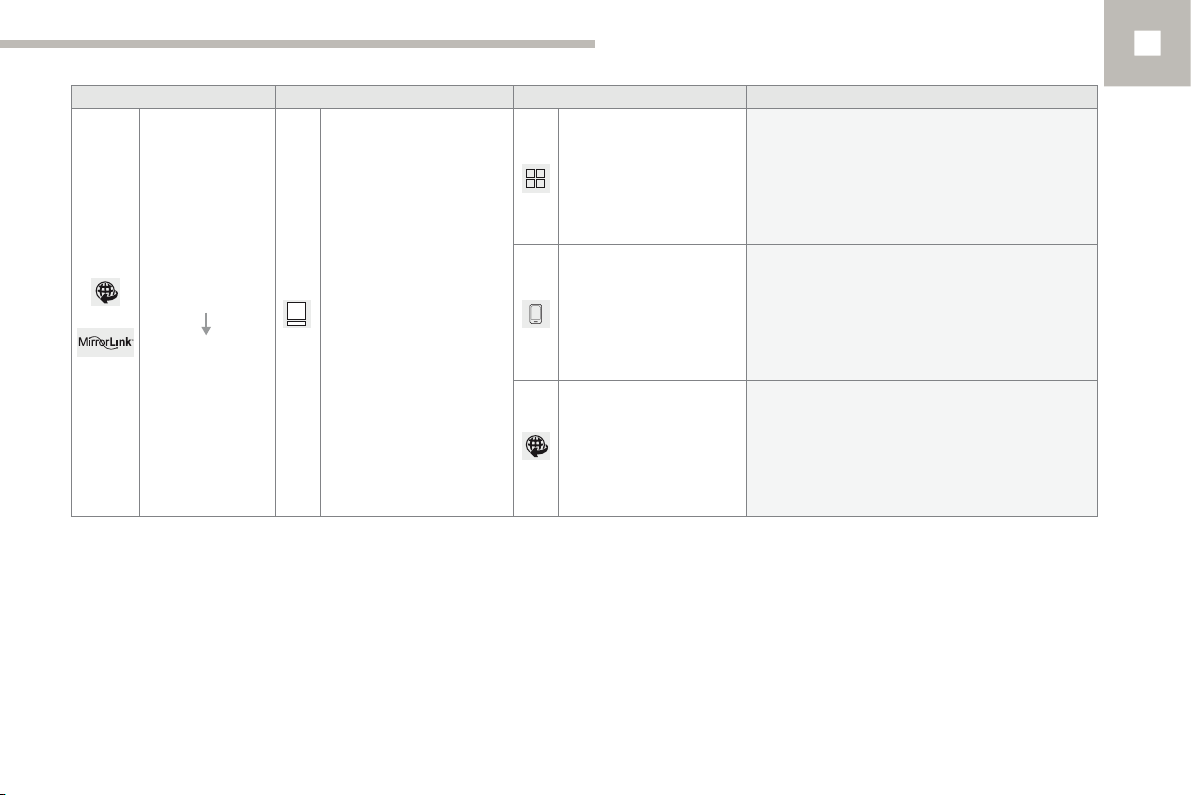
Access or return to the applications already
downloaded to your smartphone and adapted to
MirrorLink
TM
technology.
10
Connected
services
MirrorLink
Access to a menu list depending on the
application chosen.
"Back": abandon the current operation, go up one
TM
level.
"Home": access or return to the "Car mode" page.
Access to the "Connected services" primary
page.
273
Page 51
Audio and Telematics
CarPlay
®
274
Page 52
CarPlay® smartphone
connection
As a safety measure and because it
requires sustained attention by the
driver, using a smartphone when
driving is prohibited.
All operations must be done with the
vehicle stationary.
The synchronisation of a
smartphone allows applications on a
smartphone that are adapted to the
®
CarPlay
the vehicle's screen.
As the principles and standards are
constantly evolving, it is recommended
that you update the operating system of
your smartphone.
For the list of eligible smartphones,
connect to the brand's internet website
in your country.
technology to be displayed in
Or
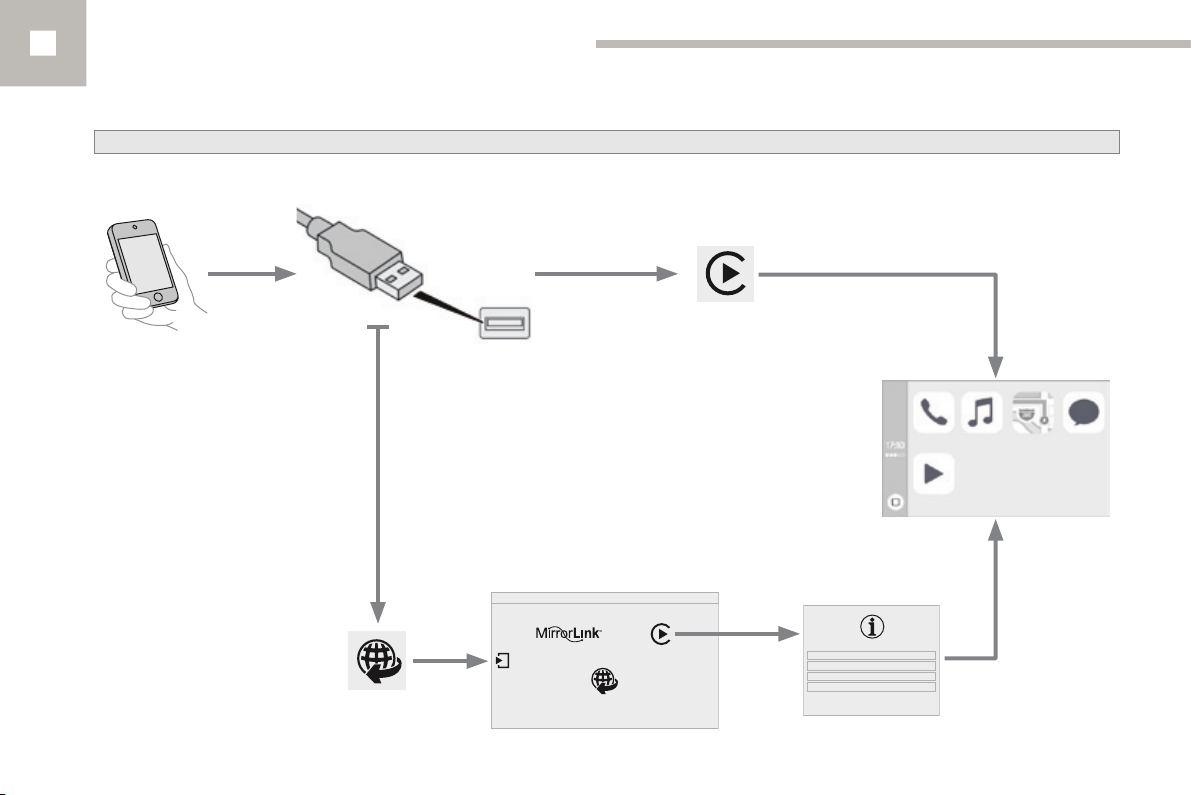
Connect a USB cable. The
smartphone charges when
connected by a USB cable.
On connecting the USB cable, the
"Telephone" function changes to
"CarPlay" in the menu carrousel.
Press on "CarPlay" to display the
®
CarPlay
Connect the USB cable. The
smartphone is charged while
connected by the USB cable.
From the system, press on
"Connected services" to display the
primary page.
Press on "CarPlay" to display the
CarPlay
interface.
®
interface.
Audio and Telematics
10
Voice recognition
Press the end of the lighting control stalk to
start voice recognition of your smartphone via
the system.
As a safety measure, applications
can only be viewed with the vehicle
stationary; display is interrupted once
the vehicle is moving.
During the procedure, one or more
screen pages relating to certain
functions are displayed on connection.
275
Page 53
Audio and Telematics
Level 1 Level 2 Level 3
276
Page 54
Level 1 Level 2 Level 3 Comments
Favourites
Connected services
Apple
®
CarPlay
®
Calls
Telephone
Music
Plan Destinations
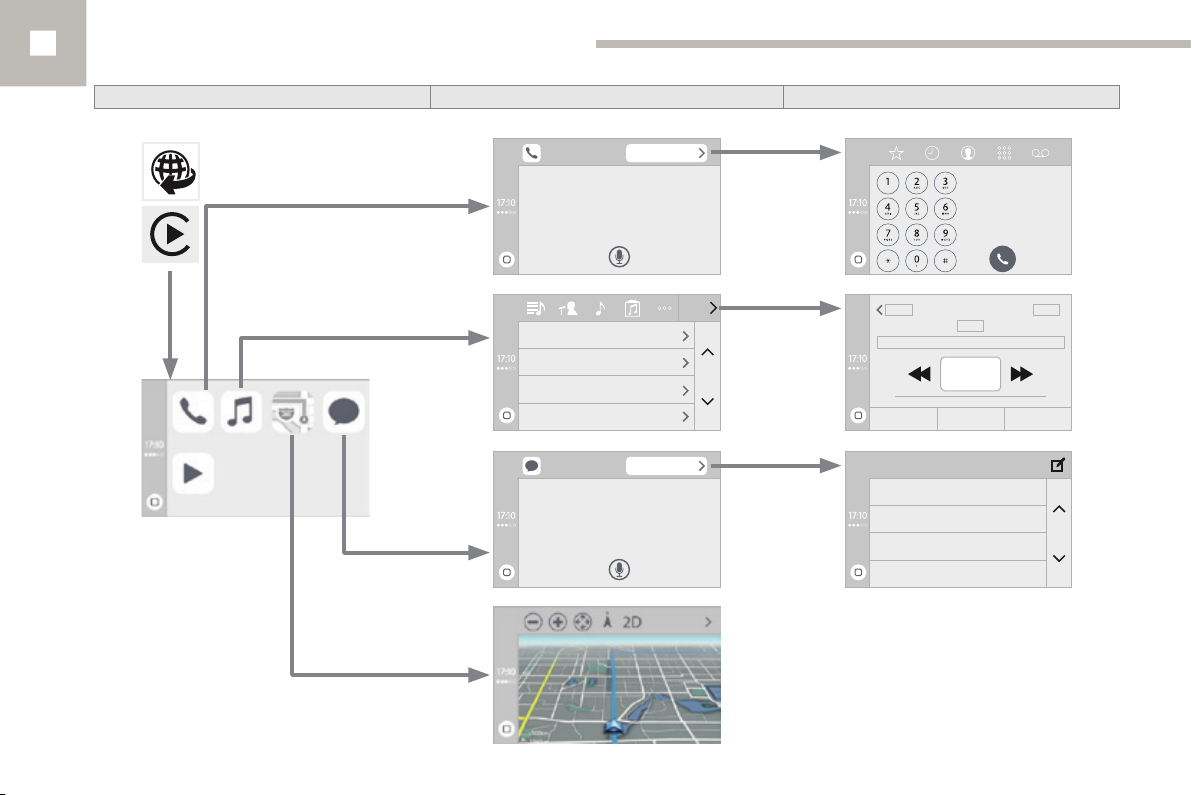
Messages Display messages
Contacts
Keypad
Messages
Lists
Artists
Tracks
Albums
Other...
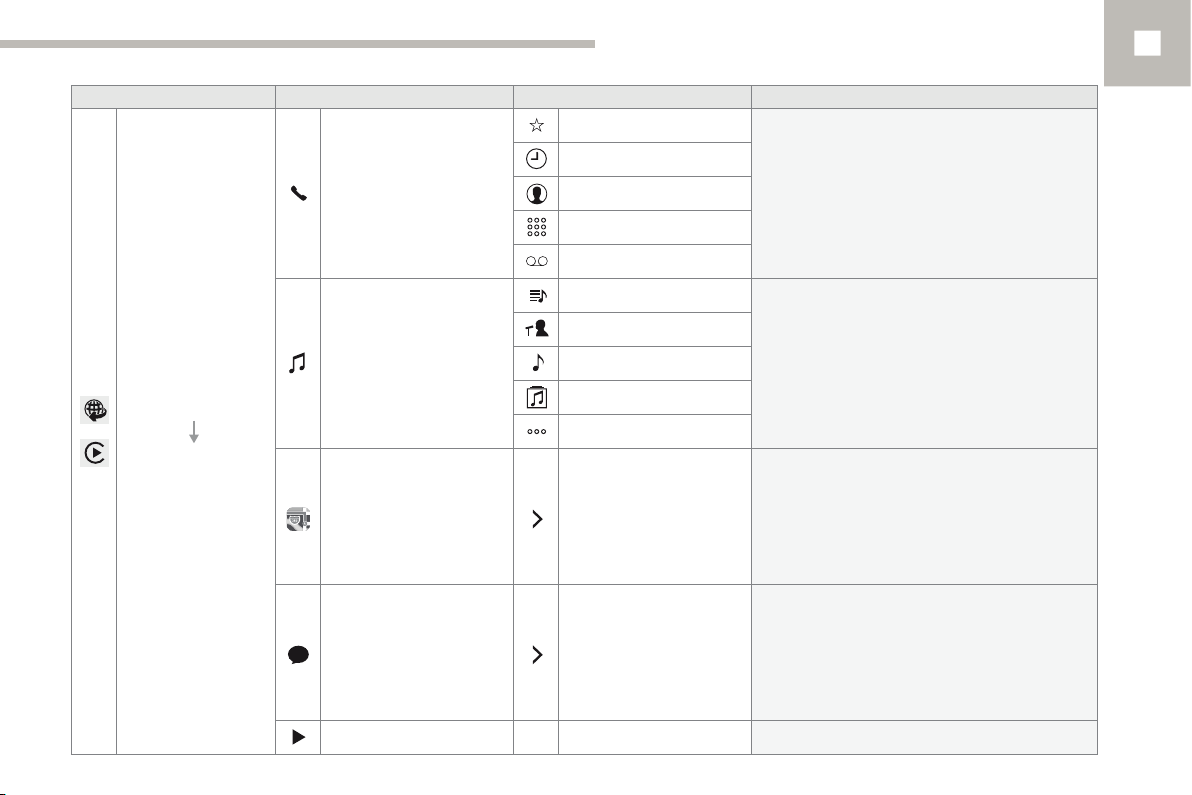
The "Telephone" function is placed automatically
in "Siri" voice mode.
Press on "Display contacts" for access to the
telephone menus.
Press on "Music" to browse and select the tracks
on your smartphone.
Press on "Playing" for access to the track
currently playing.
Press on "Destinations" to search for an address
by "Siri" voice command or by using the keypad.
The GPS function is through the telephone's 3G,
4G or Wi-Fi internet connection.
The "Messages" function is place automatically
in "Siri" voice mode to speak the message and
the addressee.
Press on "Display messages" for access to the
messages.
Audio and Telematics
10
Playing Access to the track currently playing.
277
Page 55
Audio and Telematics
Telephone
Level 1
Level 2 Level 3
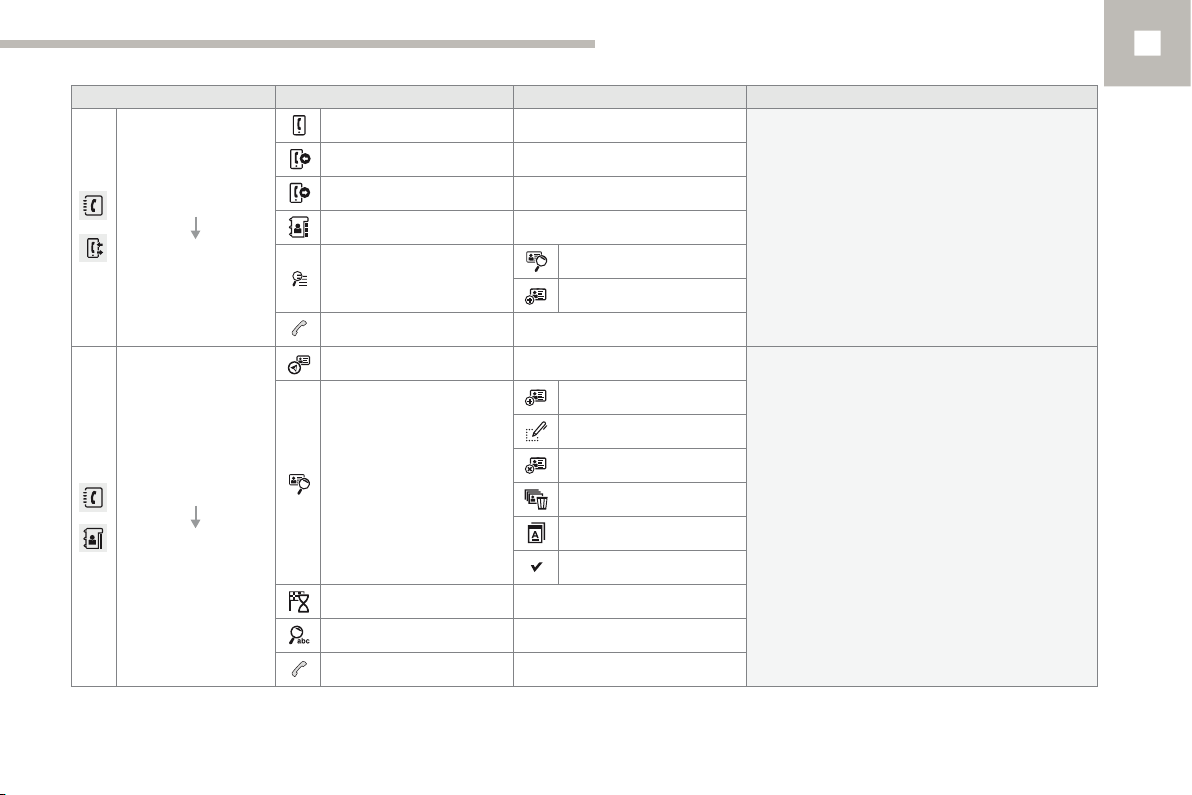
Call log
Contacts
278
Page 56
Audio and Telematics
Level 1 Level 2 Level 3 Comments
All calls
Telephone
Call log
Telephone
Contacts
Incoming calls
Outgoing calls
Contacts
Magnifying glass
Call
Addresses
View
Navigate to
Search for contact
Call
10
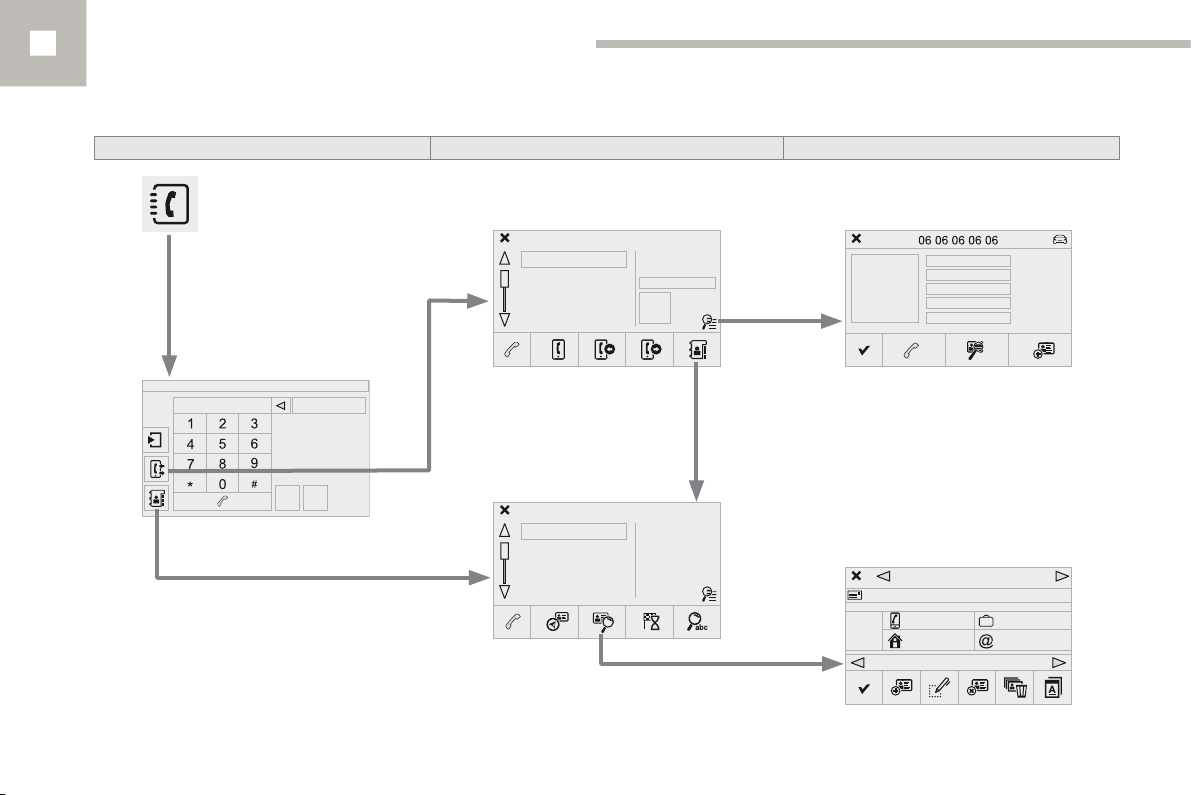
After making choices, start the call.
View
Create
Create
Modify
Delete
Delete all
After making choices, start the call.
By name
Confirm
279
Page 57
Audio and Telematics
Level 1 Level 2 Level 3
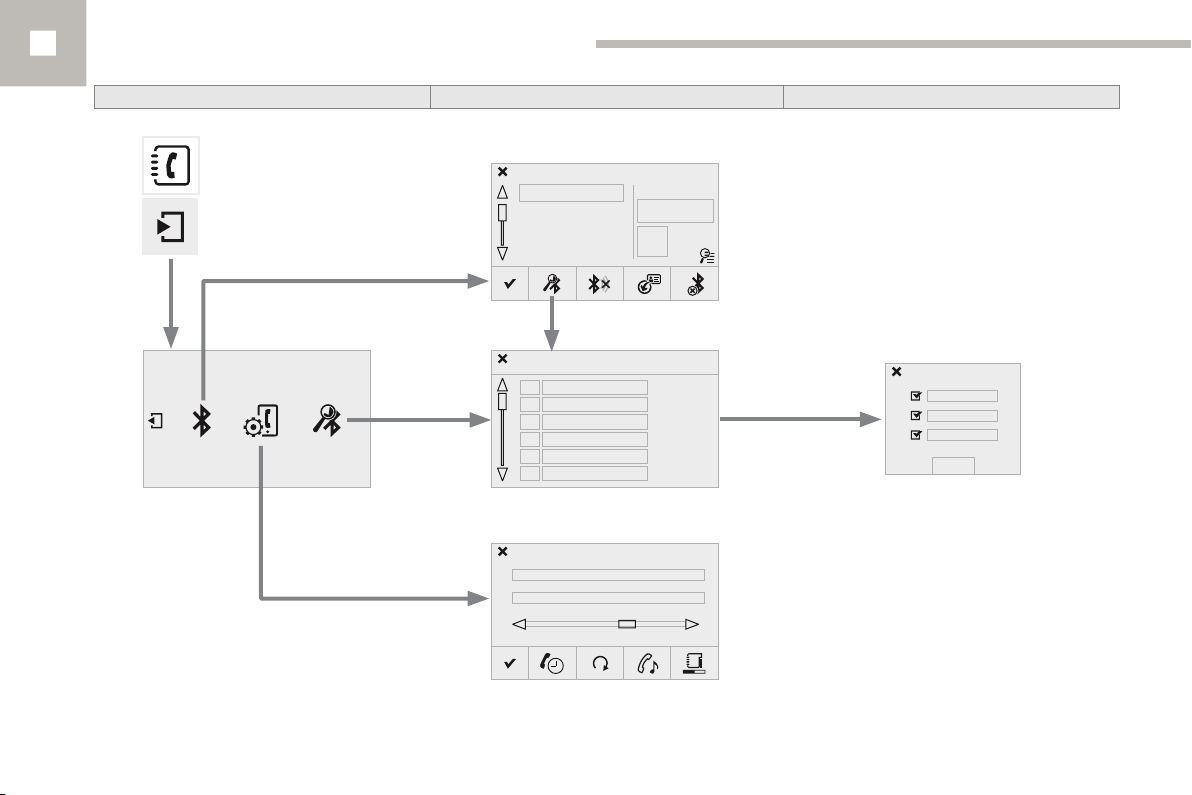
Bluetooth (devices)
280
Telephone connection
Devices detected
Telephone Options
Page 58
Level 1 Level 2 Level 3 Comments
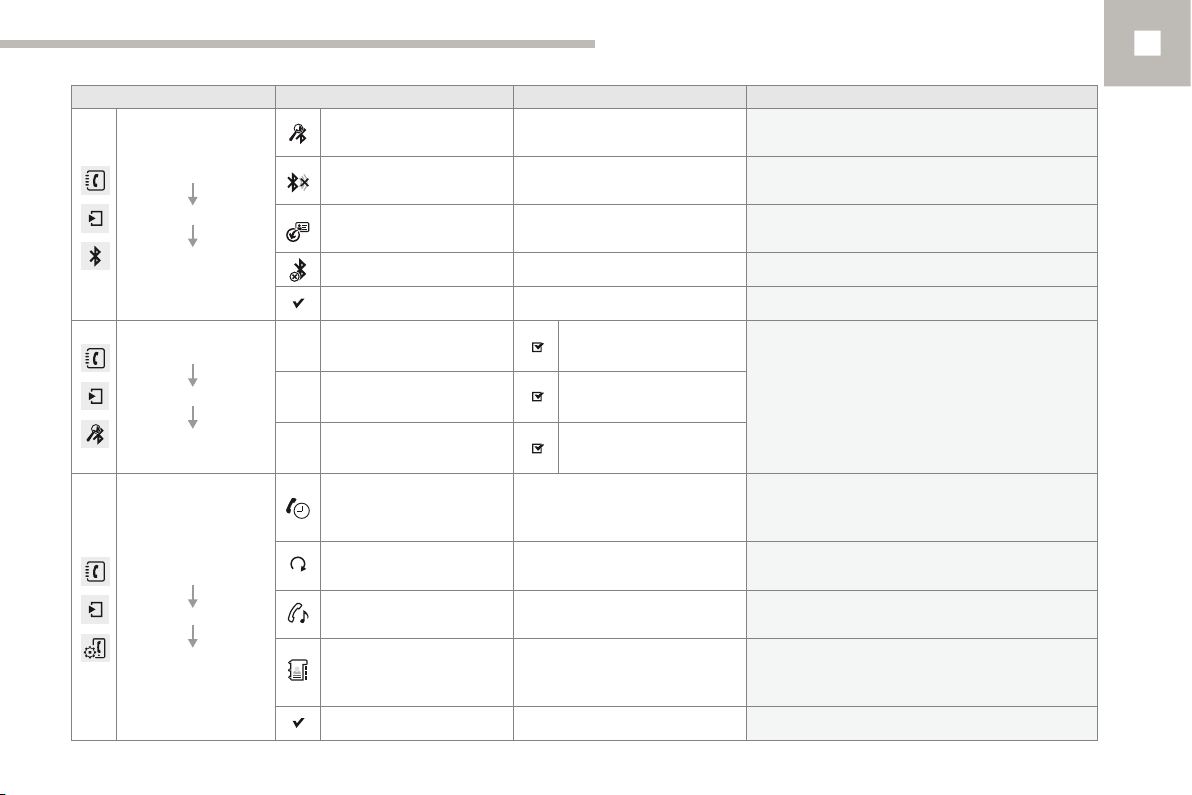
Start the search for another peripheral device to
connect.
Start or stop the Bluetooth connection to the
selected peripheral device.
Import the contacts from the selected telephone
to store them in the audio system.
Telephone
connection
Secondary page
Bluetooth
connection
Telephone
connection
Search
Connect / Disconnect
Update
Delete Delete the selected telephone.
Confirm Save the settings.
Telephone
Audio and Telematics
10
Secondary page
Search
for devices
Telephone
connection
Secondary page
Telephone Options
Devices detected
Internet
Put on hold
Update
Ringtones Choose the telephone ringtone and volume.
Memory info.
Confirm Save the settings.
Start the search for peripheral devices.Audio streaming
Cut the microphone temporarily so that the
contact cannot hear your conversation with a
passenger.
Import the contacts from the selected telephone
to save then in the audio system.
Contact records used and free, percentage of
storage space used by internal contacts and
Bluetooth contacts.
281
Page 59
Audio and Telematics
Pairing a Bluetooth®
telephone
For reasons of safety and because they
require prolonged attention on the part
of the driver, the operations for pairing
the Bluetooth mobile telephone to the
hands-free system of the audio system
must be carried out with the vehicle
stationary.
Procedure from the system
Activate the telephone's Bluetooth function
and ensure that it is "visible to all" (telephone
configuration).
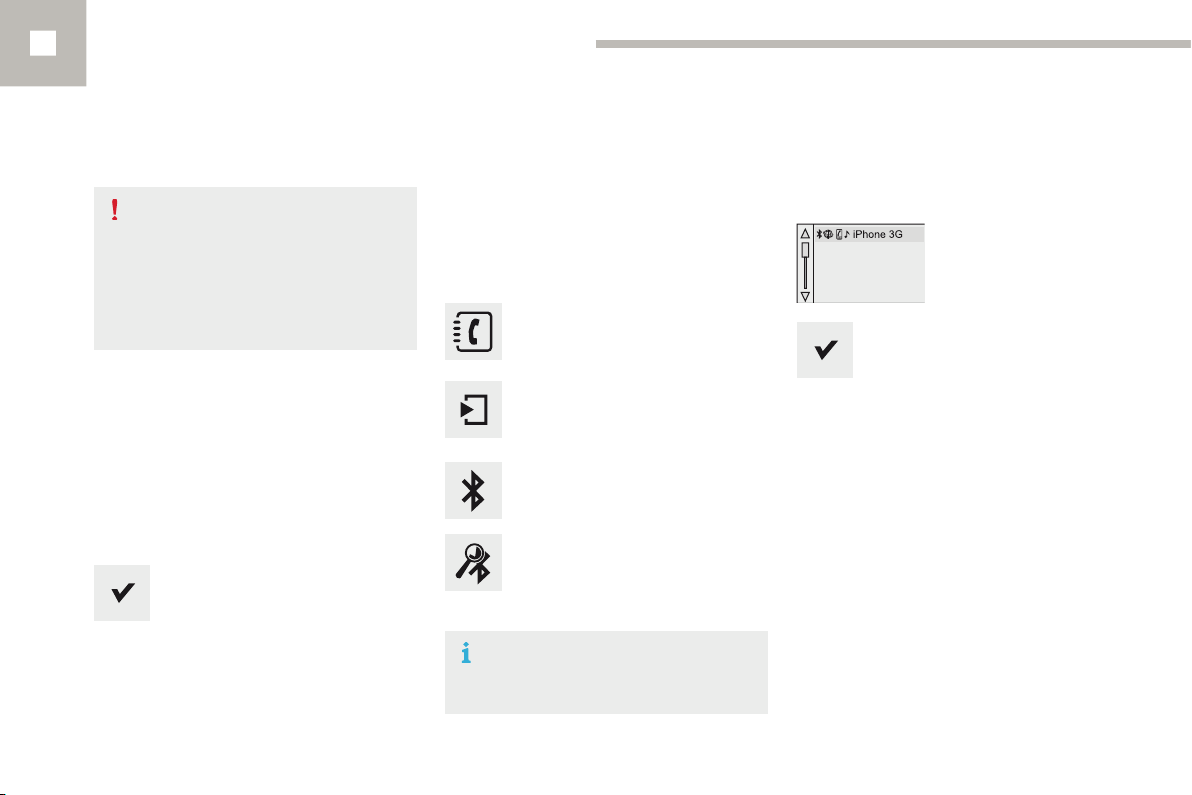
Press on Telephone to display the
primary page.
Select the name of the
desired peripheral from the
list and "Confirm".
Enter a code of at least 4 figures for
the connection then "Confirm".
282
Procedure (short) from the
telephone
In the Bluetooth menu of your device, select the
system name in the list of devices detected.
Enter a code of at least 4 figures in the device
and confirm.
Enter this same code in the system,
select "OK" and confirm.
Press on the secondary page.
Select "Bluetooth connection".
Select "Search for devices".
The list of telephones detected is
displayed.
If the telephone is not detected, it is
recommended that you switch the Bluetooth
function on your telephone off and then on again.
Enter this same code in the telephone then
accept the connection.
The system offers to connect the telephone:
- in "Telephone" (hands-free kit, telephone
only),
- in "Audio streaming" (streaming: wireless
playing of audio files from the telephone),
- in "Internet" (internet browsing, only if your
telephone is compatible with the "DUN"
Dial-Up Networking Bluetooth standard).
Select one or more profiles and confirm.
Page 60
The services available depend on
the network, the SIM card and the
compatibility of the Bluetooth telephone
used. Check the telephone manual and
with your network provider for details of
the services available to you.
Depending on the type of telephone,
the system will ask you to accept or not
the transfer of your contacts.
If not, select "Update".
Audio and Telematics
Connecting a Bluetoot h®
peripheral device
Automatic reconnection
On switching on the ignition, the telephone
connected when the ignition was last switched
off is automatically reconnected, if this
connection mode had been activated during the
pairing procedure.
The connection is confirmed by the display of a
message and the name of the telephone.
10
The ability of the system to connect
with only one profile depends on the
telephone. The three profiles may all
connect by default.
Visit www.peugeot.co.uk for more information
(compatibility, additional help, ...).
The recognised telephone
appears in the list.
Depending on your telephone, you may be
asked to accept automatic connection every
time the ignition is switched on.
On return to the vehicle, if the last telephone
connected is present again, it is reconnected
automatically and within around 30 seconds
after switching on the ignition the pairing is
done without any action on your part, with
(Bluetooth activated).
To modify the automatic connection mode,
select the telephone in the list then select the
desired profile.
Manual connection
Press on Telephone to display the
primary page.
Press on the secondary page.
Select "Bluetooth" to display the list
of paired peripherals.
Select the peripheral to connect.
Press on "Search for devices".
The connection is confirmed by the display of a
message and the name of the telephone.
283
Page 61
Audio and Telematics
Managing paired
telephones
This function allows the connection or
disconnection of a peripheral device as
well as the deletion of a pairing.
Press on Telephone to display the
primary page.
Press on the secondary page.
Select "Bluetooth" to display the list
of paired peripheral devices.
Select the peripheral in the list.
Select "Search for devices"
Or
"Connect / Disconnect" to start or
end the Bluetooth connection with
the selected device.
Or
"Delete" to delete the pairing.
Receiving a call
An incoming call is announced by a ring and a
superimposed display in the screen.
Make a short press on the steering
mounted TEL button to accept an
incoming call.
Make a long press
on the steering mounted TEL button
to reject the call.
Or
Select "End call".
Making a call
Using the telephone is not
recommended while driving.
Park the vehicle.
Make the call using the steering
mounted controls.
Calling a new number
Press on Telephone to display the
primary page.
Enter the phone number using the
digital keypad.
Press "Call" to start the call.
Calling a contact
Press on Telephone to display the
primary page.
Or make a long press
on the steering mounted TEL button.
284
Page 62
Managing contacts / entr ies
Audio and Telematics
Select "Contacts".
Select the desired contact from the list offered.
Select "Call".
Calling a recently used number
Press on Telephone to display the
primary page.
Select "Call log".
Select the desired contact from the list offered.
It is always possible to make a call
directly from the telephone; park the
vehicle first as a safety measure.
Or
Or
Or
Press on Telephone to display the
primary page.
Select "Contacts".
Select "View".
Select "Create" to add a new contact.
"Modify" to edit the selected contact.
"Delete" to delete the selected
contact.
"Delete all" to delete all information
for the selected contact.
Select "By name" to view the list of
contacts.
10
285
Page 63
Audio and Telematics
Frequently asked questions
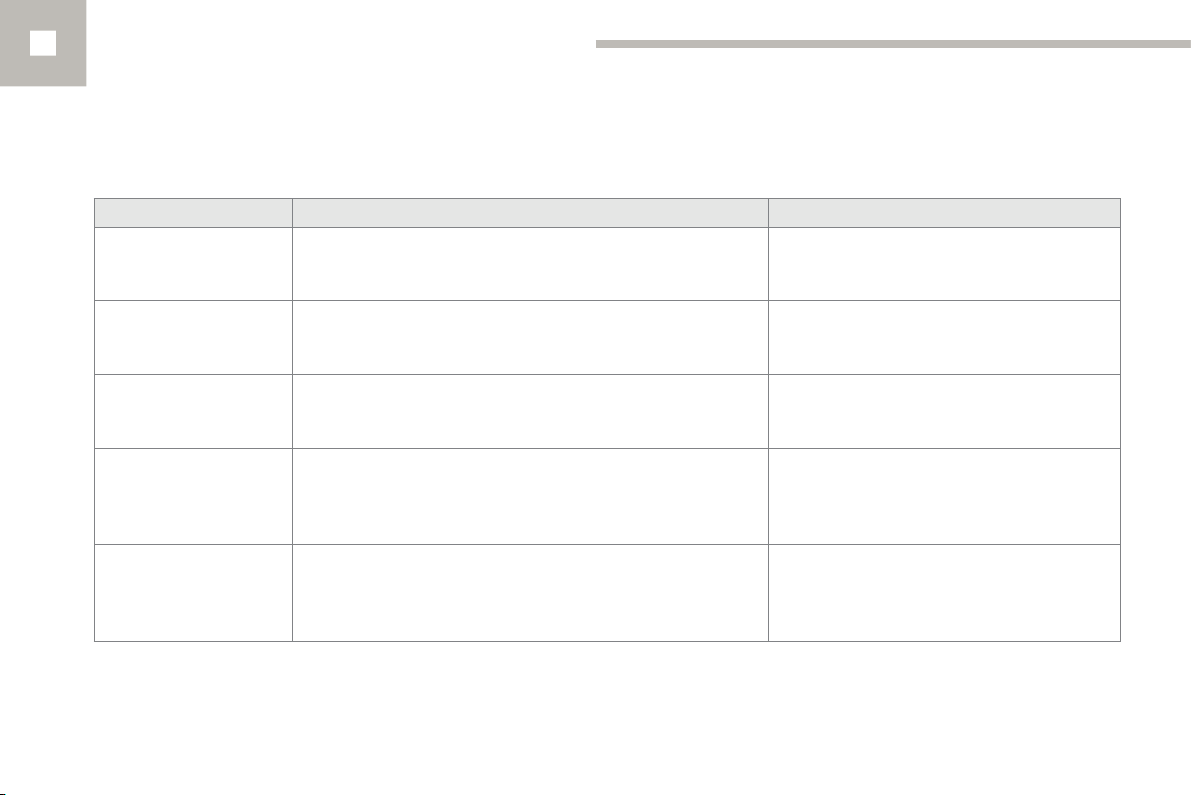
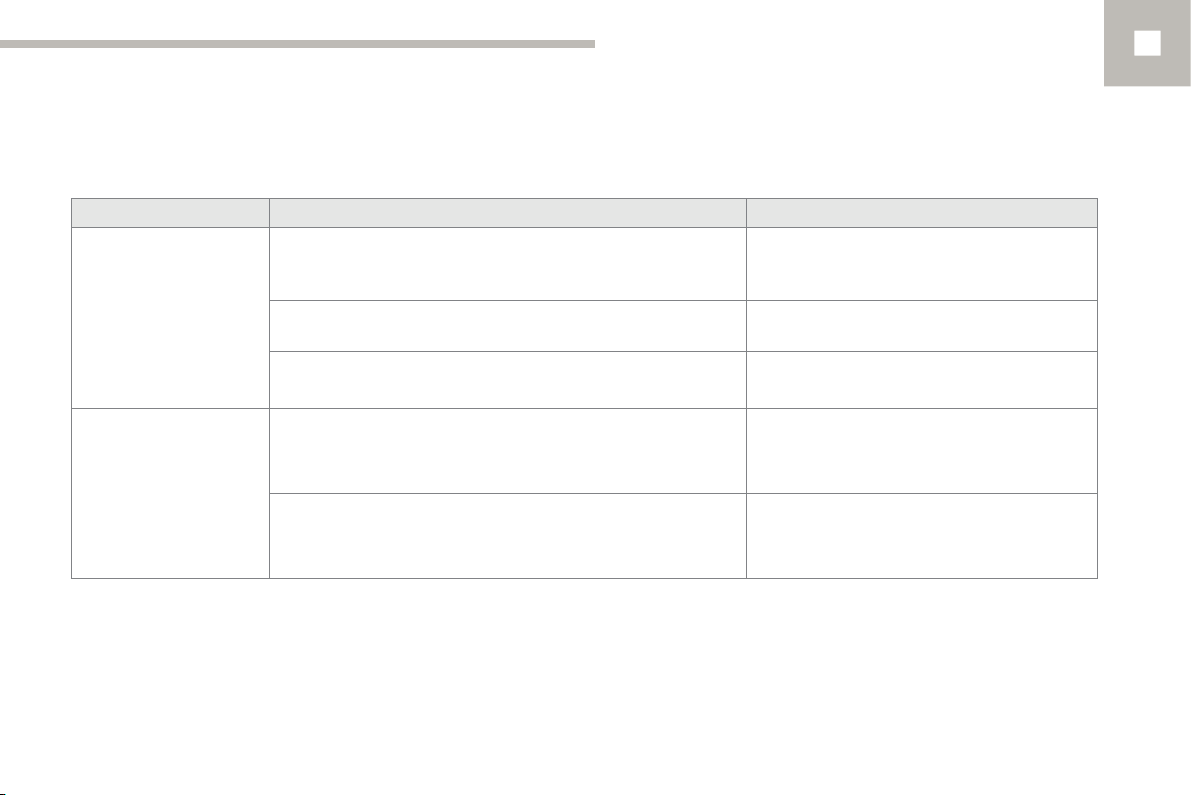
The following table groups together the answers to the most frequently asked questions concerning your audio system.
Navigation
QUESTION ANSWER SOLUTION
The route calculation is not
successful.
The POIs do not appear. The POIs have not been selected. Select the POIs in the list of POIs.
The route settings may conflict with the current location (exclusion of
toll roads on a toll motorway).
Check the route settings in the "Navigation"
menu.
286
The Risk areas audible
warning does not work.
The system does not
suggest a detour around an
incident on the route.
I receive a Risk areas alert
which is not on my route.
The audible warning is not active. Activate audible warnings in the "Navigation"
The guidance criteria do not take account of TMC messages. Select the "Information" function in the list of route
Other than guidance, the system announces all Risk areas
positioned in a cone located in front of the vehicle. It may provide an
alert for Risk areas located on nearby or parallel roads.
menu.
settings.
Zoom in on the map to view the exact position of
the Risk areas. Select "On the route" to no longer
receive alerts other than navigation instructions or
to reduce the time for the announcement.
Page 64
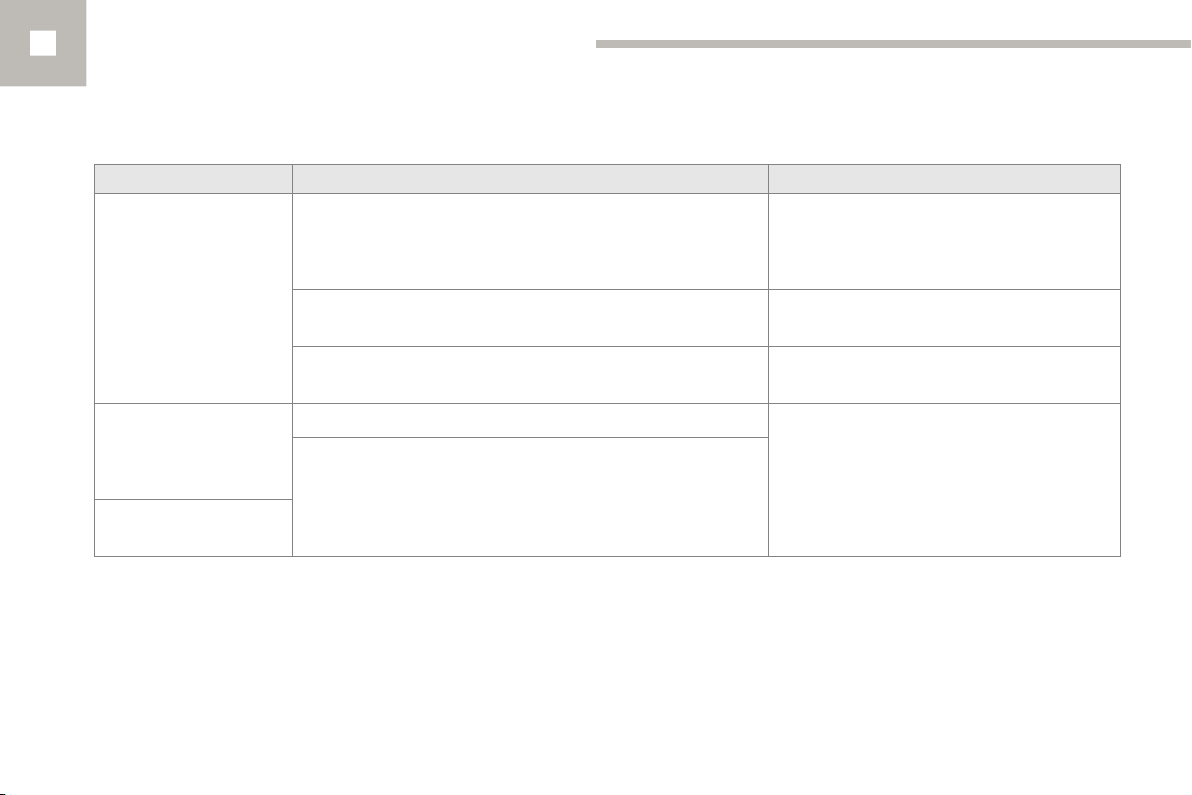
QUESTION ANSWER SOLUTION
Certain traffic jams along
the route are not indicated
in real time.
On starting, it is several minutes before the system begins to receive
the traffic information.
The filters are too restrictive. Modify the settings.
Wait until the traffic information is being received
correctly (display of the traffic information icons
on the map).
Audio and Telematics
10
The altitude is not
displayed.
In certain countries, only major routes (motorways...) are listed for
the traffic information.
On starting, the initialisation of the GPS may take up to 3 minutes to
receive more than 4 satellites correctly.
Depending on the geographical environment (tunnel...) or the
weather, the conditions of reception of the GPS signal may vary.
This phenomenon is normal. The system is
dependent on the traffic information available.
Wait until the system has started up completely so
that there is GPS coverage by at least 4 satellites.
This phenomenon is normal. The system
is dependent on the GPS signal reception
conditions.
287
Page 65
Audio and Telematics
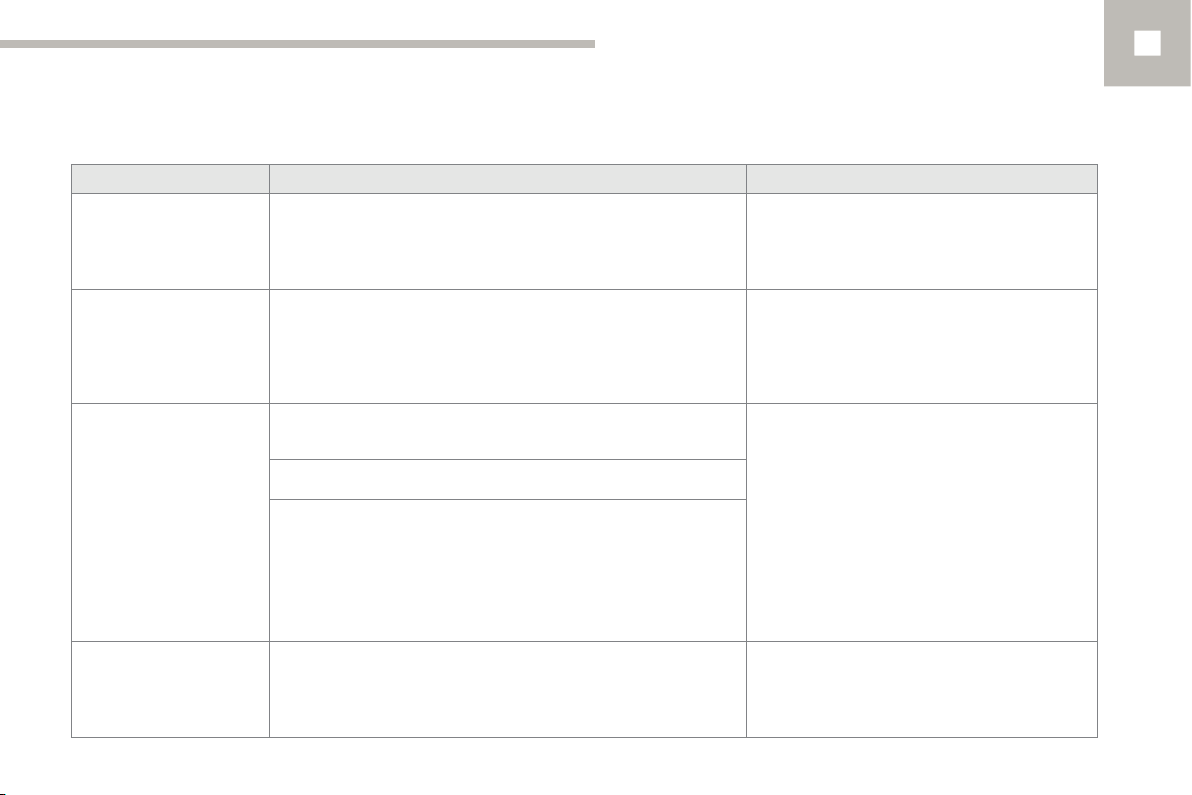
Radio
QUESTION ANSWER SOLUTION
The quality of reception of
the radio station listened
to gradually deteriorates
or the stored stations do
not function (no sound,
87.5 Mhz is displayed...).
The vehicle is too far from the transmitter used by the station
listened to or there is no transmitter in the geographical area
through which the vehicle is travelling.
The environment (hills, buildings, tunnels, basement car parks...)
block reception, including in RDS mode.
Activate the "RDS" function by means of the
short-cut menu to enable the system to check
whether there is a more powerful transmitter in
the geographical area.
This phenomenon is normal and does not indicate
a fault with the audio system.
288
I cannot find some radio
stations in the list of
stations received.
The name of the radio
station changes.
The aerial is absent or has been damaged (for example when going
through a car wash or into an underground car park).
The station is not received or its name has changed in the list. Press and hold the "List" button at the steering
Some radio stations send other information in place of their name
(the title of the song for example).
The system interprets this information as the name of the station.
Have the aerial checked by a PEUGEOT dealer.
mounted controls to update the list of stations
received or press on the system update function:
"Update list".
Page 66
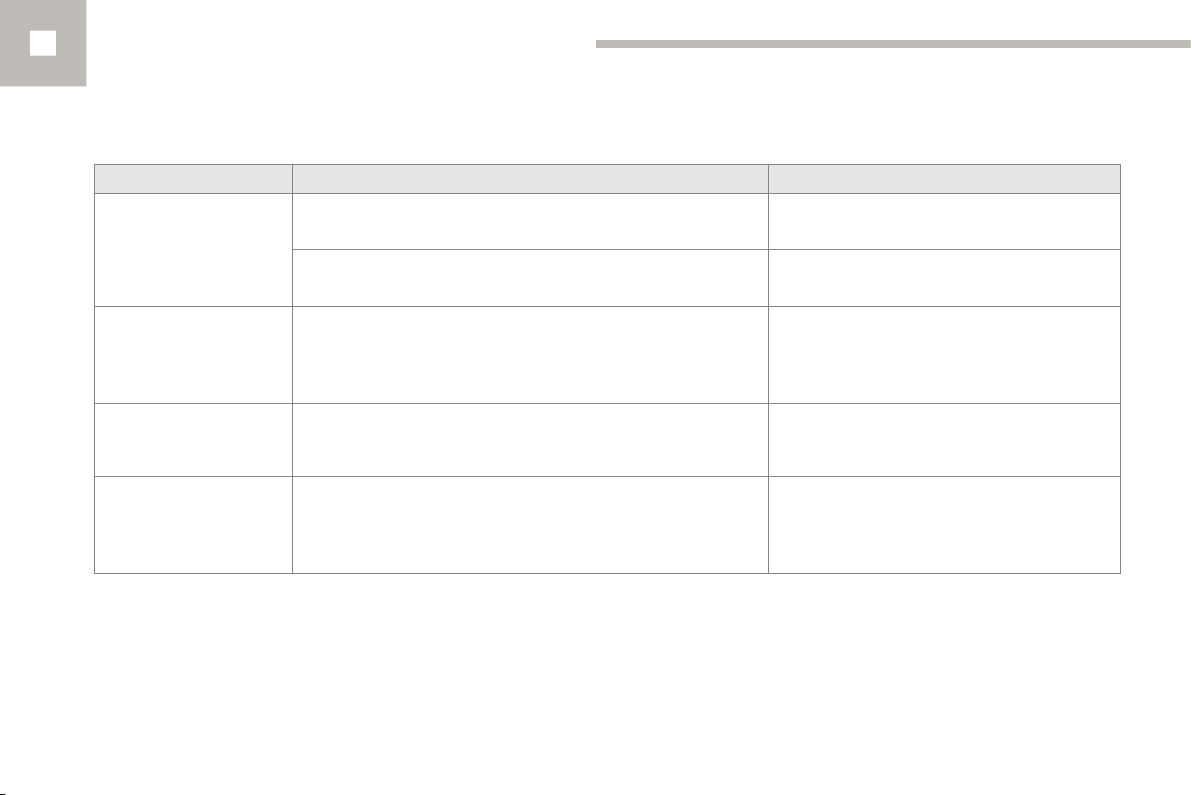
Media
Audio and Telematics
QUESTION ANSWER SOLUTION
Playback of my USB
memory stick starts only
after a very long wait
(around 2 to 3 minutes).
When I connect my iPhone
as a telephone and to the
USB port at the same time,
I am unable to play the
music files.
The CD is ejected
automatically or is not
played by the player.
There is a long waiting
period following the insertion
of a CD or connection of a
USB memory stick.
Some files supplied with the memory stick may greatly slow down
access to reading the memory stick (multiplication by 10 of the
catalogue time).
When the iPhone connects automatically as a telephone, it forces
the streaming function. The streaming function takes the place of
the USB function which is then not useable, there is a period without
sound of the track being played with Apple
The CD is inserted upside down, is unplayable, does not contain any
audio data or contains an audio format which the player cannot play.
The CD has been recorded in a format that is not compatible with the player (udf...).
The CD is protected by an anti-pirating protection system which is
not recognised by the audio system.
When a new medium is inserted, the system reads a certain
amount of data (directory, title, artist, etc.). This may take from a few
seconds to a few minutes.
®
players.
Delete the files supplied with the memory stick
and limit the number of sub-folders in the file
structure on the memory stick.
Disconnect and reconnect to the USB port (the
USB function takes priority over streaming).
Check that the CD is inserted in the player the
right way up.
Check the condition of the CD: the CD cannot be
played if it is too badly damaged.
Check the content in the case of a recorded CD:
refer to the advice in the "AUDIO" section.
The audio system's CD player does not play
DVDs.
Some recorded CDs will not be played by the
audio system because they are not of adequate
quality.
This phenomenon is normal.
10
289
Page 67
Audio and Telematics
QUESTION ANSWER SOLUTION
The CD player sound is
poor.
The CD used is scratched or of poor quality. Insert good quality CDs and store them in suitable
conditions.
290
Some characters in the
media information are not
displayed correctly while
playing.
Playing of streaming files
does not start.
The names of tracks and
the track length are not
displayed on the screen
when streaming audio.
The audio equipment settings (bass, treble, ambiences) are
unsuitable.
The audio system does not display some types of characters. Use standard characters to name tracks and
The peripheral device connected does not support automatic play. Start the playback from the device.
The Bluetooth profile does not allow the transfer of this information.
Set the treble or bass level to 0, without selecting
an ambience.
folders.
Page 68
Settings
Audio and Telematics
QUESTION ANSWER SOLUTION
In changing the setting
of treble and bass the
equalizer setting is
deselected.
In changing the equalizer
setting, treble and bass
return to zero.
When changing the
balance settings, the
distribution setting is
deselected.
When changing an
distribution setting,
the balance setting is
deselected.
The selection of an equalizer setting imposes the balance settings.
Modifying one without the other is not possible.
The selection of a distribution setting imposes the balance settings.
Modifying one without the other is not possible.
Modify the balance or equalizer settings to obtain
the desired musical ambience.
Modify the balance or distribution settings to
obtain the desired musical ambience.
10
291
Page 69

Audio and Telematics
QUESTION ANSWER SOLUTION
There is a difference in
sound quality between the
different audio sources.
For optimum sound quality, the audio settings for Loudness,
Ambience, Treble, Bass, Volume can be adapted to the different
sound sources, which may result in audible differences when
changing source.
Check that the audio settings (Loudness,
Ambience, Treble, Bass, Volume) are adapted to
the sources listened to. Adjust Balance, Treble
and Bass to the middle position, select the
"None" musical ambience and set the loudness
correction to the "Active" position in CD mode or
to the "Inactive" position in radio mode.
292
With the engine off, the
system switches off after a
few minutes of use.
When the engine is switched off, the system's operating time
depends on the state of charge of the battery.
The switch-off is normal: the system switches to economy mode and
switches off to prevent discharging of the vehicle's battery.
Start the vehicle's engine to increase the battery
charge.
Page 70
Telephone
Audio and Telematics
QUESTION ANSWER SOLUTION
I cannot connect my
Bluetooth telephone.
The volume of the
telephone connected
in Bluetooth mode is
inaudible.
Some contacts are
duplicated in the list.
Contacts are not shown in
alphabetical order.
The system does not
receive SMS text messages.
The telephone's Bluetooth function may be switched off or the
telephone may not be visible.
The Bluetooth telephone is not compatible with the system. You can check the compatibility of your
The volume depends both on the system and on the telephone. Increase the volume of the audio system, to
The ambient noise level has an influence on the quality of
telephone communication.
The options for synchronizing contacts are synchronizing the
contacts on the SIM card, the contacts on the telephone, or both.
When both synchronizations are selected, some contacts may be
duplicated.
Some telephones offer display options. Depending on the settings
chosen, contacts can be transferred in a specific order.
The Bluetooth mode does not permit sending SMS text messages
to the system.
Check that your telephone's Bluetooth function is
switched on.
Check in the telephone settings that it is "visible
to all".
telephone at www.peugeot.co.uk (services).
maximum if required, and increase the volume of
the telephone if necessary.
Reduce the ambient noise level (close the
windows, reduce the booster fan speed, slow
down...).
Select "Display SIM card contacts" or "Display
telephone contacts".
Modify the display setting in the telephone
directory.
10
293
Page 71

Page 72
Audio and Telematics
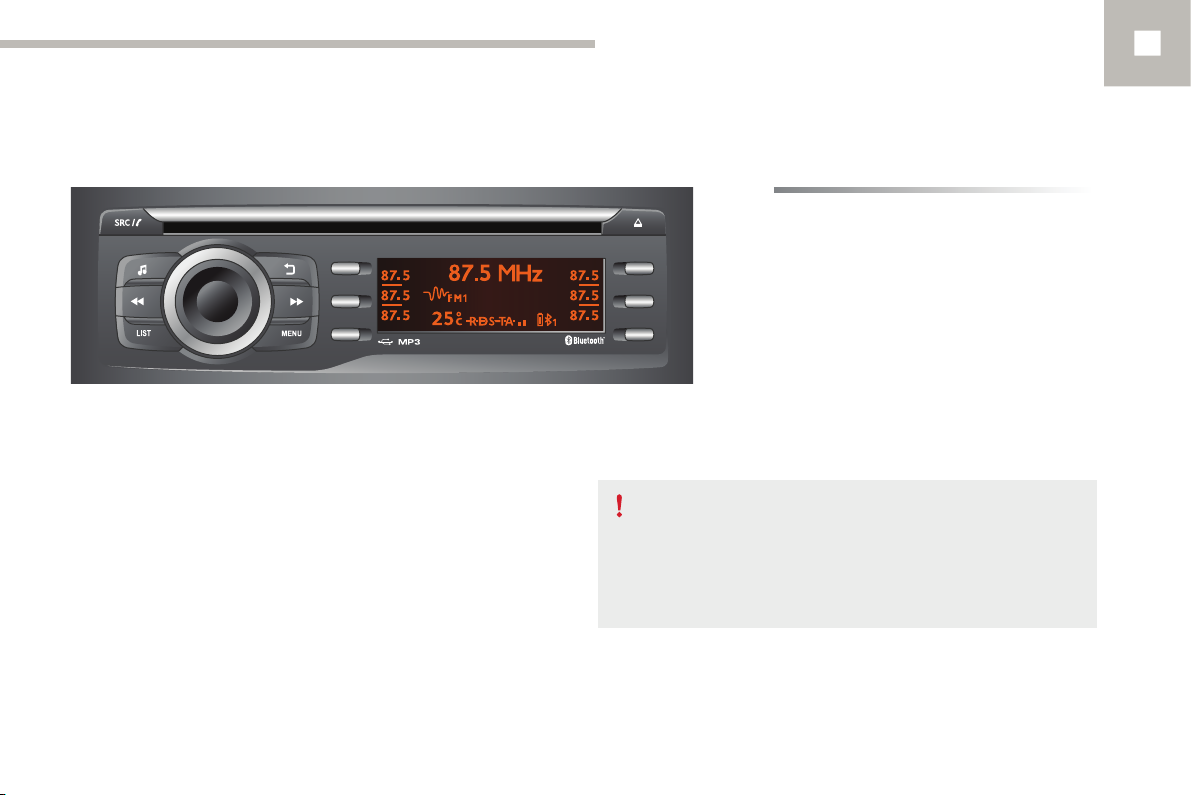
Audio system / Bluetooth
®
10
Contents
First steps 296
Steering mounted controls 297
Radio 298
Media 300
Telephone 304
Audio settings 307
Conguration 308
Screen menu map(s) 309
Frequently asked questions 310
As a safety measure, the driver must only carry out operations
which require prolonged attention while the vehicle is stationary.
When the engine is switched off and to prevent discharging of
the battery, the system switches off after activation of energy
economy mode.
295
Page 73
Audio and Telematics
First steps
296
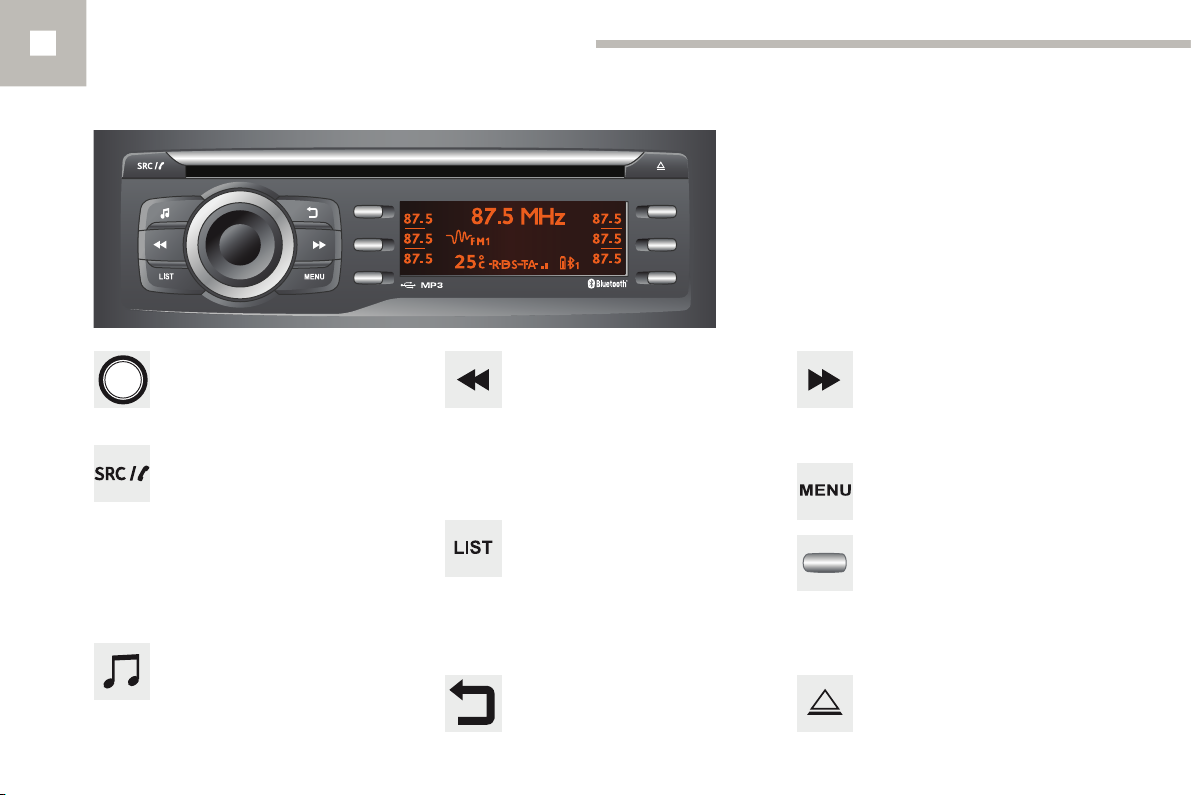
On / Off, volume adjustment.
Select the source:
Radio: FM1, FM2, AM, CD, USB,
AUX, Streaming.
Telephone: accept an incoming call.
Telephone, press and hold: end
a call, access the calls log for the
connected telephone.
Adjust audio settings: sound
ambience, treble, bass, loudness,
distribution, left/right balance, front/
rear balance, automatic volume.
Automatic search for a lower radio
frequency.
Select the previous CD, USB track.
Navigation in a list.
Press and hold: fast back.
Display the list of stations received,
the CD/USB tracks or folders.
Press and hold: update the list of
stations received.
Abandon the current operation.
Go up one level (menu or folder).
Automatic search for a higher radio
frequency.
Select the next CD, USB track.
Navigation in a list.
Press and hold: fast forward.
Open the main menu.
Select a preset radio station.
Radio, press and hold: preset a radio
station.
Other than radio: see the
corresponding sections.
Eject CD.
Page 74
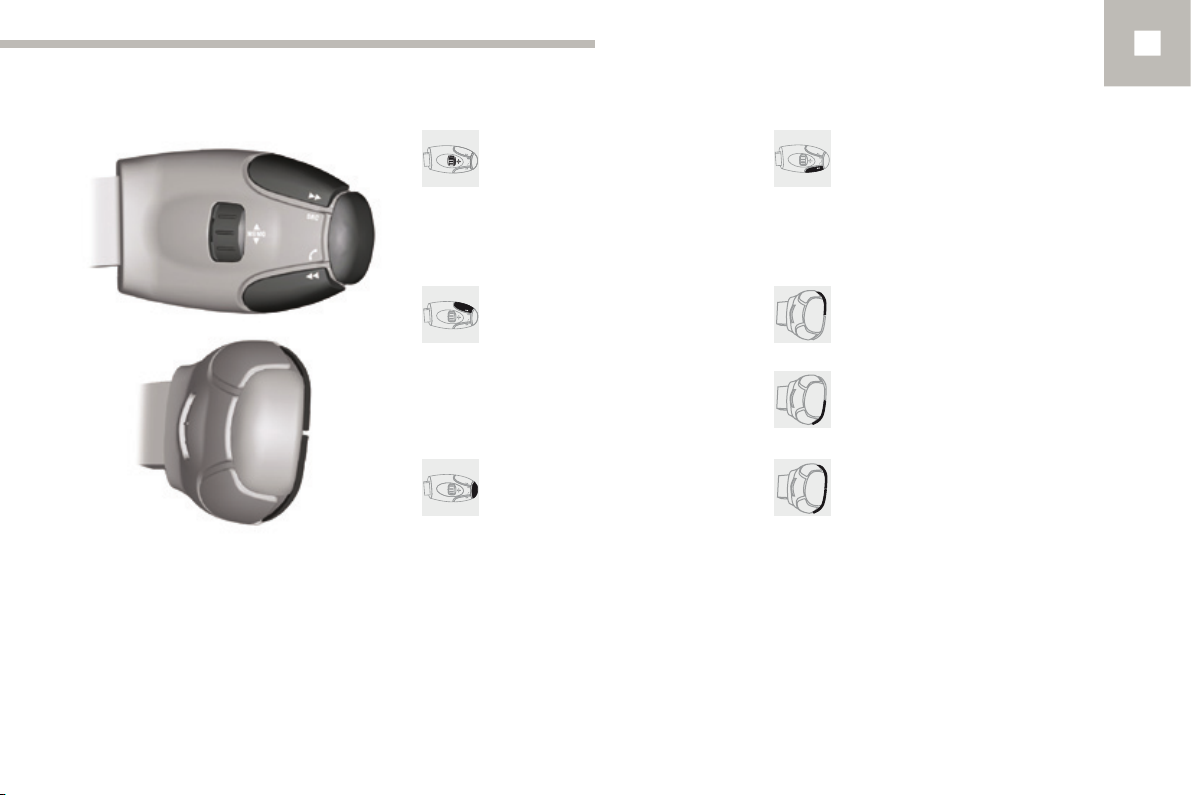
Steering mounted controls
Radio: select the previous / next
preset station.
CD / USB: select the genre /
artist / folder / playlist from the list
depending on classification.
Select the previous / next item in a
menu.
Audio and Telematics
Radio: automatic search for a lower
frequency.
CD / MP3 / USB: select the previous
track.
CD / USB: press and hold: fast back.
10
Radio: automatic search for a higher
frequency.
CD / MP3 / USB: select the next
track.
CD / USB: press and hold: fast
forward.
Change the audio sound.
Confirm a selection.
Start/end call with the telephone.
Press and hold: access to the
call log.
Volume increase.
Volume decrease.
Mute: cut the sound by
simultaneously pressing the volume
increase and decrease buttons.
Restore the sound: by pressing one
of the two volume buttons.
297
Page 75
Audio and Telematics
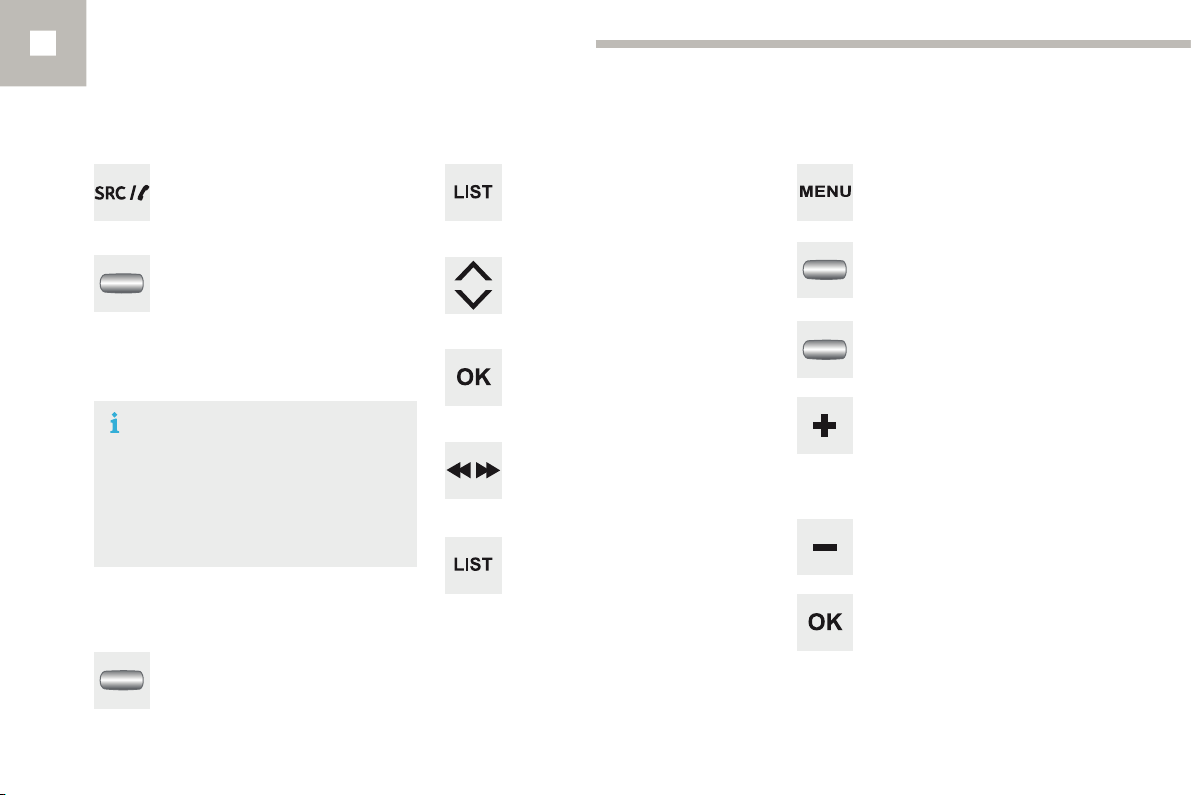
Radio
Presetting a station
Press SRC/TEL repeatedly to select
the FM1, FM2 or AM waveband.
Press and hold one of the buttons to
preset the station being listened to.
The name of the station is displayed
and an audible signal confirms the
preset.
The exterior environment (hills, bu ildings,
tunnel, car park, below ground...) may
prevent reception, even in RDS station
tracking (alternative frequencies) mode.
This phenomenon is normal in the
propagation of radio waves and is in no way
indicative of a fault with the audio system.
Selecting a station
Press a button to listen to the
corresponding preset station.
Managing a list Entering a frequency
Press LIST to display the list of
stations received in alphabetical
order.
Select the desired radio station using
one of the buttons.
Confirm with "OK".
Briefly press one of the buttons to
change to the next or previous letter.
or
Press and hold on LIST to build or
update the list of stations; audio
reception is cut momentarily.
Press on MENU.
Select "Radio".
Select "Write freq.".
Press +.
press - to select the desired
frequency.
Confirm with "OK".
298
Page 76
Audio and Telematics
Receiving TA messagesRDS Displaying RADIO TEXT
RDS, if activated, enables you to continue
listening to the same station by automatic
retuning to alternative frequencies.
However, in certain conditions, coverage
of an RDS station may not be assured
throughout the country as radio stations
do not cover 100 % of the territory. This
explains the loss of reception of the
station during a journey.
With source FM1 or FM2, press
MENU.
Select "Radio".
Select or deselect "RDS" to switch
RDS on or off.
Confirm with "OK" to save the
setting.
The TA (Traffic Announcement)
function gives priority to TA alert
messages. To operate, this function
needs good reception of a radio station
transmitting this type of message.
When a traffic report is transmitted,
the current audio source (Radio, CD,
USB, ...) is interrupted automatically to
play the TA message. Normal playback
of the audio source resumes at the end
of the transmission of the message.
Press MENU.
Select "Radio".
Select or deselect "TA" to activate
or deactivate the reception of traffic
messages.
Confirm with "OK" to save the
setting.
Radio text is information transmitted by
the radio station related to the current
programme or song.
With the radio displayed on the
screen, press MENU.
Select "Radio".
Select or deselect "TXT" to activate
or deactivate the display of Radio
Text.
Confirm with "OK" to save the
setting.
10
299
Page 77
Audio and Telematics
Media
USB player
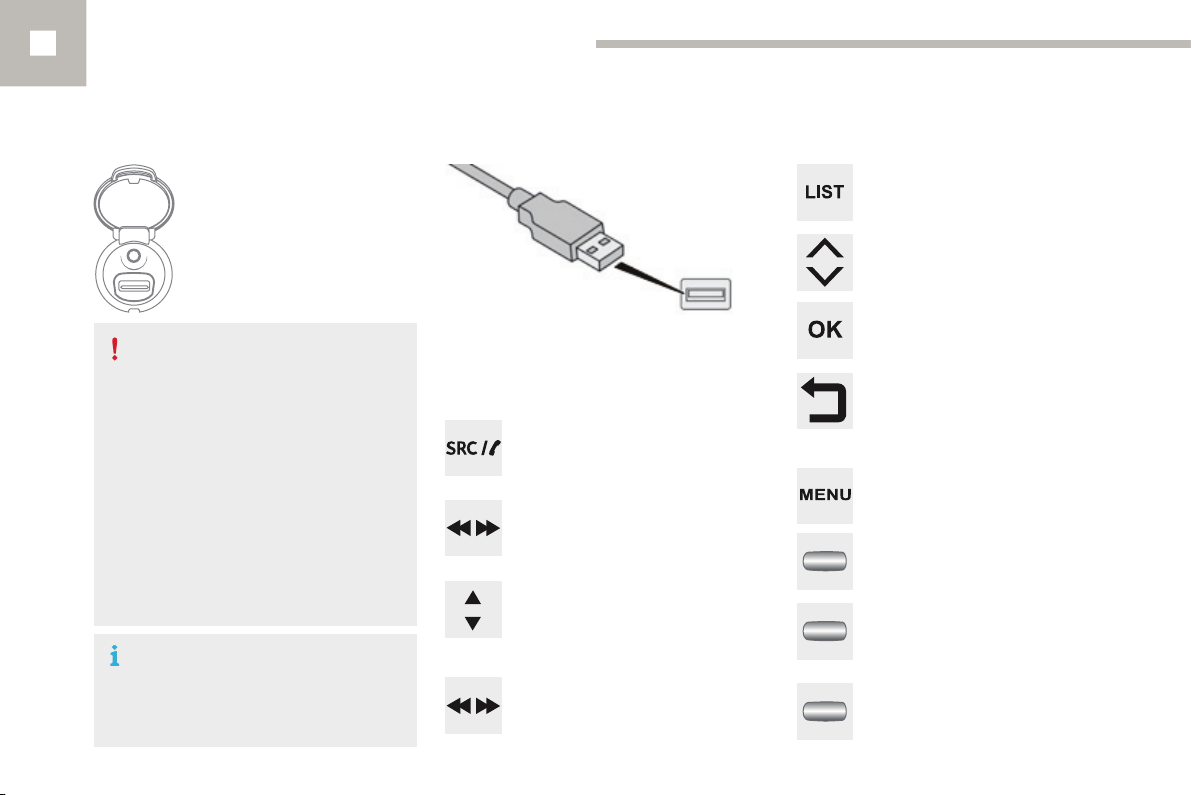
This unit comprises a USB port
and a Jack auxiliary socket,
depending on model.
The system constitutes playlists (in
temporary memory) the creation time
for which can be from a few seconds to
several minutes at the first connection.
Limiting the number of non-music files
and the number of folders reduces this
waiting time. The playlists are updated
every time the ignition is switched off or
a USB memory stick is connected.
The lists are memorised: if there is no
change in the lists, the next loading
time will be shorter.
At a first connection, the order
suggested is by folder. When
connecting again, the order previously
chosen is retained.
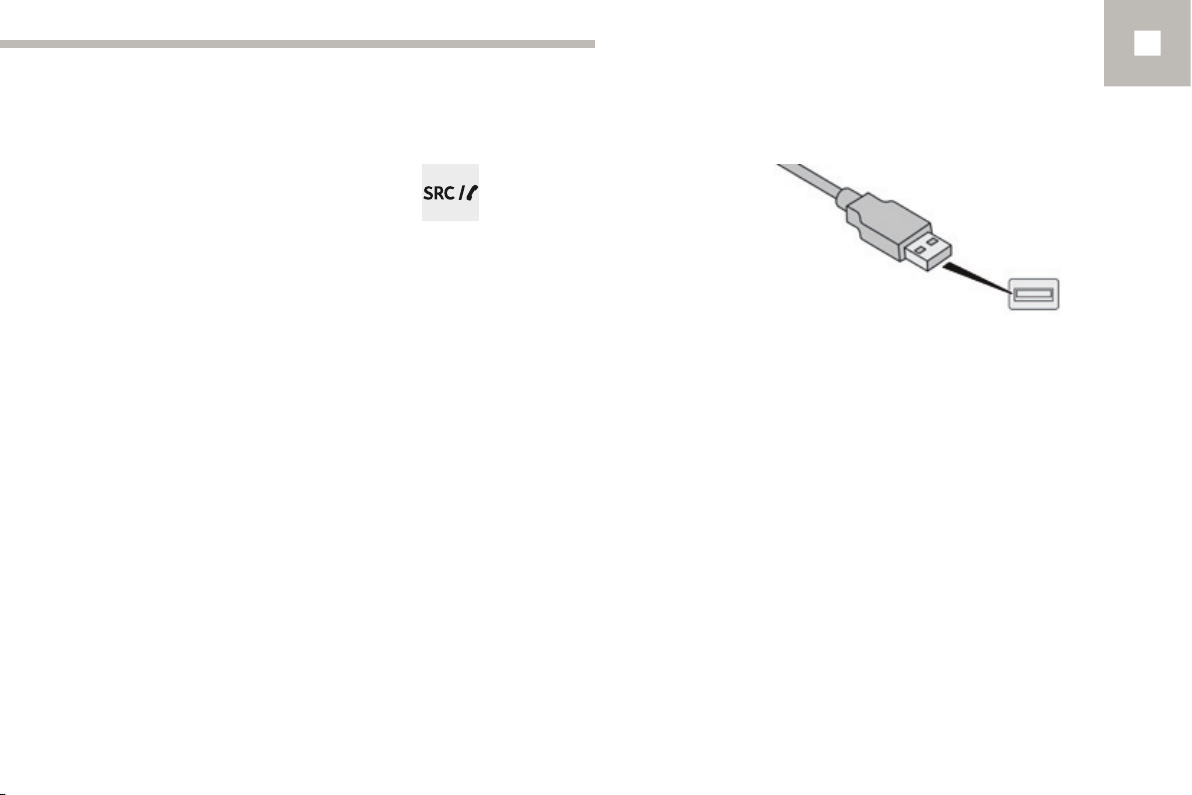
Connect a USB memory stick to the USB port
or connect a USB device to the USB port using
a suitable cable (not supplied).
Press SRC/TEL repeatedly to
select "USB".
Press one of these buttons to select
the next or previous track in the list.
Press one of these buttons to select
the next or previous folder in the
order chosen.
Press and hold one of these buttons
for fast forward or back.
Press LIST to display the structure of
the folders in the compilation.
Select a line in the list.
Confirm with "OK".
Up a level in the menu.
Press MENU.
Select "Media".
Select or deselect "TA" to switch
traffic announcements on or off.
Select the play mode: "Normal",
"Random", "Random all" or
"Repeat".
300
Page 78
Audio and Telematics
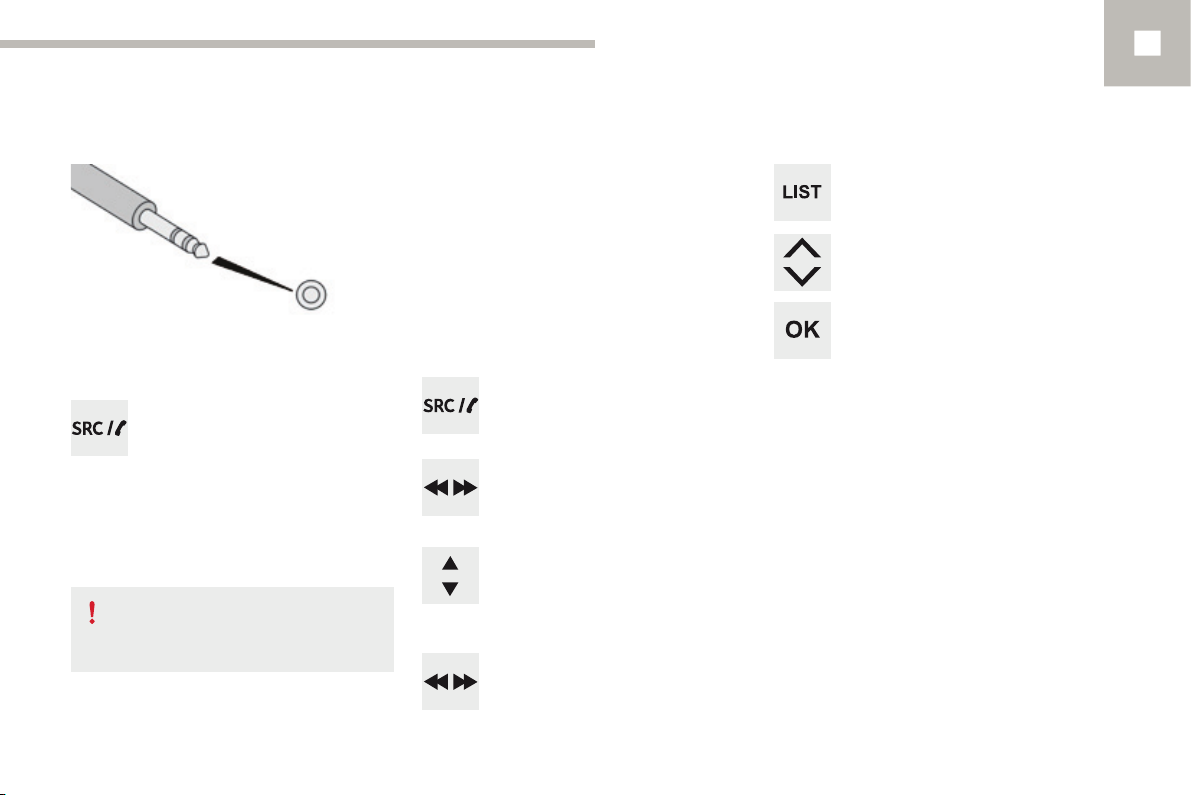
Auxiliary socket (AUX)
Connect the portable device (MP3 player...) to
the Jack auxiliary socket using an audio cable
(not supplied).
Press SRC/TEL repeatedly to
select "AUX".
First adjust the volume on the portable device
(to a high level). Then adjust the volume on
your audio system. Control is from the portable
device.
Do not connect a given device to both
the Jack auxiliary socket and the USB
port at the same time.
CD player
Insert a CD into the player, play starts
automatically.
Insert an MP3 compilation CD into the CD
player.
The audio system searches for audio tracks,
which can take from a few to several dozen
seconds before play starts.
Press the SRC/TEL button
repeatedly to select "CD".
Press one of these buttons to go the
the previous or next track in the list.
Press one of these buttons to select
the previous or next folder according
to the category chosen.
Press and hold one of these buttons
for fast forward or back.
Press LIST to display the folder
structure of the compilation.
Select a line in the list.
Confirm with "OK".
Return to the top level of the folder structure to
select the type of tracks.
- By Folders (CD or USB): all folders
containing audio files recognised on the
peripheral device, in alphabetical order
without following the folder structure.
- By Artist (USB only): all of the artist names
defined in the ID3 Tags, in alphabetical
order.
- By Genre (USB only): all of the genres
defined in the ID3 Tags.
- By Playlist (CD or USB): if playlists have
been saved.
10
301
Page 79

Audio and Telematics
Information and advice
The audio system will only play files with
".mp3", ".wma" and ".wav" on a CD and can
play files with ".ogg" extension only on USB.
It is recommended that file names be of no
more than 20 characters and avoiding special
characters (ex : " ? ; ù) so as to avoid any
problem reading or displaying the files.
In order to be able to play a recorded CDR or
CDRW, when recording it is preferable to select
standards ISO 9660 level 1.2 or Joliet.
If the disc is recorded in another format, it may
not be played correctly.
It is recommended that the same recording
standard is always used for an individual disc,
with as low a speed as possible (4x maximum)
for optimum sound quality.
In the particular case of a multi-session CD, the
Joliet standard is recommended.
The playlists accepted on CD, MP3, iPod and
USB connection are types ".m3u" and ".wpl".
The number of files recognised is limited to
5 000 in 500 folders on a maximum of 8 levels.
On a single disc, the CD player can read up
to 255 MP3 files spread over 8 folder levels
with a maximum of 192 folders. However, it is
recommended that this be kept to 2 levels so
as to limit the time taken to access and play
the CD.
During play, the folder structure is not
observed.
Do not connect a hard disk or USB device other
than audio players to the USB port. This may
cause damage to your installation.
Use only USB memory sticks formatted FAT32
(File Allocation Table).
The use of genuine Apple
is recommended to ensure correct
operation.
®
USB cables
302
Page 80
Audio and Telematics
Bluetooth® audio streaming
Streaming allows music files on a telephone to
be heard via the vehicle's speakers.
Connect the telephone: see the "Telephone"
section.
In the "Bluetooth: Audio" menu, select the
telephone to connect.
The audio system connects automatically to a
newly paired telephone.
Activate the streaming source by
pressing the SRC/TEL* button.
Control of playback is via the audio system. The control
of common tracks is possible via the audio system
control buttons and the steering mounted controls**.
Contextual information can be displayed in the screen.
The audio quality depends on the quality of the
transmission from the telephone.
* In certain cases, the play of audio files must
be initiated from the keypad.
** If the telephone supports the function.
Connecting Apple® players
Connect the Apple® player to the USB port
using a suitable cable (not supplied).
Play starts automatically.
Management of the device is via the audio
system controls.
The classifications available are those on the
portable player connected (artists / albums /
genres / playlists/ audiobooks / podcasts).
The software version of the audio system may
not be compatible with the generation of your
®
Apple
player.
10
303
Page 81
Audio and Telematics
Telephone
Pairing a Bluetooth telephone
For safety reasons and because they
require prolonged attention on the part
of the driver, the operations for pairing
of the Bluetooth mobile telephone
with the Bluetooth hands-free system
of your audio system must be carried
out with the vehicle stationary and the
ignition on.
Visit www.peugeot.co.uk for more information
(compatibility, more help, ...).
Activate the telephone's Bluetooth function and
ensure that it is set as visible to all (refer to the
telephone instructions).
Press the MENU button.
Select "Bluetooth".
Select "Search".
A window is displayed with "Searching
device".
The services available depend on
the network, the SIM card and the
compatibility of the Bluetooth telephone
used.
Consult your telephone's manual and
your operator to find out which services
are available to you.
Select the telephone to be paired
from the list.
Confirm with "OK".
Only one telephone can be paired at a time.
In some cases, the Bluetooth address of the
telephone may appear instead of the name of
the telephone.
A virtual keypad is displayed on the
screen: choose a 4 digit code.
Confirm with "OK".
A message is displayed in the screen of the
telephone: enter the same code and confirm.
If pairing fails, try again; the number of
attempts is not limited.
A message appears in the screen to confirm
the result of the connection.
Pairing can also be initiated from the
telephone by searching for detected
Bluetooth devices.
The directory and the calls list can be
accessed after the synchronisation
period (if the telephone is compatible).
Automatic connection must be
configured in the telephone to allow
the connection each time the vehicle is
started.
304
Page 82
Managing connections Making a call
Press the MENU button.
Select "Bluetooth".
Select "BT management" and
confirm. The list of paired telephones
is displayed.
Select or deselect:
- "Tel.": hands-free connection
- "Audio": play audio files
"OK" to confirm the choice.
"Delete" to delete the pairing.
From the directory
Press the MENU button.
Select "Telephone".
Select "Call".
Audio and Telematics
10
Indicates connection of the audio
profile.
Indicates connection of the handsfree profile.
In the list, select a telephone to pair.
Confirm with "OK".
It is not possible to pair more than
5 telephones. Press MENU and
select "Bluetooth". Select "BT
management". If 5 telephones are
already paired, select the telephone to
delete by pressing "OK" and selecting
"Delete" (refer to the "Managing
connections" section).
Select "Directory".
Select the desired number.
Confirm with "OK" to start the call.
305
Page 83
Audio and Telematics
Making a call
Recently called numbers*
Press and hold SRC/TEL to display
the calls list.
For access to the calls list, it is also
possible to press MENU, select
"Telephone", then select "Call", and
finally select "Calls list".
In the list of calls, select the number
and choose "Missed calls", "Dialed
calls" or "Answered calls".
Scroll through the calls list.
Confirm with "OK".
Press one of these buttons to go to
the previous or next page in the list.
"OK" starts the call.
The calls list includes the calls sent
from and by from the vehicle via the
connected telephone.
It is possible to make a call directly from
the telephone; stop the vehicle as a
safety measure.
Receiving a call
An incoming call is announced by a ring and a
superimposed display in the screen.
Press SRC/TEL.
or
select "YES" to accept the call,
or
select "NO" to reject the call.
Pressing and holding the back
button,
or
on SRC/TEL also rejects an
incoming call.
* Depending on the compatibility of the
telephone.
306
Page 84
Managing calls
Hang up
In the contextual menu, select "Hang
up" to end the call.
Pressing and holding on SRC/TEL
also ends the call.
Secret - Mute
(so that the caller cannot hear)
In the contextual menu:
Select "Micro OFF" to switch off the
microphone.
Select "Micro OFF" to switch the
microphone on again.
Combined mode
(to leave the vehicle without ending the call)
From the contextual menu:
Select "Combined mode" to transfer
the call to the telephone.
Select "Combined mode" to transfer
the call to the vehicle.
In certain cases, the combined mode has
to activated from the telephone.
The Bluetooth connection will be
restored automatically if the ignition
has been switched off, then on again
(depending on the compatibility of the
telephone).
Audio and Telematics
Audio settings
Press ¯ to display the audio settings
menu.
Press ¯ to go to the next setting.
The settings available are:
- AMBIANCE: BASS, TREBLE and
LOUDNESS.
- BALANCE (left/right balance), FADER
(front/rear balance)
- SOUND DIST. (driver or passenger).
- AUTO VOLUME.
The distribution, or spatialisation of
sound, is an audio process which
allows the sound quality to be improved
according to the setting chosen,
corresponding to the position of the
listeners in the vehicle.
10
The AMBIANCE, TREBLE and BASS
audio settings are different and
independent for each sound source.
307
Page 85
Audio and Telematics
Conguration
Display and language settings
Press the MENU button.
Select "Config.".
Select "Displaying" to activate or
deactivate scrolling text.
Select "Language" to modify the
display language.
Select "Version" for information on
the software.
Select "System" when you want to
install an update. Information can be
obtained from a PEUGEOT dealer.
308
Select "Unit" to modify the units for
temperature (Celsius, Fahrenheit).
Page 86

Screen menu map(s)
MENU
Radio Telephone
1 1
TA Call
2 2
RDS
2
TXT
2
Write freq.
2
Media
1
Normal
2
Random
2
Random all
2
Repeat
2
TA
2
Directory
3
Calls list
3
Missed calls
4
Dialed calls
4
Answered calls
4
Phone status
2
Bluetooth
1
BT management
2
Search
2
Cong.
1
Displaying
2
Scrolling text
3
Language
2
Deutsch
3
English
3
Español
3
Français
3
Italiano
3
Nederlands
3
Português
3
Português-Brasil
3
Русский
3
Türkçe
3
Version
2
System
2
Unit
2
Celsius
3
Fahrenheit
3
Audio and Telematics
10
309
Page 87

Audio and Telematics
Frequently asked questions
The following tables contain answers to the most frequently asked questions.
QUESTION ANSWER SOLUTION
There is a difference in
sound quality between the
different audio sources
(radio, CD...).
For optimum sound quality, the audio settings (volume, bass,
treble, ambience, loudness) can be adapted to the different sound
sources, which may result in audible differences when changing
source (radio, CD...).
Check that the audio settings (volume, bass,
treble, ambience, loudness) are adapted to the
sources listened to. It is advisable to adjust
audio settings (bass, treble, Front-Rear balance,
Left-Right balance) to the middle position, select
the musical ambience and set the loudness
correction to the "Active" position in CD mode or
to the "Inactive" position in radio mode.
310
When changing the
settings for treble and
bass, the ambience setting
is deselected.
When changing the
ambience setting, treble
and bass are reset to zero.
When changing the
balance setting,
distribution is deselected.
Choosing an ambience imposes settings for treble and bass.
Modifying one without the other is only possible with a personalised
ambience.
Choosing the "driver" distribution setting imposes a balance setting. Modify the balance setting or the distribution
Modify the treble and bass settings or the
ambience setting to obtain the desired sound
quality.
setting to obtain the desired sound quality.
Page 88
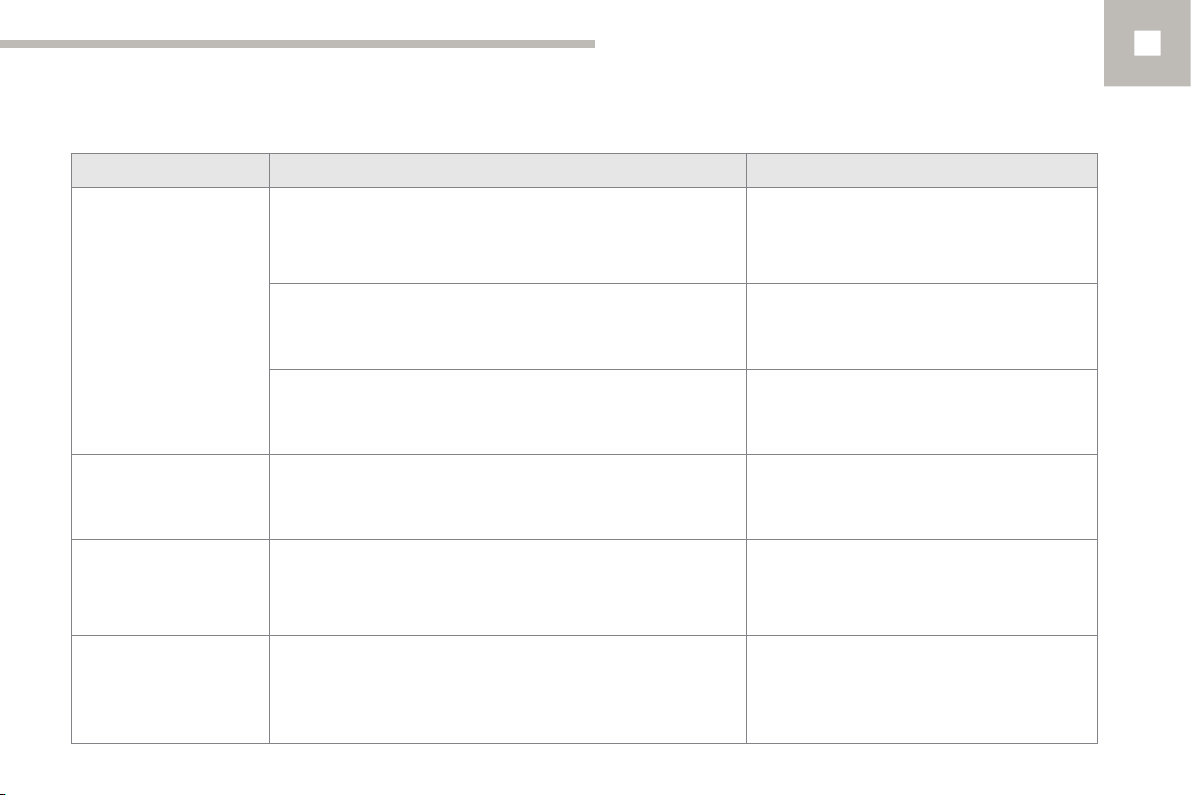
Audio and Telematics
QUESTION ANSWER SOLUTION
The quality of reception of
the radio station listened
to gradually deteriorates
or the stored stations do
not function (no sound,
87.5 MHz is displayed...).
Sound cut-outs of 1 to
2 seconds in radio mode.
Traffic announcement
TA is displayed. I do
not receive any traffic
information.
The stored stations are not
found (no sound, 87.5 MHz
is displayed...).
The vehicle is too far from the transmitter used by the station
listened to or there is no transmitter in the geographical area
through which the vehicle is travelling.
The environment (hills, buildings, tunnels, basement car parks...)
block reception, including in RDS mode.
The aerial is absent or has been damaged (for example when going
through a car wash or into an underground car park).
During this brief sound cut-out, the RDS searches for any frequency
permitting better reception of the station.
The radio station does not broadcast traffic information. Tune to a radio station which broadcasts traffic
An incorrect waveband is selected. Press the SRC/TEL button to return to the
Activate the RDS function to enable the system
to check whether there is a more powerful
transmitter in the geographical area.
This phenomenon is normal and does not
indicate a failure of the audio equipment.
Have the aerial checked by a PEUGEOT dealer.
Deactivate the RDS function if the phenomenon
is too frequent and always on the same route.
information.
waveband (FM1 or FM2) on which the stations
are stored.
10
311
Page 89
Audio and Telematics
QUESTION ANSWER SOLUTION
The CD is ejected
automatically or is not
played by the player.
The CD is inserted upside down, is unplayable, does not contain
any audio data or contains an audio format which the player cannot
play.
The CD is protected by an anti-pirating protection system which is
not recognised by the audio equipment.
- Check that the CD is inserted in the player
the right way up.
- Check the condition of the CD: the CD
cannot be played if it is too damaged.
- Check the content in the case of a recorded
CD: consult the advice in the "Audio" section.
- The audio equipment's CD player does not
play DVDs.
- Due to their quality level, certain writeable
CDs will not be played by the audio system.
312
The CD player sound is
poor.
The Bluetooth connection
is cut.
The message "USB device
error" is displayed on the
screen.
A telephone connects
automatically,
disconnecting another
telephone.
The CD used is scratched or of poor quality. Insert good quality CDs and store them in
suitable conditions.
The audio settings (bass, treble, ambience) are unsuitable. Set the treble or bass level to 0, without selecting
an ambience.
The battery of the peripheral may not be sufficiently charged. Recharge the battery of the peripheral device.
The USB memory stick is not recognised. Use only USB memory sticks formatted to FAT 32
(28-bit file allocation table).
Automatic connection overrides manual connection. Modify the telephone settings to remove
automatic connection.
Page 90
QUESTION ANSWER SOLUTION
An iPod is not recognised
when connecting to the
USB port.
The hard disk or device
is not recognised when
connecting to the USB
port.
When streaming, the
sound cuts momentarily.
The iPod is of a generation that is not compatible with the USB
connection.
Some hard disks and devices need a power supply greater than is
provided by the audio system.
Some telephones prioritise connection of the "hands-free" profile. Delete the "hands-free" connection profile to
Connect the device to the 230 V socket, the 12 V
socket or an external power supply.
Caution: ensure that the device does not
transmit a voltage greater than 5 V (risk of
destruction of the system).
improve streaming.
Audio and Telematics
10
In "Random all" play, not
all of the tracks are played.
With the engine off, the
audio system switches off
after a few minutes of use.
The message "the audio
system is overheated"
appears on the display.
In "Random all" play, the system can only take into account up to
999 tracks.
When the engine is switched off, the audio system operating time
depends on the battery charge.
The switch-off is normal: the audio system switches to economy
mode and switches off to prevent discharging the vehicle's battery.
In order to protect the installation if the surrounding temperature
is too high, the audio system switches to an automatic thermal
protection mode leading to a reduction of the volume or stopping of
the playing of the CD.
Start the vehicle's engine to increase the battery
charge.
Switch the audio system off for a few minutes to
allow the system to cool.
313
Page 91

Page 92
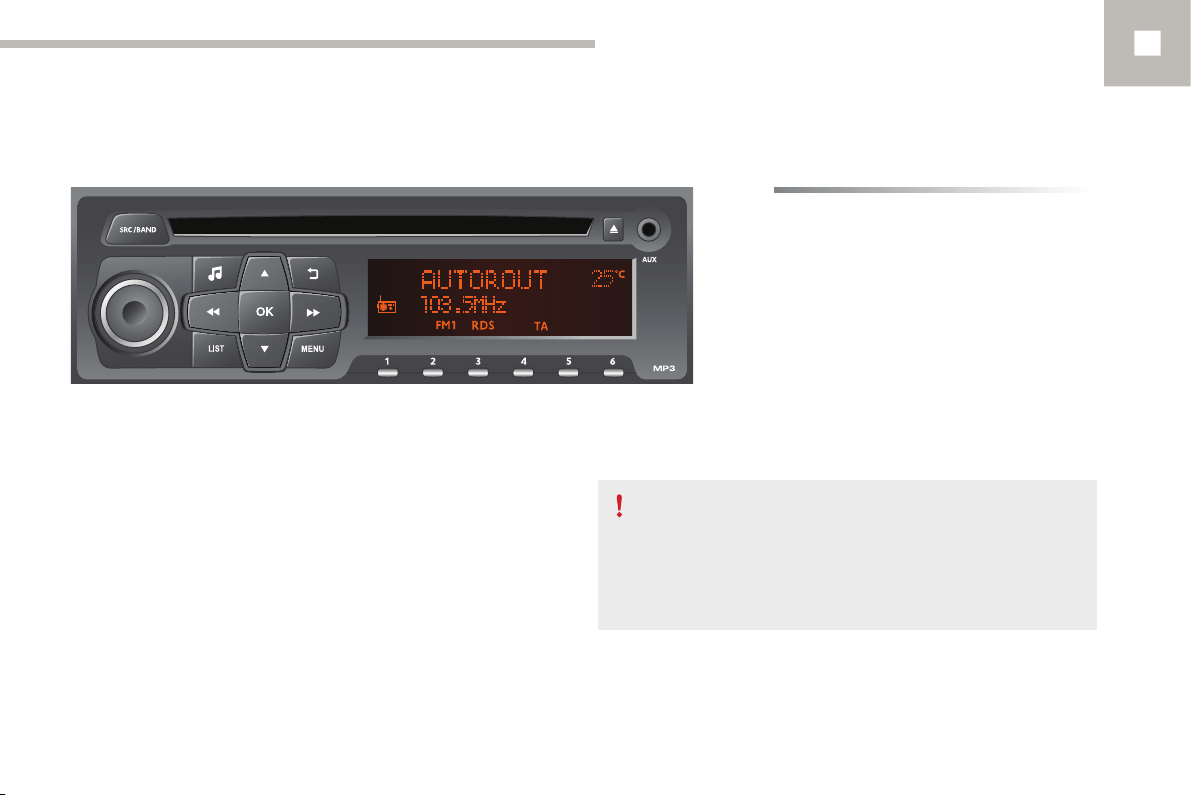
Audio system
Audio and Telematics
10
Contents
First steps 316
Steering mounted controls 317
Radio 318
Media 320
Audio settings 322
Screen menu map(s) 323
Frequently asked questions 324
As a safety measure, the driver must only carry out operations
which require prolonged attention while the vehicle is stationary.
When the engine is switched off and to prevent discharging of
the battery, the system switches off after activation of economy
mode.
315
Page 93
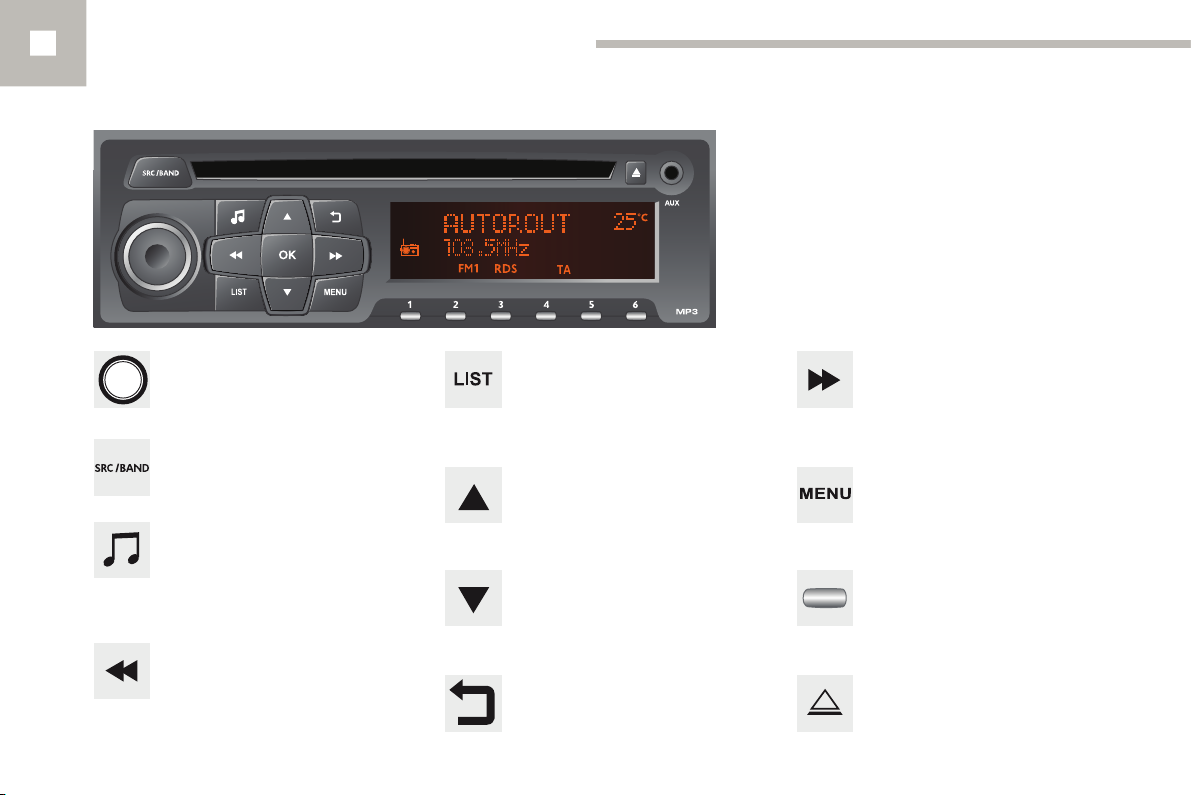
Audio and Telematics
First steps
316
On / Off, volume adjustment.
Selection of source:
FM1, FM2, AM, CD, AUX.
Adjust audio settings:
sound ambience, treble, bass,
loudness, left/right balance,
automatic volume.
Automatic search for a lower/higher
radio frequency.
Select the next CD track.
Navigation in a list.
Press and hold: fast forward or back.
Display the list of stations received,
the CD/MP3 tracks or folders.
Press and hold: update the list of
stations received.
Manual search step by step for a
higher radio frequency.
Select the next MP3 track.
Navigation in a list.
Manual search step by step for a
lower radio frequency.
Select the previous MP3 track.
Navigation in a list.
Abandon the current operation.
Go up one level (menu or folder).
Automatic search step by step for a
higher radio frequency.
Select the next CD track.
Navigation in a list.
Press and hold: fast forward.
Open the main menu.
Select a preset radio station.
Radio, press and hold: preset a radio
station.
Eject CD.
Page 94
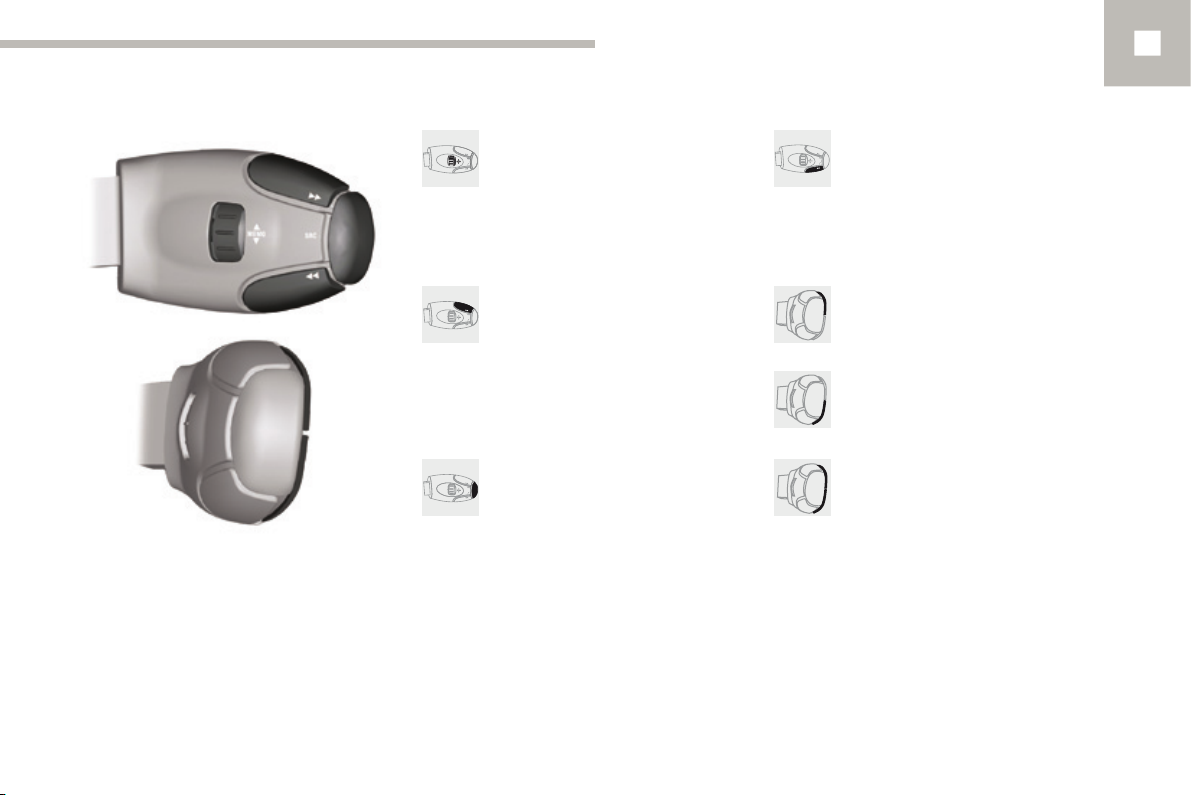
Steering mounted controls
Radio: select the previous / next
preset station.
Select the previous / next item in a
menu.
Audio and Telematics
Radio: automatic search for a lower
frequency.
CD / MP3: select the previous track.
CD: press and hold: fast back.
10
Radio: automatic search for a higher
frequency.
CD / MP3: select the next track.
CD: press and hold: fast forward.
Change audio source.
Confirm a selection.
Volume up.
Volume down.
Mute on: cut the sound by
simultaneously pressing the volume
up and down buttons.
Mute off: press one of the volume
buttons.
317
Page 95
Audio and Telematics
Radio
Presetting a station
Press the SRC/BAND button
repeatedly to select the FM1, FM2 or
AM waveband.
Press and hold a button to preset the
station being listened to. The name
of the station is displayed and an
audible signal confirms that it has
been preset.
The external environment (hills,
buildings, tunnels, basement car
parks) may block reception, including
in RDS mode. This is a normal effect
of the way in which radio waves are
transmitted and does not indicate any
failure of the audio equipment.
Managing the list
Press LIST to display the list of
stations received, in alphabetical
order.
Select the desired radio station by
pressing one of the buttons.
Confirm with OK.
Briefly press one of the buttons to
change to the next or previous letter.
Press and hold on LIST to construct
or update the list of stations; the
sound is interrupted temporarily.
RDS
RDS, if displayed, enables you to continue
listening to the same station by automatic
retuning to alternative frequencies.
However, in certain conditions, coverage
by an RDS station may not be assured
throughout the country as radio stations
do not cover 100 % of the territory. This
explains the loss of reception of the
station during a journey.
Press MENU.
Select "Radio".
Confirm with OK.
Selecting a station
318
Select "RDS".
Press a button to listen to the
corresponding preset station.
Confirm with OK.
Page 96
Audio and Telematics
Receiving TA messages
Select "On" or "Off" to switch RDS
on or off.
Confirm with OK. Confirm with OK.
The TA (Traffic Announcement)
function gives priority to TA alert
messages. To operate, this function
needs good reception of a radio station
transmitting this type of message.
When a traffic report is transmitted, the
current audio source (Radio, CD, ...)
is interrupted automatically to play the
TA message. Normal playback of the
audio source resumes at the end of the
transmission of the message.
Press MENU.
Select "Radio".
Confirm with OK.
Select "On" or "Off" to switch
on or off the reception of traffic
announcements.
10
Select "Traffic TA".
Confirm with OK.
319
Page 97
Audio and Telematics
Media
Display RADIO TEXT
Radio Text is information transmitted
by the radio station on the station or on
the song being played.
Press MENU.
Select "Radio".
Confirm with OK.
Select "INFO TEXT".
Confirm with OK.
Select "On" or "Off" to switch radio
text on or off.
Confirm with OK.
Auxiliary socket (AUX)
Connect the portable device (MP3 player...) to
the auxiliary Jack socket using an audio cable
(not supplied).
Press the SRC/BAND button
repeatedly and select "AUX".
First adjust the volume on your portable device
(to a high level). The adjust the volume on your
audio system. Control is from the portable
device.
CD player
Insert a CD into the player, play starts
automatically.
Insert an MP3 compilation in the CD player.
The audio system searches for audio tracks,
which can take from a few to several dozen
seconds before play starts.
Press the SRC/BAND button
repeatedly to select "CD".
Press one of these buttons to select
a track in the list.
Press one of these buttons to select
the previous or next folder according
to the category chosen.
Press and hold one of these buttons
for fast forward or back.
320
Page 98
Audio and Telematics
Playing a compilation
Press LIST to display the folder
structure for the compilation.
Select a line in the list.
Confirm with "OK".
Jump a page.
Select a folder / Playlist.
Start play of the chosen track.
Go up one level.
Go back to the first level to select the track
classification:
- By Folders: all folders containing audio
files recognised on the peripheral device,
in alphabetical order, ignoring the folder
structure.
- By Playlist: depending on the playlists
saved.
The play modes available are:
- Normal: the tracks are played
in order, depending on the
classification of the selected files.
- Random: the tracks in an album
or folder are played in a random
order.
- Random all: all of the tracks saved
in the media ar played in random
order.
- Repeat: the tracks played are only
those from the current album or
folder.
Play mode
Press MENU.
Select "Media".
Confirm with OK.
Select the desired play mode.
Confirm with OK to save the
changes.
10
321
Page 99
Audio and Telematics
Information and advice
The audio system can only play files with
".mp3", ".wma" or ".wav" extensions.
It is advisable to restrict file names to
20 characters without using special characters
(e.g. " ? ; ù) to avoid any playing or displaying
problems.
In order to be able to play a recorded CDR or
CDRW, when recording it is preferable to select
standards ISO 9660 level 1.2 or Joliet.
If the disc is recorded in another format, it may
not be played correctly.
It is recommended that the same recording
standard is always used for a given disc, with
as low a speed as possible (4x maximum) for
optimum sound quality.
In the particular case of a multi-session CD, the
Joliet standard is recommended.
Playlists accepted are types .m3u and .pls.
The system can recognise up to 5 000 files in
500 folders on 8 levels.
On a given disc, the CD player can read up to
255 MP3 files spread over 8 levels. However,
it is advisable to keep to a limit of two levels
to reduce the access time before the CD is
played.
The folder structure is not observed during
playback.
Audio settings
Press ¯ to display the audio settings
menu.
The settings available are:
- AMBIANCE,
- BASS,
- TREBLE,
- LOUDNESS,
- BALANCE (L/R),
- AUTO VOLUME.
Select the settings to adjust.
Confirm with OK.
Adjust the setting.
Confirm with OK.
322
The AMBIANCE, TREBLE and
BASS settings are different and
independent for each sound source.
Page 100
Screen menu map(s)
MENU
Radio Displaying
1 1
Traffic SCROLLING
2 2
RDS
2
TEXT INFO
2
Media
1
Play
2
Normal
3
Random
3
Random all
3
Repeat
3
TEXT INFO
2
Unit
1
Celsius
2
Fahrenheit
2
Language
1
Audio and Telematics
10
323
 Loading...