

Peugeot 108 2018 Owner's Manual

HANDBOOK
PEUGEOT 108

Access to the Handbook
From the appropriate Store, download the Scan
MyPeugeot APP smartphone application.
Then select:
- the vehicle,
- the print edition appropriate for the date of 1
vehicle.
Download the content of the vehicle's Handbook.
st
registration of your
The Handbook is available on the PEUGEOT website,
in the "MY PEUGEOT" section or at the following
address:
http://public.servicebox.peugeot.com/APddb/
Select:
- the language,
- the vehicle, its body style,
- the print edition of your handbook appropriate for the date of 1
registration of your vehicle.
Access to the Handbook.
This symbol indicates the latest
information available.
st
Welcome
This document presents the information and recommendations required
for you to be able to explore your vehicle in complete safety.
Your vehicle will be fitted with only some of the equipment described in
this document, depending on its trim level, version and the specification
for the country in which it was sold.
The descriptions and illustrations are given as indications only.
Automobiles PEUGEOT reserves the right to modify the technical
specifications, equipment and accessories without having to update this
edition of the guide.
If ownership of your vehicle is transferred, please ensure this Complete
Handbook is passed on to the new owner.
In this document, you will find all of the instructions and recommendations
on use that will allow you to enjoy your vehicle to the fullest. It is
strongly recommended that you familiarise yourself with it as well as the
Maintenance and Warranty Guide which will provide you with information
about warranties, servicing and roadside assistance associated with your
vehicle.
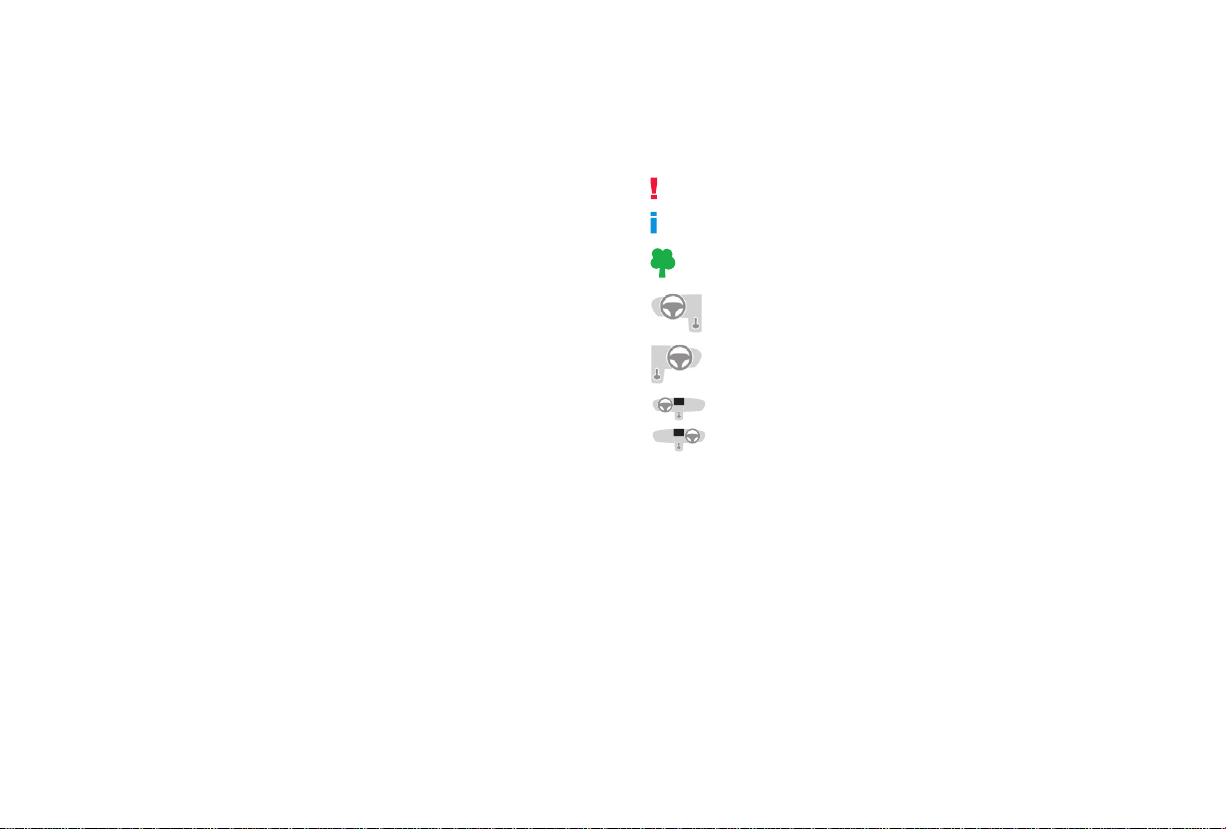
Key
Safety warning
Additional information
Contributes to the protection of the environment
Left-hand drive vehicle
Right-hand drive vehicle
Location of the equipment/button described with a black zone
1
Contents
Instruments and controls 4
.
Eco-driving
Eco-driving 6
Instruments
Instrument panels 8
Displays 9
Warning and indicator lamps 9
Indicators 18
Trip computer 18
Adjusting the time 20
.
AccessOverview
Keys 22
" Keyless Entry and Starting" system 23
Doors 26
Boot 27
Front electric windows 28
Quarter windows 29
Electric fabric roof 29
Advice on care 31
Ease of use and c o mfo rt
Front seats 32
Rear seats 34
Mirrors 35
Steering wheel adjustment 36
Ventilation 36
Heating 37
Manual air conditioning 37
Automatic air conditioning 38
Front demist – defrost 40
Rear screen demist – defrost 41
Courtesy lamp 41
Boot lighting 41
Interior ttings 42
Rear shelf 44
Boot ttings 45
Lighting and visibility
Lighting control stalk 46
Automatic headlamp illumination 48
Direction indicators 48
Headlamp adjustment 49
Wiper control stalk 49
Changing a wiper blade 50
Safety
General safety recommendations 51
Horn 51
Hazard warning lamps 52
ESC system 52
Seat belts 54
Airbags 56
Child seats 59
Deactivating the front passenger airbag 60
ISOFIX mountings and child seats 66
i-Size child seats 70
Child lock 71
2
Contents
.
Driving
Starting/Switching off the engine with the
key 73
Starting/Switching off the engine with the
system Keyless Entry and Starting 73
Manual parking brake 76
5-speed manual gearbox 76
ETG gearbox 76
Gear shift indicator 79
Hill start assist 80
Stop & Start 81
Speed Limit recognition and
recommendation 82
Speed limiter 84
Active City Brake 86
Lane departure warning system 90
Reversing camera 91
Under-ination detection 92
Practical info rm atio n
Fuel tank 96
Compatibility of fuels 97
Snow chains 97
Energy economy mode 98
Fitting roof bars 98
Bonnet 98
Engine compartment 99
Checking levels 99
Checks 102
In the event of a brea kdow n
Temporary puncture repair kit 104
Spare wheel 107
Changing a bulb 111
Changing a fuse 114
12 V battery 121
Towing the vehicle 123
Technical data
Engine specications 125
Engines 125
Dimensions 126
Identication markings 127
Audio equipment and telematics
Radio
7-inch touch screen tablet
Alphabetical index
Access to additional videos
bit.ly/helpPSA
.
.
3

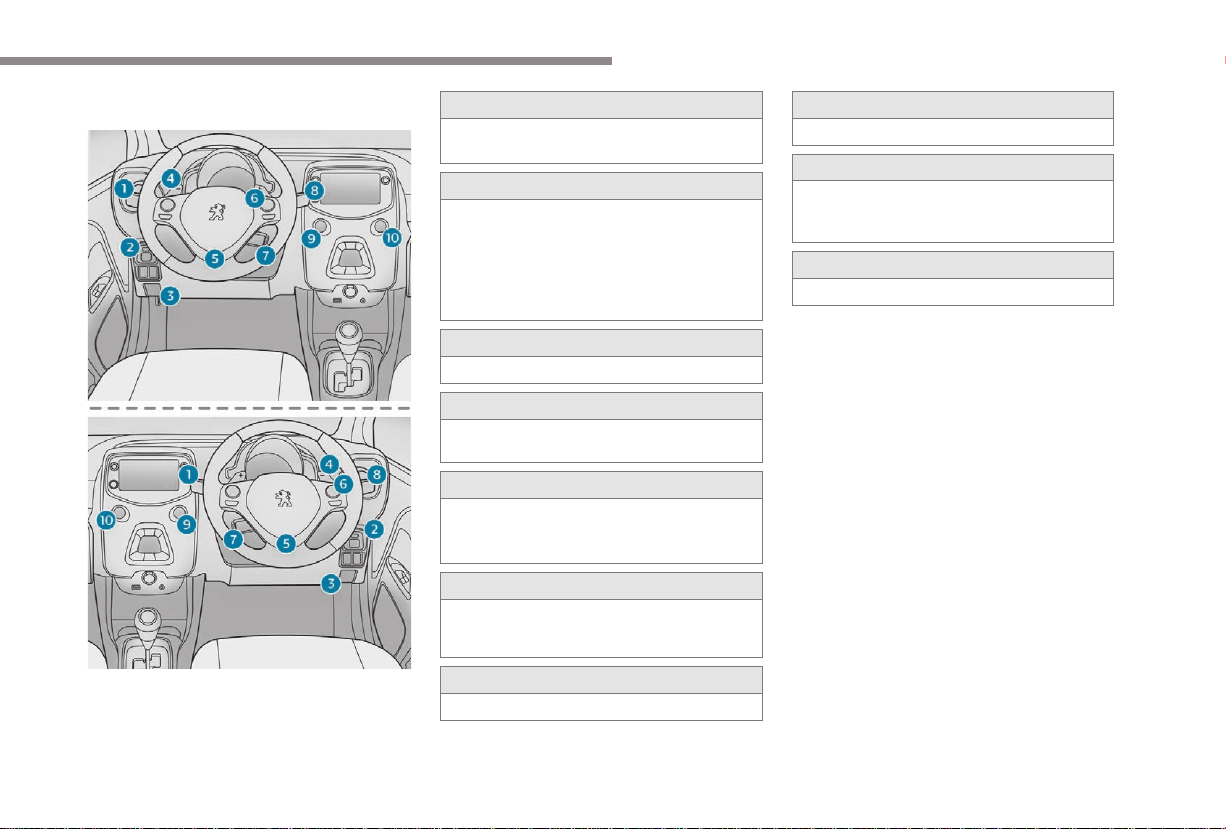
Overview
Instruments and controls
1
Door mirrors
Electric windows
Central locking
2
Bonnet release
3
Dashboard fuses
4
Instrument panel
Rev counter
Central display
Warning and indicator lamps
Indicators
Trip computer
5
Courtesy lamp
Fabric electric roof opening control
Speed Limit recognition and
recommendation
Active City Brake
Rear view mirror
Sun visor
6
Touch screen
Radio
Setting the time
7
Heating, ventilation
Manual air conditioning
Automatic air conditioning
Front demist/defrost
Rear screen demisting/defrosting
8
12 V accessory socket
USB port
Auxiliary Jack socket
9
Manual gearbox
ETG gearbox
Gear efficiency indicator
Hill start assist
10
Manual parking brake
11
Front passenger airbag
12
Side vents
13
Glove box
Deactivating the front passenger airbag
Reinitialisation of the under-inflation
detection system
4
.Overview
Instruments and controls (continued)
1
Lighting controls
Direction indicators
2
Stop & Start
Active City Brake
Electric mirrors adjustment
Headlamp adjustment
Deactivating the DSC/TRC systems.
Front foglamps (accessory)
3
Opening the fuel filler flap
4
ETG gearbox steering mounted control
paddles
5
Steering wheel height adjustment
Horn
Driver front airbag
6
Steering mounted controls
- Touch screen, Radio
- Lane Departure Warning System
7
Speed limiter
8
Wiper control stalk
9
Ignition, starting/switching off (key)
Ignition, starting/switching off ("Keyless
Entry and Starting" system)
10
Hazard warning lamps
5

Eco-driving
Eco-driving
Eco-driving is a range of everyday practices
that allow the motorist to optimise their fuel
consumption and CO
Optimise the use of your
gearbox
With a manual gearbox, move off gently
and change up without waiting. During
acceleration change up early.
With an ETG gearbox, give preference to
automatic mode (Easy) and avoid pressing the
accelerator pedal heavily or suddenly.
The gear shift indicator invites you to engage
the most suitable gear: as soon as the
indication is displayed in the instrument panel,
follow it straight away.
For vehicles fitted with an ETG gearbox, this
indicator only appears in manual mode.
emissions.
2
Drive smoothly
Maintain a safe distance between vehicles,
use engine braking rather than the
brake pedal, and press the accelerator
progressively. These practices contribute
towards a reduction in fuel consumption and
CO
emissions and also help reduce the
2
background traffic noise.
Control the use of your electrical
equipment
Before moving off, if the passenger
compartment is too warm, ventilate it by
opening the windows and air vents before
using the air conditioning.
Above 30 mph (50 km/h), close the windows
and leave the air vents open.
Consider using equipment that can help
keep the temperature in the passenger
compartment down (sunroof and window
blinds…).
Unless it has automatic regulation, switch off
the air conditioning as soon as the desired
temperature has been reached.
Switch off the demisting and defrosting
controls, if not automatic.
Switch off the heated seat as soon as
possible.
Switch off the headlamps and front foglamps
when the ambient light level does not require
their use.
Avoid running the engine before moving off,
particularly in winter; your vehicle will warm up
much faster while driving.
As a passenger, if you avoid connecting your
multimedia devices (film, music, video game,
etc.), you will contribute towards limiting the
consumption of electrical energy, and so of
fuel.
Disconnect your portable devices before
leaving the vehicle.
6

Eco-driving
.
Limit the causes of excess
consumption
Spread loads throughout the vehicle; place
the heaviest items in the bottom of the boot,
as close as possible to the rear seats.
Limit the loads carried in the vehicle and
reduce wind resistance (roof bars, roof rack,
…). Use a roof box in preference.
Remove roof bars and the roof rack after use.
At the end of winter, remove winter tyres and
refit your summer tyres.
Observe the recommendations
on maintenance
Check the tyre pressures regularly, when cold,
referring to the label in the door aperture,
driver's side.
Carry out this check in particular:
- before a long journey,
- at each change of season,
- after a long period out of use.
Do not forget the spare wheel and the tyres on
any trailer or caravan.
Have your vehicle serviced regularly (engine
oil, oil filter, air filter, passenger compartment
filter…) and observe the schedule of
operations recommended in the warranty and
maintenance record.
7
Instruments
Instrument panels
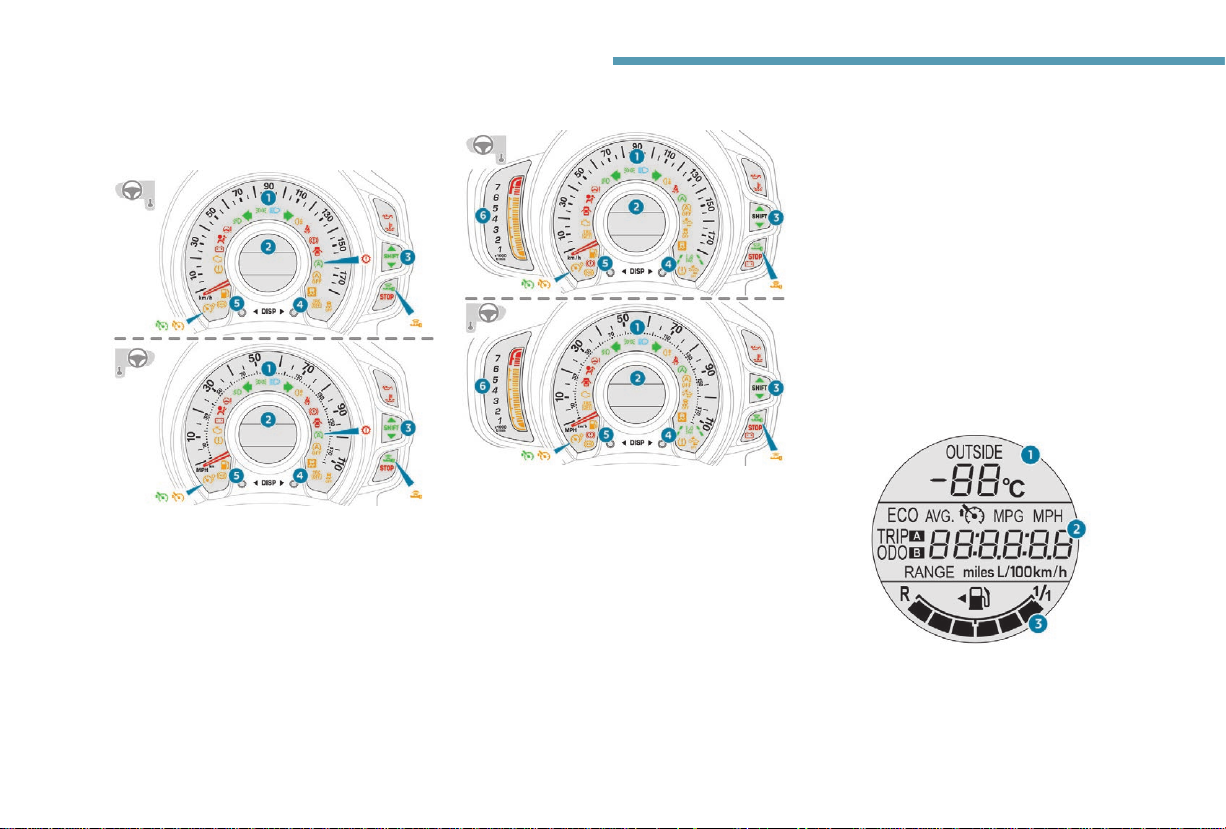
Type 1 instrument panel
1. Speed indicator (mph or km/h).
2. Central screen.
3. Gear shift indicator.
4. Display management button.
Display of information in ascending order.
5. Display management button.
Display of information in descending
order.
Type 2 instrument panel
1. Speed indicator(mph or km/h).
2. Central screen.
3. Gear shift indicator.
4. Display management button.
Display of information in ascending order.
5. Display management button.
Display of information in descending
order.
6. Rev counter.
The engine speed is indicated by the
display of bright orange coloured bars.
Above the maximum engine speed, the
bars light up in red to indicate the need to
shift up a gear.
Central display
The information displayed differs according to
the type of gearbox that your vehicle has.
Central display with
a manual gearbox
1. Outside temperature. This flashes if there
is a risk of ice.
8
Instruments
2. Vehicle information with:
- Total distance and trip recorders.
- Trip computer information.
- Speed limiter information.
3. Fuel level indicator.
Central display with an ETG
gearbox
1. Position of the gear selector and the gear
engaged.
2. Vehicle information with:
- Total distance and trip recorders.
- Trip computer information.
- Speed limiter information.
- Outside temperature. This flashes if
there is a risk of ice.
3. Fuel level indicator.
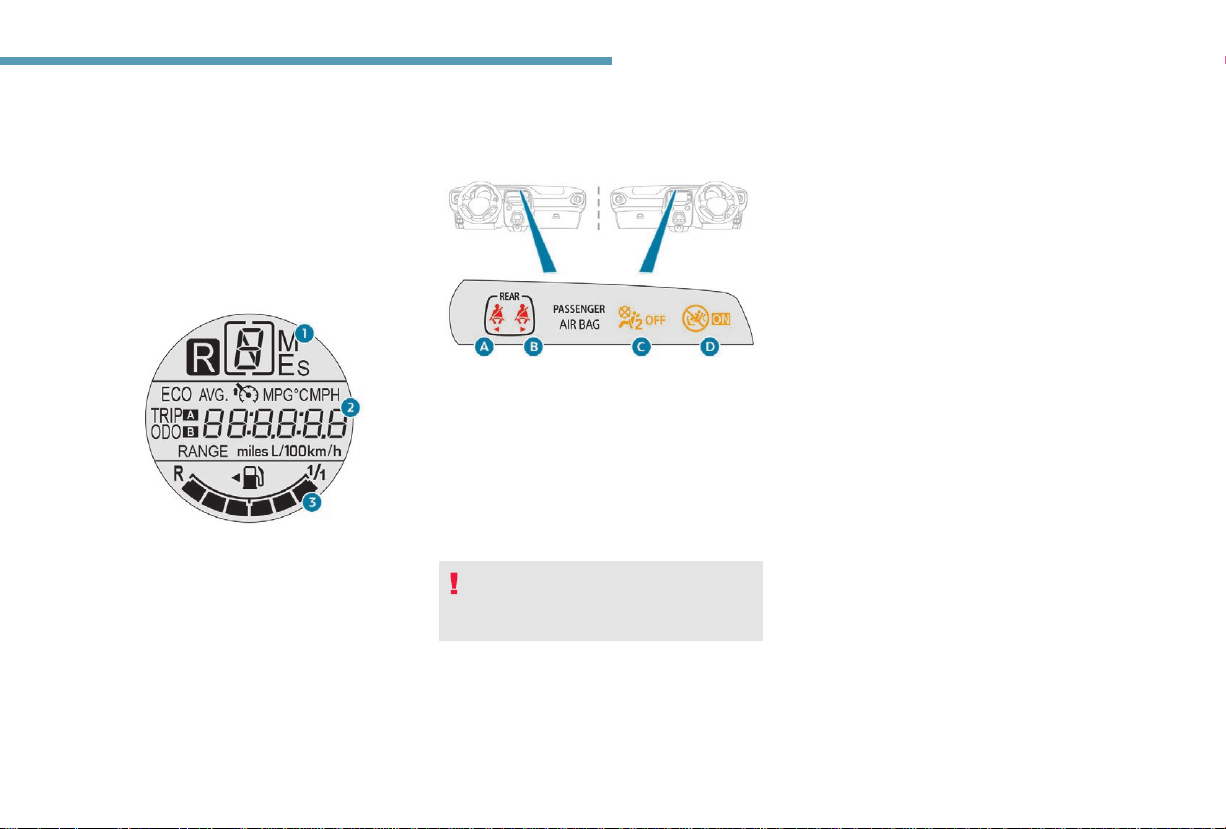
Warning lamps display for
the passenger seat belts and
the front passenger airbag
A. Rear left seat belt warning lamp.
B. Rear right seat belt warning lamp.
C. Front passenger airbag deactivated
warning lamp.
D. Front passenger airbag activated warning
lamp.
Warning lamp C or warning lamp D remains
lit depending on the state of the front
passenger airbag (deactivated or activated).
Warning lamps
Displayed as symbols, visual indicators
which inform the driver of the occurrence
of a malfunction (warning lamps) or of the
operating status of a system (operation or
deactivation indicator lamps). Certain lamps
light up in two ways (fixed or flashing) and/or in
several colours.
Associated warnings
The illumination of a lamp can be accompanied
by an audible signal and/or a message
displayed in a screen.
Relating the type of alert to the operating status
of the vehicle allows you to determine whether
the situation is normal or a fault has occurred:
refer to the description of each lamp for further
information.
When the ignition is switched on
Certain red or orange warning lamps come on
for a few seconds when the ignition is switched
on. These warning lamps should go off as soon
as the engine is started.
For more information on equipment or
a function, refer to the corresponding section.
1
9

Instruments
Persistent warning lamp
When the engine is running or the vehicle is
being driven, the illumination of a red or orange
warning lamp indicates a fault that needs
further investigation, using any associated
message and the description of the warning
lamp in the documentation.
Where a warning lamp remains lit
The references (1) (2) and (3) in the warning
and indicator lamp description indicate whether
you should contact a qualified professional
in addition to the immediate recommended
actions.
(1 ): You must stop as soon as it is safe to
do so and switch off the ignition.
(2): Contact a PEUGEOT dealer or a qualified
workshop.
(3): Go to a PEUGEOT dealer or a qualified
workshop.
10
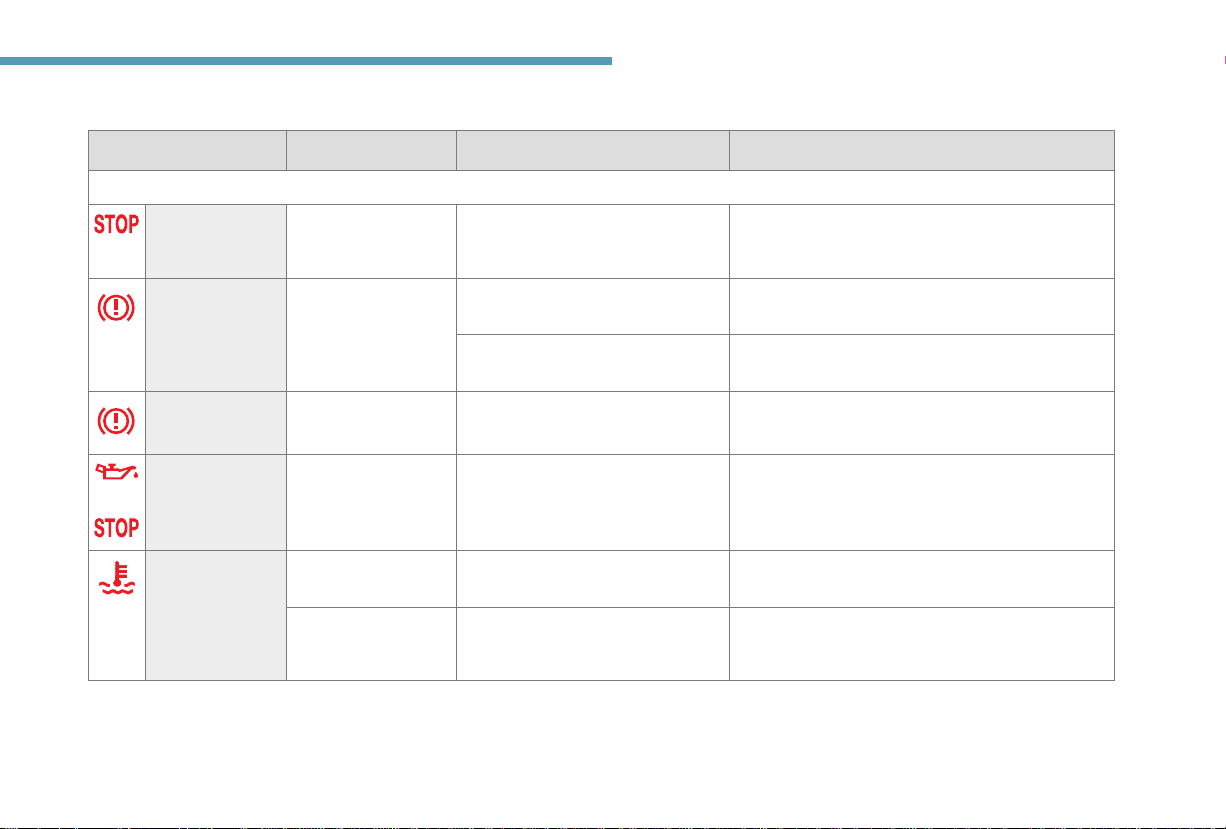
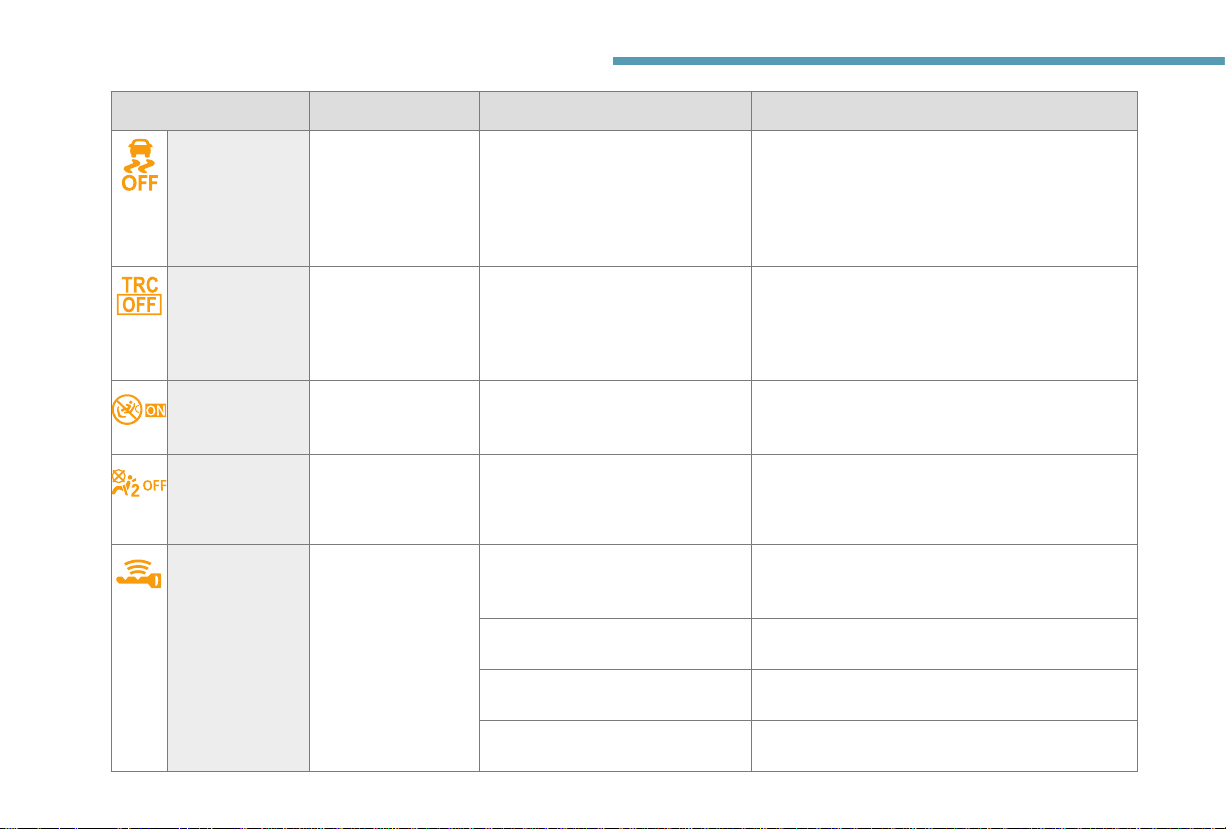
List of warning and indicator lamps
Warning/indicator lamp State Cause Actions/Observations
Red warning/indicator lamps
STOP Flashing, together
with another warning
lamp.
Brakes Fixed. The brake fluid level has dropped
Together with the engine oil pressure
or the engine coolant temperature.
significantly.
The braking system is faulty. Carry out (1) then (2).
Carry out (1) and then (2).
Top up with brake fluid approved by PEUGEOT.
If the problem persists, carry out (3).
Instruments
1
Parking brake Fixed, accompanied
Engine oil
pressure
+
Maximum
engine coolant
temperature
by an audible signal.
Fixed. The engine oil pressure is too low. Carry out (1) and then (2).
Flashing. The temperature of the engine
Fixed. The temperature of the cooling
The parking brake is applied or not
properly released.
coolant is rising.
system is too high.
Drive carefully.
Carry out (1), then wait until the engine has cooled
down before topping up to the required level if
necessary. If the problem persists, carry out (2).
11
Instruments
Warning/indicator lamp State Cause Actions/Observations
Front seat belts Flashing,
accompanied by an
audible signal.
The driver has not fastened or has
unfastened his/her seat belt.
The front passenger has unfastened
his/her seat belt.
12
Airbags Fixed. One of the airbags or seat belt
ETG gearbox Fixed. The ETG gearbox has a fault. Quickly carry out (3).
Clutch Flashing,
Power steering Flashing or fixed,
Battery charge Fixed. The battery charging circuit has
Door(s) open/
Boot open
accompanied by an
audible signal.
accompanied by an
audible signal.
Fixed, accompanied
by an audible signal.
pretensioners is faulty.
The temperature of the clutch is too
high.
The power steering has a fault. Drive carefully at moderate speed, then carry out (3).
a fault (dirty terminals, slack or cut
alternator belt, etc.).
A door or the boot is still open. Close the access concerned.
Carry out (3).
Carry out (1), place the selector of the ETG
gearbox in position N and wait 15 minutes until the
temperature of the clutch has dropped.
Clean and retighten the lugs. If the warning
lamp does not go off when the engine is started,
carry out (2).

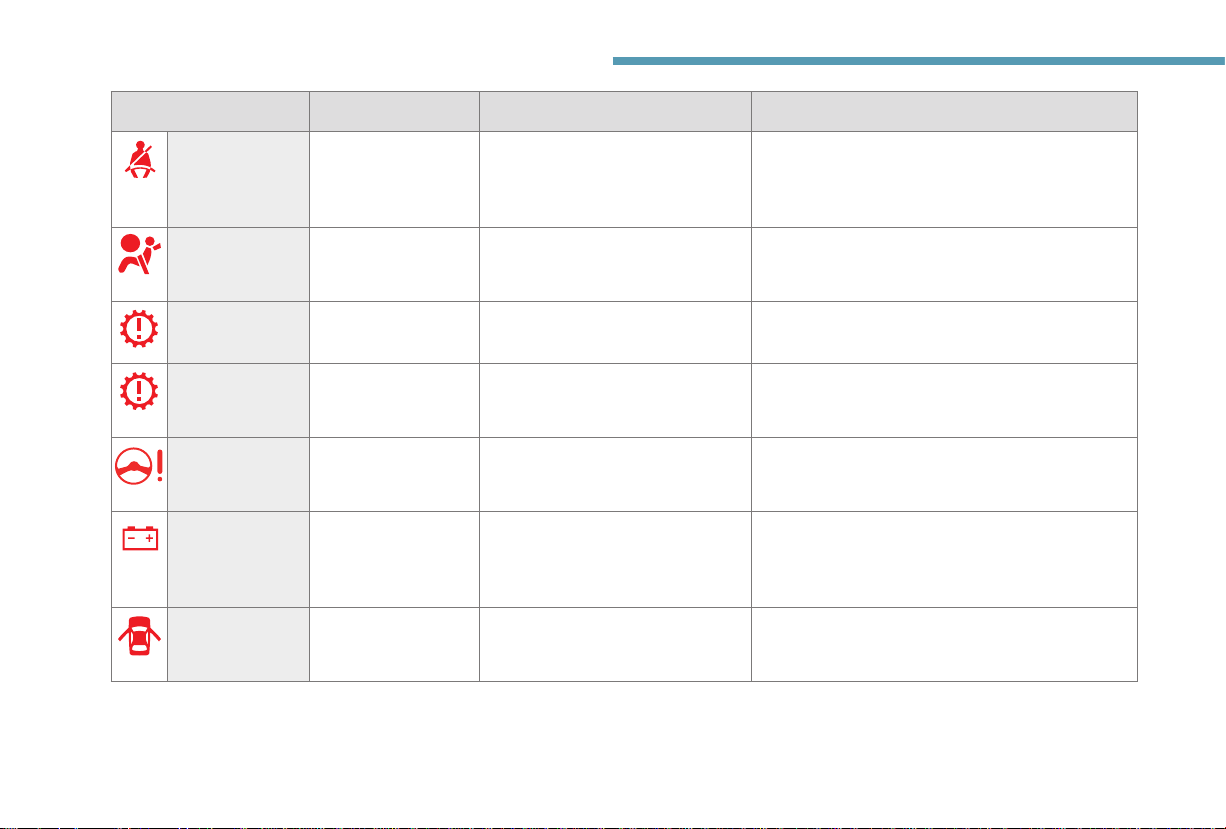
Instruments
Warning/indicator lamp State Cause Actions/Observations
Orange warning/indicator lamps
Anti-lock
braking system
(ABS)
Emission
control system
Engine fault Fixed.
Low fuel level Fixed, accompanied
Under-inflation Fixed. The pressure in one or more tyres is
Dynamic
stability control
(DSC)/Traction
control (TRC)
Fixed. The anti-lock braking system has
Fixed. The emission control system is
by an audible signal.
Flashing. DSC/TRC is activated if there is
Fixed. The DSC/TRC systems are faulty. Carry out (3).
a fault.
faulty.
A major fault that does not have a specific
warning lamp has been detected.
When it first comes on there remains
approximately 5 litres of fuel in the
tank (reserve).
too low.
a loss of grip or trajectory.
The vehicle retains conventional braking.
Drive carefully at moderate speed, then carry out (3).
Quickly carry out (3).
Carry out (2) without fail.
Refuel without delay to avoid running out of fuel.
Never drive until completely empty, this could
damage the emissions and injection systems.
Check the pressure of the tyres as soon as possible.
Reinitialise the detection system after adjusting the
pressure.
1
13
Instruments
Warning/indicator lamp State Cause Actions/Observations
Dynamic
stability control
(DSC)
Fixed. With the vehicle stopped, the
button has been pressed for more
than 3 seconds.
Traction control (TRC) and
dynamic stability control (DSC) are
deactivated.
Press the button to activate the systems.
The DSC system is activated automatically when the
vehicle is started.
14
Traction control
(TRC)
Front passenger
airbag (ON)
Front passenger
airbag(OFF)
Keyless Entry
and Starting
System
Fixed. The button has been pressed briefly.
Fixed. The front passenger airbag is
Fixed. The front passenger airbag is
Flashing,
accompanied by an
audible signal.
The traction control (TRC) is
deactivated.
activated.
The control is in the "ON" position.
deactivated.
The control is in the "OFF" position.
The battery of the electronic key is
defective.
You are leaving the vehicle without
having activated the "OFF" mode.
The electronic key is not recognised. Check that you have the electronic key on your
The Keyless Entry and Starting
system has a fault.
Press the button to activate the system.
The TRC system is activated automatically when the
vehicle is started.
If the system is deactivated, it is reactivated automatically
once a speed of around 30 mph (50 km/h) is reached.
In this case, do NOT install a "rearward facing"
child seat on the front passenger seat – Risk of
serious injury!
You can install a "rearward facing" child seat,
unless there is a fault with the airbags (airbag
warning lamp on).
Change the battery.
With the electronic key on your person, press the
START/STOP button to go into "OFF" mode.
person.
Carry out (3).
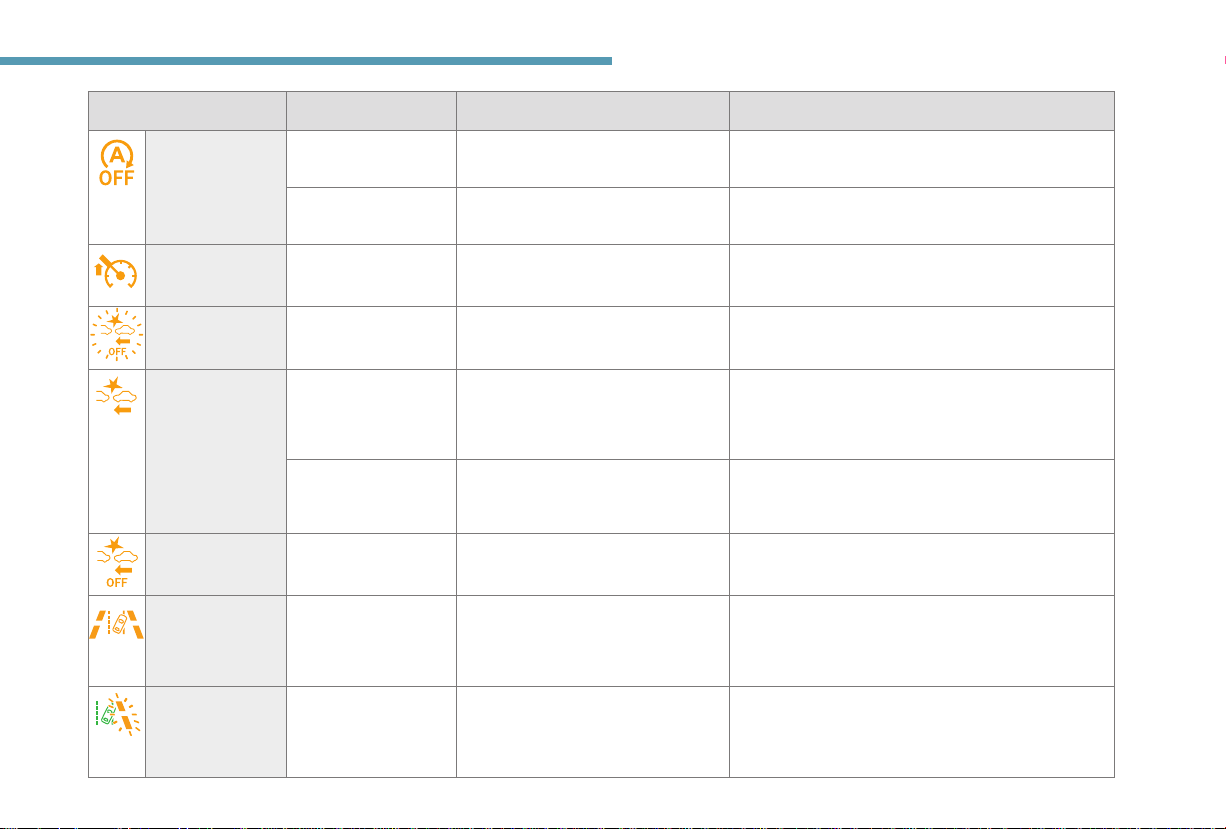
Instruments
Warning/indicator lamp State Cause Actions/Observations
Stop & Start Fixed. The Stop & Start system has been
Flashing. The Stop & Start system has a fault. Carry out (3).
Speed limiter Fixed. The speed limiter is faulty. Carry out (3).
Active City
Brake
Active City
Brake
Active City
Brake
Lane Departure
Warning System
Flashing. The Active City Brake system has
Fixed. The button has been pressed.
Flashing,
accompanied by an
audible signal.
Fixed. The Active City Brake system has
Fixed. The lane departure warning system
deactivated.
a fault.
The configuration of the system has
been changed.
The Active City Brake system is in
action.
been deactivated.
is faulty.
Reactivate the system by pressing the button again.
Carry out (3).
The Active City Brake system is activated.
The system optimises the braking to avoid a collision.
Reactivate the system by pressing the button again.
Carry out (3).
1
Lane Departure
Warning System
Flashing (orange),
accompanied by an
audible signal.
A line is being crossed, right side. Turn the steering wheel in the opposite direction to
return to the correct trajectory.
15
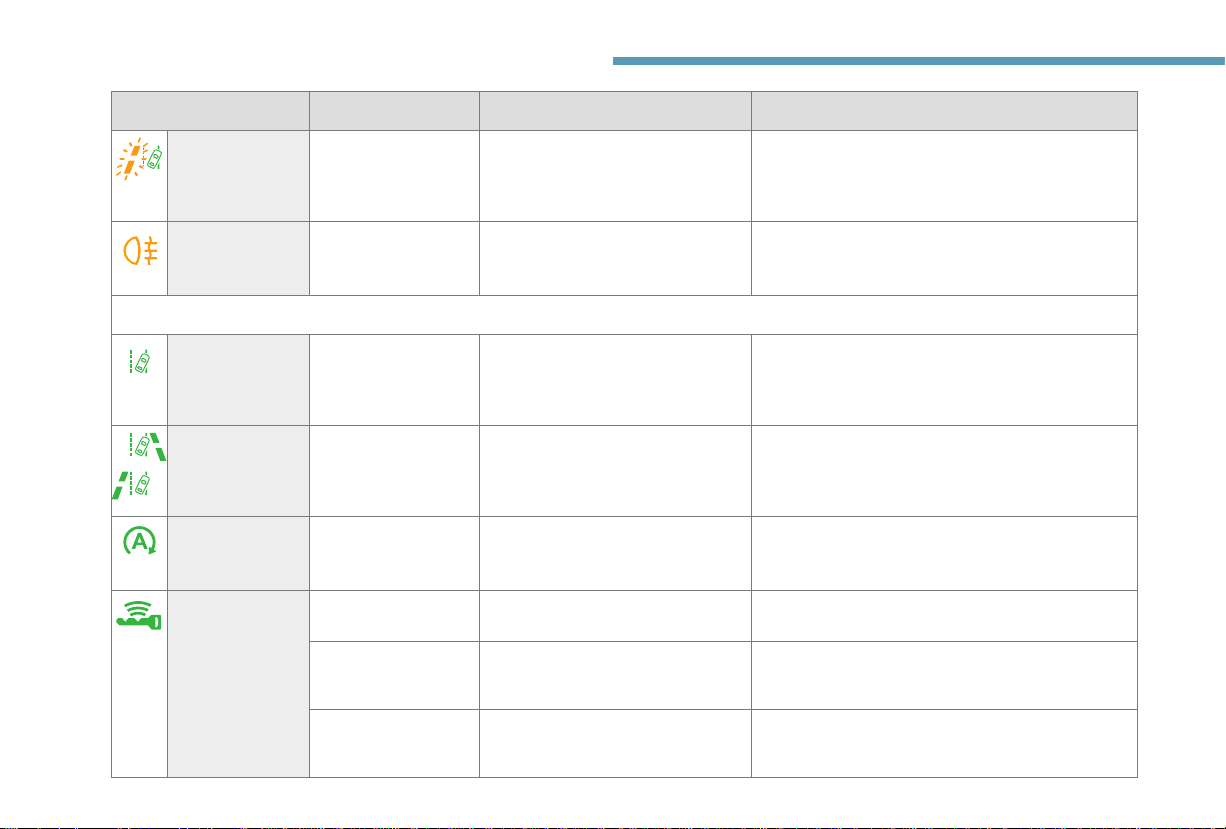
Instruments
Warning/indicator lamp State Cause Actions/Observations
Lane Departure
Warning System
Rear foglamp Fixed. The lamp is on.
Flashing (orange),
accompanied by an
audible signal.
A lane is being crossed, left side. Turn the steering wheel in the opposite direction to
return to the correct trajectory.
Green warning/indicator lamps
Lane Departure
Warning System
Fixed. The button has been pressed. The lane departure warning system is activated.
16
Lane Departure
Warning System
Stop & Start Fixed.
Keyless Entry
and Starting
System
Fixed. The button has been pressed. The system is operational: it has detected the lines on
Fixed. The conditions for starting the
Flashing slowly. The vehicle is in "ACC" mode.
Flashing rapidly. The steering column is not unlocked. Go into "OFF" mode, then into "ON" mode and gently
When the vehicle stops (red lights, traffic
jams, etc.) the Stop & Start system puts
the engine into STOP mode.
engine are met.
The accessories (audio system, 12 V
socket, …) can be used.
the right and/or left sides.
The lamp goes off and the engine restarts
automatically in START mode, as soon as you want
to move off.
turn the steering wheel to unlock the steering column.
Instruments
Warning/indicator lamp State Cause Actions/Observations
Speed limiter Fixed. The speed limiter is active.
Gear efficiency
indicator
Direction
indicators
Sidelamps or
dipped beam
headlamps
Front foglamps Fixed. The front foglamps are lit. Attention: if the front foglamps have been installed
Fixed. The next higher/lower gear may be
Direction indicators
with audible signal.
Fixed. The sidelamps or dipped beam
engaged.
The direction indicators are on.
headlamps are lit.
as aftermarket accessories, the control switch may
be different.
Blue warning/indicator lamps
Main beam
headlamps
Fixed. The lamps are on.
1
17
Instruments
18
Indicators
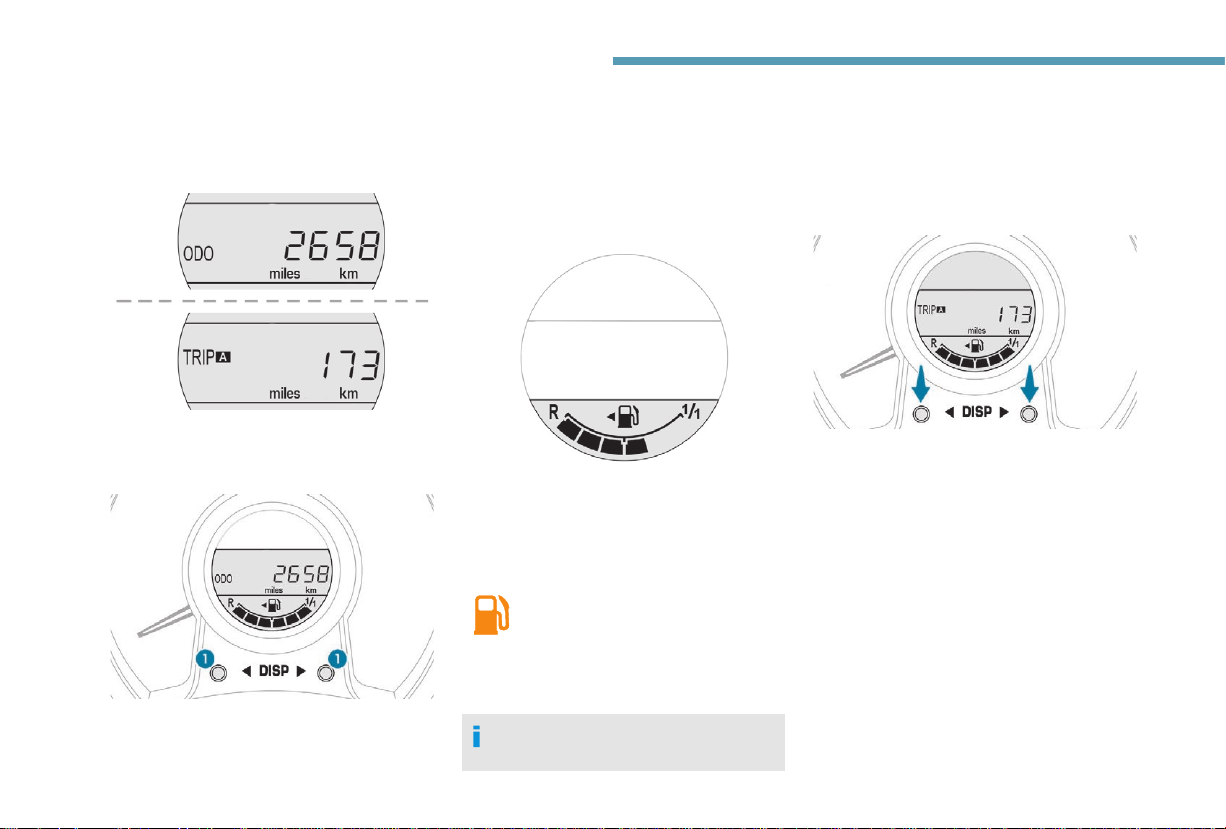
Total/trip distance recorder
When the ignition is switched on, the distance
recorder that was selected when the engine
was last switched off is displayed.
Pressing button 1 allows you to alternate the
distance display:
- total with ODO (odometer) displayed,
- trip recorder with TRIP displayed.
To reset the trip recorder to zero, while it is
displayed, press one of the two buttons 1.
Fuel level indicator
Shows the quantity of fuel available:
- 1/1 and six bars, the tank is full.
- R and one bar, the fuel in the tank is at the
reserve level.
Low fuel level
When the fuel in the tank reaches
a low level, this warning lamp
comes on in the instrument panel,
accompanied by an audible warning.
You have about 5 litres of fuel left.
You must add at least 5 litres of fuel after
running out of fuel.
Trip computer
System that gives you information on the
current journey (range, fuel consumption…).
Data displays
F Press the steering mounted control to
display the various trip computer tabs in
succession.
- Total distance travelled.
- Trip A.
- Trip B.
- The partial Stop & Start time counter*.
- The total Stop & Start* time counter.
- The outside temperature*.
- Current fuel consumption.
- Average fuel consumption.
- Range.
- Average speed.
- Lighting dimmer.
* depending on version.
Instruments
Outside temperature
In some situations, it may happen that the
outside temperature is displayed after a delay
or not at all, including:
- when stationary or moving at a slow speed
(less than about 16 mph (25 km/h),
- in the case of a change that is too high
(entering or leaving a garage, tunnel, etc.),
- during very short journeys (less than about
2 minutes).
Lighting dimmer control
When driving at night, this function allows
certain instrument panel displays to be
switched off so as to reduce visual fatigue for
the driver.
It operates only while the sidelamps are on.
F As soon as the "Lighting dimmer" menu is
displayed, keep one of the DISP buttons
pressed to access the settings.
F Then press one of the two DISP buttons
successively to increase or decrease the
brightness. The display flashes to show you
the brightness chosen.
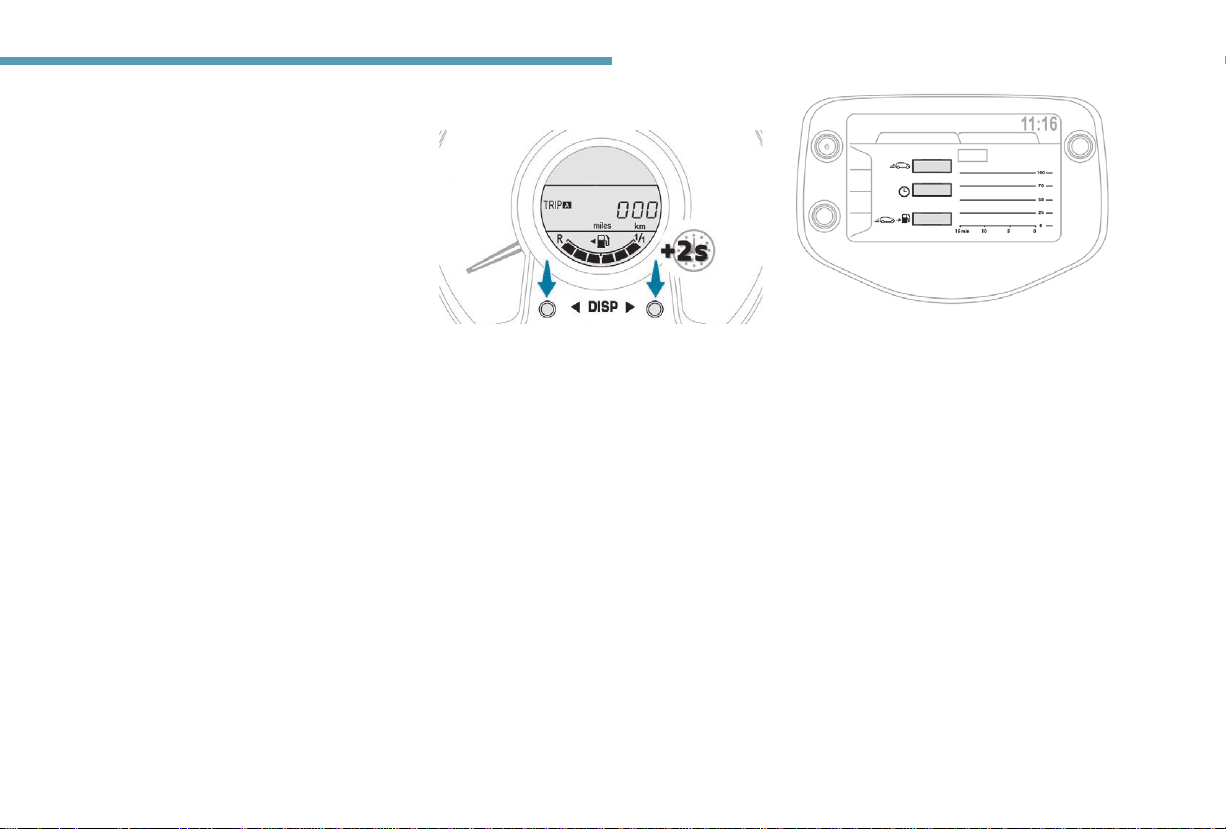
Trip reset
F When the desired trip is displayed, press
one of the two DISP buttons for more than
two seconds.
Trips A and B are independent but their use is
identical.
For example, trip A can be used for daily
figures and trip B for monthly figures.
With the touch screen
If your vehicle is equipped with the touch
screen, your can refer to information about the
journey in progress.
1
Starting from the Menu page of the touch
screen:
F Select the Vehicle information tab.
The "Journey information" tab displays the
following information:
- "Average speed",
- "Elapsed time",
- "Range",
- the current fuel consumption presented in
graphical form,
- the "History" tab which allows display
of fuel consumption figures for the latest
journeys made.
The "Delete" button allows the consumption
figures to be reset to zero on the the touch
screen tablet and in the instrument panel.
The "Update" button is used to display the best
result from the "History" tab.
19

Instruments
Trip computer, some
definitions
Range
(miles or km)
The distance which can still be travelled with
the fuel remaining in the tank (at the average
fuel consumption seen over the last few miles
(kilometres) travelled).
This value may fluctuate if a change
of driving style or terrain results in
a significant change in the current fuel
consumption.
When the level of fuel is low, the message "Lo
FUEL" is displayed.
While the level of the fuel is low, the range
cannot be recalculated.
Current fuel consumption
(mpg or l/100 km or km/l)
Calculated over the last few seconds.
Average fuel consumption
(mpg or l/100 km or km/l)
Calculated since the last time the trip recorder
was reset to zero.
Average speed
(mph or km/h)
Calculated since the last time the trip recorder
was reset to zero.
Stop & Start time counter
(minutes/seconds or hours/minutes)
If your vehicle is fitted with the Stop & Start, a
time counter adds up the time spent in STOP
mode during a journey.
It resets to zero every time the ignition is
switched on.
Adjusting the time
Radio
The time is adjusted using the "MENU" dial:
- press the dial to access the menus and to
confirm a selection,
- turn the dial to select a function, an item in
a list.
At any time you can return to the previous step
using the "Back" button.
F Press the dial to access the menus.
F Turn the dial to select "CLOCK".
F Press the dial to confirm. The hours digits
flash.
F Turn the dial to adjust the hours.
F Press the dial to confirm. The minutes digits
flash.
F Turn the dial to adjust the minutes.
F Press the dial to confirm and leave the
menu.
20
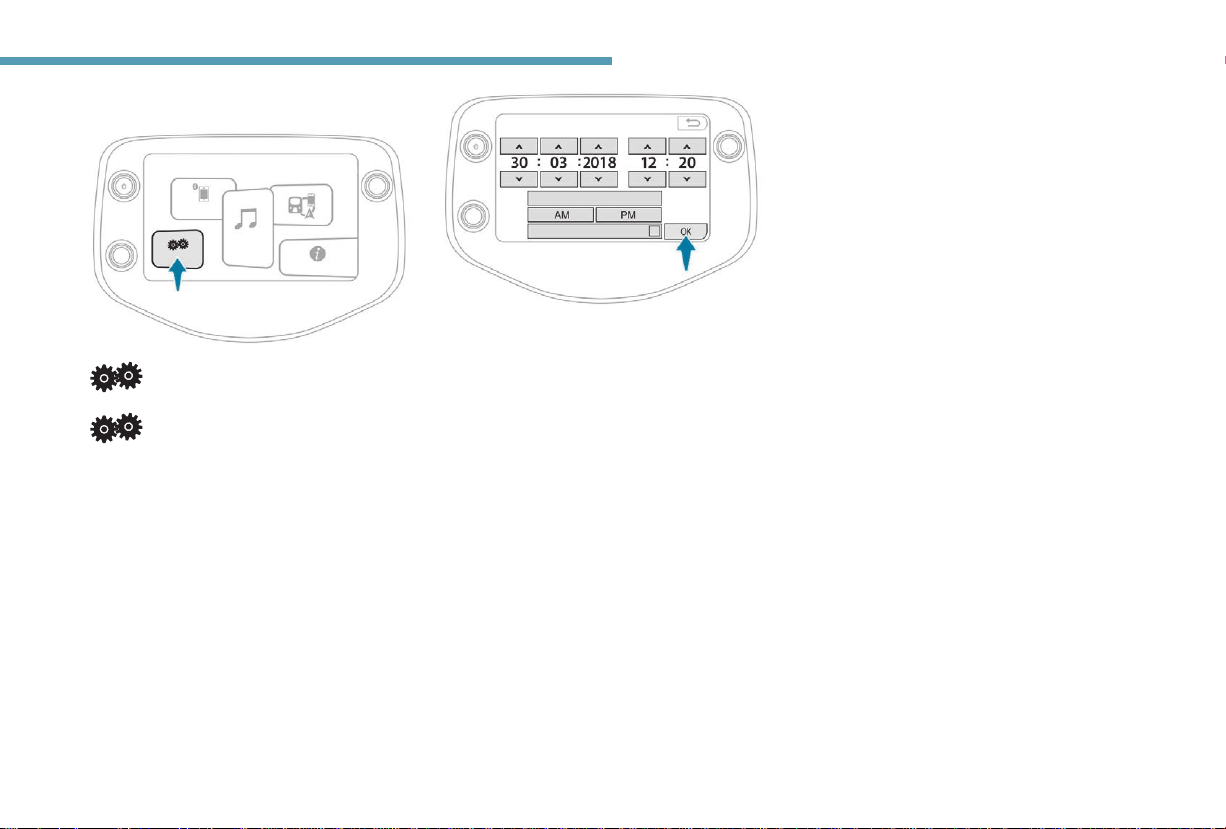
Touch screen
Press "Configuration".
Press "General".
Select "Date/Time".
Instruments
1
Adjust the day, month, year, hours and minutes
using the arrows shown on the screen.
Choose the format for the hours.
Press "OK" to confirm and quit the menu.
21
Access
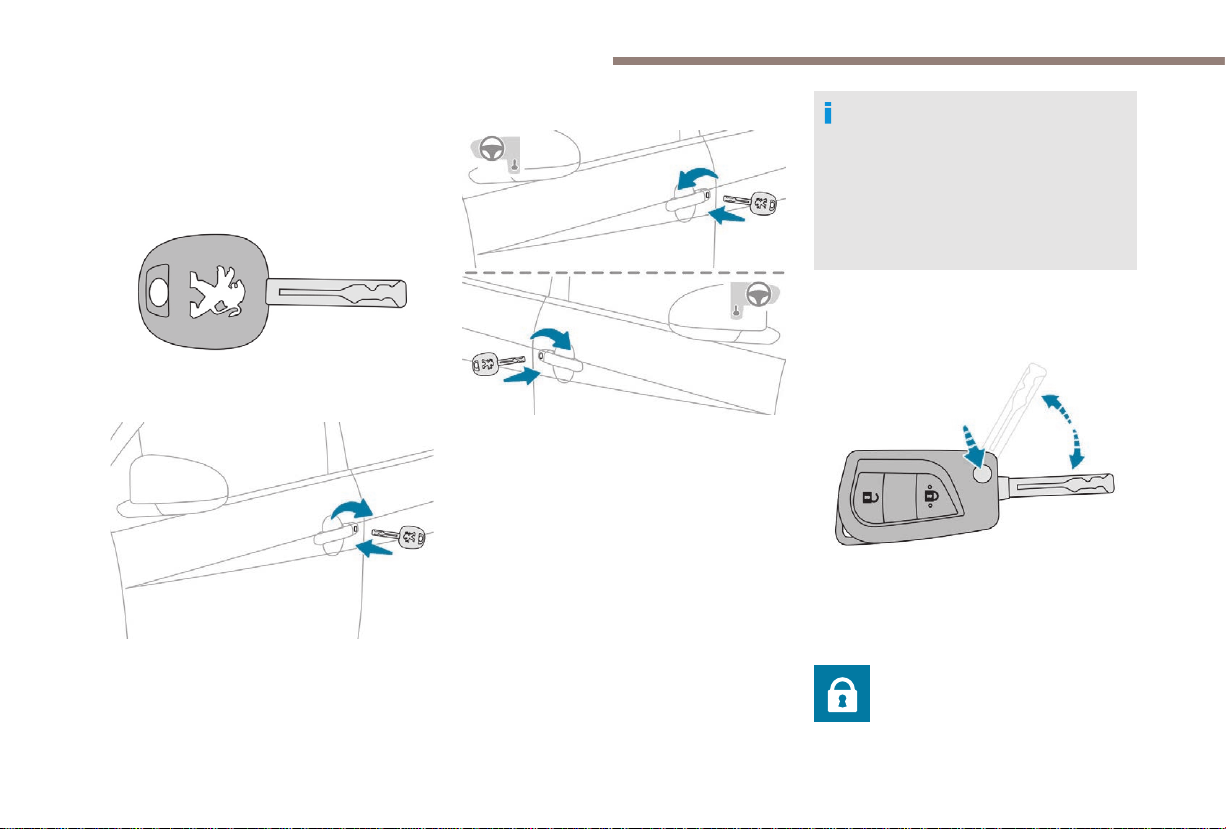
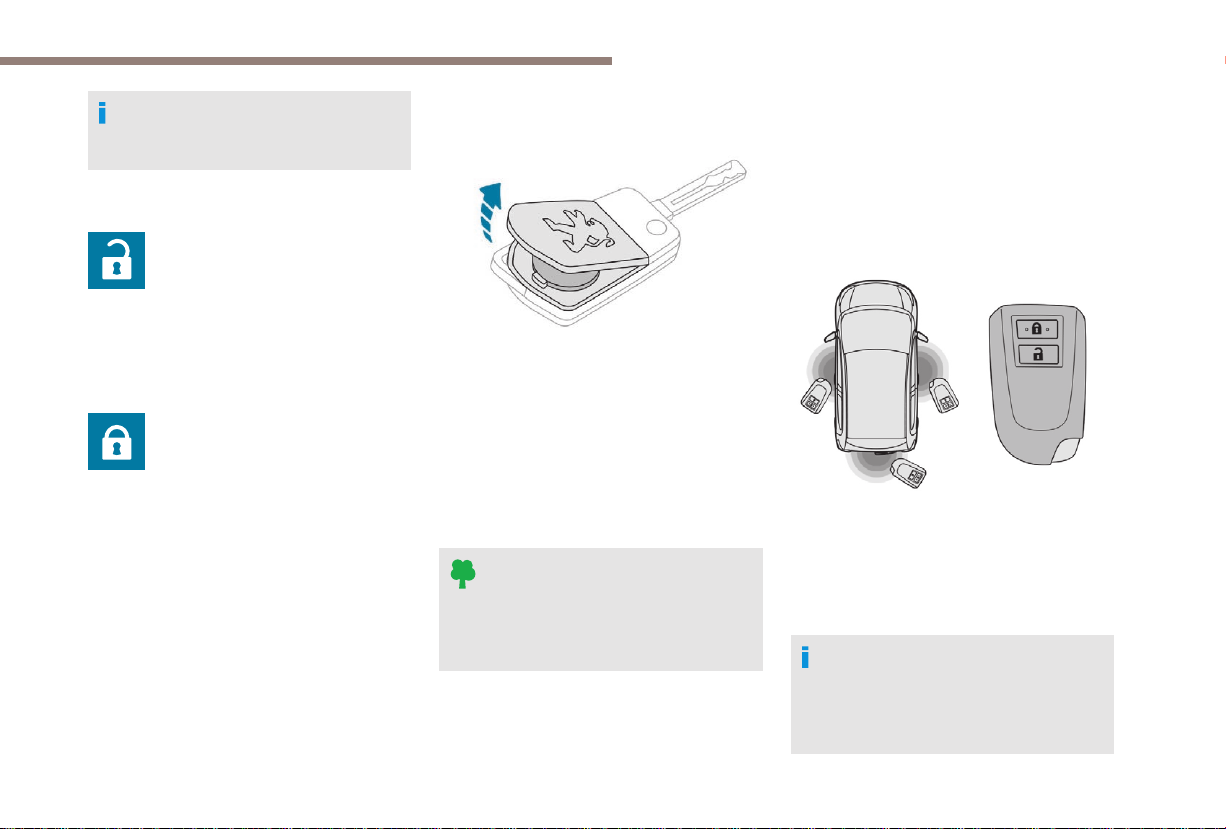
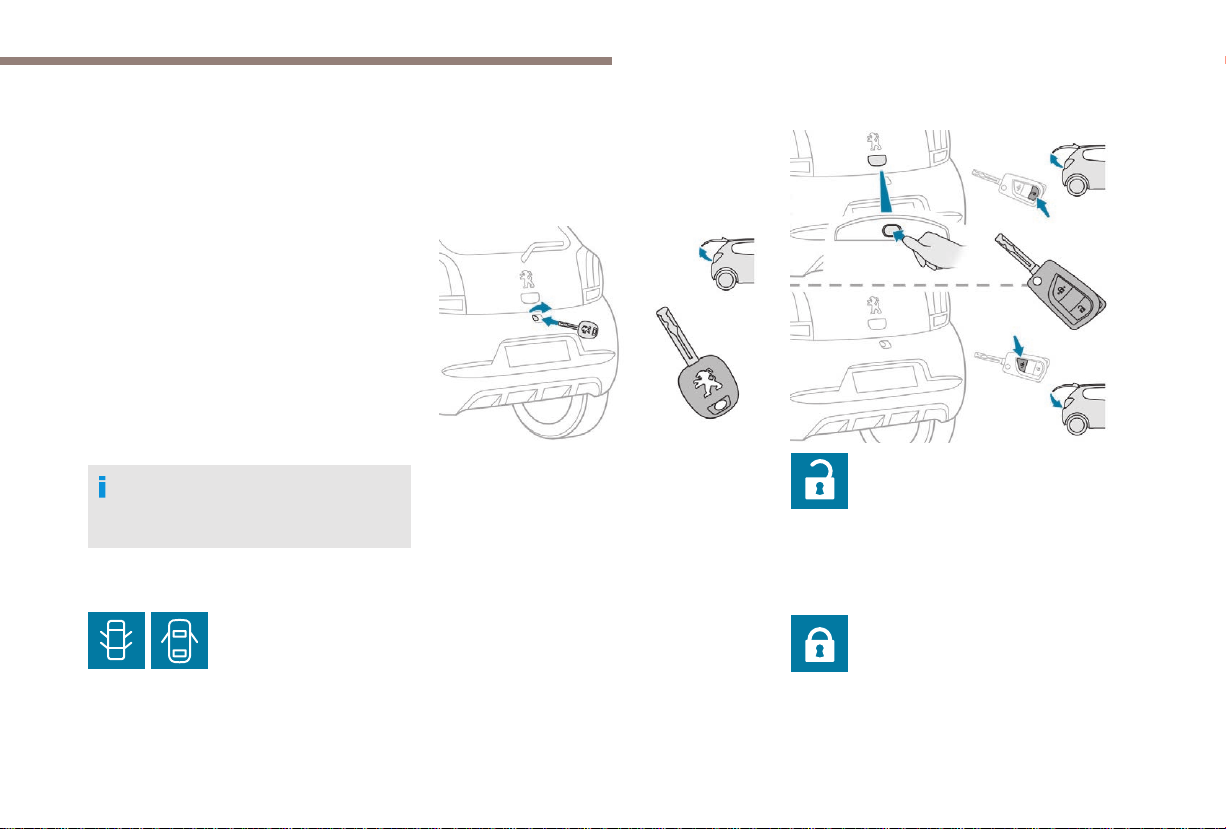
Keys
These allow operation of the front door locks,
the boot lock, the steering lock, the control
for deactivating the passenger airbag and the
ignition.
Locking
- Insert the key into the lock of one of the
front doors and turn it towards the rear to
lock the door concerned.
- Insert the key into the boot lock and turn it
to the right to lock it.
Unlocking
- Insert the key into the lock of one of the
front doors and turn it towards the front of
the vehicle to unlock the door concerned.
- Insert the key into the boot lock and turn it
to the left to unlock it.
Remote control
This allows the vehicle to be locked/unlocked
and located from a distance.
The high frequency remote control is
a sensitive system; do not operate it while
it is in your pocket as there is a possibility
that it may unlock the vehicle, without you
being aware of it.
Do not repeatedly press the buttons of
your remote control when out of range of
your vehicle, you may stop it from working.
Unfolding/Folding the key
F Press this button to unfold or fold the key.
Locking
F Press this button to lock the
vehicle.
The direction indicators flash once.
22
Access
If you find that a door is not properly
closed after locking, close it again and
then relock the vehicle.
Unlocking
F Press this button to unlock the
vehicle.
The direction indicators flash twice.
Locating your vehicle
F Press this button to locate your
locked vehicle in a car park.
This is signalled by the lighting up of the
direction indicators for a few seconds.
Changing the remote
control batter y
Battery type: CR 2016/3 volts.
F Unclip the cover by inserting a small
screwdriver in the slot.
F Remove the cover.
F Remove the dead battery from its
compartment.
F Fit the new battery into its compartment
observing the original fitting direction.
F Clip the cover into place.
Do not throw remote control batteries
away, they contain metals which are
harmful to the environment.
Take them to a PEUGEOT dealer or to
any other approved collection point.
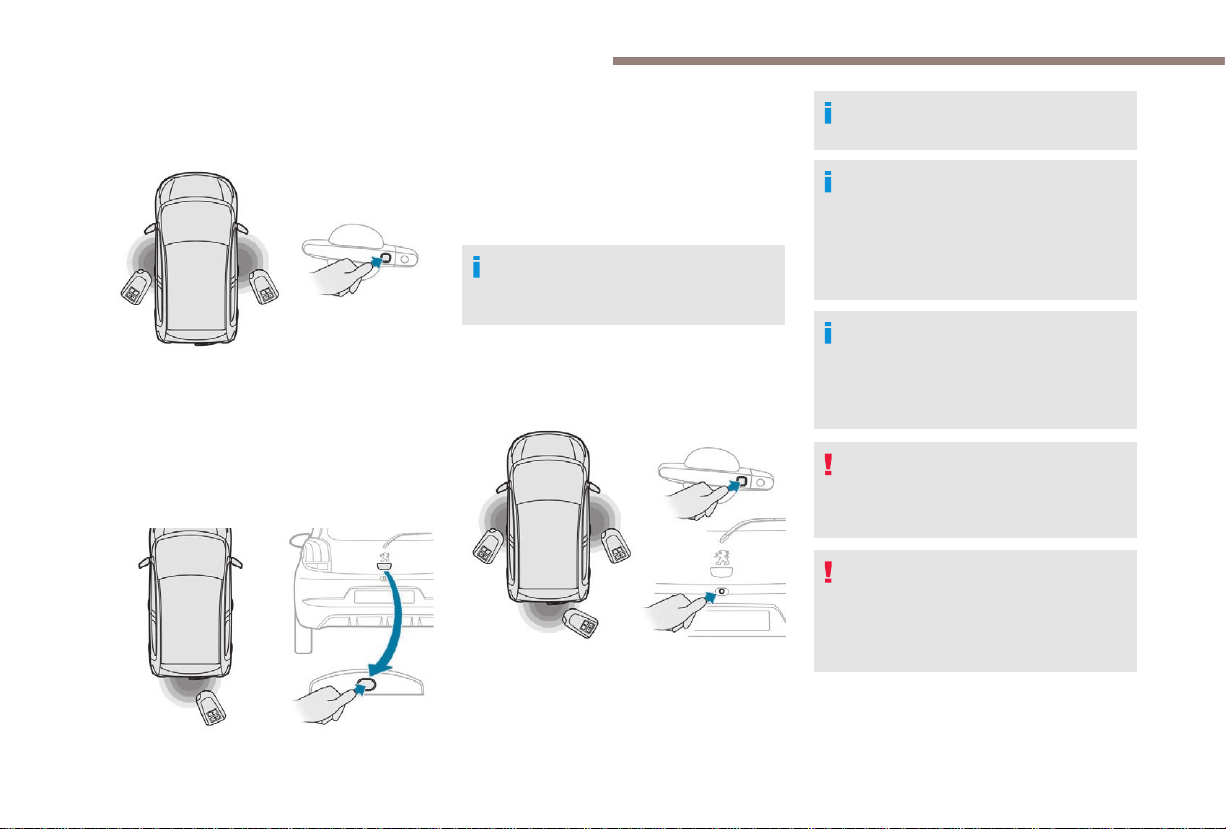
" Keyless Entry and
Starting" system
System that allows the unlocking, locking
and starting of the vehicle while keeping the
electronic key on your person.
Electronic key
This electronic key can also be used as
a remote control.
It includes a built-in emergency key.
For more information on the remote control,
refer to the corresponding section.
For security, the detection zones in which
the electronic key is operational have
a radius of about 70 cm around each
opening button.
2
23
Access
Opening the vehicle
Unlocking via the doors
F With the electronic key on your person in
one of the recognition zones, press the
button on one of the front door handles to
unlock the vehicle.
F Then pull the handle to open the door.
Unlocking via the boot
F With the electronic key on your person and
in the recognition zone at the rear, press the
button on the handle of the boot to unlock
the vehicle and partially open the boot lid.
F Then lift the boot lid to fully open it.
Unlocking of the vehicle is confirmed by
rapid flashing of the direction indicators
(twice).
Closing the vehicle
Locking
F With the key in one of the recognition zones,
press the button on one of the front door
handles or press the button on the boot sill.
The direction indicators flash once.
If one of the doors or the boot is still open
or if the electronic key for the Keyless
Entry and Starting system has been left
inside the vehicle, you are alerted by an
audible signal and central locking does not
take place.
If the vehicle is unlocked and there is no
action at the doors or boot, the vehicle will
automatically lock itself again after about
30 seconds.
Never expose the electronic key to
extreme temperatures (less than -20°C
or more than +60°C), that would cause
malfunctions.
For safety and theft protection reasons,
do not leave your electronic key in the
vehicle, even when you are close to it.
It is recommended that you keep it with
you.
24
Access
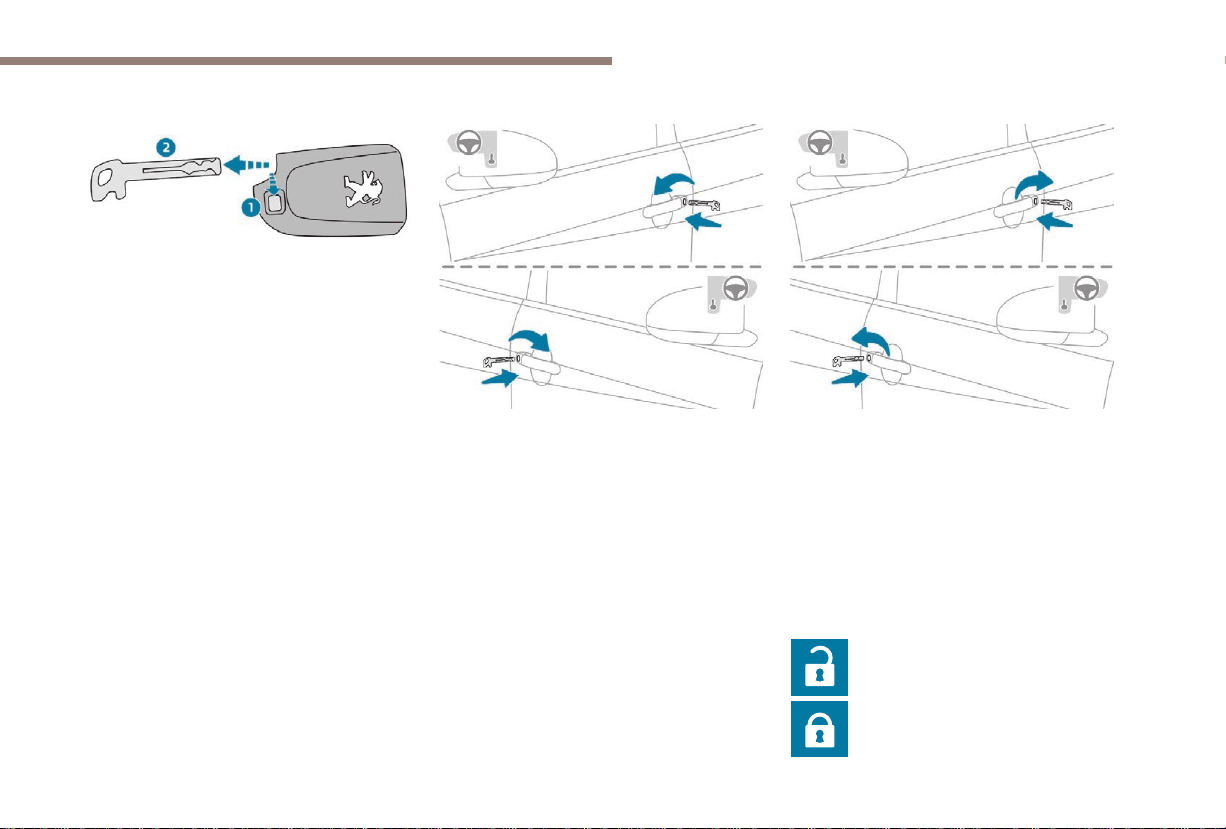
Emergency procedure
The integral key is used to lock or unlock the
vehicle when the electronic key cannot operate
and if there is a malfunction of the " Keyless
Entry and Starting" system:
- key battery flat, vehicle battery discharged
or disconnected, etc.
- vehicle located in an area with strong
electromagnetic signals.
F Hold down catch 1 to extract the integral
key 2.
Unlocking
F Insert the integral key into the driver's side
lock and turn it towards the front of the
vehicle to unlock it.
Locking
2
F Insert the integral key into the driver's side
lock and turn it towards the rear of the
vehicle to lock it.
Conserving the batte r y of
the electronic key
In order to conserve the battery, it is possible
to prevent the electronic key from operating (no
reception of radio waves).
F Press twice on the open padlock
while keeping the closed padlock
pressed.
25
Access
Check that the light on the electronic key
flashes 4 times.
While this function is activated, the " Keyless
Entry and Starting" system is inoperative.
To reactivate the electronic key, press one of
the buttons (open or closed padlock).
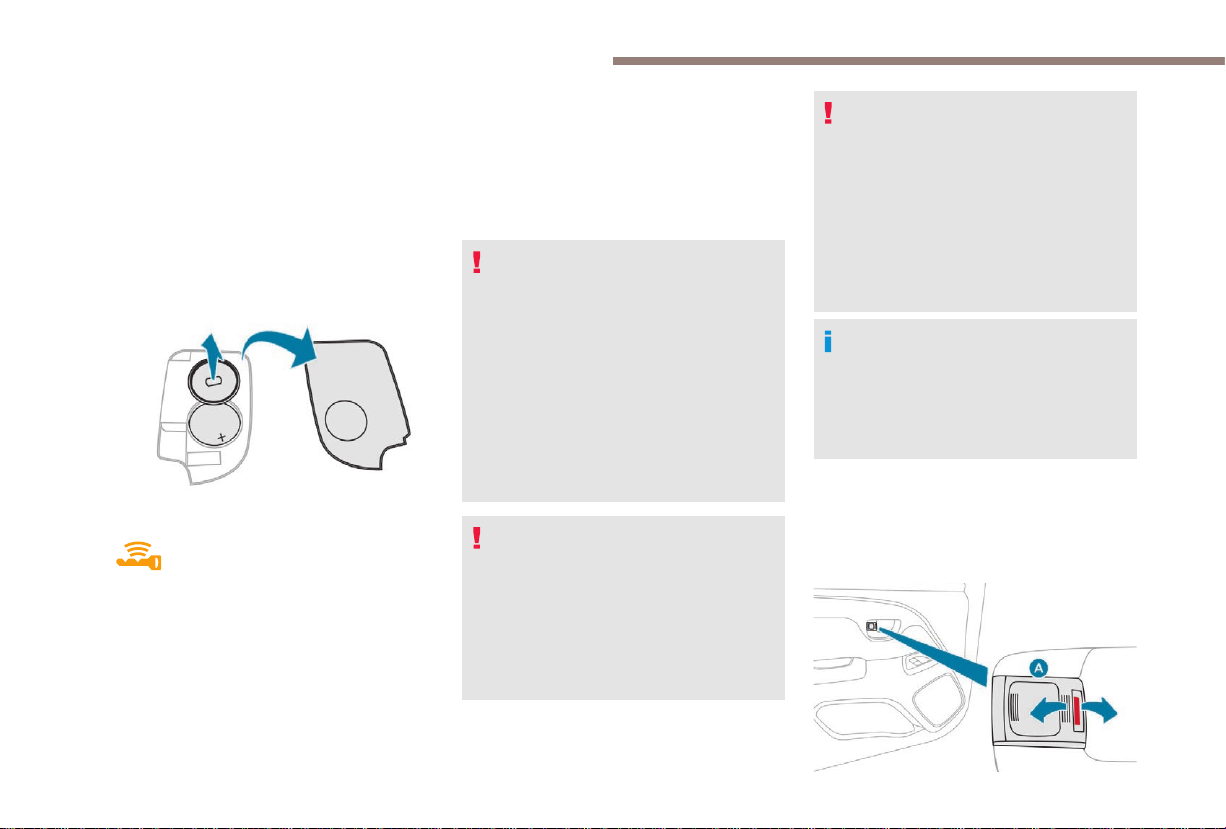
Changing the battery of th e
electronic key
Battery type: CR2032/3 volts.
If the battery of the electronic key is
defective, this warning lamp comes
on in the instrument panel.
F Unclip the cover using a small screwdriver
at the cut-out.
F Remove the casing.
F Remove the protective cover from the
battery by pulling it upwards.
F Remove the dead battery from its
compartment.
F Fit the new battery into its compartment
observing the original fitting direction.
F Replace the protective cover.
F Clip the cover onto the casing.
Advice
Remote control/electronic key
These high frequency remote controls are
sensitive systems; do not handle them
while in your pocket as there is a risk that
the vehicle may unlock without you being
aware of it.
Do not repeatedly press the buttons of
your remote control or your electronic key
when out of range and out of sight of your
vehicle. You may stop it from working.
The remote control would then have to be
reinitialised.
Locking the vehicle
Driving with the doors locked could make
it difficult for the emergency services to
enter the vehicle in an emergency.
As a safety precaution (with children on
board), remove the key from the ignition or
take the electronic key when you leave the
vehicle, even for a short time.
Lost keys, remote control, electronic
key
Visit a PEUGEOT dealer with the vehicle's
registration certificate, your personal
identification documents and if possible,
the label bearing the key code.
The PEUGEOT dealer will be able to look
up the key code and the transponder code
required to order a new key.
Purchasing a second-hand vehicle
Have the pairing of all of the keys in your
possession checked by a PEUGEOT
dealer, to ensure that only your keys can
be used to open and start the vehicle.
Doors
Locking/unlocking from
inside
26
Access
To lock/unlock a door, press/pull button A.
Vehicles without central locking
An action at button A locks/unlocks only the
door concerned.
Vehicles with central locking
An action at button A on the driver's side locks/
unlocks all the doors and the boot.
An action at button A on the passenger's side
locks/unlocks only the door concerned.
An action at the handle always allows the
door to be opened from the inside, even if
it is locked.
Door open
Locking/unlocking and
opening the boot
With the key
- Insert the key in the lock and turn it to the
right to unlock and partially open the boot
lid. The vehicle remains locked.
- Lift the boot lid by the outside handle to
open it.
As soon as you shut the boot lid again, it
relocks itself immediately.
With the remote control
2
F Press this button to unlock the
vehicle and the boot.
F Press the opening button to partially open
the boot lid.
F Lift the boot lid by the outside handle to
open it.
F Press this button to lock the boot
and the vehicle.
If a door is open, the courtesy lamp remains lit
if the button is in this position.
27
Access
28
With the " Keyless Entry and
Starting" system
F With the electronic key on your person,
press the button for opening the boot, to
unlock and partially open it.
The vehicle is also unlocked.
F Lift the boot lid by the outside handle to
open it.
If the vehicle had previously been unlocked
using the front doors, it is not necessary to
have the electronic key on your person to use
the button for opening the boot.
F With the electronic key on your person,
press the button on the boot sill to lock it.
or
Lock the vehicle using the front doors.
When closing the boot, be careful not to
slam the boot lid: guide it as it closes and
release it towards the end of its travel.
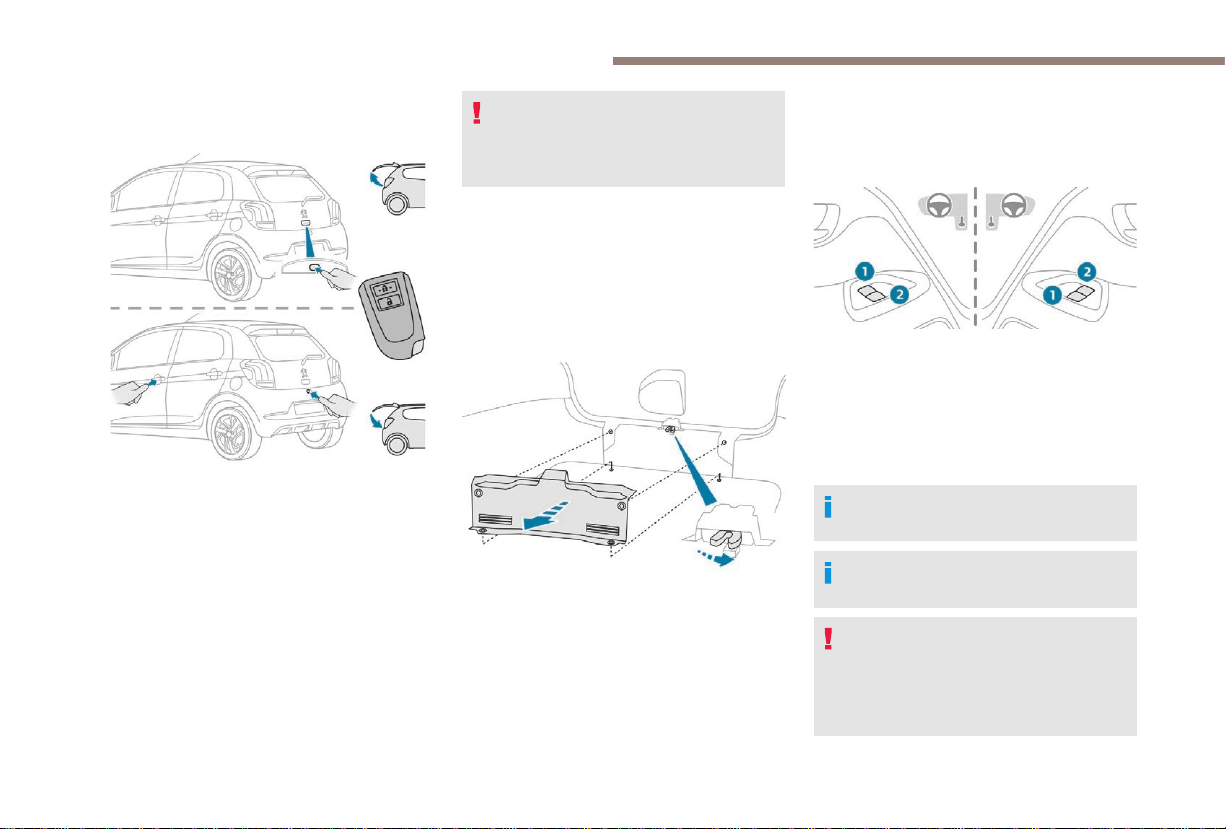
Emergency control
Measures for mechanically unlocking the boot
in the event of a battery or central locking fault.
Unlocking
F Fold the rear seat backrest to gain access
to the lock from inside the boot.
F Using a screwdriver protected by a cloth,
remove the 4 retaining clips then the boot
trim.
F Move the catch to the right to unlock the
boot.
Front electric windows
(Depending on version).
1. Left-hand front.
2. Right-hand front.
After switching on the ignition, press one of the
controls to open or pull it to close. The window
stops as soon as the control is released.
The driver has access to the controls for
both front windows.
The window controls are inoperative with
the ignition switched off.
The operation of closing the windows
could cause serious injuries.
Make sure that nothing obstructs the
windows from being raised, and pay
special attention to children.
 Loading...