

Page 1
Handbook
Page 2
On-line handbook
Select one of the following means of access to view your
handbook on-line...
Find your handbook on the PeugeOt website, under
"MyPeugeOt".
Referring to the handbook on-line also gives you access to the latest information available, easily identified by the bookmark, associated with
this symbol:
Scan this code for direct access to your handbook.
If the "MyPeugeOt" function is not available on the PeugeOt
public website for your country, you can find your handbook at the
following address:
http://public.servicebox.peugeot.com/ddb/
Select:
the language,
the vehicle, its body style,
the print edition of your handbook appropriate for the date of registration of
your vehicle.
Page 3
Welcome
Thank you for choosing a 108, a symbol of
condence, passion and inspiration
this handbook has been designed to help to make the most of your 108
in all circumstances and in complete safety.
take the time to read through it so as to familiarise yourself with
your vehicle.
this handbook covers all of the variations in equipment available across
the whole 108 range.
Your vehicle will be fitted with only some of the equipment described in
this document, depending on its trim level, version and the specification
for the country in which it was sold.
the descriptions and illustrations are given as indications only.
Automobiles PeugeOt reserves the right to modify the technical
characteristics, equipment and accessories without having to update
this edition of the handbook.
this document forms an integral part of your vehicle. Remember to
pass it on to the new owner in the event of the sale of the vehicle.
Key
Warning:
this symbol marks warnings which it is essential to observe for your
own safety, for the safety of others or to avoid any risk of damaging
your vehicle.
Protection of the environment:
this symbol accompanies advice relating to protection of
the environment.
For any work on your vehicle, use a qualified workshop that has the
technical information, competence and equipment required, which a
PeugeOt dealer is able to provide.
We draw your attention to the following points:
- the fitting of electrical equipment or accessories not listed by
PeugeOt may cause faults and failures with the electrical
system of your vehicle. Contact a PeugeOt dealer for
information on the range of recommended accessories.
- Any modification or adaptation not intended or authorised by
Automobiles PeugeOt or carried out without meeting the
technical requirements defined by the manufacturer would lead
to the suspension of the new vehicle warranty.
Information:
this symbol draws your attention to additional information for better
use of your vehicle.
Page reference:
this symbol invites you to refer to the pages which provide details of
the function.
Page 4

Contents
Overview
eco-driving
.
.
Monitoring
Instrument panels 10
Display screens 12
Indicator and warning lamps 14
Indicators 25
trip computer 26
Setting the time 28
Access
Keys 30
Keyless entry and Starting system 33
Doors 37
Boot 38
Front electric windows 40
Rear quarter windows 40
electric fabric roof 41
Front seats 45
Comfort
Front seats 45
Rear seats 47
Mirrors 49
Steering wheel adjustment 50
Ventilation 51
Heating 53
Manual air conditioning 54
Automatic air conditioning 56
Front demist - defrost 59
Rear screen demist - defrost 60
Interior ttings 61
Fittings
Interior ttings 61
Rear parcel shelf 65
Boot ttings 66
Driving
Driving recommendations 68
Starting - switching off the engine with the key 69
Starting - switching off the engine with the
Keyless entry and Starting system 70
Manual parking brake 74
5-speed manual gearbox 74
etg electronic gearbox 75
gear shift indicator 79
Hill start assist 80
Stop & Start 81
Speed limiter 84
Reversing camera 90
Lane departure warning system 91
exterior lighting control stalk 93
Visibility
exterior lighting control stalk 93
Automatic illumination of headlamps 96
Headlamp adjustment 98
Courtesy lamp 98
Boot lamp 98
Wiper control stalk 99
Direction indicators 101
Page 5

Contents
Safety
Direction indicators 101
Horn 101
Hazard warning lamps 102
Under-ination detection 102
eSC system 105
Active City Brake 108
Seat belts 113
Airbags 116
Child seats 121
Child safety
Child seats 121
Deactivating the passenger's front airbag 124
ISOFIX child seats 130
Child lock 135
Fuel tank 136
Practical info rmat ion technical data
Fuel tank 136
temporary puncture repair kit 138
Changing a wheel 143
Snow chains 148
Changing a bulb 149
Changing a fuse 154
12 V battery 163
electrical energy economy mode 166
Changing a wiper blade 166
towing the vehicle 167
Fitting roof bars 168
Accessories 169
Checks
Bonnet 172
Petrol engines 173
Checking levels 174
Checks 177
engines 179
Weights 180
Dimensions 181
Identication markings 182
7-inch touch screen 183
Audio equipment and telematics
7-inch touch screen 183
Radio 223
Visual search
.
Alphabetical index
.
Page 6
Overview
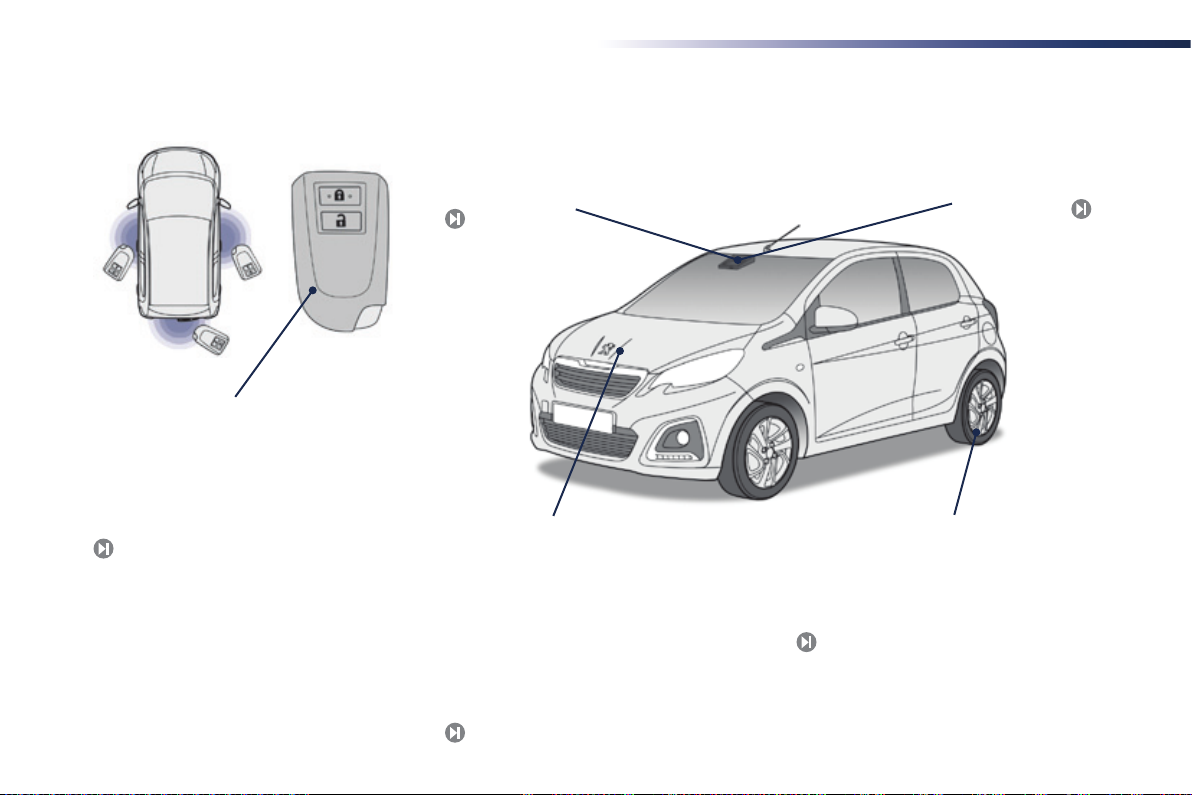
exterior
Electronic key: Keyless
Entry and Starting
this system allows the locking, unlocking and
starting the vehicle by keeping the key on your
person and in the recognition zone.
33
Lane departure warning
system
this system gives a warning if you inadvertently
cross a longitudinal road marking.
91
Stop & Start
this system puts the engine temporarily
into standby during stops in the traffic (red
lights, traffic jams, etc...). the engine restarts
automatically as soon as you want to move
off. the Stop & Start system reduces fuel
consumption, exhaust emissions and the noise
level when stationary.
Active City Brake
the aim of this system is to avoid a frontal
collision or reduce the speed of impact if the
driver fails to react or reacts too late.
108
Under-inflation detection
this system automatically checks the tyre
pressures when driving and alerts you in the
event of an under-inflated tyre.
102
81
4
Page 7
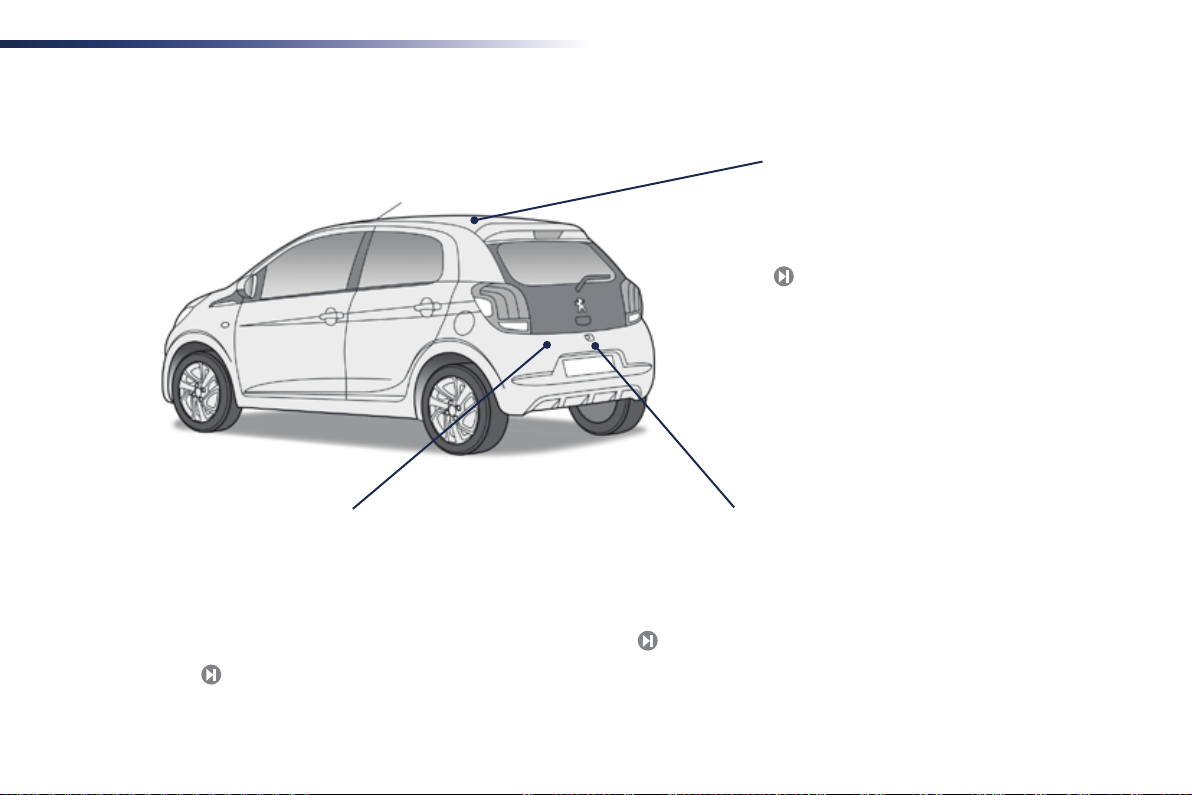
exterior
Overview
Electric fabric roof
this roof can be changed from closed to open
configuration and then closed again with just a
simple action on the control switch.
41
.
Temporary puncture
repair kit
this kit is a complete system, consisting of a
compressor and a sealant cartridge, for the
temporary repair of a tyre.
138
Reversing camera
this system operates automatically when
engaging reverse gear and provides an image
in the touch screen.
90
5
Page 8
Overview
6
Page 9

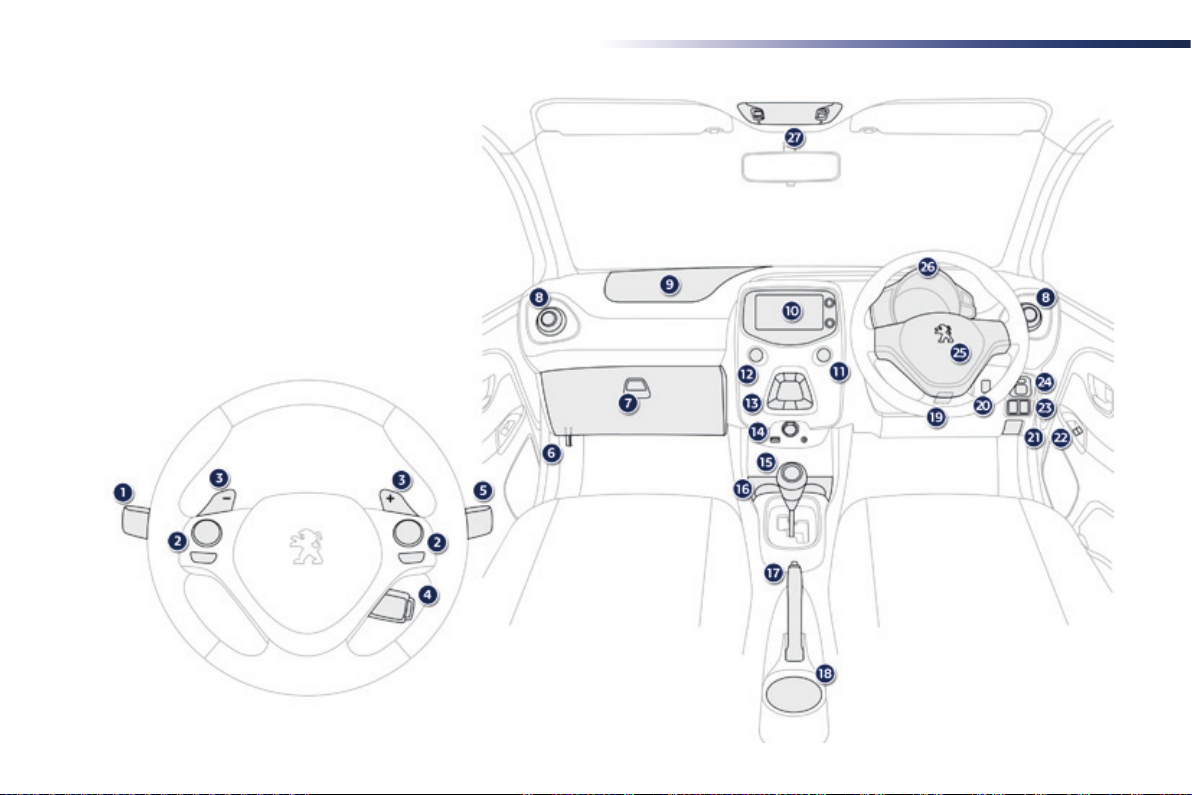
Instruments and controls
1. Lighting and direction indicator stalk
2. Steering mounted controls for the audio
system or the touch screen
Activation / Deactivation of the lane
departure warning system
3. Steering mounted controls for the etg
electronic gearbox
4. Speed limiter control
5. Screen wash/wipe control stalk
6. Bonnet release
7. glove box/
Deactivation of the passenger's front
airbag/
Reinitialisation of the tyre under-inflation
detection system
8. Side air vents
9. Passenger's front airbag
10. Radio, touch screen or open storage
11. StARt/StOP button
12. Hazard warning lamps
13. Manual or automatic air conditioning
controls
14. Auxiliary sockets for portable devices
15. gear lever
16. Cup holder and storage
17. Parking brake
18. Can holder
19. Steering wheel adjustment control
20. Deactivation of VSC / tRC systems
21. Fuel filler flap release
22. electric window controls
Overview
23. Deactivation of Stop & Start
or Activation / Deactivation of Active City
Brake
Headlamp beam height control
24. Door mirror adjustment controls
25. Driver's front airbag
Horn
26. Instrument panel
27. Courtesy lamp
electric fabric roof control
.
7
Page 10

Eco-driving
eco-driving
eco-driving is a range of everyday practices that allow the motorist to optimise their fuel consumption and CO2 emissions.
Optimise the use of your gearbox
Control the use of your electrical
equipment
With a manual gearbox, move off gently and change up without waiting.
During acceleration change up early.
With an etg electronic gearbox, give preference to automatic (easy)
mode and avoid pressing the accelerator pedal heavily or suddenly.
the gear shift indicator invites you engage the most suitable gear:
as soon as the indication is displayed in the instrument panel, follow it
straight away.
For vehicles fitted with an etg electronic gearbox, this indicator
appears only in manual mode.
Drive smoothly
Maintain a safe distance between vehicles, use engine braking rather
than the brake pedal, and press the accelerator progressively. these
practices contribute towards a reduction in fuel consumption and
CO
emissions and also helps reduce the background traffic noise.
2
8
Before moving off, if the passenger compartment is too warm, ventilate it
by opening the windows and air vents before using the air conditioning.
Above 30 mph (50 km/h), close the windows and leave the air vents
open.
Remember to make use of equipment that can help keep the
temperature in the passenger compartment down ( s unroof and window
blinds...).
Switch off the air conditioning, unless it has automatic regulation, as
soon as the desired temperature is attained.
Switch off the demisting and defrosting controls, if not automatic.
Switch off the heated seat as soon as possible.
Switch off the headlamps and front foglamps when the level of light
does not require their use.
Avoid running the engine before moving off, particularly in winter; your
vehicle will warm up much faster while driving.
As a passenger, if you avoid connecting your multimedia devices
(film, music, video game...), you will contribute towards limiting the
consumption of electrical energy, and so of fuel.
Disconnect your portable devices before leaving the vehicle.
Page 11

.Eco-driving
Limit the causes of excess consumption
Spread loads throughout the vehicle; place the heaviest items in the
bottom of the boot, as close as possible to the rear seats.
Limit the loads carried in the vehicle and reduce wind resistance
(roof bars, roof rack...). use a roof box in preference.
Remove roof bars and roof racks after use.
At the end of winter, remove snow tyres and refit your summer tyres.
Observe the recommendations on
maintenance
Check the tyre pressures regularly, when cold, referring to the label in
the door aperture, driver's side.
Carry out this check in particular:
- before a long journey,
- at each change of season,
- after a long period out of use.
Don't forget the spare wheel and the tyres on any trailer or caravan.
Have your vehicle serviced regularly (engine oil, oil filter, air filter,
passenger compartment filter...) and observe the schedule of
operations recommended in the warranty and maintenance record.
When refuelling, do not continue after the third cut-off of the nozzle to
avoid any overflow.
At the wheel of your new vehicle, it is only after the first 1 800 miles
(3 000 kilometres) that you will see the fuel consumption settle down to
a consistent average.
9
Page 12
Monitoring
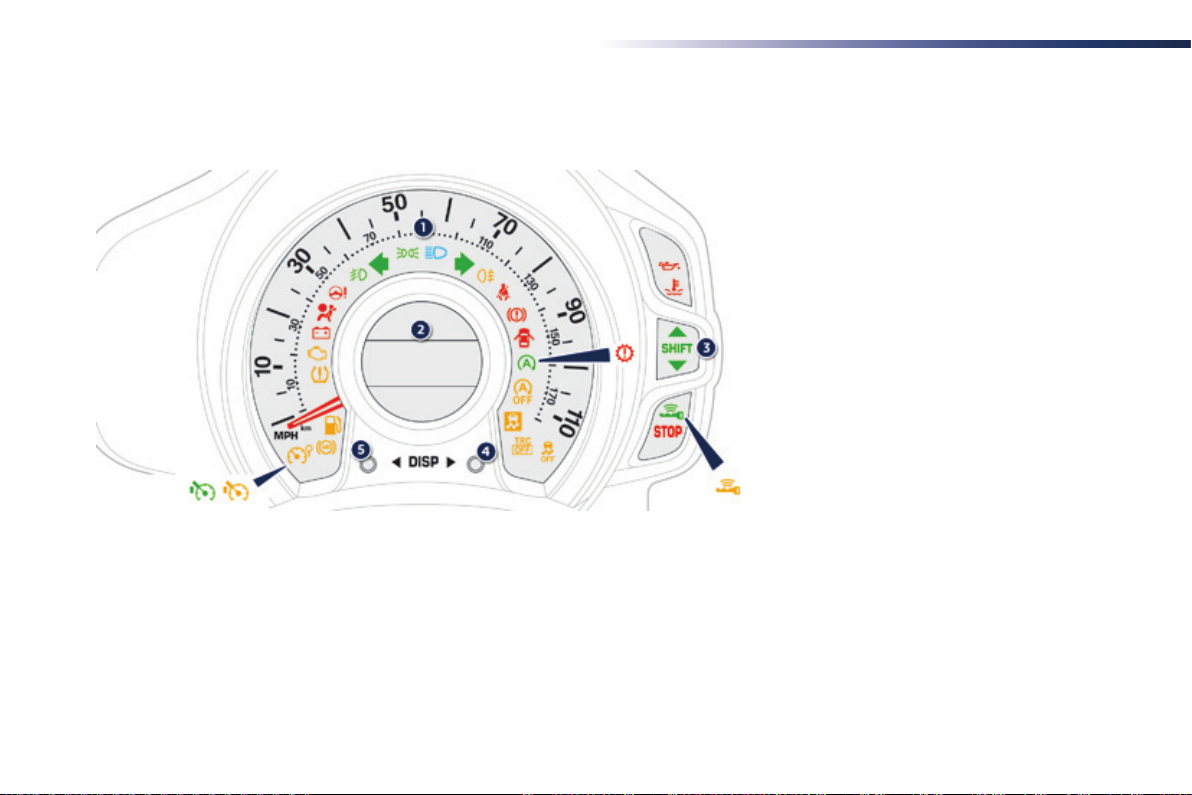
Instrument panels
Type 1 instrument panel
10
1. Speedometer (mph or km/h).
2. Central display screen.
For more information, refer to the
corresponding section.
3. gear shift indicator.
4. Display management button (Display).
Display of information in ascending order.
5. Display management button (Display).
Display of information in descending order.
Page 13
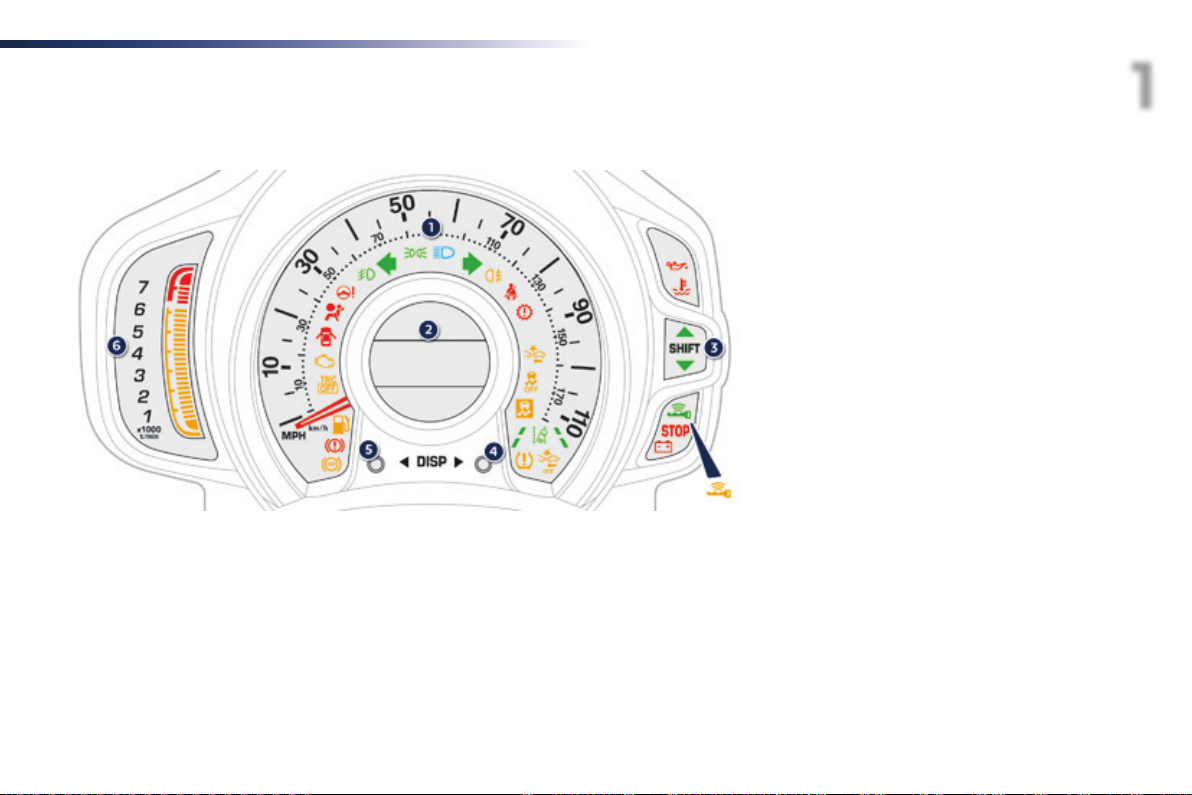
Type 2 instrument panel
Monitoring
1
1. Speedometer (mph or km/h).
2. Central display screen.
For more information, refer to the
corresponding section.
3. gear shift indicator.
4. Display management button (Display).
Display of information in ascending order.
5. Display management button (Display).
Display of information in descending order.
6. Rev counter
the engine speed is indicated by the
display of orange illuminated bars.
Above the maximum engine speed, the
bars are displayed in red to warn you of the
need to change up.
11
Page 14
Monitoring
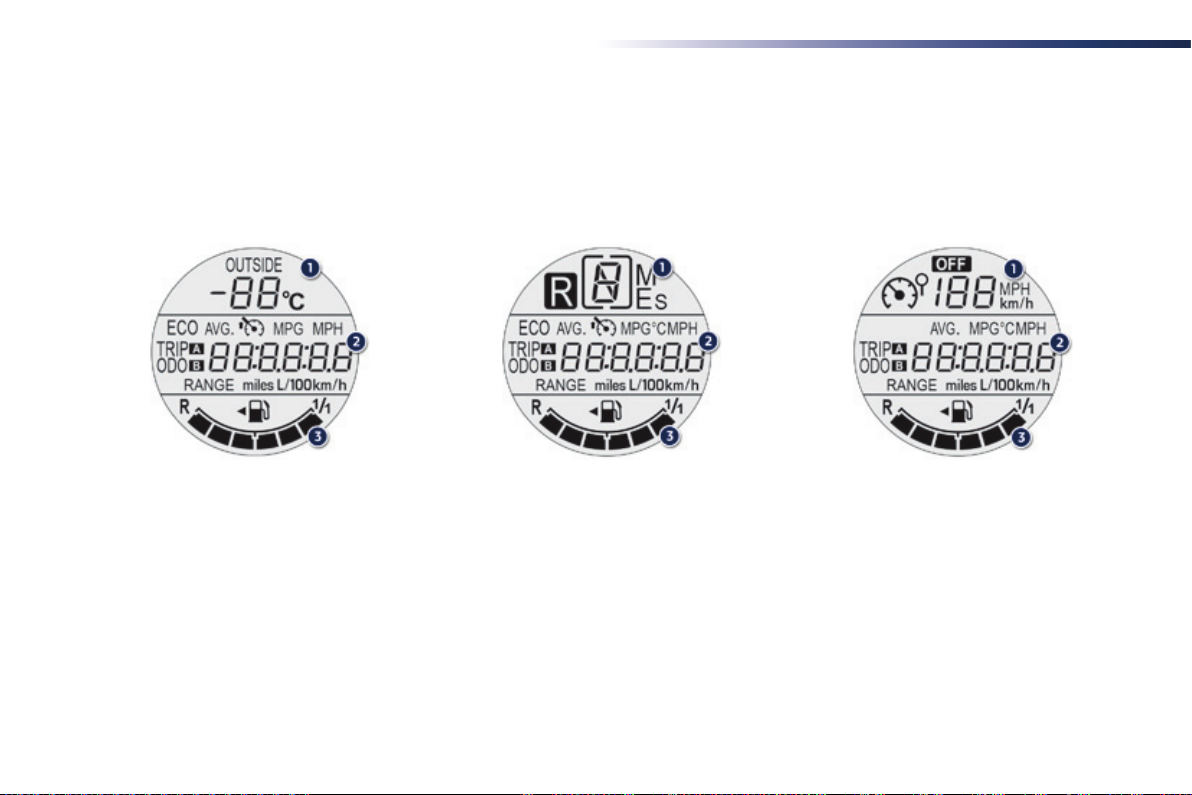
Central display screen
the information displayed varies according to your vehicle's engine and type of gearbox.
Central display screen
with the VTi 68 engine and
manual gearbox
1. Ambient temperature.
It flashes if there is a risk of ice.
2. Vehicle information with:
- total and trip distance recorders.
Refer to the corresponding section.
- trip computer information.
Refer to the corresponding section.
- Speed limiter information.
Refer to the corresponding section.
3. Fuel gauge.
Central display screen
with the VTi 68 and ETG
electronic gearbox
1. gear selector position and gear engaged.
2. Vehicle information with:
- total and trip distance recorders.
Refer to the corresponding section.
- trip computer information.
Refer to the corresponding section.
- Speed limiter information.
Refer to the corresponding section.
3. Fuel gauge.
Central display screen with
the PureTech 82 engine and
manual gearbox
1. Speed limiter information.
Refer to the corresponding section.
2. Vehicle information with:
- total and trip distance recorders.
Refer to the corresponding section.
- trip computer information.
Refer to the corresponding section.
3. Fuel gauge.
12
Page 15

Seat belts and passenger's
front airbag warning lamps
display screen
A. Left hand rear seat belt unfastened
warning.
B. Right hand rear seat belt unfastened
warning.
C. Passenger's front airbag deactivated
warning lamp.
D. Passenger's front airbag activated warning
lamp.
Monitoring
1
Warning lamp C or D remains on,
depending on the state of the passenger's
front airbag (deactivated or activated).
13
Page 16
Monitoring
Indicator and warning lamps
Visual indicators informing the driver that a system is in operation or is switched off (indicator lamp) or has a fault (warning lamp).
14
When the ignition is switched on
Certain warning lamps come on for a few
seconds in the instrument panel when the
vehicle's ignition is switched on.
When the engine is started, these same
warning lamps should go off.
If they remain on, before moving off, refer to the
information on the warning lamp concerned.
Associated warnings
the switching on of certain warning lamps may
be accompanied by an audible signal.
the warning lamps may come on continuously
(fixed) or flash.
Certain warning lamps may come on in
one of two modes: fixed (continuous) or
flashing.
Only by relating the type of illumination
to the operation of the vehicle can it
be determined whether the situation is
normal or a fault has occurred.
Refer to the tables in the following
pages for more information.
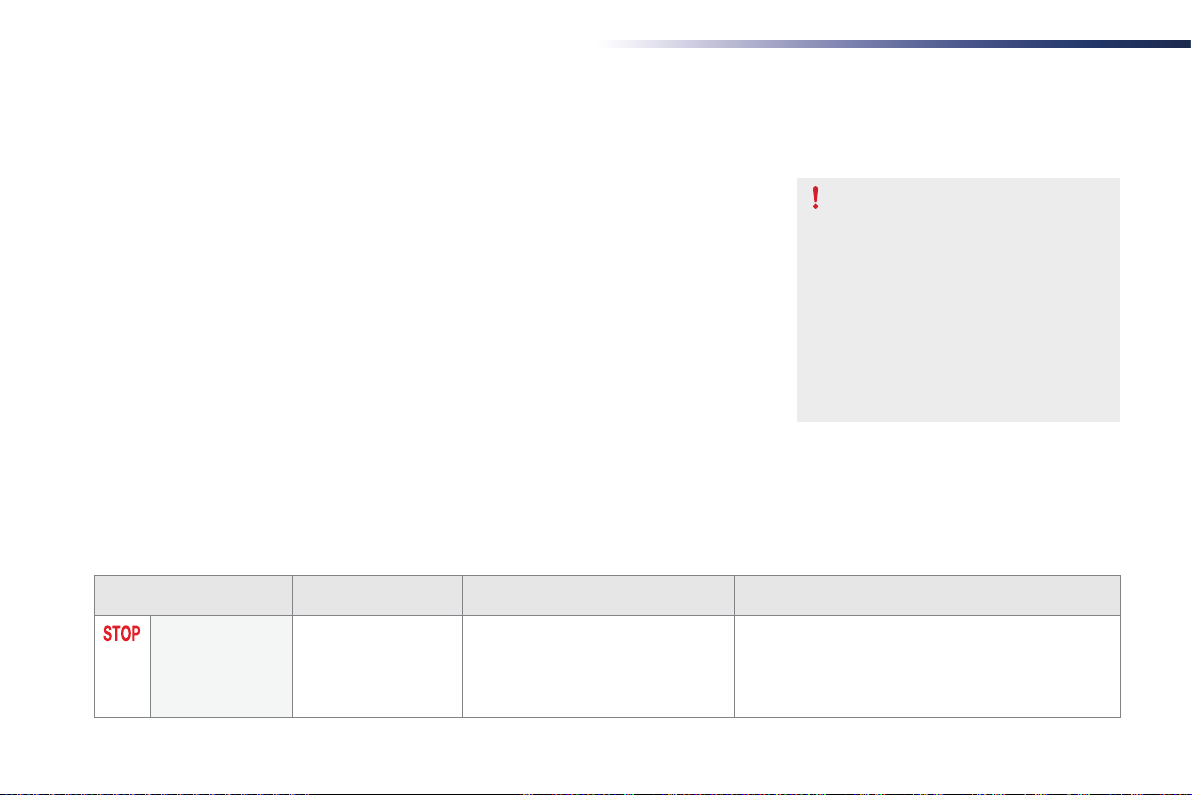
Warning lamps
When the engine is running or the vehicle is being driven, illumination of one of the following warning lamps indicates a fault which requires action on
the part of the driver.
Any fault resulting in the illumination of a warning lamp must be investigated further.
If you encounter any problems, do not hesitate to contact a PeugeOt dealer or a qualified workshop.
Warning / indicator lamp State Cause Action / Observations
STOP flashing, associated
with another warning
lamp.
It is associated with the engine
oil pressure or the engine coolant
temperature.
Stop as soon as it is safe to do so.
Park, switch off the ignition and call a PeugeOt
dealer or qualified workshop.
Page 17

Monitoring
Warning / indicator lamp State Cause Action / Observations
Braking fixed. the braking system fluid level has
Engine oil
pressure
Coolant
temperature
Anti-lock
Braking System
(ABS)
fixed, associated with
the StOP warning
lamp.
flashing (Vti 68 engine
only).
fixed. the temperature of the engine
fixed. the anti-lock braking system has a
dropped significantly.
the braking system has a fault. Stop as soon as it is safe to do so.
the engine oil pressure is too low. Stop as soon it is safe to do so.
the temperature of the engine
coolant is increasing.
coolant is too high.
fault.
top up with brake fluid recommended by PeugeOt.
If the problem persists, have the system checked by a
PeugeOt dealer or a qualified workshop.
Park, switch off the ignition and contact a PeugeOt
dealer or a qualified workshop.
Park, switch off the ignition and contact a PeugeOt
dealer or a qualified workshop.
Drive gently.
Stop as soon as it is safe to do so.
Wait until the engine has cooled down before
checking up the level; top up if necessary.
If the problem persists, contact a PeugeOt dealer or
qualified workshop.
the vehicle retains conventional braking.
Drive carefully at reduced speed and contact a
PeugeOt dealer or a qualified workshop without
delay.
1
15
Page 18
Monitoring
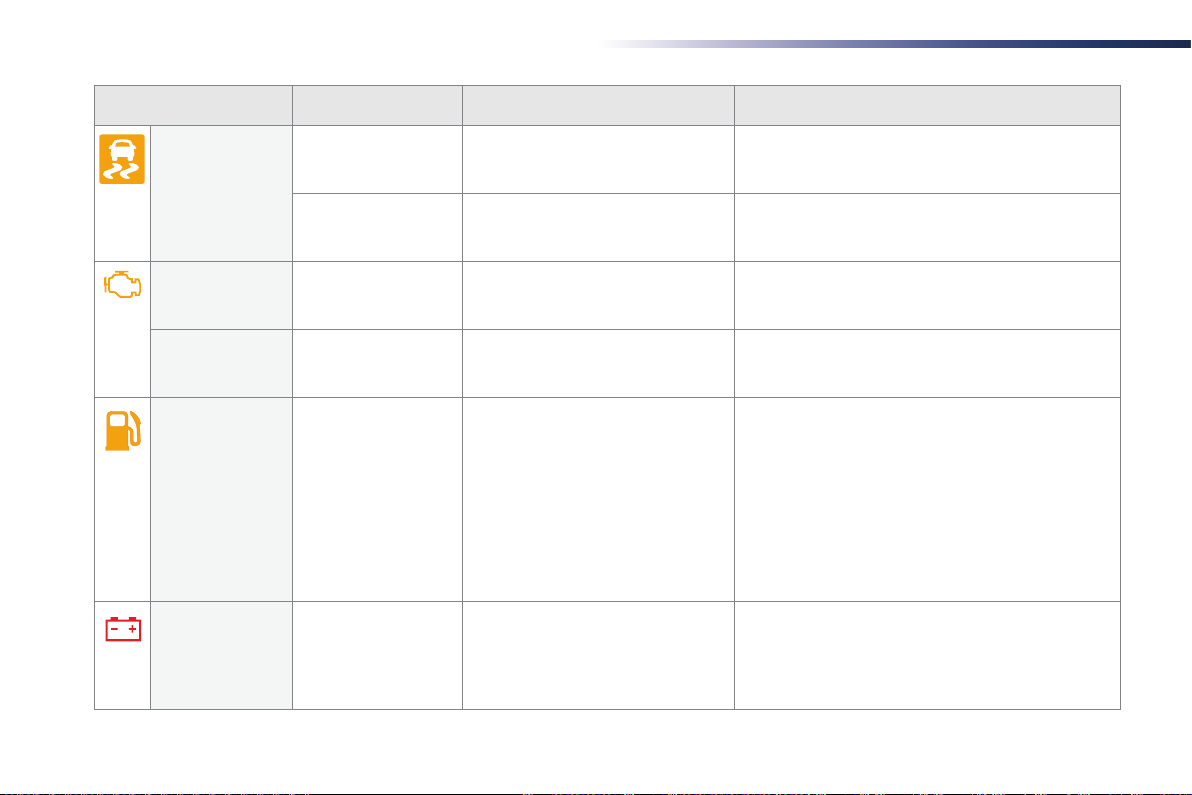
Warning / indicator lamp State Cause Action / Observations
Dynamic
stability control
and traction
control
(DSC/TRC)
Emission control
system
Engine fault fixed. A major fault has been detected that
Low fuel level fixed. When it first comes on there remains
Battery charge fixed. the battery charging circuit has a
flashing. the DSC/tRC system is in action. the system optimises traction and improves the
fixed. the DSC/tRC system has a fault. Have it checked by a PeugeOt dealer or a qualified
fixed. the emission control system has a
fault.
does not have a specific warning lamp.
approximately 5 litres of fuel in the
tank.
fault (dirty or loose terminals, slack or
cut alternator belt, ...).
directional stability of the vehicle.
workshop.
Contact a PeugeOt dealer or a qualified workshop
without delay.
You must contact a PeugeOt dealer or a qualified
workshop.
You must refuel as soon as possible to avoid running
out of fuel.
this warning lamp will come on every time the ignition
is switched on, until a sufficient addition of fuel is
made.
Fuel tank capacity: approximately 35 litres.
Never continue to drive until you run out of fuel as
this could damage the emission control and injection
systems.
Contact a PeugeOt dealer or a qualified workshop.
16
Page 19

Monitoring
Warning / indicator lamp State Cause Action / Observations
Front seat belts flashing accompanied
Airbags fixed. One of the airbags or seat belt
ETG electronic
gearbox
Clutch flashing, accompanied
Electric power
steering
by an audible signal.
fixed. the etg electronic gearbox has a
by an audible signal.
flashing or fixed,
accompanied by an
audible signal.
the driver has not fastened or has
unfastened their seat belt.
the front passenger has unfastened
their seat belt.
pretensioners has a fault.
fault.
the clutch temperature is too high. Stop as soon as it is safe to do so, place the etg
the electric power steering has a
fault.
Pull the strap then insert the tongue in the buckle.
Have it checked by a PeugeOt dealer or a qualified
workshop.
Contact a PeugeOt dealer or a qualified workshop
without delay.
electronic gearbox selector in position N, and wait
about 15 minutes for the clutch to cool down.
Drive carefully at reduced speed.
Have it checked by a PeugeOt dealer or qualified
workshop.
1
17
Page 20
Monitoring
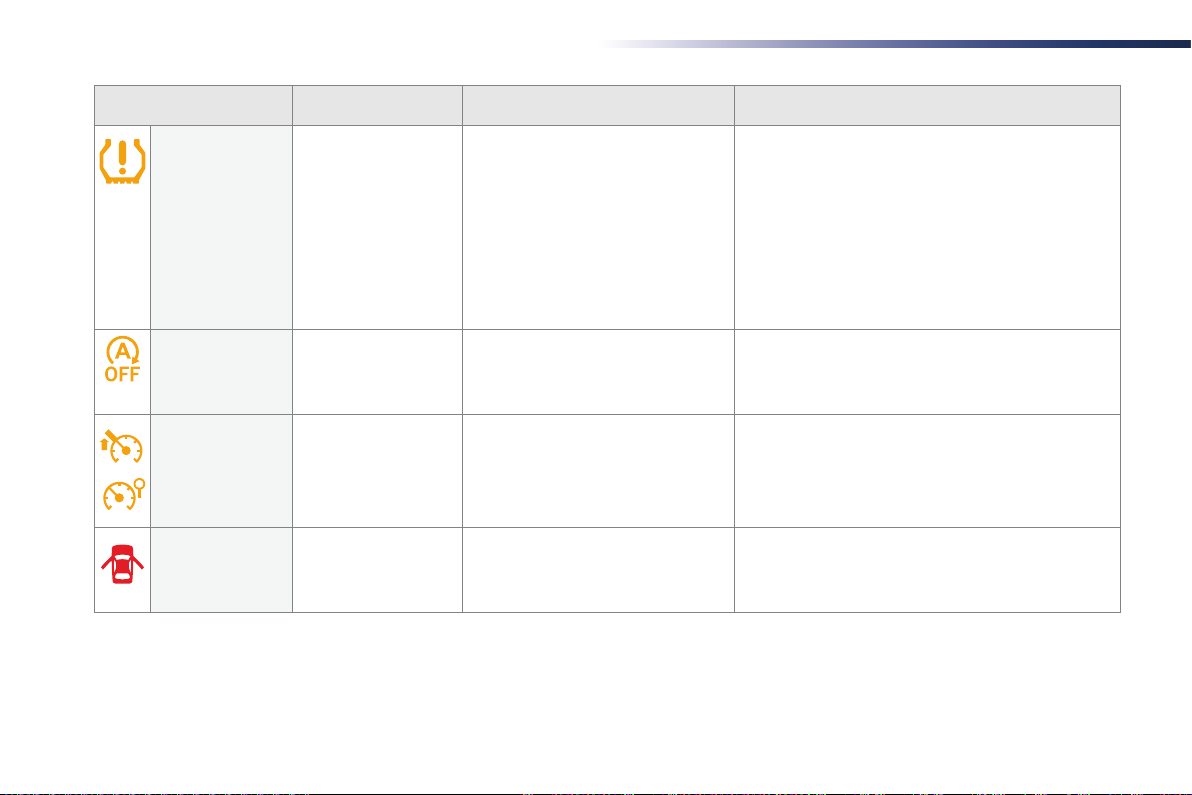
Warning / indicator lamp State Cause Action / Observations
Under-inflation fixed. the pressure in one or more wheels
Stop & Start
(VTi 68 S&S
engine)
Speed limiter fixed. the speed limiter has a fault. Have it checked by a PeugeOt dealer or a qualified
Door(s) open /
Boot open
flashing. the Stop & Start system has a fault. Have the system checked by a PeugeOt dealer or a
fixed, accompanied by
an audible signal.
is too low.
A door or the boot is still open. Close the door or boot.
Check the pressure of the tyres as soon as possible.
this check should preferably be carried out when the
tyres are cold.
You must reinitialise the system after the adjustment
of one or more tyre pressures and after changing one
or more wheels.
For more information, refer to the "under-inflation
detection" section.
qualified workshop.
workshop.
18
Page 21

Monitoring
Warning / indicator lamp State Cause Action / Observations
Keyless Entry
and Starting
system
Lane departure
warning system
Active City
Brake
flashing quickly. the steering column has not been
flashing, accompanied
by an audible signal.
flashing (orange),
accompanied by an
audible signal.
fixed. the lane departure warning system
flashing, accompanied
by an audible signal.
unlocked.
the battery in the electronic key is
discharged.
You are leaving the vehicle without
activating "OFF" mode.
the electronic key has not been
detected.
the Keyless entry and Starting
system has a fault.
A lane marking is being crossed, on
the right.
A lane marking is being crossed, on
the left.
has a fault.
the Active City Brake system is in
action.
Change to "OFF" mode, then "ON" mode and turn the
wheel slightly to unlock the steering column.
Replace the battery.
Refer to the corresponding section.
With the electronic key on your person, press the
StARt/StOP button to change to "OFF" mode.
Check that you have the electronic key with you.
Have the system checked by a PeugeOt dealer or a
qualified workshop.
turn the wheel in the other direction to return to the
correct trajectory.
For more information, refer to the corresponding
section.
Have the system checked by a PeugeOt dealer or a
qualified workshop.
the system optimises braking to avoid a collision.
For more information, refer to the corresponding
section.
1
flashing. the Active City Brake system has a
fault.
Have the system checked by a PeugeOt dealer or a
qualified workshop.
19
Page 22

Monitoring
Operation indicator lamps
Illumination of one of the following indicator lamps confirms that the corresponding system has been switched on.
It may be accompanied by an audible signal.
Warning / indicator lamp State Cause Action / Observations
20
Left-hand direction
indicator
Right-hand
direction indicator
Sidelamps or
dipped beam
headlamps
Main beam
headlamps
Front foglamps fixed. the front foglamps (if your vehicle
Rear foglamp fixed. the rear foglamp has been switched
flashing with buzzer. the lighting stalk is pushed down.
flashing with buzzer. the lighting stalk is pushed up.
fixed. the sidelamps or dipped beam
headlamps are on.
fixed. the lighting stalk is pulled towards
you.
has them) are switched on.
on using the ring on the lighting
control stalk.
Pull the stalk to return to dipped beam headlamps.
turn the ring on the stalk rearwards twice to switch off
the front foglamps.
Please note: if front foglamps have been fitted as an
accessory, the control may be different.
turn the ring on the lighting control stalk to the rear to
switch off the rear foglamp.
Page 23

Monitoring
Warning / indicator lamp State Cause Action / Observations
Parking brake fixed, accompanied by
Passenger's
front airbag
Stop & Start
(VTi 68 S&S
engine)
Keyless Entry
and Starting
system
an audible signal.
fixed in the seat belt
and passenger's front
airbag warning lamps
display.
fixed. When the vehicle stops (red lights,
fixed. the conditions for starting are met. For more information, refer to the "Starting - switching
flashing slowly. the vehicle is in "ACC" mode.
the parking brake is applied or not
properly released.
the control switch, located in the
glove box, has been placed in the
"ON" position.
traffic jams...) the Stop & Start system
has put the engine into StOP mode.
the accessories (audio system,
12V socket...) can be used.
Release the parking brake to switch off the warning
lamp, keeping your foot on the brake pedal.
Observe the safety recommendations.
For more information on the parking brake, refer to the
corresponding section.
the passenger's front airbag is activated.
In this case, do not install a rearward facing child seat.
the indicator lamp goes off and the engine restarts
automatically in StARt mode, as soon as you want to
move off.
off the engine with the Keyless entry and Starting
system" section.
1
21
Page 24

Monitoring
Warning / indicator lamp State Cause Action / Observations
Gear shift
indicator
Speed limiter
(VTi 68 engine)
Lane departure
warning system
Active City
Brake
fixed. You can change up. For more information, refer to the corresponding
section.
You can change down (only for the
Vti 68 engine).
fixed. the speed limiter is active.
fixed. the button has been pressed. the lane departure warning system has been
activated.
For more information, refer to the corresponding
section.
fixed. the system is operational: it has detected road
markings to the left and /or right.
For more information, refer to the corresponding
section.
fixed. the button has been pressed. the Active City Brake system has been activated.
For more information, refer to the corresponding
section.
22
Page 25

Monitoring
Deactivation indicator lamps
If one of the following indicator lamps comes on, this confirms that the corresponding system has been switched off intentionally.
this is may be accompanied by an audible signal.
Warning / indicator lamp State Cause Action / Observations
Passenger's
front airbag
Traction control
(TRC)
Dynamic
stability control
(DSC)
fixed, in the seat belt
and front passenger's
airbag warning lamps
display.
fixed. A brief press has been made on the
fixed. Vehicle stationary, the button
the control switch, located in the
glove box, is set to the OFF position.
button.
the traction control (tRC) system is
deactivated.
has been pressed for more than
3 seconds.
the traction control (tRC) and
dynamic stability control (DSC)
systems are deactivated.
the passenger's front airbag is deactivated.
You can install a rearward facing child seat on the
front seat unless there is a fault with the airbags
(Airbag warning lamp on).
Press the button to activate the system.
the tRC system is activated automatically when the
vehicle is started.
If deactivated, the system is reactivated automatically
from around 30 mph (50 km/h).
For more information, refer to the corresponding
section.
Press this button to activate the systems.
the DSC system is activated automatically when the
vehicle is started.
For more information, refer to the corresponding
section.
1
23
Page 26

Monitoring
Warning / indicator lamp State Cause Action / Observations
Stop & Start
(VTi 68 S&S
engine)
Active City
Brake
fixed. the Stop & Start system has been
deactivated.
fixed. the Active City Brake system has
been deactivated.
Reactivate the system by pressing the button again.
For more information, refer to the corresponding
section.
Reactivate the system by pressing the button again.
For more information, refer to the corresponding
section.
24
Page 27
Monitoring
Indicators
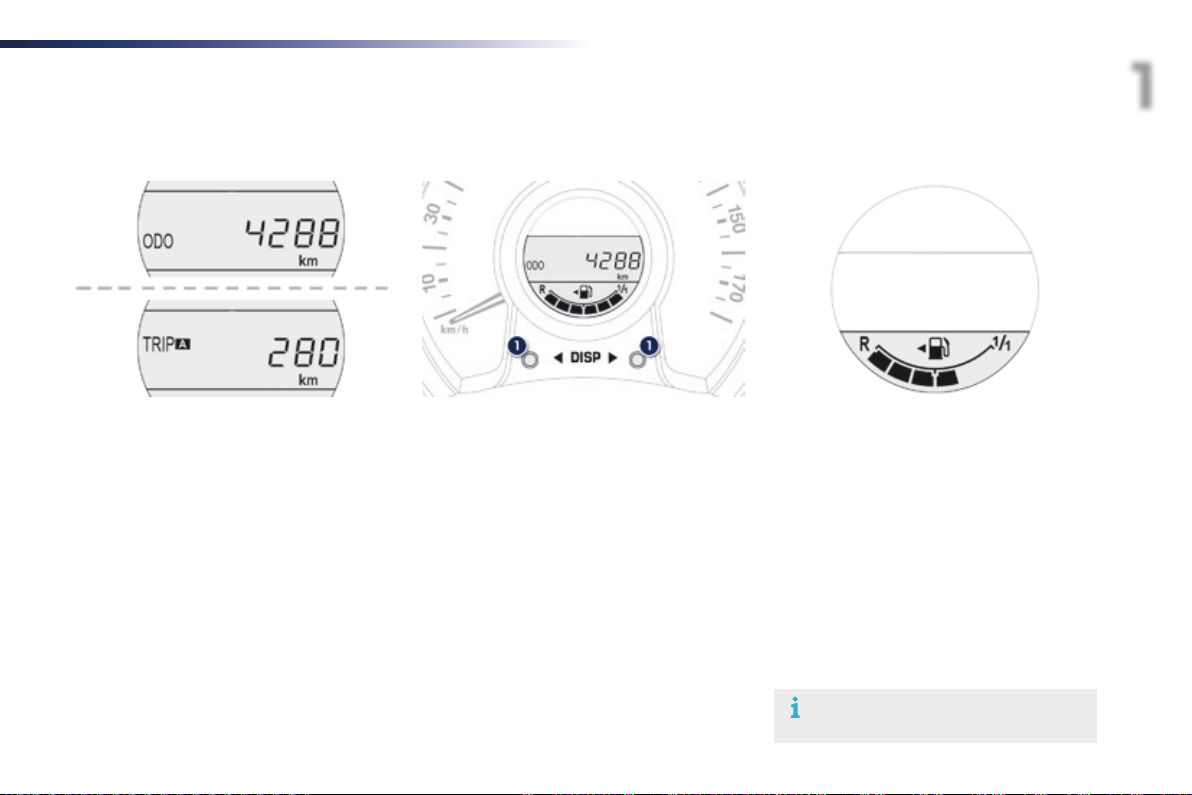
Total/trip distance recorder
When the ignition is switched on, the distance
recorder selected when the engine was
switched off is displayed.
Press one of the buttons 1 to alternate the
distance display:
- total with "ODO" (odometer) displayed,
- trip with "TRIP" displayed.
to reset the trip recorder to zero, when
it is displayed, press and hold one of the
two buttons 1.
1
Fuel gauge
this indicates the quantity of fuel available:
- 1/1 and six bars, the fuel tank is full.
- R and one bar flashing, the fuel tank is on
the reserve.
Low fuel level
When the low level in the fuel tank is reached,
the last bar flashes accompanied by an audible
signal.
You have approximately 5 litres remaining.
When the frequency of the flashing increases,
you have approximately 3 litres remaining.
At least 5 litres must be added after
running out of fuel.
25
Page 28
Monitoring
trip computer
System that gives you information on the journey in progress (range, fuel consumption…).
26
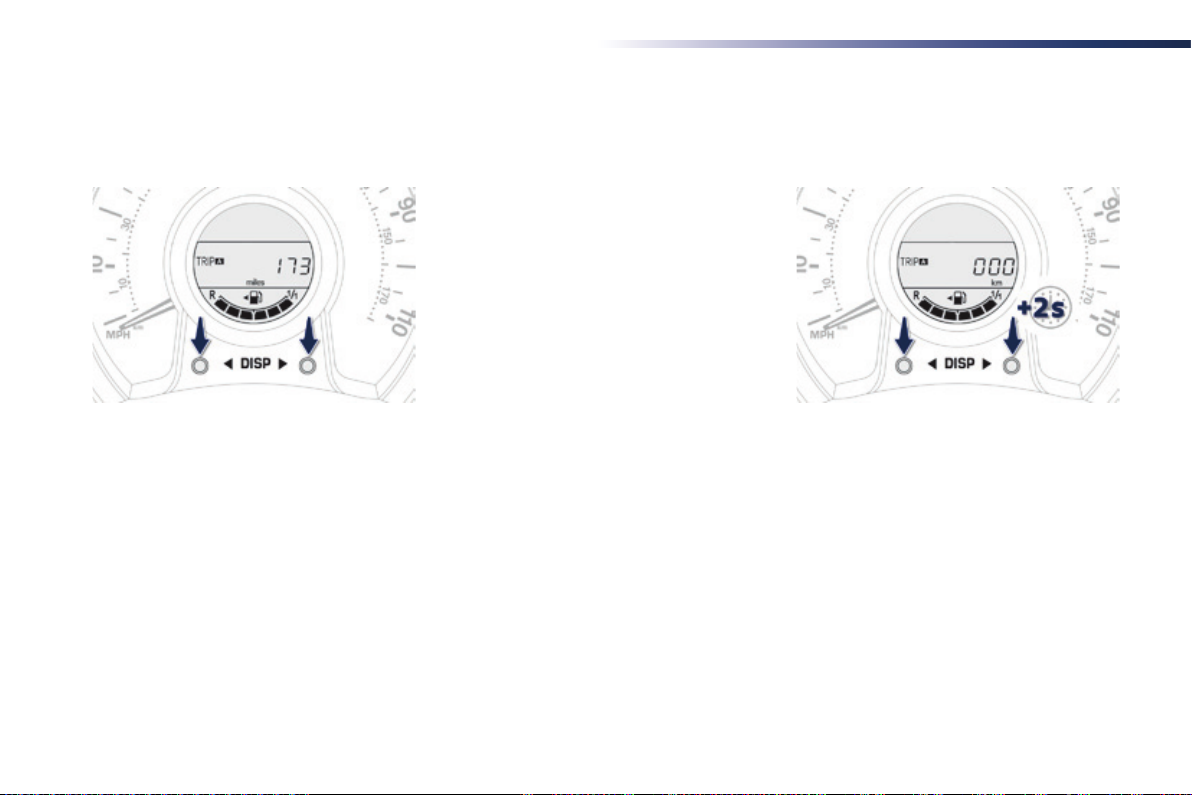
Information display
F Press one of theses buttons to display the
various trip computer tabs in turn:
- the total distance.
- the trip "A".
- the trip "B".
- the Stop & Start partial time counter*.
- theStop & Start global time counter*.
- the ambient temperature*.
- the current fuel consumption.
- the average fuel consumption.
- the remaining range.
- the average speed.
- the lighting dimmer.
Lighting dimmer
When driving at night, this function allows
certain displays in the instrument panel to be
switched off to reduce visual fatigue for the
driver.
It operates only when the sidelamps are on.
F When the "Lighting dimmer" menu is
displayed, press and hold one of the
buttons for access to the adjustment.
F then make repeated presses on one of
the two buttons to increase or reduce the
brightness.
the display flashes to show you the
brightness chosen.
Trip reset
F When the trip required is displayed, press
one of the two buttons for more than
two seconds.
trips "A" and "B" are independent but their
use is identical.
For example, trip "A" can be used for daily
figures, and trip "B" for monthly figures.
* Depending on version.
Page 29
Monitoring
1
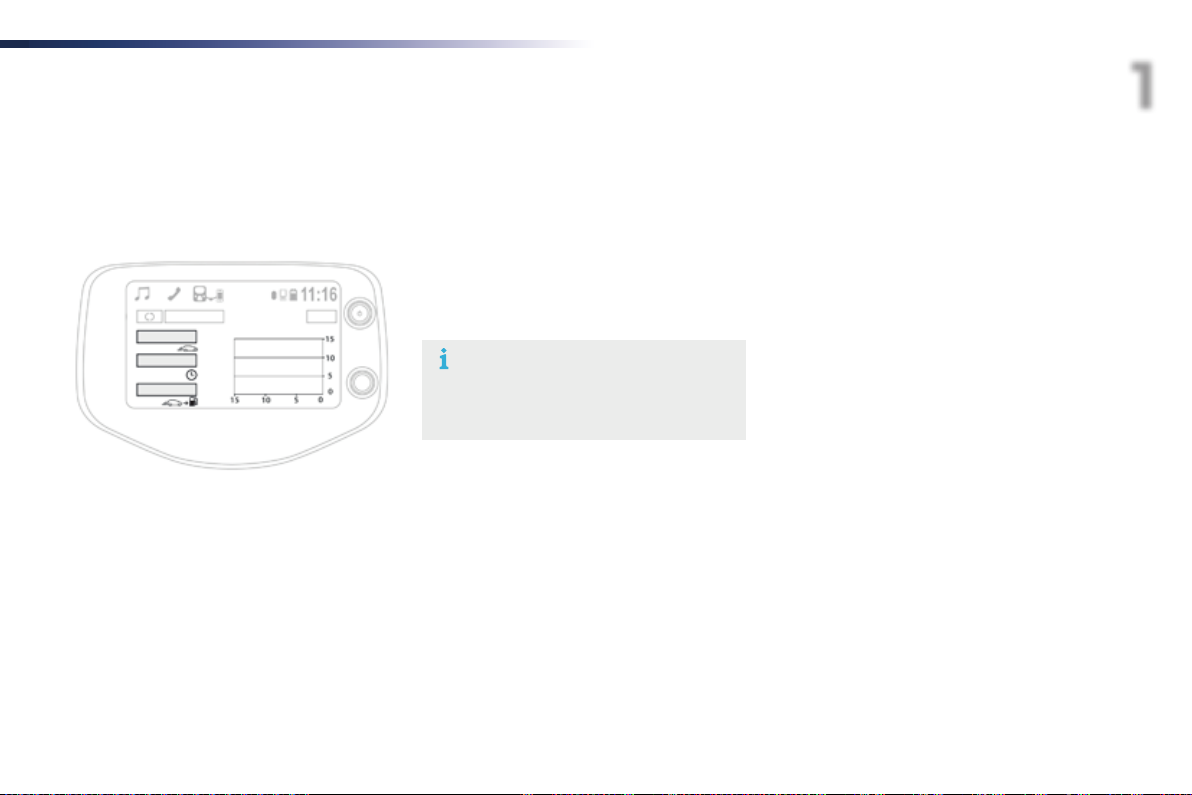
With the touch screen
If your vehicle has a touch screen, you can
view information on the current journey.
From the Menu page in the touch screen:
F Select the "Vehicle information" tab.
the "Trip information" window is displayed
with the following information:
- "Average speed",
- "Elapsed time",
- "Range",
- the current fuel consumption, presented in
graphical form.
the "Erase" button resets the fuel consumption
data in the touch screen and the instrument
panel.
Trip computer, a few definitions
Range
(miles or km)
the distance which can still be travelled with
the fuel remaining in the tank (related to the
average fuel consumption over the last few
miles (kilometres) travelled).
this value may vary following a change
in the style of driving or the relief,
resulting in a significant change in the
current fuel consumption.
When the fuel level is low, the message "Lo
FueL" is displayed.
If only a small amount of fuel is added, the
range may not be recalculated.
Current fuel consumption
(mpg or l/100 km or km/l)
Calculated over the last few seconds.
Average fuel consumption
(mpg or l/100 km or km/l)
Calculated since the last trip computer reset.
Average speed
(mph or km/h)
Calculated since the last trip computer reset.
Stop & Start time counter
(minutes / seconds or hours / minutes)
If your vehicle is fitted with Stop & Start,
a time counter calculates the time spent in
StOP mode during a journey.
It resets to zero every time the ignition is
switched on.
27
Page 30

Monitoring
Setting the time
Radio
28
the time is adjusted using the "MENU" knob:
- press the knob for access to menus and to
confirm a selection,
- turn the knob to select a function, an item
in a list.
You can go back to the previous step at any
time by using the "Back" button.
F Press the knob for access to the menus.
F turn the knob to select "CLOCK".
F Press the knob to confirm.
the hours figure flashes.
F turn the knob to adjust the hours.
F Press the knob to confirm.
the minutes figure flashes.
F turn the knob to adjust the minutes.
F Press the knob to confirm and quit the
menu.
Page 31

Touch screen
Monitoring
1
Press on "Configuration".
Select "Clock".
Adjust the hours and minutes using the virtual
arrows in the screen.
Choose the time format.Press on "General".
Press on "OK" to confirm and quit the menu.
29
Page 32

Access
Keys
the keys allow you to switch on the ignition and operate the locks on the front doors, the boot, the steering lock and the passenger's front airbag
deactivation switch.
Locking Unlocking
30
- Insert the key in one of the front door lock
barrels and turn it towards the rear of the
vehicle to lock the door in question.
- Insert the key in the boot lock barrel and
turn it to the right to lock the boot.
- Insert the key in one of the front door lock
barrels and turn it towards the front of the
vehicle to unlock the door in question.
- Insert the key in the boot lock barrel and
turn it to the left to unlock the boot.
Page 33

Remote control
this is used to lock, unlock and locate the vehicle at a distance.
Unfolding / Folding
the key
F Press this button to unfold / fold the key.
Locking
the direction indicators flash once.
After locking, if you notice that a door
is not closed properly, close it then lock
the vehicle again.
Unlocking
the direction indicators flash twice.
F Press the closed padlock to lock
the vehicle.
F Press the open padlock to unlock
the vehicle.
Access
Locating your vehicle
F Press the closed padlock to
locate your locked vehicle in a
car park.
this is indicated by lighting of the direction
indicators for a few seconds.
the high frequency remote control is
a sensitive system; do not handle it in
your pockets as there is a risk that it may
unlock the vehicle without you being
aware of this.
Avoid pressing the buttons of your
remote control out of range of your
vehicle, you risk rendering it inoperativ e .
2
31
Page 34

Access
Changing the remote
control batter y
32
Battery ref.: CR 2016 / 3 volts.
F unclip the cover using a small screwdriver
in the cut-out.
F Lift of the cover.
F Remove the old battery from its housing.
F Fit the new battery in its place, observing
the direction of fitment.
F Clip the cover in place.
Do not discard the remote control
batteries, they contain metals which are
harmful to the environment.
take them to a PeugeOt dealership,
or to an approved collection point.
Page 35

Keyless entry and Starting system
System that allows the opening, closing and starting of the vehicle while keeping the electronic key on your person.
Unlocking the vehicle
Electronic key
this electronic key can also be used as a
remote control.
Refer to the "Remote control" section.
It includes an integral emergency key.
As a safety measure, the detection
zones in which the the electronic key
is operational have a radius of about
70 cm around each opening button.
Unlocking by the doors
F With the electronic key on your person
and in one of the recognition zones, press
one of the buttons on the door handles to
unlock the vehicle.
F then pull on the door handle to open the
door.
Unlocking by the boot
F With the electronic key on your person
and in the recognition zone located at the
rear, press the button on the boot handle to
unlock the vehicle and release the tailgate.
F then raise the tailgate to open it.
the direction indicators flash twice to
confirm the unlocking of the vehicle.
Access
2
33
Page 36

Access
Locking the vehicle
34
Locking
F With the electronic key in the recognition
zone, press one of the buttons on the front
door handles or press the button on the
boot sill.
the direction indicators flash once.
If one of the doors or the boot is still
open or if the electronic key for the
Keyless entry and Starting system has
been left inside the vehicle, you are
warned by an audible signal and the
central locking does not take place.
If the electronic key is left inside the
vehicle after switching off the engine,
there is a continuous audible signal on
opening the driver's door.
If the vehicle is unlocked and no door
or the boot is opened, the vehicle will
lock again automatically after about
thirty seconds.
Never expose the electronic key to
extreme temperatures (below -20°C or
above +60°C); this could cause faults.
For reasons of safety and theft
protection, do not leave your electronic
key in the vehicle, even when you are
close to it.
It is recommended that you keep it on
your person.
Page 37

Access
Emergency procedure
the integral key is used to lock and unlock the
vehicle when the electronic key cannot operate
and in the event of a fault with the Keyless
entry and Starting system:
- cell battery discharged, vehicle battery
discharged or disconnected, ...
- vehicle located in an area with strong
electromagnetic signals.
F Press and hold the latch 1 to extract the
integral key 2.
Unlocking
F Insert the integral key into the driver's door
lock barrel and turn it towards the front of
the vehicle to unlock the vehicle.
Locking
F Insert the integral key into the driver's door
lock barrel and turn it towards the rear of
the vehicle to lock the vehicle.
Saving the electronic key
battery
to preserve the battery, it is possible to prevent
the electronic key working (no reception of
radio waves).
F Press on the open padlock twice,
while pressing on and holding
the closed padlock.
Check that the indicator lamp in the electronic
key flashes 4 times.
When this function is activated, the "Keyless
entry and Starting" system is inoperative.
to reactivate the electronic key, press one of
the buttons (open or closed padlock).
2
35
Page 38

Access
Changing the battery of
the electronic key
Battery ref.: CR2032 / 3 volts.
When replacement of the battery is
needed, this warning lamp comes on
in the instrument panel.
F unclip the cover using a small screwdriver
at the cutout.
F Remove the cover.
F Remove the protective battery holder,
pulling it upwards.
F Remove the discharged battery from its
housing.
F Fit the new battery into its housing
observing the original direction of fitment.
F Refit the battery holder.
F Clip the cover onto the casing.
Lost keys
go to a PeugeOt dealer with the vehicle's registration document, your personal
identification documents and if possible the key code label.
the PeugeOt dealer will be able to look up the key code and the transponder code
required to order a new key.
Remote control / Electronic key
these high frequency devices are sensitive systems; do not handle them while in your
pocket as there is a risk of unlocking the vehicle, without you being aware of it.
Do not repeatedly press the buttons of your remote control or electronic key out of range
and out of sight of your vehicle. You run the risk of stopping it from working and the remote
control would have to be reinitialised.
Locking the vehicle
As a safety precaution, never leave children alone in the vehicle, except for a very short
period.
In all cases, it is essential to remove the key from the ignition switch, or take the electronic
key with you when leaving the vehicle.
When purchasing a second-hand vehicle
Have the pairing of all of the keys in your possession checked by a PeugeOt dealer, to
ensure that only your keys can be used to open and start the vehicle.
36
Page 39

Doors
Locking/unlocking from
the inside
to lock/unlock a door, press/pull button A.
Vehicles without central
locking
Pressing button A locks/unlocks the driver's
door only.
Vehicles with central
locking
Pressing button A, driver's side, locks/unlocks
all of the doors and the boot.
Pressing button A, passenger's side, locks/
unlocks just that door.
Operating the handle always opens the
door, even if it is locked.
Access
Door open
2
If a door is open, the courtesy lamp remains on
if the button is in this position.
Driving with the doors locked may make
access to the passenger compartment
by the emergency services more
difficult in an emergency.
37
Page 40

Access
Locking / unlocking and opening the boot
Using the key Using the remote control
- Insert the key in the lock barrel and turn
it to the right to unlock and release the
tailgate.
the vehicle remains locked.
- Raise the tailgate by the exterior handle to
open it.
As soon as you close the tailgate, it locks
again.
F Press the opening button to release the
F Raise the tailgate by the exterior handle to
F Press the open padlock to unlock
the vehicle and boot.
tailgate.
open it.
F Press the closed padlock to
unlock the boot and vehicle.
38
Page 41

Using the Keyless Entry
and Starting system
Access
2
F With the electronic key on your person,
press the boot opening control to unlock
and release the tailgate.
the vehicle is unlocked as well.
F Raise the tailgate by the exterior handle to
open it.
If the vehicle had been previously unlocked by
the front door, it is not necessary to have the
electronic key on your person to use the boot
opening control.
F With the electronic key on your person,
press the button on the boot sill to lock it.
or
Lock the vehicle by the front doors.
When closing the boot, do not slam shut
the tailgate: guide it down and release it
at the end of its travel.
39
Page 42

Access
Front electric windows*
1. Left hand front electric window.
2. Right hand front electric window.
After the ignition has been switched on, press
one of the control switches to open or pull to
close the window. the window stops when you
release the control switch.
the driver has controls for both front
windows.
the electric windows do not work with
the ignition off.
Closing the windows can cause serious
injury.
ensure that nothing is preventing
the closing of the windows and take
particular care with children.
Rear quarter windows
On the 5-door versions, system for ventilation
of the rear seats by the partial opening of the
window.
Opening
F tilt the lever outwards.
F Push it fully to secure the window in the
open position.
Closing
F Pull the lever to release the window.
F tilt the lever fully inwards to secure the
window in the closed position.
40
* Depending on version.
Page 43

electric fabric roof*
Your vehicle may be fitted with an electrically operated fabric roof.
Electric opening and closing
Operation of the roof is possible with
the ignition on and when driving.
In order to maintain the state of charge
of the battery, it is recommended that the
roof be operated with the engine running.
During operation of the roof with just
the roof is opened and closed by pressing
the control at the interior lamp, in the opening
direction 1 and in the closing direction 2.
the asymmetric shape of the opening
control avoids closing the roof by
mistake.
* Depending on version.
the ignition on, starting the engine may
cause the roof to stop, depending on
the state of charge of the battery. to
have the roof continue the operation,
operate the control again after the
engine has started.
Operation of the roof could cause
serious injuries: before operating the
roof, ensure that no occupant of the
vehicle or person outside the vehicle
could be subject to any risk related
to the movement of the roof and that
no object could interfere with the
operation.
Access
2
Position of the roof
Position 0: Roof completely closed.
Position 1: Automatic stop position for the roof.
Position 2: Roof completely open.
41
Page 44

Access
42
Opening
F Briefly press the control in the opening
direction to open the the roof in stages.
or
F Press and hold the control in the opening
direction, until the manoeuvre is complete,
to open the roof completely.
Pressing again stops the movement of the
roof.
Closing
F Briefly press the control in the closing
direction to open the the roof in stages.
or
F Press and hold the control in the closing
direction, until the manoeuvre is complete,
to close the roof to position 1.
Pressing again stops the movement of the
roof.
F to close the roof completely, press and
hold the control (between positions 1
and 0) until the roof locks closed.
the closing manoeuvre of the roof
could cause serious injuries: take
particular care with children.
If the roof does not close correctly:
- check that nothing is blocking the roof
(ignition off),
- repeat the closing command (with the
engine running).
If the problem persists, contact a PeugeOt
dealer or a qualified workshop.
Protection of the electric motors
used for opening and closing the
roof
Following repeated opening and closing of the
roof, the electric motors may become too warm
and no longer allow the roof to be opened or
closed. Allow the motors to cool down with no
operation of the roof for 10 minutes.
Operating fault
In the event of an electrical fault,
contact a PeugeOt dealer or a
qualified workshop.
Page 45

Access
Aero-acoustic deflector Precautions for use
Never place objects on the roof,
whether open or closed.
Never sit on or place objects on the
transverse roof support when the roof
is open.
to avoid damaging the roof, do
not open it under snowy or frosty
conditions.
Never use sharp tools to remove ice or
accumulations of snow on the roof.
An aero-acoustic deflector is available to
improve the acoustic comfort of occupants
of the vehicle in certain driving conditions
(high speed), by reducing the turbulence in
the passenger compartment resulting from the
displacement of air.
On opening the roof, the aero-acoustic
deflector is deployed.
On closing the roof, the deflector folds away
automatically.
to limit the creation of folds in the roof
fabric, it is recommended that the roof
not be left open for long periods.
the vehicle's air conditioning system
should not be operated while the roof
is open.
2
In the event of prolonged storage of the
vehicle outside, it is recommended that
the roof be protected with a cover.
It is recommended that the roof be
closed when the vehicle is left parked.
even if the roof is closed, it is prudent
not to leave any valuable objects inside
the vehicle.
When you leave the vehicle, switch off
the ignition and remove the key (take
the electronic key with you) to avoid any
unwanted operation of the roof.
43
Page 46

Access
Recommendations on care of your vehicle
the general recommendations on the care of your vehicle are given in the warranty and maintenance record.
Fabric roof
44
Before washing the fabric roof, first
remove as much dirt as possible from
the surface using a soft brush or a
vacuum cleaner.
to avoid damaging the roof.
- never use a high pressure jet wash,
- never wash your vehicle in an
automatic roller-brush car wash.
Allow the vehicle to dry in a shaded
area and avoid direct exposure to the
sun.
to remove marks, sponge them (but
never rub them) using soapy water, then
immediately rinse with clean water.
Remove bird droppings or tree resins as
their acidity may damage the roof.
For the regular maintenance of the
fabric roof and to conserve its original
appearance, we recommend an
ecological "Fly remover - Fabric roof
cleaner" from the "teCHNAtuRe"
range. to obtain this product go to a
PeugeOt dealer.
Never use chemical products,
detergents, stain removers, solvents,
alcohol, petrol, wdt. to clean the roof.
to waterproof the roof, use only special
waterproofing products for fabric roofs.
Aero-acoustic deflector
We recommend that you clean the
aero-acoustic defector with care using
a soft brush.
Page 47

Front seats with manual adjustments
As a safety measure, seat adjustments should only be carried out when stationary.
Forwards-backwards Driver's seat height*Seat backrest angle
Comfort
3
F Raise the control and slide the seat
forwards or backwards.
Before moving the seat backwards, ensure that there is nothing that might prevent the full
travel of the seat, so as to avoid the risk of of jamming the seat caused by the presence of
objects on the floor behind the seat or rear passengers. If the seat jams, stop the movement
immediately.
F take the weight of the backrest with your
body.
F turn the knob to obtain the desired angle.
F Pull the control upwards to raise or push
it downwards to lower, as many times as
required, to obtain the position required.
* Depending on version.
45
Page 48

Comfort
Access to the rear seats
(3-door)
F Pull this control toward you to fold the seat
back and move the seat forward.
When returning the seat to its initial position,
guide it back until the seat and backrest lock
into place.
ensure that no person or object
prevents the seat slide from returning to
its initial position.
Check that the seat belt has reeled in
correctly so as to not impede access for
passengers to the rear seats.
46
Page 49

Rear seats
Your vehicle is fitted with a fixed one-piece cushion bench rear seat, and depending on version:
- a folding split (50/50) backrest,
- a folding one-piece backrest.
Comfort
Stowing the seat belts Folding the seat backrest
3-door 5-door
When not in use, or before folding the seat
backrest(s), stow the rear seat belts by
inserting their tongues in the dedicated holders,
located on the side pillars.
the seat backrest is folded from the rear of the
vehicle, with the boot open.
F Place the head restraints in the low
position.
Refer to the "rear head restraints" section.
F Pull the strap(s) A, located behind the seat
backrest(s) to release them, and lay them
on the seat cushion.
Returning the backrest of the
bench seat to its initial position
F unfold the backrest to the rear and engage
it on the anchorage B.
F ensure that the seat back has locked in
place correctly.
3
47
Page 50

Comfort
Rear head restraints*
48
the rear head restraints can be removed and
have two positions:
- high, position for use.
- low, storage position.
to raise the head restraint, pull it upwards.
to lower it, press lug A then the head restraint.
to remove it:
- tilt the seat back slightly,
- move the head restraint to the high
position,
- press lug A pulling the head restraint
upwards at the same time.
to refit it:
- tilt the seat back slightly,
- engage the rods of the head restraint in the
openings.
to put the head restraint in the low position,
press lug A.
* Depending on version.
Page 51

Mirrors
Manual door mirrors
Electric door mirrors
Comfort
Demisting - Defrosting
use the heated rear window switch.
Refer to the "Rear screen demist - defrost"
section.
3
F Operate the lever in four directions to
adjust the mirror.
Adjustment
F Move control A to the right or to the left to
select the corresponding mirror.
F Move control B in all four directions to
adjust.
F Return control A to the central position.
the objects observed are, in reality,
closer than they appear.
take this into account in order to
correctly judge the distance of vehicles
approaching from behind.
Folding / Unfolding
When parking, the mirrors can be folded
manually.
the initial adjustments are retained
when unfolding.
49
Page 52

Comfort
Steering wheel adjustment
(with power steering)
50
Manual rear view mirror
the rear view mirror has two positions:
- day (normal),
- night (anti-dazzle).
to change from one to the other, push or pull
the lever on the lower edge of the mirror.
Correct driving position
Before taking to the road and to make the most
of the ergonomics of your driving position, carry
out these adjustments in the following order:
- backrest angle,
- cushion height,
- longitudinal position of the seat,
- height of the steering wheel,
- the interior and door mirrors.
F When stationary, hold the steering
wheel then lower the lever to release the
adjustment mechanism.
F Adjust the steering wheel to the desired
height and then raise the lever to lock the
adjustment mechanism.
For safety reasons, these operations
must not be carried out while driving.
Once these adjustments have been made,
ensure that you can see the instrument
panel clearly from your driving position.
Page 53

Ventilation
1. Windscreen demisting/defrosting vent.
2. Centre vent.
3. Side vents.
4. Air outlets to the front footwells.
5. Air outlets to the rear footwells (depending
on version).
Comfort
3
51
Page 54

Comfort
Recommendations for use
If the interior temperature remains very high after a prolonged period parked in the sun, first
ventilate the passenger compartment for a few minutes.
For an even air distribution, make sure that you do not block the outside air inlet grille, the
vents, the air passages and the air outlets to the footwells.
ensure that the passenger compartment filter, located behind the glove box in the heater
unit, is in good condition. Have the filter elements replaced regularly. If you drive in dusty
conditions, change them twice as often.
Operate the air conditioning system for 5 to 10 minutes, once or twice a month, to keep it in
perfect working order.
In order to ensure that your air conditioning system continues to operate correctly, you are
advised to have it checked regularly.
If the system does not produce cold air, do not use it and contact a PeugeOt dealer or a
qualified workshop.
the condensation created by the air
conditioning results in a flow of water
under the vehicle when stationary which
is perfectly normal.
the air conditioning system does not
contain chlorine and does not present
any danger to the ozone layer.
52
Page 55

Heating
the heating system works only when the engine is running.
Comfort
Temperature adjustment
F turn the control from blue
(cold) to red (hot) to adjust the
temperature to your wishes.
Air flow adjustment
F turn the knob from position 1
to 4 to obtain the desired flow
of air.
Avoid driving for too long without
ventilation (risk of misting and
deterioration of air quality).
Air distribution adjustment
Centre vent and side air vents.
Centre vent, side vents and footwells.
Footwells.
Windscreen and footwells.
Windscreen.
the air distribution can be varied by
placing the control in an intermediate
position.
3
53
Page 56

Comfort
Manual air conditioning
the system only operates with the engine running.
Temperature level
adjustment
F turn the control knob from
blue (cold) to red (hot) to
adjust the temperature to your
requirements.
Air flow adjustment
F turn the control knob from
position 1 to position 4 to obtain
a comfortable air flow.
If you put the air flow control in position 0
(system off), the temperature is no longer
controlled. However, a slight flow of air can
still be felt, resulting from the movement of
the vehicle.
Air distribution adjustment
Centre and side vents.
Centre and side air vents, footwells.
Footwells.
Windscreen and footwells.
Windscreen.
54
Page 57

Comfort
Air intake / Air recirculation
the recirculation of interior air insulates the
passenger compartment from exterior odours
and smoke.
Return to exterior air intake as soon as possible
to prevent deterioration of the air quality and
the formation of mist.
F Move the manual control to the
left for the "Recirculation of
interior air" position.
F Move the manual control to the
right to return to the "exterior air
intake" position.
Air conditioning On / Off
the air conditioning is designed to
operate effectively in all seasons,
with the windows closed.
It enables you to:
- lower the temperature, in summer,
- increase the effectiveness of the demisting
in winter, above 3°C.
Switching on
F Press this button, the associated indicator
lamp comes on.
the air conditioning does not operate
when the air flow adjustment is set to off.
Switching off
F Press the button again, the associated
indicator lamp switches off.
3
55
Page 58

Comfort
Automatic air conditioning
the air conditioning operates when the engine is running.
Automatic programme
We recommend that you use this mode.
It provides optimised automatic control of
all of the following functions: passenger
compartment temperature, air flow, air
distribution and air intake, in accordance with
the comfort value that you have chosen.
this system is designed to operate effectively
in all seasons, with the windows and fabric roof
closed.
For your comfort, when the engine is switched
off, the settings are retained until the engine is
switched on again.
to prevent too great a distribution of cold air
when the engine is cold, the air flow will only
reach its optimum level gradually.
F Press the "AUTO" button.
the "AUTO" symbol comes on.
By pressing the "AUTO" button again, you can
choose from one of the following settings in
turn:
Allows optimum operation of the
system.
Offers temperature control while
restricting air flow.
Dynamic air distribution mainly
towards the side air vents.
Manual override
It is possible to adjust one or more functions
manually while leaving the other functions in
automatic mode.
the "AUTO" symbol switches off.
to return to automatic mode, press the "AUTO"
button.
Switching to manual mode may not be suitable
(temperature, humidity, odour, condensation)
and does not provide optimum comfort.
56
Page 59

Comfort
Temperature adjustment
the value indicated in the screen corresponds
to a level of comfort and not to a temperature in
degrees Celsius or Fahrenheit.
F Press this button downward to
reduce the value and upward to
increase it.
A setting around 21 gives optimum comfort.
However, depending on your requirements,
a setting between 18 and 24 is normal.
On entering the vehicle, if the interior is very
cold or hot, there is no need to change the
value displayed in order to reach the required
level of comfort. the system corrects the
temperature difference automatically and as
quickly as possible.
For maximum cooling or heating of the
cabin, it is possible to go beyond the
minimum 14 or maximum 28 value.
F Press the temperature adjustment
button down or up until "LO" or
"HI" is displayed.
Air flow adjustment
F Press this button to increase air
flow.
F Press this button to decrease air
flow.
the air flow symbol, the fan, fills progressively.
Air distribution adjustment
F Press this button repeatedly to
direct the air to:
- the centre and side air vents,
- the centre vent, side air vents and
footwells,
- the footwells,
- the windscreen and footwells,
- the centre vent, side air vents and
windscreen,
- the windscreen.
Air intake / Air recirculation
F Pressing this buttons isolates the
passenger compartment from the
outside air.
the air recirculation symbol is
displayed.
Air recirculation enables the passenger
compartment to be isolated from exterior odours
and smoke.
Press this button again or press the "AUTO"
button to resume automatic management of the
intake of air. the air recirculation symbol goes off.
Avoid prolonged recirculation of interior
air (risk of condensation or deterioration
of the air quality).
3
57
Page 60

Comfort
Air conditioning on / off
F Press this button to stop the air
conditioning.
Stopping the air conditioning may cause some
problems (humidity, misting).
Automatic operation of the air conditioning is
resumed when the button is pressed again.
the "A/C" symbol is displayed.
Switching the system off
F Press the air flow adjustment
button until the fan symbol
disappears.
this action switches off all of the functions of
the air conditioning system.
thermal comfort is no longer controlled.
A slight flow of air resulting from the movement
of the vehicle, remains perceptible however.
Pressing the "AUTO" button again reactivates
the system with the values set before it was
switched off.
Avoid driving for long periods with the air
conditioning switched off (risk of misting
and reduction of the air quality in the cabin).
58
Page 61

Front demist - defrost
these markings on the control panels indicate the control positions for rapid demisting or defrosting of the windscreen and side windows.
During the winter period, direct the side air vents towards the side glasses to optimise their demisting and defrosting.
With the heating /
ventilation system
F Put the temperature and air flow controls to
the dedicated marked position.
F Put the air distribution control to the
"Windscreen" position.
With the manual air
conditioning system
F Put the temperature and air flow controls to
the dedicated marked position.
F Put the air intake control to the "exterior air
intake" position
(manual control to the right).
F Put the air distribution control to the
"Windscreen" position.
F Switch on the air conditioning by pressing
the appropriate button; the indicator lamp
in the button comes on.
Comfort
3
With automatic air
conditioning system
F Press this button.
the indicator lamp in the button comes on.
F Press this button again to switch it off.
the indicator lamp in the button goes off.
Other settings (air flow, ai r dis tribution. ..)
are controlled automatically.
59
Page 62

Comfort
Rear screen demist - defrost
the control button is located on the heating / ventilation or air conditioning system control panel.
60
the heated rear screen can only operate when
the engine is running.
F Press this button to demist/defrost the rear
screen and, depending on version, the
door mirrors.
the indicator lamp associated with the
button comes on.
Switching offSwitching on
F Press this button again to switch off the
heated rear screen.
the indicator lamp associated with the
button goes off.
Switch off the demisting/defrosting
of the rear screen and door mirrors
(depending on version) as soon
as appropriate, as lower current
consumption results in reduced fuel
consumption.
Page 63

Front ttings
1. Sun visor.
2. glove box.
3. Radio, touch screen or storage.
4. 12 volt accessory socket
(maximum 120 W).
Do not exceed the power rating to avoid
damaging your accessory.
5. uSB port.
6. Auxiliary socket.
7. Storage or cup holder.
8. Cup holder.
9. Door pockets.
Storage for a bottle of water.
Fittings
4
61
Page 64

Fittings
the sun visors are fitted with a vanity mirror,
with a concealing flap and a map holder (or
ticket holder).
Glove boxSun visor
It can be used to hold the vehicle's handbook
pack...
F to open the glove box, raise the handle.
It houses the front passenger airbag
deactivation switch A and the reinitialisation
button (B) for the tyre under-inflation detection
system (depending on equipment).
On one side there is a location C intended to
hold a water bottle (1 litre maximum).
12 V accessory socket
F to connect a 12 V accessory (maximum
power: 120 Watts), lift the cover and
connect a suitable adaptor.
Do not exceed the maximum power
rating of the socket (risk of damage to
your device).
62
Page 65

Connected to the uSB port, the
portable device charges automatically
while in use.
Fittings
Auxiliary socketUSB port
It permits the connection of a portable device,
such as a digital audio player of the iPod
or uSB memory stick.
It reads the audio files, which are sent to your
audio system to be heard via the vehicle's
speakers.
You can manage these files using the steering
mounted controls or those on the audio system
control panel.
®
type
For more information on the use of this
equipment, see the "Audio equipment
and telematics" section.
4
It permits the connection of a portable device
to listen to your music files via the vehicle's
speakers.
the management of the files is done using your
portable device.
For more information on the use of
this equipment, refer to the "Audio
equipment and telematics" section.
63
Page 66

Fittings
Mats
Fitting Removal
to remove the mat on the driver's side:
F move the seat as far back as possible,
F unclip the fixings,
F remove the mat.
Refitting
to refit the mat on the driver's side:
F position the mat correctly,
When fitting the mat for the first time, on the
driver's side use only the fixings provided in the
wallet attached.
the other mats are simply placed on the
carpet.
F refit the fixings by pressing,
F check that the mat is secured correctly.
to avoid any risk of jamming of the
pedals:
- only use mats which are suited to
the fixings already present in the
vehicle; these fixings must be used,
- never fit one mat on top of another.
the use of mats not approved by
PeugeOt may interfere with access
to the pedals and hinder the operation
of the speed limiter or etg electronic
gearbox.
64
Page 67

Rear parcel shelf
Fittings
4
to facilitate loading of the boot, the rear parcel
shelf is fitted to the tailgate.
When closing the tailgate, check that nothing
could interfere with the return to position of the
shelf.
to remove the shelf:
F open the tailgate,
F unclip the two cords,
F pull firmly on the shelf to disengage it from
its hinges on the tailgate inner trim.
You can then stow the shelf behind the front
seats.
to refit the shelf:
F open the tailgate,
F position the underside of the shelf facing
you,
F clip the shelf into the two hinges,
F pass the two cords through the guides
either side of the struts,
F clip the two cords in place.
Do not place heavy loads on the shelf,
as they may cause the shelf to unclip.
65
Page 68

Fittings
Boot ttings
1. Hooks.
2. temporary use spare wheel and tools.
or
Storage box.
the wheel or storage box must be put
in place under the carpet before loading
the boot.
66
Page 69

Fittings
Hooks
the hooks can be used to secure shopping
bags.
Maximum authorised load on the
hooks: 2 kg.
Storage box
F Remove the boot carpet for access to the
storage box.
Depending on the configuration, it is laid out for
storing:
- a towing eye,
- a temporary puncture repair kit,
- ...
4
For versions with storage box: it must
be in place before loading the boot.
67
Page 70

Driving
A few driving recommendations
Observe the driving regulations at all times and
remain vigilant whatever the traffic conditions.
Pay close attention to the traffic and keep your
hands on the wheel so that you are ready to
react at any time to any eventuality.
On a long journey, a break every two hours is
strongly recommended.
In difficult weather, drive smoothly, anticipate
the need to brake and increase the distance
from other vehicles.
Driving on flooded roads
We strongly advise against driving on flooded
roads, as this could cause serious damage
to the engine or gearbox, as well as to the
electrical systems of your vehicle.
If you are obliged to drive through water:
- check that the depth of water does not
exceed 15 cm, taking account of waves
that might be generated by other users,
- deactivate the Stop & Start system,
- drive as slowly as possible without
stalling. In all cases, do not exceed 6 mph
(10 km/h),
- do not stop and do not switch off the
engine.
On leaving the flooded road, as soon as
circumstances allow, make several light brake
applications to dry the brake discs and pads.
If in doubt on the state of your vehicle, contact
a PeugeOt dealer or a qualified workshop.
Important!
Never drive with the parking brake
applied - Risk of overheating and
damage to the braking system!
Do not park or run the engine when
stationary in areas where inflammable
substances and materials (dry grass,
dead leaves...) might come into contact
with the hot exhaust system - Risk of
fire!
Never leave a vehicle unsupervised
with the engine running. If you have
to leave your vehicle with the engine
running, apply the parking brake
and put the gearbox into neutral or
position N, depending on the type of
gearbox.
68
Page 71

Driving
Starting - swit chin g off the engi ne with th e k e y
Never leave the engine running in
an enclosed area without adequate
ventilation: internal combustion
engines emit toxic exhaust gases,
such as carbon monoxide. Danger of
intoxication and death. In very severe
winter conditions (temperatures
below -23°C), it is necessary to allow
the engine to run for 4 minutes before
setting off, in order to ensure the
correct operation and durability of
the mechanical components of your
vehicle, the engine and gearbox.
Ignition switch
1. "LOCK" position.
2. "ACC" position.
3. "ON" position.
4. "STA RT " position.
If you use the accessories for a
prolonged period (key in position 2
or 3), you risk discharging the battery.
Starting your vehicle will then no longer
be possible. Be aware.
Starting using the key
For vehicle fitted with a manual gearbox:
F Insert the key in the ignition switch.
F turn the key to position 2.
F unlock the steering column, by turning the
wheel slightly.
F Fully depress the clutch pedal.
F Put the gear lever into neutral.
F Operate the starter by turning the key to
position 4 (START).
F Once the engine is running , release the key.
the key returns automatically to position 3
(ON).
For vehicles fitted with an ETG gearbox:
F Insert the key in the ignition switch.
F turn the key to position 2.
F unlock the steering column, by turning the
wheel slightly.
F Press and hold the brake pedal.
F Put the gear selector into position N.
F Operate the starter by turning the key to
position 4 (START).
F Once the engine is running , release the key.
the key returns automatically to position 3
(ON).
5
69
Page 72

Driving
Starting - switching off the engine with
Switching off
F Immobilise the vehicle.
F With a manual gearbox: put the gear lever
into neutral.
F With an etg gearbox: place the selector at
position N.
F turn the key towards you to position 2
(ACC).
F Press in and turn the key to position 1
(LOCK).
F Remove the key from the ignition switch.
F turn the steering until the steering column
locks.
Avoid attaching heavy objects to the
key, which would weigh down on its
blade in the ignition switch and could
cause a malfunction.
Key in ignition
If the key has been left in the ignition,
an audible signal is heard on opening
the driver's door.
the Keyless entry and Starting system
Changing the mode of the
vehicle
If you use the accessories for a
prolonged period, the vehicle will
automatically switch to "OFF" mode
after about 20 minutes.
Be aware in order to avoid discharging
the battery.
With the electronic key inside the
vehicle; each press on the "START/
STOP" button, with no action on the
pedals, changes the vehicle's mode:
F First press ("ACC" mode).
the accessories (radio, 12V socket...) can
be used.
F Second press ("ON" mode).
Ignition on.
F third press ("OFF" mode).
70
Page 73

Starting using
the electronic key
For vehicles fitted with an ETG gearbox:
F With the electronic key inside the vehicle,
put the gear selector at N and press the
brake pedal.
this indicator lamp comes on in the
instrument panel.
F Press and release the "START/
STOP" button.
Driving
If one of the starting conditions is
not met, the "Keyless entry and
Starting" system indicator lamp flashes
in the instrument panel. In some
circumstances, it is necessary to
turn the steering wheel slightly while
pressing the "START/STOP" button to
assist unlocking of the steering.
5
With the first press on the "STA RT/
STOP" button, this indicator lamp
flashes slowly in the instrument panel.
For vehicles fitted with a manual gearbox:
F With the electronic key inside the vehicle,
put the gear lever into neutral and fully
depress the clutch pedal.
this indicator lamp comes on in the
instrument panel.
F Press and release the "START/
STOP" button.
Depending on the ambient temperature,
each attempt at starting can take up to
around 30 seconds. During this period,
do not press the "START/STOP" button
again, or release the clutch pedal or
brake pedal (depending on the type of
gearbox).
After this period, if the engine has not
started, press the "START/STOP"
button again for another attempt at
starting.
the presence of the electronic key in
the vehicle is essential for switching
on the ignition and starting only. Once
the engine has started, make sure
that the electronic key remains with
the vehicle until the end of the journey:
otherwise you would not be able to lock
the vehicle.
71
Page 74

Driving
Switching off using
the electronic key
F Immobilise the vehicle.
F With a manual gearbox: put the gear lever
into neutral.
F With an etg gearbox: place the gear
selector at N.
F With the electronic key inside
the vehicle, press the "STAR T/
STOP" button.
the engine stops.
the steering locks when a door is opened or on
locking the vehicle.
If the vehicle is not immobilised, the
engine will not stop.
there is an audible signal when the driver's
door is opened and the vehicle is not in
"OFF" mode.
F Press the "START/STOP" button
again to change to "OFF" mode.
Emergency starting
When the electronic key is in the
recognition zone and your vehicle
does not start after pressing the
"START/STOP" button, this warning
lamp flashes in the instrument panel.
F With a manual gearbox: put the gear lever
into neutral.
F With an etg gearbox: place the selector
lever at N.
F Put the corner of the electronic key, where
the indicator lamp is located, in contact
with the "START/STOP" button.
there is an audible signal when the
electronic key is recognised; the vehicle
changes to "ON" mode.
F With a manual gearbox: press the clutch
pedal fully down.
F With an etg gearbox: press the brake
pedal.
F Check that the "Keyless entry and starting"
indicator lamp comes on in green in the
instrument panel.
F Press the "START/STOP" button.
the engine starts.
If the engine does not start, contact a
PeugeOt dealer or a qualified workshop.
72
Page 75

Emergency switch-off
In the event of an emergency only, the engine
can be switched of without conditions. to do
this, press and hold the "START/STOP" button
for more than 2 seconds.
In this case the steering column locks as soon
as the vehicle stops.
Electronic key not
recognised
If the electronic key is no longer in the
recognition zone when driving or when you
(later) request switching off the engine, there is
an audible signal to warn you.
F Press and hold the "START/
STOP" button for more than
2 seconds if you want to force
switching off the engine (note
that restarting will not be
possible without the key).
Driving
electronic engine
immobiliser
this locks the engine management system as
soon as the ignition has been switched off and
therefore prevents starting of the vehicle by
anyone who does not have the key.
the ignition key has an electronic chip which
has a special code. When the ignition is
switched on, the code must be recognised for
starting to be possible.
In the event of a malfunction, your vehicle will
not start.
Contact a PeugeOt dealer or a qualified
workshop.
Do not make any modifications to the
electronic immobiliser system.
5
73
Page 76

Driving
Manual parking brake
Applying
F Pull the parking brake lever up to
immobilise your vehicle.
Releasing
F Pull the parking brake lever up gently,
press the release button then lower the
lever fully.
When the vehicle is being driven, if
the parking brake is still on or has
not been fully released, this warning
lamp comes on accompanied by an
audible signal.
When parking on a slope, direct your
wheels against the kerb, apply the
parking brake, switch off the ignition
and engage a gear (vehicles fitted with
a manual gearbox).
5-speed manual gearbox
Engaging reverse gear
F Press the clutch pedal fully down.
F Push the gear lever fully to the right then
backwards.
Only engage reverse gear when the
vehicle is stationary with the engine at idle.
74
Page 77

etg electronic gearbox
the five-speed etg electronic gearbox offers a choice between the ease of automated operation or the pleasure of manual gear changing.
Driving
Gear selector
R. Reverse: with your foot on the brake pedal,
move the gear selector to the right then
forward to select this position.
N. Neutral: with your foot on the brake pedal,
select this position to start the engine.
E. Automatic (easy) mode: move the gear
selector back to select this mode.
M. Manual mode with sequential gear
changing: move the gear selector back
then to the left to select this mode.
Steering mounted control paddles
Press behind the "+" steering
mounted control paddle to change up.
Press behind the "-" steering
mounted control paddle to change
down.
the steering mounted control paddles
cannot be used to select neutral or to
engage or come out of reverse gear.
Display in the instrument panel
5
the position of the gear selector (R, N, E or M)
is displayed in the instrument panel.
In automatic (easy) mode, when you
temporarily take control of gear changing,
the gear engaged is also displayed in the
instrument panel.
75
Page 78

Driving
Moving off
F With the parking brake applied, press the
brake pedal then select position N.
F Start the engine.
if you do not press the brake pedal or
if the gear selector is not in position N,
engine starting is not possible.
F With your foot on the brake pedal, select
position R, E or M.
F Release the parking brake.
F Progressively release the brake pedal.
Accelerate away.
Creep function
this function makes manoeuvring the vehicle
at low speed easier (parking, traffic jams…).
After first placing the gear selector in
position E, M or R, the vehicle moves off as
soon as you take your foot off the brake
pedal, at low speed, with the engine at idle.
Never leave a child unsupervised inside
the vehicle with the engine running.
the creep function may be temporarily
unavailable if the clutch temperature is
too high or the gradient too steep. An
audible signal gives a warning if the
clutch temperature is too high.
Automatic (EASY) mode
F Select position E using the gear selector.
the gearbox then operates in auto-active
mode, without any intervention required by the
driver.
It continuously selects the most suitable gear
for:
- optimised fuel consumption,
- the driving style,
- the profile of the road,
- the load in the vehicle.
to obtain optimum acceleration, when
overtaking another vehicle for example, press
firmly on the accelerator pedal going beyond
the point of resistance.
It is possible to change mode at any time, by
moving the gear selector from position E to
position M and the other way round.
Never select neutral N when the vehicle
is moving.
76
Page 79

Manual mode
Driving
Temporarily taking control of
gear changes
You can temporarily take control of gear
changes using the "+" and "-" steering
mounted control paddles.
gear change commands are only acted on if
the engine speed allows. there is an audible
signal if a command is not accepted.
the gear engaged is displayed in the
instrument panel.
this function allows you to anticipate certain
situations such as overtaking a vehicle or
approaching a corner.
After a few moments with no action on the
controls, the gearbox returns to automatic
control of the gears.
F Place the gear selector in position M.
F Change up or down using:
- the gear selector, pushing:
- back, "+" to change up,
- forward, "-" to change down.
- or the "+" or "-" steering mounted
control paddle.
the gear engaged is displayed.
gear change commands are only acted on if
the engine speed allows.
It is not necessary to release the accelerator
peal during gear changes. there is an audible
signal if a command is not accepted.
When braking or slowing down, the gearbox
automatically changes down so that pick-up is
in the right gear.
under sharp acceleration, the gearbox will
not change up without action by the driver on
the gear selector or steering mounted control
paddles (unless the engine speed is close to
maximum).
It is possible to change mode at any time, by
moving the gear selector from position E to
position M and the other way round.
Never select neutral N when the vehicle
is moving.
5
77
Page 80

Driving
Reverse
to engage reverse, the vehicle must be
stationary with your foot on the brake pedal.
F Select position R.
there is an audible signal on engaging reverse.
Switching off
the vehicle can be stopped whatever the
position of the gear selector (N, E or R).
However, there is an audible signal on opening
the driver's door if the gear selector is not at
position N.
When the vehicle is stopped with the
engine running, always put the gear
selector to neutral N.
there is a continuous audible signal
if you turn the ignition switch to "OFF"
with the vehicle in 2
In this case return the ignition switch
to "ON", move the gear selector to
position N, then to position E, M or R,
then turn the ignition switch to "OFF".
nd
, 3rd, 4th or 5th gear.
On a slope, use the brakes to
immobilise the vehicle and place the
gear selector in position N, E or R.
In all cases, it is essential that you
apply the parking brake to immobilise
the vehicle.
Before doing anything under the
bonnet, check that the gear selector is
in neutral N and the parking brake is
applied.
Limits of operation
On a gradient, or when hill start assist is
activated, never hold the vehicle using the
accelerator: you could damage the clutch.
In these situations there is an audible signal.
F Move the gear selector to position N.
F Wait 15 minutes to allow the clutch to cool
down before setting off.
Operating faults
With the ignition on, illumination
of this warning lamp indicates a
gearbox fault.
Contact a PeugeOt dealer or a
qualified workshop.
If N is flashing in the instrument panel
accompanied by an audible signal for
a long time:
- check that the ignition switch is at
the "ON" position,
- place the gear selector at N, then move it
to E, M or R.
If 1 is flashing in the instrument panel:
- place the gear selector at E or M, then
move it to N.
If R is flashing in the instrument panel:
- place the gear selector at R, then move it
to N.
78
Page 81

gear shift indicator
System which reduces fuel consumption by recommending the most appropriate gear.
Operation
Depending on the driving situation and your
vehicle's equipment, the system may advise
you to change gear.
the gear engagement recommendations must
not be considered compulsory. In fact, the
configuration of the road, the amount of traffic
and safety remain determining factors when
choosing the best gear. therefore, the driver
remains responsible for deciding whether or not
to follow the advice given by the system.
this function cannot be deactivated.
example:
- You are in third gear.
- You press the accelerator pedal.
- the system may suggest that you engage
a higher gear.
the information appears in the
instrument panel in the form of an
arrow.
With an etg electronic gearbox, the
system is only active in manual mode.
With the Puretech 82 engine, the
system only suggests when to change
up.
the system adapts its gear change
recommendation according to the
driving conditions (slope, load, ...) and
the demands of the driver (power,
acceleration, braking, ...).
the system never suggests:
- engaging first gear,
- engaging reverse gear.
Driving
5
79
Page 82

Driving
Hill start assist
System which keeps your vehicle immobilised
temporarily (approximately 2 seconds) when
starting on a gradient, the time it takes to
move your foot from the brake pedal to the
accelerator pedal.
this system only operates when:
- the vehicle is completely stationary, with
your foot on the brake pedal,
- certain conditions of slope are met,
- with the driver’s door closed.
the hill start assist system cannot be
deactivated.
Operation
80
Do not exit the vehicle while it is being
held in the hill start assist phase.
If you need to exit the vehicle with the
engine running, apply the parking brake
manually.
On an ascending slope, with the vehicle
stationary, the vehicle is held for a
momentarily when you release the brake pedal:
- if you are in first gear or neutral with a
manual gearbox,
- if you are in position E or M with an etg
electronic gearbox.
On a descending slope, with the vehicle
stationary and reverse gear engaged, the
vehicle is held momentarily when you
release the brake pedal.
Operating fault
If a fault in the system occurs, this
warning lamp comes on. Contact
a PeugeOt dealer or a qualified
workshop to have the system
checked.
Page 83

Stop & Start (Vti 68 S&S engine)
the Stop & Start system puts the engine temporarily into standby - StOP mode - during stops in the traffic (red lights, traffic jams, or other...).
the engine restarts automatically - StARt mode - as soon as you want to move off. the restart takes place instantly, quickly and silently.
Perfect for urban use, the Stop & Start system reduces fuel consumption and exhaust emissions as well as the noise level when stationary.
Operation
Going into engine STOP mode
this indicator lamp comes on in the
instrument panel and the engine
goes into standby automatically:
- when stationary, in neutral, and you
release the clutch pedal.
Stop & Start time counters
A partial time counter counts the periods in
StOP mode during a journey.
It is displayed in the trip computer once the
Stop & Start acts.
Press one of the screen management buttons
to return to the previous display.
A global time counter counts the periods in
StOP mode since the last reset.
When it is displayed, press one of the screen
management buttons to reset the counter.
For smoother operation, during
parking manoeuvres StOP mode is
not available for a few seconds after
coming out of reverse gear.
StOP mode does not affect the
vehicle's systems, such as for example,
braking, power steering...
Never refuel with the engine in
StOP mode; you must switch off the
ignition with the button.
Special cases: STOP mode not
available
StOP mode is not invoked principally when:
- the driver's door is open,
- the driver's seat belt is not fastened,
- the engine is needed to maintain a
comfortable temperature in the passenger
compartment,
- demisting is active,
- some special conditions (battery charge,
engine temperature, braking assistance,
vehicle stopped on a steep gradient, high
altitude...) where the engine is needed to
assure control of a system.
Driving
5
81
Page 84

Driving
Operating fault
82
Going into engine START mode
this indicator lamp goes off and the
engine starts automatically:
- when you fully depress the clutch pedal.
Special cases: START invoked
automatically
StARt mode is invoked automatically when:
- you open the driver's door,
- you open the bonnet,
- you unfasten the driver's seat belt,
- some special conditions (battery charge,
engine temperature, braking assistance,
descending a steep gradient, adjustment of
the air conditioning...) where the engine is
needed for control of a system.
In the event of a fault with the system,
this warning lamp flashes in the
instrument panel.
Have it checked by a PeugeOt dealer or a
qualified workshop.
Page 85

Driving
Maintenance
Before doing anything under the
bonnet, deactivate the Stop & Start
system to avoid any risk of injury
resulting from automatic operation of
StARt mode.
this system requires a 12 V battery with a
special specification and technology (reference
numbers available from PeugeOt dealers).
Fitting a battery not listed by
PeugeOt introduces the risk of malfunction of
the system.
For charging, use a 12 V charger and do not
reverse the polarity.
the Stop & Start system makes use of
advanced technology. For any work on
the system go to a qualified workshop
with the skills and equipment required,
which a PeugeOt dealer is able to
provide.
Deactivation
At any time, press this button to deactivate the
system.
this is confirmed by the illumination
of this indicator lamp in the
instrument panel.
If the system has been deactivated in
StOP mode, the engine restarts immediately.
Reactivation
Press this button again.
the system is active again; this is confirmed by the
indicator lamp going off in the instrument panel.
the system is reactivated automatically at
every new engine start by the driver.
5
83
Page 86

Driving
Speed limiter (Puretech 82 engine)
System which prevents the vehicle from exceeding the speed programmed by the driver.
the speed limiter is switched on manually:
this can be done whatever the speed of the
vehicle. However, if you are driving at less than
20 mph (30 km/h), the programmed speed will
be fixed at 20 mph (30 km/h).
the speed limiter is paused by operation of the
control.
the programmed speed can be exceeded
temporarily by pressing the accelerator firmly
beyond the point of resistance.
to return to the programmed speed, simply
release the accelerator pedal until the vehicle
returns to the programmed speed limit.
the programmed speed remains in the
memory when the ignition is switched off.
the speed limiter cannot, in any
circumstances, replace the need to
observe speed limits, nor can it replace the
need for vigilance on the part of the driver.
Steering mounted controls
the controls are grouped together on this
control stalk at the steering wheel.
1. Speed limiter on / off: by pressing the end
of the control stalk.
2. Decrease setting: by pushing the control
stalk down.
3. Increase setting: by pushing the control
stalk up.
4. Speed limiter on / pause: by pulling the
control stalk towards you
Displays in the instrument panel
the information is grouped together in the
instrument panel screen.
5. Speed limiter mode selection indication.
6. Speed limiter on / pause indication.
7. Speed value setting.
84
Page 87

Driving
Switching on
F Press the end of the control stalk: the
speed limiter mode is selected but is not
switched on.
F Switch the speed limiter on by pulling the
control stalk towards you, if the speed
displayed is suitable (by default, the last
speed programmed).
Pause
F You can temporarily stop the the speed
limiter by pulling the control stalk towards
you again: the display confirms that it has
been stopped (Pause).
F Pull the control stalk towards you again to
restore the speed limiter.
Adjusting the speed limit
setting
You do not have to switch the speed
limiter on in order to set the speed.
Once the function is selected, you can modify
the speed setting by:
- by pushing the control stalk up to increase
the setting,
- by pushing the control stalk down to
decrease the setting.
A brief push on the control stalk modifies the
speed setting by + or - 1 km/h.
A maintained push on the control stalk modifies
the speed setting by + or - 5 km/h.
5
85
Page 88

Driving
Temporarily exceeding the
programmed speed
F Press firmly on the accelerator pedal,
going beyond the point of resistance, to
exceed the programmed speed limit.
the speed limiter is deactivated temporarily
and the displayed programmed speed flashes.
An audible signal accompanies the
flashing of the programmed speed
when exceeding the speed is not due to
an action by the driver (steep hill...).
As soon as the vehicle's speed returns to the
programmed value, the limiter operates again:
the display of the programmed speed becomes
steady again.
Switching off
F Press the end of the control stalk.
the display of information related to the
speed limiter disappears.
Operating fault
Illumination of this warning lamp in
the instrument panel indicates a fault
with the speed limiter.
Have it checked by a PeugeOt
dealer or a qualified workshop.
the use of mats not approved by
PeugeOt may interfere with the
operation of the speed limiter.
to avoid any risk of jamming of the
pedals:
- ensure that the mat is secured
correctly,
- do not fit one mat on top of another.
86
Page 89

Speed limiter (Vti 68 engine)
System which prevents the vehicle from exceeding the speed programmed by the driver.
Driving
the speed limiter is switched on manually:
this can be done whatever the speed of the
vehicle. However, if you are driving at less than
20 mph (30 km/h), the programmed speed will
be fixed at 20 mph (30 km/h).
the speed limiter is paused by operation of the
control.
the programmed speed can be exceeded
temporarily by pressing the accelerator firmly
beyond the point of resistance.
to return to the programmed speed, simply
release the accelerator pedal until the vehicle
returns to the programmed speed limit.
the programmed limit speed is erased
when switching off the ignition.
the speed limiter cannot, in any
circumstances, replace the need to
observe speed limits, nor can it replace the
need for vigilance on the part of the driver.
Steering mounted controls
the controls are grouped together on this
control stalk at the steering wheel.
1. Speed limiter on / off: by pressing the end
of the control stalk.
2. Programming the speed, then
Decrease the setting: by pushing the
control stalk down.
3. Restore speed limiter
Increase the setting: by pushing the control
stalk up.
4. Pause speed limiter: by pulling the control
stalk towards you.
Displays in the instrument panel
5
the information is grouped together in the
instrument panel screen.
5. Speed limiter on / pause indication.
6. Speed value setting.
If you choose to display other information
(trip A for example), the speed limiter
information is automatically displayed again
after about 6 seconds.
87
Page 90

Driving
Switching on
F Press the end of the control stalk: the
speed limiter is switched on.
this indicator lamp comes on in the
instrument panel.
F Accelerate or decelerate to attain the
desired speed.
F Push the control stalk down and release, to
programme the speed.
the speed at which the vehicle is running
at the moment when you release the
control stalk becomes the programmed
speed.
Pause
F You can temporarily stop the the speed
limiter by pulling the control stalk towards
you.
F Push the control stalk up to restore
operation of the speed limiter with the
same speed setting.
Adjusting the speed limit
setting
Once a speed is programmed, you can modify
it by pushing and releasing the control stalk:
- up to increase the speed setting,
- down to reduce the speed setting.
A brief push on the control stalk modifies the
speed setting by + or - 1 km/h.
A maintained push on the control stalk modifies
the speed setting by + or - 5 km/h.
88
Page 91

Driving
Temporarily exceeding the
programmed speed
F Press firmly on the accelerator pedal,
going beyond the point of resistance, to
exceed the programmed speed limit.
the speed limiter is deactivated temporarily
and the displayed programmed speed flashes.
An audible signal accompanies the
flashing of the programmed speed
when exceeding the speed is not due to
an action by the driver (steep hill...).
As soon as the vehicle's speed returns to the
programmed value, the limiter operates again:
the display of the programmed speed becomes
steady again.
Switching off
F Press the end of the control stalk
the display of information related to the
speed limiter disappears.
Operating fault
Illumination of this warning lamp in
the instrument panel indicates a fault
with the speed limiter.
Have it checked by a PeugeOt dealer or a
qualified workshop.
5
the use of mats not approved by
PeugeOt may interfere with the
operation of the speed limiter.
to avoid any risk of jamming of the
pedals:
- ensure that the mat is secured
correctly,
- do not fit one mat on top of another.
89
Page 92

Driving
Reversing camera
the reversing camera is activated automatically when reverse gear is engaged.
90
the reversing camera cannot in any
circumstances replace the need for the
vigilance on the part of the driver.
the image is provided in the touch screen
only, with an indication of the limit of the rear
bumpers (red line) and the general direction of
the vehicle (blue lines).
Never reverse the vehicle looking only
at the screen.
High pressure jet washing
When washing your vehicle, do not
direct the lance within 30 cm of the
camera lens.
the field of vision covered by the camera is
limited: objects in the immediate proximity of
the bumper or located below it are not visible.
the camera's wide-angle lens deforms the
image presented in the screen: the distances
visible in the screen may be different from
the true distances. this deformation varies
according to the loading of the vehicle and the
slope of the road.
Clean the reversing camera regularly
using a soft, dry cloth.
Page 93

Lane departure warning system
System which detects the unintended crossing of longitudinal traffic lane markings on the ground, using a camera that recognises both solid and
broken lines.
to improve your safety, the camera analyses the image and then triggers a warning if the vehicle wanders over a lane marking (speed higher than
30 mph (50 km/h)).
this system is particularly suitable for motorways and dual carriageways.
Driving
the lane departure warning system
cannot in any circumstances replace
the need for vigilance on the part of the
driver.
It is necessary to observe driving
regulations and take a break every
two hours.
Activation
F Press this button, located on the steering
wheel.
Detection
You are alerted by an audible signal and the
display of a warning lamp in the instrument panel.
5
No alert is given if the direction
indicators are on and for around
20 seconds after they stop flashing.
91
Page 94

Driving
Displays in the instrument panel
Display in the instrument panel Comments
the function has been activated (green indicator).
the system has identified a marking on the ground (green
indicator).
the system is alerting you that a road marking is being crossed
(green and orange warning).
the display of this warning is accompanied by an audible signal.
the detection may be impeded:
- if the ground markings are worn,
- if there is little contrast between the markings on the ground and the road surface,
- if the windscreen is dirty,
- in certain extreme weather conditions: fog, heavy showers, bright sunlight or direct
exposure to the sun (low sun, leaving a tunnel...) and shadows.
Deactivation
F Press this button again.
the status of the system remains in the
memory when the ignition is switched off.
Operating fault
In the event of a malfunction, this (orange)
warning lamp comes on in the instrument panel.
Contact a PeugeOt dealer or a qualified
workshop without delay.
92
Page 95

exterior lighting control stalk
Visibility
Main lighting
the various front and rear lamps of the vehicle
are designed to adapt the driver's visibility
progressively according to the ambient light
level and weather:
- sidelamps, to be seen,
- dipped beam headlamps to see without
dazzling other drivers,
- main beam headlamps to see clearly when
the road is clear.
Additional lighting
Other lamps are provided to meet the
requirements of particular driving conditions:
- a rear foglamp,
- front foglamps,
- daytime running lamps to be more visible
during the day.
In some weather conditions (e.g. low
temperature or humidity), the presence
of misting on the internal surface of the
glass of the headlamps and rear lamps
is normal; it disappears after the lamps
have been on for a few minutes.
6
Travelling abroad
If using your vehicle in a country that
drives on the other side of the road, the
headlamps must be adjusted to avoid
dazzling on-coming drivers.
Contact a PeugeOt dealer or a
qualified workshop.
93
Page 96

Visibility
Selection ring for main lighting
mode
turn the ring to position the symbol required
facing the mark.
Lighting off / Daytime running lamps.
Sidelamps only.
94
Model without AUTO lighting
Model with AUTO lighting
Dipped or main beam headlamps.
Automatic illumination of
headlamps.
Dipping the headlamps
With dipped beam on, push the control stalk
away from you to change to main beam. Pull
the stalk toward you change back to dipped
beam.
In the lighting off and sidelamps modes, the
driver can switch on the main beam headlamps
temporarily ("headlamp flash") by maintaining a
pull on the stalk.
Displays
Illumination of the corresponding indicator lamp
in the instrument panel confirms the lighting
switched on.
Page 97

Visibility
Foglamp selection ring
the front foglamps operate with dipped and
main beam headlamps.
Front foglamps and rear
foglamp
Rotate and release the ring:
F forward once to switch on the rear foglamp,
F forward again to switch on the front
foglamps,
F rearward once to switch off the front
foglamps,
F rearward again to switch of the rear
foglamp.
In good or rainy weather, both day
and night, the front foglamps and the
rear foglamp are prohibited. In these
situations, the power of their beams
may dazzle other drivers. they should
only be used in fog or snow.
In these weather conditions, it is your
responsibility to switch on the foglamps
and dipped beam headlamps manually
as the sunshine sensor may detect
sufficient light.
Do not forget to switch off the front
foglamps and the rear foglamp when
they are no longer necessary.
When the headlamps switch off with automatic
illumination of headlamps (AutO model)
or when the dipped beam headlamps are
switched off manually, the foglamps and
sidelamps remain on.
F turn the ring rearward to switch off all the
lamps.
Switching off the lamps when
the ignition is switched off
On switching off the ignition, all of the
lamps turn off immediately, except for
dipped beam if guide-me-home lighting
is activated.
Switching on the lamps
after the ignition is
switched off
to reactivate the lighting control, rotate
the ring to the "0" position - lamps off,
then to the desired position.
On opening the driver's door a
temporary audible signal warns the
driver that the lighting is on.
6
95
Page 98

Visibility
Automatic illumination of
headlamps
Switching on
F turn the ring to the "AUTO" position.
Switching off
F turn the ring to another position.
96
using a sunshine sensor, if a low level of
ambient light level is detected, the sidelamps
and dipped beam headlamps come on
automatically, without any action by the driver.
When the ambient light returns to a sufficient
level or the wipers are switched off, the lighting
is switched off automatically.
the sensor is located at the base of the
windscreen.
In foggy weather or in snow, the
sunshine sensor may detect sufficient
light. the lighting will not come on
automatically.
Do not cover the sunshine sensor, the
associated functions will no longer be
controlled.
Page 99

Manual guide-me-home
lighting*
Visibility
Switching on
F Place the lighting control stalk in the
"lighting off" or "AutO" position.
F With the ignition off, "flash" the headlamps
using the lighting control stalk.
the lighting comes on for about 30 seconds.
6
temporarily keeping the dipped beam
headlamps on after the vehicle's ignition has
been switched off makes the exit of the vehicle's
occupants easier when the light is poor.
* Depending on version.
Switching off
the manual guide-me-home lighting switches
off immediately if you.
- flash the headlamps again,
- place the lighting control stalk in another
position,
- switch the ignition on.
97
Page 100

Visibility
Headlamp adjustment
to avoid causing a nuisance to other road
users, the height of the headlamps should be
adjusted according to the load in the vehicle.
0. Driver only.
0.5. Driver + front passenger.
1.5. 4 people.
3. 4 people + maximum authorised load.
3.5. Driver + maximum authorised load.
Courtesy lamp Boot lamp*
In this position, it comes on
when one of the doors is
opened.
the courtesy lamp is permanently
off.
the courtesy lamp is permanently
on.
If left in the "permanently on" position,
the courtesy lamp will switch off about
20 minutes after the last door is closed.
this comes on automatically when the boot is
opened and goes off automatically when the
boot is closed.
98
the initial setting is position "0".
* Depending on version.
 Loading...