

Peugeot 1007 2006 Owner Manual
10
-
Familiarisation
01-10-2005
11
-
Familiarisation
01-10-2005
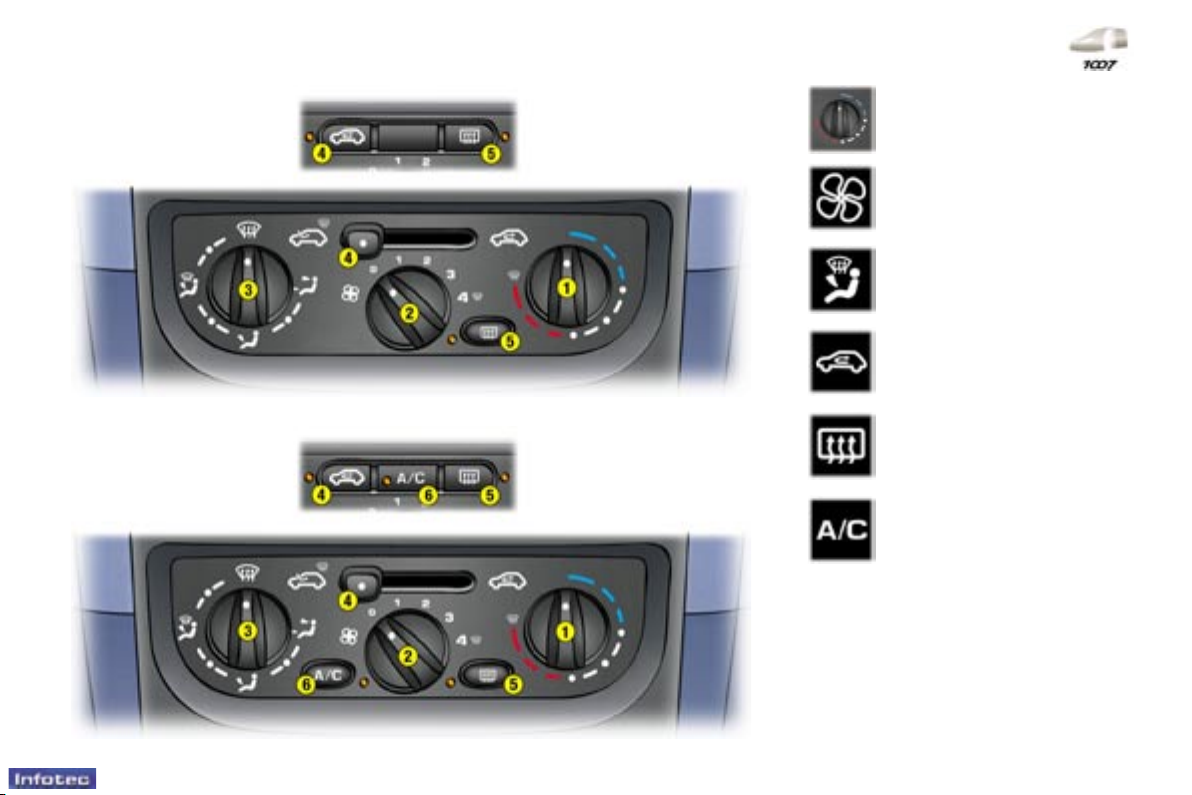
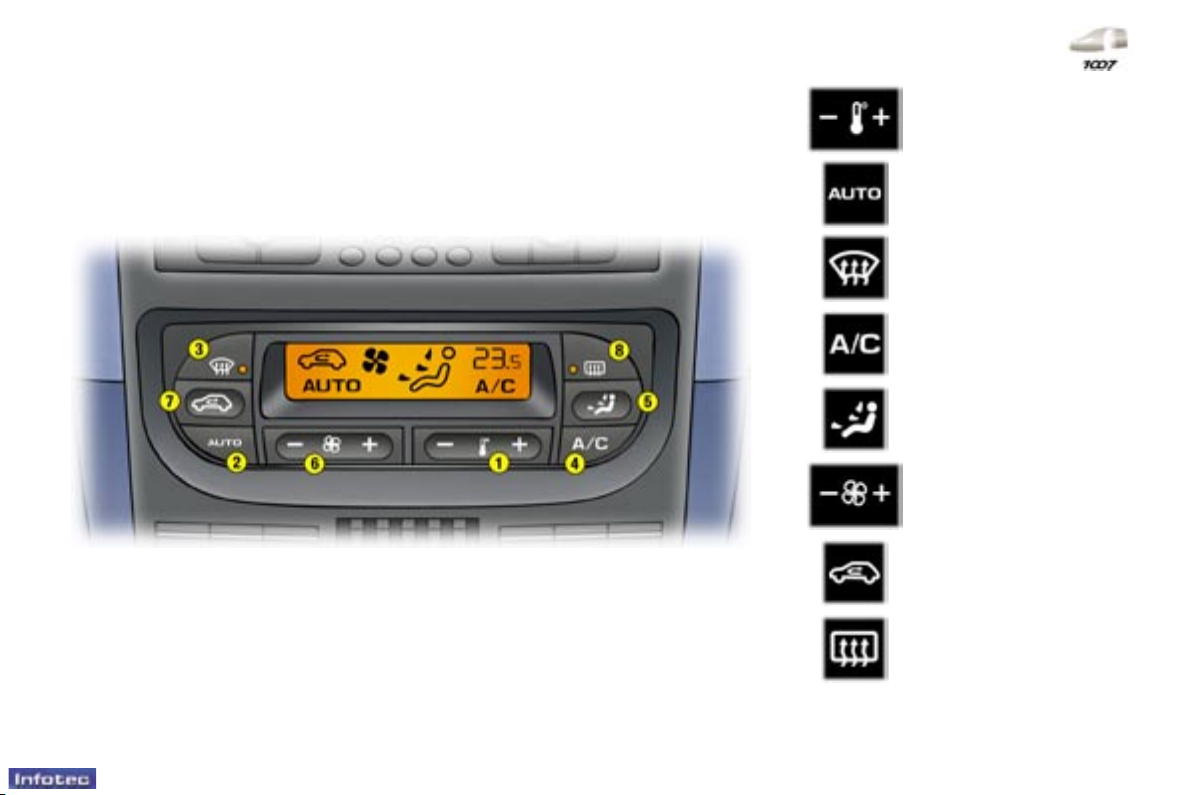
1. Temperature
adjustment.
HEATING : 86
MANUAL AIR CONDITIONING : 88
2. Air ow adjustment.
3. Air distribution
adjustment.
4. Air intake/Air
recirculation.
5. Rear screen and
exterior mirrors
demisting.
6. Air conditioning on/off.
–
11
-
Familiarisation
01-10-2005
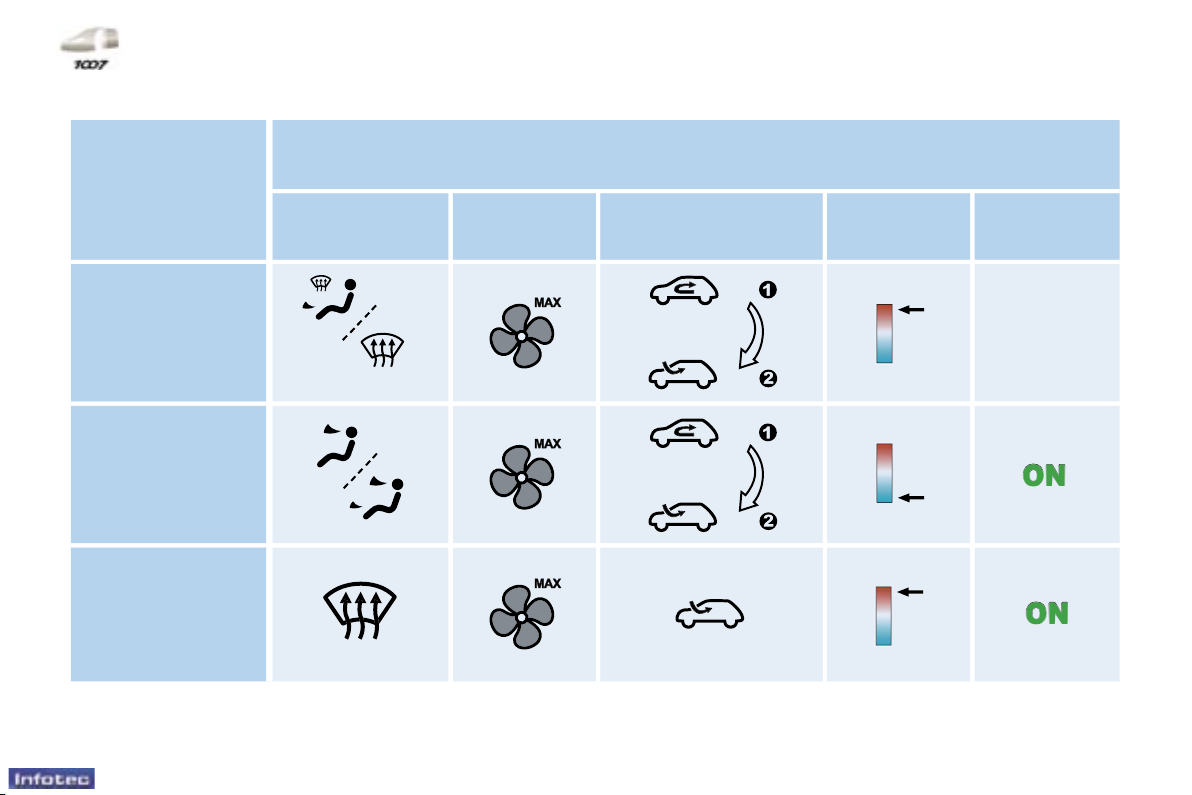
I require...
Heating or Manual air conditioning
Air distribution Air ow
Air recirculation/Intake
of exterior air
Temperature Manual AC
HOT
COLD
DEMISTING
DE-ICING
RECOMMENDED INTERIOR SETTINGS

100
-
Comfort
01-10-2005
101
-
Comfort
01-10-2005
Although one of PEUGEOT's main
criteria when designing your vehicle,
the safety of your children also depends on you.
INSTALLING A CHILD SEAT
USING A THREE POINT SEAT
BELT
Intermediate longitudinal
position
* According to current legislation in
the country.
** According to model.
GENERAL POINTS RELATING
TO CHILD SEATS
"Forwards-facing"
When a "forwards-facing" child seat
is installed on the front passenger
seat, adjust the vehicle's seat to the
intermediate longitudinal position
with the seat back upright and leave
the passenger air bag armed**.
"Rearwards-facing"
When a "rearwards-facing"
child seat is installed on
the front passenger seat,
it is essential that the pas-
senger air bag** is disarmed. Otherwise, the child would risk being
seriously injured or killed if the air
bag were to inate.
For maximum safety,
please follow these precautions:
- since 1992, and in accordance with
Directive 2000/3, all children un-
der the age of 12 must travel in
approved child seats* suited to
their weight, on seats tted with a
seat belt or ISOFIX mountings**.
- statistically, the safest seats in
your vehicle for the transportation of children are the rear
seats,
- a child weighing less than 9 kg
must travel in the "rearwardsfacing" position both in the front
and in the rear.
PEUGEOT recommends that chil-
dren should travel in the rear seats
of your vehicle:
- "rearwards-facing" up to the age
of 2,
- "forwards-facing" over the age of 2.
101
-
Comfort
01-10-2005
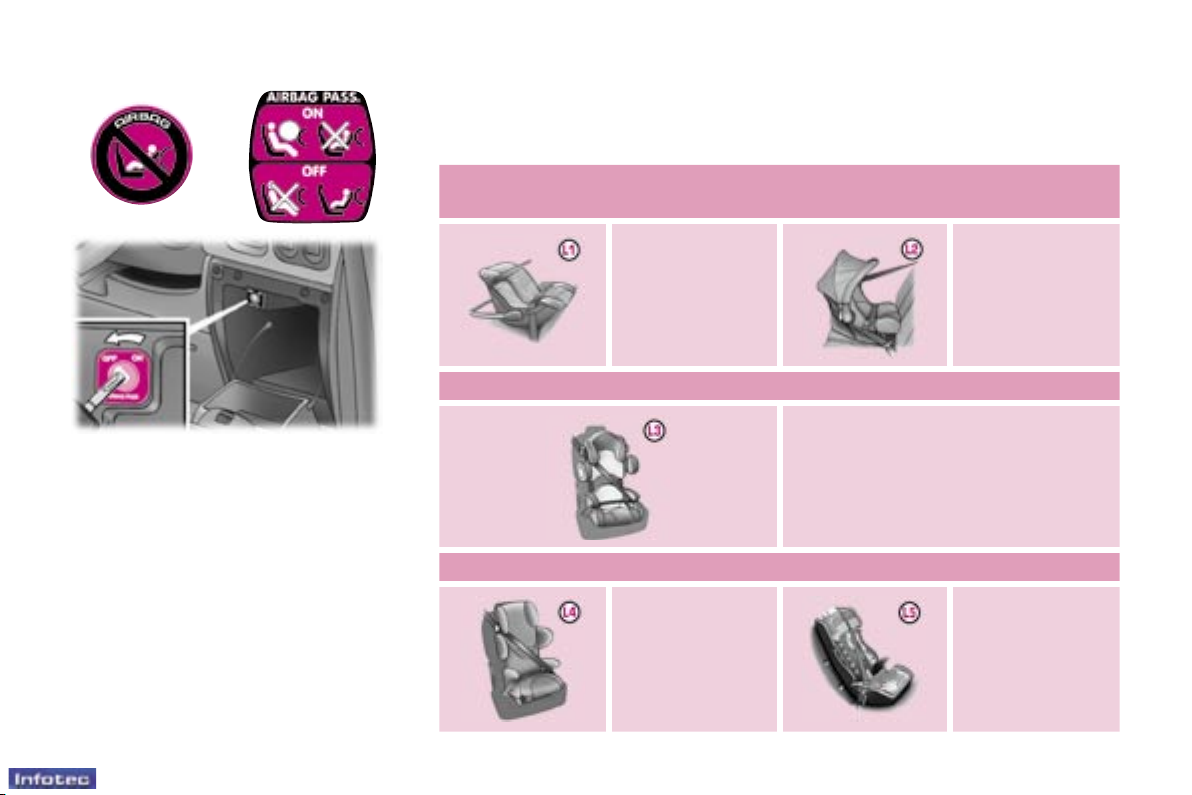
CHILD SEATS RECOMMENDED BY PEUGEOT
PEUGEOT offers a complete range of recommended child seats which are secured using a three point seat belt:
Group 0: from birth to 10 kg
Group 0+: from birth to 13 kg
L1
"BRITAX
Babysure"
(E11 0344117)
Installed in the
rear-facing
position.
L2
"ROMER
Baby-Safe"
(E1 03301146)
Installed in the
rear-facing
position.
Groups 1, 2 and 3: from 9 to 36 kg
L3
"KIDDY Life"
(E1 03301135)
For the safety of young children
(from 9 to 18 kg), PEUGEOT recom-
mends use of the restraining cushion.
Groups 2 and 3: from 15 to 36 kg
L4
"RECARO Start''
(E1 03301108).
L5
"KLIPPAN
Optima"
(E17 030007)
From the age of
6 years (approximately
22 kg), the booster is
used on its own.
Passenger air bag OFF**
** According to version.
102
-
Comfort
01-10-2005
103
-
Comfort
01-10-2005
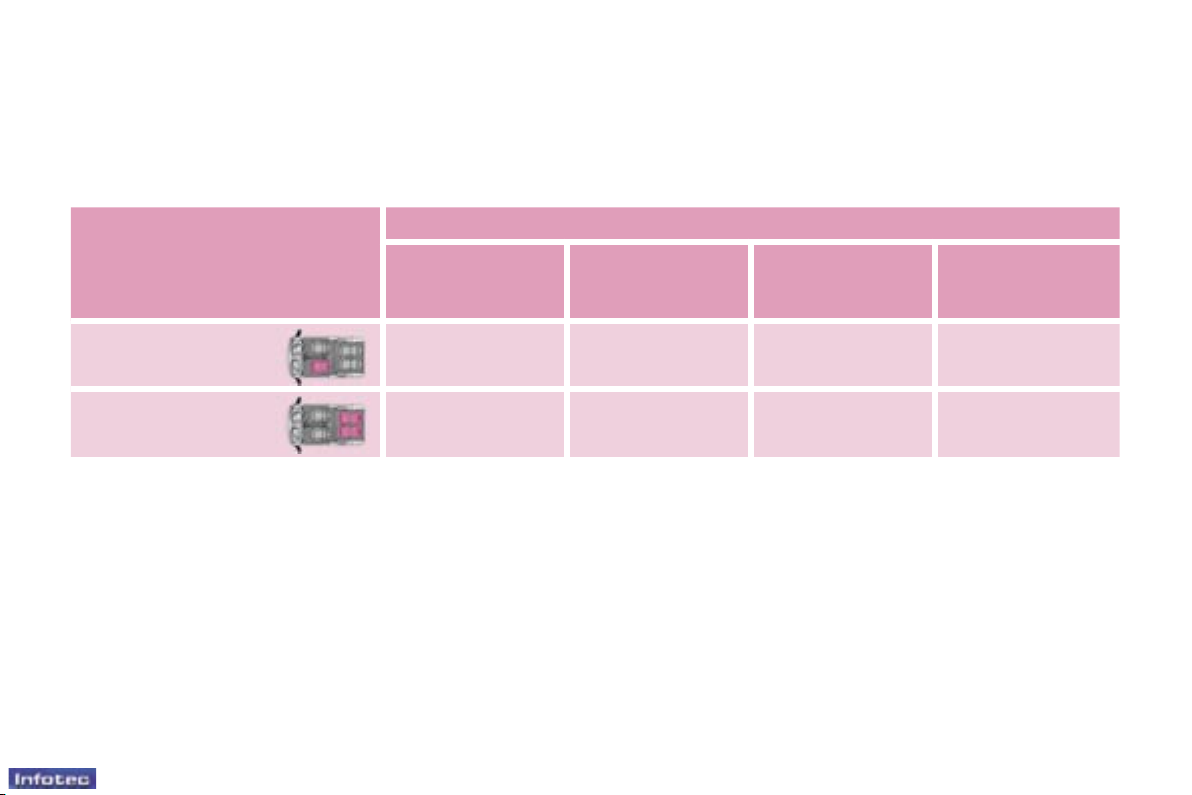
INSTALLING CHILD SEATS SECURED USING THE SEAT BELT
In accordance with the European regulation (Directive 2000/3), this table indicates the options for the installation of child seats
secured using the seat belt and universally approved in accordance with the weight of the child and the seat in the vehicle.
U: seat suitable for the installation of a child seat secured using the seat belt and universally approved "rear facing" and/or
"forward facing".
(a) Group 0: from birth to 10 kg.
(b) Consult the legislation in force in your country before installing your child on this seat.
(c) Vehicle seat in the intermediate longitudinal position.
(d) Vehicle seat in the most rearward position.
Seat
Weight of the child/indicative age
Below 13 kg
groups 0 (a) and 0+)
Up to ≈ 1 year
From 9 to 18 kg
(group 1)
From 1 to ≈ 3 years
From 15 to 25 kg
(group 2)
From 3 to ≈ 6 years
From 22 to 36 kg
(group 3)
From 6 to ≈ 10 years
Front passenger seat
(b)
U U U (c) U (c)
Rear seat U (d) U U (c) U (c)

103
-
Comfort
01-10-2005
ADVICE ON CHILD
SEATS
Installing a booster seat
The chest part of the seat belt must
be positioned on the child's shoulder
without touching the neck.
Ensure that the lap part of the seat
belt passes correctly over the child's
thighs.
PEUGEOT recommends the use of
a booster seat which has a back, tted with a seat belt guide at shoulder
level.
* According to version.
As a safety precaution, do not leave:
- one or more children alone and unsupervised in a vehicle,
- a child or an animal in a vehicle
which is exposed to the sun, with
the windows closed,
- the keys within reach of children
inside the vehicle.
To prevent accidental opening of the
doors, use the "Child lock"*.
Take care not to open the rear windows by more than one third*.
To protect young children from the
rays of the sun, t side blinds on the
rear windows.
Children under the age of 10 must
not travel in the "forward facing"
position on the front passenger seat,
unless the rear seats are already occupied by other children, cannot be
used or are absent.
Disarm the passenger air bag* when
a "rear facing" child seat is installed
on the front seat.
Otherwise, the child would risk being
seriously injured or killed if the air
bag were to inate.
The incorrect installation of a child
seat in a vehicle compromises the
child's protection in the event of an
accident.
Remember to fasten the seat belts
or the child seat harnesses keeping
the slack in relation to the child's
body to a minimum, even for short
journeys.
For optimum installation of the "forward facing" child seat, ensure that
the back of the child seat is in contact
with the back of the vehicle's seat
and that the head restraint does not
cause any discomfort.
If the head restraint has to be removed, ensure that it is stored or
attached securely to prevent it from
being thrown around the vehicle in
the event of sharp braking.
104
-
Comfort
01-10-2005
105
-
Comfort
01-10-2005
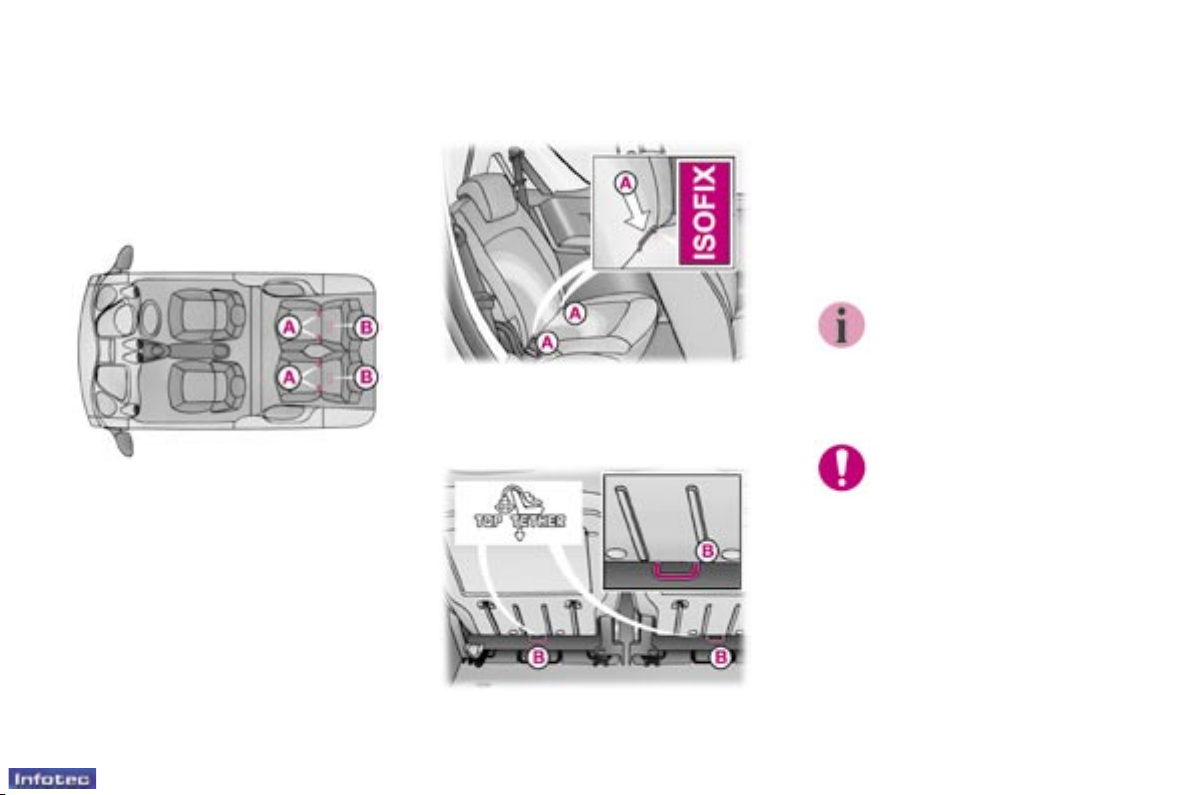
"ISOFIX" MOUNTINGS
Your vehicle has been approved in
accordance with the new ISOFIX
regulation.
The seats*, represented below, are tted with regulation ISOFIX mountings:
These are three rings for each seat: This ISOFIX mounting system guar-
antees you fast, reliable and safe tting of the child seat in your vehicle.
The ISOFIX child seats are tted
with two locks which are secured
easily on these lower rings A.
Some also have an upper strap
which is attached to the upper ring B.
- two lower rings A, located between
the vehicle seat back and cushion,
indicated by a label,
* According to version.
- an upper ring B, referred to as the
TOP TETHER, indicated by a label.
To attach this strap, raise
the vehicle seat's head restraint then pass the hook
between its rods. Then x
the hook on the upper ring B and
tighten the upper strap.
The incorrect installation
of a child seat in a vehicle
compromises the child's
protection in the event of
an accident.
For information regarding the ISOFIX
child seats which can be installed in
your vehicle, consult the summary
table for the location of the ISOFIX
child seats.
105
-
Comfort
01-10-2005
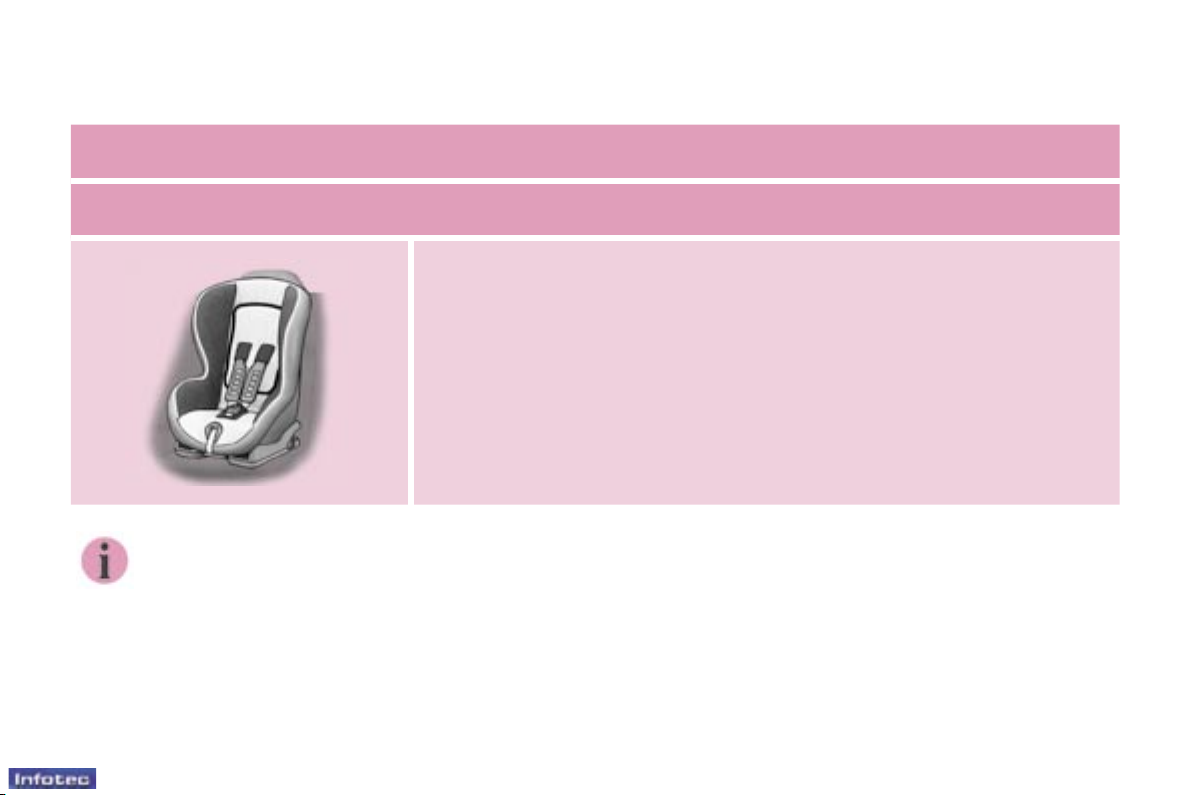
RÖMER Duo (size category B1)
Group 1: from 9 to 18 kg
Installed in the forward facing position.
Fitted with an upper strap.
Three seat body angles: sitting, reclining, lying.
This child seat can also be used on seats which are not tted with ISOFIX mountings. In this case, it must be attached to the vehicle seat using the three point seat belt.
Follow the instructions for tting the child seat given in the seat manufacturer's installation guide.
ISOFIX CHILD SEAT RECOMMENDED BY PEUGEOT

106
-
Comfort
01-10-2005
SUMMARY TABLE FOR THE INSTALLATION OF ISOFIX CHILD SEATS
In accordance with the European regulation (ECE 16), this table indicates the options for the installation of ISOFIX child seats
on the vehicle seats tted with ISOFIX mountings.
In the case of the universal and semi-universal ISOFIX child seats, the child seat's ISOFIX size category, determined by a
letter from A to G, is indicated on the child seat next to the ISOFIX logo.
IUF: seat suitable for the installation
of an Isox Universal seat, "Forward
facing" and secured using the "Top
Tether" upper strap.
* The ISOFIX infant car seat is xed
to the lower rings of an ISOFIX seat
and occupies the two rear seats.
IL-SU: seat suitable for the installation an Isox Semi-Universal seat
which is:
- "rear facing",
- "forward facing" tted with a stay,
- an infant car seat which is secured
using the "Top Tether" upper strap
or which is tted with a stay.
For the securing of the "Top Tether"
upper strap, refer to the "Isox
Mountings" section.
Weight of the child/indicative age
Less than 10 kg
(group 0)
Up to approx.
6 months
Less than 10 kg
(group0)
Less than 13 kg
(group 0+)
Up to approx. 1 year
From 9 to 18 kg
(group 1)
From 1 to 3 years approx
Type of ISOFIX child seat Infant car seat*
"
rear facing
" "
rear facing
" "
forward facing
"
ISOFIX size category
F G C D E C D A B B1
Universal and semi-universal
ISOFIX child seats which can be
installed on the rear seats
IL-SU IL-SU IL-SU
IUF
IL-SU

104
-
Comfort
01-10-2005
105
-
Comfort
01-10-2005
"ISOFIX" MOUNTINGS
Your vehicle has been approved in
accordance with the new ISOFIX
regulation.
The seats*, represented below, are tted with regulation ISOFIX mountings:
These are three rings for each seat: This ISOFIX mounting system guar-
antees you fast, reliable and safe tting of the child seat in your vehicle.
The ISOFIX child seats are tted
with two locks which are secured
easily on these lower rings A.
Some also have an upper strap
which is attached to the upper ring B.
- two lower rings A, located between
the vehicle seat back and cushion,
indicated by a label,
* According to version.
- an upper ring B, referred to as the
TOP TETHER, indicated by a label.
To attach this strap, raise
the vehicle seat's head restraint then pass the hook
between its rods. Then x
the hook on the upper ring B and
tighten the upper strap.
The incorrect installation
of a child seat in a vehicle
compromises the child's
protection in the event of
an accident.
For information regarding the ISOFIX
child seats which can be installed in
your vehicle, consult the summary
table for the location of the ISOFIX
child seats.

105
-
Comfort
01-10-2005
RÖMER Duo (size category B1)
Group 1: from 9 to 18 kg
Installed in the forward facing position.
Fitted with an upper strap.
Three seat body angles: sitting, reclining, lying.
This child seat can also be used on seats which are not tted with ISOFIX mountings. In this case, it must be attached to the vehicle seat using the three point seat belt.
Follow the instructions for tting the child seat given in the seat manufacturer's installation guide.
ISOFIX CHILD SEAT RECOMMENDED BY PEUGEOT

106
-
Comfort
01-10-2005
SUMMARY TABLE FOR THE INSTALLATION OF ISOFIX CHILD SEATS
In accordance with the European regulation (ECE 16), this table indicates the options for the installation of ISOFIX child seats
on the vehicle seats tted with ISOFIX mountings.
In the case of the universal and semi-universal ISOFIX child seats, the child seat's ISOFIX size category, determined by a
letter from A to G, is indicated on the child seat next to the ISOFIX logo.
IUF: seat suitable for the installation
of an Isox Universal seat, "Forward
facing" and secured using the "Top
Tether" upper strap.
* The ISOFIX infant car seat is xed
to the lower rings of an ISOFIX seat
and occupies the two rear seats.
IL-SU: seat suitable for the installation an Isox Semi-Universal seat
which is:
- "rear facing",
- "forward facing" tted with a stay,
- an infant car seat which is secured
using the "Top Tether" upper strap
or which is tted with a stay.
For the securing of the "Top Tether"
upper strap, refer to the "Isox
Mountings" section.
Weight of the child/indicative age
Less than 10 kg
(group 0)
Up to approx.
6 months
Less than 10 kg
(group0)
Less than 13 kg
(group 0+)
Up to approx. 1 year
From 9 to 18 kg
(group 1)
From 1 to 3 years approx
Type of ISOFIX child seat Infant car seat*
"
rear facing
" "
rear facing
" "
forward facing
"
ISOFIX size category
F G C D E C D A B B1
Universal and semi-universal
ISOFIX child seats which can be
installed on the rear seats
IL-SU IL-SU IL-SU
IUF
IL-SU
107
-
Accesses
01-10-2005
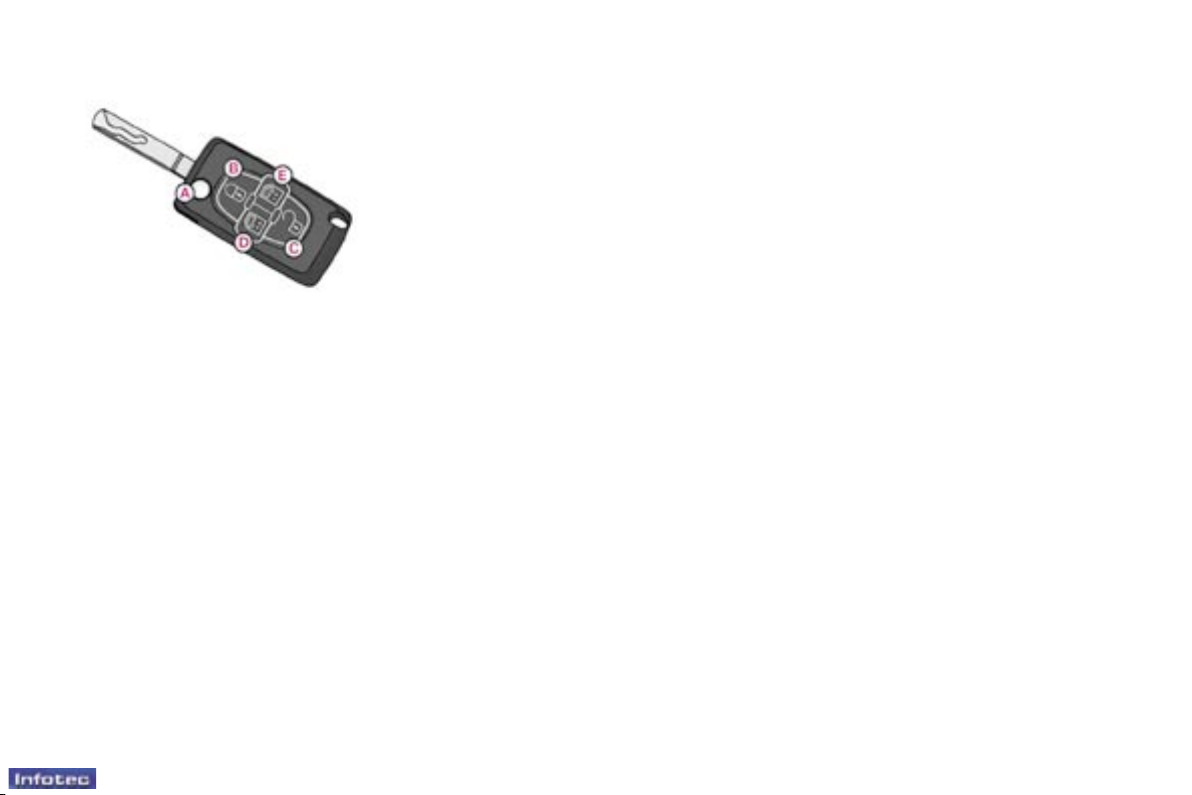
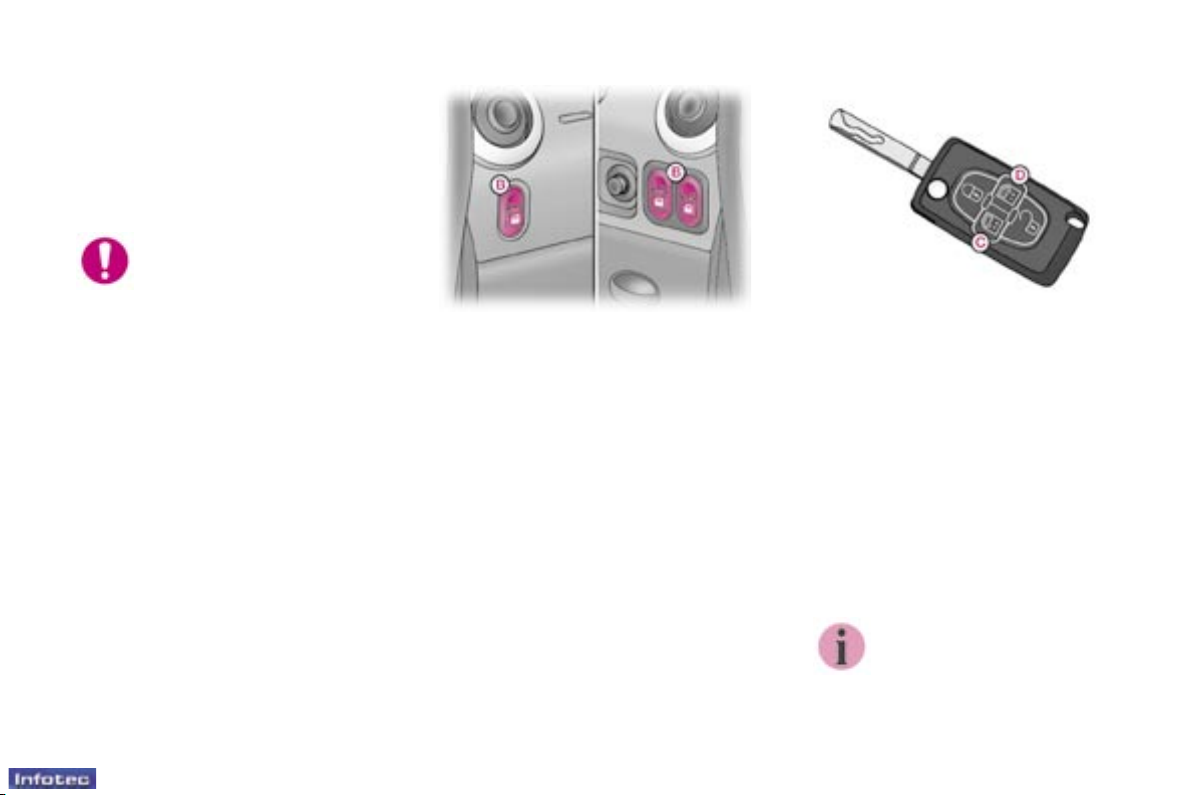
THE KEYS
The keys allow you to switch on the
ignition and to independently operate
the locks on the driver's door the fuel
ller cap and the passenger air bag
disarming switch.
The remote control
Version with normal locking
Press button B to lock the vehicle.
This is conrmed by xed lighting of
the direction indicators for approximately two seconds.
Version with deadlocking
Warning: deadlocking renders the
internal and external door controls
inoperative.
Never leave anyone inside the vehicle when it is deadlocked.
Pressing button B deadlocks the
vehicle.
This is conrmed by xed lighting of
the direction indicators for approximately two seconds.
A second press on button B within
ve seconds following deadlocking,
changes the deadlocking to normal
locking.
This is conrmed by xed lighting of
the direction indicators for approximately two seconds.
If the deadlocking is operated from
inside the vehicle, it will change to
normal locking when the vehicle is
started.
Central locking
Version with normal locking
From the driver's door, the keys allow
you to lock or unlock the doors and
tailgate.
If one of the doors or the tailgate is
open, the central locking does not
work.
Opening/Closing the "Sesame"
doors
Pressing button D or E opens or
closes the left or right door.
This press unlocks the vehicle before
opening the corresponding door.
A second press stops the move-
ment of the corresponding door.
A third press reverses the move-
ment of the corresponding door.
Folding/unfolding the key
To fold the key, press button A then
fold the key into the casing of the remote control.
To unfold the key, press button A.
Version with deadlocking
Turning the key a second time within
a maximum of ve seconds changes
the deadlocking of the vehicle to normal locking.
The remote control performs the
same functions at a distance.
Unlocking
Press button C to unlock the vehicle.
This is conrmed by rapid ashing of
the direction indicators.
When the vehicle is locked, if unlock-
ing is activated inadvertently, without the doors being opened within
30 seconds, the vehicle will lock
automatically.
108
-
Accesses
01-10-2005
109
-
Accesses
01-10-2005
ELECTRONIC ENGINE
IMMOBILISER
This locks the engine management
system as soon as the ignition has
been switched off and therefore
prevents starting of the vehicle by
anyone who does not have the key.
The ignition key has an electronic
chip which has a special code. When
the ignition is switched on, the code is
recognised and starting is possible.
If the system does not function correctly, contact a PEUGEOT dealer as
soon as possible.
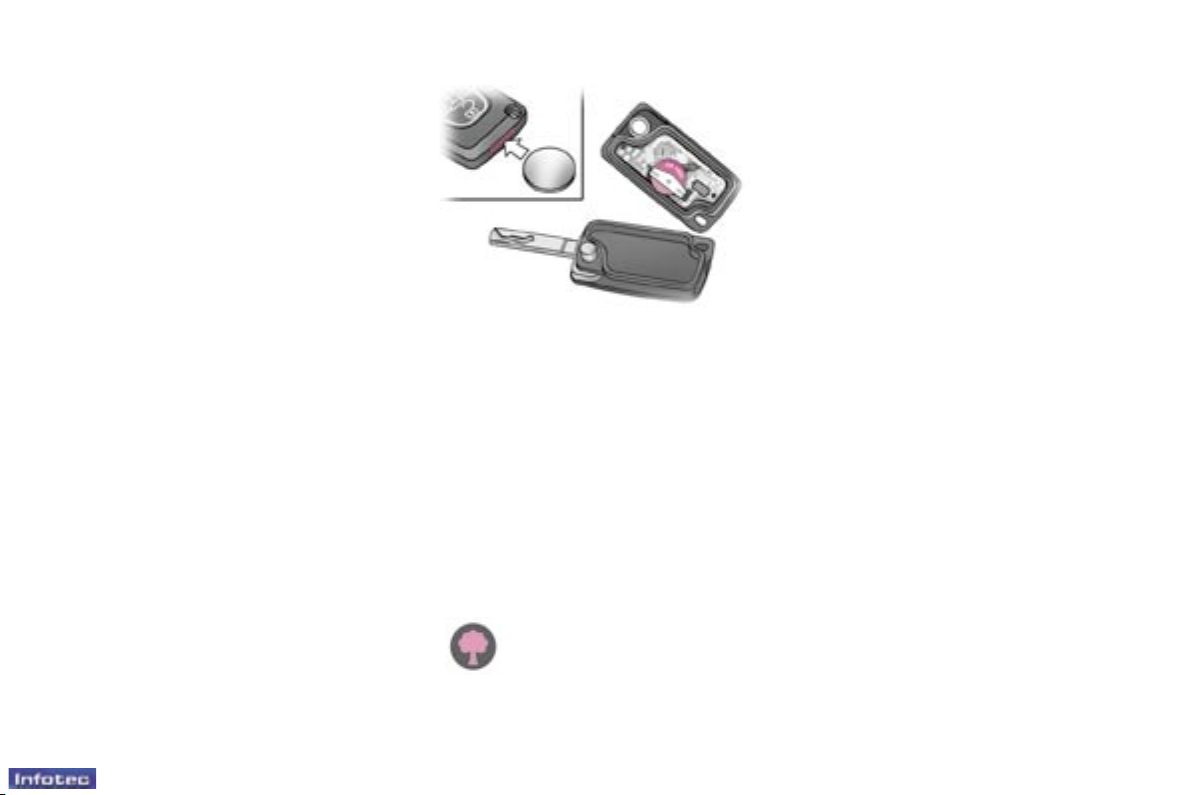
Changing the battery of the
remote control
Battery ref.: CR1620/3 volts.
The information "battery at" is given
by an audible signal, accompanied
by a message on the multifunction
display.
To replace the battery, unclip the casing using a coin at the ring.
If the remote control does not work
after the battery has been changed,
re-programme the remote control.
Key in ignition
A message on the multi-function display, accompanied by a buzzer on
opening the driver's door, indicates
that the key has been left in the ignition.
Locating your vehicle
To locate your vehicle, if you have
locked it, in a car park:
F press button B, the courtesy lights
come on and the direction indicators ash for a few seconds.
Programming the remote
control
Following changing of the remote
control battery or disconnection of
the vehicle battery, the remote control must be reprogrammed.
F Wait at least one minute before
using the remote control.
F Switch on the ignition.
F Press button B or C for at least
ve seconds within the next ten
seconds.
F Switch off the ignition.
F Wait at least one minute before
using the remote control.
The remote control is now working
again.
Do not discard the remote
control batteries, they contain metals which are harmful to the environment.
Take them to a PEUGEOT dealership, or to any other approved collection point.
109
-
Accesses
01-10-2005
CONFIDENTIAL CARD
The condential card contains the
identication code necessary for any
work carried out by a PEUGEOT
dealer on the electronic immobiliser
system. This code is hidden by a
lm, which should be removed only
if necessary.
Keep your card in a safe place,
never inside the vehicle.
Make a careful note of the
number on each key. The
key number is coded on the
label attached to the key.
If the keys are lost, your PEUGEOT
dealer can rapidly supply you with
new keys.
The high frequency remote control
is a sensitive system; do not operate it while it is in your pocket as
there is a possibility that it may
unlock your vehicle, without you
being aware of it.
The remote control does not operate when the key is in the ignition,
even when the ignition is switched
off, except for reprogramming.
Do not operate the deadlocking
function if there is anyone inside
the vehicle.
Driving with the doors locked may
make access to the passenger compartment by the emergency services more difcult in an emergency.
As a safety precaution (with children on board), remove the ignition
key when you leave the vehicle,
even for a short time.
Do not repeatedly press the button of your remote control out
of range of your vehicle. You run
the risk of stopping it from working and the remote control would
have to be reprogrammed.
When purchasing a second-hand
vehicle:
- ensure that you are given the
condential card;
- have the key codes memorised by
a PEUGEOT dealer, to ensure that
the keys in your possession are
the only ones which can start the
vehicle.
Do not make any modications to
the electronic engine immobiliser
system.

108
-
Accesses
01-10-2005
109
-
Accesses
01-10-2005
ELECTRONIC ENGINE
IMMOBILISER
This locks the engine management
system as soon as the ignition has
been switched off and therefore
prevents starting of the vehicle by
anyone who does not have the key.
The ignition key has an electronic
chip which has a special code. When
the ignition is switched on, the code is
recognised and starting is possible.
If the system does not function correctly, contact a PEUGEOT dealer as
soon as possible.
Changing the battery of the
remote control
Battery ref.: CR1620/3 volts.
The information "battery at" is given
by an audible signal, accompanied
by a message on the multifunction
display.
To replace the battery, unclip the casing using a coin at the ring.
If the remote control does not work
after the battery has been changed,
re-programme the remote control.
Key in ignition
A message on the multi-function display, accompanied by a buzzer on
opening the driver's door, indicates
that the key has been left in the ignition.
Locating your vehicle
To locate your vehicle, if you have
locked it, in a car park:
F press button B, the courtesy lights
come on and the direction indicators ash for a few seconds.
Programming the remote
control
Following changing of the remote
control battery or disconnection of
the vehicle battery, the remote control must be reprogrammed.
F Wait at least one minute before
using the remote control.
F Switch on the ignition.
F Press button B or C for at least
ve seconds within the next ten
seconds.
F Switch off the ignition.
F Wait at least one minute before
using the remote control.
The remote control is now working
again.
Do not discard the remote
control batteries, they contain metals which are harmful to the environment.
Take them to a PEUGEOT dealership, or to any other approved collection point.
110
-
Accesses
01-10-2005
111
-
Accesses
01-10-2005
ALARM*
The alarm offers two types of protection.
- external; the alarm sounds if one
of the doors, the bonnet or the
tailgate is opened,
- internal; the alarm sounds if there
is air movement in the passenger
compartment (a broken window or
movement within the car).
The alarm also has an anti-tamper
function.
If there is an attempt to tamper with
the following equipment:
- the wires to the siren or the control
unit, the siren sounds accompanied by ashing of the direction
indicators.
- the battery, the siren sounds.
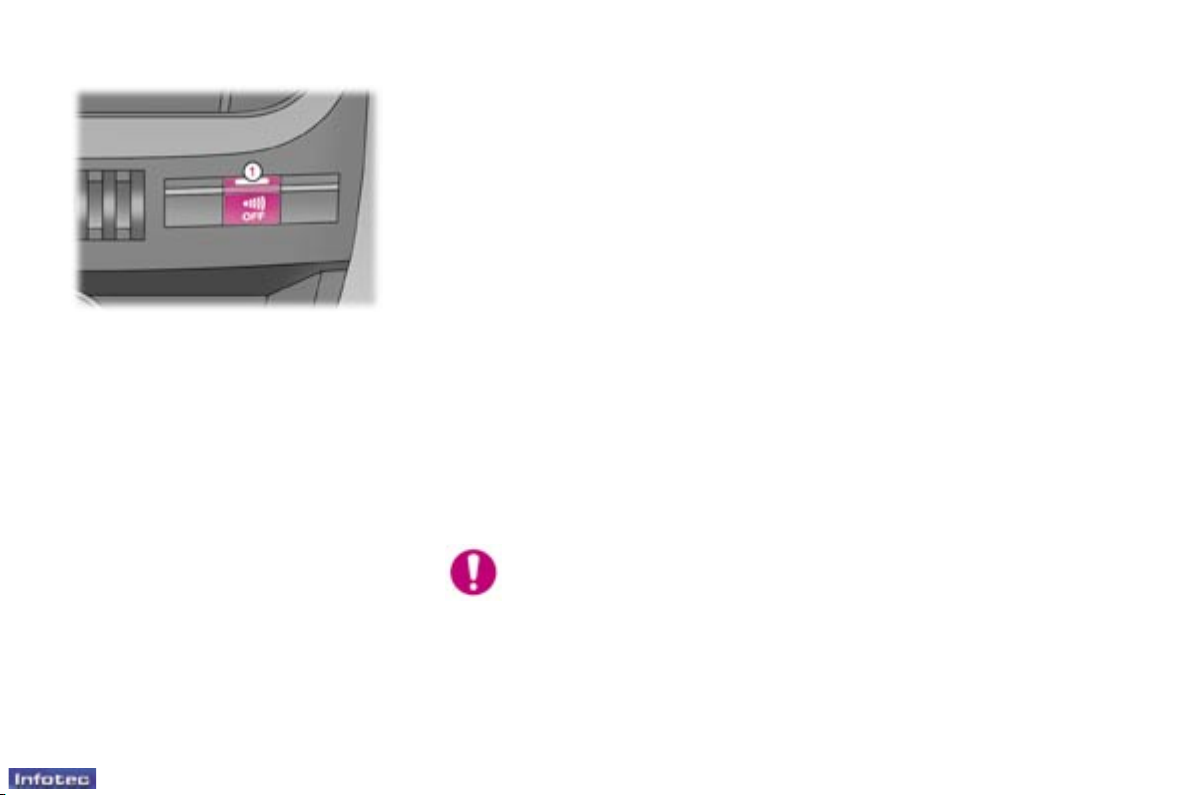
Complete setting and
disarming of the alarm
Complete setting of the alarm
Switch off the ignition and get out
of the vehicle.
Lock or deadlock the vehicle.
The direction indicators light for two
seconds.
The red indicator light on the switch 1
ashes once a second.
5 seconds later, external protection
is set.
45 seconds later, internal protection
is set.
Note: when the alarm is triggered,
the siren sounds for thirty seconds.
However, after the siren stops, the
alarm remains set.
Complete disarming of the alarm
Press the unlocking button on the
remote control.
The direction indicators ash for two
seconds.
The red indicator light on the switch
1 goes out.
Note: if the indicator light continues
to ash after de-activation of the
alarm, it is a sign that the alarm has
been triggered during your absence.
The ashing will stop when the ignition is switched on.
* According to country
When the alarm is set, if
a door, the tailgate or the
bonnet is not closed cor-
rectly, the siren sounds for
a moment. If the vehicle is closed
correctly in the following 45 seconds,
the alarm is set. In all cases, the
alarm is set after 45 seconds.
Automatic setting*
The alarm is set automatically 2 minutes after the last door or the boot is
closed.
To prevent the alarm being triggered
when a door or the boot is opened,
the remote control unlocking button
must be pressed again.
Locking the vehicle without
alarm
To lock the vehicle without activating
the alarm (for example when washing), insert the key in the lock, then
lock it.

111
-
Accesses
01-10-2005
Selection of the type of
protection
To set the alarm to external
protection only
If you want to leave a window partially open, or a pet inside the vehicle,
you need to select external protection only:
- switch off the ignition,
- within the next ten seconds, press
the control button 1 until the warning light comes on continuously,
- get out of the vehicle,
- lock or deadlock the vehicle,
- the direction indicators light for two
seconds,
- the red indicator light on the switch
1 ashes once a second.
Remote control failure
Unlock the doors using the key.
Open the door.
The alarm is triggered.
Switch on the ignition.
The electronic engine immobiliser
system recognises the key.
The siren stops and the alarm is dis-
armed.
Do not make any modications to the alarm system,
this could result in malfunctions.
To de-activate external protection
only
Press the unlocking button on the
remote control.
The direction indicators ash for two
seconds.
The red indicator light on the switch
1 goes out.
Work on the battery
The alarm must not be set when the
battery is disconnected. Otherwise,
the siren will sound.
After reconnecting the battery:
- lock or deadlock, then unlock the
vehicle using the remote control,
- the alarm will be operational again
the next time the vehicle is locked
or deadlocked.
112
-
Accesses
01-10-2005
113
-
Accesses
01-10-2005
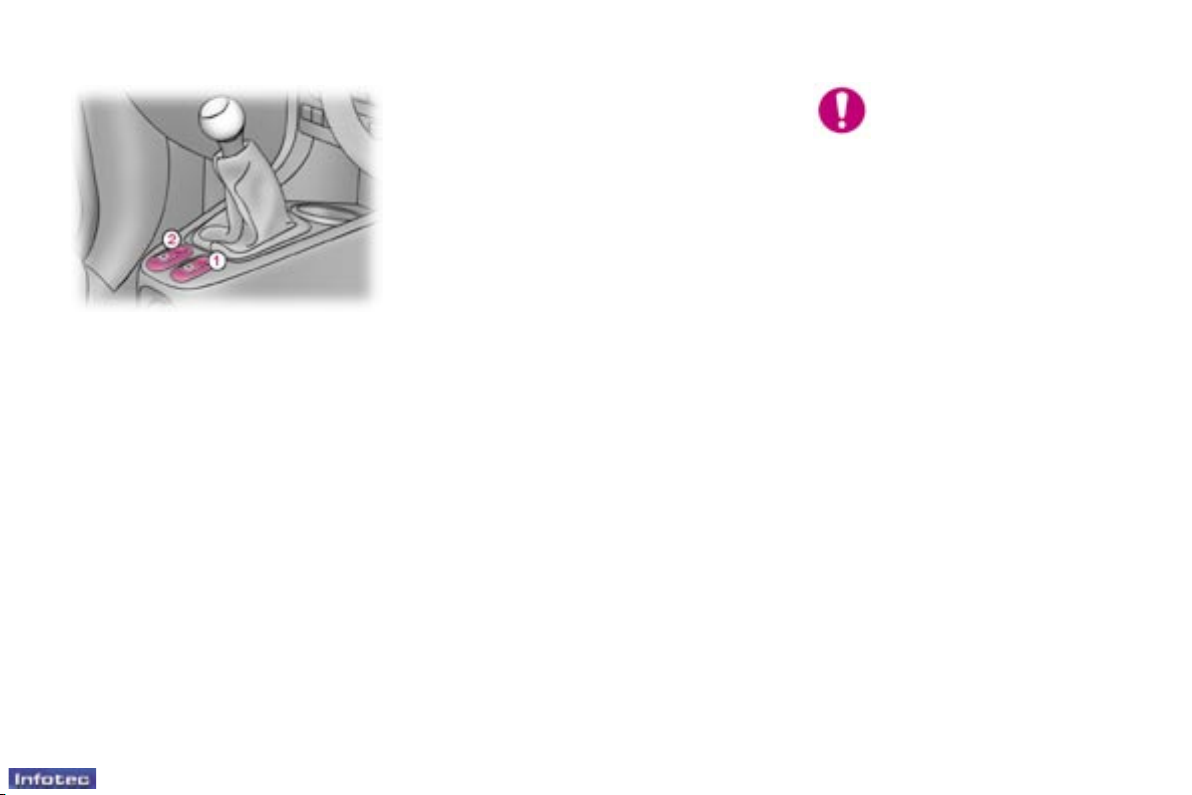
ELECTRIC WINDOWS
1 - Driver's electric window
switch.
2 - Passenger electric window
switch.
Notes:
The electric window controls are not
active when the door concerned is
open.
The movement of a window stops if
the door is opened. A second action
on the electric window control will
only be taken into account when the
door is closed.
The electrical functions of the electric
windows are deactivated approximately one minute after the ignition
is switched off.
Always remove the key
from the ignition when leaving the vehicle, even for a
short time.
In the event of contact when operating the windows, you must reverse
the movement of the window. To do
this, press the control concerned.
When the driver operates the passenger window controls, he must ensure that no one is preventing correct
closing of the window.
The driver must ensure that passengers use the electric windows
correctly.
Be aware of children when operating
the windows.
Safety auto-reverse
When the window rises and meets
an obstacle, it stops and partially
lowers again.
Note:
In the case of unwanted opening of
the window on closing or if the window will not rise, lower it completely
and raise it again immediately, by
pulling the control until the window
closes completely. Continue to press
the control for approximately one
second after closing.
You have two options:
- Manual operation:
Press or pull control 1 gently. The
window stops as soon as the control
is released.
- Automatic operation:
Press or pull control 1 fully. The
window opens or closes completely
when the control is released. Pressing the control again stops the movement of the window.
113
-
Accesses
01-10-2005
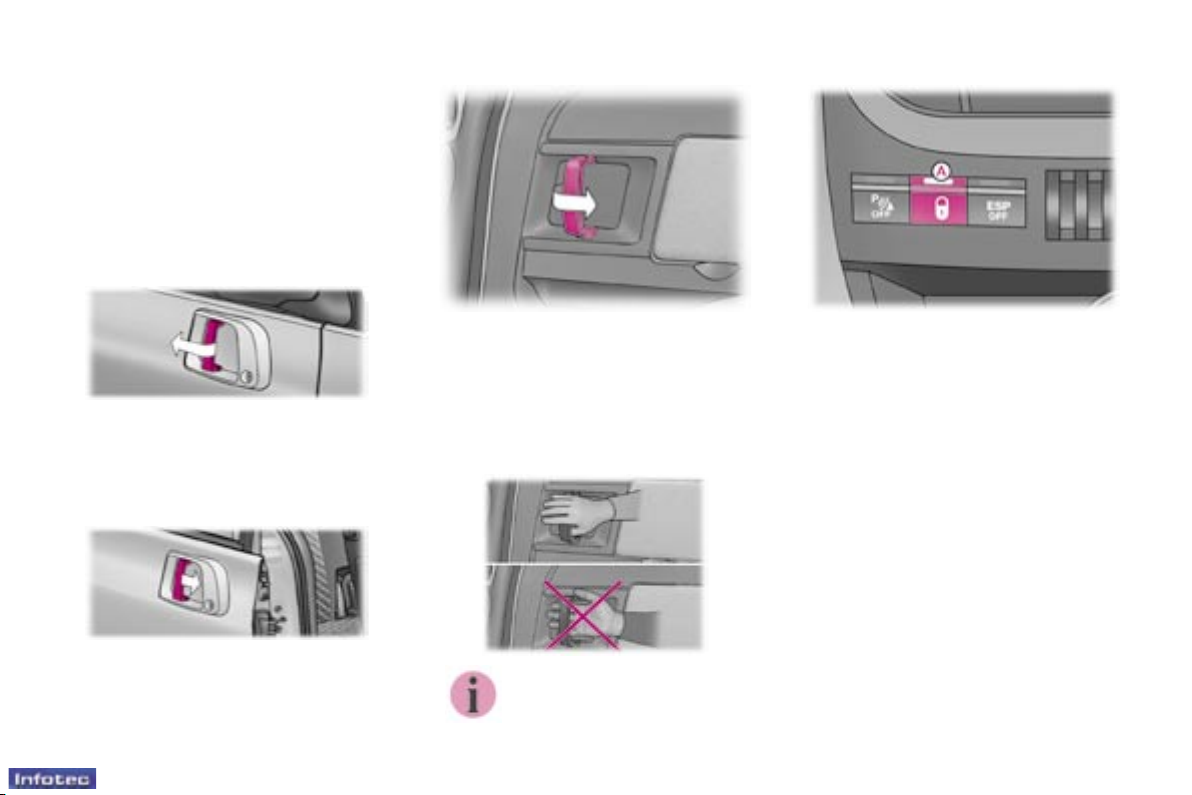
THE "SESAME" DOORS
The exterior and interior handles
only permit triggering of the electric
movement of the door when it is fully
closed or fully open.
Opening and closing of the doors is
accompanied by an audible signal.
Closing from outside
Give a rm, fast push forwards on the
handle, without guiding the door, to
trigger the electric movement of the
door.
Opening from outside
Using your hand, tilt the handle towards the rear of the vehicle and
remove your hand from the handle
when the electric movement of the
door begins.
Locking/Unlocking from inside
Press button A, the red warning light
comes on when the vehicle is locked
and switches off when it is unlocked.
This locks/unlocks the doors and the
tailgate.
If the vehicle is locked or deadlocked
from outside, the red warning light
ashes and button A does not function. In this case, use the key or the
remote control for unlocking.
Opening/Closing from inside
The opening and closing operates in
the same way as from outside.
None of the door opening switches
function when the vehicle is deadlocked.
To open using the interior
handle: tilt the handle, with
the palm of your hand towards the door.
114
-
Accesses
01-10-2005
115
-
Accesses
01-10-2005
Automatic central locking
The doors can lock automatically
when you are driving (at a speed of
more than 6 mph (10 km/h)).
You can activate or deactivate this
function.
Driving with the doors
locked may make access
to the passenger compartment by the emergency
services more difcult in an
emergency.
Activation
With the ignition on, press and hold
button A.
Activation of the function is accompanied by an audible signal and a message on the multifunction display.
Deactivation
With the ignition on, press and hold
button A.
Deactivation of the function is accompanied by an audible signal.
"Door open" alert
When the vehicle is moving, a diagram or a message locating the door
on the multifunction display, accompanied by a permanent audible signal and ashing of the courtesy light
warn you that a door or the boot is
not properly closed.
Opening/Closing from the front
Press switch B to open or close the
corresponding door.
Choosing the movement of the door
using the switches:
- pull è opens the door,
- push è closes,
- second press è stops the movement,
- the switches do not function above
3 mph (5 km/h).
Opening/Closing using the
remote control
Press button C or D to open or close
the left or right door.
The opening and closing of the door is
accompanied by an audible signal.
2nd press on button C or D during
opening/closing è interruption of the
movement.
3rd press on button C or D
è movement of the door in the op-
posite direction.
You are advised to use
the remote control or the
switches as much as possible.
115
-
Accesses
01-10-2005
General
recommendations
Always check that it is safe to operate the door and be sure, in particular, not to leave children or animals
near the door controls without supervision.
When opening the door, with the
window open, ensure that no person,
animal or object is hanging through
the window.
Before any opening or closing and
during any movement of the doors,
ensure that no person, animal or
object is preventing the required
manoeuvre, either inside or outside
the vehicle.
It is imperative that the doors are
operated only when the vehicle is
stationary.
For your safety and for that of your
passengers, you are strongly advised not to drive with a door open.
The ashing of the courtesy light +
audible warning + "door open" message are there to remind you.
Lock your vehicle when using an automatic carwash.
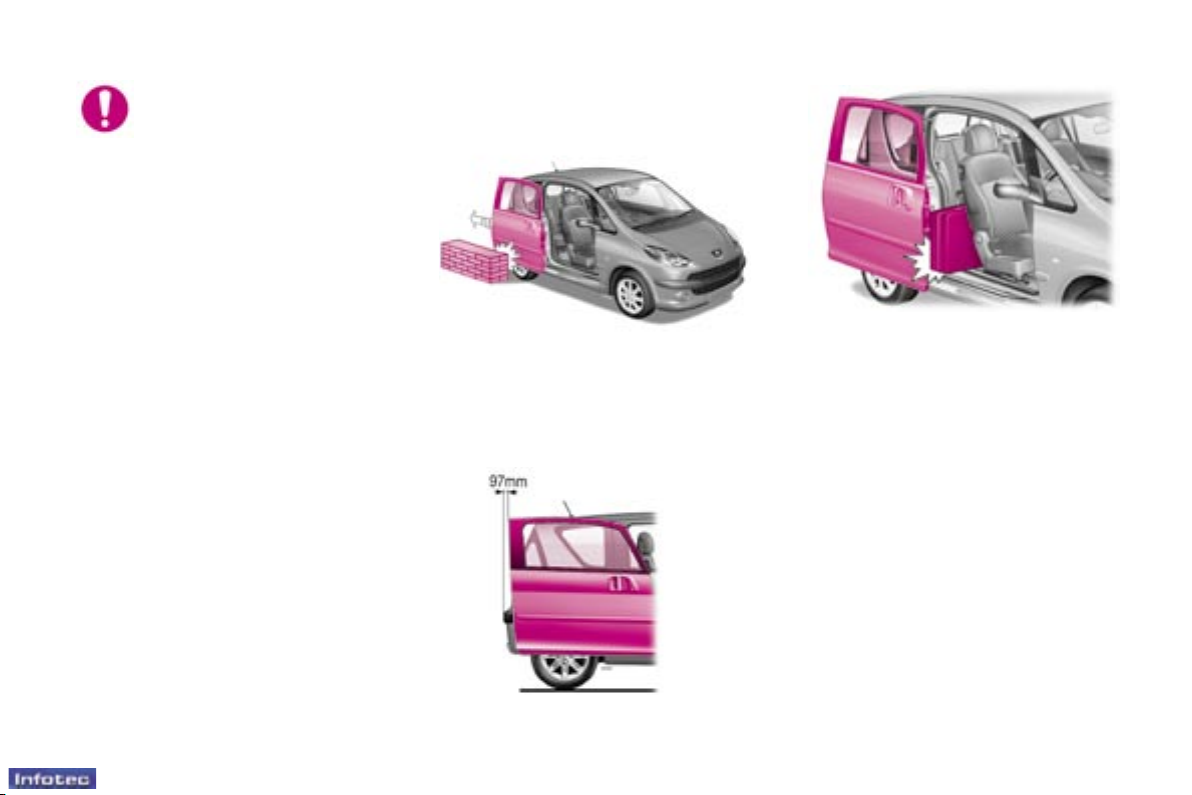
The doors and the overall
dimensions of the vehicle
Safety/Obstacle detection
The obstacle detection system is
triggered when an obstacle of a certain physical resistance hinders the
movement of the door.
• If an obstacle is detected while the
door is closing, the door stops then
opens fully.
• If an obstacle is detected while the
door is opening, the door stops.
When you have removed the obstacle, complete or restart the action using buttons C or D on the
remote control or the switches B.
When open, a door never protrudes
beyond the rear bumper.
When open, a door exceeds the
width of the exterior mirror by 8 mm,
be sure to take this into account
when you park alongside a wall, a
post or a high kerb...
116
-
Accesses
01-10-2005
117
-
Accesses
01-10-2005
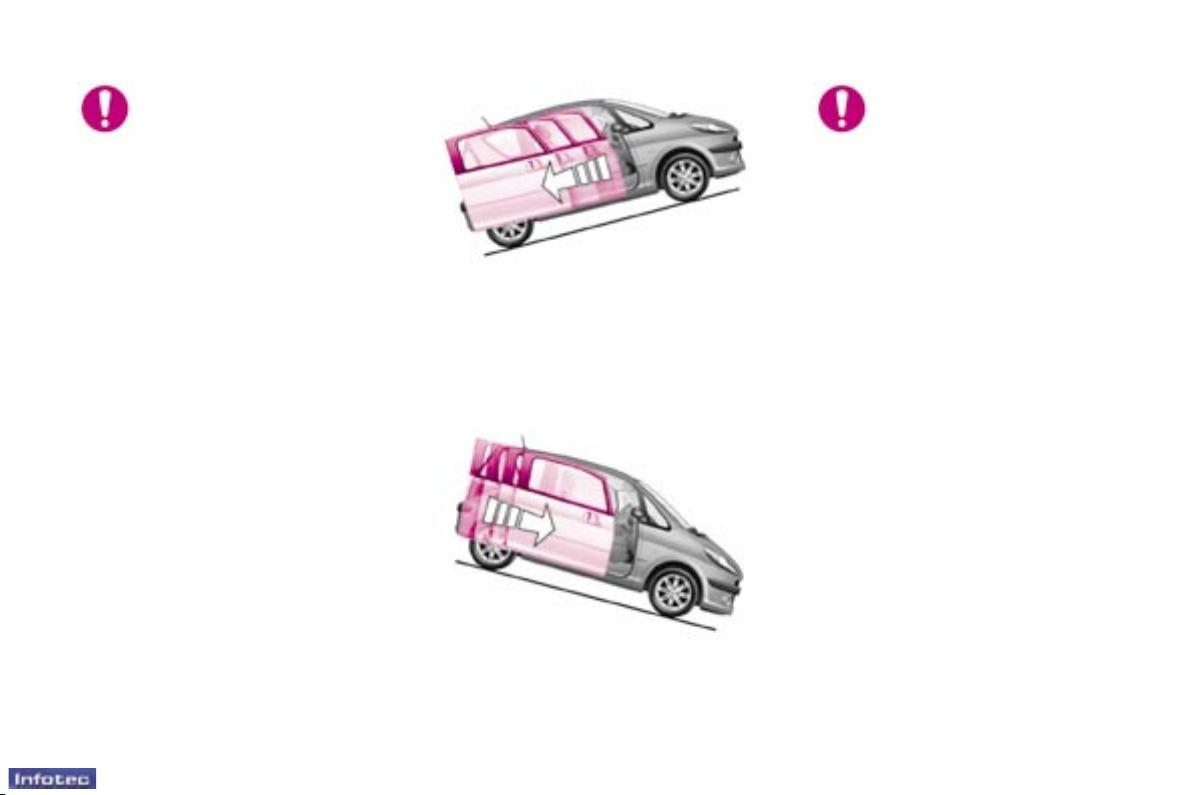
Behaviour in the case of a
steep slope
It is possible to open and close the
doors electrically up to a gradient of
20 %.
In the case of a steep slope,
the door may be driven by
its own weight and as a
consequence may open or
close sharply.
Therefore:
• There would not be time for operation of one of the electric controls to
be taken into account.
• There would not be time for the
obstacle detection system to be
triggered.
Take care not to leave the vehicle on
a steep slope with the door(s) open
without supervision. If this advice is
not followed, injuries or damage may
occur if a part of the body or an object is trapped or caught.
In the event of an impact
The electric controls are deactivated
in the event of an impact. Manual
opening and closing is still possible.
Special features of operation
With the ignition off,
• doors open, power consuming
equipment on (radio, lights…),
or
• doors in an intermediate position
(door neither fully open nor fully
closed).
After 30 minutes, the vehicle automatically switches to energy economy mode.
However, if your vehicle is on a
slope, with the front of the vehicle
facing up, open the door with care.
The door may open more quickly due
to the incline of the ground.
However, if your vehicle is on a
slope, with the front of the vehicle
facing down, the door may not stay
open and may close again sharply
with the risk of injury.
Before any opening or closing and during any movement of the doors, ensure
that no person, animal or
object is preventing the required
manoeuvre, either inside or outside
the vehicle. If this advice is not followed, injuries or damage may occur
if a part of the body or an object is
trapped or caught.
Electric closing and opening of the
doors is not possible above 3 mph
(5 km/h):
• If you set off with the door(s) open,
you must slow down to below the
threshold of 3 mph (5 km/h) in order to close the door(s).
• Any attempt to open a door electri-
cally using the interior handle, while
driving, results in the door opening
partially and, as a safety measure,
locking in this position immediately.
Flashing of the courtesy light + audible warning + "door open" message accompany this situation. In
order to release the door and be
able to operate it again, you must
slow down to below the threshold
of 3 mph (5 km/h) again.
117
-
Accesses
01-10-2005
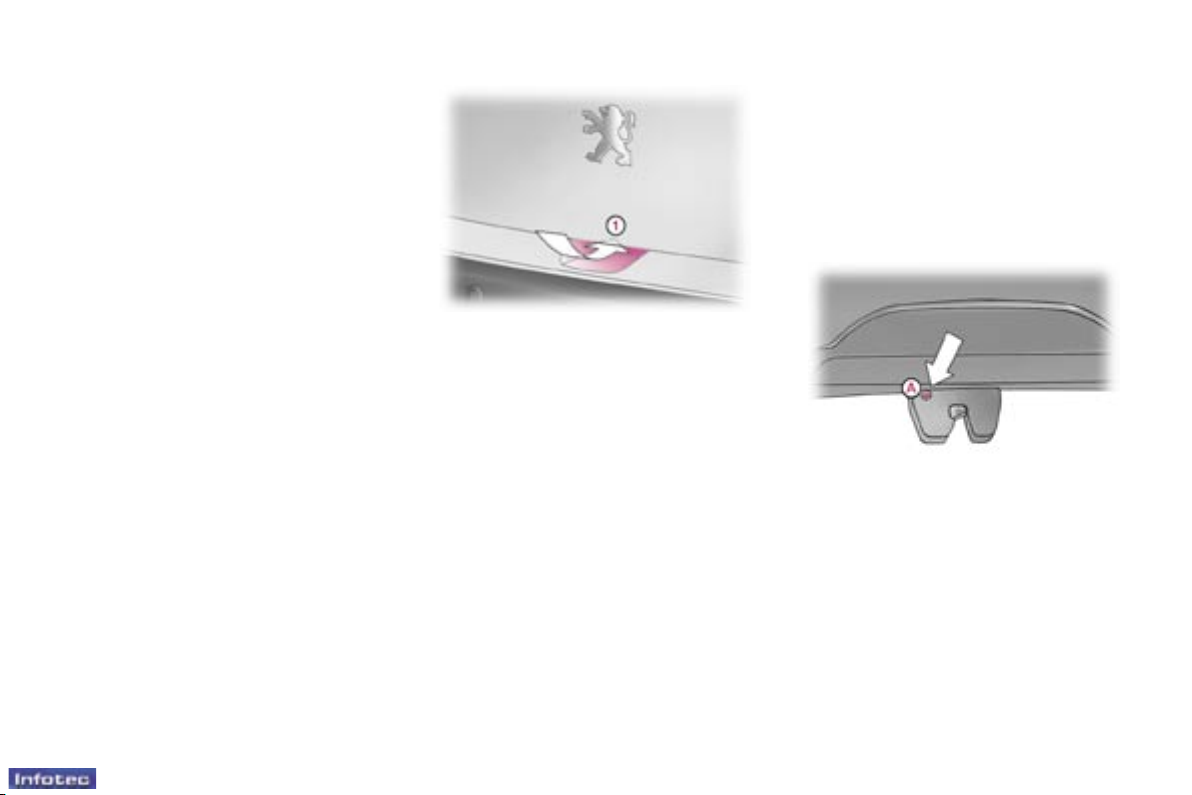
TAILGATE
Simultaneous locking or
unlocking of the tailgate and the
doors
The tailgate is locked or unlocked
by the remote control or the driver's
door lock.
To open, press the control 1 and lift
the tailgate.
Note: the tailgate locks automatically
when the vehicle speed reaches
6 mph (10 km/h). It unlocks when
one of the doors is opened if the
speed is below 6 mph (10 km/h) or
when the central locking button on
the centre console is pressed.
Tailgate release
This enables the tailgate to be unlocked in the event of a central locking fault.
- Fold back the rear seats to gain
access to the lock from inside the
boot,
- Insert a small screwdriver into hole A
of the lock to unlock the tailgate.
"Tailgate open" warning
With the engine running, an audible
signal and a diagram or a message
displayed briey on the multifunction
screen warn you that the tailgate is
not properly closed.
In this case, or following reconnection of the battery, with the doors
open, it may be necessary to close
the doors manually, in order to reinitialise them, and start the engine.
When the door has stopped in an
intermediate position (neither fully
open nor fully closed), only the remote control or the switches permit
electric operation of the door.
When closing requests are made
when the door is in a partially open
position, the door may open slightly
before closing.
When closing a door electrically when
the battery is low, you are advised to
guide the door manually. Recharge
the battery as soon as possible.
If the electric controls (remote control
or switches) no longer operate, reinitialise the doors(s) as follows:
1. Start the engine.
2. Manually open the door(s) fully.
3. Close the door(s) fully.
On completion of this procedure,
electric operation of the doors is restored.
However, if a problem persists following this procedure, contact a
PEUGEOT dealer.

117
-
Accesses
01-10-2005
TAILGATE
Simultaneous locking or
unlocking of the tailgate and the
doors
The tailgate is locked or unlocked
by the remote control or the driver's
door lock.
To open, press the control 1 and lift
the tailgate.
Note: the tailgate locks automatically
when the vehicle speed reaches
6 mph (10 km/h). It unlocks when
one of the doors is opened if the
speed is below 6 mph (10 km/h) or
when the central locking button on
the centre console is pressed.
Tailgate release
This enables the tailgate to be unlocked in the event of a central locking fault.
- Fold back the rear seats to gain
access to the lock from inside the
boot,
- Insert a small screwdriver into hole A
of the lock to unlock the tailgate.
"Tailgate open" warning
With the engine running, an audible
signal and a diagram or a message
displayed briey on the multifunction
screen warn you that the tailgate is
not properly closed.
In this case, or following reconnection of the battery, with the doors
open, it may be necessary to close
the doors manually, in order to reinitialise them, and start the engine.
When the door has stopped in an
intermediate position (neither fully
open nor fully closed), only the remote control or the switches permit
electric operation of the door.
When closing requests are made
when the door is in a partially open
position, the door may open slightly
before closing.
When closing a door electrically when
the battery is low, you are advised to
guide the door manually. Recharge
the battery as soon as possible.
If the electric controls (remote control
or switches) no longer operate, reinitialise the doors(s) as follows:
1. Start the engine.
2. Manually open the door(s) fully.
3. Close the door(s) fully.
On completion of this procedure,
electric operation of the doors is restored.
However, if a problem persists following this procedure, contact a
PEUGEOT dealer.
118
-
Accesses
01-10-2005
119
-
Accesses
01-10-2005
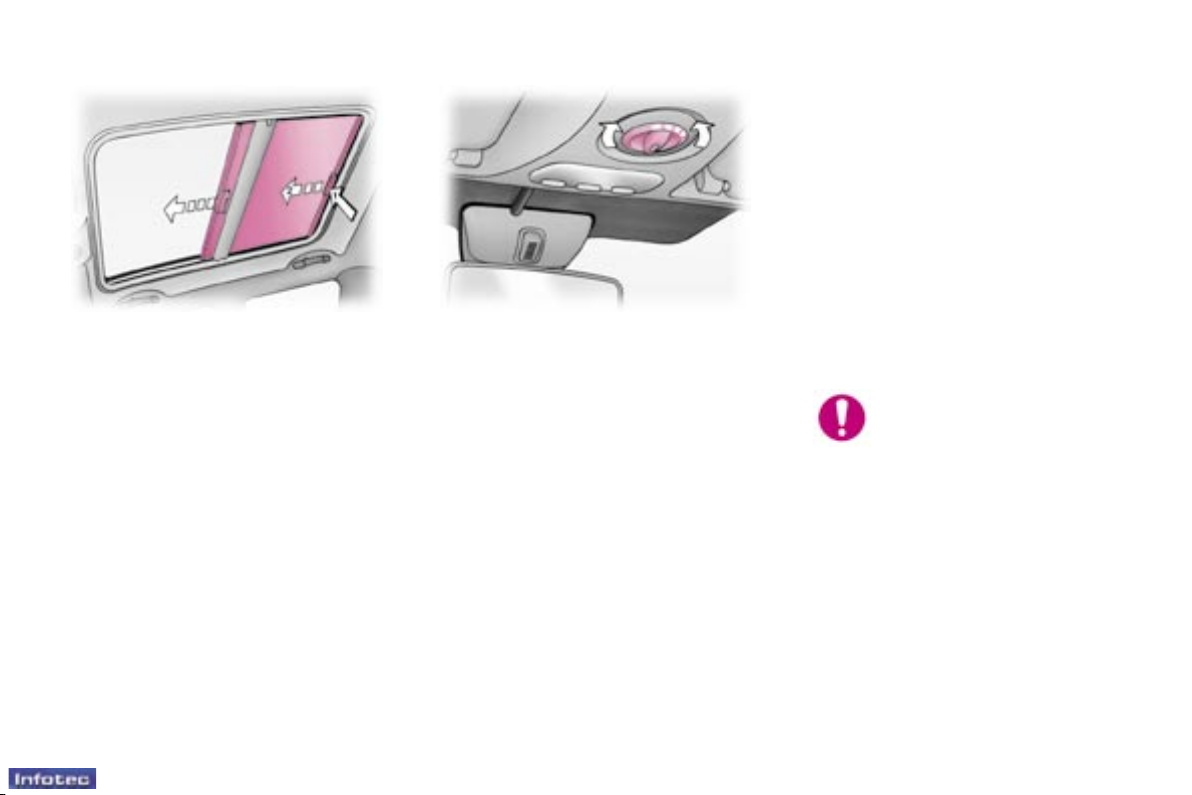
PANORAMIC SUNROOF
This sunroof is a panoramic assembly which provides maximum brightness and visibility in the passenger
compartment.
It consists of two parts:
- a xed rear part,
- a moving front part.
Each part has an independent manual shutter.
The sunroof is controlled electrically
by a dial with 9 opening positions.
To open: turn the dial to the left (nine
possible settings).
Once the roof is open, the front
shutter cannot be closed.
To close: return the control to the
initial position "O".
Following reconnection of the battery, in the event of a malfunction or
in the event of unwanted opening of
the roof on closing, the safety autoreverse must be reinitialised:
- place the dial in the fully closed
position (initial position "O"),
- press the dial immediately,
- continue to press until the roof is
fully closed.
The safety auto-reverse function
is not operational during this operation.
Always remove the ignition
key when leaving the vehicle, even for a short time.
In the event of contact
during operation of the roof, the
movement of the roof must be reversed. To do this, operate the control concerned.
When the driver operates the roof
control, he must ensure that no one
is preventing the roof from closing
correctly.
The driver must ensure that the passengers use the sunroof correctly.
Be aware of children when operating
the roof.
Check that the slides are clean to
ensure that the sunroof slides correctly.
Safety auto-reverse
When the roof meets an obstacle
while closing, it partially opens again.
119
-
Accesses
01-10-2005
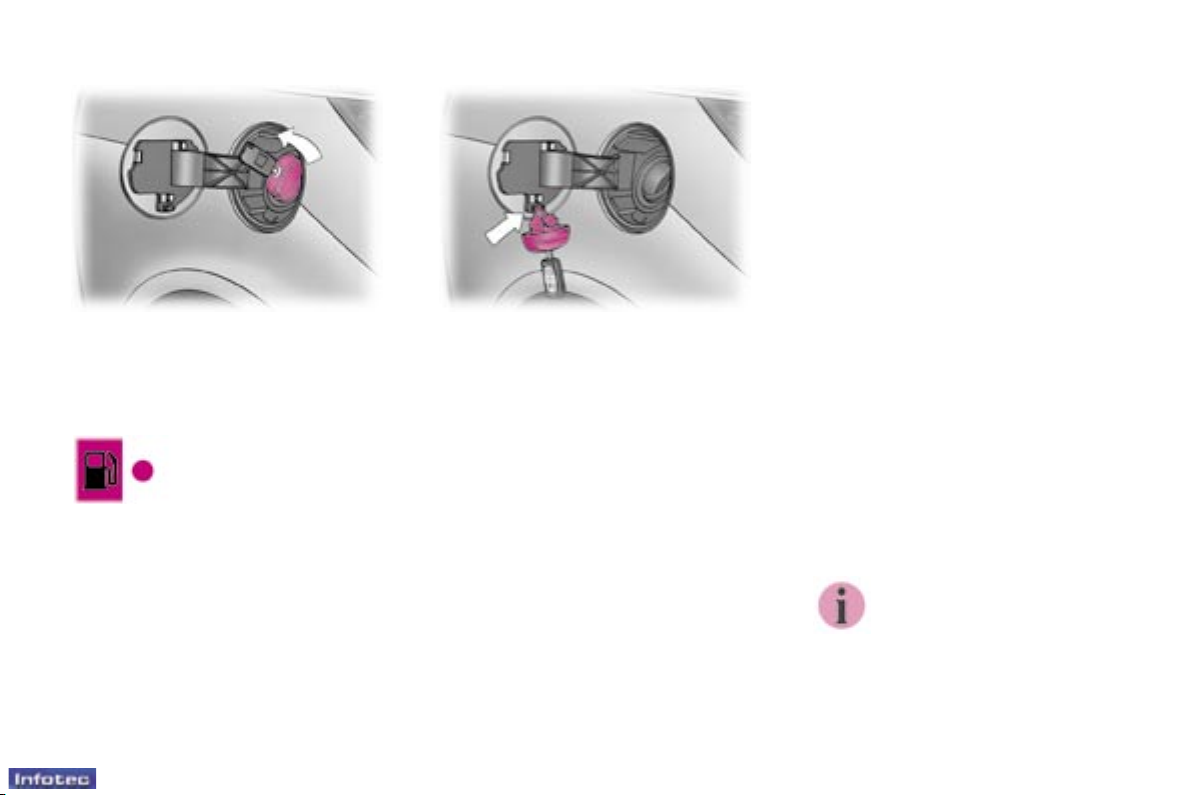
FILLING THE FUEL TANK
The tank must be lled with fuel with
the engine off.
F Open the fuel ller ap.
F Insert the key then turn it to the
left.
F Remove the cap and attach it to
the clip located on the inside of
the ap.
A label on the inside of the ap indicates which type of fuel to use.
If you ll your tank, do not continue
after the third cut-off of the pump
nozzle. This could result in vehicle
malfunctions.
The capacity of the tank is
approximately 9 gallons (40 litres).
F After lling the tank, lock the cap
and close the ap.
You have enough fuel left to cover
approximately 30 miles (50 km).
The electric opening of the
left-hand door is inhibited
when the fuel ller ap is
open.
The key cannot be removed from the
cap's lock until the cap is retted on
the tank.
Low fuel level
When the tank's minimum level is reached,
this warning light comes
on, accompanied by a
message on the multifunction display.
12
-
Familiarisation
01-10-2005
13
-
Familiarisation
01-10-2005
AUTOMATIC AIR CONDITIONING : 90
1. Temperature
adjustment.
2. Automatic comfort
programme.
3. Automatic visibility
programme.
4. Air conditioning on/
off.
5. Air distribution
adjustment.
6. Air ow adjustment.
7. Air intake/Air
recirculation.
8. Rear screen and
exterior mirrors
demisting.
120
-
Visibility
01-10-2005
121
-
Visibility
01-10-2005
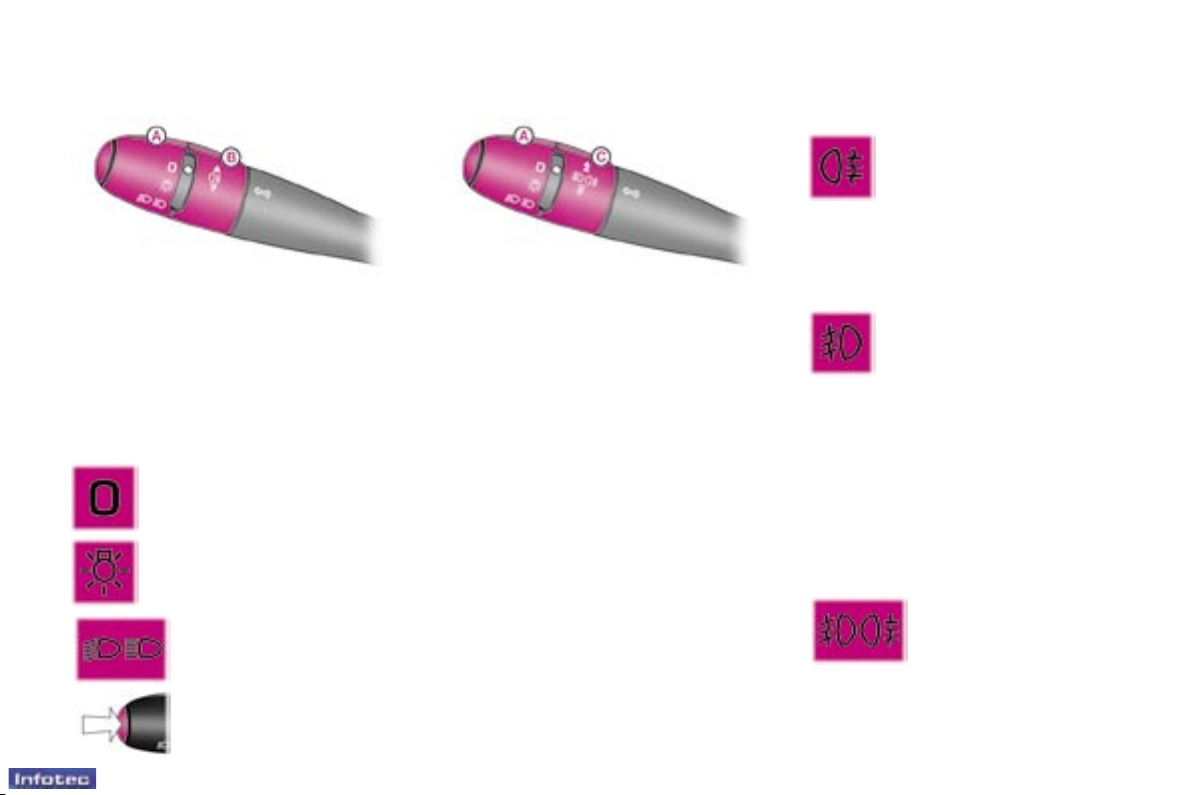
THE LIGHTS STALK
Front and rear lights
Selection is by turning ring A.
Lights off
Side lights
D i p pe d / m a i n b e a m
headlamps
Automatic switching on
of lights
Dipped/Main beam change
Pull the stalk fully towards you.
Front fog lamps and rear fog
lamp
Rotate the ring forwards to switch on
and backwards to switch off. The status is displayed by the indicator light
on the instrument panel.
Vehicles tted with a rear fog
lamp (ring B)
Rear fog lamp
Vehicles tted with front fog
lamps and a rear fog lamp
(ring C)
Front fog lamps (1st rotation
of the ring forwards)
These operate with the side lights
and dipped headlamps.
Front fog lamps and
rear fog lamp (2nd
rotation of the ring forwards)
Note: to switch off the rear fog lamp
and the front fog lamps, turn the ring
backwards twice in succession.
Lights on
With the ignition off, when the driver's
door is opened, if you have left your
lights on, a buzzer sounds, accompanied by a message on the multifunction display.
This can only operate with the dipped
and main beam headlamps.
Notes:
When the main beam headlamps are
switched on, the front fog lamps are
switched off.
When the lights are switched off automatically, the front fog lamps and
the side lights will remain on (turn
the ring backwards to switch the fog
lamps off).

121
-
Visibility
01-10-2005
Direction indicators (ashers)
Left: downwards.
Right: upwards.
Follow-me-home lighting
In poor light or at night, if you leave
your vehicle, the side lights and
dipped headlamps can be left on for
approximately one minute.
To do this:
- turn the key to the STOP position,
- place the lights stalk in position 0,
- within the next minute, ash the
headlamps,
- get out of the vehicle and lock it.
In good or rainy weather,
both day and night, the
front fog lamps and the rear
fog lamps are dazzling and
are prohibited.
Do not forget to switch them off when
they are no longer needed.
AUTOMATIC SWITCHING ON
OF LIGHTS
The side lights and dipped beam
headlamps switch on automatically if
the light is poor and when the windscreen wipers operate continuously.
They switch off when the light becomes bright enough or the windscreen wipers are switched off.
In foggy weather or in snow, the
brightness sensor can detect
sufcient light, the lights will not
come on automatically.
This function is active when the
vehicle is supplied to the customer.
To disarm or activate the function:
- Place the key in the accessories
position (1st notch),
- Place the lights stalk in position 0,
- Press the end of the lights stalk for
more than two seconds.
Do not cover the brightness sensor, coupled with the rain sensor,
located in the centre of the windscreen, behind the interior mirror.
It is used for automatic switching
on of the lights.
Operating check
Activation
The activated function is accompanied
by an audible signal and a message
on the multifunction display.
Disarming
The disarmed function is accompanied
by an audible signal and a message
on the multifunction display.
When the driver uses the manual
lighting controls, the function is disarmed temporarily.
If the brightness sensor does not
function correctly, the lights come
on accompanied by an audible signal
and a message on the multifunction
display.
Contact a PEUGEOT dealer.
 Loading...