

Peugeot 1007 2005 Owner Manual

111
-
28-02-2005
Special position of the
windscreen wipers
In the minute following switching off
of the ignition, any action on the stalk
positions the wipers in the centre of
the windscreen.
This position permits cleaning or
replacement of the wiper blades
(See section "Practical information Changing a wiper blade").
To park the wipers after this has been
done, switch on the ignition and operate the stalk.
Windscreen wash
Pull the wiper stalk towards you. The
windscreen wash, then the windscreen
wipers, operate for a specied time.
Do not cover the rain sensor
located on the windscreen
behind the interior mirror.
When using an automatic
car wash, switch off the ig-
nition or check that the wiper stalk is
not in the AUTO position.
In winter, it is advisable to wait for the
windscreen to completely clear of ice
before operating the automatic wipe.
Rear windscreen wiper
Turn ring A to the rst notch
for intermittent wiping.
Rear windscreen wash
Turn ring A past the rst
notch; the windscreen wash
then the windscreen wiper
operate for a xed period.
Visibility
Automatic windscreen wipers
In the AUTO position, the windscreen wipers operate automatically and
adapt their speed to the intensity of
the rainfall.
Operating check
Activation
Activation of the function is accompanied by a message on the multifunction display.
In the event of malfunction, the
driver is informed by an audible
signal.
In the AUTO position, the windscreen wiper will operate in intermittent
mode.
Contact a PEUGEOT dealer to have
the system checked.
112
-
28-02-2005
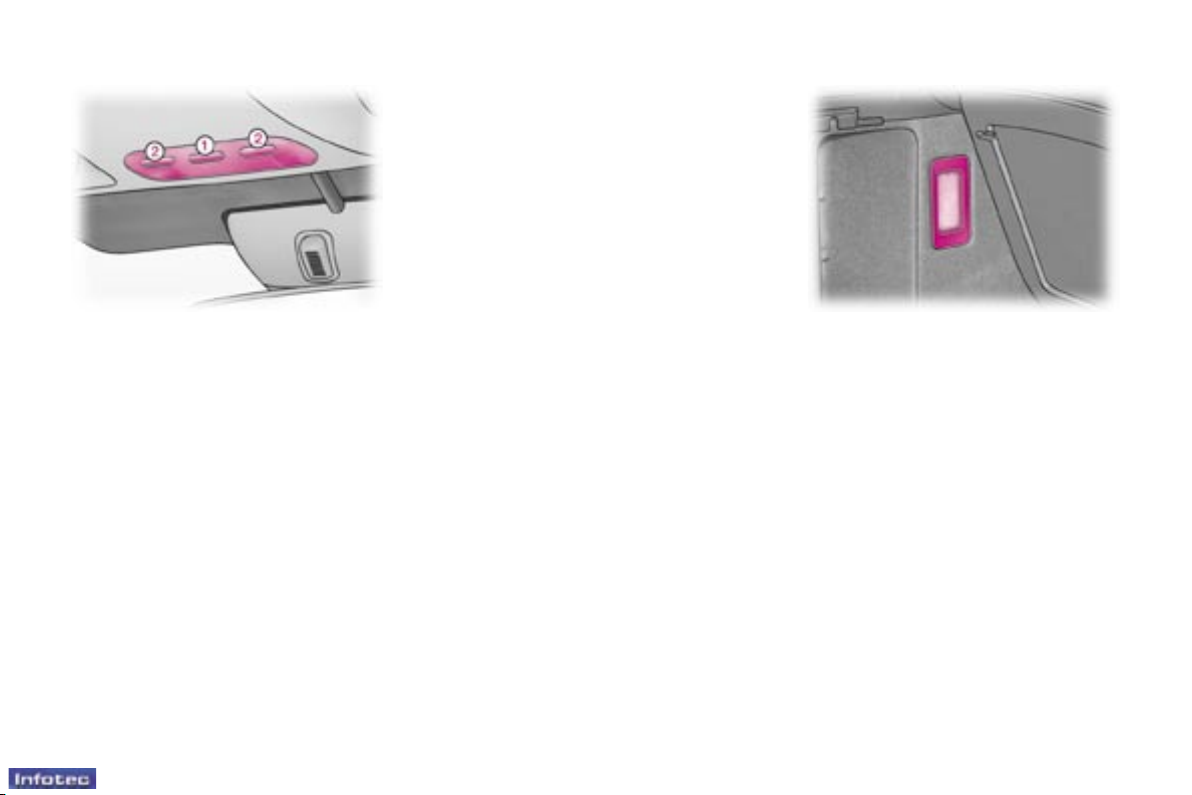
COURTESY LIGHT
1 - Front courtesy light
2 - Map reading lights
With the key in the accessories position (1st notch) or with the ignition on,
operate the relevant switch.
Pressing switch 1 switches on the
front courtesy light for a duration of
10 minutes.
The front courtesy light comes on
automatically when the ignition key
is removed, on unlocking the vehicle
or on opening one of the doors.
It gradually goes off after the ignition
has been switched on or the vehicle
is locked.
Deactivation
When the ignition key is removed or
when a door is opened, the courtesy
light can be deactivated by pressing
switch 1 for more than two seconds.
A brief press on switch 1 switches the
courtesy light on and off.
The map reading lights are not affected by this and can still be switched
on.
Boot light
The boot light is located in the left
boot trim.
It comes on automatically when the
boot is opened and switches of automatically when the boot is closed.
Visibility
Activation
To re-activate the automatic lighting,
press switch 1 again for more than
two seconds when the ignition key is
removed or a door is opened.
"Door open" warning
When the vehicle is moving, if a door
or the boot is not closed properly, you
are warned by ashing of the courtesy light and a diagram or message
locating it on the multifunction display, accompanied by a continuous
audible signal.
117
-
28-02-2005
FRONT INTERIOR
LAYOUT
1. Sun visor
Each sun visor has a courtesy mirror
with concealer and a ticket holder.
2. Storage trays on the fascia
3. Glove box
To open the glove box, lift the handle.
The glove box lights when the lid is
opened.
The lid has two opening positions,
intermediate and full.
It contains a ventilation nozzle that
can be closed, distributing the same
conditioned air as the vents of the
passenger compartment, the CD
changer and three sockets for connecting video equipment.
The layout allows storage of a pen,
the vehicle handbook, a pair of spectacles, maps, etc.
It provides access to the fascia fuse
box.
4. Enclosed storage
compartment/Movable
ashtray
This can be placed in the positions
marked 10, 12 and 14.
5. Storage compartment
To open, raise the handle.
This permits the storage of small
objects.
6. Door storage trays
Before opening the door, ensure that
there are no objects protruding from
the tray.
7. Writing table
When the front passenger seat is
placed in the table position, you have
a table with two pieces of elastic to
retain A4 format documents, as well
as pen holders.
8. Coin storage
9. Storage compartment
10. Can holder
11. Lighter/12 volt accessories
socket
This is supplied with current from the
accessories position (1st notch).
12. Can holder
13. Mobile storage
14. Bottle storage
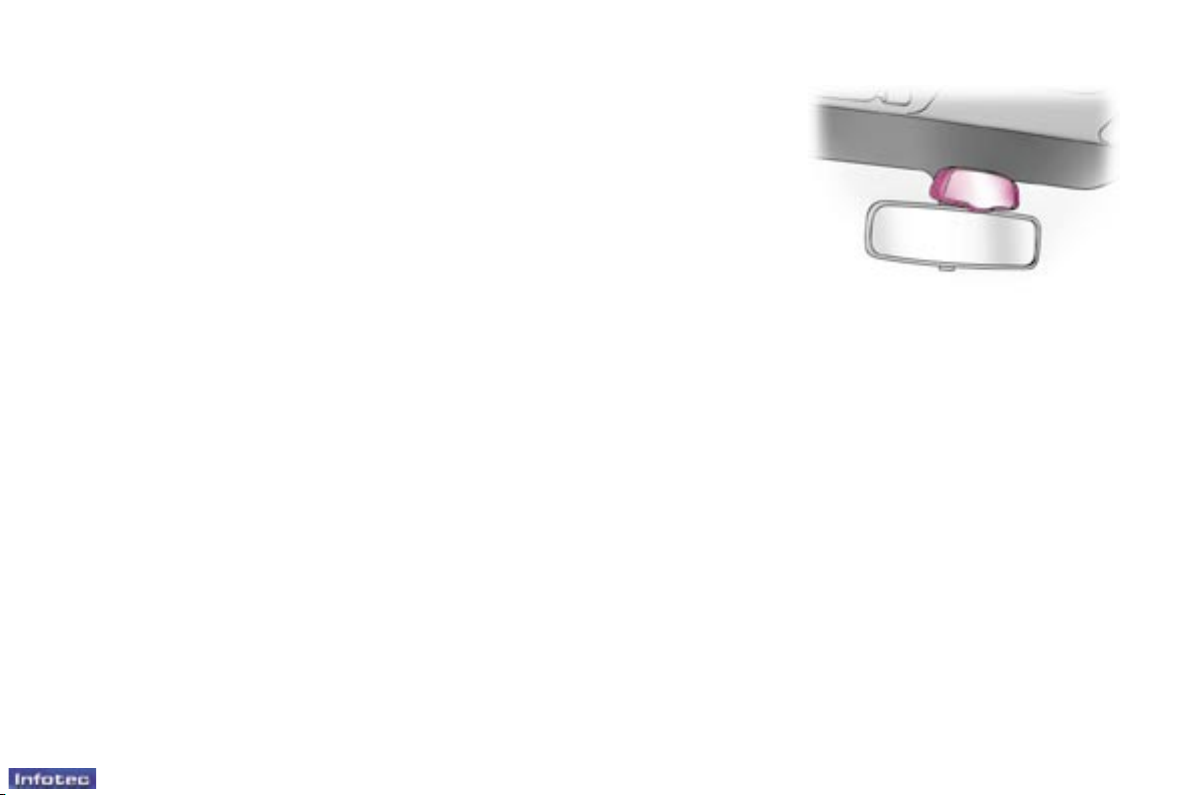
CHILD MONITORING MIRROR
This mirror enables the driver or front
passenger to observe all the rear
seats.
Fitted on its own ball joint, it provides
a panoramic view of the rear interior
of the vehicle.
AREAS FOR TOLL CARDS/
CAR PARK TICKETS
The athermic windscreen has a nonreective zone located above the
base of the interior mirror.
It is intended for afxing toll cards
and/or car park tickets.
Layout
120
-
28-02-2005
121
-
28-02-2005
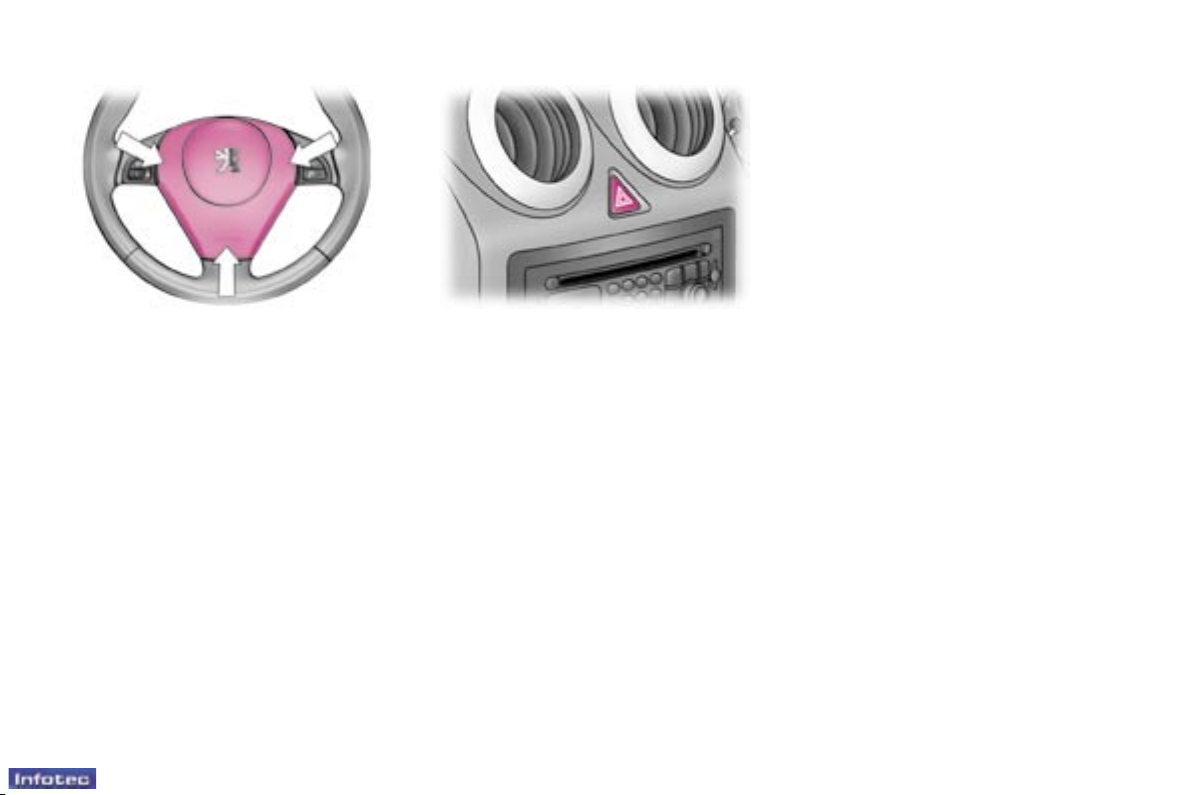
HORN
Press one of the spokes of the steering wheel.
HAZARD WARNING LIGHTS
Press the button, the direction indicators ash.
They can operate with the ignition off.
Automatic lighting of hazard
warning lights
When braking in an emergency,
depending on the force of deceleration, the hazard warning lights
come on automatically. They switch
off automatically the rst time you
accelerate.
It is also possible to switch them off
by pressing the button on the fascia.
Safety
121
-
28-02-2005
ANTI-LOCK BRAKING
SYSTEM (ABS) AND THE
ELECTRONIC BRAKE FORCE
DISTRIBUTION (EBFD)
The ABS, in conjunction with the
electronic brake force distribution,
increases the stability and manoevrability of your vehicle on braking, in
particular on poor or slippery road
surfaces.
Note: when changing wheels (tyres
and rims), make sure that these are
approved.
The anti-lock braking system comes
into operation automatically when
there is a risk of wheel lock.
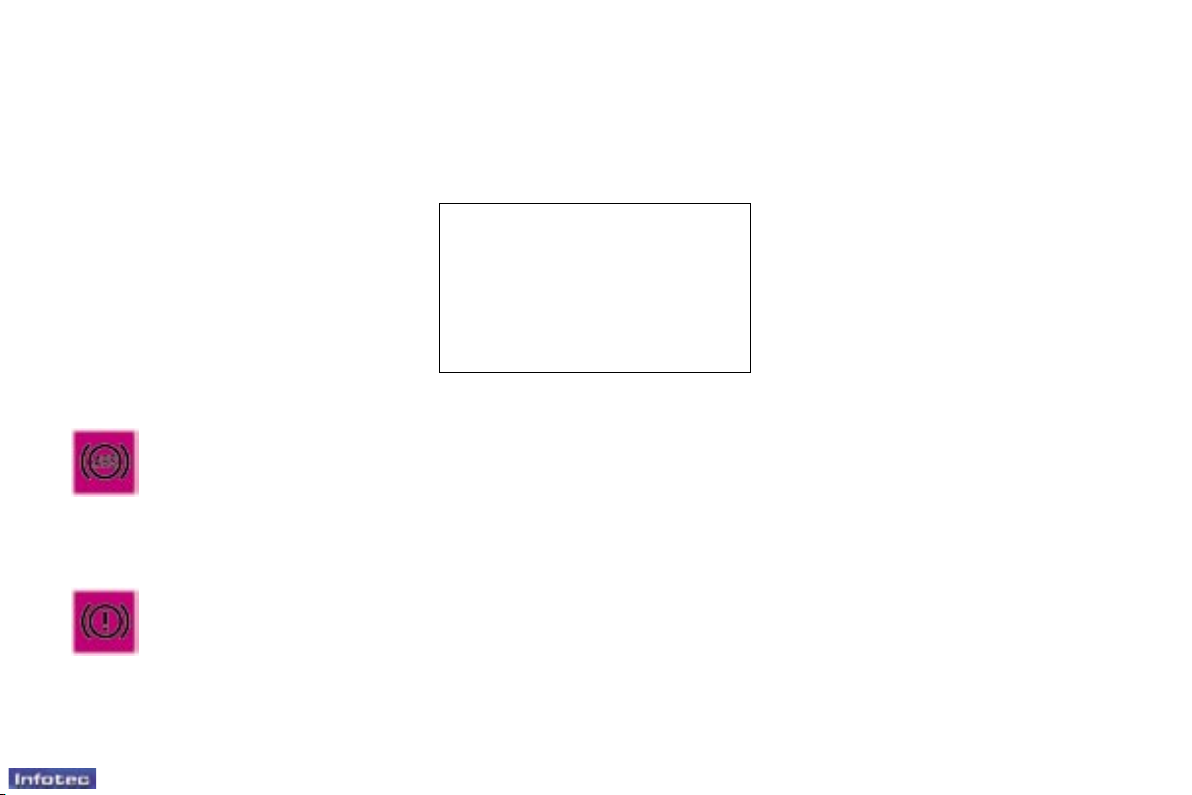
When this warning light
comes on, accompanied by
a buzzer and a message,
it indicates that there is a
malfunction of the ABS,
which can cause a loss of control of
the vehicle when braking.
When this warning light
comes on, connected to
the STOP warning light,
accompanied by a buzzer
and a message, it indicates that there is a malfunction of the
electronic brake force distribution,
which can cause a loss of control of
the vehicle when braking.
Stop immediately.
In both cases, consult a PEUGEOT
dealer.
EMERGENCY BRAKING
ASSISTANCE SYSTEM
In an emergency, this system enables the optimum braking pressure to
be reached more quickly, thus reducing the stopping distance.
It is triggered by the speed at which the
brake pedal is activated. The effect of
this is a reduction in the resistance of
the pedal and an increase in braking
efciency.
Safety
Normal operation of the ABS may
make itself felt by slight vibrations
of the brake pedal.
In emergency braking, press
very rmly without releasing the
pressure.
122
-
28-02-2005
123
-
28-02-2005
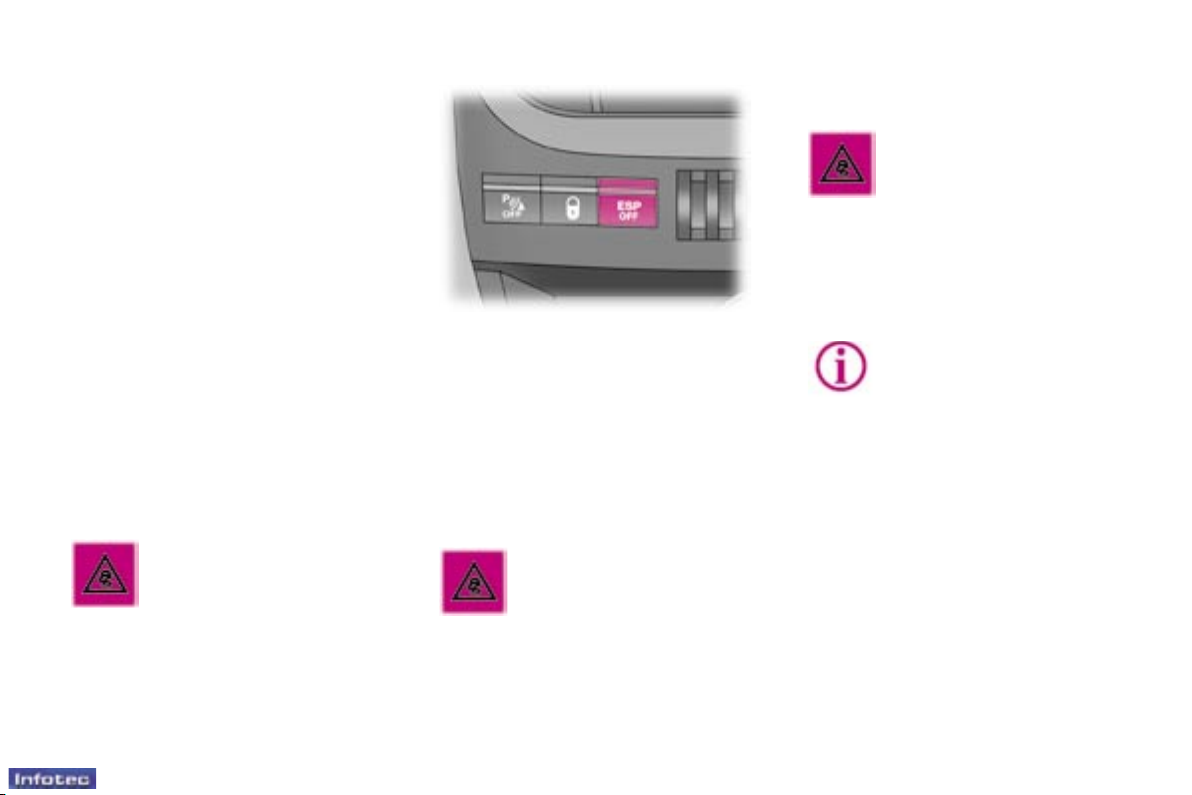
The switch lights up and
the warning light comes on:
the ASR and ESP systems
are disarmed.
TRACTION CONTROL (ASR)
AND DYNAMIC STABILITY
CONTROL (ESP)
These systems are linked and complement the ABS.
The ASR system optimises drive to
prevent the wheels skidding, by acting on the brakes of the drive wheels
and on the engine. It also allows the
directional stability of the vehicle to
be improved on acceleration.
If there is a variation between the
trajectory followed by the vehicle and
that required by the driver, the ESP
system automatically acts on the
engine and the brake of one or more
wheels, in order to put the vehicle
back on course.
Operation of the ASR and ESP
systems
The warning light ashes
if the ASR or ESP is acti-
vated.
Disarming the ASR/ESP systems
In exceptional conditions (starting a
vehicle which is bogged down, stuck
in snow, on soft ground, ...), it may
be advisable to disarm the ASR and
ESP systems, so that the wheels can
move freely and regain grip.
F Press the "ESP OFF" switch, lo-
cated on the central section of the
fascia.
These are triggered again:
F automatically if the ignition is swit-
ched off,
F automatically above 30 mph
(50 km/h),
F manually by pressing the switch
again.
Operating check
When a malfunction of the
systems occurs, the warning
light comes on, accompanied by an audible signal and
a message on the multifunction display.
Contact a PEUGEOT dealer to have
the systems checked.
The ESP/ASR systems
offer exceptional safety
in normal driving, but this
should not encourage the
driver to take extra risks or
drive at high speed.
The correct functioning of these
systems depends on observation
of the manufacturer's recommendations regarding the wheels (tyres
and rims), the braking components,
the electronic components and the
PEUGEOT assembly and operation
procedures.
After an impact, have the systems
checked by a PEUGEOT dealer.
Safety
128
-
28-02-2005
129
-
28-02-2005
When the vehicle is being
driven, illumination of this
warning light and of the
STOP warning light, ac-
companied by an audible
signal and a message on the multifunction display, indicates that the
handbrake is still on or has not been
properly released.
When parking on a slope,
direct your wheels towards
the pavement and pull the
handbrake.
The handbrake must not be
used to stop or brake while the vehicle is moving.
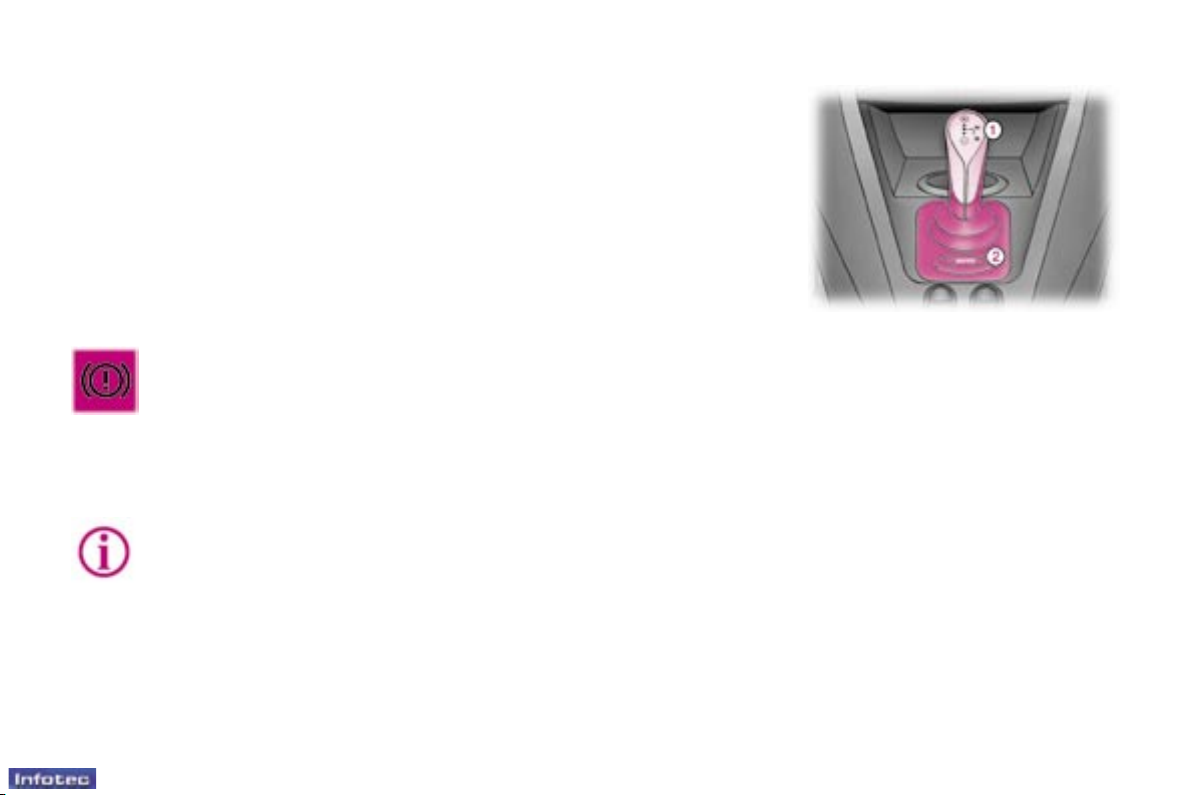
"2 TRONIC" GEARBOX
The ve-speed controlled manual
gearbox offers a choice between the
comfort of automatic regulation or the
pleasure of manual gear changing.
This gearbox enables you to access
two driving modes:
- an automated mode for automatic
control of the gears by the gearbox,
- a sequential mode for manual changing of the gears by the driver.
It consists of the following controls:
- a gear lever 1 on the centre console for changing gear in sequential
mode, reverse gear and neutral,
- an "AUTO" button 2 on the centre
console for activation or deactivation of the automated mode,
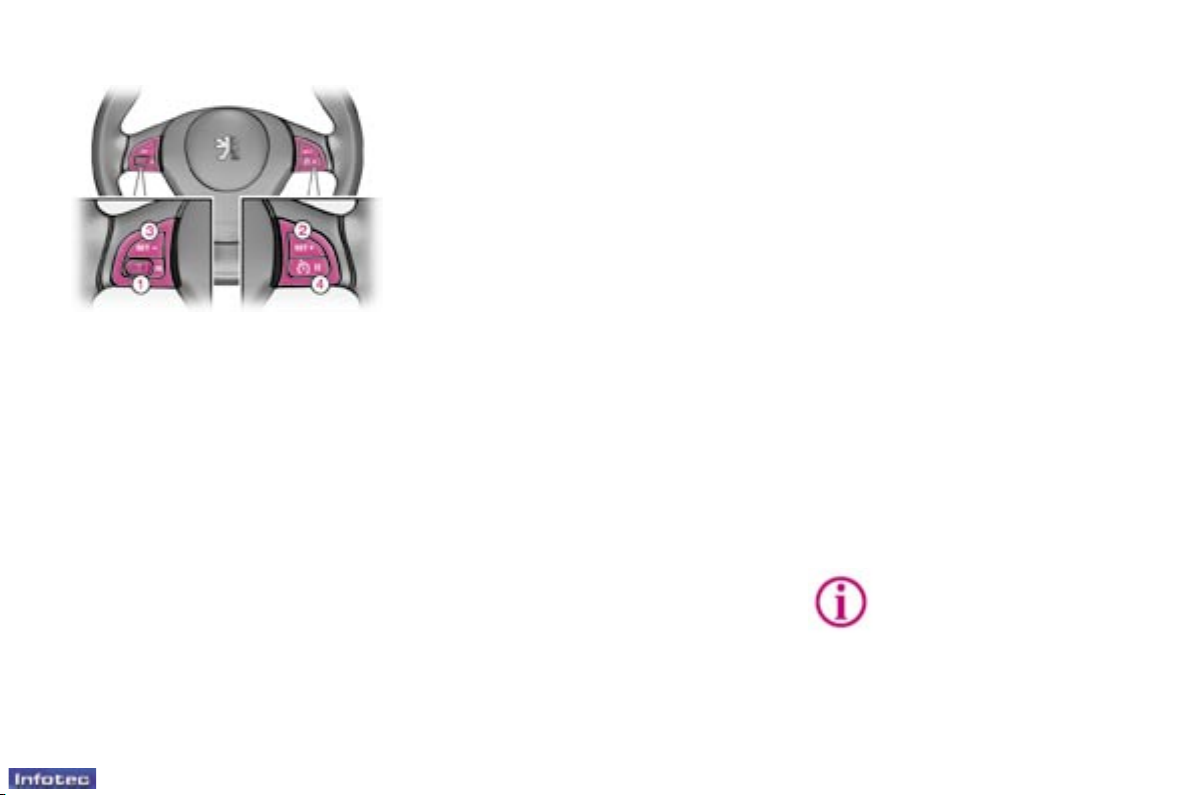
- a "-" steering wheel control 3 for se-
quential downward gear changes,
- a "+" steering wheel control 4 for
sequential upward gear changes.
HANDBRAKE
Applying
Pull the handbrake to immobilise
your vehicle.
Gear lever positions
N: neutral.
Push the lever to the right to change
to neutral.
R: reverse gear.
Hold the lever pushed to the right,
then press rearward to engage
reverse gear.
Reverse gear can only be selected
from the gear lever with your foot
on the brake.
+/-: manual gear changing in sequ-
ential mode.
Push forward to change up.
Push rearward to change down.
Driving
Releasing
Pull on the handle and press the button to release the handbrake.
131
-
28-02-2005
CRUISE CONTROL
Cruise control enables the vehicle to
maintain a steady speed programmed by the driver, regardless of the
road characteristics and without the
driver having to touch the accelerator
or brake pedals.
In order for it to be memorised, the
vehicle speed must be greater than
25 mph (40 km/h) and fourth gear at
least must be engaged (second gear
for the "2 Tronic" gearbox).
Memorising a speed
As soon as you reach the chosen
speed, press button 2 or 3. This
memorises the speed, which will be
maintained automatically.
Note: It is possible to accelerate and
drive momentarily at a speed greater
than the memorised speed. When
the accelerator pedal is released, the
vehicle will return to the memorised
speed.
Changing a memorised speed
To memorise a speed higher than the
previous one:
F press button 2;
F release it when you have reached
the required speed.
To memorise a speed lower than the
previous one:
F press button 3;
F release it when you have reached
the required speed.
Do not use the cruise control on slippery roads or in
heavy trafc.
The driver must remain attentive and stay in full control of his
vehicle.
Driving
Operation
F Place control 1 in the ON position.
A speed can be memorised.
F Place control 1 in the OFF positi-
on to cancel.
Cancelling the memorised
speed
If you wish to cancel the memorised
speed:
F press button 4 or the brake or
clutch pedal.
Recalling the memorised
speed
After cancellation, press button 4.
Your vehicle will return to the last
memorised speed.
Cancelling the cruise control
F Place control 1 in the OFF positi-
on or switch off the ignition when
the vehicle becomes stationary.

132
-
28-02-2005
REAR PARKING ASSISTANCE
This system consists of four proximity
sensors, located in the rear bumper,
and a special speaker.
This detects any obstacle (person,
vehicle, tree, gate, etc.) behind the
vehicle. Nevertheless, it cannot detect obstacles located just below the
bumper.
An object, such as a stake, a roadworks cone or any other similar
object may be detected at the beginning of the manoeuvre, but may no
longer be detected when the vehicle
comes close to it.
Note: in bad or wintry weather, ensure that the sensors are not covered
with mud, frost or snow.
Detection zone
Detection
The system is activated as soon as
reverse gear is engaged, accompanied by an audible signal and lighting
of the button A indicator light.
The proximity information is given by
an audible signal, which becomes
more rapid as the vehicle approaches the obstacle.
When the distance between the rear
of the vehicle and the obstacle is less
than thirty centimetres, the audible
signal becomes continuous.
On completion of the manoeuvre,
when you exit reverse gear, the system becomes inactive.
Note: during the manoeuvre, press
button A to deactivate the system tem-
porarily (child asleep in the rear...).
If there is an operating fault,
the indicator light ashes,
accompanied by an audible
signal which will be a short
bleep followed by a long bleep, when
changing to reverse gear.
Driving
Deactivation
With the ignition on, press button A
for more than four seconds to deactivate the system permanently.
The indicator light on the button is
switched off, accompanied by an
audible signal.
Note: this function must be deactivated when towing a trailer or when
a bicycle carrier is tted (vehicle tted with a towbar or bicycle carrier
recommended by PEUGEOT).
Reactivation
Press button A again to reactivate
the system. The indicator light on the
button is switched on, accompanied
by an audible signal.
133
-
28-02-2005
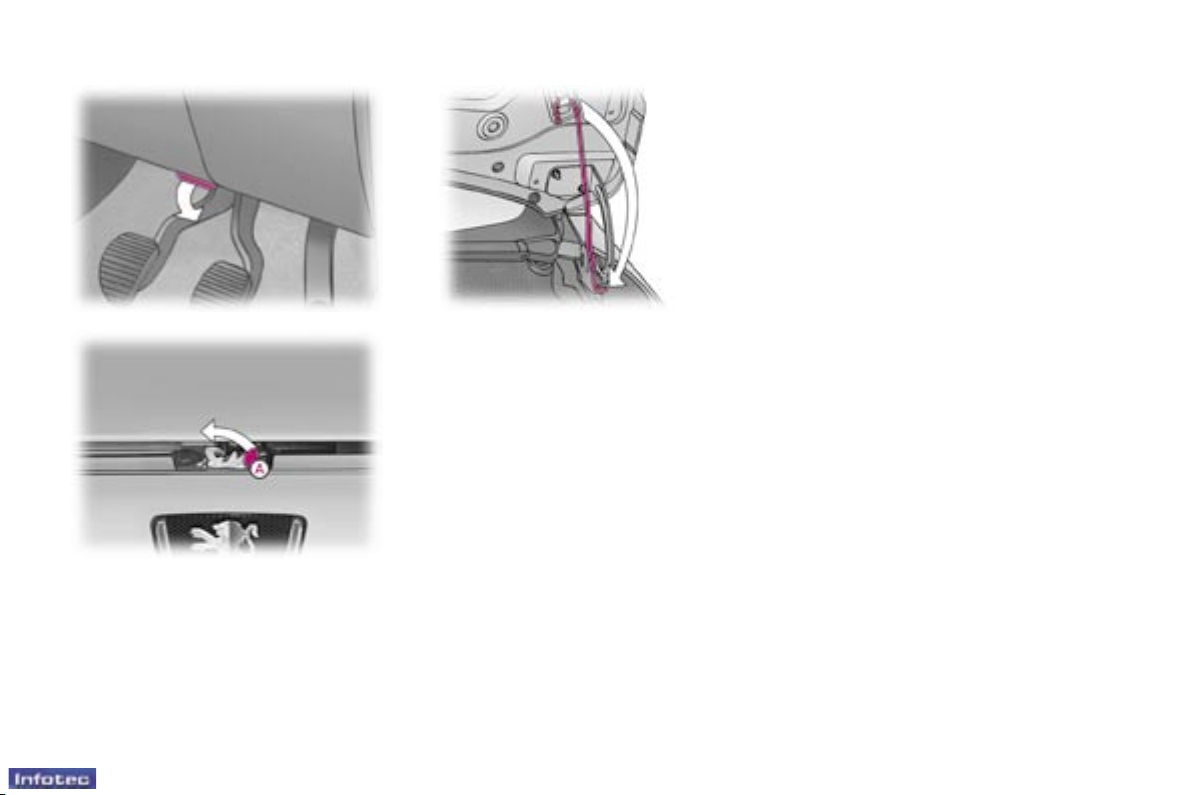
OPENING THE BONNET
From inside: pull the handle on the
right-hand side under the fascia.
From outside: lift the catch A and
raise the bonnet.
Bonnet strut
Secure the strut to hold the bonnet
open.
Before closing the bonnet, replace
the strut in its housing.
Checks
To close
Lower the bonnet and release it at
the end of its travel. Check that the
bonnet is properly locked.
134
-
28-02-2005
135
-
28-02-2005
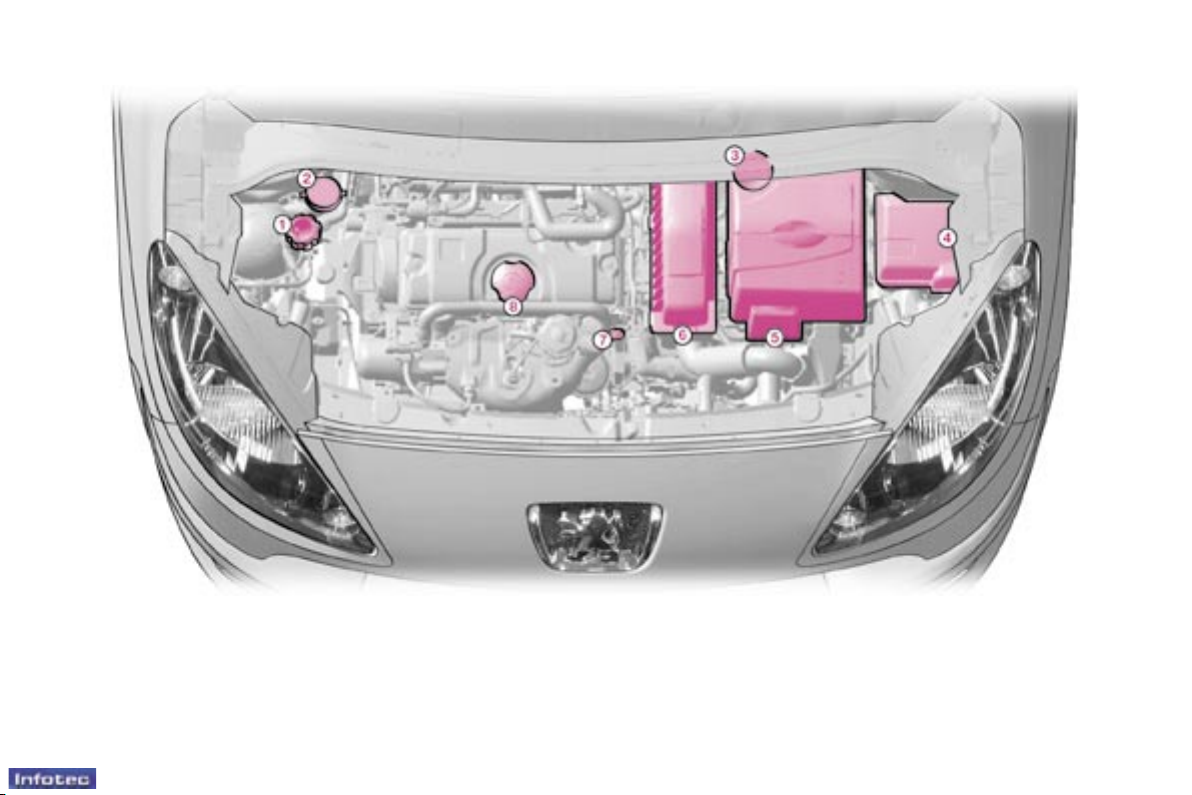
1.4 LITRE PETROL ENGINE
1 - Coolant reservoir
2 - Windscreen wash and
headlamp wash* reservoir
3 - Brake uid
reservoir
4 - Fuse box
5 - Battery
6 - Air lter
7 - Dipstick
8 - Engine oil ller cap
* According to country.
Checks
135
-
28-02-2005
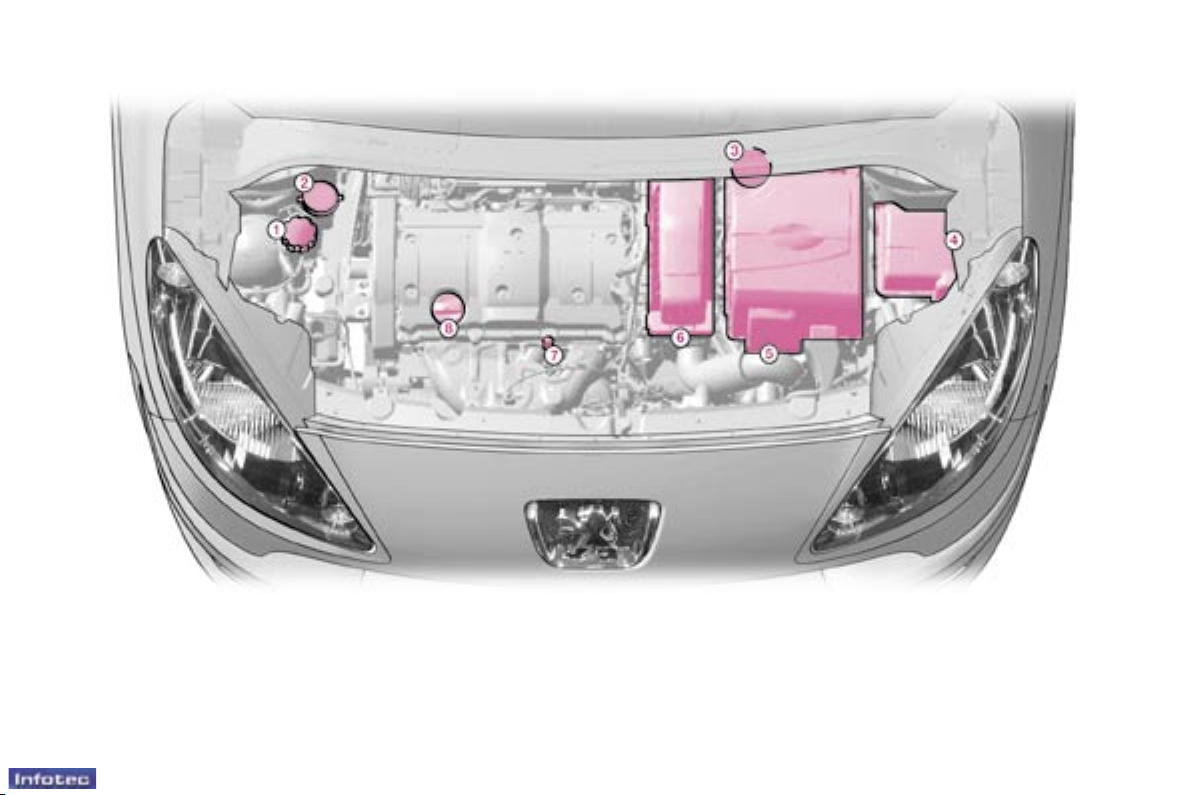
1.6 LITRE 16V PETROL ENGINE
1 - Coolant reservoir.
2 - Windscreen wash and
headlamp wash* reservoir.
3 - Brake uid
reservoir.
4 - Fuse box.
5 - Battery.
6 - Air lter.
7 - Dipstick.
8 - Engine oil ller cap.
* According to country.
Checks

136
-
28-02-2005
137
-
28-02-2005
1.4 LITRE TURBO DIESEL HDI ENGINE
1 - Coolant reservoir.
2 - Windscreen wash and
headlamp wash* reservoir.
3 - Priming pump.
4 - Air lter.
5 - Brake uid reservoir.
6 - Fuse box.
7 - Battery.
8 - Dipstick.
9 - Engine oil ller cap.
* According to country.
Checks
137
-
28-02-2005
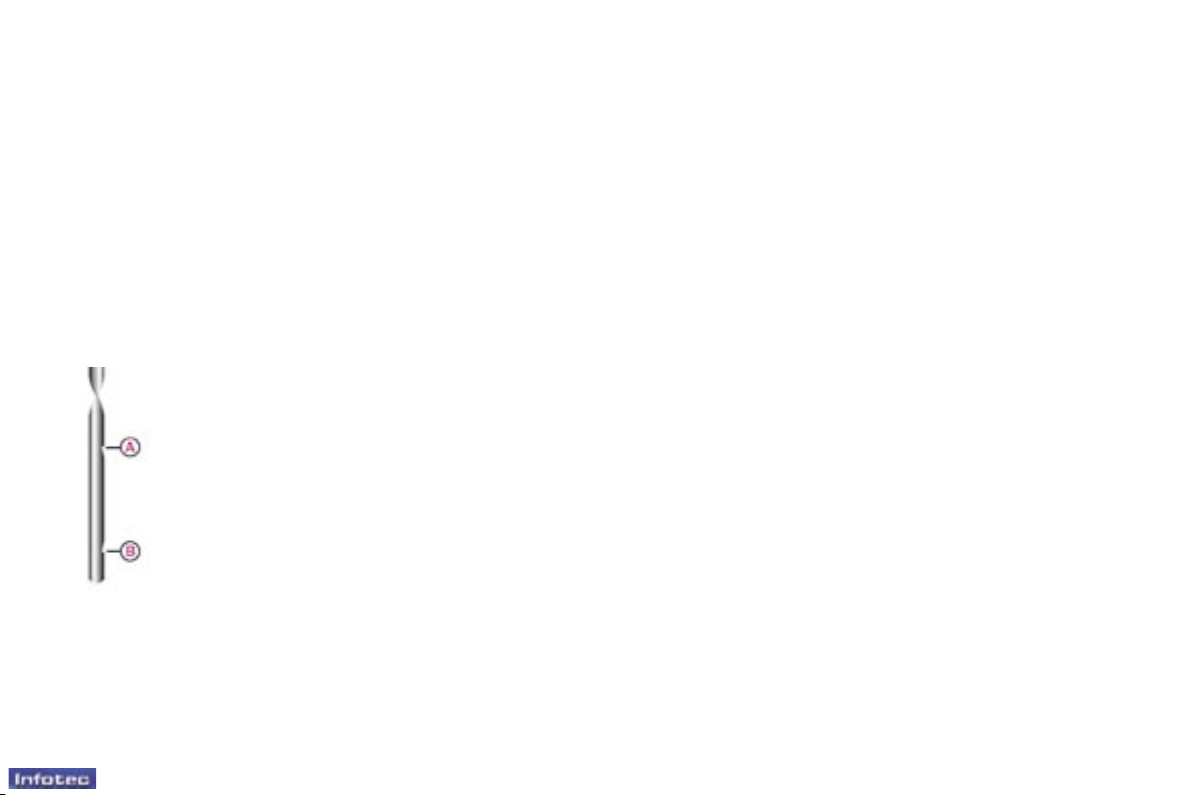
CHECKING THE LEVELS
Oil level
Check the level regularly and top up
between changes. The maximum
consumption is 0.5 l per 600 miles
(1 000 km).
Check the level with the vehicle level, engine cold, using the oil level
gauge on the instrument panel or the
dipstick.
There are two marks on
the dipstick:
A = maximum
Never ll past this mark.
B = minimum
To maintain the reliability
of engines and emission
control systems, the use
of additives in engine oil
is prohibited.
Dipstick
Oil change
According to the information given in
the servicing booklet.
Changing the brake uid
The brake uid must be changed at
the intervals stated, according to the
manufacturer's servicing schedule.
Use uids recommended by the
manufacturer, which full DOT4
standards.
Windscreen and headlamp*
wash level
For best quality cleaning and for
your safety, we would advise that
you use products recommended by
PEUGEOT.
* According to country.
Checks
Viscosity selection
In all cases, the oil selected must meet
the manufacturer's requirements.
Cooling system
Use the uid recommended by the
manufacturer.
When the engine is warm, the temperature of the coolant is controlled
by the engine fan. As this fan can
operate with the ignition key removed and because the cooling system
is pressurised, wait for at least one
hour after the engine has stopped
before carrying out any work.
Slacken the cap by two turns to release the pressure to prevent any risk
of scalding. When the pressure has
dropped, remove the cap and top up
the level.
Note: the coolant does not need to
be changed.
Used oil
Avoid prolonged contact of used oil
with the skin.
Brake uid is harmful to health and
very corrosive.
Do not dispose of used oil, brake
uid or coolant into drains or into the
ground.
138
-
28-02-2005
CHECKS Oil lter
Change the lter regularly, in accordance with the servicing schedule.
Only use products recommended by PEUGEOT or
products of equivalent quality and characteristics.
To ensure best performance
from components as important as the
braking system, PEUGEOT selects
and offers quite specic products.
To prevent damage to the electrical
units, avoid washing the engine.
Checks
To check the main levels and
certain components, in accordance with the manufacturer's
servicing schedule, refer to the
pages of the servicing booklet
which correspond to your vehicle's engine.
Battery
At the start of winter, have your battery checked by a PEUGEOT dealer.
Air lter and passenger
compartment lter
Have the lter elements replaced
regularly. If you drive in dusty
conditions, change them twice as
often.
Brake pads
Brake pad wear depends on the style
of driving, in particular for vehicles
which are used in town, over short
distances.
It may be necessary to check the
thickness of the pads, even between
services.
Handbrake
Where the handbrake travel is too
great or there is a reduction in the
performance of the system, the
handbrake should be adjusted, even
between services.
Have the system checked by a
PEUGEOT dealer.
Manual gearbox
This does not require an oil change.
Have the level checked in accordance with the manufacturer's servicing
schedule.
144
-
28-02-2005
145
-
28-02-2005
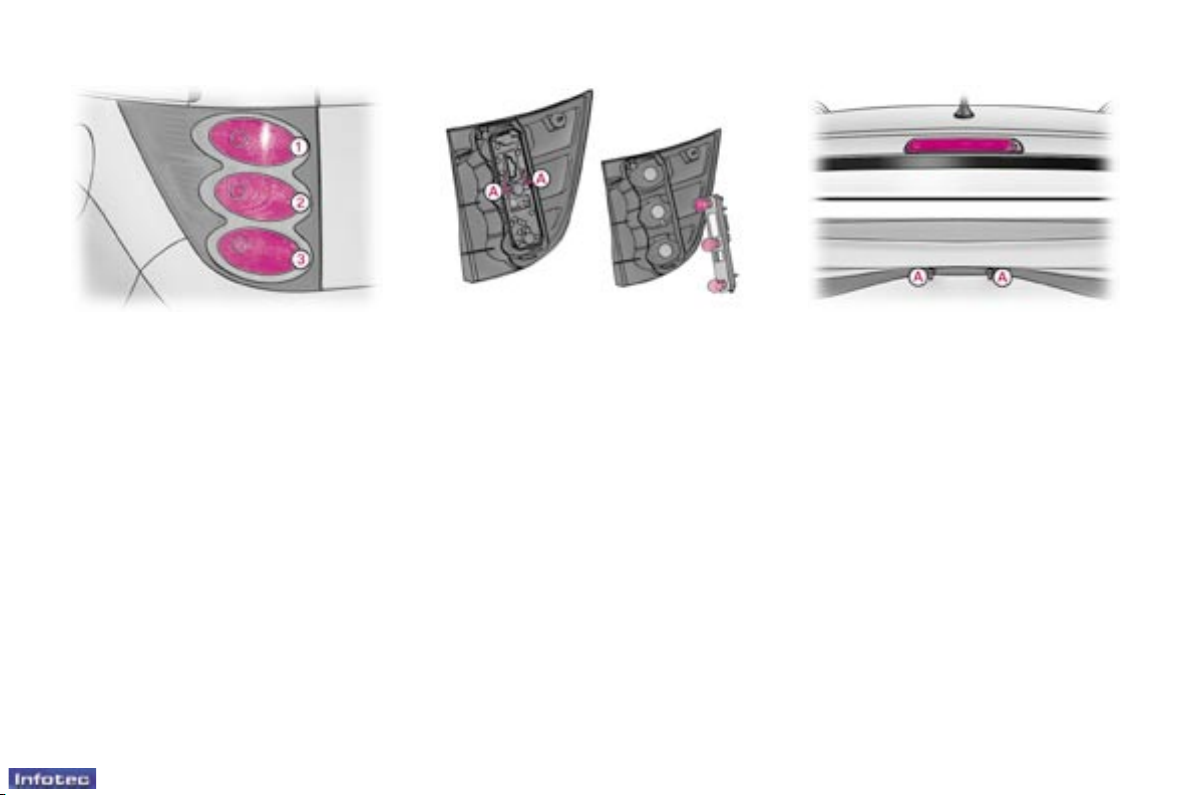
Rear lights
1 - Brake/side lights
(P 21 W/5 W).
2 - Direction indicators (P 21 W).
3 - Reversing light (P 21 W), left
side.
Fog lamp (P 21 W), right side.
These 4 bulbs are changed by removing the light:
F Remove the access ap in the
corresponding boot side trim to
access the light,
F Remove the two light xing nuts
inside the boot,
F Unclip the harness,
F Remove the light pressing on the
retaining tabs,
F Remove the seal,
F Remove the bulb holder moving
aside the two tabs A,
F Turn the bulb a quarter of a turn,
F Remove the bulb and change it.
Note: if necessary, use the wheelbrace to remove the nuts.
When retting, proceed in the reverse order and take care to position
the bulb holder, the seal and the light
correctly.
Third brake light
(4 W 5 W bulbs)
F Using a 10 mm box spanner, un-
screw the 2 xing nuts A.
F Release the lamp unit by pushing
it outwards.
F Disconnect the connector and the
rear wash-wipe pipe.
F Turn the bulb holder a quarter of a
turn and remove it.
F Remove the bulb and change it.
When retting, proceed in the reverse
order and ensure that the lamp unit
seal and the rear wash-wipe pipe have
been put back in place correctly.
Do not tighten the nuts more than is
necessary at the risk of breaking the
light.
Practical information
Number plate lights (W 5 W)
F Insert a thin screwdriver into one
of the external holes of the lens.
F Push it outwards to unclip it.
F Remove the lens.
F Remove the bulb and change it.
145
-
28-02-2005
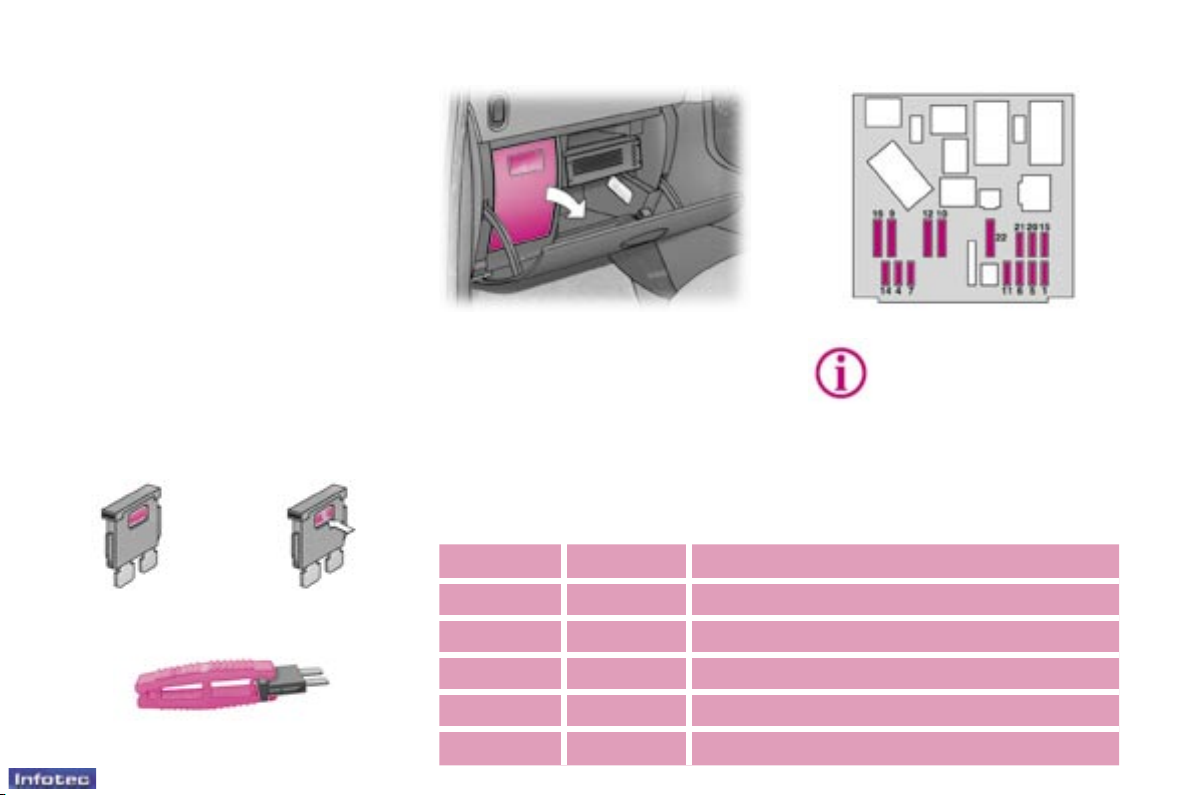
CHANGING A FUSE
The fuse boxes are located under the
fascia on the left-hand side (in the
glove box) and in the engine compartment next to the battery.
Correct
Removing and tting a fuse
Before changing a fuse you must nd
out the cause of the fault and have it
put right. The fuse numbers are indicated on the fuse box.
F Use the pliers A.
Always replace a faulty fuse with
one of the same rating.
Incorrect
Pliers A
Practical information
* The maxi fuses provide
additional protection for the
electrical systems. All work
must be carried out by a
PEUGEOT dealer.
Fascia fuse box
F Open the glove box, then tilt the
cover to open it.
F Turn the lever a quarter of a turn,
then push and tilt the box to gain
access to the fuses.
The pliers A and the spare fuses are
xed on the inside of the cover.
Fuse N° Rating Functions
FH1* 40 A Left "Sésame" door.
FH2* 40 A Right "Sésame" door.
FH3* - Not used.
FH4* 20 A Audio amplier.
FH5* - Not used.
150
-
28-02-2005
151
-
28-02-2005
Practical information
CHANGING A WINDSCREEN
WIPER BLADE
Placing the wiper blades in the
special position
F Less than a minute after switching
off the ignition, operate the wipers
stalk to position the wiper blades
in the centre of the windscreen.
BATTERY
To charge the battery using a
battery charger:
- Disconnect the battery,
- Follow the instructions for use
given by the battery charger manufacturer,
- Reconnect starting with the negative (-) terminal,
- Check that the terminals and connectors are clean. If they are covered with
sulphate (white or greenish deposit),
disconnect them and clean them.
It is advisable to disconnect the
battery if the vehicle is not to be
used for a period of more than
one month.
Before disconnecting the
battery, you must wait for
2 minutes after switching
off the ignition.
Never disconnect a terminal when the
engine is running.
Never charge a battery without rst
disconnecting the terminals.
Close the windows, the sunroof and
the doors before disconnecting the
battery. If they do not operate normally following reconnection of the
battery, they must be reinitialised
(see sections "Sesame doors" and
"Sunroof").
After every reconnection of the battery, switch on the ignition and wait
1 minute before starting to allow the
electronic systems to be initialised. If
slight difculties are experienced after this, please contact a PEUGEOT
dealer.
Changing a front wiper blade
F Lift the wiper arm.
F Unclip the blade and remove it.
F Fit the new blade.
F Push back the wiper arm.
Note: the shortest blade is tted on
the right-hand wiper arm.
To return the windscreen wipers
to their normal position, switch on
the ignition and operate the wipers
stalk.
Changing the rear wiper blade
F Lift the wiper arm.
F Unclip the blade and remove it.
F Fit the new blade.
F Push back the wiper arm.
To start the vehicle from another
battery:
- Connect the red cable to the positive (+) terminals of the two batteries,
- Connect one end of the green or
black cable to the negative (-) terminal of the slave battery,
- Connect the other end of the green
or black cable to an earth point on
the broken down vehicle as far as
possible from the battery,
- Operate the starter, let the engine
run,
- Wait for the engine to return to idle,
then disconnect the cables.

151
-
28-02-2005
Practical information
ECONOMY MODE FUNCTION
After the engine has stopped, with
the key in the accessories position,
certain functions (doors, windscreen
wipers, electric windows, courtesy
lights, audio equipment, etc.) can only
be used for a cumulative duration of
thirty minutes, to prevent discharging
of the battery.
Once the thirty minutes are over, a
message informing you of the switch
to economy mode appears on the
multifunction display and the active
functions are put on standby.
To resume the use of these functions
immediately, start the engine and let
it run for a few seconds.
RUNNING OUT OF FUEL
(DIESEL)
If you should run out of fuel, it is
necessary to re-prime the circuit:
- ll the fuel tank with at least ve
litres of diesel,
- squeeze and release the manual
re-priming pump, under the bonnet
under the protective cover, until fuel
appears in the transparent pipe,
- operate the starter until the engine
starts.
A at battery will prevent
the engine from starting.
152
-
28-02-2005
153
-
28-02-2005
Practical information
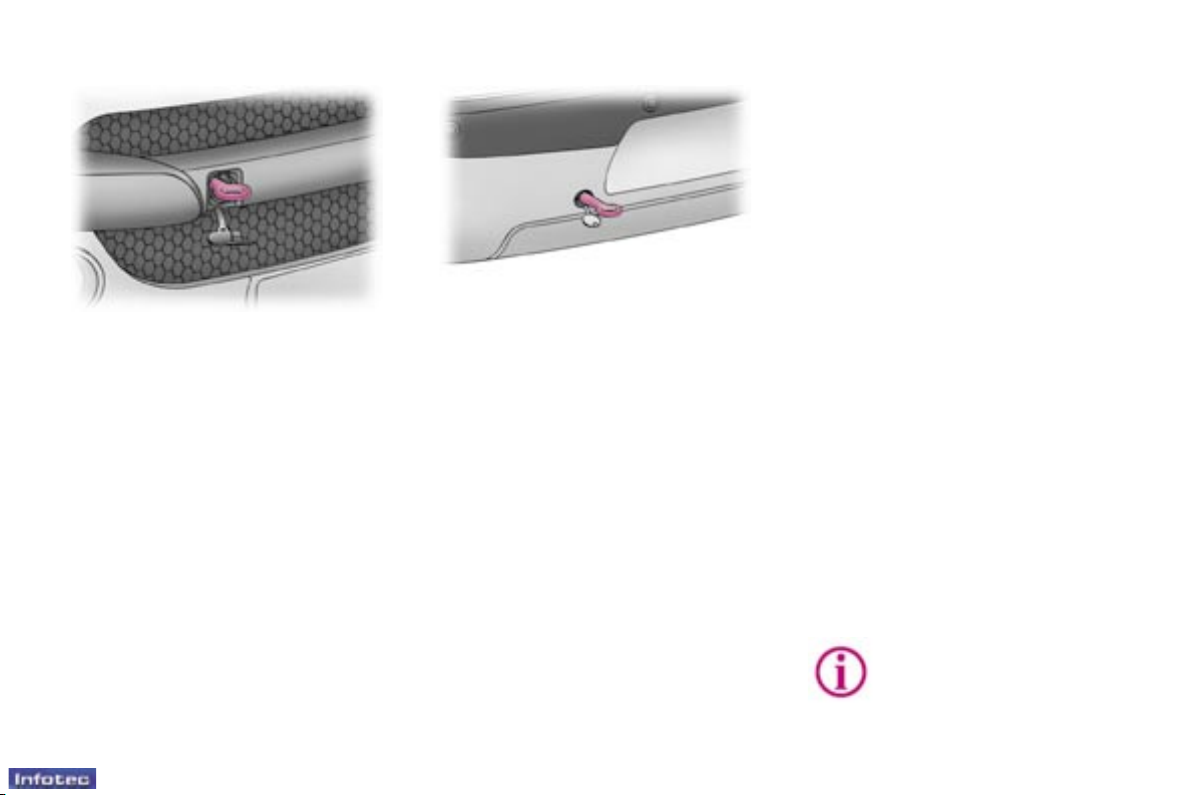
TOWING YOUR VEHICLE
Without lifting
(4 wheels on the road)
You should always use a towbar.
The removable towing eye is stored
in the tool case, located in the left
boot trim.
From the rear:
F Unclip the side of the cover using
the at part of the towing eye,
F Screw in the towing eye until it
locks.
When towing with the engine switched off, there is
no braking assistance.
Special features of the
"2 Tronic" gearbox
When towing with four wheels on the
ground, the following rules must be
obeyed:
- gear lever in position N,
- tow the vehicle at less than 30 mph
(50 km/h) over a maximum distance of 30 miles (50 km),
- do not add oil to the gearbox.
From the front:
F Unclip the bottom of the cover,
using the at part of the towing
eye.
F Screw in the towing eye until it
locks.
Lifting (2 wheels only
on the road)
It is preferable to raise the vehicle by
the wheels.
Never use the radiator crossmember.

153
-
28-02-2005
Practical information
TOWING A TRAILER,
CARAVAN, BOAT, ETC.
Only use original PEUGEOT tow
bars that have been tested and
approved from the design stage of
your vehicle.
The tow bar must be tted by a
PEUGEOT dealer.
Your vehicle is primarily designed
for transporting people and luggage
but it may also be used for towing a
trailer.
Driving with a trailer subjects the towing vehicle to more signicant stress
and its driver must be particularly
careful.
Air density decreases with altitude,
thus reducing engine performance.
The maximum towing load must be reduced by 10 % for every 1 000 metres
of altitude.
Cooling: Towing a trailer on a slope
increases the temperature of the
coolant.
As the fan is electrically controlled,
its cooling capacity is not dependent
on the engine speed.
On the contrary, use a high gear to
lower the engine speed, and reduce
your speed.
The maximum towing speed on a
long slope depends on the gradient
and the outside temperature.
For vehicles tted with a direct injection petrol engine, after towing or
driving at high speed for a long period of time, the fan may operate for
approximately 6 minutes.
In all cases, pay attention to the coolant temperature.
In certain cases of particularly arduous
use (towing of the maximum load on
a steep slope when the temperature is
high), switching off the air conditioning
permits the recovery of engine power
and, therefore, an increase in the towing capacity.
If the warning light comes on, stop
the vehicle and switch off the engine
as soon as possible.
FITTING ROOF BARS
When tting transverse or longitudinal
roof bars, use the accessories recommended by PEUGEOT and follow the
manufacturer's tting instructions.
For further information, contact a
PEUGEOT dealer.
Please refer to national legislation
in order to comply with the regulations concerning the transportation
of objects which are longer than the
vehicle.
Driving advice
Distribution of loads: Distribute the
load in the trailer so that the heaviest
items are as close as possible to the
axle and the nose weight approaches the maximum permitted without
exceeding it.
Tyres: Check the tyre pressures of
the towing vehicle and the trailer,
observing the recommended pressures.
Brakes: Towing increases the braking
distance.
Lights: Check the electrical signalling on the trailer.
Side wind: Take into acount the
increased sensitivity to side wind.
154
-
28-02-2005
Practical information
ACCESSORIES FOR
YOUR 1007
A wide range of accessories recommended by PEUGEOT and original
parts are offered by the Network.
They all benet from PEUGEOT's
recommendation.
These accessories and parts, having
been tested and approved for reliability and safety, are all adapted to
your PEUGEOT vehicle.
This product range offered by
PEUGEOT Accessories is structured
around 5 categories: PROTECTION TOURING - IN-CAR TECHNOLOGY STYLING - UNIVERSAL.
The tting of electrical
equipment or accessories
which are not recommended by PEUGEOT may
result in a failure of your
vehicle's electronic system.
Please note this specic
warning. You are advised to contact
a representative of the Marque to be
shown the range of recommended
equipment and accessories.
"P rote ctio n": a nti- thef t
alarm, engraved windows,
wheel anti-theft devices,
rst aid kit, warning triangle, high visibility safety
jacket, snow chains.
"Touring": armrest, storage under the rear shelf,
mats, boot tray, sun blinds.
For leisure pursuits: roof
bars, transportation accessories (bicycle carrier, ski
carrier), roof box, child seats
and booster cushions, audio/telephone
console, side blinds, cool box.
Trailer towbar which must be tted by
the PEUGEOT Network.
"In-Car Technology": tele-
phones, hands-free kits,
satellite navigation systems,
CD changer, multimedia.
"Styling": alloy wheels,
wheel trims, spoiler, styling
strips, door spoilers, sill pro-
tectors.
"Universal": windscreen
wash uid, interior and ex-
terior cleaning and mainte-
nance products.
You can obtain other
"Cameleo" customising kits
from PEUGEOT dealers.
You will be offered either a
complete kit, like the original
kit, or a partial kit consisting
of the vent trims only.

155
-
28-02-2005
ENGINES AND GEARBOXES
Technical data
Model codes
PETROL
KFV KFV NFU
ENGINES 1.4 litre (75 bhp) 1.6 litre 16V (110 bhp)
Cubic capacity (cm3) 1 360 1 587
Bore x stroke (mm) 75 x 77 78.5 x 82
EU standard maximum power (kW) 54 80
Maximum power engine speed (rpm) 5 400 5 800
EU standard maximum torque (Nm) 118 147
Maximum torque engine speed (rpm) 3 400 4 000
Fuel Unleaded Unleaded
Catalytic converter Yes Yes
Gearbox
Manual
(5-speed)
"2 Tronic"
(5-speed)
"2 Tronic"
(5-speed)
Oil capacity (in litres)
Engine (with cartridge replacement) 3.15* 3.15* 3.35*
Gearbox-Final drive 2 - -
* Draining by gravity with oil ller cap open.

156
-
28-02-2005
157
-
28-02-2005
ENGINES AND GEARBOXES
Model codes
DIESEL
8HX
ENGINES 1.4 litre Turbo HDI (70 bhp)
Cubic capacity (cm3) 1 398
Bore x stroke (mm) 73.7 x 82
EU standard maximum power (kW) 50
Maximum power engine speed (rpm) 4 000
EU standard maximum torque (Nm) 160
Maximum torque engine speed (rpm) 2 000
Fuel Diesel
Catalytic converter Yes
Particle emission lter No
Gearbox
Manual
(5-speed)
Oil capacity (in litres)
Engine (with cartridge replacement) 3.8*
Gearbox-Final drive 1.9
Technical data
* Draining by gravity with oil ller cap open.
157
-
28-02-2005
Fuel consumption indications correct at time of printing.
CONSUMPTION
In accordance with directive 1999/100/CE
Engine Gearbox
Model
codes
Urban driving
mpg
(l/100 km)
Inter-urban
driving
(l/100 km)
Mixed
driving
(l/100 km)
Emission
of CO2 by
weight (g/km)
1.4 litre Manual KFV 33.2 (8.5) 54.3 (5.2) 44.1 (6.4) 153
1.4 litre "2 Tronic" KFV 35.8 (7.9) 54.3 (5.2) 45.6 (6.2) 147
1.6 litre 16V "2 Tronic" NFU 32.8 (8.6) 52.4 (5.4) 42.8 (6.6) 156
1.4 litre Turbo
HDI
Manual 8HX 53.3 (5.3) 74.3 (3.8) 64.2 (4.4) 115
Technical data

158
-
28-02-2005
159
-
28-02-2005
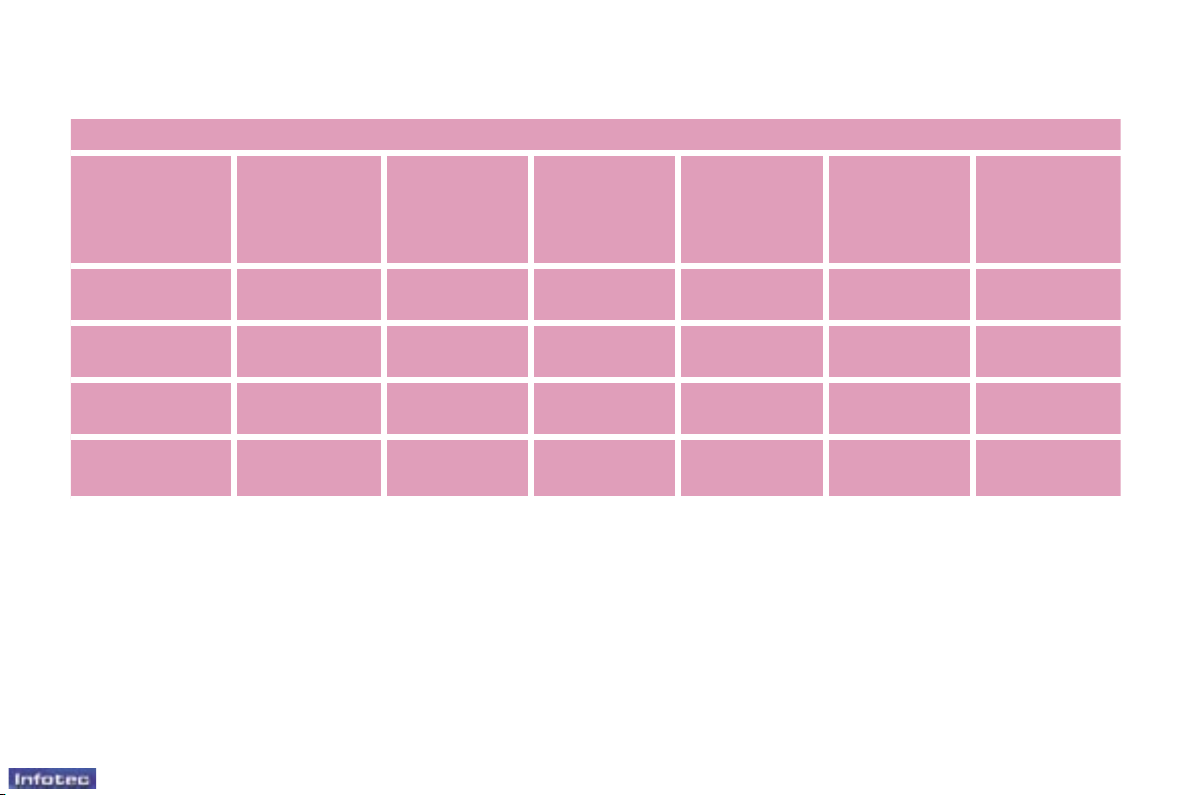
WEIGHTS AND TOWED LOADS (in kg)
* The speed of a towing vehicle is limited to 60 mph (100 km/h).
Petrol engine 1.4 litre 1.6 litre 16V
Gearbox Manual "2 Tronic" "2 Tronic"
Model codes KFV KFV NFU
• Kerb weight 1 140 1 145 1 216
• Gross vehicle weight (GVW) 1 554 1 559 1 596
• Gross train weight (GTW)* 2 304 2 309 2 496
• Unbraked trailer 605 605 645
• Braked trailer (within the limit of the GTW) 987 987 1 137
• Recommended nose weight 40 40 46
Diesel engine 1.4 litre Turbo HDI
Gearbox Manual
Model codes 8HX
• Kerb weight 1 168
• Gross vehicle weight (GVW) 1 582
• Gross train weight (GTW)* 2 482
• Unbraked trailer 620
• Braked trailer (within the limit of the GTW) 1 137
• Recommended nose weight 46
Technical data
159
-
28-02-2005
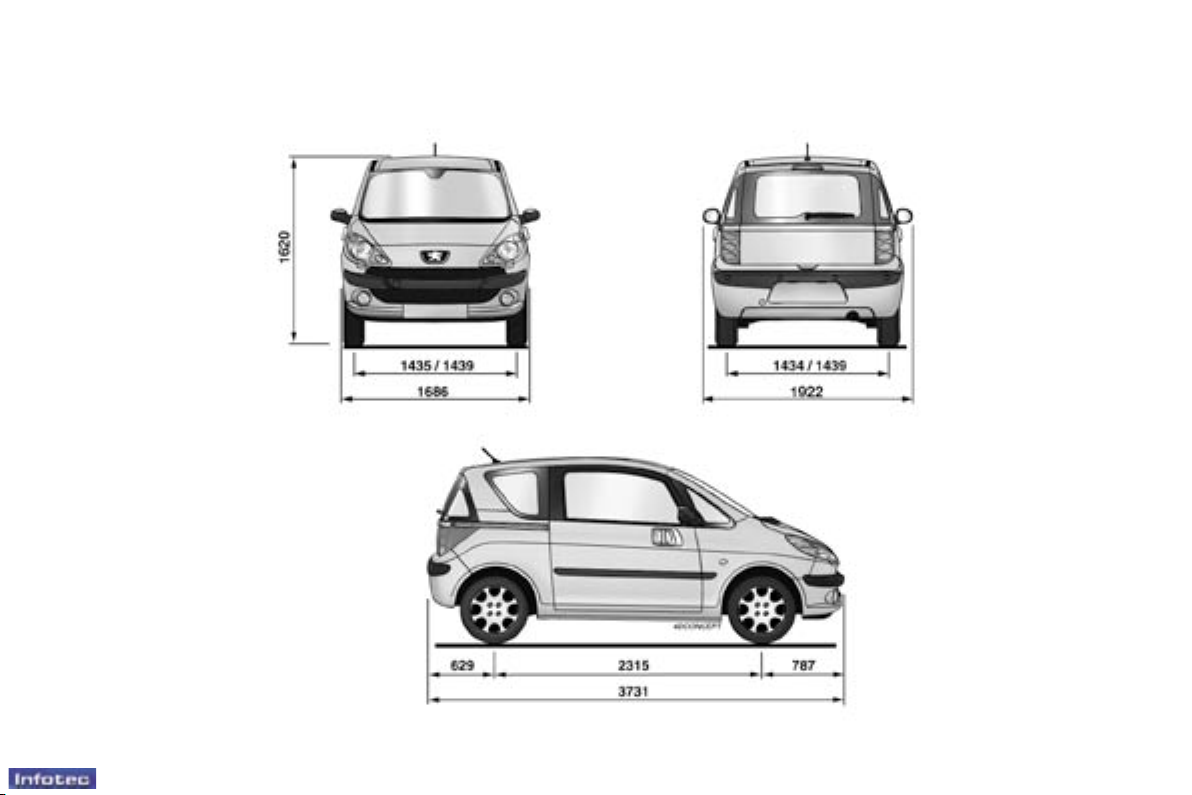
DIMENSIONS (in mm)
Technical data
160
-
28-02-2005
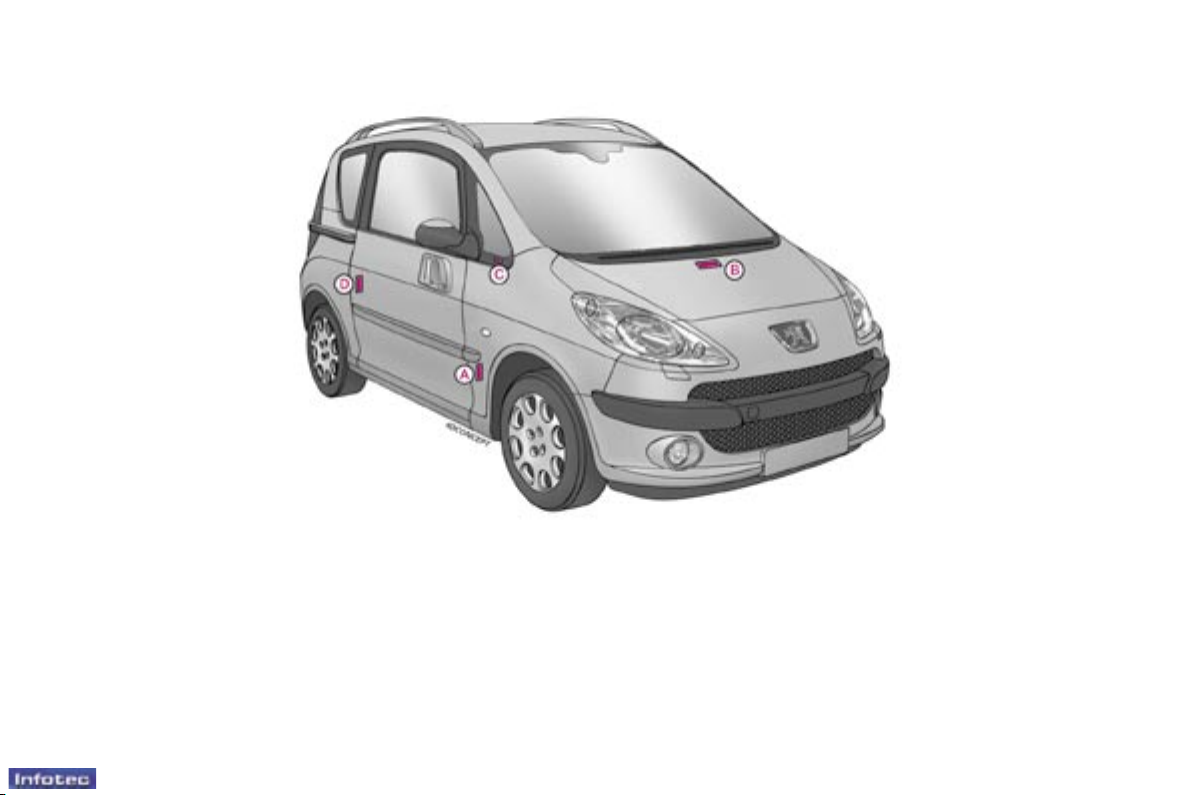
THE IDENTIFICATION
FEATURES OF
YOUR 1007
A. Manufacturer's plate.
B. Serial number on
the bodywork (under the
bonnet, at the centre of the
crossmember).
C. Serial number on the fascia
(on the small aperture,
driver's side).
D. Tyres and paint colour
reference.
The label D on the pillar, near the
driver's door striker, indicates:
- the wheel and tyre sizes,
- the brands of tyres approved by the
manufacturer,
- the tyre pressures (the tyre pres-
sure must be checked when
the tyre is cold, at least once a
month),
- the paint colour reference.
Wheels equipped with 195/50R16
tyres cannot be tted with snow
chains.
Contact a PEUGEOT dealer for
information.
Technical data
83
-
28-02-2005
Comfort
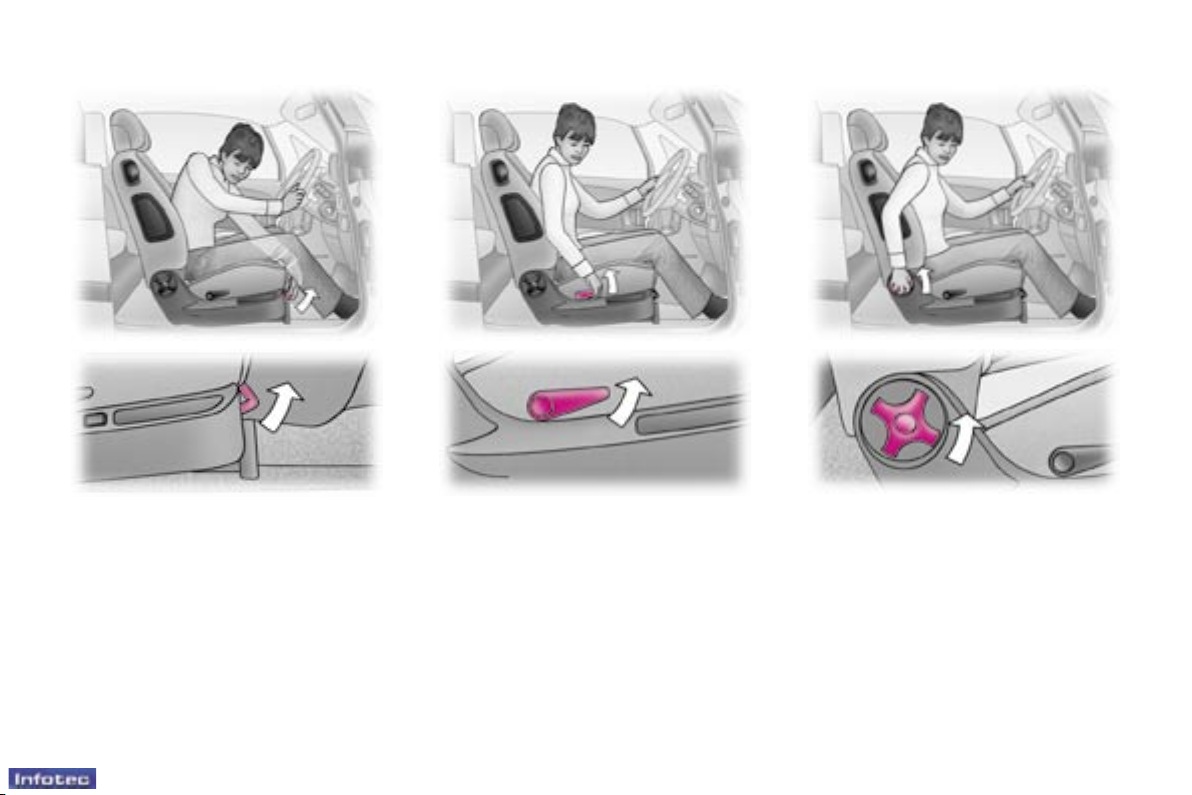
FRONT SEATS
2 - Driver's seat height
adjustment
Pull the control upwards.
Take your weight off the seat to raise
it or press on the seat to lower it.
3 - Seat back angle adjustment
Turn the knob to adjust the angle of
the seat back.
1 - Forwards-backwards
adjustment
Lift the control and slide the seat forwards or backwards.
84
-
28-02-2005
85
-
28-02-2005
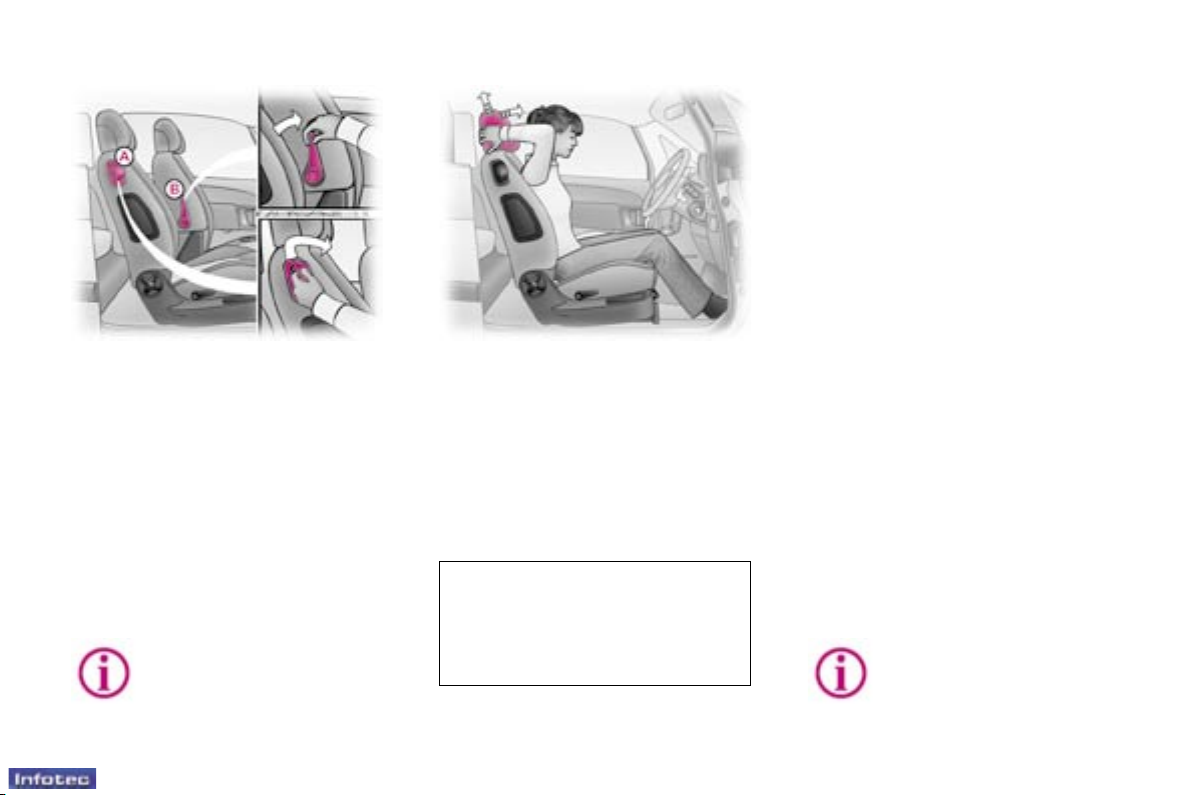
Comfort
4 - Access to the rear seats
If necessary, detach the seat belt
from the handle and position it along
the door pillar.
Pull the handle A upwards and forwards to fold the seat back and move
the seat forwards.
The driver has a courtesy handle B
to enable him to operate the passenger seat from his seat.
When it is put back in place, the seat
returns to its initial position.
5 - Head restraint height and
angle adjustment
To raise the head restraint, pull it
upwards.
To lower it, it is necessary to push
simultaneously:
- the button, located on the left guide
at the base of the head restraint
frame,
- the head restraint downwards.
No person or object should
prevent the seat from returning to its initial position;
the return to this position is
necessary in order for it to
be secured.
The adjustment is correct when
the upper edge of the head
restraint is level with the top of
the head.
The head restraint is tted with a
frame which has notches which
prevent it from lowering; this is an
impact safety device.
To adjust the angle of the head restraint, tilt it.
To remove it, press the lug and pull
it upwards.
Never drive with the head
restraints removed; they
must be in place and correctly adjusted.
 Loading...