

Page 1
Please read this entire manual before beginning
PIG 0 0 -11116
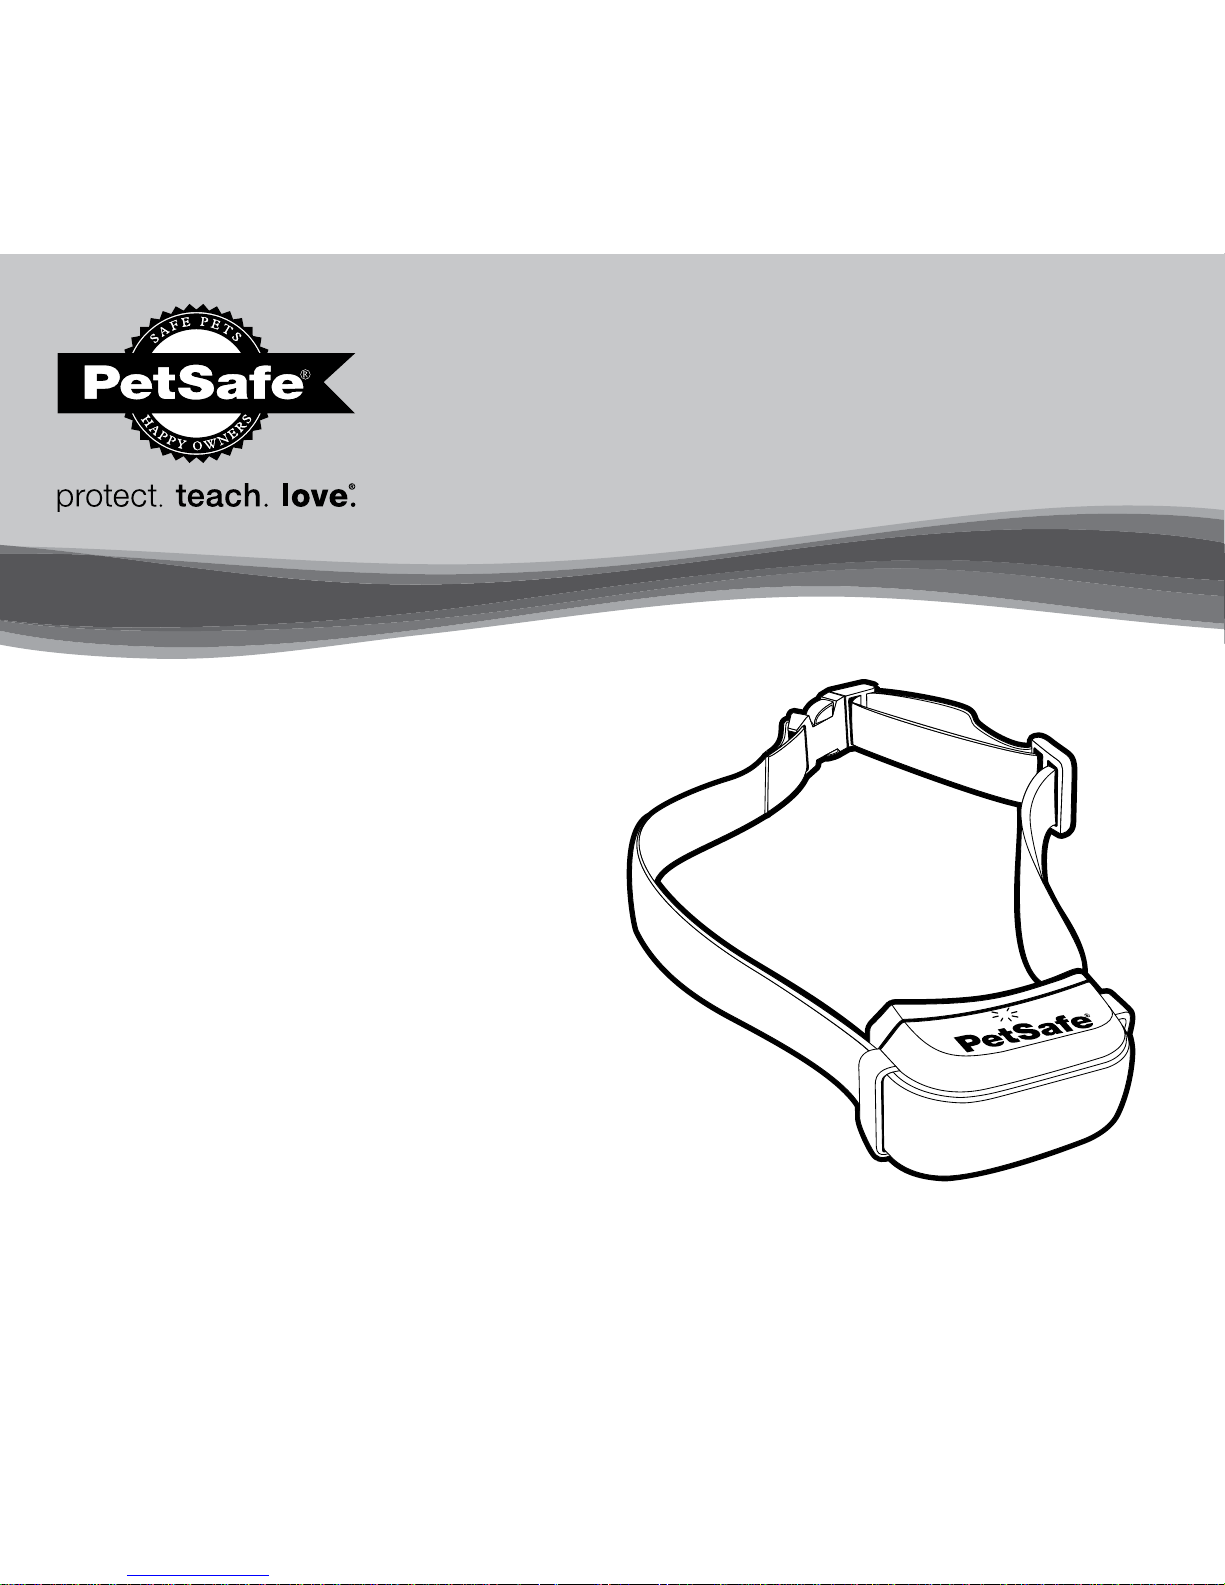
YardMax® Rechargeable
In-Ground Fence
™
Receiver Collar
Product Manual
Page 2

+1 (800) 732-26772
Welcome
You and your pet were made for each other. Our aim is to help you have
the best companionship and the most memorable moments together. Your
YardMax® Rechargeable In-Ground Fence™ receiver collar is designed to give
your pet more yard space while keeping him safe.
We know that safe pets make happy owners. Before getting started, please
take a moment to read through the important safety information. If you have any
questions, please don’t hesitate to contact us.
Hereinafter Radio Systems Corporation, Radio Systems PetSafe Europe Ltd.,
Radio Systems Australia Pty Ltd. and any other affiliate or brand of Radio Systems
Corporation may be referred to collectively as “We” or “Us.”
Page 3
petsafe.com 3
Important Safety Information
Explanation of attention words and symbols used in this manual.
This is the safety alert symbol. It is used to alert you to potential personal injury
hazards. Obey all safety messages that follow this symbol to avoid possible injury
or death.
WARNING indicates a hazardous situation which, if not avoided,
could result in death or serious injury.
CAUTION, used with the safety alert symbol, indicates a hazardous
situation which, if not avoided, could result in minor or moderate injury.
CAUTION, used without the safety alert symbol, indicates a
hazardous situation which, if not avoided, could result in harm to
your pet.
NOTICE is used to address practices not related to personal injury.
Page 4

+1 (800) 732-26774
• Not for use with aggressive pets. Do not use this product if your pet is prone to
aggressive behavior. Aggressive pets can cause severe injury or death to their owners
and others. If you are not sure that this product is right for your pet, please talk to your
veterinarian or a certified trainer.
• The battery should be charged in areas with temperatures ranging from 32°F to
113°F / 0°C to 45°C. Recharging the battery outside of this temperature range can
cause the battery to overheat, explode or catch fire.
• This system is NOT a solid barrier. It is designed to act as a deterrent to remind pets to
remain within the established boundary by use of static correction. It is important that
you reinforce training with your pet on a regular basis. Since the tolerance level to static
correction varies from pet to pet, Radio Systems Corporation CANNOT guarantee that
the system will, in all cases, keep a pet within the established boundary. Not all pets
can be trained to avoid crossing the boundary! Therefore, if you have reason to believe
that your pet may pose a danger to others or harm himself if he is not kept from crossing
the boundary, you should NOT rely solely upon this system to confine your pet. Radio
Systems Corporation shall NOT be liable for any property damage, economic loss or
any consequential damages sustained as a result of any animal crossing the boundary.
• Keep away from children
Page 5

petsafe.com 5
Proper fit of the receiver collar is important. A receiver collar worn for too long or made too
tight on your pet’s neck may cause skin damage, ranging from redness to pressure ulcers. This
condition is commonly known as bed sores.
• Avoid leaving the receiver collar on your pet for more than 12 hours per day.
• When possible reposition the collar on your pet’s neck every 1 to 2 hours.
• Check the fit to prevent excessive pressure; follow the instructions in this manual.
• Regularly recheck the fit to prevent excessive pressure; follow the instructions in
this manual.
• You may need to trim the hair in the area of the contact points. Never shave your pet’s
neck; this may lead to a rash or infection.
• Never connect a leash to a collar with contact points. It will cause excessive pressure on
the contact points.
• When using a separate collar for a leash, do not put pressure on the receiver collar.
• Wash your pet’s neck area and the contact points of the receiver collar weekly with a
damp cloth.
• Examine the contact area daily for signs of a rash or a sore.
• If a rash or sore is found, discontinue use of the receiver collar until the skin has healed.
• If the condition persists beyond 48 hours, see your veterinarian.
• For additional information on bed sores and pressure necrosis, please visit our website.
Page 6

+1 (800) 732-26776
• Proper training of your pet is essential to successfully using the system. During the first 2
weeks of training, do not use the system without direct supervision of your pet.
• The receiver collar should not be on your pet when the system is tested. If it is, your pet
may receive an unintended correction.
• Do not change the transmitter setting from Traditional mode (B) to YardMax
®
mode (A)
without verifying that the receiver collar will still contain your pet.
• If the receiver collar fails the ReadyTest
®
startup, the receiver collar is automatically
turned off. Your pet will not be contained.
• Always remove your pet’s receiver collar before performing any fence transmitter
testing. This will prevent unintended corrections.
• The boundary width of the system must be tested whenever an adjustment is made to the
pet area to prevent unintended corrections to your pet.
• To prevent an unintended correction, after the boundary flags have been placed, be
sure to set the static correction on the receiver collar back to level 1, which is tone only.
• Remove the receiver collar from your pet when indoors for the comfort of your pet.
• You should expect hundreds of recharge cycles from your battery; however, do not
charge your receiver collar every night. Charging too often can reduce battery life.
• Charge your receiver collar when the receiver indicator light blinks red.
Page 7

petsafe.com 7
How the System Works
The system works by sending a radio signal through a buried wire (boundary
wire). Your pet wears a receiver collar that picks up the signal. It warns your pet
with a beep when he or she enters the warning zone. If your pet continues to
venture out, the collar will issue a safe but startling correction, similar to the static
you feel if you drag your feet across a carpet and then touch a door handle. Of
course, different pets respond to different levels of correction. We have built in 5
levels of correction plus a tone-only setting to accommodate any pet. The only
pets that we do not recommend the system for are aggressive pets and pets below
6 months of age or under 5 lb.
Page 8
+1 (800) 732-26778
• Charge your receiver collar when the receiver indicator light blinks red.
Do not charge your receiver collar every night. Charging too often can
reduce battery life.
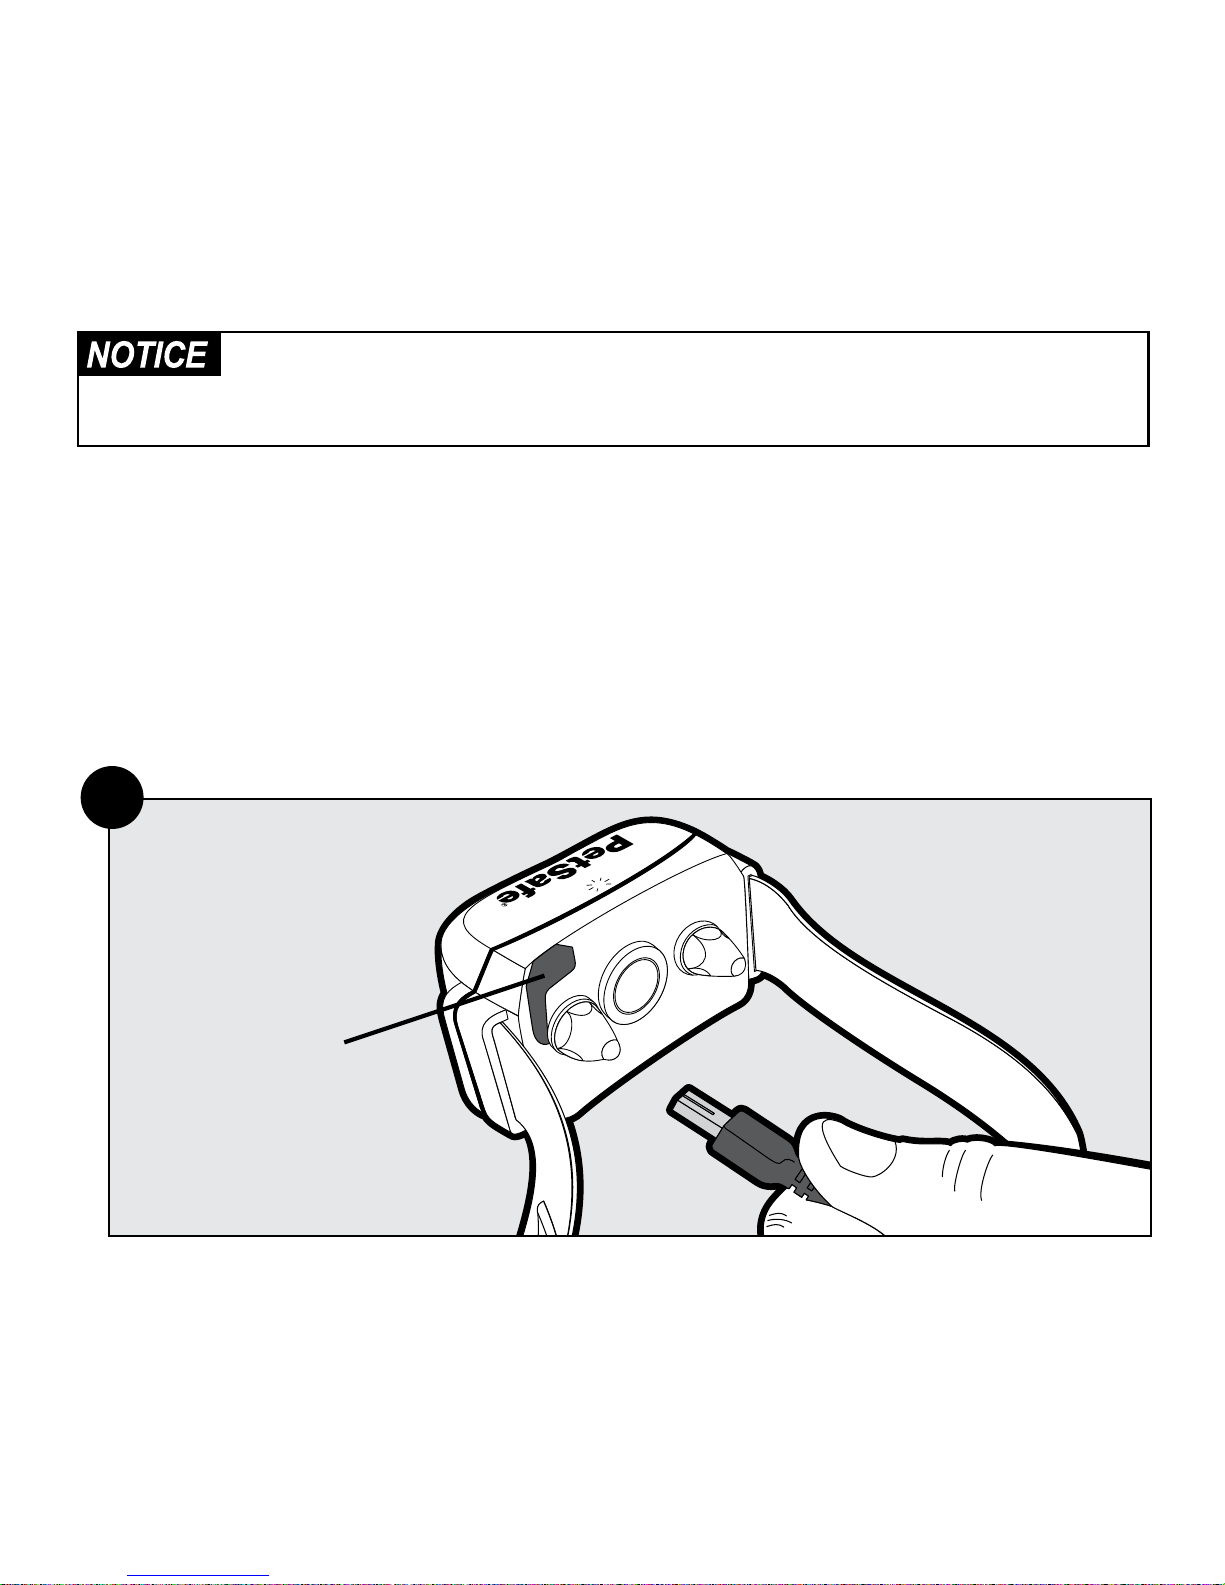
Step 1: Charge the Receiver Collar
The receiver charger has two jacks that allow you to charge two receiver
collars at the same time. Open the rubber cap on the back of the receiver collar
(1A). Plug one end of the charger into the outlet and the other into the receiver
collar. The collar light is red while charging and green when fully charged. The
first charge will take about 2 or 3 hours. Each charge can last up to 3 months
depending on the frequency of use.
Receiver
Charge Jack
1A
Page 9
petsafe.com 9
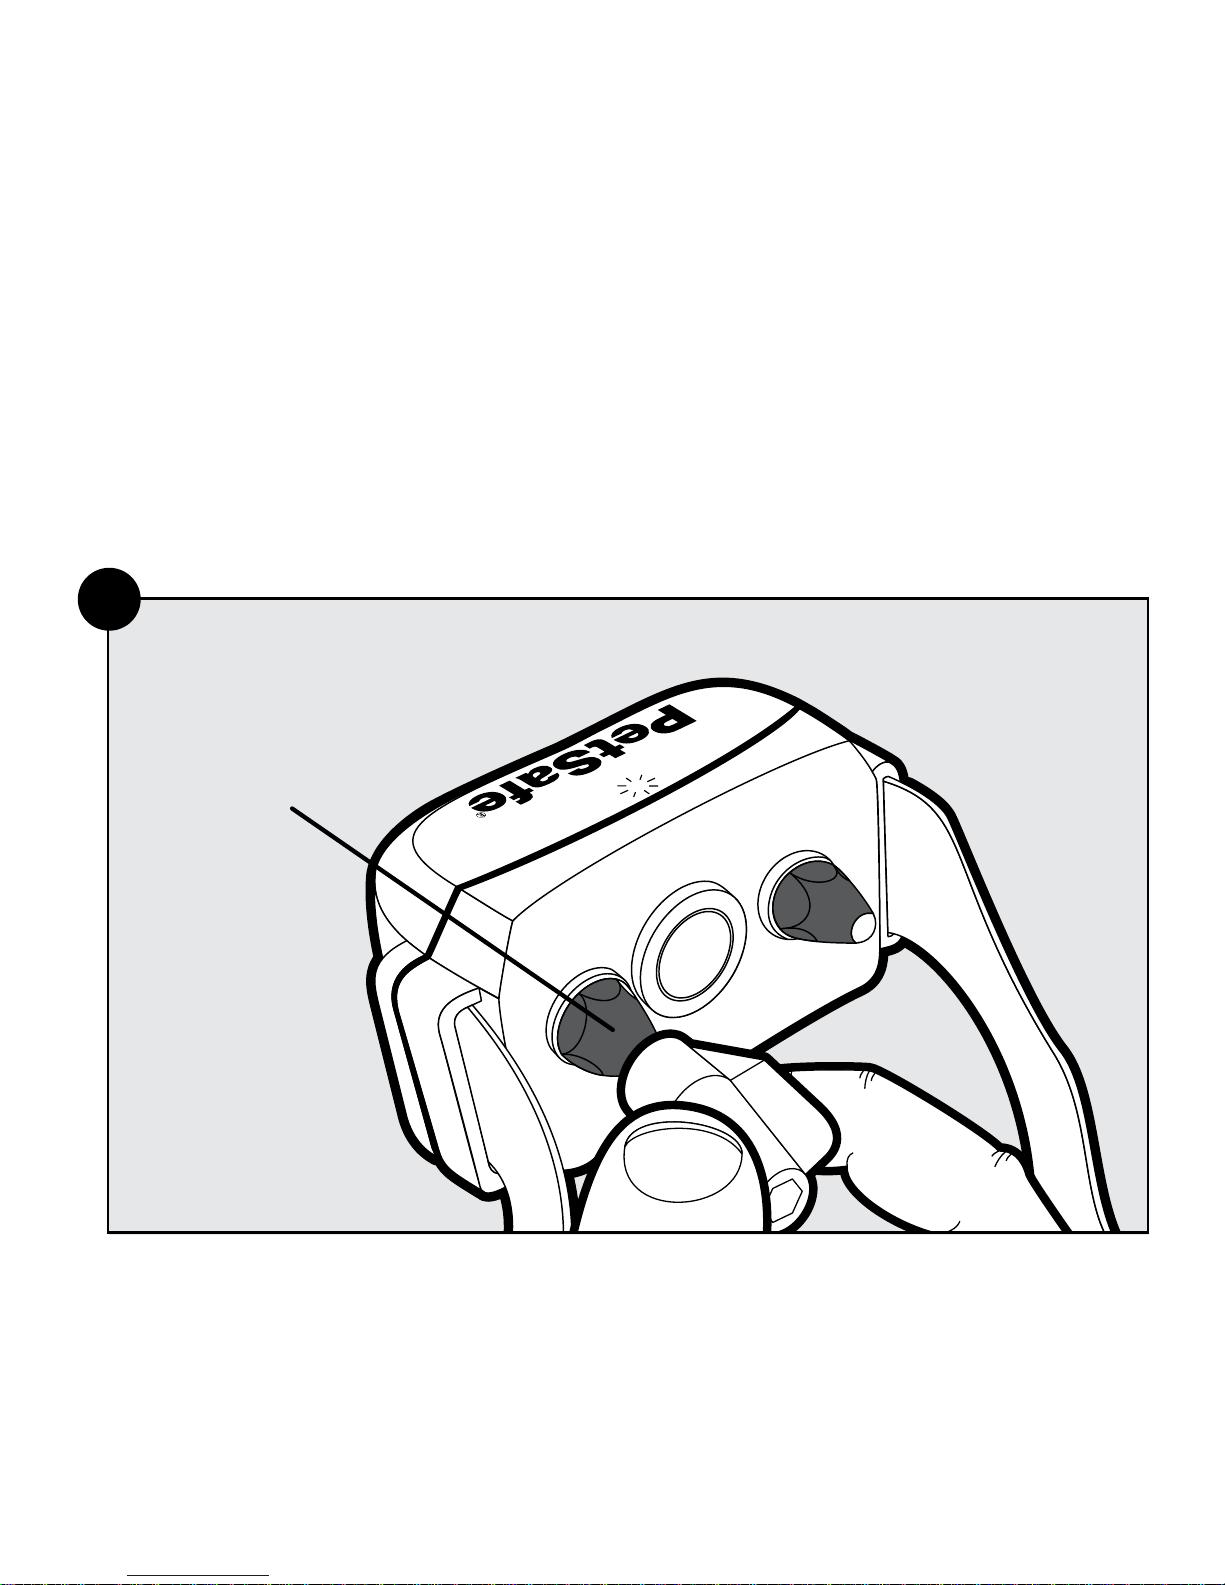
Step 2: Prepare the Receiver Collar
Your receiver collar comes installed with short contact points. If your pet has long
or thick hair, use the long contact points instead. Tighten or switch the contact
points by using the contact point wrench (2A).
Contact
Point
2A
Page 10
+1 (800) 732-267710
Turn On the Receiver Collar
The collar will automatically turn on whenever it is removed from the charger. To
turn on the receiver collar when it is not on the charger, press and hold the mode
button for 1 second (2B). Avoid touching the metal contact points.
Next, the indicator light will flash green once and then go off for 1 second. It will
then come back on and glow continuously for 5 seconds—either solid red, solid
green, or red+green together to indicate the status of the battery (2B). Finally,
there will be a series of red flashes which represent the static correction level. This
quick, opening series of tests is part of the ReadyTest
®
startup feature. The receiver
collar will then automatically start the PerfectFit test by flashing red+green together
every second for 90 seconds.
Mode
Button
Indicator
Light
2B
Page 11

petsafe.com 11
If the receiver collar fails the ReadyTest® startup, the receiver collar is
automatically turned off; your pet will not be contained.
ReadyTest Feature
ReadyTest is a startup feature that lets you know the status of the battery as well
as the current correction level of the receiver collar. It also checks that all circuits
are working correctly. This mode automatically starts every time you remove
the receiver collar from the charger, or first turn it on. If the receiver collar is on
your pet during the ReadyTest startup, the test will fail and the receiver collar will
automatically turn off. This also means the system will not contain your pet!
If the ReadyTest feature does detect a problem, the receiver collar will continually
beep and the indicator light will glow solid red for 20 seconds. The receiver
collar will automatically turn off. Do not put the receiver collar on your pet at this
time; your pet will not be contained. Instead, turn the receiver collar back on and
repeat the test. If the receiver collar continues to fail the ReadyTest startup, call the
Customer Care Center.
Page 12

+1 (800) 732-267712
PerfectFit Test
This test is an added feature to verify a “perfect” fit of the collar around your pet’s
neck; however, it is not required for the system to function. After the ReadyTest®
statup finishes with the series of red flashes that correspond to the static correction,
the receiver collar will automatically start the PerfectFit mode. For 90 seconds
the receiver collar will continually flash red+green together. You must place the
receiver collar on your pet and adjust the fit within the 90 seconds or it will go
back to normal operation mode and flash the status of the battery (red, green, or
red+green together) every 4 seconds.
After you adjust the collar on your pet and the contact points are touching his or
her skin (or if you inadvertently touch both of the contact points with your fingers),
the receiver collar will emit a unique double tone. You will know you have the
proper fit after you hear 5 consecutive double tones and you see 5 green flashes.
Then the receiver collar moves into normal operation mode and flashes the status
of the battery every 4 seconds.
Turn Off the Receiver Collar
To turn off the receiver collar, press and hold the mode button continuously for
5 seconds until the red light turns off. To extend the time between charging the
receiver collar, consider turning off the receiver collar when it is not in use.
Page 13

petsafe.com 13
Set the Static Correction Level
The static correction levels increase in strength from 2 to 6, with level 1 being tone
only (no correction), and level 6 being the maximum setting. Refer to the table on
the following page to choose the static correction that best fits your pet.
To set or check the static correction, press and hold the mode button until you
see a red light. Then let go. The collar will then emit a series of red flashes that
correspond to the current correction level (e.g., 4 red flashes means level 4). Press
and hold the mode button again for 1 second to increase the level by one setting.
You must count the number of red flashes to determine the level setting.
Note: Once you count 6 red flashes you are at level 6, and an additional hold
will cycle the receiver collar back to level 1, which is tone only.
Refer to the table “Receiver Collar Status Indicators” on page 21 for a complete
guide to all the status lights and tones for the receiver collar.
Page 14

+1 (800) 732-267714
Static Correction Level Table
Level Indicator Light Static Correction
1 1 red flash None—tone only
2 2 red flashes Low
3 3 red flashes Medium-low
4 4 red flashes Medium
5 5 red flashes Medium-high
6 6 red flashes High
Page 15

petsafe.com 15
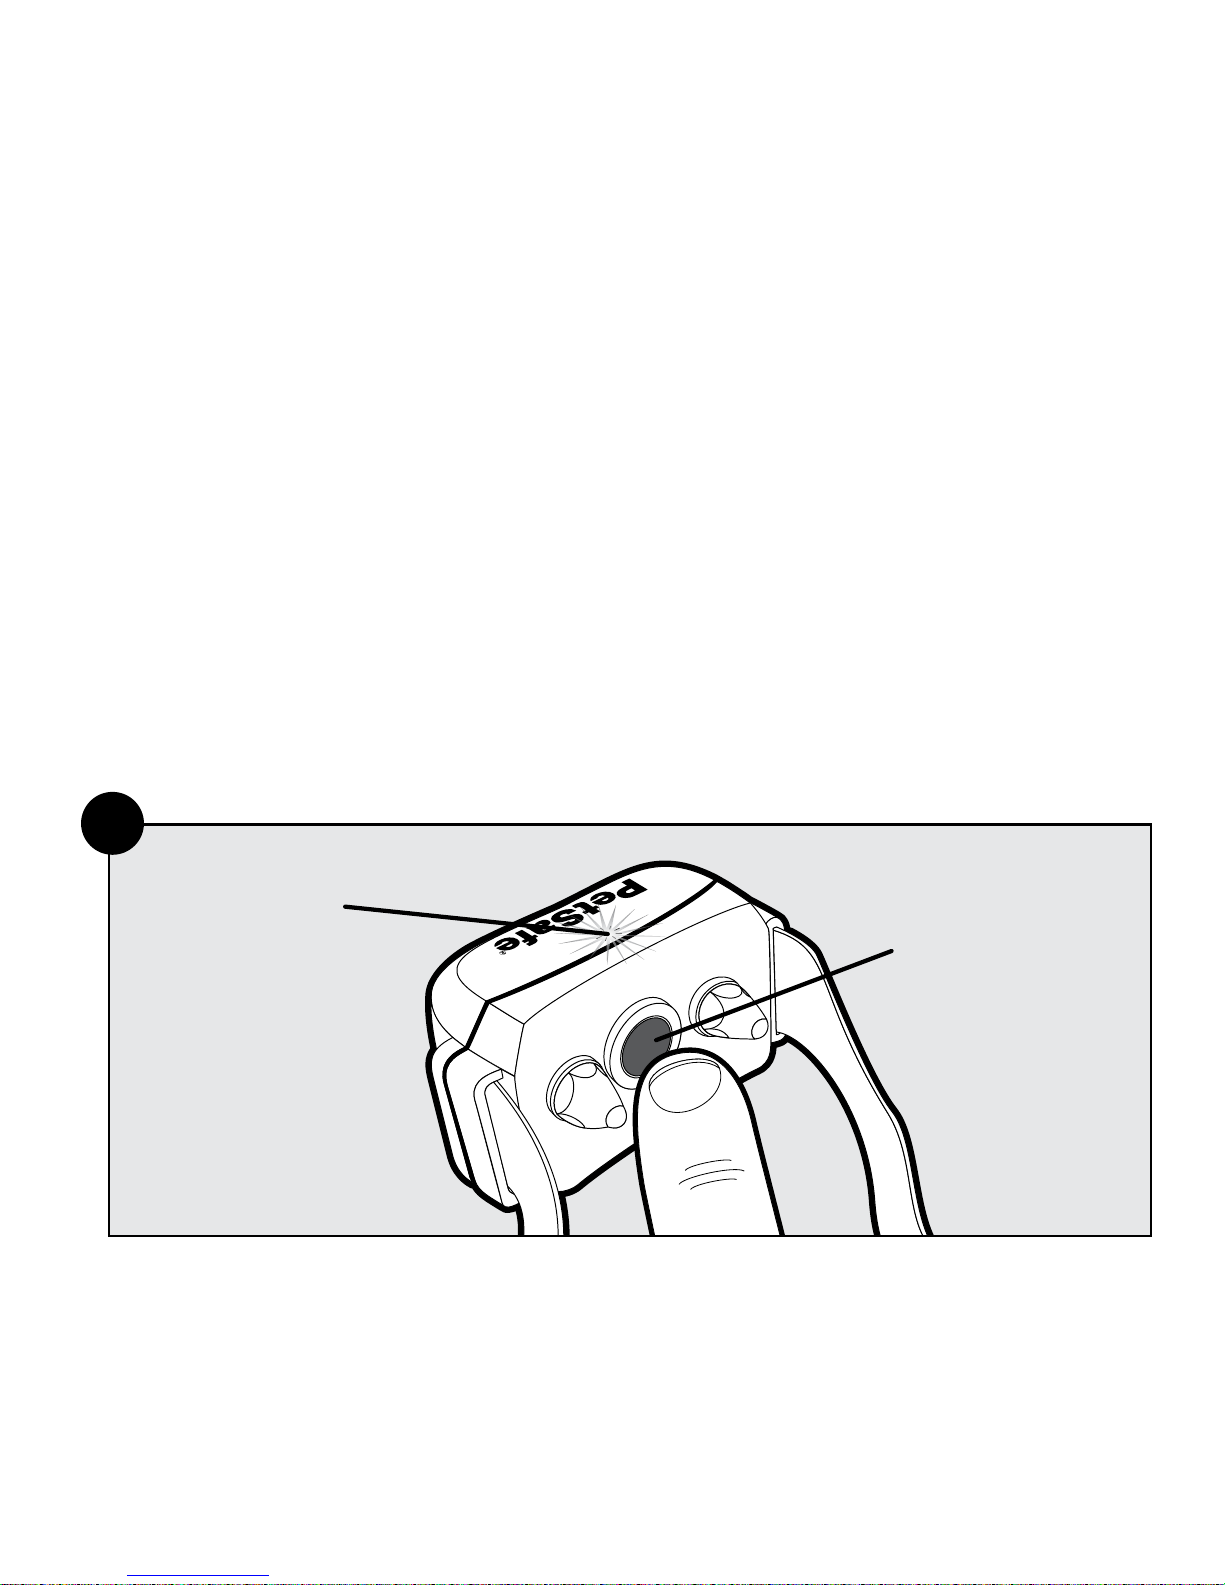
Step 3: Fit the Receiver Collar
Important: The proper fit and placement of your receiver collar is important for
effective training. The contact points must have direct contact with your pet’s skin on
the underside of his neck. See the important safety information on pages 5 and 6.
1. Be sure the receiver collar is off before placing it on your pet. Then with your pet
standing, fit the receiver collar snugly onto your pet’s neck so that the contact
points make contact with your pet’s skin on the underside of his or her neck.
Make sure the PetSafe® logo is right-side up (3A).
3A
Page 16

+1 (800) 732-267716
You may need to trim the hair in the area of the contact points. Never shave
your pet’s neck; this may lead to a rash or infection.
2. Check the tightness of the receiver collar by inserting one finger between
the end of a contact point and your pet’s neck. The fit should be snug but
not constricting.
3. Allow your pet to wear the receiver collar for a few minutes, then check it again.
4. Once you are satisfied with the fit of the receiver collar, remove it from your
pet and trim it, but make sure to allow room for growth or a thicker winter
coat. Use a lighter to seal the cut so that it will not fray (3B).
5. The collar will slip if it is not properly threaded. The slide buckle prevents the
collar from becoming loose around your pet’s neck and the ridges must be
facing up (3C).
6. While the receiver collar is still off your pet, turn it on by holding the mode
button until a green light comes on. The first thing your receiver collar does
is a ReadyTest® startup (page11 ) to ensure that it is ready for use. You will
know it is done when the indicator flashes the series of red flashes to indicate
the current static correction level. Do not touch the contact points during the
ReadyTest startup.
7. Once the ReadyTest startup is done, the receiver collar will automatically go
through an optional PerfectFit Test (page 12), which lasts for 90 seconds. This
mode begins with simultaneous flashing red+ green lights.
8. Place the collar on your pet and adjust the fit.
Page 17

petsafe.com 17
9. The receiver collar will emit a unique double tone as the contact points touch
your pet’s skin. You will know that you have the proper fit when you hear the
receiver collar emit the double tone and it flashes green 5 consecutive times.
10. After 90 seconds, the receiver collar moves into normal operation mode. If
you do not hear the 5 consecutive double tone, tighten the collar and repeat
the PerfectFit Test.
3B
Slide
Buckle
Ridges
3C
Page 18

+1 (800) 732-267718
Taking Your Pet Out of the Pet Area
Important: Remove the receiver collar and leave it at home.
Once your pet learns the boundary, he will be reluctant to cross it for walks or
car rides.
Option 1:
Replace the receiver collar with a regular collar. Put your pet in a car that is within
the pet area and drive him out of the pet area.
Option 2:
Replace the receiver collar with a regular collar and leash. Walk your pet out of
the pet area while giving a command such as “OK” at a specific place along the
boundary (the end of your driveway, sidewalk, etc.). Always leave the pet area
from the same spot in your yard with a leash and your pet will associate leaving
the pet area only on a leash, only at this spot, and only with a person. You may
initially need to convince your pet to leave the pet area with a treat and lots
of praise.
Note: You may also carry your pet out of the pet area.
Page 19

petsafe.com 19
Advanced Features
Anti-Linger Prevention
The Anti-Linger Prevention feature keeps your pet from staying in the warning
zone for long periods of time and draining the receiver collar’s rechargeable
battery. Your pet will hear a 2-second warning tone when he reaches the warning
zone. If your pet does not return to the pet area after 2 seconds, he will receive
a continuous static correction until he returns to the pet area or until the Over
Correction Protection feature is enabled.
Run Through Prevention
This system includes a unique Run Through Prevention feature so that your
pet cannot “run through” the pet area without receiving an increased level of
static correction.
YardMax
®
Mode
When your pet crosses over the wire and passes the warning zone, static correction is
activated at a variable distance dependent on the height of your pet and the height of
the receiver activation distance setting. The ideal warning zone distance is where the
receiver collar activates between 1 to 1½ ft. above your pet’s neck height.
If you have a very timid pet, you may increase the warning zone distance to allow
more distance before the higher level, run through prevention static correction
is generated. You can accomplish this by increasing the height of the receiver
collar activation.
Page 20

+1 (800) 732-267720
Traditional Mode
The receiver collar automatically increases the static correction when your pet
continues more than 20% of the way through the boundary width.
For example, if the signal is detected 10 ft. from the wire and your pet enters the
static correction zone, this feature is activated when he is approximately 8 ft.
from the boundary wire. Your pet will then receive a static correction that is at an
increased level corresponding to the static correction level setting on the
receiver collar.
Over Correction Protection
Over Correction Protection is designed to protect your pet from prolonged static
correction if he “freezes” in the static correction zone or runs beyond the boundary.
YardMax
®
Mode (A)
In the unlikely event that your pet “freezes” or continues beyond the boundary,
the static correction duration continues for 15 seconds. The receiver collar locks
out further static correction and the green light will remain on for 10 seconds. The
receiver collar remains locked out until your pet re-enters the pet area.
Traditional Mode (B)
In the unlikely event that your pet “freezes” in the static correction zone, this feature
limits the static correction duration to 15 seconds. While the receiver collar locks out
further static correction, the green light will remain on for 10 seconds. The receiver
collar remains locked out until your pet leaves the static correction zone.
Page 21

petsafe.com 21
Receiver Collar Status Indicators
The receiver collar light and with the alarm tones are used to determine the
operational mode, the battery status and the correction level. Refer to the receiver
collar status table to understand the status lights and tones for the receiver collar.
During normal operation, the receiver collar light will flash every 4 seconds to
indicate the battery status as shown in the table below. If your receiver collar has
not been moved for at least 20 seconds, the battery status light will function, but
the receiver collar will enter sleep mode to conserve battery life. To wake up the
receiver collar simply pick it up and flip it over or shake it.
Receiver Collar Status Table
Light Status Alarm Tone Condition
While Plugged into the Receiver Charger
Solid red No tone Charge in progress
Solid green No tone Charge complete
No light No Tone
Charge failure—contact
Customer Care Center
Page 22

+1 (800) 732-267722
Light Status Alarm Tone Condition
ReadyTest
®
Startup
(After removing the receiver collar from the charger or after first turning it on)
Off for 1 second No tone
Unit is starting the ReadyTest
startup feature
Continuous red, green,
or red+green together
(5 seconds)
No tone Battery charge status
Flashing red from
1 to 6 times
No tone
Receiver collar is reporting
the static correction level
from 1 to 6
Continuous red 20 seconds
ReadyTest failure;
Unit is not operational—contact
Customer Care Center
Page 23

petsafe.com 23
Light Status Alarm Tone Condition
PerfectFit Test
Flashing red+green
together
(every 1 second)
No tone
Unit is in PerfectFit mode for
90 seconds
after the Readytest startup
is completed
Flashing green
(every 1 second)
5 consecutive
double tones for
a confirmed fit
PerfectFit mode indicates
that the collar is making true
contact with the pet’s skin
Static Correction Level
Flashing red from
1 to 6 times
No tone
Receiver collar is reporting
the static correction level
from 1 to 6
Page 24

+1 (800) 732-267724
Light Status Alarm Tone Condition
Receiver Activation Status
Fast pulsating green Warning tone Warning tone
Fast pulsating red
Duration of the
correction
Static correction is being
delivered
(up to 15 seconds)
Continuous green
(10 seconds)
No tone
Over Correction Protection
feature; Collar is locked for
10 seconds
Slow blinking green
(every 4 seconds)
No tone
Collar battery charge
100%–60%
Slow blinking red+green
together
(every 4 seconds)
No tone
Collar battery charge
60%–20%
Slow blinking red
(every 4 seconds)
No tone
Collar battery charge
20% or less;
Charge immediately
Page 25

petsafe.com 25
Troubleshooting
The receiver collar
is not beeping
or correcting.
• Make sure the receiver collar is turned on,
and the battery status lights are flashing every
4 seconds.
• Charge the receiver collar and go through
the ReadyTest
®
startup and PerfectFit
diagnostic tests.
• Check that the fence transmitter power is turned
on and the transmitter status light is solid green.
If not, refer to the YardMax® Rechargeable
In-Ground Fence™ manual.
• In YardMax mode (A), excessive snowfall
(>1½ ft.) may place your pet outside the signal
field. You may need to switch to Traditional
mode (B) or increase the boundary width until
the snow recedes.
Page 26

+1 (800) 732-267726
The receiver collar is
beeping, but the pet is
not responding to the
static correction.
• Make sure the static correction level is set
at 2 or above.
• Test the receiver collar with the test light by
walking toward the boundary wire. If the test
light flashes, adjust the fit of the receiver collar
using the PerfectFit feature.
• Trim your pet’s fur where the contact points
touch the neck or use the long contact points.
• Increase the static correction level.
• Repeat the training steps in order to reinforce
the training.
Receiver collar is
not charging.
• Check that the charger is properly seated into
the receiver collar jack.
• If the indicator light on the receiver collar
still does not glow red when connected to
charger, there is a problem with the charger. If
the indicator light glows red when placed on
the charger but goes out after disconnecting
the receiver collar without performing the
ReadyTest
®
startup there is a problem with the
receiver collar. Call the Customer Care Center.
Page 27

petsafe.com 27
The receiver collar has
injured my pet’s neck.
• Failing to follow the important safety
information at the front of the manual has
caused pressure ulcers. Some descriptions of
advanced pressure ulcers describe the sores as
looking like burns on the pet’s neck. Be assured
that electronic collars do not use enough
energy to create electrical burns. The energy
in an output pulse is only a few thousandths of
a Joule; it is similar in nature to the static pulse
that you may feel when getting out of your car.
In some cases, pressure ulcers are described
as chemical burns. The battery in your receiver
collar is sealed; in addition, your collar’s
housing is also sealed. This redundant sealing
makes it virtually impossible, without misuse or
abuse, for your receiver collar battery to leak
onto your pet’s neck. Please review and follow
the important safety information starting on
page 3 and the instructions in Step 3 under the
heading “Fit the Receiver Collar” on page15.
Page 28

+1 (800) 732-267728
Terms of Use and Limitation of Liability
1. Terms of Use
This Product is offered to you conditioned upon your acceptance without
modification of the terms, conditions and notices contained herein. Usage of
this Product implies acceptance of all such terms, conditions, and notices.
2. Proper Use
This Product is designed for use with pets where training is desired. The
specific temperament of your pet may not work with this Product. If you
are unsure whether this is appropriate for your pet, please consult your
veterinarian or certified trainer.
3. No Unlawful or Prohibited Use
This Product is designed for use with pets only. This pet training device is not
intended to harm, injure or provoke. Using this Product in a way that is not
intended could result in violation of Federal, State or local laws.
4. Limitation of Liability
In no event shall Radio Systems Corporation be liable for any direct, indirect,
punitive, incidental, special or consequential damages, or any damages
whatsoever arising out of or connected with the use or misuse of this Product.
Buyer assumes all risks and liability from the use of this Product.
5. Modification of Terms and Conditions
Radio Systems Corporation reserves the right to change the terms, conditions
and notices under which this Product is offered.
Page 29

petsafe.com 29
Compliance
FCC: USA
This device complies with part 15 of the FCC Rules. Operation is subject to the
following two conditions: (1) This device may not cause harmful interference, and
(2) this device must accept any interference received, including interference that
may cause undesired operation.
NOTE: This equipment has been tested and found to comply with the limits
for a Class B digital device, pursuant to part 15 of the FCC Rules. These limits
are designed to provide reasonable protection against harmful interference
in a residential installation. This equipment generates, uses, and can radiate
radio frequency energy and, if not installed and used in accordance with the
instructions, may cause harmful interference to radio communications. However,
there is no guarantee that interference will not occur in a specific installation. If
interference does occur to radio or television reception, which can be determined
by turning the equipment off and on, the user is encouraged to try to correct the
interference by one or more of the following measures:
• Reorient or relocate the receiving antenna.
• Increase the separation between the equipment and the receiver.
• Connect the equipment to an outlet on a circuit different from that to which the
receiver is connected.
• Consult customer care, the dealer, or an experienced radio/TV technician for help.
Page 30

+1 (800) 732-267730
CAUTION: Modification or changes to this equipment not expressly approved
by Radio Systems Corporation may void the user’s authority to operate
the equipment.
IC: Canada
This device complies with Industry Canada license-exempt RSS standard(s).
Operation is subject to the following two conditions: (1) this device may not
cause interference, and (2) this device must accept any interference, including
interference that may cause undesired operation of the device.
Le présent appareil est conforme aux CNR d’Industrie Canada applicables
aux appareils radio exempts de licence. L’exploitation est autorisée aux deux
conditions suivantes : (1) l’appareil ne doit pas produire de brouillage, et (2)
l’utilisateur de l’appareil doit accepter tout brouillage radioélectrique subi, même
si le brouillage est susceptible d’en compromettre le fonctionnement.
Page 31

petsafe.com 31
Customer Care International
USA & Canada—Tel: +1 (800) 732-2677
Monday–Friday 8 AM – 8 PM / Saturday 9 AM – 5 PM
Australia—Tel: +1 (800) 786-608
Monday–Friday 8:30 AM – 5 PM
New Zealand—Tel: +0 (800) 543-054
Monday–Friday 10:30 AM – 7 PM
Battery Disposal
Separate collection of spent batteries is required in many regions; check the
regulations in your area before discarding spent batteries. At the end of the
product life, please contact our Customer Care Center to receive instructions
on proper disposal of the unit. Please do not dispose of the unit in household or
municipal waste. For a listing of Customer Care Center telephone numbers in your
area, visit our website at www.petsafe.com.
Page 32

+1 (800) 732-267732
Warranty
One Year Non-Transferable Limited Warranty
This Product has the benefit of a limited manufacturer’s warranty. Complete
details of the warranty applicable to this Product and its terms can be found
at www.petsafe.net and/ or are available by contacting your local Customer
Care Center.
United States and Canada—Radio Systems Corporation, 10427 PetSafe
Way, Knoxville, TN 37932 USA
Europe—Radio Systems PetSafe Europe Ltd., 2nd Floor, Elgee Building, Market
Square, Dundalk, Co. Louth, A91 YR9X Ireland
Australia/New Zealand—In compliance with the Australian Consumer Law,
Warranties Against Defects, effective January 1, 2012, warranty details of this
Product are as follows:
One Year Non-Transferable Limited Warranty
What is covered: Radio Systems Australia Pty Ltd (hereinafter referred to as
“Radio Systems”) warrants to the original retail purchaser, and not any other
purchaser or subsequent owner, that its Product, when subject to normal and
proper residential use, will be free from defects in material or workmanship for
a period of one (1) year from the purchase date. An “original retail consumer
purchaser” is a person or entity who originally purchases the Product, or a gift
Page 33

petsafe.com 33
recipient of a new Product that is unopened and in its original packaging. When
serviced by Radio Systems Customer Service, Radio Systems covers labor and
parts for one year of ownership; after the first year, a service or upgrade charge
will apply relative to replacement of the Product with new or refurbished items at
Radio Systems’ sole discretion.
The limited warranty is non-transferable and shall automatically terminate if the
original retail consumer purchaser resells the Radio Systems Product or transfers
the property on which the Radio Systems Product is installed. This Limited
Warranty excludes accidental damage due to dog chews; lightning damage;
or neglect, alteration and misuse. Consumers who purchase products outside of
Australia, New Zealand or from an unauthorised dealer will need to return the
Product to the original place of purchase for any warranty issues.
Please note that Radio Systems does not provide refunds, replacements
or upgrades for change of mind, or for any other reason outside of these
Warranty terms.
Page 34

+1 (800) 732-267734
Claims Procedure: Any claim made under this Warranty should be made
directly to Radio Systems Australia Pty Ltd Customer Care Centre at:
Radio Systems Australia Pty Ltd., PO Box 7266, Gold Coast Mail Centre
QLD 9726, Australia
Australia Residents: 1800 786 608
New Zealand Residents: 0800 543 054
Email: aus-info@petsafe.net
To file a claim, a proof of purchase must be provided. Without a proof of
purchase, Radio Systems will not repair or replace faulty components. Radio
Systems requests the Consumer to contact the Radio Systems Customer Care
Centre to obtain a Warranty Return number, prior to sending the Product. Failure
to do so may delay in the repair or replacement of the Product.
If the Product is deemed to be faulty within 30 days from date of original
purchase, Radio Systems will organize for a replacement to be sent in advance
of returning the faulty Product. A Post Bag will be included with the replacement
Product for the return of the faulty Product. The Product must be returned within 7
days of receiving the replacement. If the Product is deemed to be faulty after 30
days from the date of original purchase, the consumer will be required to return
the Product to Radio Systems at the consumer’s own expense. Radio Systems will
test and replace the faulty unit or its components and return to the consumer free
of charge provided the Product is within its said warranty period. This warranty
is in addition to other rights and remedies available to you under the law. Radio
Page 35

petsafe.com 35
Systems goods come with guarantees that cannot be excluded under the Australia
Consumer Law. You are entitled to a replacement or refund for a major failure
and for compensation for any other reasonably foreseeable loss or damage. You
are also entitled to have the goods repaired or replaced if the goods fail to be of
acceptable quality and the failure does not amount to a major failure.
Should you have any queries or require any further information, please contact
our Customer Care Centre on 1800 786 608 (Australia) or
0800 543 054 (New Zealand).
Page 36

Radio Systems Corporation
10427 PetSafe Way
Knoxville, TN 37932
+1 (800) 732-2677
petsafe.com
For a list of patents protecting this product, please visit
www.radiosystemscorporation.com/patents
L400-003/1
©
2017 Radio Systems Corporation
 Loading...