

Petsafe HPA11-10876 Installation Manual
Interior/Exterior Cat Door
4-Way Locking
Système de verrouillage à 4 positions
4 posiciones de cierre
installation guide
guide d’installation
guía de instalación
Model Number
Numéro de modèle
Número de modelo
HPA11-10876
Please read this entire guide before beginning installation.
Veuillez lire l’intégralité de ce manuel avant de procéder à l’installation.
Lea esta guía en su totalidad antes de empezar la instalación.

2 Customer Care Center 1-800-732-2677
IMPORTANT SAFETY INFORMATION
Explanation of Attention Words and Symbols used in this guide
This is the safety alert symbol. It is used to alert you to potential personal injury hazards.
Obey all safety messages that follow this symbol to avoid possible injury or death.
WARNING indicates a hazardous situation which, if not avoided, could result in
death or serious injury.
CAUTION, used with the safety alert symbol, indicates a hazardous situation
which, if not avoided, could result in minor or moderate injury.
NOTICE is used to address practices not related to personal injury.
• When children are present in the home, it is important to consider the pet door
during child proong activities, the pet door may be misused by a child resulting
in the child accessing potential hazards that may be on the other side of the
pet door. Purchasers/Homeowners with swimming pools should ensure that
the pet door is monitored at all times and that the swimming pool has adequate
barriers to entry. If a new hazard is created inside or outside of your home,
which may be accessed through the pet door, Radio Systems Corporation
recommends that you properly guard access to the hazard or remove the pet
door. The closing panel or lock, if applicable, is provided for aesthetic and
energy efciency purposes and is not intended as a security device. Radio
Systems Corporation will not be liable for unintended use and the purchaser of
this product accepts full responsibility for oversight of the opening it creates.
• Power Tools. Risk of severe injury; follow all safety instructions for power tools.
Be sure to always wear proper safety equipment.
• The user, prior to installation, must become familiar with all building codes that
may affect the installation of the pet door and determine, along with a licensed
contractor, its suitability in a given installation. This pet door is not a re door.
It is important for the owner and contractor to consider any risks that may be
present inside or outside of the pet door, and any risks that may be created by
subsequent changes to your property and how they may relate to the existence
and use, including misuse of the pet door.
• If cutting a metal surface, be aware of sharp edges to prevent injury.
• Keep these instructions with important papers; be sure to transfer these
instructions to the new owner of the property.
• If homeowner’s door or other application is not level, the pet door must be
marked level to swing properly.
• When applying cutting template there should be a minimum of 3” between the
bottom and sides of the door and the outer edge of the template to maintain the
structural integrity of the door.
• Make sure there is nothing underneath the door where you will be drilling the
holes or cutting out opening.
• Use a manual screwdriver to tighten screws. Do not overtighten. Overtightening
can warp the pet door frame.
• It is not possible to cut holes in tempered or double pane glass except at the
time of manufacture. Consult a professional glazier or glass manufacturer to
install the pet door in a glass door or window.

www.petsafe.net 3
Thank you for choosing the PetSafe® brand. You and your pet deserve a companionship that includes
memorable moments and a shared understanding together. Our products and training tools enhance
the relationship between pets and their owners. If you have any questions about our products or
training your pet, please visit our website at www.petsafe.net or contact our Customer Care Center at
1-800 -7 3 2-2677.
To get the most protection out of your warranty, please register your product within 30 days at www.
petsafe.net. By registering and keeping your receipt, you will enjoy the product’s full warranty and
should you ever need to call the Customer Care Center, we will be able to help you faster. Most
importantly, your valuable information will never be given or sold to anyone. Complete warranty
information is available online at www.petsafe.net.
TABLE OF CONTENTS
Kit Includes .................................................................................................................................4
Tools Needed ..............................................................................................................................4
Key Denitions ............................................................................................................................4
Installation ...................................................................................................................................5
Determine Pet Door Location ..................................................................................................5
Prepare Door ...........................................................................................................................5
Cut Pet Door Opening ............................................................................................................6
Install Pet Door ........................................................................................................................7
Training Pet ..............................................................................................................................8
4-Way Locking System ...............................................................................................................9
Cleaning the Cat Door ..............................................................................................................10
Replacement Flap Installation Instructions ..............................................................................10
Terms of Use and Limitation of Liability ...................................................................................10
Customer Care International ..................................................................................................... 11
Warranty .................................................................................................................................... 11
Français ...................................................................................................................................13
Español ....................................................................................................................................24
4 Customer Care Center 1-800-732-2677
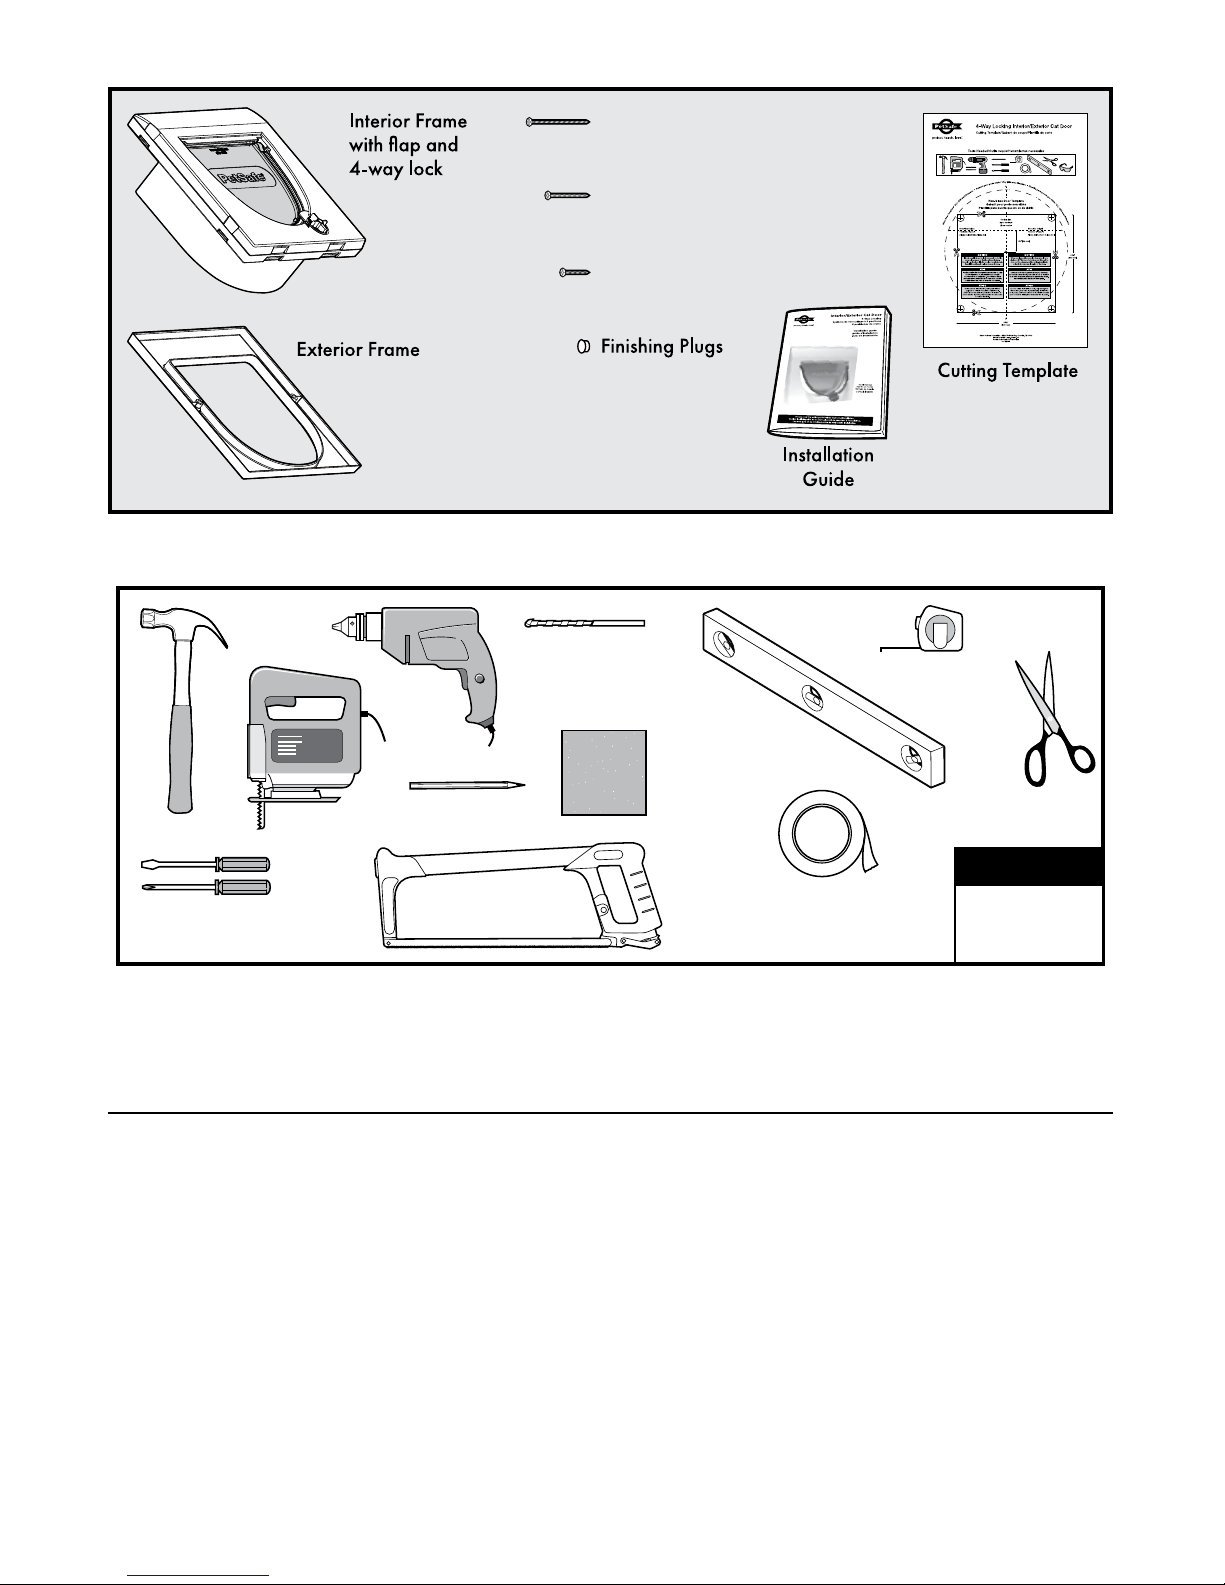
Kit Includes
(4pcs.)
1¹⁄₈” (28 mm)
Screws (2pcs.)
2” (50 mm)
Screws (2pcs.)
3” (75 mm)
Screws (2pcs.)
Tools Needed
Jigsaw
Hammer
Drill
³⁄₁₆
” (5 mm)
½” (13 mm)
Drill Bits
Slotted & Phillips
Screwdrivers
Pencil
Masking or
Painter’s Tape
Sand Paper
Scissors
Tape Measure
Level
Optional
•Duct Tape
•Caulk
Hacksaw
Safety
Equipment
NOTE: The Cat Door can be installed in most doors and walls. Additional skills, tools and materials
(such as wood framing and hardware) may be required. It is not possible to cut holes in tempered
or double pane glass except at the time of manufacture. Consult a professional glazier or glass
manufacturer to install the pet door in a glass door or window.
Key Definitions
• Outer Frame Size: Overall pet door dimensions
• Cut-Out Size: Dimensions of opening cut in homeowner’s door for proper t and pet door installation
• Flap Opening Size: Usable ap size for pet to enter and exit through pet door
• Interior Frame: Pet door frame on the inside of home; frame with ap and 4-way lock
• Exterior Frame: Pet door frame on the outside of home
• 4-Way Lock: Red knob on interior frame used to control the pet’s access to the pet door
www.petsafe.net 5
Installation
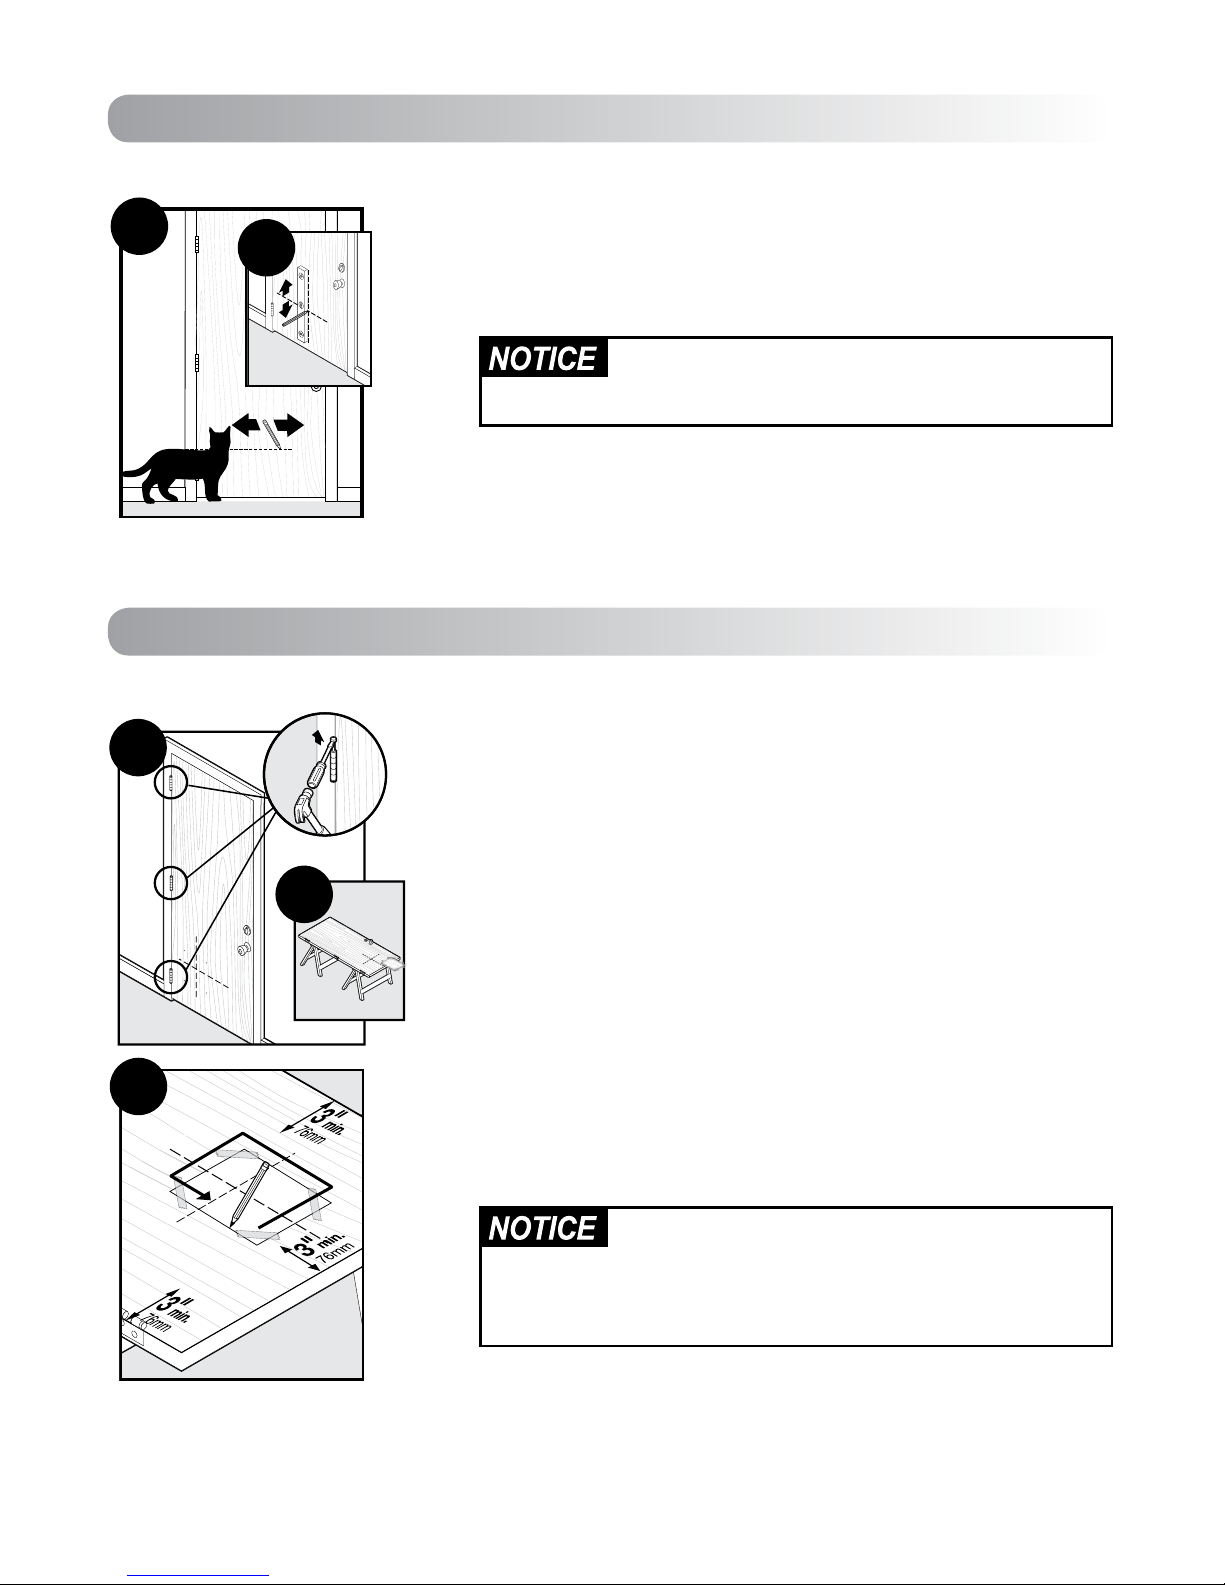
Determine Pet Door Location
1A.
Measure and mark your pet’s shoulder height on the interior side
of door.
1B.
Determine location for the pet door. Draw a vertical center line
through the shoulder height line using a level.
If homeowner’s door or other application is
not level, the pet door must be marked level to
swing properly.
Prepare Door
2A.
Remove door by removing door hinge pins.
2B.
Place on a raised level surface such as saw horses. Place interior
side of door facing up.
Helpful Tip: Clamp down the door to prevent it from moving.
NOTE: The Pet Door can be installed with the door hanging
based on your skill level.
2C.
Cut out template for Non-Glass Doors. Match the marked lines
on the door with the shoulder and center lines on the template.
Tape template in place and trace template. Make sure to trace
underneath tape and connect the corners. Remove the template
and any excess tape from the door.
When applying cutting template there should be
a minimum of 3” between the bottom and sides
of the door and the outer edge of the cutting
template to maintain the structural integrity of
the door.
Step 1
1A
1B
Step 2
2A
2B
2C
6 Customer Care Center 1-800-732-2677
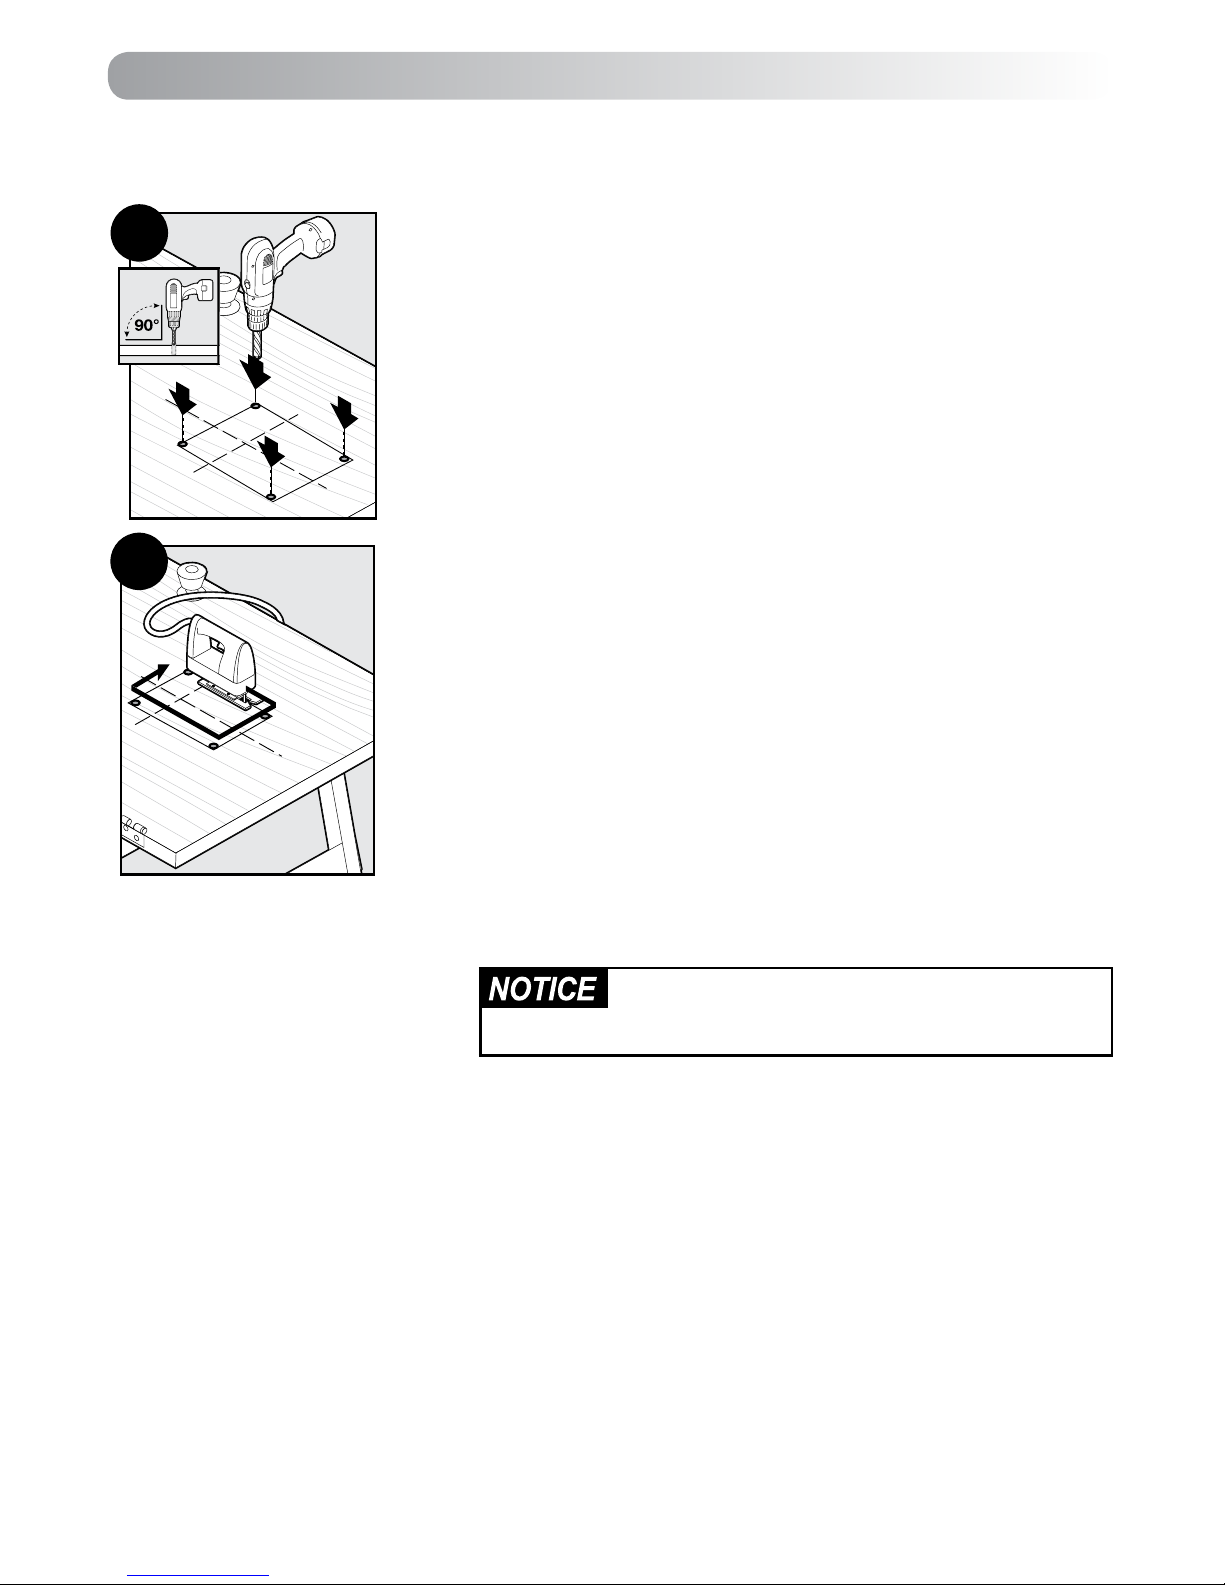
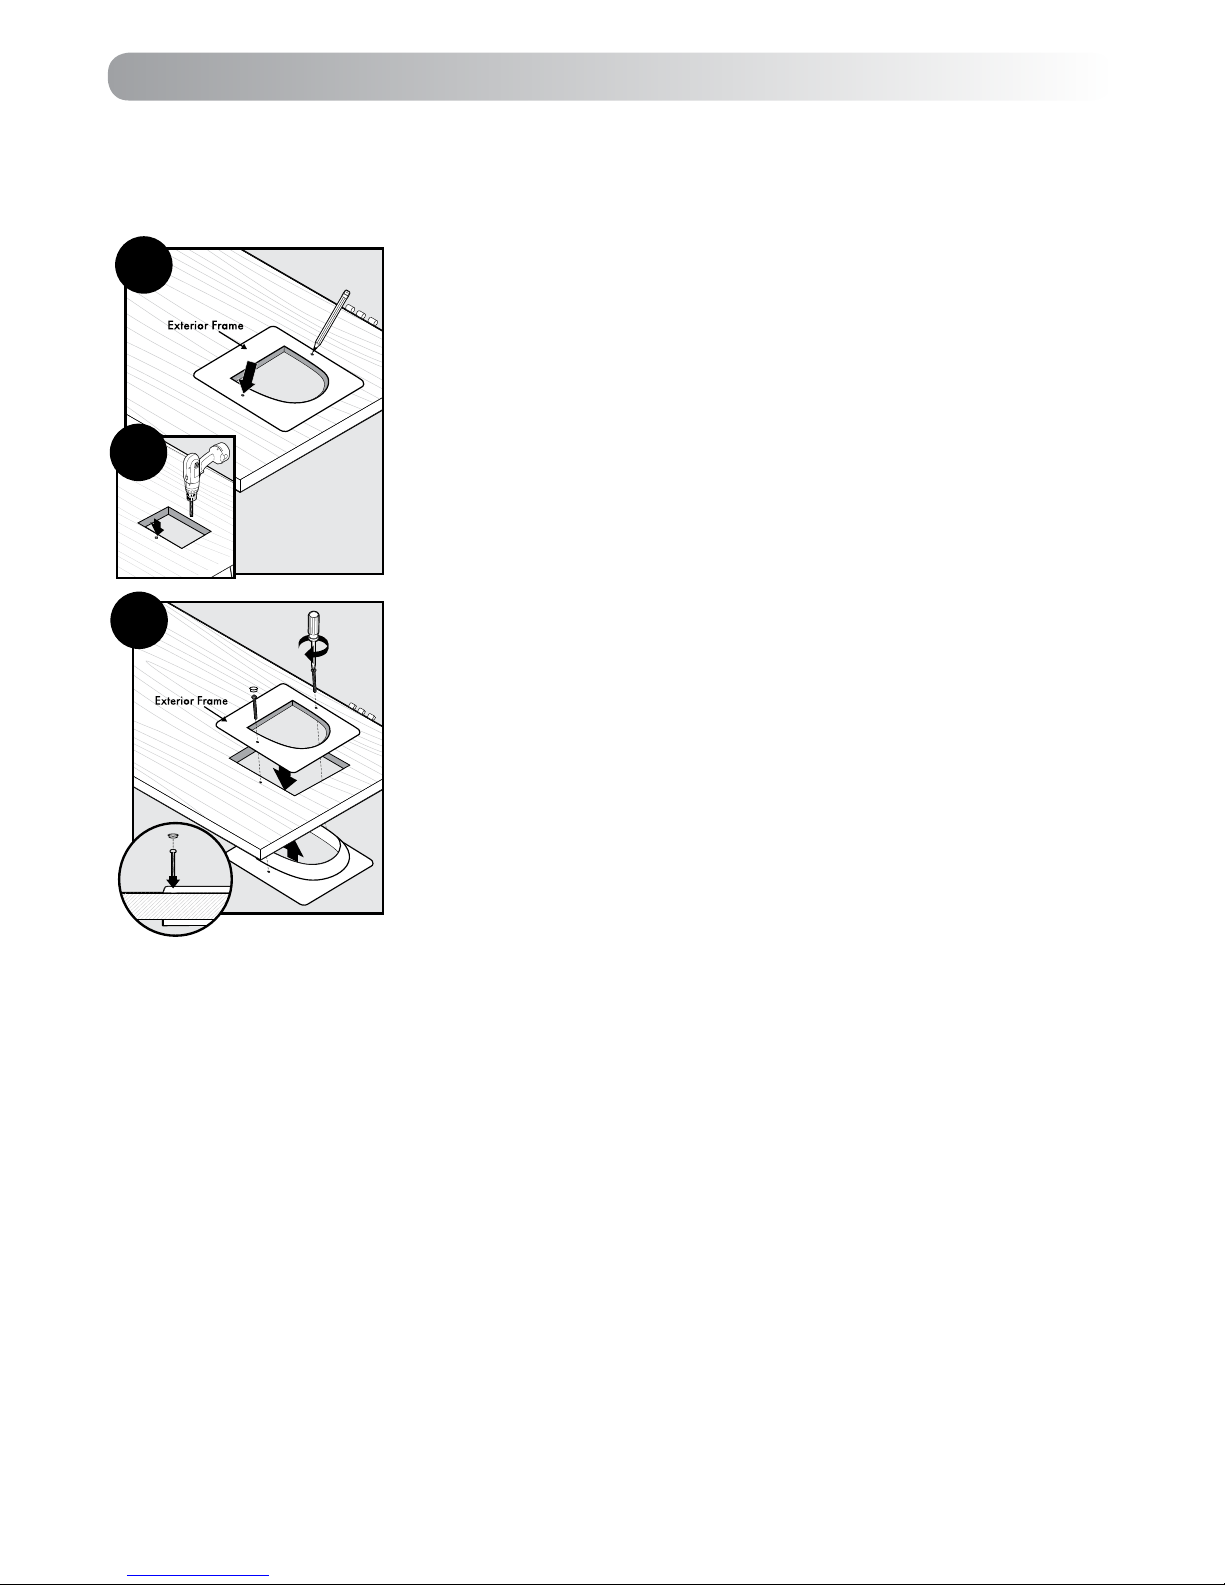
Cut Pet Door Opening
In Wood and PVC/uPVC/Metal
3A.
Drill ½” (13 mm) holes in inside corners of drawn template.
Helpful Tip: Use both hands to hold drill steady and straight at a
90° angle.
3B.
Beginning in one of the holes just drilled, cut along the drawn
template lines. After cutting out the opening, you may need to
recut to square the opening. This is necessary for the pet door
frame to t correctly.
Helpful Tip: Apply masking or painter’s tape on bottom of jigsaw
and outer edges of drawn template to protect door nish. Use a
le to remove burrs after drilling and cutting to make cutting and
installation easier.
Helpful Tip: Use proper saw blade length and type according to
door thickness and material (for example a wood blade for a
wood door and a metal blade for a metal door). Cut slowly using
both hands to hold the saw steady and straight at a 90° angle.
This will help prevent the blade from cutting unevenly between
interior and exterior sides of the door.
Make sure there is nothing underneath the door
where you will be drilling the holes or cutting out
opening.
In Glass
NOTE: It is not possible to cut holes in toughened glass or double glazed
units except at the time of manufacture. Please consult a glazier.
The cat door requires a circular cut-out with a diameter of 8 ¼” (210 mm).
For best results you should refer your glazier to the enclosed cutting template.
In Walls
Follow the instructions for “Wood and PVC/uPVC/Metal”, by using the enclosed cutting template.
Please note that additional tools, materials and competent DIY skills may be required.
Step 3
3A
3B
www.petsafe.net 7
Install Pet Door
NOTE: Your PetSafe® cat door should be installed with the red 4-way lock on the inside of your house.
In Doors and Walls Less Than 2 ¼” (57 mm) Thick
4A.
Temporarily place the cat door in the hole and position the
exterior frame on the outside of the door. From the outside, mark
screw holes on the door through the holes in the exterior frame.
4B.
Remove the cat door and drill the holes with a 3/16” (5 mm) drill bit.
4C.
Replace the cat door in the hole and screw into place. If the
screws are too long they may need to be cut down to match the
depth of your door. Using over-long screws may damage the cat
door. The screws should be removed from the cat door before
cutting. File down to ensure there are no sharp edges.
Finally, cover the screw holes with the nishing plugs on the
exterior frame to ensure a neat nish.
Step 4
4A
4B
4C
8 Customer Care Center 1-800-732-2677
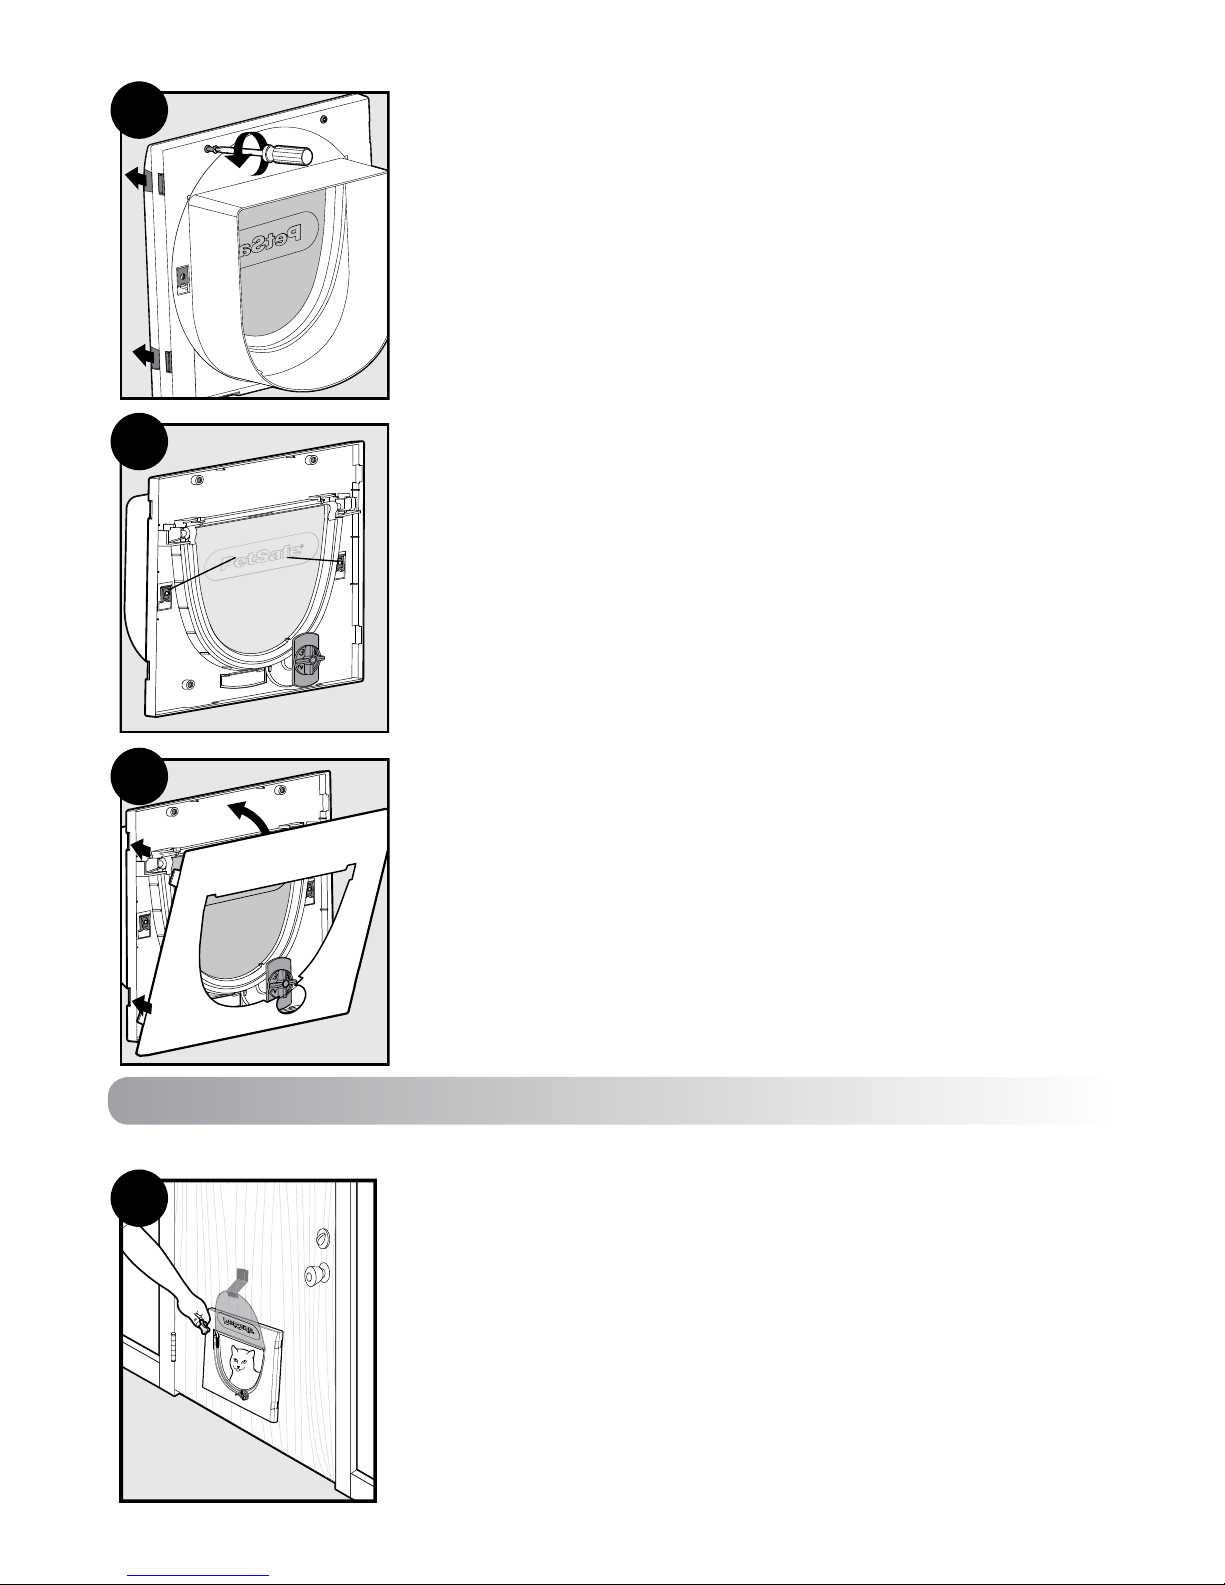
In Doors and Walls Greater Than 2 ¼” (57 mm) Thick
4D.
Remove the interior frame cover from the interior frame by
removing the screws (these screws will not be used in doors and
walls greater than 2 ¼” (57 mm) thick) and unsnapping the snaps,
starting with the snaps closest to the top on each side.
4E.
Place interior frame in hole and attach to wall through hole in
metal screw clips with appropriate fastener based on the material
of your wall (may require fasteners not provided).
4F.
Reattach interior frame cover by snapping it in place. Insert
the bottom hooks of the frame cover rst and then rotate it into
place. Then attach exterior frame with appropriate fastener
based on the material of your wall (may require fasteners
not provided).
Training Pet
5A.
Rehang your door and begin training your pet. It may help for you
to be on one side of the door and your pet on the other. Lift or
tape open ap and try to talk your pet through the pet door. After
your pet has gone through a few times, allow the ap to touch
your pet’s back so they will become comfortable using the pet
door. If your pet will not go through the door, tape the ap open
until they use it on their own. Do not use the 4-way lock until your
pet is familiar with using the pet door.
Helpful Tip: Try treats or toys to encourage your pet to go through
the pet door and become comfortable using it.
4D
Screw
Clips
4E
4F
Step 5
5A
www.petsafe.net 9
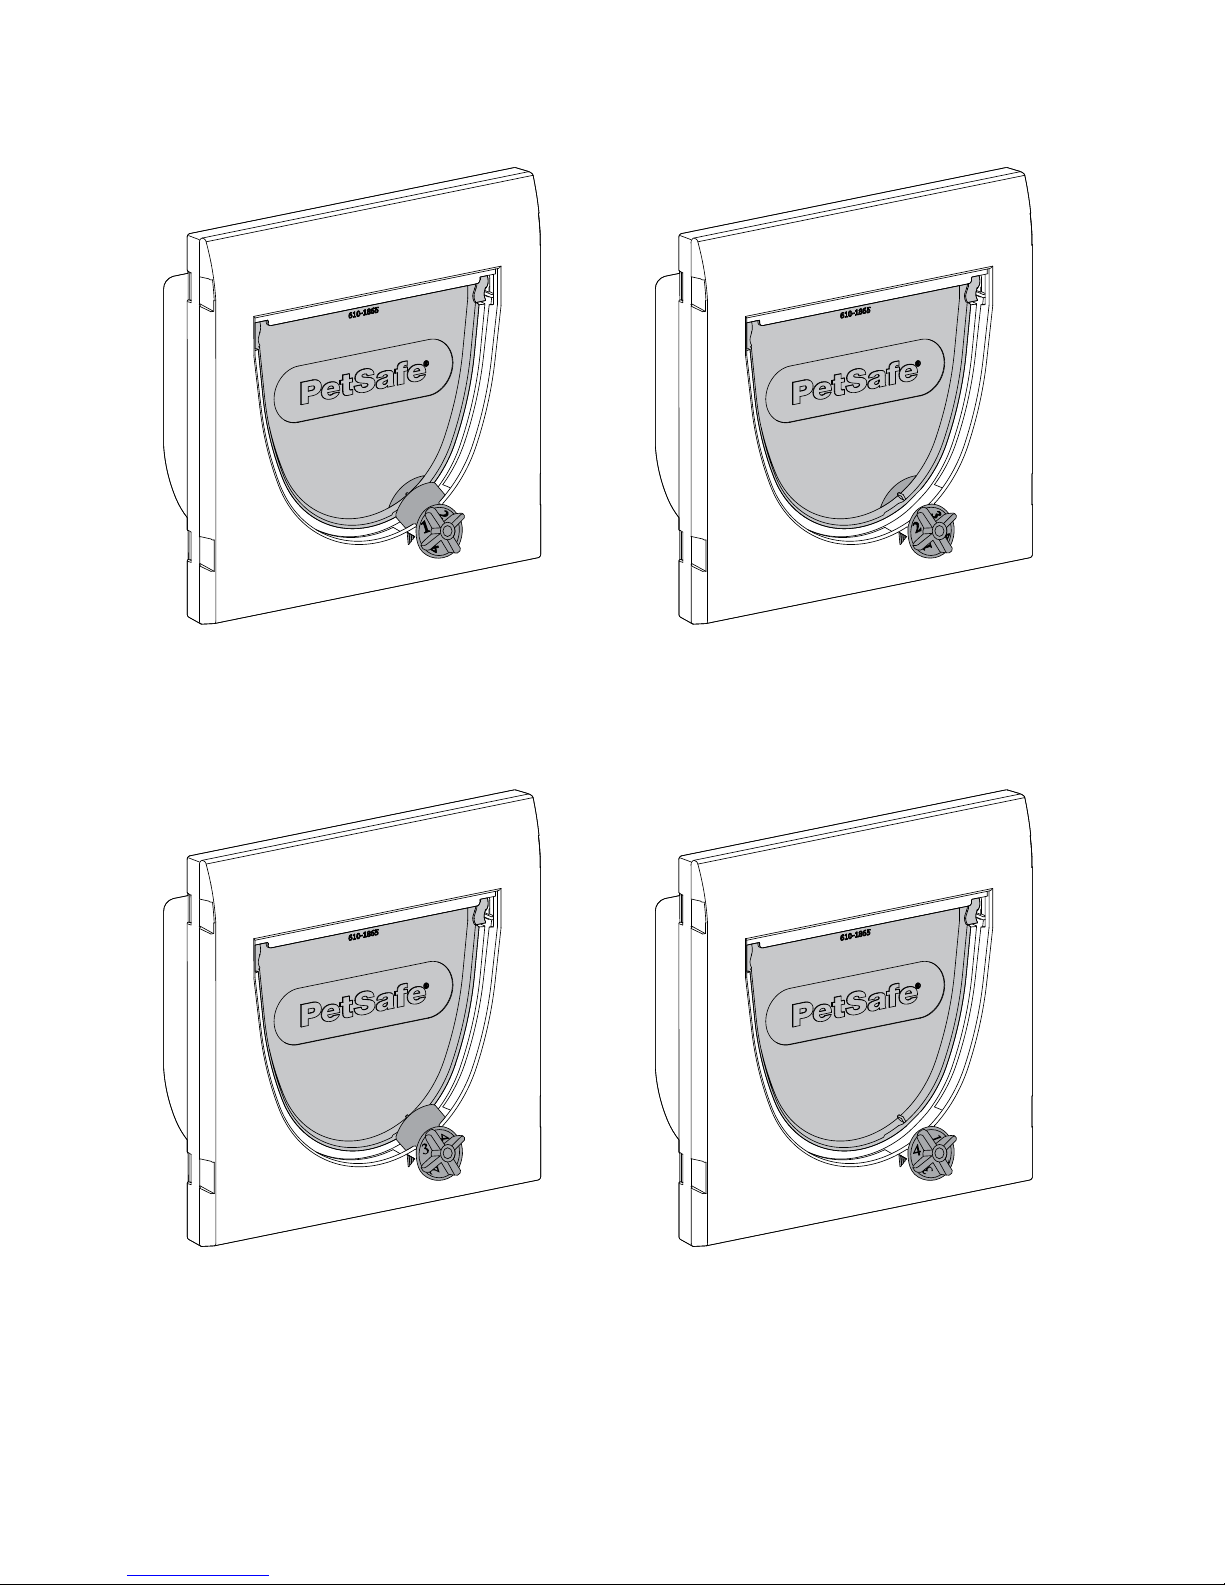
4-Way Locking System
The 4-way lock is located on the inside of your door and allows you to control your pet’s access in and
out of your home. Do not use the 4-way lock until your pet is familiar with using the pet door.
1 - Locked: To keep your pet from using
the pet door, set the 4-way lock to the
locked position.
2 - In-Only: The in-only access option allows
your pet to enter the pet door but does not
allow your pet to exit. This access option is
useful at nighttime or if you need to take your
pet to the vet.
3 - Out-Only: The out-only access option
allows your pet to exit the pet door but does
not allow your pet to enter.
4 - Opened: Setting the pet door to the opened
position allows your pet full access in and out
of your home to come and go as they please.

10 Customer Care Center 1-800-732-2677
Cleaning the Cat Door
Your cat door is constructed in the highest quality material with a toughened ap and has been
designed to last for many years. To maintain its appearance, occasional wiping with a damp cloth is
all that is necessary.
Replacement Flap Installation Instructions
1. From the inside of the house, ensure that the 4-Way Lock is in position 4 (Opened).
2. If installed in a door or wall greater than 2 1/4” (57 mm) thick, remove interior frame cover from the
interior frame by unsnapping the snaps, starting with the snaps closest to the top on each side of the door.
If installed in a door or wall less than 2 1/4” (57 mm) thick, remove the two nishing plugs
(half-way down on either side of the exterior frame) and then remove the screws. The cat door will
now come away from the door. The part of the cat door that is on the inside of the house should be
dismantled. To do this remove the screws from the back of the interior frame. Remove interior frame
cover from the interior frame by unsnapping the snaps, starting with the snaps closest to the top on
each side of the door.
3. Remove only the old ap and the ap magnet assembly, leaving the jamb seal magnet and hinge
springs in the frame.
4. Place the new ap into the frame ensuring that the ap seal magnet and jamb seal magnet are
attracting and not repelling. To ensure that this is the case, on the ap, the word “PetSafe®” should
read from left to right.
5. If installed in a door or wall greater than 2 1/4” (57 mm) thick, reattach interior frame cover by
snapping it in place. Insert the bottom hooks of the frame cover rst and then rotate it into place.
Reposition the 4-way lock to the desired setting.
If installed in a door or wall less than 2 1/4” (57 mm) thick, reattach interior frame cover by
snapping it in place. Insert the bottom hooks of the frame cover rst and then rotate it into place.
When the interior frame and the interior frame cover edges are ush, turn the assembly over and
replace the screws. Replace the cat door into the hole in your door/wall, line up the outside frame
and screw back into place. Re-cover the screw holes with the nishing plugs and nally reposition
the 4-Way Lock to the desired setting.
Replacement aps are available online at www.petsafe.net or by contacting the Customer Care Center.
Terms of Use and Limitation of Liability
1. Terms of Use
This Product is offered to you conditioned upon your acceptance without modication of the terms, conditions and
notices contained herein. Usage of this Product implies acceptance of all such terms, conditions, and notices.
2. Proper Use
This Product is designed for use with pets where training is desired. The specic temperament of your pet may not
work with this Product. If you are unsure whether this is appropriate for your pet, please consult your veterinarian
or certied trainer. Proper use includes reviewing the entire Operating Guide provided with your Product and any
specic Caution statements.
3. No Unlawful or Prohibited Use
This Product is designed for use with pets only. This pet training device is not intended to harm, injure, or
provoke. Using this Product in a way that is not intended could result in violation of Federal, State or local laws.
4. Limitation of Liability
In no event shall Radio Systems Corporation be liable for any direct, indirect, punitive, incidental, special or
consequential damages, or any damages whatsoever arising out of or connected with the use or misuse of this
Product. Buyer assumes all risks and liability from the use of this Product.
5. Modification of Terms and Conditions
Radio Systems Corporation reserves the right to change the terms, conditions and notices under which this
Product is offered.

www.petsafe.net 11
Customer Care International
USA & Canada - Tel: 800-732-2677
Monday - Friday 8 AM - 8 PM / Saturday 9 AM – 5 PM
Australia - Tel: 1800 786 608
Monday - Friday 8:30 AM - 5 PM
New Zealand - Tel: 0800 543 054
Monday - Friday 10:30 AM - 7 PM
Warranty
One Year Non-Transferrable Limited Warranty
This Product has the benet of a limited manufacturer’s warranty. Complete details of the warranty
applicable to this Product and its terms can be found at www.petsafe.net and/or are available by
contacting your local Customer Care Center:
Radio Systems PetSafe Europe Ltd, 2nd Floor, Elgee Building, Market Square, Dundalk, Co. Louth, Ireland
Radio Systems Corporation, 10427 PetSafe Way, Knoxville, TN 37932 USA
Australia/New Zealand – In compliance with the Australian Consumer Law, Warranties Against Defects,
effective January 1, 2012, warranty details of this Product are as follows:
One Year Non-Transferrable Limited Warranty
What is covered: Radio Systems Australia Pty Ltd (hereinafter referred to as “Radio Systems”) warrants
to the original retail purchaser, and not any other purchaser or subsequent owner, that its Product,
when subject to normal and proper residential use, will be free from defects in material or workmanship
for a period of one (1) year from the purchase date. An “original retail consumer purchaser” is a person
or entity who originally purchases the Product, or a gift recipient of a new Product that is unopened and
in its original packaging. When serviced by Radio Systems Customer Service, Radio Systems covers
labor and parts for the rst year of ownership; after the rst year, a service or upgrade charge will apply
relative to replacement of the Product with new or refurbished items at Radio Systems’ sole discretion.
The limited warranty is non-transferrable and shall automatically terminate if the original retail
consumer purchaser resells the Radio Systems Product or transfers the property on which the Radio
Systems Product is installed. This Limited Warranty excludes accidental damage due to dog chews;
lightning damage; or neglect, alteration, and misuse. Consumers who purchase products outside of
Australia, New Zealand, or from an unauthorized dealer will need to return the Product to the original
place of purchase for any warranty issues. Please note that Radio Systems does not provide refunds,
replacements, or upgrades for change of mind, or any other reason outside of these Warranty terms.
Claims Procedure: Any claim made under this Warranty should be made directly to Radio Systems
Australia Pty Ltd Customer Care Centre at:
Radio Systems Australia Pty Ltd
PO Box 7266, Gold Coast Mail Centre QLD 9726, Australia
Australia Residents: 1800 786 608
New Zealand Residents: 0800 543 054
Email: info@petsafeaustralia.com.au
To le a claim, a proof of purchase must be provided. Without a proof of purchase, Radio Systems will
not repair or replace faulty components. Radio Systems requests the Consumer to contact the Radio
Systems Customer Care Centre to obtain a Warranty Return Number, prior to sending the Product.
Failure to do so may delay in the repair or replacement of the Product. If the Product is deemed to be
faulty within 30 days from date of original purchase, Radio Systems will organize for a replacement to
be sent in advance of returning the faulty Product. A Post Bag will be included with the replacement
Product for the return of the faulty Product. The Product must be returned within 7 days of receiving
the replacement. If the Product is deemed to be faulty after 30 days from the date of original purchase,
the consumer will be required to return the Product to Radio Systems at the consumer’s own expense.
Radio Systems will test and replace the faulty unit or its components and return to the consumer free

12 Customer Care Center 1-800-732-2677
of charge, provided the Product is within its said warranty period. This warranty is in addition to other
rights and remedies available to you under the law. Radio Systems goods come with guarantees that
cannot be excluded under the Australia Consumer Law. You are entitled to a replacement or refund
for a major failure and for compensation for any other reasonably foreseeable loss or damage. You are
also entitled to have the goods repaired or replaced if the goods fail to be of acceptable quality and the
failure does not amount to a major failure.
Should you have any queries or require any further information, please contact our Customer Care
Center on 1800 786 608 (Australia) or 0800 543 054 (New Zealand).
 Loading...