

Page 1
PetSafe® 3in1 Harness
The PetSafe® 3in1 Harness is the perfect all-inclusive
harness, designed for maximum comfort, adjustability
and safety. The 3in1 Harness is a versatile harness that
is great for everyday use. The harness can be used as a
standard harness and can easily transition to a no-pull
solution. It also features a seat belt handle to limit your
dog’s movement in the car, creating a safer driving
environment for the driver, passengers and pet.
Features of the harness include neoprene padded
straps for added comfort and reflective nylon for added
visibility. Five-way adjustability provides the ultimate fit.
Quick-release buckles on the shoulder strap and girth
straps make it easy to get on and o your dog.
Back Leash Attachment
To use as a standard
harness, attach your
favorite leash to the
D-ring on the back
of the harness. If
your dog typically
pulls on the leash,
he will likely
continue to do
so because of the
“opposition reflex”.
Opposition reflex is the reflex that causes sled dogs to
pull against pressure.
No-Pull Leash Attachment
To transition to the
no-pull function,
attach a nylon or
leather 4-6 ft. leash
to the D-ring on the
center chest strap
of the harness. We
don’t recommend
using a retractable
leash with the nopull function, as the
constant tension could encourage the dog to pull.
Although the harness may have an immediate impact
on your dog’s pulling habits, and it may be more
manageable to walk him, he may still pull some while
wearing it. The harness is designed to redirect your dog
from pulling and help achieve a loose leash walk. The
front leash attachment reduces pulling by steering your
dog to the side and redirects his attention towards you.
In addition, the martingale loop provides extra leverage
for easy, relaxed control.
To achieve the best results, hold the leash so your dog
has enough leash to walk by your side but not enough to
forge ahead.
As soon as you feel tension on the leash, redirect your
dog’s attention to you; you may need to slow down or
stop. Once he is back in the desired heeling position, we
suggest rewarding your dog with a treat before you start
walking again. You may find yourself redirecting your
dog quite a bit in the beginning, but with some patience,
consistency and rewards (like a favorite treat or toy), he
will quickly learn the correct way to walk with you.
Reward your dog often when he is walking politely
beside you. Keep treats in a pouch or your pocket for
quick access.
Examples of rewards include:
• Small pieces of a favorite tasty treat.
• Praise! In a calm and pleasant voice, praise for good
leash manners; never yell or scold as this may frighten
your dog, hindering the learning process.
• Releasing tension on the leash the instant your dog is
walking politely next to you.
No-pull leash tips:
• No tension and a loose leash = “YES!” and the walk
continues. This is the moment to reward your dog with
a treat or praise.
• Tension or a tight leash = “No,” and you should gently
redirect the dog back into position beside you.
• Never jerk or yank the leash.
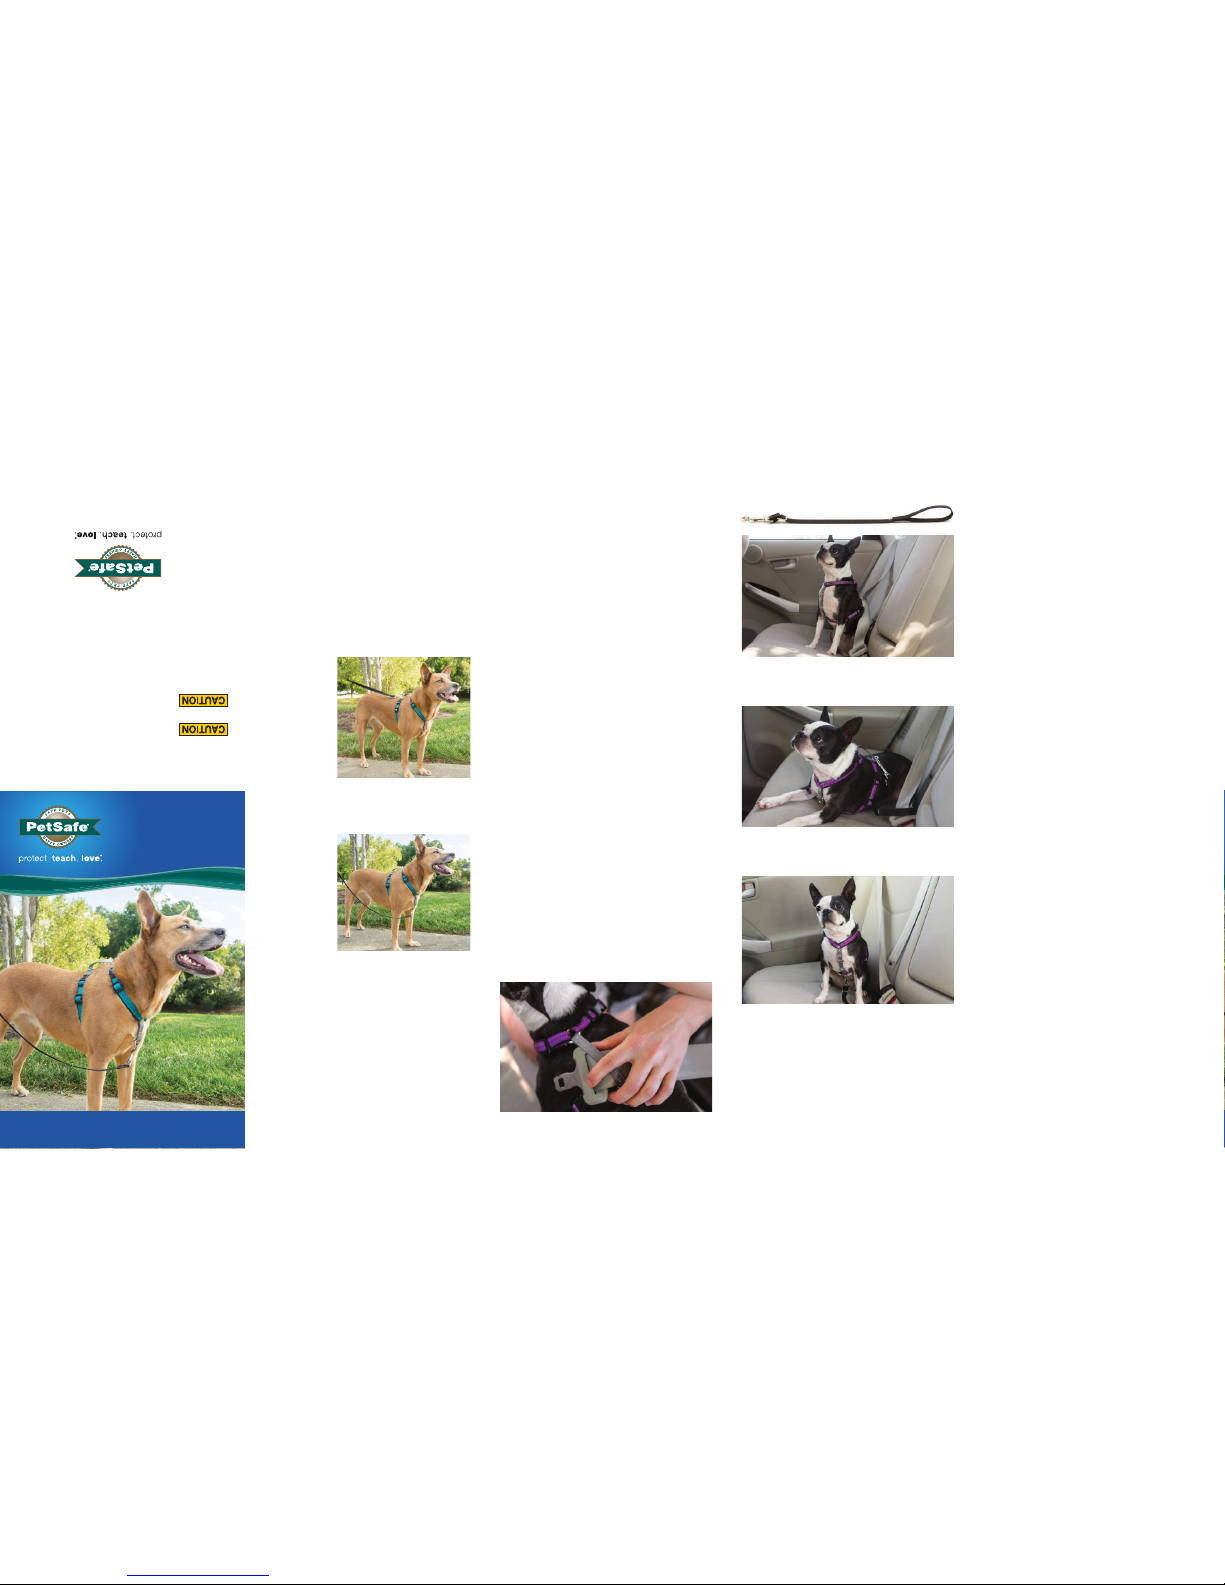
Use in a Car
When your dog is restrained, he should be able to sit or
stand comfortably but will not have full access to roam
the car. When restrained in the car, the PetSafe® 3in1
Harness will prevent your dog from interfering with your
driving, creating a safer experience. For the ultimate
safety of you and your dog, do not restrain your dog in
the front passenger seat.
The PetSafe 3in1 Harness has multiple car restraint
options designed to allow for the maximum comfort of
your dog. Try each to find the best solution for your dog
before going for your first car ride.
Option 1: Slide the seat belt through the gray seat belt
handle, located on the back of the harness, and attach as
usual.
Option 2: Use the adjustable car control strap included
with the harness. Slide the seatbelt through the handle of
the car control strap, and buckle the seat belt as usual.
Car Control Strap Attachment Option 2A:
Attach the car control strap to the D-ring on the back of
the harness.
Car Control Strap Attachment Option 2B:
Attach the car control strap to the O-ring located on the
belly of the dog.
Acclimating Your Dog
to the Car Restraint
It may take some time for your dog to get used to being
restrained in the car. You can help him acclimate with the
use of these tips.
Place the harness on your dog, and let him wear it during
normal daily use. Allow your dog to engage in his favorite
activities - including playtime and mealtime - so that he
associates a pleasant experience with the harness.
When he is comfortable wearing the harness during his
daily activities, you can begin introducing him to wearing
the harness in the car. Start with short, 5-10 minute
training sessions in a parked car. Ask him to hop in and out
of the car a few times, and give your dog treats when he
is in the car. Your dog should be able to hop in and out as
often as he likes and not feel like he is trapped. You can
make your dog more comfortable by bringing in a familiar
towel or blanket to sit on.
As he becomes comfortable in the car for longer periods
of time, start introducing the seat belt attachment. Attach
the seat belt by sliding it through the seat belt handle,
and provide lots of treats and praise so he enjoys the
experience. Give your dog time to acclimate to the
sensation of being buckled in before you begin driving. It
is best to do this in several short sessions. If the seat belt
restraint makes your dog uncomfortable or restricts his
movement too much, use the car control strap.
Take shorter drives at first so your dog can become
familiar with traveling while restrained in the car. As he
becomes more comfortable, you can take longer trips.
Running or Jogging With the
PetSafe 3in1 Harness
The 3in1 harness is a great harness for everyday use,
including running or jogging. We suggest using only the
back leash attachment when running. A leash attached to
the center chest strap when running could accidentally
trip your dog.
Be sure to fit the harness according to the fitting
instructions. If your dog begins to chafe, stop using the
harness, and consult your veterinarian.
Unwanted Behaviors on Walks
If your dog is exhibiting other behavior problems on
walks, such as excessive barking, lunging, aggression or
fearful behaviors, we encourage you to consult with a
local trainer, veterinarian or behavior specialist.
Warranty
Check the harness regularly, especially on growing dogs.
Over time and multiple uses the harness may stretch or
adjust. Examine the harness for signs of chewing, fraying
or damage. Do not leave your dog unattended while
wearing the harness. When not in use, safely store the
harness. If your dog chews the 3in1 Harness, we will gladly
replace it for a small fee. Call (800) 732-2677 for details.
3 in 1
Harness
Radio Systems Corporation
10427 PetSafe Way
Knoxville, TN 37932
800.732.2677
www.petsafe.net
©2016 Radio Systems Corporation
Made in China.
400-2068
Fitting & Use Guide
Important Safety Information
Explanation of Attention Words and Symbol in this
Guide.
CAUTION, without the safety alert symbol, is
used to address practices not related to personal injury
Risk of Serious Injury: if you’re securing a
dog in a vehicle, only use this product in the rear passenger
seat. This harness has not been crash tested. No dog
restraint can guarantee protection from injury or death, but
proper use helps reduce the risk. Before using this product,
read and follow all of the instructions and warnings.
Do not leave your dog unattended in the car, especially in
warmer weather.
Not for tie-out use.
Page 2

Open all 3 quick-release
buckles, and then fit the
shoulder strap around your
dog’s shoulders. The gray
seat belt handle should lie
flat in between the dog’s
shoulder blades.
Bring the center strap between
the dog’s front legs, and adjust
the girth straps for a comfortable
snug fit.
When fit properly, two fingers
should barely fit between the fur
and nylon strap. This prevents
movement and chafing.
Adjust the center chest
strap to a comfortable
length. When fit properly,
the center strap should be
snug and should not hang
down o the dog’s chest.
1
Open the Girth and Shoulder Straps
2
Adjust the Shoulder Straps
3
Adjust the Girth Straps
4
Adjust the Center Chest Strap
5
Check for Proper Fit
3in1 Harness Fitting Step-by-step
Important: Throughout the fitting process and during initial use of 3in1 Harness,
motivate and encourage your dog with praise and treats. If your dog is especially
active, have someone help you by feeding treats while you fit and adjust. Remove
the harness to make fitting adjustments. Fit your dog in a quiet, indoor space to
ensure a stress-free and safe environment. Start with all straps fully extended. To
achieve a proper fit, your dog should be standing. Dogs may “tense up” during
fitting, so check the fit again after the dog has walked in the harness for a few
minutes. Readjust as needed.
Adjust the shoulder straps so that
the front O-ring is on or above
the breast bone. This portion
of the fitting is key—proper
placement of the O-ring is
essential for your dog’s comfort,
as well as the eectiveness of
the no-pull function.
Seat Belt Handle
(Gray Nylon)
D-Ring for
Back Leash
Attachment
Girth Straps
with Quick-
Release Buckle
Shoulder
Straps
Center Chest Strap
with D-Ring for Front
Leash Attachment
(Gray Nylon)
Front O-ring
Press your fingers on
the lower front of the
dog’s chest to locate
the breast bone.
 Loading...