

Page 1
PetSafe
®
Electronic SmartDoor
™
Operating Guide
Guide d’emploi
Guia para el uso
Please read this entire guide before beginning.
Veuillez lire tout ce manuel avant de commencer.
Por favor, lea completamente esta guía antes de comenzar.
Page 2

2 1-800-732-2677 (US), 1-800-457-3911 (Canada)
Thank you for choosing PetSafe®. Our mission is to be the most trusted brand in the
pet ownership experience. We want to ensure your pet’s safety by providing you with
the tools and techniques to successfully train your pet. If you have any questions, please
contact the Customer Care Center at 1-800-732-2677 (US), 1-800-457-3911 (Canada)
or visit our website at www.petsafe.net.
To get the most protection out of your limited warranty, please register your product
within 90 days at www.petsafe.net. By registering, you will enjoy the product’s full
warranty and should you ever need to call the Customer Care Center, we will be
able to help you faster. Additionally, you will not have to save your product receipt as
registering serves as proof of purchase. Most importantly, PetSafe will never give or
sell your valuable information to anyone.
________________________________________________________________________
Table of Contents
Components .....................................................................................................3
Other Items You May Need ................................................................................3
How the Electronic SmartDoor™ Works ..............................................................3
Key Defi nitions .................................................................................................4
Installing the Electronic SmartDoor ...................................................................5
Preparing Your Electronic SmartDoor ................................................................5
Using Your Electronic SmartDoor ...................................................................... 6
Training Your Pet to Use the Electronic SmartDoor ............................................ 7
Troubleshooting ................................................................................................ 7
Replacement Parts.............................................................................................7
Terms of Use and Limitation of Liability ............................................................8
Product Warranty .............................................................................................. 8
Perchlorate Battery ............................................................................................9
Français ........................................................................................................ 10
Español ......................................................................................................... 18
Page 3
www.petsafe.net 3
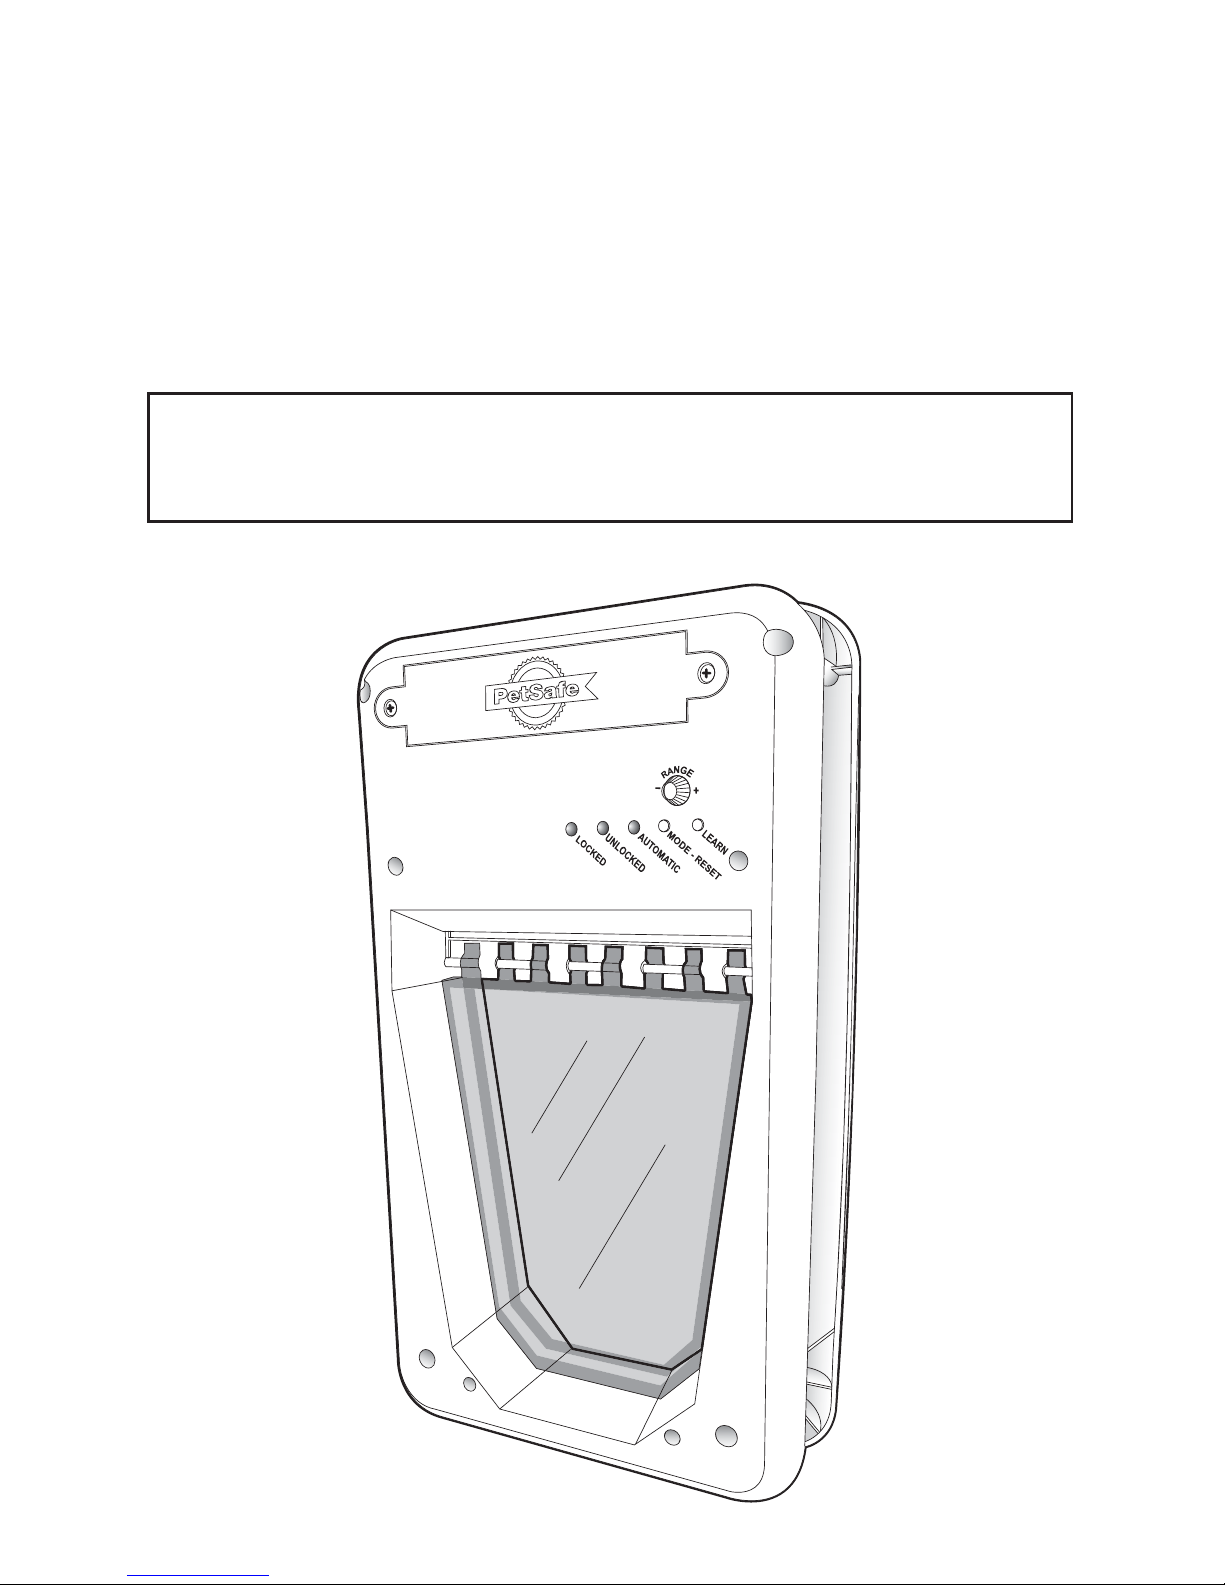
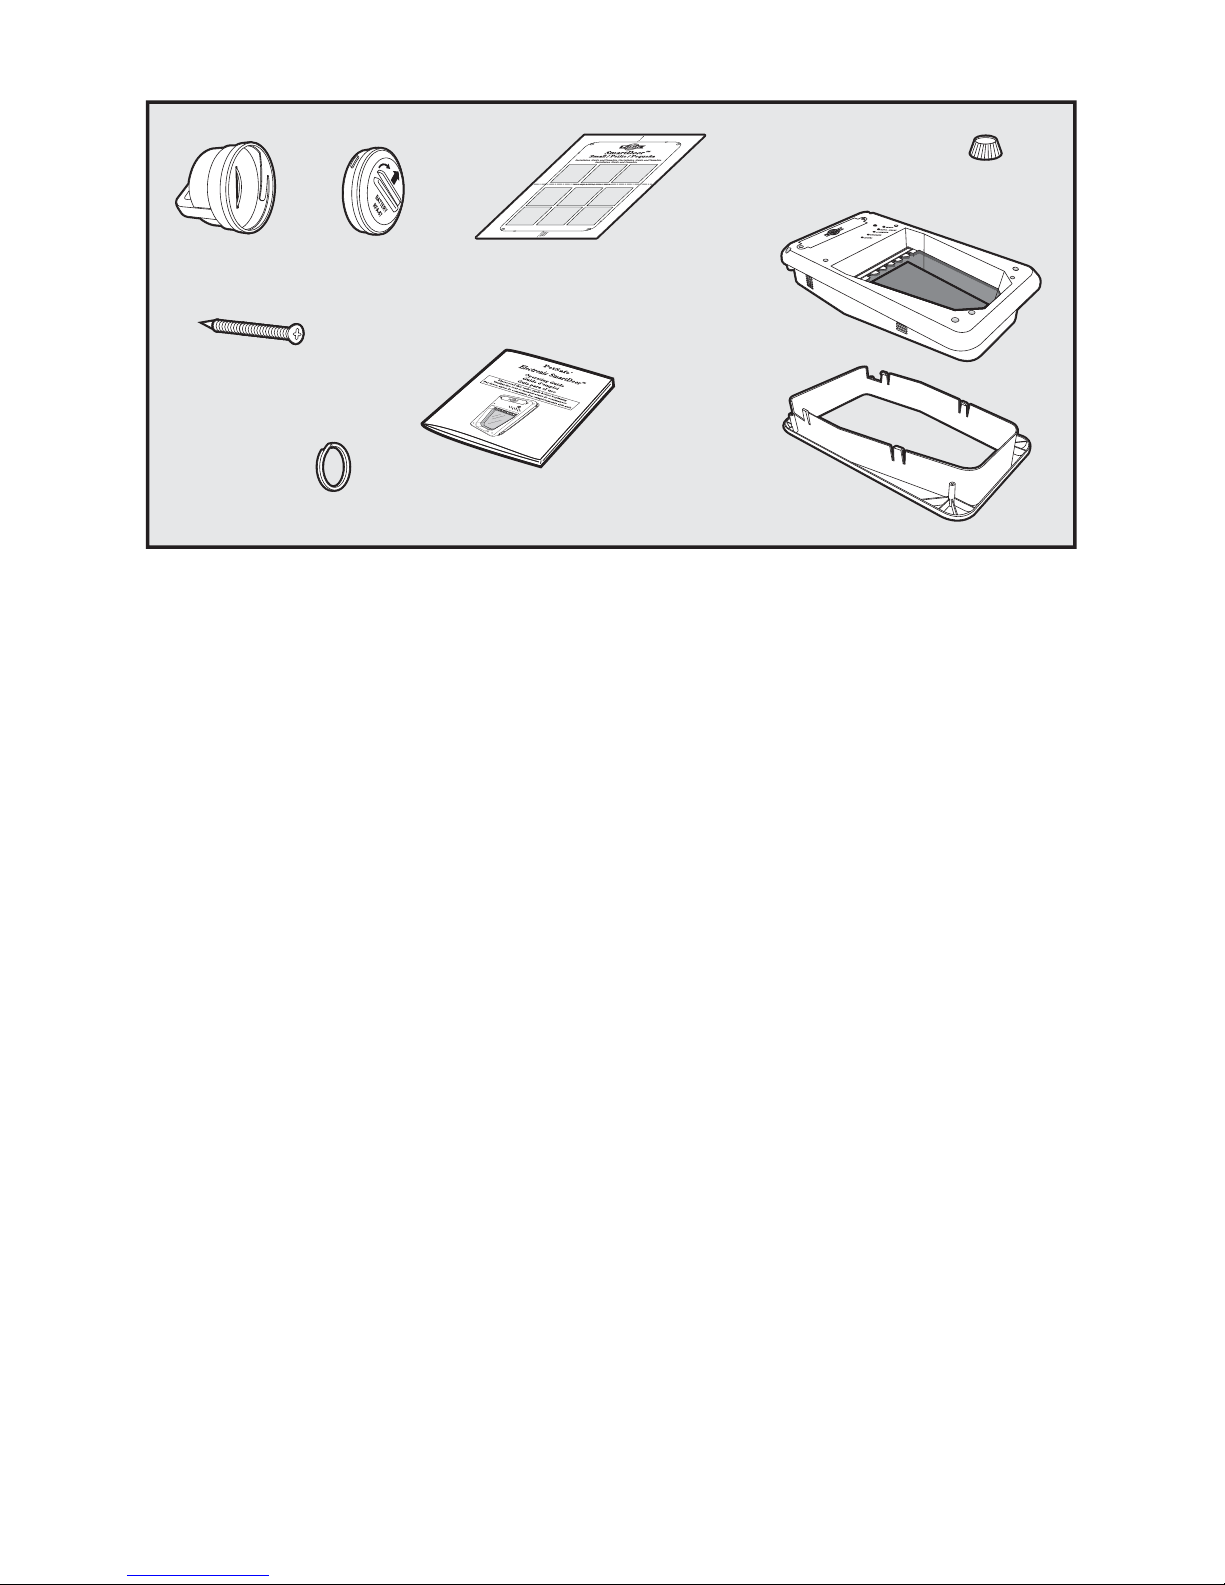
Components
Electronic
SmartDoor
™
Rear Door Frame
Range Knob
Installation Guide
and Template
Operating Guide
Mounting Screws
(4 pcs. small)
(8 pcs. large)
Key Ring
SmartKey
™
Battery
(PetSafe
®
RFA-67)
Other Items You May Need
• Jig Saw
• Electric Drill
• 3/8" Drill Bit
• Phillips Screwdriver
• 4 D-Cell Batteries (required)
• Level
• Tape
• Pencil
• String
____________________________________________________________________________________
How the Electronic SmartDoor™ Works
The PetSafe® Electronic SmartDoor allows you to control the access of your pets. When the Electronic
SmartDoor is set to Automatic mode, only your pets wearing the SmartKey can pass through the
Electronic SmartDoor. As your pet enters the adjustable range of the Electronic SmartDoor, the
Electronic SmartDoor detects the SmartKey and unlocks automatically. The range is adjustable up to 3
feet. After your pet passes through the Electronic SmartDoor, the door will lock automatically. Without
the SmartKey, no other animals can pass through.
Page 4
4 1-800-732-2677 (US), 1-800-457-3911 (Canada)
Key Defi nitions
Electronic SmartDoor™: The Electronic SmartDoor mounts in any entry door or wall through which
your pet may have access.
Battery Box Cover: This cover, with the PetSafe® logo, is placed over the required 4 D-cell batteries
on the front of the unit, and is secured with 2 Battery Box Cover screws.
Lights:
• Locked/Low Battery Red LED: The red LED
indicates “Locked” mode; a fl ashing red LED
indicates low battery condition.
• Unlocked/Learn Mode Green LED: The green
LED indicates “Unlocked” mode; a fl ashing
green LED indicates learn mode.
• Automatic/Error Mode Yellow LED: The
yellow LED indicates “Automatic” mode; a
fl ashing yellow LED indicates error mode.
LED Color Condition Pet Door Status
RED
Solid Locked Mode
Flashing Low battery alert
GREEN
Solid Unlocked Mode
Flashing Learn Mode
YELLOW
Solid Automatic Mode
Flashing Error alert
Mode/Reset Selection Button: The left-most button allows selection of the “Locked”, “Unlocked” and
“Automatic” modes of operation for the Electronic SmartDoor. This button is also used to reset the unit.
Learn Mode Selection Button: The right-most button allows you to add different SmartKey ID
codes to the Electronic SmartDoor’s memory, one for each of your pets, up to fi ve.
Range Knob: The knob located on the front of the Electronic SmartDoor controls the distance or
range at which the SmartKey will activate the Electronic SmartDoor. By turning the Range Knob
clockwise, the range of detection of the SmartKey is increased. By turning the Range Knob counterclockwise, the range of detection is decreased.
Flap: The clear center portion of the Electronic SmartDoor locks/unlocks to allow access for your
pet. The fl ap is pushed open by your pet when entering or exiting and then swings to centered closed
position. In “Automatic” mode, once the pet leaves the detection zone, the fl ap will lower and lock.
SmartKey™: The SmartKey, which attaches to your pet’s collar, sends a unique coded signal to the
Electronic SmartDoor.
RFA-67 Battery: The replaceable battery that powers the SmartKey. Additional RFA-67 batteries are
available where you purchased your Electronic SmartDoor, or by calling
1-800-732-2677 (US), 1-800-457-3911 (Canada).
SmartKey
™
RFA-67 Battery
Electronic
SmartDoor
™
Battery Box Cover
B. Locked/Low Battery Red LED
C. Unlocked/Learn Mode Green LED
D. Automatic/Error Mode Yellow LED
E. Mode/Reset Selection Button
F. Learn Mode Selection Button
A. Range Knob
Flap
Rear Door Frame
A
BC
D
E
F
Page 5
www.petsafe.net 5
Installing the Electronic SmartDoor
™
See accompanying installation template for installation instructions.
__________________________________________________________________________________________
Preparing Your Electronic SmartDoor
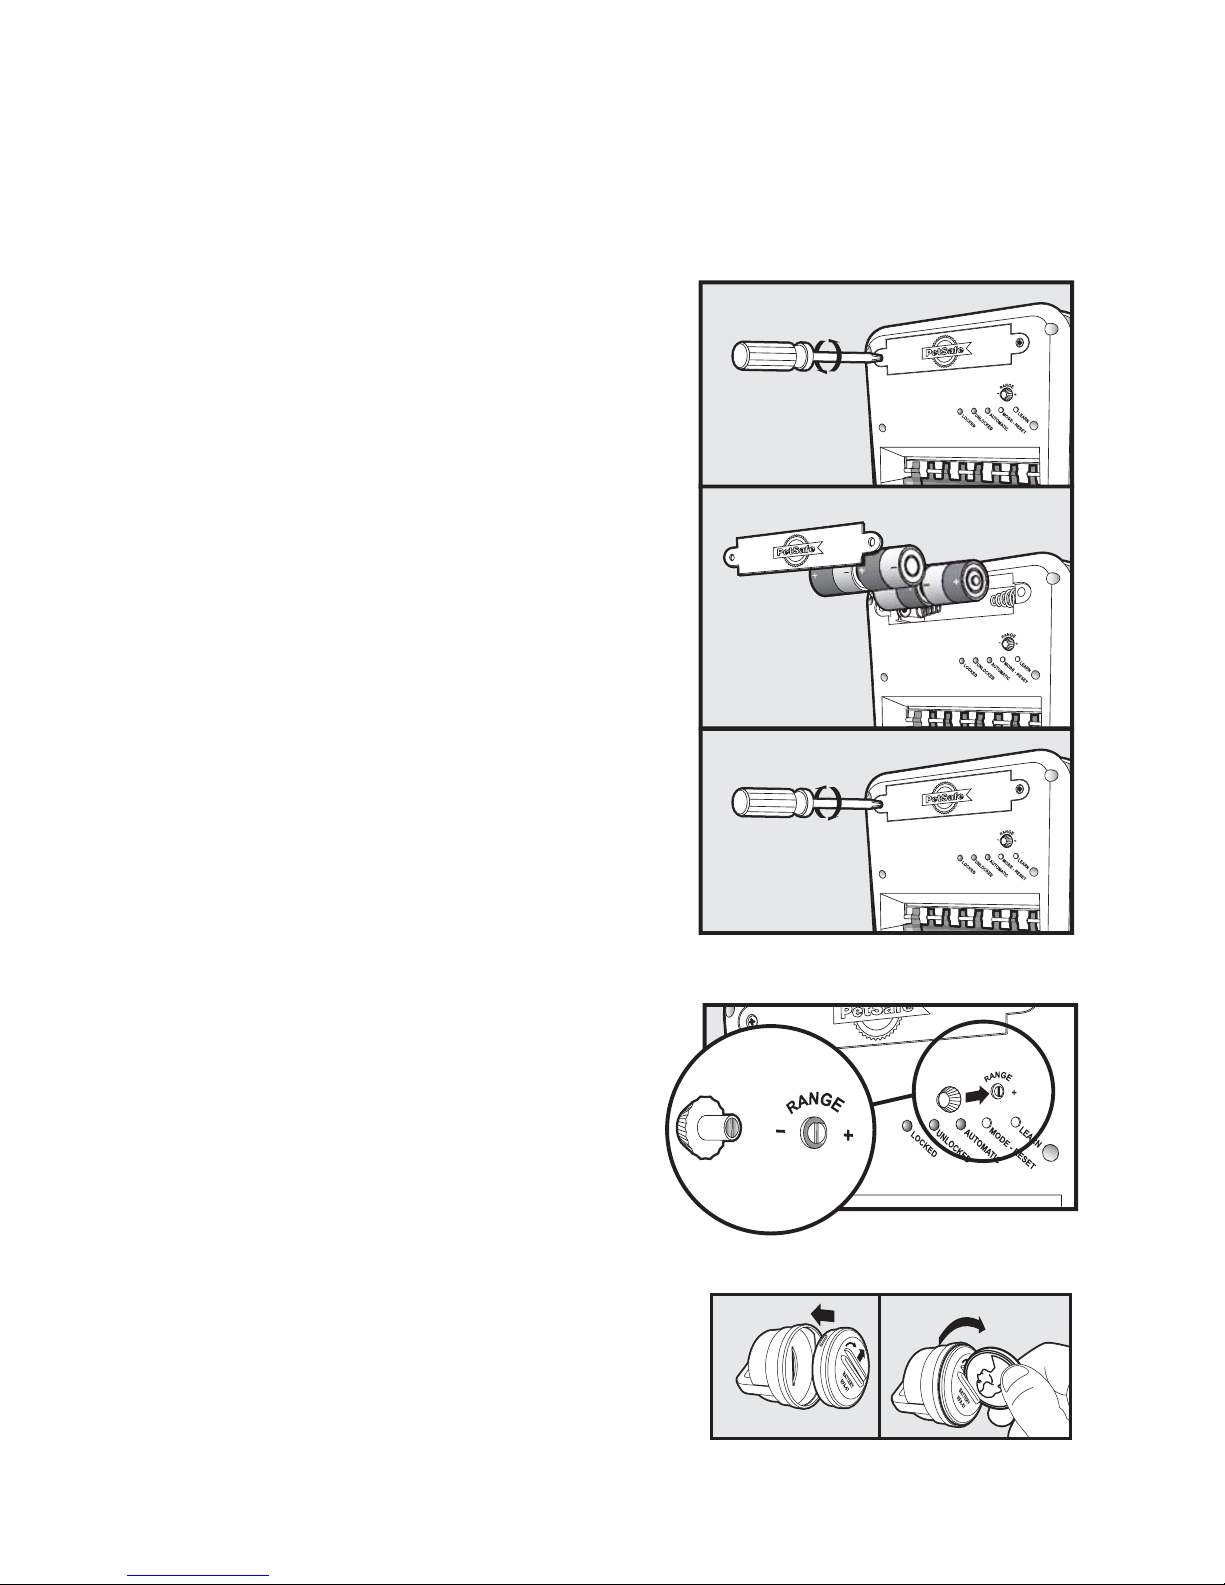
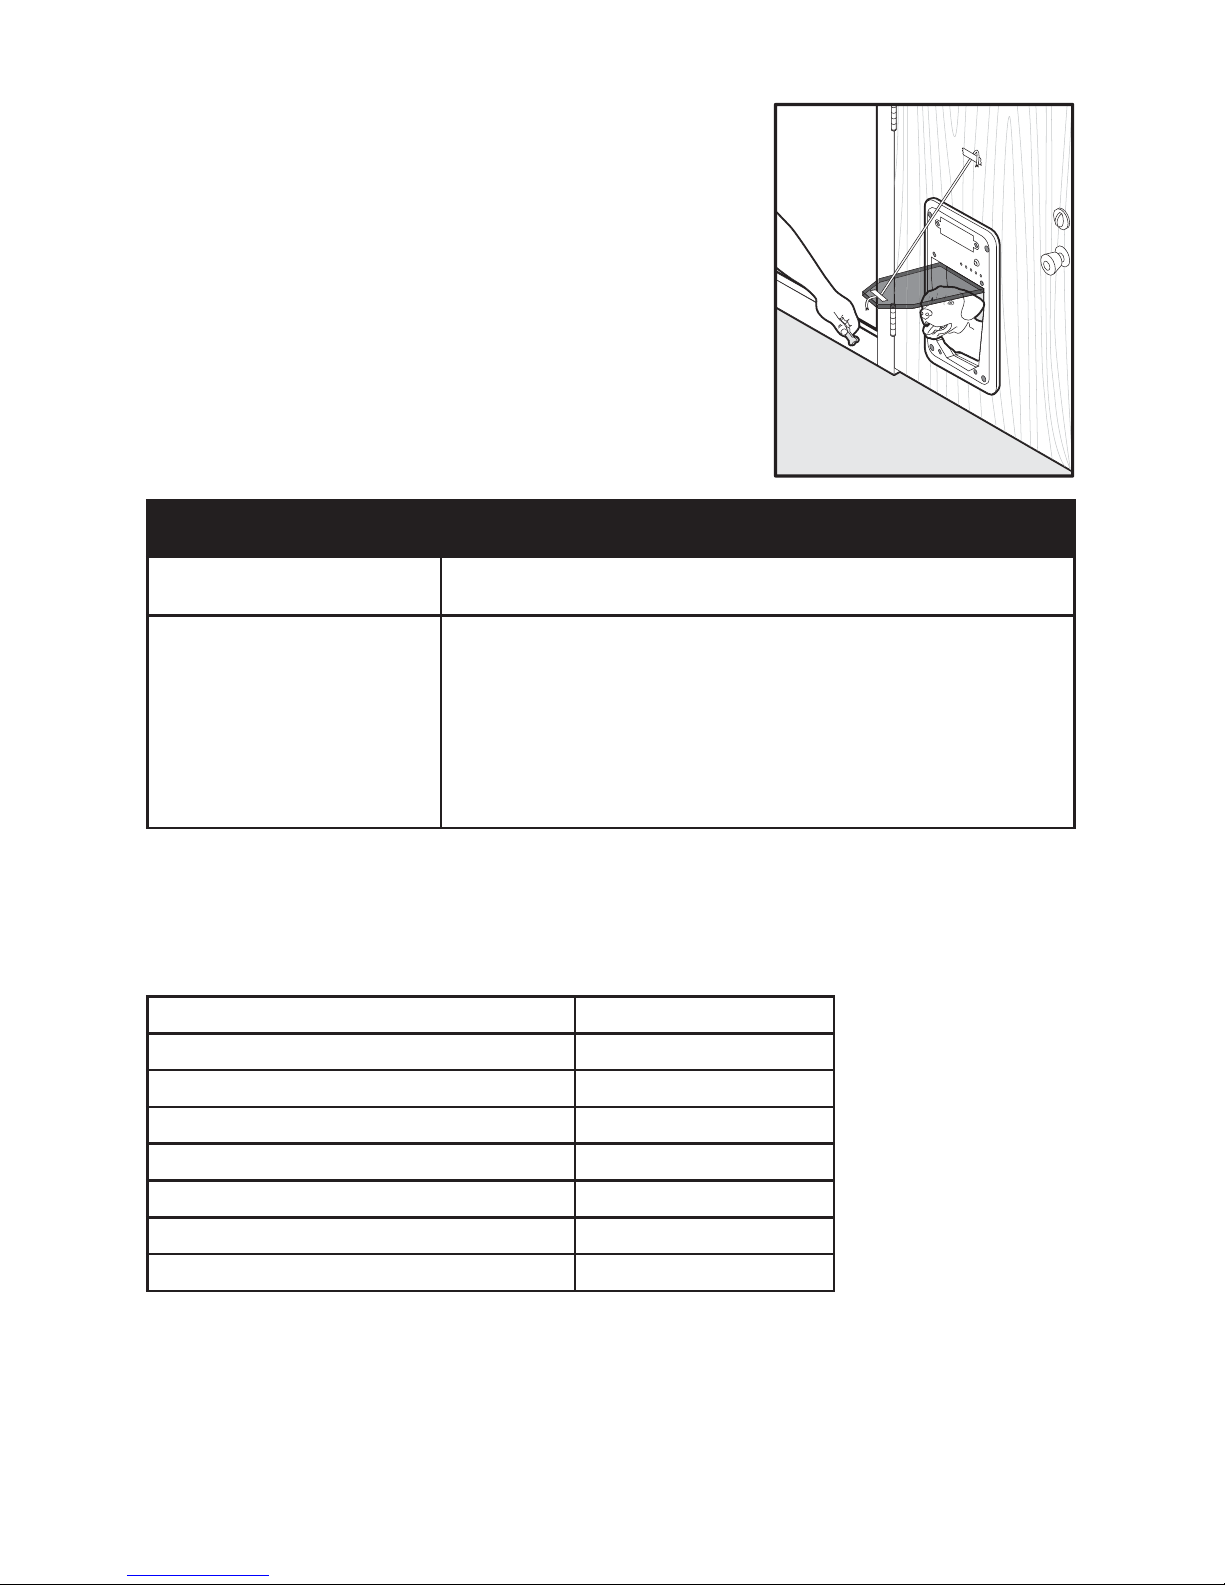
Step 1: Install the 4 D-Cell Batteries
1. With a Phillips screwdriver, remove the two Battery Box
Cover screws.
2. Remove the Battery Box Cover.
3. Refer to the inside of the Battery Box Cover for the
proper orientation of the four D-cell batteries.The fi rst
set of two D-cell batteries should be installed, in the
bottom of the Battery Box, with the positive connection
towards the right. The second set of two D-cell batteries
should be installed with the positive connection towards
the left.
4. When the batteries are placed in the Electronic
SmartDoor’s battery box, the red LED will illuminate for
2 seconds and the fl ap will move to the locked position. If
the fl ap is in the locked position, nothing will happen.
Note: The door must be in the vertical position for the fl ap to
center properly and operate correctly.
5. Replace the Battery Box Cover and re-install the 2
Battery Box Cover screws.
Step 2: Install the Range Knob
Fit the Range Knob over the Range Knob shaft (located
above control buttons) and press it fi rmly into place.
Note: The blade in the provided Range Knob must align with
the slot in the Range Knob shaft.
Step 3: Install the PetSafe® RFA-67 Battery in the SmartKey
™
1. Place the PetSafe RFA-67 battery into the front of the
SmartKey.
2. Using a coin, rotate one-quarter turn clockwise to secure
the PetSafe RFA-67 battery.
SmartKey Low Battery Indicator
The SmartKey is equipped with a red LED inside
the housing. Should the LED begin to fl ash, the PetSafe RFA-67 battery is getting low on charge and
should be replaced as soon as possible.
Page 6

6 1-800-732-2677 (US), 1-800-457-3911 (Canada)
Step 4: Attach the SmartKey™ to the Pet’s Collar
Thread your pet’s collar through the SmartKey’s attachment
loop. Your pet’s collar must be ¾" wide or less. The
SmartKey should hang under the pet’s neck.
If your pet’s collar is too large to thread through the key, a
key ring has been provided for use for attachment to your
pet’s collar ring.
__________________________________________________________________________________________
Using Your Electronic SmartDoor
™
Locked Mode
The Electronic SmartDoor ships from the factory in the Locked mode. The Electronic SmartDoor will
enter Locked mode when the 4 D-cell batteries are placed in the Battery Box.
To enter Locked mode when the Electronic SmartDoor is in either the Unlocked or Automatic
mode, press and hold the Mode/Reset button until the red LED is illuminated. While the red LED is
illuminated, release the Mode/Reset button. The fl ap is locked.
Entering Unlocked Mode
To enter Unlocked mode, press and hold the Mode/Reset button; the red LED will illuminate
indicating Locked mode, then the green LED will illuminate. While the green LED is illuminated,
release the Mode/Reset button. The fl ap will unlock.
Automatic Mode
To enter Automatic mode, press and hold the Mode/Reset button; the green LED will illuminate
indicating Unlocked mode, then the yellow LED will illuminate. While the yellow LED is illuminated,
release the Mode/Reset button. The fl ap will enter Automatic mode. The fl ap will move down (locking)
and the Electronic SmartDoor will seek the presence of the SmartKey. When the unit senses the
SmartKey, the fl ap will unlock. When the SmartKey signal is no longer detected, the fl ap will lock. The
SmartKey signal must be out of range of the Electronic SmartDoor for 10 seconds before the door will
respond to the SmartKey signal again.
Learning Mode
To enter Learn mode, press and hold the Learn button until the green LED begins to fl ash. Release the
button. Bring the SmartKey into range of the Electronic SmartDoor; the green LED will stop blinking
and will illuminate continuously. The code has been successfully added to memory.
Learn Mode may be accessed when the Electronic SmartDoor is in any operating mode. Up to fi ve
different SmartKey codes can be added to memory. When the Learn mode is activated, if no SmartKey
transmitter signal is detected, the green LED will blink for 60 seconds and extinguish; the Electronic
SmartDoor will return to its previous mode.
Error Mode
When the yellow LED is fl ashing, the Electronic SmartDoor is in Error mode, indicating an error has occurred.
If the fl ap is off-of-center, either to the inside or outside, while the fl ap is being pushed down to lock,
the Electronic SmartDoor will stop moving the fl ap down and start fl ashing the yellow LED. The
Electronic SmartDoor will remain in Error mode until the error is cleared. Simply center the fl ap, then
depress and hold the Mode/Reset button until the Electronic SmartDoor begins to lock.
Low Battery Indicator
When the red LED is fl ashing, the Electronic SmartDoor is in low battery condition. The four D-cell
batteries should be replaced as soon as possible to ensure the Electronic SmartDoor continues to operate
properly.
Page 7
www.petsafe.net 7
Training Your Pet to Use the Electronic SmartDoor
™
To begin training your pet to use the Electronic SmartDoor, fi rst
set the Electronic SmartDoor to the Unlocked mode. Attach the
SmartKey™ to your pet’s collar. Temporarily tape the fl ap up to the
surface in which your pet door is mounted to hold the fl ap open.
Sometimes it helps for you to be on one side of the door and your
pet on the other. Use food or treats to coax your pet through the
open pet door. Let the pet become familiar with passing through the
pet door with the fl ap up.
In time, remove the tape and let the fl ap hang in the Unlocked
mode. Again coax your pet through the pet door with food or treats.
After your pet becomes accustomed to pushing through the fl ap, set
the Collar ID door to the Automatic mode. When the pet is near the
Collar ID door and the fl ap unlocks, again coax the pet through with
food or treats.
Troubleshooting
Electronic SmartDoor will
not lock.
• Make sure the flap is in the center position and repeat the operating
cycle.
Electronic SmartDoor
does not respond to the
presence of the SmartKey
transmitter.
• Check that the Electronic SmartDoor is in Automatic mode.
• Check that the SmartKey has been “learned” by the Electronic
SmartDoor.
• Check that the Range Knob is fully clockwise.
• Check that the PetSafe® RFA-67 battery in the SmartKey is fully charged.
• Check that the batteries in the Electronic SmartDoor are fresh.
• If the condition persists, check that there are no radio-frequency
transmitting devices or electronic devices that radiate electrical energy,
which may interfere with the operation of the Electronic SmartDoor.
Replacement Parts
To purchase replacement parts for your PetSafe Electronic SmartDoor, contact the Customer Care
Center at 1-800-732-2677 (US), 1-800-457-3911 (Canada) or visit our website at www.petsafe.net to
locate a retailer near you.
Component Part Number
PetSafe® RFA-67 Battery RFA-67
Flap (Small) 615-049
Flap (Large) 615-064
Battery Cover Screws 202-231
Battery Cover 700-967
Range Adjustment Knob 700-1139
SmartKey
™
PAC11-11045
Page 8

8 1-800-732-2677 (US), 1-800-457-3911 (Canada)
Terms of Use and Limitation of Liability
1. Terms of Use
This Product is offered to you conditioned upon your acceptance without modification of the terms,
conditions and notices contained herein. Usage of this Product implies acceptance of all such terms,
conditions, and notices.
2. Proper Use
This Product is designed for use with pets where training is desired. The specific temperament of
your pet may not work with this Product. If you are unsure whether this is appropriate for your pet,
please consult your veterinarian or certified trainer.
Proper use includes reviewing the entire Operating Guide provided with your Product and any
specific Caution statements.
3. No Unlawful or Prohibited Use
This Product is designed for use with pets only. This pet training device is not intended to harm,
injure, or provoke. Using this Product in a way that is not intended could result in violation of
Federal, State or local laws.
4. Limitation of Liability
In no event shall Radio Systems® Corporation be liable for any direct, indirect, punitive, incidental,
special or consequential damages, or any damages whatsoever arising out of or connected with the
use or misuse of this Product. Buyer assumes all risks and liability from the use of this Product.
5. Modification of Terms and Conditions
Radio Systems Corporation reserves the right to change the terms, conditions and notices under
which this Product is offered.
____________________________________________________________________________________
Product Warranty
Please register your product online at www.petsafe.net. All parts are covered under warranty for the life of
this product. Labor is covered for the fi rst year of ownership. Thereafter, there is a minimum service charge
for the repair or replacement of the product. Misuse, loss, damage by pet or improper use or handling is not
covered. PetSafe® will not pay for loss of time, inconvenience, loss of use of your product or any incidental or
consequential damage. Warranty void if product resold.
Please contact the Customer Care Center at 1-800-732-2677 (US), 1-800-457-3911 (Canada) if you need
service, help in troubleshooting or to arrange a repair for your product (a service charge may apply). Also, please
visit our website www.petsafe.net for Frequently Asked Questions and Troubleshooting Tips.
____________________________________________________________________________________
Perchlorate Battery
Perchlorate Material – special handling may apply. See www.dtsc.ca.gov/hazardouswaste/perchlorate.
Page 9
www.petsafe.net 9
Important Recycling Advice
Please respect the Waste Electrical and Electronic Equipment regulations in your country. This
equipment must be recycled. If you no longer require this equipment, do not place it in the normal
municipal waste system. Please return it to where it was purchased in order that it can be placed in our
recycling system. If this is not possible, please contact the Customer Care Center for
further information.
Caution
Unauthorized changes or modifi cations may void the user’s authority to operate this equipment, and
void the warranty.
FCC /
A copy of the EU declaration of conformity can be requested by contacting the Customer Care Center at
1-800-732-2677 (US), 1-800-457-3911 (Canada) or at www.petsafe.net.
This device complies with Industry Canada rules. This device complies with part 15 of the FCC Rules.
Operation is subject to the following two conditions:
1. This device may not cause harmful interference.
2. This device must accept any interference received, including interference that may cause undesired operation.
This equipment has been tested and found to comply with the relevant FCC part 15 rules for home and offi ce use.
Page 10

10 1-800-732-2677 (US), 1-800-457-3911 (Canada)
Merci d’avoir choisi PetSafe®. Notre mission consiste à être la marque de confiance des
propriétaires d’animaux domestiques. Nous voulons assurer la sécurité de votre animal
en vous fournissant des outils et des techniques pour bien le dresser. Si vous avez des
questions à poser, veuillez contacter le Centre de service à la clientèle en composant le
1-800-732-2677 (US), ou le1-800-457-3911 (Canada), ou consultez le site Web
www.petsafe.net.
Pour obtenir la meilleure protection de votre garantie limitée, veuillez inscrire votre
produit dans les 90 jours à l’adresse www.petsafe.net. En inscrivant votre produit,
vous profiterez de la garantie complète du produit, et nous serons en mesure de vous
aider plus rapidement si vous appelez le Centre de service à la clientèle. De plus,
vous ne serez pas obligé de conserver le reçu du produit, car l’inscription sert de
preuve d’achat. D’autre part, sachez que, PetSafe ne donnera ni ne vendra jamais les
renseignements vous concernant à quiconque.
________________________________________________________________________
Table des matières
Pièces ............................................................................................................. 11
Autres choses dont vous pouvez avoir besoin .................................................... 11
Fonctionnement de l’Electronic SmartDoor™ ................................................... 11
Défi nitions importantes ................................................................................... 12
Installation de l’Electronic SmartDoor ............................................................. 13
Préparation de l’Electronic SmartDoor ............................................................ 13
Utilisation de l’Electronic SmartDoor™ ............................................................. 14
Entraînement de votre animal à utiliser l’Electronic SmartDoor™ ....................... 15
Dépannage ...................................................................................................... 15
Pièces de rechange .......................................................................................... 15
Modalités d’utilisation et limitation de la responsabilité ..................................... 16
Pile au perchlorate ........................................................................................... 16
Français
Page 11

www.petsafe.net 11
Pièces
Electronic
SmartDoor
™
Cadre arrière de
la chatière
Bouton
de réglage
Manuel d’installation
et modèle
Mode d’emploi
Vis de montage
(4 pièces petite)
(8 pièces grand)
Anneau de collier
SmartKey
™
Pile
(PetSafe
®
RFA-67)
Autres choses dont vous pouvez avoir besoin
• Scie sauteuse
• Perceuse électrique
• Trépan de 3/8 po
• Tournevis Phillips
• Quatre piles D-cell (nécessaires)
• Niveau
• Mètre à ruban
• Crayon
• Ficelle
____________________________________________________________________________________
Fonctionnement de l’Electronic SmartDoor™
L’Electronic SmartDoor de PetSafe® vous permet de gérer l’accès de vos animaux. Lorsque l’electronic
SmartDoor est réglée en mode automatique, seuls les animaux qui portent la SmartKey peuvent
passer par l’Electronic SmartDoor. Lorsque votre animal pénètre dans l’intervalle de portée réglable de
l’Electronic SmartDoor, cette dernière détecte la SmartKey et déverrouille automatiquement le système.
La portée peut être réglée jusqu’à environ 3 pieds. Après le passage de votre animal par l’Electronic
SmartDoor, la porte se verrouille automatiquement. Sans la SmartKey, aucun autre animal ne peut passer
par la porte.
Page 12

12 1-800-732-2677 (US), 1-800-457-3911 (Canada)
Défi nitions importantes
Electronic SmartDoor™: l’Electronic SmartDoor se fi xe sur les portes ou les murs pour offrir un accès à
votre animal.
Couvercle de compartiment à piles : ce couvercle, qui comporte le logo de PetSafe®, est placé sur
les 4 piles D-cell nécessaires sur la partie avant de l’appareil, et il est fi xé à l’aide des deux vis.
Lumières :
• DEL rouge verrouillé/piles faibles : la DEL
rouge indique le mode « verrouillé »; la DEL
rouge qui clignote indique que les piles sont
faibles.
• DEL verte déverrouillé/mode apprentissage :
la DEL verte indique le mode
« déverrouillé »; la DEL verte qui clignote
indique le mode apprentissage.
• DEL jaune mode automatique/erreur : la
DEL jaune indique le mode « automatique »; la
DEL jaune qui clignote indique le mode erreur.
Couleur de la
DEL
État État de la chatière
ROUGE
Constante Mode verrouillé
Clignotante Indicateur de piles
faibles
VERTE
Constante Mode déverrouillé
Clignotante Mode apprentissage
JAUNE
Constante Mode automatique
Clignotante Indicateur d’erreur
Bouton de sélection mode/réinitialisation : le bouton à l’extrême gauche vous permet de choisir
les modes « verrouillé », « déverrouillé » et « automatique » pour l’Electronic SmartDoor. Ce bouton est
également utilisé pour réinitialiser l’appareil.
Bouton de sélection du mode apprentissage : le bouton à l’extrême droite vous permet d’ajouter
différents codes d’identifi cation à la mémoire de l’Electronic SmartDoor, un pour chacun de vos
animaux, jusqu’à un maximum de cinq.
Bouton de réglage : le bouton situé sur la partie avant de l’Electronic SmartDoor commande la
distance ou l’intervalle auquel la SmartKey active l’Electronic SmartDoor. En tournant le bouton de
réglage dans le sens horaire, l’intervalle de détection de la SmartKey augmente. En tournant le bouton
dans le sens anti-horaire, l’intervalle de détection diminue.
Volet : la partie centrale libre de l’Electronic SmartDoor se soulève pour laisser passer votre animal.
Le volet s’ouvre lorsque votre animal entre ou sort de la maison, puis il retourne en position fermée
centrale. En mode « automatique », le volet s’abaisse et se verrouille lorsque votre animal quitte la zone
de détection.
SmartKey™ : la SmartKey, qui se fi xe au collier de votre animal, envoie un signal codé unique à
l’Electronic SmartDoor.
Pile RFA-67 : la pile remplaçable qui alimente le transmetteur de la SmartKey. Vous pouvez obtenir
des piles RFA-67 supplémentaires là où vous avez acheté l’Electronic SmartDoor, ou en composant le
1-800-732-2677 (US), 1-800-457-3911 (Canada)
SmartKey
™
Pile RFA-67
Electronic
SmartDoor
™
Couvercle du
compartiment à pile
A. Bouton de réglage
B. DEL rouge verrouillé/pile faible
C. DEL verte déverrouillé/mode apprentissage
D. DEL jaune mode automatique/erreur
E. Bouton de sélection mode/réinitialisation
F. Bouton de sélection mode apprentissage
Vo l et
Cadre arrière de
la chatière
A
BC
D
E
F
Page 13

www.petsafe.net 13
Installation de l’Electronic SmartDoor
™
Les instructions d’installation sont avec le gabarit fourni.
__________________________________________________________________________________________
Préparation de l’Electronic SmartDoor
Étape 1 : installez les 4 piles D-Cell
1. À l’aide d’un tournevis Phillips, retirez les deux vis du
compartiment à piles.
2. Retirez le couvercle du compartiment à piles.
3. Suivez les indications à l’intérieur du couvercle du
compartiment à piles pour savoir comment placer les
4 piles D-cell de façon appropriée.
4. Le premier ensemble de 2 piles D-cell doit être placé
dans la partie inférieure du compartiment à pile; les
bornes positives doivent être orientées vers la droite. Les
bornes positives du deuxième ensemble de piles D-cell
doivent être orientées vers la gauche.
5. Lorsque les piles sont placées dans le compartiment à
piles de l’Electronic SmartDoor, la DEL rouge s’allume
pendant deux secondes et le volet passe en position
verrouillée. Si le volet est en position verrouillée, rien ne
se passe.
Remarque : la chatière doit être en position verticale pour que
le volet soit centré et qu’il fonctionne de façon appropriée.
6. Replacez le couvercle du compartiment à piles, ainsi que
les deux vis.
Étape 2 : installez le bouton de réglage
Placez le bouton d’intervalle sur la tige du bouton de
réglage et appuyez fermement.
Remarque : la lame du bouton de réglage fourni doit être
alignée sur la fente de la tige du bouton de réglage.
Étape 3 : installez la pile PetSafe® RFA-67 dans l’enveloppe de
la SmartKey
™
1. Placez la pile PetSafe RFA-67 dans la partie avant de la
SmartKey.
2. À l’aide d’une pièce de monnaie, tournez un quart de tour
dans le sens horaire pour fi xer la pile PetSafe RFA-67.
Indicateur de piles faibles de la SmartKey
Le transmetteur de la SmartKey est doté d’une DEL rouge
Si la DEL commence à clignoter, la pile PetSafe RFA-67 est faible et elle doit être remplacée dès que
possible.
Page 14

14 1-800-732-2677 (US), 1-800-457-3911 (Canada)
Étape 4 : fi xez le transmetteur de la SmartKey™ au collier de l’animal
Passez le collier de l’animal dans la boucle de la SmartKey.
La largeur du collier ne doit pas dépasser 2 cm (3/4 po). Le
transmetteur de la SmartKey doit pendre sous le cou de
l’animal.
Si le collier est trop large pour passer dans la clé, l’anneau de
clé fourni peut être fi xé à l’anneau du collier.
__________________________________________________________________________________________
Utilisation de l’Electronic SmartDoor
™
Basculer en mode verrouillé
L’Electronic SmartDoor est confi gurée en mode verrouillé à la sortie de l’usine. L’Electronic
SmartDoor bascule en mode verrouillé lorsque les 4 piles D-cell sont insérées dans le compartiment à
piles.
Pour basculer en mode verrouillé lorsque l’Electronic SmartDoor est en mode déverrouillé ou
automatique, appuyez et maintenez enfoncé le bouton mode/réinitialisation jusqu’à ce que la DEL
rouge s’allume. Pendant que la DEL rouge est allumée, relâchez le bouton mode/réinitialisation. Le
volet est verrouillé.
Basculer en mode déverrouillé
Pour basculer en mode déverrouillé, appuyez et maintenez enfoncé le bouton mode/réinitialisation; la
DEL rouge s’allume pour indiquer le mode verrouillé, puis la DEL verte s’allume. Pendant que la DEL
verte est allumée, relâchez le bouton mode/réinitialisation. Le volet est déverrouillé.
Basculer en mode automatique
Pour basculer en mode automatique appuyez et maintenez enfoncé le bouton mode/réinitialisation;
la DEL verte s’allume pour indiquer le mode déverrouillé, puis la DEL jaune s’allume. Pendant
que la DEL jaune est allumée, relâchez le bouton mode/réinitialisation. Le volet bascule en mode
automatique. Le volet s’abaisse (verrouillage) et l’Electronic SmartDoor cherche la présence du
transmetteur SmartKey. Lorsque l’appareil capte le signal du transmetteur SmartKey, le volet est
déverrouillé. Lorsque le signal de la SmartKey n’est plus détecté, le volet est verrouillé. Le signal de la
SmartKey doit se trouver hors de portée de l’Electronic SmartDoor pendant 10 secondes avant que
cette dernière ne réponde à nouveau au signal de la SmartKey.
Apprendre un code du transmetteur de la SmartKey
Pour basculer en mode apprentissage, appuyez et maintenez enfoncé le bouton apprentissage jusqu’à
ce que la DEL verte commence à clignoter. Relâchez le bouton. Placez la SmartKey à la portée de
l’Electronic SmartDoor; la DEL verte arrêtera de clignoter et elle s’allumera de façon continue. Le
code a bien été ajouté à la mémoire.
Il est possible d’accéder au mode apprentissage lorsque l’Electronic SmartDoor est positionnée dans
tous les modes de fonctionnement. Vous pouvez ajouter à la mémoire jusqu’à cinq codes SmartKey
différents. Lorsque le mode apprentissage est activé, si aucun signal du transmetteur SmartKey n’est
détecté, la DEL verte clignote pendant 60 secondes, puis elle s’éteint; l’Electronic SmartDoor revient
au mode précédent.
Mode erreur
Lorsque la DEL jaune clignote, l’Electronic SmartDoor est en mode erreur, ce qui indique qu’une
erreur est survenue.
Si le volet est décentré, de l’intérieur ou de l’extérieur, pendant qu’il est abaissé pour être verrouillé,
l’Electronic SmartDoor cesse d’abaisser le volet et la DEL commence à clignoter. L’Electronic
SmartDoor reste en mode erreur jusqu’à ce que l’erreur soit effacée. Recentrez simplement le
volet, puis appuyez et maintenez enfoncé le bouton mode/réinitialisation jusqu’à ce que l’Electronic
SmartDoor commence à se verrouiller.
Piles faibles
Lorsque la DEL rouge clignote, les piles de l’Electronic SmartDoor sont faibles. Les 4 piles D-cell doivent
être remplacées dès que possible pour assurer le fonctionnement approprié de l’Electronic SmartDoor.
Page 15

www.petsafe.net 15
Entraîner votre animal à utiliser l’Electronic
SmartDoor
™
Pour commencer à dresser l’animal à l’utilisation de l’Electronic
SmartDoor, réglez d’abord l’Electronic SmartDoor en mode
déverrouillé. Fixez le transmetteur de la SmartKey™ au collier de
l’animal. À l’aide d’un ruban adhésif, fi xez temporairement le volet
sur la surface sur laquelle la chatière est montée pour qu’il reste
ouvert. Il est parfois utile de vous placer d’un côté de la chatière et
de placer votre animal de l’autre côté. Utilisez de la nourriture ou
des gâteries pour faire passer votre animal par la chatière ouverte.
Laissez votre animal s’habituer à passer par la chatière lorsque le
volet est soulevé.
Au moment opportun, enlevez le ruban adhésif et laissez le volet
s’abaisser en mode déverrouillé. Encouragez à nouveau votre animal
à passer par la chatière à l’aide de nourriture ou de gâteries. Une
fois que l’animal s’est habitué à pousser le volet, réglez la chatière en
mode automatique. Lorsque l’animal est proche de la chatière et que
le volet est déverrouillé, encouragez à nouveau l’animal à passer par
la chatière à l’aide de nourriture ou de gâteries.
Dépannage
L’Electronic SmartDoor
ne peut être verrouillée.
• Assurez-vous que le volet est en position centrale et recommencez le
cycle de fonctionnement.
L’Electronic SmartDoor
ne répond pas à la
présence du transmetteur
de la SmartKey.
• Vérifiez que l’Electronic SmartDoor est en mode automatique.
• Vérifiez que la SmartKey a été enregistrée par l’Electronic SmartDoor.
• Vérifiez que le bouton de réglage est tourné à fond dans le sens horaire.
• Vérifiez que la pile PetSafe® RFA-67 de la SmartKey est complètement
chargée.
• Vérifiez que les piles de l’Electronic SmartDoor sont neuves.
• Si le problème persiste, vérifiez qu’il n’y a pas d’appareils qui
transmettent des fréquences radio ou d’appareils électriques causant
des interférences qui peuvent nuire au fonctionnement de l’Electronic
SmartDoor.
Pièces de rechange
Si vous souhaitez acheter des pièces de rechange pour l’Electronic SmartDoor de PetSafe, contacter le
centre de service à la clientèle en composant le 1-800-732-2677 (US) ou le 1-800-457-3911 (Canada),
ou encore consultez le site Web www.petsafe.net pour trouver le détaillant le plus près de chez vous.
Pièce Numéro de pièce
Pile PetSafe® RFA-67 RFA-67
Volet (Petite) 615-049
Volet (Grand) 615-064
Vis du couvercle du compartiment à piles 202-231
Couvercle du compartiment à piles 700-967
Bouton de réglage de l’intervalle 700-1139
SmartKey
™
PAC11-11045
Page 16

16 1-800-732-2677 (US), 1-800-457-3911 (Canada)
Modalités d’utilisation et limitation de la responsabilité
1. Modalités d’utilisation
Ce produit vous est livré sous réserve de votre acceptation intégrale des modalités, conditions et
notices contenues dans ce livret. L’utilisation de ce produit implique l’acceptation de toutes ces
modalités, conditions et notices.
2. Principes de bon usage
Ce produit est destiné à une utilisation avec des animaux de compagnie qui auront besoin d’un
dressage adéquat. Il est possible que le tempérament spécifique de l’animal ne soit pas compatible
avec ce produit. Si vous ne savez pas si ce dispositif peut convenir à votre animal, veuillez consulter
le vétérinaire ou un dresseur certifié.
Le bon usage de ce produit sous-entend la lecture intégrale du guide fourni avec le produit et de
toute mise en garde spécifique.
3. Aucune utilisation illégale ou interdite
Ce produit est destiné à une utilisation avec des animaux de compagnie exclusivement. Son rôle
n’est ni de nuire à l’animal, ni de le blesser, ni de le provoquer. L’utilisation de ce produit de
manière indésirable peut enfreindre des lois fédérales, provinciales ou locales.
4. Limitation de la responsabilité
Radio Systems® Corporation décline toute responsabilité en cas de dommages directs ou indirects,
dommages-intérêts exemplaires, dommages accessoires, spéciaux ou consécutifs, ou de tous
dommages liés à l’utilisation ou à la mauvaise utilisation de ce produit ou en résultant. L’acheteur
est responsable devant tous les risques posés par l’utilisation de ce produit.
5.Modification des modalités et conditions
Radio Systems Corporation se réserve le droit de modifier les modalités, conditions et notices selon
lesquelles ce produit est livré.
____________________________________________________________________________________
Garantie du produit
Veuillez enregistrer votre produit en ligne sur le site Web www.petsafe.net. Toutes les pièces sont couvertes
par la garantie pour la durée de vie utile de ce produit. La main-d’œuvre est couverte pendant la première
année qui suit l’achat du produit. Ensuite, des frais de service minimaux s’appliquent pour la réparation ou le
remplacement du produit. La mauvaise utilisation, la perte, les dommages causés par les animaux, l’utilisation
ou la manipulation abusive ne sont pas couverts pas la garantie. PetSafe® ne paiera pas pour la perte de temps,
les inconvénients, la perte d’utilisation du produit ou pour tout dommage indirect ou consécutif. La garantie est
annulée si le produit est revendu.
Veuillez contacter le centre de service à la clientèle en composant le 1-800-732-2677 (US) ou le
1-800-457-3911 (Canada) si vous avez besoin de service ou d’aide au dépannage et, le cas échéant, pour obtenir
la réparation du produit (des frais de service peuvent s’appliquer). Vous pouvez également consulter notre site
Web www.petsafe.net pour lire la foire aux questions et les conseils en matière de dépannage.
____________________________________________________________________________________
Pile au perchlorate
Perchlorate – une manipulation particulière peut être nécessaire. Consultez le lien www.dtsc.ca.gov/
hazardouswaste/perchlorate.
Page 17

www.petsafe.net 17
Avis important sur le recyclage
Veuillez respecter les réglementations sur les déchets d’équipements électriques et électroniques en
vigueur dans votre pays. Cet équipement doit être recyclé. Si cet équipement ne vous est plus d’aucune
utilité, ne l’introduisez pas dans le circuit ordinaire d’élimination des déchets municipaux. Retournez-le
sur son lieu d’achat afi n qu’il soit introduit dans notre circuit de recyclage. En cas d’impossibilité de
retour, veuillez contacter le Service d’assistance à la clientèle pour plus d’informations.
Attention
Les changements ou les modifi cations non autorisés peuvent vider l’autorité de l’utilisateur pour
actionner cet équipement, et vident la garantie.
Page 18

18 1-800-732-2677 (US), 1-800-457-3911 (Canada)
Gracias por elegir los productos PetSafe®. Nuestra misión es ser la marca de mayor
confianza en lo relacionado con sus mascotas. Queremos garantizar la seguridad de su
mascota, ofreciéndole las herramientas y las técnicas que necesite para poder entrenarla
bien. Si tiene alguna pregunta, póngase en contacto con el Centro de atención al cliente,
llamando al 1-800-732-2677 (US), al 1-800-457-3911 (Canadá) o visitando nuestro
portal, en www.petsafe.net.
Para aprovechar al máximo su garantía limitada, sírvase inscribir su producto en www.
petsafe.net antes de los 90 días. Al inscribir su producto, usted podrá disfrutar de la
garantía completa del mismo y, si necesita llamar al Centro de atención al cliente, lo
podremos atender con mayor rapidez. Además, no necesitará guardar su recibo de
compra ya que el hecho de inscribirse sirve como comprobante de la compra. Y, aún
más importante, PetSafe nunca transmitirá ni venderá sus datos personales a ninguna
otra persona.
________________________________________________________________________
Índice
Componentes .................................................................................................. 19
Otras piezas que puede necesitar ...................................................................... 19
Cómo funciona la puerta Electronic SmartDoor™ ............................................. 19
Terminos importantes ..................................................................................... 20
Como instalar la puerta Electronic SmartDoor ................................................. 21
Como preparar su puerta Electronic SmartDoor ............................................... 21
Como usar su puerta Electronic SmartDoor™ ................................................... 22
Como enseñar a su mascota a utilizar la puerta Electronic SmartDoor™ ............. 23
Resolución de problemas ................................................................................. 23
Piezas de repuesto ........................................................................................... 23
Términos del uso y limitación de la responsabilidad ..........................................24
Garantía del producto ..................................................................................... 24
Pila de perclorato ............................................................................................ 24
Español
Page 19

www.petsafe.net 19
Componentes
Puerta Electronic
SmartDoor
™
Marco posterior
para la puerta
Perilla reguladora
de alcance
Guía y plantilla
de instalación
Guía de funcionamiento
Tornillos de instalación,
(4 unidades pequeña)
(8 unidades grande)
Aro de llavero
Llave SmartKey
™
Pila
(RFA-67 de PetSafe
®
)
Otras piezas que puede necesitar
• Sierra de vaivén o de pelo
• Taladro eléctrico
• Broca de 3/8”
• Destornillador Phillips
• 4 pilas de botón tamaño D (necesarias)
• Nivel de burbuja
• Cinta métrica
• Lápiz
• Cordel
____________________________________________________________________________________
Como funciona la puerta Electronic
SmartDoor™
La puerta Electronic SmartDoor de PetSafe® le permite controlar la entrada y salida de sus mascotas.
Cuando la puerta está en modo automático, sólo las mascotas que lleven la llave SmartKey pueden pasar
por la puerta Electronic SmartDoor. A medida que la mascota entra en el campo de alcance regulable
de la puerta Electronic SmartDoor, ésta detecta la llave SmartKey y retira el seguro automáticamente.
La distancia de alcance se puede ajustar hasta a 3 pies. Después de que la mascota pasa por la puerta
Electronic SmartDoor, el cerrojo se vuelve a armar automáticamente. Sin la llave SmartKey no puede
pasar ningún otro animal.
Page 20

20 1-800-732-2677 (US), 1-800-457-3911 (Canada)
Términos importantes
Electronic SmartDoor™: La puerta Electronic SmartDoor se instala en cualquier puerta de entrada o
pared por la cual pueda entrar su mascota.
Tapa del compartimiento de las pilas: Esta tapa, con el logotipo de PetSafe®, cubre las 4 pilas de
botón de tamaño D en la parte delantera de la unidad, y se instala con 2 tornillos para la tapa de las
pilas.
Luces:
• Diodo LED de color rojo, de Cierre/Pila
descargada: El diodo LED de color rojo indica
el modo de cierre. Si parpadea, indica que la pila
tiene poca carga.
• Diodo LED de color verde, de Apertura/
Programación: El diodo LED de color verde
indica el modo de apertura. Si parpadea, indica
el modo de programación.
• Diodo LED de color amarillo, de modo
Automático/Error: El diodo LED de color
amarillo indica el modo de funcionamiento
automático. Si parpadea, indica el modo de
error.
Color del
diodo
Condición Condición de
la puerta para
mascotas
ROJO
iluminado Modo de cierre
parpadeante Pilas con poca carga
VERDE
iluminado Modo de apertura
parpadeante Modo de
programación
AMARILLO
iluminado Modo automático
parpadeante Alerta de error
Botón selector de modo/de reposicionamiento: El botón a la extrema izquierda permite elegir
entre los modos de funcionamiento de “Cierre”, “Apertura” y “Automático” para la puerta Electronic
SmartDoor. También se usa para reposicionar la unidad.
Botón selector de modo de programación: El botón a la extrema derecha permite agregar hasta
cinco códigos de identifi cación de llave SmartKey distintos a la memoria de la puerta Electronic
SmartDoor, uno para cada una de sus mascotas.
Perilla para ajustar el alcance: La perilla al frente de la puerta Electronic SmartDoor permite
regular la distancia a la que la llave SmartKey activará la puerta Electronic SmartDoor. Cuando se gira
en el sentido de las agujas del reloj, se aumenta el alcance de detección. Al girarla en sentido contrario
a las agujas del reloj, se reduce el alcance de detección.
Gatera o postigo: La parte central transparente de la puerta Electronic SmartDoor se levanta para
permitir que entre su mascota. Cuando la mascota entra o sale, empuja la gatera o el postigo para
abrirlo y éste gira de vuelta a su sitio para cerrarse. En el modo “automático”, cuando la mascota sale
de la zona de detección, la gatera o postigo desciende y se cierra.
Llave SmartKey™: La llave SmartKey, que se coloca en el collar de su mascota, envía una señal
codifi cada única a la puerta Electronic SmartDoor.
Pila RFA-67: La pila reemplazable que suministra energía al transmisor de la llave SmartKey. Puede
obtener pilas RFA-67 adicionales donde adquirió su puerta Electronic SmartDoor, o llamando al
1-800-732-2677 (US) o al 1-800-457-3911 (Canadá).
Llave SmartKey
™
Pila RFA-67
Puerta Electronic
SmartDoor
™
Tapa del compartimento
de las pilas
A. Perilla reguladora de alcance
B. Diodo LED de color rojo, de modo de cierre/
pila con poca carga
C. Diodo LED de color verde, de modo de
apertura/programación
D. Diodo LED de color amarillo, de modo
automático/de error
E. Botón selector de modo/reposicionamiento
F. Botón selector de modo de programación
Gatera o postigo
Marco posterior para
la puerta
A
B C
D
E
F
Page 21

www.petsafe.net 21
Como instalar la puerta Electronic SmartDoor
™
Lea las instrucciones de instalación en la plantilla adjunta.
__________________________________________________________________________________________
Como preparar su puerta Electronic SmartDoor
1er paso: Instale las 4 pilas de botón tamaño D
1. Use un destornillador Phillips para retirar los dos
tornillos de la tapa de las pilas.
2. Retire la tapa del compartimento de las pilas.
3. Consulte en el diagrama ubicado en la parte interior de
la tapa de las pilas, la orientación de las 4 pilas de botón
tamaño D.
4. El primer par de pilas de tamaño D se debe colocar en el
fondo del recinto, con el polo positivo hacia la derecha. El
segundo par de pilas se debe instalar con el polo positivo
hacia la izquierda.
5. Una vez instaladas las pilas en su compartimento, el
diodo LED de color rojo se encenderá por 2 segundos
y la gatera o postigo pasará a la posición cerrada. Si la
gatera ya está en posición cerrada, no pasará nada.
Nota: Para que la gatera o postigo se centre y funcione bien, la
puerta debe estar en posición vertical.
6. Vuelva a tapar el compartimento de las pilas y coloque los
2 tornillos de la tapa de las pilas.
2do paso: Instale la perilla reguladora de alcance
Coloque la perilla reguladora sobre el vástago de la
perilla y oprímala para fi jarla en su sitio.
Nota: La hoja de la perilla suministrada se debe alinear con
la ranura del eje de la perilla reguladora.
3er paso: Instale la pila RFA-67 de PetSafe® en la llave SmartKey
™
1. Coloque la pila RFA-67 de PetSafe en la parte delantera
de la llave SmartKey.
2. Use una moneda para hacerla girar un cuarto de vuelta, en
el sentido de las agujas del reloj, para instalar la pila
RFA-67 de PetSafe.
Pilas de la llave SmartKey descargadas
El transmisor de la llave SmartKey viene con un diodo LED
de color rojo. Si el diodo comienza a encenderse en forma intermitente, la carga de la pila RFA-67
PetSafe está baja y se debe cambiar a la brevedad posible.
Page 22

22 1-800-732-2677 (US), 1-800-457-3911 (Canada)
4to paso: Coloque el transmisor SmartKey™ en el collar de la mascota
Haga pasar el collar de su mascota por el asa de la llave
SmartKey. El collar de su mascota debe medir ¾” de
anchura o menos. El transmisor SmartKey debe colgar por
debajo del cuello de su mascota.
Si el collar de su mascota es demasiado grande para pasar
por el asa de la llave, se suministra un aro de llavero que
puede usar para colgar la llave en el collar.
__________________________________________________________________________________________
Como usar su puerta Electronic SmartDoor
™
Como pasar al modo de cierre
La puerta Electronic SmartDoor viene de la fábrica en modo de cierre. Al colocar las 4 pilas de botón
de tamaño D en su compartimento, la puerta pasará al modo de cierre.
Para pasar al modo de cierre cuando la puerta Electronic SmartDoor esté en modo de apertura o de
funcionamiento automático, pulse y mantenga oprimido el botón de modo/reposicionamiento, hasta
que se encienda el diodo LED de color rojo. Cuando el diodo se encienda, suelte el botón de modo/
reposicionamiento. La gatera o postigo quedará cerrado.
Como pasar al modo de apertura
Para pasar al modo de apertura, pulse y mantenga oprimido el botón de modo/reposicionamiento. El
diodo LED de color rojo se encenderá para indicar que está en modo de cierre y luego se encenderá
un diodo LED de color verde. Cuando el diodo LED de color verde se encienda, suelte el botón de
modo/reposicionamiento. La gatera o postigo quedará sin cerrojo.
Como pasar al modo automático
Para pasar al modo automático, pulse y mantenga oprimido el botón de modo/reposicionamiento.
El diodo LED de color verde se encenderá para indicar que está en modo de apertura y luego se
encenderá un diodo LED de color amarillo. Cuando el diodo LED de color amarillo se encienda,
suelte el botón de modo/reposicionamiento. Ahora la gatera o postigo estará en modo automático. La
gatera o postigo girará hacia abajo (para cerrarse) y la puerta Electronic SmartDoor estará atenta a la
presencia del transmisor SmartKey. Cuando lo detecte, se abrirá el cerrojo de la gatera. Cuando deje
de detectar la señal de la llave SmartKey, se activará el cerrojo de la gatera o postigo. La señal de la
llave debe estar fuera del alcance de la puerta por 10 segundos antes de que la puerta pueda volver a
responder a la señal de la llave SmartKey.
Cómo programar un código para el transmisor SmartKey
Para pasar al modo de programación, pulse y oprima el botón de programación hasta que el diodo
LED de color verde se encienda en forma intermitente. Suelte el botón. Ponga la llave SmartKey en
el área de alcance de la puerta Electronic SmartDoor; el diodo LED dejará de parpadear y brillará de
manera continua. El código ha quedado grabado en memoria.
Se puede pasar al modo de programación cuando la puerta Electronic SmartDoor está en cualquier
modo de funcionamiento. Se puede guardar en memoria hasta cinco códigos SmartKey distintos. Si se
activa el modo de programación y no se detecta una señal del transmisor SmartKey, el diodo LED de
color verde parpadeará por 60 segundos y se apagará, y la puerta volverá a la modalidad en que estaba
antes.
Modo de error
Si el diodo LED de color amarillo se enciende de manera intermitente, la puerta Electronic SmartDoor
está en modo de error para indicar que ha ocurrido un error.
Si la gatera o postigo ha quedado descentrado, ya sea hacia afuera o hacia dentro, cuando la gatera
bajaba para cerrarse, la puerta Electronic SmartDoor dejará de bajar la gatera y hará que el diodo LED
de color amarillo comience a parpadear. La puerta Electronic SmartDoor seguirá en modo de error
hasta que éste se resuelva. Simplemente centre la gatera o postigo y pulse y mantenga oprimido el
botón de modo/reposicionamiento, hasta que la puerta se comience a cerrar.
Pilas descargadas
Si el diodo LED de color rojo comienza a encenderse de manera intermitente, las pilas de la puerta
Electronic SmartDoor tienen poca carga. Las 4 pilas de botón de tamaño D se deben cambiar tan pronto
sea posible, para garantizar que la puerta siga funcionando debidamente.
Page 23

www.petsafe.net 23
Como enseñar a su mascota a utilizar la puerta
Electronic SmartDoor
™
Para comenzar a entrenar a su mascota en el uso de la puerta
Electronic SmartDoor, primero ponga la puerta en modo de
apertura. Coloque el transmisor SmartKey™ en el collar de su
mascota. Mantenga la gatera o postigo provisionalmente abierta, con
cinta adhesiva pegada a la superfi cie donde está instalada la puerta
para mascotas. A veces resulta útil poner a la mascota a un lado de
la puerta y colocarse usted en el otro lado. Use comida o golosinas
para animales para tentar a la mascota a pasar por la puerta para
mascotas abierta. Deje que su mascota se acostumbre a pasar por la
puerta para mascotas con la gatera o postigo abierto.
Después de un tiempo, quite la cinta adhesiva y deje que la gatera o
postigo cuelgue en modo de apertura. Vuelva a tentar a la mascota
a pasar, dándole comida o golosinas para animales. Después de que
su mascota se acostumbre a empujar la gatera o postigo para pasar,
ponga la puerta detectora de collar en modo automático. Cuando
la mascota se acerque a la puerta y el seguro de la gatera se abra,
anime a la mascota a pasar, tentándola con comida o golosinas para
animales.
Resolución de problemas
La puerta Electronic
SmartDoor no se cierra.
• Verifique que la gatera o postigo esté centrado y repita el ciclo de
funcionamiento.
La puerta Electronic
SmartDoor no responde
ante el transmisor
SmartKey.
• Verifique que la puerta Electronic SmartDoor esté en modo automático.
• Verifique la puerta Electronic SmartDoor “reconozca” la llave SmartKey.
• Asegúrese de haber girado la perilla reguladora de alcance al máximo en
el sentido de las agujas del reloj.
• Verifique que la pila RFA-67 de PetSafe®, colocada en la llave SmartKey,
esté cargada.
• Verifique que las pilas de la puerta Electronic SmartDoor estén recién
cargadas.
• Si persiste el problema, verifique que no haya dispositivos que transmitan
frecuencias radiales o dispositivos electrónicos que generen energía
eléctrica, que puedan interferir con el funcionamiento de la puerta
Electronic SmartDoor.
Piezas de repuesto
Para adquirir piezas de repuesto para su puerta Electronic SmartDoor de PetSafe, comuníquese con
el Centro de atención al cliente al 1-800-732-2677 (US), al 1-800-457-3911 (Canadá) o visite nuestro
portal, en www.petsafe.net para ubicar una tienda minorista cercana.
Componente Pieza No.
Pila RFA-67 de PetSafe® RFA-67
Gatera (Pequeña) 615-049
Gatera (Grande) 615-064
Tornillos de la tapa de las pilas 202-231
Tapa de las pilas 700-967
Perilla para ajustar el alcance 700-1139
SmartKey
™
PAC11-11045
Page 24

24 1-800-732-2677 (US), 1-800-457-3911 (Canada)
Términos del uso y limitación de la responsabilidad
1. Términos del uso
Este producto es ofrecido a usted condicionado a su aceptación sin modificación de los términos,
condiciones y anuncios aquí contenidos. El uso de este producto implica la aceptación de todos
dichos términos, condiciones y anuncios.
2. Uso correcto
Este producto está diseñado para ser utilizado con animales domésticos, donde se desee
amaestramiento. El temperamento específico de su animal podrá no funcionar con este producto.
Si usted no está seguro de si este sistema es adecuado para su animal, por favor consulte a su
veterinario o amaestrador certificado.
El uso correcto incluye la revisión de toda la guía proporcionada con su producto y cualquier
declaración específica de advertencia.
3. No se debe utilizar en forma ilegal o prohibida
Este producto está diseñado para ser utilizado con animales domésticos solamente. Este dispositivo
para amaestrar animales domésticos no está intencionado para dañar, lastimar o provocar. El uso
de este producto de una manera para la que no fue creado, puede resultar en la violación de leyes
federales, estatales o locales.
4. Limitación de la responsabilidad
En ninguna circunstancia Radio Systems® Corporation será responsable por ningún daño directo,
indirecto, punitivo, incidente, especial o consecuente, ni ningún otro daño que surgiere a partir
o conectado con el uso o mal uso de este producto. El comprador asume todos los riesgos y
responsabilidad provenientes del uso de este producto.
5. Modificación de términos y condiciones
Radio Systems Corporation se reserva el derecho de cambiar los términos, condiciones y anuncios
bajo los cuales este producto es ofrecido.
____________________________________________________________________________________
Garantía del producto
Sírvase inscribir su producto en línea, en www.petsafe.net. Todas las piezas están amparadas por la garantía,
durante la vida útil de este producto. La mano de obra está cubierta sólo por el primer año de posesión del
producto. Una vez transcurrido ese plazo, se cobrará un monto mínimo de servicio por reparar o cambiar el
producto. No están amparados el abuso, la pérdida, los daños ocasionados por las mascotas o por el manejo o el
uso indebido. PetSafe® no cubrirá los gastos de pérdida de tiempo, molestias, pérdida de uso de su producto ni
pagará ningún daño incidental o secundario. La garantía quedará nula si el producto se vuelve a vender.
Si necesita que se le preste servicio, necesita ayuda para determinar algún problema o si llega a ser necesario
disponer la reparación del producto (lo cual puede generar un cargo de servicio), comuníquese con el Centro de
atención al cliente al 1-800-732-2677 (US), o al 1-800-457-3911 (Canadá). Además, puede leer las Preguntas
Frecuentes y Consejos para resolver problemas en nuestro portal, www.petsafe.net.
____________________________________________________________________________________
Pila de perclorato
Producto con perclorato – es posible que se requieran técnicas especiales para su manipulación. Visite
www.dtsc.ca.gov/hazardouswaste/perchlorate.
Page 25

www.petsafe.net 25
Consejos importantes sobre el reciclaje
Respete las normas vigentes de reciclaje de desechos eléctricos y de equipos electrónicos de su país.
Este equipo se debe reciclar. Si ya no necesita este equipo, no lo deseche en un cubo de desperdicios
municipal. Regréselo a la tienda donde lo compró para que ingrese a nuestro sistema de reciclaje. De
no ser esto posible, póngase en contacto con el Centro de atención al cliente para más información.
Precaución
Los cambios o las modifi caciones desautorizados pueden anular la autoridad del usuario para funcionar
este equipo, y anulan la garantía.
Page 26

26 1-800-732-2677 (US), 1-800-457-3911 (Canada)
Page 27

www.petsafe.net 27
Page 28

Radio Systems Corporation
10427 Electric Avenue
Knoxville, TN 37932
1-800-732-2677 (US)
1-800-457-3911 (Canada)
www.petsafe.net
J400-900-11/1
©2007, Radio Systems Corporation
 Loading...