

Page 1
EN
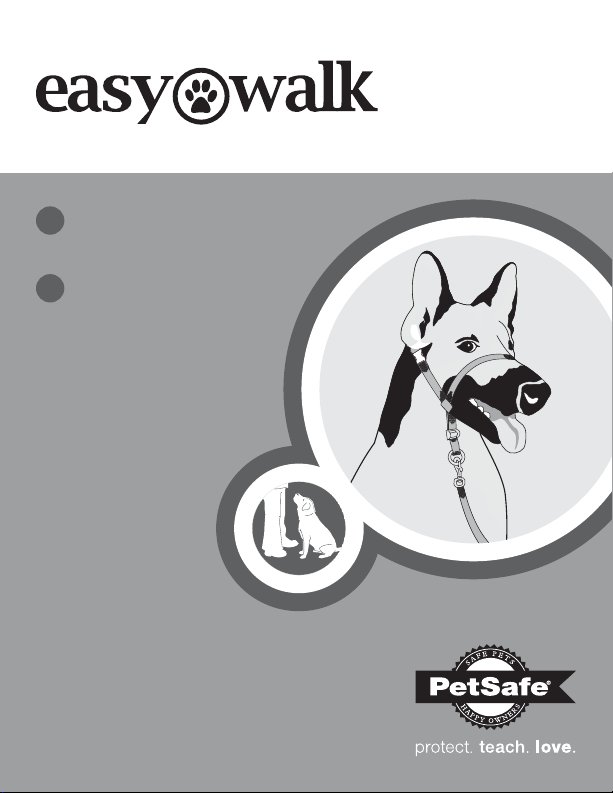
HEADCOLLAR
FR
LICOL
™
Training Guide
Manuel de dressage
Please read this entire guide before beginning.
Veuillez lire ce manuel en entier avant de commencer.
Page 2
ENFR
IMPORTANT SAFETY INFORMATION
Explanation of Attention Words and Symbols used in this guide
This is the safety alert symbol. It is used to alert you to potential
personal injury hazards. Obey all safety messages that follow this
symbol to avoid possible injury or death.
WARNING indicates a hazardous situation which, if not avoided,
could result in death or serious injury.
CAUTION, used without the safety alert symbol, indicates a
hazardous situation which, if not avoided, could result in harm to
your pet.
Not for use with aggressive dogs. Do not use this product if your
dog is aggressive, or if your dog is prone to aggressive behaviour.
Aggressive dogs can cause severe injury and even death to
their owner and others. If you are unsure whether this product is
appropriate for your dog, please consult your veterinarian or a
certifi ed trainer.
• Follow instructions carefully when fi tting and using on bulldogs
and other breeds with genetically limited airways or fl at
noses. It is typical for these dogs to frequently experience
breathing diffi culties when exercising or under stress because
of their physically limited airways. If their usual breathing
diffi culties increase when wearing the headcollar, immediately
discontinue and consult your veterinarian.
• A dog needs to open his mouth to pant/breathe during
physical activity or stress. Do not keep a constant pull on the
lead for more than about 20 - 30 seconds. Your dog will be
able to open his mouth as needed when there is no tension
on the lead.
• If you choose to run or jog with your dog, please be mindful
of the possibility of chafi ng and discontinue use at the fi rst sign
of discomfort.
• Do not leave the headcollar on your dog unattended. Please
be sure to supervise your dog while he wears the headcollar
and store it safely away when not in use.Discard or replace
your collar if it should become damaged or worn. Collars that
have been damaged or worn may fail to restrain your pet.
2 www.petsafe.net
Page 3

Thank you for choosing the PetSafe® brand. You and your pet deserve a companionship that
includes memorable moments and a shared understanding together. Our products and training
tools promote a lifestyle of protection, teaching, and love - essentials that influence memories
for a lifetime. If you have any questions about our products or training your pet,
please visit our website at www.petsafe.net or contact our Customer Care
Centre. For a listing of Customer Care Centre telephone numbers, visit our
website at www.petsafe.net.
To get the most protection out of your warranty, please register your product within 30 days
at www.petsafe.net. By registering and keeping your receipt, you will enjoy the product’s full
warranty and should you ever need to call the Customer Care Centre, we will be able to help
you faster. Most importantly, your valuable information will never be given or sold to anyone.
Complete warranty information is available online at www.petsafe.net.
Table of Contents
How it Works . . . . . . . . . . . . . . . . . . . . . . . . . . . . . . . . . . . . . . . . . . . . 4
Size Chart . . . . . . . . . . . . . . . . . . . . . . . . . . . . . . . . . . . . . . . . . . . . . . 4
Identifying the Parts . . . . . . . . . . . . . . . . . . . . . . . . . . . . . . . . . . . . . . . . . 4
Fitting Guide . . . . . . . . . . . . . . . . . . . . . . . . . . . . . . . . . . . . . . . . . . . 5
Why the Proper Fit is Essential . . . . . . . . . . . . . . . . . . . . . . . . . . . . . . . . . 5
Fitting the Headcollar . . . . . . . . . . . . . . . . . . . . . . . . . . . . . . . . . . . . . . 6
Using the Headcollar . . . . . . . . . . . . . . . . . . . . . . . . . . . . . . . . . . . . . . 9
Training Guide . . . . . . . . . . . . . . . . . . . . . . . . . . . . . . . . . . . . . . . . . .10
Positive Motivation andRewards . . . . . . . . . . . . . . . . . . . . . . . . . . . . . . . .10
Teaching Your Dog to Walk Along Your Side . . . . . . . . . . . . . . . . . . . . . . . . . 11
Teaching Your Dog to Sit . . . . . . . . . . . . . . . . . . . . . . . . . . . . . . . . . . . . 11
Prevent Pulling and Lunging. . . . . . . . . . . . . . . . . . . . . . . . . . . . . . . . . . . 12
Prevent Jumping . . . . . . . . . . . . . . . . . . . . . . . . . . . . . . . . . . . . . . . . . 12
General Tips. . . . . . . . . . . . . . . . . . . . . . . . . . . . . . . . . . . . . . . . . . . . . 13
Terms of Use and Limitation of Liability. . . . . . . . . . . . . . . . . . . . . . . . . . . . . . . 13
Warranty. . . . . . . . . . . . . . . . . . . . . . . . . . . . . . . . . . . . . . . . . . . . . . .14
FREN
www.petsafe.net 3
Page 4
How it Works
ENFR
The Easy Walk™ Headcollar allows you to communicate with your dog in a way that he instinctively
understands, translating your requests into “Dog Language,” telling him that you are the leader.
The Nose Loop encircles your dog’s muzzle in the same way a “pack leader” gently but fi rmly grasps
a subordinate’s muzzle in his mouth. This is a clear signal to your dog that YOU are his leader!
The Neck Strap puts pressure on the back of the neck, working with your dog’s “opposition refl ex”
(the natural instinct of dogs to push against pressure rather than move away). Traditional collars put
pressure on the front of the throat, causing dogs to keep pulling even while choking. The Easy Walk™
Headcollar patented design places 80% of the pressure at the back of the neck, taking advantage
of the opposition refl ex. Your dog will instinctively lean back against the pressure, putting an end to
lead pulling forever.
Where the nose goes, the body follows! That’s why halters are used on horses – it takes very little
strength to control a large animal by the head vs. the neck. If your dog tries to pull ahead, simply hold
the lead fi rmly and his nose and head turn back to look at you, making it virtually impossible for him
to drag you down the street.
Dogs feel more secure with the Easy Walk™ Headcollar. Many experts and owners report the
amazing calming effect that the Easy Walk™ Headcollar has in helping shy, nervous or fearful dogs
to relax and gain greater confi dence.
Size Chart
Small Up to 11 kg Beagles and Shelties
Medium 11 kg - 27 kg Pointers and Spaniels
Large 27 kg - 59 kg Labradors and Shepherds
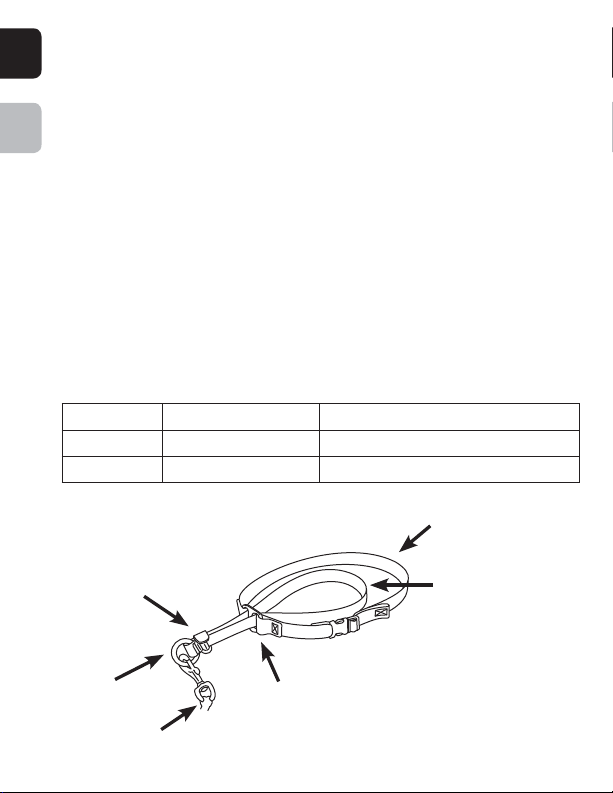
Identifying the Parts
Snap Clamp
Control Ring
1.8 m Nylon Lead
4 www.petsafe.net
Center Bar Ring
Neck Strap
Nose Loop
Easy Walk™ Headcollar
Page 5
Fitting Guide
Why the Proper Fit is Essential
The Easy Walk™ Headcollar fi ts differently than other collars or halters you may have used
before! Without a proper fi t, you may experience unnecessary problems – excessive pawing,
rubbing and resistance, or chafi ng of the nose.
The Nose Loop needs to be as loose and comfortable as possible, moving freely from just in
front of the eyes to the beginning of the fl eshy part of the nose – but NOT so loose that it can
come off. The proper fi t of the Nose Loop is totally dependent on the proper fi t of the Neck
Strap, which must be high at the very top of the neck (touching the skull) and very snug (only
one fi nger barely squeezes underneath) so that it cannot rotate. (If the Neck Strap rotates, so
will the Nose Loop – which may cause chafi ng of the skin.)
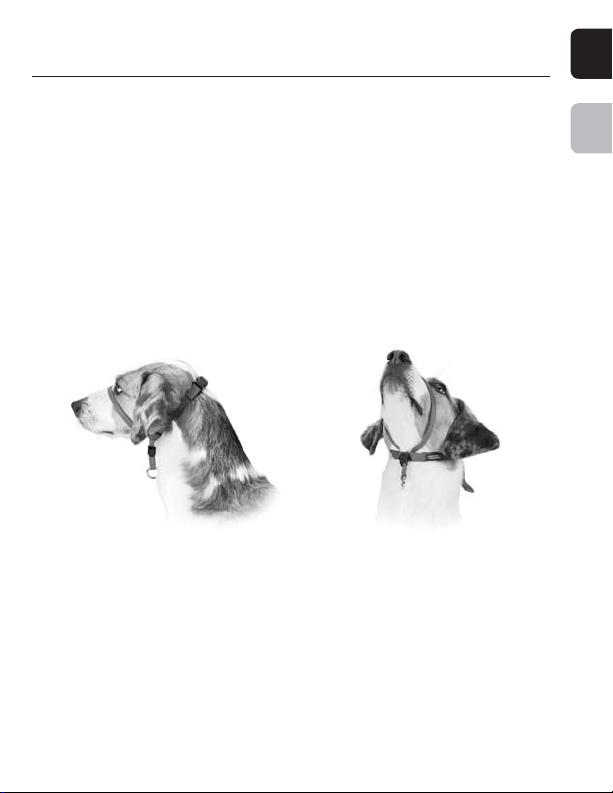
When properly fi tted and viewed from the side, the Easy Walk
resemble a “V”. The Center Bar will rest above the tracheal area.
The Neck Strap MUST:
• Be positioned as high on the neck as possible, directly behind ears and touching base of
skull in back, and above Adam’s apple in front.
• Not be able to rotate around neck.
• Fit very snuggly at top of neck so that you can barely squeeze only one fi nger underneath,
like a belt, watch band or shoe. This is the MOST important part of the entire fi tting process!
It is different than other collars you may be used to, but does not cause discomfort to your
dog. (To better understand, push against the very top of your throat above your Adam’s
apple; now use the same pressure below your Adam’s apple – notice that pressure above
is not uncomfortable, but pressure below is!) Please resist the temptation to make the Neck
Strap loose – if you loosen it, your dog may be able to paw the Nose Loop off, or you will
wind up making the Nose Loop too tight or the Nose Loop will rotate causing discomfort.
www.petsafe.net 5
™
Headcollar will
FREN
Page 6
The Nose Loop should:
• Be loose and comfortable so that your dog can freely open his mouth (even fetch a ball)!
ENFR
• Be able to move freely from just in front of eyes to beginning of the fl eshy (wet) part of nose.
• Rest behind the corners of mouth.
• Not be so loose that it can be pulled off over the nose (after snap clamp is adjusted).
Fitting the Headcollar
Follow instructions carefully when fi tting and using on bulldogs
and other breeds with genetically limited airways or fl at noses. It is
typical for these dogs to frequently experience breathing diffi culties
when exercising or under stress because of their physically
limited airways. If their usual breathing diffi culties increase when
wearing the headcollar, immediately discontinue and consult your
veterinarian.
Throughout the fi tting process and during initial use of the Easy Walk
encourage your dog with praise and special tasty treats. If your dog is especially wiggly, have
someone help you by feeding treats while you fi t and adjust.
™
Headcollar, motivate and
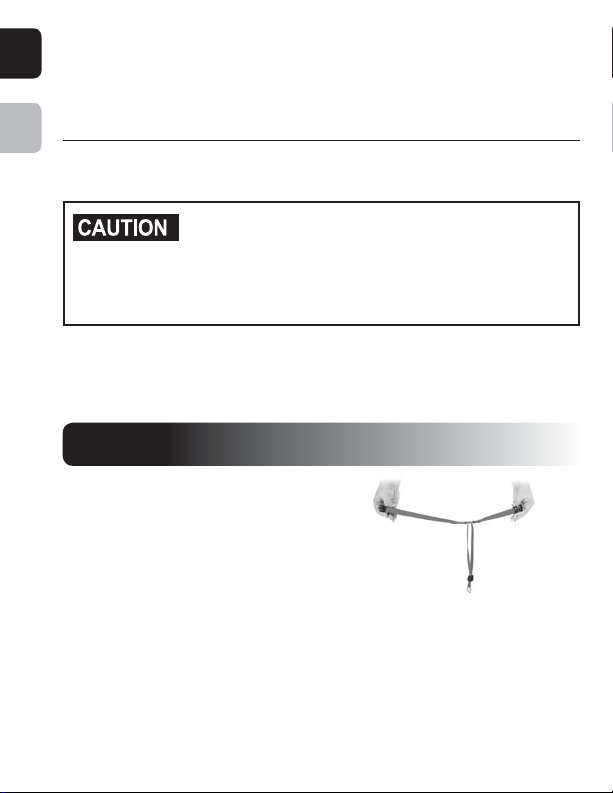
STEP 1
1. Open Neck Strap and hold one
end in each hand. Nose Loop
should hang down, like the
letter “T” (1A).
1A
6 www.petsafe.net
Page 7

STEP 2
1. Pre-fi t Neck Strap high on the neck touching base of
skull in back, with Center Bar Ring in the niche just above
the Adam’s apple infront.
2. Center Bar Ring should be parallel to the neck, not the
underside of jawbone (2A). Neck Strap must be snug so
that only one fi nger can squeeze under it, and it cannot
rotate around neck.
3. Gently grasp skin at back of neck and pull downward
toward shoulders, while at the same time holding Neck
Strap against base of skull – this pulls any excess skin or
coat from under Neck Strap, improving the fi t.
4. Check again to be sure that only one fi nger can barely
squeeze under Neck Strap, and tighten if
needed (2B). Notice that even though the Neck
Strap fi ts much more snugly than other collars,
your dog is comfortable, able to easily pant
and shows no signs of distress.
FREN
2A
2B
www.petsafe.net 7
Page 8
STEP 3
ENFR
1. Take Neck Strap off your dog.
2. Slide adjustable Snap Clamp down
to Control Ring. To open, lift tab with
thumb, dime or key; to close press tab
until it snaps into locked position. The
snap is designed to lock fi rmly into
place and not slip; therefore, it requires
a bit of pressure to open and close.
3. Pull Nose Loop up through
Center Bar Ring (3A).
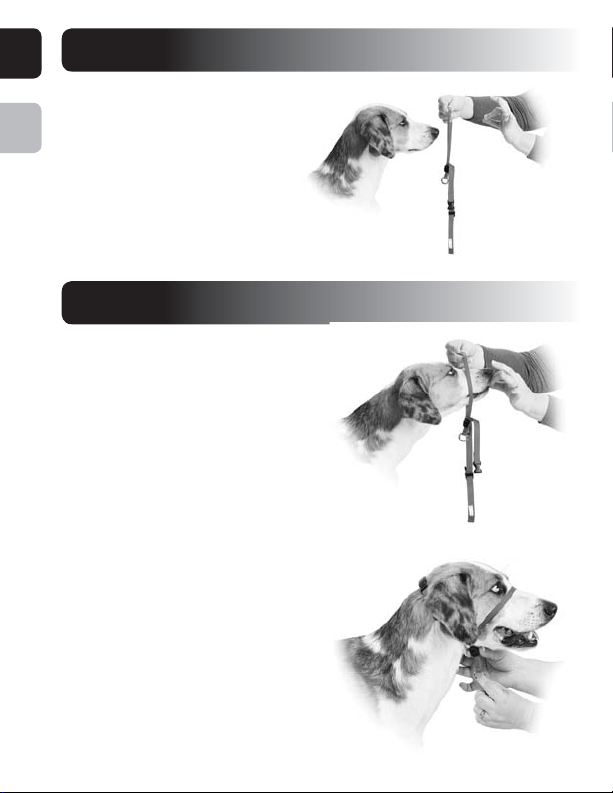
STEP 4
1. With dog at your side or between
your legs, hold Nose Loop open.
2. Reach under dog’s head to slip Nose
Loop onto base of muzzle (4A) and give
a treat to keep him occupied.
3. Snap Neck Strap high on neck at its
prefi tted position (4B).
4. Make fi nal adjustment to Nose Loop. It
should be behind corners of mouth and
loose enough to pull forward to fl eshy
part of nose, but not so loose that it can
be pulled entirely off muzzle.
5. Slide Snap Clamp up or down
to adjust. With thumb and index
fi nger, pinch Nose Loop underneath
Snap Clamp, temporarily holding it
frommoving.
3A
4A
8 www.petsafe.net
4B
Page 9
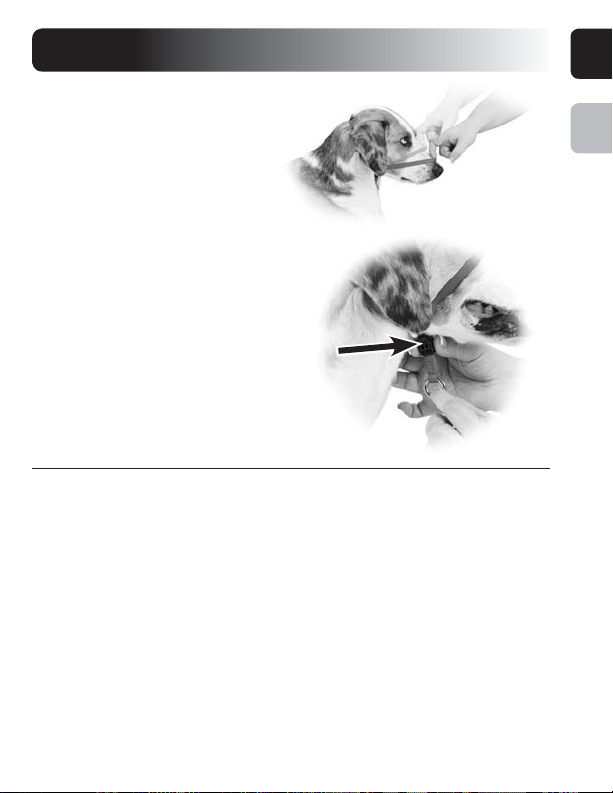
STEP 5
1. Test size of Nose Loop by pulling it
forward as far as it will go (5A).
2. When it touches beginning of fl eshy
part of nose, but is not so loose that
you can pull it off, close Snap Clamp
by pressing down on tab – you’ll
hear a snap as it locks.
3. Attach the 1.8 m nylon lead to
Control Ring.
Note: When your dog has reached full growth,
you can remove any excess length of Neck
Strap. With the Easy Walk
your dog, cut end of strap with scissors and
use match or lighter fl ame to seal cut edge and
prevent fraying.
™
Headcollar off
Snap
Clamp
Using the Headcollar
It may take your dog several minutes to adjust to the new sensation of the Easy Walk™
Headcollar. As soon as you have completed fi tting, we recommend that you immediately
encourage your dog (with a treat and a happy voice) to walk at your side for 5 or 6 steps, then
sit (reward with treat/praise/stroking), then walk and sit again. (See “Teaching Your Dog to
Walk Along Your Side” and “Teaching Your Dog to Sit.”) Repeat 5 to 10 times or until your dog
walks and sits quietly under control.
Your dog may resist by pawing at the Nose Loop, fl opping on the ground or even standing up
on his hind legs like a young colt wearing a halter for the fi rst time. Generally speaking, the
dogs that resist the most are the ones who need it the most!
Remember that he is not in pain, he is simply resisting the new message telling him he is no
longer in control. Do not try to “comfort” your dog with petting or soothing phrases. If you do
this while he is resisting you’ll be reinforcing unwanted behaviour. Save your praise and stroking
for when he is no longer resisting and is calmly walking, sitting, standing or lying at your side.
Keep dog busy walking and sitting with lots of opportunities to be rewarded. Reactionary
behaviour will fade as your dog acknowledges your leadership.
www.petsafe.net 9
5A
5B
FREN
Page 10

A dog needs to open his mouth to pant/breathe during physical
ENFR
If positive results take longer, it is almost always due to:
• Improper fi t (Neck Strap too loose, Nose Loop too tight. Key - fi x the Neck Strap First!)
• Lack of a strongly motivating reward (food and praise) or
• Failure to release ALL the tension on the lead the instant the dog does what you want.
Tip
Think of your lead as a “yes/no” signal. Total release of the tension on the
lead means “Yes, this is what I want you to do!” Any tension on the lead,
no matter how slight, means “This is NOT what I want you to do, please do
something different.” You can see how important it is that you be very clear
with this signal – if your dog is walking calmly or sitting quietly, be sure to give
him the “yes” signal of TOTAL release on the lead.
activity or stress. Do not keep a constant pull on the lead for more
than about 20 - 30 seconds. Your dog will be able to open his
mouth as needed when there is no tension on the lead.
Training Guide
Positive Motivation andRewards
Use positive motivation and rewards to help your dog learn quickly and have fun!
Rewards:
• Use small pieces of a very tasty treat – it helps if your dog is hungry!
• Praise your dog with soft, high-pitched “happy talk” – never yell or harshly scold as this
will frighten your dog and slow his learning.
• Release ALL tension on the lead the instant your dog does what you want (walks calmly,
sits quietly, etc.) – this is very important!
Tip
Your reward (especially the release of tension in the lead!) MUST be given
during the desired behaviour or within 0.5 seconds of it ending...otherwise
he won’t know what he’s being rewarded for! Keep treats in a pouch or your
pocket for quick access.
10 www.petsafe.net
Page 11

Teaching Your Dog to Walk Along Your Side
Stand to one side of your dog, and grasp the lead fairly close to the snap, leaving 2.5 cm - 5
cm of slack (no more). Begin by walking forward and encouraging your dog to come alongside
you, saying, “Let’s Go,” “Walk” or anything else you desire in a happy, encouraging voice.
When your dog is walking calmly next to your side, there should be ABSOLUTELY NO tension
on the lead! As he walks at your side, give a treat and encouraging praise.
If your dog tends to hang back and not want to walk with you, do not pull the lead – the
pressure at the back of his neck will make your dog want to slow down. Instead, pat your leg,
use your treats or a toy and lots of “happy talk” to encourage him to come with you. As he
walks, praise in a friendly, cheerful voice and offer a treat.
If he doesn’t seem to want to move even with the treat, you may need to give a short, gentle tug
and immediate release to rock his balance and move him. This usually 9works better if you tug
slightly to the side rather than straight ahead. When he’s walking calmly at your side, be sure
the lead is loose and praise your dog!
Teaching Your Dog to Sit
With the Easy Walk™ Headcollar, your dog can learn to sit almost automatically with no need to
press down on his back or hindquarters. If your dog already knows the command “Sit,” you will
simply use the Easy Walk™ Headcollar as a backup in case he chooses not to respond quickly
to your command.
Remember, when your dog is sitting calmly, there must be ABSOLUTELY NO tension on the
lead! This release of tension is the message to your dog that he is doing what you want.
Begin with your dog at your side or in front of you. Grasp the lead only a few centimeters from
the snap. Pull the lead forward in line with nose and upward to point your dog’s nose gently
skyward. As you tip his nose up, his head should go slightly back and his hindquarters will
naturally lower to the ground. As soon as he begins to sit, release the tension of the lead and
say “Good sit!” Immediately offer a treat as a reward along with praise and stroking. He will
quickly associate the sitting position with the word “Sit” and will begin to respond with a lighter
and lighter pull on thelead.
To help your dog respond even more quickly, use a treat in addition to the Easy Walk
Headcollar. While pulling up and forward on the lead, hold a treat in your closed hand just in
front of his nose, and move it slowly upward and back over the top of his head – his nose will
follow your hand, shifting his weight back and encouraging the sitting position.
As soon as he begins to sit, immediately release the tension and say “Good sit,” then reward
with the treat, praise and stroking.
If you have diffi culty getting your dog to sit, you can
use a “cupping” technique. Stand with your dog at your
left side. Grasp the lead with your right hand (the hand
farthest from the dog), holding your hand right next to
the snap. With your left hand, reach around your dog’s
head and cup it under the chin. Pull the lead forward
and upward to point your dog’s nose gently skyward, at
the same time using your hand to help guide his nose.
If your dog is somewhat resistant, hang in there! Keep the
tension on the lead forward and upward until he yields
™
FREN
www.petsafe.net 11
Page 12

and begins to lower his rear into a sit – then immediately release the tension to reward him, praise
with your voice and offer a tasty treat. Important: Do not grasp muzzle.
ENFR
Some dogs will jump up or stand on their hind legs as they resist. Do not get fl ustered – he can’t
stand up like that forever! The proper technique is to calmly continue to pull up and forward
(not down), using your hand cupped under the chin. As soon as he begins to lower into a sit,
immediately release and reward.
Prevent Pulling and Lunging
To prevent pulling in front or lunging, allow only 2.5 cm - 5 cm of slack in the lead. When your
dog attempts to lunge or pull, simply hold the lead fi rmly (do not jerk) and his nose and head
will turn back to look at you. Immediately release ALL the tension (the most important part of the
training process!) as he stops pulling and slows his pace. Reward with treat andpraise.
If your dog succeeds in pulling out ahead of you, this means you’ve allowed too much slack
in the lead. Quickly take up all the slack (do not jerk!), and give a gentle pull to turn his head
to look at you. This will prevent him pulling further ahead. Keep walking at your normal pace,
and as you come alongside him (which puts him in the correct position), immediately reward by
releasing the tension on the lead, along with a treat and praise.
Prevent Jumping
If your goal is to prevent jumping in the fi rst place, then the easiest way is to replace it with
the desired behaviour of “Sit.” As your friend approaches, tell your dog to “Sit” and reward
appropriately. Hold the lead with no more than 2.5 cm - 5 cm of slack. If your dog remains
sitting, be sure to reward him immediately. After 10 - 15 seconds, ask the person to greet your
dog, praise him, and reward him with a treat if you desire. If your dog tries to move from the Sit,
steady him with a smooth pull (do not jerk!) up and forward to prevent the movement, repeat
“Sit” and immediately release the tension on the lead as he relaxes in the sitting position. Try to
anticipate your dog’s movement – just as he begins to shift his weight to move, quickly steady
him with a forward, upward pull.
If your dog succeeds in actually jumping up, do not pull down on the lead. This is the natural
tendency, but it is not effective (remember the “opposition refl ex”). The correct technique is to
pull up and forward, just as when teaching him to sit. Remember to praise when he sits.
12 www.petsafe.net
Page 13

General Tips
• Beginning as early as 8-10 weeks of age, the Easy Walk™ Headcollar can be worn by
your puppy or dog whenever you want to prevent lead pulling, lunging, jumping, barking,
etc. Although we generally recommend that the Easy Walk
night, there are some unique situations in which your behaviour professional may advise
that it be worn 24 hours per day for a specifi ed period of time. In these cases, please be
sure you fully understand and follow the instructions given, and discuss any questions with
your professional.
• Never keep a constant pull on the lead as this will confuse your dog and may cause him
to resist.
• Never jerk or yank the lead – try to forget everything you’ve ever learned before about
“choke chains,” “jerk & release” and “traditional” training. A smooth gentle pull (with
immediate release) is all you’ll need.
• Leading behaviourists and trainers report that the Easy Walk
effective in helping fearful and shy dogs feel more secure and calm in situations that
produce anxiety. With the Easy Walk
responds to your leadership, allowing him to relax and let you be responsible for his
welfare. When fear and anxiety are reduced, your dog will learn faster and be a more
rewarding companion.
• If you are experiencing more complicated behaviour problems, or simply would like
additional hands on assistance, we encourage you to consult with your veterinarian, local
trainer, or behaviour specialist.
• While the Easy Walk
dealing with many aggression problems, it is not a “cure.” We highly advise you seek
the services of a professional (behaviourist, veterinarian or trainer) with the experience
in diagnosing and prescribing treatment programs for aggression problems. Your regular
veterinarian can provide you with a referral to such a specialist.
™
Headcollar can be an extremely effective and important tool in
™
Headcollar, your dog instinctively senses and
™
Headcollar be taken off each
™
Headcollar is particularly
Terms of Use and Limitation of Liability
1. Terms of Use
Use of this Product is subject to your acceptance without modifi cation of the terms,
conditions and notices contained herein. Use of this Product implies acceptance of all
such terms, conditions and notices. If you do not wish to accept these terms, conditions,
and notices, please return the Product, unused, in its original packaging and at your own
cost and risk to the relevant Customer Care Centre together with proof of purchase for a
fullrefund.
2. Proper Use
This Product is designed for use with pets where training is desired. The specifi c
temperament or size/weight of your pet may not be suitable for this Product (please refer
to “Size Chart” in this Training Guide). Radio Systems Corporation recommends that
this Product is not used if your pet is aggressive and accepts no liability for determining
FREN
www.petsafe.net 13
Page 14

suitability in individual cases. If you are unsure whether this Product is appropriate for your
pet, please consult your veterinarian or certifi ed trainer prior to use. Proper use includes,
ENFR
without limitation, reviewing the entire Training Guide and any specifi c safety statements.
3. No Unlawful or Prohibited Use
This Product is designed for use with pets only. This pet training device is not intended to
harm, injure or provoke. Using this Product in a way that is not intended could result in
violation of Federal, State or locallaws.
4. Limitation of Liability
In no event shall Radio Systems Corporation or any of its associated companies be
liable for (i) any indirect, punitive, incidental, special or consequential damage and/
or (ii) any loss or damages whatsoever arising out of or connected with the misuse of this
Product. The Purchaser assumes all risks and liability from the use of this Product to the
fullest extent permissible by law. For the avoidance of doubt, nothing in this clause 4 shall
limit Radio Systems Corporation’s liability for human death or personal injury or fraud or
fraudulentmisrepresentation.
5. Modifi cation of Terms and Conditions
Radio Systems Corporation reserves the right to change the terms, conditions and notices
governing this Product from time to time. If such changes have been notifi ed to you prior to
your use of this Product, they shall be binding on you as if incorporated herein.
Warranty
Two Year Non-Transferrable Limited Warranty
This Product has the benefi t of a limited manufacturer’s warranty. Complete details of the
warranty applicable to this Product and its terms can be found at www.petsafe.net and/ or are
available by contacting your local Customer Care Centre.
• Radio Systems PetSafe Europe Ltd, 2nd Floor, Elgee Building, Market Square, Dundalk,
Co. Louth, Ireland
• Radio Systems Corporation, 10427 PetSafe Way, Knoxville, TN 37932 USA
Australia/New Zealand – In compliance with the Australian Consumer Law, Warranties
Against Defects, effective January 1, 2012, warranty details of this Product are as follows:
Three Year Non-Transferrable Limited Warranty
What is covered: Radio Systems Australia Pty Ltd (hereinafter referred to as “Radio Systems”)
warrants to the original retail purchaser, and not any other purchaser or subsequent owner,
that its product, when subject to normal and proper residential use, will be free from defects in
material or workmanship for a period of two (2) years from the purchase date. An “original
retail consumer purchaser” is a person or entity who originally purchases the Product, or a gift
recipient of a new product that is unopened and in its original packaging. When serviced by
Radio Systems Customer Service, Radio Systems covers labor and parts for the fi rst two (2)
years of ownership; after the fi rst two (2) years, a service or upgrade charge will apply relative
to replacement of the product with new or refurbished items at Radio Systems’ sole discretion.
14 www.petsafe.net
Page 15

The limited warranty is non-transferrable and shall automatically terminate if the original retail
consumer purchaser resells the Radio Systems product or transfers the property on which the
Radio Systems product is installed. This Limited Warranty excludes accidental damage due to
dog chews; lightning damage; or neglect, alteration, and misuse. Consumers who purchase
products outside of Australia, New Zealand, or from an unauthorised dealer will need to return
the Product to the original place of purchase for any warranty issues.
Please note that Radio Systems does not provide refunds, replacements, or upgrades for change
of mind, or for any other reason outside of these Warranty terms.
Claims Procedure
Any claim made under this Warranty should be made directly to Radio Systems Australia Pty Ltd
Customer Care Centre at:
Radio Systems Australia Pty Ltd
PO Box 765, Mudgeeraba QLD 4213
Australia Residents: 1800 786 608
New Zealand Residents: 0800 543 054
Email: info@petsafeaustralia.com.au
To fi le a claim, a proof of purchase must be provided. Without a proof of purchase, Radio
Systems will not repair or replace faulty components. Radio Systems requests the Consumer to
contact the Radio Systems Customer Care Centre to obtain a Warranty Return number, prior to
sending the Product. Failure to do so may delay in the repair or replacement of the Product.
If the Product is deemed to be faulty within 30 days from date of original purchase, Radio
Systems will organise for a replacement to be sent in advance of returning the faulty Product. A
Post Bag will be included with the replacement Product for the return of the faulty Product. The
Product must be returned within 7 days of receiving the replacement. If the Product is deemed
to be faulty after 30 days from the date of original purchase, the consumer will be required to
return the Product to Radio Systems at the consumer’s own expense. Radio Systems will test and
replace the faulty unit or its components and return to the consumer free of charge, provided
the Product is within its said warranty period. This warranty is in addition to other rights and
remedies available to you under the law. Radio Systems goods come with guarantees that
cannot be excluded under the Australia Consumer Law. You are entitled to a replacement or
refund for a major failure and for compensation for any other reasonably foreseeable loss or
damage. You are also entitled to have the goods repaired or replaced if the goods fail to be of
acceptable quality and the failure does not amount to a major failure.
Should you have any queries or require any further information, please contact our Customer
Care Centre on 1800 786 608 (Australia) or 0800 543 054 (New Zealand).
FREN
www.petsafe.net 15
Page 16

CONSIGNES DE SÉCURITÉ IMPORTANTES
ENFR
Description des termes et symboles utilisés dans ce manuel
Ce symbole est une alerte de sécurité. Il est utilisé pour
vous alerter des risques de blessures. Veuillez respecter
tous les messages de sécurité qui suivent ce symbole pour
éviter tout risque de blessure ou de décès.
AVERTISSEMENT indique une situation dangereuse qui,
si elle n’est pas évitée, pourrait entraîner la mort ou des
blessures graves.
ATTENTION, utilisé sans le symbole d’alerte de sécurité,
indique une situation dangereuse qui, si elle n’est pas
évitée, pourrait blesser votre animal.
Ne pas utiliser avec les chiens agressifs. Ne pas utiliser
ce produit si votre chien est agressif ou s’il a tendance à
l’être. Les chiens agressifs peuvent causer des blessures
graves et même tuer leur maître ou d’autres personnes. Si
vous n’êtes pas sûr que ce dispositif soit approprié pour
votre chien, veuillez consulter votre vétérinaire ou un
dresseur professionnel.
• Veuillez suivre attentivement les instructions lorsque
vous utilisez ce collier à museau plat ou avec des voies
respiratoires génétiquement limitées. Il arrive souvent
que ces chiens aient des diffi cultés respiratoires pendant
l’exercice physique ou en cas de stress à cause de la
limitation physique de leur voies respiratoires. Si les
diffi cultés respiratoires augmentent lorsque votre chien
porte le licol, arrêtez immédiatement son utilisation et
demandez conseil à votre vétérinaire.
• Un chien à besoin d’ouvrir la gueule pour haleter et
respirer durant une activité physique ou en cas de stress.
Ne tirez pas sur la laisse pendant plus de 20 à 30
secondes. Votre chien pourra ouvrir la gueule librement si
la laisse n’est pas tendue.
• Si vous voulez courir ou faire du jogging avec votre chien,
n’oubliez pas qu’il peut y avoir un frottement avec le licol
et arrêtez son utilisation au premier signe de gêne.
• Ne laissez pas le licol de tête sur votre chien sans
surveillance. Veuillez superviser votre chien lorsqu’il porte
le licol et le ranger en lieu sûr lorsque vous ne l’utilisez pas.
• Veuillez jeter ou remplacer le collier s’il devient
endommagé ou usé. Les colliers endommagés ou usés
risquent de ne pas pouvoir retenir votre animal.
16 www.petsafe.net
Page 17

Merci d’avoir choisi la marque PetSafe®. Votre relation avec votre animal doit être faite des
moments mémorables et d’une complicité mutuelle.
Nos produits et nos outils de dressage favorisent la protection, le dressage et l’affection, des
éléments essentiels pour garder des souvenirs pour la vie. Si vous avez des questions sur
nos produits ou sur le dressage de votre chien, visitez notre site www.petsafe.
net ou contactez notre Service clientèle. Pour consulter la liste des numéros de
téléphone du Service clientèle, visitez notre site www.petsafe.net.
Pour bénéficier pleinement de votre garantie, veuillez enregistrer votre article dans les 30 jours
sur le site www.petsafe.net. Grâce à cet enregistrement et en conservant le reçu, votre produit
sera totalement couvert par notre garantie et si vous deviez contacter notre service clientèle,
nous pourrions vous aider plus rapidement. Il est important de souligner que vos informations
personnelles ne seront jamais données ni vendues à qui que ce soit. Une description complète
de la garantie est disponible sur le site www.petsafe.net.
Table des matières
Fonctionnement du système. . . . . . . . . . . . . . . . . . . . . . . . . . . . . . . . . . . . . 18
Guide des tailles. . . . . . . . . . . . . . . . . . . . . . . . . . . . . . . . . . . . . . . . . . . 18
Identifi cation des pièces . . . . . . . . . . . . . . . . . . . . . . . . . . . . . . . . . . . . . . 18
Manuel de montage . . . . . . . . . . . . . . . . . . . . . . . . . . . . . . . . . . . . . .19
Pourquoi il est essentiel de bien régler le collier . . . . . . . . . . . . . . . . . . . . . . . . 19
Comment mettre le licol . . . . . . . . . . . . . . . . . . . . . . . . . . . . . . . . . . . . .20
Utilisation du licol . . . . . . . . . . . . . . . . . . . . . . . . . . . . . . . . . . . . . . . .23
Manuel de dressage . . . . . . . . . . . . . . . . . . . . . . . . . . . . . . . . . . . . . .24
Motivation positive et récompenses . . . . . . . . . . . . . . . . . . . . . . . . . . . . . .24
Apprenez à votre chien à marcher à vos côtés . . . . . . . . . . . . . . . . . . . . . . . .25
Apprenez à votre chien à s’asseoir . . . . . . . . . . . . . . . . . . . . . . . . . . . . . . .25
Empêchez votre chien de tirer brusquement . . . . . . . . . . . . . . . . . . . . . . . . . .26
Empêchez votre chien desauter . . . . . . . . . . . . . . . . . . . . . . . . . . . . . . . . 27
Conseils . . . . . . . . . . . . . . . . . . . . . . . . . . . . . . . . . . . . . . . . . . . . . . .27
Termes et conditions. . . . . . . . . . . . . . . . . . . . . . . . . . . . . . . . . . . . . . . . .28
Garantie . . . . . . . . . . . . . . . . . . . . . . . . . . . . . . . . . . . . . . . . . . . . . . . 29
FREN
www.petsafe.net 17
Page 18

Fonctionnement du système
ENFR
Le licol Easy Walk™ vous permet de communiquer avec votre chien d’une manière qu’il
comprend instinctivement, traduisant vos demandes en « langage canin » lui disant que vous
êtes le maître.
La boucle de museau encercle le museau de votre chien comme le fait le chef de meute quand il
saisit doucement mais fermement le museau d’un subordonné dans sa gueule. Pour votre chien
ceci est un signal clair qui lui indique que VOUS êtes le chef !
La sangle de cou exerce de la pression sur l’arrière du cou, ce qui permet de travailler avec le
« refl exe d’opposition » (l’instinct naturel des chiens de pousser contre la pression au lieu de
céder). Les colliers traditionnels mettent de la pression sur l’avant de la gorge, ce qui fait que
les chiens continuent de tirer même en cas d’étranglement. La conception brevetée du licol Easy
Walk™ permet de placer 80% de la pression sur l’arrière du cou pour tirer profi t du refl exe
d’opposition. Votre chien va instinctivement pencher sa tête en arrière contre la pression et ne
tirera plus jamais sur sa laisse.
Si vous contrôlez le museau, vous contrôlez tout le reste ! C’est pour cette raison qu’on utilise
les licous avec des chevaux : très peu de force est nécessaire pour contrôler un animal par la
tête en comparaison avec le cou. Si votre chien tente de tirer sur sa laisse, il vous suffi t de tenir
fermement la laisse pour que sa tête se tourne de votre côté, évitant ainsi que votre chien vous
traîne derrière lui en promenade.
Les chiens se sentent plus en sécurité avec le collier de tête Easy Walk™. De nombreux experts
et maîtres reconnaissent l’incroyable effet calmant qu’a le licol Easy Walk™ pour aider les
chiens timides, nerveux ou craintifs à se relaxer et à gagner de la confi ance.
Guide des tailles
Petite Jusqu'à 11 kg Beagles et shelties
Moyenne
Grande
11 kg à 27 kg Chiens d’arrêt et épagneuls
27 kg à 59 kg Labradors et bergers
Identifi cation des pièces
Clip réglable
Anneau de contrôle
Laisse en nylon de 1,8 m
18 www.petsafe.net
Sangle centrale
Sangle de cou
Boucle de museau
Licol Easy Walk
™
Page 19

Manuel de montage
Pourquoi il est essentiel de bien régler
le collier
Le licol Easy Walk™ se règle différemment des autres colliers ou dispositifs de retenue que vous
avez pu utiliser avant ! Un réglage inadéquat risque de provoquer des problèmes inutiles :
votre chien peut essayer de l’enlever avec les pattes, montrer de la resistance ou le licol peut
provoquer un frotement excessif ou une irritation au museau.
La boucle du museau doit être ample et confortable pour l’animal; elle doit pouvoir bouger
librement entre les yeux et le début de la truffe, mais PAS trop lâche pour ne pas qu’elle tombe.
Pour bien fi xer la boucle du museau il faut préalablement régler correctement la sangle du cou,
qui doit être tout en haut du cou (elle doit toucher le crâne) et très tendue (vous devez pouvoir à
peine passer un doigt dessous) de manière à ce qu’elle ne puisse pas pivoter. (Si la sangle du
cou pivote, la boucle du museau pivotera également, ce qui risque de provoquer un frottement
avec la peau.)
Lorsque que le collier de tête Easy Walk™ est bien réglé et vu de côté,
il ressemble à un « V ». La sangle centrale reposera au-dessus de la
pommed’Adam.
La sangle de cou :
• DOIT être mise le plus haut possible sur le cou, directement derrière les oreilles. Elle doit
toucher la base du crâne à l’arrière et doit être au-dessus de la pomme d’Adam à l’avant.
• NE DOIT PAS pouvoir pivoter autour du cou.
• DOIT être très bien ajusté en haut du cou de manière à que vous puissiez à peine passer
un doigt en-dessous, tout comme avec une ceinture, un bracelet de montre ou une
chaussure. Il s’agit là de l’étape la PLUS importante du processus de réglage ! Ce dispositif
www.petsafe.net 19
FREN
Page 20

est différent des autres colliers que vous avez pu utiliser auparavant, mais ne provoque
aucune gêne pour à chien. (Pour mieux comprendre, appuyez tout en haut de votre gorge,
ENFR
au-dessus de la pomme d’Adam ; ensuite, appliquez la même pression en-dessous de
la pomme d’Adam : vous allez sentir que la pression au-dessus n’est pas inconfortable,
qu’en dessous ça l’est !) Veillez à ce que la sangle du cou ne soit pas lâche, sinon votre
chien risquerait de pouvoir enlever la boucle du museau avec sa patte, ou vous allez
fi nir par trop serrer la boucle du museau ou bien elle pivotera et provoquera une gêne
pourl’animal.
La boucle du museau doit :
• être confortablement réglée pour que votre chien puisse facilement ouvrir la gueule (même
attraper une balle !)
• pouvoir bouger sans diffi culté entre les yeux et la base de la truffe.
• appuyer derrière les commissures des lèvres.
• être suffi samment ajustée pour ne pas tomber du museau (une fois la pince réglée).
Comment mettre le licol
Veuillez suivre attentivement les instructions lorsque vous utilisez ce
collier avec des bulldogs ou d’autres races à museau plat ou avec
des voies respiratoires génétiquement limitées. Il arrive souvent
que ces chiens aient des diffi cultés respiratoires pendant l’exercice
physique ou en cas de stress à cause de leurs voies respiratoires
limitées. Si les diffi cultés respiratoires augmentent lorsque votre
chien porte le licol, arrêtez immédiatement son utilisation et
demandez conseil à votre vétérinaire.
Pendant le réglage et durant la phase initiale d’utilisation du licol Easy Walk™, veillez à motiver
et à encourager votre chien en le félicitant et en lui donnant des friandises. Si votre chien ne
reste pas tranquille, une autre personne peut lui donner des friandises pendant que vous réglez
le collier.
ÉTAPE 1
1. Ouvrez la sangle du cou et tenez une
extrémité dans chaque main. La boucle
du museau et la laisse doivent
pendre et forme un « T »(1A).
20 www.petsafe.net
1A
Page 21

ÉTAPE 2
1. Pré-régler la sangle haut sur le cou en touchant la base
du crâne à l’arrière, avec la sangle centrale dans le petit
creux juste au-dessus de la pommed’Adam.
2. La sangle centrale doit être parallèle au cou, pas à la
partie inférieure de la mâchoire (2A). La sangle du cou
doit être bien serrée de manière à ce que vous ne puissiez
passer qu’un doigt en-dessous et ce qu’elle ne puisse pas
pivoter autour du cou.
3. Prendre doucement la peau à l’arrière du cou et tirer vers
les épaules, tout en maintenant la sangle du cou contre
la base du crâne, ceci permet de tendre la peau ou la
fourrure sous la sangle de cou et d’obtenir un meilleur
ajustement.
4. Contrôlez à nouveau pour être sûr que
seulement un doigt puisse à peine passer sous
la sangle du cou, et serrez si nécessaire (2B).
Notez que même si la sangle du cou est bien
plus ajustée que les autres colliers, votre chien
est à son aise, il peut facilement haleter et ne
montre pas de signes de détresse.
FREN
2A
2B
www.petsafe.net 21
Page 22

ÉTAPE 3
ENFR
1. Enlevez la sangle du cou de votre chien.
2. Faitez glisser la pince ajustable vers
l’anneau de contrôle. Pour ouvrir, levez la
languette avec le pouce, une pièce ou une
clé ; pour fermer, appuyez sur la languette
jusqu’à enclenchement. Ce verrouillage
est conçu pour obtenir une fermeture
robuste ; il est donc nécessaire d’excercer
une certaine pression pour l’ouverture et
lafermeture.
3. Tirez la boucle du museau vers le haut, par
la sangle centrale (3A).
ÉTAPE 4
1. Avec le chien à côté de vous
ou entre vos jambes, ouvrez
la boucle du museau.
2. Passez les mains sous la tête du chien pour
faire glisser la boucle jusqu’à la base du
museau (4A) et donnez-lui une friandise
pour qu’il reste tranquille.
3. Positionner et boucler la sangle à l’endroit
préinstallé sur la hauteur de la nuque (4B).
4. Effectuez le réglage fi nal de la boucle
du museau. Elle doit se trouver derrière
les commissures des lèvres et doit être
suffi samment ample pour pouvoir
glisser jusqu’à la base de la truffe, mais
suffi samment serrée pour qu’elle ne
puisse pas tomber du museau.
5. Faites glisser la pince vers le haut
ou vers le bas pour régler. Avec le
pouce et l’index, pincez la boucle du
museau sous la pince, pour l’empêcher
temporairement de bouger.
22 www.petsafe.net
3A
4A
4B
Page 23

ÉTAPE 5
1. Testez la taille de la boucle
du museau en tirant dessus vers
l’avant pour voir jusqu’où elle
va(5A).
2. Lorsqu’elle touche la base de la
truffe, mais qu’elle est suffi samment
serrée pour ne pas tomber, fermez la
pince en appuyant sur la languette.
Vous entendrez un clic au moment
duverrouillage.
3. Attacher la laisse en nylon de 1,8 m à
l’anneau de contrôle.
Remarque: Lorsque votre chien a atteint sa taille
adulte, vous pouvez couper la longueur en trop
sur la sangle du cou. Enlevez le licol Easy Walk™
à votre chien, coupez le bout de la sangle avec
des ciseaux et brûlez-le avec un briquet ou une
allumette pour éviter qu’il ne s’effi loche.
Utilisation du licol
Votre chien peut prendre plusieurs minutes pour se faire à la nouvelle sensation du licol Easy
Walk™. Une fois le réglage terminé, nous recommandons d’encourager immédiatement votre
chien (en lui donnant une friandise ou en le félicitant) à marcher à vos côtés pendant 5 ou 6
pas, puis faites-le asseoir (donnez-lui des friandises/félicitez-le/caressez-le), puis renouvelez
l’opération. (Voir « Apprenez à votre chien à marcher à vos côtés » et « Apprenez à votre chien
à s’asseoir ».) Renouvelez l’opération 5 à 10 fois, ou jusqu’à ce que votre chien marche et
s’assoit calmement en obéissant à vos ordres.
Il est possible que votre chien résiste en essayant d’enlever la boucle du museau avec sa patte,
en se roulant sur le sol ou même en se tenant sur ses pattes arrières comme un jeune poulain
portant un licol pour la première fois. En règle générale, les chiens qui résistent le plus sont ceux
qui en ont le plus besoin !
Souvenez-vous que votre chien n’a pas mal, il ne fait que résister contre le nouveau message
qui lui indique qu’il n’a plus le contrôle. N’essayez pas de « réconforter » votre chien en le
www.petsafe.net 23
La
Pince
FREN
5A
5B
Page 24

caressant ou avec des mots gentils. Si vous faites cela pendant qu’il résiste, vous allez renforcer
ce comportement indésirable. Gardez les caresses pour quand il marche, s’assoit, se met
ENFR
debout ou se couche calmement à vos côtés. Gardez votre chien occupé, faites-le marcher
et s’asseoir pour lui donner de nombreuses occasions d’être récompensé. Le comportement
réactionnaire va disparaître au fur et à mesure que votre chien reconnaît que vous êtes le maître.
Un chien à besoin d’ouvrir la gueule pour haleter et respirer durant
une activité physique ou en cas de stress. Ne tirez pas sur la laisse
pendant plus de 20 à 30 secondes. Votre chien pourra ouvrir la
gueule librement si la laisse n’est pas tendue.
Si les résultats positifs se font attendre, c’est pratiquement toujours à cause :
• d’un réglage incorrect (sangle du cou trop lâche, boucle du museau trop serrée. Réglez la
sangle du cou en premier !)
• d’un manque de récompense et de motivation (friandise ou félicitations) ou
• de la tension sur la laisse qui n’est pas COMPLÈTEMENT relâchée au moment même où le
chien fait ce que vous lui demandez.
Conseil
Considérez la laisse comme le moyen de dire oui ou non. Le
relâchement total de la tension sur la laisse signifie « Oui, c’est ce que
je veux que tu fasses ! » Toute tension sur la laisse, même si elle est très
légère, signifie « Non, ce n’est PAS ce que je veux que tu fasses, il faut
que tu fasses autre chose. » Vous voyez qu’il est très important que vous
soyez très clair avec ce signal, si votre chien marche calmement ou est
tranquillement assis, veillez à relâcher TOUTE la tension sur la laisse.
Manuel de dressage
Motivation positive et récompenses
Utilisez la motivation positive et les récompenses pour aider votre chien à apprendre
rapidement et à s’amuser !
Récompenses :
• Utilisez des petits morceaux de friandise très goûteuse ; c’est encore plus effi cace si votre
chien a faim !
• Félicitez votre chien avec une voix douce et joyeuse ; ne criez jamais et ne soyez pas
brusque avec votre chien car cela le rendrait craintif et ralentirait son apprentissage.
• Il est très important de relâcher TOUTE la tension sur la laisse dès que votre chien vous
obéit (marche, s’assoit calmement, etc.).
24 www.petsafe.net
Page 25

Conseil
Votre récompense (tout spécialement le relâchement de la tension
sur la laisse !) DOIT être donnée durant le comportement souhaité
ou dans la demi-seconde qui suit... sinon votre chien de saura pas
pourquoi il est récompensé ! Gardez les friandises dans un sac ou
dans une poche pour pouvoir les prendre rapidement.
Apprenez à votre chien à marcher à vos côtés
Mettez-vous à côté de votre chien et prenez la laisse assez proche de la pince (laissez 5 cm
de jeu au maximum). Commencez à marcher et encouragez votre chien pour qu’il marche à
vos côtés, en lui disant « Avec moi », « marche » ou toute autre chose d’une voix joyeuse et
motivante. Lorsque votre chien marche calmement à vos côtés, il doit y avoir ABSOLUMENT
AUCUNE tension sur la laisse ! Quand il marche à vos côtés, donnez-lui une friandise et
félicitez-le.
Si votre chien a tendance à rester en arrière et ne veut pas marcher avec avous, ne tirez pas sur
la laisse : la pression sur l’arrière de son cou le fera ralentir. Tapez plutôt sur votre jambe, utilisez
vos friandises ou un jouet et motivez-le pour l’encourager à venir avec vous. Quand il marche,
félicitez-le d’une voix gaie et offrez-lui une friandise.
S’il ne semble pas vouloir bouger même avec la friandise, vous pouvez donner un petit coup
sur la laisse avant de relâcher immédiatement la pression pour le déstabiliser et le faire avancer.
Ce mouvement est généralement plus effi cace si vous le faites légèrement sur le côté plutôt que
droit devant. Lorsque votre chien marche calmement à vos côtés, veillez à ce que la laisse soit
lâche et félicitez votre chien !
Apprenez à votre chien à s’asseoir
Avec le collier de tête Easy Walk™, votre chien peut apprendre à s’asseoir presque
automatiquement sans avoir à appuyer sur son dos ou sur son train arrière. Si votre chien
connaît déjà l’ordre « assis », vous pourrez simplement utiliser le licol Easy Walk™ dans les cas
où votre chien n’obéit pas rapidement.
Souvenez-vous que lorsque votre chien est assis calmement, il ne doit y avoir
ABSOLUTELEMENT AUCUNE tension sur la laisse ! Le relâchement de la tension est votre façon
de dire à votre chien qu’il fait ce que vous attendez de lui.
Commencez avec votre chien à côté de vous ou devant vous. Prenez la laisse à quelques
centimètres de la pince. Tirez la laisse vers l’avant, dans la ligne du museau et vers le haut pour
faire pointer doucement le museau de votre chien vers le ciel. Lorsque son museau pointe vers
le haut, sa tête doit aller légèrement vers l’arrière et son train arrière va naturellement se poser
sur le sol. Dès qu’il commence à s’asseoir, relâchez la tension sur la laisse et dites « Assis. Bien !
». Offrez-lui immédiatement une friandise, félicitez-le et caressez-le. Il associera rapidement la
position assise à l’ordre « Assis » et répondra à une tension de plus en plus légère sur lalaisse.
Pour aider votre chien à obéir encore plus rapidement, utilisez une friandise en plus du licol
Easy Walk™. Tout en tirant sur la laisse vers l’avant et vers le haut, tenez une friandise devant
son museau avec la main fermée, et montez-la doucement au-dessus de sa tête : son museau va
www.petsafe.net 25
FREN
Page 26

suivre votre main, faisant ainsi basculer son poids vers l’arrière pour encourager la position
assise. Dès qu’il commence à s’asseoir, relâchez immédiatement la tension et dites « Assis, Bien!
ENFR
», donnez-lui la friandise, félicitez-le et caressez-le.
Si vous avez des diffi cultés à faire asseoir votre chien,
vous pouvez utiliser une technique de « coquille ».
Tenez vous debout à droit de votre chien.Prenez la
laisse dans la main droite (la main la plus éloignée du
chien), en tenant la laisse juste à côté de la pince.
Avec la main gauche, passez les doigts sous le menton
de votre chien. Tirez la laisse vers l’avant et vers le haut
pour faire pointer doucement le museau de votre le
ciel, tout en utilisant votre main pour l’aider à guider
son museau.
Si votre chien fait preuve de résistance, persévérez ! Maintenez la tension sur la laisse vers
l’avant et vers le haut jusqu’à ce qu’il commence à baisser son train arrière. Lorsqu’il est assis,
relâchez immédiatement la tension pour le récompenser, félicitez-le et offrez-lui une friandise.
Important : ne serrez pas le museau.
Certains chiens sautent ou se mettent sur leurs pattes arrières quand ils résistent. Ne vous
inquiétez pas, il ne pourra pas se tenir comme ça pour toujours ! La technique à suivre est de
continuer calmement à tirer vers l’avant et vers le haut (pas vers le bas), en prenant son menton
dans votre main par en-dessous. Dès qu’il s’assoit, relâchez immédiatement la tension et
récompensez-le.
Certains chiens n’ont besoin que d’un signal léger pour s’asseoir, donc si votre chien continue
de résister ou à lutter, essayez de tirer de manière plus légère. Utilisez uniquement la tension
nécessaire pour obtenir les résultats souhaités.
Empêchez votre chien de tirer
brusquement
Pour empêcher votre chien de tirer sur sa laisse, laissez 5 cm de jeu au maximum. Lorque votre
chien essaie de s’élancer ou de tirer, il vous suffi t de tenir fermement la laisse (sans accoup) et
sa tête va se tourner dans votre direction. Relâchez immédiatement TOUTE la tension (il s’agit
là de la partie la plus importante du dressage !) dès qu’il arrête de tirer et ralentit son allure.
Félicitez-le et donnez-lui une friandise.
Si votre chien réussit à vous devancer, cela veut dire que vous avez laissé trop de jeu sur la
laisse. Réduisez rapidement tout le jeu (sans accoup !), et tirant doucement sur la laisse pour
faire tourner la tête de votre chien dans votre direction. Ceci va l’empêcher de tirer davantage.
Continuez de marcher à votre rythme, et quand vous arrivez à sa hauteur (ce qui le place dans
la bonne position), récompensez-le immédiatement en relâchant la tension sur la laisse, en lui
donnant une friandise et en lefélicitant.
26 www.petsafe.net
Page 27

Empêchez votre chien desauter
Si votre objectif est d’éviter que votre chien saute sur les gens, le plus simple est de remplacer
ce comportement pour celui du « assis ». Lorsque votre ami s’approche de vous, dites à votre
chien de s’asseoir et récompensez-le. Tenez la laisse avec 5 cm de jeu au maximum. Si votre
chien reste assis, demandez un « assis » et recompensez-le en conséquence. Après 10 à 15
secondes, demandez à la personne de saluer votre chien, de le féliciter et de le récompenser
si vous le souhaitez. Si votre chien essaie de se lever, tirez doucement sur la laisse (sans
accoup !) vers l’avant et vers le haut et pensez à nouveau à demander un « assis » et relâchez
immédiatement la tension lorsqu’il se rassoit. Essayez d’anticiper les mouvements de votre chien,
juste au moment où il bascule son poids pour se déplacer, arrêtez-le rapidement en tirant sur la
laisse vers l’avant et vers le haut.
Si votre chien parvient néanmoins à sauter, ne tirez pas la laisse vers le bas. C’est un réfl ex
naturel, mais il n’a aucune effi cacité (souvenez-vous du « réfl ex d’opposition »). La bonne
technique est de tirer vers le haut et vers l’avant, tout comme quand vous lui apprenez à
s’asseoir. Souvez-vous de le féliciter quand il s’asseoit.
Conseils
• Dès l’âge de 8 à 10 semaines votre chiot ou votre chien peut porter le licol Easy Walk™ peut
être porté par votre chiot ou votre chien à chaque fois que vous voulez l’empêcher de tirer
sur sa laisse, de sauter, d’aboyer, etc. Même si nous recommandons d’enlever le licol Easy
Walk™ tous les soirs. Dans des situations spécifi ques, votre comportementaliste peut vous
conseiller de laisser le collier 24h/24 sur votre chien pendant une durée déterminée. Dans ce
cas, veillez à bien respecter les instructions que vous avez reçues. Si vous avez des questions,
parlez-en à votre comportementaliste canin.
• N’excercez jamais une tension constante sur la laisse, votre chien risquerait d’être confus et
de résister.
FREN
www.petsafe.net 27
Page 28

• Ne donnez jamais d’accoup sur la laisse, essayez d’oublier tout ce que vous avez appris
avant (colliers étrangleurs, tirer un coup sec puis relâcher, dressage traditionnel). À présent, il
ENFR
suffi t de tirer doucement sur la laisse (et de la relâcher immédiatement).
• Les comportementalistes et les dresseurs de renom confi rment que le licol Easy Walk™ est
très effi cace pour aider les chiens craintifs et timides à se sentir rassurés et calmes dans des
situations produisant de l’anxiété. Avec le licol Easy Walk™, votre chien ressent et répond
instinctivement à vos ordres, ce qui lui permet de se relaxer et de vous laisser être responsable
de son bien-être. Lorsque le niveau de peur et d’anxiété est réduit, votre chien apprend plus
vite et devient un compagnon plus gratifi ant.
• Si vous avez d’autres problèmes de comportement plus diffi ciles, ou si vous voulez simplement
recevoir une assistance pratique, nous vous conseillons de consulter votre vétérinaire,
dresseur ou comportementaliste.
• Même si le licol Easy Walk™ peut être un outil extrêmement effi cace et utile pour gérer les
comportements agressifs, il ne s’agit pas d’un « remède ». Nous vous conseillons fortement
de faire appel à un professionnel (comportementaliste, vétérinaire ou dresseur) ayant une
expérience dans le diagnostic et la prescription de programmes thérapeutiques pour les
problèmes d’agressivité. Votre vétérinaire pourra vous indiquer quel spécialiste contacter.
Termes et conditions
1. Conditions d’utilisation
En achetant ce produit, vous acceptez les termes, conditions et consignes d’utilisation tels
qu’ils sont stipulés dans ce manuel. L’utilisation de ce produit revient à en accepter les
termes, conditions et consignes d’utilisation. Si vous n’acceptez pas ces termes, conditions
et consignes d’utilisation, veuillez renvoyer ce produit, inutilisé, dans son emballage
d’origine et à vos frais et risques, au Service clientèle approprié avec une preuve d’achat
afi n d’obtenir un remboursement complet.
2. Utilisation adéquate
Ce produit est conçu pour être utilisé avec des animaux pour lesquels un dressage est
nécessaire. Le tempérament spécifi que ou la taille/le poids de votre chien peuvent ne pas
convenir pour ce produit (veuillez consulter le « Guide des tailles » dans ce manuel). Radio
Systems Corporation déconseille l’utilisation de ce produit si votre chien est agressif et
rejette toute responsabilité quant au caractère approprié du produit à un animal spécifi que.
Si vous n’êtes pas sûr que ce dispositif soit approprié à votre animal, veuillez consulter
votre vétérinaire ou un dresseur agréé avant de l’utiliser. Une utilisation appropriée
comprend, entre autres, la consultation de la totalité de ce manuel ainsi que des consignes
de sécurité importantes.
28 www.petsafe.net
Page 29

3. Utilisation illégale ou interdite
Ce produit est conçu pour être utilisé exclusivement avec des animaux de compagnie. Ce
dispositif de dressage n’est pas destiné à blesser ni à provoquer un animal. L’utilisation
inappropriée de ce produit peut représenter une violation des lois fédérales, nationales
oulocales.
4. Limite de responsabilité
Radio Systems Corporation et ses sociétés affi liées ne peuvent en aucun cas être tenus
responsables pour (i) des dommages directs, indirects, punitifs, accidentels, spéciaux
ou secondaires, (ii) ni pour des dommages occasionnés ou associés à l’utilisation ou à
l’utilisation inappropriée de ce produit. L’acheteur prend à sa charge les risques et les
responsabilités en rapport avec l’utilisation de ce produit et dans la pleine mesure prévue
par la loi. Dans le but d’éviter toute ambiguïté, aucune partie de la clause 4 ne peut
engager la responsabilité de Radio Systems Corporation en cas de décès, de blessures
corporelles, de fraude ou de fausse déclaration.
5. Modifi cation des termes et des conditions
Radio Systems Corporation se réserve le droit de modifi er les termes, les conditions et les
consignes d’utilisation applicables à la vente du produit. Si de telles modifi cations vous ont
été communiquées avant que vous n’utilisiez ce produit, elles ont une valeur contractuelle
et s’appliquent comme si elles faisaient partie du présent document.
Garantie
Garantie Limitée De Deux Ans, Non Transférable
Ce produit bénéfi cie d’une garantie limitée du fabricant. Pour une description détaillée, veuillez
consulter le site web www.petsafe.net. Vous pouvez également obtenir une copie des conditions
de garantie en contactant votre service clientèle regional ci dessous:
• Radio Systems PetSafe Europe Ltd, 2nd Floor, Elgee Building, Market Square, Dundalk,
Co. Louth, Ireland
• Radio Systems Corporation, 10427 PetSafe Way, Knoxville, TN 37932 USA
FREN
www.petsafe.net 29
Page 30

Page 31

Page 32

PetSafe® products are designed to enhance the relationship between you and your pet.
To learn more about our extensive product range which includes Containment Systems,
Training Systems, Bark Control, Pet Doors, Health & Wellness and Play & Challenge
products, please visit www.petsafe.net.
Les produits PetSafe
®
sont conçus pour améliorer la relation entre vous et votre animal
de compagnie. Pour en savoir plus sur notre vaste gamme de produits, comprenant des
systèmes de confi nement, de dressage, de contrôle de l’aboiement, des chatières, des
produits consacrés à la santé et au bien-être ainsi qu’au jeu et aux défi s, rendez-vous sur
notre site www.petsafe.net.
Radio Systems Corporation
10427 PetSafe Way
Knoxville, TN 37932 USA
(865) 777-5404
www.petsafe.net
400-1283-17/1
©2013 Radio Systems Corporation
 Loading...