

Page 1

Operating Guide
Manuel d’utilisation
Gebruiksaanwijzing
Manual de funcionamiento
Guida all’uso
Gebrauchsanweisung
Brugervejledning
Drinkwell® Original Pet Fountain - 1.5 Litres
Fontaine pour animaux de compagnie - 1,5 Litres
Oorspronkelijk fontein voor huisdieren - 1,5 Liter
Fuente para Mascotas - 1,5 Litros
Fontana per animali domestici - 1,5 Litri
Haustierbrunnen - 1,5 Liter
Please read this entire guide before beginning
Veuillez lire ce manuel en entier avant de commencer
Gelieve deze gids volledig door te lezey voordat u begint
Por favor, lea este manual completamente antest de empezar
Si prega di leggere attentamente la guida al uso prima di utilizzare il collare
Bitte lesen Sie die gesamte Betriebsanleitung vor dem Trainingsbeginn
400-1253-19
www.petsafe.net
1
Page 2

U.S. Patents No. 5,799,609 and 5,842,437
WARRANTY
To get the most protection out of your warranty, please register
your product within 30 days at www.petsafe.net. By registering,
and keeping your receipt, you will enjoy the product’s full
warranty and should you ever need to call the Customer Care
Centre we will be able to help you faster. Most importantly,
PetSafe® will never give or sell your valuable information to
anyone. Complete warranty information is available online at
www.petsafe.net.
For a full listing of our Customer Care Centre telephone
numbers, visit our website at www.petsafe.net.
Table of Contents
Important Safety Instructions.............................................
Components.......................................................................
Features.............................................................................
Operating Instructions........................................................
Fountain Cleaning Instructions...........................................
Reassembling the Fountain...............................................
Fountain and Your Environment........................................
Tips on Use........................................................................
CE Compliance & Recycling Information...........................
Manufacturer’s Safety Instructions.....................................
Français.............................................................................
Nederlands........................................................................
Español..............................................................................
Italiano...............................................................................
Deutsch.............................................................................
2
www.petsafe.net
3
4
4
5
6
8
9
10
10
11
12
22
32
42
52
Page 3

U.S. Patents No. 5,799,609 and 5,842,437
IMPORTANT SAFETY INSTRUCTIONS
Instructions pertaining to: Risk of Fire, Electrical
Shock, or Harm to Persons.
Read all the instructions before using the appliance.
1)
To reduce the risk of injury, close supervision is
2)
necessary when an appliance is used near children.
Only use attachments recommended or sold by the
3)
manufacturer.
Do not use outdoors. FOR INDOOR USE ONLY.
4)
Do not unplug by pulling on cord. To unplug, grasp the
5)
plug, not the cord.
Do not operate any appliance with a damaged cord or
6)
plug, or after the appliance malfunctions or is dropped or
damaged in any manner. Immediately call your country’s
Customer Care Centre for further instructions.
For a portable appliance - To reduce the risk of electrical
7)
shock, do not place or store appliance where it can fall
or be pulled into a tub or sink.
Always unplug any appliance when not in use, before
8)
putting on or taking off parts, and before cleaning. Never
pull on the cord to remove the adaptor from the wall
outlet.
SAVE THESE INSTRUCTIONS
www.petsafe.net
3
Page 4

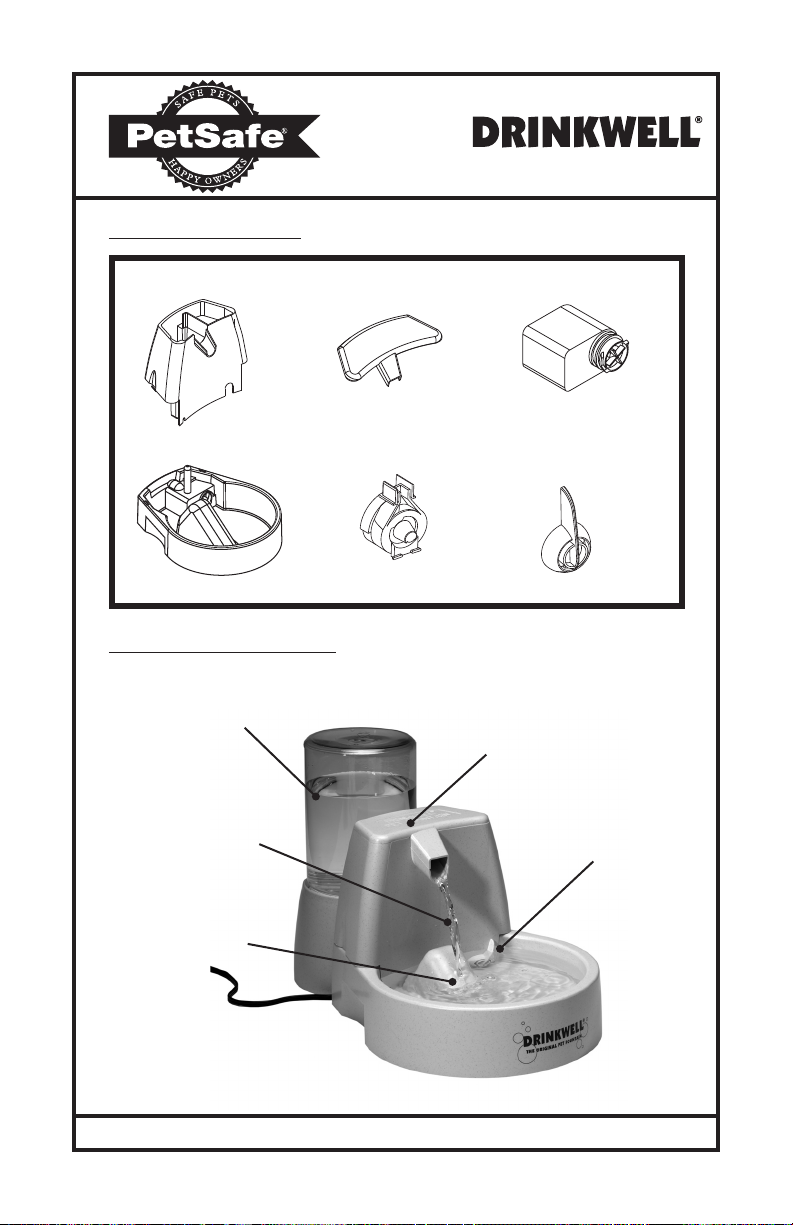
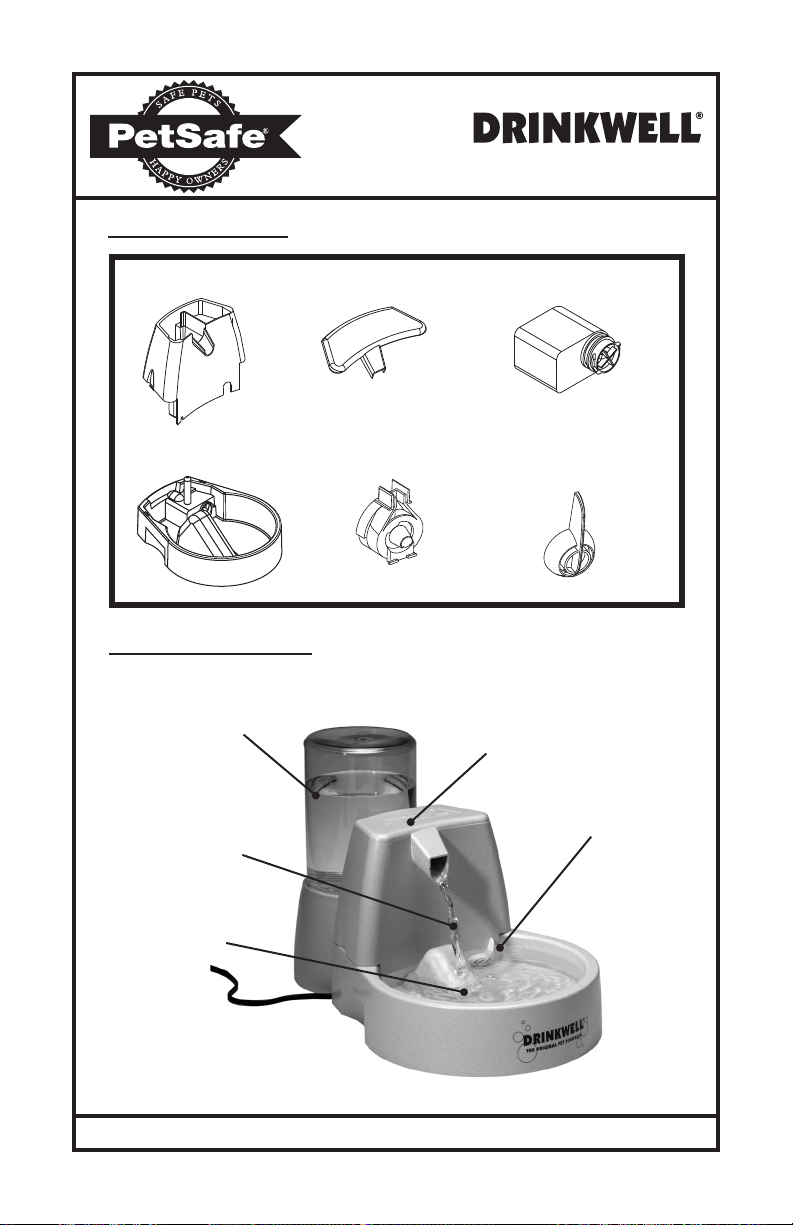
Components
U.S. Patents No. 5,799,609 and 5,842,437
Housing/
Filter Housing
Bowl
Features
OPTIONAL: Increase
Water Capacity with
Additional Capacity
Reservoir (1.5 L)
Patented Free-Falling
water stream encourages
pets to drink more water
Lid Motor / Pump
Flow Control KnobStator
Replaceable Charcoal
Filter removes bad
tastes and odors
Adjustable Flow
Control
Receiving Ramp
reduces splash of
falling water
4
1.5 L Water Capacity
www.petsafe.net
Page 5
OPERATING INSTRUCTIONS
DO NOT RUN DRY - FOR INDOOR USE ONLY
1)
As with any electrical device, check the electrical
cord for any tears or damage before use.
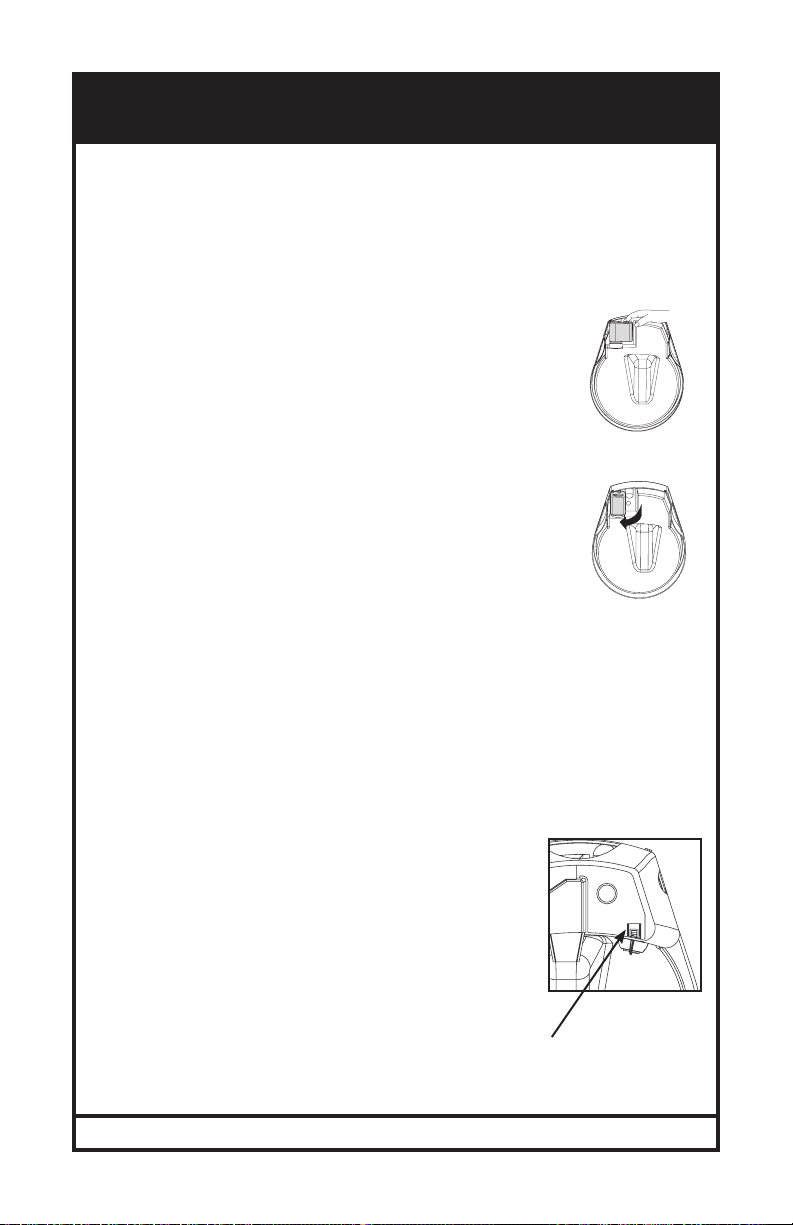
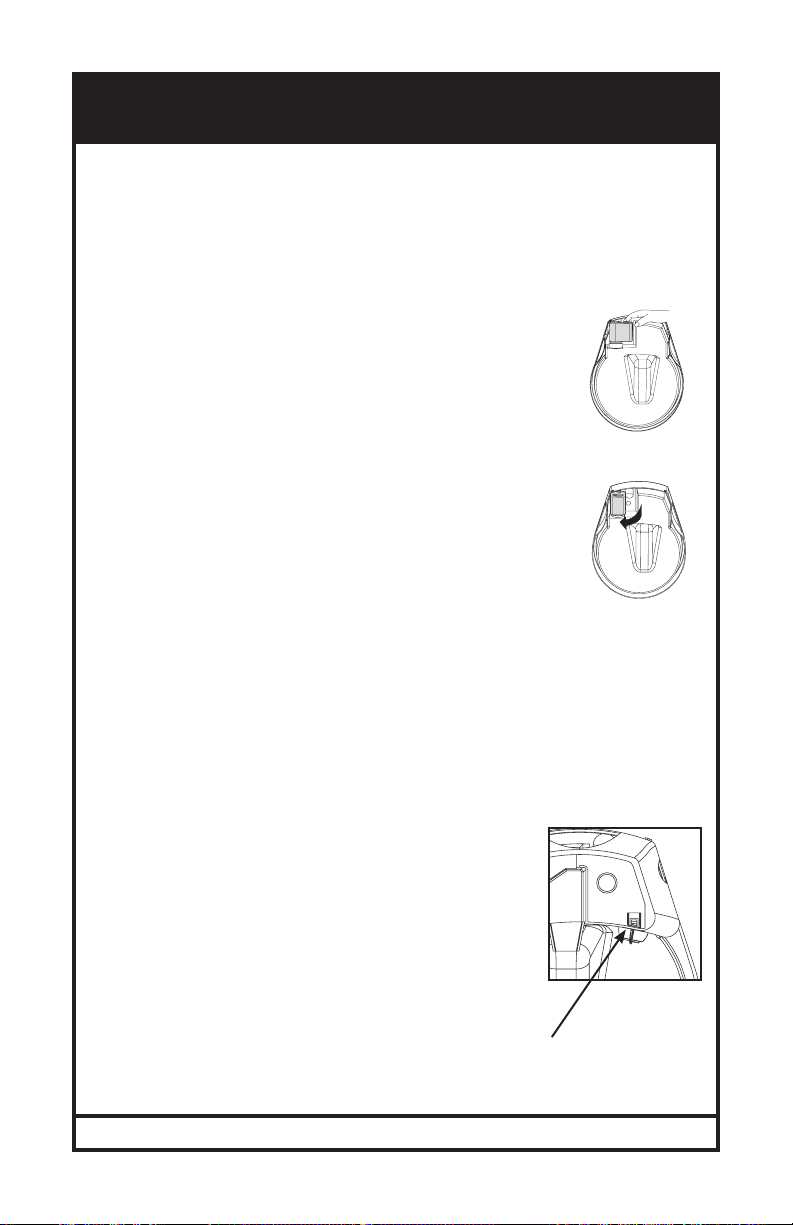
2)
Inspect the bottom of the fountain to be sure the
motor is securely attached. (Fig. 1)
3)
Remove the housing lid and insert the charcoal
lter. The lter will t diagonally into the two
triangular slots located inside the housing. The
lter ts narrow side down, with the black side
facing the front of the fountain (toward the spout).
The lter will slide easily into place, but make sure
it is pushed all the way down. (See Fig. 2a & 2b)
Fig. 1
MOTOR
Fig. 2a
FILTER
NOTE: Rinse the lter thoroughly under cool water before placing
in the fountain. This will remove any loose charcoal dust, which is
harmless. A small amount of charcoal dust may shed for the life of the
lter. This is normal and not harmful to your pet.
4)
Place fountain in desired location. If placing on carpet, tile or
Fig. 2b
wood ooring use a protective mat or other durable, water
resistant surface to protect your oors from splashing or
dripping caused by the pet.
5)
Fill the unit with water. This includes both the bowl and the
lter housing. This will prime the pump. Replace the lid.
6)
Before you plug the fountain in, make sure the cord and your
hands are dry. Plug the fountain into an electrical outlet.
www.petsafe.net
5
Page 6

OPERATING INSTRUCTIONS
7)
Set your desired ow rate with the ow control knob, which is
next to the ramp inside the bowl. When the knob is in the 10
o’clock position, ow is at its lowest. When the knob is in the 2
o’clock position, ow is at its highest.
8)
Add water to the bowl as needed. Do not let the water level
fall below the ow control knob or you may burn out the motor.
Never pick up a full fountain by the lter housing. Only pick up
the fountain by placing both hands underneath the base of the
fountain and grip the sidewalls for a sturdy hold.
FOUNTAIN CLEANING
Filters: Change every 2 to 4 weeks
1)
Filters should be changed every two to four weeks. Replace
the lters more frequently when using the fountain for multiple
pets or pets that produce a lot of saliva.
2)
Filters are an added feature of the fountain. Their use is not
required for normal operation, but will keep the fountain water
cleaner.
3)
Filters may be rinsed out when the fountain is cleaned. Never
wash the lter with soapy water, you will not be able to remove
the soap residue.
Fountain: Clean once a week
Unplug fountain, remove housing lid, and
1)
remove the lter.
Empty the water out of the fountain.
2)
Remove the lter housing by pressing in the
3)
tabs at the sides and lifting up. (See Fig. 3)
6
www.petsafe.net
Fig. 3
Page 7

FOUNTAIN CLEANING
The ow control knob and stator are not attached and are
4)
freed when the housing is removed.
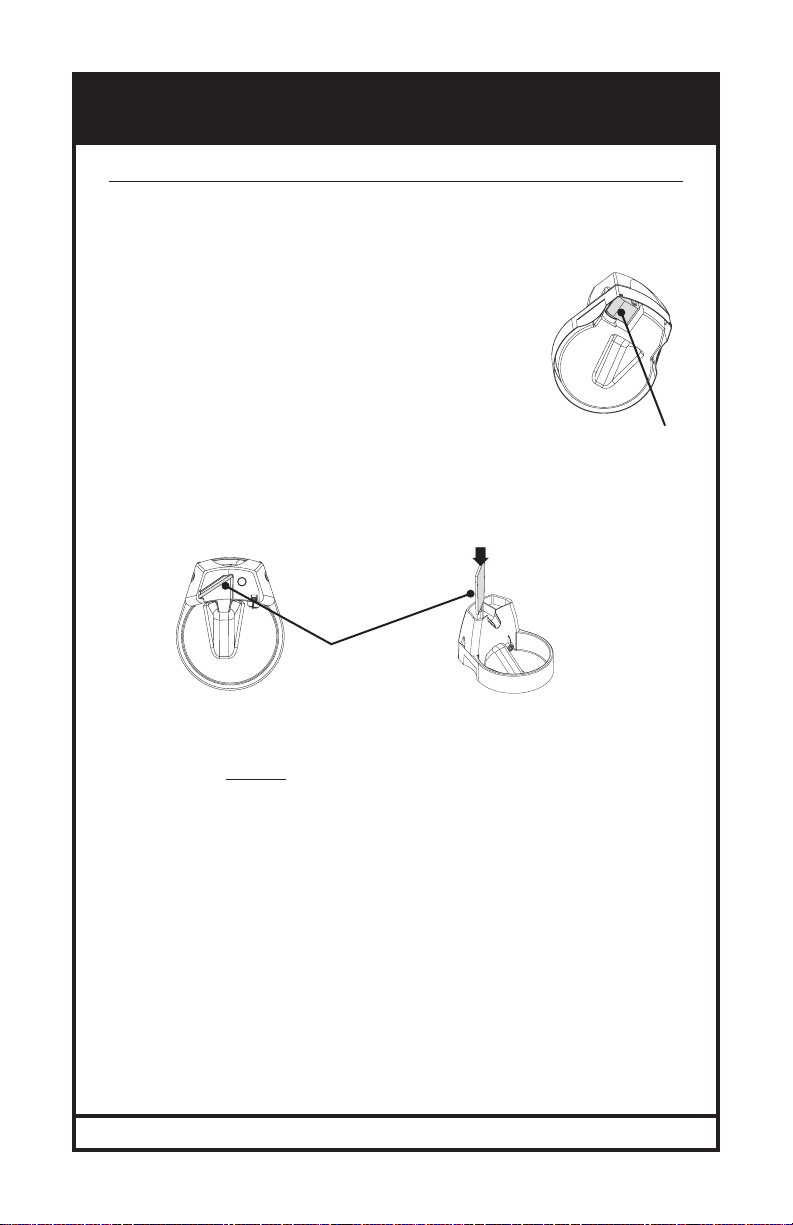
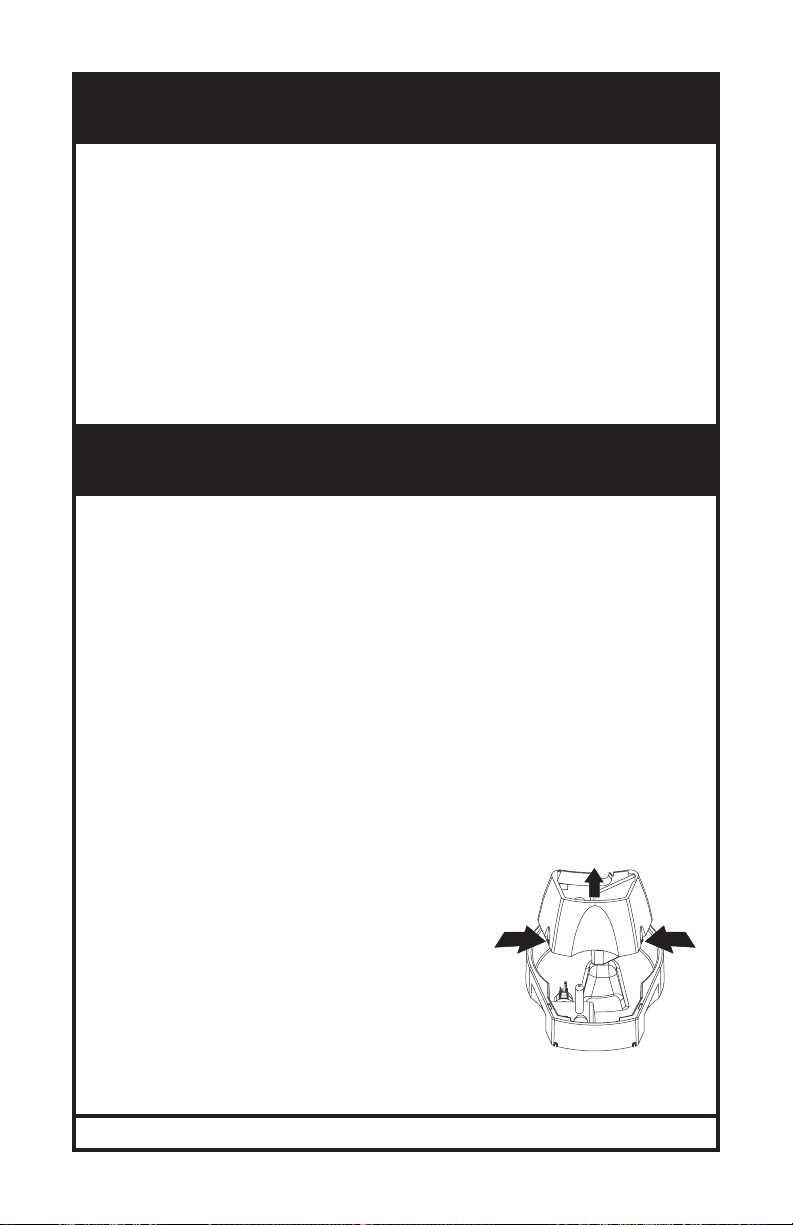
IMPORTANT: Motor must be cleaned regularly or the
5)
warranty may be voided!
Turn the bowl over and unlock the motor from its
a)
cavity by slipping your nger into the indentation
behind the motor (Fig. 4a) and pulling that end of the
motor out toward you, so that it has turned a quarter
of a turn (Fig. 4b). Do not attempt to remove motor
without turning it 90 degrees, this may damage the
fountain and cause a leak.
Now that the motor is unlocked, remove it from the
b)
fountain. If you nd this difcult, you can push the
motor out from the bowl side.
Carefully lift the impeller (the white “propeller”) out
c)
of the motor. It should slide out with no resistance.
Remove any hair tangled around it and wash it with
the rest of the parts.
Fig. 4a
Fig. 4b
Pour soapy water inside the motor cavity and clean
d)
it with a small round bristle brush (Cleaning Kits are
available). Rinse well and replace the impeller after it
is cleaned.
Hand wash the rest of the fountain
6)
Fig. 5
parts in soapy water and rinse
well. You may place items in the
dishwasher, but if your dishwasher
is too hot - the plastic parts can be
damaged. Use a longer bristle brush
to clean the square discharge tube in
the lter housing. (See Fig. 5)
Square
Discharge Tube
www.petsafe.net
7
Page 8

FOUNTAIN REASSEMBLY
Turn the bowl upside down. Reattach the motor by pushing the
1)
threads of the motor through the hole in the bowl. The motor
goes in at a right angle to the bowl, see Figures 6a & 6b. If
you cannot turn the motor into its resting position (Fig. 6b), the
motor is not pushed into the hole as far as it will go.
Fig. 6a Fig. 6b
After turning the motor a quarter turn, it should now be even
2)
with the bottom of the bowl (Fig. 6b). Turn the bowl back over.
Place the stator over the exposed portion of the motor found in
3)
the bowl. (See Fig. 7)
Fig. 7
STATOR
Join the ow control knob and stator together by placing the
4)
tabs of the knob into the groove of the stator. (See Fig. 8)
Fig. 8
TABS
HOLD THESE PARTS IN PLACE with one
5)
GROOVE
Fig. 9
hand while attaching the housing with the
other hand (Fig 9). Attach the housing by
sliding the cutout in the wall of the housing
down in between the control knob and stator.
The housing will click into place, when the
side tabs are inserted in the bowl.
8
www.petsafe.net
Page 9
FOUNTAIN REASSEMBLY
6)
Place the fountain in desired location. Make sure to use a
protective surface, such as a towel or place mat, to protect
your oors from splashing or dripping from your pet.
7)
Replace the lter and ll the housing and bowl with water.
Replace the lid.
8)
Before you plug the fountain in, make sure your hands and the
cord are dry. Check the cord for any damage before plugging
in the fountain. Plug the fountain into an electrical outlet.
THE FOUNTAIN AND YOUR
ENVIRONMENT
If you live in a humid environment and have problems with mold or
algae, soak all the parts in a diluted bleach solution for about 10
minutes after regular cleaning. Use a 10% bleach and 90% water
solution. Pour some of the bleach solution down into the motor cavity
too. This is an excellent way to disinfect the fountain. However, you
must be sure to rinse all the parts thoroughly in only water to remove
all the chlorine.
If you have hard water, you may start to see white mineral deposits
on or inside the motor. This can eventually prevent the impeller from
turning properly. To avoid having to replace the motor, please take
the following steps:
1)
Clean the motor more frequently than you have in the past;
or
2)
Clean the motor with a vinegar solution (20% White Vinegar
and 80% Water) and let the solution soak for several
minutes down inside the motor cavity; or
3)
Use bottled water instead of faucet water.
www.petsafe.net
9
Page 10

TIPS ON USE
When being introduced to the Drinkwell® Pet Fountain, your pet
may be cautious of this new and unusual object. After beginning
operation of your fountain, simply allow your pet to adjust at his or
her own pace. Some pets may take several days or longer to begin
use, while others will start right away.
Your pet may prefer that the fountain be placed away from their
normal feeding area. Try placing it in another location, such as a
different area of the kitchen or in a bathroom or utility room.
Add ice cubes to the bowl for refreshing, ice-cold running water!
CE COMPLIANCE & RECYCLING
This equipment complies with the EMC and Low Voltage
Directives. Unauthorized changes or modications to
the product that are not approved by Radio Systems®
Corporation may violate EU regulations, could void the
user’s authority to operate the equipment, and will void the
warranty.
10
The Declaration of Conformity can be found at:
http://www.petsafe.net/customercare/eu_docs.php
Important Recycling Advice
Please respect the Waste Electrical and Electonic
Equipment regulations in your country. This equipment
must be recycled. If you no longer require this equipment,
do not place it in the normal municipal waste system.
Please return it to where it was purchased in order that
it can be placed in our recycling system. If this is not
possible, please contact the Customer Care Centre for
further information.
www.petsafe.net
Page 11

MANUFACTURER’S SAFETY
INSTRUCTIONS
It is not recommended that any appliance be left running unattended for
1)
a prolonged period of time as the water may get consumed or evaporate
and cause the motor to run dry.
Do not allow pets or children to chew on or swallow any parts. If you are
2)
concerned about the power cord, purchase a cord conduit (a hard plastic
protector) at any hardware store.
Standard Safety Precautions
3)
Do not attempt repairs on the motor
yourself. Return it under the cover
of the warranty.
If the plug of this device gets wet,
turn off the electricity to that outlet.
Do not attempt to unplug.
To avoid the possibility of the plug or
outlet getting wet, the outlet should
always be above the level of the
fountain.
Exam i ne this ap pliance af ter
installation. It should not be plugged
in if there is water on the cord or
plug.
Do not operate any appliance if it
has a damaged cord or plug, or
if it is malfunctioning or has been
damaged.
If an extension cord is necessary,
a cord with a proper rating should
be used.
FOR INDOOR USE ONLY
The electrical use of this appliance is
6 watts.
Close supervision is necessary when
any appliance is used by or near
children.
Always unplug any appliance when not
in use, before putting on or taking off
parts, and before cleaning. Never pull
on an electrical cord to remove from
the outlet.
Do not use appliance for anything
other than intended use. The use of
attachments not recommended or
sold by the manufacturer may cause
an unsafe condition. Do not modify
the unit.
Do not install or st ore appliance
where it will be exposed to weather or
temperatures below freezing.
Rea d and obse rve all im portan t
notices on the appliance and in the
packaging.
Some animals have been known to be sensitive to plastic food and water
4)
containers. If your animal shows signs of an allergic reaction to the plastic,
please discontinue use until you have consulted with your veterinarian.
www.petsafe.net
11
Page 12

U.S. Patents No. 5,799,609 and 5,842,437
FRANÇAIS
GARANTIE
Pour bénécier pleinement de votre garantie, veuillez
enregistrer votre dans les 30 jours sur le site
www.petsafe.net. Grâce à cet enregistrement et en conservant
le reçu, votre produit sera totalement couvert par notre
garantie. Si vous avez la moindre question, veuillez contacter
ntore Service clientèle, nous serons heureux de vous aider.
Enn, vous pouvez avoir la certitude que PetSafe® ne
communique jamais les informations personnelles de ses
clients à des tiers. Une description complète de la garantie est
disponible sur le site Internet www.petsafe.net.
Pour connaître les numeros de téléphone du Service clientèle,
visitez notre site Internet www.petsafe.net.
Table des matières
Garantie..............................................................................
Consignes de Sécurité.......................................................
Contenu du kit....................................................................
Caractéristiques.................................................................
Mode D’emploi...................................................................
Nettoyage de la fontaine....................................................
Réassemblage de la fontaine.............................................
Fontaine et votre environnement.......................................
Aides d’utilisation...............................................................
CE Conformité et recycler..................................................
Consignes de sécurité du fabricant....................................
12
www.petsafe.net
12
13
14
14
15
16
18
19
20
20
21
Page 13

U.S. Patents No. 5,799,609 and 5,842,437
CONSIGNES DE SÉCURITÉ
INFORMATIONS RELATIVES AUX; RISQUES D”INCENDIE,
D’ELECTROCUTION OU DE BLESSURES CORPORELLES.
1)
Lire toutes les consignes avant d'utiliser cet appareil.
2)
Pour réduire le risque de blessures, il faut exercer une
surveillance étroite est requise lorsque l'appareil est utilisé à
proximité d'enfants.
3)
Utiliser uniquement les accessories recommandés ou vendus
par le fabricant.
4)
Ne pas utiliser à l'extérieur. RÉSERVÉ EXCLUSIVEMENT À
L'USAGE INTÉRIEUR.
5)
Ne pas débrancher en tirant sur le cordon d'alimentation. Pour
débrancher, saisir la che et non le cordon.
6)
Ne jamais utiliser un appareil si la che ou le cordon
d'alimentation sont abîmés, si l'appareil présente un problème de
fonctionnement, s'il est tombé par terre ou s'il a été endommagé
de quelque manière que ce soit. Retournez l'appareil au centre
de service agréé le plus proche de chez vous pour révision,
réparation ou réglage des pièces électriques et mécaniques.
7)
Toujours débrancher les appareils électriques lorsqu'on ne les
utilise pas, avant d'ajouter ou d'enlever des pièces ou avant de
les nettoyer. Ne jamais tirer sur un cordon électrique pour le
débrancher d'une prise.
8)
Dans le cas d’un appareil portatif - Pour réduire les risques
d'électrocution, ne pas installer ou entreposer l'appareil à un
endroit d’oú il pourrait tomber ou être poussé dans une baignoire
ou un lavabo.
CONSERVER CES CONSIGNES
www.petsafe.net
13
Page 14
Contenu du kit
U.S. Patents No. 5,799,609 and 5,842,437
Boîtier (du filtre)
Bol
Caractéristiques
FACULTATIF : Le
Réservoir supplémentaire
de Capacité (1,5 L)
Le système breveté
d’écoulement libre
incite les animaux à
boire plus d’eau
Couvercle du
boîtier
Stator
Pompe / Moteur
Bouton de réglage
du débit
Le filtre à charbon
remplaçable supprime les
mauvais goûts et odeurs
Débit réglable
La rampe réduit les
éclaboussures du à
l’écoulement de l’eau
Capacité de 1,5 L
14
www.petsafe.net
Page 15

MODE D’EMPLOI
NE PAS FAIRE FONCTIONNER À SEC
RÉSERVÉ EXCLUSIVEMENT À L’USAGE INTÉRIEUR
Votre fontaine est livrée assemblée et prête à l’emploi.
1)
Comme pour tout appareil électrique, vériez si le
cordon d’alimentation présente des coupures ou
autres signes d’endommagement avant de l’utiliser.
2)
Inspectez le fond de la fontaine pour voir si le moteur
est solidement xé (Fig. 1).
3)
Retirez le couvercle du boîtier et insérez-y le ltre
à charbon. Le ltre s’installe en diagonale dans les
deux fentes triangulaires, à l’intérieur du boîtier.
Insérez le ltre, partie étroite vers le bas et côté noir
vers l’avant de la fontaine (vers le bec verseur).
Le ltre glisse facilement en place, mais veillez à
l’enfoncer jusqu’au bout (voir Fig. 2a et 2b).
Fig. 1
Le moteur
Fig. 2a
Le filtre
REMARQUE : Rincez complètement le ltre sous l’eau froide avant de l’installer dans la
fontaine. Cela élimine les poussières de charbon détachées, ce qui ne pose aucun danger.
Il est possible qu’une petite quantité de poussière de charbon se détache pendant la durée
de vie du ltre. Ce phénomène est normal et ne pose aucun danger pour les animaux.
4)
Installez la fontaine à l’endroit désiré. Si vous la posez sur une
Fig. 2b
moquette, du carrelage ou un parquet en bois, mettez un tapis de
protection ou tout autre type de toile solide et imperméable pour
protéger votre sol des éclaboussures ou des gouttes faites par votre
animal.
5)
Remplissez l’appareil d’eau. Versez l’eau dans le boîtier du ltre et
dans l’écuelle, ce qui préparera la pompe. Remettez le couvercle en
place.
6)
Avant de brancher la fontaine, assurez-vous que vos mains et le
cordon sont secs. Branchez l’appareil dans une prise murale.
www.petsafe.net
15
Page 16

7)8)Réglez l’écoulement avec le bouton de contrôle du débit situé à
côté de la rampe, à l’intérieur de l’écuelle. Lorsque le bouton est
en position 10 heures, l’écoulement est le plus faible. Lorsque le
bouton est en position 2 heures, l’écoulement est le plus fort.
Ajoutez de l’eau dans l’écuelle si nécessaire. Ne laissez pas le
niveau d’eau descendre au dessous du bouton de contrôle du débit
pour éviter toute surchauffe du moteur. Ne soulevez jamais une
fontaine pleine en la tenant par le boîtier, mais en plaçant les deux
mains sous sa base et en la tenant fermement par les côtés.
NETTOYAGE DE LA FONTAINE
Nettoyer la fontaine pour qu’elle fonctionne convenablement !
Filtres : à changer toutes les 2 à 4 semaines.
1)
Les ltres doivent être remplacés toutes les deux à quatre semaines.
Remplacez-les plus souvent si plusieurs animaux boivent à la fontaine
ou s’ils salivent beaucoup.
2)
Les ltres sont en supplément de la fontaine. Ils ne sont pas
nécessaires au fonctionnement de l’appareil, mais ils assurent une
plus grande propreté de l’eau.
3)
Les ltres peuvent être rincés pendant le nettoyage de la fontaine. Ne
lavez jamais un ltre à l’eau savonneuse, car vous ne pourriez pas
éliminer les résidus de savon.
Fontaine : à nettoyer une fois par semaine
1)
Débranchez la fontaine, retirez le
couvercle du boîtier et enlevez le ltre.
2)
Videz l’eau de la fontaine.
3)
Retirez le boîtier en appuyant sur les
ergots situés sur les côtés et en le
soulevant (voir Fig. 3).
4)
Le bouton de contrôle du débit et le stator ne sont pas xes et se
détachent lorsque le boîtier est retiré.
16
www.petsafe.net
Fig. 3
Page 17

NETTOYAGE DE LA FONTAINE
5)
IMPORTANT : Le moteur doit être nettoyé régulièrement pour
que la garantie reste valide !
a)
Retournez l’écuelle et délogez le moteur de sa cavité
en glissant le doigt dans l’indentation située derrière
le moteur (g. 4a) et soulevant cette partie du moteur
vers vous an de le faire pivoter d’un quart de tour
(g. 4b). N’essayez pas de déloger le moteur sans le
faire pivoter de 90 degrés pour éviter d’endommager
la fontaine et de provoquer une fuite.
b)
Une fois le moteur débloqué, vous pouvez le dégager
de la fontaine. Si vous n’y arrivez pas, vous pouvez
pousser sur le moteur depuis le côté de l’écuelle.
c)
Soulevez prudemment la turbine (roue à hélice
blanche) pour la dégager du moteur. Elle devrait
n’offrir aucune résistance. Enlevez les poils qui s’y
sont emmêlés et lavez-la avec les autres pièces.
d)
Versez de l’eau savonneuse dans la cavité du
moteur et nettoyez-la avec une petite brosse ronde
à poils raides (kits de nettoyage disponibles). Rincez
soigneusement et remettez en place la turbine propre.
Fig. 4a
Fig. 4b
Lavez les autres pièces de la
6)
fontaine à l’eau savonneuse et rincez
soigneusement. Vous pouvez placer
ces pièces dans le lave-vaisselle,
mais si l’eau est trop chaude, les
pièces en plastique risquent d’être
endommagées. Utilisez une brosse à
poils durs plus longue pour nettoyer
le tube de vidange carré dans le
boîtier (voir g. 5).
www.petsafe.net
Fig. 5
Tube de vidange
carré
17
Page 18

RÉASSEMBLAGE DE LA FONTAINE
Retournez l’écuelle à l’envers. Rattachez le moteur en poussant
1)
ses parties letées dans la cavité de l’écuelle. Le moteur se place
à angle droit par rapport à l’écuelle (voir gures 6a et 6b). Si vous
n’arrivez pas à faire pivoter le moteur dans sa position nale (g.
6b), cela veut dire que vous n’avez pas poussé le moteur à fond
dans la cavité.
Fig. 6a
Après avoir pivoté d’un quart de tour, le moteur devrait être à niveau
2)
avec le fond de l’écuelle (g. 6b). Retournez l’écuelle.
Placez le stator par-dessus la partie exposée du moteur, dans
3)
l’écuelle (voir g. 7).
Fig. 7
Fig. 6b
STATOR
Fixez le bouton de contrôle du débit au stator en faisant glisser les
4)
languettes du bouton dans la rainure du stator (voir g. 8).
Fig. 8
LANGUETTES
MAINTENEZ CES PIÈCES EN PLACE d’une
5)
RAINURE
Fig. 9
main tout en rattachant le boîtier de l’autre
(g. 9). Fixez le boîtier en faisant glisser sa
découpe entre le bouton de contrôle et le
stator. Le boîtier s’encliquette en place lorsque
ses languettes latérales se glissent dans les
fentes de l’écuelle.
18
www.petsafe.net
Page 19

6)
Une fois le boîtier rattaché, placez la fontaine à l’endroit désiré.
Veillez à utiliser un tapis de protection si vous la posez sur un
parquet de bois ou une moquette.
Remettez le ltre en place et remplissez le boîtier et l’écuelle
7)
d’eau. Remettez le couvercle.
Avant de brancher la fontaine, assurez-vous que vos mains
8)
et le cordon sont secs. Vériez l’état du cordon avant de
brancher la fontaine. Branchez-la dans une prise murale.
LA FONTAINE ET VOTRE
ENVIRONNEMENT
Si vous vivez dans une région humide propice aux problèmes
de moisissure ou d’algues, faites tremper toutes les pièces de
la fontaine dans une solution javellisante pendant environ 10
minutes après le nettoyage normal. Pour cette solution, diluez
10 % d’eau de Javel dans 90 % d’eau. Versez aussi un peu de
cette solution dans la cavité du moteur. C’est un excellent moyen
de désinfecter la fontaine. Vous devez toutefois veiller à bien
rincer toutes les pièces à l’eau pure an d’éliminer toute trace de
chlore.
Si votre eau est calcaire, il est possible que vous remarquiez des
dépôts minéraux sur ou dans le moteur. Ces dépôts peuvent nir
par empêcher la bonne rotation de l’hélice. Pour éviter de devoir
remplacer le moteur, prenez les mesures suivantes :
1)
Nettoyez le moteur plus souvent qu’auparavant ; ou
2)
Nettoyez le moteur avec une solution vinaigrée (20 %
de vinaigre blanc et 80 % d’eau) et laissez cette solution
pendant plusieurs minutes dans la cavité du moteur ; ou
3)
Utilisez de l’eau en bouteille au lieu de l’eau du robinet.
www.petsafe.net
19
Page 20
AIDES D’UTILISATION
Lorsque vous utilisez la fontaine Drinkwell® Original pour la
première, votre animal peut être intimidé par ce nouvel objet
inhabituel. Au début, il suft simplement de permettre à votre
animal de s’habituer la fontaine à son rythme. Il faut parfois
plusieurs jours voire davantage de temps à certains animaux avant
qu’ils ne commencent à l’utiliser.
Votre animal préférera peut-être que la fontaine soit éloignée de
l’endroit où sa nourriture est placée normalement. Essayer de la
placer ailleurs, comme dans la buanderie, la salle de bain ou dans
un autre coin de la cuisine.
Ajouter des glaçons pour obtenir de l’eau fraîche!
CE CONFORMITÉ ET RECYCLER
Ce matériel est conforme aux directives européennes
relatives à la conformité électromagnétique et à la basse
tension. Toute modication du dispositive non autorisée par
Radio Systems® Corporation peut enfreindre les directives
européennes, peut annuler la capacité de l’acheteur à
utiliser le dispositif et annule la garantie.
20
Vous pouves trouver la déclaration de conformité sur le lien
suivant: http://www.petsafe.net/customercare/eu_docs.php.
Avis important concernant le recyclage
Veuillez vous conformer aux réglementations relatives aux
déchets d’équipements électriques et électroniques en
vigueur dans votre pays. Cet équipement doit être recyclé.
Si vous n’avez plus besoin de cet équipement, ne l’éliminez
pas en passant par le circuit ordinaire d’élimination des
déchets municipaux. Veuillez le renvoyer au magasin où
vous l’avez acheté an que nous puissions le revaloriser
dans notre système de recyclage. Si ce n’est pas
possible, veuillez contacter le Service clientèle pour plus
d’informations.
www.petsafe.net
Page 21

CONSIGNES DE SÉCURITÉ DU
FABRICANT
Si la capacité de la nouvelle génération de fontaines Drinkwell® Original
1)
est maintenant accrue, il n’est toutefois pas recommandé de la laisser
en marche sans surveillance pendant une période prolongée car
l’eau peut être consommée ou s’évaporer, ce qui risque d’entraîner le
fonctionnement à sec du moteur.
Ne pas laisser les animaux ni les enfants mâcher ou avaler les pièces.
2)
Si nécessaire, faire passer le cordon électrique dans un tube protecteur
que l’on peut se procurer dans une quincaillerie (protection en plastique
dur).
Consignes de sécurité élémentaires.
3)
Ne pas essayer de réparer soi-même le
moteur. Retourner-le en garantie.
La consommation électrique de cet appareil
est de 6 watts.
Si la fiche du dispositif est mouillée,
couper l’alimentation électrique de cette
prise. Ne pas essayer de débrancher
la che.
Pour éviter de mouiller la che ou la prise
électrique, cette dernière doit toujours
être placée au-dessus du niveau de la
fontaine.
Examiner l’appareil après son installation.
Ne pas le brancher si de l’eau se trouve
sur le cordon ou sur la che électrique.
Ne pas faire fonctionner l’appareil si
son cordon ou sa che électrique sont
endommagés, ou s’il fonctionne mal ou
a été endommagé.
Si vous devez d’utiliser une rallonge
électrique, veillez à en choisir une
avec des spécifications électriques
appropriées.
Certains animaux présentent une sensibilité aux récipients alimentaires
4)
Une supervision étroite est requise lorsque
l’appareil est utilisé par ou près d’enfants.
Toujours débrancher les appareils électriques
lorsqu’on ne les utilise pas, avant d’ajouter
ou d’enlever des pièces ou avant de les
nettoyer. Ne jamais tirer sur un cordon
électrique pour le débrancher de la prise.
Ne pas utiliser l’appareil à des ns autres
que celles auxquelles il n’est pas destinées.
L’utilisation d’accessoires non recommandés
ni vendus par le fabricant peut présenter un
danger. Ne pas modier l’appareil.
Ne pas installer ni entreposer l’appareil
dans un lieu exposé aux éléments ni par
température de gel.
RÉSERVÉ EXCLUSIVEMENT À L’USAGE
INTÉRIEUR.
Lire et respecter toutes les consignes
importantes gurant sur l’appareil.
en plastique. Si vous observez chez votre animal des symptômes de
réaction allergique au plastique, veuillez interrompre l’utilisation de
l’appareil jusqu’à ce que vous ayez consulté votre vétérinaire.
www.petsafe.net
21
Page 22
U.S. Patents No. 5,799,609 and 5,842,437
NEDERLANDS
GARANTIE
Om volop van uw garantie te kunnen genieten, verzoeken
wij u uw product binnen 30 dagen te registreren via
www.petsafe.net. Door deze registratie, samen met het
bewaren van uw aankoopbewijs, zult u kunnen genieten
van de volledige garantie en zullen we u, wanneer u het
nodig acht contact op te nemen met de klantendienst,
sneller kunnen helpen. Belangrijk: PetSafe® zal uw
waardevolle informatie nooit aan derden geven of
verkopen. De volledige informatie over de garantie is
beschikbaar op www.petsafe.net.
Voor een lijst van telefoonnummers van de Klantenservice
bezoekt u onze website op www.petsafe.net.
Inhoud
Garantie..............................................................................
Belangrijke veiligheidsinstructies.......................................
Onderdelen.........................................................................
Kenmerken.........................................................................
Bedieningsinstructies.........................................................
Reinigen van de fontein......................................................
Opnieuw monteren van de fontein.....................................
De fontein en uw omgeving................................................
Gebruikstips.......................................................................
CE Conformiteit en Recyclage-Informatie..........................
Veiligheidsinstructies van de fabrikant...............................
22
www.petsafe.net
22
23
24
24
25
26
28
29
30
30
31
Page 23

U.S. Patents No. 5,799,609 and 5,842,437
BELANGRIJKE
VEILIGHEIDSINSTRUCTIES
Instructies met betrekking tot: brandrisico,
elektrische schok, of letsel aan personen
Lees alle instructies vóór het apparaat te gebruiken.
1)
Om het risico van letsel te verminderen is nauwkeurige supervisie
2)
noodzakelijk wanneer het apparaat in de buurt van kinderen wordt
gebruikt.
Gebruik alleen accessoires die door de fabrikant aanbevolen of
3)
verkocht worden.
Niet buitenshuis gebruiken. ALLEEN BESTEMD VOOR GEBRUIK
4)
BINNENSHUIS.
Niet aan het snoer trekken om de stekker uit het stopcontact te halen.
5)
Om de stekker uit het stopcontact te trekken, de stekker, niet het
snoer, vastpakken.
Apparaten niet gebruiken als het snoer of de stekker beschadigd is
6)
of nadat het apparaat niet meer naar behoren werkt of gevallen is, op
enige andere wijze beschadigd is. Onmiddellijk het klantencentrum
van uw land bellen voor verdere instructies.
Desenchufe siempre un aparato que no está en uso, antes de colocar
o quitar partes, y antes de limpiarlo. Nunca jale del cordón para
quitarlo del tomacorriente.
Voor een draagbaar apparaat – Om het risico van elektrische schok
7)
te verminderen, het apparaat niet ergens zetten of opslaan waar het
kan vallen of in een bad of gootsteen kan worden getrokken.
Altijd de stekker uittrekken als een apparaat niet gebruikt wordt,
8)
voordat u onderdelen aanbrengt of verwijdert en voor het reinigen.
Nooit aan het snoer trekken om de adapter uit de wandcontactdoos
trekken.
BEWAAR DEZE INSTRUCTIES
www.petsafe.net
23
Page 24

Onderdelen
U.S. Patents No. 5,799,609 and 5,842,437
Behuizing
Kom
Kenmerken
FACULTATIEF:
Bijkomend Capaciteit
Reservoir (1,5 L)
Het gepatenteerde
systeem van stromend
water moedigt
huisdieren aan om meer
te drinken
Deksel
Stator
Motor/Pomp
Stroomregelknop
Vervangbare houtskoolfilter
verwijdert slechte smaken
en geuren
Bijstelbare
stroomregeling
Waterhelling
vermindert
spattend water
24
Kapaciteit 1,5 L
www.petsafe.net
Page 25

BEDIENINGSINSTRUCTIES
NIET DROOG LATEN LOPEN
ALLEEN BESTEMD VOOR GEBRUIK BINNENSHUIS
1)
Zoals met elk elektrisch apparaat dient u het elektrisch
snoer op scheuren of schade te controleren vóór het te
gebruiken.
2)
Inspecteer de onderkant van de fontein om er zeker van
te zijn dat de motor veilig is bevestigd. (afb. 1a)
3)
Verwijder het behuizingsdeksel en steek de
houtskoollter in. De lter zal diagonaal in de twee
driehoekige gleuven in de behuizing passen. De lter
past erin met de smalle zijde naar beneden, met de
zwarte kant naar de voorkant van de fontein gericht
(naar de tuit toe). De lter zal gemakkelijk op zijn plaats
schuiven, maar zorg ervoor dat deze helemaal naar
beneden is gedrukt. (Zie afb. 2a en 2b)
afb. 1
MOTOR
afb. 2a
FILTER
NB: Reinig de lter grondig onder koel water vóór deze in de fontein
te plaatsen. Dit zal los houtskoolstof, dat schadeloos is, verwijderen.
Het kan zijn dat de lter altijd een beetje houtskool zal verliezen. Dit is
normaal en schadeloos voor uw huisdier.
Plaats de fontein op de gewenste plaats. Als u de fontein op een tapijt,
4)
tegels of een houten vloer plaatst, gebruik dan een beschermende mat
of ander duurzaam, waterbestendig oppervlak om uw vloeren tegen
spatten en druipen van uw huisdier te beschermen.
Vul het apparaat met water. Dit geldt zowel voor de kom en de
5)
lterbehuizing. Hierdoor wordt de pomp gevoed. Breng het deksel
opnieuw aan.
6)
Voordat u de stekker van de fontein insteekt, moet u er op letten dat het
snoer en uw handen droog zijn. Steek de stekker van de fontein in een
elektrische aansluiting.
afb. 2b
www.petsafe.net
25
Page 26

BEDIENINGSINSTRUCTIES
7)8)Stel de gewenste stroomsnelheid in met de stroomregelknop die zich
naast de helling binnen in de kom bevindt. Wanneer de knop op 10 uur
staat, is de stroming op zijn laagst. Wanneer de knop op 2 uur staat, is
de stroming op zijn hoogst.
Voeg water bij de kom zoals nodig is. Laat het waterniveau niet onder
de stroomregelknop komen want dit kan de motor verbranden. Nooit
een vol fontein optillen bij de lterbehuizing. Til de fontein alleen op
door beide handen onder de basis van de fontein te plaatsen en de
zijwanden beet te pakken voor een stevige houvast.
REINIGEN VAN DE FONTEIN
Filters: om de 2 tot 4 weken veranderen
1)
Filters dienen om de twee tot vier weken veranderd te worden. Vervang
de lters vaker wanneer u de fontein voor meerdere huisdieren
gebruikt of voor huisdieren die veel speeksel produceren.
2)
Filters zijn een extra kenmerk van de fontein. Ze zijn niet nodig voor
de normale werking van de fontein maar ze houden het fonteinwater
schoner.
3)
Filters kunnen afgespoeld worden als de fontein wordt gereinigd.
Nooit de lter met zeepachtig water reinigen; de zeepresten kunnen
niet worden verwijderd.
Fontein: wekelijks reinigen
Trek de stekker van de fontein uit het
1)
stopcontact, verwijder het deksel van de
behuizing en verwijder de lter.
Giet het water uit de fontein.
2)
Verwijder de lterbehuizing door de tabs
3)
aan de zijkanten in te drukken en de
behuizing op te tillen. (Zie afb. 3)
De stroomregelknop en stator zijn niet bevestigd en komen vrij
4)
wanneer de behuizing verwijderd is.
26
www.petsafe.net
afb. 3
Page 27
REINIGEN VAN DE FONTEIN
5) BELANGRIJK: De motor moet regelmatig gereinigd worden of de
garantie vervalt!
a)
Draai de kom om en ontgrendel de motor van de
motorruimte door uw vinger in de inkerving achter
de motor te steken (afb. 4a) en door dat uiteinde
van de motor naar u toe te trekken, zodat het
een kwartdraai draait (afb. 4b). Niet proberen de
motor te verwijderen zonder deze 90 draden te
draaien; dit kan de fontein beschadigen en een
lekkage veroorzaken.
b)
Nu dat de motor ontgrendeld is, verwijdert u deze
van de fontein verwijderen. Als u het moeilijk
vindt om dit te doen, kunt u de motor naar buiten
duwen van de komzijde.
c)
Til voorzichtig de rotor (de witte propeller) op
uit de motor. Die zou er zonder moeite moeten
uitglijden. Verwijder haar dat er eventueel
rondgedraaid zit en was de rotor met de andere
onderdelen.
afb. 4a
afb. 4b
d)
Giet zeepachtig water in de motorruimte en
reinig met een kleine, harde, ronde borstel.
(Reinigingssets zijn beschikbaar.) Goed spoelen
en de rotor opnieuw aanbrengen nadat deze
gereinigd is.
Was de overige onderdelen van de
6)
fontein met de hand met zeepachtig
water en spoel goed af. U kunt
onderdelen in de vaatwasmachine
plaatsen, maar als de vaatwasmachine
te heet is, kunnen de plastic onderdelen
beschadigd worden. Gebruik een
borstel met langere stekelharen
om de vierkanten afvoerbuis in de
lterbehuizing te reinigen. (Zie afb. 5)
www.petsafe.net
afb. 5
Vierkanten
afvoerbuis
27
Page 28

OPNIEUW MONTEREN VAN DE FONTEIN
Draai de kom ondersteboven. Breng de motor opnieuw aan door de
1)
bedrading ervan door het gat in de kom te duwen. De motor wordt in
een rechte hoek met de kom ingebracht, zie afbeeldingen 6a en 6b. Als
u de motor niet in de motorruimte kunt draaien (afb. 6b) betekent dit dat
de motor niet ver genoeg in het gat geduwd is.
afb. 6a afb. 6b
Nadat de motor een kwartdraai werd gedraaid, zou deze nu gelijk
2)
moeten zijn met de onderkant van de kom (afb. 6b). Draai de kom
opnieuw om.
3)
Plaats de stator over het blootgestelde gedeelte van de motor in de
kom. (Zie afb. 7)
afb. 7
STATOR
Voeg de stroomregelknop en de stator samen door de tabs van de knop
4)
in de groef van de startor te plaatsen. (Zie afb. 8)
afb. 8
TABS
HOUD DEZE ONDERDELEN OP HUN PLAATS met
5)
één hand terwijl u met de andere hand de behuizing
aanbrengt (afb. 9). Breng de behuizing aan door het
blad met de uitsnijding in de wand van de behuizing
te schuiven, naar beneden toe tussen de regelknop
en de stator. De behuizing zal op zijn plaats klikken
wanneer de tabs aan de zijkanten in de gleuven in
de kom schuiven.
28
www.petsafe.net
GROEF
afb. 9
Page 29

6)
Zodra de behuizing bevestigd is, plaatst u de fontein op
de gewenste plaats. Zorg ervoor dat er een beschermend
oppervlak onder de fontein gebruikt is als deze op een houten
vloer of vloer met tapijt wordt gezet.
Breng de lter opnieuw aan en vul de behuizing en kom met
7)
water. Breng het deksel opnieuw aan.
Voordat u de stekker van de fontein in het stopcontact steekt,
8)
moet u er op letten dat uw handen en het snoer droog zijn.
Controleer het snoer op enige schade voor de fontein in te
steken. Steek de stekker van de fontein in een elektrische
aansluiting.
DE FONTEIN EN UW OMGEVING
Als u in een vochtige omgeving woont en problemen hebt met
schimmel en algen, dompel dan gedurende 10 minuten na een
gewone reinigingsbeurt alle onderdelen onder in een verdunde
bleekwateroplossing. Gebruik een oplossing met 10% bleekwater
en 90% water. Giet een gedeelte van de bleekwateroplossing
ook in de motorholte. Dit is een uitstekende manier om de
fontein te desinfecteren. U dient er echter zeker van te zijn dat u
alle onderdelen grondig reinigt in alleen water om alle chloor te
verwijderen.
Als u hard water hebt, kan het zijn dat u witte mineraalafzettingen
op of binnen de motor ziet. Dit kan er uiteindelijk toe leiden dat de
rotor niet goed meer ronddraait. Om te voorkomen dat u de motor
moet worden vervangen, dient u het volgende te doen:
Reinig de motor vaker dan u in het verleden hebt gedaan; of
1)
Reinig de motor met een azijnoplossing (20% witte azijn en
2)
80% water) en laat de oplossen gedurende verschillende
minuten binnenin de motorruimte zitten; of
Gebruik essenwater in plaats van kraantjeswater.
3)
www.petsafe.net
29
Page 30

GEBRUIKSTIPS
Wanneer u uw huisdier het Drinkwell® Original fontein voor huisdieren
toont, kan het zijn dat uw huisdier argwanend staat tegenover dit
nieuwe en ongewone object. Nadat u uw fontein aanzet, moet
u uw huisdier zich laten aanpassen op zijn of haar tempo. Voor
sommige huisdieren duurt het verschillende dagen of langer voor ze
het beginnen gebruiken terwijl anderen het onmiddellijk beginnen
gebruiken.
Het kan zijn dat uw huisdier er de voorkeur aan geeft dat de fontein
weg van het normale voedingsgebied wordt gehouden. Probeer het
op een andere plaats te zetten, zoals in een verschillend gedeelte van
de keuken of in een badkamer of een opslagruimte.
Voeg ijsblokjes toe aan de kom voor verfrissend, ijskoud stromend
water!
CE CONFORMITEIT EN
RECYCLAGE-INFORMATIE
Deze apparatuur voldoet aan richtlijnen van de EMC en
de Lage Voltage Richtlijnen. Ongeoorloofde wijzigingen
of aanpassingen aan de apparatuur, welke niet zijn
geaccordeerd door de Radio Systems® Corporation,
kunnen leiden tot inbreuk op de EU richtlijnen, tot het
verbod op het gebruik van dit systeem en tot het nietig
verklaren van de garantie.
30
De Verklaring van Conformiteit kan vorden gevonden op:
http://www.petsafe.net/customercare/eu_docs.php
Belangrijk advies met betrekking tot hergebruik
Houd u aan de regelgeving met betrekking tot het
verwijderen van elektrische en elektronische apparaten.
Deze halsband moet worden ingeleverd. Als u de halsband
niet meer nodig hebt, gooi hem dan niet in de afvalbak.
Breng hem terug naar de plaats waar u hem hebt gekocht,
zodat de halsband kan worden hergebruikt. Als dit niet
mogelijk is, neem dan contact op met onze Klantendienst
voor meer informatie.
www.petsafe.net
Page 31

VEILIGHEIDSINSTRUCTIES VAN DE
FABRIKANT
Het is niet aanbevolen dat een apparaat gedurende een langere periode
1)
blijft aanstaan zonder supervisie omdat het water opgebruikt kan raken
of kan verdampen waardoor de motor droog draait.
Niet toelaten dat huisdieren of kinderen op kleine onderdelen kauwen
2)
of ze inslikken. Als u zich zorgen maakt over het stroomsnoer, koop dan
een snoerbeschermingsbuis (een harde plastic bescherming) bij om het
even welke ijzerhandel.
Standaard veiligheidsvoorzorgsmaatregelen
3)
Niet proberen om de motor zelf te
repareren. Retourneer de motor die door
garantie wordt gedekt.
Als de stekker van dit apparaat nat
wordt, zet dan de elektriciteit naar dit
stopcontact uit. Probeer niet de stekker
te verwijderen.
Om te voorkomen dat een stekker
of stopcontact nat wordt, moet het
stopcontact altijd boven het niveau van
de fontein liggen.
Onderzoek dit apparaat zorgvuldig
na de installatie. Het mag niet in een
stopcontact worden gestoken als er
water aanwezig is op het snoer of de
stekker.
Gebruik geen enkel apparaat als het
een beschadigd snoer of beschadigde
stekker heeft of als het niet naar behoren
functioneert of beschadigd is.
Als een verlengdraad nodig is, moet
een snoer met het juists toelaatbare
vermogen worden gebruikt.
Het elektrische gebruik van dit apparaat
bedraagt 6 watt.
Nauwkeurige supervisie is noodzakelijk
waneer een apparaat door of in de buurt van
kinderen wordt gebruikt.
Altijd de stekker van het apparaat uittrekken
als het apparaat niet in gebruik is, voordat
u onderdelen aanbrengt of verwijdert en
voor het reinigen. Nooit aan een elektrisch
snoer trekken om het uit een stopcontact te
verwijderen.
Het apparaat uitsluitend voor het bestemde
gebruik aan wenden. Het gebruik van
accessoires die niet door de fabrikant
aa nbev olen of ver kocht worde n kan
onveilige condities creëren. Geen wijzigingen
aanbrengen aan het apparaat.
Het apparaat niet installeren of opslaan daar
waar het blootgesteld wordt aan weer of
temperaturen onder het vriespunt.
ALLEEN BESTEMD VOOR GEBRUIK
BINNENSHUIS
Lees en neem alle belangrijke opmerkingen
op het apparaat en op de verpakking in
acht.
Sommige dieren kunnen gevoelig zijn voor plastic voedsel- en
4)
watercontainers. Als uw dier tekenen van een allergische reactie voor
plastic toont, staak dan het gebruik ervan tot u een dierenarts hebt
geraadpleegd.
www.petsafe.net
31
Page 32

U.S. Patents No. 5,799,609 and 5,842,437
ESPAÑOL
GARANTÍA
Para obtener la mayor protección de su garantía, por favor
registre su producto dentro de los 30 días posteriores a la
compra en www.petsafe.net. Al registrarse, disfrutará de
la garantía plena del producto y si tuviera necesidad de
contactar con el Centro de Atención al Cliente, podremos
ayudarle con mayor rapidez. Y lo que es más importante,
PetSafe® nunca le dará ni venderá su valiosa información
a nadie. La descripción completa de la garantía está
disponible en el sitio Web www.petsafe.net.
Para obtener un listado de los números de teléfono de los
Centros de Atención al Cliente visite nuestro sitio web en
www.petsafe.net.
Índice de contenidos
Garantía..............................................................................
Instrucciones Importantes de Seguridad...........................
Componentes....................................................................
Características...................................................................
Instrucciones de Operación................................................
Limpieza de la fuente.........................................................
Reensamblado de la fuente...............................................
La fuente y su ambiente.....................................................
Consejos para el uso.........................................................
Conformidad de CE y Reciclaje.........................................
Instrucciones de seguridad del fabricant...........................
32
www.petsafe.net
32
33
34
34
35
36
38
39
40
40
41
Page 33

U.S. Patents No. 5,799,609 and 5,842,437
INSTRUCCIONES IMPORTANTES DE
SEGURIDAD
INSTRUCCIONES REFERNTES A RIESGO DE INCENDIO;
CHOQUE ELÉCTRICA O LESIONES.
Lea todas las instrucciones antes de utilizar el aparato.
1)
Para reducir el riesgo de lesiones, es necesaria una
2)
supervisión estricta cuando se usa un aparato cerca de los
niños.
Use sólo accesorios recomendados o vendidos por el
3)
fabricante.
No use el aparato en el exterior. SÓLO PARA USO EN
4)
INTERIORES.
No lo desenchufe jalando el cordón. Para desenchufarlo,
5)
tire del enchufe, no del cordón.
No haga funcionar un aparato que tenga un cordón o un
6)
enchufe dañado, ni lo use después que funcione mal o que
se lo haya dejado caer o dañado de algún modo. Devuelva
el aparato al centro de servicio autorizado más próximo
para su examen, reparación o ajuste eléctrico o mecánico.
Desenchufe siempre un aparato que no está en uso, antes
7)
de colocar o quitar partes, y antes de limpiarlo. Nunca jale
del cordón para quitarlo del tomacorriente.
Para un aparato portátil - Para reducir el riesgo de
8)
descarga eléctrica, no coloque o guarde el aparato donde
pueda caerse o dejarse caer dentro de una bañera o
fregadero.
GUARDE ESTAS INSTRUCCIONES
www.petsafe.net
33
Page 34
Componentes
U.S. Patents No. 5,799,609 and 5,842,437
Caja
Tazón
Características
OPCIONAL:
Tanque adicional de
capacidad (1,5 L)
El chorro de caída
libre patentada atrae a
las mascotas a beber
más agua
Tapa de la caja
Estator
Motor / Bomba
Botón de control del
caudal
El filtro reemplazable de
carbón elimina sabores y
olores desagradables
Control de flujo
adjustable
La rampa de recepción
reduce la salpicadura
del agua que cae
Capacidad de 1,5 L
34
www.petsafe.net
Page 35

INSTRUCCIONES DE OPERACIÓN
¡NO LO DEJE FUNCIONAR EN SECO!
PARA USO EN EL INTERIOR SOLAMENTE
1)
Como con todos los aparatos eléctricos, compruebe
antes de usarlo si hay alguna desgarradura o un daño
en el cordón eléctrico.
2)
Inspeccione la parte inferior de la fuente para
cerciorarse de que el motor esté bien asegurado.
(Fig. 1)
3)
Retire la cubierta de la carcasa e inserte el ltro de
carbón. El ltro debe entrar en diagonal en las dos
ranuras triangulares ubicadas dentro de la carcasa. El
ltro cabe con la parte angosta hacia abajo, con el lado
negro mirando hacia la parte delantera de la fuente
(hacia el caño). El ltro se deslizará fácilmente en su
lugar pero es necesario asegurar que se ha empujado
enteramente hacia abajo. (Ver las Fig. 2a y 2b)
Fig. 2a
Fig. 2b
Fig. 1
MOTOR
EL FILTRO
NOTA: Enjuague bien el ltro con agua fresca antes de colocarlo en la
fuente. Esto eliminará el polvillo de carbón suelto, si bien éste es inocuo.
Es posible que una pequeña cantidad de polvillo de carbón se desprenda
durante toda la vida útil del ltro. Esto es normal y no dañará a su
mascota.
Coloque la fuente en la ubicación deseada. Si se coloca sobre una
4)
alfombra, baldosa o piso de madera, use una alfombrilla protectora u
otra supercie duradera, resistente al agua, para proteger su piso de las
salpicaduras o del goteo que producirá su mascota.
Llene de agua la unidad. Esto incluye el tazón y la carcasa. Esto cebará
5)
la bomba. Vuelva a colocar la cubierta.
Antes de enchufar la fuente, asegúrese de que tanto el cordón como
6)
sus manos están secos. Enchufe la fuente en un tomacorriente
eléctrico.
www.petsafe.net
35
Page 36

INSTRUCCIONES DE OPERACIÓN
7)8)Ajuste el caudal deseado con la perilla de control del ujo que se
encuentra a la derecha de la rampa dentro del tazón. Cuando la perilla
está en la posición de las 10 en el reloj, el caudal está en el nivel más
bajo. Cuando la perilla está en la posición de las 2 en el reloj, el caudal
está en el nivel más alto.
Agregue el agua necesaria. No deje que el nivel de agua caiga por
debajo de la perilla de control del ujo porque podría quemarse el
motor. Nunca levante la fuente llena de agua por la carcasa del ltro.
Levántela solamente colocando ambas manos debajo de la base de la
fuente y sujetando las paredes laterales para un agarre rme.
LIMPIEZA DE LA FUENTE
Filtros: Cámbielos cada 2 a 4 semanas
1)
Los ltros deben cambiarse cada dos a cuatro semanas. Reemplace los
ltros con mayor frecuencia cuando usa la fuente para múltiples mascotas
o para mascotas que producen mucha saliva.
2)
Los ltros son una característica adicional de la fuente. No se requiere
usarlos para la operación normal pero mantendrán el agua de la fuente
más limpia.
3)
Pueden enjuagarse los ltros cuando se limpia la fuente. Nunca lave el
ltro con agua jabonosa porque no será posible quitarle el residuo de
jabón.
Fuente: Limpieza semanal
Desenchufe la fuente, quite la cubierta de la
1)
carcasa y saque el ltro.
Vacíe el agua de la fuente.
2)
Saque la carcasa del ltro oprimiendo las
3)
lengüetas a los costados y levantándola.
(Vea la Fig. 3)
El botón de control del ujo y el estator no están sujetos y se sueltan
4)
cuando se retira la carcasa.
36
www.petsafe.net
Fig. 3
Page 37

LIMPIEZA DE LA FUENTE
5) IMPORTANTE: ¡El motor debe limpiarse en forma regular; de lo
contrario se anulará la garantía!
a)
Voltee el tazón y destrabe el motor de su
cavidad deslizando un dedo en la hendidura
que está detrás del motor (Fig. 4a) y tirando de
ese extremo del motor hacia usted, de manera
que haya girado un cuarto de vuelta (Fig. 4b).
No intente sacar el motor sin hacerlo girar 90
grados, ya que esto podría dañar la fuente y
causar una fuga.
b)
Una vez que el motor está destrabado, sáquelo
de la fuente. Si le resulta difícil, puede empujarlo
para hacerlo salir del lado del tazón.
c)
Levante cuidadosamente el impulsor (la “hélice”
blanca) sacándolo del motor. Debería salir
deslizándose sin resistencia alguna. Quite el pelo
que pueda haberse enroscado en el mismo y
lávelo con el resto de las piezas.
Fig. 4a
Fig. 4b
d)
Vierta agua jabonosa dentro de la cavidad del
motor y límpiela con un cepillo pequeño redondo
de cerdas (hay kits de limpieza disponibles).
Enjuáguela bien y vuelva a colocar el impulsor
después que está limpio.
Lave a mano el resto de las piezas
6)
de la fuente con agua jabonosa y
enjuáguelas bien. Puede colocar piezas
en el lavaplatos pero si éste está muy
caliente, podrían dañarse las piezas de
plástico. Use un cepillo más largo de
cerdas para limpiar el tubo cuadrado
de descarga que está en la carcasa del
ltro. (Vea la Fig. 5)
www.petsafe.net
Fig. 5
Tubo cuadrado
de descarga
37
Page 38

REENSAMBLAR LA FUENTE
1) Voltee el tazón. Vuelva a jar el motor haciendo pasar las roscas del
mismo por el agujero del tazón. El motor entra en ángulo derecho al
tazón, ver Figuras 6a y 6b. Si no puede hacer girar el motor en su
posición de descanso (Fig. 6b), no lo ha hecho entrar en el agujero todo
lo posible.
Fig. 6a Fig. 6b
Después de hacer girar el motor un cuarto de vuelta, debería estar
2)
nivelado con la parte inferior del tazón (Fig. 6b). Vuelva a poner el tazón
boca arriba.
3)
Coloque el estator sobre la parte expuesta del motor que se ve en el
tazón. (Vea la Fig. 7.)
Fig. 7
ESTATOR
Junte la perilla de control del ujo con el estator colocando las
4)
lengüetas de la perilla en la ranura del estator. (Vea la Fig. 8)
Fig. 8
LENGÜETAS
MANTENGA ESTAS PIEZAS EN SU LUGAR con
5)
una mano mientras ja la carcasa con la otra mano
(Fig. 9). Fije la carcasa deslizando hacia abajo el
recorte en la pared de la carcasa entre la perilla de
control del ujo y el estator. La carcasa quedará
colocada con un chasquido cuando las lengüetas en
sus costados entren en las ranuras del tazón.
38
www.petsafe.net
RANURA
Fig. 9
Page 39

6)
Una vez que se ha jado la carcasa, coloque la fuente en la
ubicación deseada. Asegúrese de que haya una supercie
protectora debajo de la fuente si se coloca sobre pisos de
madera o alfombrados.
7)
Vuelva a colocar el ltro y llene la carcasa y el tazón con agua.
Vuelva a colocar la cubierta.
8)
Antes de enchufar la fuente, asegúrese de que sus manos y
el cordón estén secos. Verique que el cordón no esté dañado
antes de enchufar la fuente. Enchúfela en un tomacorriente
eléctrico.
LA FUENTE Y SU AMBIENTE
Si usted vive en un entorno húmedo y tiene problemas con moho
o algas, remoje todas las piezas en una solución de lejía diluida
por aproximadamente 10 minutos después de la limpieza regular.
Use una solución de 10% de lejía y 90% de agua. Vierta también
un poco de la solución dentro de la cavidad del motor. Ésta es
una excelente manera de desinfectar la fuente pero es importante
asegurarse de enjuagar muy bien todas las piezas con agua
solamente para quitar todo vestigio de cloro.
Si usted tiene agua con mucha cal (agua dura), empezará a notar
depósitos minerales blancos sobre o dentro del motor. A la larga
esto impedirá que el impulsor gire correctamente. Para evitar el
tener que reemplazar el motor, siga los pasos siguientes:
1)
Limpie el motor con mayor frecuencia que antes; o
2)
Limpie el motor con una solución de vinagre (20% de
vinagre blanco y 80% de agua) y deje que la solución
remoje el interior de la cavidad del motor durante varios
minutos; o
3)
Use agua embotellada en lugar de agua de la llave.
www.petsafe.net
39
Page 40

CONSEJOS PARA EL USO
La primera vez que su mascota se encuentre frente a la Fuente
Drinkwell® Original es posible que tenga curiosidad por este objeto
nuevo y desacostumbrado. Después que ponga la fuente en
operación, simplemente deje que su mascota se acostumbre poco
a poco. A algunas mascotas les toma varios días o a veces más
comenzar a usarla.
Es posible que su mascota preera que la fuente se coloque lejos
del lugar donde come normalmente. Pruebe de enchufarla en otro
lugar, como el lavadero, un cuarto de baño u otro rincón de la
cocina.
¡Agregue cubos de hielo a la taza para que salga agua helada y
refrescante!
CONFORMIDAD DE CE Y RECICLAJE
Este equipo cumple las directivas EMC y de baja tensión.
Los cambios o modicaciones sin autorización realizados
en el equipo que no estén aprobados por Radio Systems®
Corporation pueden infringir las normas de la EU, podrían
anular la autoridad del usuario para usar el equipo y
anularán la garantía.
40
La declaración de conformidad se puede encontrar en:
http://www.petsafe.net/customercare/eu_docs.php
Consejo importante sobre el reciclado
Respete las normativas sobre Residuos de aparatos
eléctricos y electrónicos en su país. Este aparato debe
ser reciclado. Si ya no necesita este dispositivo, no lo
deje en el sistema municipal de residuos normales.
Entréguelo en el lugar de adquisición para que procedan
a enviarlo a nuestro sistema de reciclado. Si no fuera
posible, póngase en contacto con el Centro de atención al
cliente para obtener más información.
www.petsafe.net
Page 41

INSTRUCCIONES DE SEGURIDAD DEL
FABRICANTE
1)
Si bien ha aumentado la capacidad de la fuente Drinkwell®
Original, no se recomienda dejar este dispositivo sin atender
por un período prolongado, ya que el agua podría consumirse o
evaporarse y hacer que el motor funcione en seco.
2)
No deje que los niños o las mascotas mastiquen o traguen ninguna
parte. Si le preocupa el cordón eléctrico, compre un conductor
para cordones (un protector de plástico duro) en cualquier tienda
de artículos de ferretería.
3)
Precauciones de seguridad básicas:
No intente reparar el motor usted
mismo(a). Devuélvalo acogiéndose a
la garantía.
Si el enchufe de este aparato se
mo ja, desconecte la elec tri cid ad
en ese tomacorri ente. No intente
desenchufar.
Para evitar la posibilidad de que el
enchufe o el tomacorriente se mojen, el
tomacorriente deberá estar siempre por
encima del nivel de la fuente.
Examine este aparato después de la
instalación. Si hay agua en el cordón o
el enchufe, no deberá enchufarse.
El uso de electricidad de este aparato es
de 6 vatios.
Debe supervisarse estrictamente el uso
de este aparato por parte de niños o si
éstos están cerca.
Desenchufe siempre un aparato que no
está en uso, antes de colocar o quitar
partes, y antes de limpiarlo. Nunca jale del
cordón para quitarlo del tomacorriente.
Use el aparato sólo para el uso al que está
destinado. Accesorios no recomendados
ni vendidos por el fabricante pueden
reducir su seguridad. No modique la
unidad.
No haga funcionar ningún aparato si
tiene un cordón o enchufe dañado, si no
funciona bien o si ha sufrido daños.
Si se necesita un cordón de extensión,
deberá usarse uno con la capacidad
nominal adecuada.
Algunos animales han mostrado susceptibilidad a los recipientes plásticos
4)
No instale ni almacene el aparato en
un lugar expuesto a la intemperie o a
temperaturas bajo cero.
SÓLO PARA USO EN INTERIORES
Lea y observe todos los avisos importantes
del aparato.
de alimento o bebida. Si su mascota muestra indicios de reacción alérgica
al plástico, interrumpa el uso del aparato hasta que haya consultado al
veterinario
www.petsafe.net
41
Page 42

U.S. Patents No. 5,799,609 and 5,842,437
ITALIANO
GARANZIA
Per usufruire della copertura integrale della nostra garanzia,
è necessario registrare il prodotto entro 30 giorni sul sito Web
www.petsafe.net. La registrazione e la conservazione della
ricevuta consentono di usufruire della completa garanzia sul
prodotto e di ottenere un’assistenza più rapida dal Centro
di assistenza clienti in caso di necessità. Ma soprattutto,
PetSafe® non divulgherà né venderà mai a nessuno i vostri
preziosi dati personali. Il testo completo della garanzia si trova
sul nostro sito Web all’indirizzo www.petsafe.net.
Per un elenco dei numeri di telefono del nostro Centro di
assistenza clienti, visitate il nostro sito web all’indirizzo
www.petsafe.net.
Indice
Garanzia............................................................................
Importanti istruzioni di sicurezza........................................
Componenti........................................................................
Caratteristiche....................................................................
Istruzioni di funzionamento................................................
Pulizia della fontana...........................................................
Riassemblaggio della fontana............................................
La fontana e il vostro ambiente..........................................
Consigli sull’uso.................................................................
Conformità CE e riciclaggio................................................
Istruzioni di sicurezza del fabbricante................................
42
www.petsafe.net
42
43
44
44
45
46
48
49
50
50
51
Page 43

U.S. Patents No. 5,799,609 and 5,842,437
IMPORTANTI ISTRUZIONI DI SICUREZZA
Istruzioni relative a: rischio di incendio, scossa
elettrica, o danno alle persone.
Leggere tutte le istruzioni prima di usare l’apparecchio.
1)
Per ridurre il rischio di infortunio, si raccomanda un’attenta
2)
supervisione quando l’apparecchio è in funzione in prossimità
di bambini.
Utilizzare soltanto gli accessori raccomandati o venduti dal
3)
fabbricante.
Non usare all’aperto. ESCLUSIVAMENTE PER USO
4)
INTERNO.
Non tirare il cavo per togliere la spina dalla presa di corrente.
5)
Per togliere la spina dalla presa, afferrare la spina non il cavo.
Non utilizzare un apparecchio con un cavo o una spina
6)
danneggiata, se l’apparecchio non funziona bene, se è
caduto o è stato danneggiato in qualsiasi modo. Contattare
immediatamente il Centro Assistenza Clienti del proprio Paese
per ottenere ulteriori istruzioni.
Apparecchio portatile – Per ridurre il rischio di scossa elettrica,
7)
non posare o riporre l’apparecchio dove possa cadere
soprattutto in una vasca o un lavello.
Togliere sempre la spina dalla presa di corrente quando
8)
l’apparecchio non è in uso, prima del montaggio o smontaggio
dei componenti e prima di procedere alla sua pulizia. Non
tirare mai il cavo di alimentazione per rimuovere l’adattatore
dalla presa a muro.
CONSERVARE QUESTE ISTRUZIONI
www.petsafe.net
43
Page 44

Componenti
U.S. Patents No. 5,799,609 and 5,842,437
Custodia /
Custodia del filtro
Ciotola
Caratteristiche
FACOLTATIVO:
Il Serbatoio di Capacità
addizionale (1,5 L)
Il flusso brevettato a
caduta libera stimola
gli animali domestici
a bere di più
Coperchio
Statore
Motore/Pompa
Manopola di
regolazione del flusso
Il filtro al carbone attivo
elimina sapori e odori
cattivi
Intensità del
flusso regolabile
La rampa di scivolo
riduce gli spruzzi del
getto d’acqua
44
Capacità 1,5 L
www.petsafe.net
Page 45

ISTRUZIONI DI FUNZIONAMENTO
NON FAR FUNZIONARE A SECCO
ESCLUSIVAMENTE PER USO INTERNO
1)
Come per qualsiasi apparecchio elettrico, prima dell’uso
controllare che il cavo di alimentazione non sia rotto o
danneggiato.
2)
Ispezionare il fondo della fontana per assicurarsi che il
motore sia saldamente ssato. (Fig. 1)
3)
Togliere il coperchio della custodia e inserire il ltro al
carbone attivo. Il ltro alloggia diagonalmente nelle due
scanalature triangolari situate all’interno della custodia.
Il ltro va inserito con la parte più stretta verso il basso
e con il lato nero rivolto verso il davanti della fontana
(verso il becco). Il ltro è facile da inserire ma è importante spingerlo no in fondo. (Vedi Fig. 2a e 2b)
Fig. 1
MOTORE
Fig. 2a
FILTRO
NOTA: Sciacquare bene il ltro con acqua fredda prima di inserirlo nella
fontana. Ciò eliminerà eventuali polveri disperse di carbone, che sono
innocue. È possibile che durante l’intero periodo di utilizzo il ltro perda
piccole quantità di polvere di carbone. Questo è normale e non è nocivo
per gli animali domestici.
Collocare la fontana nel luogo desiderato. Se posizionata su moquette,
4)
piastrelle o superci in legno, si raccomanda di utilizzare un tappetino
o altro materiale resistente all’acqua per proteggere il pavimento da
spruzzi o spargimenti causati dal vostro animale domestico.
Riempire la fontana di acqua, sia la ciotola che la custodia del ltro. In
5)
questo modo viene adescata la pompa. Riposizionare il coperchio.
Prima di collegare la fontana alla presa di corrente, assicurarsi che il
6)
cavo e le vostre mani siano asciutti. Collegare la fontana alla presa
elettrica.
Fig. 2b
www.petsafe.net
45
Page 46
ISTRUZIONI DI FUNZIONAMENTO
7)8)Regolare il usso dell’acqua mediante l’apposita manopola situata
accanto allo scivolo dentro la ciotola. Quando la manopola è nella
posizione “Min.” il usso è minimo. Quando la manopola è nella
posizione “Max.” il usso è massimo.
Aggiungere acqua nella ciotola secondo necessità. Per non correre
il rischio di bruciare il motore, assicurarsi che il livello dell’acqua non
scenda al di sotto della manopola di regolazione del usso. Non
sollevare mai una fontana piena d’acqua afferrandola dalla custodia del
ltro. Sollevare la fontana reggendola con entrambe le mani e tenendola
ben salda ai lati.
PULIZIA DELLA FONTANA
Filtri: Sostituire ogni 2-4 settimane
1)
Il ltro deve essere sostituito ogni 2-4 settimane. Sostituire il ltro con
maggiore frequenza se la fontana è usata da più animali domestici o da
animali che producono molta saliva.
2)
Il ltro è un accessorio supplementare della fontana. Non è indispensabile
per il normale funzionamento della fontana ma serve per mantenere
pulita l’acqua.
3)
Il ltro può essere risciacquato quando si pulisce la fontana. Non lavare
il ltro con acqua insaponata, in quanto i residui di sapone non vengono
mai eliminati completamente.
Fontana: Pulizia settimanale
Scollegare la fontana dalla presa di corrente,
1)
togliere il coperchio della custodia e il ltro.
Svuotare l’acqua dalla fontana.
2)
Per togliere la custodia del ltro premere
3)
verso l’interno le linguette laterali e sollevare.
(Vedi Fig. 3)
La manopola di controllo del usso e lo statore non sono componenti ssi
4)
e possono essere smontati quando si rimuove la custodia.
46
www.petsafe.net
Fig. 3
Page 47
PULIZIA DELLA FONTANA
5) IMPORTANTE: Si raccomanda di pulire regolarmente il motore
per evitare l’annullamento della garanzia!
a)
Capovolgere la ciotola e sbloccare il motore dal
suo vano inserendo un dito nella tacca dietro al
motore (Fig. 4a); per estrarre il motore, afferrarlo
dal suo lato posteriore e tirarlo verso di sè
ruotandolo di un quarto di giro (Fig. 4b). Non
tentare di rimuovere il motore senza ruotarlo di
90 gradi; questo può danneggiare la fontana e
provocare una perdita.
b)
Una volta sbloccato il motore, toglierlo dalla
fontana. Se questa operazione risulta difcile,
spingere il motore facendolo uscire dal lato della
ciotola.
c)
Togliere attentamente il girante (“l’elica” bianca)
tirandolo verso l’alto. Dovrebbe uscire senza
sforzo. Rimuovere gli eventuali peli accumulati e
lavarlo insieme agli altri componenti.
Fig. 4a
Fig. 4b
d)
Versare acqua insaponata nella cavità del
motore e pulirla con uno spazzolino rotondo
(sono disponibili set di spazzole di pulizia).
Risciacquare bene e riposizionare il girante dopo
averlo pulito.
Lavare a mano gli altri componenti
6)
della fontana con acqua insaponata e
risciacquare bene. I componenti possono
essere lavati nel lavastoviglie, ma se
l’acqua è troppo calda i componenti
di plastica possono danneggiarsi.
Utilizzare una spazzola lunga per pulire
il tubo quadrato di scarico nella custodia
del ltro. (Vedi Fig. 5)
www.petsafe.net
Fig. 5
Tubo quadrato
di scarico
47
Page 48

RIASSEMBLAGGIO DELLA FONTANA
1) Capovolgere la ciotola. Per riposizionare il motore, spingerne la
lettatura nella cavità della ciotola. Il motore entra ad angolo retto nella
ciotola; vedi Figure 6a e 6b. Se non si riesce a girare il motore nella sua
sede (Fig. 6b), signica che non è stato spinto no in fondo nella cavità.
Fig. 6a Fig. 6b
Dopo che il motore è stato ruotato di un quarto di giro, dovrebbe essere
2)
a livello con il fondo della ciotola (Fig. 6b) Capovolgere nuovamente la
ciotola.
3)
Posizionare lo statore sopra la parte esposta del motore presente nella
ciotola. (Vedi Fig. 7)
Fig. 7
STATORE
4)
Collegare la manopola di regolazione del usso allo statore inserendo le
linguette della manopola nella scanalatura dello statore. (Vedi Fig. 8)
Fig. 8
LINGUETTE SCANALATURA
TENERE SALDE QUESTE PARTI con una mano
5)
mentre si ssa la custodia con l’altra mano (Fig.
9). Fissare la custodia facendola scorrere verso il
basso mediante le guide sulla parete tra la manopola
di regolazione e lo statore. La custodia scatta in
posizione quando le linguette laterali entrano nelle
scanalature della ciotola.
48
www.petsafe.net
Fig. 9
Page 49

6)
Quando la custodia è stata ssata, procedere nel modo
seguente. Collocare la fontana nel luogo desiderato. Se la
fontana viene collocata su moquette o un pavimento di legno,
provvedere una base protettiva.
Sostituire il ltro e riempire d’acqua la custodia e la ciotola.
7)
Riposizionare il coperchio.
Prima di collegare la fontana alla presa di corrente, assicurarsi
8)
che il cavo e le vostre mani siano asciutti e che il cavo non sia
danneggiato. Collegare la fontana alla presa elettrica.
LA FONTANA E IL VOSTRO AMBIENTE
In ambienti umidi o ambienti con problemi di muffa o alghe,
mettere a bagno i componenti in una soluzione di candeggina
diluita per circa 10 minuti dopo la regolare pulizia. Usare
una soluzione di 10% candeggina e 90% acqua. Versare un
po’ di soluzione anche nella cavità del motore. Questo è un
modo eccellente per disinfettare la fontana. È importante però
eliminare il cloro; per fare questo, risciacquare completamente
tutti i componenti solo con acqua.
Se si utilizza acqua dura, potrebbero formarsi depositi minerali
bianchi sul motore o al suo interno. Questo potrebbe impedire
il corretto funzionamento del girante. Per non dover sostituire il
motore, prendere le seguenti precauzioni:
1)
Pulire il motore con maggiore frequenza rispetto al passato;
oppure
2)
Pulire il motore con una soluzione di aceto (20% di aceto
bianco e 80% di acqua) e lasciare agire la soluzione per
alcuni minuti all’interno della cavità del motore; oppure
3)
Usare acqua imbottigliata invece di acqua di rubinetto.
www.petsafe.net
49
Page 50

CONSIGLI SULL’USO
Prima di bere dalla Fontana Drinkwell® Original, il vostro animale
potrebbe avvicinarsi con circospezione a questo oggetto nuovo e
sconosciuto. Dopo avere messo in funzione la fontana, date tempo
al vostro animale di abituarsi. Alcuni animali domestici impiegano
diversi giorni o periodi anche più lunghi prima di bere dalla
fontana, mentre altri iniziano ad usarla subito.
Il vostro animale potrebbe preferire che la fontana sia collocata
lontano dalla zona in cui mangia normalmente. Provate a
collocare la fontana in un posto diverso, per esempio in un angolo
diverso della cucina, in un bagno o in un ripostiglio.
Aggiungete alcuni cubetti di ghiaccio nella ciotola per rendere
l’acqua corrente più fresca e dissetante!
CONFORMITÀ CE E RICICLAGGIO
Questa apparecchiatura è conforme alle direttive EMC e
sul basso voltaggio. Variazioni o modiche non autorizzate,
non direttamente approvate da Radio Systems
Corporativo possono violare le disposizioni europee,
annullare il diritto dell’utente a usare il prodotto e rendere
nulla la garanzia.
®
50
La dichiarazione di conformità è pubblicata sulla pagina
Web:
http://www.petsafe.net/customercare/eu_docs.php
Consigli sullo smaltimento
Si consiglia di osservare le norme in vigore nel proprio
Paese relative allo smaltimento di apparecchi elettrici ed
elettronici. Il presente apparecchio deve essere riciclato. Al
momento dello smaltimento, non depositare l’apparecchio
nei raccoglitori dei riuti normali. Restituirlo al punto
vendita dove è stato acquistato per immetterlo nel nostro
sistema di riciclo. Nel caso non sia possibile, contattare il
Servizio assistenza per ulteriori informazioni.
www.petsafe.net
Page 51

ISTRUZIONI DI SICUREZZA DEL
FABBRICANTE
Non si consiglia di lasciare un apparecchio in funzione per lunghi periodi
1)
di tempo senza sorveglianza; l’acqua può essere consumata o evaporare
causando il funzionamento a secco del motore.
Non permettere agli animali domestici di mordicchiare i pezzi e fare
2)
attenzione che i bambini non li ingeriscano accidentalmente. Se vi
preoccupa il cavo di alimentazione, acquistate un copricavo (tubo
protettivo rigido di plastica) in un negozio di ferramenta.
Normali precauzioni di sicurezza
3)
Non tentate di riparare da soli il motore.
Restituitelo sotto copertura di garanzia.
Se la spina dell’apparecchio si bagna,
disattivate l’alimentazione della presa di
corrente utilizzata. Non tentate di togliere
la spina dalla presa di corrente.
Per evitare che la spina o la presa di
corrente si bagnino, fate in modo che
la presa si trovi sempre sopra il livello
della fontana.
Ispezionate l ’ a pp a r e c c h i o dopo
l’installazione. L’apparecchio non deve
essere collegato alla presa di corrente
se il cavo o la spina sono bagnati.
Non utilizzate un apparecchio con un
cavo o una spina danneggiata, se non
funziona correttamente o ha subito
danni.
Qualora sia necessario l’uso di una
prolunga, utilizzate un cavo della giusta
potenza.
E S C LU SIVA MEN T E PE R U S O
INTERNO.
Si sa che alcuni animali sono sensibili ai contenitori in plastica di cibo
4)
Il consumo energetico di questo apparecchio
è di 6 watt.
Si raccomanda un’attenta supervisione
quando l’apparecchio è in funzione in
prossimità di bambini.
Togliere sempre la spina dalla presa di
corrente quando l’apparecchio non è in
uso, prima del montaggio o smontaggio
dei componenti e prima di p rocedere
alla sua pulizia. Non tirare mai il cavo di
alimentazione per toglierlo dalla presa di
corrente.
Non utilizzare l’apparecchio per scopi diversi
da quello per cui è stato concepito. L’uso di
accessori non raccomandati o non venduti
dal fabbricante può provocare condizioni di
rischio. Non modicare l’unità.
Non installare o riporre l’apparecchio in
luoghi in cui potrebbe essere esposto a
condizioni atmosferiche o temperature di
congelamento.
Leggere e osservare tutte le importanti
avvertenze riportate sull’apparecchio e nella
confezione.
e acqua. Se l’animale manifesta sintomi di una reazione allergica alla
plastica, interrompere l’uso del prodotto e consultare il veterinario.
www.petsafe.net
51
Page 52

U.S. Patents No. 5,799,609 and 5,842,437
DEUTSCH
GARANTIE
Um den größten Schutz für Ihre Garantie zu erhalten,
registrieren Sie bitte Ihr Produkt innerhalb von 30 Tagen
auf www.petsafe.net. Wenn Sie registrieren und Ihre
Quittung behalten, können Sie die volle Garantieleistung
für das Produkt in Anspruch nehmen und sollten Sie die
Kundenbetreuung je kontaktieren müssen, können wir
Ihnen viel schneller helfen. Sehr wichtig! Von PetSafe® wird
Ihre wertvolle Information nie an Dritte weitergegeben oder
verkauft. Die komplette Gewährleistungsdetails nden Sie
über www.petsafe.net.
Besuchen Sie unsere Webseite www.petsafe.net um die
Telefonliste unseres Kundendienstes zu nden.
Inhoud
Garantie..............................................................................
Wichtige Sicherheitsanweisungen.....................................
Bestandteile.......................................................................
Funktionen..........................................................................
Betriebsanweisungen.........................................................
Reinigung...........................................................................
Wiederzusammenbau........................................................
Der trinkbrunnen und ihre umgebung................................
Tipps zum gebrauch...........................................................
CE Einhaltung und Recycling.............................................
Sicherheitsanweisungen des Herstellers...........................
52
www.petsafe.net
52
53
54
54
55
56
58
59
60
60
61
Page 53
U.S. Patents No. 5,799,609 and 5,842,437
WICHTIGE
SICHERHEITSANWEISUNGEN
INSTRUKTIONEN BEZIEHEN SICH AUF; FEUERGEFAHR,
ELEKTROSCHOCK ODER SCHÄDEN AN PERSONEN
1)
Lesen Sie alle Anweisungen vor Gebrauch des Geräts.
2)
Um das Risiko von Verletzungen zu reduzieren, ist eine enge
Beaufsichtigung notwendig, wenn das Gerät in der Nähe von Kindern
verwendet wird.
3)
Verwenden Sie nur Aufsätze, die durch den Hersteller empfohlen oder
verkauft werden.
4)
Verwenden Sie das Gerät nicht im Freien. NICHT FÜR DEN
GEBRAUCH IM FREIEN.
5)
Entfernen Sie den Stecker nicht durch Ziehen am Kabel aus der
Steckdose. Um den Stecker zu entfernen, halten Sie den Stecker und
nicht das Kabel.
6)
Bedienen Sie kein Gerät mit einem beschädigten Kabel oder Stecker
oder wenn am Gerät Störungen vorliegen, es herunterfällt oder auf
irgendeine Weise beschädigt wurde. Bringen Sie das Gerät zur
Untersuchung, Reparatur oder zur elektrischen oder mechanischen
Fehlerbehebung zum nächsten Servicefachhändler.
7)
Ziehen Sie den Stecker des Geräts immer heraus, wenn es nicht
verwendet wird, wenn Sie Teile anbringen oder abnehmen sowie vor
dem Reinigen. Ziehen Sie nie am Kabel, um den Stecker aus der
Steckdose zu ziehen.
8)
Für tragbares Gerät - Um das Risiko eines Elektroschocks zu
reduzieren, legen Sie das Gerät so ab, dass es nicht herunterfallen oder
in eine Wanne oder in ein Waschbecken fallen kann.
SPAREN SIE DIESE ANWEISUNGEN
www.petsafe.net
53
Page 54

Bestandteile
U.S. Patents No. 5,799,609 and 5,842,437
Gehäuse/
Filtergehäuse
Funktionen
WAHLFREI: Zusätzliches
Wasser Kapazität Behälter
(1,5 L)
Frischer Wasserstrahl
ermuntert Haustiere
mehr zu trinken!
Gehäusedeckel/
Abdeckung
Stator RegelungsknopfSchüssel
Motor/Pumpe
Auswechselbarer
Kohlefilter entfernt
schlechte Geschmacks
und Geruchsstoffe
Einstellbare Fließstärke
Wasserrutsche zur
Vermeidung von
Spritzern
Kapazität 1,5 Liter
54
www.petsafe.net
Page 55

BETRIEBSANWEISUNGEN
NUR MIT WASSERFÜLLUNG BETREIBEN
NUR ZUR VERWENDUNG IN INNENRÄUMEN
Wie bei anderen Elektrogeräten auch, prüfen Sie vor
1)
dem Gebrauch des Geräts bitte das Stromkabel auf
Risse und Schäden.
Inspizieren Sie die Unterseite des Trinkbrunnens, um
2)
sich zu vergewissern, dass der Motor gut befestigt
ist. (Abb. 1)
Nehmen Sie den Deckel vom Gehäuse und lege Sie
3)
den Kohlelter ein. Der Filter wird diagonal in die
beiden dreieckigen Schlitze im Inneren des Gehäuses geschoben. Die schmale Seite muss nach unten
und die schwarze Seite nach vorne (zum Ausguss
hin) zeigen. Der Filter sollte sich leicht einsetzen
lassen. Achten Sie jedoch darauf, dass er ganz
eingeschoben ist. (Siehe Abb. 2a und 2b)
Abb. 1
MOTOR
Abb. 2a
Kohlefilter
HINWEIS: Spülen Sie den Filter vor dem Einsetzen in den Trinkbrunnen
gründlich mit kaltem Wasser. Dadurch werden lose Kohlestaubpartikel
entfernt. Diese Partikel sind ungefährlich. Der Filter kann während seiner
gesamten Nutzlebensdauer geringe Mengen an Kohlestaub abgeben.
Dies ist völlig normal und für Ihr Haustier nicht gesundheitsschädlich.
Stellen Sie den Trinkbrunnen am gewünschten Ort auf. Wenn Sie den
4)
Trinkbrunnen auf Teppichboden, Fliesen oder Holzböden verwenden,
legen Sie eine Schutzmatte oder eine sonstige widerstandsfähige
und wasserfeste Unterlage unter, um den Boden vor Spritzern und
Wassertropfen zu schützen.
Füllen Sie den Trinkbrunnen mit Wasser. Dabei müssen sowohl der
5)
Trinknapf als auch das Filtergehäuse gefüllt werden, damit das Gerät
angepumpt werden kann. Legen Sie den Deckel auf.
Abb. 2b
www.petsafe.net
55
Page 56

6)
Achten Sie vor dem Anschleißen des Trinkbrunnens darauf, dass Ihre
Hände und das Kabel trocken sind. Schließen Sie den Trinkbrunnen an
eine Netzsteckdose an.
7)
Stellen Sie mit dem Regler die gewünschte Fließstärke ein. Der Regler
bendet sich direkt neben der Wasserrampe im Trinknapf. Die Fließrate
ist am kleinsten, wenn der Regler auf der 10-Uhr-Position steht. Die
Fließrate ist am größten, wenn der Regler auf der 2-Uhr-Position steht.
8)
Füllen Sie bei Bedarf immer Wasser nach. Lassen Sie den Wasserstand
nicht unter den Fließstärkeregler abfallen, weil sonst der Motor
durchbrennen kann. Heben Sie den vollen Trinkbrunnen nie am
Filtergehäuse hoch. Legen Sie zum Anheben des Trinkbrunnens
stets beide Hände unter die Trinkbrunnenbasis und fassen Sie die
Seitenwände, damit Ihnen das Gerät nicht aus der Hand rutscht.
REINIGUNG
Filter: Wechseln Sie die Filter alle 2 bis 4 Wochen
1)
Die Filter sollten alle zwei bis vier Wochen ausgewechselt werden.
Wechseln Sie die Filter häuger, wenn Sie den Trinkbrunnen für mehrere
Haustiere verwenden, die viel Speichel produzieren.
2)
Die Filter sind ein Zusatzmerkmal des Trinkbrunnen. Ihre Verwendung ist
für den normalen Betrieb nicht unbedingt erforderlich, sie halten aber das
Wasser sauberer.
3)
Die Filter können jeweils bei der Reinigung des Trinkbrunnens ausgespült
werden. Waschen Sie die Filter auf keinen Fall mit Seifenwasser, weil
sich Seifenrückstände nicht aus dem Filter entfernen lassen.
Trinkbrunnen: Wöchentliche Reinigung
Ziehen Sie den Netzstecker, nehmen Sie
1)
den Gehäusedeckel ab und nehmen Sie
den Filter heraus.
Gießen Sie das Wasser aus dem
2)
Trinkbrunnen.
Nehmen Sie das Filtergehäuse heraus,
3)
indem Sie die Laschen an der Seite
zusammendrücken und das Gehäuse nach
oben ziehen. (Siehe Abb. 3)
56
www.petsafe.net
Abb. 3
Page 57

REINIGUNG
4) Der Fließstärkeregler und Stator sind nicht befestigt und werden
frei, wenn das Gehäuse abgenommen wird.
5) WICHTIG: Der Motor muss regelmäßig gereinigt werden,
weil ansonsten möglicherweise die Garantie verfällt!
a)
Stellen Sie den Wassernapf auf den Kopf und
rasten Sie den Motor aus der dafür vorgesehenen
Aussparung aus, indem Sie einen Finger in die
Ausbuchtung hinter dem Motor schieben (Abb. 4)
und das Ende den Motors zu sich ziehen, sodass
er um eine Viertel Drehung gedreht wird (Abb.
4b). Versuchen Sie auf keinen Fall, den Motor
herauszunehmen, ohne ihn vorher um 90 Grad zu
drehen, weil dadurch der Trinkbrunnen beschädigt und
undicht werden könnte.
Abb. 4a
b)
Jetzt wo der Motor ausgerastet ist, nehmen Sie ihn
aus dem Trinkbrunnen. Wenn Ihnen dies nicht leicht
gelingt, können Sie den Motor von der Trinknapfseite
herausdrücken.
c)
Heben Sie vorsichtig den weißen Pumpenpropeller
aus dem Motor. Er sollte sich ohne Widerstand
herausnehmen lassen. Entfernen Sie Haare, die sich
eventuell um den Propeller gewickelt haben, und
waschen Sie den Propeller mit den restlichen Teilen.
d)
Gießen Sie Seifenwasser in die Motoraussparung
und reinigen Sie diese mit einer kleinen Rundbürste
(Reinigungsbürstensätze erhältlich). Spülen Sie das
Gerät und den Propeller nach der Reinigung gut ab.
Waschen Sie die restlichen
6)
Trinkbrunnenteile von Hand mit
Seifenwasser und spülen Sie sie gut ab.
Sie können die Teile in der Spülmaschine
waschen, aber wenn Ihre Spülmaschine
zu heiß wäscht, können die Kunststoffteile
beschädigt werden. Reinigen Sie
den viereckigen Ausgussstutzen des
Filtergehäuses mit einer Bürste mit
längeren Borsten. (Siehe Abb. 5)
Abb. 4b
Abb. 5
Viereckiger
Ausgussstutzen
www.petsafe.net
57
Page 58

WIEDERZUSAMMENBAU
1) Stellen Sie den Wassernapf auf den Kopf. Bringen Sie den Motor
wieder an, indem Sie das Motorgewinde durch das Loch im Wassernapf
stecken. Der Motor wird im rechten Winkel zum Napf eingesetzt. Siehe
Abb. 6a und 6b. Wenn Sie den Motor nicht in die Endposition (Abb. 6b)
drehen können, wird der Motor nicht soweit wie möglich in das Loch
gedrückt.
Abb. 6a Abb. 6b
Wenn Sie den Motor um 90 Grad gedreht haben, sollte er mit der
2)
Unterseite des Napfes abschließen (Abb. 6b). Stellen Sie den
Wassernapf wieder aufrecht.
3)
Platzieren Sie den Stator über dem freiliegenden Teil des Motors im
Napf. (Siehe Abb. 7)
Abb. 7
STATOR
4)
Verbinden Sie den Fließstärkeregler mit dem Stator, indem Sie die
Laschen des Reglers in die Rille am Stator drücken. (Siehe Abb. 8)
Abb. 8
LASCHEN RILLE
HALTEN SIE DIESE TEILE mit einer Hand fest,
5)
während Sie mit der anderen Hand das Gehäuse
anbringen (Abb. 9). Befestigen Sie das Gehäuse,
indem Sie die Aussparung in der Gehäusewand
nach unten zwischen den Fließstärkeregler und
den Stator schieben. Das Gehäuse rastet ein, wenn
seine Seitenlaschen in den Schlitzen im Wassernapf
greifen.
58
www.petsafe.net
Abb. 9
Page 59

6)
Wenn das Gehäuse befestigt ist, stellen Sie den Trinkbrunnen
am gewünschten Ort auf. Legen Sie auf jeden Fall eine
Schutzunterlage unter den Trinkbrunnen, wenn dieser auf Holzoder Teppichböden aufgestellt wird.
7)
Setzen Sie den Filter ein und füllen Sie das Gehäuse und den
Wassernapf mit Wasser. Legen Sie den Deckel auf.
8)
Bevor Sie den Trinkbrunnen anschließen, achten Sie darauf,
dass Ihre Hände und das Kabel trocken sind. Überprüfen Sie
das Kabel auf etwaige Schäden, bevor Sie den Trinkbrunnen
anschließen. Schließen Sie den Trinkbrunnen an eine
Netzsteckdose an.
DER TRINKBRUNNEN UND IHRE
UMGEBUNG
Wenn Sie in einer feuchten Umgebung leben und Probleme
mit Schimmel oder Algen haben, legen Sie alle Teile nach jeder
regelmäßigen Reinigung ca. 10 Minuten lang in verdünnte
Haushaltsbleichlauge. Verwenden Sie eine Mischung aus 10
% Bleichlauge und 90 % Wasser. Geißen Sie auch einen Teil
der Bleichlösung in den Motorraum. Auf diese Weise wird der
Trinkbrunnen hervorragend desinziert. Spülen Sie jedoch alle
Teile gründlich mit reinem Wasser nach, um das Chlor vollständig
zu entfernen.
Wenn Sie hartes Wasser haben, lagern sich möglicherweise weiße
Mineralrückstände an der Innenseite des Motors ab. Dies kann
nach einiger Zeit den Propeller blockieren. So vermeiden Sie einen
Motorwechsel:
1)
Reinigen Sie den Motor häuger als in der Vergangenheit
oder
2)
Reinigen Sie den Motor mit einer Essiglösung (20 % klarer
Essig und 80 % Wasser) und lassen Sie die Lösung im
Motorraum mehrere Minuten einwirken oder
3)
Verwenden Sie Wasser aus Flaschen anstatt
Leitungswasser.
www.petsafe.net
59
Page 60

TIPPS ZUM GEBRAUCH
Nach der Aufstellung des Drinkwell® Original Trinkbrunnens,
ist es möglich, dass sich Ihr Haustier scheu gegenüber diesem
neuen und ungewöhnlichen Objekt verhält. Nach Beginn
des Betriebs lassen Sie Ihrem Haustier Zeit, sich mit dem
Trinkbrunnen vertraut zu machen. Bei einigen Haustieren kann
dieser Prozess bis zur Benutzung einige Tage länger dauern.
Es ist möglich, dass Ihr Haustier bevorzugt, dass der
Trinkbrunnen nicht in dem Gebiet steht, wo die Fütterung
gewöhnlich stattndet. Versuchen Sie ihn an einem anderen
Platz aufzustellen, wie im Badezimmer, im Waschzimmer oder in
einer anderen Ecke der Küche.
Geben Sie Eiswürfel in die Schüssel für erfrischendes, eiskaltes
Wasser!
CE EINHALTUNG UND RECYCLING
Die Ausrüstung ist mit der EMC- und NiedrigstromDirektive konform. Nicht autorisierte Änderungen oder
Modikationen der Ausrüstung, die nicht von Radio
Systems® Corporation genehmigt wurden, könnten die
EU-Richtlinien verletzen, die Autorisierung des Benutzers
die Ausrüstung zu betreiben annullieren und die Garantie
ungültig machen.
60
Die Konformitätserklärung nden Sie unter:
http://www.petsafe.net/customercare/eu_docs.php
Wichtiger Recycling-Hinweis
Befolgen Sie bitte die landesüblichen Bestimmungen zum
Entsorgen von Elektroschrott. Dieses Gerät muss dem
Recycling zugeführt werden. Wenn Sie es nicht mehr
benötigen, sollten Sie es nicht mit dem normalen Hausmüll
entsorgen. Geben Sie das Gerät bitte dort ab, wo Sie
es gekauft haben, damit es unserem Recyclingsystem
zugeführt werden kann. Falls dies nicht möglich sein sollte,
wenden Sie sich bitte an das Kundenbetreuungszentrum.
Dort erhalten Sie weitere Informationen.
www.petsafe.net
Page 61

SICHERHEITSANWEISUNGEN DES
HERSTELLERS
Auch wenn die Kapazität des Drinkwell® Original Trinkbrunnens erhöht
1)
wurde, ist es nicht ratsam, dass ein Gerät über einen längeren Zeitraum
unbeaufsichtigt betrieben wird, da Wasser verbraucht oder verdampfen
kann und der Motor in Gefahr läuft, trocken zu laufen.
Achten Sie darauf, dass Haustiere oder Kinder nicht an Teilen kauen oder
2)
diese verschlucken. Wenn Sie Bedenken wegen dem Stromkabel haben,
kaufen Sie ein Kabelschutzrohr (Schutzrohr aus hartem Kunststoff), das
in jedem Heimwerkergeschäft erhältlich ist.
Standard-Sicherheitsvorsichtsmaßnahmen
3)
Nehmen Sie nicht selbst Reparaturen
am Motor vor. Geben Sie ihn zur
Inan s p ruchna h m e der Garan t i e
zurück.
Wenn der Stecker dieses Geräts feucht
wird, schalten Sie die Stromzufuhr zur
Steckdose ab. Versuchen Sie nicht, den
Stecker herauszuziehen.
Um zu vermeiden, dass der Stecker
oder die Steckdose feucht werden,
sollte sich die Steckdose immer in einer
höheren Position als der Trinkbrunnen
benden.
Untersuchen Sie das Gerät nach der
Installation. Stecken Sie den Stecker
nicht in die Steckdose, wenn sich am
Stecker oder auf dem Kabel Wasser
bendet.
Der elektrische Verbrauch dieses Geräts
beträgt 6 Watt.
Wird das Gerät durch oder in der Nähe
von Kindern verwendet, ist eine enge
Überwachung erforderlich.
Ziehen Sie den Stecker des Geräts immer
heraus, wenn es nicht verwendet wird,
wenn Sie Teile anbringen oder abnehmen
sowie vor dem Reinigen. Ziehen Sie
nie am Kabel, um den Stecker aus der
Steckdose zu ziehen.
Verwenden Sie das Gerät nur für den
dargestellten Zweck. Die Verwendung
von Aufsätzen, die vom Hersteller nicht
empfohlen oder verkauft werden, kann
zu einem unsicheren Zustand führen.
Nehmen Sie am Gerät keine Änderungen
vor.
Sie sollten k ein Gerät mit eine m
beschädigten Kabel oder Ste cker
bediene n o der wenn es schlecht
funktioniert bzw. beschädigt ist.
Wenn ei ne Verl ängerungsschnur
notwendig ist, sollte ein Kabel mit einer
geeigneten Nennleistung verwendet
werden.
4)
Einige Tiere reagieren empndlich auf Futter- und Wasserbehälter aus
Das Gerät darf nicht an Orten installiert
oder aufbewahrt werden, wo es dem
Wetter oder Temperaturen unter dem
Gefrierpunkt nicht ausgesetzt ist.
NIC HT FÜ R DE N GEB RAUCH IM
FREIEN.
Lesen und befolgen Sie alle wichtigen
Hinweise zum Gerät.
Kunststoff. Wenn Ihr Haustier eine allergische Reaktion auf Kunststoff
zeigt, verwenden Sie das Gerät nicht weiter und konsultieren Sie Ihren
Tierarzt.
www.petsafe.net
61
 Loading...