


Programmable Heut Pump Thermostat
,,”
Your new programmable heat pump thermostat is a precision instrument:that’s quality-built to
,,:give~,yau:many years ,of satisfactory, service. It’s a %mart” thermostat that lets you save energy
while still maintaining the standard,Cf comWyo,u want in your home.
This Owner’s Guide will show you how to get the,most benefit from your new thermostat.

Monitor thermostat oper$idn,
read current time and room
Check statuslights to See if the
thermostat is on’and saving energy,
Set different
schedules for
Choose manual
or automatic
~Prqgram up,,to
four different
AUX. HT.,
(on some models). See Glossary,
page 29.
EM. or SUPL. HT., CHECK
Simple Four-Step Programming
warmer or cooler
‘at the touch of a
Bypass the stored
Of course, you can use the schedule preprogrammed into your new
thermostat (see Glossary, page 29). But it’s an easy matter to program the
thermostat to fit you! lifestyle.
1 Set the current time and day. See
page 1.
2 Set the program schedule and
heating temperatures. See page 2.
Programming Your Thermostat ..............
Set the current day and time ..................
Set the program schedule and
heating temperatures .......................
Set the cooling temperatures .................. 9
Set the system and fan switches
on the subbase .............................
Operating Your Thermostat .................
Temporarily changing the program
Permanently changing the program .......... 19
Operating the thermostat manually ..........
Canceling program settings., ...............
Checking the program times and
temperatures ..............................
..........
.l-16
2
15
17-23
17
.20
.21
,22
.3 Set the cooling temperatures. See
page 9.
4 Set the system and fan switches.
See page 15.
Checking the current temperature
1
sefiing ...................................... 23
Maintaining Your Thermostat ............... 25-28
Removing the thermostat .................... .25
Replacing the thermostat
Replacing the batteries
Power outages ..............................
Glossary ..................................... 29-30
Your Personal Program ..................... 31-32
Troubleshooting Guide ...................... 33-34
Quick Reference to the Keys
Index ......................................... 37-38
.................... .26
....................... 27
................ 35-36
.28

STEP 1
,,,,-SET:J+E CURRENT DAY
,~ ,~,:: ,,:+y? Tl,lME
:‘,’ ~:-??&I :can prggram this thermostat
,‘, ,‘i@tt$i:& the wall or in your
‘, hsnd.‘SEE PAGE 25 TO FIND
OUT,HOW TO REMOVE THE
THERMOSTAT FROM THE
WALL
Always press the keys with your
fingertip or similar blunt tool.
Sharp instruments like a pen or
pencil point can damage the
keyboard.
NOTE: Check the glossary, page
29, for definitions of unfamiliar
words.
SET
z%%
0
. < time appears in the display. Be
ml
:.
Ea
Press and release. The display
shows 1:00 PM Mon.
Press and hold until the current
day appears in the display.
Press and hold until the current
sure AM or PM appears as
desired.
You have programmed the
current day atid time. Go on to
Step 2.
STEP 2
SET THE PROGRAM
SCHEDULE AND HEATING
TEMPERATURES
Before You Begin.
The schedule form on page 31
provides an oppotiunity to plan
your schedule.
Now.
Start by programming the WAKE
time and temperature for
weekdays.
The thermostat requires a
program for WAKE. You can
program LEAVE, RETURN and
SLEEP or not, as you please.
Press and release. Note that the
display shows WAKE and the
preprogrammed time and
temperature.
If the display reads COOL, press
and release to switch to HEAT.
If display reads SAT or SUN,
I.
m
Ka
press and hold until MON TUE
WED THU FRI appears.
Press and hold until the display
shows the desired starting time.
. .
:.
El

Press and hold until the display
shows the desired temperature.
If the display starts to blink while
you are holding down
TEMPERATURE WARMER or
COOLER, you have reached the
setting limit. If your thermostat
can switch automatically
between heating and cooling, the
heating temperature must be at
least 3 degrees below the air
conditioning temperature. For
example, if the cooling setting is
75” F, the maximum heating
setting is 72” F.
Program the LEAVE time and
temperature, if desired.
NOTE: You can cancel the
LEAVE. RETURN or SLEEP
program by holding down the
period key until the time and
temperature disappear from
the display.
. .
M
-.
El
Press and release. The display
shows LEAVE, but no time or
temperature.
Press and hold until the display
shows the desired starting time.
Press and hold until the display
shows the desired temperature.
4

Program the RETURN time and
temperature, if desired.
Press and release. The display
shows RETURN, but no time or
temperature.
Program the SLEEP time and
temperature, if desired.
Ea
Ka
I .
.
Press and hold until the display
shows the desired starting time.
Press and hold until the display
shows the desired temperature.
Press and release. The display
shows SLEEP and the
preprogrammed time and
temperature.
Press and hold until the display
shows the desired starting time.
Press and hold until the display
shows the desired temperature.

Set the SATURDAY schedule.
Use the same procedure as for
weekdays.
Press and release until SAT
appears on the display.
Press WAKE, LEAVE, RETURN or
SLEEP to select the time period.
Use the AHEAD/BACK keys to
Ka
:.
set the time and the
WARMER/COOLER keys to set
the temperature.
@!a
7
Set the SUNDAY schedule. Use
the same procedure as for
weekdays.
Press and hold until SUN
appears on the display.
Press WAKE, LEAVE, RETURN or
m
SLEEP to select the time period.
m
. .
&a
. .
Ea
WARMER/COOLER keys to set
the temperature.
You have completed setting the
program schedule and heating
temperatures. To set air
conditioning, go to Step 3.
If you do not want to program
cool temperature skip Step 3 and
press RUN PROGRAM key.
Use the AHEAD/BACK keys to
set the time and the
8

The oroaram times are the same
for bbthheating and cooling.
Only the cooling temperatures
need to be programmed if you
have already programmed for
heating. To set ti~mes as you program the cooling temperatures,
use the TIME AHEAD and BACK
keys as described in Step 2. But
if you change times for cooling,
you are also changing them for
heating!
First program the WAKE temper-
ature for weekdays.
Press and release. The display
shows WAKE and the time and
temperature you programmed for
heating.
Press and release so COOL
shows on the display, along with
the preprogrammed cooling
temperature.
If display reads SAT or SUN,
press and hold until MON TUE
WED THU FRI appears.
Press and hold until the display
shows the desired temperature.
If the display blinks while you
hold down TEMPERATURE
WARMER or COOLER, you have
reached the setting limit. If your
thermostat can switch
automatically between heating
and cooling, the cooling
temperature must be at least 3
degrees higher than the
corresponding heating
temperature. For example, if the
heating setting is 70’ F, the
minimum cooling setting is 73” F.
If you desire a lower cooling
temperature, the heating
temperature must first be
lowered accordingly.
1_533-1
10

Program the LEAVE temperature,
if desired.
Press and release. The display
shows LEAVE, the time programmed for heating, and 7a0 F.
Press and hold until the display
shows the desired temperature.
Program the RETURN tempera-
ture, if desired.
Program the SLEEP temperature,
if desired.
Set the cooling temperatures for
the SATURDAY schedule. Use
the same procedure as for
weekdays.
Press and release. The display
shows RETURN, the time programmed for heating, and 78’ F.
Press and hold until the display
shows the desired temperature.
Press and release.
Press and hold until the display
shows the desired temperature.
Press and hold until SAT
appears on the display.
Press WAKE, LEAVE, RETURN or
SLEEP to select the time period.
[pEgi=-‘““]
1-1
m
. .
m
12

Use the WARMER/COQLER
keys to set the temperature.
Set the cooling temperatures for
the SUNDAY schedule. Use the ,.
same procedure as for
weekdays.
m
m
Press and hold until SUN
appears on the display.
Press WAKE, LEAVE, RETURN or
SLEEP to select the time period.
Use the WARMER/COOLER
keys to set the temperature.
You have completed program-
ming the cooling temperatures.
Press and release to start the
program.
Go to Step 4.
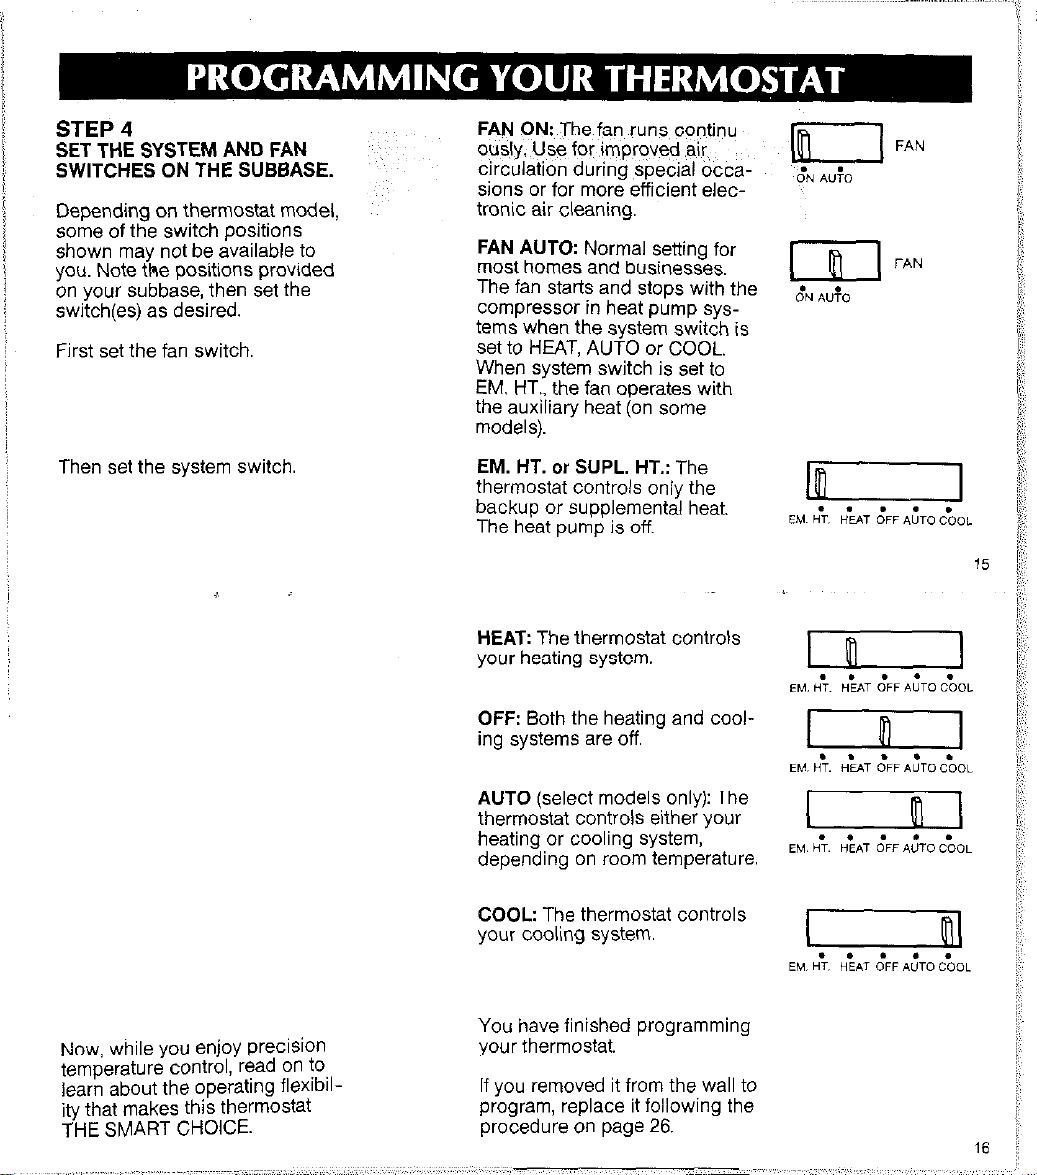
STEP 4
SET THE SYSTEM AND FAN
SWITCHES ON THE SUBBASE.
Depending on thermostat model,
some of the switch positions
shown may not be available to
you. Note the positions provided
on your subbase, then set the
switch@) as desired.
First set the fan switch.
FAN ON: The fan runs, continuously. Use for improved ,air
circulation during special occasions or for more efficient elec-
tronic air cleaning.
FAN AUTO: Normal setting for
most homes and businesses.
The fan starts and stops with the
compressor in heat pump systems when the system switch is
set to HEAT, AUTO or COOL.
When system switch is set to
EM. HT., the fan operates with
the auxiliary heat (on some
models).
Then set the system switch,
Now, while you enjoy precision
temperature control, read on to
learn about the operating flexibility that makes this thermostat
THE SMART CHOICE.
EM. HT. or SUPL. HT.: The
thermostat controls only the
backup or supplemental heat.
The heat pump is off.
HEAT: The thermostat controls
your heating system.
OFF: Both the heating and cool-
ing systems are off
AUTO (select models only): The
thermostat controls either your
heating or cooling system,
depending on room temperature.
COOL: The thermostat controls
your cooling system.
You have finished programming
your thermostat.
If you removed it from the wall to
program, replace it following the
procedure on page 26.
16

TEMPORARILY CHANGING
THE PROGRAM
These features let you custom-
tailor the program for those times
when someone comes home
early, or you’re staying up late, or
you plan to be out for the
evening.
To keep the current temperature
through the next program period:
To go back to the temperature
of the previous program period:
To temporarily raise or lower the
temperature for the current
period only:
If you change your mind:
Press and release. The name of
the period to be skipped will
flash in the display until the next
regularly scheduled period starts
Press and release. The display
will show the name of the pre-
vious period and flash “temporary” until the next regularly
scheduled period starts.
Press and hold until the desired
temperature is reached. The dis-
play w rlasn ~‘remporary’ unl11
the next programmed time period
starts.
Press and release to cancel any
of the temporary settings.
.~ ..,
I
,t_M -“’

PERMANENTLY CHANGING
THE PROGRAM
If your schedule changes or you
want a different temperature, you
can update any setting without
affecting the rest of the program.
Press and release the desired
period key.
m
Press and hold until the desired
day schedule shows on the
display.
Press and hold the Time or
Temperature keys until the dis-
play shows the desired new
program.
Press and release to return to
normal operation.
OPERATING THE
THERMOSTAT MANUALLY
This feature is particularly
when you go oh vacation or
other extended absences. It does
not cancel your program.
USefUl
HOLD
TEMP
0
PRESENT
SE71IW.X
L-l
RUN
PROGRAM
0
Press and release.
Press and hold to change the
temperature setting. After a few
seconds the display will show
the current temperature.
Press and release to check the
temperature setting.
Press and release to cancel
hold.
NOTE: Moving the system switch
also cancels hold.

CANCELING PROGRAM
SETTINGS
The thermostat requires time and
temperature settings in the
WAKE period, but any of the oth-
ers can be canceled. Weekday,
Saturday and Sunday settings
are canceled separately
m
RUN
PROGRAM
0
Press and hold the desired
period key until the time and
temperature clear from the dis-
play (about 3 seconds).
Press and release to return to
normal operation.
CHECKING THE PROGRAM
TIMES AND TEMPERATURES
You can check all the stored settings without affecting the per-
manent program.
RUN
PROGRAM
0
Press and release the desired
period key. The start time and
temperature setting will appear
on the display.
Press and release to display the
next daily time and temperature
for that period.
Press and release to return to
normal operation.
22

CHECKING THE CURRENT
TEMPERATURE SETTING
press a single key to compare
current room temperature to the
setting at any time.
PRESENT
SETnNG
0
Press and release. The display
will show the current temperature settina for several seconds,
then rever? to the room
temperature.
During recovery from energy
savings, the setting displayed will
not match the programmed set-
ting. This is because the ther-
mostat gradually changes the
temperature setting during recovery to provide most efficient
use of the heating or cooling
equipment.
24

REMOVING THE THERMOSTAT
1 Loosen the two captive screws
at the bottom corners of the
case.
REPLACING THE THERMOSTAT
1 Hang the thermostat on the tabs
at the top of the subbase.
2 Pull the thermostat out from 3 Lift the thermostat UD and off
the bottom. the subbase.
I I I
:1
2 Swing down and press
on lower edge until thermostat snap5 in place.
3 Tighten the captive screws,

REMOVI’
FRIES
A3 AAA
misplay will
,nen the bat- . Remove the thermostat from
,tless the display the wall. See page 25.
;ating the batteries
, Nhen you start, You
,ave to reprogram the
..mostat if you insert the new
&eries within 20-30 seconds of
taking out the old ones.
POWER OUTAGES
Backup batteries will hold the
programming and keep the display on during most power outages. Once the power is restored, the system will resume
normal operation.
To replace:
, Set the system switch to OFF.
n
Lift the batteries out Of the
holder.
If the display goes off when
power is lost, either the backup
batteries need to be replaced or
are not installed. When power is
restored, the display will flash
I:00 PM to remind you to
reprogram.
n
Insert the new batteries, making sure the positive (+) terminals all face toward the right.
n
Replace the thermostat on the
wall. See page 26.
n
Reprogram, if necessary
28

Comfort temperature
the temperature you want in the
morning and evening when you’re
home.
Energy-saving temperature
The lower (heating) or higher
[cooling) temperature that lets you
be oi heating and cooling costs
when you’re asleep or away. Also
called the setback (heating) or setup
(cooling) temperature.
Period key
Ona of the four kevs-WAKE. LEAVE.
RETURN or SLEEP-that you press
to check or program the Start time
and temperature for a time period.
Preprogrammed schedule
This is the schedule programmed
into your thermostat at the factory It
sets a night program that provides
energy savings if you don’t set your
own program, or if your personal
program is lost for any reason. The
program, which is the same for all
davs of the week. is:
Program
The times and temperatures you set
to define the comfort and energy
savings periods for each schedule
(weekdays, Saturday, Sunday).
Recovery
The time when the thermostat
operates the heating or cooling
equipment to return the house from
the energy savings to the comfort
temperature. The thermostat starts
the recovery period early so the
house will be at the comfort setting
by the time you’ve chosen.
Saturday program schedule
The schedule of WAKE, LEAVE,
RETURN and SLEEP period start
times and temperatures that you
program to run on Saturdays.
Setback
Reducing the!emperature in the
house for a set period every day in
winter for energy savings. The lower
temperature is the energy savings
temperature.
setup
Raising the temperature in the house
for a set period every day in summer
for energy savings. The higher
temperature is the energy savings
temperature.
Set point
The temperature you set on the
thermostat. The thermostat turns the
heating or cooling equipment on and
off to maintain this temperature at the
thermostat location until another
temperature setting goes into effect.
29
Status Lights-Lights that show
system operating mode.
ENRG SAV light (green)-This
light glows during the LEAVE and
SLEEP periods llocated on
therm&tat).
SYSTEM light (yellow)-This light
glows whenever the thermostat is
calling for heating or cooling
(located on thermostai).
AUX HT light (green)-This light
glows whenever the thermostat is
calling for operation of the
backuo heater. Backuo iauxiliarv)
heat ii more expensive io oper& heat ii more expensive io oper&
than the heat pump and typically
than the heat pump and typically
is used only when the heat pump is used only when the heat pump
is unable to handle the load is unable to handle the load
(located on subbase). (located on subbase).
CHECK light (yellow)-Consult
your heat pump equipment
literature to determine whether
this light is used and its meaning
(located on subbase).
EM HT or SUPL. HT light (red)-
This light glows whenever the
thermostai system switch is in the
EM HT or SUPL HT position
(located on subbase). On some
systems it may also indicate the
need to switch to EM. HEAT or
SUPL Hi because of a problem
with the heat pump.
Sunday program schedule
The schedule of WAKE, LEAVE,
RETURN and SLEEP period start
times and temperatures that you
program to run on Sundays.
Time oeriod
One~df four program periods: WAKE,
LEAVE, RETURN and SLEEP
available with the thermostat. One
period begins when the previous
period ends.
WAKE-The time period when
you want the house at a
comfortable temperature while
the family gets up and gets ready
to leave for work or school. This
is the only period that must
contain a time and temperature.
LEAVE-The time period when
you can set back (winter) or up
(summer) the temperature for
energy savings because the
family is usually away from home.
RETURN-The time period when
you want the house at a
comfortable temperature for
family activities in the evening
before bedtime.
SLEEP-The time period when
you can set back (winier) or up
(summer) the temperature for
energy savings because the
family is sleeping. Set it to stait at
your lamily’s normal bedtime.
Often the SLEEP program is set
only for the heating season so
family members can sleep cool in
?unmer.
Weekday program schedule
The schedule of WAKE, LEAVE,
RETURN and SLEEP period start
times and temperatures that you
program to run Monday throuqh
Friday

You can use the tables below to plan your schedule
before you begin programming. If you choose not to program a
daytime energy savings period, leave the LEAVE and
RETURN periods blank.
Weekday Program
PERIOD
WAKE
LEAVE
RETURN
SLEEP
PERIOD
WAKE
LEAVE
RETURN
SLEEP
PERIOD
WAKE
LEAVE
RETURN
SLEEP
START HEATING
TIME
TEMPERATURE
COOLING
TEMPERATURE
Saturday Program
START
TIME
START
TIME TEMPERATURE TEMPERATURE
HEATING
TEMPERATURE
HEATING COOLING
COOLING
TEMPERATURE
32

IF. .
Display will not come on.
Display
flashes during programming. n YOU have reached the temperature setting limit. The setting range is
Display flashes during operation.
Program is lost due
to power outage.
Temperature change occurs
at the wrong times.
Heating will not come on.
THEN. .
n
Check that heat or cool system power is on. If you use batteries,
replace with fresh ones.
n
Make sure thermostat is correctly mounted on subbase.
45’F to 88°F. In models with automatic heat-cool changeover, the
COOL temperature setting must be at least 3°F above the HEAT
temperature setting.
n
Programming has been lost because ofa power outage. You must
reprogram.
. Check that backup batteries are installed correctly. Replace if
necessary. Reprogram the thermostat.
m Check the program times for the period in question. Be sure that
AM and PM indications are correct. Make sure the current day and
time are correct. Reprogram if necessary
n
Remember that the heating system or cooling system comes
on
before the WAKE and RETURN start times so the house will be at
the desired temperature when the period starts.
n
Checkthefuseorcircuitbreakerand replaceorresetifnecessary.
n
Check that switch on thermostat is set to HEAT or AUTO.
33
The building is too
warm or too cool.
Display says HEAT ON or system
light is on, but no,heat is coming
from the registers.
Display tlsshes,REPL~~A~, or goes
blank,when @tier:& turned
o!.
‘:
. The:thermostat has a built-in time delay, which may add to time
delays in th&cooling e$juipment. Allow up to 10 minutes after
changing the setting before the compressor starts.
n
,If temp@ure setti@is’lower than current:temperature, and dis-
,,play $8)~ COOL ON
qi
SYSTEM Iight’iS on, contact your heating
and air conditioning contractor.
n
Press ~PRESENT SETTIN& to check, the current temperature
setting.
. If desired, change the time or tem@rature setting. See page 19.
. Allbwiime forthe heating equipmentto heat up before checking for
heat at the register. ,,~
~,~,~~stalJ, fresh A&:alk$ne ,t+tteries (Seem page ,271.
,,: ,,,,, ‘,,:,~,,~ ~,
34

Press these keys to:
Begin the current day or time
programming.
Set the day of the week and
select the program day during
programming.
Select the time period to program
or review.
Switch between heat and cool
modes during programming or
when reviewing the program.
Set the time ahead and back.
Hold either key down to change
the setting faster.
Set the temperature while programming and temporarily
change the temperature during
operation. Hold either key down
to change the setting faster.
Hold any temperature you desire
for an extended period.
Change the temperature to the
set point of the previous period.
Maintain the current temperature
through the next program period.
Start your programmed schedule,
cancel temporary program
changes.
See the current temperature setting. Setting may not match programmed setting during recovev
from energy savings

Auxiliary heat light.. 30
Batteries, replacement.. 27
Blinking display.. 33
Canceling programs.. 21
Change temperature.. 19
Check light.. .30
Checking present
setting . . . . . . . . . . . . . . . . . . . . ...23
Checking programs .22
Clock display *,l
Cooling temperatures 9
Day 1
Display.. *,l
Emergency heat
or Supplemental heat light .30
Energy-saving
temperature .29
Enrg Sav light .30
Fan switch 15
Features *
Flashing display
Glossary ......................
........................
..............
.33
.z9
Heating temperatures ..........
Hold temperature .............
Keys
..........................
LEAVE
Lights
.....................
........................
Maintenance ..................
.20
.35
.30,35
*,29
.25
Manual operation. ............. ,20
Operation 17
Period keys
...................
Personal program ............
Power outage
.................
.29
.31
.28
Preprogrammed
schedule
Present
...................
Setting ................ .23
.29
Program schedule.. 2
Programming
overview.. *
Programming steps .: 1: 1
2
Quick reference to
the keys ,35
RETURN.. .30,35
Removing thermostat.. .25
Replacing batteries .27
SLEEP .30,35
Saturday
program 7,12,29
Set cooling
temperatures
Set current day :: 1
Set current time.. 1
Set fan switch
Set heating
temperatures 2
9
15
*See the product features inside the front cover,
,, ~,,, ,~,,~

 Loading...