

Page 1
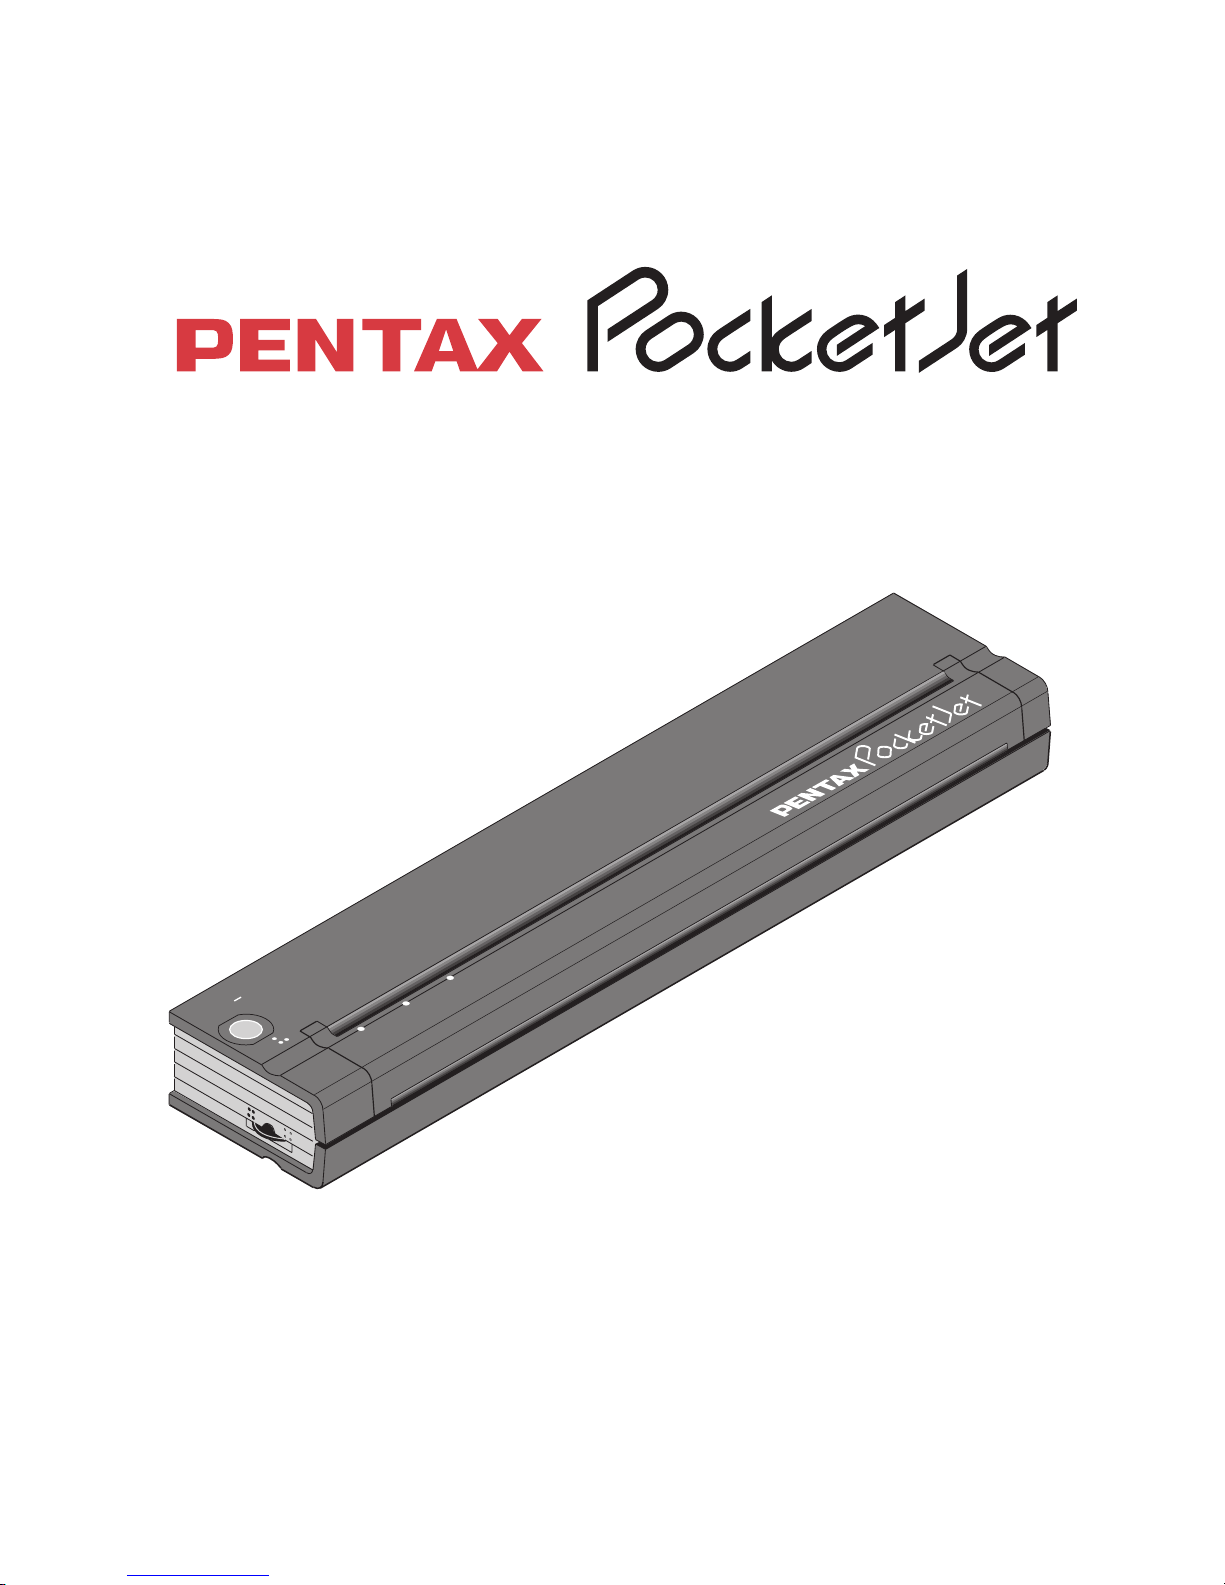
Printer User’s
Guide
The Future of Portable
Printing . . . Today!
POWER
DATA
BATTERY
CHARGE
REFRESH
ON
OFF
™
®
Page 2

Page 3

Contents i
Printer User’s Guide
™
®
Page 4

ii Pentax PocketJet Printer User’s Guide
PENTAX ® is a registered trademark and PocketJet™ is a
trademark of Asahi Optical Co., Ltd.
Centronics ® is a registered trademark of Centronics Data
Corporation.
Helvetica™ and Times™ are trademarks of Linotype-Hell AG
and/or its subsidiaries.
HP ®, LaserJet ® and PCL ® are registered trademarks of
Hewlett-Packard Company.
Macintosh ®, Newton ®, PowerBook ® and TrueType ® are
registered trademarks of Apple Computer, Inc.
OS/2 ® is a registered trademark of International Business
Machines Corporation.
PhoenixPage™ is a trademark of XIONICS.™
RBRC™ is a trademark of the Rechargeable Battery
Recycling Corporation.
Windows ® is a registered trademark of Microsoft.
The “CE” mark on the printer indicates compliance with
European Union regulations.
Copyright © 1995, 1997 by PENTAX Technologies Corporation.
All rights reserved. Specifications subject to change without notice.
P/N 201986-003
In Europe, P/N AC000801
Page 5

Contents iii
Contents
Safety Information 1
Safety Precautions ............................................................... 1
Battery Recycling/Disposal Information ............................ 2
Printer Features 3
Warranty Information 4
Setting Up the Printer 5
Unpacking the Printer .......................................................... 5
Installing the Battery ............................................................. 6
Connecting to an AC Outlet .............................................. 8
Charging the Battery ........................................................... 9
Removing the Battery ........................................................ 11
Tips on Using the Battery .................................................... 12
Checking the DIP Switches ............................................... 13
Printing a Self-Test Sheet .................................................... 14
Checking the Self-Test Sheet............................................. 16
Identifying Your Printer Model....................................... 18
Connecting to Your Computer ......................................... 19
Parallel Interface ............................................................ 19
Optional Serial Interface ............................................... 20
Optional Infrared Interface .......................................... 22
Using the Printer 23
Checking the Printer Driver ............................................... 23
Installing a Printer Driver ................................................ 23
Selecting a Printer.......................................................... 25
Setting Default Paper Size ................................................. 26
Printing ................................................................................. 27
Turning the Printer Off......................................................... 29
Auto-off Timer Feature ................................................... 29
Activating and Disabling the Auto-off Timer .............. 29
Making Prints Lighter or Darker ......................................... 30
Tips on Printing Large Graphics ........................................ 31
Using Fonts ........................................................................... 32
Protecting the Printer ......................................................... 32
PRINTER USER’S GUIDE
CHAPTER
1
CHAPTER
2
Page 6

iv Pentax PocketJet Printer User’s Guide
CHAPTER
3
Tips on Using Paper 33
Inserting Paper .................................................................... 33
Use Recommended Paper ............................................... 34
Usage and Handling Instructions...................................... 34
Clearing a Paper Jam ....................................................... 35
Guide to Imprinting Letterhead ....................................... 36
Maintaining the Printer 37
Cleaning the Print Head .................................................... 37
Cleaning the Platen Roller ................................................ 39
Cleaning the Printer’s Case .............................................. 40
Reference 41
Using the Operation Panel ................................................ 41
Indicator Lights ................................................................... 42
DIP Switches ........................................................................ 44
Troubleshooting 45
Indicator Light Warnings .................................................... 45
Paper Problems .................................................................. 47
Printed Image Problems .................................................... 48
Pages Don’t Print ................................................................ 51
Pages Are Partially Printed ................................................ 52
Technical Information 53
Specifications...................................................................... 53
Radio & Television Interference ........................................ 55
Ordering Information 59
Supplies and Accessories .................................................. 59
Replacement Parts and Upgrades .................................. 60
Printer Commands 61
Character Sets 67
Index 75
CHAPTER
6
CHAPTER
4
CHAPTER
5
CHAPTER
7
CHAPTER
8
APPENDIX
A
APPENDIX
B
Page 7

1
Safety Information
Safety Precautions
◆ Avoid placing the printer in direct sunlight or dusty
environments. Avoid high temperatures and rapid
changes in temperature or humidity.
◆ Avoid use in areas of high vibration.
◆ Because the printer uses a thermal printing method, it
produces heat during operation. Be sure to place it
where it will receive adequate ventilation.
◆ Don’t allow moisture to come in contact with the printer,
accessories, the AC adapter or the AC power cord.
Outdoor Use Warning
To reduce the risk of electric shock, do not expose this
printer, its AC adapter or the power cord to rain or moisture.
Caution: Using AC Power
To use AC power (with or without battery installed), you must
use the AC adapter supplied with the printer.
With the AC adapter, you can connect the printer to 110 240 volt power outlets. The adapter automatically accepts
the correct voltage when connected.
Check the standard power plug configurations that are
used in your country. If the appropriate power cord is not
included with your printer, notify your local reseller.
United
Kingdom
Australia and
New Zealand
U.S.A. and
Canada
Continental
Europe
Use an SEV approved
plug in Switzerland.
Safety Information
Page 8

2 Pentax PocketJet Printer User’s Guide
Unplug AC cable when printer is not in use.
Always unplug the AC cable from the AC power outlet when
you stop using the printer or charging the battery. The
transformer inside the AC adapter generates heat while it is
plugged in. Unplugging the AC adapter extends its life.
Battery Recycling/Disposal Information
This printer contains a rechargeable Nickel-Cadmium (Ni-Cd)
battery. The battery is recyclable. At the end of its useful life,
please consider recycling options (contact your local solid
waste officials) or proper disposal (see paragraphs below). It
may be illegal under various state and local laws to dispose of
the battery in your solid waste collection.
The RBRC™ seal on the Ni-Cd battery pack contained in the
PocketJet printer indicates that Pentax Technologies is
voluntarily participating in an industry program to collect
and recycle these battery packs at the end of their useful
life, when taken out of service within the United States. The
RBRC program provides a convenient alternative to putting
spent Ni-Cd battery packs into the trash or municipal waste
stream, which is illegal in some areas.
Pentax Technologies’ payments to RBRC make it easy for you
to drop off the spent battery pack at local retailers of
replacement Ni-Cd batteries or at authorized Pentax
product service centers. You may also contact your local
recycling center for information on where to return the spent
battery packs. The involvement of Pentax in this program is
part of its commitment to protecting our environment and
conserving natural resources.
For users
outside the United States, please contact your local
reseller or local solid waste official for information on
recycling your used batteries.
Page 9

3
Printer Features
The Pentax PocketJet printer is an ultra-light portable printer.
The printer’s small size and light weight make it the ideal
traveling companion for your PC notebook computer.
The Pentax PocketJet printer features:
◆ Models for letter, legal, and A4 paper sizes.
◆ Models with 512 KB and 2 MB of memory.
◆ High-quality images with a resolution of 300 by 300 dots
per inch.
◆ Print speed of up to three pages per minute.
◆ Operation on battery power or via AC adapter that
automatically switches between 110 and 240 volt power.
◆ Operation via optional car adapters.
◆ Parallel and serial interfaces. The complete printer kit
includes a parallel interface cable. A serial cable and
cables for selected laptops and PDAs are available.
◆ An optional infrared interface adapter for wireless
communication between your printer and computer.
◆ Full HP-PCL4 LaserJet
®
IIP compatibility. The printer can be
driven directly from most software applications and
operating systems.
◆ Direct thermal technology—no toner, ribbons, or ink are
ever needed.
◆ Connectivity options for Macintosh PowerBook and
Newton computers as well as many Personal Digital
Assistants (PDAs), palmtops and pen-based systems.
Printer Features
Page 10

4 Pentax PocketJet Printer User’s Guide
Warranty Information
Standard Warranty
Pentax provides, free of charge, a one-year limited warranty for
your new PocketJet printer. For one year from the date of original
purchase, Pentax will repair or replace a failed unit with a new or
rebuilt unit when it is returned postpaid to an authorized Pentax
service center. A return material authorization (RMA) number and
proof of purchase are required—in the continental United States
call Pentax at 1-800-543-6144 or 1-303-460-1820 and ask for
Customer Support.
See the Warranty Registration Card for details.
Outside the continental United States, see the Warranty
Registration Card for contact information and warranty details or
visit the Pentax Technologies Web site (www.pentaxtech.com) for
the location nearest you.
If the PocketJet battery or thermal paper fails due to defects
in material or workmanship within the first 90 days of
ownership, it will be replaced. Contact Pentax or your local
reseller for further information.
Pentax makes no other warranty, either expressed or implied,
with respect to this product. Some states or provinces do not
allow limitations, so the above limitation may not apply to you.
Extended Warranty
See the warranty card included with your PocketJet printer
for extended warranty information, or contact your local
reseller.
Page 11
5
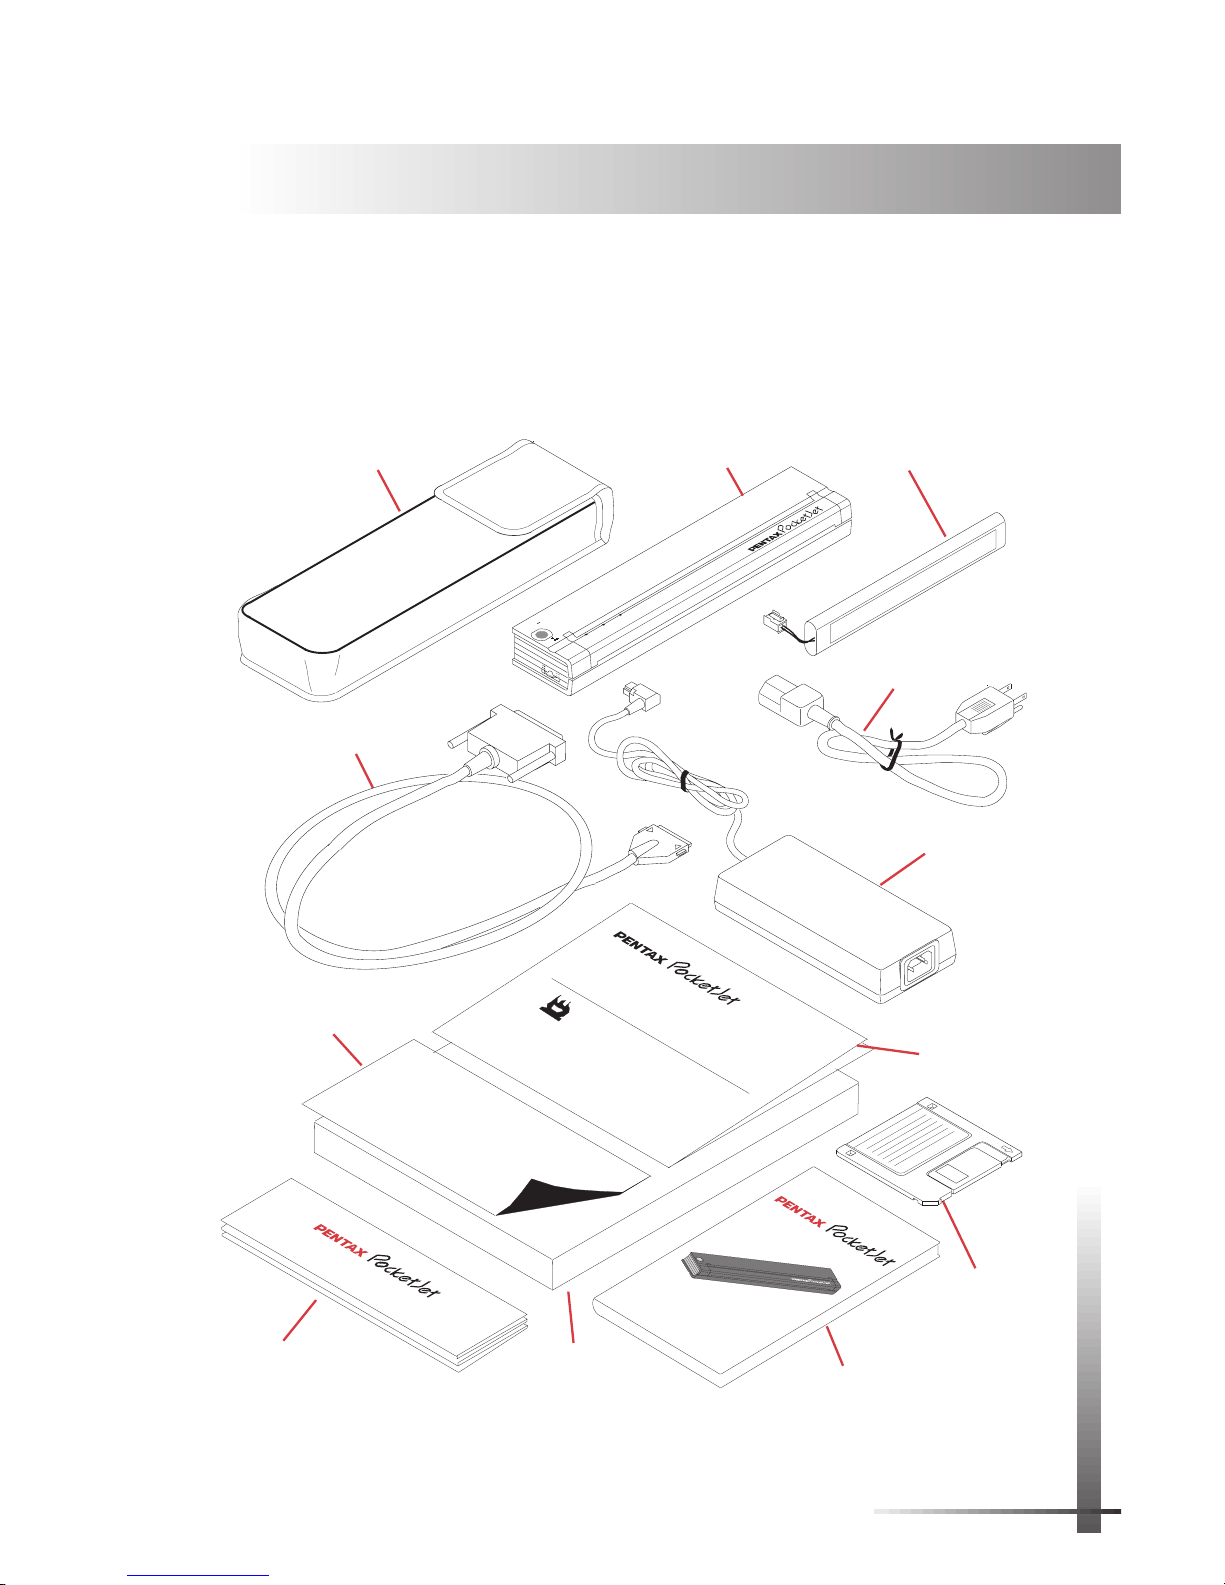
Setting Up the Printer
Unpacking the Printer
Follow the instructions on the
Read Me First
sheet.
The complete printer kit contains the items in Figure 1.
CHAPTER
1
PENTAX
POWER
DATA
BATTERY
CHARGE
REFRESH
ON
OFF
PENTAX
Protective Case
Parallel Interface
Cable
Printer
Battery
AC Adapter
AC Cable
Quick Reference Card
®
Service Plans
If Tim
e
Is
n
't A
n
Issu
e
. . .
If Tim
e
ˆs C
ritic
a
l . . .
During the first year of ownership, Pente=ax will repair or replace, at their option,
a
n
y
P
o
ck
e
tJe
t u
n
it o
r
a
cc
e
s
so
ry
w
h
ich
m
a
lfu
n
c
tio
n
s d
u
e
to
fa
ilu
re
o
f p
a
r
ts o
r
worksmanship. Owner must call Pentzx for a Return Maerchandise Aurhtorization
n
u
m
b
e
r,
th
a
n
se
n
d
th
e
u
n
it p
o
s
tp
a
id
to
P
e
n
ta
x
w
ith
p
ro
o
f o
f p
u
rch
a
se
.
D
u
rin
g
th
e
firs
t y
e
a
r o
f o
w
n
e
r
sh
ip
, P
e
n
te
=
a
x
w
ill re
p
a
ir o
r rep
la
ce
, a
t th
e
ir o
p
tio
n
,
a
n
y
P
o
c
k
e
tJe
t u
n
it o
r
a
c
c
e
ss
o
ry
w
h
ich
m
a
lfu
n
c
tio
n
s d
u
e
to
fa
ilu
re
o
f p
a
rts
o
r
worksmanship. Owner must call Pentzx for a Return Maerchandise Aurhtorization
n
u
m
b
e
r,
th
a
n
se
n
d
th
e
u
n
it p
o
stp
a
id
to
P
e
n
ta
x
w
ith
p
ro
o
f o
f p
u
rch
a
s
e
.
For a longer term needs, you can pruchase the same Hot Swap Service listed above
fo
r a
th
re
e
y
e
a
r te
rm
. p
lu
s a
n
a
d
d
itio
n
a
l tw
o
y
e
a
rs in
s
te
a
d
o
f o
n
ly
o
n
e
y
e
a
r.
S
ta
n
d
a
rd
1
Ye
a
r Wa
rra
n
ty
S
ta
n
d
a
rd
1
Ye
a
r Wa
rra
n
ty
S
ta
n
d
a
rd
1
Ye
a
r Wa
rra
n
ty
DOS Print
Utility Disk
User's Guide
Print Head
Cleaning
Cloth
Quick Reference
Card
Thermal Paper
(100 Sheet Box)
Warranty
Card
Printer User's
Guide
The Future of Portable
Printing . . . Today!
™
®
FIGURE 1. The contents of the complete printer kit.
Setting Up the Printer
Page 12
6 Pentax PocketJet Printer User’s Guide
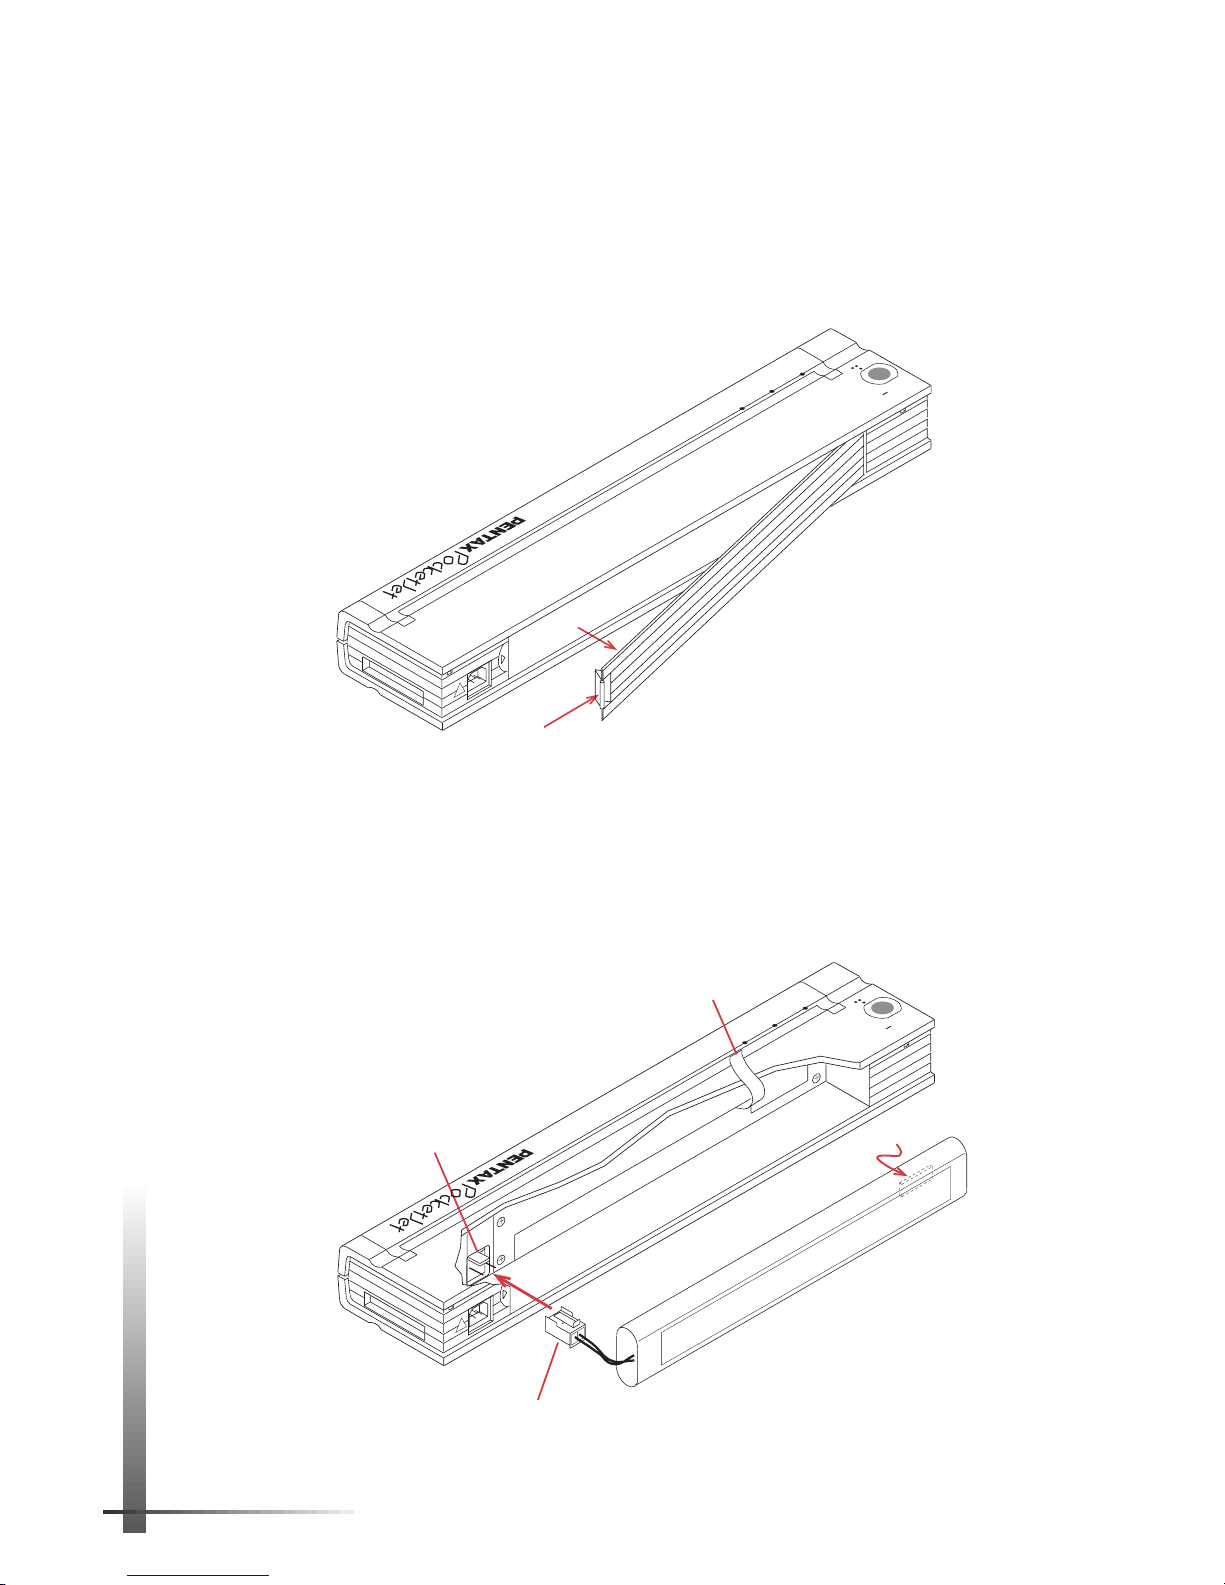
Installing the Battery
1 Open the printer’s battery cover by pressing the
cover latch. Push the cover away from the AC adapter
receptacle.
See Figure 2.
2 Swing the cover open and remove it.
3 Gently push the battery connector into the terminal
on the inside of the printer’s battery compartment next
to the cover latch.
See Figure 3.
FIGURE 3. Pushing the
battery connector into the
terminal.
CHARGE
REFRESH
ON
OFF
POWER
DATA
BATTERY
PARALLEL/SERIAL
AC ADAPT.
!
Terminal
Battery Connector
Removal Ribbon
Bulge
1
2
CHARGE
REFRESH
ON
OFF
POWER
DATA
BATTERY
PARALLEL/SERIAL
AC ADAPT.
!
FIGURE 2. Opening the battery cover.
Page 13

7
Setting Up the Printer
CAUTION:
Do not force the battery connector into the
terminal. If you are having difficulty inserting the connector, make sure the connector tab is facing the top
of the printer case. See Figure 3.
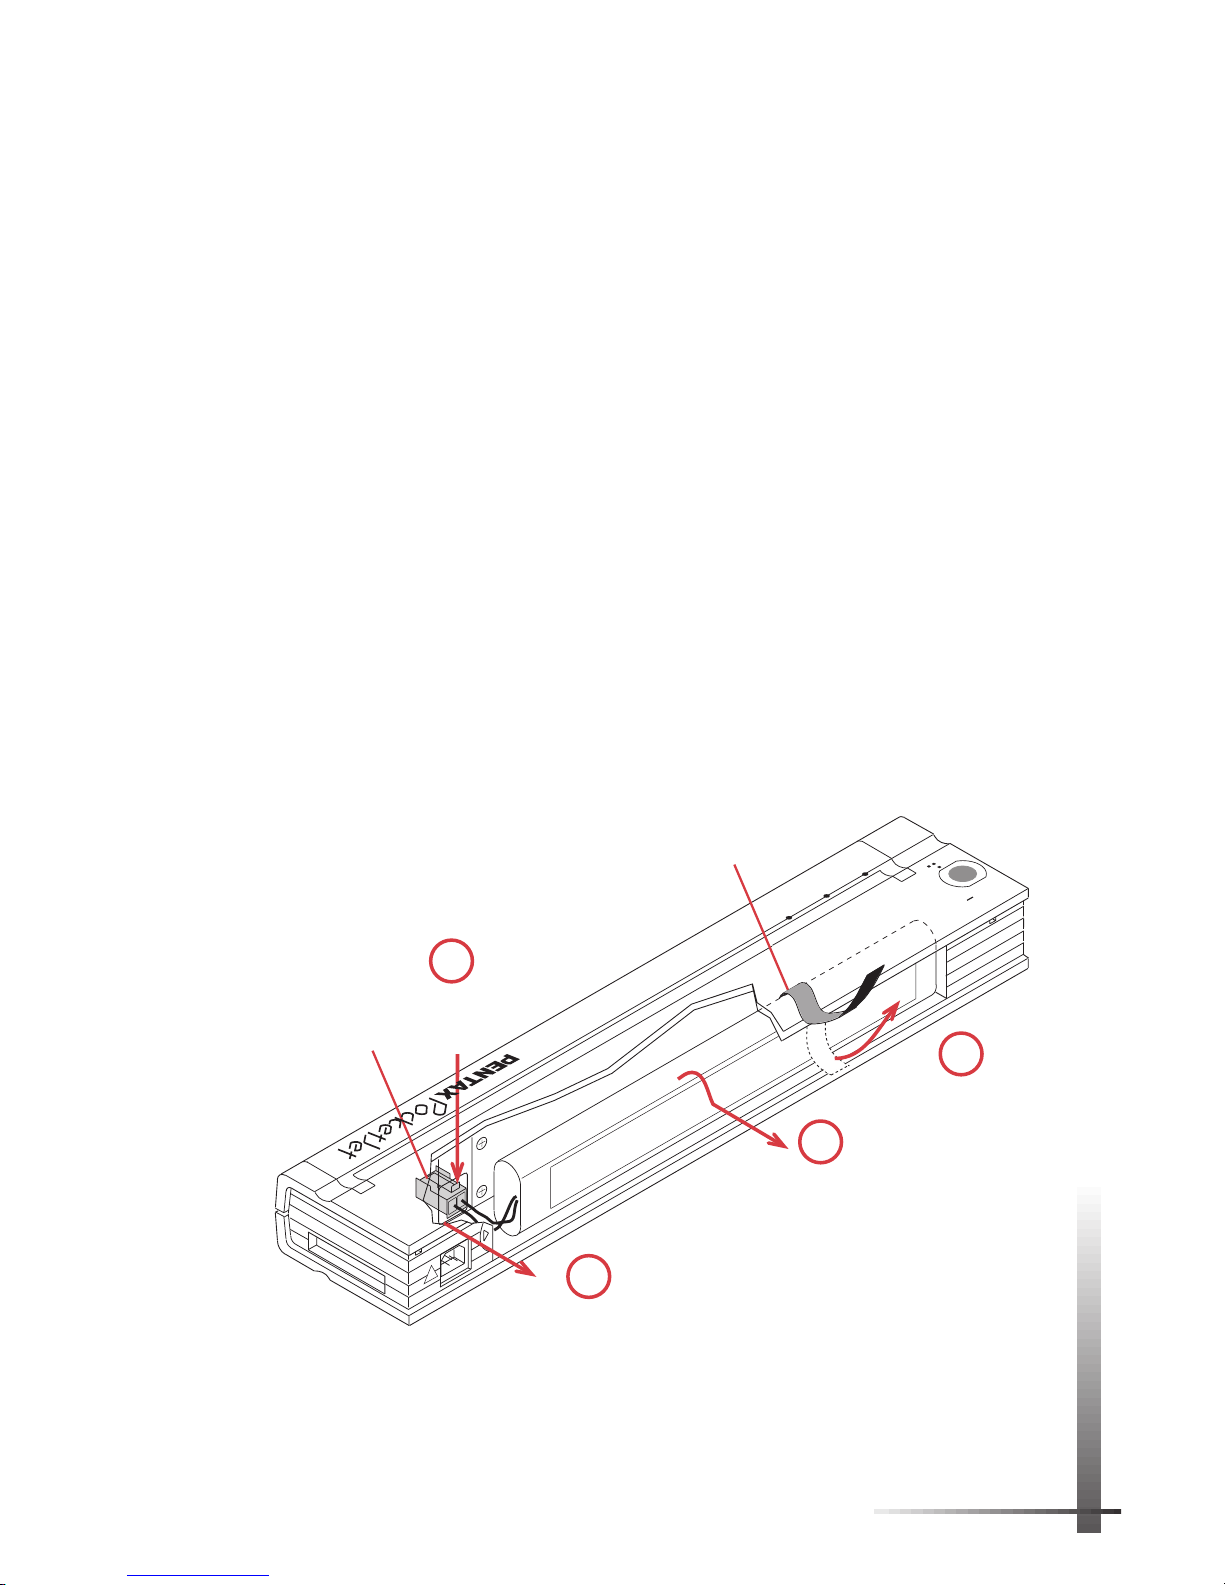
4 Grasp the battery removal ribbon, which is attached
to the inside of the battery compartment.
See Figure 4.
NOTE:
If you forget to hold on to the ribbon, you may
accidentally insert the battery on top of it. Then you
won’t be able to remove the battery by pulling on
the ribbon.
5 While holding on to the ribbon, tilt the battery and
place it inside the battery compartment. Once the
battery clears the outer edges of the compartment,
press it securely into position.
Make sure the side of the battery with the warning label
faces the outside of the battery compartment.
Otherwise, the battery cover will not close properly.
NOTE:
The side of the battery opposite the warning
label contains a heat sensor that stops the flow of electricity if the battery overheats.
6 Attach the battery cover to the end of the battery
compartment opposite the AC adapter receptacle.
Close and latch the cover. If necessary, gently push the
cover latch toward the AC adapter receptacle until it
latches.
Removal Ribbon
CHARGE
REFRESH
ON
OFF
POWER
DATA
BATTERY
PARALLEL/SERIAL
AC ADAPT.
!
FIGURE 4. Placing the battery inside the
battery compartment.
Page 14

8 Pentax PocketJet Printer User’s Guide
Connecting to an AC Outlet
Connect the printer to a nearby AC power outlet to run it
on AC power or to charge the battery.
1 Connect the AC adapter to the printer.
2 Connect the AC cable to the AC adapter.
3 Plug the AC cable into a nearby AC power outlet.
The AC adapter works with 100 - 240 volt, 50/60 Hz power.
It senses the voltage in the power outlet and
automatically switches to the proper voltage.
NOTE:
The plug on the AC cable shown in Figure 5 is
compatible with AC power outlets in the U.S.A. and
Canada. Your printer should ship with a power cord
that meets your country’s power requirements. If you
have the wrong power cord, please contact your local
dealer or order direct from Pentax. See Chapter 8,
“Ordering Information,” on page 59.
FIGURE 5. Instructions for connecting
the printer to a power outlet.
CHARGE
REFRESH
ON
OFF
POWER
DATA
BATTERY
PARALLEL/SERIAL
AC ADAPT.
!
Printer
1
PENTAX
AC Adapter
AC Cable
To power
receptacle
3
2
Page 15

9
Charging the Battery
The battery MUST be charged prior to first use.
Follow these steps to charge a new battery and to
recharge a used battery.
1 Make sure the printer is connected to an AC power
outlet with the AC adapter and power cord. See page 8.
2 Make sure the printer is off.
3 Make sure the battery is installed. See page 6.
4 Press the main switch and hold it down for a few
seconds until the green BATTERY indicator light stays lit.
See Figure 6.
This puts the printer in Charge mode, which completely
discharges the battery and then charges it.
The green BATTERY indicator light stays lit continuously
until discharging is completed; then it blinks until
charging is completed.
NOTE:
During the charging cycle, you will not be able
to print.
When the printer finishes charging the battery, it
automatically turns itself off, and the green BATTERY
indicator light goes off.
The entire process should take about 70 minutes.
Setting Up the Printer
Press and hold down
a few seconds
POWER
DATA
BATTERY
CHARGE
REFRESH
ON
OFF
Green BATTERY light
Main
switch
FIGURE 6. Charging the battery.
Page 16

10 Pentax PocketJet Printer User’s Guide
NOTE:
Your Ni-Cd battery will last much longer and
carry a greater charge if it is always completely discharged prior to charging. Steps 1-4 in “Charging the
Battery” explain this procedure.
Refreshing the Battery
Refreshing the battery “tops off” the charge without first
discharging the battery. You may refresh a
seasoned
battery
occasionally
when you don’t have time to
completely discharge and charge it.
CAUTION:
This procedure is not recommended, particularly with a new battery, as it may reduce the
battery’s life and its ability to carry a charge.
1 Make sure the printer is connected to an AC power
outlet with the AC adapter and power cord.
2 Make sure the printer is off.
3 Press the main switch and hold it down for a few
seconds until the green BATTERY indicator light stays lit.
This puts the printer in Charge mode, and it starts
discharging the battery.
4 Press the main switch and hold it down for a few
seconds until the green BATTERY indicator light starts to
blink. This bypasses the discharging process and puts the
printer in Refresh mode, which charges the battery
immediately.
The green BATTERY indicator light blinks until charging is
completed.
When the printer finishes refreshing the battery, it
automatically turns itself off, and the green BATTERY
indicator light goes off.
Stopping the Charge or Refresh Process
If you want to stop the printer while it is in Charge or Refresh
mode, press the main switch twice quickly.
Page 17
11
Removing the Battery
1 Open the printer’s battery cover by pressing the
cover latch. Swing the cover open and remove it.
2 Pull out on the battery removal ribbon as shown in
Figure 7 until the battery starts to tilt out of its
compartment.
NOTE:
If the battery removal ribbon is caught behind
the battery, insert a thin metal object such as a flatblade screwdriver between the battery and the case
at the end away from the AC adapter receptacle.
Gently push the battery toward the AC adapter receptacle and tilt it out of its compartment.
3 Remove the battery from the compartment.
4 Squeeze the connector tab on the battery connector
down.
5 Gently pull the battery connector from the terminal
inside the printer.
Setting Up the Printer
CHARGE
REFRESH
ON
OFF
POWER
DATA
BATTERY
PARALLEL/SERIAL
AC ADAPT.
!
Removal
Ribbon
Battery
Connector
Pull ribbon out
Squeeze
connector
tab down
2
4
Tilt battery out
3
Gently pull
connector out
5
FIGURE 7. Instructions for removing the battery.
Page 18

12 Pentax PocketJet Printer User’s Guide
Tips on Using the Battery
◆ Charging the battery after it has been completely
discharged takes about 70 minutes. For instructions, see
page 9.
◆ When you use the printer with a battery, it can print
approximately 30-35 pages on a full charge.
◆ Darker prints discharge the battery faster than lighter
prints do. Use the density dial to adjust lightness and
darkness.
◆ The printer’s protective vinyl carrying case has a sleeve
on the inside for an extra battery. With two batteries, you
can print twice as many pages before you have to
charge the batteries. (The sleeve on the back of the case
is for the quick reference card.) To order a spare battery,
see page 59.
◆ If the battery is not used for an extended period and
becomes discharged, it is best to recharge it without
using Refresh mode. Follow the instructions for “Charging
the Battery” on page 9.
◆ Use of the optional infrared adapter may decrease the
number of pages that can be printed with a fully
charged battery.
◆ Activating the auto-off timer (see page 29) extends the
battery’s life and is recommended when using the
optional infrared adapter.
Page 19
13
Setting Up the Printer
Checking the DIP Switches
The PocketJet printer has eight DIP switches that control
how the printer works. Follow these steps to make sure the
switches are set correctly.
1 Set the printer face down so that the battery
compartment is toward you.
2 Find the set of eight DIP switches marked SW1 on the
bottom of the printer.
See Figure 8.
3 Check the settings of the DIP switches.
At the factory, DIP switches 1,3-6, and 8 are set in the OFF
position. Switches 2 and 7 are set in the ON position.
Figure 8 shows the factory settings.
For a table listing the function of each DIP switch, see
“DIP Switches” on page 44.
PENTAX
THERMAL PRINTER
MODEL NO. PT-A4301
INPUT: DC 14.4V-1.3A
SER. NO.
AO4X12345
This device complies with Part 15 of
the FCC Rules. Operation is subject
to the following two conditions: (1) this
device many not cause harmful
interference, and (2) this device must
accept any interference received
including interference that may cause
undesired operation.
This product meets radio onterference
noise limits EN 55022 (B).
ASAHI OPTICAL CO.,LTD.
MADE IN JAPAN
SW1
Battery compartment
FCC ID: DU2 PT-A4301
TO BE USED WITH MODEL PT-1501A
RECHARGEABLE BATTERY.
SW1
ON
OFF
1234567
8
FIGURE 8. Checking the printer’s DIP switches.
Page 20

14 Pentax PocketJet Printer User’s Guide
Printing a Self-Test Sheet
1 Make sure the printer is turned off.
2 Set the printer face down so that the battery
compartment is toward you.
3 Using a pointed object such as
a push pin or paper clip, gently
move DIP switch 3 away from you
to the ON position.
4 Turn the printer face up and press the
main switch once quickly to turn the
printer on. The red POWER indicator lights
up. (If you are using the battery, the green
BATTERY indicator also lights up.)
See
Figure 9.
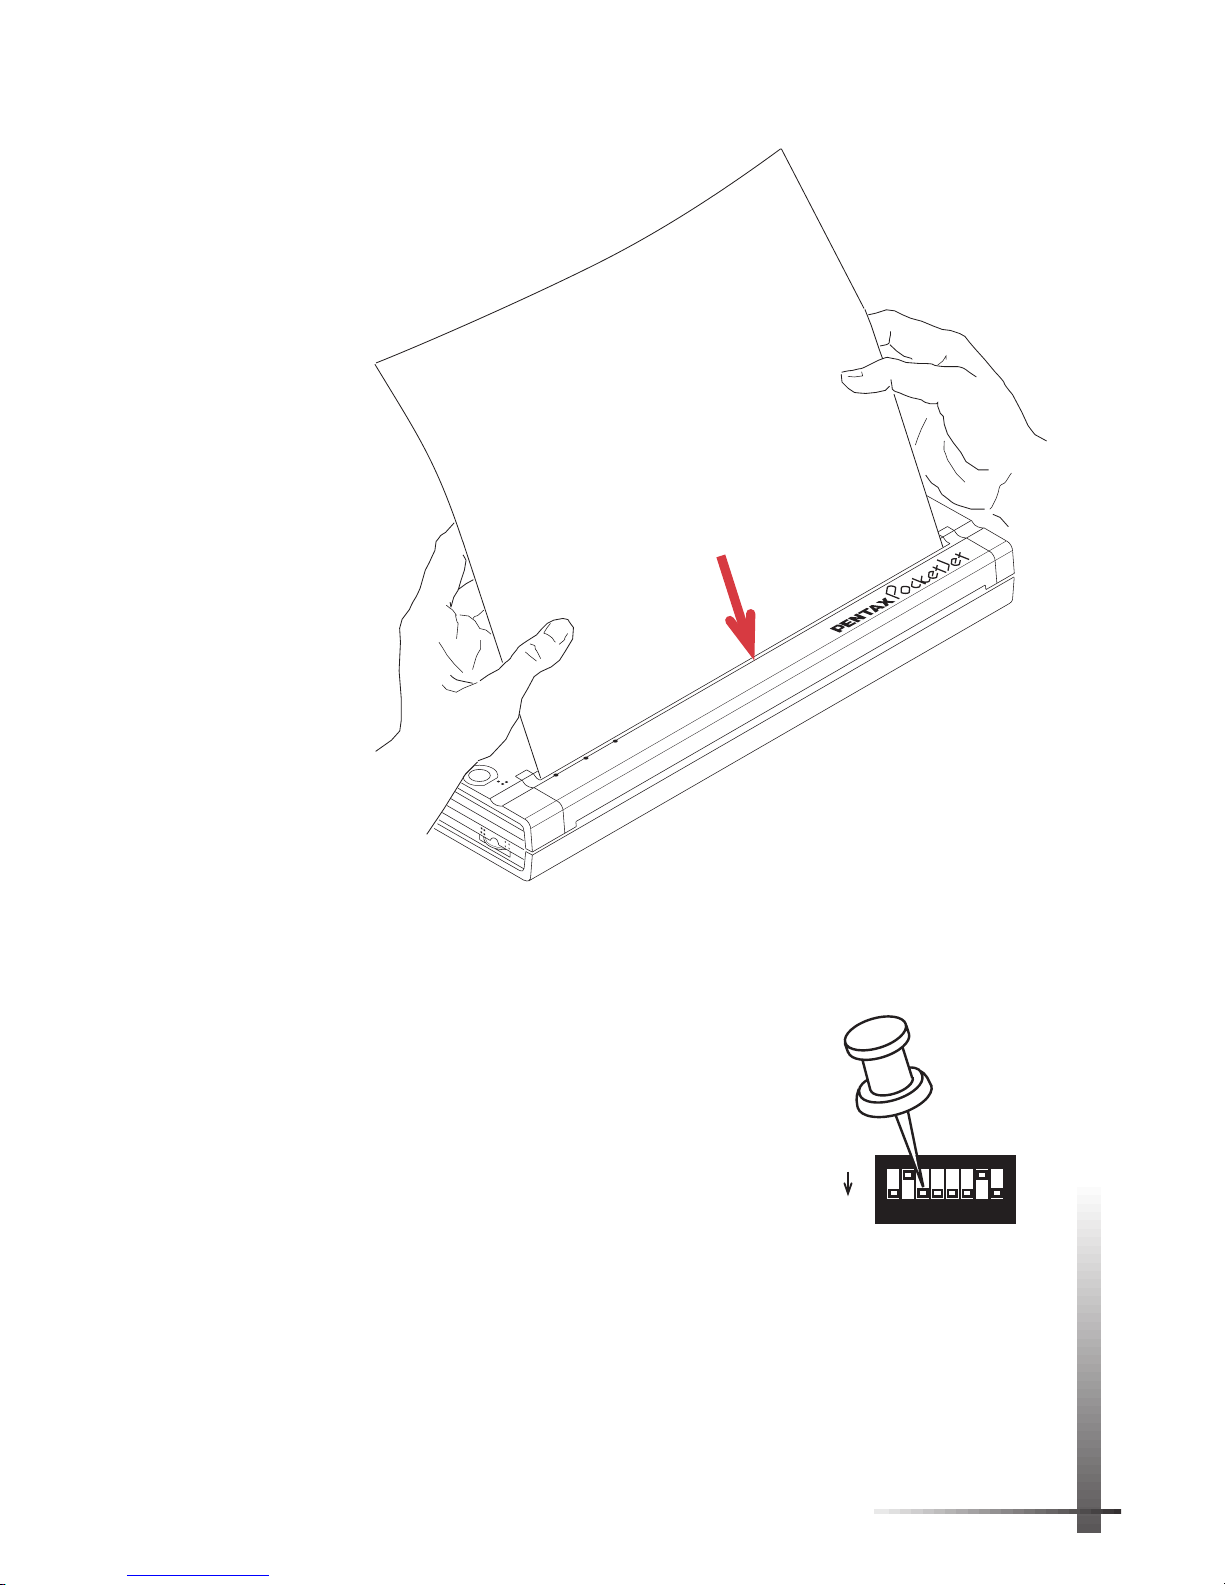
5 Insert a sheet of the recommended thermal paper
into the paper input slot. Place the print side of the
paper away from you, so that it faces the rear of the
printer.
See Figure 10.
NOTE:
You can print on only one side of thermal paper. This is the smooth, coated side. For more
information, see “Tips on Using Paper” on page 33.
6 After you insert the paper, the printer pulls it though
and prints the self-test image.
See Figure 11.
The green DATA indicator light comes on and stays lit.
One quick press
Red POWER light
POWER
DATA
BATTERY
CHARGE
REFRESH
ON
OFF
Green BATTERY light
FIGURE 9. Turning on the printer.
SW1
ON
OFF
1234567
8
Page 21
15
Setting Up the Printer
NOTE:
If the printer doesn’t print the self-test image,
see “Troubleshooting” on page 45.
7 Turn the printer off by pressing
the main switch twice quickly. All
the indicator lights turn off.
8 Using a pointed object, gently
move DIP switch 3 toward you to
the OFF position.
9 Turn the printer face up again.
It is now ready for use.
NOTE:
If you do not return DIP switch 3 to the OFF
position, the printer will print a self-test sheet every
time you power up the printer.
POWER
DATA
BATTERY
ON
OFF
Non-coated,
less-smooth
side of paper
FIGURE 10. Inserting a test sheet.
SW1
ON
OFF
1234567
8
Page 22
16 Pentax PocketJet Printer User’s Guide
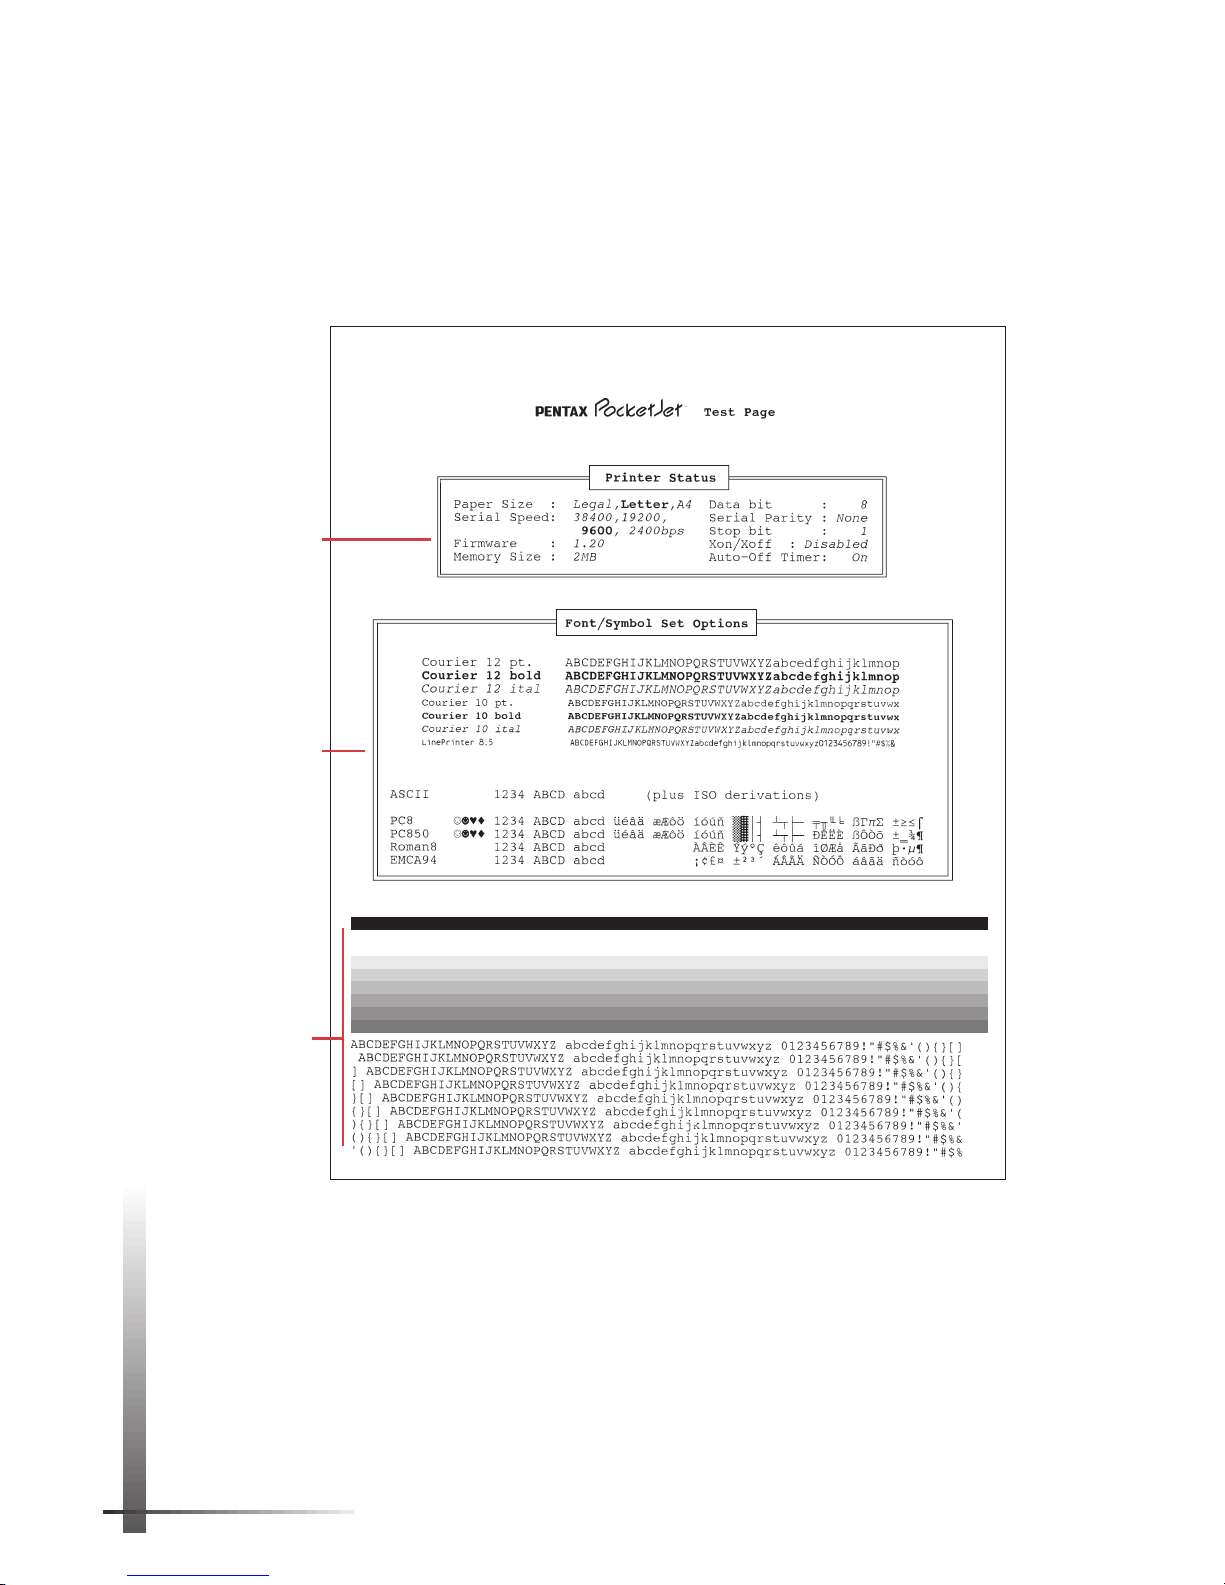
Checking the Self-Test Sheet
The self-test sheet gives you three sets of information: Printer
Status, Font/Symbol Set Options, and print quality.
See
Figure 11.
FIGURE 11. Self-test page with Printer Status for
models that support legal-size paper.
Printer Status
Font/Symbol
Set Options
Print Quality
(for models
supporting
legal-size
paper)
Page 23
17
Setting Up the Printer
Printer Status
The information in this section varies by printer model.
For a model that supports legal-size paper, the Printer Status
section shows:
◆ Paper Size—the default paper size and character set.
The current setting appears in bold type. The “Letter” and
“Legal” paper sizes common in the United States use the
PC-8 character set. If the model supports A4-size paper
common in Europe, the “A4” paper size uses the PC-850
character set. To change the default setting, see “Setting
Default Paper Size” on page 26.
◆ The serial speed and other serial settings (data bit,
serial parity, stop bit, and Xon/Xoff) used with a serial
interface. The current serial speed appears in bold
type. To change these settings, see “Optional Serial
Interface” on page 20.
◆ The firmware version number.
◆ The memory size, for example, 512 KB or 2 MB.
◆ The setting of the auto-off timer. To change the setting,
see “Auto-off Timer Feature” on page 29.
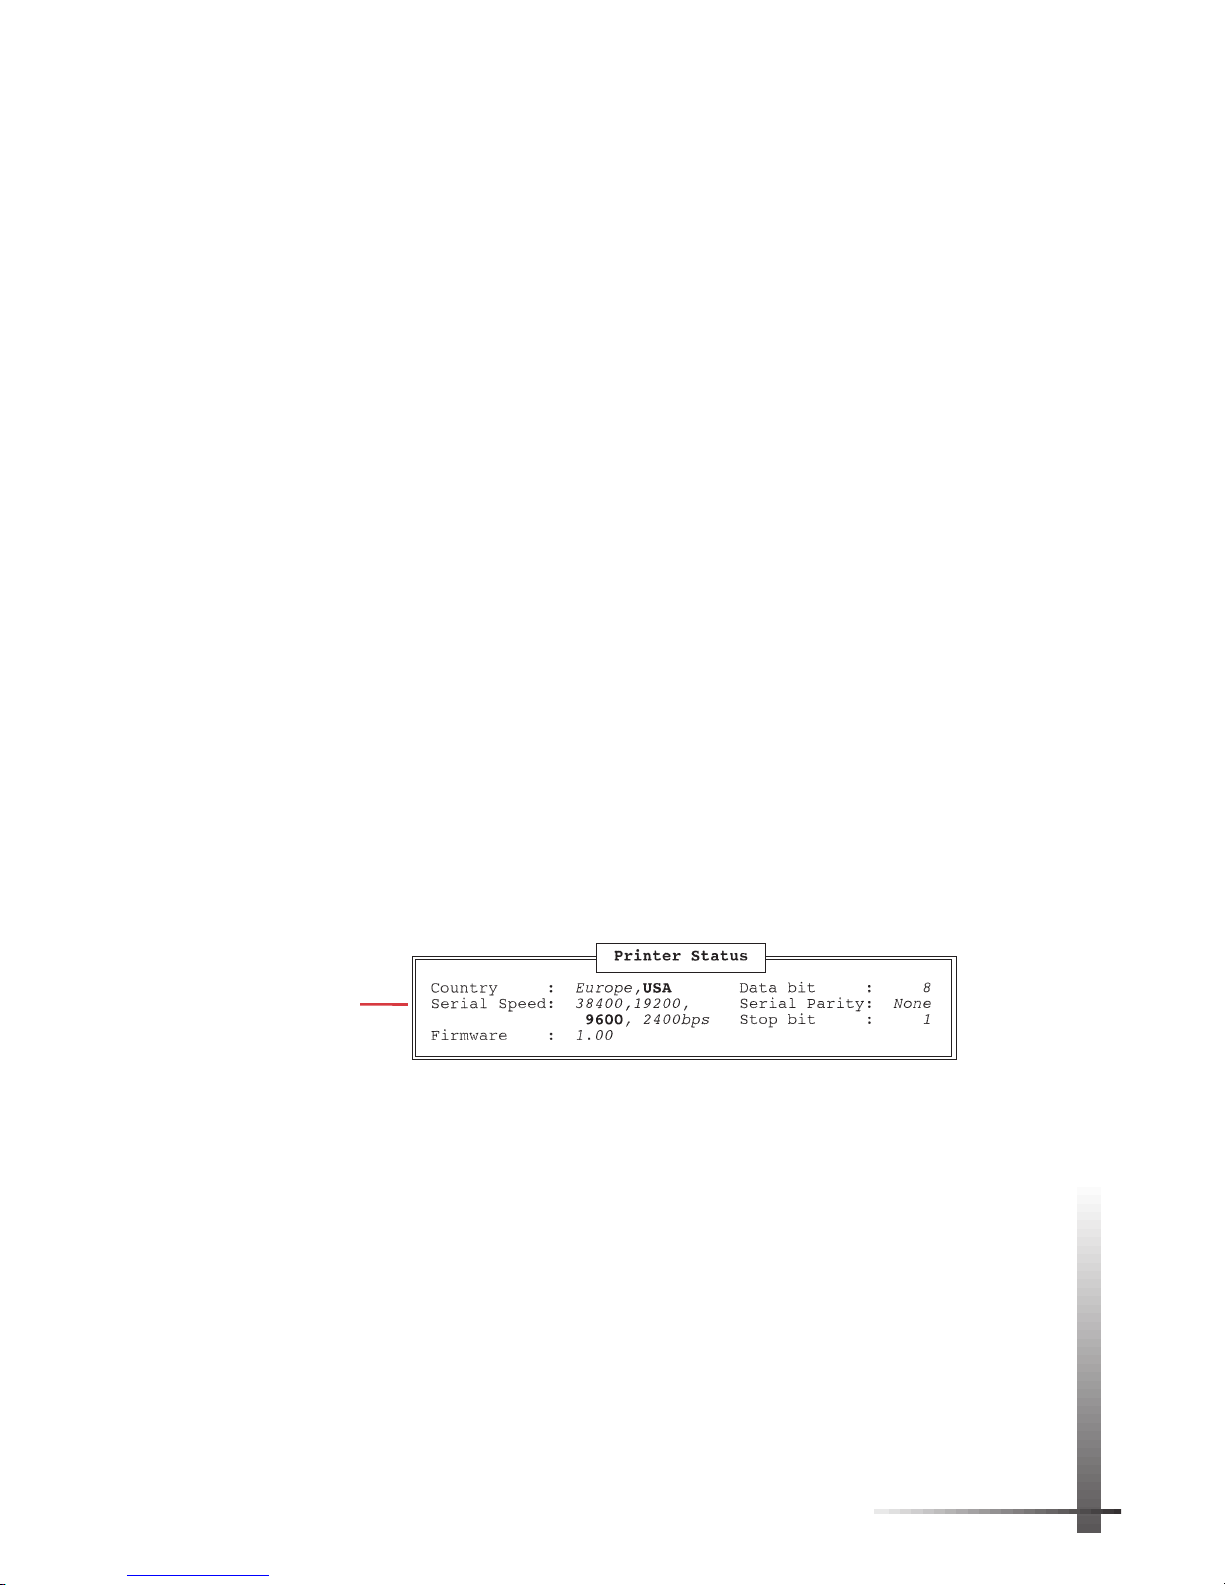
For the Letter/A4 512 KB model, the Printer Status section
shows “Country” instead of “Paper Size.” It does not show
the Memory Size and the settings for Xon/Xoff and the autooff timer.
“Country” shows the default paper size and character set.
The current setting appears in bold type: “USA” for letter-size
paper and PC-8 character set, or “Europe” for A4-size paper
and PC-850 character set. To change the default setting,
see “Setting Default Paper Size” on page 26.
Printer Status
(for Letter/A4
512 KB model)
Page 24

18 Pentax PocketJet Printer User’s Guide
Font/Symbol Set Options
This section shows samples of the printer’s seven internal
fonts and its character sets.
Print Quality
The lower part of the sheet contains a black line, shaded
bars, and lines of characters. Examine this section of the
self-test sheet to check the quality of the printed image.
Identifying Your Printer Model
You can identify your printer model by looking at the
Printer Status section of the self-test sheet.
◆ Letter/A4 512 KB Model: Look for the word “Country.”
There is no indication of memory size.
◆ Letter/Legal 512 KB Model: Look for the words “Paper
Size” followed by two options: “Letter” and Legal.”
“Memory Size” is 512 KB.
◆ Letter/Legal/A4 512 KB Model: Look for the words
“Paper Size” followed by three options: “Letter,”
Legal,” and “A4.” “Memory Size” is 512 KB.
◆ Letter/Legal/A4 2 MB Model: Look for the words “Paper
Size” followed by three options: “Letter,” Legal,” and
“A4.” “Memory Size” is 2 MB.
NOTE:
Unless your printer has been upgraded, you
can identify your model by looking at the serial
number on the bottom of the printer’s case. If the
serial number is in the format T1LGxxxxx, you have
one of the Letter/Legal models. If the serial number
is in the format T1xxxxxxx or A1xxxxxxx, you have a
Letter/A4 512 KB model. If your printer has been
upgraded, the self-test sheet indicates which
model and how much memory is installed, as listed
above.
Page 25

19
Setting Up the Printer
Connecting to Your Computer
You can connect the printer to your computer by using:
◆ The parallel interface cable supplied with the complete
printer kit. See “Parallel Interface” below.
◆ The optional RS-232C serial interface cable. See
“Optional Serial Interface” on page 20.
◆ The optional infrared adapter. See “Optional Infrared
Interface” on page 22.
◆ The optional interface cables for Macintosh PowerBook
and Newton computers and for many Personal Digital
Assistants (PDAs), palmtops and pen-based systems. See
pages 59 and 60.
For information about what type of printer connection your
computer has and about connecting your computer to a
printer, see the documentation that came with your
computer.
Parallel Interface
1 Make sure your printer is off before installing the
interface cable.
2 Take the printer end of the cable and hold it so the
notched metal surface is facing up.
3 Insert the printer end of the cable into the interface
connector on the side of the printer.
See Figure 12 on
page 20.
CAUTION:
Always insert and remove the interface
cable gently. Press the latching devices on each side
of the interface connector when removing the cable.
4 Insert the other end of the cable into the appropriate
connector on your computer.
Page 26
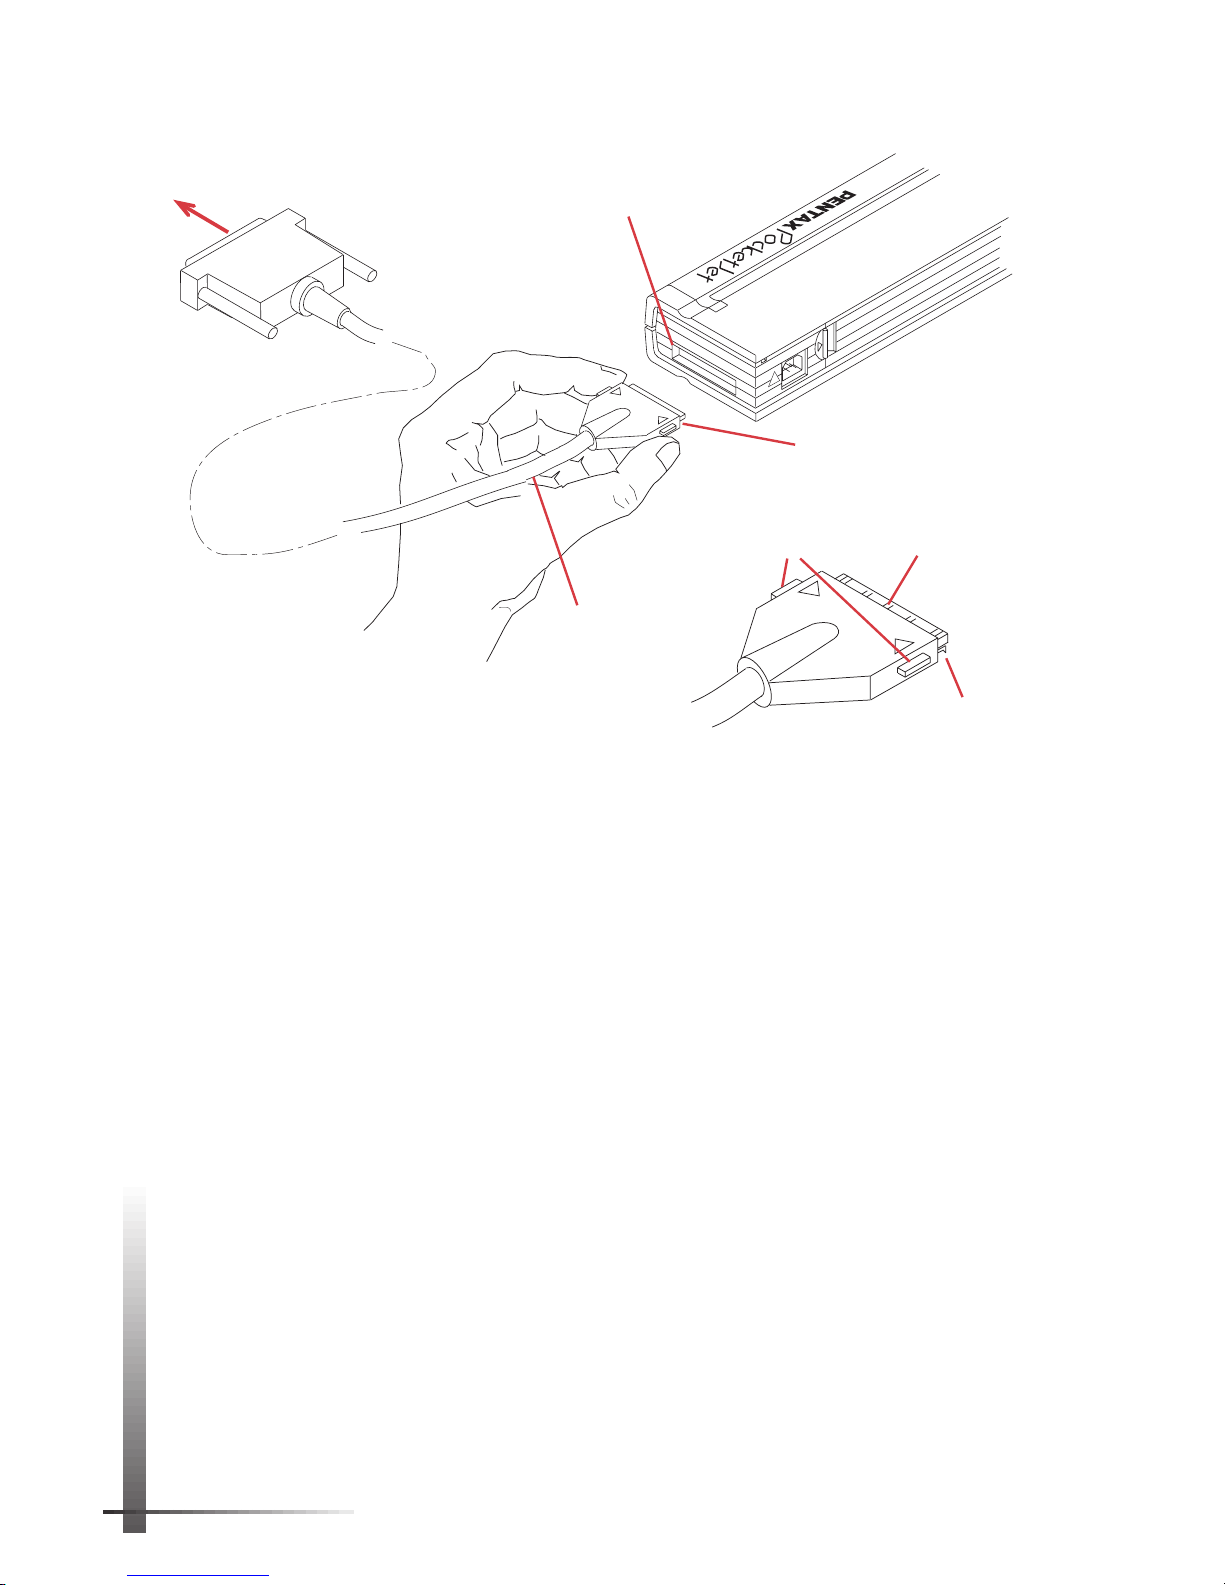
20 Pentax PocketJet Printer User’s Guide
FIGURE 12. Instructions for connecting
the printer to your computer with a cable.
PARALLEL/SERIAL
AC ADAPT.
!
Interface
connector
Printer end of cable
(see detail below)
Parallel interface
cable
To appropriate
computer input
Small catches
(bottom)
Notched metal
surface (top)
Latching
devices
Optional Serial Interface
The RS-232C serial interface cable is available from your
dealer or direct from Pentax. See Chapter 8, “Ordering
Information,” on page 59.
Set DIP switches 1, 2 and 7 (and 6 on some models) to control
the printer’s serial interface by following these instructions.
NOTE:
The printer automatically senses whether it is
connected to the computer with a parallel or serial
interface. It does not use a DIP switch for this purpose.
Switches 1, 2 and 7 have no effect when the printer is
connected with a parallel interface.
1 Make sure the printer is turned off.
2 Set the printer face down so that the battery
compartment is toward you.
3 Use a pointed object such as a push pin or paper clip
to change the setting of a DIP switch. Gently move the
DIP switch away from you to turn it ON. Move it toward
you to turn it OFF.
Page 27

21
4 Set switches 1 and 2 to the baud rate that you have
specified for the serial interface using your computer’s
operating system.
◆ For 38,400 bits per second (bps), set switches 1 and
2 to the OFF position.
◆ For 19,200 bps, set switch 1 to the ON position and
switch 2 to the OFF position.
◆ For 9,600 bps, set switch 1 to the OFF position and
switch 2 to the ON position.
◆ For 2,400 bps, set switches 1 and 2 to the ON
position.
5 Set the DIP switches to the handshaking method your
computer is using to communicate with the printer.
◆ For Xon / Xoff handshaking, set switch 7 to the OFF
position (Activate). When Xon / Xoff handshaking is
active, DTR hardware handshaking is disabled.
◆ For DTR hardware handshaking, set switch 7 to the
ON position to disable Xon / Xoff handshaking.
If you have a Letter/A4 or Letter/Legal printer
model, switch 6 controls the DTR polarity. Set switch
6 to the OFF position (Active High) in most
situations.
If you have a Letter/Legal/A4 printer model, switch
6 (together with switch 5) controls the default
paper size and character set. For these models,
DTR hardware handshaking is permanently set to
“Active High.”
To identify your printer model, see page 18.
NOTE:
Your computer controls the DTR polarity for DTR
hardware handshaking. Most computers use high
polarity. If your computer is using low polarity and if
you have a Letter/A4 or Letter/Legal printer model,
set switch 6 to the ON (Active Low) position.
Connect the RS-232C serial Interface cable to the printer
and computer by following the instructions for “Parallel
Interface” on page 19.
Setting Up the Printer
Page 28

22 Pentax PocketJet Printer User’s Guide
Optional Infrared Interface
The PocketJet printer can communicate with your computer
through a wireless infrared adapter.
The infrared adapter is available from your dealer or direct
from Pentax. See Chapter 8, “Ordering Information,” on
page 59.
To connect the infrared adapter to your printer, see the
instructions supplied with the infrared adapter.
NOTE:
The infrared adapter requires a special, modified
version of the PocketJet printer. The modified printer
can connect to your computer with the parallel
interface cable or the infrared interface adapter but
not with the serial interface cable. The settings of the
DIP switches that control the serial interface have no
effect on the modified printer. For more information
about PocketJet printers that support the infrared
interface adapter, contact your dealer or Pentax.
Page 29

23
Using the Printer
Checking the Printer Driver
The PocketJet printer uses the LaserJet IIP printer driver. It
can also use the LaserJet II printer driver in many instances
where a IIP driver is not available. Make sure that one of
these drivers is installed and selected on your computer or
available within your DOS application.
CAUTION:
Do not use the LaserJet IIP Plus driver. It is
not compatible with this printer in all situations.
Installing a Printer Driver
If you are using the Microsoft Windows, Windows NT or OS/2
operating environment, follow the instructions in your
Windows, Windows NT or OS/2 user’s guide for installing a
LaserJet IIP or LaserJet Series II printer driver. This section
gives brief instructions for installing a printer driver using
Windows 3.1 (see below) or Windows 95 (see page 24).
If you are using DOS, see “Selecting a Printer” on page 25.
Windows 3.1
Follow these instructions to install a printer driver using
Windows 3.1.
You may need your Windows installation disks or CD-ROM to
install a printer driver. Have them ready to use.
NOTE:
The DOS print utility disk included with the
complete printer kit does not contain any drivers.
1 At the Windows Program Manager, double-click the
Main icon. Double-click the Control Panel icon. Doubleclick the Printers icon.
2 At the Printers window, click the Add button.
A List of Printers appears in the lower part of the window.
3 Scroll through the List of Printers until you find the
HP LaserJet IIP (or HP LaserJet Series II) printer. Click
the HP LaserJet IIP and then click the Install button.
Using the Printer
CHAPTER
2
Page 30

24 Pentax PocketJet Printer User’s Guide
4 You may be prompted to insert your Windows
installation disks or CD-ROM. Follow the instructions on
the screen, and then click the OK button.
5 To make the printer the default printer, click it on the
list of Installed Printers and then click the Set As Default
Printer button.
6 Click the Connect button to specify which port the
printer is connected to.
7 When you are done installing printers, click Close.
Windows 95
Follow these instructions to install a printer driver using
Windows 95.
You may need your Windows installation disks or CD-ROM to
install a printer driver. Have them ready to use.
NOTE:
The DOS print utility disk included with the
complete printer kit does not contain any drivers.
1 Start Windows 95. Select the Settings option. Select
the Control Panel option. Double-click the Printers icon.
Double-click the Add Printer icon.
2 In the Printer Wizard window, click the Next button
until lists of manufacturers and printers appear. Scroll
through the Manufacturers list until you find HP. Click HP.
Scroll through the Printers list until you find the HP LaserJet
IIP (or HP LaserJet Series II) printer. Click the HP LaserJet
IIP and then click the Next button.
3 Answer each of the Printer Wizard’s questions and
click the Next button. For example, select a port for the
printer, give the printer a name, and decide whether to
print a test page. Click the Finish button.
4 You may be prompted to insert your Windows 95
installation disks or CD-ROM. Follow the instructions on
the screen, and then click the OK button.
5 To make the printer the default printer, click the Yes
radio button when the Printer Wizard asks “Default
printer?”
Page 31

25
Using the Printer
Selecting a Printer
This section gives brief instructions for selecting a printer using
Windows, Windows NT, OS/2 or DOS.
Windows, Windows NT and OS/2
Once the printer driver is installed, follow the instructions in
your Windows, Windows NT or OS/2 user’s guide to select
the printer driver as your printer.
If the HP LaserJet IIP or HP LaserJet Series II printer is the
default printer, you can print from a Windows application
without selecting a printer.
Under Windows 3.1, select a printer by choosing Printer
Setup on the File menu. Click the Specific Printer radio
button and then click the HP LaserJet IIP (or HP LaserJet
Series II) printer. If neither printer appears on the list, you
must install a printer driver. See page 23.
DOS
If you are using DOS applications, your application may
include support for LaserJet IIP (or LaserJet II) printers. If so,
select this option.
When using a DOS application (including the DOS “PRINT”
command) that offers no printer selection options, you may
still control the features of the printer, including internal font
selection, character set, portrait or landscape orientation,
lines per inch, etc. To do this, run the POCKETJT.EXE program,
found on the DOS print utility disk included with your printer,
before running your DOS program. Alternatively, it may be
possible to embed PCL4 command codes directly into your
document. For a list of these commands and character sets,
see Appendices A and B.
Printer Emulation
The printer emulates a LaserJet IIP using Hewlett-Packard’s
printer control language PCL4 (PhoenixPage™ PCL4
licensed from XIONICS™).
This emulation supports all LaserJet IIP capabilities except
those that clearly do not apply, such as support for paper
trays, envelope feeding, etc.
Page 32

26 Pentax PocketJet Printer User’s Guide
Setting Default Paper Size
Windows and many DOS-based applications send papersize and character-set information to the printer.
The default paper size and character set are important
only for situations like using the DOS “PRINT” and “COPY”
commands and for certain DOS applications that do not
send PCL printer setup information prior to the print job.
1 Make sure the printer is turned off.
2 Set the printer face down so that the battery
compartment is toward you.
3 Using a pointed object, set the DIP switches for
your model printer. Gently move the DIP switch away
from you to turn it ON. Move it toward you to turn it
OFF. To check which model printer you have, see
“Identifying Your Printer Model” on page 18.
Letter/A4 Model
◆ Letter-size paper and PC-8 character set: switch 5 OFF.
◆ A4-size paper and PC-850 character set: switch 5 ON.
Letter/Legal Model
◆ Letter-size paper and PC-8 character set: switch 5 OFF.
◆ Legal-size paper and PC-8 character set: switch 5 ON.
Letter/Legal/A4 Model
◆ Letter-size paper and PC-8 character set: switches 5
and 6 OFF.
◆ Legal-size paper and PC-8 character set: switches 5
and 6 ON.
◆ A4-size paper and PC-850 character set: switch 5 ON
and switch 6 OFF. (Or switch 5 OFF and switch 6 ON.)
NOTES:
You can use different settings (such as a nonstandard paper size or letter-size paper with the
PC-850 character set) for an individual print job by
specifying the character set, paper size, or both in
your printer driver or software application.
For character set tables, see Appendix B.
Page 33

27
Using the Printer
Printing
You MUST charge the battery before using the printer the
first time. For instructions, see page 9.
1 Make sure that you have installed a charged
battery or have connected the printer to an AC
power outlet.
2 Turn the printer on by pressing the main switch
once quickly. The red POWER indicator lights up. (If
you are using the battery, the green BATTERY indicator
also lights up.)
See Figure 13.
3 Print one or more pages from a software
application on your computer.
The green DATA indicator light blinks to indicate that
the printer is receiving data from your computer.
4 Insert a sheet of thermal paper into the paper
input slot. Place the print side of the paper away
from you, so that it faces the rear of the printer.
See
Figure 14.
NOTE:
You can print on only one side of thermal
paper. This is the smooth, coated side. For more
information, see “Tips on Using Paper” on page 33.
FIGURE 13. Turning on the printer.
One quick press
Red POWER light
POWER
DATA
BATTERY
CHARGE
REFRESH
ON
OFF
Green BATTERY light
Page 34

28 Pentax PocketJet Printer User’s Guide
FIGURE 14. Inserting a sheet of paper.
POWER
DATA
BATTERY
ON
OFF
Non-coated,
less-smooth
side of paper
NOTE:
If you have inserted paper into the input slot
and the green DATA indicator light stays on (without
blinking), the printer has received an insufficient
amount of data to print an entire page. This situation
occurs normally in some software applications when
a partial page remains to be printed at the end of a
print job.
You can print the partial page by pushing the main
switch once quickly after you have loaded the paper.
Page 35

29
Turning the Printer Off
Press the main switch twice quickly to turn the printer off.
Auto-off Timer Feature
The auto-off timer conserves battery power when the printer
is being powered from its battery. When the timer is active,
the printer turns itself off after 60 seconds if it is not receiving
data (unless there is data in the printer buffer).
When the printer is being powered from the AC adapter or
a car adapter, the auto-off timer is automatically disabled.
NOTE:
Once the auto-off timer has turned the printer
off, you must turn it back on by pressing the main switch
once quickly. The printer does not turn itself back on
automatically when the computer is attempting to
send data to it.
Activating and Disabling the Auto-off Timer
1 Make sure the printer is turned off.
2 Set the printer face down so that the battery
compartment is toward you.
3 Using a pointed object such as a push pin or paper
clip, set DIP switch 8 as follows:
◆ To activate the auto-off timer, gently move switch 8
toward you to the OFF position.
◆ To disable the auto-off timer, gently move switch 8
away from you to the ON position.
Using the Printer
Page 36

30 Pentax PocketJet Printer User’s Guide
Making Prints Lighter or Darker
You can make prints lighter or darker with the density dial
on the side of the printer near the main switch. The larger
the number you select, the darker the print becomes.
See
Figure 15.
Try setting the density to 5; then adjust it to suit your taste.
You can change the density setting while printing. Watch
the print turn lighter or darker as you turn the density dial.
NOTE:
Changing the density setting results in changes
to the printer’s speed and the number of pages that
can be printed on a battery charge.
POWER
DATA
BATTERY
CHARGE
REFRESH
ON
OFF
2
0
Lighter
10
Darker
Density
dial
FIGURE 15. Using the density dial.
Page 37

31
Tips on Printing Large Graphics
When the PocketJet printer doesn’t have enough memory
to print a large graphics file, it prints as much of the page
as it can and then ejects the partially printed page. If this
happens, insert the page again. The printer will finish
printing it.
If you always insert the page into the printer in the same
way (all the way to the right or left), you should be able to
achieve near perfect alignment if you have to reinsert a
partially printed page.
To avoid having to feed a page through the printer twice:
◆ Print in portrait mode rather than in landscape mode.
◆ Remove shading and grids; use underlined borders
instead.
◆ Use as few fonts as possible.
In addition, you may be able to speed or improve printing
by:
◆ Making sure both HP LaserJet Series II and HP LaserJet
Series IIP printer drivers are installed.
◆ Setting the HP LaserJet Series II as the default printer.
◆ Enabling the “Print TrueType as Graphics” option. See the
instructions below.
◆ Changing the printer port from LPT1 to LPT1.DOS—
if
the
printer is connected to the computer with a parallel
interface cable.
If you are using a PocketJet printer with 512 KB of memory,
you can upgrade it to 2 megabytes. See chapter 8,
“Ordering Information,” on page 59.
Enabling “Print TrueType as Graphics”
These instructions apply to Windows 3.1.
1 At the Windows Program Manager, double-click the
Main icon. Double-click the Control Panel icon. Doubleclick the Printers icon.
2 Click the Setup button. Click the Options button.
Using the Printer
Page 38

32 Pentax PocketJet Printer User’s Guide
3 Make sure the box in the lower left corner of the
window is checked.
4 Click OK, then click OK again, then click Close.
Using Fonts
The PocketJet printer contains seven internal fonts, which can
be printed in portrait or landscape orientation. The fonts are:
The printer also supports downloadable fonts, including
TrueType fonts. The PocketJet printer can print any
downloaded font supported by an HP LaserJet IIP printer.
NOTE:
Your computer transfers downloadable fonts to
your printer, and the printer stores the downloaded
fonts in its memory while it’s printing. Using many
downloaded fonts increases printing time and may
require you to feed a page through the printer twice.
See “Tips on Printing Large Graphics” on page 31.
Protecting the Printer
When you are not using the printer for an extended time or
are not regularly charging its battery, always take the
following precautions:
◆ Unplug the AC cable from the power outlet
◆ Remove the battery from the printer
◆ Store the printer in its protective vinyl carrying case
NOTE:
The transformer inside the AC adapter generates heat while it is plugged in. Unplugging the
adapter extends its life.
Page 39

33
Tips on Using Paper
Inserting Paper
Inserting paper is easy. Just to make sure you don’t have
any problems, here are some helpful tips.
1 Use both hands to hold the paper straight while you
insert it into the printer’s paper input slot. Make sure the
bottom edge of the paper is parallel to the feed roller.
2 Insert the paper by pressing it gently and evenly on
both the left and right sides until it can’t be inserted any
farther. After a short pause, the roller pulls the paper into
the starting position. Let go of the paper when the roller
starts to pull it.
If the paper is skewed after the printer pulls it into the
starting position, you can correct the situation as follows.
◆ If the printer
does not
start to print immediately,
open the release cover as far back as it will go.
See
Figure 16 on page 35.
Pull the paper out and
reinsert it. Close the cover.
◆ If the printer
does
start to print, wait for the page to
be printed and then reprint that page if necessary.
NOTE:
If you insert the paper into the printer
before
you start the print job, you will have time to adjust the
paper if it is skewed after the printer pulls it into the
starting position.
Tips on Using Paper
CHAPTER
3
Page 40

34 Pentax PocketJet Printer User’s Guide
Use Recommended Paper
The printer never needs toner, ribbons, or ink because it uses
thermal paper specifically designed for it. To order paper,
see your dealer or order direct from Pentax. Refer to
Chapter 8, “Ordering Information,” on page 59.
Usage and Handling Instructions
◆ When loading paper, make sure the smooth, coated side
faces the back of the printer.
◆ To avoid wrinkling and tearing, keep paper in its box until
ready to use.
◆ Do not fold, crease or wrinkle paper prior to loading it
into the printer.
◆ When storing paper, avoid high temperatures and
humidity.
◆ Avoid prolonged exposure to intense ultraviolet light.
◆ Avoid contact with Diazo (blueprint), carbonless or
castcoated papers.
◆ Avoid contact with vinyl or acetate materials, such as
many notebook or report covers.
◆ Avoid contact with organic solvents, oils and ammonia.
Page 41

35
Clearing a Paper Jam
Remove the paper as follows when a jam occurs.
1 Open the release cover as far back as it will go.
See
Figure 16.
2 Gently pull the paper out of the printer.
See Figure 17.
3 Close the release cover.
4 Reinsert a new sheet of paper in the printer and
restart the print job.
Tips on Using Paper
FIGURE 16. Opening the release cover.
CHARGE
REFRESH
ON
OFF
BATTERY
DATA
POWER
CHARGE
REFRESH
ON
OFF
BATTERY
DATA
POWER
FIGURE 17. Pulling jammed paper
out of the printer.
Page 42

36 Pentax PocketJet Printer User’s Guide
Guide to Imprinting Letterhead
PocketJet thermal paper can be imprinted with colored
logos or graphics prior to being printed in a PocketJet.
Here are some guidelines for commercial printers.
◆ Use only water-based inks.
◆ Use low-tack ink to avoid pick and backside offset.
◆ Backside printing is possible with a few limitations. Light
blues or blacks with a 25% screen or less should work
without causing the printer to hesitate or stop.
◆ Avoid exposure to solvents, either in printing or in storage.
◆ Flexo presses are recommended. When thermal paper is
printed on offset presses, sticking and offsetting problems
may occur.
Contact Pentax for more details about imprinting
letterhead or backside printing.
Page 43

37
Maintaining the Printer
Cleaning the Print Head
Clean the print head to maintain high print quality after 200
to 300 prints or whenever you detect broken or light
characters in a vertical line on the page.
NOTE:
Defective paper can also cause broken or light
characters. If the problem does not go away after
you clean the print head, try a different sheet of paper or a higher density setting.
1 Make sure the printer is turned off.
2 Set the printer face down so that the battery
compartment is toward you.
3 Using a pointed object such
as a push pin, mechanical pencil
or paper clip, gently move DIP
switch 4 away from you to the
ON position.
4 Turn the printer face up and
press the main switch once
quickly to turn the printer on.
5 To start the printer platen roller turning, press the main
switch once quickly.
6 Insert the cleaning cloth into the printer’s paper input
slot with the rough black side, which contains the
cleaning material, toward the rear of the printer.
See
Figure 18.
The printer pulls the cleaning cloth through. The platen
roller continues to turn until you turn off the printer.
Repeat step 6 several times for thorough cleaning.
CAUTION:
Do not attempt to clean the print head with
any material other than the cleaning cloth.
The cleaning cloth is for head cleaning only. Do not
use it to clean any other part of the printer.
Maintaining the Printer
CHAPTER
4
SW1
ON
OFF
1234567
8
Page 44

38 Pentax PocketJet Printer User’s Guide
7 Turn off the printer by pressing the main switch twice
quickly.
8 Set the printer face down so
that the paper outlet slot is
away from you.
9 Using a pointed object,
gently move DIP switch 4 toward
you to the OFF position.
10 Turn the printer face up again. It is now ready for use.
NOTE:
Don’t throw the cleaning cloth away after you
clean the print head. It should last for the life of the
printer. Keep the cleaning cloth with your printer supplies and use it whenever you need to clean the print
head.
POWER
DATA
BATTERY
ON
OFF
Cleaning
side
FIGURE 18. Inserting the cleaning cloth.
SW1
ON
OFF
1234567
8
Page 45

39
Cleaning the Platen Roller
Dirt and debris on the platen roller can make the roller feed
paper into the printer at an angle, degrade the quality of
the printed image, or both.
1 Open the release cover.
See Figure 19.
2 Clean the platen roller with a soft, dry, lint-free cloth
to gently remove any dirt or debris on the roller.
See
Figure 20.
Maintaining the Printer
CHARGE
REFRESH
ON
OFF
BATTERY
DATA
POWER
FIGURE 20. Cleaning the platen roller.
FIGURE 19. Opening the release cover.
CHARGE
REFRESH
ON
OFF
BATTERY
DATA
POWER
Soft, dry
cloth
Platen
Roller
Page 46

40 Pentax PocketJet Printer User’s Guide
Cleaning the Printer’s Case
Should the outside of the printer become dirty, clean it using
a soft cloth moistened with water. If necessary, add a very
small amount of a mild soap such as a liquid dishwashing
detergent.
CAUTION: Avoid saturating the cloth. Do not allow
water to get inside the printer.
Avoid the use of benzene, alcohol, paint thinner or
cleaners that are abrasive, alkaline or acidic. Such
cleaners may damage the printer’s case.
Page 47

41
Reference
Using the Operation Panel
The operation panel consists of the main switch and three
indicator lights.
See Figure 21.
Main Switch Functions
Power On: Push once quickly while the printer is off.
Form Feed: Push once quickly while the printer is on and a
partial page has been sent to the printer.
Power Off: Push twice quickly.
NOTE:
The printer automatically powers off when it is
running under battery power and it has not received
any data for 60 seconds (if the auto-off timer is active). See page 29.
Charge battery: Push once and hold for several seconds
until the green BATTERY indicator stays lit. When the printer
finishes discharging the battery, it starts to charge the
battery, and the green BATTERY indicator starts to blink.
Reference
CHAPTER
5
POWER
DATA
BATTERY
CHARGE
REFRESH
ON
OFF
2
Main
Switch
Red POWER
Indicator
Green DATA
Indicator
Green BATTERY
Indicator
FIGURE 21. Operation panel.
Page 48

42 Pentax PocketJet Printer User’s Guide
Refresh battery: While in Charge mode, push once and hold
for several seconds until the green BATTERY indicator starts to
blink.
To power off during Charge or Refresh mode: Push twice
quickly.
Indicator Lights
The three indicator lights—POWER, DATA, and BATTERY—tell
you about the current status of the printer. When an error
occurs, they show the type of error.
◆ Red POWER Light Steady: Power is on.
◆ Red POWER Light Blinking: An error has occurred.
◆ Green DATA Light Steady: Unprinted data in printer buffer.
◆ Green DATA Light Blinking: Receiving data from
computer.
◆ Green BATTERY Light Steady: Charge is high or battery is
being discharged.
◆ Green BATTERY Light Blinking: Charge is low or battery is
being charged.
The Indicator Light Table on page 43 shows all combinations
of indicator lights.
Page 49

43
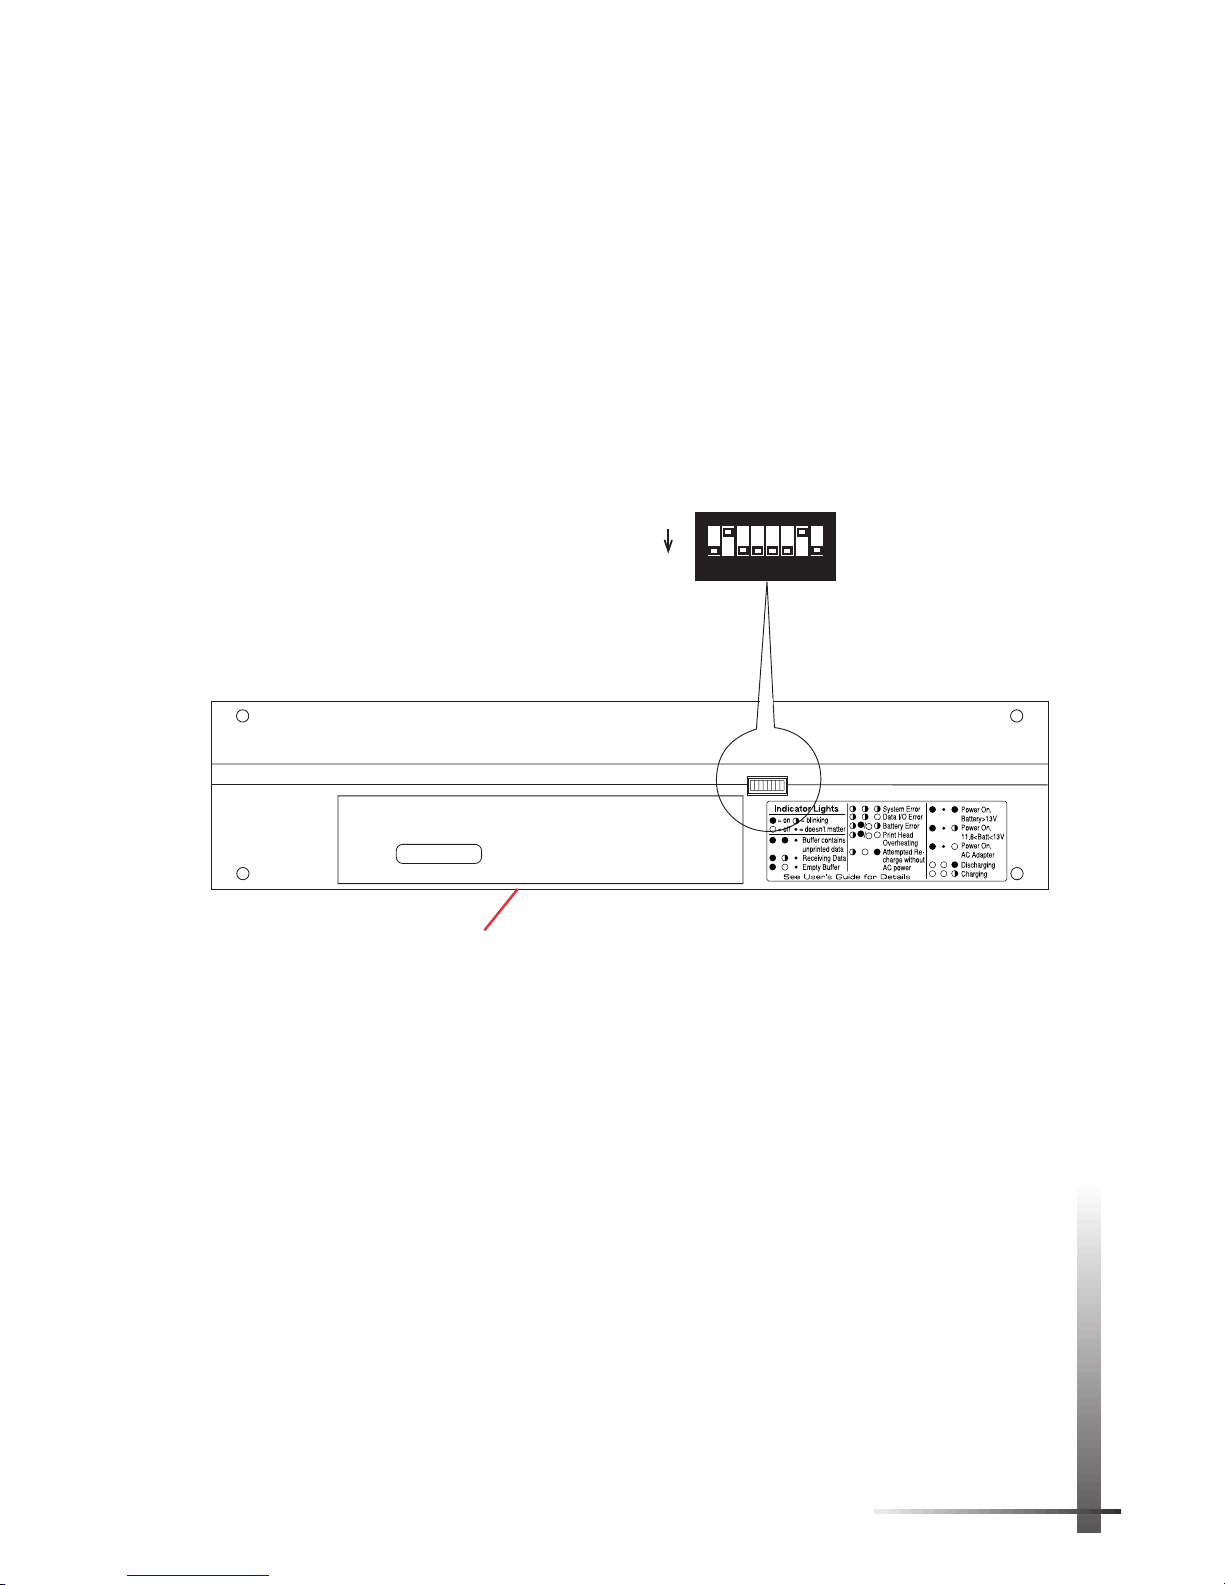
Indicator Light Table
Reference
System error
Data I/O error
Battery error
Print head overheating
Attempted recharge without AC power
Discharging battery
Charging battery
Power on, battery greater than 13V
Power on, battery between 11.8V - 13V
Power on, AC adapter
Empty data buffer
Receiving data from computer
Buffer contains unprinted data
Power Data Battery
On Blinking
Off
Doesn't
matter
Indication
Either on
or off
Page 50

44 Pentax PocketJet Printer User’s Guide
DIP Switches
The DIP Switch Table lists the feature that each switch
controls and the effect of the ON and OFF settings.
DIP Switch Table
No. Control On Off Page
1 Serial speed See below See below 20
2 Serial speed See below See below 20
3 Self test On Off 14
4 Cleaning On Off 37
5 Paper size and See below See below 26
character set
6 DTR polarity* Active low Active high 20
or
paper size and See below See below 26
character set
7 Xon / Xoff Disable Activate 20
8 Auto-off timer Disable Activate 29
*For Letter/A4 and Letter/Legal model printers.
Serial Speed
◆ 2,400 bps: switches 1 and 2 on
◆ 9,600 bps: switch 1 off and 2 on
◆ 19,200 bps: switch 1 on and 2 off
◆ 38,400 bps: switches 1 and 2 off
NOTE:
If you are using the parallel interface cable,
the settings of switches 1 and 2 don’t matter.
Paper Size and Character Set
Letter/A4 Model:
◆ Letter-size paper and PC-8 character set: switch 5 off
◆ A4-size paper and PC-850 character set: switch 5 on
Letter/Legal Model:
◆ Letter-size paper and PC-8 character set: switch 5 off
◆ Legal-size paper and PC-8 character set: switch 5 on
Letter/Legal/A4 Models:
◆ Letter paper, PC-8 character set: switches 5 and 6 off
◆ Legal paper, PC-8 character set: switches 5 and 6 on
◆ A4 paper, PC-850 character set: switch 5 on and
switch 6 off (or switch 5 off and switch 6 on)
Page 51

45
Troubleshooting
If you have difficulty getting your printer to work properly, first
check to make sure you have done the following tasks in
Chapter 1, “Setting Up the Printer,” correctly:
◆ Installing the battery or connecting the printer to an
AC outlet
◆ Connecting the printer to your computer
◆ Printing a self-test sheet
Make sure you have installed and selected the proper
printer driver as explained in Chapter 2, “Using the Printer.”
Look through the troubleshooting tips in this chapter for help
correcting the problem.
If none of these suggestions works:
◆
If you are in the U.S., call Pentax at 1-303-460-1820 or
1-800-543-6144 from 8AM to 5PM Mountain Time,
Monday through Friday, and ask for Technical Support.
◆ If you are outside the U.S., contact your local reseller or
any Authorized Service Center.
Indicator Light Warnings
Chapter 5, “Reference,” contains a table listing all combinations
of indicator lights. See page 43.
The POWER indicator light does not light.
If you are using the AC adapter, make sure it is connected
properly. See page 8. Also make sure the AC power outlet is “live.”
If you are using the battery, make sure it is installed properly.
See page 6. If it is installed properly, follow the procedure for
charging the battery. See page 9.
The POWER and BATTERY
indicator lights are blinking.
A battery error has occurred. Make sure the battery has
been installed and connected properly. See page 6.
Troubleshooting
CHAPTER
6
Power Data Battery
Page 52

46 Pentax PocketJet Printer User’s Guide
If the battery is connected properly, you may have
attempted to charge the battery when it has become
overheated during a discharge or charge cycle. Allow the
battery to cool before continuing to discharge or charge it.
If the indicator lights still show that a battery error has
occurred, the battery may be defective or the printer may
need service. Call Pentax or your local Authorized Service
Center and ask for Technical Support.
The POWER, DATA and
BATTERY indicator lights
are blinking.
A system error has occurred. Turn the printer off and on
again to clear the system error. If you cannot clear it, call
Technical Support.
The POWER and DATA
indicator lights are blinking.
A data I/O error has occurred. If you are using the parallel
interface cable, the parallel connection may be defective,
and the data is overflowing the print buffer. Replace the
defective part—most likely the interface cable.
If you are using an optional RS-232C serial interface cable,
make sure the serial port speed and handshaking method
on the printer and the computer match. DIP switches 1 and
2 control the speed of the serial port. DIP switch 7 controls
the handshaking method. See page 20. If the serial port
speed and handshaking method are correct, the serial
connection may be defective. Replace the defective
part—most likely the serial interface cable.
The POWER indicator light is
blinking and the BATTERY
indicator light is off.
The thermal print head has overheated. Turn the printer off
or wait until the POWER indicator light stops blinking before
you continue printing.
Power Data Battery
Power Data Battery
Power Data Battery
Page 53

47
Power Data Battery
The POWER indicator light
is blinking and the BATTERY
indicator light is on.
The printer is attempting to charge the battery, but it is not
receiving any AC power. Make sure you have connected
the printer to an AC power outlet. See page 8.
Paper Problems
The paper is jammed in the printer.
See “Clearing a Paper Jam” on page 35.
Paper moves through the printer, but
nothing appears on the paper.
Make sure you are using recommended paper and that
you are loading it properly with the print side away from
you. See page 33.
The software application may have sent a form feed
command on a blank sheet. Try printing another print job
such as a one-page memo.
The printer may be in cleaning mode. Check to make sure
DIP switch 4 is in the OFF position. Follow steps 7-10 for
“Cleaning the Print Head” on page 38.
Paper does not move through the printer
even though the motor is running.
If the release cover has been left open, close it completely.
Use recommended paper only. Heavy paper may not feed
through the printer.
If the release cover is closed and you are using
recommended paper, the printer may have a damaged
drive system. Call Technical Support.
Troubleshooting
Page 54

48 Pentax PocketJet Printer User’s Guide
Printed Image Problems
The printed image is out of alignment.
Make sure you are using the recommended paper.
Make sure you are inserting the paper correctly. See
page 33.
Check whether the platen roller is dirty. If it is, clean it. Follow
the instructions for “Cleaning the Platen Roller” on page 39.
The print quality is poor, and the image is
too light or dark.
Raise or lower the setting on the density dial to produce a
better image. See page 30.
Make sure you are using recommended paper.
The image is squashed and stretched in
many places.
Make sure the release cover was not left open during
printing. If it is open, close it completely.
Make sure the paper is not slipping in the printer. If it is,
make sure the print head and platen roller are clean. See
Chapter 4, “Maintaining the Printer,” on page 37.
Make sure you are using recommended paper.
The image has light or white vertical lines.
Make sure the release cover was not left open during
printing. If it is open, close it completely.
Clean the print head. Follow the instructions on page 37.
If cleaning the print head does not correct the problem, the
print head may need maintenance. Call Technical Support.
All pages have a white vertical line.
The print head may need maintenance. Call Technical
Support.
Page 55

49
Troubleshooting
All pages have a black vertical line.
The print head may need maintenance. Call Technical
Support.
Light patches of print appear on the image.
Make sure the paper does not have any dents or wrinkles. It
should lie flat, and it should not have a defective or uneven
surface coating. Use recommended paper, and make sure
it does not have any obvious deformities. The printer requires
smooth paper to work properly.
Check the setting of the density dial. If the setting is too low,
raise it. See page 30.
Clean the print head. Follow the instructions on page 37.
The top margin is incorrect.
Make sure the correct margins have been set in the
software application. If not, set the margins for the top and
bottom of the page.
Make sure you are not inserting the paper into the paper
input slot with excessive force. Always insert the paper gently.
NOTE:
PCL4 automatically assumes top and bottom
margins of approximately 0.25 inch. Although the
PocketJet printer is not limited to 0.25 inch margins,
the margins are necessary to maintain compatibility
with the PCL4 printer emulation.
The image for one page requires more or
fewer sheets than you expected.
Make sure the software application or printer driver has
been set to print the same size paper that you are loading
into the printer. If the application or printer driver has been
set to print legal-size paper and you insert letter-size paper,
the image will require two sheets. Adjust the application or
printer driver settings as needed, or reduce the print image
within your application to fit on a letter-size page.
If you are using DOS “PRINT” or “COPY” commands or a DOS
application that does not send PCL printer setup information
prior to the print job, check the settings of the DIP switches
that control the default paper size. See page 26.
Page 56

50 Pentax PocketJet Printer User’s Guide
NOTE:
In its default mode (six lines per inch), the printer
expects 60 lines per letter-size page, 64 lines per A4-size
page, and 78 lines per legal-size page. Other lines-perpage totals are possible if you adjust the lines per inch
by sending the appropriate commands to the printer.
See also “The Printer Ejects a Partially Printed Page...” on
page 52.
The side margins are incorrect.
Check to make sure the correct margins have been set in
the application. Adjust the left margin as needed.
Make sure the software application or printer driver has
been set to print the same size paper that you are loading
into the printer. If the application or printer driver has been
set to print a different width paper, the image will not print in
the proper horizontal position. Adjust the application or
printer driver as needed.
If you are using DOS “PRINT” or “COPY” commands or a DOS
application that does not send PCL printer setup information
prior to the print job, check the settings of the DIP switches
that control the default paper size. See page 26.
The print doesn’t show the proper characters.
Make sure you have defined the proper character set in the
application or other software. If incorrect, change it.
If you are using DOS “PRINT” or “COPY” commands or a DOS
application that does not send PCL printer setup information
prior to the print job, check the settings of the DIP switches
that control the default character set. See page 26.
If you are using a downloaded font, try another font to see if
the original font is in error.
The print shows random characters.
Check the printer driver you are using. Select the LaserJet IIP
printer driver, or if necessary, the LaserJet II driver. Do
not
select the LaserJet IIP Plus driver.
If you are using the parallel interface cable, the parallel
connection may be defective. Replace the defective
part—most likely the interface cable.
Page 57

51
If you are using an optional RS-232C serial interface cable,
make sure the serial port speed on the printer and the
computer match. DIP switches 1 and 2 control the speed of
the serial port. See page 20. If the serial port speed is
correct, the serial connection may be defective. Replace
the defective part—most likely the serial interface cable.
Some characters print normally, but others
print incorrectly.
Check the printer driver you are using. Select the LaserJet IIP
printer driver, or if necessary, the LaserJet II driver. Do
not
select the LaserJet IIP Plus driver.
If you are using DOS “PRINT” or “COPY” commands or a DOS
application that does not send PCL printer setup information
prior to the print job, check the settings of the DIP switches
that control the default character set. See page 26.
Pages Don’t Print
The green DATA indicator remains lit but
does not blink.
The print buffer contains unprinted data from the software
application. If you have already inserted paper in the
printer, press the main switch to “form feed” the incomplete
page. If paper is not inserted, insert another sheet of paper
to continue printing.
The application should be sending data to
the printer, but the green DATA indicator is
not lit.
Make sure the interface cable matches the port to which
the computer is sending the data. Use the parallel interface
cable with a parallel port and a serial interface cable with a
serial port. See page 19.
Make sure the interface cable is connected to the port to
which the computer is sending data.
If you are using a serial cable, make sure the serial port
speed on the printer and the computer match. DIP switches
1 and 2 control the speed of the serial port. See page 20.
Troubleshooting
Page 58

52 Pentax PocketJet Printer User’s Guide
Pages Are Partially Printed
The green DATA indicator light goes out
while a page remains in the printer.
The software application did not send a full page of data.
Remove the paper from the printer by pressing the main
switch once quickly to “form feed” the incomplete page.
This problem is usually caused by giving the printer the
wrong information about paper size or by using a sheet
longer than the page that the operating system or
application told the printer to expect.
If you are using DOS “PRINT” or “COPY” commands or a DOS
application that does not send PCL printer setup information
prior to the print job, check the settings of the DIP switches
that control the default character set. The printer ejects the
first 11 inches of A4 or legal paper when the default setting for
paper size is “letter.” See page 26.
The printer ejects a partially printed page,
and the green DATA indicator light remains
lit or blinking.
If you are sending many fonts or a large bit-mapped
graphic image to the printer, it may not have sufficient
memory to print the entire page. Insert the page again, and
the printer will print the rest of the image starting where the
previous portion of the image ended.
See “Tips on Printing Large Graphics” on page 31.
The printer stops printing. The POWER
indicator light is blinking and the BATTERY
indicator light is off.
The print head has overheated. Turn the printer off and allow
it to cool before continuing to print. The printer may
overheat if you use it over an extended period at a very
high print density.
Page 59

53
Technical Information
Technical Information
Specifications
Physical
Height: 1.18 in. (30 mm)
Width: 10.04 in. (255 mm)
Depth: 2.17 in. (55 mm)
Weight: 1.10 lb. (497 g) with battery
Printing
Method Direct thermal printing
Resolution 300 by 300 dots per inch
Density Adjustable via dial setting on printer
Speed Three pages per minute at normal
(5%) page coverage
Language LaserJet IIP (PCL4) emulation
Fonts Seven HP
®
internal fonts and
downloadable fonts
Paper Sizes
Letter
8.5 in. by 11 in. (216 mm by 279 mm)
A4
210 mm by 297 mm (8.27 by 11.69 in.)
Legal
8.5 in. by 14 in. (216 mm by 355 mm)
Print Area
Width
Letter: 8.17 in. (207 mm)
A4: 201 mm (7.93 in.)
Legal: 8.17 in. (207 mm)
Height
Letter: 10.67 in. (271 mm)
A4: 289 mm (11.36 in.)
Legal: 13.67 in. (347 mm)
Paper Type Thermal—cut sheet
Paper Loading Manual—single sheet
Memory 512 Kilobytes or 2 Megabytes
CHAPTER
7
Page 60

54 Pentax PocketJet Printer User’s Guide
Interfaces
Standard Centronics parallel and RS-232C serial
(auto-sensing).
Complete printer kit includes parallel
cable.
Serial cable is optional.
Cables for selected laptops and PDAs
are optional.
Wireless Infrared adapter is optional.
Environmental
Temperature Operating: 41° to 95° F (5° to 35° C)
Storage: 5° to 122° F (-15° to 50° C)
Humidity 30-80% relative humidity (non-
condensing)
Electrical
Power Supply DC: 14.4 volts from internal Ni-Cd
battery
DC: 12 volts from car battery, with
optional car adapter
AC: 100 - 120 or 220 - 240 volts, 50 or
60 Hz, with AC adapter
Power Usage Operating: 106 watts (maximum) at
120 volts
Stand-by: 13 watts
Battery Type Rechargeable nickel-cadmium (Ni-Cd)
Battery Yield 30 to 35 pages per charge
(depending on page coverage)
Regulatory
Compliance CSA C22.2. No.950
UL 1950, IEC950
FCC Part 15 Class B
Declarations of Conformity, see pages
57 and 58
Page 61

55
Technical Information
Radio & Television Interference
United States FCC Regulations
This equipment has been tested and found to comply with
the limits for a Class B digital device, pursuant to Part 15 of
the FCC Rules. These limits are designed to provide
reasonable protection against harmful interference in a
residential installation. This equipment generates, uses, and
can radiate radio frequency energy and, if not installed and
used in accordance with the instructions, may cause
harmful interference to radio communications. However,
there is no guarantee that interference will not occur in a
particular installation. If this equipment does cause harmful
interference to radio or television reception, which can be
determined by turning the equipment off and on, the user is
encouraged to try to correct the interference by one or
more of the following measures:
• Reorient or relocate the receiving antenna.
• Increase the separation between the equipment and
receiver.
• Connect the equipment to an outlet on a circuit different
from that to which the receiver is connected.
• Consult the dealer or an experienced radio/TV
technician for help.
The use of a shielded cable is required to comply with
Class B limits of FCC Rules.
Any changes or modifications not expressly approved by
Pentax Technologies could void the user’s authority to
operate this equipment.
You may purchase a booklet prepared by the FCC entitled
“Interference Handbook,” stock number ISBN 0-16-041736-8,
from the Superintendent of Documents, U.S. Government
Printing Office, Washington, D. C. 20402.
Page 62

56 Pentax PocketJet Printer User’s Guide
○ ○○○○○○○○○○○○○○○○○○○○○○○○○○○○○○○○○
Canadian Regulations
This Class B digital apparatus meets all requirements of the
Canadian Interference-Causing Equipment Regulations.
Cet appareil numérique de la classe B respecte toutes les
exigences du Règlement sur le matériel brouilleur du
Canada.
Bescheinigung des Herstellers/Importeurs
Hiermit wird bescheinigt, daß der
PENTAX Thermodrucker PT-A4301 (‘PocketJet’)
in Übereinstimmung mit den Bestimmungen der BMPTAmtsblVfg 243/1991 funkentstört ist. Der vorschriftsmäßige
Betrieb mancher Geräte (z.B. Meßsender) kann allerdings
gewissen Einschränkungen unterliegen. Beachten Sie
deshalb die Hinweise in der Bedienungsanleitung.
Dem Bundesamt für Zulassungen in der Telekommunikation
wurde das Inverkehrbringen dieses Gerätes angezeigt und
die Berechtigung zur Überprüfung der Serie auf die
Einhaltung der Bestimmungen eingeräumt.
PENTAX TECHNOLOGIES EUROPE N.V. - Zaventem, Belgium
○ ○○○○○○○○○○○○○○○○○○○○○○○○○○○○○○○○○
Page 63

57
For PocketJet units sold in Europe, the following documents apply.
Declaration of Conformity
Product Identification
Product Type: Thermal Printer
Product Name: PocketJet PT-A4301
Means of Conformity
The above product has been tested to be in conformity with the
Electromagnetic Compatibility Directives, 89/336/EEC, 92/31/EEC
based on test results using harmonised standards in accordance
with Article 10-1 of the Directive.
Standards Used: EN50082-1:1994
IEC-1000-4-2:1994
EN50082-1:1992
IEC801-3:1984, IEC801-4:1988
Standard Used: EN50081-1:1992
EN55022:1994 Class B
EC Representative: Pentax Technologies Europe
Weiveldlaan 3-5
1930 Zaventem, Belgium
Title: Sales & Marketing Manager
Signature: _______________________ 28 January 1997
Technical Information
Page 64

58 Pentax PocketJet Printer User’s Guide
Declaration of Conformity
Product Identification Product Type: Power Supply
Product Name: PT-1102A
Means of Conformity
The above product has been tested to be in conformity with the Electromagnetic
Compatibility Directives, 89/336/EEC, 92/31/EEC based on test results using harmonised
standards in accordance with Article 10-1 of the Directive.
Standards Used: EN50082-1:1994
IEC-1000-4-2:1994
EN50082-1:1992
IEC801-3:1984, IEC801-4:1988
Standard Used: EN50081-1:1992
EN55022:1994 Class B
The above product has been tested to be in conformity with the Low Voltage
Directive, 73/23/EEC, Amended by 93/68/EEC Directive.
Standard Used: EN60950:1992+A1+A2:1993
IEC950:1992+A1+A2:1993 modified
The last two digits of the year in which the CE marking was affixed for Low Voltage
Directive, 73/23/EEC, is 97
EC Representative: Pentax Technologies Europe
Weiveldlaan 3-5
1930 Zaventem, Belgium
Title: Sales & Marketing Manager
Signature: _______________________________ 28 January 1997
Declaration of Conformity
Product Identification Product Type: Power Supply
Product Name: PT-1102B
Means of Conformity
The above product has been tested to be in conformity with the Electromagnetic
Compatibility Directives, 89/336/EEC, 92/31/EEC based on test results using harmonised
standards in accordance with Article 10-1 of the Directive.
Standards Used: EN50082-1:1994
IEC-1000-4-2:1994
EN50082-1:1992
IEC801-3:1984, IEC801-4:1988
Standard Used: EN50081-1:1992
EN55022:1994 Class B
The above product has been tested to be in conformity with the Low Voltage
Directive, 73/23/EEC, Amended by 93/68/EEC Directive.
Standard Used: EN60950:1992+A1+A2:1993
IEC950:1992+A1+A2:1993 modified
The last two digits of the year in which the CE marking was affixed for Low Voltage
Directive, 73/23/EEC, is 97
EC Representative: Pentax Technologies Europe
Weiveldlaan 3-5
1930 Zaventem, Belgium
Title: Sales & Marketing Manager
Signature: _______________________________ 28 January 1997
Page 65

59
CHAPTER
8
Ordering Information
Ordering Information
For the name of the dealer closest to you or to order the
following items:
◆
If you are in the U.S., call Pentax at 1-800-543-6144 from
8AM to 5PM Mountain Time, Monday through Friday, and
ask for Sales.
◆ If you are outside the U.S., contact the dealer where you
purchased your printer for information about ordering
supplies, accessories and replacement parts.
Supplies
◆ Letter-size paper (100-sheet boxes)
◆ Legal-size paper (100-sheet boxes)
◆ A4-size paper (100-sheet boxes)
◆ Paper in 8.5-inch width rolls (100 feet)
◆ Paper in A4-width rolls (100 feet)
Accessories
◆ Interface cable
❖ Parallel
❖ RS-232C serial
❖ HP 200LX
❖ Psion
❖ Macintosh
❖ Newton
◆ Infrared interface adapter (requires special, modified
version of printer)
◆ Extra Ni-Cd battery
◆ Car adapter (with battery recharging feature)
◆ Car adapter (without battery recharging feature)
◆ Connectivity package for Macintosh and Newton
computers (interface cable and printer driver)
◆ Connectivity packages for many Personal Digital
Assistants (PDAs) and pen-based systems
◆ Roll paper holder
◆ Carrying case for roll of paper and roll paper holder
◆ 220-volt power cable
Page 66

60 Pentax PocketJet Printer User’s Guide
Replacement Parts
◆ Interface cable
❖ Parallel
❖ RS-232C serial
❖ HP 200LX
❖ Psion
❖ Macintosh
❖ Newton*
◆ AC adapter (universal)
◆ AC cable (115 or 230 volts)
◆ Protective vinyl carrying case
◆ Cleaning cloth
◆ Documentation sets in various languages
*For Newton connections, call GDT at 1-800-663-6222.
Upgrades
◆ You can upgrade any PocketJet printer to a model that
supports letter-, legal- and A4-size paper and has two
megabytes of memory.
◆ You can upgrade a Letter/A4 512 KB model to a Letter/
Legal 512 KB model.
◆ You can upgrade to a special, modified version of the
printer with an infrared adapter.
Contact Pentax at 1-800-543-6144 or 1-303-460-1820 for
complete information and prices.
Page 67

61
Printer Commands
This appendix contains a table of printer commands
grouped under these topics:
◆ Reset
◆ Page control
◆ Orientation
◆ Margins and length
◆ Vertical spacing
◆ Horizontal spacing
◆ Cursor positioning
◆ Symbol set selection
◆ Font selection and management
◆ End of line handling
◆ Push/pop position
◆ Raster graphics
◆ Macros
◆ Miscellaneous
The Printer command codes listed in this appendix are not
used for normal printing from a Windows application or from
many DOS-based applications.
When you are printing from a DOS application that does not
offer any printer selection options, you may be able to
control the features of the printer by embedding the PCL4
printer command codes directly into your document.
APPENDIX
A
Printer Commands
Page 68

62 Pentax PocketJet Printer User’s Guide
FUNCTION PARAMETER(s) COMMAND DECIMAL VALUE(s)
RESET
Reset -
EscE
027 069
Number of Copies # of Copies (1-99)
Esc&l#X
027 038 108 [#] 088
Long Edge Offset
Registration # Decipoints (1/720")
Esc&l#U
027 038 108 [#] 085
Short Edge Offset
Registration # Decipoints (1/720")
Esc&l#Z
027 038 108 [#] 090
PAGE CONTROL
Paper Size Letter
Esc&l2A
027 038 108 050 065
(see note) A4
Esc&l26A
027 038 108 050 054 065
Legal
Esc&l3A
027 038 108 051 065
Page Length # of Lines (5-128)
Esc&l#P
027 038 108 [#] 080
Note:
The A4 and legal paper sizes are available only on selected models.
ORIENTATION
Orientation Portrait
Esc&lØO
027 038 108 048 079
Landscape
Esc&l1O
027 038 108 049 079
MARGINS AND LENGTH
Te xt Lines per Page # of Lines
Esc&l#F
027 038 108 [#] 070
Top Margin # of Lines
Esc&l#E
027 038 108 [#] 069
Left Margin # of Columns
Esc&a#L
027 038 097 [#] 076
Right Margin # of Columns
Esc&a#M
027 038 097 [#] 077
Clear Horiz Margins -
Esc9
027 057
VERTICAL SPACING
Ver tical Motion Index # of 1/48"
Esc&lC
027 038 108 [#] 067
Lines per Inch 1 line / inch
Esc&l1D
027 038 108 049 058
2 lines / inch
Esc&l2D
027 038 108 050 058
3 lines / inch
Esc&l3D
027 038 108 051 058
4 lines / inch
Esc&l4D
027 038 108 052 058
6 lines / inch
Esc&l6D
027 038 108 054 058
8 lines / inch
Esc&l8D
027 038 108 056 058
12 lines / inch
Esc&l12D
027 038 108 049 050 058
16 lines / inch
Esc&l16D
027 038 108 049 054 058
24 lines / inch
Esc&l24D
027 038 108 050 052 058
48 lines / inch
Esc&l48D
027 038 108 052 056 058
Page 69

63
FUNCTION PARAMETER(s) COMMAND DECIMAL VALUE(s)
HORIZONTAL SPACING
Horiz Motion Index # of 1/120"
Esc&k#H
027 038 107 [#] 072
CURSOR POSITIONING
Ver tical Position Row #
Esc&a#R
027 038 097 [#] 082
# of Dots
Esc*p#Y
027 042 112 [#] 089
# of Decipoints
Esc&a#V
027 038 097 [#] 086
Horizontal Position Column #
Esc&a#C
027 038 097 [#] 067
# of Dots
Esc*p#X
027 042 112 [#] 088
# of Decipoints
Esc&a#H
027 038 097 [#] 072
Half Line Feed -
Esc=
027 061
SYMBOL SET SELECTION
Primary Symbol Set
Roman 8
Esc(8U
027 040 056 085
PC-8
Esc(1ØU
027 040 049 048 085
PC-850
Esc(12U
027 040 049 050 085
PC-8 (Danish/Norwegian)
Esc(11U
027 040 049 049 085
ISO 2: I.R.V.
Esc(2U
027 040 050 085
ISO 4: U.K.
Esc(1E
027 040 049 069
ISO 6: ASCII
Esc(ØU
027 040 048 085
ISO 10: Swedish
Esc(3S
027 040 051 083
ISO 11: Swedish
Esc(ØS
027 040 048 083
ISO 14: JIS ASCII
Esc(ØK
027 040 048 075
ISO 15: Italian
Esc(ØI
027 040 048 073
ISO 16: Portuguese
Esc(4S
027 040 052 083
ISO 17: Spanish
Esc(2S
027 040 050 083
ISO 21: German
Esc(1G
027 040 049 071
ISO 25: French
Esc(ØF
027 040 048 070
ISO 57: Chinese
Esc(2K
027 040 050 075
ISO 60: Norwegian I
Esc(ØD
027 040 048 068
ISO 61: Norwegian II
Esc(1D
027 040 049 068
ISO 69: French
Esc(1F
027 040 049 070
ISO 84: Portuguese
Esc(5S
027 040 053 083
ISO 85: Spanish
Esc(6S
027 040 054 083
ECMA-94: Latin I
Esc(ØN
027 040 048 078
HP German
Esc(ØG
027 040 048 071
HP Spanish
Esc(1S
027 040 049 083
Note:
The primary font printer commands can be specified as secondary commands by replacing the left
parenthesis “(” with a right parenthesis “)”.
Printer Commands
Page 70

64 Pentax PocketJet Printer User’s Guide
FUNCTION PARAMETER(s) COMMAND DECIMAL VALUE(s)
FONT SELECTION AND MANAGEMENT
Primary Spacing Proportional
Esc(s1P
027 040 115 049 080
Fixed
Esc(sØP
027 040 115 048 080
Primary Pitch # Characters / inch
Esc(s#H
027 040 115 [#] 072
Primary Point Size # Points
Esc(s#V
027 040 115 [#] 086
Primary Style Upright
Esc(sØS
027 040 115 048 083
Italic
Esc(s1S
027 040 115 049 083
Primary Stroke Weight Medium
Esc(sØB
027 040 115 048 066
(see note below) Bold
Esc(s3B
027 040 115 051 066
Light
Esc(s-3B
027 040 115 045 051 066
Typeface Courier
Esc(s3T
027 040 115 051 084
LinePrinter
Esc(sØT
027 040 115 048 084
Font Default Primary Font
Esc(3@
027 040 051 064
Secondary Font
Esc)3@
027 041 051 064
Underscore Enable Fixed
Esc&dØD
027 038 100 048 068
Enable Floating
Esc&d3D
027 038 100 051 068
Disable
Esc&d@
027 038 100 064
Tr ansparent Print # of Bytes
Esc&p#X(data)
027 038 112 [#] 088 +++
Assign Font I.D. Font ID #
Esc*c#D
027 042 099 [#] 068
Font/Char. Control Delete All Fonts
Esc*cØF
027 042 099 048 070
Delete All Temp. Fonts
Esc*c1F
027 042 099 049 070
Delete Last Font ID Ref’d
Esc*c2F
027 042 099 050 070
Make Font Temporary
Esc*c4F
027 042 099 052 070
Make Font Permanent
Esc*c5F
027 042 099 053 070
Select Font w/ID# ID # of Primary Font
Esc(#X
027 040 [#] 088
ID # of Secondary Font
Esc)#X
027 041 [#] 088
Create Font Descriptor # Bytes
Esc)s#W(data)
027 041 115 [#] 087 +++
Download Character # Bytes
Esc(s#W(data)
027 040 115 [#] 087 +++
Character Code ASCII Code # (decimal)
Esc*c#E
027 042 099 [#] 069
Note:
Full functionality for downloaded fonts; limited functionality for resident fonts.
Page 71

65
FUNCTION PARAMETER(s) COMMAND DECIMAL VALUE(s)
END OF LINE HANDLING
Line Termination CR=CR, LF=LF, FF=FF
Esc&kØG
027 038 107 048 071
CR=CR+LF, LF=LF, FF=FF
Esc&k1G
027 038 107 049 071
CR=CR, LF=CR+LF,
FF=CR+FF
Esc&k2G
027 038 107 050 071
CR=CR+LF, LF=CR+LF,
FF=CR+FF
Esc&k3G
027 038 107 051 071
PUSH/POP POSITION
Push/Pop Position Push (Save)
Esc&lØS
027 038 102 048 083
Pop (Restore)
Esc&l1S
027 038 102 049 083
RASTER GRAPHICS
Resolution 75 DPI
Esc*t75R
027 042 116 055 053 082
100 DPI
Esc*t1ØØR
027 042 116 049 048 048 082
150 DPI
Esc*t15ØR
027 042 116 049 053 048 082
300 DPI
Esc*t3ØØR
027 042 116 051 048 048 082
Graphics Orientation Rotate Image
Esc*rØF
027 042 114 048 070
LaserJet Landscape
Esc*r3F
027 042 114 051 070
Start Graphics Mode Using Left Graphics Margin
Esc*rØA
027 042 114 048 065
Using Current Cursor
Esc*r1A
027 042 114 049 065
Position
Set Compression Uncoded
Esc*bØM
027 042 098 048 077
Run-Length Encoded
Esc*b1M
027 042 098 049 077
Tagged Image File
Esc*b2M
027 042 098 050 077
Tr ansfer Graphics # of Bytes
Esc*b#W +++
027 042 098 [#] 087 +++
End Graphics Mode -
Esc*rB
027 042 114 066
Draw Rectangle Width, # Dots
Esc*c#A
027 042 099 [#] 065
(size) Width, # Decipoints
Esc*c#H
027 042 099 [#] 072
Height, # Dots
Esc*c#B
027 042 099 [#] 066
Height, # Decipoints
Esc*c#V
027 042 099 [#] 086
Fill Rectangle With Solid (Black) Fill
Esc*cØP
027 042 099 048 080
Solid (White) Fill
Esc*c1P
027 042 099 049 080
Gray Scale (below)
Esc*c2P
027 042 099 050 080
HP Pattern (below)
Esc*c3P
027 042 099 051 080
Printer Commands
Page 72

66 Pentax PocketJet Printer User’s Guide
FUNCTION PARAMETER(s) COMMAND DECIMAL VALUE(s)
Fill Rectangle With Horizontal Line Pattern
Esc*c1G
027 042 099 049 071
(continued) Vertical Line Pattern
Esc*c2G
027 042 099 050 071
Diagonal Lines I
Esc*c3G
027 042 099 051 071
Diagonal Lines II
Esc*c4G
027 042 099 052 071
Square Grid
Esc*c5G
027 042 099 053 071
Diagonal Grid
Esc*c6G
027 042 099 054 071
Gray, 2%
Esc*c2G
027 042 099 050 071
Gray, 10%
Esc*c1ØG
027 042 099 049 048 071
Gray, 15%
Esc*c15G
027 042 099 049 053 071
Gray, 30%
Esc*c3ØG
027 042 099 051 048 071
Gray, 45%
Esc*c45G
027 042 099 052 053 071
Gray, 70%
Esc*c7ØG
027 042 099 055 048 071
Gray, 90%
Esc*c9ØG
027 042 099 057 048 071
Gray, 100% (black)
Esc*c1ØØG
027 042 099 049 048 048 071
MACROS
Macro ID Assign Macro ID #
Esc&f#Y
027 038 102 [#] 089
Macro Control Start Macro Definition
Esc&fØX
027 038 102 048 088
Stop Macro Definition
Esc&f1X
027 038 102 049 088
Execute Macro
Esc&f2X
027 038 102 050 088
Call Macro
Esc&f3X
027 038 102 051 088
Enable Overlay
Esc&f4X
027 038 102 052 088
Disable Overlay
Esc&f5X
027 038 102 053 088
Delete Macros
Esc&f6X
027 038 102 054 088
Delete Temp. Macros
Esc&f7X
027 038 102 055 088
Delete Macro ID
Esc&f8X
027 038 102 056 088
Make Temporary
Esc&f9X
027 038 102 057 088
Make Permanent
Esc&f1ØX
027 038 102 049 048 088
MISCELLANEOUS
Show PCL4 Codes Enabled
EscY
027 089
Disabled
EscZ
027 090
End-of-Line Handling Wrap Long Lines
Esc&sØC
027 038 115 048 067
Don’t Wrap Long Lines
Esc&s1C
027 038 115 049 067
Ø=Zero (used in commands to distinguish the number zero from the letter 0)
Esc = The “Escape” code. 27 Decimal, or 1B hex.
# and [#] = In many commands, a series of one or more ASCII digits representing the values required by
this command
+++ = Raw data required by this command
Note:
When multiple commands are sent in a single stream, all commands except the last one must—if they
end in a letter—end in the
lower case
version of the letter, not the upper case version shown in this table.
Page 73

67
Character Sets
This appendix contains tables showing the following
character sets:
◆ PC-8
◆ Roman 8
◆ PC-850
◆ PC-8 (N/D)
◆ ECMA-94 (Latin I)
◆ ISO 6 (ISO ASCII)
◆ ISO Substitutions
Windows and many DOS applications send character-set
information to the printer. Some of these applications may
offer options for selecting the character set.
For situations like using the DOS “PRINT” and “COPY”
commands and printing from certain DOS applications that
do not send PCL printer setup information prior to the print
job, the PocketJet printer lets you set the default character
set and paper size. For more information, see “Setting the
Default Paper Size” on page 26.
You can also specify the character set by using the Symbol
Set Commands on page 63 of Appendix A.
Character Sets
APPENDIX
B
Page 74

68 Pentax PocketJet Printer User’s Guide
PC-8
Page 75

69
Roman 8
Character Sets
Page 76

70 Pentax PocketJet Printer User’s Guide
PC-850
Page 77

71
PC-8 (N/D)
Character Sets
Page 78

72 Pentax PocketJet Printer User’s Guide
ECMA-94 (Latin I)
Page 79

73
ISO 6 (ISO ASCII)
Character Sets
Page 80

74 Pentax PocketJet Printer User’s Guide
ISO Substitutions
Page 81

Index 75
Index
A
A4 PAPER
used in Europe 17
AC ADAPTER
automatic power
switching 3
caution about use 1, 2
connecting 8
extending life of 32
ACCESSORIES
ordering 59
ADAPTER.
SEE
AC
ADAPTER; CAR ADAPTER
AUTO-OFF TIMER
activating 29
checking setting 17
disabling 29
extending battery life 12
feature 29, 41
B
BATTERY
auto-off timer 12, 29
carrying a spare 12
charge time 12
charging 9, 41
conserving power 29
discharging 9
disposal 2
extending its life 12
infrared adapter use 12
installing 6
new 9
ordering 59
pages per
charge 12, 54
reason for
discharging 10
recharging 9, 12, 41
recycling 2
refreshing 10, 12, 42
removing 11
type 54
usage tips 12
BATTERY LIGHT.
SEE
INDICATOR LIGHTS
BAUD RATE
serial interface 21
BORDERS
printing 31
BUFFER.
SEE
PRINT BUFFER
BUTTON.
SEE
MAIN SWITCH
C
CABLE
caution about use 2
connecting to AC
outlet 8
connecting to
computer 19
connecting to printer 8
ordering 59, 60
CANADA
regulations 56
CAR ADAPTER
option 3
ordering 59
CARRYING CASE
sleeve for quick reference
card 12
sleeve for spare
battery 12
CASE
cleaning 40
CHARACTER SET
checking default
setting 17
ECMA-94 (Latin I) 72
ISO 6 (ISO ASCII) 73
ISO Substitutions 74
PC-8 68
PC-8 (N/D) 71
PC-850 70
Roman 8 69
samples 18
selecting default set 26
specifying 26
Page 82

76 Pentax PocketJet Printer User’s Guide
DOS
print utility 23, 24, 25
printer selection 25
printer setup 26
DRIVER.
SEE
PRINTER DRIVER
DTR.
SEE
HANDSHAKING
DTR POLARITY
setting 21
E
EMULATION.
SEE
PRINTER
EMULATION
ENVIRONMENT
printer use 1
specification 54
EUROPE
regulations 57, 58
F
FCC
regulations 55
FEATURES
printer 3
FIRMWARE VERSION
checking 17
FONT/SYMBOL SET OPTIONS
information 18
FONTS
Courier 32
downloadable 32
line printer 32
printing 31
samples 18
specification 53
TrueType 31
using 32
FORM FEED
instructions 41, 51
G
GRAPHICS
printing tips 31
GRIDS
printing 31
tables 67
with DOS
applications 25
CHARGE
battery 9
CLEANING.
SEE
MAINTENANCE
CLEANING CLOTH
cleaning print head 37
ordering 60
COMMANDS.
SEE
PRINTER
COMMANDS
COMPUTER
connecting to printer 19
COPY
DOS command 26
COUNTRY
checking default
setting 17
COURIER.
SEE
FONTS
D
DARKER PRINTS
specifying 30
DATA
unprinted 51
DATA LIGHT.
SEE
INDICATOR
LIGHTS
DC ADAPTER.
SEE
CAR
ADAPTER
DENSITY
setting 12, 30
DENSITY DIAL
instructions 30
DIP SWITCHES
auto-off timer 29
checking 13
cleaning print head 37
default character set 26
default paper size 26
factory settings 13
self-test sheet 14
serial interface 20
table 44
DISK
print utility 25
Page 83

Index 77
H
HANDSHAKING
DTR 21
hardware 21
Xon / Xoff 21
I
IMAGE QUALITY
checking 18
INDICATOR LIGHTS
illustration 41
summary 42
table 43
warnings 45
INFRARED ADAPTER
battery use 12
interface 22
option 3
ordering 59, 60
INK
never needed 3, 34
INTERFACE CABLE.
SEE
CABLE
INTERFACES
infrared adapter 22, 54
parallel 19, 54
serial 20, 21, 54
supported 3
wireless 54
INTERFERENCE
radio and television 55
L
LASERJET II
default printer 31
DOS printer 25
printer driver 23, 31
Windows printer 25
LASERJET IIP
DOS printer 25
printer driver 3, 23, 31
Windows printer 25
LASERJET IIP PLUS
printer driver 23
LETTERHEAD
imprinting 36
LIGHTER PRINTS
specifying 30
LIGHTS.
SEE
INDICATOR LIGHTS
LINE PRINTER.
SEE
FONTS
LOGO
imprinting 36
LPT1
printer port 31
M
MACINTOSH
connectivity 3, 59
MAIN SWITCH
functions 41
MAINTENANCE
cleaning platen roller 39
cleaning print head 37
cleaning printer case 40
MARGINS
incorrect 49, 50
side 50
top and bottom 49
MEMORY
checking 17
needed for large
graphics 31
sizes 3
specification 53
upgrading 60
MODEL
identifying 18
Letter/A4 17, 18, 26
Letter/Legal 17, 18, 26
Letter/Legal/A4 17, 18, 26
options 3
printer 26
self-test sheet 16
serial number 18
N
NEWTON
connectivity 3, 59
Page 84

78 Pentax PocketJet Printer User’s Guide
O
ON/OFF SWITCH.
SEE
MAIN
SWITCH
OPERATION PANEL
using 41
OS/2
installing printer driver 23
selecting printer 25
P
PALMTOP.
SEE
PERSONAL
DIGITAL ASSISTANT
PANEL.
SEE
OPERATION
PANEL
PAPER
A4-size 17
clearing a jam 35
defective 37
inserting 27, 33
ordering 59
print area 53
problems 47
recommended 34
sizes 3, 53
specification 53
storing 34
upgrading to support
legal size 60
usage and handling 34
PAPER HOLDER
carrying case 59
ordering 59
PAPER SIZE
checking default
setting 17
selecting default size 26
specifying 26
PCL4
command codes 25, 61
printer control
language 3, 25, 26
PDA.
SEE
PERSONAL DIGITAL
ASSISTANT
PERSONAL DIGITAL
ASSISTANT
connectivity 3, 59
PLATEN ROLLER
cleaning 39
PLUG
connecting to AC
outlet 8
standard configurations 1
POCKETJT.EXE
print utility program 25
POWER
AC adapter 1, 8
off 41, 42
on 41
specifications 54
usage 54
POWER LIGHT.
SEE
INDICATOR LIGHTS
PRINT
DOS command 25, 26
PRINT AREA
A4-size paper 53
legal-size paper 53
letter-size paper 53
PRINT BUFFER
data 29, 51
PRINT HEAD
cleaning 37
PRINT UTILITY.
SEE
DOS
PRINTER
auto-off timer 29
components 5
connecting to AC
outlet 8
connecting to
computer 19
data 29
default 24, 25, 31
emulation 25, 53
features 3
feed roller 33
identifying model 18
input slot 33
kit 5, 23, 24
model 3, 16, 26
outdoor use 1
platen roller 37, 39
port 31
print head 37
protecting 32
Page 85

Index 79
release cover 33, 35, 39
resolution 3, 53
selecting 25
setting up 5
size 53
specifications 53
speed 3, 30, 31, 53
turning off 29, 41, 42
turning on 27, 41
unpacking 5
PRINTER COMMANDS
tables 61
with DOS
applications 25, 26
PRINTER DRIVER
checking 23
installing 23, 24
LaserJet II 31
LaserJet IIP 31
loading 23, 24
selecting 25
PRINTER STATUS
information 17
PRINTING
borders 31
fonts 31
grids 31
instructions 27
landscape mode 31
large graphics 31
lines per page 50
method 3, 53
portrait mode 31
shading 31
PROBLEMS.
SEE
TROUBLESHOOTING
R
REFRESH
battery 10
REGULATIONS
Canadian 56
European 57, 58
FCC 55
REGULATORY COMPLIANCE
CSA 54
FCC 54
UL 54
RELEASE COVER
opening 35, 39
REPLACEMENT PARTS
ordering 60
RESOLUTION
dots per inch 3, 53
RIBBON
battery removal 7, 11
S
SAFETY
information 1
SELF-TEST SHEET
checking 16
Font/Symbol Set
Options 18
image quality 18
Printer Status 17
printing 14
SERIAL INTERFACE
checking settings 17
setting DIP switches 20
SERIAL NUMBER
model 18
SHADING
printing 31
SPECIFICATIONS
printer 53
SPEED.
SEE
PRINTER
SPEED; SERIAL INTERFACE
STATIONERY.
SEE
LETTERHEAD
SUPPLIES
ordering 59
SWITCHES.
SEE
DIP SWITCHES
SYMBOL SET.
SEE
CHARACTER
SET
Page 86

80 Pentax PocketJet Printer User’s Guide
T
TECHNICAL INFORMATION
interference 55
specifications 53
TECHNICAL SUPPORT
calling 45
TEMPERATURE
operating 54
storage 54
TEST SHEET.
SEE
SELF-TEST
SHEET
THERMAL PAPER.
SEE
PAPER
TIME
charging battery 12
TIMER.
SEE
AUTO-OFF TIMER
TONER
never needed 3, 34
TROUBLESHOOTING
battery removal 11
clearing a paper jam 35
general instructions 45
indicator light
warnings 45
pages don't print 51
pages partially print 52
paper problems 47
printed image
problems 48
TRUETYPE
print as graphics 31
U
UPGRADE
ordering 60
W
WARRANTY
extended 4
standard 4
WINDOWS 3.1
installing printer driver 23
selecting printer 25
WINDOWS 95
installing printer driver 24
selecting printer 25
WINDOWS NT
installing printer driver 23
selecting printer 25
X
XON/XOFF.
SEE
HANDSHAKING
Page 87

Page 88

PENTAX Technologies Corporation
100 Technology Drive, Suite 200
Broomfield, Colorado 80021 U.S.A.
303-460-1600
Fax: 303-460-1628
BBS: 303-460-1637
Internet web site: www.pentaxtech.com
Pentax Technologies Europe nv
Weiveldlaan 3-5
1930 Zaventem (Belgium)
Tel: (+32)2 720 77 76
Fax: (+32)2 720 24 24
Internet e-mail: pentax.tech.eur@skynet.be
Technical Support
In U.S.: 1-303-460-1820 or 1-800-543-6144,
8AM to 5PM Mountain Time, M-F
Outside U.S.: contact your local reseller or any of the
Authorized Service Centers
Ordering Supplies, Accessories or Replacement Parts
In U.S.: 1-800-543-6144, 8AM to 5PM Mountain Time, M-F
Outside U.S.: contact your printer dealer
™
®
Printer User’s Guide
 Loading...