

Page 1
Operating Manual
(Version 3.10)
Page 2

Thank you for purchasing this PENTAX Digital Camera.
This is the manual for “PENTAX PHOTO Browser 3” and “PENTAX PHOTO
Laboratory 3” software for your Windows PC or Macintosh for enjoying images
created with your camera. Please read the separate camera operating manual
and this manual before using your camera, “PENTAX PHOTO Browser 3”, or
“PENTAX PHOTO Laboratory 3”, in order to get the most out of all the features
and functions.
Keep the camera operating manual and this manual safe, as they can be
valuable tools in clarifying and helping you to understand all the camera’s
capabilities.
Regarding copyrights
Images taken using this camera that are for anything other than personal enjoyment
cannot be used without permission according to the rights as specified in the Copyright
Act. Please take care, as there are even cases where limitations are placed on taking
pictures even for personal enjoyment during demonstrations, performances or of items
on display. Images taken with the purpose of obtaining copyrights also cannot be used
outside the scope of use of the copyright as laid out in the Copyright Act, and care
should be taken here also.
Regarding trademarks
• PENTAX and smc PENTAX are trademarks of PENTAX Corporation.
• PENTAX PHOTO Browser, PENTAX PHOTO Laboratory, PENTAX REMOTE
Assistant are trademarks of PENTAX Corporation.
• Microsoft and Windows are registered trademarks of Microsoft Corporation in the
United States and other countries.
• Windows Vista is either a registered trademark or trademark of Microsoft Corporation
in the United States and/or other countries.
• Mac OS and Macintosh are registered trademarks of Apple Computer, Inc.
• The DNG logo is either a registered trademark or trademark or of Adobe Systems
Incorporated in the United States and/or other countries.
• All other brands or product names are trademarks or registered trademarks of their
respective companies.
Regarding PictBridge
PictBridge allows the user to connect the printer and digital camera directly, using the
unified standard for the direct printout of images. You can print images directly from the
camera through a few simple operations.
Page 3
Disclaimer
• PENTAX is not responsible for any damages resulting from the direct or indirect use
of this software or repercussive damages, damage to data, programs or other
intangible property, loss of profit or anticipated profit, or dispute with a third party
resulting from the use of this software.
• The specifications of this software are subject to change without notice.
Symbols used in this manual have the following meanings:
Gives information that is useful to know.
Gives cautions and notes about the operation.
The screen pictures shown in this manual may differ depending on the
type of computer used.
Page 4

Memo
Page 5
Contents
Enjoying Your Digital Camera Pictures ............................. 4
Provided Software ............................................................... 6
Software Provided....................................................................................6
System Requirements..............................................................................7
Installing the Software......................................................... 9
When Using Windows..............................................................................9
When Using Macintosh ..........................................................................12
Saving Images on Your Computer ................................... 14
Saving Images by Connecting Your Camera and Computer (For
Windows) ...............................................................................................14
Saving Images by Connecting Your Camera and Computer (For
Macintosh)..............................................................................................19
Other Methods for Saving Images .........................................................21
PENTAX PHOTO Browser 3 .............................................. 22
Opening PENTAX PHOTO Browser 3 ...................................................22
About the PENTAX PHOTO Browser 3 Window....................................23
Transferring Images...............................................................................34
Viewing Images......................................................................................35
Main Image View Window......................................................................39
Managing Image Files and Folders........................................................50
Saving a List of Image Data...................................................................56
Continuous Image Playback in a Slideshow ..........................................58
Printing an Image...................................................................................61
Changing the PENTAX PHOTO Browser 3 Settings .............................68
PENTAX PHOTO Laboratory 3.......................................... 74
3
Opening PENTAX PHOTO Laboratory 3 ...............................................74
About the PENTAX PHOTO Laboratory 3 Window................................76
Selecting a RAW File to Process ...........................................................83
Easily Modifying RAW Files ...................................................................87
Setting RAW File Processing Conditions...............................................88
Saving Image Files.................................................................................93
Saving Image File Adjustment ...............................................................94
Recalling Image File Adjustment............................................................95
Printing...................................................................................................96
Changing the PENTAX PHOTO Laboratory 3 Settings .......................102
Glossary............................................................................ 106
Page 6
4
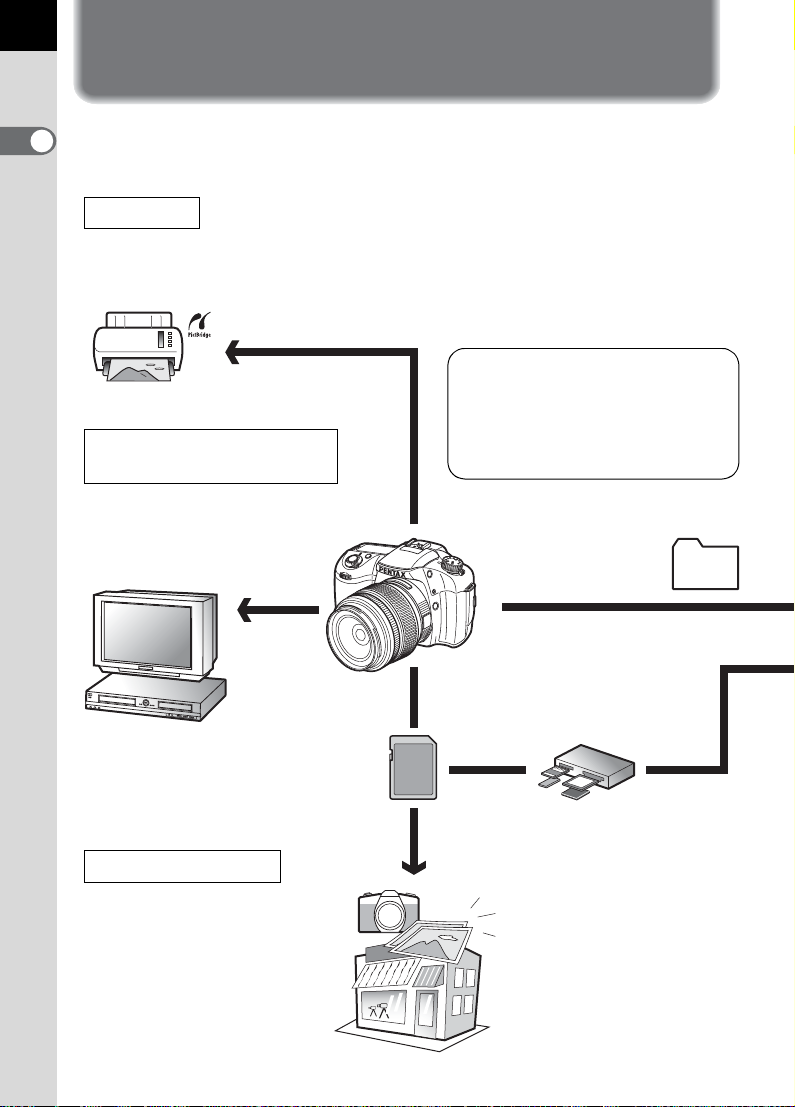
Enjoying Your Digital Camera Pictures
You can use a computer to organize and edit the pictures captured with
your digital camera.
Direct Print
Connect your camera directly to a
PictBridge-compatible printer using the
USB cable. (Not available on w.)
Your computer is...
• equipped with a standard USB
interface.
• using Windows 2000, Windows XP,
View and record images on
AV equipment
Connect your camera to a TV,
DVD recorder or other audiovisual
equipment using an AV cable to
view and/or record images.
Windows Vista or
Mac OS X Ver. 10.2 or later.
Connect your camera
to a computer using
the USB cable to copy
the camera images to
a computer.
Use your photo shop
You can have prints made from
images recorded on your
Memory Card at a photo shop.
• Set DPOF settings on your
camera, and get prints from
your photo shop.
• Select the images for prints.
You can transfer your
images using a built-in
card slot + PC card
adapter or a card reader.
• Remove the Memory
Card from the camera.
When transferring
images on the card to a
computer with another
device, make sure to
review the user manual
accompanying that
device.
Page 7
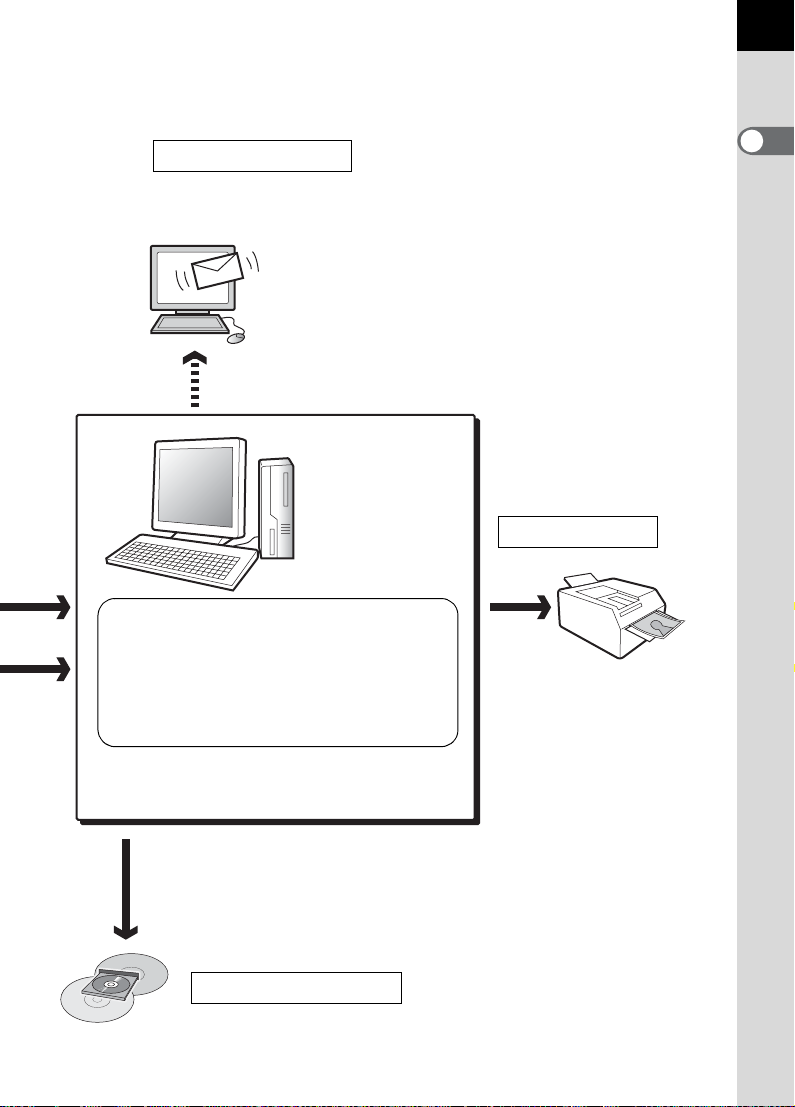
Use your image data
You can use your e-mail software to attach and send images
by e-mail, or post the images on your website.
• See the operating manual of your e-mail
software for details on how to make
attachments to e-mails.
• See the operating manual of the software
you are using for details on how to use
images on your website.
PENTAX PHOTO Browser 3 (p.22 - p.73)
PENTAX PHOTO Laboratory 3 (p.74 - p.105)
• View images • Organize and save images
• Print images • Rename all
• Save all image data
•
PENTAX-specification RAW file processing*
Use a commercially-available image editing
software to perform image editing operations.
* You can also perform file processing
operations for DNG files taken with
PENTAX digital cameras, DNG files
converted with PENTAX PHOTO
Browser 3, and DNG files taken with
PENTAX digital cameras and
converted with Adobe DNG converter.
You can use your printer to
print images transferred to
your computer.
Some printers can print
directly from Memory
Cards.
• For details, see the
5
Use your printer
operating manual of the
printer you are using.
Save your image data
Images transferred to the computer can
be saved onto a CD-R or other media.
Page 8

6
Provided Software
The provided CD-ROM (S-SW55) contains the following software:
• PENTAX PHOTO Browser 3
• PENTAX PHOTO Laboratory 3
This manual describes PENTAX PHOTO Browser 3 and PENTAX PHOTO
Laboratory 3 with screen images from Windows XP.
The operation of these software applications is nearly the same on Macintosh
with the exception of some keys. For information on Macintosh-specific
instructions, see the sections labeled “For Macintosh” or the online help.
Software Provided
PENTAX PHOTO Browser 3
PENTAX PHOTO Browser 3 is software for viewing, printing and
managing images taken on your digital camera and saved on your
computer.
Files with extensions .bmp (BMP), .jpg (JPEG), .pef (Files recorded in
PENTAX's exclusive digital-camera CCD RAW format. Hereafter “PEF”),
.pct (PICT), .png (PNG), .tif (TIFF) and .dng (DNG) are supported.
PENTAX PHOTO Browser 3 can perform the following tasks:
• Save image files under the same or a new name, change file names and
file types, copy, cut, paste, rotate and delete.
• Create new folders, change folder names, copy, cut, delete and paste.
• Save image data list.
• Check image data.
• View PEF files and DNG files easily.
• Print images.
You can also start PENTAX PHOTO Laboratory 3 and PENTAX REMOTE
Assistant
*1: PENTAX REMOTE Assistant can only be used together with w or
*1
q.
from within PENTAX PHOTO Browser 3.
Page 9
PENTAX PHOTO Laboratory 3
This application supports a number of image processing functions for use
with PEF and DNG files including data conversion, color adjustment, and
image compensation, and further allows you to save these images in
formats compatible with other commercial image browsing and editing
software. You can also print PEF and DNG files.
PENTAX PHOTO Laboratory 3 can also be run as a standalone application.
You can only perform image processing operations for DNG files taken with
PENTAX digital cameras and DNG files converted with PENTAX PHOTO
Browser 3.
DNG (Digital Negative) is a general-purpose, publicly-available RAW file
format designed by Adobe Systems.
System Requirements
We recommend the following system requirements to transfer images
from your camera to a computer and to install and use PENTAX PHOTO
Browser 3 and PENTAX PHOTO Laboratory 3.
Windows System Requirements
7
USB Connection
• Computer with Windows 2000, Windows XP or Windows Vista (32-bit)
preinstalled.
• USB port must be standard equipment.
Application Software
< PENTAX PHOTO Browser 3 and PENTAX PHOTO Laboratory 3 >
(9 languages: English, French, German, Spanish, Italian, Russian,
Chinese [traditional and simplified], Korean, Japanese)
• Operating System : Windows 2000, Windows XP or Windows Vista
(32-bit)
• CPU : Pentium 4 or higher
(Pentium 4 2.0 GHz or higher recommended)
• RAM : 512 MB or more (1.0 GB or more recommended)
• Monitor : 1024×768 pixels or more (1280×1024 pixels or more
recommended) with 24-bit full color (approximately
16.77 million colors)
• Free Disk Space : 250 MB or more (500 MB or more recommended)
Page 10

8
We recommend using AC adapter (sold separately) when the camera is
connected to the computer. If the batteries become depleted during image
transfer, the image data or Memory Card may be damaged.
Macintosh System Requirements
USB Connection
•
Macintosh with Mac OS X 10.2 or later preinstalled.
• USB port must be standard equipment.
* Installation of the USB driver is not necessary.
Application Software
PENTAX PHOTO Browser 3 and PENTAX PHOTO Laboratory 3
(9 languages: English, French, German, Spanish, Italian, Russian,
Chinese [traditional and simplified], Korean, Japanese)
• Operating System : Mac OS X 10.2 or later
• CPU : PowerPC G4 or higher
(Intel Core processor or PowerPC G5
recommended. Universal Binary format)
• RAM : 512 MB or more (1.0 GB or more recommended)
• Monitor : 1024×768 pixels or more (1280×1024 pixels or more
recommended) with 24-bit full color (approximately
16.77 million colors)
• Free Disk Space : 250 MB or more (500 MB or more recommended)
We recommend using AC adapter (sold separately) when the camera is
connected to the computer. If the batteries become depleted during image
transfer, the image data or Memory Card may be damaged.
Page 11
Installing the Software
Here is the procedure for installing PENTAX PHOTO Browser 3 and
PENTAX PHOTO Laboratory 3.
PENTAX PHOTO Browser and PENTAX PHOTO Laboratory can overwrite
earlier versions of the software.
Make sure to install PENTAX PHOTO Browser 3 and PENTAX PHOTO
Laboratory 3 on the provided CD-ROM (S-SW55) in order to use RAW
files shot with the PENTAX digital camera.
When multiple accounts have been setup in Windows 2000, Windows XP,
Windows Vista or Mac OS X, log on with an account that has
administrative rights before installing the software.
When Using Windows
1
Turn your computer on.
Close any other software that is open.
2
Place the provided CD-ROM (S-SW55) into the CD-ROM
drive on your computer.
9
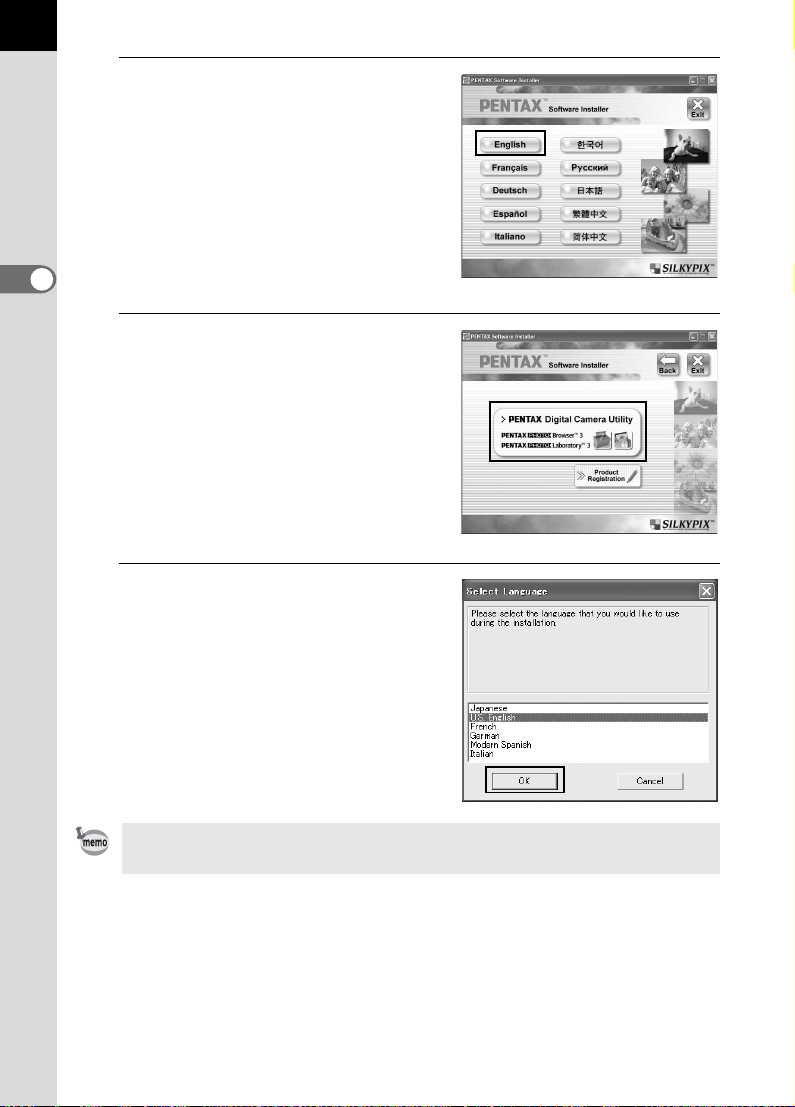
The PENTAX Software Installer screen appears.
• If you are using Windows Vista
When the [AutoPlay] screen appears, display the language selection
screen following the steps below.
1) Click [Run setup.exe].
2) Click [Allow].
The PENTAX Software Installer screen appears.
• If the PENTAX Software Installer screen does not appear
Display the PENTAX Software Installer screen following the steps below.
1) Click [My Computer] from the start menu.
2) Double-click the [CD-ROM drive (S-SW55)] icon.
3) Double-click [Setup.exe].
Page 12
10
3
You can choose the languages
from the displayed screen.
The software selection screen
appears.
4
Click [PENTAX Digital Camera
Utility].
5
Select the desired language in
the Select Language screen
and click [OK].
Some operating environments select the language automatically. Continue
with the installation in step 6. The installer starts.
Page 13
6
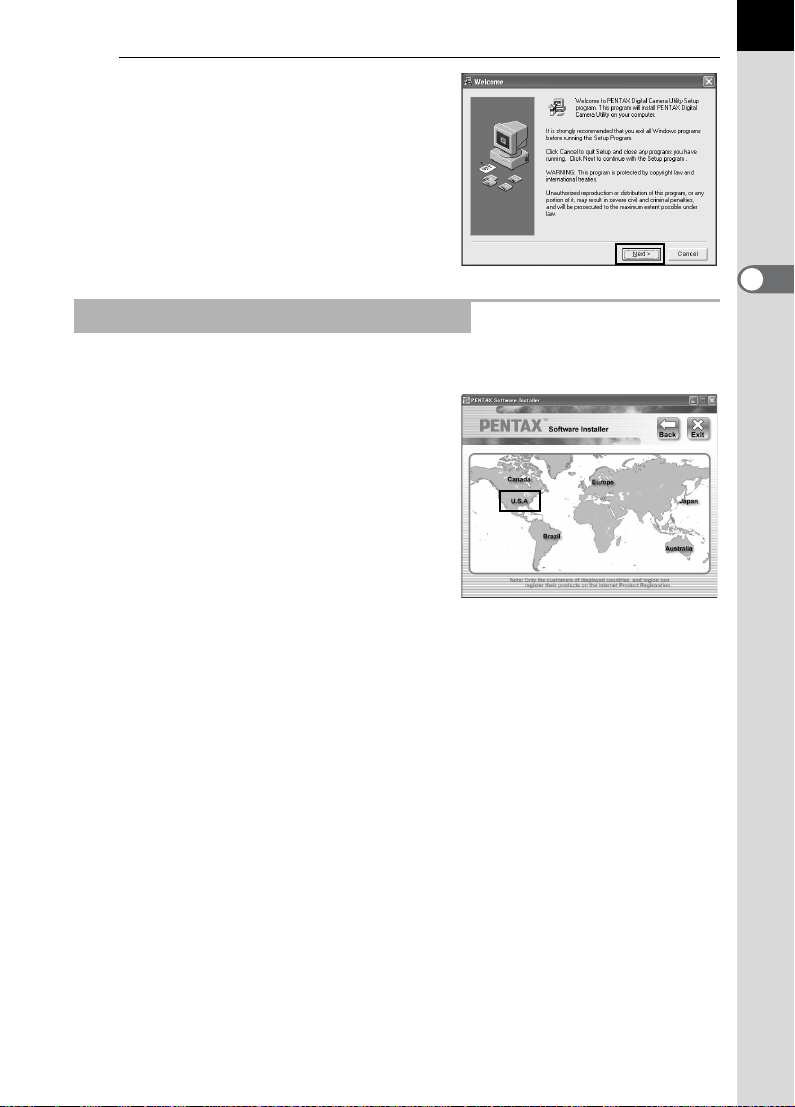
The installer starts. Click
[Next].
Follow the instructions on the screen
and continue with the installation.
Product Registration on the Internet
To better serve you, please take a moment to register your software.
Please click [Product Registration] on the
software selection screen in step 4 (p.10).
A world map for Internet Product
Registration is displayed. If your computer
is connected to the Internet, click the
displayed country or region and then
follow the instructions to register your
software.
11
Page 14
12
When Using Macintosh
1
Turn on your Macintosh.
Close any other software that is open.
2
Place the provided CD-ROM (S-SW55) into the CD-ROM
drive on your Macintosh.
3
Double-click the [CD-ROM
drive (S-SW55)] icon.
The contents of the CD-ROM are
displayed.
4
Double-click the [PENTAX
Installer] icon.
The PENTAX Software Installer
screen appears.
5
You can choose the languages
from the displayed screen.
The software selection screen
appears.
Page 15
6
Click [PENTAX Digital Camera
Utility].
Follow the instructions on the screen
and continue with the installation.
Product Registration on the Internet
To better serve you, please take a moment to register your software.
Please click [Product Registration] on the software selection screen in step
6. Next, follow the instructions on the screen to register your software
(p.11).
13
Page 16
14
Saving Images on Your Computer
Here is the procedure for saving images captured with your digital camera
onto your computer.
This section describes the method for saving images by connecting your
camera and computer with the USB cable, as well as other methods.
Saving Images by Connecting Your Camera and Computer (For Windows)
Setting [Transfer Mode] on the Camera to [PC]
q
not need to be set. Go to “Connecting Your Camera to Your Computer” (p.15).
1
2
3
4
5
is used as an example here. When using
Press the 3 button on the camera.
The [A Rec. Mode] menu or the [Q Playback] menu appears.
Press the four-way controller (5) to display the [H Set-up] menu.
Use the four-way controller (
23
Press the four-way controller (5).
A pull-down menu appears.
Use the four-way controller
(23) to select [PC].
[Transfer Mode] settings depend on the
connected device.
When connecting to a computer:
[PC] = USB 2.0 (Hi-Speed USB
compatible)
[PC-F] = USB 1.1
When printing with a printer:
[PictBridge] (only for compatible printers)
w
, [Transfer Mode] does
) to select [Transfer Mode].
Set-up
Guide display
Brightness Level
Video Out
Transfer Mode
Auto Power Off
Folder Name
MENU
Cancel
3 sec
0
NTSC
PC
PictBridge
PC-F
OK
OK
Page 17
6
Press the 4 button on the camera.
• Do not connect the camera to your computer while [PictBridge] is selected for
the [Transfer Mode].
• If the USB transmission speed of the computer is slower than that of the
camera, an error may occur when transferring data. If this occurs, set the
Transfer Mode to [PC-F]. This sets the transfer speed to the USB 1.1 data
transfer rate, thereby reducing the possibility of an error.
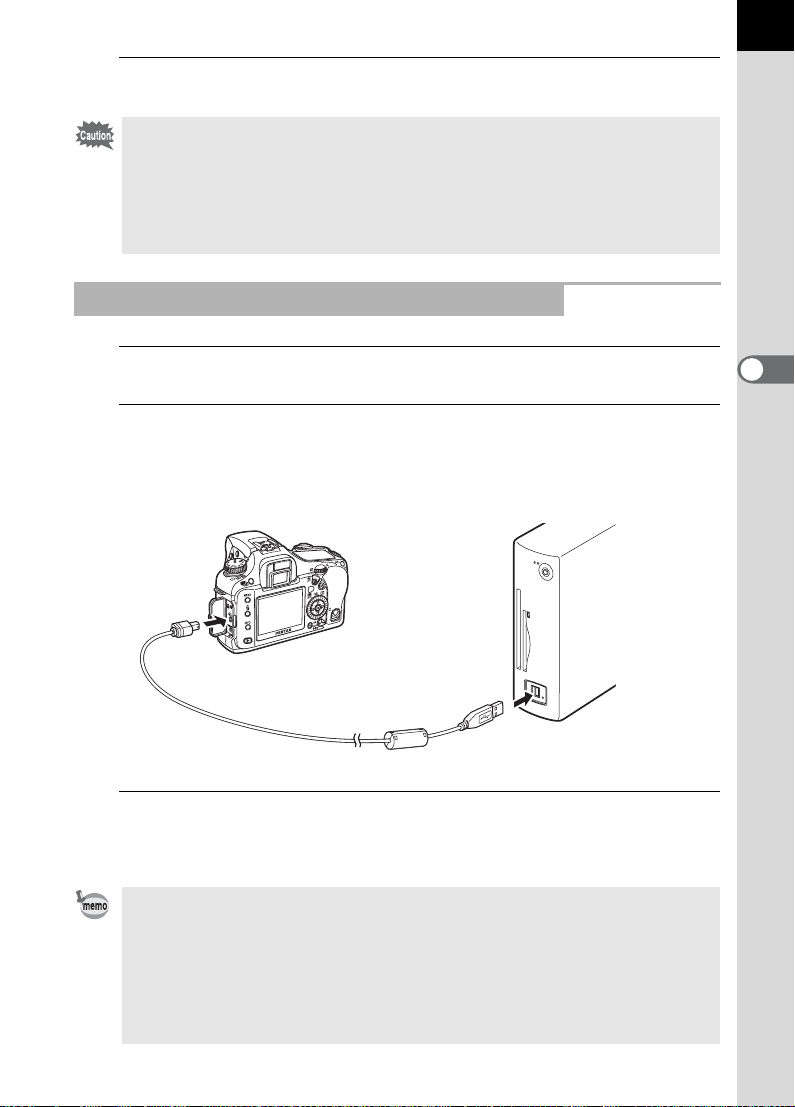
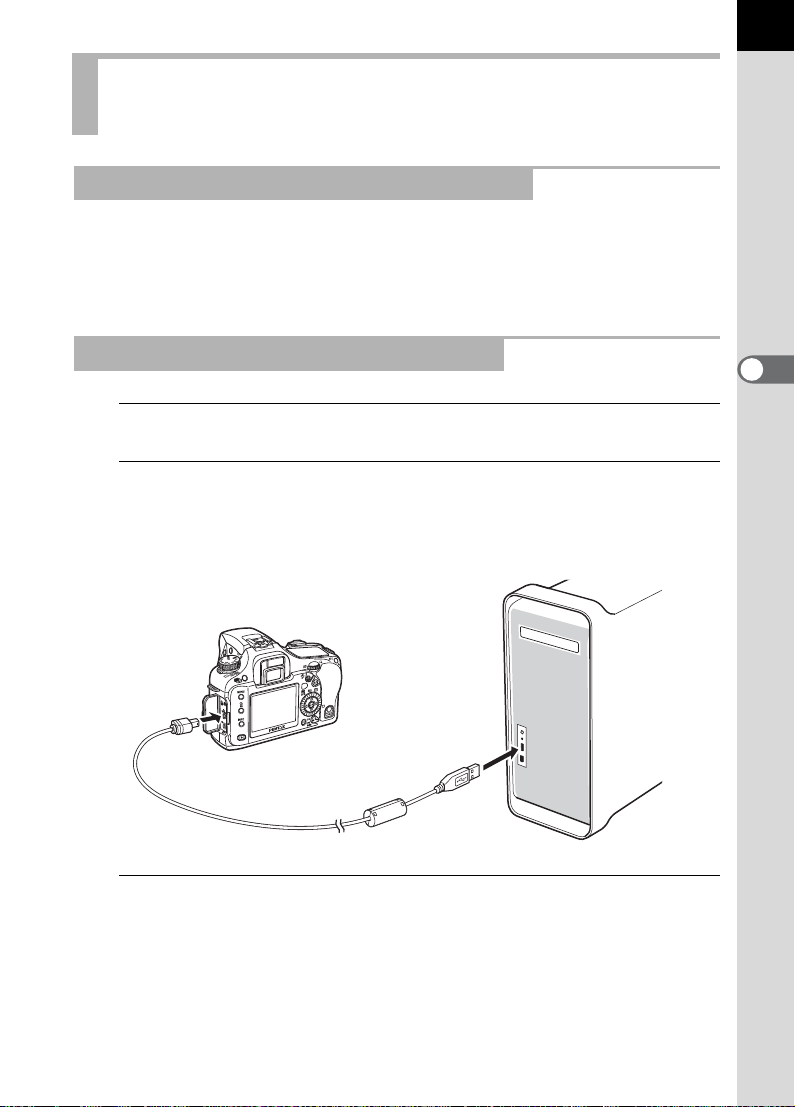
Connecting Your Camera to Your Computer
1
Turn your computer on.
2
Turn off your camera and use the USB cable to connect
your camera and your computer.
Confirm that a Memory Card is inserted into your camera.
15
3
Turn your camera on.
The camera is recognized as a [Removable Disk] in [My Computer].
• If the [Removable Disk Drive] dialog appears in Windows XP, select [Open
folder to view files using Windows Explorer] and click [OK]. The window in
step 3 on p.16 appears.
• When using Windows XP, if the Memory Card has a volume label, the
content of the volume label name appears instead of [Removable Disk]. A
new unformatted Memory Card may show the manufacturer name or model
number.
Page 18
16
Saving Camera Images on Your Computer
Windows XP is used as an example here.
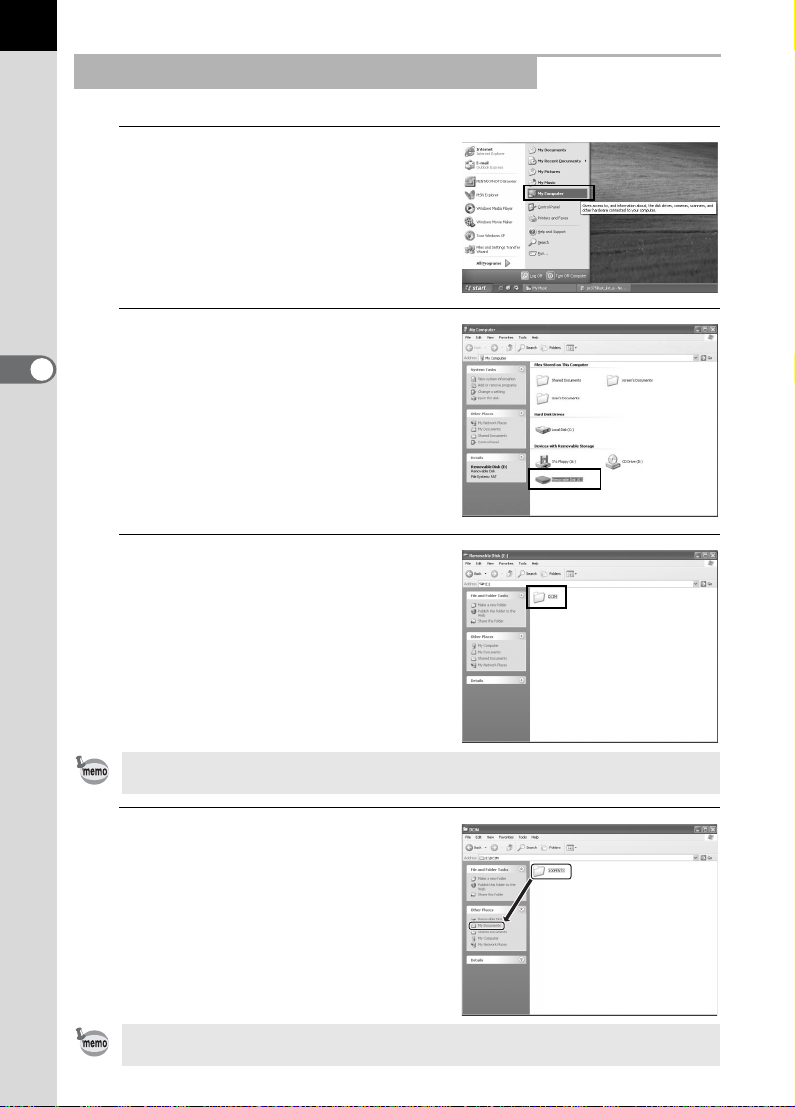
1
Click [My Computer] from the
start menu.
2
Double-click the [Removable
Disk] icon.
3
Double-click the [DCIM] icon.
The [xxxPENTX] (xxx is a three-digit
number) folder appears.
The camera image files are in this
folder.
When the method for assigning folder names is set to [Date], the [xxx_MMDD] folder
(where MMDD is the shooting date) appears. (p.178 of the camera Operating Manual)
4
Drag and drop the [xxxPENTX]
or the [xxx_MMDD] folder to
the desktop or any desired
folder, such as the [My
Documents] folder.
The camera images are saved on your
computer as an entire folder.
Images can also be saved using the [Easy Image Transfer] function in PENTAX
PHOTO Browser 3. (p.34)
Page 19
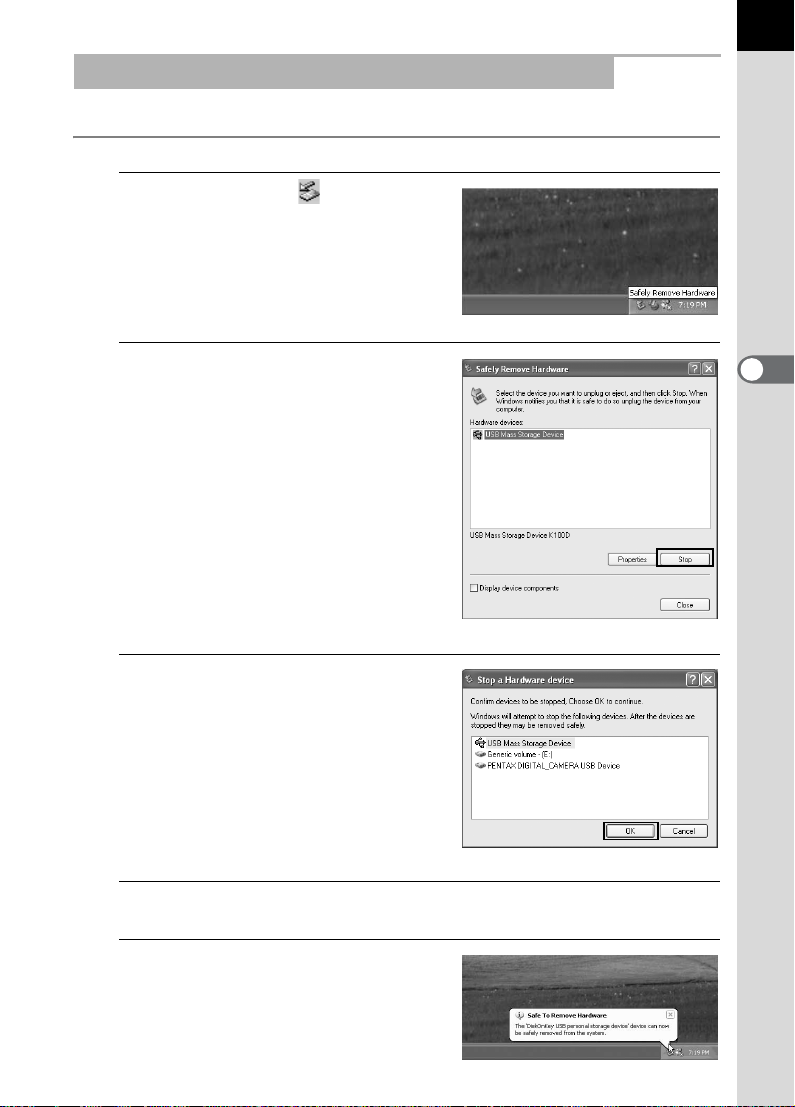
Disconnecting Your Camera from Your Computer
Windows XP
1
Double-click the [Safely
Remove Hardware] icon in the
task bar.
The [Safely Remove Hardware]
screen appears.
2
Confirm that [USB Mass
Storage Device] is selected
and then click [Stop].
The [Stop a Hardware device] screen
appears.
17
3
Select [USB Mass Storage
Device] and click [OK].
A message appears indicating that the
hardware can be safely removed.
4
Click [Close].
5
Turn off the camera and
disconnect the USB cable from
your camera and computer.
Page 20
18
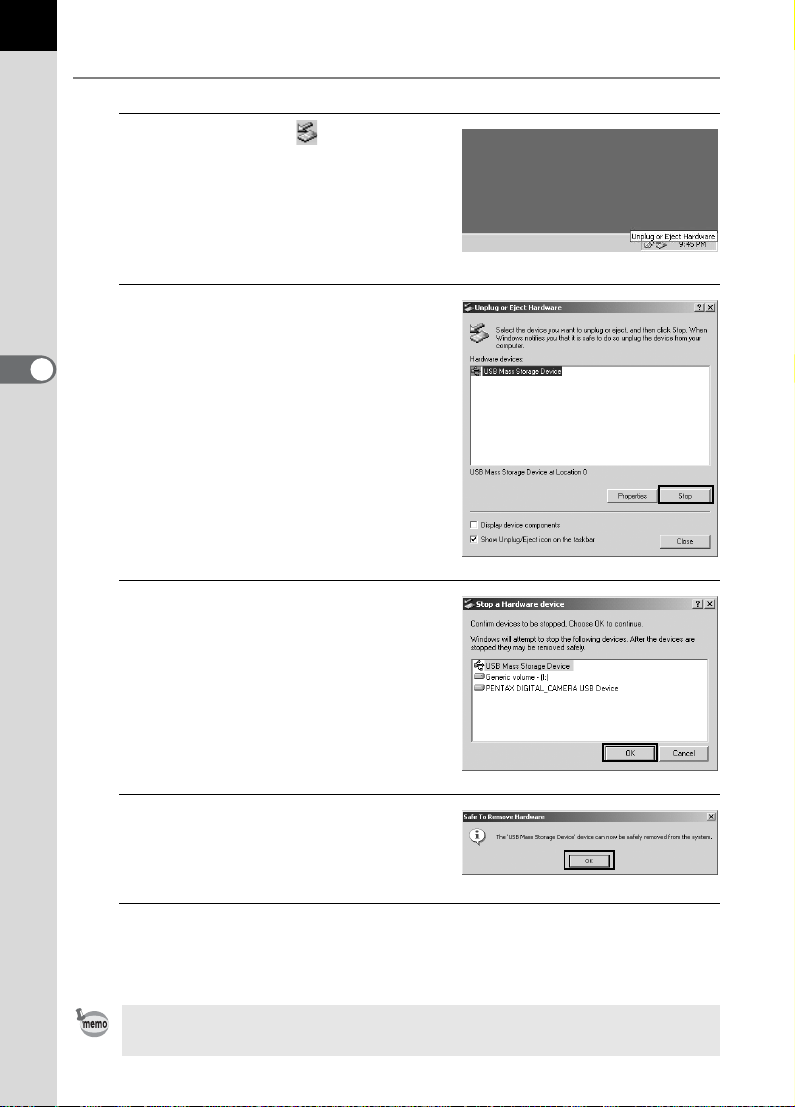
Windows 2000
1
2
3
Double-click the [Unplug or
Eject Hardware] icon in the
task bar.
The [Unplug or Eject Hardware]
screen appears.
Confirm that [USB Mass
Storage Device] is selected
and then click [Stop].
The [Stop a Hardware device] screen
appears.
Select [USB Mass Storage
Device] and click [OK].
A message appears indicating that the
hardware can be safely removed.
4
Click [OK].
5
Click [Close] and then, turn off the camera and disconnect
the USB cable from your camera and computer.
The USB mass storage device will not stop when the files stored on the
removable disk are in use for applications.
Page 21
Saving Images by Connecting Your Camera and Computer (For Macintosh)
Setting the USB Connection Mode to [PC]
When using the camera other than w, set the [Transfer Mode] on the
camera to [PC] (p.14).
When using w, [Transfer Mode] does not need to be set. Proceed to
the following steps.
Connecting the Camera and Macintosh
1
Turn on your Macintosh.
2
Turn off your camera and use the USB cable to connect
your camera and your Macintosh.
Confirm that a Memory Card is inserted into your camera.
19
3
Turn your camera on.
Your camera is recognized on the desktop as [NO_NAME (or the volume
label of the Memory Card if one is registered)].
You can change the folder name.
When the iPhoto screen appears, close it.
Page 22

20
Saving Camera Images on Your Macintosh
Mac OS X (ver. 10.3) is used as an example here.
1
Double-click the [NO NAME]
icon on the desktop.
2
Double-click the [DCIM] icon.
The [xxxPENTX] (xxx is a three-digit
number) folder appears.
The camera image files are in this
folder.
When the method for assigning folder names is set to [Date], the [xxx_MMDD]
folder (where MMDD is the shooting date) appears. (p.176 of the camera
Operating Manual)
3
Double-click the [Macintosh
HD] icon on the desktop.
This opens the [Macintosh HD]
volume.
Page 23
4
Drag the [xxxPENTX] or
[xxx_MMD] folder to
[Macintosh HD] volume or any
other volume or folder.
The complete folder, containing all
images, is saved to the destination
volume or folder.
Images can also be saved using the [Easy Image Transfer] function in PENTAX
PHOTO Browser 3. (p.34)
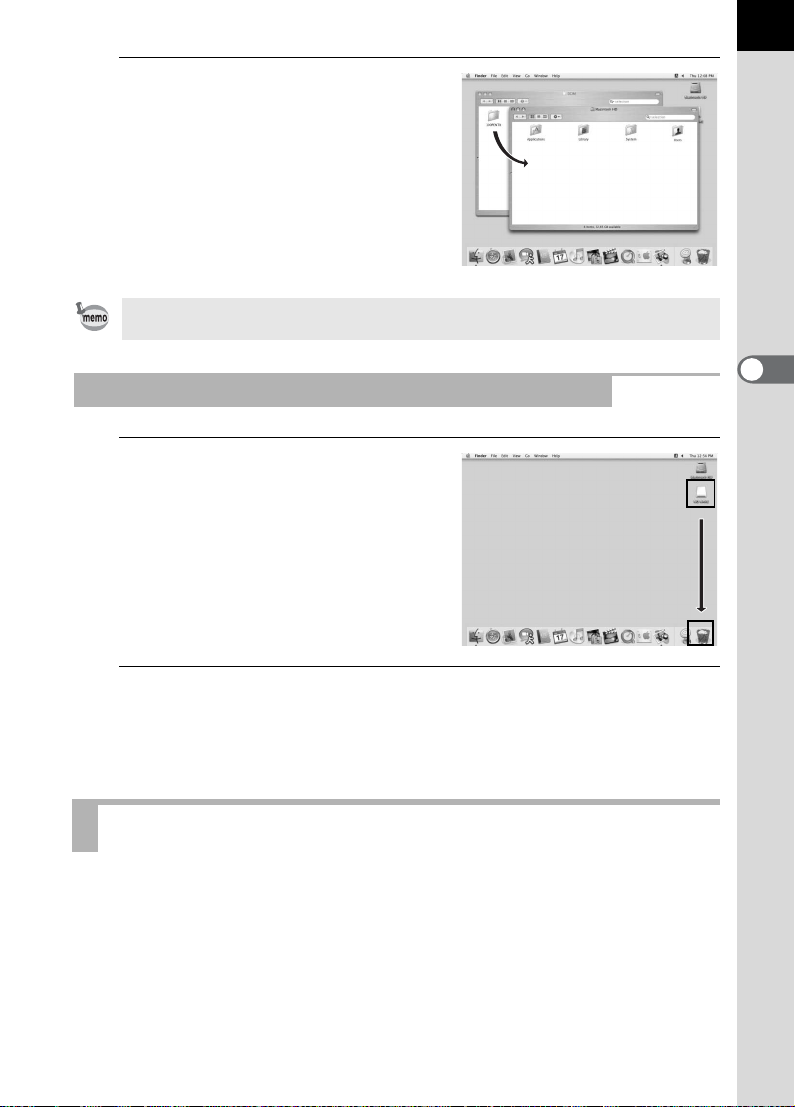
Disconnecting Your Camera from Your Macintosh
1
Drag [NO NAME (or the volume
label name on the Memory
Card)] on the desktop to the
trash can.
21
2
Turn off the camera and disconnect the USB cable from
your camera and Macintosh.
Other Methods for Saving Images
Use a card reader or card adapter to send image files directly to your
computer from a Memory Card with saved images without connecting your
camera and your computer with a USB cable. (p.34)
For details, please refer to the user’s manual for your computer or card
reader.
Page 24
22
PENTAX PHOTO Browser 3
This section describes opening and closing PENTAX PHOTO Browser 3
and viewing the PENTAX PHOTO Browser 3 window, and explains its
functions.
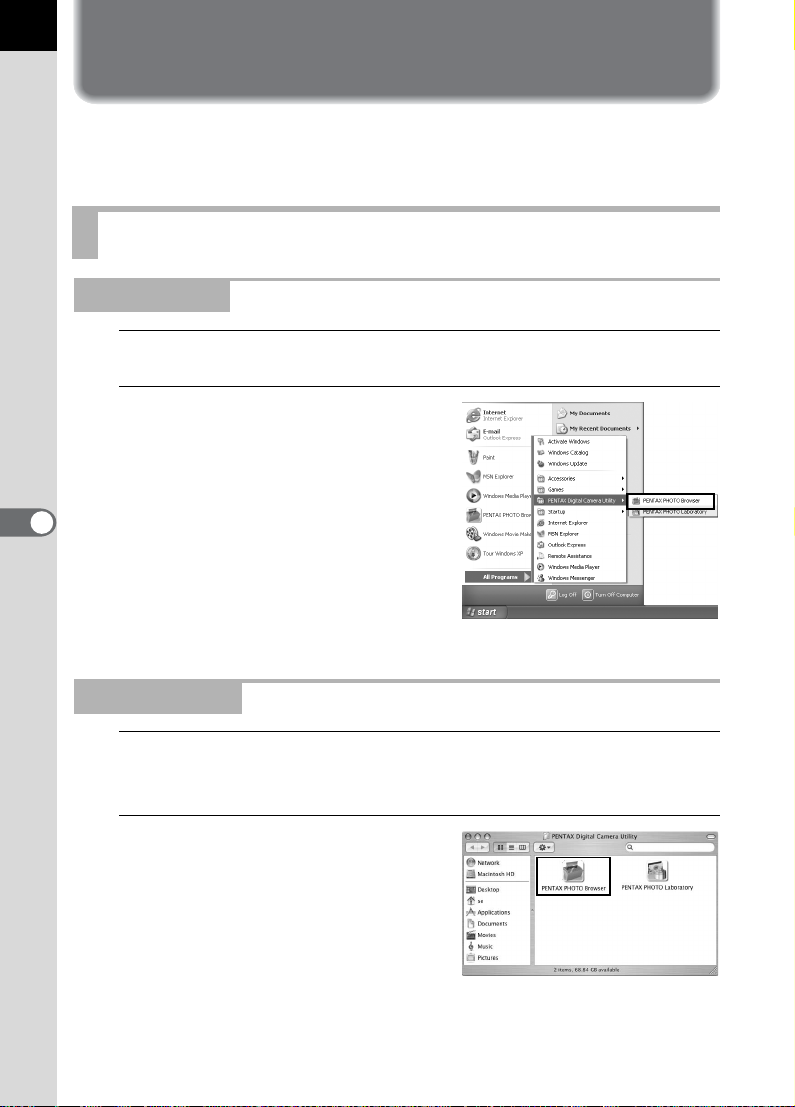
Opening PENTAX PHOTO Browser 3
For Windows
1
Select the start menu on the desktop.
2
Select [All Programs] - [PENTAX
Digital Camera Utility] - [PENTAX
PHOTO Browser].
PENTAX PHOTO Browser 3 is opened
and the PENTAX PHOTO Browser 3
window appears.
Closing PENTAX PHOTO Browser 3
Select [Exit] from the [File] menu.
For Macintosh
1
Double-click the [PENTAX Digital Camera Utility] folder in
[Applications] on the hard disk.
2
Double-click the [PENTAX
PHOTO Browser] program icon.
PENTAX PHOTO Browser 3 is opened
and the PENTAX PHOTO Browser 3
window appears.
Closing PENTAX PHOTO Browser 3
Select [Quit PENTAX PHOTO Browser] in [PENTAX PHOTO Browser] on the
desktop menu bar.
Page 25
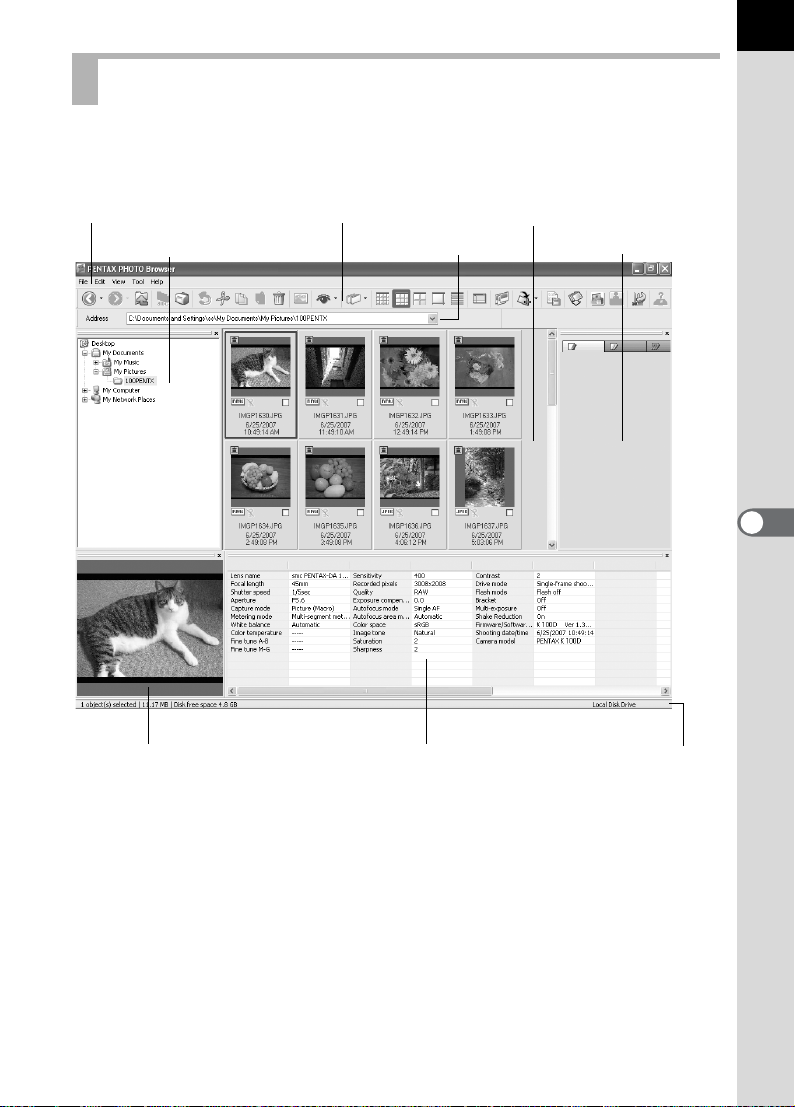
About the PENTAX PHOTO Browser 3 Window
This section explains the PENTAX PHOTO Browser 3 window layout,
names and functions.
23
Tool barMenu bar
Folder tree pane Address bar
Preview pane
Image data pane
Thumbnail pane
Checked images pane
Status bar
Menu bar (p.27)
Tool bar (p.31)
Address bar
The address of the currently displayed folder appears here.
Folder tree pane
Internal data on your computer appears here as a folder tree. Select the
folder containing saved image files here.
Also, the Folder tree pane handles operations such as creating new
folders, deleting folders and moving/copying folders.
Page 26
24
Thumbnail pane
Files in the folder selected in the Folder tree pane appear here. Select
from five file display methods. When a thumbnail image is selected in the
Thumbnail pane, the image appears in the Preview pane and the image
data appears in the Image data pane.
Checked images pane
All images with check marks in the Thumbnail pane are displayed here.
Switch between Thumbnails and Details by right-clicking the Checked
images pane. When a thumbnail image is selected in the Checked images
pane, the image appears in the Preview pane and the image data appears
in the Image data pane.
Preview pane
An image selected in the Thumbnail pane appears in this pane.
Image data pane
The image data for the image selected in the Thumbnail pane appears here.
Place the cursor over a cell dividing line at the top of the pane and drag it
to resize the cell. (For Macintosh, drag at the applicable position to resize
the cell.)
The following items appear:
Data Contents Example
Lens name Shows lens type
Focal length Focal length (in mm)
Shutter speed Shutter speed when shooting
(in seconds)
Aperture Aperture value when shooting
Capture mode Capture mode when shooting Green mode
Metering mode Metering mode when shooting Multi-segment
White balance White balance mode Auto
Color temperature Color temperature (units: Kelvin)
Fine tune A-B Amber - Blue fine tune
Fine tune M-G Magenta - Green fine tune
Sensitivity ISO sensitivity when shooting
Recorded pixels Number of recorded pixels
Quality Recorded quality Better
Exposure compensation
*1: Setting details when shooting with q or processing details when using
PENTAX PHOTO Laboratory 3 appear.
Exposure compensation
*1
*1
smc PENTAX-FA
50mmF1.4
50mm
1/250sec
F8.0
*1
5000K
0
0
200
3872×2592
0.0
Page 27

Data Contents Example
Autofocus mode Autofocus mode when shooting Single AF
Autofocus area mode Autofocus area mode when shooting Automatic
Color space Color space mode
Image tone Photo finish settings Bright
Saturation Saturation settings 0
Sharpness Sharpness settings 0
Contrast Contrast settings 0
Drive mode Drive mode settings when shooting Single-frame
Flash mode Flash mode settings when shooting Flash Off
Bracket Exposure bracket settings when
shooting
Extended Bracket Extended bracket settings when
shooting
Multi-exposure Multi-exposure settings when shooting
Shake Reduction Shake Reduction Setting
Firmware/Software
version
Shooting Date/Time Date and time shot
Camera model Camera name
*2: The range of the variable appears after the name of the item, such as
[Saturation], set during shooting.
*3: Information on the camera’s firmware appears for captured images.
Version of the software when images
were last saved
*2
*3
sRGB
shooting
Off
-----
Off
On
K10D Ver 1.30
6/25/2007
10:00:00
PENTAX K10D
Status bar
The status of PENTAX PHOTO Browser 3 appears.
The following items appear:
• Number of objects in the selected folder, total folder size (not including
subfolders) or number of selected objects and total size
• Available disk space for selected drive
• Progress status when loading thumbnails
• Identification of local disk, removable disk and network
25
Showing/Hiding Panes and Bars
Show/hide panes and bars using the [View] menu (p.28). A check is
displayed in the box ( ) in front of the item for currently showing items.
Check these to show and uncheck to hide.
Alternatively, click the [Close] button ( ) on the top right of each pane to
close.
Page 28
26
Removing and Moving the Tool Bar and Address Bar
The Tool bar and Address bar can be removed or moved from the Browser
screen.
Remove the Tool bar and Address bar
To remove a bar, double-click the left edge of the bar in the Browser
screen. Alternatively, click the left edge of the bar and drag to the
Thumbnail pane or Folder tree pane.
The bar is removed from the Browser screen.
Add the Tool bar and Address bar in the Browser screen
Double-click the bar to return the bar to the original location. Alternatively,
drag the bar back to the original location.
The bar returns to the Browser screen.
Move the Tool bar and Address bar
Click the left edge of the bar and drag to the new location.
The bar is moved to the new location.
The Address bar can only be moved below the Menu bar, next to the Tool bar,
or to the top/bottom of the Thumbnail pane.
Select [Default Position] on the [View] menu or click (Default Position) on
the Tool bar to return the bar to its default position.
Removing and Moving Panes
The Folder tree pane, Preview pane, Image data pane and Checked
images pane can be removed from the Browser screen.
Remove panes
To remove a pane, double-click the top edge of the pane in the Browser
screen. Alternatively, click the top edge of the pane and drag to the
Thumbnail pane.
The pane is removed from the Browser screen.
Page 29
Add a pane in the Browser screen
Double-click the Title bar of the pane to return to the original location.
Alternatively, click the Title bar and drag the pane back to the original
location.
The pane returns to the Browser screen.
Move panes
To move a pane, select pane and drag to the new location.
The pane is moved to the new location.
Select [Default Position] on the [View] menu or click (Default Position) on
the Tool bar to return the bar to its default position.
Menu Bar
This executes functions or sets various settings of PENTAX PHOTO
Browser 3.
For Macintosh, the Menu bar appears at the top of the desktop.
[File] menu
Create New Folder This creates a new folder in the location specified on
the Folder tree pane. (p.55)
Open This opens the selected folder. For an image
selected in the Thumbnail pane, it displays the image
in a new Main image view window.
Close All This closes all images open in the Main image view
windows.
Rename This changes the name of the selected file or folder.
(p.53)
Rename All This changes the names of all selected files. (p.54)
Page Setup This sets printing options such as margins, headers/
footers, and number of copies. (p.65)
Print This prints the selected image file. (p.61)
Properties The properties of the selected file or folder appear.
(p.57)
Exit This closes PENTAX PHOTO Browser 3.
(For Macintosh, select [Quit PENTAX PHOTO
Browser] on the [PENTAX PHOTO Browser] menu.)
27
Page 30
28
[Edit] menu
Undo This undoes the previous file operation.
Cut This prepares the selected file or folder to be moved
to a different location. (p.51)
Copy This copies the selected file or folder. (p.51)
Paste This copies the cut or copied file or folder into the
selected folder. (p.51)
Delete This deletes the selected file or folder. When a folder
is deleted, all files in the folder are also deleted.
(p.53)
Move to Folder This moves the selected file to another folder.
Copy to Folder This copies the selected file to another folder.
Check Selected Image This checks the selected file. The checked file is
displayed in the Checked images pane. (p.37)
Uncheck Selected Image This unchecks the selected file.
Uncheck All This unchecks all images.
Select All This selects all files within the currently open folder.
Invert Selection This unselects all selected files and selects all
unselected files within the currently open folder.
[View] menu
Tool Bar This shows or hides the Tool bar.
Folder Tree This shows or hides the Folder tree pane.
Preview This shows or hides the Preview pane.
Address Bar This shows or hides the Address bar.
Status Bar This shows or hides the Status bar.
Image Data This shows or hides the Image data pane.
Checked Images This shows or hides the Checked images pane.
Default Position This returns each pane to its default position.
Filter This sets the type of file that appears in the
Thumbnail pane. Select from the following four items:
PENTAX Images : Images captured with your
PENTAX digital camera
Other Images : Images other than those captured
with your PENTAX digital camera
(DNG, JPEG, TIFF, BMP, PNG,
PICT)
Folders : Folders
Others : Files that PENTAX PHOTO
Browser 3 does not support
Page 31

[View] menu
Sort by This specifies the order in which files and folders
appear in the Thumbnail pane and specifies
ascending or descending order.
You can select from File Name, File Size, File Date/
Time, File Type, Shooting Date/Time, Image Size,
Camera Name, Lens Name, Checkmark and Lock
Status.
Thumbnail Caption This sets the caption of file that appears in the
Thumbnail pane. File Name, File Date and File Time
appear by default.
Thumbnail (Smallest) The smallest size thumbnail appears in the
Thumbnail pane.
Thumbnail (Small) A small size thumbnail appears in the Thumbnail
pane.
Thumbnail (Medium) A medium size thumbnail appears in the Thumbnail
pane.
Thumbnail (Large) A large size thumbnail appears in the Thumbnail
pane.
Details Image details appear in the Thumbnail pane without
an image.
Detailed View Options Sets the information displayed in the Thumbnail pane
when set to [Details].
Go To Select [Back] to return to the previously opened
folder, [Forward] to move forward one folder, and
[Up] to move up one folder in the directory tree.
Slideshow Selected or checked images appear in order. (p.58)
If only one image is selected or no images are
selected (click the background of the Thumbnail
pane), all images in the current folder are displayed
in order.
29
[Tool] menu
Save Image Data List Use the check boxes to save the image data from
multiple folders into one CSV format file. If no images
are selected or checked, all the image data in the
current folder is saved. (p.56)
Rotate Rotates the selected image 90° left or right. (p.38)
Extract JPEG Extracts the JPEG data from a selected PEF file or
DNG RAW file (shot with q) and saves it as a
separate file.
Save as DNG Converts a selected PEF file into a DNG RAW file.
Page 32

30
[Tool] menu
Easy Image Transfer Automatically searches for DCF images recorded in
the camera or Memory Card connected to the
computer and copies the images to the computer.
(p.34)
PENTAX PHOTO
Laboratory
PENTAX REMOTE
Assistant
Options This sets various settings for PENTAX PHOTO
[Help] menu
Help Topics This shows PENTAX PHOTO Browser 3 help
Index This shows PENTAX PHOTO Browser 3 help index
What’s This? This shows pop-up tips when an icon or command
About PENTAX PHOTO
Browser
*1: PENTAX REMOTE Assistant is not included in the CD-ROM (S-SW55). The
*1
latest version can be downloaded from the PENTAX website.
This menu function can be used if PENTAX REMOTE Assistant is already
installed.
This starts PENTAX PHOTO Laboratory 3. You can
specify the image files to be opened from PENTAX
PHOTO Browser 3. (p.83)
This starts PENTAX REMOTE Assistant.
PENTAX REMOTE Assistant can be used by
installing it in the same folder as PENTAX PHOTO
Browser 3 and using it together with the w or
q.
Browser 3. (p.68)
contents.
search. (This command is not available for
Macintosh.)
button is clicked.
This shows PENTAX PHOTO Browser 3 version
information. (For Macintosh, select [About PENTAX
PHOTO Browser] on the [PENTAX PHOTO Browser]
menu.)
Page 33

Tool Bar
Frequently used functions are provided as Tool bar buttons. You can
execute these functions easily from the Tool bar.
If, after resizing the Browser screen, part of the Tool bar is not visible, you
can click the downward pointing arrow on the right edge of the Tool bar to
select a tool that is not displayed.
1 2 3 4 5 6 7 8 9 10 11 12 13
14 15 16 17 18 19 20 21 22 23 24 25 26 27
Number Icon (button) Content
1
Back
2
Forward
3
This opens the previously opened folder.
Click the downward pointing arrow to the right of
the [Back] icon to display a history of previously
opened folders. (For Macintosh, hold down this
icon to display the history.)
This opens the folder which was open before
using the [Back] button.
Click the downward pointing arrow to the right of
the [Forward] icon to display a history of
previously opened folders. (For Macintosh, hold
down this icon to display the history.)
This moves up one folder in the directory tree.
31
Up
4
Rename All
5
Print
6
Undo
This changes the names of all selected files.
(p.54)
This prints the selected image file. (p.61)
This undoes the previous file operation.
Page 34

32
Number Icon (button) Content
7
Cut
8
Copy
9
Paste
10
Delete
11
View Image
12
Filter
13
Sort by
14
Thumbnail
(Smallest)
15
Thumbnail (Small)
16
Thumbnail (Medium)
This prepares the selected file or folder to be
moved to a different location. (p.51)
This copies the selected file or folder. (p.51)
This copies the cut or copied file or folder into the
selected folder. (p.51)
This deletes the selected file or folder. (p.53)
The selected image file appears in the Main
image view window. (p.35)
Click to select the type of file that appears in the
Thumbnail pane. Select from the following four
items:
PENTAX Images : Images captured with your
PENTAX digital camera
Other Images : Images other than those
captured with your PENTAX
digital camera (DNG, JPEG,
TIFF, BMP, PNG, PICT)
Folders : Folders
Others : Files that PENTAX PHOTO
Browser 3 does not support
Click to select the sort key and ascending/
descending order from the pull-down menu.
Thumbnails are sorted according to the selected
order.
The smallest size thumbnail appears in the
Thumbnail pane. (p.35)
A small size thumbnail appears in the Thumbnail
pane. (p.35)
A medium size thumbnail appears in the
Thumbnail pane. (p.35)
Page 35

Number Icon (button) Content
17
Thumbnail (Large)
18
Details
19
Default Position
20
Slideshow
21
Rotate
22
Save Image Data
List
23
Easy Image Transfer
24
PENTAX PHOTO
Laboratory
25
PENTAX REMOTE
Assistant
26
Options
27
Help Topics
A large size thumbnail appears in the Thumbnail
pane. (p.35)
Image details appear in the Thumbnail pane
without an image.
This returns the window layout of PENTAX
PHOTO Browser 3 to the default settings.
Selected or checked images appear in order.
(p.58)
This rotates the selected image 90° left or right.
(p.38)
This saves additional file information for specified
image files in a single CSV-format file. (Additional
file information can be saved only for PENTAX
PHOTO Browser 3-compatible image files.)
(p.56)
Automatically searches for DCF images recorded
in the camera or Memory Card connected to the
computer and copies the images to the computer.
(p.34)
This starts PENTAX PHOTO Laboratory 3. You
can specify the image files to be opened from
PENTAX PHOTO Browser 3. (p.74)
This starts PENTAX REMOTE Assistant.
PENTAX REMOTE Assistant can be used by
installing it in the same folder as PENTAX
PHOTO Browser 3 and using it together with the
w or q.
This sets various settings for PENTAX PHOTO
Browser 3. (p.68)
This shows PENTAX PHOTO Browser 3 help
contents.
33
Page 36

34
Transferring Images
This function automatically searches for DCF images recorded in the
camera or Memory Card connected to the computer and transfers the
images to the computer.
Transferring Image Files from Memory Card
1
Check that the digital camera, card reader or DCFcompatible removable disk is connected to your
computer, and then select [Easy Image Transfer] on the
[Tool] menu.
Alternatively, click the icon on the Tool bar.
The digital camera or DCF-compatible removable disk with image files is
recognized.
2
Select the drive with the images you want to transfer and
click [Next].
The message [Could not find DCF media.] appears if no digital camera or DCFcompatible removable disk is connected to the computer or the connected
device has no image files.
3
Select the folder with the images you want to transfer and
click [Next].
After selecting [Transfer selected folder(s)], select a folder from the list.
To transfer all images in the selected drive, select [Transfer all images].
4
Select the destination folder and click [Transfer images].
To create a new destination folder, select the location where the folder is
to be created and click [New Folder].
5
After the images have been transferred, click [Finish].
Page 37

Viewing Images
Display the images saved on your computer in the Preview pane or Main
image view window.
Displaying Thumbnail Pane Images in the Preview Pane
1
In the folder tree, select the folder containing the image
file to view.
Images in the selected folder appear as thumbnails in the Thumbnail
pane.
35
You can change the size of the thumbnail image. In the [View] menu, select
[Thumbnail (Smallest)], [Thumbnail (Small)], [Thumbnail (Medium)], or
[Thumbnail (Large)]. Alternatively, click the , , or icon on the Tool
bar.
2
Select an image in the Thumbnail pane.
The selected image appears in the Preview pane.
When the Preview pane is right-clicked, the following menu appears.
Preview Previous Shows previous image.
Preview Next Shows next image.
Auto Size Fits image to the size of the Preview pane.
Fixed Size Image appears in a 320-dot window (aspect ratio
is maintained).
Life Size Shows image size at 100% zoom.
Page 38
36
Images in the Checked image pane (p.24) can also be displayed in the Preview
pane.
Displaying Thumbnail Pane Images in the Main Image View Window
Follow the steps below to open the Main image view window.
1
Select an image in the Thumbnail pane of the Browser
screen and click the icon on the Tool bar.
The Main image view window opens and the selected image appears.
• Multiple images may be selected in the Thumbnail pane and opened in the
Main image view window. When multiple images are selected, the Main
image view window may be set in [Options] to show all images in one window
or multiple windows (p.46). Images are shown in one window by default.
Images in the Checked images pane can also be displayed in the Main image
view window (p.37).
•
The following methods can also be used to open the Main image view window.
– Select an image in the Thumbnail pane and then select [Open] on the [File]
menu.
– Select [Main Image View] on the menu after right-clicking an image in the
Thumbnail pane. (For Macintosh, display the menu by clicking the image
while holding down the control key.)
– Double-click an image in the Thumbnail pane.
– Drag and drop the image file from the Desktop to the opened Main image
view window.
– Select [Main Image View] on the menu after right-clicking an image in the
Checked images pane. (For Macintosh, display the menu by clicking the
image while holding down the control key.)
– Double-click an image in the Checked images pane.
RAW file display
PENTAX PHOTO Browser 3 allows you to select between [Simple display]
and [Auto RAW display] when displaying RAW files in the Main image view
window. (p.72)
Simple display :The compressed data in the RAW file appears.
Images can be viewed quickly.
Auto RAW display : The RAW file is processed. It takes time to display the
RAW data, but the image quality is superior.
Select from three levels for the processing ratio on the
[Main Image View] tab of the [Options] dialog. (p.72)
Page 39

Displaying Images in the Checked Images Pane
Each image thumbnail displayed in the Thumbnail pane (in the left column
of the list of thumbnails when [Details] is selected) shows a Check box
indicating whether an image is registered to the Checked images pane.
When this box is clicked to display a check mark, that image becomes a
“checked image”.
Each time the Check box is clicked, the check mark group switches among
Checkmark 1, Checkmark 2 and Checkmark 3. Alternatively, select an
image in the Thumbnail pane and then select a check mark group with
[Check Selected Image] on the [Edit] menu.
Checked images are registered to the tab corresponding to the check
mark group in the Checked images pane. Images stored in different
folders that are tagged with the same check mark are registered to the
same tab. The thumbnails in the Checked images pane are color-coded
according to the folder where the images are saved. There are seven
colors that are used for color-coding the thumbnails, and if there are
thumbnails from eight or more different folders with the same check mark,
the colors to indicate the folders are repeated. You can select from seven
colors using the [Options] dialog on the [Tool] menu.
When the Checked images pane is right-clicked, the following menu
appears.
Item Description
Main Image View Opens the image in a Main image view window. Multiple
images may be opened simultaneously.
Slideshow Images in the Checked images pane are displayed in
Slideshow. Opens the Slideshow screen and Slideshow
control panel.
PENTAX PHOTO
Laboratory
Save Image Data List Saves the image data list of images selected in the
Print The [Print] dialog appears with various print settings.
Rotate Rotates the selected image 90° left or right. (p.38)
Sort by Sets the order of files or folders displayed in the
Thumbnails Displays the checked images with thumbnails.
Details Displays the checked images in a list.
PENTAX PHOTO Laboratory 3 starts. Select a RAW file
in the Checked images pane and click this button to
open the image in PENTAX PHOTO Laboratory 3.
Checked images pane in CSV format.
Checked images pane.
*2
37
Page 40

38
Item Description
Uncheck Selected
*1
Image
Uncheck All Removes check marks from all images in an active
Move to Folder Moves the image selected in the Checked images pane
Copy to Folder Copies the image selected in the Checked images pane
Extract JPEG Extracts the JPEG data from a PEF file or DNG RAW file
Save as DNG Converts a PEF file selected in the Checked images
*1: This can only be selected from the right-click menu after selecting an image.
*2: When [Details] is selected, the checked images are sorted by folder and
displayed in a list.
Rotating Images in the Thumbnail Pane or Checked Images Pane
1
Select an image in the Thumbnail pane or Checked images
pane.
Removes the check mark from an image selected in the
Checked images pane. This cancels the registration of
the image in the Checked images pane.
check mark group. This cancels the registration of the
image in the Checked images pane.
to another folder.
to another folder.
(shot with K10D) selected in the Checked images pane
and saves it as a separate file.
pane into a DNG file.
2
Select [Rotate] from the [Tool] menu.
Select [Rotate (90° Left)] or [Rotate (90° Right)] to rotate the image and
save it as the same file or as a new file.
Select [Rotate Display (90° Left)] or [Rotate Display (90° Right)] to rotate
the image in the Browser screen (Thumbnail pane, Checked images
pane or Preview pane) or Main image view window. [Rotate Display (90°
Left)] and [Rotate Display (90° Right)] are available when [Yes] is
selected for [Use Image Orientation Information] on the [Browser] tab of
the [Options] dialog. This is not available for images that do not have
orientation information.)
Alternatively, select [Rotate] on the toolbar, or from the menu displayed
after right-clicking the thumbnail in the Thumbnail pane or the Checked
images pane.
Page 41

Main Image View Window
39
Menu bar
Tool bar
Image view areaImage data pane
Menu bar
This executes functions or sets various settings of the Main image view
window.
[File] menu
View Browser This shows the file browsing screen.
Open This opens the [Open] dialog to select the file to open.
If a check mark is next to [Open in new window], a
new Main image view window opens and the
selected image appears when a file is selected and
[Open] is clicked. (p.35)
Save As This saves the image being viewed in JPEG, TIFF (8-
bit or 16-bit), BMP, PNG or PICT format. (p.49)
Page Setup This sets the page setup information for printing the
selected image. (p.65)
Print This prints the current image. (p.61)
Properties Image file data appears. (p.45)
Close Closes the Main image view window.
Close All Closes all Main image view windows.
Page 42

40
[View] menu
Tool Bar This shows or hides the Tool bar.
Image Data This shows or hides the Image data pane.
Previous Image
Next Image This displays the next image when multiple images
Synchronous Display This sets whether to synchronize operations with
Slideshow Selected or checked images appear in order. (p.58)
Fit to Window This fits the image to the window size. (p.44)
Enlarge This doubles the view magnification of the image
Reduce This halves the view magnification of the image
Life size This sets the view magnification of the image
Rotate View (90° Left) This rotates the image 90° left. This does not affect
Rotate View (90° Right) This rotates the image 90° right. This does not affect
Arrange Windows This arranges multiple Main image view windows.
This displays the previous image when multiple
images are displayed in the Main image view window
or when a folder contains multiple images. This button
cannot be selected if there are no images to view.
are displayed in the Main image view window or
when a folder contains multiple images. This button
cannot be selected if there are no images to view.
other Main image view windows.
appearing in the image view area.
The maximum view magnification is 4 times. (p.44)
appearing in the image view area.
The minimum view magnification is 1/16. (p.44)
appearing in the image view area to life size. (p.44)
the image file.
the image file.
[Tool] menu
Undo This undoes the previous file operation.
Crop This cuts a specified area of an image and deletes
unnecessary portions.
Auto Image Fix This automatically adjusts the brightness, contrast
and color tone. Select [Strong] or [Slight].
Rotate This rotates the image 90° left or right. (p.47)
PENTAX PHOTO
Laboratory
Options This sets various settings for PENTAX PHOTO
This starts PENTAX PHOTO Laboratory 3. RAW
image files displayed in the Main image view window
can be opened in PENTAX PHOTO Laboratory 3.
(p.74)
Browser 3. (p.68)
Page 43

[Help] menu
Help Topics This shows PENTAX PHOTO Browser 3 help
contents. (For Macintosh, select [PENTAX PHOTO
Browser Help].)
Index This shows PENTAX PHOTO Browser 3 help index
search. (This command is not available for
Macintosh.)
What’s This? This shows pop-up tips when an icon or command
button is clicked.
About PENTAX PHOTO
Browser
This shows PENTAX PHOTO Browser 3 version
information. (For Macintosh, select [About PENTAX
PHOTO Browser] on the [PENTAX PHOTO Browser]
menu.)
Tool bar
Frequently used functions are provided as Tool bar buttons. You can
execute these functions easily from the Tool bar.
Remove the check mark next to [Tool Bar] on the [View] menu to hide the
Tool bar.
41
1 2 3 4 5 6 7 8 9 10 11 12
161514
Number Icon (button) Content
1
View Browser
2
Open
3
Save as
18 19 20 21 2217 23
This displays the Browser screen.
This opens the [Open] dialog to select the file to
open. If a check mark is next to [Open in new
window], a new Main image view window opens
and the selected image appears when a file is
selected and [Open] is clicked.
This saves the image being viewed in JPEG, TIFF
(8-bit or 16-bit), BMP, PNG or PICT format. (p.49)
13
Page 44

42
Number Icon (button) Content
4
Print
5
Properties
6
Previous Image
7
Next Image
8
Synchronous Display
9
Slideshow
10
This prints the current image. (p.61)
This shows selected file properties. (p.45)
This displays the previous image when multiple
images are displayed in the Main image view window
or when a folder contains multiple images. This button
cannot be selected if there are no images to view.
This displays the next image when multiple images
are displayed in the Main image view window or
when a folder contains multiple images. This button
cannot be selected if there are no images to view.
Sets whether to synchronize operations with
other Main image view windows.
Selected or checked images appear in order.
(p.58)
This fits the image to the window size. (p.44)
11
12
13
14
15
Fit to Window
Reduce
Enlarge
Life size
Zoom
Rotate View
(90° Left)
This halves the view magnification of the image
appearing in the image view area.
The minimum view magnification is 1/16. (p.44)
This doubles the view magnification of the image
appearing in the image view area.
The maximum view magnification is 4 times. (p.44)
This sets the view magnification of the image
appearing in the image view area to life size (1:1).
(p.44)
The current view magnification appears. You can
also set the view magnification by selecting it from
the pull-down list, or by directly inputting the
magnification. (p.44)
This rotates the image appearing in the image
view area 90° to the left (counterclockwise).
(p.46)
Page 45

Number Icon (button) Content
16
Rotate View
(90° Right)
17
Undo
18
Crop
19
Auto Image Fix
20
Rotate
21
PENTAX PHOTO
Laboratory
22
Options
23
Help Topics
This rotates the image appearing in the image
view area 90° to the right (clockwise). (p.46)
This undoes the previous file operation.
This cuts a specified area of an image and
deletes unnecessary portions.
Click and select or to automatically
adjust the brightness, contrast and color tone.
Select [Strong] or [Slight].
This rotates the image 90° left or right. (p.47)
This starts PENTAX PHOTO Laboratory 3.
Specify the applicable image files within the
Thumbnail pane of PENTAX PHOTO Browser 3.
(p.74)
The PENTAX PHOTO Browser 3 setup screen
appears. This sets various settings for PENTAX
PHOTO Browser 3. (p.68)
This shows PENTAX PHOTO Browser 3 help
contents.
43
Image view area
The image selected in the Thumbnail pane or Checked images pane of
PENTAX PHOTO Browser 3 appears.
Image data pane
The image data appears for the image appearing in the image view area.
(p.24)
Place the cursor over a cell dividing line at the top of the pane and drag it
to resize the cell. (For Macintosh, drag at the applicable position to resize
the cell.)
Page 46

44
Hiding the Tool Bar and Image Data Pane
You can set whether to show or hide the Tool bar and Image data pane in
the Main image view window.
1
Select [Tool Bar] or [Image Data] from the [View] menu in
the Main image view window and uncheck the item.
The Tool bar or Image data pane is hidden.
To display the Tool bar or Image data pane, select [Tool Bar] or [Image Data]
from the [View] menu in the Main image view window and check the item.
Changing the View Magnification
You can change the image view magnification of the image appearing in
the image view area.
1
Select [Fit to Window], [Enlarge], [Reduce] or [Life size] from
the [View] menu in the Main image view window.
Alternatively, click the , , or icon on the Tool bar.
The image view magnification can be adjusted from 1/16 to 4 times.
Page 47

Enlarged view
Reduced view
45
You can also enlarge or reduce the view by directly inputting the numerical
value of the magnification in the View Magnification box on the Tool
bar.
Displaying Image Properties
You can display file data for the image file appearing in the Main image
view window. (p.57)
Page 48

46
Synchronizing Multiple Main Image View Windows
Synchronizes up to four Main image view windows. Synchronizes zoom,
position and frame advance operations.
1
Select [Synchronous Display] from the [View] menu in the
Main image view windows.
Alternatively, click the [Synchronous Display] icon on the
Tool bar or select [Synchronous Display] on the menu
after right-clicking the Image view area.
The zoom, position and frame advance operations for the windows with
[Synchronous Display] selected are synchronized.
•
When multiple Main image view windows are synchronized, the position of an
individual image can be changed by dragging that image while pressing the Alt key.
• If you do not want the same image displayed in multiple Main image view
windows at the same time during frame advance with the Main image view
windows synchronized, use the settings on the [Options] dialog.
Rotating the Image View
Rotates the image view 90° left or right.
1
Select [Rotate View (90° Left)] or [Rotate View (90° Right)]
from the [View] menu in the Main image view window.
Alternatively, click the or icon on the Tool bar.
The image appears rotated.
Page 49

To save the rotated image, use [Rotate] on the [Tool] menu. (p.47)
Saving a Rotated Image
Data of the displayed image is rotated 90° left or right and saved. Rotation
of the image may take time depending on the size of the image.
A warning message appears when closing the Main image view window
without saving the image or when clicking .
1
Select [Rotate (90° Left)] or [Rotate (90° Right)] from
[Rotate] on the [Tool] menu in the Main image view
window.
47
Alternatively, select [Rotate (90° Left)] or [Rotate (90° Right)] from the
Tool bar. (p.43)
2
Specify [Save in], [File name] and [Save as type], and then
click [Save].
The image is rotated and saved.
• When performing lossless rotation of an unprocessed JPEG image, the
[Rotate] dialog opens before the rotated image appears.
• The [Rotate] dialog does not appear for RAW files and processed JPEG
images. To save rotated images, select [Save as] from the [File] menu in the
Main image view window or click the icon on the Tool bar.
Page 50

48
Cropping an Image
You can cut (crop) portions of an image displayed in the Main image view
window.
1
Select [Crop] from the [Tool] menu in the Main image view
window.
Alternatively, click the icon on the Tool bar.
The [Crop] dialog appears.
2
Set the cropping area.
Item Description
Cropping Aspect Ratio Maintain original aspect ratio:
Maintains aspect ratio of
original image.
Specify paper size : Uses paper size setting.
Specify aspect ratio : Sets desired aspect ratio.
Do not specify aspect ratio:
Does not set condition for
Cropping Area Center
*1: The cropping area is set by specifying the values, not by dragging the mouse.
Click [Reset] to return the set values to their initial settings.
*1
Top Left
Bottom Right
Top left coordinates : Sets top left coordinates of
Cropping Area : Sets size of cropping area.
Bottom right coordinates:
Original size : Displays number of pixels of
*1
*1
aspect ratio of cropping area.
: Centers cropping area in
middle of original image.
: Sets cropping area based on
top left coordinates.
: Sets cropping area based on
bottom right coordinates.
cropping area.
Sets bottom right coordinates
of cropping area.
original image.
3
Click [OK].
Page 51

Saving an Image
You can save the displayed image using any of the following file formats.
RAW files can be saved with any of these formats to view the image with
image processing software.
JPEG : JPEG image with image data
TIFF (8-bit) : TIFF image with image data
TIFF (16-bit) : High quality TIFF image with image data
BITMAP : BMP image without image data
PNG : PNG image without image data
PICT : PICT image without image data
1
Select [Save as] from the [File] menu in the Main image
view window or click the icon on the Tool bar.
The [Save as] dialog appears.
If the RAW file is viewed in Simple display or is reduced, a message
appears asking if you wish to return the image to full size. If [No] is
selected, the image is saved as it is displayed. The quality is reduced
compared to that of an image processed to full size.
2
Specify [Save in], [File name] and [Save as type], and then
click [Save].
49
The image is saved.
Page 52

50
Managing Image Files and Folders
Extracting a Full-size JPEG File from a RAW File
A preview JPEG file can only be extracted from PEF and DNG files shot with
q
1
Select an image for JPEG extraction in the Thumbnail
pane or Checked images pane of PENTAX PHOTO
Browser 3.
2
Select [Extract JPEG] from the [Tool] menu.
Alternatively, right-click the image for JPEG extraction
and select [Extract JPEG].
3
Specify the save destination and file name.
• To save the file with the file name of the original file, select [Use original file
• To save the file with a different file name, select [Rename]. In this case,
• When using Windows, the options [Use original file name] and [Rename] are
.
name]. For example, if the original file name is “IMGP0001.pef”, the file name
of the extracted JPEG file will be “IMGP0001.jpg”.
specify [Base file name] (file name prefix), [Number of digits] (number of
digits for number following the base file name) and [Start number] (number
following the base file name). When using [Extract JPEG] for multiple
images, the file name assigned to each image consists of the [Base file
name] and [Start number] in incremental order.
available only when using [Extract JPEG] for multiple images.
Converting a PEF File to a DNG File
DNG (Digital Negative) is a general-purpose, publicly-available RAW file
format designed by Adobe Systems.
1
Select a PEF file to convert to a DNG RAW file in the
Thumbnail pane or Checked images pane of PENTAX
PHOTO Browser 3.
Page 53

2
Select [Save as DNG] from the [Tool] menu.
Alternatively, right-click the PENTAX RAW image to be
converted to a DNG RAW file and select [Save as DNG].
3
Specify the save destination and file name.
• To save the file with the file name of the original file, select [Use original file
name]. For example, if the original file name is “IMGP0001.pef”, the file name
of the converted DNG file will be “IMGP0001.dng”.
• To save the file with a different file name, select [Rename]. In this case,
specify [Base file name] (file name prefix), [Number of digits] (number of
digits for number following the base file name) and [Start number] (number
following the base file name). When using [Save as DNG] for multiple
images, the file name assigned to each image consists of the [Base file
name] and [Start number] in incremental order.
• When using Windows, the options [Use original file name] and [Rename] are
available only when using [Save as DNG] for multiple images.
Moving/Copying Image Files
1
In the Thumbnail pane of the PENTAX PHOTO Browser 3
window, select the thumbnail image to move or copy.
51
2
Select [Cut] or [Copy] from the [Edit] menu.
Alternatively, click the or icon on the Tool bar.
Page 54

52
3
Specify the destination folder for moving or copying in the
Folder tree pane.
4
Select [Paste] from the [Edit] menu.
Alternatively, click the icon on the Tool bar.
The image file is moved or copied to the specified folder.
• You can also move an image by dragging and dropping a thumbnail image
to the destination folder.
To copy, hold down the Ctrl key while you drag and drop the file. (For
Macintosh, hold down the Option key while you drag and drop the file.)
• Use the same procedure to move or copy a folder. In the Folder tree pane,
specify the folder to move or copy. The specified folder is moved or copied
into the destination folder.
Page 55

Deleting Image Files/Folders
1
In the Thumbnail pane of the PENTAX PHOTO Browser 3
window, select the file or folder to delete.
Alternatively, select the folder to delete in the Folder tree
pane.
2
Select [Delete] from the [Edit] menu.
Alternatively, click the icon on the Tool bar.
A delete confirmation screen appears.
53
3
Click [Yes].
The file or folder is deleted.
Changing File/Folder Names
1
In the Thumbnail pane of the PENTAX PHOTO Browser 3
window, select the file or folder to be renamed.
Alternatively, select the folder to be renamed in the Folder
tree pane.
Page 56

54
2
Select [Rename] from the [File] menu.
Alternatively, directly click the file or folder name in the
Thumbnail pane or Folder tree pane.
The file or folder name is ready to be changed.
3
Input the file or folder name.
The image file or folder is renamed.
Renaming All File Names
1
In the Thumbnail pane of the PENTAX PHOTO Browser 3
window, select the thumbnail images to be renamed.
Select [Select All] from the [Edit] menu to select all images in the
Thumbnail pane. However, files not supported by PENTAX PHOTO
Browser 3 and folders cannot be renamed. Images from more than one
folder cannot be selected.
2
Select [Rename All] from the [File] menu.
Alternatively, click the icon on the Tool bar.
The [Rename All] dialog appears.
Page 57

3
Confirm the content, and input information as needed.
Item Description
Base file name Specify name to add to file names. “IMGP” is added by
default.
Number of digits Specify the number of digits to add to file names. 1 to
5 digits can be specified. 4 digits are specified by
default (example: IMGP1234.pef). When files exist in
the folder with the specified base file name, the
number of digits increases if the maximum number of
files is exceeded.
Put base file name last When this option is checked, the file name specified for
[Base file name] comes after sequential file numbering
(example: 0123IMGP.pef). Base file name is added to
the beginning by default.
Start number Sets the start number. When files exist in the folder
with the same specified base file name, the numbering
automatically starts from the number next to the
highest number of the existing file. If there is no file with
the specified base file name, numbering starts at 1.
4
Click [OK].
All files are renamed to the specified name.
55
Creating a New Folder
1
In the Folder tree pane of the PENTAX PHOTO Browser 3
window, select the folder where to create a new folder.
Alternatively, select the Thumbnail pane.
2
Select [Create New Folder] from the [File] menu.
A new folder is created under the specified folder or in the Thumbnail
pane.
Page 58
56
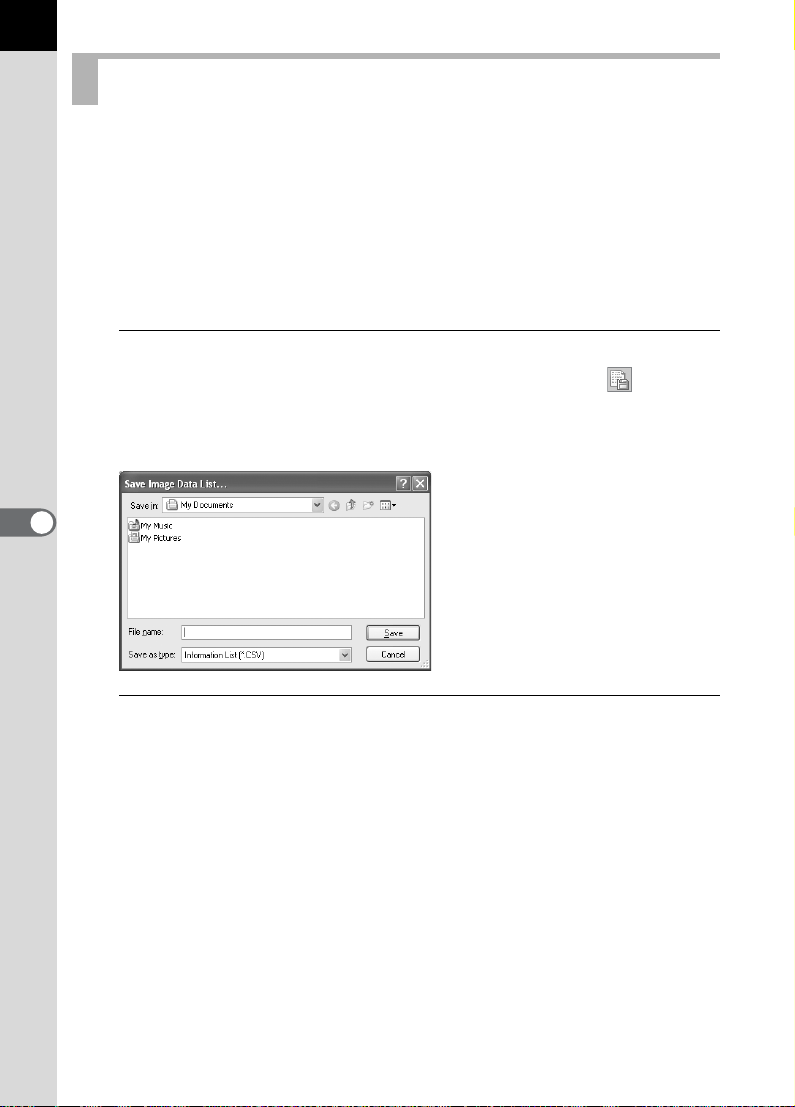
Saving a List of Image Data
• When saving image data from the Thumbnail pane, the image files in the
current folder displayed in the pane can be saved (selectable).
• When saving image data from the Checked images pane, the images in
the active tab displayed in the pane can be saved. You can save the
image data from multiple folders into one CSV format file.
In both cases, you can also save only image data for the selected files.
1
Select [Save Image Data List] from the [Tool] menu in the
PENTAX PHOTO Browser 3 window or click the icon on
the Tool bar.
The [Save Image Data List] dialog appears.
2
Specify the file name and save destination, and then click
[Save].
The image data is saved in CSV format.
Page 59

Displaying Properties of Image Files/Folders
The contents of the [Properties] dialog depends on the version of the operating
system currently running. Refer to Help in the operating system for details on
the [Properties] dialog settings.
1
In the Thumbnail pane of the PENTAX PHOTO Browser 3
window, select the thumbnail image for which properties
are to be shown.
Alternatively, in the Folder tree pane, select the folder for
which properties are to be shown.
2
Select [Properties] from the [File] menu.
The [XXX Properties] ([XXX Info] for Macintosh) dialog appears.
57
3
Confirm the content.
4
Click [OK].
The [Properties] dialog closes.
For Macintosh, click to close the [Info] dialog.
For MacintoshFor Windows
Page 60

58
Continuous Image Playback in a Slideshow
This section explains how to set up and operate the slideshow.
1
Select an image or folder in the PENTAX PHOTO Browser
3 window.
2
Select [Slideshow] from the [View] menu or click the
icon on the Tool bar.
The Slideshow screen and Slideshow control panel open.
Slideshow screen
Slideshow control panel
1234567 8
Page 61

Number Icon (button) Content
1 First Image Returns to the first image. When this is pressed
during a slideshow, the first image appears and
the slideshow pauses.
2 Rewind Rewinds slideshow. When this is pressed during
a slideshow, the next image appears and the
slideshow pauses.
3 Previous Image Slideshow is played in reverse order.
4 Pause Pauses slideshow.
5 Play Plays slideshow.
6 Fast Forward Fast-forwards slideshow. When fast-forwarding
during a slideshow, the next image appears and
the slideshow pauses.
7 Last Image Shows last image. You can use this during a
slideshow. The last image appears and the
slideshow pauses.
8 Stop Stops slideshow.
3
Press the [Play] button.
The slideshow starts.
Slideshow Settings
59
When viewing the slideshow, select between a single window and a dual
window. Additionally, view the slideshow in single full screen or dual full
screen mode (only if the computer is compatible with dual screen display).
Slideshow display settings and the image data displayed for each image
in the slideshow can be modified from the [Browser] tab in the [Options]
dialog. You can choose whether to display the image data during the
slideshow by checking the radio button [Yes] or [No] for [Display Image
Data During Slideshow]. (p.70)
The order in which frames are advanced during the slideshow is
determined by the current [Sort by] setting in the [View] menu.
Page 62

60
Select from one of the four display patterns below.
Single window Single full screen
Slideshow
A
Dual window Dual full screen
Primary
A
Secondary
B
A
BA
Image display order for dual window
When using dual window or dual full screen in PENTAX PHOTO Browser
3 slideshow, you can select the display method for images to be displayed
on the primary and secondary monitors.
Advance in order
Primary
(A)
Secondary
(B)
n n+1
n+1
n+2
n+2 n+3
n+3 n+4
Advance alternate
Primary
(A)
Secondary
(B)
n
n-1
n
n+1
n+2 n+2
n+1 n+3
Page 63

Advance two frames
61
Primary
(A)
Secondary
(B)
Fix image to primary monitor
Primary
(A)
Secondary
(B)
nn+6
n+1
n+1
n+2 n+4
n+3 n+5
nnnn
n+2 n+3 n+4
n+7
Printing an Image
When printing image files, select between [Print Index] and [Print photo].
Print Index : Prints thumbnails and their image data.
Print photo : Prints a high-quality print of an image. You can print multiple images
on one page or print one large image on multiple pages using
partition printing.
Using Print Index
1
In the Thumbnail pane of the PENTAX PHOTO Browser 3
window, select the images to print.
2
Select [Print] from the [File] menu.
Alternatively, click the icon on the Tool bar.
The [Print] dialog appears.
Page 64

62
3
Select the [Print Index] tab.
4
Make the layout and caption settings.
Item Description
Preview This displays a preview using the specified settings.
Layout Select from three layout patterns.
Number of images per
page (W × H)
Print borders Selects whether to display print borders for each
Caption The caption settings are explained below. The
Position Selects the image caption position from the list.
Contents Specifies the data that may be printed from the list.
Font Selects a font from the list. The default setting is the
Size Selects a font size from the list.
Information labels Sets whether to print information label.
Printer The name of the printer to be used appears here.
From the list, specifies the number of images to print
on one page.
image.
contents that appear depend on the selected layout.
standard system font.
Page 65

• The image size is calculated automatically from the margins, number of
images, and caption size.
• Click the [Page Setup] button to make the page settings. (p.65)
• Click the [Printer Settings] button to make the printer settings. (p.66)
5
Click [OK].
Printing starts.
Using Print Photo
1
In the Thumbnail pane of the PENTAX PHOTO Browser 3
window, select the images to print.
2
Select [Print] from the [File] menu.
Alternatively, click the icon on the Tool bar.
The [Print] dialog appears.
3
Select the [Print photo] tab.
63
Page 66

64
4
Make the layout and caption settings.
Item Description
Preview This displays a preview using the specified settings.
Layout Select from three layout patterns.
Layout 1 : Normal printing
Layout 2 : Layout printing
Layout 3 : Partition printing
(printing one image on multiple pages)
Images per page From the list, selects the number of images to print on
one page.
Multi-page printing Selects the number of partitions per page from the list.
Allocating images Selects processing options from the list when printing
Position Selects the position of the image in the printing area
Space (Vertical)/
Space (Horizontal)
Rotate to fit printing area This setting uses the printing area most effectively.
Fit to paper Sets the printer to print using the maximum printing
Print Shooting Date and
Time
Printer The name of the printer to be used appears here.
area and image size differ.
No cropping : The image does not exceed the printing
area.
Cropping : The entire printing area is used and any
part exceeding the printing area is
deleted.
from the list.
Sets the vertical and horizontal space in mm or inches.
Check this to allow the image to be rotated 90° as
needed to fit the printing area and then printed.
area.
This can be set when [Layout 1] (Normal printing) or
[Layout 3] (Partition printing) is selected.
Sets the Shooting Date/TIme print settings.
Position : Selects position to print Shooting Date/
Time.
Font : Selects a font from the list. The default
setting is the standard system font.
Print Time : Select from No (Default) or Yes
(HH:MM:SS, 24-hour format only).
Separator : Sets dividers in text.
Format : Sets date format.
Text color : Sets the font color.
Size : Selects a font size from the list.
*1
*1: When [Layout 1] (Normal printing) or [Layout 3] (Partition printing) is selected,
the [Fit to paper] checkbox is displayed. Check [Fit to paper] to ignore margin
settings and print images to the maximum print area of the printer.
Page 67

• The image size is calculated automatically from the margins, spacing, and
number of images.
• The printing orientation of the date/time depends on the image data (for
Windows only). The printing position is in a relative position to the image
data.
• Click the [Page Setup] button to select the page settings. (p.65)
• Click the [Printer Settings] button to select the printer settings. (p.66)
5
Click [OK].
Printing starts.
Using Page Setup
Use Page Setup to set printing options such as margins, headers/footers,
and number of copies.
1
Select [Page Setup] from the [File] menu in the PENTAX
PHOTO Browser 3 window or click [Page Setup] on the
[Print] dialog.
The [Page Setup] dialog appears.
65
Page 68

66
2
Make the settings.
Item Description
Margins Left, Right,
Upper,
Lower
Header/
Footer
Number of copies Specifies the number of copies to print.
Header/
Footer
3
Position Sets header/footer position. Select from Do Not Print
Font Selects a font from the list. The default setting is the
Text Enter text to print for the header/footer.
Insert Page
Number
Insert No. of
Pages
Size Selects a font size from the list. The default setting is
Click [OK].
The default setting is 25 mm (1 inch) for paper larger
than A4, and 10 mm (0.5 inches) for smaller.
The default setting is 15 mm from the top and bottom
edges.
(Default), Align left, Align center, and Align right.
standard system font.
When this is clicked, [# Page number] is inserted at the
cursor location in the Text field.
When this is clicked, [# Number of pages] is inserted at
the cursor location in the Text field.
10 point.
The page setup information is set.
Using Printer Settings
Check the printer settings and change the settings as needed.
Refer to the printer user’s manual for details on printer settings.
This section describes the printer settings for Windows. For Macintosh, the
printer setting screen is dependent on the OS.
Page 69

1
Click [Printer Settings] on the [Print] or [Page Setup]
dialog.
The [Print Setup] dialog appears.
2
Make the settings.
Item Description
Printer Selects the printer to use from the [Name] list.
Paper Size Selects paper size.
Source Selects paper feeding method.
Orientation Sets printing direction. Select [Portrait] or [Landscape].
Click [Network] to select a printer on the network.
Click [Properties] to make advanced printer settings.
67
3
Click [OK].
The printer setup information is set.
Page 70

68
Changing the PENTAX PHOTO Browser 3 Settings
Here, you can set the PENTAX PHOTO Browser 3 settings, such as the
program launch or exit settings, the initial image view size, thumbnail
caption viewing, and RAW file view format.
1
Select [Options] from the [Tool] menu in the PENTAX
PHOTO Browser 3 window.
Alternatively, click the icon on the Tool bar.
When the [Options] dialog appears, select the tab with the setting you
want to change.
Page 71

2
After making your selections, click [OK].
The options are set and the [Options] dialog closes.
Click [Reset] to return all options to default settings.
When [Reset] is clicked, all tab settings including the settings of the currently
open tab are returned to default settings.
[Program Launch/Exit] tab settings
Change the following settings for PENTAX PHOTO Browser 3 in the
[Program Launch/Exit] tab.
Item Description
Folder at Startup From the following, select the folder to open when
starting the program.
Last folder used:
This opens the folder that was last used in
PENTAX PHOTO Browser 3.
Desktop: This opens the desktop.
Always use this folder:
Click [Browse] to specify a folder.
Status at Startup Sets PENTAX PHOTO Browser 3 status at startup.
Status at last exit:
When the next session of PENTAX PHOTO
Browser 3 is started, the settings from the
previous session are used.
Default : The default screen appears.
Show Splash Screen at
Startup
On Exit Sets operation when exiting PENTAX PHOTO
Sets splash screen when PENTAX PHOTO Browser 3
starts.
Yes : Splash screen is shown.
No : Splash screen is not shown.
Browser 3.
Exit PENTAX PHOTO Browser only:
Exits PENTAX PHOTO Browser 3 only even
if PENTAX PHOTO Laboratory 3 is also
open.
Exit PENTAX PHOTO Laboratory at same time:
Exits PENTAX PHOTO Laboratory 3 at the
same time as PENTAX PHOTO Browser 3
without displaying a confirmation message.
69
Page 72

70
[Browser] tab settings
Sets the Browser screen display and slideshow settings in the [Browser]
tab.
Item Description
Thumbnail Date/Time Sets the thumbnail date and time displayed in the
Thumbnail pane and Checked images pane.
Date/Time file was last modified:
Displays the date and time the file was last modified
(after the shooting date).
Date Exif information modified (Shooting date):
Displays the date and time the file was created
(shooting date).
Use Image
Orientation
Information
Display Orientation of
Images
Indicate Changes in
Image Data During
Frame Advance
Color Coding of
Checked Image
Thumbnail Border
Slideshow Settings Sets the pattern when viewing slideshows.
Sets whether to use information indicating image
orientation in the image file on the Browser screen and
Main image view window display.
Yes : Uses image orientation information.
No : Does not use image orientation information. When [No]
is selected, the thumbnail display does not change
even if [Rotate Display (90° Left)] or [Rotate Display
(90° Right)] is selected from [Rotate].
Sets whether to display an icon indicating the image
display orientation on the Browser screen and Main image
view window.
Yes : Image display orientation is indicated with an icon.
No : Image display orientation is not indicated with an
icon.
Sets whether to indicate changes in image data in red from
one file to the next during frame advance in the Main
image view window.
Yes : Changes in image data from one file to the next are
indicated in red.
No : Changes in image data from one file to the next are
not indicated in red.
Sets the color of the thumbnail border in the Checked
images pane according to the image file location (path).
Select from seven colors.
Single window:
View slideshow in a single window.
Dual window:
View slideshow in two windows (primary and
secondary).
Single full screen:
View slideshow full-screen on a single monitor.
Dual full screen:
View slideshow full-screen on two monitors.
Page 73

Item Description
Frame Advance
During Dual View
Interval Sets interval for frame advance during slideshow.
Loop view Sets the repeat view setting.
Display Image Data
During Slideshow
Sets the refresh method when viewing two images
simultaneously (p.60).
Advance in order:
Frames advance in order. The secondary window
shows one image ahead of the primary window.
Advance alternate:
At each frame advance interval, images are shown
alternately on the primary and secondary windows.
With the first image starting at zero, even number
images are shown on the primary window and odd
number images are shown on the secondary
window.
Advance two frames:
Frames advance in twos.
Fix image to primary monitor:
The primary window shows a fixed image. The
secondary window shows images, which advance in
order.
Second(s):
Sets interval (in seconds) for frame advance.
No : When all of the images have been shown, the
slideshow ends.
Yes : The slideshow repeats until ended.
Sets whether to display image data during slideshow. Also
selects information to display.
Yes : Displays image data during slideshow.
No : Does not display image data during slideshow.
71
[Main Image Window] tab settings
Changes the Main image view window settings in the [Main Image
Window] tab.
Item Description
Image Data
Pane Height
Sets the height of the Image data pane that appears when
the Main image view window opens.
Last size specified:
Sets Image data pane height to be the same as the
previous height when the Main image view window
opens.
Auto : The height is automatically adjusted.
Fixed: The number of lines can be specified.
Page 74

72
Item Description
Window Size for
Main Image
Display File Path in
Title Bar
Display Number of
Images in Title Bar
Showing Multiple
Images
Main Image View for
RAW File
View Attributes to
Maintain
Sets the window size of the Main image view window.
Last size specified:
Opens the Main image view window to the last
window size specified.
Default : Opens the window to the default size.
Set size : Specifies the size of the Main image view
window in pixels.
Sets whether to display the file path in the title bar of the
Main image view window.
Yes : Displays the file path in the title bar.
No : Does not display the file path in the title bar.
Sets whether to display “Display order/Total number of
images” when displaying multiple images in one Main
image view window.
Yes : Displays the display order and total number of
images in the title bar.
No : Does not display the display order and total
number of images in the title bar.
When multiple images are selected in the Thumbnail pane,
select the viewing method in the Main image view window.
Single window:
Images appear in one Main image view window.
Click the icon on the Main image view
window Tool bar to switch the image view.
Separate window:
Images appear in multiple Main image view
windows.
Sets view when opening a new RAW file.
Simple display:
The compressed image data in the RAW file
appears. The image data appears more quickly,
but there is quality loss due to the high
compression rate. Therefore, this function is not
recommended for checking image details.
Auto RAW display:
The actual RAW file appears. (Full Auto
Processing)
Size (Ratio):
Select the processing ratio for Auto RAW
display from [1:4], [1:2], or [Life size]. When
emphasizing speed, select [1:4]. When
emphasizing quality, select [Life size].
Selects view attributes to maintain during frame advance.
Multiple attributes may be selected.
Zoom : View magnification is maintained.
Position : Position is maintained.
Direction: Direction is maintained.
Page 75

Item Description
Synchronous Display
Frame Advance
Sets whether to show all images for each synchronized
Main image view window when advancing frames during
synchronous display of multiple Main image view
windows.
In order : Shows all images.
Skip : Skips images displayed in other synchronous
display windows.
[Other] tab settings
Change the display alert and color management settings in the [Other] tab.
Item Description
Display Alerts Sets whether to display alerts.
Working Color
Management
Color Management
During Printing
Units mm : Sets units of length displayed in dialogs to
Yes : Displays alerts. (The “In the future, do not show this
message.” check box is not checked for all alerts.)
No : Does not display alerts. (The “In the future, do not show this
message” check box is checked for all alerts.)
Sets color management method during image display.
Normal Display:
Displays the image with the color management set
for the image.
Disable Color Management:
Color management is disabled.
Simulated wide gamut display:
Expressive range of Adobe RGB is compressed to
sRGB expressive range and displayed. As the sRGB
gamut is narrower than the Adobe RGB gamut, color
reproduction is not completely accurate. However,
you can confirm colors in the Adobe RGB gamut that
cannot be expressed by the sRGB gamut.
Sets profile to use when printing.
Use printer settings:
Uses printer settings for profile when printing.
Select color profile:
Selects profile to use when printing from the [Profile]
drop-down list.
Disable Color Management:
Disables color management and does not use a
profile when printing.
millimeters (mm).
in. : Sets units of length displayed in dialogs to inches.
73
Page 76

74
PENTAX PHOTO Laboratory 3
PENTAX PHOTO Laboratory 3 supports a number of image processing
functions for use with PEF and DNG files, including data conversion, color
adjustment, and image compensation. The processing of these files
enables images to be viewed on non PEF and DNG compatible
commercially-available image viewing and editing software.
This section describes opening and closing PENTAX PHOTO Laboratory 3
and viewing the PENTAX PHOTO Laboratory 3 window, and explains its
functions.
You can only perform image processing operations for DNG files taken with
PENTAX digital cameras and DNG files converted with PENTAX PHOTO
Browser 3.
Opening PENTAX PHOTO Laboratory 3
For Windows
1
Select the start menu on the desktop.
2
Select [All Programs] - [PENTAX
Digital Camera Utility] - [PENTAX
PHOTO Laboratory].
PENTAX PHOTO Laboratory 3 is
opened, and the PENTAX PHOTO
Laboratory 3 window appears.
Closing PENTAX PHOTO Laboratory 3
Select [Exit] from the [File] menu on the PENTAX PHOTO Laboratory 3 window.
PENTAX PHOTO Laboratory 3 can also be started from within PENTAX
PHOTO Browser 3. (p.30)
Page 77

For Macintosh
1
Double-click the [PENTAX Digital Camera Utility] folder in
[Applications] on the hard disk.
2
Double-click the [PENTAX
PHOTO Laboratory] program
icon.
PENTAX PHOTO Laboratory 3 is
opened, and the PENTAX PHOTO
Laboratory 3 window appears.
Closing PENTAX PHOTO Laboratory 3
Select [Quit PENTAX PHOTO Laboratory] in [PENTAX PHOTO Laboratory]
on the desktop menu bar.
PENTAX PHOTO Laboratory 3 can also be started from within PENTAX
PHOTO Browser 3. (p.30)
75
Page 78

76
About the PENTAX PHOTO Laboratory 3 Window
This section explains the PENTAX PHOTO Laboratory 3 window layout,
names, and functions.
PENTAX PHOTO Laboratory 3 is made up of seven panels.
The control panels are independent and can be repositioned anywhere on
the screen. Select [Arrange Windows] from the [View] menu to align the
panels.
Six panels, not including the Main panel, can be hidden or shown.
Preview panel
Tone panel
Main panel
Menu bar
White balance panel
Other settings panel
Noise reduction panel
Lens aberration correction panel
Tool bar
• When the processing mode is set to (Full Auto Processing), the White
Balance panel, Tone panel, Other Settings panel, Noise Reduction panel,
and Lens aberration correction panel are not displayed (p.80). In addition, the
and buttons in the Preview panel are not available.
• When a RAW file is not selected, the preview image does not appear. (p.81)
Page 79

Main panel
This executes functions or sets various settings of PENTAX PHOTO
Laboratory 3.
For Macintosh, the Main panel only contains the Tool bar. The Menu bar
appears at the top of the desktop.
Preview panel
You can preview adjustments made for a selected RAW file in the panels.
You can also enlarge part of the RAW file.
View adjustments in real time or by clicking the [Refresh] button. (p.81)
White balance panel
Selects white balance or sets color temperature. Adjust the image color
tone, such as when the image appears bluish or yellowish. (p.89)
Tone panel
Displays tone curve and histogram information of displayed image. (p.90)
Adjusts the image tone using the tone curve.
Other settings panel
Adjusts characteristics such as sensitivity, contrast, color depth, and
edges. (p.91)
Noise reduction panel
Removes and reduces random noise and spurious color signals peculiar
to digital cameras (color moire). (p.91)
77
Lens aberration correction panel
Corrects marginal lumination, distortion and lateral chromatic aberration
due to lens aberration. (p.92)
Menu bar
This executes functions or sets various settings of PENTAX PHOTO
Laboratory 3.
[File] menu
Open This selects the image file for processing in PENTAX
PHOTO Laboratory 3. Only applies when the
software is started as standalone. This cannot be
used when PENTAX PHOTO Laboratory 3 is started
within the PENTAX PHOTO Browser 3 window.
(p.83)
Page 80

78
[File] menu
Save This performs RAW file data processing and saves it
with the specified format. The available save formats
are JPEG (5 compression rates), TIFF-8, and TIFF-
16. Use [Save Mode] on the [Tool] menu to specify
the save format. (p.93)
Recall Adjustment Use this function to load previously saved settings for
the various panels. (p.95)
Save Adjustment Use this function to save the settings currently used
in the various panels. (p.94)
Print The [Print] dialog appears with various print settings.
Exit This closes PENTAX PHOTO Laboratory 3.
(For Macintosh, select [Quit PENTAX PHOTO
Laboratory] on the [PENTAX PHOTO Laboratory]
menu.)
[View] menu
Full Auto Processing Each RAW file is processed according to the settings
applied with shooting. All panels, except the Preview
panel, are hidden. (p.87)
Custom Processing
First Image When multiple images are selected, the preview of
Previous Image When multiple images are selected, the preview of
Next Image When multiple images are selected, the preview of
Last Image When multiple images are selected, the preview of
Refresh Preview When real-time preview is not enabled, the preview is
Preview This shows or hides the Preview panel.
White Balance This shows or hides the White balance panel.
Tone This shows or hides the Tone panel.
Other Settings This shows or hides the Other settings panel.
Noise Reduction This shows or hides the Noise reduction panel.
Lens aberration correction This shows or hides the Lens aberration correction
Arrange Windows This arranges the displayed panels.
This performs processing using the processing
condition settings specified by the user. The
processing conditions are set using the White balance
panel, Tone panel, Other settings panel, Lens
aberration correction panel, and Noise Reduction
panel. (p.88)
the first image in order of registration appears.
one image ahead in order of registration appears.
one image back in order of registration appears.
the last image in order of registration appears.
refreshed using the current settings.
panel.
Page 81

[Tool] menu
Undo When in Custom Processing mode, use this function
to cancel the previous operation. You can undo up to
five operations.
Redo When in Custom Processing mode, use this function
to redo an operation that was cancelled with the
[Undo] button.
Image Tone Select a type of photofinishing. In Custom Processing
mode, the [Natural] and [Bright] options are available.
This function is not available in Full Auto Processing
mode or when working with RAW images captured
with the w.
Save Mode This sets the quality when saving processed images.
Save images in JPEG format with one of five different
compression rates or in TIFF format with one of two
bit types. The default setting is JPEG (Highest
Quality).
Rotate Rotates the Preview panel view 90° left or right. The
rotated image is saved without changing the RAW
file.
Crop/Resize The dialog for cropping and resizing the image
appears.
Options This sets various settings for PENTAX PHOTO
Laboratory 3. (p.102)
79
[Help] menu
Help Topics This shows PENTAX PHOTO Laboratory 3 help
contents. (For Macintosh, select [PENTAX PHOTO
Laboratory Help].)
Index This shows PENTAX PHOTO Laboratory 3 help
index search. (This command is not available for
Macintosh.)
What’s This? This shows pop-up tips.
About PENTAX PHOTO
Laboratory
This shows PENTAX PHOTO Laboratory 3 version
information. (For Macintosh, select [About PENTAX
PHOTO Laboratory] on the [PENTAX PHOTO
Laboratory] menu.)
Page 82

80
Tool Bar
This executes functions or sets various settings of PENTAX PHOTO
Laboratory 3.
1 2 3 4 5 6 7 8 9 10 11 12
Number Icon (button) Content
1
Open
2
Save
3
Full Auto Processing
Custom Processing
4
Recall Adjustment
5
Save Adjustment
6
Undo
This selects the image file for processing in
PENTAX PHOTO Laboratory 3. Only applies
when the software is started as standalone. This
cannot be used when PENTAX PHOTO
Laboratory 3 is started within the PENTAX
PHOTO Browser 3 window. (p.83)
This performs RAW file processing and saves it
with the specified save mode and image size.
(p.93)
This appears when Full Auto Processing is set.
Performs processing using the processing
conditions set in the RAW file.
Click to select or from the pull-down menu.
This is displayed when Custom Processing is set.
This performs processing using the processing
condition settings specified by the user. The
processing conditions are set using the White
balance panel, Tone panel, Other settings panel,
Lens aberration correction panel and Noise
Reduction panel. (p.88)
When in Custom Processing mode, this recalls a
saved adjustment file. (p.95)
This saves the processing conditions set in
Custom Processing mode as an adjustment file.
(p.94)
When in Custom Processing mode, use this
function to cancel the previous operation. You
can undo up to five operations.
Page 83

Number Icon (button) Content
7
Redo
8
Image Tone
9
Save Mode
10
Rotate
11
Options
12
Help Topics
When in Custom Processing mode, use this
function to redo an operation that was cancelled
with the [Undo] button.
This displays the current Image tone. You can
choose [Natural] or [Bright] by clicking in
Custom Processing mode. This function is not
available in Full Auto Processing mode or when
working with RAW images captured with the
w. (p.87)
This displays the current Save mode. Click to
select the save format for the processed image
file. (p.93)
This rotates the Preview panel view 90° left or
right. RAW files are processed according to the
selected direction.
This is used to change the PENTAX PHOTO
Laboratory 3 settings. (p.102)
This shows PENTAX PHOTO Laboratory 3 help
contents.
81
Preview Panel
This shows a preview of the RAW file.
5 6 7 8 9
1
2
3
4
Page 84

82
Number Icon (button) Content
1
Rotate/Shift
2
Crop/Resize
3
Enlarge Area
4
Refresh
5 Shows the file name of the image currently
6
First Image
7
Previous Image
8
Next Image
9
Last Image
Rotates the image based on the baseline or shifts
it in a vertical or horizontal direction.
Crops portions of an image and changes the
image output size.
When this is turned on, a red frame appears in the
preview area. The Enlarge area window appears
and the magnification can be selected.
Click this to refresh the preview using the current
settings when [Refresh Preview] becomes the
[Refresh] button on the Options settings of
PENTAX PHOTO Laboratory 3.
displayed in the Preview panel. When multiple
images are selected, select the image to display
from the list.
When multiple images are selected, the preview
of the first image in order of registration appears.
When multiple images are selected, the preview
of one image ahead in order of registration
appears.
When multiple images are selected, the preview
of one image back in order of registration
appears.
When multiple images are selected, the preview
of the last image in order of registration appears.
Page 85

Selecting a RAW File to Process
1
Select a RAW file in the PENTAX PHOTO Browser 3 window.
2
Select [PENTAX PHOTO Laboratory] on the [Tool] menu of
PENTAX PHOTO Browser 3 or click the icon.
A RAW file appears in the Preview panel of the PENTAX PHOTO
Laboratory 3 window.
83
Select multiple image files to open multiple images at the same time.
Click the , , , or button on the Tool bar to preview the desired
image.
Page 86

84
• To select multiple image files, hold down the Ctrl key and click on thumbnail
images in the Thumbnail pane or the Checked images pane (For Macintosh,
hold down the command key and click on image files). Selected thumbnail
images are indicated by a blue border.
• When PENTAX PHOTO Laboratory 3 is launched with the Checked images
pane selected but no thumbnails in the active group specified (none of the
thumbnails are displayed with a blue border), all RAW images in the active
group will be opened in PENTAX PHOTO Laboratory 3.
• When a file selected in PENTAX PHOTO Browser is opened and edited with
PENTAX PHOTO Laboratory and another file is selected in PENTAX
PHOTO Browser, the “The image has been modified. Do you want to save
changes?” dialog is displayed.
Click [Cancel] to retain changes made with PENTAX PHOTO Laboratory and
select another image in PENTAXPHOTO Browser.
Select the “In the future, do not show this message” checkbox and click
[Cancel]. The confirmation dialog will no longer be displayed. Changes made
in PENTAX PHOTO Laboratory will be retained and operations in PENTAX
PHOTO Browser will be enabled.
Select [No] in “Display Alerts” of the “Options” dialog in PENTAX PHOTO
Laboratory and select [OK]. Then, select [Yes] in “Display Alerts” and click
[OK] to turn on the dialog again.
Page 87

Opening a RAW File in PENTAX PHOTO Laboratory 3
1
Click the icon in the PENTAX PHOTO Laboratory 3
window.
The [Open] dialog appears.
2
Select RAW files to display and click the [Open] button.
Select images with holding down the Ctrl key (Windows) or command key
(Macintosh) in the [Open] dialog to open multiple files simultaneously.
A RAW file appears in the Preview panel of the PENTAX PHOTO
Laboratory 3 window.
85
Rotate/Shift Settings
1
Click the icon in the PENTAX PHOTO Laboratory 3
window.
The Rotate/Shift panel appears.
2
Check the [Apply] check box and adjust the parameters to
rotate or shift the image.
When [Real time] is selected for [Refresh Preview] in the [Options]
dialog, the changes to the parameters are immediately applied to the
preview. When [Refresh button] is selected for [Refresh Preview], click
the [Refresh] button on the Preview panel or select [Refresh Preview] on
the [View] menu.
Page 88

86
Item Description
Rotate Degrees : Adjusts the angle of rotation.
Baseline : Rotates the image until the line you
Shift Vertical shift : Shifts the image vertically.
Horizontal shift : Shifts the image horizontally.
Lens angle of view : Necessary information for shifting the
Crop/Resize Settings
1
Select [Crop/Resize] from the [Tool] menu.
Alternatively, click the icon on the Preview panel.
2
Set the cropping area and image output size on the Crop/
Resize panel.
Click [Reset] to return the set values to their initial settings.
Item Description
Cropping Aspect
Ratio
Cropping Area Center : Centers cropping area in middle of original image.
Maintain original aspect ratio:
Specify paper size:
Specify aspect ratio:
Do not specify aspect ratio:
Top Left: Sets cropping area based on top left coordinates.
Bottom Right: Sets cropping area based on bottom right
Top left coordinates:
Cropping size:Sets size of cropping area.
Bottom right coordinates:
Original size: Displays number of pixels of original image.
marked on the preview image is vertical
or horizontal.
image. This is accurately set based on
the image file information by default;
however, this can be changed to alter
the vertical-horizontal shift ratio.
Maintains aspect ratio of original image.
Uses paper size setting.
Specifies desired aspect ratio.
Does not set condition for aspect ratio of
cropping area.
coordinates.
Sets top left coordinates of cropping area.
Sets bottom right coordinates of cropping
area.
Page 89

Item Description
Image Size Do not resize:
Specify image size:
Specify resolution:
3
Click [OK].
The image is cropped.
The cropping area remains on the image in the preview panel, and the
icon is selected. After the image is processed, the cropping area is
saved with the specified pixels.
To cancel cropping, click the icon again to undo the cropping area.
Select this to not change the image output size.
Select this to specify the number of pixels (by width
and height) for the image output size. Enter the
number of horizontal and vertical pixels in [W] and
[H] for [Specify image size] on the right side.
Select this to specify the resolution (in dpi) for the
image output size. Enter the resolution (dpi) and
horizontal and vertical size (in mm or inches) in
[Specify resolution] on the right side of [Specify
image size]. When [Specify paper size] is specified
in [Cropping Aspect Ratio] for [Crop/Resize], select
the paper size specified as the output size.
87
Easily Modifying RAW Files
In Custom Processing mode, simple image processing suited to your
shooting intent is possible with selection of an Image tone with PENTAX
PHOTO Laboratory 3.
You can select from the following two Image tones.
Natural Elaborates images with natural colors.
Bright Elaborates sharp, bright images.
• When in Full Auto Processing mode, RAW files are processed using the
Image tone selected at the time of shooting. This setting cannot be changed
in PENTAX PHOTO Laboratory 3.
• RAW files shot with w cannot be processed using the Image tone in
PENTAX PHOTO Laboratory 3.
Page 90

88
Setting RAW File Processing Conditions
Set individual processing conditions to create unique image modifications.
1
Select [Custom Processing] from the [View] menu, or click
on the icon on the Tool bar and then click
(Custom Processing) on the drop-down list.
The Main panel, Preview panel, White balance panel, Tone panel, Other
settings panel, Lens aberration correction panel, and Noise Reduction
panel appear.
• To close the White balance panel, Tone panel, Other settings panel, Lens
aberration correction panel, or Noise Reduction panel, select [Full Auto
Processing] from the [View] menu, or click on the icon on the Tool bar
and then click (Full Auto Processing) on the drop-down list. The image is
processed using the Image tone set at the time of shooting, and the settings
cannot be changed in PENTAX PHOTO Laboratory 3.
• When multiple RAW files are selected, the same processing conditions are
applied to all selected files. Use the Queue list to set different processing
conditions for each file and to process all the files at once. (p.94, p.105)
Page 91

2
Enter settings in each setting panel.
The settings are reflected in the Preview panel. Settings can be applied in
one of two methods, determined by the setting in the [Options] dialog.
(p.102)
• Reflect the settings immediately in real time.
Reflect the settings when clicking the icon on the Preview panel.
•
Setting the White balance
Item Description
White
Balance
Settings
Fine tune
Select from the following:
Camera setting:
Apply the white balance setting used on your camera.
Override:
Select the white balance to apply from [Daylight], [Shade], [Cloudy],
[Daylight fluorescent], [Neutral white fluorescent], [Cool white
fluorescent], [Tungsten lamp], or [Flash].
Gray point setting:
Select the point in the preview image to turn gray. Specify using
the pointer for the most appropriate white balance setting. Select
from [1 point], [3 points], or [5 points]. When shooting a gray card
to set the Gray point setting, a more accurate white balance may
be achieved. Click [Reset] to delete the selected gray points.
Set color temperature:
The white balance is set according to the color temperature setting.
Slide the bar to set the color temperature or select the value from
the list. Select from between 2500K to 10000K (in Kelvin).
Use the slide bars to adjust the white balance of Amber and Blue,
and Magenta and Green to your liking. (Set up to seven steps for all
directions of colors.) Adjust White Balance mode (Camera setting,
each Override option, Gray point setting, Set color temperature) for
white balance settings for each image.
89
Page 92

90
Setting the Tone curve/Histogram
Item Description
Tone curve Adjusts the tone curve to make precise adjustments to the
density and contrast. Change the tone curve using the
pointer. Move the curve up to brighten and move the
curve down to darken the image.
Click a point on the tone curve to fix the curve at that
point. A black dot appears. The black dot may be dragged
and moved. Right-click to erase the black dot. (For
Macintosh, hold down the control key while you click the
black dot.)
Histogram Brightness shows the distribution of luminosity when
combining RGB, R (Red), G (Green) and B (Blue).
Show Bright Portions/
Show Dark Portions
Reset Deletes the tone curve settings, and returns to a straight
Highlight Adjustment Adjusts the highlight areas. Place priority either on color
When all [Show Bright Portions] check boxes are
selected, the bright portions of the image are shown in
flashing gray.
When all [Show Dark Portions] check boxes are selected,
the dark portions of the image are shown in flashing white.
You can check bright portions with the flashing
complementary color for each color, and the dark portions
with the flashing of each color.
line.
or brightness and on saturation or hue, and use the
[Highlight compensation] slider to compensate for bright
portions.
Page 93

Setting the Sensitivity/Contrast/Saturation/Sharpness
Set these using the Other settings panel.
Item Description
Sensitivity Adjusts the sensitivity.
+ : The image becomes brighter.
– : The image becomes darker.
Contrast Adjusts the contrast between light and shadow.
+ : Increases contrast between light and shadow.
– : Decreases contrast between light and shadow.
Saturation Adjusts the strength of the colors.
+ : The colors become stronger.
– : The colors become weaker.
Sharpness Adjusts the sharpness of the edges.
+ : Image contour is enhanced.
– : Image contour is softened.
91
Setting the Noise Reduction
Set using the Noise reduction panel.
Item Description
Random noise
reduction
Spurious color
signal reduction
Reduces random noise (especially electrical noise visible in
dark areas).
Each pixel in a single-chip image sensor, such as a CCD or
CMOS, represents red, green or blue, and when photographing
a subject adjacent to clear lines or fine patterns, these pixels
may appear to generate colors not in the original image
(spurious color signals). This function reduces spurious color
signals.
Page 94

92
Setting the Lens Aberration Correction
Set using the Lens aberration correction panel.
[Marginal lumination compensation] tab
Adjusts marginal lumination of the image.
Item Description
Lens angle of view Sets the viewing angle of the lens used when shooting.
Slide to the left to make the marginal lumination linear at
the center portion of the lens, and slide to the right to
correct the outer portions of the lens.
Compensation The slider sets the compensation level. Set the
compensation level between –50 and +120. Slide
towards – for darker and + for brighter compensation.
[Distortion Correction] tab
Corrects distortions (lens aberration that photographs straight lines as
curved lines).
Item Description
Correction balance The slider adjusts the distortion correction level between
the center and margins of the image. (Slide to the right to
widen the range.)
Compensation The slider sets the compensation level.
[Lateral Chromatic Aberration Correction] tab
Corrects lateral chromatic aberration in which there is a difference in the
image magnification and image size due to different color wavelengths at
the image margins.
Item Description
Red compensation The slider adjusts the magnification of red light.
Blue compensation The slider adjusts the magnification of blue light.
Page 95

Saving Image Files
You can save the image files which have been Full Auto processed or
Custom processed. Specify the save format and image size when saving
image files. Save images in JPEG format with one of five different
compression rates, or in TIFF-8 or TIFF-16 format.
As the compression rate increases, the file size decreases, but the quality
also deteriorates.
1
Select [Save Mode] from the [Tool] menu, or click on the
right of the icon to select the save format.
Select the quality and file format when saving RAW files.
For JPEG files, image data is compressed and saved. Select from
Highest Compression, High Compression, Medium Quality, High Quality,
and Highest Quality. Select High or Highest Compression to make the
file size smaller by lowering quality. Select High or Highest Quality to
maintain high quality by keeping the file size large.
Select TIFF-8 or TIFF-16 to avoid quality loss due to compression.
Although selecting TIFF-16 leads to a larger file size, quality loss is
minimized when modifying the file with other image editing software.
93
Page 96

94
2
Select [Save] from the [File] menu or click the icon on
the Tool bar.
The [Save] dialog appears.
When multiple images are selected, the [Save] dialog is not displayed. The images
will be saved, with their original file names, to the [Folder to Use] specified in
[Options] (p.102) (file extensions will be modified automatically according to the
specified file format).
3
Specify the file name and save destination, and then click
[Save].
The image file is saved.
When [Use queue list] is set in [Options], adjustment is added as a job to the [Image
Processing Queue List] dialog for batch processing to be performed later. (p.105)
Saving Image File Adjustment
All current adjustment combinations can be saved as a parameter file.
Saved adjustment can then be applied to other RAW files for processing.
1
Click [Save Adjustment] from the [File] menu on the Main
panel or click the icon.
Page 97

The [Save Adjustments] dialog appears.
2
Specify the file name and save destination, and then click
[Save].
The current settings are saved as an adjustment setting file (*.ini).
Recalling Image File Adjustment
1
Display a RAW file in the Preview panel.
95
2
Click [Recall Adjustment] from the [File] menu on the Main
panel or click the icon.
The [Open Adjustment File] dialog appears.
3
Select a folder and parameter file name, and then click
[Open].
The settings saved in the parameter file are reflected in the parameters
of the RAW file.
Page 98

96
Printing
You can print the currently displayed RAW file. Print image files using
[Print Bracketing] or [Enlarge image].
[Print] dialog
Set the print layout, captions, and other settings in the [Print] dialog.
Using the [Print]
dialog
Select [Print] on the [File]
menu to open the [Print]
dialog.
[Print] dialog settings
The [Print Bracketing] and [Enlarge image] setting tabs appear in the
[Print] dialog.
Page 99

[Print Bracketing] tab
Print bracketing is a function that prints an image several times on one
page with automatically adjusted parameters within a set parameter
range, enabling you to view the printed results of different parameters at
the same time. Printing the image on your printer with this function is useful
for determining the optimal parameters for that image.
Display Mode
Sets preview method.
Item Description
Segment selection Switches to window for selecting image area for print
bracketing.
Print preview A preview of the print layout is displayed.
97
Page 100

98
Print Layout
Sets print bracketing settings.
Item Description
Segment
Specification
Segmentation Sets segmentation method of print area. Select from the
Segments Sets number of horizontal and vertical divisions. Selectable
Bracketing 1 Selects bracketing parameter to be changed horizontally.
Selects image area setting method for print bracketing.
Select from the following three settings.
Segment original image
Divides entire image into equal sections and
allocates bracketing variations for each section.
This is useful for reviewing the changes in set
parameters while previewing the entire image.
Repeat segment
Cuts part of image and prints several repeating
tiles with different bracketing parameters. This is
useful for reviewing the optimal settings for the
most important area in the image. When this
setting is selected (and [Segment selection] is
selected for [Display Mode]), you can select the
area repeatedly printed in the preview.
Repeat small original
Reduces entire image size and prints several
repeating tiles with different bracketing
parameters. This is useful for verifying the effects
of varying parameters on the entire image.
following three settings.
Segment vertically
Divides area vertically. Only one bracketing
parameter can be changed.
1 block
3 blocks:Divides area into multiple horizontal and vertical
value depends on selected segmentation method.
Choose from six parameters: Sensitivity, Contrast,
Saturation, Sharpness, Fine tune A-B and Fine tune M-G.
(The same parameter cannot be selected for Bracketing 1
and Bracketing 2.)
:
Divides area into multiple horizontal and vertical
sections. Two bracketing parameters can be
changed.
sections fixed at three vertical positions. One
bracketing parameter can be changed, but prints
three areas of image.
:
:
:
:
 Loading...