

Page 1

Thank you for purchasing this PENTAX Digital Camera.
Please read this manual before using the camera in order to get the most out of all the features and functions.
Keep this manual safe, as it can be a valuable tool in helping you to understand all the camera’s capabilities.
Regarding copyrights
Images taken using the PENTAX Digital Camera that are for anything other than personal enjoyment cannot
be used without permission according to the rights as specified in the Copyright Act. Please take care, as
there are even cases where limitations are placed on taking pictures even for personal enjoyment during
demonstrations, performances or of items on display. Images taken with the purpose of obtaining copyrights
also cannot be used outside the scope of use of the copyright as laid out in the Copyright Act, and care
should be taken here also.
To users of this camera
There is a possibility that recorded data may be erased or that the camera may not function correctly
when used in surroundings such as installations generating strong electromagnetic radiation or magnetic
fields.
The liquid crystal panel used in the LCD display is manufactured using extremely high precision
technology. Although the level of functioning pixels is 99.99% or better, you should be aware that 0.01% or
fewer of the pixels may not illuminate or may illuminate when they should not. However, this has no effect
on the recorded image.
Regarding trademarks
PENTAX, Optio and smc PENTAX are trademarks of PENTAX Corporation.
SD logo ( ) is a trademark.
QuickTime and QuickTime logo are trademarks used under license. The QuickTime logo is registered in
U.S. and other countries.
All other brands or product names are trademarks or registered trademarks of their respective owners.
EN-1
Page 2

Regarding PictBridge
PictBridge allows the user to connect the printer and digital camera directly, using the unified standard for
the direct printout of images. You can print images directly from the camera through a few simple
operations.
This product supports PRINT Image Matching III. PRINT Image Matching enabled digital still cameras,
printers and software help photographers to produce images more faithful to their intentions. Some functions
are not available on printers that are not PRINT Image Matching III compliant.
There is a possibility that the illustrations and the display screen of the LCD monitor in this manual are
different from the actual product.
EN-2
Page 3

USING YOUR CAMERA SAFELY
We have paid close attention to the safety of this product. When using this product, we request your special
attention regarding items marked with the following symbols.
Warning This symbol indicates that ignoring this item could cause serious personal injury.
Caution This symbol indicates that ignoring this item could cause minor or medium personal injury,
or material loss.
About the Camera
Warning
Do not attempt to take the camera apart or remodel the camera. High voltages are present within the
camera, and there is therefore a danger of electric shocks if the camera is taken apart.
If the inside of the camera should become exposed as a result of, for example, the camera being dropped,
please do not under any circumstances touch such exposed portions, as there is a danger of receiving an
electric shock.
Wrapping the strap of the camera around your neck is also dangerous. Please take care that small
children do not hang the strap around their necks.
To avoid the risk of it being swallowed by mistake, keep the SD Memory Card out of the reach of small
children. Seek medical attention immediately if an SD Memory Card is accidentally swallowed.
Use an AC adapter that is of the power and voltage specified for exclusive use with this product. The use
of an AC adapter other than that specified exclusively for use with this product may cause fire or electric
shocks.
If the camera emits smoke or a strange smell, or in the event of any other irregularity, stop using the
camera immediately, remove the battery or disconnect the AC adapter and contact your nearest PENTAX
service center. Continued use of the camera may result in fire or electric shock.
EN-3
Page 4

Caution
Never try to disassemble or short the battery. Also, do not dispose of the battery in fire, as it may explode.
Do not charge any batteries other than rechargeable Ni-MH batteries. The battery could explode or catch
fire. Of the batteries that can be used in this camera, only the Ni-MH battery can be recharged.
Do not place your finger on the flash when it is discharging as there is a risk of burns.
Do not discharge the flash while it is touching your clothing as there is a risk of discoloring.
If any battery leakage should come in contact with your eyes, do not rub them. Flush your eyes with clean
water and get medical attention immediately.
If any battery leakage should come in contact with skin or clothes, wash the affected areas thoroughly with
water.
Remove the battery from the camera immediately if it becomes hot or begins to smoke. Be careful not to
burn yourself during removal.
Some portions of the camera heat up during use, so please take care, as there is a risk of low temperature
burns if such portions are held for long periods of time.
Should the LCD be damaged, be careful of glass fragments. Also, be careful not to allow the liquid crystal
to get on your skin or in your eyes or in your mouth.
EN-4
Page 5

Handling precautions for batteries
This camera uses two AA Ni-MH or AA alkaline batteries. Do not use batteries other than those specified
here. Using some other type of battery may cause the camera to function poorly, or the batteries may
rupture or cause a fire.
AA alkaline battery cannot be recharged. Do not try to take the batteries apart. The batteries may rupture
or leak if you try to charge them or take them apart.
Do not replace the batteries with batteries that are different brands, types or capacities. Also, do not
combine old batteries with new ones. Doing so may cause the batteries to rupture or cause a fire.
Do not insert the batteries with the positive (+) and negative (-) poles in the wrong orientation. Doing so
may cause the batteries to rupture or cause a fire.
Do not remove the external seal of the batteries. If the seal is removed, the batteries may short and may
cause a fire, rupture, leak or heat.
About the AC Adapter
Caution
Do not place heavy objects on the AC plug cord, allow heavy objects to drop onto it or allow the AC plug
cord to become damaged due to excessive bending. If the AC plug cord becomes damaged, consult a
PENTAX Service Center.
Do not short or touch the output terminals of the product while it is still plugged in.
Do not plug in the AC plug cord with wet hands. This can cause an electrical shock.
Do not subject the product to strong impacts or allow it to drop onto a hard surface. This can cause a
malfunction.
EN-5
Page 6

Care to be Taken During Handling
Take the international warranty card with you when you travel abroad. Also take the Worldwide Service
Network list that is included in the package. This will be useful if you experience problems abroad.
When the camera has not been used for a long time, confirm that it is still working properly, particularly
prior to taking important pictures (such as at a wedding or during traveling). Contents of the recording
cannot be guaranteed if recording, playback or transferring your data to a computer, etc. is not possible
due to a malfunction of your camera or recording media (SD Memory Card), etc.
The lens on this camera is not exchangeable. The lens is not removable.
Do not clean the product with organic solvents such as thinner, alcohol or benzene.
Places of high temperature and humidity should be avoided. Particular care should be taken regarding
vehicles, which can become very hot inside.
Storing the camera where pesticides and chemicals are handled should be avoided. Remove from case
and store in a well-ventilated place to prevent the camera from becoming moldy during storage.
Do not use the camera where it may come in contact with rain, water or any other liquid, because the
camera is not weather, water, or liquid resistant.
Ensure that the camera is not subjected to substantial vibrations, shocks or pressure. Place the camera
on a cushion for protection when the camera is subjected to the vibrations of a motorbike, car, or ship, etc.
The temperature range in which the camera can be used is 0°C to 40°C (32°F to 104°F).
The liquid crystal display will become black at high temperatures but will return to normal when normal
temperatures are returned to.
The response speed of the liquid crystal display becomes slow at low temperatures. This is due to the
properties of the liquid crystal and is not a fault.
Periodic checks are recommended every 1 to 2 years in order to maintain high performance.
If the camera is subjected to rapid temperature changes, condensation may form on the inside and
outside of the camera. Therefore put the camera in a bag or plastic bag, and take the camera out when
the difference in temperature has subsided.
Avoid contact with garbage, dirt, sand, dust, water, toxic gases, salt, etc. as this may cause damage to the
camera. If rain or drops of water get onto the camera, please wipe dry.
EN-6
Page 7

Refer to the section in this manual titled “Precautions When Using an SD Memory Card” (EN-21, 22)
Please do not press forcefully on the LCD monitor. This could cause breakage or malfunction.
Be careful not to sit down with the camera in your back pocket as this may damage the exterior of the
camera or the LCD monitor.
When using a tripod with the camera, be careful not to overtighten the screw in the tripod socket on the
camera.
EN-7
Page 8

CONTENTS
INTRODUCTION..................................................10
Package Contents ...............................................11
GETTING TO KNOW YOUR CAMERA...............12
Front View............................................................ 12
Mode Dial.............................................................12
Rear View ............................................................ 13
LCD Monitor Information...................................... 14
PREPARING THE CAMERA...............................17
Installing the Batteries .........................................17
Using the AC Adapter with a Household Power
Supply (Optional Accessory) ...............................18
Inserting and Removing an SD Memory Card
(Optional Accessory) ........................................... 20
Attaching the Camera Strap ................................ 23
GETTING STARTED ...........................................24
Turning the Power On/Off .................................... 24
LED Indicator and Self-timer Indicator.................24
Choosing the Screen Language .......................... 25
Setting the Date and Time ................................... 26
Formatting an SD Memory Card or
Internal Memory ................................................... 27
Using the LCD Monitor ........................................ 28
EN-8
TAKING IMAGES................................................ 29
Taking Images ..................................................... 29
Using the Mode Dial ............................................ 30
Setting Image Resolution and Quality ................. 31
Using the Zoom Function..................................... 32
Using the Flash .................................................... 33
Setting Focus Mode ............................................. 34
Drive Mode .......................................................... 35
High Speed Continuous....................................... 35
Auto Bracket ........................................................36
Self-Timer ............................................................37
Adjusting the Exposure (EV Compensation) ....... 39
Setting White Balance ......................................... 40
Recording Movie Clips ......................................... 41
PLAYING BACK AND DELETING IMAGES ...... 42
Viewing Images ................................................... 42
Magnifying Images...............................................43
Thumbnail Display ............................................... 44
Playing Back Movie Clips .................................... 45
Slideshow Display................................................ 46
Deleting Images/Movie Clips ............................... 47
Protecting Images/Movie Clips ............................ 48
Playing Back Still Images/Movie Clips on TV ...... 50
Page 9

EDITING AND PRINTING IMAGES.................... 51
Changing Image Resolution and Quality............. 51
Copying Files ...................................................... 52
Setting the DPOF ................................................ 53
Connecting to a PictBridge-Compatible Printer... 55
TRANSFERRING FILES FROM YOUR DIGITAL
CAMERA TO COMPUTER ................................. 59
Step 1: Install the USB driver .............................. 59
Step 2: Connect the digital camera to
your computer ..................................................... 60
Step 3: Download images or movie clips ............ 61
Editing Software Requirements ........................... 62
Installing ACDSee for PENTAX .......................... 63
MENU OPTIONS................................................. 64
Still Picture Capture Menu .................................. 64
Movie Menu......................................................... 69
Playback Menu.................................................... 70
Setup Menu ......................................................... 73
CONNECTING THE DIGITAL CAMERA TO
OTHER DEVICES ............................................... 77
SPECIFICATIONS .............................................. 78
APPENDIX .......................................................... 80
WARRANTY POLICY ......................................... 87
EN-9
Page 10

INTRODUCTION
r
r
r
Thank you for purchasing this new digital still camera!
Equipped with a 6.0 Megapixels CCD sensor, your camera delivers high quality, 2816 x 2112 resolution
images. Other features provided by the camera include the following:
6.0 Megapixels
A high-resolution CCD sensor provides 6.0
megapixels for high quality of images.
Auto flash
An auto flash sensor automatically detects the
shooting (lighting) conditions and determines
whether the flash should be used.
2.4” TFT color image LCD monitor
Optical zoom: 1x~3x
Digital zoom: 1x~4x
Approx. 13MB internal (built-in) memory
Images can be captured without using an SD
Memory Card.
Support for SD Memory Card for memory
expansion
You may wish to expand the memory capacity
by using an additional SD Memory Card.
EN-10
USB connection
Still images or movie clips that you have
recorded can be downloaded to your compute
using the USB cable (A USB driver is required
for Windows 98/98SE).
DPOF functionality
DPOF can be used to print your images on a
DPOF compatible printer by simply inserting
the SD Memory Card.
PictBridge support
You can connect the camera directly to printe
that supports PictBridge and perform image
selection and printing using the camera LCD
monitor and controls.
Provided editing software: ACDSee fo
PENTAX
You can enhance and retouch your images on
your computer by using the provided editing
software.
Page 11

Package Contents
Carefully unpack your kit box and ensure that you have the following items. In the event that any item is
missing or if you find any mismatch or damage, promptly contact your dealer.
Common Product Components:
Digital Camera
Quick Start Guide
Operating manual CD-ROM
Software CD-ROM (S-SW60)
Camera Strap
Video Cable
USB Cable
Two AA alkaline batteries (for checking the camera’s functionality)
*******************************************************************************
Common (Optional) Accessories (not included with the camera):
AC adapter kit K-AC51 (supplied by PENTAX)
SD Memory Card (commercially available)
Batteries and battery charger (commercially available)
Accessories and components may vary by retailer.
EN-11
Page 12
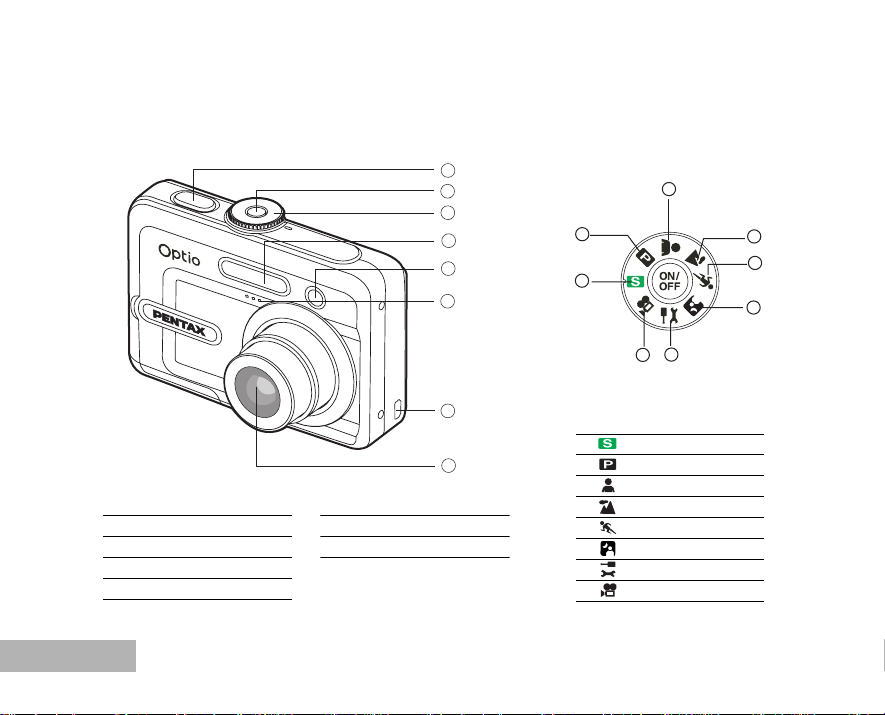
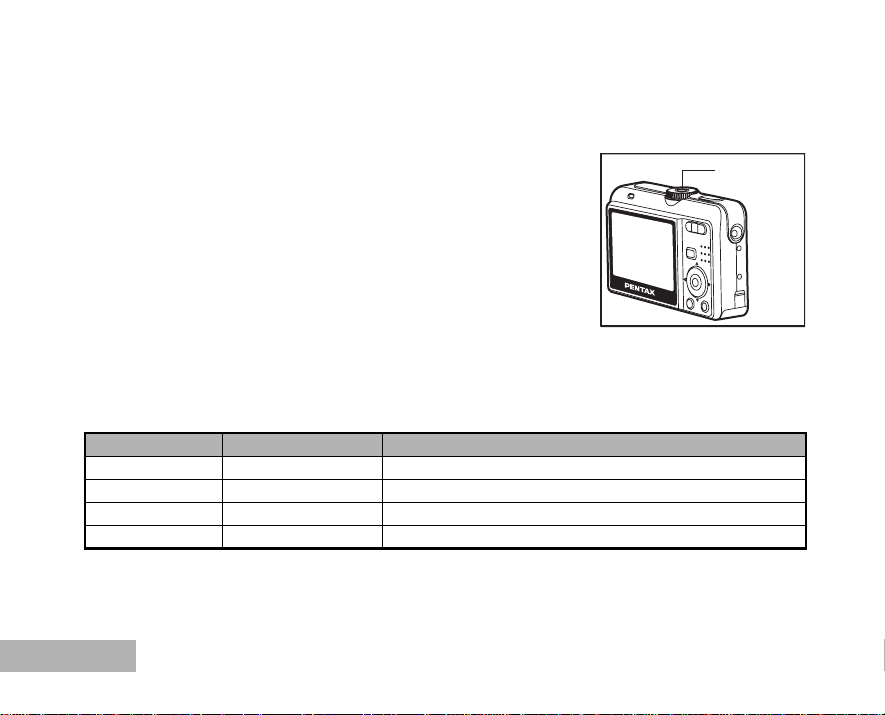
GETTING TO KNOW YOUR CAMERA
Front View
1. Shutter release button
2. Power switch
3. Mode dial
4. Flash
5. Self-timer LED
EN-12
1
2
3
4
5
6
7
8
6. Microphone
7. PC / Video terminal
8. Lens
Mode Dial
3
2
1
7
8
Mode
1. Simple
2. Program
3. Portrait
4. Landscape
5. Sport
6. Night Scene
7. Setup
8. Movie
4
5
6
Page 13
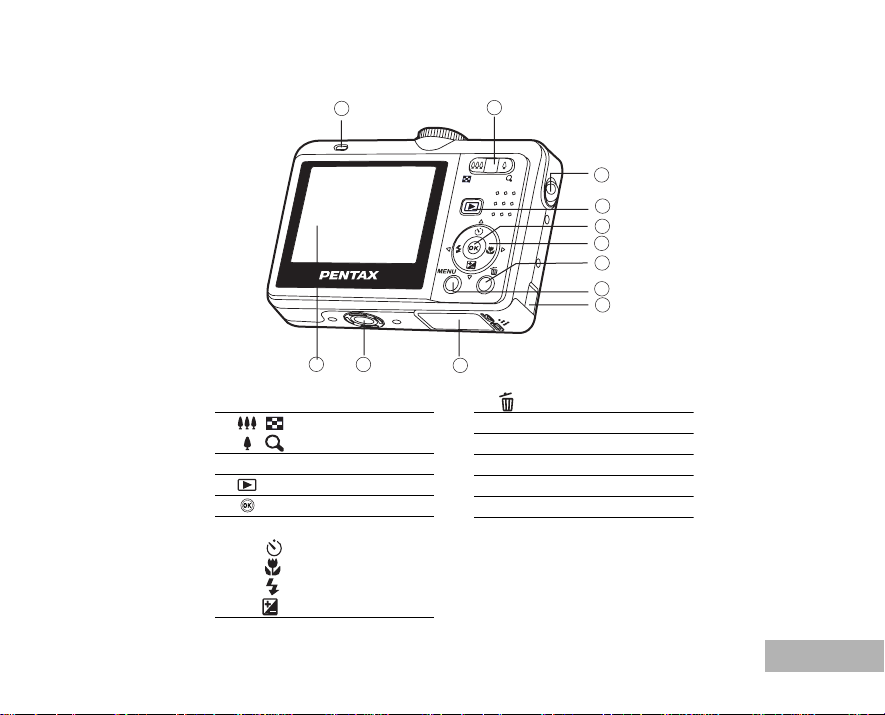
Rear View
1
11
12
2
3
4
5
6
7
8
9
10
1. LED indicator
2. / button
/ button
3. Strap lug
4. button
5. button
6. Four-way controller
S / button
X / button
W / button
T/ button
7. button
8. MENU button
9. DC coupler cable cover
10. Battery/card cover
11. Tripod socket
12. LCD monitor
EN-13
Page 14
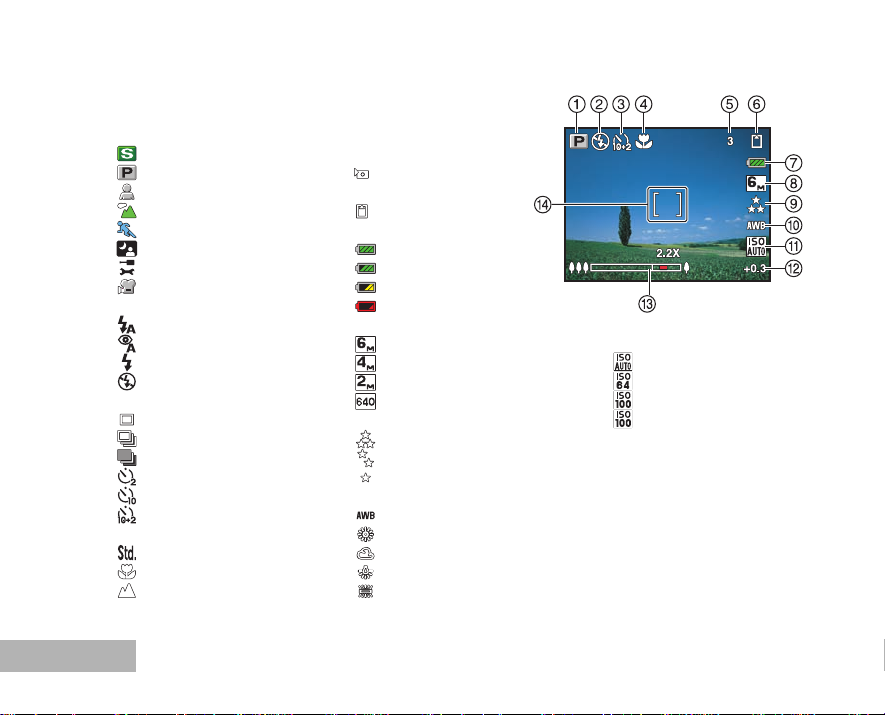
LCD Monitor Information
Camera Mode
1. Mode indication
[] Simple
[] Program
[] Portrait
[ ] Landscape
[] Sport
[ ] Night scene
[] Setup
[] Movie
2. Flash mode [] Auto [ ] Auto + Red-eye [ ] Flash on [ ] Flash off
3. Drive mode [ ] Standard [ ] High Speed Continuous [ ] Auto Bracket [ ] 2 sec. Self-timer [ ] 10 sec. Self-timer [ ] 10+2 sec. Self-timer
4. Focus mode [ ] Standard [] Macro [ ] Infinity
EN-14
5. Number of shots available
6. Memory status : Built-in memory
(without card)
: SD Memory Card
7. Battery
[ ] Full battery power
[ ] Medium battery power
[ ] Low battery power
[ ] Battery exhausted
8. Recorded pixels
[ ] 2816 x 2112
[ ] 2304 x 1728
[ ] 1600 x 1200
[ ] 640 x 480
9. Image quality
[] Best
[ ] Better
[ ] Good
10.White balance
[] Auto
[ ] Daylight
[] Cloudy
[ ] Tungsten Light
[ ] Fluorescent Light
11.ISO sensitivity
[ ] Auto
[] 64
[ ] 100
[ ] 200
12. EV compensation
13.Zoom bar
14. Focus frame
Page 15

Movie Mode
ISO100
+0.3
1/125
F2.8
100-0001
01/09/2006
12:00
J
1. Movie mode
2. Flash mode
3. Recordable movie time available
4. Memory status
5. Battery power indicator
6. Focus frame
7. Zoom bar
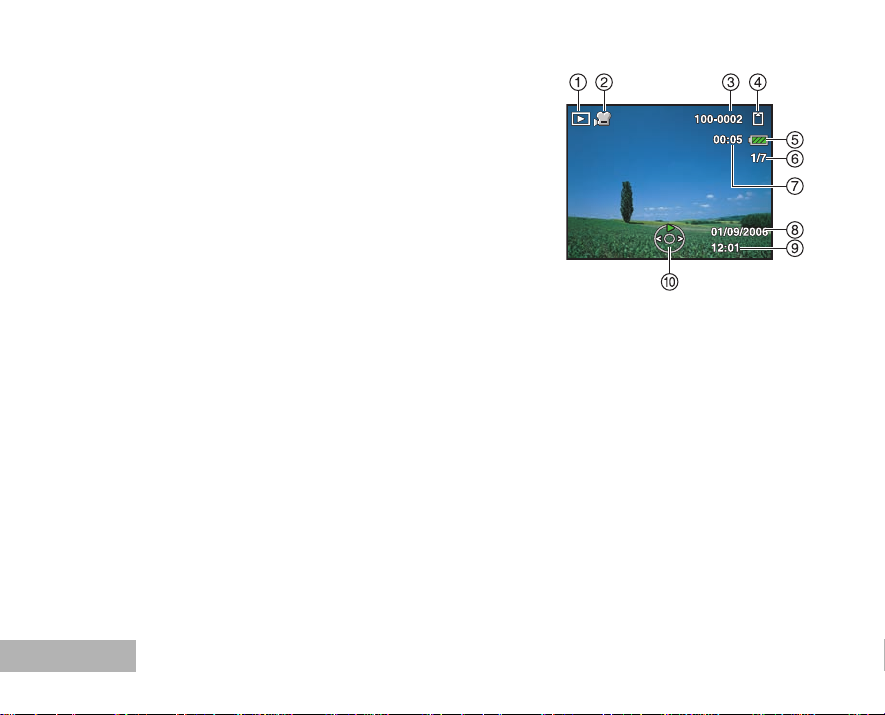
Image Playback
1. Playback mode
2. File number of image
3. Memory status
4. Battery power indicator
5. Index number of total number
6. DPOF indicator
7. Protect indicator
8. Date
9. Time
10. Four-way controller guide
11. Aperture
12. Shutter speed
13. EV compensation
14.ISO sensitivity
15.White balance
16. Image quality
17.Recorded pixels
ACB
Q
P
O
N
ISO100
ISO100
+0.3
+0.3
M
1/125
1/125
L
F2.8
F2.8
K
100-0001
100-0001
01/09/2006
01/09/2006
12:00
12:00
D
1/7
E
F
G
H
I
EN-15
Page 16
Movie Playback
1. Playback mode
2. Movie mode
3. File number of movie
4. Memory status
5. Battery power indicator
6. Index number of total number
7. Elapsed time
8. Date
9. Time
10. Four-way controller guide
EN-16
Page 17
PREPARING THE CAMERA
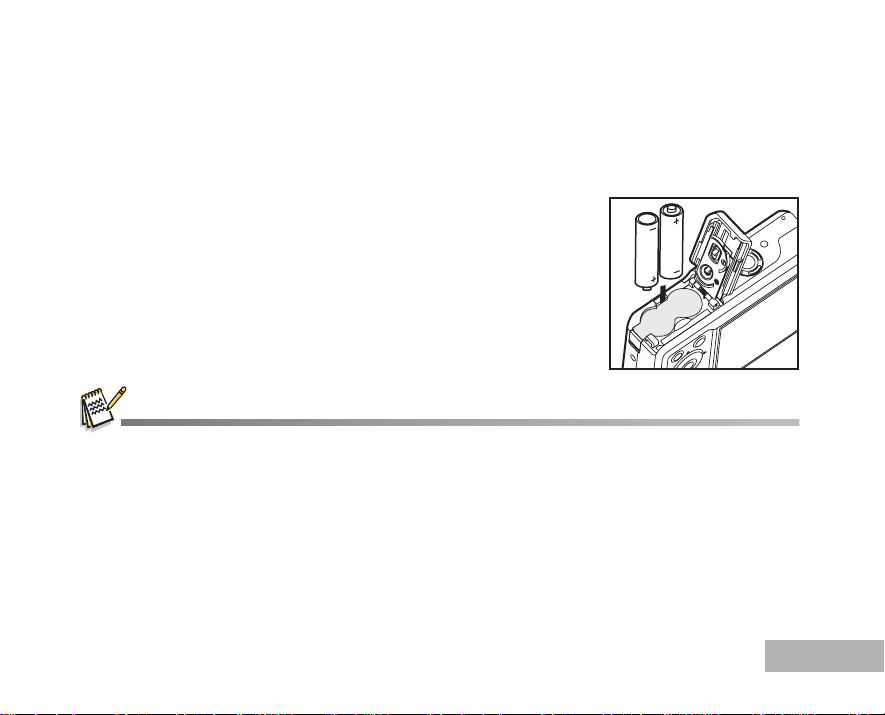
Installing the Batteries
You can use 2 AA size batteries (Ni-MH rechargeable or alkaline) to power the camera. Make sure that the
power of the digital camera is off before inserting or removing the batteries.
1. Make sure the camera is turned off.
2. Open the battery/card cover.
3. Insert the batteries in the correct orientation as shown in the illustration.
4. Close the battery/card cover. To remove the batteries, turn the camera off before removing
batteries and hold the camera with the battery/card cover
facing upward, then open the battery/card cover.
Be careful not to drop the batteries when opening or closing the battery/card cover.
Due to the characteristics of AA alkaline batteries, camera performance may deteriorate. AA alkaline batteries are not
recommended except in emergencies and checking the camera's functionality.
EN-17
Page 18
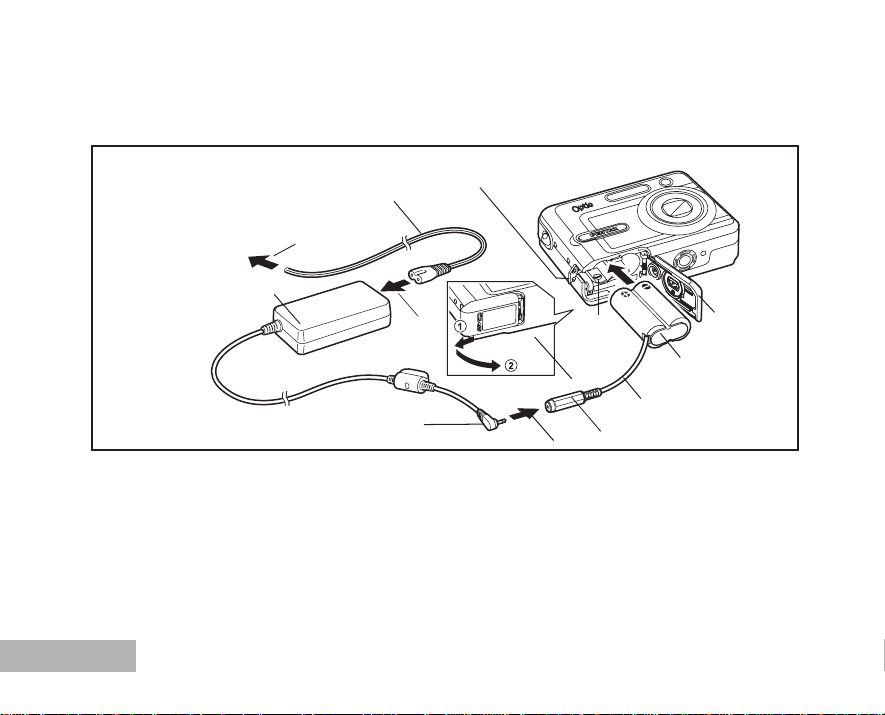
Using the AC Adapter with a Household Power Supply (Optional Accessory)
AC plug cord
DC coupler cable cover
To power outlet
6
AC adapter
5
3
2
4
DC coupler
DC coupler cable
DC terminal
Use of the AC adapter kit K-AC51 (optional) with a household power supply is recommended if you intend to
use the camera for a long time or connect it to a computer.
(The AC adapter kit K-AC51 includes AC adapter D-AC5, DC coupler D-DC51, and AC plug cord D-CO2.)
1. Connect the DC terminal of the AC adapter to the DC input terminal of the DC coupler.
2. Make sure that the camera is turned off and open the battery/card cover. Pull the battery/card cover in the direction of c and flip the cover open in the direction of d.
3. Insert the DC coupler into the battery compartment, making sure the (+) and (–) on the coupler match the
(+) and (–) on the battery compartment.
EN-18
DC input terminal
1
Page 19

4. Open the DC coupler cable cover, pass the DC coupler cable through the opening, and close the battery/ card cover. Slide the battery/card cover in the opposite direction of c. Slide the battery/card cover all the way in to
make sure it is securely closed.
5. Connect the AC plug cord to the AC adapter.
6. Plug the AC plug cord into the power outlet.
Make sure to use only the AC adapter specified for the camera. Damage caused by the use of an incorrect adapter is not
covered under the warranty.
To prevent unexpected auto power off resulting from no battery power remaining during the process of transferring your
images to the computer, use of the optional AC adapter is recommended.
EN-19
Page 20
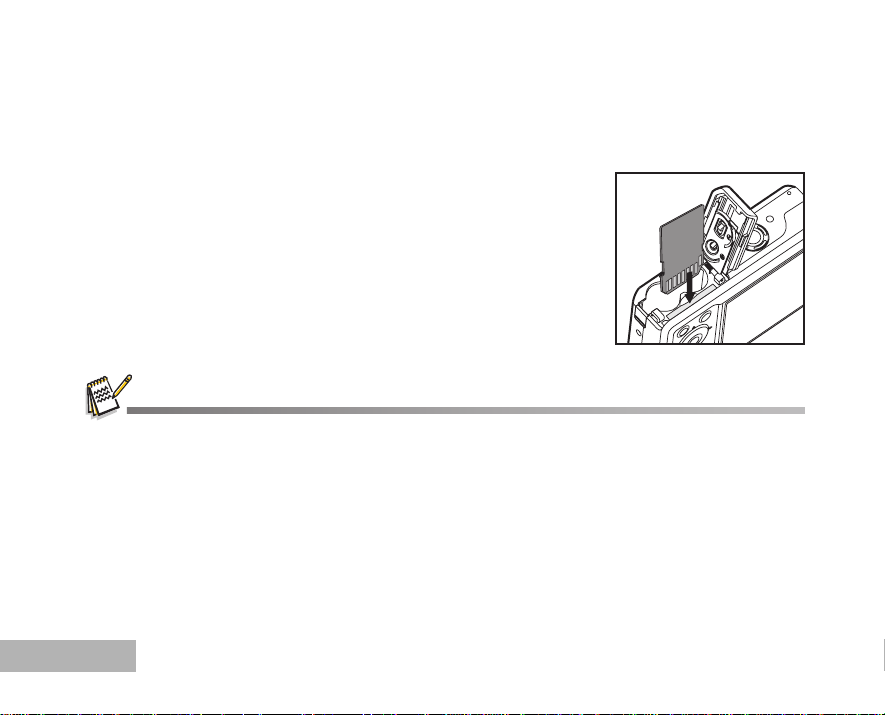
Inserting and Removing an SD Memory Card (Optional Accessory)
The digital camera comes with approx. 13MB of internal memory, allowing you to store captured still images
or movie clips in the digital camera. Moreover, you can also expand the memory capacity by using an optional
SD (Secure Digital) memory card so that you can store more files.
1. Make sure your camera is turned off before inserting or removing
an SD Memory Card.
2. Open the battery/card cover.
3. Insert an SD Memory Card in the correct orientation as shown in the illustration.
4. Close the battery/card cover To remove the SD Memory Card, make sure the camera is
turned off. Press lightly on the edge of the SD Memory Card
and it will eject.
Be sure to format an SD Memory Card with this digital camera before using it. Refer to section in the manual titled
“Formatting an SD Memory Card or Internal Memory”
EN-20
(EN-27) for further details.
Page 21

Data Backup
Very occasionally, malfunction of the camera may cause data stored in the built-in memory to become
unreadable. As a backup measure, we recommend that you download important data to a PC or store the
data in a media other than the built-in memory.
Precautions When Using an SD Memory Card
Make sure that the camera is turned off before opening or closing the
card cover.
The SD Memory Card is equipped with a write-protect switch. Setting the
switch to [LOCK] protects the existing data by prohibiting recording of
new data, deletion of existing data or formatting of the card.
[Card locked] appears on the LCD monitor in recording mode when the
card is write-protected.
Care should be taken if you remove the SD Memory Card immediately
after using the camera, as the card may be hot.
Do not remove the SD Memory Card or turn the camera off while data is being recorded on the card,
images or voice memos are being played back, or the camera is connected to a PC with the USB cable as
this may cause the data to be lost or the card to be damaged.
Do not bend the SD Memory Card or subject it to violent impact. Keep it away from water and store away
from high temperature.
Do not remove the SD Memory Card during formatting as this may damage the card and render it
unusable.
Write-protect switch
EN-21
Page 22

The data on the SD Memory Card may be deleted in the following circumstances. PENTAX does not
accept any liability for data that is deleted
(1) when the SD Memory Card is mishandled by the user.
(2) when the SD Memory Card is exposed to static electricity or electrical interference.
(3) when the card has not been used for a long time.
(4) when the card is ejected, the AC adapter is disconnected or the batteries are removed while the data
on the card is being recorded or accessed.
The SD Memory Card has a limited service life. If it is not used for a long time, the data on the card may
become unreadable. Be sure to make a backup of important data on a PC.
Avoid using or storing the card where it may be exposed to static electricity or electrical interference.
Avoid using or storing the card in direct sunlight or where it may be exposed to rapid changes in
temperature or to condensation.
When using an SD Memory Card with a slow recording speed, recording may stop while you are taking
movies even when there is adequate space in the memory, or shooting and playback may take a long
time.
If you are going to discard, give away or sell your SD Memory Card you should ensure that the data on the
card is completely deleted or the card itself is destroyed if it contains any personal or sensitive information.
Please note that formatting the SD card will not necessarily delete the data so that it cannot be recovered
using off the shelf data recovery software. There are off the shelf secure data deletion software programs
available that will completely delete the data. In any case the data on your SD Memory Card should be
managed at your own risk.
For information on compatible memory cards, contact your nearest PENTAX customer service center.
EN-22
Page 23
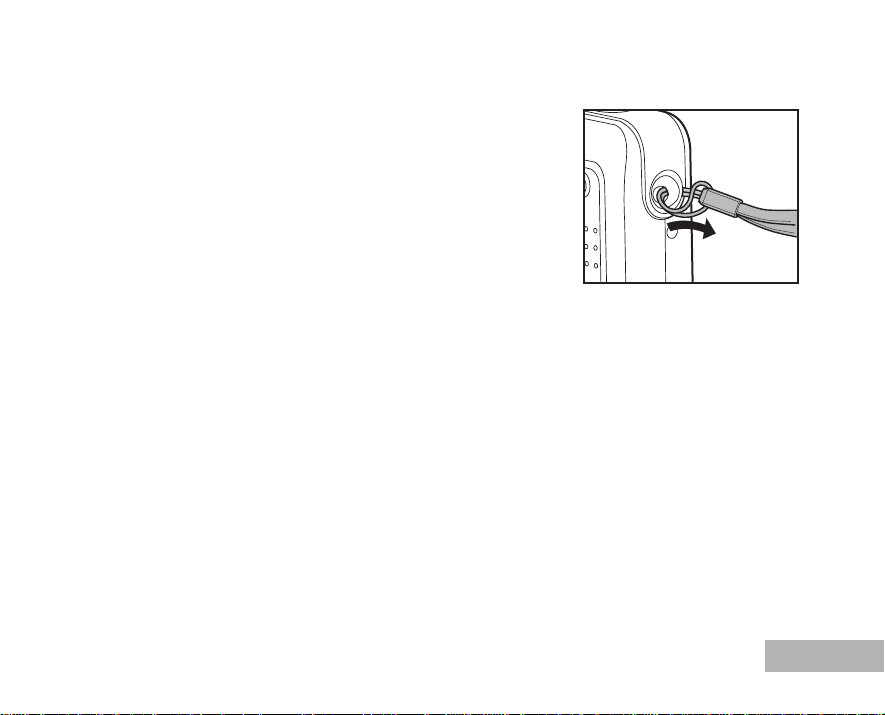
Attaching the Camera Strap
Attach the strap as shown in the illustration.
EN-23
Page 24
GETTING STARTED
Turning the Power On/Off
Press the power switch to turn the power on.
To turn the power off, press the power switch again.
LED Indicator and Self-timer Indicator
Indicator State Description/Activity
LED indicator Solid green The digital camera is on.
LED indicator Blinking red and green USB communication/transfer in progress.
LED indicator Blinking red and green Charging the flash.
Self-timer indicator Blinking blue The self-timer function is activated.
EN-24
Power switch
Page 25
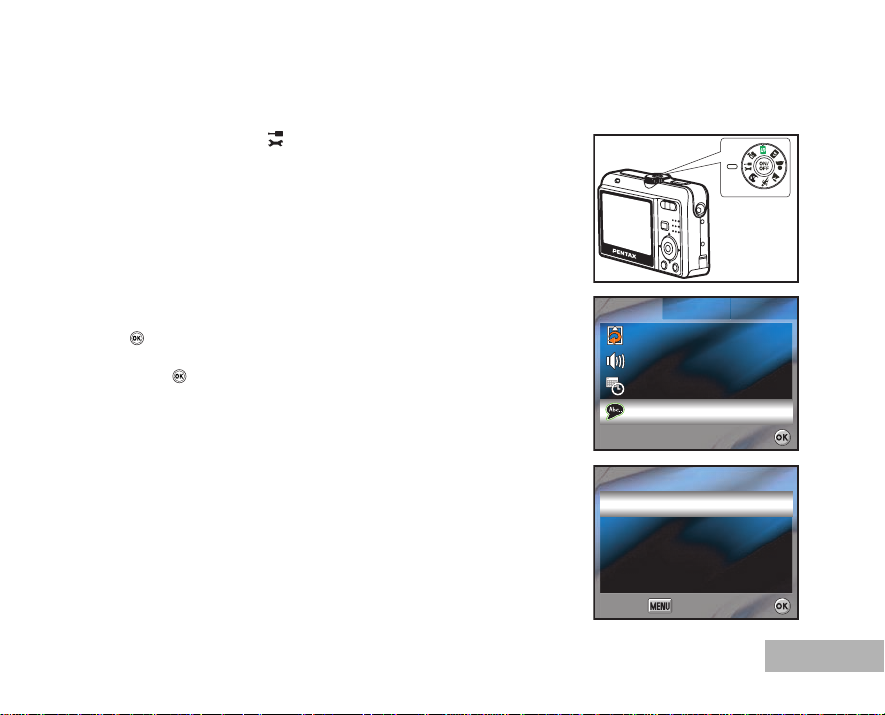
Choosing the Screen Language
Set-up1
Set-up2
Set-up3
Format
Sound
Date Adjust
Language
Select :
Off
d/m/y
English
Language
Select :
Cancel :
English
Franç
ais
Españolol
Deutsch
Follow the steps below to choose the desired language.
1. Rotate the mode dial to and turn your camera on by pressing
the power switch.
2. [Set-up1] is displayed.
3. Use the four-way controller (T) to select [Language], then press
the button.
4. Use the four-way controller (ST) to select the language you want.
5. Press the button to confirm.
Set-up1
Set-up1 Set-up2 Set-up3
Cancel :
Set-up2
Format
Format
Sound
Sound
Date Adjust
Date Adjust
Language
Language
Language
Language
English
English
Fran
Français
Espa
Español
Deutsch
Deutsch
Set-up3
Off
Off
d/m/y
d/m/y
English
English
Select :
Select :
ais
Select :
Select :Cancel :
EN-25
Page 26
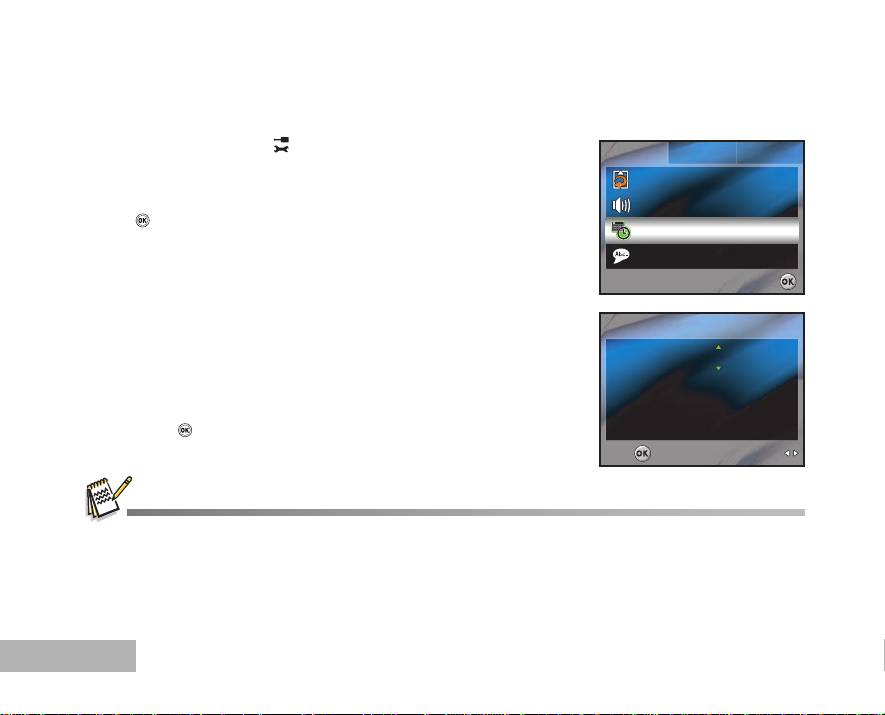
Setting the Date and Time
Set-up1
Set-up2
Set-up3
Format
Sound
Date Adjust
Language
Select :
Off
d/m/y
English
d / m / y
12h
01 / 09 / 2006
00 : 00
Date Adjust
Select :
OK :
Date Style
Follow the steps below to set the date display style, current date and time.
1. Rotate the mode dial to and turn your camera on by pressing
the power switch.
2. [Set-up1] is displayed.
3. Use the four-way controller (T) to select [Date Adjust], then press
the button.
[Date Adjust] is displayed.
Set-up1
Set-up1 Set-up2 Set-up3
Set-up2
Format
Format
Sound
Sound
Date Adjust
Date Adjust
Language
Language
Set-up3
Off
Off
d/m/y
d/m/y
English
English
Select :
Select :
4. Press the four-way controller (WX) to select Date Style, Day,
Month, Year and Time fields.
To increase a value, press the four-way controller (S).
Date Style
Date Style
To decrease a value, press the four-way controller (T).
To select the time display in 12-hours or 24-hours format, press
the four-way controller (ST).
5. Press the button after all fields are set.
OK :
OK :
The date illustration shown is for the purpose of explanation and may differ from the actual setting of your camera.
EN-26
Date Adjust
Date Adjust
d/m/y
d/m/y 12h
01 / 09 / 2006
01 / 09 / 2006
00 : 00
00 : 00
12h
AMAMAM
Select :
Select :
Page 27
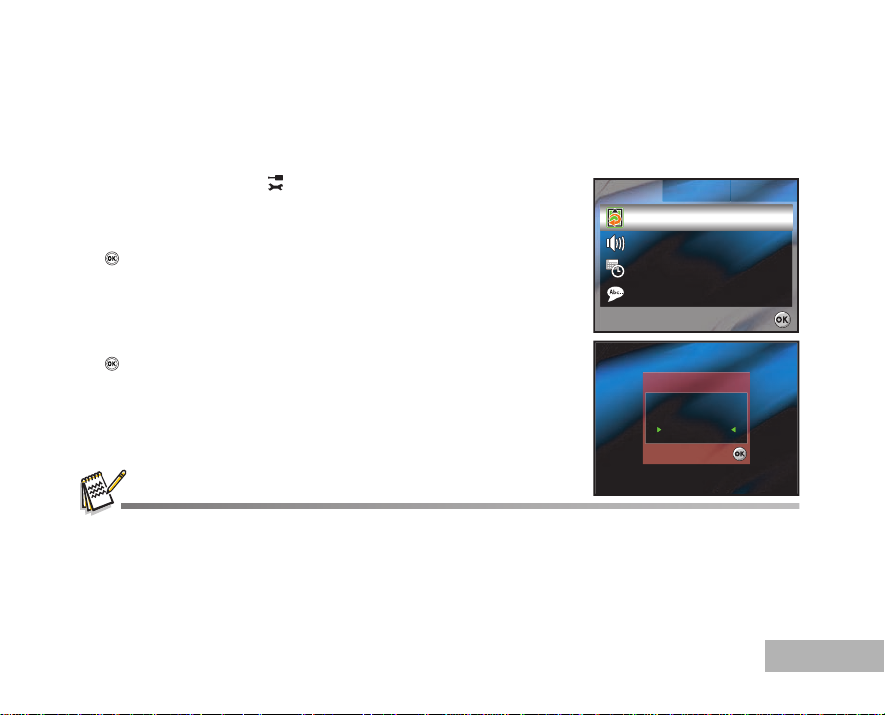
Set-up1
Set-up2
Set-up3
Format
Sound
Date Adjust
Language
Select :
Off
d/m/y
English
Format
OK
Cancel
Select :
Formatting an SD Memory Card or Internal Memory
The term “Formatting” means preparing an “SD Memory Card” to record images; this process is also called
“initialization”. This utility formats an SD Memory Card or the internal memory and deletes all stored images
and data.
1. Rotate the mode dial to and turn your camera on by pressing
the power switch.
[Set-up1] is displayed.
2. Use the four-way controller (T) to select [Format], then press the
button.
3. Use the four-way controller (ST) to select [OK], then press the
button to confirm.
When you format an SD Memory Card, be aware that all data on the SD Memory Card will be deleted. Protected images
are also deleted.
To format the internal memory, do not insert an SD Memory Card into the camera. Otherwise, you will format the SD
Memory Card.
Set-up1
Set-up1 Set-up2 Set-up3
Set-up2
Format
Format
Sound
Sound
Date Adjust
Date Adjust
Language
Language
Format
Format
Cancel
Cancel
OK
OK
Select :
Select :
Set-up3
Off
Off
d/m/y
d/m/y
English
English
Select :
Select :
EN-27
Page 28
Using the LCD Monitor
Your camera is equipped with a 2.4” full color TFT LCD monitor to help you compose images, replay recorded
images/movie clips or adjust menu settings. The mode icons, text and numbers displayed on the monitor may
vary according to the current settings.
LCD monitor display mode changes each time you press the button in the following order:
when taking still images
Normal Display Information Display No Icons LCD Off
when recording movie clips
Normal Display Æ No Icons Æ LCD Off
when playing back still pictures
Normal Display Æ Information Display Æ No Icons
The LCD monitor darkens in strong sunlight or bright light. This is not a malfunction.
EN-28
Page 29

TAKING IMAGES
Taking Images
1. Rotate the mode dial to , , , , or and turn your
camera on by pressing the power switch.
2. Compose the image on the LCD monitor so that the main subject is within the focus frame.
3. Press the shutter release button halfway to focus the image. When you press the shutter release button halfway, the
camera’s Auto Focus feature automatically focuses the image.
The focus frame turns green if the subject is in focus. Proper
exposure is determined and locked at the same time.
4. Press the shutter release button the rest of the way down to capture the image.
To prevent your images from being blurred while pressing the shutter release button, always hold it carefully. This is
especially important when you are shooting under low lighting conditions, since your camera may set longer shutter
speeds to ensure your images are properly exposed.
EN-29
Page 30

Using the Mode Dial
You can select the shooting mode according to the shooting scene by rotating the mode dial.
There are 7 available modes.
Shooting Modes
Simple mode Lets you take still pictures without having to set special functions or manual
Program mode Lets the camera automatically select the shutter speed and aperture for taking
Portrait mode Lets you take pictures of people standing out with the background out-of-focus.
Landscape mode Lets you take pictures of landscapes using the optimal settings.
Sport mode Lets you take fast moving objects.
Night-Scene mode Lets you take pictures at night or in dark environments using the optimal settings.
Movie mode Lets you take movies.
EN-30
adjustments. The camera sets the optimal focusing and exposure.
still pictures. You can adjust other functions, such as flash mode or continuous
shooting mode.
The shutter speed is slower when taking pictures of dark scenes. To prevent
camera shake, secure the camera on a tripod or other surface.
Page 31

Menu2
Menu3
Recorded Pixels
Quality Level
White Balance
Sensitivity
Menu1
Select :
Exit :
Recorded Pixels
2816 x 2112
2304 x 1728
1600 x 1200
640 x 480
Select :
Cancel :
Setting Image Resolution and Quality
As you get to know the digital camera, you can set the image resolution (number of vertical and horizontal
pixels) and image quality (compression ratio) based on the types of images you want to shoot. These settings
affect the number of images that can be stored in the internal memory, or on an SD Memory Card.
Higher resolution and higher quality images provide finer detail but cause the images’ file size to be larger.
To change image resolution or image quality, perform these steps below:
1. Rotate the mode dial to , , , , or and turn your
camera on by pressing the power switch.
2. Press the MENU button.
[Menu1] is displayed.
In the mode, [Menu] is displayed.
3. Use the four-way controller (T) to select [Recorded Pixels], then
press the button.
4. Use the four-way controller (ST) to select the desired setting,
then press the button to confirm.
5. Follow the step 3 and 4 above to set the [Quality Level].
The number of recordable images and recording time depend on the storage
size, resolution and quality settings and the subject of the image to be
captured.
You can resize the images later. Please refer to the section in this manual
titled “Changing Image Resolution and Quality” (EN-51) for further detail.
Menu1
Recorded Pixels
Recorded Pixels
Quality Level
Quality Level
White Balance
White Balance
Sensitivity
Sensitivity
Exit :
Cancel :
Menu2
Menu2 Menu3Menu1
Recorded Pixels
Recorded Pixels
2816 x 2112
2816 x 2112
2304 x 1728
2304 x 1728
1600 x 1200
1600 x 1200
640 x 480
640 x 480
Select :Exit :
Select :
Select :
Select :Cancel :
Menu3
EN-31
Page 32

Using the Zoom Function
2.2X
3
This camera is equipped with 3x optical zoom. The lens moves during the optical zoom photography, allowing
you to capture telephoto and wide-angle shots. By using the optical zoom function; images appear closer by
pressing the button, or smaller away by pressing the button.
The zoom bar indicates the current level of magnification. When the zoom is
within 3x magnification, the zoom bar is within the optical zoom range.
When the digital zoom function is set to On, you can further enlarge the
subjects with 4x digital zoom by pressing continuously the button. It is
activated after your camera reaches its maximum optical zoom factor (3x)
and the zoom bar is within the digital zoom area. You can enlarge the
subject to a maximum magnification equivalent to 12 times. A useful feature
as it is, however, the more the image is enlarged, the more pixelated the
image will appear.
To capture a zoomed image, perform the following steps:
1. Rotate the mode dial to , , , , or and turn your camera
on by pressing the power switch.
2. Adjust the magnification ratio by using the / button.
To exit the zoom photography, press continuously the button.
The status of digital magnification is displayed on the LCD monitor.
3. Compose your scene and press the shutter release button.
To enable digital zoom feature, set the [Menu2- Digital Zoom] to [On] in the , , , or mode. (Refer to the
section in this manual titled "Still Picture Capture Menu" (EN-67) for further details)
EN-32
2.2X
2.2X
Zoom bar
3
Digital zoom rangeOptical zoom range
/ button
Page 33

Using the Flash
OK :
Flash Mode
Auto
The flash is designed to function automatically when lighting conditions require the use of flash. You can take
an image using a desired flash mode to suit your circumstances.
1. Rotate the mode dial to , , , , or .
2. Press the power switch to turn on the power.
3. Press the four-way controller (W/ ). The flash mode changes
each time the button is pressed. You can also change the setting
using the four-way controller (ST).
4. Press the button to confirm the setting.
5. Compose your scene and press the shutter release button.
The camera has four flash modes as below.
Flash mode Description
Auto The flash discharges automatically according to the photographic conditions.
Auto + Red-eye This mode reduces the phenomenon of red eyes caused by the light from the
flash being reflected in the subject’s eyes. The flash discharges automatically.
Flash On The flash will always discarge regardless of the surrounding brightness.
Flash Off The flash will not discharge, regardless of the brightness. Use this mode to take
pictures at dusk or in museums etc. where flash photography is prohibited.
Flash Mode
Flash Mode
Auto
Auto
OK :
OK :
EN-33
Page 34

Setting Focus Mode
OK :
Focus Mode
Standard
Images can be captured with the focus determined automatically using auto focus. You may over-ride the
auto focus and specify [ ] macro or [ ] infinity.
1. Rotate the mode dial to , , , , or .
2. Press the power switch to turn on the power.
3. Press the four-way controller (X/ ). The focus mode changes
each time the button is pressed. You can also change the setting
using four-way controller (ST).
4. Press the button to confirm the setting.
5. Compose your scene and press the shutter release button.
The camera has three focus modes as below.
Focus mode Description
Standard Select Standard-focus setting for most occasions when you want the camera to
automatically determine the focus setting. When using Standard-focus setting,
any object at a distance of 40 cm or greater can be focused.
Macro Select Macro-focus setting to capture close-up images. When the lens is zoomed
to its widest position you may focus on objects as close as 6 cm. When the lens
is zoomed to its telephoto position (3x zoom) you may focus on objects as close
as 35 cm.
Infinity Select Infinity-focus setting when you want to capture images of subjects at a
distance of infinity.
EN-34
Focus Mode
Focus Mode
Standard
Standard
OK :
OK :
Page 35

Drive Mode
OK :
Drive Mode
High Speed Continous
High Speed Continuous
This mode is used for continuous shooting. Three pictures are taken continuously once the shutter release
button is pressed. Secure the camera to a tripod or place it on a stable surface.
1. Rotate the mode dial to , , , , or .
2. Press the power switch to turn on the power.
3. Press the four-way controller (S/ ) and use (S) to select [High
Speed Continuous]. You can also change the setting using
four-way controller (WX).
4. Press the button to confirm the setting. The indicator is displayed on the LCD monitor.
5. Press the shutter release button halfway to lock the focus.
6. Press the shutter release button to capture a sequence of three images.
In High Speed Continuous mode, the flash mode will be set to Flash Off automatically.
The interval will vary according to the Recorded Pixels and Quality Level settings.
The focus, exposure and white balance are locked with the first image.
Drive Mode
Drive Mode
High Speed Continous
High Speed Continous
OK :
OK :
EN-35
Page 36

Auto Bracket
OK :
Drive Mode
Auto Bracket
In this mode, the camera automatically changes the exposure within a set range to take three shots after you
press the shutter release button once.
1. Rotate the mode dial to , , , , or .
2. Press the power switch to turn on the power.
3. Press the four-way controller (S/ ) and use (S) to select
[Auto Bracket]. You can also change the setting using the four-way
controller (WX).
4. Press the button to confirm the setting. The indicator is displayed on the LCD monitor.
5. Press the shutter release button to capture the three images. The first frame is underexposed, the second frame is exposed
with no compensation, and the third is overexposed.
In Auto Bracket mode, the flash mode will be set to Flash Off automatically.
EN-36
Drive Mode
Drive Mode
Auto Bracket
Auto Bracket
OK :
OK :
Page 37

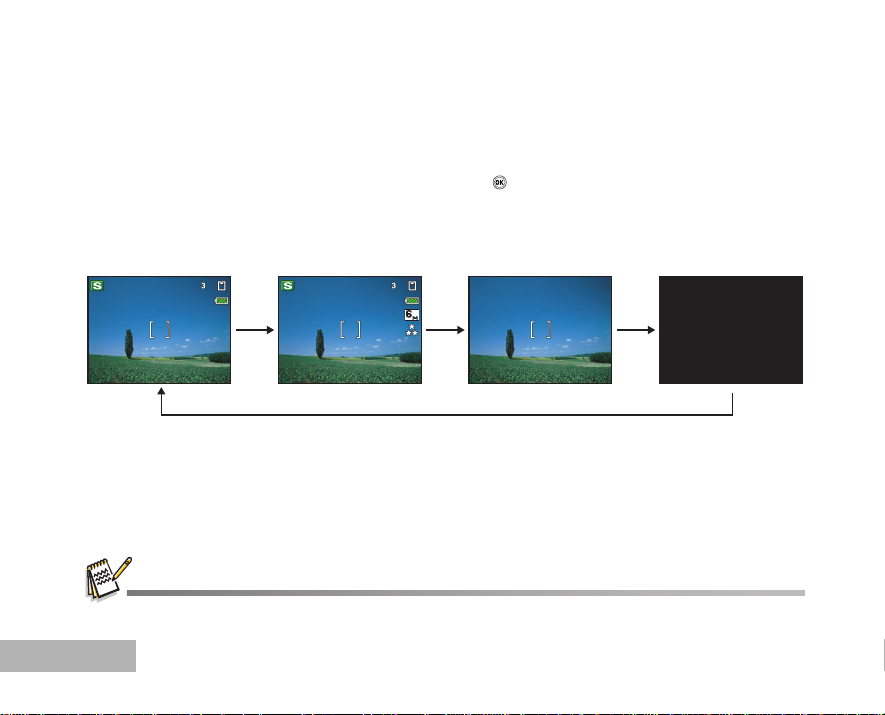
Self-Timer
OK :
Drive Mode
2 sec. Self-timer
The self-timer can be used in situations such as group shots. When using this option, you should either mount
the camera on a tripod (recommended) or rest it on a flat, level surface.
1. Secure the camera to a tripod or place it on a stable surface.
2. Rotate the mode dial to , , , , or .
3. Press the power switch to turn on the power.
4. Press the four-way controller (S/ ) and use (S) to select your
desired self-timer mode. You can also change the setting using
four-way controller (WX).
5. Press the button to confirm the setting.
6. Compose your scene and press the shutter release button.
The self-timer function is activated.
The photograph is then taken after the preset time.
To cancel the self-timer at any time, press the four-way
controller (S/ ) or press the shutter release button halfway.
Drive Mode
Drive Mode
2 sec. Self-timer
2 sec. Self-timer
OK :
OK :
EN-37
Page 38

The camera has three self-timer modes as below.
Self-timer mode Description
2 sec. Self-timer The image is captured about 2 seconds after the shutter is pressed. This mode is
useful for preventing camera shake.
10 sec. Self-timer The image is captured about 10 seconds after the shutter is pressed. This mode
is suitable for the shots in which the photographer has to be included.
10+2 sec. Self-timer The first image is captured about 10 seconds after the shutter release button is
pressed, and then the second image is captured 2 seconds later. This mode is
convenient when capturing group images in succession. Flash does not
discharge in this mode.
After one shot is taken, the self-timer mode is turned off.
If you wish to take another image using the self-timer, repeat these steps.
EN-38
Page 39

Adjusting the Exposure (EV Compensation)
OK :
±
0.0
EV
Select :
You can manually adjust the exposure determined by the digital camera. Use this mode when the proper
exposure cannot be obtained, for example, when the contrast (difference between bright and dark areas)
between the subject and the background is extremely high. The EV compensation value can be set in the
range from -2.0EV to +2.0EV.
1. Rotate the mode dial to , , , or .
2. Press the power switch to turn on the power.
3. Press the four-way controller (T/ ) and use (WX) to set the EV
compensation value from -2.0EV to +2.0EV.
4. Press the button to confirm the setting.
Select :
Select :
EV
EV
±
0.0
0.0
OK :
OK :
EN-39
Page 40

Menu2
Menu3
Recorded Pixels
Quality Level
White Balance
Sensitivity
Menu1
Select :
Exit :
White Balance
Auto
Daylight
Cloudy
Tungsten Light
Select :
Cancel :
White Balance
Fluorescent Light
Select :
Cancel :
Setting White Balance
This feature lets you make adjustments to compensate for different lighting types according to your shooting
conditions.
1. Rotate the mode dial to , , , or .
2. Press the power switch to turn on the power.
3. Press the MENU button. [Menu1] is displayed.
4. Use the four-way controller (T) to select [White Balance], then
press the button.
5. Use the four-way controller (ST) to select the desired white
balance setting, then press the button to confirm.
6. To cancel the setting, press the MENU button and exit the menu.
EN-40
Menu1
Recorded Pixels
Recorded Pixels
Quality Level
Quality Level
White Balance
White Balance
Sensitivity
Sensitivity
Exit :
Cancel :
Cancel :
Menu2
Menu2 Menu3Menu1
White Balance
White Balance
Auto
Auto
Daylight
Daylight
Cloudy
Cloudy
Tungsten Light
Tungsten Light
White Balance
White Balance
Fluorescent Light
Fluorescent Light
Menu3
Select :
Select :Exit :
Select :
Select :Cancel :
Select :
Select :Cancel :
Page 41

Recording Movie Clips
This mode allows you to record movie clips with sound via built-in microphone.
1. Rotate the mode dial to and turn your camera on by pressing
the power switch.
2. Press the shutter release button to start recording.
3. To stop recording, press the shutter release button again.
The optical zoom function (3X) can be activated before you start recording the movie clips
The digital zoom function can be activated before and during the recording.
EN-41
Page 42

PLAYING BACK AND DELETING IMAGES
Viewing Images
You can display the still images one by one.
1. Rotate the mode dial to , , , , , or and turn
your camera on by pressing the power switch.
2. Press the button.
The last recorded image appears on the LCD monitor.
Basic information is shown by indicators on the LCD monitor.
To see full information display, press the button.
3. Use the four-way controller (WX) to select the desired images.
To view the previous image, press the four-way controller (W).
To view the next image, press the four-way controller (X).
For protected images/movie clips, mark will be displayed. (Refer to the section in this manual titled “Protecting
Images/Movie Clips” (EN-48) for further details.)
For images selected for printing with DPOF setting, mark will be displayed. (Refer to the section in this manual titled
“Setting the DPOF” (EN-53, 54) for further details.)
If there is no image stored in the internal memory or on the SD Memory Card, [No image] message will appear on the LCD
monitor.
You cannot enter the Playback mode from the Setup mode.
EN-42
Page 43

Magnifying Images
1.5X
While reviewing your images, you may enlarge a selected portion of an image. This magnification allows you
to view fine details. The zoom factor displayed on the screen shows the current magnification ratio.
1. Press the button.
The last recorded image appears on the LCD monitor.
To view the previous image, press the four-way controller (W).
To view the next image, press the four-way controller (X).
2. Adjust the zoom ratio by using the / button.
To enlarge the selected image, press the button.
To return to the normal image, press the button.
The magnification factor is displayed on the LCD monitor.
3. To view different portions of the images, press the four-way
controller (STWX) to adjust the display area.
The magnification factors range from 1.5X to 4X (within 6 stages: 1.5X, 2.0X, 2.5X, 3.0X, 3.5X and 4.0X).
Movies cannot be magnified during playback.
1.5X
1.5X
EN-43
Page 44

Thumbnail Display
1 2 3
4 5
6
7 8 9
This function allows you to view 9 thumbnail images on the LCD monitor simultaneously so you may search
for a particular image.
1. Press the button.
The last recorded image appears on the LCD monitor.
2. Press the / button once.
Nine thumbnail images are displayed simultaneously.
For recorded movie clips, the movie mode icon will be
displayed.
For protected images/movie clips, mark will be displayed.
(Refer to the section in this manual titled “Protecting Images/
Movie Clips” (EN-48) for further details.)
3. Use the four-way controller (STWX) to move the cursor to select
the image to be displayed at regular size.
4. Press the or / button to display the selected image on full screen.
Pressing the button while selecting an image opens the delete screen.
EN-44
123
45
789
6
Page 45

Playing Back Movie Clips
1/7
100-0002
00:05
01/09/2006
12:01
You can play back the recorded movie clips on the LCD monitor. However, the sound recorded with movie
clips can only be played back on a computer.
1. Press the button.
2. Use the four-way controller (WX) to go through the images until
the movie clip you want to play back is displayed.
To view the previous image, press the four-way controller (W).
To view the next image, press the four-way controller (X).
3. Press the four-way controller (S) to start playing back the movie
clips.
The following operations can be performed during playback.
Four-way controller (W) Reverse playback
Four-way controller (S) Pause
The following operations can be performed while playback is
paused.
Four-way controller (W) Frame reverse
Four-way controller (X) Frame forward
Four-way controller (S) Releases the Pause function (Play)
4. Press the four-way controller (T) to stop playback.
The zoom function cannot be activated when playing back movie clips.
To playback the movie clips on the computer, we recommend you to use Windows Media Player 9.0 or later (WMP 9.0 or
later). You can download WMP version from the website at www.microsoft.com
.
100-0002
100-0002
00:05
00:05
01/09/2006
01/09/2006
12:01
12:01
1/7
1/7
EN-45
Page 46

Slideshow Display
Slideshow
Protect
DPOF
Playback1
Playback2
Select :
Exit :
Slideshow
3sec
5sec
10sec
Select :
Cancel :
The slideshow function enables you to play your images back automatically in sequential order. This is very
useful and entertaining feature for reviewing recorded images and for presentations.
1. Press the button.
The last recorded image appears on the LCD monitor.
2. Press the MENU button to access the Playback menu. Then use
the four-way controller (T) to select [Slideshow] and press the
button.
Playback1
Playback1 Playback2
Slideshow
Slideshow
Protect
Protect
DPOF
DPOF
Playback2
3. Use the four-way controller (ST) to set the playback interval, then
press the button. You can choose from 3 sec., 5 sec. and 10
sec..
The slideshow starts.
The movie clips display the first frame image, and the movie is
not played back.
To stop slide show, press the button.
EN-46
Exit :
Cancel :
Slideshow
Slideshow
3sec
3sec
5sec
5sec
10sec
10sec
Select :
Select :Exit :
Select :
Select :Cancel :
Page 47

Delete
This Image
All Images
Select :
Cancel :
Delete
OK
Cancel
Select :
Deleting Images/Movie Clips
Use this function to delete one or all images/movie clips stored in SD Memory Card or the internal memory.
Please note that the deleted images or movie clips cannot be recovered. Exercise caution before deleting a
file.
1. Rotate the mode dial to , , , , , or and turn
your camera on by pressing the power switch.
2. Press the button. The last recorded image/movie clip appears on the LCD
monitor.
3. Use the four-way controller (WX) to select the image/movie clip
you want to delete. You can also select the image/movie clip from
the thumbnail display.
4. Press the button to delete.
5. Use the four-way controller (ST) to select [This Image] or [All
Images] as your preference, then press the button.
[This Image]: Delete one image/movie.
[All Images]: Delete all images/movies (at once).
6. When the delete message appears, use the four-way controller
(ST) to select [OK], then press the button to confirm the
deletion.
If you wish to cancel the deletion, select [Cancel].
Protected images cannot be deleted with the delete function.
Cancel :
Delete
Delete
This Image
This Image
All Images
All Images
Delete
Delete
OK
OK
Cancel
Cancel
Select :
Select :
Select :
Select :Cancel :
EN-47
Page 48

Protecting Images/Movie Clips
Slideshow
Protect
DPOF
Playback1
Playback2
Select :
Exit :
Protect
This Image
All Images
Select :
Cancel :
Set the data to read-only to prevent images from being deleted by mistake.
1. Press the button.
The last recorded image appears on the LCD monitor.
2. Use the four-way controller (WX) to select the desired images.
To view the previous image, press the four-way controller (W).
To view the next image, press the four-way controller (X).
3. Press the MENU button, then use the four-way controller(T) to
select [Protect] and press the button.
4. Use the four-way controller (ST) to choose the desired setting,
then press the button.
[This Image]: Protect one image/movie.
[All Images]: Protect all images/movies (at once).
Playback1
Playback1 Playback2
Slideshow
Slideshow
Protect
Protect
DPOF
DPOF
Exit :
This Image
This Image
All Images
All Images
Protect
Protect
Playback2
Select :Exit :
Select :
EN-48
Cancel :
Select :
Select :Cancel :
Page 49

5. Use the four-way controller (ST) to select [Protect], then press
This Image
Protect
Unprotect
Select :
Cancel :
the button to confirm.
Press the MENU button to return to the mode. The
indicator appears on the selected image.
If you wish to cancel the protect function of a protected image,
select [Unprotect].
This Image
This Image
Protect
Protect
Unprotect
Unprotect
Cancel :
Even protected images and movies will be deleted by formatting the SD Memory Card or the built-in memory.
Select :
Select :Cancel :
EN-49
Page 50

Playing Back Still Images/Movie Clips on TV
You can also playback your images on a TV screen. Before connecting to any device, make sure to select
NTSC/PAL system to match the video output system of the video equipment you are going to connect to the
digital camera, then turn off all devices to be connected.
1. Connect one end of the video cable to the PC/VIDEO terminal
of the digital camera, making sure the shapes of both terminals
match each other.
2. Connect the other end to the video input socket of the TV set.
3. Turn the TV and digital camera on.
4. Playback the images/movie clips. The method of operation is the same as playing back still
images and movie clips on the digital camera.
The sound recorded with movie clips can only be played back on a computer.
EN-50
PC/VIDEO terminal
Page 51

EDITING AND PRINTING IMAGES
Resize
Quality Change
Image Copy
Playback1
Playback2
Select :
Exit :
Resize
Select :
Cancel :
2304 x 1728
1600 x 1200
640 x 480
Changing Image Resolution and Quality
You can change the image resolution and quality of a captured image.
1. Press the button.
The last recorded image appears on the LCD monitor.
2. Use the four-way controller (WX) to select the desired image.
To view the previous image, press the four-way controller (W).
To view the next image, press the four-way controller (X).
3. Press the MENU button to access the Playback menu. Press the
four-way controller (X) to select [Playback2] and press (T) to
select [Resize] and press the button.
4. Use the four-way controller (ST) to select the desired setting,
then press the button to confirm.
5. To change the image quality, select [Quality Change] in the step 3
above and select the desired setting in the step 4 and press the
button to confirm.
Playback1
Playback1 Playback2
Resize
Resize
Quality Change
Quality Change
Image Copy
Image Copy
Exit :
2304 x 1728
2304 x 1728
1600 x 1200
1600 x 1200
640 x 480
640 x 480
Resize
Resize
Playback2
Select :
Select :Exit :
You can only choose a smaller resolution and a lower quality.
Movie cannot be resized.
Cancel :
Select :
Select :Cancel :
EN-51
Page 52

Copying Files
Resize
Quality Change
Image Copy
Playback1
Playback2
Select :
Exit :
Image Copy
OK
Cancel
Select :
You can copy image files from the built-in memory to the SD Memory Card. This function can only be selected
when a card has been inserted in the camera. When files are copied from the built-in memory to the SD
Memory Card, all the files are copied at once.
1. Press the button.
2. Press the MENU button to access the Playback menu.
3. Use the four-way controller (X) to select [Playback2] and use (T)
to select [Image Copy]. Press the button. The confirmation
screen appears.
Playback1
Playback1 Playback2
Resize
Resize
Quality Change
Quality Change
Image Copy
Image Copy
Playback2
Exit :
4. Use the four-way controller (ST) to select [OK ] and then press
the to confirm.
When a file is copied from the built-in memory to the SD Memory Card, it is assigned a new file name.
EN-52
Image Copy
Image Copy
OK
OK
Cancel
Cancel
Select :
Select :
Select :
Select :Exit :
Page 53

Setting the DPOF
Slideshow
Protect
DPOF
Playback1
Playback2
Select :
Exit :
DPOF
This Image
All Images
Reset All
Select :
Cancel :
DPOF (Digital Print Order Format) allows you to embed printing information on your SD Memory Card. By
using DPOF, you can select an image to be printed and then specify the number of prints and whether or not
to imprint the data when the image was taken. Take your SD Memory Card to a DPOF enabled printer that
accepts SD Memory Cards. The DPOF/card-compatible printer will read the embedded information on the SD
Memory Card and print your images as specified.
To configure print settings for a single image / all images.
1. Press the button, then use the four-way controller (WX) to select
the desired image you want to print.
2. Press the MENU button. Use the four-way controller (ST) to select
[DPOF], then press the button.
3. Use the four-way controller (ST) to select as your preference, then
press the button.
[This Image]: To configure print settings for a single image.
[All Images]: To configure print settings for all images.
[Reset All]: Resets all DPOF settings.
Playback1
Playback1 Playback2
Slideshow
Slideshow
Protect
Protect
DPOF
DPOF
Exit :
DPOF
DPOF
This Image
This Image
All Images
All Images
Reset All
Reset All
Cancel :
Playback2
Select :
Select :Exit :
Select :
Select :Cancel :
EN-53
Page 54

4. Use the four-way controller (STWX) to select as your preference,
Copies
Date
1
Without
This Image
Select :
Cancel :
DPOF
This Image
All Images
Reset All
Select :
Cancel :
Copies
Date
1
Without
This Image
Select :
Cancel :
then press the button.
[Copies]: Allows you to select image quantity (0~10). Use the four-way
controller (WX) to set the image quantity.
[Date]: The date of recording can be printed directly on the images.
Select [With] or [Without] with the four-way controller (WX).
5. Press the MENU button to return to the image playback mode.
The print icon is marked on the displayed image.
To cancel the DPOF settings for a single image, go back to step 3
to select [This Image] and select 0 in [Copies] in the next step. For
resetting all the DPOF settings, go back to step 3 to select [Reset
All].
DPOF settings can be made only for the images stored on an SD Memory Card.
Before you perform the DPOF settings on your camera, always remember to copy
your images from the internal memory to an SD Memory Card first.
The
You cannot print movies.
Depending on the printer or printing equipment at the photo processing lab., the
print icon will appear on the LCD monitor indicating images selected for
printing.
date may not be imprinted on the pictures even if the DPOF settings are made.
Cancel :
Cancel :
Copies
Copies
Date
Date
Copies
Copies
Date
Date
This Image
This Image
This Image
This Image
DPOF
DPOF
This Image
This Image
All Images
All Images
Reset All
Reset All
Without
Without
Select :
Select :Cancel :
Without
Without
Select :
Select :Cancel :
1
1
EN-54
Cancel :
Select :
Select :Cancel :
Page 55

Connecting to a PictBridge-Compatible Printer
USB Connection
PC
PictBridge
Select :
Cancel :
Even if you do not have a computer, you can connect the camera directly to a printer that supports PictBridge
to perform image selection and printing using the camera screen and controls. DPOF support also lets you
specify which images you want to print and how many copies of each should be printed.
Connecting the camera to the printer
1. Rotate the mode dial to and turn your camera on by pressing
the power switch.
2. Press the four-way controller (X) to select the [Set-up2] menu,
then use the four-way controller (T) to select [USB Con.]. Press
the button.
3. Use the four-way controller (ST) to select [PictBridge], then press
the button.
4. Connect your camera and the printer via a supplied USB cable. The message “Data being processed” will appear on the on the
LCD monitor.
On Windows 98/98SE/ME/2000, if the camera is connected to your computer and you unintentionally set the camera's
USB connection to PictBridge, the "Install Driver" message will appear. Ignore this message and click "Cancel".
Cancel :
USB Connection
USB Connection
PC
PC
PictBridge
PictBridge
Select :
Select :Cancel :
EN-55
Page 56

Printing images
Select Printing Mode
Print
Print All
DPOF AUTOPRINT
OK :
100-0008
Copies
Date
File Name
1
Without
Without
Print Setting
OK :
Cancel :
When the camera is properly connected to a PictBridge-compatible printer, the [Select Printing Mode] screen
is displayed on the LCD monitor. Use the four-way controller (ST) to select the print mode.
In [Print] Mode:
Lets you print the specified image with PictBridge.
1. Use the four-way controller (ST) to select the [Print] mode, then press
the button.
2. Use the four-way controller (WX) to select the image you want to print,
then press the four-way controller (T) to set more detailed settings.
Select Printing Mode
Select Printing Mode
Print
Print
Print All
Print All
DPOF AUTOPRINT
DPOF AUTOPRINT
OK :
OK :
100-0008
100-0008
3. Use the four-way controller (STWX) to select as your preference,
then press the button.
[Copies]: Specifies the number of prints. You can select the number up
to 10.
[Date]: If you select [With], images are printed with the date.
[File Name]: If you select [With], images are printed with the file name.
EN-56
Select :
Cancel :
Print Setting
Print Setting
Copies
Copies
Date
Date
File Name
File Name
Setting :Cancel :
Print :
Without
Without
Without
Without
OK :
OK :Cancel :
1
1
Page 57

100-0008
Paper Size
Border Status
Total 3
Standard
Standard
Paper Setting
Print :
Cancel :
Printing now
1/3
Cancel :
Print
Continue
Cancel
OK :
Cancel :
4. After Print Setting is set, the print icon is marked on the displayed
image. You can still use the four-way controller (WX) to change the
image by your preference, then press the button.
5. Use the four-way controller (STWX) to access the paper selection
setting, then press the button to confirm.
[Paper Size]: You may select the desired item depending on the type of
printer being used.
[Border status]: You may select the desired item depending on the type
of printer being used.
6. This starts printing and displays the message “Printing now” on the LCD monitor. The message will disappear after the printing is finished. Then the screen returns to [Select Printing Mode]. To cancel printing: Pressing the button during print data transfer displays the screen for selecting whether to [Continue] or [Cancel] printing.
100-0008
100-0008
Select : Print :
Setting :Cancel :
Paper Setting
Paper Setting
Paper Size
Cancel :
Cancel :
Cancel :
Paper Size
Border Status
Border Status
Total 3
Total 3
Printing now
Printing now
1/3
1/3
Print
Print
Continue
Continue
Cancel
Cancel
Standard
Standard
Standard
Standard
Print :
Print :Cancel :
Cancel :
Cancel :
OK :
OK :
EN-57
Page 58

In [Print All] Mode:
Select Printing Mode
Print
Print All
DPOF AUTOPRINT
OK :
Select Printing Mode
Print
Print All
DPOF AUTOPRINT
OK :
Lets you print all images with PictBridge.
1. If you wish to print all the images stored in the camera, you may
choose [Print All] in [Select Printing Mode].
2. To set Print Settings, follow steps 2 to 6 in [Print] Mode.(EN-56)
In [DPOF AUTOPRINT] Mode:
This function only lets you print the specified image based on the
previously set DPOF settings.
1. If you wish to print images with DPOF setting, you may choose [DPOF
AUTOPRINT] in [Select Printing Mode].
2. To set Print Settings, follow steps 5 to 6 in [Print] Mode.(EN-57)
When connecting a printer which is not compatible with DPOF, [DPOF AUTOPRINT] cannot be selected.
EN-58
Select Printing Mode
Select Printing Mode
Print
Print
Print All
Print All
DPOF AUTOPRINT
DPOF AUTOPRINT
Select Printing Mode
Select Printing Mode
Print
Print
Print All
Print All
DPOF AUTOPRINT
DPOF AUTOPRINT
OK :
OK :
OK :
OK :
Page 59

TRANSFERRING FILES FROM YOUR DIGITAL CAMERA TO COMPUTER
For transferring files to PC, you can use either the provided USB cable or a card reader. When using the USB
cable, installing the supplied USB driver is necessary for Windows 98/98SE users.
Step 1: Install the USB driver
Installation on Windows 98 & 98SE
The USB driver on the supplied CD-ROM (S-SW60) is exclusively for Windows 98 and 98SE. Windows 2000/
ME/XP users don't need to install the USB driver.
1. Insert the enclosed CD-ROM (S-SW60) into your CD-ROM drive.
2. With your camera turned off, connect it to your PC with the USB cable and then turn it on.
3. The "Add New Hardware Wizard" will appear on screen as shown on the right. Click on "Next".
4. Select "Search for the best driver for your device". Click on "Next".
EN-59
Page 60

5. Select "CD-ROM drive" and "Specify a location" as shown on the
Set-up1
Set-up2
Set-up3
USB Con.
Video Out
Brightness
Auto Power Off
PC
PAL
2min.
Select :
USB Connection
PC
PictBridge
Select :
Cancel :
right. Click on "Next".
Follow the on-screen instructions to complete the installation.
6. After the USB driver has been installed, restart your computer.
About Windows ME/2000/XP and Mac OS 9.2 or higher
For Windows ME/2000/XP and Mac OS 9.2 or higher, the computer
will automatically recognize the digital camera and load its own USB
drivers.
Step 2: Connect the digital camera to your computer
1. Rotate the mode dial to and turn your camera on by pressing
the power switch.
2. Press the four-way controller (X) to select the [Set-up2] menu,
then use the four-way controller (T) to select [USB Con.].
3. Press the button.
4. Use the four-way controller (T) to select [PC], then press the
button.
5. Turn off your camera.
Set-up1
Set-up1 Set-up2 Set-up3
Set-up2
USB Con.
USB Con.
Video Out
Video Out
Brightness
Brightness
Auto Power Off
Auto Power Off
USB Connection
USB Connection
PC
PC
PictBridge
PictBridge
Set-up3
PC
PC
PAL
PAL
2min.
2min.
Select :
Select :
EN-60
Cancel :
Select :
Select :Cancel :
Page 61

6. Connect your camera and the computer via the supplied USB cable, making sure the shapes of input and output terminals match each other.
7. Turn your camera on by pressing the power switch.
8. There will be a new “Removable Disk” icon detected in “My
PC/VIDEO terminal
Computer”, which contains your recorded images or movie clips.
(For Mac users, double-click "Untitled" disk drive icon on your
desktop.)
Step 3: Download images or movie clips
When the digital camera is turned on and connected to your computer, it is considered to be a disk drive, just
like a floppy disk. You can download (transfer) images by copying them from the “Removable disk” ("Untitled"
disk on a Macintosh) to your computer hard disk drive.
Windows
Open the “removable disk” and double click on the DCIM folder to open it to find more folders. Your images
are inside these folder(s). Select the desired still images or movie clips and then choose “Copy” from the
“Edit” menu. Open the destination location (folder) and choose “Paste” from the “Edit” menu. You may also
drag and drop image files from the digital camera to a desired location.
Macintosh
Open the "Untitled" disk icon, and the destination location on your hard disk. Drag and drop from the digital
camera to the desired destination.
SD Memory Card users may prefer to use an SD Memory Card reader (highly recommended).
EN-61
Page 62

Editing Software Requirements
After transferring the images and movies from your camera to your computer, you can organize, display, edit,
print, and share them by installing the software (ACDSee for PENTAX) included on the provided CD-ROM to
your computer.
Check the system requirements below before installing the software.
Windows Macintosh
OS Windows 98SE/Me/NT/2000/XP Mac OS 9.2 or later
CPU Pentium or later (Pentium III 500MHz or
later)
Memory 64MB or more (128MB or more) 8MB or more
HDD volume 40MB or more (50MB or more) 6MB or more
Other Requires CD-ROM drive, Internet
Explorer 5.0 or later, Quick Time 6* or
later, DirectX 9.0 or later, and Windows
Media Player 7.1 or later.
OS should be pre-installed and updated to the latest version.
Working status is not guaranteed for all qualifying PCs.
Figures within parenthesis above represent the minimum system requirements for using the "ACD Showtime! for
PENTAX".
"ACD Showtime! for PENTAX" is compatible with Windows only.
* QuickTime 7 available on the provided CD (S-SW60) cannot be installed on Windows OS other than 2000/XP. QuickTime
6 is required to see QuickTime-compatible movies on Windows 98/98SE/Me/NT. You can download QuickTime 6 from the
web site at www.apple.com
.
EN-62
PowerPC 266MHz or later
Requires CD-ROM drive and QuickTime
6.0 (and the latest version of CarbonLib if
using OS 9.2).
Page 63

Installing ACDSee for PENTAX
With ACDSee for PENTAX, you can find, organize, and preview images and media files on your computer,
and efficiently acquire images from digital cameras, scanners, and other devices. ACDSee for PENTAX's
full-featured image viewer and media player quickly generates high-quality displays of your images and
media files.
Also, ACDSee for PENTAX includes a wide variety of image editing tools you can use to create, edit, and
touch-up your digital images. Use tools such as red-eye reduction, crop, sharpen, blur, and emboss to
enhance or correct your images. Image management tools, such as exposure adjustment, convert, resize,
rename, and rotate, can be used to adjust multiple files at the same time.
1. Insert the enclosed CD-ROM (S-SW60) into your CD-ROM drive.
2. Select the desired language.
3. Select "Install" on ACDSee for PC and MAC.
Follow the on-screen instructions to complete the installation.
For more information about the operation of ACDSee for PENTAX application
software, refer to its respective help documentation.
For Windows 2000/XP users, please make sure to install and use the ACDSee for
PENTAX in “Administrator” mode.
EN-63
Page 64

MENU OPTIONS
Menu
Recorded Pixels
Quality Level
Select :
Exit :
Menu2
Menu3
Recorded Pixels
Quality Level
White Balance
Sensitivity
Menu1
Exit :
Menu2
Menu3
AE Metering
Digital Zoom
Instant Review
Menu1
On
Off
Exit :
Menu2
Menu3
Color
Sharpness
Saturation
Date Imprint
Menu1
Exit :
Medium
Medium
Off
Still Picture Capture Menu
This menu is for the basic settings to be used when capturing still images.
Recorded Pixels
Recorded Pixels
Quality Level
Quality Level
Exit :
Menu
Menu
Select :
Select :Exit :
Menu1
Menu2
Menu1 Menu2 Menu3
Recorded Pixels
Recorded Pixels
Quality Level
Quality Level
White Balance
White Balance
Sensitivity
Sensitivity
Exit :
Exit :
Menu3
Menu2
Menu2 Menu3
Menu1 Menu3
Menu1
AE Metering
AE Metering
Digital Zoom
Digital Zoom
Instant Review
Instant Review
Exit :
Exit :
On
On
Off
Off
Menu1
Menu1 Menu2
Color
Color
Sharpness
Sharpness
Saturation
Saturation
Date Imprint
Date Imprint
Exit :
Exit :
Menu2
1. Rotate the mode dial to , , , , or and turn your camera on.
2. Press the MENU button, then use the four-way controller (WX) to select the [Menu1] / [Menu2] / [Menu3].
In Mode, press the MENU button to access the [Menu] directly.
3. Use the four-way controller (ST) to select the option item, then press the button.
4. Press the four-way controller (STWX) to select the desired setting, then press the button.
5. To exit the still picture capture menu, press the MENU button.
EN-64
Menu3
Menu3
Medium
Medium
Medium
Medium
Off
Off
Page 65

In the Mode
Item Functional Description
Recorded
Pixels
Quality Level Sets the quality (compression rate) at which the image is captured. Refer to the section in
Sets the size of the image that will be captured. Refer to the section in this manual titled
"Setting Image Resolution and Quality" (EN-31) for further details.
2816x2112
2304x1728
1600x1200
640x480
this manual titled "Setting Image Resolution and Quality" (EN-31) for further details.
Best
Better
Good
EN-65
Page 66

In the , , , or Mode.
Menu1 settings
Item Functional Description
Recorded
Pixels
Refer to the section in this manual titled “Setting Image Resolution and Quality” (EN-31)
for further details.
Quality Level Refer to the section in this manual titled “Setting Image Resolution and Quality” (EN-31)
White Balance Sets the white balance when shooting under a variety of lighting conditions and permits
Sensitivity Sets the sensitivity for taking pictures. When the sensitivity is raised (and the ISO figure is
EN-66
for further details.
photographs to be taken that approach the conditions that are seen by the human eye.
Auto
Daylight
Cloudy
Tungsten Light
Fluorescent Light
increased), photography will become possible even in dark locations, but the more
pixelated (grainier) the image will appear.
Auto / 64 / 100 / 200
Page 67

Menu2 settings
Item Functional Description
AE Metering You can select the metering mode that sets which part of the subject to measure to
determine the exposure.
Center-weighted: Averages the light metered from the entire frame, but gives greater
weight to the subject matter at the center.
Spot: The exposure is determined by the small area in the center of the screen only.
Digital Zoom This sets whether or not to use digital zoom at the time of shooting. Refer to the section in
this manual titled “Using the Zoom Function” (EN-32)
for further details.
Instant Review Set to display a photographed image on LCD monitor immediately after you have taken the
shot.
EN-67
Page 68

Menu3 settings
Item Functional Description
Color Sets the color of the image that will be captured.
Sharpness Sets the level of image sharpness.
Saturation To capture an image, your camera offers you three different degrees of color to match with
Date Imprint The date of recording can be printed directly on the still images. This function must be
EN-68
Full Color
B&W
Sepia
High
Medium
Low
your preference.
Your images will demonstrate different impression by selecting different degrees of color.
This is called “Saturation”.
High
Medium
Low
activated before the image is captured. The date appears on the right bottom of the
captured picture. When images are shot with date imprint feature, the date cannot be
removed later. Please take care about the settings of the provided software (ACDSee for
PENTAX) when printing. If the image with the date imprinted by the camera is printed with
default settings, another date is printed on the first imprinted date.
Page 69

Movie Menu
Color
Digital Zoom
On
Movie
Select :
Exit :
This menu is for the basic settings to be used when recording movie clips.
Movie
Movie
Color
Color
Digital Zoom
Digital Zoom
On
On
Exit :
Select :
Select :Exit :
1. Rotate the mode dial to and turn your camera on.
2. Press the MENU button.
3. Press the four-way controller (ST) to select the option item. Then press the button
4. Press the four-way controller (STWX) to select the desired setting, then press the button.
5. To exit the movie menu, press the MENU button.
Item Functional Description
Color Refer to the Still Picture Capture Menu's option item (the , , , or Mode) for
further details. (EN-68)
Digital Zoom Refer to the Still Picture Capture Menu's option item (the , , , or Mode) for
further details. (EN-67)
EN-69
Page 70

Playback Menu
Slideshow
Protect
DPOF
Playback1
Playback2
Exit :
Resize
Quality Change
Image Copy
Playback1
Playback2
Exit :
In the menu, set the settings used for playback.
Playback1
Playback1 Playback2
Slideshow
Slideshow
Protect
Protect
DPOF
DPOF
Exit :
Exit :
1. Press the button.
The last recorded image appears on the LCD monitor.
2. Press the MENU button, then use the four-way controller (WX) to select the [Playback1] / [Playback2]
menu.
3. Use the four-way controller (ST) to select the option item, then press the button.
4. Press the four-way controller (ST) to select the desired setting, then press the button.
5. To exit the playback menu, press the MENU button.
Playback2
Playback1
Resize
Resize
Quality Change
Quality Change
Image Copy
Image Copy
Exit :
Exit :
Playback2
Playback2Playback1
EN-70
Page 71

Playback1
Item Functional Description
Slideshow You can play back recorded images in order with a selected interval time.
This function is useful for checking your images or for presentations, etc.
Refer to the section in this manual titled “Slideshow Display” (EN-46) for further details.
3 sec. / 5 sec. / 10 sec.
Protect Set the data to read-only to prevent images from being deleted by mistake.
Refer to the section in this manual titled “Protecting Images/Movie Clips” (EN-48) for
further details.
DPOF Allows you to select the desired pictures to be printed and set the number of prints and
whether or not to imprint the date in DPOF format. You can print images easily just by
inserting the SD Memory Card to a DPOF-compatible printer or taking it to a print shop.
Refer to the section in this manual titled “Setting the DPOF” (EN-53) for further details.
EN-71
Page 72

Playback2
Item Functional Description
Resize Changes the size of a recorded image.
Quality Change Changes the quality (compression rate) of a recorded image.
Image Copy Allows you to copy your files from the digital camera’s internal memory to an SD Memory
EN-72
Resizing replaces the original image with the changed image. Only resizing to a
smaller size is available. Refer to the section in this manual titled “Changing Image
Resolution and Quality” (EN-51) for further details.
2304x1728
1600x1200
640x480
Compresses images and overwrites an old size images with a newly compressed image.
Only quality changing to a lower quality level is available. Refer to the section in this
manual titled “Changing Image Resolution and Quality” (EN-51) for further details.
Better
Good
Card. You can only do this if you have an SD Memory Card installed and some files in
internal memory. Refer to the section in this manual titled “Copying Files” (EN-52) for
further details.
Page 73

Setup Menu
Set-up1
Set-up2
Set-up3
Format
Sound
Date Adjust
Language
Off
d/m/y
English
Set-up1
Set-up2
Set-up3
USB Con.
Video Out
Brightness
Auto Power Off
PC
PAL
2min.
Set-up1
Set-up2
Set-up3
Reset No.
Reset
Version
This feature allows you to change the default settings to your preferences for using your camera.
Set-up1
Set-up1 Set-up2
1. Rotate the mode dial to mode and turn your camera on.
2. Press the four-way controller (WX) to select the [Set-up1] / [Set-up2] / [Set-up3] menu.
3. Use the four-way controller (ST) to select the desired option item, then press the button.
4. Press the four-way controller (STWX) to select the desired setting, then press the button.
5. To exit the setup menu, rotate the mode dial to another mode.
Set-up2 Set-up3
Format
Format
Sound
Sound
Date Adjust
Date Adjust
Language
Language
Set-up3
Off
Off
d/m/y
d/m/y
English
English
Set-up1
Set-up1 Set-up3
Set-up2
Set-up2 Set-up3
USB Con.
USB Con.
Video Out
Video Out
Brightness
Brightness
Auto Power Off
Auto Power Off
PC
PC
PAL
PAL
2min.
2min.
Reset No.
Reset No.
Reset
Reset
Version
Version
Set-up2
Set-up1
Set-up1 Set-up2
Set-up3
Set-up3
EN-73
Page 74

Set-up1 settings
Item Functional Description
Format Deletes all images and reformats the SD Memory Card loaded in your camera. Protected
Sound This sets whether or not to mute the camera sound each time you press a camera button.
images are also deleted. SD Memory Card cannot be formatted if it is write-protected.
Refer to the section in this manual titled “Formatting an SD Memory Card or Internal
Memory” (EN-27) for further details.
Loud / Soft / Off
Date Adjust This sets the date and the time.
Language Sets the language that is displayed on the LCD monitor.
EN-74
Refer to the section in this manual titled “Setting the Date and Time” (EN-26) for further
details.
d/m/y
m/d/y
y/m/d
Refer to the section in this manual titled “Choosing the Screen Language” (EN-25) for
further details.
English/ Français / Español / Deutsch / Italiano / Svenska / Nederlands / Русский /
Português / /
Page 75

Set-up2 settings
Item Functional Description
USB Con. Used to choose one of the following modes for further settings.Refer to the section in this
Video Out Sets video output of the camera to match the video output system of the equipment that
Brightness This sets the brightness of the LCD monitor.
manual titled “Connecting to a PictBridge-Compatible Printer” (EN-55) and Step 2 in
“TRANSFERRING FILES FROM YOUR DIGITAL CAMERA TO COMPUTER” (EN-60)
for further details.
PC / PictBridge
you are going to connect to the camera.
PAL / NTSC
The adjustment range is from -5 to +5.
Auto Power Off If no operation is performed for a specific period of time, the power to the camera is
automatically turned off. This feature is useful to reduce battery wear. The Auto Power Off
function will not work when the USB cable is connected.
2 min. / 3 min. / 5 min. / Off
EN-75
Page 76

Set-up3 settings
Item Functional Description
Reset No. Sets whether or not to reset the file number when you take photographs. This creates a
Reset Returns all basic settings to the digital camera's default settings. Date Adjust, Language
Version This displays the current firmware version of the camera.
EN-76
new folder. The captured images are recorded to the newly created folder from number
0001.
and Video Out setting will not be reset.
Page 77

CONNECTING THE DIGITAL CAMERA TO OTHER DEVICES
VIDEO CABLE
audio-video equipment
USB CABLE
PC
SD Card Reader
SD Memory Card
PCMCIA Adapter
USB CABLE
(PictBridge Function)
Printer
EN-77
Page 78

SPECIFICATIONS
Item Description
Image Sensor CCD
Effective pixels 6.0 Mega pixels
Image size Still image: 2816x 2112, 2304 x 1728, 1600 x 1200, 640 x 480
Image quality Still image: Best, Better, Good
Recording media Approx. 13MB internal memory
File format JPEG (Exif 2.2), DCF, Motion JPEG (AVI)
Lens F-no.: Wide-angle: 2.8 / Telephoto: 4.8
Focus range Normal: 0.4m to infinity
Flash effective range Wide-angle: Approx. 0.5 m - Approx.3.4 m (at the standard output sensitivity of 200)
LCD monitor 2.4” TFT color LCD
EN-78
Movie clip: 320 x 240
Movie image: Good
SD Memory Card
Focal length: 5.5mm-16.5mm (Equivalent to 35mm Camera: 34~102 mm)
Macro :0.06m to infinity (Wide-angle)
:0.35m to infinity (Telephoto)
Telephoto: Approx. 0.5 m - Approx. 2.0 m (at the standard output sensitivity of 200)
Approx. 112,000 pixels display
Page 79

Item Description
Self-timer 10 sec self-timer, 2 sec self-timer, 10+2 sec self-timer
Exposure compensation -2.0EV~ +2.0EV (in 0.3EV increments)
White balance Auto, Daylight, Cloudy, Tungsten, Fluorescent
ISO Auto, 64, 100, 200
Interface PC/VIDEO terminal
Power 2 x AA (alkaline or Ni-MH rechargeable) batteries
(Two alkaline batteries allow approximately 100 shots to be taken*)
(Two Ni-MH rechargeable batteries (2500mAh) allow approximately 350 shots to be
taken*)
AC-DC Adapter (3V/2A) (Optional)
Dimension Approx. 90 x 63 x 32 mm
Weight Approx. 130g (without batteries and SD Memory Card)
Others PictBridge support, DPOF, PRINT Imaging Matching III
* Recording capacity shows approximate number of shots recorded during CIPA-compliant testing. Actual performance may
vary according to operating conditions.
* Design and specifications are subject to change without notice.
EN-79
Page 80

APPENDIX
Troubleshooting Guide
Symptom Possible causes Solutions / Corrective Actions
Power does not turn
on.
Camera suddenly
powers down.
Image is not captured
when the shutter
release button is
pressed.
EN-80
* The battery has run out.
* The battery is not oriented correctly.
* The battery/card cover is not closed
properly.
* The AC adapter (optional) is
disconnected.
* The function of [Auto Power Off] in the
mode has been activated.
* The battery has run out.
* The camera is in the or mode.
* Memory is full.
* Load new or fully charged battery.
* Load the battery in the correct
direction.
* Close the battery/card cover correctly.
* Properly connect the AC adapter.
* Turn the power back on and set the
option of [Auto Power Off] to [Off].
* Load new or fully charged battery.
* Rotate the mode dial to , , ,
, or .
* Transfer the desired files to your
computer and then delete
unnecessary files, or use a different
memory card.
Page 81

Symptom Possible causes Solutions / Corrective Actions
Flash does not
discharge.
Continuous shooting is
not possible.
Cannot transfer files
over a USB
connection.
* Flash off is selected in flash mode.
* 10+2 sec. Self-timer is selected in
self-timer mode.
* The [Drive Mode] is set to [High Speed
Continuous] or [Auto Bracket].
* The camera is in the (movie) mode.
* The capacity of the built-in memory or
SD Memory Card is full.
* USB cable is not connected securely.
* USB driver is not installed.
* Camera is turned off.
* Select a different flash mode.
* Select [Standard] in the [Drive Mode].
* Switch the mode dial to another
mode.
* Insert SD Memory Card with available
space or delete unwanted images.
* Check all connections.
* Install the USB driver on your
computer.
* Turn on the camera.
EN-81
Page 82

Possible Number of Recordable Images
The frame counter indicates the approximate number of images that can be stored on the internal memory
and the SD Memory Card. The number of recordable images may vary depending on the recorded subject,
the capacity of the memory card, if there are files other than images or when the recording is made while
switching the picture quality or resolution.
Resolution Quality
2816 x 2112 Best 4 9 20 42 82 164 329 670
Better 8 20 41 85 166 329 659 1342
Good 13 30 63 127 249 494 989 2013
2304 x 1728 Best 6 15 31 63 124 247 494 1006
Better 13 30 63 127 249 494 989 2013
Good 19 43 90 182 356 706 1414 2877
1600 x 1200 Best 13 30 63 127 249 494 989 2013
Better 26 61 126 256 499 989 1980 4028
Good 38 88 180 366 713 1414 2829 5754
640 x 480 Best 68 154 317 641 1249 2475 4951 10071
Better 113 258 528 1068 2082 4125 8253 16785
Good 152 344 705 1425 2776 5501 11004 22381
The above data shows the standard testing results. The actual capacity varies according to the shooting
conditions and settings.
EN-82
Internal
Memory
32MB 64MB 128MB 256MB 512MB 1GB 2GB
SD Memory Card
Page 83

Approximate Duration of Recording Time
The table below indicates the approximate duration of recording time depending on the capacity of the
internal memory and the SD Memory Card.
Image size
320 x 240 00:49 01:53 03:53 07:51 15:18 30:19 01:00:41 02:03:25
The values for the recording time may vary depending on the shooting conditions and settings.
The frame rate is 30 fps (frames per second).
Internal
Memory
32MB 64MB 128MB 256MB 512MB 1GB 2GB
SD Memory Card
EN-83
Page 84

INDEX
A
AC Adapter...................................................... 18
ACDSee for PENTAX ...................................... 63
AE Metering..................................................... 67
APPENDIX ...................................................... 80
Auto Bracket.............................................. 14, 36
Auto Power Off................................................ 75
B
Batteries .......................................................... 17
Battery/card cover ........................................... 13
Brightness ....................................................... 75
C
Color.......................................................... 68, 69
D
Date Adjust...................................................... 26
Date Imprint..................................................... 68
DC input terminal............................................. 18
Delete button ............................................. 13, 47
Deleting ........................................................... 47
Digital Zoom .................................. 10, 32, 67, 69
DPOF .............................................................. 53
Drive Mode ................................................ 14, 35
E
EV Compensation ...................................... 14, 39
F
Flash (Flash mode) .................................... 14, 33
Focus frame ......................................... 14, 15, 29
Focus mode ............................................... 14, 34
Format.............................................................. 27
Four-way controller .......................................... 13
H
High Speed Continuous ................................... 35
I
Infinity......................................................... 14, 34
Instant Review.................................................. 67
L
Landscape............................................ 12, 14, 30
Language ................................................... 25, 74
LCD Monitor ......................................... 10, 13, 28
LED Indicator ................................................... 24
Lens ................................................................. 12
EN-84
Page 85

M
Macro ........................................................ 14, 34
Magnifying ....................................................... 43
Menu ............................................................... 64
Menu button .................................................... 13
Microphone...................................................... 12
Mode Dial .................................................. 12, 30
Movie............................................. 12, 14, 30, 69
N
Night Scene......................................... 12, 14, 30
NTSC......................................................... 50, 75
O
OK button .................................................. 13, 28
P
PAL............................................................ 50, 75
PC ....................................................... 59, 60, 75
PC / Video terminal.......................................... 12
PictBridge ........................................................ 55
Playback button............................................... 13
Playing Back Movie......................................... 45
Portrait................................................. 12, 14, 30
Power (Power switch)................................ 12, 24
Program............................................... 12, 14, 30
Protect ....................................................... 48, 71
Q
Quality Change .......................................... 51, 72
Quality Level ........................................ 31, 65, 66
R
Recorded Pixels............................. 14, 31, 65, 66
Recording Movie .............................................. 41
Reset................................................................ 76
Reset No. ......................................................... 76
Resize ........................................................ 51, 72
S
Saturation......................................................... 68
SD Memory Card ............................................. 20
Self-Timer......................................................... 37
Self-timer LED.................................................. 12
Sensitivity................................................... 14, 66
Setup................................................................ 73
Sharpness........................................................ 68
Shutter release button...................................... 12
Simple .................................................. 12, 14, 30
Sound............................................................... 74
SPECIFICATIONS............................................ 78
Sport..................................................... 12, 14, 30
Strap................................................................. 23
Strap lug........................................................... 13
EN-85
Page 86

T
Thumbnail Display............................................ 44
Transferring files .............................................. 59
Tripod socket.................................................... 13
TV .................................................................... 50
U
USB connection ....................... 10, 55, 59, 60, 75
USB driver........................................................ 59
V
Version............................................................. 76
Video Out ......................................................... 75
W
White Balance...................................... 14, 40, 66
Z
Zoom bar.................................................... 32, 43
Zoom button......................................... 13, 32, 43
EN-86
Page 87

WARRANTY POLICY
All PENTAX cameras purchased through authorized bona fide photographic distribution channels are
guaranteed against defects of material or workmanship for a period of twelve months from date of purchase.
Service will be rendered, and defective parts will be replaced without cost to you within that period, provided
the equipment does not show evidence of impact, sand or liquid damage, mishandling, tampering, battery or
chemical corrosion, operation contrary to operating instructions, or modification by an unauthorized repair
shop. The manufacturer or its authorized representatives shall not be liable for any repair or alterations
except those made with its written consent and shall not be liable for damages from delay or loss of use or
from other indirect or consequential damages of any kind, whether caused by defective material or
workmanship or otherwise; and it is expressly agreed that the liability of the manufacturer or its
representatives under all guarantees or warranties, whether expressed or implied, is strictly limited to the
replacement of parts as hereinbefore provided. No refunds will be made on repairs by non-authorized
PENTAX service facilities.
Procedure during 12-month Warranty Period
Any PENTAX which proves defective during the 12-month warranty period should be returned to the dealer
from whom you purchased the equipment or to the manufacturer. If there is no representative of the
manufacturer in your country, send the equipment to the manufacturer, with postage prepaid. In this case, it
will take a considerable length of time before the equipment can be returned to you owing to the complicated
customs procedures required. If the equipment is covered by warranty, repairs will be made and parts
replaced free of charge, and the equipment will be returned to you upon completion of servicing. If the
equipment is not covered by warranty, regular charges of the manufacturer or of its representatives will apply.
Shipping charges are to be borne by the owner.
EN-87
Page 88

If your PENTAX was purchased outside of the country where you wish to have it serviced during the warranty
period, regular handling and servicing fees may be charged by the manufacturer’s representatives in that
country. Not withstanding this, your PENTAX returned to the manufacturer will be serviced free of charge
according to this procedure and warranty policy. In any case, however, shipping charges and customs
clearance fees to be borne by the sender. To prove the date of your purchase when required, please keep the
receipt or bills covering the purchase of your equipment for at least a year. Before sending your equipment for
servicing, please make sure that you are sending it to the manufacturer’s authorized representatives or their
approved repair shops, unless you are sending it directly to the manufacturer. Always obtain a quotation for
the service charge, and only after you accept the quoted service charge, instruct the service station to
proceed with the servicing.
* This warranty policy does not affect the customer’s statutory rights.
* The local warranty policies available from PENTAX distributors in some countries can
supersede this warranty policy. Therefore, we recommend that you review the warranty card
supplied with your product at the time of purchase, or contact the PENTAX distributor in
your country for more information and to receive a copy of the warranty policy.
The CE Mark is a Directive conformity mark of the European Union.
EN-88
Page 89

Information on Disposal for users
1. In the European Union
If your product is marked with this symbol, it means that used electrical/electronic
products should not be mixed with general household waste. There exists a separate
collection system for these products.
Used electric/electronic equipment must be treated separately and in accordance with
legislation that requires proper treatment, recovery and recycling of these products.
Following the implementation by member states, private households within the EU
states may return their used electrical/electronic equipments to designated collection
facilities free of charge*. In some countries your local retailer may also take back your
old product free of charge if you purchase a similar new one.
*Please contact your local authority for further details.
By disposing of this product correctly you will help ensure that the waste undergoes the
necessary treatment, recovery and recycling and thus prevent potential negative
effects on the environment and human health which could otherwise arise due to
inappropriate waste handling.
2. In other countries outside the EU
If you wish to discard this product, please contact your local authorities and ask for the
correct method of disposal.
For Switzerland: Used electrical/electronic equipment can be returned free of charge to
the dealer, even when you don’t purchase a new product. Further collection facilities
are listed on the home page of www.swico.ch or www.sens.ch.
EN-89
Page 90

FCC STATEMENT (For customers in USA)
This device complies with Part 15 of the FCC Rules. Operation is subject to the following two conditions:
(1) This device may not cause harmful interference, and
(2) This device must accept any interference received, including interference that may cause undesired
operation.
Note:
This equipment has been tested and found to comply with the limits for Class B digital devices, pursuant to Part 15 of the FCC
rules. These limits are designed to provide reasonable protection against harmful interference in a residential installation. This
equipment generates, uses and can radiate radio frequency energy and, if not installed and used in accordance with the
instructions, may cause harmful interference to radio communications. However, there is no guarantee that interference will
not occur in a particular installation. If this equipment does cause harmful interference to radio or television reception, which
can be determined by turning the equipment off and on, the user is encouraged to try to correct the interference by one or
more of the following measures:
Reorient or relocate the receiving antenna.
Increase the separation between the equipment and receiver.
Connect the equipment into an outlet on a circuit different from that to which the receiver is connected.
Consult the dealer or an experienced radio/TV technician for help.
Use of shielded cable is required to comply with Class B limits in Subpart B of Part 15 of the FCC rules.
Do not make any changes or modifications to the equipment unless otherwise specified in the manual. If such
changes or modifications should be made, you could be required to stop operation of the equipment.
For customers in Canada
This Class B digital apparatus meets all requirements of the Canadian Interference - Causing Equipment
Regulations.
Pour les utilisateurs au Canada
Cet apareil numérique de la classe B respecte toutes les exigences du Règlement sur le matériel brouilleur
du Canada.
EN-90
Page 91

Declaration of Conformity
According to 47CFR, Parts 2 and 15 for
Class B Personal Computers and Peripherals
We: PENTAX IMAGING COMPANY
A Division of PENTAX of America, Inc.
Located at: 600 12 Street, Suite 300
Golden, Colorado 80401 U.S.A.
Phone: 303-799-8000 FAX: 303-790-1131
Declare under sole responsibility that the product identified herein, complies with 47CFR Parts 2 and 15 of
the FCC rules as a Class B digital device. Each product marketed is identical to the representative unit tested
and found to be compliant with the standards.
Records maintained continue to reflect the equipment being produced can be expected to be within the
variation accepted, due to quantity production and testing on the statistical basis as required by 47CFR
§2.909. Operation is subject to the following two conditions: (1) This device may not cause harmful
interference, and (2) This device must accept any interference received, including interference that may
cause undesired operation. The above named party is responsible for ensuring that the equipment complies
with the standards of 47CFR §15.101 to §15.109.
Product Name: PENTAX Digital Still Camera
Model Number: Optio E20
Contact person: Customer Service Manager
Date and Place: September 2006, Colorado
EN-91
 Loading...