

Page 1
LIMITED WARRANTY
INSTALLATION INSTRUCTIONS
Compool Corporation warrants tot he purchaser oft his control system, for the period of
one year from the date of original purchase for use, that any defective product proved to
be caused by faulty workmanship or faulty material, will be repaired or replaced at
Compool's option for no charge, providing the product is returned to Compool
with all transportation charges prepaid.
First Ninety
shall be found to be defective due solely to faulty material and workmanship, Compool
Corporation will additionally cover the reasonable replacement cost charged by an
authorized service company.
After Ninety Days: Between the ninety-first day and the end of the first year after
installation, no allowances will be made for labor for the removal or reinstallation of any
soclaimed defective products
This warranty covers the Time Master Controller,
Valve Operators, and optional Remote Controls, including all components and parts.
It does not include Valves or Sensors. It extends to the first retail purchaser and any
subsequent owners of the system.
This limited warranty applies only to controls which have been installed and maintained
in strict accordance with installation and operating instructions provided by Compool
Corporation, using installation hardware supplied
Compool, and to controls which have been connected to the correct supply voltage.
This limited warranty does not apply to any controls which have been repaired or
altered by anyone other than Compool ora person authorized by it;
subject to misuse, neglect or accident; or which have been damaged by wind, freezing
or other cause, thing, person or act of God; or which have been subject to damage in
transit, during
have been damaged because of a defect in a component or part which is not part of the
Compool Control System; or upon which the serial number has been altered, effaced or
removed.
This warranty gives you specific legal rights and you may also have other rights which
vary from state to state. Compool
any other obligation or liability in connection with Compool controls. Compool
Corporation makes no warranty of merchantability or fitness for
warranty applicable to Compool controls is limited in duration to the duration of this
written warranty.
Compool Corporation shall not be liable for consequential or incidental damages
resulting from breach of this written warranty or any implied warranty. Some states do
not allow the exclusion or limitation of incidental or consequential damages, so the
above limitation of incidental or consequential damages may not apply to you.
exerclse this warranty, send defective unit, with copy of dated receipt,
To
postage prepaid, to:
Computerized
Days: During the first ninety days after installation, if any Compool control
LX-10
Service Center, VOR-24
and/or recommended in writing by
orwhich have been
installation,or by someone other than Compool Corporation; or which
Corpora!ion does not authorize any person to create
any use. Any implied
599 Fairchild
COMPOOL CORPORATION
Drive, Mountain View, California 94043-221
Pool
Systems
MEMBER
[m
N.,,oN.L
fie..
INSTITUTt
599 Fairchild Drive
Mountain View
California 94043-221
(415) 964-2201
POOL
7
TIME MASTER
POOL-SPA CONTROL SYSTEM
IMPORTANT SAFETY PRECAUTIONS:
All wiring must
Basic safety precautions and local codes should be observed when installing
and using this electrical equipment.
FiEAD AND FOLLOW ALL INSTRUCTIONS
EQUIPMENT LOCATION:
All electrical equipment must
exception of the optional Spa-side Remote Control
1.
LX-10
2. Time Master inside house or other weather-protected area
3. VOR-24 Valve
4.
WS5L Water Sensor at filter pump
SS100 Spaside Remote Control (optionar) at spa site
5.
LOW VOLTAGE CABLES:
Determine lengths of 22AWG low voltage cable needed between equipment
6pair cable from Time Master to LX-10 Service Center.
1.
2. 2 conductor cable from gas heater to LX-10 Service Center.
3. Water Sensor is provided with 10 feet of 2 conductor cable.
4.
Valve Operators are provided with 15 feet of 3 conductor cable
5. Spa-side Remote Control is provided with 100 feet of 4 conductor cable
Remote Control is also available with 50. 150 or 200 feet of cable
Install cable. Place cable in plastic or metallic conduit where it runs
ihrough concrete, etc
NOTE: Never install low voltage cable and high voltage wires in the same
conduit A minimum distance of
of low voltage cable and AC current-carrying wires.
22AWG cable is available from Compool Corporation
PLUMBING:
Fol!ow recommended schematic (see next page) for location of threeport valves
2" dia. plumbing is advised to ensure optimum filter pump efficiency.
1. A
Y2" spa makeup line, (incorporating a Y2" manual gate or ball valve and, for elevated
aY2" checkvalve) should be provided around the retum valve(see schematic).
spas,
This enables clean water to be circulated to the spa while the system is in POOL
mode
2. Spa should be at or above the level of the pool If spa is attached to pool provide a
dam between the two bodies of water to allow spa overflow into pool If spa is not
attached to pool an overflow, sufficient in size to carry full pumpflow, must be
7
installed at water level in the spa
be
performed by a qualified electrician.
be
located five feet or more from pool or spa with the
Service Center at t!le equipment pad area
Opemtors at threeport valves
12" must be maintained between parallel runs
underground
Page 2
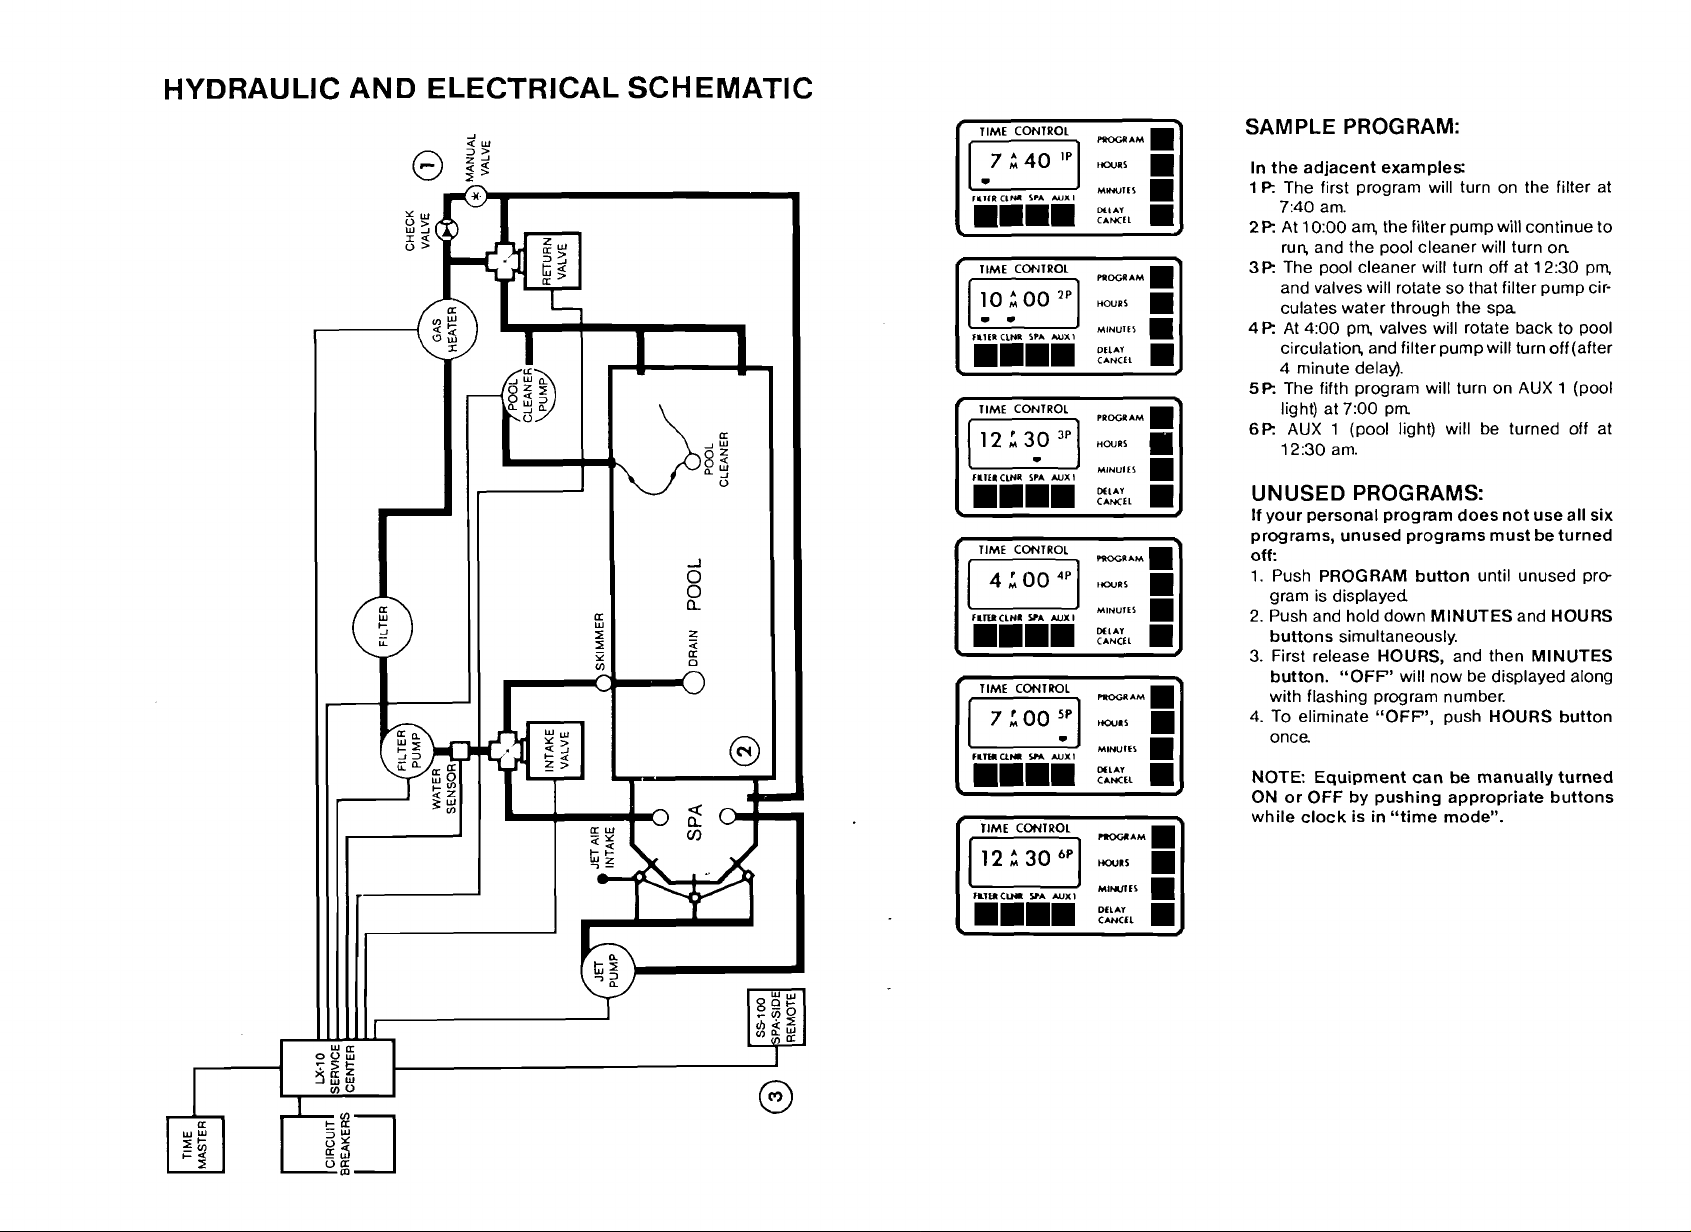
HYDRAULIC AND ELECTRICAL SCHEMATIC
llME
CONTROL
rlru
CLNR
TLNCLNI
TIME
CONlllOL
FLlUUH
SPA
wx
SPA
WXI
SM
WXI
SAMPLE PROGRAM:
In the adjacent examples
1
P.
The first program will turn on the filter at
7:40 am.
2P:
At 10:OO arq the filter pump will continue to
run, and the pool cleaner will turn on
3P:
The pool cleaner will turn off at 12:30 pm
and valves will rotate so that filter pump circulates water through the spa
4
P:
At 4:00 pm valves will rotate back to pool
circulation, and filter pump will turn off (after
4 minute delay).
5P.
The fifth program will turn on AUX 1 (pool
light) at
6P:
7:00 pm
AUX 1 (pool light) will be turned off at
12:30 am.
I
UNUSED PROGRAMS:
If your personal program does not use all six
programs, unused programs must be turned
off:
1. Push PROGRAM button until unused pro
gram is displayed
2. Push and hold down MINUTES and HOURS
buttons simultaneously.
3. First release HOURS, and then MINUTES
button.
with flashing program number.
4. To eliminate
once
NOTE Equipment can be manually turned
ON or OFF by pushing appropriate buttons
while clock is in "time mode".
"OFP' will now be displayed along
"OFP', push HOURS button
Page 3

LOW VOLTAGE WlHlNti UlAGHAM
OPERATING INSTRUCTIONS
I I I
0 0 0
n k k k
ZZZZ
ommm
tttt
XOJZ
JWW(1:
m
(1:
+
0
Do not untwist pairs.
It is neccessary to retain
wires in pairs so that
appropriate connections
can be identified.
-
N
(1:
LA
:I
I
Ell
GENERAL CONTROL FEATURES
FILTER PUMP OFF DELAY. This causes the filter pump to run an additional
4
minutes every time it is turned off. The purpose of this is to protect the gas heater
and plumbing from possible scale build-up and thermal stress. These occur when
residual heat in the gas heater is not allowed to dissipate after heater is turned off.
POOLCLEANER ON DELAY. Every time the pool cleaner pump is turned on, this
circuit prevents it from running until
pump from damage caused by air in the water lines that may have entered into
the plumbing since it was last used.
4
minutes have passed. This protects the
TIME CONTROL
EQUIPMENT BUlTON FUNCTIONS:
FILTER:
CLN R:
SPA:
AUX1:
Turns filter pump ON and circulates POOL water.
Turns filter and cleaner pumps ON. (Cleaner delayed
Turns filter pump ON and circulates
operate. Overrides CLNR key and turns pool cleaner pump OFF,
if
CLNR "flag" is present.
even
Turns electrically controlled function ON. (lights, jets, etc.)
SPAwater. Allows heater to
4
minutes)
TEMPERATURE CONTROL
WATER TEMPERATURE Display:
Pool temperature is displayed when the pool is operating, spa temperature when
the spa is operating. If filter pump is off, display may be meaningless
THERMOSTAT:
Desired pool or spa temperature is set here.
HEATER CONTROL
SWITCH POSITIONS:
PO
0
L:
SPA:
OFF: Allows no heating.
Allows heating of pool to the preset temperature level.
Allows heating of spa to the preset temperature level.
I I I
000
nkkk
ZZZZ
ommm
tttt
X3XZ
dJJ(1:
mmmo m3mrr
-~m
aaa
r55p
<<<N
JJJ
tttt
xkxn
-I I -I
+
w
HIGH VOLTAGE
R6
R7
RELAYS
HEATER ON Light:
When lit, indicates that heater is on.
STATUS DISPLAY
The presence of a light next to an equipment label indicates that it is ON. The
absence of a light indicates OFF.
DELAY CANCEL
FILTER: To override the Filter Delay Circuit, press CANCEL OFF DELAY
CLNR: To override the Cleaner Delay Circuit, press CANCEL ON
BUlTON FUNCTIONS:
button. Provided that there is no "flag" present at either
FILTER, CLNR or SPA buttons, the filter pump will shut off
immediately.
DELAY button. Provided that there is a "flag" present at the
CLNR button, the pool cleaner pump will start immediately.
If SPA is on, CLNR is inoperative.
Page 4

SETTING
THE
1. Push PROGRAM button until no flashing
number appears on the right of the display.
The clock is now in
2. Push HOURS and MINUTES buttons until
correct time of day is displayed NOTE: Pay
attentinn
CLOCK
"time mode".
to the AM/PM indicator.
3.
If the spa is constructed in concrete and optional Spa-side Remote Control (model
SS-100) is to be used, select a convenient location in the deck or above water level in
the spa wall
Install
100. This pipe should be level and protrude beyond the finished surface of spa
can be cut back at a later date. Connect 1
'
either
Service Center.
Do not install Outdoor Remote Control until spa construction is completed.
SS-100 should not be submerged by the spa water.
a6" to 12" length of 1
%"
or
%"
conduit and provide conduit as necessary to location of LX-10
%"
pvc pipe at this location to provide a receptable for SS
l/2"
coupling and reducing bushing for
It
PROGRAMMING
There are six possible programs during a 24 hour period for turning the pool
equipment ON or OFF. More than one piece of equipment may be programmed
ON or OFF at the same time.
1. Push PROGRAM button once
The clock is now in "program mode".
2. Enter desired program time by pushing the HOURS and MINUTES buttons In
"program mode", minutes are advanced in ten minute increments
AWPM indicator.
the
3.
Push FILTER, CLNR, SPA, orAUX1 button to program equipment ON or OFF. The
presence of a "flag" above each button indicates that the equipment is
grammed ON. The absence of a "flag" indicates OFF.
4. Repeat the preceding sequence for the remaining five programs
NOTE: Each time change requires a new program.
5. After programming, push PROGRAM button to return clock
is forgotten, after four minutes the clock will automatically return to "time mode".
A1 P(l st Program) will flash on the right of the display.
Pay~ttention to
pre
(2P6P).
toL'time mode". If this
U-10
Select a convenient location (at the equipment pad area) to mount LX-10 Service
Center. Ensure that the location is greater than
further than 15 feet from the
appropriate
the enclosure. Do not drill and mount from inside the enclosure. Install to provide
drainage of compartment for electrical components
All low voltage connections are
hinged faceplate in left side
Strip jacket of Gpair cable
nections Strip insulation of each wire
with wiring diagram located on inside of enclosure cover.
NOTE For the convenience of the serviceman, the screw terminal can be unplugged
from printed circuit board without disconnecting wires
SERVICE CENTER:
5
feet from the water's edge and no
scr'ews through the three external mounting points located on the side of
threeport valves Mount the LX-10 on a flat surface, using
mads to printed circuit board, located behind
compartment.
6"
to identify the twisted pairs and assure correct cop
Y4",
and connect to screw terminal inaccordance
VALVE OPERATORS:
Mount Valve Operators (model VOR-24) to threeport valves in accordance with
instructions printed on box
Plug cables into side of each Valve Operator, and run cables
ment of
on printed circuit board:
RET
LX-10 Service Center. Plug other end of cables into appropriate valve socket
intake(suction) valve to INT valve socket, and return valve to
.~alve socket
t~ low voltage compart-
WATER SENSOR:
Select a convenient location to mount Water Sensor(mode1 WS5L) in the plumbing
system at the filter pump Ensure that thislocation is nogreaterthan 10 feet from LX-10
Service Center, otherwise cable will need to be extended Disconnect Water Sensor
WTS-
and
WTSe
from
Remove clamp kit from behind service panel in right side compartment of LX-10, and
i~stall Sensor in accordance with instructions
Cautior.: Overtighting of clamp can cause deformation of Oring seal.
Run cable from Sensor
if
necessary. Strip insulation
cable
acco:dance with wiring diagram located inside LX-10 cover. Pay special attention to
polarity of Sensor as indicated by color-coding.
terminals on printed circuit board of Time Master.
I~ation to low voltage compartment of LX-10. Cut off excess
l/4"
and connect to black-green pair of 6pair cable in
GAS HEATER:
Inside the heater, interrupt wire between thermostat and gas valve, and connect2 cop
ductor cable with wire nut% in accordance with wiring diagram which is located inside
LX-10 cover. Do not disconnect high limit and pressure switches
%",
Run cable to LX-10 low voltagecompartment Strip insulation
terminals on printed circuit board
and connect to HTR
Page 5

AUXILIARY EQUIPMENT CONTROL (OPTIONAL):
The standard Time Master system is provided with 3 power relays for controlling filter
pump, pool cleaner, and auxiliary 1 (pool light).
It is possible to control additional equipment (such as a jet pump, air blower, spa light,
etc) by installing extra relay kits (model RLY-LX). The LX-10 Service Center will
accommodate a total of 7 relays Note: Further relays may be controlled by an addt
tional Power Center (model
lnstall RLY-LX Relay Kit at the LX-10 in accordance with instructions provided.
LX-36).
SPAaSIDE REMOTE CONTROL (OPTIONAL):
When the spa construction is completed, install optional Spa-side Remote Control
SS100) in accordance with instructions provided:
(model
1. Cut back the
2.
Making sure that screw threads are facing out, glue adapter into receptacle using
pvc cement
3. Thread cable through gasket, and run through conduit to LX-10
compartment
4. Before installing SS-100, rotate 7 turns counterclockwise to avoid undue twisting
of cable
5. Screw
6.
At the LX-10, cut off excess cable
connections to REMOTE SWITCHES screw terminals in accordance with
wiring diagram located inside enclosure cover.
Connect black wire (switch common) to GND terminal, and connect red, yellow,
and green wires to desired terminal for
Note: for the convenience of the serviceman, the screw terminal can be unplugged
from printed circuit board without disconnecting wires
11/2" dia pvc receptacle flush with spa wall finish or surface of deck
low voltage
SS100 into adapter and finger-tighten. Caution: Do not use wrench
if
necessary. Strip insulation
SPq AUX 1, AUX
2,
'/a",
and make
AUX 3 and AUX
4.
INDOOR REMOTE CONTROL (OPTIONAL):
Select a convenient location inside the house or other weather-protected area to
mount the LVS-3(3 button indoor remote) or
temperature display).
Install in accordance with instructions provided At the
partment, strip jacket of cable
connections Strip insulation of each wire
terminals at REMOTE SWITCHES and REMOTE LAMPS terminal:
1. Select any three circuits from SPA, AUX 1, AUX
2. Number the circuits 1,
3. Make sure that the corresponding SW and LMP wires from the Indoor Remote are
connected to the appropriate circuit at the LX-10 REMOTE SWITCHES and
REMOTE LAMPS terminal.
NOTE:
If
accordance with previous instructions and run cable to LX-10 low voltage con
partment Wire nut to yellowblack pair of wires from LVS-3TR cable (red connects to
yellow, green connects to black), in accordance with wiring diagram located inside
LVS-3TR
A Label
Compool Corporation. This set of
ment identification at each remote control button.
the LVS3TR is being used install the second Water Sensor (included) in
Set for indoor remote controls (model LBL-100) is available from
2,
6"
and 3.
LVSSTR(3 button indoor remote w/ digital
to identify the twisted pairs and assure correct
'/4",
and connect to appropriate screw
100
different labels provides custom equip
LX-10 low voltage con
2,
AUX
3,
and AUX
4.
SYSTEM START-UP
Apply power to the system.
theTime Master, pullout batteryshield toactivate back-up battery, and push HOURS
At
button until digital readout is displayed
At the LX-10 Service center, turn SYSTEM CONTROL Switch
and FLOW CONTROL Switch to "POOL" position.
Check that Valve Operators have rotated to correct positions
valve, simply reverse the cable plug on the side of Valve Operator.
At the LX-10 Service Center, turn MANUAL CONTROL Switches to "ON positions
and check that all equipment is operating.
Turn OUTDOOR
Remote Control is functioning correctly.
Turn MANUAL CONTROL Switches
The system is now ready to be operated as desired
REMOTES Switch to"ONn position and check that optional Spa-side
to"OFF1 positions
to"SERV1CE position
Toadjust position of any
SYSTEM OPTIONS
TWO SPEED PUMP CONTROL:
If the system is equipped with a two speed filter pump, a Dual Speed Relay Kit (model
RLY-LXD) should be added at the LX-10 in accordance with installation instructions
provided
The system will automatically run the filter pump in high speed under any of the
following conditions
1. Whenever the heater is on
2. Whenever pool cleaner is running
3. Whenever spa is running
It is possible to eliminate one or more of these conditions by adjusting
Switch, which is located at the top of the printed circuit board See RLY-LXD
installation instructions for details
PROGRAMMABLE TWO SPEED PUMP CONTROL:
If the system is equipped with a two speed filter pump, it is additionally possible to
1
program the pump to run in high speed by using AUX
Time Master Controller. However, this feature will only operate when the filter pump is
running Install RLY-LXD as above.
U10
Adjust
Switches #1,
programmed OFF.
Program Switch (located at the bottom of the printed circuit board) so that
#3 and
#6
are programmed ON, and Switches #2, #4, #5, and #7 are
Program Button on the
ADDITIONAL VALVE CONTROL:
It is possible to add valve operators(mode1 VOR-24) to the system to actuate additional
threeport valvesfor pool cleaning or for a custom hydraulic feature(such as a fountain,
waterfall second spa, etc). A total of three valve operators may be added. Install Valve
Module (model
instructions provided, and connect valve operators accordingly.
MODVLV1) at LX-10 low voltage compartment in accordance with
U11 Program
Page 6

ADDITIONAL REMOTE CONTROL IN LIEU OF CLEANER:
If the system does not utilize aseparate pool cleanerpum~ it is possible to use the pool
cleaner relay to activate an additional remote circuit This circuit is controlled by the
Spa-side Remote Control
NOTE: CLNR Program Button on the Time Master Controller will be redundant.
Flag and Status Light may still be turned ON, but display is meaningless.
Adjust
U1O Program Switch (located at the bottom of the printed circuit board) so that
Switches #4,
programmed OFF.
Modify low voltage wiring as follows
Disconnect black wire of
circuit board, and subsitute with yellow wire from SS-100 Spa-side Remote
#5 and #6 are programmed ON, and Switches #1, #2, #3 and
blklyel pair from CLNR screw terminal on LX-10 printed
#7
are
SPA WATERFALL CONTROL:
For systems where spa water level is higher than that of the
Control (model RLY-WRFL) may be added
AUXl Button at theTime Master or an optional Remote Control switch can be used to
rotate the return valve operator to SPA position while system is in POOL mode, thus
creating an
the system is in SPA mode.
Install RLY-WRFL in accordance with instructions provided.
overflow(waterfall effect) from spa to pool This effect will ceasewhenever
pooh
a Spa Waterfall
ELECTRIC HEATER CONTROL:
For systems which utilize a heat pump or electric heater in lieu of a gas heater, a Relay
Kit (model RLY-LX) should be added at the LX-10. Install RLY-LX in accordance with
instructions provided, and plug into ELEC HTR relay socket on printed circuit board
The power relay is capable of controlling a heat pump, an electric heater rated up to
3KV4 or the magnetic contactor of a larger electric heater.
HIGH VOLTAGE WIRING:
All high voltage connections are made to terminal blocks, which are located be
hind service panel in right side compartment of LX-10 Service Center.
A high voltage wiring label is located adjacent to terminal blocks.
Knock out holes are provided on bottom of enclosure for conduit mounting.
Provide a separate circuit breaker (if possible) to power the system. Either 1
230VAC can be used System draws less than 1 amp. Run wires from circuit breaker to
high voltage compartment of LX-10, and connect to top terminal blockwhich is marked
"SYSTEM POWER".
to wiring label.
Provide independent circuit
Note: AUX 2,"AUX
(model RLY-LX).
Run wires from breakers to high voltage compartment of LX-10, and connect to
LlNE 2 of relevant terminal blocks
and
Connect pumps and other high voltage equipment to LOAD 1 and LOAD 2 terminals at
relevant terminal blocks Each individual terminal
230V AC. A relay allocation chart is provided inside enclosure cover for the service
man's convenience
To reduce the risk of electric shock provide a continuous green insulated copper wire,
no smaller than #12
electrical supply panel
A wire connector is provided for bonding to local ground points To further reduce the
risk of electric shock this connector should be bonded with a
any metal ladders, water pipes, or other metal within 5 feet of pool or spa
Install2 jumpersfor1 15V, or1 jumperfor230Vwiring, according
3,
AWG between grounding bus of LX-10 and grounding terminal of
breakers(if possible) for FLTR, CLNR, and AUX
and AUX 4 are optional and require additional relay kits
blockcan be wired for either 11 5 or
#8 AWG copper wire to
15VAC or
1.
LlNE 1
FREEZE SENSOR:
A Recirculating Freeze Sensor(mode1 FPS-C) may be added to the system It protects
the plumbing and equipment from possible freeze damage by running the filter pump
whenever the temperature falls to approx
instructions provided
An Auxiliary Pump Freeze
activate auxiliary equipment (such as jet pump) during potential freezing conditions
Install FPS-AUX in accordance with instructions provided
Sensor(mode1 FPS-AUX) may also beadded to the system to
41'F. Install FPS-C in accordance with
CUSTOM OPTIONS:
Additional custom options are also available. These options, however, require custom
adjustments at the factory.
Consult
SAVE THESE INSTRUCTIONS
Compool Corporation for details.
TIME MASTER:
Select a convenient location inside the house or other weather-protected area to
mount Time Master Controller.
Unscrew faceplate from enclosure, and use enclosure as a template to mark and cut
(
8%" wide by 4%" high) in sheetrock or wall
hole
provided, install enclosure into wall.
Strip jacket of
twisted pairs and assure correct connections
Strip insulation of each wire
screw terminal in accordance with wiring diagram located inside enclosure.
Caution: Do not untwist pairs
retain wires in pairs so that appropriate connections can be identified
Note: For the convenience of the
'
screw terminal can be unplugged from printed
circuit board without disconnecting wires
Mount faceplate to enclosure.
panel in^
Using the mounting clips
6pair cable 6" to identify the
l/4"
and connect to
It is necessary to
sewiceman
 Loading...