

Pella Insynctive Window and Door Sensor Quick Start Manual

FCC Compliance and Industry Canada
This equi pment has bee n tested and f ound to compl y with the lim its for Clas s B
digita l devices, pu rsuant to Par t 15 of the FCC Rules . These limi ts are desig ned
to provide reasonable protection against harmful interference in a residential
installation. This equipment generates, uses and can radiate radio frequency
energy an d, if not inst alled and us ed in accordan ce with the in struc tion manual,
may cause h armful int erferenc e to radio comm unicatio ns. However, the re is
no guaran tee that inte rferenc e will not occu r in a partic ular insta llation. If t his
equipment does cause harmful interference to radio or television reception,
which ca n be determin ed by turning t he equipmen t off and on, t he user is
encoura ged to try to c orrect th e interfe rence by one or m ore of the follo wing
measures:
• Reorien t or relocate t he receivin g antenna.
• Increas e the separa tion betwe en the equipm ent and recei ver.
• Connec t the equipm ent to an outle t on a differe nt circuit f rom the recei ver.
• Consult t he dealer or an ex perience d radio/T V contrac tor for help.
Changes or modifi cations not expressly approved by Pella Corporation could
void the us er’s author ity to oper ate the equip ment.
This devi ce complies w ith Indust ry Canada l icense-e xempt RSS sta ndard(s).
Operat ion is subjec t to the follow ing two cond itions: (1) this devi ce may not
cause interference, and (2) this device must accept any interference, including
interf erence that m ay cause unde sired opera tion of the dev ice.
Cet appar eil est conf orme avec Indu strie Can ada exempts d e licence st andard
RSS. L’opérati on est soumi se aux deux con ditions sui vantes: (1) cet appar eil ne
peut causer d’interférences, et (2) cet appareil doit accepter toute interférence,
y compris les interférences qui peuvent causer un mauvais fonctionnement de
l’appareil.
FCC ID: SO7-205T0000
IC ID: 11009A-205T0000
WINDOW AND
DOOR SENSOR
QUICK START GUIDE
1. Get Star ted
• Plug BRID GE into an elec trical ou tlet
(light will t urn green and t hen fl ash bl ue).
NOTE: Follo w Bridge Quic k Start Guid e to set
up BRIDGE.
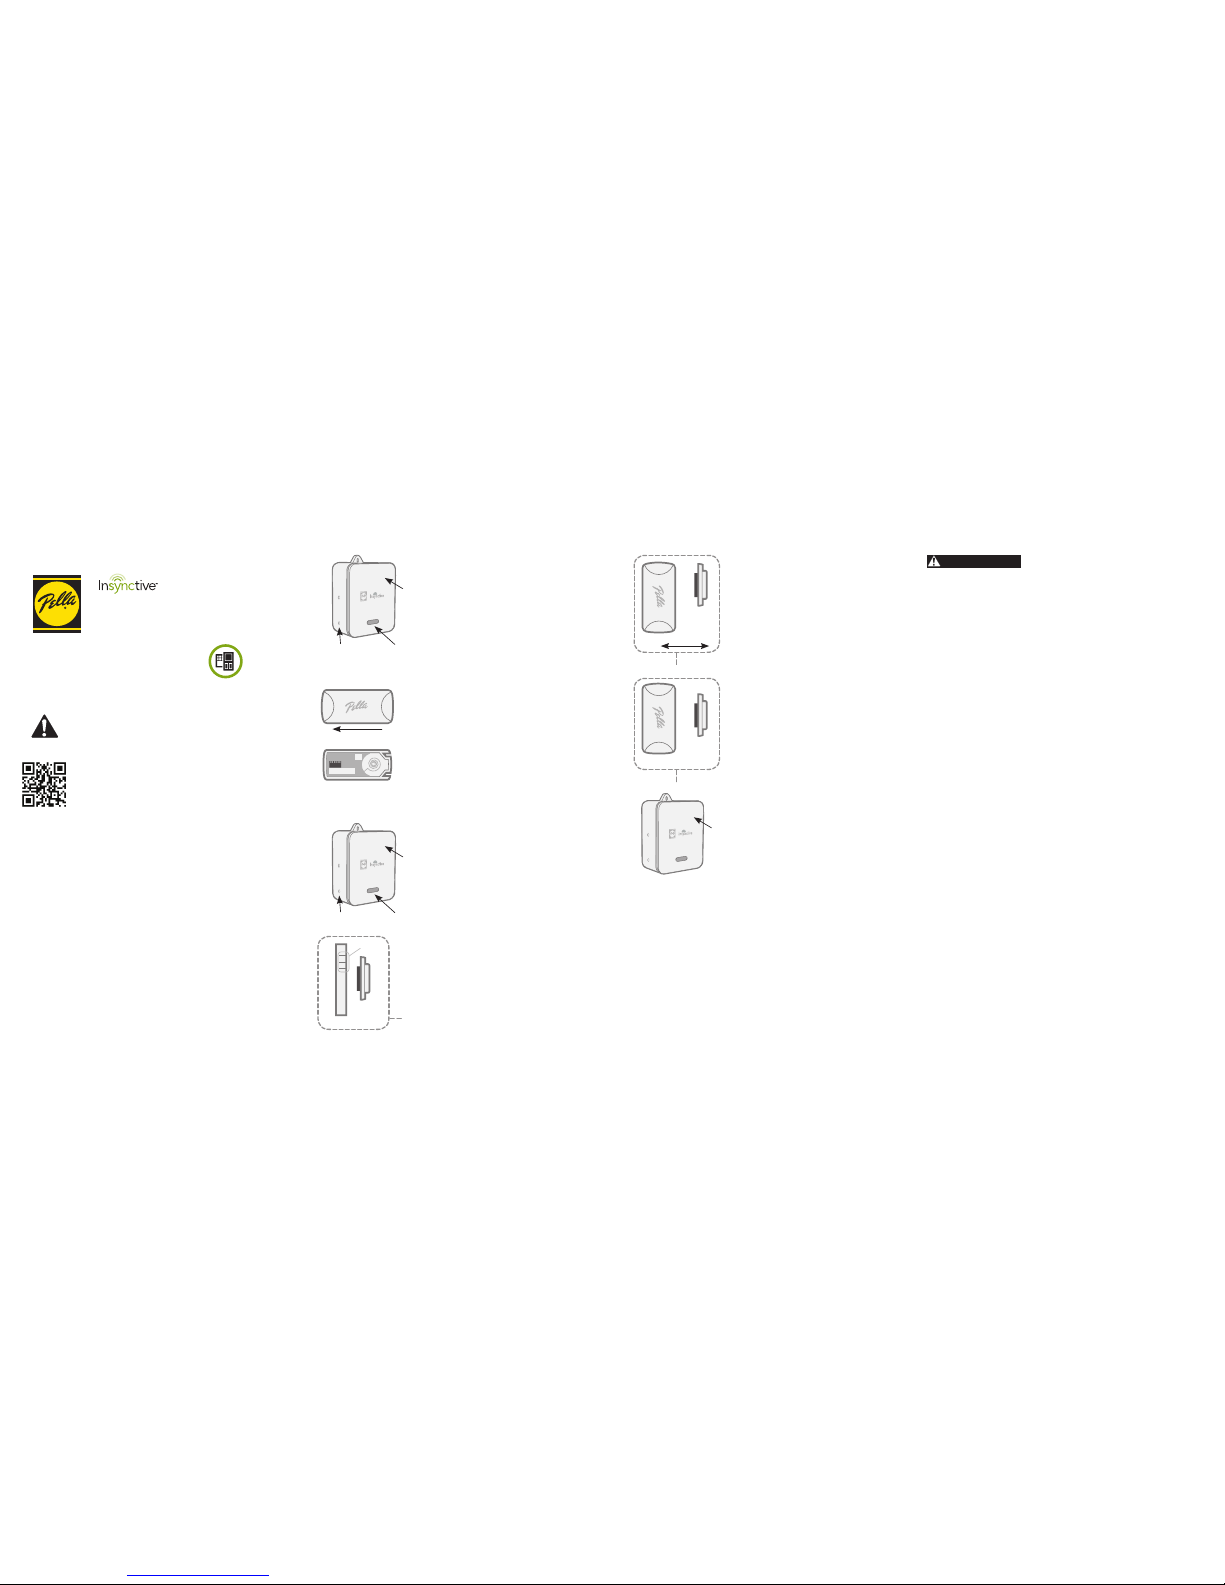
2. Prepa re SENSOR
• Slide cov er off TRA NSMITTER to s eparate
the cover f rom the base.
• Pull and re move plasti c battery t ab.
• Replace w ith brown or wh ite cover.
NOTE: Once t he plastic t ab is removed fr om the
batter y, you will have 2 mi nutes to sync y our SENSOR
to BRIDGE (Step 3). If 2 minu tes pass wit hout a
successful sync, remove and insert the battery again.
3. Sync SENSOR to BRIDGE
• Press an d release the Sy nc button on
BRIDGE (bu tton neare st the light) .
Orange light will fl ash continuously.
BRIDGE is i n sync mode whi le the light
is fl ashing orange.
• Touch MAGNE T to raised lin es on side
of TRAN SMITTER , and then sepa rate a
minimum of 1 inch. R epeat twice w ithin
2 seconds.
• Green lig ht on BRIDGE an d beep will
indicate success.
• To exit sync m ode: press and h old
Sync but ton on BRIDGE u ntil light st ops
fl ashing orange.
4. Test SENSOR
• Move MAGN ET at least 1 in ch away from
TRANSMITTER.
• BRIDGE s hould beep t wice.
5. Insta ll SENSOR
• Apply do uble-side d tape to SENSO R —
smaller pi ece applies t o MAGNET; larger
piece applies to TRANSMITTER.
• Please reference Insynctive.Pella.com/
WindowandDoorSensor for
recommended placement on Pella®
produc ts and how to ins tall.
NOTE: Do NOT exc eed a 1/2-inch gap b etween
MAGNET and TRANSMITTER.
TRANSMITTER MAGNET
SENSOR
SENSOR
TRANSMITTER
MAGNET
RAISED LINE S
SLIDE COVER
INSIDE SHOWN
TRANSMITTER
MAGNET
SENSOR
SYNC
BUTTON
6. Test Installed SENSOR
• Open the w indow or door.
• BRIDGE s hould beep t wice.
WARNING ! SENSOR may indica te a closed st atus
when the wi ndow or door is no t completel y closed.
See Product Guide on Insynctive.Pella.com for
complete r eview of WIND OW AND DOOR SEN SOR
operation.
LIGHT
BRIDGE
BRIDGE
SYNC
BUTTON
LIGHT
BRIDGE
Scan the Q R Code® or visi t Insynctive.Pella.com/
WindowandDoorSensor for complete Product Guide
and warni ngs, instr uctional v ideos and oth er Pella®
Insynctive™ quick tips.
This Quic k Start Gui de is intended o nly to provide a n
overvi ew of the produc t and its us e. Before usin g
this product, read the complete Product Guide
and warnings.
WHAT’S INCLUDED:
• WIN DOW AND DOOR SE NSOR: SENSOR w ill transmi t a signal
t o BRIDGE when y our window or do or is opened or c losed.
• QUIC K START GUIDE
• MOUNTING TAPE
• BAT TER Y
• WHITE MAGNET
• BROWN COVER
• BROW N MAGNET
WHAT’S REQUIRED:
• BRIDGE (required — sold separately): W irelessly c onnect s your
Insynctive produc ts to STATUS INDIC ATOR or a compatibl e
securit y or home automation system.
• STATUS INDICATOR (optional — sold separately): Lights indicate
stat us of Pella Insy nctive SEN SORS. Or you ca n use a compat ible
security or home automation system to monitor your windows
and doors.
Failure to adhere to the warnings below may result in death, serious injury
and/or loss of valuables.
• Pella® Ins ynctiv e
™
produc ts are not 100% r eliable for a va riety of rea sons
(see Produc t Guide and t he Warning in Ste p 6 of this Quick S tart Guid e for
more information). Therefore, Pella Insync tive products should not be relied
upon in sit uations wh ere life, safe ty and/or pro tection of v aluables ar e solely
depende nt on their fun ction. Test e ach produc t at least on ce per year to
help ensure proper operation.
• Pella Ins ynctive p roducts a re not a subst itute for ca reful adult s upervis ion
of children.
• Keep bat tery and s mall part s out of reach of c hildren. If sw allowed,
immediately seek medical help.
Read the complete Product Guide for additional warnings and information.
WARNING
© 2014 Pella Corpor ation
IQS GWDS 0414
If you wil l be using the Pel la Insync tive™ STATU S INDIC ATOR to
monito r your windows a nd doors, ple ase referen ce the Quick S tart
Guide in t he STATUS I NDIC ATOR package to sync.
HAVE A HOME AU TOMATION OR SECU RITY SYST EM?
For inst ructions on h ow to sync a Pella In synctive W INDOW AND DOOR
SENSOR to i t, visit Insynctive.Pella.com/HomeAutomation.
NEED HELP WITH THE STEPS ABOVE?
Find troubleshooting information and videos at
Insynctive.Pella.com/Support or call 855 -473-5524.
WANT TO EA SILY REGISTER PE LLA INSYN CTIVE PRODU CTS?
Visit Insync tive.Pella.com/Registration for instan t access to
instructions, warranties and how-to videos.
LUZ
BOTÓN DE
SINCRONIZACIÓN
PUENTE
LUZ
BOTÓN DE
SINCRONIZACIÓN
PUENTE
ADVERTENCIA
Cumplim iento con FCC y c on el Minist erio de Indu strias d e Canadá
Este equ ipo ha sido prob ado y se ha verifi cado que cum ple con los lími tes para
disposi tivos digit ales clase B , conforme a la p arte 15 de las reg las de la FCC. Es tos
límites han sido diseñados para proporcionar una protección razonable contra la
interferencia perjudicial en una instalación residencial. Este equipo genera, utiliza
y puede irr adiar energí a de radiofre cuencia y, si no s e instala y us a de acuerdo
con el manual de instrucciones, puede causar interferencia perjudicial a las
comunic aciones de ra dio. Sin embar go, no se garant iza que no se pro ducirán
interferencias en una instalación en especial. Si este equipo genera una
interferencia perjudicial para la recepción de radio o televisión, que se puede
determinar apagando y encendiendo el equipo, se recomienda al usuario que
intente corregir la interferencia con una o más de las siguientes medidas:
• Reorie ntar o reubic ar la antena de r ecepción.
• Aument ar la separa ción entre el e quipo y el rece ptor.
• Conec tar el equi po a un tomacor riente de un c ircuito dis tinto al del re ceptor.
• Solici tar ayuda al c oncesionar io o a un técnico c on experien cia en radio/ TV.
Los cambi os o modifi caciones que no e stén expres amente apro bados por Pell a
Corpora tion podrí an anular la aut orizació n del usuario p ara utiliza r el equipo.
Este dis positivo c umple con las no rmas RSS sin li cencia del Mi nisterio d e
Indust rias de Canad á.
El funcionamiento está sujeto a las siguientes dos condiciones: (1) este dispositi vo
no debe causar interferencia, y (2) este dispositivo debe aceptar cualquier
interferencia recibida, incluso aquella que pudiese causar un funcionamiento
no deseado del dispositivo.
Cet appar eil est confo rme avec Indu strie Can ada exempts d e licence st andard
RSS. L’opérati on est soumis e aux deux con ditions sui vantes: (1) cet appar eil ne
peut causer d’interférences, et (2) cet appareil doit accepter toute inter férence,
y compris les interférences qui peuvent causer un mauvais fonctionnement de
l’appareil.
FCC ID: SO7-205T0000
IC ID: 11009A-205T0000
SENSOR PARA
PUERTA Y VENTANA
GUÍA DE INICIO RÁPIDO
1. Emp iece
• Enchuf e el PUENTE en un to macorrien te
(la luz se pon drá verde y lueg o titilará
azul).
NOTA: Siga la guí a de inicio ráp ido del puent e para
confi gurar el PUENTE.
2. Prepa re el SENSOR
• Deslic e y retire la cubi erta del
TRANSMISOR para separar la
cubier ta de la base.
• Jale y ret ire la pesta ña plástic a de
la batería.
• Reempla ce con la cubier ta marrón
o blanca.
NOTA: Despué s de retirar la p estaña pl ástica de
la batería , usted tend rá 2 minutos pa ra sincroni zar
el SENSOR al PU ENTE (paso 3). Si p asan 2 minuto s
sin que logr e la sincroni zación, ret ire la baterí a y
vuélvala a colocar.
3. Sincr onice el SENSO R al PUENTE
• Pre sione y suel te el botón de si ncroniza ción
en el PUENT E (el botón más cer cano a la luz).
La luz anaranjada destellará continuamente.
El PUENTE e stá en modo s incroniz ación
mientra s la luz dest elle naranj a.
• Toque e l IMÁN hast a las líneas en r elieve al
costa do del TRAN SMISOR y lueg o separe
2,54 cm com o mínimo. Repi ta la opera ción
dos veces e n menos de 2 seg undos.
• La l uz verde en el PU ENTE y el sonid o breve
indicar án que tuvo éx ito.
• Par a salir del mod o sincroni zación:
mantenga presionado el botón de
sincron ización en el P UENTE has ta que
la luz deje de d estella r anaranjad o.
4. Pruebe el SENSOR
• Despla ce el IMÁN a 2,54 c m como
mínimo del TRANSMISOR.
• El PUENTE d ebería sona r dos veces.
5. Insta le el SENSOR
• Apliqu e cinta doble f az al SENSOR; la
pieza peq ueña en el IMÁN , la pieza
grande en el TRANSMISOR.
• Consult e Insynctive.Pella.com/
WindowandDoorSensor para conocer
la ubicac ión recomen dada de los
produc tos Pella® y cómo in stalar.
NOTA: NO separ e por más de 1,27 cm el I MÁN del
TRANSMISOR.
SENSOR
TRANSMISOR
IMÁN
LÍNEAS EN
RELIEVE
DESLICE LA CU BIERTA
SE MUESTRA EL INTERIOR
TRANSMISOR IMÁN
SENSOR
TRANSMISOR
IMÁN
SENSOR
PUENTE
Escane e el QR Code® o vis ite Insynctive.Pella.com/
WindowandDoorSensor para obte ner toda la guía d el
produc to y las adver tencias, v ideos infor mativos y ot ros
consejos rápidos Pella® Insynctive™.
Esta gu ía de inicio ráp ido está di señada únic amente con la
fi nalidad de brindar una descripción general del producto
y de su uso. An tes de usar el pr oducto, lea t oda la guía del
producto y las advertencias.
LO QUE INCL UYE:
• S ENSOR PARA PU ERTA Y VENTANA : El SENSOR tran smitirá una
s eñal al PUEN TE cuando la ve ntana o la puer ta se abra o s e cierre.
• GUÍA DE INICI O RÁPIDO
• CINTA DE MONTAJE
• BATERÍA
• IMÁN BLANCO
• CUBI ERTA M ARRÓ N
• IMÁN MARRÓN
SE REQUIERE:
• PUENTE (se requiere, se vende por separado): Conec ta de forma
inalámbrica su s product os Insync tive a un INDIC ADOR DE ESTAD O
o a un sistema de se guridad o de au tomatizac ión de hogar
compa tible.
• INDICADO R DE ESTADO (opcional, se vende por separado):
Las luces indic an el estad o de los SENSORE S Pella Insync tive o
puede usar un sistema de seguridad o de automatización del hogar
compatible para monitorear sus ventanas y puertas.
El no respectar las advertencias a continuación puede ocasionar la muerte,
lesiones graves o pérdida de objetos valiosos.
• Los prod uctos Pella® I nsyncti ve
™
no son 100% confi ables por diferentes razones
(consulte l a guía del produ cto y la adver tencia en e l paso 6 de est a guía de
inicio rápido para obtener más información). Por tanto, no debe confi ar en los
produc tos Pella Insy nctive en s ituacione s en las que la vid a, la segurid ad o
la protección de bienes valiosos dependan exclusivamente de su buen
funcion amiento. Pru ebe cada prod ucto al meno s una vez por año p ara
asegurar un funcionamiento adecuado.
• Los prod uctos Pella I nsyncti ve no susti tuyen una sup ervisión a tenta de niño s
por part e de adultos.
• Manten ga la batería y l as piezas peq ueñas fuer a del alcance d e los niños.
Si se ingier e, busque ayud a médica de inm ediato.
Lea toda la guía del producto para obtener información y adver tencias
adicionales.
© 2014 Pella Corpor ation
IQS GWDS 0414
Si va a usar e l INDICADO R DE ESTADO de Pell a® Insynct ive™ para
monito rear sus puer tas y ventan as, consul te la guía de inic io rápido
en el paqu ete del INDIC ADOR DE ESTAD O para sincro nizar.
¿CUENTA CON UN SI STEMA DE SEG URIDAD O DE AUTOM ATIZACIÓN
DEL HOGAR?
Para obtener instrucciones sobre cómo sincronizarlo con los productos
Pella Insy nctive, vis ite Insynctive.Pella.com/HomeAutomation.
¿NECESI TA AYUDA CON LOS PASOS ANTE RIORES?
Encuentre información sobra la solución de problemas y videos en
Insynctive.Pella.com/Support o llame 855 -473-5524.
¿DESEA R EGISTRA R DE FORMA SENCI LLA LOS PRODUC TOS PELLA
INSYNCTIVE?
Visite Ins ynctive.Pella.com/Registration para acceder rápidamente a
instrucciones, garantías y videos instructivos.
6. Pruebe el SENSOR instalado
• Abra la ve ntana o la puer ta.
• El PUENTE d ebería sona r dos veces.
¡
ADVERTEN CIA! El SENSO R puede indic ar un
estado de c errado aun c uando la vent ana o la
puerta n o está compl etamente ce rrada. Con sulte
la guía del producto en Insynctive.Pella.com
para obten er una descr ipción compl eta del
funciona miento del SE NSOR PARA VENTA NA Y
PUER TA.
 Loading...