

Page 1
Updated 4/10 35123
Owner’s Guide and Installation Manual
PELLA
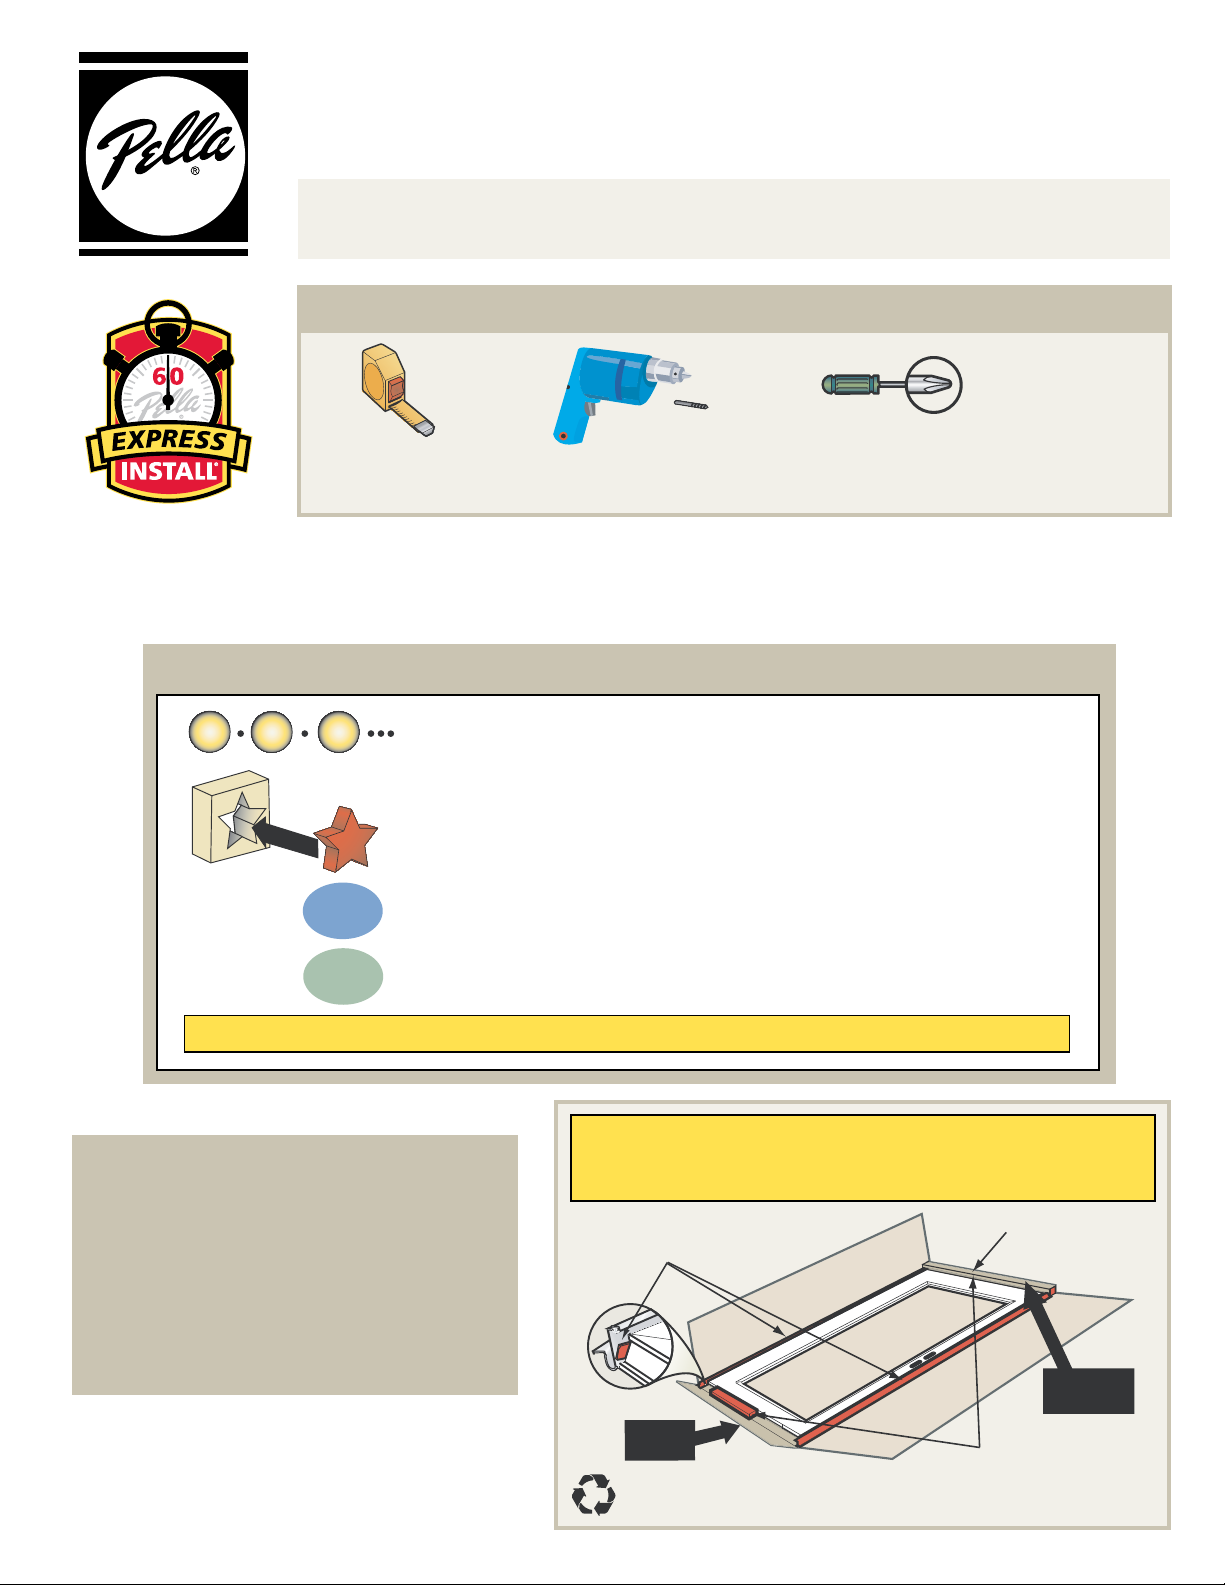
Recommended Tools
Read the legend below in order to easily follow along and install your storm door.
For reference, the storm door assembly is illustrated on page 2.
®
EXPRESS INSTALL® STORM DOOR MODELS
NOTE TO THE INSTALLER: This Owner’s Guide and Installation Manual is the property of the
homeowner. Please leave it with the homeowner upon completion of the installation.
2
1
Tape Measure
For safety reasons, the assistance of a second person is recommended when handling the door.
Power Drill with
3/32” drill bit
Phillips
Screwdriver #2
Legend
1
2
MUST READ! Instructions in this box style are IMPORTANT!
To order replacement parts, call
3
tresnI
Follow the steps in order, from 1 to 35.
RED objects are the action items for that step.
Steps in BLUE apply to LEFT HINGE congurations ONLY.
(Hinge side will be determined in a later step.)
Steps in GREEN apply to RIGHT HINGE congurations ONLY.
(Hinge side will be determined in a later step.)
1-800-374-4758
or visit us at
www.pella.com
Lay door flat.
Before discarding the carton, make sure ALL parts are
accounted for -- check in carton roll-ups.
Loose Parts
Loose Parts
(in Roll-up)
Please have your registration number
ready when you contact us either by
telephone or on the internet.
TROUBLE SHOOTING GUIDE
is located on page 12 of this manual.
Carton
Roll-up
The carton material is recyclable
Carton
Roll-up
Hardware
Kit(s)
Page 2
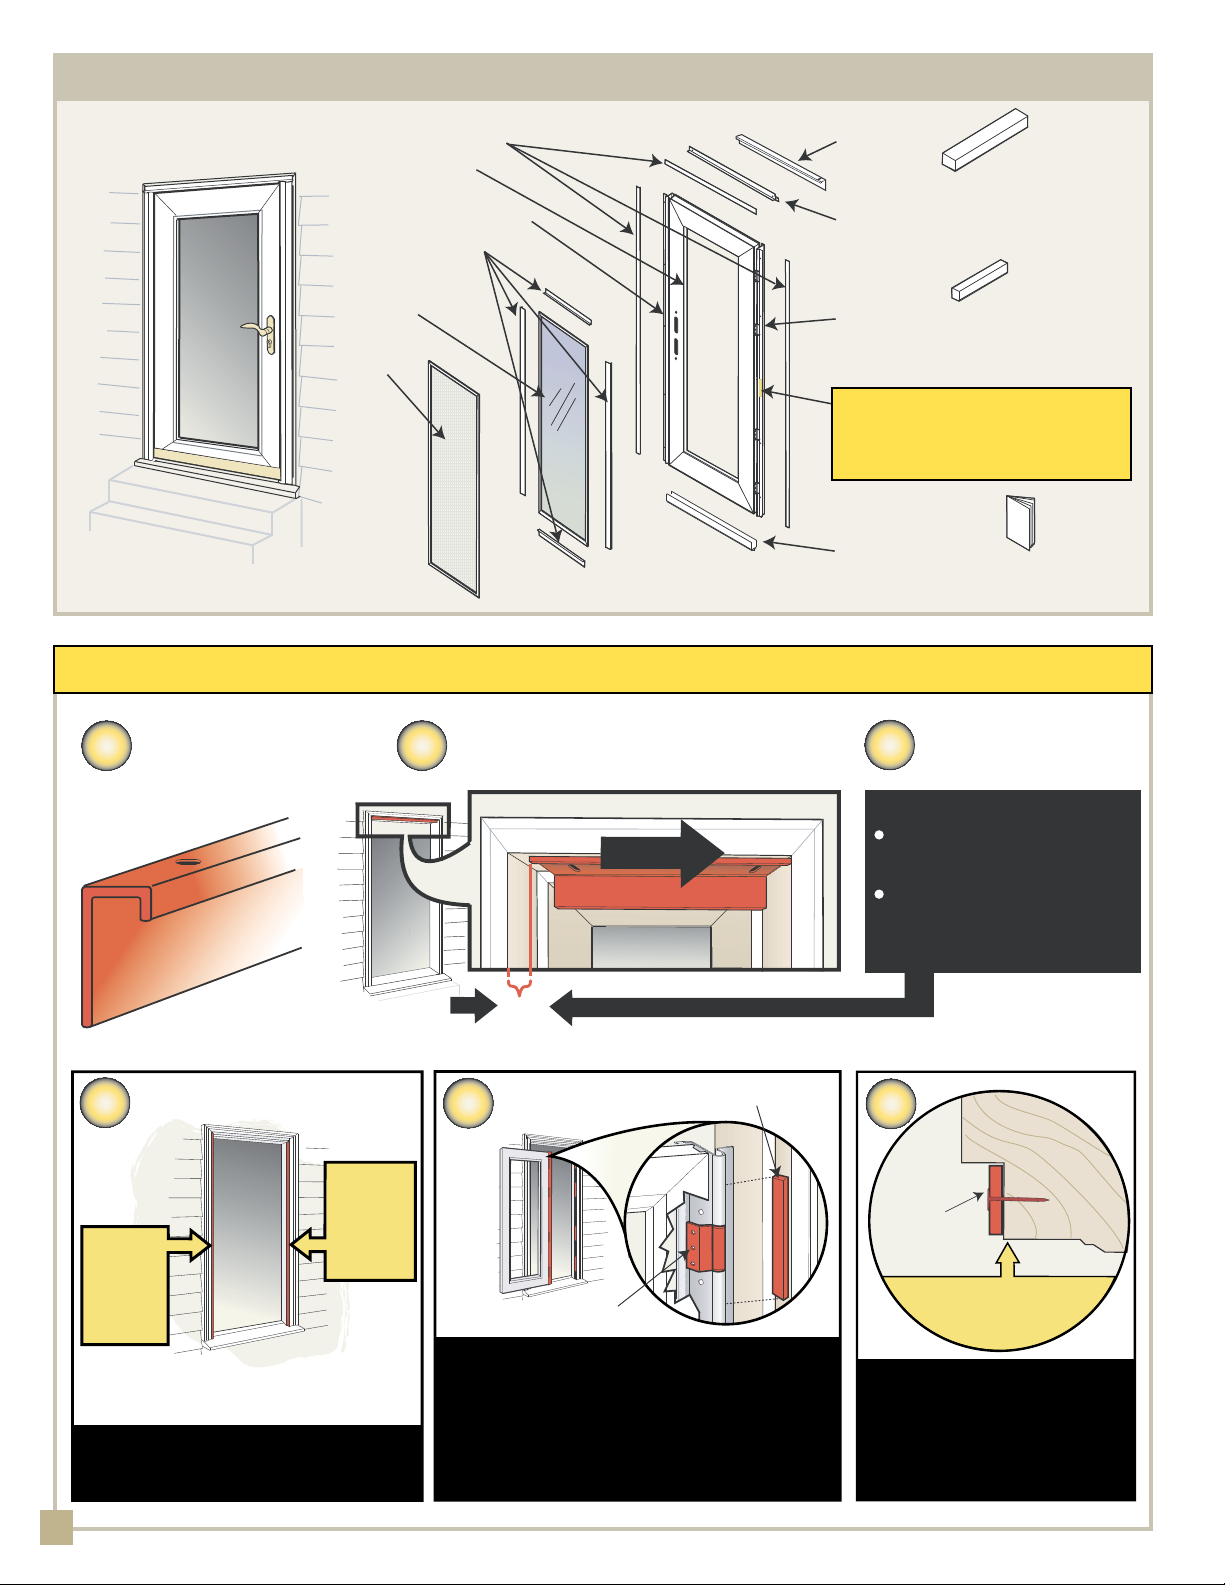
Storm Door Components
NOTE: Actual door styles may vary from illustrations, however, the installation steps will be the same.
Screw Cover Strips
Door
Latch Mounting Frame
Glass/Screen
Retainer Strips
Glass
Screen
Header
Frame
Top
Mounting
Frame
Hinge
Mounting
Frame
Registration
Number
Bottom
Expander
Hardware Kit
Door Closers
Includes mounting
screws and some
handle components
Handle Kit
Includes handle
hardware with
seperate instruction
sheet
This is your door’s
identification number.
Leave this sticker on
your door.
Installation
Instructions
Before you begin Follow steps a, b and c to verify your entryway opening requirements.
Locate header
a
frame.
d
RIGHT
HINGE
LEFT
HINGE
doors,
shim this
side
Shim on YOUR hinge side - see Step
6 on Page 3, to determine your hinge
side.
doors,
shim this
side
Slide to one side of the entryway.
b
Slide Tight
Gap
e
Hinge
Shim may be one long piece or small 8” to
12” sections.
NOTE: small sections must fully support
the hinges on the mounting frame.
Use an appropriate shim thickness to reduce
the gap in step C, to 1/4” or less.
Household shim materials may include
paint stir sticks or wooden yardsticks.
Shim
Measure gap.
c
If this gap is ...
LESS than 1/4”,
Go to START on page 3
1/4” or GREATER,
Go to Step d, to shim
Note: if this gap is over 9/16”,
a custom storm door is required.
f
Shim
Shim must not
extend beyond
entryway face
Nail shims in place.
Note: If you removed an old
storm door, you may wish to
paint and coverany existing
holes before proceeding.
Go to START on page 3.
2
Page 3
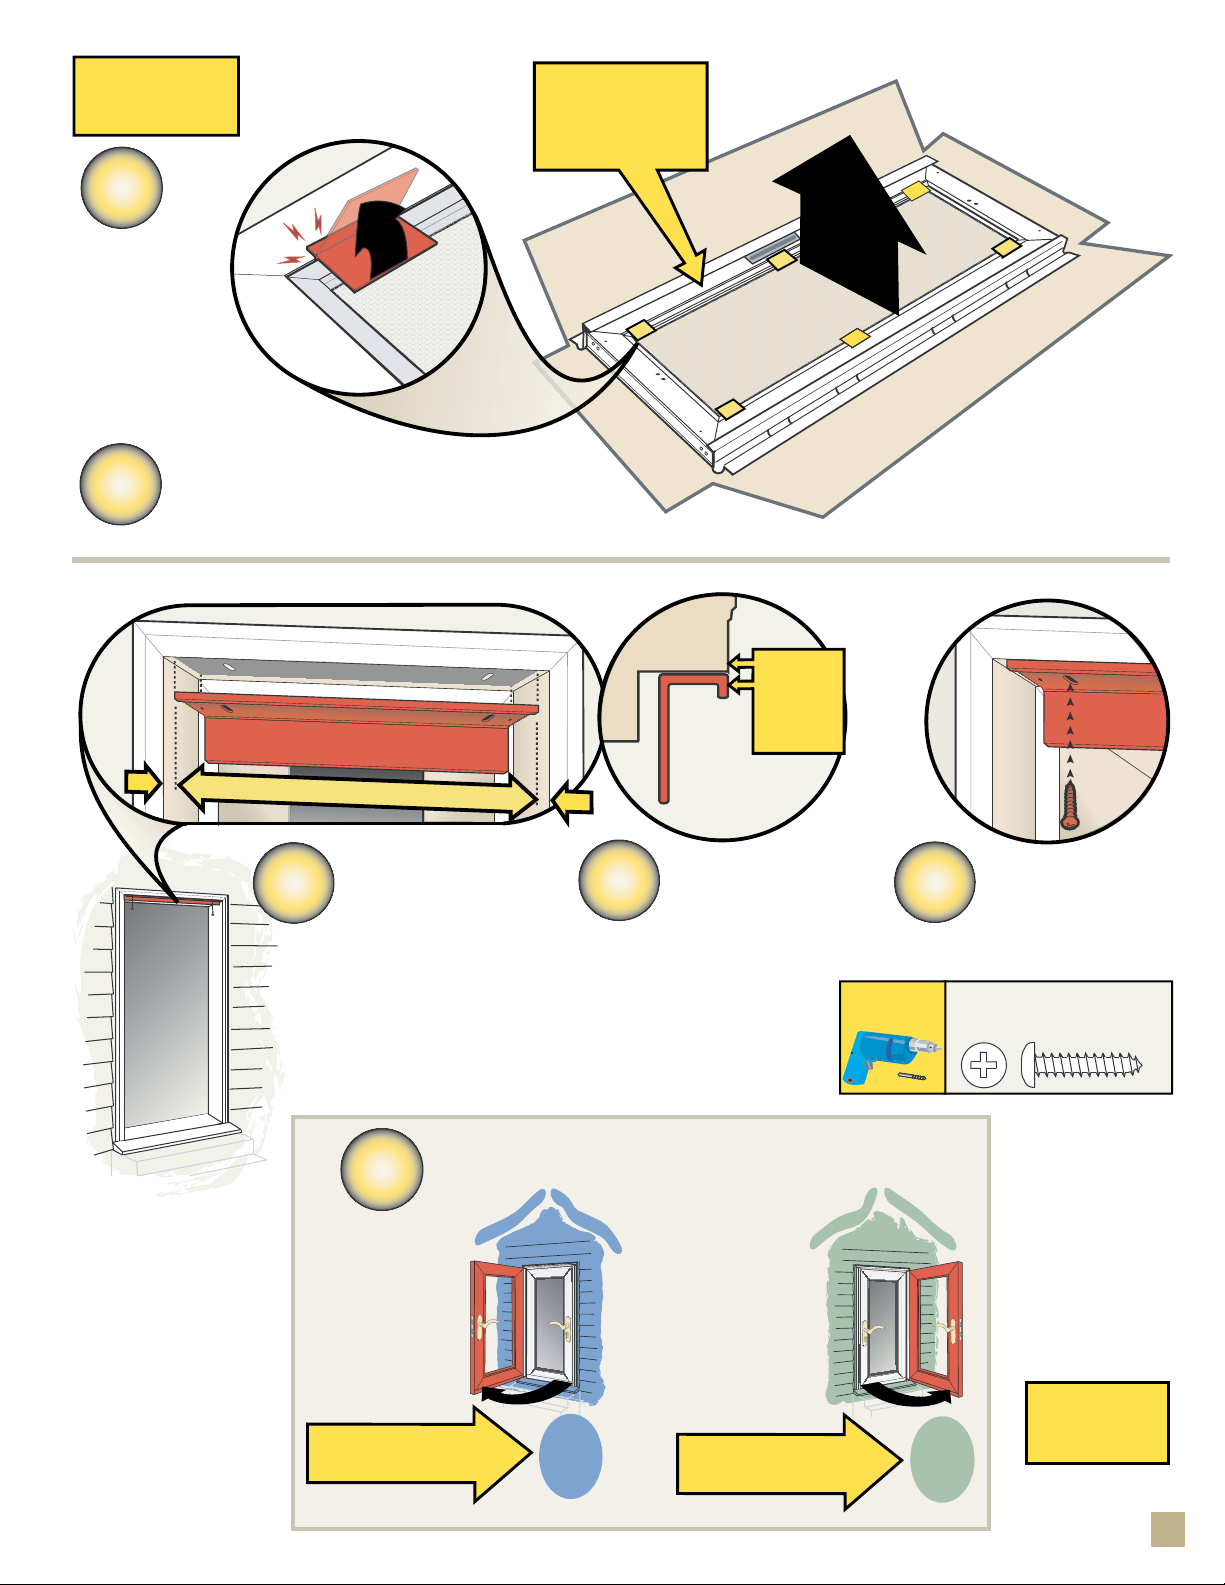
START
Your Installation
Remember
this is the
INTERIOR SIDE
of the door
1
Turn door
over.
Remove
shipping clips.
2
Remove glass
and screen.
evomeR
panS
tfiL
ssalg
dna
neercs
Align
outer
edges
FIRST, center header
3
frame in entryway
opening ...
6
Left Hinge
Orientation
viewed from outside
LEFT HINGE
Watch for this color
throughout the manual
inepO ni retneC gn
4
Determine the side you want your door to hinge.
S
I
D
... THEN,
align with face of
brickmold.
Right Hinge
throughout the manual
W
E
E
I
V
Orientation
viewed from outside
RIGHT HINGE
Watch for this color
Drill 3/32”
Pilot Holes
5
Predrill the
two holes.
Secure with
jamb screws.
Qty.
2
“Jamb Screw Bag”
unpainted
#8 x 3/4” Pan Head
Continued
on page 4
3
Page 4
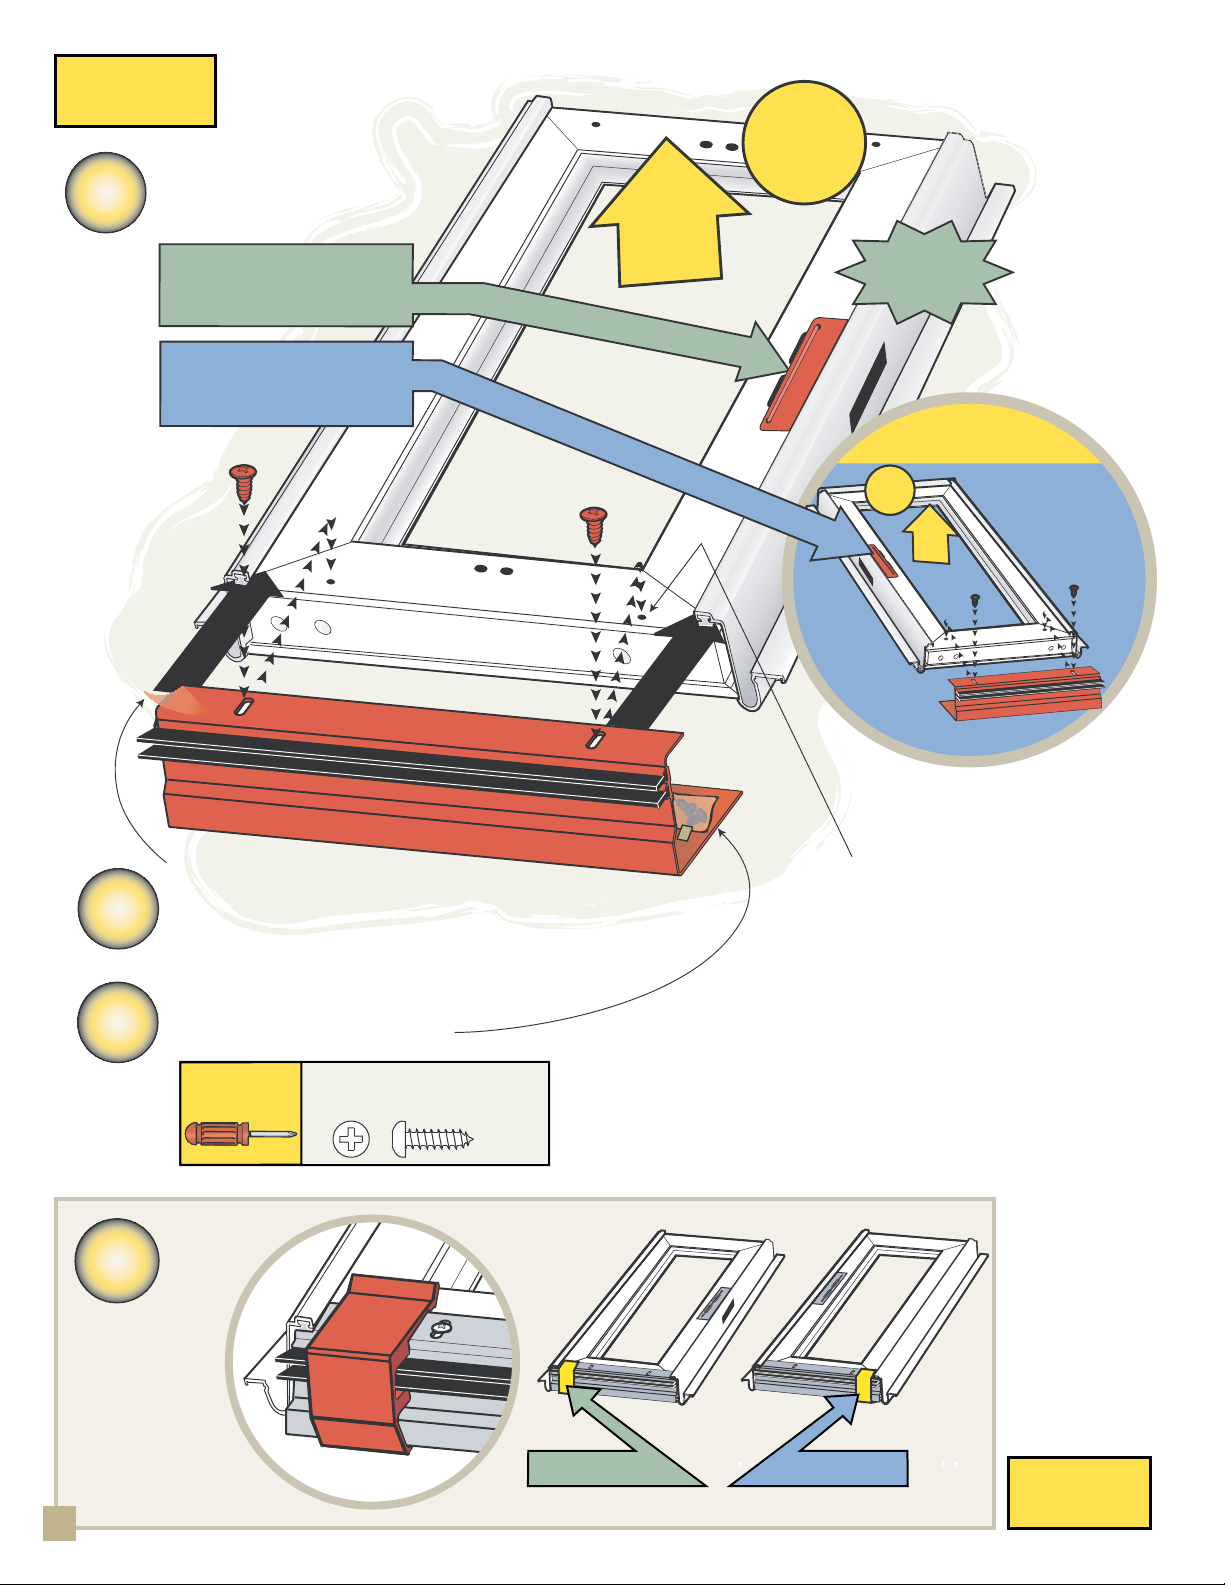
Continued
from page 3
Position door for
7
LEFT hinge or
RIGHT hinge.
RIGHT HINGE DOORS
position metal plate
on this side
LEFT HINGE DOORS
position metal plate
on this side
edilS
Inside
Facing
UP
This is
the TOP
of Your
Door
Right
Hinge
Illustration
Left Hinge
Illustration
This is
the TOP
of Your
Door
Inside
Facing
UP
8
9
Remove any protective lm.
Slide bottom expander tight onto bottom of door.
NOTE: Bottom expander is packaged with the handle
for Select® 6000 models.
Secure with screws
(Bag taped inside expander).
Use a HAND
screwdriver
Qty.
#6 x 1/2” Pan Head
2
(Extra screw provided)
edilS
Factory
Drilled
Holes
10
Place
installation
support block
on door’s
HINGE side.
4
Right Hinge
Left Hinge
Continued
on page 5
Page 5

Continued
from page 4
Set door in opening
11
(resting on bottom spacer from step 10).
Hold tight to hinge side.
Predrill the ve hinge
12
side hole locations.
Secure with screws.
Left Hinge
Illustration
LEFT HINGE
Doors Only
SLIDE To This Side
Right
Hinge
Illustration
RIGHT HINGE
Doors Only
SLIDE To This Side
then Lower
13
Drill 3/32”
Pilot Holes
Qty.
5
“Mounting Frame Screw Bag”
#6 x 1” Pan Head
Open the door.
Predrill the eight holes.
Secure with screws.
Drill 3/32”
Pilot Holes
Qty.
8
unpainted
“Jamb Screw Bag”
unpainted
#8 x 3/4” Pan Head
Raise Up, Slide Over,
Installation
Support Block
Right
Hinge
Illustration
Left Hinge
Illustration
14
Remove and discard
installation support block.
Remove
and
Discard
O
p
e
n
Continued
on page 6
5
Page 6

Continued
from page 5
Horizontal
Retainer
Strip
Install horizontal strips
first (top then bottom)
15
Install glass panel.
IMPORTANT:
Hold glass in place
while installing
retainer strips.
Secure with
retaining strips.
Predrill the ve hole locations.
16
Drill 3/32”
Pilot Holes
Secure with screws.
Qty.
“Mounting Frame Screw Bag”
5
unpainted
#6 x 1” Pan Head
Install
teS
ni
ecalP
Both
Top
and
Bottom
Vertical
Retainer
Strip
Install Both
Left and
Right
Right
Hinge
Illustration
17
6
Left Hinge
Illustration
Remove shipping strap and
“Do not cut” label.
Continued
on page 7
Page 7

Continued
from page 6
18
Position top
mounting frame.
Note: if you have
interference with siding,
remove the break-off tab
with a pliers, then caulk
along the back surface, for
protection from rain.
19
Close door.
Rest mounting frame
on door.
Predrill the two
hole locations.
Secure with screws.
Drill 3/32”
Pilot Holes
Qty.
“Mounting Frame Screw Bag”
2
unpainted
#6 x 1” Pan Head
Break-off Tab
(Remove if necessary)
no
Factory
Installed
Spacer
Leave this
plate in
place
Right
Hinge
Illustration
Left Hinge
tseR
Illustration
rooD
20
22
Remove the two spacers.
dracsiD dna evomeR
Factory
Installed
Spacer
Install
your
handle
set.
latsnieR l
21
Remove the two
yellow clips.
Re-install the screws.
erawdraH
eldnaH
Kit
noitcurtsnI
teehS
Go to the seperate
hardware instruction
sheet in the handle kit
evomeR
dna
dracsiD
7
Page 8

Continued
from
Hardware
Instruction
23
Remove the two hole plugs
from the closer bases.
Insert into the factory
drilled holes near the top
corners of the door.
Qty.
Hole Plugs
2
Break off of closer base
Determine which
side to install
24
the closers.
[Right versus Left].
Align closer base arrow with
25
small notch on mounting frame
(install both top and bottom).
Rest Against Back of
Mounting Frame
Predrill holes(3/32” bit).
26
Secure with screws.
Right Hinge
Illustrated
LEFT HINGE Install Closers
on This Side.
RIGHT HINGE Install Closers
on This Side.
Approx
1-1/2”
Align
Arrow
with
Notch on
Mounting
Frame
Right
Hinge
Illustration
Interior
Side
of the
Door
Top
Closer
Location
(Right Hinge)
Bottom
Closer
Location
(Right Hinge)
Rest Against
Back of
Mounting
Frame
GNITNUOM
RF
EMA
Drill 3/32”
Pilot Holes
27
8
Qty.
4 each
“Closer Screw Bag”
Unpainted
#10 x 1 1/2” Pan Head
Break off alignment tabs.
R
e
m
o
v
e
Approx
1-1/2”
Align Arrow
with Notch on
Mounting Frame
Left Hinge
Illustration
Top
Closer
Location
Bottom
Closer
Location
Continued
on page 9
Page 9

Continued
from
page 8
Slide top and bottom closers
29
onto their bases.
Rotate bottom closer as shown.
Right Hinge
Illustration
S
l
i
d
e
Pin door bracket onto closer
30
assembly.
28
Leave Clip
in Place
Remove
Locate
the top
TOP
Closer
and
bottom
closers.
Bottom Closer: Rotate so
One-Touch
Points Up
BOTTOM
Closer
®
Button
One-Touch
Closer
®
One-Touch
Button
Right
Hinge
Illustration
Top
Closer
Bottom
Closer
with One-Touch
Button
®
®
Left Hinge
Illustration
To Use:
Open the door,
then tap then button.
To Close:
Nudge the door
open slightly.
Insert
Close door.
31
Qty.
“Closer Screw Bag”
color matched to door
#10 x 5/8” Pan Head
Secure door bracket
with screws.
2 each
Discard
Factory
Drilled
Holes
32
Discard clips
(top and bottom).
and
Remove
Discard
33
Top
Closer
Bottom
Closer
Adjust closer speed
with adjustment screw.
r
e
w
o
l
S
-
r
e
t
s
a
F
Adjustment
Screw
Continued
on page 10
9
Page 10
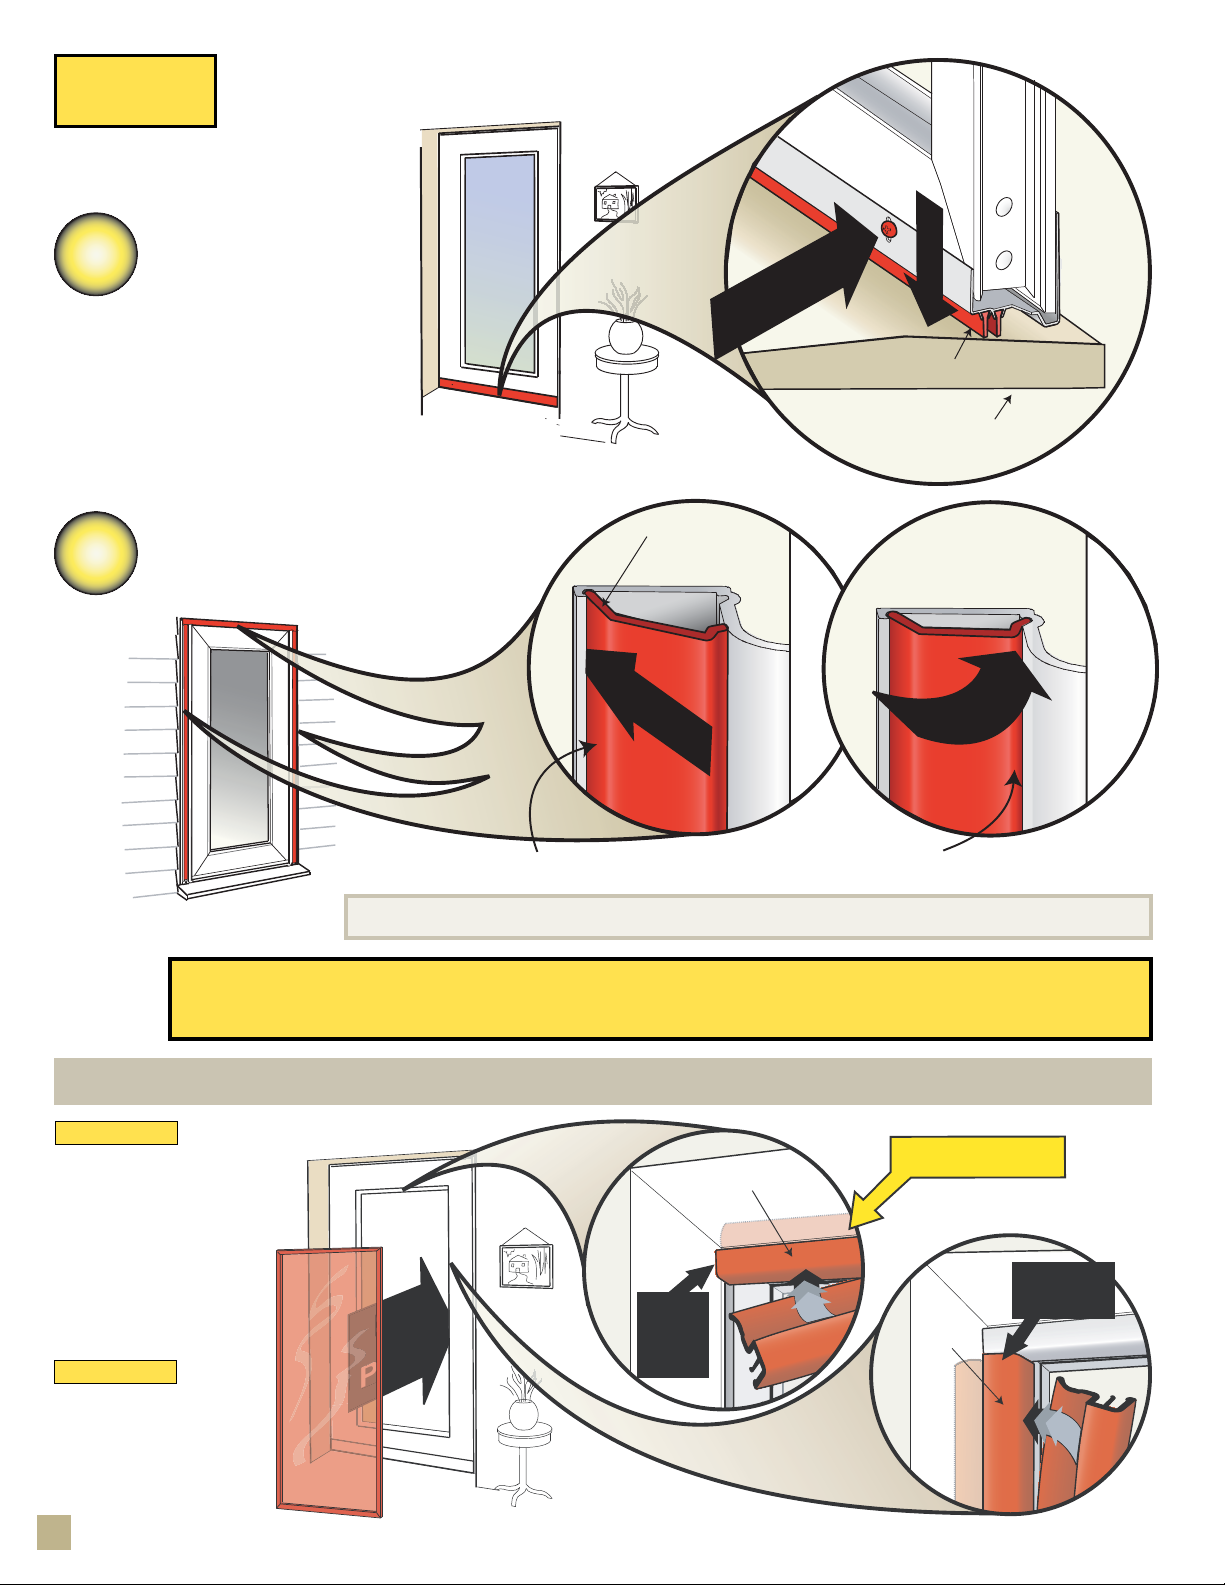
Continued
from page 9
Close door.
34
Adjust bottom expander
to lightly contact the sill.
35
Install screw cover strips
(1 Horizontal, 2 Vertical).
ooL ,tsujdA ot nes
Angled Edge
Points Away
From Door
A
d
j
nethgiteR neht
u
s
t
Sweep
Sill
Finished with the installation. See page 11 for care and maintenance.
Glass or Screen Operation
To Remove:
Remove the vertical strips
rst, then the horizontals,
by pulling the corners away
from the door frame.
IMPORTANT:
Hold the glass in place
before removing the top
retaining strip.
To Install:
Hold the glass or screen
in place and insert the
top then bottom
horizontal strips rst,
then the verticals.
10
e
c
a
l
gnA tresnI del
egdE
Hint: With the angled edge in place, run your finger down the length of the inner edge to snap in place.
Horizontal
Retainer
Strip
teS
nI
ecalP
Install
Both
Top
and
Bottom
S
Horizontal Strips
Go In First
Vertical
Retainer
Strip
P
n
i
n
p
a
Install Both
Left and
Right
Page 11

Care and Maintenance
Door
Cleaning
Glass
Cleaning
Use a soft cloth with any household grease-cutting cleaner to clean the door.
PLEASE NOTE: Thin marks on the painted surfaces of the door can be removed using
turpentine and light rubbing with a clean cloth.
IMPORTANT: DO NOT use brass polish or steel wool on the bottom expander - - Use a
household grease-cutting cleaner or a mild soap and water solution.
PLAIN GLASS
Models with decorative glass - follow instructions below.
PLEASE NOTE: DO NOT use an ammonia-based cleaner for the rst cleaning of the glass.
FIRST CLEANING: Use a mixture of one part vinegar with four parts water to remove the protective coating (for shipping purposes) from the glass.
ROUTINE CLEANING: Use any household glass cleaner.
DECORATIVE STAINED GLASS (If included with your model)
ONE-OF-A-KIND ORIGINALS
The stained glass on your Pella® panel is hand crafted. Slight imperfections or variation of color
are normal. No two glass panels are exactly alike.
CLEANING THE STAINED GLASS
Use a household glass cleaner or mild soap and water to clean the stained glass.
DECORATIVE CAMING (If included with your model)
The glass is hand crafted with decorative caming.
Use a household glass cleaner or mild soap and water to clean the caming.
For Bright Brass and Satin Nickel caming ONLY:
You may use a quality brass polish or brass cleaner. Follow the product’s directions and carefully wipe down
the caming. Be sure to wipe all of the cleaner from the glass. Use a toothbrush to carefully remove any
cleaner from between the caming edges and the glass.
Cleaning may also be done by using #0000 steel wool. Carefully rub down the caming with light even
strokes - avoid touching the glass with the steel wool.
PLEASE NOTE: For brass handle cleaning, see “Cleaning & Renishing” below.
Handle
Cleaning
Cleaning &
Renishing
Damaged
Brass
BRASS & OTHER METALLIC HANDLES
Routine Cleaning: Use a soft cloth with a mild soap and water solution to clean the surfaces.
Apply a high quality, non-abrasive automobile wax to polish.
Note: DO NOT use ammonia-based cleaners on brass or other metallic nish handles.
If your Pella® door includes a solid brass handle, the brass is polished and sealed with a clear coating by the manufacturer. Should
the finish be accidentally damaged by an abrasive or sharp object, it will succumb to a natural oxidation process that occurs when
the elements contact unprotected brass. Brass has an enduring quality, in that it can be refurbished to its original polished finish
again and again by using a quality brass polish and a soft cloth. Do not clean the bottom expander in this manner - see door
cleaning above.
1. Remove the hardware from the door so the finish of the door will not be affected. See the hardware instructions for removal.
NOTE: you may be able to leave the hardware in place on the door when polishing the handle only – make certain to
completely mask off all areas around the handle before starting. If polishing the key cylinder, protect the internal mechanism
by covering the opening with tape.
2. Use a quality brass polish or cleaner to clean the brass - follow the product’s directions and cautions. Note: Firm rubbing may
be necessary to loosen the coating on the brass.
3. Reseal the brass per instructions below.
a. Use the properties from the brass polish you used to clean the brass. (Easiest method, but requires more frequent polishing.)
b. Apply a high quality, non-abrasive, polymer-based automobile wax to seal the surface.
c. Apply a new clear coat with a clear lacquer spray - follow the product’s directions. (Most difficult, but lasts the longest.)
PLEASE NOTE: If you removed the hardware from the door, lubricate any internal workings with a spray lubricant. Re-install the
hardware on the door. See the hardware instructions for installation.
11
Page 12

Trouble Shooting Guide
If you have a question that you do not see listed here, or have not been able to resolve through your Pella® Owner’s Manual
and Installation Guide, call one of our customer service representatives toll-free at 1-800-374-4758.
Common Questions Probable Causes Suggested Solutions
Door does not open or close properly. Entryway framing is out or square/plumb or
frame is warped
Closer(s) out of position or adjustment. 1. Remove the adjustment screw from the
Bottom Expander is out of position. 1. Verify the expander is centered on the door
Header Frame is out of position. 1. Verify header frame is centered and aligned
Hinges are binding 1. Verify mounting frame screws are not over
Handle does not latch properly. Latch not hitting trim plate 1. Adjust the trim plate until the latch catches.
Closer is out of position 1. See “Closer(s) out of position” in the “Door
Water between the storm door and entry
door.
Bottom Sweep is making a tight seal against
the door sill
1. Verify the entryway framing and shim as
necessary. [See Page 2]
closer(s), cycle the door a few times, then
replace the screw. [See Page 9, Step 33]
2. Adjust the position of the closer door
bracket until the door operates properly. [see
Page 9, Step 31]
3. If switching from glass to screen, vary the
closer speed for proper operation. [see page
9, step 33]
– adjust if necessary. [See Page 4]
2. Verify the expander is not too low - adjust
as necessary. [See Page 10, Step 34]
in the opening - adjust as necessary. [See Page
3, Steps 3 & 4]
tightened - back off screws slightly. [See Page
5, Steps 12 and 13]
2. Verify entryway framing is not twisted or
warped - shim or modify as necessary.
3. Verify hinge mounting frame is not twisted
or bent - replace if necessary.
[See separate hardware instruction]
does not open or close properly” question
above.
1. Open the storm door and notch up to 1/2”
off the ends of the black vinyl sweep.
Pella® Storm Doors Limited Warranty
Congratulations on choosing a Pella storm door to protect and beautify your home. This superior quality door has been designed to give you years of trouble-free
service, and you are protected by this limited warranty:
Pella warrants to the ORIGINAL HOMEOWNER PURCHASER of this storm door that it will, without charge to the purchaser, provide parts or exchange, at its option, any
door determined to be defective in material or workmanship for 20 years after the purchase date. The purchaser will be responsible for transportation charges. Should
the door be determined to be defective in material or workmanship AFTER 20 years from the purchase date, the original purchaser may buy one new Pella storm door
at 50% of the then- current manufacturer’s suggested list price for as long as the original purchaser owns the home on which the door was installed. The purchase must
be made directly from the factory, and all transportation charges are the responsibility of the purchaser.
Should the door be determined to be defective and the purchaser incurs a reinstallation cost within three years of the purchase date, he or she may be reimbursed for
these costs up to a maximum of $25.00, upon furnishing a copy of the invoice for the reinstallation costs.
As a condition of this warranty, it is required that the door be used for residential use only in an owner-occupied home, that it be installed properly as an operating
door according to manufacturer’s instructions, and that it not be altered in any way. For multi-unit housing applications, ask your dealer for a copy of the appropriate
warranty or phone Pella’s Customer Service Department at the phone number listed below. This warranty is not transferable.
To make a claim under this warranty, you should:
a) Call our Customer Service Department at 1-888-646-5354 or write to Pella Warranty Service; 2333 Eastbrook Drive; Brookings, SD 57006 USA.
b) Furnish the original or a copy of the sales receipt or other documents showing the original purchase date and that you are the original purchaser of this door.
Exchange is limited to supplying a replacement door of comparable size, style, and color and does not include any cost of removal or installation except as noted
above.
The warranty on the latch set and air closer is one year, and any labor charges are not covered. This warranty excludes all damage to glass and screen. This warranty
does not cover problems caused by improper storage, handling, installation, use, modification, or maintenance, by Acts of God or by accidents, including accidental
glass breakage. It does not apply to normal wear or discoloration of finish; finish problems caused by mechanical damage or abrasion; normal effects of sun and weather, including acid rain, salt spray, or other corrosive elements; damage caused by severe wind; or damage caused by customer abuse or neglect. Oil-Rubbed Bronze is
a living finish that will develop its own unique patina with use and is not covered under the Lifetime Finish Guarantee. Bright Brass, Antique Brass, Brushed Brass and
Satin Nickel hardware is guaranteed not to tarnish and carries a lifetime finish warranty for as long as the purchaser owns their home.
THIS WARRANTY EXCLUDES ALL INCIDENTAL AND CONSEQUENTIAL DAMAGES. Nothing in this document shall give rise to or extend the period of any warranties implied under state or provincial law, and no implied warranty shall extend beyond the periods covered by this written warranty. Neither Pella Corporation nor any seller
of Pella products will be responsible for incidental or consequential damages which may result from a product defect or malfunction. Some states do not allow the
exclusion or limitation of incidental or consequential damages, so the above limitation or exclusion may not apply to you. This warranty gives you specific legal rights,
and you may have additional rights which vary from state to state. Effective 7/2006.
© Pella Corp., 060198 16110
12
 Loading...