

Pella Insynctive Garage Door Sensor Quick Start Manual
GARAGE
DOOR SENSOR
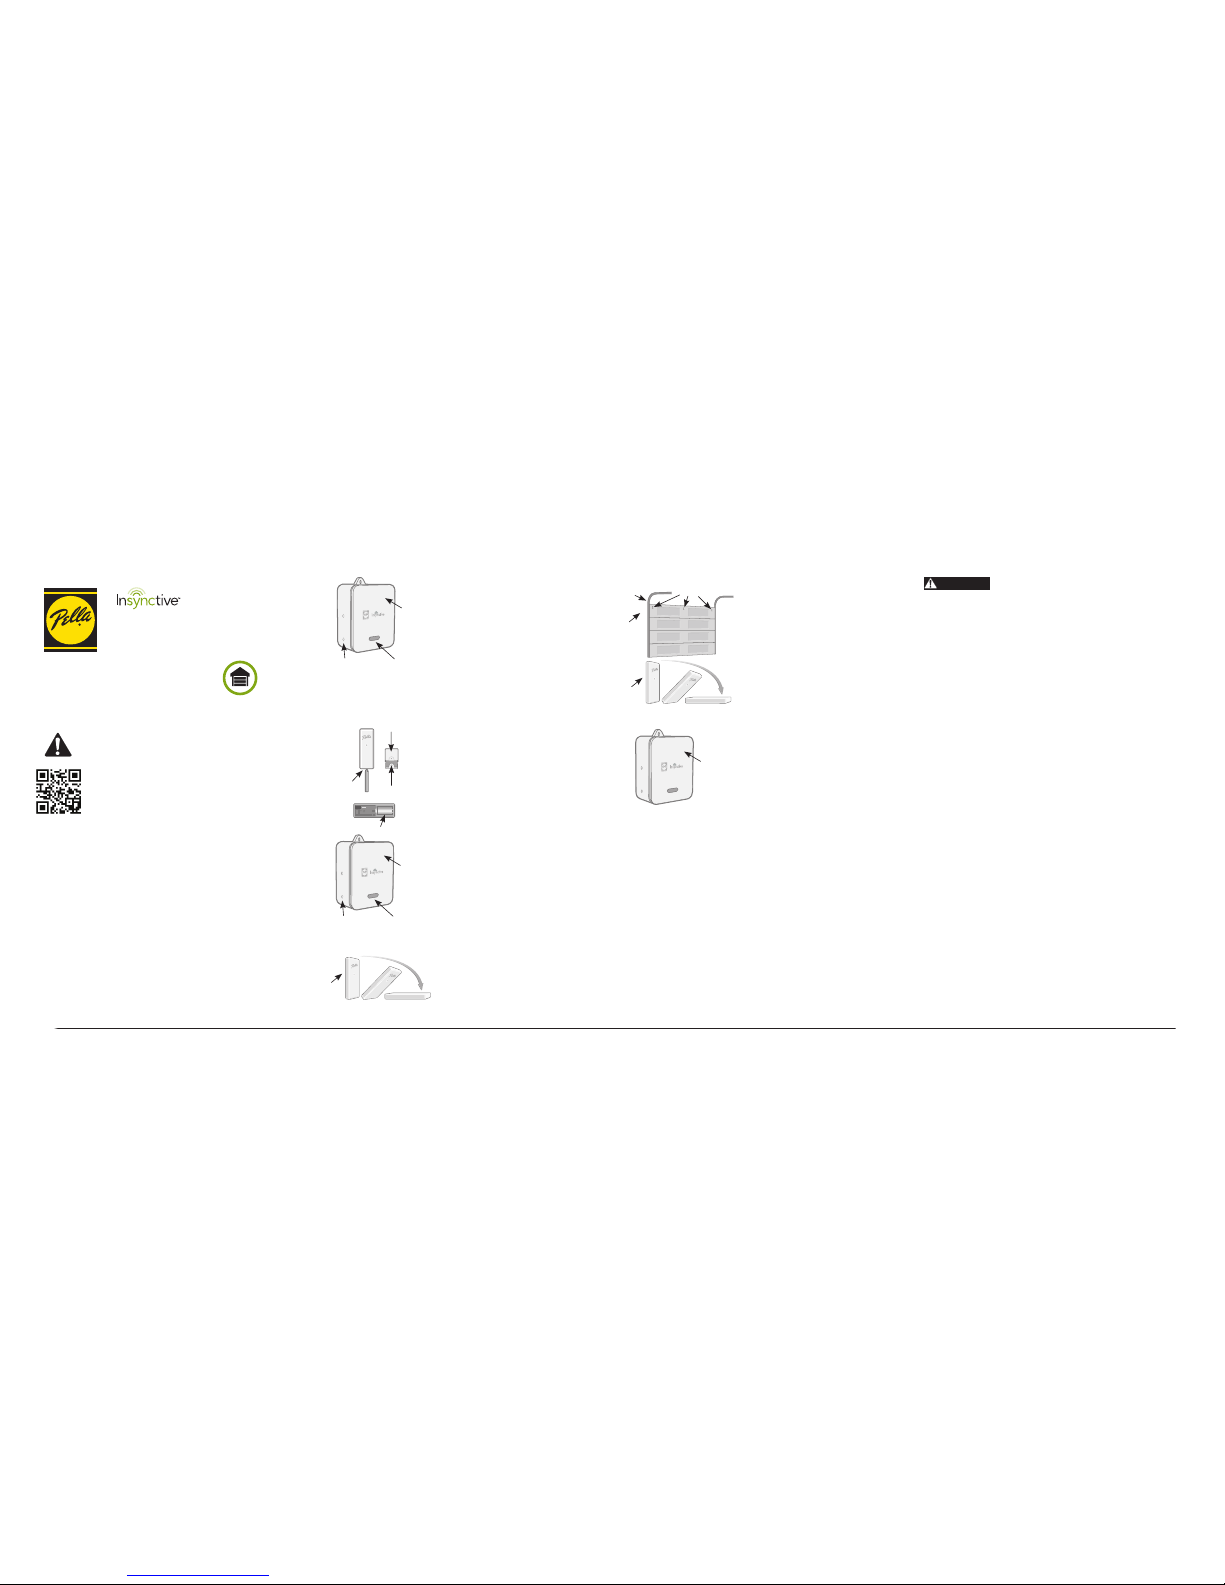
1. Get Star ted
• Plug BRID GE into an elec trical ou tlet
(light will t urn green and t hen fl ash blue).
NOTE: Follow B ridge Quick S tart Guide t o set up BRIDG E.
2. Prepar e SENSOR
• Use a Phillips-head screwdriver to remove
the screw s ecuring the t op cover.
• Pull the ba se away from the t op cover to reveal
the battery.
• Remove bat tery tab .
• Snap the ba se back onto th e top cover.
Do not reins tall the scr ew at this time.
NOTE: You will have 2 m inutes to sy nc your SENSOR t o
BRIDGE (Step 3). I f 2 minutes pa ss without a s uccessfu l
sync, remove and insert the battery again.
3. Sync SENS OR to BRIDGE
• Press and r elease Sync bu tton on BRI DGE
(button n earest the l ight). Orange l ight will
fl ash continuously.
• Hold SENSO R in the vert ical positi on with the
arrow poin ting up.
• Rotate SE NSOR from ver tical posi tion to
horizont al positio n with the Pella® lo go face
down and bac k to the vert ical positi on twice
within 2 seconds.
• Green lig ht on BRIDGE and b eep will indic ate
success.
• To exit sync m ode: press and ho ld Sync but ton
on BRIDGE un til light st ops fl ashing or ange.
4. Insta ll SENSOR
• Reinst all the screw to s ecure the top c over
to the base o f SENSOR.
• For best r esults, mo unt SENSOR on top o f
interior panel of garage door, either on side
or in middle.
• SENSOR wil l register as c losed when in t he
vertical position.
• SENSOR wil l register as o pened when in t he
horizontal position.
NOTE: SENSOR changes status at 45-degree angle.
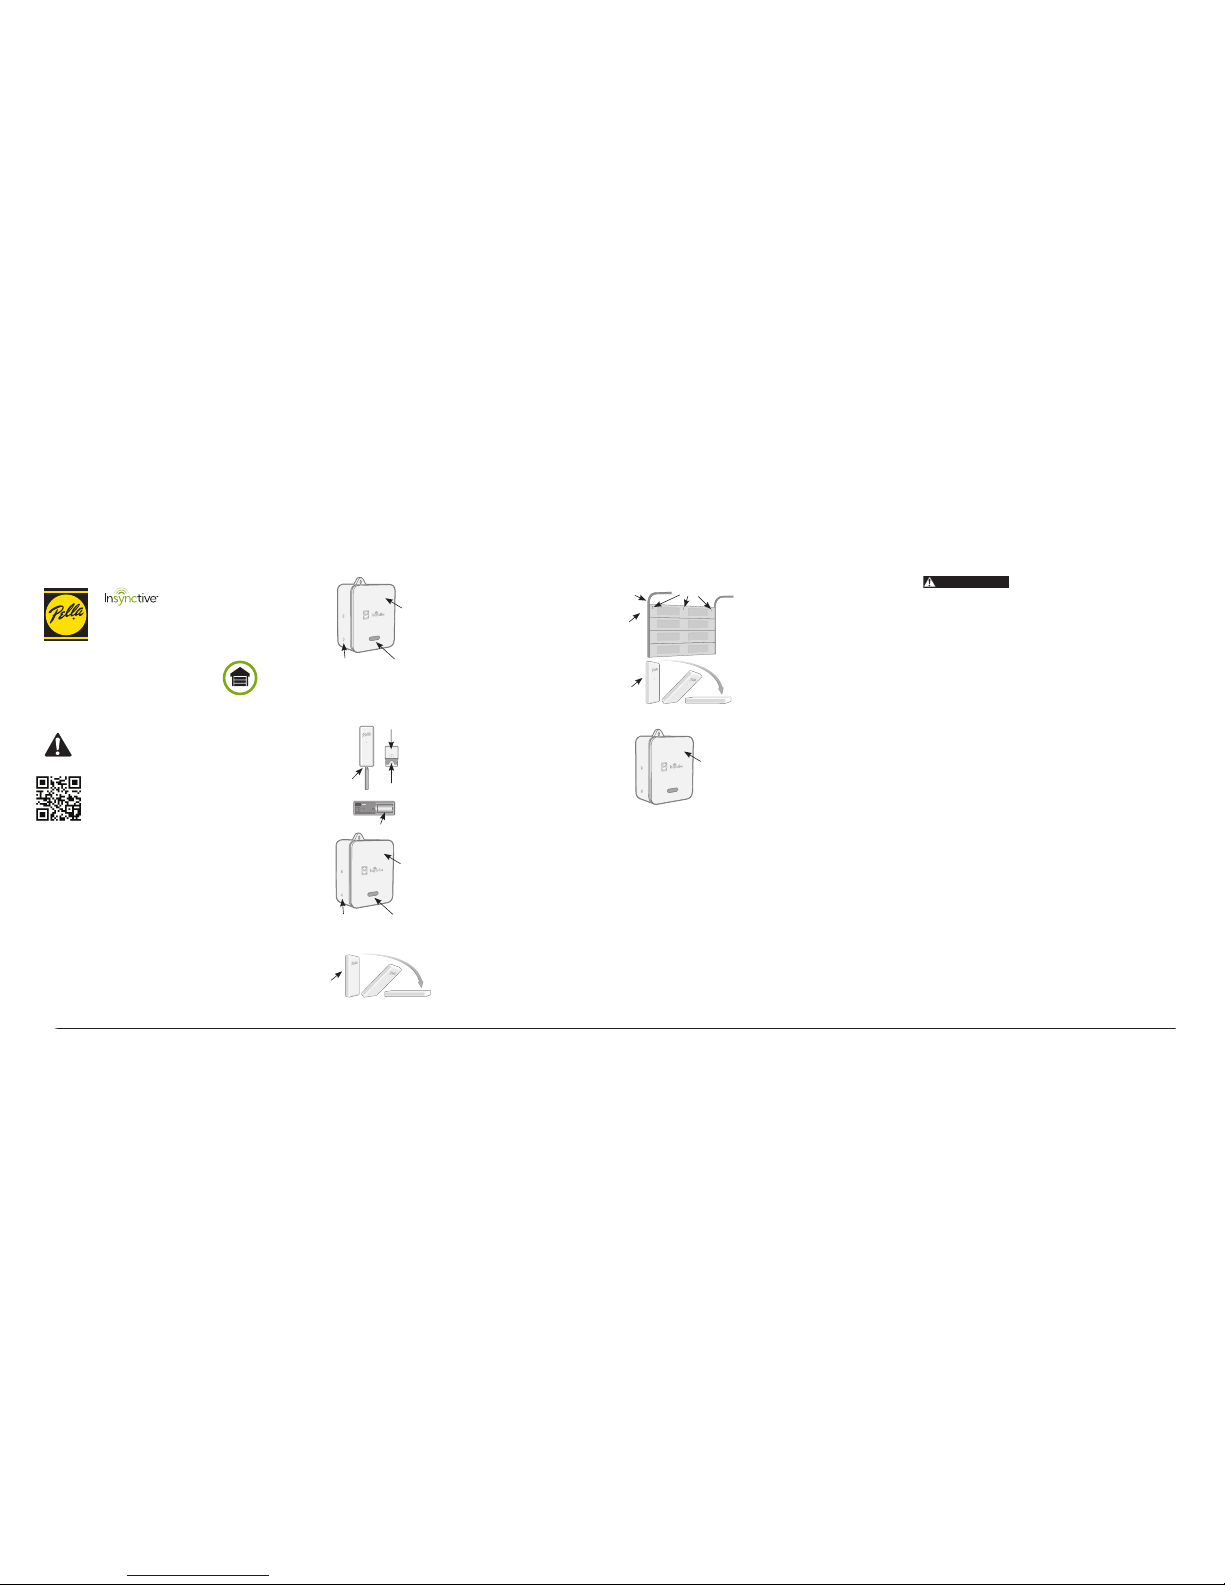
5. Test SENSO R
• Open your g arage door wi th SENSOR ins talled.
• When the d oor is opened, B RIDGE should
beep twi ce.
WARNING! SEN SOR may indica te a closed st atus when th e
garage doo r is not comple tely closed . See Produc t Guide
on Insync tive.Pella .com for comp lete review o f GARAGE
DOOR SENSOR operation.
SCREW
BATTE RY
COVER
BASE
BRIDGE
TRACK
OPTIONAL SENSOR
PLACEMENT
TOP
PANEL
SENSOR
VERTICAL
(CLOSED)
HORIZONTAL
(OPENED)
INTERIOR VIEW
BRIDGE is in s ync mode whil e the
light is fl ashing orange .
© 2014 Pella Corpora tion
IQS GGD0 414
QUICK START GUIDE
SENSOR
VERTICAL
(CLOSED)
HORIZONTAL
(OPENED)
Scan the QR C ode® or visit In synctive.Pella.com/
GarageDoorSensor for complete Product Guide
and warnin gs, instr uctional v ideos and oth er
Pella® Insynctive™ quick tips.
This Quick S tart Guid e is intended o nly to provide a n overview
of the produ ct and its u se. Before usi ng this produ ct, read the
complete Product Guide and warnings.
WHAT’S INCLUDED:
• GARAGE D OOR SENSOR: S ENSOR will tra nsmit a signa l to BRIDGE if you r
garage door is opened or closed.
• QUICK START G UIDE
• BATT ERY
WHAT’S REQUIRED:
• BRIDGE (required — sold separately): Wirelessly connects your
Insync tive produ cts to STATUS IND ICATOR or a compa tible secur ity or home
automation system.
• STATUS INDICATOR (optional — sold separately): Lights indicate status of
Pella® Insyn ctive SENSORS. Or y ou can use a comp atible sec urity or ho me
automation system to monitor your garage door.
• PHILLIPS-HEAD SCREWDRIVER
LIGHT
SYNC BUT TON
BRIDGE
LIGHT
SYNC BUT TON
BRIDGE
If you will b e using the Pel la® Insynct ive™ STATUS INDIC ATOR to
monitor y our garage do or, please refe rence the Qu ick Start Gu ide
in the STAT US IND ICATO R package to sync.
HAVE A HOME AUT OMATION OR SECU RITY SYSTE M?
For instr uctions on ho w to sync a Pella Ins ynctive GA RAGE DOOR
SENSOR to it , visit Insynctive.Pella.com/HomeAutomation.
NEED HELP WITH THE STEPS ABOVE?
Find troubleshooting information and videos at
Insynctive.Pella.com/Support or call 855 -473-5524.
WANT TO EAS ILY REGISTER PE LLA INSYNC TIVE PRODUC TS?
Visit Insync tive.Pella.com/Registration for instant a ccess to
instructions, warranties and how-to videos.
FCC Compliance and Industry Canada
This equip ment has been t ested and fou nd to comply wi th the limits f or Class B
digital d evices, pur suant to Part 15 of t he FCC Rules. Th ese limits ar e designed
to provide reasonable protection against harmful interference in a residential
install ation. This e quipment gen erates, use s and can radia te radio freq uency
energy and , if not insta lled and used in a ccordance w ith the inst ruction ma nual,
may cause ha rmful inter ference to r adio communi cations. Ho wever, there is
no guarant ee that inter ference wil l not occur in a pa rticular i nstallat ion. If this
equipment does cause harmful interference to radio or television reception, which
can be dete rmined by tur ning the equip ment off and o n, the user is enc ouraged
to try to co rrect the in terferen ce by one or more of t he following m easures:
• Reorient o r relocate t he receiving a ntenna.
• Increase t he separat ion betwee n the equipmen t and receiver.
• Connec t the equipmen t to an outlet on a d ifferent c ircuit from t he receiver.
• Consult t he dealer or an ex perienced r adio/TV c ontract or for help.
Changes or modifi cations not expressly approved by Pella Corporation could
void the use r’s authori ty to opera te the equipme nt.
This devic e complies wi th Industr y Canada lic ense-exem pt RSS standa rd(s).
Operati on is subjec t to the followi ng two condit ions: (1) this device m ay not
cause interference, and (2) this device must accept any interference, including
interf erence that ma y cause undes ired operat ion of the devic e.
Cet appare il est confo rme avec Indus trie Canad a exempts de lic ence stand ard
RSS. L’opératio n est soumis e aux deux cond itions suiva ntes: (1) cet apparei l ne
peut causer d’interférences, et (2) cet appareil doit accepter toute interférence,
y compris les interférences qui peuvent causer un mauvais fonctionnement de
l’appareil.
FCC ID: SO7-206F0000
IC ID: 11009A-206F0000
Failure to adhere to the warnings below may result in death, serious injury
and/or loss of valuables.
• Pella® Insynctive
™
produc ts are not 100% re liable for a var iety of reas ons (see
Product G uide and the War ning in Step 5 of th is Quick Star t Guide for mo re
information). Therefore, Pella Insynctive products should not be relied upon
in situat ions where li fe, safety a nd/or protec tion of valuab les are solel y
dependen t on their fun ction. Test ea ch produc t at least once p er year to
help ensure proper operation.
• Pella Insy nctive pr oducts ar e not a substi tute for car eful adult su pervisi on
of children.
• Keep bat tery and sm all parts o ut of reach of ch ildren. If sw allowed,
immediately seek medical help.
Read the complete Product Guide for additional warnings and information.
WARNING
SENSOR PARA
PUERTA DE GARAJE
1. Emp iece
• Enchufe e l PUENTE en un tom acorrient e
(la luz se pon drá verde y lueg o titilará az ul).
NOTA: Siga la guía d e inicio rápi do del puente p ara
confi gurar el PUENTE.
2. Prepar e el SENSOR
• Utilice un destornillador Phillips para retirar
el tornill o que fi ja la cubie rta super ior.
• Jale y reti re la base de la cub ierta sup erior
para dejar a l descubier to la baterí a.
• Retire la p estaña de la b atería.
• Vuelva a col ocar la base e n la cubiert a
superior. No coloque el tornillo todavía.
NOTA: Usted te ndrá 2 minuto s para sincro nizar el SENS OR
al PUENTE (pa so 3). Si pasan 2 min utos sin que lo gre la
sincroniz ación, ret ire la batería y v uélvala a co locar.
3. Sincro nice el SENSOR a l PUENTE
• Presion e y suelte el botó n de sincroniz ación en
el PUENTE (el bo tón más cerca no a la luz). La luz
anaranjada destellará continuamente.
• Manteng a el SENSOR en pos ición vert ical con la
fl echa hac ia arriba.
• Gire el SENS OR de la posició n vertica l a la
posición h orizontal c on el logo Pella ha cia abajo
y de vuelt a a la posición ve rtical do s veces en
menos de 2 segundos.
• La luz verd e en el PUENTE y el s onido breve
indicar án que tuvo éxit o.
• Para sali r del modo sincr onización: M antenga
presionado el botón de sincronización en el
PUENTE has ta que la luz de je de destell ar
anaranjado.
.
4. Insta le el SENSOR
• Vuelva a ins talar el tor nillo para fi jar la
cubier ta superior a l a base del SENSO R.
• Para obte ner mejores re sultados, i nstale el
SENSOR sob re el panel inte rior de la puer ta
de garaje, y a sea en el cost ado o en el
medio.
• El SENSOR re gistrará c omo cerrado c uando
esté en la posición vertical.
• El SENSOR re gistrará c omo abiert o cuando
esté en la posición horizontal.
NOTA: El estad o del SENSOR ca mbia a un ángul o de
45 grados.
5. Pruebe el SENSOR
• Abra su pu erta de gar aje con el SENSOR
instalado.
• Cuando se a bra la puert a, el PUENTE de bería
sonar dos ve ces.
¡ADVERTEN CIA! El SENSO R puede indic ar un estad o
de cerrado a un cuando la pu erta de gara je no está
completa mente cerra da. Consul te la guía del pro ducto
en Insynctive.Pella.com para obtener una descripción
completa d el funciona miento del SE NSOR PARA PUER TA
DE GARAJ E.
TORNILLO
BATERÍA
CUBIERTA
BASE
PUENTE
RIEL
UBICACIÓN OPCION-
AL DEL SENSOR
PANEL
SUPERIOR
SENSOR
VERTICAL
(CERRADO)
HORIZONTAL
(ABIERTO)
VISTA INTERIOR
El PUENTE es tá en modo sin cronizaci ón
mientras la luz destelle naranja.
LO QUE INCLU YE:
• SENSOR PAR A PUERTA DE GAR AJE: El SENS OR transmit irá una señal a l
PUENTE si su p uerta de ga raje se abre o se c ierra.
• GUÍA DE INICI O RÁPIDO
• BATERÍA
SE REQUIERE:
• PUENTE (se requiere, se vende por separado): Conec ta de forma ina lám
brica su s producto s Insynct ive a un INDIC ADOR DE ESTADO o a u n sistema
de seguridad o de automatización de hogar compatible.
• INDICADOR DE ESTADO (opcional, se vende por separado): Las luces
indican e l estado de l os SENSORES Pel la Insync tive o puede u sar un siste ma
de seguridad o de automatización del hogar compatible para monitorear su
puerta de garaje.
• DESTORNILLADOR PHILLIPS
© 2014 Pella Corpora tion
IQS GGD0 414
Escane e el QR Code® o vis ite Insynctive.Pella.com/
GarageDoorSensor para obtener to da la guía del
produc to y las adver tencias, v ideos infor mativos y otr os
consejos rápidos Pella® Insynctive
™
.
Esta guí a de inicio ráp ido está dis eñada única mente con la
fi nalidad de brindar una descripción general del producto
y de su uso. Ant es de usar el pro ducto, lea to da la guía del
producto y las advertencias.
GUÍA DE INICIO RÁPIDO
LUZ
BOTÓN DE
SINCRONIZACIÓN
PUENTE
LUZ
BOTÓN DE
SINCRONIZACIÓN
PUENTE
SENSOR
VERTICAL
(CERRADO)
HORIZONTAL
(ABIERTO)
Si va a usar el I NDICADOR D E ESTADO de Pella® I nsyncti ve™ para
monitor ear su puert a de garaje, co nsulte la guí a de inicio ráp ido en
el paquet e del INDICA DOR DE ESTADO pa ra sincroni zar.
¿CUENTA CON UN SIS TEMA DE SEGU RIDAD O DE AUTOMATI ZACIÓN
DEL HOGAR?
Para obtener instrucciones sobre cómo sincronizarlo con los productos
Pella Insy nctive, vis ite Insynctive.Pella.com/HomeAutomation.
¿NECESITA AYU DA CON LOS PASOS ANTE RIORES?
Encuentre información sobra la solución de problemas y videos en
Insynctive.Pella.com/Support o llame 855- 473-5524.
¿DESEA RE GISTRAR D E FORMA SENCI LLA LOS PRODUC TOS PELLA
INSYNCTIVE?
Visite Insync tive.Pella.com/Registration para acceder rápidamente a
instrucciones, garantías y videos instructivos.
ADVERTENCIA
El no respectar las advertencias a continuación puede ocasionar la muerte,
lesiones graves o pérdida de objetos valiosos.
• Los produ ctos Pella® In syncti ve
™
no son 100% confi ables por diferentes razones
(consulte la g uía del produc to y la adver tencia en el p aso 5 de esta g uía de
inicio rápido para obtener más información). Por tanto, no debe confi ar en los
productos Pella Insynctive en situaciones en las que la vida, la seguridad
o la protección de bienes valiosos dependan exclusivamente de su buen
funciona miento. Prue be cada produ cto al meno s una vez por año pa ra ayudar
a asegurar un funcionamiento adecuado.
• Los produ ctos Pella In synctiv e no sustit uyen una super visión ate nta de niños
por part e de adultos.
• Manteng a la batería y la s piezas pequ eñas fuera de l alcance de lo s niños. Si se
ingiere, busque ayuda médica de inmediato.
Lea toda la guía del producto para obtener información y advertencias adicionales.
Cumplim iento con FCC y co n el Ministe rio de Indus trias de Ca nadá
Este equi po ha sido proba do y se ha verifi cado que cumpl e con los límite s para
disposi tivos digit ales clase B, co nforme a la par te 15 de las reglas d e la FCC. Esto s
límites han sido diseñados para proporcionar una protección razonable contra la
interferencia perjudicial en una instalación residencial. Este equipo genera, utiliza y
puede irr adiar energía d e radiofrec uencia y, si no se in stala y usa de a cuerdo con el
manual de instrucciones, puede causar interferencia perjudicial a las comunicaciones
de radio. Sin e mbargo, no se ga rantiza que n o se producirá n interfer encias en una
instalación en especial. Si este equipo genera una interferencia perjudicial para la
recepción de radio o televisión, que se puede determinar apagando y encendiendo
el equipo, se r ecomienda al u suario que int ente correg ir la interfe rencia con una o
más de las siguientes medidas:
• Reorient ar o reubicar l a antena de rece pción.
• Aumentar l a separació n entre el equi po y el receptor.
• Conect ar el equipo a un t omacorrien te de un circui to distinto a l del receptor.
• Solicit ar ayuda al conc esionario o a un t écnico con ex periencia en r adio/T V.
Los cambio s o modifi caciones que no es tén expresa mente aproba dos por Pella
Corpora tion podría n anular la autor ización del u suario para u tilizar el eq uipo.
Este disp ositivo cu mple con las nor mas RSS sin lice ncia del Minis terio de Indu strias
de Canadá.
El funcionamiento está sujeto a las siguientes dos condiciones: (1) este dispositivo no
debe causar interferencia, y (2) este dispositivo debe aceptar cualquier interferencia
recibida, i ncluso aque lla que pudies e causar un fun cionamient o no deseado de l
dispositivo.
Cet appare il est confor me avec Indus trie Canad a exempts de lic ence stand ard RSS.
L’opération es t soumise aux d eux conditi ons suivante s: (1) cet appareil ne pe ut causer
d’interférences, et (2) cet appareil doit accepter toute interférence, y compris les
interférences qui peuvent causer un mauvais fonctionnement de l’appareil.
FCC ID: SO7-206F0000
IC ID: 11009A-206F0000
 Loading...