

Pella 801W0103 User Manual
©2008 Pella Corporation
INSTALLATION INSTRUCTION - INSTRUCCIONES DE INSTALACIÓN
FOR CLAD SLIDING PATIO DOOR
PUERTA CORREDERA PARA PATIO
Part Number: 801W0103
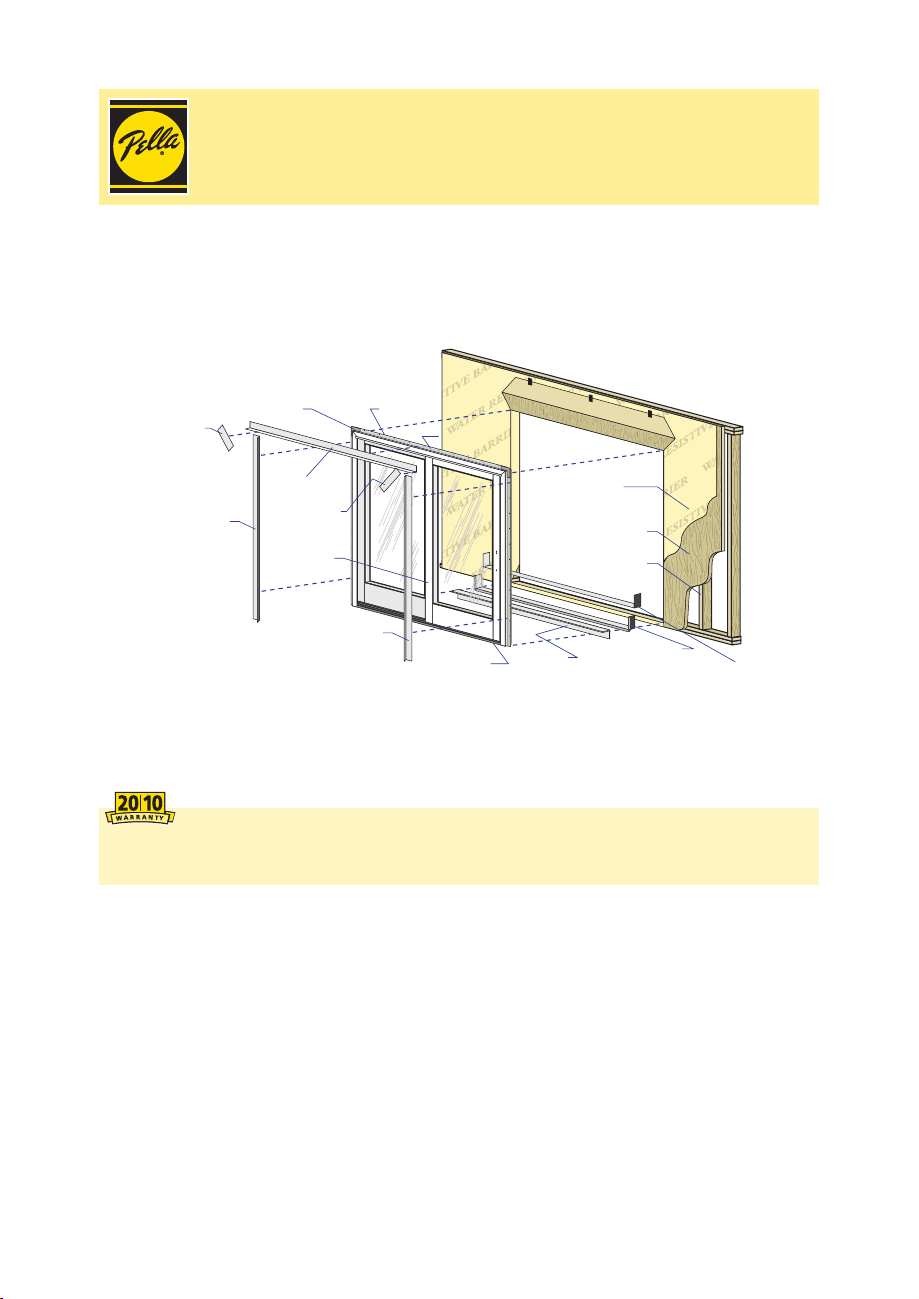
Side
Flashing
Tap e
Door
Top
Nailing Fin
Door
Bottom
Water
Resistive
Barrier
Sill
Support
Sheathing
Framing
Sill Flashing
Tape #1
Sill Flashing Tape #2
Corner
Flashing
Tape
Side
Flashing
Tape
Fin
Corner
Top
Flashing
Tap e
Corner
Flashing
Tap e
Interlocker
Always read the Pella® Limited Warranty before purchasing or installing Pella products. By
installing this product, you are acknowledging that this Limited Warranty is part of the terms of the
sale. Failure to comply with all Pella installation and maintenance instructions may void your Pella
product warranty. See Limited Warranty for complete details at http://warranty.pella.com.
Installation Instructions for Typical Wood Frame Construction.
ese instructions were developed and tested for use with typical wood frame wall construction in
a wall system designed to manage water. ese instructions are not to be used with any other
construction method. Installation instructions for use with other construction methods, multiple
units or bow and bay windows, may be obtained from Pella Corporation or a local Pella retailer,
or by visiting http://www.pella.com. Building designs, construction methods, building materials,
and site conditions unique to your project may require an installation method dierent from
these instructions and additional care. Determining the appropriate installation method is the
responsibility of you, your architect, or construction professional.
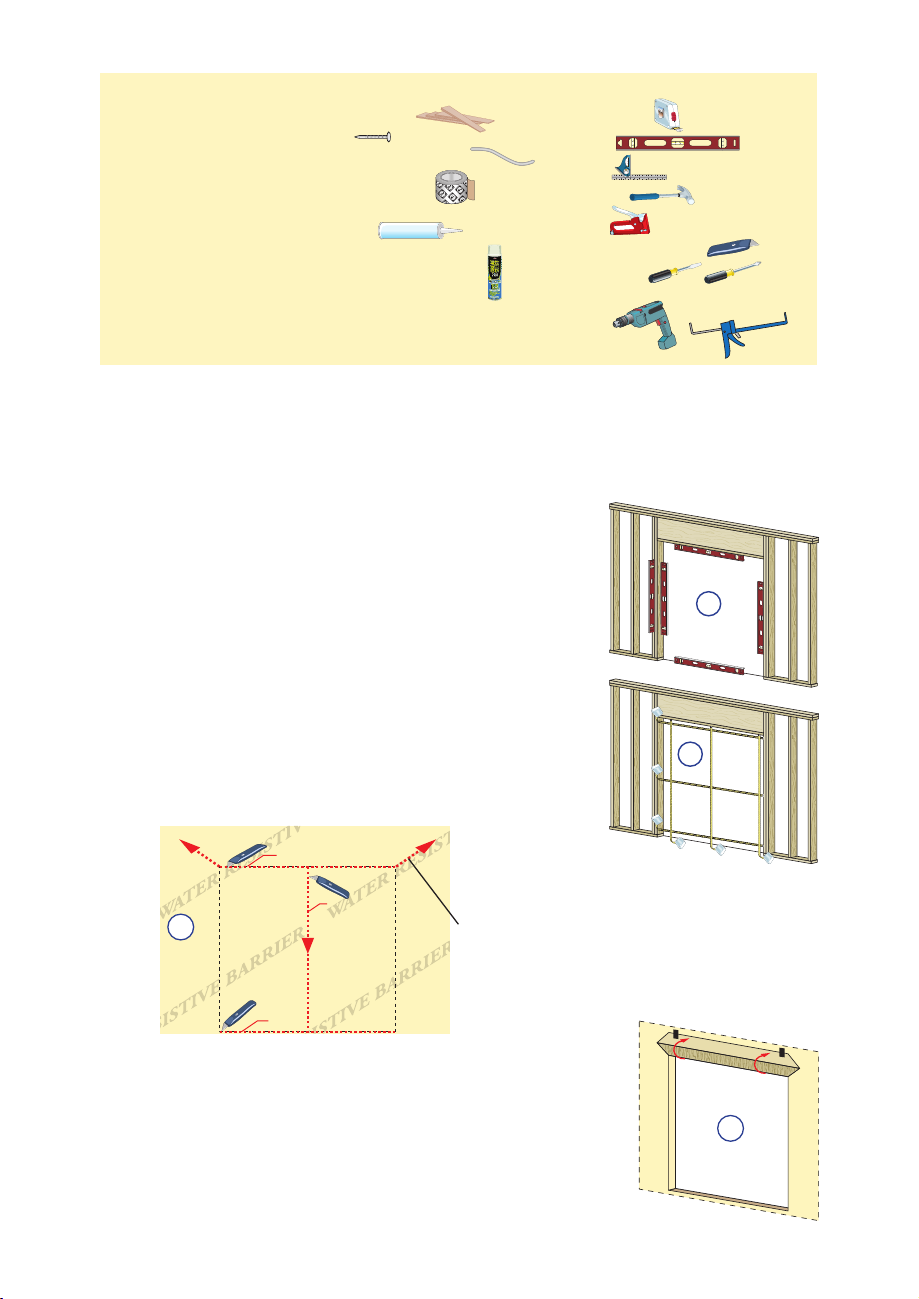
YOU WILL NEED TO SUPPLY: TOOLS REQUIRED:
• Cedar or Impervious shims/spacers (12 to 20)
• 2" galvanized roong nails (1/4 lb.)
• Closed cell foam backer rod/sealant backer (12 to 30 ft.)
• Pella® SmartFlash™ foil backed butyl window and
door ashing tape or equivalent
• High quality exterior grade polyurethane or silicone
sealant (2 to 3 tubes per door)
• Great Stu
™
Window and Door Insulating Foam Sealant
SEALANT
SEALANT
by the Dow Chemical Company or equivalent low
pressure polyurethane window and door foam
- DO NOT use high pressure or latex foams
• Pella aluminum sill support or 2 x 4 wood blocking
• Interior trim and/or jamb extensions (15 to 40 ft.)
• Tape measure
• 6' Level
• Square
• Hammer
• Stapler
• Scissors or utility knife
• Screwdrivers
(#2 Phillips with 8" shaft and small at blade)
• Drill
• Sealant gun
REMEMBER TO USE APPROPRIATE PERSONAL PROTECTIVE EQUIPMENT.
1 ROUGH OPENING PREPARATION
A. Conrm the opening is plumb and level.
Note: It is critical that the bottom is level.
Interior
B. Conrm the door will t the opening. Measure all four sides
of the opening to make sure it is 3/4" larger than the door in
width and 1/2" larger in height. Measure the width at the top,
bottom, and center. Measure the height at the far left side, the
far right side, and in the center.
Note: 1-1/2" or more of solid wood blocking is required
around the perimeter of the opening. Fix any problems with
the rough opening before proceeding.
C. Cut the water resistive barrier (1C).
Water Resistive Barrier
1st cut
3rd cut
1C
2nd
cut
4th cut:
Make a 6” cut up from
each top corner at a 45°
angle to allow the water
resistive barrier to be
lapped over the fin at the
head of the door.
D. Fold the water resistive barrier (1D). Fold side aps into
the opening and staple to inside wall. Fold top ap up and
temporarily fasten with ashing tape.
In
1B
1A
ter
i
or
Exterior
1D

1 ROUGH OPENING PREPARATION (CONTINUED)
E. Apply sill ashing tape #1. Cut a piece of ashing tape 12" longer
than the opening width. Apply at the bottom of the opening as
shown (1E) so it overhangs 1" to the exterior.
Note: e tape is cut 12" longer than the width of the opening so
that it will extend up each side approximately 6".
F. Tab the sill ashing tape and fold. Cut 1" wide tabs at each corner
(1/2" from each side of corner) (1F). Fold tape to the exterior and
press rmly to adhere it to the water resistive barrier.
G. Apply sill ashing tape #2. Cut a piece of ashing tape 12" longer
than the opening width. Apply at the bottom, overlapping tape #1 by
at least 1". Do not allow the tape to extend past the interior face of
the framing (1G).
Note: e ashing tape may not fully cover the framing members.
H. Attach the aluminum sill support or wood blocking to the exterior
of the box plate to support the edge of the door sill. Place the sill
support ush with the suboor.
1"
6"
1F
1"
1/2"
1E
1/2"
1G
1H
2 PREPARE THE DOOR FOR INSTALLATION
A. Remove the plastic wrap and cardboard packaging from the door.
Note: If screens, grilles or hardware are removed from the door at this time, label them
and store them in a protected area.
B. Remove the shipping spacers. Carefully slide the movable panel halfway open and remove the
spacers from both the top and bottom of the movable panel.
TWO OR MORE PEOPLE WILL BE REQUIRED FOR THE FOLLOWING STEPS.
C. Remove the venting panel by lifting it out of the lower track and tilting the bottom of the
panel away from the door frame. en, lower the panel out of the top track. Carefully set
the panel aside.
Note: Assemble the OXXO frame per the instructions included with the door splice kit.
D. Fold out installation n to 90º. Be careful not to remove or tear
the n corners.
Note: If the n is not at 90°, the door will not line up correctly
on the interior.
2D
 Loading...